
The Hidden Controls in the iPhone’s Camera App
Want to use a timer when taking an iPhone photo or manually control the depth of field in Portrait mode? You’ll need to reveal the Camera app’s hidden controls. Read on to find out how to show them—and what they help you do.

The beauty of the iPhone camera is that it combines the ease of use of a point-and-shoot camera with the image quality of a DSLR. To take a picture, you simply open the Camera app, frame your shot, and tap the shutter button. Simple, but what’s happening behind the scenes is anything but. The iPhone captures multiple images at once, concentrating on variables such as exposure, focus, tone, highlights, shadows, and more. It then merges all that data to produce what it thinks is the best possible image. Impressively, all this computational photography happens in real-time with no perceptible delay. (That said, iOS 15 provides a Prioritize Faster Shooting option in Settings > Camera that adapts—and presumably reduces—the image quality when you rapidly press the shutter multiple times.)
Despite all this automation, Apple still provides numerous manual controls you can employ to take photos the way you want. These controls are hidden, though, so you’re excused if you haven’t noticed them or have been frustrated looking for them. (“Where is that dratted Timer button? It must be here somewhere!”)
First, you have to reveal the controls, which is easy, although you’d never guess how. When you’re in the Camera app, swipe up anywhere on the screen above the shutter button. If you swipe up on the horizontal row of camera mode labels, your swipe can be quite short. However, if you swipe up on the viewfinder image, the Camera app might interpret a short swipe as a tap-and-swipe and display the in-image exposure control instead. On the viewfinder, use a longer, more emphatic swipe ➊. Either way, the camera controls replace the camera modes underneath the viewfinder ➋.
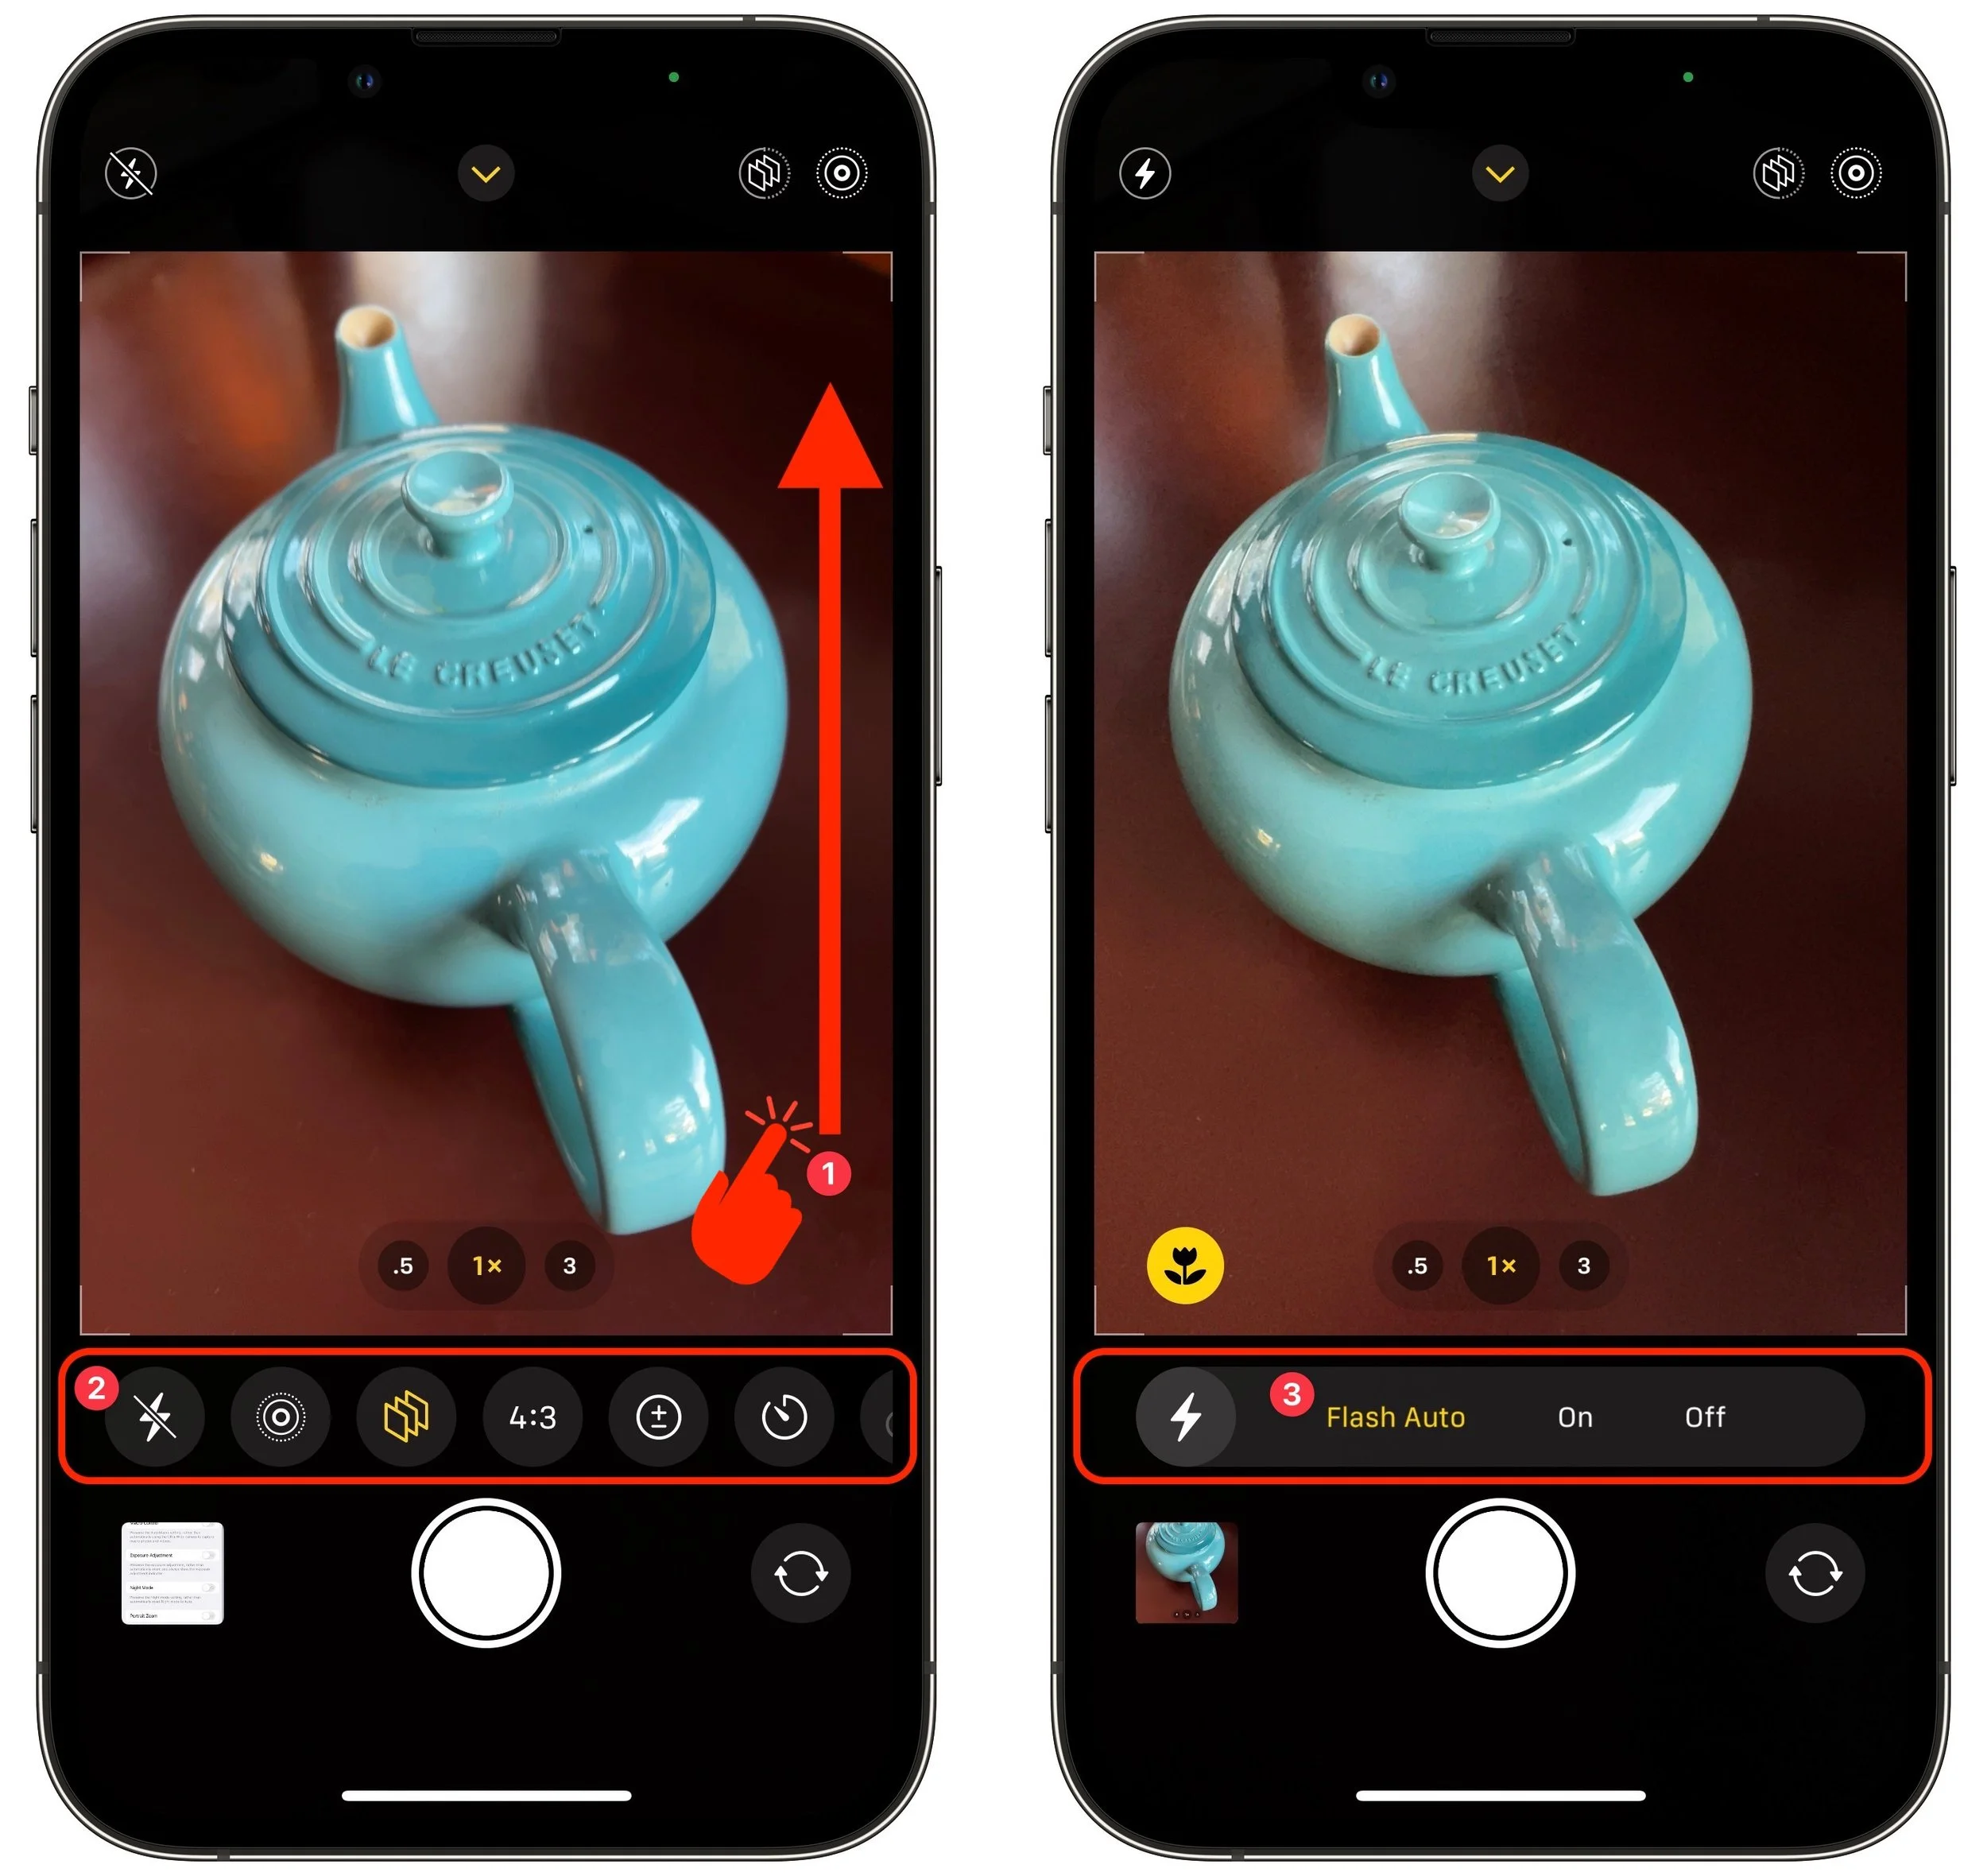
Once you have the controls showing, tap a button to access its options, use a slider or button to adjust the settings ➌, tap the original button to hide the options, and swipe down in the same way you swiped up to hide all the controls. The really confusing bit is that not all the controls may fit on the screen, so if you’re looking for the Timer or Filter buttons on an iPhone 13 Pro, for instance, you may have to swipe left on the controls to bring those buttons into view.
Here’s the full set—note that all except Depth (the rightmost one below) are in Photo mode; some may also appear in other modes. (Not all controls appear on all iPhone models, and the Low Light button, for instance, shows up only in low-light situations.)

Now, let’s look at what the controls make possible:
Flash: Use the Flash control to allow the camera to use the flash as needed or force it to be on or off. You can also control the flash in Video and Slo-Mo modes.

Low Light: Night mode on some of Apple’s high-end iPhones makes it possible to take better pictures in very low-light situations. With this control, you can set a specific amount of time for Night mode’s exposure. The longer the exposure, the lighter the photo, but the more small movements will cause blur and graininess.

Live Photo: Live Photo records 1.5 seconds of video before and after you take a photo, animating the photo slightly. Use this control to set whether the camera takes Live Photos all the time, none of the time, or automatically when it thinks it’s warranted (which is a lot).

Photographic Styles: These custom settings—Rich Contrast, Vibrant, Warm, and Cool—let you apply that distinct look to all your photos automatically. Or stick with Standard and apply the look you want afterward by editing.

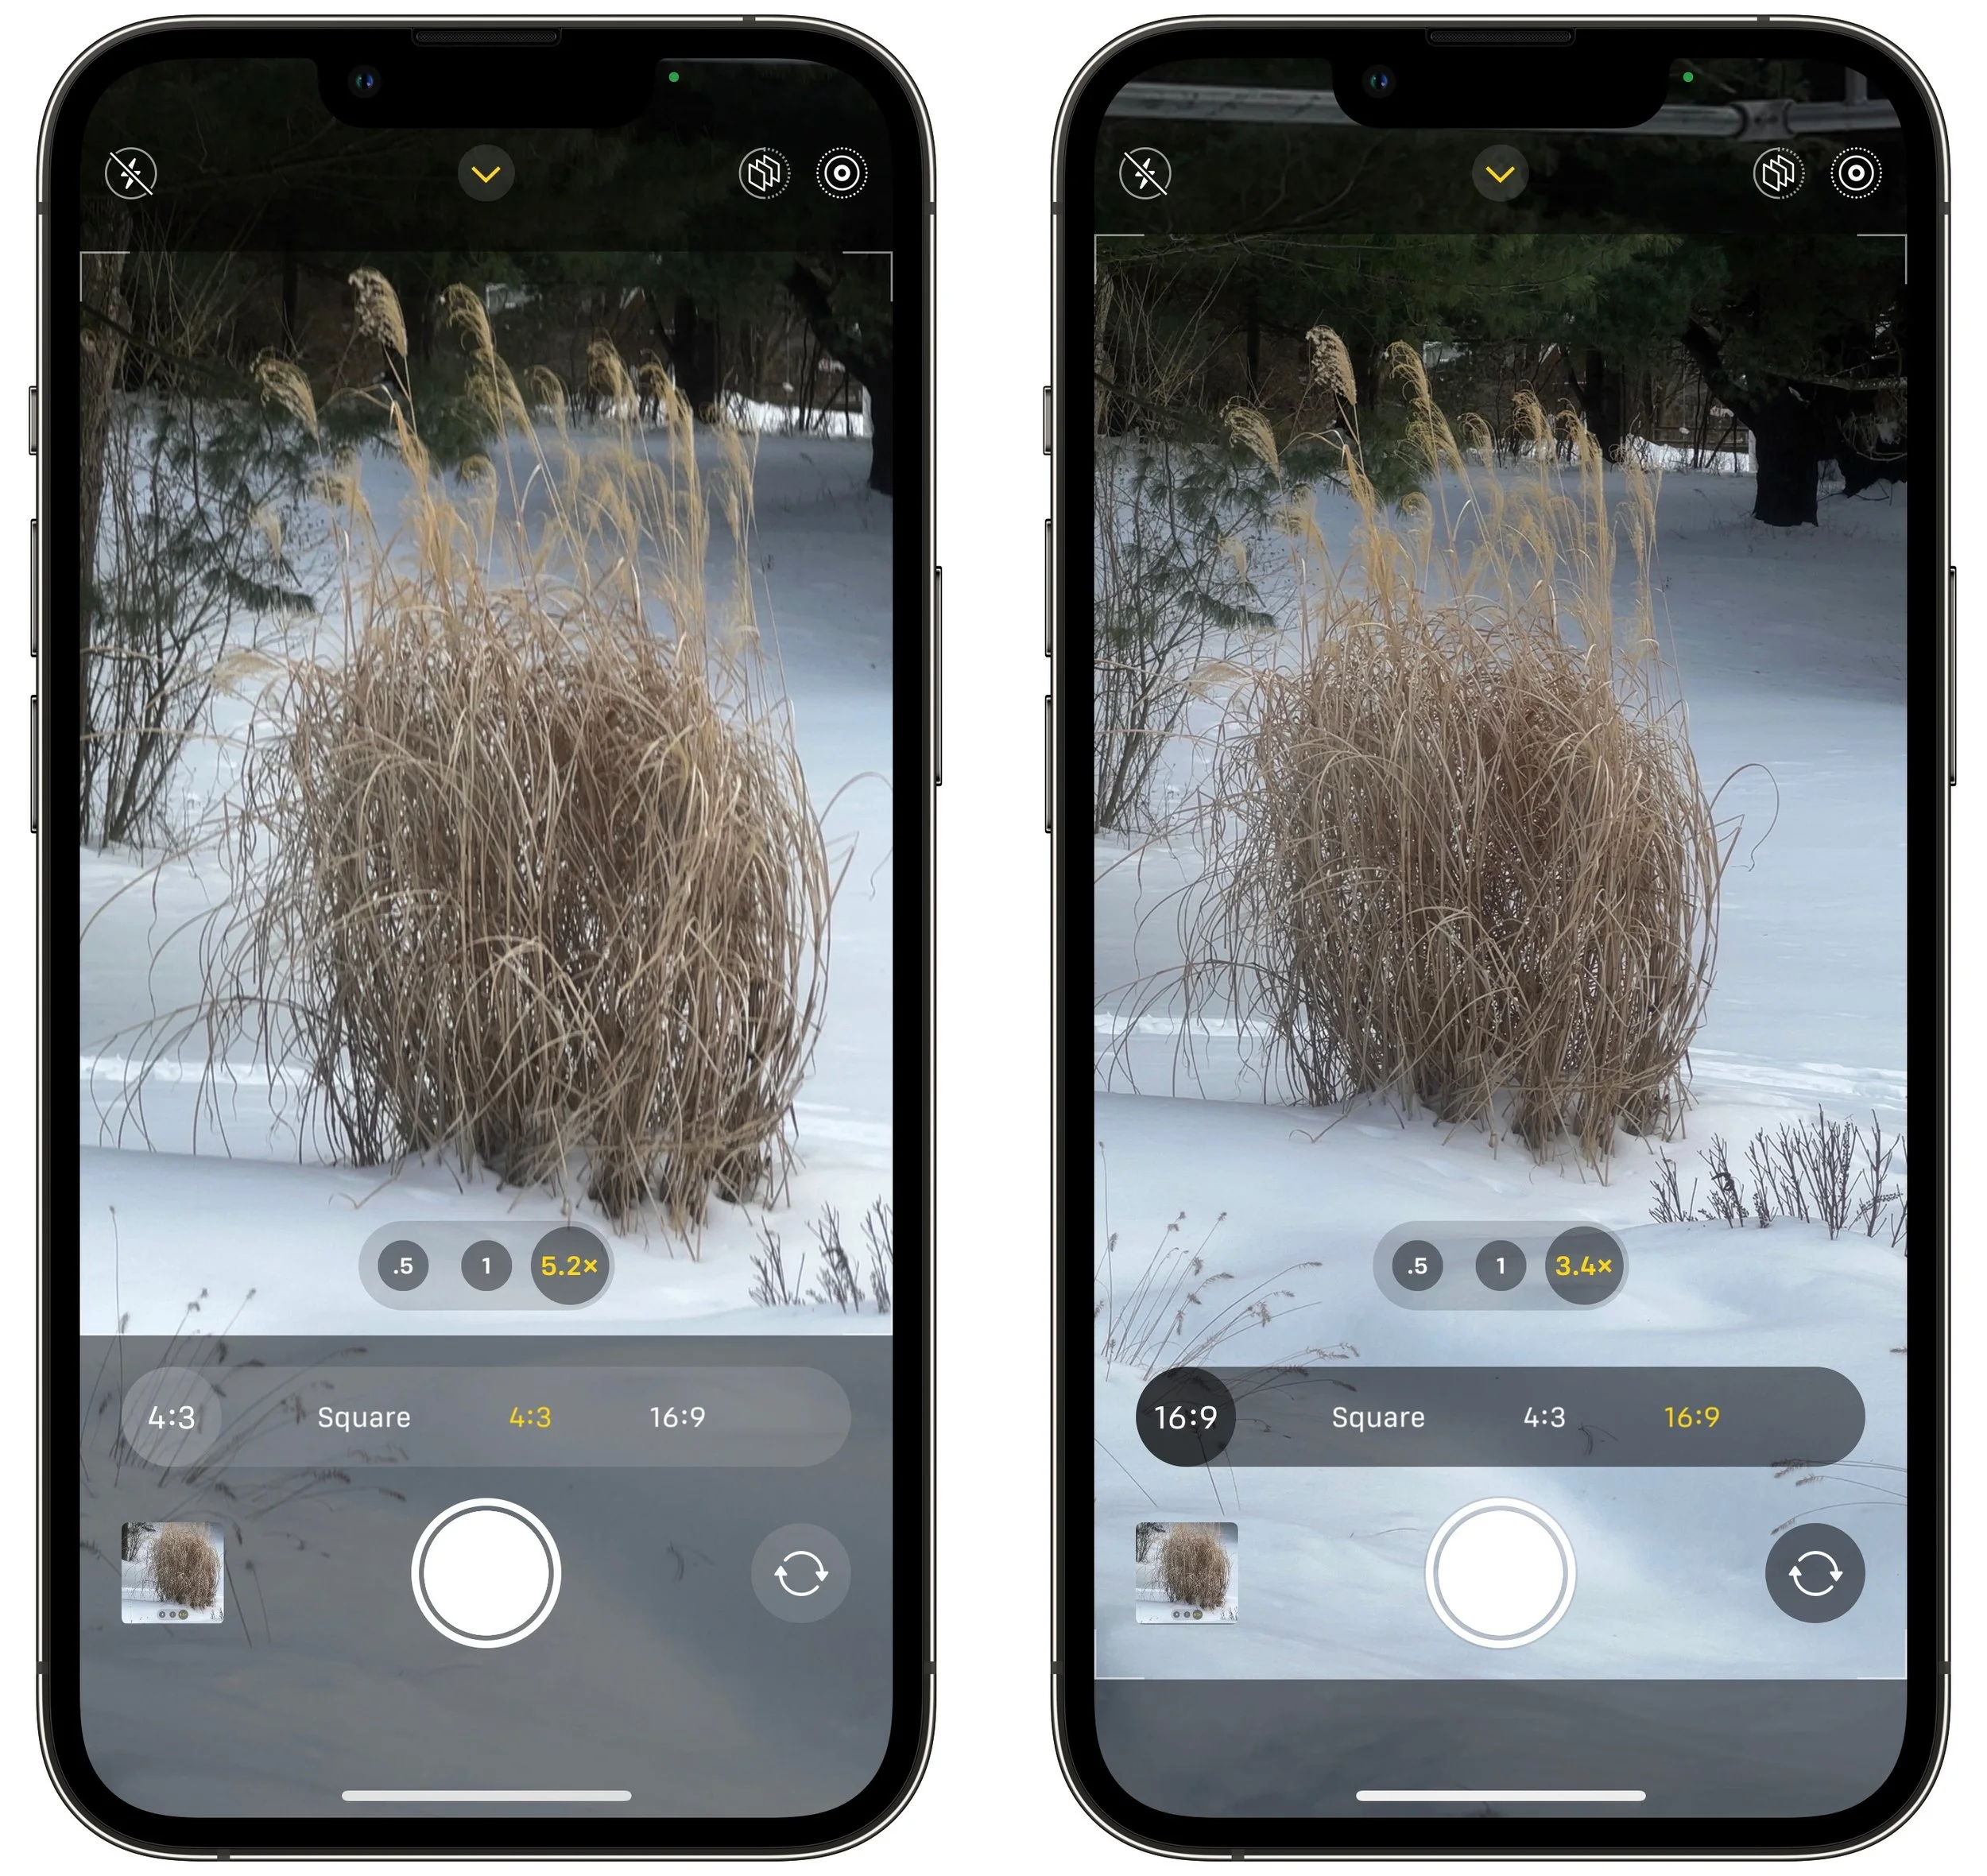
Aspect Ratio: Some iPhones can take photos in multiple aspect ratios. Use this control to choose from the standard 4:3 (below left) ratio, square, and 16:9 (below right). The 16:9 ratio expands the viewfinder to show what it will capture.
Exposure: Although automatic exposure control is usually fine (and you can adjust it afterward as well), you can use this control to increase or decrease the exposure manually. It’s also available in Video, Slo-Mo, and Time-Lapse modes.

Timer: For a hands-free selfie or a group photo that includes the photographer, use this control to set the timer to 3 or 10 seconds, starting from when you tap the shutter button. The iPhone counts down with both flash bursts and an onscreen number.

Filter:The Filter button offers nine options, three each in Vivid, Dramatic, and Mono. You may want to turn one of these on to see its effect while composing the shot. Otherwise, it’s easier to apply them in editing later.

Depth: This control is available only in the Portrait and Cinematic modes, where it lets you increase or decrease the depth of field. If you increase the depth of field, the background becomes sharper; if you decrease it, the background gets blurrier.

Apart from Photographic Styles, which automatically remembers your setting from session to session, the Camera app generally resets any changes you make in the next session. That’s usually what you’d want, but if you would prefer to keep a setting until you change it manually, go to Settings > Camera > Preserve Settings. That screen provides switches that tell the Camera app to preserve specific settings. Pay particular attention to Creative Controls, Exposure Adjustment, Night Mode, and Live Photo—we often make a point of using Preserve Settings with Live Photo so we don’t waste a lot of space unless we actually want to shoot a Live Photo.
In the end, it’s nice that these controls are neither necessary nor cluttering your view most of the time, but they’re extremely useful on occasion. We hope that Apple comes up with a way of hinting at their existence in future versions of iOS.
(Featured image by iStock.com/Darkdiamond67)
Perturbed by the Price of Adobe Creative Cloud? Consider the Affinity Suite
Looking for an affordable alternative to an expensive Adobe Creative Cloud subscription? Check out the Affinity suite: Affinity Designer, Affinity Photo, and Affinity Publisher. Read on for thoughts on how they compare and if Affinity is for you.

Few would disagree that the most popular image editing software in the world is Adobe Photoshop, the top illustration app is Adobe Illustrator, and the preeminent page layout package is Adobe InDesign. Many design and publishing professionals spend their lives in one or more of these apps.
There’s one problem: cost. Adobe provides access to them only via Creative Cloud subscriptions, where each app costs $21 per month, making it hard to pass up the $53-per-month All Apps bundle that includes all three plus Premiere Pro, Acrobat Pro, and more. That All Apps bundle works out to an eye-watering $636 per year.
For many people, that $636 annual expense is just the cost of doing business. They need the full power of Adobe’s tools, and they need to collaborate with others using native Photoshop, Illustrator, and InDesign files. If you fall into that camp, no worries, and you can stop reading right now.
However, if you’re subscribing to Adobe Creative Cloud merely because you need a capable image editor, illustration app, or page layout package, and you aren’t otherwise deep in the Adobe ecosystem, consider the Affinity suite from Serif: Affinity Photo, Affinity Designer, and Affinity Publisher, each of which costs $55. Once. That’s right, you can buy all three for $165, or just about the same as 3 months of Creative Cloud. Updates are free. Versions for Microsoft Windows are available for $55 too, and Affinity Photo and Affinity Designer also come as $10 iPad apps.
The obvious question is if you could replace Photoshop, Illustrator, and InDesign with Affinity Photo, Affinity Designer, and Affinity Publisher. We can’t answer that for sure—the Adobe apps have so many features that it’s impossible to know which are most important to you and if the Affinity apps’ features are comparable. Some may not match up—we’ve been told that master pages in Affinity Publisher are a bit funkier than master pages in InDesign, for instance. Others may even be better—some people we know find exporting Web graphics from Affinity Designer easier than exporting from Illustrator. And some may not exist at all—it doesn’t seem that Affinity Publisher (the newest addition to the suite) has a Track Changes feature like InDesign.

For instance, just as you can embed Photoshop and Illustrator files in an InDesign layout and then use the Edit Original command to edit them in the other app, you can embed Affinity Photo and Affinity Designer files in Affinity Publisher. Serif’s StudioLink technology provides direct access to the primary tools from Affinity Photo and Affinity Designer right within an Affinity Publisher document. It’s neat.
Overall, the feature sets are similar. Those who would consider switching from Creative Cloud can probably figure out how to accomplish their necessary tasks using the Affinity apps. That’s not to say that they’re clones of Adobe’s apps. In many cases, you might need to learn a new technique for accomplishing some task. Along with full documentation, Serif provides hundreds of tutorial videos and runs an active user forum where people ask questions, make suggestions, and share tutorials. Simple Web searches also often turn up blog posts with useful techniques from Affinity users.
What about moving files back and forth? Affinity Photo can open Photoshop’s proprietary PSD files, although it’s not guaranteed to import everything perfectly. Affinity Designer can open Illustrator documents as long as they were saved with the Create Compatible PDF File option selected. Similarly, it can open Illustrator-created PDF files that many designers send to clients as proofs. And Affinity Designer can open InDesign files that have been saved in IDML (InDesign Markup Language) format. Plus, you can often just copy and paste text and objects between the apps. If you decide to switch, you might want to continue your Creative Cloud subscription while ensuring that your key Adobe files are saved such that the Affinity apps can open them.
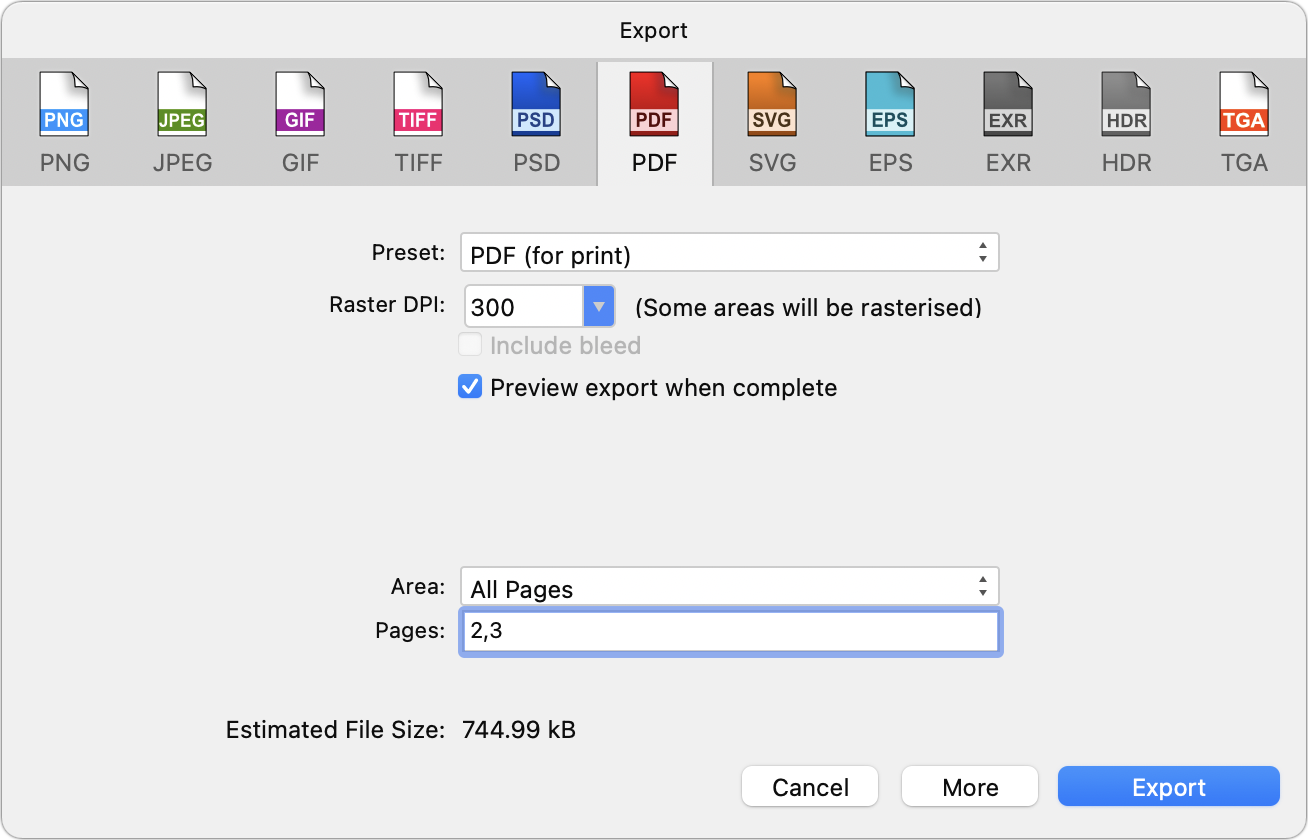
On the export side, the Affinity apps can export in many formats, but they’re more for final exports when it’s time to print or publish. You probably wouldn’t want to use the Affinity apps to collaborate on files with those using the Adobe apps. That said, Affinity Photo can export PSD files for use in Photoshop, and Affinity Designer and Affinity Publisher are probably best served by exporting PDF files that Illustrator and InDesign can open. Just don’t expect everything to move between the apps flawlessly.
In the end, the decision is yours—we’re merely suggesting the Affinity suite as a cost-saving option if you don’t need everything Creative Cloud provides. Visit the Affinity site, watch Serif’s marketing and tutorial videos, and poke around in the extensive online help. Free trial versions of all the apps are available, and there’s a 14-day money-back guarantee. In the best of all worlds, you’ll save hundreds of dollars per year and find that you like the Affinity apps more than Adobe’s.
(Featured image by Serif)
Plan for the Future by Establishing a Legacy Contact
Apple’s new Legacy Contact feature makes it simpler for you to give a family member access to your iCloud data after your death. Read on to learn how to make someone a Legacy Contact or what to do if you are a Legacy Contact.

Have you heard the expression “hit by a bus”? It’s a somewhat macabre attempt to inject a little levity into planning for the unthinkable event of dying without warning. No one expects to be hit by a bus, but people do die unexpectedly in all sorts of ways. That’s terrible, of course, but it’s also incredibly hard on that person’s family, who suddenly must deal with an overwhelming number of details. Many of those details revolve around the deceased’s digital life—devices, accounts, passwords, subscriptions, and more.
We strongly encourage everyone, regardless of age or infirmity, to think about what your family would want and need to do with your digital presence in the event of your death. The ultimate guide to this topic is Joe Kissell’s book Take Control of Your Digital Legacy, although the current version is a little out of date and is slated for updating in 2022.
The next edition of that book will undoubtedly discuss Apple’s new Legacy Contact feature, introduced in iOS 15.2, iPadOS 15.2, and macOS 12.1 Monterey. It enables you to specify one or more people as a Legacy Contact. Should you die unexpectedly, those people can use an access key along with your death certificate to access much of your Apple content and remove Activation Lock from your devices. (If you have time to prepare for your passing, it’s easier to share all your passwords and passcodes explicitly.) The person or people you set as Legacy Contacts don’t have to be running Apple’s latest operating systems or even be Apple users, though it’s easier if they are. (Like so many other things in life.)
Don’t put off specifying someone as a Legacy Contact, whether it’s a family member or close friend. The entire point of the “hit by a bus” scenario is that it’s both unexpected and could happen at any time. (It’s possible to get access without being a Legacy Contact, but it requires a court order and will undoubtedly be significantly more work.)
Apple provides good directions for the Legacy Contact feature, and while we’ll summarize the steps below, read Apple’s documentation to get the word from the horse’s mouth. Apple’s support pages include:
What Data Can a Legacy Contact Access?
Apple has the full list at the link above, but in short, a Legacy Contact can access anything stored in iCloud, including photos, email, contacts, calendars, messages, files, and more, as well as the contents of iCloud Backup. Not included are licensed media (music, movies, and books), in-app purchases (upgrades, subscriptions, and game currency), payment information (Apple ID payment info or Apple Pay cards), and anything stored in the account holder’s keychain (usernames and passwords, credit card details, and more). A Legacy Contact cannot access the deceased’s devices—Apple is incapable of sharing passcodes. However, Apple can remove Activation Lock so those devices can be erased and reused.
How Do You Add a Legacy Contact?
Adding someone as a Legacy Contact is easy. You must be running iOS 15.2, iPadOS 15.2, or macOS 12.1 Monterey to initiate the process, and two-factor authentication must be turned on for your Apple ID (this is a very good idea anyway).
On an iPhone or iPad, go to Settings > Your Name > Password & Security > Legacy Contact > Add Legacy Contact. On a Mac, use System Preferences > Apple ID > Password & Security > Legacy Contact > Manage. You can choose a group member if you’re in a Family Sharing group or pick someone from your contacts list.
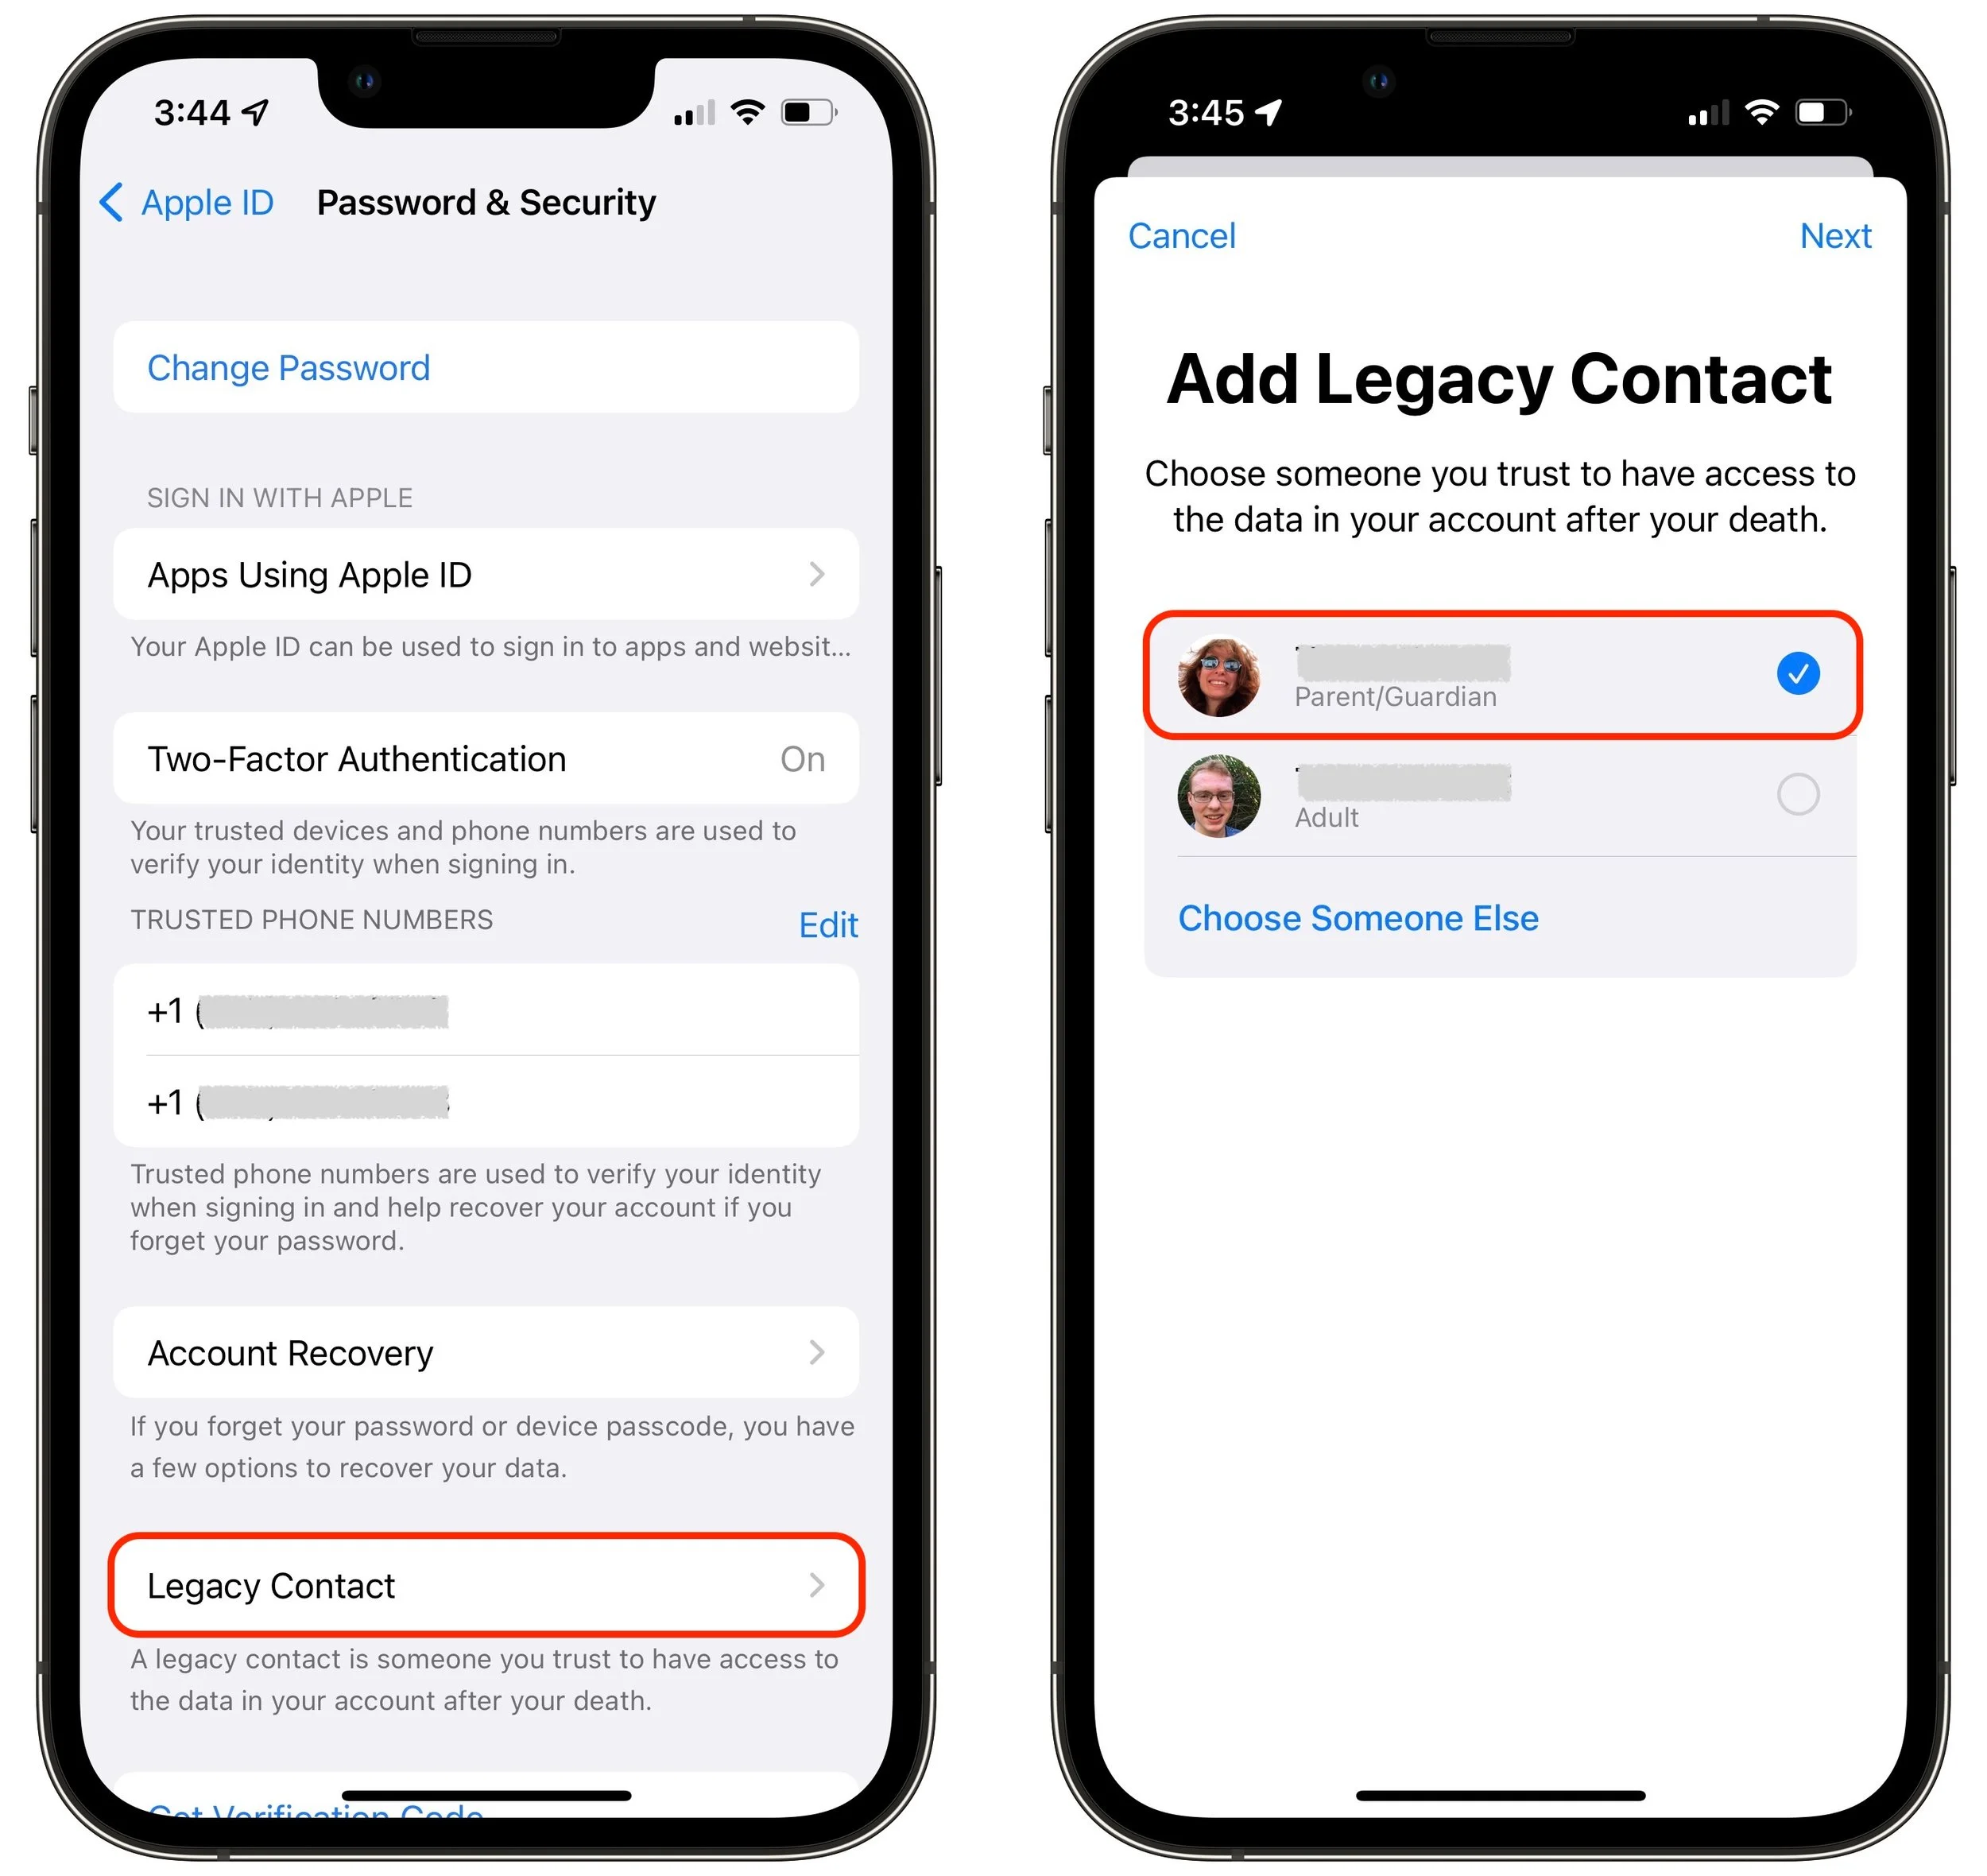
As part of the process of picking someone, Apple allows you to share the access key via Messages if they’re running iOS 15.2, iPadOS 15.2, or macOS 12.1 Monterey. If they accept, a copy of the access key will automatically be stored in their Apple ID settings. If they’re not running a necessary operating system or don’t use an Apple device, you can instead print out an access key QR code and give that to them. You might also want to print a copy to store with your will and other important documents.
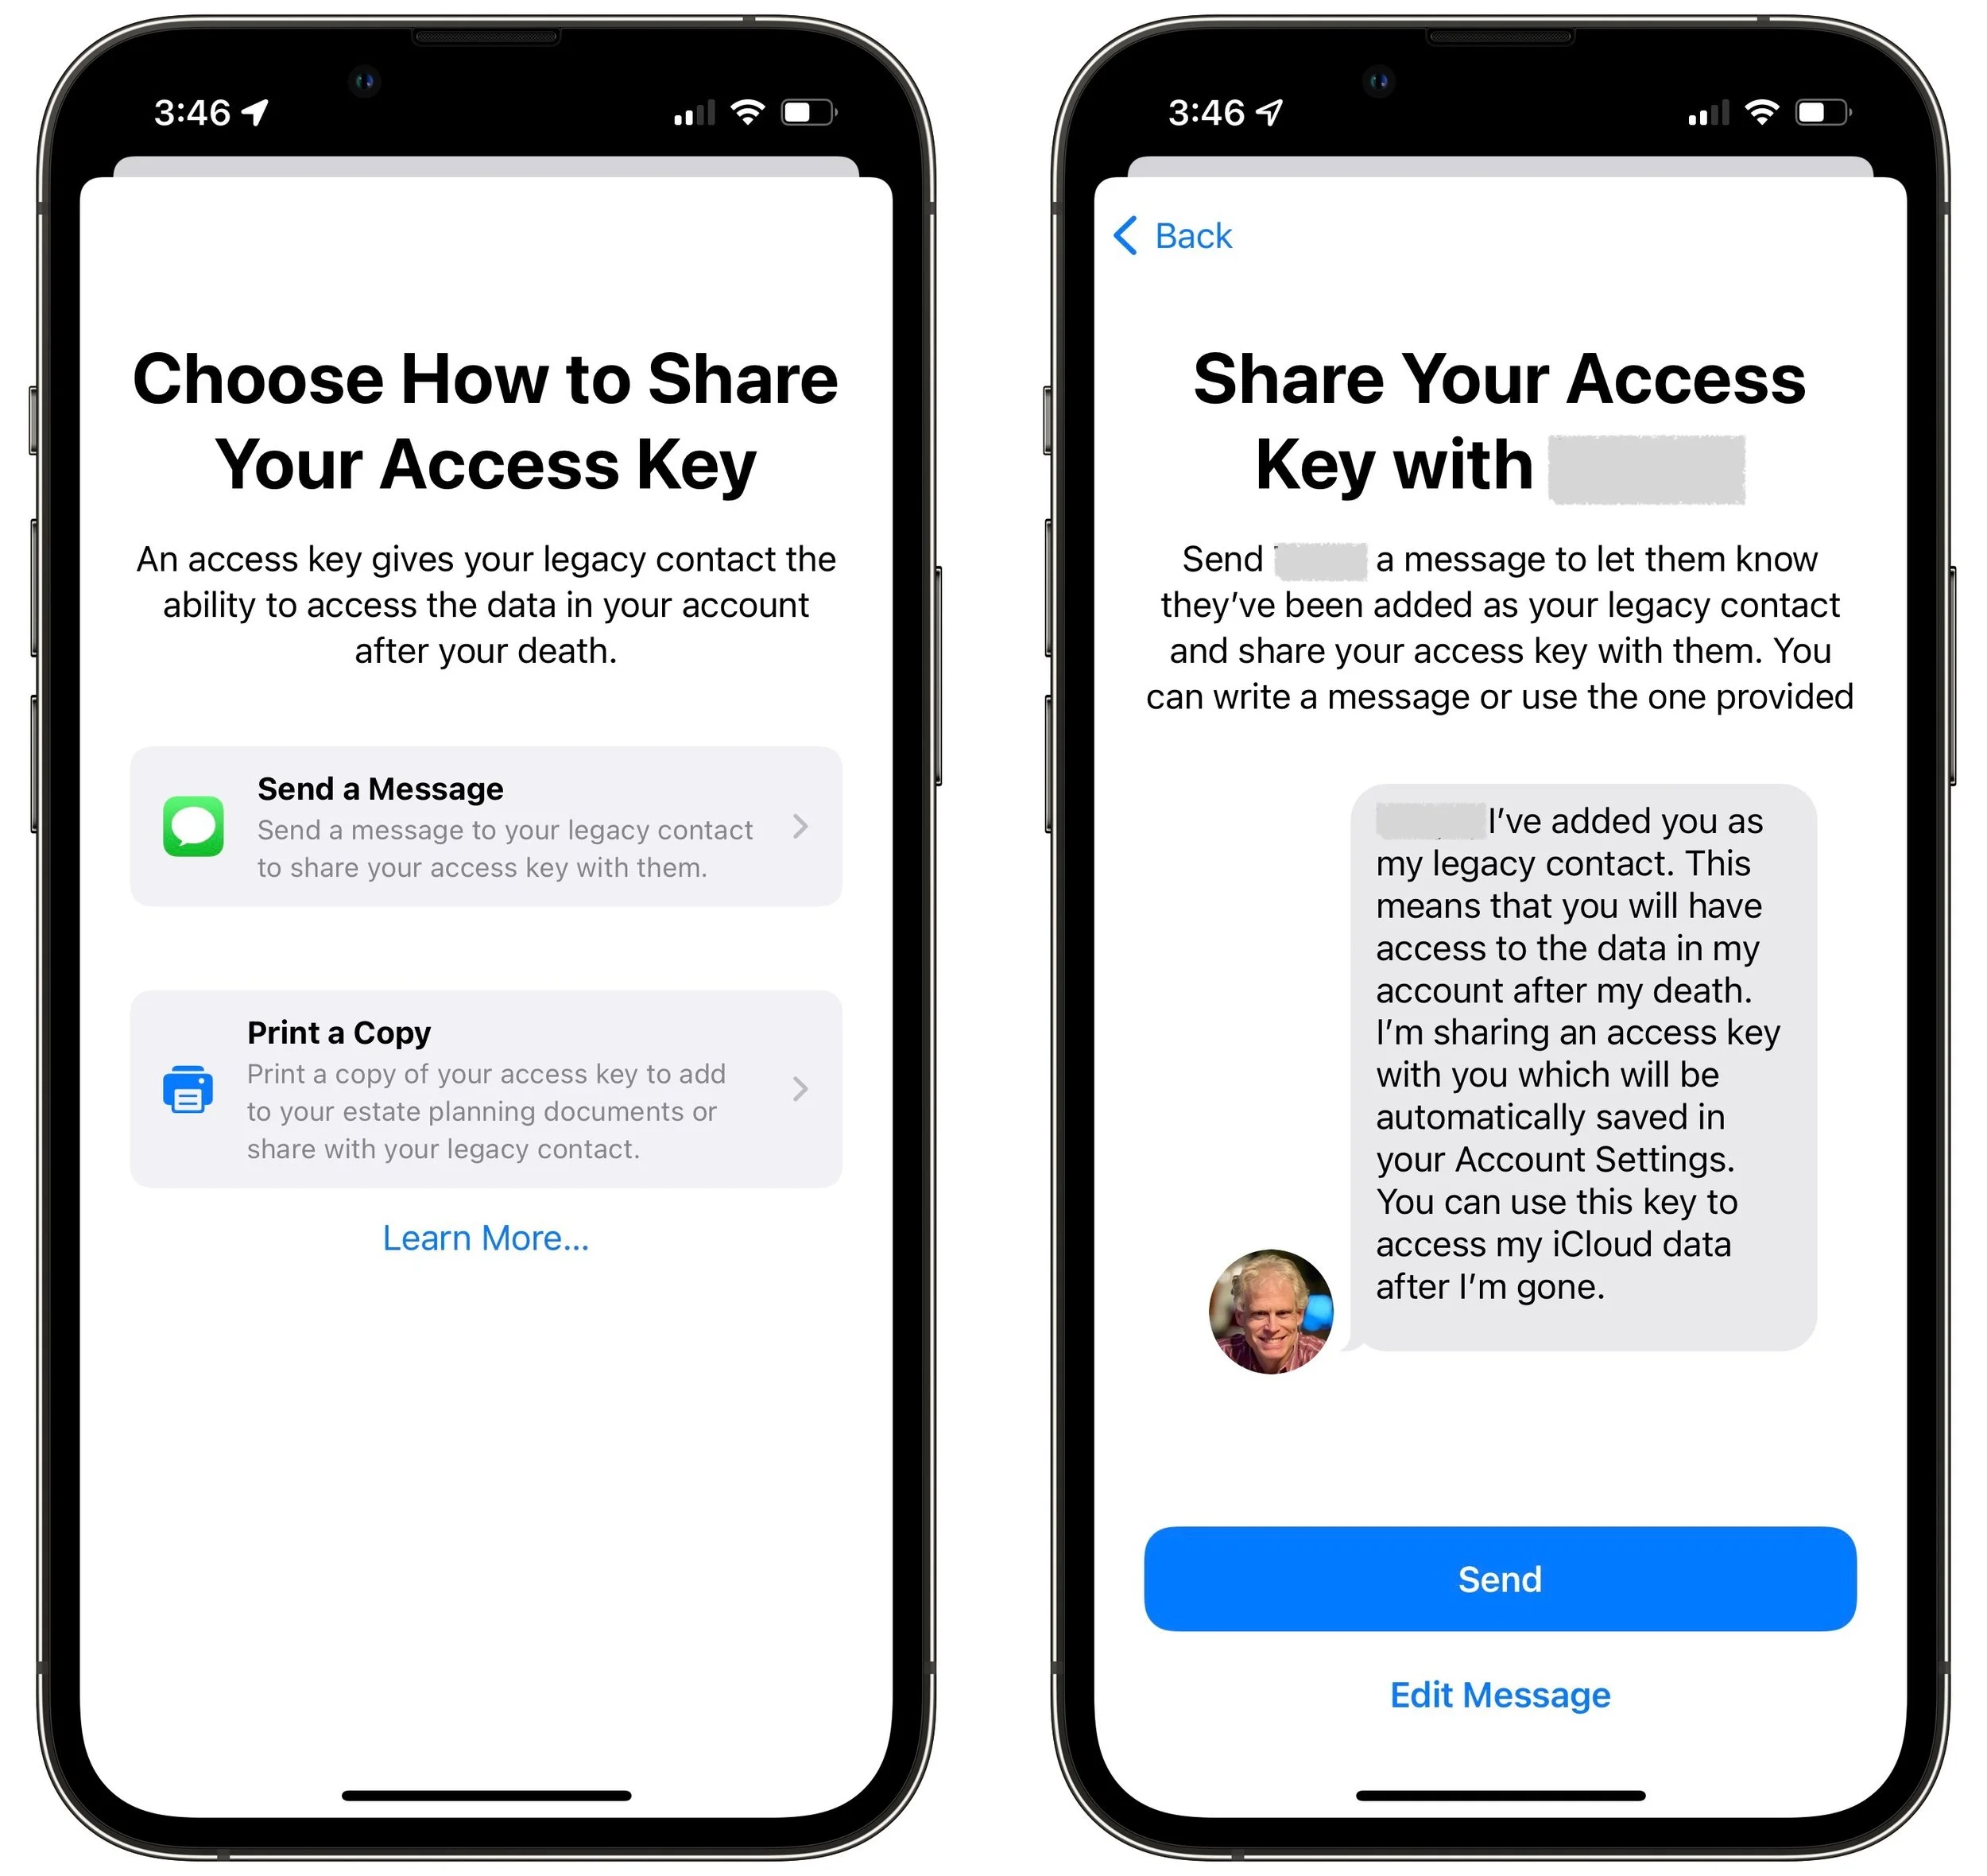
It may often be appropriate to act as a Legacy Contact for the people you’re asking to be your Legacy Contacts, particularly with spouses or adult children.
How Does a Legacy Contact Request Account Access?
Let’s assume the worst and pretend that someone who has added you as a Legacy Contact has passed away. To request access to their Apple ID, you need the access key that the person shared with you and a copy of their death certificate. You can find the access key on an iPhone or iPad in Settings > Your Name > Password & Security > Legacy Contact > Contact’s Name, and on the Mac in System Preferences > Apple ID > Password & Security, where you click Manage next to Legacy Contact settings and then Details next to the person’s name. It’s also possible that the person shared the access key as a document stored with their estate planning documents.
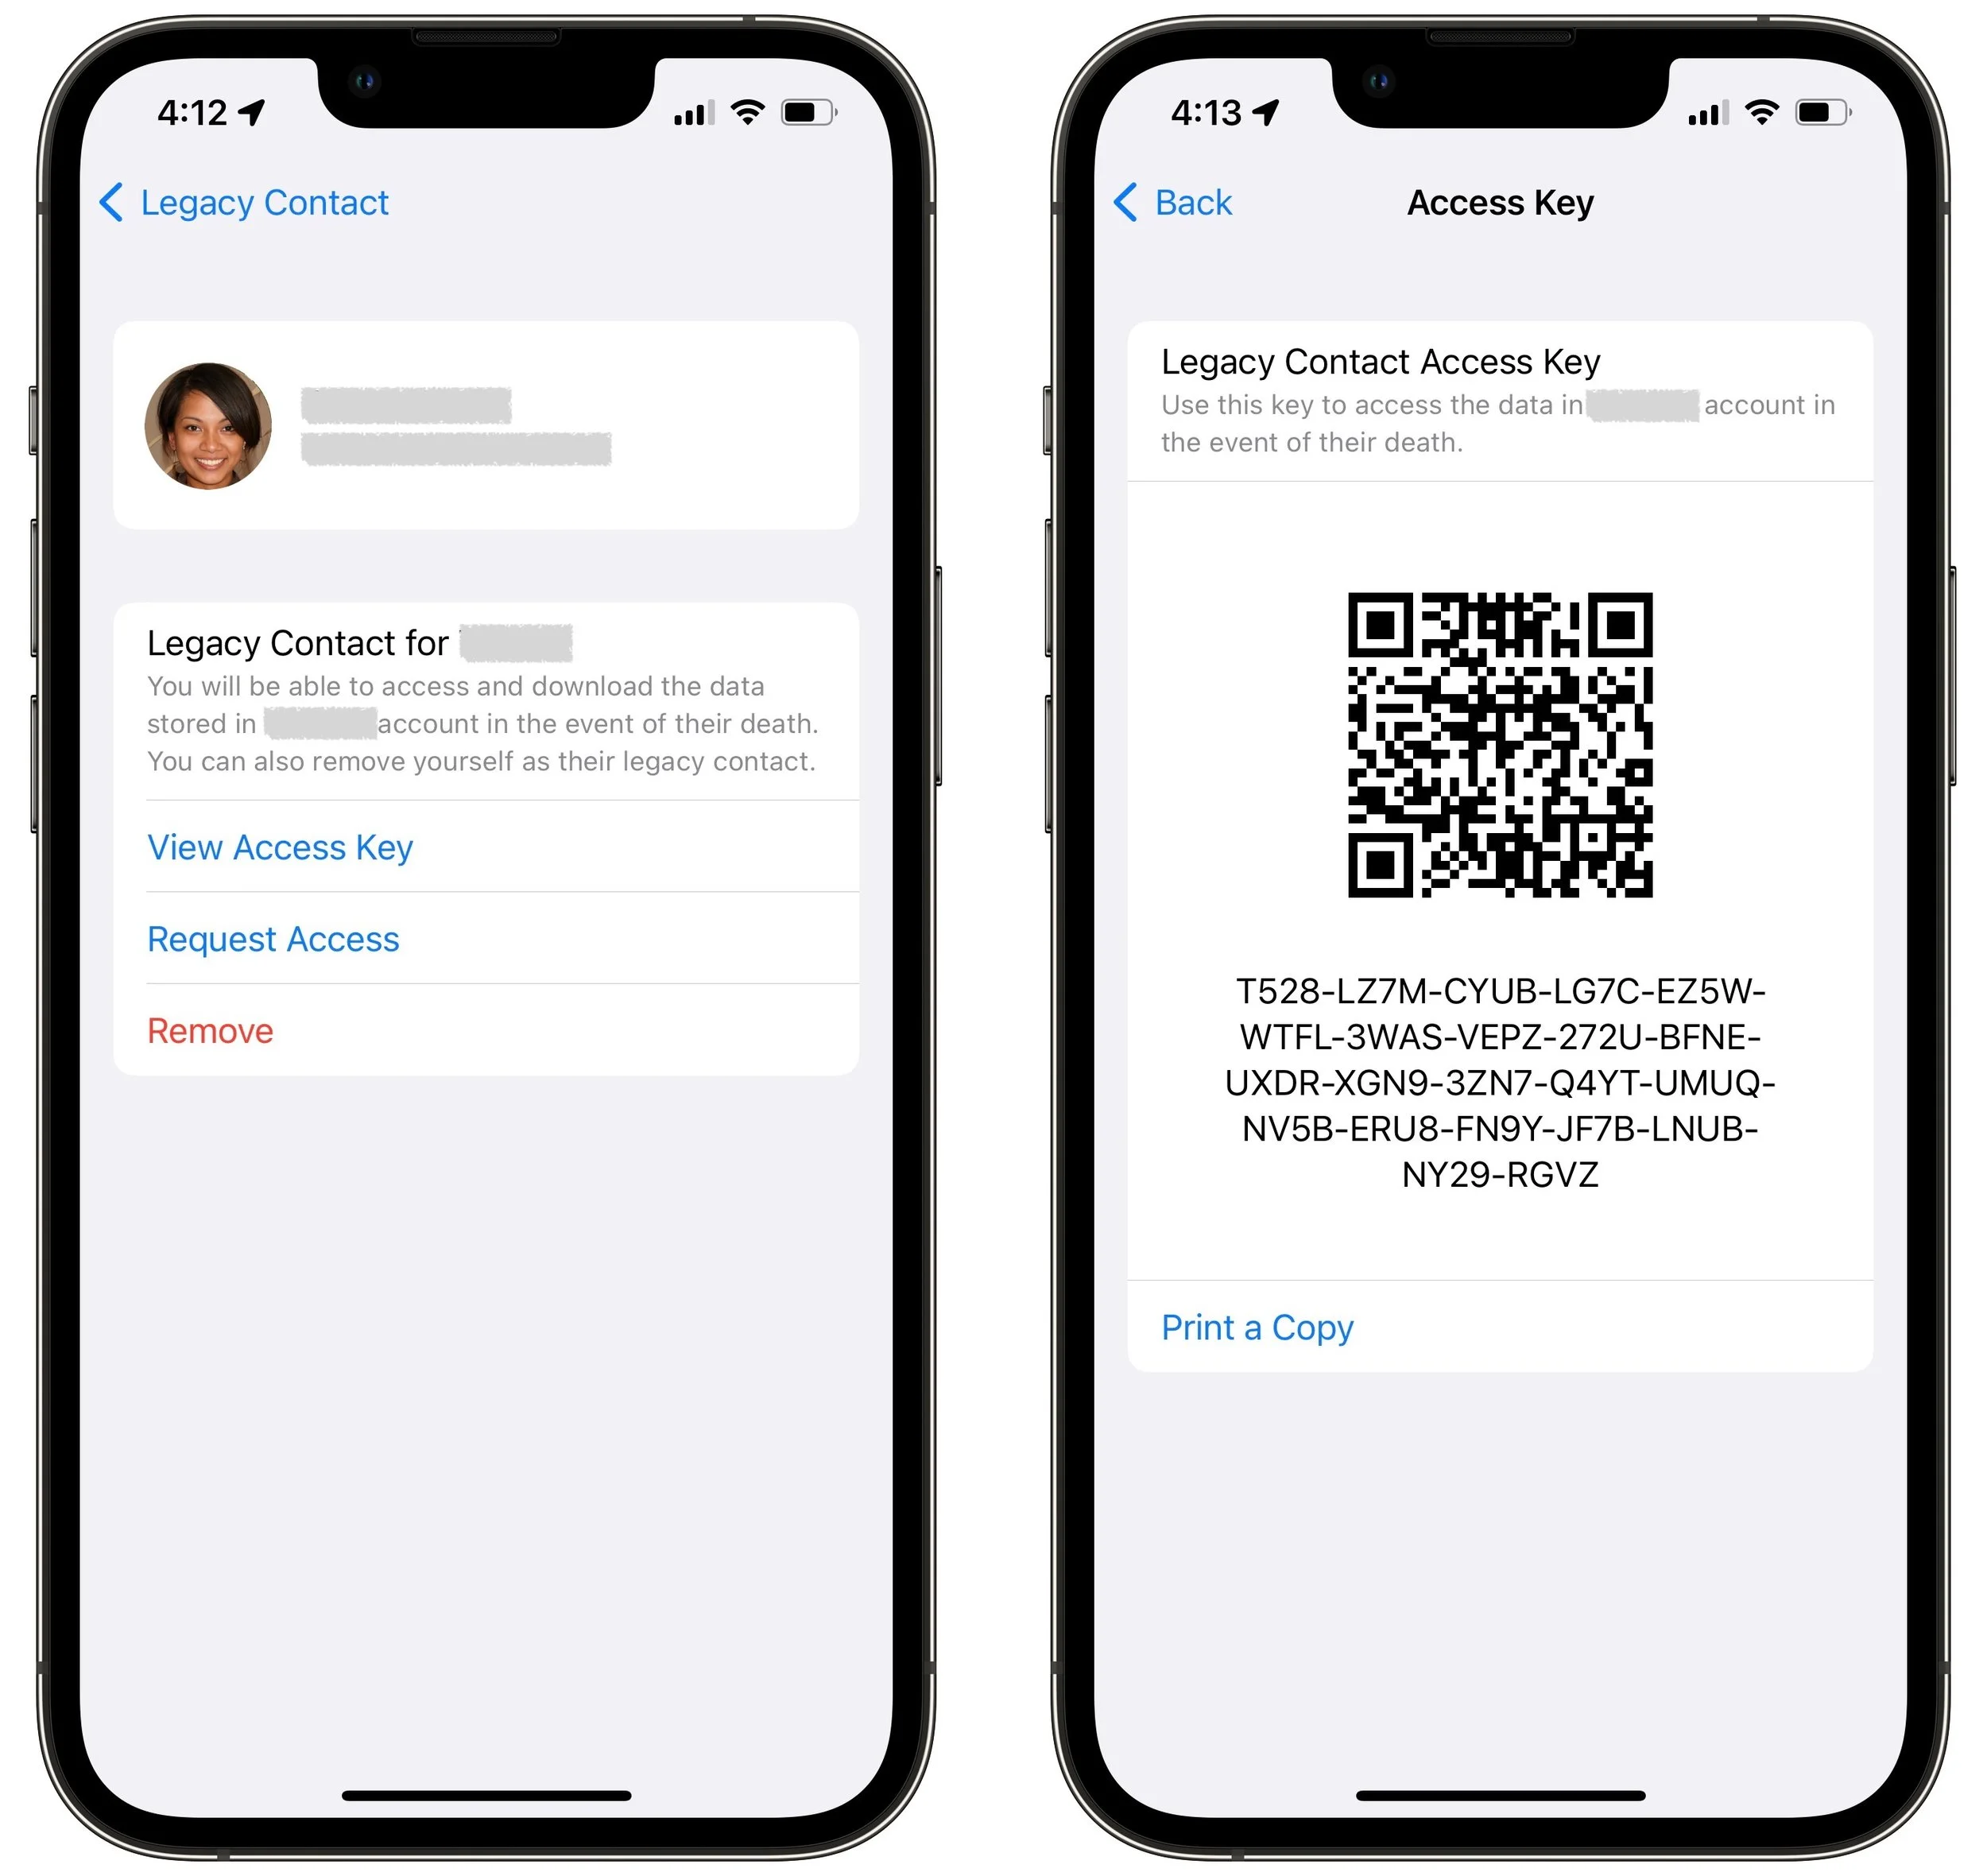
The screens that provide the access key also have a Request Access link. Tap or click that and follow the instructions to upload the death certificate. If you don’t have an appropriate Apple device, you can also do this on the Web at Apple’s Digital Legacy – Request Access page.
Apple evaluates all access requests to make sure they’re legitimate, and once approved, sends you an email with more details and instructions. That email will also include a special Legacy Contact Apple ID that replaces the deceased’s previous Apple ID. You can use that Apple ID to log in to iCloud.com or download data at privacy.apple.com, sign in to an Apple device, or restore an iCloud backup to another Apple device. Having an access request approved also removes Activation Lock from the deceased’s Apple devices so you can restore them to factory settings and set them up again, either fresh or with the Legacy Contact’s Apple ID’s data.
The main limitation is that the Legacy Contact Apple ID is good only for 3 years, after which the legacy account is permanently deleted. So be sure to download everything important fairly quickly—don’t just keep using the Legacy Contact Apple ID or assume that you’ll be able to go back to it at any time.
We sincerely hope that you never have to act as Legacy Contact for a loved one, but we can say from experience that this new feature can only help make an already stressful time more manageable.
Badges? We Don’t Need No Stinkin’ Red Badges (On Our iPhone Apps)
Do you love or hate those red badges on your iPhone Home screen icons? Or maybe you’re indifferent and mostly ignore them? Regardless of your opinion, our article explains how to make the most of them—or eliminate them entirely.
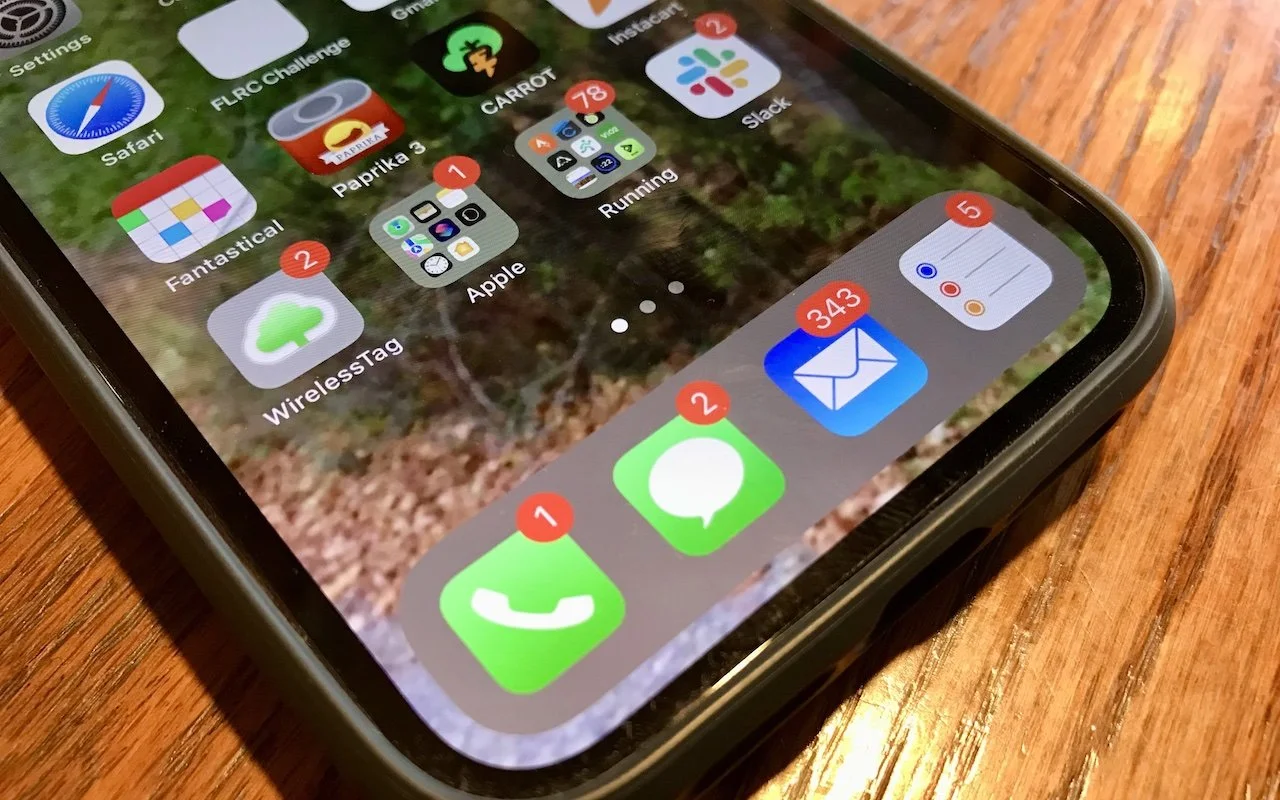
Quick quiz: what does a red number badge on the Phone icon on your iPhone mean? You’d be right if you said that it indicates the number of missed calls or voicemail messages. The Mail and Messages apps also use a red badge to display the number of unread messages; Settings uses one to indicate that software updates are available; and Reminders shows a badge for the number of tasks due today. Third-party apps also use red badges to indicate that some number of somethings await you inside. You’ll also see a red badge on any folder that contains apps that are themselves showing badges—the folder’s badge sums the total of the badges inside.
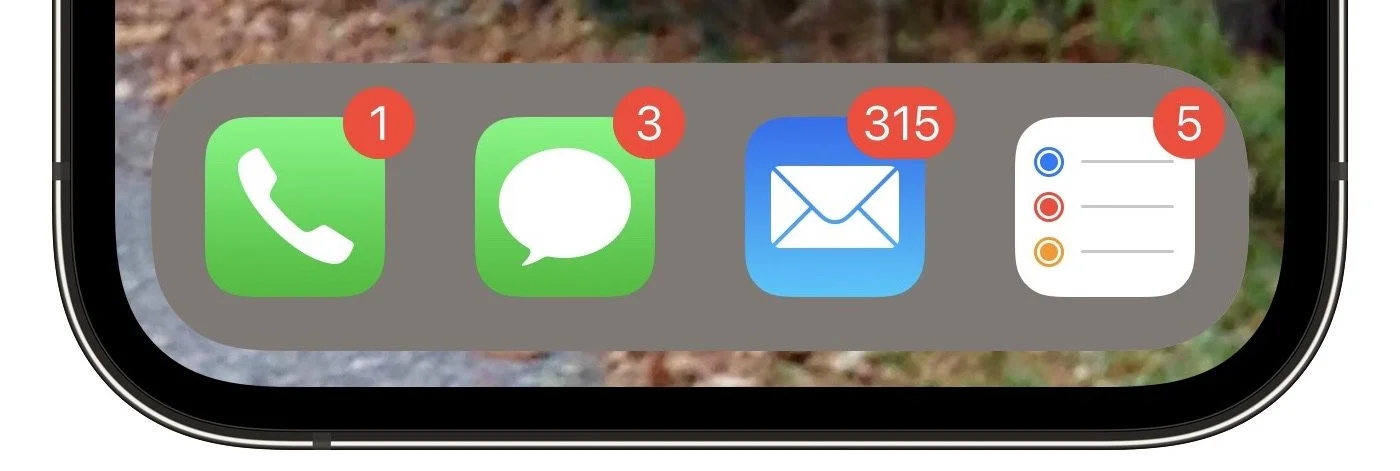
We’re willing to bet that some of you stay on top of your badges at all times, checking the missed calls, reading the messages, and completing the to-dos. Others don’t find the badges helpful and either ignore them or find them somewhat annoying. Who needs to know they have 315 unread email messages?
Here then is our advice on how to ensure that the red badges either provide useful information or get out of your way.
Clear Badges Organically
Being told that you have 17 voicemail messages that you haven’t listened to or 32 unread texts in Messages isn’t helpful—at best, you have to remember that you had only 16 voicemail messages yesterday. There’s no option for dealing with them all at once, but it’s worth taking a few minutes while standing in line or otherwise killing time to clear the badges manually.
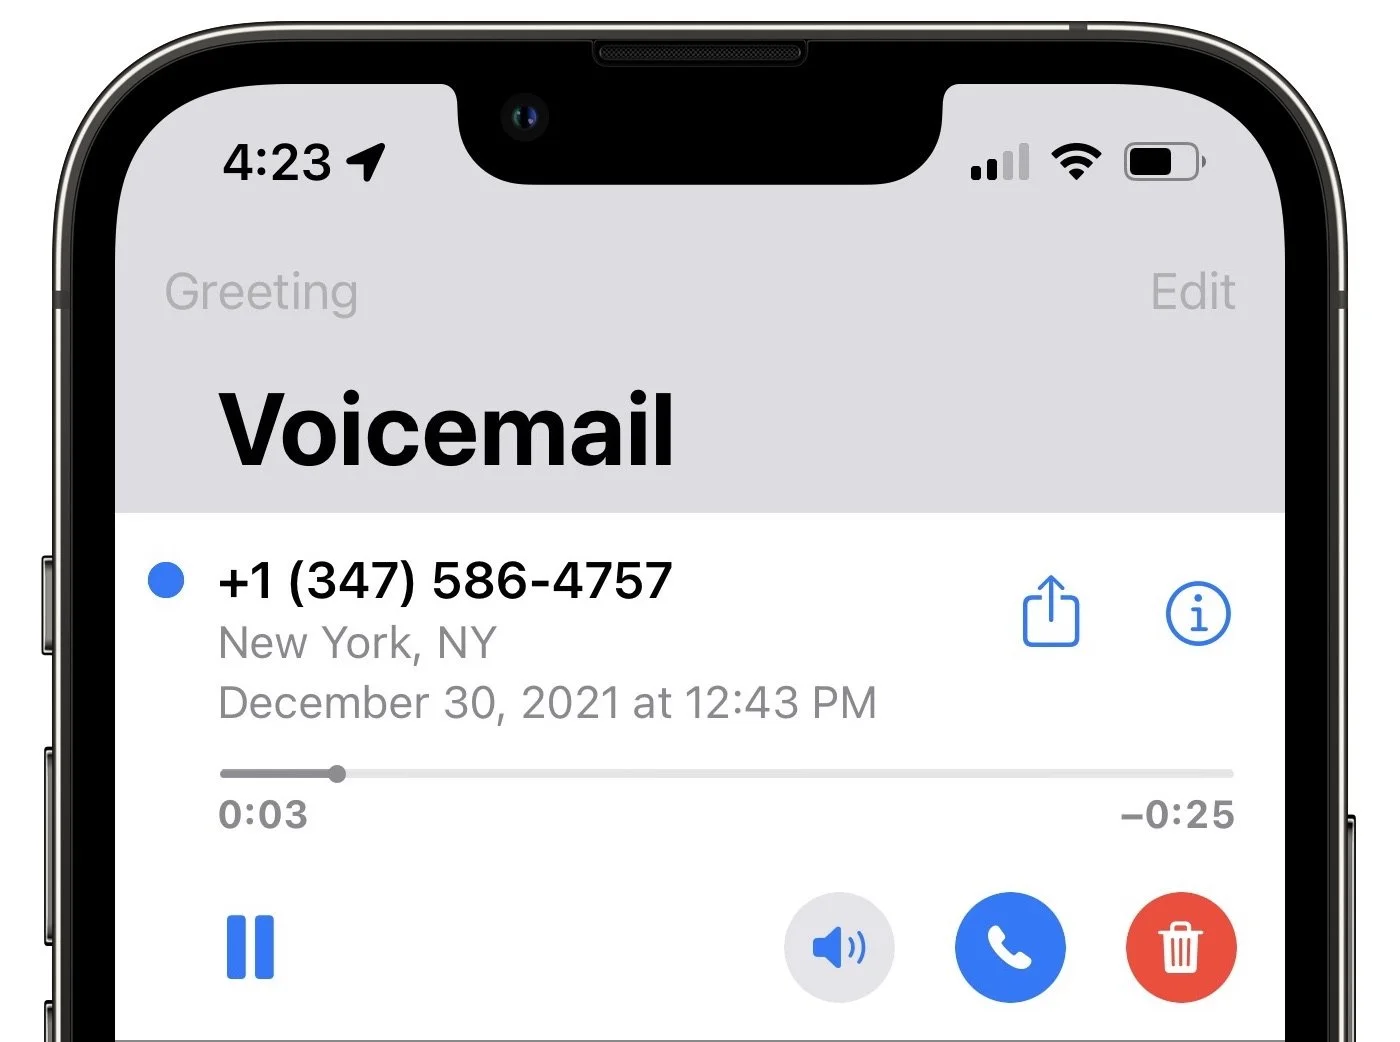
Precisely how you do this depends on the app. In the Phone app, all you have to do to clear the missed calls in the badge is tap Recents at the bottom—that’s enough to mark them as viewed. For voicemails, however, you’ll either have to listen to at least some of the message or delete it by swiping all the way to the left. (Remember that you can drag the playback slider to fast-forward if you want to mark it as listened without actually doing so.)
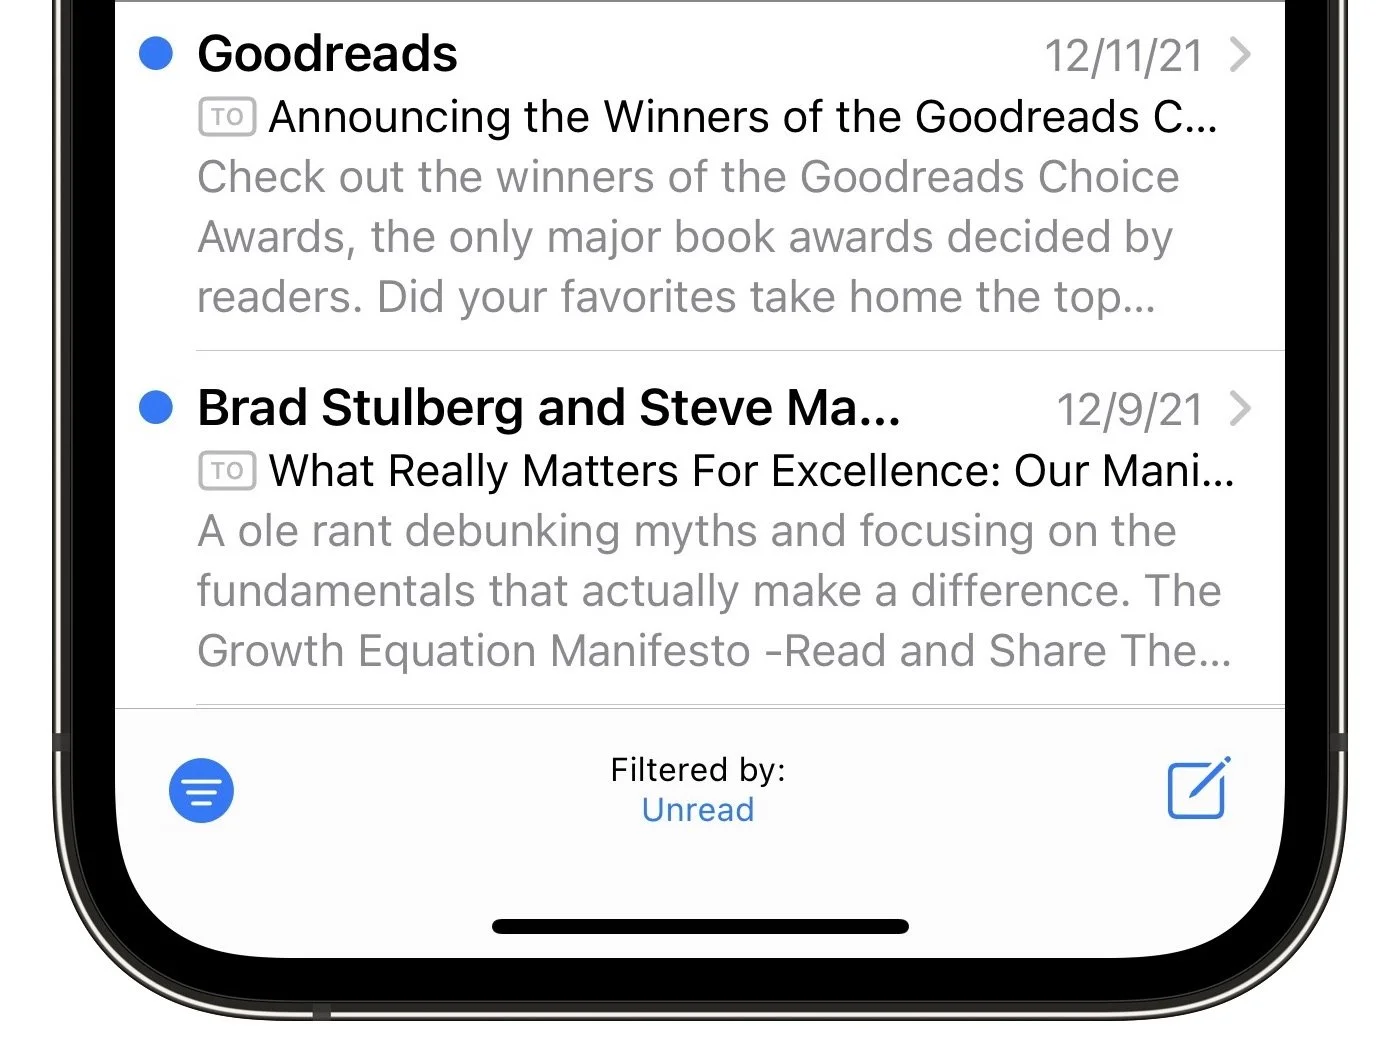
In Messages and Mail, the trick is to read or delete each message. That mostly means just loading it quickly and then moving on, although you can also swipe left to delete unread conversations or email threads. In Messages, you’ll have to scroll through all your conversations, looking for those that have a blue unread dot next to them. In Mail, you can tap the Filter button at the bottom to show only unread messages (tap Filtered By and select Unread if it’s set some other way).
Regardless, the goal is to mark everything as dealt with so the badge goes away, not for the sake of making it go away, but so when it returns with the next unread message or new voicemail, it’s giving you actionable information.
Disable Unnecessary Badges
However, some badge numbers are never useful. Unless you receive very little email, being told you have more than a handful of unread emails will likely just cause stress, not encourage you to deal with those messages. That’s especially true if a session in Mail merely knocks the number down to a still-high value. (“Oh good, now I only have 289 unread messages.”) Or you may just dislike the badges in general—that’s fine too.
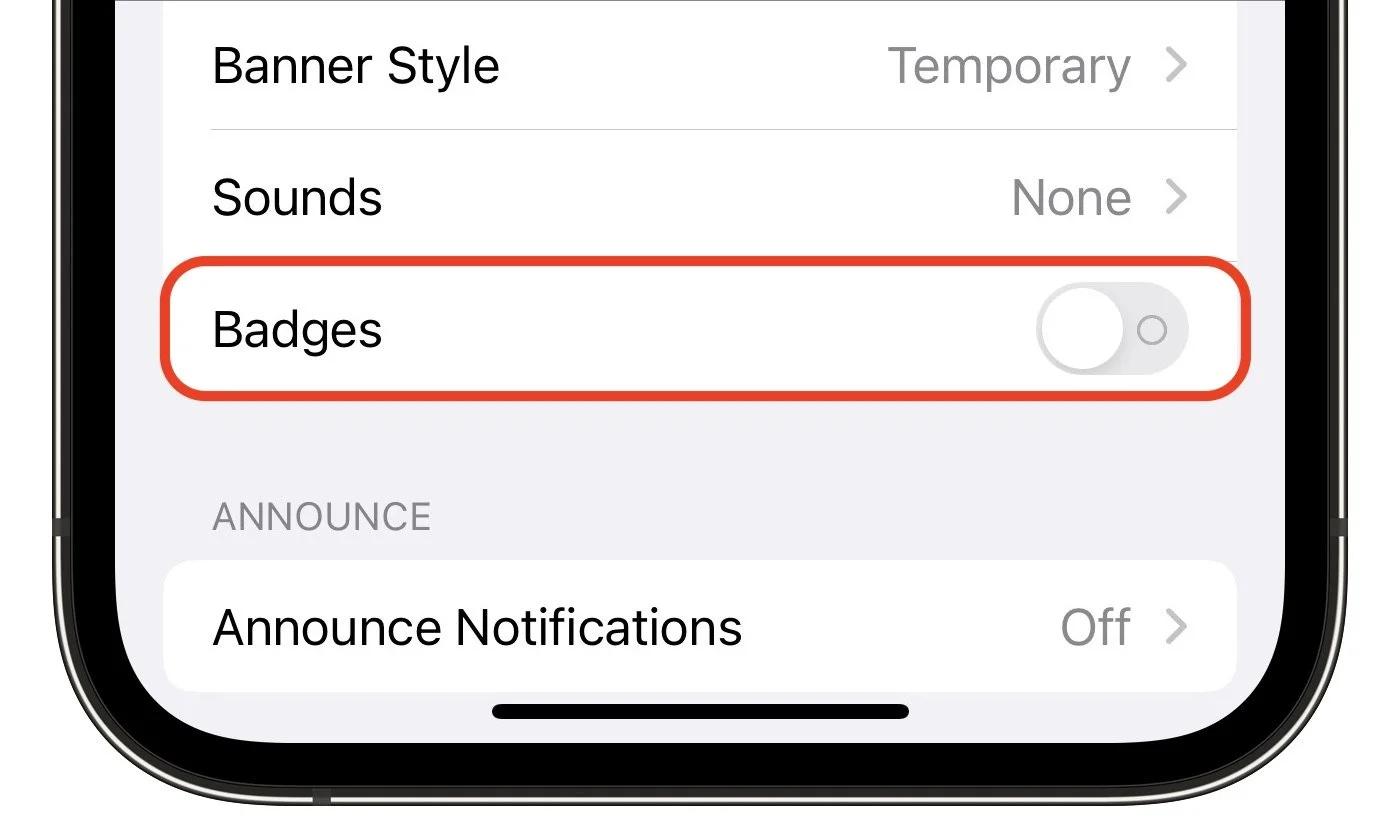
Luckily, you can turn the badges off entirely. Go to Settings > Notifications > AppName and disable Badges. You’ll never see that red badge of nagging again.
Clear Stuck Badges
Sometimes an app will end up with a red badge even when you’re certain that you’ve done whatever is necessary to clear it. Here are a few things to try:
Update the app: Go to the App Store app, tap your avatar in the upper-right corner, and tap Update All if it appears (pull down to make the App Store check for new updates). It’s generally worth going to Settings > App Store and enabling App Updates so they come in automatically.
Force-quit the app: There’s no reason to force-quit apps unless they’re misbehaving, but a stuck badge counts as bad behavior. Swipe up from the very bottom of the screen and pause to enter the app switcher—or on Touch ID-equipped devices, double-press the Home button—and then swipe up on the card for the app in question to force-quit it.
Restart the iPhone: If all else fails, restart the iPhone. First, press and hold the side button and either volume button (iPhone X, 11, 12, and 13), the side button (iPhone 6, 7, 8, and second-generation iPhone SE ), or the top button (first-generation iPhone SE, iPhone 5, and earlier). Wait until the power off slider appears, drag it, wait 30 seconds, and then press either the side button or the top button to turn the iPhone back on.
Disable that app’s badges: If nothing else works to clear a stuck badge, you can always resort to the steps above to disable badges for that app.
Making sure that app badges are either useful or hidden won’t change your life, but given how often we look at our iPhones, even little tweaks like this can lift your mood.
(Featured image by Adam Engst)
How to Stop Forgetting Your Apple Gear with “Notify When Left Behind”
Tired of forgetting your AirPods or iPhone when leaving home? The Find My app’s new Notify When Left Behind feature can remind you of that fact before you’ve gone too far. Learn more at:

Apple’s Find My technology is a lifesaver when it works, enabling you to locate and potentially retrieve lost or stolen devices. It’s not perfect, even with the addition of the Find My Network, which drafts other nearby Apple devices to relay the location of a lost device, but it’s a heck of a lot better than nothing. Part of the problem is that you have to notice that a device is missing before you can bring Find My into play to see where it might be.
No longer, thanks to the brilliant new Notify When Left Behind feature of iOS 15. Why wait until you notice that your AirPods aren’t in your bag when the Find My app can notify you shortly after you leave their immediate vicinity? Even if that means talking your way back onto an airplane to retrieve your AirPods from the seatback pocket, that’s better than discovering your loss an hour or two later.
Notify When Left Behind doesn’t support all Apple devices—you know that you’re leaving your 27-inch iMac behind whenever you leave home, and HomePods tend to stay put. But it does work with the iPhone, iPad, AirPods, AirTag, and Mac laptops. Somewhat surprisingly left out is the Apple Watch, perhaps because Apple assumes it would always be either charging or on your wrist.
To set up Notify When Left Behind for your devices, follow these steps:
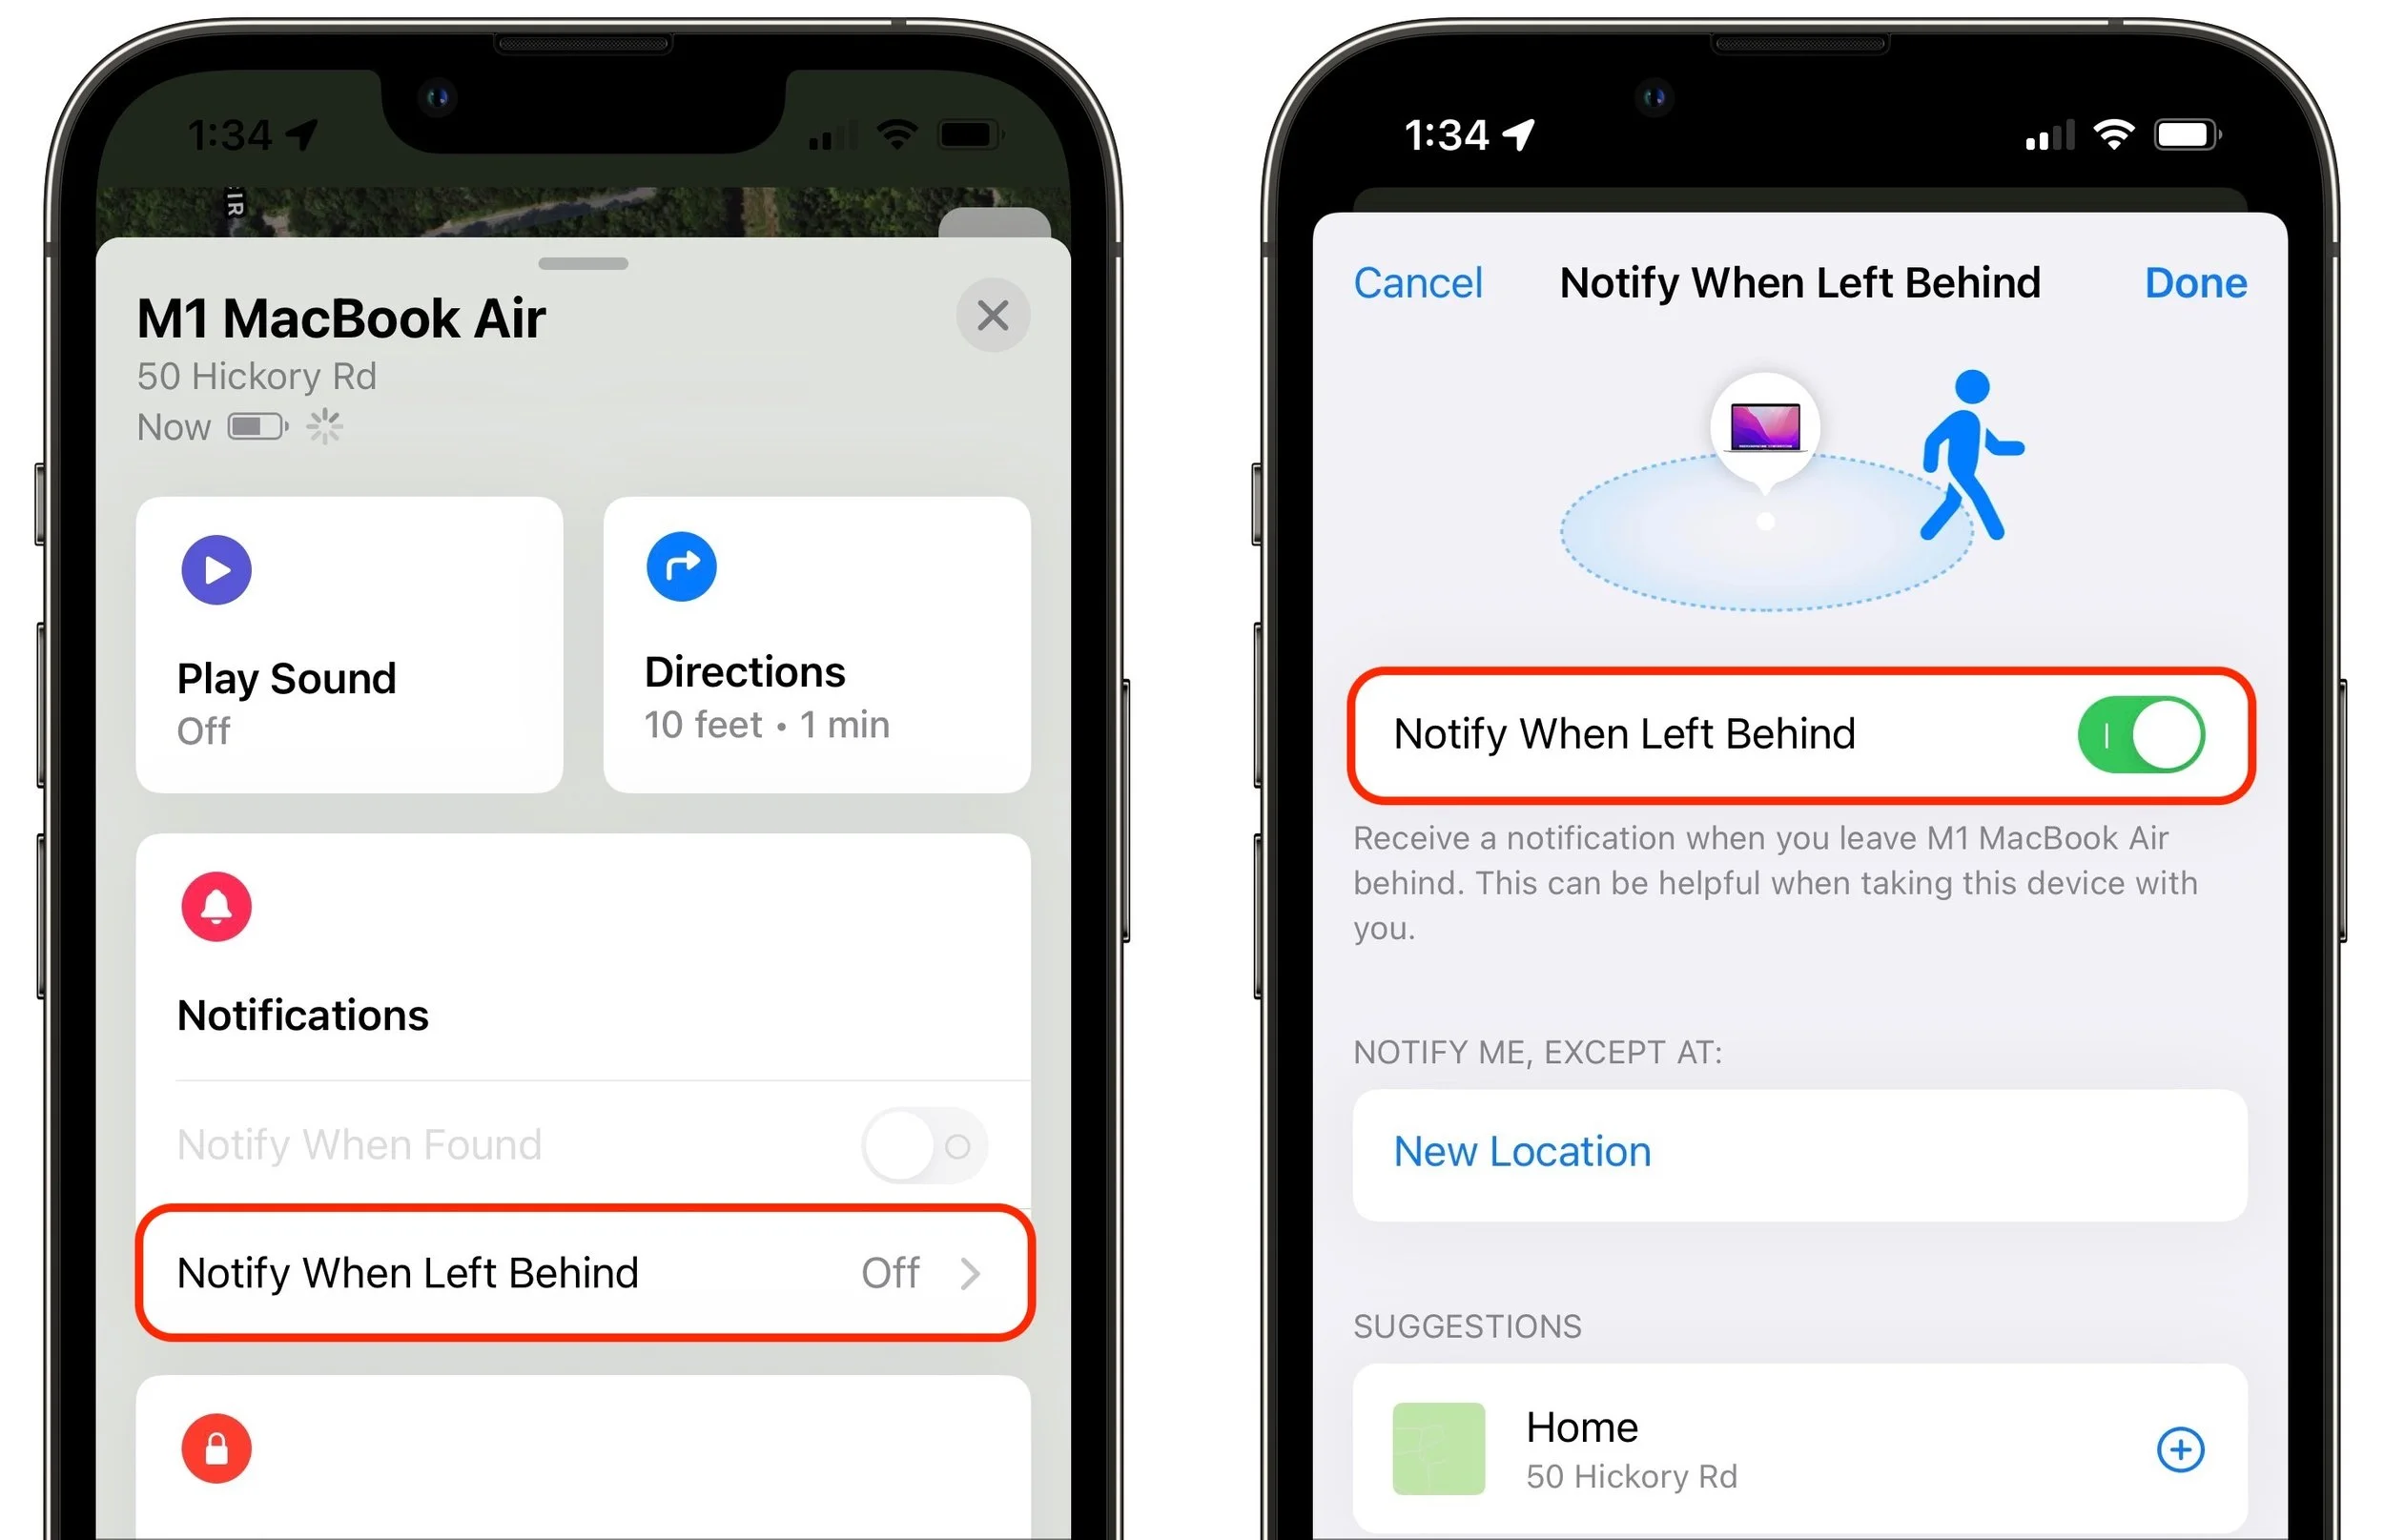
In the Find My app, tap Devices at the bottom of the screen to show all your devices.
Tap the name of the device for which you want to enable Notify When Left Behind.
Scroll up to reveal the Notifications section, and tap Notify When Left Behind.
Enable the Notify When Left Behind switch, then tap Done.
Repeat for each desired device, switching to the Items screen to include AirTags.
“Wait a second,” you’re thinking. “How can your iPhone tell you that you’ve left it behind if it’s not with you?” Apple is one step ahead of you. The key is your Apple Watch—if you leave your iPhone on your desk at work when going home for the day, your Apple Watch will alert you 5 or 10 minutes later. It may be annoying to go back for it, but it’s better than not realizing until you get home.
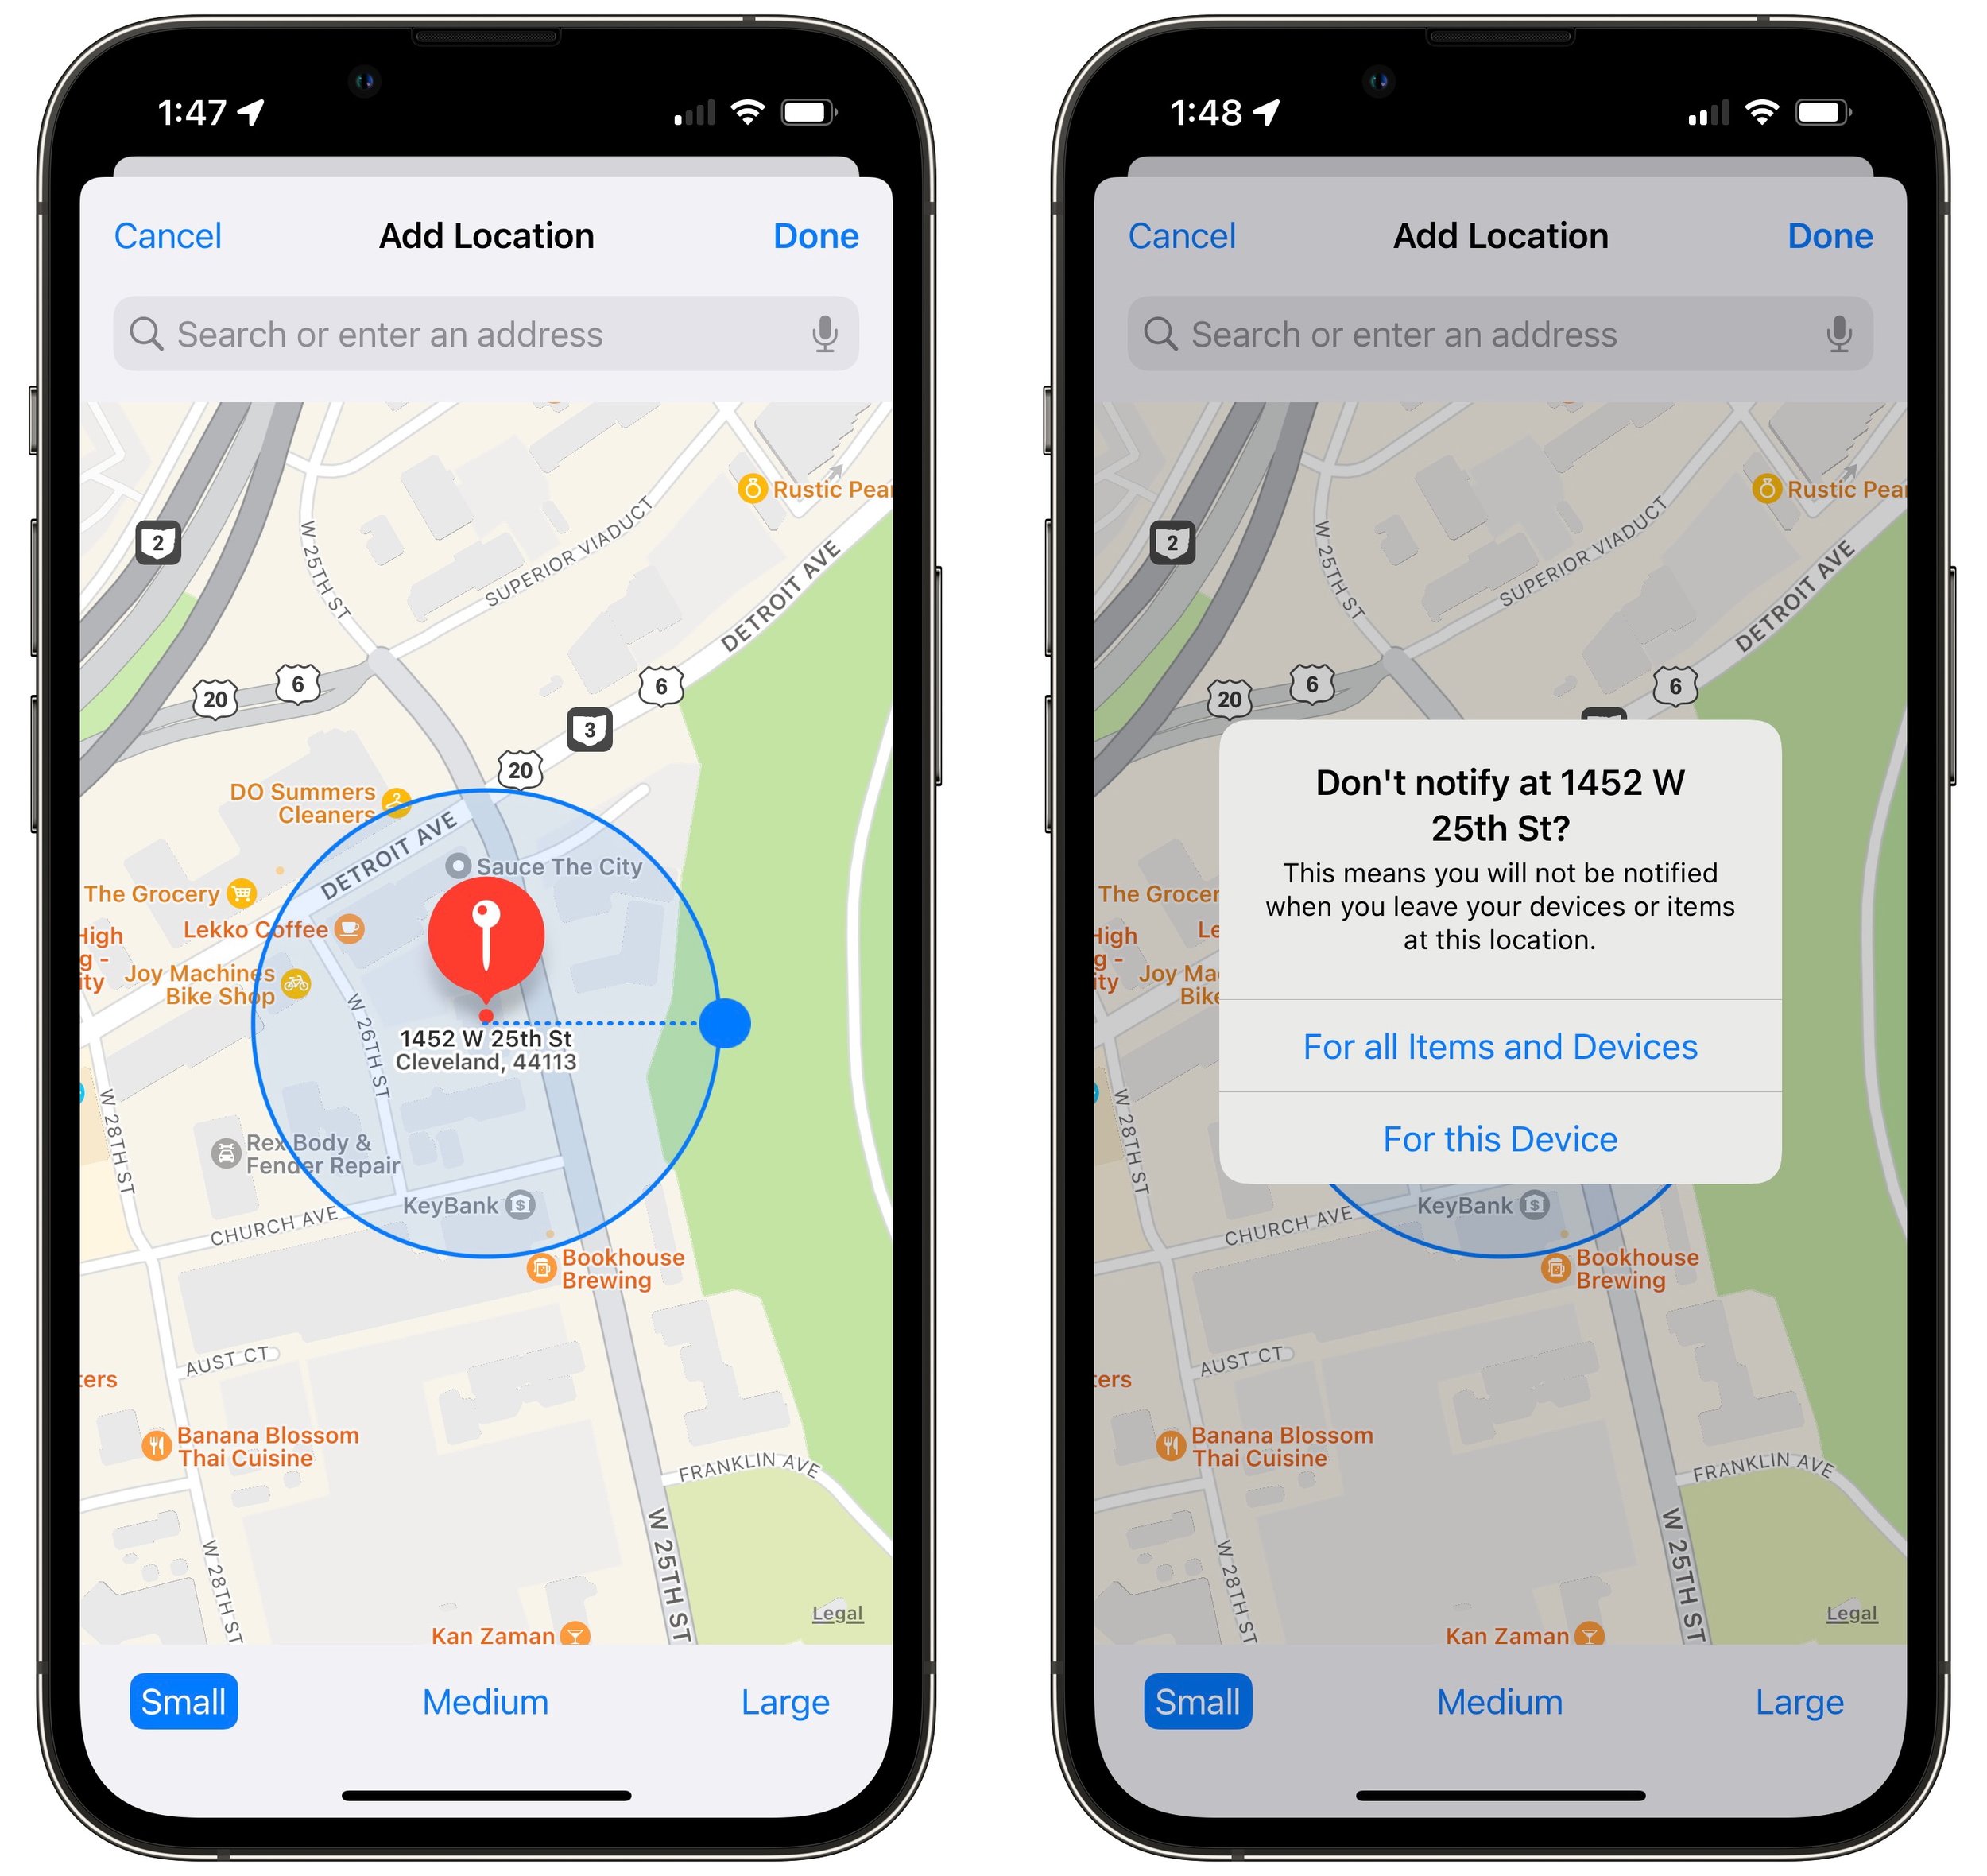
Your next thought is probably, “Won’t it be annoying if my iPhone tells me that I’ve left various devices behind even when I meant to leave them there?” Apple has an answer to that as well. As you can see in the Notify When Left Behind screen above, there’s a Notify Me, Except At section to which you can add places that it’s acceptable to leave your devices. Find My even suggests your Home location; just tap the + button to add it. If you tap New Location, you can scroll the map to any location, press and hold to drop a pin, and then choose a small (300 feet), medium (800 feet), or large (1400 feet) radius to ignore. When you add a custom location, Find My asks if it should apply to just the current device or to all your devices and items.
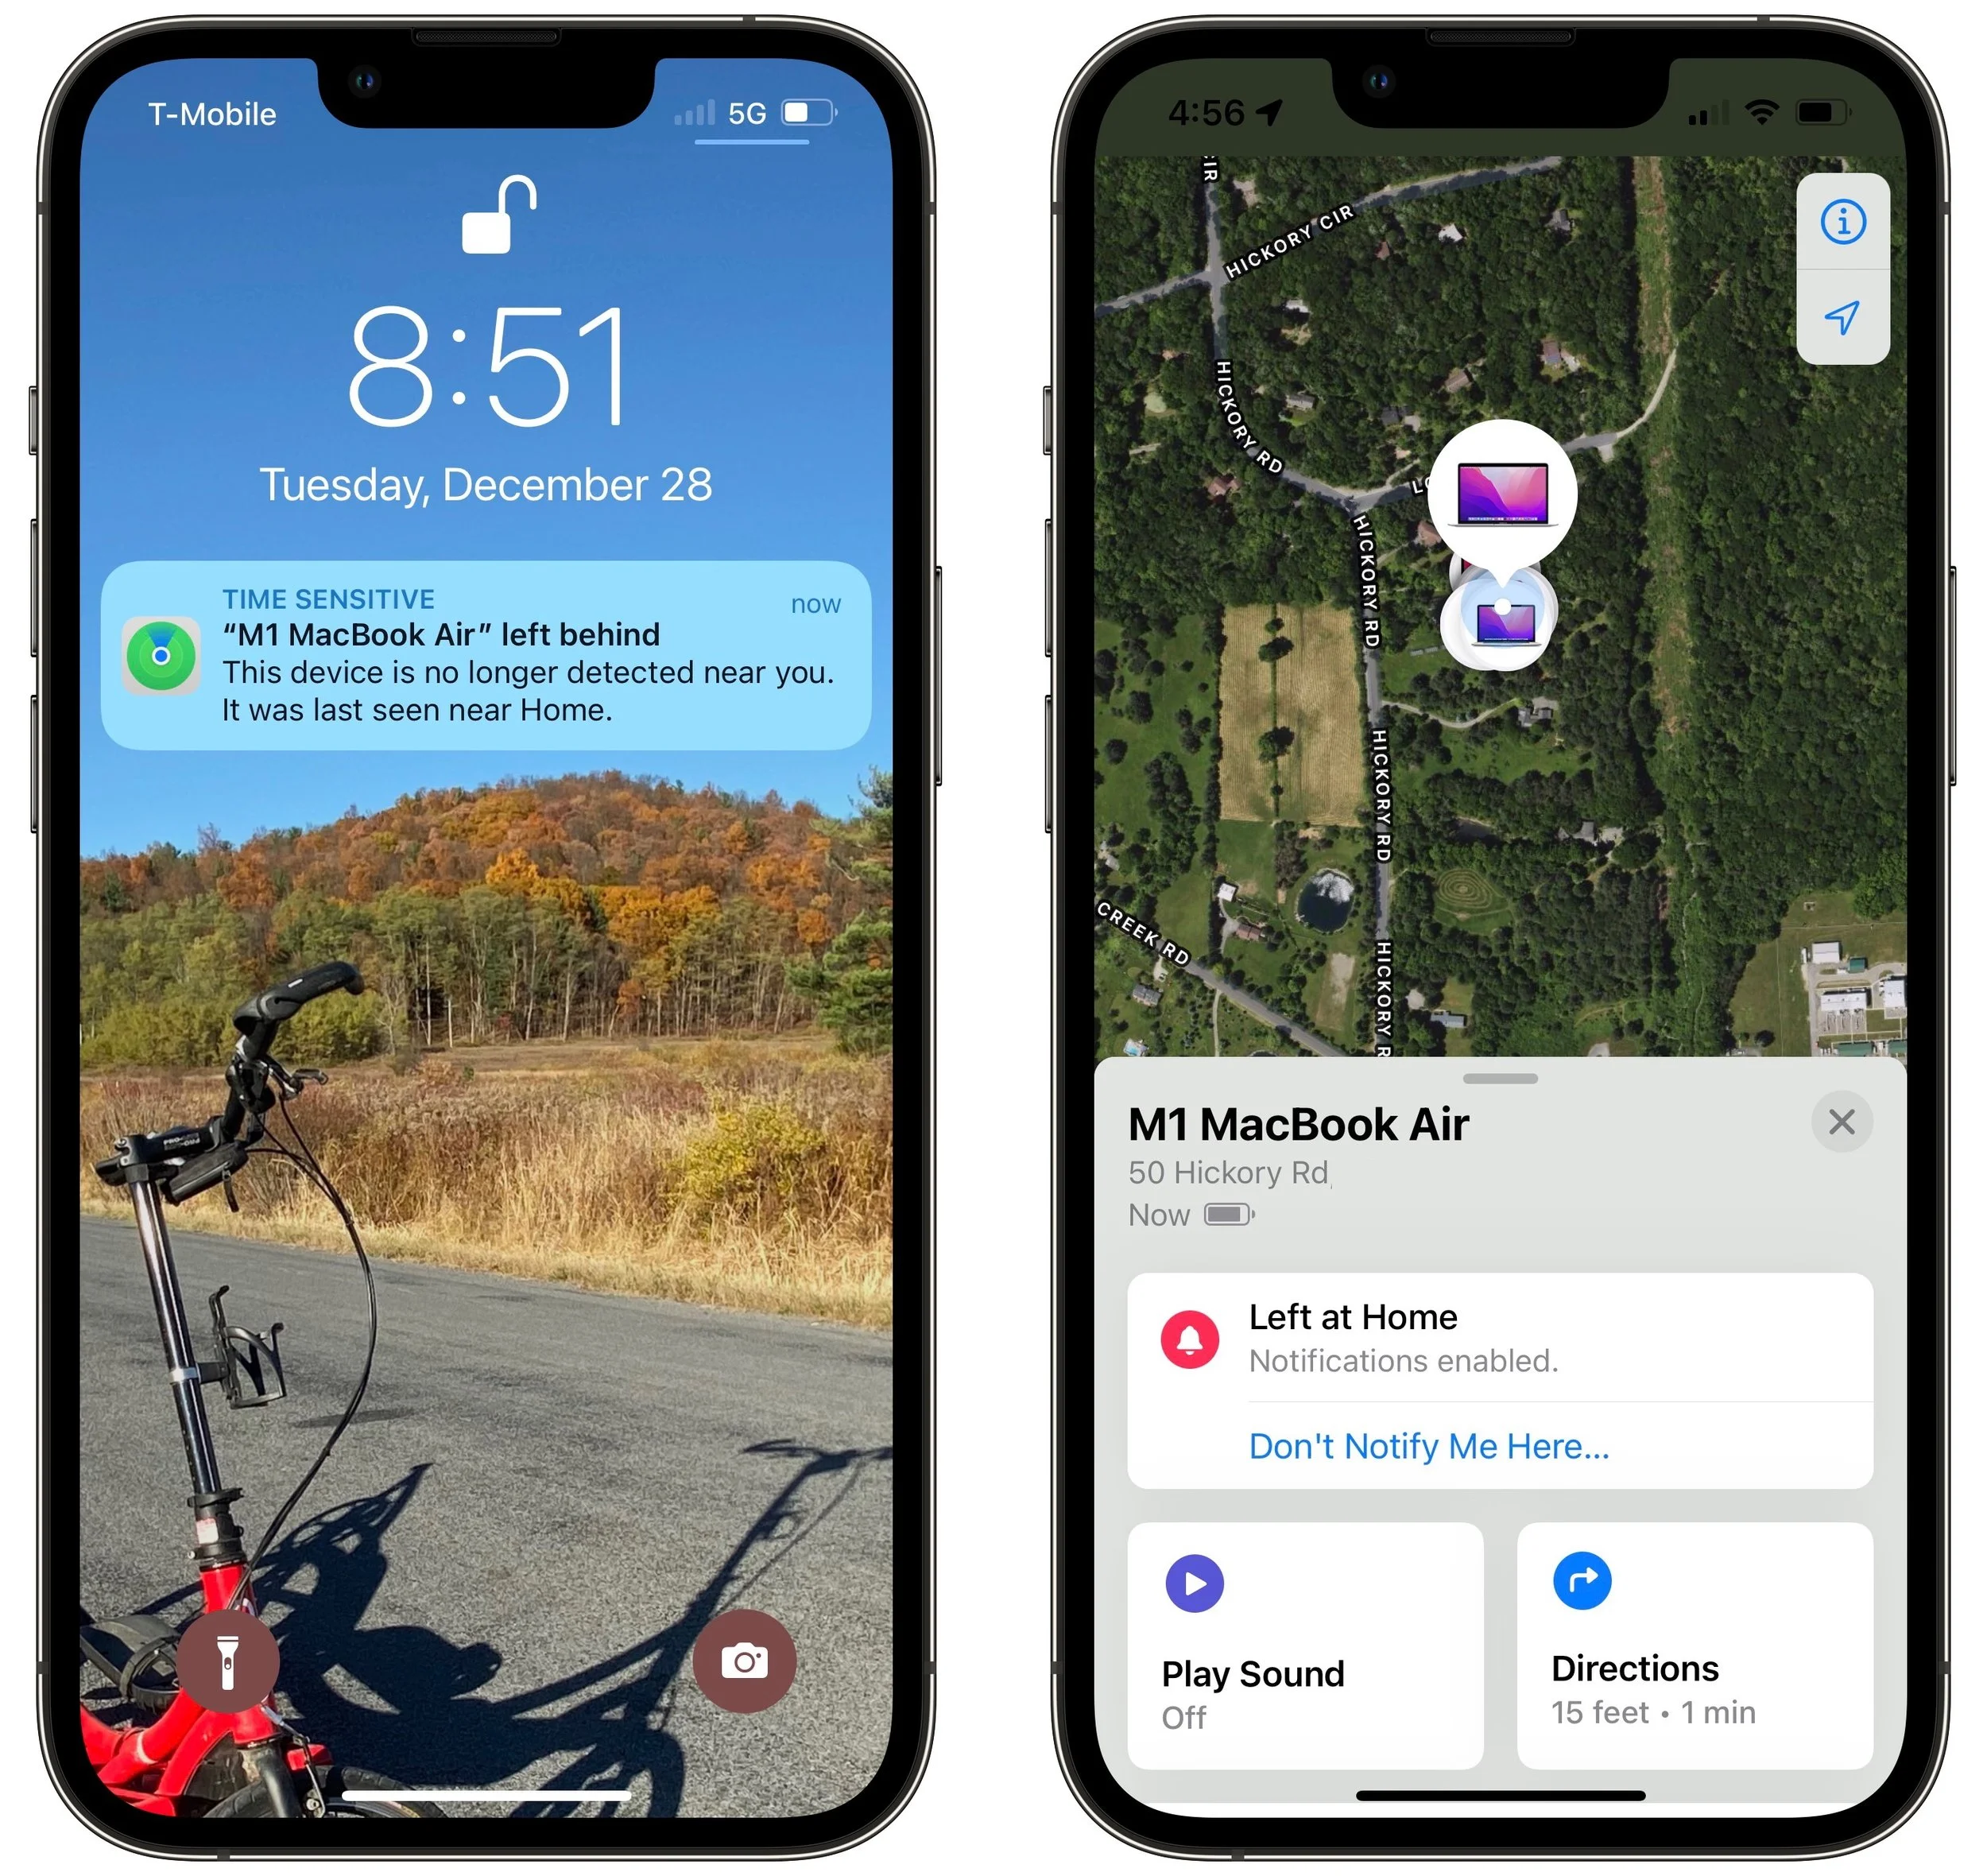
When you actually leave a device behind, you’ll get a notification on your iPhone. Tap it to see where you left the item, which may be all the reminder you need. If you tap Continue to open the Find My app, you can tap Directions to be directed to where the device is or tap Don’t Notify Me Here if the location is a place where you don’t mind leaving your devices.
That’s all there is to Notify When Left Behind. It’s the perfect example of a feature that works quietly in the background to help you avoid problems.
(Featured image by iStock.com/Farknot_Architect)
Print Mailing Labels for Your Holiday Cards with Apple’s Contacts App
Much of the work of sending holiday cards is addressing all those envelopes. However, with the Contacts app on your Mac, you can easily print mailing labels for all your friends and family rather than writing addresses out by hand.

If mailing your holiday cards (which you designed in Photos with a plug-in like Motif or Mimeo Photos, right?) is made harder by having to write addresses on envelopes, you can skip the handwriting step this year. Although many people don’t realize this, it’s easy to print mailing labels on standard label stock using the Contacts app on the Mac. You can even add a personal touch by including a graphic and using a custom color and font choice. Follow these steps:
1. In Contacts, choose File > New Group to create an empty group into which you can collect your card recipients. Name the group something like Holiday Cards.
2. Click All Contacts to see your full collection of contacts, and then drag your recipients from the center column to copy them into the Holiday Cards group. Note that you have to click and hold briefly before Contacts lets you start dragging a contact. You can drag contacts one at a time or select several at once and drag the entire selection. This doesn’t move contacts out of All Contacts—you’re just adding them to the Holiday Cards group, which functions like a playlist in Music.
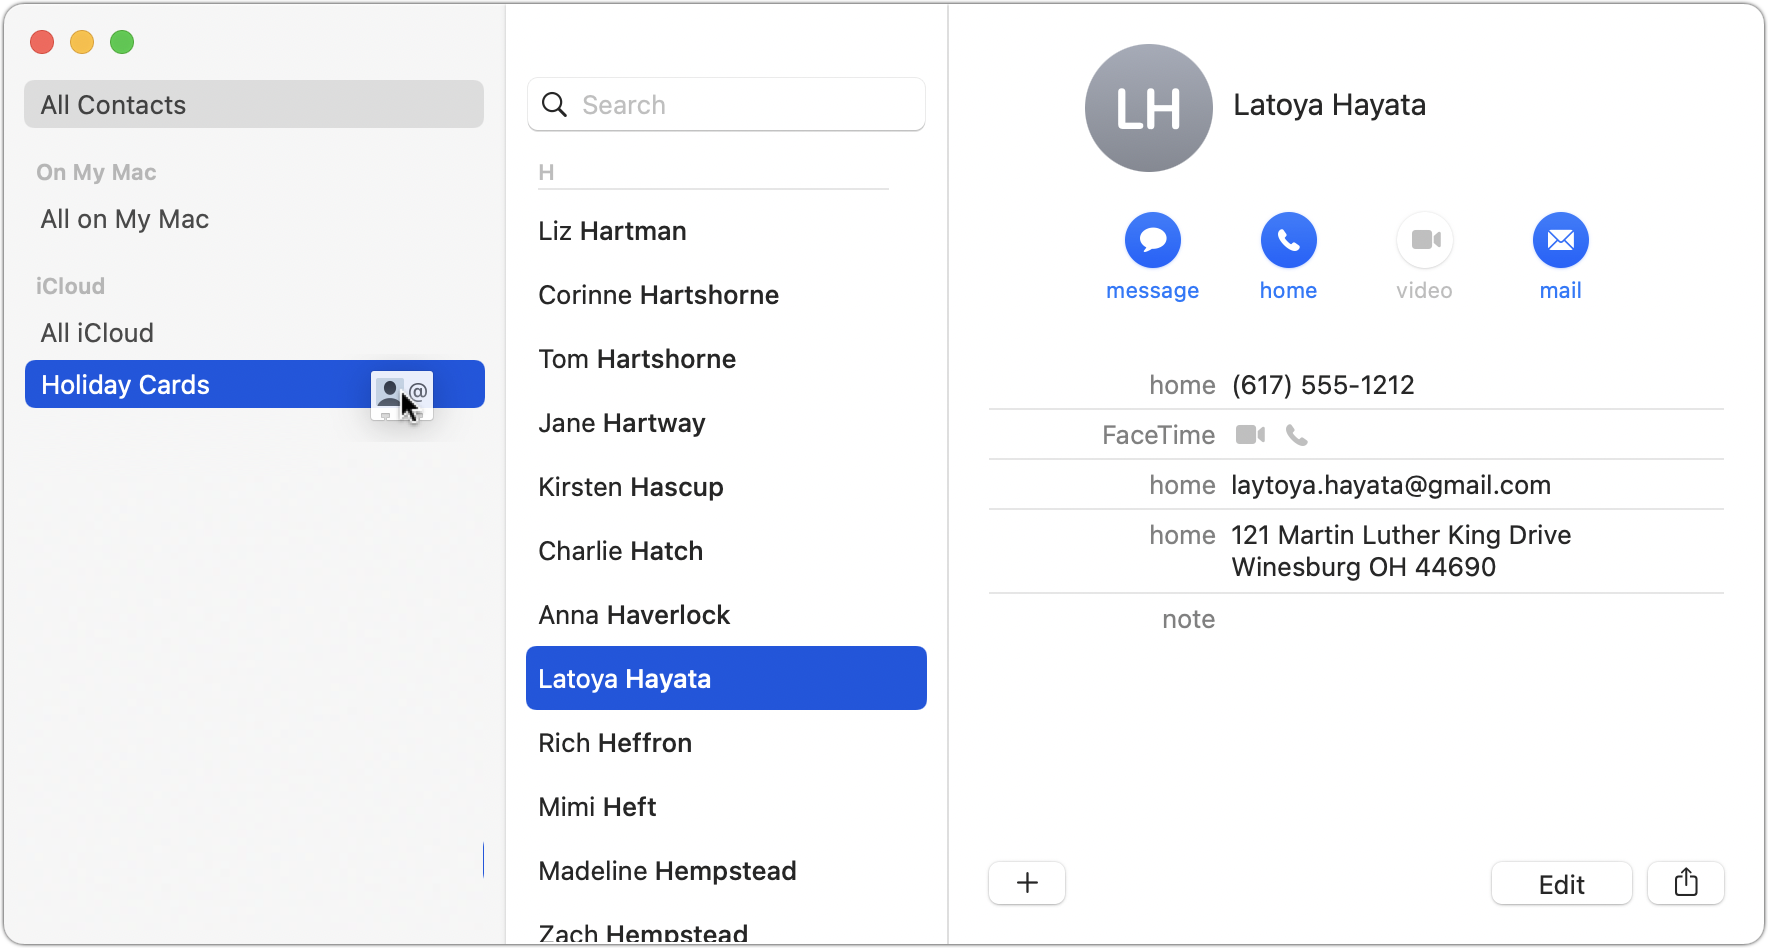
3. Once the Holiday Cards group contains all your recipients, click its name in the sidebar, and then choose File > Print to open the Print dialog.
4. To set up your cards, you need to see details in the Print dialog, so at the bottom of the Print dialog, click the Show Details button (if it’s already called Hide Details, you’re all set). You also need to see the special controls for Contacts, so make sure Contacts is chosen from the pop-up menu underneath the page range fields. Then from the Style pop-up menu, choose Mailing Labels.
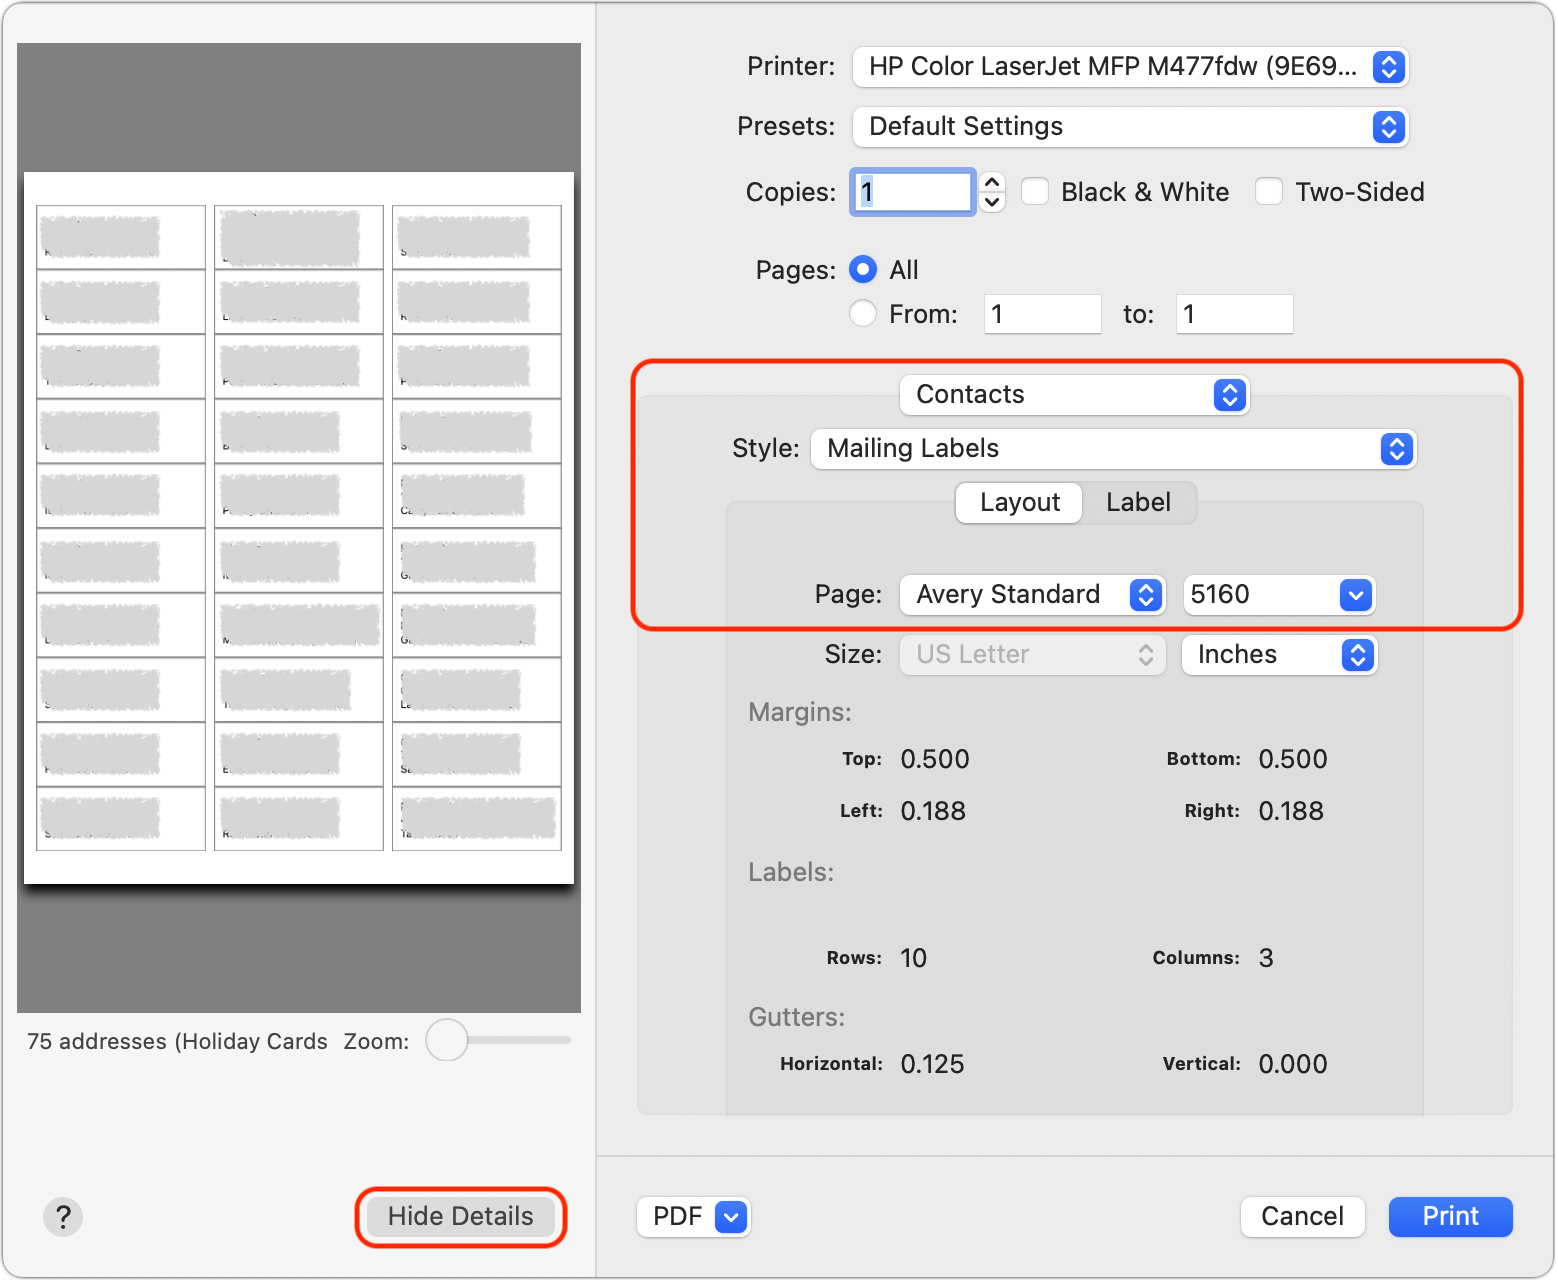
5. Beneath the Style pop-up menu, make sure Layout is selected, and then in the Layout view, from the Page pop-up menus, choose the manufacturer of your labels and the number associated with the labels. (Avery 5160 is a particularly common label type and is readily available at office supply stores and online.)
6. Click Label to switch to the Label view. From the Addresses pop-up menu, choose the type of address you’re using. Home is likely the most appropriate; if you choose All, Contacts will print both Home and Work addresses if available. You can also select the checkboxes for Company and Country here, and if you print the country, you can exclude your own country, which makes it easy to include overseas friends and relatives without printing the country for most people.
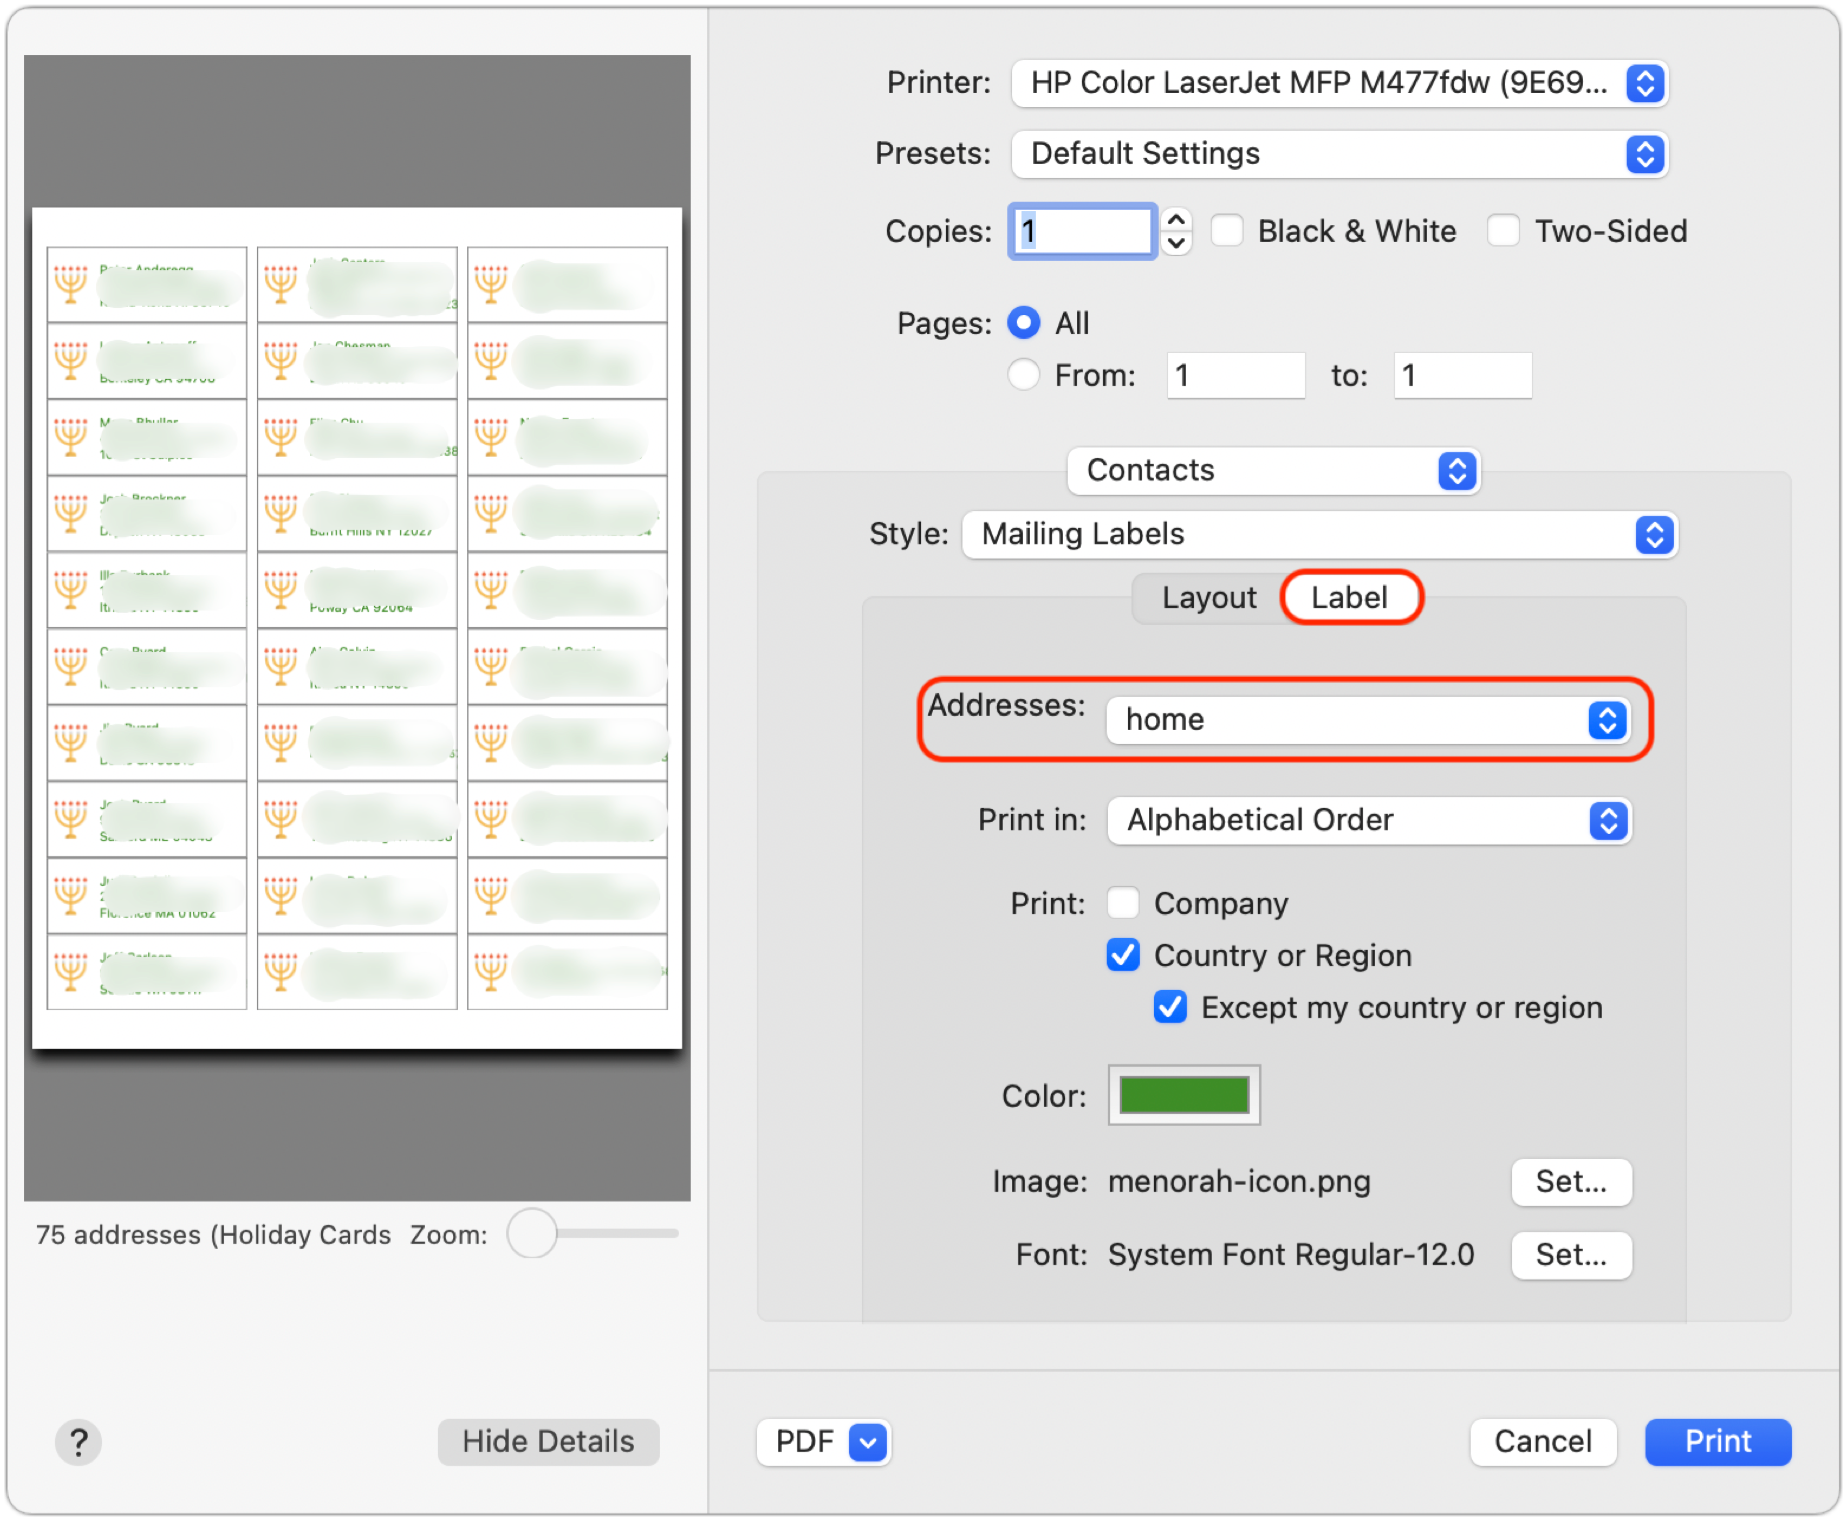
7. Although the defaults are fine, you can change the color of the label text, select a small image to print next to each contact, and change the font.
8. It’s time to print, but not on your label stock just yet! Click the Print button to print a draft of your labels on plain paper. You’ll use this draft for two things—checking the addresses for accuracy and verifying that the labels will print properly on the label stock. To check if the labels will print correctly, stack a page from the draft on top of a sheet of blank labels, and then hold them up to a bright light or sunlit window. You should be able to see whether the positioning is right—it should be in most cases. If not, make sure you’ve chosen the right label in the Print dialog, and if all else fails, create a custom label with your own margins and gutters to make it work. You may also want to increase or decrease the font size, making sure that even your longest addresses will fit.
9. Once you’ve fixed addresses for everyone who has moved recently and verified your positioning, you can print for real on your label stock.
There’s only one limitation to using Contacts to print your labels. If you’re a perfectionist, you might want to customize how the names of couples appear on the label. Even though it has the necessary Spouse relationship field that links contacts together, Contacts doesn’t support different name formats on labels. For instance, if you’re sending a card to a couple who share a last name, you might want the name line to read “Barack and Michelle Obama.” The same goes for couples who don’t share a last name, like “Ellen DeGeneres and Portia de Rossi.” The solution for this picky conundrum is Belight Software’s $9.99 Swift Publisher app, which lets you create label templates using individual fields from Contacts.
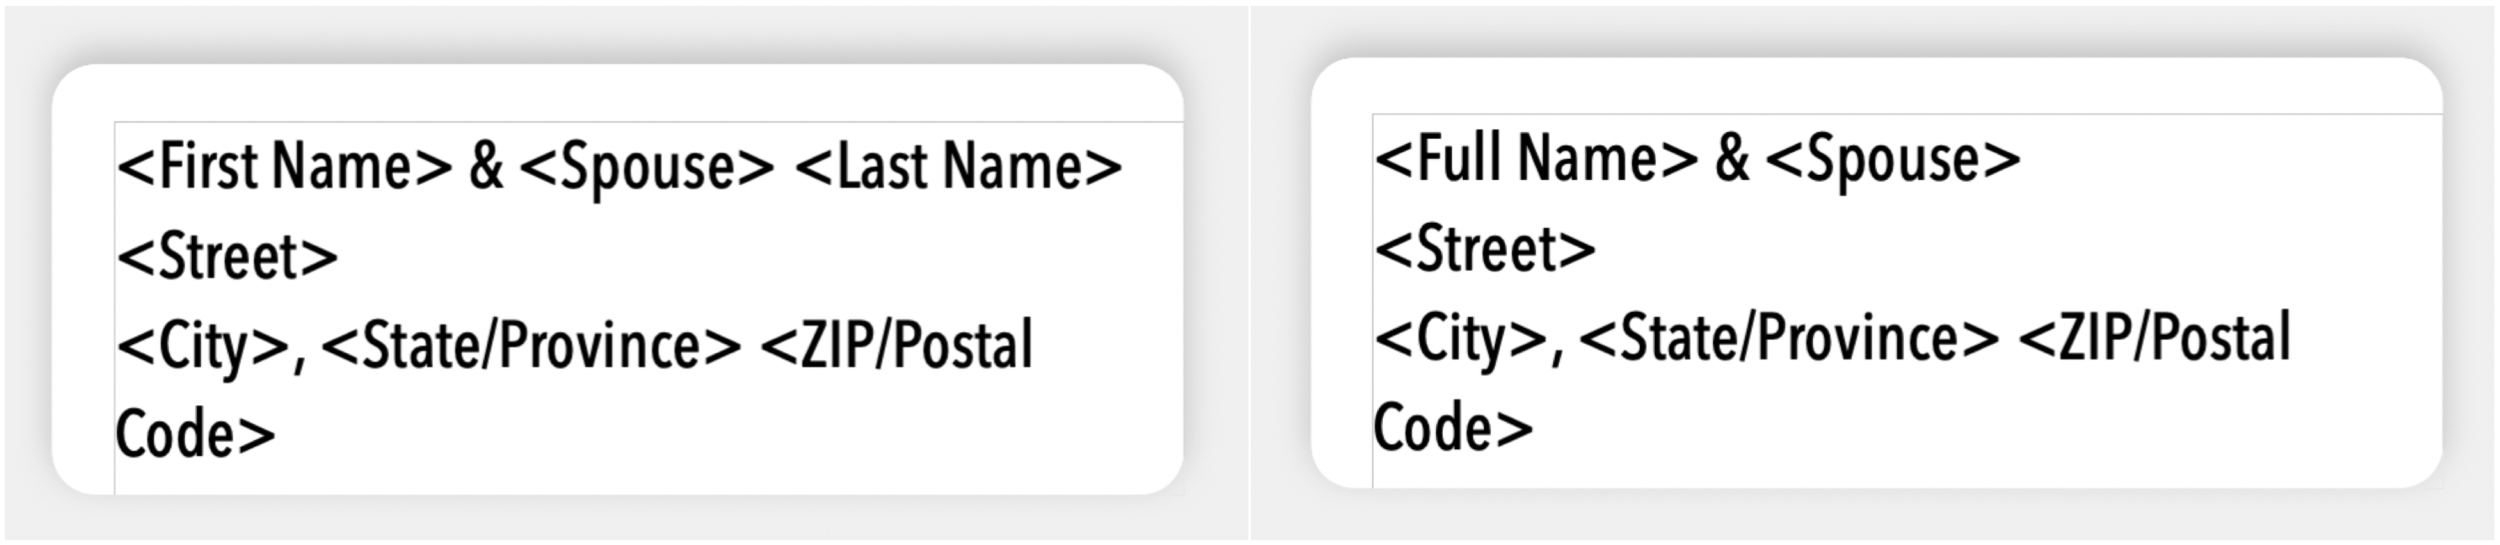
But that’s overkill for most of us, who care more about what’s inside the envelope. Most of the work comes in selecting people, making sure their addresses are right, and updating those that have changed—actually printing labels takes only a few minutes. As you stick your labels on envelopes, you can revel in the knowledge that it will go even faster next year!
(Featured image by iStock.com/Bet_Noire)
FaceTime Gains Cool New Features in Apple’s Latest Operating Systems
FaceTime has joined the big leagues in iOS 15, iPadOS 15, and macOS 12 Monterey. Read on to learn about FaceTime links, its cross-platform Web app, special mic modes and video effects, grid view, screen sharing, and SharePlay.

It’s no exaggeration to say that videoconferencing went mainstream during the pandemic. However, Apple’s FaceTime didn’t stack up well against Zoom and others due to its emulation of the telephone call experience, questionable interface decisions, and lack of cross-platform compatibility. However, with iOS 15, iPadOS 15, and macOS 12 Monterey, Apple has nearly brought FaceTime into feature parity with Zoom and others and it has even added a few features that break new ground.
FaceTime Links
One of the smallest new features in FaceTime may be the most important. No longer do you have to call others via FaceTime, an awkward approach left over from the days of landlines. That’s still possible, but it’s easier and more considerate to make and share a FaceTime link instead, which lets others join your call when they’re ready. FaceTime links make it effortless to rejoin a call if you have to drop off or if something goes wrong, and they simplify switching from one device to another. You can share FaceTime links like any other Web link, through Messages, email, discussion systems like Slack, or posting on a Web page.
To create a FaceTime link, launch the FaceTime app and use the Create Link button in the upper left. If you’re creating it in iOS 15 or iPadOS 15, you can add a name before copying or sharing the link in the share sheet. In Monterey, clicking the button presents a sharing menu with similar appropriate options.
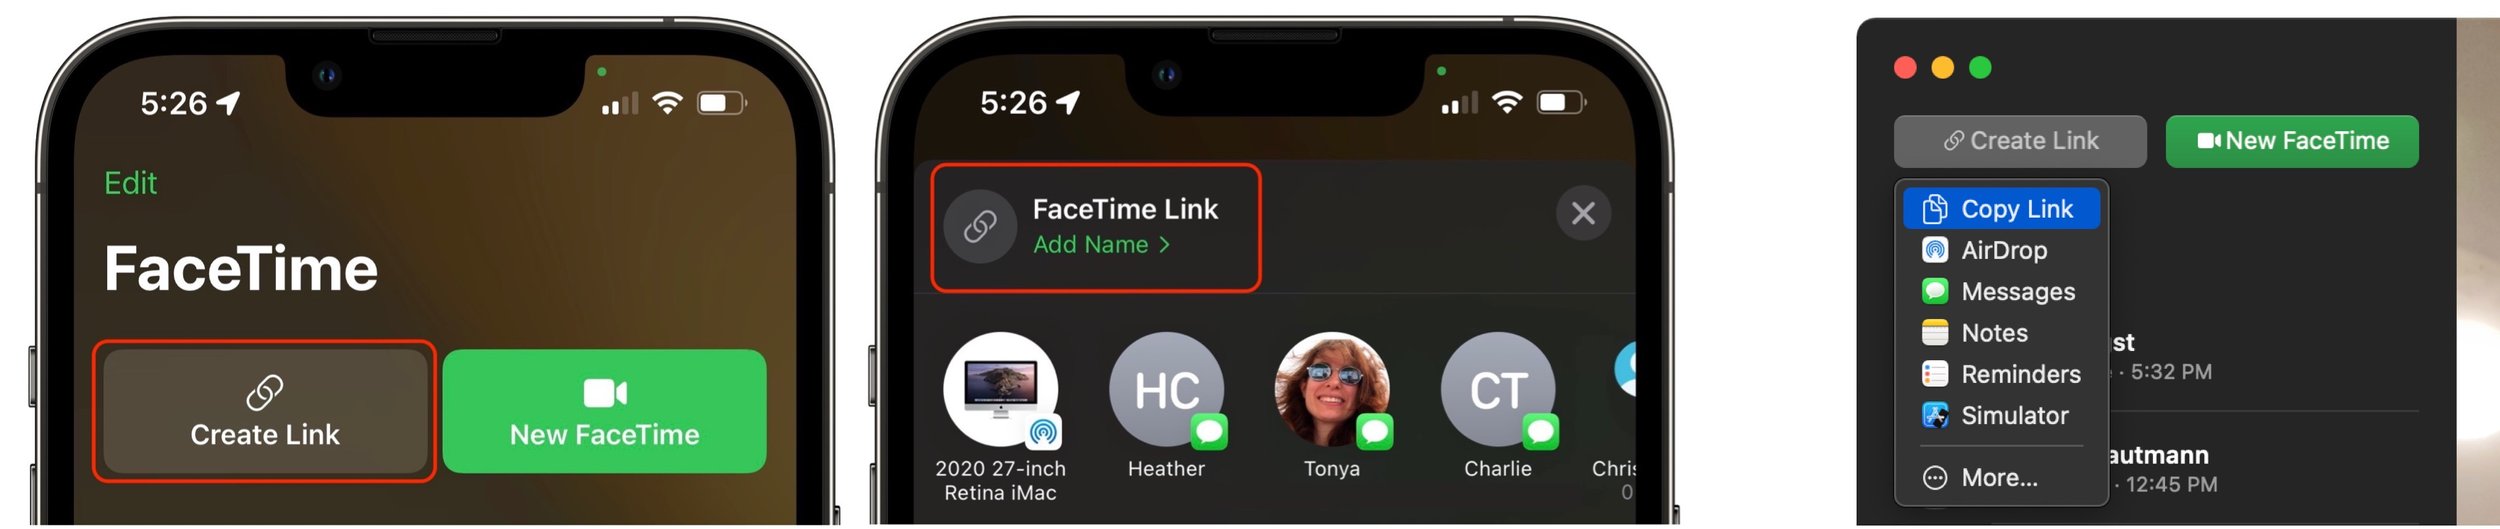
To join a call, all a recipient of the link has to do is tap or click the link. If they’re running one of Apple’s latest operating systems, the call will also appear in the FaceTime app, under Upcoming.
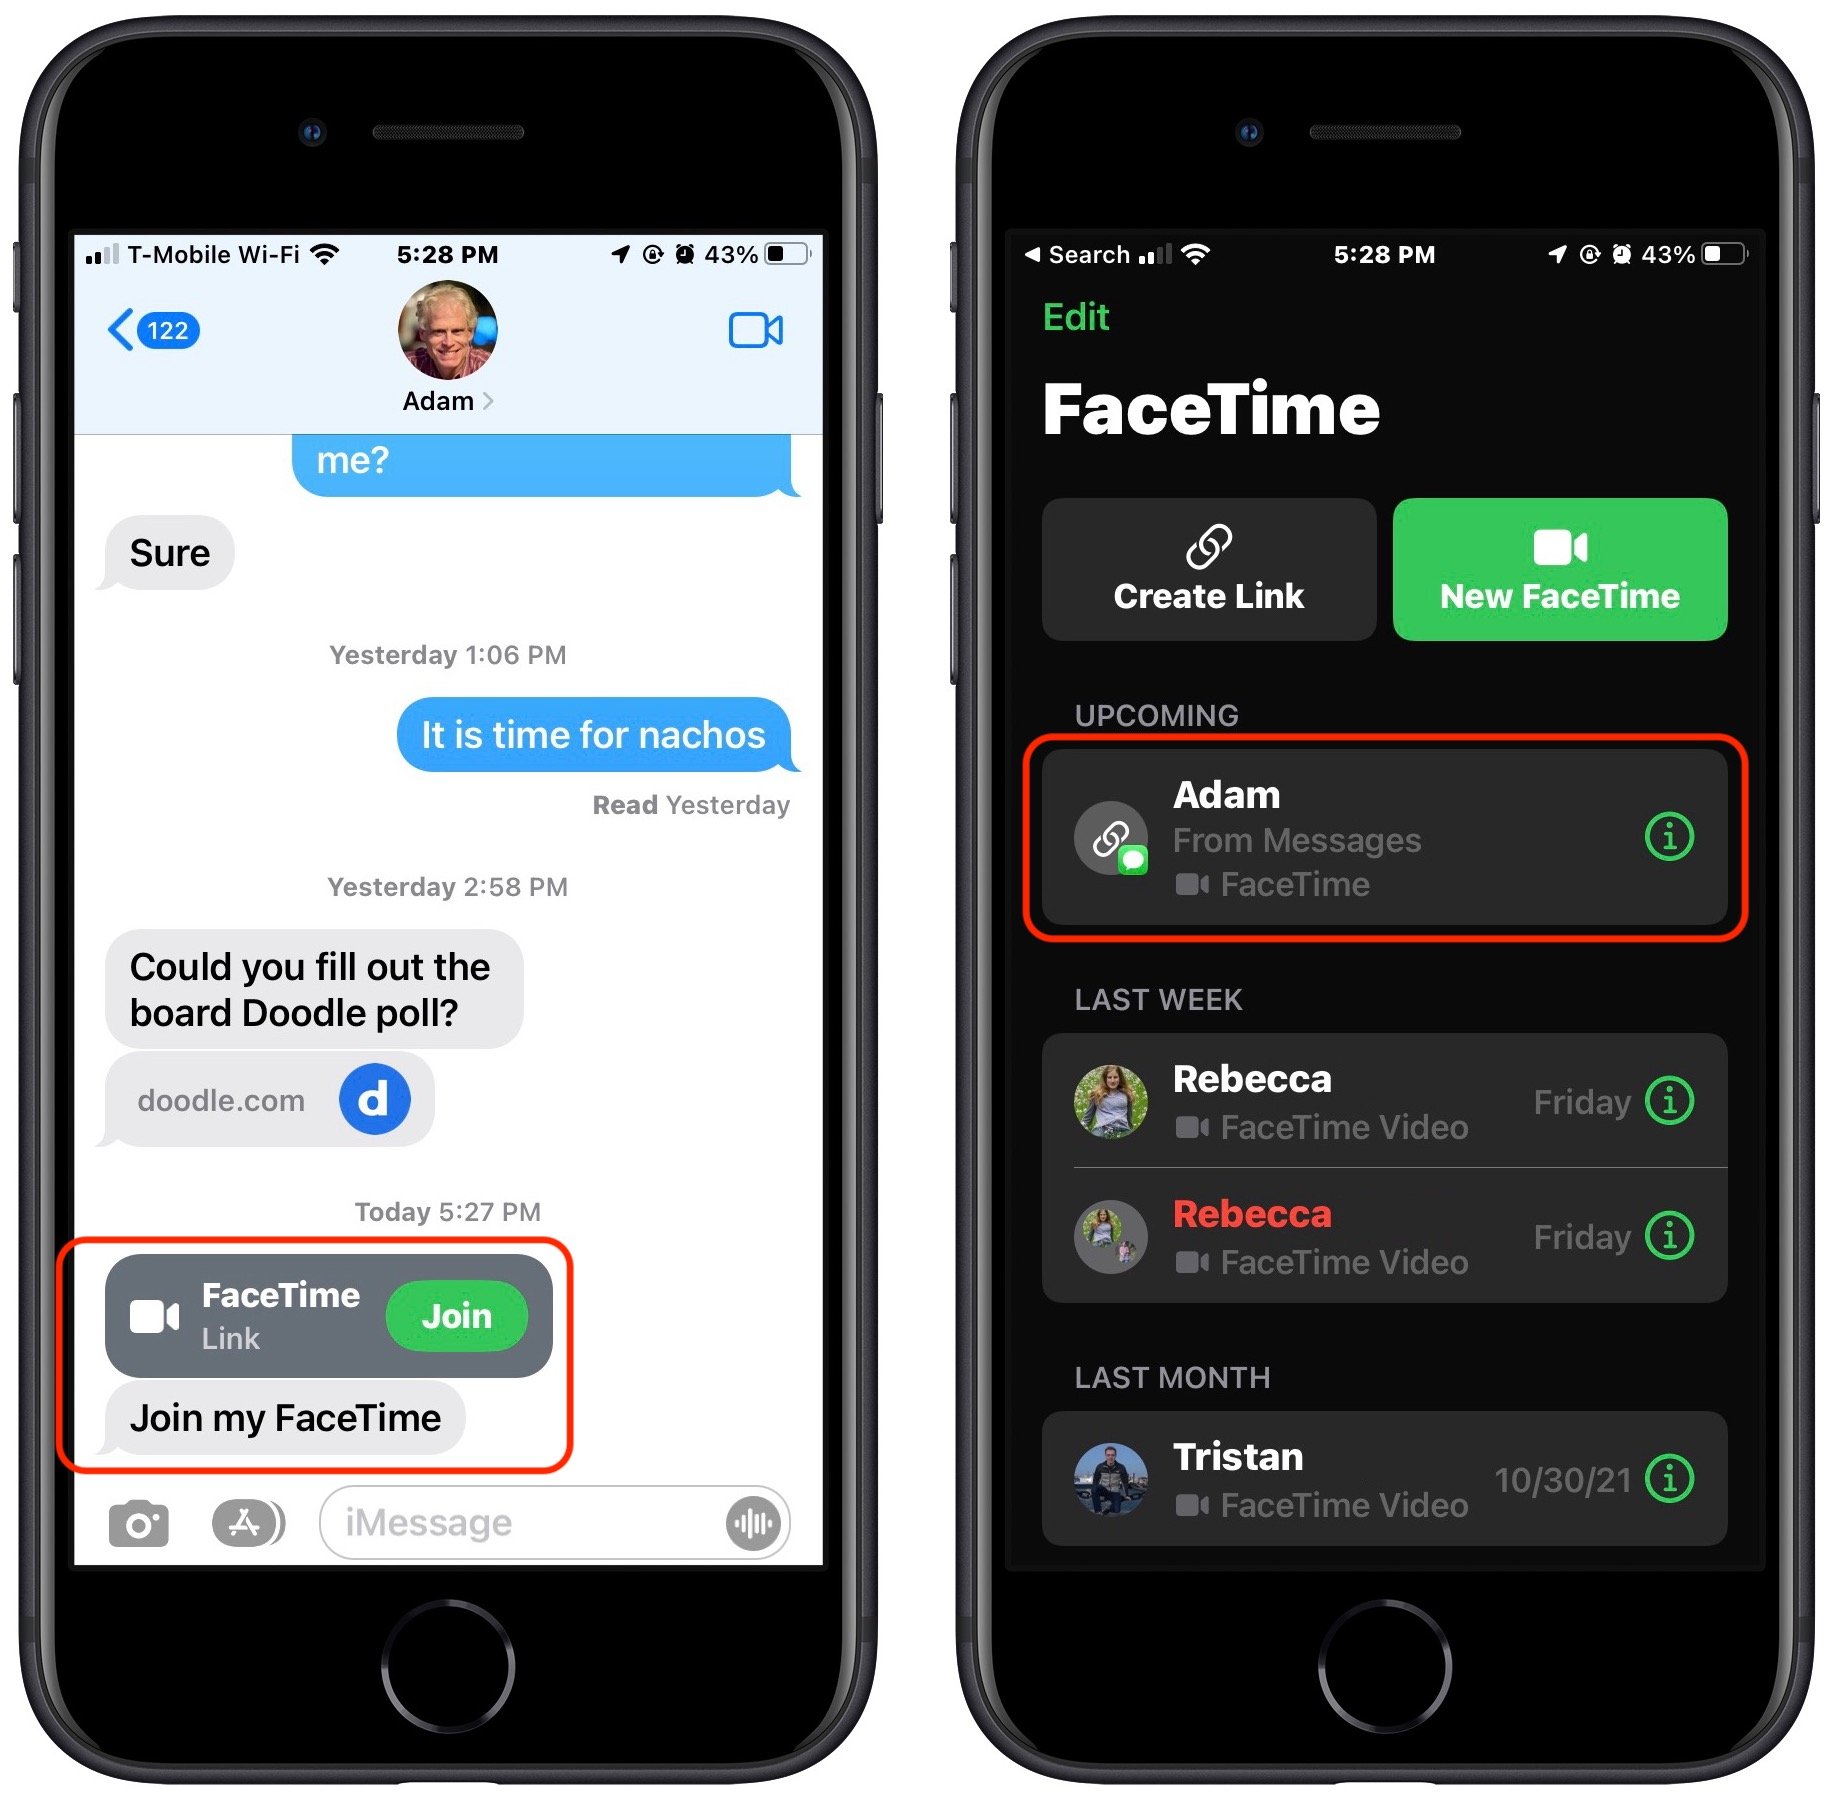
Either way, people joining the call get a preview window in which they can adjust their video and mic settings. After they hit the Join button, the organizer is notified that they’re waiting and can add them to the call. (That may seem like an unnecessary extra step, but it ensures random trolls can’t join FaceTime calls whose links have been shared publicly.)
If you’re scheduling a call, you can create a FaceTime link within an event in Calendar. That’s handy to make sure you have the link available at the right time, to make it available on all your devices, and to let others access it via a shared calendar. Use the Location or Video Call field, and select FaceTime when it’s offered. The event then gets a Join button that makes it easy to access the call. (If you’re sharing the calendar with someone who isn’t using one of Apple’s latest operating systems, they’ll just see a link they can click.)
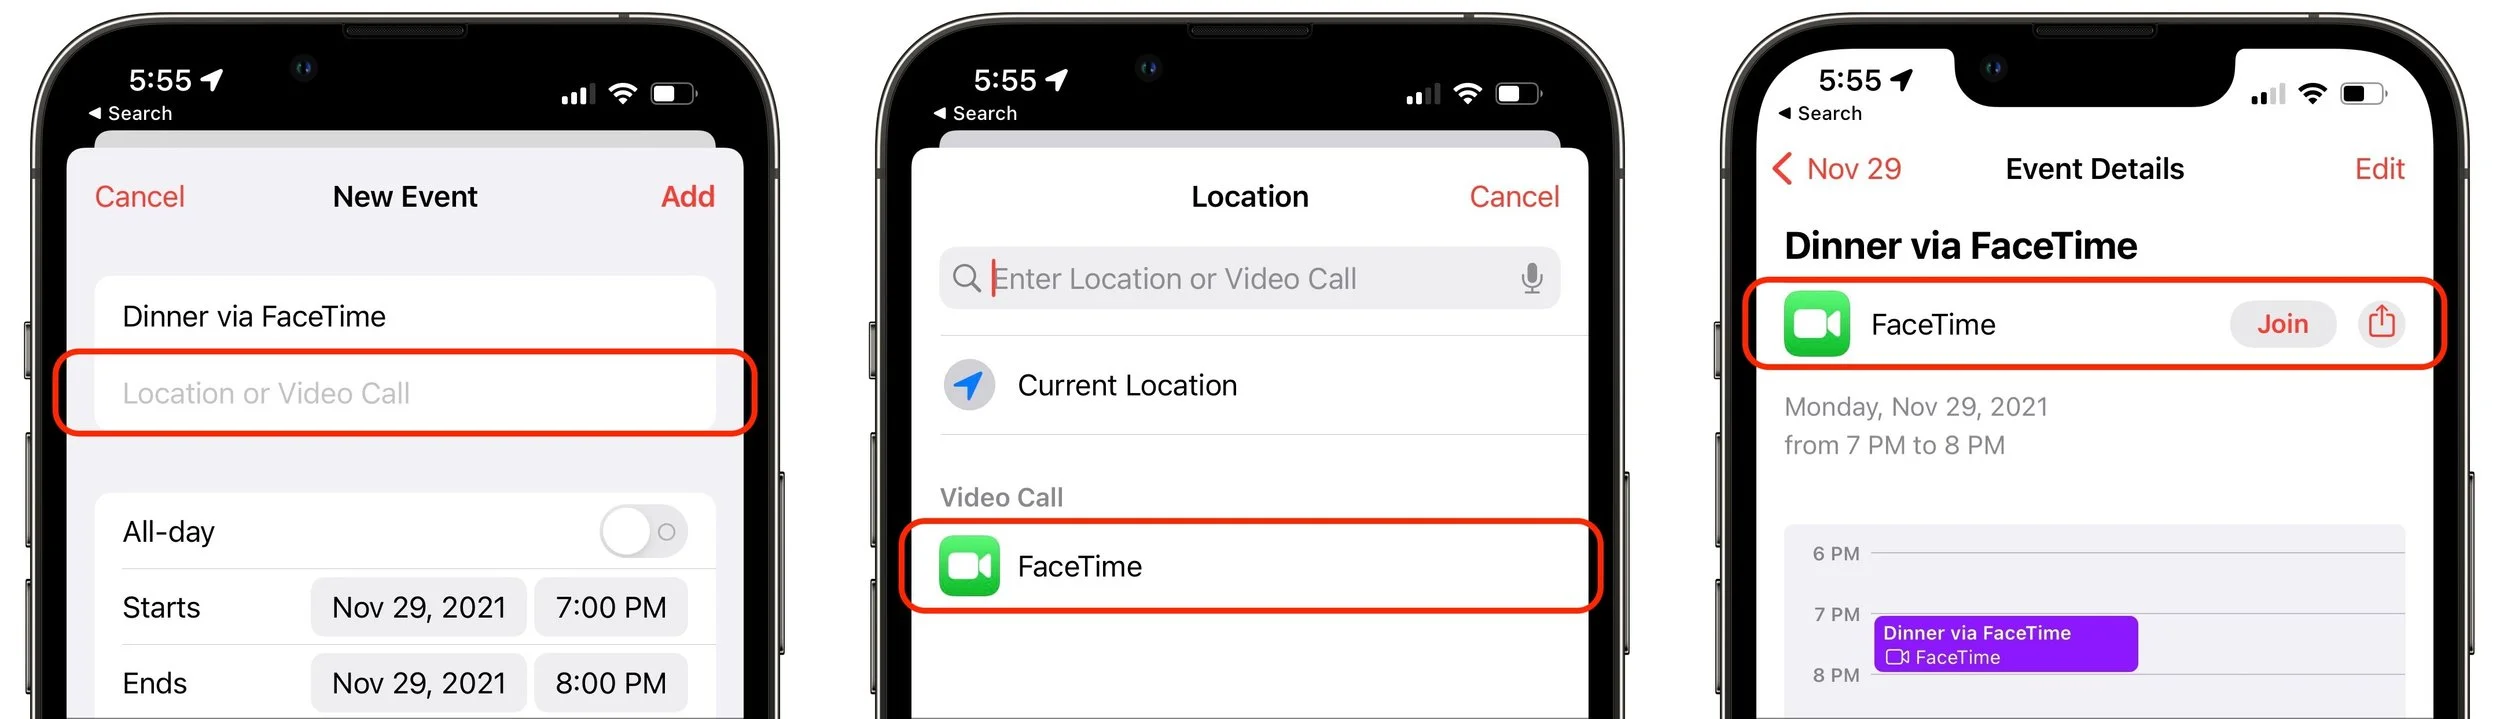
Despite being associated with an event, such FaceTime links aren’t time-specific. You can start the call any time you want, and anyone else can attempt to join it at any time, but they’ll be able to get in only if you as the organizer let them in. So it won’t do them any good to join before or after the scheduled time.
FaceTime Web App
FaceTime links are also essential for allowing FaceTime calls to include those who aren’t running Apple’s latest operating systems. If you’re still on macOS 11 Big Sur or iOS 14, opening a FaceTime link switches to Safari and opens the FaceTime Web app. That also works for those using Android, Windows, or Linux, as long as they have a compatible Web browser, which means Google Chrome or another Chrome-based browser like Brave or Microsoft Edge. Firefox won’t work.
For the most part, the FaceTime Web app works just like the native FaceTime app, with the ability to change basic camera and microphone settings and support for grid view. There are two notable limitations:
FaceTime Web app users can only join calls, not initiate them.
Advanced options like the mic modes and video effects aren’t available.
Mic Modes and Video Effects
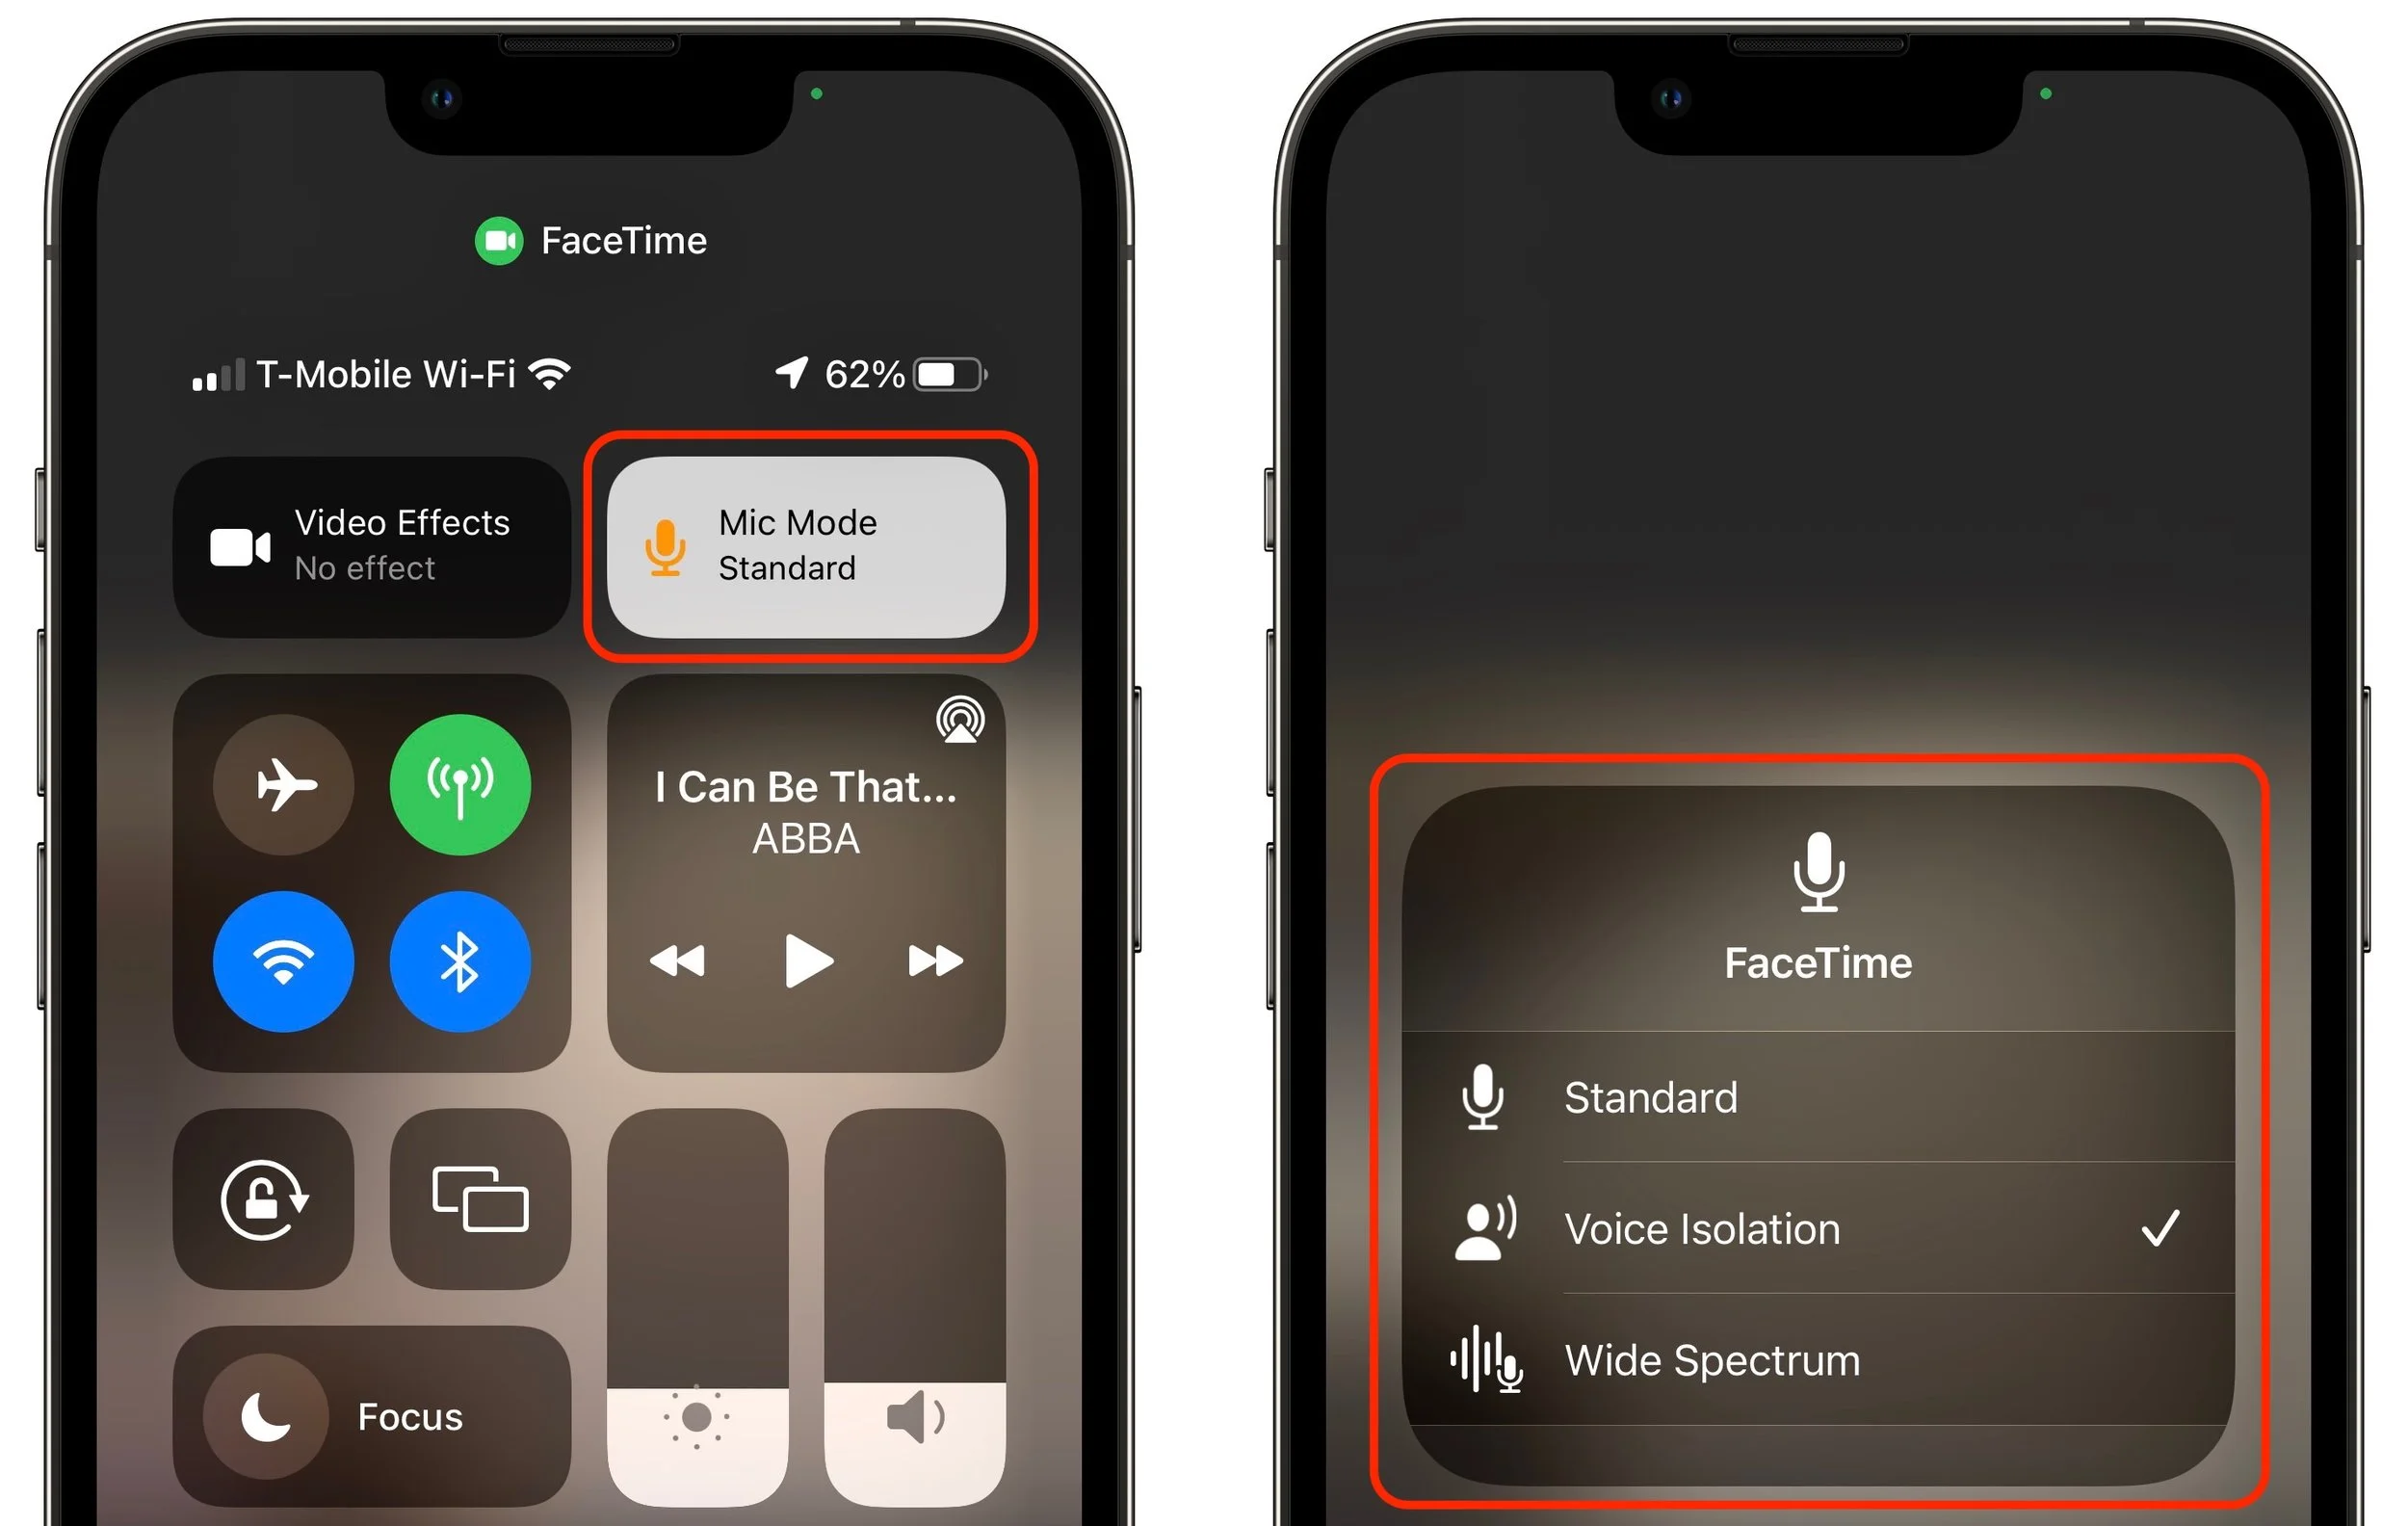
In an effort to catch up with the likes of Zoom, Apple added several audio and video features to FaceTime. There are now three mic modes that you can enable in Control Center during a call:
Standard: FaceTime does nothing special to the audio.
Voice Isolation: FaceTime focuses on your voice, working to eliminate non-vocal sounds and other background noise.
Wide Spectrum: FaceTime expands its attention to all the sounds in the room, which is essential for things like music lessons.
Although the equivalent Control Center button is labeled Video Effects, there’s only one at the moment: Portrait mode. It works exactly as it does in the Camera app for photos, keeping you in focus and blurring the background. Perhaps Apple will add other video effects in the future, much like Zoom’s virtual backgrounds and immersive sets. You can also toggle Portrait mode by tapping the Video Effects button in your FaceTime tile.
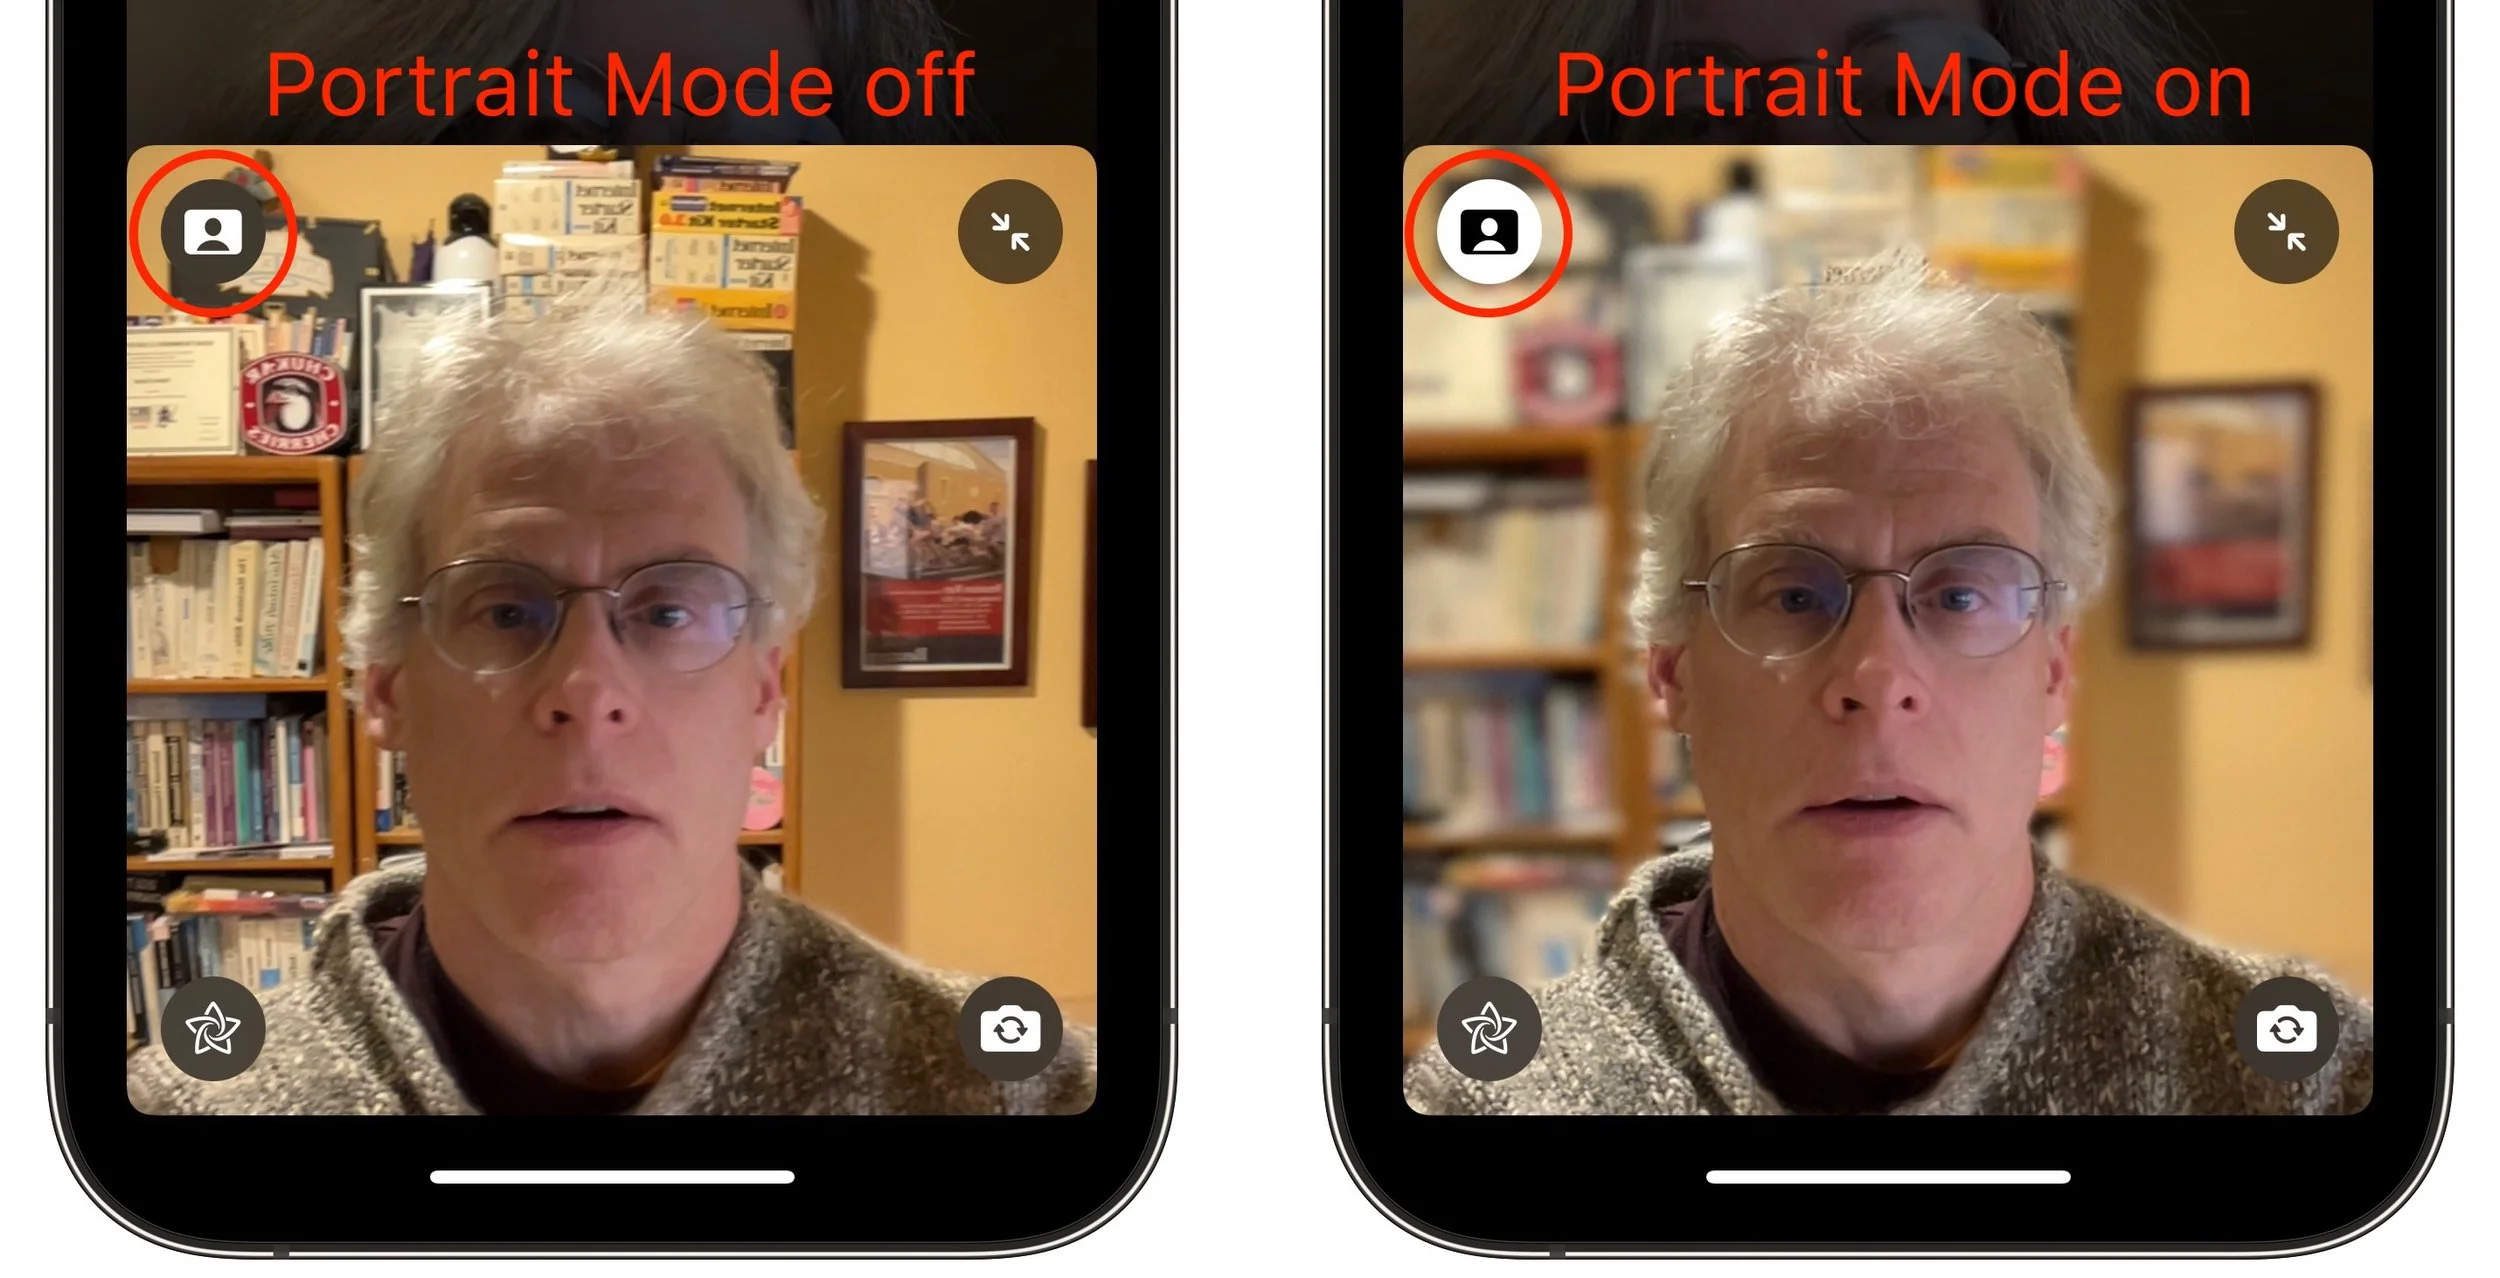
The Voice Isolation and Wide Spectrum mic modes, and the Portrait mode video effect, are available only on iPhones and iPads that have an A12 Bionic chip or later, or an M1 chip. Similarly, they work only on M1-based Macs, not older Intel-based Macs.
Grid View
When Apple first introduced FaceTime group calls, participants’ tiles would swim around on the screen, moving and expanding to indicate who was speaking. It was dizzying. Happily, Apple finally listened to annoyed users and has now introduced a simple grid view like every other videoconferencing app on the planet.
Once there are four or more participants in a call on an iPhone or iPad, a Grid button appears when you tap the screen to reveal the FaceTime controls. Tap it to switch into or out of grid view. In Monterey, there’s an always-visible Grid button in the upper-right corner.
Screen Sharing for iPhones and iPads
As helpful as FaceTime links are, our favorite new feature of FaceTime is screen sharing for those using an iPhone or iPad. (Macs can’t currently participate in FaceTime screen sharing but have their own screen sharing capabilities, accessed through the Conversations menu in Messages.) With a couple of taps, you can share your screen with someone else, or they can share their screen with you, all while maintaining the video call. For many remote workers, this feature is essential, whether you are collaborating on a project or showing your work to your boss. Another obvious use is remote tech support. If someone is having trouble accomplishing something on their iPhone or iPad, you can see what’s going wrong live on a FaceTime call. And kids, no doubt, will find many fun things to do together.
To share your screen during a FaceTime call, tap anywhere on the screen to reveal the FaceTime controls, tap the screen sharing button on the right, and tap the Share My Screen confirmation prompt. After a 3-second countdown, others on the call can see your screen, even as you switch away from the FaceTime app and use your iPhone or iPad however you want.
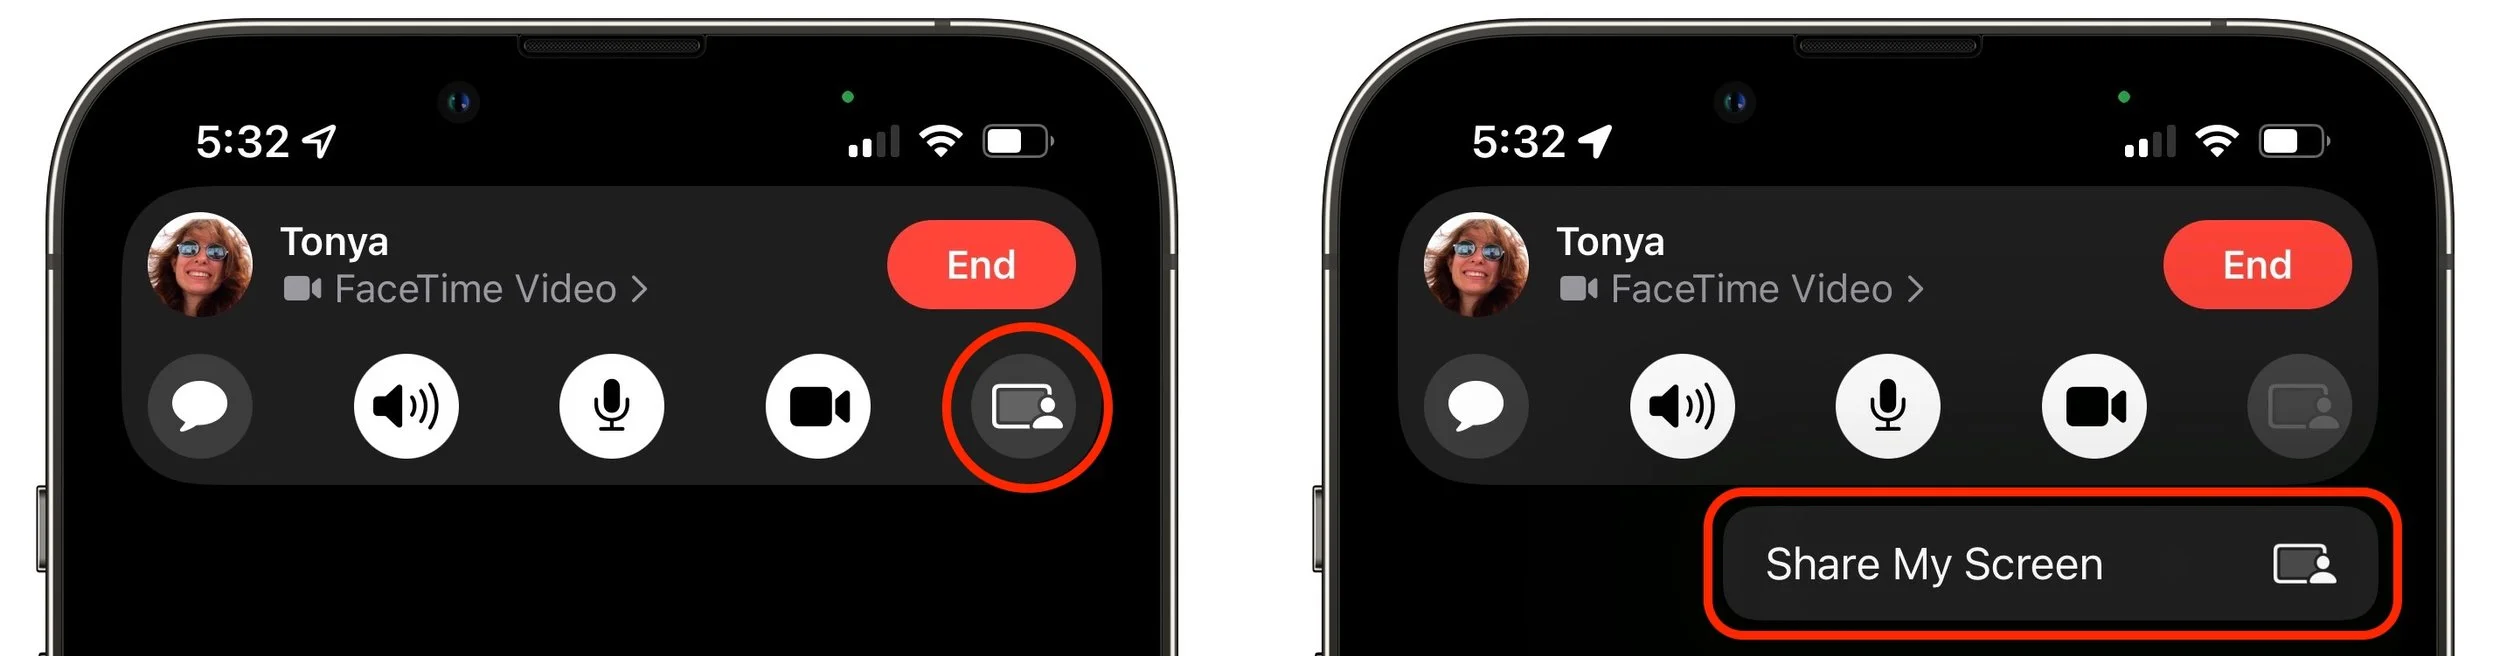
While you’re sharing your screen, a purple status icon reminds you that others can see what you’re doing. To stop sharing your screen, tap someone’s video tile to switch back to the FaceTime app and tap the screen sharing button again.
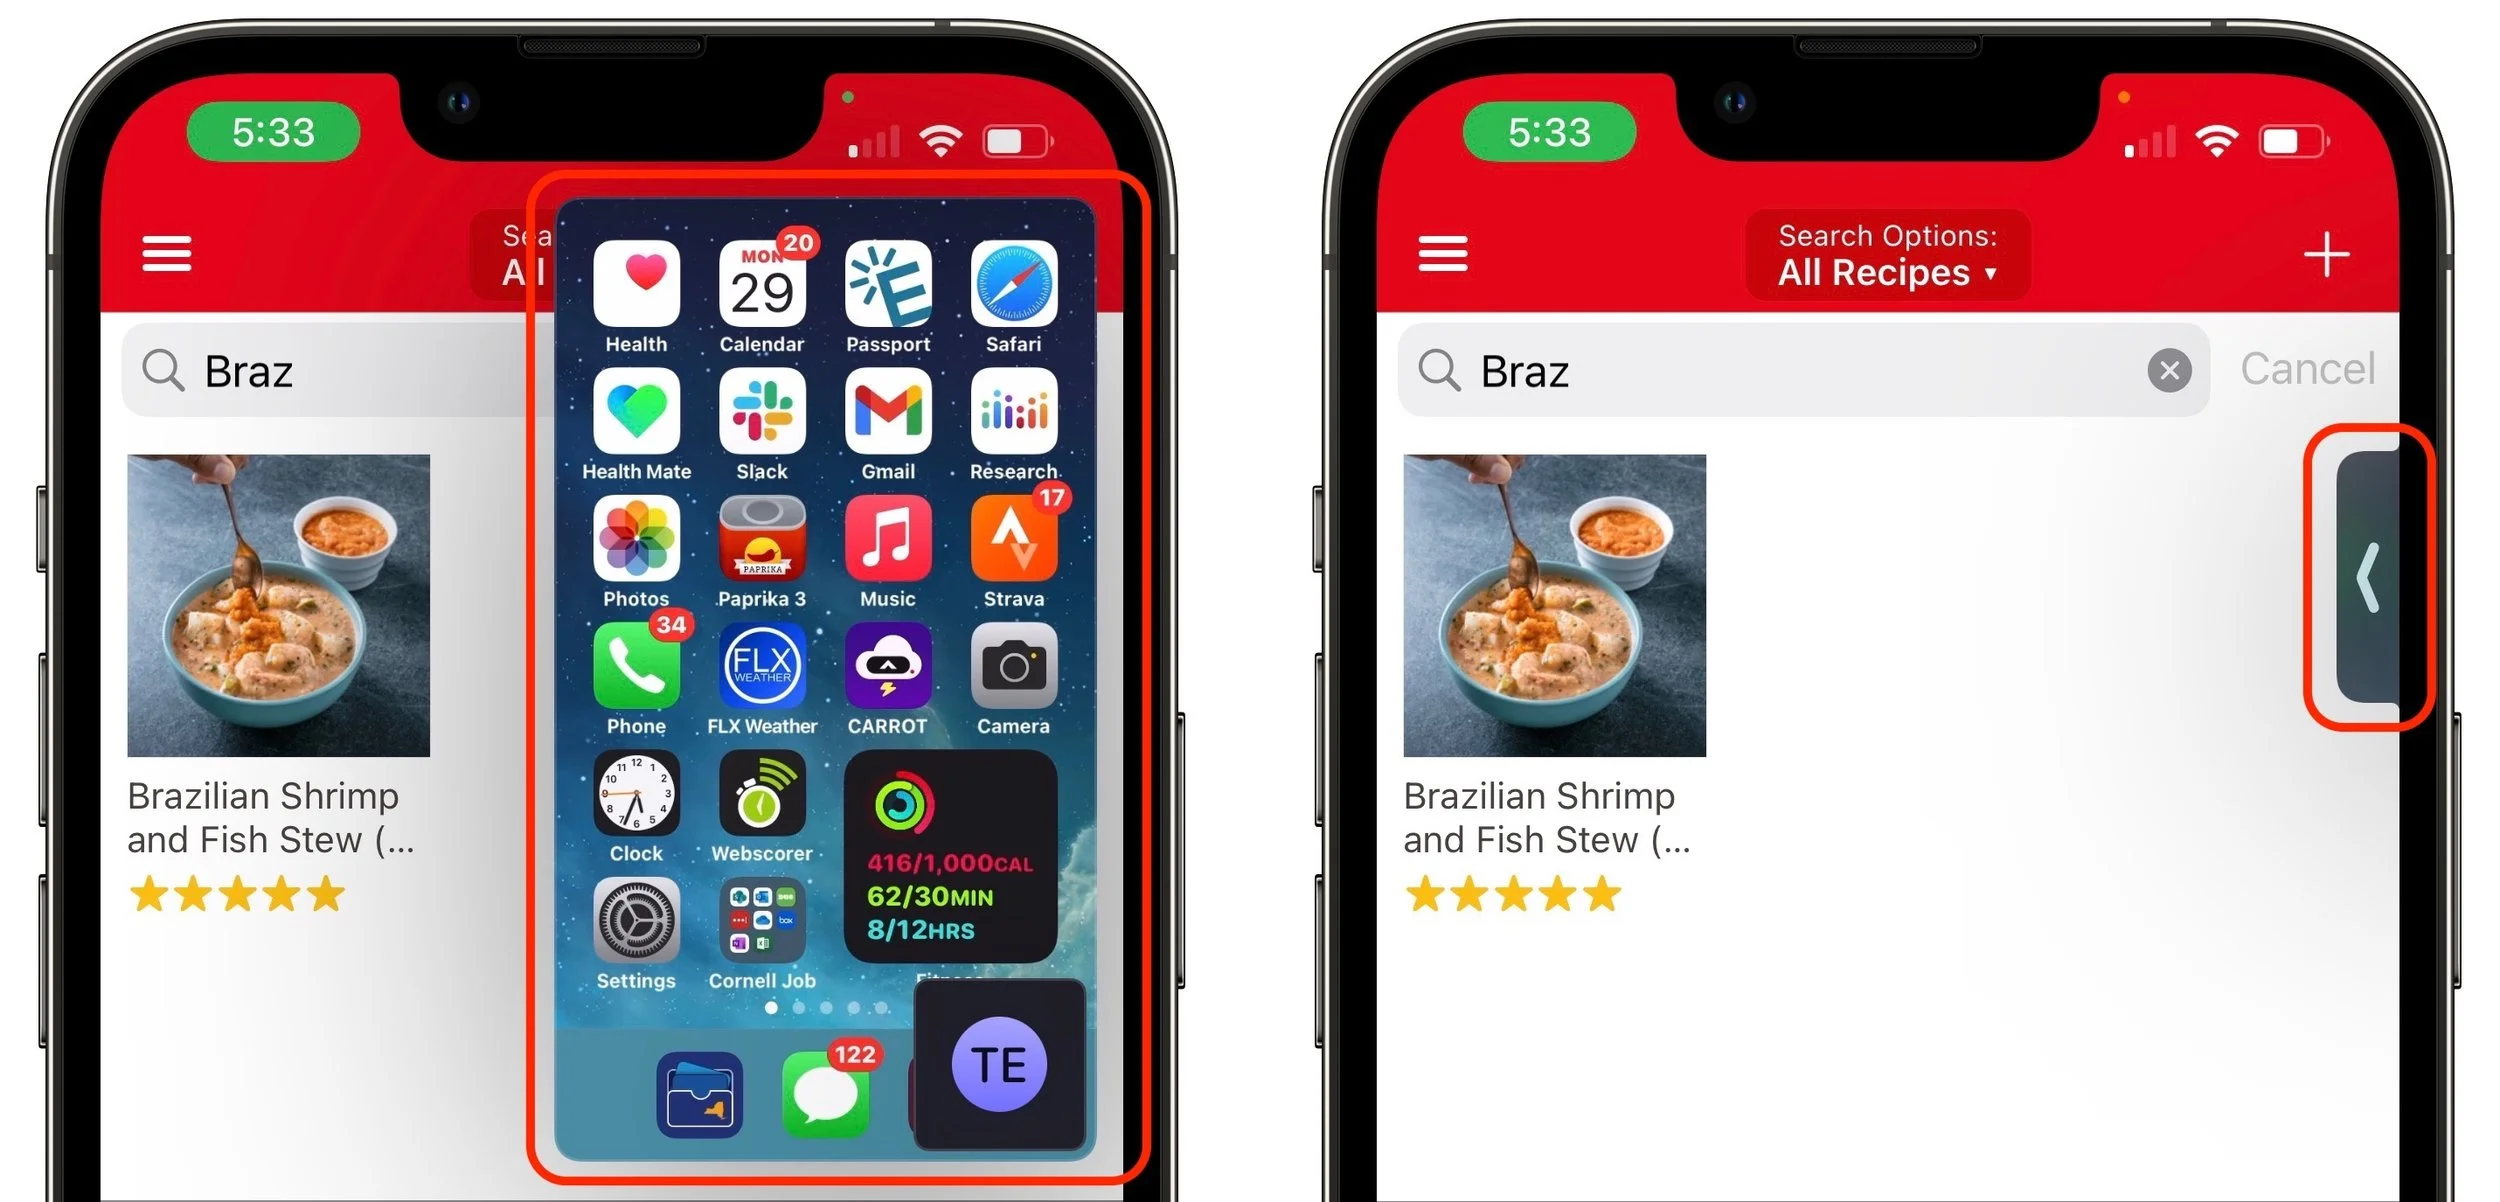
When someone shares their screen with you, a Picture-in-Picture (PiP) window of their screen appears. Tap it to expand it to the entire screen, moving the FaceTime call video to its own PiP window. Tap that FaceTime PiP window to return to the call. If you switch to another app, as shown below, the shared screen returns to being a PiP window. If any PiP window is in your way, you can drag it to another corner or swipe it off the screen to the left or right to hide it entirely. A tab appears to indicate the hidden PiP window; tap it to bring the window back.
SharePlay
People will either love SharePlay or ignore it entirely. It enables everyone on a FaceTime call to watch the same video or listen to the same audio while continuing the conversation. The big caveat is that everyone must have legal access to the content, which generally means a subscription to whatever service is being used, whether that’s Apple Music, Apple TV+, Disney+, HBO MAX, or Paramount+. Currently, SharePlay works only in iOS 15 and iPadOS 15 and on the Apple TV running tvOS 15. It’s slated to appear in a future version of Monterey, perhaps 12.1.
Initiating a SharePlay session is easy: simply navigate to Apple’s TV or Music app, or another app that supports SharePlay, and start playing something. You may be asked if you want to play it for everyone or just for yourself, or you may be told the content will play automatically. Assuming everyone on the call has the necessary subscription, the audio or video starts playing instantly.
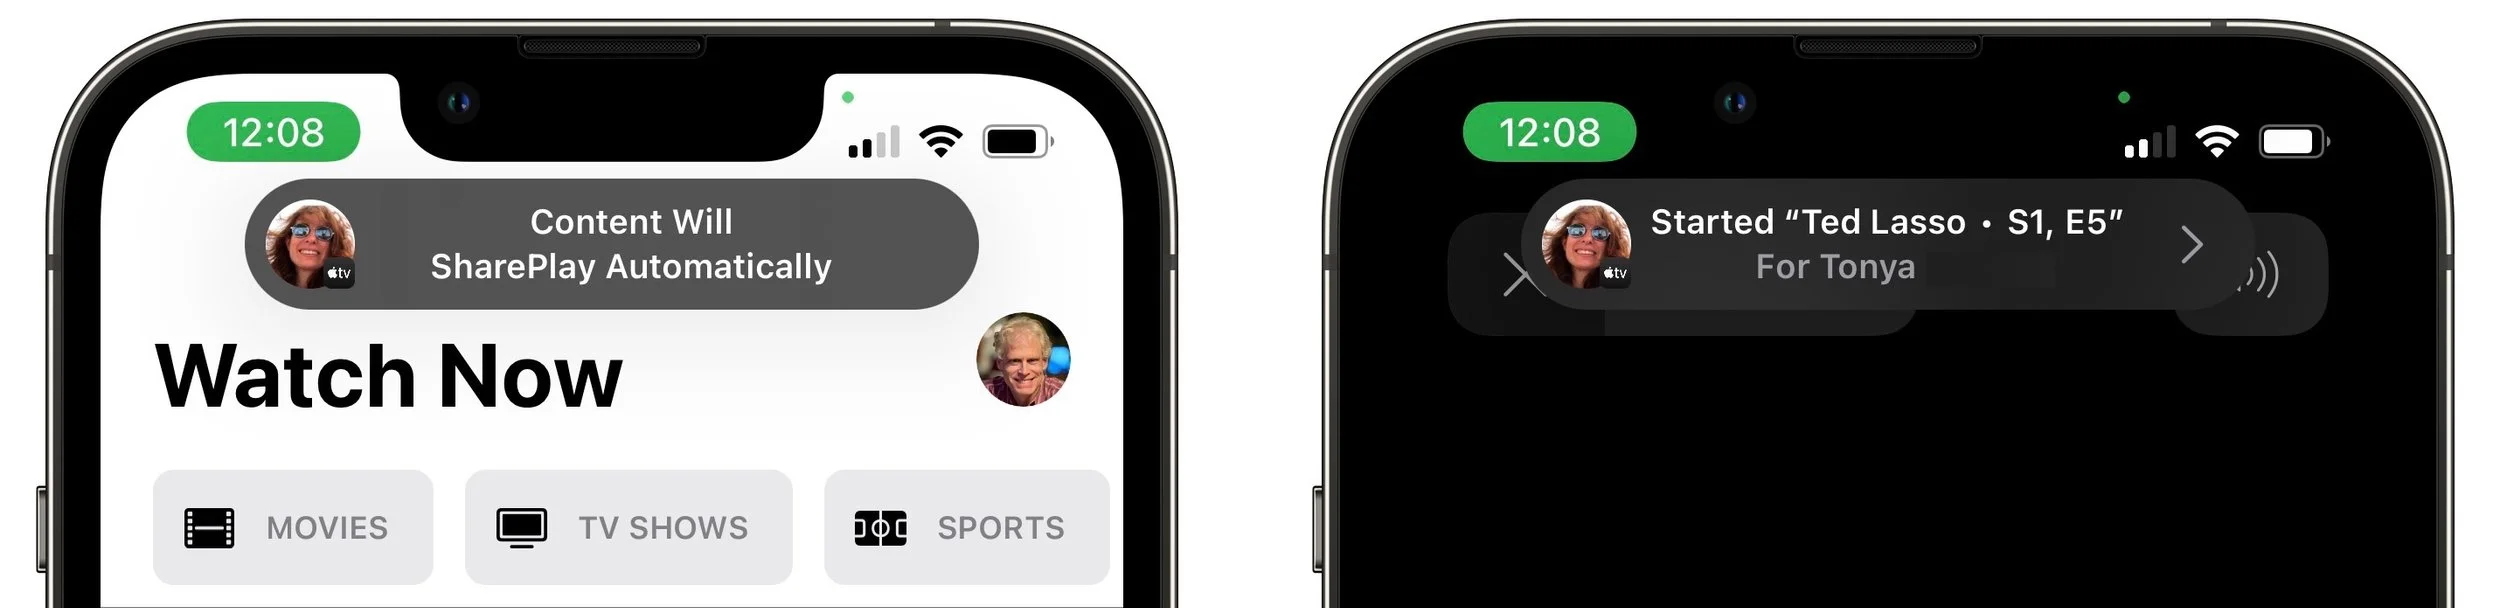
What’s a little freaky about SharePlay is that, with one minor exception, everyone is an equal participant. If you start playing something, someone else can pause it or rewind it, say, and the video will pause or rewind for everyone. The exception is that only the person who started playing a video can stop it (tap the screen to reveal the controls), although anyone can start playing something else to replace it.
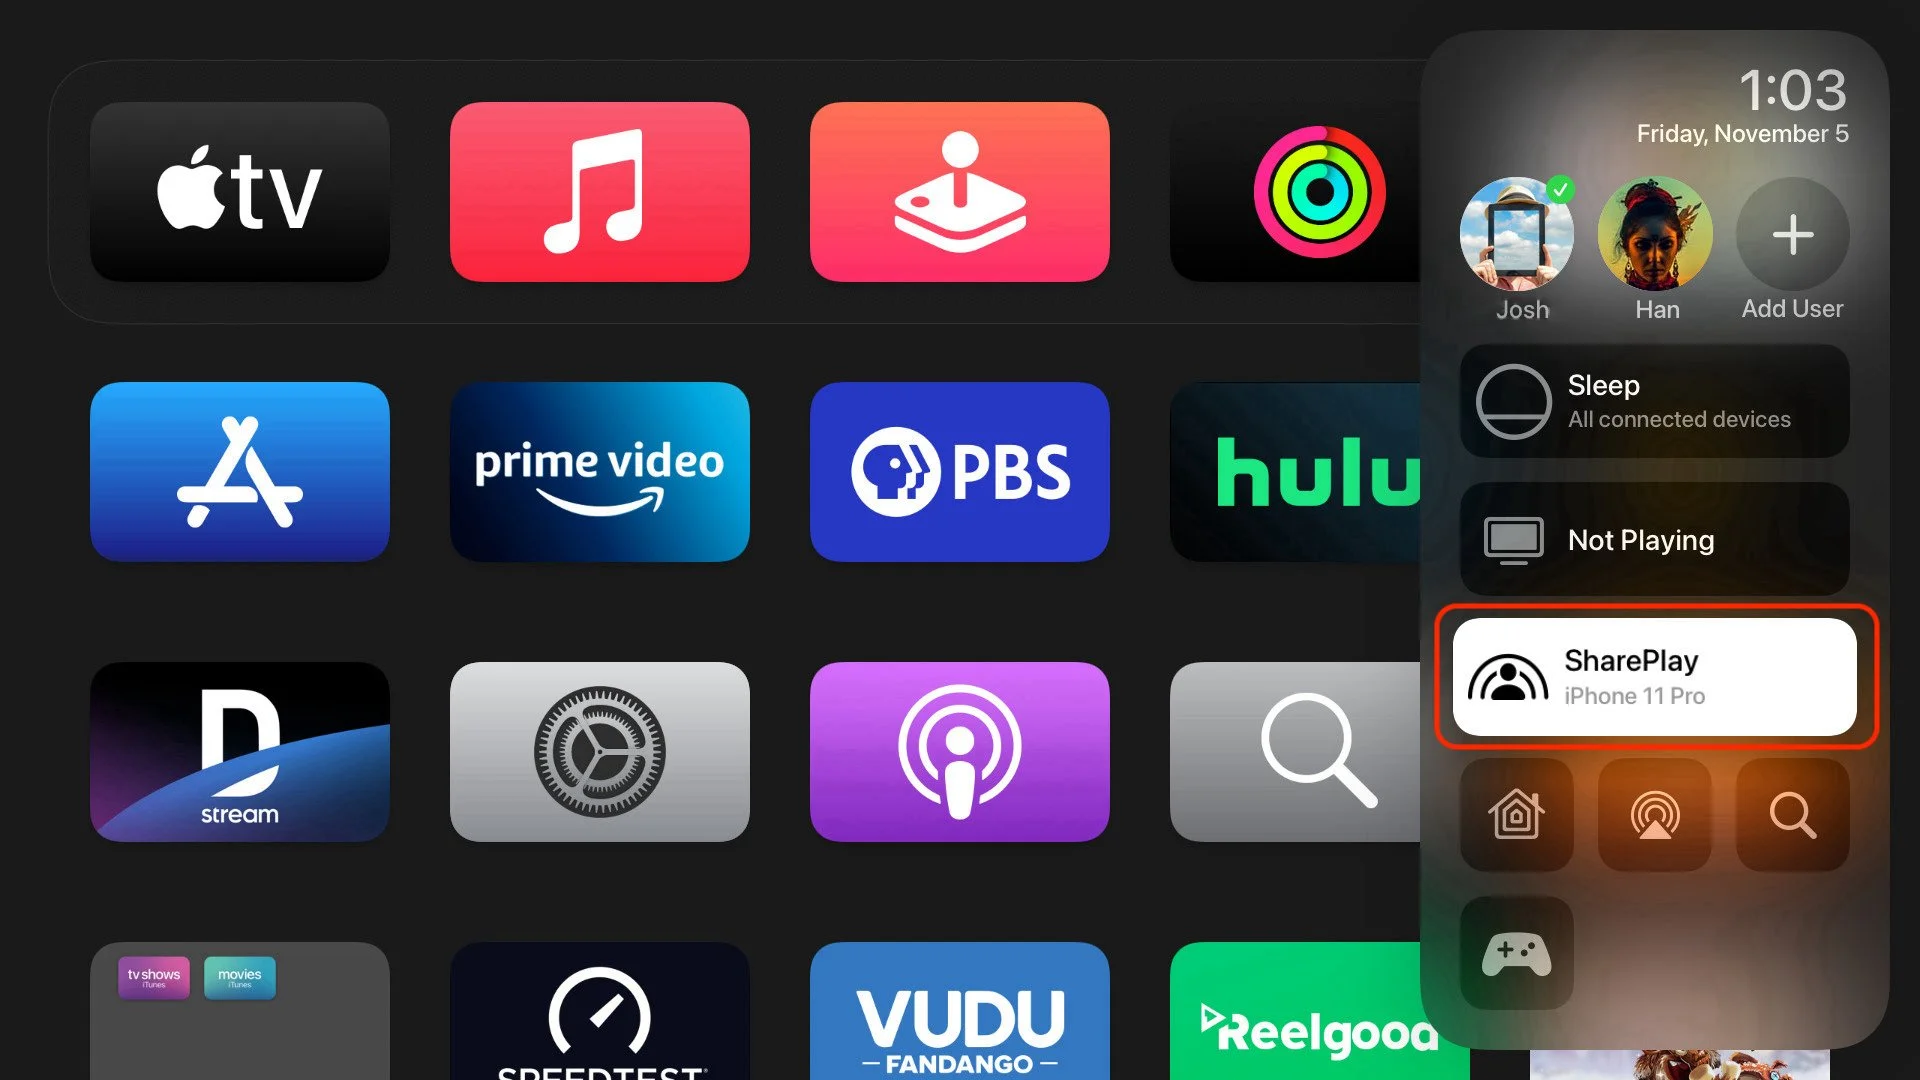
If you have an Apple TV, you can initiate video playback from the Apple TV or move something that’s already playing to the Apple TV. While you’re on a FaceTime call on your iPhone or iPad, press and hold the TV button on the Apple TV’s remote to open Control Center, and then select the SharePlay button that appears there to get started.
With all these new features, it’s time to rethink how you use FaceTime, and that’s especially true if you haven’t been using FaceTime because it lacked the features in some other videoconferencing app.
(Featured image by iStock.com/jacoblund)
Apple’s Evolution of Do Not Disturb Helps You Focus
Do you want more control over Do Not Disturb on your Apple devices? How about muting notifications while a particular app is active or while you are at a certain location? All this and more is now easy to set up with Apple’s new Focus feature—learn how at:

Between texts, alarms, reminders, calls, and myriad other notifications on our iPhones, iPads, and Macs, it’s a miracle we get anything done at all. To free us from this onslaught, Apple previously provided Do Not Disturb, which let you set times during which you could be free from interruption.
In iOS 15, iPadOS 15, and macOS 12 Monterey, Apple has gone even further. Do Not Disturb is now called Focus, and Apple has made it more powerful and flexible. Focus can turn on automatically at certain times, at particular locations, or when you’re using certain apps so you can avoid interruptions during activities like working out, doing homework, eating dinner, or gaming. But not all interruptions—you can allow certain people and apps to break through the cone of silence. A Focus can also hide or show certain Home screen pages, prevent notifications from appearing on the Lock screen, and more. Plus, all your devices can share the same Focus settings—we’re showing iPhone screenshots below, but the interface is identical in iPadOS and similar on the Mac, where you’ll find it in System Preferences > Notifications & Focus > Focus.
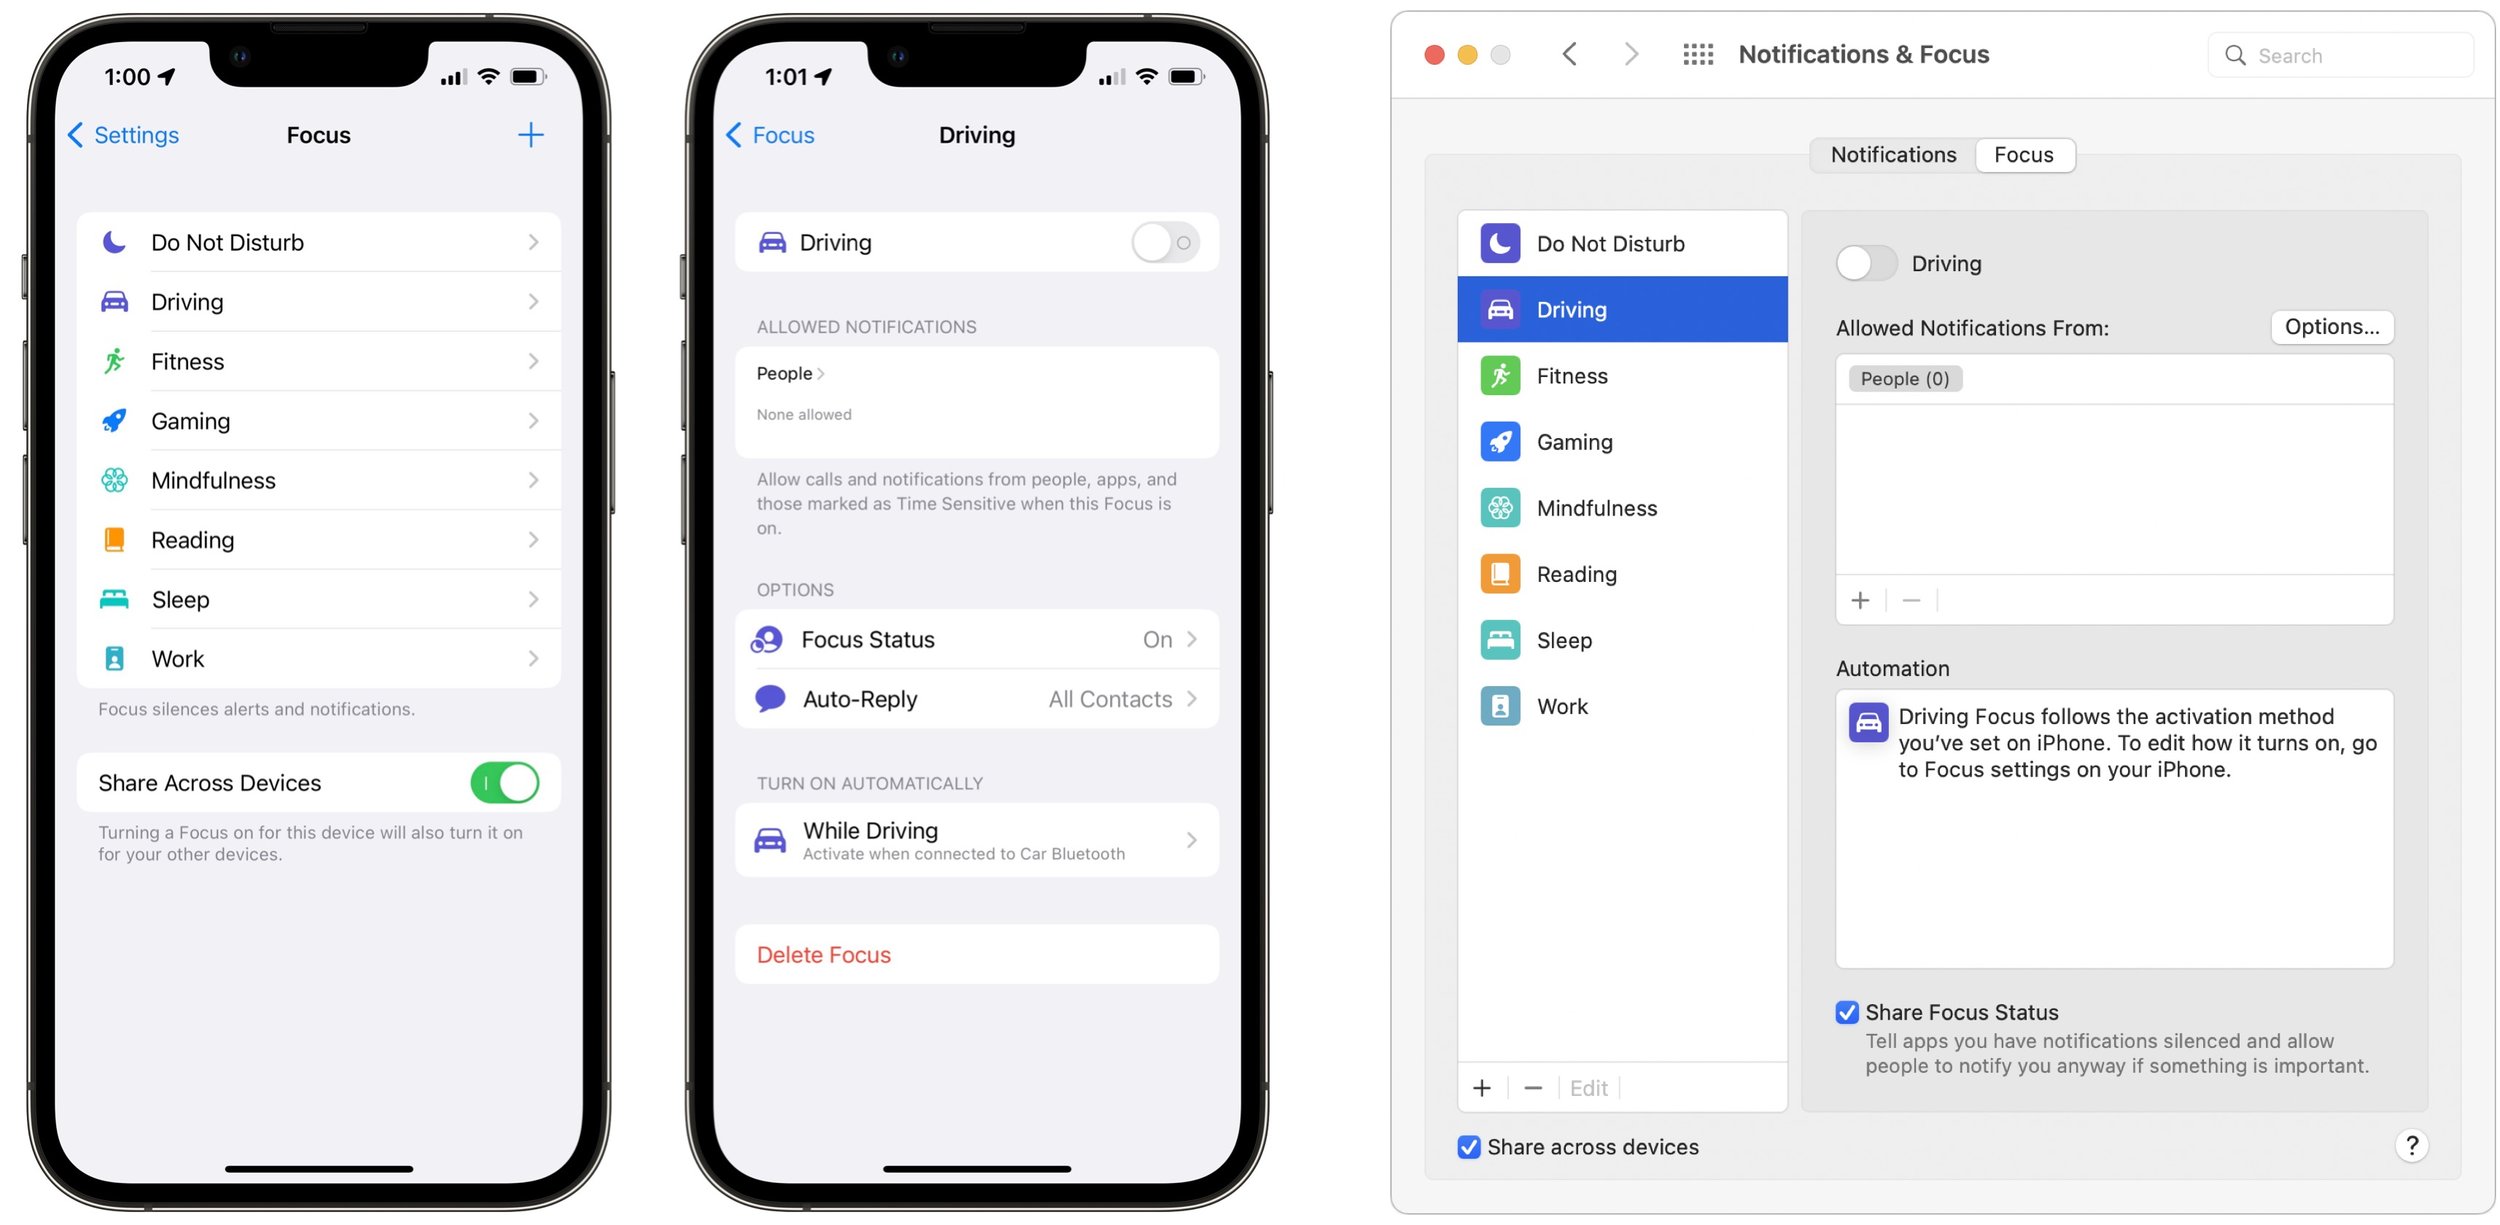
In Settings > Focus, Apple provides a pre-built Focus for Do Not Disturb, Driving, and Sleep to match the old Do Not Disturb options:
Do Not Disturb: This catch-all Focus takes over from the old Do Not Disturb setting.
Driving: This Focus replaces the old Do Not Disturb While Driving option. It’s unusual in that it doesn’t allow any app notifications through at all (eyes on the road!). It also lets you write a custom auto-reply for those who text you while you’re driving.
Sleep: If you use Apple’s sleep management features in the Health app, you’ll use this Focus to control which notifications can get through while you’re asleep.
Apart from those, Apple makes six suggestions: Personal and Work (in the main list), and Fitness, Gaming, Mindfulness, and Reading (when you add a new Focus). You can also create a custom Focus from scratch.
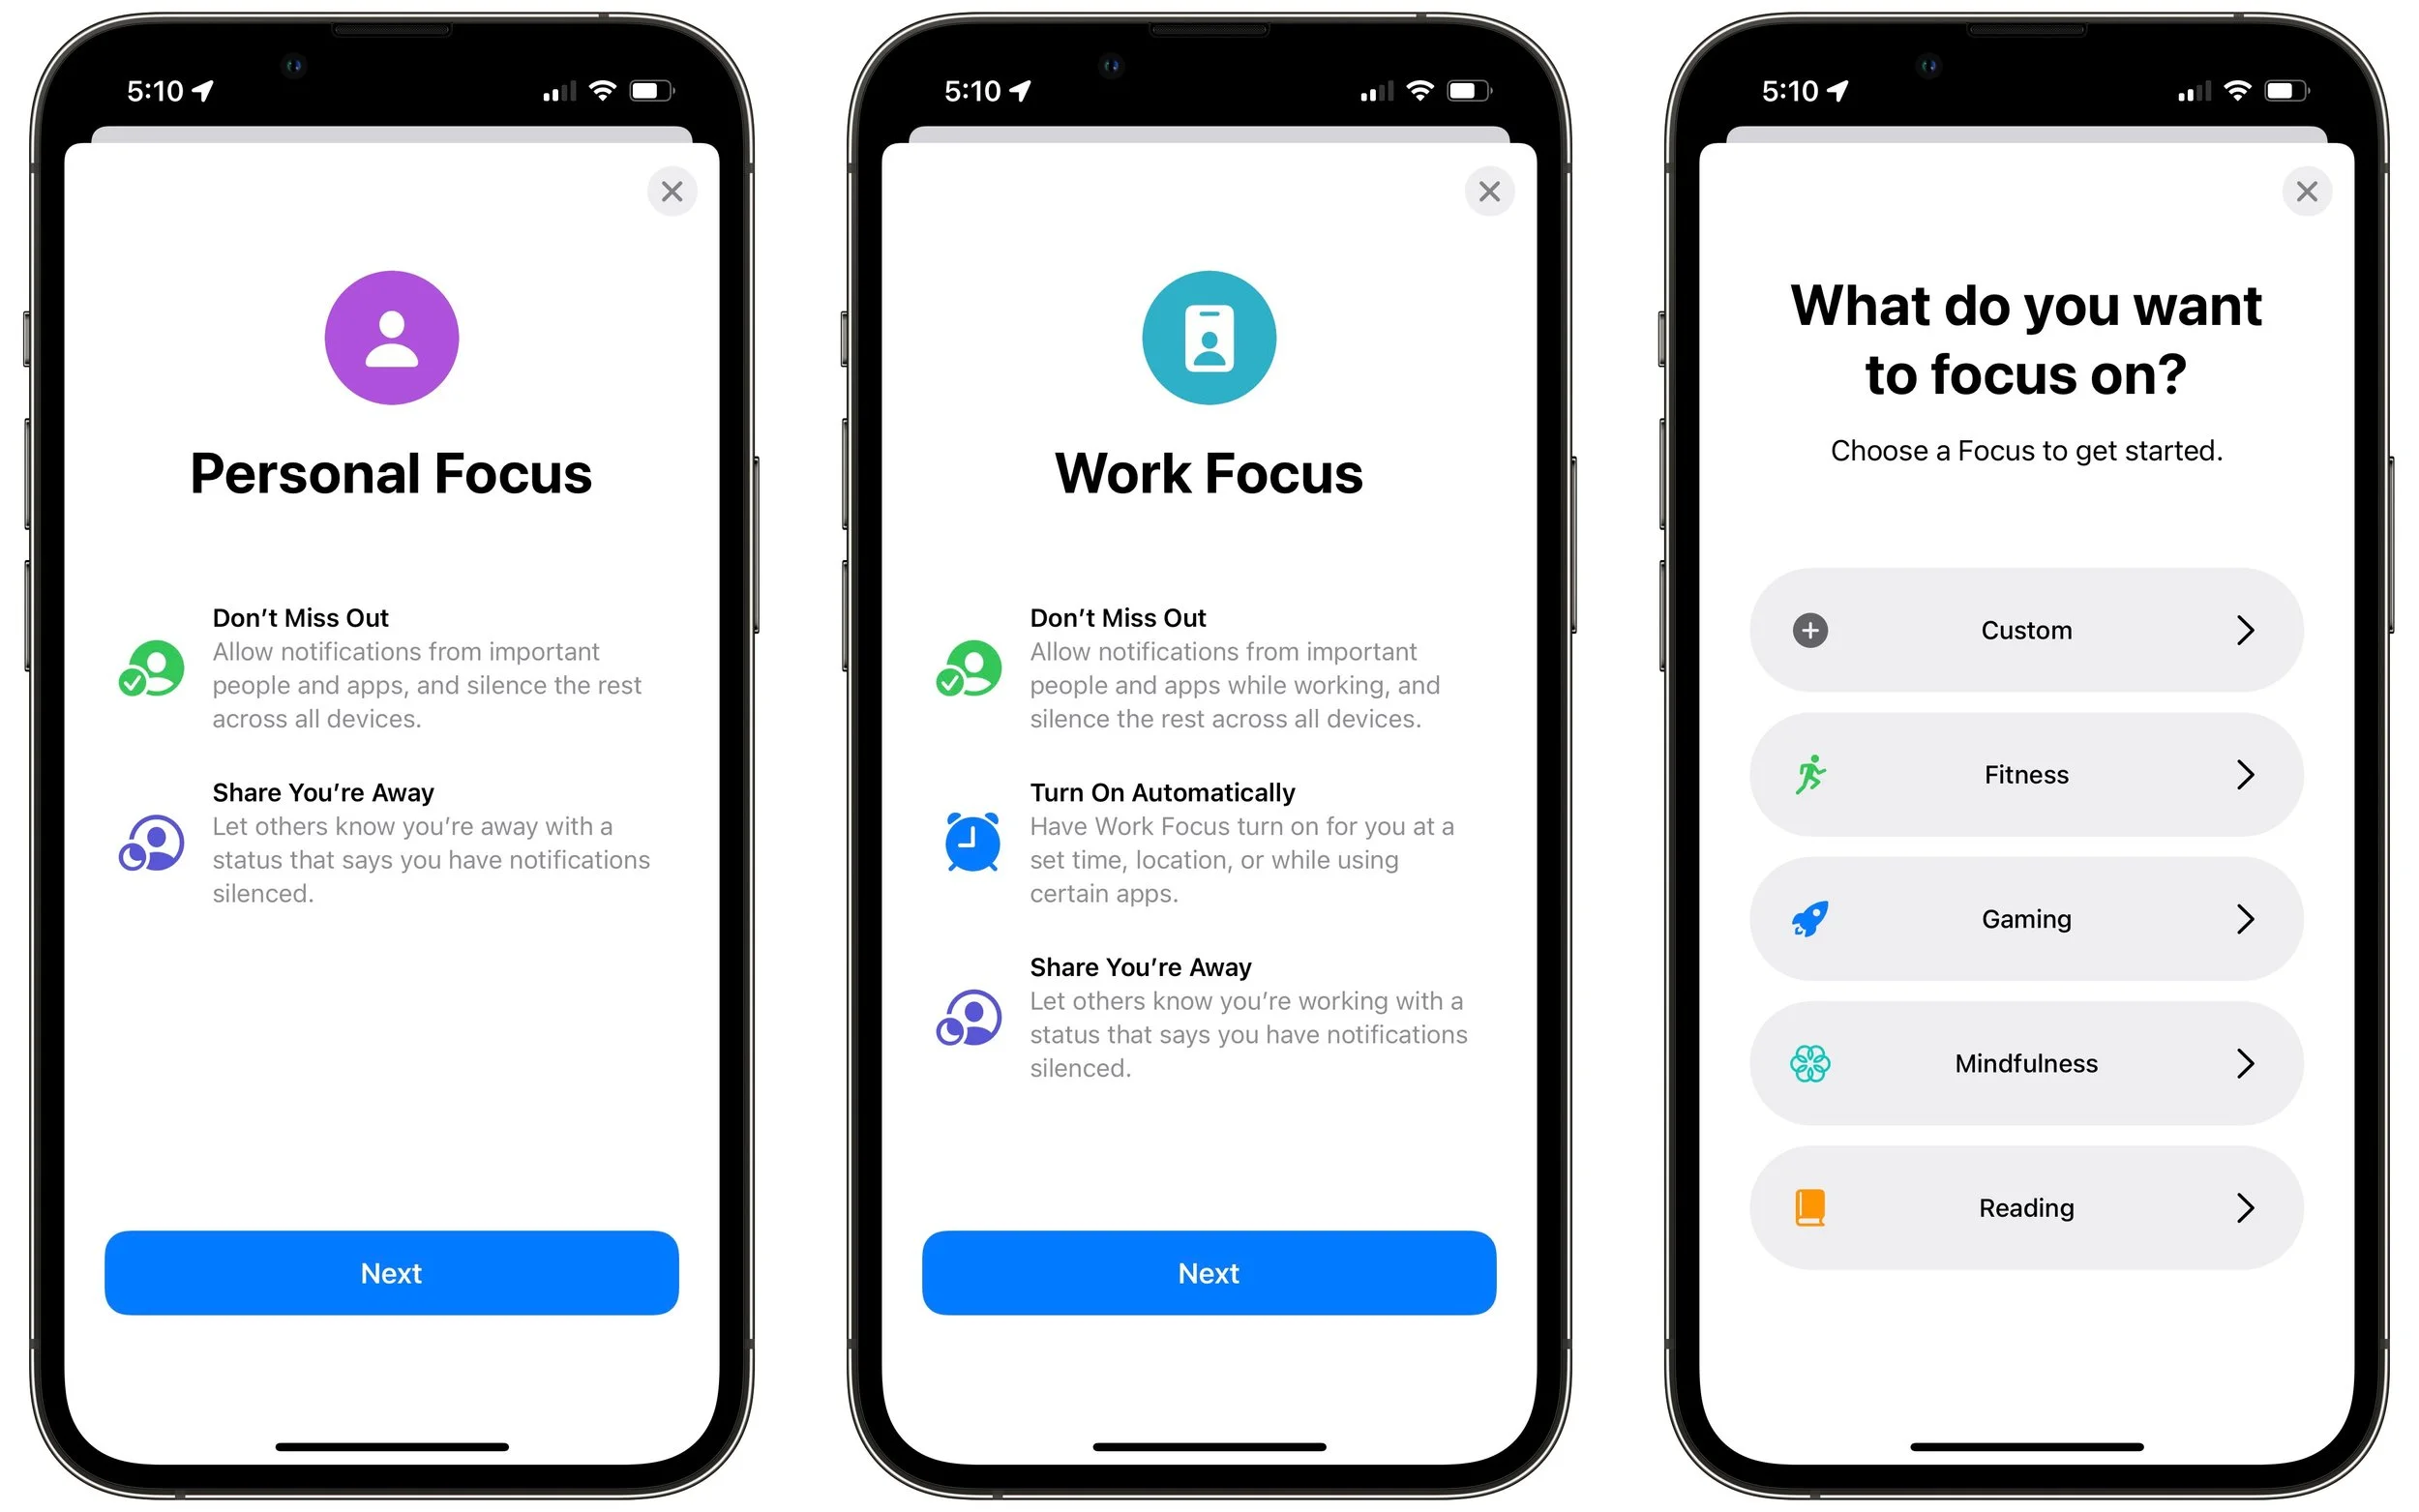
Apple’s suggestions are special in one important way. Fitness, Gaming, and Mindfulness can turn on automatically: when you’re engaged in a workout, when you connect a wireless controller, and when you’re in a Mindfulness session started from your Apple Watch, respectively.
When configuring a suggested Focus or creating a new one from scratch, Focus runs you through several setup screens. One has you choose people whose notifications you want to come through regardless, and what to do about incoming phone calls. The other screen lets you pick which apps can notify you when the Focus is active, with an additional option to allow notifications marked as Time Sensitive through regardless. (Time Sensitive notifications include timed Reminders alerts, for instance, and are usually best left enabled.)
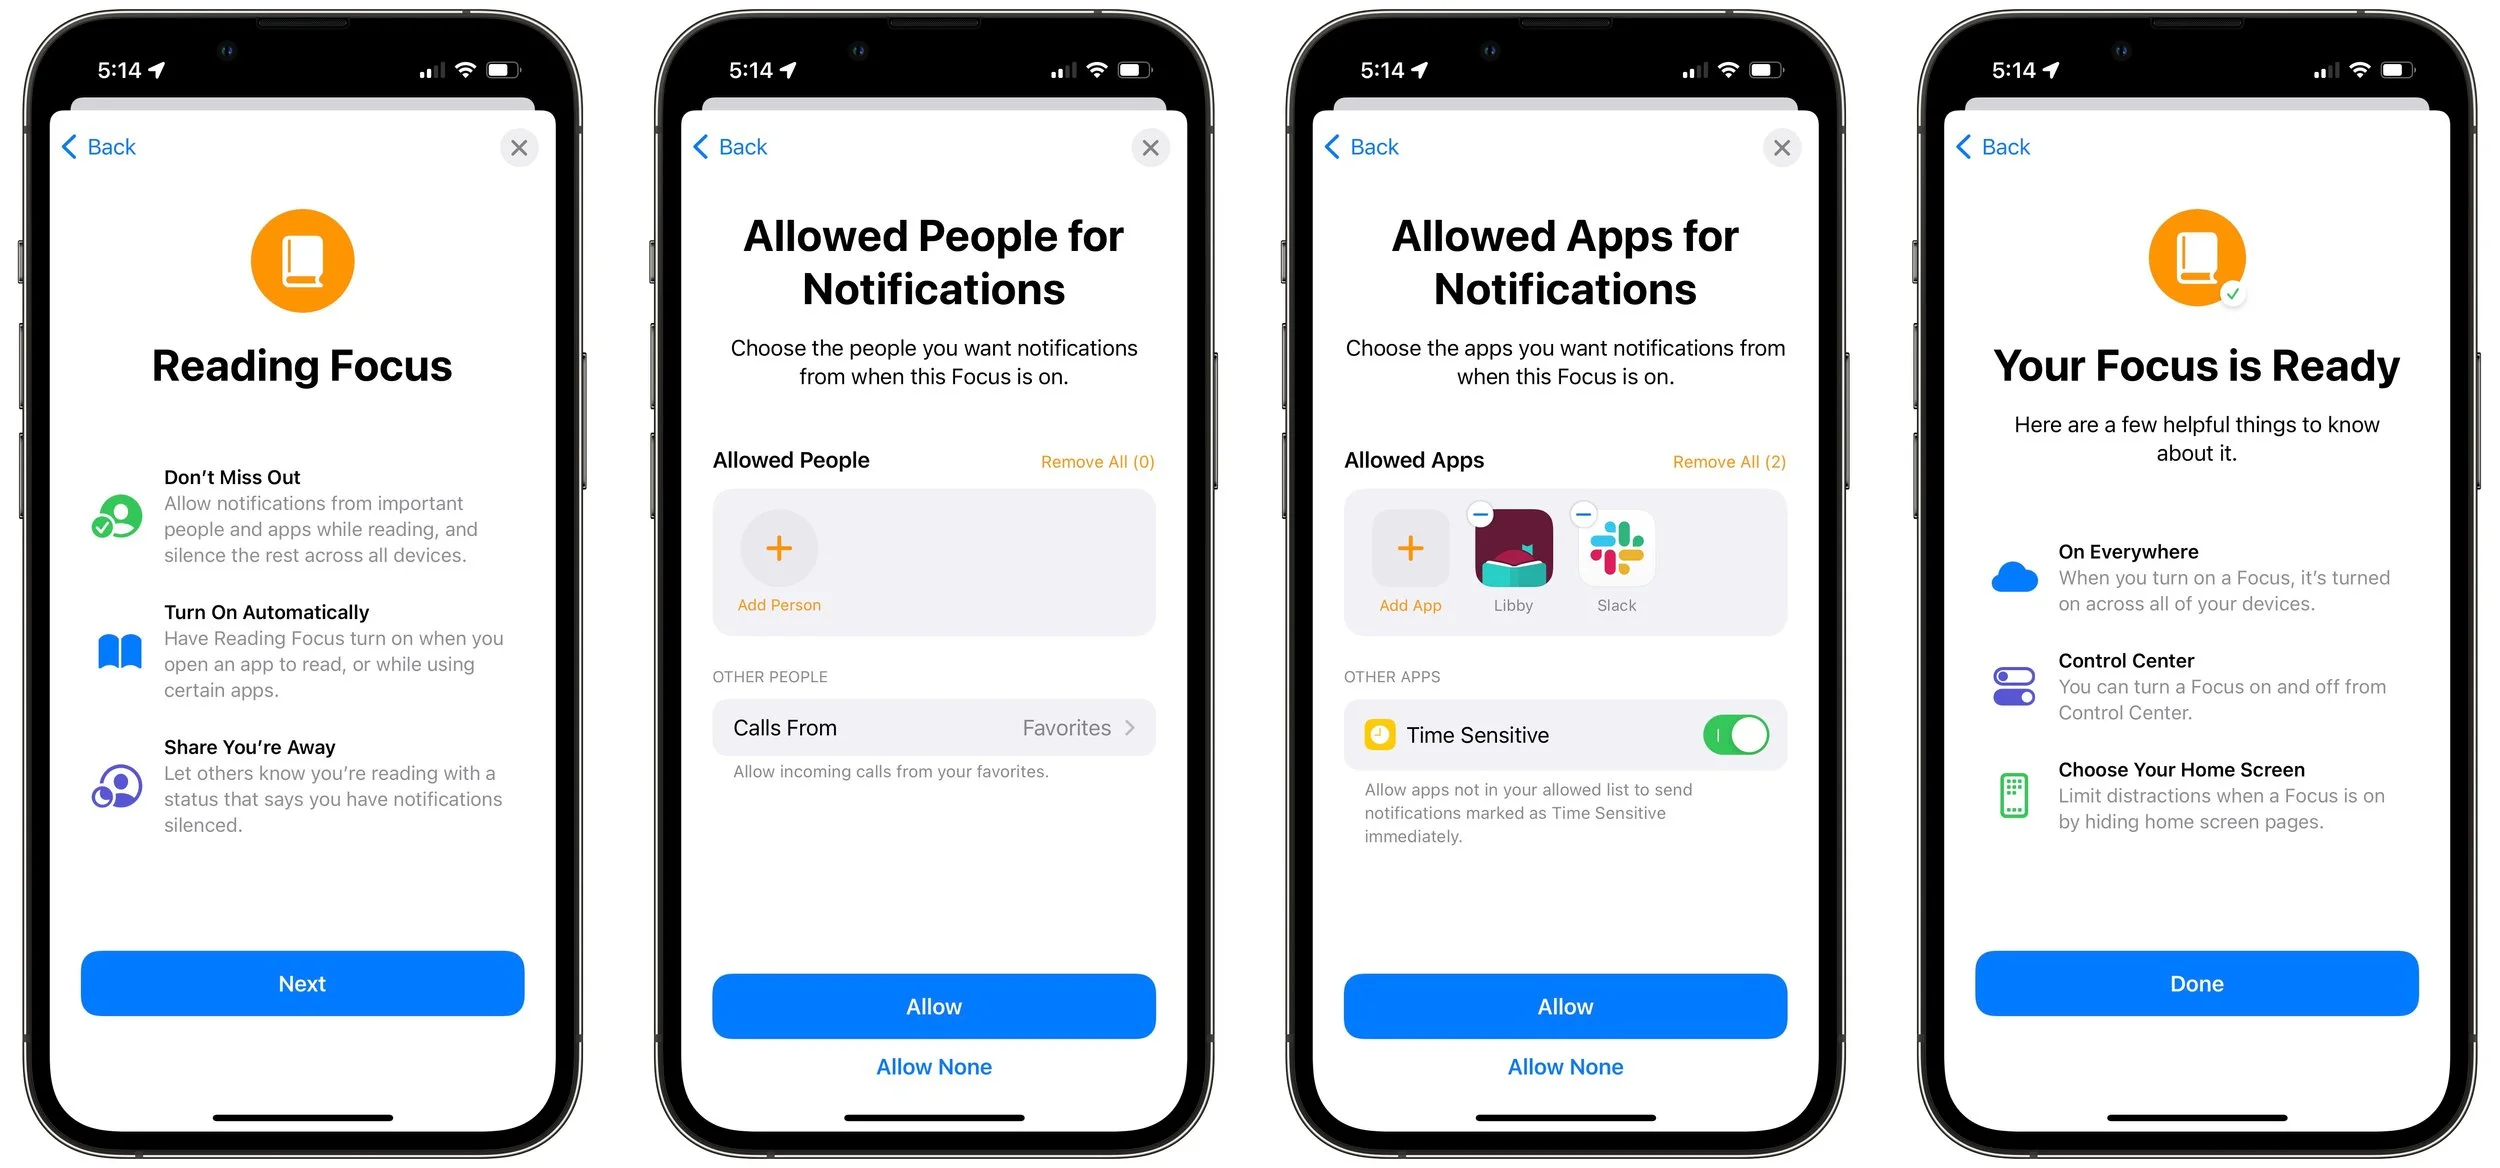
Once your Focus is ready, you can configure various options, including:
Focus Status: Enable this option to allow apps to alert those who message you that you have notifications silenced.
Home Screen: If your Focus involves you using the Home screen a lot, you can have it hide notification badges that might lure you into another app or even hide entire Home screen pages that could be distracting.
Lock Screen: If you might be looking at your Lock screen while the Focus is active, you can have it dim automatically and hide or show silenced notifications as appropriate.
Schedule or Automation: Although you can turn on any Focus from Control Center, it may be easier to have it turn itself on automatically at certain times, in particular locations, or when certain apps are active.
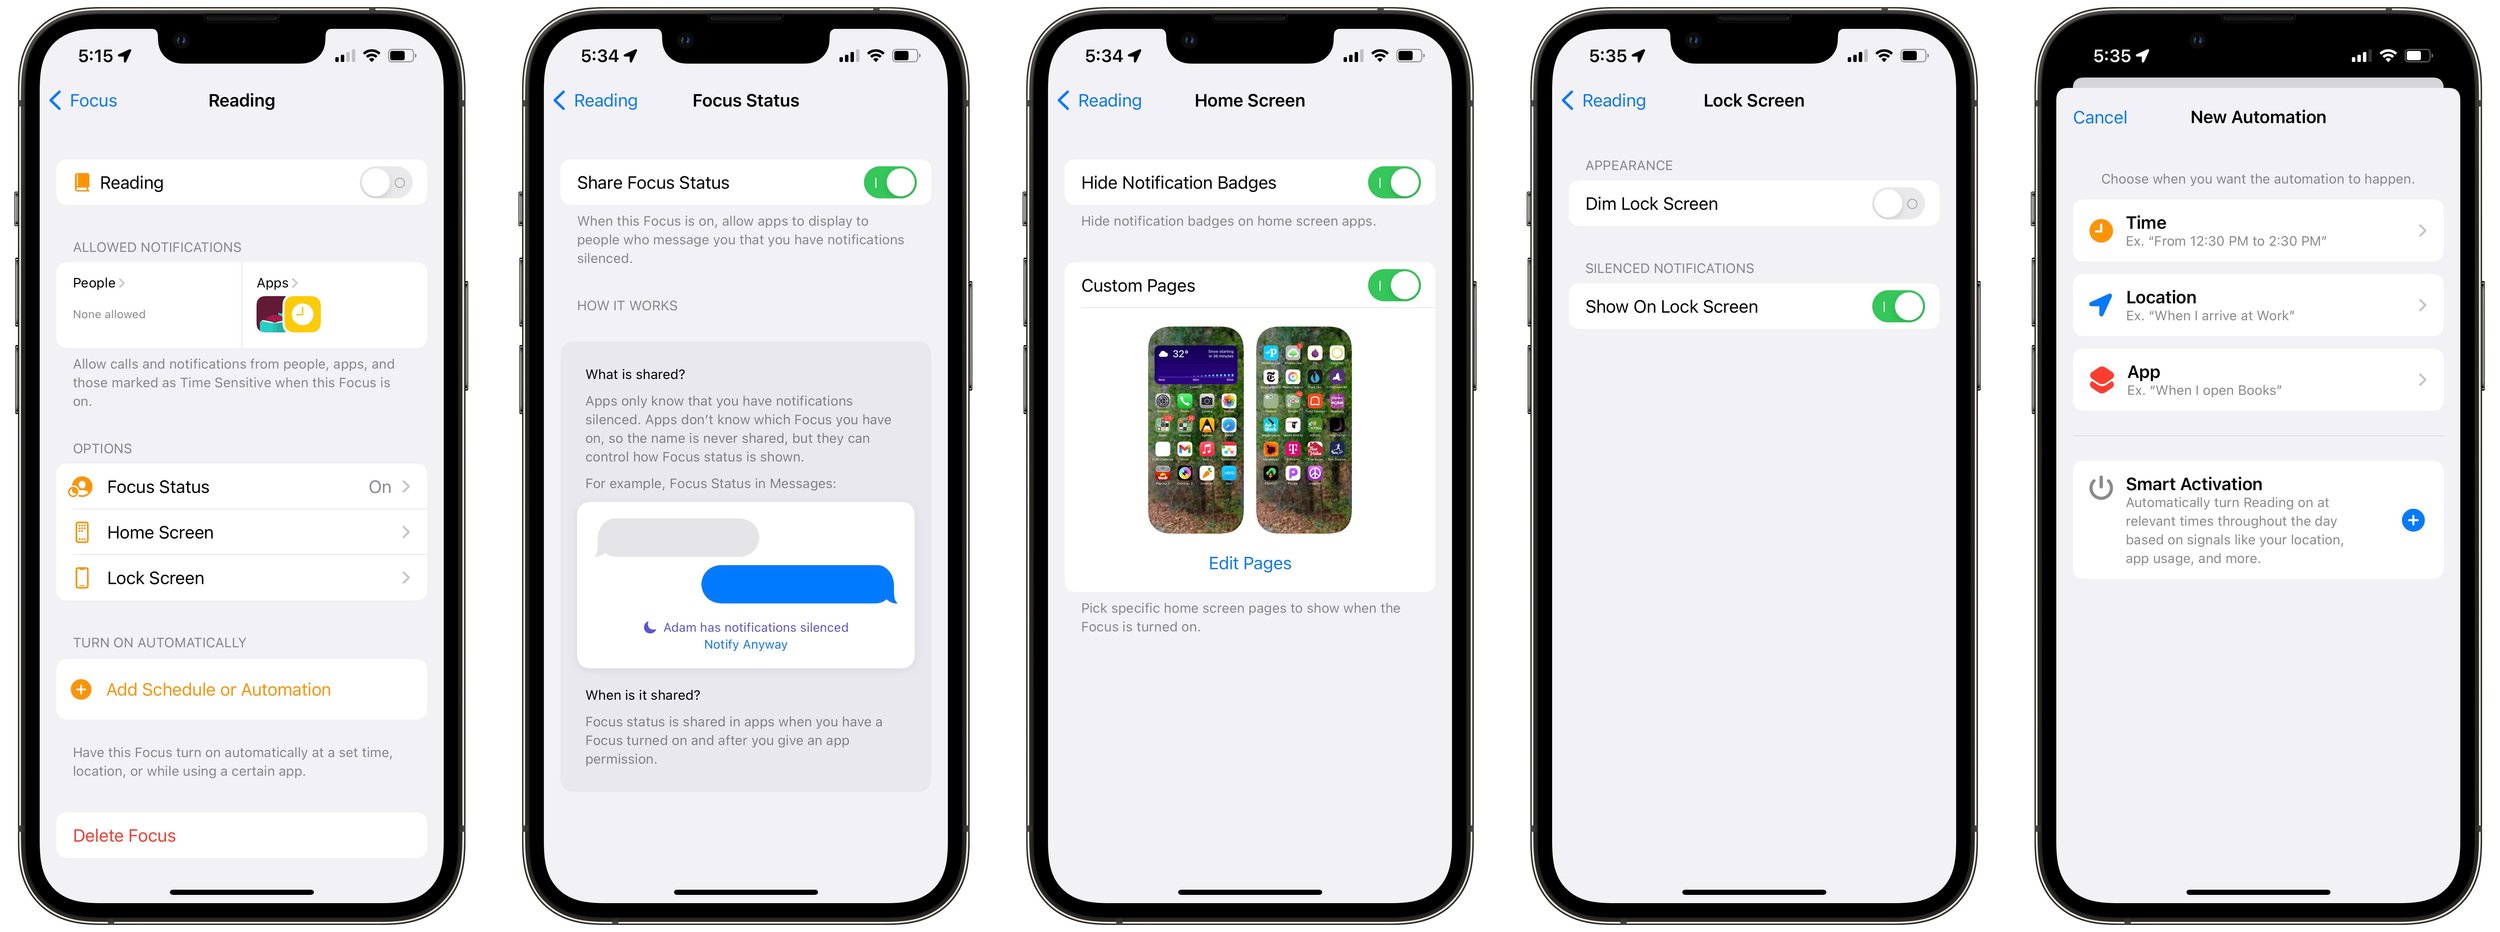
As with any new feature, it’s going to take a bit to figure out how to make Focus work best for you. We’re still learning it ourselves, but here are some recommendations:
To identify when a Focus would be helpful, wait until you find notifications irritating and then think about which ones you’d want a Focus to block.
Create just one or two Focuses at first. You don’t want to end up with a bunch that interact in unexpected ways and cause you to miss important notifications.
Be careful with schedules and automations. An automation that invokes the Reading Focus when Books is open might work well for reading before bed but could be problematic if you read while waiting for a meeting to start.
It may be safest to allow silenced notifications to appear on the Lock screen so you can easily see what you missed afterward and adjust the Focus as necessary.
You can manually invoke a Focus by tapping the Focus button in Control Center and selecting the one you want. Tap the ••• button to the right of the Focus to specify when it should turn off automatically, or just tap the Focus again to turn it off.
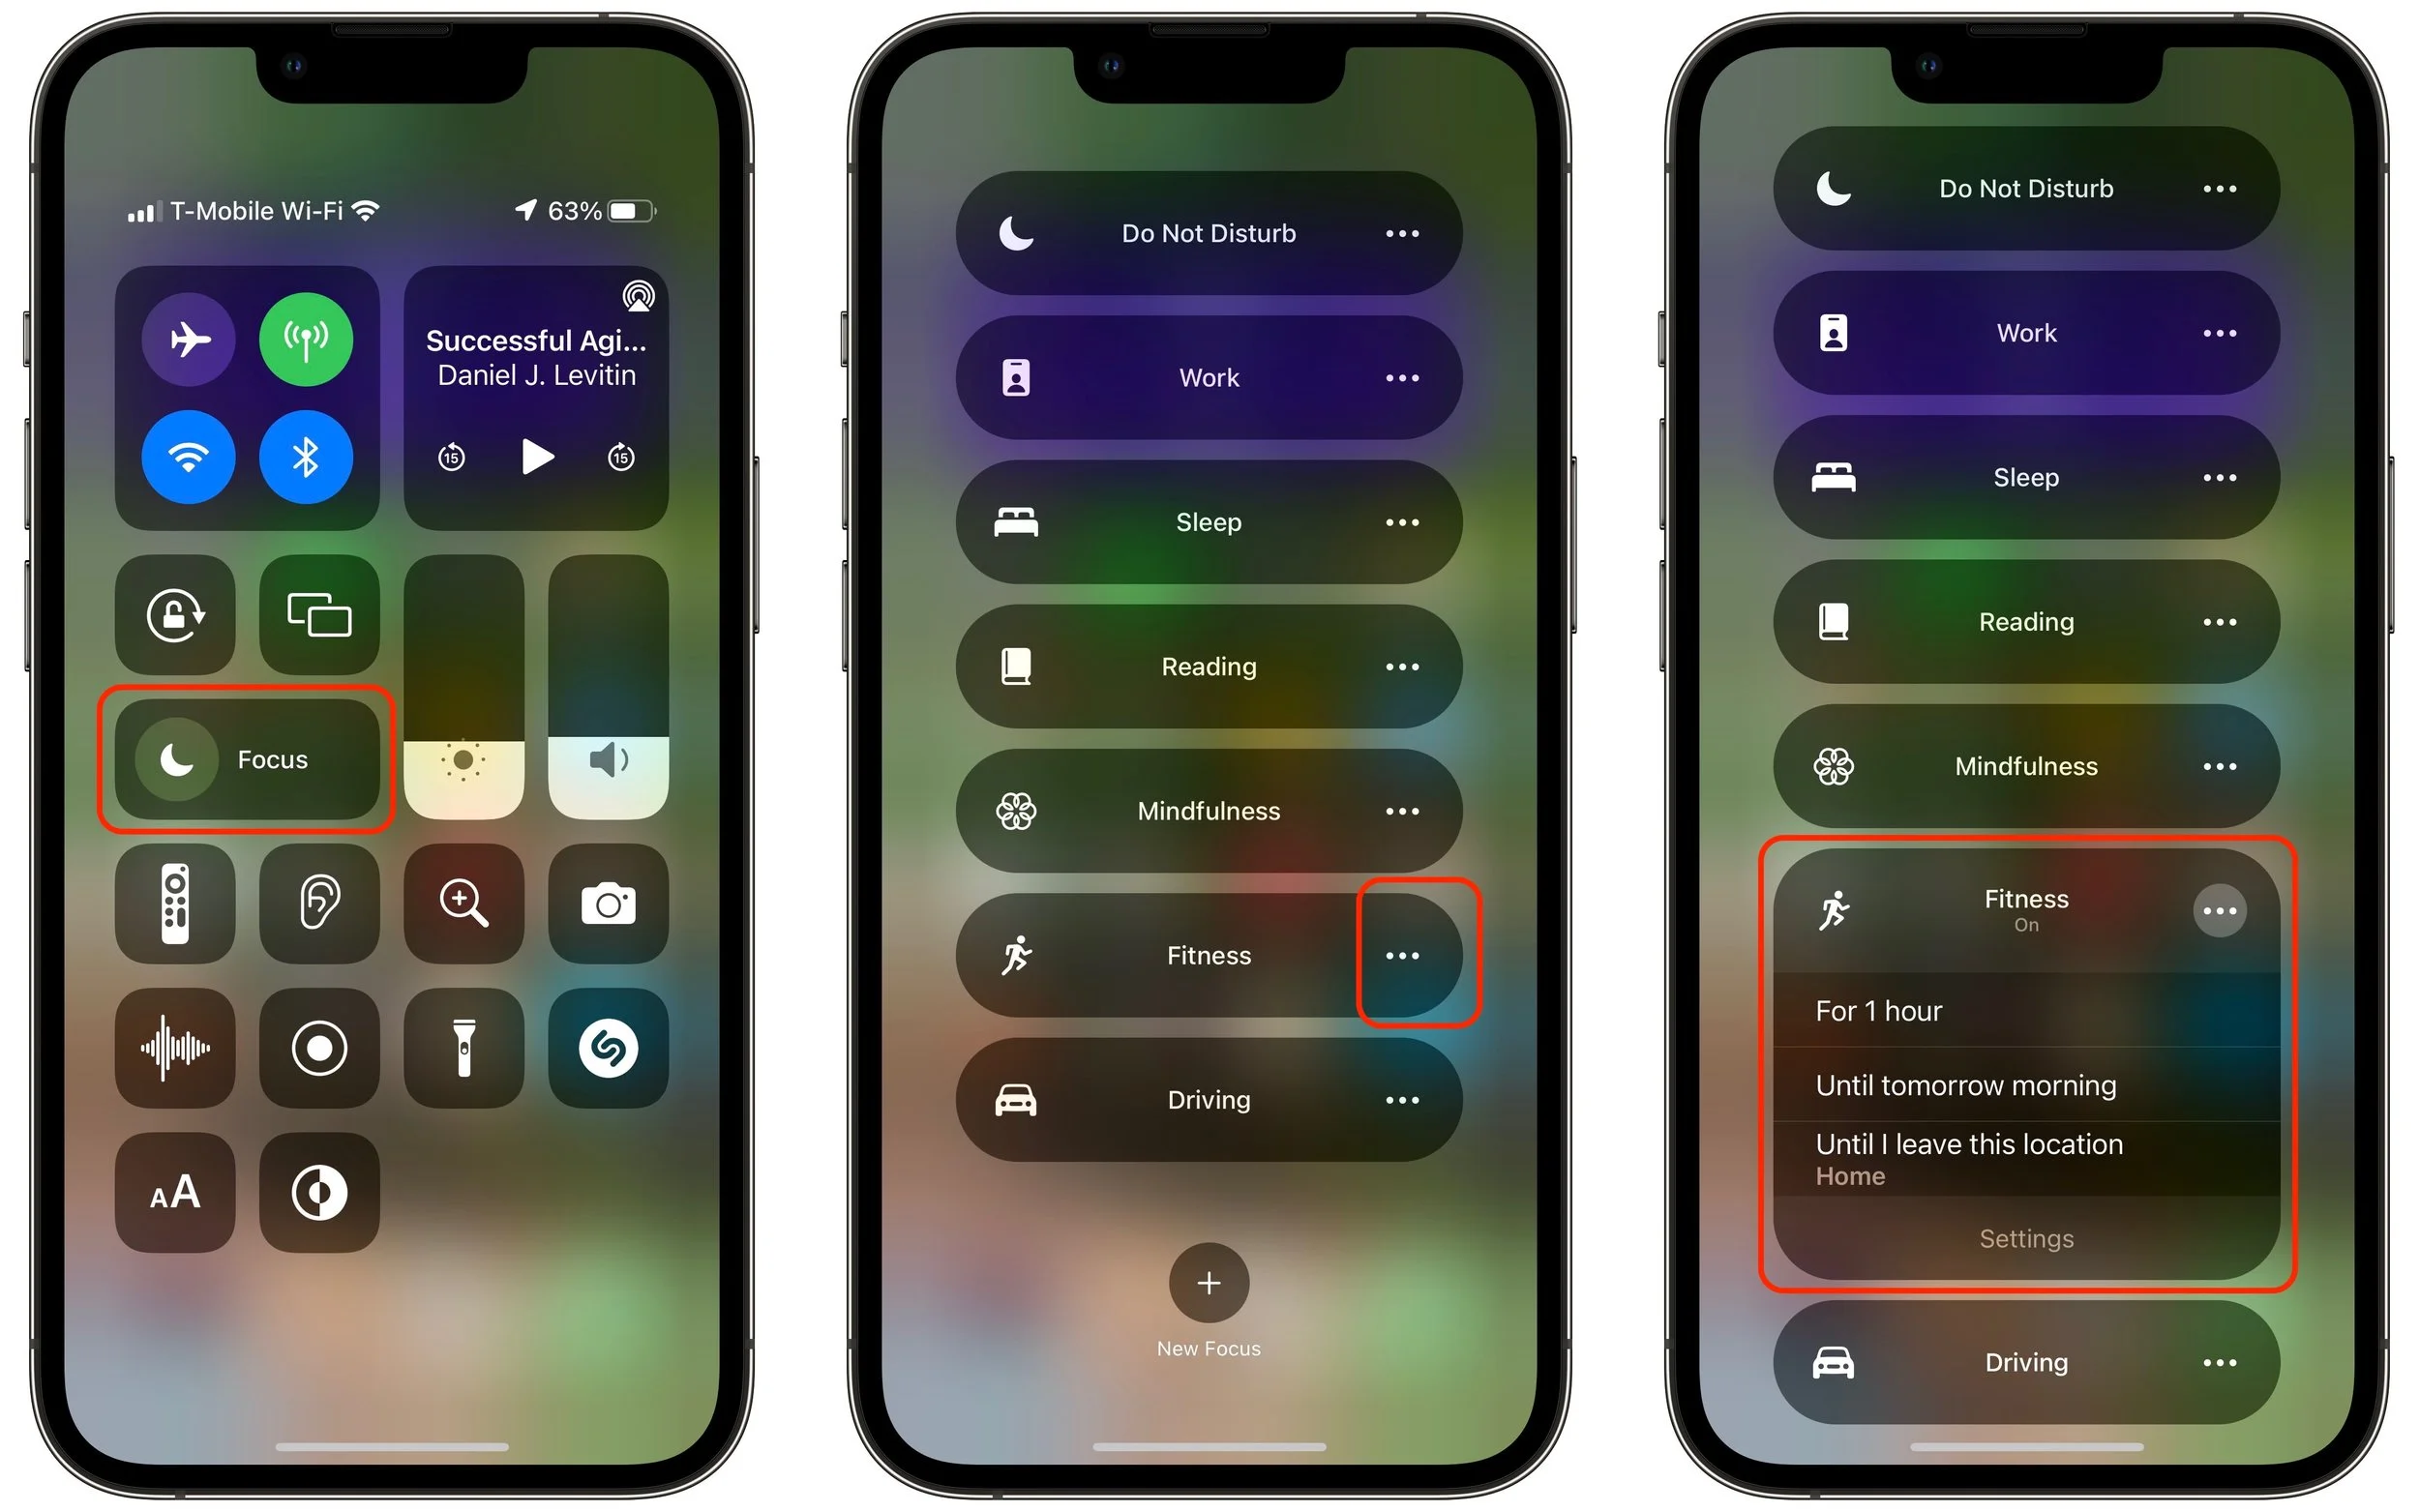
Newness aside, Focus looks like it will help us all cut down on distracting notifications. And if all else fails, stick with just Do Not Disturb, Driving, and Sleep to replicate what we had before.
(Featured image by iStock.com/Daisy-Daisy)