
15 Ways to Solve Call Failures on Your iPhone
Having problems making or receiving calls on your iPhone? We’re confident that something in this long list of fixes will resolve your problem.

Sure, we know that phone calls aren’t the most common thing people do on their iPhones—especially anyone under 30—but it’s still important to be able to make and take calls. There are a wide variety of reasons that outgoing or incoming calls might fail, so the solutions vary equally as widely. Some may seem a little scattershot, but most are easy to try and set back if they don’t help.
1. Try another location: This can’t come as news, but sometimes you’re in a bad spot for cellular coverage. Move to another area and try again.
2. Check Do Not Disturb in Focus: The Focus feature won’t prevent you from making a call but can prevent you from receiving one. Go to Settings > Focus > Do Not Disturb and make sure Do Not Disturb is off. Also, check any other Focus you created that could be blocking calls.
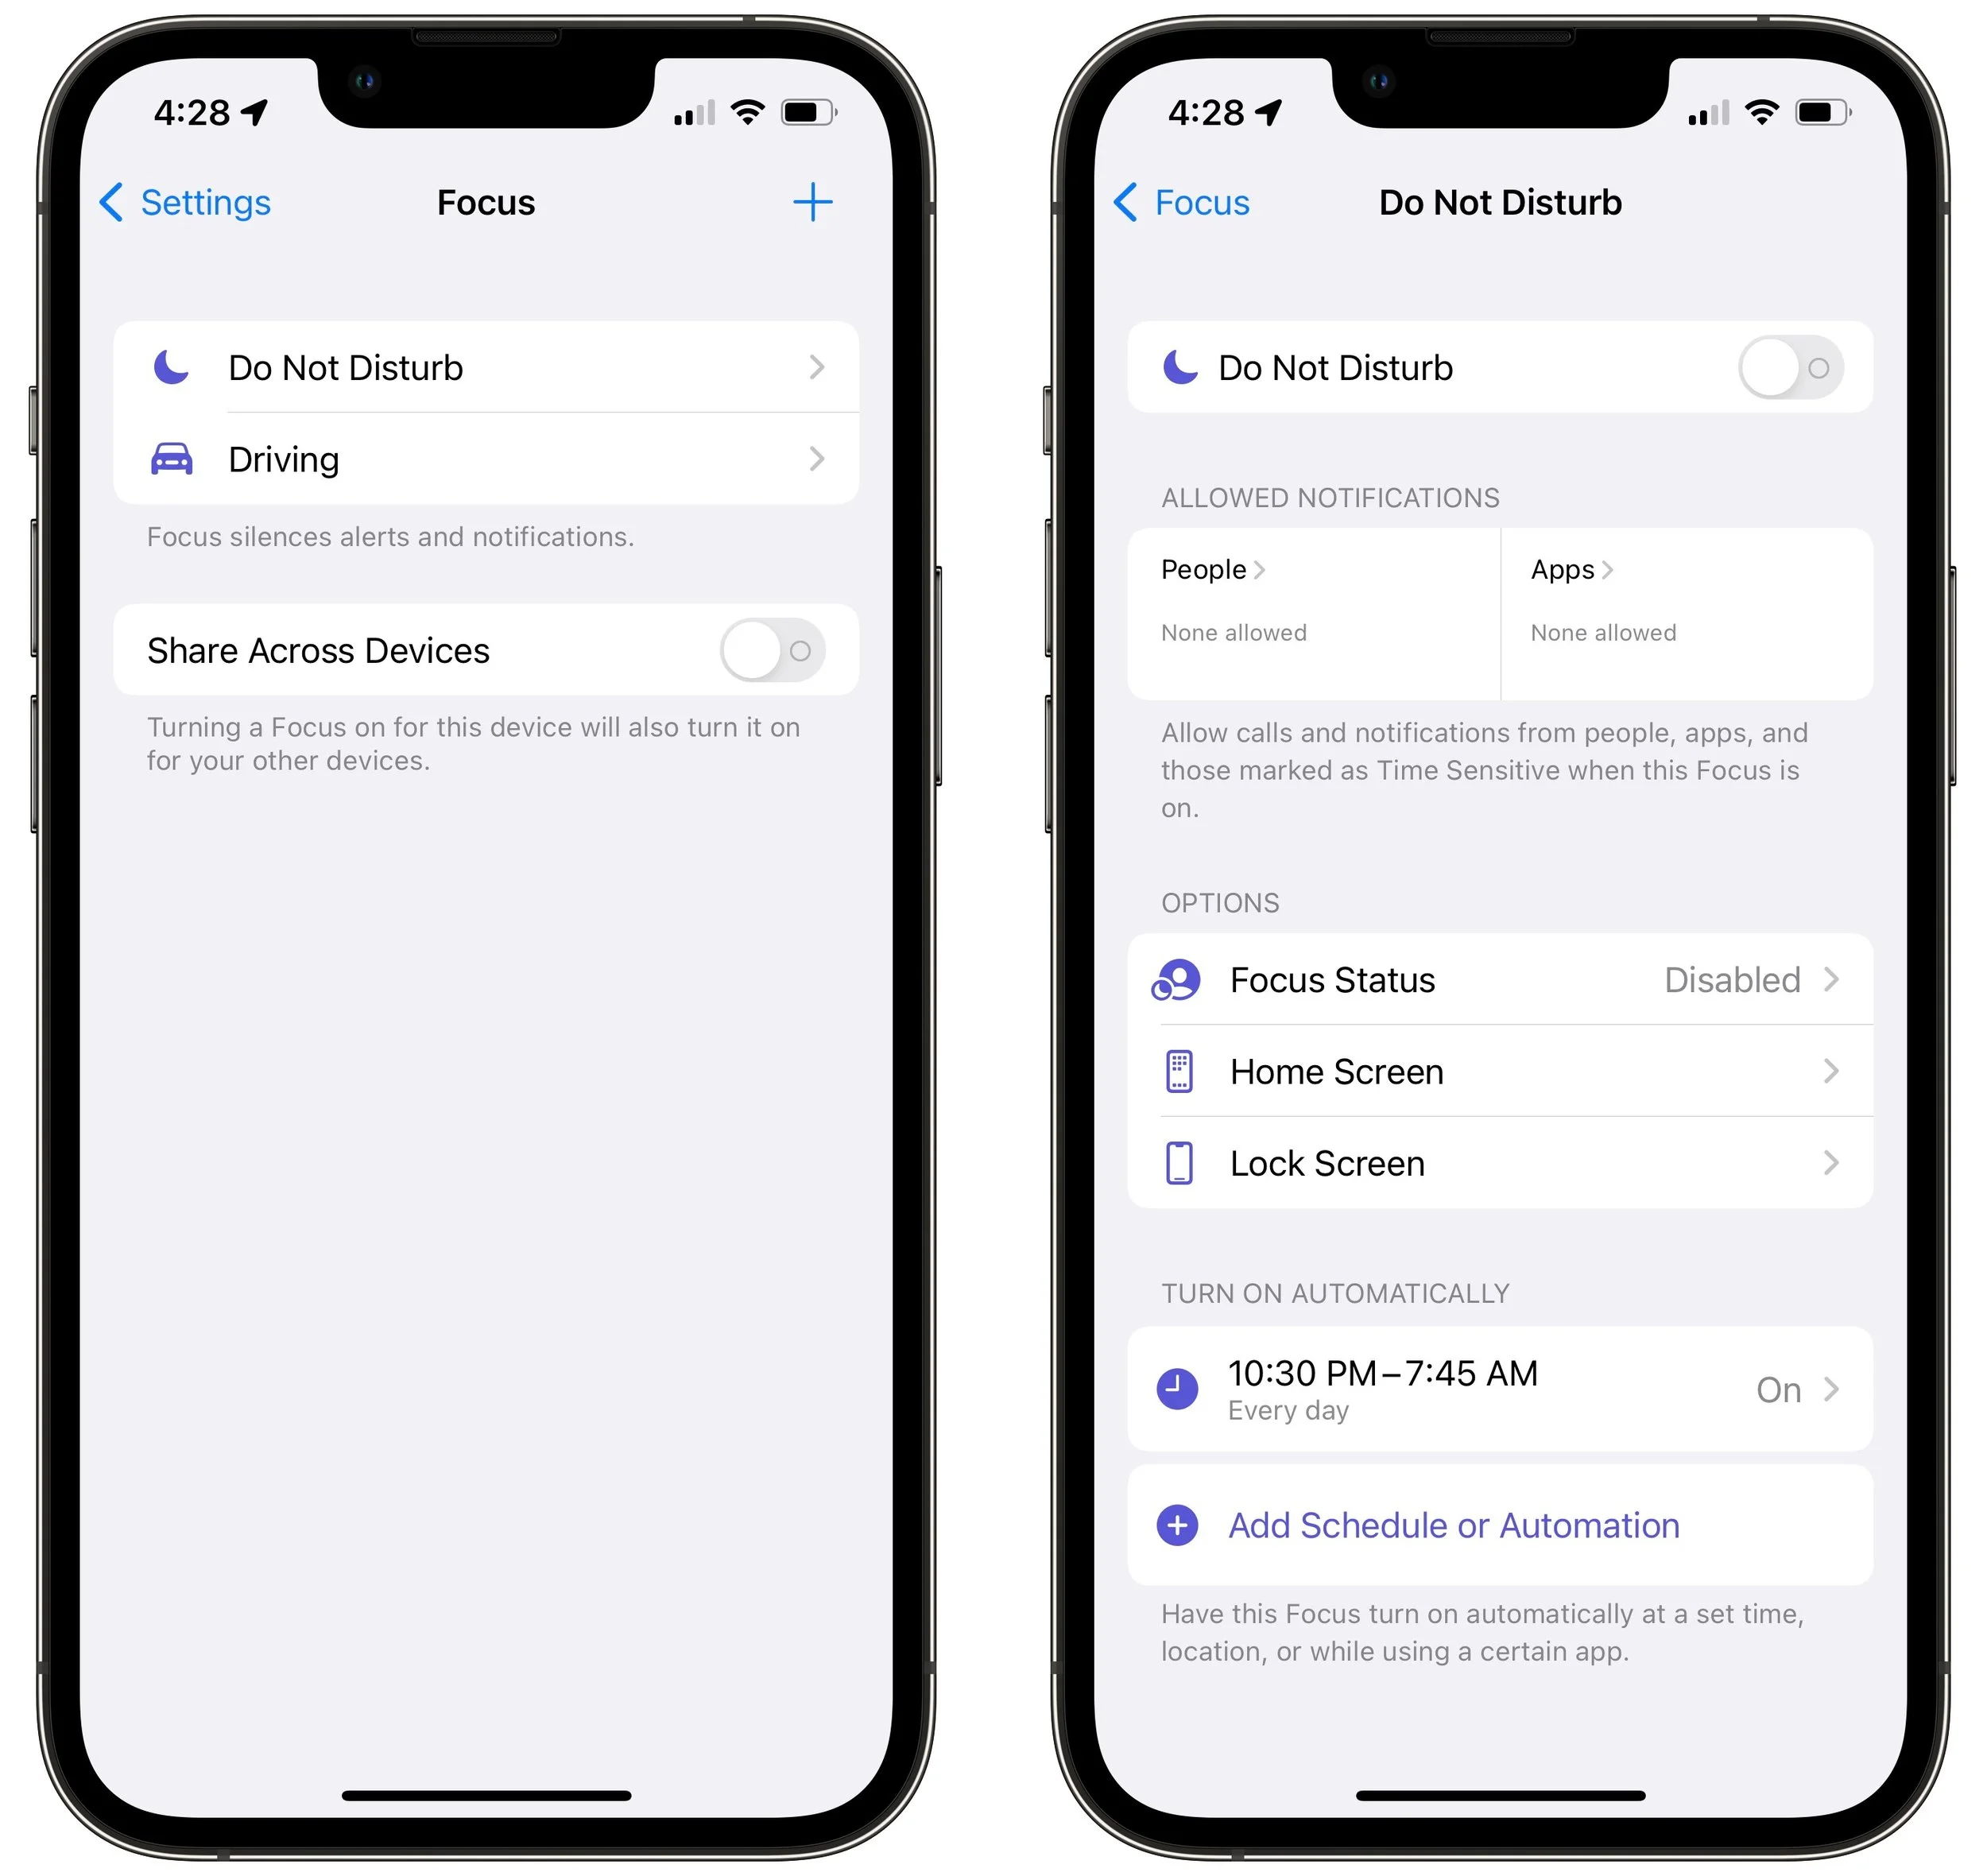
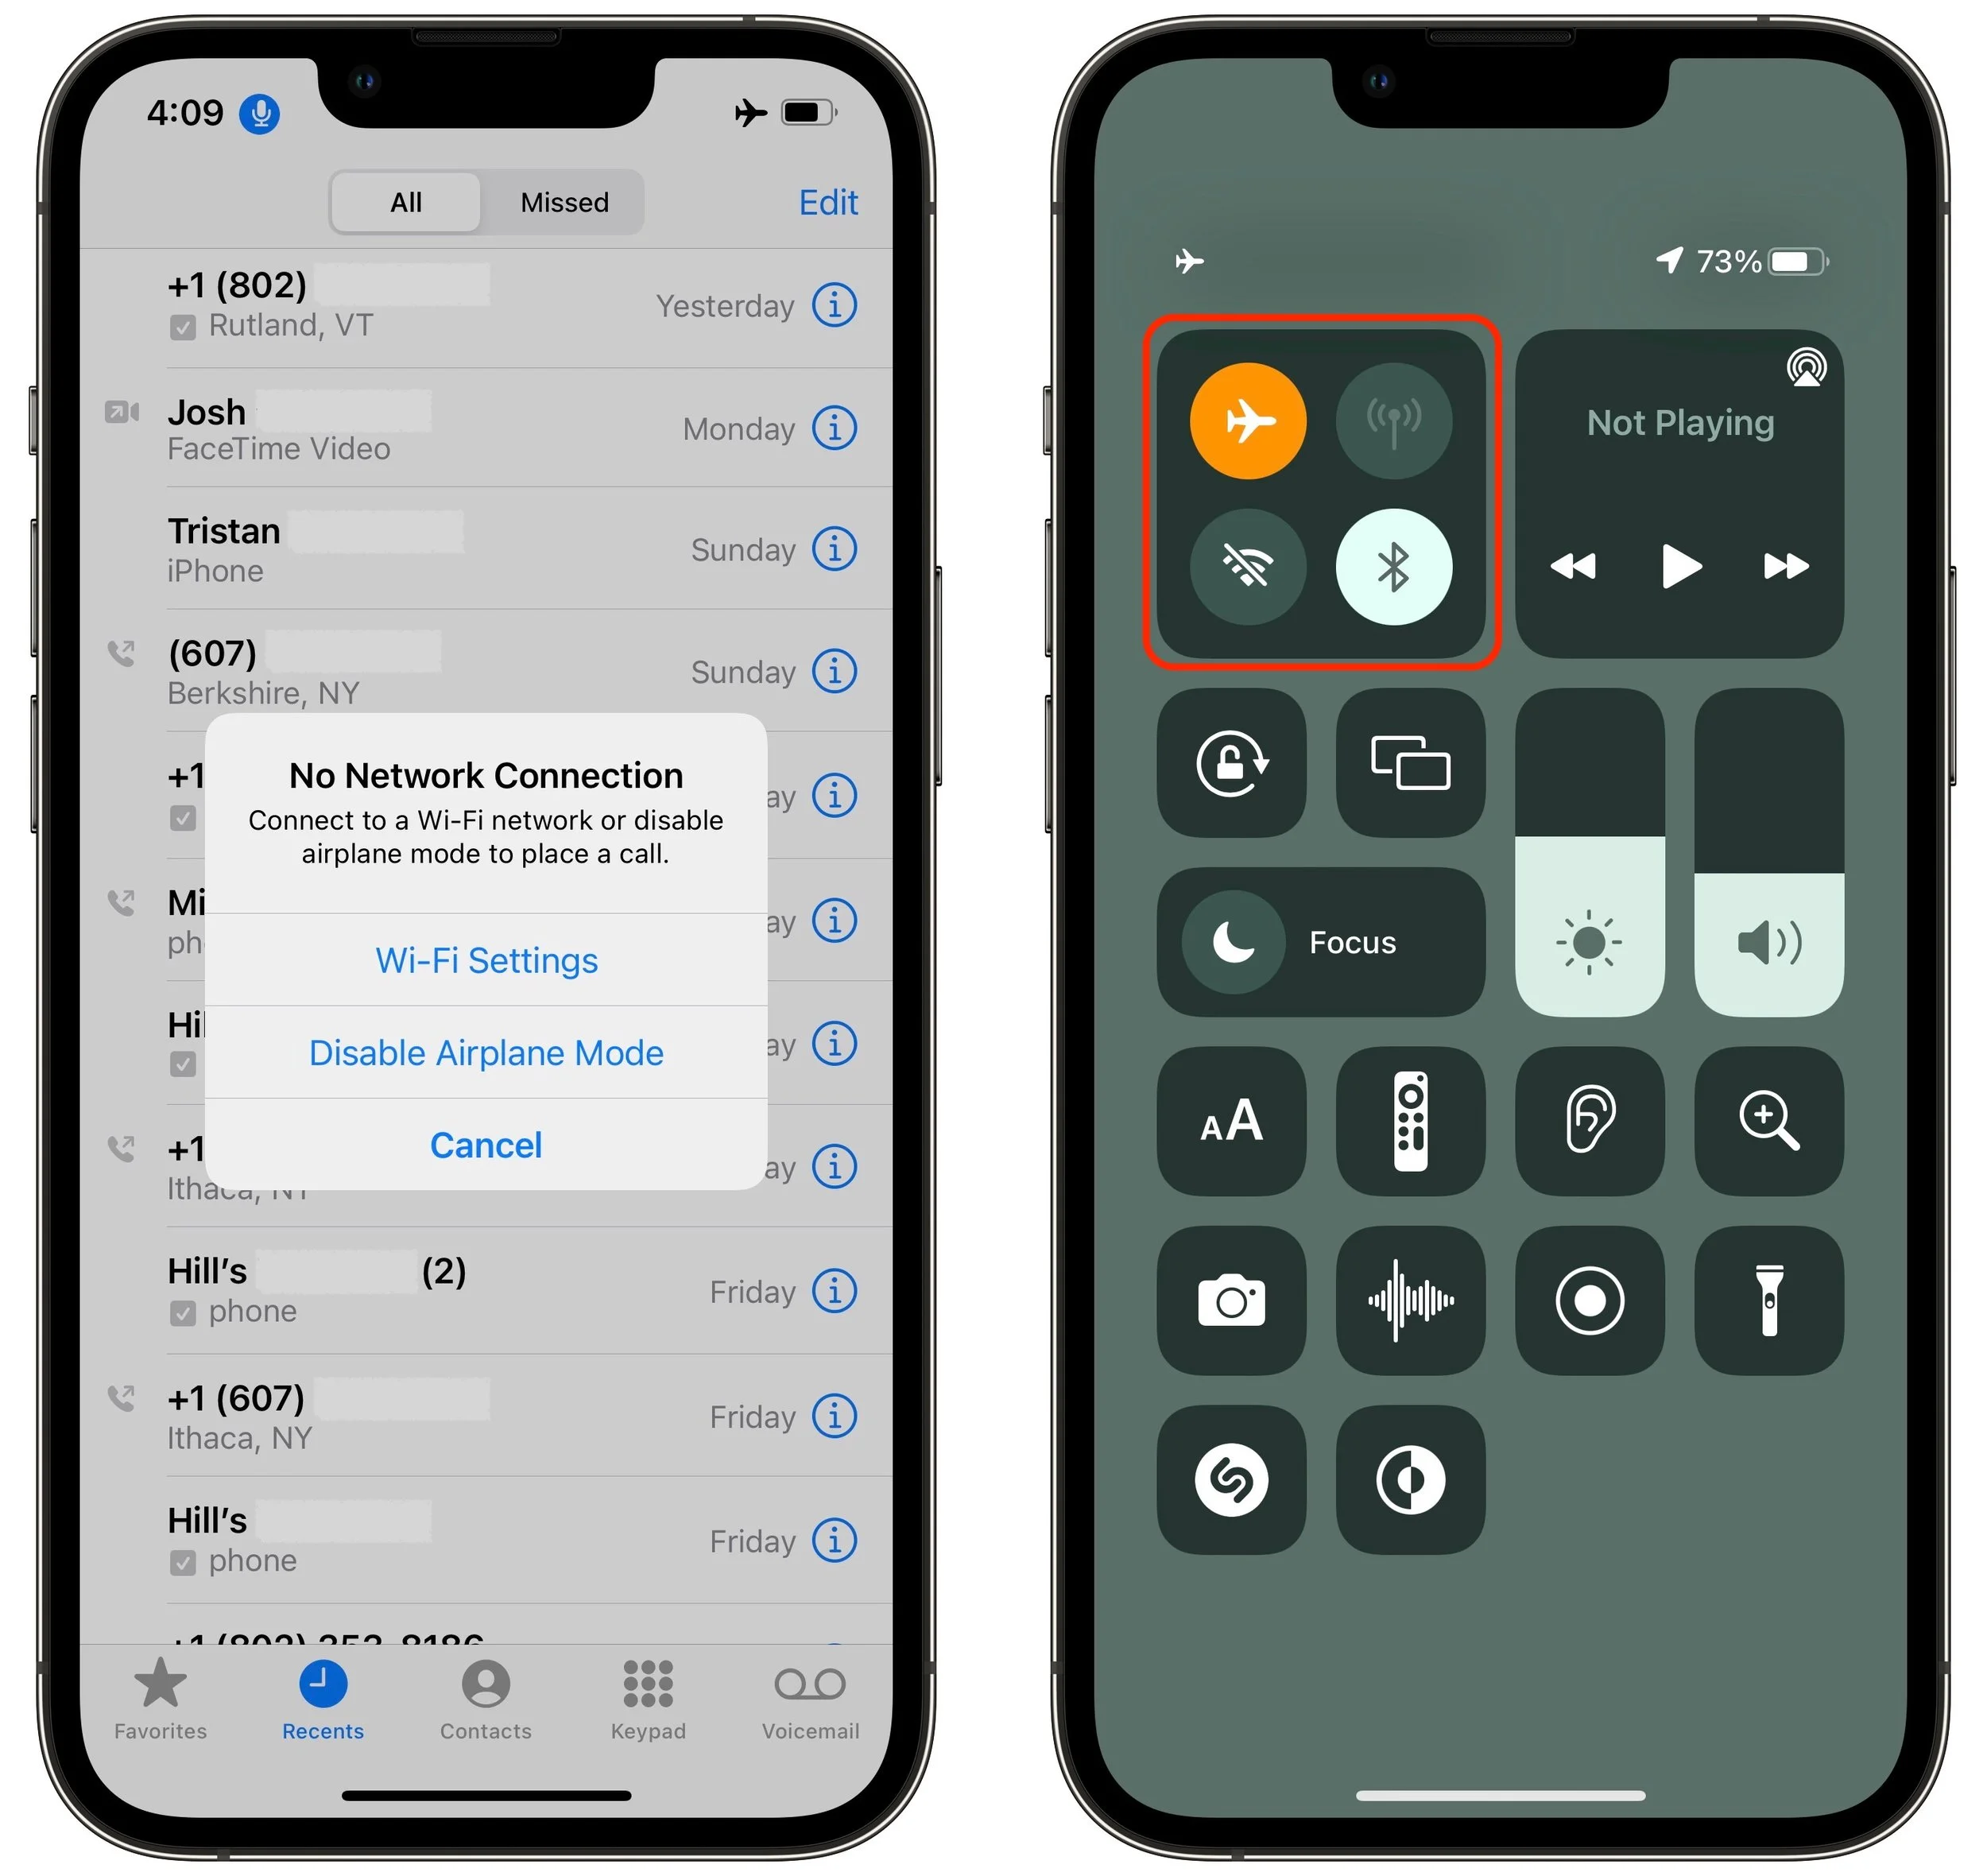
3. Toggle Airplane mode: Although the Phone app should alert you if you try to make a call while in Airplane mode, the entire point of the feature is to block cellular access. If Airplane mode is on, turn it off, and if it’s off, turn it on briefly and back off to reset the iPhone’s radios. Note that the Wi-Fi Calling feature may let you make a call even if Airplane mode is on.
4. Turn off Silence Unknown Callers: This feature can be a boon for avoiding telemarketers and spam calls, but it also prevents legitimate unknown calls from ringing through. Either turn it off in Settings > Phone or pay more attention to adding new numbers to Contacts.
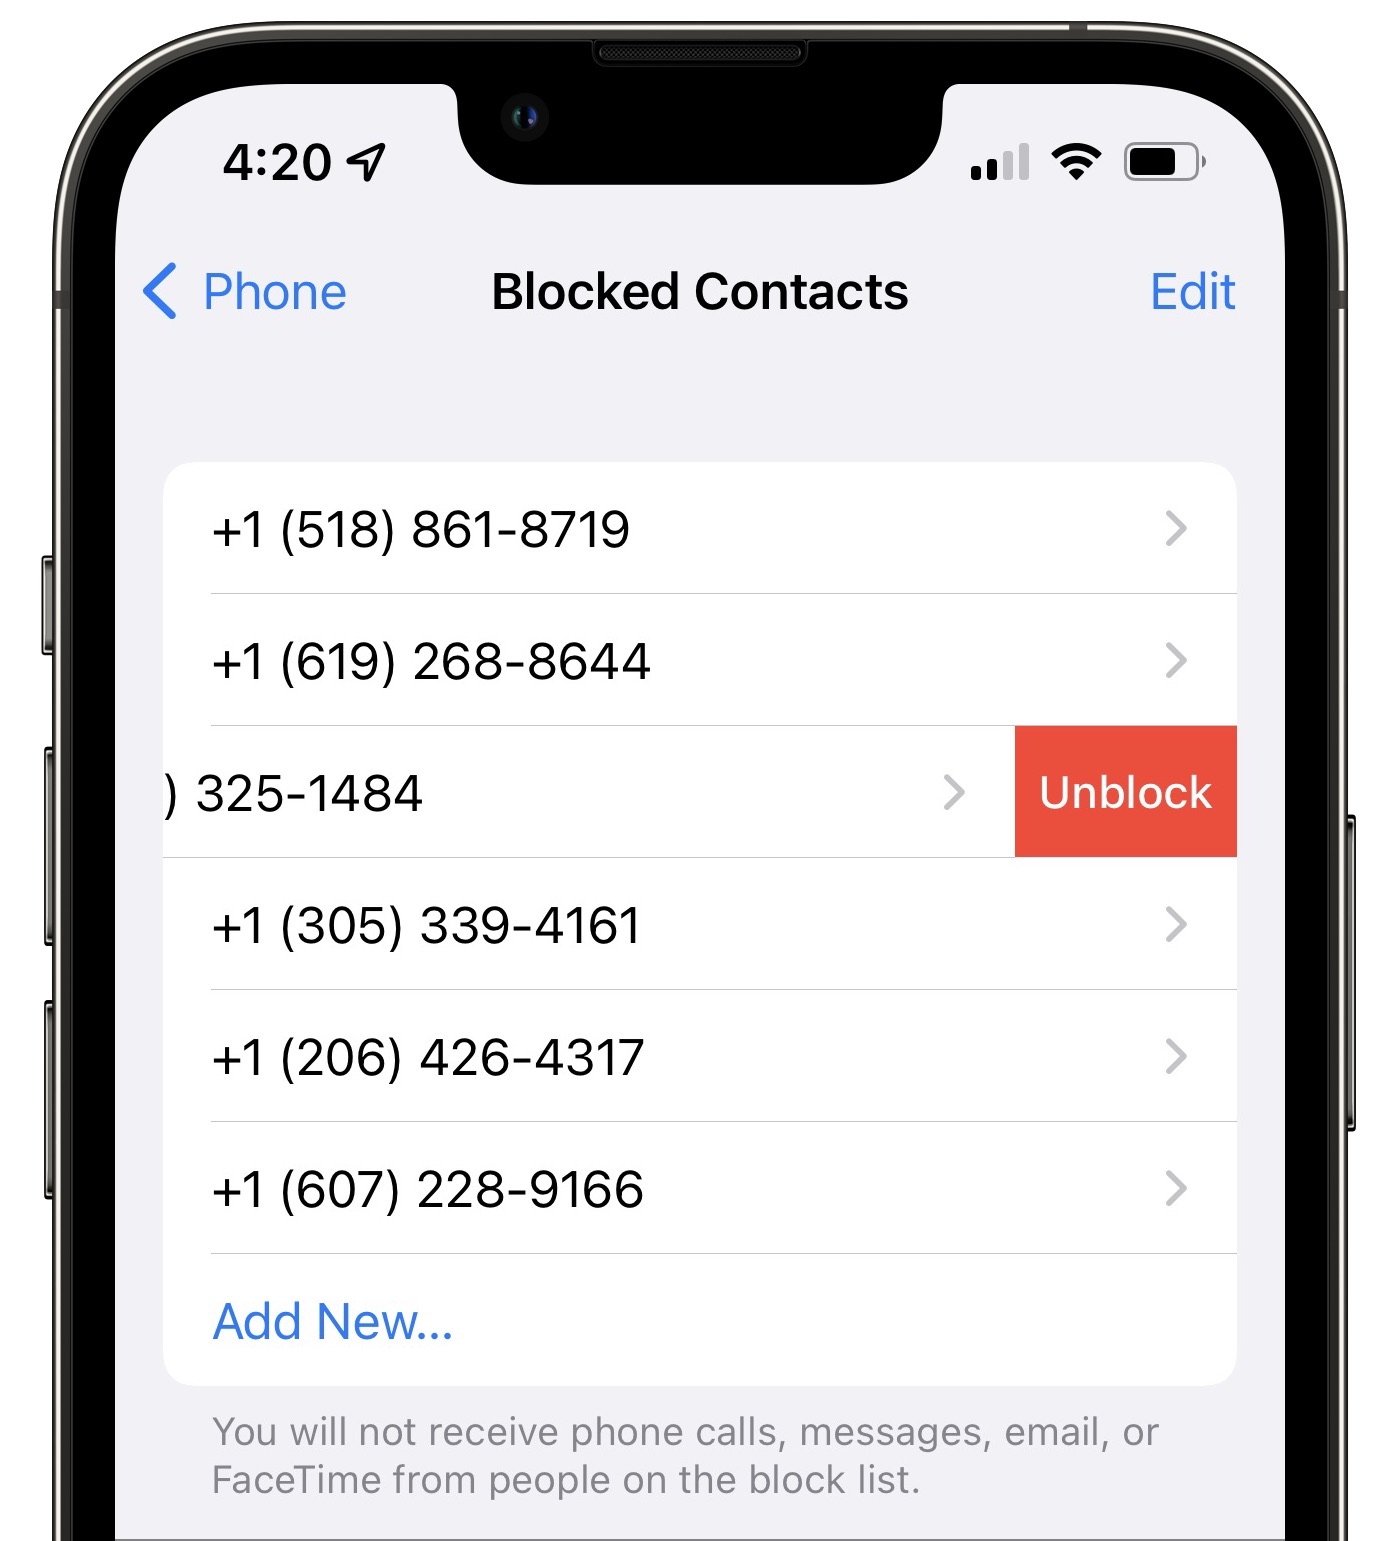
5. Unblock the contact: In theory, you should still be able to place calls to blocked numbers, but incoming calls from blocked numbers will be sent directly to voicemail. Look for blocked contacts in Settings > Phone > Blocked Contacts and swipe left on a contact to unblock it.
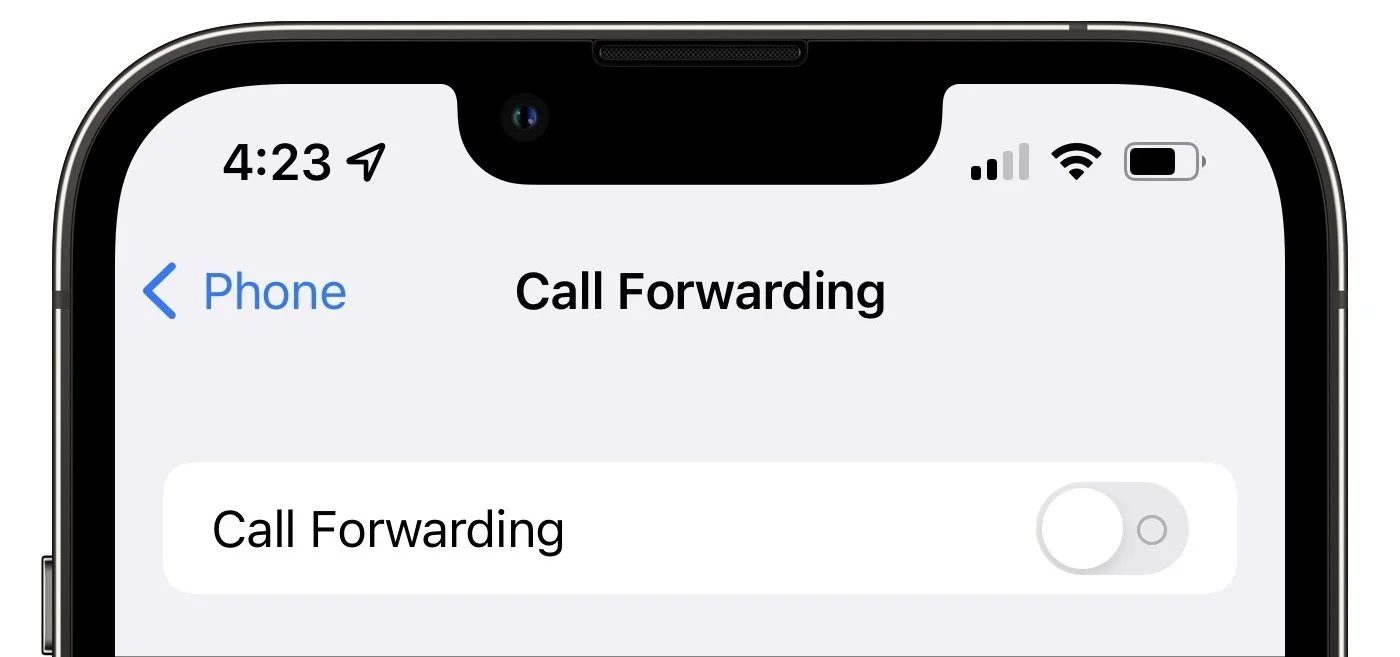
6. Disable call forwarding: Needless to say, if you’re forwarding your calls, you won’t be receiving them. Go to Settings > Phone > Call Forwarding and make sure the switch is off.
7. Toggle Dial Assist: The Dial Assist feature determines the correct international or local prefix when dialing, so if it gets confused, all bets are off. It can’t hurt to go to Settings > Phone, turn off Dial Assist, make a call, and then turn it back on again.
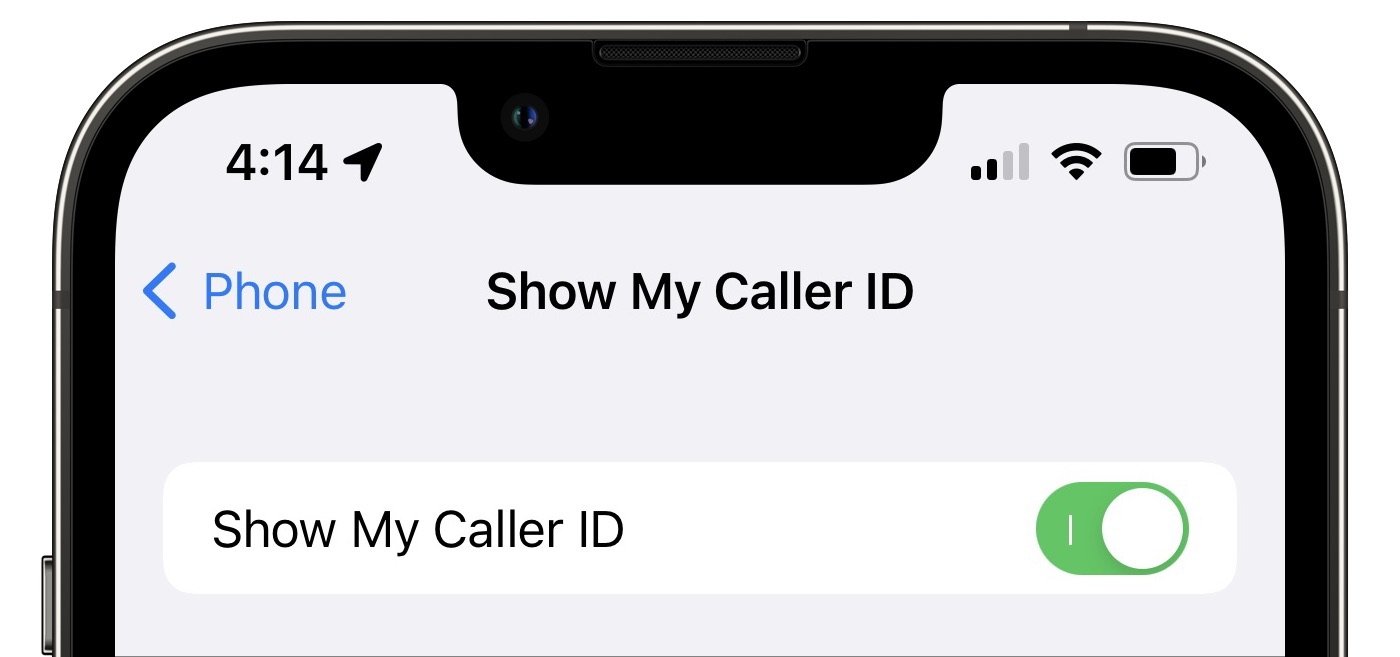
8. Show Caller ID: Some phone systems refuse to accept calls that aren’t associated with caller ID information. Check that Show Caller ID is turned on in Settings > Phone > Show My Caller ID.
9. Check for a carrier settings update: Carrier updates are always worth installing because they can improve network connectivity and performance and add new features like 5G or Wi-Fi Calling. If you dismiss a carrier update installation notification, you can install it later by going to Settings > General > About and following the onscreen instructions.
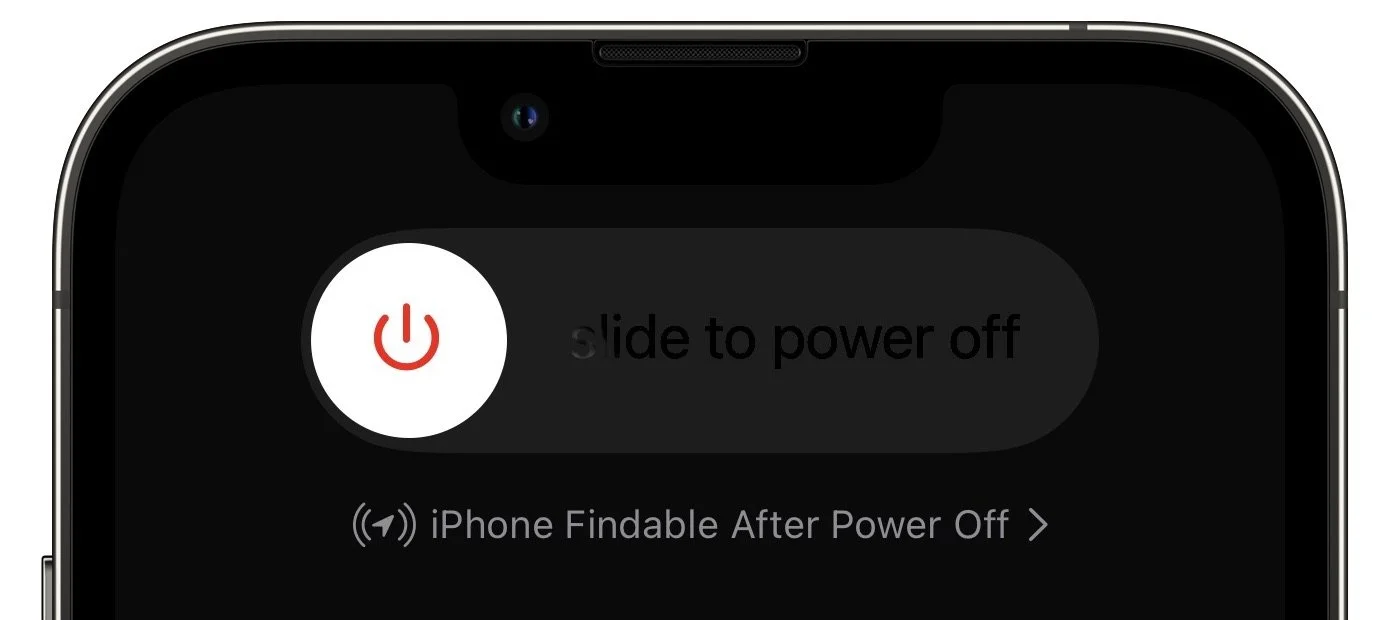
10. Restart the iPhone: When in doubt… We know it’s a cliché, but restarting the iPhone really does solve many inexplicable problems. The easiest way to do this is to go to Settings > General > Shut Down (at the bottom) and then drag the slider. Press the side (Sleep/Wake) button on the iPhone to turn it on.
11. Update iOS: It’s very unlikely that an iOS version would have a bug that caused problems with phone calls, but updating iOS creates enough of a clean slate that it can resolve quirky problems. Besides, it’s good to stay up-to-date for security reasons. Look in Settings > General > Software Update for any available updates.
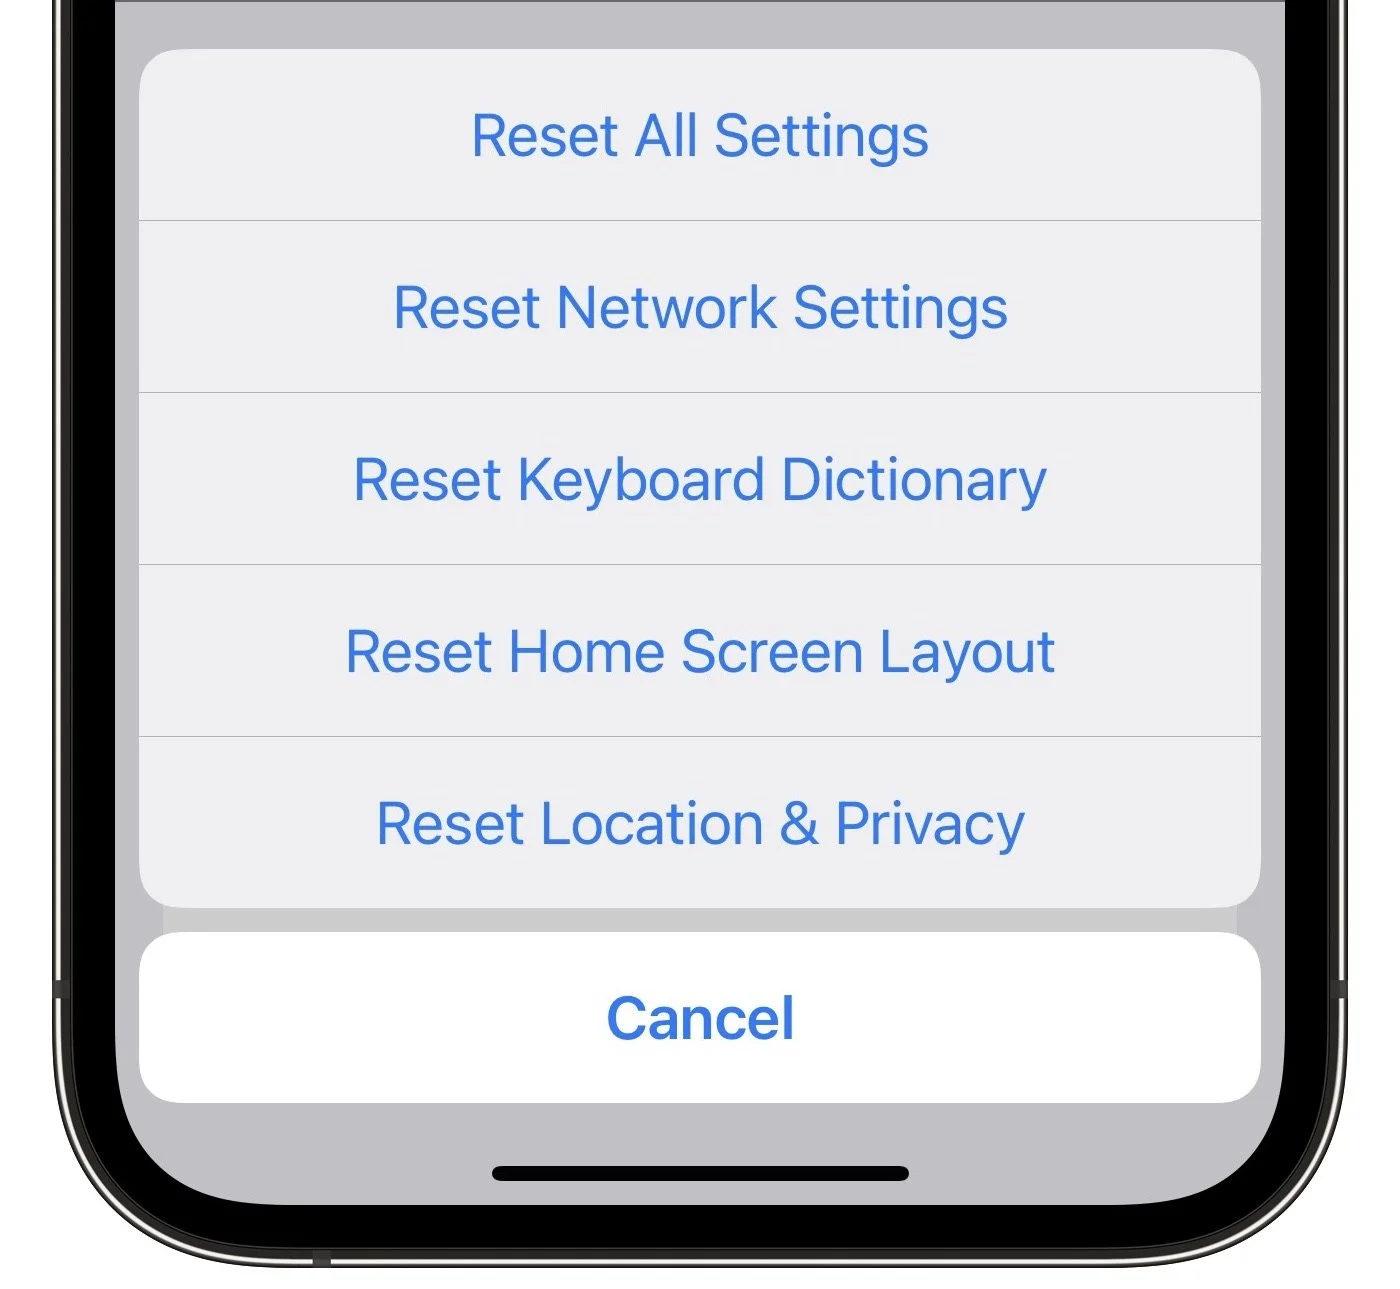
12. Reset network settings: Leave this option for late in the troubleshooting process because it will erase your saved Wi-Fi passwords, preferred networks, and VPN settings, which will be annoying to recreate. If it becomes necessary, invoke it in Settings > General > Transfer or Reset iPhone > Reset > Reset Network Settings.
13. Eject and reinsert SIM card: If all outgoing and incoming calls fail, it’s worth using a paperclip or SIM extraction tool to pop your SIM card out and reinsert it. Be very careful when doing this because the card is small and easily dropped.
14. Contact your carrier: If all else fails, contact your carrier. (Yes, we see the irony here—you may have to use another phone.) There may be a problem with your account, a service outage in your area, or some other problem in their system. You might even need a new SIM card.
15. Contact Apple support: If none of these work, your iPhone could be broken and need repair. Contact Apple support and see what they say—a replacement iPhone will almost certainly fix the problem.
We’re confident that something on this list will resolve your problem!
(Featured image by iStock.com/fizkes)
iCloud, Google Calendar, Microsoft Exchange: Choosing a Personal Calendar Service
What’s the best calendar service for personal calendars? It depends on whether everyone in your family is all-Apple or if some use Chromebooks, Android phones, or Windows PCs. Read on!

We Mac, iPhone, and iPad users have an embarrassment of riches when it comes to calendaring flexibility. Apple provides free calendar services via iCloud, and the Calendar app lets you add calendar accounts from a wide variety of providers. Most notable among them are Microsoft Exchange and Google Calendar, which are commonly used in the business world.
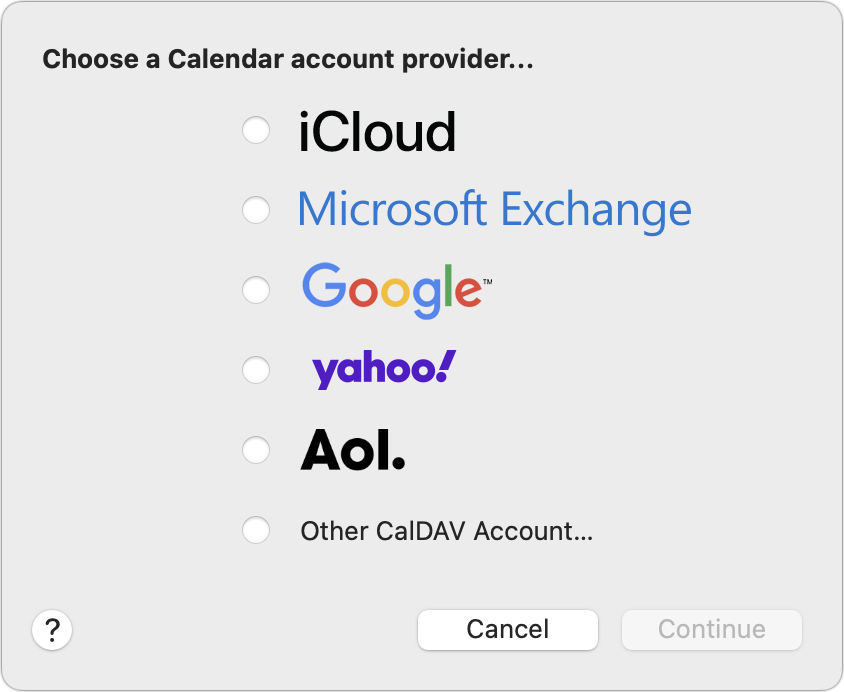
Since you can add multiple calendar accounts to the Calendar app, there’s no problem bringing your entire scheduling life together, even if your work uses Exchange and your kid’s school uses Google. But which service should you use for your primary personal calendars, which you likely need to share with your immediate family to ensure everyone is on the same scheduling page? There’s no one answer, but here’s our take.
Start by considering the platforms used by the people with whom you share calendars. Although it’s easy to share iCloud calendars with other Apple users, sharing an iCloud calendar outside the Apple ecosystem requires making it a read-only public calendar, which may not be appropriate for usability and privacy reasons. You can work around this limitation in different ways, depending on the platforms in play:
All Apple: If you and your family all use Apple devices, the answer is easy—stick with iCloud calendars. You can easily invite people to your shared calendars, and everyone can both see and edit events on those calendars using a Mac, iPhone, or iPad.
Apple and Google: What if your child’s only computing device is a school Chromebook or your spouse relies on an Android phone? In such a scenario, centralize your personal calendars on Google Calendar, where calendars can be shared read/write. If you don’t already have a free Google account, make one, log in to Google Calendar, and create and share the calendars from there.
Apple and Windows: Perhaps a member of your family relies on a Windows laptop. If that person installs iCloud for Windows, they can access iCloud calendars shared with their iCloud account. (Anyone can sign up for a free iCloud account, even if they don’t have an Apple device.)
Apple, Google, and Windows: Going for the trifecta, what if different members of your family rely on Apple devices, Android phones, and Windows PCs? The compromise option here is to fall back on Google Calendar, since both Apple devices and Windows PCs can access calendars shared from Google Calendar.
That’s the overview. Briefly, here’s how you share those calendars in iCloud and Google Calendar.
Sharing to iCloud Calendars
To share an iCloud calendar, open the Calendar app on your Mac. Control-click the calendar you want to share, and choose Share Calendar. In the Share With field of the dialog that appears, start typing the name of the person with whom you want to share, select their iCloud account from the suggestions, and click Done to send the invite.
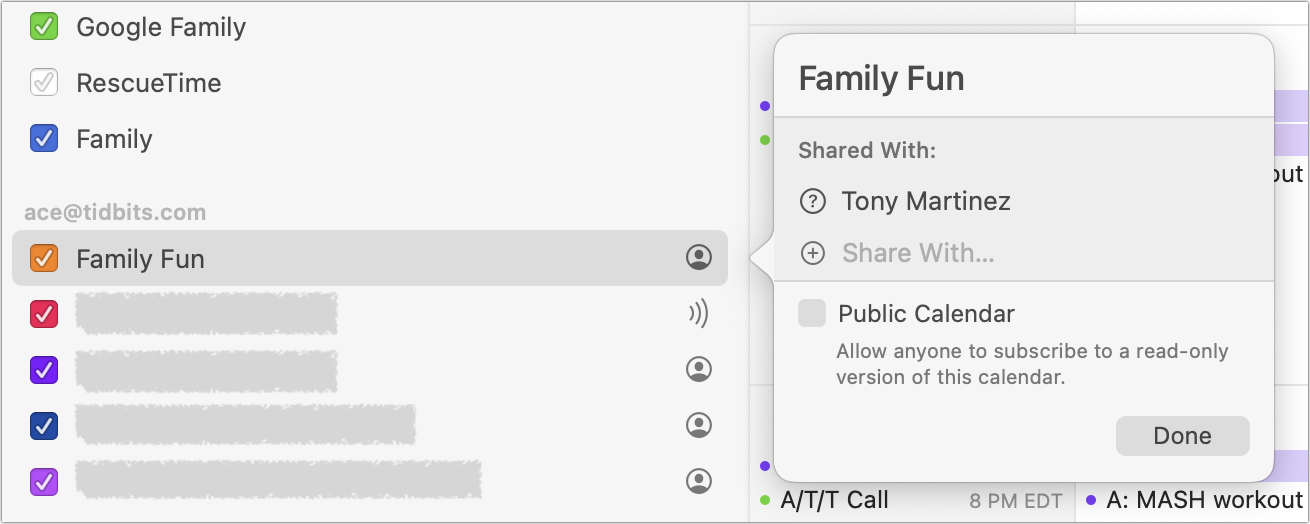
Subscribing to a shared iCloud calendar is usually just a matter of clicking a link in an email, giving the calendar a name, and adding it to your iCloud account.
Sharing Google Calendars
To share a Google calendar, visit calendar.google.com in a Web browser. Hover the pointer over a calendar name in the sidebar, click the stacked dot button that appears, and choose Settings and Sharing. In the Settings screen, scroll down to Share With Specific People, click Add People, and enter enough of someone’s name that you can select their email address. Then adjust the permissions as desired.
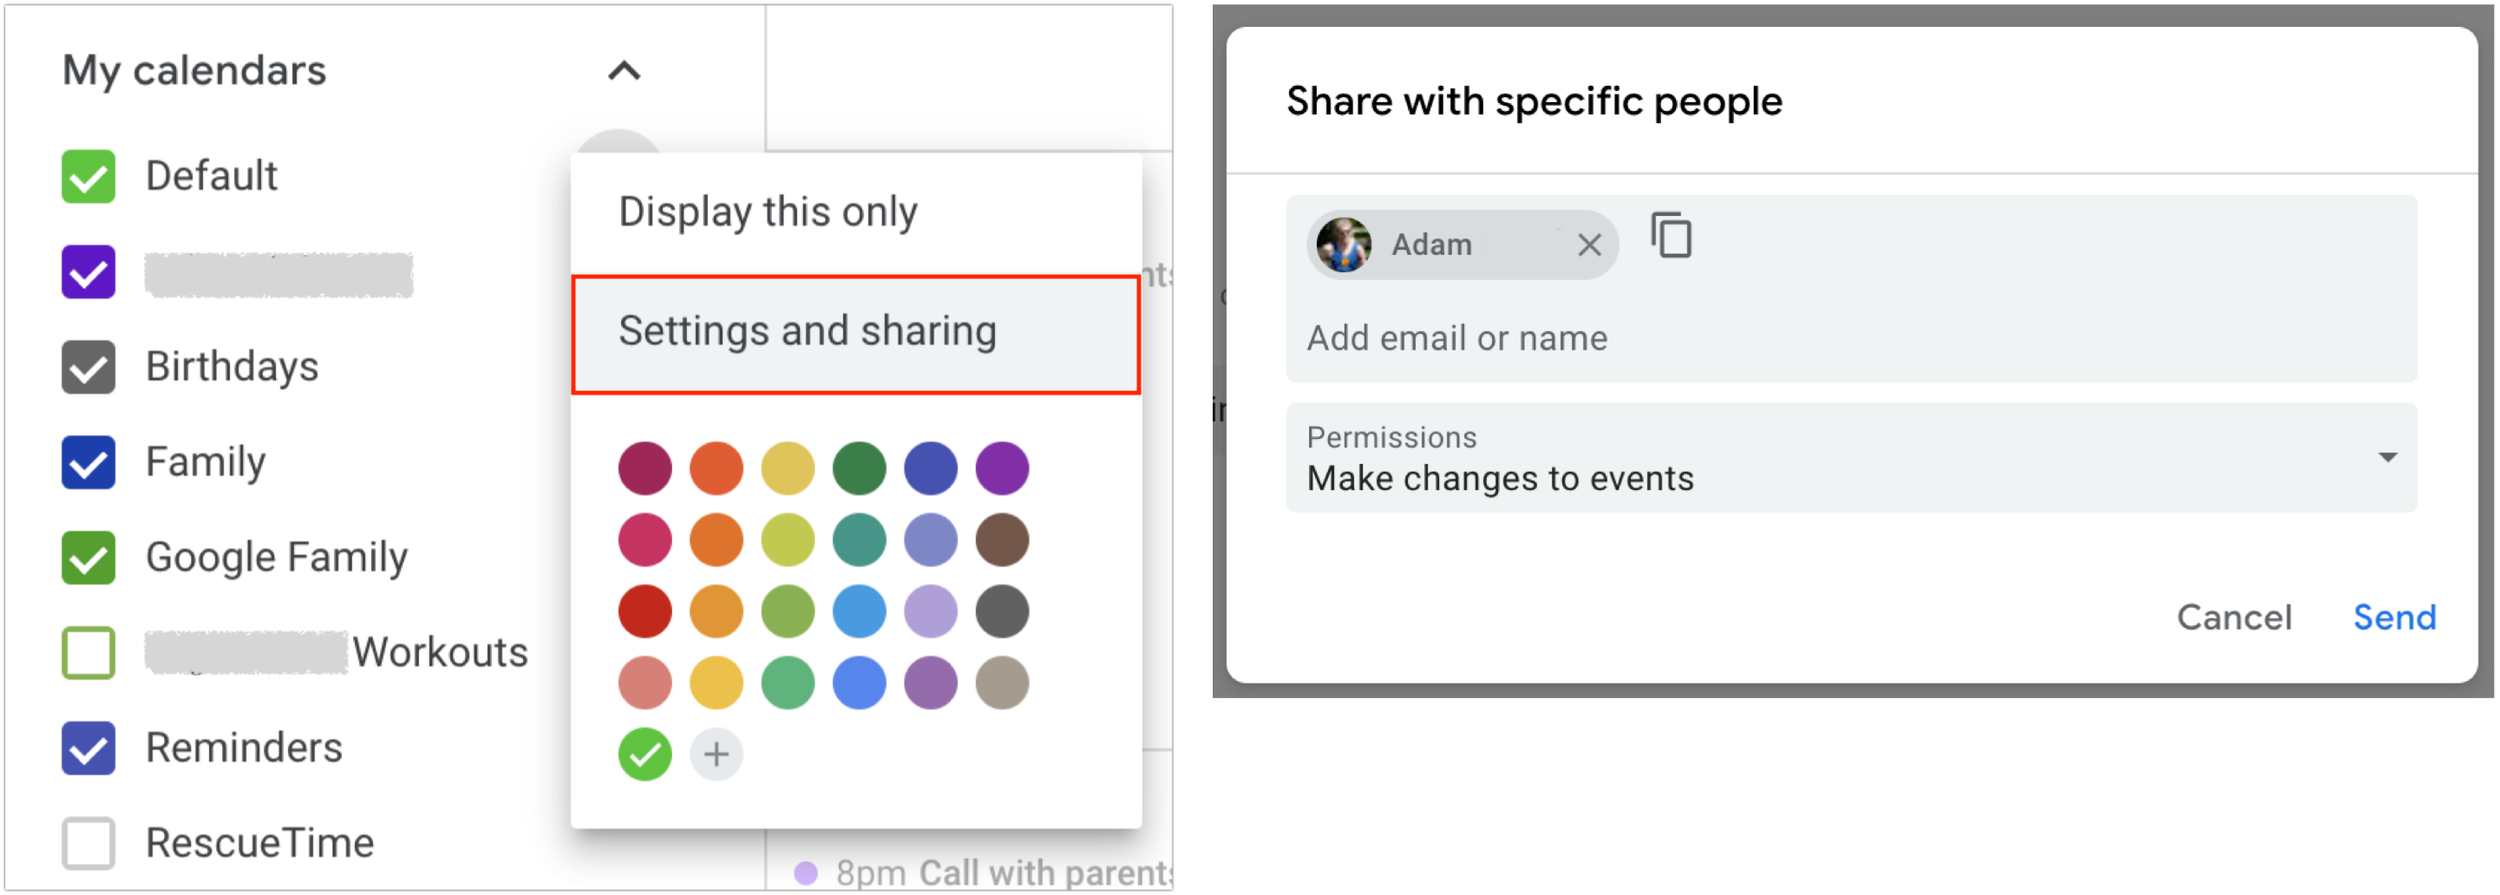
There are too many variables to get into the details of subscribing to shared calendars in Google Calendar and Microsoft Outlook, but check those links for advice on getting started. And of course, if you’re having trouble working your way through all the combinations of sharing and subscribing, don’t hesitate to give us a call.
(Featured image by iStock.com/NicoElNino)
Choosing the Best Mac for a College-Bound Student in 2022
Which Mac is best for a new college student? Short answer: the new M2 MacBook Air. Read on for the longer explanation and how we recommend configuring it.

Do you have a child starting college soon? It’s likely that your kid has been relying heavily on a computer throughout high school, but if it was a school-provided laptop or shared family computer, now’s the time to get them something of their own. And even if they had their own laptop throughout high school, if it’s old or unreliable, college is a good excuse to bring them up to date. If you haven’t been paying close attention to Apple’s Mac lineup, you might wonder which model makes the most sense.
First, don’t buy anything without first checking with the college. Many college de-partments have specific requirements based on the software students use in their classes. Generally, these revolve around processor type, amount of RAM, and storage space. Luckily, current Macs should meet the requirements. Second, see if the college provides access to education pricing—most will—to save a few hundred dollars.
Colleges often specify—and students usually prefer—laptops instead of desktop machines. Although the 24-inch iMac is an excellent machine with a gorgeous screen, it’s too big and unwieldy for the transient lifestyle of the typical college student. The same applies to a Mac mini or Mac Studio with an external display. A laptop is much easier to pack during moves, and it can travel to class every day. A student who’s accustomed to taking notes on an iPad with a Smart Keyboard and Apple Pencil might be able to use that along with a desktop Mac, but most students should focus on Apple’s laptops.
In the past, it was harder to decide which model was best for a given student, but with Apple’s move to the M1 and M2 chips, which significantly outperform the Intel processors used in previous models, the decision is easier. We see three primary scenarios:
Most students: Buy Apple’s MacBook Air. It’s Apple’s smallest, lightest, and least expensive laptop, but thanks to its M1 or M2 processor, it has fabulous performance for everyday tasks. Although the M1 MacBook Air from 2020 remains available for those who need the most cost-effective option (starting at $999), the new M2 MacBook Air is a better choice for most people, thanks to its bigger-brighter-better 13.6-inch screen, faster performance, 24 GB memory ceiling, and higher-resolution webcam. It starts at $1199.
Better specs: If performance is more important than cost—particularly if your student will be working with processor-intensive tasks like video editing—look to the 14-inch MacBook Pro. It features an M1 Pro chip that’s more powerful than the base-level M2 and is configurable with an even faster M1 Max chip. Its screen is bigger, and it can take up to 32 GB of memory. Its price starts at $1999.
Windows compatibility: The only downside of the transition to Apple silicon is that it’s no longer easy to run Windows using virtualization software like VMware Fusion (free for students) or Parallels Desktop. On M1 and M2 Macs, it is possible to run Parallels Desktop and Windows for ARM Insider Preview, but we can’t recommend that anyone rely on that combination yet. If Windows compatibility is paramount, your choices are a used Intel-based MacBook Pro or—much as we hate to say it—a PC laptop that runs Windows natively.
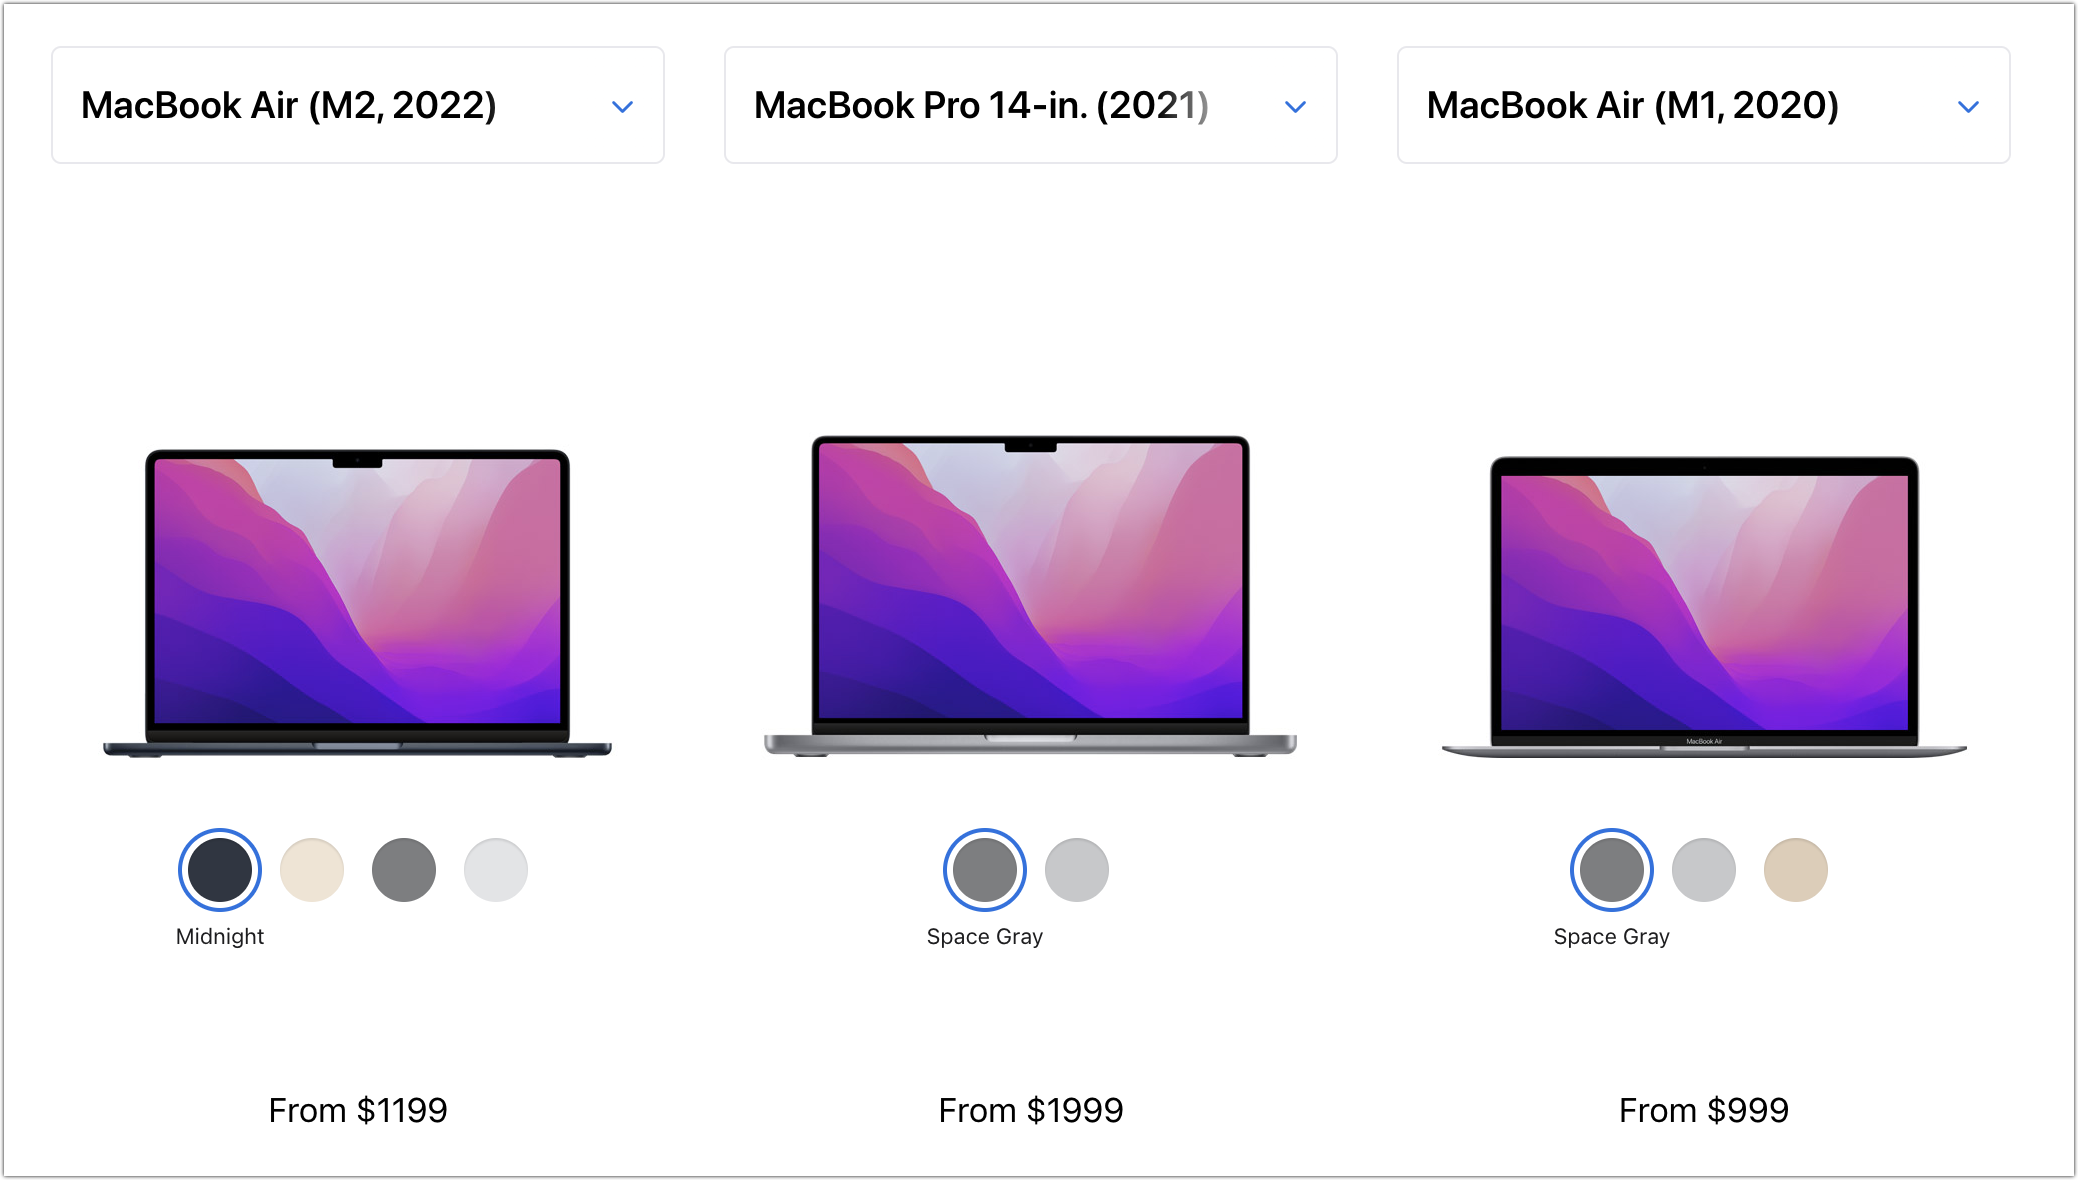
Regardless of which laptop you decide on, you’ll have to pick a processor, an amount of RAM, and storage capacity:
Processor: With the M1 MacBook Air, you’re limited to the M1 chip with an 8-core CPU and 7-core GPU, so there is no choice to make. However, with the M2 MacBook Air, the M2 chip always has an 8-core CPU, but you can pay $100 to upgrade from an 8-core GPU to a 10-core GPU. The performance difference isn’t likely to be noticeable with everyday apps, but for $100, it might be worth it, just in case. The 14-inch MacBook Pro has three M1 Pro options and two more M1 Max options, and choosing among them is probably best done by weighing likely performance needs against the increased cost.
Memory: The M1 MacBook Air offers the choice of 8 GB or 16 GB. 8 GB is acceptable for most college students, but we’d encourage 16 GB to reduce the chance that memory becomes a limiting factor in performance. The M2 MacBook Air lets you choose from 8 GB, 16 GB, or 24 GB, and again, we’d default to 16 GB unless there’s some particularly memory-hungry software in play. With the 14-inch MacBook Pro, 16 GB is standard and fine for most tasks, but 32 GB is available if you think it will be necessary, and for seriously intensive work, the M1 Max chip in the 14-inch MacBook Pro offers a 64 GB option.
Storage: For both MacBook Air models, 256 GB is the lowest storage level, and you can upgrade to 2 TB. The 14-inch MacBook Pro starts at 512 GB and offers upgrades up to a whopping 8 TB. Choose the amount of storage based on budget—it gets expensive fast—and anticipated usage—audio and especially video can consume a lot of space, as can large numbers of photos, but most other uses don’t. Remember that it’s easy to connect an external Thunderbolt SSD or hard drive to offload large files that don’t have to be kept available at all times.
To our thinking, the most obvious choice for a Mac that’s likely to last for four years of college would be the new M2 MacBook Air with a 10-core GPU, 16 GB of memory, and 512 GB of storage. Be sure to budget for AppleCare+, too; it’s almost guaranteed that some mishap will befall a student laptop, and AppleCare+ covers up to two incidents of accidental damage every year.
You’ll need to have some conversations with your child to find out what they think they’ll need—and be sure to double-check that against the college’s recommendations—but if you have any questions after that, don’t hesitate to contact us.
(Featured image by Apple)
Manage Email Faster in Mail by Swiping
We can’t reduce your email load, but we can show you how to process it faster by swiping on items in Mail’s message list on your iPhone, iPad, or Mac. Details at:

We all get too much email, and while Mail can’t help you get less (other than by making it easy to unsubscribe from mailing lists), it does provide shortcuts for processing your mail more quickly. Regardless of whether you’re using iOS, iPadOS, or macOS, you can swipe on messages in the message list to perform various actions—some of which you can customize. It’s an efficient way to work through email quickly.
Swiping on the iPhone and iPad
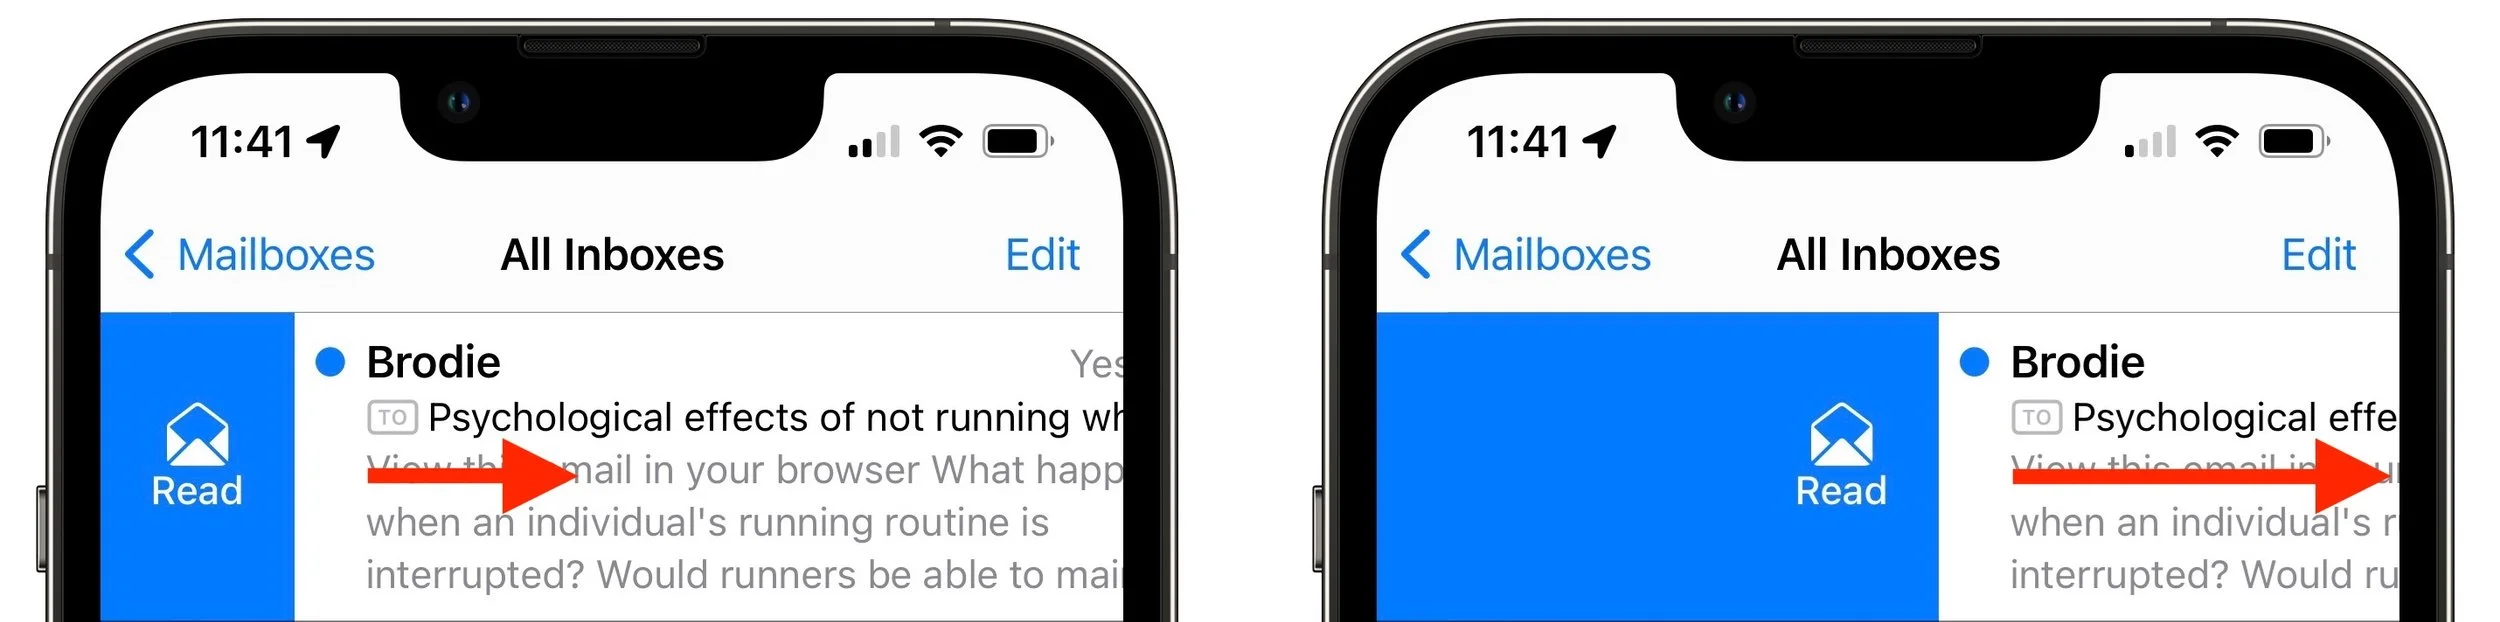
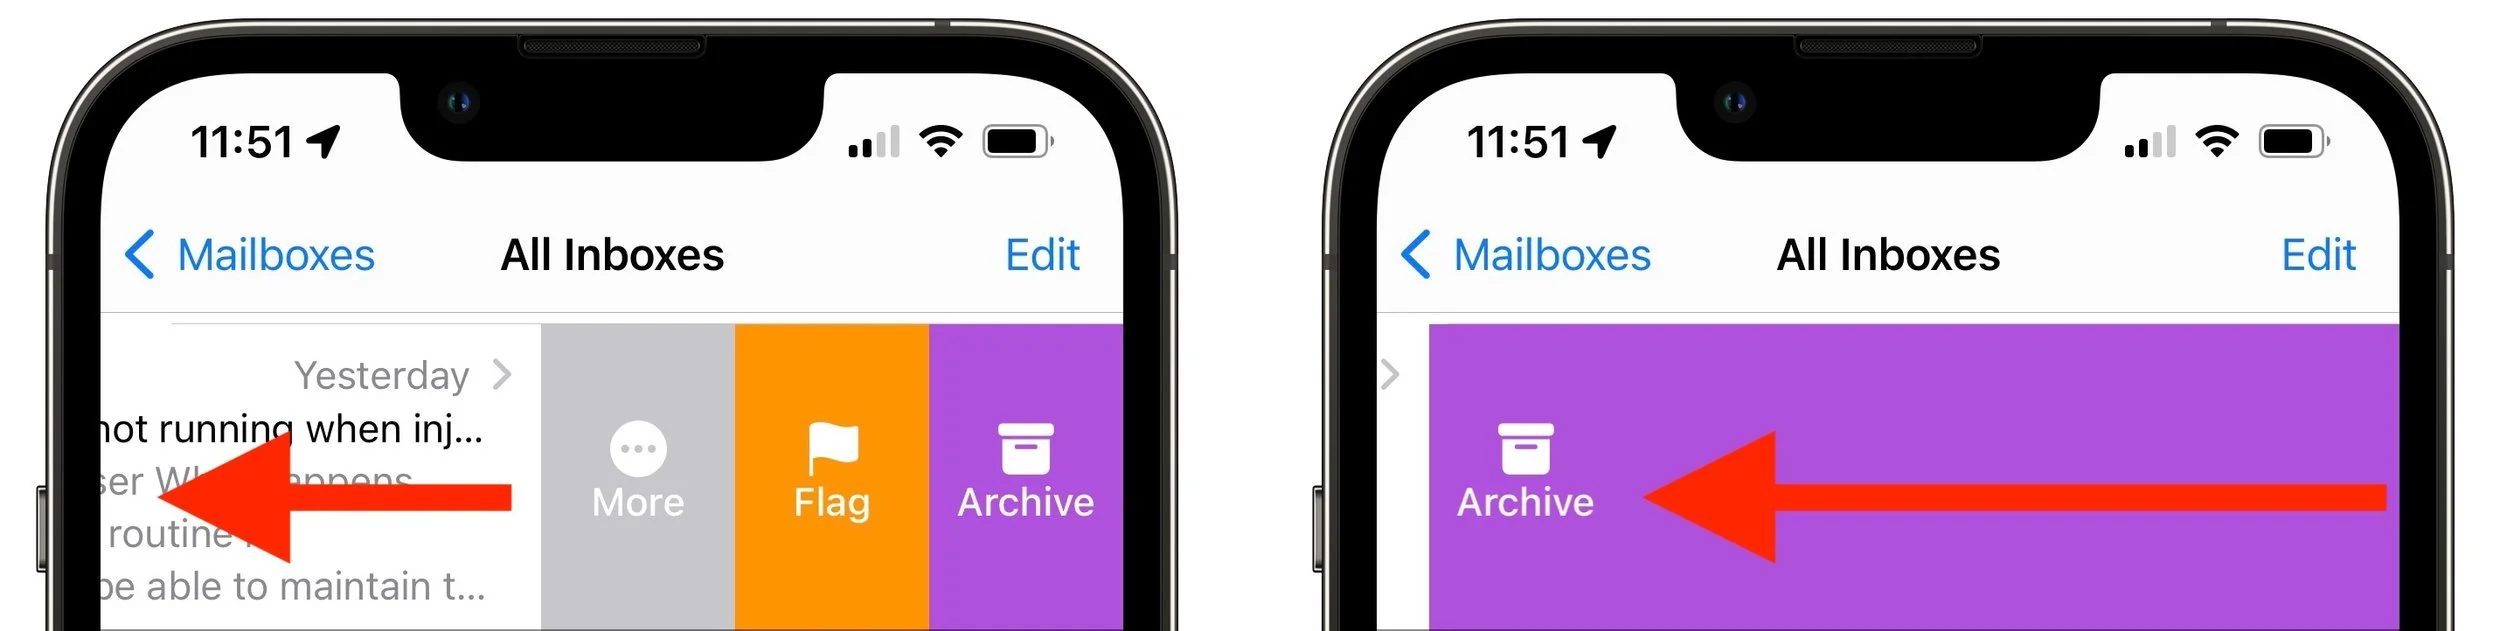
In iOS and iPadOS, when you swipe a short distance right on an unread message (from left to right), Mail displays a Read button. You can either stop swiping and tap it or keep swiping to the right to mark the message as read. If the message has already been read, that button changes to Unread. This swipe is great for those who like marking messages as unread to keep them around for later processing.
Swipe left (from right to left) a short distance, and you get three buttons, More, Flag, and Archive. (If you see Trash instead of Archive, that’s fine. We talk more about configuring which buttons you see shortly.) Tap Archive to store the message in an Archive mailbox (or All Mail for Gmail users), which is good for getting it out of your face without deleting it. Flag marks the message with a flag so you can find it again easily in Mail’s Flagged mailbox—some people do this to track messages that need replies or other actions. You can also swipe all the way to the left to archive the message with one motion.
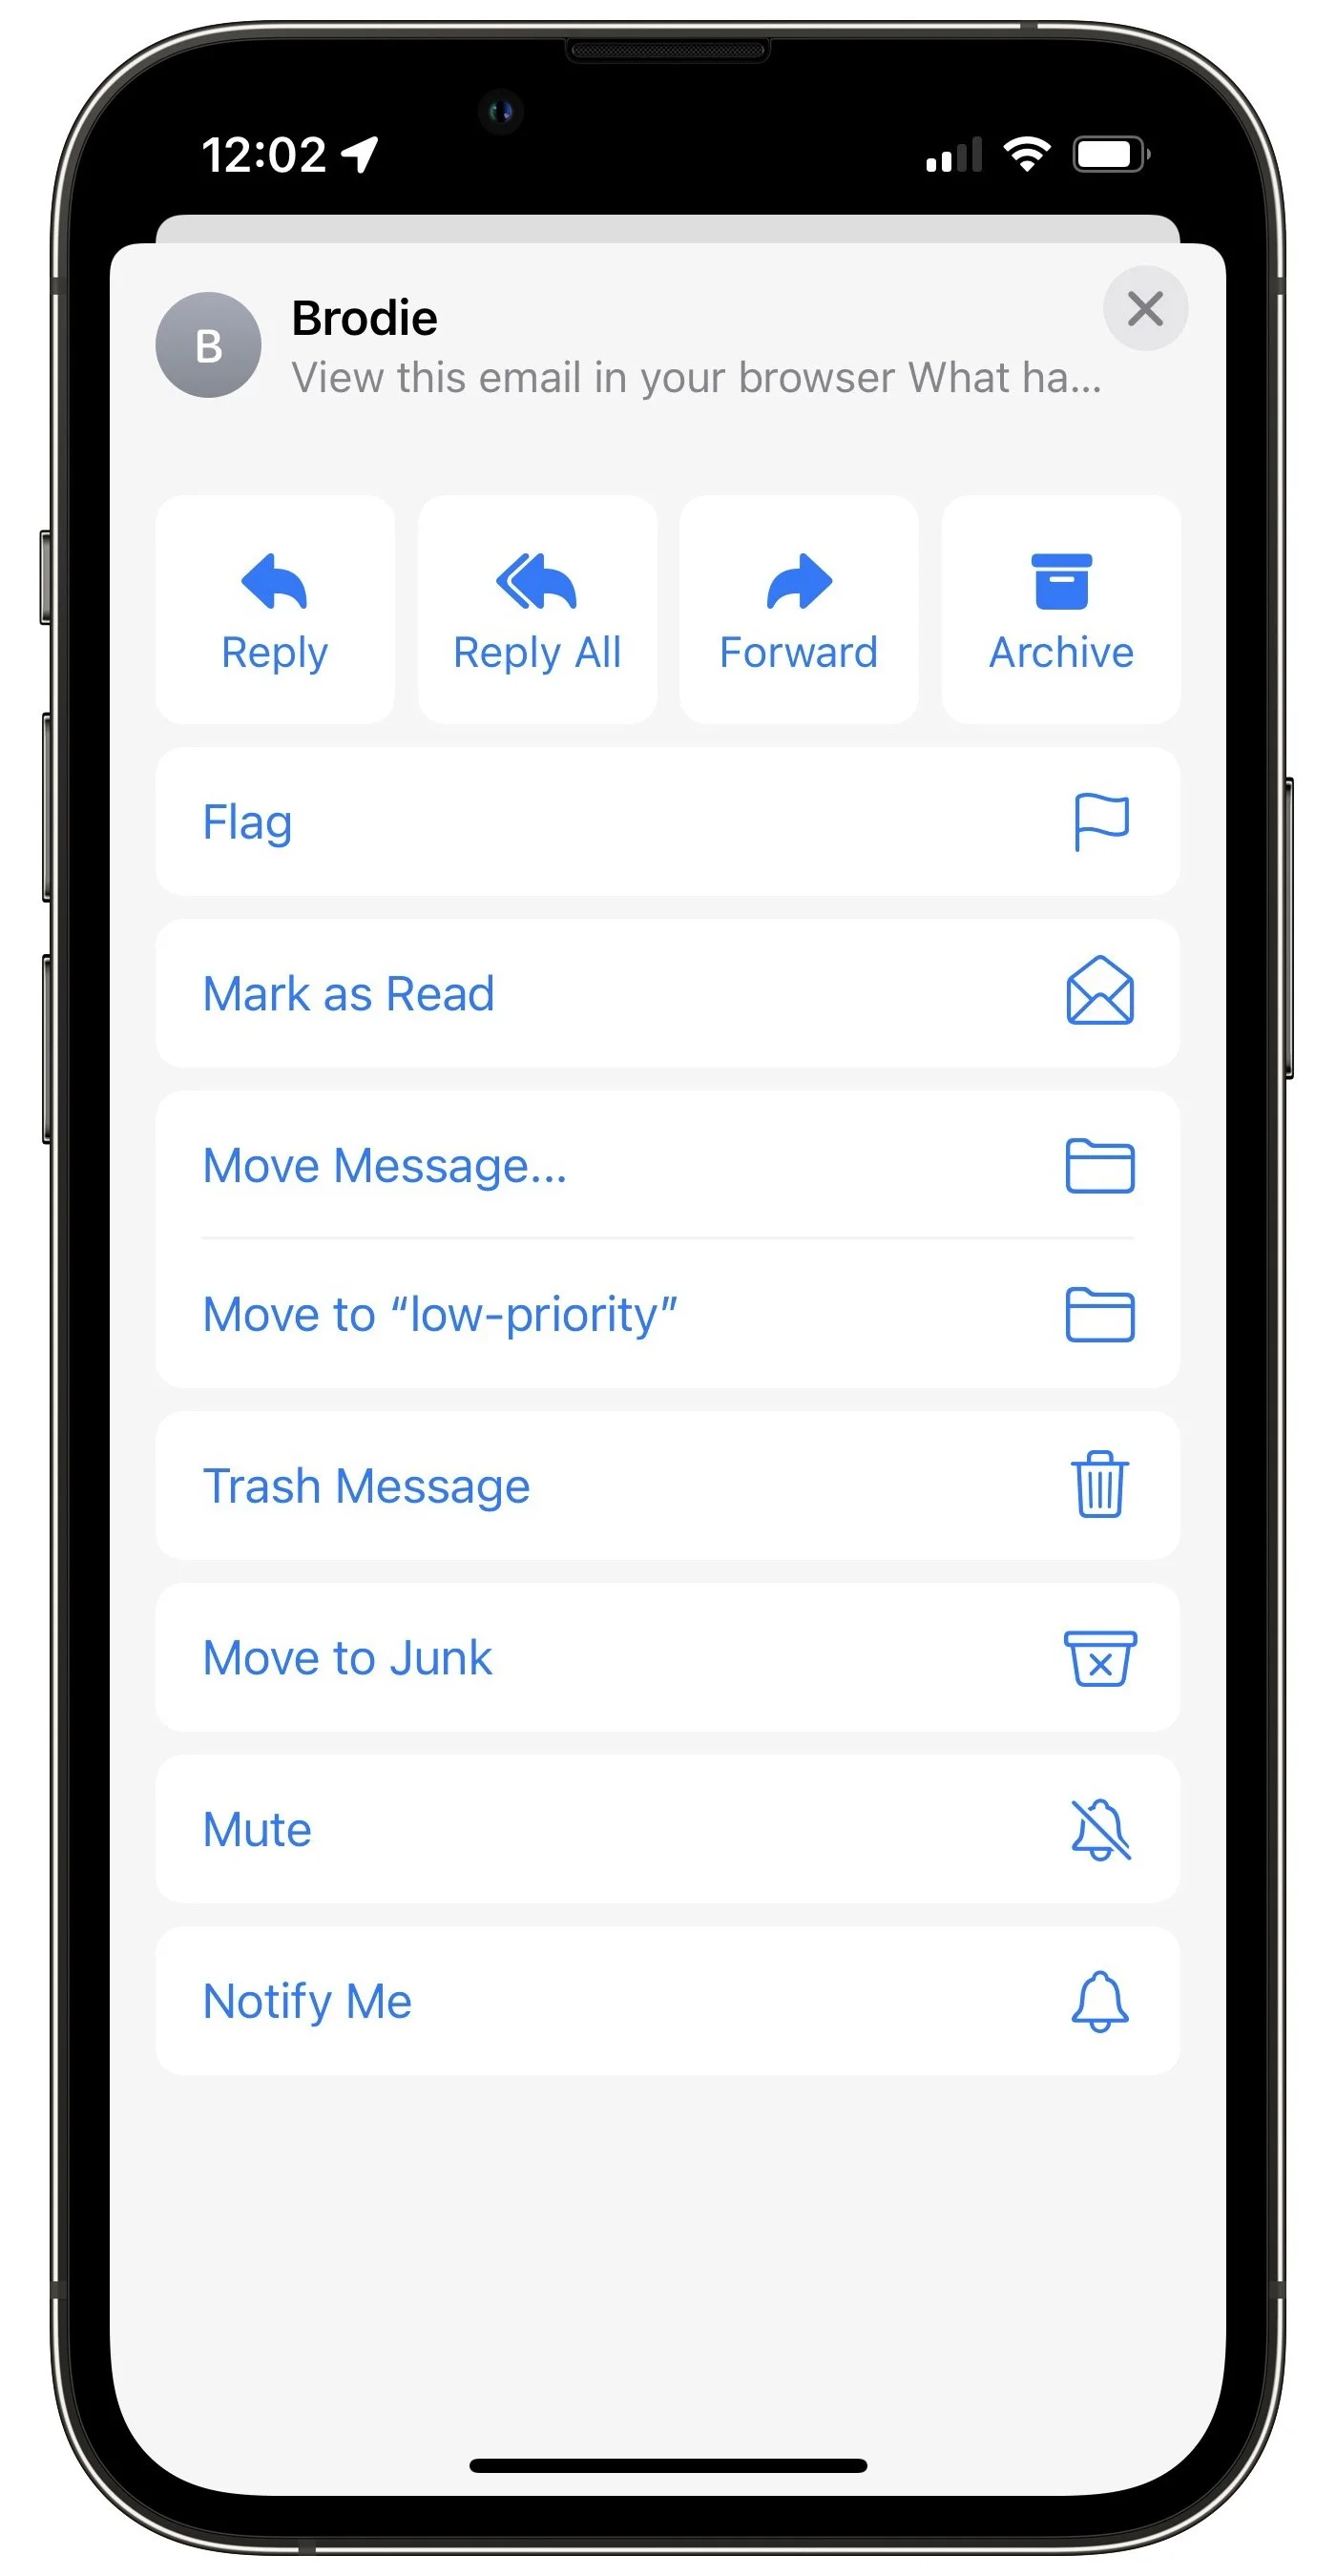
If you tap More, you get a bunch of additional options (depending on the message) that include Reply, Reply All, Forward, Archive, Flag, Mark as Read, Move Message (for filing in another folder), Trash Message, Move to Junk, Mute (to silence notifications from the thread), and Notify Me (which alerts you when anyone replies to the message).
Do you prefer to have your full swipes manage mail in a different way than the default? Go to Settings > Mail > Swipe Options and choose which button appears when you swipe right or left. You can select only one unique action for the middle swipe left button and for the swipe right action.
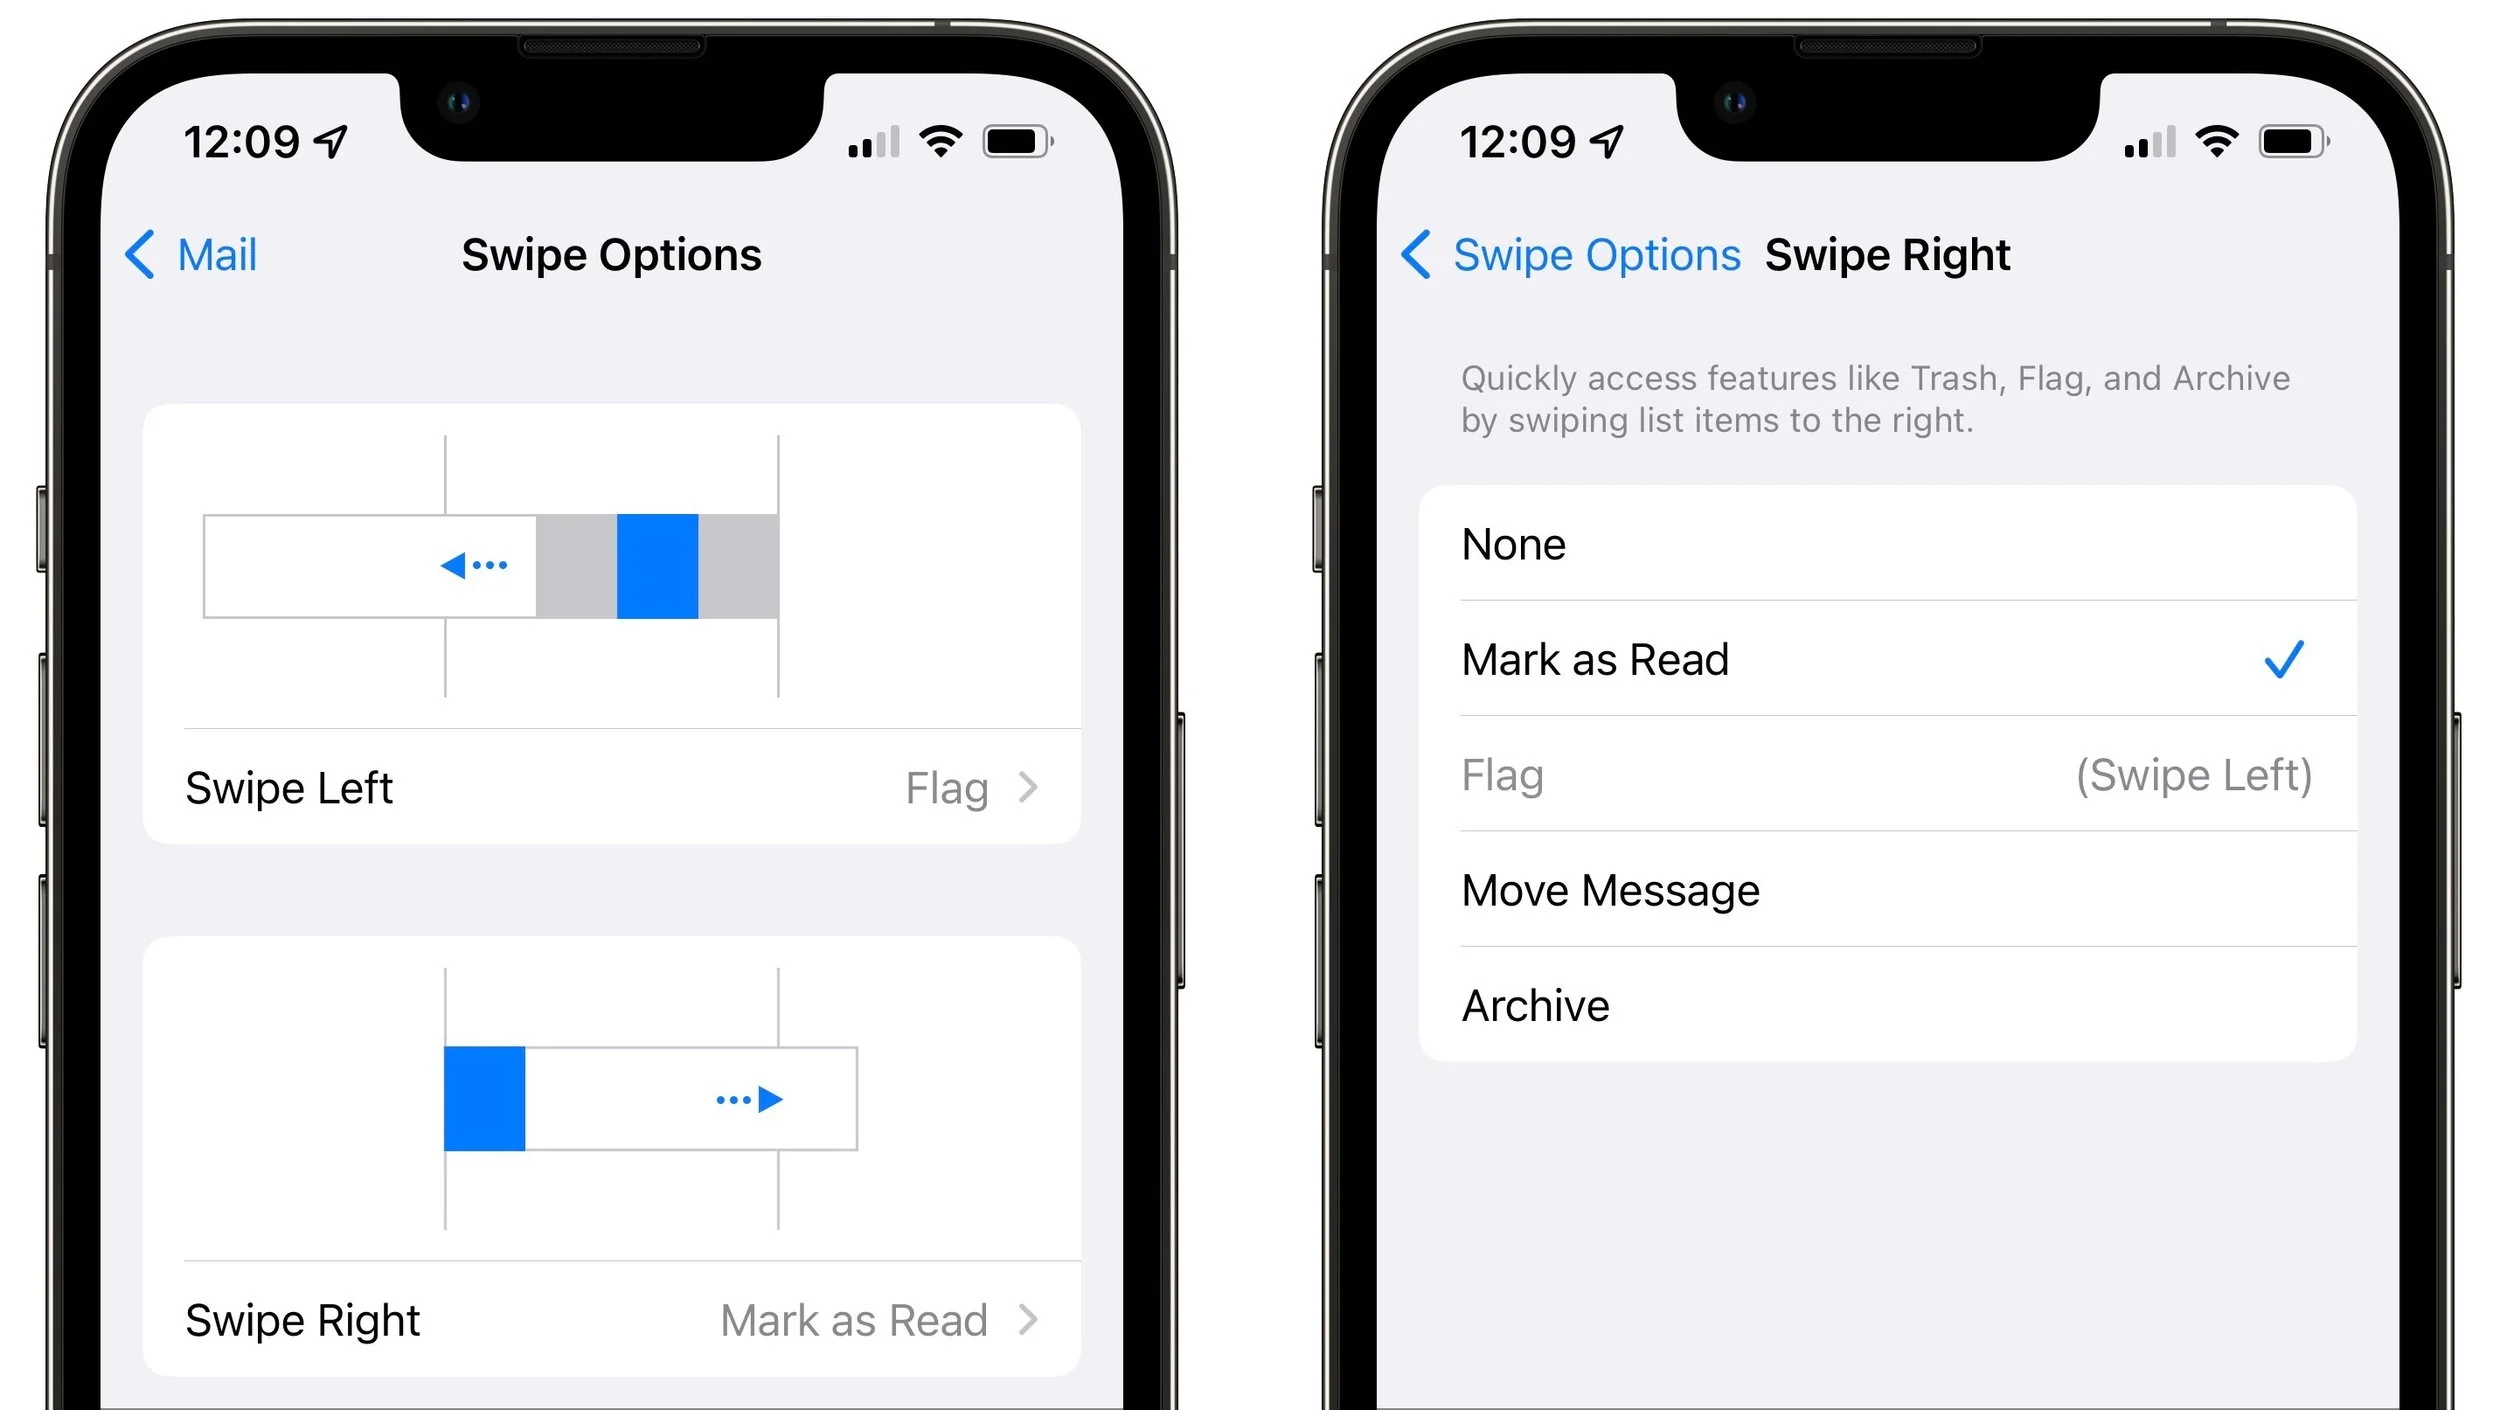
If you prefer to delete messages instead of archiving them, select Archive in the Swipe Right settings and it will become Trash automatically if the account requires swiping left to offer the Archive button. If you use Gmail or some other email providers, you can reverse these settings (so swiping left offers Trash and swiping right gives you Archive) by navigating to Settings > Mail > Accounts > YourAccount > Account > Advanced and selecting Deleted Mailbox under Move Discarded Messages Into.
Remember that you can undo an errant swipe action by swiping left anywhere on the screen with three fingers or by shaking the iPhone or iPad, assuming you’ve left that setting enabled in Settings > Accessibility > Touch.
Swiping on the Mac
On the Mac, swiping works similarly, but fewer options are available. You can swipe right with two fingers to mark a message as read or unread, depending on its current status, or you can swipe left to delete or archive the message. Short swipes reveal a button you can click; long swipes perform the action without needing an additional click.
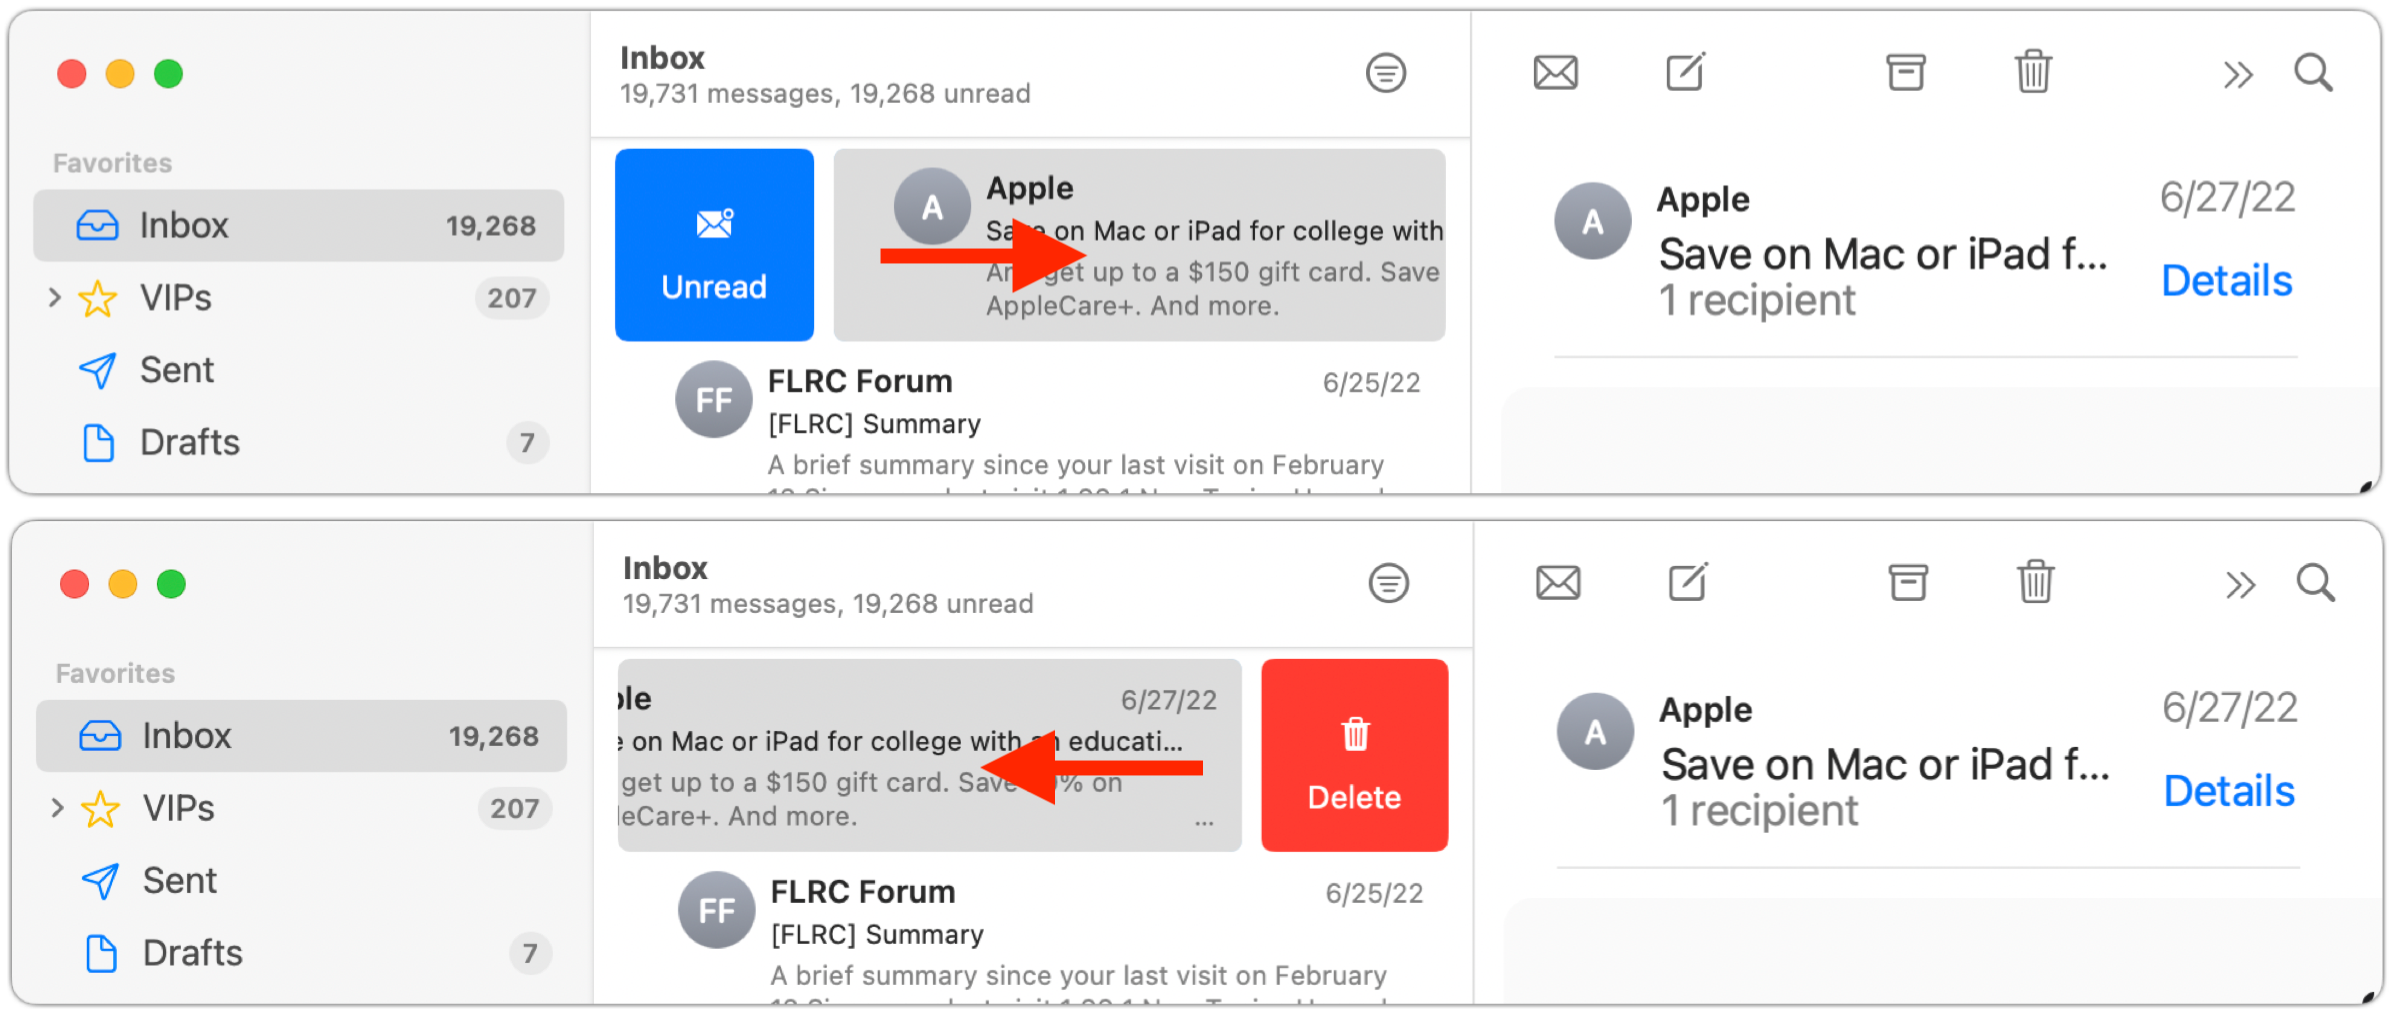
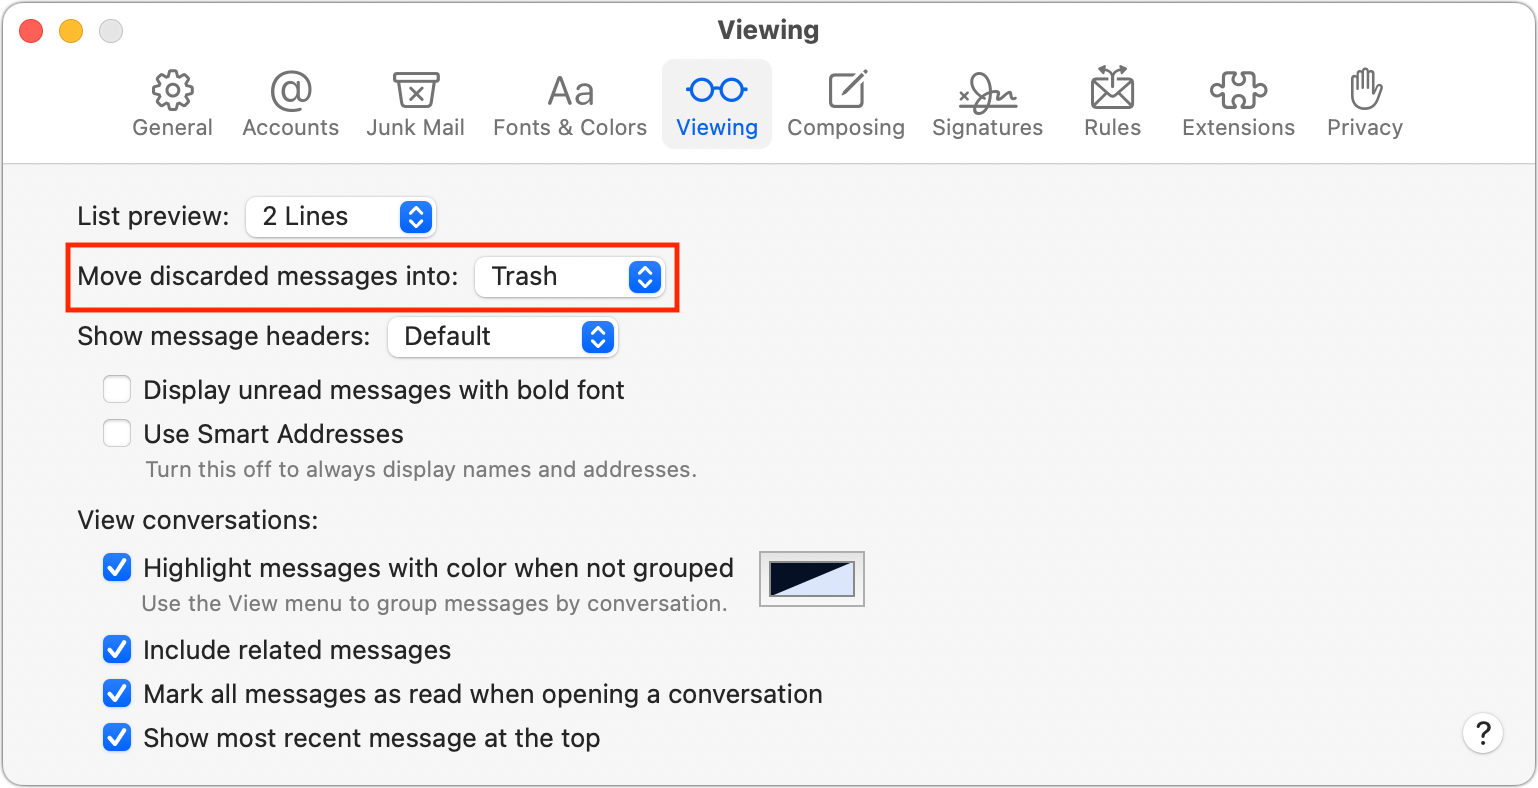
As with Mail in iOS, you can toggle the delete/archive setting by choosing Mail > Preferences > Viewing. Choose Trash or Archive from the Move Discarded Messages Into pop-up menu.
That’s it! Take a few minutes to practice swiping, and before long, you’ll be marking, flagging, and archiving messages with just a flick of the finger.
(Featured image by iStock.com/Pheelings Media)
Picking Group Meeting Times Is Easy with Crab Fit
Having trouble finding the best time for a group to meet? Check out the oddly named Crab Fit, which lets people add their availability and shows the best scheduling overlaps.

Various calendar services let you schedule a meeting based on invited attendees picking preferred times from a set of specified options—Doodle is the most well-known. But the problem with such services is that you have to know which dates and times are likely to work for the people you’re polling. If you want to set up an hour-long meeting sometime in the next week but have no idea what might work for others, you’ll spend an excessive amount of time specifying all the possible options.
A free—if oddly named—Internet service called Crab Fit turns this scheduling problem around. Instead of letting people vote for preset options—none of which may work—Crab Fit asks everyone when they could possibly meet and then reveals which days and times have the most overlap. It’s easy to use and remarkably effective.
You can use Crab Fit to schedule a movie night with friends, a workgroup brainstorming session, or any other event where people need to assemble at the same time. As an example, let’s walk through finding a time for a committee meeting.
Create a Crab Fit Event
Creating an event is straightforward.
1. Name your event.

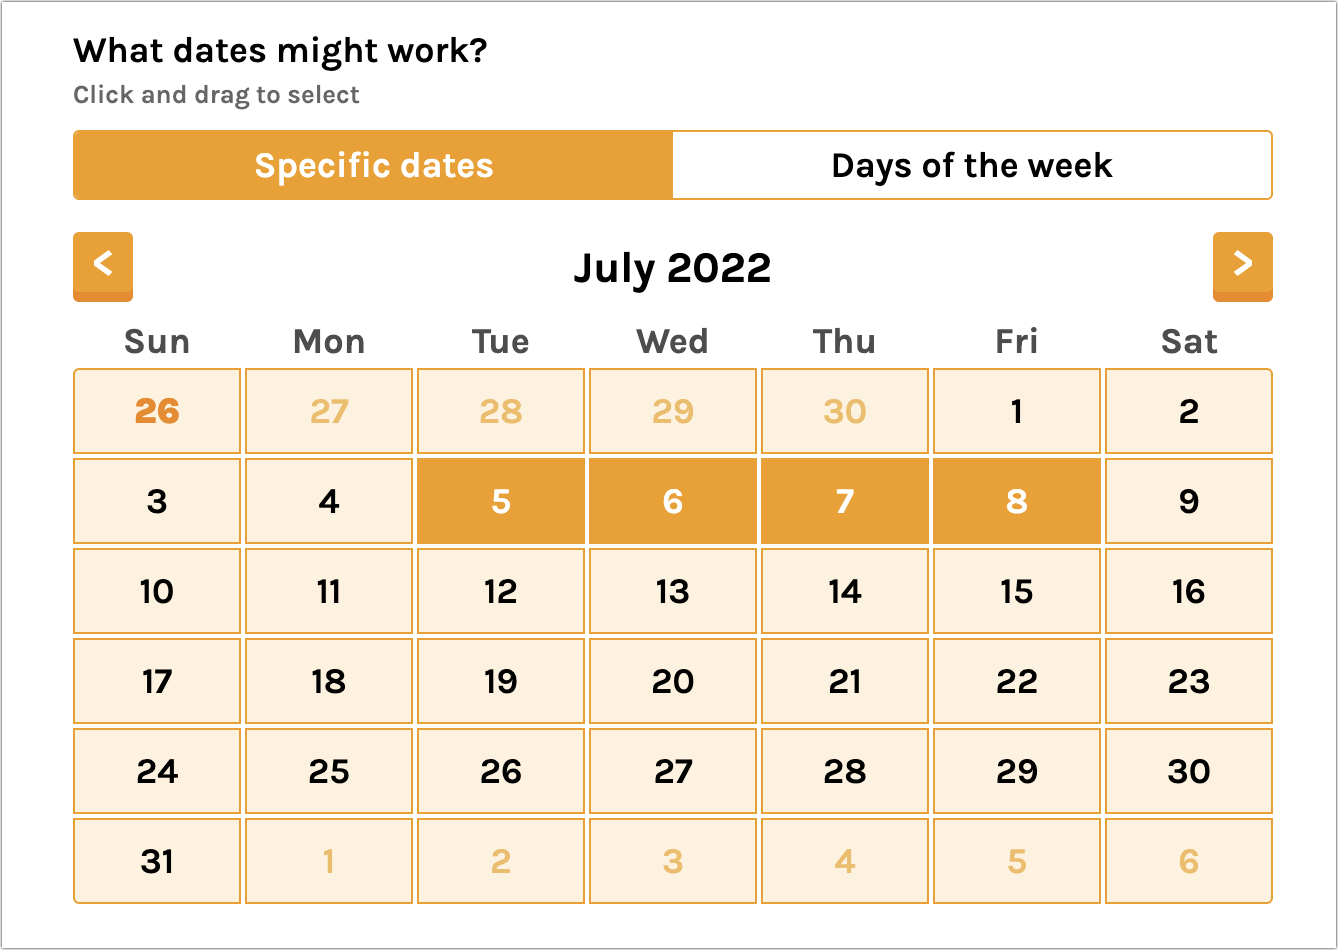
2. Choose whether you are setting up a specific date or a general day of the week. Most of the time, you’ll want to identify specific dates when your group can meet. You can also switch to days of the week to find a regularly repeating time, such as for a weekly lunch meeting.
3. Select the dates or days of the week you want to include—you can select individual boxes or drag across a range.
4. Pick the broad range of times that might work for your event. Crab Fit defaults to 9 AM to 5 PM, but you can adjust the sliders for different times to accommodate a breakfast meeting or movie night. If you’re setting up an online event for people across multiple time zones, you can also specify your time zone so others see the options in theirs.
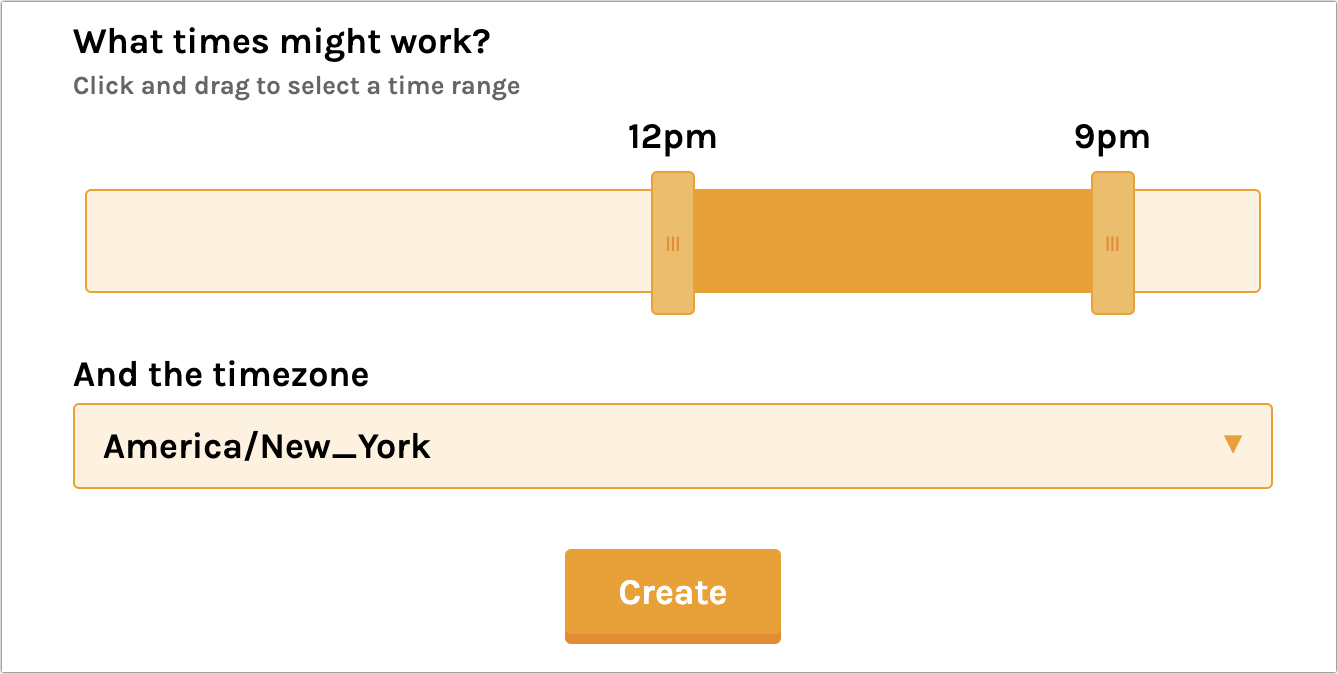
5. Click Create to create the event and load the voting page. Before voting yourself, copy the link to the page—just click it to copy it to the clipboard—or click the email link to create a new email message containing the link.

6. Send the link to the people you want to invite to the meeting however you want: email, Messages, Slack, whatever.
Add Your Availability to a Crab Fit Event
Once you’ve created and shared your event, it’s time to say when you’re available. This process is the same for you as it is for everyone you’re inviting, so if you get invited to a Crab Fit event, the same process applies:
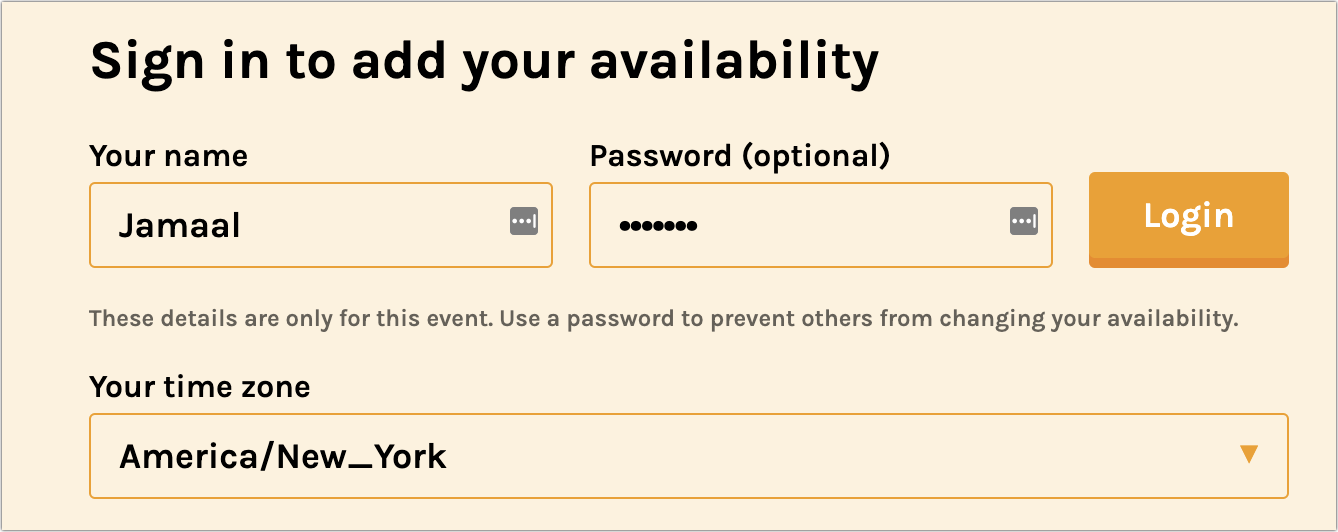
1. Sign in. Don’t worry about having to create yet another account—you’re only providing a name so others know that you’ve voted, and the password is necessary only if you want to ensure that no one else can use your name to change your availability. If you use Crab Fit regularly, you can save your name and password in a password manager and autofill them whenever necessary.
2. If your time zone is different from the one shown, choose your time zone. When you do that, the times in the next step will reflect your local time rather than the times specified when the event was created.
3. Select times when you’re available. You may be able to sync with your Google Calendar or Outlook Calendar (the Google Calendar option didn’t work for us) to select times that aren’t already scheduled, but it’s simple enough to drag to select the times you’re available. While working, you can click the Group Availability tab to see when others have said they’re available—you may wish to adjust your times if you see that the group is already heading toward a consensus that works better or worse for you.
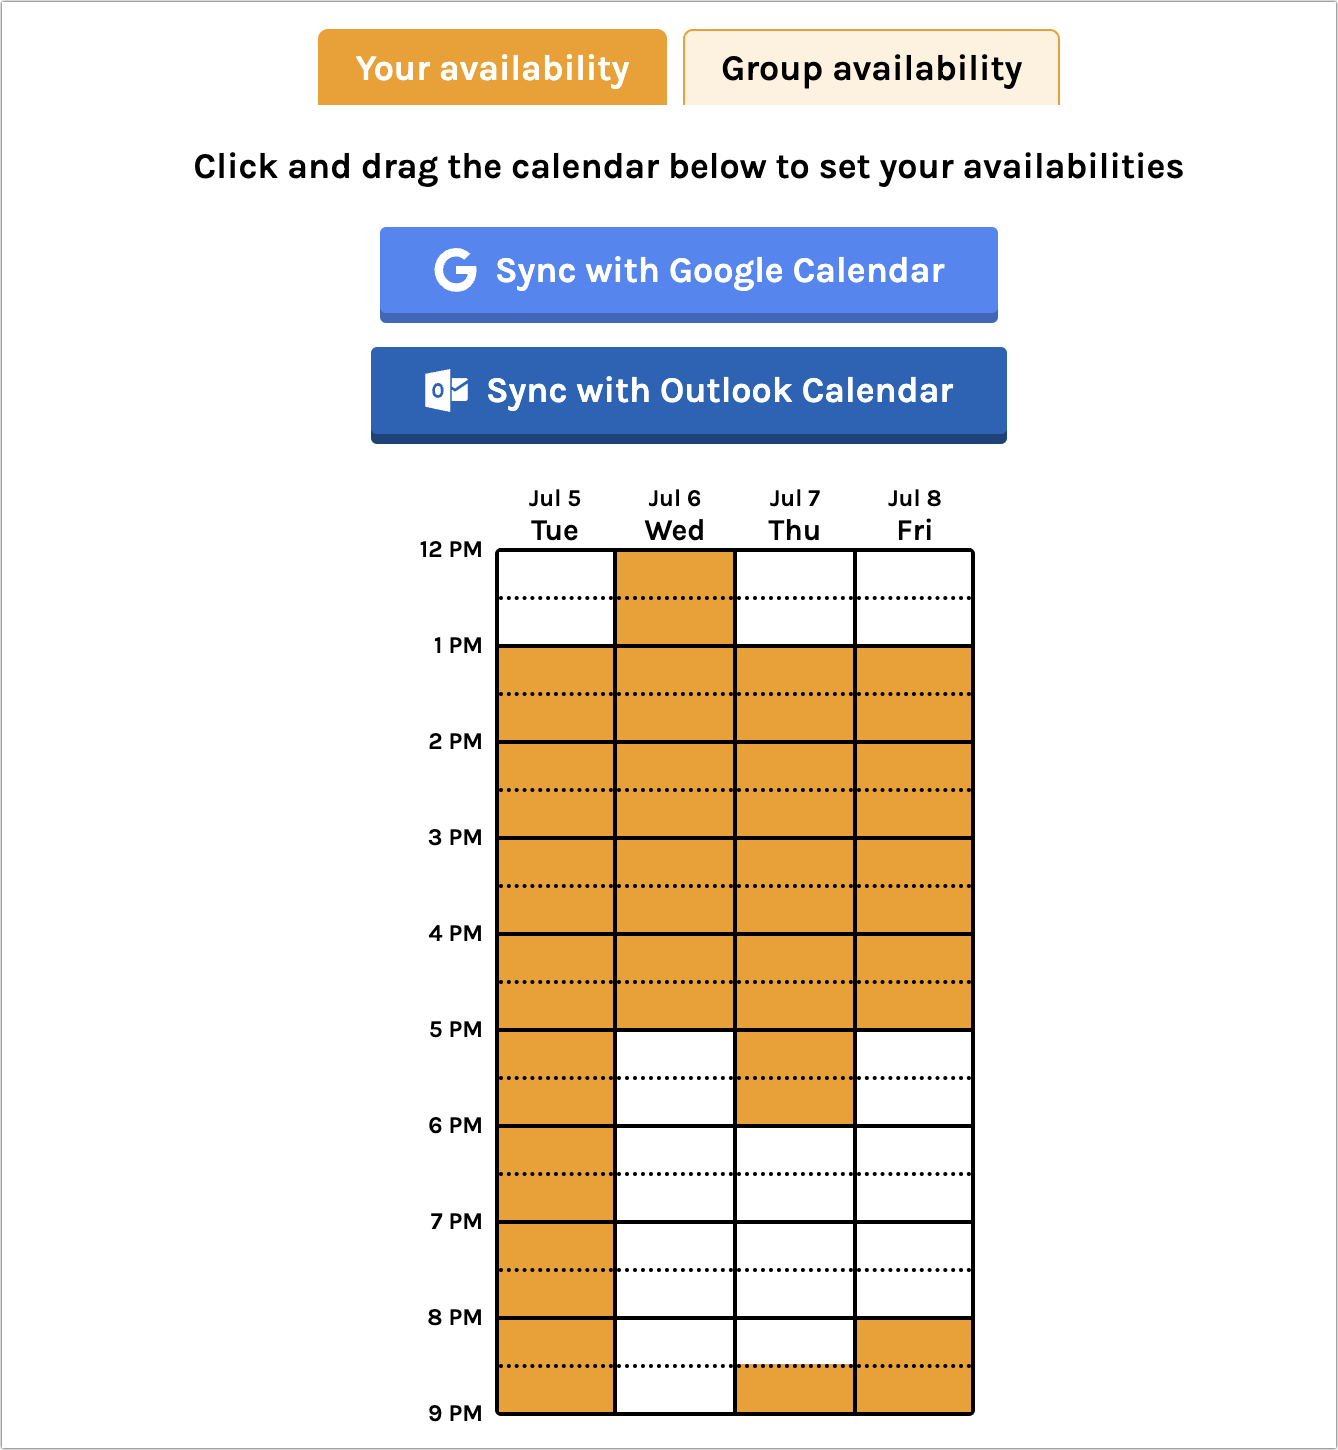
That’s all there is to it—there’s no need to do anything else to submit your available times. The magic happens when all the other people in your group say when they’re available too, following the same steps.
Pick the Best Time to Meet
As the organizer, it’s your job to pick the best time, but everyone can see on the Group Availability tab which times are better and worse—the darker the color, the more overlap between schedules. Hover your pointer (or tap on an iPhone or iPad) over a particular time to see who is available then.
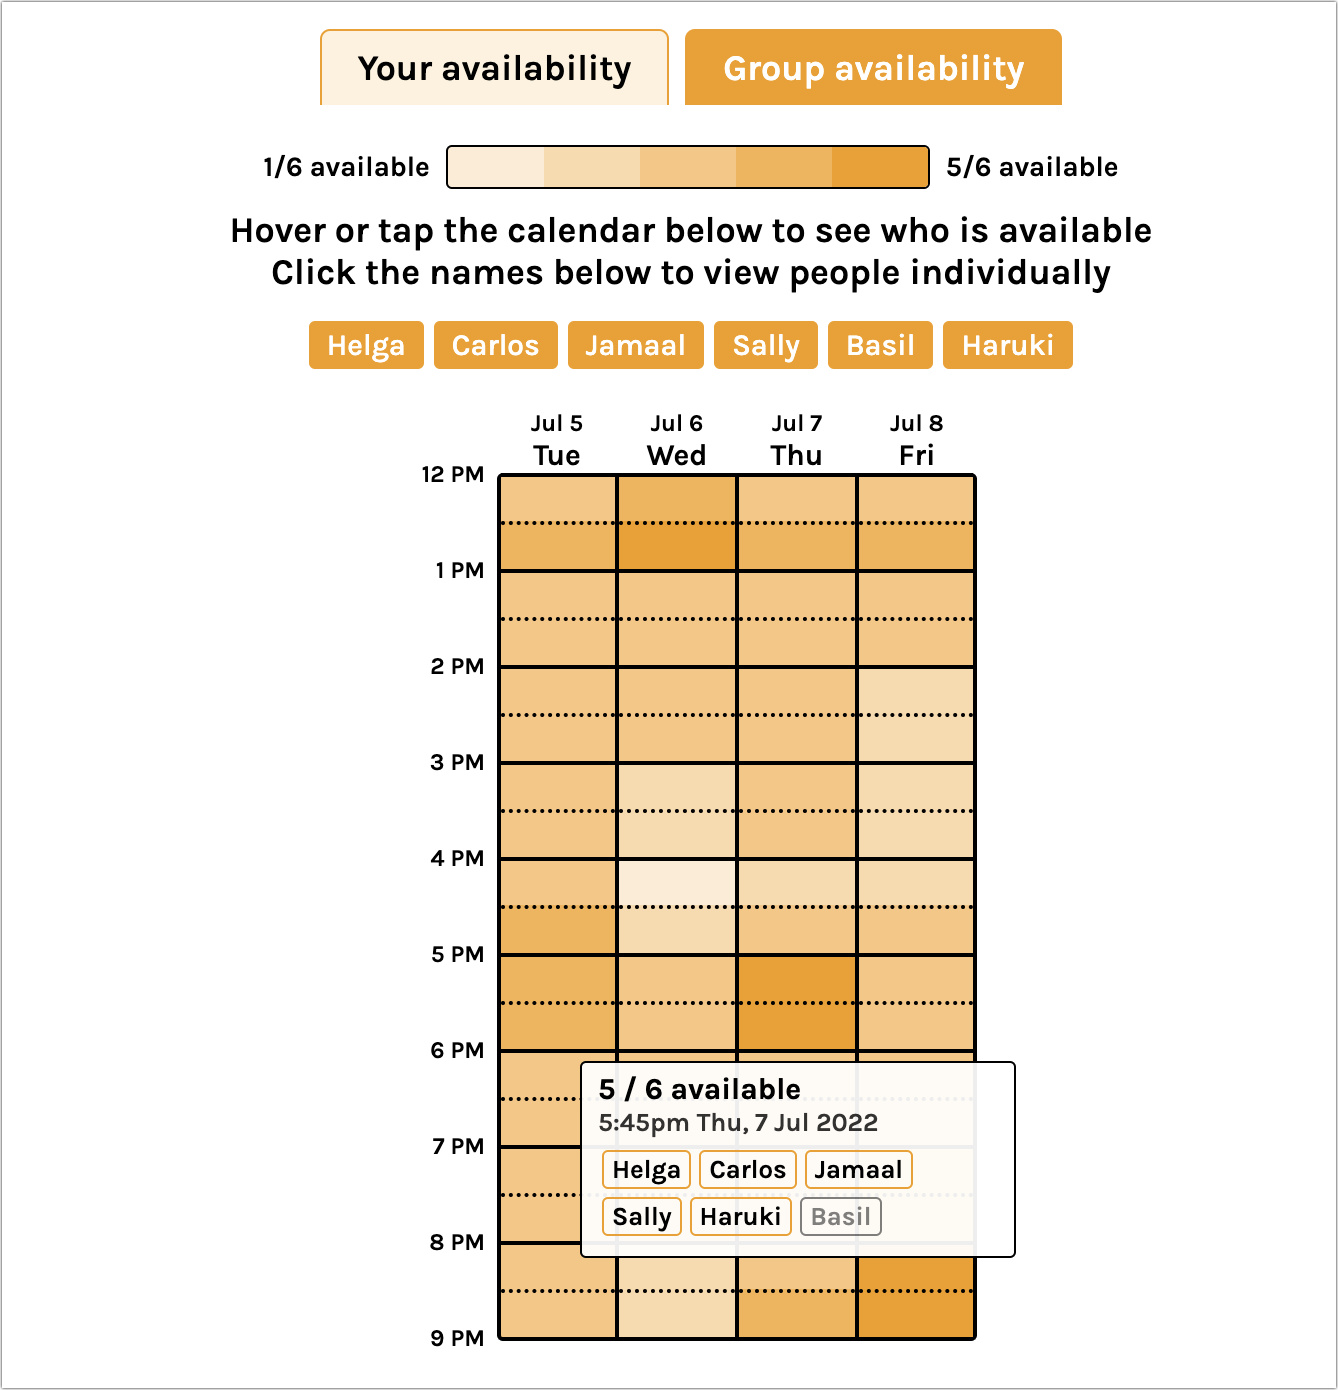
The rest is up to you—Crab Fit doesn’t alert participants or do anything else, so you need to identify the best time and convey that to the people you’ve invited.
When there’s only a single time when everyone can make it, agreeing on it is easy, but you’ll likely have to choose from multiple times that are equally as good for everyone. The hardest situation comes when there are conflicting possibilities, none of which is perfect. In the example above, the best solutions get only five of six people, and who can’t make it differs by time. You’ll have to decide who to leave out.
Regardless, Crab Fit radically simplifies homing in on the best possible meeting time. It works well in desktop Web browsers and the iPhone and iPad. And if there’s some-thing about it that you don’t like, check out When2Meet, which works nearly identically but doesn’t display well on the small iPhone screen.
(Featured image by iStock.com/fizkes)
Get Some Color (On Your Mac) This Summer with the Color Picker
Have you found the macOS color picker confusing? Here’s how to find, set, and share colors.
If you’re over 40, you probably remember the point in The Wizard of Oz where the movie switches from black-and-white to Technicolor (and if not, go see it!). It wasn’t the first color film, but the vibrant images of Dorothy’s ruby slippers, the yellow brick road, and the Emerald City helped make the movie a classic.
On the Mac, whenever you want to fill a drawing with color, colorize some text, or format spreadsheet cells in color, you need to use the Colors window, commonly called the color picker. Like many long-standing elements of the Mac experience, most people have seen and used it, but don’t realize how much it can do. How you bring it up varies by app but usually entails clicking a color button associated with styles or formats.
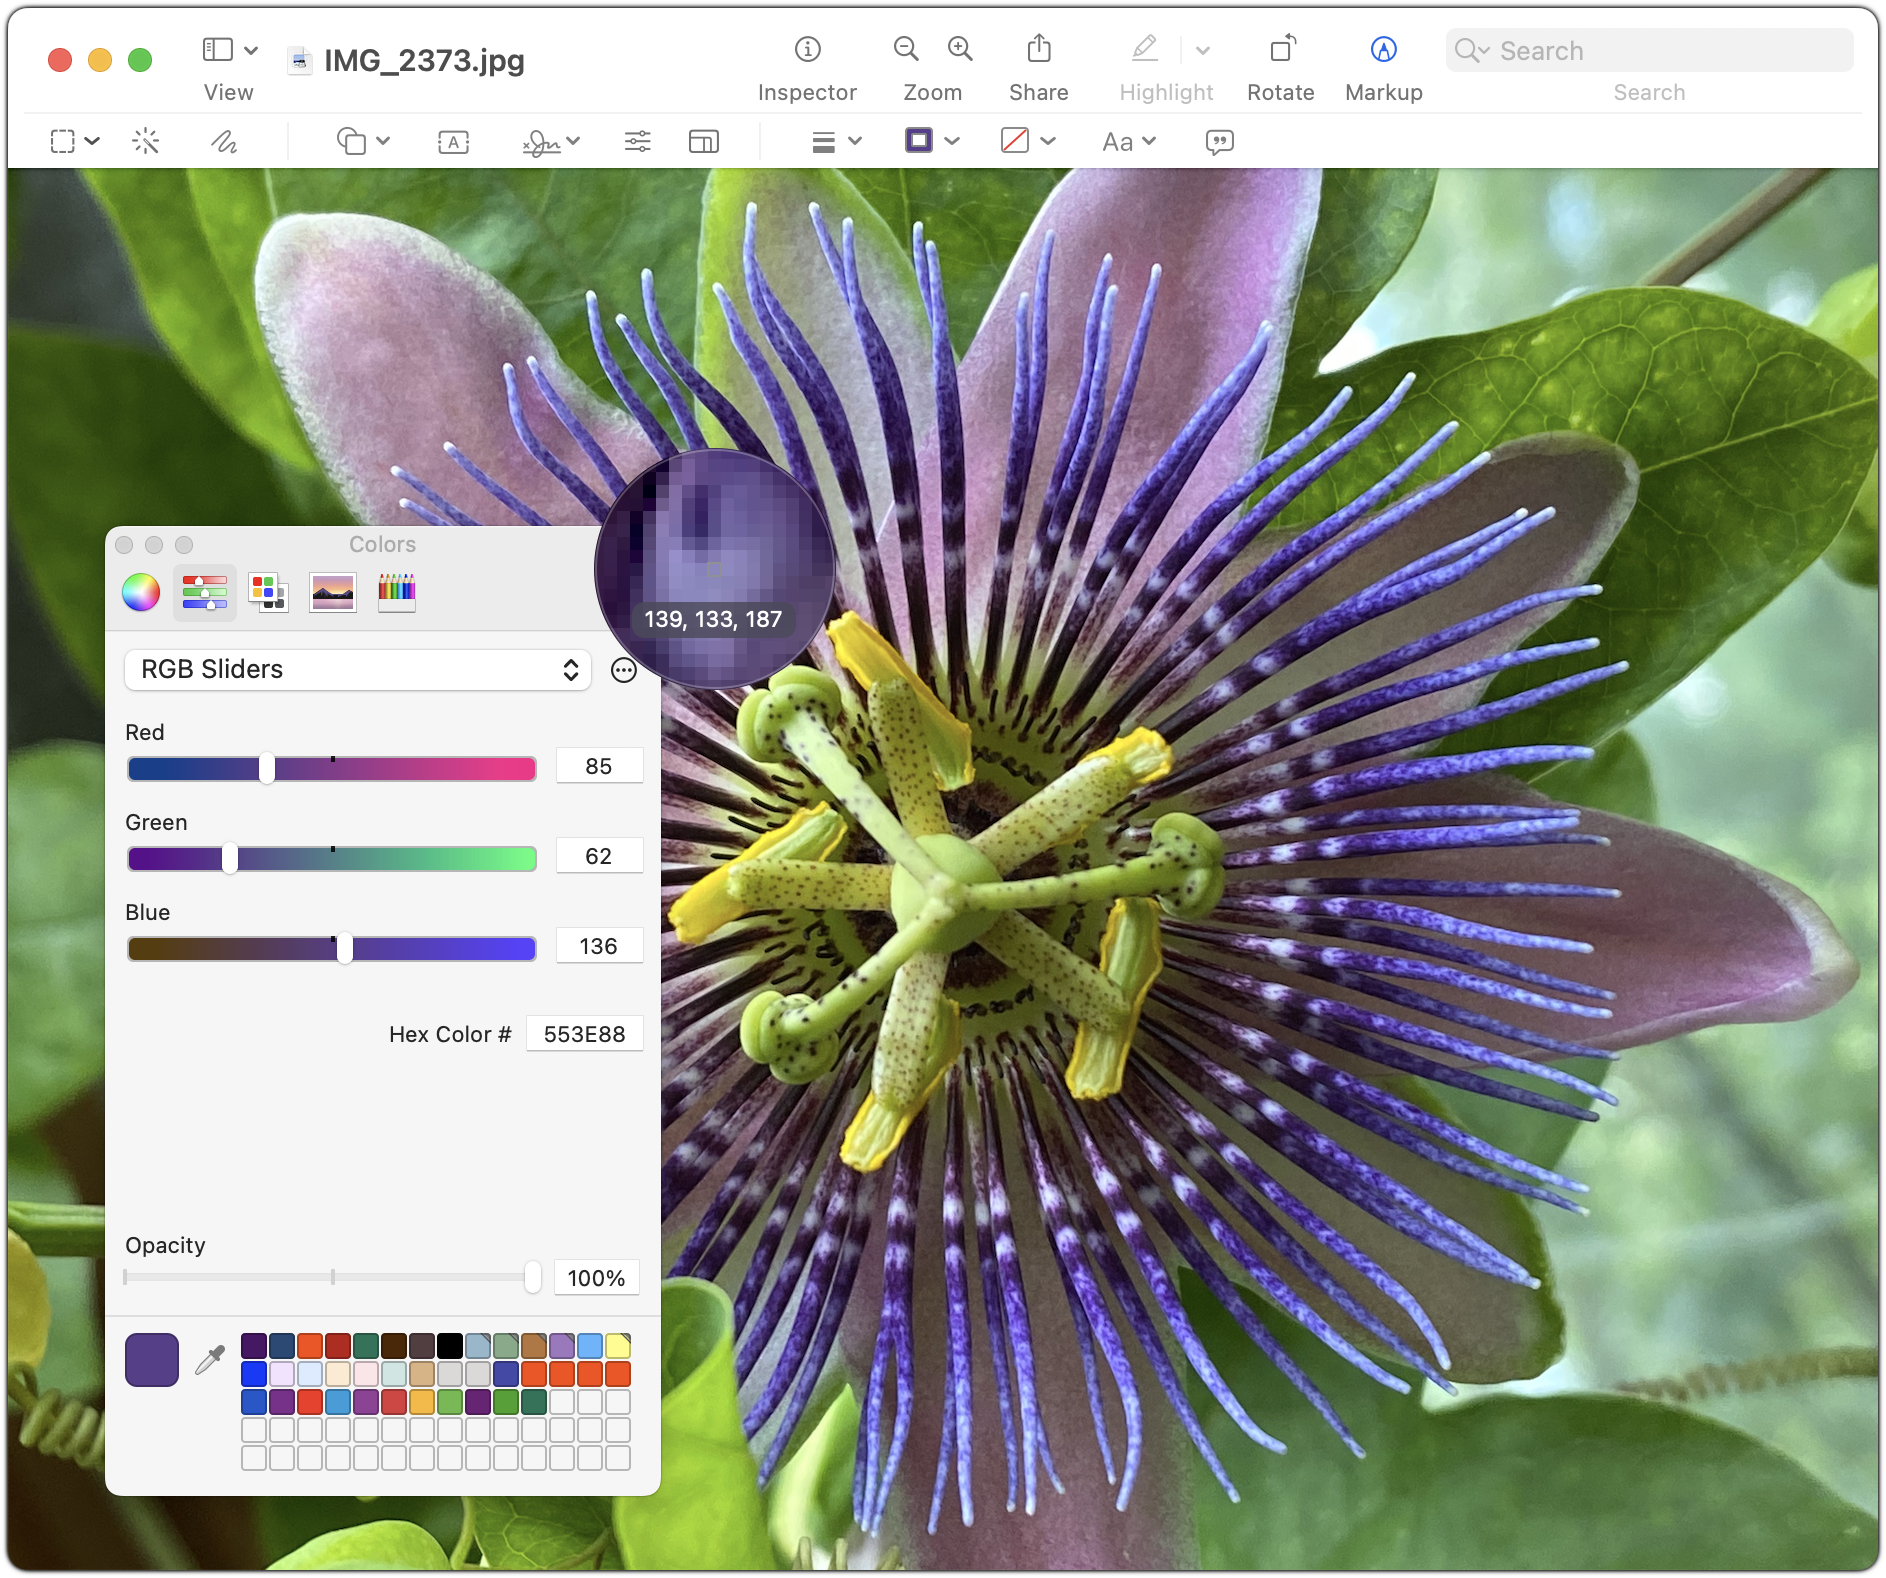
The Colors window has three sections: buttons for the color pickers at the top, their individual controls in the middle, and user-specified swatches at the bottom.
Color Pickers
Click the buttons at the top to switch between these pickers:
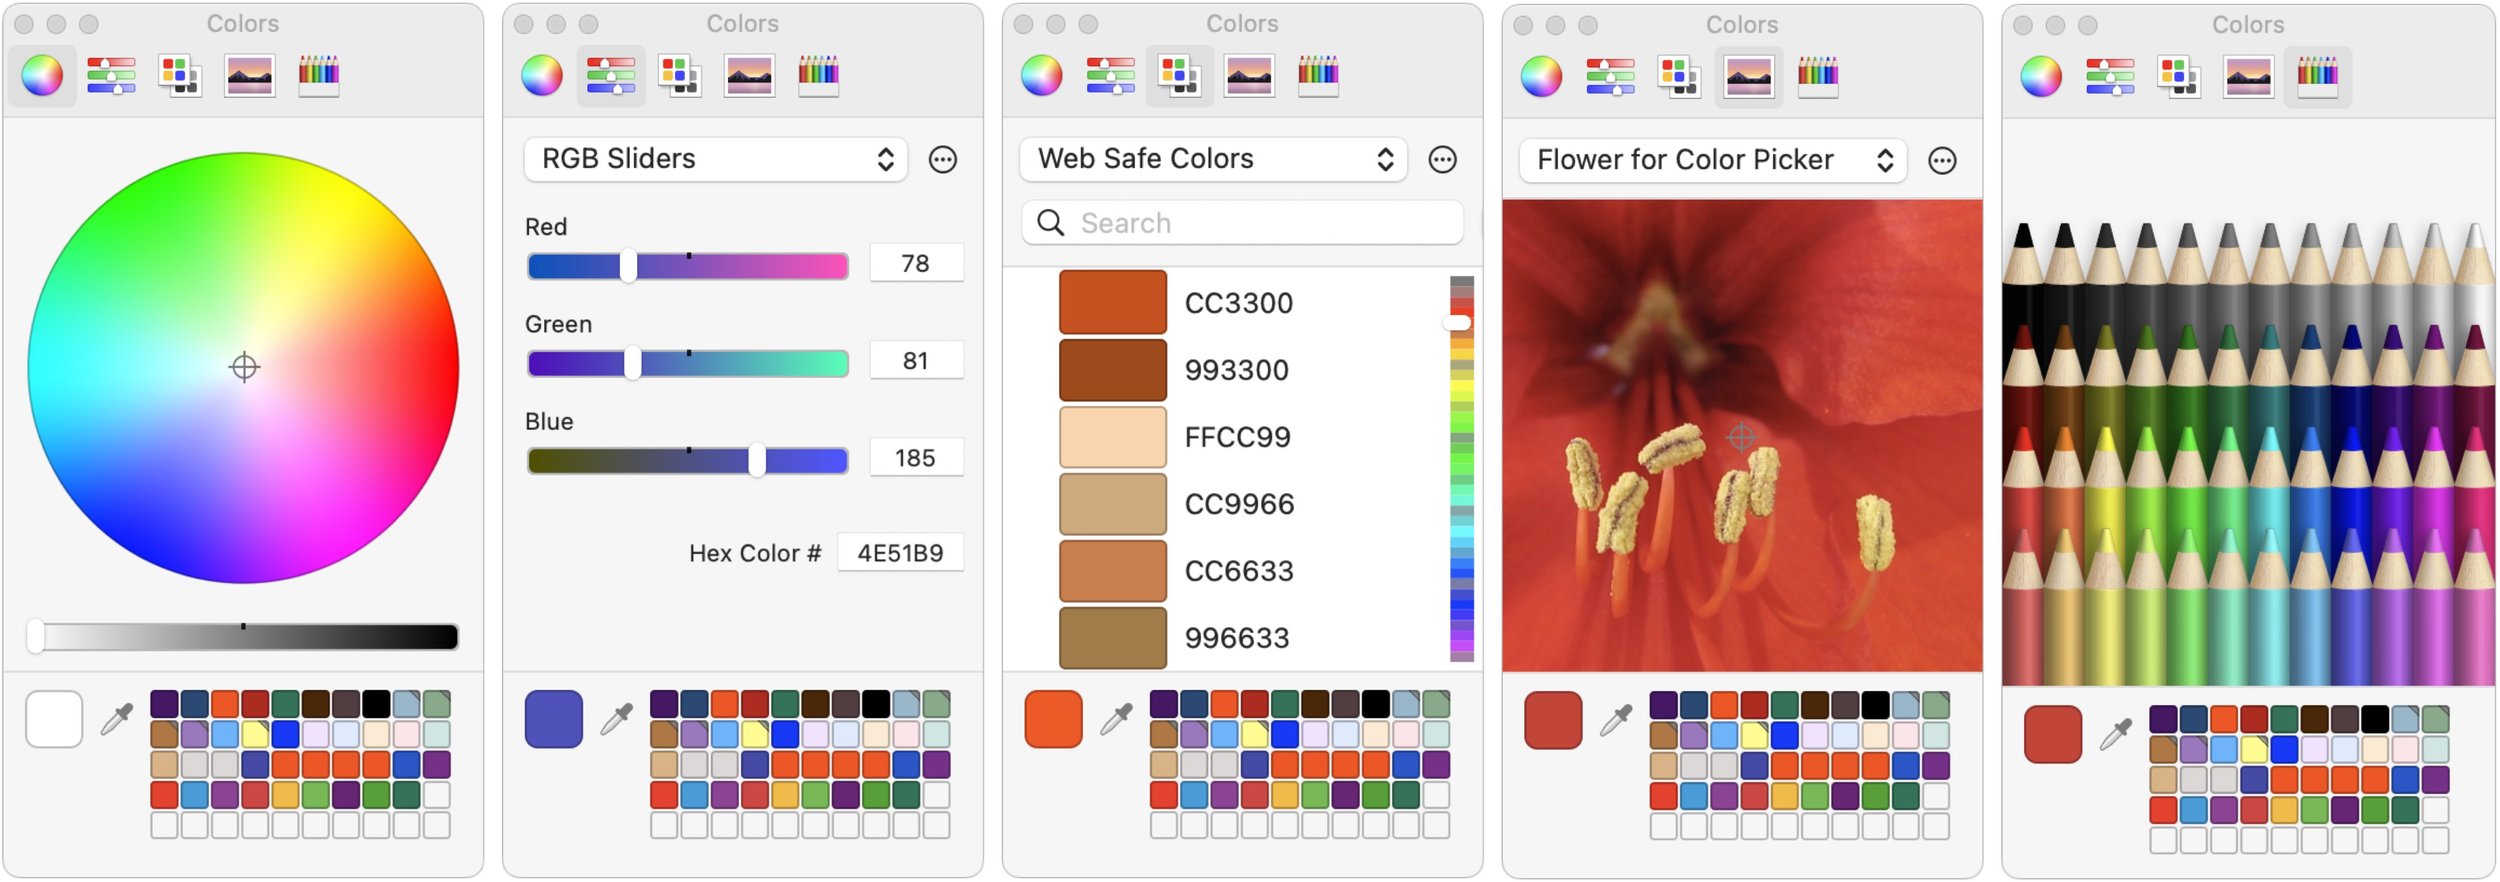
Color Wheel: This picker is useful for exploring a wide range of colors. Pay attention to the brightness slider at the bottom, which changes the colors in the wheel above.
Color Sliders: Use these sliders to specify particular grayscale brightnesses or RGB, CMYK, or HSB colors by number. You can also enter a hex color num-ber directly. Or, you can find a color with another picker or the eyedropper tool and then look up its exact values here. Desktop publishers use this feature a lot, as do Web designers trying to determine hex colors. When matching colors with outside sources, click the gear button to choose the appropriate industry standard color palette before picking a color.
Color Palettes: This picker shows color swatches from different custom palettes. Use the ••• button to make, add, rename, and delete palettes. (Find them in ~/Library/Colors.) The utility of these palettes is that you can share your own color collections, enabling coworkers to use identical colors easily, or you can download and import palettes for different uses, such as land-use categories for maps.
Image Palettes: Click the ••• button here to load a new image, after which you can select any color in that image by clicking it. This picker could be useful for matching colors in a layout with those in a photo.
Pencils: They used to be crayons, but then Apple got sophisticated. Or stopped licensing the names from Crayola.
Within each color picker, it’s usually obvious how to select different colors. Click the wheel, move the sliders, enter red-green-blue percentages, and so on. The selected color, which should be applied to the selection in your drawing or text, appears in the large square color well at the bottom left. If your selection doesn’t pick up the desired color, try dragging the color well in the lower section to a corresponding color box in your app.
Eyedropper
The Colors window offers another extremely useful way to select a color: the eyedropper. Find it in the bottom portion of the window, and click it to see a circular loupe that magnifies anything under it. Move the loupe until the single pixel in the middle is over the color you want, and then click. If you press the Space bar while the loupe is showing, the loupe displays the RGB values of that pixel.
Swatch Drawer
What are those little squares to the right of the eyedropper? That area is called the swatch drawer, and it’s where you store particular color swatches that you want to use repeatedly. To create a swatch, drag the color from the big color well into a swatch square. You can pick a color swatch up and move it around, so you can arrange your swatches in a way you’ll remember. Swatches you store here become available in all Mac apps, so it’s a great way to ensure you’re using the same colors everywhere.
To use a swatch, just click it. It immediately becomes the selected color in the color well and is applied to whatever object you’re editing.
To remove a swatch, drag it to the right of the swatch squares and let go just inside the right edge of the Colors window (if this doesn’t work, expand the window to the right as much as possible before another column of squares appears, then try again).
By default, you see twenty swatch squares in two rows, but the swatch drawer has room for hundreds of squares! Expand just the drawer vertically by dragging the divider line at its top, or expand the entire window vertically or horizontally by dragging any edge or corner.
Now that we’ve looked into the heart of the color picker to provide you with more knowledge, we hope you’ll find the courage to use colors more confidently in your everyday Mac work!
(Featured image by iStock.com/barbdelgado)
The Hardware You’ll Need to Run Apple’s 2022 Operating Systems
Later this year, Apple will release macOS 13 Ventura, iOS 16, iPadOS 16, and watchOS 9. Here’s the hardware you’ll need to run these operating systems—and to support some of the whizzier features.
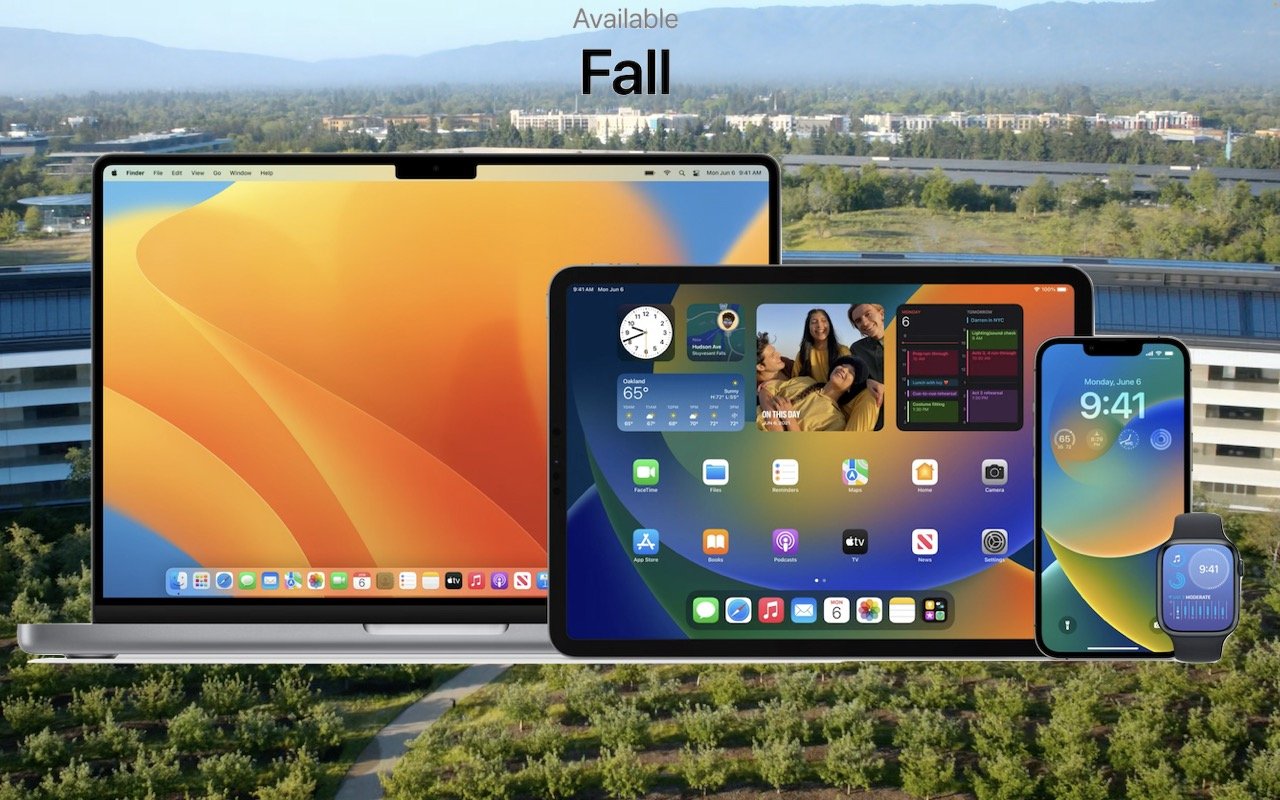
At Apple’s Worldwide Developer Conference in June, the company threw back the curtains on macOS 13 Ventura, iOS 16, iPadOS 16, and watchOS 9. These operating systems won’t be available until September or October of 2022, and we usually recommend waiting some time to upgrade—particularly for macOS.
Even so, it’s not too early to think about how these operating systems might impact your plans to buy new hardware in the next six months. Any Apple device you buy now—or have bought in the last few years—will be able to run the new operating systems. But some devices that can run the current macOS 12 Monterey, iOS 15, iPadOS 15, and watchOS 8 won’t be able to upgrade to their replacements later this year. And some older devices that can upgrade won’t support all the new features.
Here’s what you’ll need and compatibility gotchas to keep in mind.
macOS 13 Ventura
For macOS 13 Ventura, Apple has dropped support for every Mac model released before 2017. That’s in contrast to macOS 12 Monterey, which supported previous generation Macs that came out as early as 2013. If your Mac predates 2017 and you want to run Ventura, think about when it would make sense to buy a new Mac, perhaps in early 2023.
iMac: 2017 and later (late 2015 supported by Monterey)
iMac Pro: 2017 and later
MacBook: 2017 and later (early 2016 supported by Monterey)
MacBook Air: 2018 and later (early 2015 supported by Monterey)
MacBook Pro: 2017 and later (early 2015 supported by Monterey)
Mac mini: 2018 and later (late 2014 supported by Monterey)
Mac Pro: 2019 and later (2013 supported by Monterey)
Mac Studio: 2022
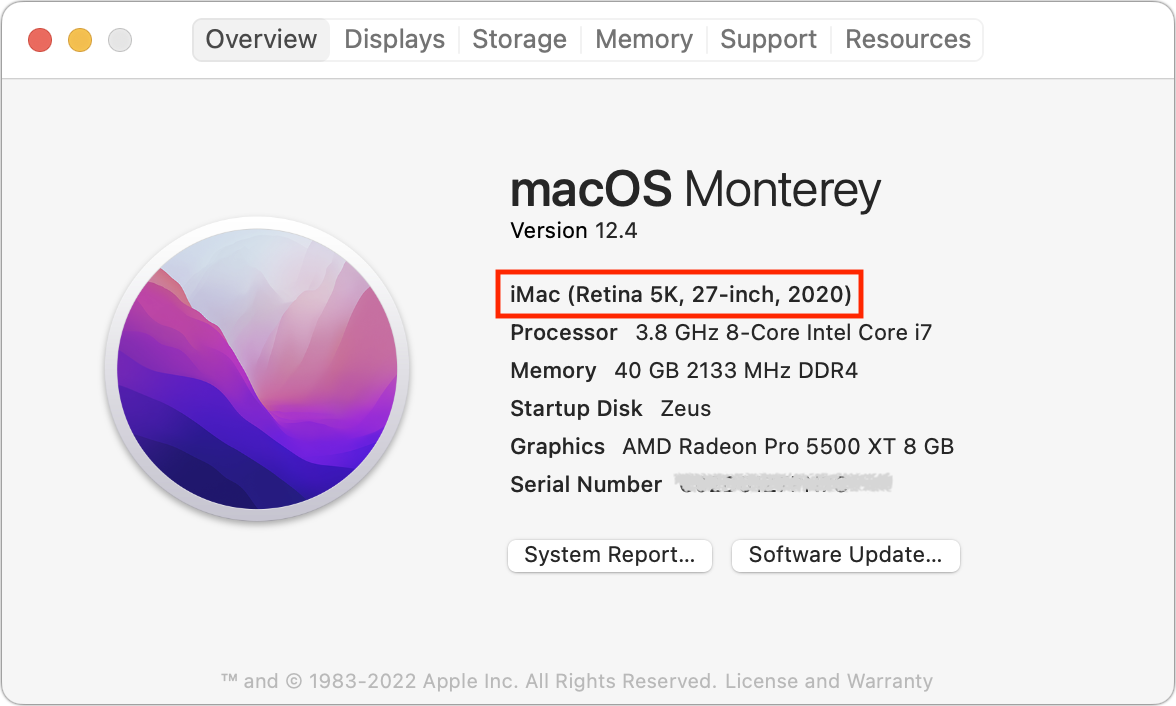
If you’re unsure which Mac you have, choose About This Mac from the Apple menu and look in the first line under the macOS version.
iOS 16
With iOS 16, Apple has maintained the same basic timeframe, supporting all iPhone models released in 2017 and later but dropping everything earlier, along with all iPod touch models. That means you’ll be able to run iOS 16 on these iPhones:
iPhone 13/mini/Pro/Pro Max: A15 Bionic
iPhone 12/mini/Pro/Pro Max: A14 Bionic
iPhone 11/mini/Pro/Pro Max: A13 Bionic
iPhone SE (2nd generation or later): A13 Bionic
iPhone XR/XS/XS Max: A12 Bionic
iPhone X: A11 Bionic
iPhone 8/8 Plus: A11 Bionic
We included each model’s chip family in the list above because that becomes important for particular features we’ll discuss later.
Practically speaking, these iOS 15-compatible devices won’t be able to upgrade to iOS 16:
iPod touch (all models)
iPhone SE (1st generation)
iPhone 6s/6s Plus
iPhone 7/7 Plus
iPadOS 16
Things get more complicated with iPadOS 16 due to there being four different iPad model types with varying capabilities. As with the iPhone models, we’ve included the chip families for reference.
iPad Pro 12.9-inch (1st–5th generation): A9X, A10X Fusion, A12X Bionic, A12Z Bionic, M1
iPad Pro 11-inch (1st–3rd generation): A12X Bionic, A12Z Bionic, M1
iPad Pro 10.5-inch: A10X Fusion
iPad Pro 9.7-inch: A9X
iPad Air (3rd–5th generation): A12 Bionic, A14 Bionic, M1
iPad (5th–8th generation): A9, A10 Fusion, A10 Fusion, A12 Bionic, A13 Bionic
iPad mini (5th and 6th generation): A12 Bionic, A15 Bionic
While that’s a long list, a simpler way to look at it is that only two iPad models that can run iOS 15 now won’t be able to upgrade to iOS 16:
iPad mini (4th generation)
iPad Air (2nd generation)
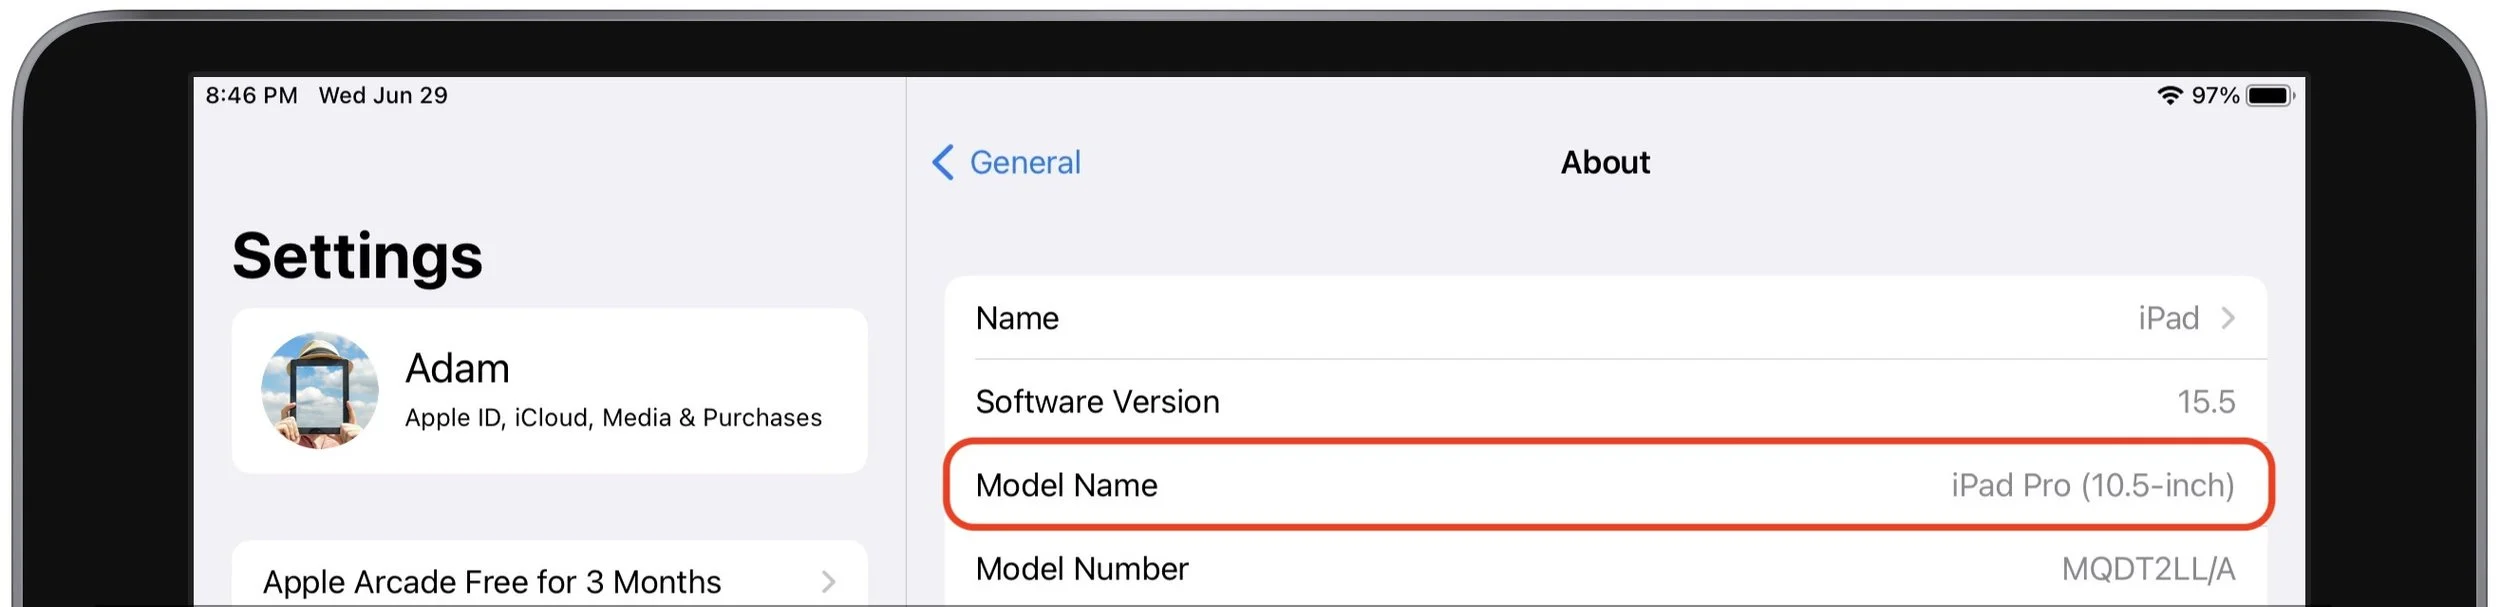
If you’re unsure which iPad model you have (this goes for the iPhone, too), look in Settings > General > About > Model Name.
watchOS 9
The upcoming watchOS 9 has a simple upgrade story. It supports the Apple Watch Series 4 through the Apple Watch Series 7, including the unnumbered Apple Watch SE. (Look in the Watch app on your iPhone if you can’t remember which model you have.) The only current model that won’t be able to upgrade is the Apple Watch Series 3. Although that model is quite old, dropping support for it is somewhat awkward since Apple continues to sell it even today as a low-cost option. If you’re planning to buy an Apple Watch soon, avoid the Series 3.
Feature-Based System Requirements
For some new features in iOS 16 and iPadOS 16, Apple has drawn a line in the sand at the A12 Bionic chip. These features will work on an iPhone or iPad with an A12 Bionic or later, but not on older devices that can still run iOS 16 and iPadOS 16. Some will also work on the Mac. These features include:
Lifting the subject of a photo from its background (also works on all Ventura-compatible Macs)
Live Text support in videos (also works on all Ventura-compatible Macs)
Spotlight search for images by location, people, scenes, text, and contents
Using dictation alongside the onscreen keyboard
Inserting emojis using dictation (in Ventura, requires a Mac with Apple silicon)
Enhanced Siri support for asking an app what voice commands it supports, hanging up calls, inserting emojis in texts, and working offline (these features won’t be available on the Mac in Ventura)
Recognition of birds, insects, and statues in Visual Lookup (also works on all Ventura-compatible Macs)
Some additional features have idiosyncratic system requirements:
Live Captions that automatically generate text for any audio require an iPhone 11 or later, an iPad with A12 Bionic or later, or a Mac with Apple silicon.
Detection Mode in the Magnifier app, which can identify objects like doors, requires an iPhone 12 Pro or iPhone 13 Pro, an iPad Pro 12.9-inch (4th and 5th generation), or an iPad Pro 11-inch (2nd and 3rd generation).
The Camera app will let you blur the foreground in Portrait photos and improves the quality of Cinematic mode videos, but only for the iPhone 13 lineup.
The capability to use an iPhone as a webcam requires an iPhone XR or later.
When using an iPhone as a webcam, the Center Stage and Desk View features (the latter lets you show the other party what’s in front of you on your desk) require an iPhone 11 or later.
The new Studio Light feature that dims the background and lights up your face to simulate external lighting needs an iPhone 12 or later.
The Health app’s capability to scan medicine labels requires an iPhone XR or later.
Dictation can add punctuation automatically if you’re using an iPhone 11 or later, an iPad with an A12 Bionic or later, or a Mac with Apple silicon.
You can shrink iPad user interface elements to be smaller to fit more onto the screen with M1 iPads.
iPadOS 16 supports virtual memory swapping to provide up to 16 GB of memory to demanding apps, but only on M1 iPads.
The new Stage Manager windowing feature requires an M1 iPad in iPadOS 16 but will work with all Ventura-compatible Macs.
It can be disappointing when your fully functional Mac, iPhone, or iPad doesn’t support some snazzy new feature, but it’s better that Apple lets that device upgrade to the latest operating system rather than kicking it off the upgrade train just because it doesn’t have enough processor power for everything.
(Featured image by Apple)
11 Features to Look Forward to in Apple’s 2022 Operating Systems
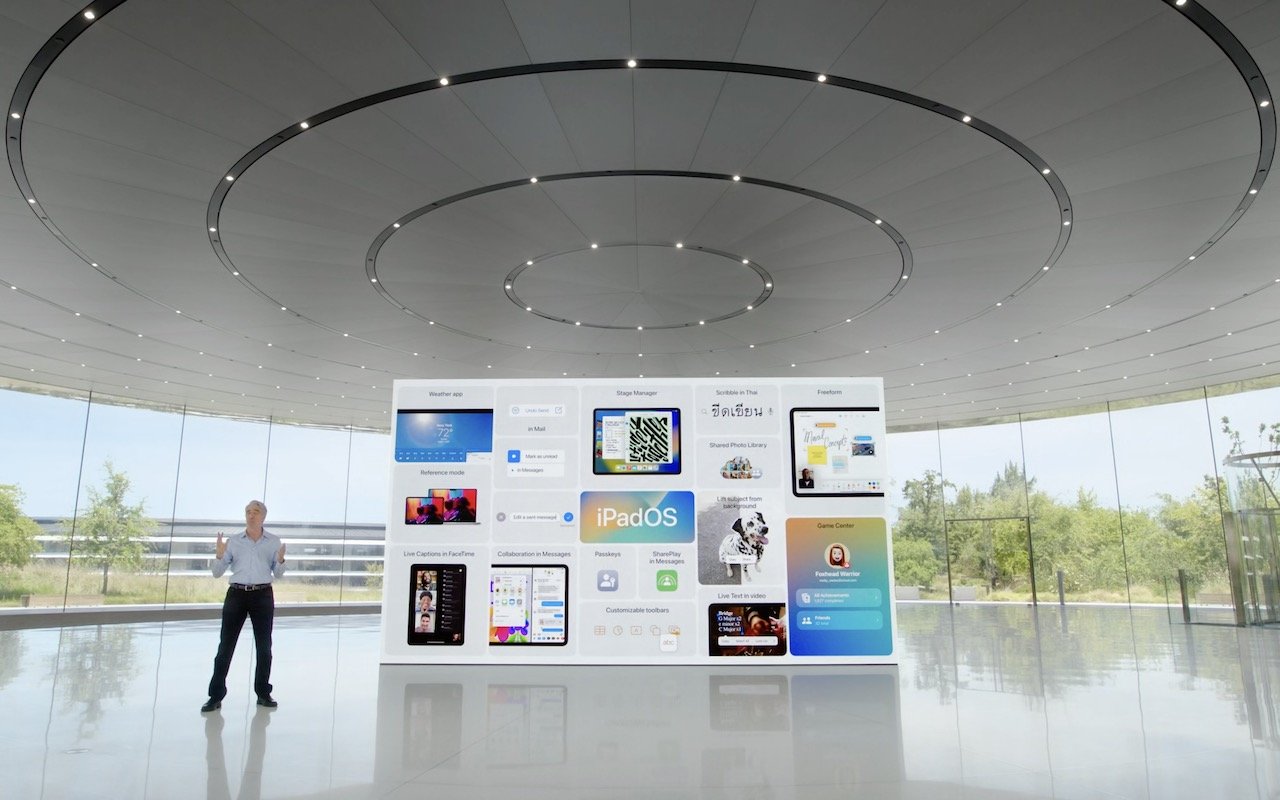
It’s that time of year again. Apple CEO Tim Cook and numerous Apple employees took the virtual stage again at the company’s Worldwide Developer Conference keynote on June 6th to share what we can expect to see later this year in macOS 13 Ventura, iOS 16, iPadOS 16, and watchOS 9. (Almost no mention was made of tvOS or the HomePod, but Apple will undoubtedly move them forward in small ways as well.)
The announcements came thick and fast, and like last year, many of the technologies cut across several of Apple’s operating systems. Before we dive in, however, remember that some older devices won’t be able to upgrade. Here are the basic system requirements, though certain features won’t be available on all devices:
macOS 13 Ventura: iMac, iMac Pro, MacBook, and MacBook Pro from 2017 and later. MacBook Air and Mac mini from 2018 and later. Mac Pro from 2019 and later. Mac Studio from 2022.
iOS 16: Second-generation iPhone SE, iPhone 8, and later
iPadOS 16: Fifth-generation iPad and later, fifth-generation iPad mini and later, third-generation iPad Air and later, and all iPad Pro models
watchOS 9: Apple Watch Series 4 and newer, including the Apple Watch SE
Here are the promised new features we think will have the most impact on your Apple experience. Assume that these features are available on the Mac, iPhone, and iPad unless otherwise specified.
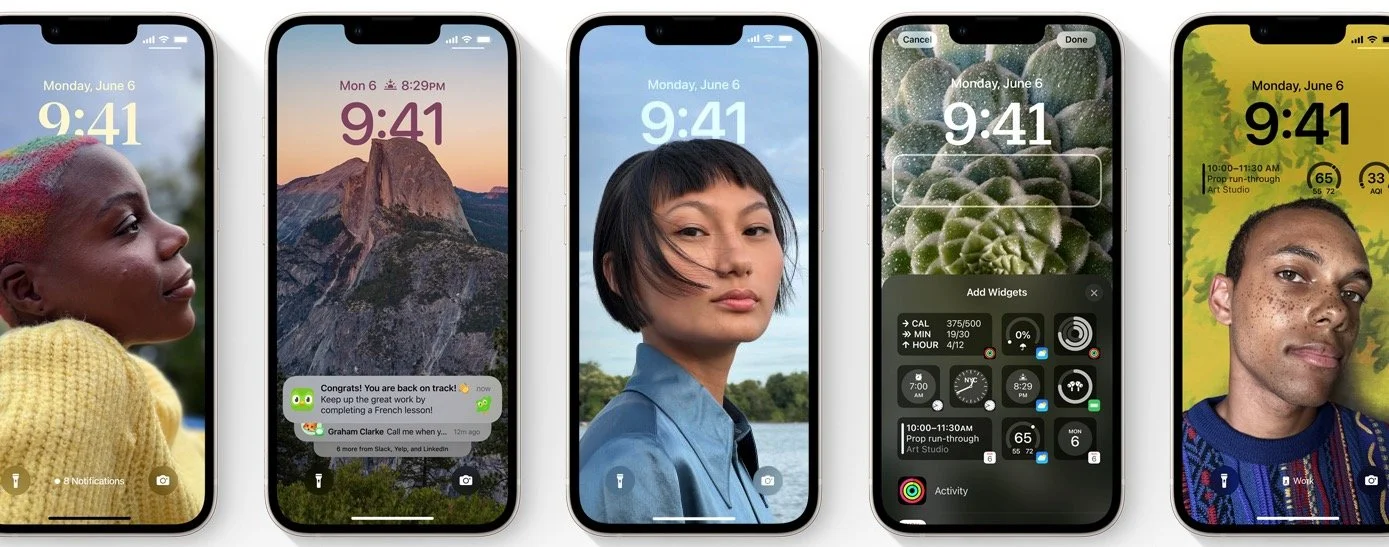
Customizable iPhone Lock Screen
We’ve been able to put a photo on the iPhone’s Lock screen for years, but that’s it. With iOS 16, Apple is opening up lots of customization options along the lines of what you can do to Apple Watch faces. To start, you can customize the font, color, and placement of various options, just like a watch face. Photos dynamically display in front of the time, and you can have a set of photos shuffle throughout the day. Widgets from Apple and third-party developers provide at-a-glance information so you can check the weather, say, without even unlocking your iPhone. Notifications now scroll up from the bottom, and Live Activities help you stay up on the music that’s currently playing or the latest score in the big game.
Messages Gains Editing, Undo Send, and Mark as Unread
At long last, Messages will let us edit messages after sending, undo sending to call a message back, and mark messages as unread. The first two features are essential for clear communication, especially when you’re fixing auto-correct failures, and being able to mark messages as unread ensures that you won’t forget to respond to something that you read when you’re not in a position to reply.

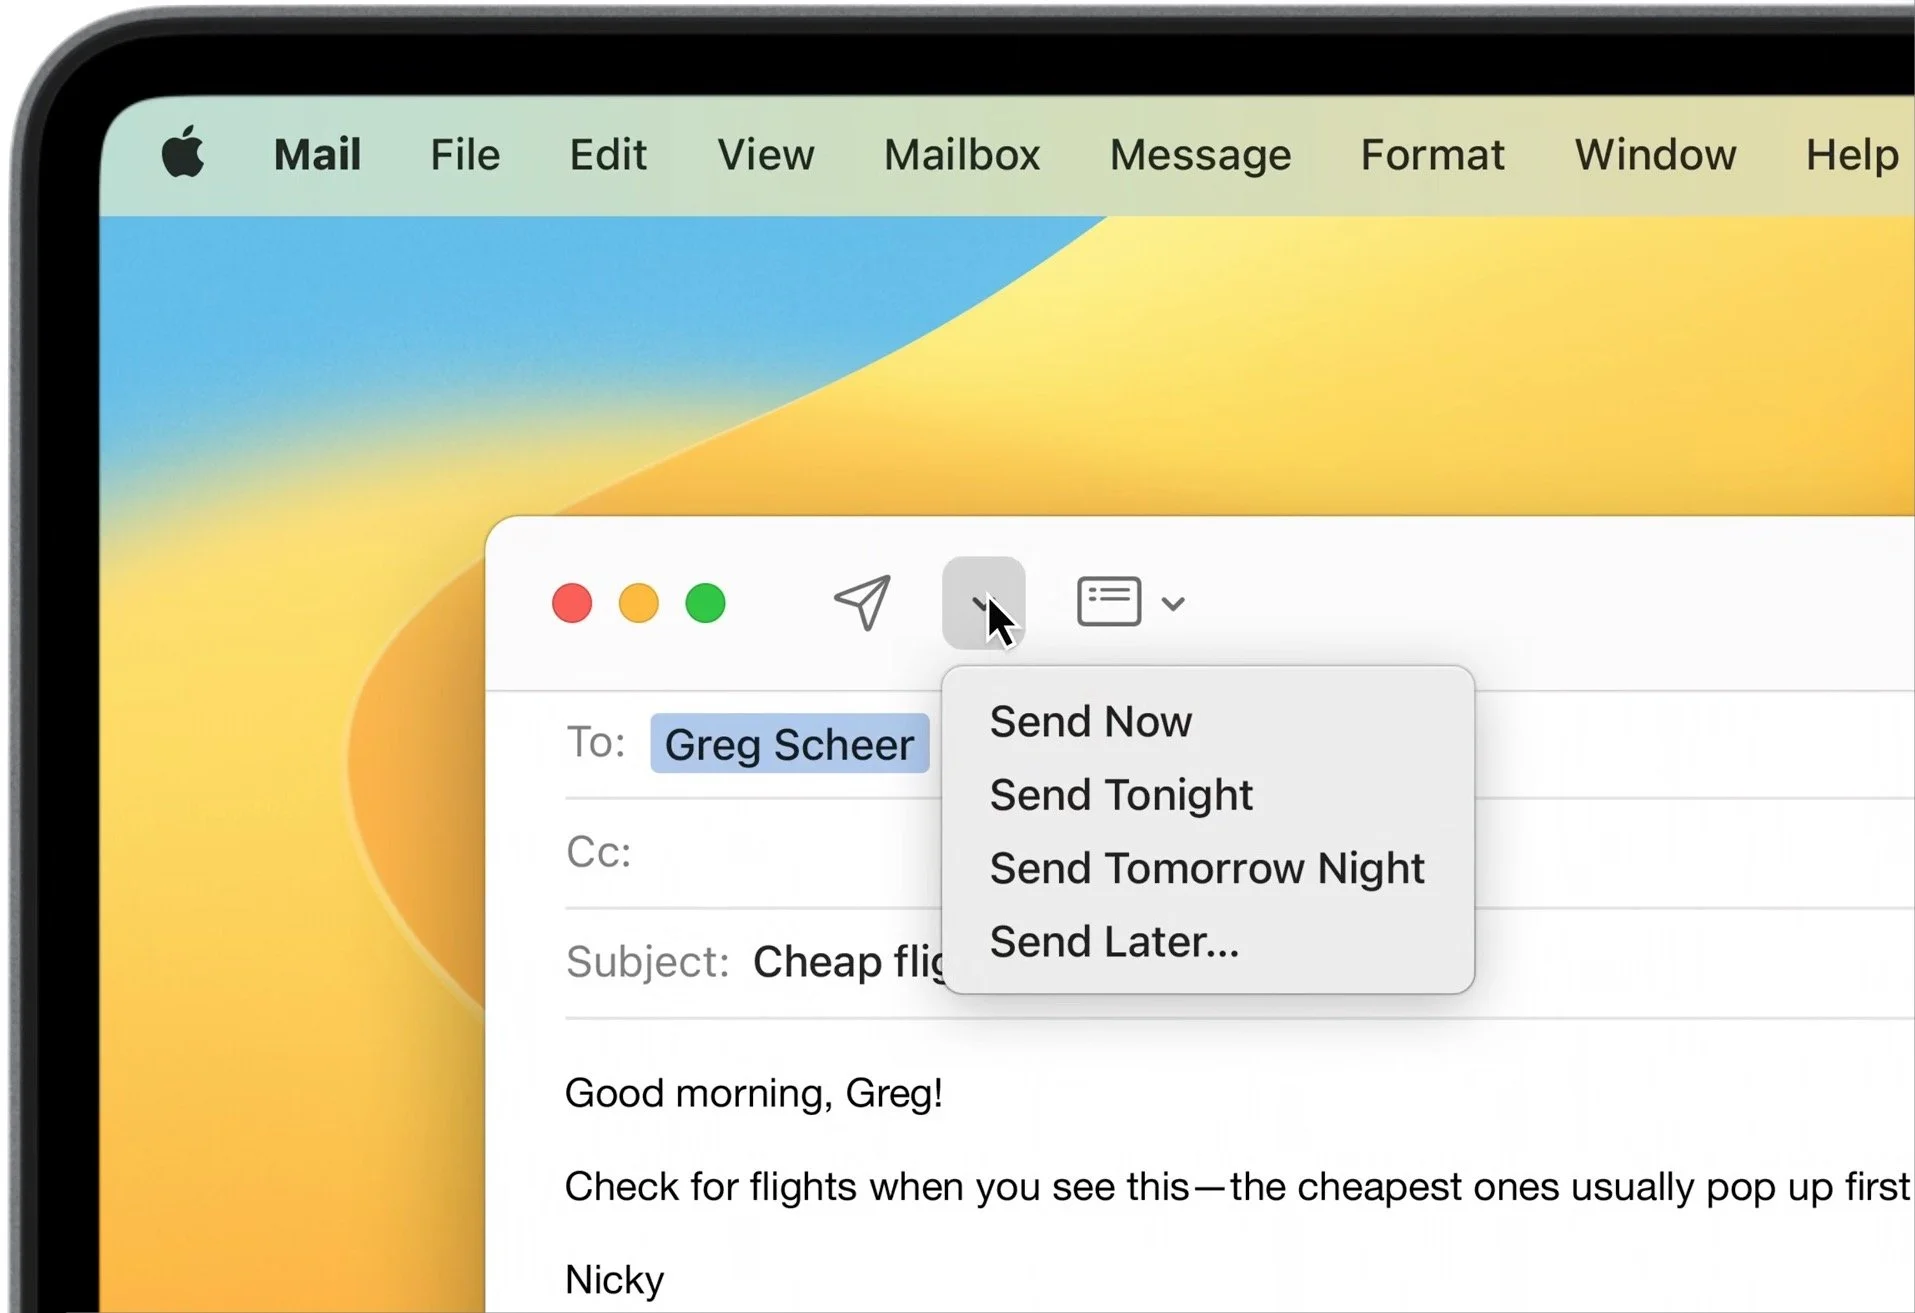
Mail Adds Undo Send, Scheduled Send, Follow-up, and Remind Me
It’s surprising that Apple hasn’t spent more time on Mail in recent years, but that’s changing in 2022, when it will gain some welcome features that are commonplace in other email apps. You’ll be able to undo sending, which is helpful when you remember something to add to a message within 10 seconds after clicking the Send button. For more specific timing, scheduled send lets you specify when a message should go out. This is helpful when you are working on the weekend or late at night but don’t want your coworkers to feel that they need to reply right away. Mail will also move sent messages that haven’t received replies to the top of your inbox so you can follow up, and you can set a reminder to come back to messages that you’ve opened but not dealt with (many of us just mark those as unread).
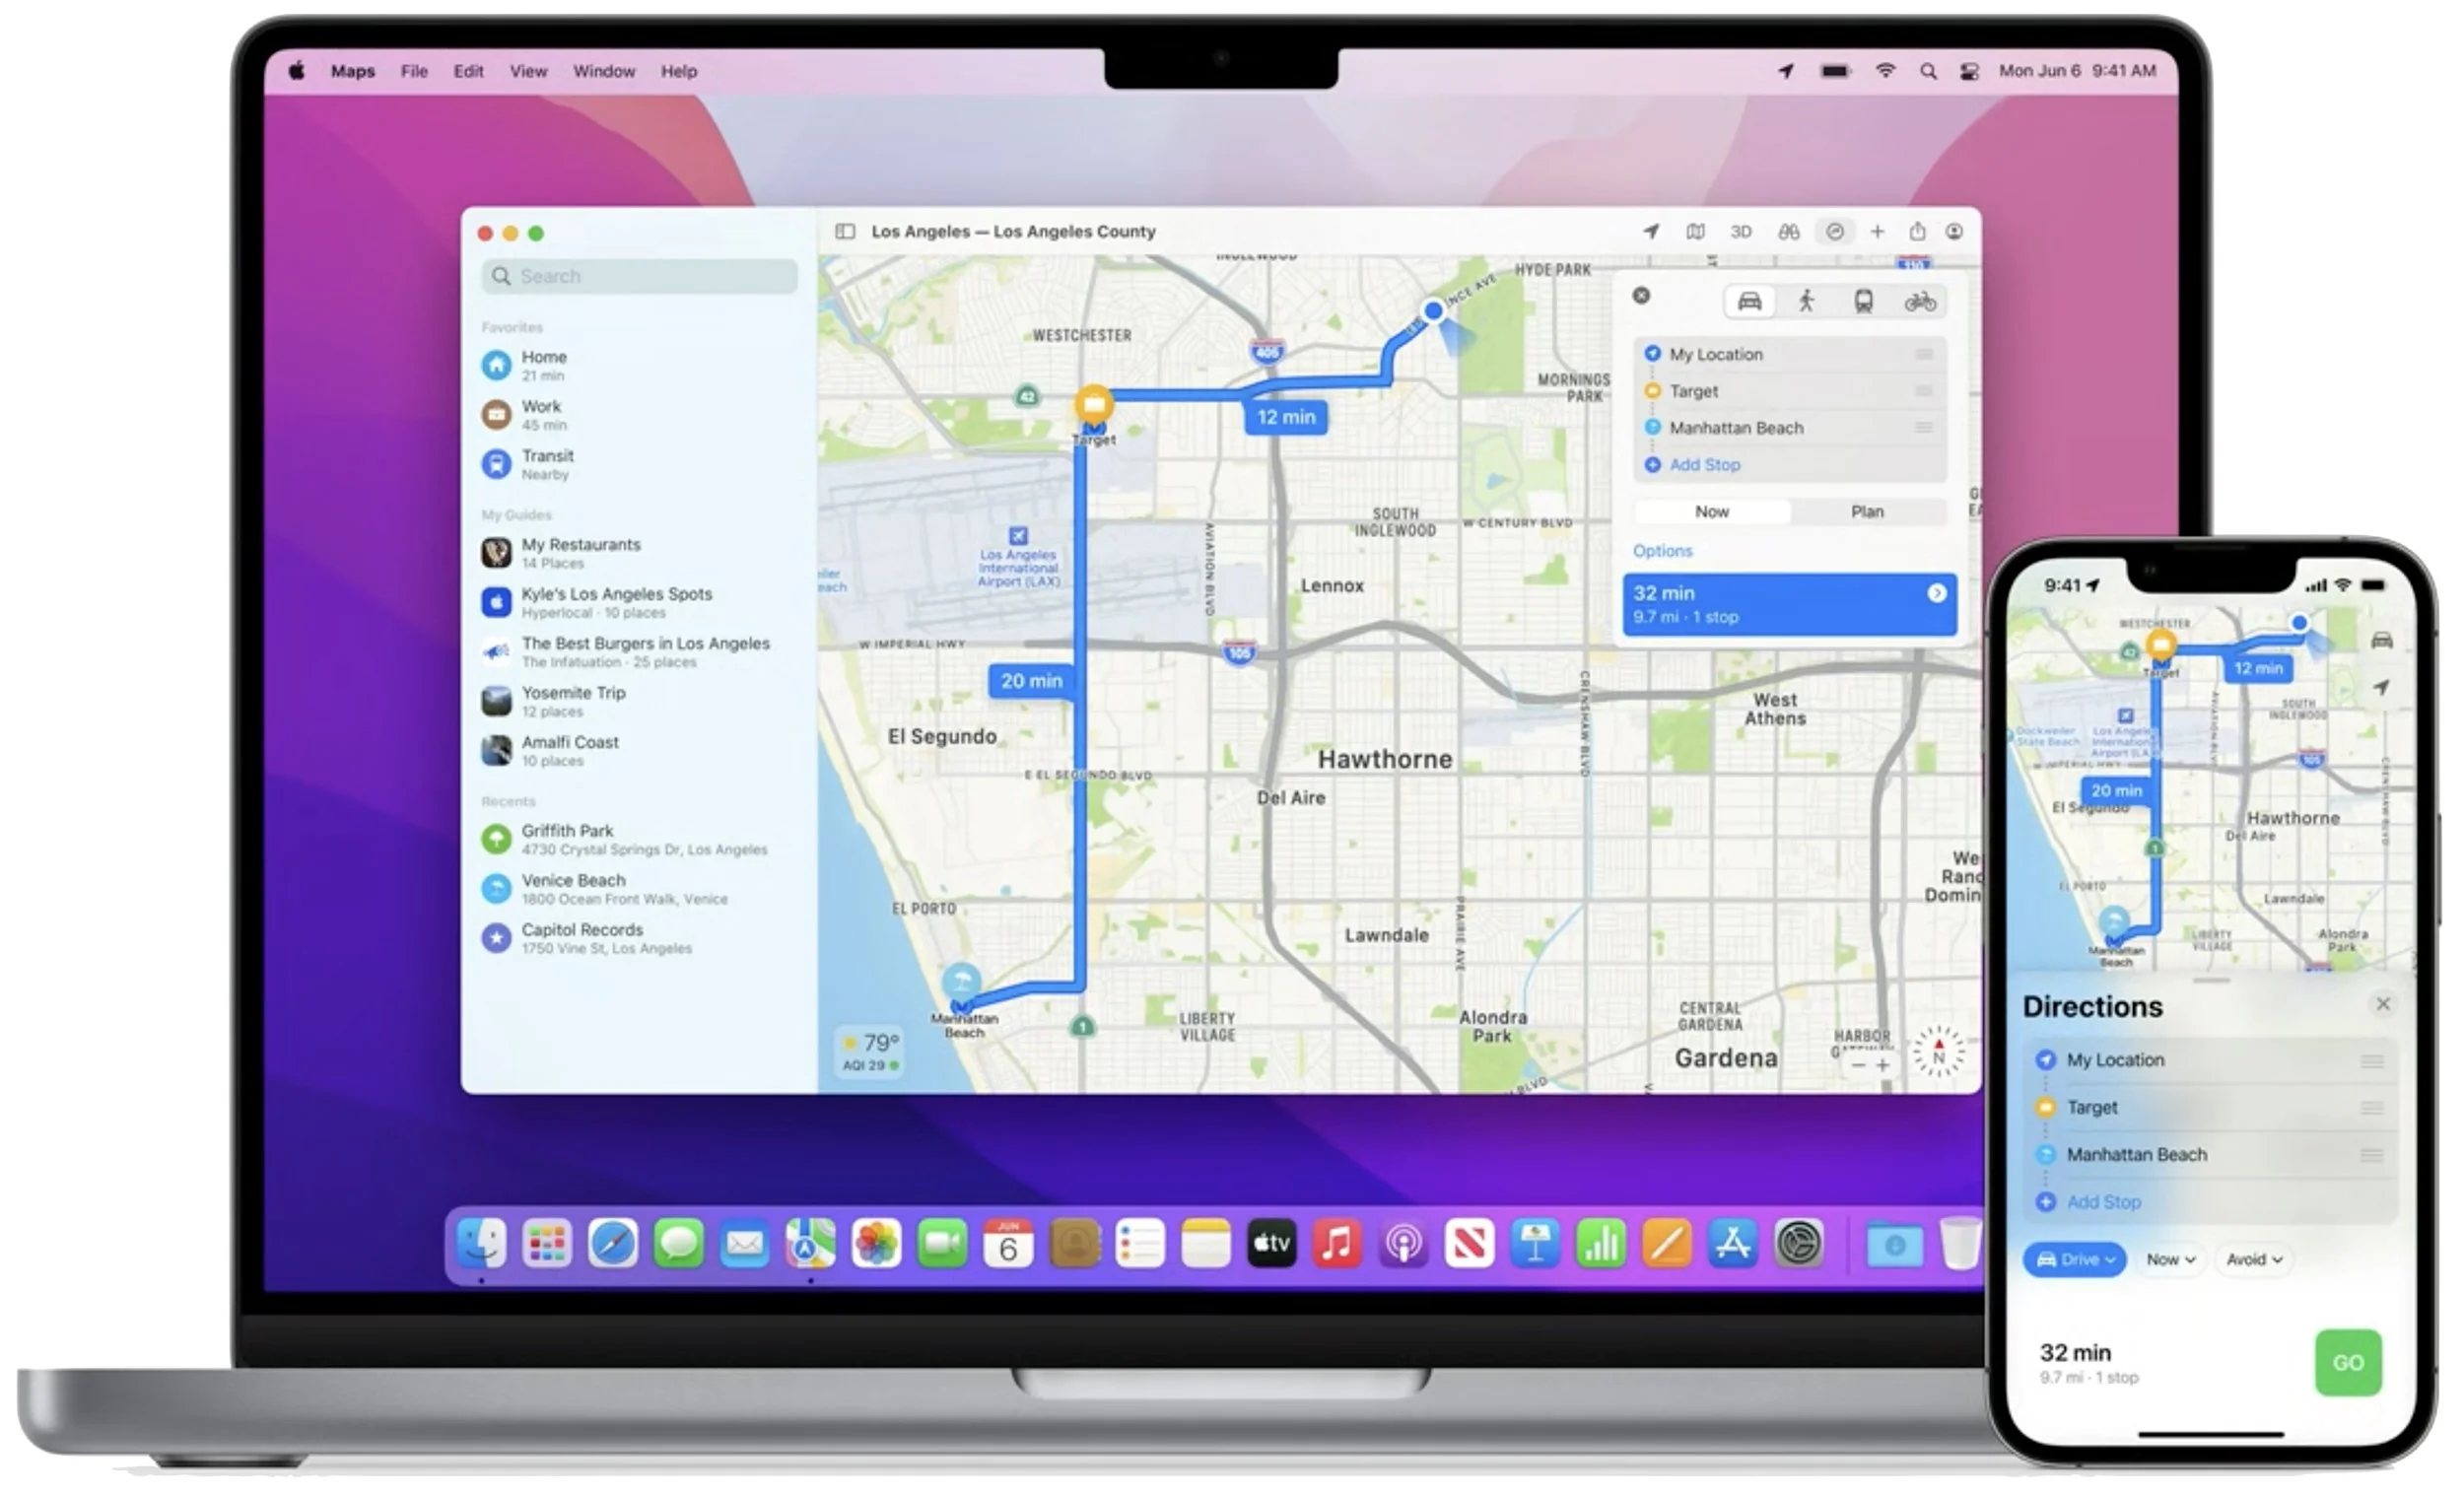
Multi-Stop Routing in Maps
No longer are you limited to a single destination when creating a route in Maps. You’ll be able to specify up to 15 stops on a route, making it easy to build a trip that includes a swing by your favorite diner, a quick visit with an old friend, and a pilgrimage to the World’s Largest Bull in Iowa.
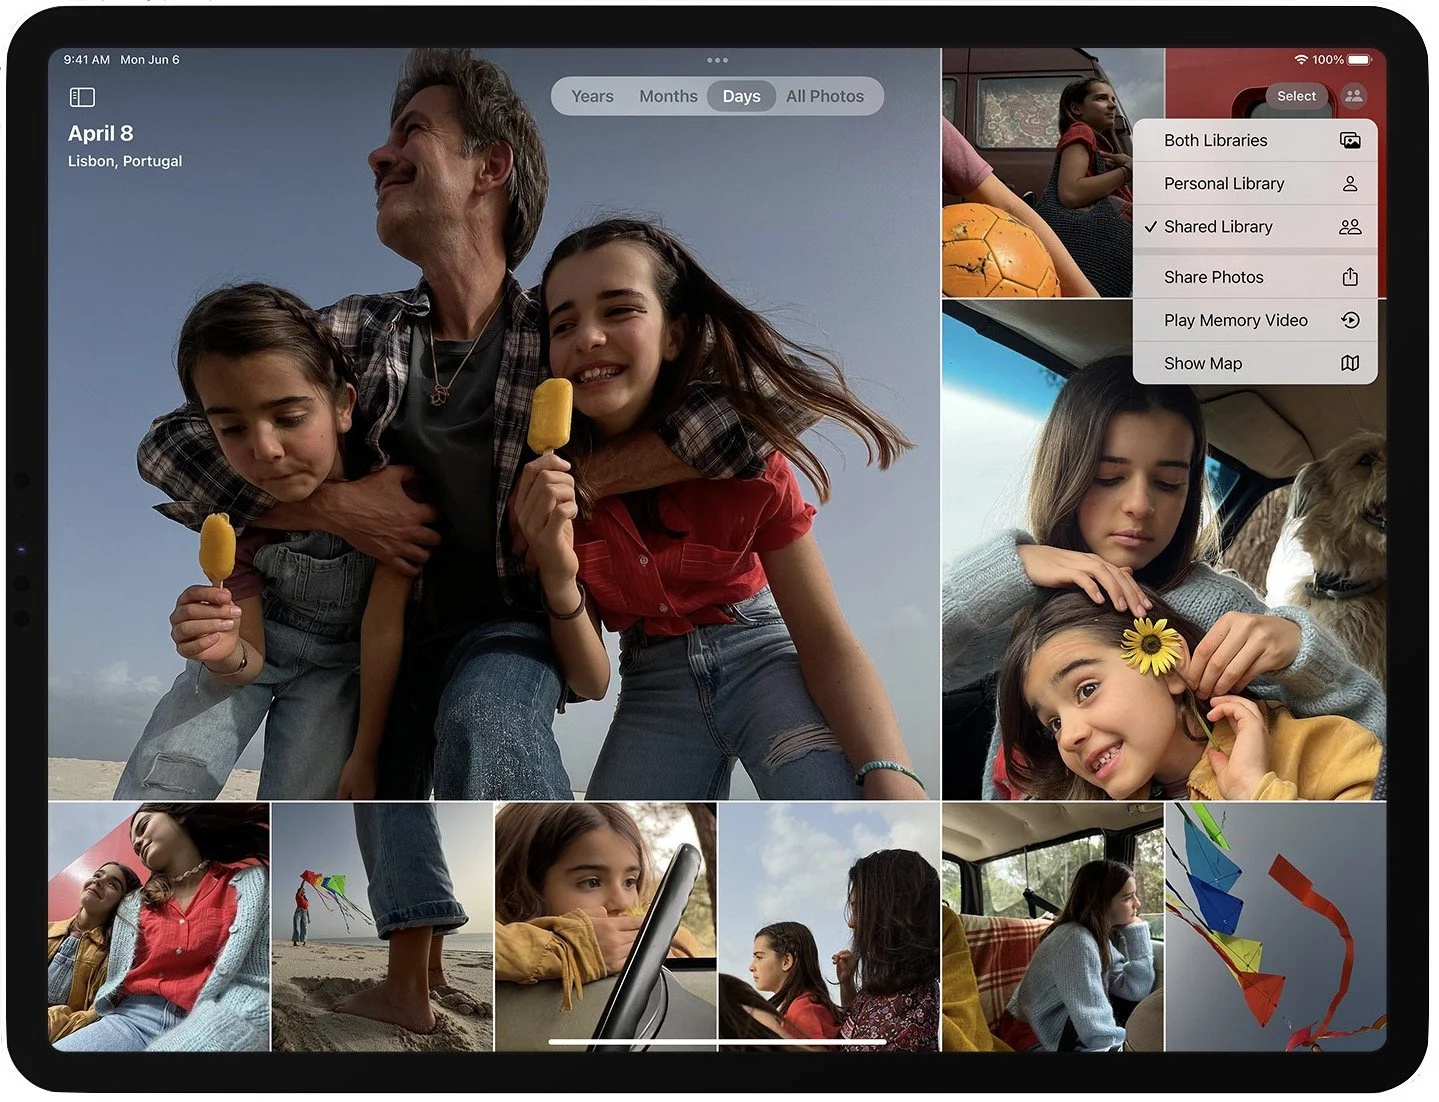
iCloud Shared Photo Library Improves Family Photo Sharing
Apple’s latest attempt to help families share photos looks like the best yet—certainly better than the shared Family album that’s created for Family Sharing groups now. It will be a completely separate iCloud photo library shared with up to five other people. You’ll be able to populate it with all your existing photos or a subset based on start date or who’s in them. Everyone will have equal permission to add, edit, favorite, caption, and delete photos, so maintaining and improving it becomes a group activity. Sharing new photos will be easy with a switch in the Camera app, automatic sharing based on proximity to family members, and sharing suggestions in Photos.
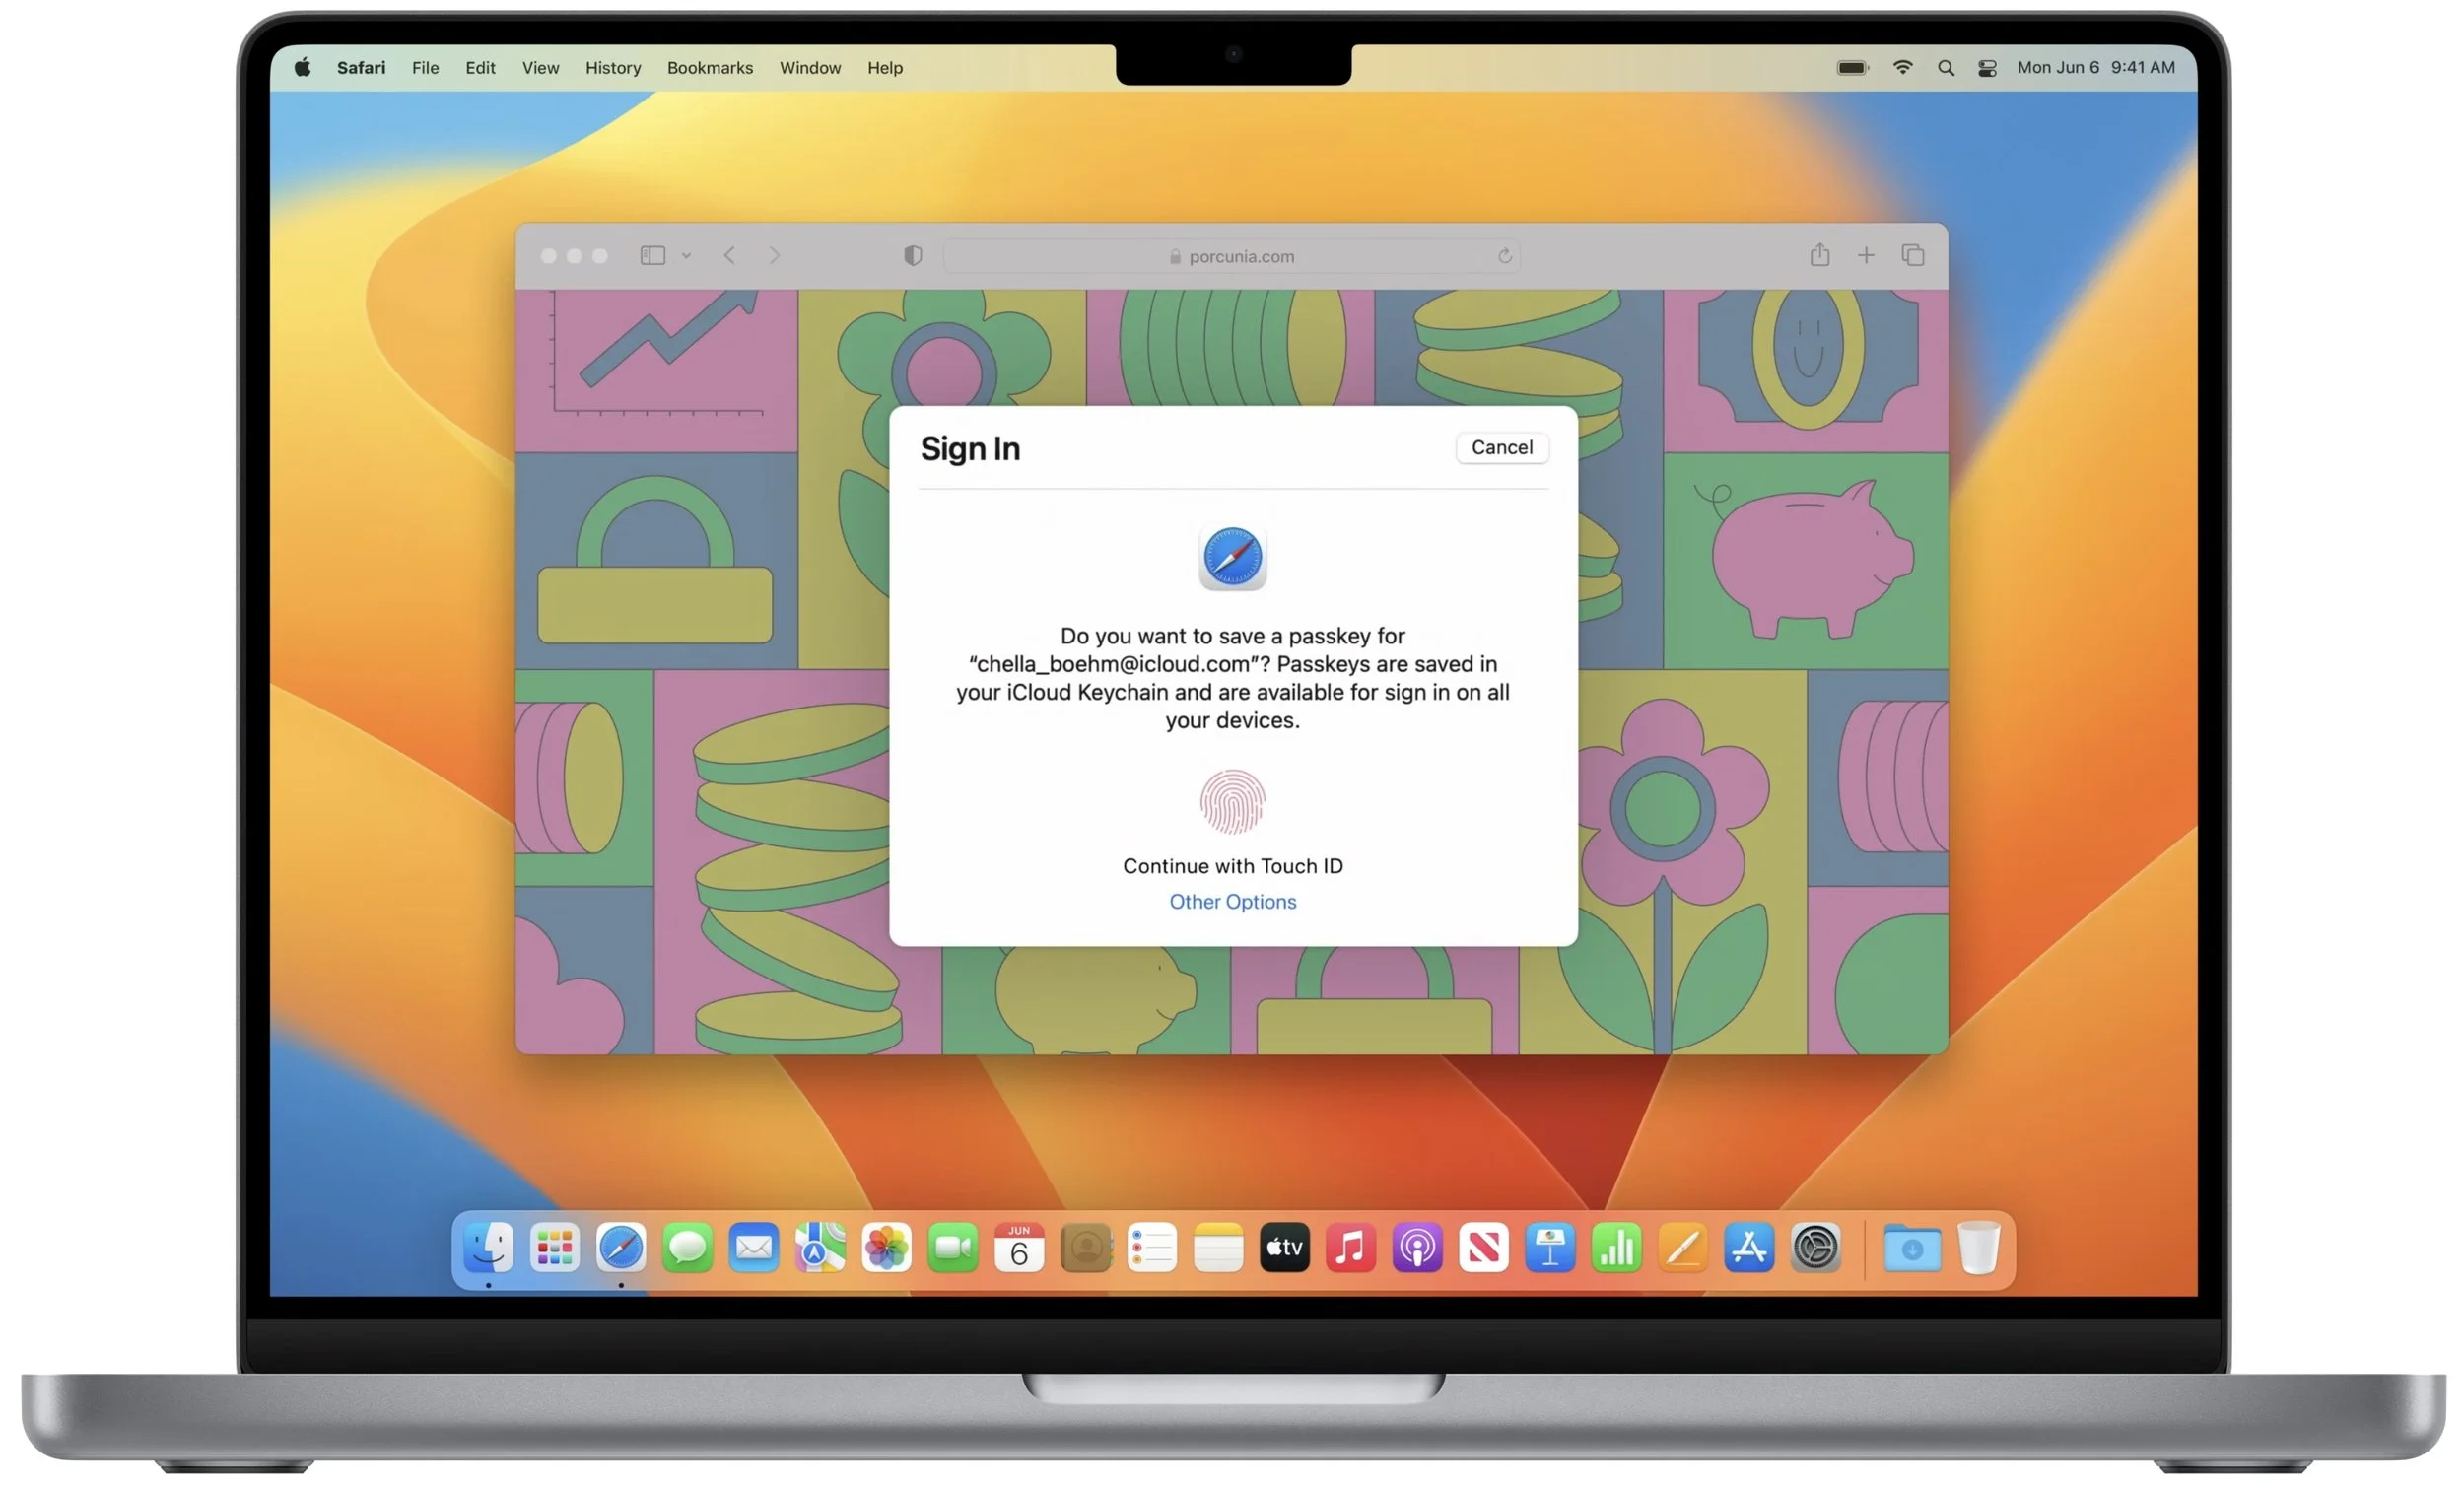
Passkeys Aims to Replace Passwords… Eventually
Apple’s new Passkeys technology, which is associated with the work of an industry consortium called the FIDO Alliance to ensure cross-platform support, aims to replace passwords for websites and apps with private passkeys that are stored only on your device and accessed by Touch ID or Face ID. Passkeys are easier to use than passwords and significantly safer because they can’t be stolen from websites and each one is specific to the site for which you create it. They’ll be available on all your Apple devices, syncing end-to-end encrypted through iCloud Keychain.
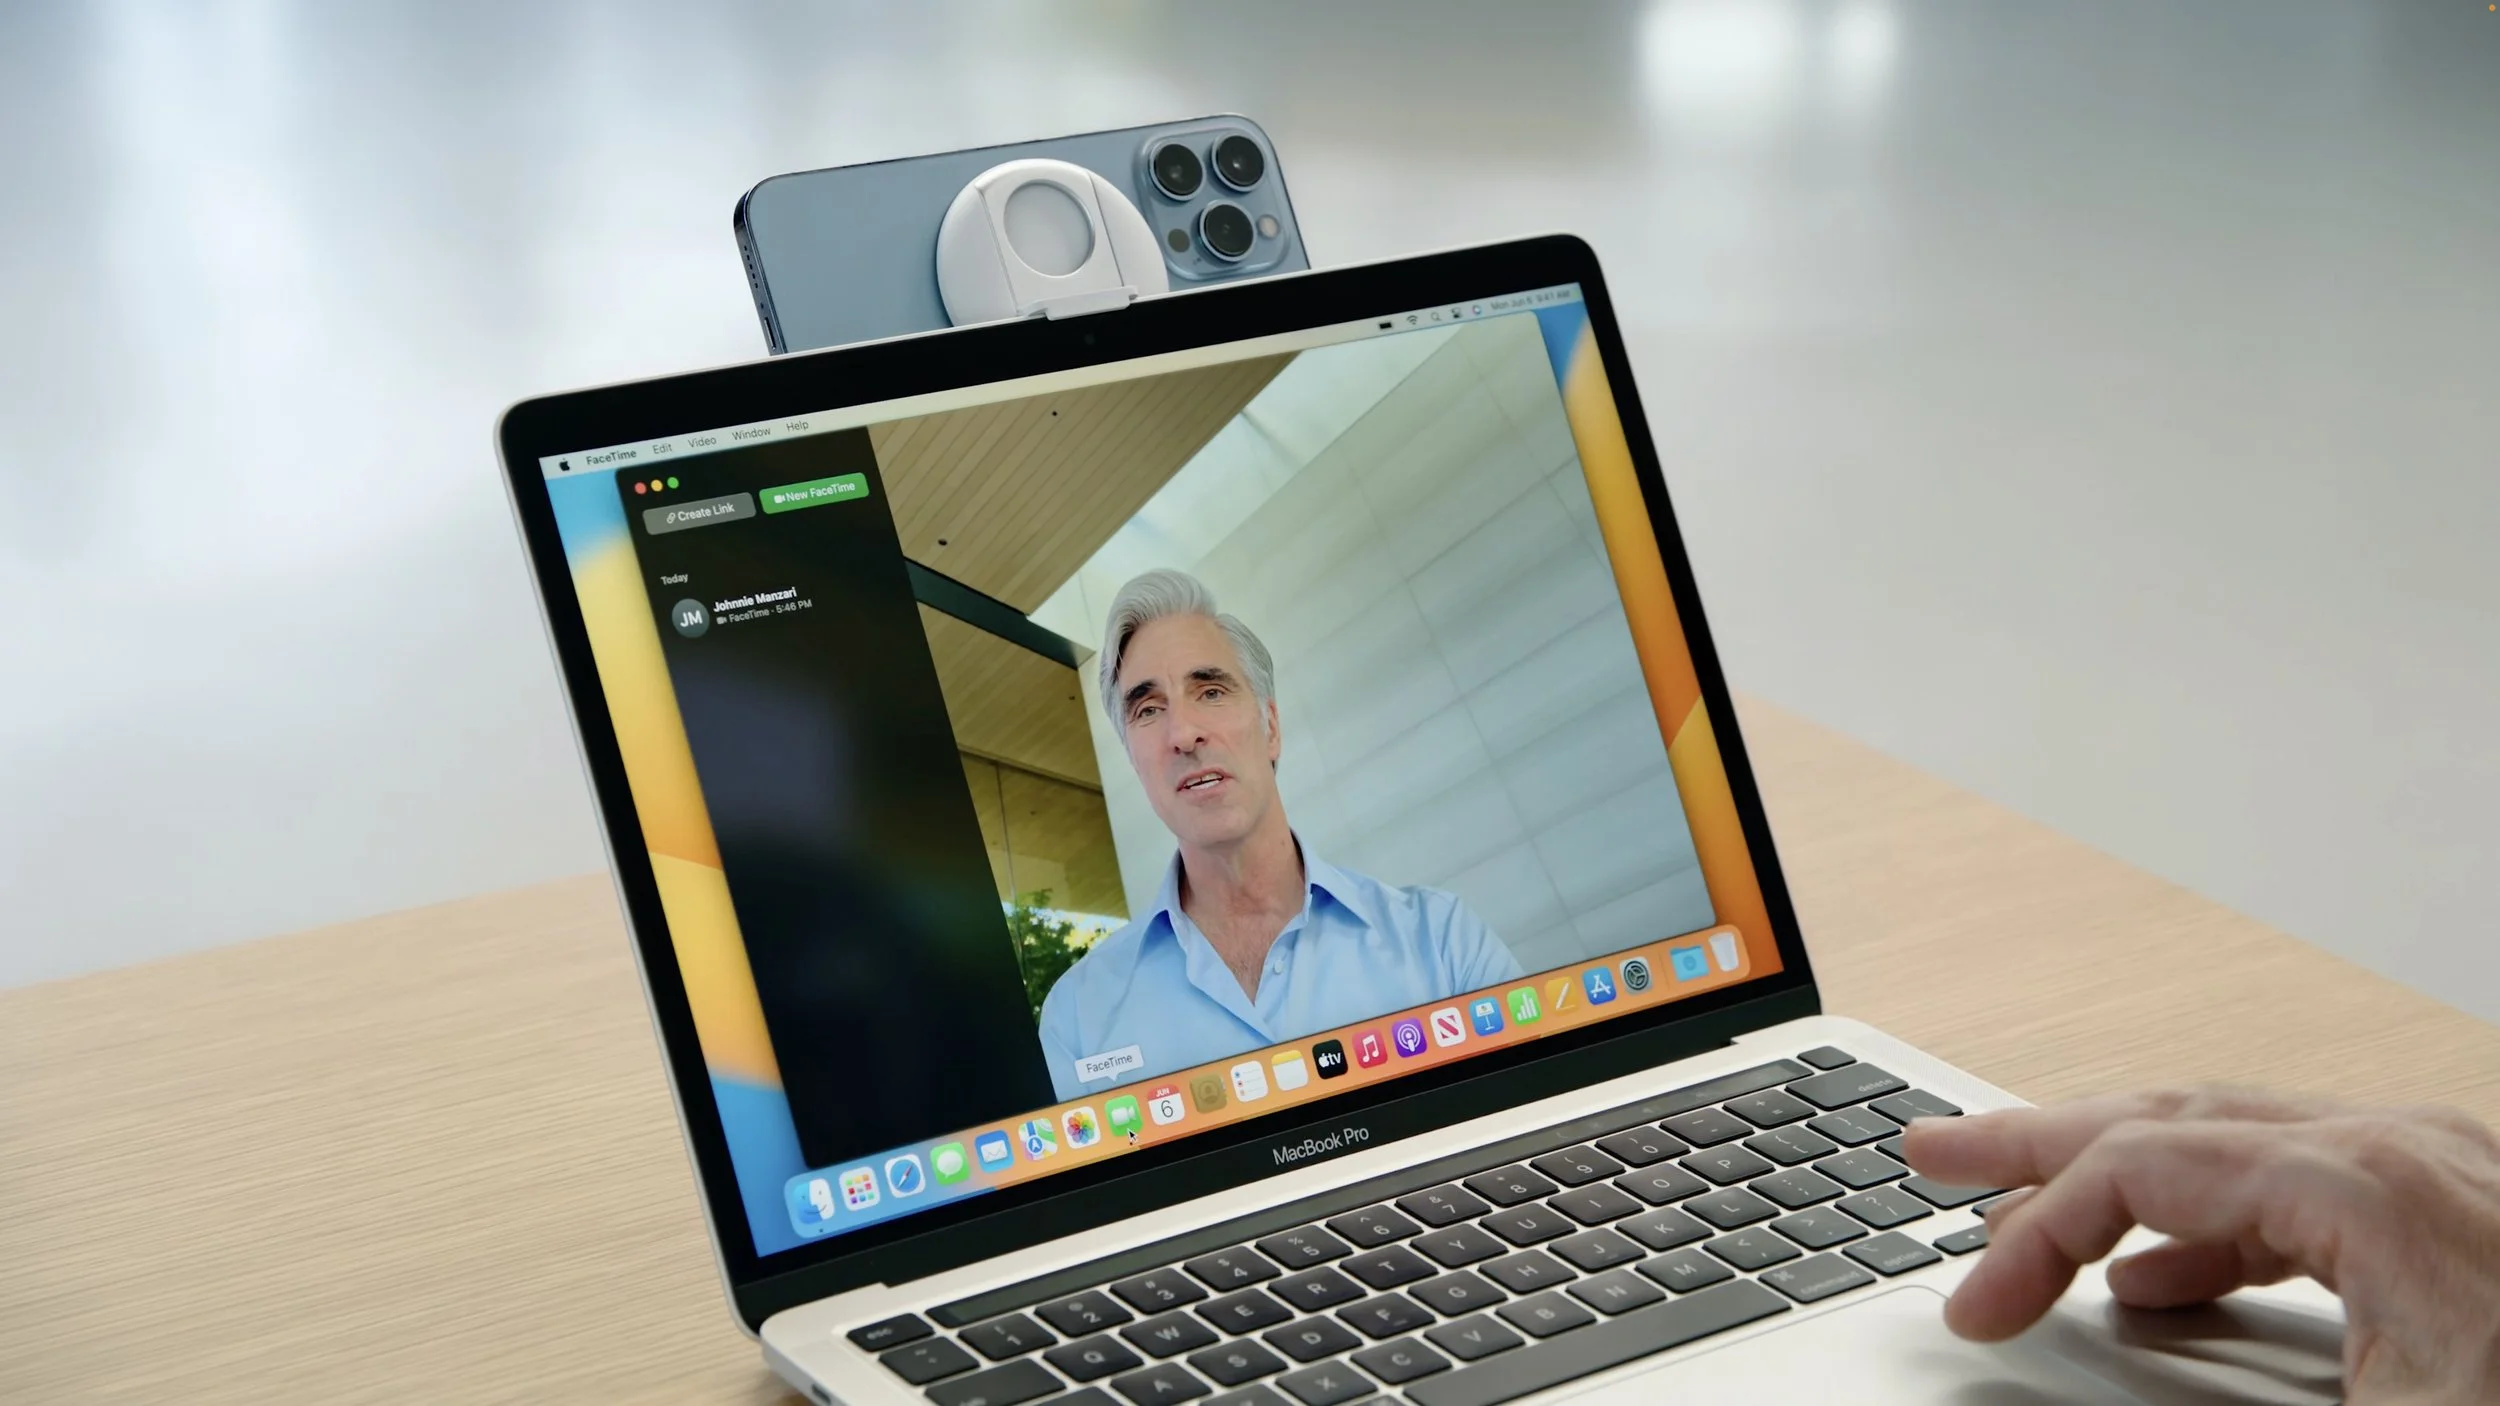
Use Your iPhone as a Webcam for Your Mac
Mac webcams are nowhere near as good as the rear-facing cameras in your iPhone, so Apple is helping us improve our videoconferencing by using an iPhone as a webcam and microphone. The feature, called Continuity Camera, works wired or wirelessly and can automatically switch to using your iPhone as a webcam when you bring it close to your Mac. It provides Portrait mode to blur the background, Center Stage so you can move around, Studio Light to dim the background and illuminate your face, and even Desk View to show what’s on your desk in front of your Mac. Apple says Belkin will be making clips to attach your iPhone to your Mac.
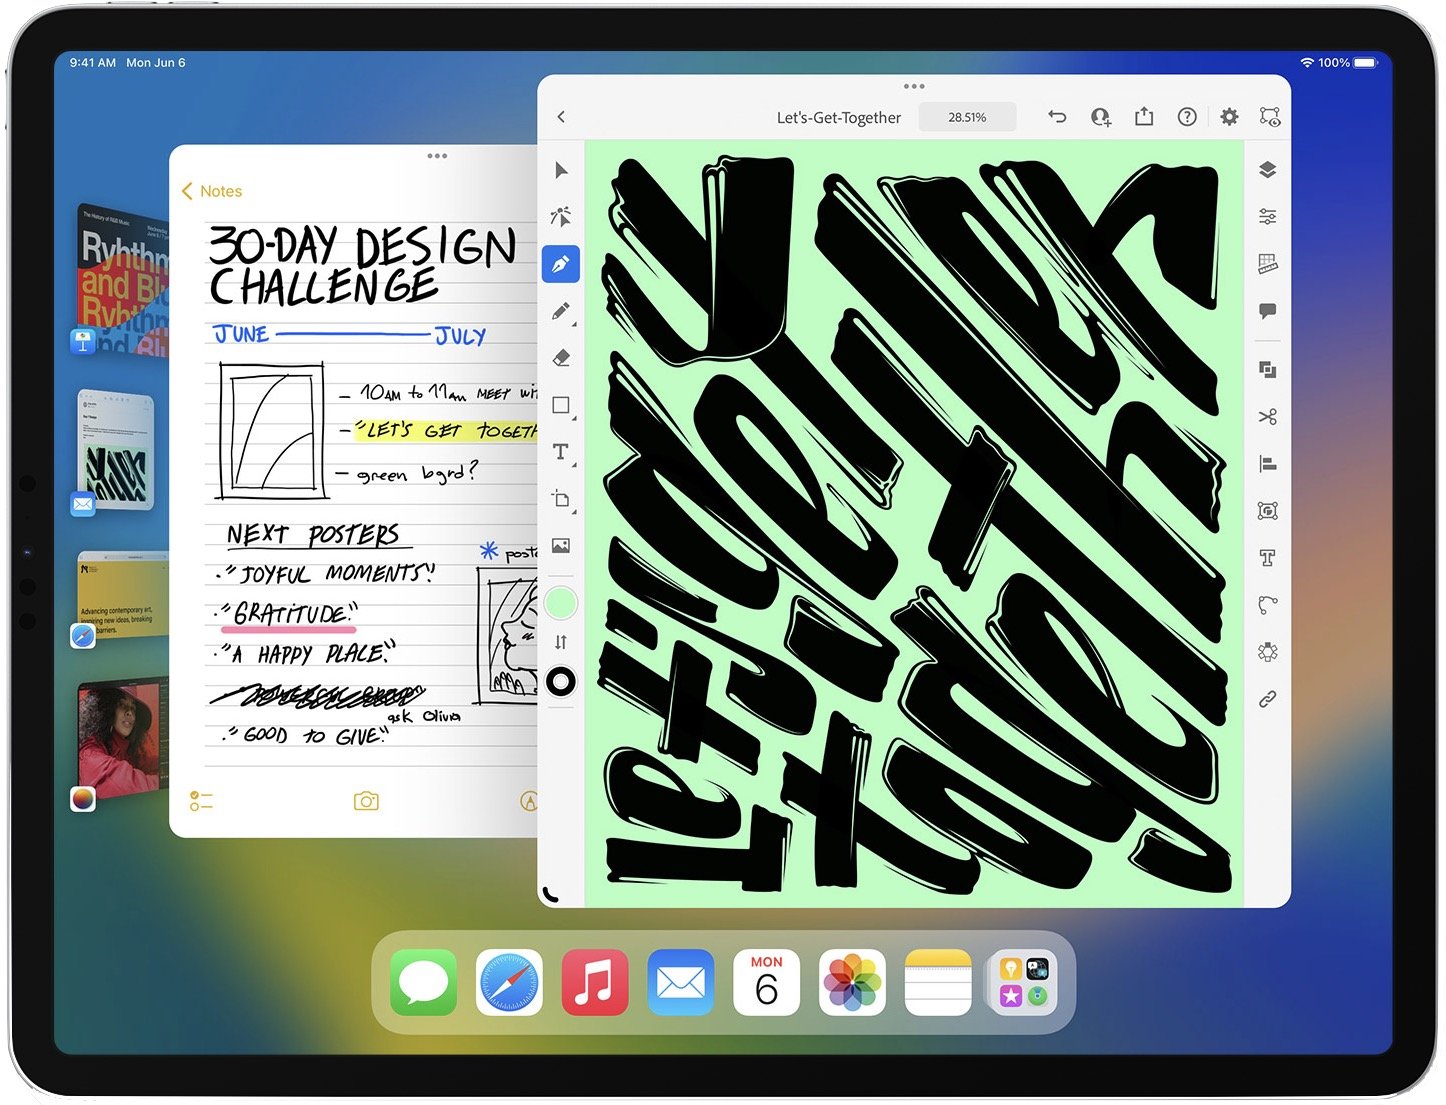
Stage Manager Offers New Window Management Approach
We’re not yet sure what to make of Stage Manager, which is Apple’s new approach to window management on the iPad and Mac. It puts one app in the center of the screen while keeping other apps off to the side, making it easy to flip between apps or show multiple apps at once. It doesn’t replace traditional window management—you have to turn it on in Control Center—so you won’t be forced to change, but it might be welcome, especially on the iPad, where it also enables the use of an external display.
Simultaneous Dictation, Touch Selection, and Keyboard Editing
On the iPhone and iPad, you’ve been able to tap a microphone button to invoke Dictation, a huge boon when you want to send a message without typing. In iOS 16 and iPadOS 16, Apple has radically improved Dictation, so you can now simultaneously talk, type, edit on the keyboard, select text via touch, and use the Apple Pencil (on an iPad). Dictation will also automatically add commas, periods, and question marks as you dictate, and you can insert emojis with voice commands. Sadly, it seems that the Mac gets only the punctuation and emoji capabilities.

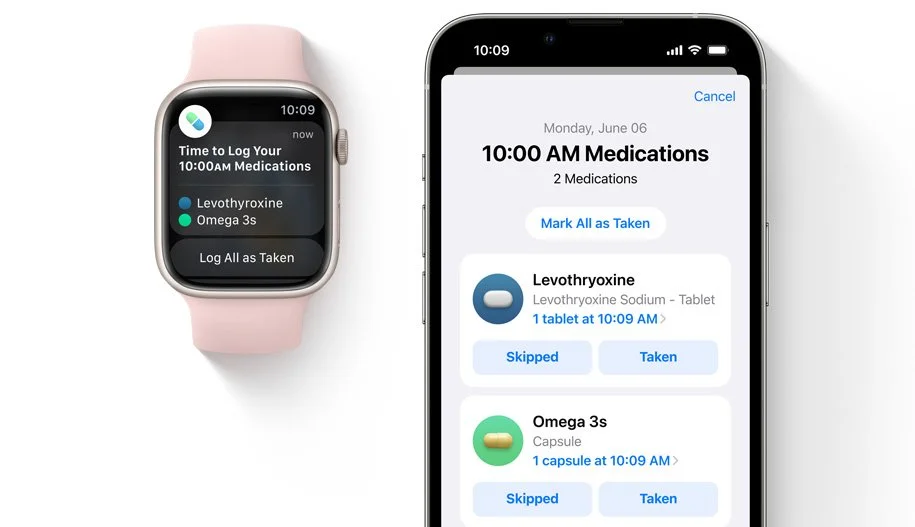
Medications App on the Apple Watch
Many of us have to take medications, vitamins, and supplements regularly. To help us better manage our health, Apple is adding the Medications app to watchOS 9. You’ll be able to enter your meds in the Health app on the iPhone, be alerted to any critical interactions between drugs, and have your Apple Watch notify you to take the right pills at the right times.
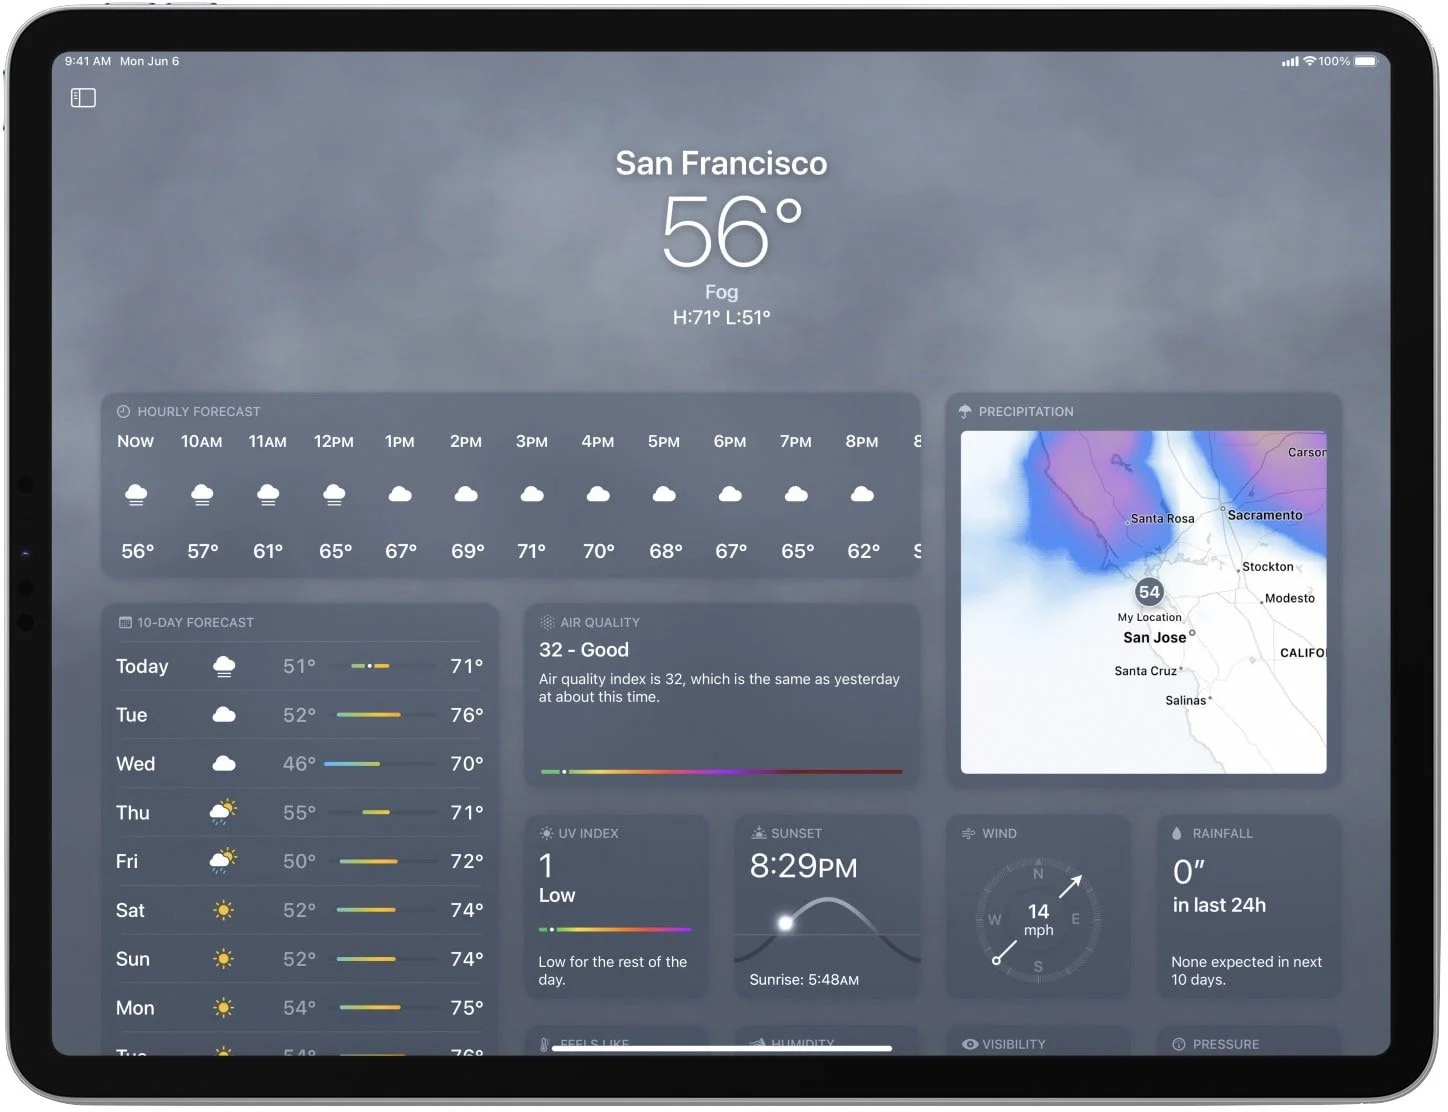
Weather App Appears on the iPad and Mac
Finally, because our list goes to 11, Apple says it’s bringing the Weather app to the iPad and the Mac. Since Weather has been on the iPhone since the beginning, it’s hard to fathom what took Apple so long. If you haven’t already jumped ship for one of the 17,000 other weather apps out there, you’ll be able to enjoy using Apple’s built-in app in iPadOS 16 and macOS 13 Ventura.
Apple’s upcoming operating system releases boast many other new features, and we plan to explore more of them once everything ships in a few months. We’ll let you know when it’s time to update!
(Featured image by Apple)