
Four Solutions to Gotchas in macOS 14 Sonoma
Some of the new default features in Sonoma have caused confusion. We explain why windows hide when you click the desktop, where printer queue apps went, how to turn off the new reaction gestures, and the privacy awareness icons.

We’re seeing an increasing number of people switching to macOS 14 Sonoma, and for the most part, things are going well. However, Apple introduced some new features—and turned them on by default—that are causing some consternation. If you’ve switched to Sonoma or are planning to soon, here are four features you might want to know about.
Hide Windows when Clicking on the Desktop
The most immediately surprising thing you’ll notice when you upgrade to Sonoma is that clicking an empty area on the desktop moves all windows off to the side to give you full access to icons and widgets on your desktop. It’s not a bad feature, but if you’re accustomed to clicking the desktop simply to switch to the Finder, it can be off-putting. To keep windows where they are, open System Settings > Desktop & Dock, and under Desktop & Stage Manager, where it says “Click wallpaper to reveal desktop,” choose Only in Stage Manager.
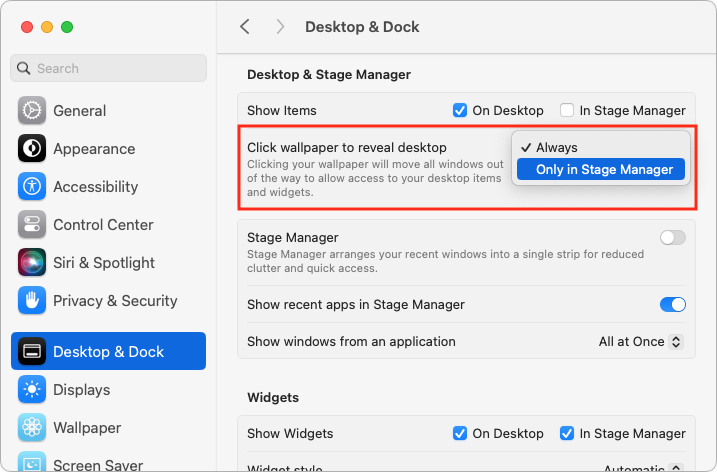
Apple has introduced additional interlocking settings here, so you might want to play with them to see if they support your preferred working style. In particular, note the Show Items checkboxes—if you don’t like seeing all your desktop icons, deselect the On Desktop box to make those icons appear only when you click the desktop.
Print Queue Apps Are Now Part of Print Center
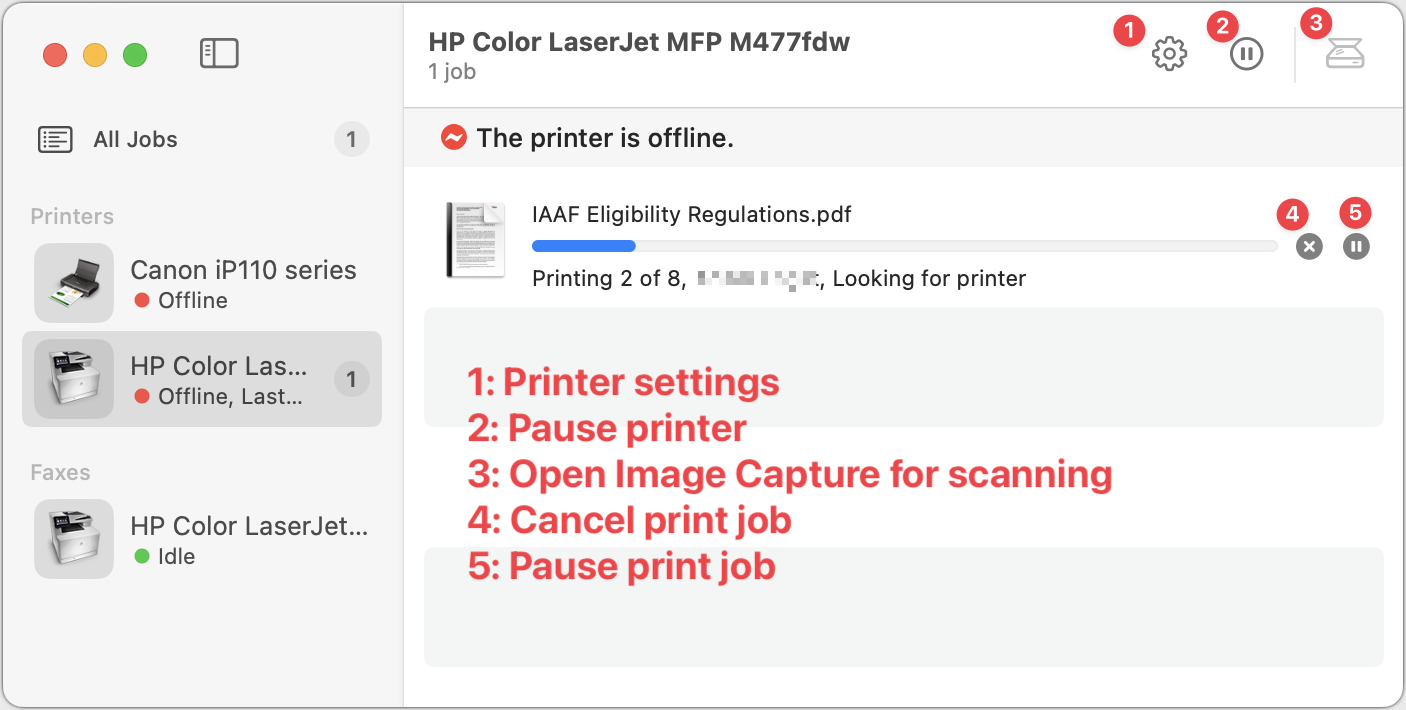
For many years, when you printed from a Mac, a print queue app launched to show the progress of your print job and quit automatically once the job was completed. Some people kept those print queue apps in the Dock afterward, perhaps as a way of accessing a multifunction printer’s scanner. Upgrading to macOS 14 Sonoma broke those Dock icons because individual print queue apps have been replaced by the new Print Center app.
Print Center now launches automatically to show print job progress, but you can also open it manually from the Application folder’s Utilities folder. It also offers options to manage the printer and launch Image Capture, Apple’s default interface for scanning. If you’ve been surprised by printing changes in Sonoma, take a few minutes to familiarize yourself with Print Center.
Gestures Can Trigger Fireworks and Other Effects
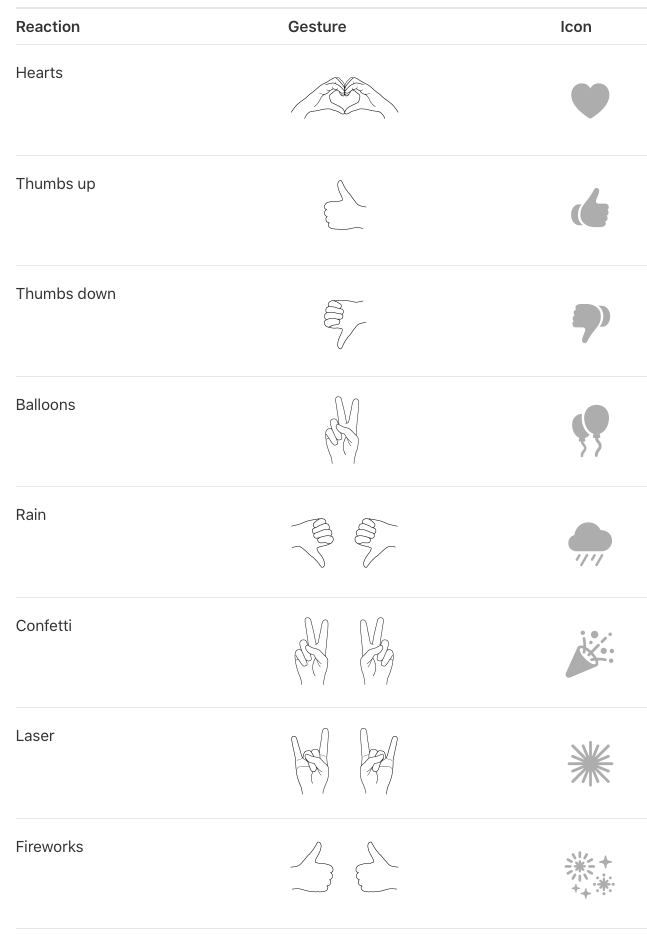
In Sonoma, when you’re in a video call using FaceTime, Zoom, Webex, or another supported videoconferencing app, making certain hand gestures will trigger special effects. (This works only on a Mac with Apple silicon or when using an iPhone as your webcam.) These reactions are fun… except when they’re not. A double thumbs-down gesture that generates rain during a therapy session may be utterly inappropriate, and causing balloons to fall during a serious business meeting just because you inadvertently made a V with your index and middle fingers might not be considered amusing. Here are the gestures and what they trigger.
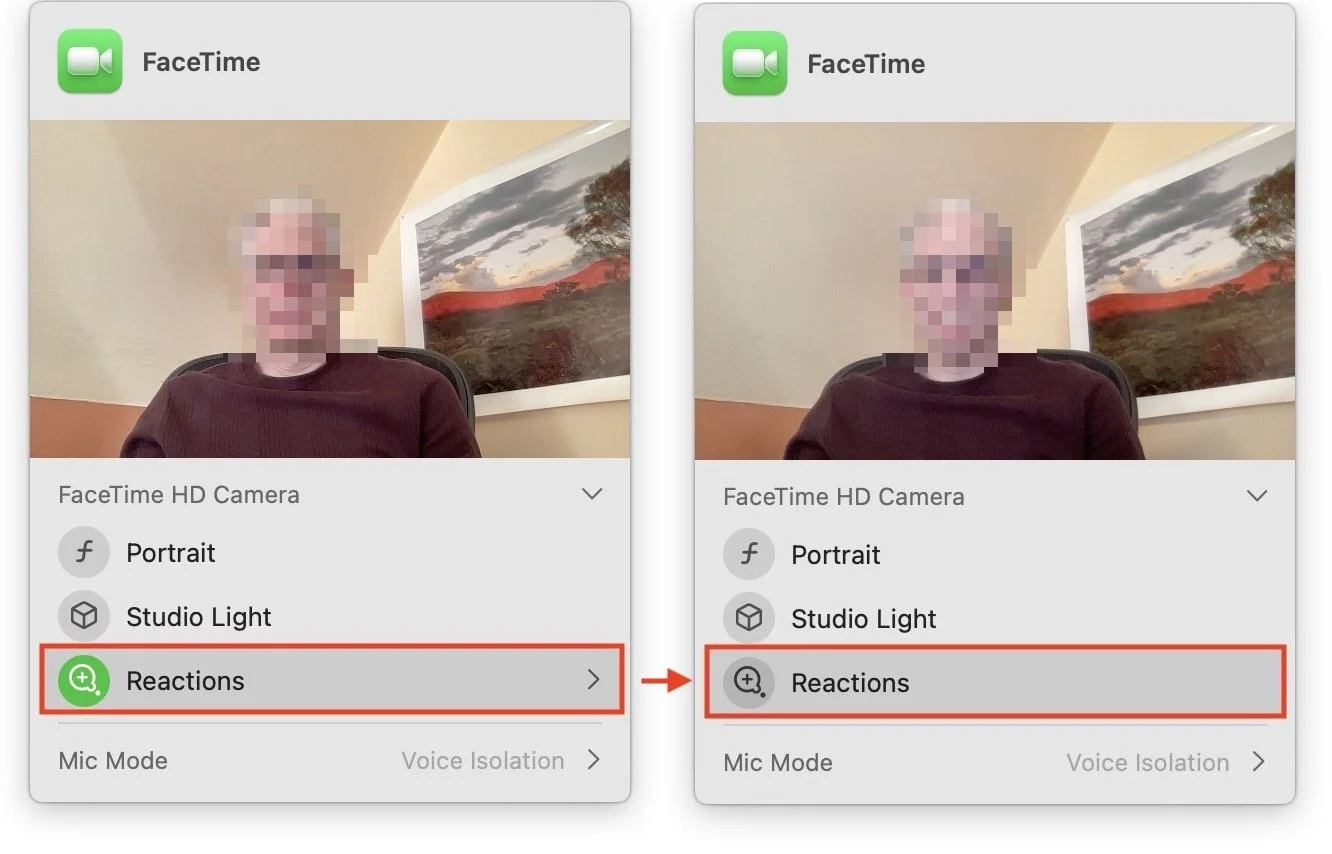
To ensure you don’t accidentally generate a reaction with a stray gesture, click the green video camera icon that appears in your menu bar when using one of the apps that supports reactions. (You must be actively sending video—just having the app open may not be sufficient to make the green icon appear.) Then click Reactions under your preview so it goes from having a green icon to a gray icon. Reactions are now disabled. That app should remember your preference, but you’ll have to turn off reactions separately in every app where they’re available.
New Privacy Awareness Icons
That green video camera icon that appears in your menu bar when sending video in Sonoma isn’t the only one that can appear in that spot, and we’ve fielded questions from people who are surprised and confused by these icons appearing. Don’t worry; they aren’t an indication of malware on your Mac! Apple added them so you’d always be aware when an app was using your Mac’s camera or microphone, or recording the screen. You can think of them as an expansion of the tiny green LED that lights up next to the Mac’s camera when it’s in use.
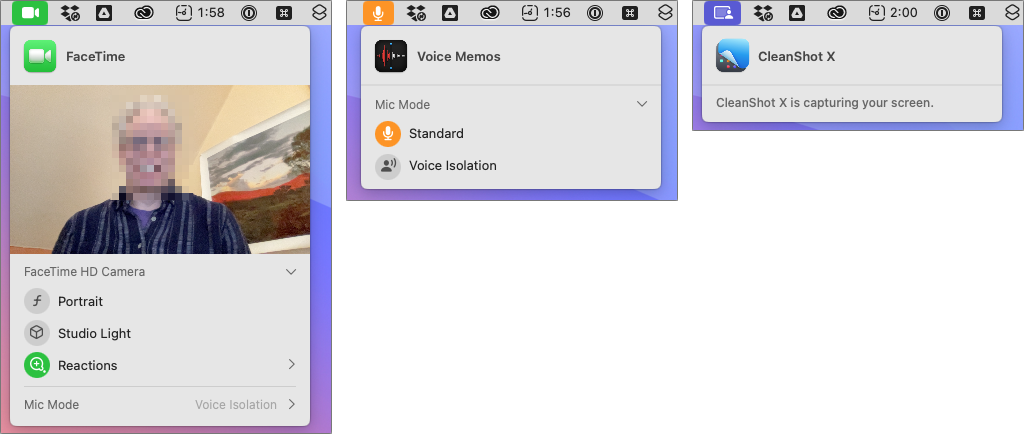
The three icons you might see are:
Green camera, which indicates that the Mac’s video camera is in use. The microphone may also be active, but that’s not indicated separately.
Orange microphone, which shows that the Mac’s mic is recording audio.
Purple screen, which tells you that an app is recording your screen. Beyond screen-sharing apps, other apps like screenshot utilities can trigger this icon.
Click the icon to see what app is involved. You could even see multiple apps listed at the top, if several apps are recording the screen, for instance.
If you’ve switched to Sonoma already, we hope this quick tour of a few potentially confusing features has helped explain what’s going on. And if you’re still waiting to install Sonoma—which is fine!—remember to come back to this article when you decide to upgrade.
(Featured image based on an original by iStock.com/fizkes)
New M3 Chip Family Powers Updated MacBook Pros and 24-inch iMac
Apple has unveiled the M3, M3 Pro, and M3 Max chips alongside new 14-inch and 16-inch models of the MacBook Pro that use the new chips. The company also refreshed the 24-inch iMac, replacing its M1 with an M3.

At Apple’s Halloween-themed Scary Fast event on October 30, the company unveiled its next-generation Apple silicon chips for Macs, the M3, M3 Pro, and M3 Max. Apple also showcased new 14-inch and 16-inch MacBook Pro models and a faster version of the 24-inch iMac based on these chips. They’re available to order now, with units in stores and orders starting to arrive on November 7, apart from the M3 Max models that will arrive in late November. Apple also dropped the awkwardly positioned 13-inch MacBook Pro model from the lineup, leaving the low end to the highly capable MacBook Air.
Apart from the new chips, the updated MacBook Pro models boast only a brighter screen, a slightly longer battery life in the M3 14-inch model, and a new Space Black aluminum finish for the M3 Pro and M3 Max models. There are no other changes for the M3 24-inch iMac.
M3, M3 Pro, and M3 Max Bring More Power to the 14-inch and 16-inch MacBook Pro
Although the MacBook Air has done an admirable job of supporting everyday laptop users, professionals who rely on processor-intensive apps have long turned to the 14-inch and 16-inch MacBook Pro for more power. Apple updated the MacBook Pro to the M2 Pro and M2 Max in January 2023, a release that probably came later than Apple wanted. There’s less reason to upgrade from an M2 model to a new M3 one, but the performance gains are significant when upgrading from Intel-based and M1 models.
The M3 MacBook Pro models beat the equivalent Intel-based MacBook Pro models by 3x, 5.5x, 7.4x, and even 20x, depending on the specific app and task. Overall, Apple claims speed improvements up to 11x over the fastest Intel-based MacBook Pro. Gains over equivalent M1-based MacBook Pros are also significant, with improvements from 30% to 60%.
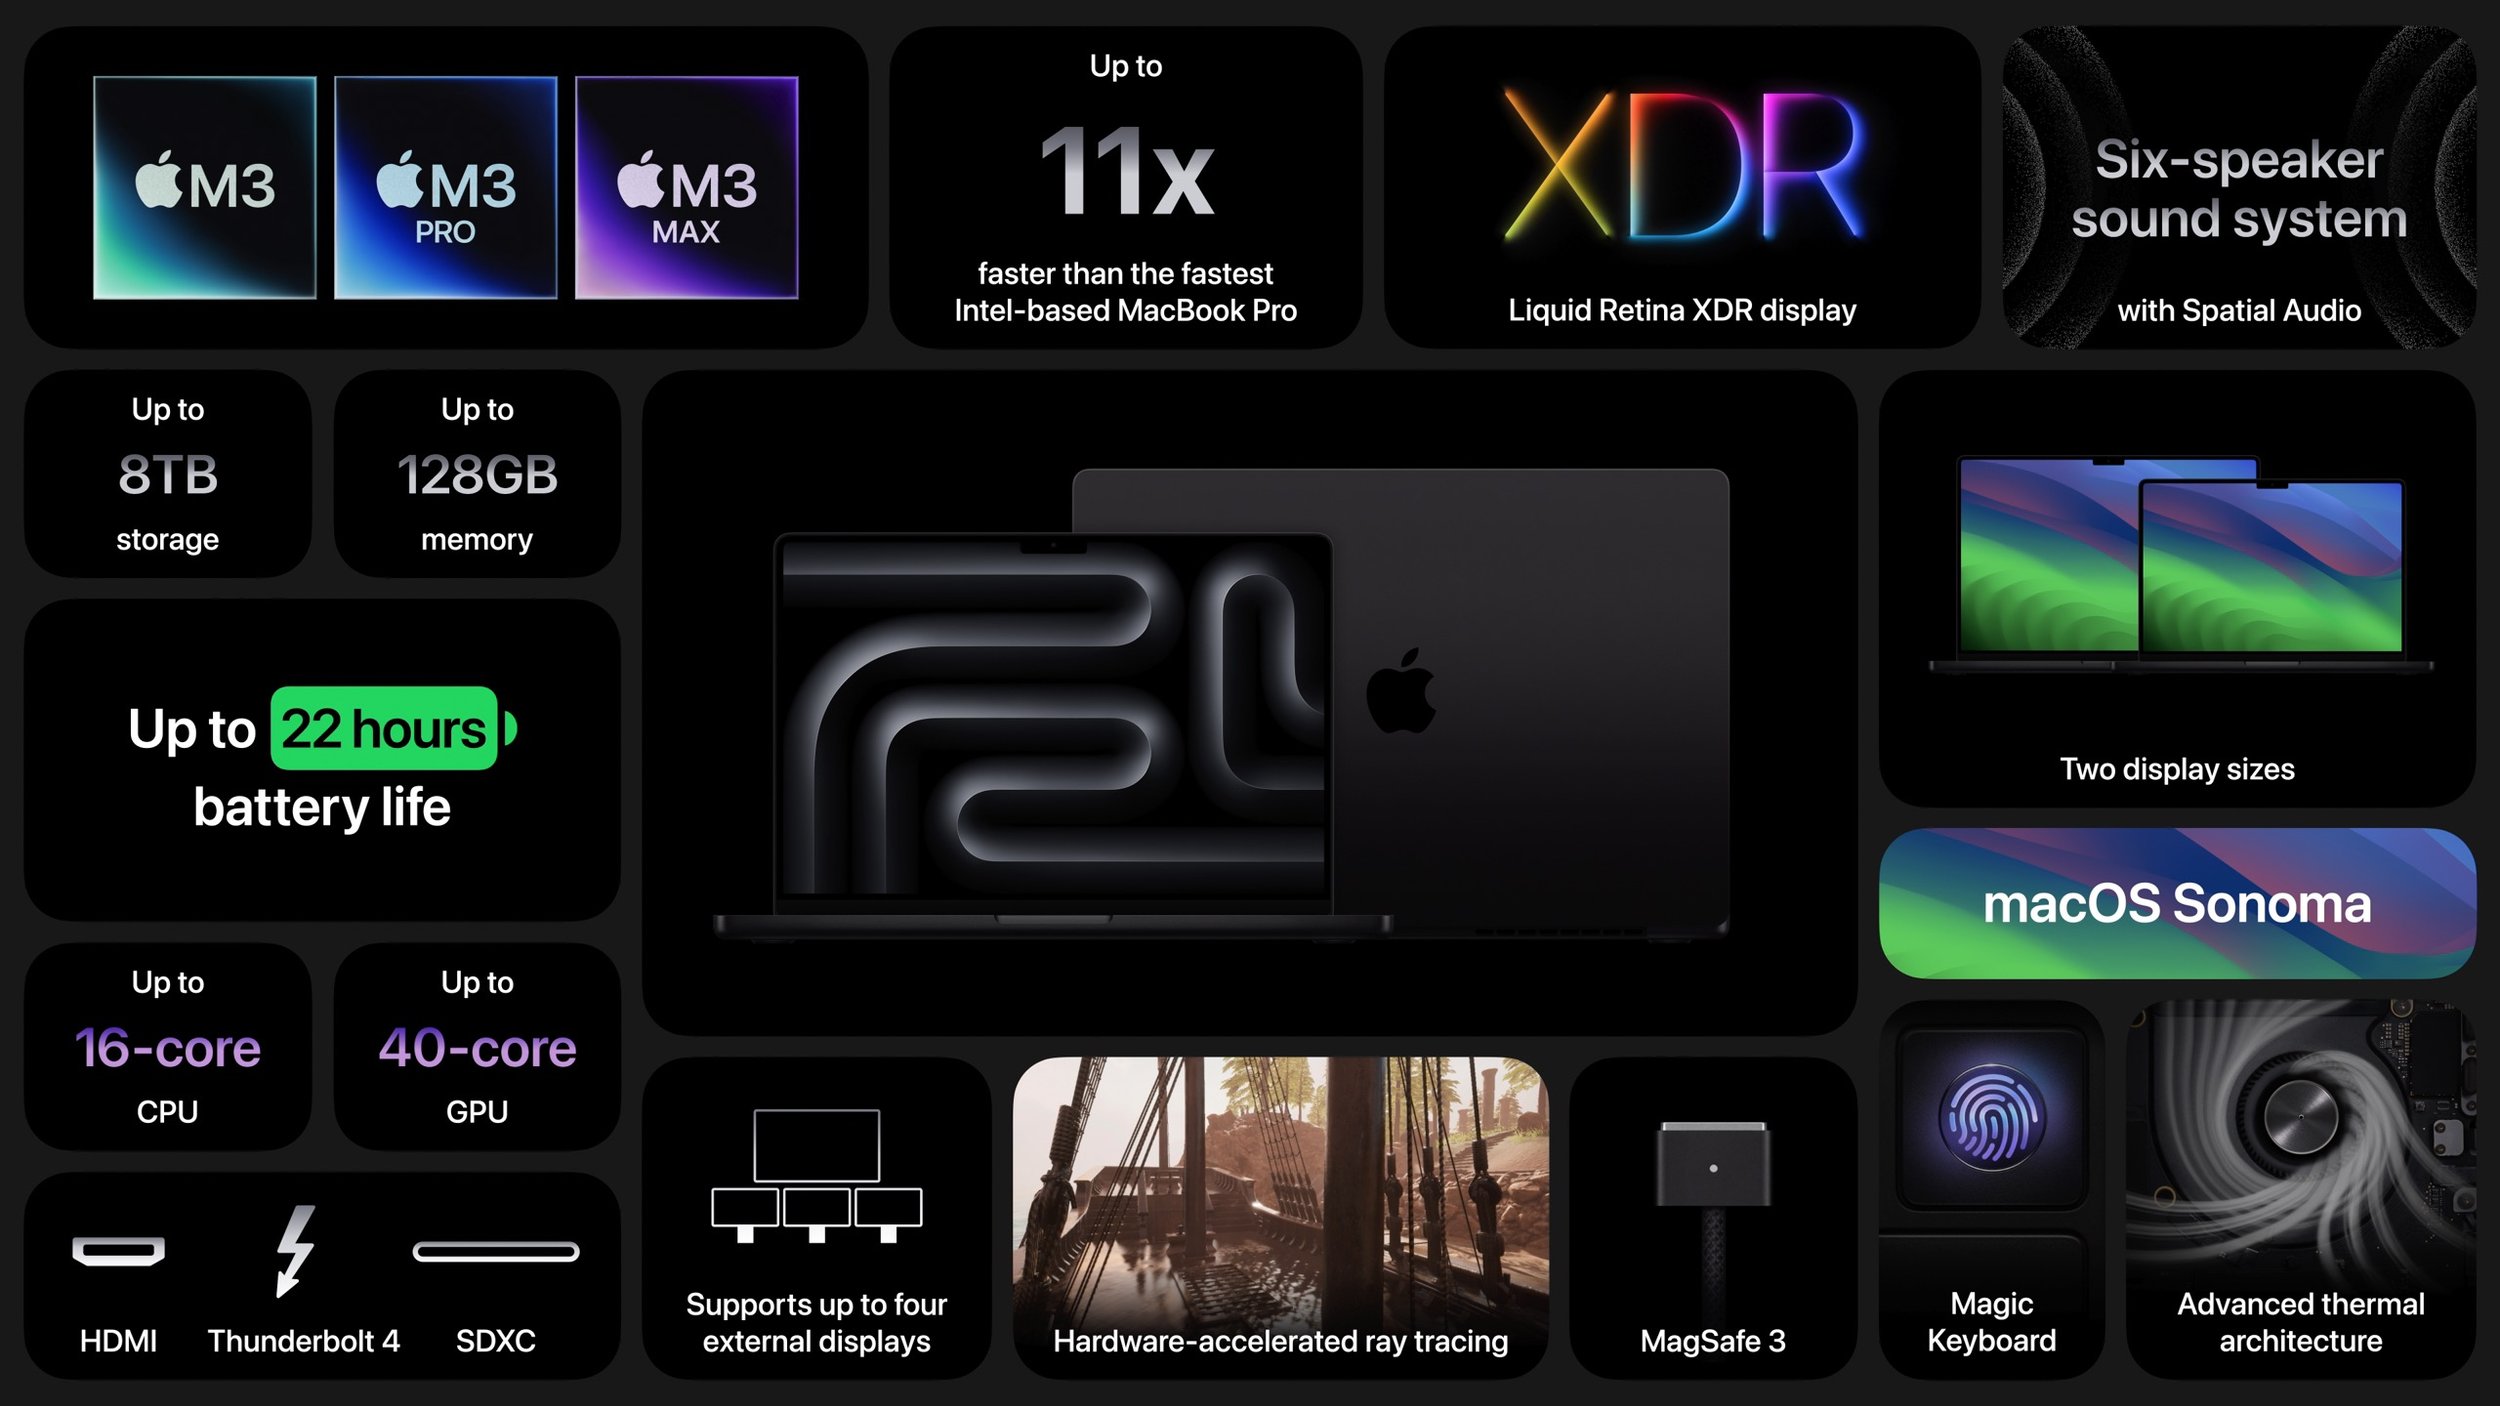
Apple expanded the options for the 14-inch MacBook Pro, so there are now three basic configurations:
M3 starting at $1599: It has an 8-core CPU, 10-core GPU, 8 GB of memory, and 512 GB of storage. You can (and probably should) jump to 16 GB of memory; 24 GB is also available. This model has only two Thunderbolt/USB 4 ports and can drive only a single external display.
M3 Pro starting at $1999: You have two options here: either 11 or 12 CPU cores and 14 or 18 GPU cores, and either 18 GB or 36 GB of memory. These models feature three Thunderbolt/USB 4 ports and support one or two external displays.
M3 Max starting at $3199: The maxed-out configuration also sports two options: either 14 or 16 CPU cores and 30 or 40 GPU cores, plus 36 GB of memory, upgradeable only to 96 GB. These models also have three Thunderbolt/USB 4 ports but can drive up to four external displays.
The 16-inch MacBook Pro has only M3 Pro and M3 Max configurations:
M3 Pro starting at $2899: There’s only one option here, matching the beefier 14-inch M3 Pro model: a 12-core CPU, 18-core GPU configuration with 36 GB of memory.
M3 Max starting at $3499: The choices here are either 14 or 16 CPU cores and 30 or 40 GPU cores. The lower-end configuration comes with 36 GB of memory and can upgrade to 96; the higher-end configuration has 48 GB of memory and has options for 64 GB or 128 GB.
Storage starts at 512 GB for the M3 14-inch model and 1 TB for the rest, with options for 2 TB, 4 TB, and 8 TB.
Note that the M3 14-inch MacBook Pro replaces the awkwardly positioned M2 13-inch MacBook Pro, which offered only the slightest advantage over its cheaper M2 13-inch MacBook Air cousin. The new M3 14-inch MacBook Pro does cost $100 more than the comparable 13-inch MacBook Pro that it replaces, but that’s a fair trade for the bigger, better screen and 1080p FaceTime HD camera. Now there’s once again a clear physical and performance distinction between the MacBook Air and the MacBook Pro lineups.
Otherwise, some prices have increased, but in most cases, that may be because the new configurations include more unified memory. For instance, the M3 Pro 16-inch MacBook Pro previously started at $2499 with 16 GB of memory, but now starts at $2899 with 36 GB of memory. Regardless, the professionals buying these speedy Macs can often justify paying more if the performance boost directly increases productivity.
M3 Chip Improves 24-inch iMac Performance
There isn’t much to say about the refreshed 24-inch iMac, which trades its M1 chip for an M3 but sports no other notable changes and keeps its $1299 starting price. The 24-inch iMac remains an attractive option for anyone looking for an all-in-one desktop Mac.
The switch to the M3 does provide more memory choices. Previously, you could choose only 8 GB or 16 GB of memory. With the M3, 8 GB of memory remains standard, but you can upgrade to either 16 GB (a good idea) or 24 GB (probably unnecessary for most people). Storage still starts at 256 GB, which isn’t much these days, particularly if you take a lot of photos or videos, and you can upgrade to 512 GB, 1 TB, or 2 TB.
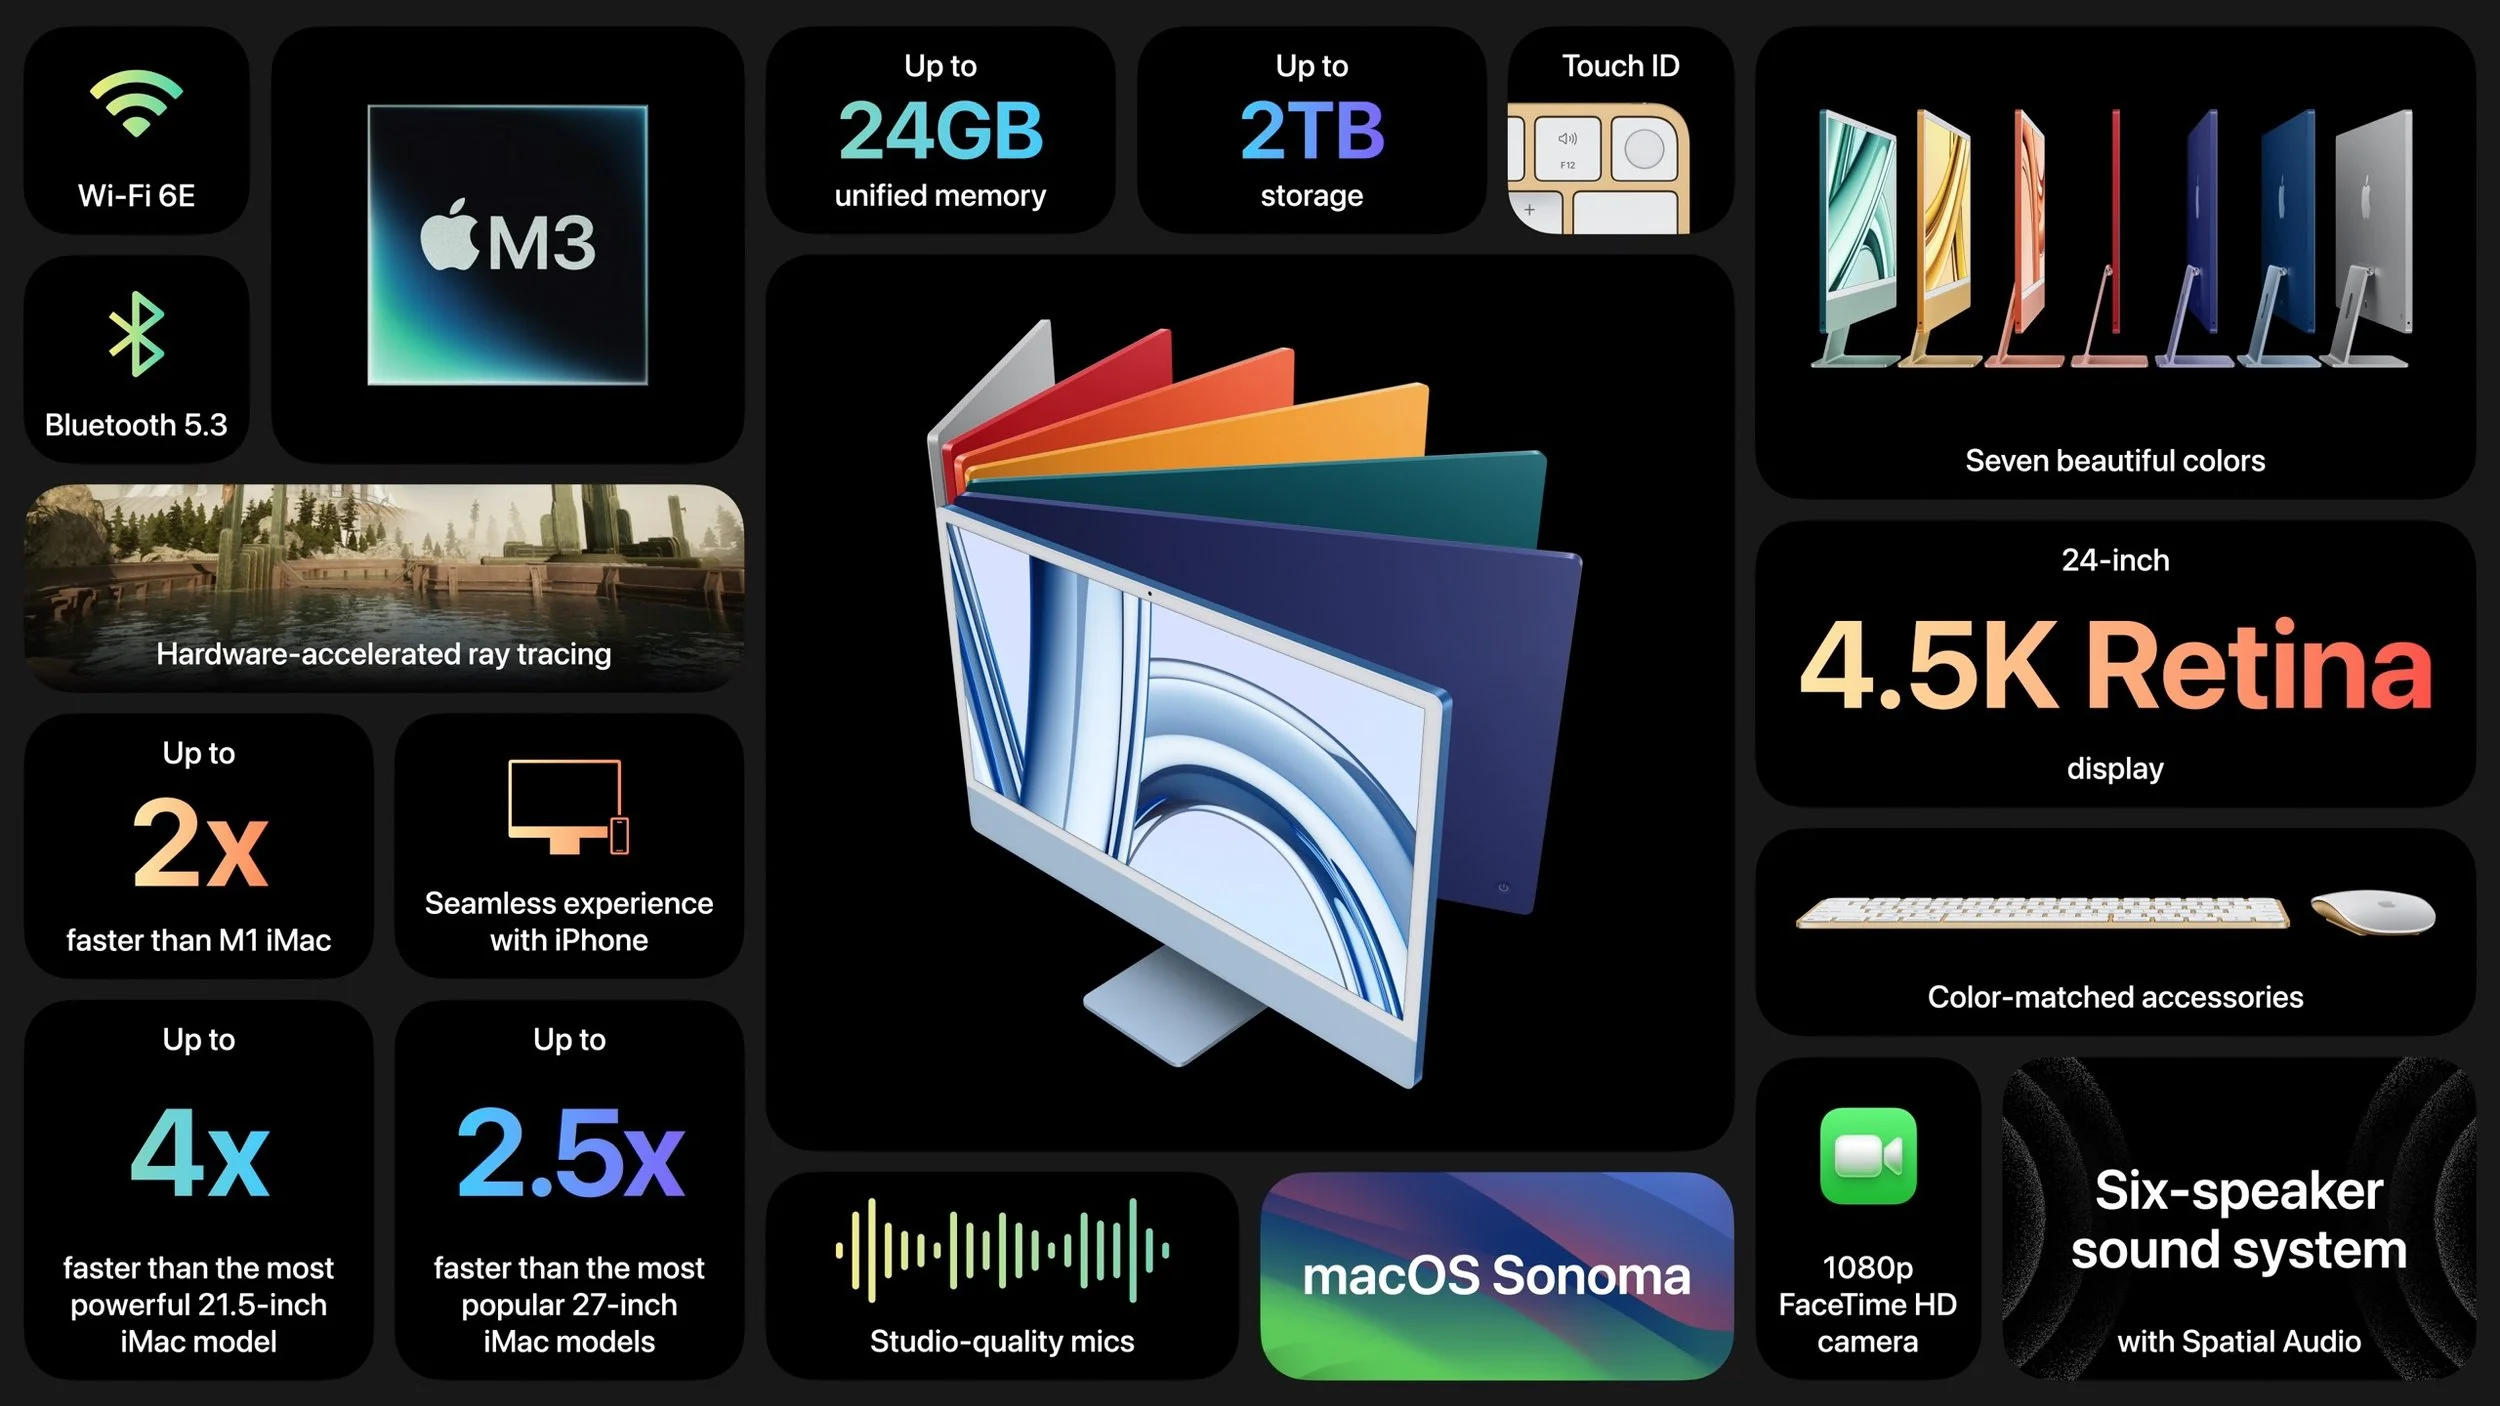
Apple gave no hints that it is considering a replacement for the popular 27-inch iMac that Apple discontinued when it introduced the Mac Studio and 27-inch Studio Display. Though the 24-inch iMac has an impressive 4.5K Retina display, it’s still smaller than the 5K Retina display in the 27-inch iMac. Speculation has swirled around the possibility of a 32-inch iMac Pro, but given that a Mac Studio starts at $1999 and the 32-inch Pro Display XDR sells for $4999, it’s hard to imagine such an iMac Pro having a competitive price.
Also missing from the announcement was any mention of USB-C versions of the Magic Keyboard, Magic Trackpad, and Magic Mouse. Those accessories continue to use the Lightning connector and ship with a USB-C to Lightning cable for charging.
(Featured image by Apple)
Use iOS 17’s Check In Feature to Reduce Worry
The new Check In feature of iOS 17 can provide peace of mind by letting you specify a safety partner who will automatically be notified if you fail to arrive at your destination or complete a timer.

We’ve all had a friend or family member say, “Text me when you get home,” because they want the peace of mind from knowing you arrived safely. But what if something goes wrong—or you forget—so they never receive that text? They’ll be worried and won’t know where you are, if you’re OK, and so on.
In iOS 17, Apple has introduced the Check In feature to provide peace of mind—or in the worst case, to help emergency services. It’s conceptually simple. Before you leave to go somewhere, you create a Check In with someone—call them a safety partner—in Messages. You specify where you’re going and whether you’re driving, taking transit, or walking. Then, when you arrive, the Check In automatically ends, alerting your safety partner that you arrived. If you’re delayed en route, Check In takes that into account and extends the expected arrival time appropriately. If you fail to arrive, Check In shares your location and route with your safety partner. Also, if you make an Emergency SOS call or your iPhone or Apple Watch calls emergency services automatically during the Check In, it notifies your safety partner.
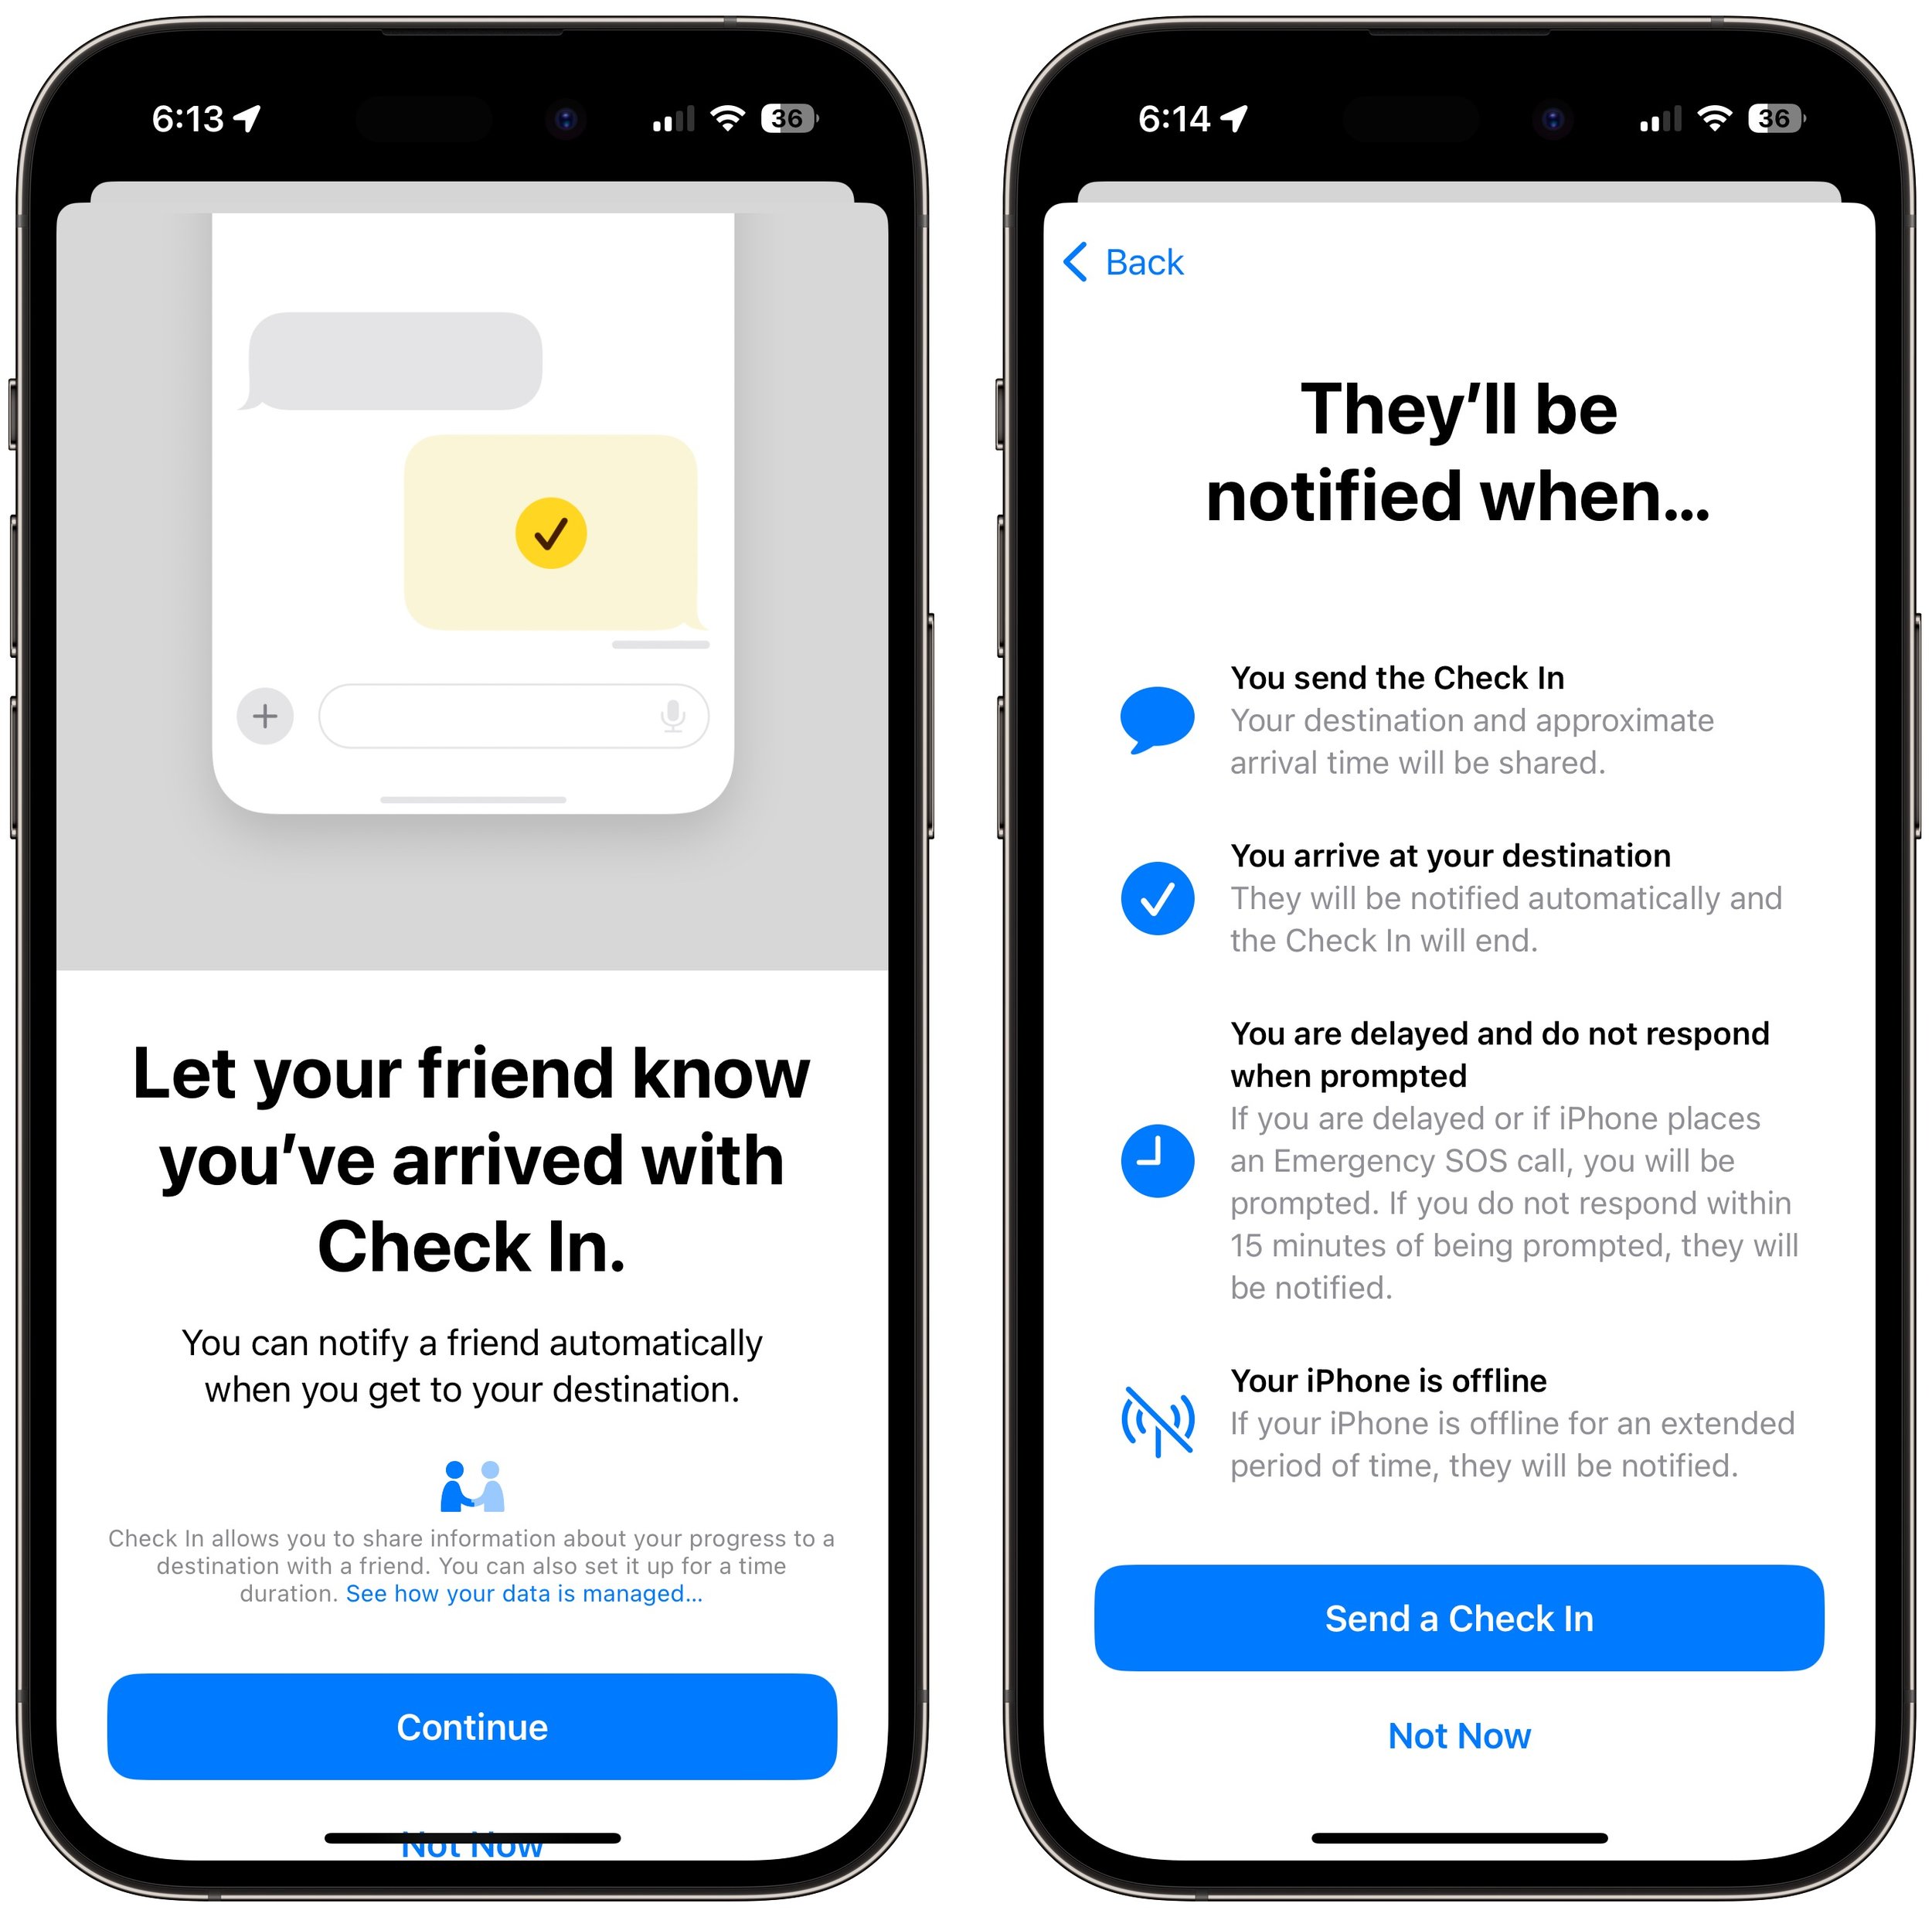
Not all situations revolve around following a specific route to a location, so Check In also supports timers. Perhaps a college student is going for an hour-long trail run and wants a friend to check on her if she’s not back as expected. She can use Check In to set a timer for 1 hour, share it with her friend, and when the timer ends, either tap the End button if she’s back or add more time if the run is going fine but taking longer than expected.
Although Check In may seem targeted at friends and family, it could have business uses as well. For instance, a destination Check In might work well for keeping tabs on a colleague traveling to a make-or-break pitch presentation.
Before you start using Check In with someone—in either direction—explain Check In to them and discuss an appropriate response if you or they fail to end Check In successfully. Responses should probably start with a quick text, followed by a phone call. If initial efforts to reach out are met with silence, contacting other people—friends, family members, neighbors, etc.—may be appropriate. At some point, depending on various factors, it will be time to call law enforcement. Of course, if the other person triggers an Emergency SOS during the Check In, call law enforcement immediately. At least in the US, if the person isn’t in your area, don’t call 911. Instead, find the law enforcement website for where the person is and call that organization’s 10-digit number. And here’s hoping it never comes to that!
Create a Check In
To get started with Check In, follow these steps:
1. In Messages, open a conversation with the person you want to be your safety partner (Check In doesn’t currently work with group conversations).
2. Tap the ⊕ button to the left of the message field, tap More at the bottom, and tap Check In.
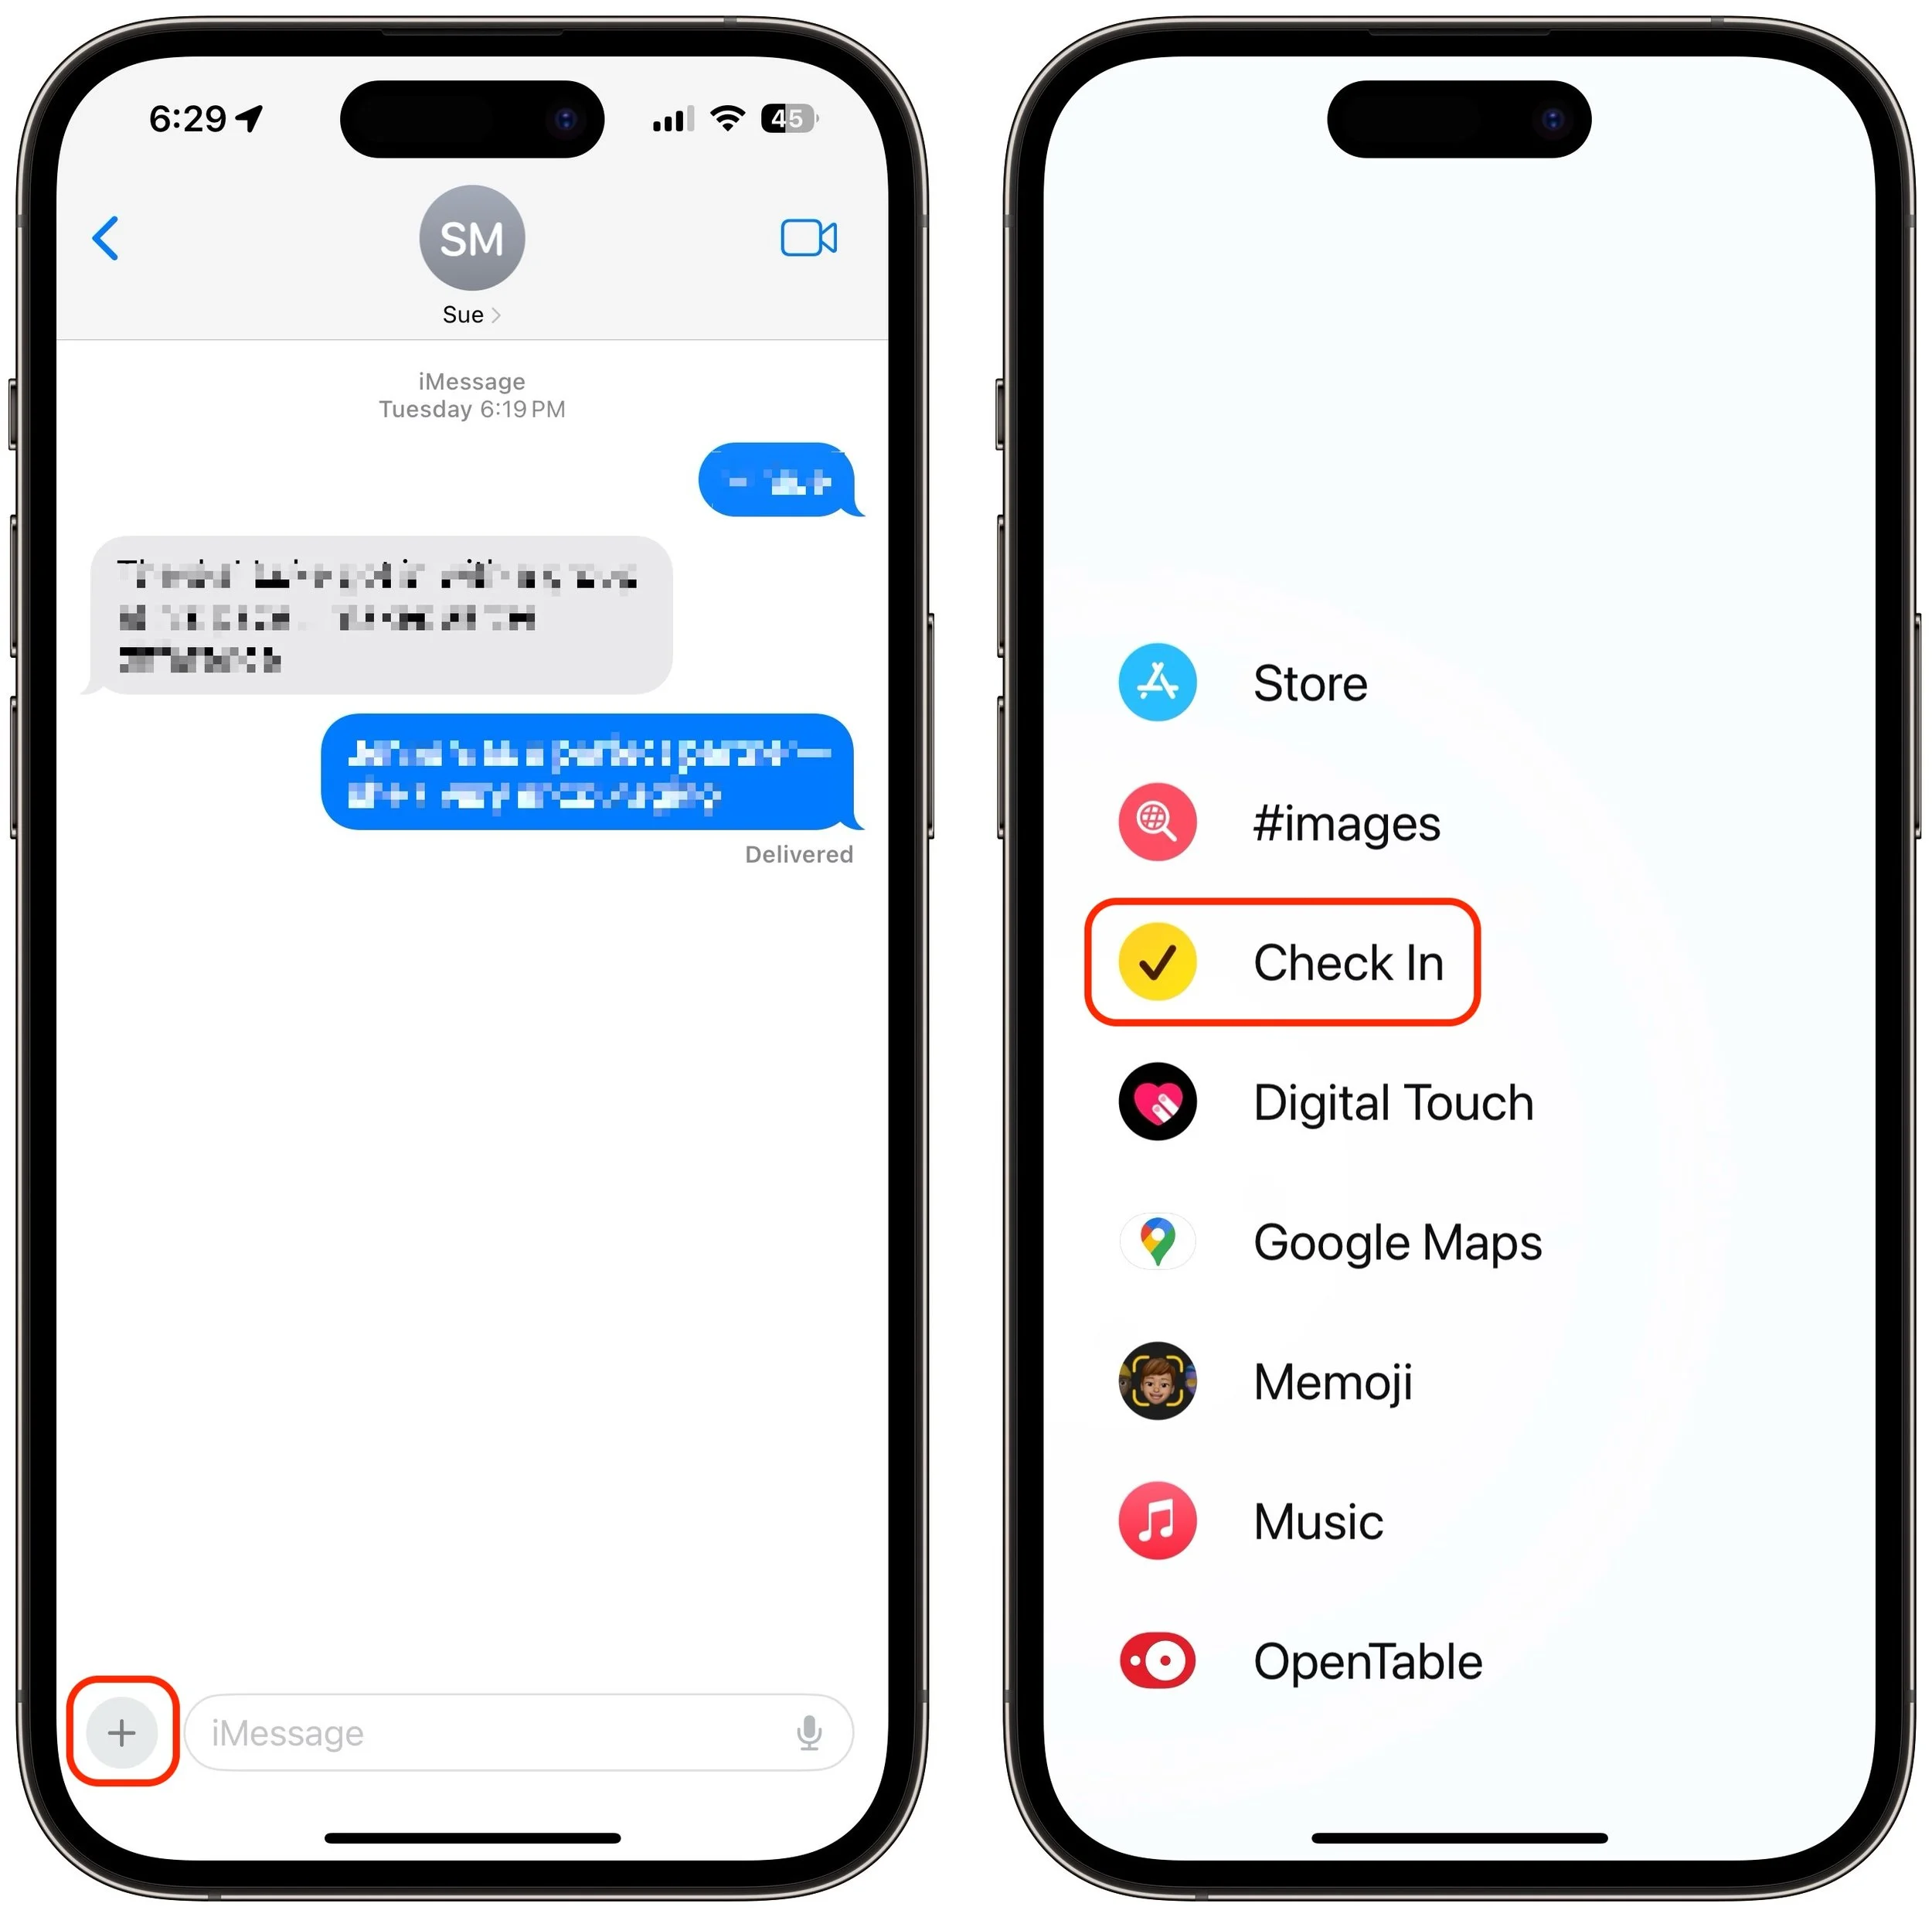
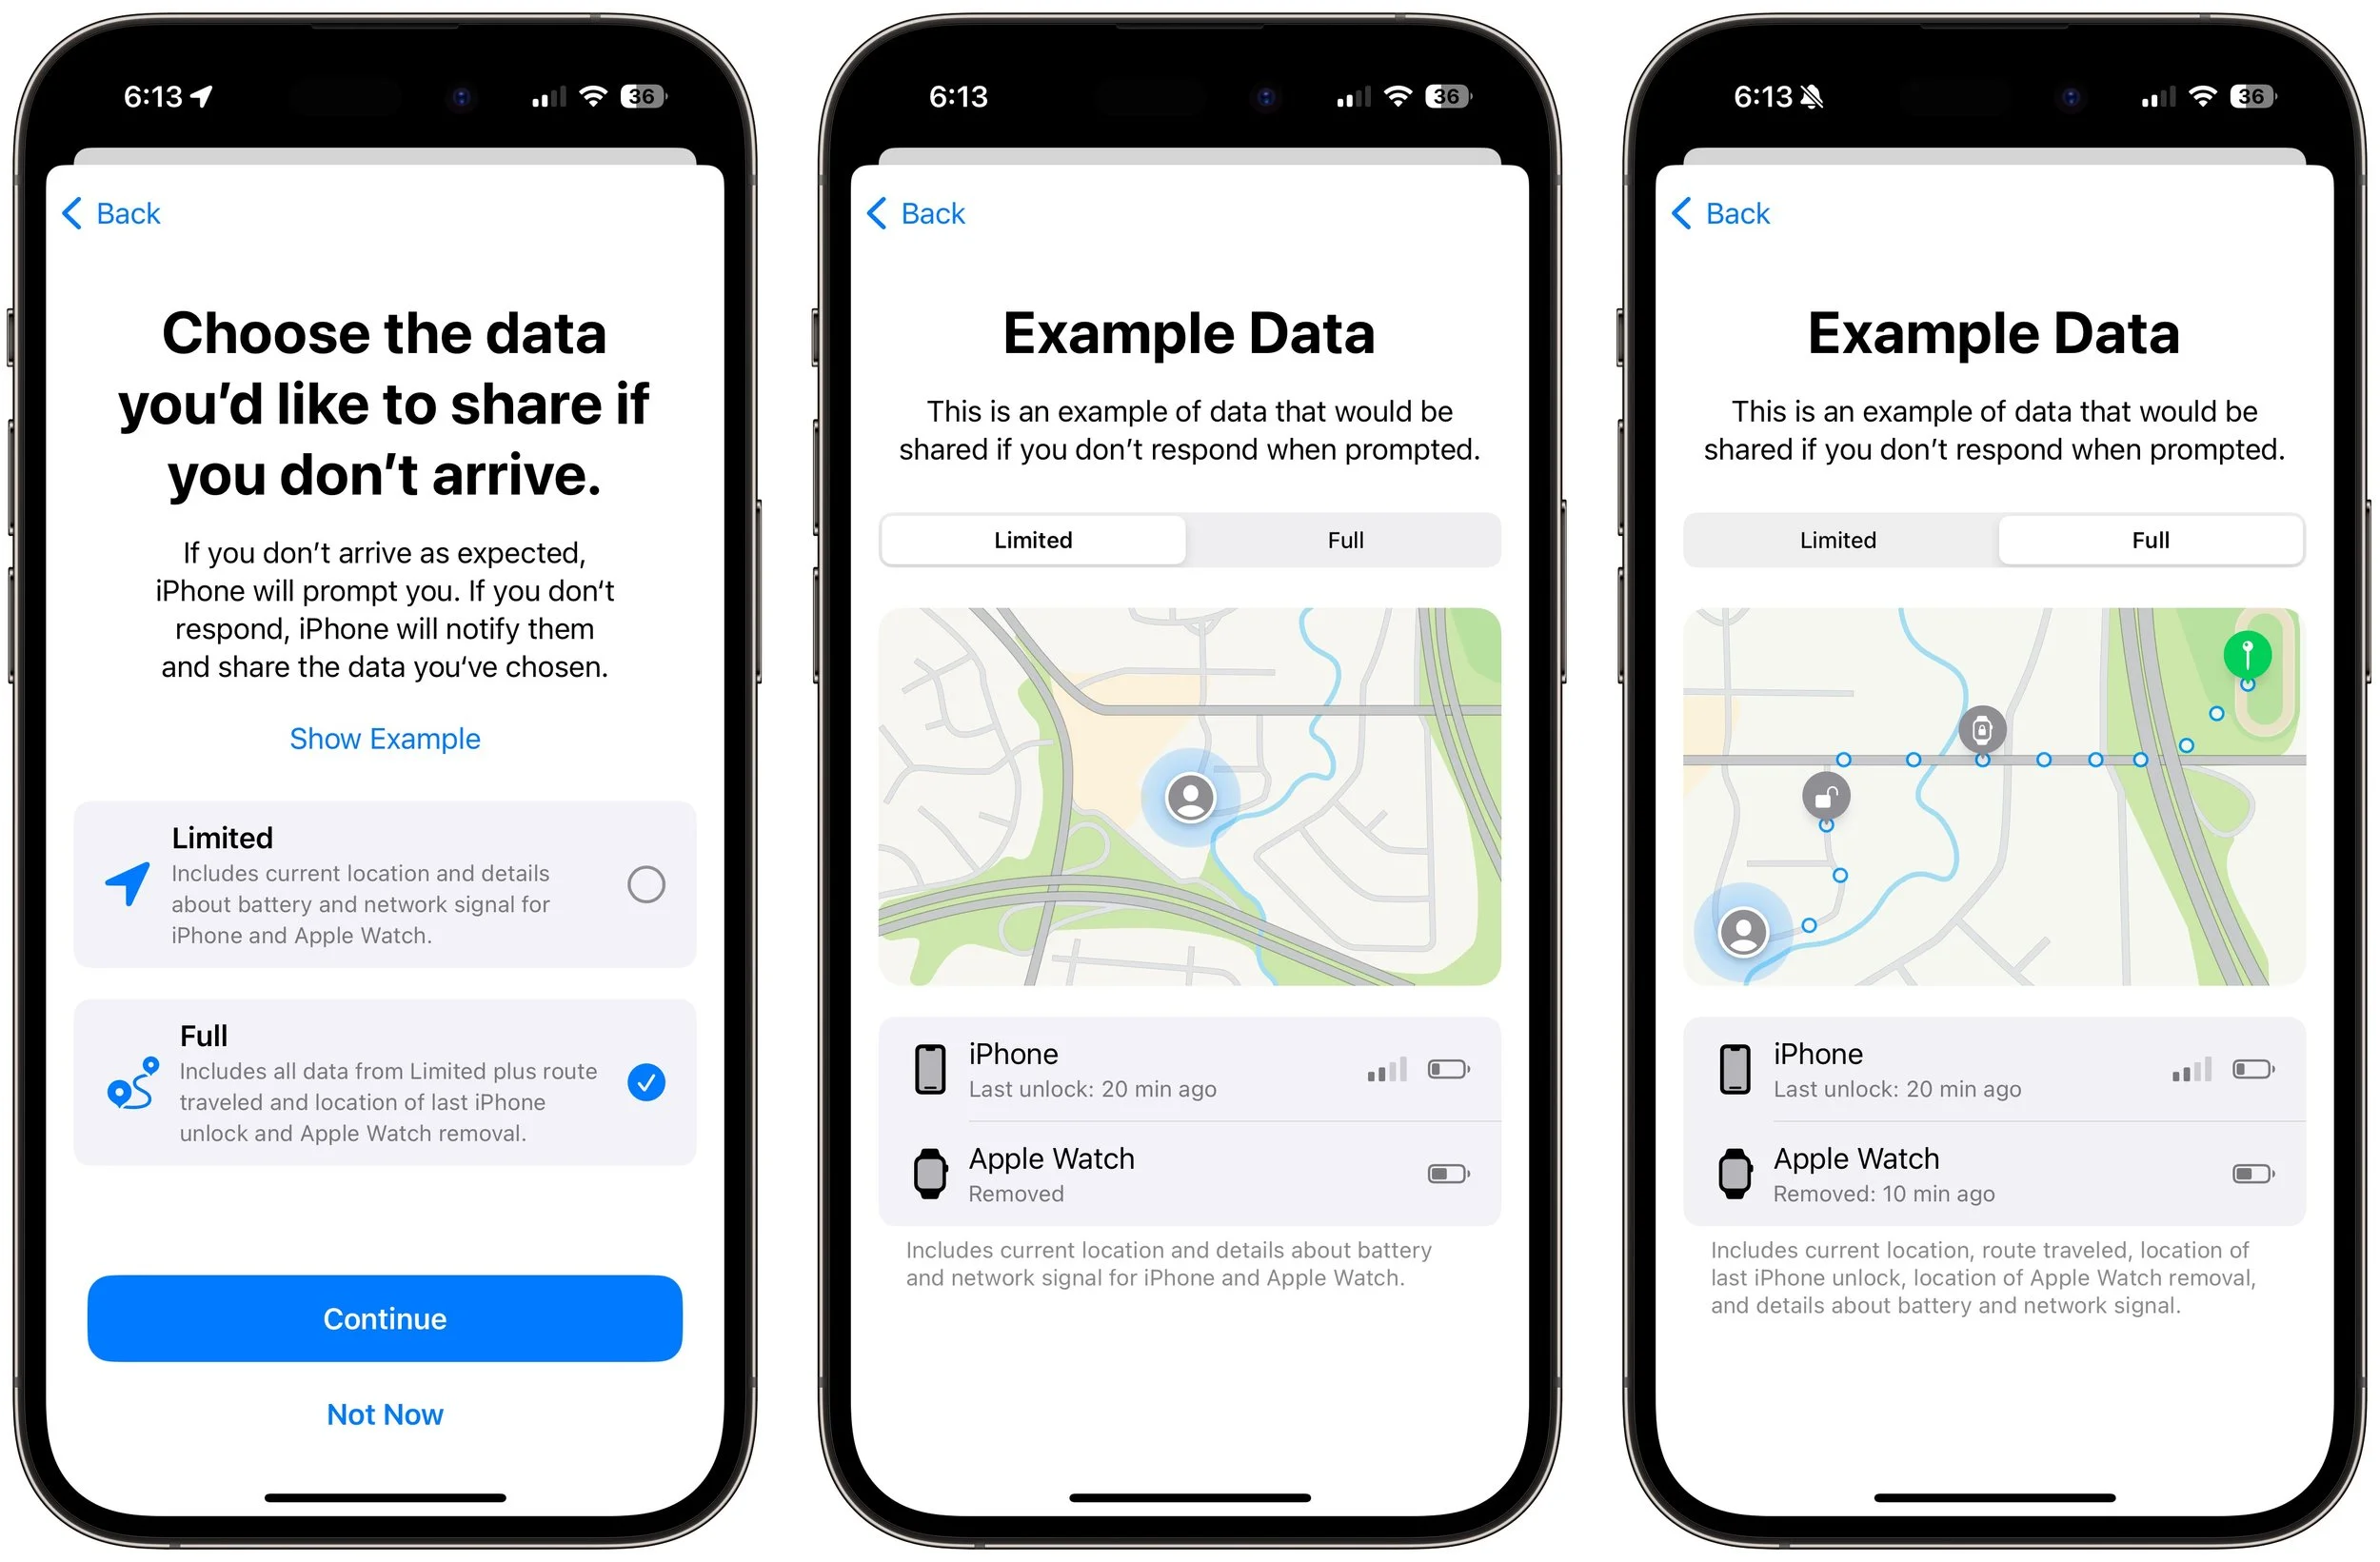
3. The first time you invoke Check In, Messages walks you through a series of explanatory screens, one of which is important—the privacy level of the data shared with your safety partner if you don’t arrive. Select Full—we can see almost no reason why you wouldn’t want that person to be able to share your exact location and route with emergency services if something has gone wrong. (If necessary, tweak this setting later in Settings > Messages > Data.)
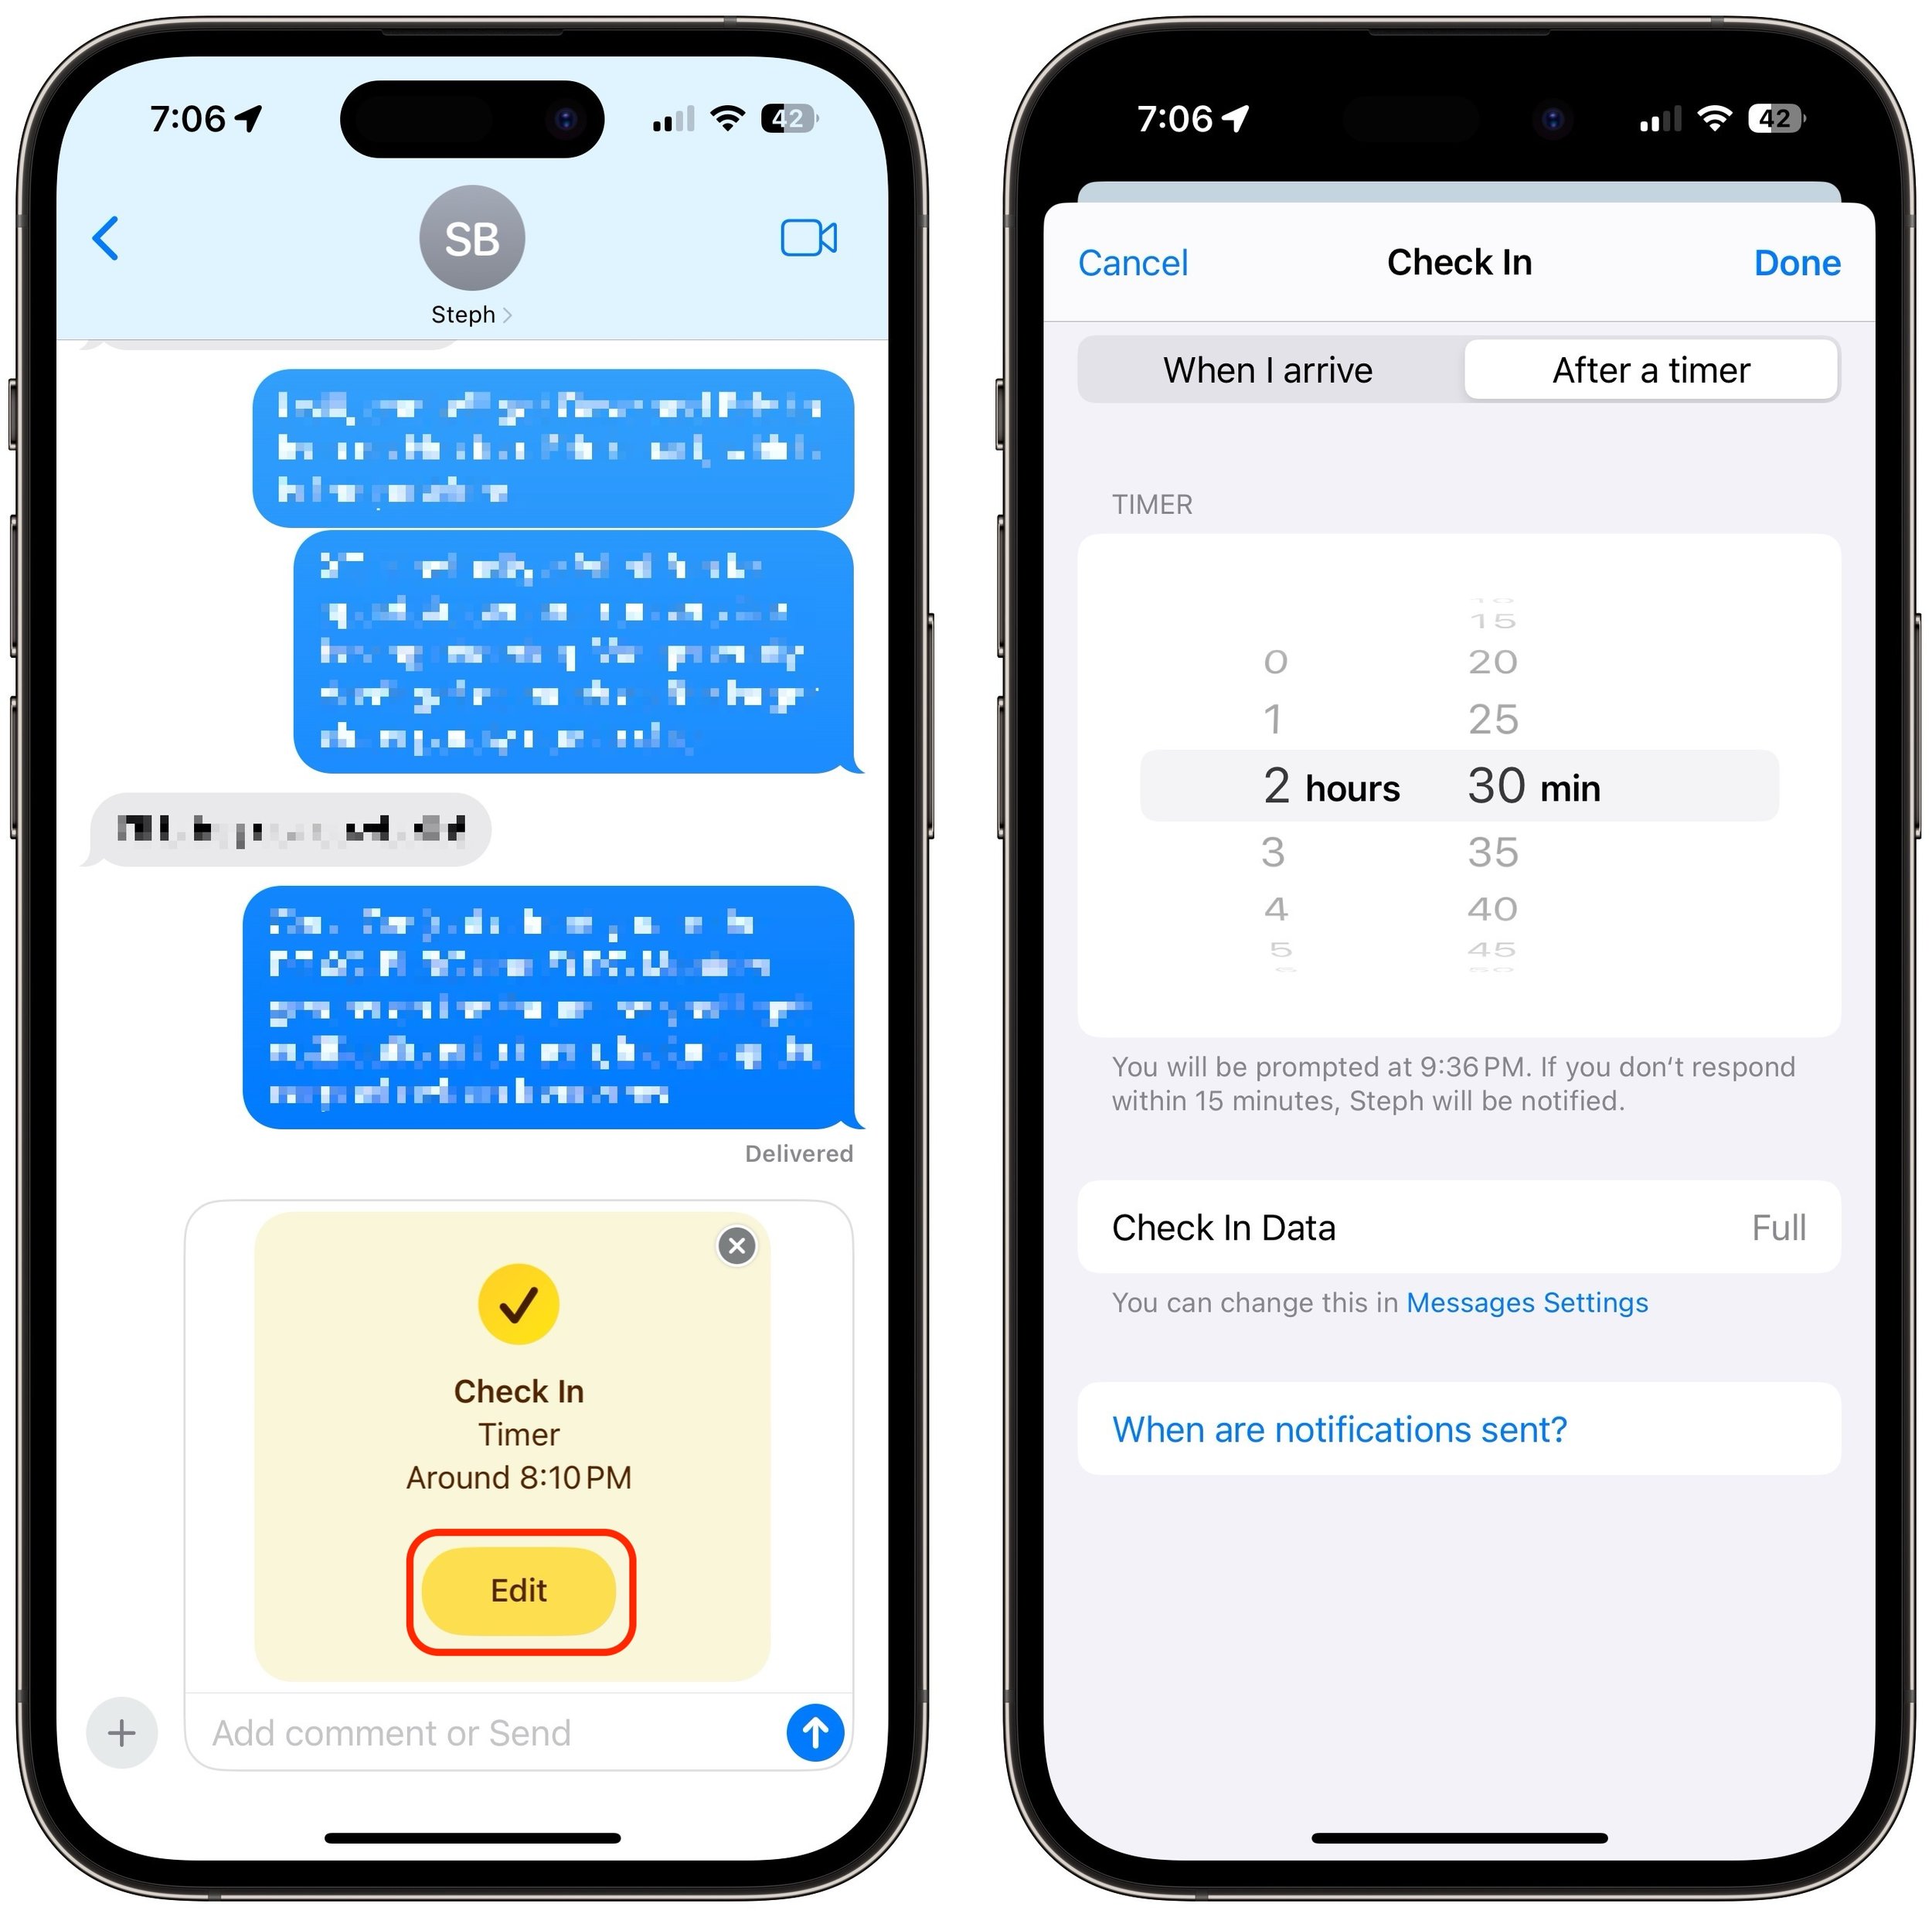
4. On subsequent uses of Check In, an unsent card appears in the Messages conversation, usually set for an hour in the future. The card isn’t sent automatically so you can customize it before sending it.
5. Tap the Edit button to adjust the timer or destination.
6. To change the timer duration, use the time picker and tap Done. Skip to the last step in this list.
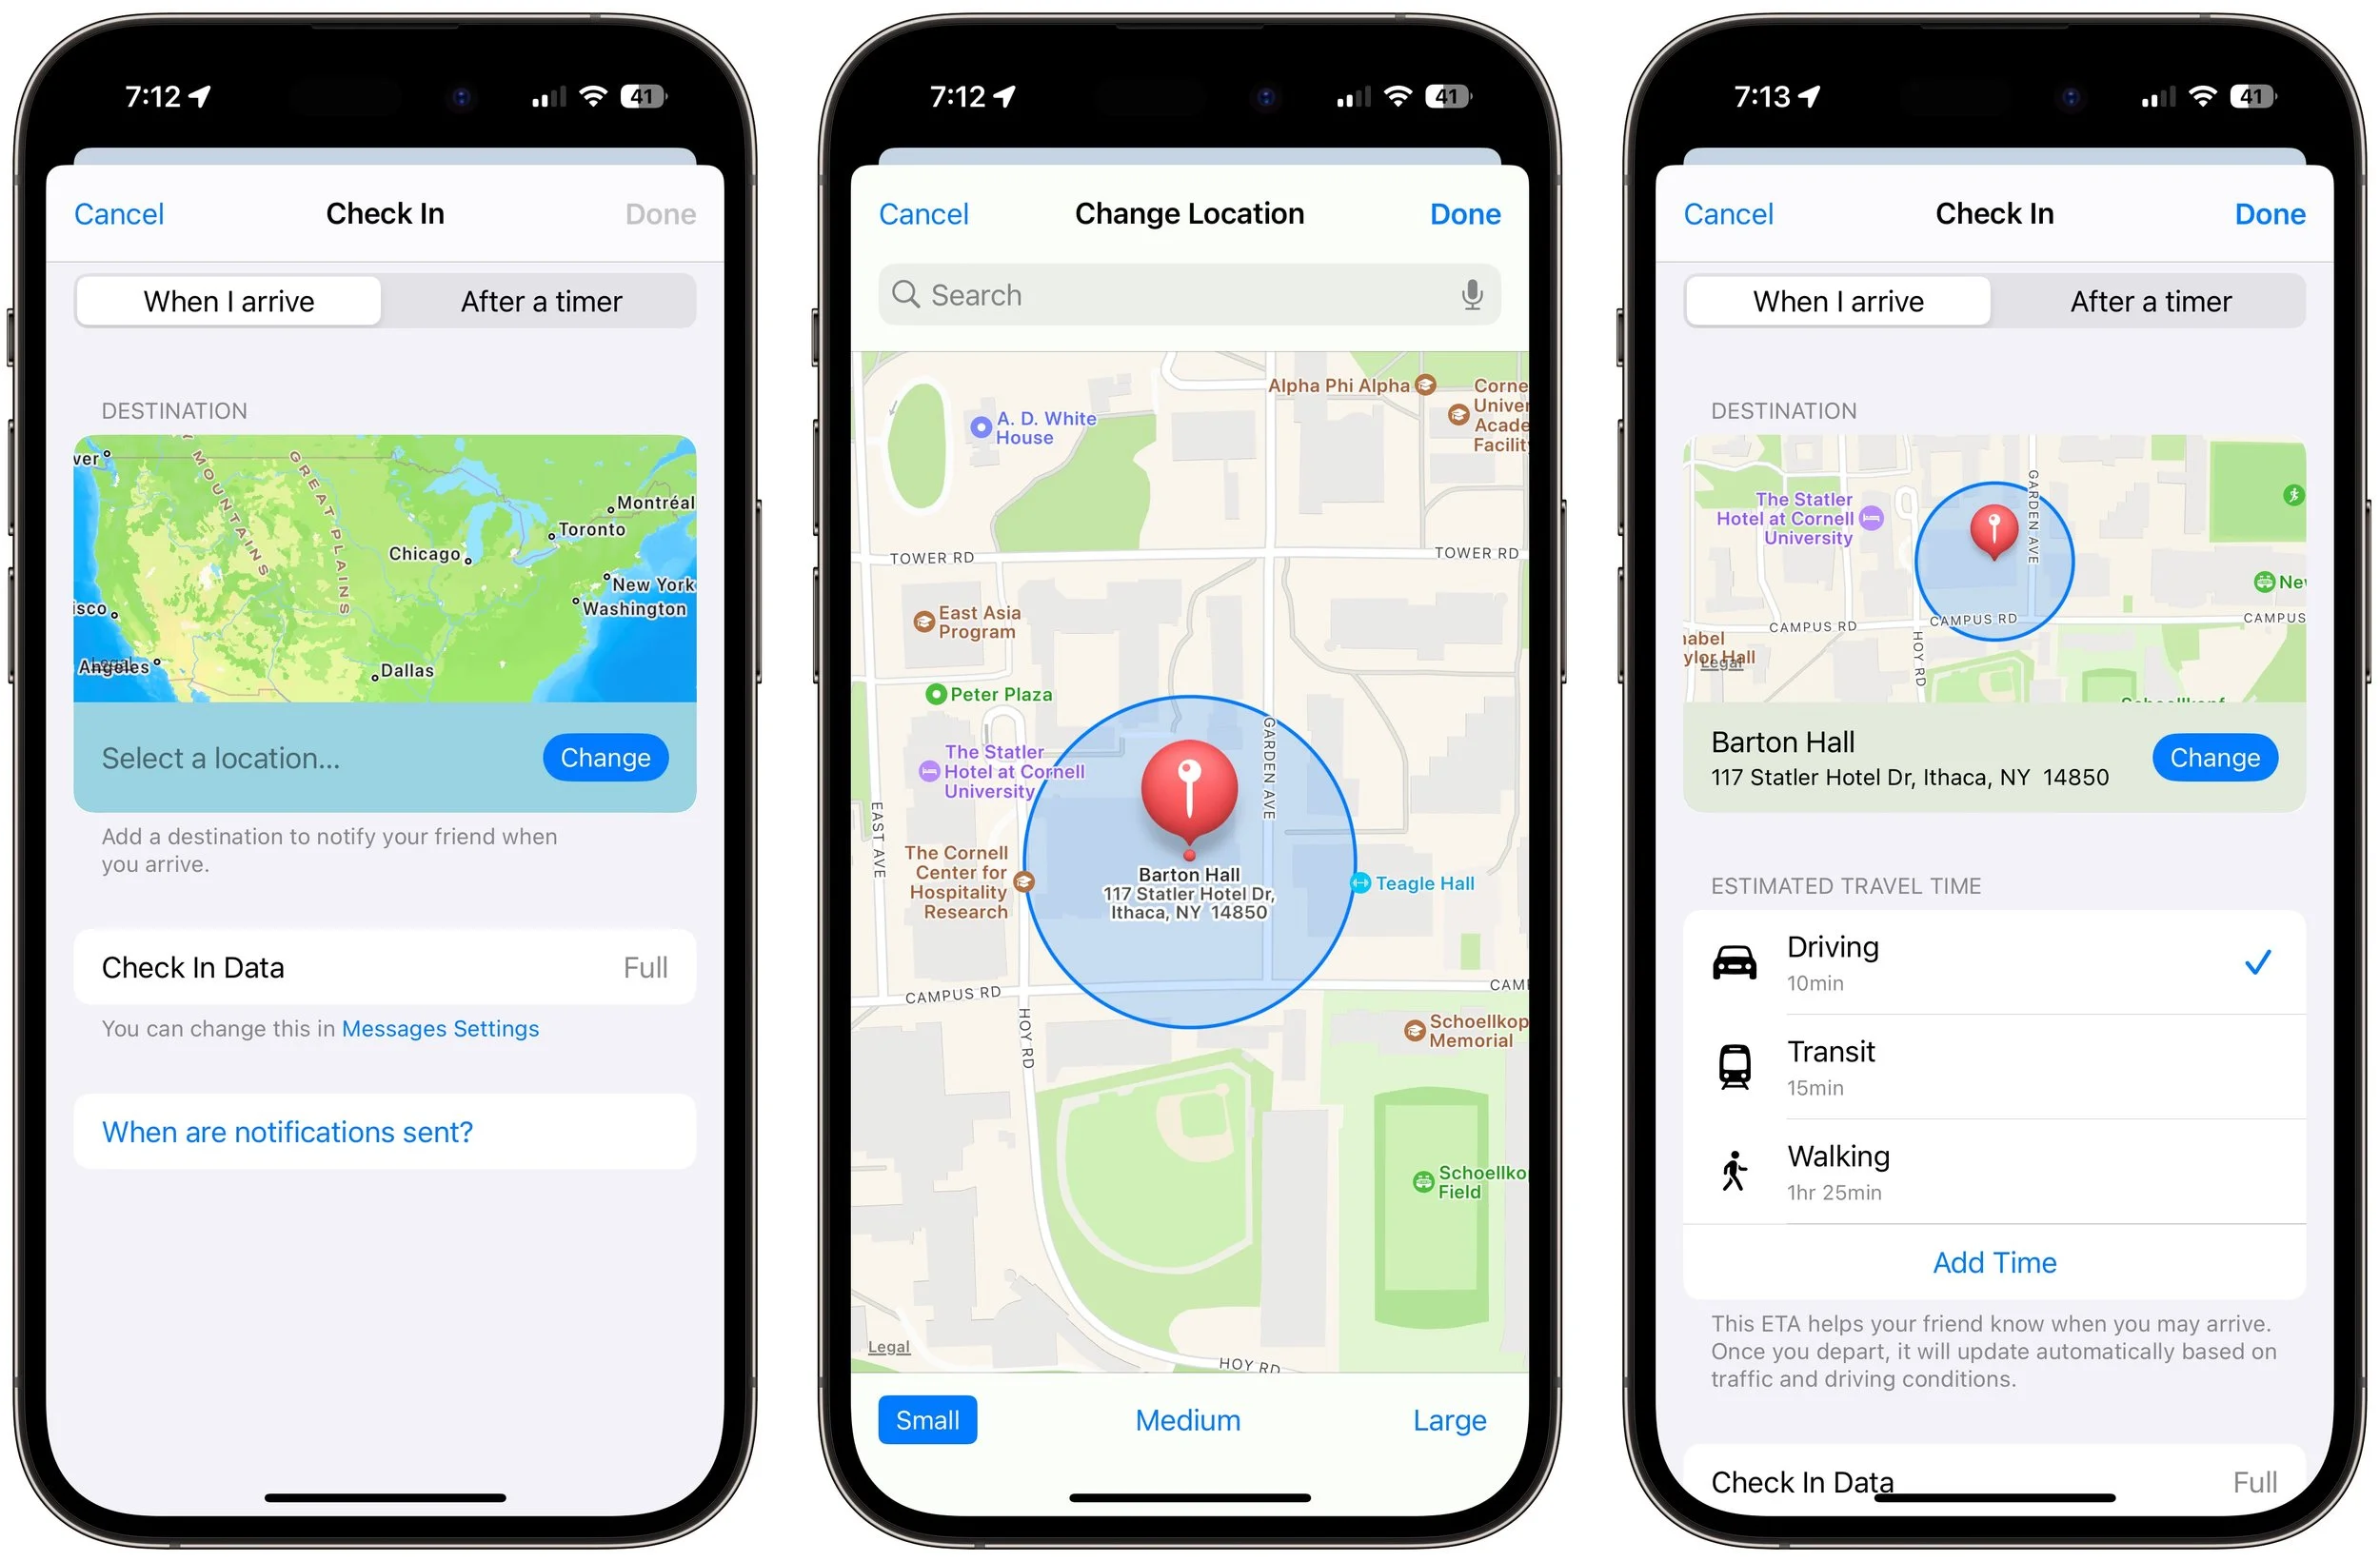
7. To set a destination instead of a timer, tap “When I arrive” at the top of the screen.
8. Tap the Change button, and in the map, either search for a location or find one manually by pinching and zooming—touch and hold the map to drop a destination pin. At the bottom of the screen, select Small, Medium, or Large to set the size of the area in which you’ll arrive.
9. Tap Done to close the map and then select Driving, Transit, or Walking so Check In can estimate your arrival time based on your method of transportation.
10. If you want additional buffer time, tap Add Time and give yourself 15, 30, or 60 minutes beyond when Check In thinks you’ll arrive. This shouldn’t usually be necessary.
11. Tap Done.
12. Once you’re back to the Check In card in the Messages conversation, tap the Send button to start the Check In.
Note that safety partners can’t reject Check In cards.
End a Check In
Once you trigger a Check In, it can end in a few ways. First, you can cancel it before the timer completes or you arrive at your destination. Second, it can end successfully when you tap End when the timer finishes or when you arrive at your specified location. Third and finally, there’s the core purpose of the Check In, which is to alert your safety partner if you fail to respond to a timer or arrive where and when you said you would.
Cancel: To cancel a Check In, tap the Details button on the Check In card in Messages, tap Cancel Check In, and agree that you don’t want your safety partner notified. Timer and destination Check Ins look slightly different but act the same way. Your safety partner will only see that the Check In card in Messages says it has ended.
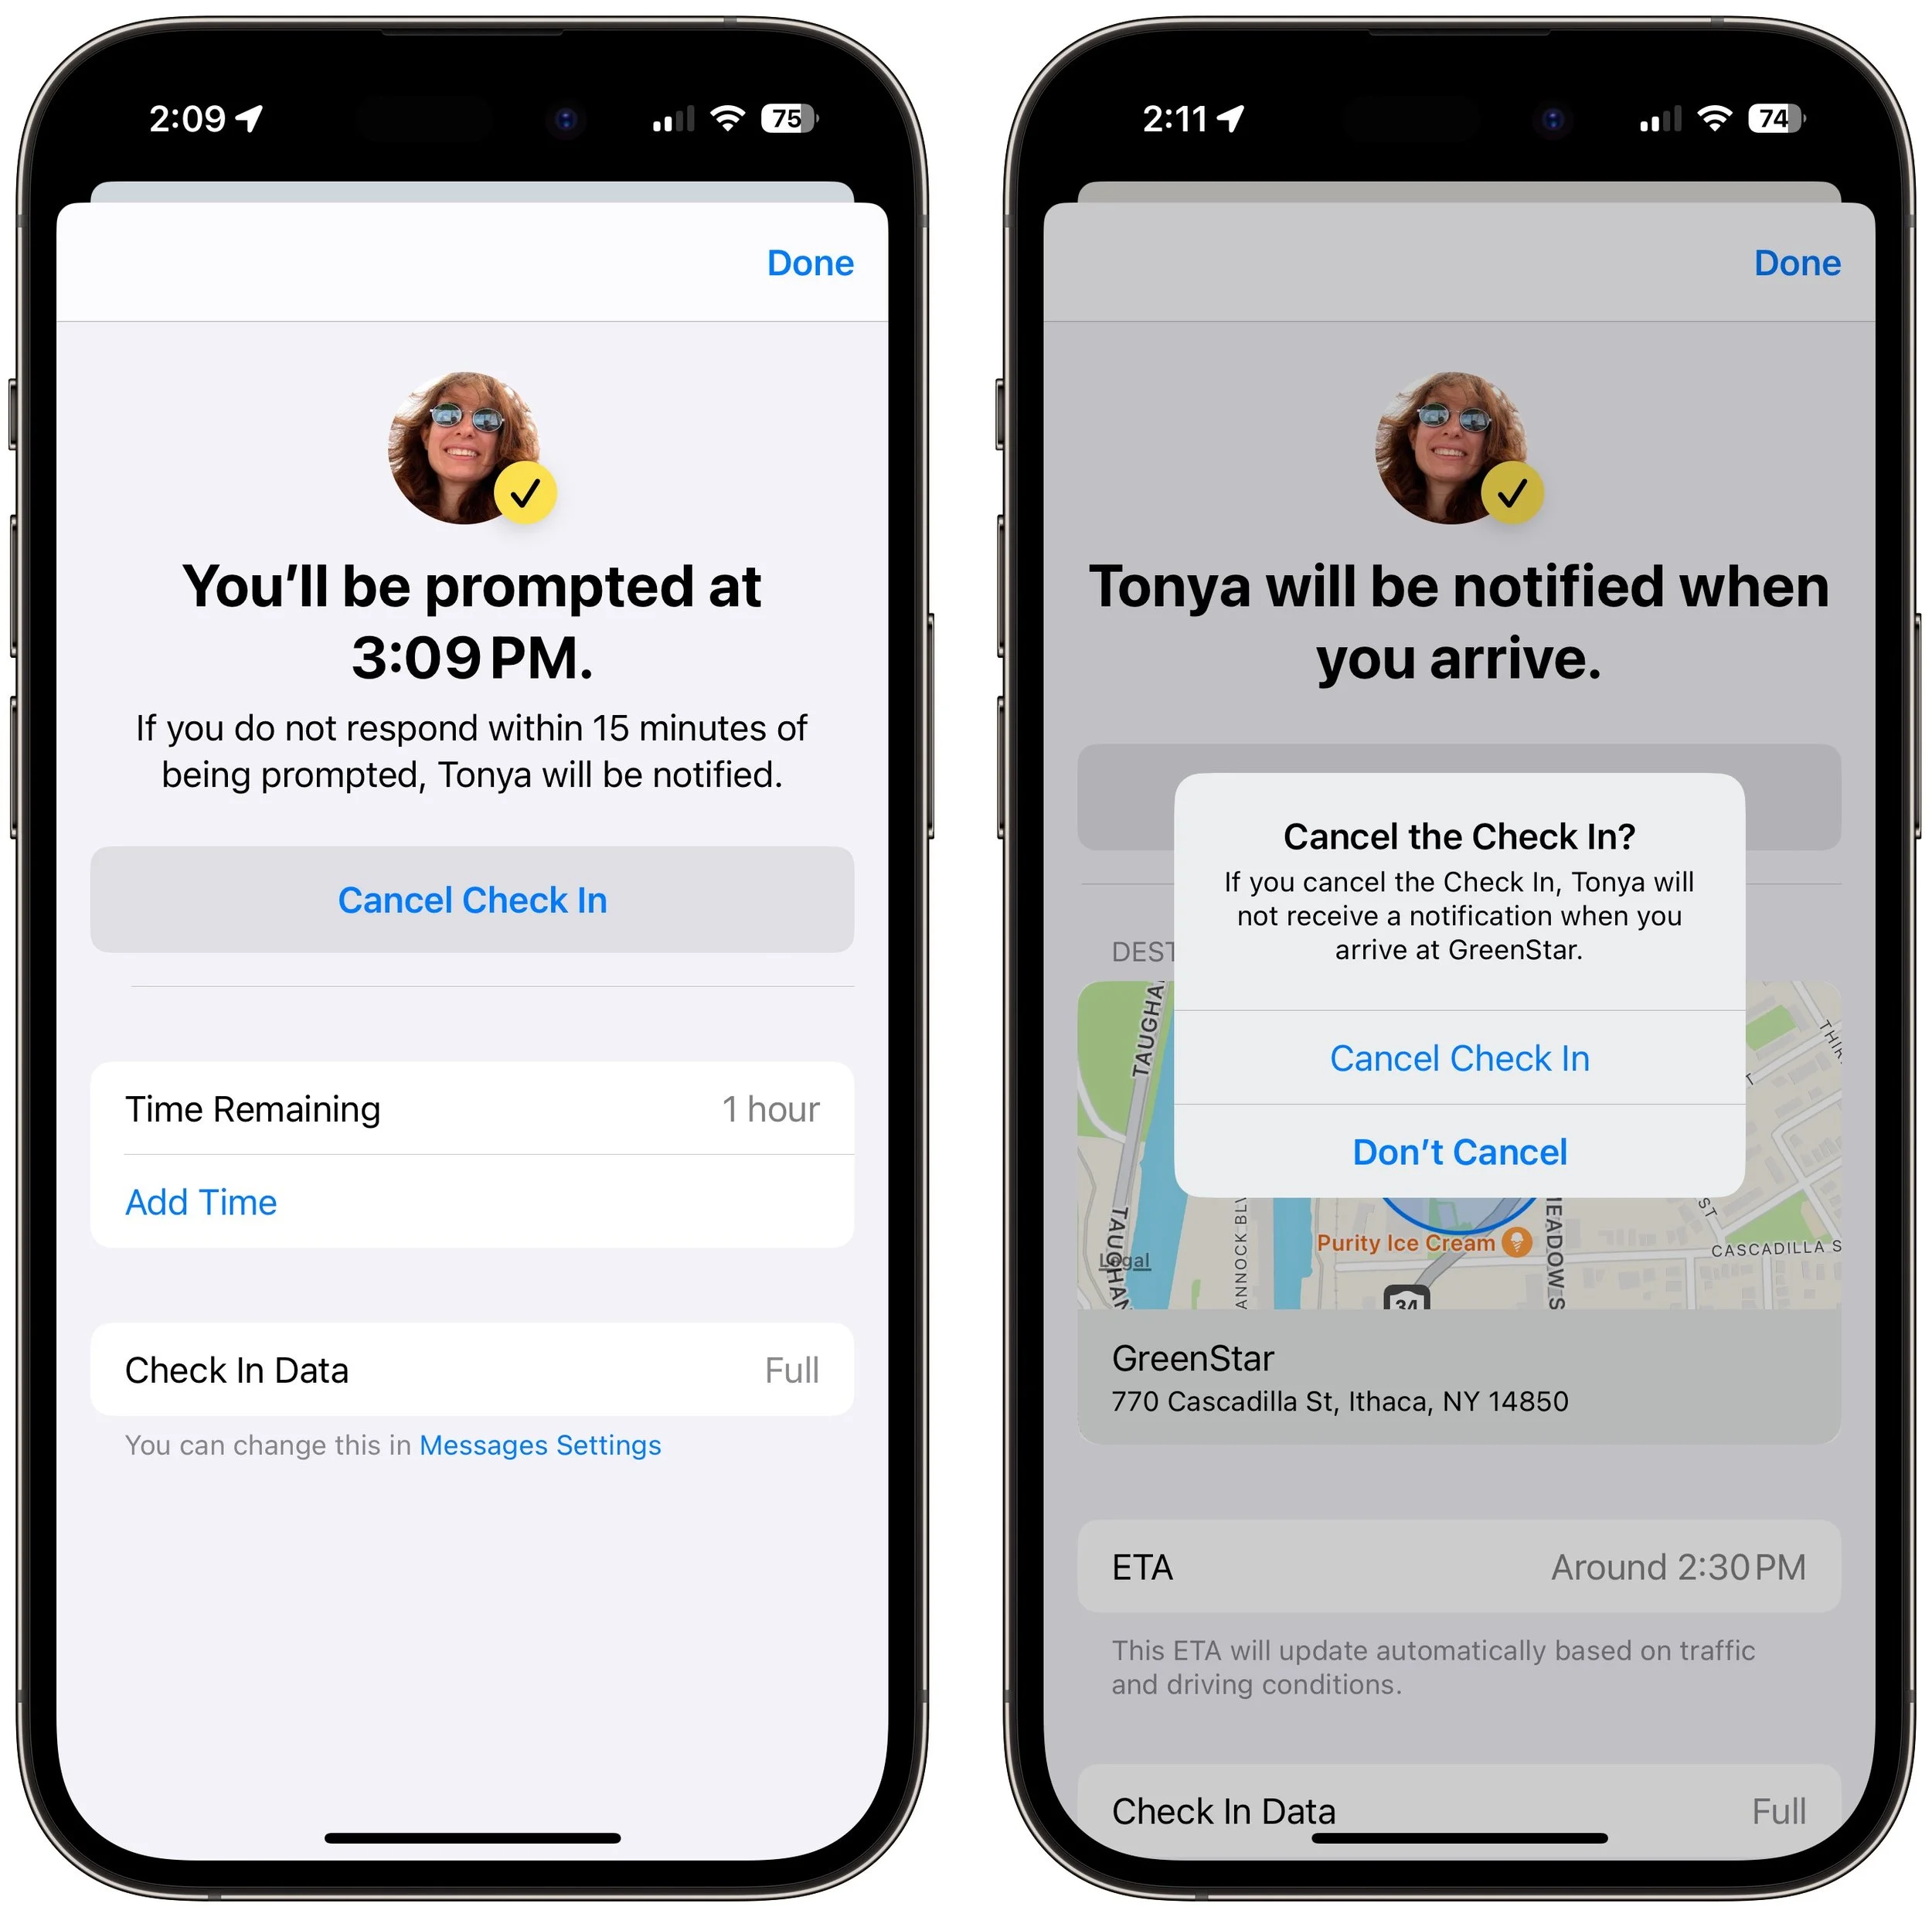
End successfully: For a timer Check In to end successfully, you must respond when the iPhone prompts you (below left). All your safety partner sees when that happens is a note in the Check In card that the timer ended (below right). You don’t need to interact with your iPhone for a destination Check In to end successfully—just arrive at the specified location. The safety partner’s Check In card updates to say that you arrived.
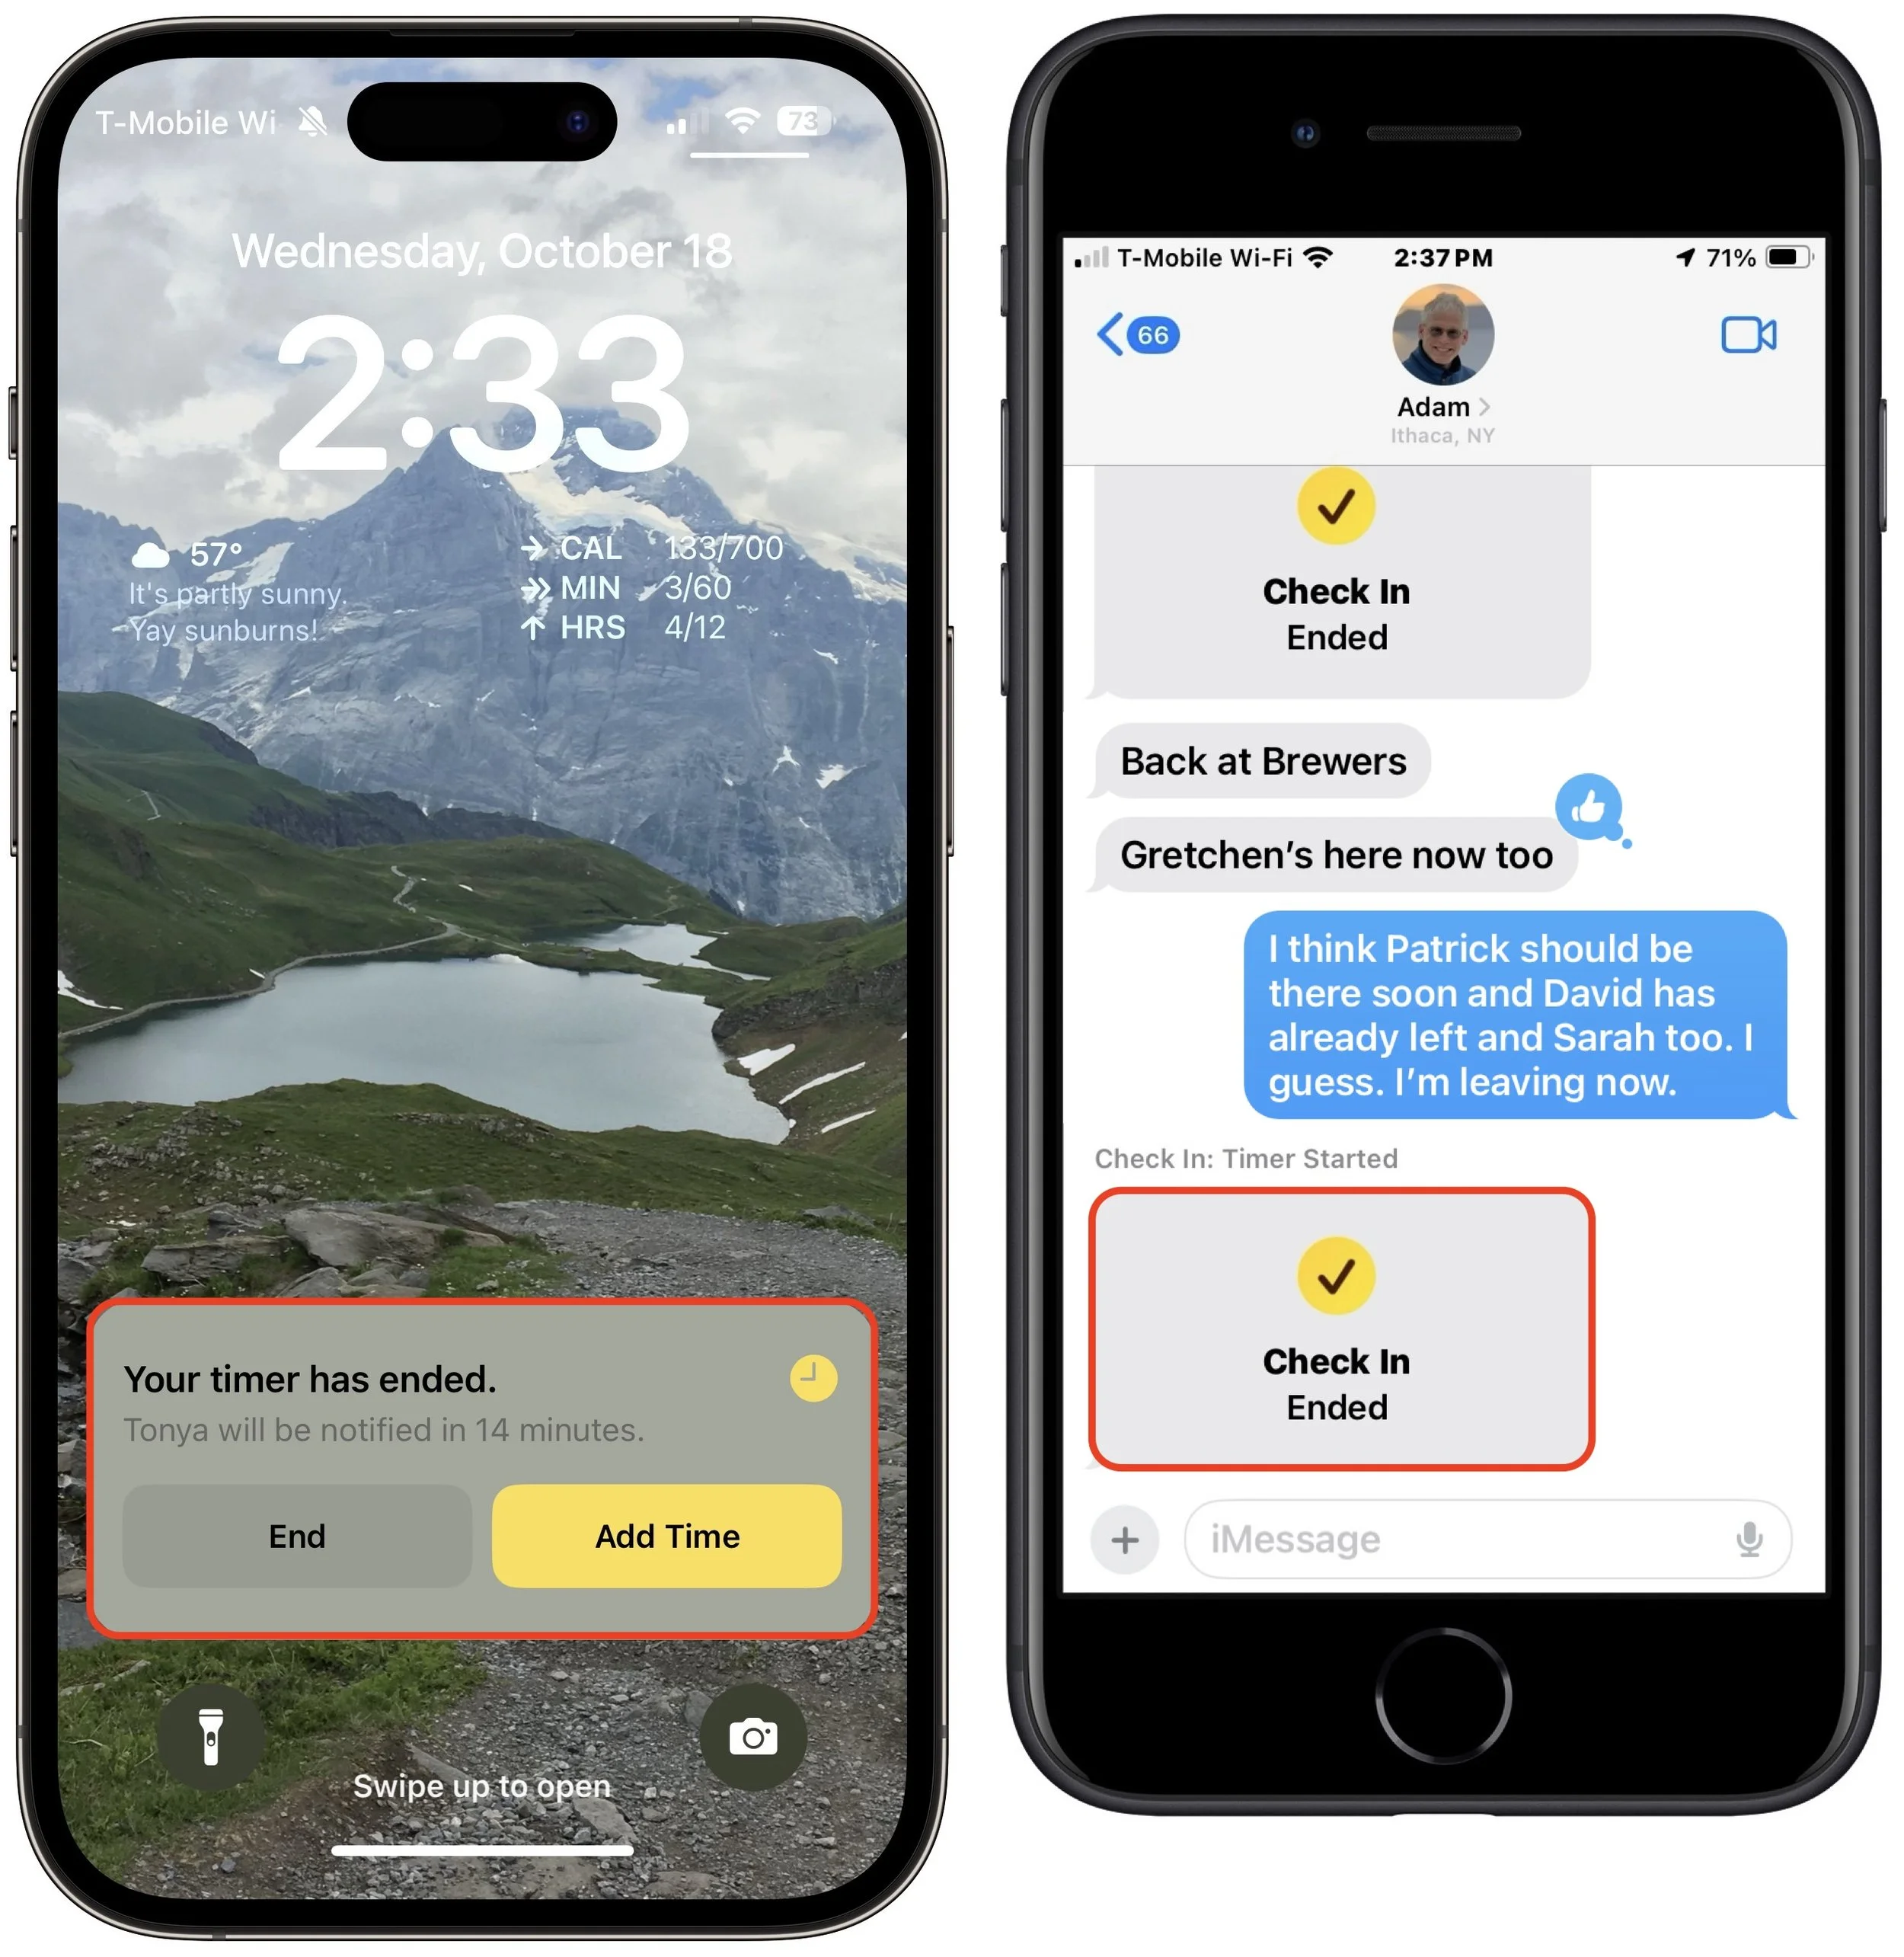
Check In fails to end (initiator): If you don’t arrive at your destination or fail to tap End when prompted, Check In gives you the option of adding time (below left) but after 15 minutes, tells you that it has alerted your safety partner (below center and right).
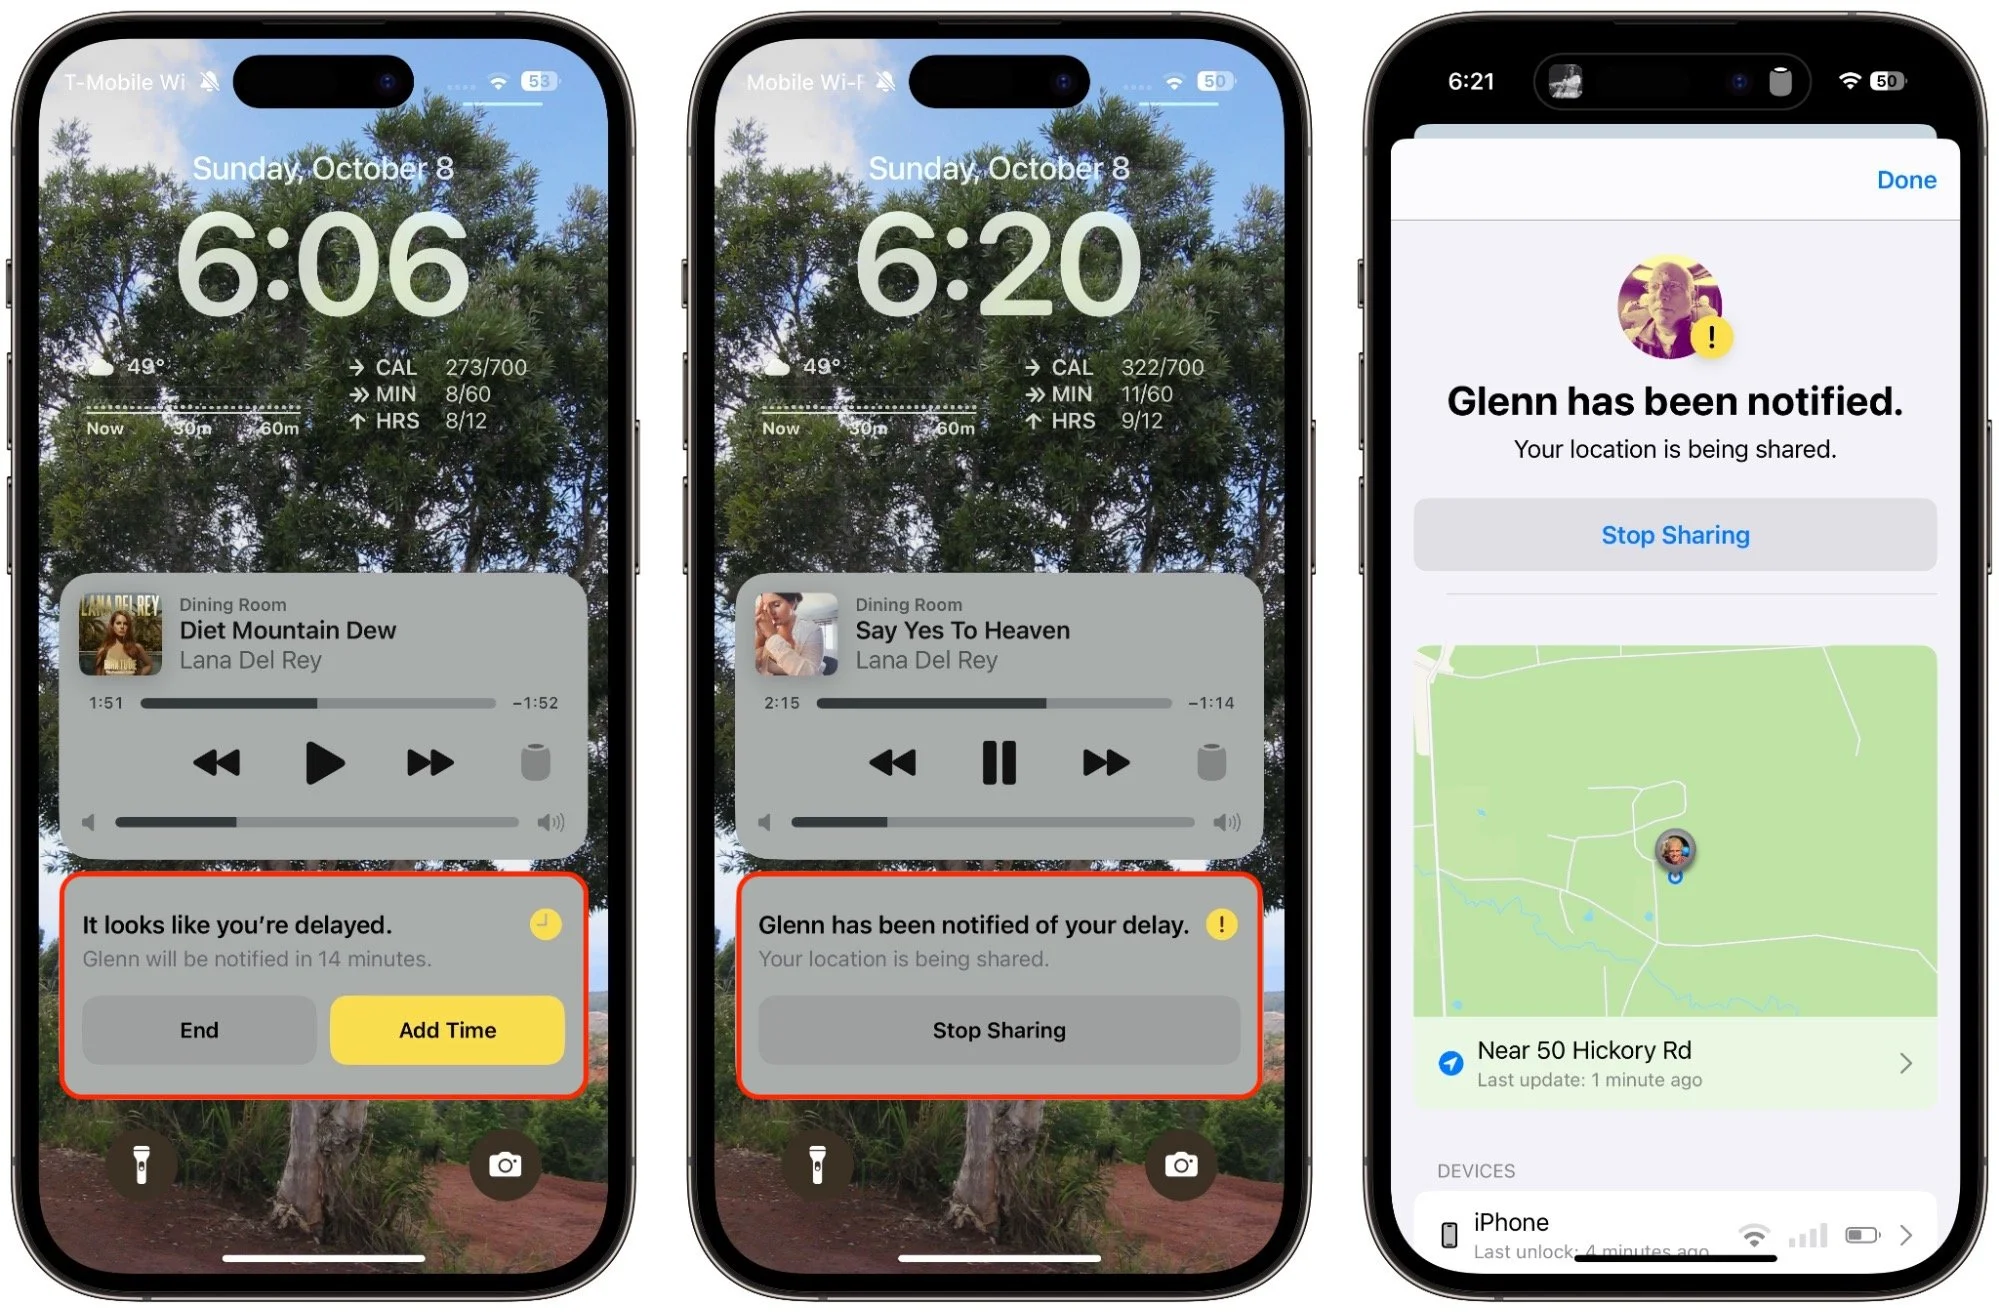
Check In fails to end (safety partner): More interesting is what your safety partner sees if you fail to complete a Check In. They’ll be alerted and can tap Details to see your location, when your devices were last unlocked, and more. They then have to figure out the best way to respond given your setup conversation.

It can take some practice to become fluid with Check In, so it’s worth testing it in everyday situations before using it when it might really matter. Once you use it a few times, you may notice Siri Suggestions offering to start it for you, making it even easier to initiate regularly. We hope you find that it provides some peace of mind and, in the worst-case scenario, helps someone in need of emergency services.
(Featured image by iStock.com/PeopleImages)
Want to Password-Protect a PDF? Follow These Best Practices
If you have a PDF with confidential information that you want to share, you can set a password to restrict opening, printing, or editing. We have instructions for Preview and Adobe Acrobat, plus advice on ensuring your document stays secure.
We periodically field questions about password-protecting a PDF to prevent the wrong people from reading it. Lawyers want to ensure that drafts of legal documents don’t fall into the wrong hands, financial advisers want to keep confidential financial information private, and authors want to prevent their writing from being shared broadly on the Internet. Others don’t worry so much about a document being read but want to ensure that it can’t be changed or printed.
PDF provides options for password-protecting documents for just these reasons, and you can add such protection to your PDFs in both Apple’s Preview and Adobe Acrobat. We’ll explain how to do that, but before we do, we want to share some best practices to increase the likelihood that your PDFs will remain protected as you wish.
Also, if you’re looking for a comprehensive solution to protecting lots of documents for a wide variety of situations, you’d be better off investigating document digital rights management systems along the lines of LockLizard and Vitrium.
Best Practices for Password-Protecting PDFs
There’s no such thing as perfect security, especially when you want to share information with others rather than just keeping it as your own secret. But you can increase the security of shared documents with these best practices.
Use strong passwords: All PDF passwords should be longer than 12 characters and include uppercase and lowercase letters, numbers, and punctuation, without using dictionary words or well-known number/letter substitutions. A plethora of online PDF unlocking tools can remove weak passwords, and passwords should be strong enough to withstand brute force and dictionary attacks from a determined attacker who could bring significant computing re-sources to bear.
Focus on Document Open passwords: PDFs can have two passwords: the Document Open password that users must enter to open the document and a Permissions password that restricts actions like editing, printing, and copying. Even if you mainly want to restrict actions, it’s worth setting a Document Open password because the Permissions password’s restrictions can be bypassed by third-party utilities or by screenshots and Live Text.
Share passwords out of band: When sharing a protected PDF with someone, send them the password via a different communications channel. So, if you email the PDF, give them the password via Messages or a voice call. That way, if an attacker gains access to the PDF, they won’t also have the password sitting next to it.
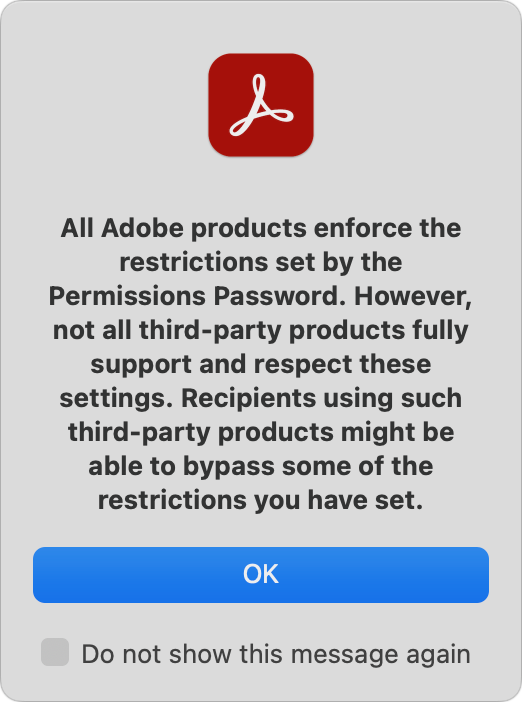
Educate recipients: When you share a user password with someone else, they can give it to anyone they want and, depending on how you set things up, remove the protection from the document. In short, your document security is only as strong as your recipients want it to be, so make sure to communicate your wishes to them.
Watermark documents: Along those lines, it may be worth adding a header/footer or watermark that identifies the document as Confidential or Draft to clarify why it shouldn’t be shared.
Avoid online tools: Numerous websites offer PDF utility functions, such as adding passwords, watermarking, merging and splitting, conversion, and more. There’s no harm in using them with documents you don’t care about, but if you’re concerned enough to password-protect a PDF, don’t upload it to a website with unknown security and document retention policies.
Clear metadata: Passwords protect PDF content, but not necessarily metadata that might include the author’s name, employer, and keywords.
Use Adobe Acrobat: Apple’s Preview is a decent PDF app and offers basic password-protection capabilities, but for more protection capabilities and options, use the full-featured Adobe Acrobat. Preview is OK for those who need to protect an occasional PDF, but Acrobat is a better choice if protecting PDFs is essential for your situation.
Password-Protect a PDF Using Preview
It’s easy to add password protection to a PDF with Preview. Apple recommends a slightly fussier approach that involves setting the permissions during an export, although we didn’t find that it made any difference. Apple is likely trying to get you to make a copy so you don’t password-protect your original, but it’s easier to duplicate the file in the Finder first with File > Duplicate. Here’s the simple method:
With a copy of a PDF open in Preview, choose File > Edit Permissions to display the permissions dialog.
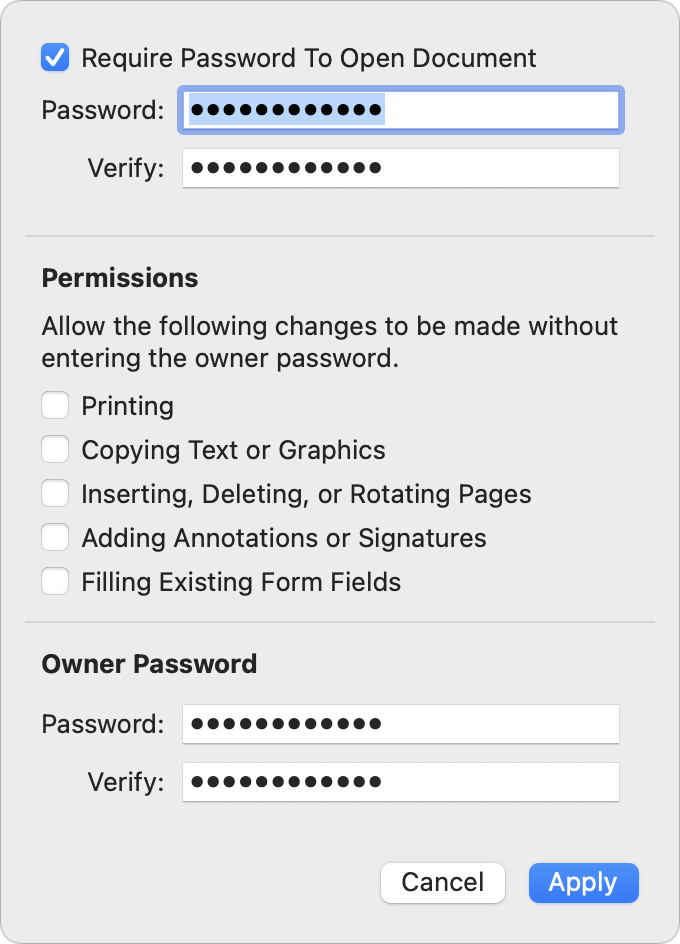
2. Select Require Password To Open Document, and enter the desired Document Open password twice.
3. Deselect desired checkboxes in the Permissions section to restrict those activities.
4. Enter the Owner (Permissions) password twice at the bottom of the dialog. It should be different from the Document Open password. Either will open the document, but only the Owner (Permissions) password will allow the document to be printed, copied, or edited as per those checkboxes.
5. Click Apply and save the document.
Password-Protect a PDF Using Adobe Acrobat
Adobe has extensive instructions on password-protecting PDFs using Acrobat in different scenarios, but the basics are still simple.
1. With a copy of a PDF open in Acrobat, choose File > Protect Using Password to open the password dialog.
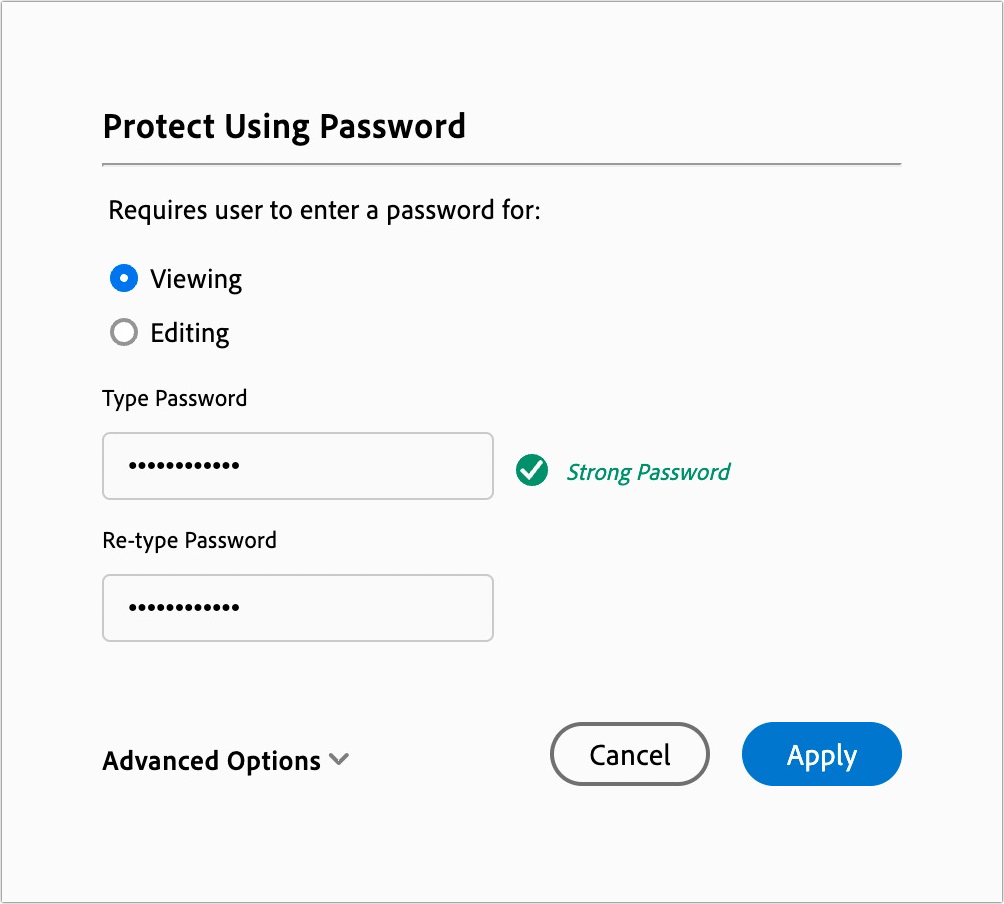
2. Select Viewing to add a Document Open password or Editing to add a Permissions password.
3. Enter the password, and retype it to confirm it.
4. Click Apply and save the document.
For a simple Document Open password, you’re all done, but if you want to set specific printing, editing, and copying restrictions, follow these steps:
1. Choose Edit > Protection > Security Properties to open the Document Properties dialog with the Security tab selected.
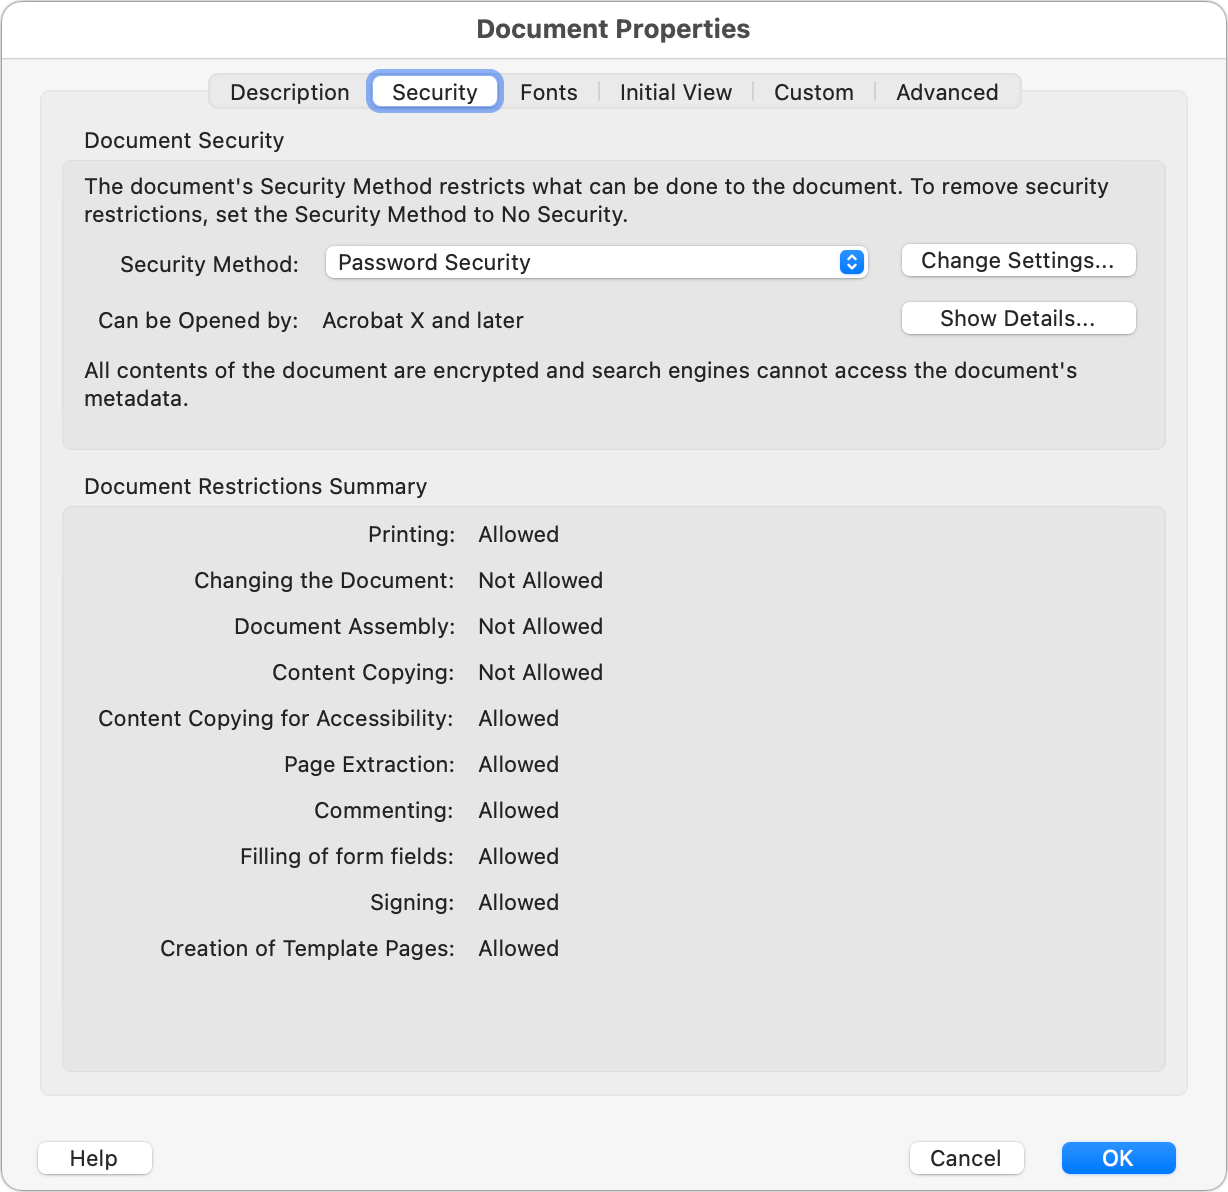
2. Next to Security Method (which should be set to Password Security), click Change Settings to open the Password Security - Settings dialog.
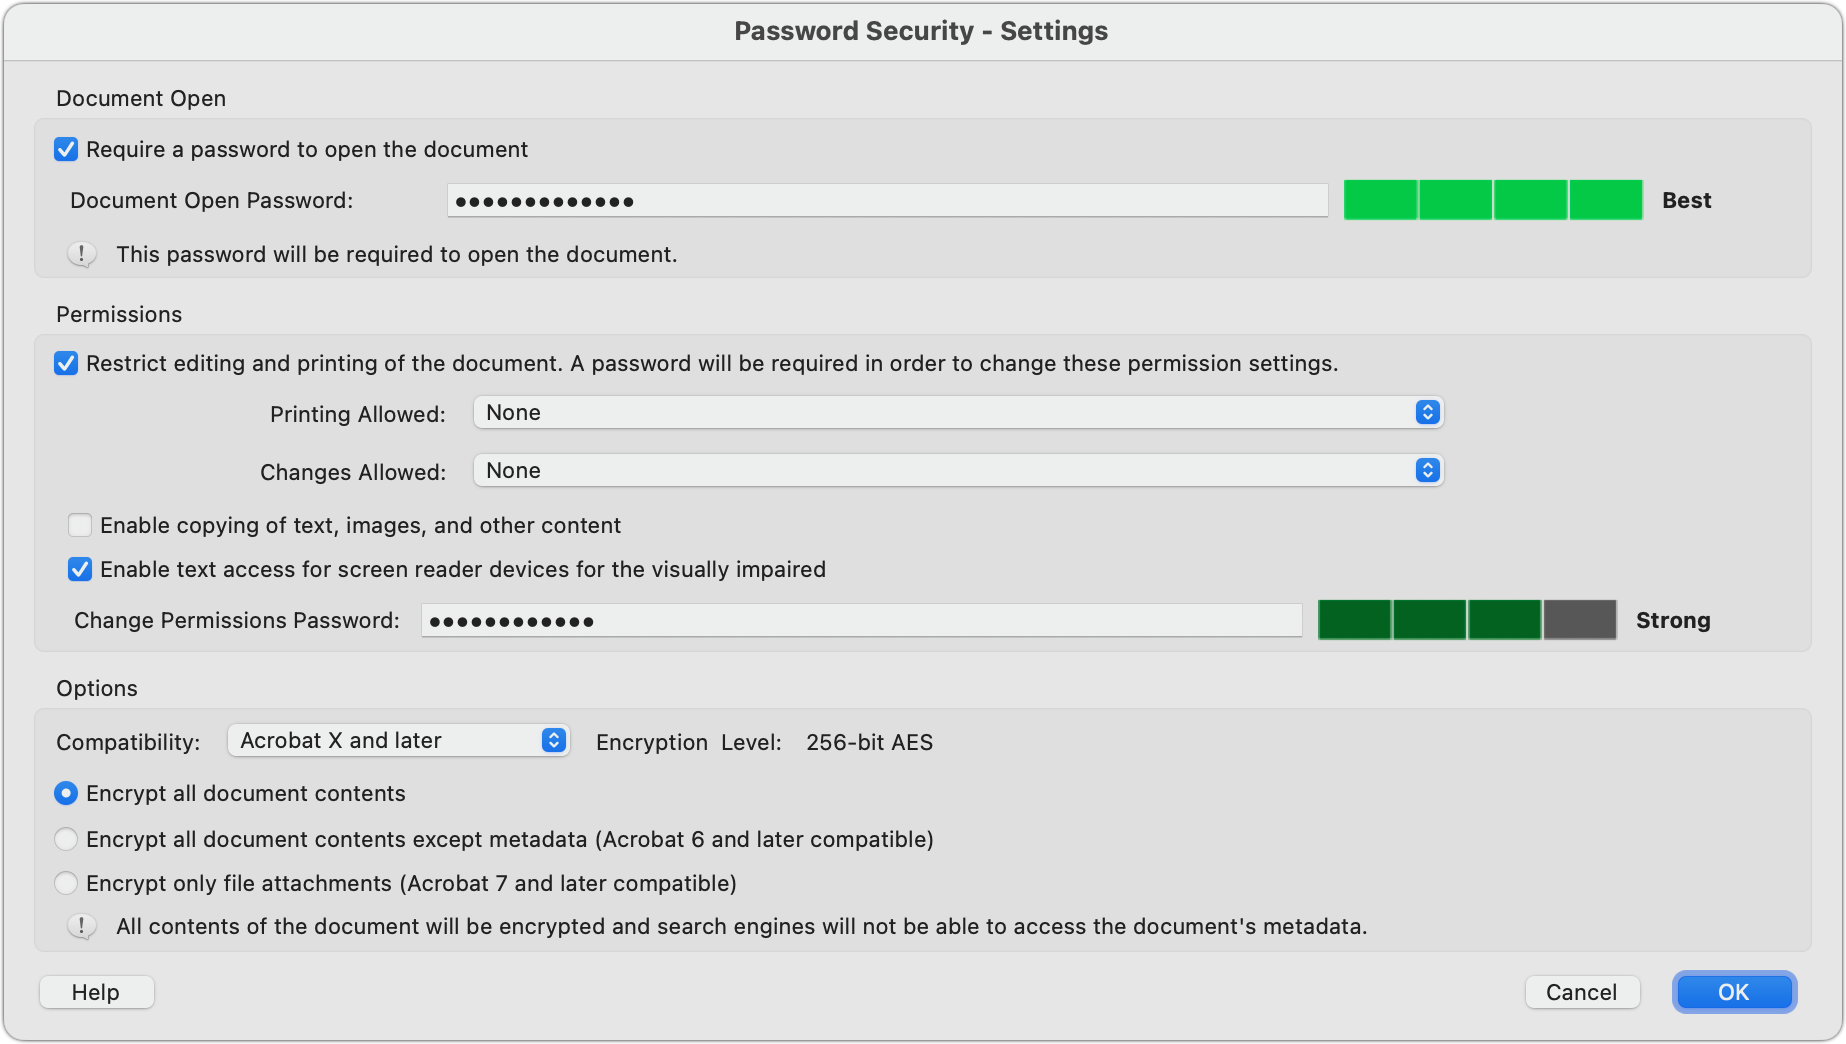
3. In the Permissions section, select the desired options to restrict printing, editing, and copying text in various ways.
4. Click OK and, when prompted, confirm the passwords you’ve entered.
5. Dismiss the Document Properties dialog and save the document.
Password-protecting a PDF can be helpful when you want to ensure a PDF containing sensitive information can’t be viewed or edited by the wrong people. Make sure to use strong passwords since weak passwords are so easily removed!
(Featured image based on an original by iStock.com/Thitichaya Yajampa)
Networking Gear Does Wear Out—Suspect It in Internet Slowdowns and Dropouts
If you’re suffering from Internet slowdowns and dropouts, remember that networking gear and cables can get flaky with age, so it’s worth checking your modems, routers, and switches when troubleshooting.
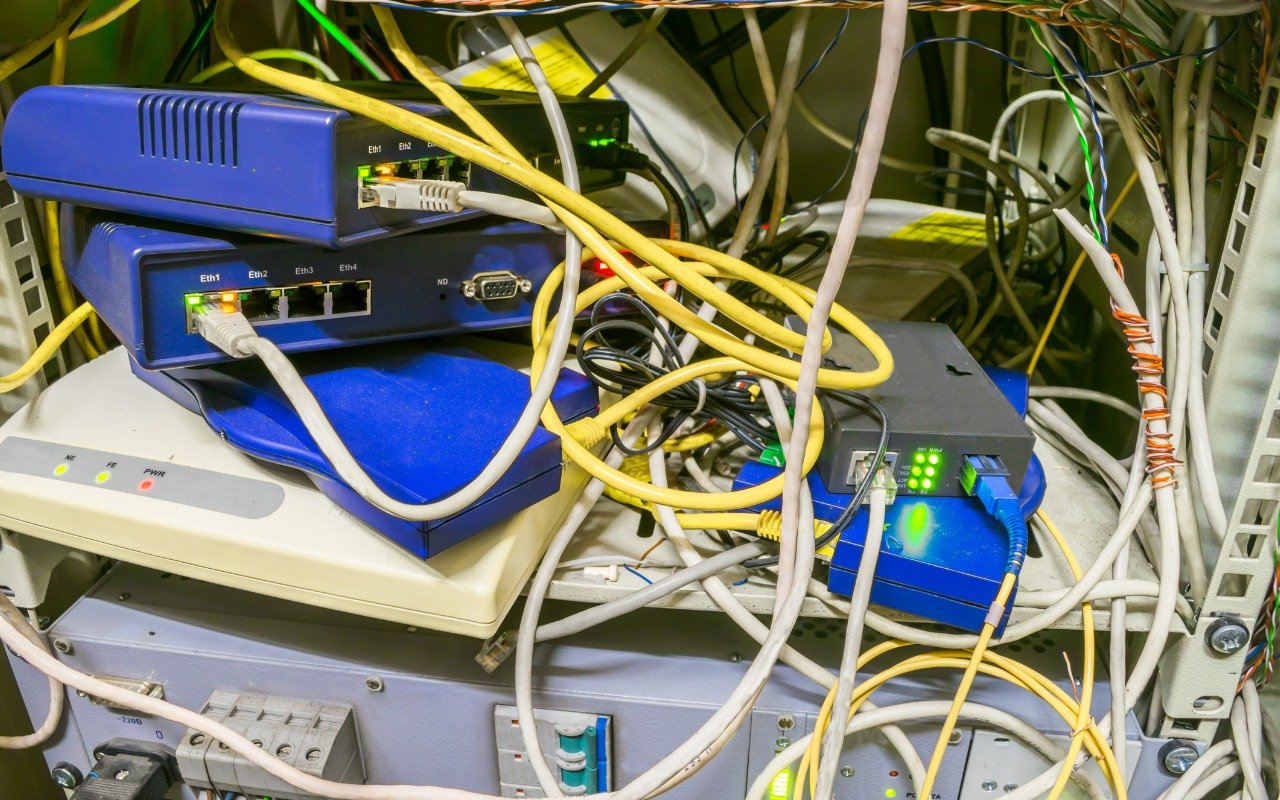
We’ve helped some clients recently with networking problems that seemed to be related to Internet connections. Most notable was intermittently slow Internet performance, causing the client to call their ISP to upgrade to a higher bandwidth connection with guaranteed throughput. But that extra monthly expense turned out to be unnecessary once we tracked the problem to a malfunctioning cable modem. Other problems we’ve seen involved occasional network dropouts (a bad Ethernet switch), flaky Wi-Fi access (a dying AirPort base station), and Internet slowdowns (squirrels gnawing on an outdoor coaxial cable).
Networking infrastructure is often the very definition of “out of sight, out of mind.” Modems, routers, and switches are usually hidden away in corners, closets, or machine rooms where few people notice them regularly. In addition, most users rely on Wi-Fi–equipped laptops, tablets, and smartphones and put no thought into how those Wi-Fi connections get their Internet access. Nor do many people realize the extent that physical cables—Ethernet, coaxial, fiber optic—are required.
Plus, because network cables and gear are so hidden, they tend to stay in place for years. For the most part, that’s fine. Most network devices other than those involving network-attached storage have no moving parts to fail, and cables that aren’t exposed to extreme environmental conditions or physical movement will last for a long time. But even solid-state electronic devices wear out, and while cables seldom degrade on their own, they’re easily damaged by movement. And never underestimate the damage mice and squirrels can inflict!
It’s worth making sure you or someone in your organization has a solid knowledge—and documentation—of your network infrastructure. For instance, can someone answer these questions:
Where does your Internet connection come into the building?
What cable modem or other router are you using? Do you own or rent it?
Does your network rely on multiple Ethernet switches? Other networking gear?
Is your Ethernet cabling Cat 5 (obsolete, limited to 100 Mbps), Cat 5e (capable of 1 Gbps), Cat 6 (up to 10 Gbps), Cat 6a (10 Gbps at longer distances), or Cat 6e (a meaningless marketing term)?
Where is your Ethernet cable strung, and is it reasonably accessible? Can you isolate portions of your network for testing?
We also recommend putting an installation date sticker on the bottom of your network devices. That way, if you’re troubleshooting a problem like poor performance or intermittent connections, you can check quickly to see if any suspect devices are truly ancient. Even when older devices like cable modems seem to be working correctly, they may lack support for newer standards or firmware updates that provide better stability and throughput. We’ve also seen that issue with powerline networking adapters that are useful for extending connectivity to areas that can’t easily be served by Wi-Fi or Ethernet—newer adapters can provide significantly more performance. Plus, hardware does degrade over time—in particular, we’ve seen Ethernet switches and Wi-Fi routers get flaky as they age.
Finally, if solving a network problem requires new gear or cables, we strongly encourage purchasing quality hardware and cabling. Spending a little more upfront can save a lot of money in troubleshooting down the road, especially when it comes to pulling new cables.
(Featured image by iStock.com/klmax)
Tired of Nonstop Cookie Popups? Dismiss Them Automatically with These Extensions
If you’re as annoyed as we are by constant cookie consent popups on seemingly every website these days, check out our recommendations for browser extensions that can banish them for good.

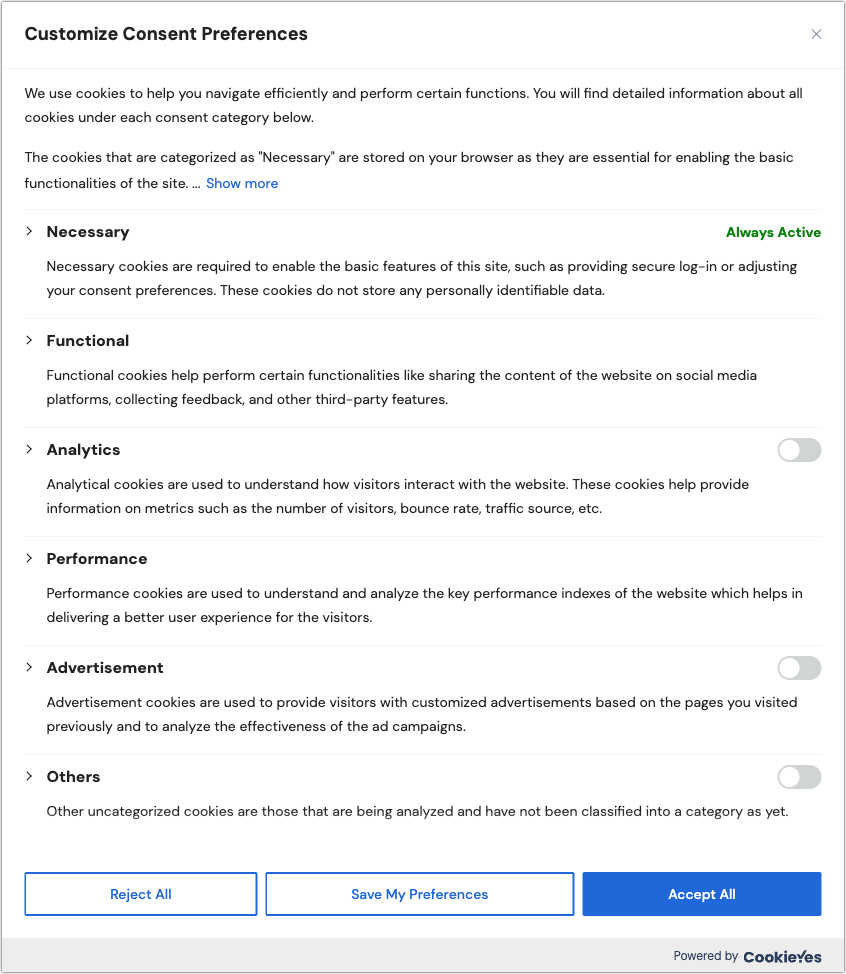
The European Union has for many years required that websites—at least those serving European users—gain informed consent before storing the personal data of those users. That data includes cookies, which are bits of information stored in Web browsers that websites can read and write. Cookies are widely used for remembering login information, saving user account information, maintaining a shopping cart, and other legitimate purposes. However, they’re also used to target advertising at you by tracking your behavior across websites, which many people consider to be an abuse of user privacy. Hence the EU’s ePrivacy Directive, which resulted in the proliferation of cookie consent popups like this one.

Websites that rely on advertising or user tracking prefer that everyone click Accept All, but because of the EU requirement for informed consent, they have to tell you more about the cookies they use, explain why they want to use them, and allow you to reject types of cookies. Clicking Customize in the cookie consent popup above presents this expanded view. So many details!
On the one hand, thanks to the EU for working to safeguard user privacy. Without laws like the ePrivacy Directive and the overarching General Data Protection Regulation (GDPR), the Web would be even more of a sausage factory that grinds up and sells our personal data.
On the other hand, could cookie consent popups on nearly every website be any more annoying?!? While it’s a nice idea that we provide informed consent for cookies, few people have the time and inclination to read all this and make an informed decision. If you’re like us, you’re probably mashing Reject All as fast as you can. And even that is more effort than you’d prefer to expend.
Happily, there are Web browser extensions that can simplify your life, responding to cookie consent popups automatically using preferences you set once. Why can’t Web browsers do this themselves? They could, and the privacy-focused Brave does, but the W3C’s Platform for Privacy Preferences working group’s recommendations for standardizing behavior around privacy were ignored by browser makers and dropped back in 2006.
Two browser extensions we’ve tested successfully in multiple Mac browsers are Consent-O-Matic and Super Agent. They work by learning how to interact with the common consent popups (many of which come from Consent Management Platforms like Osano and CookieYes) and automatically clicking the switches to match your preferences. More specifically, the Hush extension blocks cookie consent popups in Safari on the iPhone, iPad, and Mac.
Consent-O-Matic
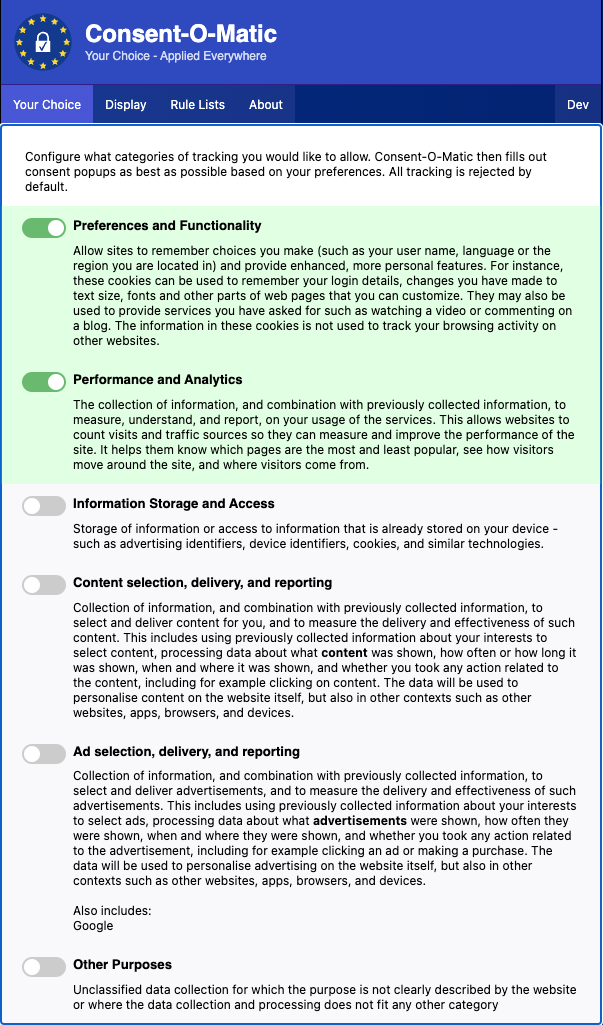
The open-source Consent-O-Matic is free from privacy researchers at Aarhus University. It comes as a Chrome extension that works with Google Chrome (and other Chromium browsers like Arc, Brave, and Edge, shown below), as an add-on for Firefox, and as an extension for Safari on the Mac and Safari in iOS and iPadOS. Consent-O-Matic works reasonably well on the Mac; in testing, it wasn’t effective enough in Safari on the iPhone and iPad to be worth installing. Installation and interface vary by browser—the Chrome extension is shown below.
By default, Consent-O-Matic allows no cookies, though we recommend enabling the Preferences and Functionality option and, if you’re feeling generous toward websites, the Performance and Analytics option. The first option improves your experience on any site where it’s helpful for it to remember information about you, and the second allows the website admins to collect metrics on how the site is being used. If a site doesn’t work correctly with Consent-O-Matic enabled, you can turn off the extension for just that site. In the Display preferences, you can choose whether Consent-O-Matic minimizes consent popups or hides them entirely, and on the About screen, you’ll see how many clicks it has saved you.
Super Agent
Super Agent seems to focus its paid plans on its version for the iPhone and iPad, but we didn’t find it effective enough there to install. On the Mac, however, Super Agent is free and works well, perhaps a bit more so than Consent-O-Matic. It’s available as a Chrome extension for Google Chrome and other Chromium browsers, as a Firefox add-on, and as a Safari extension. Installation and interface vary by browser—the Chrome extension is shown below.
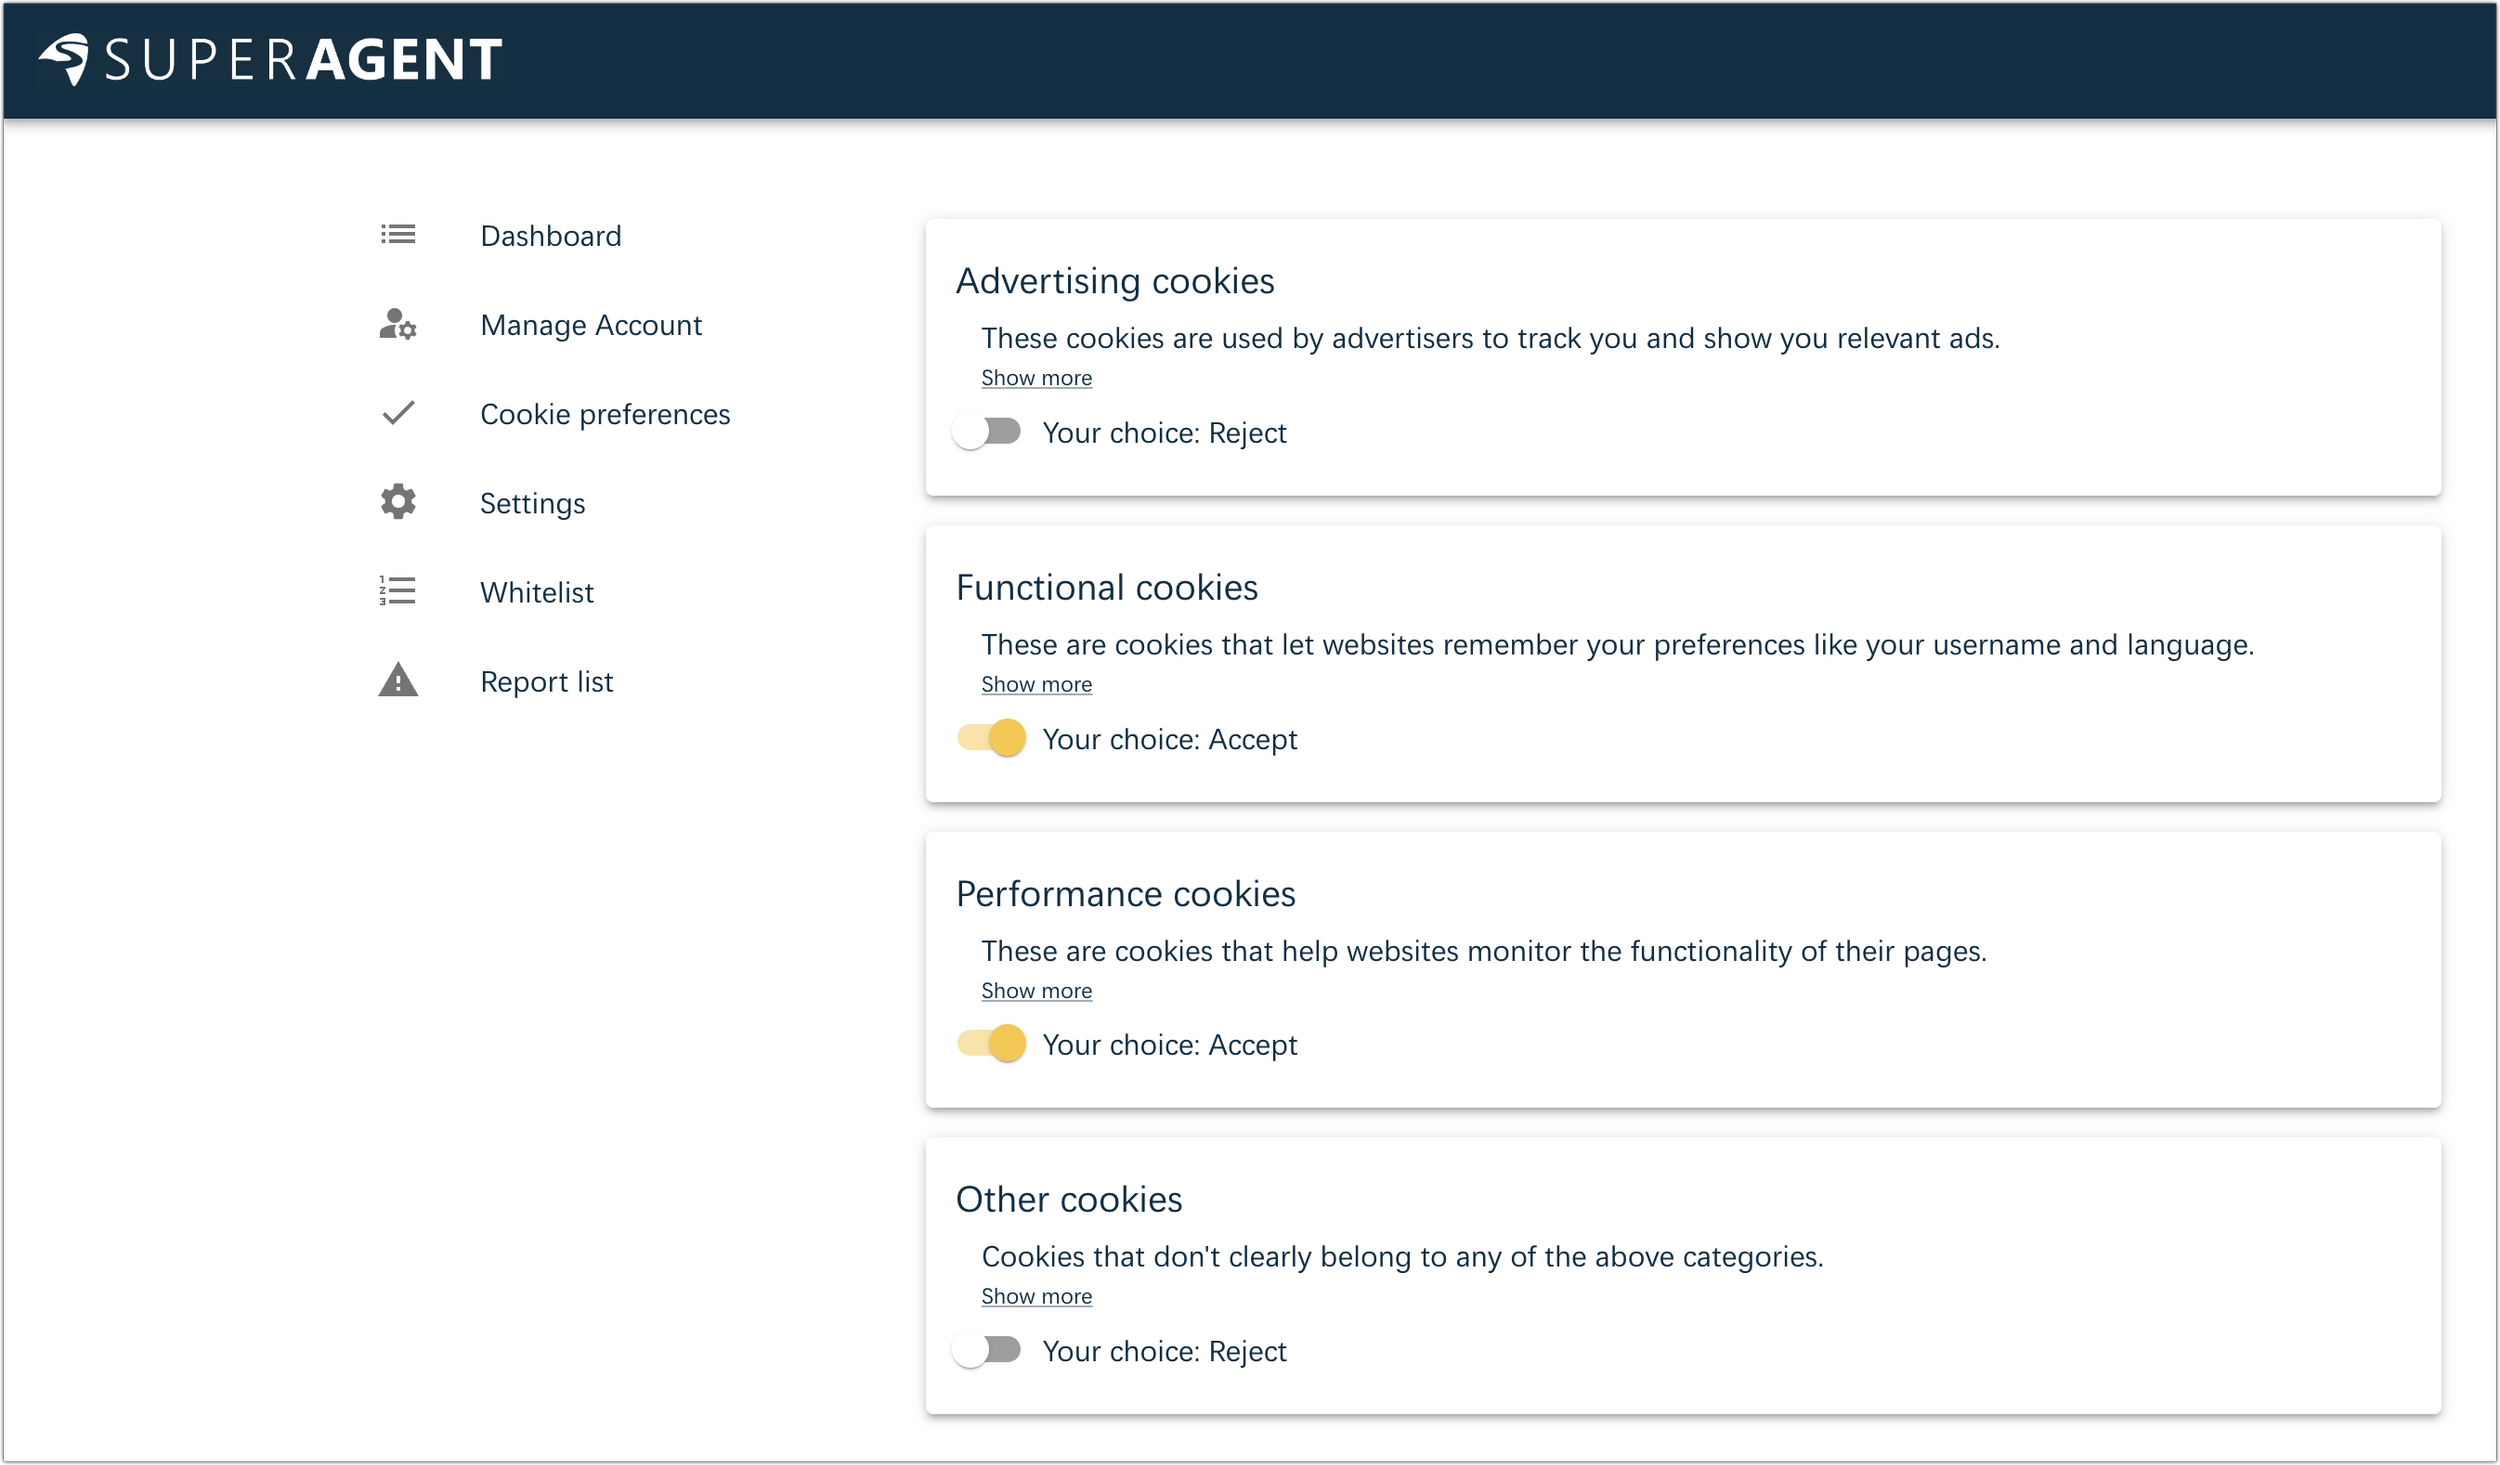
Your first task in Super Agent is to set your preferences for cookies to accept. Again, we recommend enabling Functional cookies; turn on Performance cookies if you wish. Leave Advertising and Other cookies off.
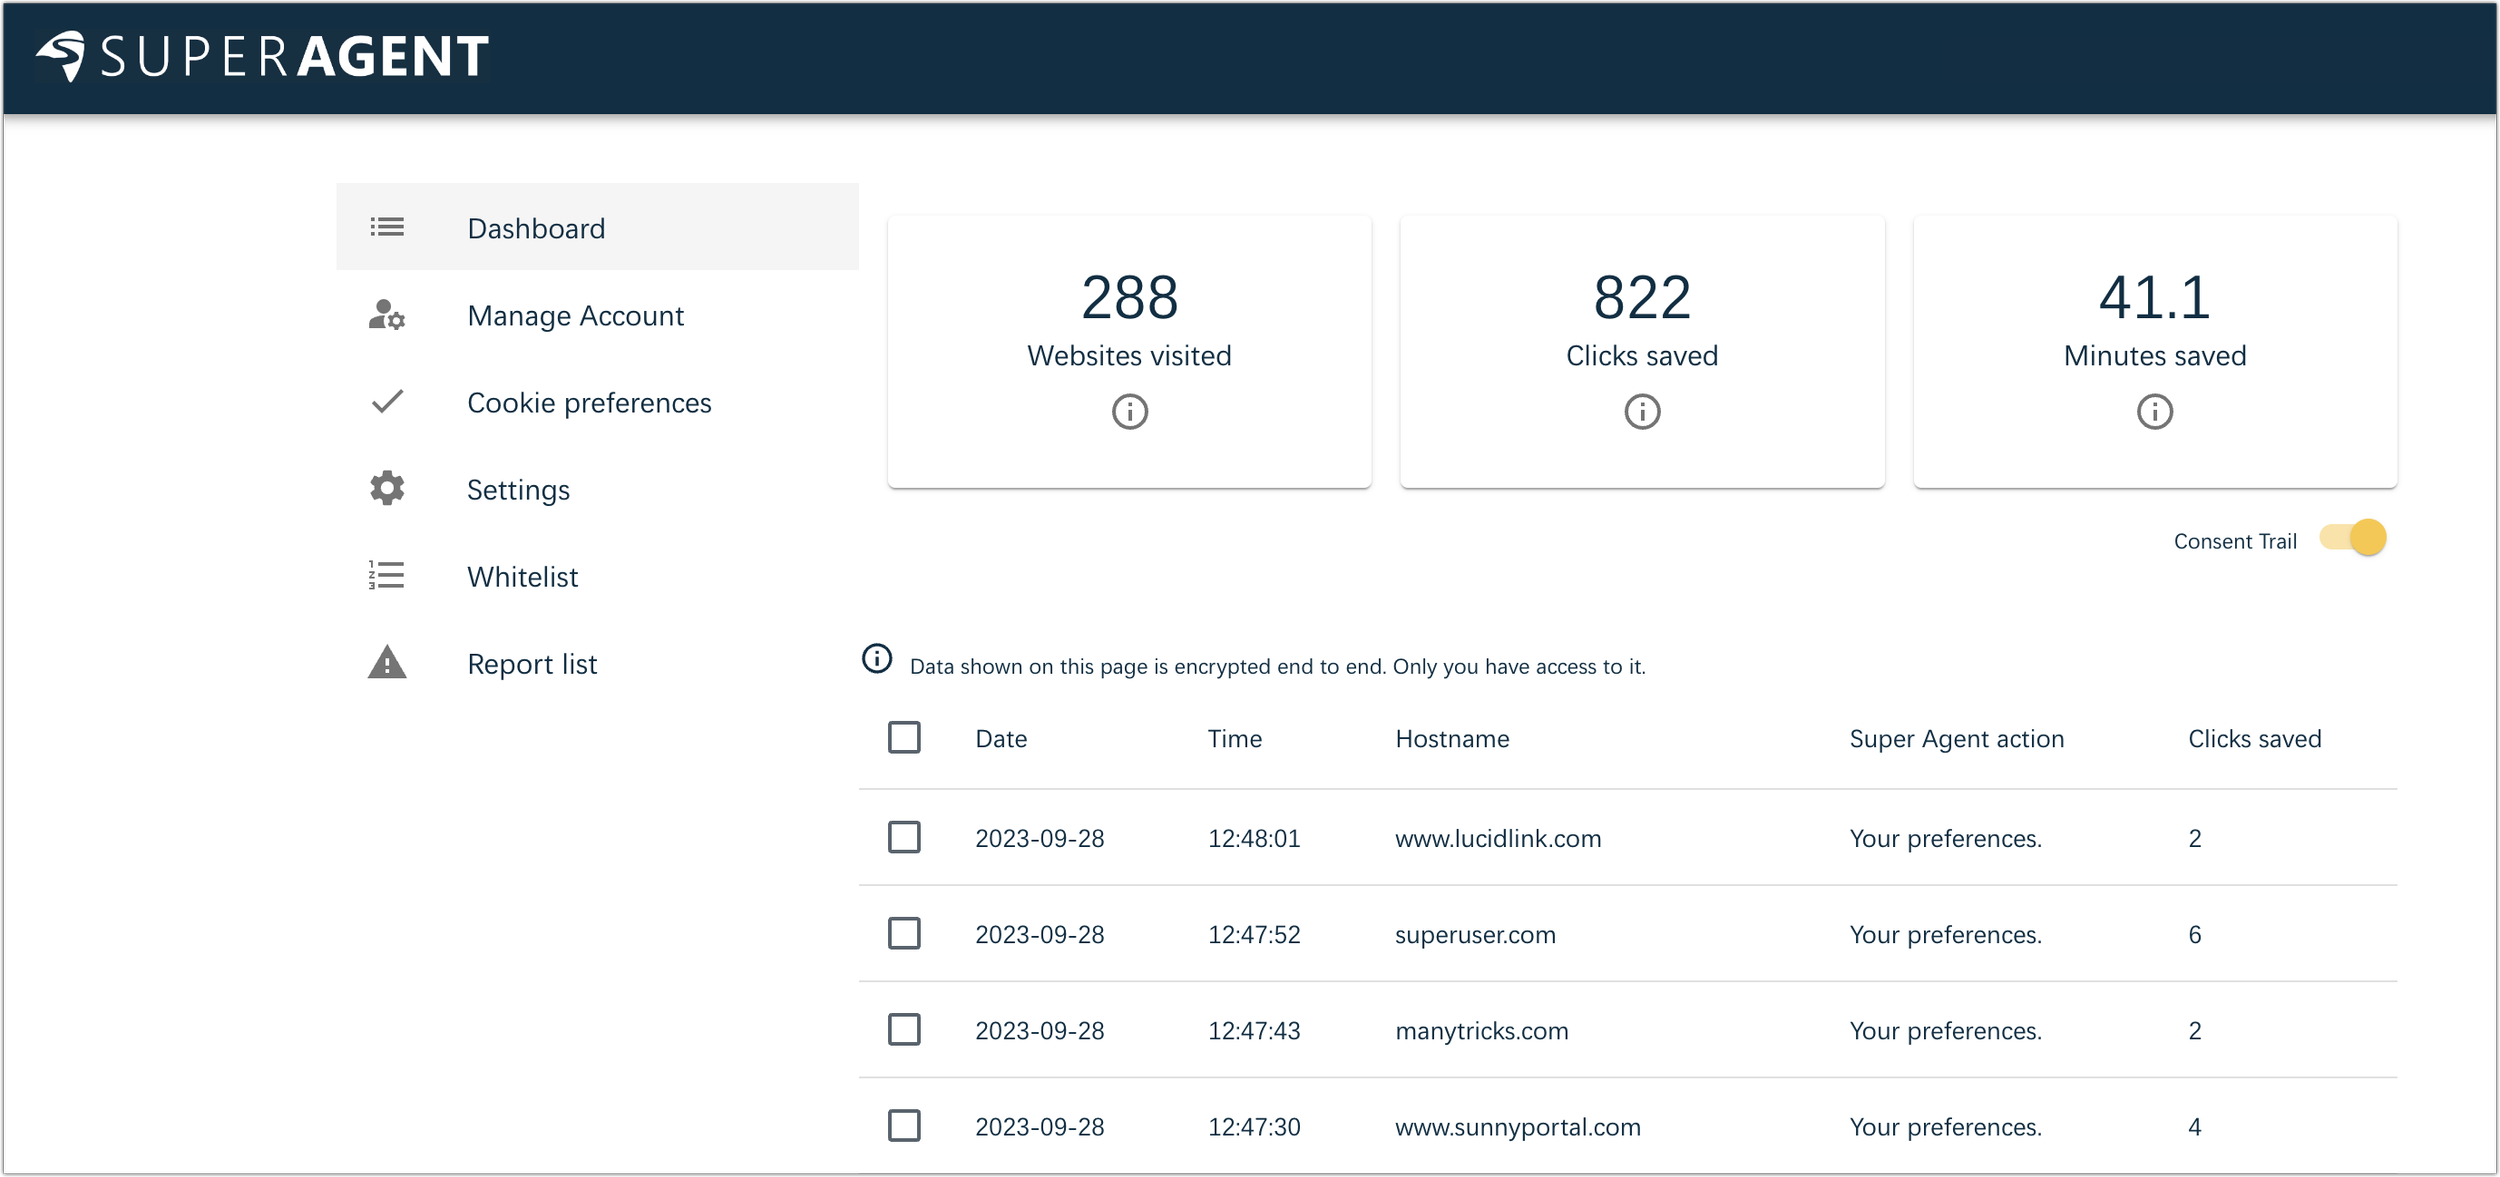
Although it’s not required, you can create a Super Agent account and enable the Consent Trail switch to see a list of the sites whose cookie consent popups Super Agent filled out for you. It’s end-to-end encrypted so that only you can see the data, but if you’re particularly concerned about privacy, don’t turn it on.
Hush
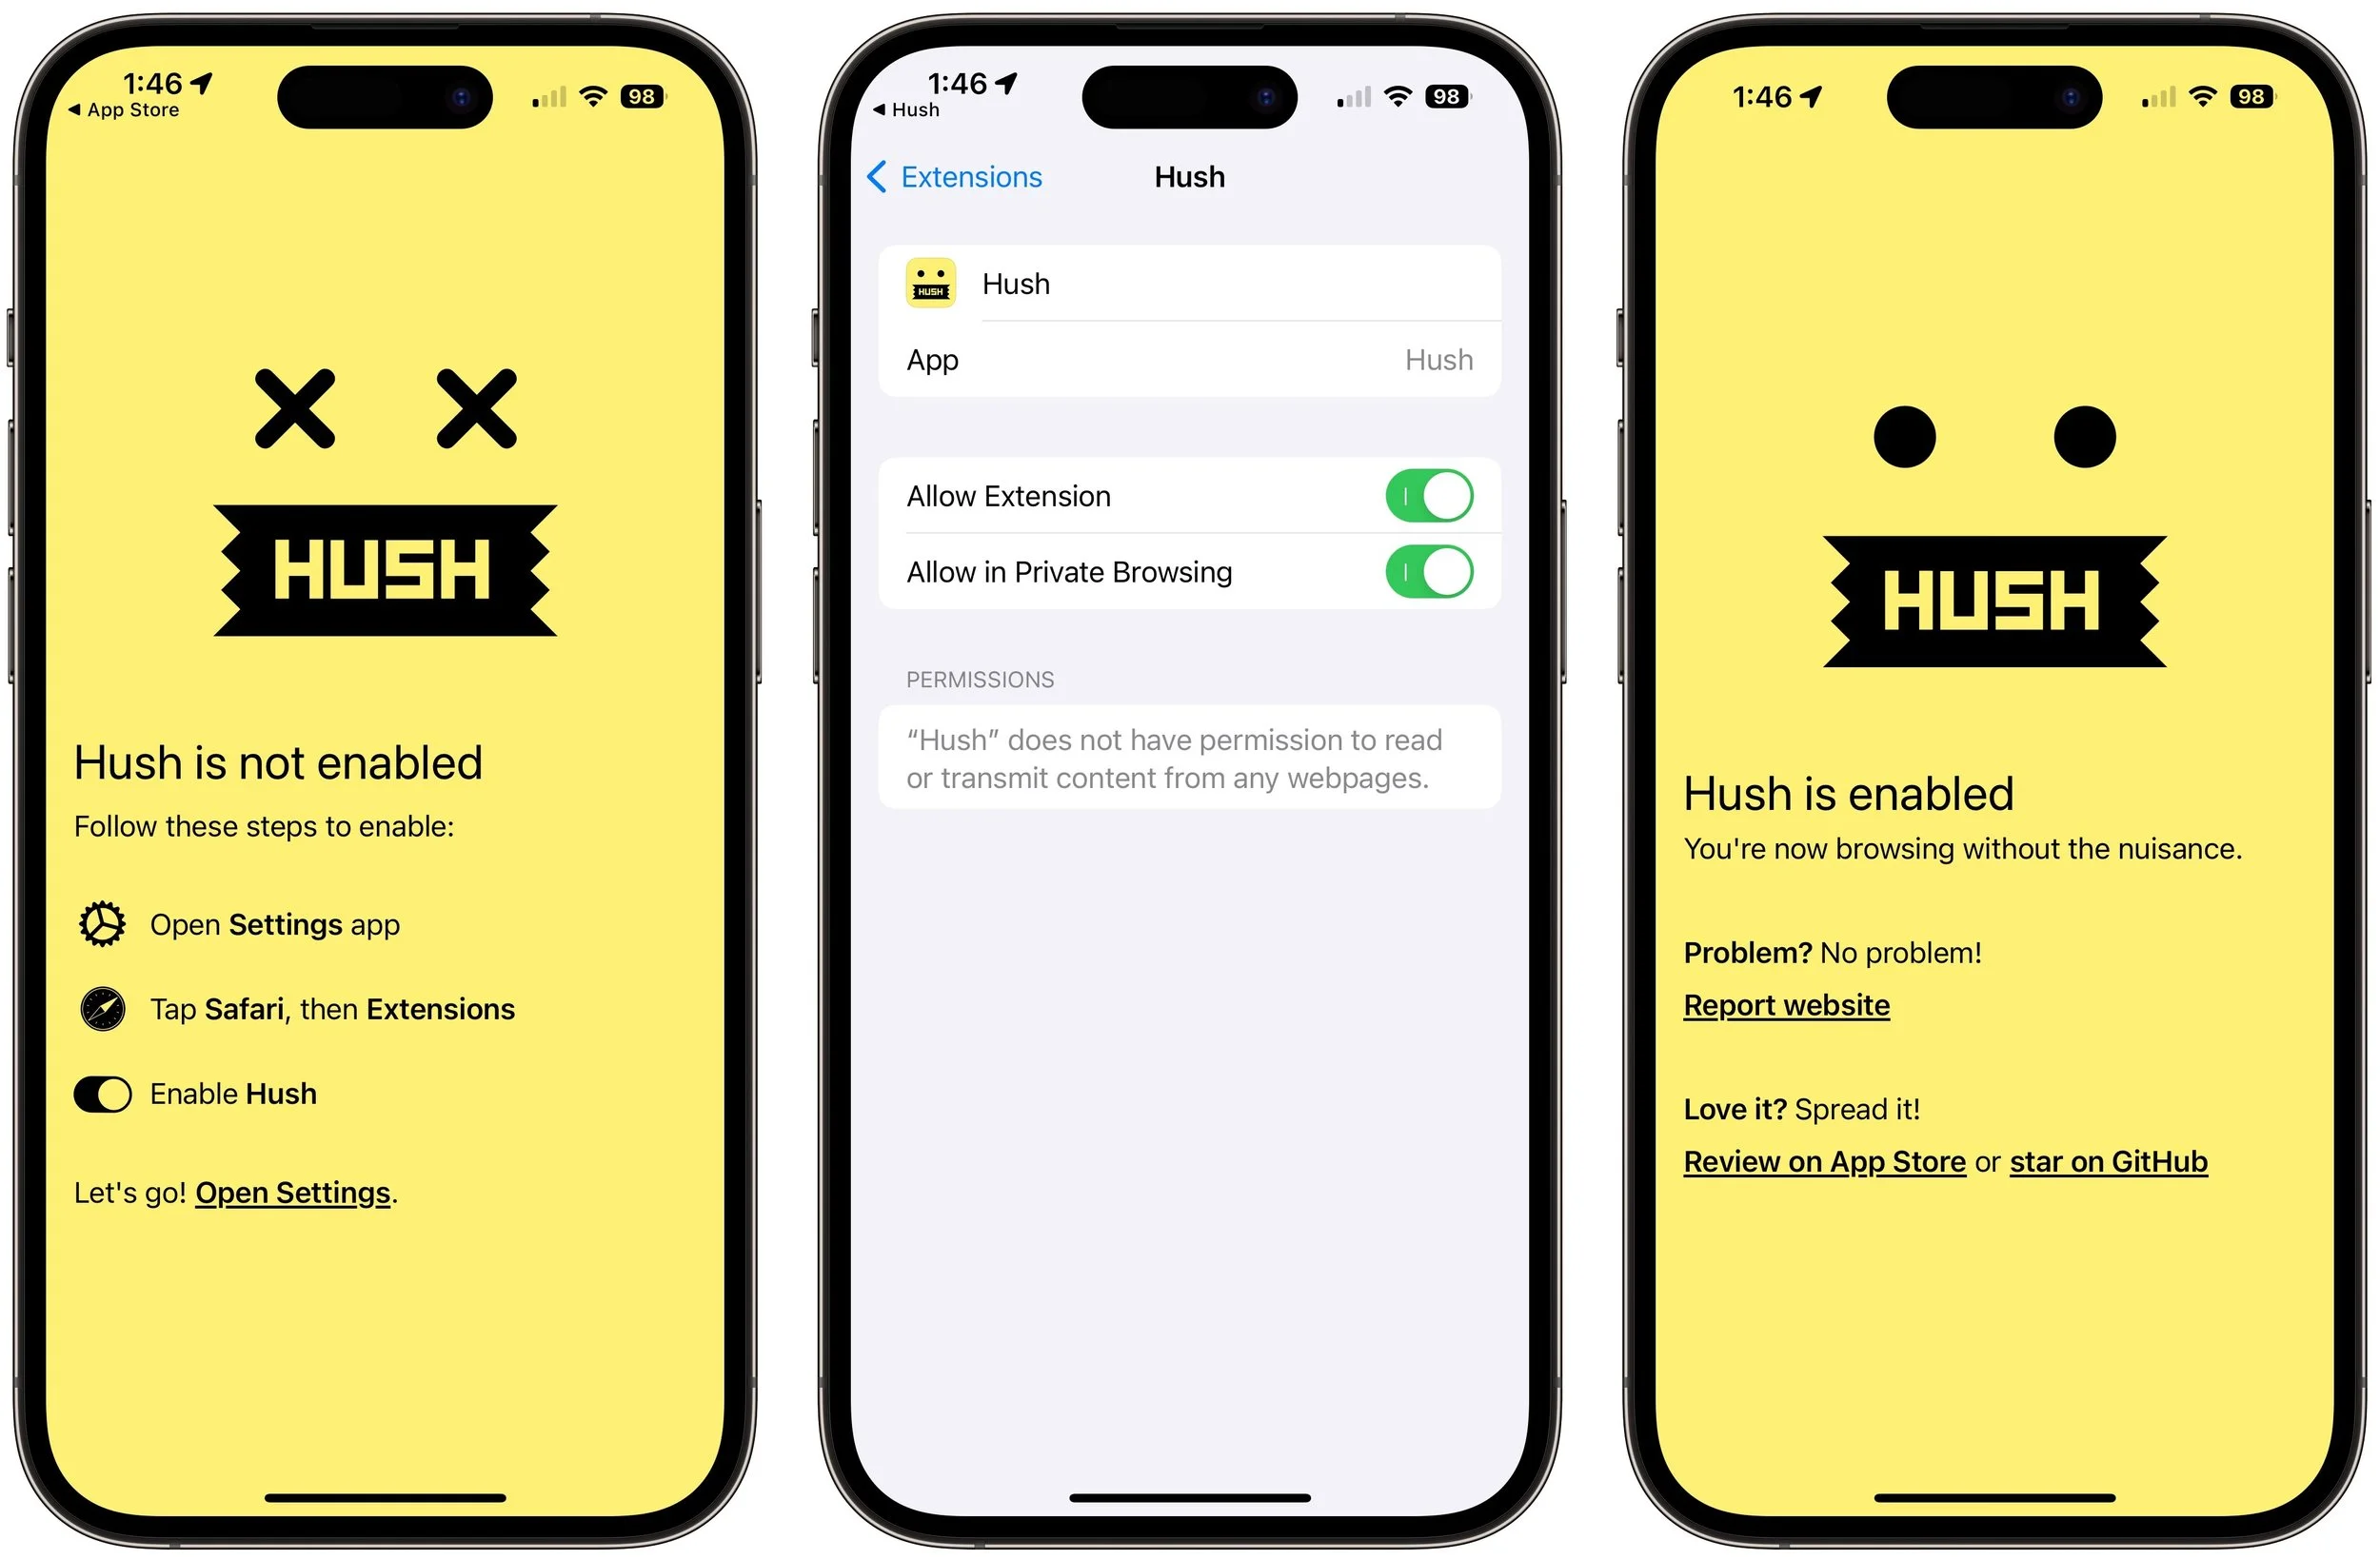
What about the iPhone and iPad, or those who care only about Safari on the Mac? We recommend Joel Arvidsson’s Hush, which bills itself as a nag blocker. It’s a free download from the App Store, and once it’s on your device, you enable it in Settings > Safari > Extensions > Hush (iOS/iPadOS) or Safari > Settings > Extensions (Mac).
That’s it. From then on, it silently blocks cookie consent popups—it doesn’t attempt to register your preferences like Consent-O-Matic and Super Agent. As a result, it might cause problems if a site requires that you accept some cookies for it to function correctly. We haven’t encountered such a site yet, but it’s not impossible. If that happens on an iPhone or iPad, tap the AA button in the Safari address bar and then Turn On Content Blockers; on the Mac, choose View > Reload Without Content Blockers.
The Web is an ever-evolving place, so there’s no guarantee that these extensions will respond to or block every cookie consent popup. But you can report missed sites to the Content-O-Matic and Super Agent developers, and Joel Arvidsson releases regular updates to block more nags and fix partially broken websites.
If you use only Safari for Web browsing, Hush could be all you need on all your Apple devices. Those who rely on other Web browsers on the Mac can pick either Consent-O-Matic or Super Agent to supplement Hush on the iPhone and iPad.
(Featured image by iStock.com/Pla2na)
Is Your Mac Running Low on Disk Space? Here’s How to Delete Unnecessary Files
Is your Mac low on drive space? Learn how to use Apple’s built-in storage management capabilities—perhaps supplemented with a third-party utility—to find and delete gigabytes of unnecessary files.
Between apps, photos, videos, music, and downloads, it’s easy to fill up your Mac’s drive, particularly one with just 128 or 256 GB of drive space. macOS warns you when you get too low on space, but those warnings may come late—for optimum Mac performance, we recommend you keep at least 10–20% of your drive free for new downloads and virtual memory swap files. There are excellent utilities that help you find and delete unnecessary files, such as the free GrandPerspective, the $9.99 DaisyDisk, and the $14.99 WhatSize, but Apple’s built-in storage management capabilities will likely be all you need.
Apple first introduced its Storage Management tool in the System Information app in macOS 10.12 Sierra, making it accessible from the About This Mac dialog. Starting in macOS 13 Ventura, Apple moved those capabilities to System Settings > General > Storage, providing a quick overview of your drive usage at the top. Hover over each colored bar to see how much space is taken up by a particular type of data. The light gray space at the end of the bar is what’s still available.
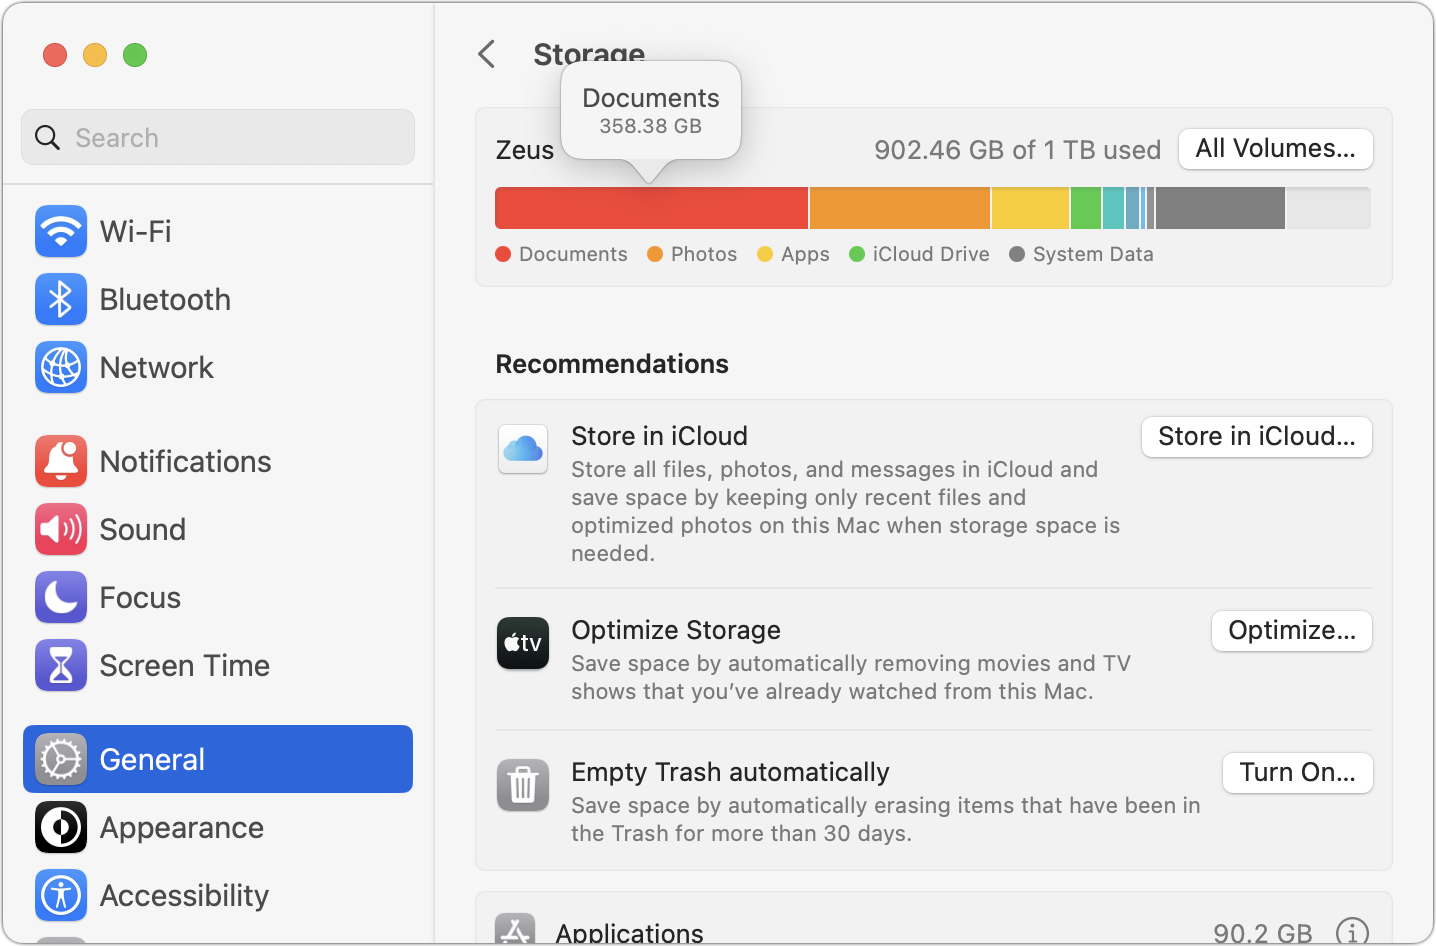
Below the graph, macOS may offer some recommendations for reducing storage over time, but they come with tradeoffs. Storing files in iCloud and optimizing Apple TV videos will replace local files with stubs pointing at a version stored in the cloud. That’s OK, but you then have to download the original before you can use it. Deleting files automatically after they’ve been in the Trash for more than 30 days is also fine but could have undesirable results if you ever want to recover older files from the Trash. Enable these if you wish, but the real work happens farther down on the screen, where you find all the categories of files you can explore. Depending on what apps you use, they will vary a bit between Macs, but they correspond to the colored bars you saw in the storage graph. Double-click each one to see what it displays.
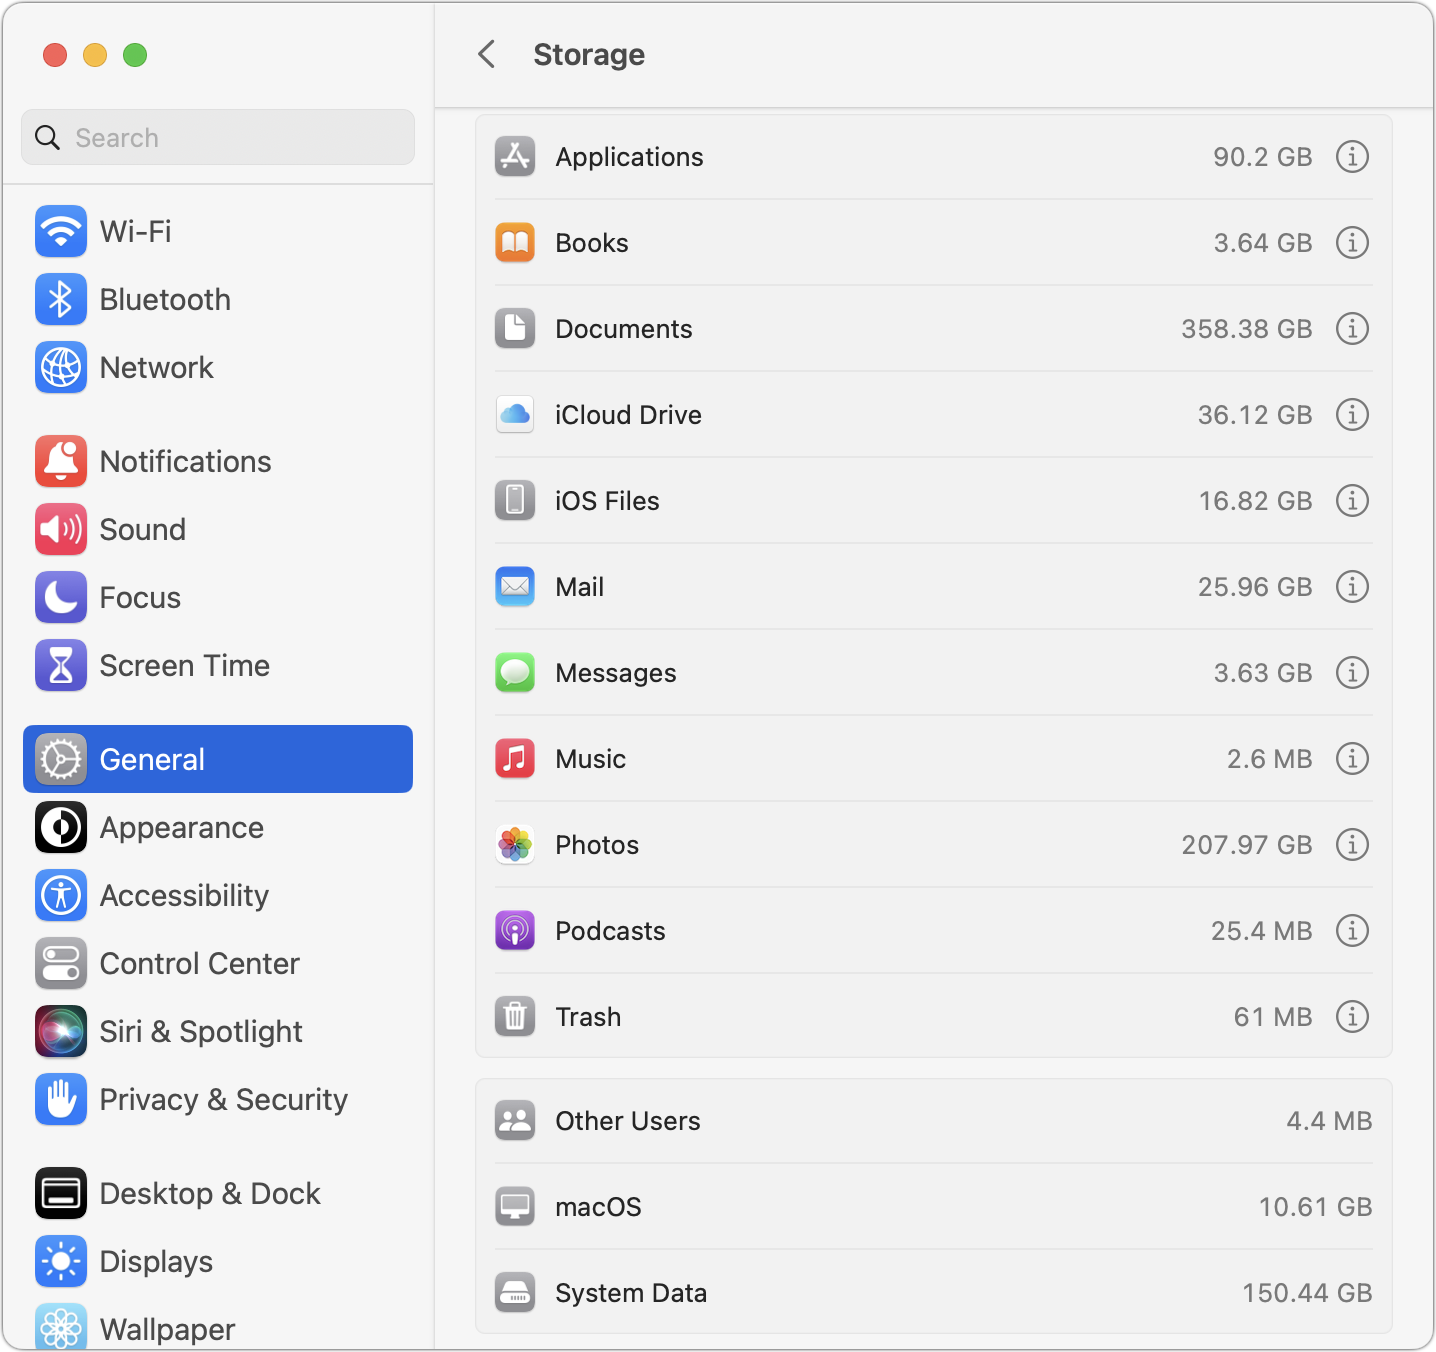
For a few app-specific categories, like Mail and Podcasts, you merely learn how much space the app’s data occupies—to save space, you must delete unnecessary data from within the app itself. iCloud Drive and Photos are similar but also let you enable space optimization, which stores only placeholder files or smaller optimized photos on the Mac, leaving the originals in iCloud for later downloading whenever you access them.
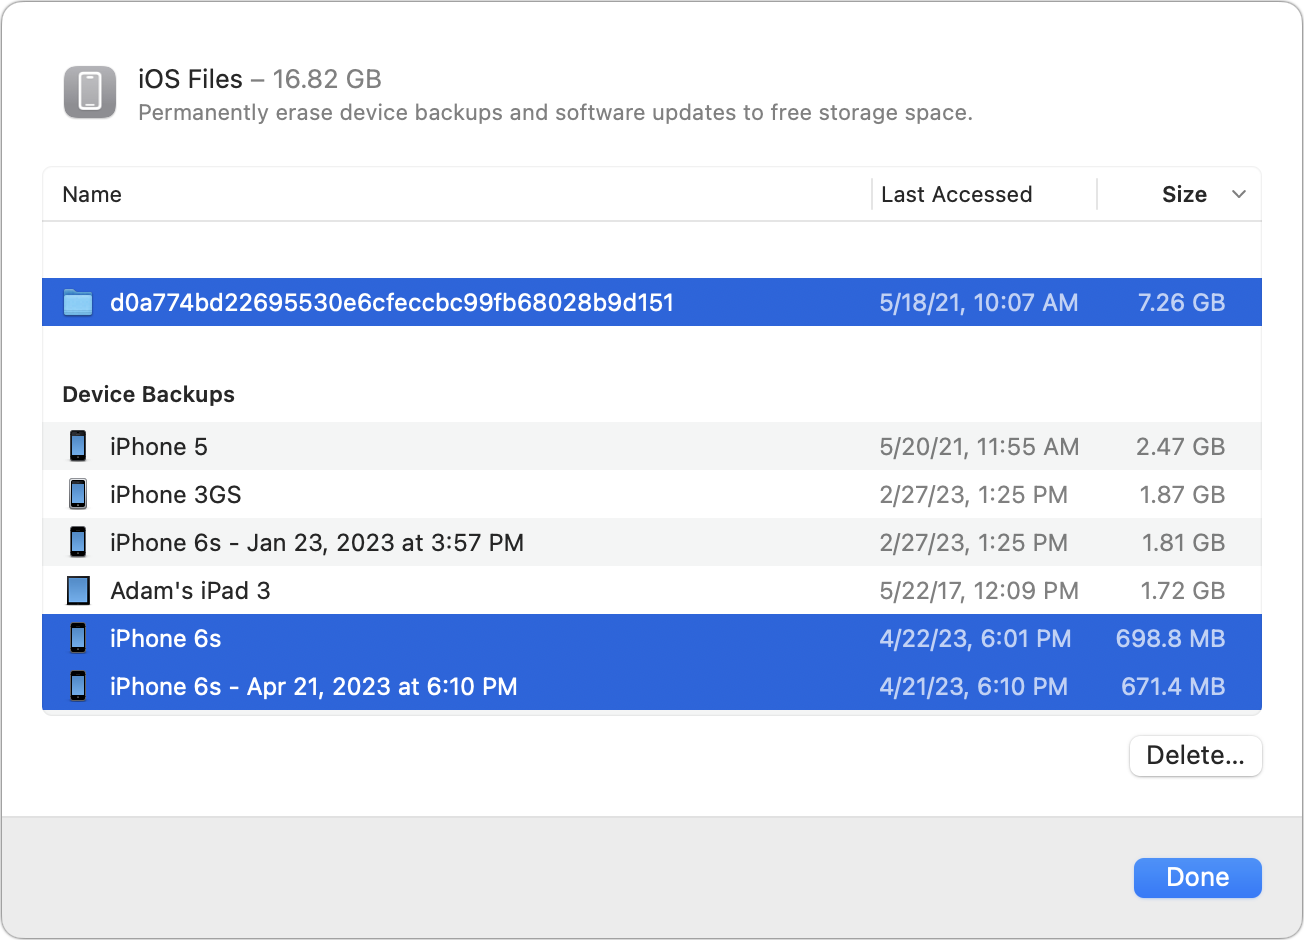
More interesting are the Applications, Documents, and iOS Files categories, each of which may reveal gigabytes of unnecessary data. iOS Files, for instance, shows any device backups and software updates stored on your Mac’s drive. It’s worth keeping the latest backup of devices you still use, but delete any older backups and updates that are just wasting space—well over 8 GB in the screenshot below.
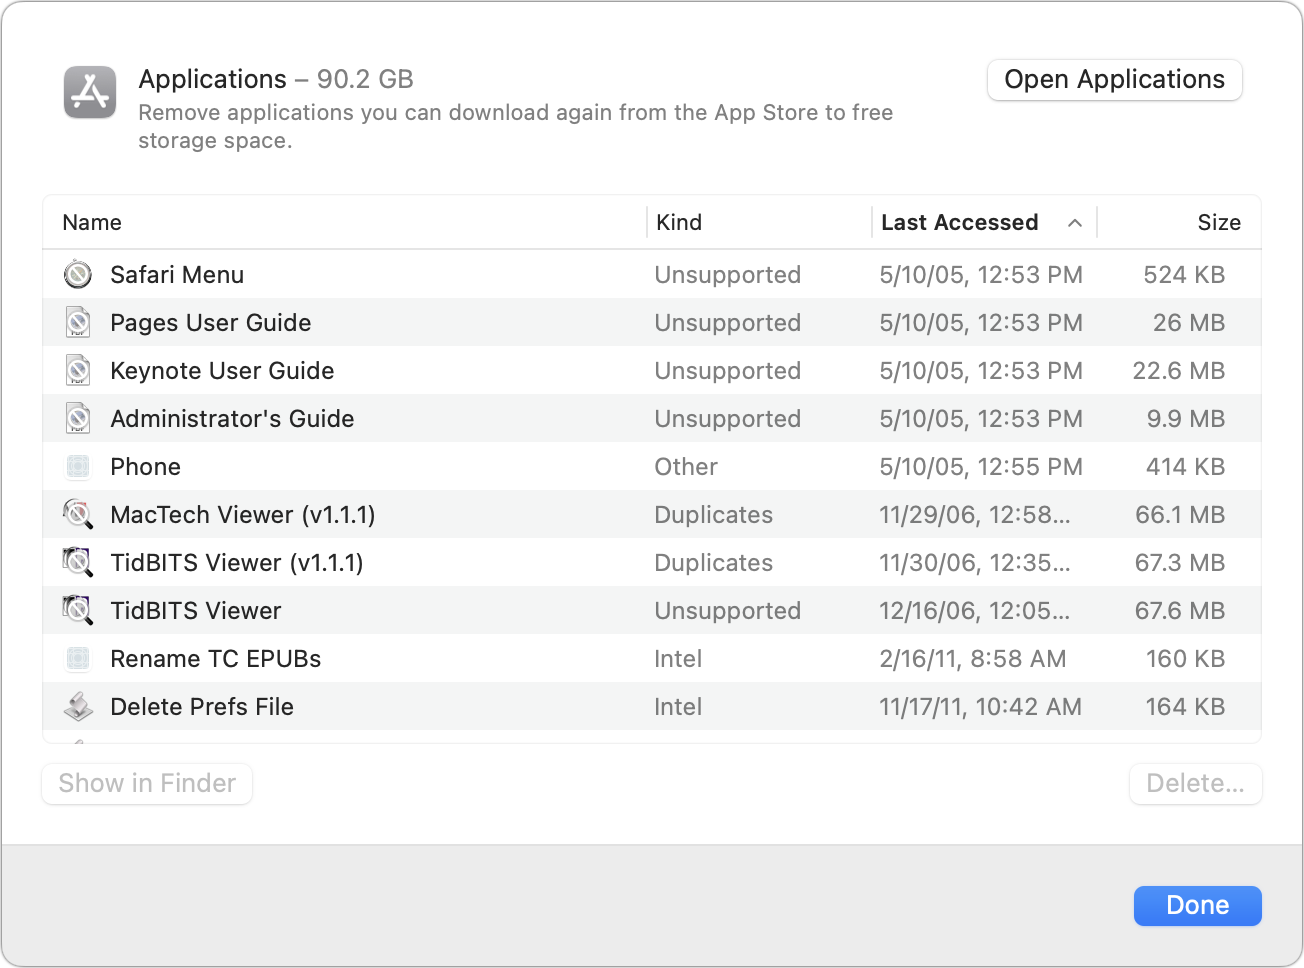
The Applications category lists your apps and is sorted by size by default. But try clicking the column header for Kind and scrolling down. You can probably delete most apps tagged as Unsupported, Duplicates, or Older Versions. Similarly, click the Last Accessed column header to see which apps you haven’t launched in years. Many of them can probably go, too.
In Documents, you’ll see four buttons: Large Files, Downloads, Unsupported Apps, and File Browser.
Large Files shows huge files regardless of where on your drive they’re located.
Downloads shows you the contents of your Downloads folder, much of which you likely don’t need.
Unsupported Apps lists any PowerPC or 32-bit apps that won’t run on your Mac. You can delete them.
File Browser provides a column view sorted by file size and shows sizes next to each item. It’s great for trawling through your drive to see what’s consum-ing all that space.
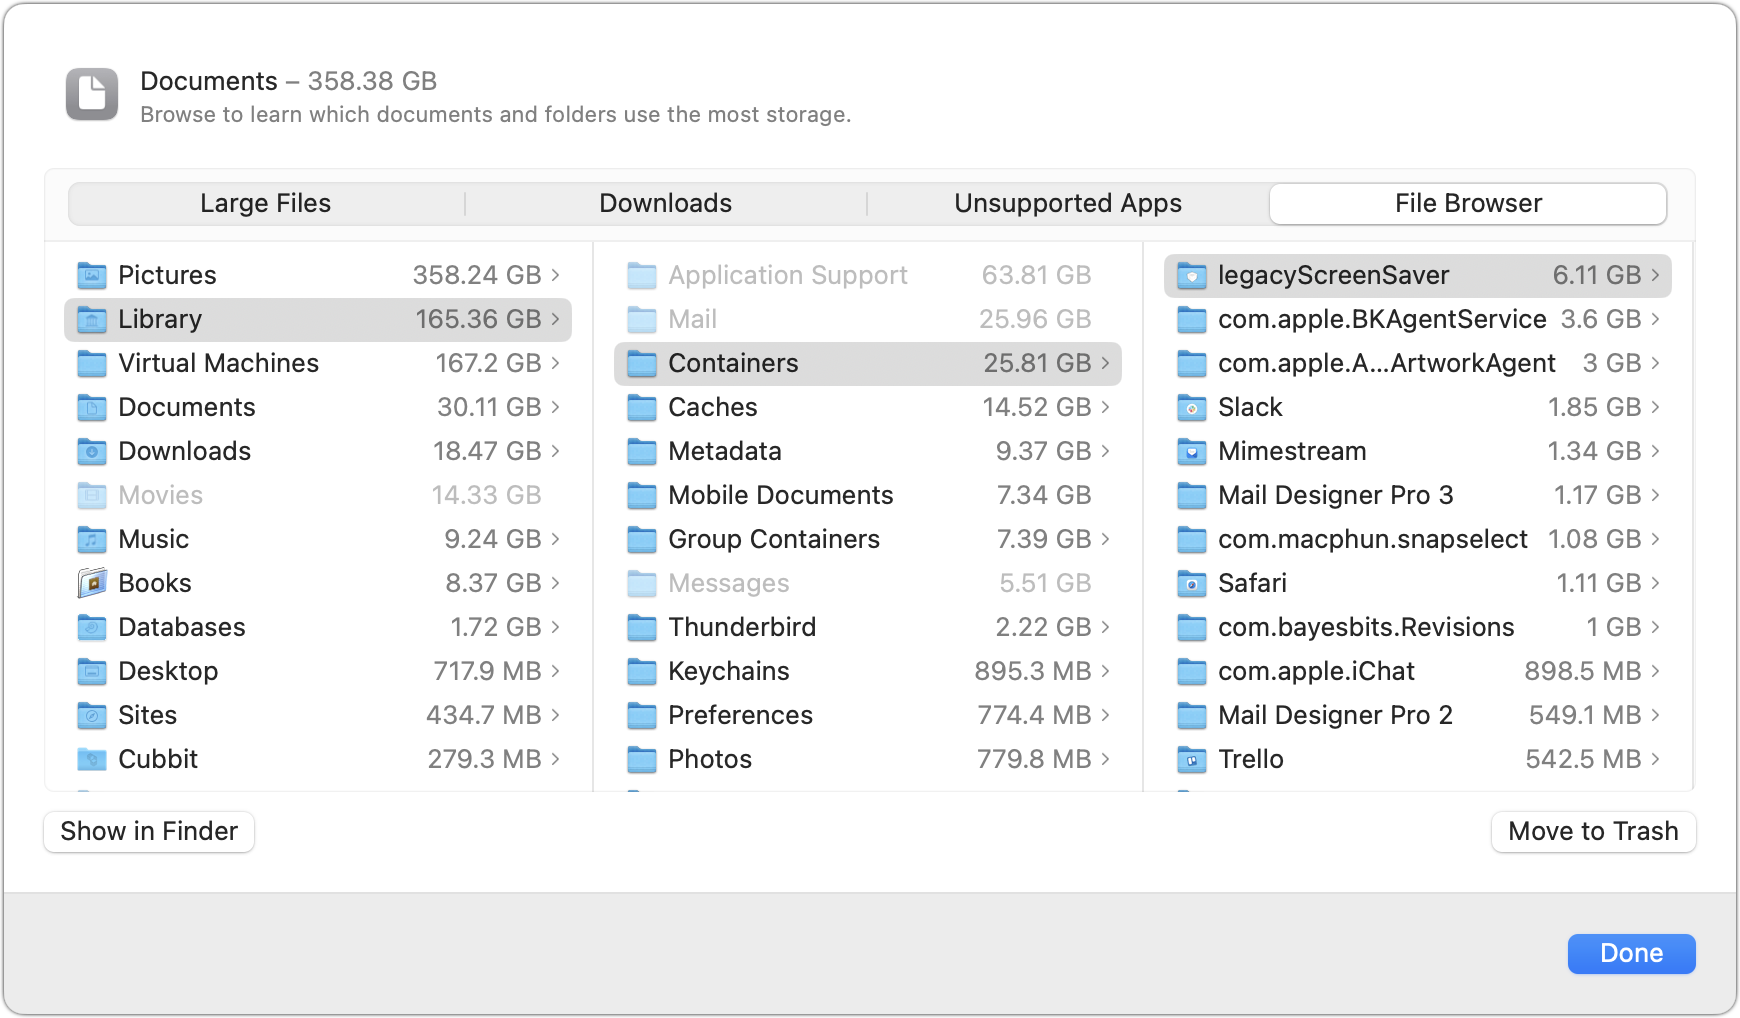
In any of these views, click Delete or Move to Trash to remove the file or Show In Finder to see it in its native habitat, which may help you decide if you should keep or delete the file. To delete multiple files at once, Command-click or Shift-click to select them and then click Delete to remove them all at once.
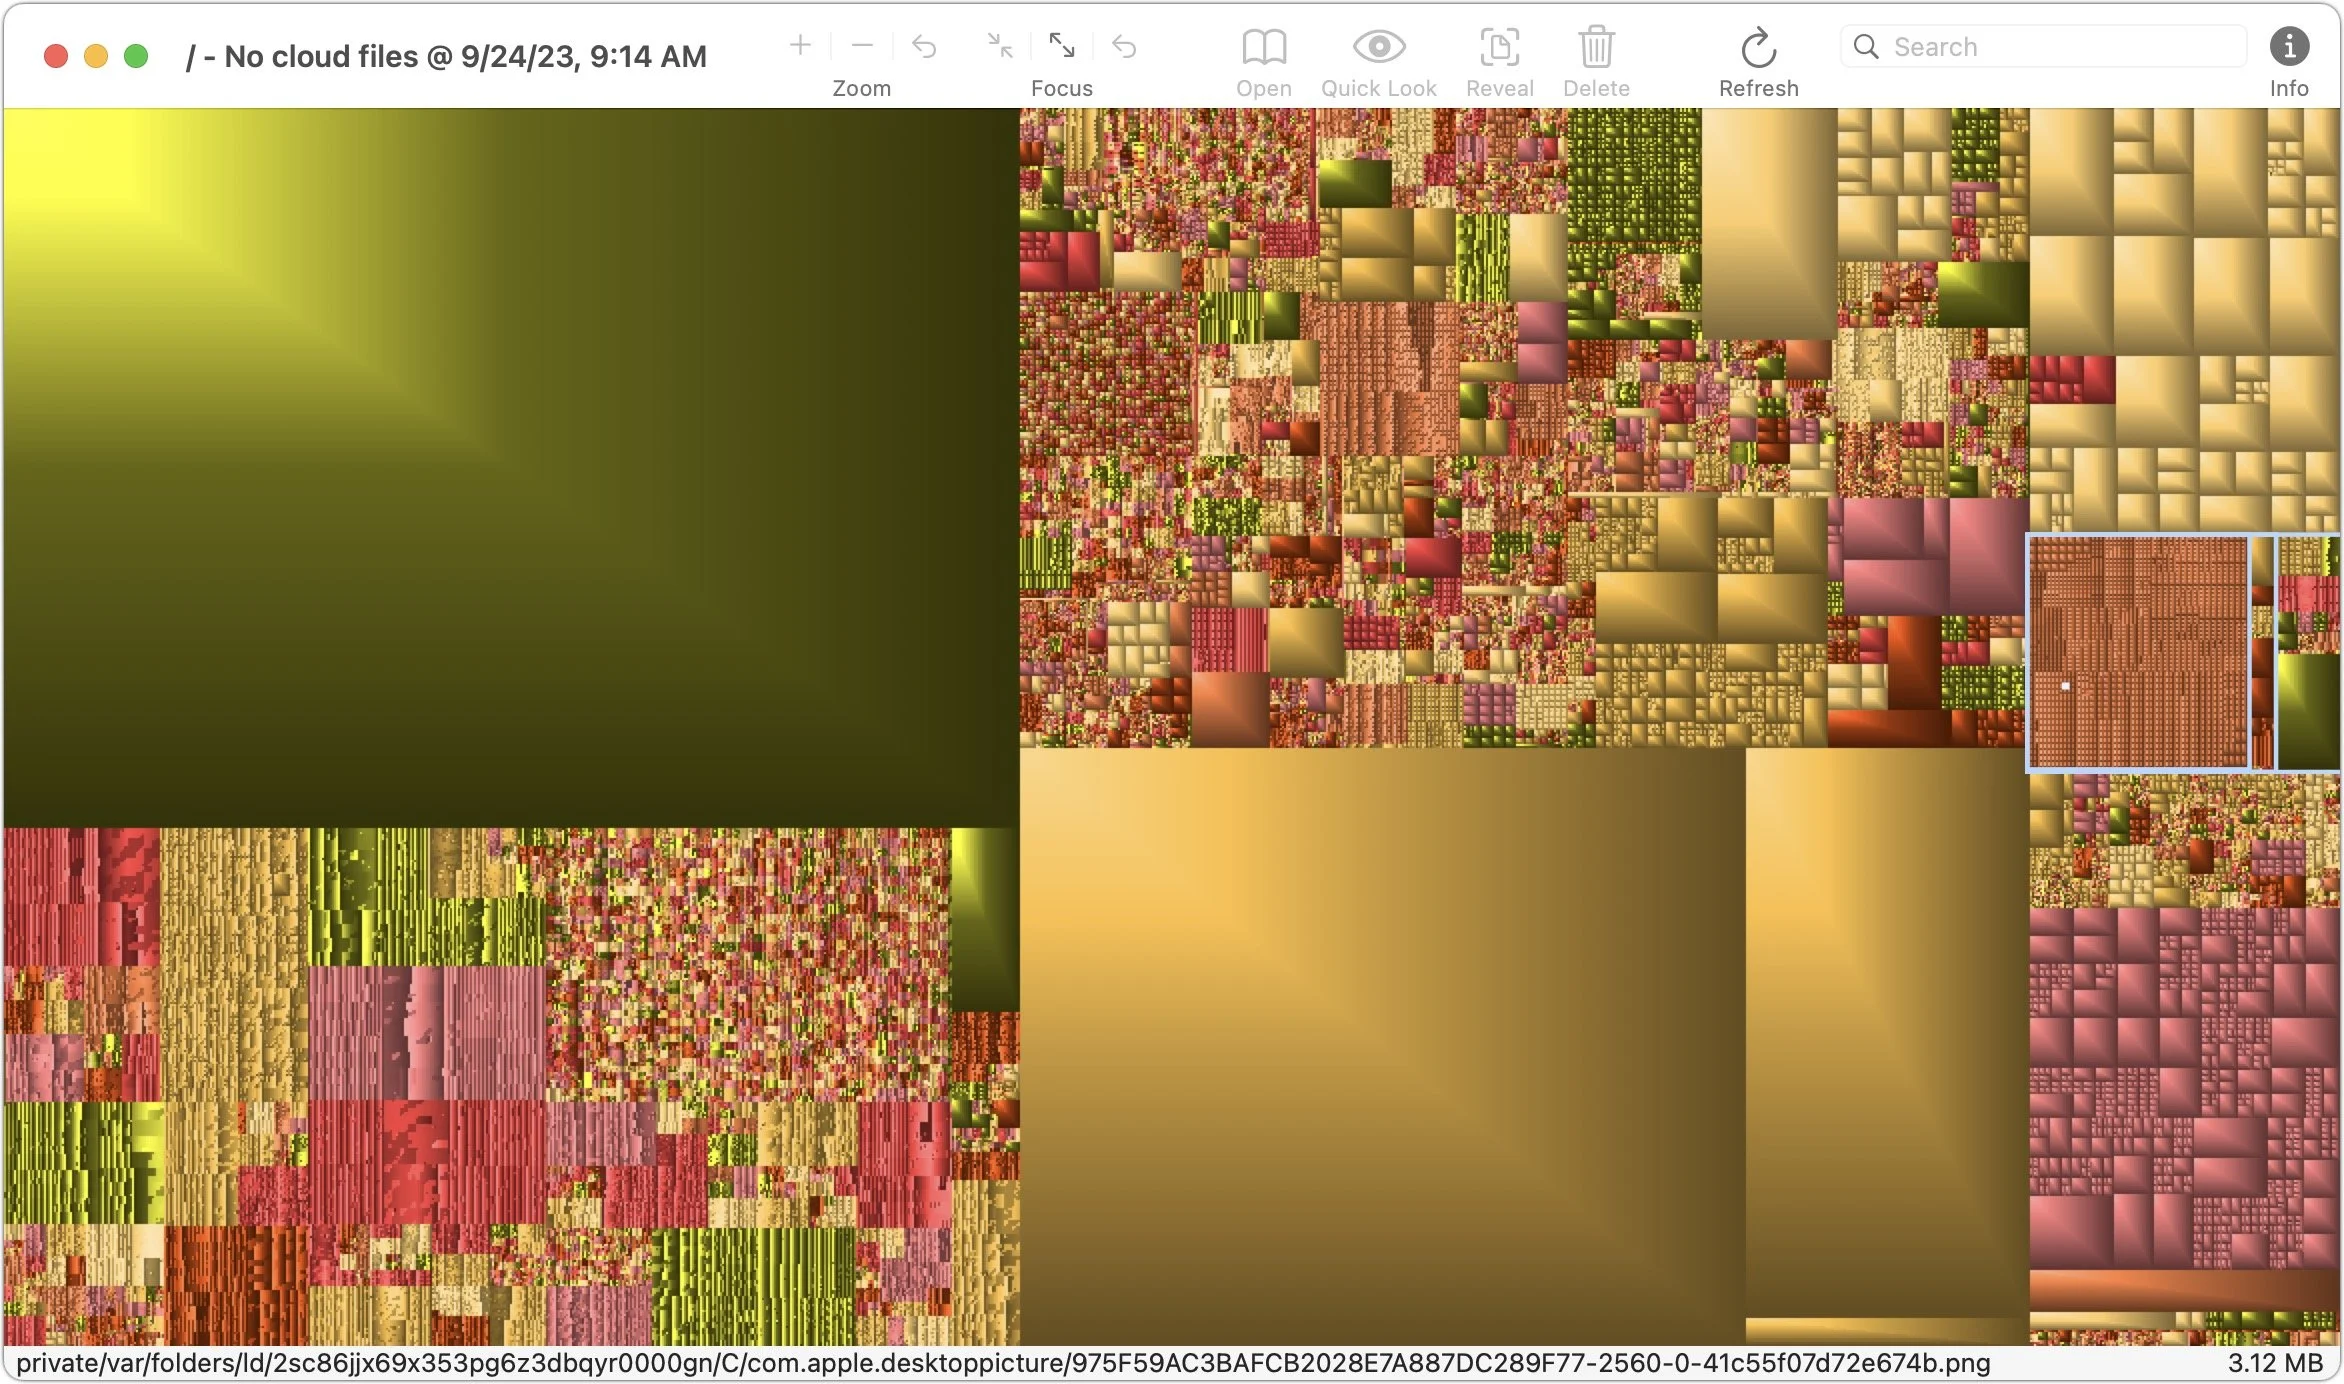
You may find it worth using GrandPerspective to get a visual overview of how space is used on your drive. After scanning, which can take a long time, it uses tiny colored blocks to represent files, collecting multiple blocks into bigger rectangles to show folder size. Toolbar buttons let you open, preview with Quick Look, reveal location, or delete whatever file block you click. Look in the status bar at the bottom of the window to see the path to the file.
In the screenshot below, the big boxes of color are massive virtual machine disk images, and the selected folder outlined in white at the right contains desktop pictures downloaded by an app that rotates them regularly—gigabytes of old files that can easily be deleted.
If your Mac’s drive has less than 10% free space, consider using Apple’s storage management capabilities—perhaps supplemented with GrandPerspective or another utility—to find and delete files that are wasting space.
Two final notes: Don’t get too wrapped up in the exact numbers in the storage graph matching what the Finder reports, and give the Mac some time to update its free space amounts after deleting files directly or emptying the Trash.
(Featured image based on an original by iStock.com/Bet_Noire)
With Storms Increasing, Protect Your Tech Gear from Damaging Power Fluctuations
How can you protect your tech gear from unexpected power fluctuations? A UPS is best in some scenarios, but a not-too-old surge protector is often sufficient. You can also let your Apple chargers do their job without worrying about what they are plugged into.

It has been a tough year for extreme weather events. While the connection between weather and technology may seem tenuous, heat waves, high winds, and lightning strikes can play havoc with all sorts of powered and networked electronic devices.
Anything that causes power fluctuations—spikes, surges, sags, brownouts, and blackouts—can hurt your tech gear. Protecting your most vulnerable devices doesn’t have to be expensive, but don’t be complacent because you plug your Mac into a cheap surge protector you’ve had since college. And note that many power strips offer no surge protection at all.
First off, why are power fluctuations problematic? There are two scenarios:
Too little power: Sags and brownouts are drops in voltage; a sag is a short-term dip, whereas brownouts last longer. Blackouts are complete power outages. Although they’re less damaging than surges, sags and brownouts can cause electronic devices to behave erratically or crash, and the fluctuation in voltage—particularly when coming back from an outage—can stress components. Losing power entirely will cause you to lose any unsaved work and possibly end up with document or even drive corruption.
Too much power: Spikes and surges are sudden, brief increases in voltage; the difference is that spikes are shorter than surges. Either way, the excessive power can degrade or damage sensitive electronic components, reducing lifespan or causing immediate failures.
The best solution to these scenarios is an uninterruptible power supply (UPS). Put simply, a UPS is a big battery into which you plug your Mac and other peripherals. It then plugs into a wall outlet and monitors the incoming power. If the power surges, falls below a certain threshold, or fails outright, the UPS switches the power source to its internal battery. This happens so quickly that your Mac never even notices.
If your gear is plugged into a UPS when a blackout hits, you get some time to save your work and shut down gracefully, ensuring that you don’t lose data or flirt with drive corruption. A UPS also protects against spikes and surges, filtering out the ex-cess voltage so it can’t harm the devices plugged into it. The downsides to UPSes are that they’re an extra expense, their batteries need replacing every few years, and they take up space under your desk. For a home or small office UPS, consult Wirecutter’s recommendations. For larger installations, contact us.

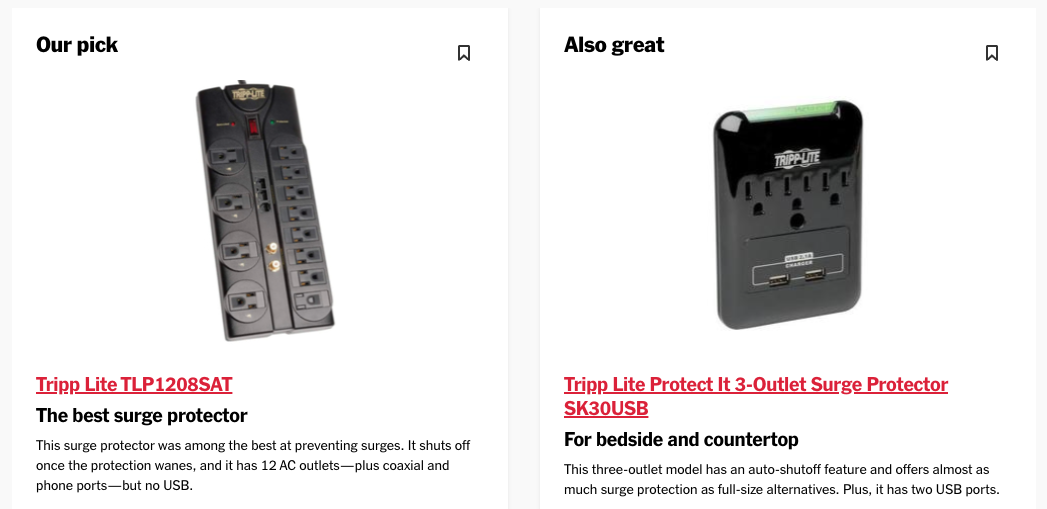
If power outages are rare in your location, you may prefer to rely on a surge protector instead of a UPS. As the name implies, surge protectors filter out voltage spikes and surges so they won’t damage your gear. Surge protectors are smaller and less expensive than UPSes, and while they don’t have batteries to fail, their protection circuitry degrades over time, so they should be replaced every few years as well. Better surge protectors alert you or stop working entirely when they can no longer provide protection. Again, Wirecutter has good recommendations.
If most of your expensive tech gear is battery-powered, you could forgo even a surge protector. Outages aren’t an issue, and a MacBook or iPhone power adapter will protect against most sags, brownouts, spikes, and surges. The power adapter may incur damage, but it’s inexpensive to replace.
One final thought. No UPS, surge protector, or power adapter can protect against a direct lightning strike. Lightning is too fast and too powerful—it’s millions or even hundreds of millions of volts. Even turning your equipment off isn’t sufficient because lightning that has traveled miles through the air to hit the ground can easily jump across an open switch. If lightning strikes are common in your area, unplug your most expensive devices entirely during severe storms.
To sum up:
For a desktop Mac and peripherals, a UPS is a worthwhile investment if you ever suffer from power outages. Also, consider a UPS for essential networking gear—cable modems, routers, switches, and network-attached storage.
If power outages are extremely rare, or for equipment that doesn’t need to remain on during an outage, get a good surge protector. If it doesn’t automatically disable itself when it’s no longer effective, write the date on the bottom and replace it in a few years.
Although there’s no harm in doing so, it’s not necessary to plug battery-powered device chargers into a surge protector or UPS. A spike or surge may damage them, but they’ll probably sacrifice themselves to protect your gear.
When in doubt during severe storms, unplug your most valuable equipment to protect against a direct lightning strike.
(Featured image by iStock.com/HardRockShotz)