
The Importance of Staying Updated
We know it seems like your Apple devices are constantly asking you to install an update. Other than for major upgrades, we recommend updating shortly after updates appear so you can take advantage of bug fixes, security updates, and new features.

Does it feel like your Apple devices are always asking you to install operating system updates? You’re not wrong—from September 2022 to January 2024, we saw the following releases in Apple’s previous set of operating systems:
macOS 13 Ventura: 20 releases
iOS 16: 25 releases
iPadOS 16: 20 releases
watchOS 9: 15 releases
tvOS 16: 12 releases
Apple issued many of those at the same time, but since you might not use all your devices every day, it can seem as though you spend all your time installing updates. As annoying as updating can be, we encourage you to do so soon after you’re notified for three reasons.
Reason One: Fewer Bugs
First, as has always been the case, updates fix bugs. You may not have experienced all the bugs that Apple fixes, but when one blocks something you want to do, the fix comes as a huge relief.
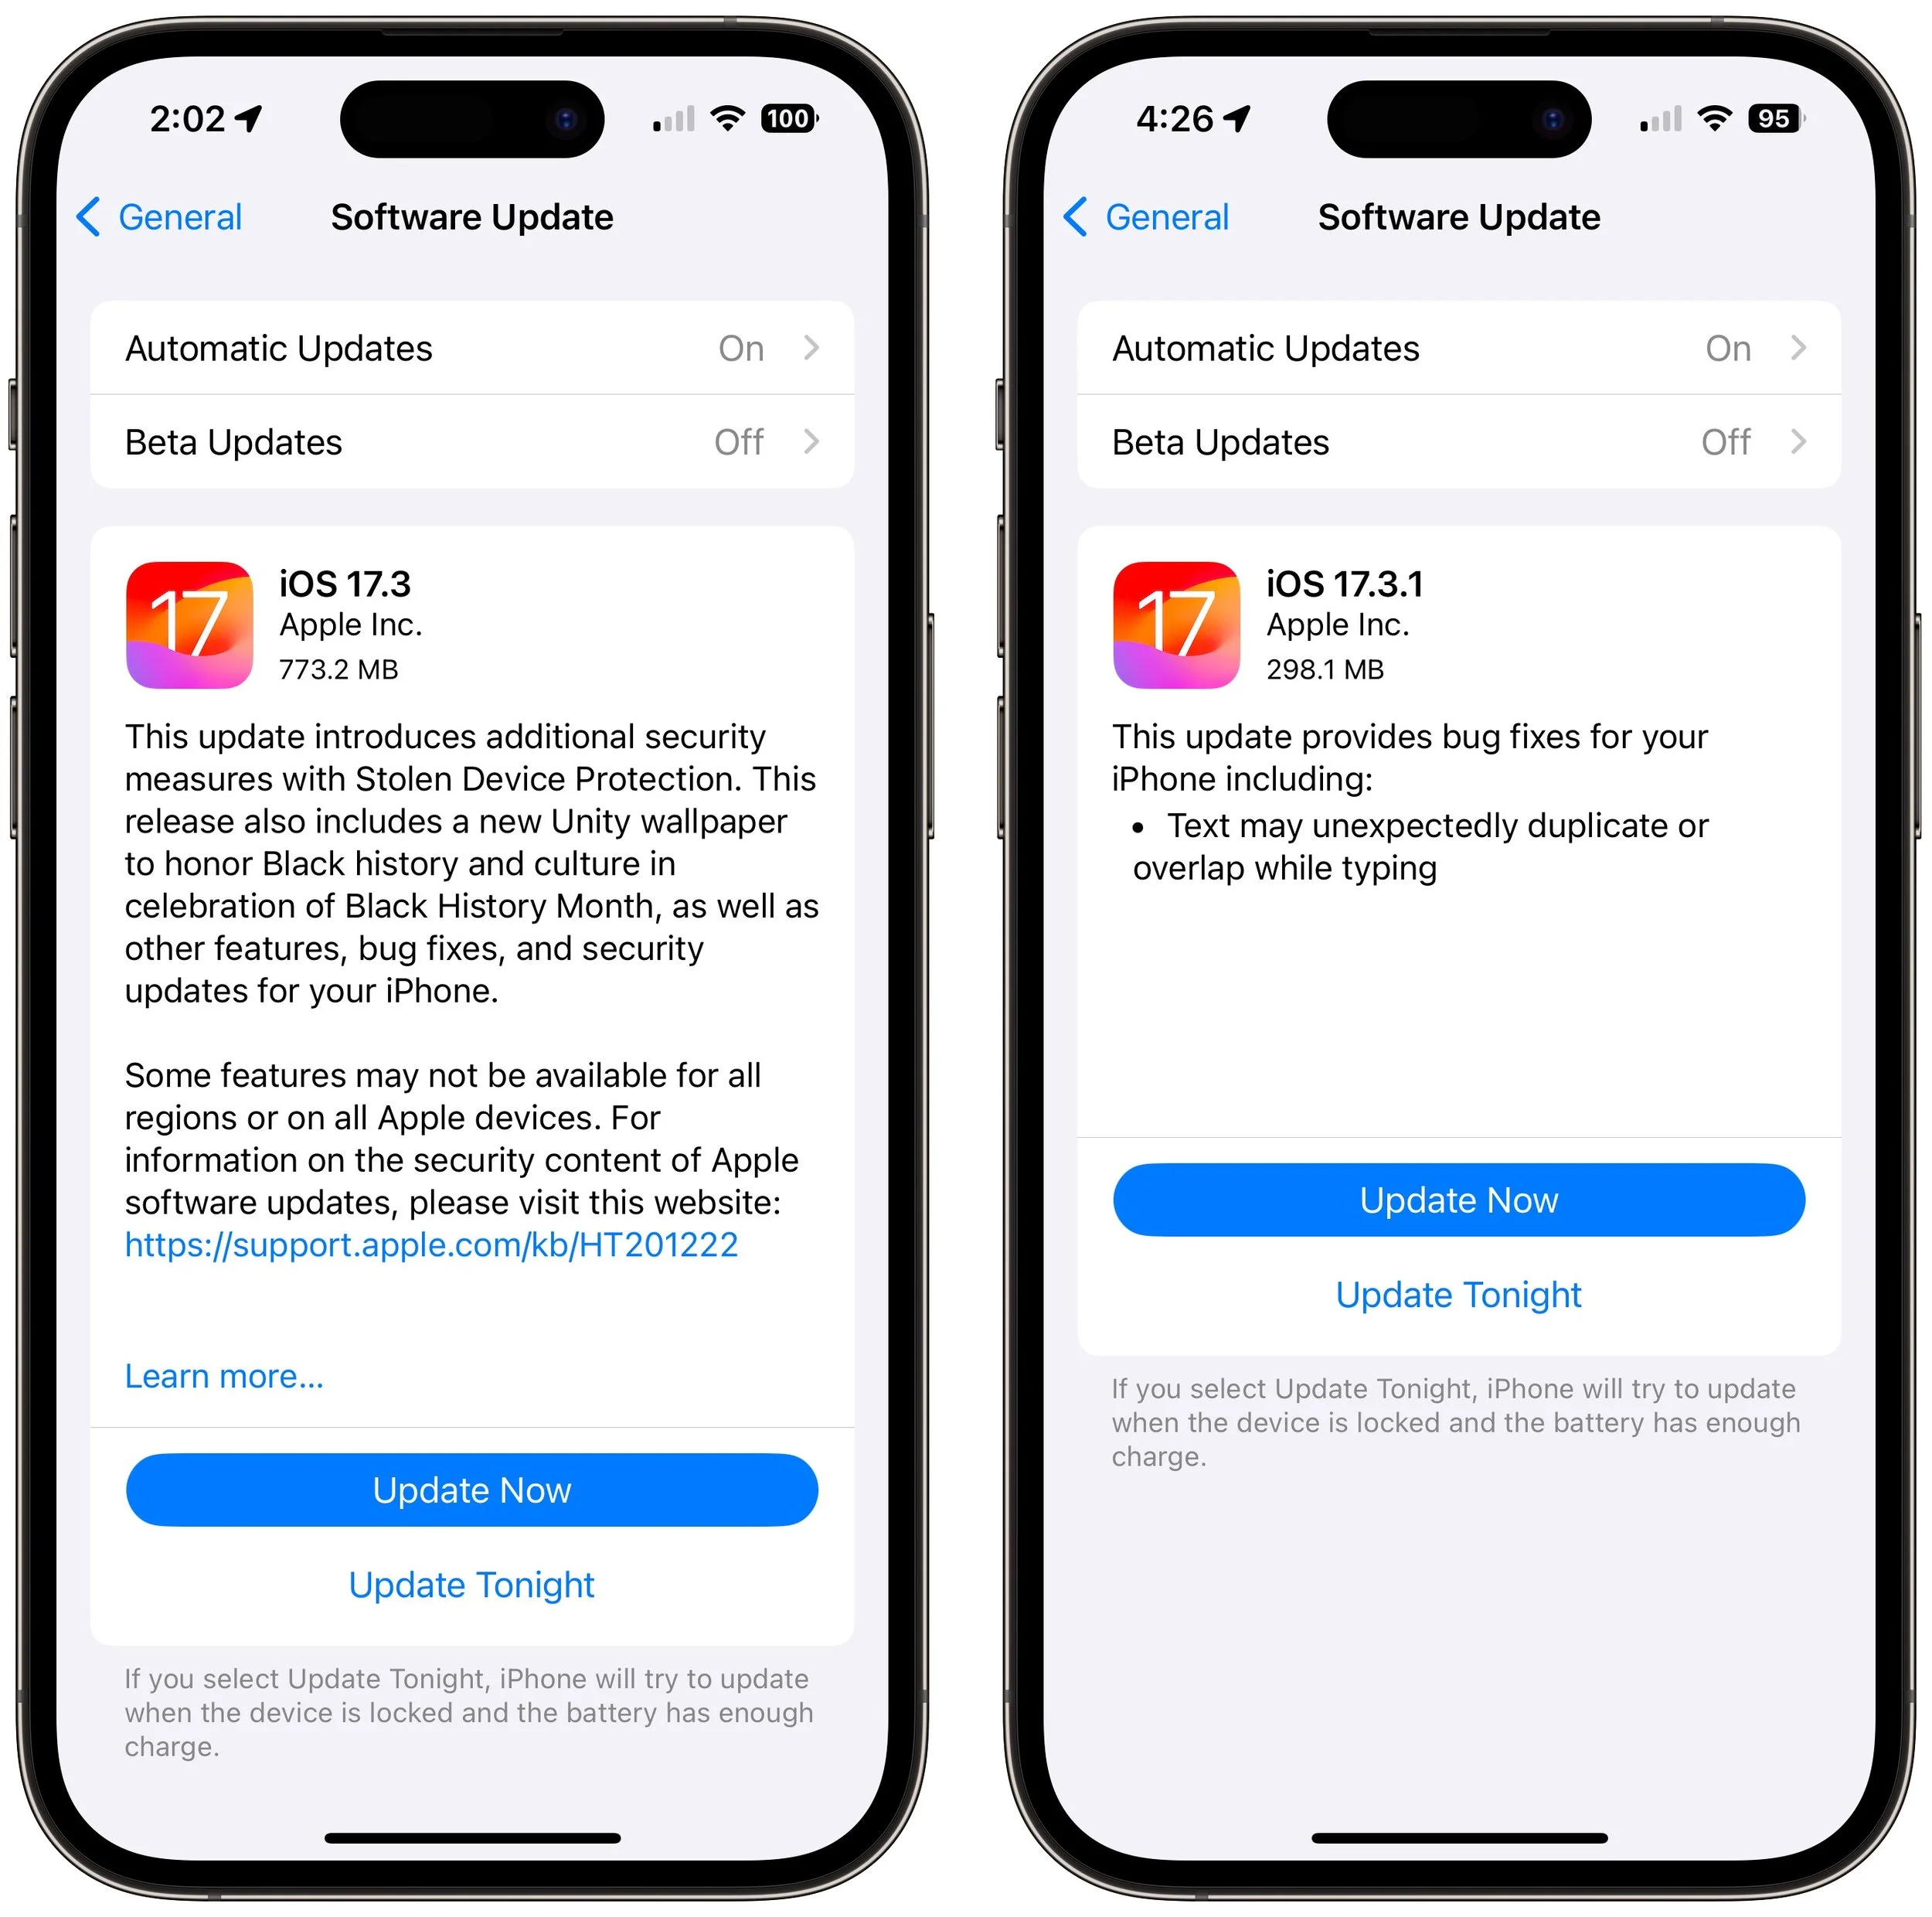
For instance, in a set of releases in January 2024, Apple inadvertently introduced a bug that caused text in many apps, including Mail, Notes, and Safari, to appear to be duplicated and overlap. It was only cosmetic, and switching to another window or resizing the window would make it look right again. But the bug was hugely disconcerting, so Apple fixed it two weeks later in macOS 14.3.1 Sonoma, iOS 17.3.1, iPadOS 17.3.1, and Safari 17.3.1 (which brought the fix to macOS 13 Ventura and macOS 12 Monterey).
Reason Two: Better Security
Second, many of the bugs Apple fixes won’t impact your experience of using your device, but they make it possible for attackers to steal information, install malware, spy on your communications, or even take over your entire device. Nearly all of Apple’s operating system updates contain security fixes to address newly discovered vulnerabilities, and some releases only have security fixes. Apple continues to release security updates for the last two versions of macOS and older versions of iOS and iPadOS as appropriate.
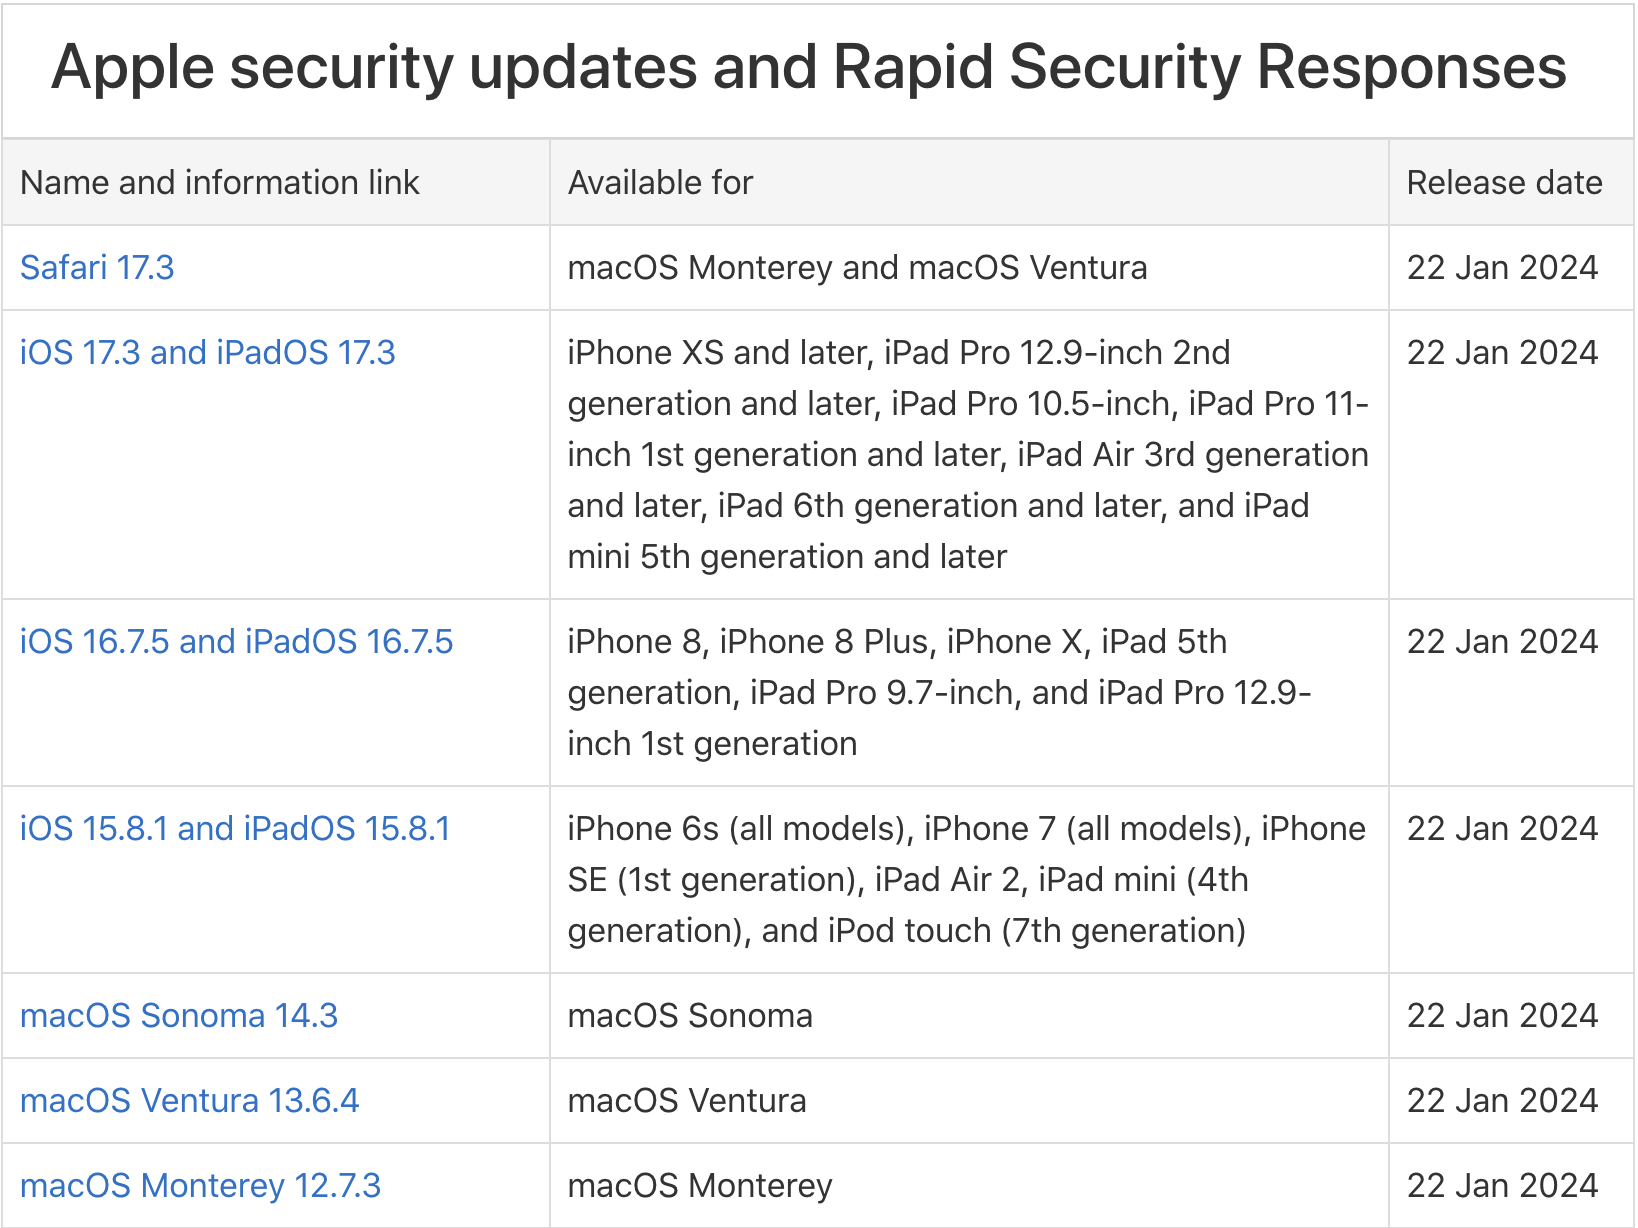
It’s easy to think that you won’t be impacted by security vulnerabilities, but remember that as soon as Apple releases an update outlining what it has fixed, attackers know what vulnerabilities exist in unpatched systems. Apple has to react swiftly to some reported vulnerabilities because blocking them can literally be a matter of life or death when it comes to, for instance, iPhone-using dissidents, activists, or journalists working in opposition to repressive governments that employ spyware against their enemies. (All spyware relies on previously unidentified vulnerabilities.)
However, some security vulnerabilities are more likely to impact regular users. For instance, in macOS 14.2.1, Apple fixed a bug in Screen Sharing. If you were sharing your full screen with someone else and had multiple Spaces, Screen Sharing could show the other person random windows in other Spaces, which could range from embarrassing (adult pictures) to seriously problematic (passwords or financial details).
Reason Three: New Features
Third, on the positive side, many operating system releases introduce welcome new features. When Apple unveils its next set of operating systems at the Worldwide Developer Conference in June, some of the promised features won’t appear with the initial releases. New features that shipped in later releases of macOS 14 Sonoma, iOS 17, iPadOS 17, and watchOS 10 include:
watchOS’s double-tap gesture for tapping the default button in many apps
AirDrop transfers continuing over the Internet when you move out of AirDrop range
Adding NameDrop to share contact info when you bring two devices near each other
Additional options to control when the iPhone screen shuts off in StandBy
The option to choose a specific album for the Lock Screen’s Photo Shuffle wallpaper
HomeKey support for Matter locks
Expanded Favorites in the Music app
A new automatic Favorite Songs playlist in the Music app
The addition of Apple’s Journal app
A Translate option for the Action button in the iPhone 15 Pro models
10-day precipitation forecasts in the Weather app
Sharing of eligible passes in the Wallet app via NameDrop-like proximity
A catch-up arrow in Messages that lets you jump to the first unread message
Multiple timers in the Clock app on the Mac
Stolen Device Protection for the iPhone
Collaborative playlists in Apple Music
Support for streaming content to TVs in select hotel rooms using AirPlay
Just Update It
Updates provide both a carrot (user-facing bug fixes and new features) and a stick (security fixes). That’s why we recommend updating soon after Apple pushes out a new release and why devices under management usually receive updates quickly. Even if a security breach is unlikely, the liability of allowing devices to remain unpatched is too high for most organizations. Installing updates is an easy way to reduce worry about things like compromised accounts and ransomware.
There are three types of operating system releases:
Minor bug fix and security updates: Install these as soon as convenient, usually within a few days. Examples of these include macOS 14.3 to 14.3.1.
Interim feature updates: Because these include bug fixes and security updates alongside the new features, you’ll also want to install these within a few days. An example is iOS 17.2.1 to iOS 17.3.
Major version upgrades: Because Apple always releases security updates for the two versions of macOS before the current one, you can wait a month or three before installing a major upgrade, such as from macOS 13 to macOS 14. However, once you’ve verified that your apps and workflow are compatible with the new version, we recommend upgrading because skipping a major version of macOS often results in a more difficult upgrade experience.
In each of these cases, if you’re worried about how an update might impact your workflow, check online forums for discussions of each update and feel free to ask us what we recommend for your particular situation.
(Featured image by iStock.com/Fokusiert)
Loose Lips Sink Chips: Beware What You Say to AI Chatbots
Privacy concerns are starting to crop up around conversations held with AI chatbots. For safety’s sake, never share anything with a chatbot that you wouldn’t tell a stranger.

Generative AI chatbots like ChatGPT, Microsoft’s Bing/CoPilot, and Google’s Gemini are the vanguard of a significant advance in computing. Among much else, they can be compelling tools for finding just the right word, drafting simple legal documents, starting awkward emails, and coding in unfamiliar languages. Much has been written about how AI chatbots “hallucinate,” making up plausible details that are completely wrong. That’s a real concern, but worries about privacy and confidentiality have gotten less attention.
To be sure, many conversations aren’t sensitive, such as asking for a recommendation of bands similar to The Guess Who or help writing an AppleScript. But increasingly, we’re hearing about people who’ve asked an AI chatbot to analyze or summarize some information and then pasted in the contents of an entire file. Plus, services like ChatPDF and features in Adobe Acrobat let you ask questions about a PDF you provide—it can be a good way to extract content from a lengthy document.
While potentially useful from a productivity standpoint, such situations provide a troubling opportunity to reveal personally sensitive data or confidential corporate information. We’re not talking hypothetically here: Samsung engineers inadvertently leaked confidential information while using ChatPDF to fix errors in their code. What might go wrong?
The most significant concern is that sensitive personal and business information might be used to train future versions of the large language models used by the chat-bots. That information could then be regurgitated to other users in unpredictable contexts. People worry about this partly because early large language models were trained on text that was publicly accessible online but without the knowledge or permission of the authors of that text. As we all know, lots of stuff can unintentionally end up on the Internet.
Although the privacy policies for the best-known AI chatbots say the right things about how uploaded data won’t be used to train future versions, there’s no guarantee that companies will adhere to those policies. Even if they intend to, there’s room for error—conversation history could accidentally be added to a training model. Worse, because chatbot prompts aren’t simple database queries, there’s no easy way to determine if confidential information has made its way into a large language model.
More down to earth, because chatbots store conversation history (some let you turn off that feature), anything added to a conversation is in an uncontrolled environment where at least employees of the chatbot service could see it, and it could be shared with other partners. Such information could also be vulnerable should attackers compromise the service and steal data. These privacy considerations are the main reason to avoid sharing sensitive information with chatbots.
Adding emphasis to that recommendation is the fact that many companies operate under master services agreements that specify how client data must be handled. For instance, a marketing agency tasked with generating an ad campaign for a manufacturer’s new product should avoid using any details about the product in AI-based brainstorming or content generation. If those details were revealed in any way, the agency could be in violation of its contract with the manufacturer and be subject to significant legal and financial penalties.
In the end, although it may feel like you’re having a private conversation with an AI chatbot, don’t share anything you wouldn’t tell a stranger. As Samsung’s engineers discovered, loose lips sink chips.
(Featured image by iStock.com/Ilya Lukichev)
Apple Announces New MacBook Air Lineup with M3 Chip
Apple has announced 13-inch and 15-inch MacBook Air models based on the M3 chip. Along with faster performance, they can drive two external displays when the MacBook Air’s lid is closed.

In November 2023, Apple unveiled the M3 chip in new versions of the 24-inch iMac and MacBook Pro, causing speculation about when other Mac models would be updated to match. If you’ve been longing for a MacBook Air with an M3 chip, your wait is over. (And we expect Apple to update the Mac mini soon.)
Apple has now announced M3 versions of the 13-inch and 15-inch MacBook Air. For most Mac laptop users who don’t need the additional speed of the M3 Pro or M3 Max chips in the MacBook Pro lineup, these new MacBook Air models combine excellent performance with low prices. The 13-inch MacBook Air starts at $1,099, and the 15-inch model starts at $1,299.

Nothing has changed regarding size, weight, and industrial design, and nearly all the specs remain identical to the previous M2 MacBook Air models. There are three notable differences:
The M3 chip: Although the earlier M1 and M2 chips are no slouches, the M3 chip provides even better performance. Benchmarks suggest a 25% to 35% improvement over the M1, and Apple cites real-world examples where the M3 is 35% to 60% faster than the M1. Compared to the M2, the M3 is probably 10% to 20% faster.
Support for two external displays: Previously, the MacBook Air could drive only one external display. These new models, however, can drive one external display at up to 6K resolution and another at up to 5K resolution, as long as the lid is closed. (Apple says a software update will enable the same capability for the 14-inch M3 MacBook Pro.)

Wi-Fi 6E and Bluetooth 5.3 wireless connectivity: These upgrades aren’t exciting, but they bring the MacBook Air up to par with other recent Apple devices and industry standards. Both provide faster, more robust wireless connectivity, but only when used with other compatible gear.
Should you buy one of these new MacBook Air models? It all depends on what you use now:
Intel-based Mac laptop: In terms of performance, the M3 MacBook Air will blow the doors off any Intel-based Mac laptop, and we strongly encourage you to upgrade. The main area where the MacBook Air might disappoint is in the number of ports. It charges via MagSafe 3 and has two Thunderbolt/USB 4 ports, which are sufficient for an external display and a Time Machine backup drive, for instance. If you need more ports, a Thunderbolt hub is probably in your future.
M1 or M2 MacBook Air or MacBook Pro: Although the M3 chip is faster than the base-level M1 and M2, our experience is that most people with those Macs aren’t suffering from performance problems. So no, don’t upgrade. If you need more performance, a MacBook Pro with an M3 Pro or M3 Max chip makes more sense.
No laptop: For most students getting their first computer or someone who’s adding a laptop to complement a desktop Mac, the M3 MacBook Air models are extremely attractive. We recommend the higher-end MacBook Pro models only for those who anticipate doing processor-intensive audio, video, photo, or development work.
Finally, if you’re pinching pennies, you can still buy the 13-inch M2 MacBook Air starting at $999, and even if you customize it with more memory or storage, you’ll save $100.
You have four decisions to make once you’ve decided to buy a new M3 MacBook Air. We’re happy to consult on your specific situation, but here’s our general advice:
Memory: The base amount of memory on the M3 chip is 8 GB (it’s on the chip and can’t be upgraded later), but you can get versions that come with 16 GB or 24 GB. 8 GB is acceptable for casual use, but 16 GB is safer if you want to run a bunch of apps or may have more involved needs in the future. Get 24 GB only if you use memory-intensive apps.
Storage: The base level of storage is 256 GB, which isn’t much. We know many people with photo libraries larger than that. You can upgrade to 512 GB, 1 TB, or 2 TB. Note that if you have a lot of old, seldom-needed files, it may be better to order only 512 GB of storage, for instance, and buy an inexpensive external SSD for your archives.
Processor: The M3 comes in two versions. Both have 8 CPU cores, but one has only 8 GPU cores, whereas the other has 10 GPU cores. The 8/8 version is available only in the 13-inch MacBook Air and only if you don’t expand memory beyond 8 GB or storage beyond 256 GB. Get the low-end version only if you’re sure you don’t need more memory or storage.
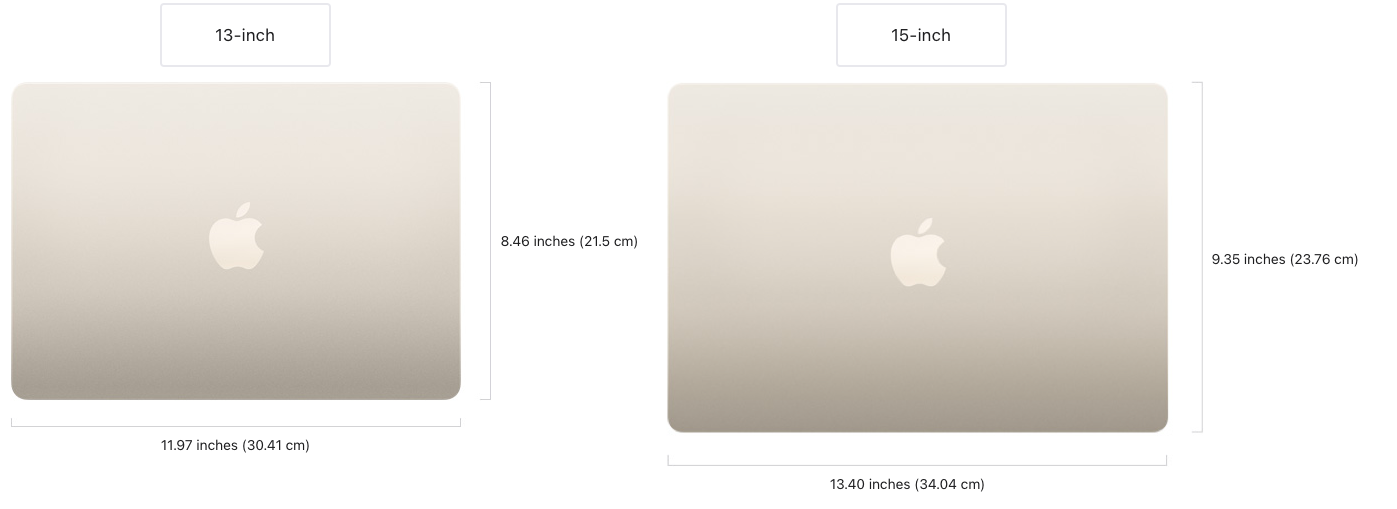
Screen size: You must choose a 13.6-inch or 15.3-inch Liquid Retina screen. The 15-inch screen is undeniably larger and displays more content, but the overall Mac is about an inch (2.25–3.5 cm) larger in both dimensions, and it weighs 3.3 pounds (1.51 kg) compared to 2.7 pounds (1.24 kg) for the 13-inch model. This decision is purely personal preference, and we recommend checking out each one in person before buying.
For most Mac laptop users, the M3 MacBook Air models are compelling and well worth a look.
(Featured image by Apple)
You Can Now Have Zoom Meetings on an Apple TV
Have you wanted to put Zoom meetings on a large-screen TV? You can now do that with tvOS 17 and the new Zoom app for Apple TV. It takes some getting used to due to the lack of a keyboard and any way to follow links, but it does work.

When Apple introduced tvOS 17 last September, an eagerly awaited feature was its support for FaceTime calls, using Continuity Camera on an iPhone or iPad to equip an Apple TV with the necessary camera and microphone. FaceTime on the Apple TV requires a second-generation Apple TV 4K or later and an iPhone running iOS 17 or an iPad running iPadOS 17.
The feature works pretty well. Setting up Continuity Camera is simple—you launch the FaceTime app on the Apple TV, select your user profile, confirm on the iPhone or iPad, and then position the iPhone or iPad in landscape orientation so the rear camera faces you. You can start FaceTime calls from the Apple TV or move a call in progress from an iPhone or iPad to the Apple TV. The video quality is excellent, the audio is surprisingly good even across the room, and Center Stage zooms and pans to keep you in the picture. You can also add reactions like hearts and fireworks with hand gestures. Or not.
But that’s not what we’re here to talk about today. Apple also said that other videoconferencing apps like Zoom and Webex would be coming to the Apple TV, which could make the Apple TV a compelling addition to offices and conference rooms everywhere. It’s also perfect for joining Zoom-based exercise classes or community meetings from the comfort of your living room. In December 2023, Zoom was the first out of the gate, shipping its Zoom for Home TV app for tvOS 17.
With Zoom available, the Apple TV becomes an interesting option for businesses and organizations that want to display video meetings on a large screen. In the past, it was possible to use AirPlay to share an iPhone or iPad screen to an Apple TV, but it was difficult to position the iPhone or iPad effectively, and there was no way to use the higher-quality rear-facing camera.
To get started, launch the Zoom app on the Apple TV. It first prompts you to connect your iPhone via Continuity Camera. Select the Apple ID account that matches the one logged in on the iPhone, bring the iPhone close, tap the notification that appears, and tap Accept. Then, turn the iPhone around and set it down on the base of the TV with the rear camera facing you.

Next, you’ll be prompted to pair it with your account, which you can do most easily by navigating to https://zoom.us/pair on another device and entering a code.

Once you’re connected to your account, you can create a new meeting or join an existing meeting.

Here’s where things get tricky. It’s easy to start a meeting—select New Meeting on the main screen—but inviting people is more arduous. Starting from the Contacts screen or choosing Invite from the More pop-up menu requires that you laboriously enter an email address to invite someone via email. Instead, we recommend that you first add people on the Personal Contacts screen in your account on the Zoom website. After that, you can select several people and invite them to the meeting. Unfortunately, in our testing, the email invitations didn’t always arrive.

The remaining option is to swipe up on the clickpad during a meeting to select the green shield button in the upper-left corner. That displays the meeting details, and a Join by Laptop button (the second screenshot below) shows the necessary URL, meeting ID, and passcode to share in another channel, like Messages or the phone. There’s no other way to share a link to a meeting that we could find.
Joining someone else’s meeting is difficult. Most Zoom meetings are shared via a link, and once you click or tap it in email, Messages, a calendar event, or on a website, the meeting starts. The Apple TV breaks that model—there’s no apparent way to load a Zoom link. FaceTime sidesteps this limitation by making it easy to move a call from the iPhone to the Apple TV—just put the iPhone close to the Apple TV, and a notification will suggest the move. Zoom offers no such option.
Instead, to join a Zoom call, you must manually enter the meeting ID and passcode. If you’ve been sent only the link, you’ll have to request the passcode separately (the numeric meeting ID can be extracted from the URL). Entering characters with the Siri Remote is slow and awkward, so we recommend using Siri, which recognizes spoken numbers well (hold down the Siri button on the side of the remote). You could also use an iPhone or iPad as a remote control for the Apple TV since you can type more effectively or use copy and paste on those devices. But if you’re already using your iPhone for Continuity Camera, for instance, you’ll need another device. Zoom does provide a Meeting History, which is helpful for recurring meetings, but you must still enter the passcode each time.

Once you start a call, touch the clickpad on the Siri Remote to display the Zoom menu at the bottom of the screen. You can then navigate using the clickpad (press the center to activate the selected command) and the Back button. Available options let you mute yourself, turn your video off and on, switch between the usual Zoom views, display Zoom reactions, manage participants, invite more people, turn on captions, and control the Continuity Camera video effects (Center Stage, Portrait Mode, and Apple’s gestural Reactions). Center Stage does an excellent job of following you around as you move. Portrait Mode just makes the background a little fuzzy; it’s not a strong effect. If you press the Back button to leave the Zoom app, your video pauses for others on the call.

Two common Zoom actions don’t translate fully to the Apple TV: chat and screen sharing. Incoming chat messages appear on the Apple TV in the corner, but only for 6 seconds, and longer messages are truncated after a handful of lines. There’s no way to keep them onscreen longer or get back to them. There’s no way to reply to chat messages. Zoom on the Apple TV does provide an option to share the screen, but that’s the screen of another device—there’s no app or desktop to share on the Apple TV, and no, you can’t share video.
Overall, the Zoom app for Apple TV feels like a 1.0. Most of the features that make sense are present, but fully adapting to a platform that lacks a keyboard or any way to follow links will take Zoom some time. If the company could add the capability to move an in-progress call from an iPhone or iPad to an Apple TV as FaceTime can, that would help a lot. Another possible concern is the need to have the Apple ID on the Apple TV match the one on the iPhone—all the possible logins could get confusing in a larger office.
Regardless, Zoom on the Apple TV works well enough to try out. Just make sure to run through the initial setup well before your meeting is due to start.
(Featured image based on an original by iStock.com/gorodenkoff)
Use iOS 17.3’s Stolen Device Protection to Reduce Harm from iPhone Passcode Thefts
In iOS 17.3, Apple has introduced Stolen Device Protection to discourage iPhone thefts enabled by a revealed passcode. It requires additional biometric authentication, and we recommend that everyone who uses Face ID or Touch ID enable it.

Last year, a series of articles by Wall Street Journal reporters Joanna Stern and Nicole Nguyen highlighted a troubling form of crime targeting iPhone users. A thief would discover the victim’s iPhone passcode, swipe the iPhone, and run. With just the passcode, the thief could quickly change the victim’s Apple ID password, lock them out of their iCloud account, and use apps and data on the iPhone to steal money, buy things, and wreak digital havoc.
In essence, Apple allowed the passcode, which could be determined by shoulder surfing, surreptitious filming, or social engineering, to be too powerful, and criminals took advantage of the vulnerability. It’s best to use Face ID or Touch ID, especially in public, but some people continue to rely solely on the passcode.
Apple has now addressed the problem for iPhone users with the new Stolen Device Protection feature in iOS 17.3. It protects critical security and financial actions by requiring biometric authentication—Face ID or Touch ID—when you’re not in a familiar location like home or work. The most critical actions also trigger an hour-long security delay before a second biometric authentication. We recommend everyone who uses Face ID and Touch ID turn on Stolen Device Protection. The feature is not available for the iPad or Mac, but neither is as likely to be used in places like the crowded bars where many iPhones have been snatched.
How Stolen Device Protection Works
The location aspect of Stolen Device Protection is key. When you’re in a “significant location,” a place your iPhone has determined you frequent, you can do everything related to security and financial details just as you have been able to in the past, including using the passcode as an alternative or fallback.
However, when you’re in an unfamiliar location, as you would likely be if you were out in public where someone might steal your iPhone, Stolen Device Protection requires biometric authentication to:
Use passwords or passkeys saved in Keychain
Use payment methods saved in Safari (autofill)
Turn off Lost Mode
Erase all content and settings
Apply for a new Apple Card
View an Apple Card virtual card number
Take certain Apple Cash and Savings actions in Wallet (for example, Apple Cash or Savings transfers)
Use your iPhone to set up a new device (for example, Quick Start)
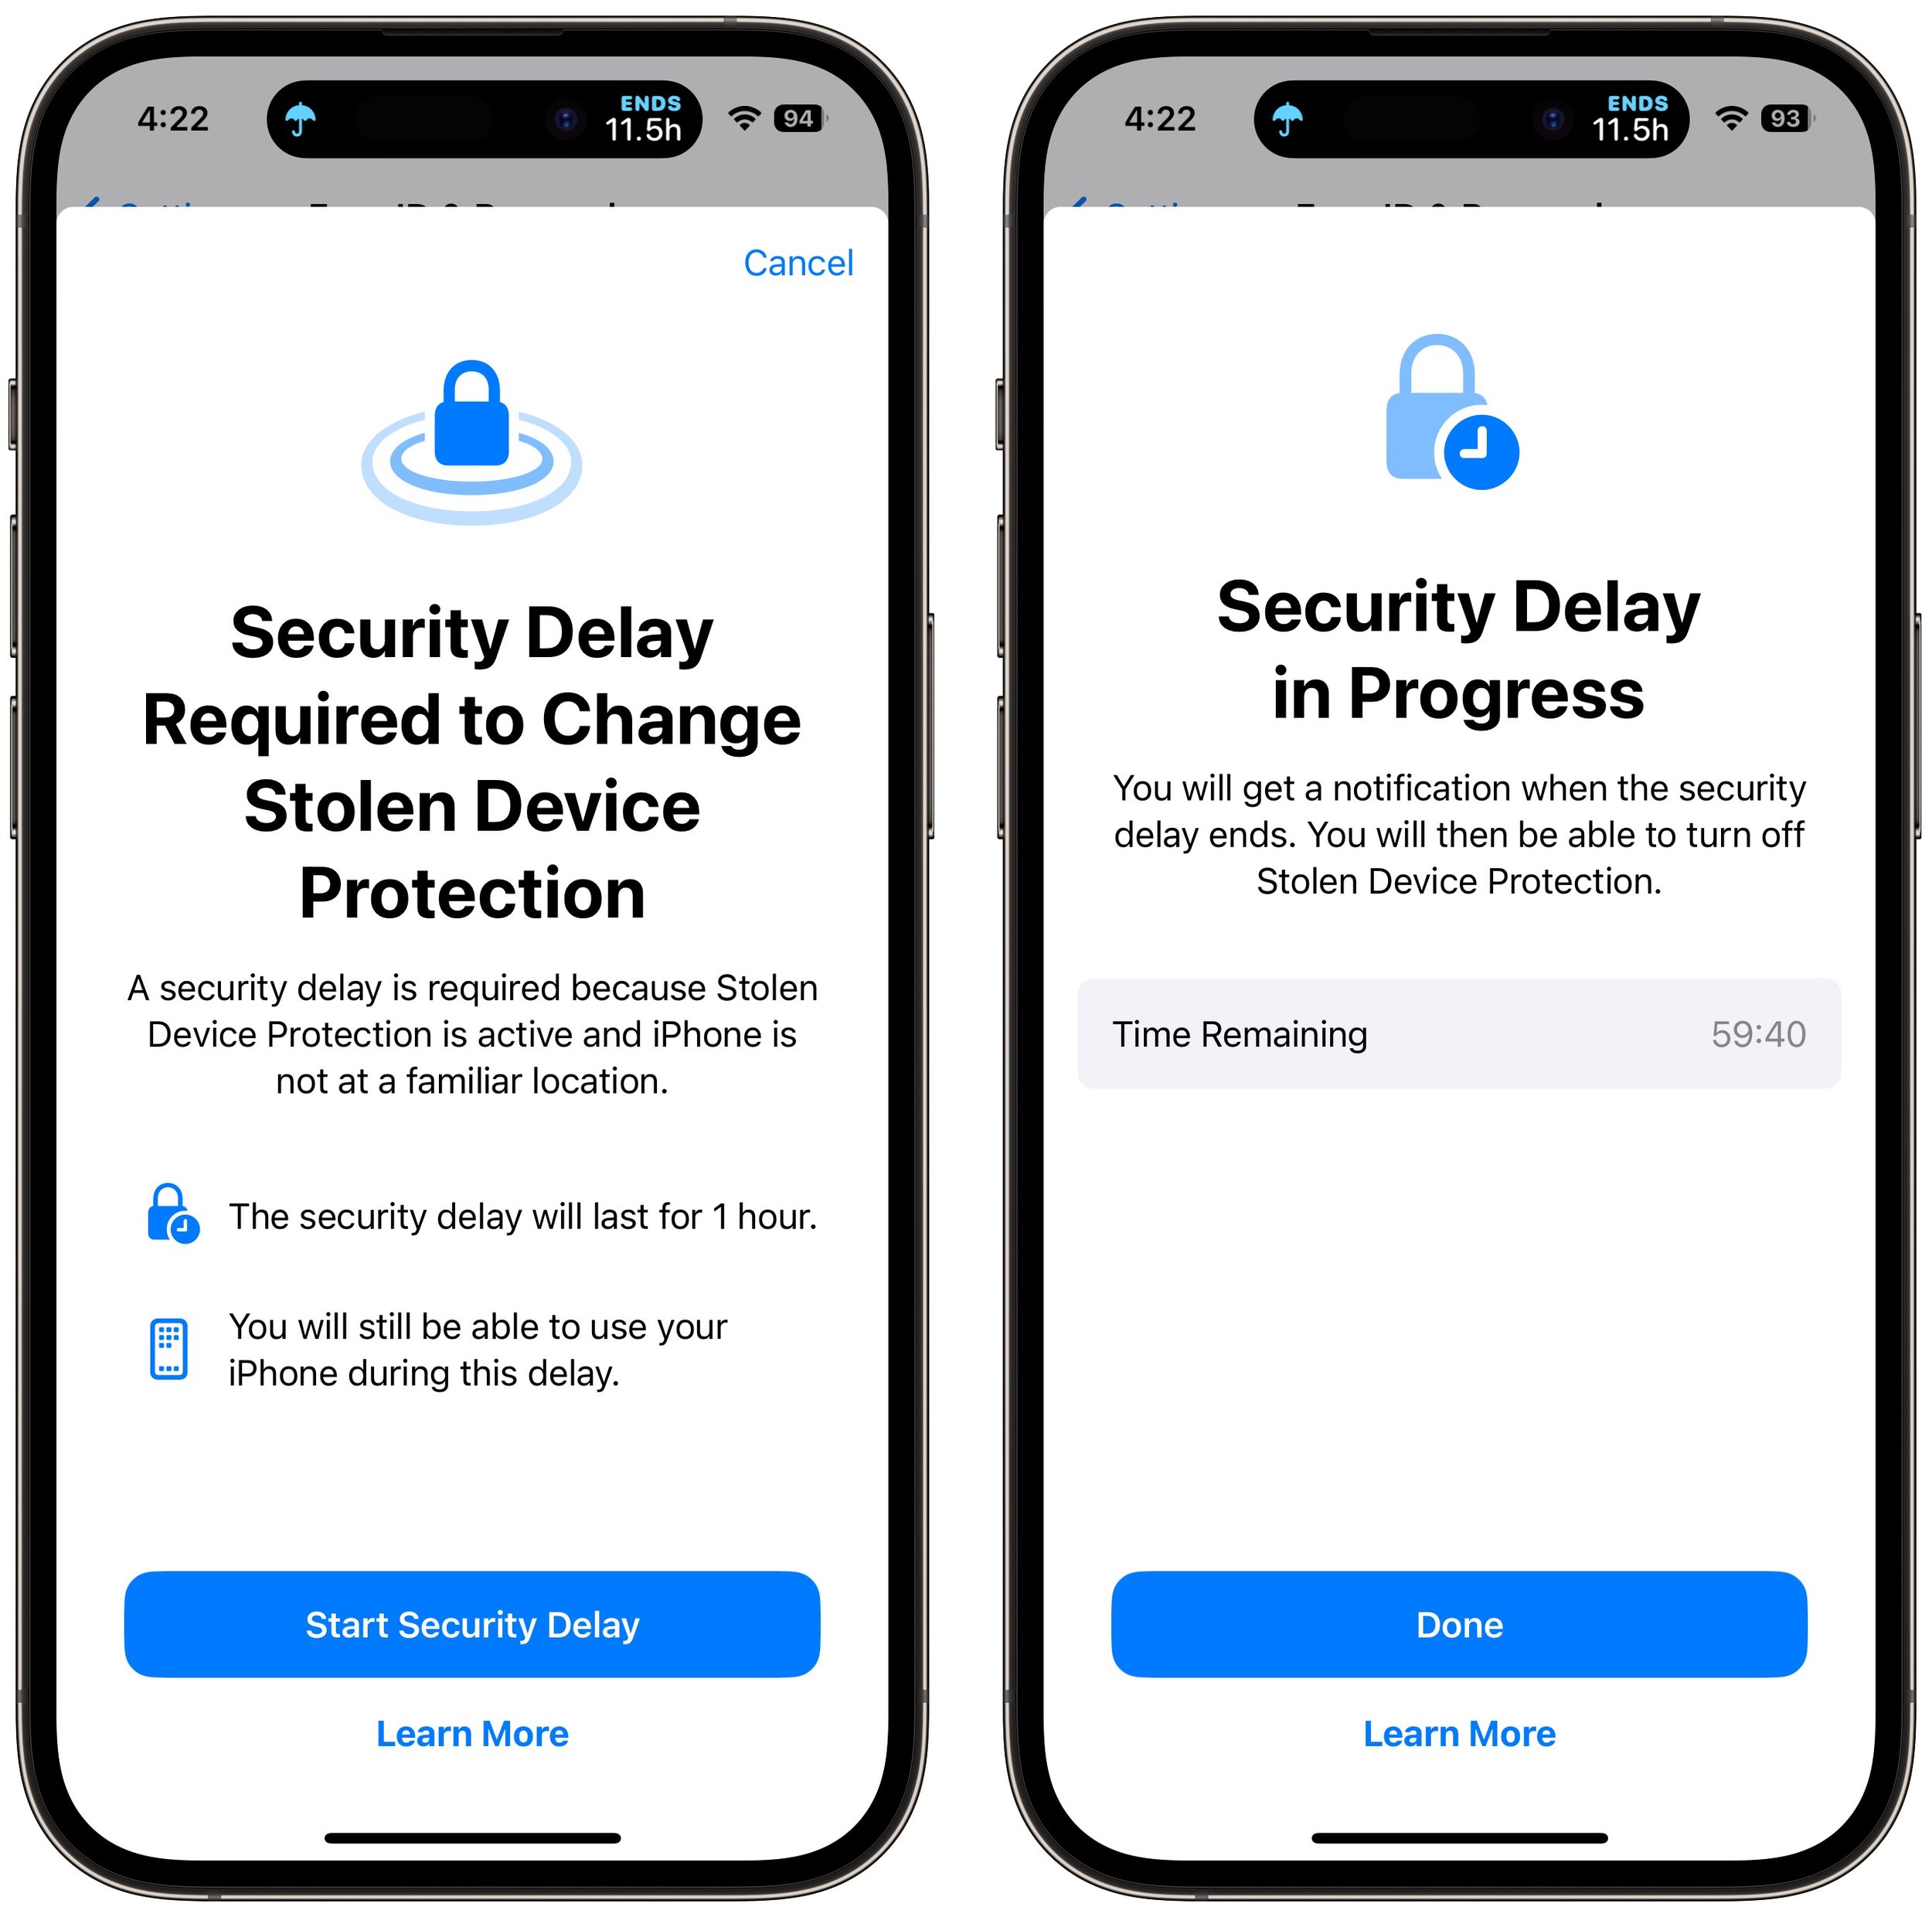
Some actions have even more serious consequences, so for them, Stolen Device Protection requires biometric authentication, an hour security delay—shown with a countdown timer—and then a second biometric authentication. The delay reduces the chances of an attacker forcing you to authenticate with the threat of violence. You’ll need to go through the double authentication plus delay when you want to:
Change your Apple ID password (Apple notes this may prevent the location of your devices from appearing on iCloud.com for a while)
Sign out of your Apple ID
Update Apple ID account security settings (such as adding or removing a trusted device, Recovery Key, or Recovery Contact)
Add or remove Face ID or Touch ID
Change your iPhone passcode
Reset All Settings
Turn off Find My
Turn off Stolen Device Protection
There are a few caveats to keep in mind:
The iPhone passcode still works for purchases made with Apple Pay, so a thief could steal your passcode and iPhone and buy things.
Although Apple says it’s required, you can turn off Significant Locations to require the extra biometric authentication and security delay everywhere. That would eliminate the worry about a thief using Significant Locations to go to your most recent familiar spot in an attempt to sidestep the extra authentication.
If you plan to sell, give away, or trade in your iPhone, make sure to turn off Stolen Device Protection first. Once it’s out of your physical control, no one else will be able to reset it.
Turn On Stolen Device Protection
Before you get started, note that Apple says you must be using two-factor authentication for your Apple ID (everyone should be anyway), have a passcode set up for your iPhone (ditto), turn on Face ID or Touch ID, enable Find My, and turn on Significant Locations (Settings > Privacy & Security > Location Services > System Services > Significant Locations), although this last one doesn’t actually seem to be required.
Then, go to Settings > Face ID/Touch ID & Passcode, enter your passcode, and tap Turn On Protection. (If it’s enabled, tap Turn Off Protection to remove its additional safeguards.)
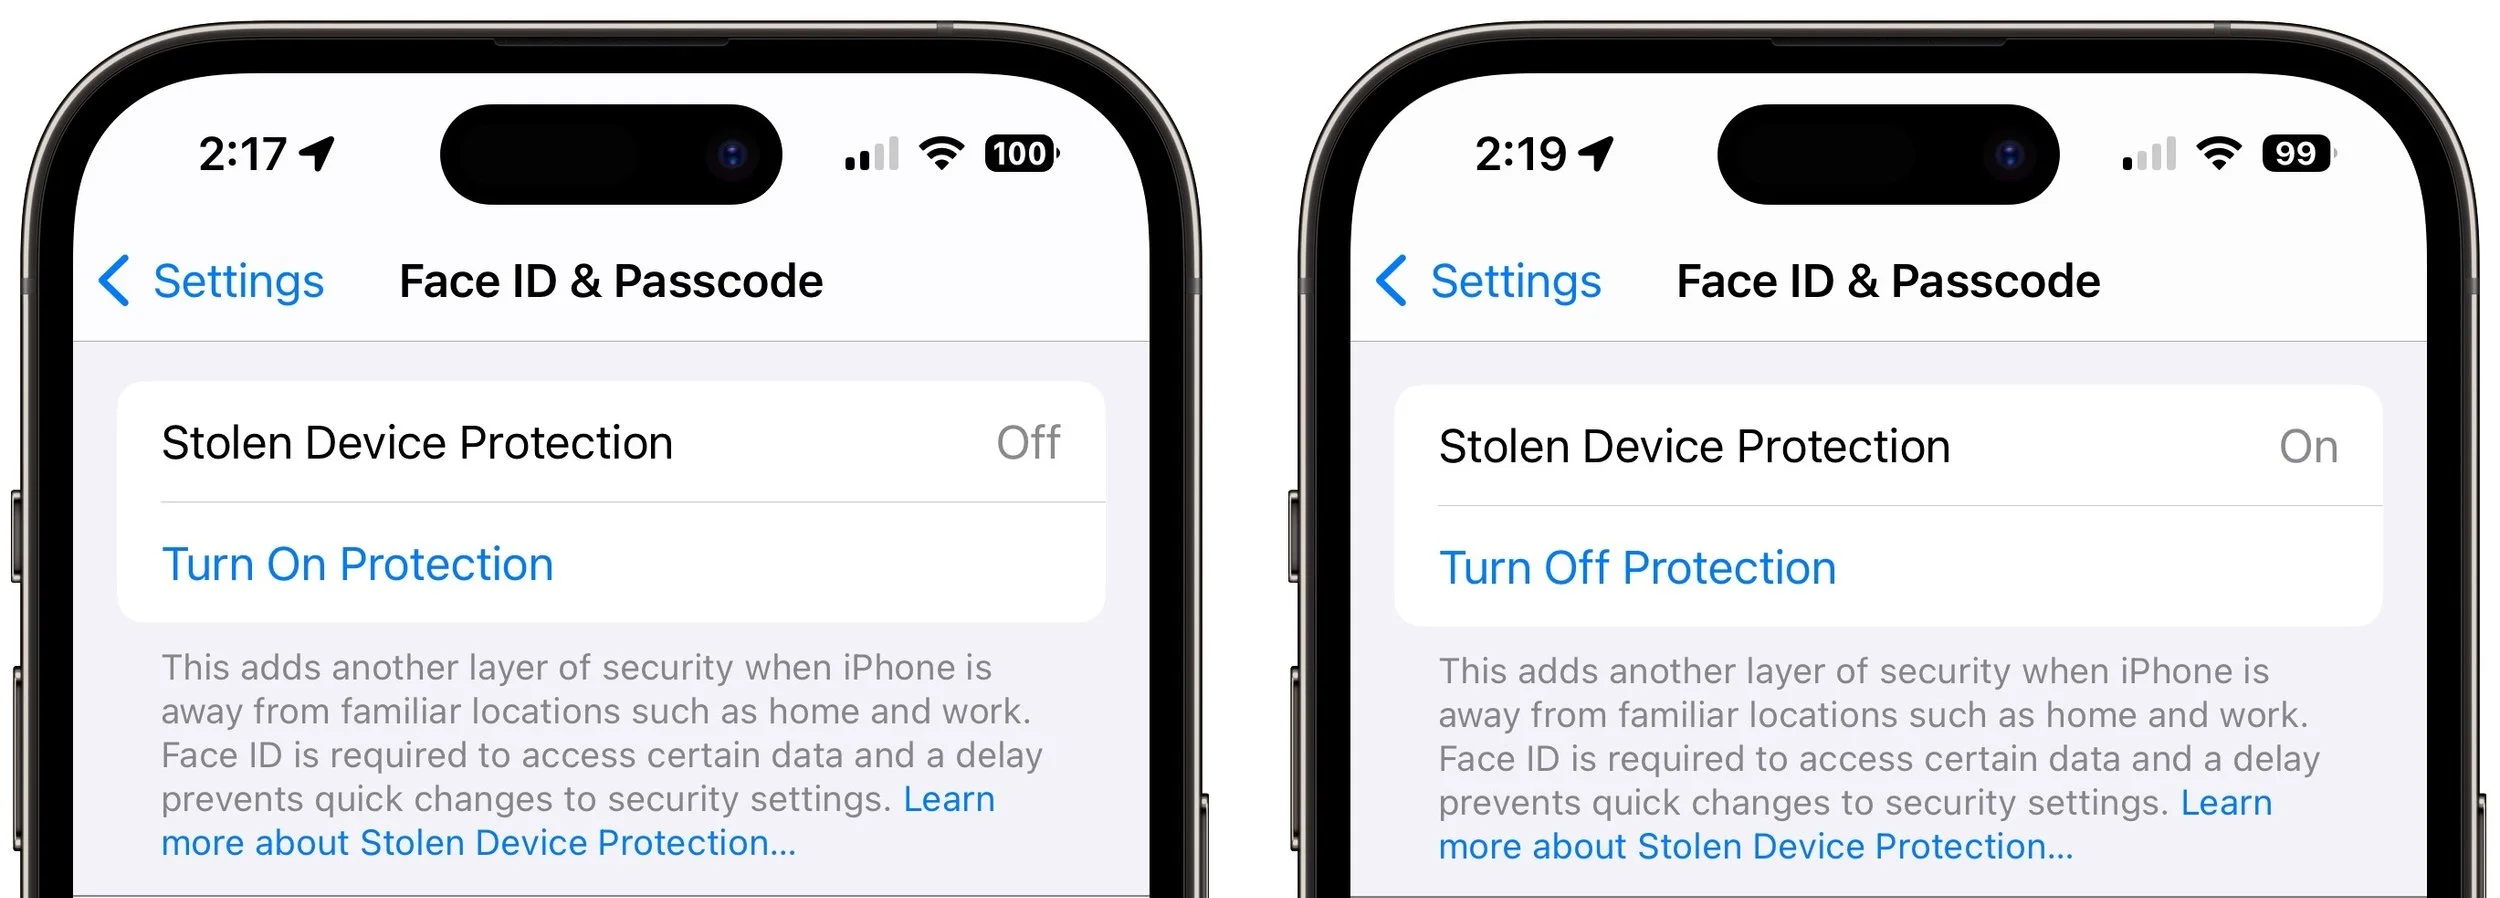
Once Stolen Device Protection is on and you’re in an unfamiliar location, the actions listed above will require either biometric authentication or two biometric authentications separated by the hour-long security delay.
There is one group of people who should not turn on Stolen Device Protection: those for whom Face ID or Touch ID don’t work. Most people have no trouble with Apple’s biometric technologies, but some people have worn off their fingerprints or have other physical features that confuse Touch ID or, less commonly, Face ID.
If that’s you, stick with our general recommendation for discouraging possible iPhone thefts: Never enter your iPhone passcode in public where it could be observed.
(Featured image by iStock.com/AntonioGuillem)
How to Search Directly in Your Favorite Websites from Safari’s Search Bar
Do you frequently use the internal search engine on a website? You can now search that site faster using Safari’s Quick Website Search feature, which automatically learns which sites you search.

We’re all accustomed to searching the Web generally in Safari by typing in the search field and pressing Return or tapping Go. Most of us are also familiar with the search suggestions that Safari shows below the search field as we type.
But did you know that Safari has a feature that lets you use the search field to search directly within your favorite websites, so you don’t have to wade through unnecessary search engine results or navigate somewhere manually before searching? It’s called Quick Website Search and is available for the Mac, iPhone, and iPad. It’s helpful for websites within which you search often. For example, we often search for technical information on Apple’s website. You might find the feature helpful for searching Amazon or another shopping site, a help center, or an events calendar.
All you have to do to prime Quick Website Search’s pump is search a website using its internal search option. Look for a magnifying glass or Search option, enter a term in the search field, and submit the search. It doesn’t matter what you search for—all you’re doing is teaching Safari how to search on that site, and it will remember the site from then on.
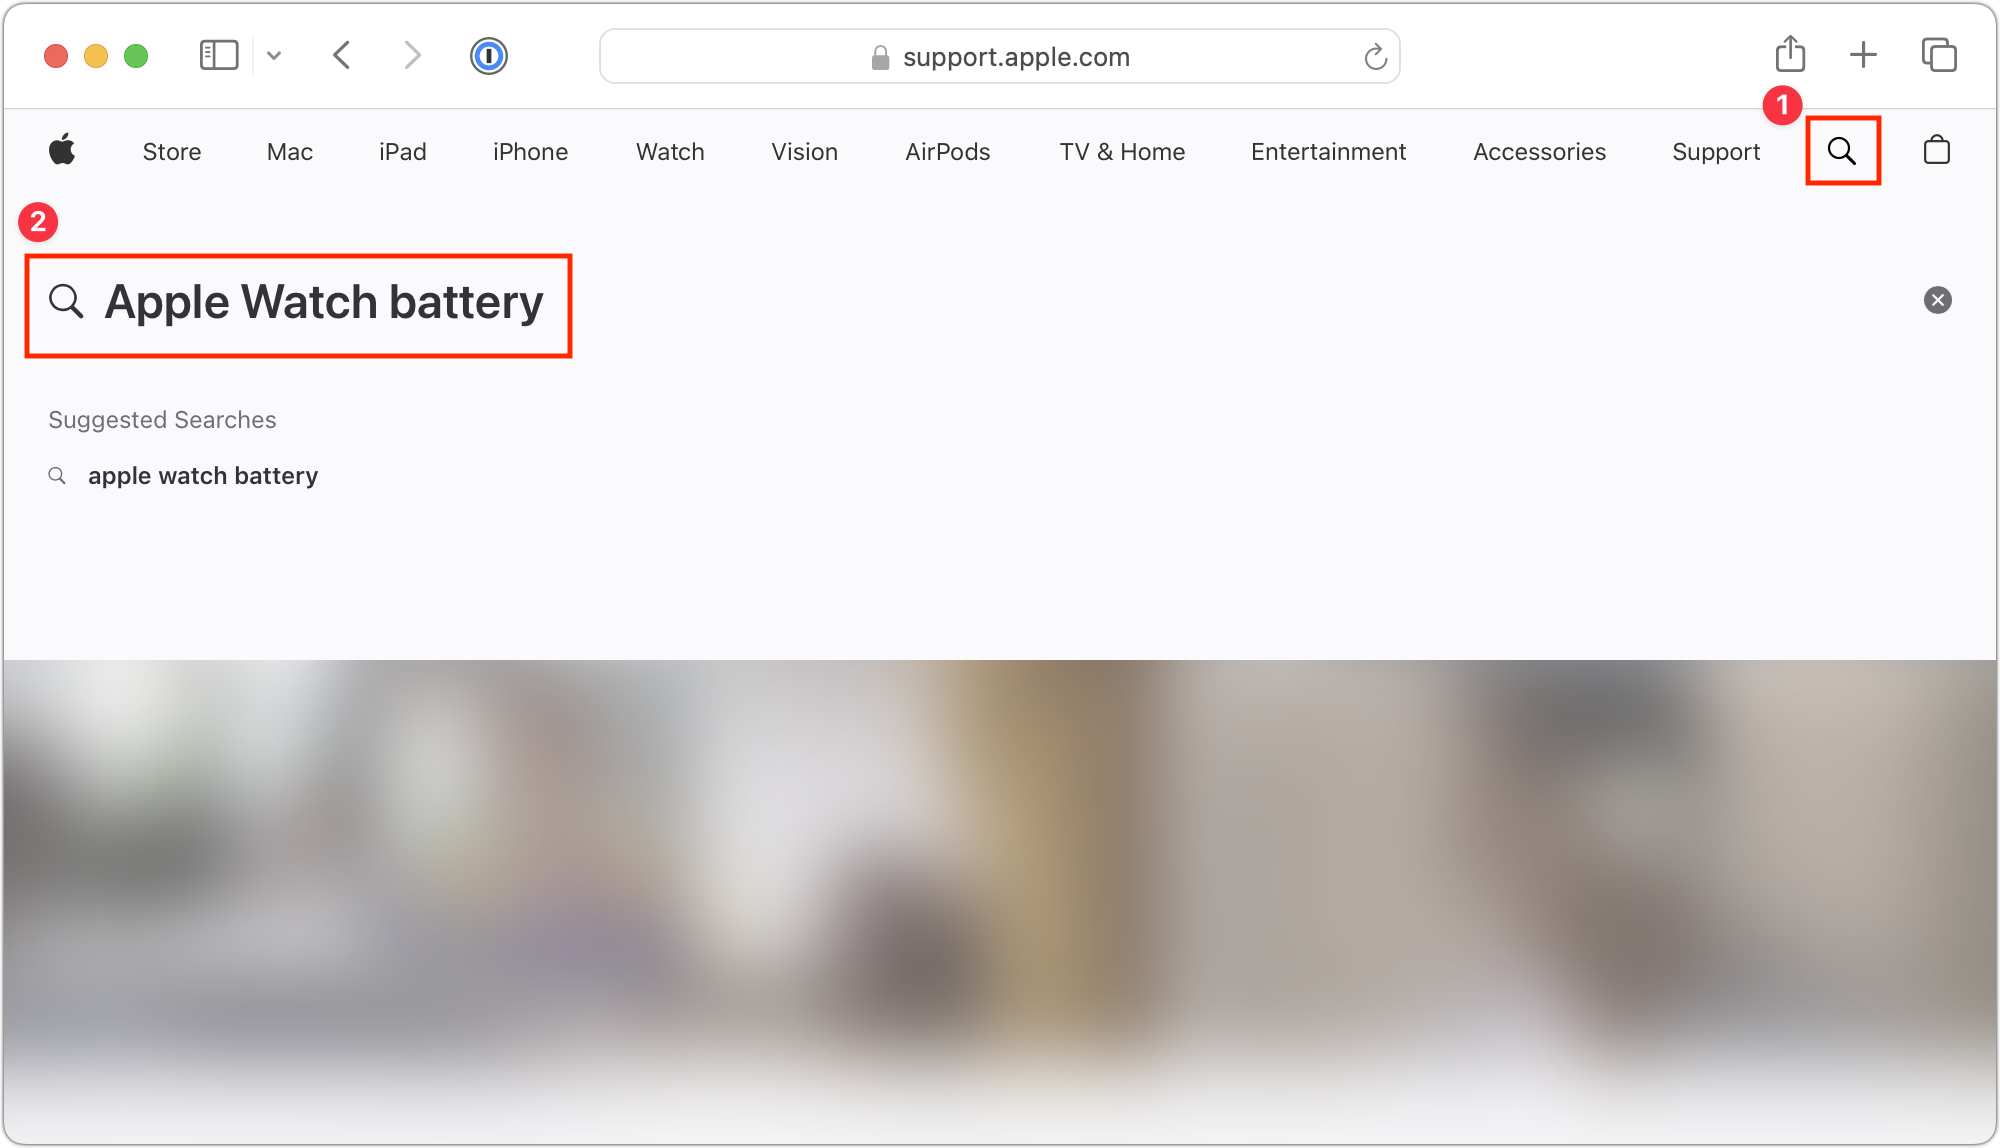
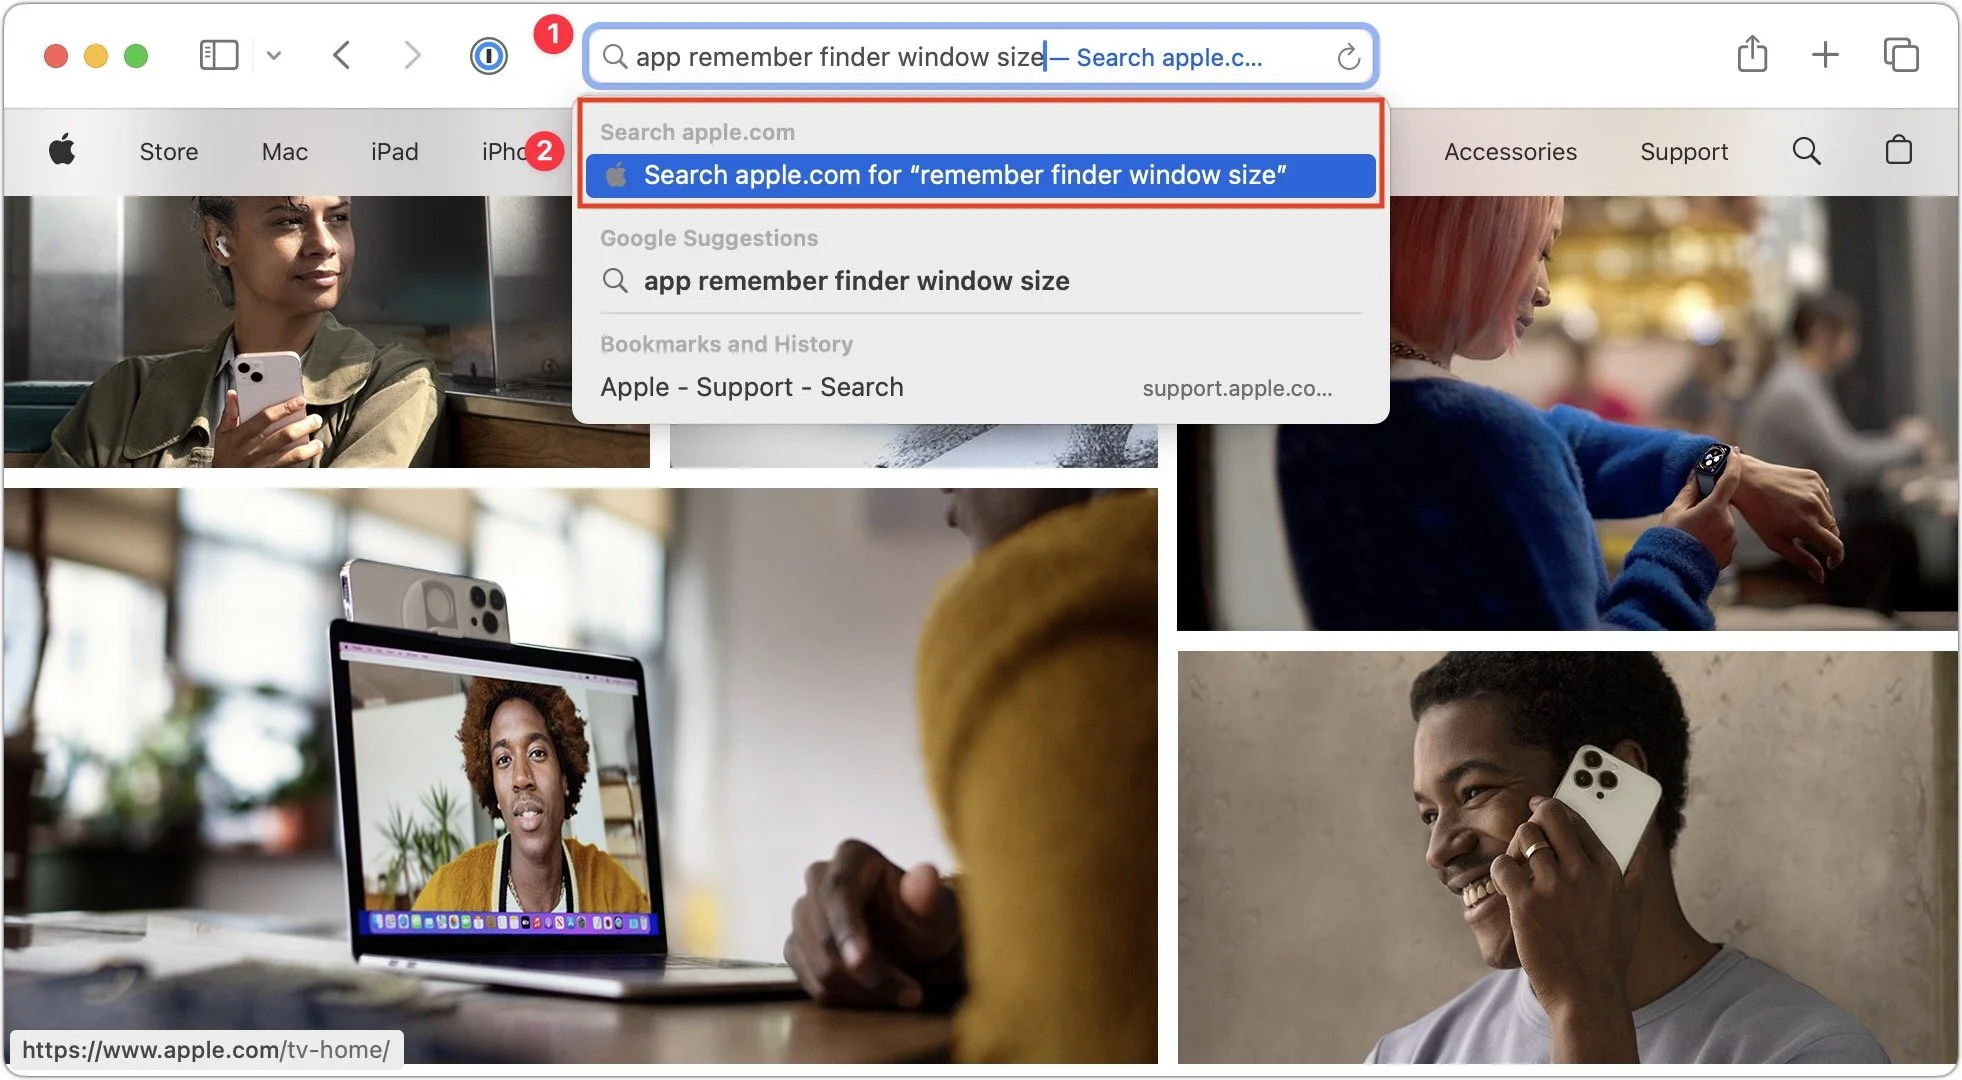
Later, to look for pages only from that site, enter three or four characters from its name (don’t accept any auto-completions!), a space, and then your search term. Don’t press Return or tap Go, however. Instead, pick the suggestion from the suggestion list under the “Search sitename” heading.
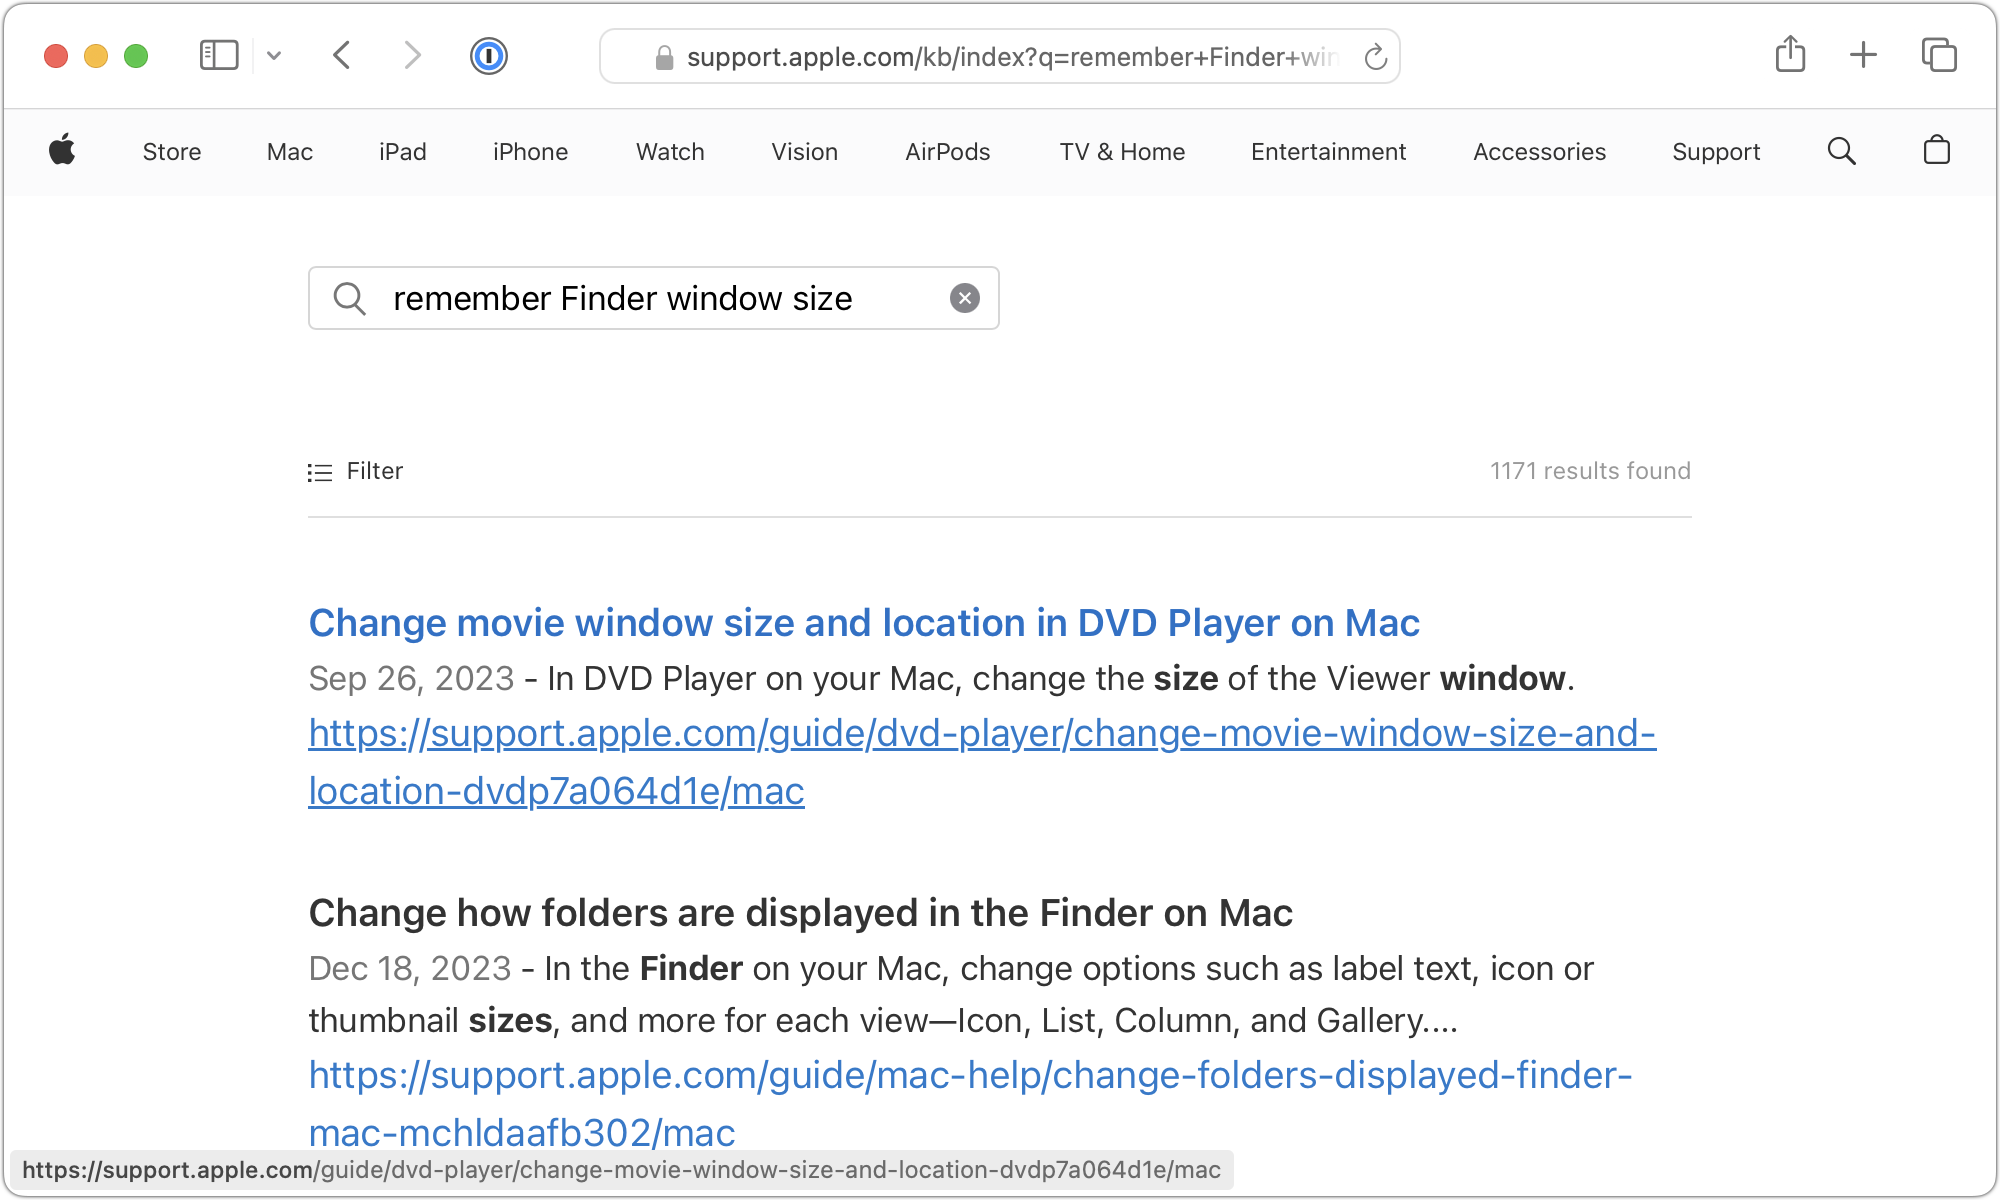
Safari then sends the search directly to the site in question, so instead of results from Google or your default search engine, you’ll see the results on the desired site.
The process is the same on the iPhone and iPad, although Safari on those platforms doesn’t remember websites you’ve searched as reliably.
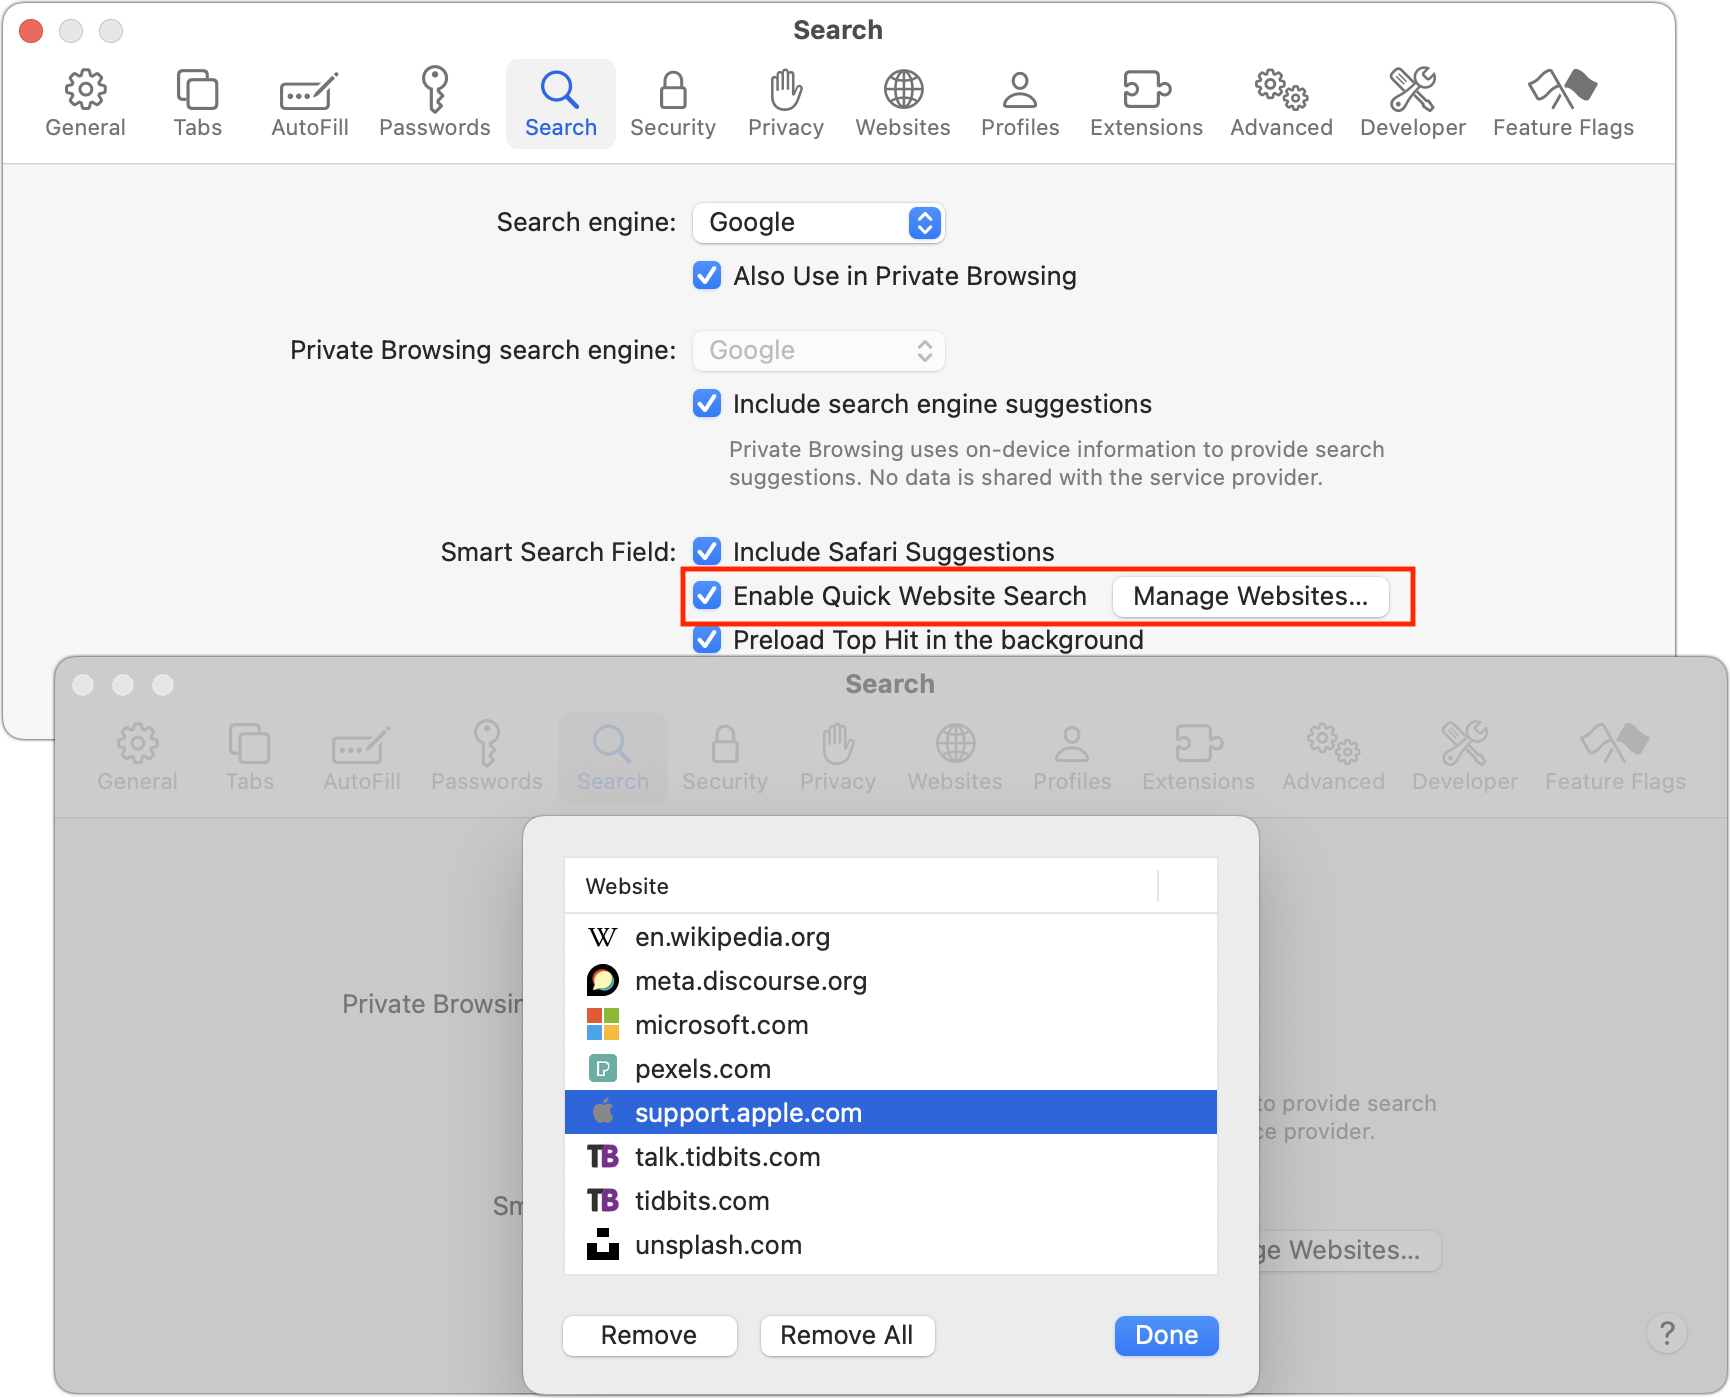
On the Mac, you can see which sites Quick Website Search has remembered and remove them by opening Safari > Settings > Search and clicking Manage Websites next to Enable Quick Website Search.
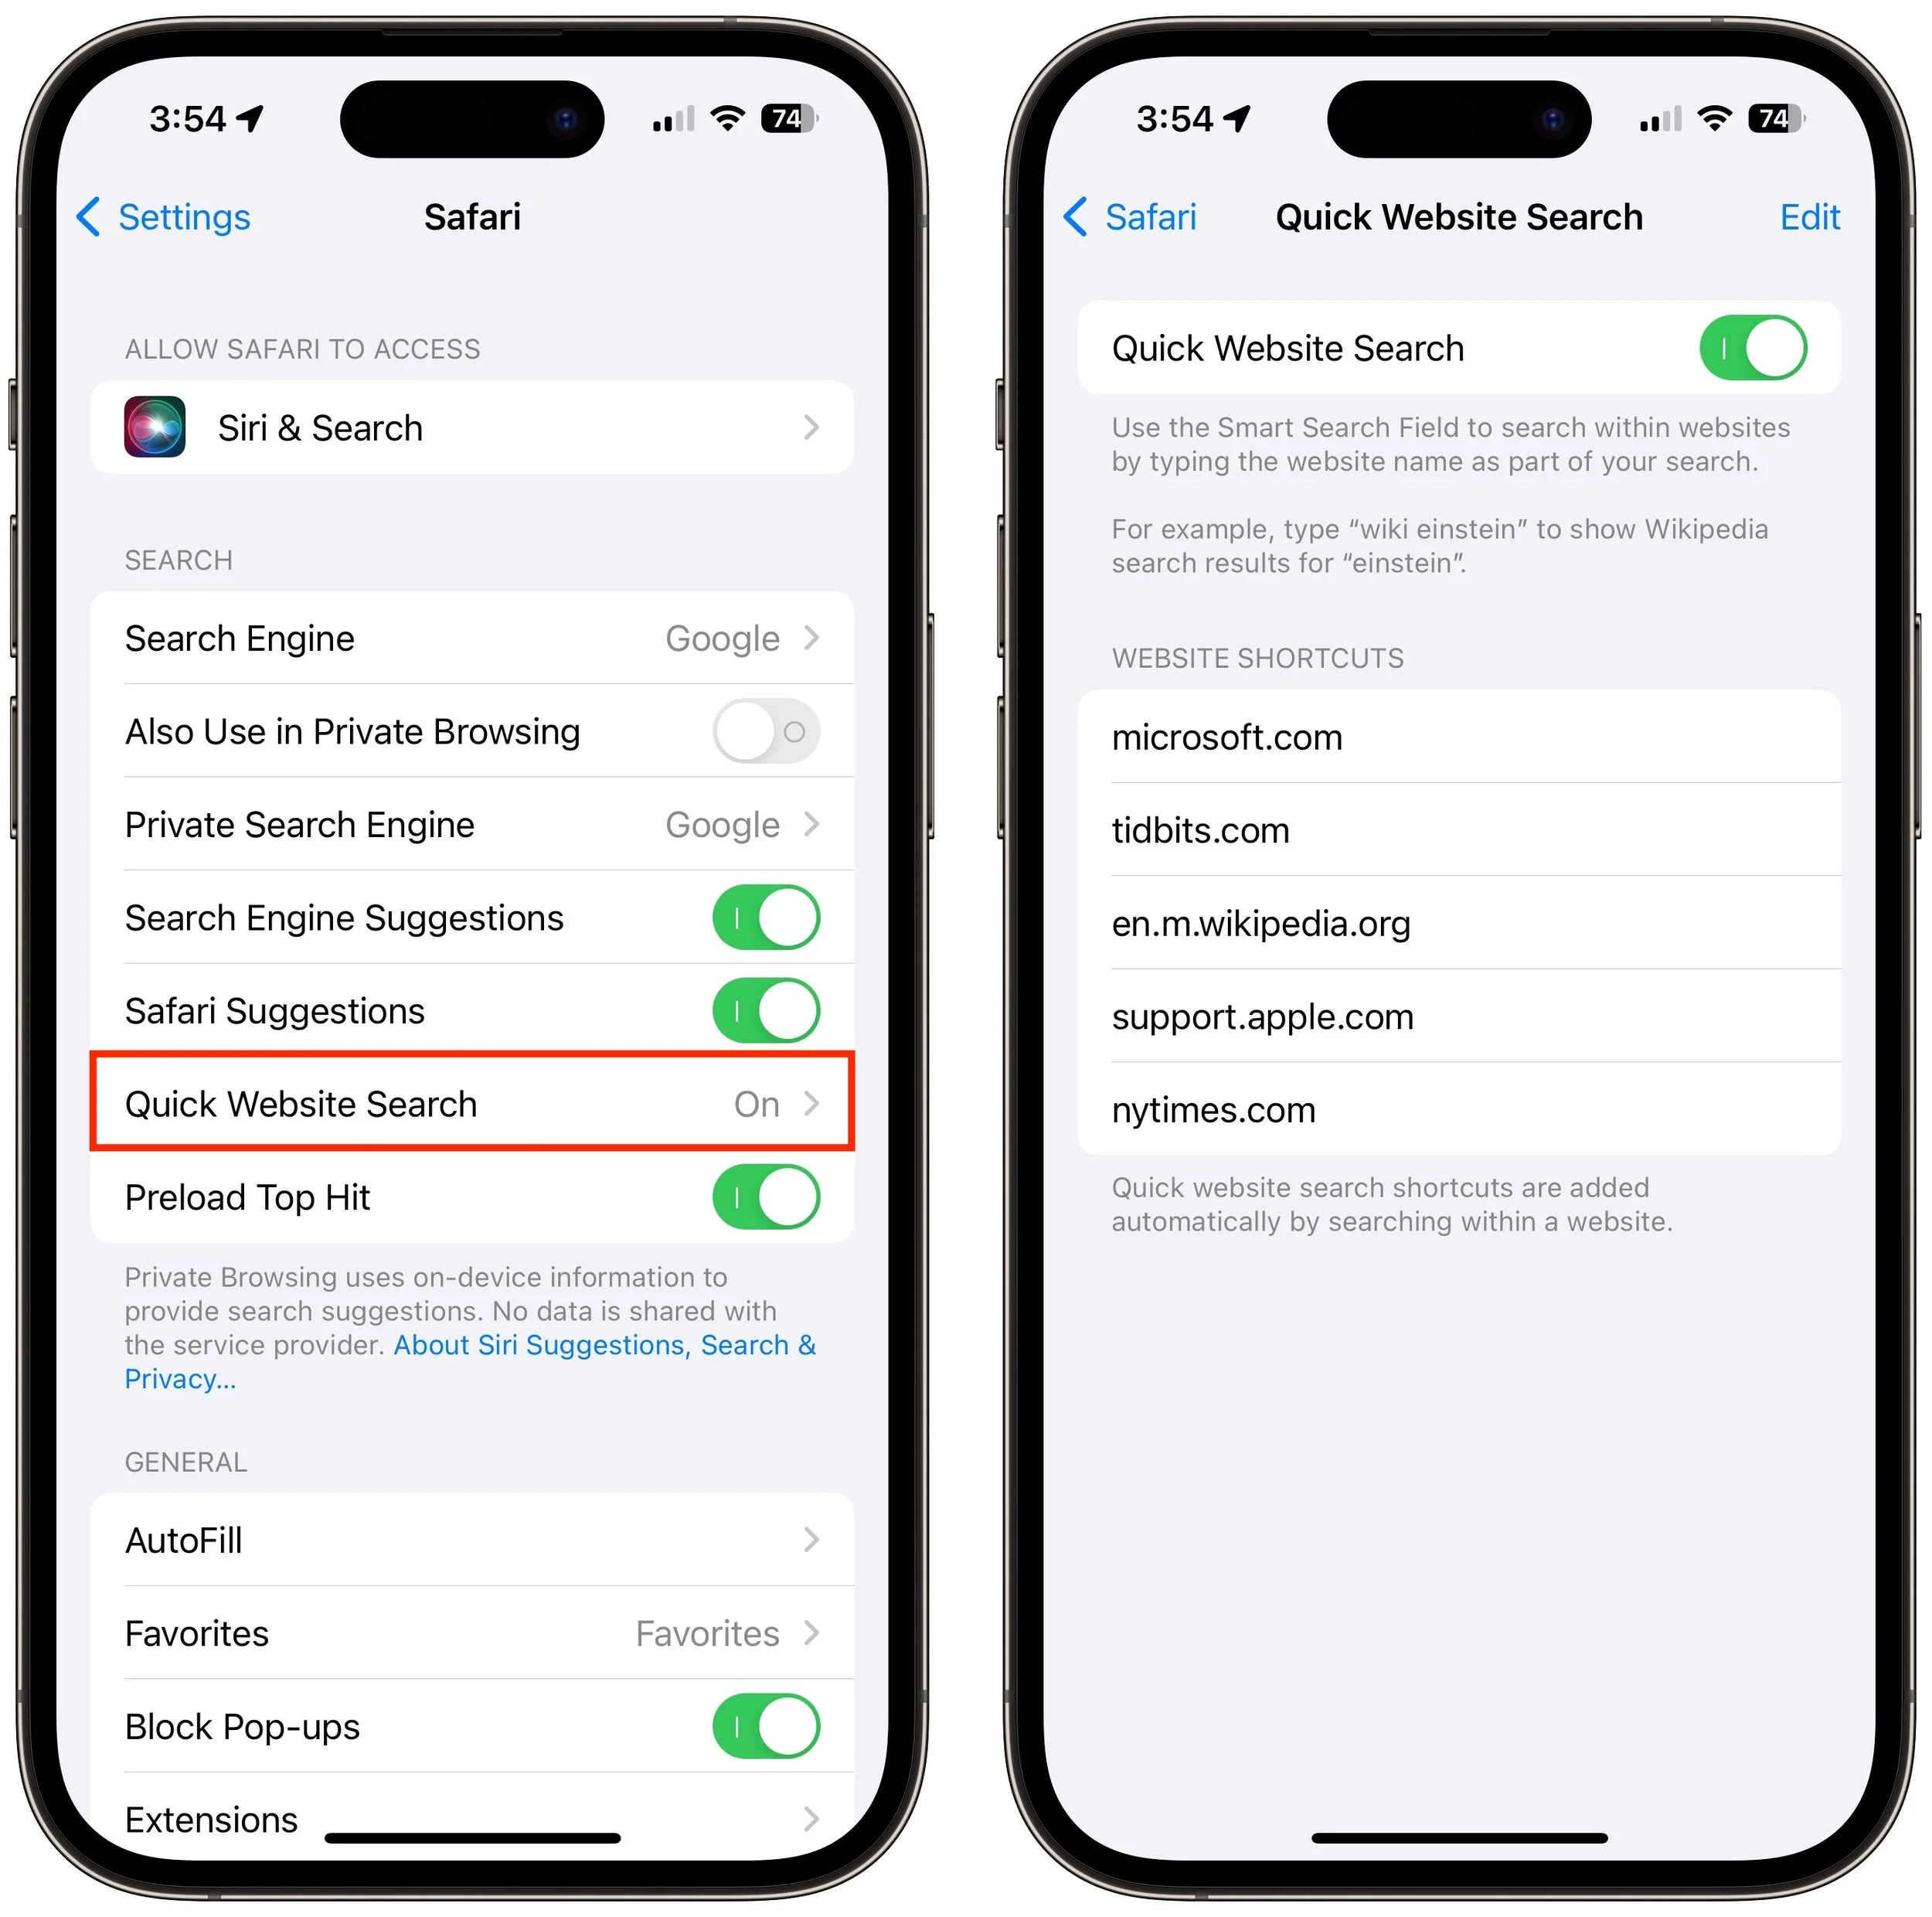
On the iPhone and iPad, open Settings > Safari > Quick Website Search to see and remove the remembered sites.
This way of searching within a website can be a big productivity win, so it probably won’t take long to get used to this new way of jumping into your most used websites’ internal search engines.
(Featured image based on an original by iStock.com/YiuCheung)
Help! My Account Has Been Hacked—What Should I Do?
If you notice strange behavior in your online accounts, you might have been hacked. It’s imperative that you act immediately to verify the breach, change passwords, lock accounts, and alert support personnel. We provide steps here.

How would you realize that one or more of your Internet accounts—email, social media, financial—have been hacked? (Some prefer the terms “compromised” or “breached”—you may hear them from support techs.) Unfortunately, there’s no tell-tale warning sign because “hacked” could mean any number of things. Here are some possible indications:
People you trust report receiving email that you didn’t send.
Social media friend requests are made to people you don’t know, or messages you don’t recognize are sent from your account.
Although you’re certain you have the correct password, you can’t log in to an account.
You become aware of your personal data appearing in places it shouldn’t.
Unknown charges or transfers appear in a bank or credit card account.
However, attackers will also try to fool you into thinking an account has been compromised to get you to enter passwords or financial information on a website designed to steal data. Don’t assume you’ve been hacked just because you received a phishing email saying so or because you see unexpected notifications claiming your computer is infected. No legitimate entity will ever send such email, and the only notification about malware you should ever see would come from anti-malware software you installed.
(Speaking of malware, dealing with that is a topic for another day—we’re focusing on online accounts in this article. Nonetheless, if one of your accounts has been compromised, it’s also worth scanning your Mac with the free version of Malwarebytes or VirusBarrier Scanner, just in case.)
First off, don’t panic. It’s important to take a deep breath, document everything you see with screenshots (press Command-Shift-5), and move quickly to regain control over whatever accounts were hacked and prevent others from falling prey to the attacker.
When you suspect an account has been compromised, try to verify the problem. Do the following:
Alert techs: If the account in question is for work, immediately alert your IT department and follow their instructions. If it’s a personal account, contact us. Tell whoever is helping you that you have screenshots you can send and be ready to forward any suspicious messages you have as well.
Gather evidence: Ask the person who told you about the problem to forward the message they received to another of your email addresses, or to a close friend or family member so you can see what’s being said in your name. Scrutiny of the fake message may reveal information about what has happened, though you may need help from someone with more technical experience.
Examine email: Since email account breaches are the most concerning (because they can be used to reset passwords elsewhere), scan your email for messages you didn’t send or replies to such messages. Along with the Inbox, look in the Sent mailbox and the Trash. Also, check your settings and filters to ensure incoming messages aren’t being forwarded elsewhere and then deleted.
Check social media: Connect to all your social media accounts—even those you don’t use regularly—and look for posts, friend requests, messages, or anything else that suggests an attacker has been impersonating you.
Audit accounts: Log in to important accounts and look for suspicious activity, such as login attempts from unfamiliar locations or IP addresses or changes to account settings.
If you find evidence to suggest that one or more of your accounts have been compromised, follow these steps:
Immediately change the passwords for any affected accounts. We always recommend using a password manager like 1Password to generate strong, random passwords.
Whenever possible, turn on two-factor authentication.
If available for the account in question, follow advice from the service. Apple, Facebook, Google, Instagram, Microsoft, and Twitter all have advice on how to respond, as will many other companies.
Review account settings for unauthorized changes, especially recovery options like backup phone numbers and email addresses.
Look through your accounts in your password manager and change the passwords for the most important ones and any that might be related.
If you can’t get into an account because the password has been changed, make sure you have sole control of your email account and then trigger a password reset.
For affected financial accounts, along with changing the password, immediately call the institution and ask for their help locking the account to prevent any transfers.
If your email account was used to send phishing messages to contacts, you should alert any friends, family, and colleagues who might have received the messages that your account was hacked and that the previous message wasn’t from you.
Security breaches are stressful, we know, but it’s imperative that you deal with them right away. The longer you wait, the more damage the attacker can cause, including stealing your money, impersonating you, scamming your friends and family, and compromising your employer’s systems. We’re here to help.
(Featured image by iStock.com/PUGUN SJ)
Turn Your Most-Used Sites into Safari Web Apps in macOS 14 Sonoma
Safari in macOS 14 Sonoma introduced Web apps—also known as site-specific browsers—that let you turn a website into what looks and feels like an independent app on your Mac.
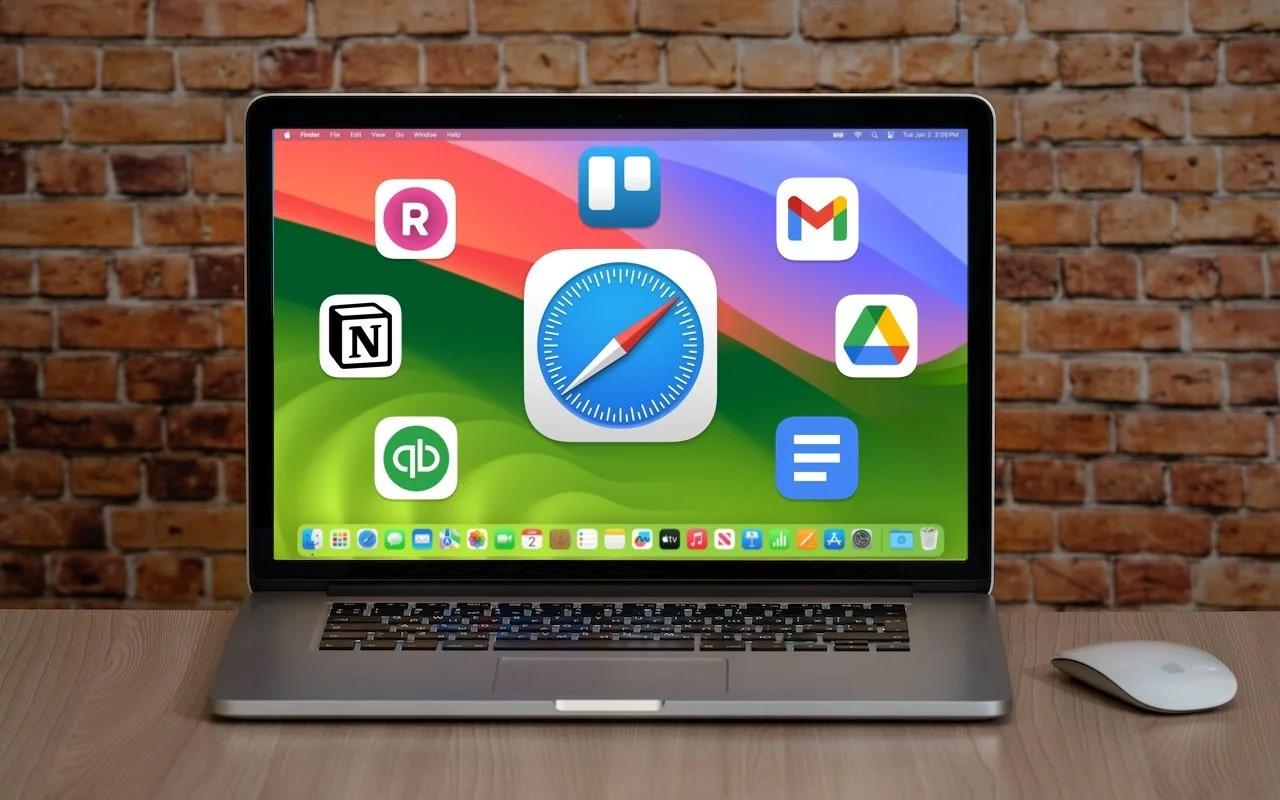
The concept of site-specific browsers has been around for a long time, but in the version of Safari that comes with macOS 14 Sonoma, Apple brought it to the big time by making setup easier than ever.
Put simply, a site-specific browser is a Mac app that encapsulates a single Web app or site. The goal is to break a website out of a Web browser and turn it into what looks and works like a regular Mac app. Gmail the Web app can become Gmail the Mac app.
What kind of websites might you want to turn into a standalone app? Beyond Gmail, consider Google Docs, Netflix, Notion, QuickBooks, and any other Web-focused app that feels more natural as a standalone app. Additionally, a site-specific browser can be helpful for any website you use regularly throughout the day, such as a discussion site, news aggregator, or company intranet.
To create a Web app in Safari, open the desired page, choose File > Add to Dock, and give the app your desired name.
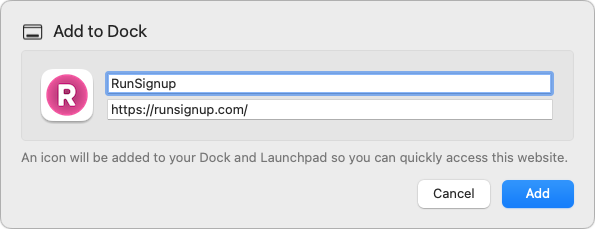
That’s it! Safari saves the Web app to the Applications folder in your Home folder (not the regular top-level Applications folder), adds it to the next open spot on the Dock and in Launchpad, and enables you to open it using Spotlight. The tab you had open in Safari remains open, so close that and launch the new Web app from the Dock.
Web apps look and feel just like Web pages in Safari, with a few exceptions:
If you click a link to another page on the same website as the Web app, the page opens within the window, but clicking a link to another website opens it in Safari as a new tab. There are a few special cases, too—double-clicking a document in a Google Drive Web app opens it in a new window within the Web app rather than in Safari.
Web apps have their own browsing history, cookies, website data, and settings, which aren’t shared with Safari.
Web app toolbars have only back and forward buttons and a Share button. They lack an address bar, bookmarks, tabs, and extensions, but you can switch back to Safari to get those—choose File > Open in Safari.
For websites that have notifications, the Web app’s icon in the Dock can show the number of unread notifications.
To tweak the name or appearance of the Web app, click the app’s name in the menu bar and choose Settings. The only option that isn’t obvious is the icon—if it’s too fuzzy or not what you prefer, click it and select a file in the dialog that appears. You can select either an image file or another app. (Hint: To find more icons, search for “AppName icon” in Google or Bing.)
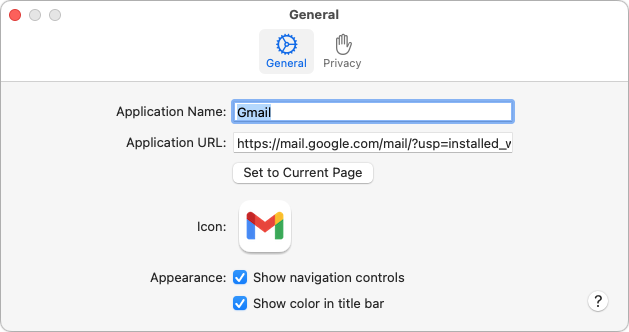
Keep these tips about Web apps in mind:
You can remove a Web app from the Dock without deleting it from your drive.
To delete a Web app, drag its icon from your Home folder’s Applications folder to the trash.
To make the Web app launch at login, add it to your login items in System Settings > General > Login Items.
Web apps cannot receive incoming URLs on their own. In other words, if you have a Google Docs Web app and click a Google Docs link that someone sends you in email, it will open in your default Web browser, not your Google Docs Web app. However, you can use the $10 utility Choosy to redirect appropriate links to specific Web apps.
Overall, Apple has done a good job with Safari Web apps. They’re easy to create and provide most of what you’ll likely want in an app that encapsulates a website. Give them a try, but if you find yourself needing capabilities beyond what Safari provides, such as access to extensions, support for tabs, more control over how links open, and choices of different browser engines, check out alternative site-specific browser apps like Unite, Coherence X, and WebCatalog.
(Featured image based on an original by iStock.com/Armastas)