
Two Techniques for Improving Google Chrome Security
If you use Google Chrome or another Chromium browser instead of Safari, you can stay secure by following two simple rules regarding updates and extensions.

Although most Mac users rely on Apple’s Safari for Web browsing, plenty of people prefer Google Chrome for its cross-platform compatibility, massive collection of extensions, and tight integration with the Google ecosystem. Chrome is by far the most popular browser in the world, with about 65% of the market, compared to Safari’s 18%. Still others opt for alternative browsers based on the same open-source Chromium engine, such as Arc, Brave, Microsoft Edge, Opera, and Vivaldi.
Unfortunately, Chrome’s dominance makes it a target for attackers in two ways. First, attackers may attempt to find vulnerabilities that would let them steal data or compromise credentials. Second, although Google reviews extensions submitted to the Chrome Web Store, researchers have discovered malicious extensions with millions of downloads. To keep your copy of Chrome secure, we recommend two things: relaunch the browser regularly and be careful with extensions.
Relaunch Chrome to Install Updates
Google Chrome and all the other Chromium-based browsers update themselves automatically. Sort of. While the browser is running, it downloads the latest update but doesn’t install it until you quit and relaunch. Since both macOS and most apps are highly reliable, many people go weeks or even months without relaunching, leaving Chrome vulnerable to recent security exploits. You can check if you’re running the latest version or need to install an update by choosing Chrome > About Google Chrome. (Some extensions, like 1Password, even refuse to run when an update is required.)

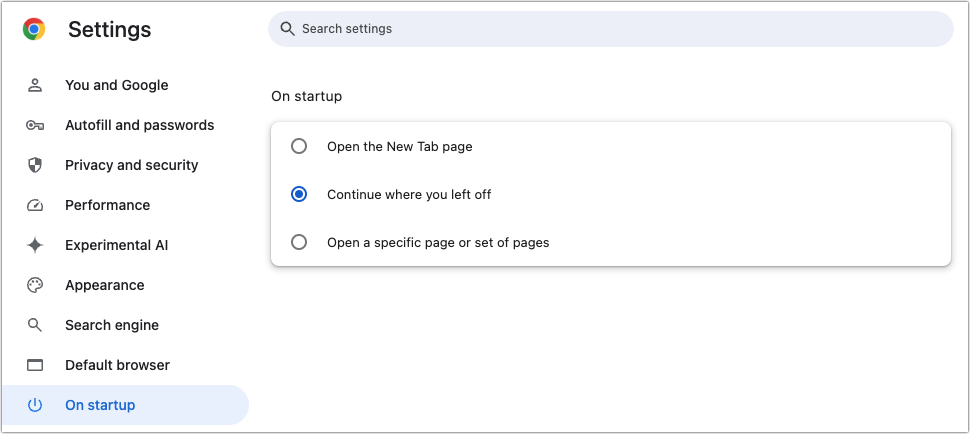
In other words, it’s important that you quit and relaunch Chrome and any other Chromium browsers regularly—we recommend a weekly schedule to match Google’s schedule for security updates. There’s no need to worry about losing your open tabs as long as you set Chrome to “Continue where you left off” in Chrome > Settings > On Startup. All the Chromium-based browsers have a similar setting. (While we’re on the topic, remember that it’s also a good idea to restart your Mac occasionally!)
There is one exception among the alternative browsers: Arc. Its developers have figured out how to download and install updates automatically. The feature is still being rolled out to all users, but when enabled, it installs updates when the Mac wakes from sleep rather than forcing the user to quit and relaunch.
Be Careful with Chrome Extensions
Chrome extensions can be both a blessing and a curse. There are vastly more Chrome extensions than Safari extensions, so Chrome and the Chromium browsers enjoy added features that Safari lacks. On the downside, in 2023, researchers discovered dozens of malicious extensions with tens of millions of combined downloads. Google has removed all of them, but many had been on the Chrome Web Store for 6 months or more.
There are over 100,000 extensions in the Chrome Web Store, so while malicious extensions are real, most extensions are legitimate. But if Google can miss them for months or years, how can you reduce the chances of installing something evil? Here’s what we do:
Reduce the number of extensions you install: The fewer extensions you install, the less likely one is to be malicious or cause other problems. Regularly uninstall any extensions you don’t use from Window > Extensions (the location may vary slightly in the Chromium browsers).
Only install from the Chrome Web Store: Stick to extensions that have at least gone through Google’s reviews for the Chrome Web Store and avoid direct downloads for extensions.
Read reviews before installing: Although reviews are no guarantee, if you see people complaining about unusual behavior, that may be a clue that the extension is doing something sketchy.
Evaluate extension metadata: In general, avoid extensions that aren’t used by many people, that don’t have many reviews, or that aren’t updated frequently. Those aren’t guaranteed signals of a malicious extension but may be a hint to be cautious.
Review permissions before installing: When you click the Add to Chrome button in the Chrome Web Store, a prompt explains what permissions will be granted to the extension. If they seem unnecessarily broad, cancel the installation.
Don’t stress too much about this. Maintaining good Chrome security comes down to relaunching the browser once a week and being careful about which extensions you use—it’s easy.
(Featured image based on an original by iStock.com/ArtemisDiana)
Choosing the Best Mac for a College-Bound Student in 2024
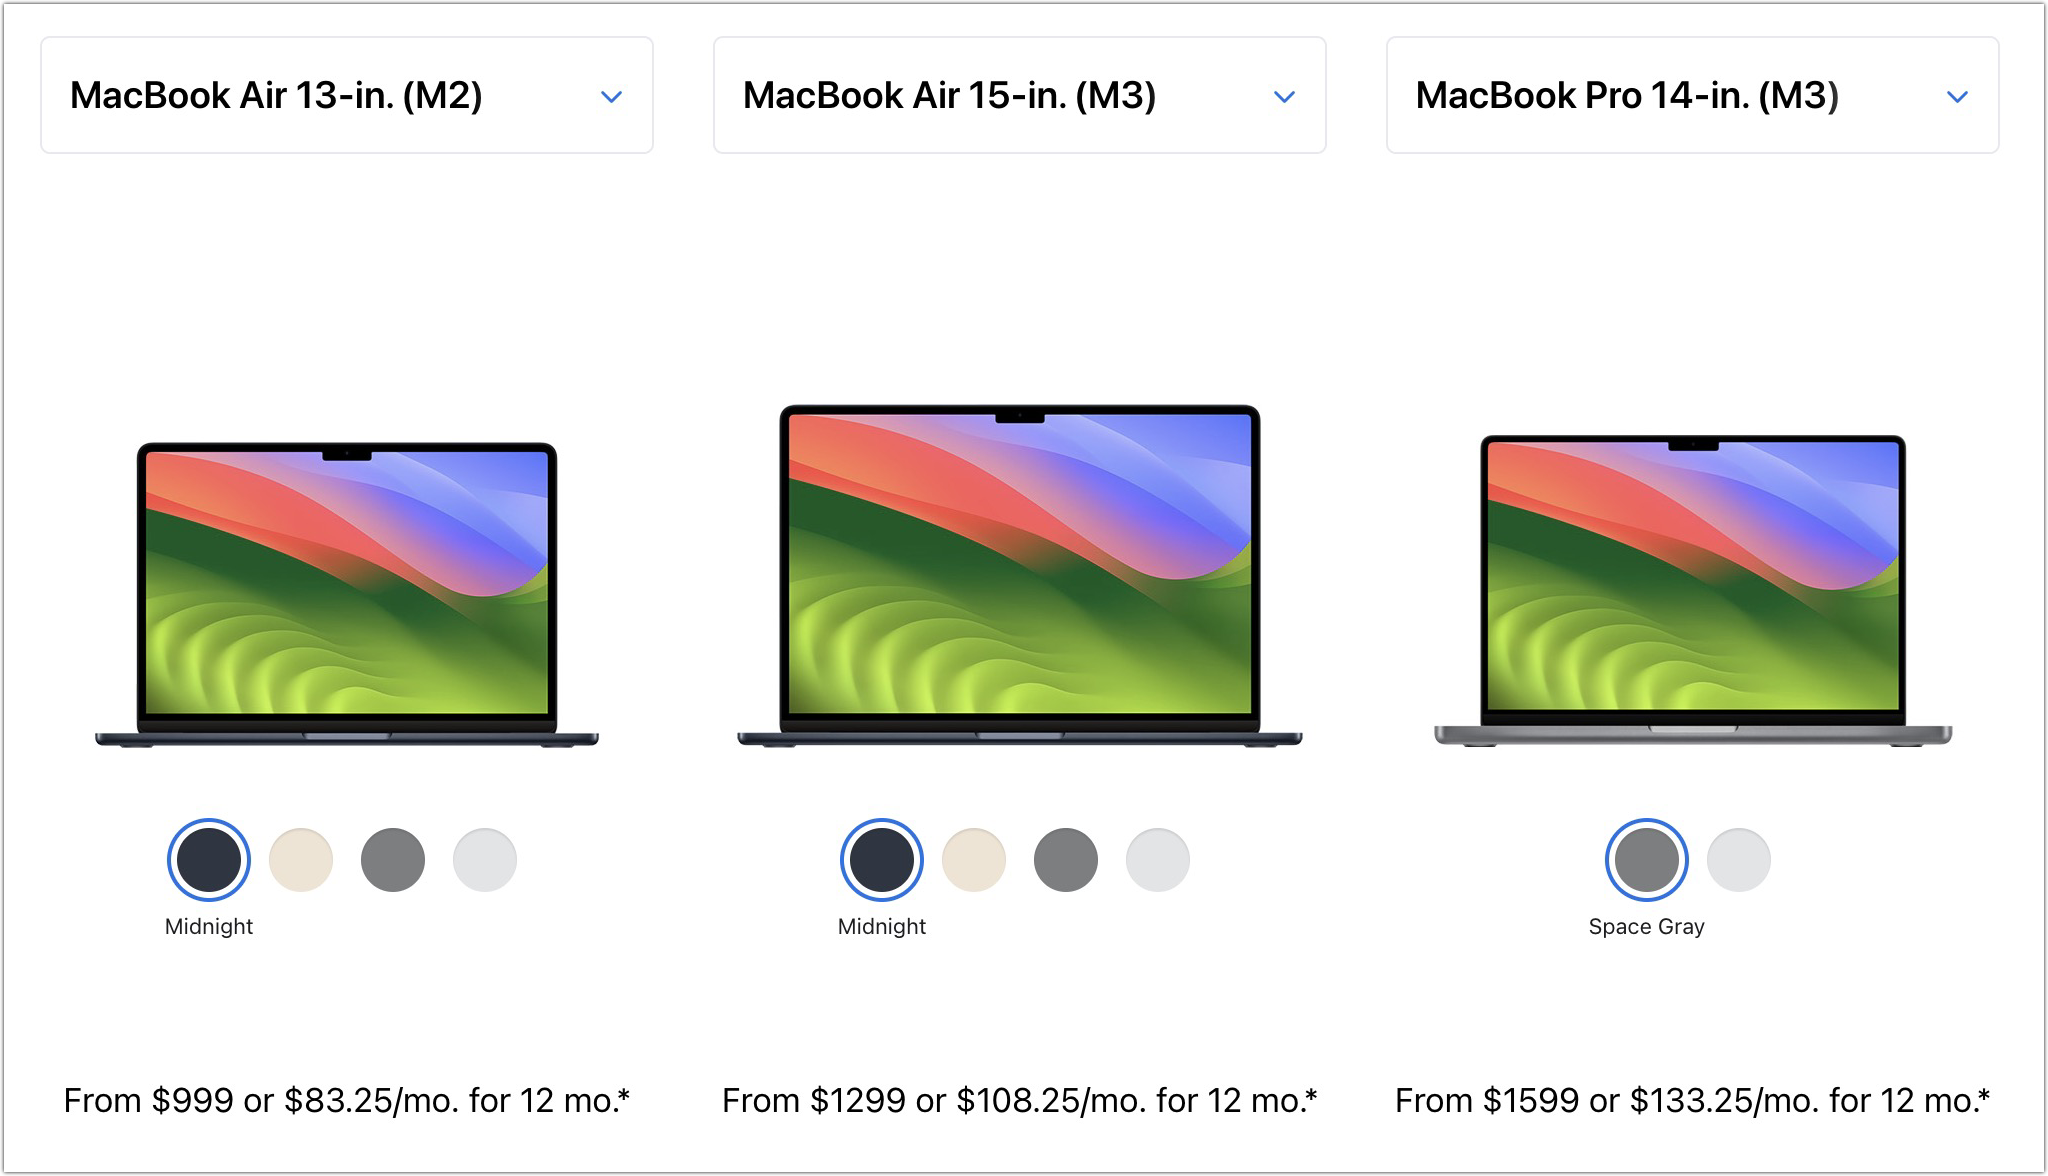
Which Mac is best for a college student in 2024? Our short answer is either the 13-inch or 15-inch M3 MacBook Air, although students with significant processing needs (like audio or video editing) might consider the 14-inch MacBook Pro.

Is your child heading off to college soon? They’ve undoubtedly been using a computer throughout high school, though now is a good time to look at getting them a new one, especially if theirs is old or unreliable, is shared with other family members, or was a school loaner. If you haven’t been keeping up with Apple’s Mac lineup, you might be unsure which model is the best choice.
First, check with the college before buying. Although this is less common than in the past, some college departments have specific requirements based on the software students use in their classes. Generally, these revolve around processor type, amount of RAM, and storage space. Current Macs should meet or exceed all those requirements. More problematic is if the college requires a Windows machine; if that’s the case, see if the requirement is based on specific Windows-only software needs or is just a general desire on the part of the IT staff to maintain a homogeneous support environment. Second, see if the college provides access to educational pricing—most will—to save a few hundred dollars off the prices listed below. Regardless, Apple often has a Back to School offer.
Aim for a laptop over a desktop Mac. Students lead nomadic lives and need to get work done in multiple places on campus, so having to head back to the dorm to use an iMac or Mac mini will be limiting. Plus, they often need to work during breaks, so they need a Mac that’s easy to bring home. A student accustomed to taking notes on an iPad with a keyboard and Apple Pencil might be able to use that in conjunction with a desktop Mac, but most students should get laptops.
In the past, deciding which model was best for a given student was more challenging, but Apple’s move to the speedy and power-efficient M-series chips makes the decision easier. We see three primary scenarios:
Most students: Buy Apple’s MacBook Air, Apple’s lightest and least expensive laptop. Within the MacBook Air line, you have four choices. The least expensive is the 13-inch M1 MacBook Air from 2020, which costs $699 exclusively from Walmart. Get it only if budget is paramount. The three remaining choices begin with the 13-inch M2 MacBook Air from 2022, which Apple has kept in the lineup at $999. However, the longest-lasting choice is either the 13-inch or 15-inch M3 MacBook Air introduced in March 2024. The 13-inch model boasts a 13.6-inch screen, faster performance, 24 GB memory ceiling, and up to 2 TB of storage, starting at $1099. Those who want a larger screen should look at the 15-inch M3 MacBook Air, which starts at $1299 and is otherwise nearly identical.
Better specs: If performance is more important than price—especially if your student will be working with processor-intensive tasks like video editing—look to the 14-inch MacBook Pro. It features a powerful M3, M3 Pro, or M3 Max chip, and the M3 Pro and M3 Max models can be configured with much more memory. Although its 14.2-inch screen is physically a little smaller than that of the 15-inch MacBook Air, it has a somewhat higher resolution. Its price starts at $1599 but goes up quickly with the M3 Pro and M3 Max chips. (There’s also a 16-inch MacBook Pro, which comes only in M3 Pro and M3 Max configurations and is more than most students need.)
Windows compatibility: The only downside of the transition to Apple silicon is that it’s more challenging to run Windows using virtualization software like Parallels Desktop (half-price for students) or VMware Fusion (free for personal use). If Windows compatibility is a bonus but not essential, either of those with the Arm version of Windows 11 should work for most apps. However, if Windows compatibility is paramount, your choices are a used Intel-based MacBook Pro or—much as we hate to say it—a PC laptop that runs Windows natively.
Regardless of which laptop you decide on, you’ll have to pick a processor, amount of memory, and storage capacity:
Processor: With the 13-inch M1 MacBook Air, you’re limited to the M1 chip with an 8-core CPU and 7-core GPU. The 13-inch M2 and M3 MacBook Air models always have an 8-core CPU, but you can pay $100 to upgrade from an 8-core GPU to a 10-core GPU. The 15-inch M3 MacBook Air always comes with a 10-core GPU. The performance difference isn’t likely noticeable with everyday apps, but for $100, it might be worth upgrading, just in case. The 14-inch MacBook Pro has two M3 Pro options and one M3 Max option; choose between them by weighing likely performance needs against increased costs.
Memory: The 13-inch M1 MacBook Air only comes with 8 GB, which is acceptable for most college students. The M2 and M3 MacBook Air models and the M3 models of the 14-inch MacBook Pro offer 16 GB and 24 GB options. We usually recommend 16 GB to reduce the chance that memory becomes a performance-limiting factor, although 24 GB could be helpful in higher-performance situations. With the 14-inch MacBook Pro with M3 Pro or M3 Max, the amount of memory changes with the chip. The M3 Pro comes with 18 GB standard, but you can opt for 36 GB. With the M3 Max, 36 GB is standard, with options to upgrade to 48, 64, 96, or 128 GB.
Storage: For all the MacBook Air models, 256 GB is the lowest storage level, and you can upgrade to 2 TB. The 14-inch MacBook Pro starts at 512 GB and offers upgrades up to a whopping 8 TB. Choose the amount of storage based on two considerations: budget (storage gets expensive fast) and anticipated usage (audio and especially video production can consume a lot of space, as can very large numbers of photos, but most other uses don’t). Remember that it’s easy to connect an external Thunderbolt SSD or hard drive to offload large files that don’t always have to be available. Large files can also be kept in cloud-based storage.
For most students, the best choice for a Mac likely to last across four years of college would be the 13-inch or 15-inch M3 MacBook Air with a 10-core GPU, 16 GB of memory, and 512 GB of storage. Although the 15-inch size has a larger screen, it’s also heavier and takes up more space in a backpack, so consider portability when making your final choice. Be sure to budget for AppleCare+, too; it’s almost guaranteed that some mishap will befall a student laptop, and AppleCare+ covers up to two incidents of accidental damage every year.
We recommend having conversations with your child to find out what they think they’ll need—and be sure to compare against the college’s recommendations—but if you have any questions after that, feel free to contact us.
(Featured image based on an original by Apple)
At WWDC, Apple Unveils Apple Intelligence and Previews New OS Features
At this years Worldwide Developer Conference, Apple announced a treasure trove of new features in its upcoming operating system upgrades, including practical, everyday improvements and impressive AI-based capabilities.
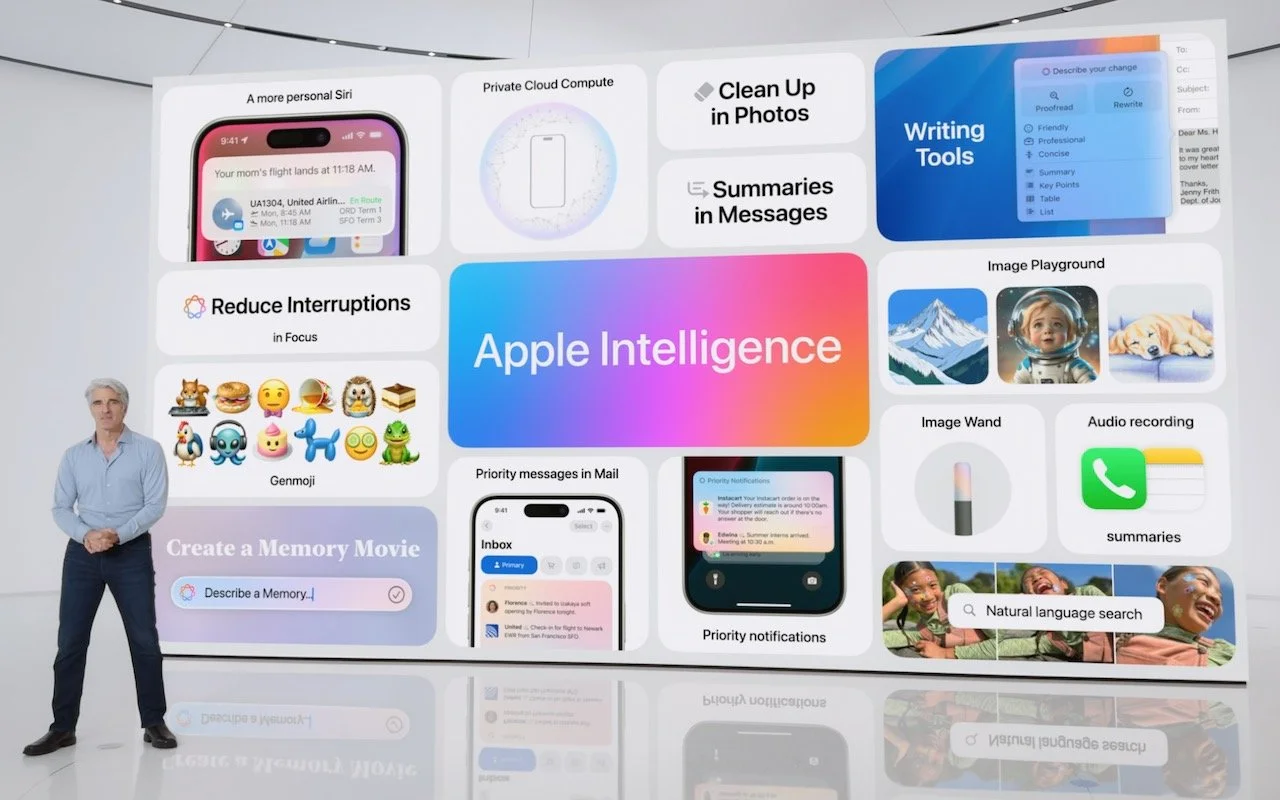
Apple’s Worldwide Developer Conference keynote was a lightning-fast (even in the full 1:44-long video—or try the 3-minute recap) look at what Apple is bringing to the software side of the Apple experience in the next year. Although some past keynotes have introduced hardware like new Macs and the Vision Pro, this year’s keynote stuck to new operating system features before previewing a suite of AI features collected under the umbrella term “Apple Intelligence.”
Apple previewed a boatload of new features and listed even more on its website. We’ll focus on those we think will make the biggest splash in your Apple experience, but we recommend that you scroll through Apple’s pages for each operating system to see more of what’s coming. Those are linked below, along with basic hardware requirements so you can see if your devices will be eligible to upgrade (not all features will be available on all devices):
macOS 15 Sequoia: iMac Pro from 2017, MacBook Pro and Mac mini from 2018 and later, iMac and Mac Pro from 2019 and later, MacBook Air from 2020 and later, and Mac Studio from 2022 and later
iOS 18: Second-generation iPhone SE, iPhone XR, and later (same as iOS 17)
iPadOS 18: Seventh-generation iPad and later, fifth-generation iPad mini and later, third-generation iPad Air and later (including M2 models), first-generation 11-inch iPad Pro and later, and third-generation 12.9-inch iPad Pro and later, and all M4 iPad Pro models
watchOS 11: Second-generation Apple Watch SE, Apple Watch Series 6 and later, and Apple Watch Ultra and later
tvOS 18: Apple TV HD (with fewer features), Apple TV 4K
visionOS 2: All Vision Pro headsets
Here are a handful of new features we think Apple users will find most interesting. Then we’ll look at Apple Intelligence.
Personalize Your iPhone and iPad Home Screen
iOS 18 and iPadOS 18 introduce significantly enhanced Home Screen customization options aimed at letting your creativity shine through. You can leave blank spaces between icons and arrange icons and widgets however you like. Additionally, you can change the size of icons and widgets and apply color tints.

Tile Windows Automatically in Sequoia
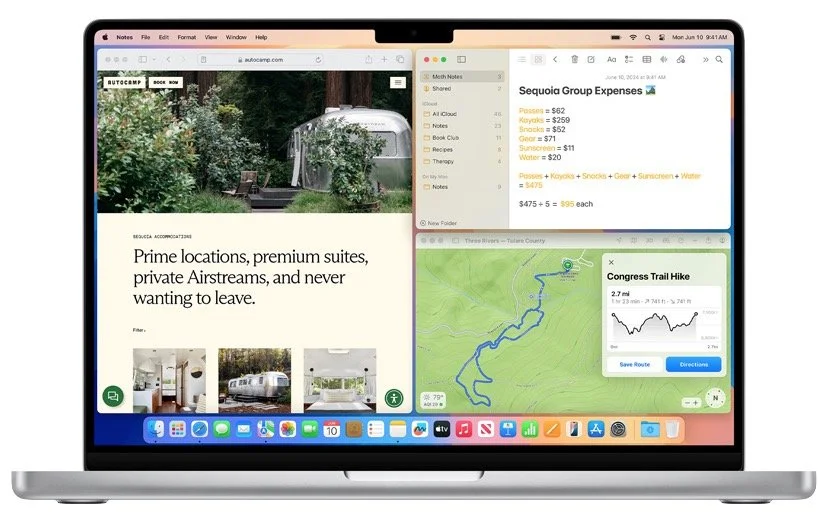
macOS has long had a subtle window alignment effect that makes it easy to line up windows, but in macOS 15 Sequoia, when you drag a window to the side of the screen, macOS suggests a tiled position on your desktop, intelligently sizing it for the window’s content. Window tiling makes it easy to put windows side-by-side and fill the screen without wasting space. Keyboard jockeys will appreciate new keyboard shortcuts for window tiling as well. (If you don’t want to wait for Sequoia, numerous utilities offer similar features now, including Amethyst, BetterTouchTool, Magnet, Moom, Rectangle, and Yabai.)
Notes and Phone Gain Audio Recording and Transcription
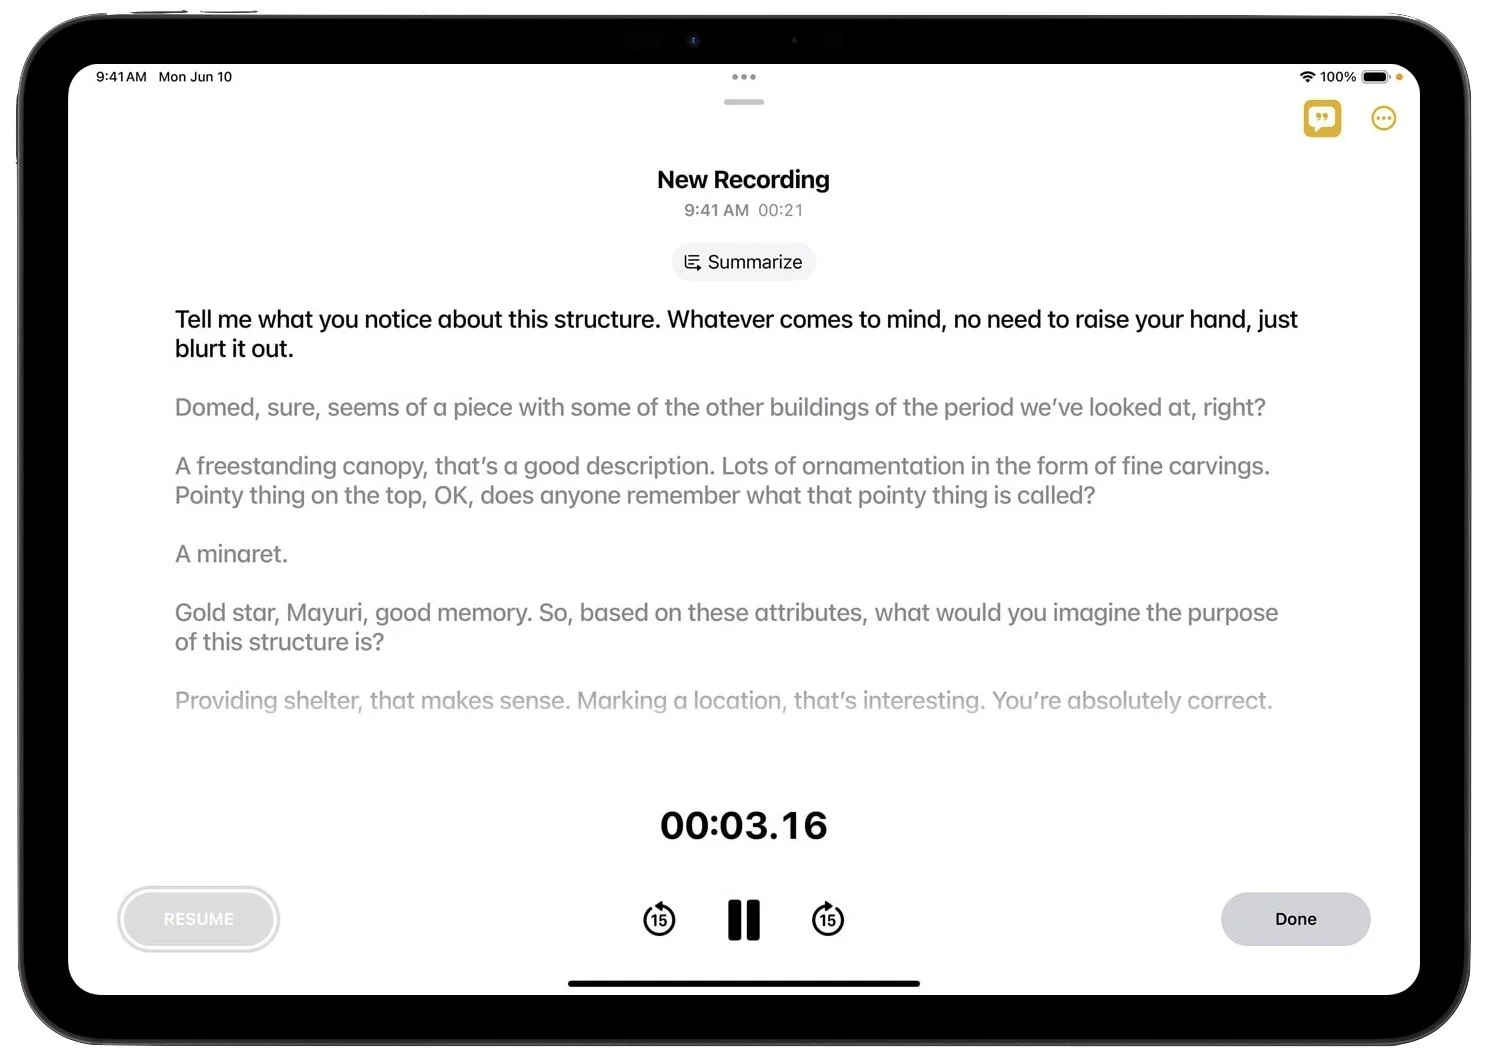
If you find yourself wanting to revisit what was said in a lecture, appointment, or phone call, a pair of upcoming features can boost your recall. The Notes app on all platforms will record audio and create live transcriptions, allowing you to pay attention during a talk rather than furiously taking notes. Plus, the Phone app in iOS 18 will let you record and transcribe a live call—when you start recording, participants are automatically notified so everyone knows it’s happening.
Mirror Your iPhone on Your Mac
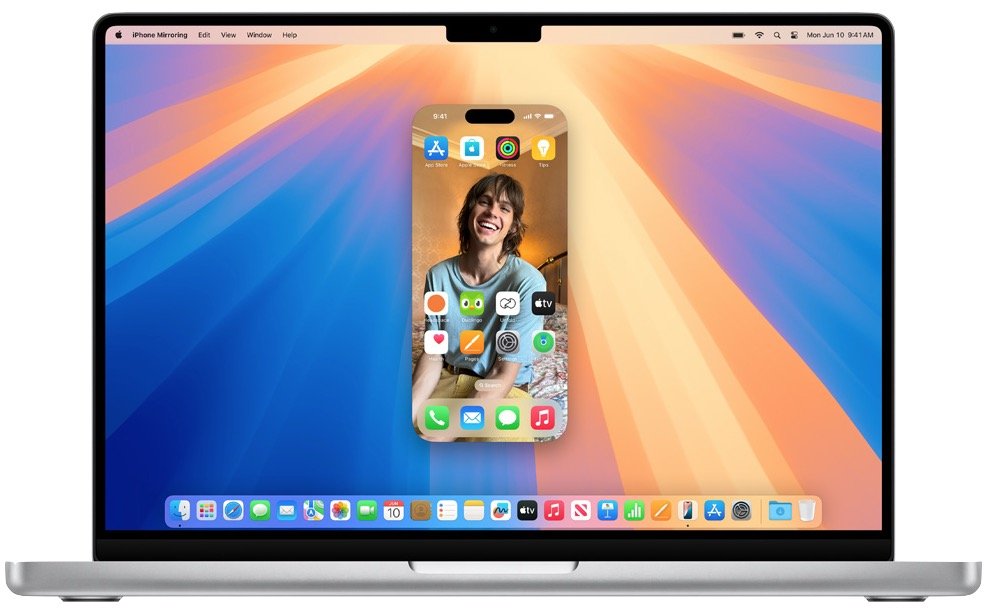
If you frequently pull out your iPhone while working on your Mac, you’ll appreciate Sequoia's new iPhone mirroring feature. It lets you use your Mac’s pointing device and keyboard to interact with all your iPhone apps in a window on your Mac while the iPhone remains locked or in StandBy. Audio from the iPhone plays through your Mac, and you can share data between devices with drag and drop. A related Continuity feature displays iPhone notifications on your Mac—when mirroring your iPhone, clicking those notifications opens the associated iPhone app.
Passwords Breaks Free of Settings
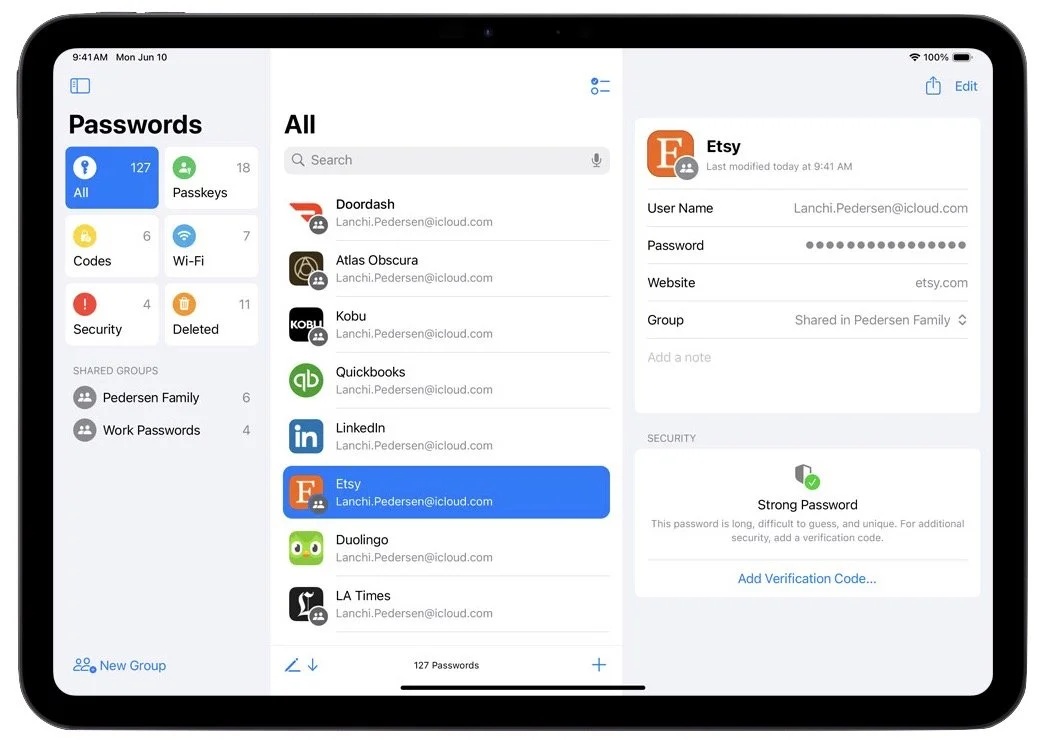
At long last, Apple has given us a dedicated Passwords app in Sequoia, iOS 18, iPadOS 18, and visionOS 2. The company’s password management features have become quite good over the past few years, but they are awkward to access in Settings on the iPhone and iPad and System Settings on the Mac. We don’t anticipate significant feature changes beyond the addition of categories, but the Passwords app should make managing your logins even easier. Passwords still won’t fully match up to the likes of 1Password, but you won’t go wrong with Apple’s built-in solution. Remember that if you use a Web browser other than Safari, you’ll need the iCloud Passwords extension we’ve mentioned previously. You can also share your passwords with a Windows PC using iCloud for Windows.
Five More Welcome Features
For more reasons to upgrade once these new operating systems are out and stable, consider the following additional features:
Customize Control Center: iOS 18 and iPadOS 18 feature a thoroughly revamped Control Center, accessible with a continuous swipe down on the Home Screen. You can create custom groups of controls—some from third-party apps—with resizing and mixing options.
iPad Calculator app and Math Notes: Not only does the iPad finally get a Calculator app, but it also introduces Math Notes. You handwrite an equation with an Apple Pencil, and when you write an equals sign, Calculator solves the equation. Math Notes works with keyboards, too, and you can also find it in the Notes app.
Lock and hide iPhone apps: New privacy features in iOS 18 and iPadOS 18 let you lock apps with Face ID or Touch ID so the friend who’s scrolling through your vacation photos can’t also read your journal. You can also move apps to a hidden folder in the App Library that can’t be opened without biometric authentication.
More tapbacks: In Messages, when you want to use a tapback to acknowledge a message without typing out a reply, you’ll be able to use any emoji or sticker, or a new AI-powered Genmoji.
Vitals app collects overnight data: When you wear your Apple Watch to sleep, a new Vitals app in watchOS 11 collects and displays your overnight health metrics on your wrist, including heart rate, respiratory rate, temperature, blood oxygen, and sleep duration. It might help you rest up to fight off that cold that’s going around.
Apple usually releases its new operating systems in September or October; we’ll write more about them as we get closer. Generally speaking, it’s OK to upgrade to everything but macOS shortly after release; with macOS, we recommend caution to ensure your existing apps and workflows won’t be impacted.
Apple Intelligence
Apple devoted a large chunk of the keynote to introducing Apple Intelligence, a collection of AI-powered features coming to the Apple ecosystem over the next year. These features will enable your iPhone, iPad, and Mac to understand language and create both text and images, plus take actions aimed at simplifying your interactions with apps. What sets Apple Intelligence apart from AI efforts from other companies is its focus on—and understanding of—your personal context. Apple Intelligence will know about your contacts, schedule, email, messages, photos, and much more.
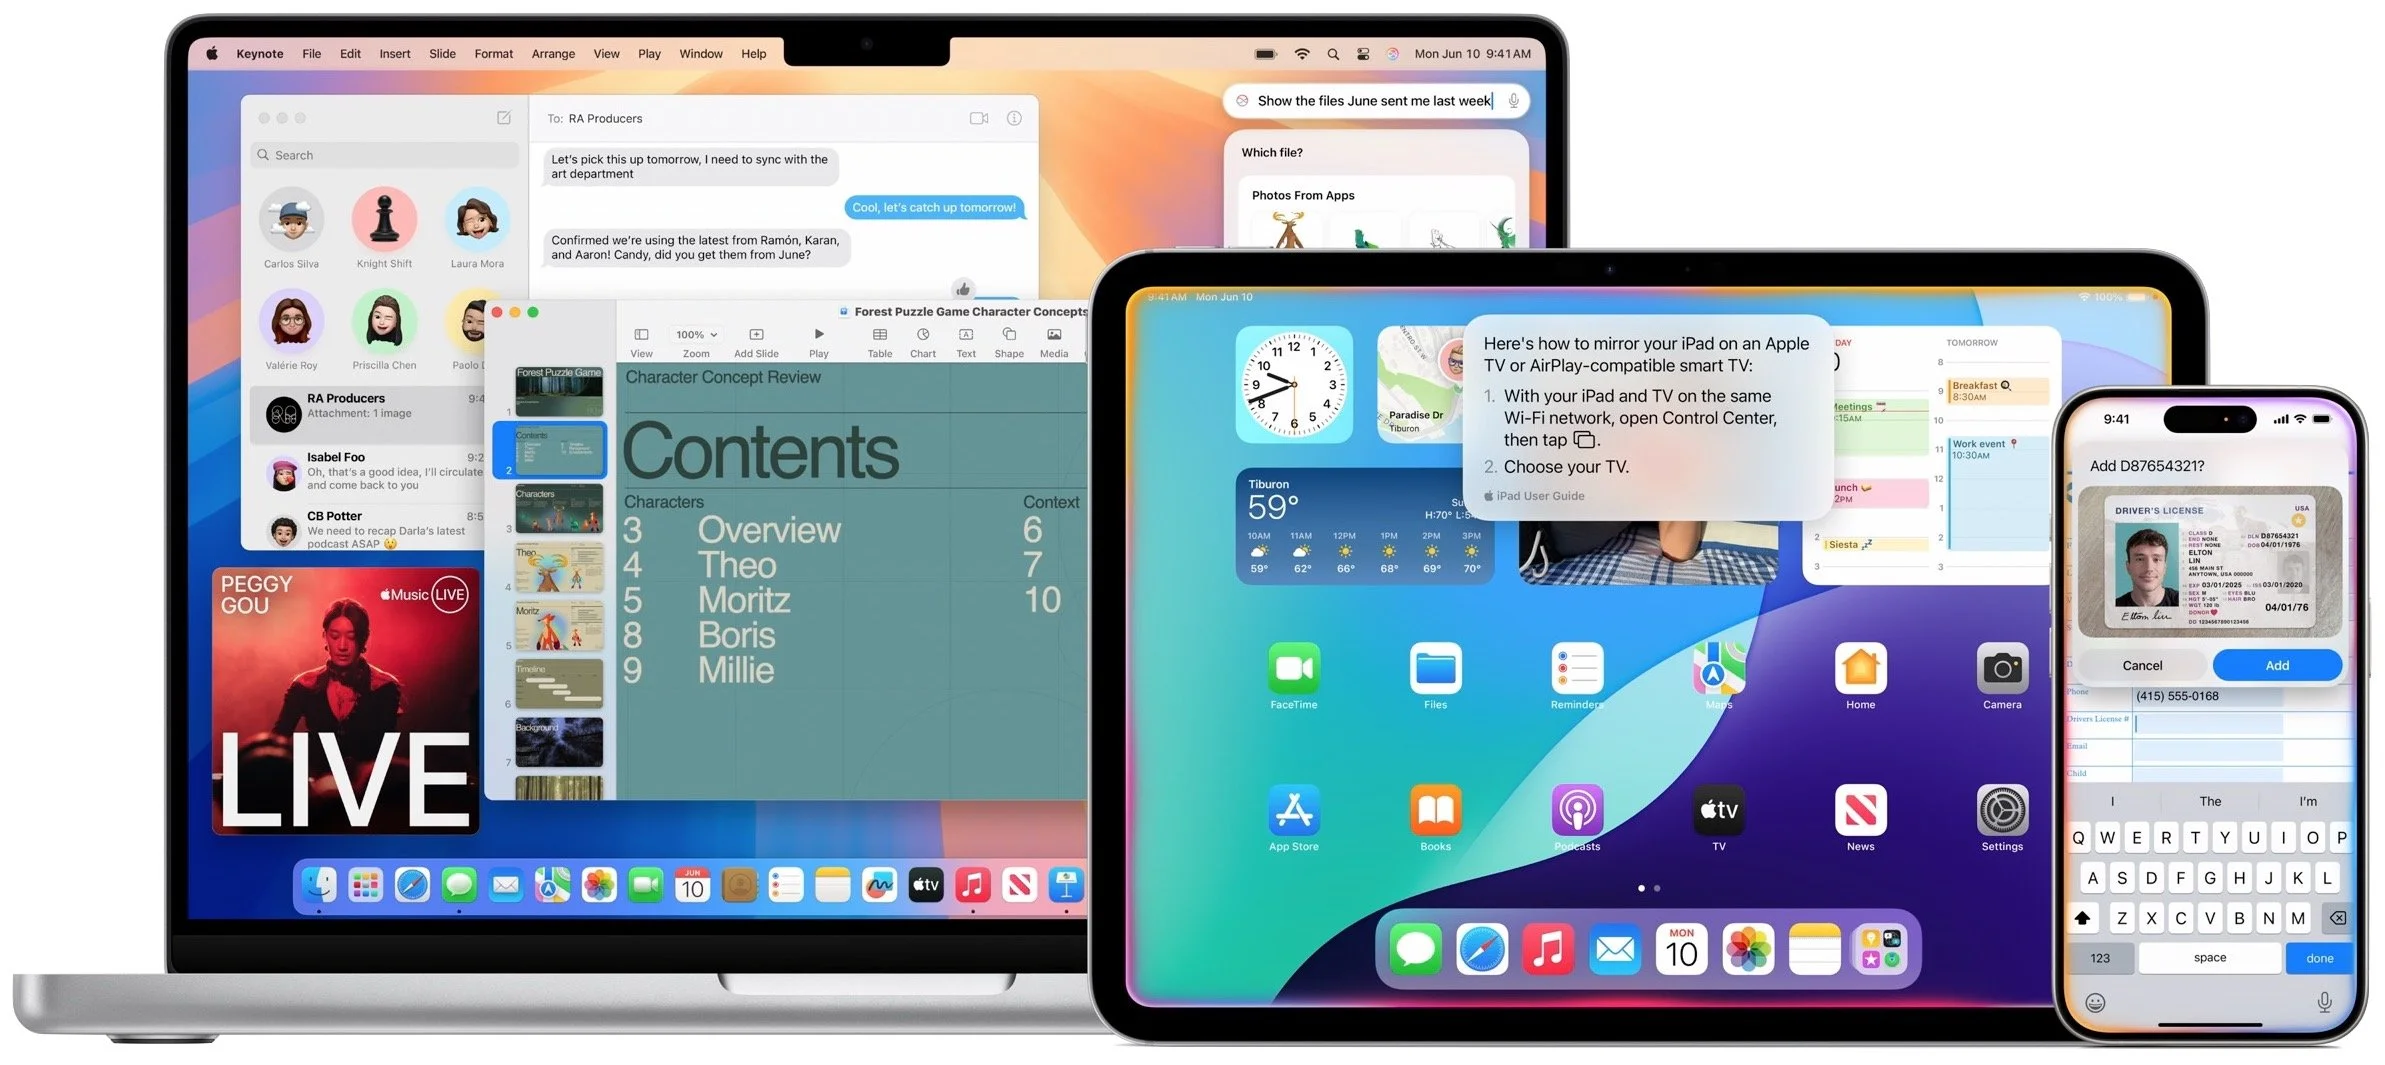
The most significant use of Apple Intelligence will come with Siri, which will let us speak more naturally and understand what we mean if we make mistakes. We’ve trained ourselves to say only things Siri is likely to be able to handle, but that won’t be necessary when Siri gains Apple Intelligence capabilities. You’ll be able to search for photos of your child holding a fishing rod, for instance, or ask Siri to find something when you can’t remember if it was in Mail or Messages. Siri will also gain context awareness, so you can ask what the weather will be like at the beach tomorrow, and if the response is good enough, have it schedule a trip there. Siri will even know a lot more about your Apple devices and can help you use them. For the most part, though, Siri won’t have global knowledge. If Siri can’t answer your query directly, it will offer to send it to ChatGPT for free.
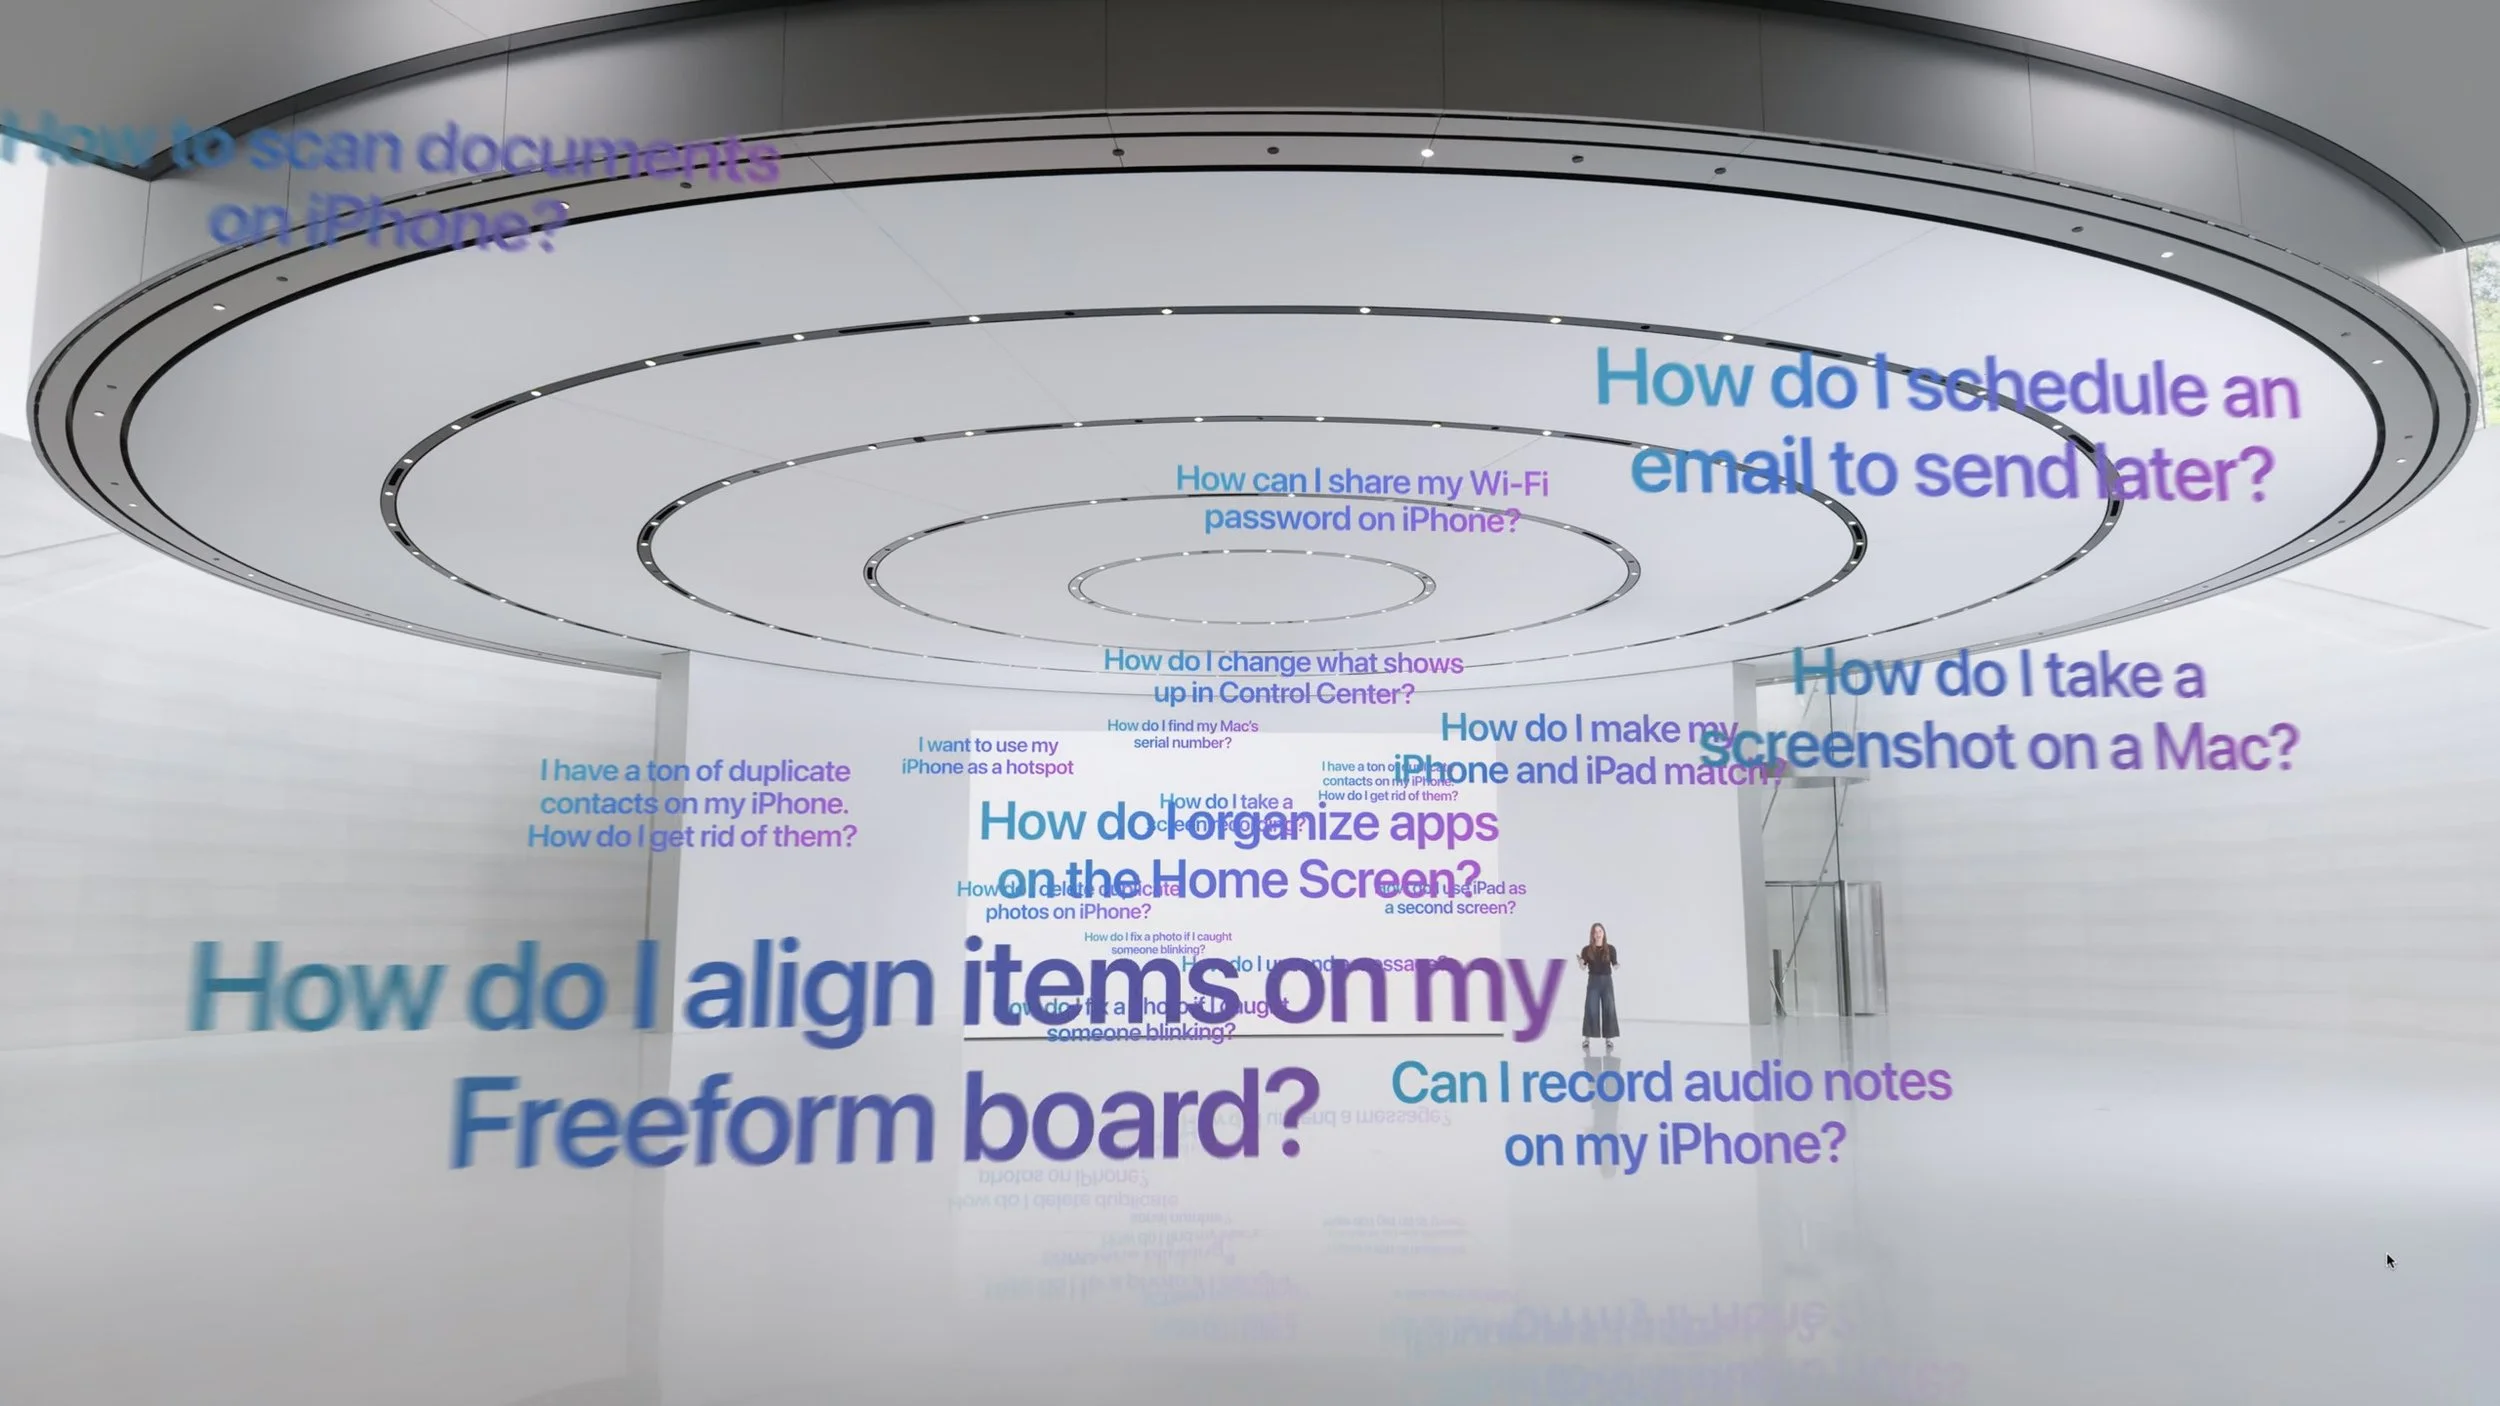
Apple Intelligence also includes writing tools, but unlike ChatGPT, it’s not aimed at creating text from scratch. Instead, it can rewrite text you’ve written to help you fine-tune the wording or adjust the tone to be more appropriate. It can also proofread text, helping you with grammar, word choice, and sentence structure (if you need this now, check out Grammarly). Even when Apple Intelligence does create text, such as the Smart Reply feature coming to Mail, it asks you questions to guide its response.
Text summarization powered by Apple Intelligence shows up repeatedly. In Notes, you’ll be able to summarize a transcription. If you save a long article to Safari’s Reader, it can provide a table of contents and summary. In Mail, instead of the first few sentences appearing in the message list, you’ll get a short summary. Apple Intelligence can even prioritize and summarize notifications.
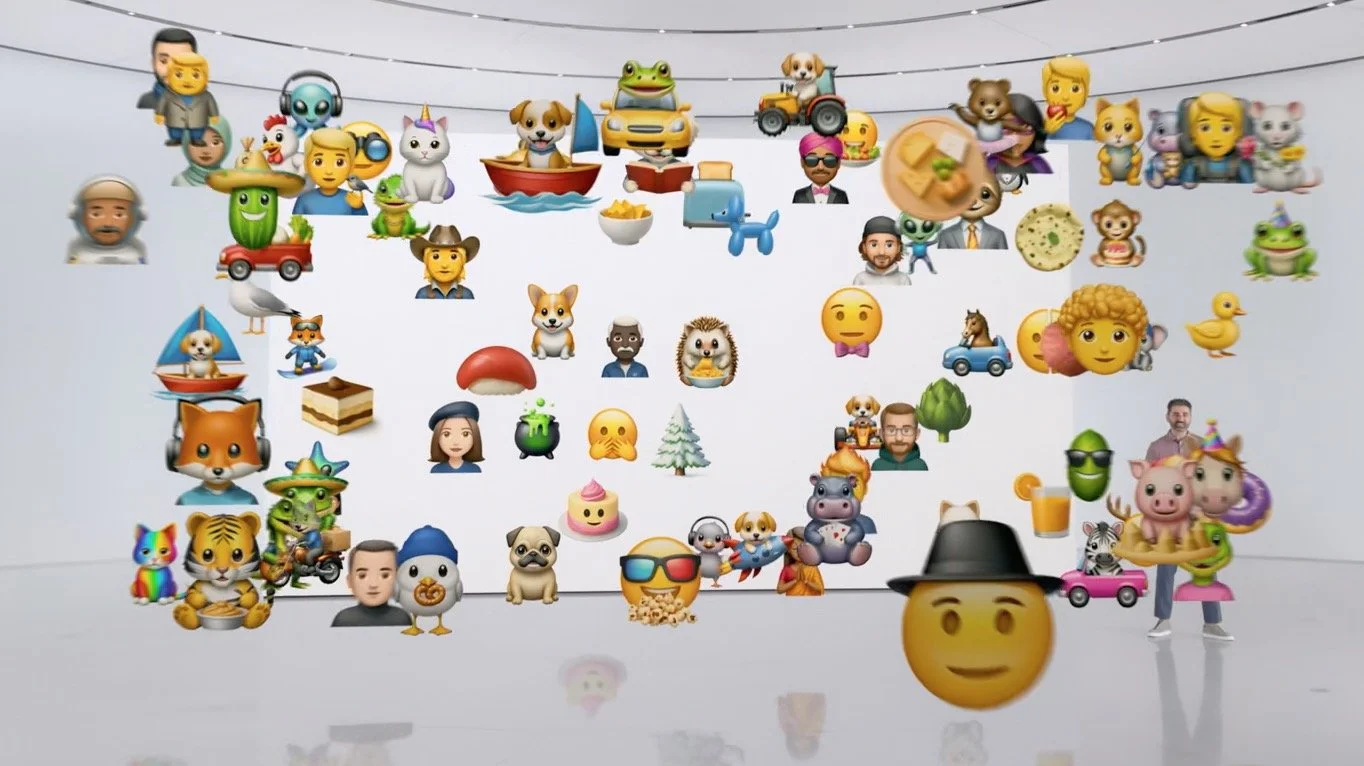
Unsurprisingly, Apple Intelligence lets you create and edit images, but it’s a far cry from the AI artbots that let you create photo-realistic images. Instead, Apple Intelligence lets you create custom emoji, called Genmoji, which let you express yourself graphically in ways that standard emoji can’t support. Image Playground lets you create images for inclusion in conversations and documents, but it limits you to three styles: Sketch, Illustration, and Paint. Apple doesn’t want anyone making deepfakes with Apple Intelligence. A new Image Wand feature in Notes even turns your rough sketches into polished images.
Apple took great pains to emphasize the privacy aspects of Apple Intelligence. Most Apple Intelligence tasks will take place entirely on your device, hence the need for powerful Apple silicon chips with their Neural Engines and Secure Enclaves. Some tasks require more processing power; to handle those, Apple has developed a highly secure system called Private Cloud Compute. It relies on Apple silicon servers, transfers only the data necessary to the task, and stores nothing.
Apple Intelligence features will start arriving in the fall and continue to roll out in feature-release updates over the next 6–8 months. They will run only on the iPhone 15 Pro, iPhone 15 Pro Max, and iPads and Macs with M1 or later chips. Intel-based Macs and less-powerful iPads and iPhones need not apply. Apple Intelligence will also require Siri and the device language to be set to US English in the early releases, with other languages to follow.
Overall, Apple appears to have put a great deal of thought and effort into integrating AI into the Apple experience in focused, helpful ways that offer new capabilities while preserving user privacy. We won’t know how well these features will work until they ship, but we look forward to seeing how they can improve interactions with our Apple devices.
(Featured image by Apple)
Sorry, Apple Isn’t Going to Update the 27-inch iMac with Apple Silicon
Sorry, 27-inch iMac lovers, but Apple isn’t going to release a 27-inch iMac with Apple silicon chips. We explain why and run down the upgrade options for those who need to move on.

Are you a 27-inch iMac owner wondering when Apple will release a new model with speedy Apple silicon? We hate to be the bearer of bad news, but the answer seems to be an unequivocal “Never.” Late last year, Apple confirmed to The Verge that it would not be making an Apple silicon version of the 27-inch iMac. Technically, that leaves open the possibility of a 32-inch iMac, for instance, but that feels like wishful thinking given the $5000 cost of Apple’s 32-inch Pro Display XDR. How did we get here, and where should 27-inch iMac owners look next?
Apple introduced the 27-inch iMac with 5K Retina display in 2014 and updated it several times before discontinuing it in 2022. It was hugely popular due to its large, gorgeous screen and a price that made the guts of the Mac seem cheap when paired with such a nice screen. An 8-year run isn’t bad, but once Apple introduced the powerful Mac Studio and the 27-inch Studio Display (also a 5K Retina display), the company felt there was no room for the 27-inch iMac in the lineup.
Apple isn’t necessarily wrong. One of the reasons 27-inch iMac owners are so attached to their Macs is that they can’t upgrade the computer and keep using that lovely screen, which remains one of the best available. Target Display Mode (which lets you use some much older iMacs as an external display for another Mac) never supported that model of iMac, and although the $80 Luna Display dongle does let you use a 27-inch iMac as a screen for another Mac, its tradeoffs may be hard to accept.
In the new world order, an Apple silicon Mac paired with a Studio Display provides a fast, capable Mac you can swap for a newer one when necessary and an extremely nice display you can use across multiple Macs. It’s not uncommon for an external display to last a decade or more, whereas many businesses upgrade their Macs every 3 to 5 years. A Studio Display could easily outlast two or three Macs.
“But, but, but,” we can hear you spluttering, “what about the 24-inch iMac with Apple silicon?” It may seem odd for Apple to drop the 27-inch model but keep a smaller iMac around. The reason is that the 24-inch iMac is meant to be a low-cost Mac that doesn’t skimp on display quality. It has a 4.5K Retina display that’s just a little smaller than the 27-inch iMac’s 5K Retina display while matching its quality. (Those numbers refer to the number of horizontal pixels on the screen—4,480 or 5,120—although the actual resolutions nearly everyone uses are half that to get crisp text at a readable size.) A Mac mini paired with an inexpensive external display would be cheaper than a 24-inch iMac, but you would have trouble getting a comparably good display for so little. The 24-inch iMac is perfect for a receptionist’s desk or a family’s kitchen computer, and its M3 chip will seriously outperform the Intel chips in the now-discontinued 27-inch iMac.
So, let’s assume you’ve been holding onto your 27-inch iMac, but it’s finally time to move on. The calculus of what to buy has changed due to the excellent performance of the Apple silicon Macs, even on the low end, and the existence of the Studio Display. Here’s what we recommend for different needs:
You’re on a very limited budget: Buy a 24-inch iMac. The screen isn’t quite as large, but the price/performance ratio is hard to beat for such a nice screen. The lowest-end model has fewer USB ports, which might be annoying.
You want a basic desktop Mac with a Retina screen: Choose between a Mac mini paired with a Studio Display or a 24-inch iMac, which is comparable to the low-end Mac mini. For higher performance needs, go for the Mac mini with an M2 Pro.
You want portability, too: The Studio Display works well with a MacBook Air (13-inch or 15-inch) for a budget solution or a MacBook Pro (14-inch or 16-inch) for a high-performance option. Using two screens also increases productivity.
You’re willing to pay more for performance: Things get interesting here because you can use a Studio Display with a Mac mini with M2 Pro, a Mac Studio with M2 Max, or a MacBook Pro with either M3 Pro or M3 Max. The MacBook Pro options are the most expensive but offer portability and a second screen.
You want the ultimate performance: Pair a Studio Display with a Mac Studio or a Mac Pro, both of which come with the M2 Ultra. The choice comes down to expandability: the Mac Pro offers PCIe slots and more ports.
Right now, the M-series chips are a little confusing. The original M1 is available only in an inexpensive 13-inch MacBook Air model sold exclusively through Walmart. The previous MacBook Air (13-inch only), Mac mini, Mac Studio, and Mac Pro all use variants of the M2, whereas the newer MacBook Air and MacBook Pro models sport M3 variants. Until recently, we expected Apple to standardize the rest of the line on the M3, but then the iPad Pro came out with an M4 because of yield issues with the M3 fabrication process.
It now seems probable that some models will skip the M3 entirely in favor of the M4, but don’t get too caught up in the latest and greatest. There’s more performance to be gained in the Pro, Max, and Ultra versions of the chips than in the next generation, so for now, the M2 Ultra remains the fastest chip for most processor-intensive tasks.
Regardless of what Mac and display combination best meets your needs, you’ll enjoy vastly better performance than was available with the 27-inch iMac, and the Studio Display is every inch as good a monitor. And maybe you can sell your 27-inch iMac on eBay.
(Featured image by Adam Engst)
How to Make Productive Use of Generative AI Chatbots and Artbots
Generative AI is all the rage, but what if you want to use it to create more than bad essays and surreal images? We explain how to make the most of AI chatbots and artbots, and how to benefit from AI-powered search engines.

Artificial intelligence dominates the tech news these days, but it’s hard to separate the hype from the reality. Every large company seems to have some major AI initiative in the works. Even Apple, which tends to stick to its own path, has started to tout features previously described as relying on “machine learning” as being “AI.” If you can get past the hype, AI has plenty of good uses now.
Despite Apple’s recent relabeling of features as using AI, when most people think about AI, they’re thinking of “generative AI” systems like OpenAI’s ChatGPT chatbot or Adobe’s Firefly artbot. These systems generate impressively good text and images from scratch based on user prompts. Ask ChatGPT to write an excuse for your sick kid, and you’ll get fluid, correct English. With Firefly, describe an image—“silhouettes of male and female runners with bright colors and black background”—and you’ll get images that match pretty well.

How do they accomplish this magic? Chatbots use statistical models to predict the next word based on training datasets that contain hundreds of billions of words—think autocomplete on radioactive steroids. Artbots work a little differently, but they also use statistical models to create images based on having been trained to identify numerous images.
Enough background. How can you make the most of today’s leading chatbots (ChatGPT, Claude, Copilot, Gemini, Meta AI, Pi, and Le Chat Mistral) and artbots (Adobe Firefly, Microsoft’s Copilot Designer, NightCafe, Meta AI, and Midjourney)?
Identify Good Uses of Generative AI
It’s essential to recognize that the effectiveness of generative AI for a particular task is highly individualized. What works for one person may not work for another due to varying skill levels, requirements, and preferences. With that in mind, here are three ways to evaluate tasks that might be a good fit for generative AI.
Skill levels: The less skillful or knowledgeable you are about a subject, the happier you’ll be with generative AI’s results. You can think of an AI chatbot as a C+ student—its work will get a passing grade, but it won’t fool an expert. But we’re all happy to do or receive C+ work in many parts of our lives—no one is above average in everything.
Requirements: Are you looking for something definitive—precisely what you have in mind—or would you be happy with an open-ended set of results? AI chatbots and artbots generate statistically likely results, so if you’re not caught up in things being just right, you’ll probably like what you get. Don’t expect them to read your mind, however.
Preferences: It’s best to think of an AI chatbot as an assistant, because you must be willing to go back and forth with it. And that means you have to be willing to work with an assistant who is dumber than they seem, entirely reactive, unpredictable, and inconsistent. (On the plus side, chatbots are also tireless, imperturbable, incredibly well-read, and non-judgemental.)
To sum up, the best tasks for generative AI are those where you know little or aren’t particularly skillful, don’t have specific expectations about what you’ll get, and are willing to interact with a potentially annoying helper.
Get Better Results from Generative AI
These recommendations will help you get better responses from AI chatbots:
Set the stage with detail and expectations: Unlike Web searches, chatbots work best when provided with more than essential keywords. Instead, tell the chatbot a little about yourself, provide background about the topic, and lay out your expectations. ChatGPT even lets you provide instructions to apply to all your chats. Additional detail helps the chatbot’s statistical model better predict what you want.
Iterate repeatedly and push harder: You don’t have to provide all that detail up front. Chatbots retain context—they know what has been said in the chat—so after your initial prompt, you can and should keep pushing the chatbot to refine and improve its answer. Don’t be shy to ask, “What’s missing from this?” or “How could this be improved?” While it’s always best to be polite, there’s no harm in asking a chatbot to do better. Pretend you’re a coach or therapist and keep asking probing questions.
Remember, unlike a search engine, where each search stands alone, working with an AI chatbot is a conversation. Right now, that’s less true of AI artbots, but we’re moving in that direction.
Good Uses for Generative AI
AI has innumerable possible uses, limited mostly by your imagination. Here are a few that have worked well for us:
Brainstorming: Have you ever needed to come up with a name for a program, product, or service and found your mind utterly blank? Or maybe you’re writing and can’t put your finger on precisely the word you want? Ask an AI chatbot! With a little direction, they’re great at coming up with a bunch of possible names or words. You may not get exactly what you want, but the chatbot’s suggestions will help you think in new directions.
Coding: An AI chatbot won’t turn you into a professional programmer, but it can help you write a small AppleScript to automate a task like adding sequentially numbered calendar events to every Monday for the rest of the year. Chatbots are also good at helping you use powerful but complex Unix tools for reformatting text like sed, awk, and grep. But perhaps our favorite real-world use is getting help with devilishly complicated spreadsheet formulas that do lookups as part of their calculations.
Talk to documents: Some AI chatbots (and services like ChatPDF) enable you to have conversations with long documents. That sounds weird, but it’s much easier to ask a few questions about how a hundred-page report affects your business, for instance, than to slog through the entire thing. Such systems provide page references to support their answers, so you can (and should) verify what you’re told.
Drafting difficult email: Some email messages are hard—no one likes having to reprimand an employee, express condolences to a business associate, or announce layoffs. But such messages are essentially genres—if you’ve seen one corporate merger announcement, you’ve seen them all. If you seed your prompt with plenty of appropriate details, an AI chatbot can generate a credible first draft that you can tweak to improve accuracy and make it sound like you instead of an overeager college student. Never send an AI-generated email without taking an edit pass.
Evaluating ideas: It’s always a good idea to talk through ideas and decisions, and conversations with AI chatbots can help you think about them. Should you ask for a raise or try for a promotion? What are the pros and cons of moving to a new location? Does it make more sense to rent or buy? An advantage of AI chatbots is that you can tell them to respond like a particular type of professional, such as a lawyer, financial advisor, or life coach. Of course, all chatbot responses are just statistically probable, so they won’t compete with those from actual professionals, but they’re a good start.
AI-Powered Searching
Finally, let’s look at AI-powered search engines like Perplexity and Arc Search (on the iPhone), and increasingly prominent AI-generated summaries in Google, Bing, and Brave Search. They blur the distinction between search engines and chatbots. Search engines focus on providing answers to questions, either link to or summarize their sources, and include the most recent information. In contrast, chatbots focus on conversation, generate answers from scratch, and always have some date after which their knowledge stops.
When might an AI-powered search engine be more effective than a traditional search engine’s list of links? Try one in situations like these:
Searches for easy but non-obvious answers: If you want to know who held the mile world record before Hicham El Guerrouj, for instance, an AI search engine will just tell you, rather than make you read a Wikipedia page about the world record progression. It could even tell you who has come the closest to his world record in the last decade, which would be difficult to determine otherwise.
Searches for answers to idle questions: If you don’t want to spend a long time reading source materials and don’t care much about the answer, an AI-powered summary will be efficient.
Searches that require assembling information from multiple sources: Imagine that you want to know how many people live in New York City, Boston, and Chicago. With a traditional search engine, you’d need to find each city’s population independently (or a list of major US city populations) and add them manually. An AI-powered search engine could find them all and add them for you.
Searches where you don’t quite know what you’re looking for: When you’re starting to explore a topic, an AI-powered search engine can suggest additional searches as you home in on aspects of the topic that especially interest you.
Google’s recent addition of AI-driven summaries quickly drew mockery for suggesting the addition of glue to pizza and encouraging the ingesting of rocks. But remember, humans say incorrect things all the time, often intentionally. In fact, both of those examples were triggered by jokes and could have come up in traditional searches as well, but in contexts that were clearly silly.
Regardless of whether information comes from an AI chatbot, an AI-powered search engine, a Facebook post, or the woman next to you on a plane, you have to discern whether it’s likely to be right. AI can be helpful in many ways, but it won’t do your thinking for you.
None of the text of this article was generated by AI.
(Featured image by iStock.com/Blue Planet Studio)
Tame the Tangle! Quick Cable Management Tips
Do you have a rat’s nest of random cables behind your Mac? Follow our quick tips to bring order to the mess, reduce the chance of accidents, and avoid degraded data signals.

Take a moment and look behind your Mac. Do you see a tangle of cables? The main downside of a mess of cables is that it’s a cluster of chaos that attracts dust bunnies. However, it’s possible for power cables—especially when tightly bundled or looped—to emit electromagnetic interference that can disrupt or degrade the signal carried by nearby data or network cables. They can also heat up, which is generally best avoided. Plus, the more tangled the cable nest, the more likely you’ll cause harm if you pull too hard while attempting to remove a cable from the tangle.
Also, consider cables that extend beyond your desk. Do you have power cables that run across the ground or Ethernet cables that loosely snake up into the ceiling? To protect both people and equipment, ensure that cables aren’t a tripping or catching hazard.
If your cables are a complete disaster, take some time to shut down your devices, disconnect all the cables, clean underneath, and reconnect them in an organized fashion, removing unused cables and replacing damaged or unnecessarily long cables with new ones.
To keep your cables under control going forward, follow these tips:
Select and reduce cables:
Buy and use cables that are only as long as they need to be.
When buying new cables, prefer braided cables, which catch less and last longer.
If you have many cables, try to trim the number with judicious use of docks or hubs.
Upgrade to wireless accessories, like the Magic Keyboard and Magic Trackpad, that only need to be plugged in occasionally to charge.
Pay attention to cable location:
Try to keep cables off the floor, but use a floor cord cover if it’s unavoidable.
Attach long runs of network cabling to the wall or floor to reduce the chance of accidents.
Run cables through raceways or inside cable trays to keep them together under desks.
Add adhesive cable clips to the back or underside of desks without cable man-agement options.
Ensure cables don’t interfere with workstation ergonomics, especially with mov-able sit/stand desks.
Keep power adapters away from other cables for better heat management.
Group your cables:
Use Velcro straps or cable ties to bundle power and data cables separately.
Avoid bundling too many power cables too tightly to avoid heat buildup.
Label cables with their type and use so you can easily distinguish between them.
Store extra cables in clear zip lock bags or bins, one per cable type.
Maintain your cables:
Throw out any damaged or suspect cables right away.
Periodically check and reorganize your cables, removing any that aren’t in active use.
You should be able to find a wide variety of cable management accessories, such as Velcro cable ties, cable labels, cable clips, and floor cord covers, at your preferred electronics retailer.
None of these suggestions are difficult to follow, and you’d be surprised how much you will appreciate having neatly organized cables in use and available when you need them.
(Featured image by Adam Engst)
Apple Introduces New iPad Air, iPad Pro, Apple Pencil Pro, and Magic Keyboard
Apple has released new 11-inch and 13-inch iPad Air and iPad Pro models, plus a new Apple Pencil Pro and Magic Keyboard for iPad Pro. We round up the new features and provide advice on what to consider for your next iPad.

After no new iPads throughout 2023, Apple has unveiled new 11-inch and 13-inch iPad Air and iPad Pro models, plus a more capable Apple Pencil Pro and a redesigned Magic Keyboard for iPad Pro. The company also refined the iPad lineup by dropping the ninth-generation iPad and reducing the price of the tenth-generation iPad to $349. Only the iPad mini was left untouched. We wouldn’t be surprised to see a new iPad and iPad mini before the end of 2024.
iPad Air Adds 13-inch Model and Moves to the M2 Chip
The 11-inch iPad Air has long been Apple’s mid-range iPad, offering more power and better specs than the iPad while leaving the high end to the iPad Pro. With this refresh, Apple significantly enhanced the lineup by adding a 13-inch model of the iPad Air, a screen size previously limited to the iPad Pro. Both iPad Air models now position their front-facing camera on the longer landscape edge, so you appear to others on landscape-orientation calls as if you’re looking directly at them rather than off to the side, as happened with the previous shorter portrait edge location. They continue to use Touch ID via a top-mounted sensor.
Apple switched the iPad Air from the M1 to the M2 chip, improving performance by 50%. Storage has also increased, with the base level jumping from 64 GB to 128 GB. For those needing more space, Apple now provides storage tiers of 256 GB, 512 GB, and 1 TB. Finally, Apple updated the iPad Air with the latest wireless technologies, Wi-Fi 6E and Bluetooth 5.3.
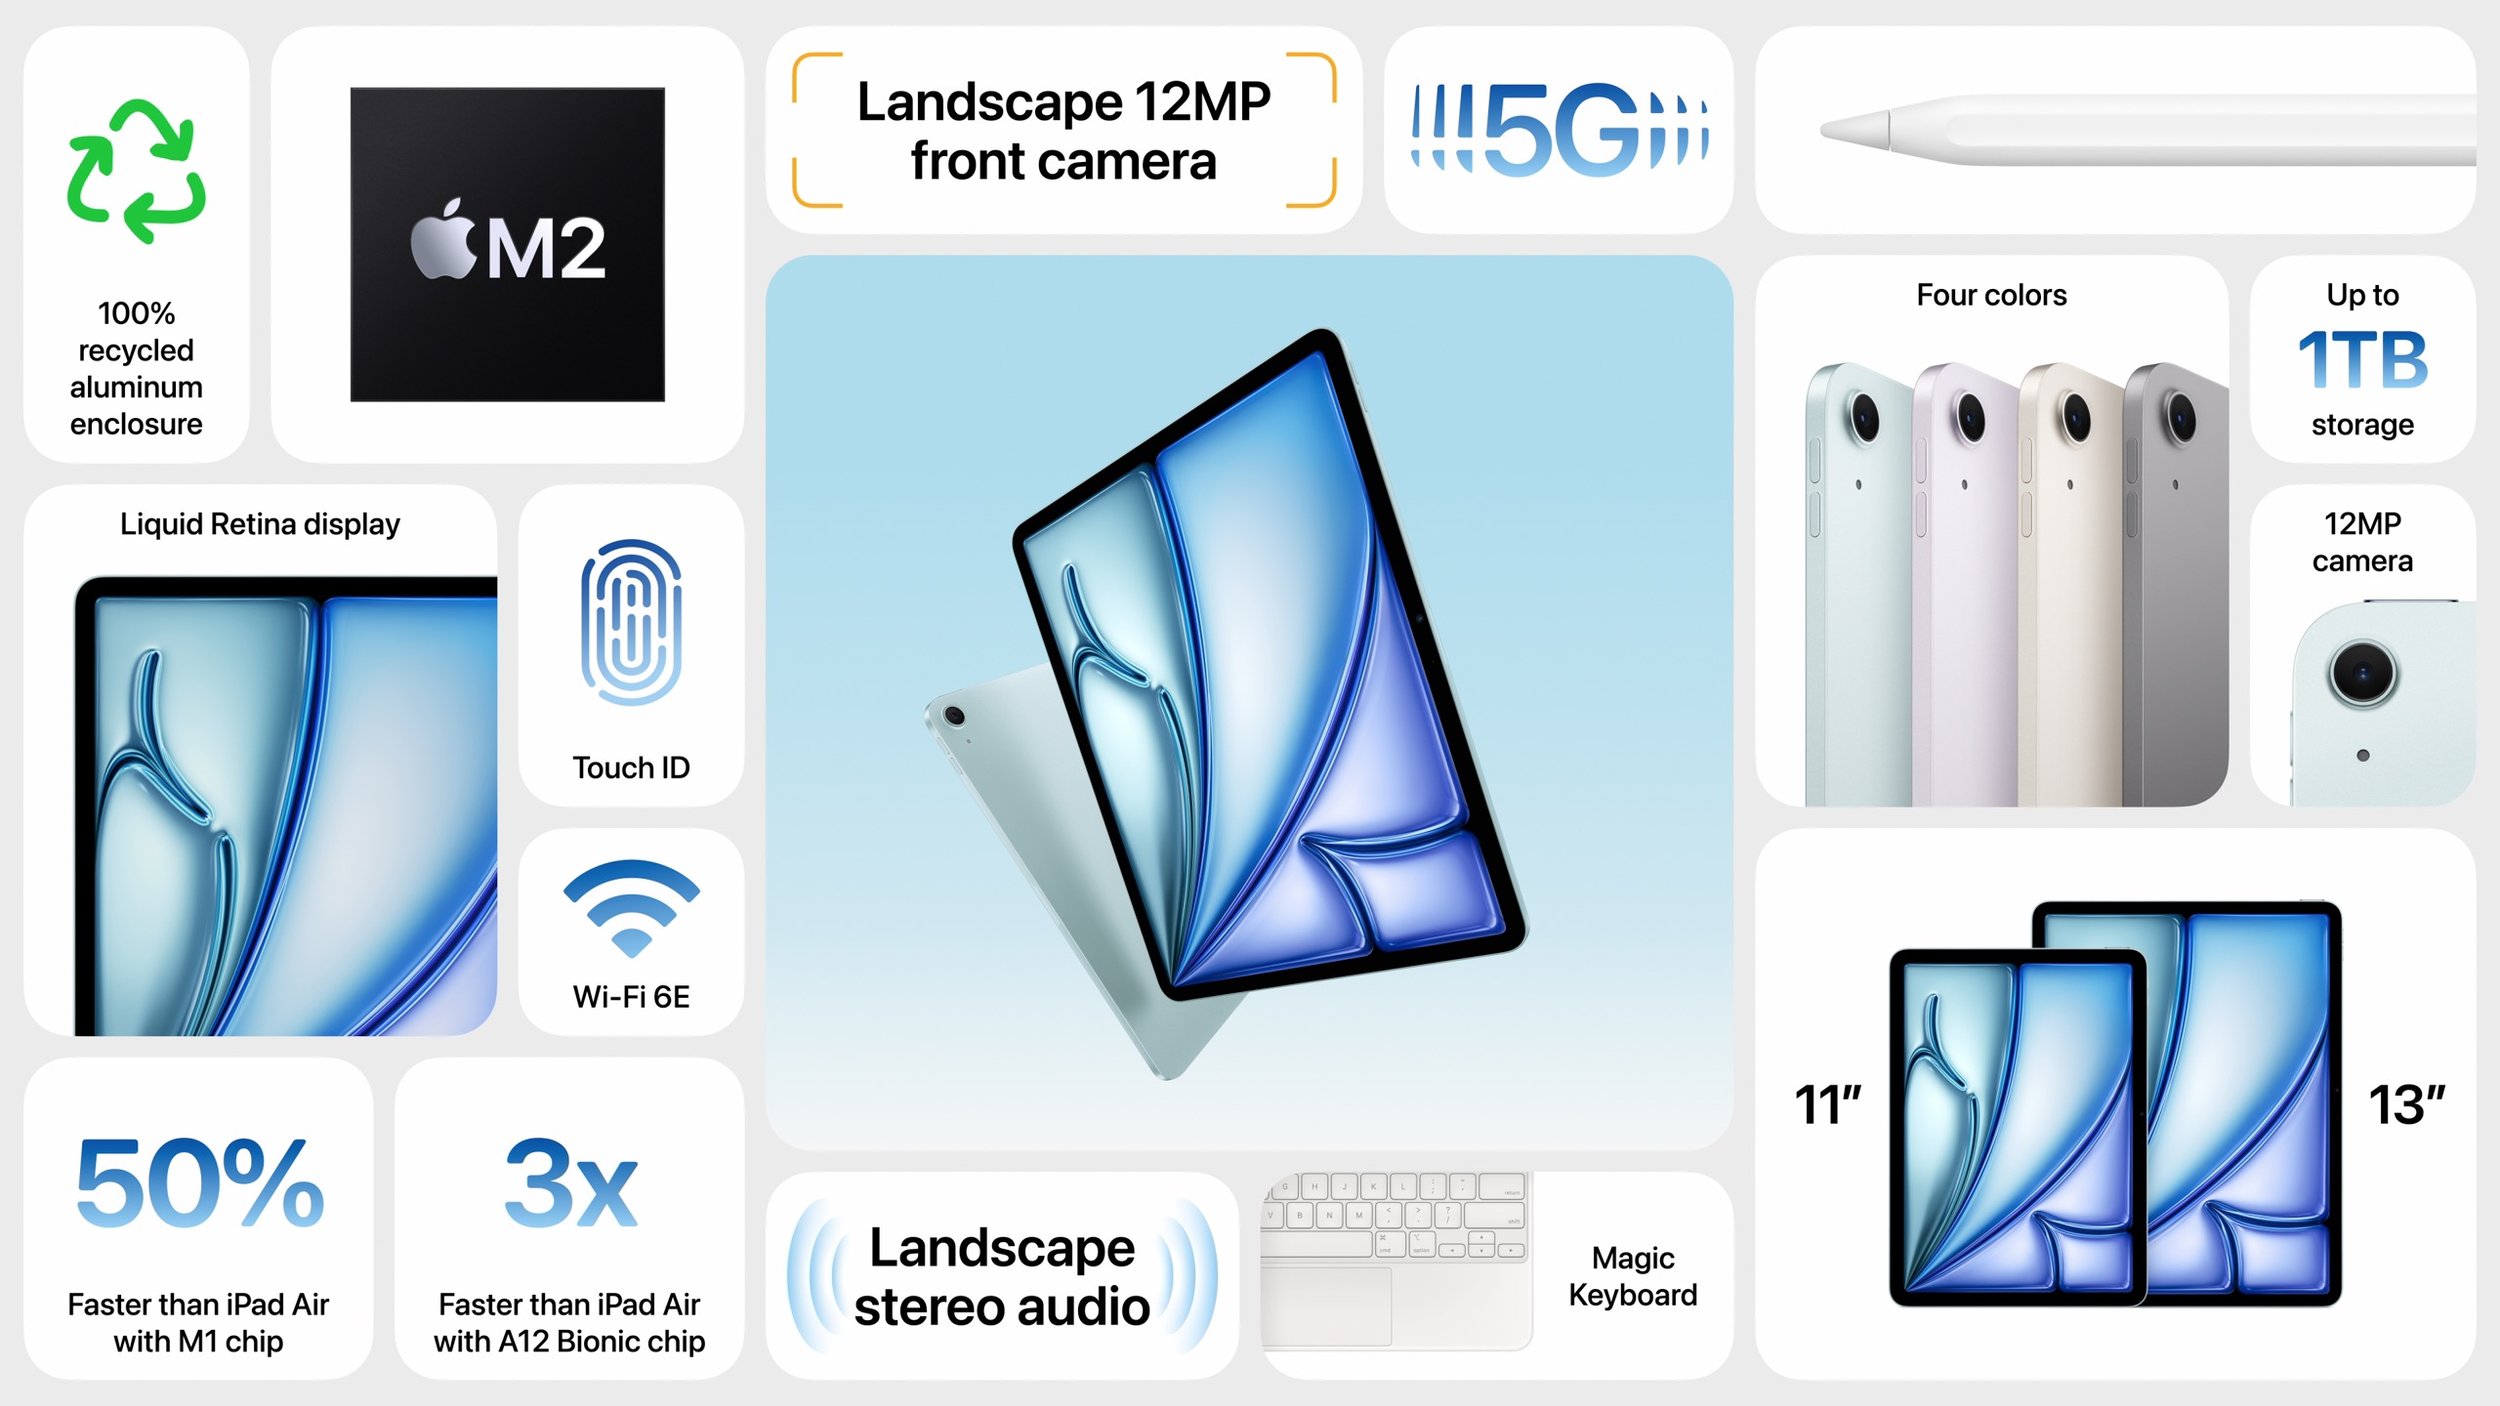
Those who want a keyboard can purchase the current Magic Keyboard for $299 (11-inch) or $349 (13-inch), and the new iPad Air models are compatible with the new $129 Apple Pencil Pro and the $79 USB-C Apple Pencil.
The 11-inch iPad Air starts at $599, and the 13-inch iPad Air at $799. Adding 5G cellular connectivity increases the price by $150. Moving to 256 GB bumps the price by $100, 512 GB adds $300, and 1 TB costs $500 more. You can choose from four subtle colors—blue, purple, starlight, and space gray—and you can order now with units arriving next week.
iPad Pro Gains M4 Chip and Ultra Retina XDR Display in Thinnest Apple Product Ever
While the new iPad Air models feel like modernized versions of the previous iPad Pro models, the new iPad Pro models break new ground. They boast new Ultra Retina XDR displays that leverage OLED technology that promises brighter highlights, deeper blacks, and faster response times. They’re noticeably better and brighter than the iPad Air Liquid Retina screens, which are already pretty good. Because Apple targets the iPad Pro at professional photographers and cinematographers who need the best display accuracy, there’s even a nano-texture glass option that reduces glare.
As with the iPad Air, the front-facing camera is now located on the longer landscape edge, along with the Face ID sensor. Surprisingly, the rear-facing camera isn’t as capable as the previous models, which sported Wide and Ultra Wide cameras and supported 2x optical zoom. The new models drop the Ultra Wide camera and retain just the 12-megapixel Wide camera. However, they now feature an adaptive True Tone flash that improves document scanning by stitching together multiple photos to eliminate the shadows that plague most camera-based scans.
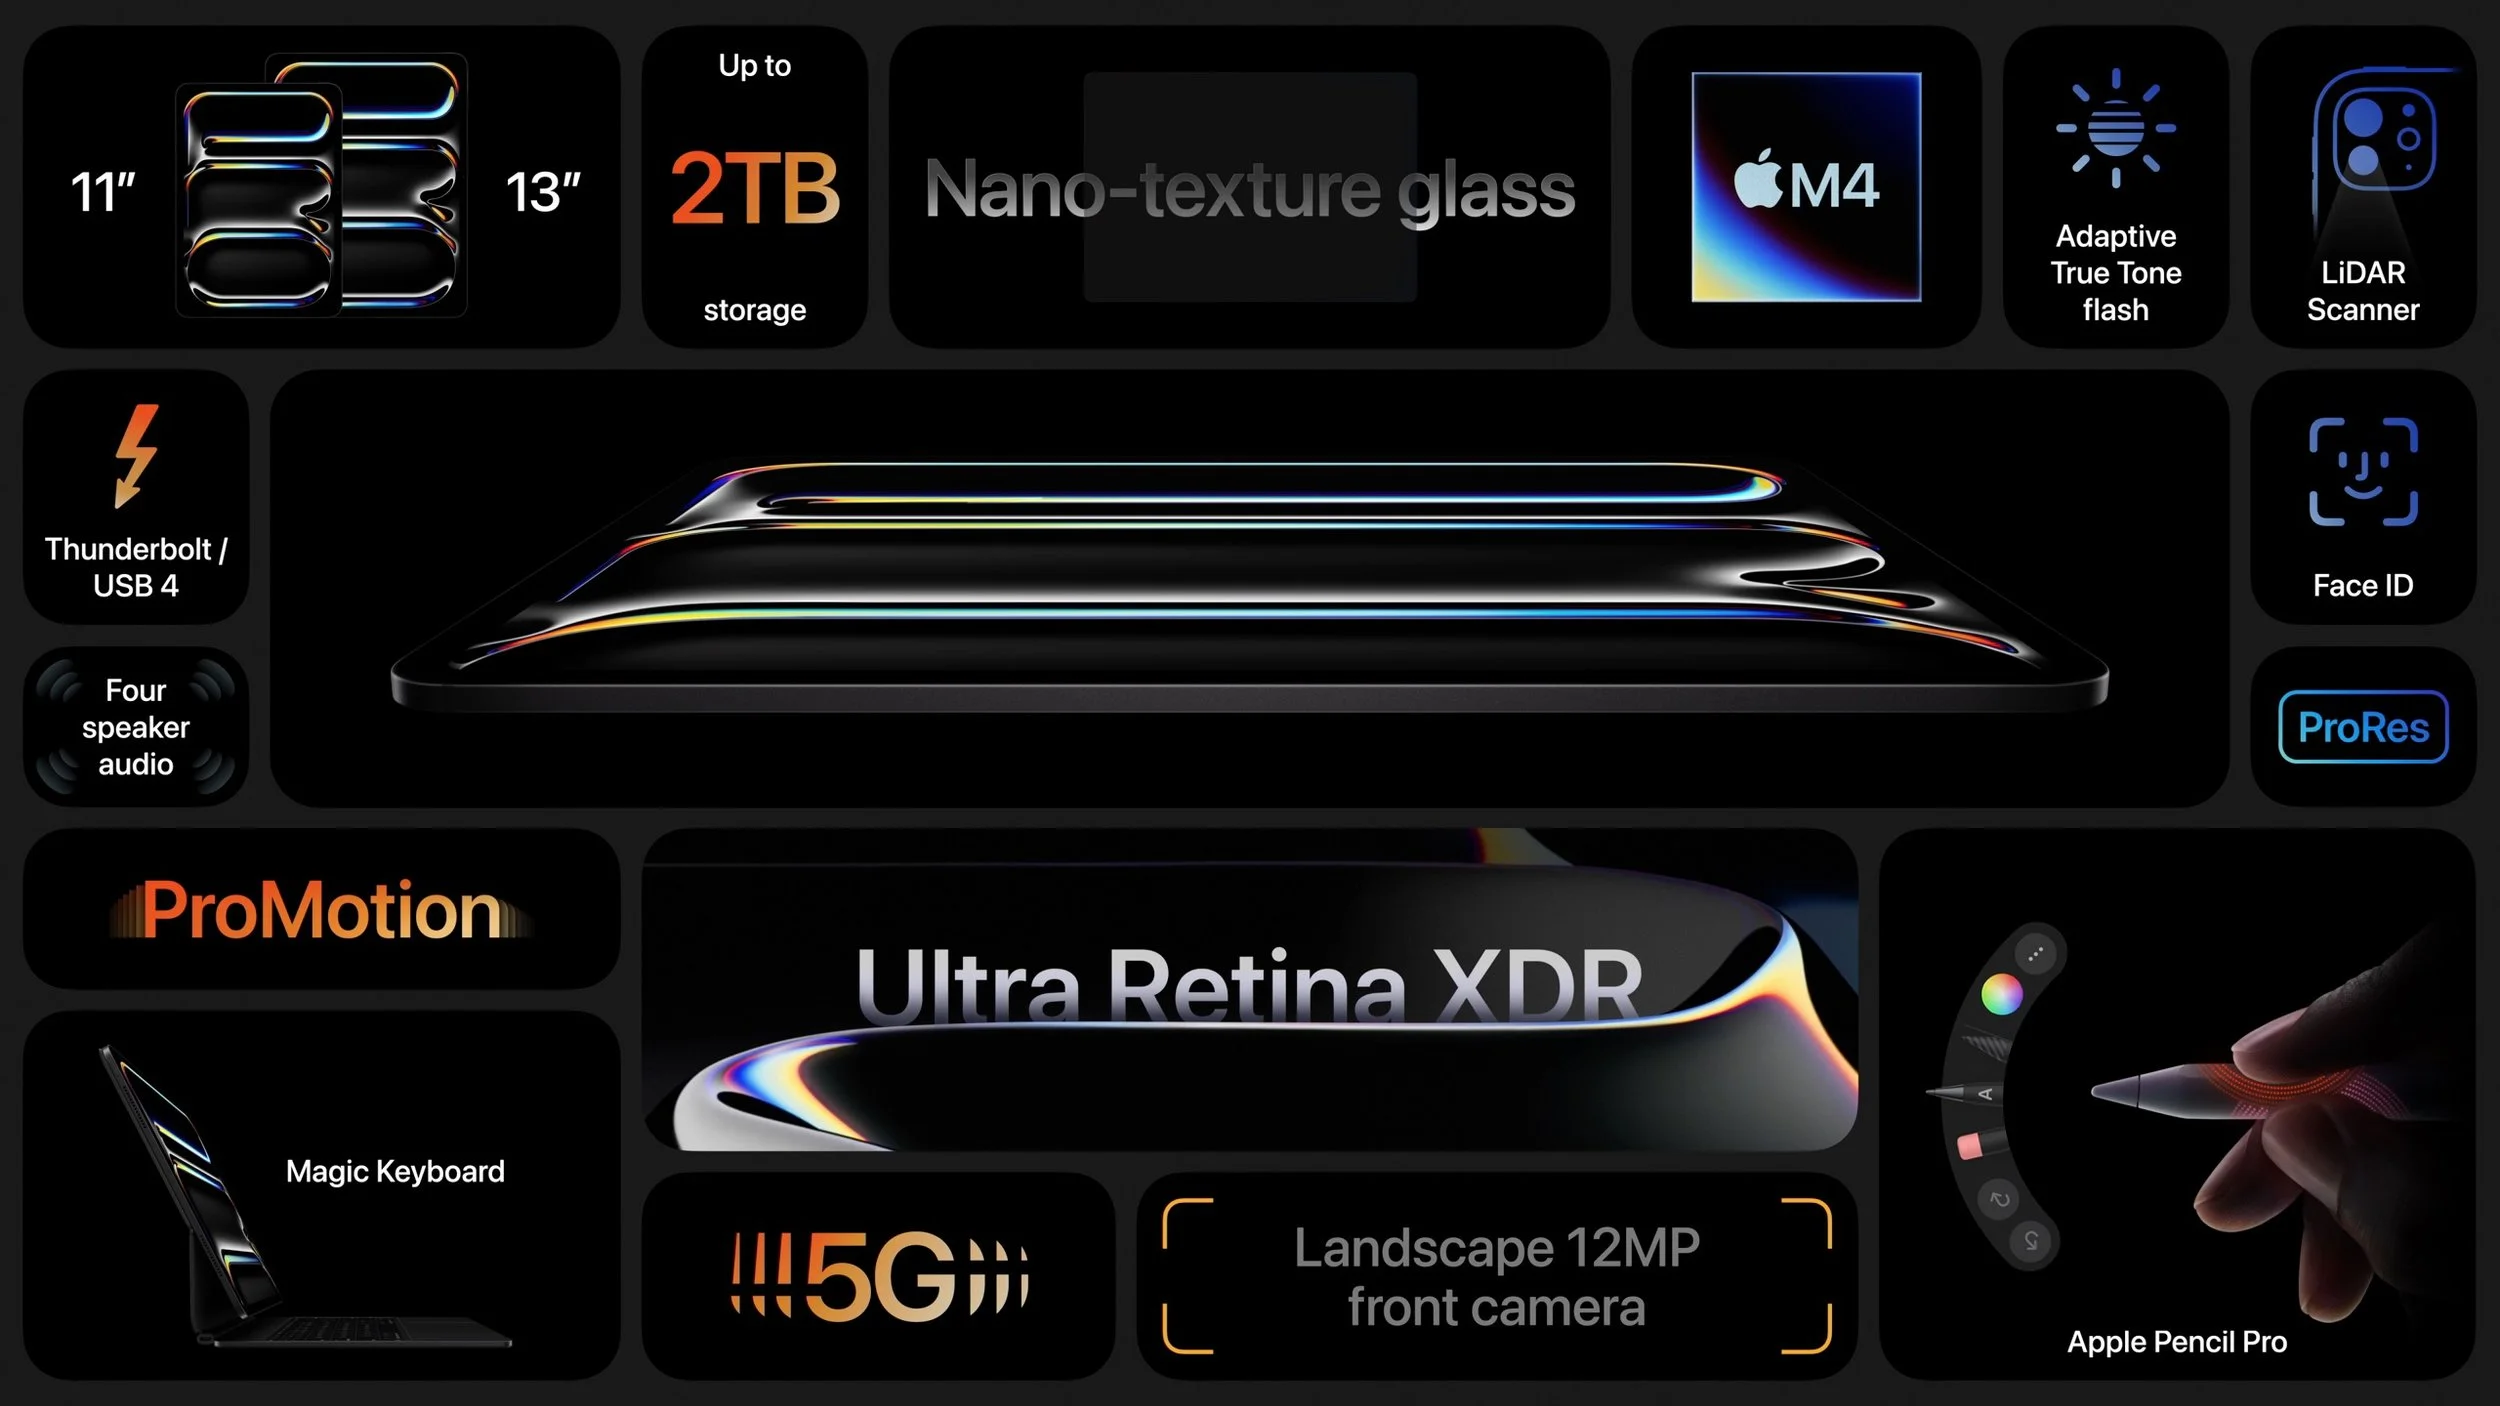
In part because of the Ultra Retina XDR display, the new iPad Pro models are thinner than before, so much so that the 13-inch iPad Pro is the thinnest product Apple has ever made at 5.1 mm thick. More impressive is that the 13-inch model also shed nearly a quarter of a pound in weight—103 grams. Ignore the fact that the iPad Pro is now thinner and lighter than the iPad Air, and that the iPad Air is the mid-range iPad, but the MacBook Air is the low-end MacBook. Air is just a name now.
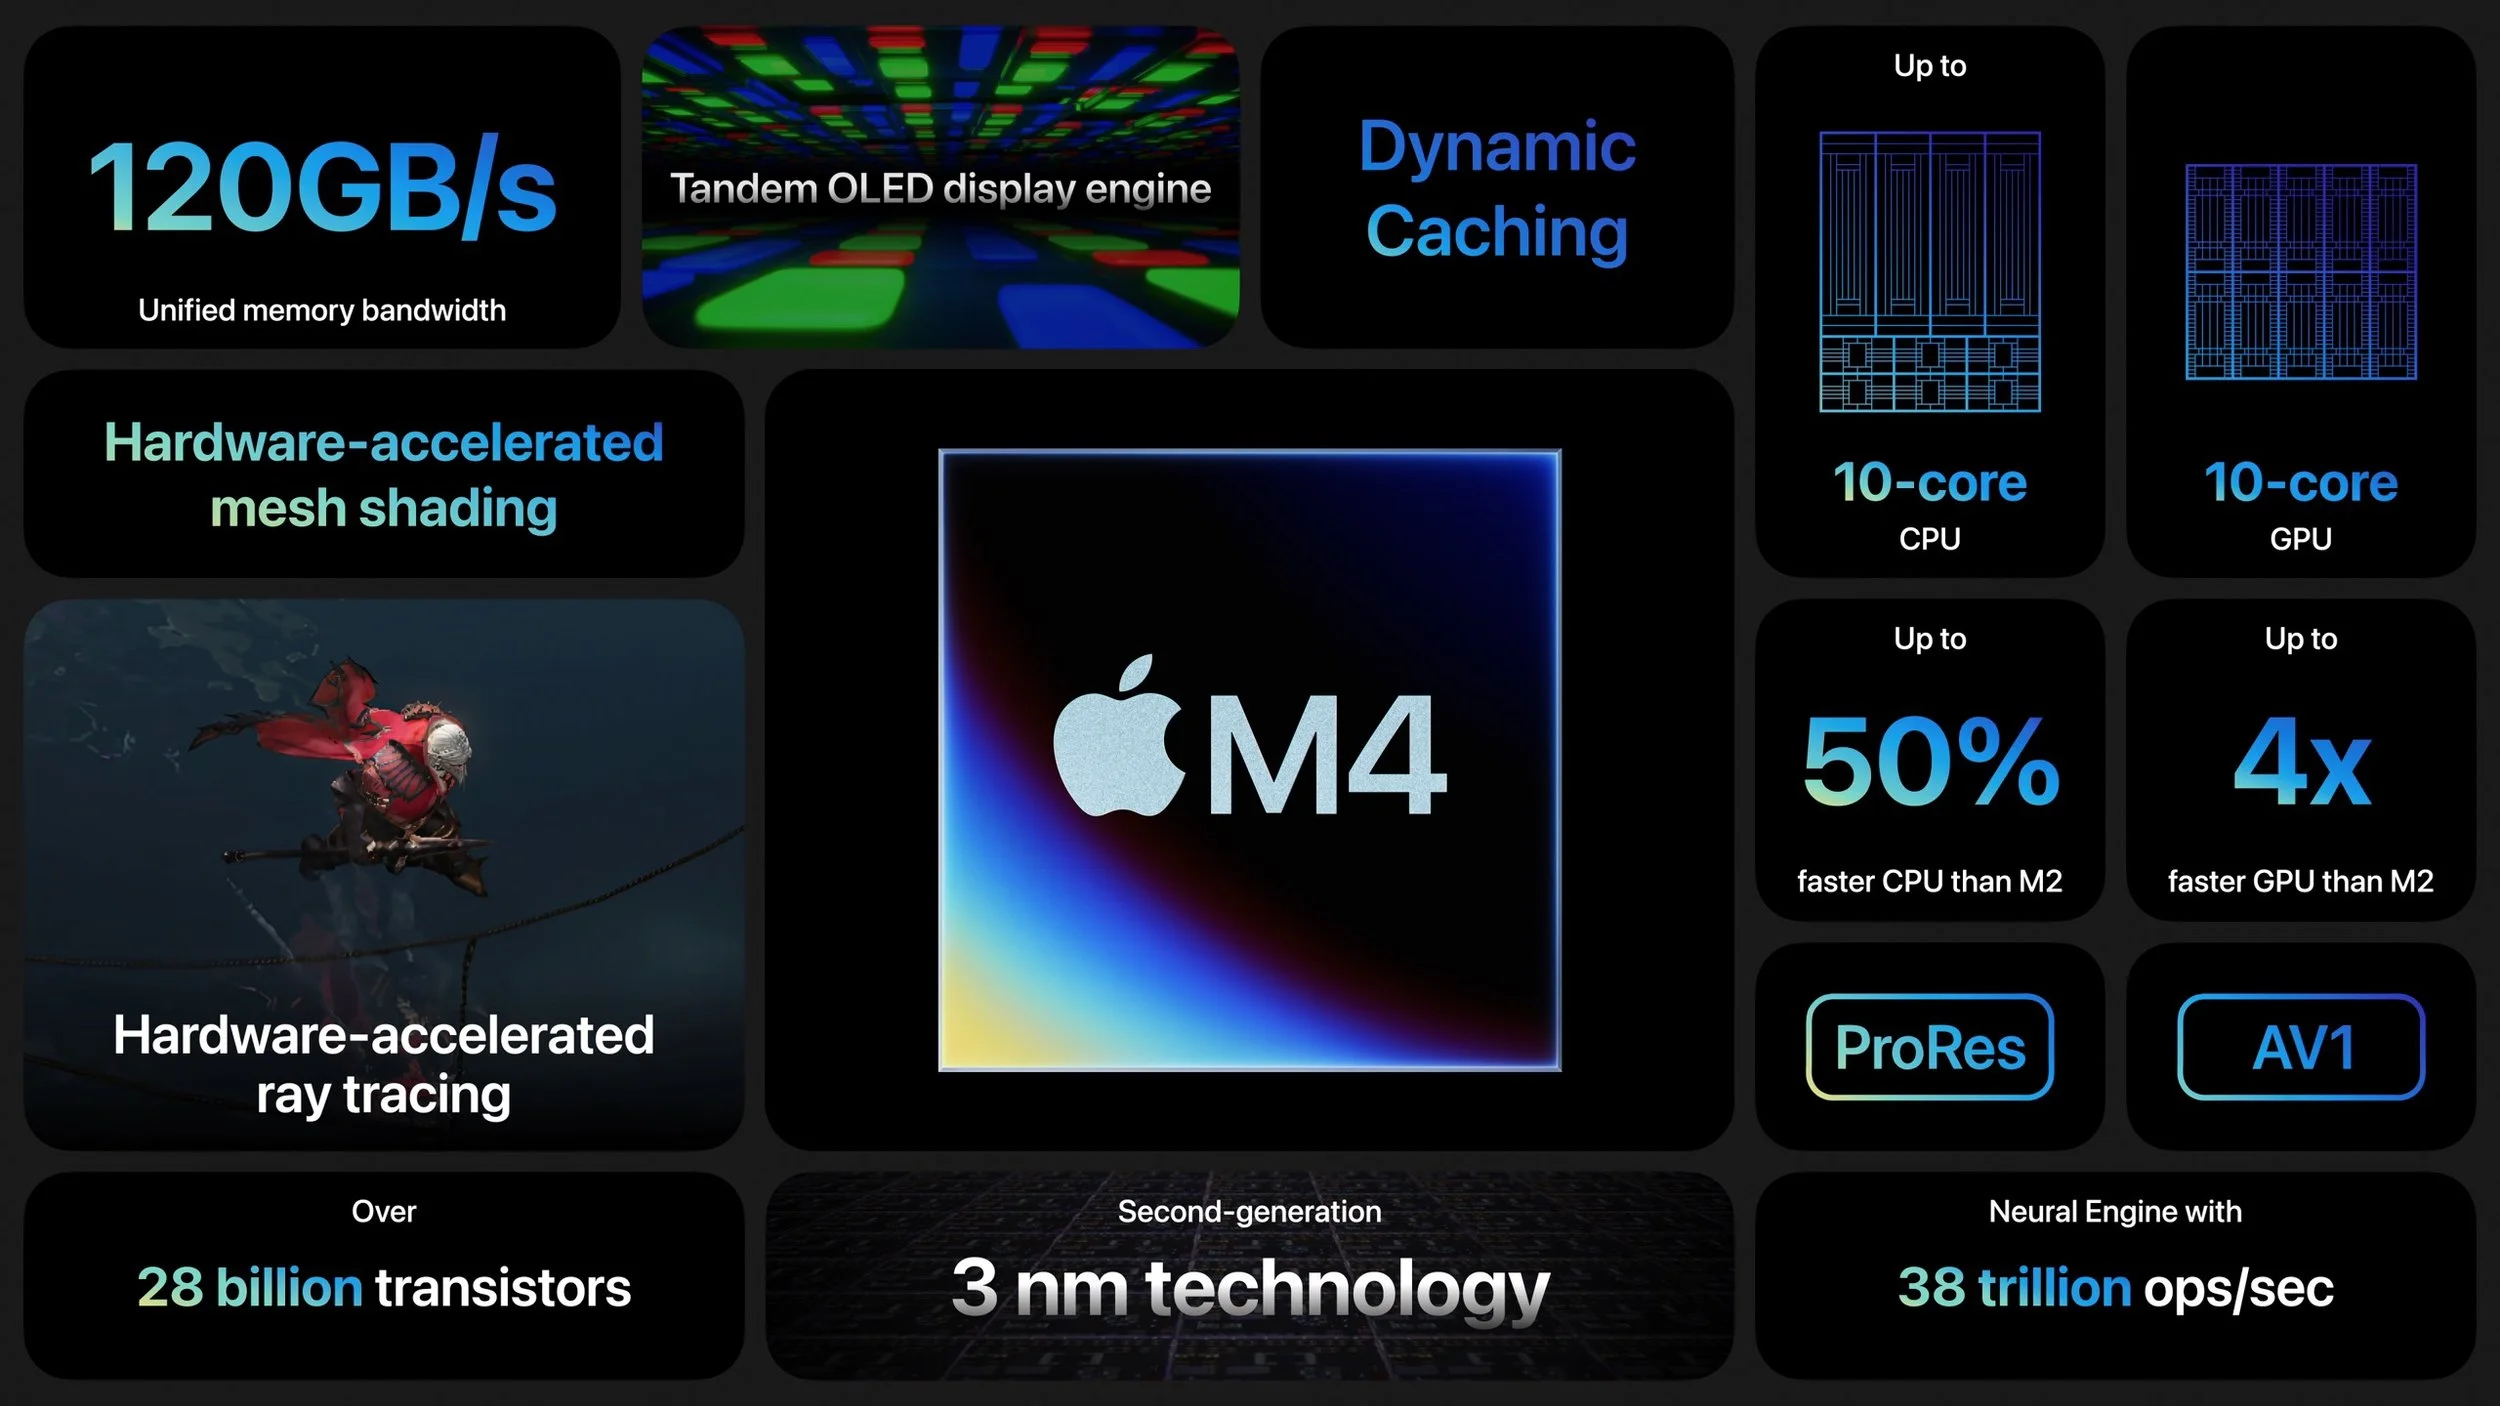
To power the Ultra Retina XDR display and make the iPad Pro models as thin as they are, Apple leapfrogged a chip generation, moving from the M2 to the new M4, which hasn’t appeared in any Macs yet. Apple says the M4’s CPU is 50% faster than the M2 in the previous models, and its GPU is up to four times faster.
For those who want a keyboard, the new iPad Pros are compatible only with the just-released Magic Keyboard for iPad Pro ($299 for 11-inch, $349 for 13-inch). As with the iPad Air, you can use either the new $129 Apple Pencil Pro or the $79 USB-C Apple Pencil.
Pricing for the 11-inch iPad Pro starts at $999, with the 13-inch iPad Pro at $1299. 5G cellular connectivity adds $200. Storage starts at 256 GB, up from 128 GB, and Apple offers tiers of 512 GB ($200 more), 1 TB ($600), and 2 TB ($1000). The nano-texture glass also adds $100 and is available only for models with 1 TB or 2 TB of storage. The only available colors are black and silver.
Apple Releases Apple Pencil Pro and Magic Keyboard for iPad Pro
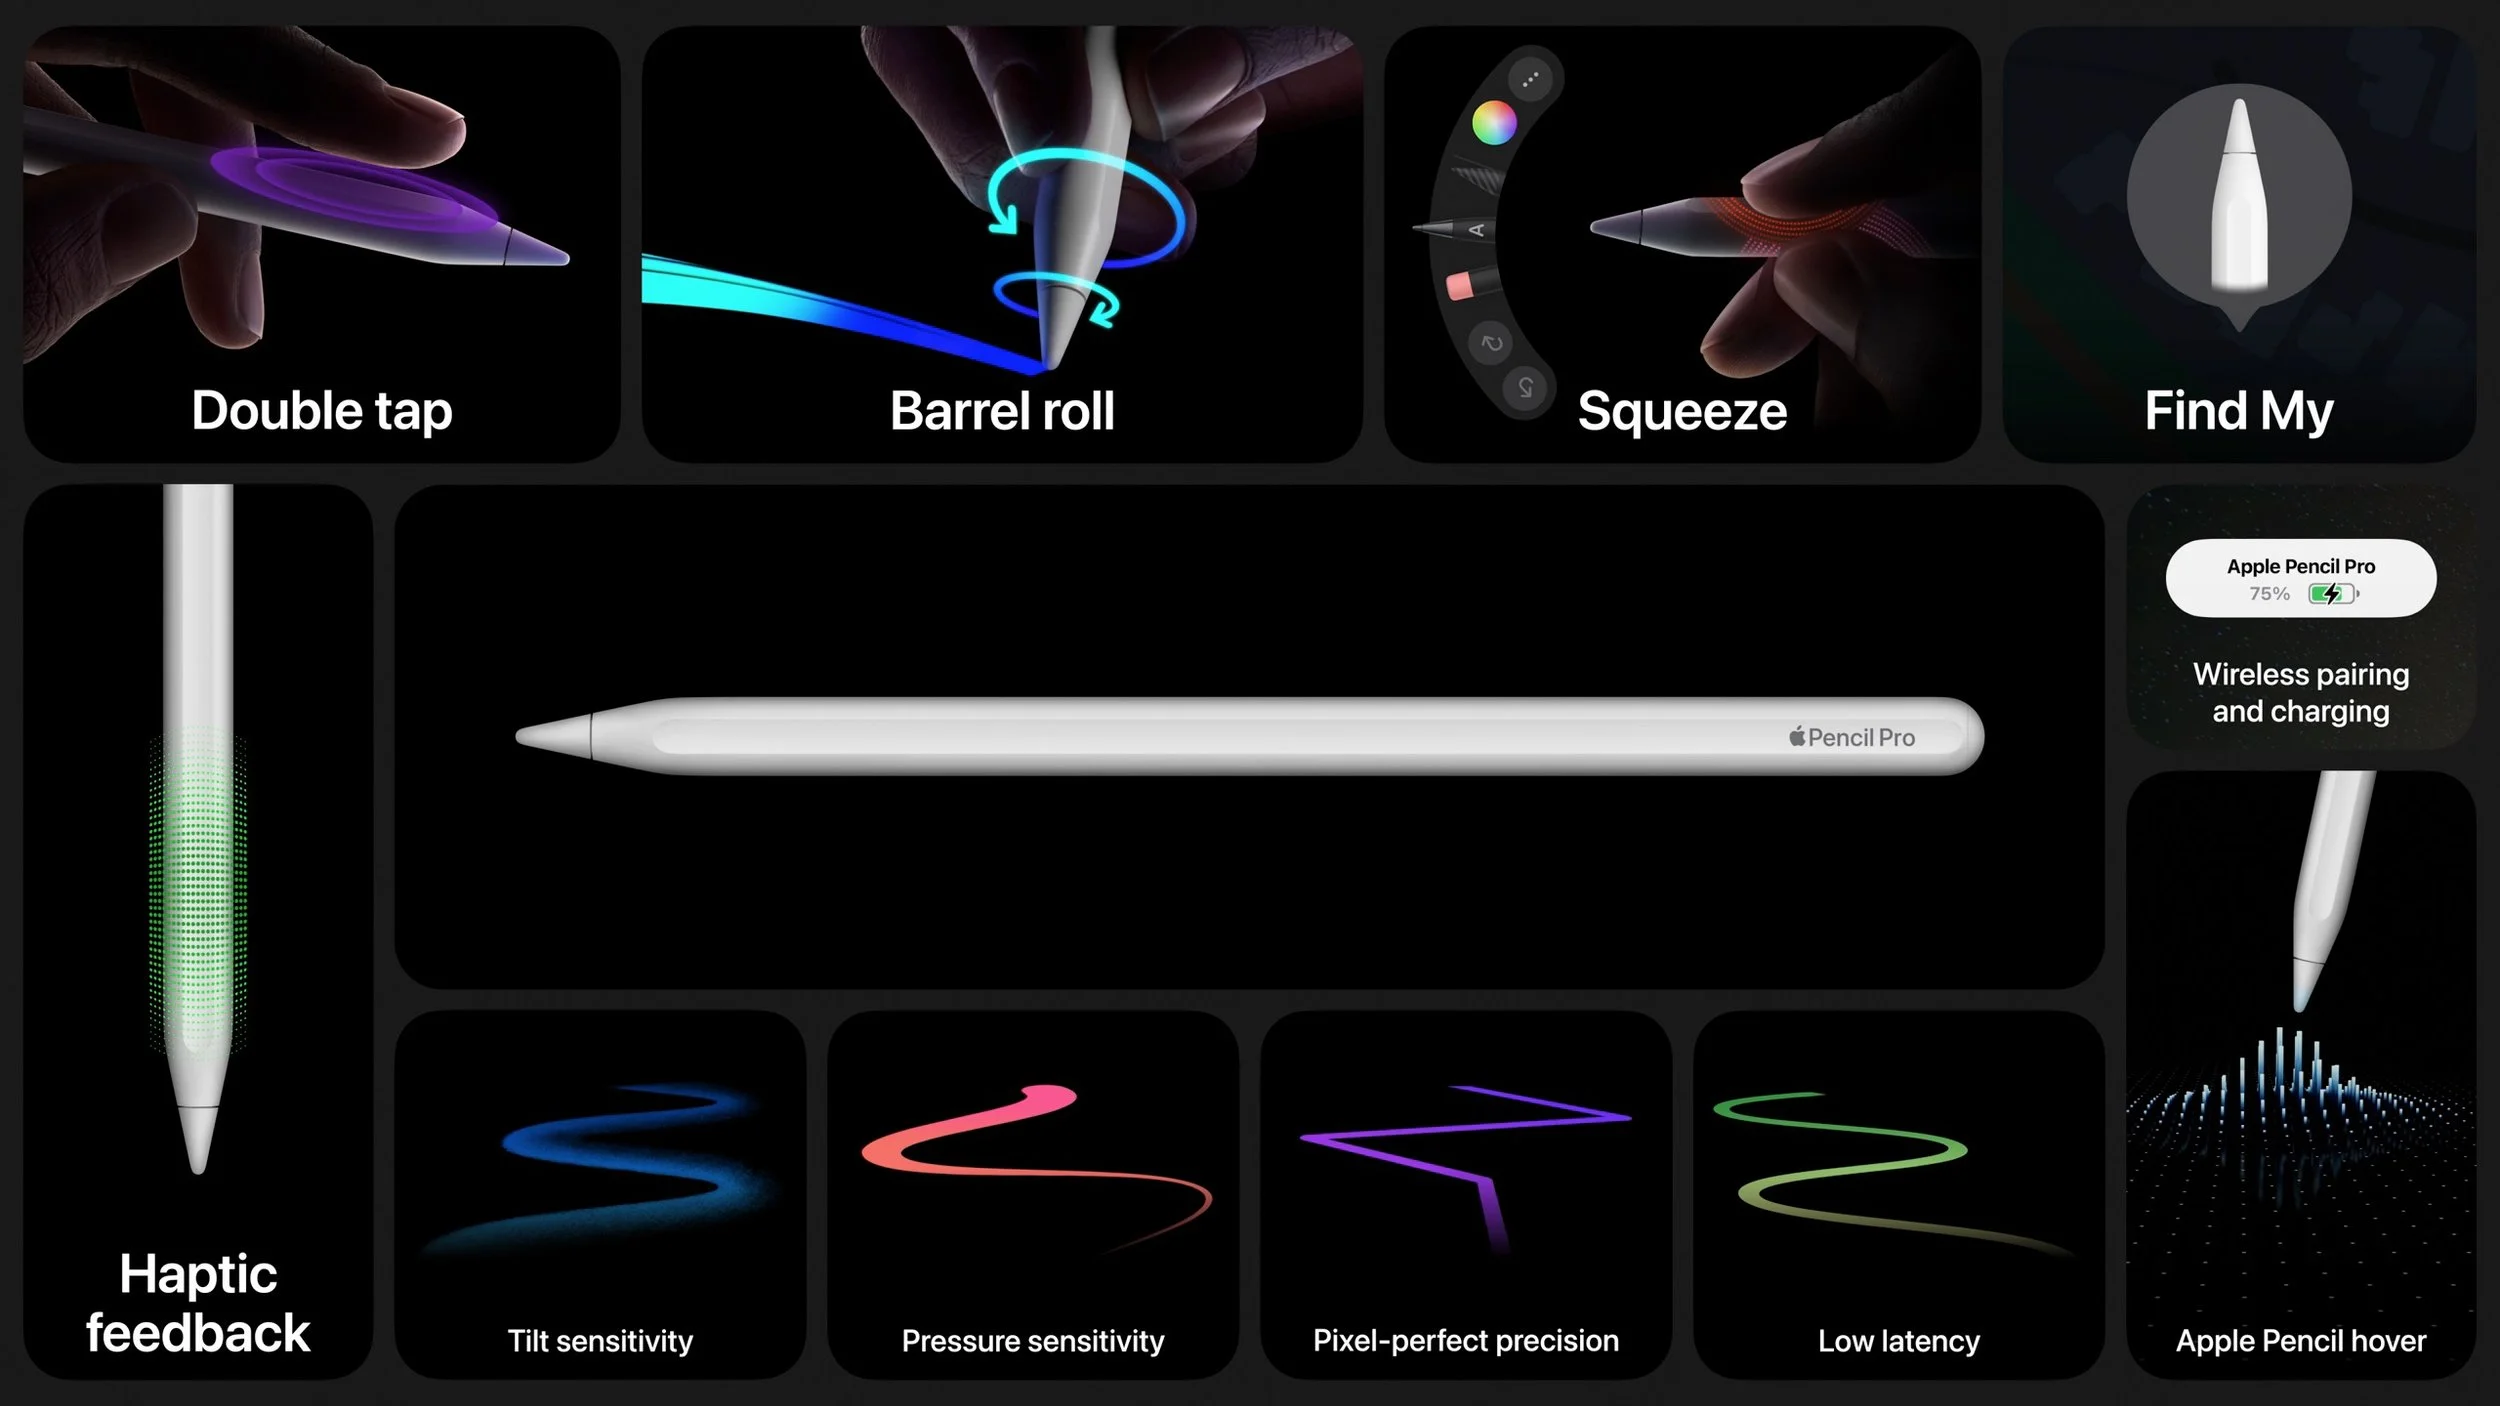
For artists, students, and others who like precise stylus input, the new Apple Pencil Pro offers a variety of new sensors and capabilities. A sensor in the barrel detects a squeeze that brings up a tool palette, and a gyroscope notices when you roll the barrel to change the orientation of shaped pen and brush tools. A new haptic engine provides confirmation of actions like squeezing, double tapping, and snapping to a Smart Shape. When used with the iPad Pro, the Apple Pencil Pro pairs, charges, and is stored on the side using a magnetic interface. If you lose it, you can now locate it with Find My.
While the new iPad Air models work with the existing Magic Keyboard, the new iPad Pro models are compatible only with the new Magic Keyboard for iPad Pro. It retains the design that floats the iPad Pro above the keyboard but adds a function row of keys for features like screen brightness and volume. The palm rest is made of aluminum, and it has a larger trackpad with haptic feedback, so it feels more like using a MacBook. It attaches magnetically and uses the Smart Connector to connect power and data without Bluetooth—there’s also a USB-C connector in the hinge for charging.
Buying Advice
All these products are available for order now and will ship next week. Who should buy what? Apple’s comparison page can be helpful, but here’s our advice:
iPad: With the price drop to $349, the tenth-generation iPad becomes a remarkable deal, and it’s an ideal iPad for watching videos, browsing the Web, reading email, and other basic tasks.
iPad mini: If smaller is better for you, the iPad mini remains in the lineup, starting at $499. It performs slightly better than the iPad, but its size is the main reason to buy it.
iPad Air: The iPad Air is the workhorse of the iPad line, with sufficient performance to do nearly anything you want. The addition of the 13-inch model is particularly welcome because it’s $500 cheaper than the equivalently sized iPad Pro. Buy the iPad Air if you want to do more than the basics with your iPad.
iPad Pro: The technology in the iPad Pro is impressive, but so is the cost. As with the Mac lineup, the Pro models are mainly targeted at creative professionals who need the ultimate power and are willing to pay for it.
A related question surrounds upgrades. Generally speaking, upgrading to a new iPad may not be worthwhile if you have the previous model. However, once you’re two generations back, the performance increases tend to be significant. The caveat to that advice is that if an iPad isn’t doing what you want, it’s time to upgrade. For instance, if you have an M1 iPad Air that runs your drawing app slower than you’d like, it’s worth considering either an M2 iPad Air or an M4 iPad Pro, depending on how important performance is to you.
Regardless, contact us if you have any questions about what iPad makes the most sense for you.
(Featured image by Apple)
Did You Know Most Mac Apps Keep Versions of Your Documents as You Work?
If you ever regret making a change too long ago to revert using Undo, try the versioning capabilities in many macOS apps that let you view, copy data from, and revert to previous versions of a document.

We all make mistakes, which is why Undo exists. Immediately choose Edit > Undo or press Command-Z to undo your last change. Most Mac apps support multiple levels of Undo, so you can keep pressing Command-Z to revert change after change. However, suppose you delete a table in your Pages document, but 30 minutes and many changes later, you decide you want it back. Undo won’t help because you want to keep all the other interim changes, and Time Machine backups may not help because a backup may not have occurred at the right time.
Since OS X 10.7 Lion, Mac apps have been able to take advantage of a built-in Apple technology called versioning to save users from such situations. Apps that support versioning create a separate version of each document every time you save manually or the app auto-saves, at least once per hour. You can browse through all those versions in a Time Machine-like interface and copy data from a previous version or revert the current document to a previous state.
Some cross-platform apps, and those with a long history and legacy architecture, such as Microsoft Word, Excel, and PowerPoint, don’t support versioning, but most modern document-centric apps do. You can identify version-capable apps by the presence of a Revert To command in the File menu.
How Versioning Works
As you work, whenever a document is saved, either automatically by its app or because you chose File > Save or reflexively pressed Command-S, the previous version is added to a database of versions stored in a hidden folder on the same volume. When a file is deleted, all its versions are removed, too, so there’s no worry about wasting storage space on long-deleted files.
When you discover you need to recover some data from an older version of a file, you choose File > Revert To > Browse All Versions, which opens a Time Machine-like browser for exploring all the previous versions. On the right, you can click the arrows to scroll through previous versions, comparing them visually against the current one on the left. A few apps provide additional ways of comparing versions.
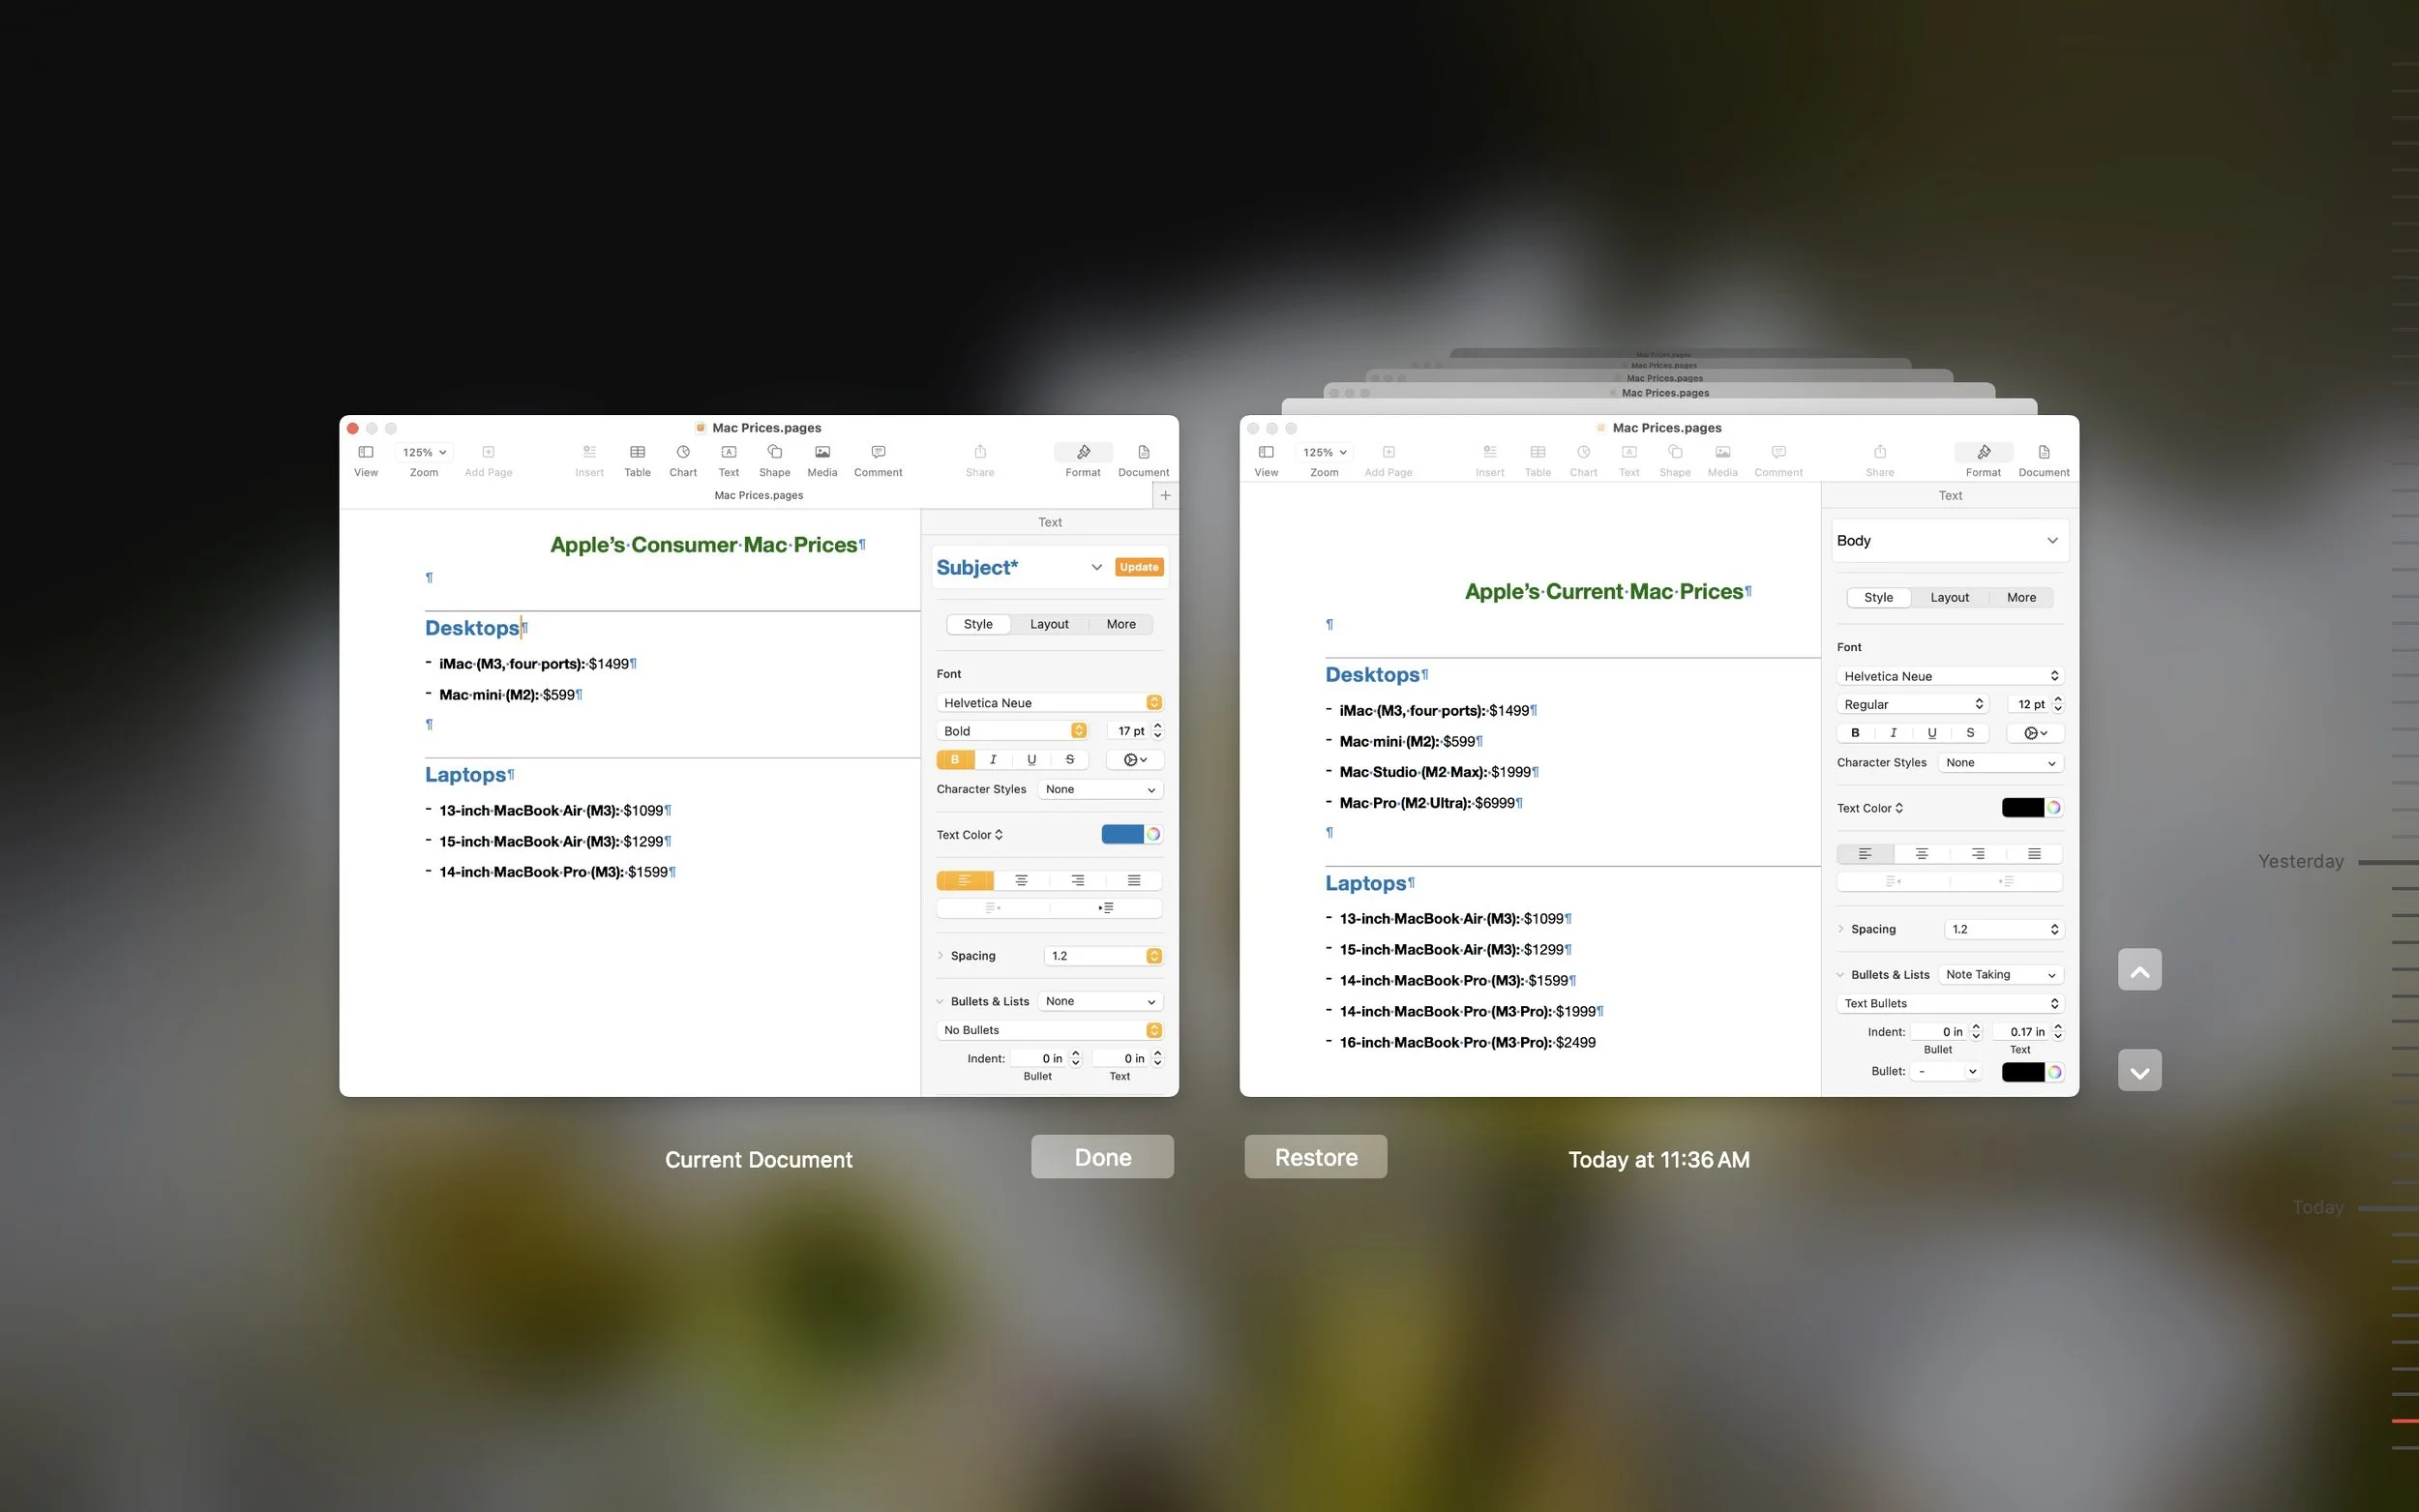
Once you’ve found the version you want, you can try copying the desired content and pasting it into the current version of your document on the left—depending on the app and type of document, you may not even have to leave the version browser.
If copying and pasting doesn’t work, you can instead click Restore to revert the document to that previous version. Unlike Time Machine, the version browser doesn’t ask if you want to overwrite the current version, so if you aren’t sure you want a wholesale reversion, press Option to change the button to Restore a Copy. That opens a separate copy of the document in the app so you can pick and choose what you want to move from the old version back into the current version.
More Versioning Details
Although versioning is easy to use, there’s quite a bit going on behind the scenes, which can generate some questions:
What about copies of a document? Copies of a document, such as you would make using File > Duplicate, File > Save As, or in the Finder, are different files from the versioning perspective and lose access to the original file’s versions.
Is iCloud Drive supported? iCloud Drive maintains its own version database, so although you may have to click a Load Version link to see a particular version when browsing past versions, they should all be accessible.
Are files shared between my Macs versioned? Versions are stored at the top level of the document’s volume, so while it works with files stored on an external drive that moves between Macs, files shared between Macs over a network or using a file-sharing service like Dropbox will have different versions on each Mac, based on where the file was open when it was saved.
Are there any privacy or security risks to versioning? The version database is completely locked down and better protected than regular documents on your Mac. Also, if you open a confidential file but close it without making any changes or saving, it won’t be added to the version database.
No one expects to make mistakes, but if you do, macOS’s versioning may save you from having to recreate work. Look for that File > Revert To menu in your favorite apps to see if they support versioning, and if they do, give it a try so you’ll know how to use it if you ever need it.
(Featured image by Adam Engst)