
Not All Your Mac’s USB-C Ports Are the Same
Your Mac’s USB-C ports look identical, but one is special—and using it can cause macOS installations or updates on external drives to fail, or trigger other errors with Thunderbolt docks. Learn which USB-C port isn’t like the others.

We recently helped a client set up an external boot drive on a Mac mini for testing, but the installation kept failing near the end with vague errors. We tried different cables, swapped drives, and more, to no avail. On a hunch, we moved the SSD to a different USB-C port, and the installation completed on the next attempt. But the port wasn’t bad—it was just the wrong port. Here’s what we mean.
All the USB-C ports on a Mac look identical, but they don’t all behave the same way. On Macs with Apple silicon and Intel-based Macs with the T2 chip, Apple designates one port as the DFU (device firmware update) port. Most of the time, this distinction doesn’t matter—you can plug a device into any port, and it’ll work normally. But for certain tasks, using the wrong port can cause mysterious failures that waste hours of troubleshooting time.
Note that we say “USB-C” here, even though in most cases, these are Thunderbolt ports. However, Thunderbolt uses the USB-C connector, and Apple refers to the ports as USB-C ports, so we’re following Apple’s lead.
When It Matters Which Port You Use
The DFU port exists for one specific purpose: reviving or restoring your Mac’s firmware using another Mac and the Apple Configurator app. This recovery procedure requires connecting a USB-C cable (not a Thunderbolt cable!) to the DFU port. It’s extremely uncommon to need to revive a Mac in this way, but it might be necessary if the Mac starts up to an exclamation point in a circle, starts up to a blank screen, shows the status indicator light pattern for firmware recovery mode, or has problems installing macOS.
For most everyday tasks, the DFU port should work like any other USB-C port. However, Apple has documented one notable exception on Macs with Apple silicon: when installing or updating macOS on an external drive, avoid using the DFU port. If your external drive is connected to it during installation, the process may fail partway through, often without a useful error message and certainly without a clear “Connect your drive to a different port” message. You might see vague notifications like “Some updates could not be installed” or cryptic errors like “com.apple.OSInstallerSetup.error 702.” After installation or updating completes, you can connect your external drive to any port, including the DFU port.
We’ve also heard of situations where seemingly inexplicable problems, such as errors from an Apple SuperDrive attached to a Thunderbolt dock, were resolved by switching to a different port. It wasn’t always clear which port was responsible, but it’s always worth trying a different one if you have trouble.
Finding Your Mac’s DFU Port
How do you figure out which USB-C port is the DFU port? Apple maintains a support document describing the DFU port locations for each Mac model. The location varies by model and, within the same model, sometimes by generation. Apple does not explain why a particular port is designated as the DFU port or provide another way to identify it. All you can do is refer to Apple’s documentation.

Unfortunately, users have found errors on that page in the past, so if you’re experiencing unexplained installation failures or other errors, try a different port even if you believe you’re using the correct one.
DFU Port Takeaways
For everyday use—connecting displays, drives, docks, and other peripherals—you shouldn’t need to think about which port you’re using. The only time you must use the DFU port is when reviving or restoring a very unhappy Mac.
However, if you’re setting up an external boot drive or updating macOS on an external drive, take a moment to identify your Mac’s DFU port and plug your drive into a different one. And if a peripheral, even if it’s connected through a dock, behaves inexplicably, treat the port itself as a variable. Before troubleshooting cables, drives, or software, move the connection to another USB-C port. This simple step can save you from frustrating troubleshooting sessions where everything appears to work but ultimately fails.
(Featured image by iStock.com/Milosz Deptula)
View Suspicious Documents Safely with Dangerzone
Got a suspicious attachment? Dangerzone converts potentially dangerous PDFs and Office docs into safe, pixel-only copies you can view without risk. Think of it as a virtual photocopier that strips any hidden malware, JavaScript, or macros.

A standard piece of advice for staying safe online is to avoid opening attachments from people you don’t know or attachments that seem suspicious. It’s good advice, since PDFs and office documents can contain JavaScript and macros that present a security risk, or they could be maliciously crafted to take advantage of vulnerabilities in common apps to execute code on your computer.
But in the real world, unless the document is attached to a message that is obviously spam, it’s difficult to know whether you should be worried. If you could just look at the document, you might be able to tell, but how can you do that without opening it?
Enter Dangerzone, an open source app created by the nonprofit Freedom of the Press Foundation. The impetus for creating it came from journalists who need to review attachments from possibly untrustworthy sources while protecting themselves from hacking and retaliation from powerful corporate and government interests.
Dangerzone won’t tell you whether or not a document is safe. Instead, when you drop a document on its window, it creates a PDF image of the document that contains nothing of the original other than the visual representation of its pixels. Think of Dangerzone as a virtual photocopier—it makes a visual copy.
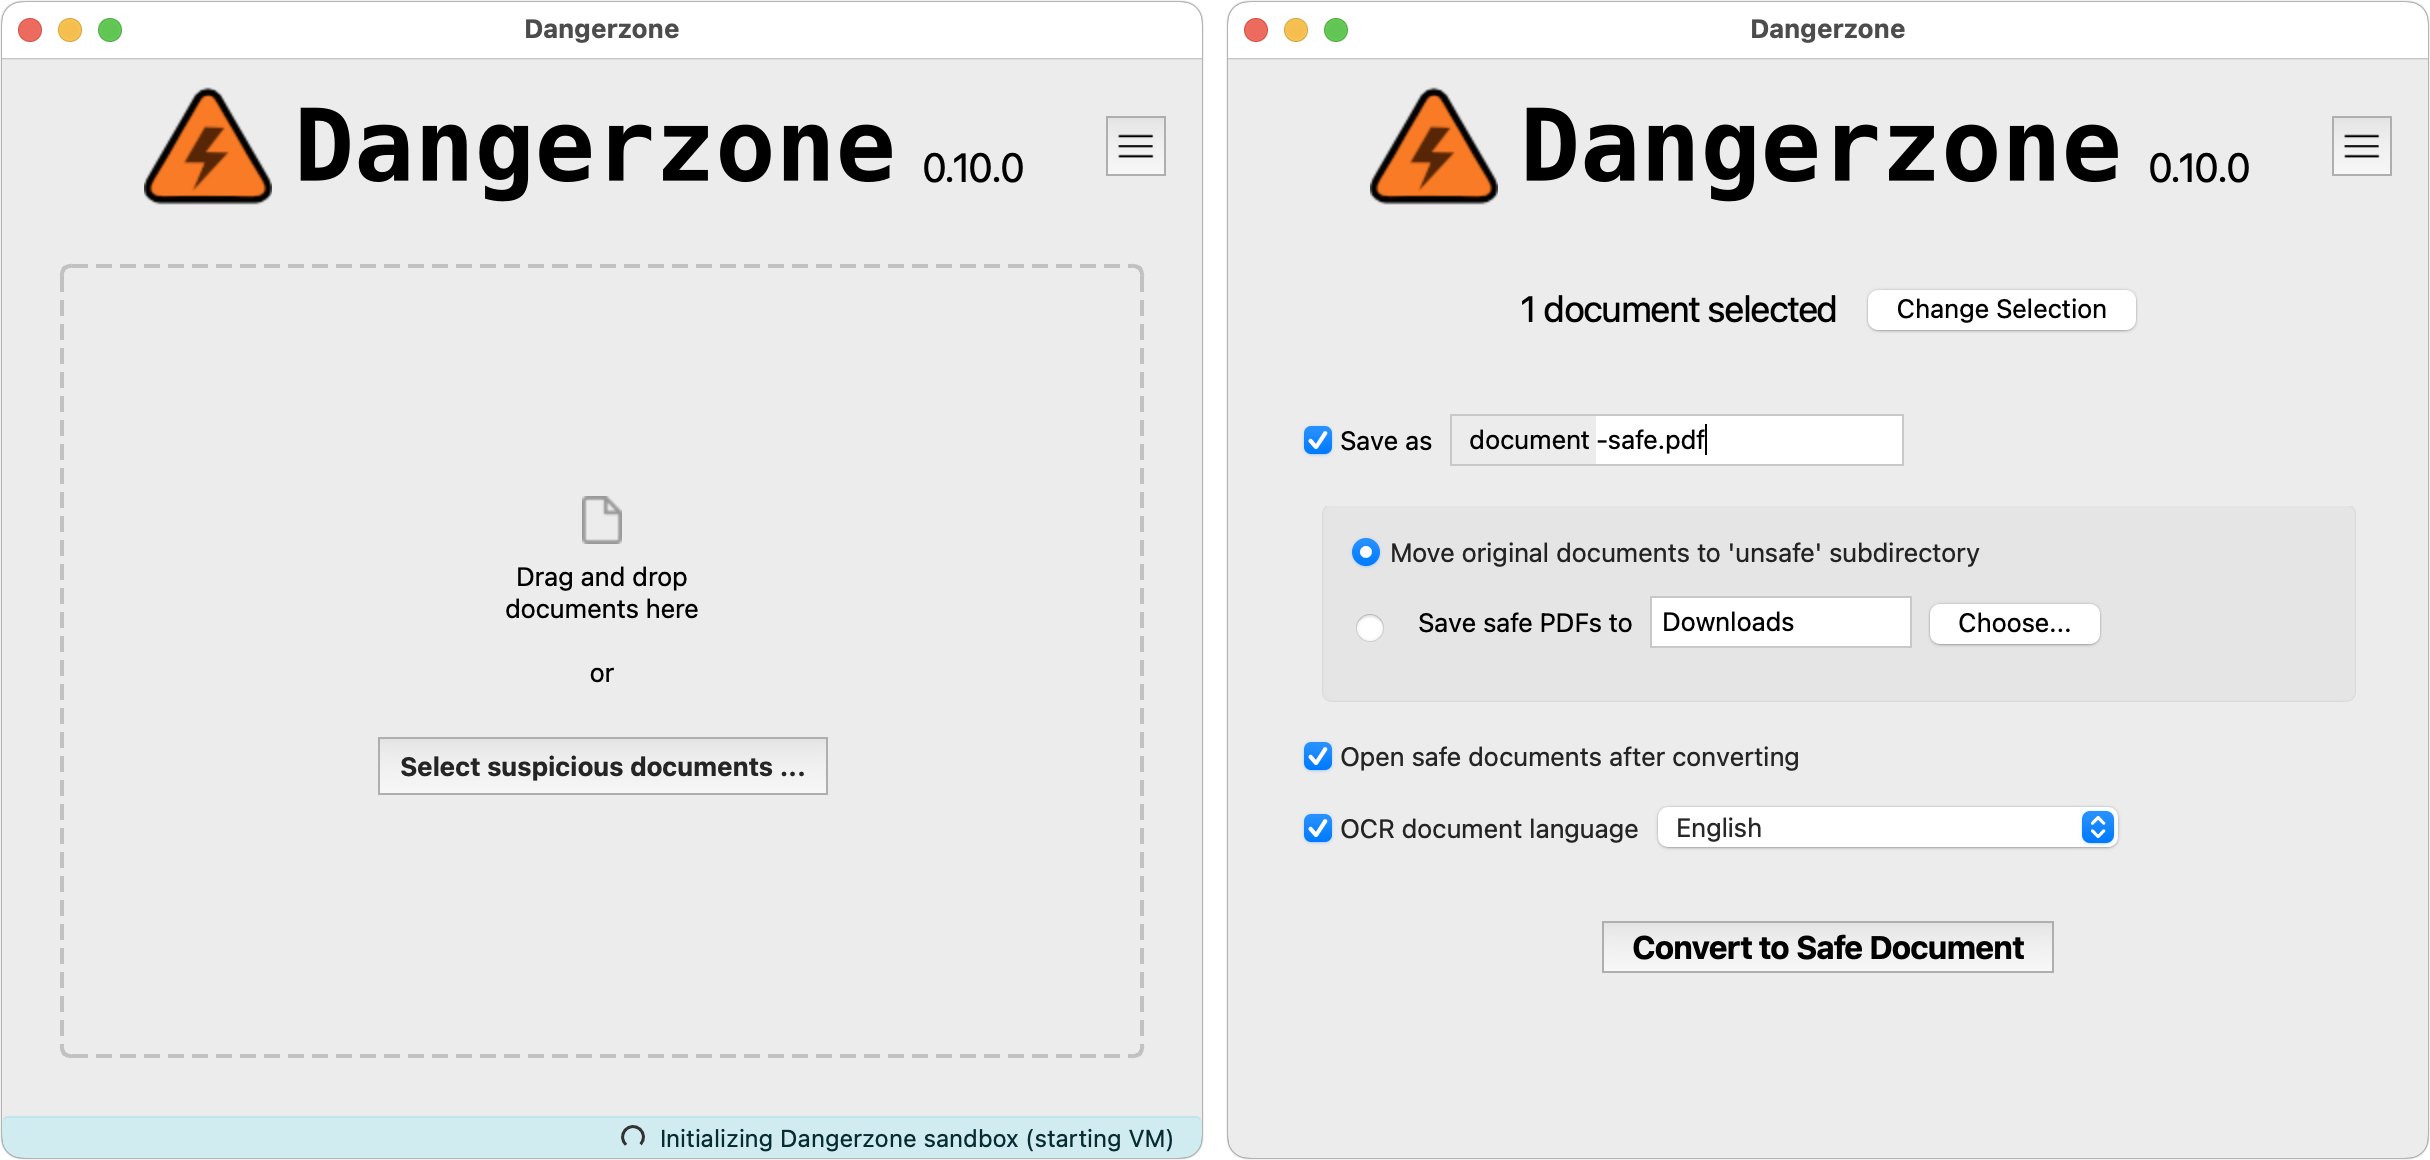
But Dangerzone is a highly sophisticated virtual photocopier, since it has to work with malicious documents without allowing them to cause harm. Behind the scenes, Dangerzone first creates a Linux container to keep the document away from your Mac. Within the container, it then creates a sandbox to protect the Linux kernel. Then it uses open source tools—LibreOffice and PyMuPDF—to convert the original document to a PDF, split that PDF into individual pages, and convert each page to RGB pixels—just colored dots. Then it quits the sandbox since the file has been sanitized, and if possible, it converts the RGB pixel data into a compressed, searchable PDF. Finally, it saves the PDF to the specified folder and archives the original file. You can process only one file or batch of files at a time to ensure that the entire secure conversion environment starts fresh each time.
Here are the document types that Dangerzone can convert into safe PDFs:
PDF (.pdf)
Microsoft Word (.docx, .doc)
Microsoft Excel (.xlsx, .xls)
Microsoft PowerPoint (.pptx, .ppt)
ODF Text (.odt)
ODF Spreadsheet (.ods)
ODF Presentation (.odp)
ODF Graphics (.odg)
EPUB (.epub)
JPEG (.jpg, .jpeg)
GIF (.gif)
PNG (.png)
SVG (.svg)
TIFF (.tif, .tiff)
Other image formats (.bmp, .pnm, .pbm, .ppm)
You won’t want to use Dangerzone on every document you receive in email. There’s no reason to fuss with it for attachments that come from people you know, in contexts where it makes sense that they’re sending you something. But if you get an attachment out of the blue that makes you think, “Why is this person sending me a document?” run the document through Dangerzone to make sure it’s safe.
(Featured image by iStock.com/shironosov)
Apple’s Focus Is Powerful but Unpredictable
Apple’s Focus can silence distractions when you need quiet time, but its complexity can cause you to miss important notifications. Learn how to configure it safely—and avoid the pitfalls that lead to missed calls and messages.

Sometimes you just don’t want your phone to ring, chirp, or even vibrate. Maybe you’re asleep, in an important meeting, having dinner with family, meditating, playing a game, or simply enjoying some quiet time.
Apple’s Focus feature on the iPhone, iPad, and Mac can silence those interruptions, but Focus is considerably more complex than the straightforward Do Not Disturb feature it replaced in 2021. Misconfiguring Focus such that it activates unexpectedly can cause you to miss important calls, messages, and other notifications.
What Focus Does
Focus lets you create customized notification environments that block unwanted interruptions while allowing important ones through. You can have a Focus for different situations—when you’re at work, eating dinner, at the gym, and more—each with its own rules about when it activates and which people and apps can reach you.
When a Focus is active, it can:
Silence notifications from selected people and apps
Allow specific people and apps to break through
Change your Lock Screen appearance
Hide certain Home Screen pages
Automatically reply to messages explaining you’re unavailable
Filter content in apps like Mail, Calendar, and Messages
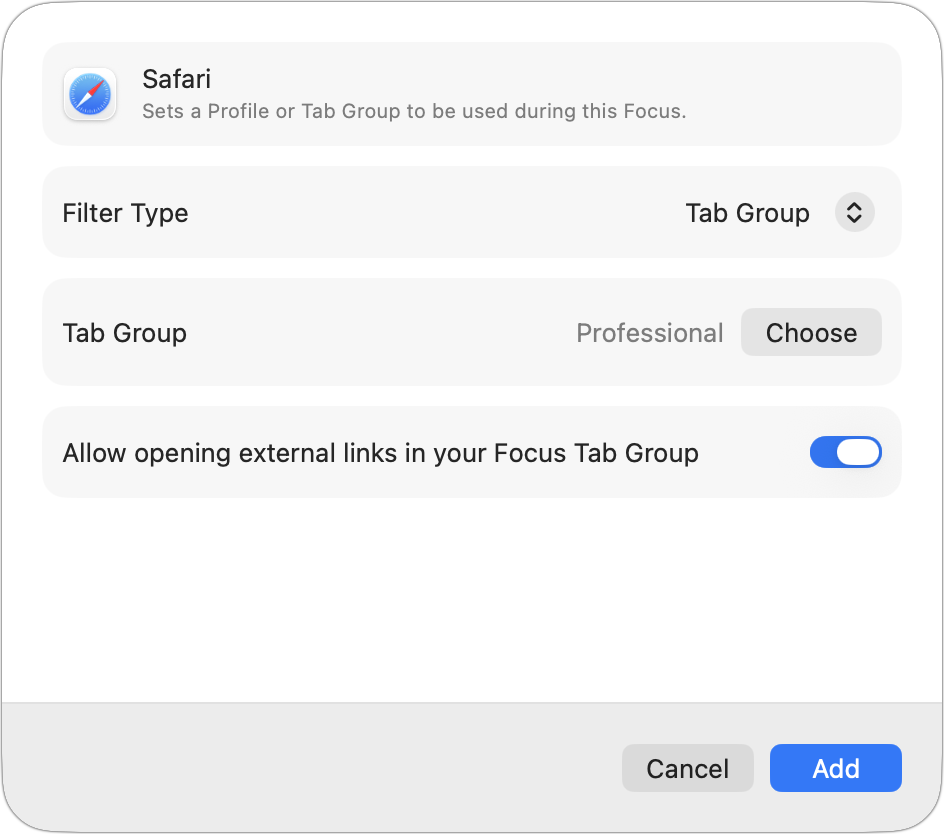
Make a certain profile or tab group active in Safari
Focus can share your settings across all your Apple devices, which saves you from having to configure it on each device but can also create confusing interactions.
The Built-In Focus Modes
Apple provides three essential Focus modes that cover most people’s needs:
Do Not Disturb: A general-purpose Focus for when you need to ensure your iPhone doesn’t interrupt you. It’s ideal for doctor appointments, workouts, movies, and similar situations. You can schedule it, but it’s often best to activate it manually from Control Center for a specific amount of time or until you leave the current location.
Sleep: This Focus activates according to the Sleep schedule you set on the iPhone (in either Settings > Focus > Sleep or in the Health app) to minimize nighttime interruptions. It lets you choose a specific Lock Screen, Home Screen, and Apple Watch face to limit distractions at night.
Driving: Automatically activates when your iPhone connects to a car’s Bluetooth system or detects driving motion. (The Bluetooth connection may be best if you’re frequently a passenger and want to use your iPhone while being driven.) It blocks nearly all notifications to keep your attention on the road and can send custom automatic replies to people who text you.
For further customization, you can create additional Focus modes—Apple suggests modes for Gaming, Mindfulness, Personal, Reading, and Work. For instance, if you take a spin class every Tuesday at noon and yoga on Thursdays at 7 AM, you could create a Focus for Working Out that would automatically activate during those times.
Configuring a Focus
To set up a Focus, go to Settings > Focus on your iPhone or iPad, or System Settings > Focus on your Mac. Select the Focus you want to configure or create a new one, then:
1. Choose allowed people: Decide whether to allow or silence notifications from specific people. You can also specify whether phone calls from certain groups (Allowed People, Favorites, Contacts, or Contacts groups) can break through.
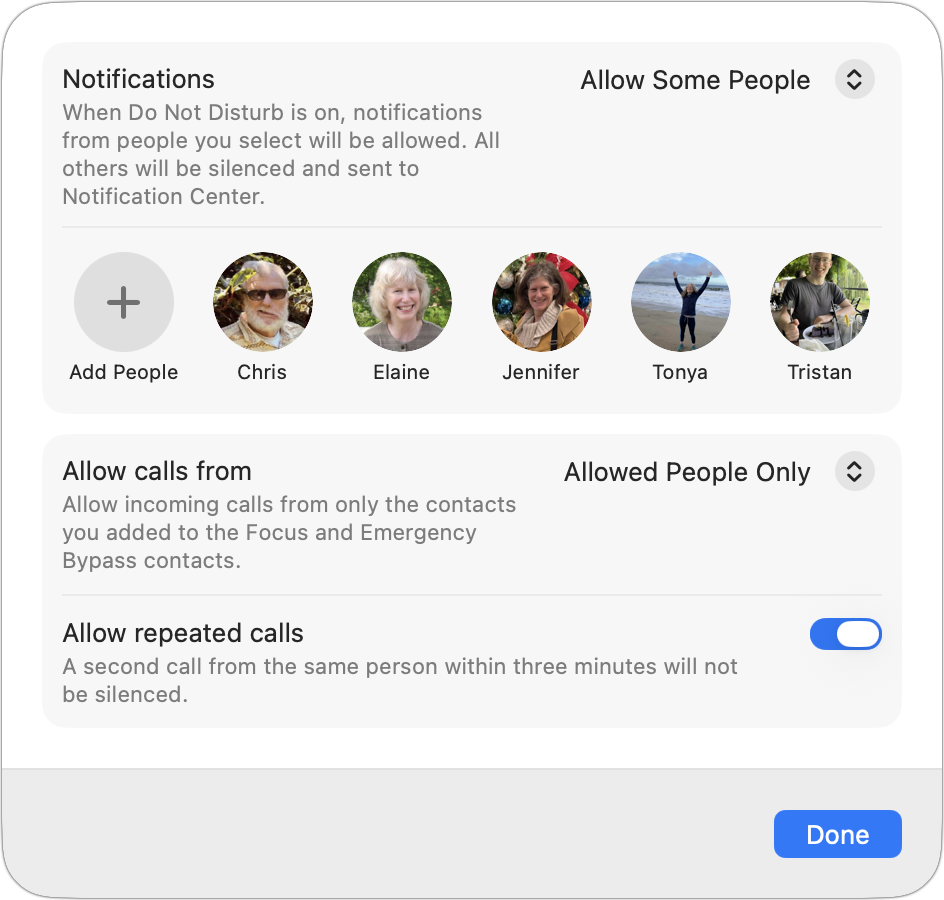
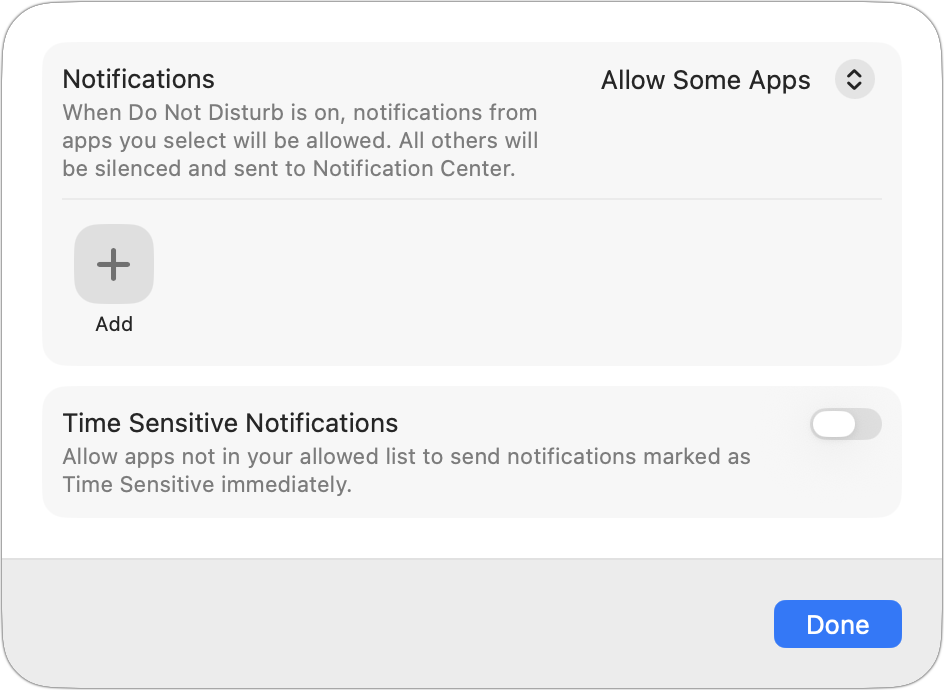
2. Choose allowed apps: Similarly, allow or silence specific apps. You can also enable Time Sensitive Notifications, which lets urgent alerts (like delivery notifications or security alerts) come through even from disallowed apps.
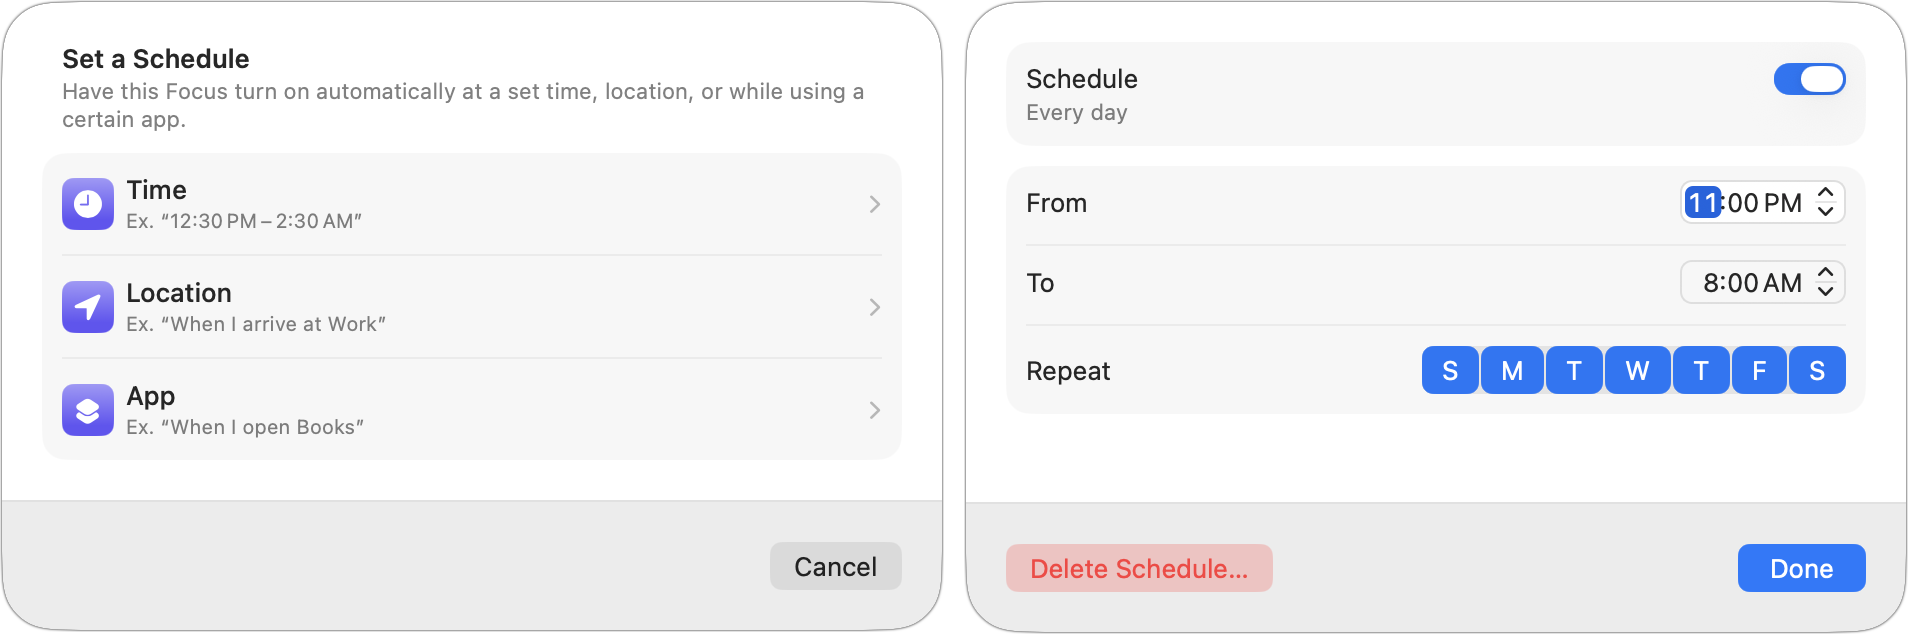
3. Set a schedule: Have the Focus turn on at certain times, locations (on when you arrive, off when you leave), or when using specific apps (but not when apps are in the background). App-based triggers are useful for presentations, live performances, and games. A Smart Activation option on the iPhone can automatically turn on a Focus based on your location, app usage, and time of day.
4. Add Focus Filters: Customize how Calendar, Mail, Messages, Safari, and others behave when the Focus is active—for example, showing only certain Safari tab groups and your work email accounts during a Professional Focus.
5. Intelligent Breakthrough & Silencing: If you have Apple Intelligence enabled, this option “intelligently” allows priority notifications to interrupt you and silences others. It doesn’t override your explicit settings for allowing or silencing notifications.
The Complexity Problem
While Focus is powerful, its complexity can create unpredictable behavior. Here are common pitfalls to avoid:
Unexpected activation: With automatic schedules based on time, location, and apps, it’s hard to predict when a Focus might turn on. You may not realize notifications are being silenced until you’ve missed something important. This is especially important if your routine is interrupted. Perhaps you normally work out at noon, but today you are at a professional conference or dealing with a family emergency.
Cross-device confusion: By default, Focus syncs across all your Apple devices via the Share Across Devices option. Syncing means a Focus activated on your iPhone—such as Sleep—might also silence notifications on your Mac when you’re working late and need to communicate with colleagues. Consider turning off Share Across Devices unless you’re certain you want synchronized behavior.
Unpredictable AI: Focus includes two features that rely on machine learning—Smart Activation and Intelligent Breakthrough & Silencing—to make contextual decisions about when Focus should activate and which notifications are important enough to bypass it. We recommend against using them because they make an already unpredictable scenario even more unpredictable.
Silenced notifications indicator: When a Focus is active, people who text you in Messages see that your notifications are silenced. While this can be helpful, it can also confuse others when a Focus activates unexpectedly.

The forgotten Focus: A Focus that activates automatically when you go to a specific location or open a particular app might remain active longer than you expected. For instance, what if a Focus activates when Mail is your frontmost app, but you have to leave unexpectedly and your Mac doesn’t sleep automatically, so Mail remains the active app over the weekend? That might be particularly confusing when a Focus Filter hides certain accounts or data.
Practical Recommendations
To get the benefits of Focus without the confusion:
Keep it simple: Start with Do Not Disturb, Sleep, and Driving. These three cover the needs of most people and have the most predictable behavior. If you created Focus modes you’re not using, delete them.
Be conservative with triggers: If you add schedules or triggers based on location or apps, keep them to a minimum. The more triggers you add, the harder it becomes to predict when a Focus will be active.
Allow more calls: These days, unexpected calls from people you know well are fairly uncommon, and those that do happen are more likely to be important. So consider allowing calls from family and close friends (perhaps via Favorites or a Contacts group) and enabling Allow Repeated Calls, which lets someone through if they call twice within three minutes.
Check Focus status when troubleshooting: If you or someone you know is missing notifications, check whether a Focus is unexpectedly active. The easiest place to check is Control Center.
Review Share Across Devices: If you experience unexpected Focus behavior, turn off Share Across Devices and configure each device’s Focus settings independently.
Control notifications directly: Rather than rely on Focus, limit notifications to just those that are actually important to you. Many apps are unnecessarily chatty.
Focus is a powerful tool for managing the constant stream of notifications from our devices, but it requires careful configuration. When in doubt, keep it simple: Sleep to protect your sleeping hours, Driving to block distractions in the car, and Do Not Disturb for ad hoc appointments and performances may be all you need.
(Featured image by iStock.com/DragonImages)
How Does the New MacBook Neo Compare to the MacBook Air?
Apple’s new $599 MacBook Neo offers an affordable entry into the Mac ecosystem, but its compromises mean it’s best suited for K–12 students and users with basic computing needs. Here’s how it compares to the MacBook Air.
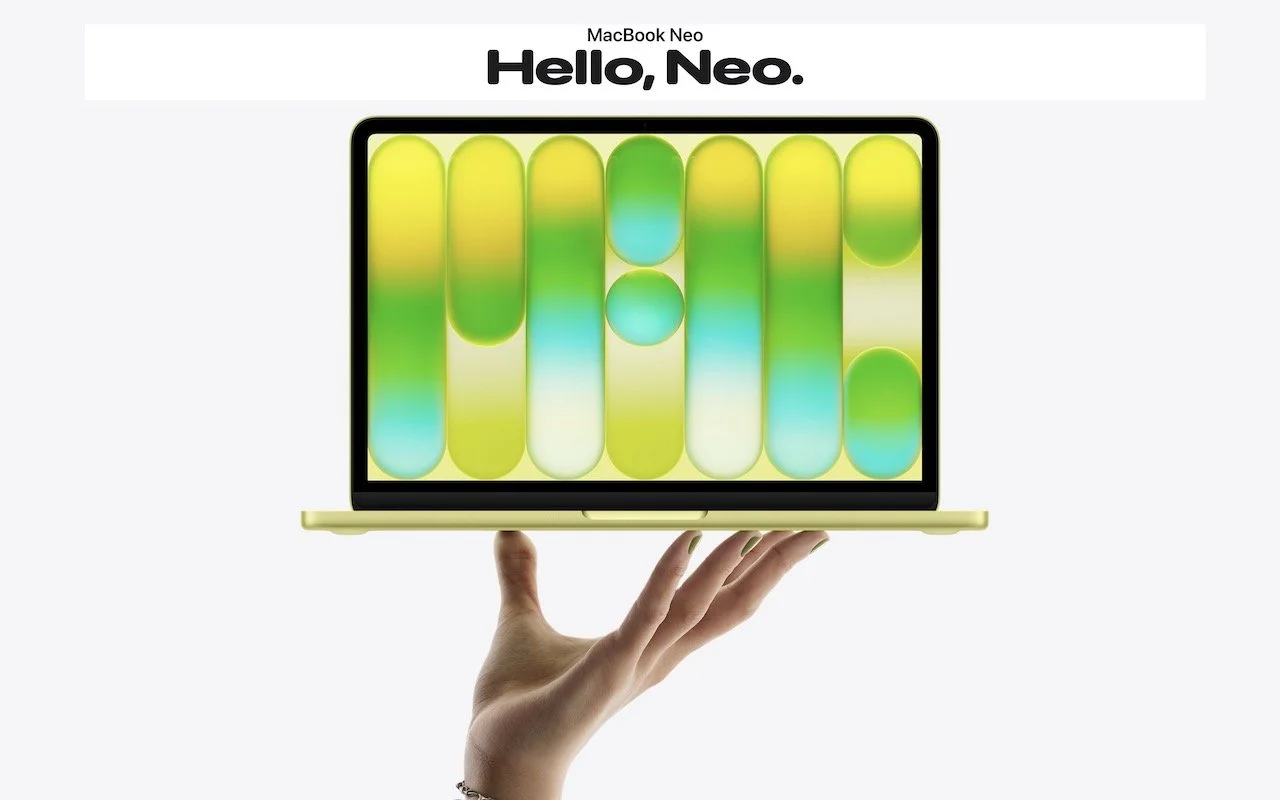
Apple has unveiled the MacBook Neo, a new entry-level laptop. With pricing starting at $599, a whopping $500 less than the MacBook Air, the MacBook Neo is positioned as an affordable computing option, particularly for families buying devices for K–12 students.

Despite its low price, the MacBook Neo is a Mac, so it works like any other modern Mac, complete with support for Apple Intelligence. A key question is how it compares to the MacBook Air, which Apple just updated with the M5 processor. Unsurprisingly, Apple made numerous compromises to hit the lower price point compared to the $1,099 13-inch MacBook Air. Those compromises may or may not make a difference for your intended usage.
Comparing the Specs
Let’s run through the MacBook Neo’s specs and see how it matches up to the MacBook Air:
A18 Pro chip: One of the main places Apple cut costs is by relying on an A18 Pro chip with 6 CPU cores and 5 GPU cores, previously used in 2024’s iPhone 16 Pro models. This is the first time Apple has used an iPhone-class chip in a Mac. For everyday tasks in a single app, performance is nearly comparable to the MacBook Air’s M5, which has 10 CPU cores and 8 or 10 GPU cores. However, the MacBook Neo will be significantly slower for multi-threaded tasks such as video editing, code compilation, or heavy multitasking.
8 GB unified memory: Another notable difference is that the MacBook Neo has only 8 GB of unified memory, whereas the MacBook Air starts at 16 GB and can be configured with 24 GB or 32 GB. Being limited to 8 GB means the MacBook Neo will struggle with memory-intensive tasks or running many apps at once, but that isn’t likely to be an issue with everyday Web browsing, email, and messaging.
256 GB or 512 GB storage: The base MacBook Neo has only 256 GB of storage, which may fill up quickly with photos, videos, and games. For $100 more, you can get 512 GB. In comparison, the MacBook Air starts with 512 GB and can be configured with 1 TB, 2 TB, or 4 TB. You can always buy an external SSD to offload little-used data.
13.0-inch Liquid Retina display: The display is another significant difference. The MacBook Neo has a 13.0-inch display that shows slightly less content on screen than the MacBook Air’s 13.6-inch display—imagine losing about a half-inch of space vertically and horizontally. The MacBook Neo also lacks True Tone, which adjusts the display for ambient light conditions, and supports only sRGB color rather than Wide color (P3), so colors will be slightly less vibrant when viewing photos or videos, though this will be unnoticeable in most apps.
1080p FaceTime camera: The MacBook Neo’s webcam is several years behind the current 12-megapixel Center Stage camera that debuted with the M4 MacBook Air in 2025. It’s fine, but it is noticeably lower quality and lacks the Center Stage feature that keeps you in the frame as you move around. The MacBook Air’s camera also supports Desk View, which shows items underneath it, but that’s not a commonly used feature.
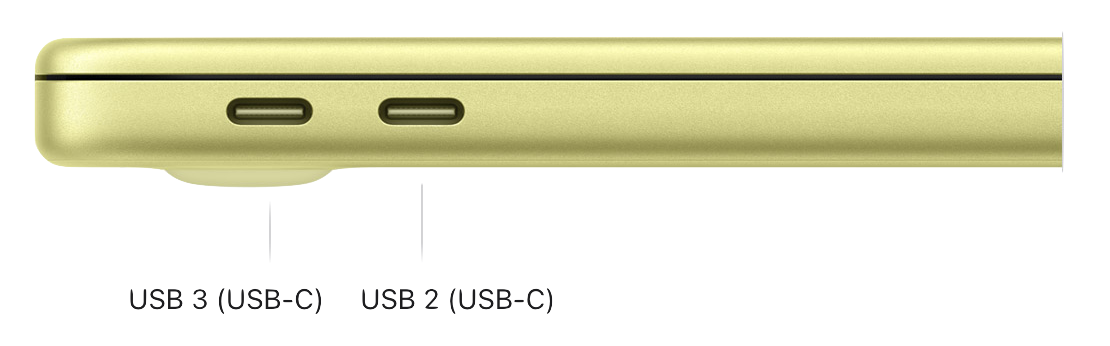
Two USB-C ports: Connectivity is another place where the MacBook Neo makes compromises. It offers two USB-C ports, but only the left one supports USB 3 at 10 gigabits per second; the right one supports only USB 2 at 480 megabits per second. You can use the left one for an external drive or a single 4K display; the right one is primarily useful for a keyboard, mouse, or printer. The MacBook Air, in comparison, has two 40 gigabits-per-second Thunderbolt 4 ports and supports up to two 6K displays. The MacBook Neo has to use one of its ports to charge, since it lacks the MagSafe charging port found on the MacBook Air.
Magic Keyboard: The $599 MacBook Neo has the same Magic Keyboard as the MacBook Air, but lacks keyboard backlighting for typing in the dark and Touch ID for authentication and Apple Pay support. Moving to the $699 model gets you Touch ID along with 512 GB of storage. All MacBook Air models have Touch ID, which is a convenience.
Multi-Touch Trackpad: The MacBook Neo uses Apple’s much older Multi-Touch trackpad with a physical click mechanism rather than pressure sensors and haptic click simulation in the MacBook Air’s Force Touch trackpad. Few people will miss Force Touch features like pressing deeply on a file in the Finder to open it in Quick Look.
Dual mics, dual speakers: For audio input and output, the MacBook Neo relies on a dual-mic array and a dual-speaker sound system. It will undoubtedly be fine, but it doesn’t match up to the MacBook Air’s three-mic array and four-speaker sound system. Both have 3.5 mm headphone jacks, or you can just use AirPods.
Wi-Fi 6E and Bluetooth 6: Although the MacBook Air has slightly newer Wi-Fi 7 support (both have Bluetooth 6), no one in the MacBook Neo’s target audience will notice the difference with Wi-Fi 6E. Few people have Wi-Fi 7 base stations yet anyway.
Battery life: Apple rates the MacBook Neo at 16 hours of video streaming and 11 hours of “wireless web” use, which qualifies it for “all-day” battery life. It’s respectable and probably sufficient for most situations, but well below the MacBook Air’s 18 and 15 hours on those benchmarks.
Size and weight: In terms of raw numbers, the MacBook Neo is slightly narrower and shallower than the MacBook Air—about a quarter of an inch— but essentially the same thickness (about half an inch) and weight (2.7 pounds). You wouldn’t notice the difference.
Who Should Consider the MacBook Neo
Apple is clearly aiming the MacBook Neo at specific audiences. Anyone working with a lot of apps at once, doing photo or video editing, playing high-end games, or using a bunch of peripherals will be better suited with the additional processing power, memory, and connectivity of the MacBook Air. And those with even more intensive workflows will gravitate to the MacBook Pro line.
But the MacBook Neo is meant to be a small, cute, and inexpensive laptop. It's entirely adequate for the kind of schoolwork that most K–12 students do: educational apps, online lessons, writing assignments, creating presentations, and conducting research. Its aluminum enclosure will withstand the rigors of daily student use, and the battery life should be sufficient for a full school day.
It would also be appropriate for budget-conscious adults with minimal computing needs. Many people do little more than browse the Web, check email, stream video, and use basic productivity apps. Those who spend most of their time in a handful of bundled Apple apps don’t need the performance of the MacBook Air.
However, we can’t recommend the MacBook Neo for most college students. Although it could handle basic word processing, Web browsing, and video streaming, college students can’t predict what they may need to do during their time in school, and it’s easy to imagine them needing to edit video, do data analysis, or work with 3D graphics. Plus, the limited port selection may be problematic for students needing to connect to external displays, storage drives, and other peripherals.
Although the same concerns apply to creative and business professionals, the MacBook Neo may be an economical travel laptop for someone who does most of their real work on a Mac mini or Mac Studio at the office. For keeping up with email, managing travel details on websites, and giving presentations, it should be more than sufficient and cheaper than most iPads with keyboards.
Pricing and Availability
The MacBook Neo costs $599 for the 256 GB model with Magic Keyboard (no Touch ID) or $699 for the 512 GB model with Touch ID. All configurations are limited to 8 GB unified memory, and there are no other build-to-order options. It comes in four colors—silver, blush, citrus, and indigo—with color-coordinated keyboards.
(Featured image by Apple)
Why Cloud Storage Isn’t a Backup
Do you think using Dropbox or iCloud Drive means your files are backed up? Wrong. Delete or corrupt a file, and that change syncs everywhere instantly. Here’s why cloud storage isn’t a backup—and what to do about it.

Many people assume that storing files in iCloud Drive, Box, Dropbox, Google Drive, or OneDrive means those files are backed up. After all, the files exist on remote servers maintained by large companies with professional IT teams and redundant storage. But that doesn’t mean they are backed up.
Cloud storage is tremendously useful and can play a valuable role in recovering from disasters, but it is not a backup. Understanding the difference could save you from a devastating data loss.
What Makes a Backup a Backup?
A true backup creates a separate copy of your files through a process that’s distinct from your normal saving. With cloud storage, saving is syncing—the moment you save a file (or it auto-saves), that exact version propagates everywhere. There’s no separate copy, just one file that exists in multiple places simultaneously.
With a real backup system like Time Machine, backing up is an independent operation. You work on your file, saving changes as you go, and separately, on its own schedule, Time Machine backs up that file. If something happens to that file at 2 PM, you can still recover it from the 1 PM backup.
Risks Not Mitigated by Cloud Storage
Why might you need a real backup? Computers and apps are significantly more reliable than they used to be, but they’re not perfect. Plus, human error is always a risk, and you can never discount the possibility of unexpected events.
Cloud storage won’t fully protect you from these scenarios:
Inadvertent deletion: It’s all too easy to delete important files or folders. With cloud storage, those deletions are synced across all your devices and the cloud. (Though hopefully you can pull them out of the trash—never empty it immediately after deleting files.)
Accidental changes: A misbehaving app could corrupt data in an important file, or, more likely, you could change or delete data within the file that you later decide was a mistake. With cloud storage, those changes sync instantly, making it difficult or impossible to revert.
Account compromise: Cloud storage is protected only by your password. If you don’t use a strong, unique password, an online thief could use it to access your account and delete or encrypt your files.
Account problems: Even if an attacker doesn’t compromise your account, if you lose the password, have billing issues, or do something that the provider considers a terms-of-service violation, you could be locked out of your account and all your files.
Ransomware: If malware encrypts all your files, those encrypted files will be synced to the cloud and become unrecoverable everywhere. Ransomware isn’t a significant problem on the Mac today, but that could change at any time.
How to Back Up Cloud Storage Files
The solution to these problems is not to stop using cloud storage, but to back up your cloud storage files just like you back up everything else. However, there are two things to keep in mind when backing up cloud storage.
First, verify that the local copies of your cloud storage files are being backed up. By default, the local versions of cloud-based files are stored in ~/Library/CloudStorage/ for everything but iCloud Drive, which puts files in the hidden folder ~/Library/Mobile Documents/. Time Machine automatically backs up your entire user folder, including cloud storage folders, but other backup apps may exclude them.
Second, cloud storage services can optionally store data only in the cloud to save local disk space, showing just placeholder icons on your Mac. These cloud-only files won’t be backed up by Time Machine or most other backup apps, though Carbon Copy Cloner can download them, back them up, and then evict the local data to save space.
How do you ensure cloud storage files are also kept locally? All cloud services offer an option to Control-click a folder or file and choose a command like Keep Downloaded, Make Available Offline, or Always Keep on This Device. That works, but requires manual intervention.
For all the major cloud storage services other than Box, you can also set a preference to keep files locally at all times:
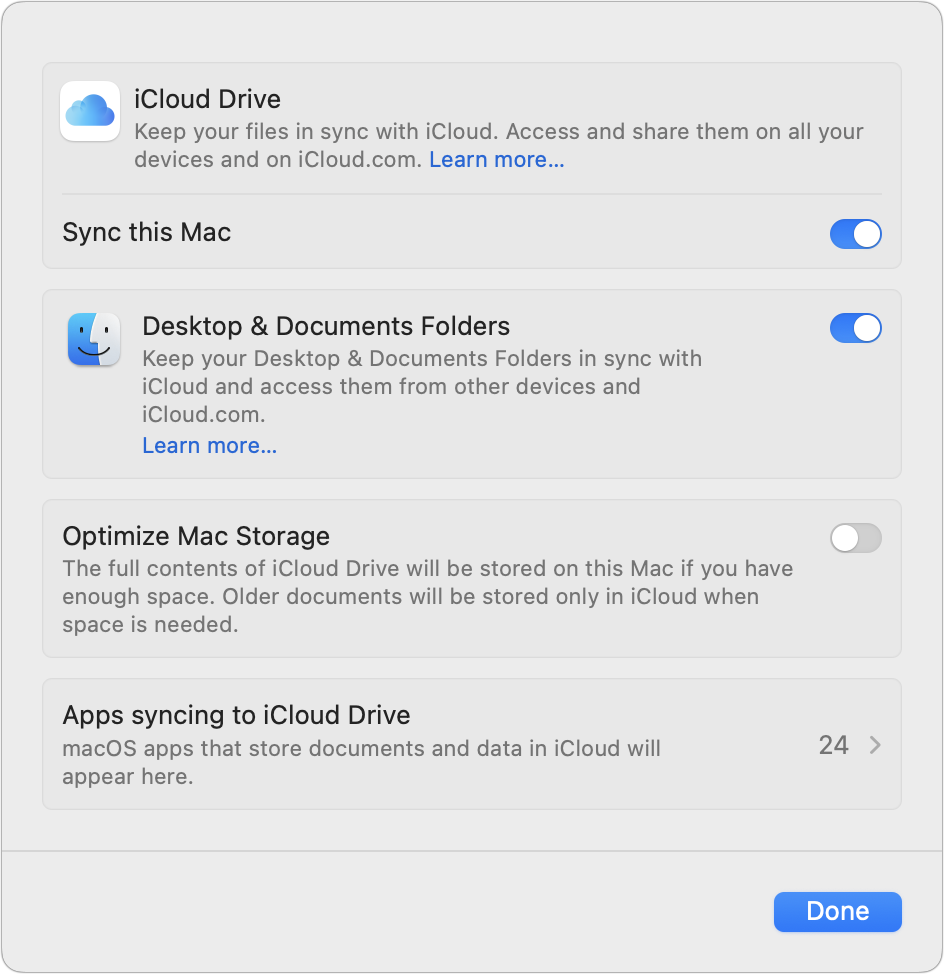
iCloud Drive: Turn off System Settings > Your Name > iCloud > iCloud Drive > Optimize Mac Storage.
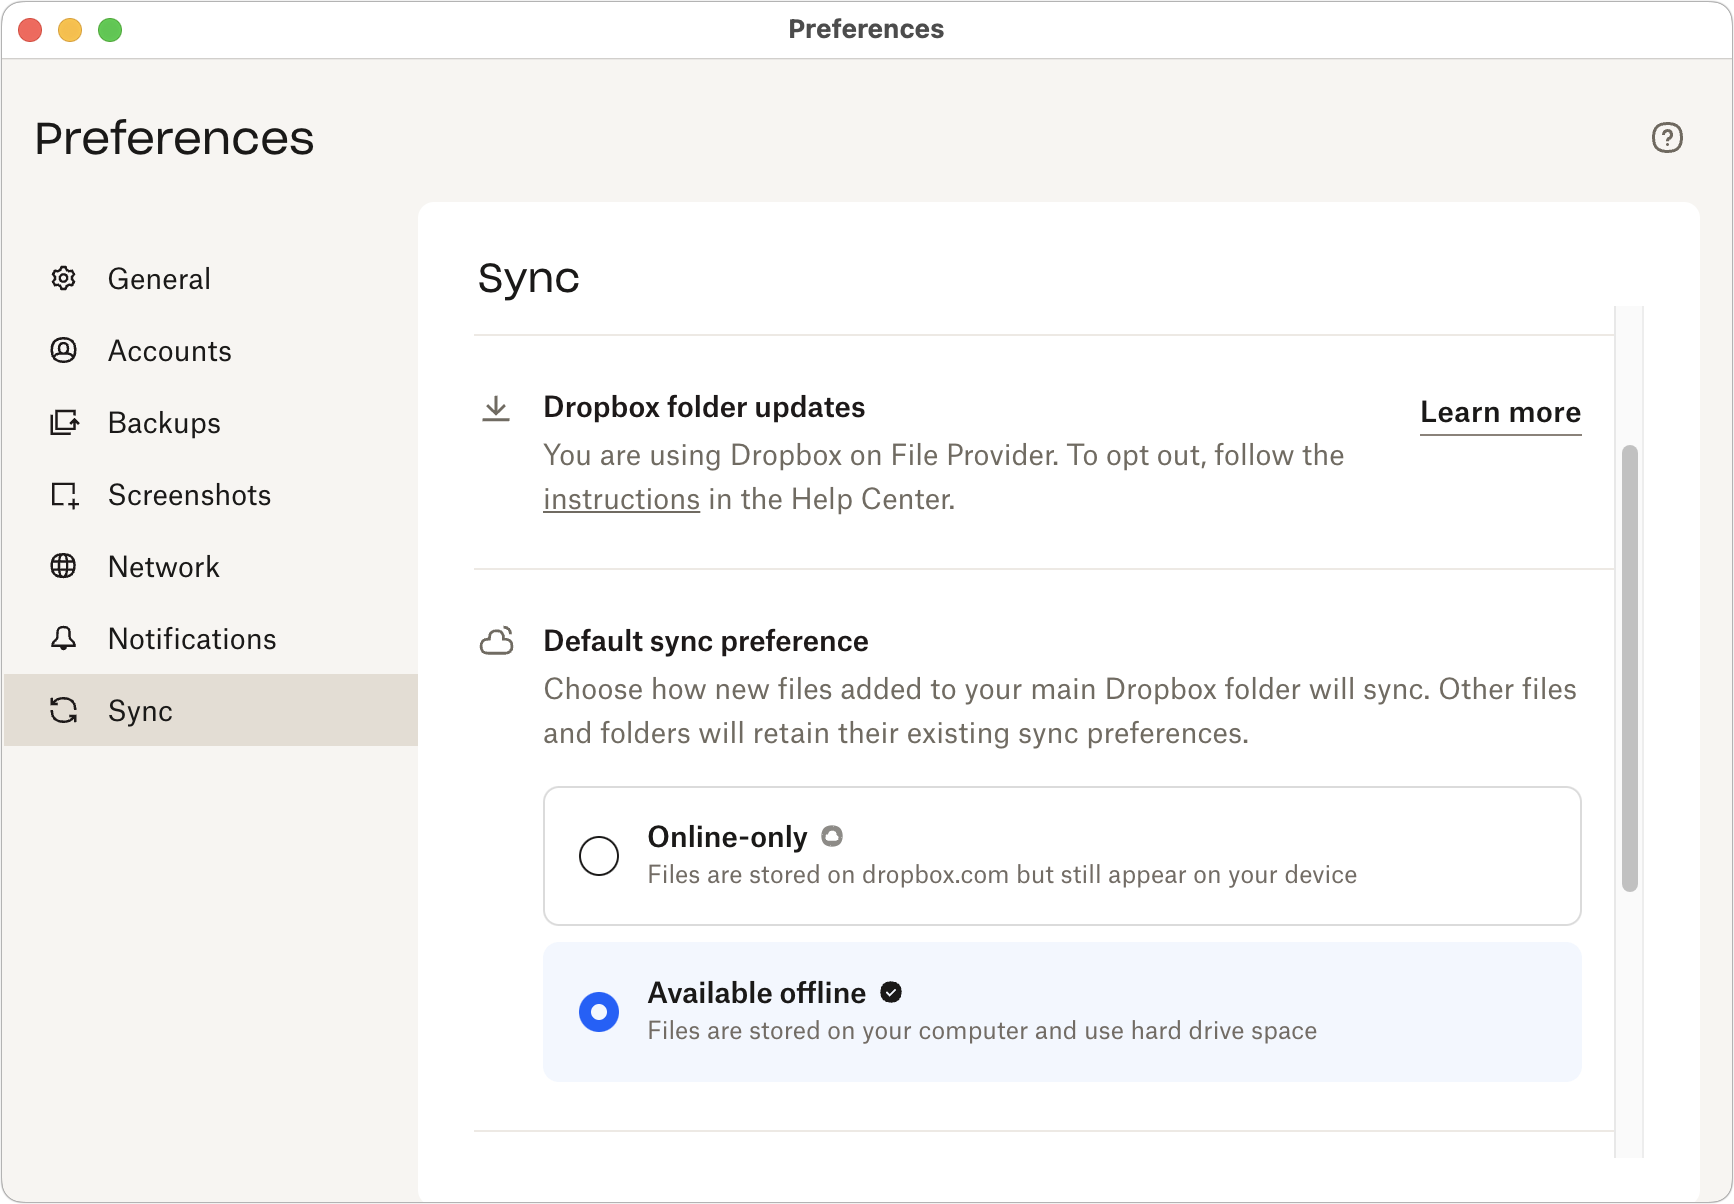
Dropbox: Click the Dropbox icon in the menu bar and then, in Dropbox > Account > Preferences > Sync, choose Available Offline for the Default Sync Preference. Note that this applies only to new files!
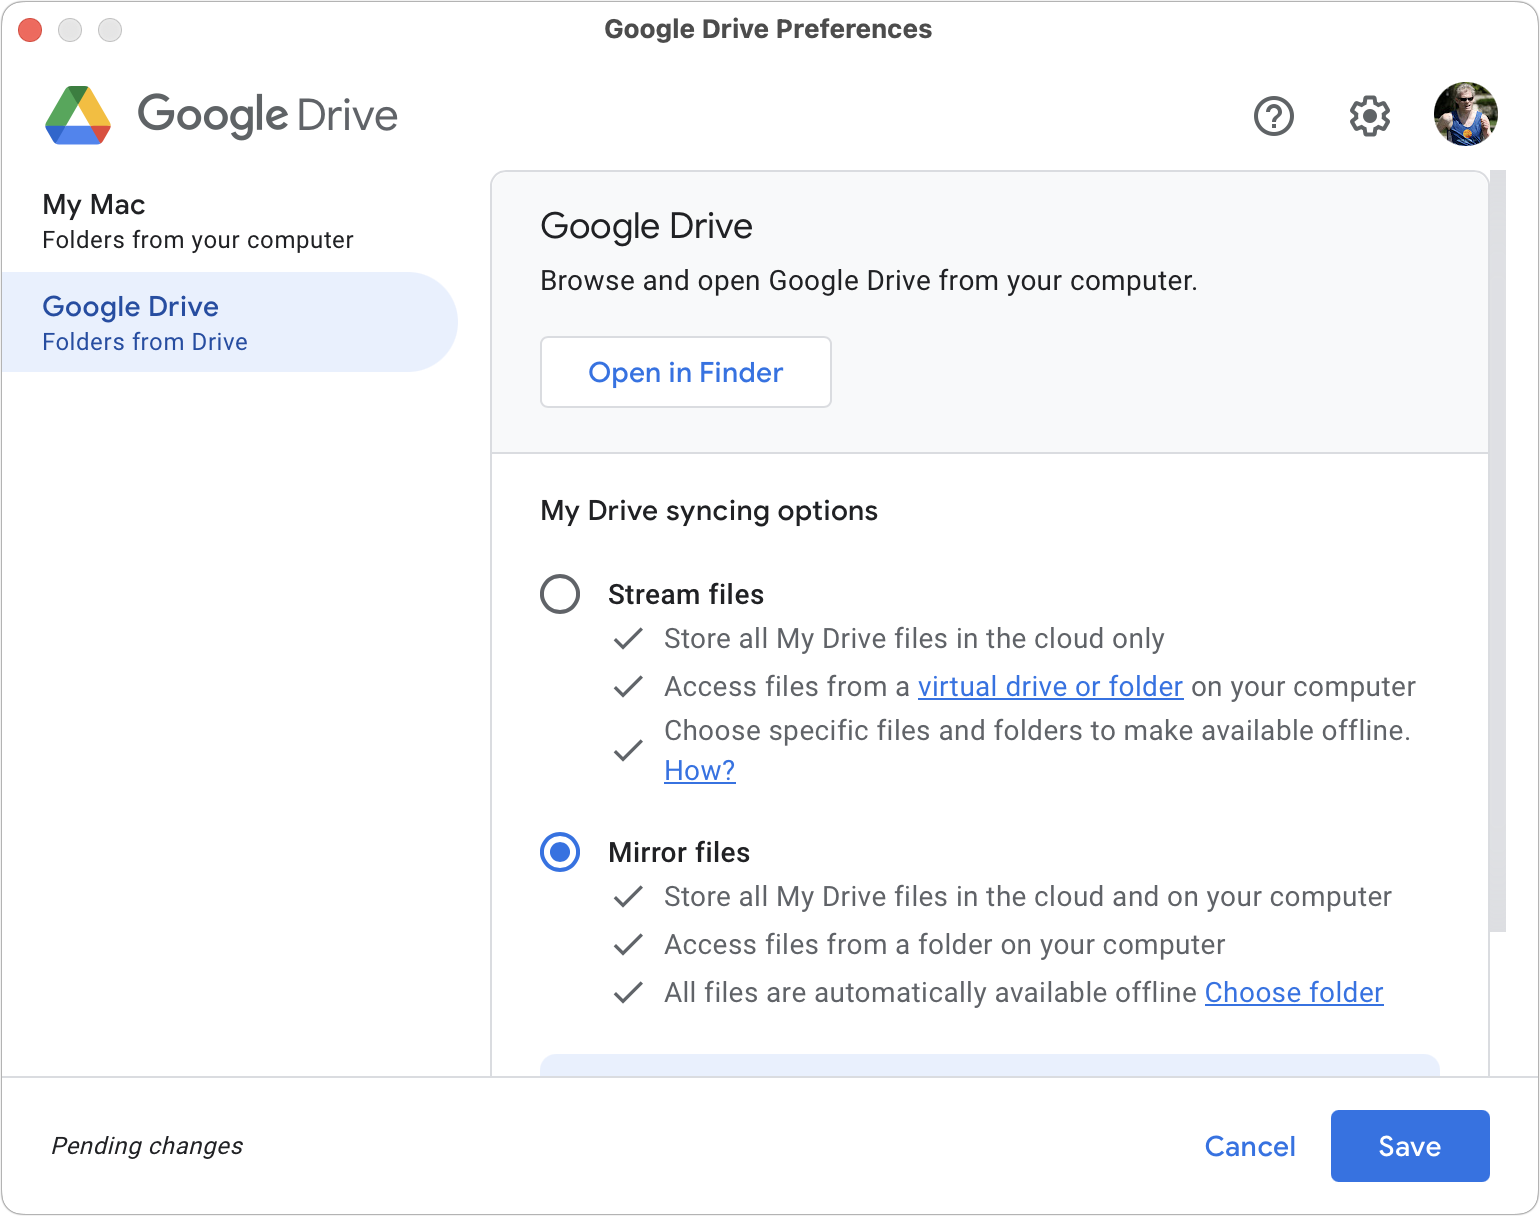
Google Drive: Click the Google Drive icon in the menu bar, click the gear menu, choose Preferences, click Google Drive, and select Mirror Files for the My Drive syncing options.
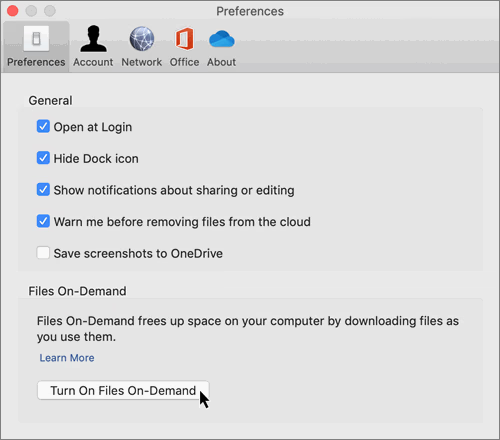
OneDrive: Click the OneDrive icon in the menu bar, click More, click Preferences, and in the Preferences screen, make sure Files On-Demand is turned off.
What About Version History?
Most cloud storage services other than iCloud Drive offer version history, allowing you to restore previous versions of changed or deleted files. Version history provides a safety net against inadvertent deletions or modifications, but it’s not a substitute for comprehensive backups. It has two notable limitations:
Time: Version history is typically limited to 30–180 days, depending on your plan. You might not realize you need a deleted file or that your database has become corrupted until after that window closes.
Trouble: Restoring many files from version history can be tedious compared to restoring from a proper backup. It might be fine for a file or two, but recovering from a more significant disaster might be difficult.
The Real Value of Cloud Storage
None of this means cloud storage is useless for disaster recovery. If your Mac fails, is stolen, or is destroyed in a fire, you can access all your cloud storage files as soon as you sign in to your account from a new or repaired Mac. You can even get to them from an iPhone or iPad. That also applies to Web apps like Google Docs, where data is never stored locally.
But cloud storage won’t protect against accidental deletion, file corruption, ransomware, or account issues. For that, you need separate, independent backups of all your files—including those stored in the cloud.
(Featured image by iStock.com/ismagilov)
Why Your Windows Reopen (Or Don’t) As You Expect
Frustrated when your Mac apps don’t remember their windows—or when they stubbornly reopen old documents? Two little-discussed settings control this behavior. Here’s how Apple’s Resume technology really works.

Have you noticed that when you restart your Mac or relaunch an app, your previous windows and documents sometimes reappear exactly as you left them, but at other times you’re greeted with a clean slate?
This behavior is controlled by Resume, a technology introduced in OS X 10.7 Lion back in 2011. Resume automatically reopens app windows and documents so you can pick up where you left off after a restart or app relaunch. Apple’s goal was to make macOS work more like iOS, which tries to preserve your place in apps. However, many Mac users found it confusing when apps opened old documents or appeared in unexpected positions when the number of displays changed. Some also objected to how long it took to open old documents that were not relevant to the task at hand. Apple quickly reversed course and made reopening apps and windows optional.
Users are much more familiar with how the iPhone and iPad work now, so you may wish your Mac apps remembered their open documents and window positions. Various settings control this behavior, but it can be hard to find them and understand what they’ll do. Let’s explore how Resume works and how you can make it do what you want.
First, note that Resume operates in two distinct situations. One applies only at restart or logout, and you decide at that moment. The other governs what happens every time you quit and relaunch an app and is controlled by a persistent system setting.
The “Reopen Windows” Option at Restart
Whenever you restart, shut down, or log out of your Mac, macOS asks whether you want to reopen your apps and windows when you log back in. You’ve undoubtedly seen the checkbox in the confirmation dialog: “Reopen windows when logging back in.” When the checkbox is selected, macOS dutifully relaunches the currently running apps after you log in, putting you back where you were. If you uncheck it, your Mac will start fresh, without reloading previously open apps.
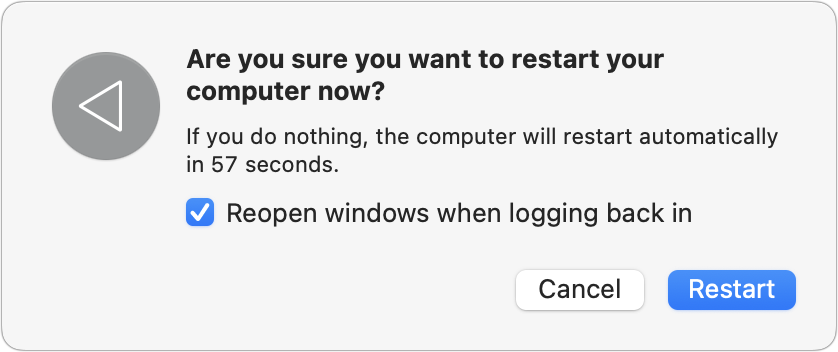
macOS remembers how you’ve selected this checkbox, so if it’s checked when you click Restart, it will also be selected the next time you restart, and vice versa. If you ever perform a forced restart or skip the dialog by holding the Option key when choosing Restart or Shut Down, macOS uses the last known state of that checkbox on the next startup.
Many users either love or hate the “Reopen windows” behavior. For those who enjoy having their entire workspace restored after a reboot, keeping that checkbox checked makes sense. For others, including many IT professionals, the point of a reboot is to start fresh. Pick whichever behavior you prefer.
Controlling Resume When Relaunching Apps
Resume also governs what happens each time you quit and reopen an individual app. This behavior is controlled by a switch in System Settings > Desktop & Dock under the Windows section, labeled “Close windows when quitting an application.”
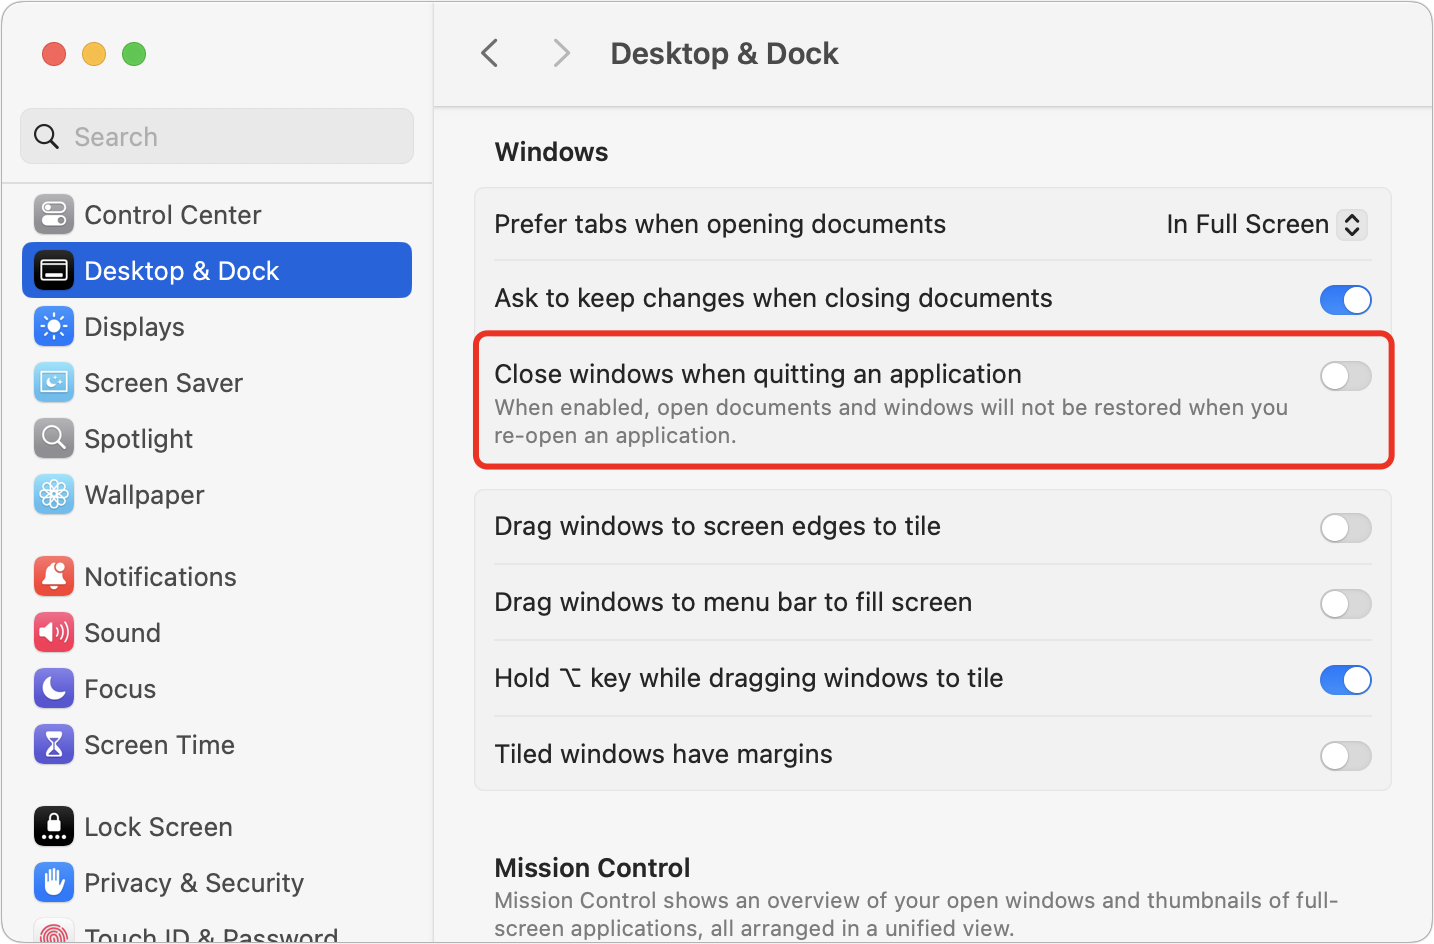
When this “Close windows” switch is turned on—it’s the default—macOS will close all windows and discard their restorable state before allowing an app to quit. Because macOS has closed the windows before quitting, there’s nothing for Resume to restore when you next launch that app. Effectively, the app will always start fresh with no memory of past windows (unless it has its own session-restore mechanism).
On the other hand, when this option is turned off, quitting an app will not discard its windows, so when you reopen the app later, Resume will automatically restore whatever documents and windows you had open, putting you right back where you left off.
There are three main scenarios where Resume can have effects that you may or may not like:
Document-centric apps: With these apps, like Pages and Numbers, you work on individual documents, each of which opens in its own window. When “Close windows” is enabled, apps start fresh on each launch; when it’s disabled, the documents you were working on when you quit reopen automatically.
Unsaved documents: As a corollary to the previous scenario, if you have unsaved documents open when “Close windows” is on, you’ll be prompted to save your changes before the window is closed. When “Close windows” is off, you won’t be prompted because those documents—with all their unsaved changes—will open automatically at the next launch.
Window-based apps: Other apps, like Mail and Messages, display their content in a main window. They’ll open this window regardless of the “Close windows” setting. However, Resume determines where that window appears. If “Close windows” is turned on, macOS does not remember which display or Space the window occupied, so the app often reopens on the primary display, even if that’s not where it was when it quit.
Most users have no idea that this “Close windows” setting exists or what it does. If you’re irritated by having to reopen Pages documents you were working on before or reposition Mail’s window after every relaunch, make sure “Close windows” is turned off. Conversely, leave it on if you want apps to start fresh.
Exceptions and Caveats
For most people, controlling Resume using the “Reopen windows” checkbox and the “Close windows” switch is sufficient. However, some people may want more control or wonder why some apps ignore those settings.
Nonstandard apps: Everything we’ve said so far describes the behavior of standard apps using Apple’s recommended development frameworks and tools. Some apps don’t use Apple tools or play by Apple’s rules—we’re looking at you, Microsoft—and will ignore the Resume settings. Don’t be surprised if Word, Excel, and PowerPoint fail to act as described.
Turn off Resume per launch: If you set apps to restore their windows by turning off the “Close windows” switch, you can override that on a one-off basis in some apps by holding the Shift key down as they launch. This trick doesn’t work in all apps, but it’s worth trying.
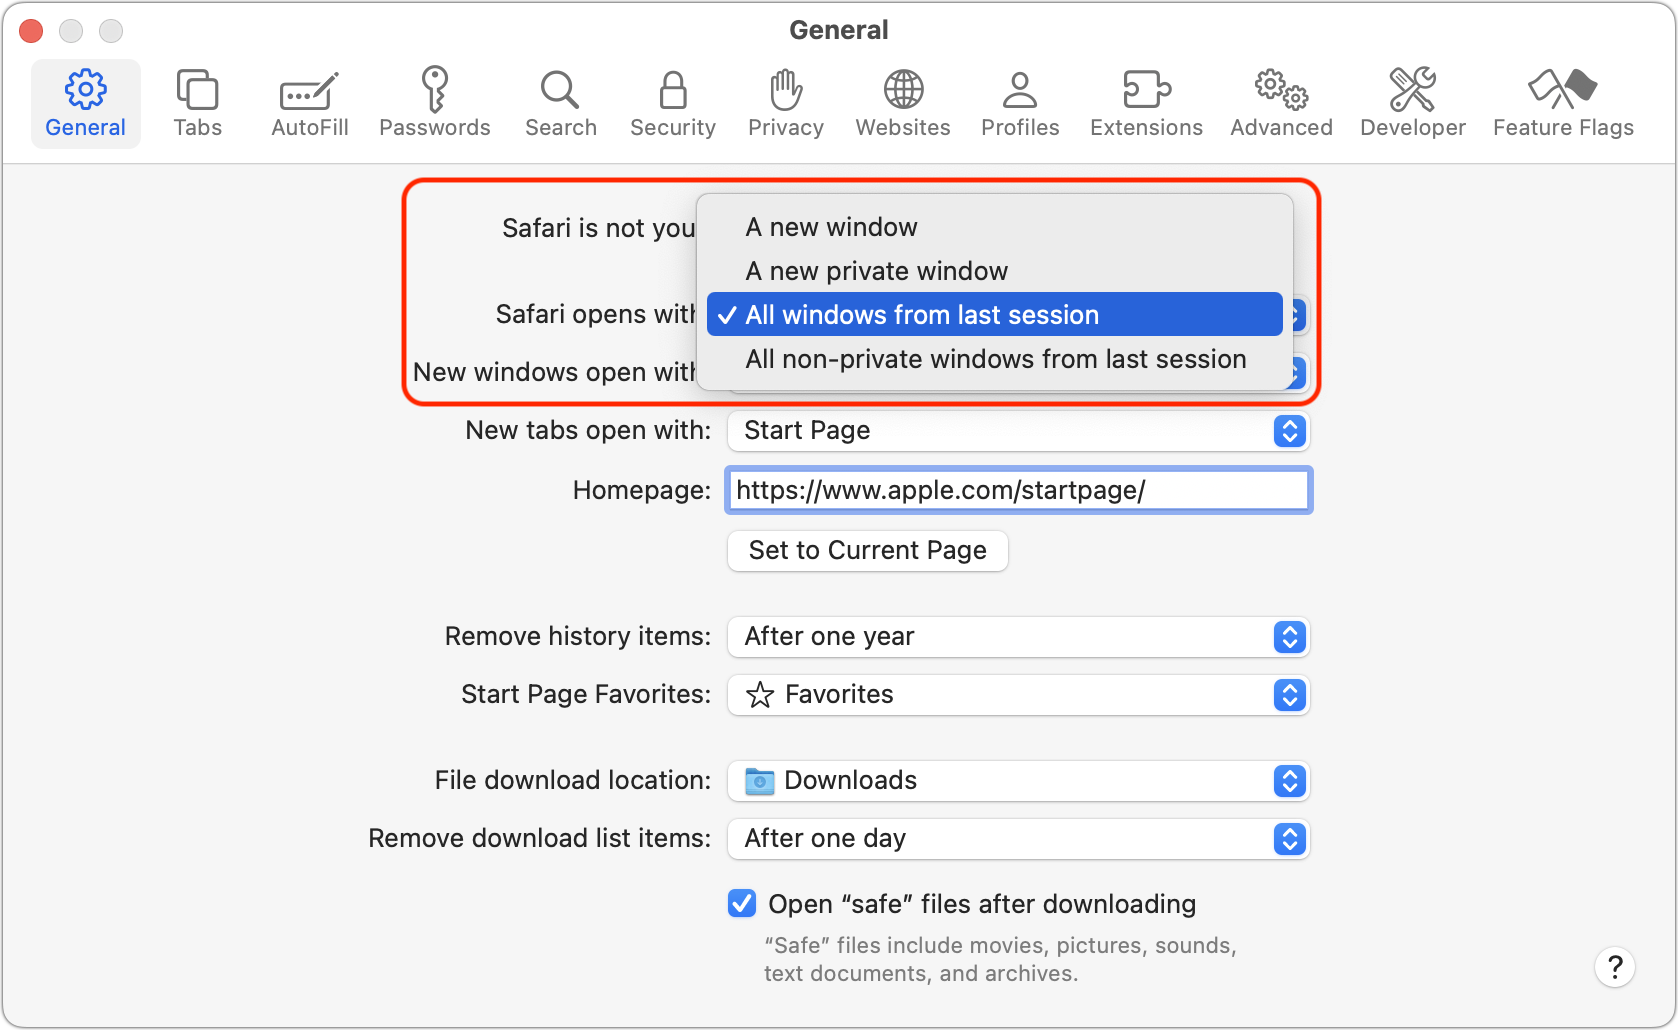
Custom session restore: Some apps manage session restoration on their own, most notably Safari and apps built with the Electron framework, such as Slack, Discord, and Notion. For instance, in Safari > Settings > General > Safari opens with, you can choose a new window, a new private window, all windows from the last session, or all non-private windows from the last session. With such apps, look for internal settings that control their behavior.
Login Items: Even if you deselect “Reopen windows” when restarting, apps and documents that you’ve added as login items in System Settings > General > Login Items & Extensions > Open at Login will still open. Think of this as a manual Resume—you’ll restart to a preset workspace, not to the way things were when you restarted. Some software may also install helper apps that control what appears at launch.
Full-screen apps and Spaces: Apps that were last used in full-screen mode reopen into their own Spaces when “Close windows” is disabled. After a restart or relaunch, the app may appear not to have reopened because it is occupying a separate Space that is currently not visible.
In practice, Resume comes down to a simple set of choices:
If you want your workspace restored after a restart, select “Reopen windows when logging back in.” Ensuring that apps—even if they’re set as login items—open full-screen or in particular Spaces also requires “Close windows when quitting an application” to be turned off.
If you want apps to remember documents (even unsaved documents), window positions, and displays when you quit and relaunch them, turn off “Close windows.”
If you want a clean slate, deselect “Reopen windows” and leave “Close windows” turned on.
When windows don’t appear as you expect, check these two settings as your first troubleshooting step.
(Featured image by iStock.com/BigNazik)
Be Very Careful with AI Agents!
AI agents like OpenClaw promise to automate tedious tasks, but recent security vulnerabilities highlight the dangers of using them. Learn the risks and how to protect yourself—and your organization—if you choose to use an agent.

AI agents—software that can take actions on your behalf using artificial intelligence—are having a moment. The appeal is obvious: imagine a robot butler that triages your inbox, manages your calendar, and handles tedious tasks while you focus on more important work.
That’s the promise driving the recent surge in popularity of OpenClaw (formerly known as Clawdbot and Moltbot), which is now all the rage in tech circles. Token Security found that at least one person is using it at nearly a quarter of its enterprise customers, mostly running from personal accounts. That’s a shadow IT nightmare—employees connecting work email and Slack to an unsanctioned tool that IT doesn’t know about and can’t monitor. Whether you’re an individual tempted by OpenClaw’s promise or a manager wondering what your users are up to, you need to understand the risks these AI agents pose.
OpenClaw is an AI agent built around “skills”—installable plugins that let it integrate with your messaging apps, email, calendar, and more. You communicate with OpenClaw via Messages, Slack, WhatsApp, and similar apps. Because it’s open source, you’ll need to provide your own API keys for AI services like OpenAI or Anthropic, which means ongoing costs that can add up quickly—people have reported spending $10–$25 per day.
The more serious problem? Security researchers have discovered serious vulnerabilities, including misconfigured instances exposed to the internet that leak credentials, API keys, and private messages, and a supply chain vulnerability where malicious skills uploaded to the ClawdHub library can execute arbitrary commands on users’ systems. Even beyond specific bugs, OpenClaw’s fundamental design encourages users to grant broad access to sensitive accounts.
Why AI Agents Are Risky
Security concerns aren’t unique to OpenClaw—they apply to any AI agent that acts on a user’s behalf. Here’s what’s at stake:
Credential exposure: For an AI agent to send emails, manage your calendar, or post to Slack, it needs your authentication tokens or login credentials. If the agent software stores these credentials insecurely, or an attacker gains control, they could be exposed.
Prompt injection: AI agents work by following instructions, but they can’t easily distinguish between prompts and data in the content they use. A class of attacks called “prompt injections” trick AI systems by hiding malicious content in emails, websites, or documents that will be processed. An attacker could embed instructions in an email that would cause your agent to search for and forward email messages containing passwords or financial data, follow links to malware sites, or take other harmful actions. There is currently no foolproof defense against this class of attack.
Data exfiltration: An AI agent with access to your email and your computer’s filesystem could be manipulated to extract information from elsewhere on your computer—financial data, customer lists, or personal details—and send it to an attacker.
Unvetted extensions: OpenClaw and similar AI agents let users install “skills” or plugins to extend functionality. Libraries that allow users to share custom skills often have minimal or no security vetting, making it easy for attackers to submit poisoned skills. Installing such a skill could grant malicious code access to everything your agent can touch.
Exposed control interfaces: Security researchers found OpenClaw control servers exposed on the Internet, potentially leaking API keys, VPN credentials, and conversation histories. This risk is unique to OpenClaw at the moment, but future AI agents may suffer from similar vulnerabilities, particularly as they’re adopted by less technically savvy users.
How to Reduce Your Risk
We’ll come right out and say it: we strongly recommend against installing OpenClaw or other AI agents on your Mac. In a year or so, Apple may have updated Siri to provide many of these capabilities with significantly stronger privacy and security. But for now, just say no.
If you decide to use AI agents despite these risks, here are practical steps to protect yourself:
Use dedicated accounts: When possible, create separate accounts specifically for agent use rather than linking your primary personal or work accounts.
Limit permissions: Grant the agent access only to accounts it absolutely needs. If you only want help with your calendar, don’t also connect your email and messaging services.
Avoid connecting sensitive services: Never connect anything involving money, healthcare, or confidential business information. The liability is too high if something goes wrong.
Review agent actions: If the platform offers logs or activity feeds, check them regularly. Look for unexpected messages sent, files accessed, or connections made.
Vet extensions carefully: Don’t install skills or plugins from unknown sources, and even with known libraries, look for evidence of others using and reviewing the skills. Treat skills like any other software you’d install on your computer.
Keep software updated: Security patches for OpenClaw and similar tools address known vulnerabilities. If you’re running an agent, keep it up to date.
Run agents in isolated environments: Technical users should consider running agents in sandboxed environments or virtual machines to limit potential damage.
If you run a business, you should assume that some employees have already installed OpenClaw or will soon, and may have connected their work email and Slack accounts without realizing the associated risks. Here’s what you can do:
Educate before it’s a problem: Proactively explain the risks to employees. People are more receptive before they’ve already invested time setting something up.
Update acceptable use policies: Make clear that connecting work accounts to unsanctioned AI agents is prohibited, and explain why.
Offer sanctioned alternatives: If employees want AI assistance, point them toward safer options that don’t require handing over credentials to sensitive accounts.
What About Claude Cowork and OpenAI Codex?
Not all AI agent platforms carry the same level of risk. Anthropic’s Claude Cowork and OpenAI’s Codex take a different architectural approach from OpenClaw. Rather than requesting authentication tokens for your email, messaging, and other personal services, they operate within their own controlled, sandboxed environments. These systems work primarily with files, code, and data you explicitly place into their workspace, which substantially limits the fallout from an attacker gaining some level of control.
This containment approach reduces risk, but does not eliminate it. Prompt injection remains a concern whenever an AI system processes untrusted content, even inside a sandbox. An AI agent analyzing a malicious document could still be manipulated into taking unintended actions within its allowed environment. Similarly, any code generated by these systems—particularly code that touches the network or executes system commands—should be reviewed carefully to make sure it hasn’t been compromised by prompt injection.
The key distinction is scope. Claude Cowork and Codex are designed to operate within a defined workspace, whereas tools like OpenClaw require standing access to your most sensitive accounts. From a security perspective, a compromised sandbox is a recoverable incident; a compromised email or messaging account may not be.
The Bottom Line
AI agents promise a lot and may provide genuine convenience, but at a cost beyond just paying for API tokens. Before you or anyone in your organization connects an AI agent to sensitive accounts, consider: What’s the worst that could happen if this system were compromised by an attacker? If the answer involves passwords being stolen, private email being exposed, or photos being posted to social media without your knowledge, proceed with extreme caution. If you can imagine a way financial accounts could be accessed or business data stolen, don’t proceed at all.
(Featured image by iStock.com/Thinkhubstudio)
What Can You Do With the iPhone’s Action Button? Nearly Anything!
Your iPhone’s Action button can do much more than toggle Silent Mode. Try it for quick translations or voice memos—or explore the many options in Controls and Shortcuts to trigger nearly any action with a long press.
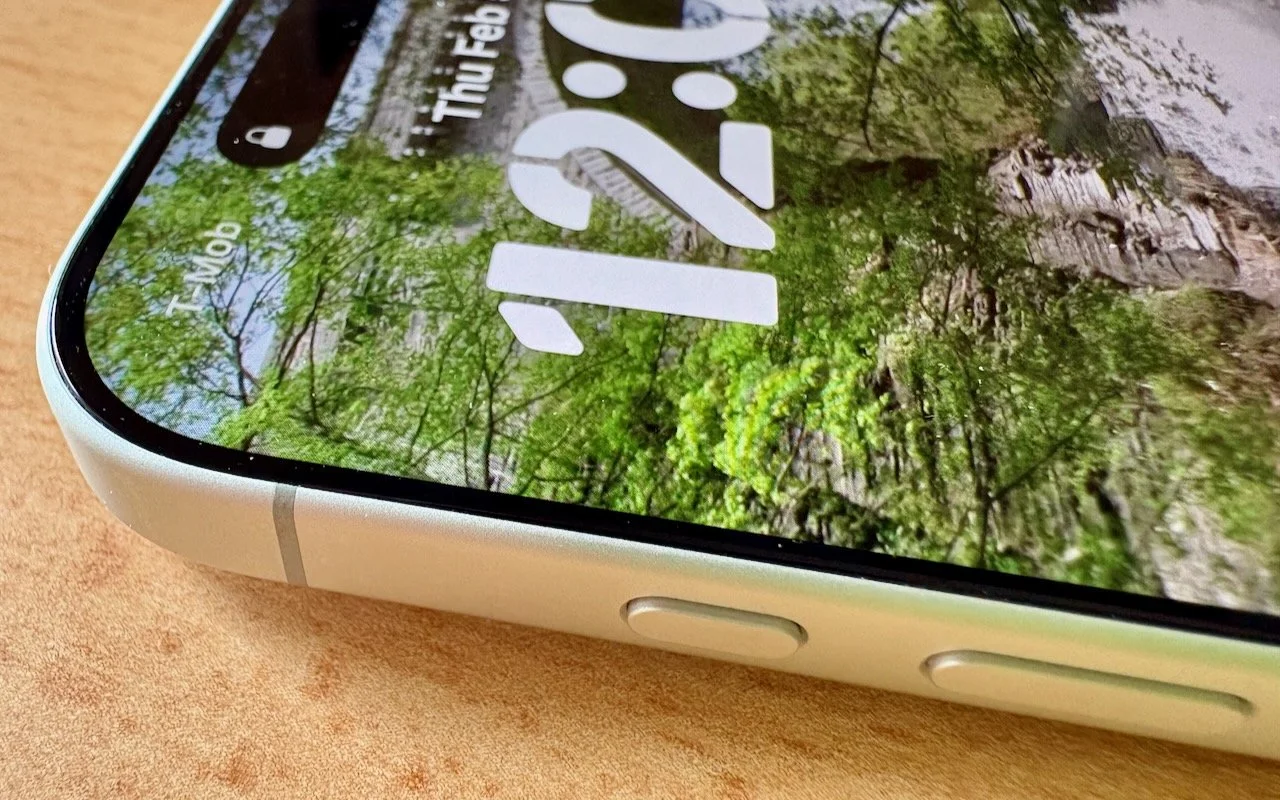
Starting with the iPhone 15 Pro and Pro Max, Apple replaced the Ring/Silent switch on the top-left edge of the iPhone with the Action button, making the new button standard across the iPhone 16 and iPhone 17 lineups in subsequent years. The Action button is a dedicated hardware button you can configure to perform one of many different tasks. Although Apple prompts everyone setting up a new iPhone to configure the Action button, our experience is that many people haven’t integrated it into their everyday usage.
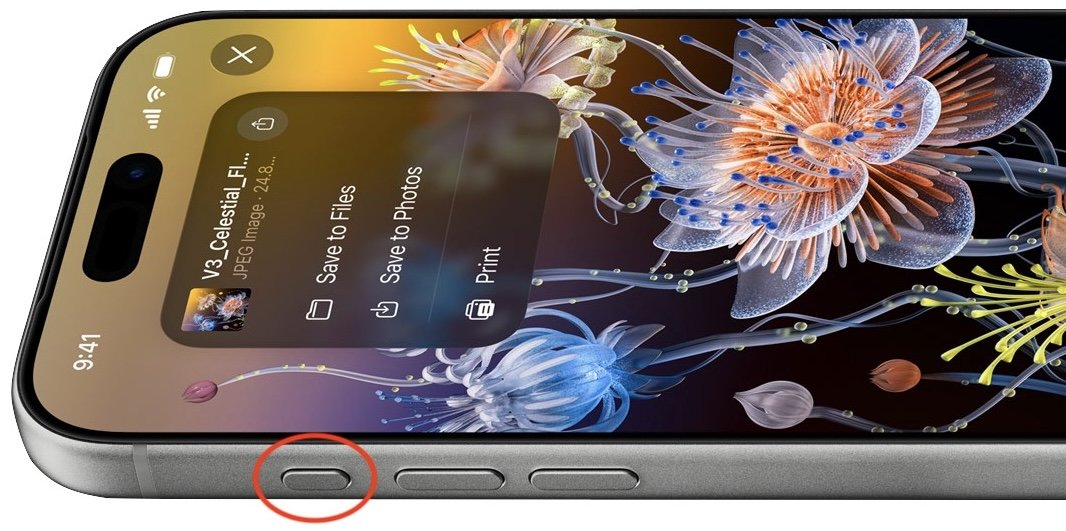
Taking advantage of the Action button isn’t hard, but there are obstacles. The Ring/Silent switch had only one function, whereas the Action button offers so many options that it’s easy to fall prey to decision paralysis. Also, because the Action button is configurable, it behaves differently even if you leave it set to Silent Mode. The Ring/Silent switch was a physical switch that also showed its state with an orange indicator. With the Action button, you can’t tell at a glance if Silent Mode is on, and activating it requires a relatively long press-and-hold. Finally, the Action button’s ultimate power lies in its Controls and Shortcuts options, but many users are unaware of the wide-ranging possibilities these unlock.
So let’s look at how to make the most of the Action button. To configure the Action button, go to Settings > Action Button and swipe through the choices. The choice on screen when you exit Settings will be active. Although there are no bad choices here, many of the options Apple provides can be activated just as easily through Control Center or Siri, so you might not want to dedicate the Action button to them.
Silent Mode: Toggle call and alert sounds on and off. This is the default setting, but unless you regularly need to toggle the ringer, it’s not worth dedicating the Action button to such a seldom-used option. You can toggle Silent Mode in Control Center just as easily.
Focus: Activate or switch Focus modes such as Do Not Disturb. We recommend using Focus sparingly because it can block desired notifications, but if you’re a fan, the Action button might be a good way to switch between them. Focus modes are also easy to select in Control Center and turn on with “Siri, turn on Do Not Disturb.”
Camera: Launch the Camera app. If your iPhone has the Camera Control (as do all Action button-equipped models except the iPhone 15 Pro/Pro Max and iPhone 16e), the Camera Control is the best way to open the Camera, but the Action button might still be helpful for opening the Camera app to a specific mode: Photo, Selfie, Video, Portrait, or Portrait Selfie.
Visual Intelligence: Launch Apple’s AI-powered object recognition feature. Again, pressing and holding the Camera Control (if available) is a better way to access Visual Intelligence.
Flashlight: Turn the flashlight on or off. This may be a good choice if you use the flashlight regularly, but if so, you’re probably already accustomed to tapping its icon on the iPhone’s Lock Screen. If your hands are too full, try “Siri, turn on the flashlight.”
Voice Memo: Start recording audio in the Voice Memos app. If you use Voice Memos heavily, you may like this use of the Action button. Alternatively, just say, “Siri, record a voice memo.”
Recognize Music: Use Shazam to identify music that’s playing nearby or on your iPhone. Another way to invoke Shazam quickly is to ask, “Siri, what’s playing?”
Translate: Starts listening to translate between the default languages you set up in the Translate app. This use of the Action button is a great shortcut if you’re traveling in another country and need quick translations, but most people don’t need it every day.
Magnifier: Launch the Magnifier app to make it easier to see tiny text and small objects. Those with low vision may particularly appreciate this use of the Action button, but the Magnifier app is also easily accessed from a Control Center button or by saying, “Siri, open Magnifier.”
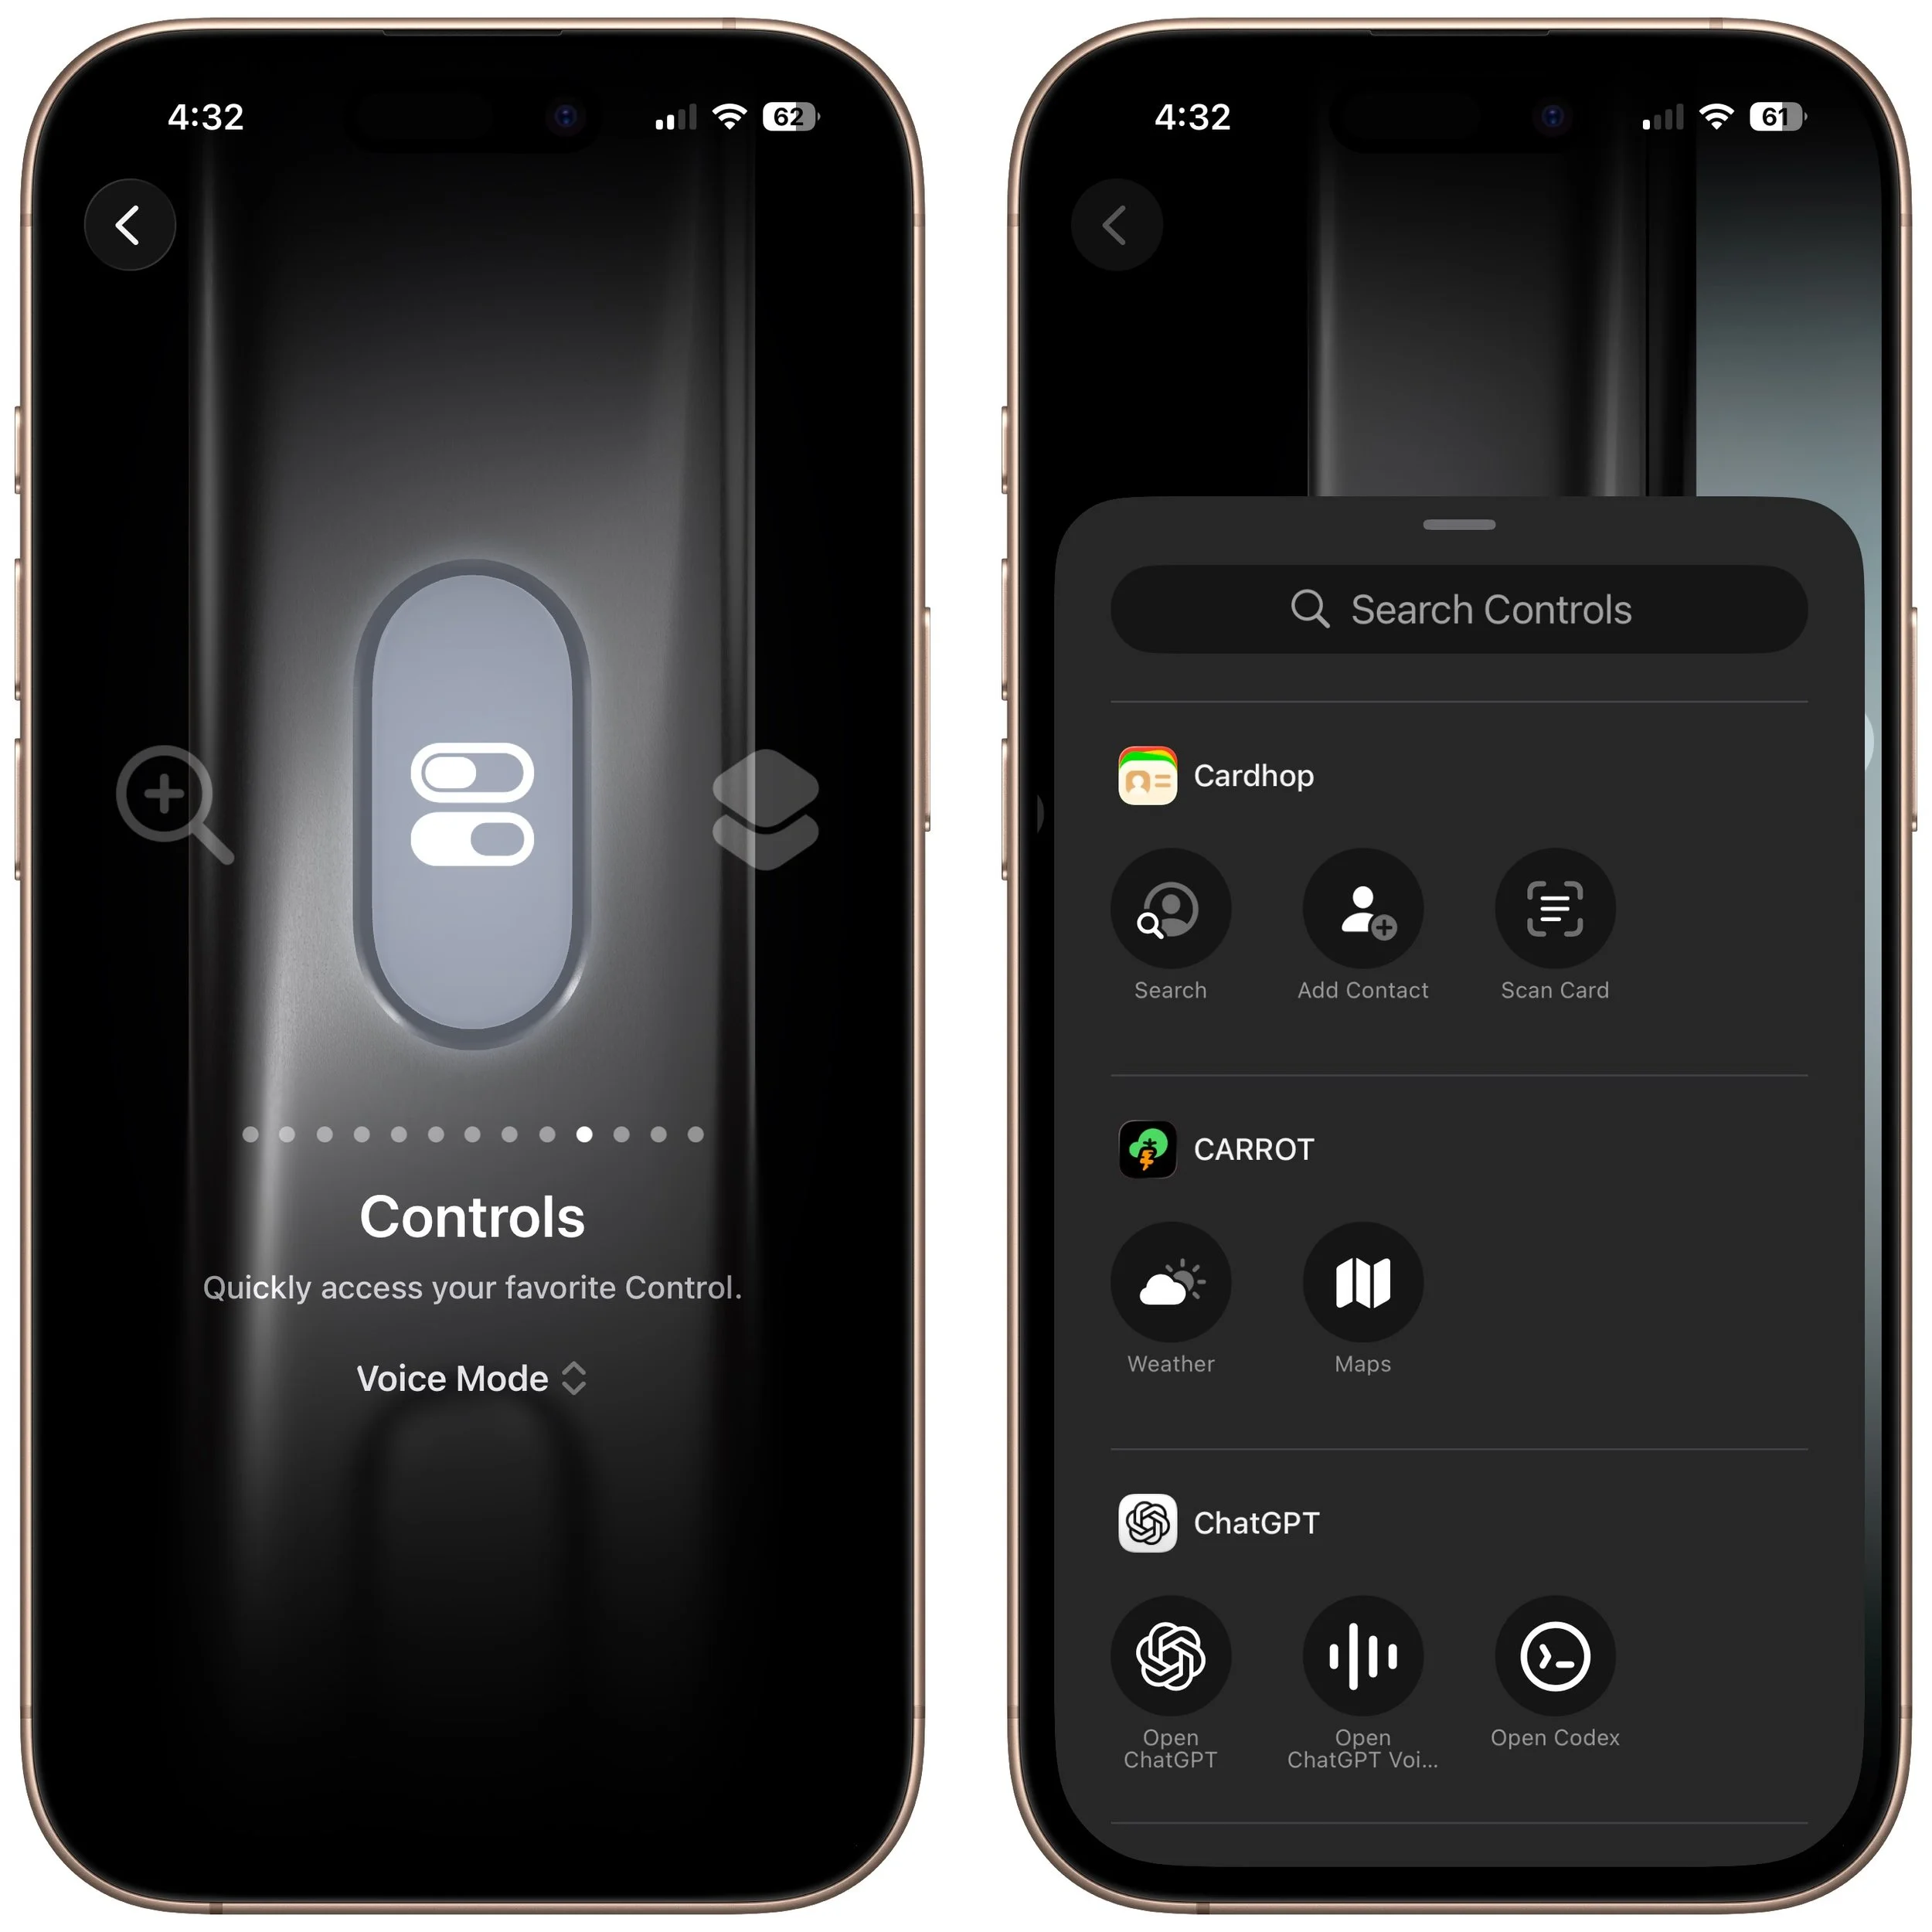
Controls: Invoke any Control Center control. Here’s where things get interesting! Starting with iOS 18, iPhone apps can create controls in Control Center. With the Controls option, you can choose any available control, so you could have the Action button start a ChatGPT conversation, add a task to TickTick, create a new event in BusyCal, or myriad other options. We strongly encourage you to scroll through the available controls to see if any catch your interest.
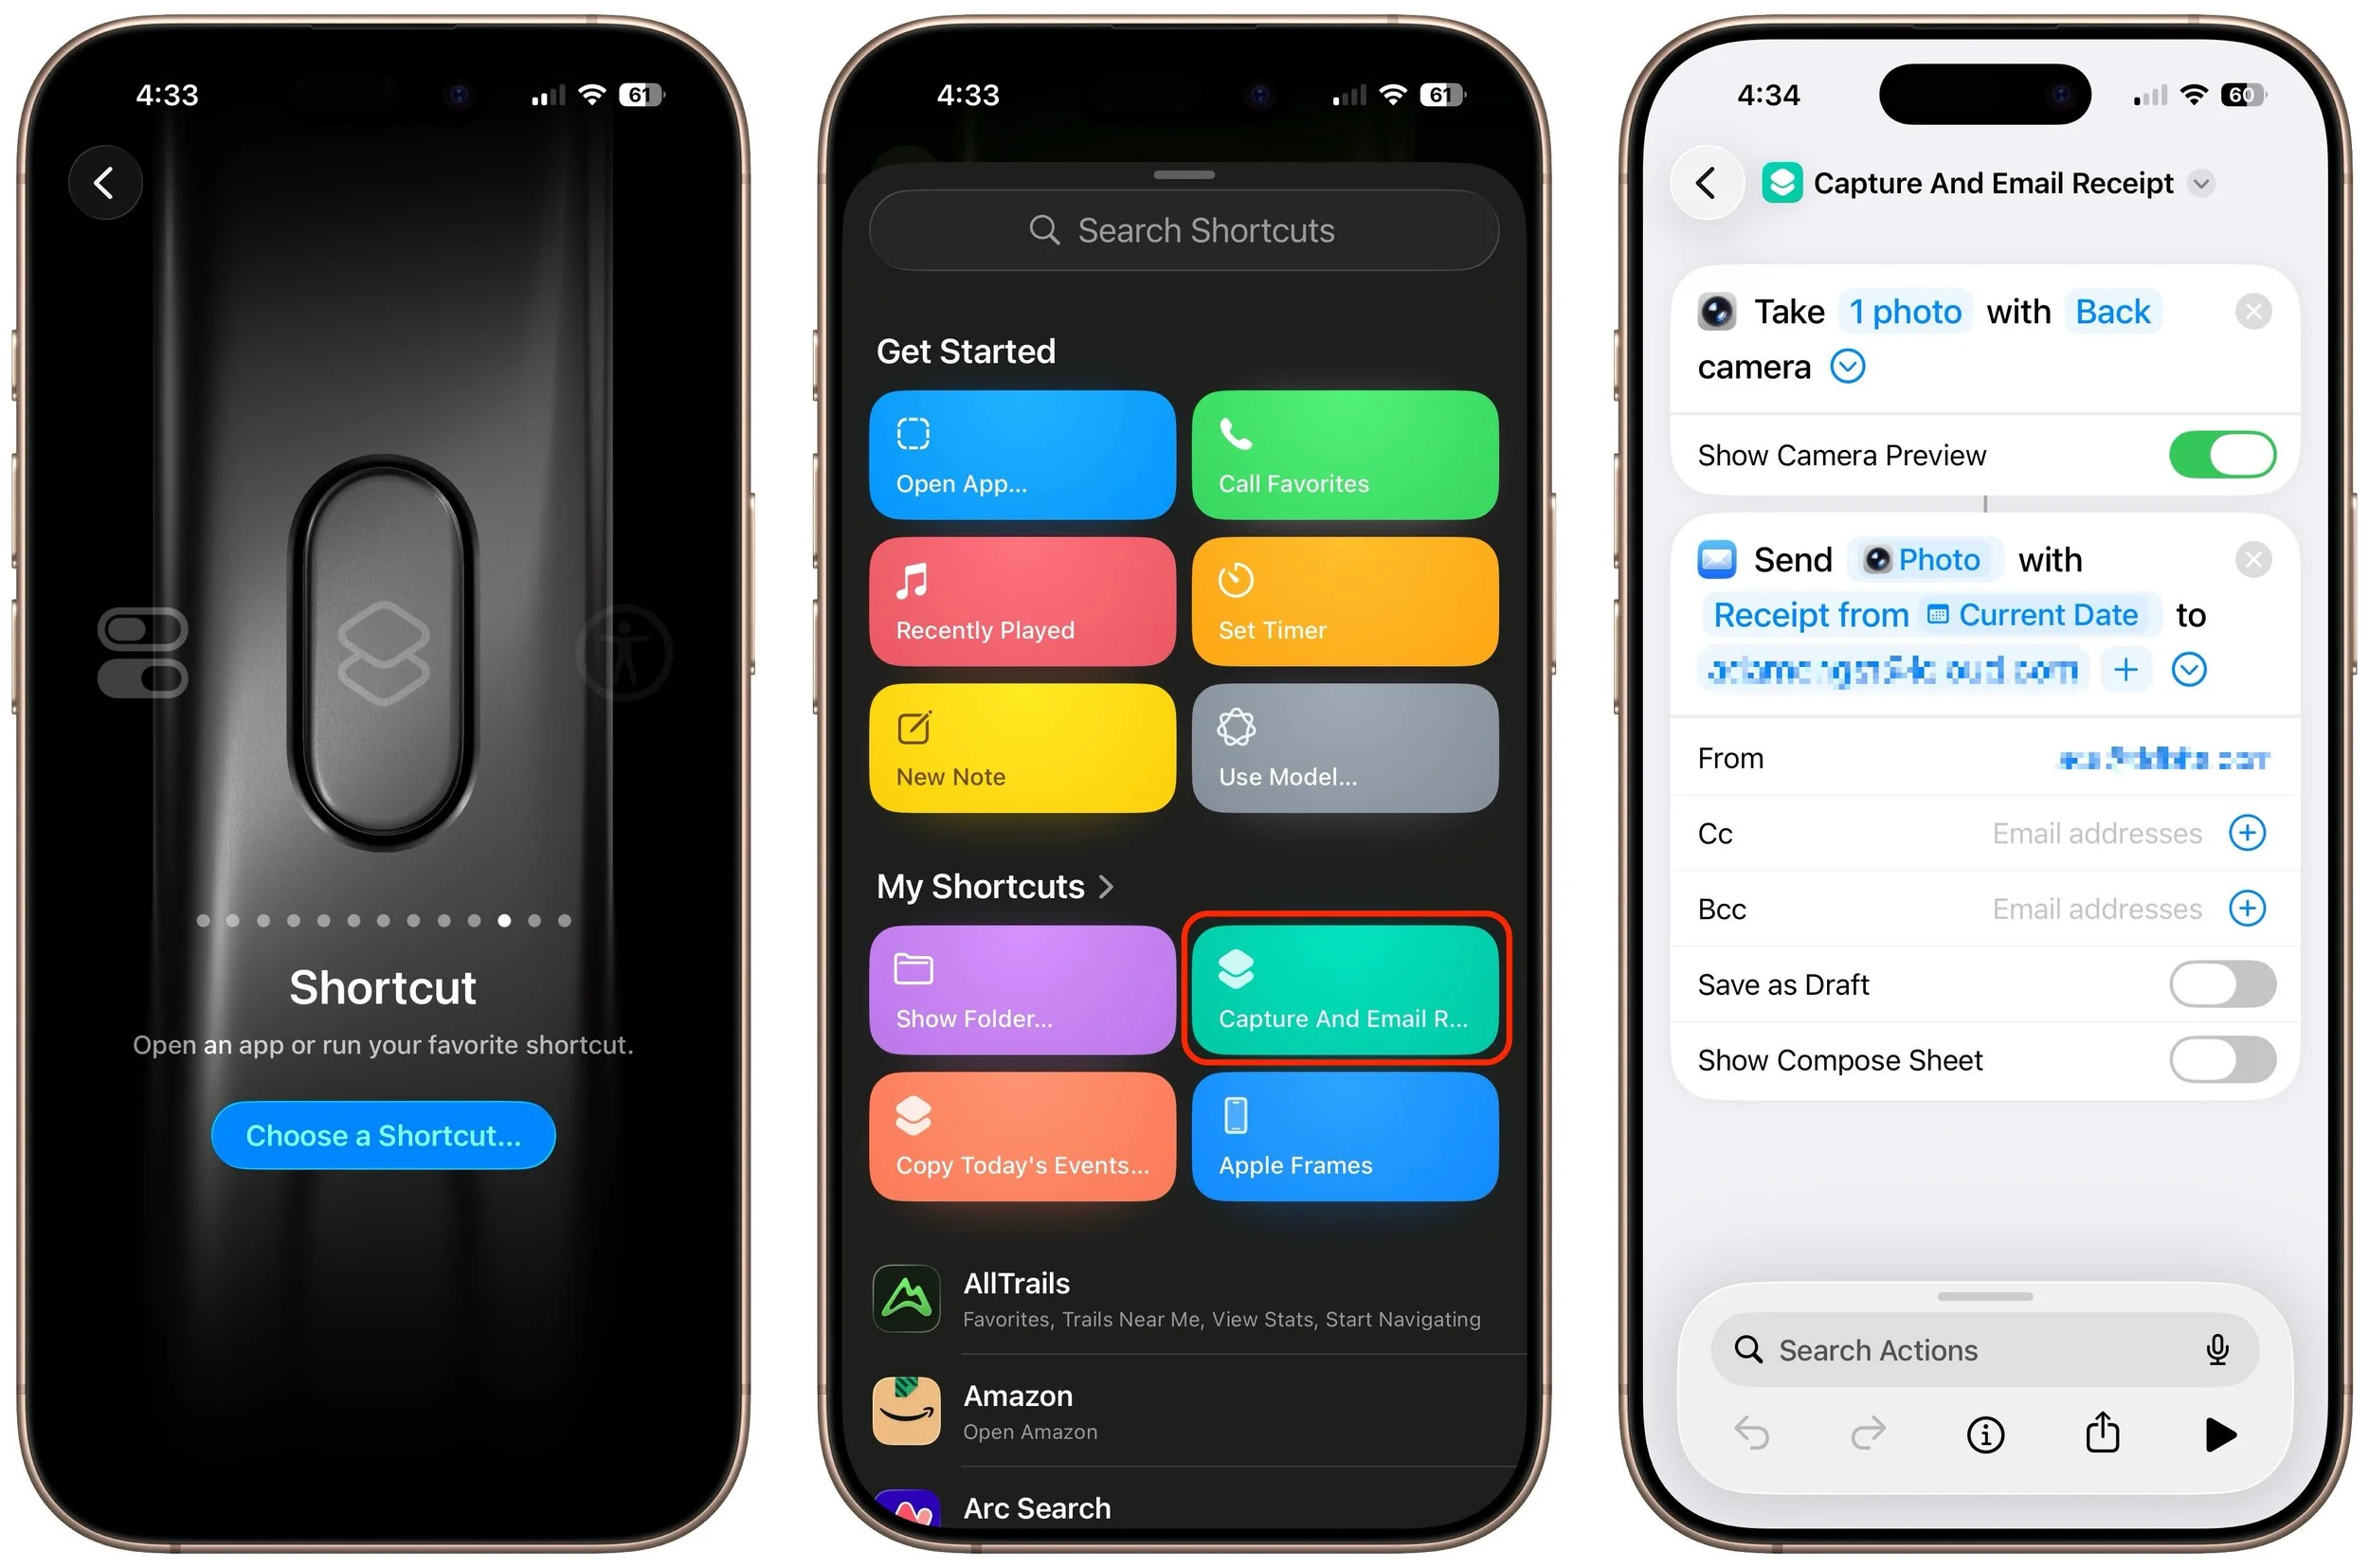
Shortcut: Activate any custom Shortcut for personalized actions. The previous Controls choice is brilliant, but what if you want even more options? With Shortcuts, you can create custom actions that can even leverage multiple apps to do exactly what you want. For instance, you could create a shortcut that takes a photo of an expense receipt and sends it to a specific email address, all triggered by a long press on the Action button. The sky is the limit here.
Accessibility: Quick access to accessibility features like VoiceOver, Zoom, Speak Screen, Apple Watch Mirroring, Live Captions, Conversation Boost, and more. Don’t assume these options are only for people with disabilities; many have broader utility.
No Action: The final option is No Action, which is useful only if you accidentally press the Action button frequently and don’t want it to do anything.
So there you have it! If you’re not currently using the Action button, take a spin through the available options to see which can make a difference in your everyday iPhone experience.
(Featured image by Adam Engst)