
How to Find and Silence the Browser Tab That’s Playing Audio
Drowning in open tabs and can’t find the one playing sound? Look for the speaker icon on the tab itself, or use Safari’s address bar icon or Chrome’s music note for quick control.

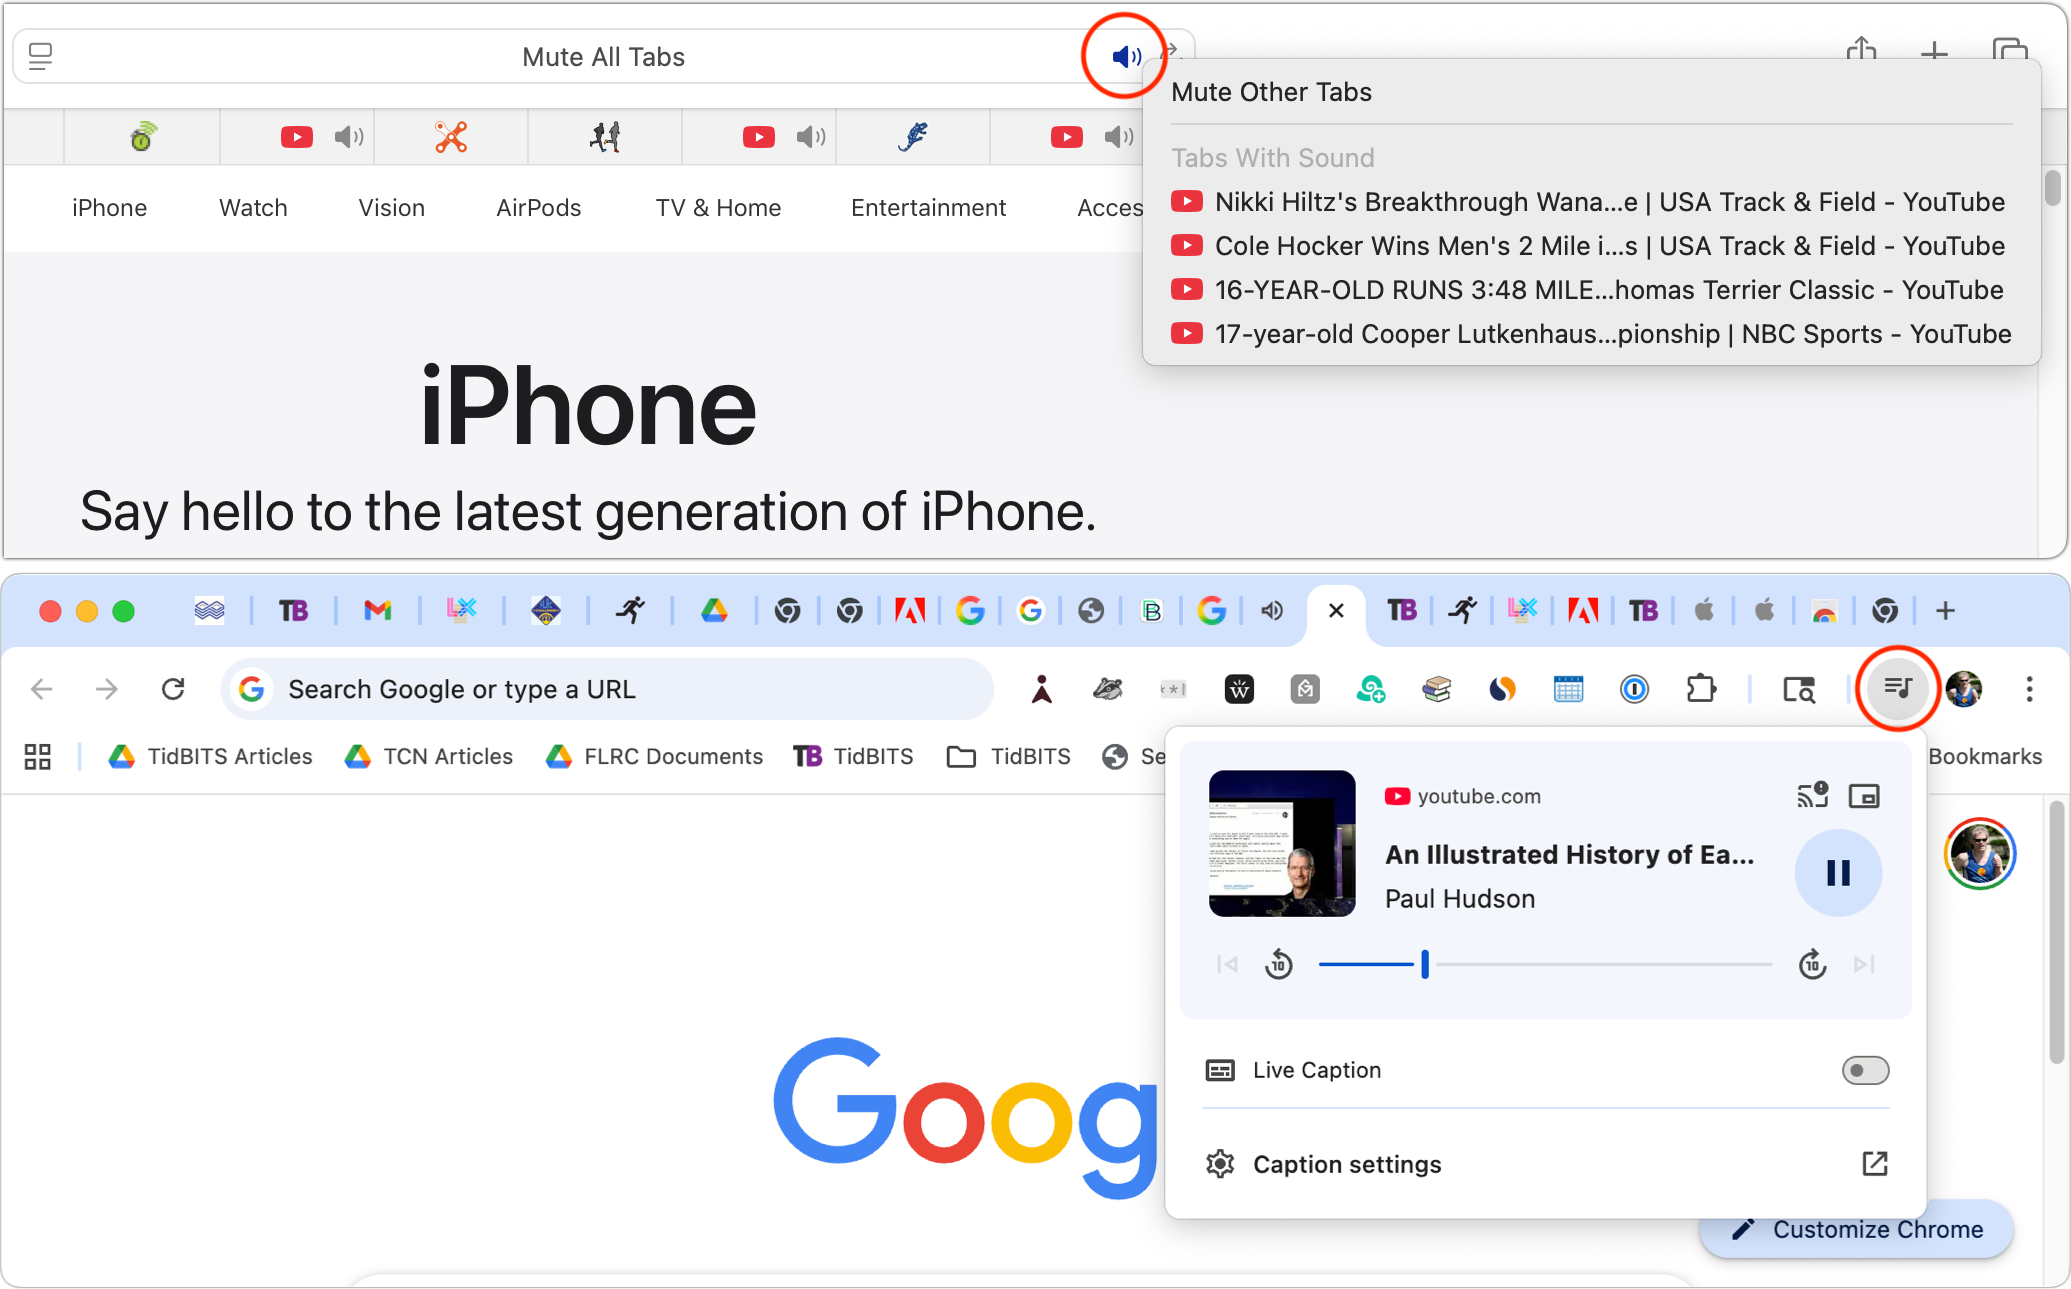
When a Web browser has many tabs open, it can be hard to find the one playing audio if you need to silence it. Worse, when a browser relaunches, it can be tough to identify and silence all the tabs that have automatically started playing audio. Happily, all browsers can help. Tabs with active audio show a speaker icon next to their names; click it to mute the audio. These speaker icons are easier to spot in browsers that display tabs vertically rather than horizontally across the top, where space constraints may prevent the speaker icons from appearing. Safari provides an additional option: a speaker icon on the right side of the address bar (see the top screenshot). Click it to mute all audio, or Control-click it to see which tabs are playing audio. Chromium-based browsers—including Google Chrome, Brave, and Microsoft Edge—display a musical note icon in the upper-right corner of the toolbar (bottom screenshot). Click it to open playback controls and stop playback.
(Featured image based on an original by iStock.com/Khosrork)
Losing Messages or Calls? Look in the Unknown Senders/Callers Filter
Missing texts from unknown numbers? iOS 26 filters them into hidden lists. Here’s where to find them in the Messages app—and how to mark senders as known so you don’t miss important messages. PS: The same applies to calls in the Phone app.

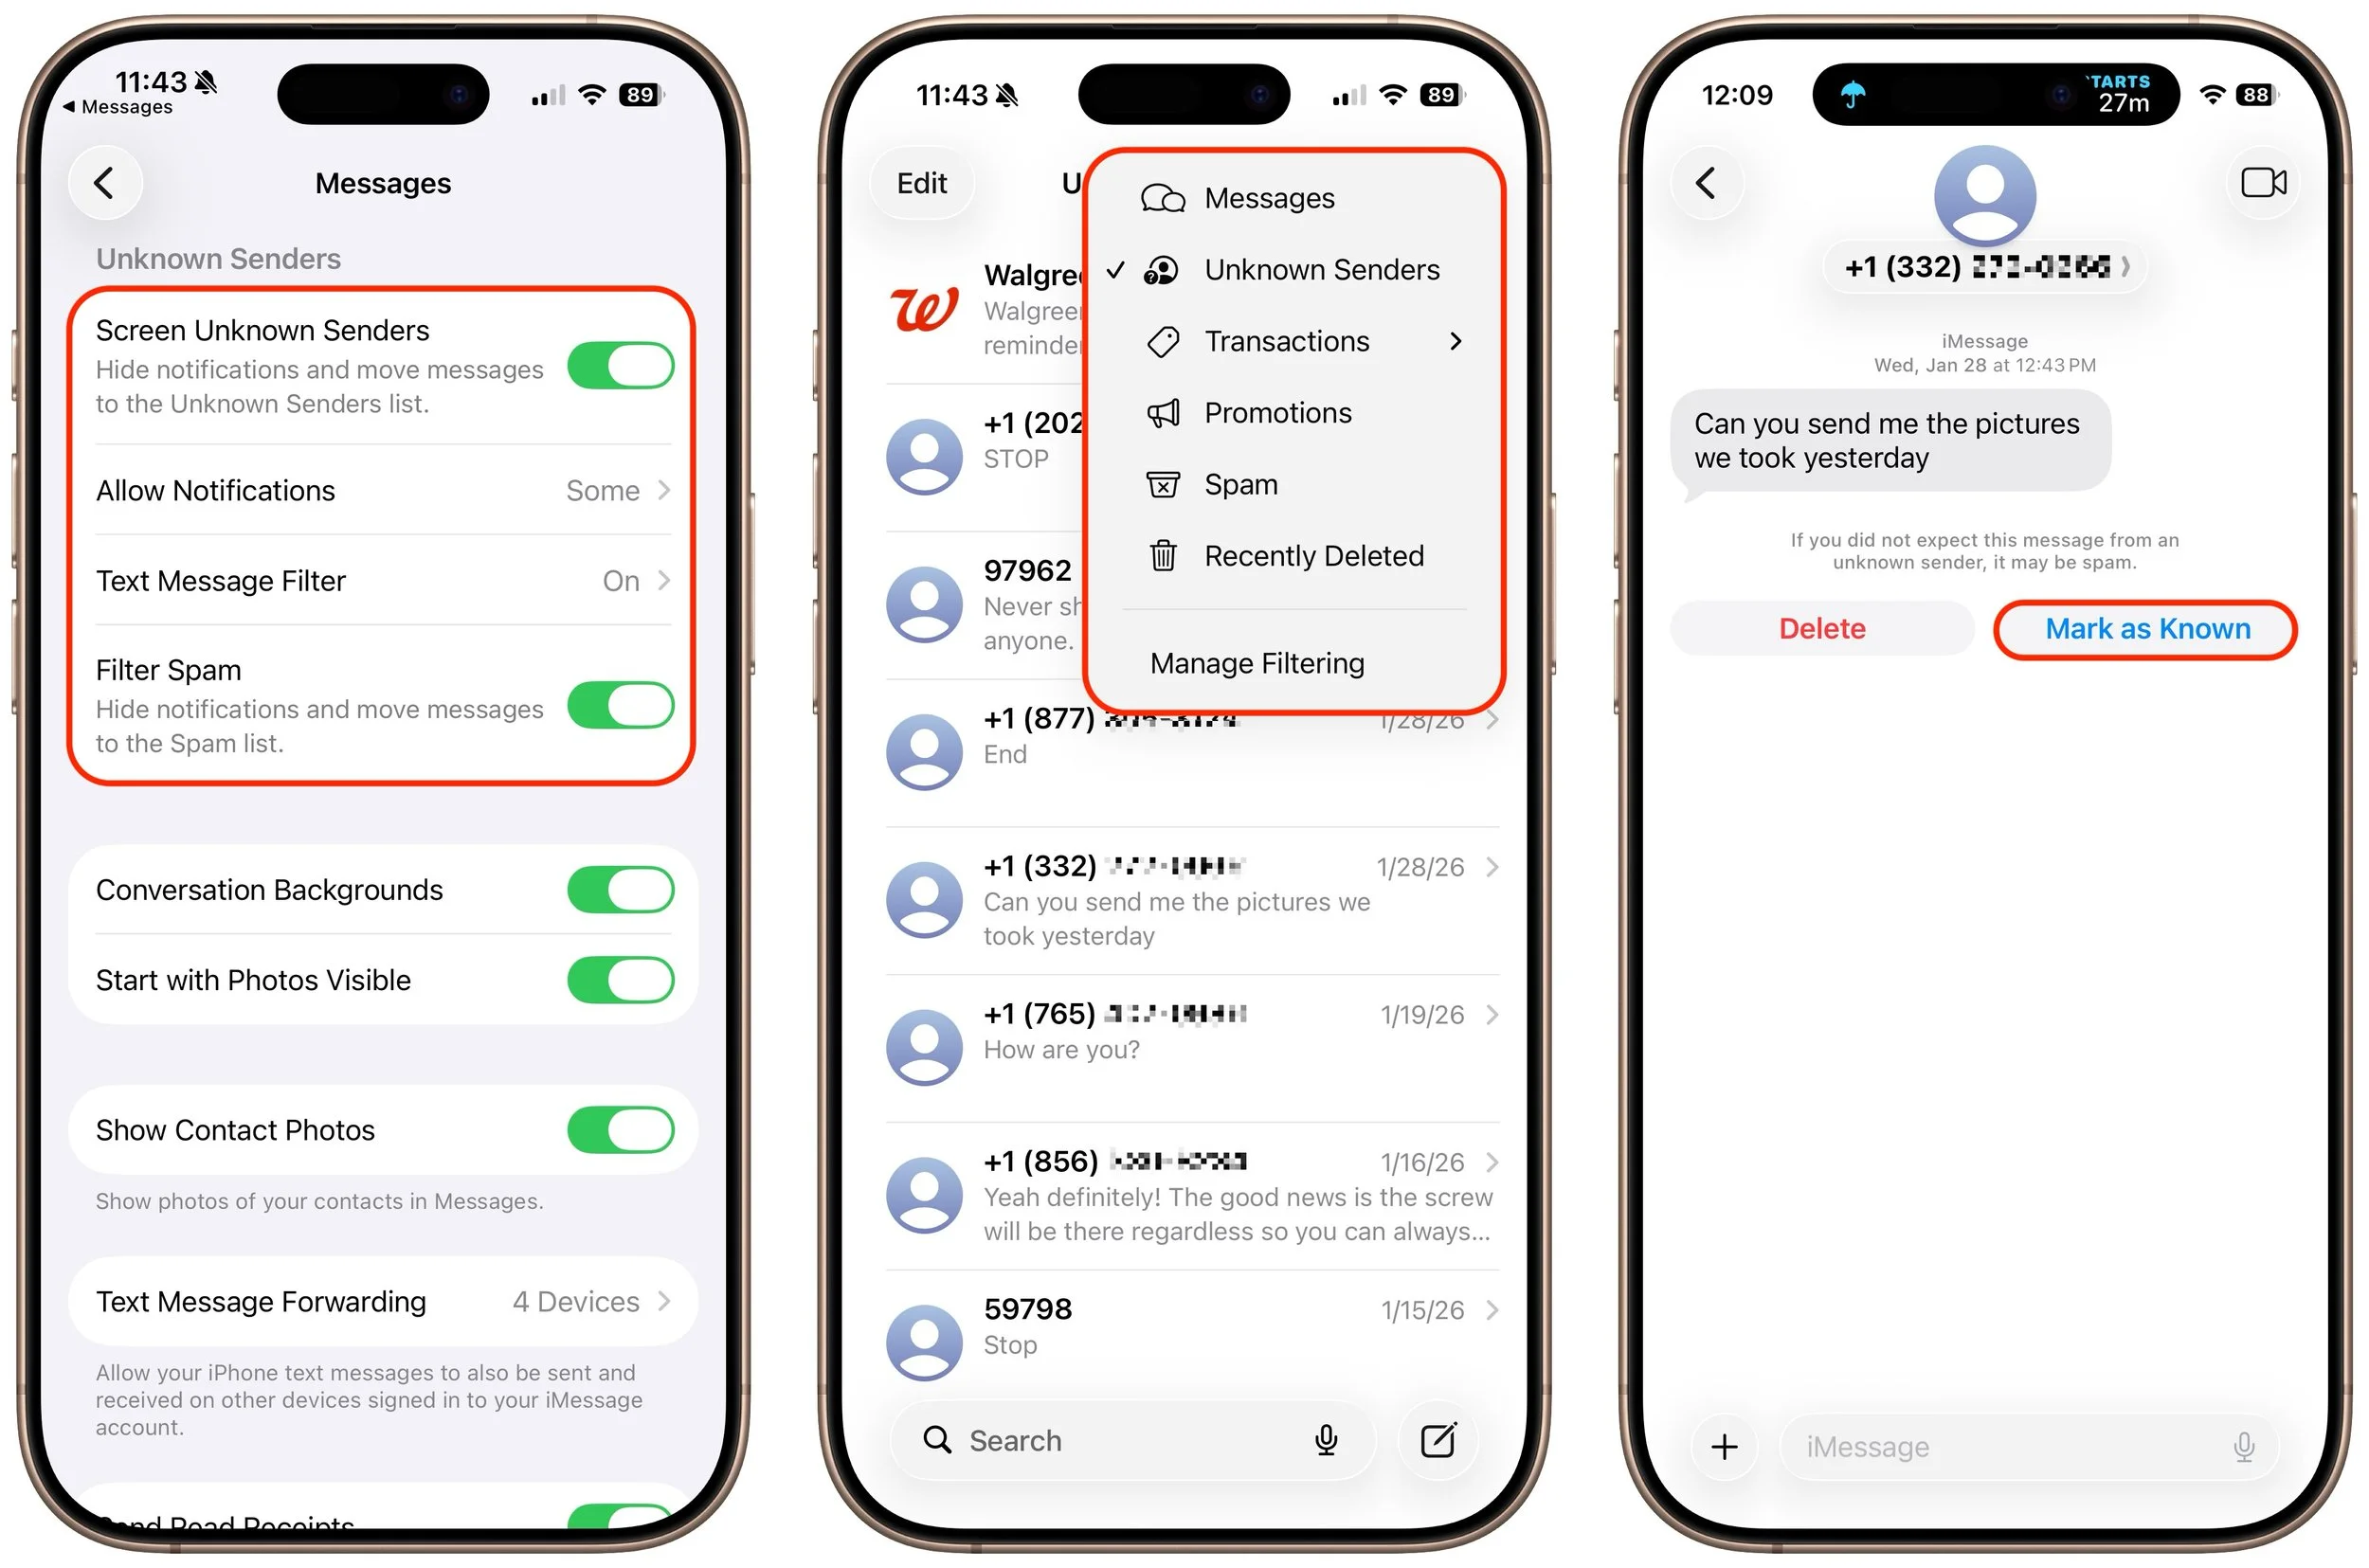
In iOS, iPadOS, and macOS 26, Apple added an option in the Messages app to filter messages from unknown people and those marked as spam by the carrier. To enable filtering, open Messages, tap the Filter button in the upper-right corner, tap Manage Filtering, and turn on Screen Unknown Senders and Filter Spam. Once those are enabled, the Filter menu gains two new options: Unknown Senders and Spam. If a text from an unknown person comes in, the main app icon will get a red badge, but you won’t see the new message in the usual list. Instead, use the Filter menu—which also gets a blue badge—to switch to Unknown Senders or Spam and look in those lists. The Phone app works similarly—enable call filtering in Settings > Apps > Phone under Call Filtering, and unknown callers will appear in separate lists accessible via the Filter button in the Phone app’s Recents or Calls views. To move a conversation out of Unknown Senders, tap Mark as Known.
(Featured image by iStock.com/Liubomyr Vorona)
Customize Folder Colors and Icons in macOS 26 Tahoe
Tired of identical blue folders? macOS 26 Tahoe lets you add colors and icons—including emoji—to folders with a few clicks. Here’s how to make your Finder easier to navigate.
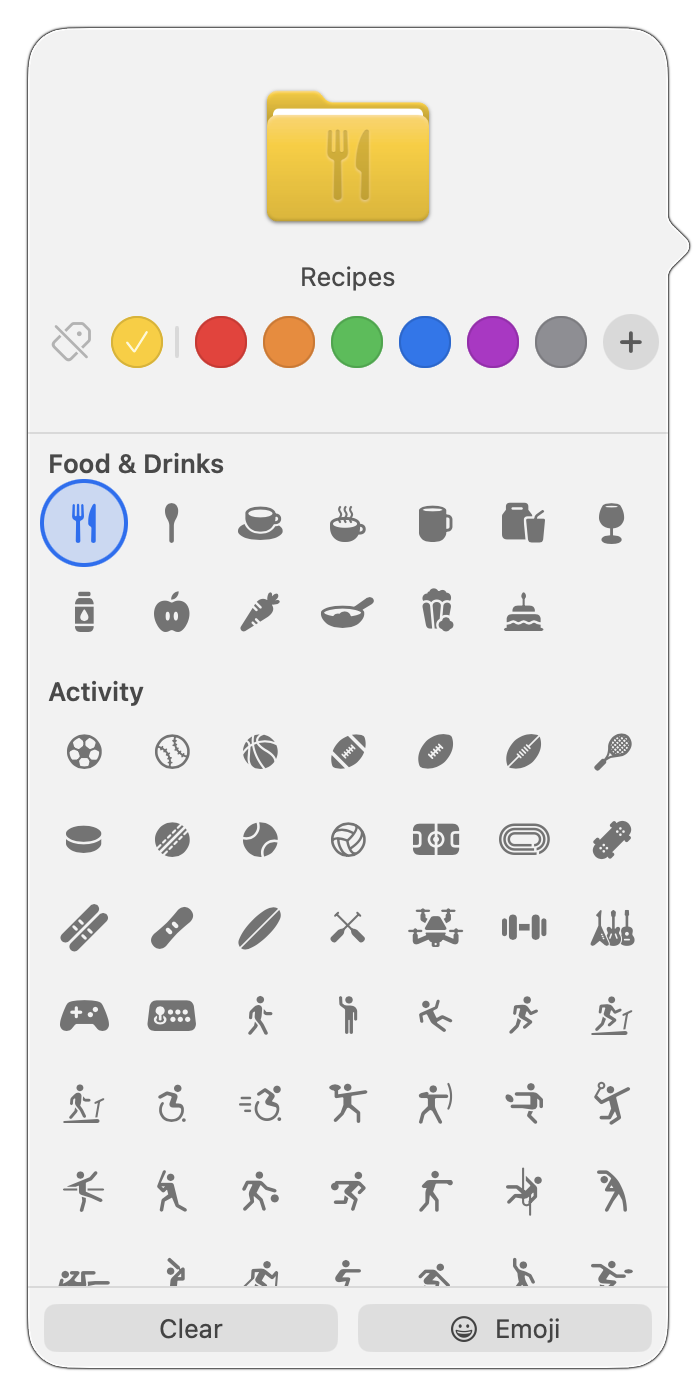
In macOS 26 Tahoe, Apple has made it easier to customize folder appearance in the Finder. Control-click any folder and choose Customize Folder. In the panel that appears, click a colored circle to apply that color and then select an icon to display on the folder. Click the Emoji button to choose from the full set of emoji instead of the icons. A few notes: Customization is available for everything except macOS’s Applications, Library, System, and Users folders. These colors are associated with Finder tags, which you can change in Finder > Settings > Tags. Although the colors and icons should sync via iCloud Drive, don’t assume they’ll survive other cloud-based syncing services or other actions (like archiving) that may not preserve Finder metadata. In other words, they’re mostly useful for individuals, not workgroups.
(Featured image by iStock.com/Christian Ouellet)
Make Finder Window Columns Resize to Fit Filenames
Tired of truncated filenames in the Finder’s Column view? macOS 26.1 Tahoe adds a simple checkbox to auto-resize columns—and you can enable the same feature in earlier macOS versions with a quick Terminal command or free utility.

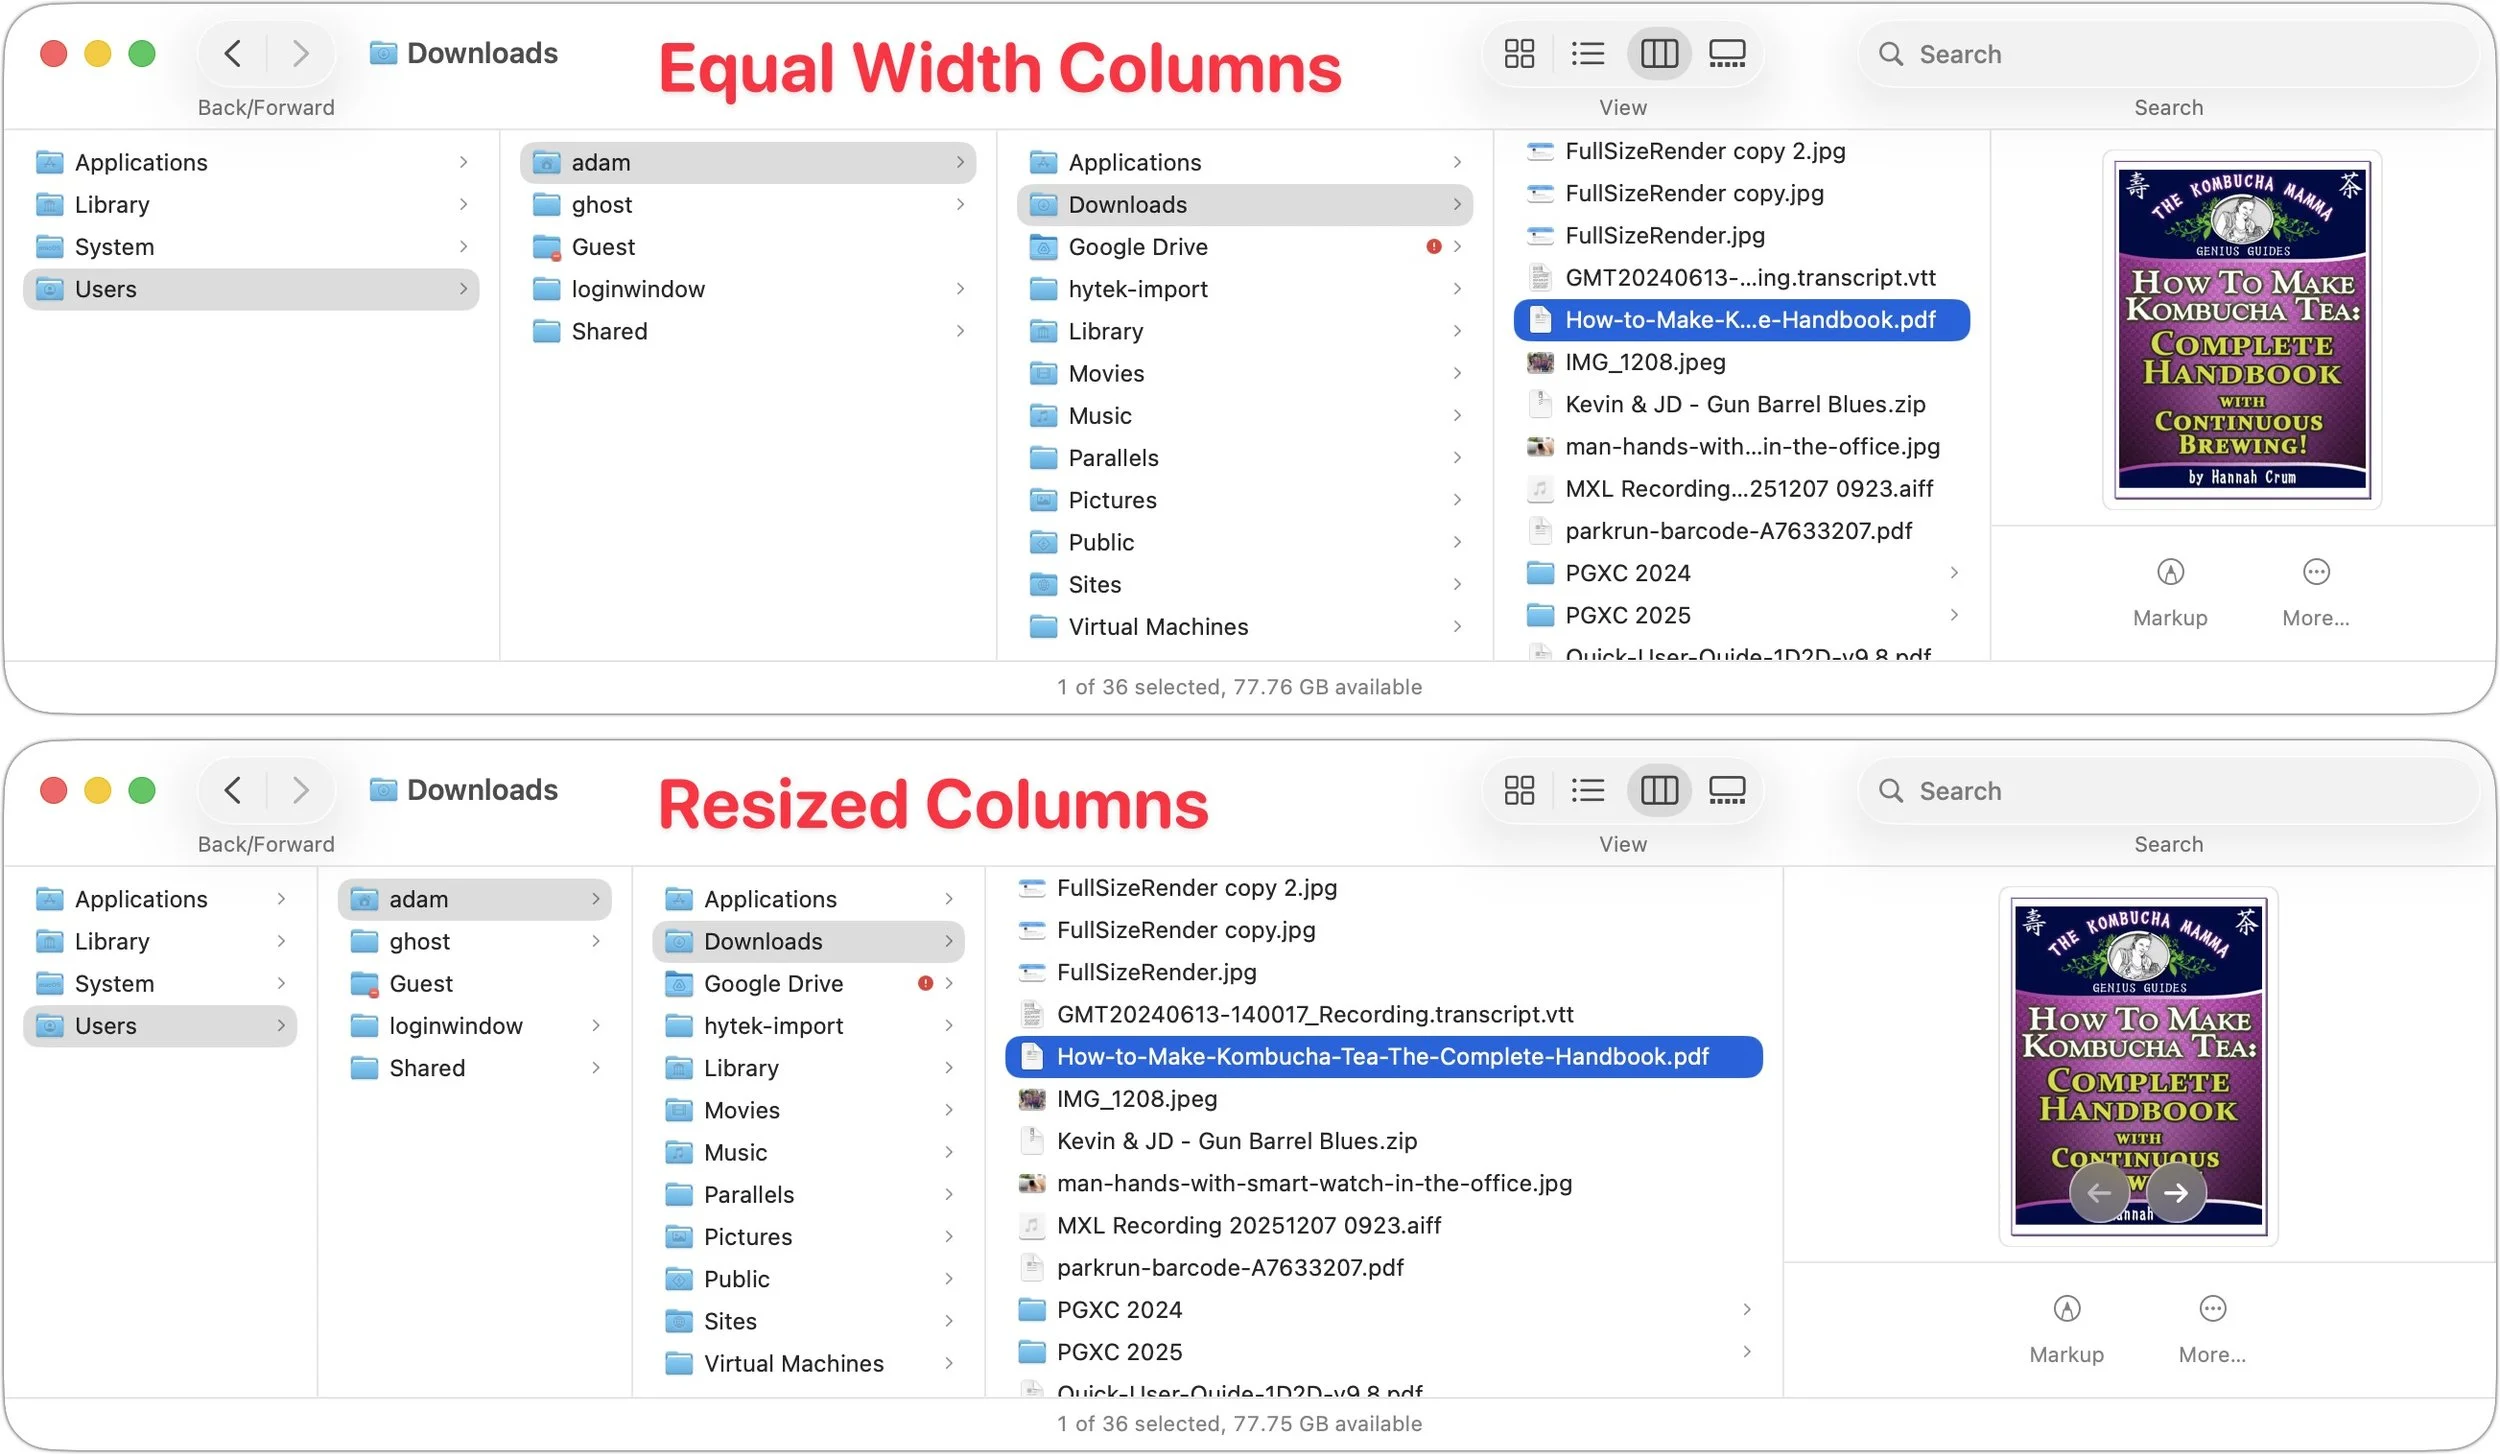
Column view in the Finder has an annoying tendency to either show overly wide columns that waste space or truncate long filenames, forcing you to drag a column divider to see more of the name. In macOS 26.1 Tahoe, Apple added an option to the Finder’s View Options window that automatically adjusts column widths to display the longest visible filename in each column. To activate it, choose View > Show View Options with a column-view window frontmost, then select the “Resize columns to fit filenames” checkbox. If you’re running macOS 13 Ventura through macOS 15 Sequoia, this option is hidden, but you can enable it by pasting this command into Terminal: defaults write com.apple.finder _FXEnableColumnAutoSizing -bool YES; killall Finder. (Change YES to NO to revert the change.) Alternatively, the free TinkerTool 10 utility provides a graphical toggle for these older operating systems—look for “Automatically adapt to file name widths in column mode” in the Finder section.
(Featured image by iStock.com/IPGGutenbergUKLtd)
New Apple Creator Studio Bundles Pro Apps
Apple’s new Creator Studio bundle includes Final Cut Pro, Logic Pro, Pixelmator Pro, and more—plus premium content and AI features in the iWork apps—for $12.99/month or $129/year. Don’t worry—Keynote, Pages, and Numbers stay free for existing features.

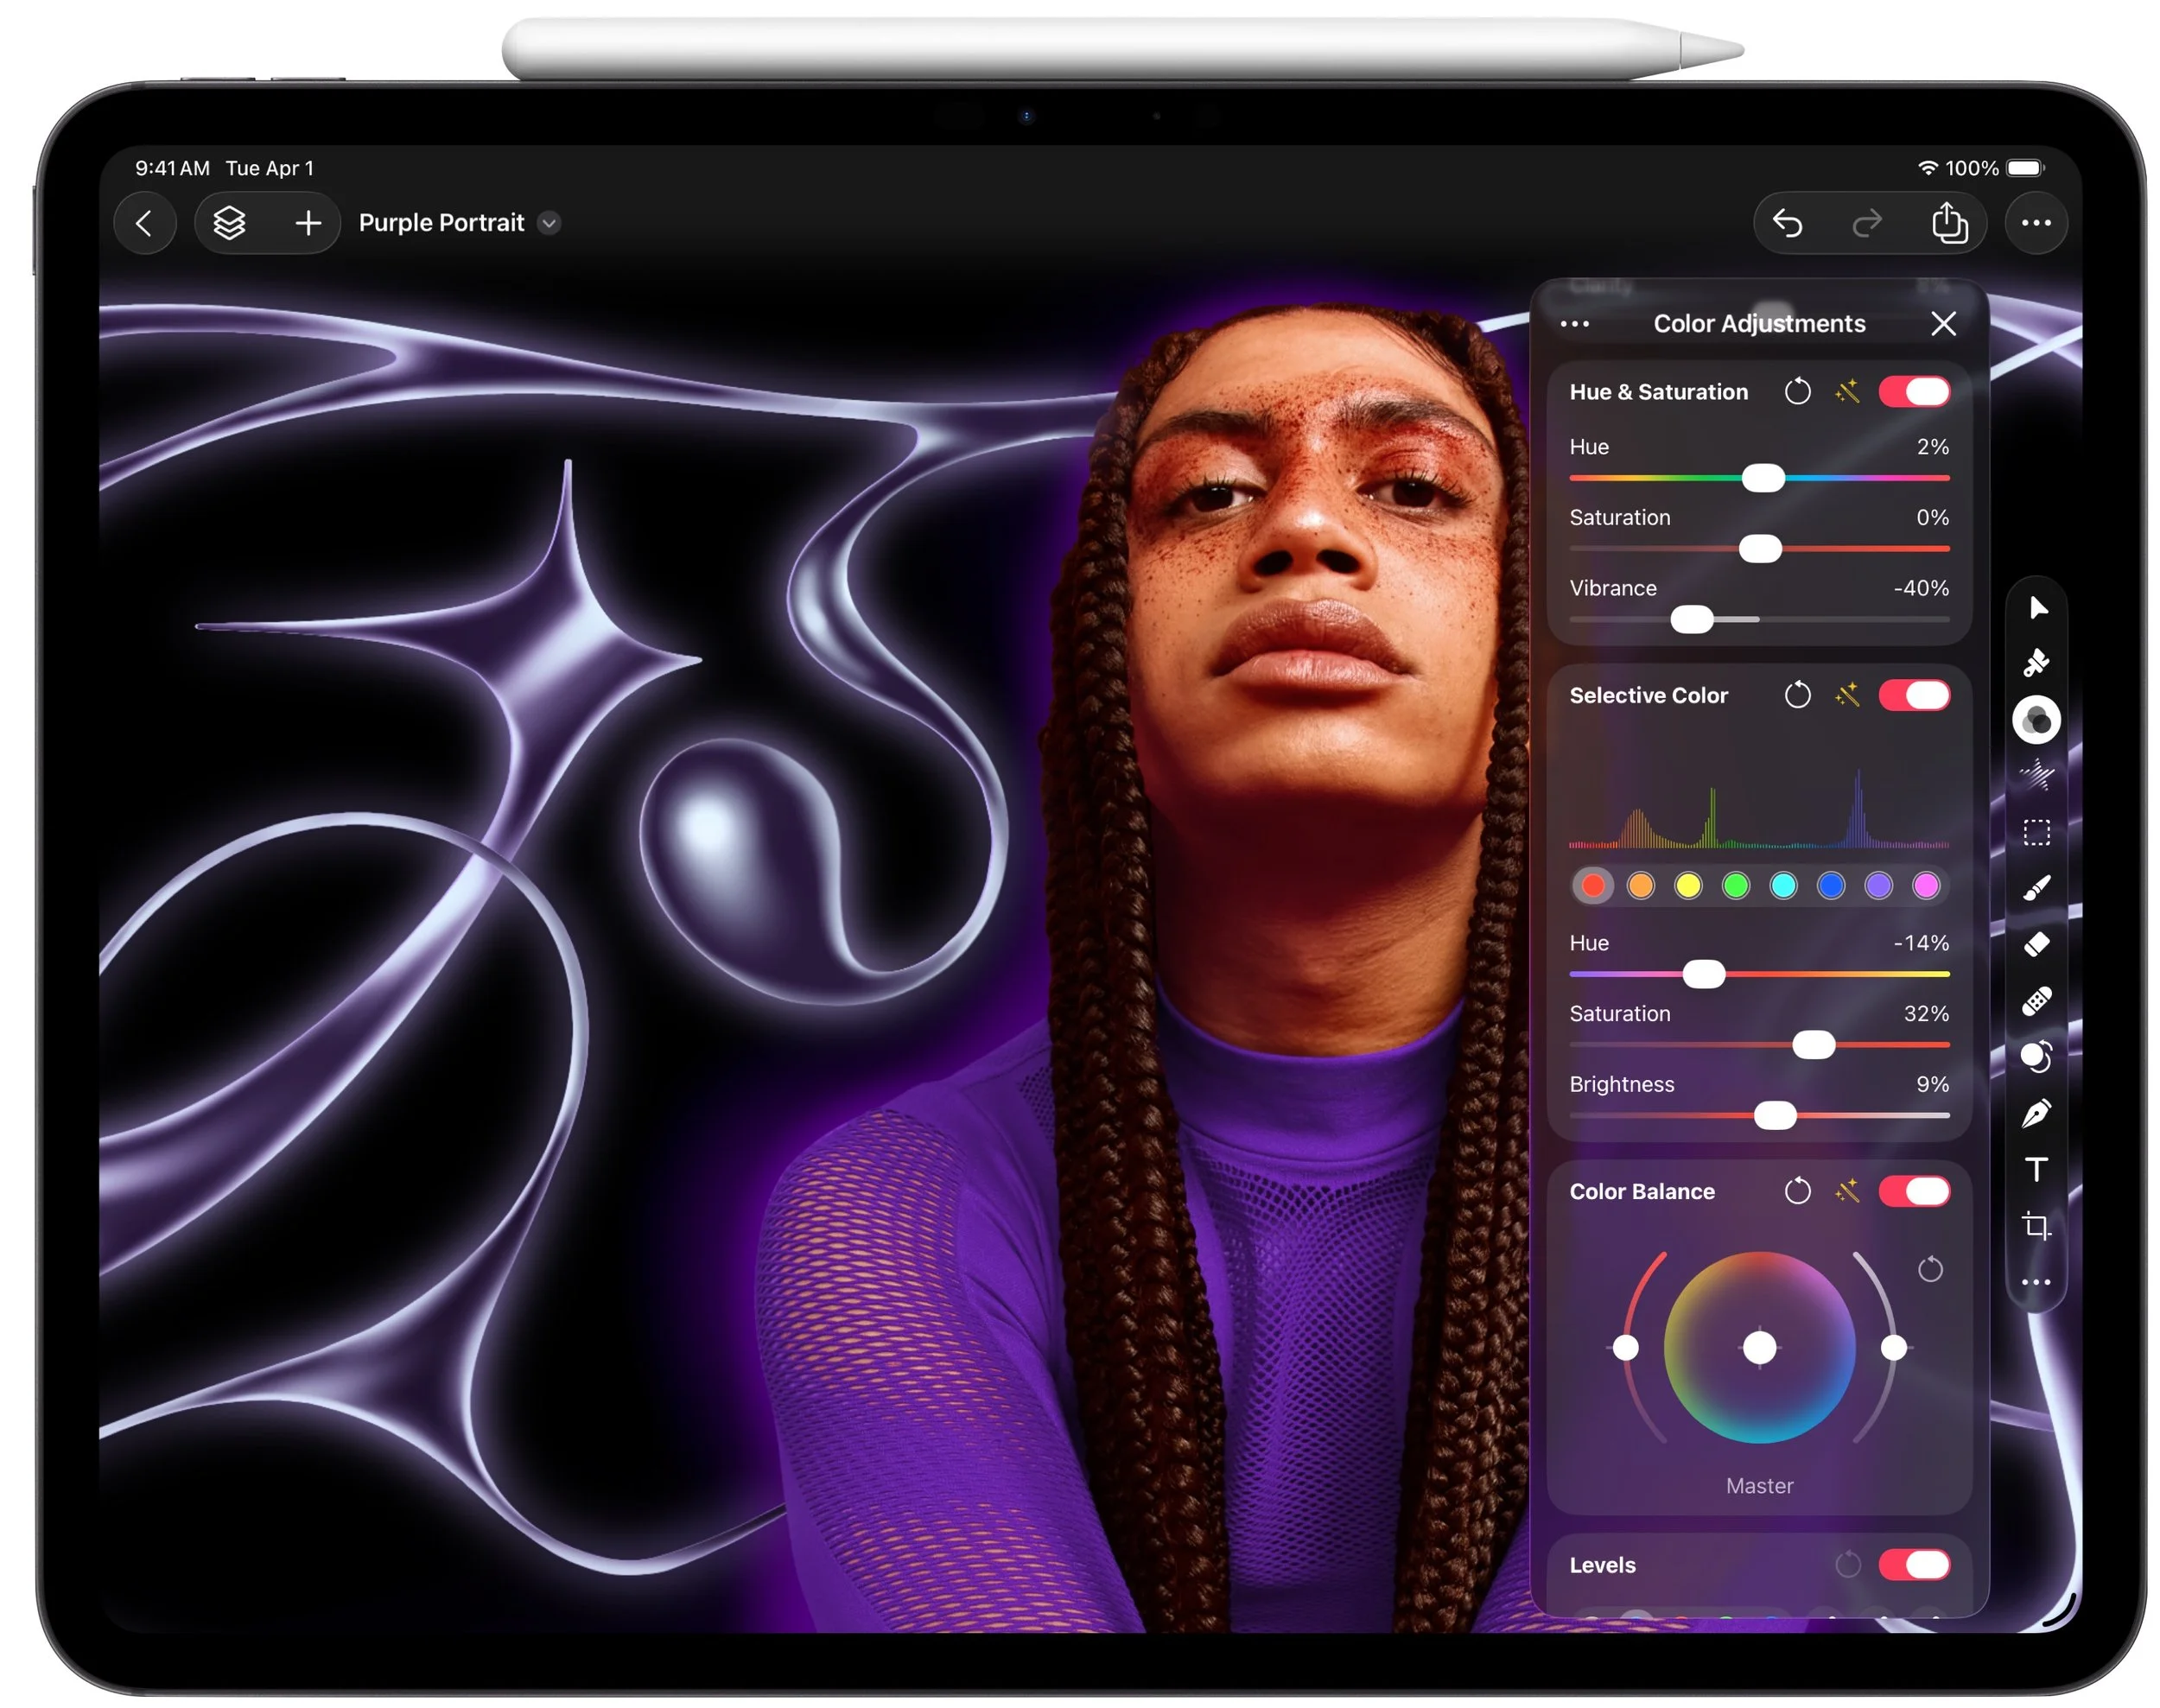
Apple has introduced Apple Creator Studio, a subscription bundle of Final Cut Pro, Logic Pro, Pixelmator Pro, Motion, Compressor, and MainStage, priced at $12.99 per month or $129 per year (with education pricing at $2.99 per month or $29.99 per year). The bundle also includes premium content and a few AI tools for the iWork apps: Keynote, Pages, and Numbers. These apps will prompt you to download the new version 15, but don’t worry—they remain free for all existing features; only the new AI capabilities and premium content require a subscription. You can also still purchase Mac versions of the pro apps, though the iPad versions of Final Cut Pro, Logic Pro, and Pixelmator Pro are now available only to subscribers. Up to six family members can share a Creator Studio subscription via Family Sharing.
(Featured image by Apple)
If Your iPhone’s Lock Screen Clock Is Too Transparent, You Can Fix It
Struggling to read the clock on your iPhone Lock Screen? iOS 26.2 lets you manually adjust the transparency—or switch to a solid background for better readability.

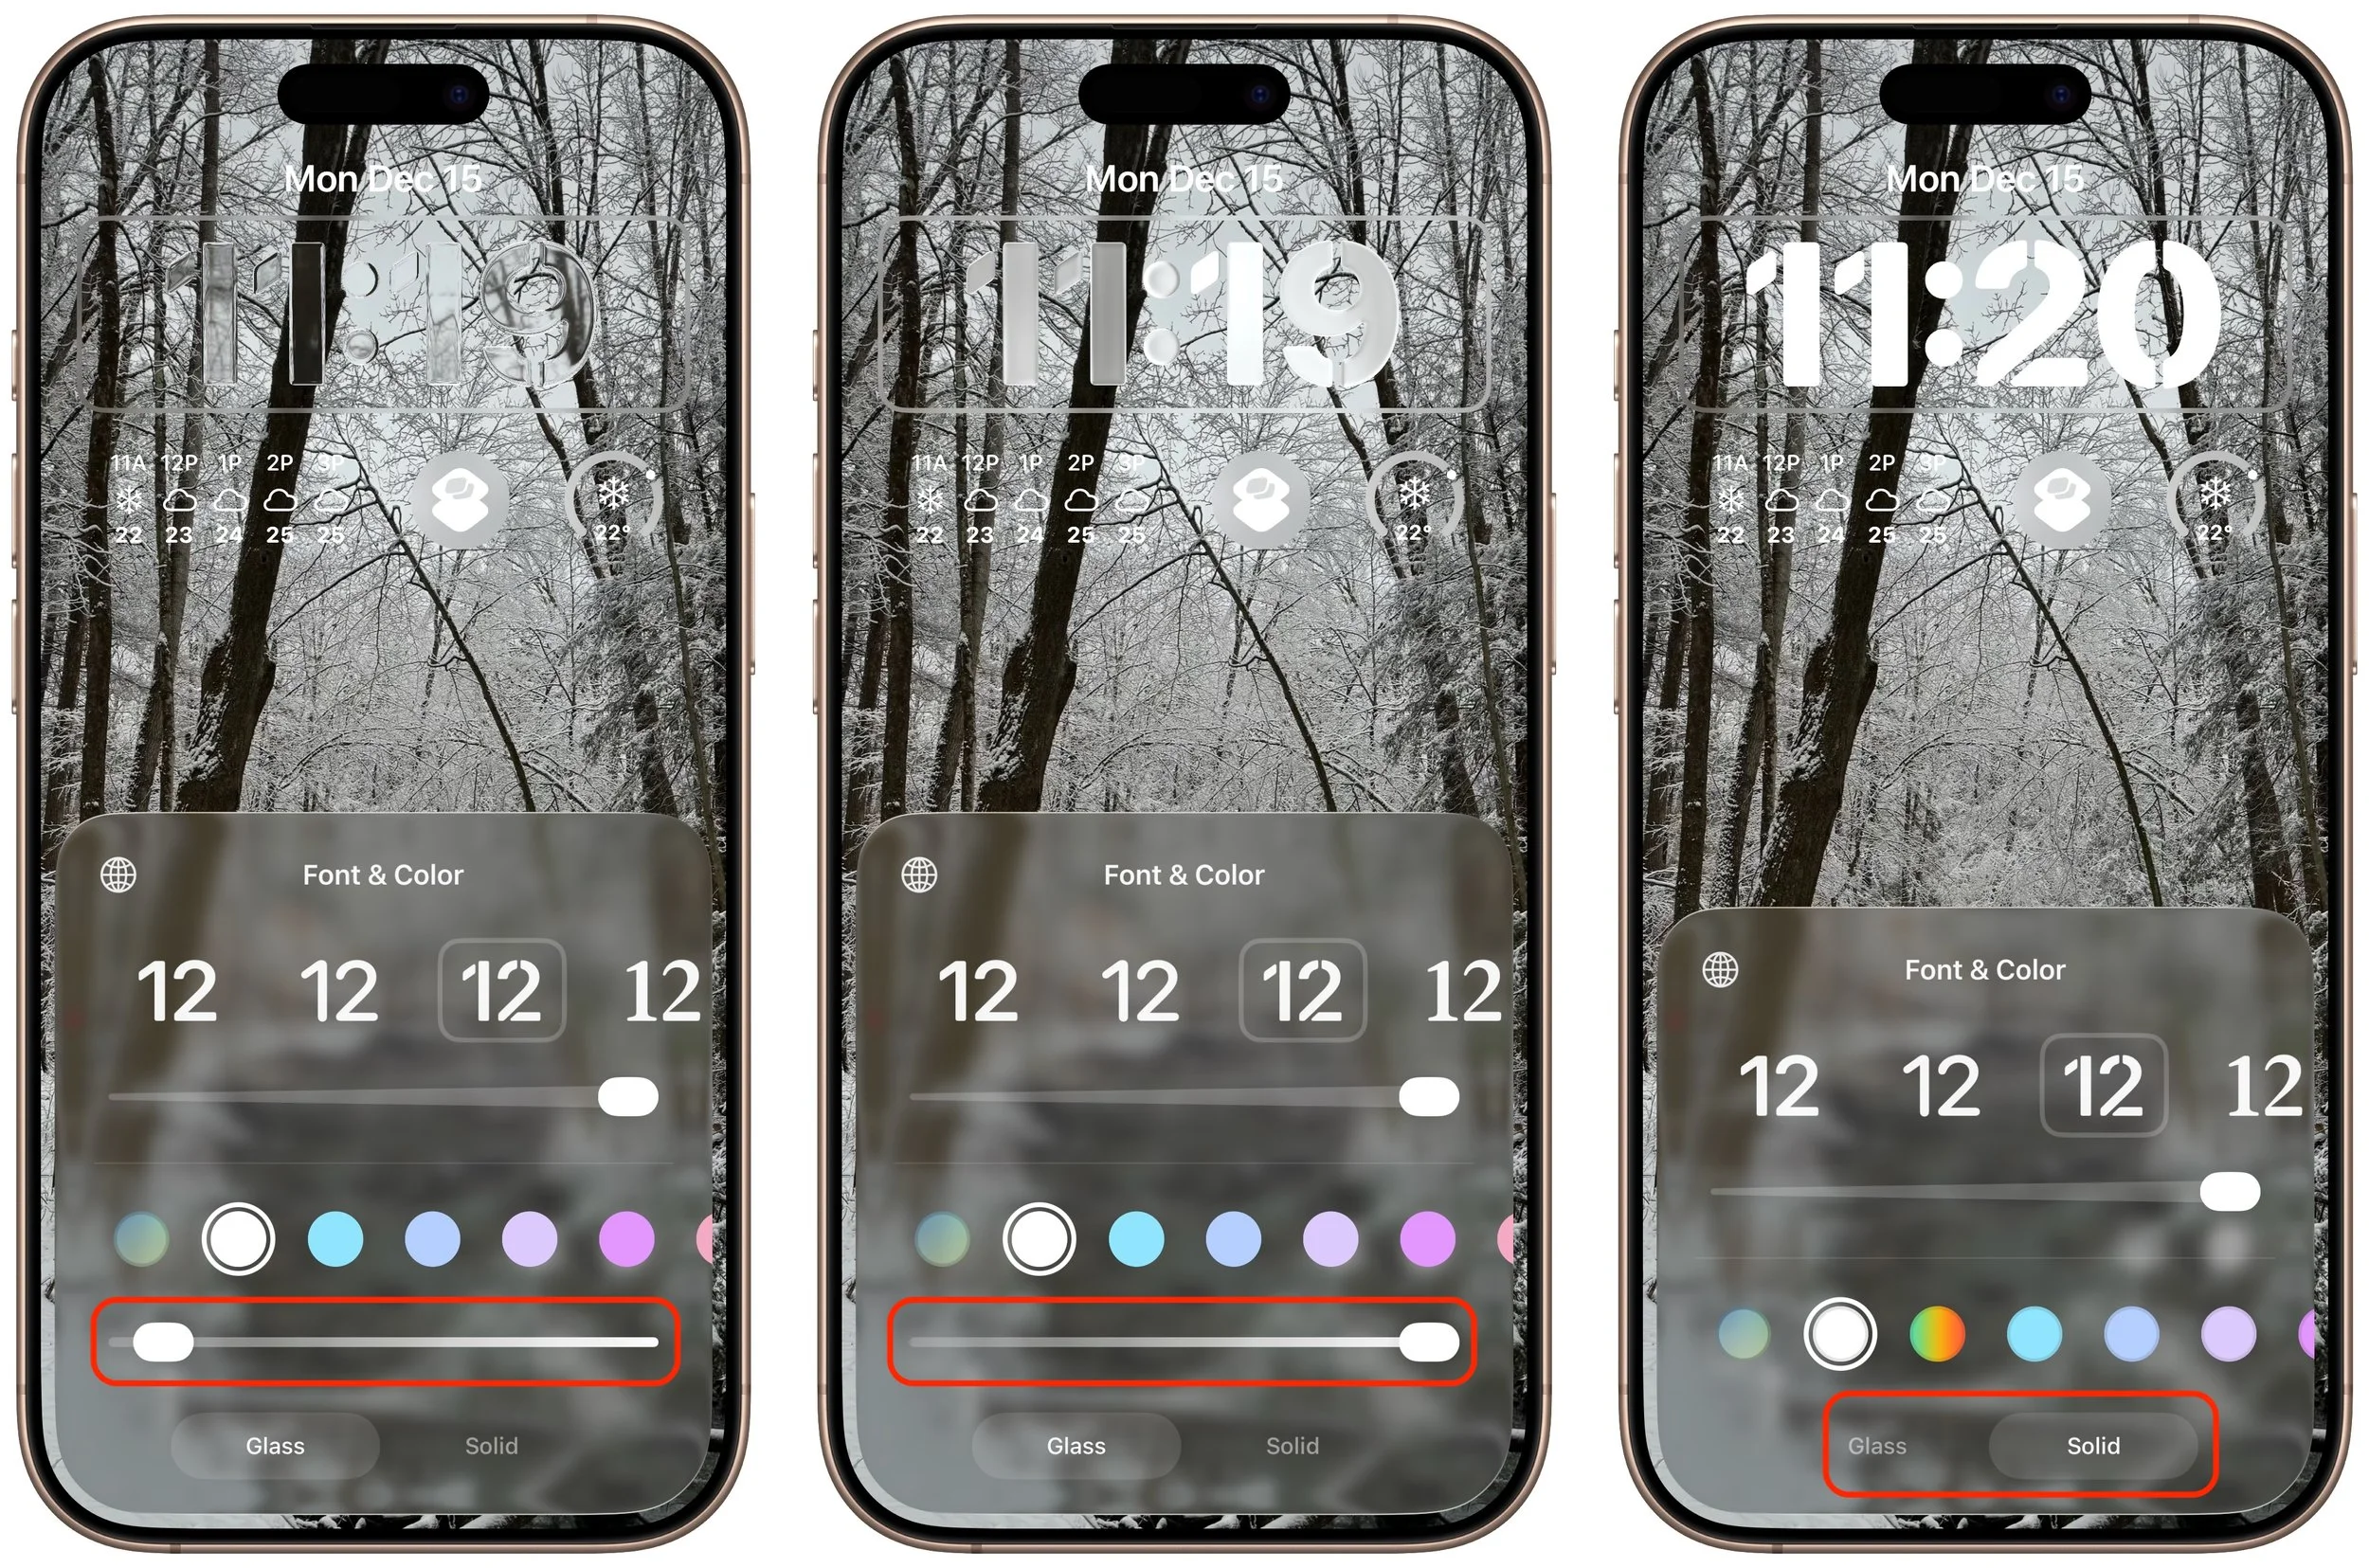
One place where the Liquid Glass transparency in iOS 26 and iPadOS 26 can be annoying is the time display on the Lock Screen. Liquid Glass tries—but often fails—to adjust the clock’s transparency so it’s readable over whatever photo you chose or the Photo Shuffle option displayed. Starting in iOS 26.2 and iPadOS 26.2, you can manually adjust the clock’s transparency: touch and hold the Lock Screen, tap Customize, tap the clock, tap Glass, and drag the Transparency slider (left and middle). If it's still not readable enough, you can switch to the previously available Solid view (right).
(Featured image by iStock.com/Wavebreakmedia)
Try macOS 26.2’s Edge Light for Low-Light Video Calls
Dark room, important video call? macOS 26.2’s Edge Light transforms your Mac’s display into an on-screen ring light, illuminating your face so you’re visible on camera.

We can’t always guarantee optimal lighting for video calls, especially when using laptops on the go. A new feature in macOS 26.2 Tahoe called Edge Light might help. It’s a video effect that uses the outermost pixels of your Mac’s display to create a bright white rectangle that illuminates your face during video calls. It acts like an on-screen ring light in low-light conditions. You can activate it from the green video camera icon in the menu bar (shown when the camera is active), and on Macs from 2024 and later, you can set it to turn on automatically in low-light environments. Click the disclosure triangle next to Edge Light to adjust the light’s width and color temperature. Mouse awareness allows the light to recede automatically when you move your pointer toward it. While Edge Light won’t replace external lights, it can help make your face visible in otherwise dark rooms.

(Featured image by iStock.com/Dima Berlin)
Control Song Transitions in Apple Music
Apple’s new DJ‑style AutoMix transitions between songs in the Music app aren’t to everyone’s taste (and sometimes flub the jump). Here’s how to switch back to a timed Crossfade or disable transitions in Music on your iPhone, iPad, and Mac.

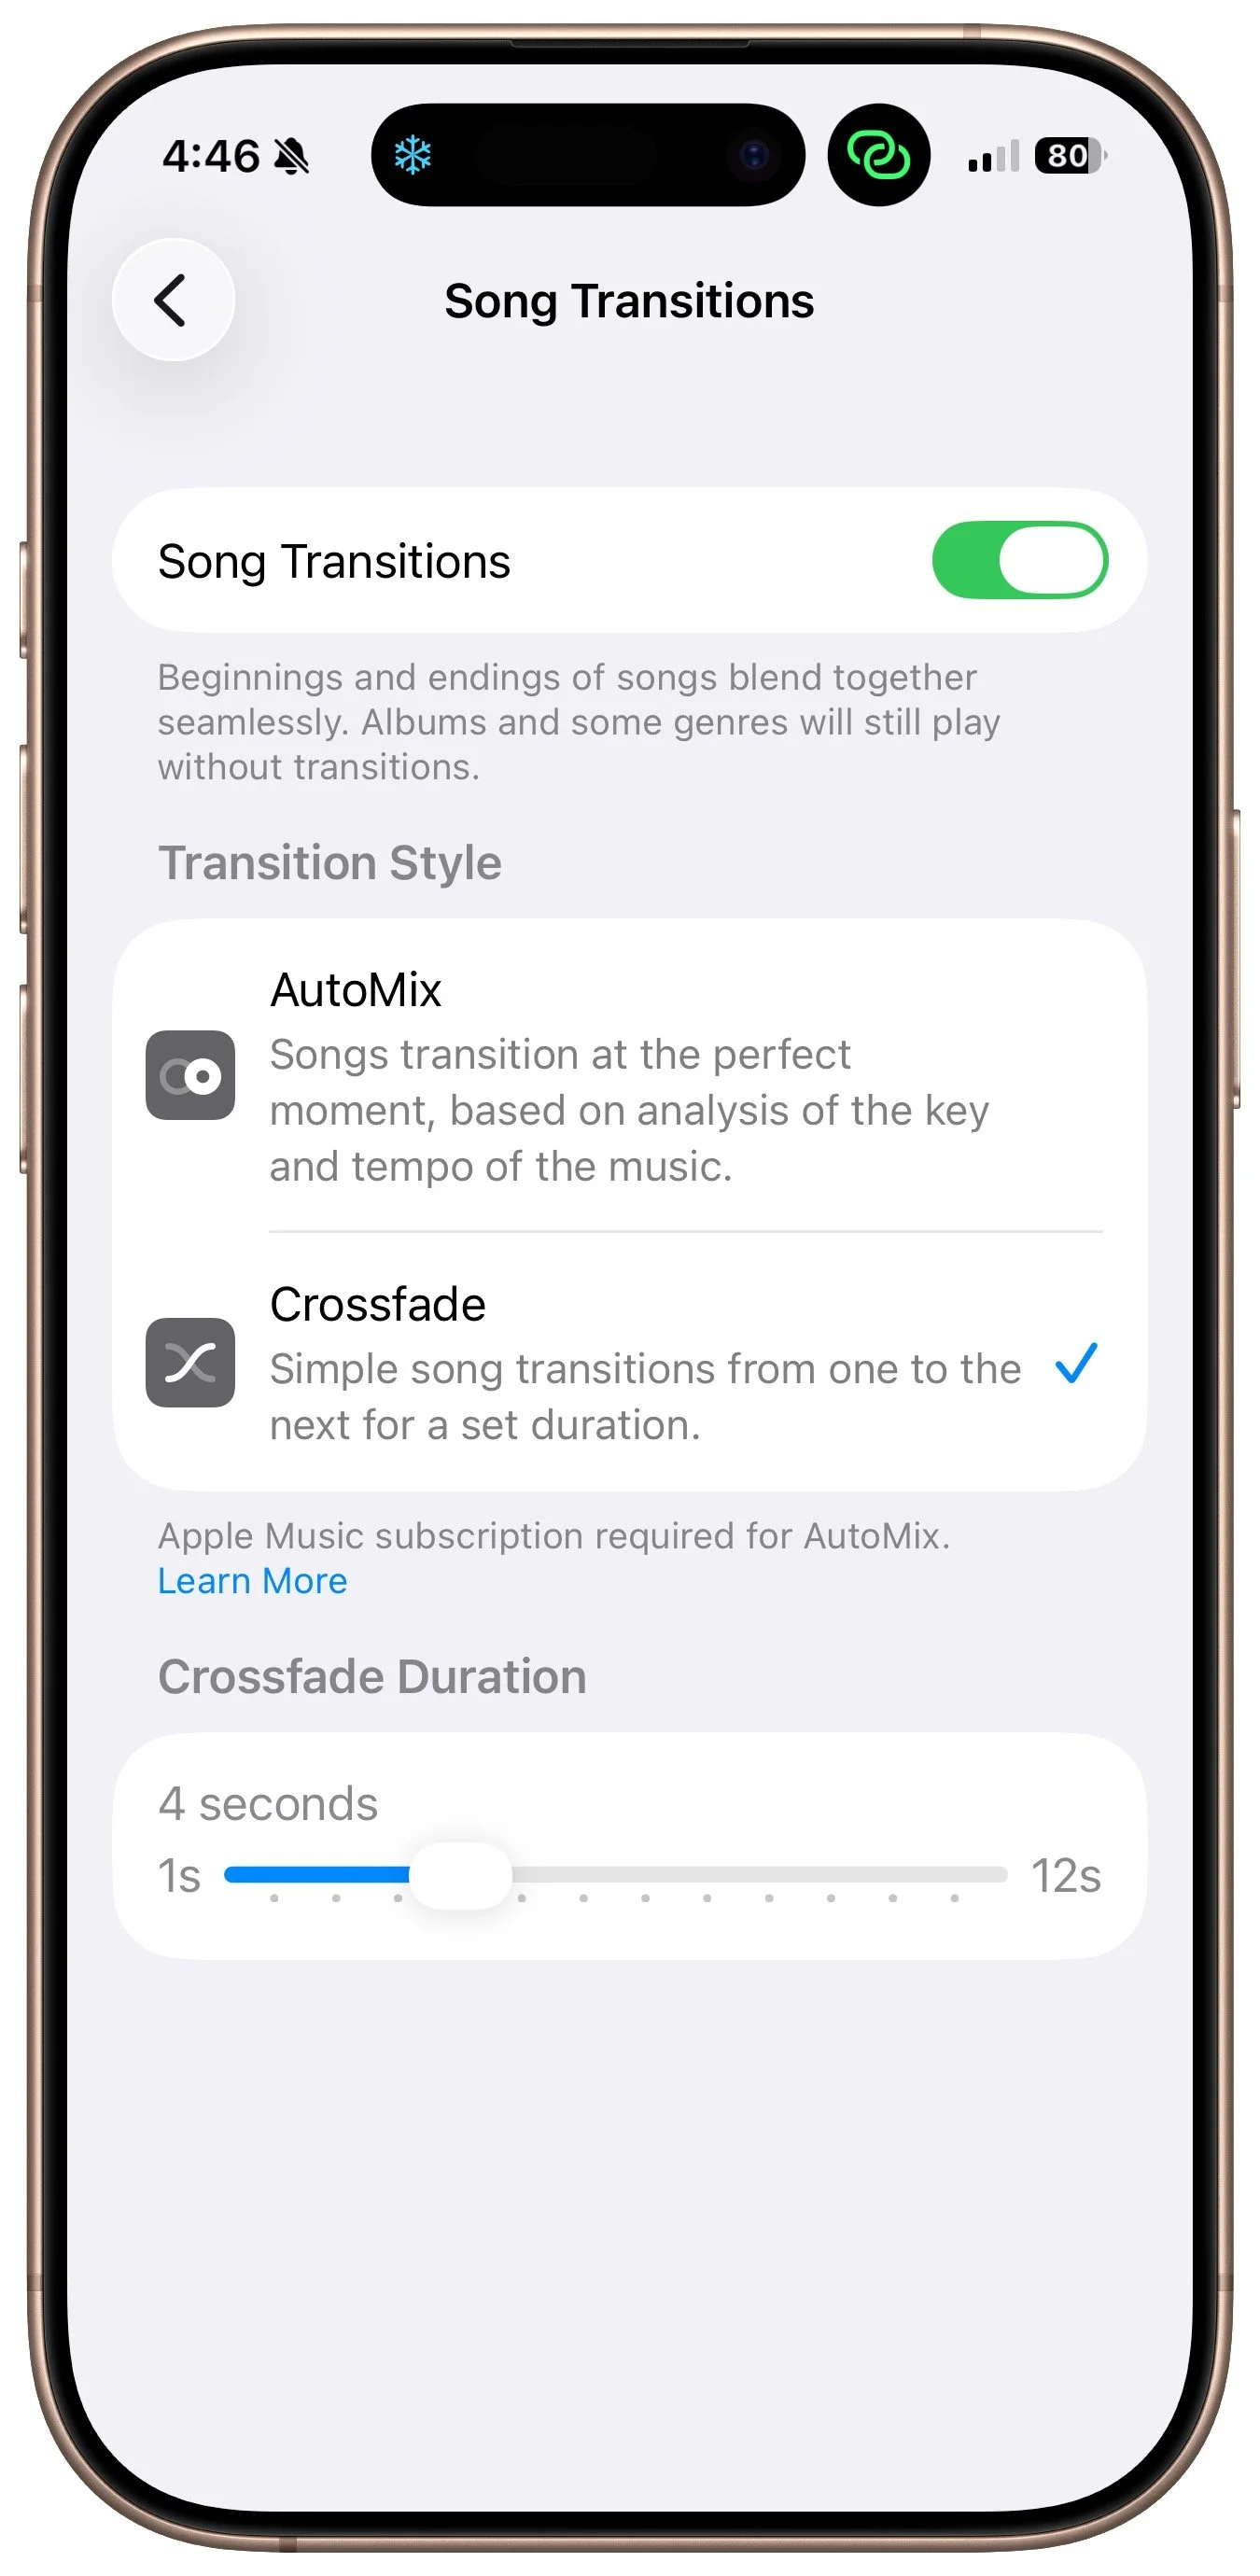
A new feature for Apple Music subscribers in the Music app in iOS 26, iPadOS 26, and macOS 26 is AutoMix, which Apple says causes songs to “transition at the perfect moment, based on analysis of the key and tempo of the music.” It fades between songs as a DJ would, but it’s not always successful. If AutoMix’s transitions aren’t to your taste, navigate to Settings > Apps > Music > Song Transitions in iOS and iPadOS, or Music > Settings > Playback > Song Transitions in macOS, and switch back to the longstanding Crossfade option, which transitions between songs over a user‑specified number of seconds. Or, just turn off the Song Transitions switch and let one song end completely before the next one starts.
(Featured image by iStock.com/lakshmiprasad S)