Share Files, Photos, and other Data between Apple Devices with AirDrop
Apple’s AirDrop lets you easily share photos and files with nearby Apple users and devices. Our article explains how to use this helpful feature with the Mac, iPhone, and iPad.

It’s common to want to share files, photos, and other data between your devices—or with friends and family. When the desired person or device isn’t nearby, it’s easiest to use Messages or Mail. But what if you want to move a file between two of your Macs, from your iPhone to your Mac, or to your friend who’s across the table? For transfers within immediate proximity, Apple provides AirDrop, a quick and easy way to move data between devices.
Make Sure AirDrop Is Ready to Go
First off, AirDrop requires both Wi-Fi and Bluetooth, so make sure both are enabled. If you use wired Ethernet on your Mac, enable Wi-Fi as well, but put the Wi-Fi service beneath the Ethernet service in System Preferences > Network (click the down-pointing arrow under the list and choose Set Service Order).
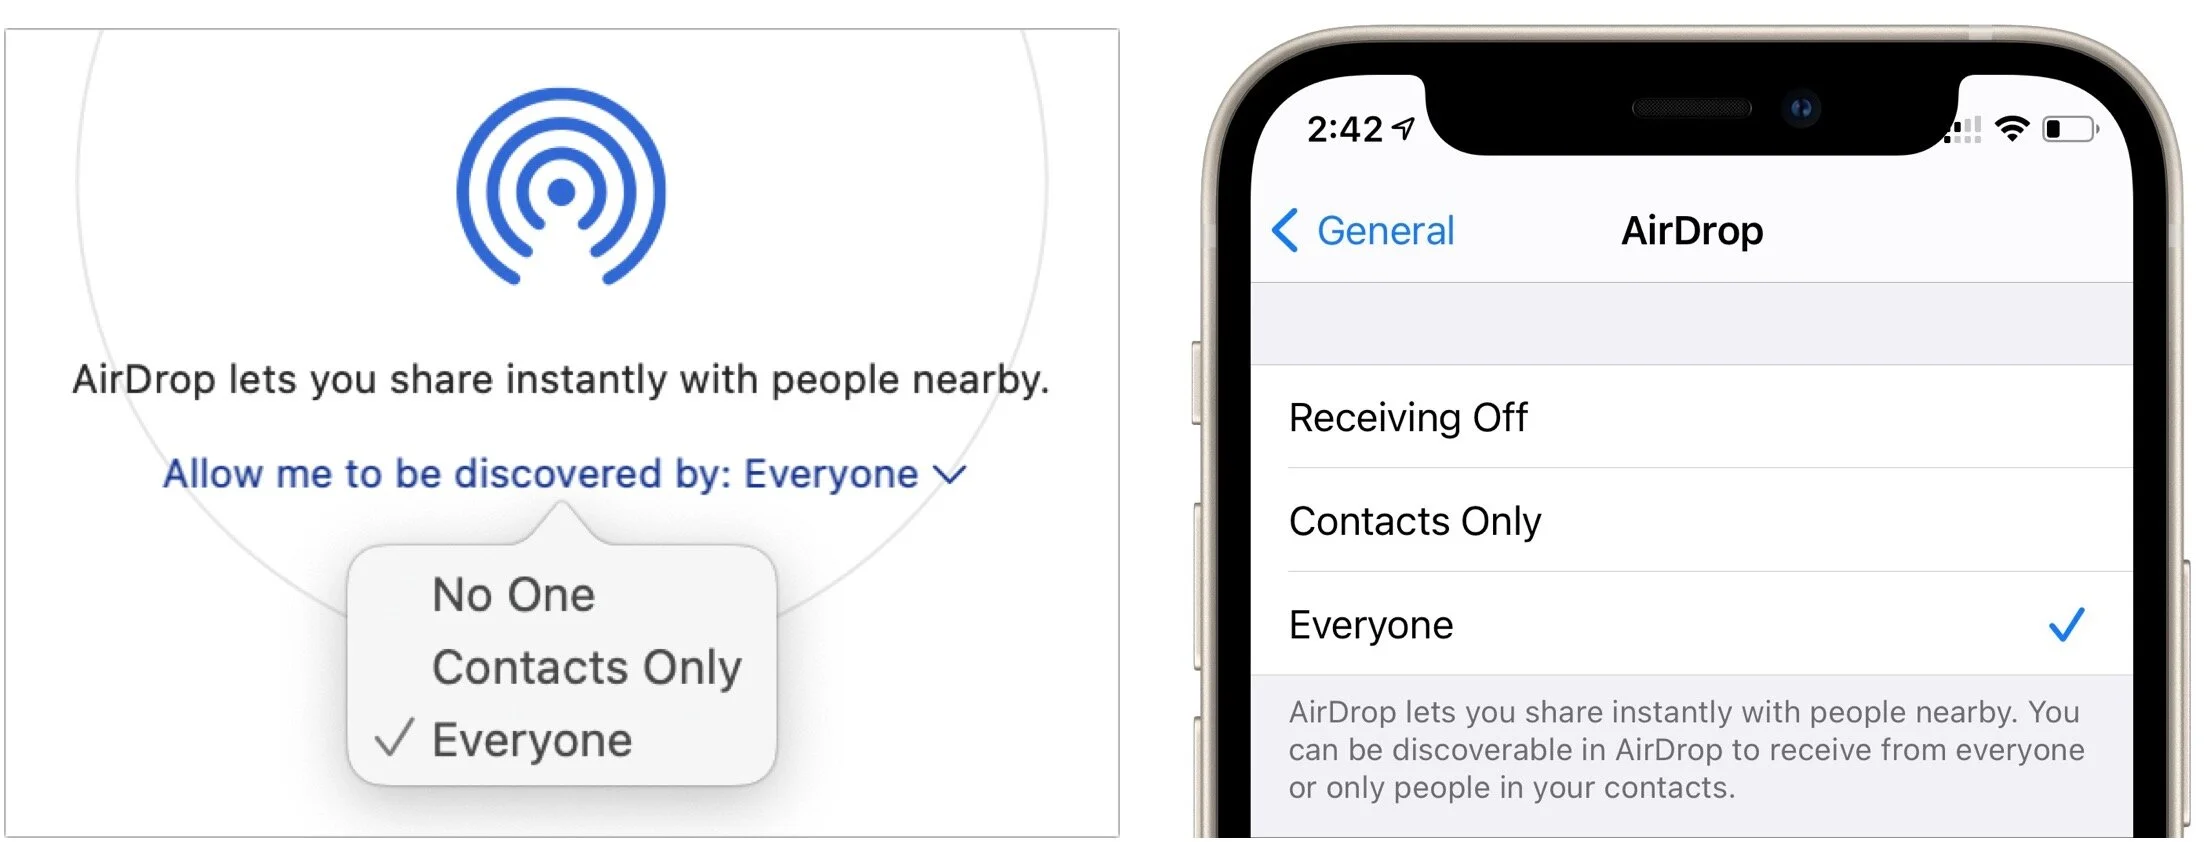
Next, make sure other devices can discover you. On the Mac, choose Go > AirDrop and, near the bottom of the Finder window that appears, choose Everyone from the pop-up menu. (If you’re out in public and random people keep trying to send you files, which would be weird, choose Contacts Only instead.) On an iPhone or iPad, go to Settings > General > AirDrop and select Everyone.
Send a File or Photo via AirDrop
Apple has integrated AirDrop into the standard sharing mechanism in macOS, iOS, and iPadOS, so sharing via AirDrop works the same as sharing via most other apps.
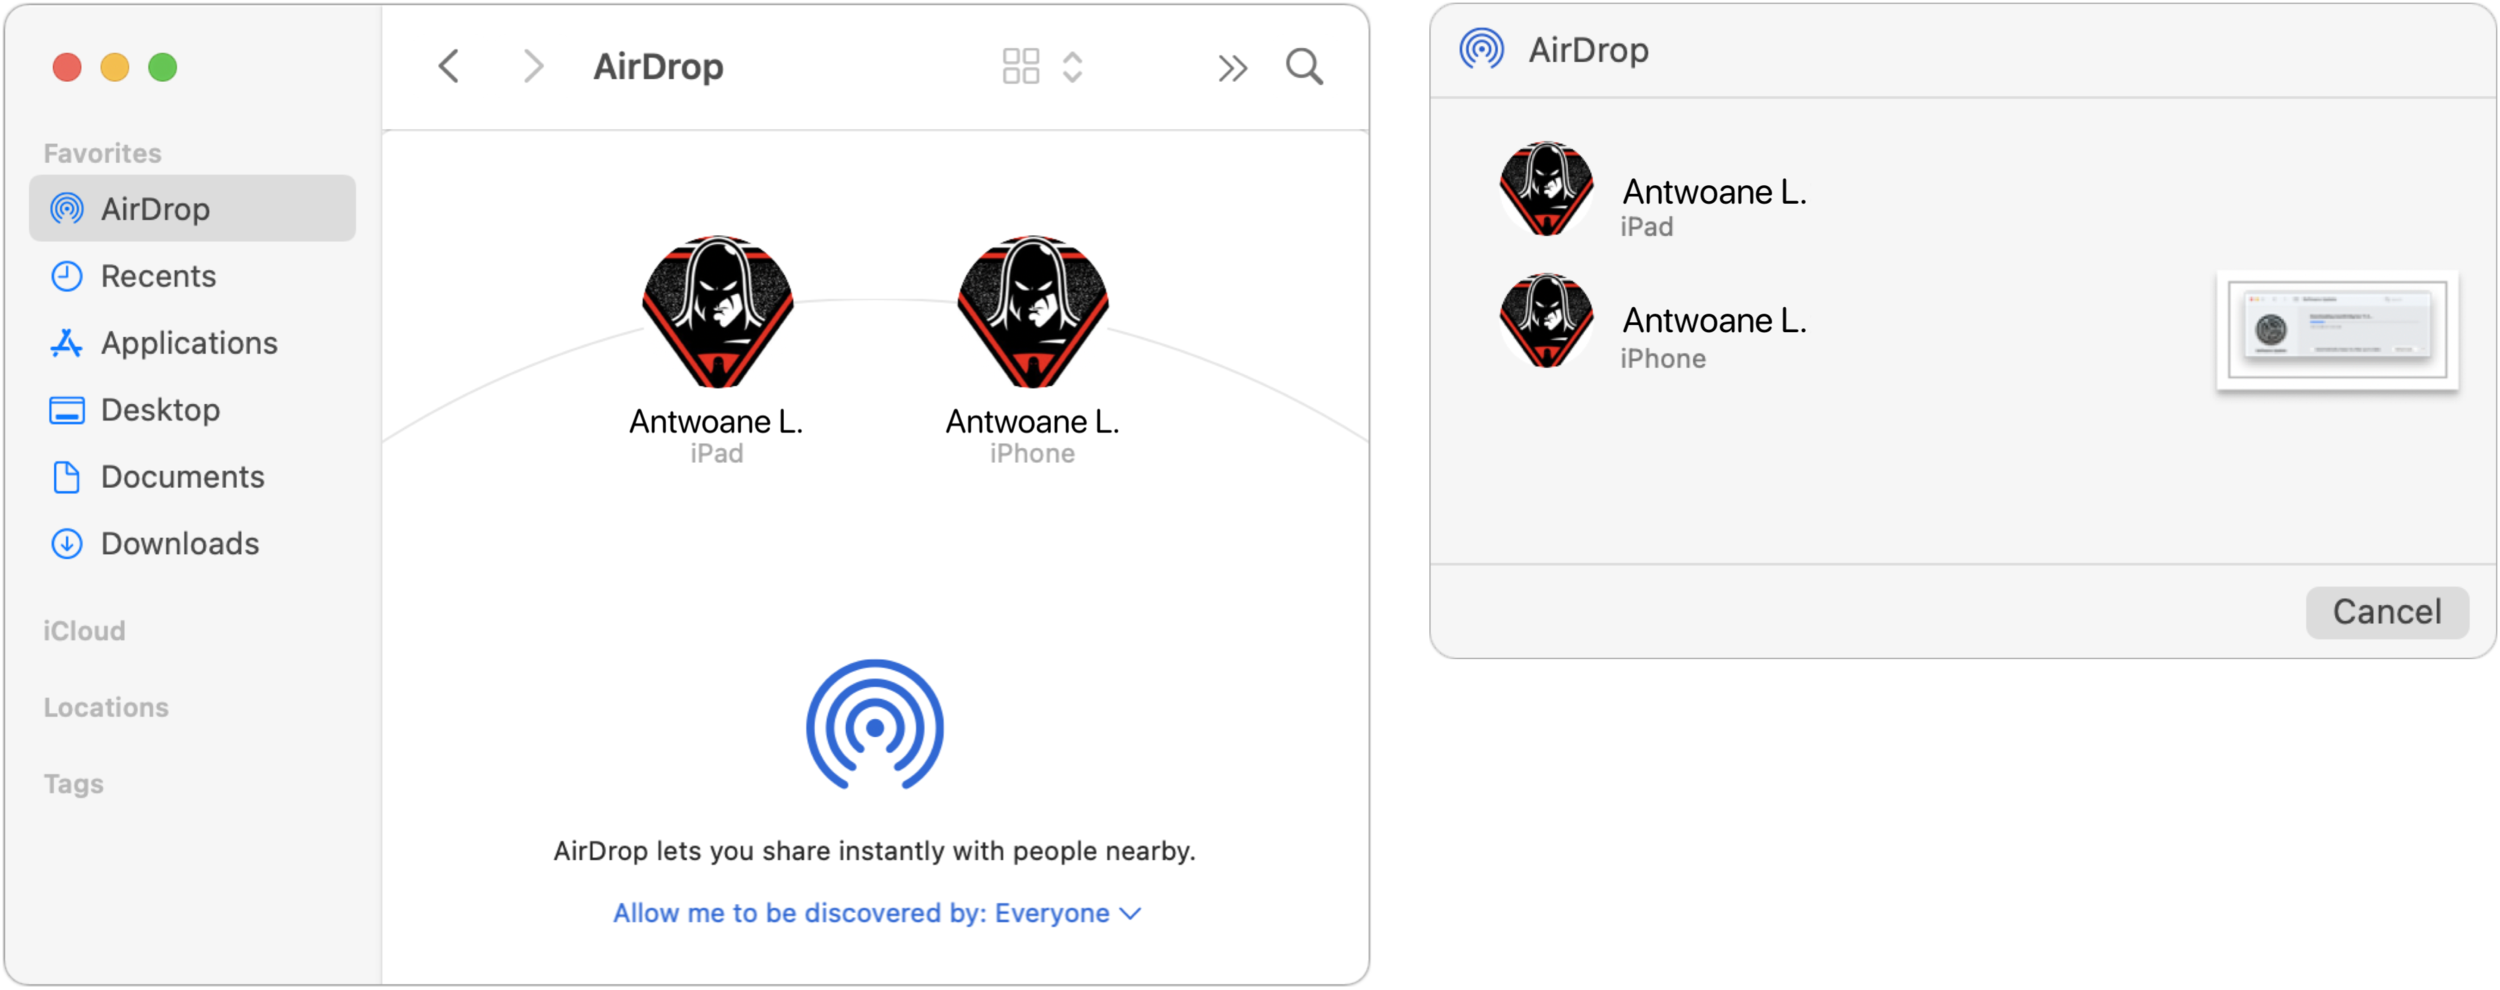
In the Finder on the Mac, the easiest approach may be to select AirDrop in a Finder window’s sidebar and then drag files to the icon representing the destination device (below left). You can also select one or more files and choose File > Share > AirDrop or Control-click them and choose Share > AirDrop, both of which present a dialog from which you can select the destination (below right). The right-hand dialog is also what you’ll see if you use the Share option in Photos or any other app.
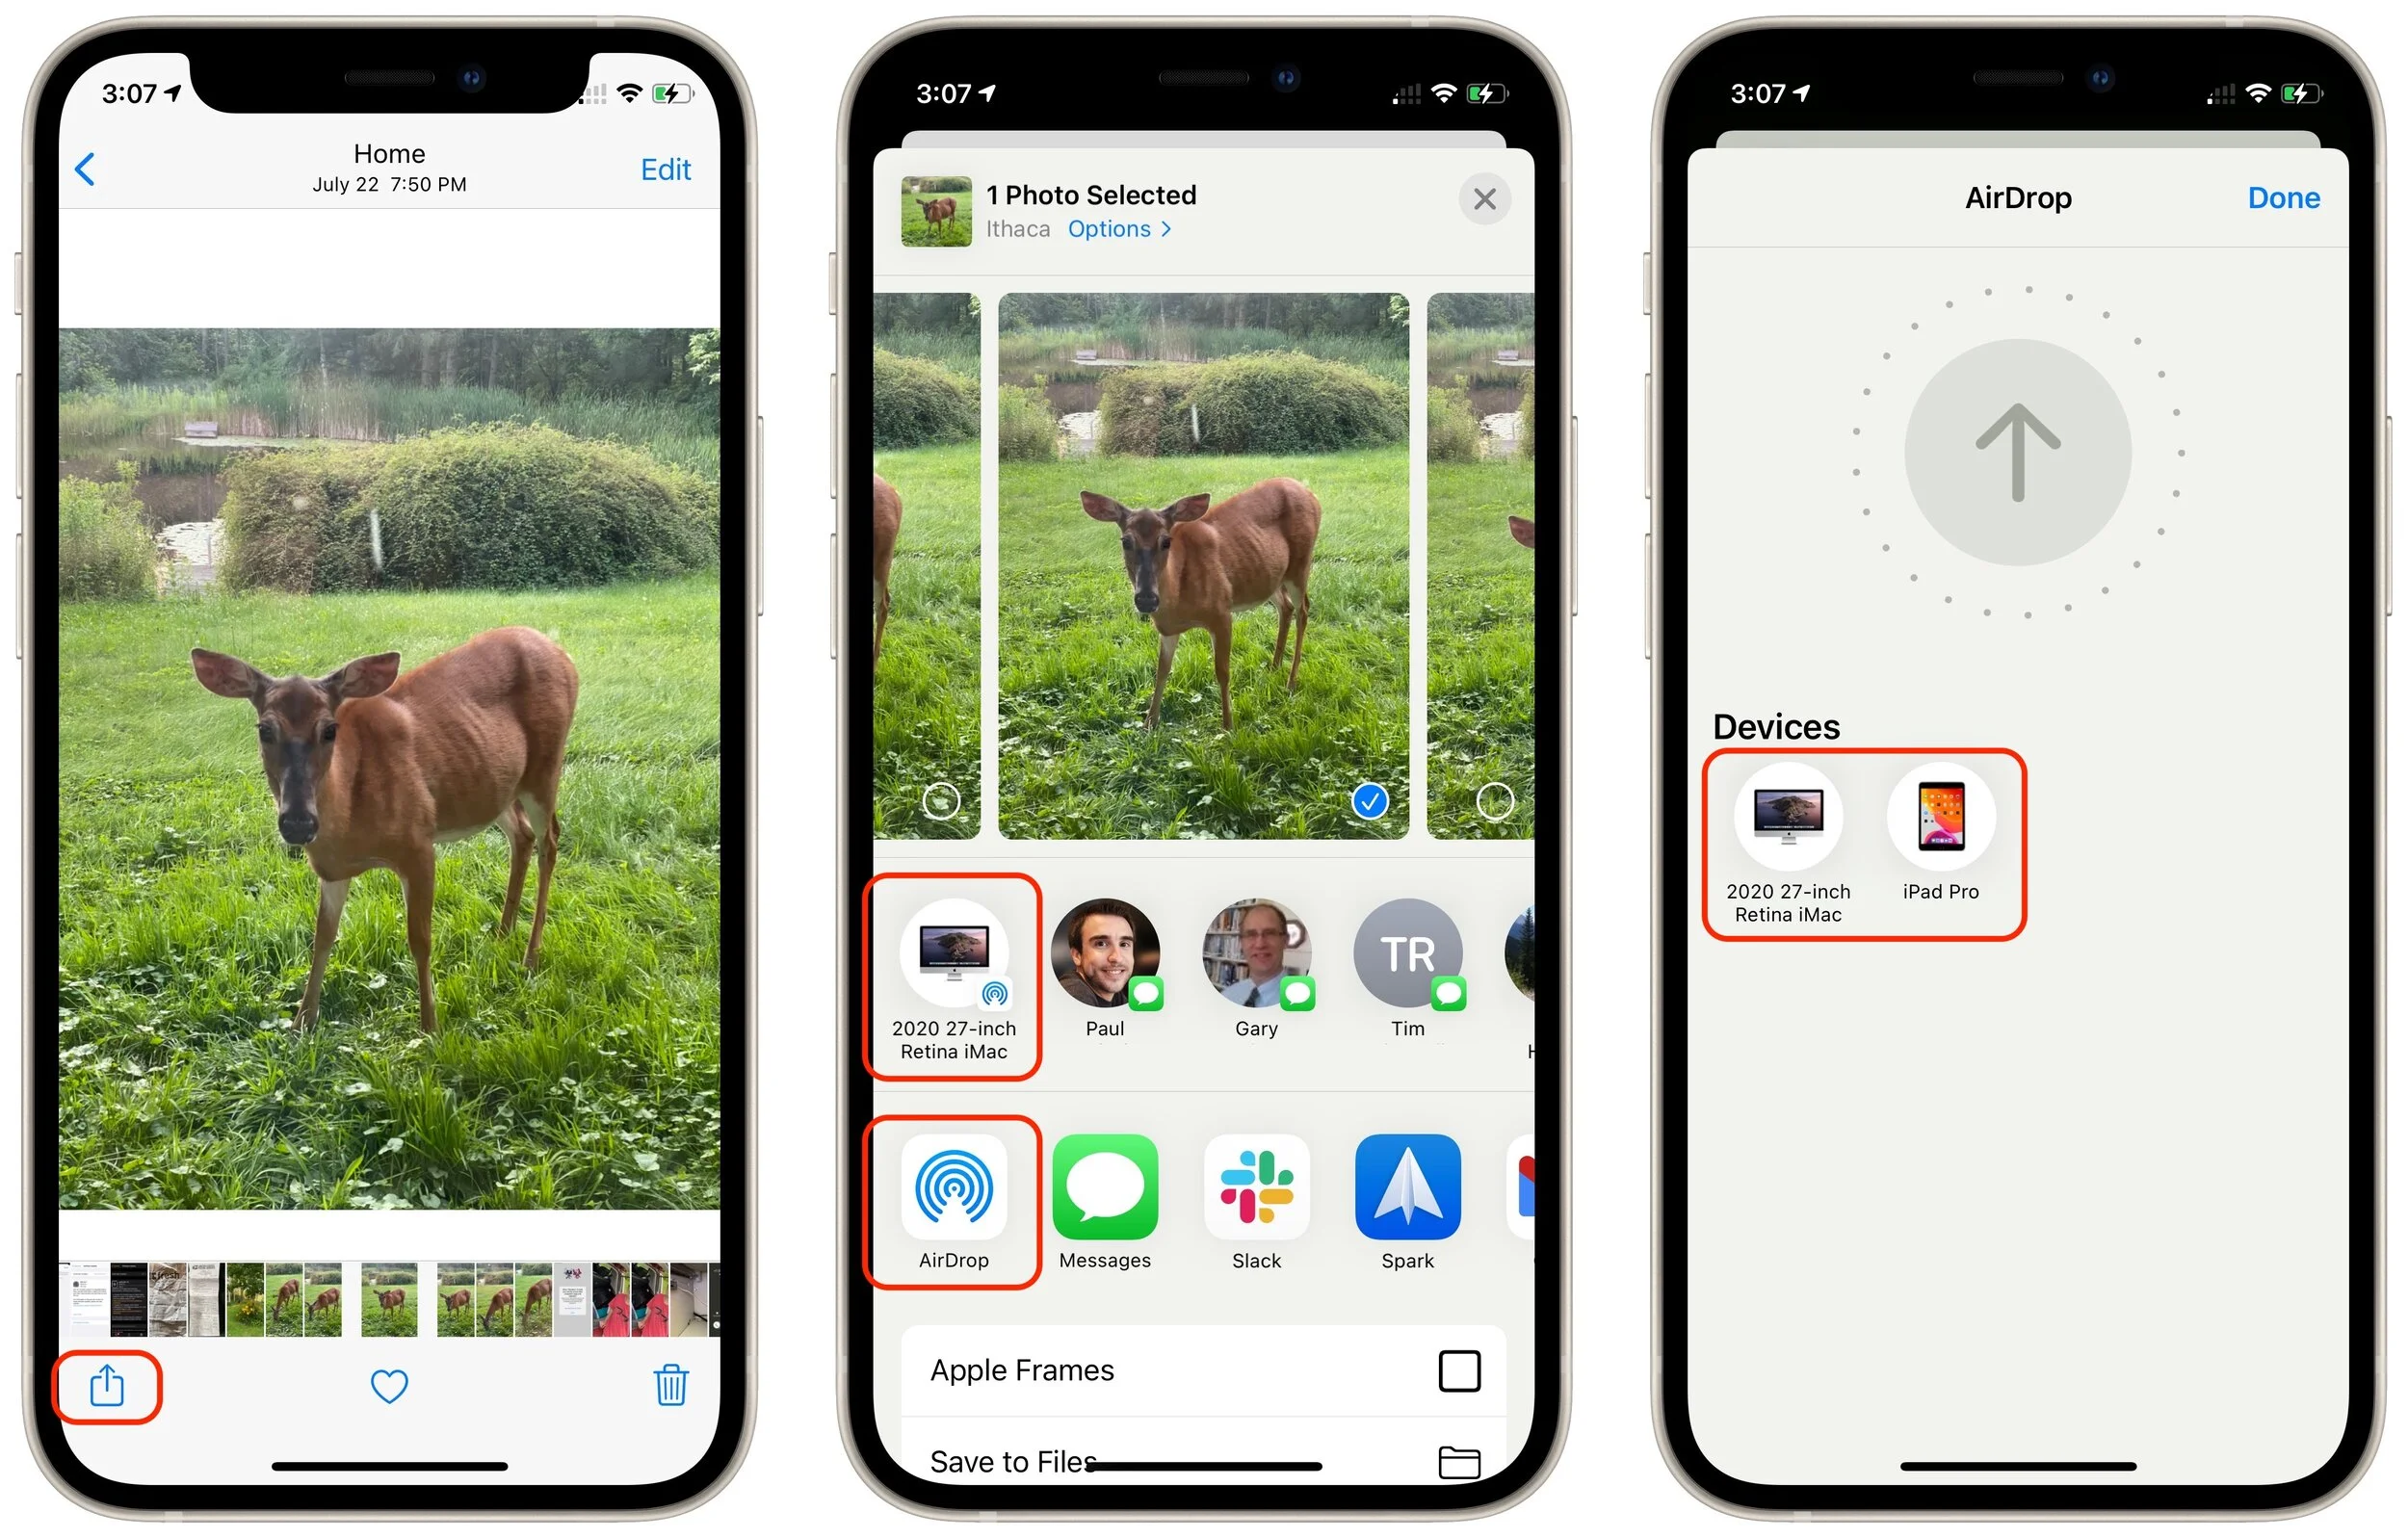
On an iPhone or iPad, when you’re viewing the item you want to share, tap the Share button to bring up the Share sheet. You may be able to tap the AirDrop icon for the desired destination directly in the top row, but if it doesn’t show what you want, tap the general AirDrop icon in the second row to display the AirDrop screen with icons for all available destinations. Either way, tap the destination to send the file.
Receive Data via AirDrop
On the receiving side, AirDrop is utterly simple, particularly when transferring files between your devices, though the experience varies a little depending on the direction and file type.
Receiving on a Mac: If you’re transferring between your own devices, you don’t need to do anything; the file will appear in the Downloads folder of the destination Mac. Files sent from other people will appear there too, but you’ll get a prompt asking you to accept or decline the file, and if you accept, an option to open it in the appropriate app.

Receiving on an iPhone/iPad: Receiving on an iPhone or iPad is similar, with one additional step. Unless iOS/iPadOS knows where the file should go (images always import into Photos automatically, for instance), it prompts you with a list of apps that can open the file. Files you transfer between your own devices are accepted automatically; for files from other people, you must tap the Accept button first.

Troubleshooting
AirDrop has been around since Mac OS X 10.7 Lion in 2011 and has seen significant updates since then. So if you had trouble getting AirDrop to work years ago, it’s worth revisiting the feature. That said, problems can still crop up:
If a Mac doesn’t appear as an AirDrop destination, make sure it has Wi-Fi active. Ethernet is not sufficient. Also, if the Mac’s firewall is active, check that it allows incoming connections. Open System Preferences > Security & Privacy > Firewall > Firewall Options and deselect “Block all incoming connections.”
If an iPhone doesn’t appear as an AirDrop destination, make sure Personal Hotspot is turned off in Settings > Personal Hotspot.
Because AirDrop relies on Bluetooth and Wi-Fi, interference with either, or a separation between devices of more than 30 feet (9 meters), can cause performance and reliability to suffer.
For best results, make sure you’re using recent Apple hardware running the latest versions of macOS, iOS, and iPadOS. Apple has improved AirDrop over the years, and it works significantly better than it did years ago. Technically, AirDrop requires a Mac introduced in 2012 (excluding the 2012 Mac Pro) or later running OS X 10.10 Yosemite or later. On the mobile device side, the iPhone, iPad, or iPod touch must be running at least iOS 7.
If you’re prompted to accept transfers between your own devices, that’s an indication that the devices aren’t logged in to the same iCloud account.
Although AirDrop has no explicit size limit, very large files (over 500 MB) will take a long time to transfer and are more likely to fail due to network issues during the transfer.
If you can’t find a transferred file in the destination Mac’s Downloads folder, remember that it retains its original creation and modification dates, so it might be sorting differently than you expect.
Next time you need to move data between nearby Apple devices, give AirDrop a try!
(Featured image by iStock.com/jroballo)
How to Take the Annoyance Out of Your Key Passwords and Passcodes
Password managers are essential, but you must still remember and enter some passcodes and passwords. Read on for our advice on how to create ones that are secure, memorable, and easy to type.

We constantly say, “Use a password manager!” for good reason. Password managers make it easy to generate, store, and enter strong passwords. You don’t have to decide whether or not your password is strong or weak, remember it, and type it accurately every time you log in to a website. Seriously, just get 1Password or LastPass, or you could use Apple’s iCloud Keychain.
But what about those passwords you have to enter regularly, like your Mac’s login password, your Apple ID password, and the master password for your password manager? And the passcodes for your iPhone, iPad, and Apple Watch? Plus, it may also be helpful to be able to remember and type passwords for a few services that require you to enter the password into an app instead of a Web browser. (Of course, you can copy and paste the password from your password manager, but that’s fussy if you have to do it frequently.)
For such passcodes and passwords, you’ll want to come up with options that are strong, memorable, and easily entered. Here’s what we recommend for most people. (If you’re a target of a nation-state or regularly deal in highly confidential government or corporate information, you’ll need an even higher level of security.)
Passcodes
It’s essential that your iPhone, iPad, and Apple Watch have a passcode that can’t easily be guessed. Once someone can get into an iPhone or iPad, they could read all your email, look at all your photos, make purchases via Apple Pay, and impersonate you in conversations with others. And yet, many people use worthless passcodes like 111111 or 123456. Don’t do that! Also, don’t worry about making a passcode that’s easy to type—with Touch ID, Face ID, and Apple Watch unlocking, you don’t have to type your passcode all that frequently.
Since we’re talking about physical objects that can’t be accessed remotely and are most likely to be compromised by someone who knows you personally, the key is to think about what six digits you can remember but that even people who know you well couldn’t guess.
For instance, you might think of using 081995 if you were born in August 1995, but your birthdate is both widely known and easily discovered. A better pattern would be the dates of the month associated with the birthdays of your best friend from high school, your favorite cousin, and your late grandmother—132408 if they were born on May 13th, July 24th, and November 8th. No one will ever guess that.
You get the idea. Think of dates associated with people or events important to you but that even close friends or family members wouldn’t necessarily know. Then combine those days, months, or years in a way that makes sense to you. You’ll end up with a strong passcode that you’ll never forget.
One last point. Given the level to which data syncs between your iPhone, iPad, and Apple Watch, we don’t see any significant benefit in creating different passcodes for each. Come up with a secure passcode and use it on all three.
Mac Login Passwords
Much like an iPhone’s passcode, the primary vulnerability for your Mac’s login password is someone who has physical access. You don’t have to worry about remote brute force attacks (as long as you don’t have remote access enabled in System Preferences > Sharing) or password files being stolen, suggesting that the password doesn’t need to be insanely strong and equivalently hard to type.
That’s especially true for an M1-based Mac or Intel-based Mac with a T2 security chip, and even more so if you have enabled FileVault. But if it’s an older Intel-based Mac without a T2 chip, it’s conceivable that a thief could image the drive and use brute force attacks to find the password. A stronger password might make sense for such an older Mac.
Considering all this, we recommend coming up with a password that’s easy to type, memorable, and difficult to guess for even those who know you well. It doesn’t have to be strong enough to protect against serious cracking software unless you live in a Spy-vs.-Spy world. Consider taking a few words from a song lyric or movie quote you’ll never forget and jamming them together, such as “ettubrute” or “goestoeleven.”
If you unlock your Mac and apps using an Apple Watch or Touch ID most of the time, you can make the login password a bit stronger without the annoyance of having to type it so frequently.
Apple ID and Password Manager Passwords
When it comes to your Apple ID password, the master password for your password manager, and other passwords to online services you need to type, attacks will take place either remotely or be directed against a stolen password file. Plus, your Apple ID password and master password to your password manager literally hold the keys to your kingdom, so they must be extremely strong and resistant to automated cracking. It’s also essential that you won’t forget them and that you be able to enter them—on both a Mac keyboard and an iPhone keyboard—reasonably easily. What to do?
One possible solution is to create a long passphrase of random but easily remembered words, as suggested in the classic xkcd cartoon. Current advice suggests that a passphrase of five words—with at least 32 characters—is now necessary to resist modern cracking methods.
Passphrases are highly secure, but they can be tedious to type and may not work well for an Apple ID password. Apple requires that Apple ID passwords have upper and lowercase letters and include at least one number. But don’t make it longer than 32 characters; some have reported problems with longer passwords.
For a compromise approach, consider a password built using the following rules:
It starts with an uppercase letter. That satisfies Apple’s requirement and means you don’t have to switch between upper and lowercase keyboards on an iPhone more than once.
That letter and subsequent lowercase letters come from the initials of unrelated people, movie titles, the first few letters of a saying or product name, or something similar that you’ll have no trouble remembering.
It includes several punctuation characters accessible from the iPhone’s numeric keyboard that don’t require the use of the Shift key on the Mac keyboard.
It ends with digits developed along the lines of the passcode above—this keeps you on the iPhone’s numeric keyboard. (You could also swap the order of the punctuation and digits.)
Overall, it has at least 13 characters, preferably more.
(As an aside, does having two-factor authentication (2FA) turned on for any account where you’re creating a memorable password let you make a weaker password? Yes, in the sense that your overall security is much higher with 2FA because someone would have to hack your password and compromise the 2FA system in some way. But no, if your password is so weak that it’s trivially crackable, such that 2FA becomes the only protection. Don’t overthink it—stick with strong passwords.)
As an example, consider this possibility for a LastPass master password: Tpmbi-alas/.19851955. It’s not entirely random, but it’s close and doesn’t use obvious patterns that cracking software could exploit. Let’s break it down:
Tpmbialas comes from the first letter of the words in the movie The Phantom Menace and the Dire Straits album Brothers in Arms, plus the first three letters of LastPass.
/. plays on the name of the tech news site Slashdot to be memorable, and the characters are easily typed on both the iPhone and Mac keyboards.
19851955 will be easily remembered by fans of the movie Back to the Future, whose characters travel in time from 1985 back to 1955.
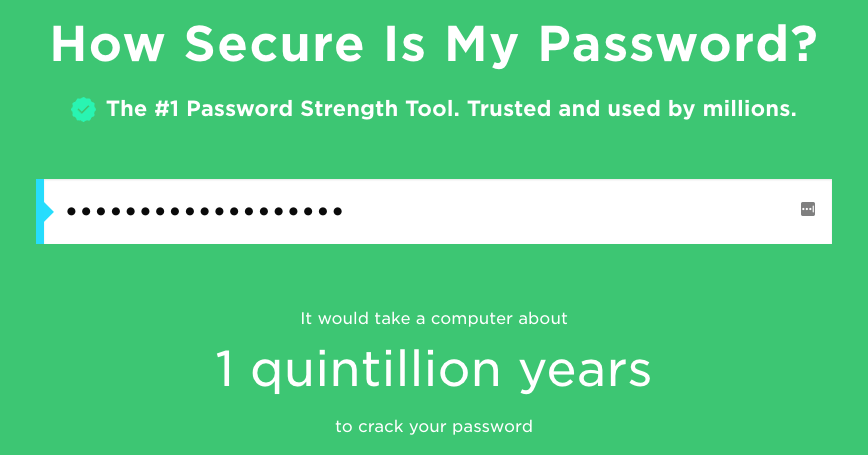
It’s highly secure—the How Secure Is My Password? site says it would take 1 quintillion years to crack, and there’s no way that even someone who knew your taste in movies and music could guess it (as long as you don’t tell them about your pattern).
One last thing to consider: is your password fun to type? Some key combinations probably roll off your fingers, whereas others will be prone to typos. Test your proposed password on both a Mac keyboard and your iPhone. If you hate typing it, tweak the characters until it’s better.
When you’re developing your own unique passwords that you must be able to remember and type, a strategy along these lines should serve you well. Just make sure to avoid dictionary words, repeated characters, and any password under 13 characters in length, all of which make passwords easier for cracking software to guess.
(Featured image by iStock.com/peshkov)
Picking the Best Mac for a College-Bound Student
Which Mac is the best for a new college student? Short answer: the M1 MacBook Air. Read on for the longer explanation and how we recommend configuring it.

Do you have a child heading off to college soon? As you’re undoubtedly aware from high school, a computer is essential for a college student. If you haven’t been paying close attention to Apple’s Mac lineup, you might wonder which model makes the most sense.
First, don’t buy anything without first checking with the college. Many college departments have specific requirements based on the software that students have to use in their classes. Generally, these revolve around processor type, amount of RAM, and storage space. Luckily, current Macs should meet the requirements.
Colleges often specify—and students usually prefer—laptops instead of desktop machines. Although the iMac is an excellent machine with a gorgeous screen, it’s too big and unwieldy for the transient lifestyle of the typical college student. The same is true of a Mac mini and external display. A laptop is much easier to pack during moves, and it can travel to class every day. A student who’s accustomed to taking notes on an iPad with a Smart Keyboard and Apple Pencil might be able to use that along with a desktop Mac, but most people should focus on Apple’s laptops.
In the past, it was harder to decide which model was best for a given student, but with Apple’s move to the M1 chip, which significantly outperforms the Intel processors used in previous models, the decision is easier. We see three primary scenarios:
Most students: Buy Apple’s M1-based MacBook Air. It’s Apple’s smallest, lightest, and least expensive laptop, but thanks to its M1 processor, it has nearly identical performance to the heavier and more costly M1-based MacBook Pro. It also has the same lovely 13.3-inch Retina display. It starts at $999, and an education discount may be available.
Slightly better specs: If cost is of little concern, the M1-based MacBook Pro offers just a bit more performance due to fans that keep its M1 chip cool. It also has a Touch Bar (which some people like, but others don’t), somewhat longer battery life, and nominally better speakers and microphones. It starts at $1299, and again, education pricing may be available.
Windows compatibility: The only reason to buy an older Intel-based Mac-Book Pro— available in either 13.3-inch ($1799) and 16-inch ($2399) models—is if Windows compatibility is essential. All Intel-based Macs can run Windows with no problems, either by restarting in Apple’s Boot Camp or using virtualization software like VMware Fusion (free for students) or Parallels Desktop. (On M1-based Macs, it’s possible to run Parallels Desktop and Windows for ARM Insider Preview, but we can’t recommend that anyone rely on that combination yet.)
Regardless of which laptop you decide on, you’ll have to pick a processor, an amount of RAM, and storage capacity:
Processor: With the M1-based MacBook Air, you have a choice between two CPUs that are identical apart from one having a 7-core GPU and the other an 8-core GPU. No one is likely to notice the difference for everyday software, but the price difference is only $50 if you’re also getting at least 512 GB of storage. (The M1-based MacBook Pro offers only the 8-core GPU chip.) For Intel-based Mac laptops, there are various options based on clock speed and number of cores. They’re all fine, but you pay for performance, so buy what fits your budget and needs.
RAM: With the M1-based Macs, you can choose between 8 GB and 16 GB of RAM. 8 GB may be acceptable, but we recommend 16 GB. Intel-based Mac laptops start at 16 GB, which is a decent base level, and you can go up to 32 GB or 64 GB (16-inch only). Generally speaking, go beyond 16 GB only if you know you need it.
Storage: For the M1-based Macs, 256 GB is the lowest storage level, whereas the Intel-based Macs usually start higher. Either way, you can upgrade to a maximum of 2 TB. Choose the amount of storage based on budget and anticipated usage—video takes a lot of space, as can large numbers of photos, but most other uses don’t.
To our thinking, the most obvious choice for a Mac that’s likely to last for four years of college would be the M1-based MacBook Air with the 8-core GPU, 16 GB of RAM, and 512 GB of storage. Be sure to budget for AppleCare+, too; it’s almost guaranteed that some mishap will befall a student laptop, and AppleCare+ covers up to two incidents of accidental damage every year.
You’ll need to have some conversations with your child to find out what they think they’ll need—and be sure to double-check that against the college’s recommendations—but if you have any questions after that, don’t hesitate to contact us.
(Featured image by Apple)
Don’t Cook Your Digital Devices in the Summer Heat
How hot is too hot for your Apple devices? You may be surprised by the answer.

As climate change continues to wreak havoc on our weather, many areas are seeing record temperatures this summer—Seattle just recorded its hottest days ever. You may be able to trade your business suit for shorts or skirts to stay more comfortable, but your electronic gear can’t do the same. Keeping your tech cool is about more than comfort—as temperatures rise, performance can suffer, charging may get slower or stop, various components might be disabled, and devices can become unreliable.
How Hot Is Too Hot?
You might be surprised by how low the recommended operating temperatures for Apple devices are—whether you’re talking about an iPhone 12 or an M1-based MacBook Pro, the company recommends keeping them under 95° F (35° C).
Such temperatures happen regularly throughout the summer. Even in cooler climes, the temperature in a parked car in the sunshine can easily hit 130º F (54º C) in an hour and rise higher as time passes. And no, opening the windows a few inches won’t make much difference. You know you shouldn’t leave a kid or dog in a parked car for that reason, and now you can see that leaving your iPhone in the car during an afternoon at the beach might be problematic as well. Apple says its products shouldn’t even be stored—turned off—at temperatures over 113º F (45º C).
It’s not just cars you have to think about. Temperatures in homes and offices without air conditioning can also rise higher than electronics would prefer, and that’s especially true for computers that stay on most of the time and aren’t located in well-ventilated areas.
What’s the Danger?
First off, remember that all electronic devices produce their own heat on top of the ambient heat in the environment, so the temperature inside a device can be much, much hotter than outside. The CPU in an iMac can hit 212º F (100º C) under heavy loads.
Temperatures that exceed component design specs can have the following detrimental effects:
Chips of all types can behave unpredictably as increased thermal noise (electrons vibrating more) causes a higher bit error rate. Because electrical resistance increases with heat, timing errors can also occur.
Lithium-ion batteries discharge well in high temperatures, but the increased rate of chemical reactions within the battery will result in a shorter overall lifespan.
As devices heat and cool, the uneven thermal expansion of different materials can cause microscopic cracks that can lead to a variety of failures over time.
Some heat-related problems are temporary, so when the device or component cools down, it will resume working correctly. But others are irreversible and worth avoiding.
When a Mac gets too hot, it will spin up its fans in an attempt to keep its internal components cool. (The M1-based MacBook Air doesn’t have a fan, so it won’t be able to provide the same level of advance warning.) If your Mac’s fans ever run at full tilt for more than a few minutes, first quit apps you aren’t using, particularly those that might be CPU-intensive, thus creating a lot of heat. If that doesn’t make a difference, restart it to ensure the problem isn’t some rogue process. If the fans come back on at full speed quickly, shut it down and let it cool off for a bit. In the worst case, an overheated Mac may start acting unpredictably or crash.
iOS devices don’t have fans, so they employ other coping mechanisms. If your iPhone or iPad gets too hot, the device will alert you.
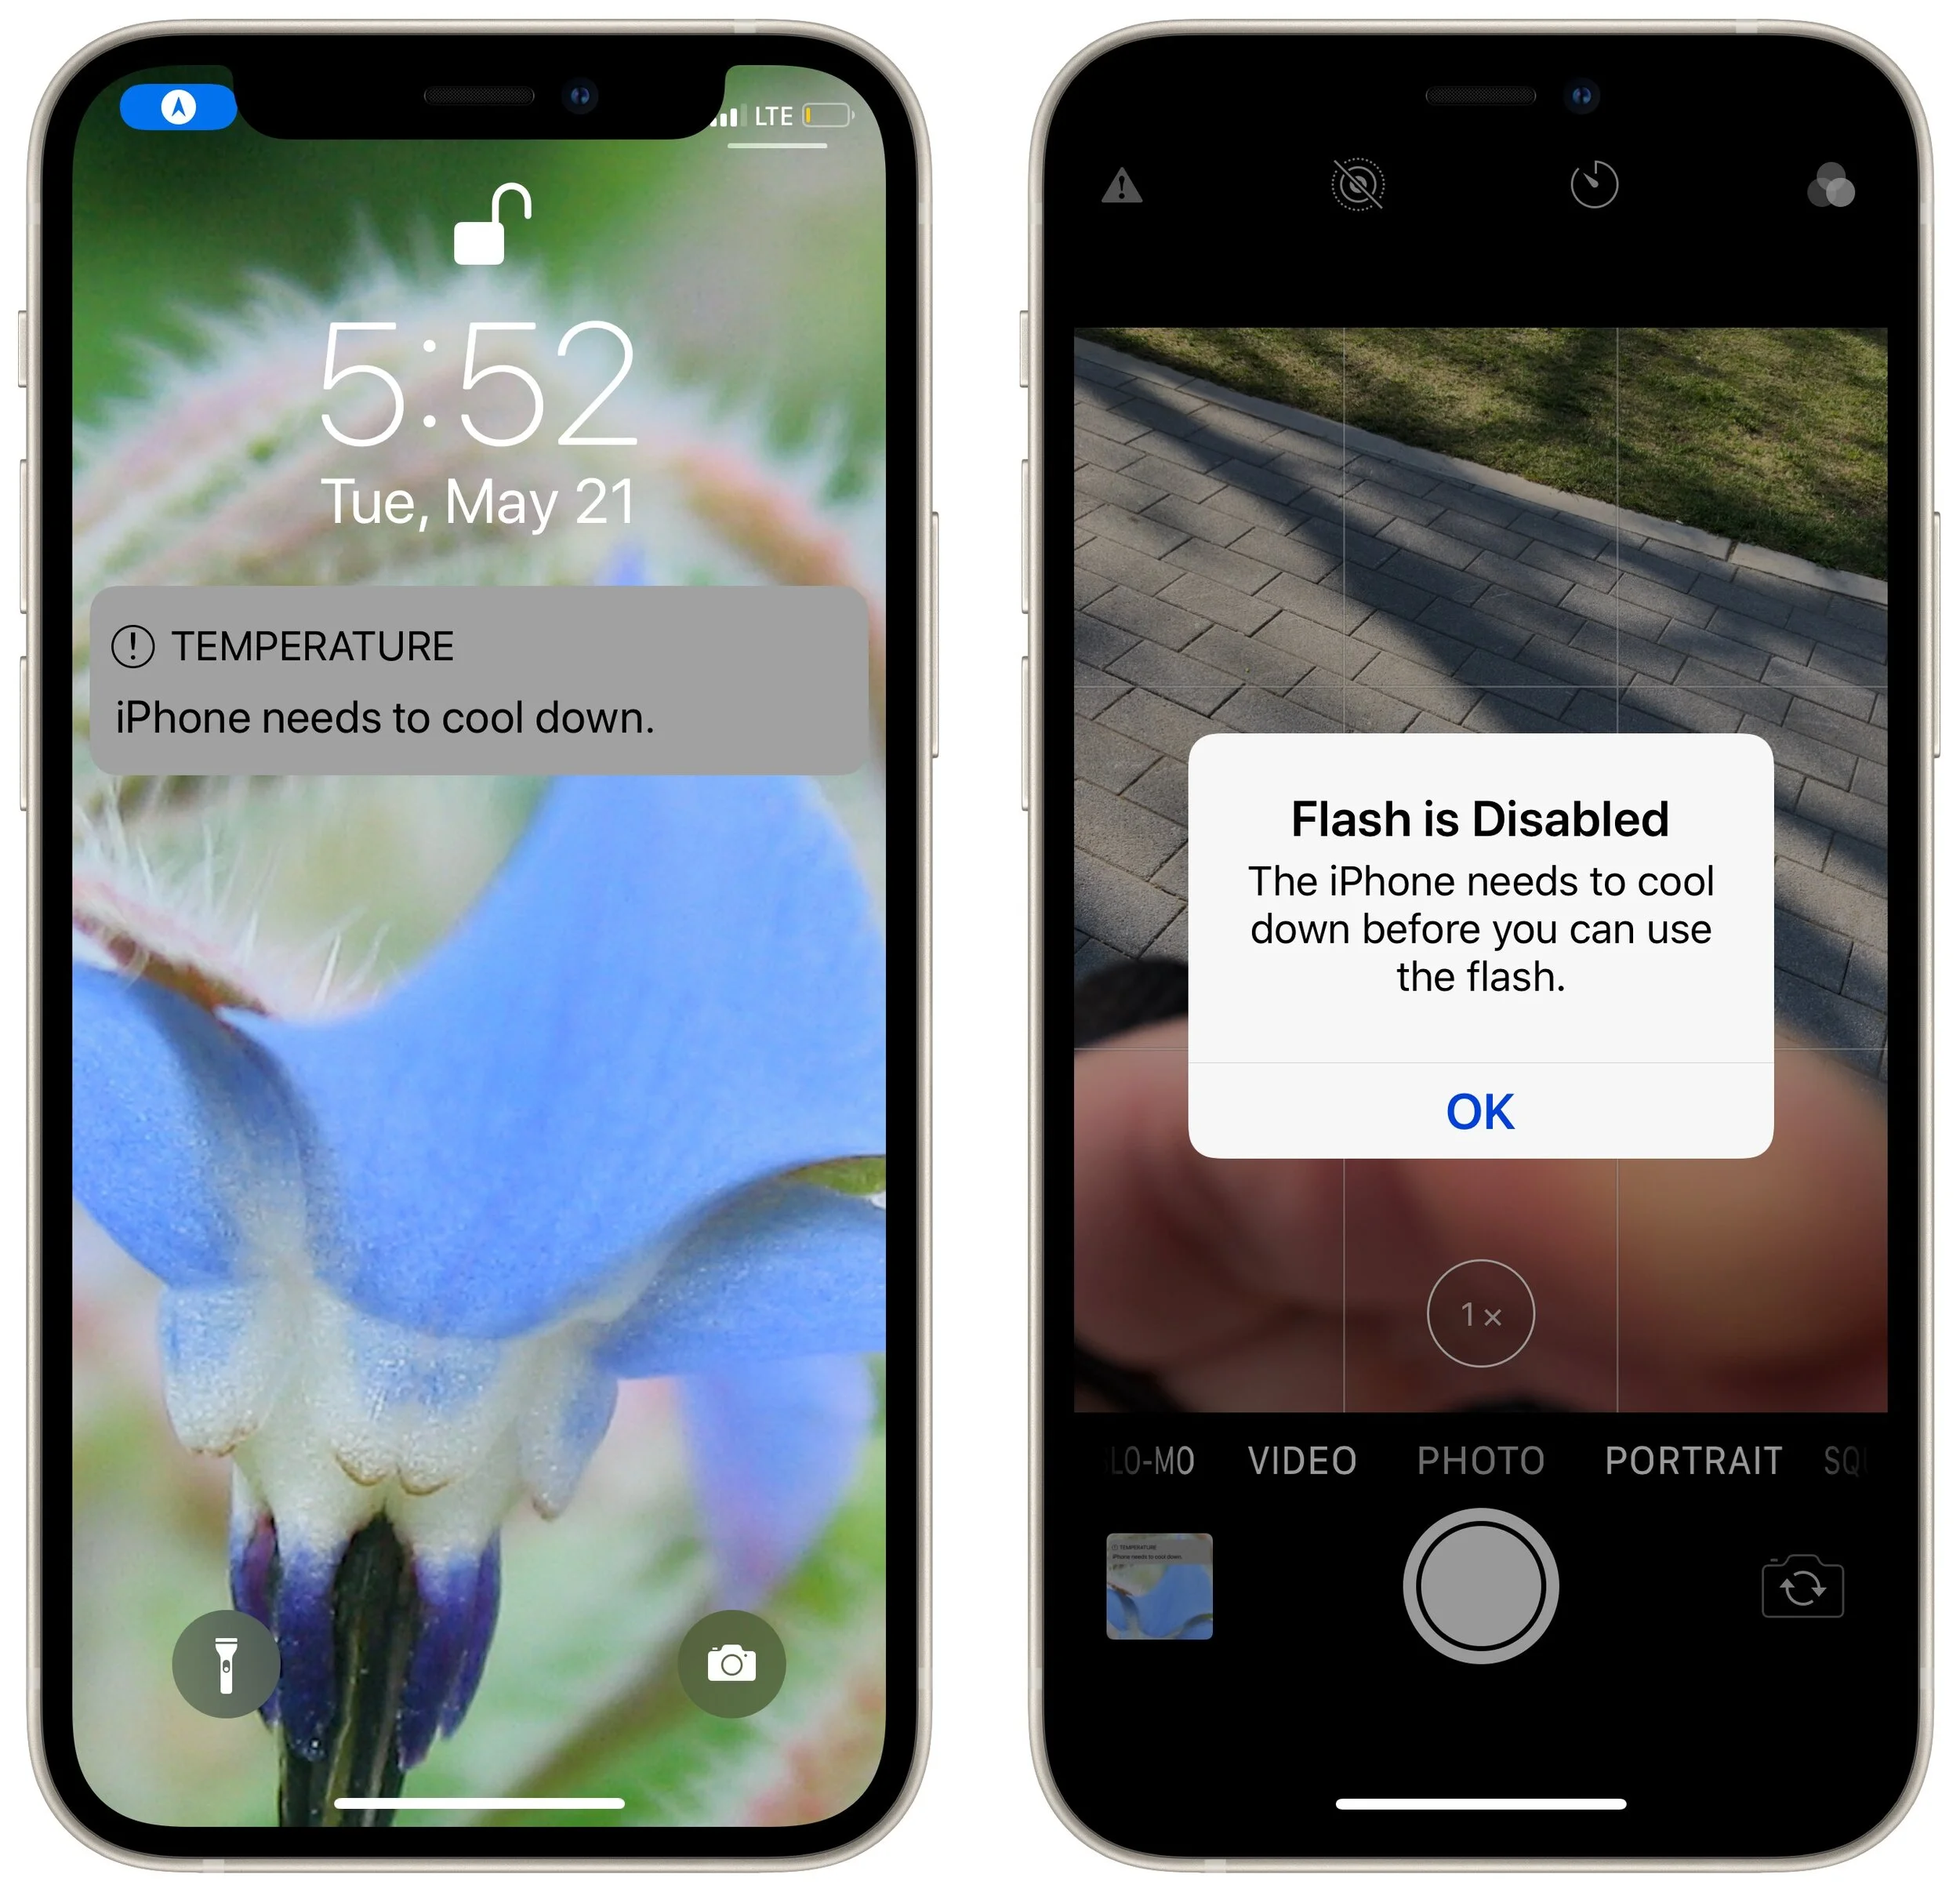
Apple says you might notice some of the following behaviors with an overheating iPhone or iPad:
Charging, including wireless charging, slows or stops.
The display dims or goes black.
Cellular radios enter a low-power state. The signal might weaken during this time.
The camera flash is temporarily disabled.
Performance slows with graphics-intensive apps or features.
If you’re using Maps on an overheating iPhone for GPS navigation in the car, it may show a “Temperature: iPhone needs to cool down.” screen instead of the map. You’ll still get audible turn-by-turn directions, and the screen will wake up to guide you through turns,
How to Keep Your Tech Cool
For the most part, keeping Apple devices cool just requires common sense:
Avoid using devices when the temperature is over 95º F (35º C). If that’s impossible, keep usage to a minimum.
Don’t leave devices in cars parked in the sun for long periods of time. If it happens accidentally, let the device cool before using it.
Provide good ventilation so air can cool the device. Don’t block ventilation ports in the back of desktop Macs, and don’t use Mac laptops in bed, propped on a pillow, or under the covers. It can be worth blowing dust out of ventilation ports with compressed air every so often.
Never put anything on the keyboard of an open Mac laptop.
Avoid stacking things on top of a Mac mini.
Monitor the temperature of server closets. If they get too hot, keep the door open, add a fan, or run the air conditioning.
Luckily, the temperatures that cause problems for Apple hardware aren’t terribly comfortable for people either, so if you’re way too hot, that’s a good sign your gear is as well.
(Featured image by Sergo Karakozov from Pexels)
Reduce Your Email Load with Three Features in Apple’s Mail: Mute, Block, and Unsubscribe
Email overload may be a fact of life, but Apple has provided three features in Mail that can reduce some of the load: muting, blocking, and unsubscribing. Start using them today with the instructions here:
Complaining about getting too much email is like complaining about bad traffic—we brought it upon ourselves, and while it’s impossible to escape entirely, it’s worth knowing how to reduce it. Apple is fully cognizant of the issue, too, and has built features into the last couple versions of Mail—on the Mac, iPhone, and iPad—to help out. Here are three that you might find useful in different situations: mute, block, and unsubscribe.
Mute
It’s a huge email conversation about the annual holiday party at work, but you can’t go, and more people keep weighing in. However, since it’s just a ton of addresses on the Cc line, there’s no way to remove yourself, even though you don’t need to be notified of all the back-and-forth.
To help you quiet a too-chatty conversation, Apple added the Mute feature to Mail. On the Mac, select the conversation and choose Message > Mute or click the Mute button in the toolbar. On an iPhone or iPad, touch and hold the message until you get a popover, then tap Mute. You can also swipe left on the message, tap More, and tap Mute.
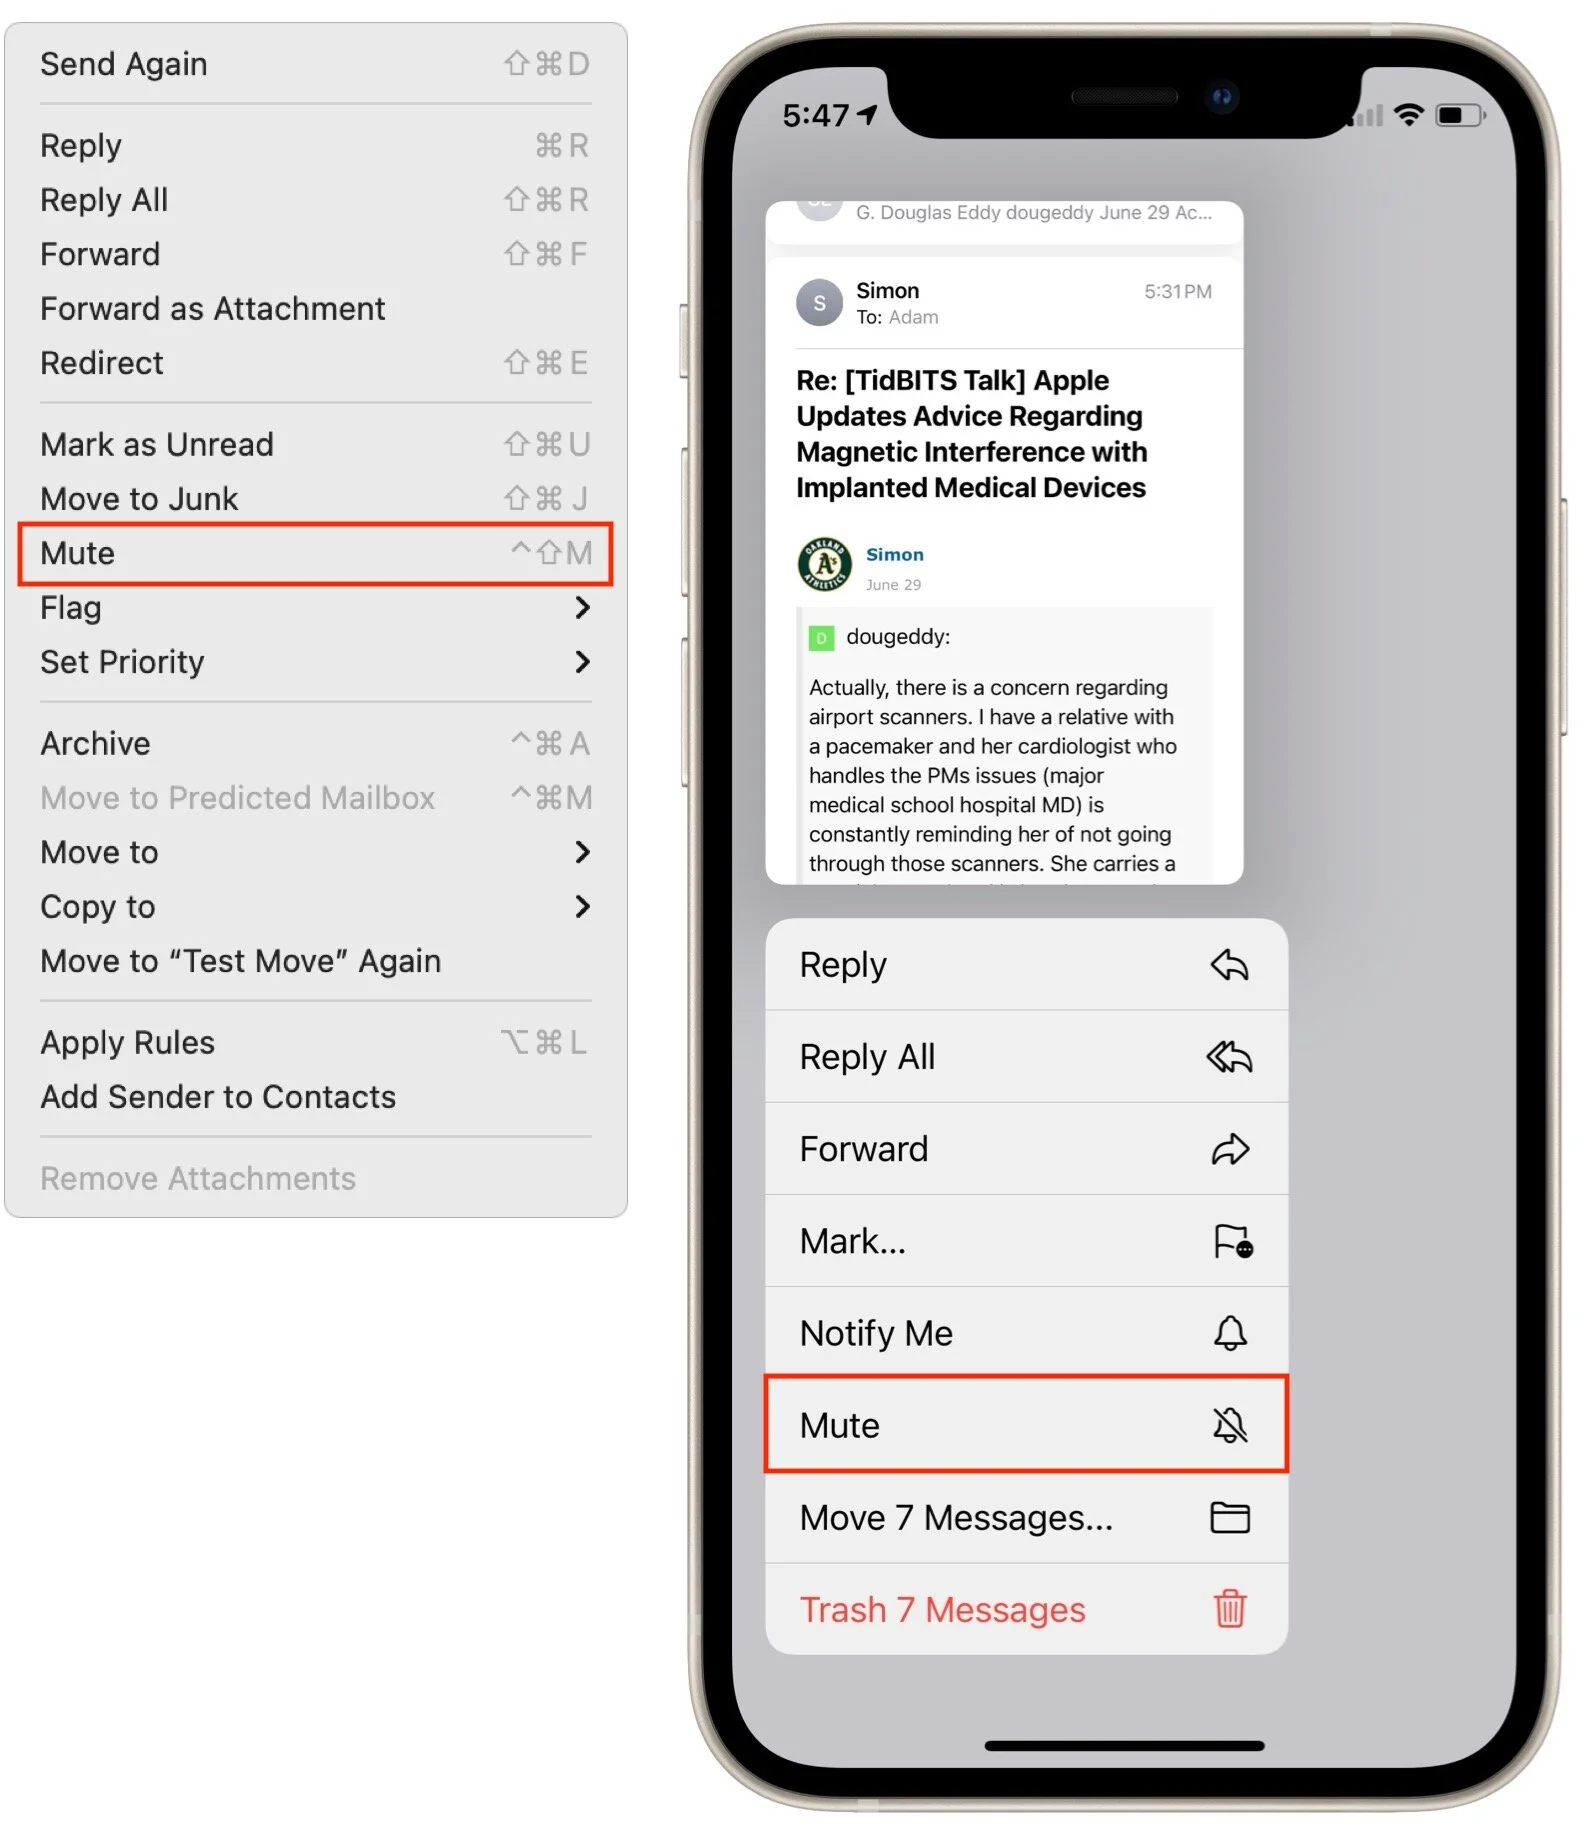
Messages will continue to flow in, but if you normally get notifications of Mail messages, you won’t get notifications for the muted conversation. In Mail, a little bell icon with a slash through it reminds you that the conversation is muted. To unmute a conversation, repeat these steps, but pick Unmute instead.
Do you never want to see those muted messages at all? You can discard them automatically. On the Mac, in Mail > Preferences > General, select “Archive or delete muted messages.” In iOS and iPadOS, go to Settings > Mail > Muted Thread Action, where you can choose between Mark as Read and Archive or Delete.
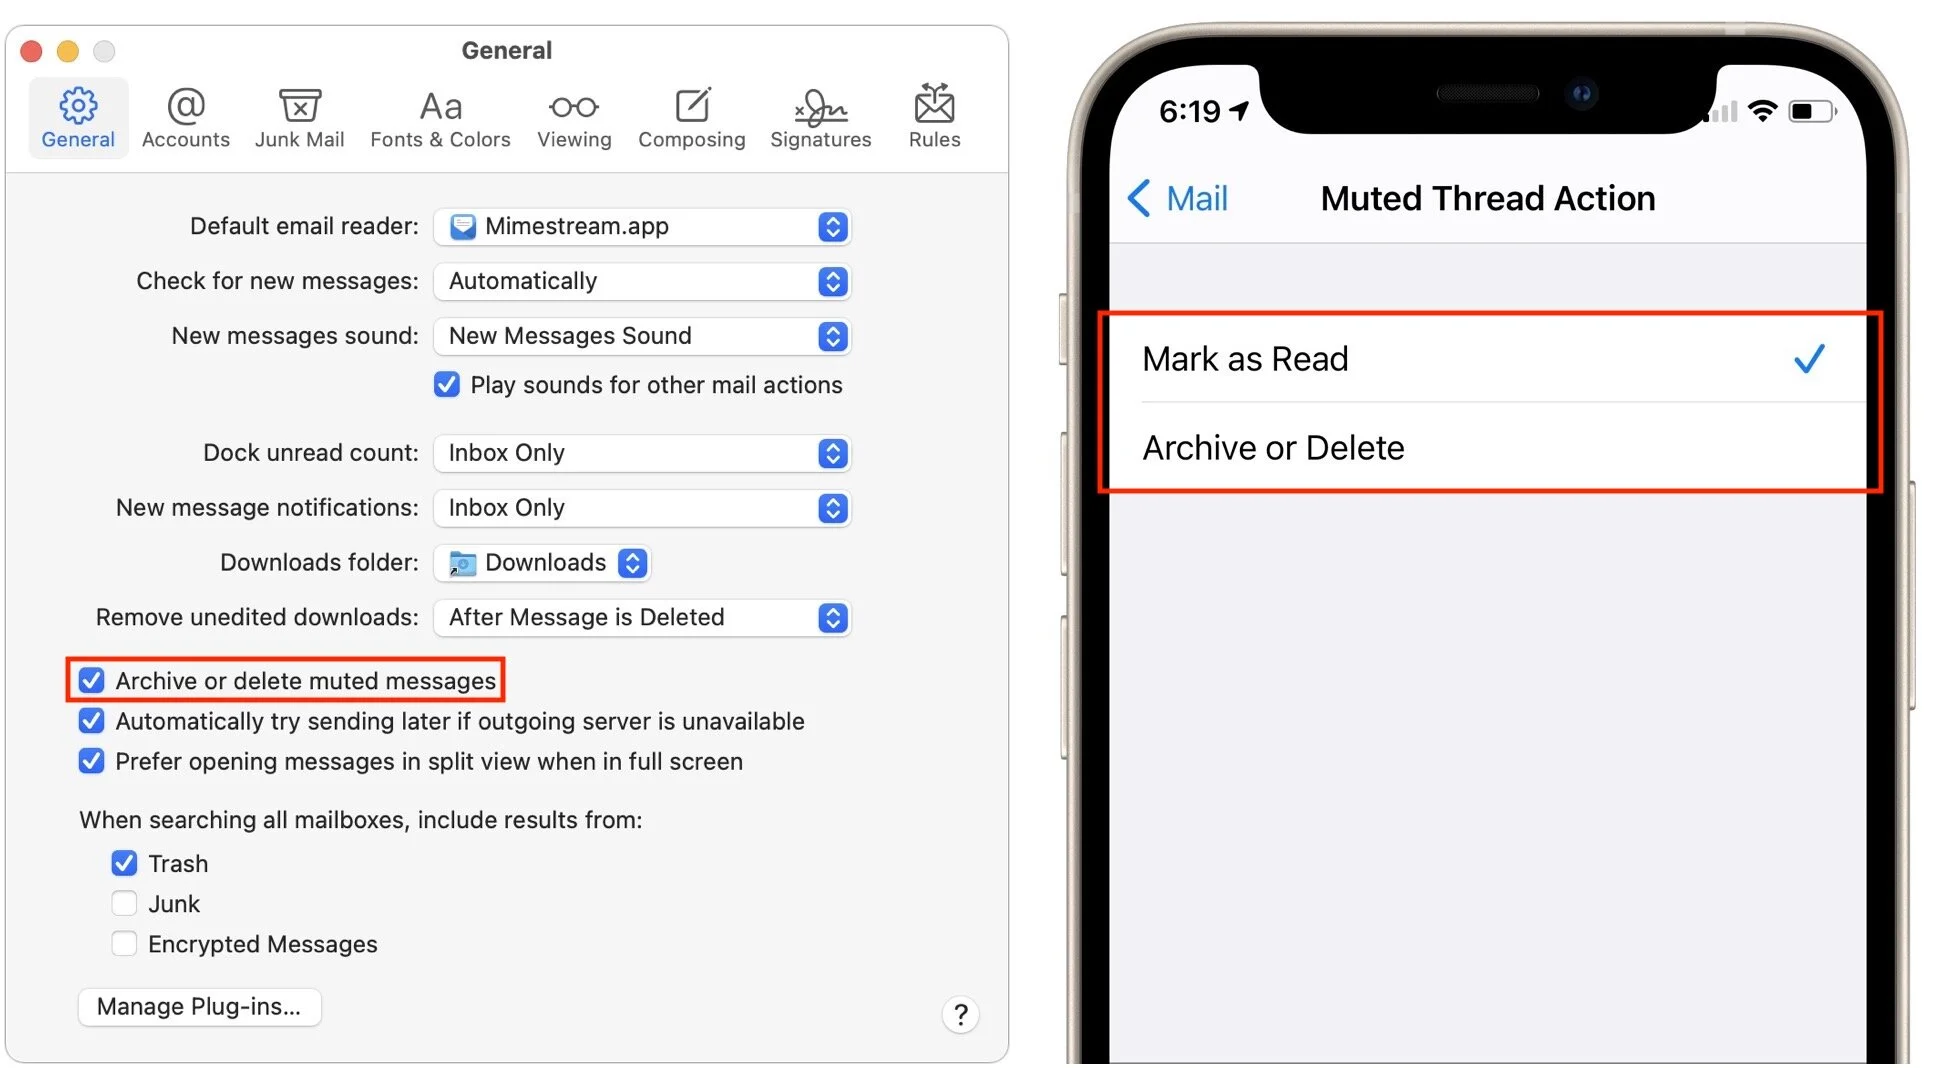
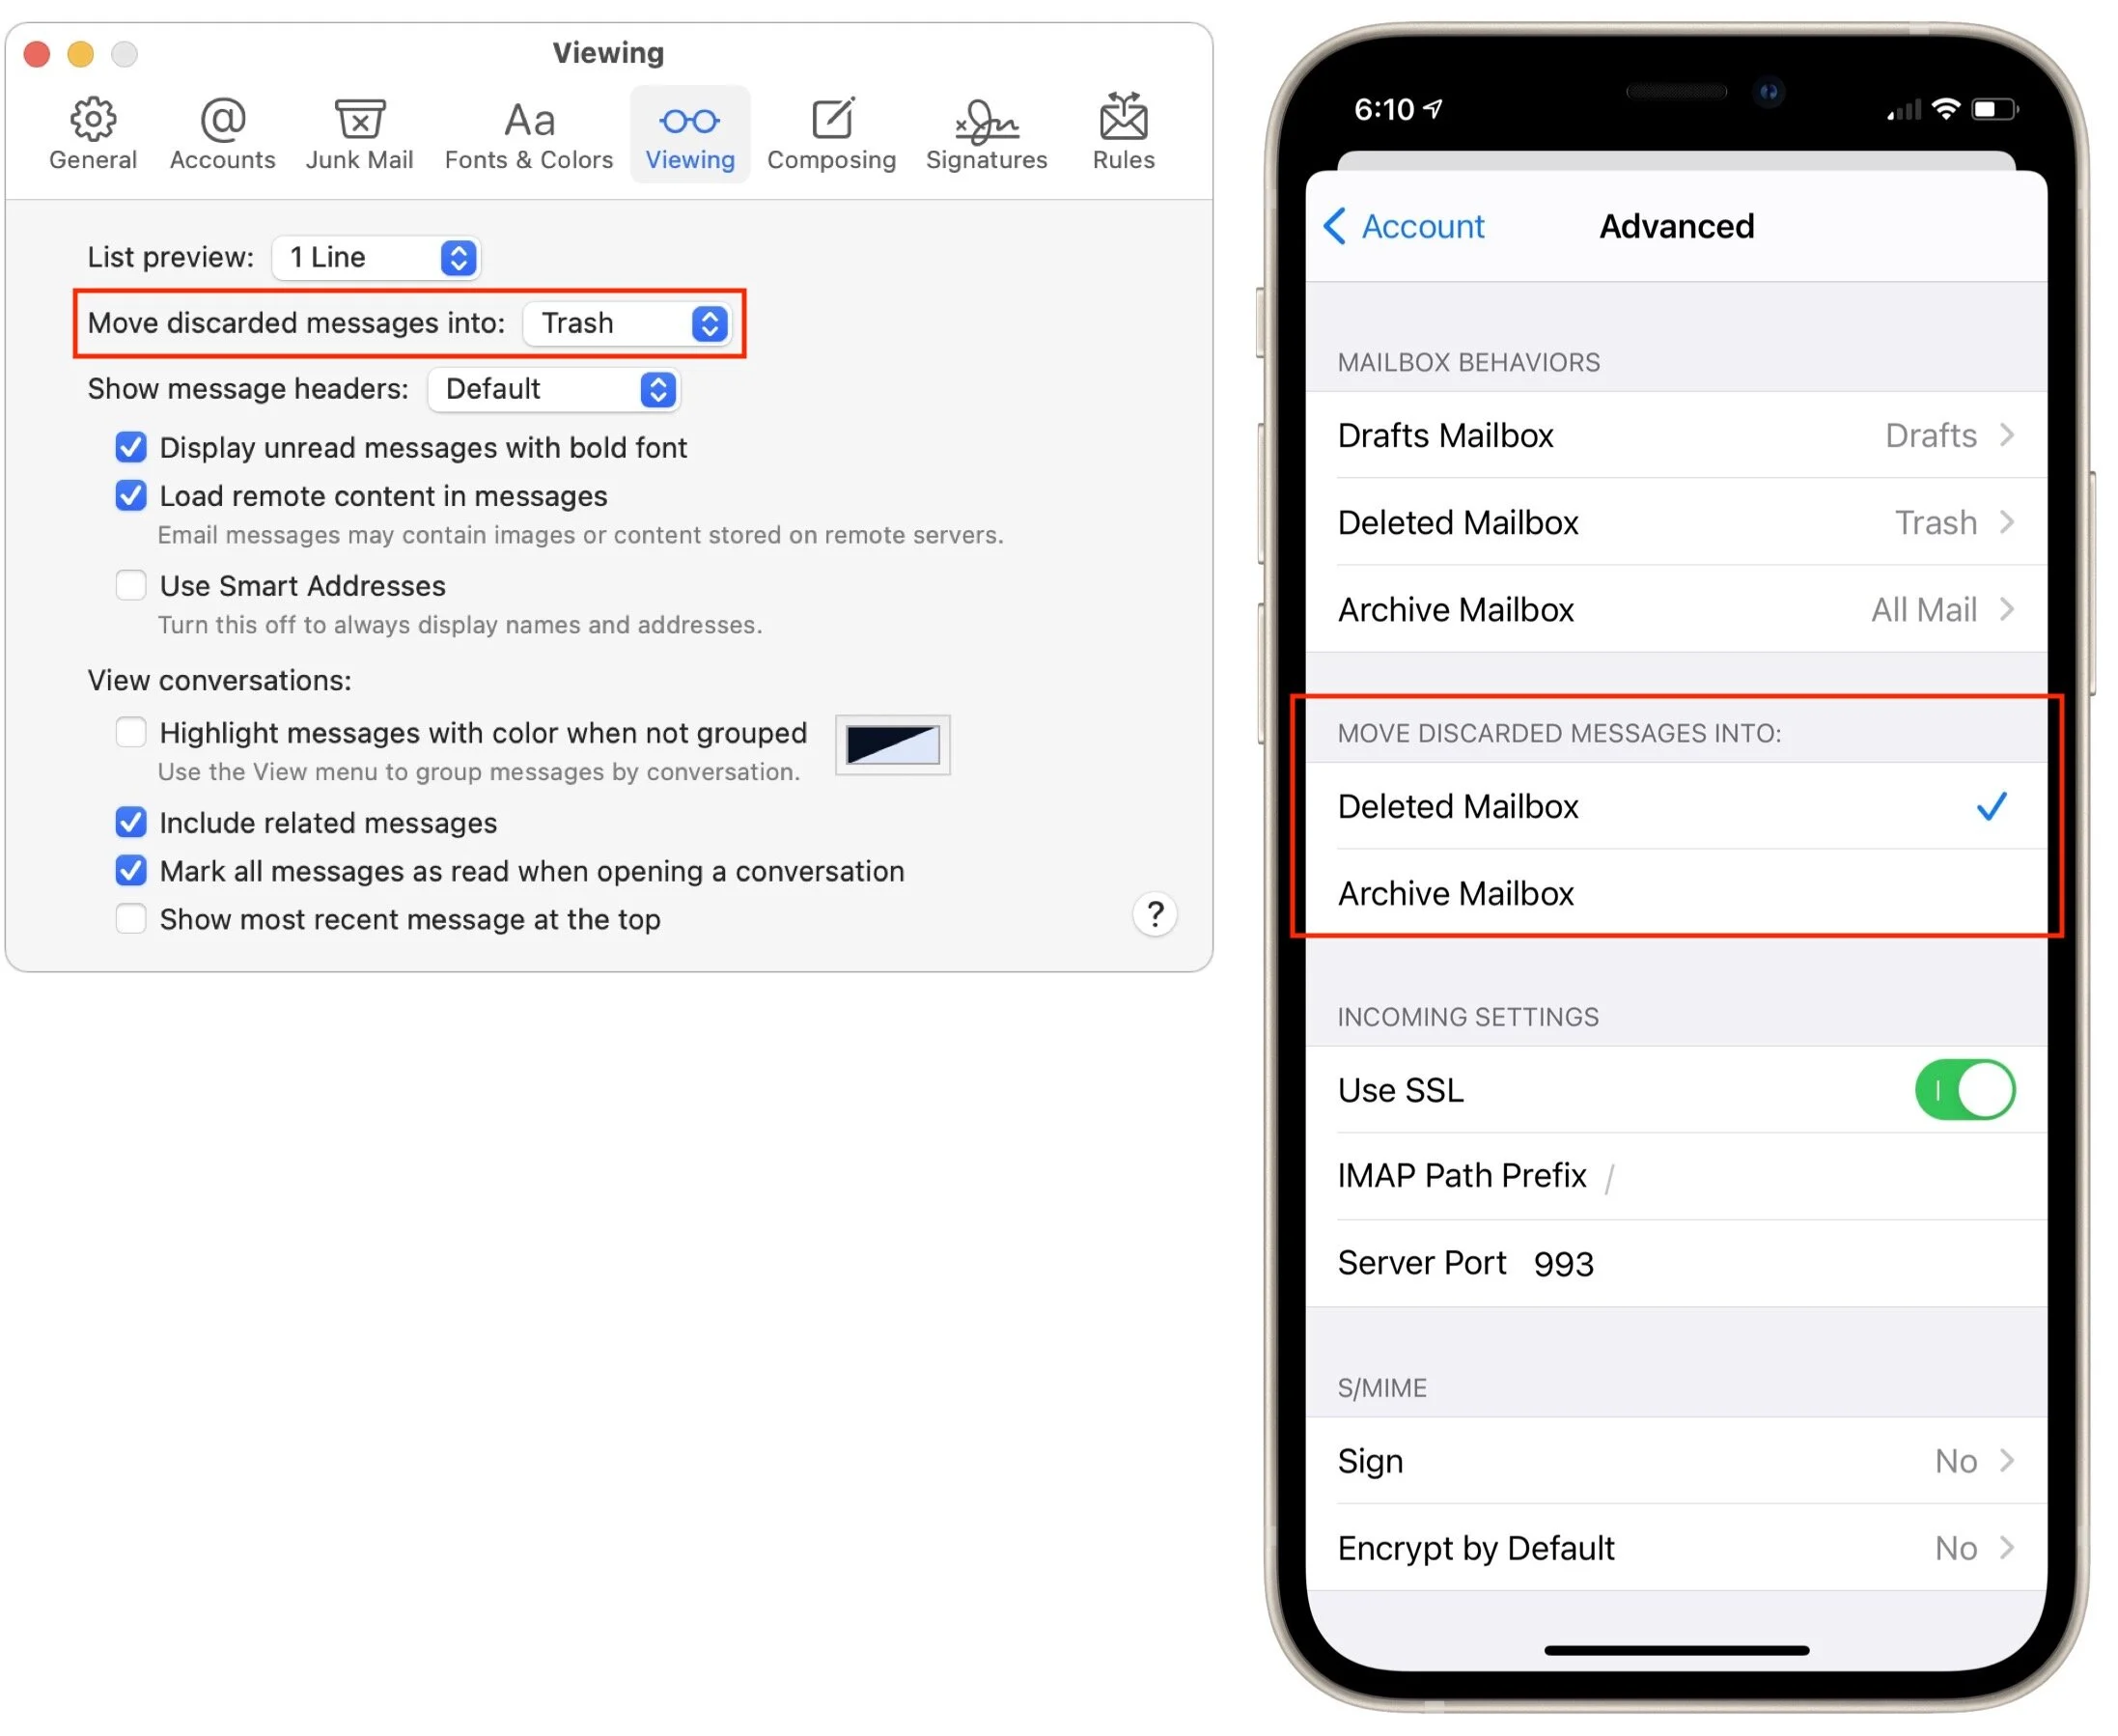
The “archive or delete” wording may seem confusing, but Apple lets you choose whether “discarding” a message archives it (removes it from your Inbox) or deletes it (moves it to the Trash mailbox). On the Mac, look for that setting in Mail > Preferences > Viewing > Move Discarded Messages Into. In iOS and iPadOS, it’s a per-account option in Settings > Mail > Accounts > accountName > Account > Advanced, under Move Discarded Messages Into.
Block
Muting is about conversations, not people. But what if you never want to see email from a particular person ever again? Perhaps it’s an angry ex-housemate, your embezzling ex-business partner, or someone who just won’t stop forwarding politically offensive memes. For such people, Apple provides blocking.
On the Mac, open a message from the offending person, hover the pointer over their name, click the down-pointing arrow, and choose Block Contact. In iOS and iPadOS, tap the person’s name so it turns into a blue link, tap it again to reveal their contact card, tap Block this Contact, and confirm your decision. Should you change your mind, repeat the steps and choose Unblock.
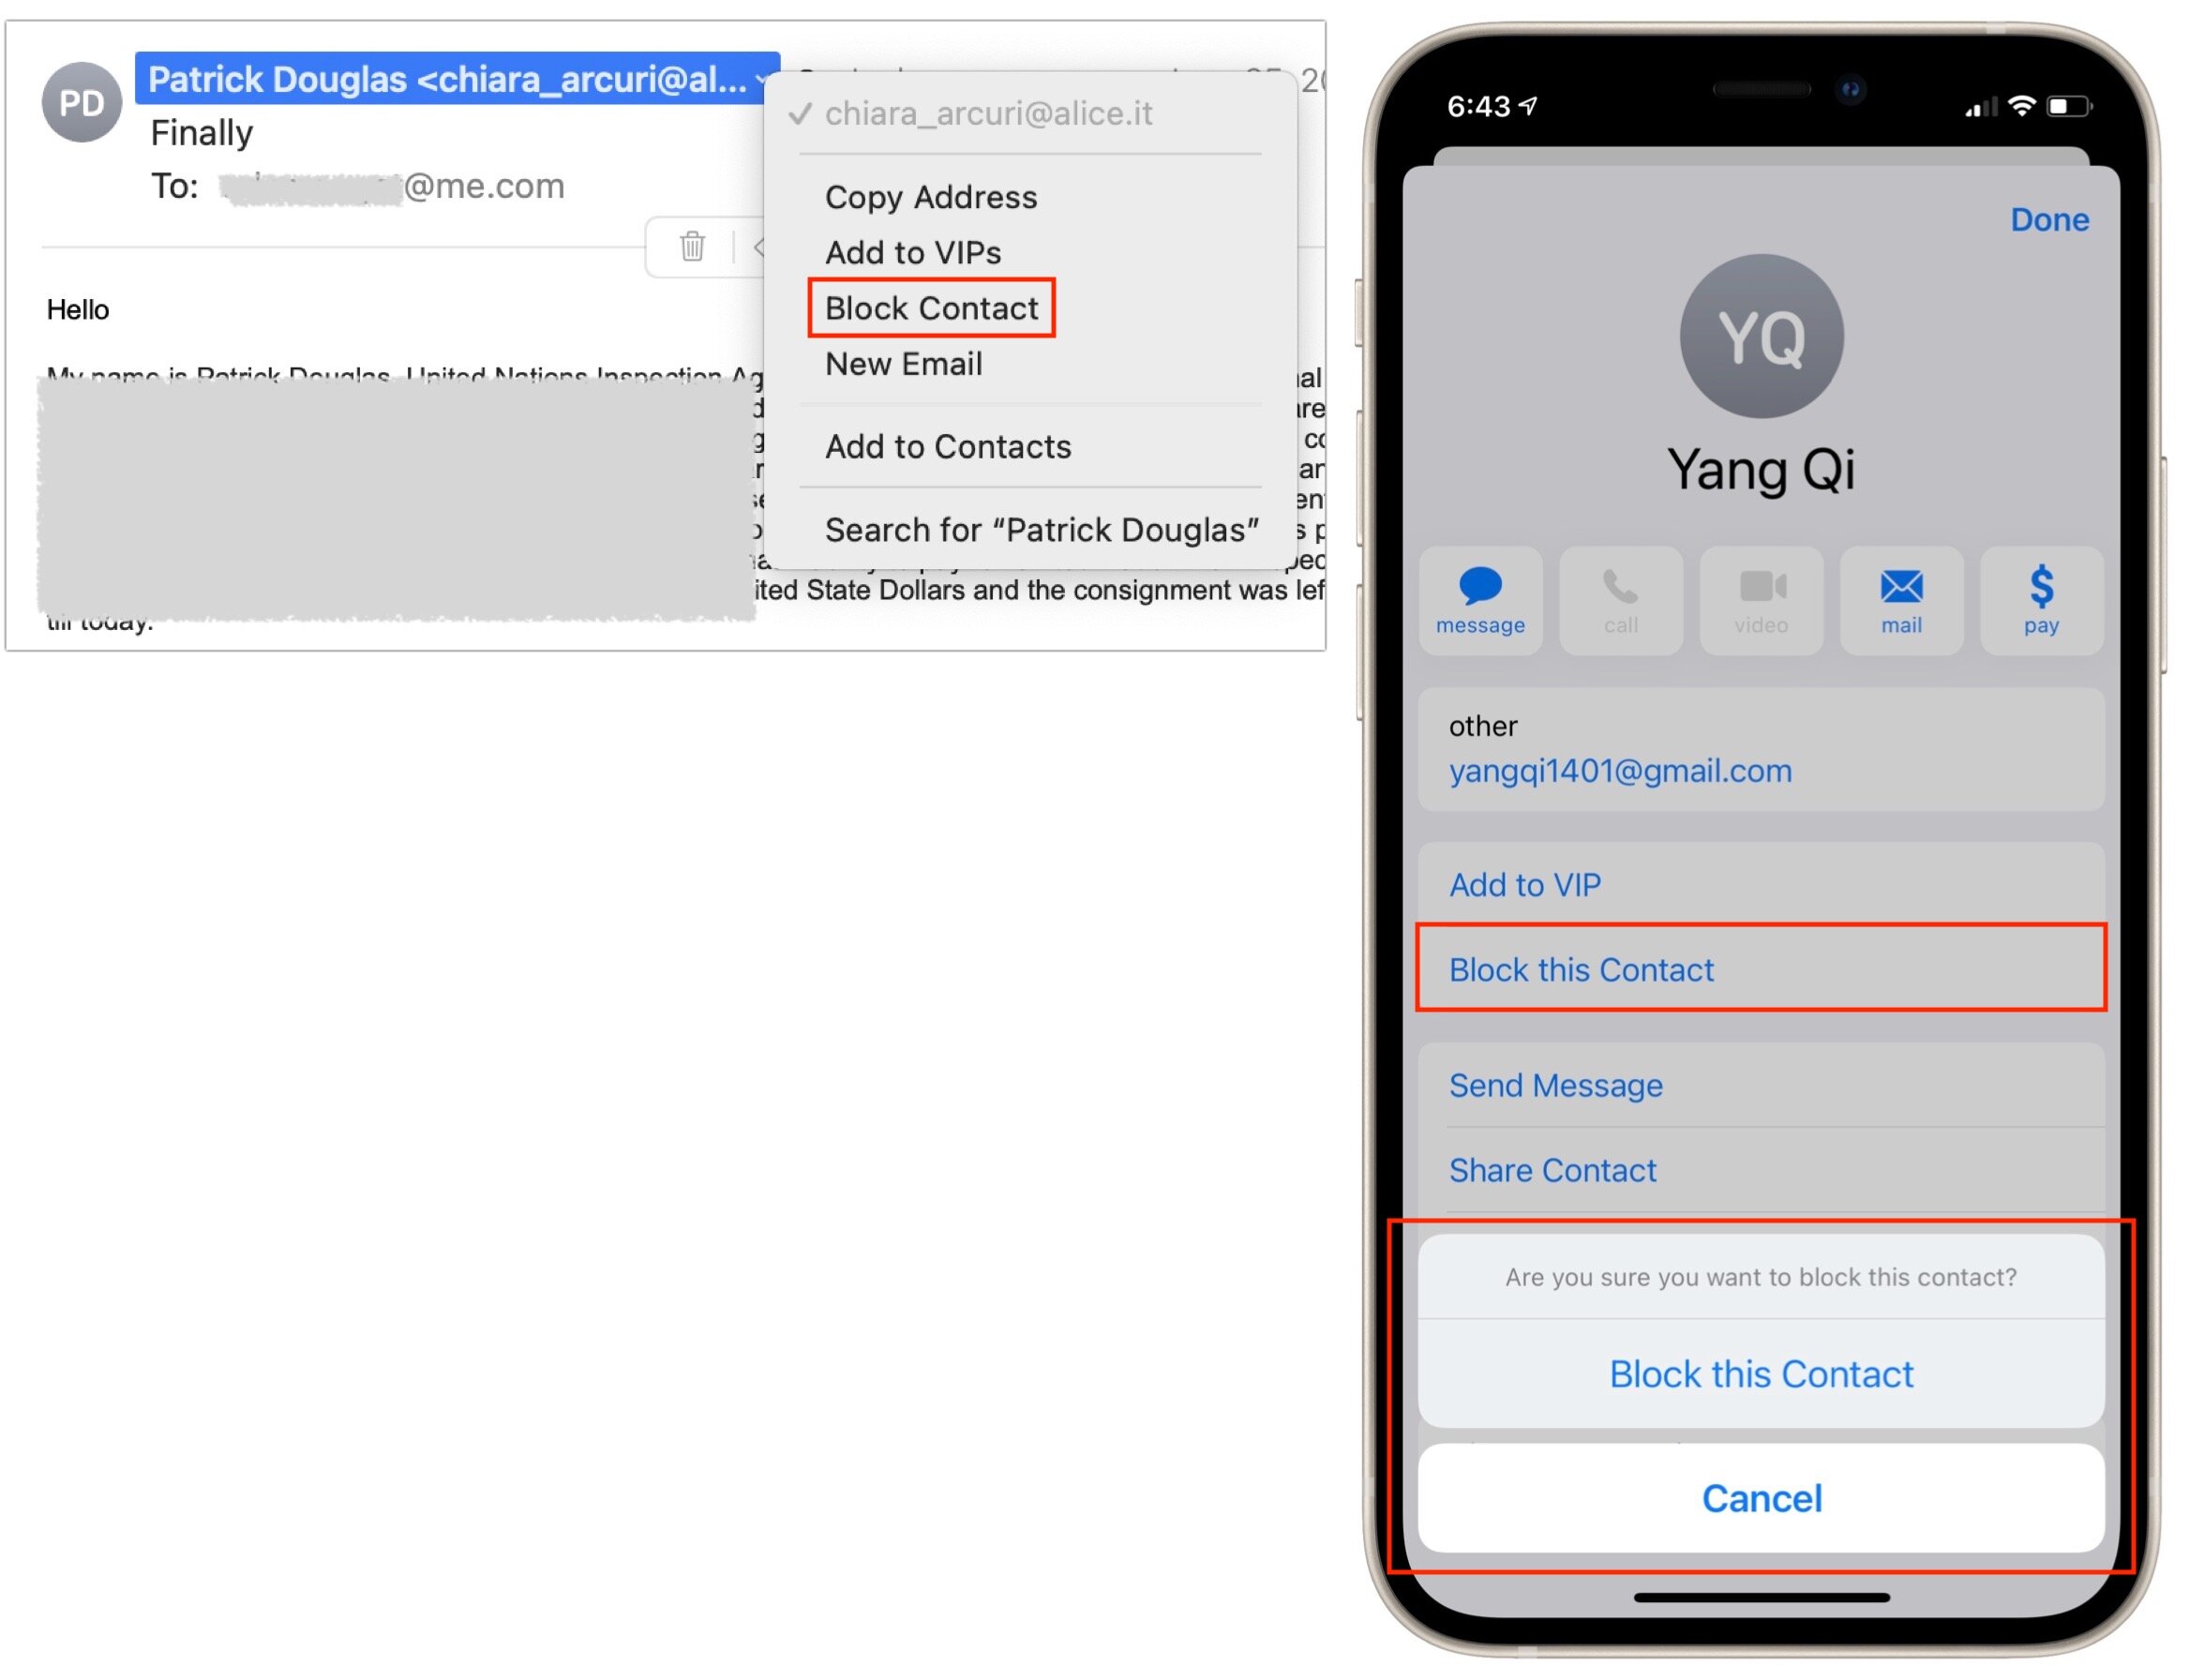
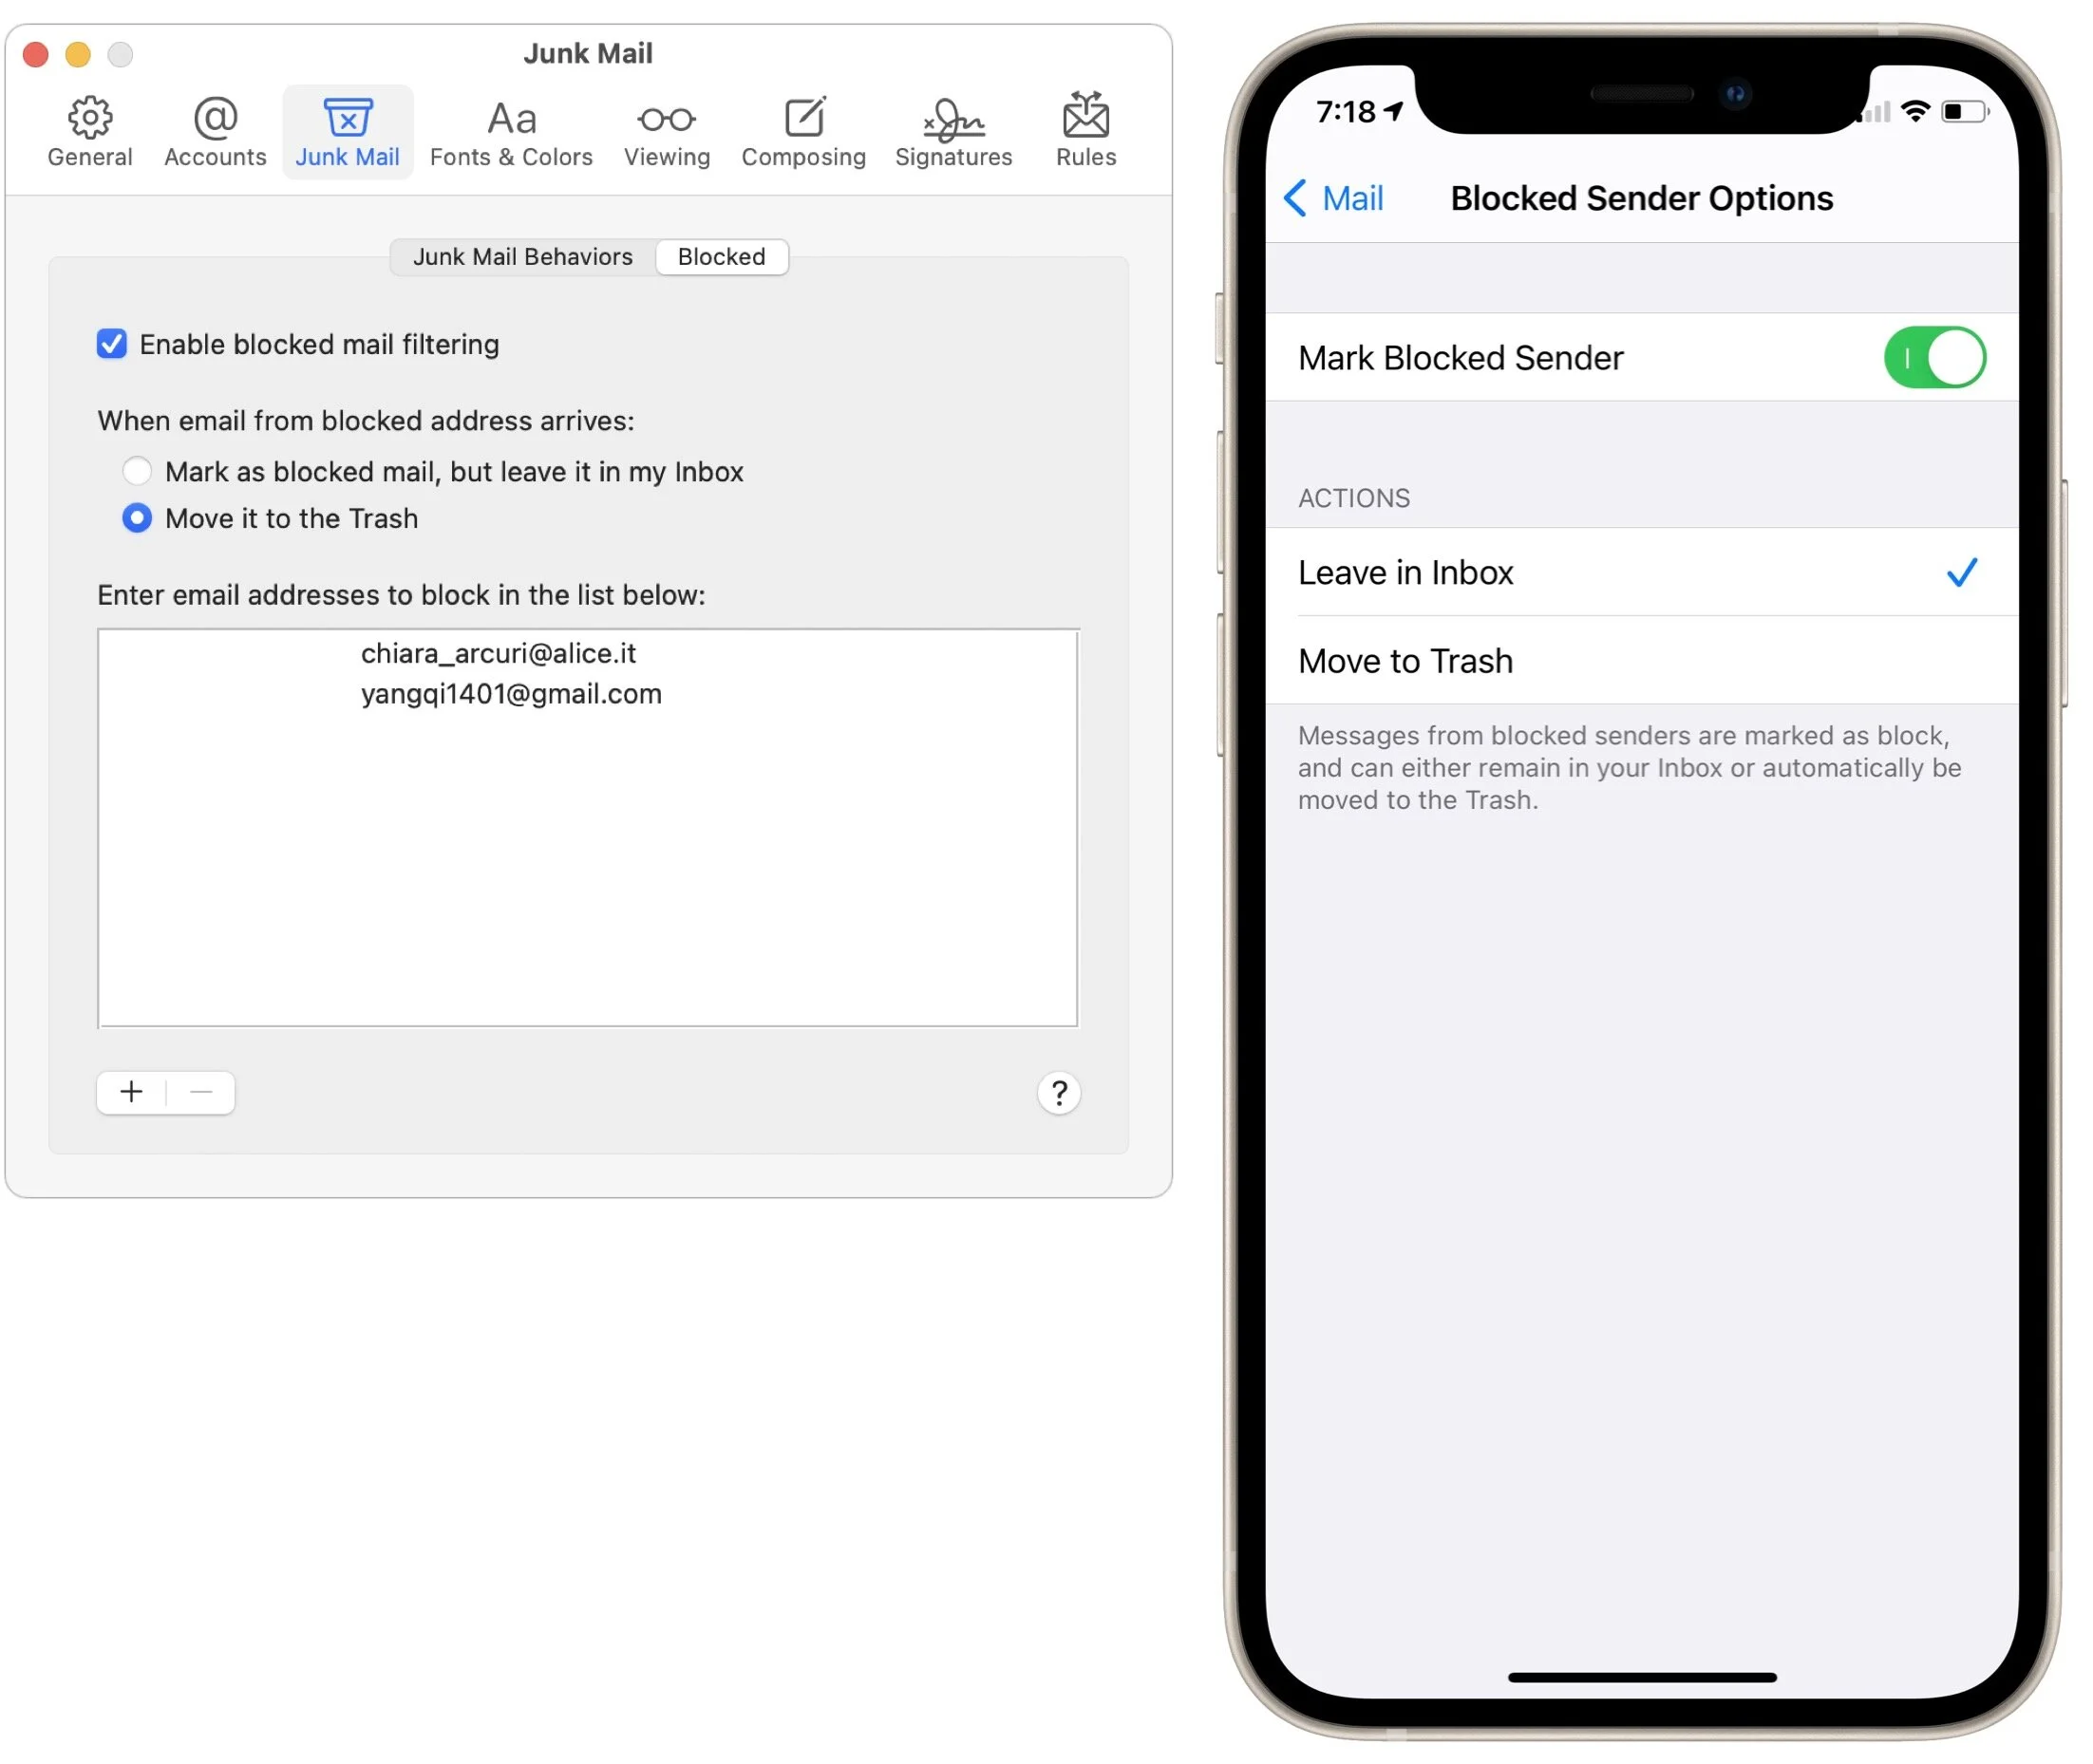
All that changes immediately is that Mail puts a banner at the top of the message that says “This message is from a blocked sender.” However, Mail also provides a button or link to preferences that offer more options. On the Mac, they’re in Mail > Preferences > Junk Mail > Blocked. In iOS and iPadOS, you’ll find them in Settings > Mail > Blocked Sender Options. You can choose between leaving blocked mail in your Inbox or moving it to the trash.
Note that we used spam senders as examples here, but for actual spam, you should instead use the Move to Junk command to mark it as spam and train Mail’s junk mail filter. Blocking is useful only for actual people, and it works only on specific email addresses, so if someone can send from another address, Mail won’t know to block that address until you block it too.
Unsubscribe
It’s all too easy to end up on a bazillion mailing lists these days. That may not be a problem if you find the messages useful and infrequent enough so as not to be annoying. But if you order something online and immediately start receiving two email blasts per week advertising new products, you don’t have to sit there and suffer.
What you shouldn’t do, however, is use the Move to Junk command to mark those messages as spam. If you have a legitimate business relationship with the organization, they’re not doing anything illegal by sending you email, and mark-ing their messages as spam might mistrain Mail’s spam filter to catch related mail you do want. It will also hurt their deliverability rate unnecessarily, and while that’s not your problem, there is a better way.
Whenever Mail detects that a message is from a mailing list, it displays a banner saying so, along with an Unsubscribe link. Click or tap it, confirm your decision, and Mail sends an unsubscribe message from you to the mailing list server.

Alas, between mailing lists not providing the necessary details and Mail not being able to understand everything, this feature is a little weak. When it works, it’s great, but just because an Unsubscribe banner doesn’t appear doesn’t mean you can’t unsubscribe.
Whenever that happens, scroll to the bottom of the message and look for an Unsubscribe link. Click it to visit a website where you can sign off. Alas, as shown below, commercial mail from Apple itself seems to be exempt from Mail’s Unsubscribe banner, and the company has one of the less obvious Unsubscribe links out there.

As helpful as muting and blocking can be, you’ll get the biggest bang for your buck from unsubscribing from mailing lists. Remember, you can always find those companies on the Web should you wish to interact with them again.
(Featured image by Brett Jordan on Unsplash)
Going on Vacation? Learn How to Write an Effective Out-of-Office Message
Vacation season is upon us, and in-person conferences are opening up again. If you’re going away, make sure to write an effective out-of-office message so you don’t end up working remotely the entire time. We have tips at

For many people, increasing vaccination rates mean that long-delayed vacations are now possible, and in-person conferences are slowly starting up again too. But before you head out for the beach or the convention center, you’ll want to write an out-of-office email auto-reply message to send to everyone who tries to get in touch while you’re away. A bit of thought upfront could reduce stress for your correspondents—and ensure that they don’t hunt you down for that burning question.
Before we look at what information should be in an effective out-of-office message, a quick tip. Don’t create a custom rule in Mail or another email app that automatically replies to every message. It is too easy to end up sending replies to every message from a mailing list or to an address that will itself reply back, causing a mail loop where each message generates another reply, ad infinitum. Plus, the Mac has to stay turned on and active while you’re gone or else it will do nothing while you’re gone and then reply to everything when you return to work and turn it on! Instead, set up such auto-responders in the server settings for your email provider, which are better about avoiding mail loops. Here are instructions for Gmail, iCloud, Outlook.com, Spectrum, Xfinity/Comcast, and Yahoo. If you use a different email provider or an email account provided by your employer or school, check with support for additional details.
The key to writing an out-of-office message that satisfies your correspondents is to put yourself in their shoes. What information are they likely to want from you? How will they react when they learn you’re away? Do the answers to these questions vary with different audiences?
There’s no single perfect out-of-office message, but while crafting yours, we strongly recommend including—or at least considering—all the following information.
Reason for the trip: Significant detail isn’t necessary, but there’s a big difference between being on vacation and at a conference. You may be too busy to read and reply to email quickly at the conference, but you’re probably not entirely unavailable, as you would be while canoeing in the Canadian wilderness. Being candid helps set expectations.
Location: Sharing your rough location may be helpful if you’re semi-available but in a radically different time zone. It can also sometimes lead to happy coincidences when a contact realizes you’re in their city. But if you’re trying to unplug and get away, there’s no need to get specific.
Availability: Some of the time, the answer is easy—you’re unavailable. But if you’re semi-available or available in case of emergency, try to set expectations appropriately for how much you want to handle versus sending to colleagues.
Dates: Always include the date range you’ll be gone. Many things can wait, and if your correspondent sees you’ll be back on the 17th, they may just shrug and make a reminder to respond to you after that. Others will realize that they need to scramble on different plans right away.
Alternative contacts: Who’s picking up the slack while you’re gone, or who can help in case of emergency? Put some thought into the different sets of people who send you email and write simple IF/THEN sentences directing them to the right person. “If you need help with print production, contact John Gutenberg at ppress@example.org.” Needless to say, always ask those people if they can field questions about your responsibilities first, in case they’re overscheduled or planning to be away too. If you find yourself listing lots of people, see if you can instead designate a single primary contact.
Provide contact info: Unless you’re in a large organization with a corporate directory and don’t communicate with outsiders much, you’ll want to provide at least an email address, perhaps along with a phone number, for each of the contacts you list.
FAQs: If many of your email questions can be answered with a pointer to a Web page, consider using such links instead of alternative contacts. Correspondents might be happier if a page provided the necessary answer rather than having to wait for a reply from another person.
Here are a few more general tips:
Keep the message short and sweet.
Stay positive—it’s a good opportunity to praise an assistant or colleague—and be careful with humor since you never quite know how others will take it.
Don’t promise to reply within a particular time frame after you get back. Even if that’s your plan, airline flights can get canceled, you might return with a bad case of the flu, or something else might conspire to delay your reply.
Edit carefully to make sure email addresses and phone numbers are correct and to eliminate typos. You don’t know who might send you email while you’re gone, and if it were the head of your company, a key supplier, or a potential investor, such mistakes wouldn’t do your career any favors.
If your email service doesn’t let you set an automatic end date, remember to turn off your out-of-office message as soon as you get back!
(Featured image by Dziana Hasanbekava from Pexels)
Reopening Your Office? Now’s a Great Time to Evaluate Your IT Infrastructure
If you’re having discussions about when and how to reopen your organization’s office, it’s worth thinking—and talking to us—about the role your IT infrastructure plays in such discussions. Learn more below:

As vaccination rates climb, many businesses are starting to think about reopening their offices and bringing back employees who have been working from home for the last year. That’s a big decision that will undoubtedly vary from company to company, but we’d like to suggest a few things to consider. Please contact us early in such deliberations so we can provide guidance before problems crop up.
Full Return or Hybrid Model?
Perhaps the biggest question firms will have to answer is if they’ll require all employees to return or if some can continue to work remotely. Many organizations have discovered that physical presence isn’t as important as they thought it was. In a post-pandemic world, many employees may prefer to continue working from home if they can, at least for a while.
If you decide on a hybrid model, you’ll want to put some thought into what technology you’ll need to enable hybrid meetings, with some people connecting remotely via videoconferencing software and others gathering in person. Large screens, specially mounted cameras, and dedicated speakerphone hardware may be necessary to conduct a hybrid meeting effectively.
With some workers remaining at home, it will also be important to ensure that everyone has appropriate access to on-premises servers. Obviously, that has been a problem for the last year as well, but it may be tempting to revert to old approaches upon reopening an office. That may not be effective in a new hybrid workplace, so check with us on cloud-based alternatives that could work better in the new world order.
Consider Your Physical Space
Particularly if you do decide on a hybrid model, it’s worth evaluating whether you need the same amount and type of space as you did before. There’s no single answer here. You don’t want to downsize your physical space only to discover in a few months that some of those employees who swore that they never wanted to come back feel that they’re missing out. Simultaneously, if your offices are a warren of small, poorly ventilated rooms, employees may be even more hesitant about returning.
Plus, your physical space is inherently related to your IT infrastructure, so don’t ignore the costs surrounding an office move. A new space might require pulling new Ethernet cables, testing Wi-Fi signal strength to ensure sufficient coverage, evaluating the cleanliness of the electrical power, and more.
We don’t mean to dissuade you from moving offices if that’s what makes the most sense for the future of your company, but talk to us before signing any new leases so we can help identify and head off any technical problems with the physical plant.
Finally, this isn’t related to IT, but if your existing office space has been entirely vacant for the last year, it’s worth reading the information that the Centers for Disease Control puts out to help employers create safe and healthy workplaces. Buildings don’t do well with prolonged shutdowns.
Does Network Infrastructure Need Updating?
Before you bring employees back, at least en masse, it’s also worth touching base with us about your IT infrastructure. If you’ve been limping along with sketchy Ethernet cabling, or if you have dirty power that could be damaging your Macs and peripherals, it’s a great time to consider addressing such problems. Pre-pandemic, attempting to install new electrical circuits or pull new network cabling might have been too disruptive, but with an office that’s empty or nearly so, such work can be done more quickly and cheaply.
Similarly, this could be a good time to replace aging computers, printers, or even phone systems. Such infrastructure upgrades and transitions can cause interruptions in normal times, but if you’re bringing people back, wouldn’t it be nice to have the office provide a better IT experience than it did before?
(Featured image by Shuki Harel from Pexels)
The Ten Upcoming Mac/iPhone/iPad Features We Think You’ll Most Like
At its Worldwide Developer Conference keynote, Apple announced a boatload of new features that we’ll see in macOS 12 Monterey, iOS 15, iPadOS 15, and watchOS 8 later this year. Here are the ten features we think you’ll most like:

At its Worldwide Developer Conference keynote on June 7th, Apple shared details about what we can expect to see later this year in macOS 12 Monterey, iOS 15, iPadOS 15, watchOS 8, tvOS 15, and HomePod Software 15. It was a firehose of announcements, but one thing became clear: Apple wants to spread its technologies across its entire ecosystem of devices. Although each platform—Mac, iPhone, iPad, Apple Watch, Apple TV, and HomePod—retains its unique qualities, nearly every feature that the company announced works across as many platforms as make sense.
Before we get into the ten features that we think you’ll most like when everything ships in September or October, we should note that Apple was surprisingly silent on one topic: future Apple silicon chips. Many observers had expected Apple to announce an M1X or M2 chip that would power professional laptop and desktop Macs. We’ll have to satisfy ourselves with the impressive performance of the M1-based Macs we have now and wait a little longer for whatever comes next.
On to the hot new features!
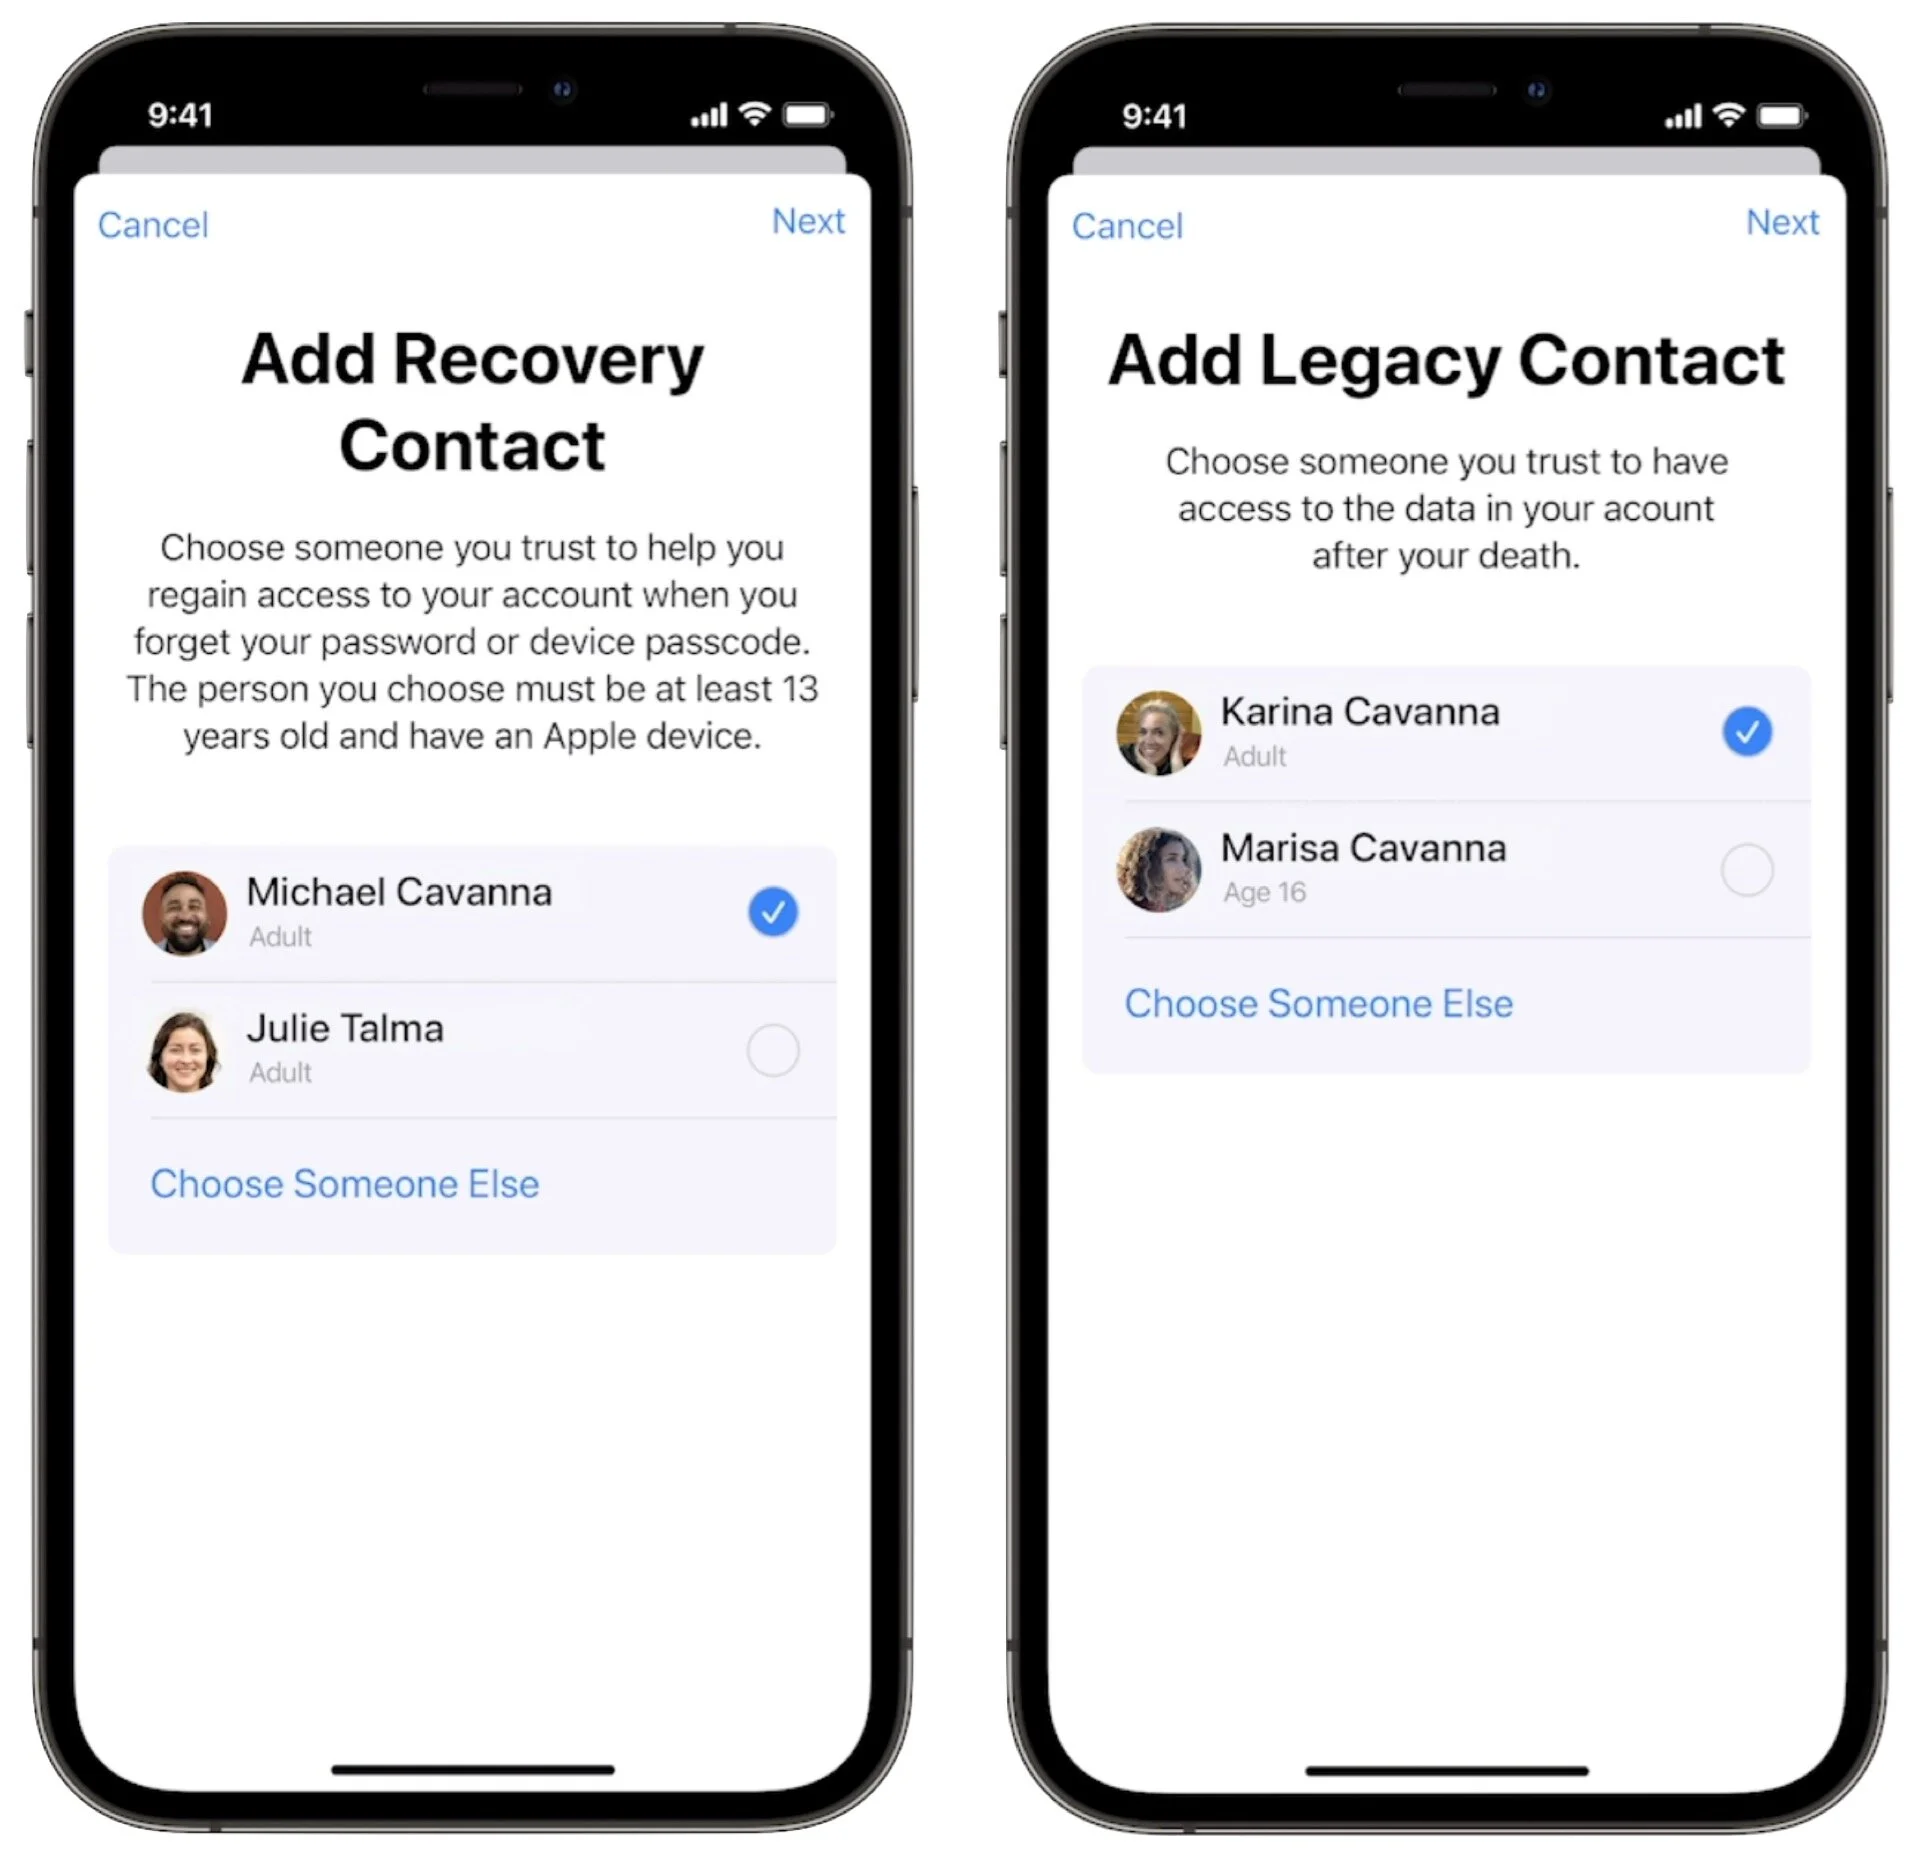
Account Recovery and Legacy Contacts Simplify Recovering Account Data
It’s all too common that people forget their Apple ID passwords and can’t access their accounts. Apple hopes to make that a little less stressful with Account Recovery Contacts. Specify someone as your Account Recovery Contact, and they’ll be able to help you reset your password and regain access to your account, with no need to call us or Apple for assistance.
Also welcome will be the addition of Legacy Contacts. Once this feature is available, everyone should make sure they have appropriate family members or friends set as Legacy Contacts. Then, in the event of your untimely death, your Legacy Contacts can access your account and personal information. Using Legacy Contacts will be far easier than having to provide the legal paperwork to Apple to request access to a deceased family member’s accounts
FaceTime Gains Features That Make It Competitive with Zoom
During the last year, we’ve all spent vastly more time in videoconferencing apps for work, school, and socializing. Alas, Apple’s FaceTime has been a weak entry in that market. With the features Apple is now promising, however, it should compete well with the likes of Zoom, Skype, and Google Meet. FaceTime will finally get a standard grid view, blur your backgrounds with Portrait mode, and offer two microphone modes: Voice Isolation to cut down on background noise (for standard meetings) and Wide Spectrum to leave ambient sound unfiltered (for performances, say). FaceTime will even be able to alert you when you’re talking but muted.

More important yet is the fact that you’ll finally be able to invite Windows and Android users to FaceTime calls using standard Web links. Non-Apple users will have to use a Chrome-based browser like Google Chrome, Microsoft Edge, or Brave. Plus, when you create an event in Calendar, you’ll be able to make a Web link for the call that you can share. And when it’s time for the call, a Join button makes it easy to get in.
Universal Control Lets Macs and iPads Share a Keyboard and Pointing Device
With Sidecar in macOS 10.15 Catalina and iOS 13, Apple made it so you could use an iPad as a secondary screen for a Mac. In macOS 12 Monterey and iPadOS 15, Apple is taking that concept further. With Universal Control, if you merely set a Mac and an iPad next to each other, you’ll be able to use the Mac’s keyboard and mouse or trackpad to work between the two devices (in fact, Universal Control supports up to three). No setup is required—just move your pointer to the edge of the Mac screen and push it “through” the edge to move it to the iPad screen. You can even drag and drop content between devices.

Live Text Lets You Work with Text in Images
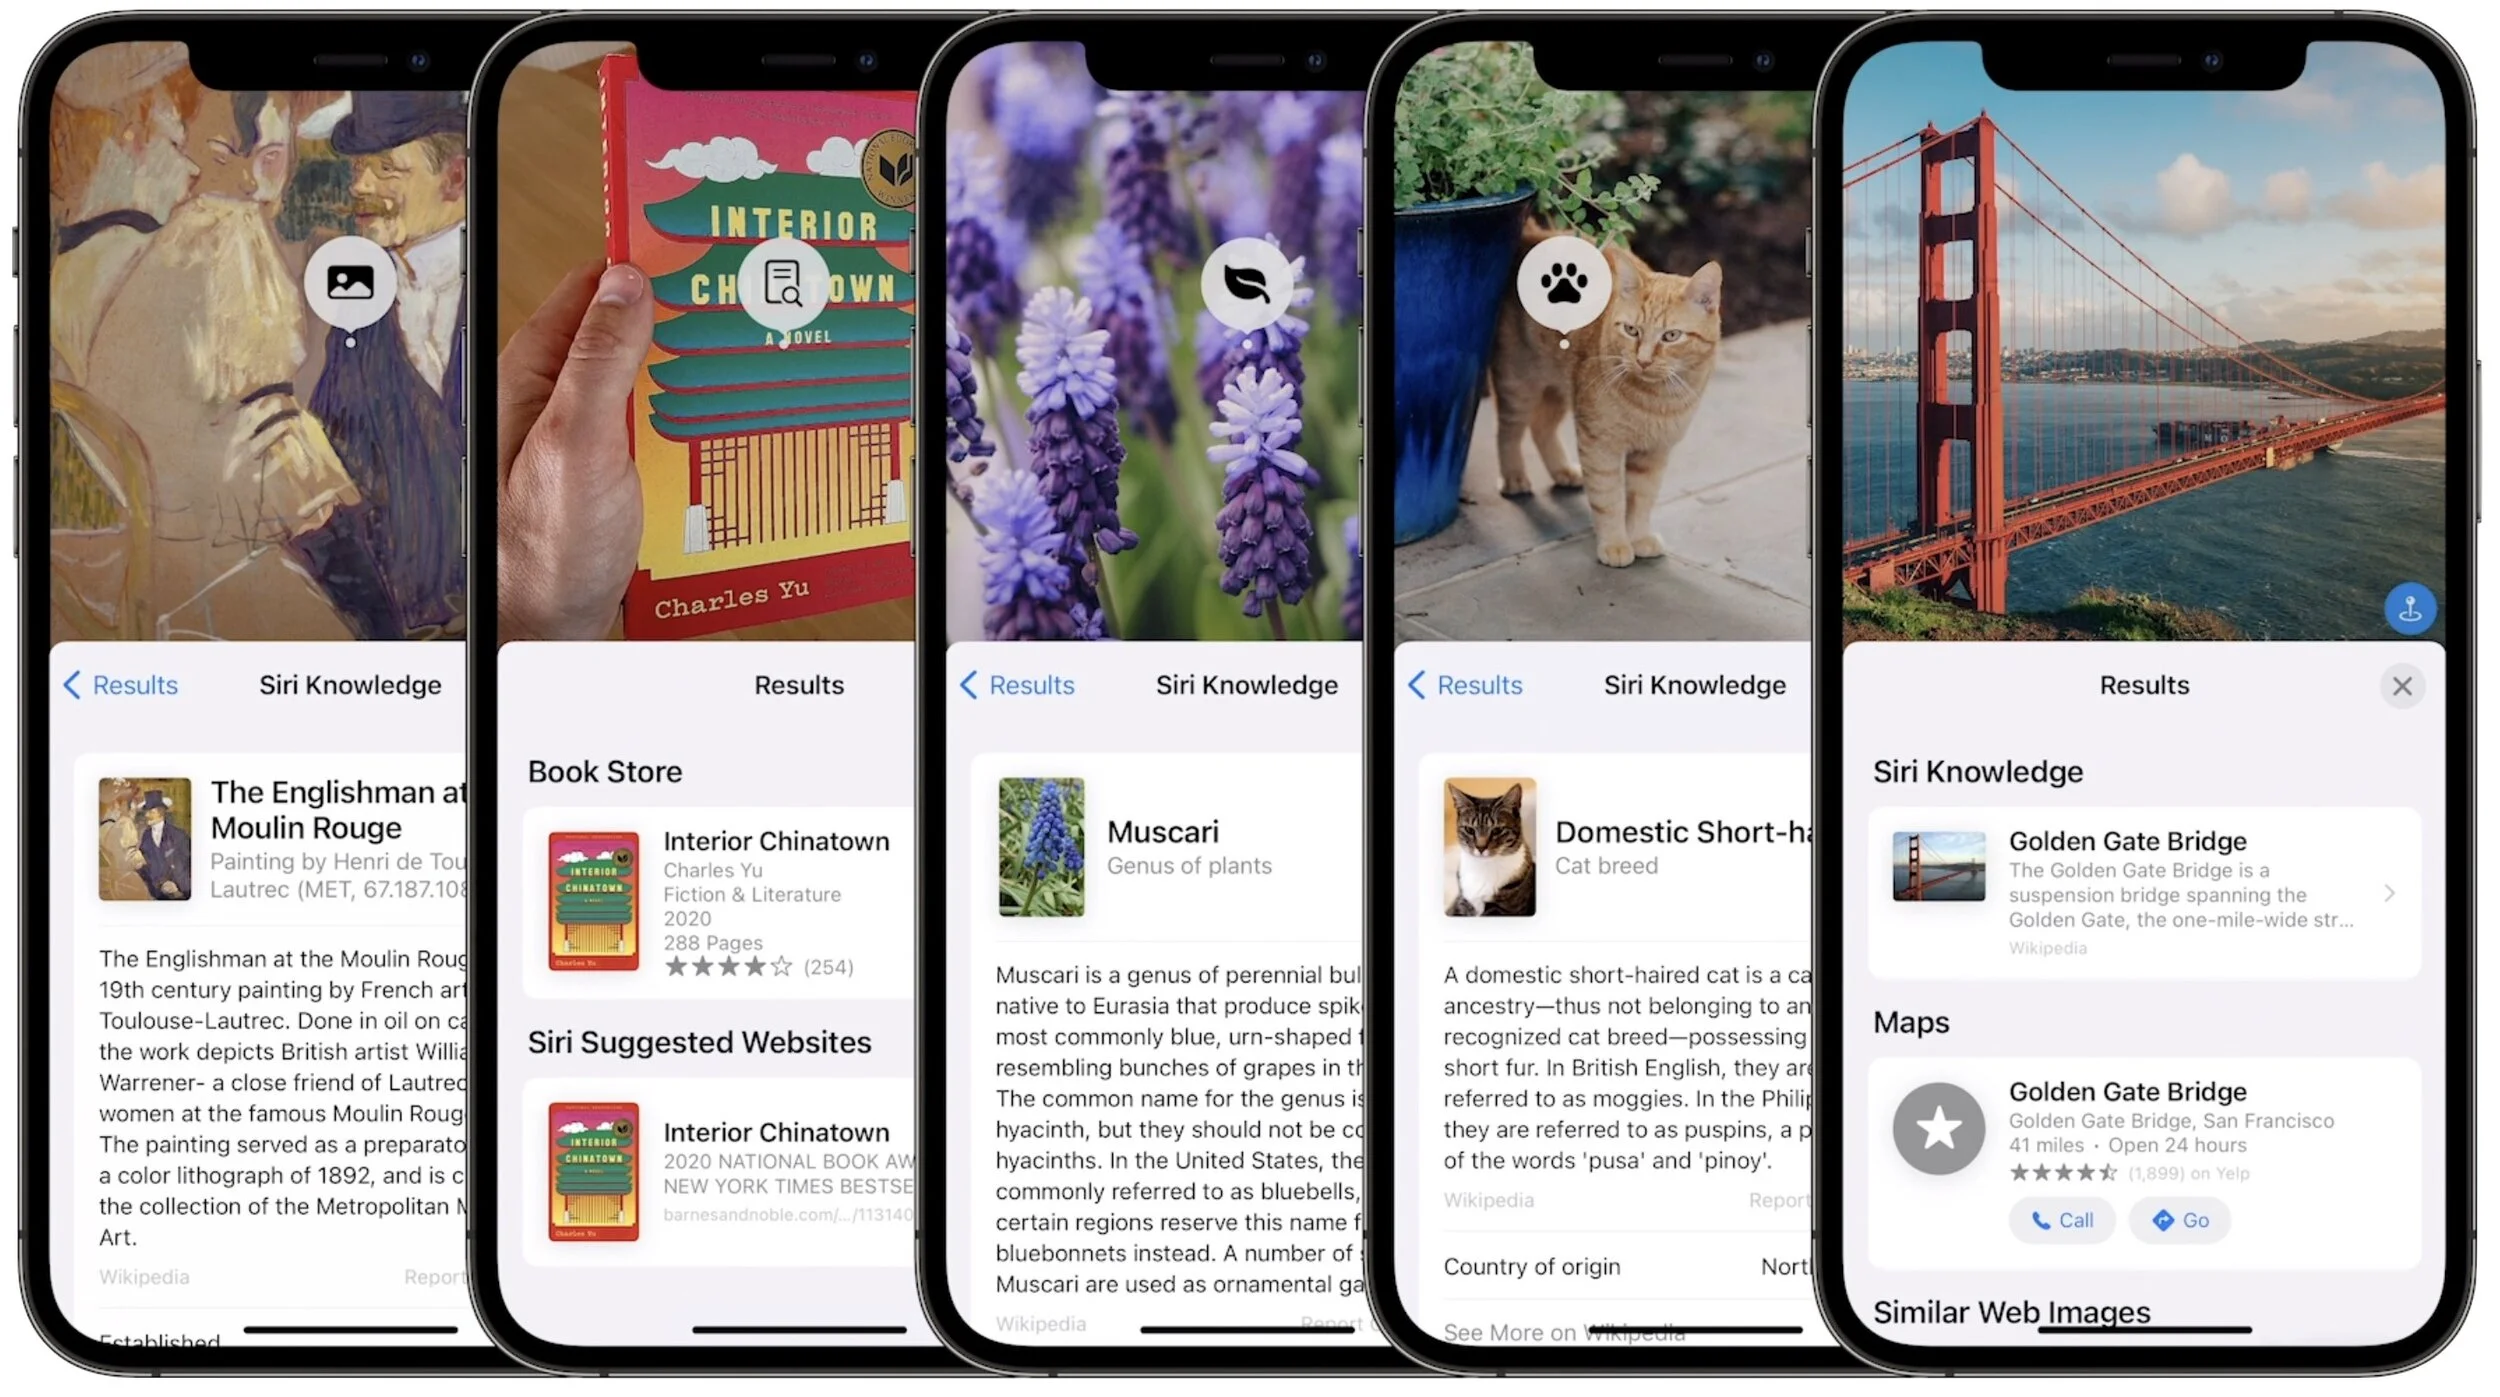
Have you ever taken a photo of something just to capture a phone number or address? We have, for sure. Apple’s new Live Text feature treats text in images just like text you type, so you can use functions like copy and paste, lookup, and translate. Live Text will work in Photos, of course, but also in Quick Look, Safari, and Screenshot, and in live Camera previews on the iPhone. It’s an impressive use of image recognition technologies.

Along the same lines, in Photos, you’ll also be able to use the information button on any photo to highlight recognized objects and scenes and get additional information about them. Apple says you’ll be able to learn more about popular art and landmarks, plants and flowers, books, and pet breeds.
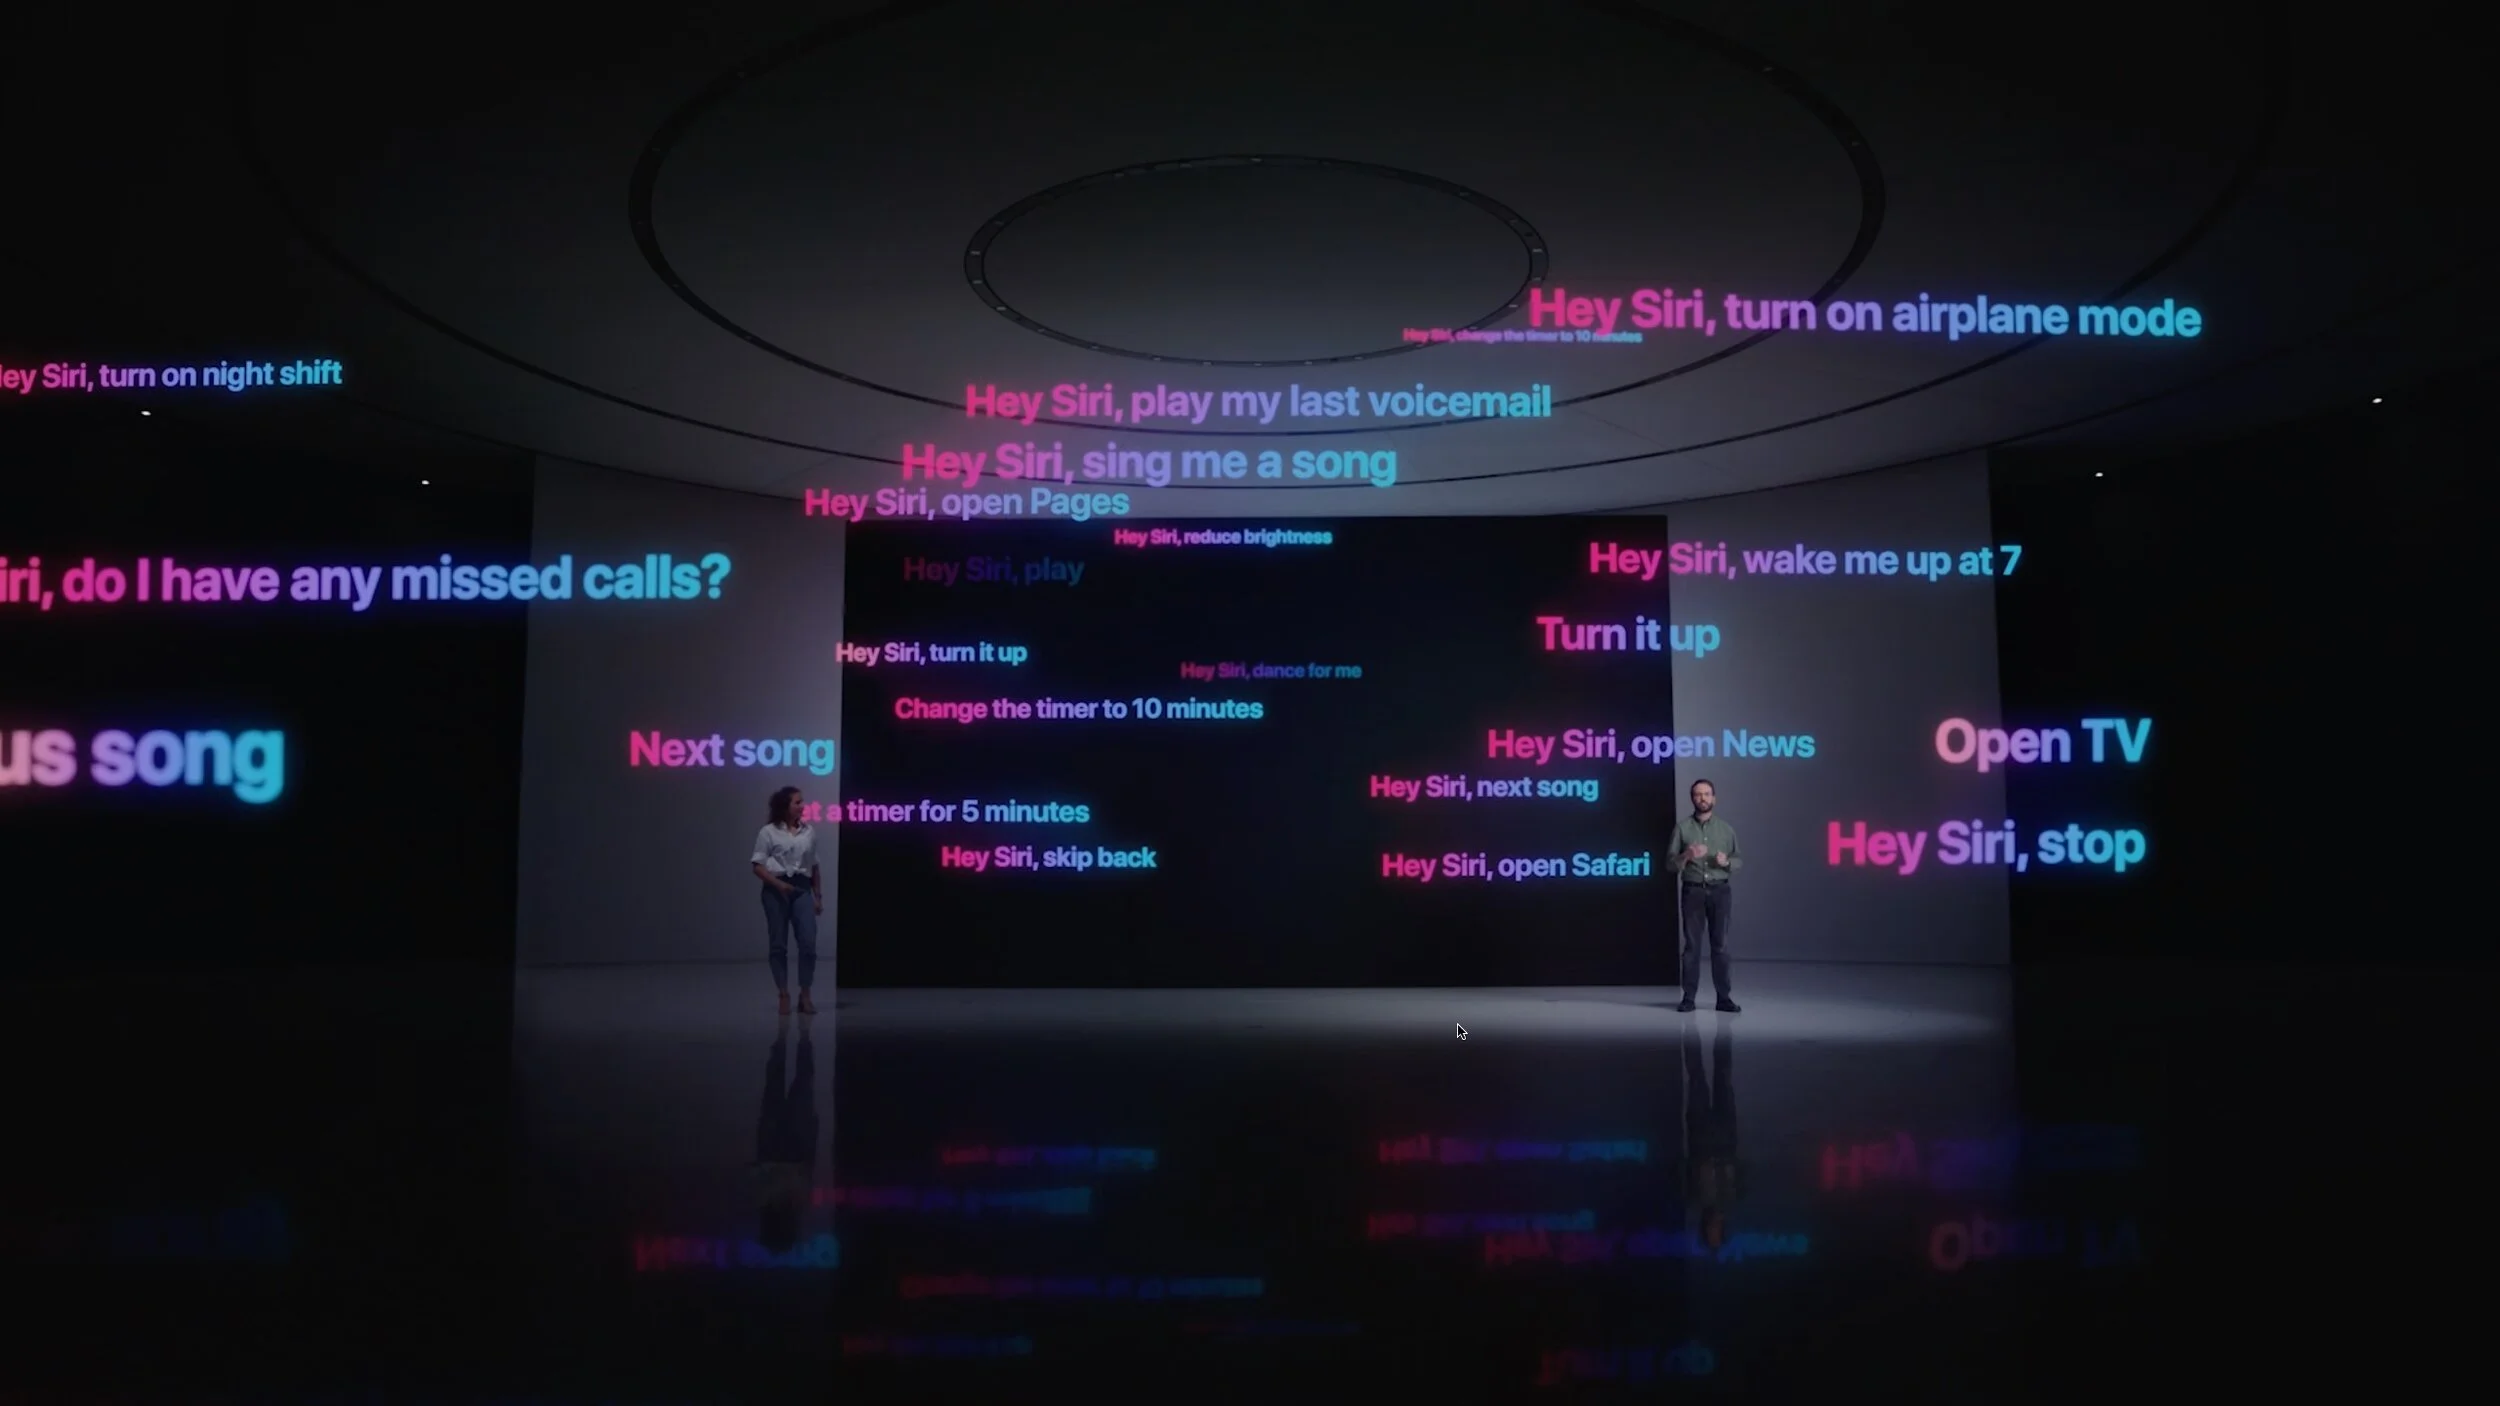
Siri Gets Faster, More Reliable, More Private, and More Useful
Thanks to the ever-increasing power of the Neural Engine in Apple devices, Apple says it will bring all processing of Siri requests onto your device. That may not sound like a big deal, but it means that Siri should work faster, more reliably, and more privately. It will be faster because there’s no need to send speech to and from Apple’s servers for processing. It will make Siri work more reliably when your iPhone doesn’t have strong cell service and enable offline support for many types of requests. And Apple won’t know what you’re saying at all.
Other Siri improvements will include the capability to announce reminders when you’re wearing AirPods, improved conversation context so you can refer to what you just asked, and support for controlling HomeKit devices at specific times. HomeKit developers will even be able to add Siri support to their products through a HomePod.
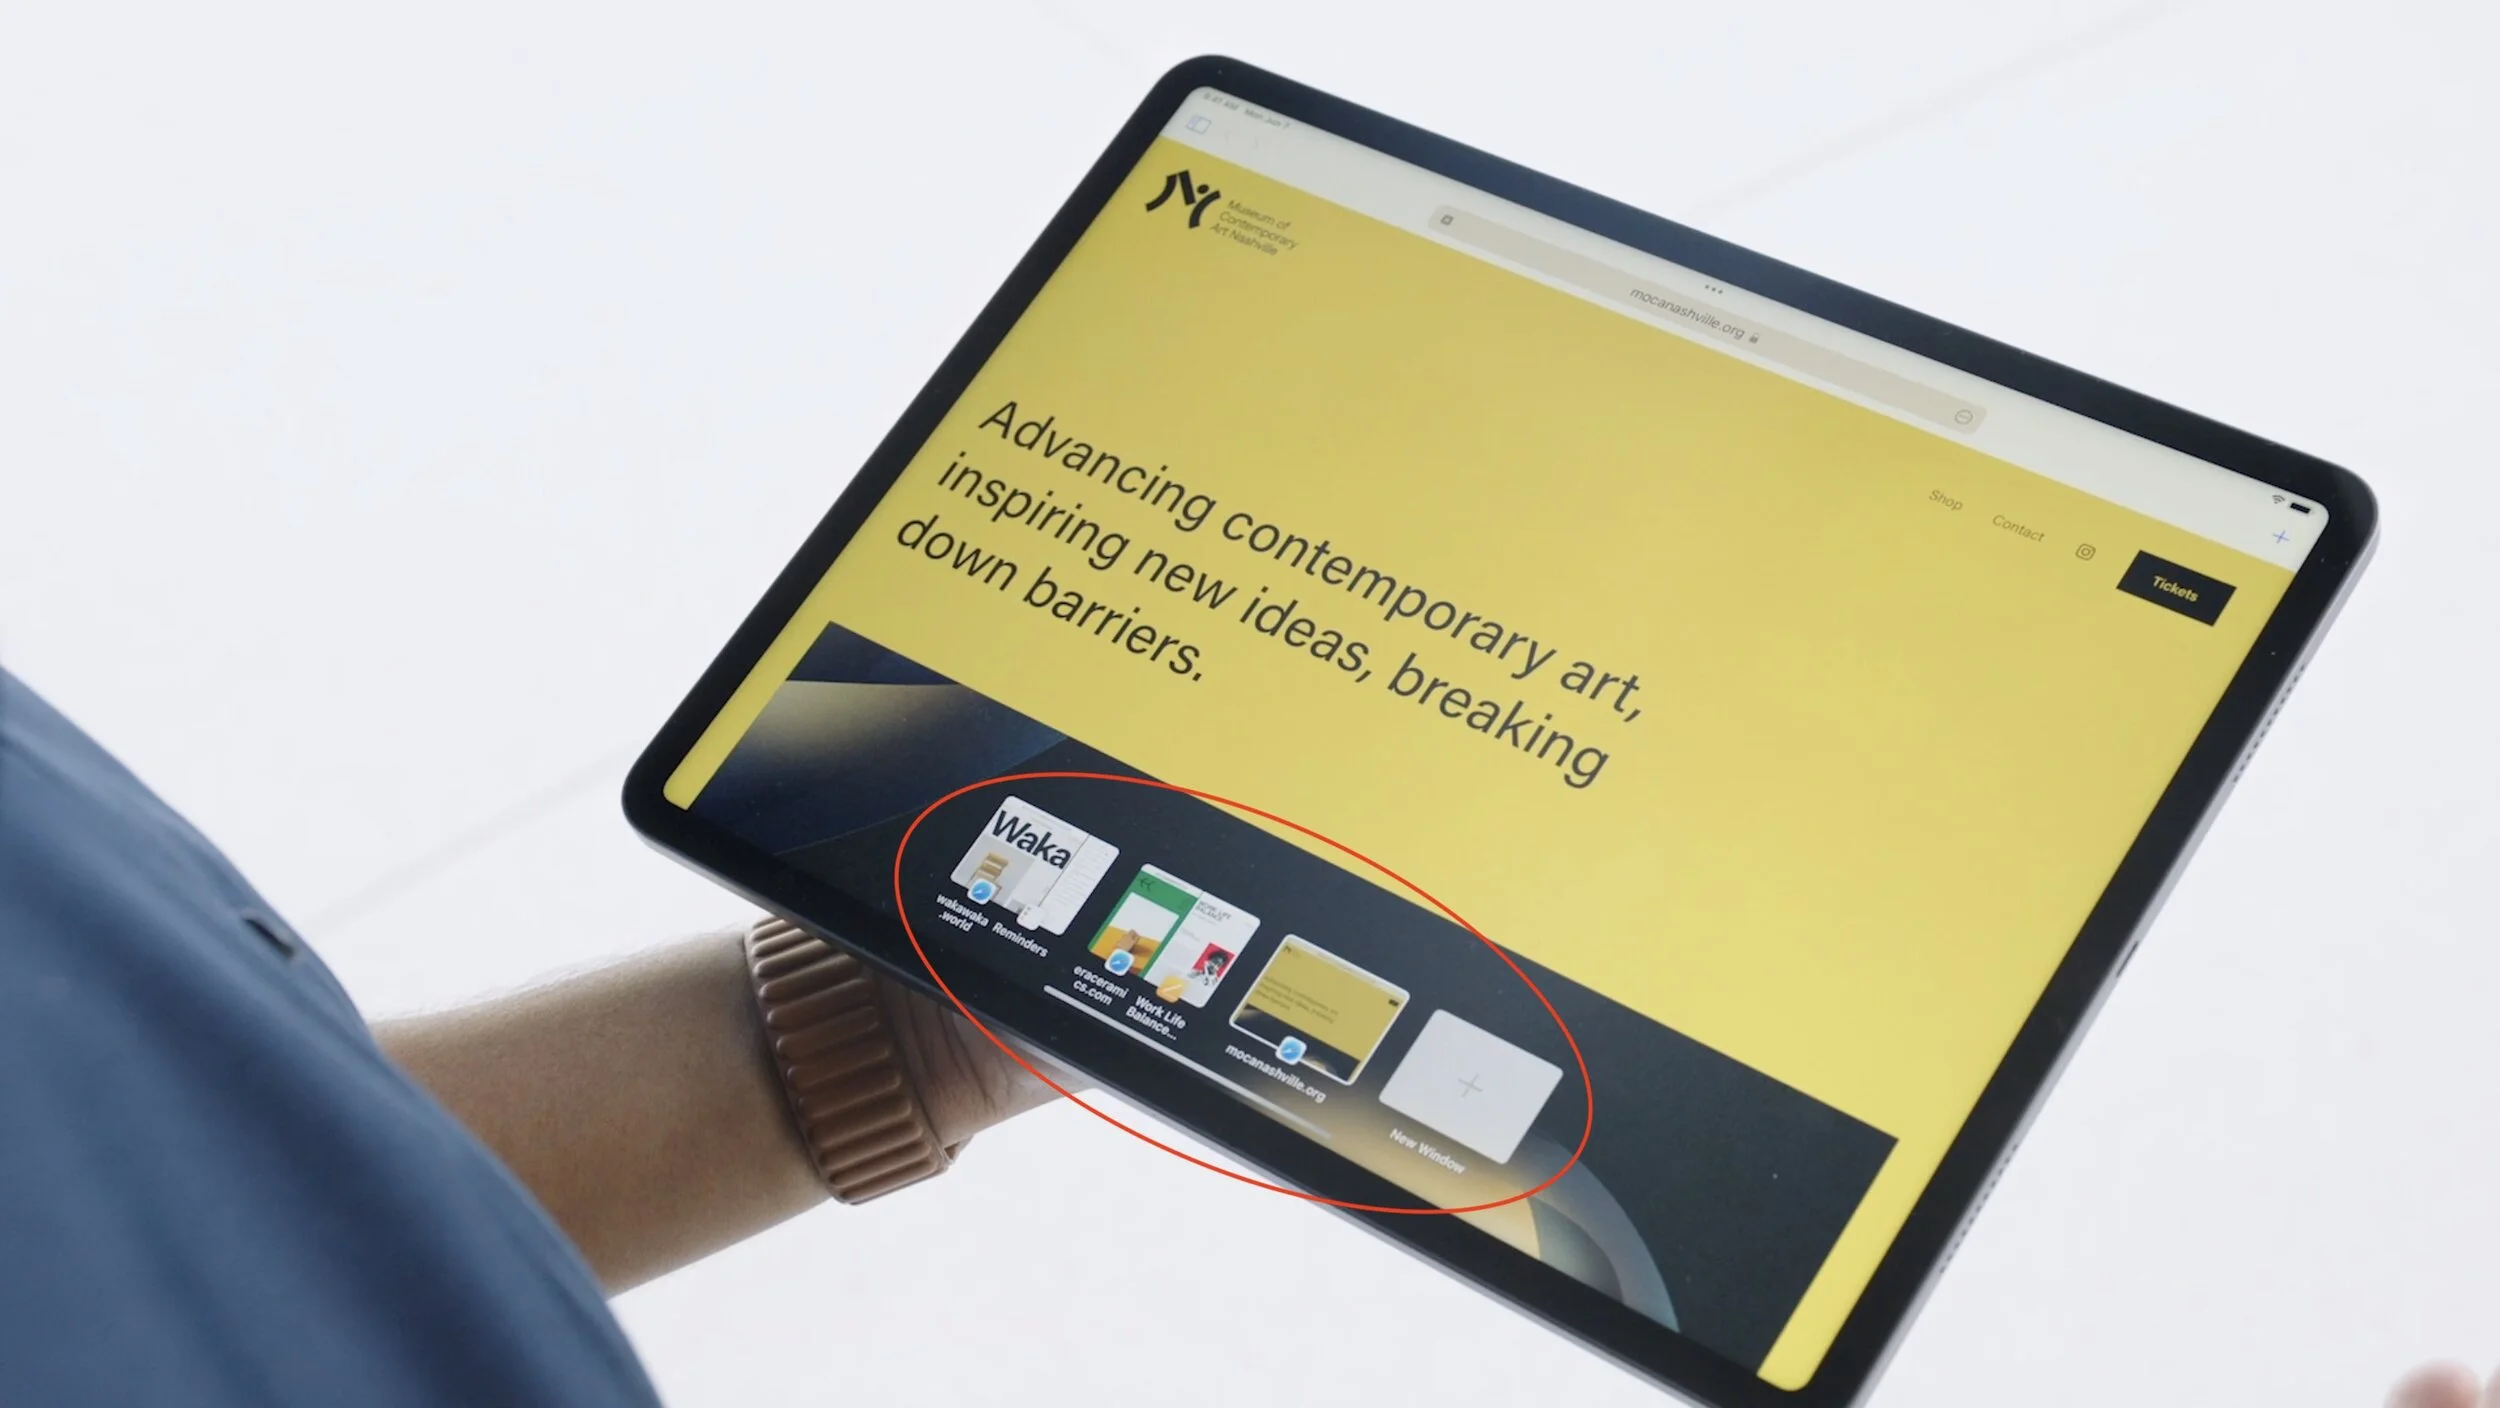
Improved Multitasking Controls Come to the iPad
The big problem with Apple’s multitasking options on the iPad has been remembering how to use them. With iPadOS 15, Apple hopes to solve that with a new menu that will appear at the top of apps, with buttons for entering full screen, Split View, or Slide Over.
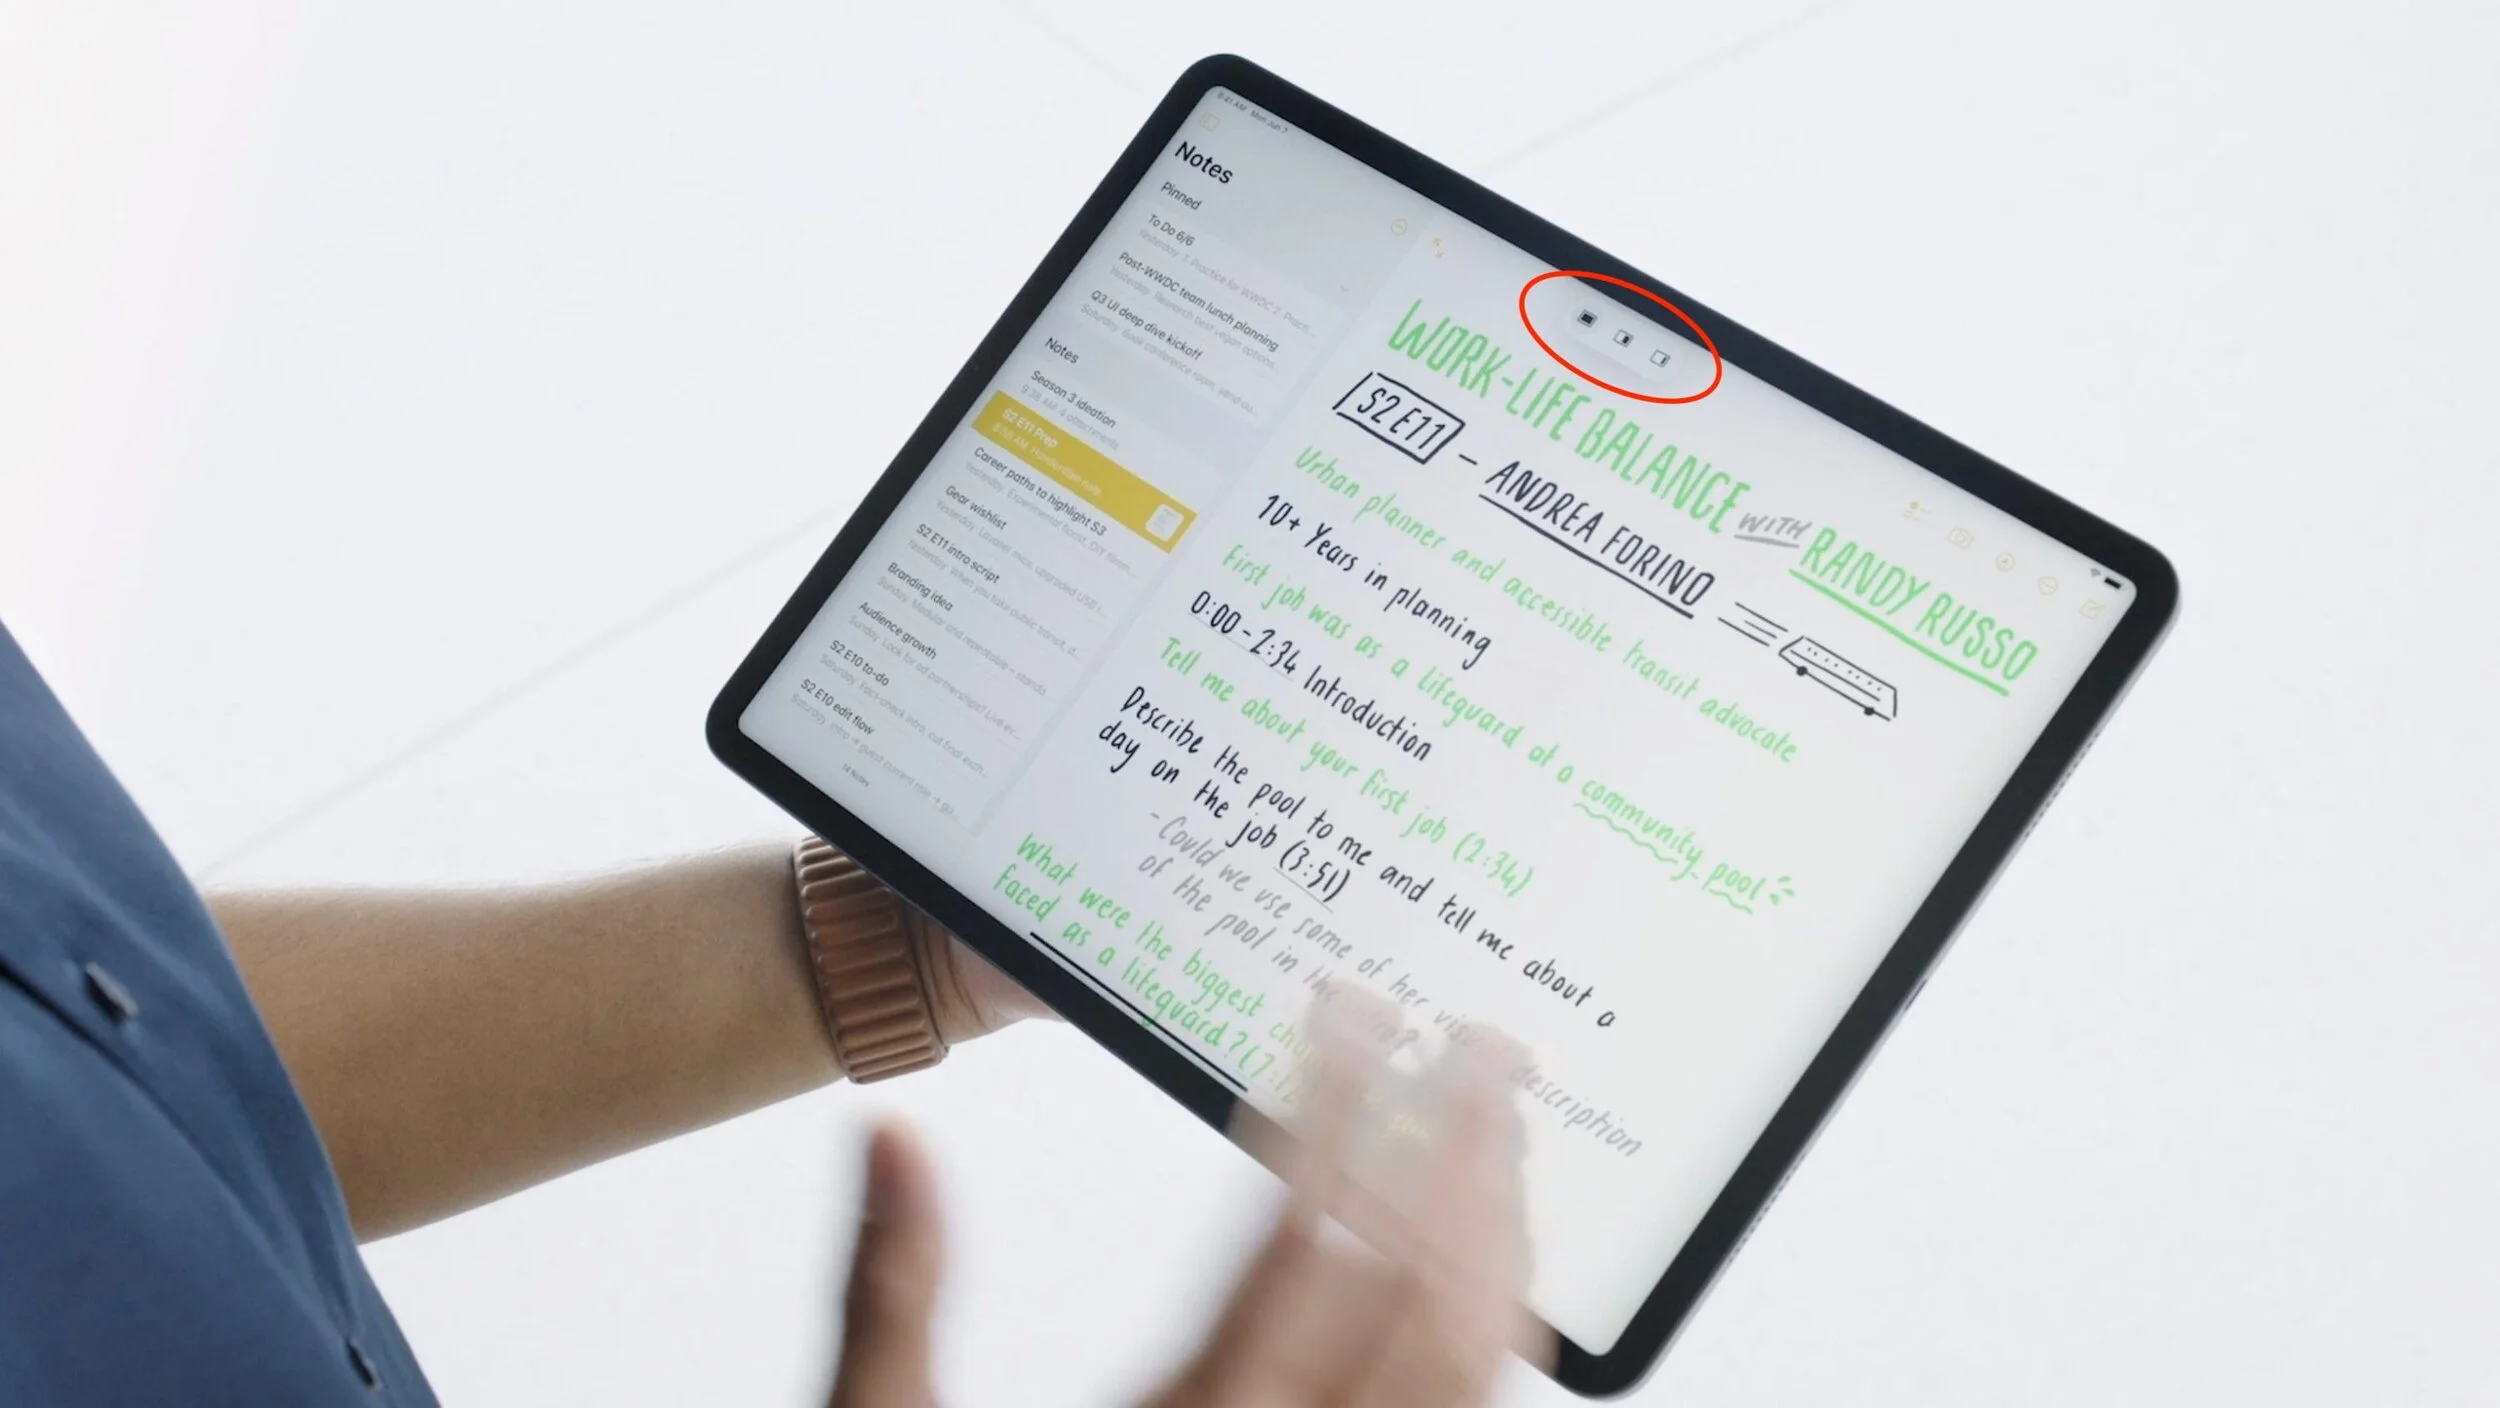
Apple also added a new multiwindow shelf that appears at the bottom of the screen at launch and provides a Dock-like view of all the open windows in that app. If you ignore it, it fades away quickly, but it should help you remember which windows you have open and access them quickly.
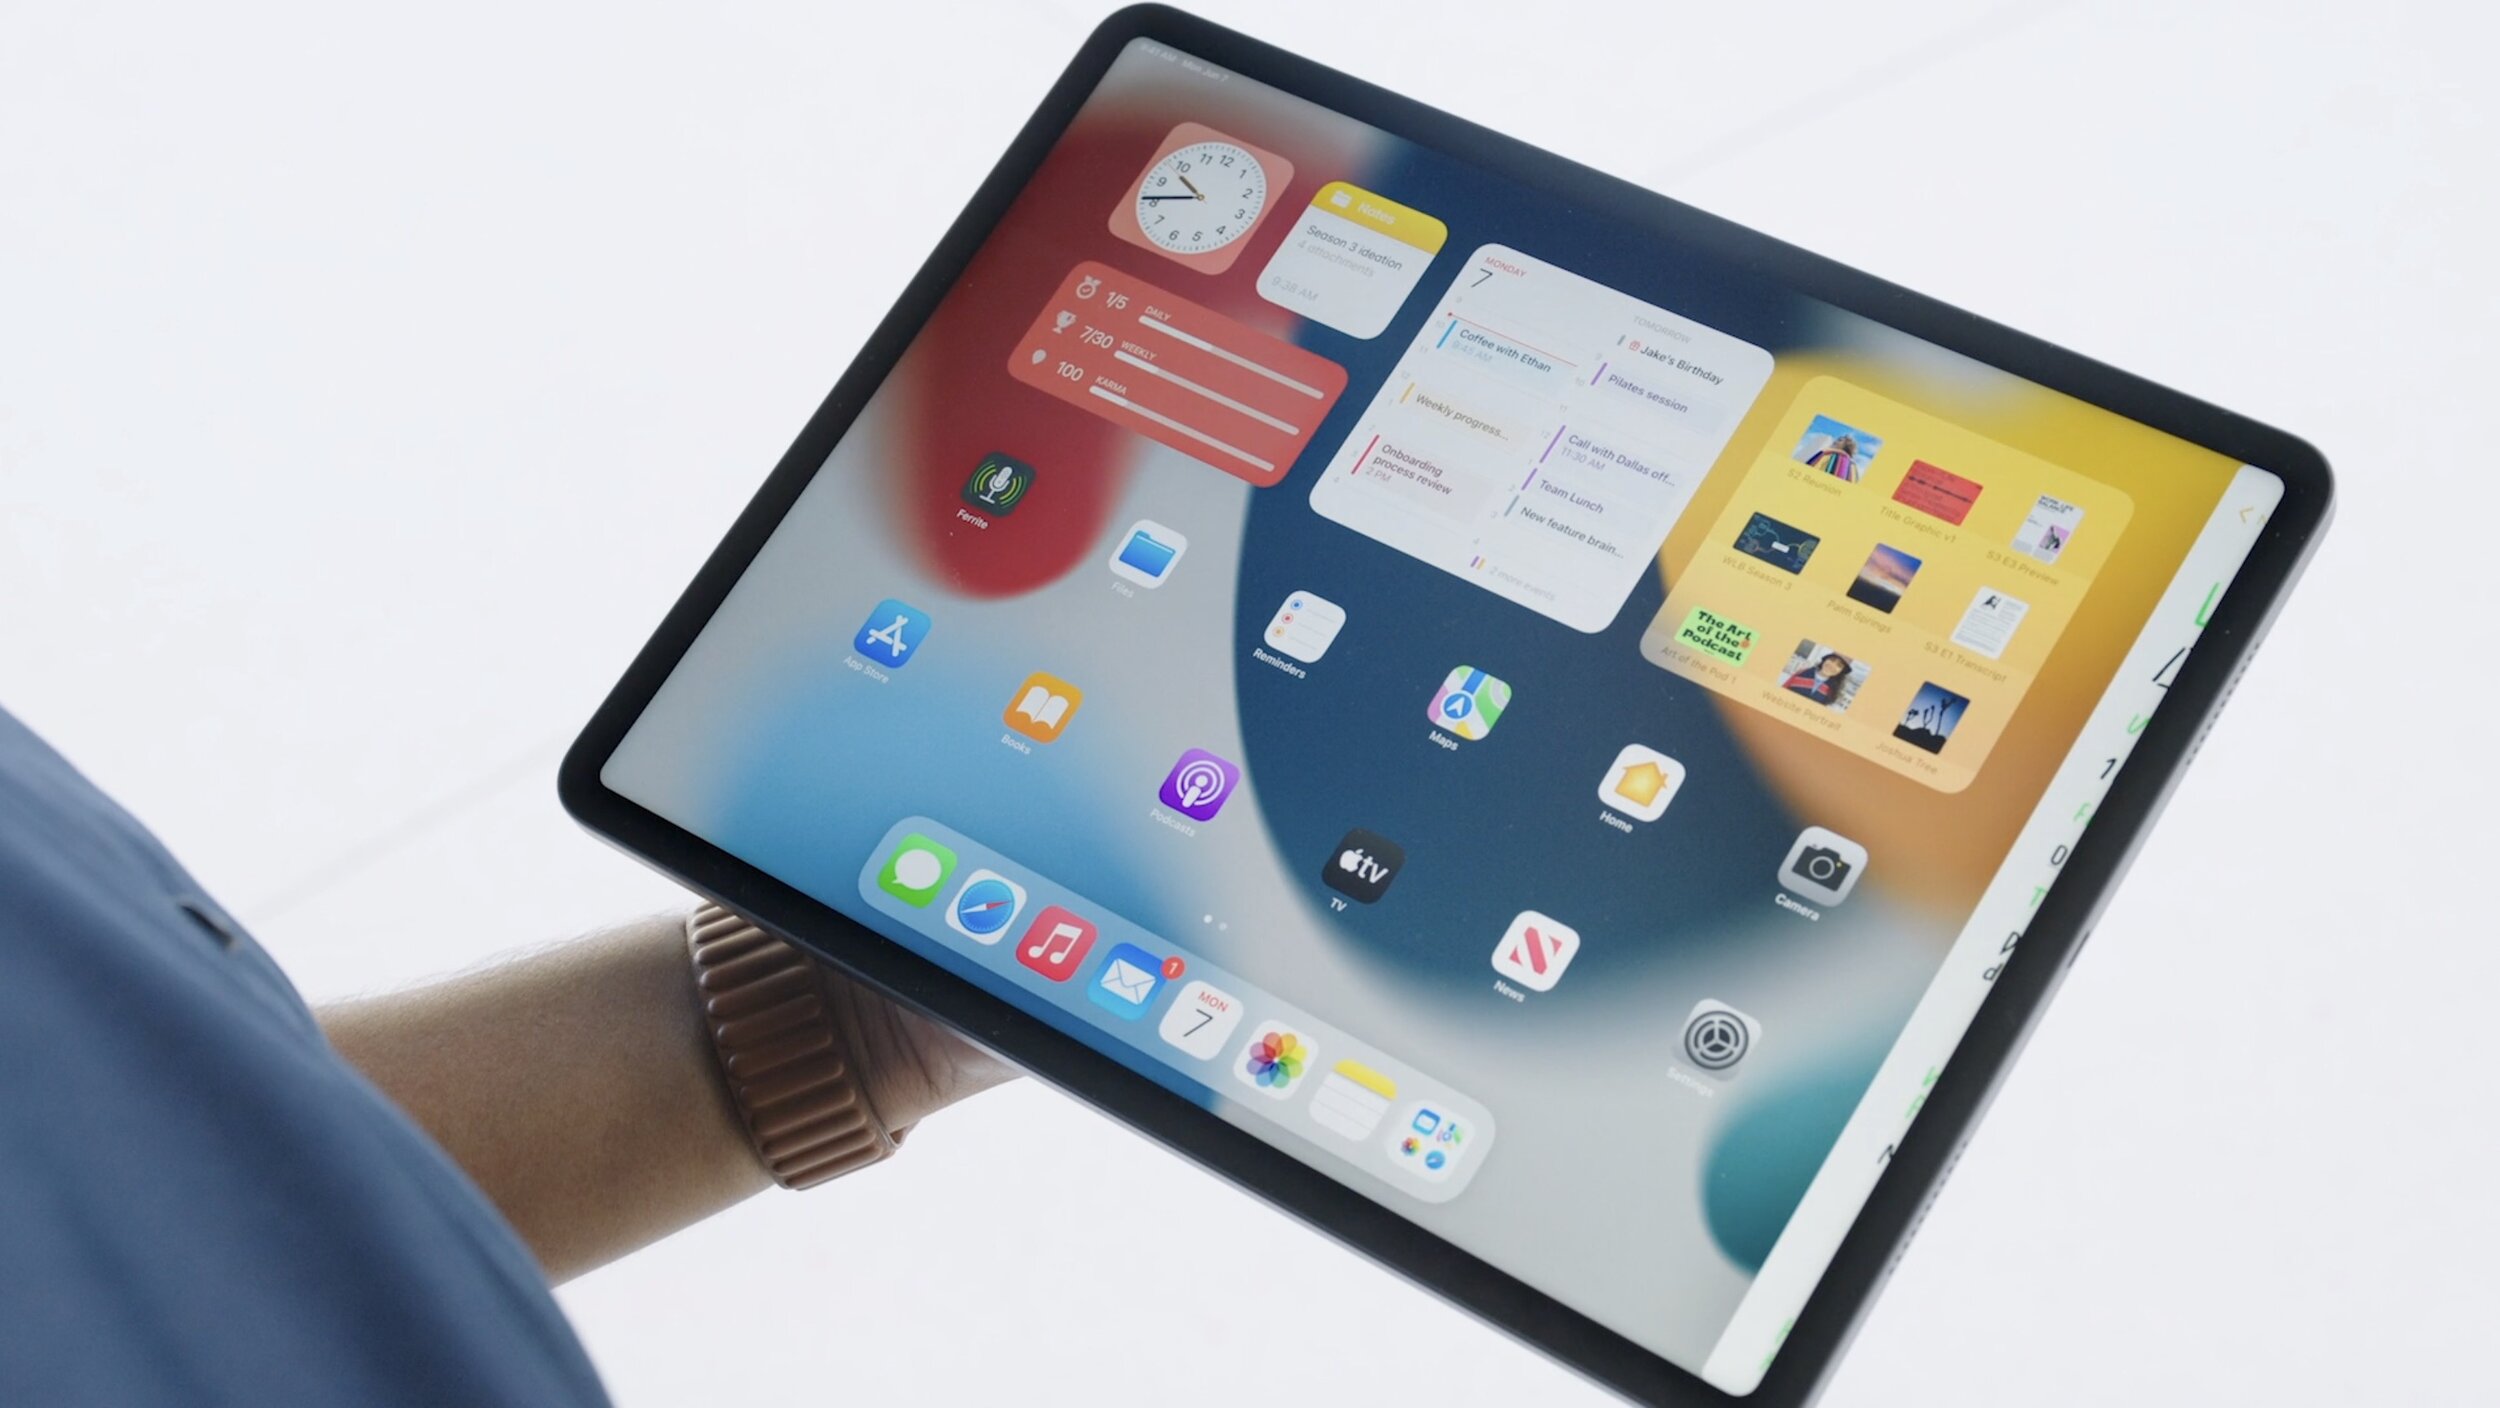
The iPad Finally Gets the App Library and Home Screen Widgets
Last year, in iOS 14, Apple introduced the App Library and Home Screen widgets. The App Library holds all your apps so you can declutter your life by removing them from the Home Screen. And Home Screen widgets let you add app-specific widgets that provide at-a-glance information. Sadly, iPadOS 14 didn’t include those features.
iPadOS 15 rectifies that oversight, adding both the App Library and Home Screen widgets, complete with some larger widget sizes for the larger iPad screen. They’ll work just like on the iPhone. It’s about time!
Locate Lost AirPods Pro and AirPods Max with Find My Network Support
As it stands now, you can theoretically find AirPods using the Find My app. However, it shows only the last position of the AirPods at a general level, and you have to get within range of them to play a sound. In the future, however, the AirPods Pro and AirPods Max will support the Find My network, so other people’s devices can report their location generally, and once you get within Bluetooth range, you can play a sound to locate them.

Hopefully, that will happen less often thanks to new separation alerts that, when enabled, will alert you when you leave an Apple device, AirTag, or Find My-compatible item behind.
Private Relay Protects Safari Traffic for iCloud+ Subscribers
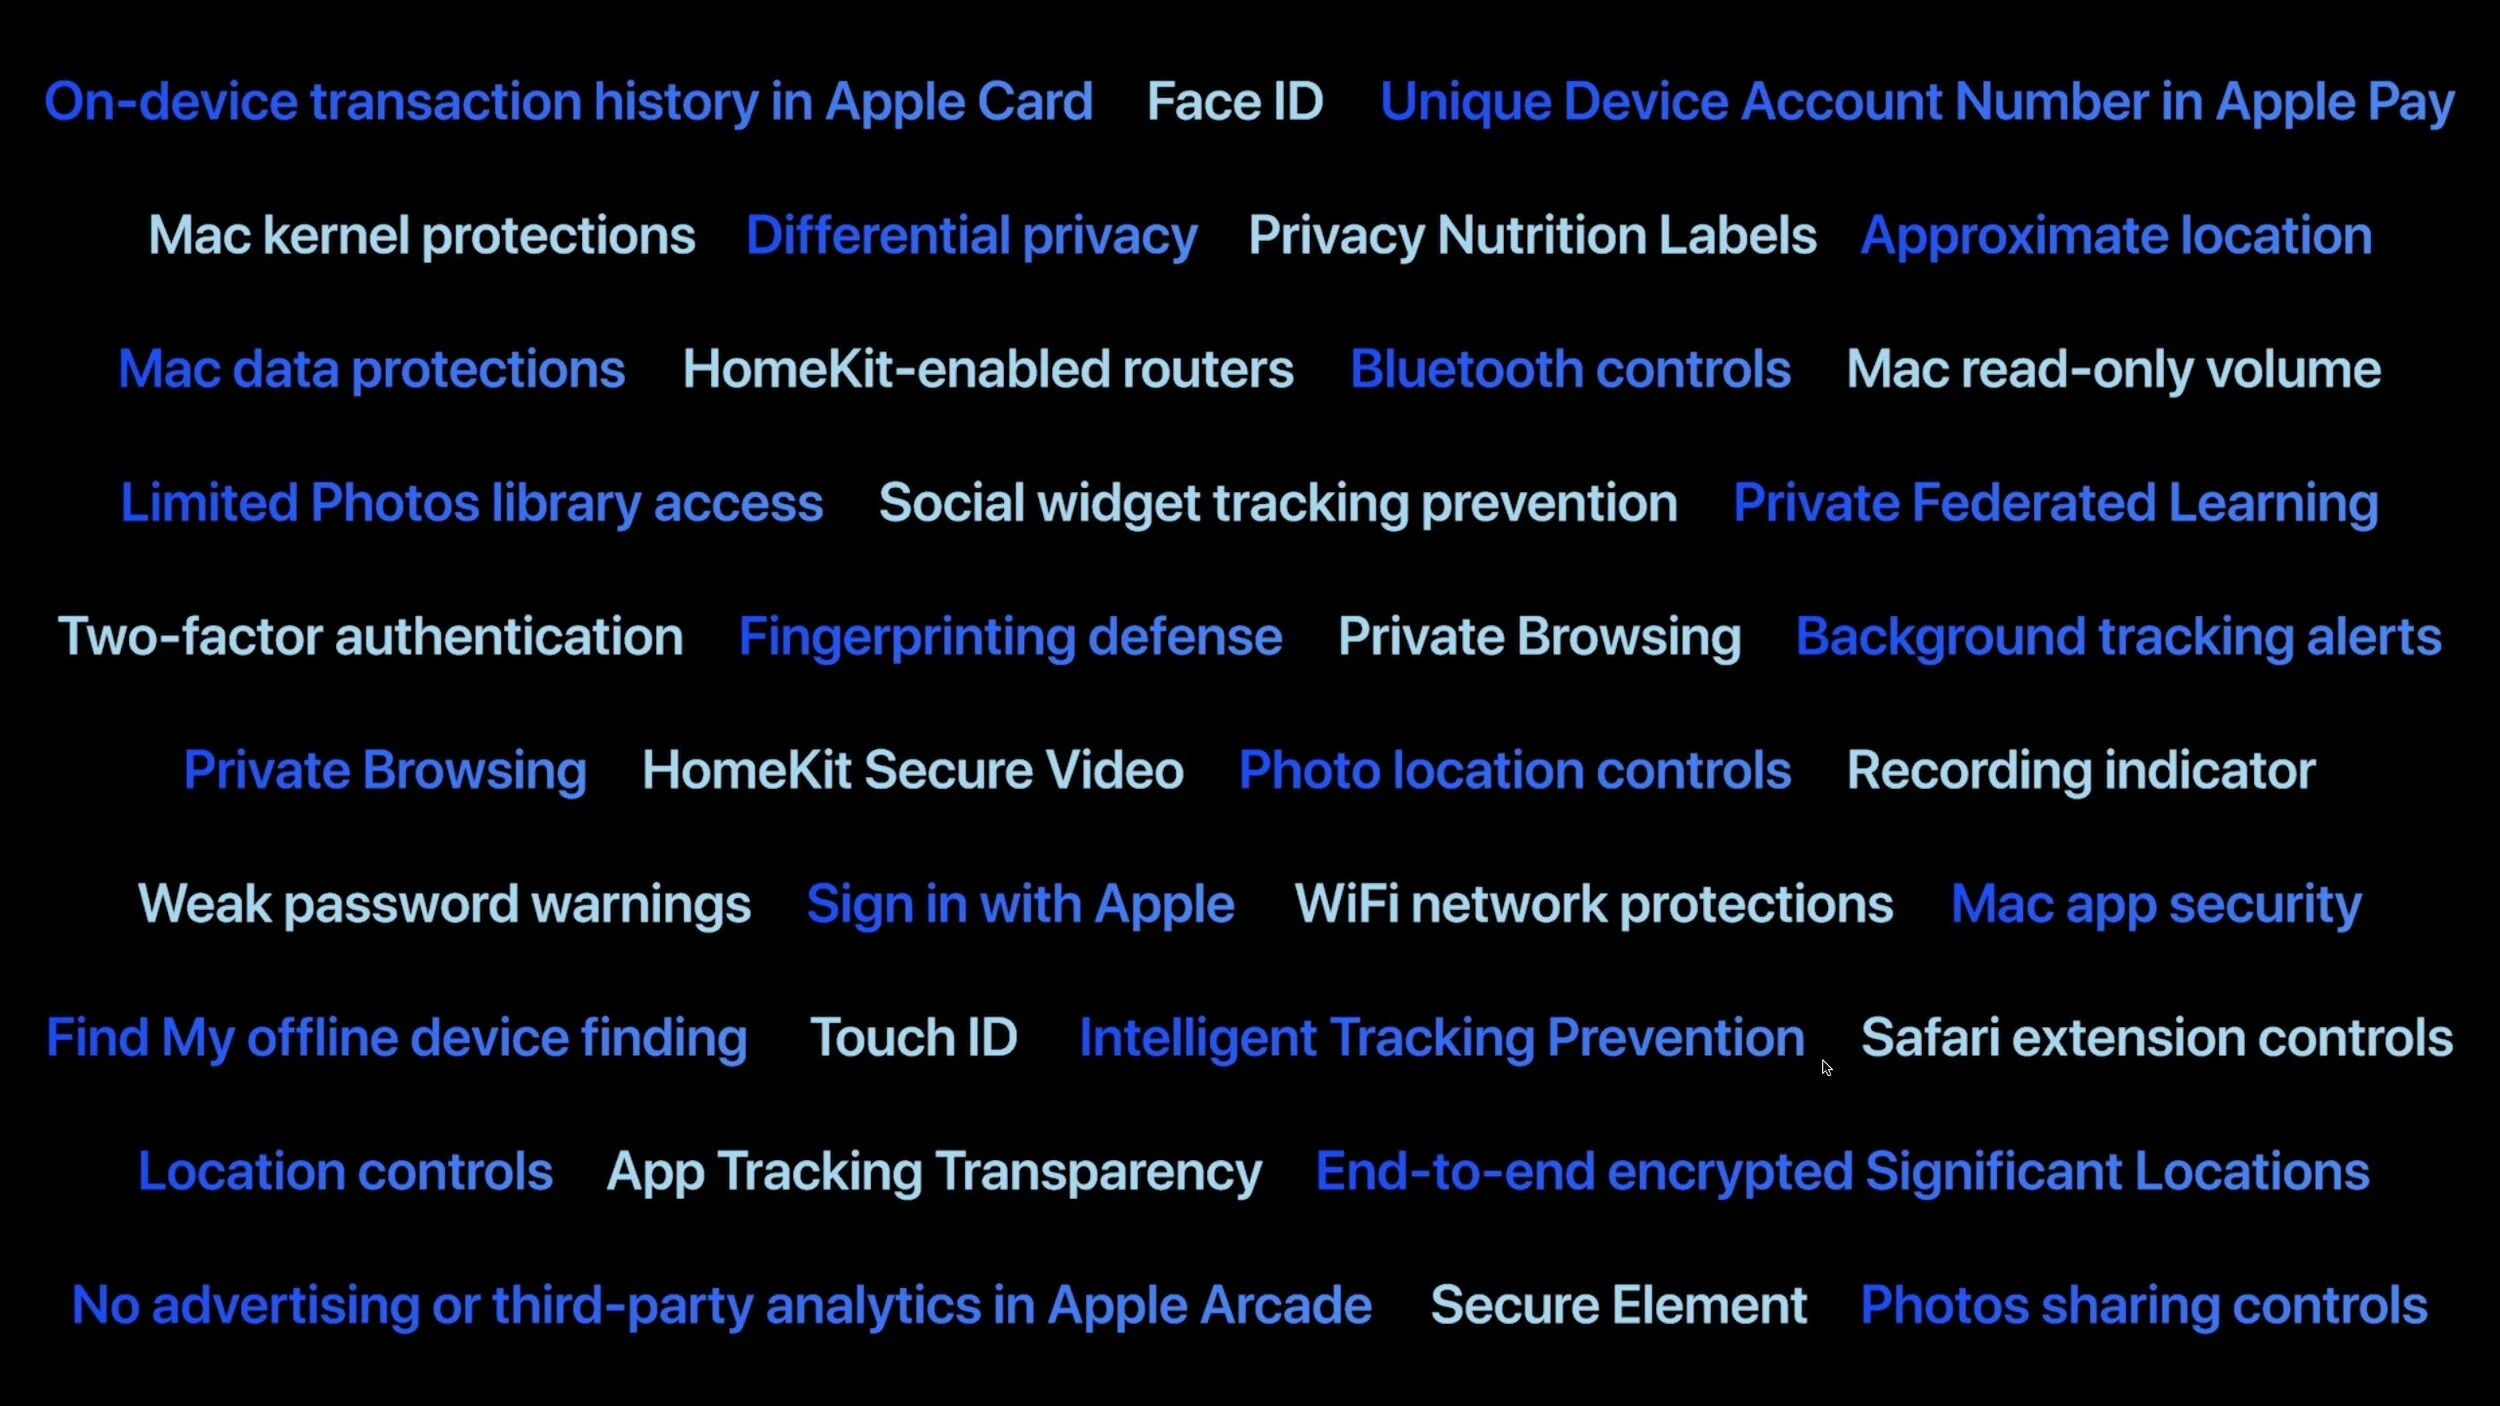
Apple has been adding lots of privacy-protecting features over the past few years, but Private Relay goes even further to ensure that even your ISP can’t track where you go on the Web and sell that data to advertisers. Private Relay encrypts your Safari traffic and passes it through two Internet relays. No one—not even Apple—can then use your IP address, location, and browsing activity to create a detailed profile of you. Everyone who pays for extra iCloud storage will transition to the new iCloud+ for the same cost and will get Private Relay for no additional fee.
While we’re talking about iCloud, Apple also says that you’ll be able to get custom domain names for iCloud Mail addresses and invite family members to use the same domain with their iCloud Mail accounts.
Use AirPlay to Send Audio or Video to Your Mac
Many people have discovered how neat it is to use AirPlay to display photos or videos from an iPhone or iPad on a TV attached to an Apple TV. Macs could also broadcast their displays to an Apple TV. But what you couldn’t do is use AirPlay to send audio or video from another Apple device to a Mac. With macOS 12 Monterey, that will become possible, enabling you to use a Mac’s large screen to play a video, share a Keynote presentation, and more.

Apple’s upcoming operating system releases boast many other new features, and we plan to explore more of them once everything ships in a few months. We’ll let you know when it’s time to update!
(Featured image by Apple)