Solve Networking Puzzles with Powerline Networking and MoCA
Wi-Fi and Ethernet are sufficient for most networking needs, but if you can’t extend a network to a particular spot, consider powerline networking, which runs over electrical cables, or MoCA, which runs on cable TV coax. Details here:

For most homes and offices, a standard or mesh Wi-Fi network works fine for providing Internet access throughout the building. And when higher throughput is necessary, it’s usually not that difficult to pull Ethernet cable from room to room.
But some buildings seem almost impervious to networking—imagine thick brick walls that both block Wi-Fi signals and make it nearly impossible to pull wire from one room to another. It may not be the entire building—you may just have trouble extending a network into a remote attic or basement room, or to a freestanding outdoor structure.
Where there’s a will (and enough money), there’s a way, of course, but there are two affordable alternatives for bringing network access to tricky spots: powerline networking and MoCA.
Powerline Networking
As you might expect from the name, powerline networking uses technical magic to piggyback data on top of the standard electric cables that are undoubtedly already in every room of your home or office. It has been around for years but was long considered slow and unreliable. Modern iterations of the technology, called HomePlug, have solved many of those problems and offer up to 2 gigabits per second (Gbps) of throughput.
You need a pair of powerline adapters to create a network, and all you have to do is plug them in. However, there are a few things to keep in mind:
Powerline adapters must plug directly into a wall socket. You can’t connect them to a power strip or an uninterruptible power supply because the surge protection blocks the frequencies they use for transmitting data.
It’s often said that powerline adapters must be on the same circuit, but it’s impossible to predict exactly what that means with the wiring in your particular building. The only way to know for sure is to test to make sure the adapters pair up and provide acceptable throughput. (Depending on the wiring, they may work, but at slower speeds.)
If you’re in an apartment or a building with electrical wiring that might extend outside of your space, you can enable security to ensure that other powerline adapters can’t join your network.
The simplest powerline adapters provide just an Ethernet port, but others may offer an additional Ethernet jack, a pass-through electric outlet, and even a built-in Wi-Fi extender. Regardless, they’re inexpensive, with prices for a two-pack well under $100.
MoCA
Its name may sound like a tasty hot drink, but MoCA stands for Multimedia over Coax Alliance, and it’s a standard for using coaxial cables for networking. This isn’t a new idea: those who were around the tech world in the 1980s and 1990s may remember 10BASE2 Ethernet, also known as thin Ethernet, which used thin coaxial cable. However, 10BASE2 Ethernet ran at only 10 megabits per second (Mbps), where-as MoCA offers throughput of up to 2.5 Gbps. MoCA’s win is that it runs over the coaxial cables installed in many buildings, primarily homes, to distribute cable TV. If you already have coaxial cable in your walls, why not use it for networking?
Security remains an issue if your coax cables also carry cable TV or broadband Internet and thus extend beyond your control. The problem is that MoCA signals are quite powerful and can travel farther than intended, such as to neighboring houses. The simple solution is a point-of-entry filter added where the coax enters your house—it prevents MoCA signals from leaving your house. You may also be able to configure a MoCA security key to keep your traffic private, but not all MoCA devices support security.
As with powerline networking, setting up a MoCA network generally requires at least two adapters, although some routers have built-in MoCA capabilities. MoCA adapters usually provide one or two Ethernet ports, although it’s also possible to get Wi-Fi network extenders that support MoCA. The hardware is a bit more expensive than powerline gear, with prices for a two-pack in the $120 to $150 range.
Choosing Wires
Both powerline networking and MoCA require that you have properly configured wires in your walls, so there are no guarantees with either. Your building’s electrical system may be too complex for powerline networking, and even if you have coax cables, there’s no way of knowing if they were installed well or have suffered damage over the years.
But neither is particularly expensive, so as long as you purchase from a vendor that allows returns, you should be able to test either one easily. And if you’re looking for a recommendation about particular brands to get or avoid, contact us.
(Featured image by iStock.com/architectphd)
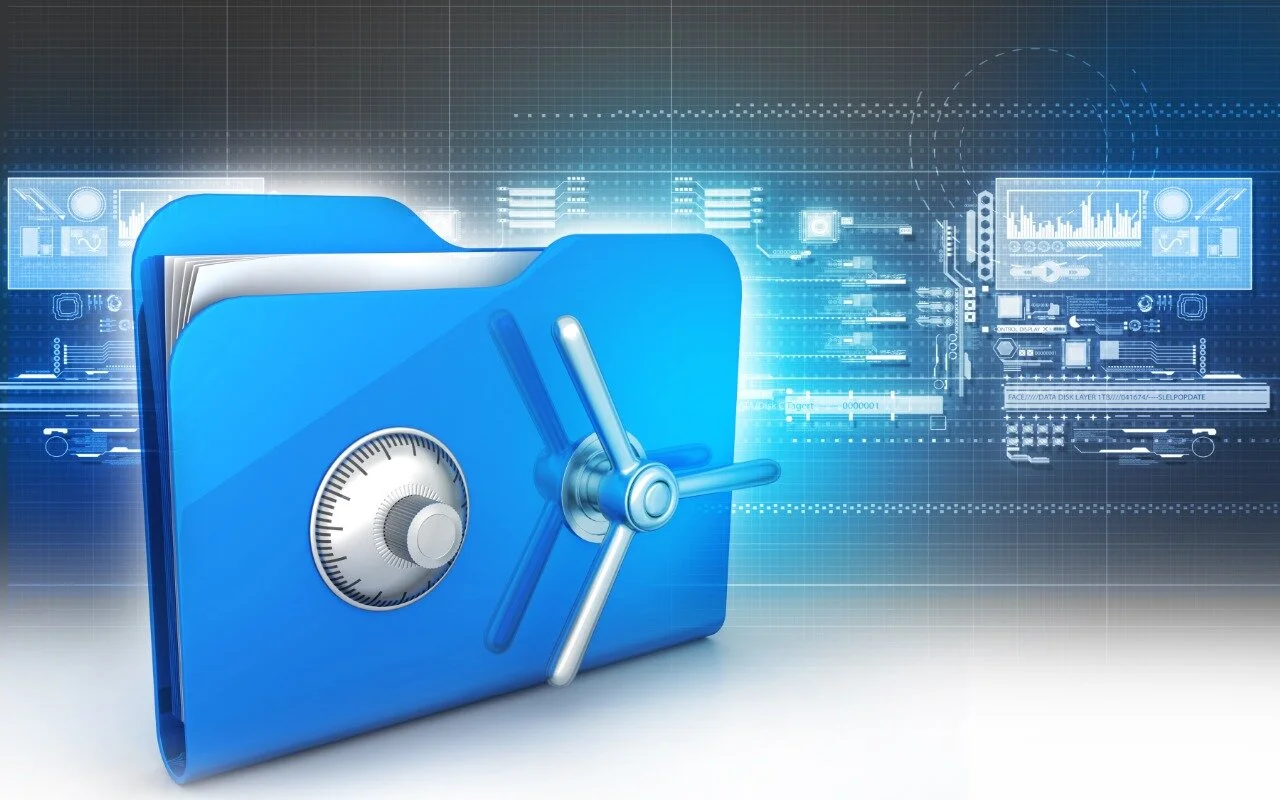
Need to Share Files Securely? Try Password-Protected ZIP Archives
It’s good to be cautious about attaching sensitive files to email—if either your or your recipient’s email account were to be compromised, confidential information could be revealed. Instead, send password-protected ZIP archives. Here’s how:
Imagine you’re staring at a file or folder—perhaps confidential employee information that you need to send to your accountant. If attaching it to an email message makes you think, “That doesn’t seem like a good idea,” award yourself a gold star!
Sending sensitive files via email is a bad idea, partly because the email could be intercepted in transit (possible but highly unlikely), but more because the files then live in both your and your recipient’s email accounts in an unprotected form. If an attacker were to gain access to either of your email accounts, they might scan for patterns like credit card numbers, ID numbers, phone numbers, and postal addresses and find them even in attachments.
There are ways of encrypting email messages so they can be read only by the recipient and never exist in an unencrypted form other than while being created or read, but they’re difficult to set up and fussy to use. For most people, most of the time, encrypted email is overkill.
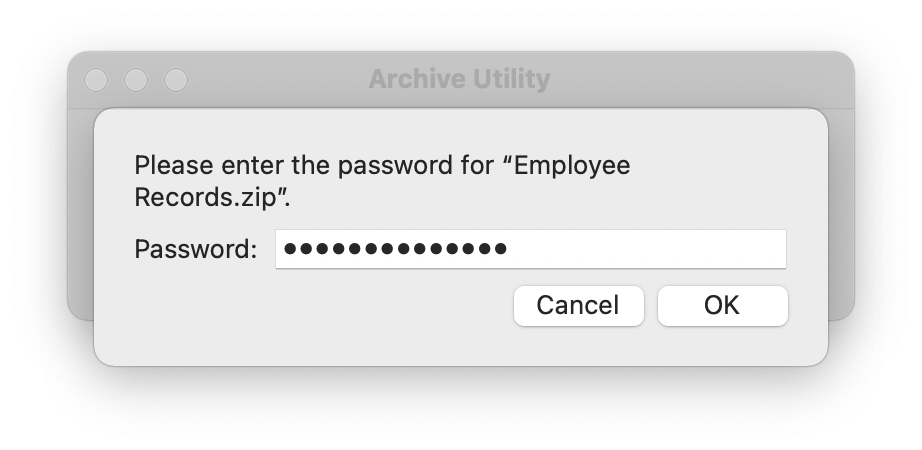
For a more straightforward solution to exchanging information securely via email, use password-protected and encrypted ZIP archives. They’re easy to create on the Mac, either using a simple command in Terminal or with a third-party utility. And better yet, any Mac user can expand them using the built-in Archive Utility simply by double-clicking and entering the necessary password.
Create Encrypted ZIP Archive Using Terminal
Although many Mac users are intimidated by using the Unix command line in Terminal, making an encrypted ZIP archive is easy enough for anyone. All it takes is typing a single command, dragging a file or folder to Terminal, and entering a password twice. Follow these steps, which make an encrypted ZIP archive on your Desktop:
In your Applications folder, open the Utilities folder and double-click Terminal to launch it.
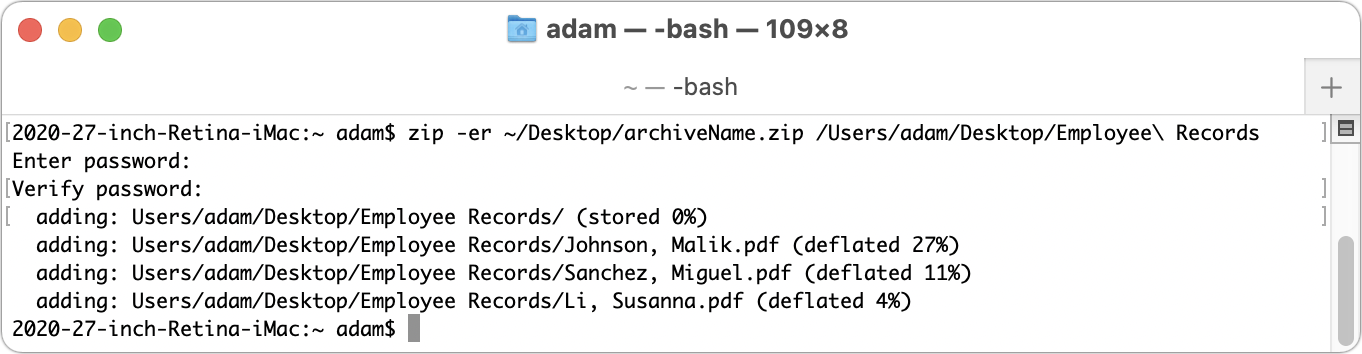
Type (or copy and paste) this command, replacing “archiveName” with whatever you want to name the ZIP file and making sure to type a space after the last letter—the “p” in “zip”. (The tilde ~ character is Shift-backtick, and it’s the key to the left of the numeral 1 key.)
zip -er ~/Desktop/archiveName.zip
Drag the file or folder you want to protect into the Terminal window to complete the command.
Press Return, and when prompted, enter the desired password twice—the second time is for confirmation.
Create Encrypted ZIP Archive Using Archiver
If you have trouble with the command-line method or plan to create encrypted ZIP archives regularly, it’s worth using a Mac app that simplifies the process even more. There are various apps, but a particularly straightforward one for those running macOS 11 Big Sur is Archiver ($19.99, with a free trial). Download it and then follow these steps to create an encrypted ZIP archive:
1. Launch Archiver.
2. Drag a file or folder to the Archiver window and click the Archive button in the toolbar.
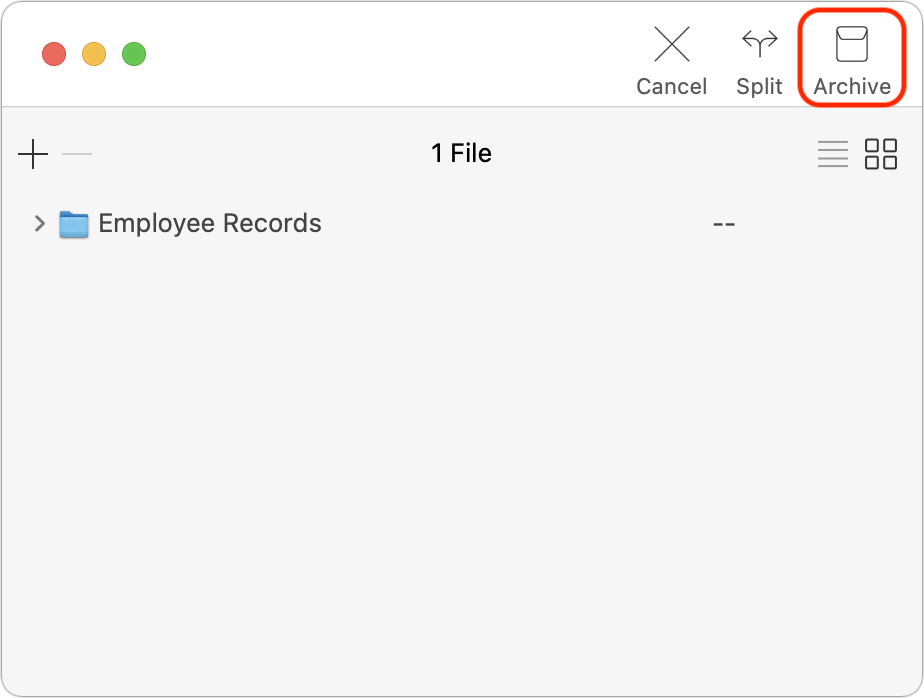
3. Select the archive format (use ZIP), click the Encrypt checkbox, enter the password twice, and click the Archive button in the toolbar.
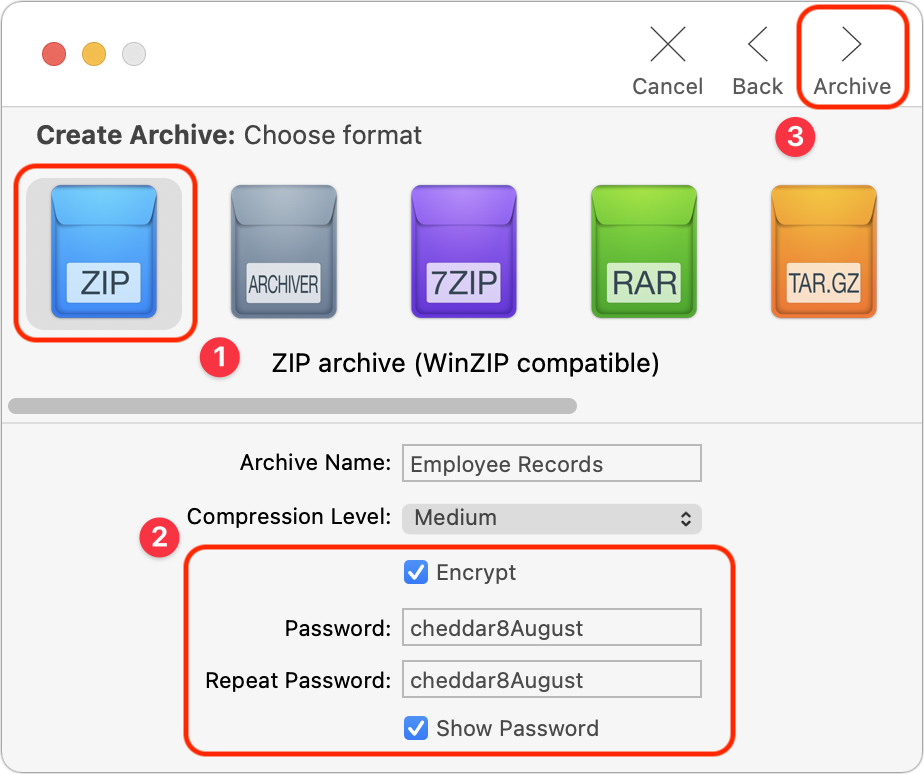
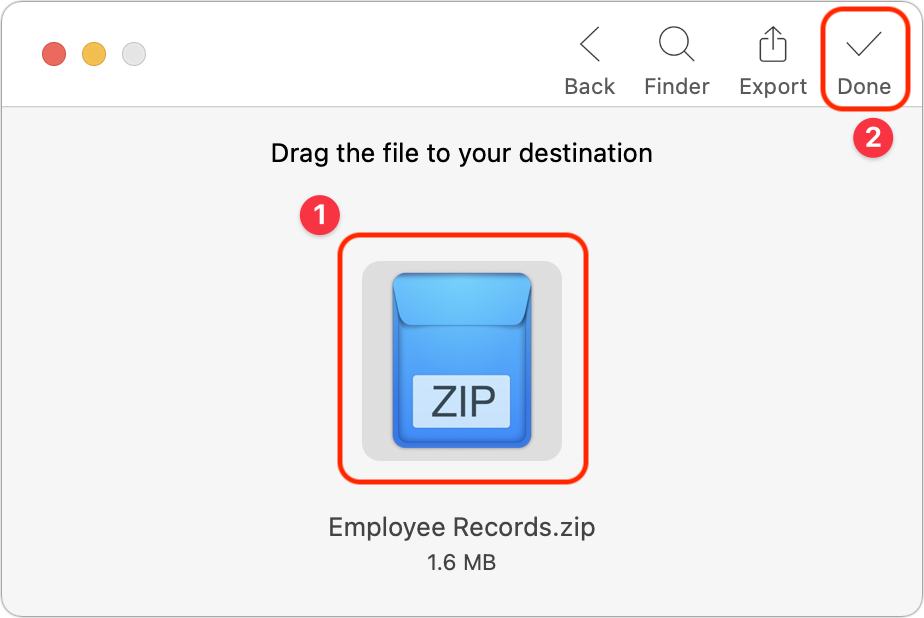
4. Drag the ZIP archive to the Desktop or another folder and click the Done button.
Decrypting a ZIP Archive
As noted earlier, decrypting a password-protected ZIP archive on the Mac is as simple as double-clicking it and entering the password when prompted.
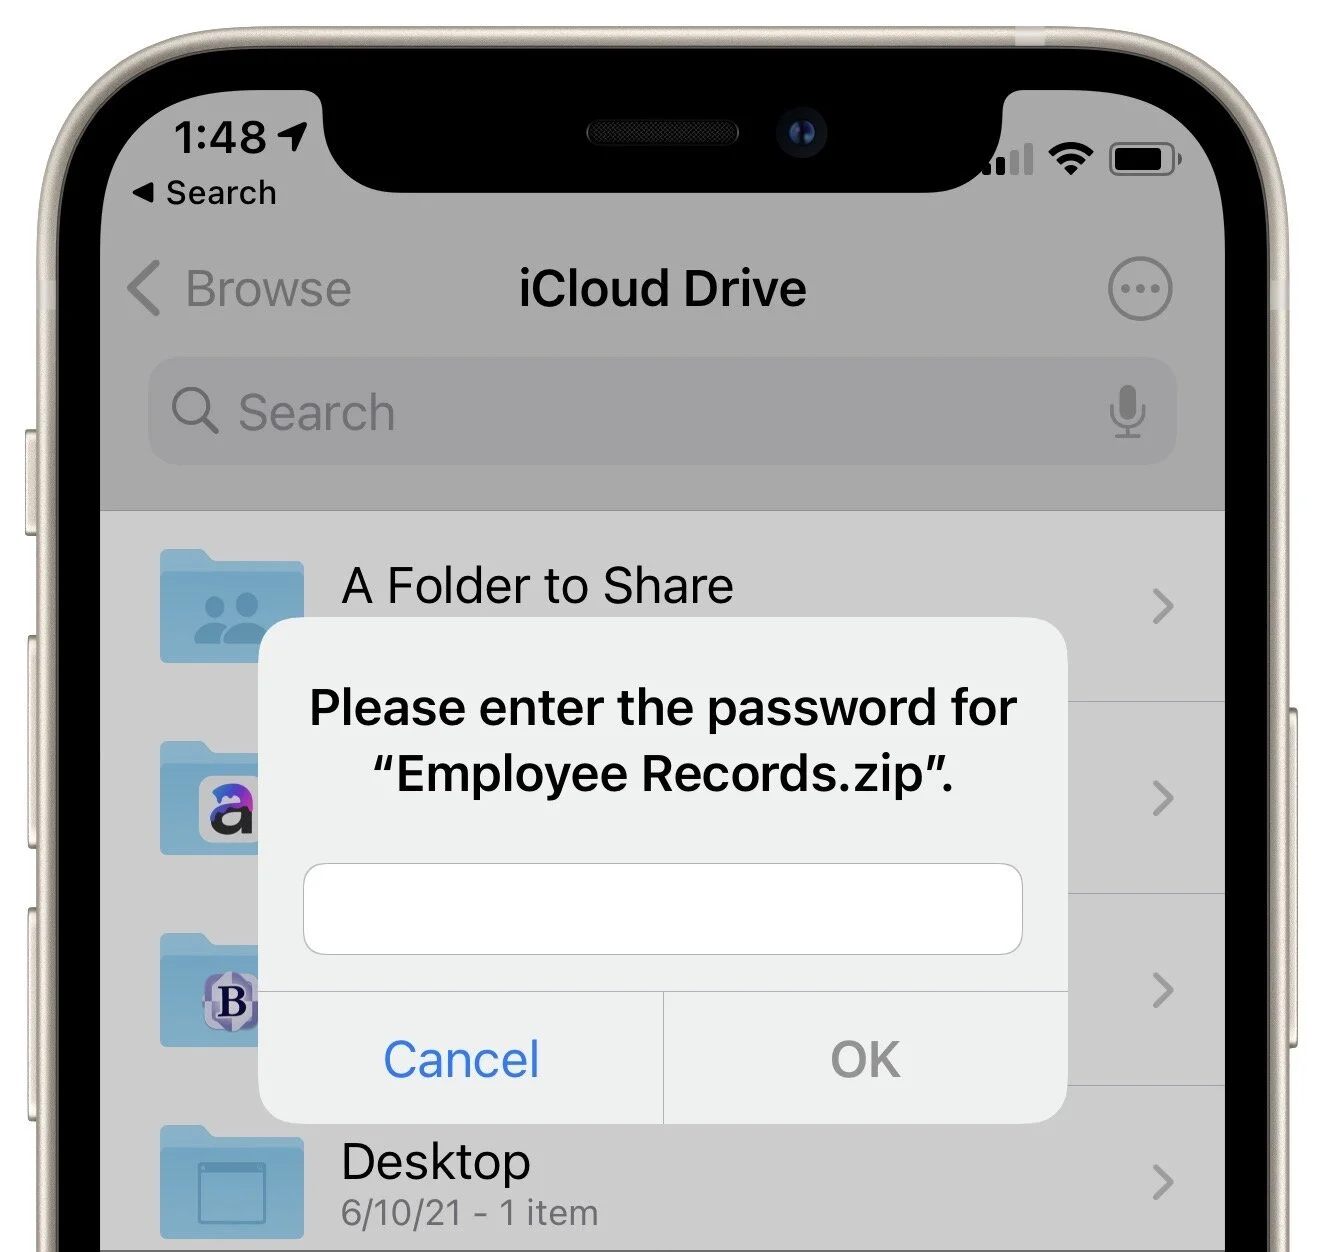
What about iOS or iPadOS? Never fear, since the Files app can also decrypt ZIP archives; just tap the archive to open it and enter the password when prompted.
A Word about Passwords
It’s important to think briefly about how you’re going to communicate the password to your recipient. Don’t send it in email or else anyone who compromises either your email account or your recipient’s account could decrypt the ZIP archive.
Instead, use what’s called an “out of band” communication channel. In other words, if you’re going to send the ZIP archive via email, communicate the password in a phone call or text message. That would keep the password safe if either of your email accounts were compromised.
If you’re sending password-protected ZIP archives to a particular person regularly (and the files don’t contain state or corporate secrets), you could agree on a system for generating passwords so you don’t have to communicate each one individually. For instance, you could combine a random word and the current month, so the password would be “cheddar9September” one month and “cheddar10October” the next.
As you can see, you can use this technique with so little extra effort that it’s worth ensuring a higher level of security whenever you need to share confidential information.
(Featured image by iStock.com/brijith vijayan)
Frequently Asked Questions Surrounding Apple’s Expanded Protections for Children
Apple’s recently announced expanded protections for child safety have generated a firestorm of criticism and confusion. We attempt to answer some of the most common questions we’ve received.

Apple’s recent announcement that it would soon be releasing two new technologies aimed at protecting children has generated a firestorm of media coverage and questions from customers. Unfortunately, much of the media coverage has been based on misconceptions about how the technology works, abetted by uncharacteristically bungled communications from Apple. It’s not inconceivable that Apple will modify or even drop these technologies in the official release of iOS 15, iPadOS 15, and macOS 12 Monterey, but in the meantime, we can provide answers to the common questions we’ve been hearing.
What exactly did Apple announce?
Two unrelated technologies:
Messages will gain features that warn children and their parents when sexually explicit photos are received or sent. Such content will be blurred, the child will be warned and given the option to avoid viewing the image, and parents may be alerted (depending on the age of the child and settings).
Photos uploaded by US users to iCloud Photos will be matched—using a complex, privacy-protecting method that Apple has developed—against known illegal photos considered Child Sexual Abuse Material, or CSAM. If a sufficient number of images match, they’re verified by a human reviewer at Apple to be CSAM and then reported to the National Center for Missing and Exploited Children (NCMEC), which works with law enforcement in the US.
Does this mean Apple is scanning all my iPhone photos?
Yes and no. Messages will use machine learning to identify sexually explicit content in received and sent images. That scanning takes place entirely on the iPhone—Apple knows nothing about it, and no data is ever transmitted to or from Apple as a result. It’s much like the kind of scanning that Photos does to identify images that contain cats so you can find them with a search. So scanning is taking place with this Messages feature, but Apple isn’t doing it.
The CSAM detection feature operates only on images uploaded to iCloud Photos. (People who don’t use iCloud Photos aren’t affected by the system at all.) On the device, an algorithm called NeuralHash creates a hash and matches it against an on-device database of hashes for known illegal CSAM. (A hash is a one-way numeric representation that identifies an image—it’s much like how a person’s fingerprint identifies them but can’t be used to re-create that person.) NeuralHash knows nothing about the content of any image—it’s just trying to match one hash against another. In this case, it’s matching against existing image hashes, not scanning for a type of content, and Apple is notified only after enough image hashes match.
It’s also important to note that this is different from how companies like Facebook, Google, and Microsoft scan your photos now. They use machine learning to scan all uploaded photos for CSAM, and if they detect it, they’re legally required to report it to the NCMEC’s CyberTipline, which received 21.7 million CSAM reports from tech companies in 2020, over 20 million from Facebook alone. Because Apple does not scan iCloud Photos in the US like other companies scan their photo services, it made only 265 reports in 2020.
What happens if the CSAM detection feature makes a mistake?
This is called a false positive, and while vanishingly improbable, it’s not mathematically impossible. Apple tested 100,000,000 images against NeuralHash and its CSAM hash database and found 3 false positives. In another test using 500,000 adult pornography images, NeuralHash found no false positives.
Even if NeuralHash does match an image hash with one in the known CSAM hash database, nothing happens. And nothing continues to happen until NeuralHash has matched 30 images. Apple says that the chances of there being 30 false positives for the same account are 1 in 1 trillion.
I have terrible luck. What if that happens with my account?
Once at least 30 images have matched, the system enables Apple to decrypt the low-resolution previews of those images so a human can review them to see if they are CSAM. Assuming they are all false positives—remember that possession of CSAM is illegal in the US—the reviewer sends them to Apple engineers to improve the NeuralHash algorithm.
Could non-CSAM images end up in Apple’s CSAM hash database?
It’s extremely unlikely. Apple is constructing its database with NCMEC and other child-safety organizations in other countries. Apple’s database contains image hashes (not the actual images; it’s illegal for Apple to possess them) for known illegal CSAM images that exist both in the NCMEC database and at least one other similar database. So multiple international organizations would have to be subverted for such image hashes to end up in Apple’s database. Each source database will have its own hash, and Apple said it would provide ways for users and independent auditors to verify that Apple’s database wasn’t tampered with after creation.
Plus, even if a non-CSAM image hash were somehow added to Apple’s database and matched by NeuralHash, nothing would happen until there were 30 such images from the same account. And if those images weren’t CSAM, Apple’s human reviewers would do nothing other than pass the images to engineering for evaluation, which would likely enable Apple to determine how the database was tampered with.
Couldn’t a government require Apple to modify the system to spy on users?
This is where much of the criticism of Apple’s CSAM detection system originates, even though Apple says the system will be active only in the US. On the one hand, Apple has said it would resist any such requests from governments, as it did when the FBI asked Apple to create a version of iOS that would enable it to break into the San Bernardino shooter’s iPhone. On the other hand, Apple has to obey local laws wherever it does business. In China, that already means that iCloud is run by a Chinese company that presumably has the right to scan iCloud Photos uploaded by Chinese users.
It’s conceivable that some country could legally require Apple to add non-CSAM im-ages to a database, instruct its human reviewers to look for images the country finds objectionable, and report them to law enforcement in that country. But if a country could successfully require that of Apple, it could presumably force Apple to do much more, which hasn’t happened so far. Plus, the CSAM detection system identifies only known images—it’s not useful for identifying unknown images.
Is Apple heading down a slippery slope?
There’s no way to know. Apple believes this CSAM detection system protects the privacy of its users more than scanning iCloud Photos in the cloud would, as other companies do. But it’s highly unusual for a technology that runs on consumer-level devices to have the capacity to detect criminal activity.
(Featured image by iStock.com/metamorworks)
Ransomware Is on the Rise: Learn How to Protect Your Macs
The scourge of ransomware isn’t yet common on the Mac, but it makes sense to prepare for the possibility—before your organization is hit with a ransom demand. Read on for our advice on how to protect your systems:

In cybercriminal circles, ransomware is all the rage. Once it has infected a computer, it encrypts all the files and then presents a ransom demand—pay up to get the decryption software necessary to recover the data.
Ransomware has been in the news all year, with the Colonial Pipeline attack in particular spending weeks in the headlines. Attacks rose 485% in 2020 and show no signs of abating. The amounts demanded by the attackers are increasing, too, with PC manufacturer Acer and Apple supplier Quanta both hit with $50 million demands. Worse, some ransomware attackers are adding an extortion component where they threaten to reveal confidential data if the victim doesn’t pay. It’s scary, we know.
First, the good news. Although there are several examples of ransomware that target the Mac, none of them have been particularly well done or (as far as we know) successful. Right now, the chances of Macs falling prey to ransomware are very low, and there’s no reason to panic.
However, complacency is dangerous. There’s a trend toward “ransomware as a service” (RaaS). The RaaS operators maintain the ransomware malware, offer a payment portal for victims, and provide “customer service” for victims who don’t know how to pay with Bitcoin or other cryptocurrencies. Affiliates spread the ransomware and split the revenues with the operators. It’s a tidy little cybercriminal enterprise, and separating the malware development and network penetration tasks has made it significantly easier for more criminals to leverage ransomware. It’s only a matter of time before they turn their attention to Macs.
For the most part, protecting your Macs from ransomware is no different than protecting against any number of other security problems. Follow this core advice:
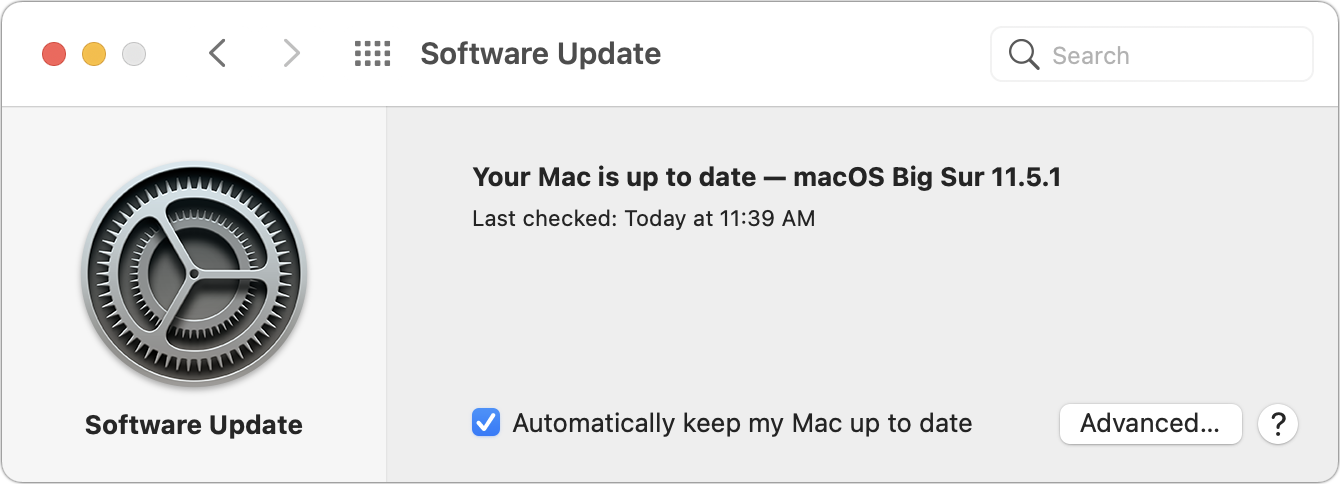
Keep Macs and apps up to date: Always install macOS and security updates, and keep other apps up to date. With every update, Apple addresses numerous security vulnerabilities, fixing the vast majority of them before attackers can exploit them with malware. Every so often, however, Apple’s security notes include this sentence: “Apple is aware of a report that this issue may have been actively exploited.” That means there may be malware that targets that vulner-ability; install such updates immediately!
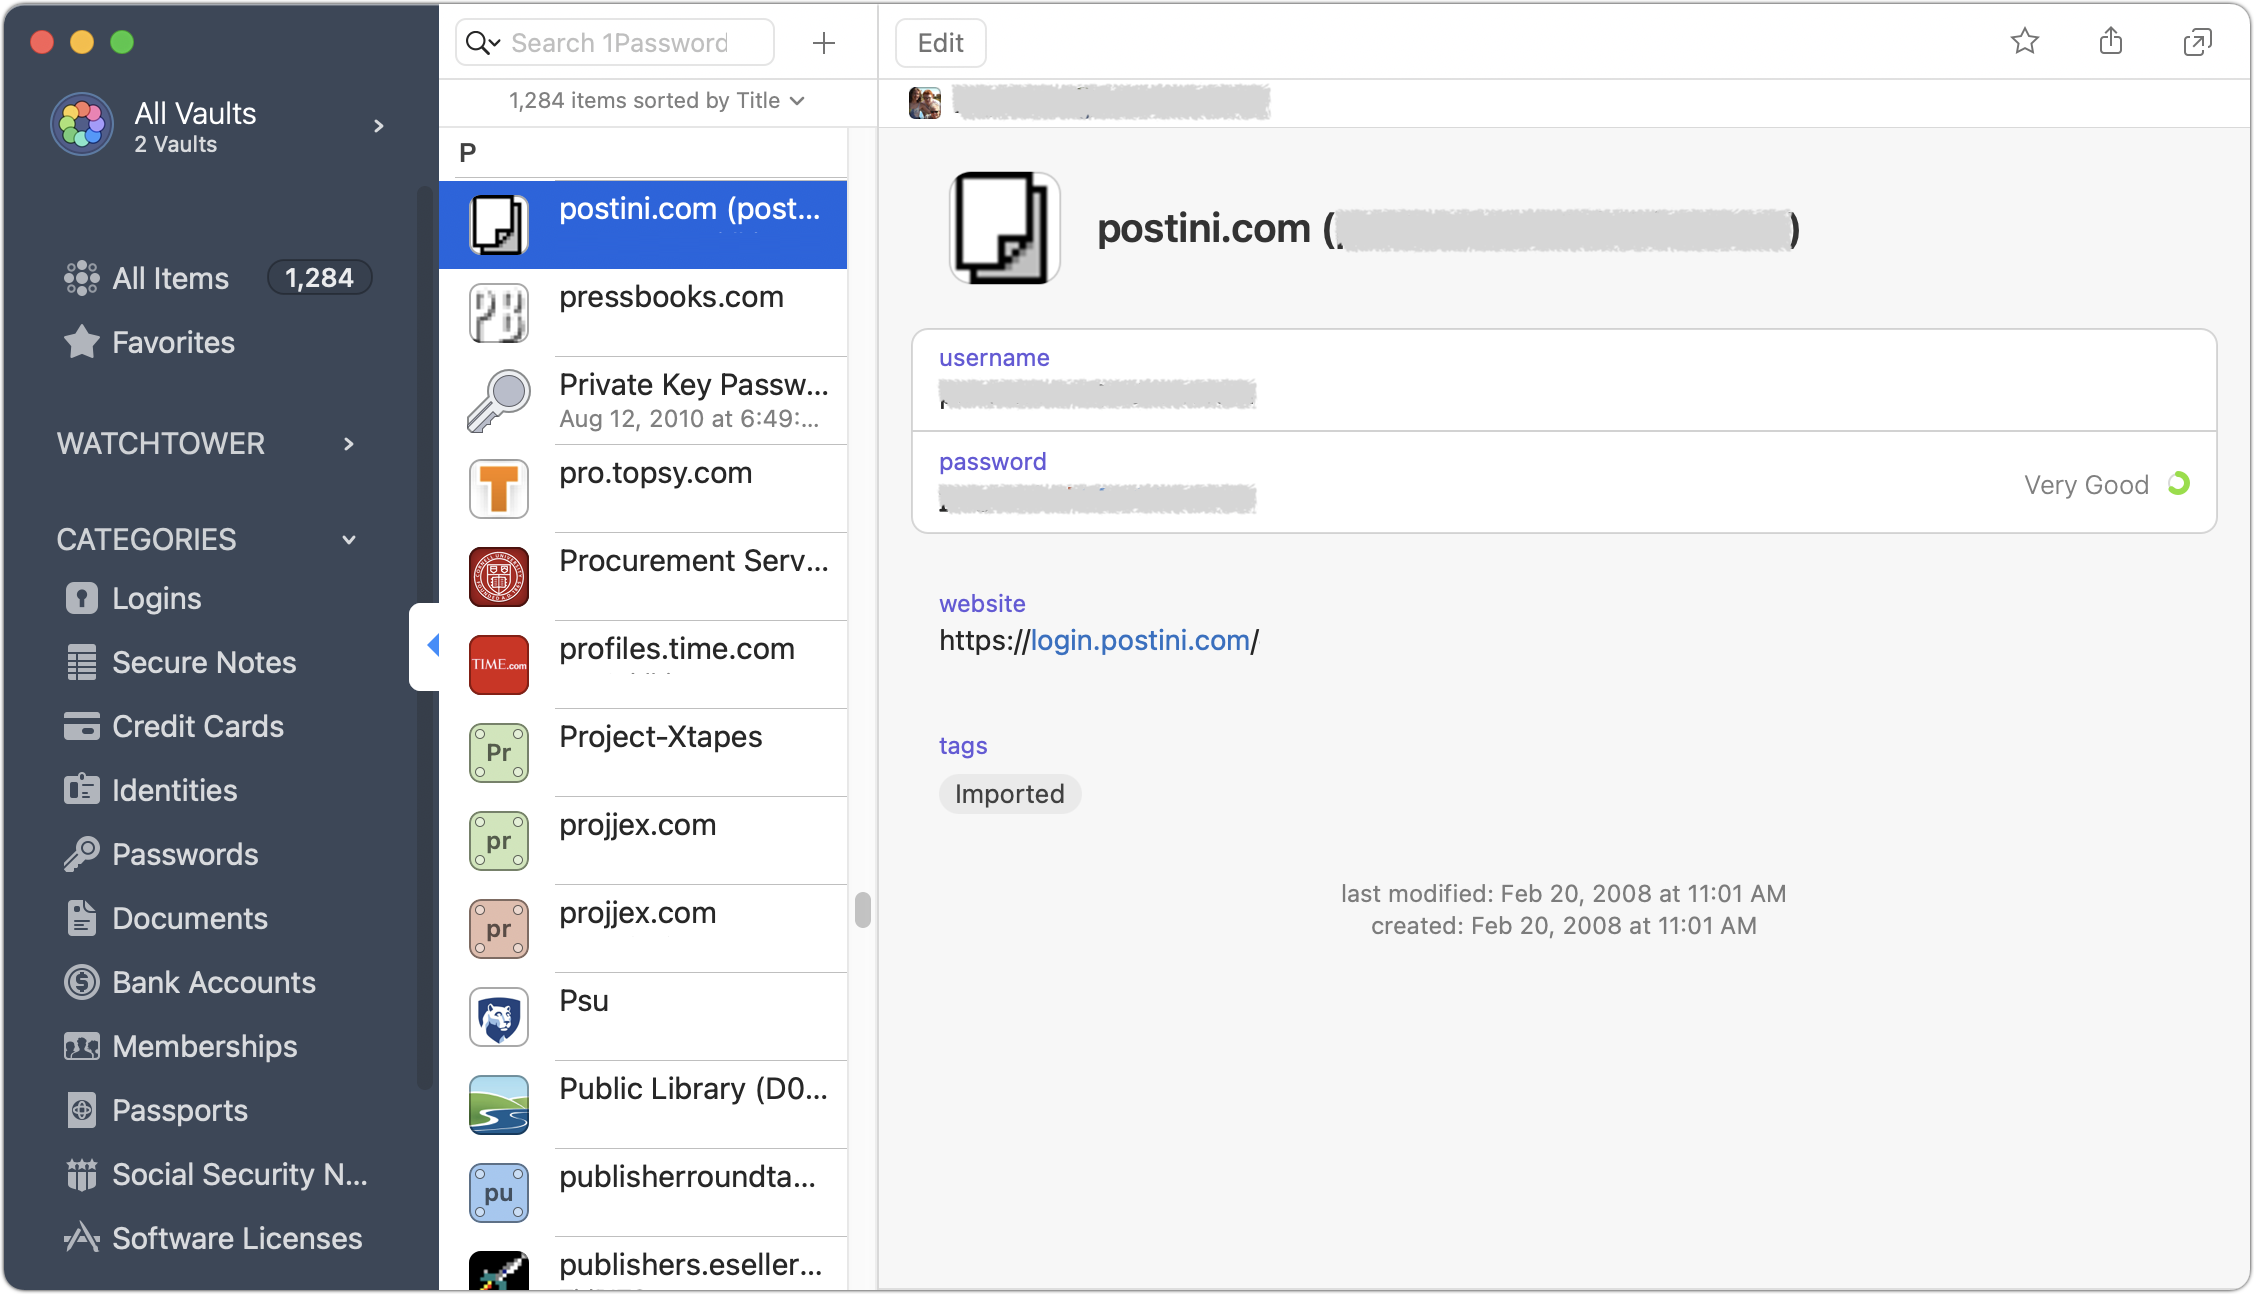
Use strong passwords with a password manager: You’ve heard it from us before, and you’ll hear it again, but it’s essential that everyone in your organization use strong, unique passwords through a password manager like 1Password, LastPass, or even Apple’s iCloud Keychain. Just one weak password could allow attackers to infiltrate a computer or server and install ransomware.
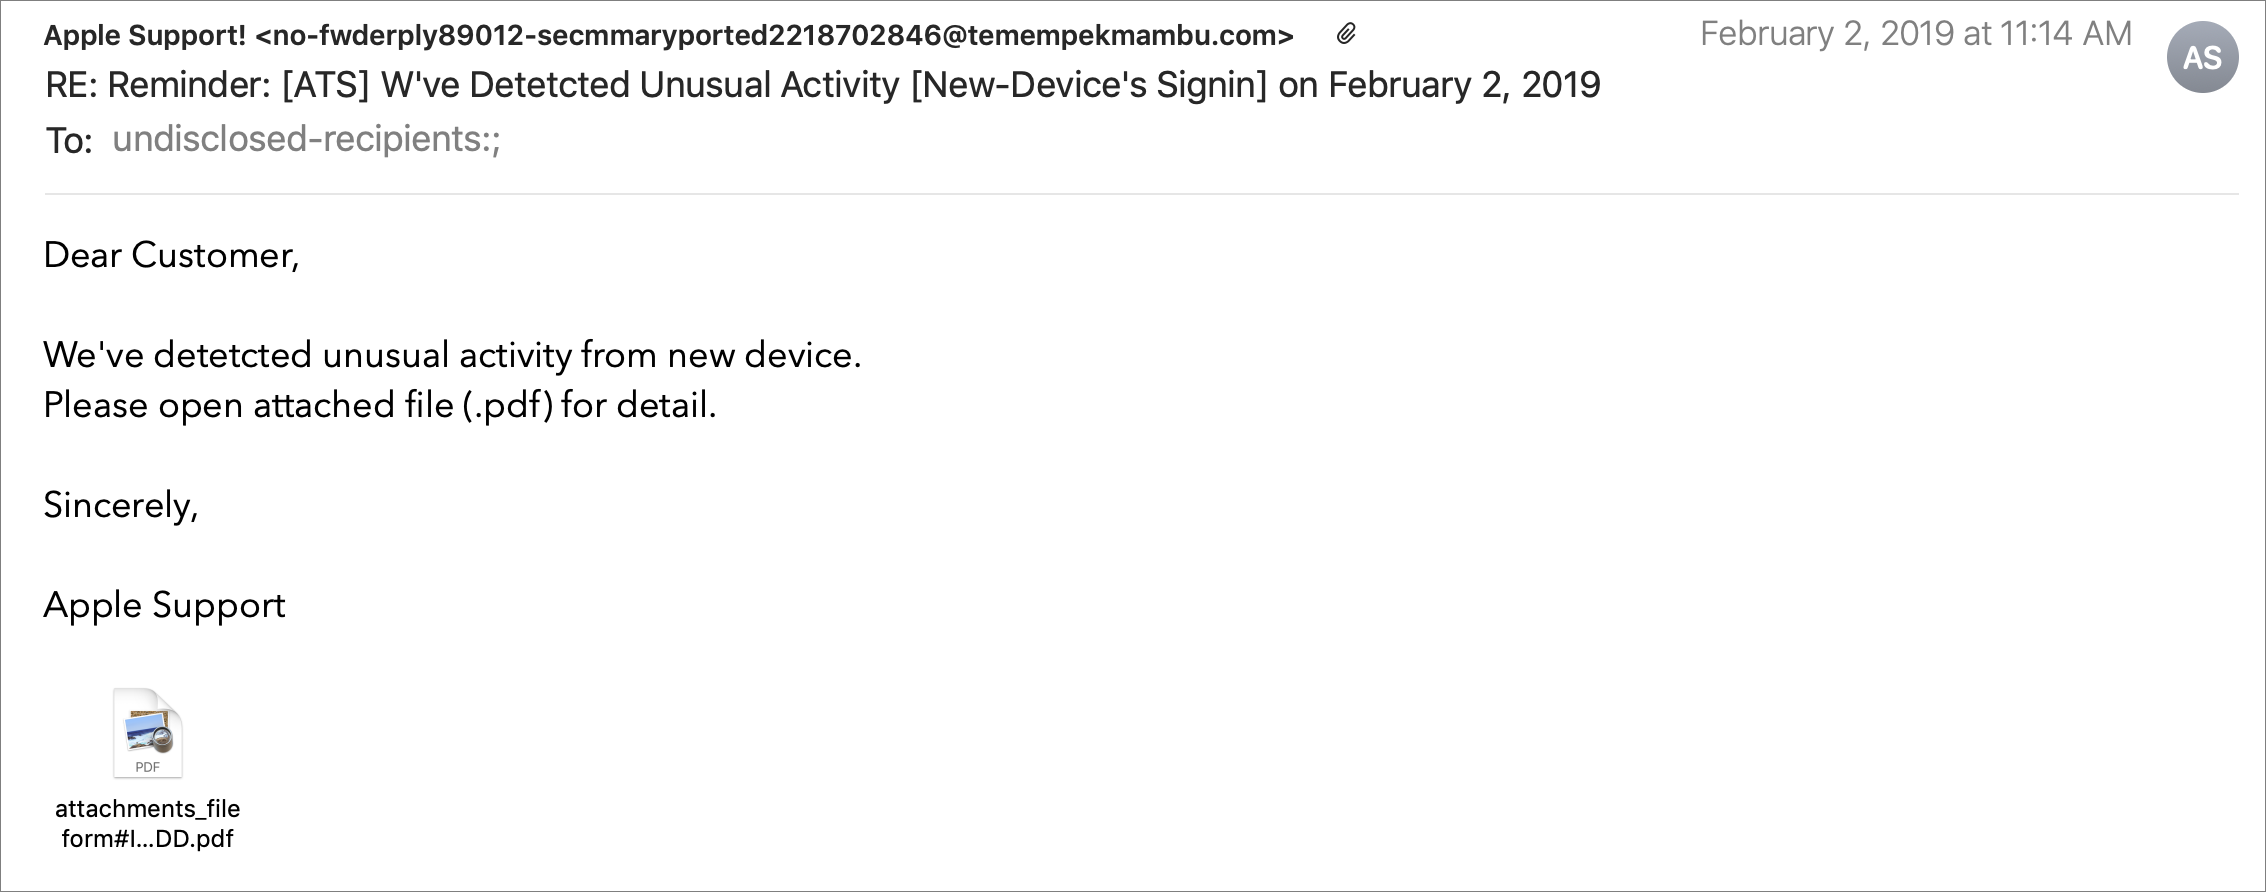
Be suspicious of links and attachments: Ensure that everyone in your organization is careful about opening attachments or clicking links in email messages from unknown people or that seem off in some way. Phishing attacks are one of the primary ways of distributing malware. (If your group needs training in phishing awareness, contact us.)
Never download pirated software! Even aside from the fact that it’s ethically problematic, the most recent piece of Mac ransomware—ThiefQuest—was initially found in a malicious installer purporting to be for the LittleSnitch network security utility (ironic, eh?). Get apps only from the developers’ official sites or the Mac App Store.
Make frequent backups: Backups are essential so, even if you do fall prey to ransomware, you can restore data from before the infection point. The caveat is that some of your backups must be isolated from the Macs in question—some ransomware intentionally tries to encrypt or delete connected backups.
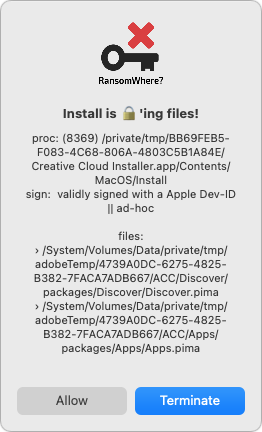
Monitor for ransomware: Although ransomware usually tries to stay below the radar while it’s encrypting files, the free RansomWhere utility can identify processes that quickly create encrypted files. It will likely incorrectly flag some legitimate behavior too (like in the screenshot below), but it’s still a helpful tool.
Have anti-malware software: For the most part, if you’re careful about following the advice above, you’ll be fine. But it’s a good idea to have a current anti-malware app around and run it occasionally—if you don’t already have one, try the free version of Malwarebytes. If you—or your users—aren’t good about the basic precautions, you might want to run anti-malware software all the time or set up broader network protections.
Have a disaster management plan: Every business should think about how it would react to a fire, flood, earthquake, or other disaster. When building a disaster management plan, be sure to include ransomware. How would you shut down infected systems, rebuild them from scratch, and restore uninfected files?
Setting up a backup strategy that protects against ransomware requires a little more thought. As noted, ransomware often tries to render backups useless in one way or another. You need to have versioned backups that allow you to restore from before the ransomware infection, and those backups need to be isolated from the computers and network being backed up. Techniques that help include:
Isolate backup drives: Rotate multiple Time Machine drives, with at least one that’s always disconnected. However, this strategy assumes you’ll detect a ransomware infection before you’ve rotated all the drives. Ransomware could lie undetected for weeks or months before activating. Manually run current anti-malware software before connecting any backup drive.
Use Internet backup: Set up an Internet backup system that will maintain versions of backed-up files, such as Backblaze with its Extended Version History feature. Retrospect 18 also supports object locking on cloud storage systems, which provides immutable storage. It ensures that no one—even someone who acquires root credentials—can delete the backups during the retention period.
Consider tape backups: Long ago, tape backups were the go-to solution for network backups, but as the price-per-gigabyte of hard drives dropped precipitously and Internet backups became feasible, tape has largely fallen by the wayside. But tape backups are still an option. They can hold a lot of data and are easily kept offline in a separate location. Plus, some tape drives can even operate in a write-once, read-many (WORM) mode that guarantees data can’t be erased or overwritten. Tape requires more human interaction than other backup methods, but it’s still a cost-effective way to protect hundreds of terabytes of data against ransomware.
Again, there’s no reason to panic about ransomware, but if it could significantly damage your business, you should take steps to reduce the chance of getting hit and ensure that you could restore your data if your computers were to get infected. There is no single approach that’s ideal for everyone, but we can help you think about what’s involved and develop a strategy that balances protection, cost, and effort.
(Featured image by iStock.com/chainatp)
Share Files, Photos, and other Data between Apple Devices with AirDrop
Apple’s AirDrop lets you easily share photos and files with nearby Apple users and devices. Our article explains how to use this helpful feature with the Mac, iPhone, and iPad.

It’s common to want to share files, photos, and other data between your devices—or with friends and family. When the desired person or device isn’t nearby, it’s easiest to use Messages or Mail. But what if you want to move a file between two of your Macs, from your iPhone to your Mac, or to your friend who’s across the table? For transfers within immediate proximity, Apple provides AirDrop, a quick and easy way to move data between devices.
Make Sure AirDrop Is Ready to Go
First off, AirDrop requires both Wi-Fi and Bluetooth, so make sure both are enabled. If you use wired Ethernet on your Mac, enable Wi-Fi as well, but put the Wi-Fi service beneath the Ethernet service in System Preferences > Network (click the down-pointing arrow under the list and choose Set Service Order).
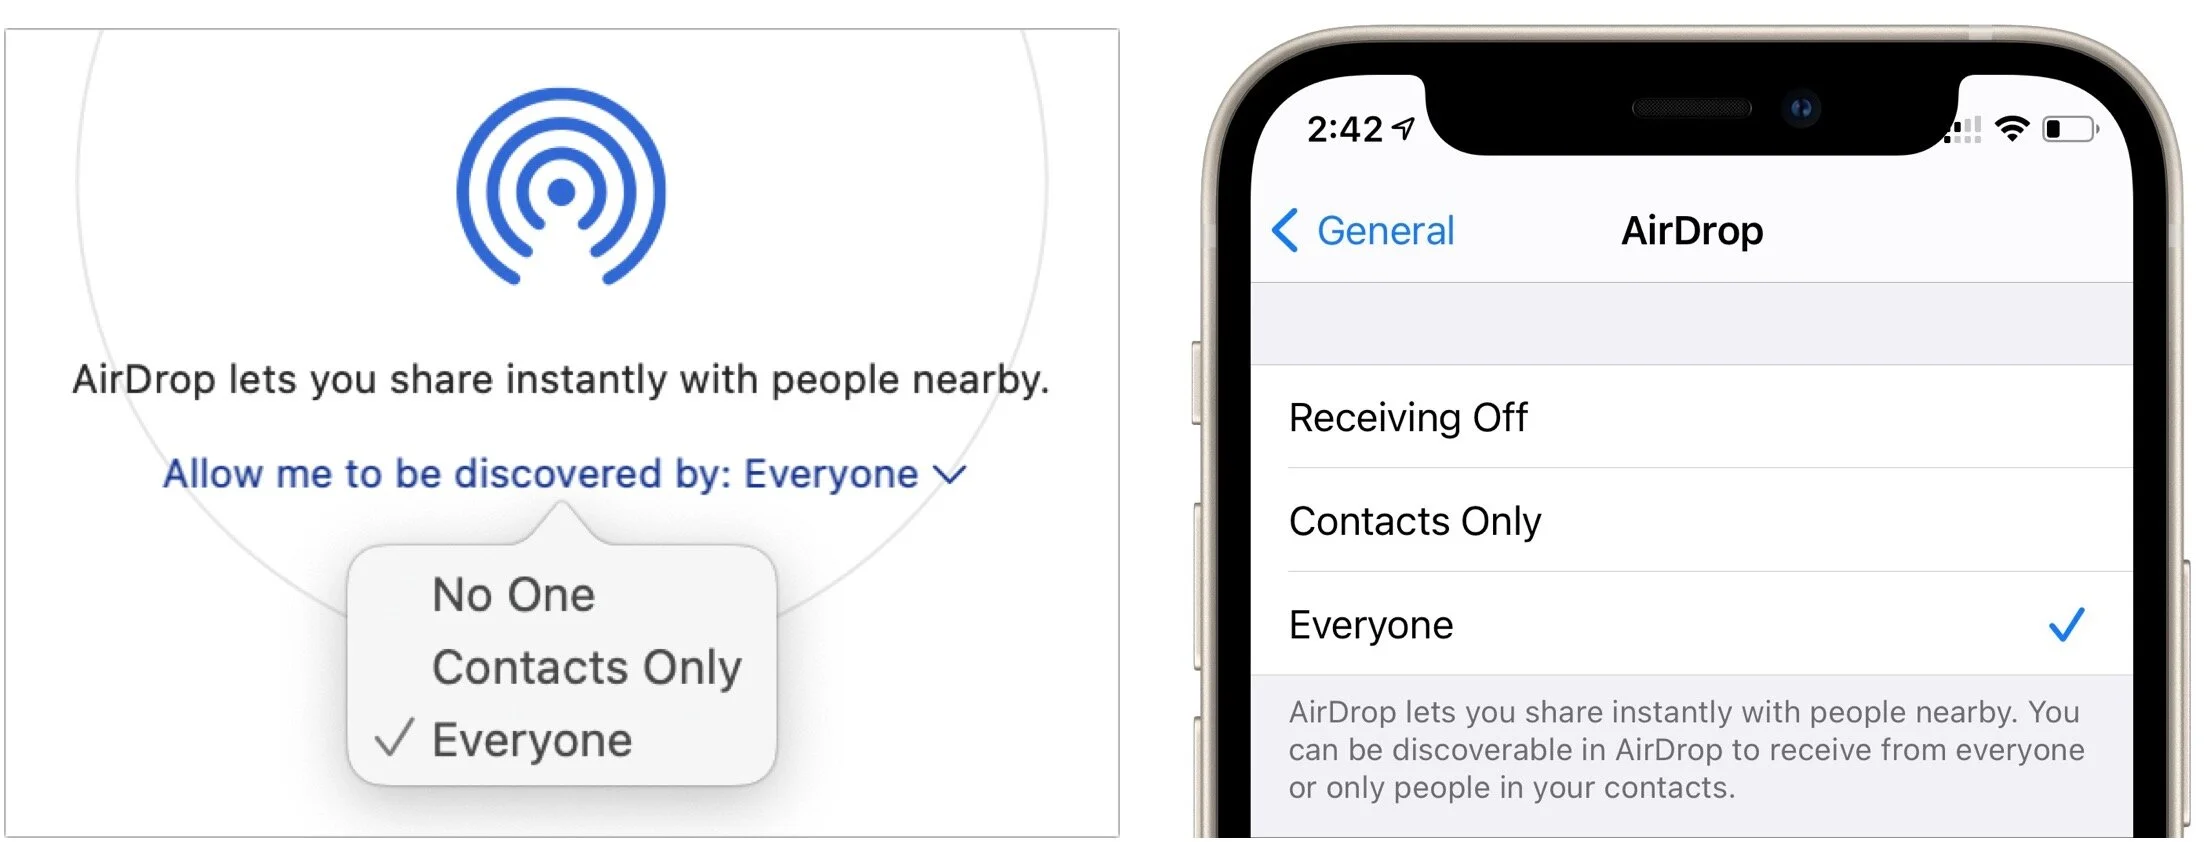
Next, make sure other devices can discover you. On the Mac, choose Go > AirDrop and, near the bottom of the Finder window that appears, choose Everyone from the pop-up menu. (If you’re out in public and random people keep trying to send you files, which would be weird, choose Contacts Only instead.) On an iPhone or iPad, go to Settings > General > AirDrop and select Everyone.
Send a File or Photo via AirDrop
Apple has integrated AirDrop into the standard sharing mechanism in macOS, iOS, and iPadOS, so sharing via AirDrop works the same as sharing via most other apps.
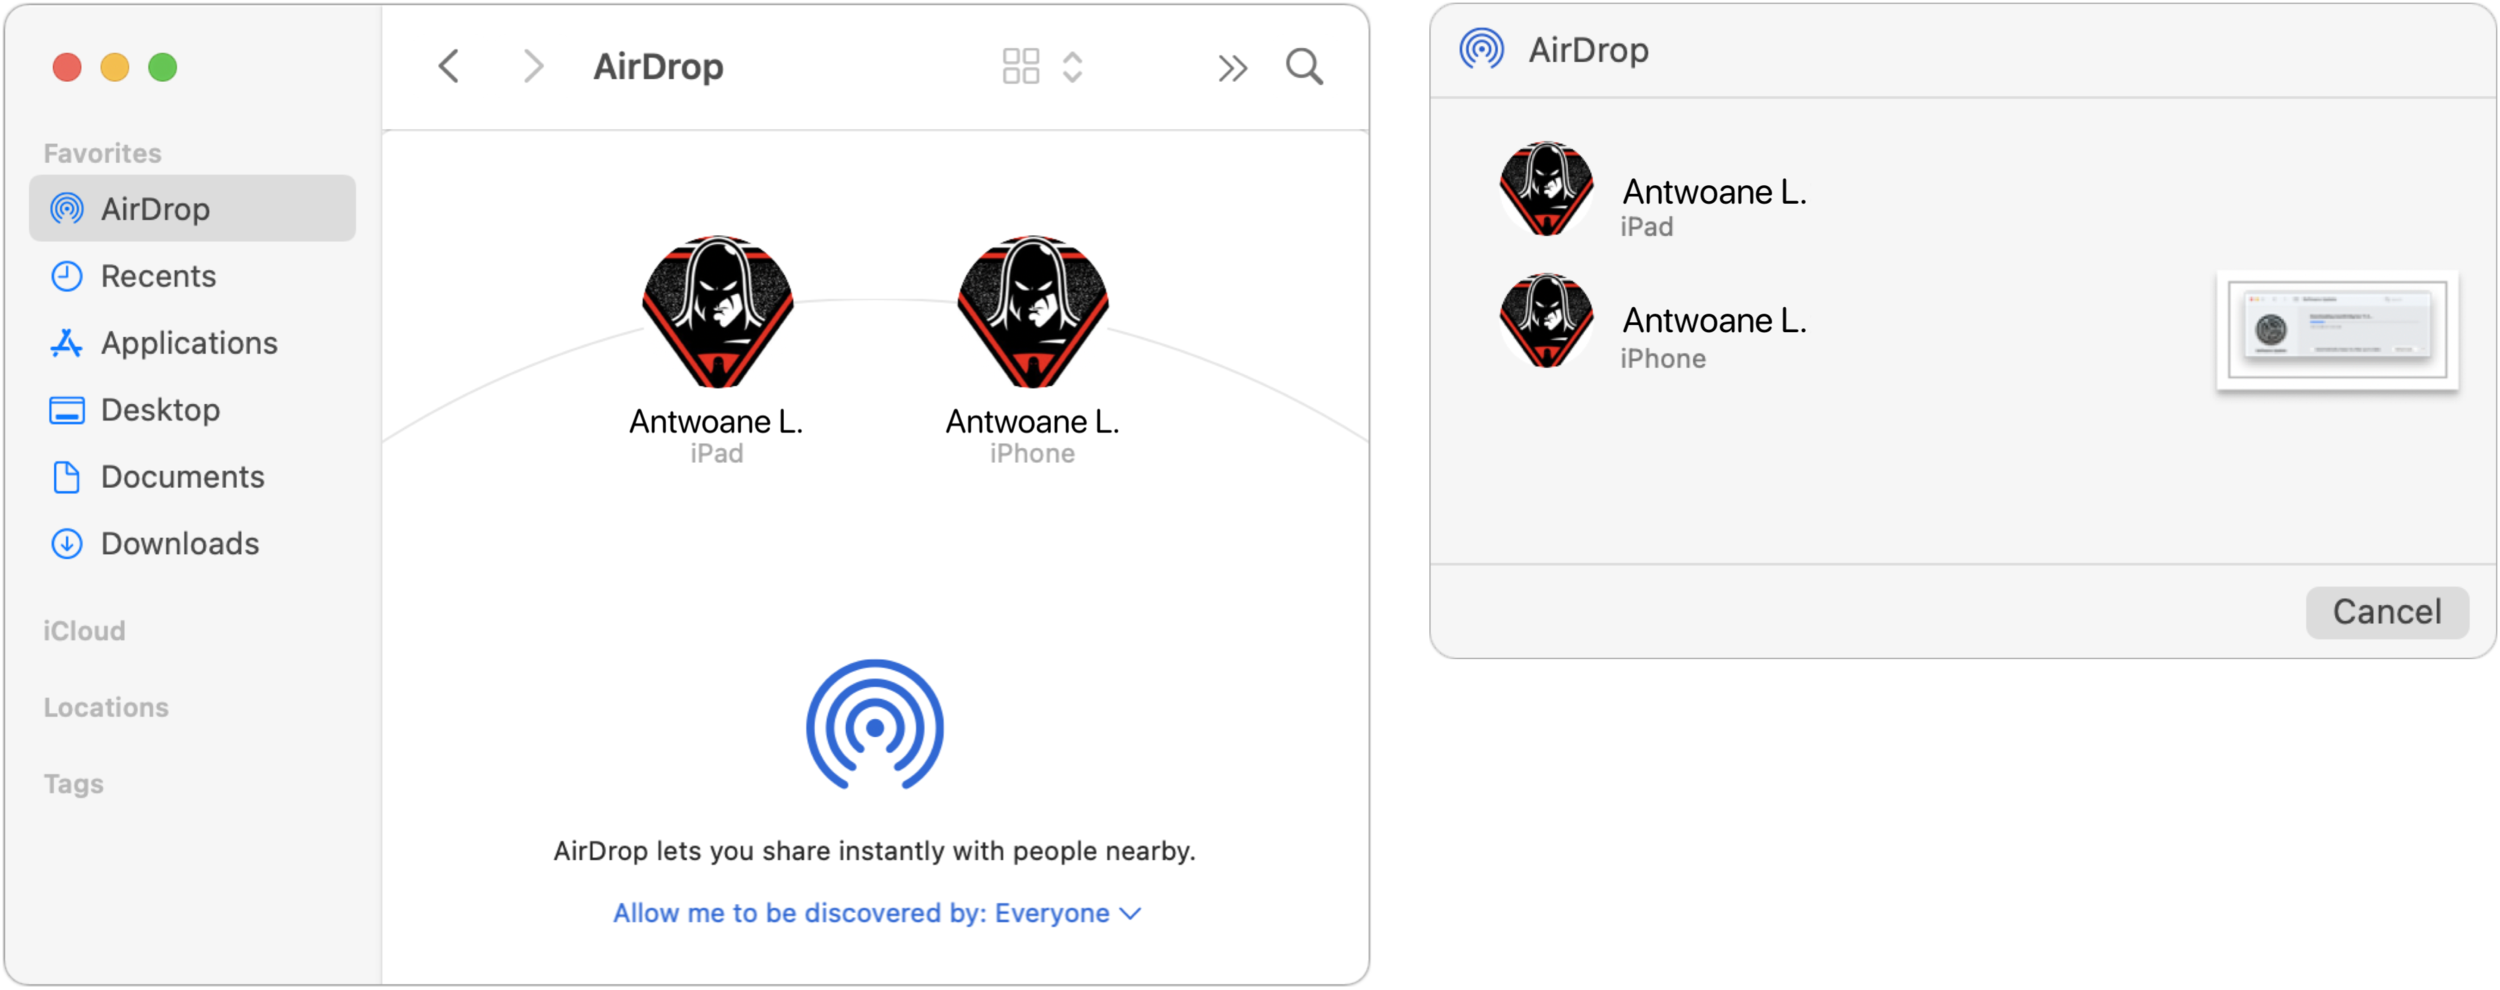
In the Finder on the Mac, the easiest approach may be to select AirDrop in a Finder window’s sidebar and then drag files to the icon representing the destination device (below left). You can also select one or more files and choose File > Share > AirDrop or Control-click them and choose Share > AirDrop, both of which present a dialog from which you can select the destination (below right). The right-hand dialog is also what you’ll see if you use the Share option in Photos or any other app.
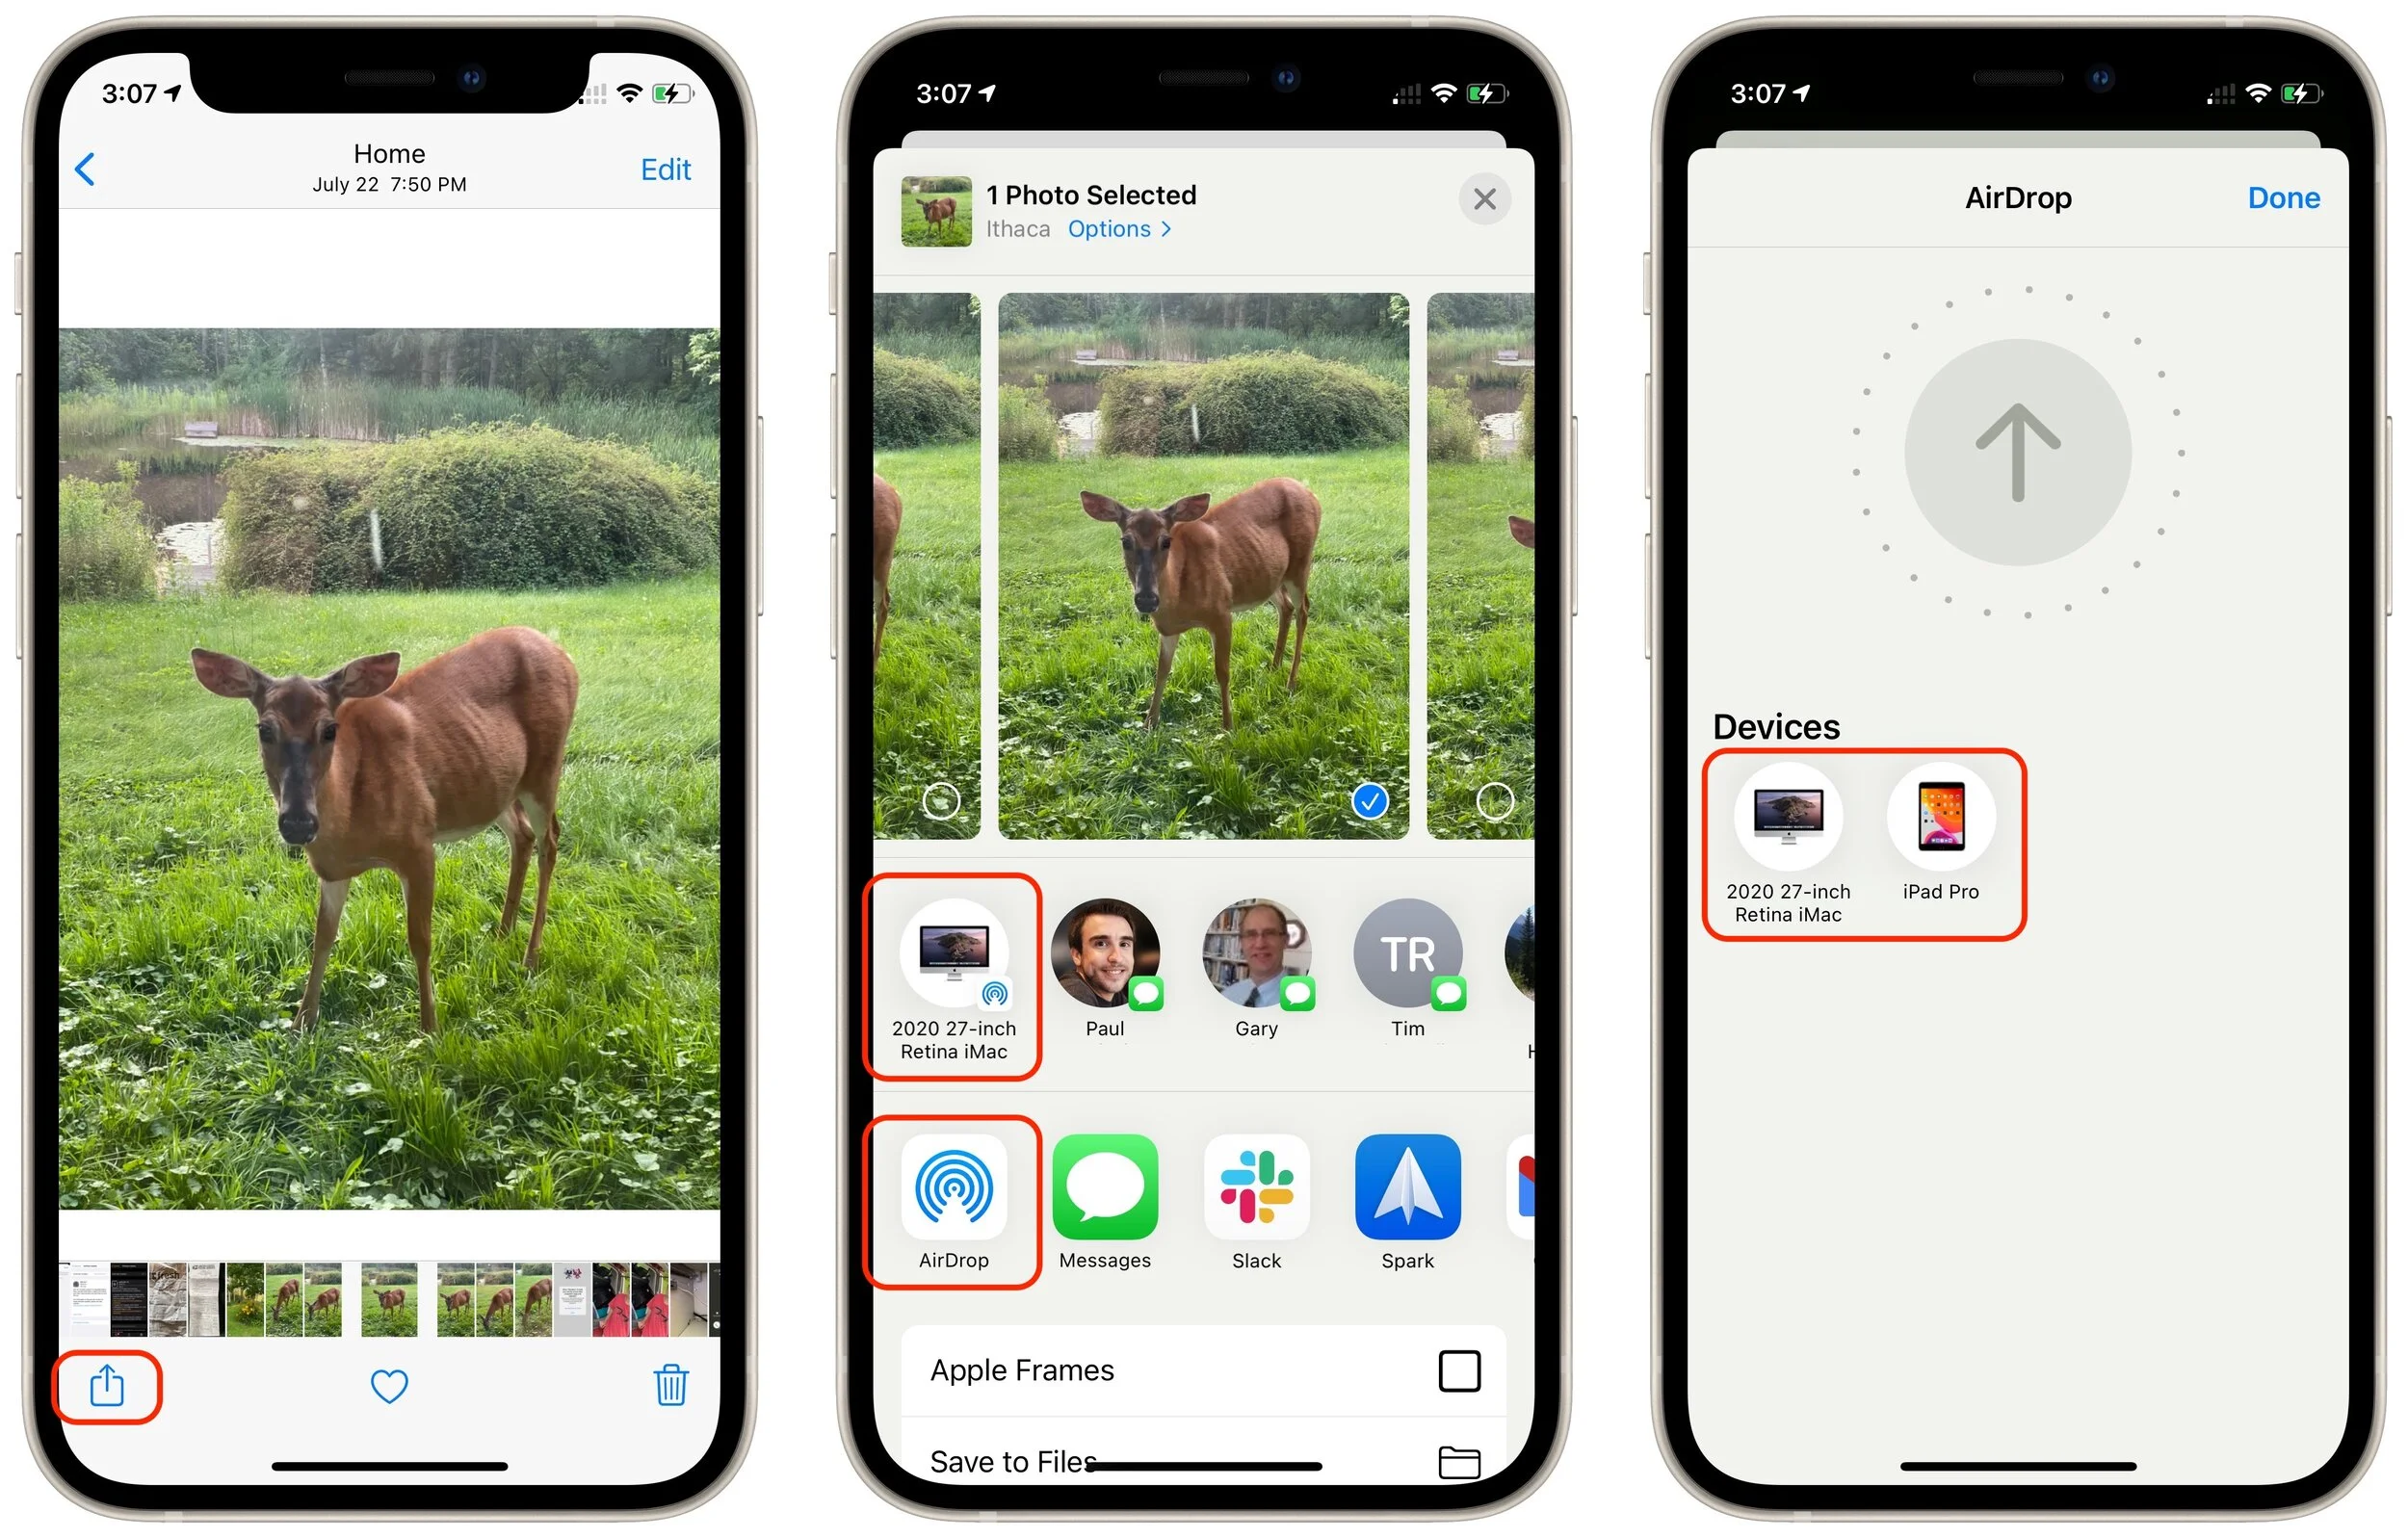
On an iPhone or iPad, when you’re viewing the item you want to share, tap the Share button to bring up the Share sheet. You may be able to tap the AirDrop icon for the desired destination directly in the top row, but if it doesn’t show what you want, tap the general AirDrop icon in the second row to display the AirDrop screen with icons for all available destinations. Either way, tap the destination to send the file.
Receive Data via AirDrop
On the receiving side, AirDrop is utterly simple, particularly when transferring files between your devices, though the experience varies a little depending on the direction and file type.
Receiving on a Mac: If you’re transferring between your own devices, you don’t need to do anything; the file will appear in the Downloads folder of the destination Mac. Files sent from other people will appear there too, but you’ll get a prompt asking you to accept or decline the file, and if you accept, an option to open it in the appropriate app.

Receiving on an iPhone/iPad: Receiving on an iPhone or iPad is similar, with one additional step. Unless iOS/iPadOS knows where the file should go (images always import into Photos automatically, for instance), it prompts you with a list of apps that can open the file. Files you transfer between your own devices are accepted automatically; for files from other people, you must tap the Accept button first.

Troubleshooting
AirDrop has been around since Mac OS X 10.7 Lion in 2011 and has seen significant updates since then. So if you had trouble getting AirDrop to work years ago, it’s worth revisiting the feature. That said, problems can still crop up:
If a Mac doesn’t appear as an AirDrop destination, make sure it has Wi-Fi active. Ethernet is not sufficient. Also, if the Mac’s firewall is active, check that it allows incoming connections. Open System Preferences > Security & Privacy > Firewall > Firewall Options and deselect “Block all incoming connections.”
If an iPhone doesn’t appear as an AirDrop destination, make sure Personal Hotspot is turned off in Settings > Personal Hotspot.
Because AirDrop relies on Bluetooth and Wi-Fi, interference with either, or a separation between devices of more than 30 feet (9 meters), can cause performance and reliability to suffer.
For best results, make sure you’re using recent Apple hardware running the latest versions of macOS, iOS, and iPadOS. Apple has improved AirDrop over the years, and it works significantly better than it did years ago. Technically, AirDrop requires a Mac introduced in 2012 (excluding the 2012 Mac Pro) or later running OS X 10.10 Yosemite or later. On the mobile device side, the iPhone, iPad, or iPod touch must be running at least iOS 7.
If you’re prompted to accept transfers between your own devices, that’s an indication that the devices aren’t logged in to the same iCloud account.
Although AirDrop has no explicit size limit, very large files (over 500 MB) will take a long time to transfer and are more likely to fail due to network issues during the transfer.
If you can’t find a transferred file in the destination Mac’s Downloads folder, remember that it retains its original creation and modification dates, so it might be sorting differently than you expect.
Next time you need to move data between nearby Apple devices, give AirDrop a try!
(Featured image by iStock.com/jroballo)
How to Take the Annoyance Out of Your Key Passwords and Passcodes
Password managers are essential, but you must still remember and enter some passcodes and passwords. Read on for our advice on how to create ones that are secure, memorable, and easy to type.

We constantly say, “Use a password manager!” for good reason. Password managers make it easy to generate, store, and enter strong passwords. You don’t have to decide whether or not your password is strong or weak, remember it, and type it accurately every time you log in to a website. Seriously, just get 1Password or LastPass, or you could use Apple’s iCloud Keychain.
But what about those passwords you have to enter regularly, like your Mac’s login password, your Apple ID password, and the master password for your password manager? And the passcodes for your iPhone, iPad, and Apple Watch? Plus, it may also be helpful to be able to remember and type passwords for a few services that require you to enter the password into an app instead of a Web browser. (Of course, you can copy and paste the password from your password manager, but that’s fussy if you have to do it frequently.)
For such passcodes and passwords, you’ll want to come up with options that are strong, memorable, and easily entered. Here’s what we recommend for most people. (If you’re a target of a nation-state or regularly deal in highly confidential government or corporate information, you’ll need an even higher level of security.)
Passcodes
It’s essential that your iPhone, iPad, and Apple Watch have a passcode that can’t easily be guessed. Once someone can get into an iPhone or iPad, they could read all your email, look at all your photos, make purchases via Apple Pay, and impersonate you in conversations with others. And yet, many people use worthless passcodes like 111111 or 123456. Don’t do that! Also, don’t worry about making a passcode that’s easy to type—with Touch ID, Face ID, and Apple Watch unlocking, you don’t have to type your passcode all that frequently.
Since we’re talking about physical objects that can’t be accessed remotely and are most likely to be compromised by someone who knows you personally, the key is to think about what six digits you can remember but that even people who know you well couldn’t guess.
For instance, you might think of using 081995 if you were born in August 1995, but your birthdate is both widely known and easily discovered. A better pattern would be the dates of the month associated with the birthdays of your best friend from high school, your favorite cousin, and your late grandmother—132408 if they were born on May 13th, July 24th, and November 8th. No one will ever guess that.
You get the idea. Think of dates associated with people or events important to you but that even close friends or family members wouldn’t necessarily know. Then combine those days, months, or years in a way that makes sense to you. You’ll end up with a strong passcode that you’ll never forget.
One last point. Given the level to which data syncs between your iPhone, iPad, and Apple Watch, we don’t see any significant benefit in creating different passcodes for each. Come up with a secure passcode and use it on all three.
Mac Login Passwords
Much like an iPhone’s passcode, the primary vulnerability for your Mac’s login password is someone who has physical access. You don’t have to worry about remote brute force attacks (as long as you don’t have remote access enabled in System Preferences > Sharing) or password files being stolen, suggesting that the password doesn’t need to be insanely strong and equivalently hard to type.
That’s especially true for an M1-based Mac or Intel-based Mac with a T2 security chip, and even more so if you have enabled FileVault. But if it’s an older Intel-based Mac without a T2 chip, it’s conceivable that a thief could image the drive and use brute force attacks to find the password. A stronger password might make sense for such an older Mac.
Considering all this, we recommend coming up with a password that’s easy to type, memorable, and difficult to guess for even those who know you well. It doesn’t have to be strong enough to protect against serious cracking software unless you live in a Spy-vs.-Spy world. Consider taking a few words from a song lyric or movie quote you’ll never forget and jamming them together, such as “ettubrute” or “goestoeleven.”
If you unlock your Mac and apps using an Apple Watch or Touch ID most of the time, you can make the login password a bit stronger without the annoyance of having to type it so frequently.
Apple ID and Password Manager Passwords
When it comes to your Apple ID password, the master password for your password manager, and other passwords to online services you need to type, attacks will take place either remotely or be directed against a stolen password file. Plus, your Apple ID password and master password to your password manager literally hold the keys to your kingdom, so they must be extremely strong and resistant to automated cracking. It’s also essential that you won’t forget them and that you be able to enter them—on both a Mac keyboard and an iPhone keyboard—reasonably easily. What to do?
One possible solution is to create a long passphrase of random but easily remembered words, as suggested in the classic xkcd cartoon. Current advice suggests that a passphrase of five words—with at least 32 characters—is now necessary to resist modern cracking methods.
Passphrases are highly secure, but they can be tedious to type and may not work well for an Apple ID password. Apple requires that Apple ID passwords have upper and lowercase letters and include at least one number. But don’t make it longer than 32 characters; some have reported problems with longer passwords.
For a compromise approach, consider a password built using the following rules:
It starts with an uppercase letter. That satisfies Apple’s requirement and means you don’t have to switch between upper and lowercase keyboards on an iPhone more than once.
That letter and subsequent lowercase letters come from the initials of unrelated people, movie titles, the first few letters of a saying or product name, or something similar that you’ll have no trouble remembering.
It includes several punctuation characters accessible from the iPhone’s numeric keyboard that don’t require the use of the Shift key on the Mac keyboard.
It ends with digits developed along the lines of the passcode above—this keeps you on the iPhone’s numeric keyboard. (You could also swap the order of the punctuation and digits.)
Overall, it has at least 13 characters, preferably more.
(As an aside, does having two-factor authentication (2FA) turned on for any account where you’re creating a memorable password let you make a weaker password? Yes, in the sense that your overall security is much higher with 2FA because someone would have to hack your password and compromise the 2FA system in some way. But no, if your password is so weak that it’s trivially crackable, such that 2FA becomes the only protection. Don’t overthink it—stick with strong passwords.)
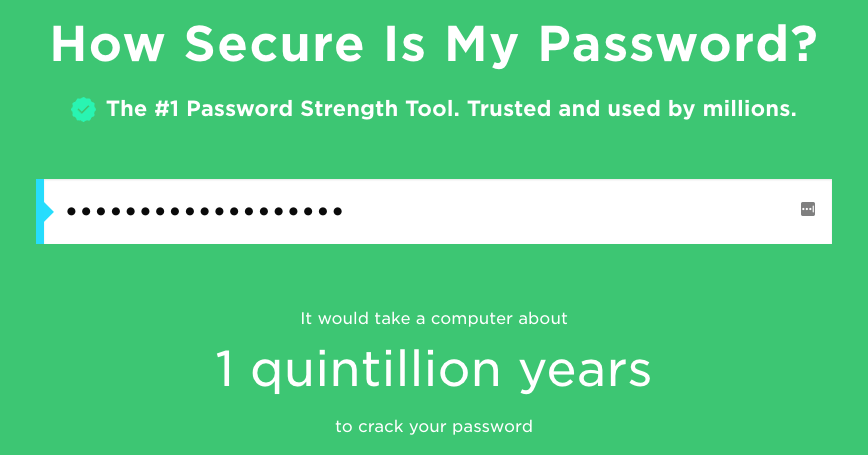
As an example, consider this possibility for a LastPass master password: Tpmbi-alas/.19851955. It’s not entirely random, but it’s close and doesn’t use obvious patterns that cracking software could exploit. Let’s break it down:
Tpmbialas comes from the first letter of the words in the movie The Phantom Menace and the Dire Straits album Brothers in Arms, plus the first three letters of LastPass.
/. plays on the name of the tech news site Slashdot to be memorable, and the characters are easily typed on both the iPhone and Mac keyboards.
19851955 will be easily remembered by fans of the movie Back to the Future, whose characters travel in time from 1985 back to 1955.
It’s highly secure—the How Secure Is My Password? site says it would take 1 quintillion years to crack, and there’s no way that even someone who knew your taste in movies and music could guess it (as long as you don’t tell them about your pattern).
One last thing to consider: is your password fun to type? Some key combinations probably roll off your fingers, whereas others will be prone to typos. Test your proposed password on both a Mac keyboard and your iPhone. If you hate typing it, tweak the characters until it’s better.
When you’re developing your own unique passwords that you must be able to remember and type, a strategy along these lines should serve you well. Just make sure to avoid dictionary words, repeated characters, and any password under 13 characters in length, all of which make passwords easier for cracking software to guess.
(Featured image by iStock.com/peshkov)
Picking the Best Mac for a College-Bound Student
Which Mac is the best for a new college student? Short answer: the M1 MacBook Air. Read on for the longer explanation and how we recommend configuring it.

Do you have a child heading off to college soon? As you’re undoubtedly aware from high school, a computer is essential for a college student. If you haven’t been paying close attention to Apple’s Mac lineup, you might wonder which model makes the most sense.
First, don’t buy anything without first checking with the college. Many college departments have specific requirements based on the software that students have to use in their classes. Generally, these revolve around processor type, amount of RAM, and storage space. Luckily, current Macs should meet the requirements.
Colleges often specify—and students usually prefer—laptops instead of desktop machines. Although the iMac is an excellent machine with a gorgeous screen, it’s too big and unwieldy for the transient lifestyle of the typical college student. The same is true of a Mac mini and external display. A laptop is much easier to pack during moves, and it can travel to class every day. A student who’s accustomed to taking notes on an iPad with a Smart Keyboard and Apple Pencil might be able to use that along with a desktop Mac, but most people should focus on Apple’s laptops.
In the past, it was harder to decide which model was best for a given student, but with Apple’s move to the M1 chip, which significantly outperforms the Intel processors used in previous models, the decision is easier. We see three primary scenarios:
Most students: Buy Apple’s M1-based MacBook Air. It’s Apple’s smallest, lightest, and least expensive laptop, but thanks to its M1 processor, it has nearly identical performance to the heavier and more costly M1-based MacBook Pro. It also has the same lovely 13.3-inch Retina display. It starts at $999, and an education discount may be available.
Slightly better specs: If cost is of little concern, the M1-based MacBook Pro offers just a bit more performance due to fans that keep its M1 chip cool. It also has a Touch Bar (which some people like, but others don’t), somewhat longer battery life, and nominally better speakers and microphones. It starts at $1299, and again, education pricing may be available.
Windows compatibility: The only reason to buy an older Intel-based Mac-Book Pro— available in either 13.3-inch ($1799) and 16-inch ($2399) models—is if Windows compatibility is essential. All Intel-based Macs can run Windows with no problems, either by restarting in Apple’s Boot Camp or using virtualization software like VMware Fusion (free for students) or Parallels Desktop. (On M1-based Macs, it’s possible to run Parallels Desktop and Windows for ARM Insider Preview, but we can’t recommend that anyone rely on that combination yet.)
Regardless of which laptop you decide on, you’ll have to pick a processor, an amount of RAM, and storage capacity:
Processor: With the M1-based MacBook Air, you have a choice between two CPUs that are identical apart from one having a 7-core GPU and the other an 8-core GPU. No one is likely to notice the difference for everyday software, but the price difference is only $50 if you’re also getting at least 512 GB of storage. (The M1-based MacBook Pro offers only the 8-core GPU chip.) For Intel-based Mac laptops, there are various options based on clock speed and number of cores. They’re all fine, but you pay for performance, so buy what fits your budget and needs.
RAM: With the M1-based Macs, you can choose between 8 GB and 16 GB of RAM. 8 GB may be acceptable, but we recommend 16 GB. Intel-based Mac laptops start at 16 GB, which is a decent base level, and you can go up to 32 GB or 64 GB (16-inch only). Generally speaking, go beyond 16 GB only if you know you need it.
Storage: For the M1-based Macs, 256 GB is the lowest storage level, whereas the Intel-based Macs usually start higher. Either way, you can upgrade to a maximum of 2 TB. Choose the amount of storage based on budget and anticipated usage—video takes a lot of space, as can large numbers of photos, but most other uses don’t.
To our thinking, the most obvious choice for a Mac that’s likely to last for four years of college would be the M1-based MacBook Air with the 8-core GPU, 16 GB of RAM, and 512 GB of storage. Be sure to budget for AppleCare+, too; it’s almost guaranteed that some mishap will befall a student laptop, and AppleCare+ covers up to two incidents of accidental damage every year.
You’ll need to have some conversations with your child to find out what they think they’ll need—and be sure to double-check that against the college’s recommendations—but if you have any questions after that, don’t hesitate to contact us.
(Featured image by Apple)
Don’t Cook Your Digital Devices in the Summer Heat
How hot is too hot for your Apple devices? You may be surprised by the answer.

As climate change continues to wreak havoc on our weather, many areas are seeing record temperatures this summer—Seattle just recorded its hottest days ever. You may be able to trade your business suit for shorts or skirts to stay more comfortable, but your electronic gear can’t do the same. Keeping your tech cool is about more than comfort—as temperatures rise, performance can suffer, charging may get slower or stop, various components might be disabled, and devices can become unreliable.
How Hot Is Too Hot?
You might be surprised by how low the recommended operating temperatures for Apple devices are—whether you’re talking about an iPhone 12 or an M1-based MacBook Pro, the company recommends keeping them under 95° F (35° C).
Such temperatures happen regularly throughout the summer. Even in cooler climes, the temperature in a parked car in the sunshine can easily hit 130º F (54º C) in an hour and rise higher as time passes. And no, opening the windows a few inches won’t make much difference. You know you shouldn’t leave a kid or dog in a parked car for that reason, and now you can see that leaving your iPhone in the car during an afternoon at the beach might be problematic as well. Apple says its products shouldn’t even be stored—turned off—at temperatures over 113º F (45º C).
It’s not just cars you have to think about. Temperatures in homes and offices without air conditioning can also rise higher than electronics would prefer, and that’s especially true for computers that stay on most of the time and aren’t located in well-ventilated areas.
What’s the Danger?
First off, remember that all electronic devices produce their own heat on top of the ambient heat in the environment, so the temperature inside a device can be much, much hotter than outside. The CPU in an iMac can hit 212º F (100º C) under heavy loads.
Temperatures that exceed component design specs can have the following detrimental effects:
Chips of all types can behave unpredictably as increased thermal noise (electrons vibrating more) causes a higher bit error rate. Because electrical resistance increases with heat, timing errors can also occur.
Lithium-ion batteries discharge well in high temperatures, but the increased rate of chemical reactions within the battery will result in a shorter overall lifespan.
As devices heat and cool, the uneven thermal expansion of different materials can cause microscopic cracks that can lead to a variety of failures over time.
Some heat-related problems are temporary, so when the device or component cools down, it will resume working correctly. But others are irreversible and worth avoiding.
When a Mac gets too hot, it will spin up its fans in an attempt to keep its internal components cool. (The M1-based MacBook Air doesn’t have a fan, so it won’t be able to provide the same level of advance warning.) If your Mac’s fans ever run at full tilt for more than a few minutes, first quit apps you aren’t using, particularly those that might be CPU-intensive, thus creating a lot of heat. If that doesn’t make a difference, restart it to ensure the problem isn’t some rogue process. If the fans come back on at full speed quickly, shut it down and let it cool off for a bit. In the worst case, an overheated Mac may start acting unpredictably or crash.
iOS devices don’t have fans, so they employ other coping mechanisms. If your iPhone or iPad gets too hot, the device will alert you.
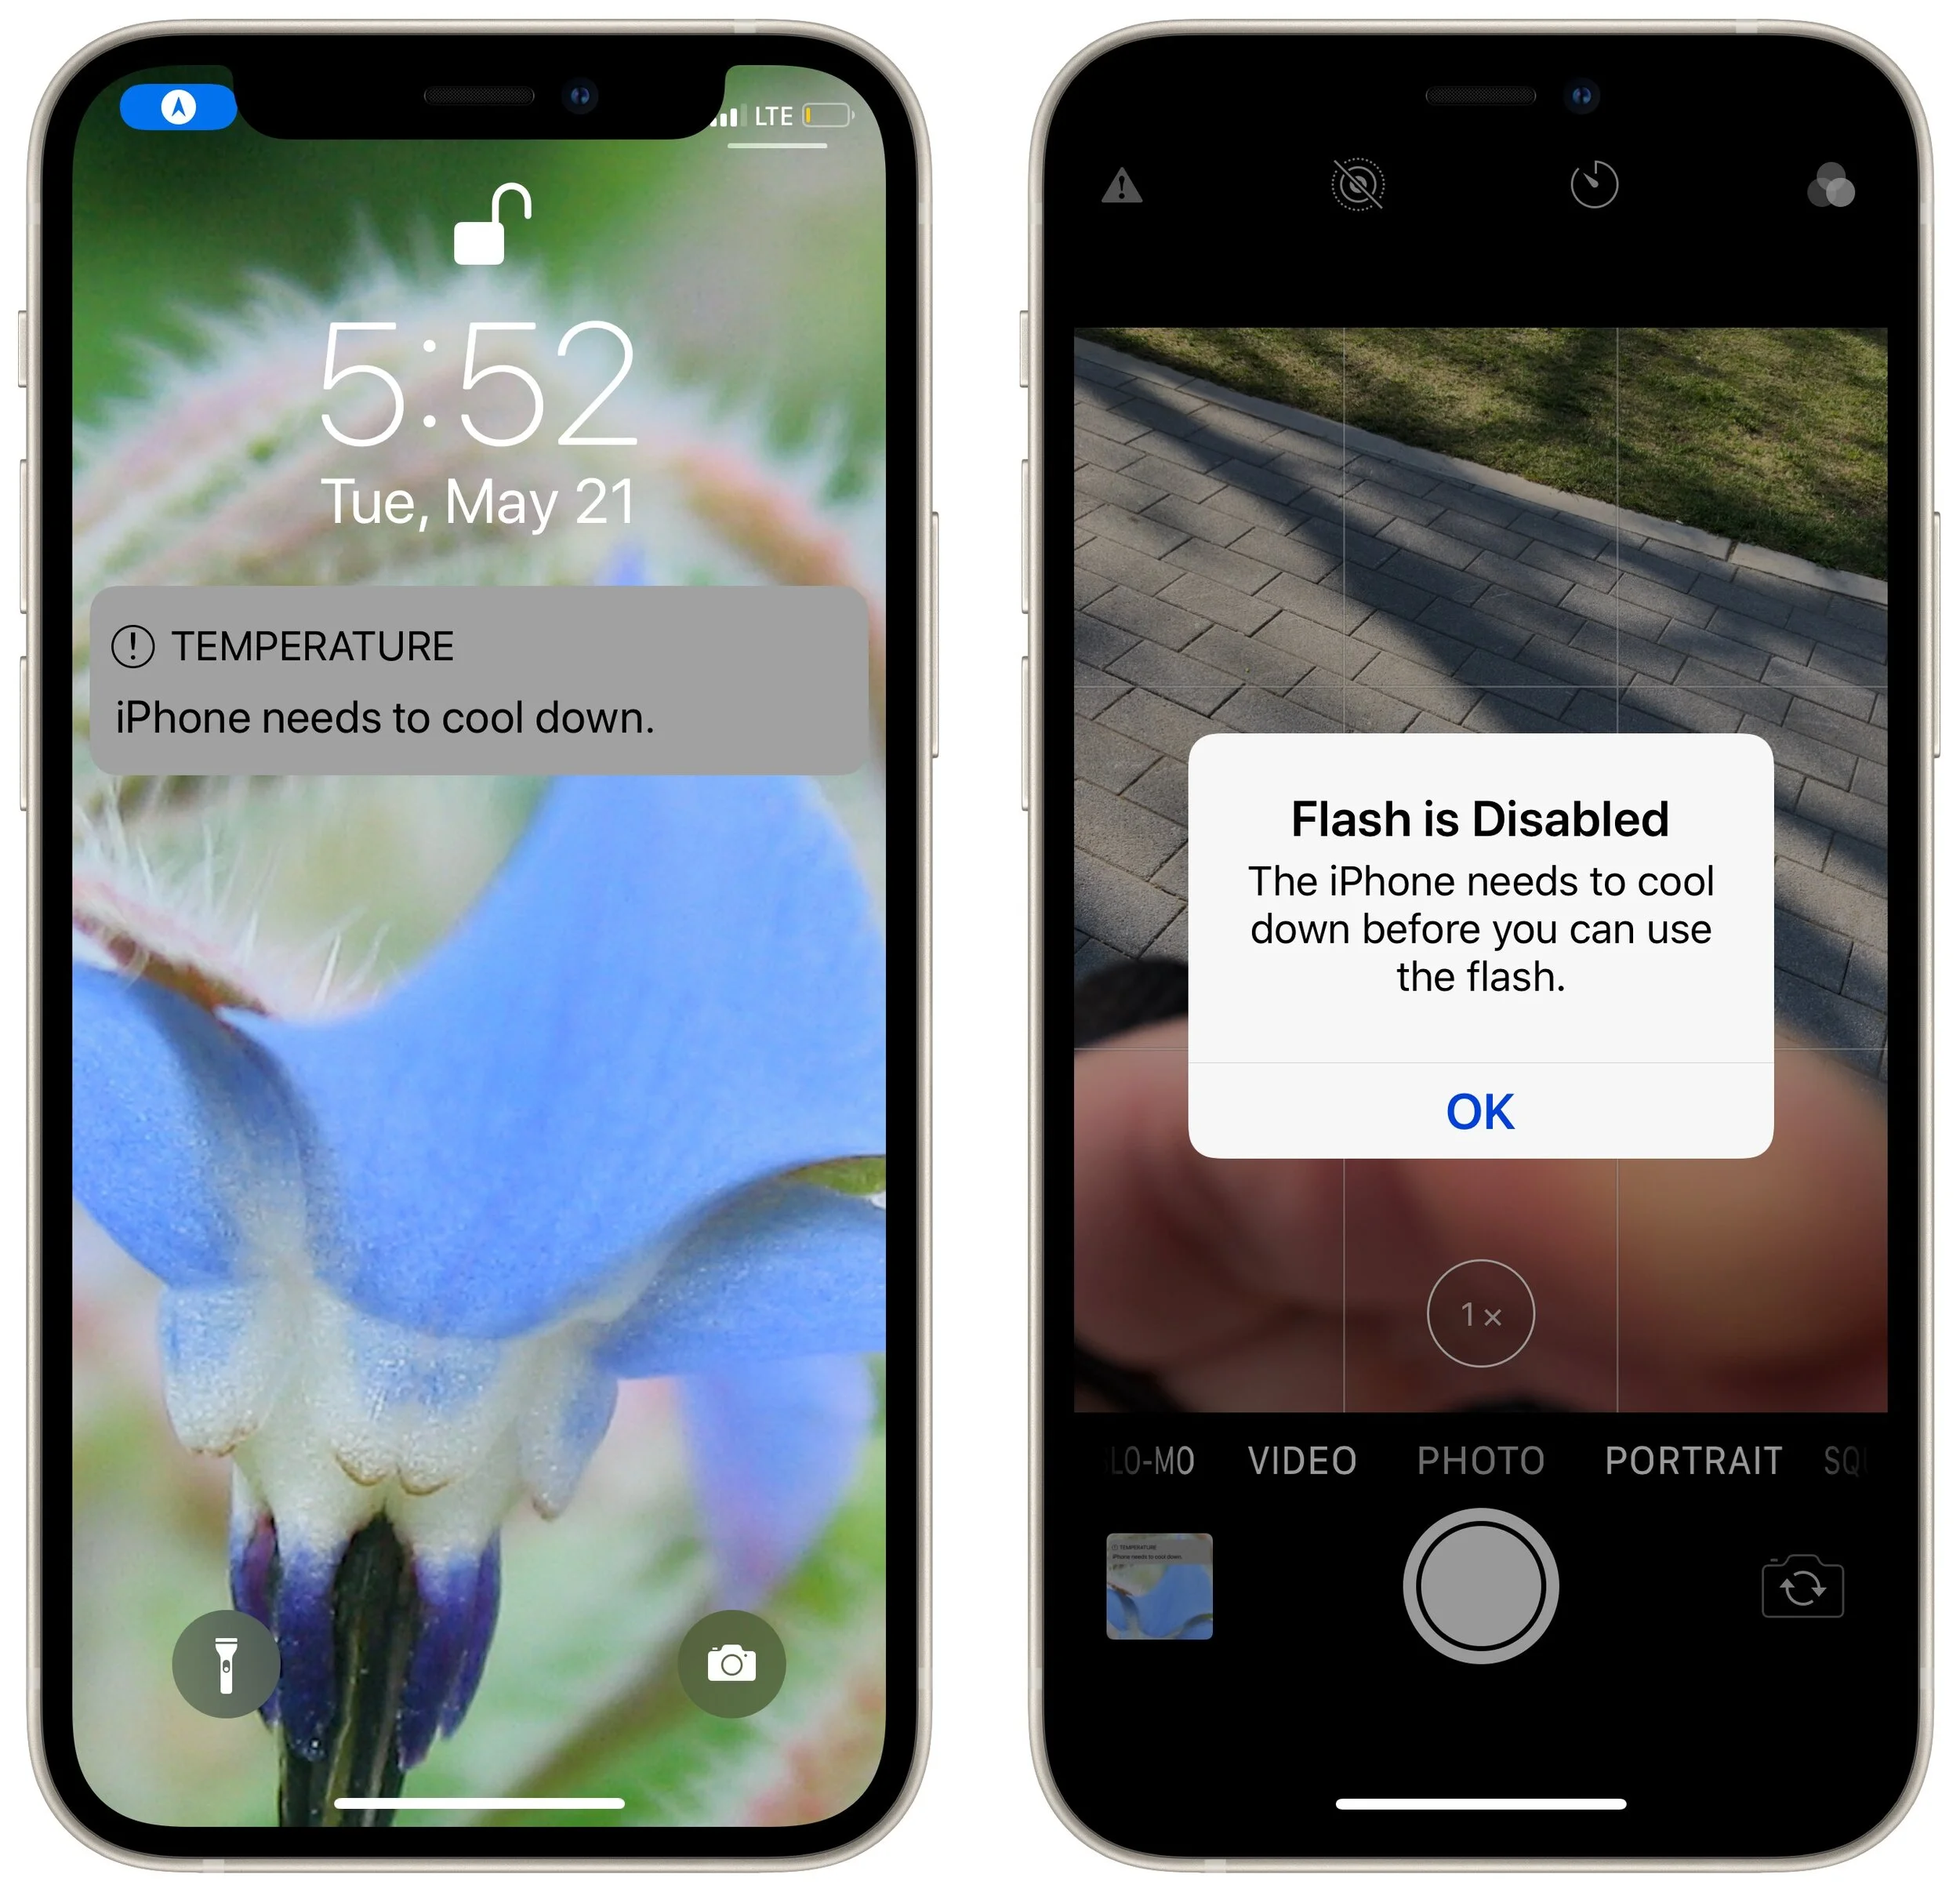
Apple says you might notice some of the following behaviors with an overheating iPhone or iPad:
Charging, including wireless charging, slows or stops.
The display dims or goes black.
Cellular radios enter a low-power state. The signal might weaken during this time.
The camera flash is temporarily disabled.
Performance slows with graphics-intensive apps or features.
If you’re using Maps on an overheating iPhone for GPS navigation in the car, it may show a “Temperature: iPhone needs to cool down.” screen instead of the map. You’ll still get audible turn-by-turn directions, and the screen will wake up to guide you through turns,
How to Keep Your Tech Cool
For the most part, keeping Apple devices cool just requires common sense:
Avoid using devices when the temperature is over 95º F (35º C). If that’s impossible, keep usage to a minimum.
Don’t leave devices in cars parked in the sun for long periods of time. If it happens accidentally, let the device cool before using it.
Provide good ventilation so air can cool the device. Don’t block ventilation ports in the back of desktop Macs, and don’t use Mac laptops in bed, propped on a pillow, or under the covers. It can be worth blowing dust out of ventilation ports with compressed air every so often.
Never put anything on the keyboard of an open Mac laptop.
Avoid stacking things on top of a Mac mini.
Monitor the temperature of server closets. If they get too hot, keep the door open, add a fan, or run the air conditioning.
Luckily, the temperatures that cause problems for Apple hardware aren’t terribly comfortable for people either, so if you’re way too hot, that’s a good sign your gear is as well.
(Featured image by Sergo Karakozov from Pexels)