Please Dispose of Old Electronics Responsibly—Not in the Trash or Standard Recycling!
Don’t throw old electronics in the trash! Or even in your usual recycling bin! It’s important to dispose of e-waste properly to avoid polluting the environment and causing destructive fires. Learn how here:

We all have old electronics squirreled away in our drawers and closets. It’s hard to admit that a computer, phone, or peripheral that cost hundreds or even thousands of dollars years ago has little or no value. That’s doubly true if it doesn’t work anymore. Once you’ve decided to get rid of that PowerBook 520 from the 1990s or your first digital camera from 2004, resist the urge to toss it in the trash.
In some places, it’s illegal to throw out electronics because they tend to contain heavy metals like mercury, lead, and lithium, plus other hazardous materials that can pollute the air if incinerated or contaminate the ecosystem if buried in landfills. Even if dumping e-waste is not actively illegal in your area, it’s a terrible thing to do. So what can you do instead?
No matter what you choose, make sure to delete all your data to the extent possible. If the device in question works, it’s best to erase or reformat its storage. Apple makes that relatively easy, especially on iOS devices; look in Settings > General for a reset option that contains Erase All Content and Settings. For dead computers whose drives contain data, you can remove the drive and ensure your data can’t be accessed by whacking it with a hammer or drilling through the case. That can be a good stress reliever too, but be sure to wear safety goggles.
Sell
If the old device is fully functional or sufficiently rare, you may be able to sell it on eBay or through Craigslist. To determine if that is likely to be worthwhile, search for similar used devices on those sites. If others are selling their old stuff, you probably can too. Keep in mind that you’re not likely to make much, and be sure to take shipping costs and fuss into account.
Donate
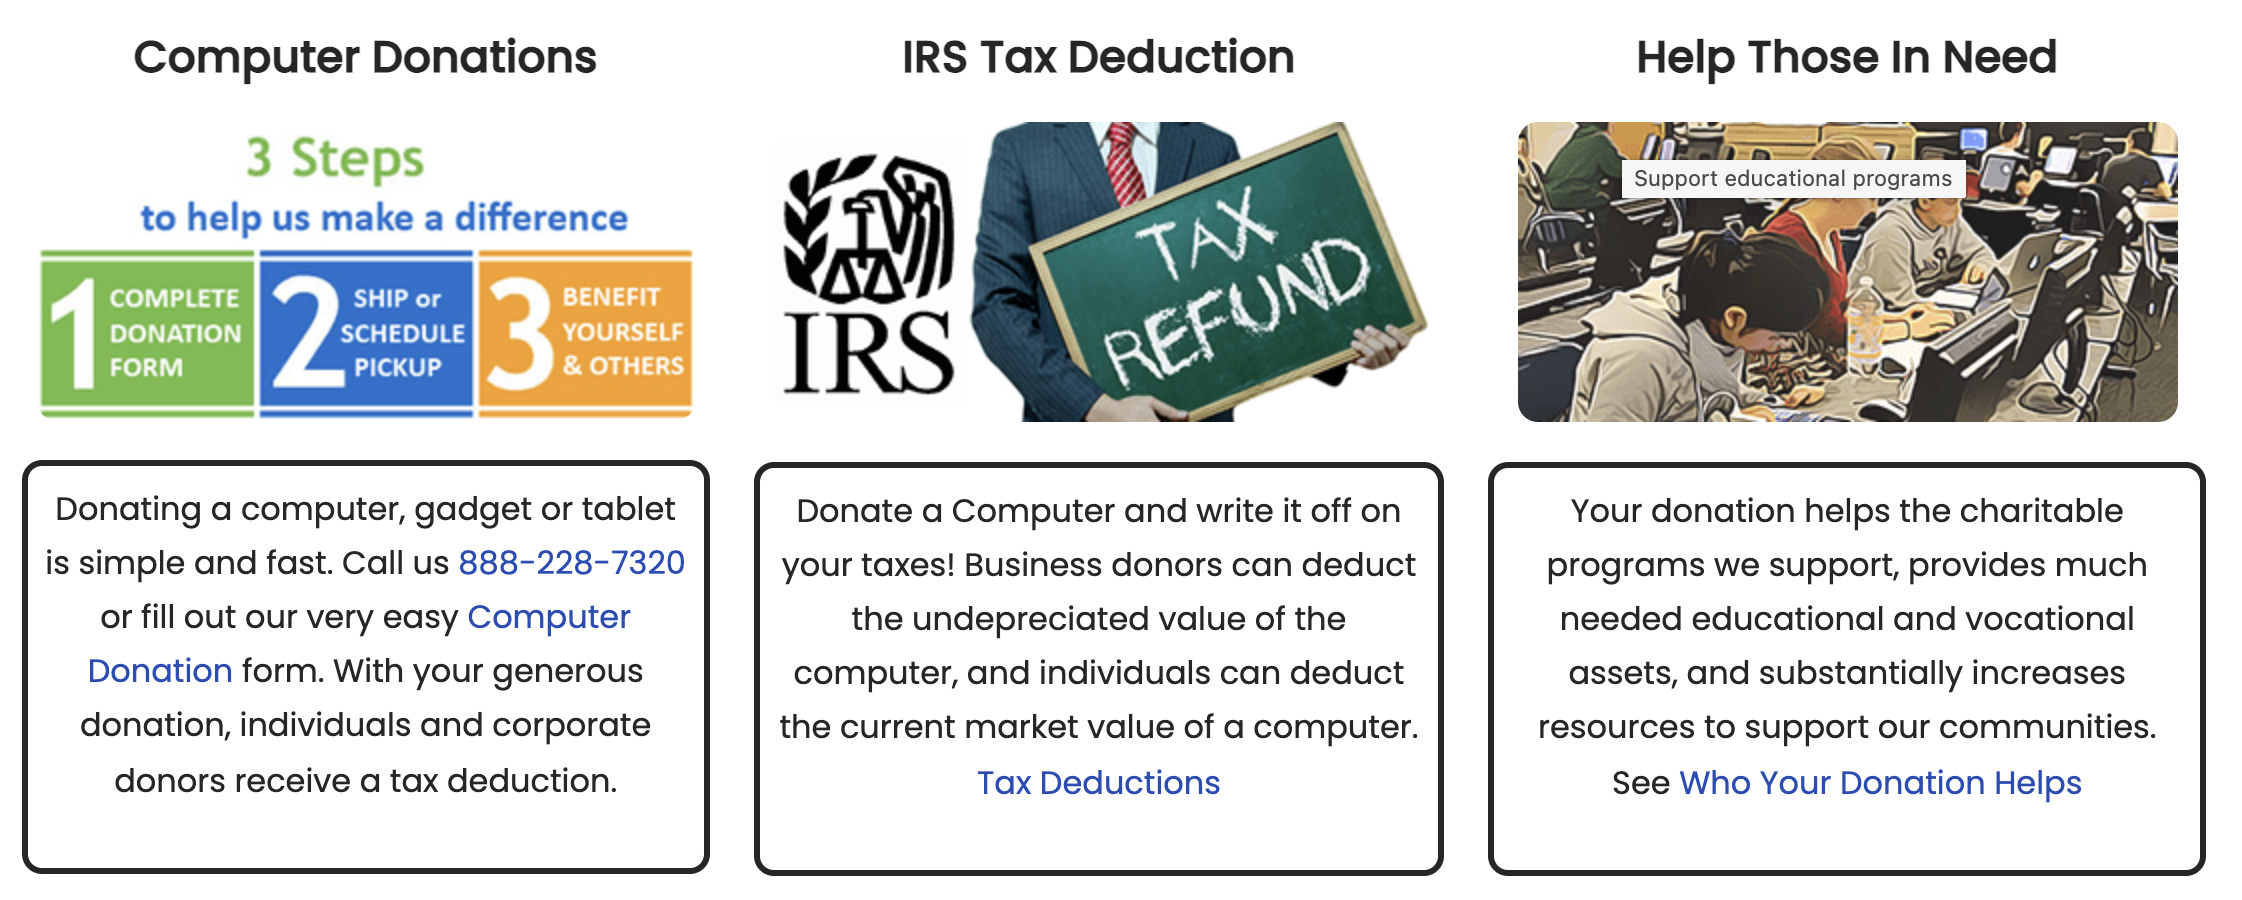
Given the low value of even fully functional hardware, a more socially beneficial option is often to take advantage of local programs that accept donations of working computers and other electronics, clean and refurbish them as necessary, and then donate them to schools, libraries, community centers, and other worthy institutions. If the program to which you’re donating is a registered nonprofit, you may even be able to deduct the value of the gear from your taxes.
If your area lacks such programs, check out Computers with Causes, which accepts donations of computers, tablets, and gadgets. It then refurbishes them and moves them on to groups like youth centers, K–12 schools, libraries, historical societies, wildlife conservation organizations, and more. Also look into World Computer Exchange, which provides donated computers and electronics to youth in developing nations.
Recycle
All too often, the only realistic option for disposing of old electronics is recycling. That doesn’t mean just tossing that old iPhone 3GS in the bin with your #2 plastics. It’s extremely important that e-waste be recycled separately from standard recyclables like cardboard, paper, cans, and plastic tubs. That’s because lithium batteries from improperly recycled electronics are causing dangerous fires at recycling centers.
Municipal waste programs are often set up to recycle e-waste properly, and they may be the easiest option in your area. GeekHampton can assist with disposal of unwanted electronics. For alternatives, look to the large chain stores Best Buy and Staples, both of which accept electronics for recycling, generally for free. Apple stores also accept electronics for recycling, or you can request a prepaid shipping label that lets you ship e-waste to Apple. Alternatively, try searching the Earth911 database for other recycling options near you. The Consumer Technology Association also provides a locator for electronics recycling; it may have slightly different listings.

Regardless of where you take your e-waste, be sure to read the requirements first. Not all sites take all types of electronics—a cell phone is much easier to handle than a broken large-screen TV. Also, you may need to remove any batteries first and recycle them separately so they can be handled with additional care to prevent fires.
Thanks for doing your part to keep old electronics from causing harm!
(Featured image by iStock.com/ThamKC)
How to Use Change Tracking Effectively When Collaborating on Documents
When you’re collaborating with others on a document, change tracking is your friend. Follow our advice to ensure that everyone stays on the same page during the editing process.

Long gone are the days of printing a document, marking it up with a red pencil, and sending it back to the author to input the changes. In the modern world, we use comments and change tracking to collaborate in word processors like Microsoft Word, Google Docs, Apple’s Pages, and Nisus Writer Pro. The specifics vary a little by app, but in essence, once you turn on change tracking, every change you make becomes visible to others working on the document, and they can accept or reject the change. Changes and comments can also host brief discussion threads.
In this article, we’re going to recommend general ways of working with change tracking and comments, rather than exploring the particular interfaces in different apps. This advice should work well for all apps that support change tracking and comments.
Establish a Working Approach
There are two typical scenarios when working with others on a document. Either you’re collaborating with colleagues to create the best possible final document, or you’re negotiating over every change, as might be the case when constructing a legal agreement where people have conflicting goals and agendas. We’ll focus on the former since everything gets tense when multiple people have to sign off on every change. If you end up in an editing scenario that’s essentially an arms-length negotiation, you’ll probably make fewer changes and examine each one closely.
Assign Roles
Talk with your fellow collaborators to clarify who will be doing what. Depending on your workflow, a document will have people in two or three roles:
Author: The author drafts the document without change tracking enabled. Subsequently, the author accepts changes made by the editor and contributors.
Editor: The editor enhances the author’s text with change tracking enabled and accepts the author’s subsequent changes. (An editor isn’t necessary as long as everyone else doesn’t mind the author accepting their own changes later.)
Contributor: Everyone else is a contributor, and they only make changes in change tracking mode. They neither accept nor reject changes.
These roles make it clear who can and should do what. Otherwise, you end up in a situation where people are hesitant to accept changes or where someone accepts changes before the author has seen them.
Even with these roles, the order in which the document gets reviewed can matter if you want certain contributors to see what’s changed, even if they don’t accept the changes. Generally speaking, people take turns with documents, with communication via email or some other channel to let others know when they can dive in.
Some documents may need only one editing pass, whereas others will require several. You’ll know you’re done when all changes have been accepted and comments have been resolved.
Decide Which Changes to Show
When you enable change tracking, every change will be tracked. That can be counterproductive if the number of changes becomes overwhelming—to either people or the software. You may wish to make certain changes without change tracking enabled or accept them before the next person’s turn. For instance:
Formatting changes: If you’re changing styles or putting text into lists to make a draft more presentable or professional, those changes can quickly clutter the document and are usually not controversial.
Consistency changes: For ensuring consistent usage, such as one space after a period, a search-and-replace with change tracking disabled lets the next person avoid dealing with hundreds of small changes. You can leave a comment at the top of the document noting what you did.
Minor proofreading changes: Everyone makes typos. You may wish to keep typo fixes visible to show how much your editing has improved the document, or you can accept them right away to save the next person time.
Too many changes to parse: At times, you may edit a paragraph so heavily that it has been almost entirely rewritten. As with proofreading changes, you might want to keep those changes visible to indicate how much you’ve done, or you might want to accept them all and leave a comment saying, “Read this paragraph carefully—too many changes to show with change tracking.”
Accept (Don’t Reject) Changes
When it comes time to review changes, apps let you either accept or reject changes. We usually recommend accepting changes even if you disagree with them. That’s not to say you have to stick with a proposed change that you dislike, but the person who made it did so for a reason, and it’s up to you to figure out what that reason is and recast the text to accommodate it, preferably with an explanatory comment. That way, they’ll see your change on their next pass and can decide if you addressed their concern.
Occasionally, someone might negatively change some carefully worded text because they didn’t realize why it was worded that way. Rather than rejecting such a change, leave it and start a discussion. In all likelihood, they’ll withdraw the change on the next pass, or you can reject it once they see where you’re coming from.
When accepting changes, you can employ several techniques:
Few changes: If there aren’t that many changes, it’s easy to accept them one at a time. As you do this, watch for mistakes that creep in—missing or double spaces, verb tense and number mismatches, and so on. These can be easy to introduce and difficult to see while editing.
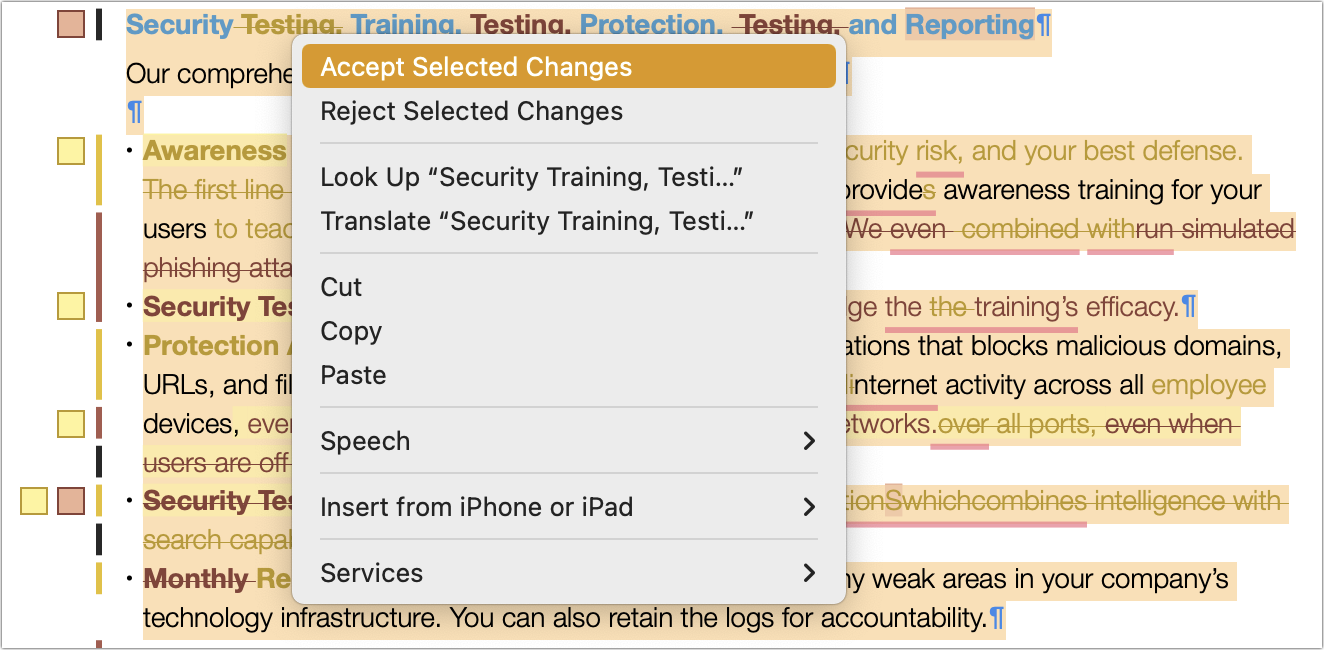
Many changes: When the entire document seems to have changed color because there are so many changes, it’s easier in most apps (other than Google Docs) to select a paragraph at a time, accept all changes in the selection, and then read it closely to make sure the changes are both helpful and don’t introduce additional mistakes. A keyboard shortcut to an Accept Selected Changes command can make this process faster.
We don’t recommend using the Accept All feature to accept all the changes in the document unless it’s quite short and you plan to read the entire thing carefully again.
Dealing with Comments
Finally, some comments about comments. In most apps, you can add a comment to a change and start a threaded discussion about the change. That’s extremely helpful if you want to explain why you made the change. However, that approach works poorly if the next person wants to accept your change and continue chatting in the comment, since accepting the change will close the comment thread. As such, we recommend restricting change-specific comments to non-controversial situations where you’re merely informing the next person about why you made the change.
When you need to ask a question or raise a topic for discussion, do that in a standalone comment instead, so the discussion doesn’t disappear with the accepted change. Even in this situation, however, you have to be careful. If you select a particular word and start a discussion asking if it’s the right word to use, the next person may not be able to change that word without deleting the comment thread. One solution is to select a few words before the text on which you’re commenting, or just the period ending the sentence, so changes can be made while retaining the comment. Another approach is to select more text—the entire sentence or paragraph that contains the text in question—for the comment. That’s more effective, but too many such comments will overwhelm the document with large colored comment blocks.
Who should resolve comment threads? Although some comments are purely informational and can be resolved by the person to whom they’re addressed, it’s usually best if the person who started the comment thread resolves it. Let’s say the editor leaves a comment that asks a question. The author responds, so the editor needs to see that response. If it doesn’t fully answer the initial question, the editor can ask for more information, and the author can provide it. The editor can then resolve the comment to indicate that the final comment from the author closed the topic.
One last point. Comment threads within a document are useful but limited. If a topic needs significant discussion, break it out to email, Slack, or even a meeting rather than going back and forth within a single comment at length.
We hope this advice makes your collaborative editing faster, easier, and more companionable—remember, the goal should always be to improve the document. However, there’s room for tweaking within these general guidelines to create the ideal workflow for your group.
(Featured image by iStock.com/FrankieMea)
Make Joining Your Wi-Fi Network as Easy as Scanning a QR Code
Want visitors to be able to access your Wi-Fi network without typing a password? Follow our steps to create a custom QR code they can scan to join your network instantly.

Whether you have guests who want to get on your home Wi-Fi network, customers who need to join your business network, or attendees who want to use your conference network, it’s always fussy to share the network name and password. If an iPhone user has your Apple ID email address in Contacts, their device should automatically prompt you to share your Wi-Fi password, but that won’t work in many situations.
Here’s another option: a QR (Quick Response, if you’re curious) code that, once scanned, lets the person join your network without knowing its name or password. Once you’ve created this QR code, you can print it on a card to share, post it on a bulletin board, or make a custom sign. QR codes are no longer the curiosity they once were, with usage skyrocketing since the pandemic. One estimate suggests that over 83 million US adult smartphone users will scan a QR code in 2022.
Follow these steps to create your custom Wi-Fi network QR code:
1. Visit QRCode Monkey and click the WIFI tab at the top. (Other sites, like QR Code Generator and Flowcode, will also work but may require a paid account.)

2. Enter the name of your network—also known as the SSID—in the Wireless SSID field.
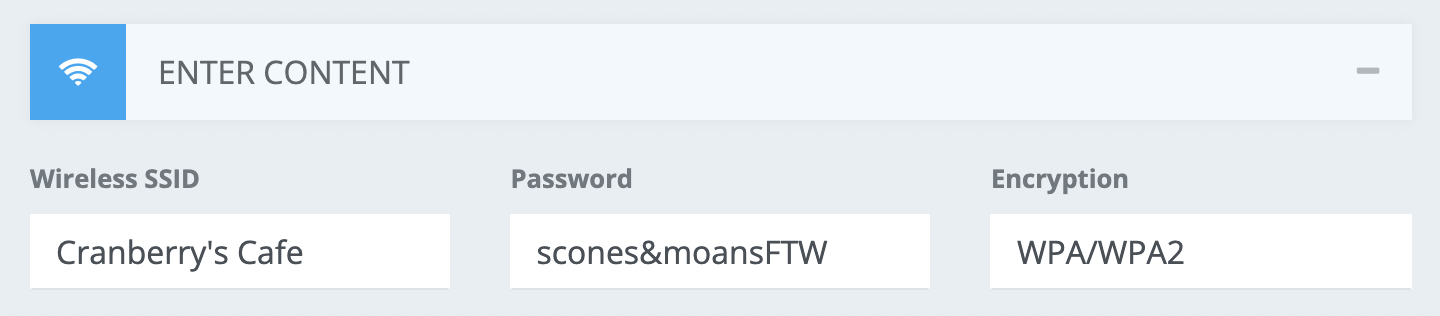
3. If your network has a password, enter it in the Password field, click Encryption, and choose WPA/WPA2. (If your network still relies on the old and completely insecure WEP, choose that instead—and plan to upgrade to a new base station with WPA support soon!)
4. If you’re sharing access to a guest network that has no password, leave the password field blank and Encryption set to No Encryption.
5.To change your QR code’s foreground and background colors from black and white, click Set Colors, click a color square, and click on the desired color in the color picker. (You can also enter color hex values.) If you plan to upload a logo, make sure the color works well with your logo.

6. If you have a logo that you want to include, click Add Logo Image and upload your logo. You may want to resize the white space around the logo to position the logo nicely in the middle of the QR code. If the logo’s background doesn’t match your background color, you may wish to select Remove Background Behind Logo.
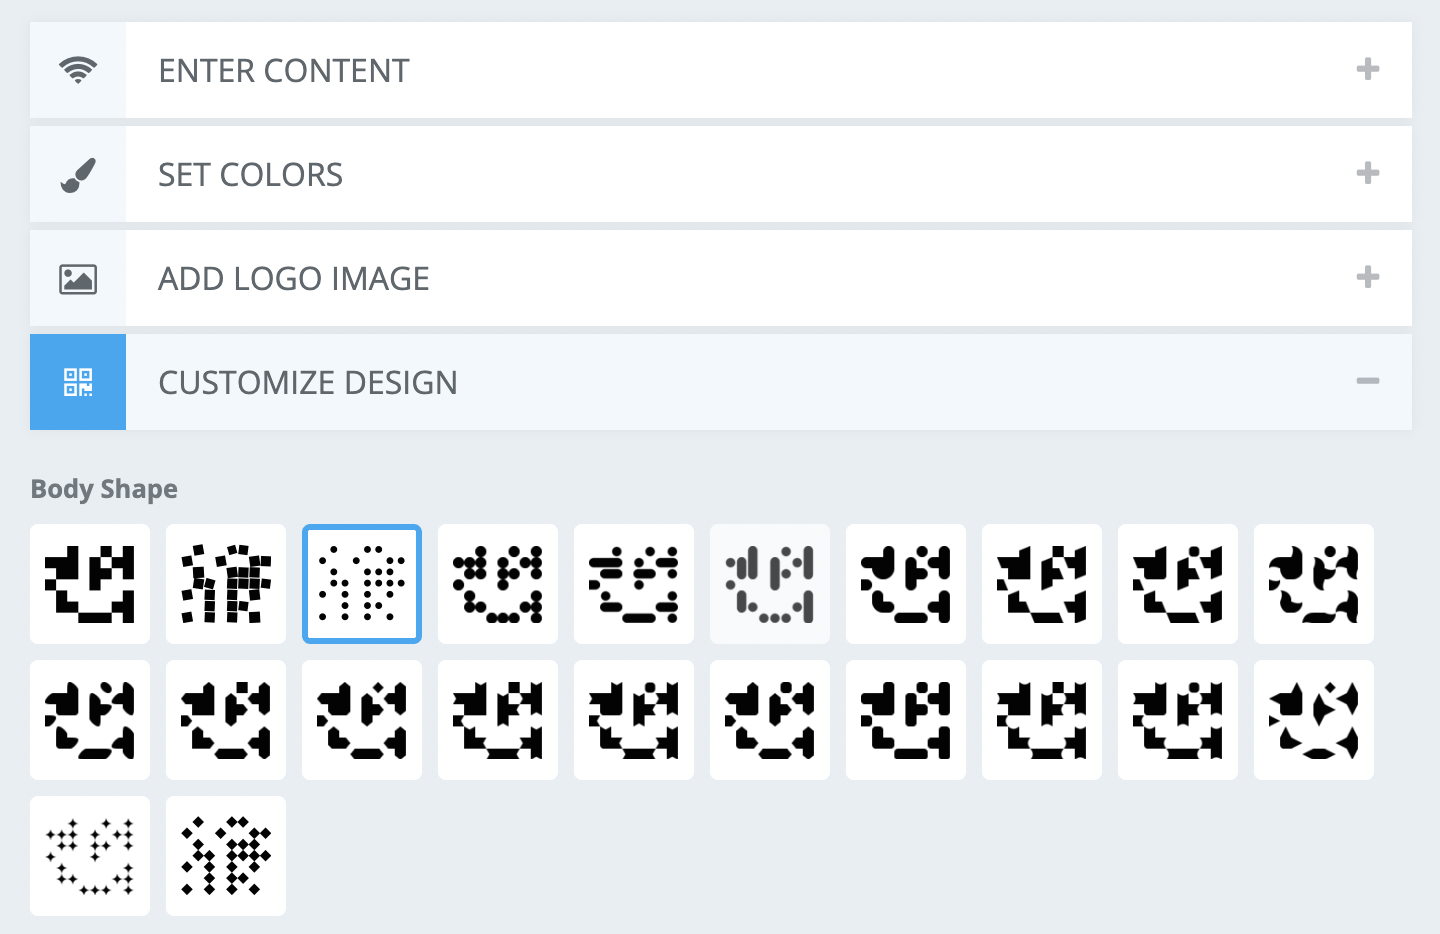
7. For a snazzier look, click Customize Design and choose among the various options for Body Shape (the overall pattern), Eye Frame Shape (the corner frames), and Eye Ball Shape (the shape inside the corner frames).
8. Click the Create QR Code button on the right to preview your custom design. Repeat Steps 5 through 8 until the QR code looks the way you want.
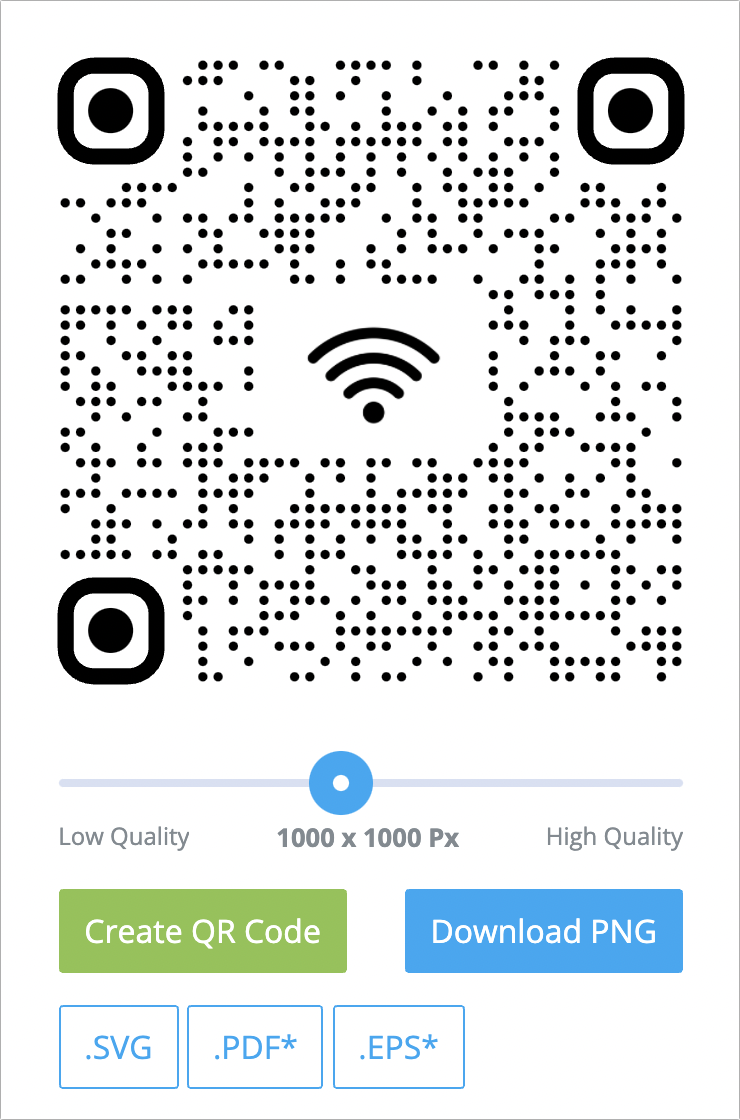
9. Adjust the Quality slider if desired—the default of 1000-by-1000 pixels is generally fine.
10. Click the Download PNG button to get the actual file. You can also click the SVG, PDF, or EPS buttons to download those less common formats.
That’s it! Once you’ve downloaded the QR code image file to your Mac, you can print it on its own, add it to other print designs, or even put it on your website. There’s probably a size that is too small for cameras to resolve accurately, but that’s easy to test using your iPhone or iPad.
From then on, anyone can access your Wi-Fi network by pointing the camera app on their phone at your QR code—they’ll be grateful for the easy access, and you’ll no longer have to supply them with the network information. It’s a win-win!
(Featured image by Adam Engst)
If Your Internet Connection Is Slow, Research These Three Numbers
Slow or unreliable Internet connection? It could be your ISP—read on to find out how to test your connection and evaluate the results.

As pandemic-related restrictions ebb and flow, many people continue to work from home at least some of the time. A key requirement for successful remote work is a fast, solid Internet connection. Unfortunately, it’s all too common for Internet connections to degrade over time as cables endure a variety of insults ranging from water seeping into connectors to squirrels gnawing through insulation. You might be surprised at how variable such problems can be—we once saw an Internet connection that dropped out infrequently; it turned out that squirrels had damaged just one pair of wires in the cable, and the Internet provider’s system hopped between pairs depending on other neighborhood traffic.
How do you know if something in your Internet connection needs fixing? If the entire connection goes offline periodically, even if it comes back on its own, that’s a hint. Videoconferencing apps and streaming video services can also provide useful warnings—if the picture often pixelates or pauses, or if the audio falls out of sync with the video, that’s another indication that something may be wrong. Finally, if you use a VPN, Internet connectivity issues can cause all sorts of weird problems.
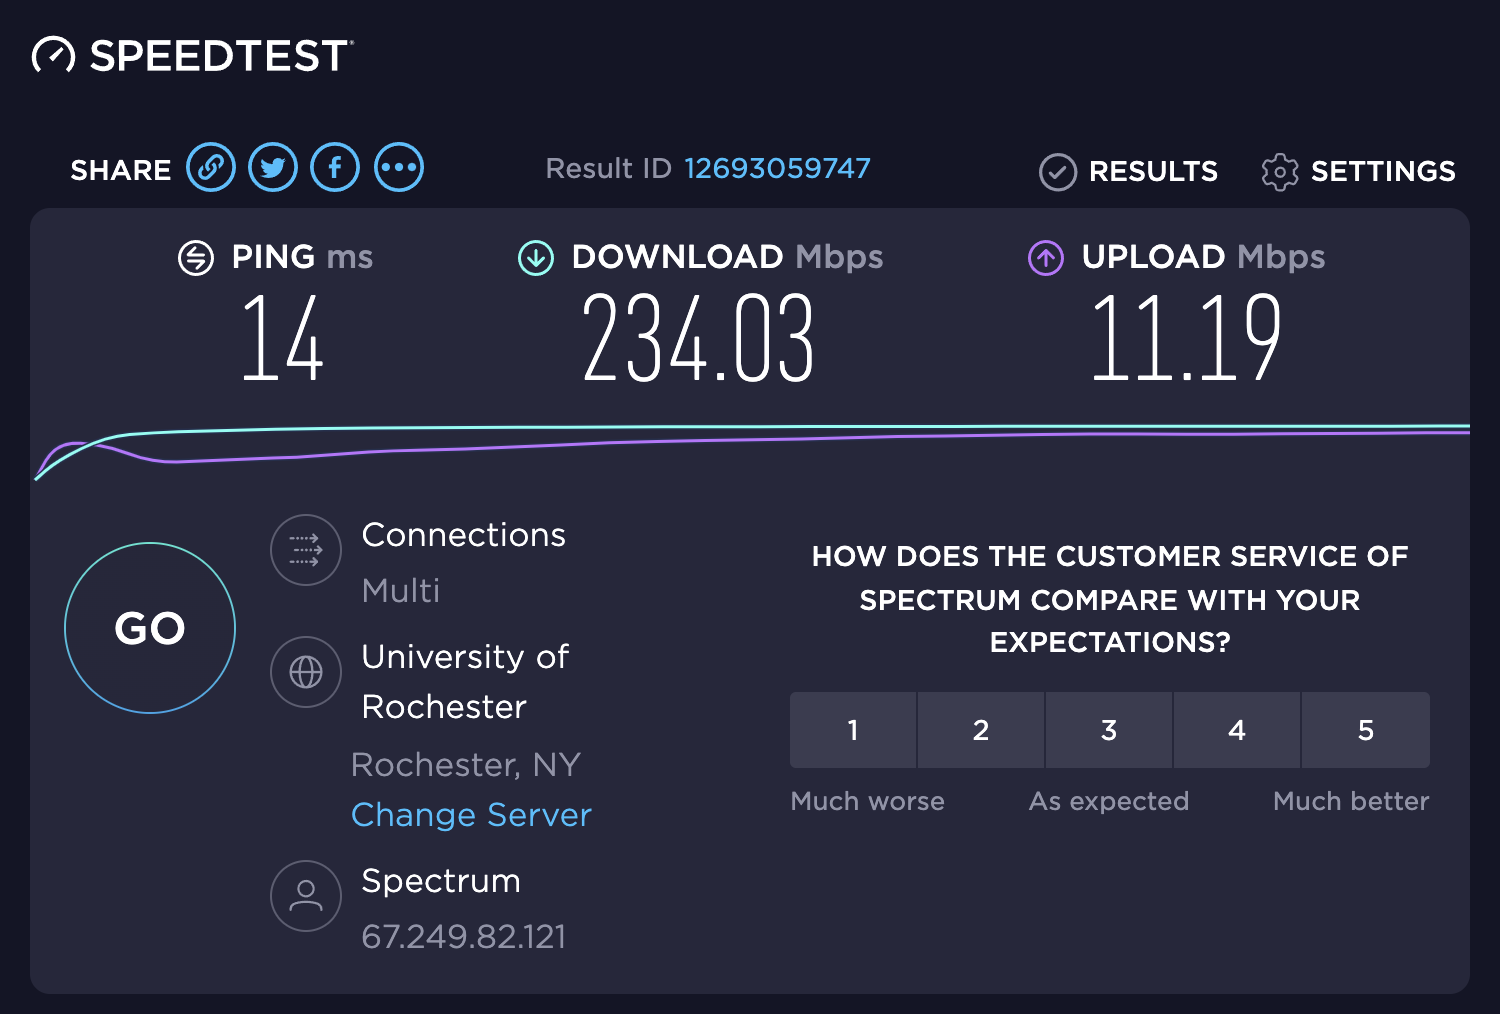
When you notice such problems, you can perform a simple test that may shed some light on the situation. First, make sure to stop any audio or video streaming or large downloads. Then go to speedtest.net and click the Go button. Speedtest will run some tests to come up with three numbers:
Download: Your download performance, generally measured in megabits per second (Mbps), is the most important and determines how quickly your computer can receive data from the Internet for downloads and streaming video.
Upload: Conversely, your upload performance, also measured in megabits per second, determines how fast you can send data to the Internet. It’s almost always much lower than download performance, but sufficient upload bandwidth is essential for your audio and video to be clear and smooth in a videoconference.
Latency: This number, which Speedtest calls “ping,” measures the amount of time in milliseconds to send a single packet to the destination server and receive it back again. The lower the latency, the more responsive communications will be, which is all-important for online gaming. Very long latencies can also cause problems for VPNs.
(You can also use other similar services, such as Netflix’s fast.com or Google’s built-in tester. Apple even built a networkQuality tool into macOS 12 Monterey—run it at the command line in Terminal—though it has an unusual Apple Network Responsiveness test that replaces the latency test.)
What should these numbers be? When you signed up for a plan with your Internet service provider (ISP), you should have been quoted download and upload numbers, such as 200 Mbps down and 10 Mbps up. If you don’t know what those numbers should be, ask your ISP. It’s not uncommon for download and upload speeds to vary somewhat from what you were promised, but they should generally be close.

Latency is trickier, and ISPs won’t promise anything specific. The lower the latency number, the better. Speedtest suggests that times under 59 milliseconds are good for gaming, times between 60 and 129 milliseconds are acceptable, a range of 130–199 milliseconds is problematic, and 200-plus milliseconds won’t be usable. There’s no way to know what latency numbers might cause other problems, but we’d pay attention to anything over 100 milliseconds.
Let’s assume your numbers aren’t what they should be—or at least what you’d like them to be. Don’t complain to your ISP right away. Instead, try these steps:
Run the test a few more times, preferably at different times of the day. (If you create an account with Speedtest, it will track your tests so you can see how they change.) You may discover that performance is slow only during peak usage hours.
Run more tests using different Speedtest servers or even different testing services. You’re testing the performance between you and a particular server, and it’s possible that server is having problems that others won’t share.
If you have other devices, run tests from those as well. Don’t assume you’ll get identical results because different devices may have varying capabilities. If you notice differences between devices that use Wi-Fi and those connected via Ethernet, that might point to your Wi-Fi router as a bottleneck. That’s not common with modern Wi-Fi routers, but if you’re still relying on an old AirPort Express, it could be slowing you down.
Restart your devices, and if that doesn’t make a difference, restart or power cycle your router and modem as well.
If your performance problems persist through all those troubleshooting tests, the problem is likely in the physical connection, and only your ISP can address that. When you call, be sure to share the testing numbers and any commonalities—times of day, for instance—that you observed. With luck, they’ll be able to confirm your issues and dispatch a technician to evaluate the physical connection for problems.
(Featured image by iStock.com/gorodenkoff)
You Can Now Upgrade to macOS 12 Monterey When You’re Ready
Should you upgrade to macOS 12 Monterey? There’s no need to do so immediately, but we think it’s now safe for those who want to take advantage of the new features and integration with Apple’s other operating systems. Details here:

When it comes to upgrading to a new version of macOS, we err on the side of caution, at least in our recommendations. Geekhampton is here to help. (We often install even beta releases on secondary machines for testing purposes.) Upgrading is easy, but if you upgrade too soon, the new version of macOS could render favorite apps inoperable, create workflow interruptions, and have other negative consequences. On the other hand, waiting too long can cause problems—it’s important so you can stay in sight of the cutting edge for security reasons and take advantage of Apple’s advances. Upgrading is not an if question; it’s a when question.
That “when” could be now. There’s no reason you must upgrade to macOS 12 Monterey right away, but if you want to, you should now be able to do so without undue interruptions. Monterey has been quite stable and has needed only two updates since its initial release in October 2021. The macOS 12.1 feature release in December 2021 added support for SharePlay, the Apple Music Voice Plan, Memories improvements in Photos, and Legacy Contacts, along with bug fixes and security updates. The macOS 12.2 maintenance release from January 2022 includes only unspecified bug fixes and some security updates. The upcoming macOS 12.3 will add the long-promised Universal Control feature for controlling multiple Macs and iPads from one keyboard and mouse. After that, Monterey should be feature-complete and will likely receive only bug fixes and security updates.
You can continue to delay as long as you’re running macOS 10.15 Catalina or macOS 11 Big Sur and are staying up to date with Apple’s security updates. Earlier versions of macOS no longer receive security fixes, rendering them more vulnerable to attack. Reasons to delay further include:
You’re too busy. The upgrade process will take a few hours, and it may take additional time to configure everything properly afterward. When you are ready to upgrade, aim for when a little downtime will be convenient.
You’re using incompatible software. The jump from Catalina or Big Sur to Monterey isn’t a big one, so most modern apps should have been updated to ensure compatibility with Monterey by now. But if you’re still running macOS 10.14 Mojave or earlier with 32-bit apps, you’ll lose access to them if you upgrade. (That happened first with Catalina.) With Mojave no longer receiving security updates, you need to find replacements for those apps and upgrade soon.
You need consistent versions for workflow reasons. We’re unaware of any major issues here, but it’s not inconceivable that a coworker could be stuck on an older version of macOS and thus older versions of shared productivity apps. If your upgrade would force you to update those apps and introduce compatibility issues when collaborating with that coworker, you may have to wait until your coworker can upgrade as well.
Monterey won’t upend your experience of using a Mac, but it has numerous welcome features, both large and small. Apple radically improved FaceTime, introduced the Shortcuts app from iOS, added privacy enhancements like iCloud Private Relay and Hide My Email, enables you to copy text from images with Live Text, provides screen sharing in FaceTime calls, lets you always display the menu bar in full-screen mode, and much more. Perhaps even more important, Monterey shares numerous features with Apple’s other operating systems: iOS 15, iPadOS 15, watchOS 8, and tvOS 15. To take full advantage of those features across all your Apple devices, your Mac must be running Monterey.
Before You Upgrade
Once you’ve decided to upgrade to Monterey, you have three main tasks:
Update apps: Make sure all your apps are as up-to-date as possible. If you regularly put off updates, now’s the time to let them complete so you have Monterey-compatible versions.
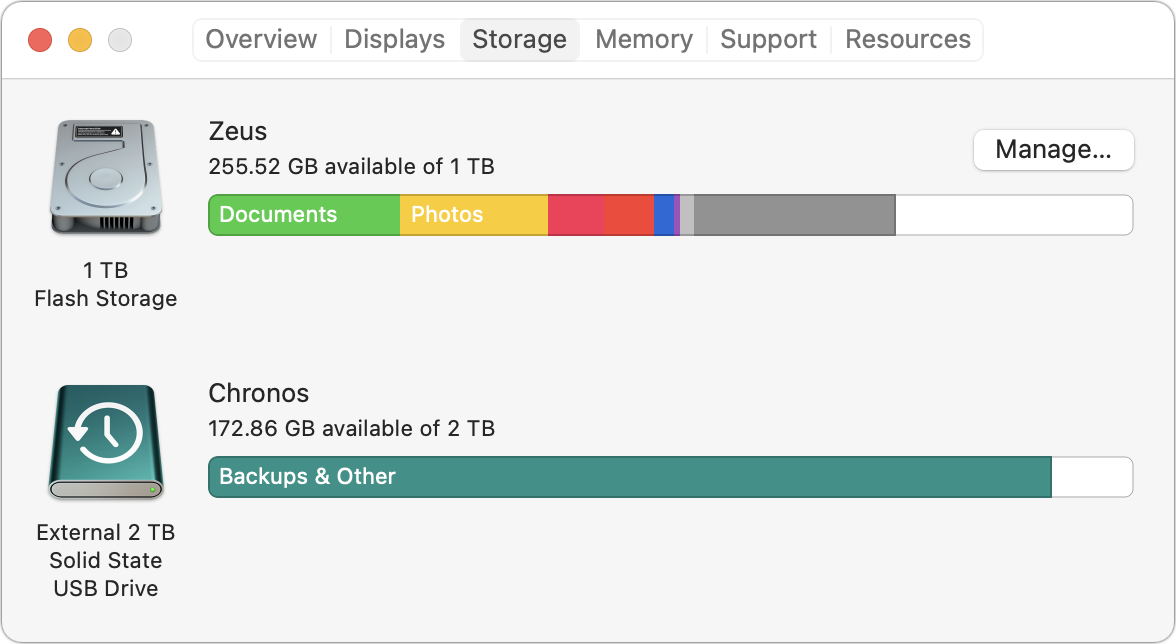
Clear space: Monterey needs about 36 GB of free space to upgrade, and the Monterey installer itself is about 12 GB, so we recommend making sure you have at least 50 GB free. Don’t cut this close—you should always have at least 10–20% free space for virtual memory, cache files, and breathing room.
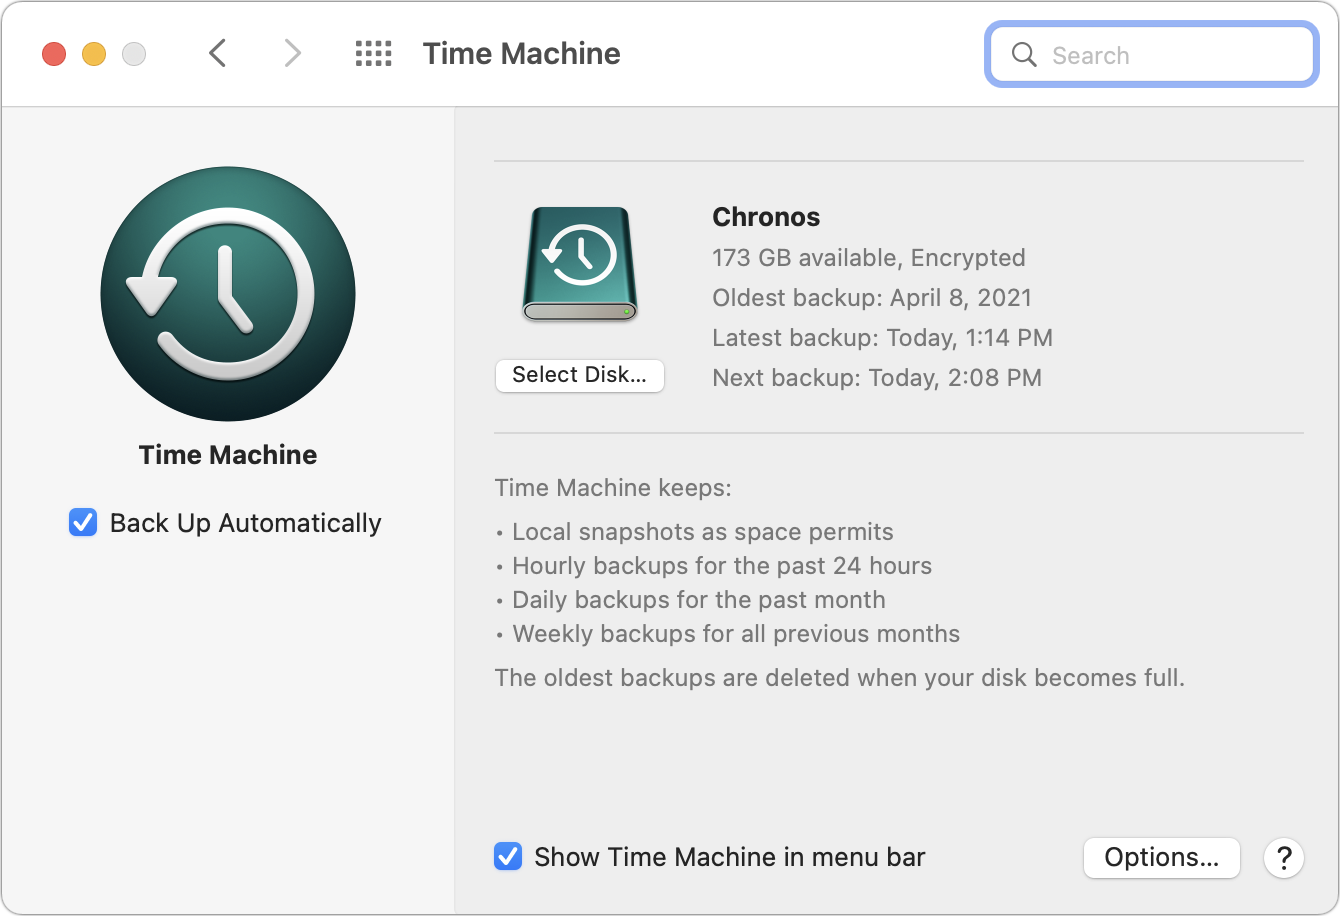
Make a backup: Never, ever install a major upgrade to macOS without ensuring that you have at least one current backup first. In an ideal world, you’d have an updated Time Machine backup, a bootable duplicate, and an Internet backup. That way, if something goes wrong, you can easily restore.
Upgrading
After the above-listed tasks are complete, make sure you don’t need your Mac for a few hours. There’s no telling exactly how long the upgrade will take, so never start an upgrade if you need the Mac soon.
Initiating the upgrade is just a matter of opening System Preferences > Software Update, clicking the Upgrade Now button, and following the instructions. If you’d like more hand-holding, check out Joe Kissell’s ebook Take Control of Monterey.

After You Upgrade
Part of the reason to set aside plenty of time for your Monterey upgrade is that there are usually cleanup tasks afterward. We can’t predict precisely what you’ll run into, depending on what version of macOS you’re running now and what apps you use, but here are a few situations we’ve noticed in the past:
macOS may need to update its authentication situation by asking for your Apple ID password, your Mac’s password, and if you have another Mac, its password too. Don’t worry that this is a security breach—it’s fine.
Some apps may have to ask for permission to access your contacts and calendar even though you previously granted permission. Again, that’s fine and won’t happen again.
If you use your Apple Watch to unlock your Mac and apps (and you should, it’s great!), you may need to re-enable that in System Preferences > Security & Privacy > General.
If you use Gmail, Google Calendar, or other Google services, you may need to log in to your Google account again.
Websites that usually remember your login state may require that you log in again. If you’re using a password manager like 1Password, that’s easy.
You may have to re-enable text message forwarding to your Mac on your iPhone in Settings > Messages > Text Message Forwarding.
With all that housekeeping done, it’s time to check out all the new features in Monterey!
(Featured image by Apple)
Looking for a New Email Provider? Try These Services
Is it time for a new email provider? Our article looks at recommended choices and helps you pick one that meets your needs, whether you’re an everyday user or a business.
If you’re completely happy with your email provider, move on, there’s nothing to see here. But if you’re unhappy with your provider’s reliability, spam filtering, or stability as a business, or if you’re tired of having a 1990s-style address from aol.com or hotmail.com, you can switch. There are innumerable email providers, and many are undoubtedly good at what they do. But we’ve seen these services performing the best over the years. We’ll start with recommendations for business and then look at options for individuals.
Business Accounts
For a business, email is essential. You cannot put up with downtime, lost email, unpredictable spam filters, or any other nonsense. Plus, you need support for custom domains, multiple users, role accounts, two-factor authentication, and an admin console where you can manage it all (or someone can manage it for you). Although there are other providers in this space, the safe choices are Google and Microsoft. (We realize this falls into the category of “No one ever got fired for buying IBM.” It’s basically true in this case—email isn’t an area to experiment with unknown quantities.)
Google Workspace: Previously known as G Suite, Google Workspace brings together Google’s well-known collaboration tools, including Gmail, Calendar, Drive, Docs, Sheets, Forms, Slides, and so on. Pricing starts at $6 per user per month and includes 30 GB of cloud storage per user; $12/user/month increases that to 2 TB. The big win of Google Workspace is that it provides a first-class experience for use within a Web browser. Google also provides iOS apps, and Apple’s Mail apps can access Gmail via IMAP.
Microsoft 365: Previously known as Office 365 (what is it with all this renaming?) Microsoft 365 offers Web and mobile versions of the Office apps (Outlook, Word, Excel, PowerPoint, and OneNote) along with hosted email with a 50 GB per user mailbox. 1 TB of OneDrive cloud storage space is standard, along with online meetings and video calls using Microsoft Teams. The Basic plan costs only $5/user/month, but to get the desktop versions of the Office apps, you need at least the Standard plan, which runs $12.50/user/month.
The main way to decide between Google Workspace and Microsoft 365 is to examine how focused your business is on core productivity apps. If you’re already relying heavily on Word, Excel, and PowerPoint, it makes sense to go with Microsoft. However, if your company is more Web-based or uses a variety of non-Microsoft productivity apps, Google is probably the better option.
Either way, it’s a big decision, and please check with us before making any major moves. Depending on your situation, there may be less obvious reasons to choose one or the other, or even a third option that’s perfect for your situation. Plus, transitioning between providers may require significant work to ensure that you retain all your email archives.
Individual Accounts
For individual users, you want reliability and good spam filtering, and some people might appreciate being able to use a custom domain name. However, most people don’t need support for multiple users, an admin console, or other big-company features. Plus, you probably don’t want to pay much, if anything. Again, tons of companies offer email—many for free—but the ones we recommend are Apple, Google, and Fastmail:
iCloud Mail: Nearly every Apple user has an iCloud account associated with their Apple ID, and with it comes iCloud Mail. It’s a fine choice for basic email, making it easy to access your messages on all your Apple devices and even on the Web at iCloud.com. Apple provides 5 GB of storage for free, which might seem like plenty for email, but it’s shared with iCloud Backup, iCloud Photos, iCloud Drive, and more, so it’s easy to run out. For more storage, upgrade to iCloud+, which costs $0.99 for 50 GB, $2.99 for 200 GB, and $9.99 for 2 TB. With iCloud+, you also get the option of adding a custom domain name, though it’s a rather involved process. The main thing we don’t like about iCloud Mail is that Apple sometimes goes overboard with spam filtering.
Gmail: The most popular email service in the world is Google’s Gmail, with well over 1.5 billion users. Although the default way to access Gmail is through a Web browser on a Mac or the Gmail app on an iPhone or iPad, you can enable IMAP support to access it using Apple’s Mail apps. There’s also a highly regarded new Gmail-specific macOS app in development called Mimestream. Gmail provides 15 GB of storage for free, which is enough to hold most people for quite some time, and more storage is available inexpensively. Gmail’s spam filtering is generally very good, and unlike iCloud, it doesn’t delete any filtered messages without allowing you to see them first.
Fastmail: In contrast with iCloud Mail and Gmail, Fastmail isn’t free—it costs $3/user/month for the Basic plan, but that’s limited to just 2 GB of storage, doesn’t support a custom domain, and requires that you use Fastmail Web and mobile apps. For $5/user/month, the Standard plan increases the storage to 30 GB, lets you set up your own custom domain, and provides full IMAP access so you can use Apple’s Mail or any other standard email app. The big reasons to choose Fastmail are the company’s focus on privacy and to support a firm that does nothing but email.
Although switching your personal email isn’t as difficult as changing email providers is for a business, it’s still not something to be undertaken lightly. Contact us if you need advice on which service provider would be best for you and if you need assistance setting up forwards and bringing your old mail over to your new account.
(Featured image by iStock.com/anyaberkut)
The Hidden Controls in the iPhone’s Camera App
Want to use a timer when taking an iPhone photo or manually control the depth of field in Portrait mode? You’ll need to reveal the Camera app’s hidden controls. Read on to find out how to show them—and what they help you do.

The beauty of the iPhone camera is that it combines the ease of use of a point-and-shoot camera with the image quality of a DSLR. To take a picture, you simply open the Camera app, frame your shot, and tap the shutter button. Simple, but what’s happening behind the scenes is anything but. The iPhone captures multiple images at once, concentrating on variables such as exposure, focus, tone, highlights, shadows, and more. It then merges all that data to produce what it thinks is the best possible image. Impressively, all this computational photography happens in real-time with no perceptible delay. (That said, iOS 15 provides a Prioritize Faster Shooting option in Settings > Camera that adapts—and presumably reduces—the image quality when you rapidly press the shutter multiple times.)
Despite all this automation, Apple still provides numerous manual controls you can employ to take photos the way you want. These controls are hidden, though, so you’re excused if you haven’t noticed them or have been frustrated looking for them. (“Where is that dratted Timer button? It must be here somewhere!”)
First, you have to reveal the controls, which is easy, although you’d never guess how. When you’re in the Camera app, swipe up anywhere on the screen above the shutter button. If you swipe up on the horizontal row of camera mode labels, your swipe can be quite short. However, if you swipe up on the viewfinder image, the Camera app might interpret a short swipe as a tap-and-swipe and display the in-image exposure control instead. On the viewfinder, use a longer, more emphatic swipe ➊. Either way, the camera controls replace the camera modes underneath the viewfinder ➋.

Once you have the controls showing, tap a button to access its options, use a slider or button to adjust the settings ➌, tap the original button to hide the options, and swipe down in the same way you swiped up to hide all the controls. The really confusing bit is that not all the controls may fit on the screen, so if you’re looking for the Timer or Filter buttons on an iPhone 13 Pro, for instance, you may have to swipe left on the controls to bring those buttons into view.
Here’s the full set—note that all except Depth (the rightmost one below) are in Photo mode; some may also appear in other modes. (Not all controls appear on all iPhone models, and the Low Light button, for instance, shows up only in low-light situations.)

Now, let’s look at what the controls make possible:
Flash: Use the Flash control to allow the camera to use the flash as needed or force it to be on or off. You can also control the flash in Video and Slo-Mo modes.

Low Light: Night mode on some of Apple’s high-end iPhones makes it possible to take better pictures in very low-light situations. With this control, you can set a specific amount of time for Night mode’s exposure. The longer the exposure, the lighter the photo, but the more small movements will cause blur and graininess.

Live Photo: Live Photo records 1.5 seconds of video before and after you take a photo, animating the photo slightly. Use this control to set whether the camera takes Live Photos all the time, none of the time, or automatically when it thinks it’s warranted (which is a lot).

Photographic Styles: These custom settings—Rich Contrast, Vibrant, Warm, and Cool—let you apply that distinct look to all your photos automatically. Or stick with Standard and apply the look you want afterward by editing.

Aspect Ratio: Some iPhones can take photos in multiple aspect ratios. Use this control to choose from the standard 4:3 (below left) ratio, square, and 16:9 (below right). The 16:9 ratio expands the viewfinder to show what it will capture.

Exposure: Although automatic exposure control is usually fine (and you can adjust it afterward as well), you can use this control to increase or decrease the exposure manually. It’s also available in Video, Slo-Mo, and Time-Lapse modes.

Timer: For a hands-free selfie or a group photo that includes the photographer, use this control to set the timer to 3 or 10 seconds, starting from when you tap the shutter button. The iPhone counts down with both flash bursts and an onscreen number.

Filter:The Filter button offers nine options, three each in Vivid, Dramatic, and Mono. You may want to turn one of these on to see its effect while composing the shot. Otherwise, it’s easier to apply them in editing later.

Depth: This control is available only in the Portrait and Cinematic modes, where it lets you increase or decrease the depth of field. If you increase the depth of field, the background becomes sharper; if you decrease it, the background gets blurrier.

Apart from Photographic Styles, which automatically remembers your setting from session to session, the Camera app generally resets any changes you make in the next session. That’s usually what you’d want, but if you would prefer to keep a setting until you change it manually, go to Settings > Camera > Preserve Settings. That screen provides switches that tell the Camera app to preserve specific settings. Pay particular attention to Creative Controls, Exposure Adjustment, Night Mode, and Live Photo—we often make a point of using Preserve Settings with Live Photo so we don’t waste a lot of space unless we actually want to shoot a Live Photo.
In the end, it’s nice that these controls are neither necessary nor cluttering your view most of the time, but they’re extremely useful on occasion. We hope that Apple comes up with a way of hinting at their existence in future versions of iOS.
(Featured image by iStock.com/Darkdiamond67)
Perturbed by the Price of Adobe Creative Cloud? Consider the Affinity Suite
Looking for an affordable alternative to an expensive Adobe Creative Cloud subscription? Check out the Affinity suite: Affinity Designer, Affinity Photo, and Affinity Publisher. Read on for thoughts on how they compare and if Affinity is for you.
Few would disagree that the most popular image editing software in the world is Adobe Photoshop, the top illustration app is Adobe Illustrator, and the preeminent page layout package is Adobe InDesign. Many design and publishing professionals spend their lives in one or more of these apps.
There’s one problem: cost. Adobe provides access to them only via Creative Cloud subscriptions, where each app costs $21 per month, making it hard to pass up the $53-per-month All Apps bundle that includes all three plus Premiere Pro, Acrobat Pro, and more. That All Apps bundle works out to an eye-watering $636 per year.
For many people, that $636 annual expense is just the cost of doing business. They need the full power of Adobe’s tools, and they need to collaborate with others using native Photoshop, Illustrator, and InDesign files. If you fall into that camp, no worries, and you can stop reading right now.
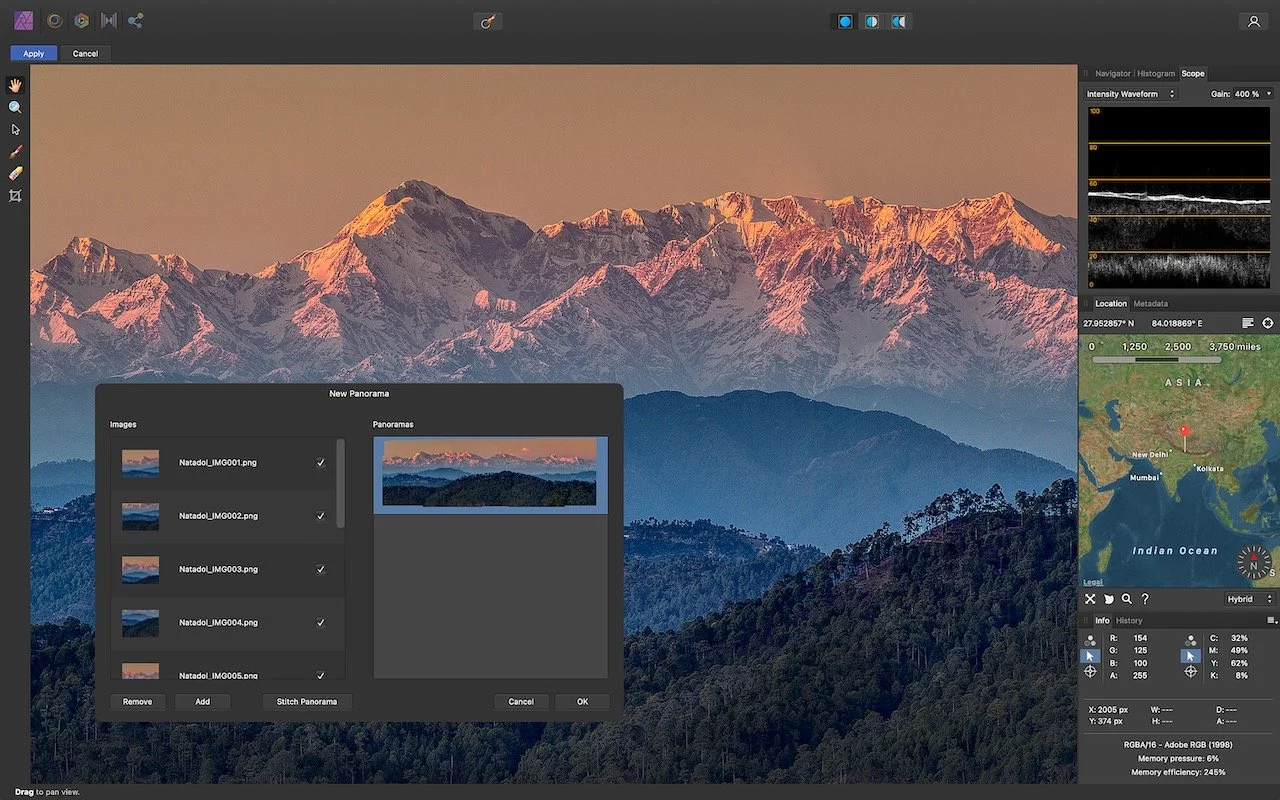
However, if you’re subscribing to Adobe Creative Cloud merely because you need a capable image editor, illustration app, or page layout package, and you aren’t otherwise deep in the Adobe ecosystem, consider the Affinity suite from Serif: Affinity Photo, Affinity Designer, and Affinity Publisher, each of which costs $55. Once. That’s right, you can buy all three for $165, or just about the same as 3 months of Creative Cloud. Updates are free. Versions for Microsoft Windows are available for $55 too, and Affinity Photo and Affinity Designer also come as $10 iPad apps.
The obvious question is if you could replace Photoshop, Illustrator, and InDesign with Affinity Photo, Affinity Designer, and Affinity Publisher. We can’t answer that for sure—the Adobe apps have so many features that it’s impossible to know which are most important to you and if the Affinity apps’ features are comparable. Some may not match up—we’ve been told that master pages in Affinity Publisher are a bit funkier than master pages in InDesign, for instance. Others may even be better—some people we know find exporting Web graphics from Affinity Designer easier than exporting from Illustrator. And some may not exist at all—it doesn’t seem that Affinity Publisher (the newest addition to the suite) has a Track Changes feature like InDesign.

For instance, just as you can embed Photoshop and Illustrator files in an InDesign layout and then use the Edit Original command to edit them in the other app, you can embed Affinity Photo and Affinity Designer files in Affinity Publisher. Serif’s StudioLink technology provides direct access to the primary tools from Affinity Photo and Affinity Designer right within an Affinity Publisher document. It’s neat.
Overall, the feature sets are similar. Those who would consider switching from Creative Cloud can probably figure out how to accomplish their necessary tasks using the Affinity apps. That’s not to say that they’re clones of Adobe’s apps. In many cases, you might need to learn a new technique for accomplishing some task. Along with full documentation, Serif provides hundreds of tutorial videos and runs an active user forum where people ask questions, make suggestions, and share tutorials. Simple Web searches also often turn up blog posts with useful techniques from Affinity users.
What about moving files back and forth? Affinity Photo can open Photoshop’s proprietary PSD files, although it’s not guaranteed to import everything perfectly. Affinity Designer can open Illustrator documents as long as they were saved with the Create Compatible PDF File option selected. Similarly, it can open Illustrator-created PDF files that many designers send to clients as proofs. And Affinity Designer can open InDesign files that have been saved in IDML (InDesign Markup Language) format. Plus, you can often just copy and paste text and objects between the apps. If you decide to switch, you might want to continue your Creative Cloud subscription while ensuring that your key Adobe files are saved such that the Affinity apps can open them.
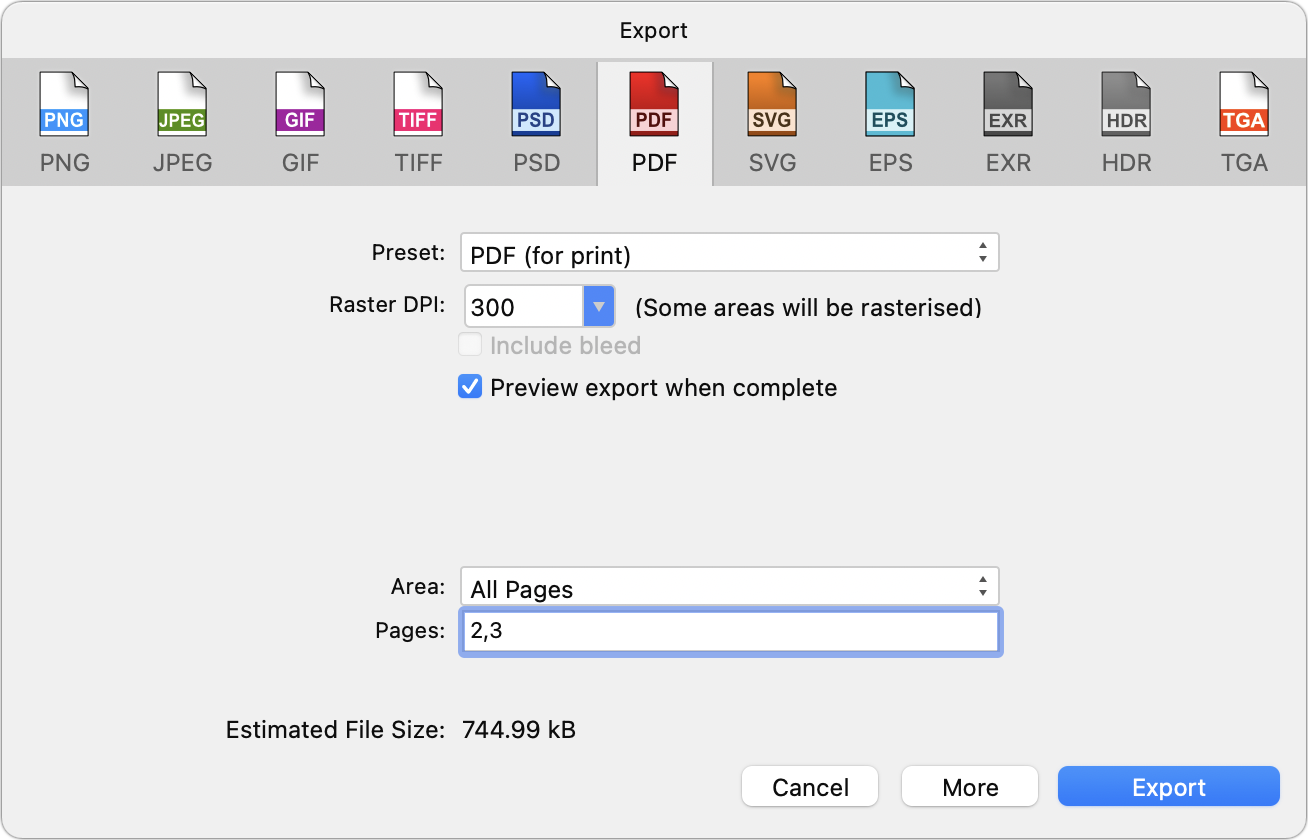
On the export side, the Affinity apps can export in many formats, but they’re more for final exports when it’s time to print or publish. You probably wouldn’t want to use the Affinity apps to collaborate on files with those using the Adobe apps. That said, Affinity Photo can export PSD files for use in Photoshop, and Affinity Designer and Affinity Publisher are probably best served by exporting PDF files that Illustrator and InDesign can open. Just don’t expect everything to move between the apps flawlessly.
In the end, the decision is yours—we’re merely suggesting the Affinity suite as a cost-saving option if you don’t need everything Creative Cloud provides. Visit the Affinity site, watch Serif’s marketing and tutorial videos, and poke around in the extensive online help. Free trial versions of all the apps are available, and there’s a 14-day money-back guarantee. In the best of all worlds, you’ll save hundreds of dollars per year and find that you like the Affinity apps more than Adobe’s.
(Featured image by Serif)