Three Tricks for Dealing with Duplicated Contacts
Everyone eventually seems to end up with duplicates in Apple’s Contacts app. Follow our steps to merge duplicates in the same account or link those in different accounts.

In today’s world, there’s no reason to remember our contacts’ phone numbers or email addresses—that’s a job for our Macs, iPhones, and iPads. This sort of data is so core to using digital devices that Apple has long provided an ecosystem-wide solution in the form of Contacts and syncing through iCloud.
Unfortunately, it’s all too common to end up with multiple cards for the same person in Contacts, either precise duplicates or versions that contain different details. Further muddying the situation, many of us have multiple contact accounts—such as from Google or Microsoft Exchange—and some contacts may be duplicated across several accounts.
This situation is sufficiently common that Apple has provided three ways to deal with duplicate contacts: manually merging selected contact cards, automatically merging duplicate cards, and linking cards replicated in multiple accounts. The first two can be done only in the Contacts app on the Mac; linking can also be accomplished on an iPhone or iPad.
Merge Contact Cards
Let’s say you’ve ended up with two or more contact cards for the same person in the same account. They’ll usually have the same name, but it doesn’t matter if the names are different. To merge them, which combines the data from each into a single card, select them in Contacts, and choose Card > Merge Selected Cards. You should now see just the single merged card.
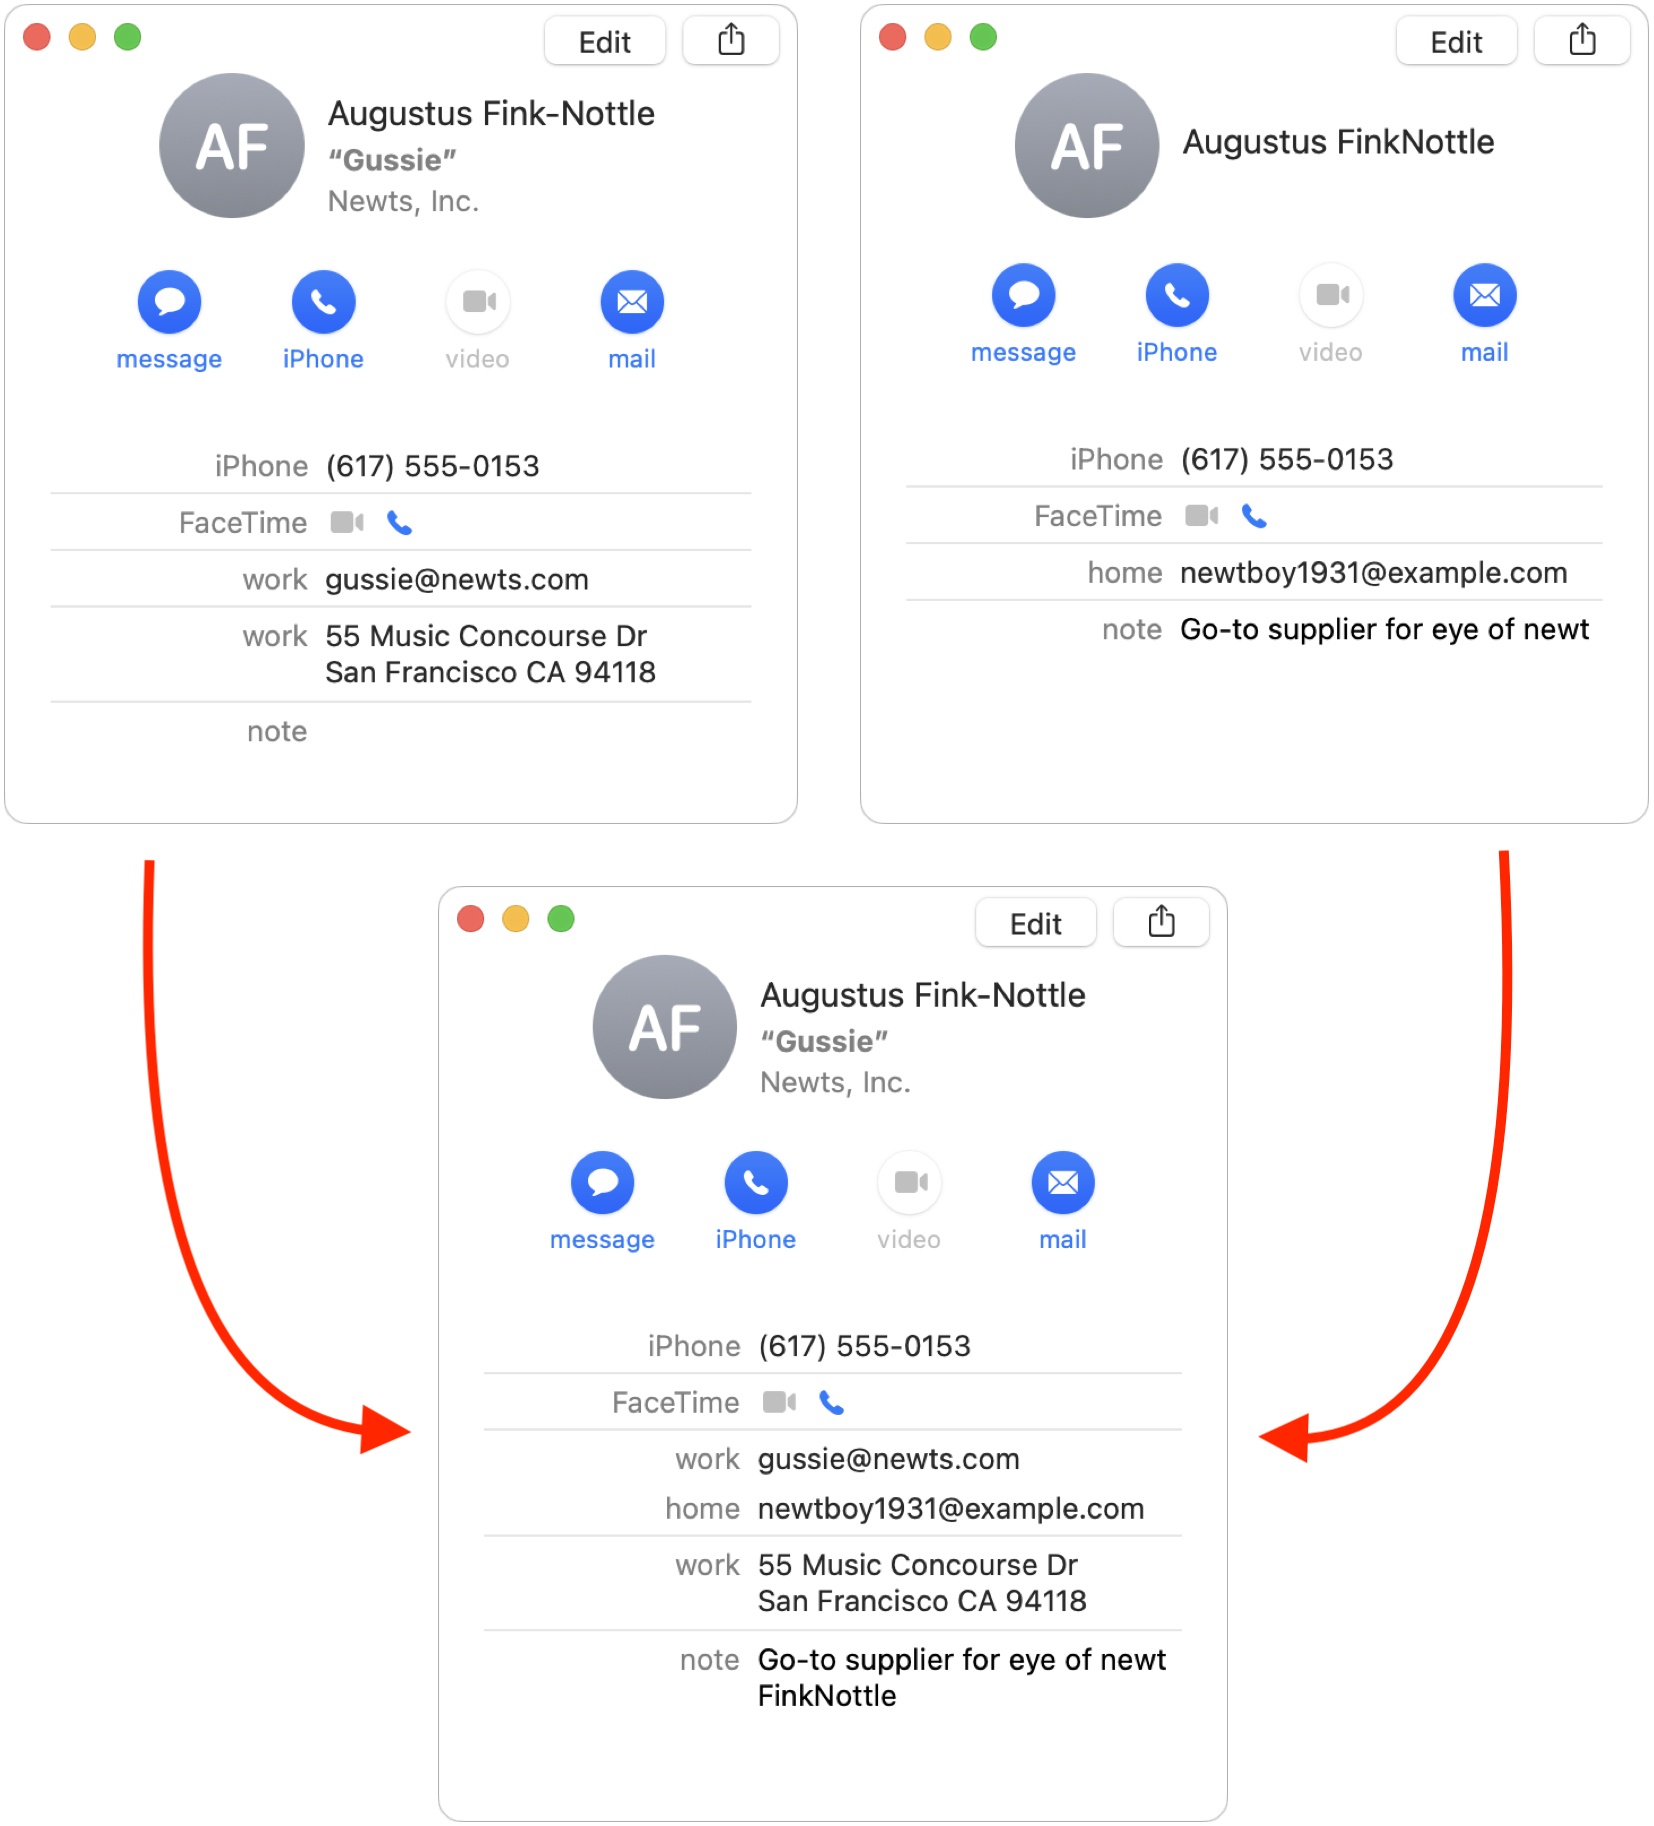
Contacts generally does a good job of identifying data that’s identical between the cards (like the iPhone numbers above), though different labels can sometimes trip it up. When there’s a conflict, Contacts creates a new entry for it. Name conflicts are added to the note field.
Look for Duplicates
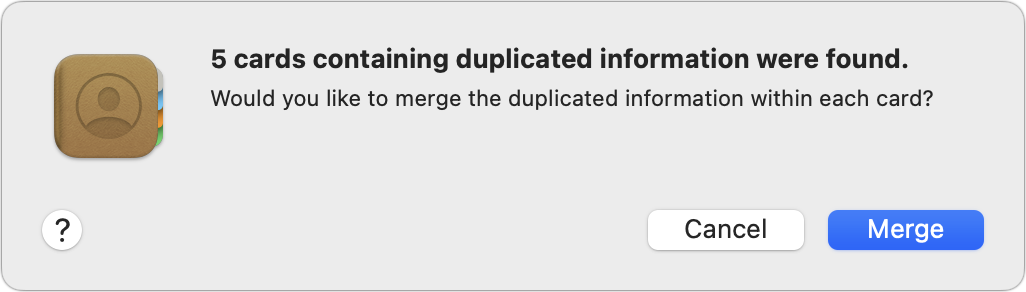
Merge Selected Cards works if you have a small number of duplicates that you can identify easily. However, many people have found themselves in situations where tens or hundreds of contacts have been duplicated, often due to a hiccup in cloud syncing or importing. To help with that too-frequent occurrence, Apple added a feature that looks at all your contact cards and merges those that it determines are duplicates.
It’s simple to use—just choose Card > Look for Duplicates. After Contacts scans all your cards, it puts up a dialog telling you how many cards it found. Click Merge to combine all the duplicates.
Although merging hundreds of cards can be stressful, it usually works very well, and it’s far faster and easier than the alternative, which is to select each set of duplicates manually and use Merge Selected Cards.
Link Contact Cards
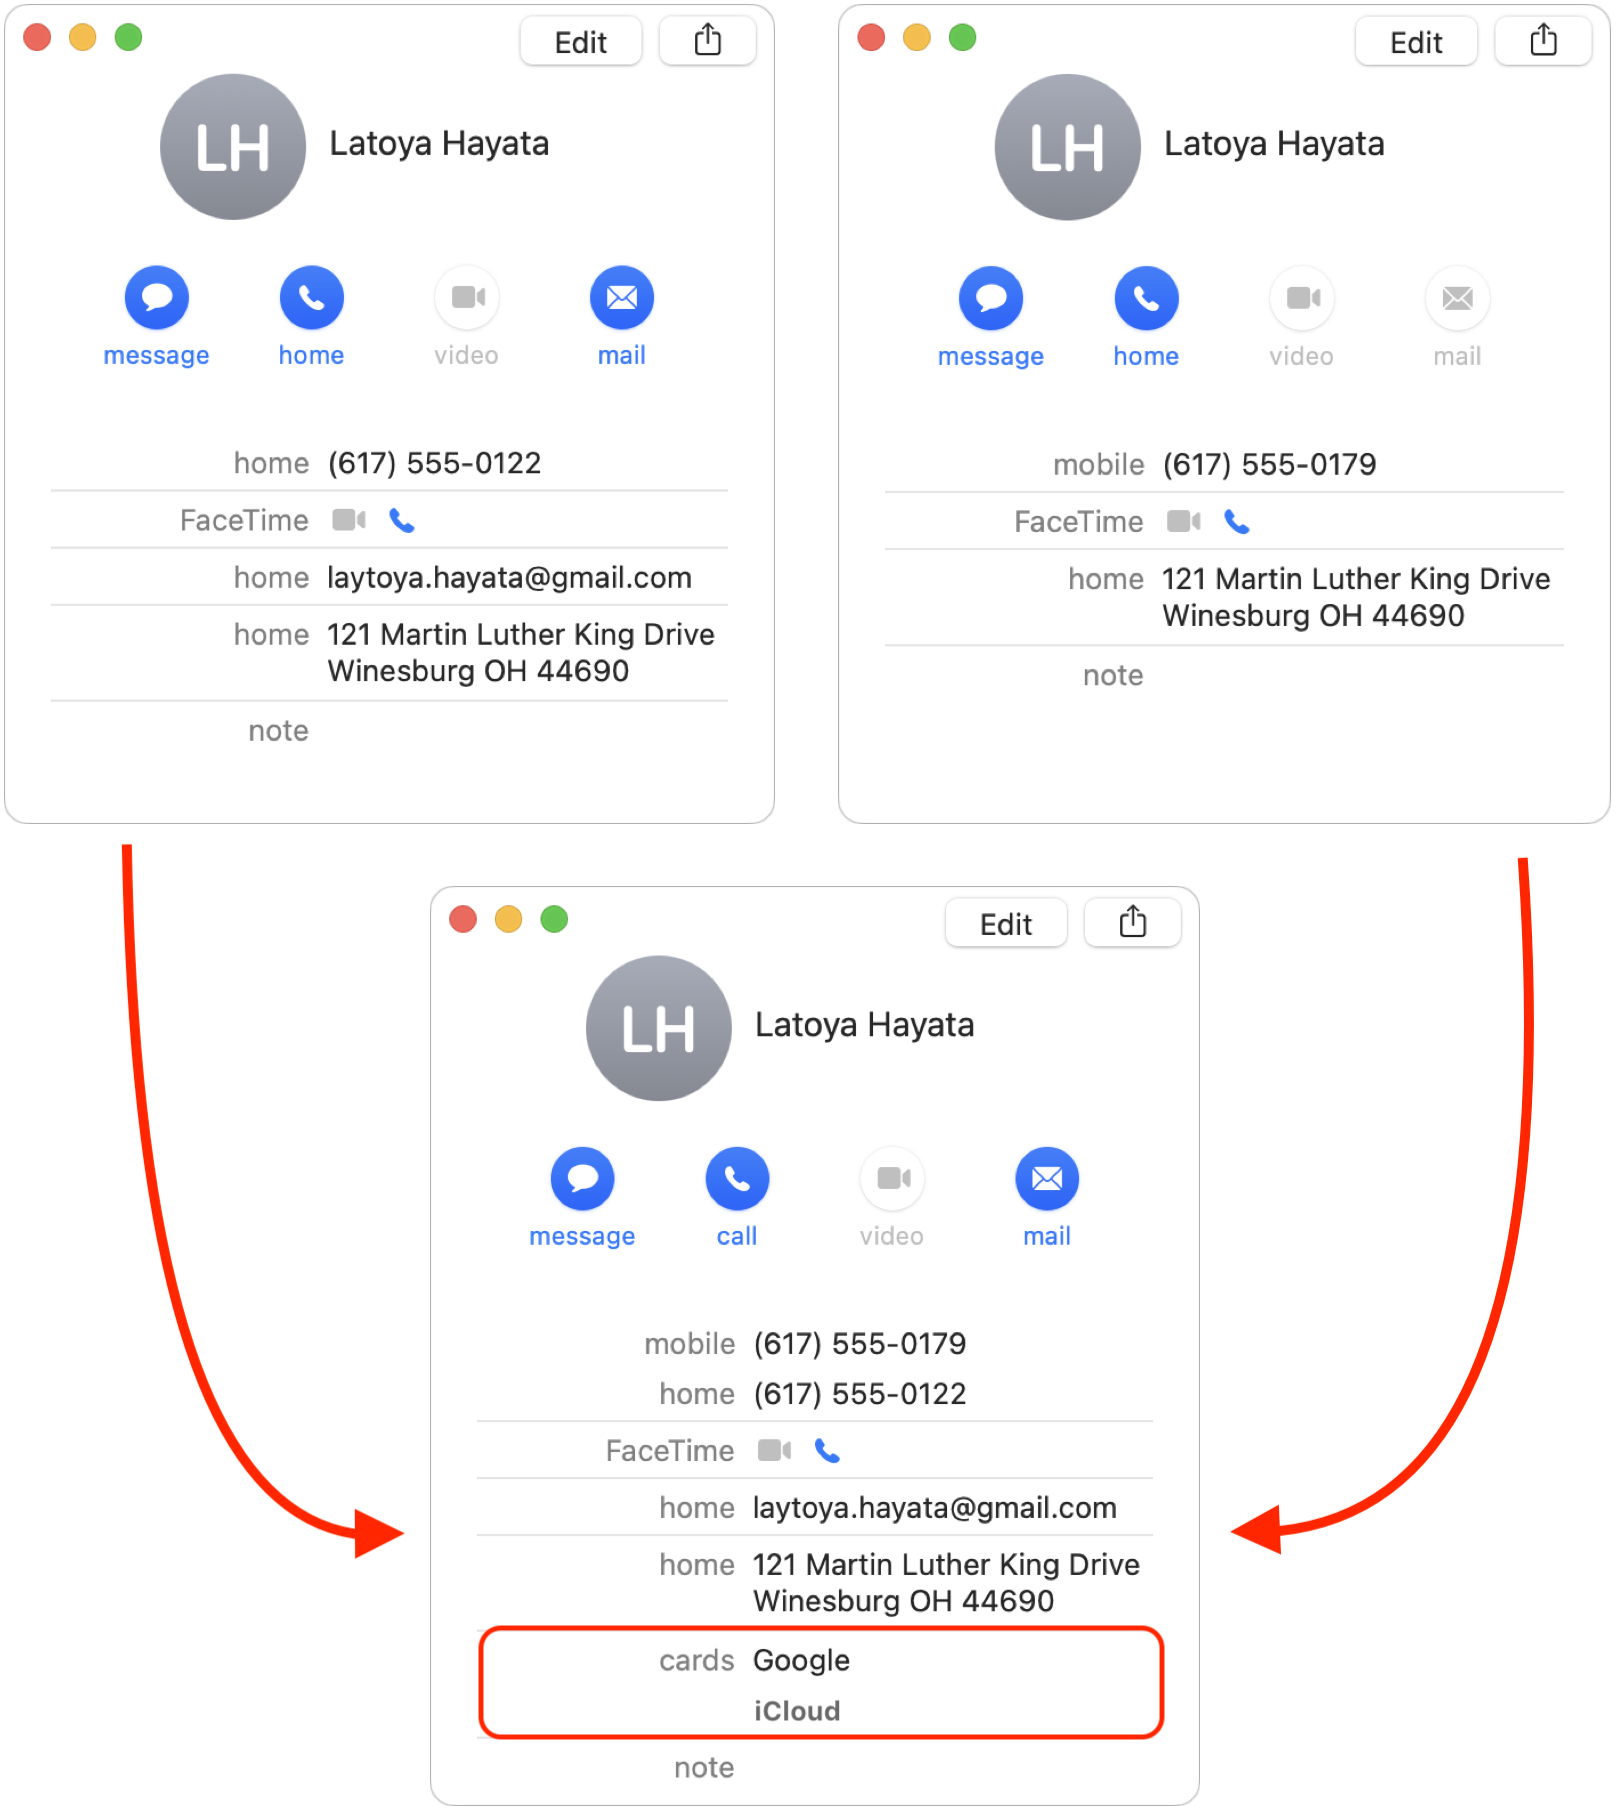
The two previous solutions help when you have duplicate contacts in a single account. Equally annoying can be ending up with contact cards for the same person across multiple accounts. (Check to see what accounts are configured and enabled in Contacts > Preferences > Accounts.) At best, those duplicates will simply clutter your contact list; at worst, you might have to check multiple cards to find the right phone number or email address.
Apple helps you clean up your contact list by linking cards for the same contact across different accounts. (You mustn’t link cards for different people; that can result in people receiving texts meant for others and other confusions.) In essence, this works like Merge Selected Cards, but the separate contact cards remain in their accounts, with Contacts displaying just one card with the combined information.
You can also link contacts using the Contacts or Phone apps on an iPhone or iPad, although the steps are much fussier than in Contacts on the Mac:
Find a person who is replicated across multiple accounts, and view one of their contact cards.
Tap Edit, scroll to the Linked Contacts section at the bottom of the card and tap the green + button.
In the contact list that appears, find and tap the second card for the person—it should either be showing or require scrolling up slightly.
Tap Link, and in the next screen, tap Done.
If you accidentally link the wrong cards and need to unlink them, edit the linked card and click or tap the red Remove button to break the link.
Changes you make to a combined card are saved to each separate card. However, if you want to edit one of the cards but not the other, you can view and edit each one separately by clicking the account name next to Cards on the Mac or tapping the appropriate card under Linked Contacts on an iPhone or iPad.
Cleaning up your contact list may not be the most exciting thing to do, but it’s worthwhile to eliminate duplicates that could cause confusion later on.
(Featured image by iStock.com/anyaberkut)
Increase Business Cybersecurity Awareness in Light of Russian Invasion of Ukraine
The Russian invasion of Ukraine is horrific, but the economic sanctions and other responses from Western nations mean that businesses of all sizes need to be more vigilant about cybersecurity. Read on for suggestions:

For several decades, Russia has targeted a wide variety of cyberattacks at countries with which it has had disputes. That includes the United States and other Western nations, which have recently levied unprecedented sanctions against Russia after it invaded Ukraine. President Biden has warned that “Russia could conduct malicious cyber activity against the United States” in response, encouraging the private sector to increase the protection of systems and networks. This isn’t theoretical—the US Cybersecurity & Infrastructure Security Agency lists numerous such attacks in the last five years.
It’s tempting to think that your business is too small or unimportant to be targeted in a Russian cyberattack. While that may be true of direct infiltration by individual Russian hackers, many cyberattacks are carried out indiscriminately by bots—the ultimate is the DDoS (distributed denial of service) attack that uses compromised computers and Internet-of-things devices to flood a targeted server or company with an unmanageable amount of random Internet traffic. Plus, a common hacking approach is to compromise an account on one seemingly unrelated system as a stepping stone to another, more secure system.
There’s nothing new here—we’ve been encouraging everyone to take cybersecurity seriously for years now. But the threat is now more serious than ever before. So, here’s what we suggest—if you need help with any of this, don’t hesitate to contact us.
Be vigilant: The most common way that hackers gain entry into computer systems is through an employee opening a malicious attachment or being fooled into entering credentials into a fake website. Implement or refresh security awareness training that teaches employees how to recognize suspicious email, identify phishing attempts, and report appropriately.
Use good password practices: Make sure that everyone uses strong, unique passwords that are created, stored, and entered using a password manager. Password managers also identify weak passwords and those that have been compromised in security breaches—ask everyone to audit their passwords and update any that aren’t secure. (But there’s no reason to change good passwords willy-nilly.)
Implement 2FA: Whenever possible, require two-factor authentication, which provides extremely strong protection against remote intrusion given that a compromised password is no longer sufficient.
Keep software up to date: Install all software and operating system updates on all platforms. In its security update notes, Apple often says that particular vulnerabilities are actively being exploited—it’s crucial to install such updates immediately. If you use anti-malware software (essential for Windows; less so for macOS), keep its signatures current.
Backup regularly: Ensure that all systems are backed up regularly, and for your most important data, make sure backups are protected from ransomware encryption by storing them offline or using object locking on a cloud storage service. Be sure to test your backups regularly as well—backing up is the first step, but being able to restore is what’s necessary.
Increase monitoring: Keep a centralized record of all employee reports of suspicious behavior to better identify attack patterns and targeted systems. Whenever possible, make sure server and network device logging is enabled so any incidents can be investigated more fully. Turn on any anomaly reporting capabilities in backup and other security-related apps.
Plan for the worst: Develop or revisit business continuity and crisis response plans. For instance, discuss how you’d deal with losing Internet connectivity, being locked out of key online accounts, or having all your data rendered inaccessible by ransomware.
There’s no reason to panic, but the increased threat from Russian cyberattacks is a good excuse to focus more attention on digital security. The Internet makes astonishing things possible, but it also opens us up to attacks that would previously have been inconceivable. Stay safe out there.
(Featured image by iStock.com/BeeBright)
How Much Memory Do You Need in an M1-Based Mac?
Unified memory in the M1-based Macs boasts increased efficiency and performance but can’t be expanded after purchase. How much should you get when you buy a new Mac? Read on for our advice:

If you’re thinking about buying a new Mac, you’re almost certainly planning to get one that uses a chip from Apple’s M1 family—the M1, M1 Pro, M1 Max, and M1 Ultra. Only the Mac Pro and one Mac mini configuration still rely on Intel CPUs, and they will likely be discontinued before the end of 2022. That’s not a bad thing—the M1 chips offer astonishing performance combined with low power consumption. But the move from Intel chips to Apple silicon has changed the game when it comes to one decision: how much memory to get.
That’s because Apple completely rearchitected how M1-based Macs incorporate memory. On Intel-based Macs that have separate CPU and GPU chips, each chip has its own memory. For instance, the base level Mac Pro comes with 32 GB of RAM on user-replaceable memory sticks, while its Radeon Pro graphics card has 8 GB of memory. The main advantage of this approach is that you can install more system memory if you need it—up to 1.5 TB at purchase time or later—and you can opt for one or even two video cards with up to 64 GB of memory. But that sort of flexibility was available only for the Mac Pro, Mac mini, and now-discontinued 27-inch iMac—with Apple’s laptops, you couldn't upgrade memory because it was soldered onto the logic board, not socketed.
For M1-based Macs, Apple went even further and built “unified memory” directly on-to the M1 chip itself. This provides significant performance benefits for two reasons:
Shared memory pool: The M1 chips contain CPU cores, GPU cores, and Neural Engine cores, all of which need to use memory. By creating a shared pool of memory—hence the “unified memory” name—each processor can operate on the same data in memory rather than sending it back and forth from chip to chip. That’s both faster and more efficient.
Higher memory bandwidth: By building memory onto the M1 chips them-selves, Apple could also speed up the connection between memory and the various processors. Communication between on-chip components is much faster than when data has to travel back and forth between chips across the circuitry of the logic board and graphics card, as was the case for Intel-based Macs.
The downside of unified memory is that you’re stuck with how much you choose when you buy a Mac—there’s no way to upgrade the memory later. Given that only certain Macs have particular M1 chips, figuring out how much you need gets a little complicated.
For instance, if you want a MacBook Air, you can only choose between 8 GB and 16 GB of memory. However, if you are interested in the 14-inch MacBook Pro, you can get either an M1 Pro or M1 Max, and which chip you choose determines whether you can opt for 16 GB, 32 GB, or 64 GB of memory. Here are your choices, with each chip offering two options:
M1: 8 GB and 16 GB. Used in the MacBook Air, 13-inch MacBook Pro, Mac mini, and 24-inch iMac. The 16 GB option adds $200 to the price.
M1 Pro: 16 GB and 32 GB. Used in the 14-inch and 16-inch MacBook Pro. The 32 GB option adds $400 to the price.
M1 Max: 32 GB and 64 GB. Used in the 14-inch and 16-inch MacBook Pro and Mac Studio. The 64 GB option costs an additional $400, half the price per gigabyte of the M1 and M1 Pro memory upgrades.
M1 Ultra: 64 GB and 128 GB. Used solely in the Mac Studio. The 128 GB option costs an additional $800, matching the M1 Max’s price per gigabyte.
With all that background in your head, here are some questions to guide your decision:
What sort of user are you? For average users who use Safari, Mail, Photos, and the apps in Apple’s iWork suite, an M1 Mac with 8 GB is probably sufficient, although $200 isn’t that much more to pay for 16 GB. If you regularly work with photos, audio, or video, a Mac with an M1 Pro or M1 Max would likely be more appropriate, and the larger the files you work with, the more memory you should get. Only those with the highest performance demands, such as a video professional working with 8K video or data scientist, should consider a Mac Studio with an M1 Ultra—if you’re at that level, you probably know if you need 64 GB or 128 GB.
How much RAM do you have now? Another way to approach the problem is to think about how much RAM your current Intel-based Mac has, and if that’s enough. (Look at the Memory Pressure graph in the Memory tab of Activity Monitor—if it’s regularly yellow or red, you need more memory.) The increased performance and efficiency of memory use on the M1 chips suggest that you can get away with the same amount or even less than you have now while still enjoying improved performance. We recommended 16 GB as the minimum for Intel-based Macs, but 8 GB seems to be an acceptable base level for M1-based Macs.
Do you anticipate increased memory needs? The hardest part of the decision is looking into the future and thinking about whether a certain amount of memory will be sufficient in several years. It’s never a bad idea to buy more memory than you think you need now to plan for the future—just more expensive. For example, if you’re on the fence between 16 GB and 32 GB with an M1 Pro-based Mac, $400 may be a reasonable price to pay for some future-proofing.
In the end, you’ll never regret having more memory, though you may dislike paying for it now. If cost is a real problem, you’re probably better off getting more memory and less internal SSD storage, since you can always add more external storage. Regardless, feel to reach out for help choosing the right Mac and memory configuration.
(Featured image by Apple)
Apple Wows with Mac Studio and Studio Display, Updates iPhone SE and iPad Air
At its March 8th Peek Performance event, Apple unveiled the impressive new Mac Studio—powered by the M1 Ultra chip—and Studio Display. The company also introduced an updated iPhone SE and iPad Air. Read on for details:

At its March 8th Peek Performance event, Apple freshened its iPhone and iPad product lines with a new third-generation iPhone SE and fifth-generation iPad Air, along with new green hues for the iPhone 13 line. Then Apple focused on the big announcements of the day: the entirely new Mac Studio, powered by the insanely fast M1 Ultra chip and accompanied by the stunning 27-inch Studio Display.
Mac Studio with M1 Ultra and Studio Display Redefine the Mac Lineup
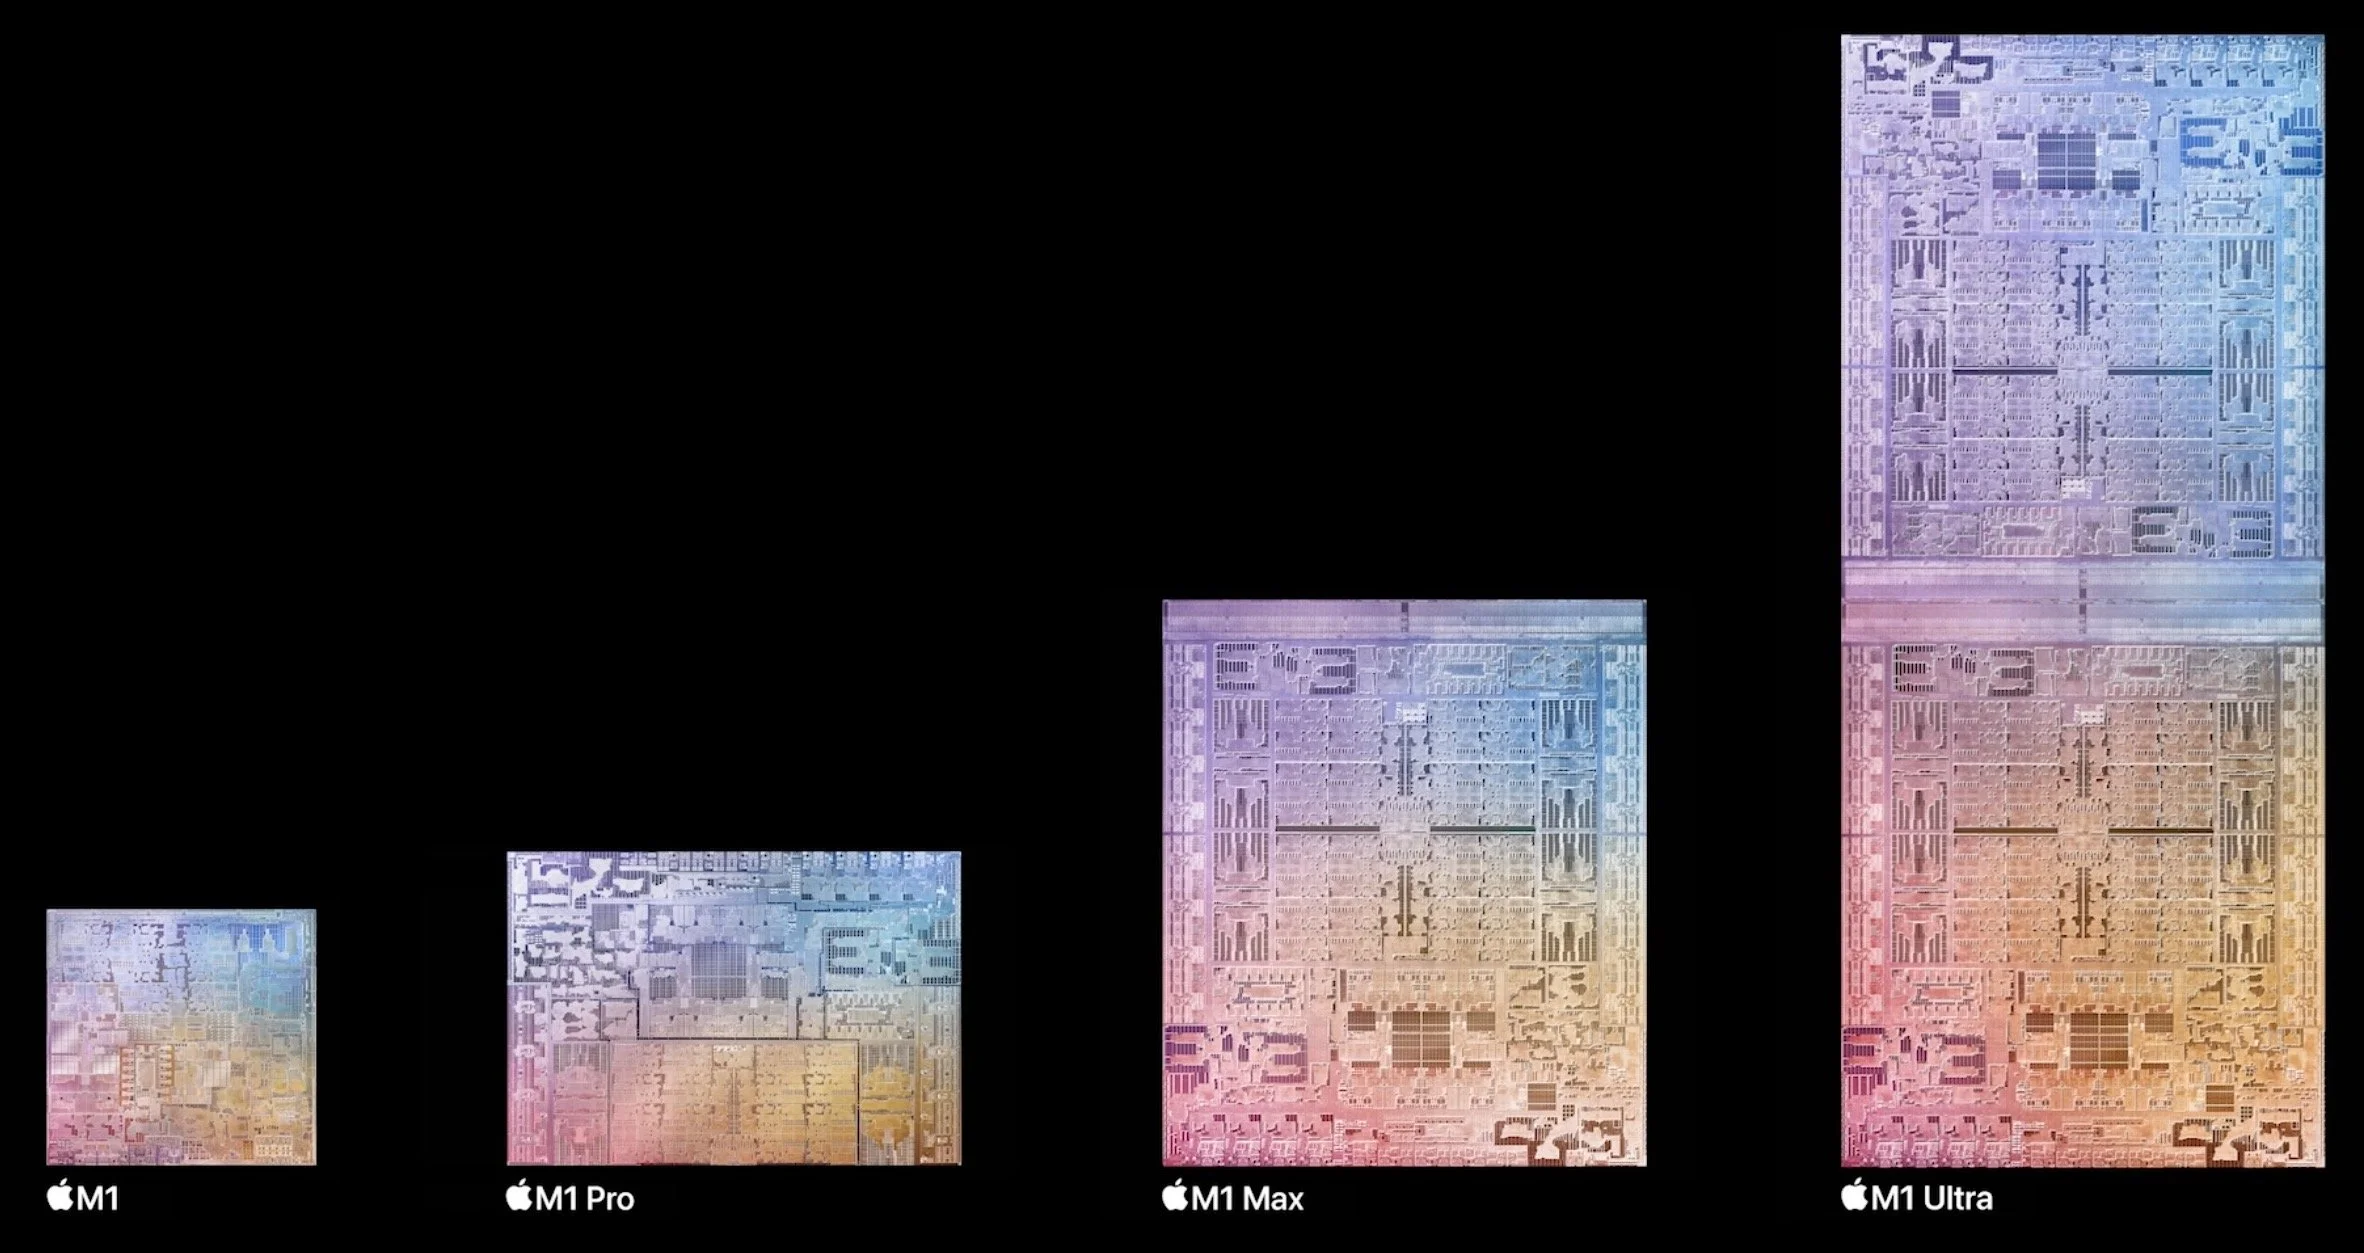
In 2020, Apple started to transition Macs away from Intel processors to Apple silicon, beginning with the M1 system-on-a-chip and a year later adding the even more powerful M1 Pro and M1 Max to the family. The performance of those chips, particularly when measured against their low power requirements, was stellar. Apple has now unveiled the M1 Ultra, which bonds two M1 Max chips together for double the performance.
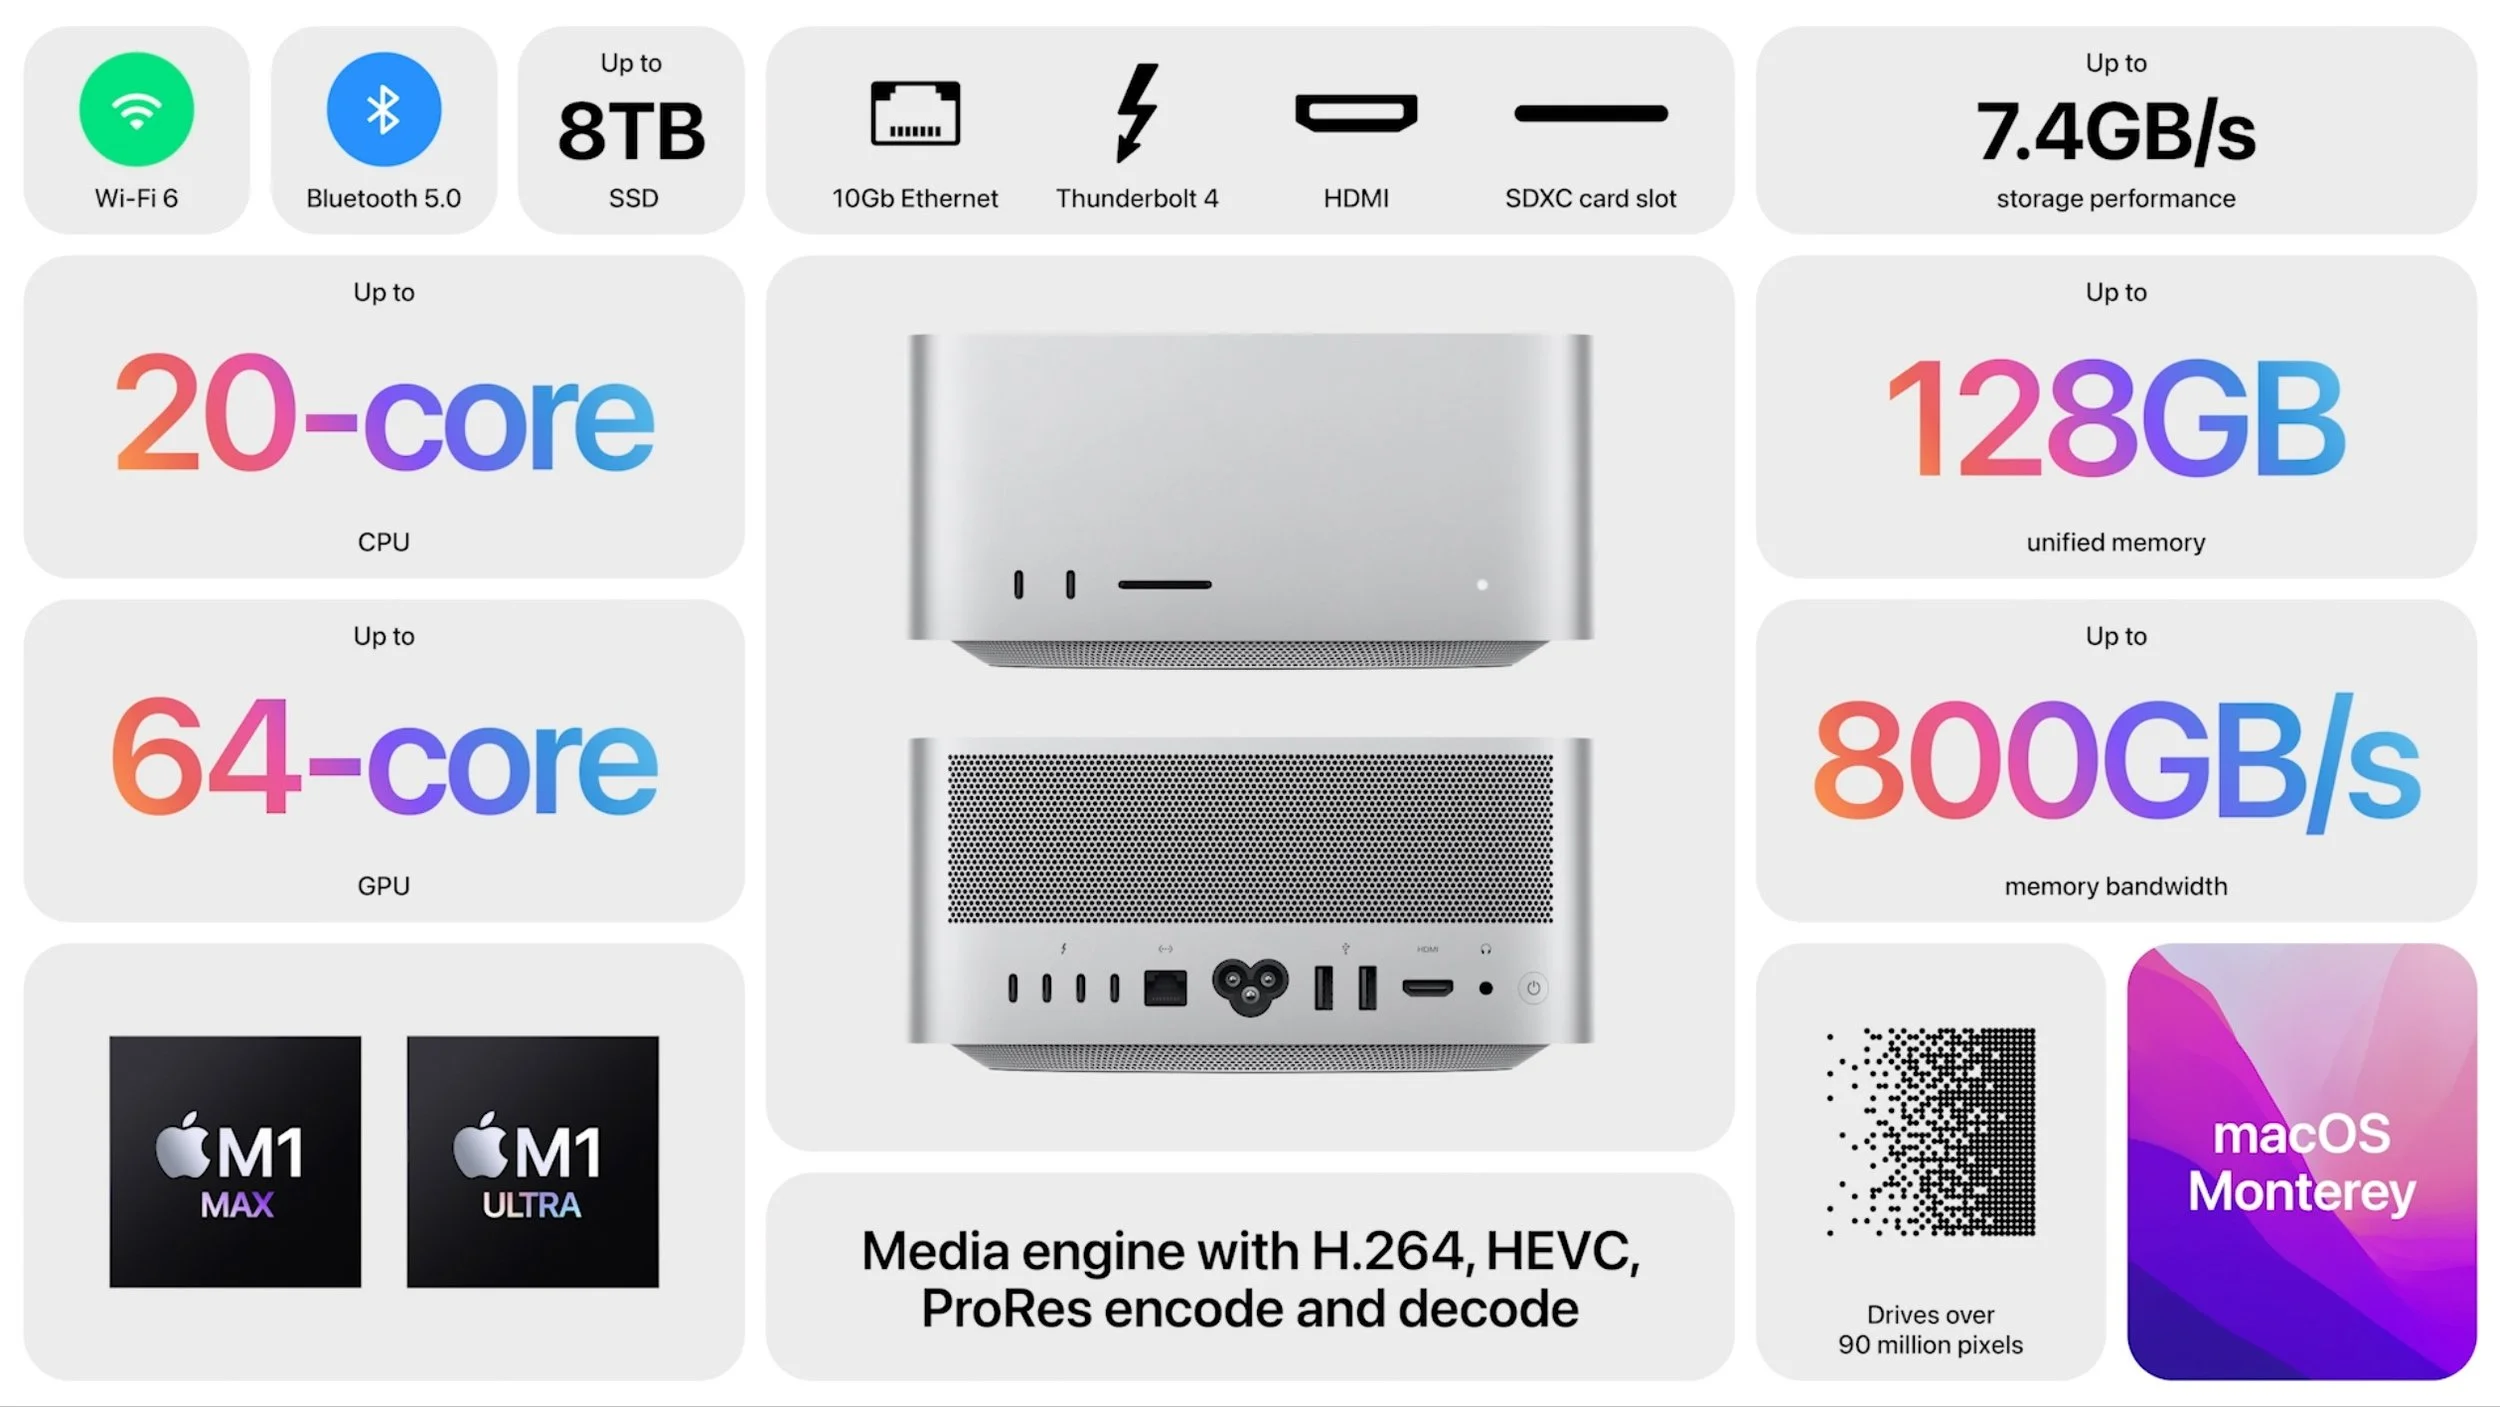
To hold the M1 Ultra—or a less expensive M1 Max—Apple introduced an entirely new Mac that looks like an inflated Mac mini. The Mac Studio has the same 7.7-inch (19.7 cm) square outline, but is more than twice as tall, clocking in at 3.7 inches (9.5 cm) high. Much of that vertical space is occupied by cooling fans, but Apple says the Mac Studio makes minimal noise.

The Mac Studio also expands the Mac mini’s price, with the M1 Max model starting at $1999 and the M1 Ultra model at $3999. You can kit a Mac Studio out with an impressive set of options:
Chip: For $1999, the M1 Max model offers 10 CPU cores, either 24 or 32 (add $200) GPU cores, and 16 Neural Engine cores. The $3999 M1 Ultra model doubles those numbers with 20 CPU cores, 48 or 64 ($1000) GPU cores, and 32 Neural Engine cores.
Memory: With the M1 Max, you can choose between 32 GB or 64 GB ($400) of unified memory. With an M1 Ultra, you can opt for either 64 GB or 128 GB ($800) of unified memory.
Storage: Internal SSD storage starts at 512 GB, with options of 1 TB ($200), 2 TB ($600), 4 TB ($1200), and 8 TB ($2400).
Because of Apple’s focus on creative professionals, the Mac Studio offers a solid set of ports. On the back, it has four Thunderbolt 4 ports, a 10-gigabit Ethernet port, two USB-A ports, an HDMI port, and a 3.5 mm headphone jack. 802.11ax Wi-Fi 6 is built in, as is Bluetooth 5.0. For ease of access, Apple finally put ports on the front, too. The M1 Max model features two USB-C ports, whereas the M1 Ultra model offers two Thunderbolt 4 ports. Both provide an SDXC card slot.
To address the Mac Studio’s lack of a screen, Apple introduced the $1599 Studio Display. It’s a 27-inch 5K Retina display with a native resolution of 5120-by-2800, P3 wide color, and True Tone technology. Nano-texture glass is a $300 option if you need less reflectivity. There are three stand options: a 30º tilt default, a VESA mount adapter, or a tilt- and height-adjustable stand for $400 more. Note that you can’t swap one for another later. The Studio Display offers one Thunderbolt 3 port to connect to a Mac—complete with 96-watt charging—and three USB-C ports for connecting peripherals.
What sets the Studio Display apart from other monitors is that it uses an A13 Bionic chip—the same brains in the iPhone 11—to power a 12-megapixel Ultra Wide camera with Center Stage (Apple’s technology for smoothly keeping you in the frame as you move around on a video call), a three-mic array with directional beamforming, and a high-fidelity six-speaker system. In short, this is the ultimate Mac videoconferencing setup. It even supports spatial audio when playing music or video with Dolby Atmos, and you can use “Hey Siri” with it.

There’s one other fact you need to know before we put all this together: Apple said that the only remaining Mac to transition to Apple silicon is the Mac Pro, which means that it’s dropping the popular 27-inch iMac from the lineup. We’re sad since that iMac was a terrifically good deal, but if you’ve been waiting for an Apple silicon 27-inch iMac, the Studio Display suggests four alternative directions, depending on your needs. Remember that even the entry-level M1 chip outperforms the most recent Intel-based 27-inch iMac.
Minimize desktop cost: If keeping costs down while sticking with Apple-designed desktop gear is important to you, couple a Mac mini with the Studio Display.
Maximize desktop performance: Need the maximum performance on your desk? A Mac Studio driving one or more Studio Displays is the ultimate professional setup today.
Minimize portability cost: Those who need portability and desktop screen real estate can get both without breaking the bank by combining a MacBook Air or 13-inch MacBook Pro and the Studio Display.
Maximize portability performance: For top-notch portability, performance, and productivity, a 14-inch or 16-inch MacBook Pro is unbeatable when matched with one or even two Studio Displays.
Finally, don’t discount the 24-inch iMac. Although its screen is smaller than the 27-inch iMac’s, its Retina screen resolution isn’t far off, and it’s notably less expensive. If you mostly like the all-in-one nature of the 27-inch iMac and don’t need the performance of the Mac Studio or MacBook Pro, you won’t go wrong with a 24-inch iMac.

Both the Mac Studio and Studio Display are available to order now, with shipments starting on March 18th, although demand is already pushing some ship dates into April. Note that the Mac Studio doesn’t include any input devices, but Apple also introduced a new silver-and-black Magic Keyboard with Touch ID and Numeric Keypad ($199), Magic Mouse ($99), and Magic Trackpad ($149) designed to complement the Studio Display.
Third-generation iPhone SE Gains A15 Bionic and Better Camera
Not everyone wants—or at least wants to pay for—the latest and greatest. For those looking for a small iPhone at a reasonable price, the new third-generation iPhone SE is still a bargain. Prices start at $429 thanks to its 4.7-inch screen in an iPhone 8 design and Touch ID-enabled Home button. That’s $30 more than the previous generation, but you get the same A15 Bionic chip that’s in the iPhone 13 line and Apple’s promise that iOS will support it for years to come. The new iPhone SE also gains 5G support for faster cellular Internet connectivity, though it doesn’t support the fastest millimeter-wave flavor of 5G.
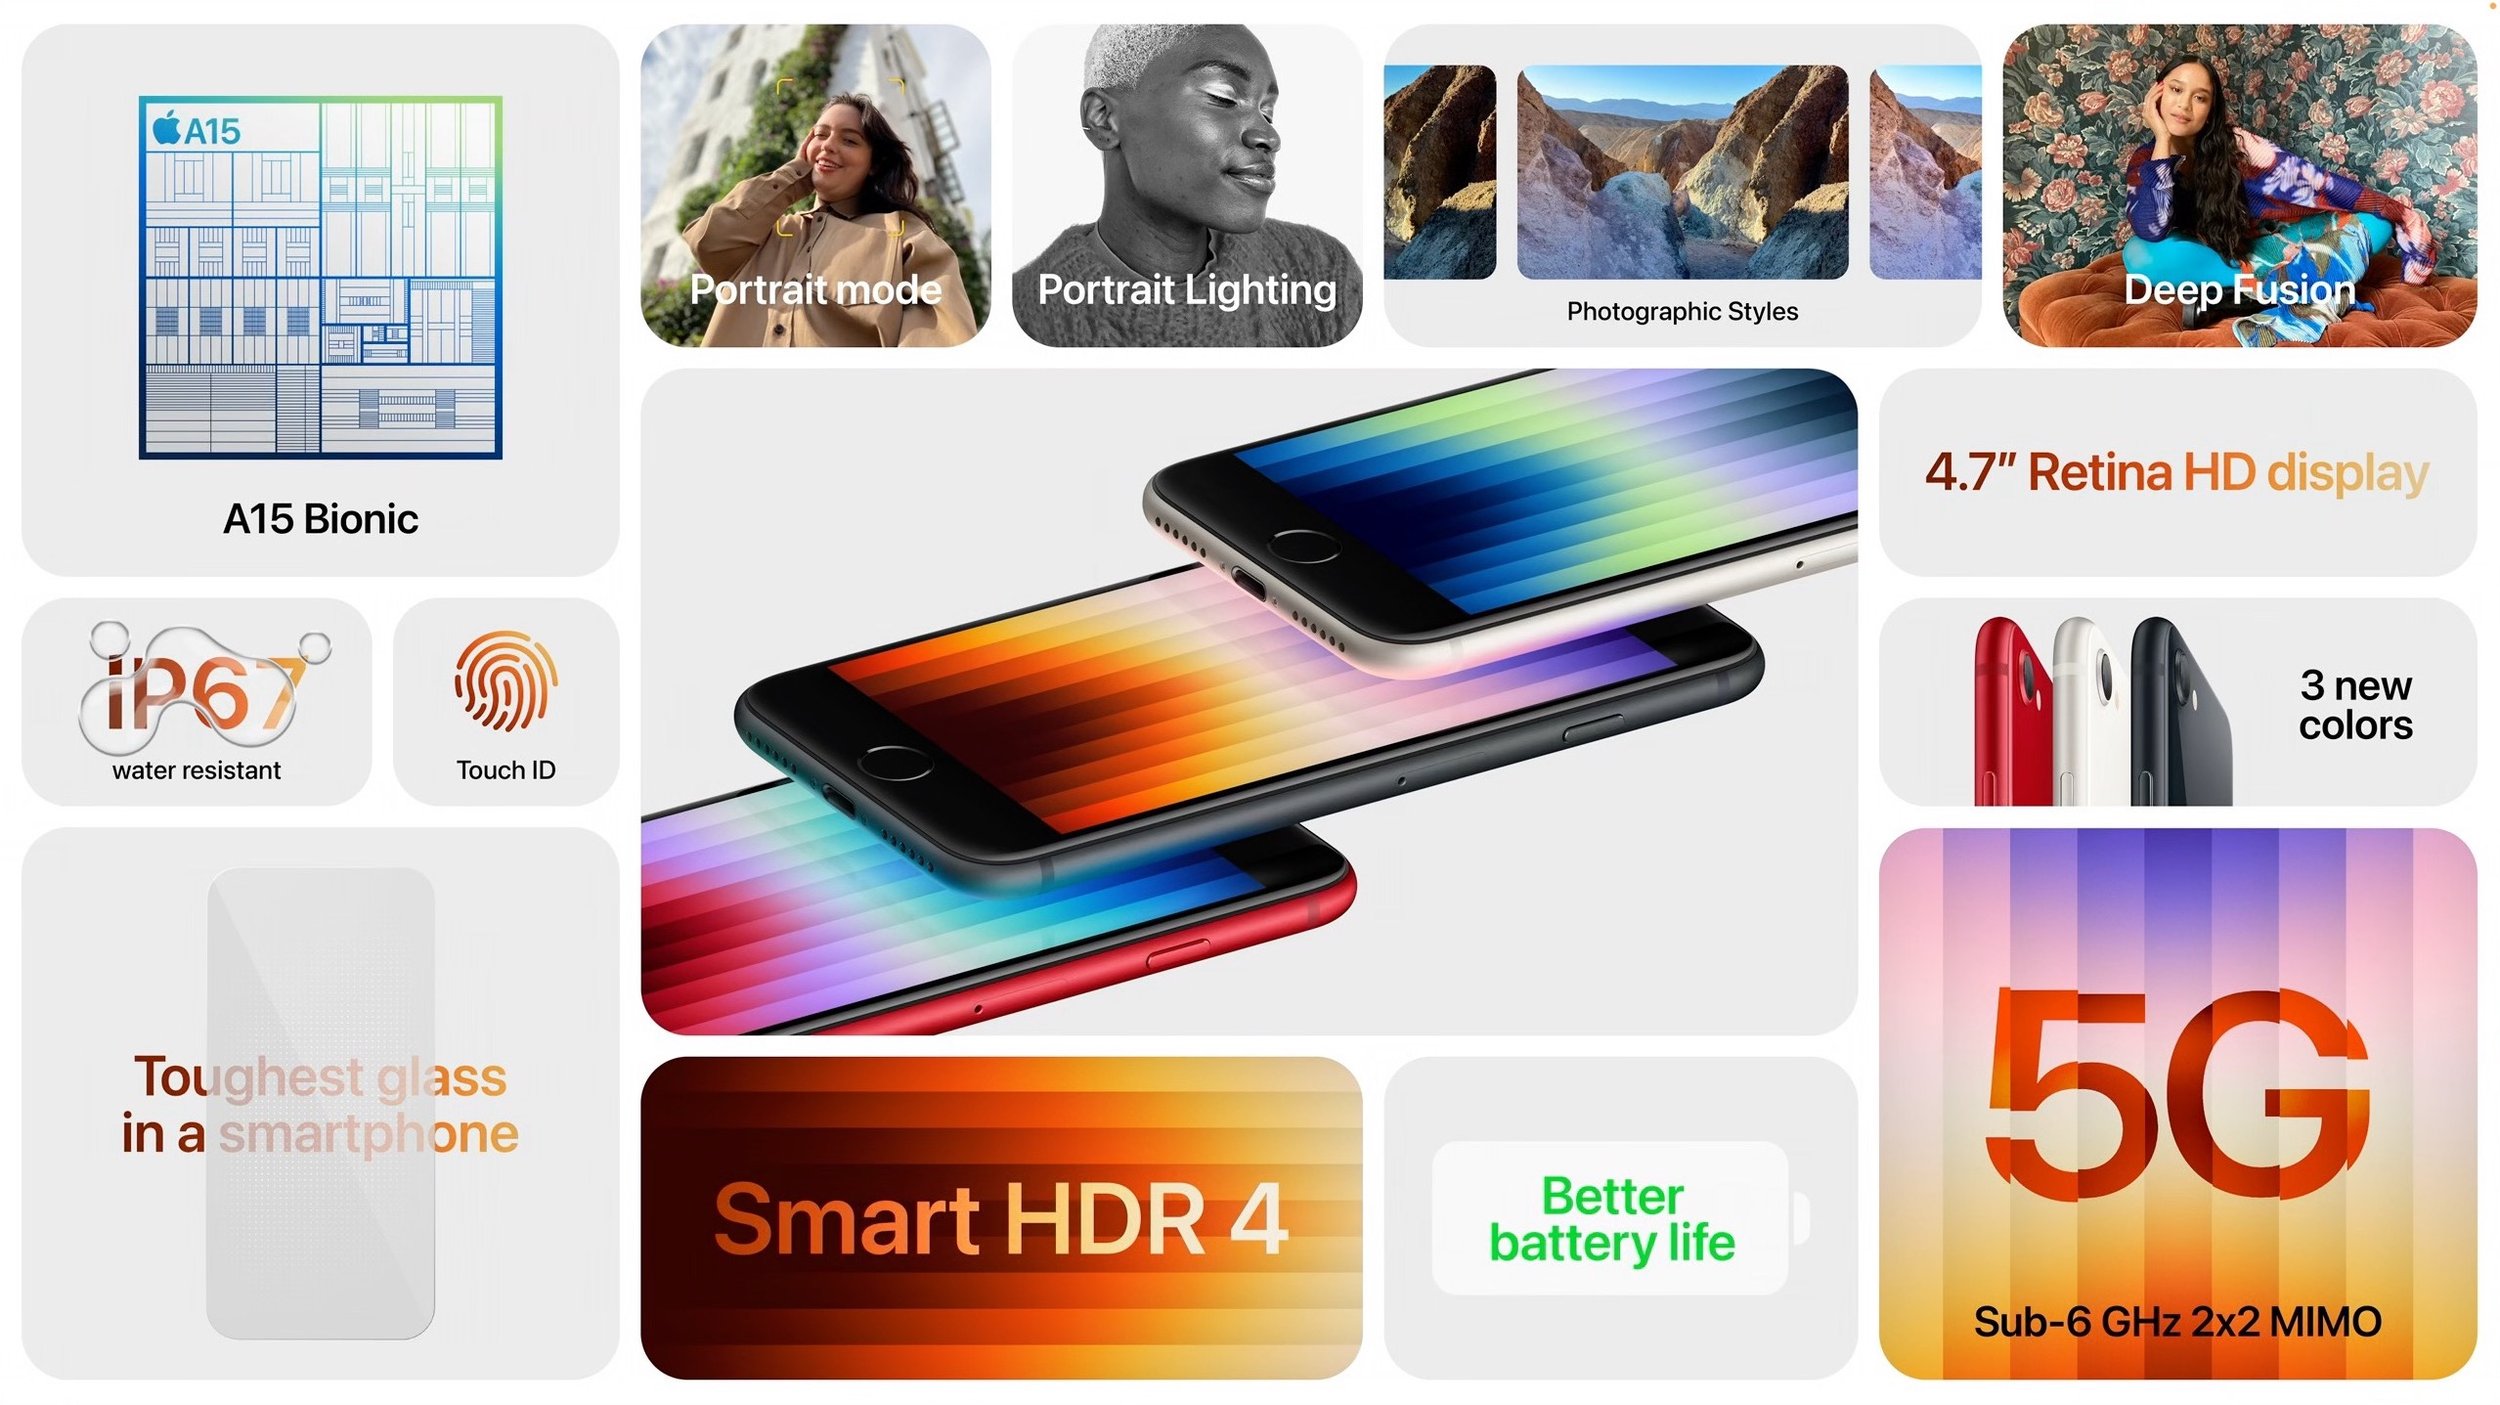
The A15 Bionic’s processing power enhances the 12-megapixel camera, providing computational photography capabilities like Smart HDR 4, Photographic Styles, Deep Fusion, and Portrait mode. The A15 Bionic’s image signal processor also improves video quality, particularly in low-light situations. Despite the increased performance, Apple says the new iPhone SE features better battery life than the second-generation iPhone SE and all previous 4.7-inch iPhone models. (Generally speaking, the bigger the iPhone, the better the battery life, thanks to additional room inside.)
You can order the new iPhone SE, which comes in midnight (black), starlight (white), and PRODUCT(RED), starting at 8 AM Eastern on March 11th, with delivery starting on March 18th. The 64 GB model costs $429, 128 GB costs $479, and 256 GB is $579.
Fifth-generation iPad Air Moves to M1 and 5G
For many people, the $599 iPad Air is the sweet spot of the iPad line, fitting nicely between the $329 iPad and the $799 11-inch iPad Pro. However, the fourth-generation iPad Air had fallen behind in a few ways, making its price less palatable.
The new fifth-generation iPad Air makes the price compelling again, thanks to the move to the same M1 chip used in the iPad Pro (and many Macs). It boasts up to 60% faster CPU performance than the previous model and twice the graphics performance. Even more noticeable in this age of videoconferencing is the addition of an Ultra Wide front-facing camera with Center Stage. Those who need speedy connectivity on the go will appreciate the new 5G support, though it doesn’t support the fastest millimeter-wave 5G. Apple also doubled the throughput for the iPad Air’s USB-C port, but it remains slower than the Thunderbolt port in the iPad Pro models.

Other key specs remain the same, including the size and industrial design, Touch ID in the top button, support for the second-generation Apple Pencil, rear-facing camera, and battery life.
As with the new iPhone SE, pre-orders for the new iPad Air open at 8 AM Eastern on March 11th, with delivery starting on March 18th. It comes in five new colors: space gray, pink, purple, blue, and starlight (white). $599 gets you 64 GB of storage, whereas 256 GB costs $749. Add another $150 for a cellular-capable model.
(Featured image by Apple)
Apple Works to Improve Safety in the Wake of AirTag Stalking Reports
Media reports suggest that miscreants are trying to use Apple’s AirTag location trackers to stalk people. Apple has responded with personal safety advice and promised AirTag safety enhancements.

Over the past few months, there has been a spate of media reports about how people may have been tracked without their knowledge using AirTags, Apple’s elegant location trackers. Like many mainstream media forays into the tech world, the reports are often short on detail and sometimes unclear on the reality of how the AirTags work. Nor is it clear that there have been many successful cases of AirTag abuse, but the mere fact that people are trying to use AirTags to stalk others is concerning.
Apple put significant effort into preventing such abuses, revolving around three features:
Safety alerts: If you have an iPhone or iPad running iOS 14.5 or later and an unknown AirTag is traveling with you, your device will alert you to that fact. Although safety alerts aren’t available for those using Android smartphones, Android users can download Apple’s Tracker Detect app to scan manually.
Safety sounds: After an AirTag has been separated from its owner for several days, it will make a sound the next time it moves.
NFC identification: If you find an AirTag, you can hold it up to an iPhone or other NFC-capable smartphone to load a website that reveals the AirTag’s serial number and the last four digits of the owner’s phone number. The police can use this information to learn the owner’s identity from Apple.
Sadly, those precautions haven’t been sufficient either to dissuade all would-be stalkers or to educate potential stalking victims (and let’s be real—dissuading stalkers is also a matter of educating people that it’s unethical, likely dangerous, and often illegal to abuse an AirTag in this way). Apple has responded in two ways, one general, the other specific to AirTags.
Personal Safety User Guide
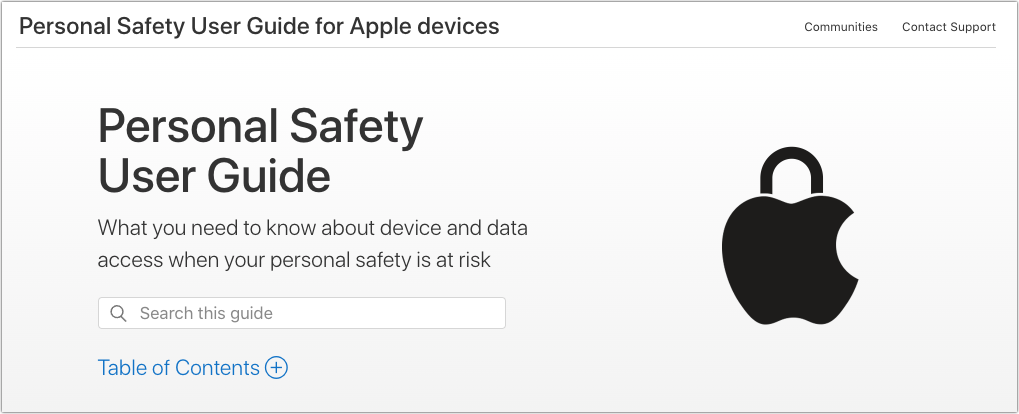
Apple documents its products and services quite well, but the company tends to generate many focused pages without much high-level organization. It’s all too easy to flail around within Apple’s support documentation looking for help if you don’t know what search terms are likely to work. In an effort to mitigate that problem for issues surrounding personal safety, Apple has created the Personal Safety User Guide website, also available as a downloadable 56-page PDF.
The Personal Safety User Guide brings together numerous Apple support articles in two main sections:
Review and take action: The first section helps you review how your devices and apps are set up, with a focus on settings that could expose you to harm. It helps you manage sharing settings, look at location sharing, control your Home accessories, and more. You’ll also learn how to block unknown sign-in attempts, document suspicious activity, delete suspicious content, and avoid fraudulent requests to share information, among much else. The main criticism here is that the section on AirTag safety doesn’t explain or link to all the features Apple provides.
Safety and privacy tools: The second section is a bit more generic, providing support documentation that encourages you to take advantage of the features Apple has provided to protect your safety and privacy. Among other topics, it discusses passcodes, setting up Face ID and Touch ID, using two-factor authentication, seeing which apps are accessing your data, blocking unwanted calls and messages, and using Emergency SOS.
The Personal Safety Guide ends with three checklists, each of which walks you through a series of steps. These are extremely useful because almost no one would necessarily know or remember all the places to check. The checklists help you:
See who has access to your device or accounts
Stop sharing with someone
Control how someone else can see your location
The Personal Safety User Guide website is best when you want an answer to a specific question, but it doesn’t lend itself to reading front to back. For that, we recommend downloading the PDF, which you can read at whatever depth you desire. But do at least scan the entire thing to get a sense of what it contains should you need that information later.
Apple AirTag Announcement
Shortly after releasing the Personal Safety Guide, Apple also posted a short but detailed statement on its website. In it, the company makes it clear that it is actively working with law enforcement on all cases involving AirTag abuse. Apple also says that it has updated its unwanted tracking documentation to explain AirTag safety features more clearly to users and to include resources for those who feel their safety is at risk.
Apple also outlined important advancements that will be coming to the AirTag and Find My network systems via software updates later this year:
New privacy warnings during AirTag setup: To ensure that everyone understands the utility of AirTags and the implications of abuse, people setting up an AirTag for the first time will see a message that clearly states that AirTags are meant to track their own belongings, that tracking people without their consent is a crime in many places, that AirTags are designed to alert victims to their presence, and that law enforcement can request identifying information about the owner of an AirTag.
Better alerts for AirPods: Instead of an “Unknown Accessory Detected” alert when your iPhone detects Find My network-compatible AirPods traveling with you, the alert will specify that AirPods are involved, not an AirTag. (There are third-party Find My network accessories that will still generate this alert, such as the Chipolo ONE Spot.)
Refined unwanted tracking logic: Apple will be updating its unwanted tracking alert system to notify users sooner that an unknown AirTag or Find My network accessory is traveling with them.
Precision Finding for unknown AirTags: Those with an iPhone 11, iPhone 12, or iPhone 13 will be able to take advantage of Find My’s Precision Finding feature to home in on the location of an unknown AirTag. Previously, this capability was limited to your own AirTags.
Display alerts with unknown AirTag sound: When an unknown AirTag emits a sound to alert anyone nearby to its presence, and it’s detected moving with your iPhone or iPad, an alert will also appear to help you play the sound again or use Precision Finding, if available. This should help when an unknown AirTag is in a place that blocks sound or if its speaker has been disabled.
More obvious AirTag alert sound: Apple will be adjusting the tone sequences to make an unknown AirTag’s alert sound easier to hear and find.
Overall, these changes are welcome, and it’s a testament to the care Apple took when designing the AirTag and Find My network systems that it can make such enhancements through software updates—no hardware changes are necessary. It’s also good to see Apple taking the problem—however small it might actually be—seriously and working to reduce it even further.
(Featured image by Apple)

Please Dispose of Old Electronics Responsibly—Not in the Trash or Standard Recycling!
Don’t throw old electronics in the trash! Or even in your usual recycling bin! It’s important to dispose of e-waste properly to avoid polluting the environment and causing destructive fires. Learn how here:

We all have old electronics squirreled away in our drawers and closets. It’s hard to admit that a computer, phone, or peripheral that cost hundreds or even thousands of dollars years ago has little or no value. That’s doubly true if it doesn’t work anymore. Once you’ve decided to get rid of that PowerBook 520 from the 1990s or your first digital camera from 2004, resist the urge to toss it in the trash.
In some places, it’s illegal to throw out electronics because they tend to contain heavy metals like mercury, lead, and lithium, plus other hazardous materials that can pollute the air if incinerated or contaminate the ecosystem if buried in landfills. Even if dumping e-waste is not actively illegal in your area, it’s a terrible thing to do. So what can you do instead?
No matter what you choose, make sure to delete all your data to the extent possible. If the device in question works, it’s best to erase or reformat its storage. Apple makes that relatively easy, especially on iOS devices; look in Settings > General for a reset option that contains Erase All Content and Settings. For dead computers whose drives contain data, you can remove the drive and ensure your data can’t be accessed by whacking it with a hammer or drilling through the case. That can be a good stress reliever too, but be sure to wear safety goggles.
Sell
If the old device is fully functional or sufficiently rare, you may be able to sell it on eBay or through Craigslist. To determine if that is likely to be worthwhile, search for similar used devices on those sites. If others are selling their old stuff, you probably can too. Keep in mind that you’re not likely to make much, and be sure to take shipping costs and fuss into account.
Donate
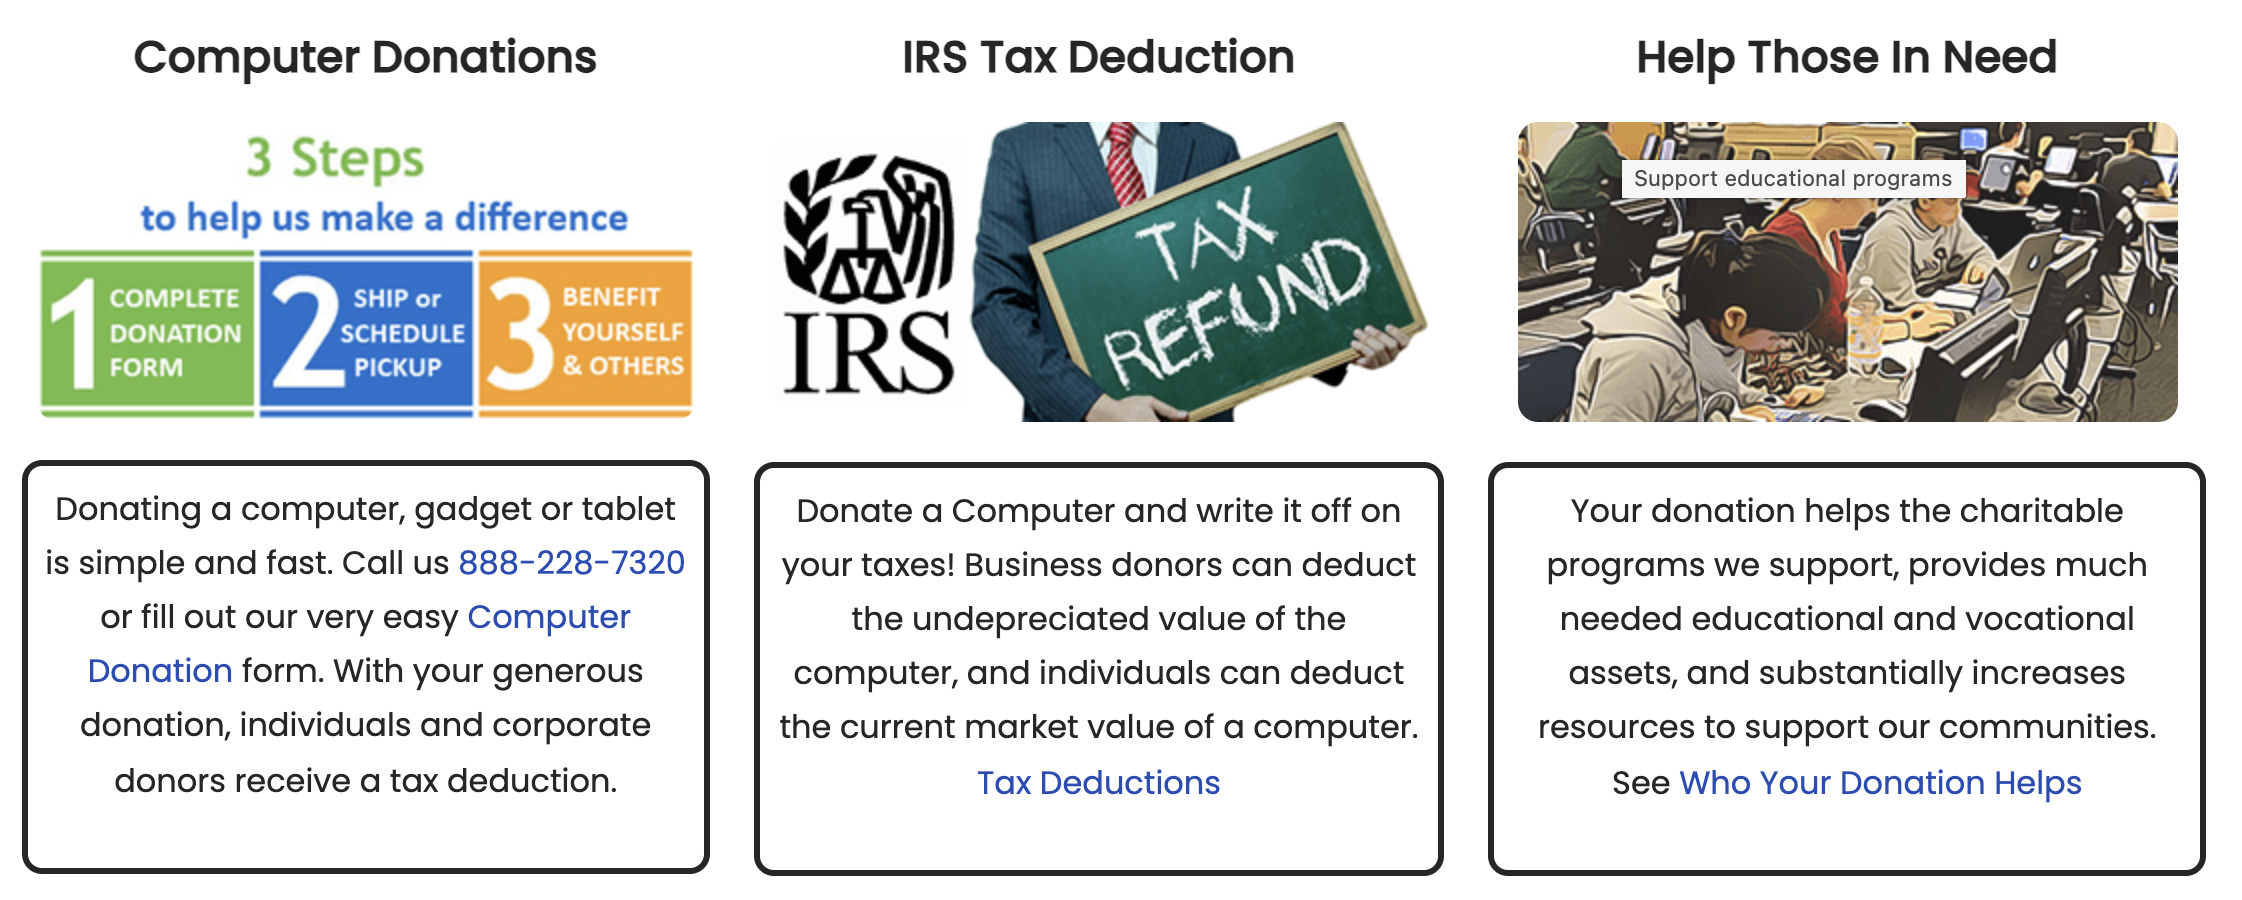
Given the low value of even fully functional hardware, a more socially beneficial option is often to take advantage of local programs that accept donations of working computers and other electronics, clean and refurbish them as necessary, and then donate them to schools, libraries, community centers, and other worthy institutions. If the program to which you’re donating is a registered nonprofit, you may even be able to deduct the value of the gear from your taxes.
If your area lacks such programs, check out Computers with Causes, which accepts donations of computers, tablets, and gadgets. It then refurbishes them and moves them on to groups like youth centers, K–12 schools, libraries, historical societies, wildlife conservation organizations, and more. Also look into World Computer Exchange, which provides donated computers and electronics to youth in developing nations.
Recycle
All too often, the only realistic option for disposing of old electronics is recycling. That doesn’t mean just tossing that old iPhone 3GS in the bin with your #2 plastics. It’s extremely important that e-waste be recycled separately from standard recyclables like cardboard, paper, cans, and plastic tubs. That’s because lithium batteries from improperly recycled electronics are causing dangerous fires at recycling centers.
Municipal waste programs are often set up to recycle e-waste properly, and they may be the easiest option in your area. GeekHampton can assist with disposal of unwanted electronics. For alternatives, look to the large chain stores Best Buy and Staples, both of which accept electronics for recycling, generally for free. Apple stores also accept electronics for recycling, or you can request a prepaid shipping label that lets you ship e-waste to Apple. Alternatively, try searching the Earth911 database for other recycling options near you. The Consumer Technology Association also provides a locator for electronics recycling; it may have slightly different listings.

Regardless of where you take your e-waste, be sure to read the requirements first. Not all sites take all types of electronics—a cell phone is much easier to handle than a broken large-screen TV. Also, you may need to remove any batteries first and recycle them separately so they can be handled with additional care to prevent fires.
Thanks for doing your part to keep old electronics from causing harm!
(Featured image by iStock.com/ThamKC)
How to Use Change Tracking Effectively When Collaborating on Documents
When you’re collaborating with others on a document, change tracking is your friend. Follow our advice to ensure that everyone stays on the same page during the editing process.

Long gone are the days of printing a document, marking it up with a red pencil, and sending it back to the author to input the changes. In the modern world, we use comments and change tracking to collaborate in word processors like Microsoft Word, Google Docs, Apple’s Pages, and Nisus Writer Pro. The specifics vary a little by app, but in essence, once you turn on change tracking, every change you make becomes visible to others working on the document, and they can accept or reject the change. Changes and comments can also host brief discussion threads.
In this article, we’re going to recommend general ways of working with change tracking and comments, rather than exploring the particular interfaces in different apps. This advice should work well for all apps that support change tracking and comments.
Establish a Working Approach
There are two typical scenarios when working with others on a document. Either you’re collaborating with colleagues to create the best possible final document, or you’re negotiating over every change, as might be the case when constructing a legal agreement where people have conflicting goals and agendas. We’ll focus on the former since everything gets tense when multiple people have to sign off on every change. If you end up in an editing scenario that’s essentially an arms-length negotiation, you’ll probably make fewer changes and examine each one closely.
Assign Roles
Talk with your fellow collaborators to clarify who will be doing what. Depending on your workflow, a document will have people in two or three roles:
Author: The author drafts the document without change tracking enabled. Subsequently, the author accepts changes made by the editor and contributors.
Editor: The editor enhances the author’s text with change tracking enabled and accepts the author’s subsequent changes. (An editor isn’t necessary as long as everyone else doesn’t mind the author accepting their own changes later.)
Contributor: Everyone else is a contributor, and they only make changes in change tracking mode. They neither accept nor reject changes.
These roles make it clear who can and should do what. Otherwise, you end up in a situation where people are hesitant to accept changes or where someone accepts changes before the author has seen them.
Even with these roles, the order in which the document gets reviewed can matter if you want certain contributors to see what’s changed, even if they don’t accept the changes. Generally speaking, people take turns with documents, with communication via email or some other channel to let others know when they can dive in.
Some documents may need only one editing pass, whereas others will require several. You’ll know you’re done when all changes have been accepted and comments have been resolved.
Decide Which Changes to Show
When you enable change tracking, every change will be tracked. That can be counterproductive if the number of changes becomes overwhelming—to either people or the software. You may wish to make certain changes without change tracking enabled or accept them before the next person’s turn. For instance:
Formatting changes: If you’re changing styles or putting text into lists to make a draft more presentable or professional, those changes can quickly clutter the document and are usually not controversial.
Consistency changes: For ensuring consistent usage, such as one space after a period, a search-and-replace with change tracking disabled lets the next person avoid dealing with hundreds of small changes. You can leave a comment at the top of the document noting what you did.
Minor proofreading changes: Everyone makes typos. You may wish to keep typo fixes visible to show how much your editing has improved the document, or you can accept them right away to save the next person time.
Too many changes to parse: At times, you may edit a paragraph so heavily that it has been almost entirely rewritten. As with proofreading changes, you might want to keep those changes visible to indicate how much you’ve done, or you might want to accept them all and leave a comment saying, “Read this paragraph carefully—too many changes to show with change tracking.”
Accept (Don’t Reject) Changes
When it comes time to review changes, apps let you either accept or reject changes. We usually recommend accepting changes even if you disagree with them. That’s not to say you have to stick with a proposed change that you dislike, but the person who made it did so for a reason, and it’s up to you to figure out what that reason is and recast the text to accommodate it, preferably with an explanatory comment. That way, they’ll see your change on their next pass and can decide if you addressed their concern.
Occasionally, someone might negatively change some carefully worded text because they didn’t realize why it was worded that way. Rather than rejecting such a change, leave it and start a discussion. In all likelihood, they’ll withdraw the change on the next pass, or you can reject it once they see where you’re coming from.
When accepting changes, you can employ several techniques:
Few changes: If there aren’t that many changes, it’s easy to accept them one at a time. As you do this, watch for mistakes that creep in—missing or double spaces, verb tense and number mismatches, and so on. These can be easy to introduce and difficult to see while editing.
Many changes: When the entire document seems to have changed color because there are so many changes, it’s easier in most apps (other than Google Docs) to select a paragraph at a time, accept all changes in the selection, and then read it closely to make sure the changes are both helpful and don’t introduce additional mistakes. A keyboard shortcut to an Accept Selected Changes command can make this process faster.
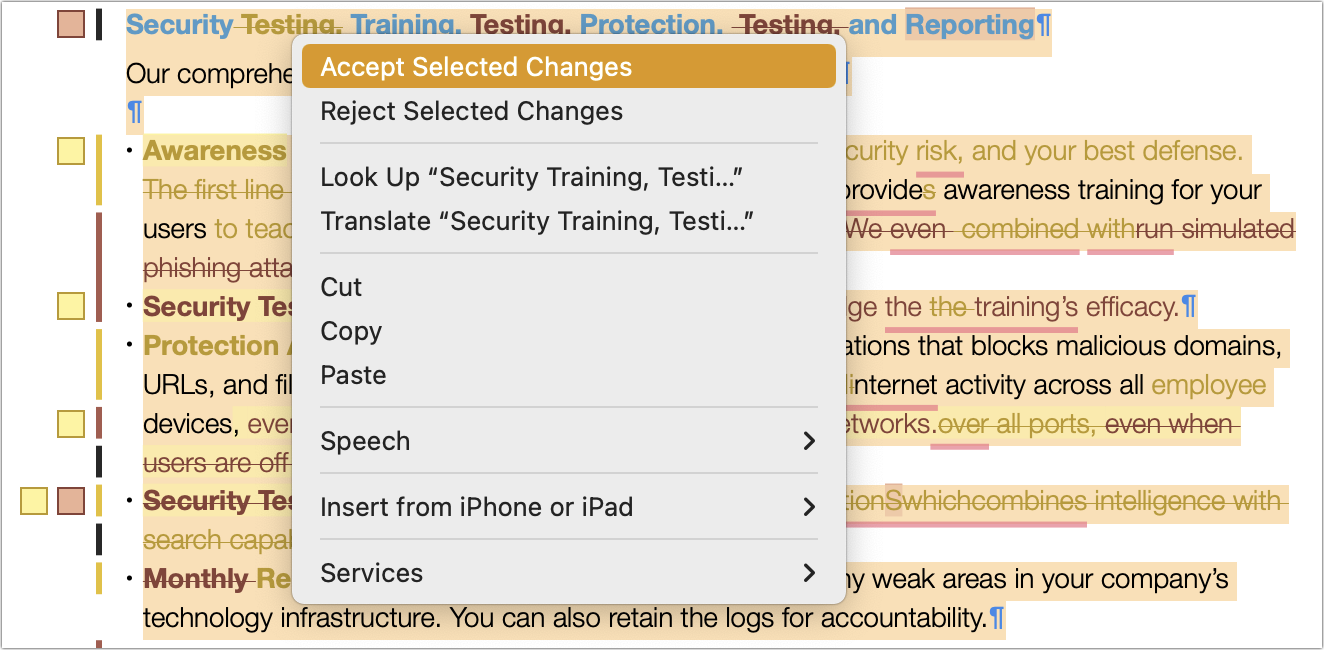
We don’t recommend using the Accept All feature to accept all the changes in the document unless it’s quite short and you plan to read the entire thing carefully again.
Dealing with Comments
Finally, some comments about comments. In most apps, you can add a comment to a change and start a threaded discussion about the change. That’s extremely helpful if you want to explain why you made the change. However, that approach works poorly if the next person wants to accept your change and continue chatting in the comment, since accepting the change will close the comment thread. As such, we recommend restricting change-specific comments to non-controversial situations where you’re merely informing the next person about why you made the change.

When you need to ask a question or raise a topic for discussion, do that in a standalone comment instead, so the discussion doesn’t disappear with the accepted change. Even in this situation, however, you have to be careful. If you select a particular word and start a discussion asking if it’s the right word to use, the next person may not be able to change that word without deleting the comment thread. One solution is to select a few words before the text on which you’re commenting, or just the period ending the sentence, so changes can be made while retaining the comment. Another approach is to select more text—the entire sentence or paragraph that contains the text in question—for the comment. That’s more effective, but too many such comments will overwhelm the document with large colored comment blocks.

Who should resolve comment threads? Although some comments are purely informational and can be resolved by the person to whom they’re addressed, it’s usually best if the person who started the comment thread resolves it. Let’s say the editor leaves a comment that asks a question. The author responds, so the editor needs to see that response. If it doesn’t fully answer the initial question, the editor can ask for more information, and the author can provide it. The editor can then resolve the comment to indicate that the final comment from the author closed the topic.
One last point. Comment threads within a document are useful but limited. If a topic needs significant discussion, break it out to email, Slack, or even a meeting rather than going back and forth within a single comment at length.
We hope this advice makes your collaborative editing faster, easier, and more companionable—remember, the goal should always be to improve the document. However, there’s room for tweaking within these general guidelines to create the ideal workflow for your group.
(Featured image by iStock.com/FrankieMea)
Make Joining Your Wi-Fi Network as Easy as Scanning a QR Code
Want visitors to be able to access your Wi-Fi network without typing a password? Follow our steps to create a custom QR code they can scan to join your network instantly.

Whether you have guests who want to get on your home Wi-Fi network, customers who need to join your business network, or attendees who want to use your conference network, it’s always fussy to share the network name and password. If an iPhone user has your Apple ID email address in Contacts, their device should automatically prompt you to share your Wi-Fi password, but that won’t work in many situations.
Here’s another option: a QR (Quick Response, if you’re curious) code that, once scanned, lets the person join your network without knowing its name or password. Once you’ve created this QR code, you can print it on a card to share, post it on a bulletin board, or make a custom sign. QR codes are no longer the curiosity they once were, with usage skyrocketing since the pandemic. One estimate suggests that over 83 million US adult smartphone users will scan a QR code in 2022.
Follow these steps to create your custom Wi-Fi network QR code:
1. Visit QRCode Monkey and click the WIFI tab at the top. (Other sites, like QR Code Generator and Flowcode, will also work but may require a paid account.)

2. Enter the name of your network—also known as the SSID—in the Wireless SSID field.
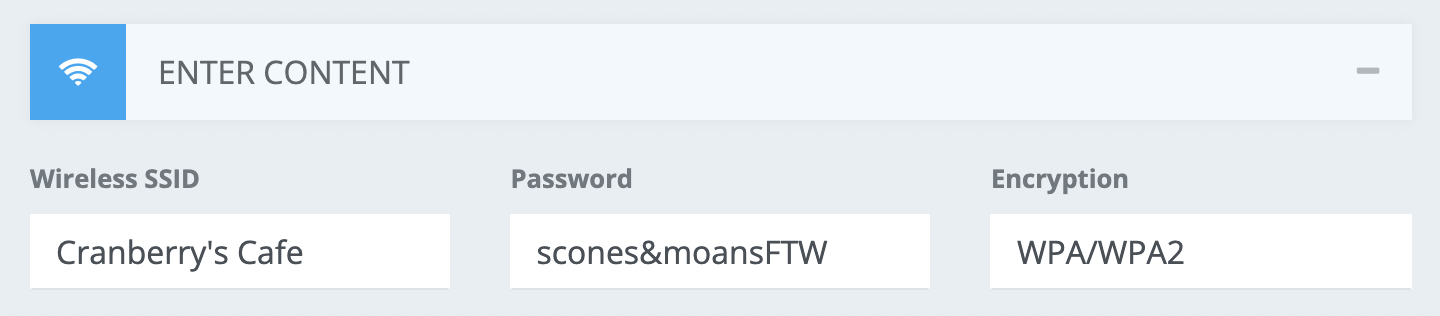
3. If your network has a password, enter it in the Password field, click Encryption, and choose WPA/WPA2. (If your network still relies on the old and completely insecure WEP, choose that instead—and plan to upgrade to a new base station with WPA support soon!)
4. If you’re sharing access to a guest network that has no password, leave the password field blank and Encryption set to No Encryption.
5.To change your QR code’s foreground and background colors from black and white, click Set Colors, click a color square, and click on the desired color in the color picker. (You can also enter color hex values.) If you plan to upload a logo, make sure the color works well with your logo.

6. If you have a logo that you want to include, click Add Logo Image and upload your logo. You may want to resize the white space around the logo to position the logo nicely in the middle of the QR code. If the logo’s background doesn’t match your background color, you may wish to select Remove Background Behind Logo.
7. For a snazzier look, click Customize Design and choose among the various options for Body Shape (the overall pattern), Eye Frame Shape (the corner frames), and Eye Ball Shape (the shape inside the corner frames).
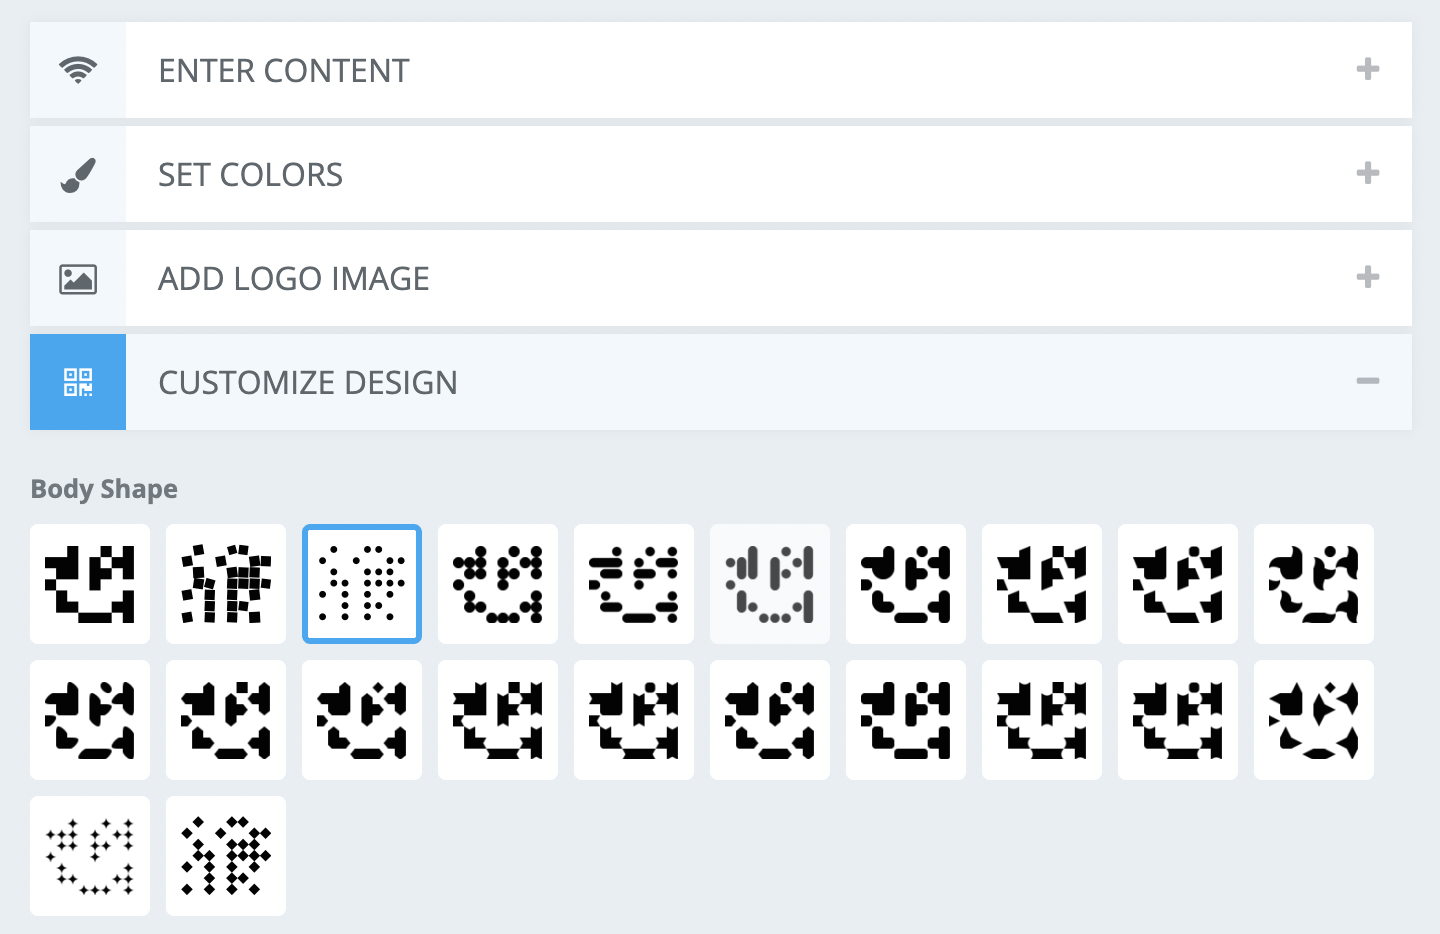
8. Click the Create QR Code button on the right to preview your custom design. Repeat Steps 5 through 8 until the QR code looks the way you want.

9. Adjust the Quality slider if desired—the default of 1000-by-1000 pixels is generally fine.
10. Click the Download PNG button to get the actual file. You can also click the SVG, PDF, or EPS buttons to download those less common formats.
That’s it! Once you’ve downloaded the QR code image file to your Mac, you can print it on its own, add it to other print designs, or even put it on your website. There’s probably a size that is too small for cameras to resolve accurately, but that’s easy to test using your iPhone or iPad.
From then on, anyone can access your Wi-Fi network by pointing the camera app on their phone at your QR code—they’ll be grateful for the easy access, and you’ll no longer have to supply them with the network information. It’s a win-win!
(Featured image by Adam Engst)