Take Advantage of CarPlay in Rental Cars While Traveling
An iPhone is an essential tool when traveling these days, and if you’re lucky enough to rent a car that supports CarPlay, you can use Maps and Music through the car’s touchscreen and speakers. Learn more at:

Renting a car has become more interesting in recent years due to changes automakers have been making to car electronics. For example, Apple’s CarPlay is becoming a common feature on rental cars. That lets you run Apple Maps or Google Maps on your iPhone while displaying the map on the car’s built-in screen and routing spoken directions through the car’s speakers. It’s way better than trying to prop your iPhone on the dash for navigation directions.
Although there are no guarantees, rental cars are usually recent models, so it’s likely that if one has a screen, it will support CarPlay. Look for some indication on the screen, see if the car is in Apple’s list of supported models, or check the car’s manual in the glove compartment. (Car manuals are universally terrible, but search for CarPlay in the index.) It might even be worth asking at the rental car desk if it’s possible to get a CarPlay-enabled car.
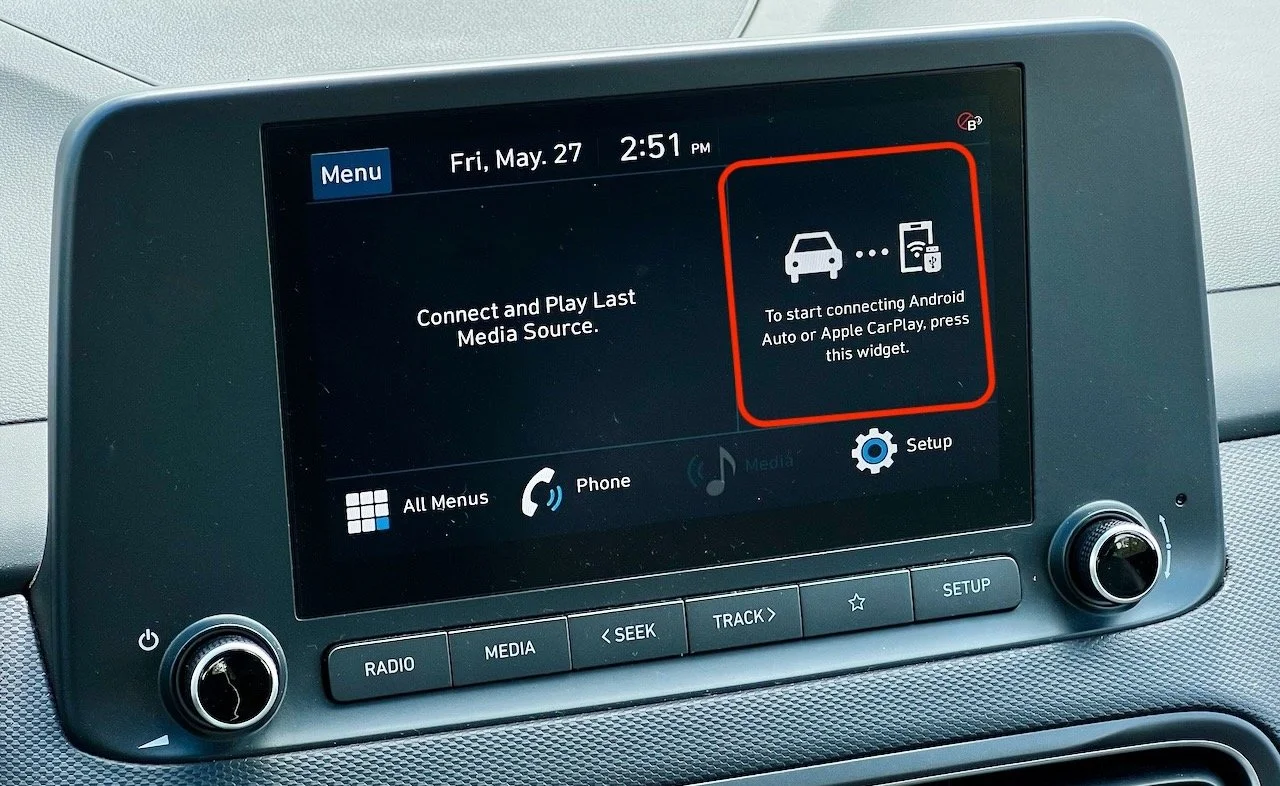
CarPlay setup should be easy. It will add only a few minutes to the time you already spend adjusting seats and mirrors and familiarizing yourself with the car’s controls. Start by plugging your iPhone into the car’s USB jack with a Lightning cable to see if that’s sufficient to start pairing. If the car supports only wireless CarPlay, you’ll instead tap a button on the screen or hold down the voice control button on the steering wheel to initiate pairing.
You may be prompted to transfer contacts and favorites to the car for access via Bluetooth, but don’t bother—you can access everything you need on your iPhone via CarPlay. There’s no worry about CarPlay revealing any of your information to later car renters.

(It’s worth keeping a Lightning cable in the car for the entire trip because GPS navigation drains iPhone batteries quickly. Keep the iPhone plugged in to ensure you have power for other activities. Remember, CarPlay just sends the iPhone’s display and audio to the car—the iPhone is still doing all the navigational work, so CarPlay won’t do you any good if your iPhone is drained.)
Once configured, CarPlay will likely display a map on screen—that’s Apple’s Maps. Assuming you want to leave the rental car agency and get on the road, bring up directions to your destination in Maps on the iPhone, and everything will start appearing directly on the car’s screen. If you don’t hear spoken directions, make sure the car stereo’s volume is turned up.
You can control CarPlay with the car’s touchscreen or Siri: use “Hey, Siri,” press the voice control button on the steering wheel, or touch and hold a button on the car’s screen. That’s helpful for playing music from your iPhone instead of suffering with random radio stations. Stick with searching for new destinations in Maps when you’re not driving, however, since using any unfamiliar car interface distracts from driving safely, especially when you’re in a new location.
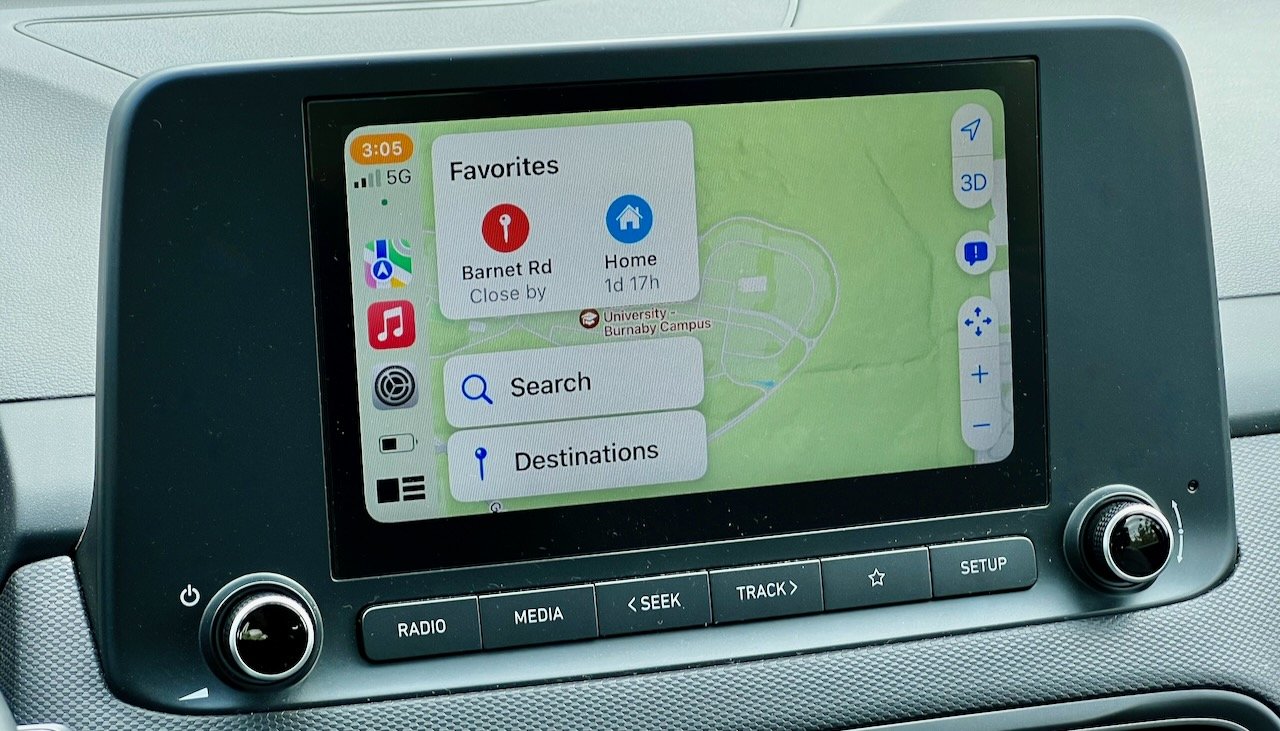
The icons on the left sidebar of the CarPlay display give you access to recent mapping and audio apps, plus Settings. Tap the bottom icon to switch to a tile view that shows the map, Now Playing, and favorite destinations.

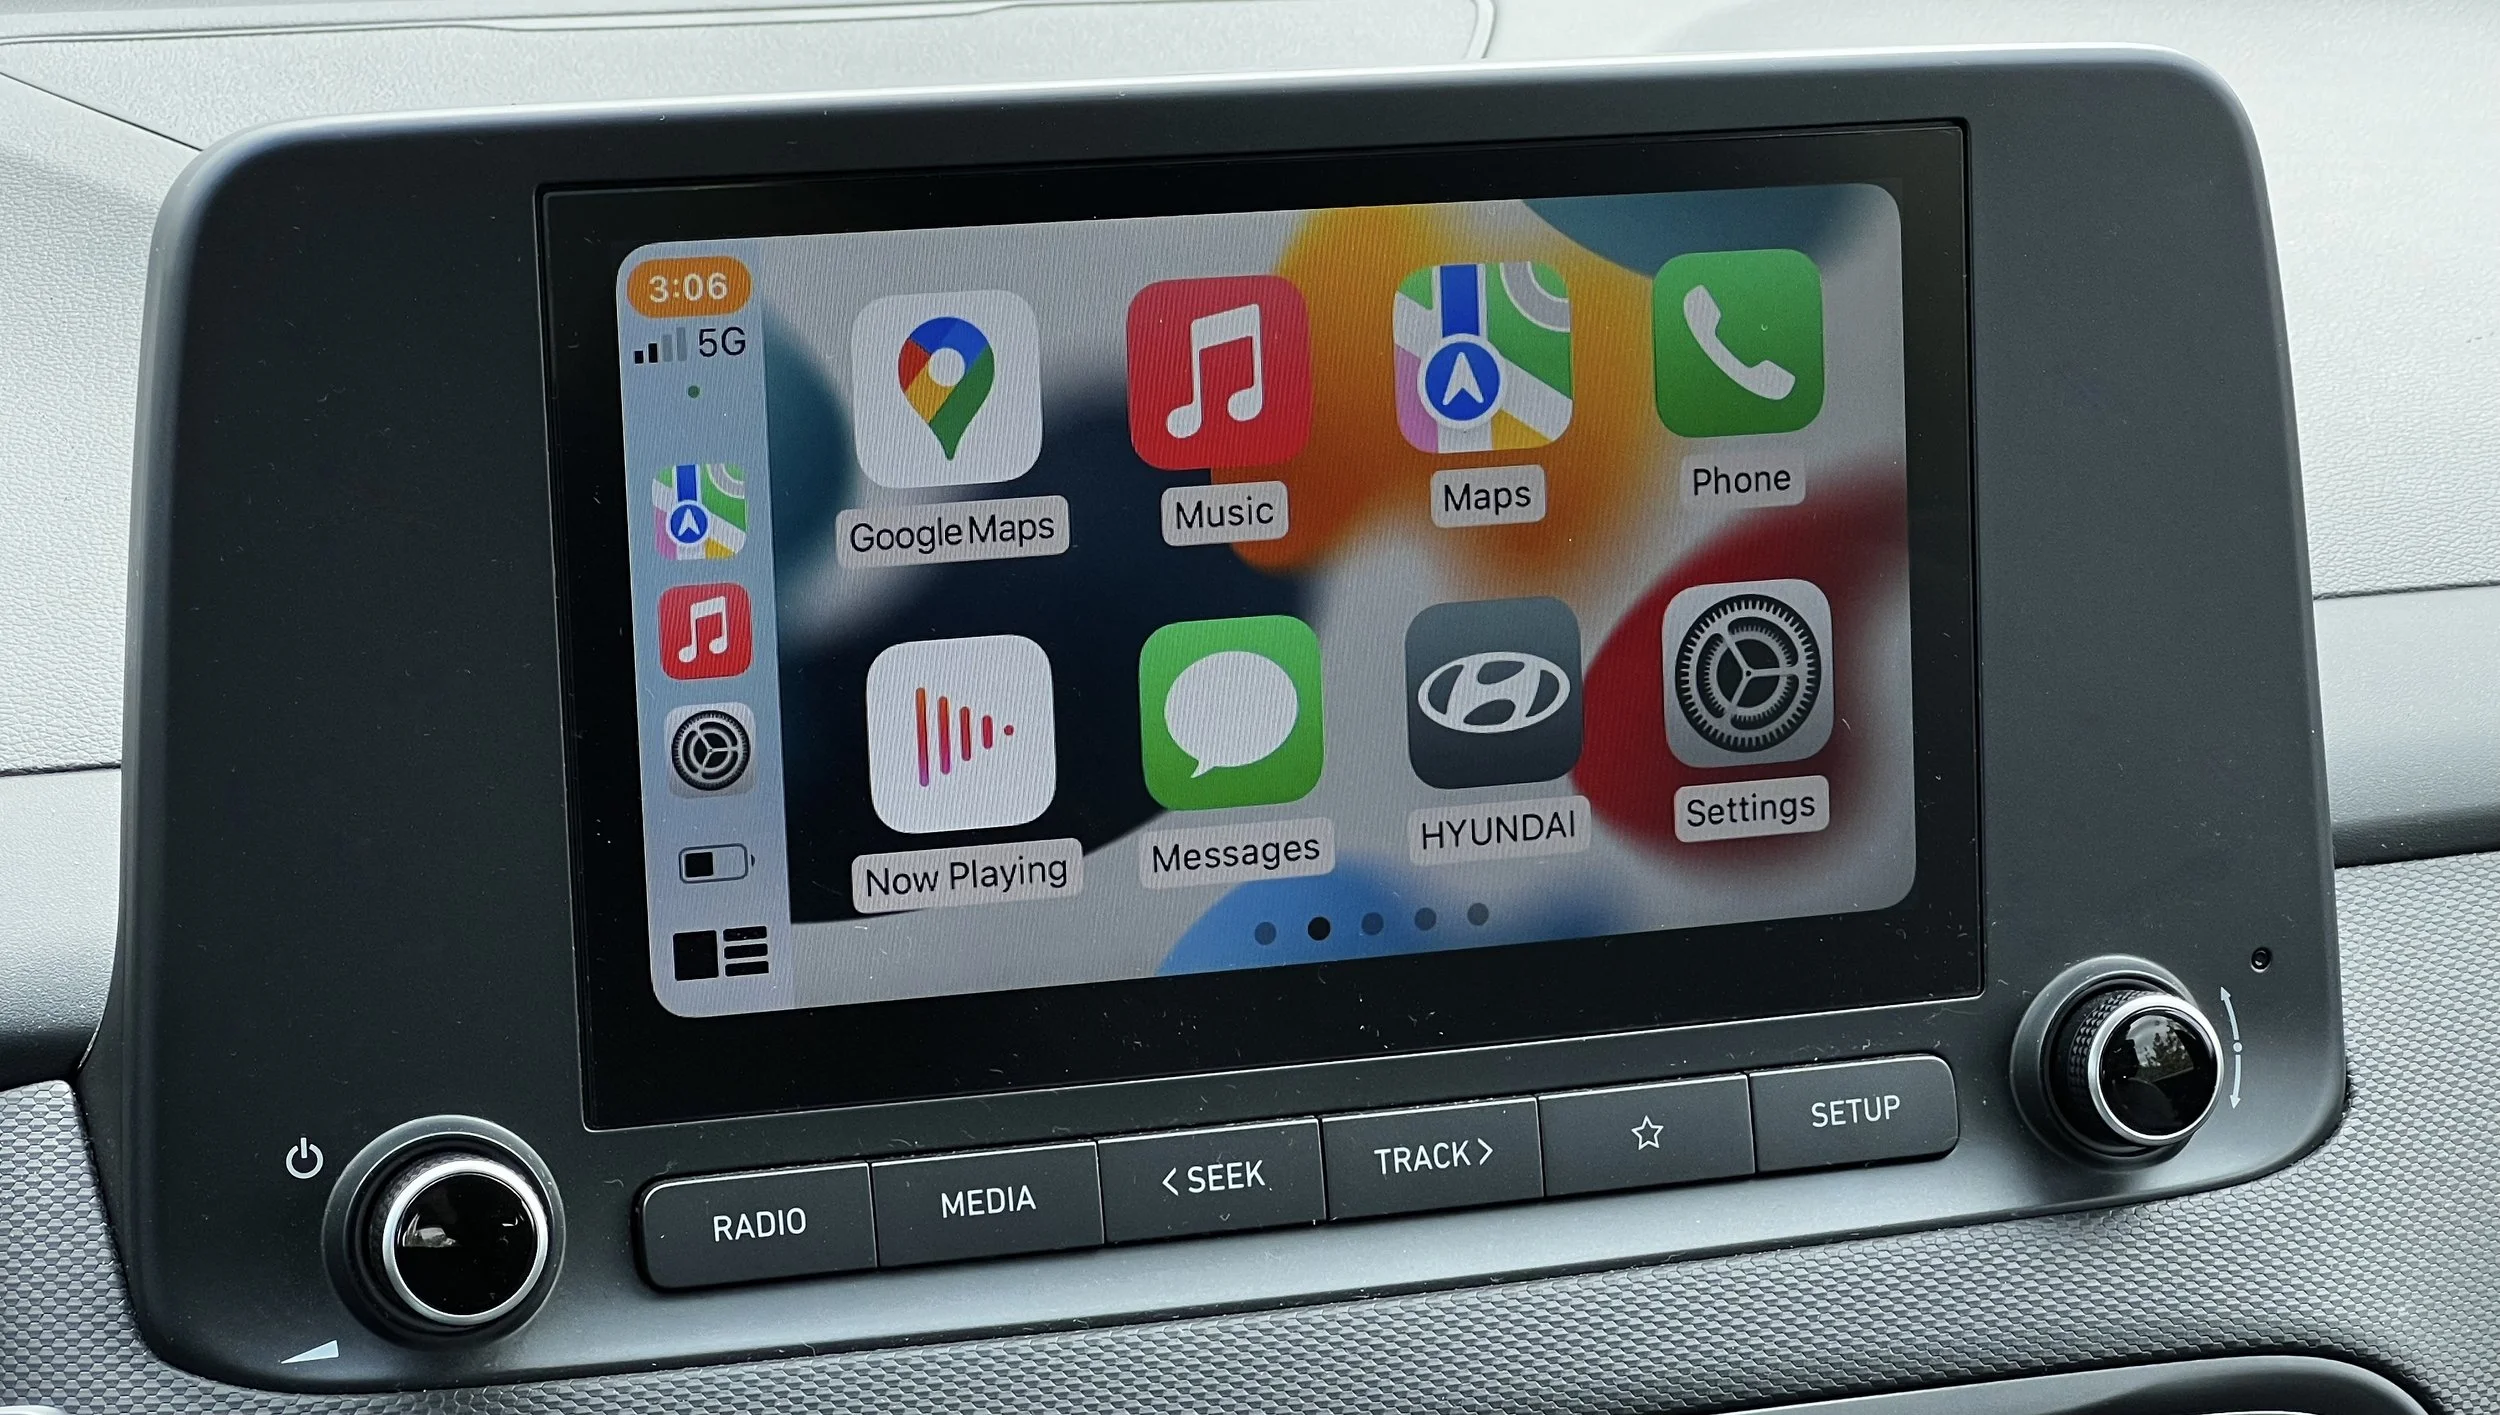
If you’re staying in the same location for several days, set its address as a favorite in Maps so it’s easy to navigate back to it merely by tapping a button on the car’s touchscreen. Although Maps works well, if you prefer Google Maps, you can now use that instead. Just start navigating in Google Maps, and CarPlay should automatically bring it up—you can also tap the bottom icon when in tile view to switch to a Home screen-like view of all apps and tap Google Maps there. If you have to swipe left to find the app you want, adjust the icon order on the iPhone in Settings > General > CarPlay > Car Name > Customize.
On subsequent trips, CarPlay should connect automatically and be available for use within a minute or two of starting the car. If it doesn’t, you may need to restart the phone, turn the car off and on again, or even start over by deleting the connection from the car and using Settings > General > CarPlay > Car Name > Forget This Car. You may need to delete the Bluetooth pairing from the car first.
There’s much more to CarPlay, but you’re traveling, so spend your time relaxing and enjoying the trip rather than fussing with technology!
(Featured image by Tonya Engst)
Business Uses of the Apple TV—Really!
Although most people see the Apple TV as a consumer-focused device, it’s also extremely useful for digital signage and presentation display in business settings. Learn more at:

Many people have an Apple TV in the living room, hooked to a large-screen TV. It’s a great streaming media box for Apple TV+, Netflix, Amazon Prime Video, and a slew of other services. It even supports a bunch of games. Don’t let the Apple TV’s consumer focus fool you, though. It’s also a highly useful device for businesses in two important ways: digital signage and presentation display.
Apple TV for Digital Signage
For businesses that need to post signs, it’s easy to print something out and stick it on the wall. But that can get out of hand quickly, and once you have more than a couple of sheets of paper posted, people won’t read them. And, let’s face it, a piece of paper taped to the wall isn’t exactly eye-catching. Professional-level design and large-format printing can help, but then costs start going up quickly, and print signs aren’t easy to update.
An Apple TV coupled with an inexpensive TV might be a better solution. Conceptually, a digital sign is just one or more graphics displayed on a screen, rotating as necessary—it’s a slideshow. For a one-off solution, you could add some images to Photos and display them as a slideshow or as a screen saver. If you go this route:
Make your images 1920 pixels wide by 1080 pixels high, assuming that your Apple TV’s resolution is set to 1080p in Settings > Video & Audio > Resolution. (If not, match whatever you’re using there.)
Avoid putting content within 60 pixels of the top and bottom of the screen and within 80 pixels of either side. Content can be difficult to read near the edge, and it may be cropped due to overscanning on older TVs.
It’s safest to set up a clean Apple ID for the Apple TV to ensure that Photos contains no personal snapshots.
After creating images on your Mac, add them to a shared album in Photos that’s shared with the Apple TV’s dedicated Apple ID.
On the Apple TV, open the Photos app, go into Shared, select the album, and start the slideshow or set the album as a screen saver. If Shared doesn’t appear, turn it on in Settings > Users and Accounts > Your Name > Shared Albums.
If you use the Set As Screensaver option, you must still configure it in Settings > General > Screen Saver.
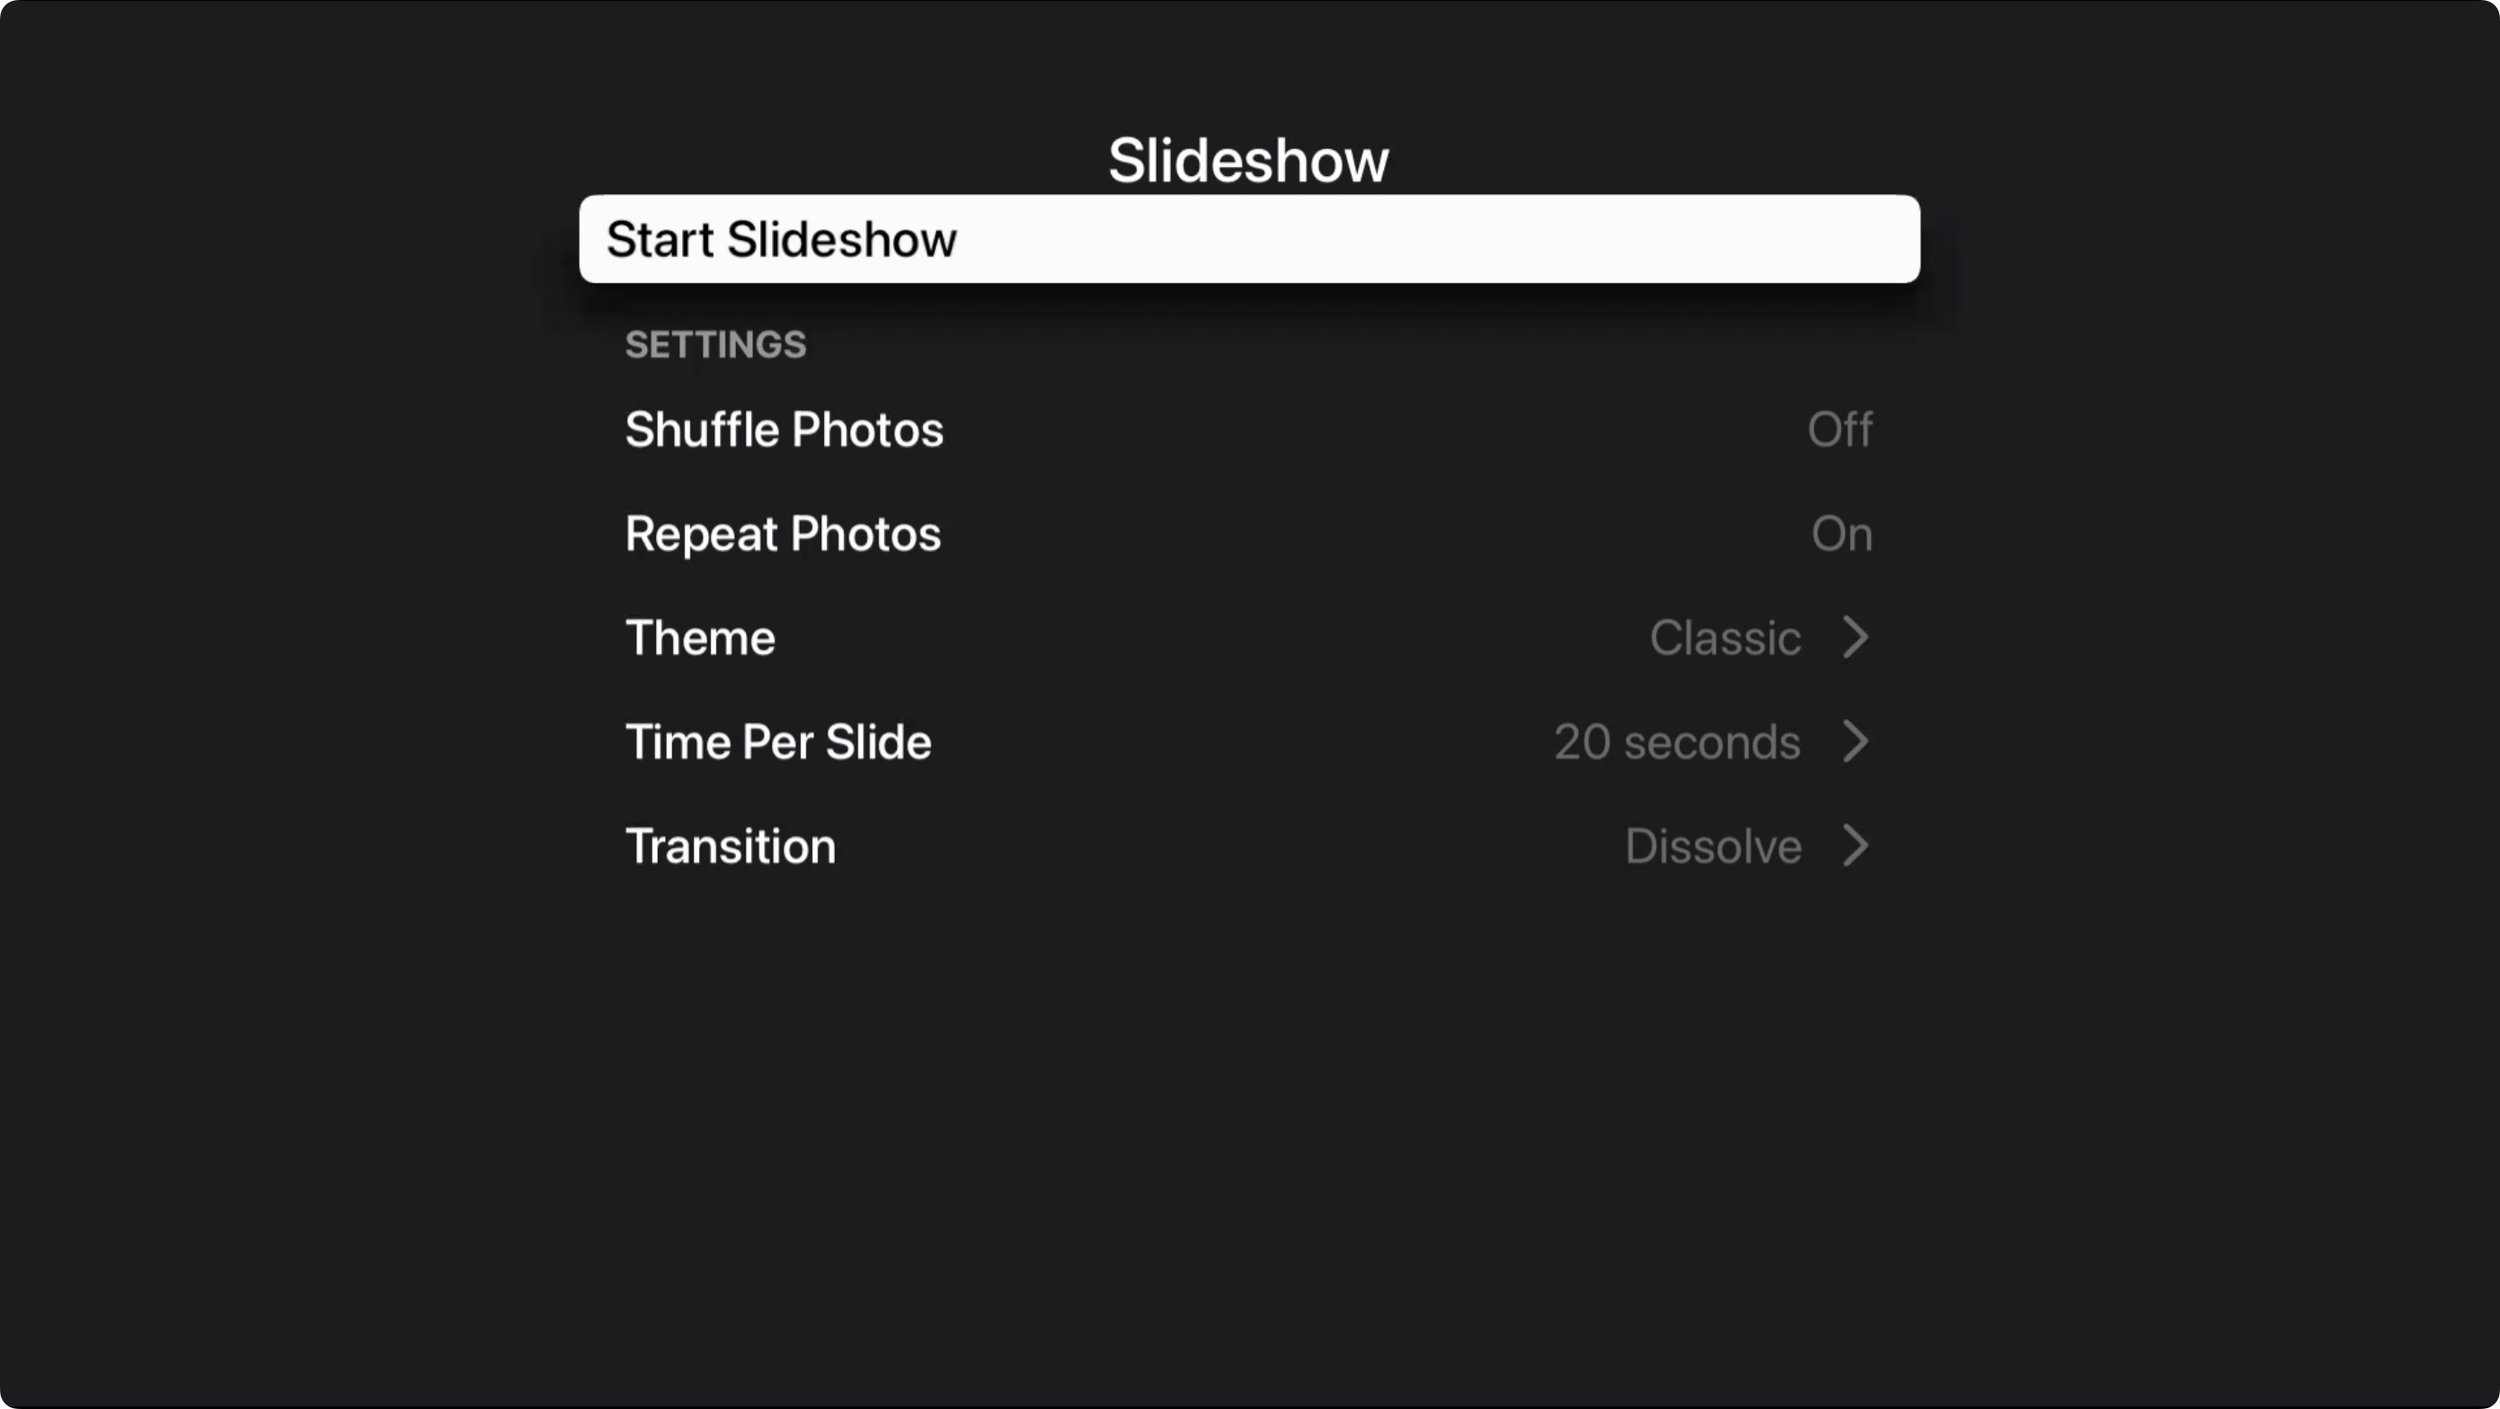
For either the slideshow or the screen saver, set the theme to Classic for a simple, full-screen display. Make sure Repeat Photos is on (slideshow only), set the Time Per Slide to 20 seconds, and stick with a simple Transition.
For more capabilities when creating and switching among slides, turn to a digital signage app. Searching on the Apple TV’s own App Store will reveal numerous digital signage apps, including DigiBoard TV and ez plus.
If you have multiple Apple TVs running digital signage, such as in a hotel, you’ll want to manage them via an MDM solution like Addigy, Hexnode, Jamf Pro, Kandji, or SimpleMDM (to name just a few that support Apple TV management). Details vary, but it’s important to be able to lock the Apple TV to a single digital signage app that will be the only thing that runs and that automatically launches whenever the Apple TV reboots after updating tvOS or after a power failure. (You can also set this mode via Apple Configurator if you don’t have an MDM solution.)
For industrial-strength digital signage, look to systems like Carousel and Kitcast. They offer significant feature sets but charge $20–$25 per screen per month, making them appropriate mostly in larger business scenarios.
Apple TV for Presentations
The other notable business capability of the Apple TV is displaying presentations on a large-screen TV via AirPlay, which lets you avoid the cabling issues and extra hardware associated with projectors. To enable that, Apple added Conference Room Display mode to tvOS to make it easier for people to connect to the Apple TV via AirPlay.
First, make sure AirPlay is on in Settings > AirPlay and HomeKit. Then, in Settings > AirPlay and HomeKit > Conference Room Display, enable Conference Room Display. Once it’s on, you can:
Require a PIN on every use of AirPlay. Enable this setting if you’re concerned about someone sending inappropriate content to the TV.
Set a custom message for the onscreen alert that encourages people to use AirPlay whenever the Apple TV is in Conference Room Display mode.
Choose a custom photo as the background whenever the Apple TV is in Conference Room Display mode.
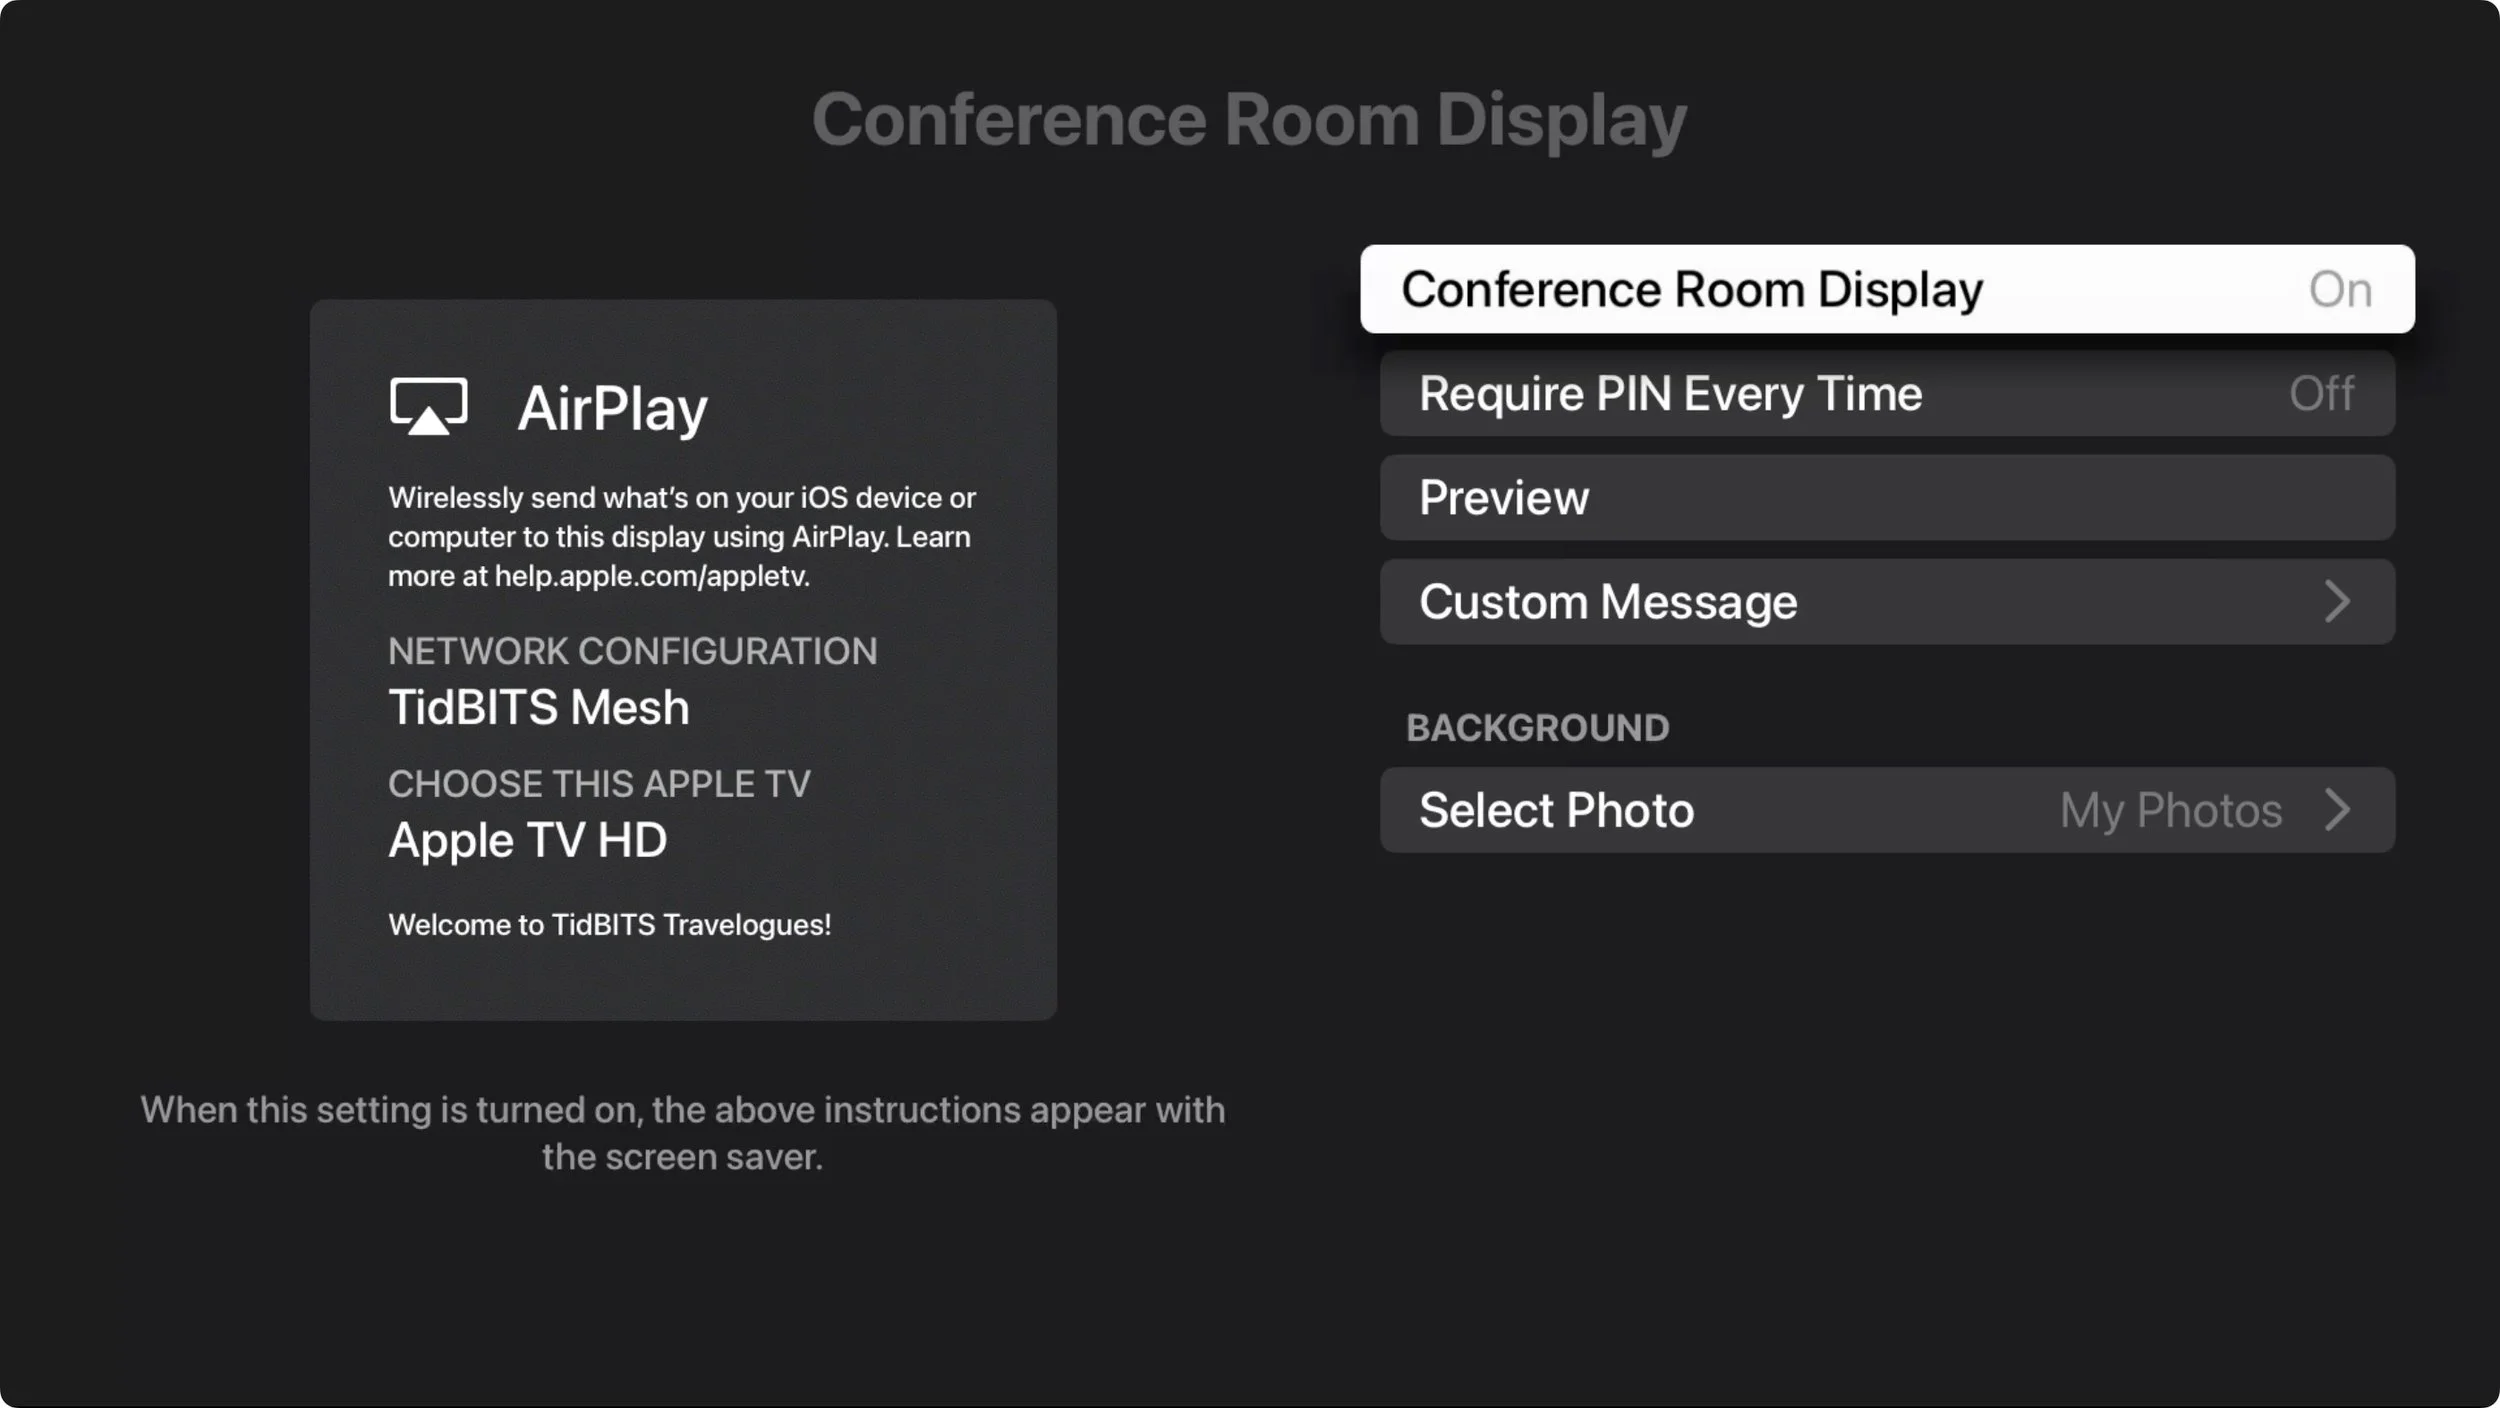
From then on, when you turn on the Apple TV, it will open to the Conference Room Display screen and alert. Note that the screen saver plays while in Conference Room Display mode, although the alert may obscure any digital signs you want to display using the screen saver.

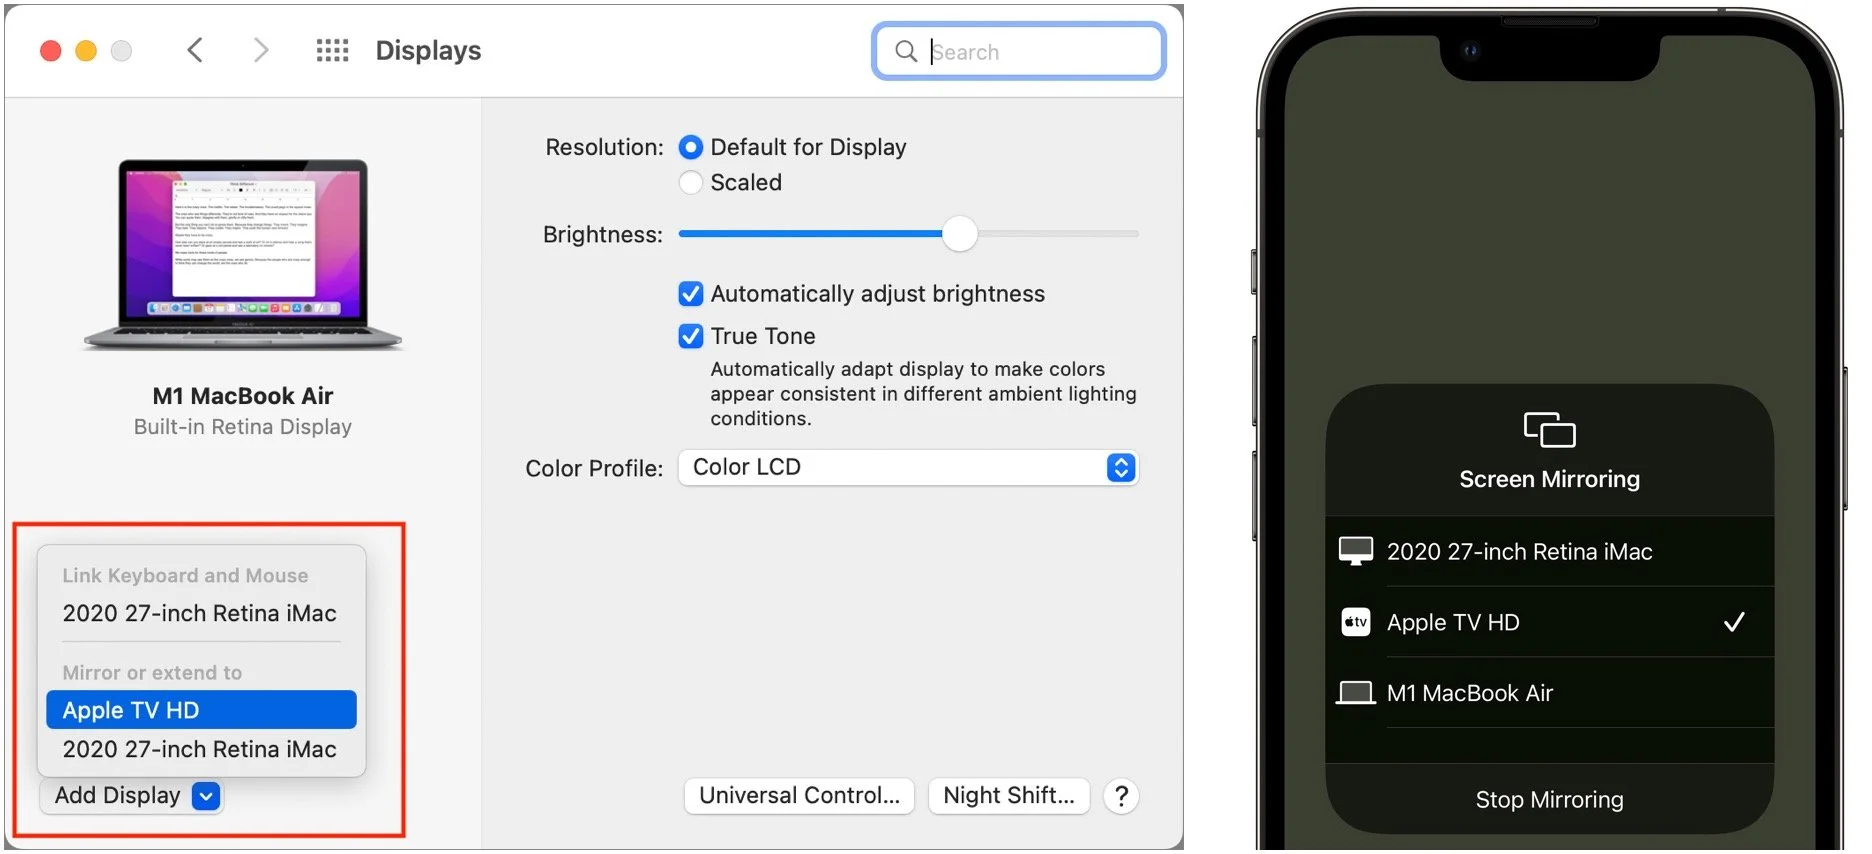
AirPlay is the key for sharing screens, displaying Keynote or PowerPoint presentations, or playing videos on an Apple TV in Conference Room Display mode. From a Mac, go to System Preferences > Displays and choose the Apple TV from the Add Display pop-up menu. From an iPhone or iPad, go into Control Center, tap the Screen Mirroring button, and select the Apple TV from the list.
What if someone wants to play a presentation from a Windows PC or share its screen? The solution, though it requires advance setup, is the $17.99 AirParrot, which enables PCs to share screens with Apple TVs.
This is a high-level overview of how you can leverage an Apple TV for digital signage and presentation display—there are lots of details that may be important in your particular situation. If you need help creating an ideal configuration, don’t hesitate to ask us.
(Featured image by iStock.com/necati bahadir bermek)
How to Help a Friend Whose Email Has Been Hacked to Send Scams
Beware of an email-based scam that’s making the rounds this year! Since January, I’ve been targeted three times, and I wanted to share the story—both to help you avoid falling prey to the scam and so you can better alert any friends or acquaintances whose email accounts have been hacked.
Beware of an email-based scam that’s making the rounds this year! Since January, I’ve been targeted three times, and I wanted to share the story—both to help you avoid falling prey to the scam and so you can better alert any friends or acquaintances whose email accounts have been hacked.
First, let me bang the drum one more time: None of these people would have had problems if their email passwords had been strong and unique. If you reuse your email password anywhere, or if it’s short and obvious, stop reading right now and go change it.
Your new email password can be at least 13 truly random characters (something like iR82dGlQf3&@C) or at least 28 characters of common words separated by hyphens (like the classic correct-battery-horse-staple), or you could generate it through some combination of numbers (like dates) and letters (such as initials) that make sense to you. Whatever you choose, it must be strong and unique. And if you’re not using a password manager, you’re wasting your time and likely being insecure.
How the Scam Progresses
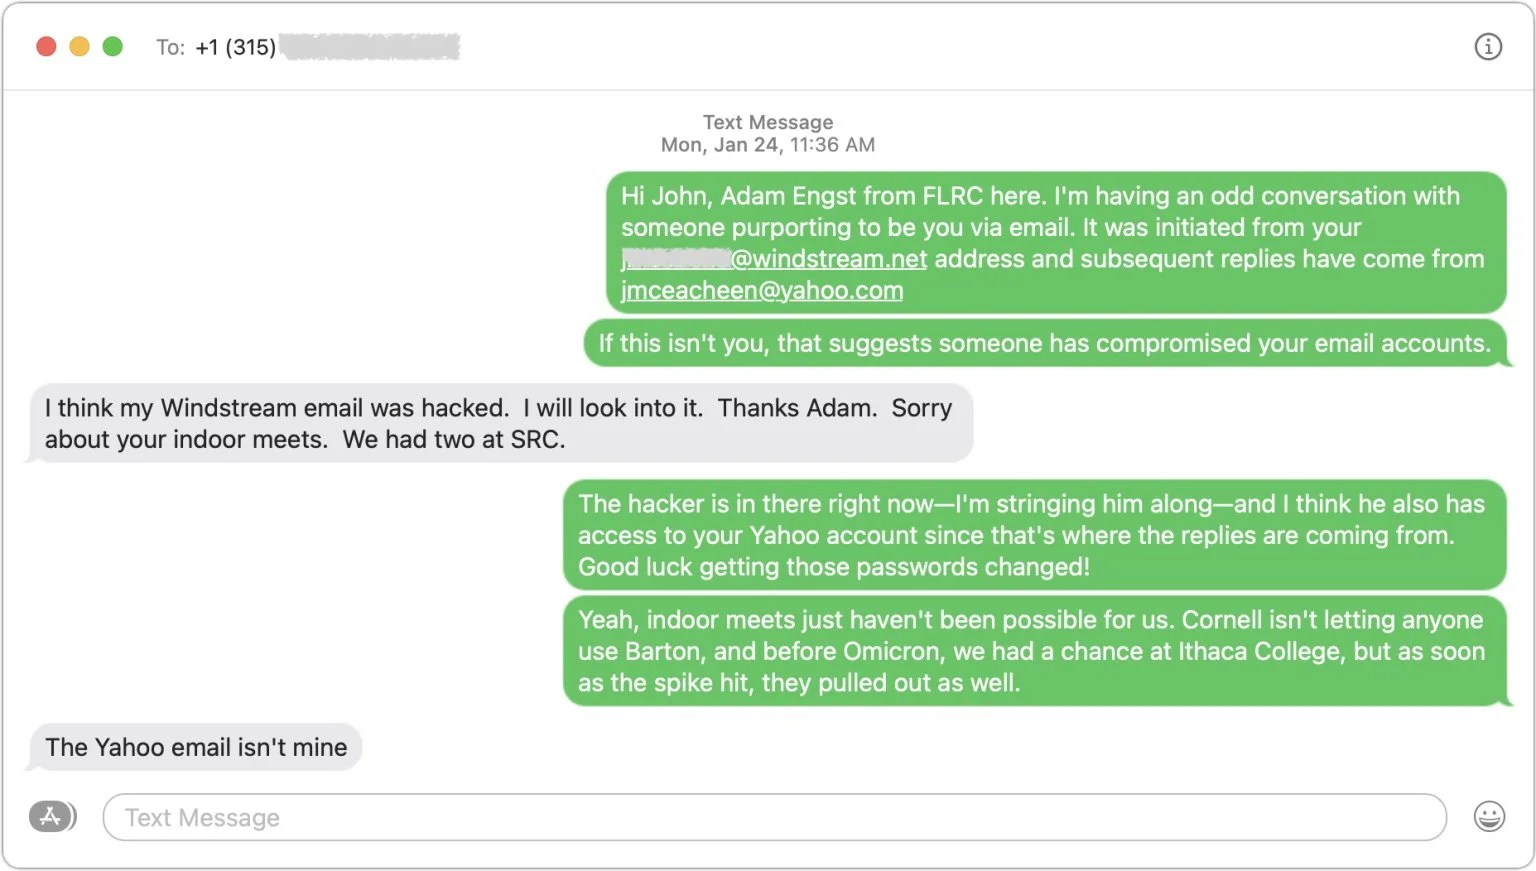
The email scam message I received came from someone I know quite tangentially—John is a runner from a nearby city who had participated in some of the track meets that I organize. Since I assign bib numbers and announce all the races, his name was sufficiently familiar that I wasn’t surprised to receive email from him—we had corresponded once in 2021 about an upcoming track meet. But with only one prior conversation, I had no sense of his email style, so his first message didn’t raise any alarm bells in my head.

I replied generally to the first message—there were various reasons an upstate New York runner might contact me—but those alarm bells went off instantly upon receiving the next message.
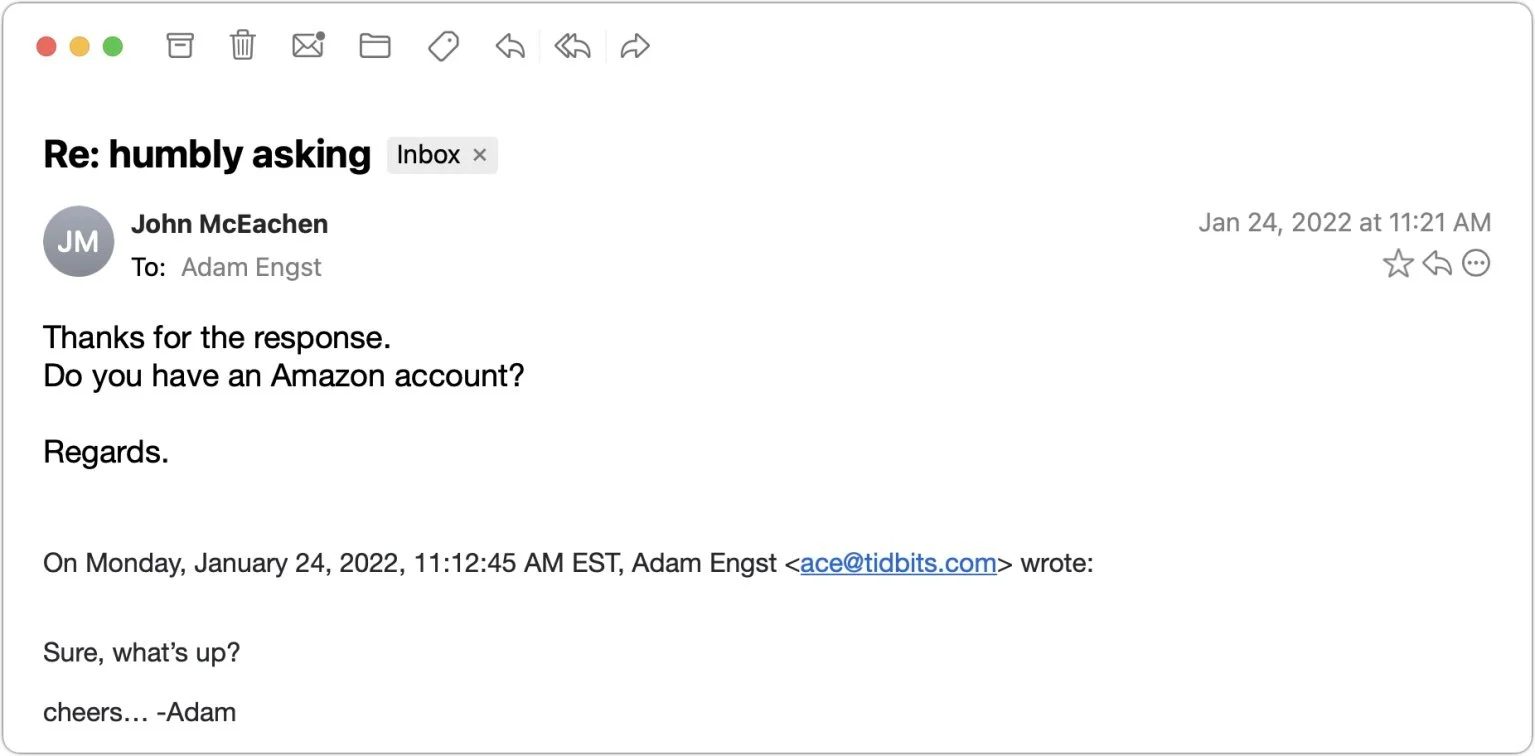
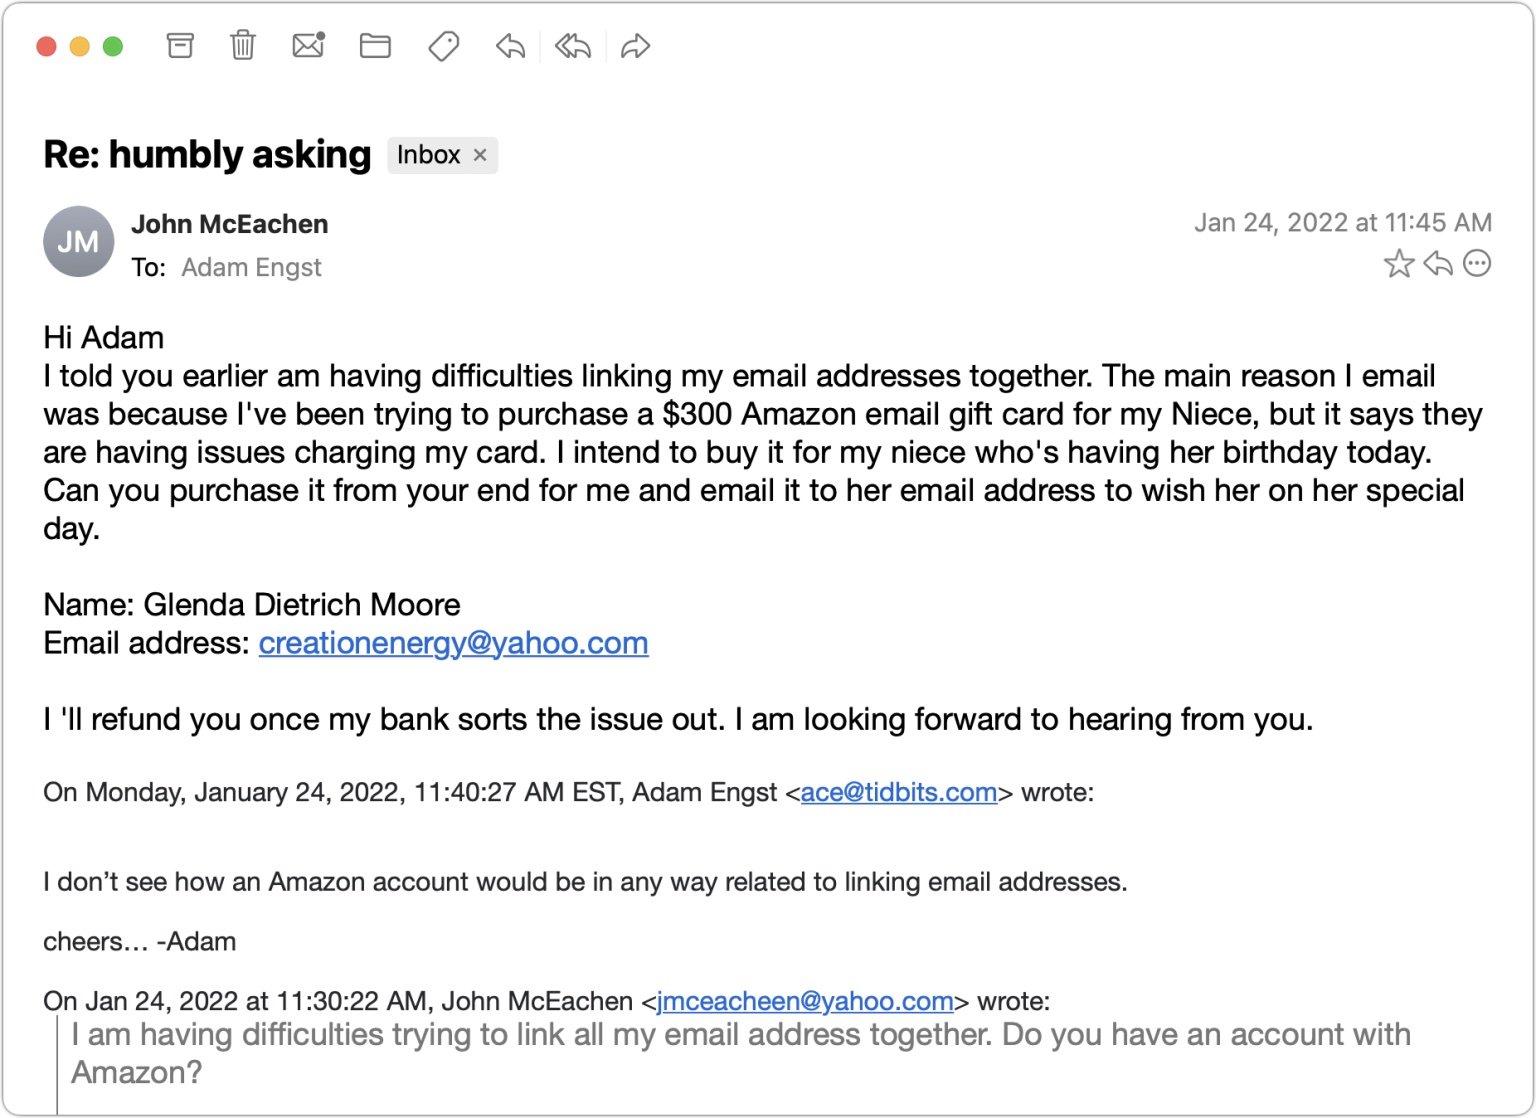
I couldn’t see any reason why a person I barely knew would ask if I had an Amazon account, and besides, at this point, who doesn’t? I switched into investigation mode. What you can’t tell from the message above is that although the sender’s name remained the same, the email address had changed from windstream.net to yahoo.com. Combined with the strange request about an Amazon account, I was now nearly certain I was talking to a scammer who was using the email address switch to get me into their own account in case John locked them out by changing his password. I decided to keep the scammer talking and see what I could learn.

After sending that message, I looked up John’s phone number in his most recent track meet registration and texted him. Luckily, I was able to provide sufficient context in my initial text that he knew who I was. As I expected, he knew nothing about what was happening and confirmed that the Yahoo account wasn’t his.
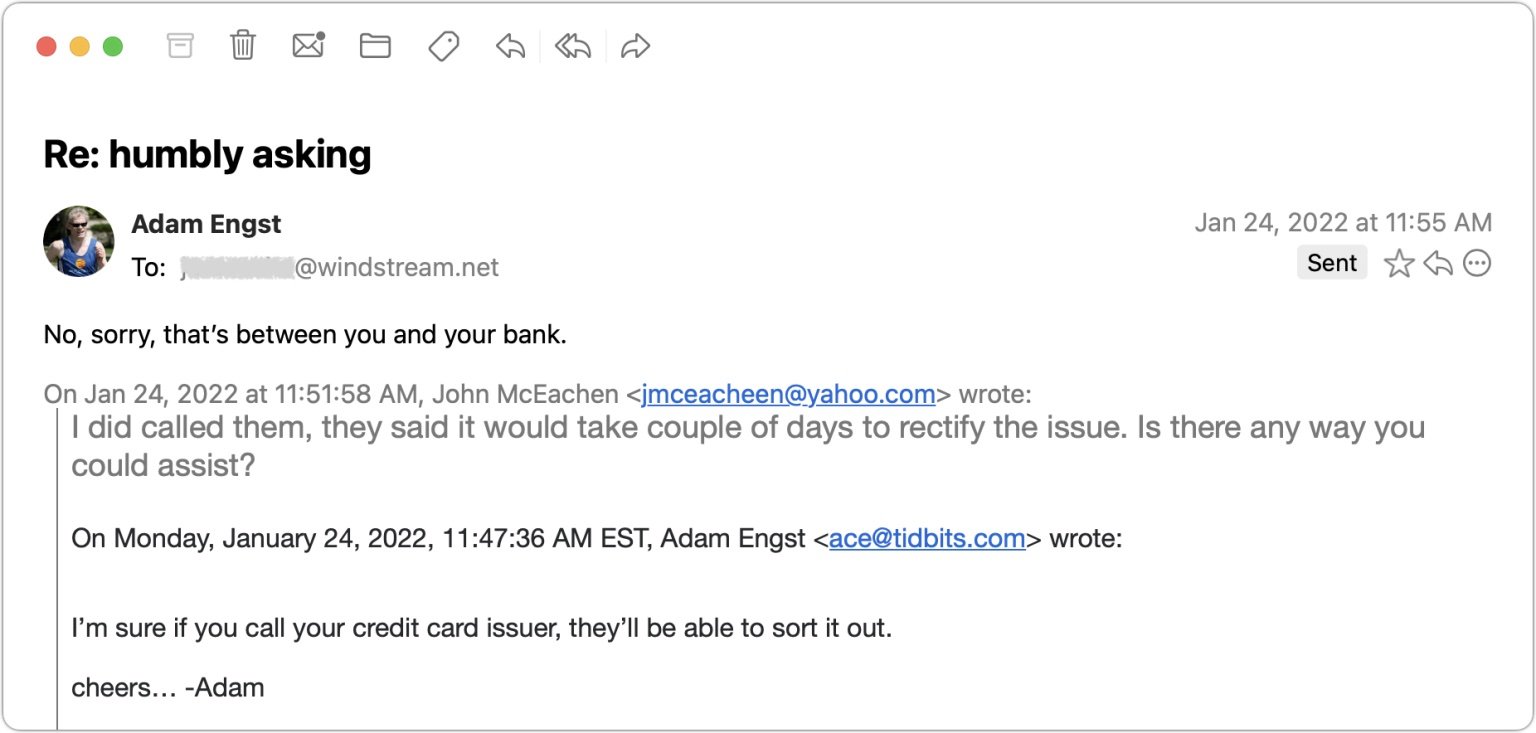
By now, I was curious what the scam would be, so I kept pretending that I was skeptical but still going along with it all. After another message or two, it became clear—the scammer wanted me to buy a $300 Amazon gift card for which they would reimburse me later. Yeah, right.
Throughout all this, I made sure to send only to the windstream.net account in part to see if the scammer would lose access. I was simultaneously keeping up the text backchannel with John, who said that he saw none of these messages in his Sent mailbox nor messages from me in his Inbox, which suggested that the scammer was somehow deleting them instantly to cover their tracks. I assume that John changed his password, but if so, that apparently didn’t kick the scammer out because I kept getting replies to the messages I sent to windstream.net.
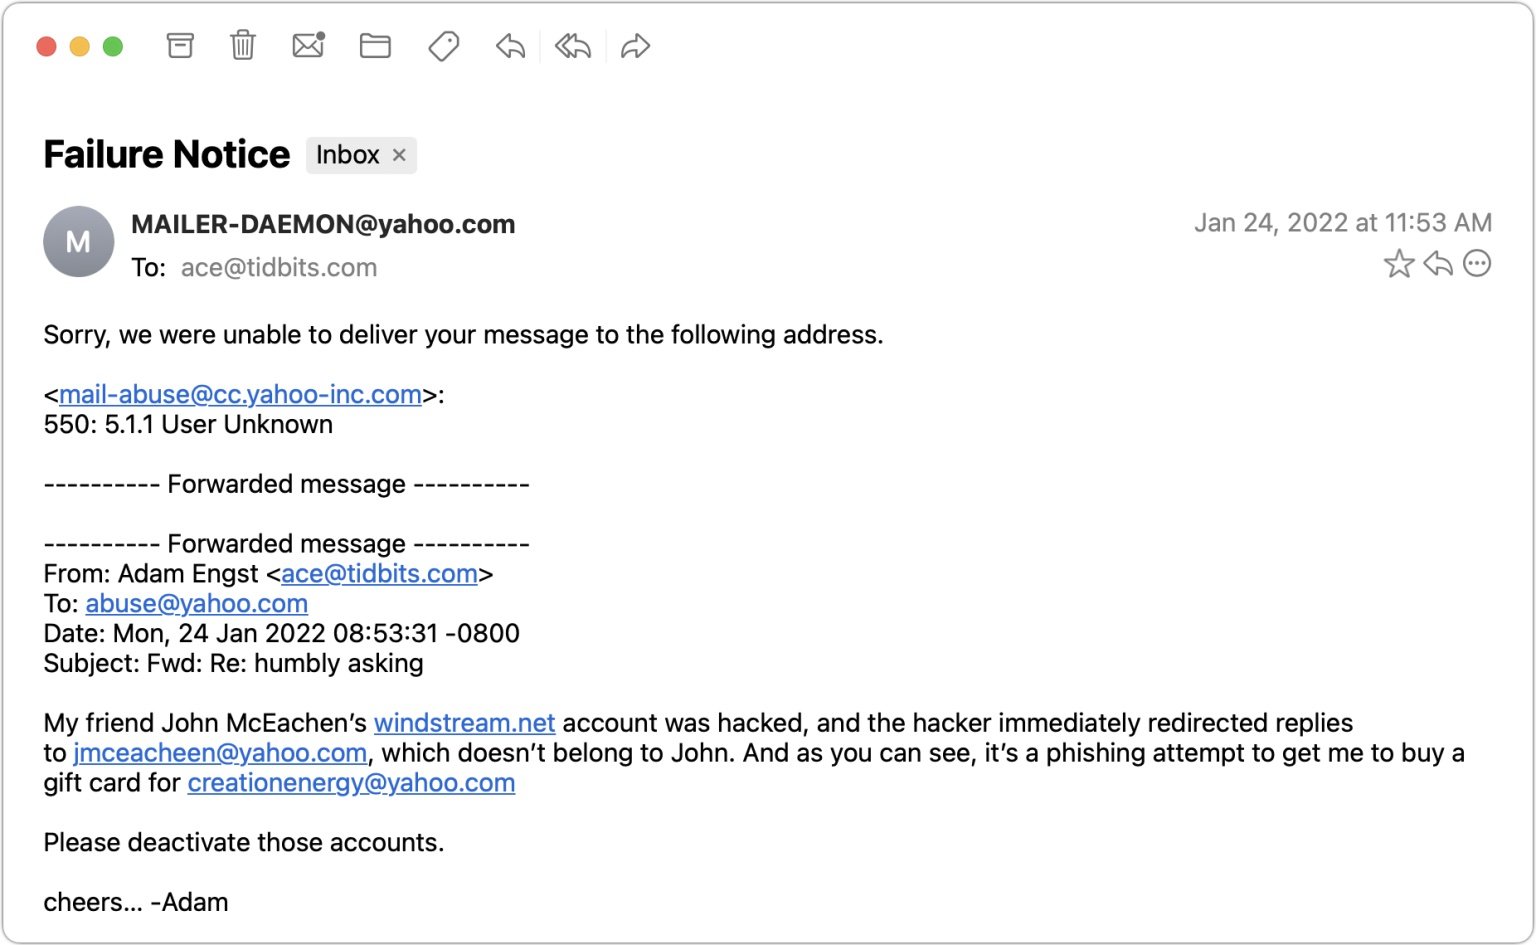
I entertained a faint hope that Yahoo would be interested in shutting down both the scammer’s address and the address they wanted me to use for the Amazon gift card. But no, my attempt to alert abuse@yahoo.com failed. I subsequently tried to contact Yahoo via a recommended Web form after I mentioned the issue in “Yahoo-Backed POP Connections Cause TidBITS Formatting Error” (26 January 2022), but that was equally unsuccessful.
By this time, I had traded a few more messages with the scammer to keep the conversation going, but they eventually gave up on me. I never heard back again after this message.
I didn’t get around to writing up this story right away and quickly forgot about it. But a month later, it happened again! Vern isn’t someone with whom I’ve ever exchanged email, but he runs an excellent U-Pick blueberry farm in my nearby hometown, and I had left my email address in his visitor book the last time I picked berries there. Luckily, I had an in for contacting him—my father used to be the mail carrier, and he still knows most people in town. Dad was able to call him and let him know about the problem, and Vern changed his password and alerted all his email contacts not to reply to the scam messages. Amusingly, this time, Vern’s real email address was at Yahoo, and the scammer was trying to redirect replies to a fake Outlook account.

Two months later, the scam reappeared in my email, with the scammer victimizing an older runner in the area. In this case, I’d been talking about Tom with another friend who worked with him regularly just the day before, so I recruited my friend to encourage Tom to change his password.

How to Help Your Friends
Let’s assume that you get one of these messages. They’re so weirdly generic that you’ll realize it’s a scam right away if they come from someone you know well. Or, as in the case of my second example, you’ll know the person so slightly that the scam will be obvious purely because a stranger would never ask such questions. The awkward middle occurs if the message is like my first and third examples, where I knew the people just well enough that I wasn’t surprised to get email from them but not well enough to be certain that the message was fake.
Nevertheless, if you’re unsure, there’s no harm in replying—just don’t get sucked in! If you notice that your reply (or any subsequent one) is going to an address other than where the first one originated, that’s another clue that you’re in the middle of a con. Once you realize what’s going on, here’s what I recommend doing… and not doing:
Do recommend a password change: By calling, texting, or emailing a secondary address, tell the person whose account has been hacked to change their email account password immediately and recommend that they create a strong, unique password using a password manager. You must assume that the scammer has full control over the victim’s primary email account and will delete all warnings and evidence of wrongdoing.
Do encourage alerting of other contacts: Although the person whose account was hacked probably won’t be able to tell who received the scam message, encourage them to alert all their contacts that the previous message was fake and should be ignored. Also, suggest that they encourage their contacts to check their passwords—might the acquaintances of people whose passwords were so weak as to be compromised be likely to have weak passwords as well?
Don’t fall for the scam: Never buy an Amazon or other gift card for someone you don’t know just because they ask. (If you want to give someone money, become a TidBITS member.)
Don’t mark it as spam: Don’t mark the initial message from the scammer as spam or report it as phishing. Remember, it’s essentially legitimate email, having been sent from the compromised account, so marking it as spam could cause future real messages from that person to be filtered too.
Don’t bother reporting the scammer: Sadly, I don’t recommend trying to report the scammer to whatever email service they’re using. The goal is good, but it’s all too likely to be a waste of your time.
To make it easier to alert victims, here’s a sample message you can text them or use as a script when talking to them:
It looks like your email account has been hacked and used to send scam messages to contacts like me. I’d encourage you to change your email password immediately, making the new password strong and unique, ideally using a password manager app. Also, it would be good to alert your contacts to ignore the scam message and encourage them to make sure their own passwords are secure.
Finally, if you have friends who aren’t Internet-savvy, share these stories so they have a better chance of avoiding being scammed or having their accounts compromised.
Understanding What “Vintage” and “Obsolete” Mean for Apple Products
It might be easier to repair vintage jeans than a vintage Mac. Read on if you want to understand Apple’s definitions of vintage and obsolete hardware and what they mean for support and repair.

Macs—and Apple products in general—tend to last a long time. It’s not unusual to see someone happily using an 8-year-old MacBook Pro. As much as it’s environmentally responsible to use electronics as long as possible, doing so may reduce your productivity or leave your business in a precarious situation if a hardware failure forces an upgrade at an inconvenient time.
Another factor to consider is whether or not you can get service and parts for your older device. It’s easy to assume that Apple will fix whatever you bring in, but unfortunately, that’s not the case. Apple has policies surrounding how long it guarantees to provide service and parts, which is reasonable. No one would expect Apple to repair a 128K Mac from 1984—many repair techs hadn’t even been born then.
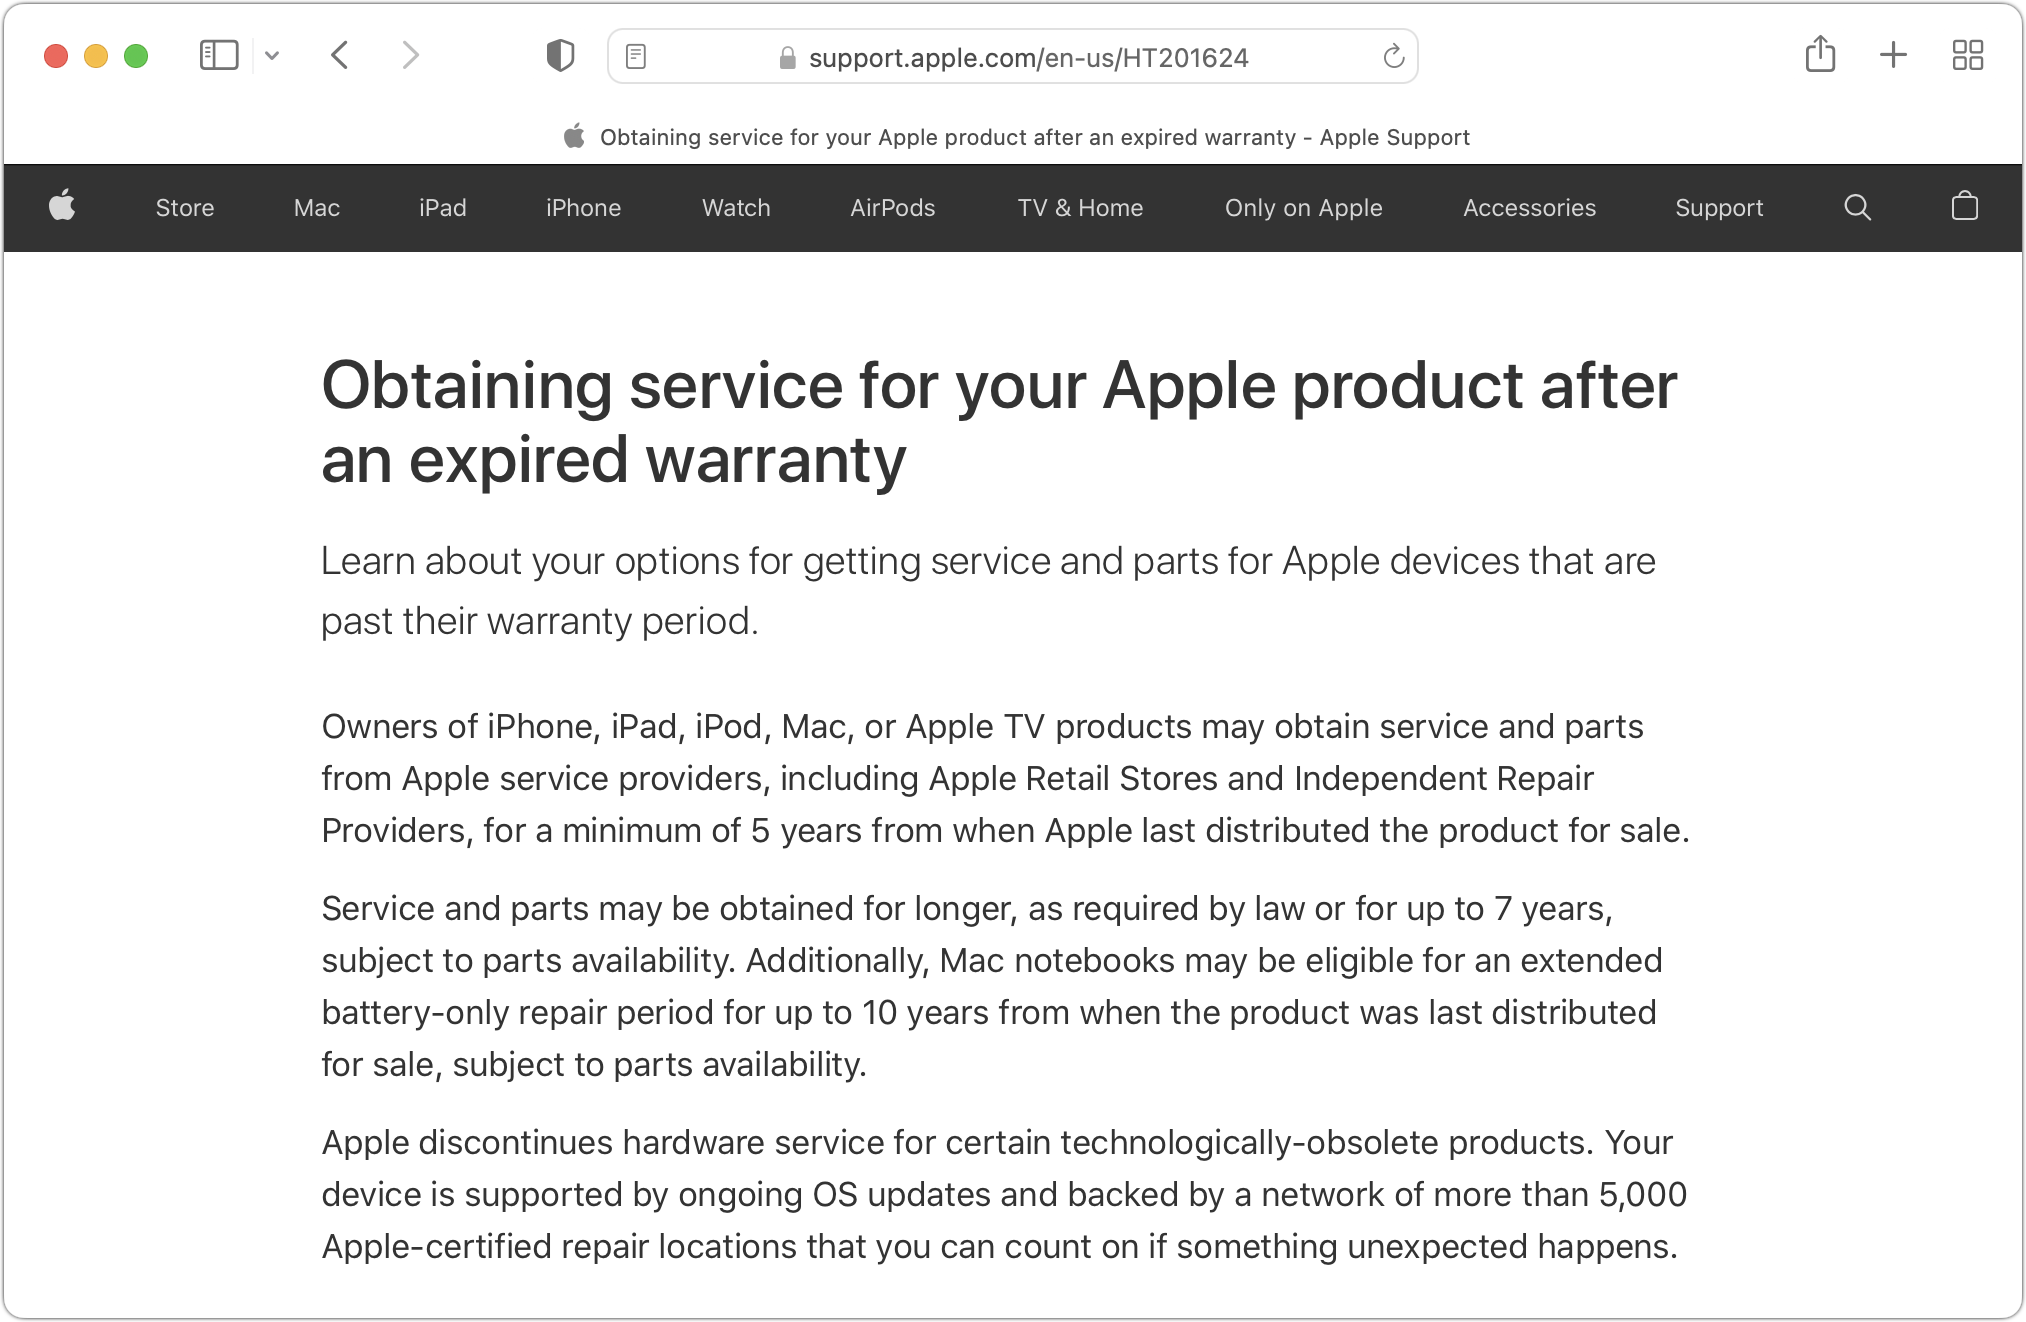
All Apple products fall into one of three categories: current, vintage, and obsolete. Current products, which Apple defines as those that were sold within the last 5 years, are eligible for service and parts from Apple, Apple Authorized Service Providers, and Independent Repair Providers. In other words, if you bought your Mac new within the last 5 years, you won’t have any problem getting Apple to fix it.
(Independent Repair Providers are firms that have signed up for Apple’s Independent Repair Provider Program to provide out-of-warranty iPhone and Mac repairs using Apple-provided parts, tools, service guides, and diagnostics. Other repair shops can repair Apple products but may lack Apple certifications and have to source parts from other suppliers.)
Things get trickier with the other two categories:
Vintage: Apple considers a product to be vintage when the company stopped selling it more than 5 and less than 7 years ago. During this 2-year window, Apple says that service and parts may be obtained, subject to parts availability.
Obsolete: As you’d expect, a product is considered obsolete when Apple hasn’t sold it for more than 7 years. Apple will not service obsolete products, and service providers cannot order parts for them.
There is one exception to these policies. Mac laptops may be eligible for an extended battery-only repair period for up to 10 years from when the product was last distributed for sale, subject to parts availability. That makes sense since a new battery may be all an old MacBook needs to keep working.
Apple maintains a page listing all vintage and obsolete products. To determine which Mac model you have, choose About This Mac from the Apple menu. For iPhones, iPads, and iPods, Apple provides pages explaining how to identify your model.
Apple’s policies surrounding vintage and obsolete products shouldn’t make a huge difference to most users. That’s because once a Mac hits 5 years old, it’s likely that upgrading to a new model will provide significant benefits. Many businesses prefer a 3-year replacement cycle because they’ve determined that’s the sweet spot where increasing support costs and lower performance make it worth selling the old Mac and buying a new one that’s faster and more reliable.
Of course, there’s nothing wrong with keeping a Mac longer if it meets your needs and you don’t mind spending more on support. At some point, though, products in the vintage and obsolete categories are living on borrowed time.
(Featured image by iStock.com/Soulmemoria)
Did You Know That You Can Run iPhone and iPad Apps on an M1-based Mac?
Running iPhone and iPad apps on your Mac is no longer science fiction if you have an M1-based Mac. Read on for instructions on finding and installing these apps, and how to control them if a trackpad isn’t sufficient.

Much has been written about the performance benefits of Apple’s M1 family of chips, but you may not have realized that M1-based Macs can also run many iPhone and iPad apps. It makes sense, given that the M1 chip grew out of the work Apple did for the A-series processors in the iPhone and iPad, and the latest iPad Pro models also rely on the M1.
Why Run iOS Apps?
Depending on how you use your iPhone and iPad, you’re thinking either, “Hey, this is great, because I want to run my favorite apps on my new Mac!” or “What could I possibly gain from putting a little iOS app on my Mac?”
If you’re in the latter camp, think about the apps you regularly use on your iPhone and iPad. Some undoubtedly have Mac versions, and others may offer Web apps that you can run in Safari on your Mac. But a few probably exist only on the iPhone or iPad, or their Web apps are limited. That might be especially true of games, one-trick-pony apps (like the Mandelpad app shown below), and smart home device apps.

What iOS Apps Are Available for the Mac?
In theory, any iPhone or iPad app should run on an M1-based Mac. However, Apple allows developers to set a switch that prevents an iOS app from installing on Macs. Developers may want to prevent that if they already make a Mac-specific app or don’t want to be on the hook for supporting customers using their iOS app on Mac. Sadly, many popular apps like Netflix, Kayak, and Libby won’t run on the Mac.
Luckily, there’s an easy way to determine which of your iPhone and iPad apps will run on your M1-based Mac. Using the Mac App Store app:
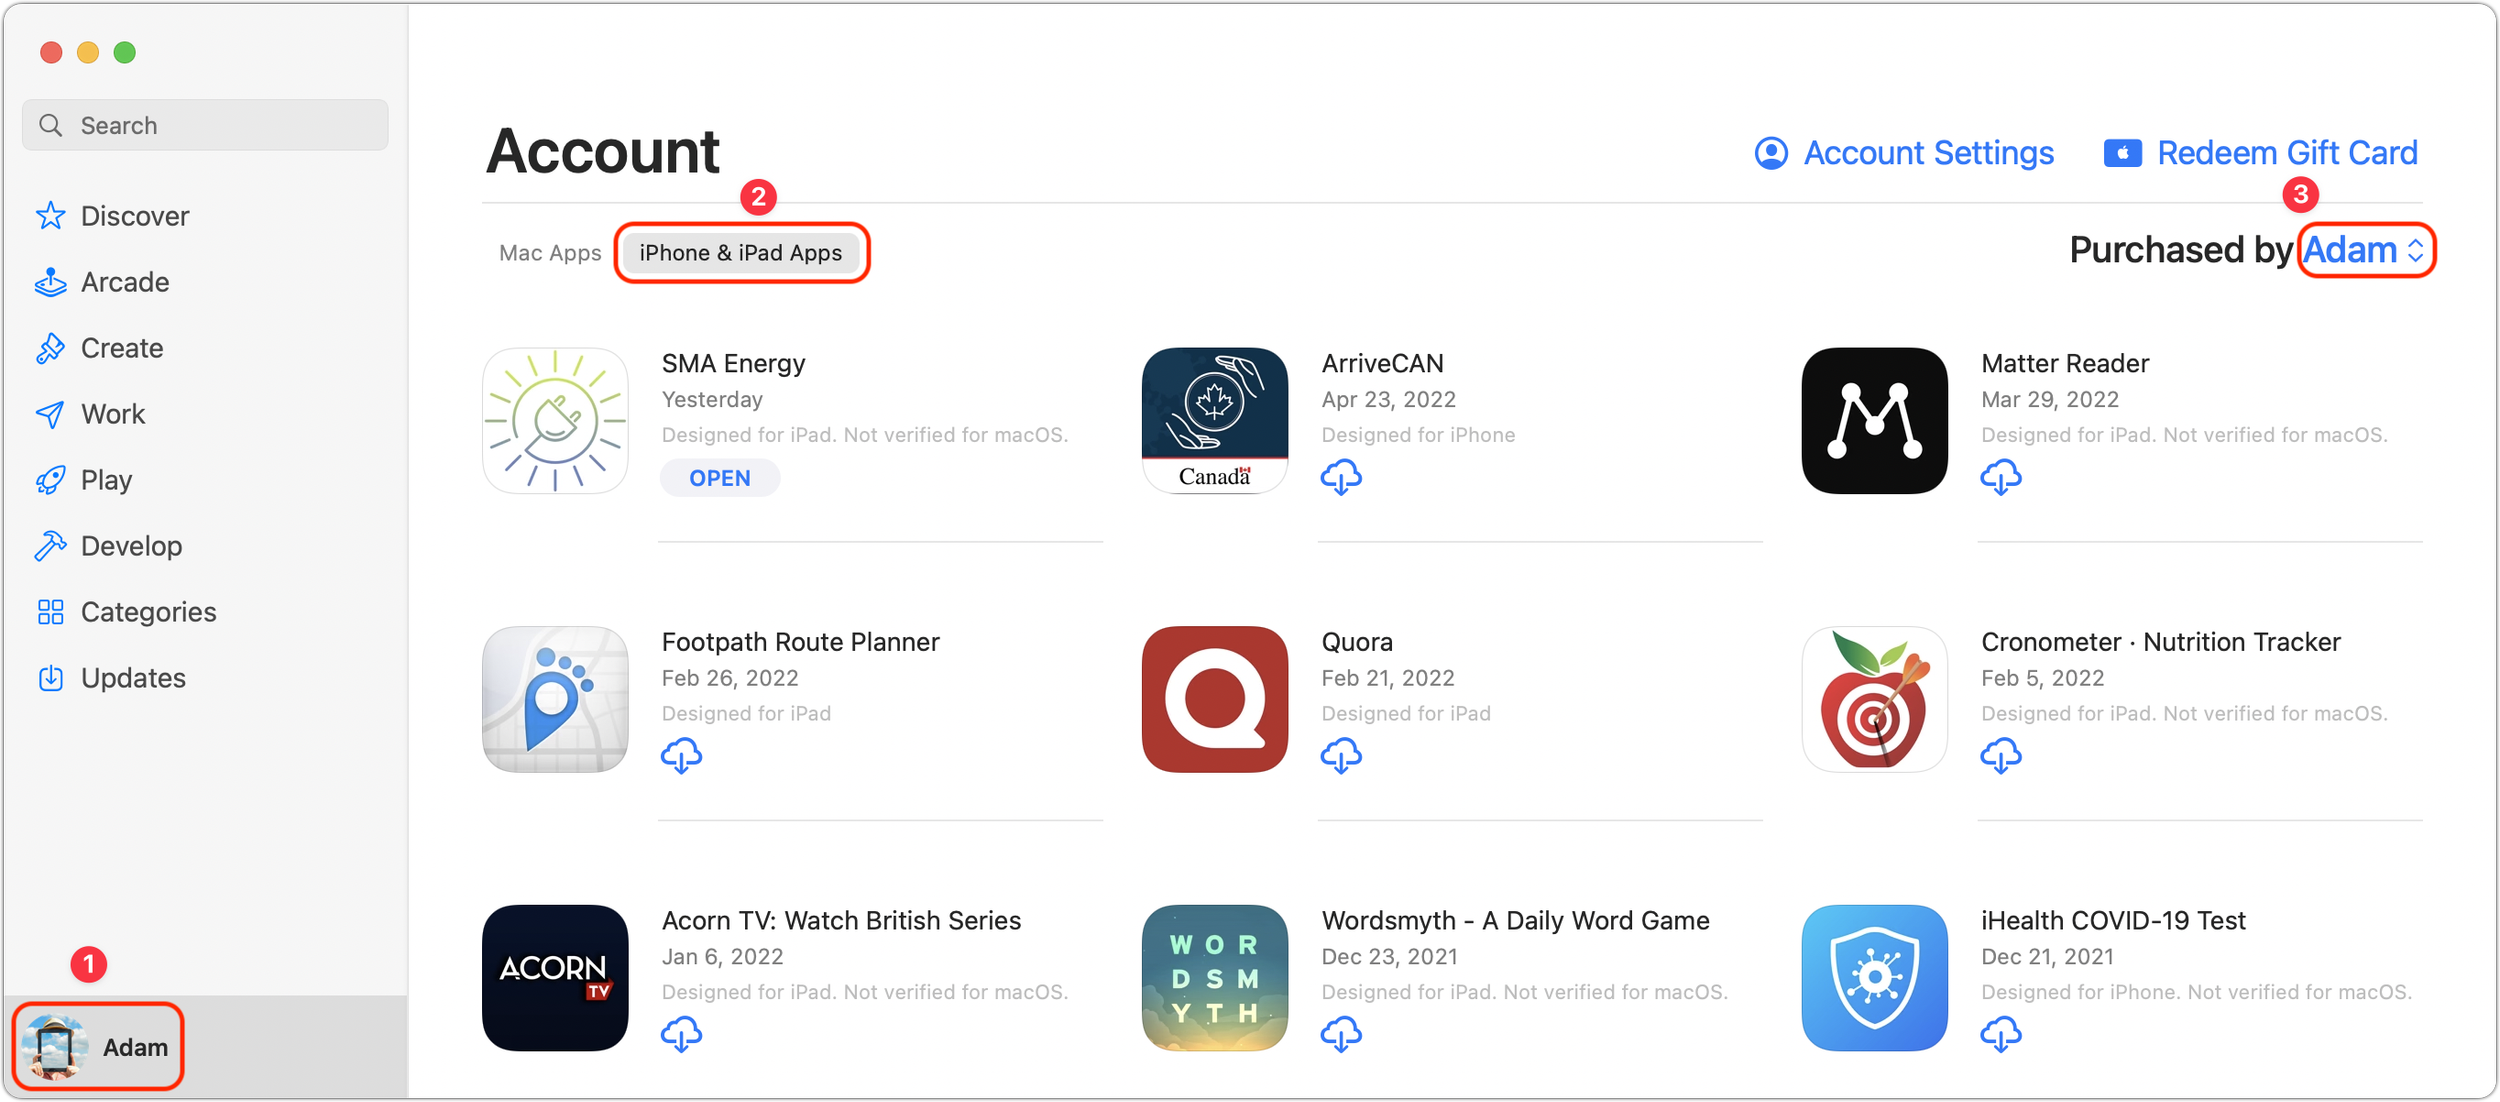
Click your avatar in the lower-left corner to view your account.
Under Account, click iPhone & iPad Apps to view the iOS apps you’ve purchased.
If desired, use the Purchased By pop-up menu to the right to see apps that other people in your Family Sharing group have purchased.
Scan the listing, which is sorted by the date you acquired the app.
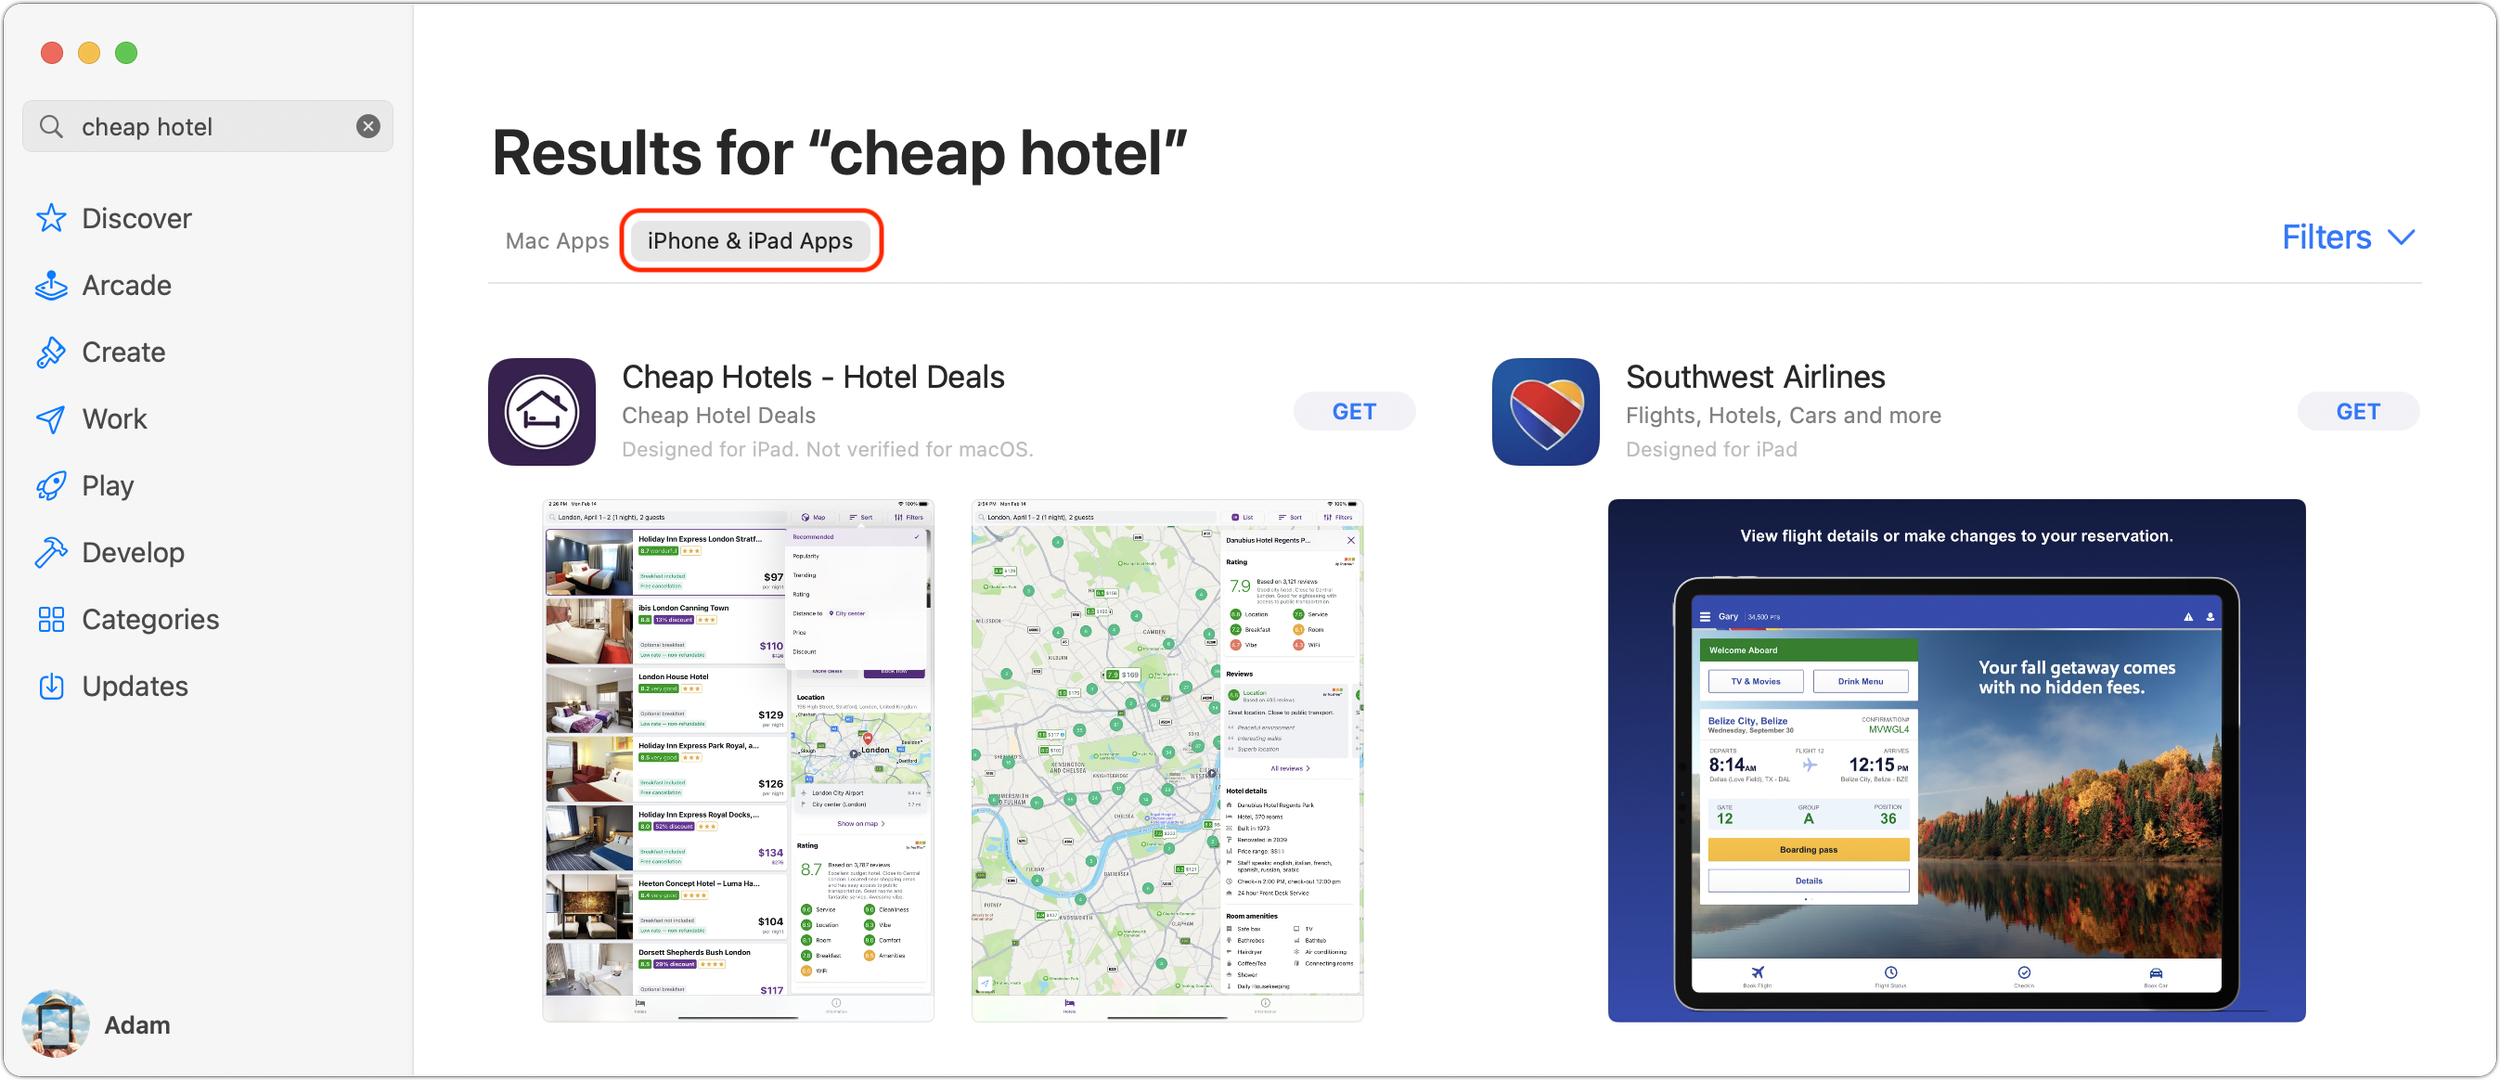
What about new apps? Whenever you’re searching for an app in the Mac App Store using an M1-based Mac, you’ll see the same two tabs: Mac Apps and iPhone & iPad Apps. Click the latter to see all the apps that match your search and will run on your Mac. Because of developer-set limitations, you may not find what you’re looking for with a search.
How Do You Install iOS Apps?
When viewing the list of your purchased iPhone and iPad apps in the Mac App Store as described above, simply click the download button to install the app in your Applications folder.
If you’ve found a new app that you want to download, click the Get or price button, just as though it were a Mac app.
How Do You Use Multi-Touch Apps on a Mac?
Needless to say, trying to tap and swipe on your Mac’s screen with a finger won’t have any effect. You’ll need to use your Mac’s keyboard and pointing device—preferably a trackpad—to control your iPhone and iPad apps. For the most part, such actions should map in an intuitive manner: you click instead of tapping, and trackpad gestures like pinching work the same.
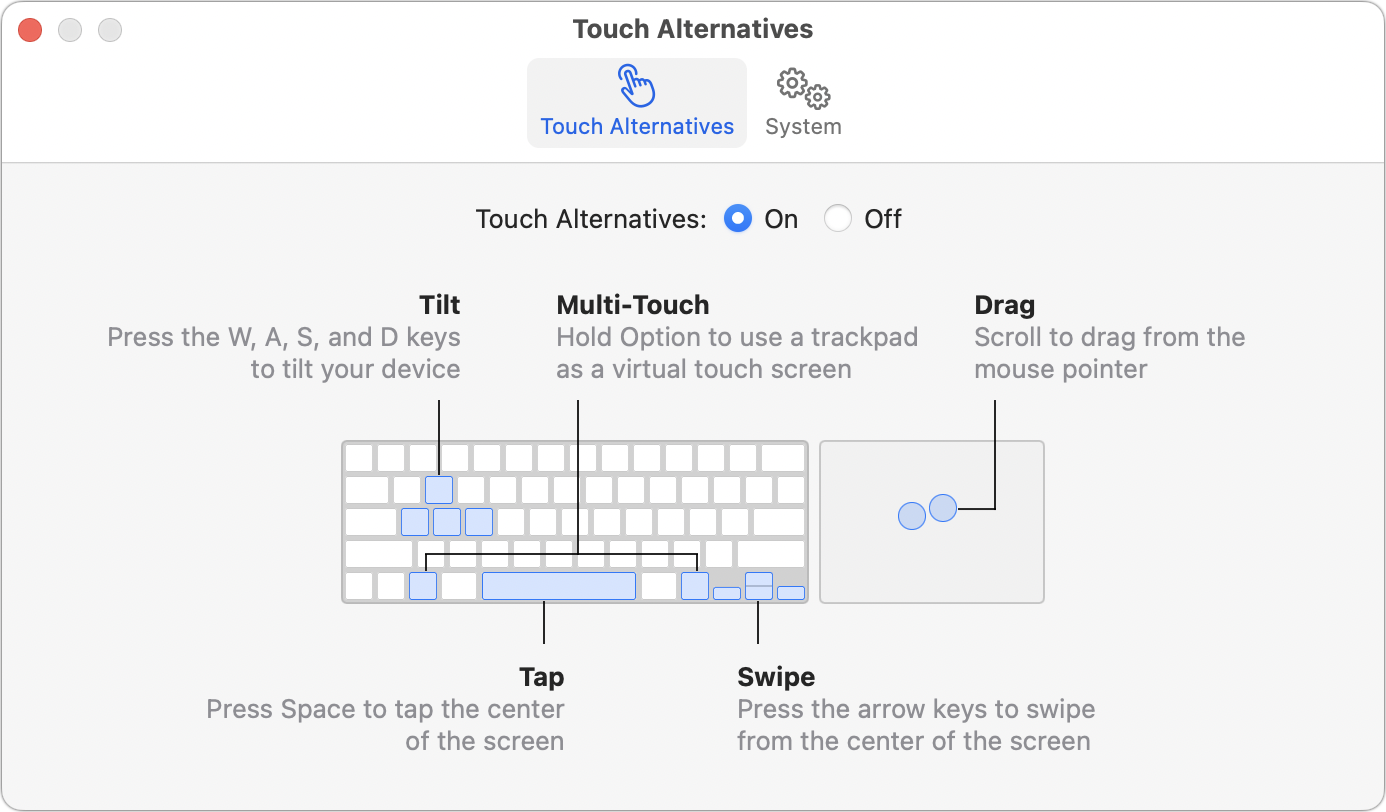
If that doesn’t work, or if the app in question requires tilting the iPhone or iPad, choose Preferences from the app’s menu and turn on Touch Alternatives to map keys on the keyboard to device actions like tilting, tapping, and swiping. How well the Mac’s input devices will work for controlling an iOS app will undoubtedly vary.
We’re not going to pretend that being able to run iPhone and iPad apps on your M1-based Mac is world-changing. It’s all too easy to whip out your iPhone and use such an app in the environment for which it was designed. But there are likely situations where it would be convenient to have an iOS app running alongside the rest of your Mac apps, and that’s now possible.
(Featured image by iStock.com/Apple)
Block Malicious and Adult Web Sites with DNS Filtering
DNS filtering is a simple way to protect yourself from malicious websites. All you have to do is configure a DNS server setting to ensure that you never accidentally load a malicious site. Learn more at:

One of the best ways to keep malware from infecting your computers is to avoid visiting websites designed to do just that. No one intentionally visits loadmetogetinfected.com, but malware authors employ all sorts of tricks to lure unsuspecting users into viewing malicious sites. Various tools can help, but the easiest free technique is called DNS filtering.
DNS, which is short for Domain Name System, is the Internet technology that maps human-readable computer names like www.apple.com to the numeric IP address of Apple’s server, 17.254.0.91. Every time you click a link to visit a new Web page, your Mac queries a DNS server to learn the IP address associated with the domain name embedded in the link—it all happens seamlessly and instantaneously in the background.
Typically, your Mac will automatically use the DNS servers specified by your Internet service provider. However, you can change your DNS servers manually, and one good reason to do so is to take advantage of DNS servers that look at your Mac’s DNS requests and refuse to resolve names associated with malicious sites. Such DNS filtering is great since it protects you from malicious sites without you having to do anything special. Such sites simply won’t load at all.
One more thing. DNS filtering can also block porn sites. That’s helpful if you want to avoid accidentally loading adult content or to ensure that those in your office don’t, in order to reduce the chances of a sexual harassment complaint. As with malicious sites, filtered adult sites just won’t load.
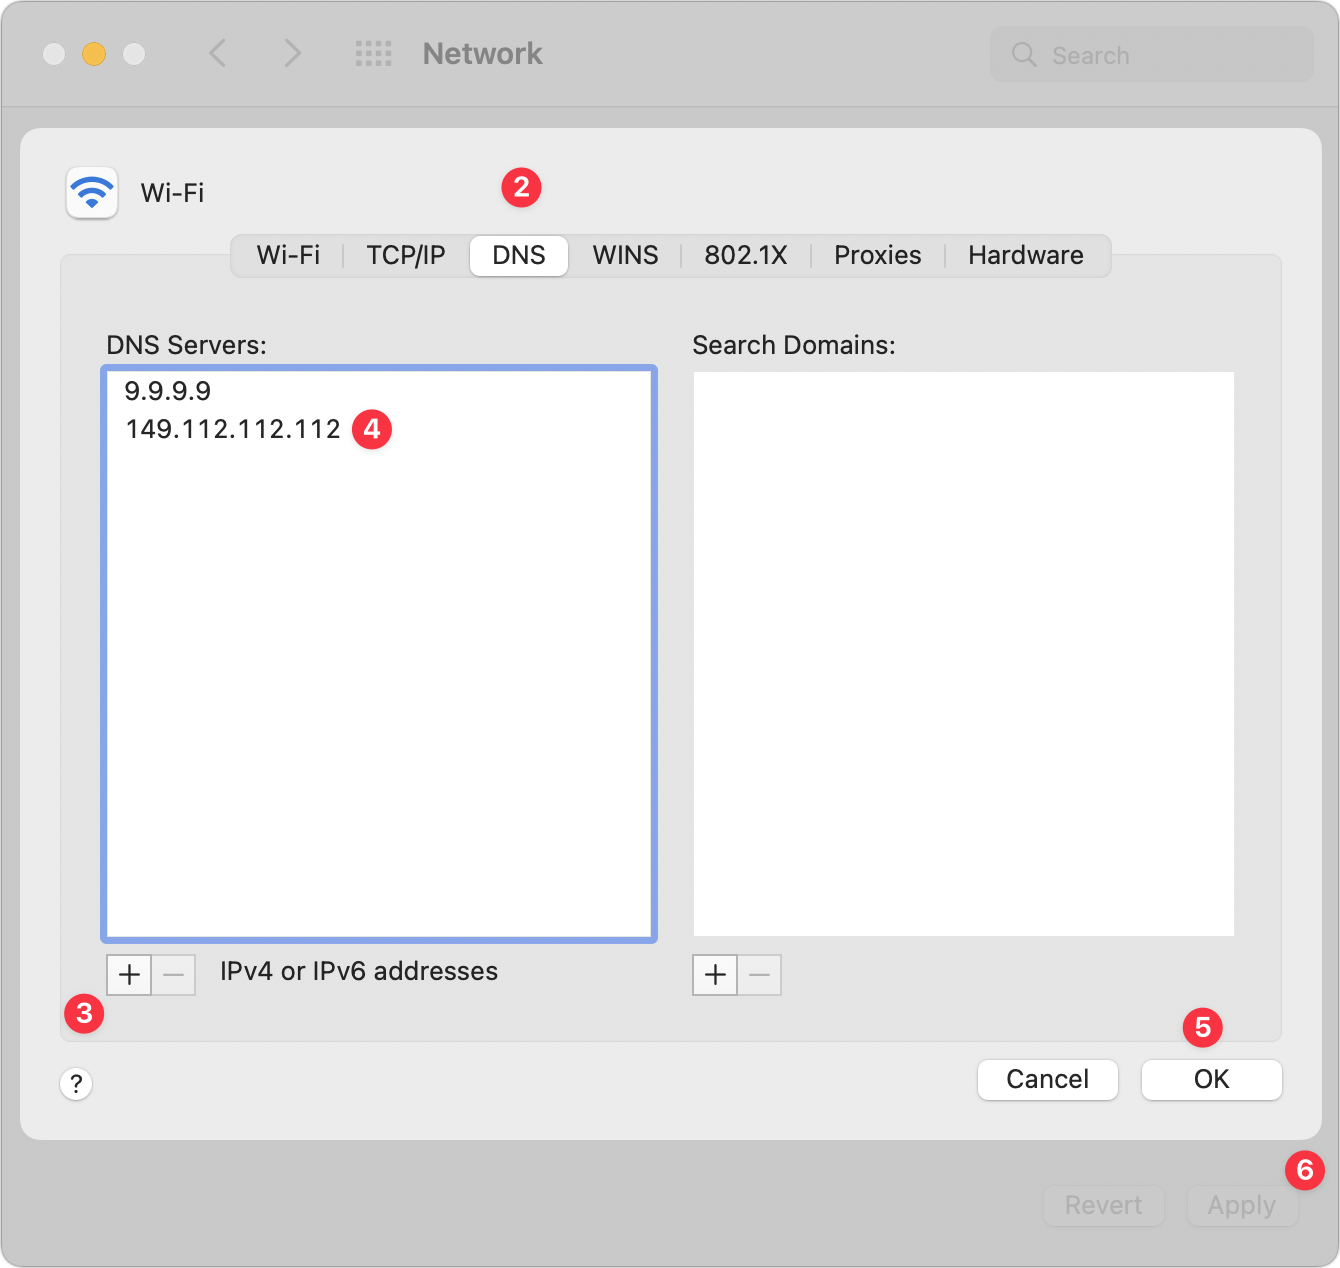
Setting up DNS filtering is easy. All you have to do is replace your current DNS server addresses with the IP address of a particular public DNS service—the steps are later in this article. The two providers we recommend are Quad9 and Cloudflare, both of which are free and run by reputable companies. Of the two, Quad9 is more focused on user privacy, but Cloudflare offers additional DNS filtering capabilities that may be useful.
The options are:
Quad9 malware blocking: 9.9.9.9 with a secondary of 149.112.112.112
Cloudflare malware-only blocking: 1.1.1.2 with a secondary of 1.0.0.2
Cloudflare malware and adult content blocking: 1.1.1.3 with a secondary of 1.0.0.3
You should always enter the secondary DNS server in case the primary server goes down. Otherwise, you wouldn’t be able to connect to any sites at all.
However, don’t mix in other DNS servers. If you use Cloudflare’s adult content filter as your primary DNS server with your ISP’s DNS server as a secondary, when Cloudflare refuses to resolve an adult site, macOS will drop down to the secondary ISP server, which will resolve it happily, thus eliminating the utility of the Cloudflare’s filtering.
One final note before you get started. Apple’s iCloud Private Relay service (in beta in macOS 12 Monterey, iOS 15, and iPadOS 15) sends all your traffic through two proxy servers, which prevents DNS filters like Quad9 and Cloudflare from working. That’s unfortunate since iCloud Private Relay is a useful way to hide your IP address and browsing activity from your network provider and the websites you visit. Apple is clear about this limitation, noting in its various DNS server interfaces:
DNS requests are being routed by iCloud Private Relay for this network. Turn off Private Relay to manually configure DNS settings.
If you need to turn off iCloud Private Relay on the Mac, open System Preferences > Apple ID and deselect the checkbox next to Private Relay. On an iPhone or iPad, open Settings > Your Name > iCloud > Private Relay and flip the switch to Off.
Set Up DNS Filtering in macOS
To use DNS filtering on the Mac, follow these steps, which should work in any version of macOS. We’re using Quad9 as the example here, but replace the primary and secondary IP addresses as desired if you want to use one of the Cloudflare filters.
Open System Preferences > Network, and select the adapter you use (likely Wi-Fi or Ethernet) in the sidebar.
Click the Advanced button, and in the sheet that appears, click DNS.
Click the + button under the DNS Servers list and enter 9.9.9.9.
Click the + button again and enter 149.112.112.112.
Click OK to dismiss the Advanced preferences, and click Apply.
Close the Network preference pane.
It’s difficult to perform a real-world test to tell if Quad9 or Cloudflare’s malware blockers are active since there’s no way to know which sites they block. However, Quad9 provides a test page at on.quad9.net that should help. If you use Cloudflare’s adult content filter, you can tell if it’s working because your Web browser will refuse to load adult sites.

Set Up DNS Filtering in iOS and iPadOS
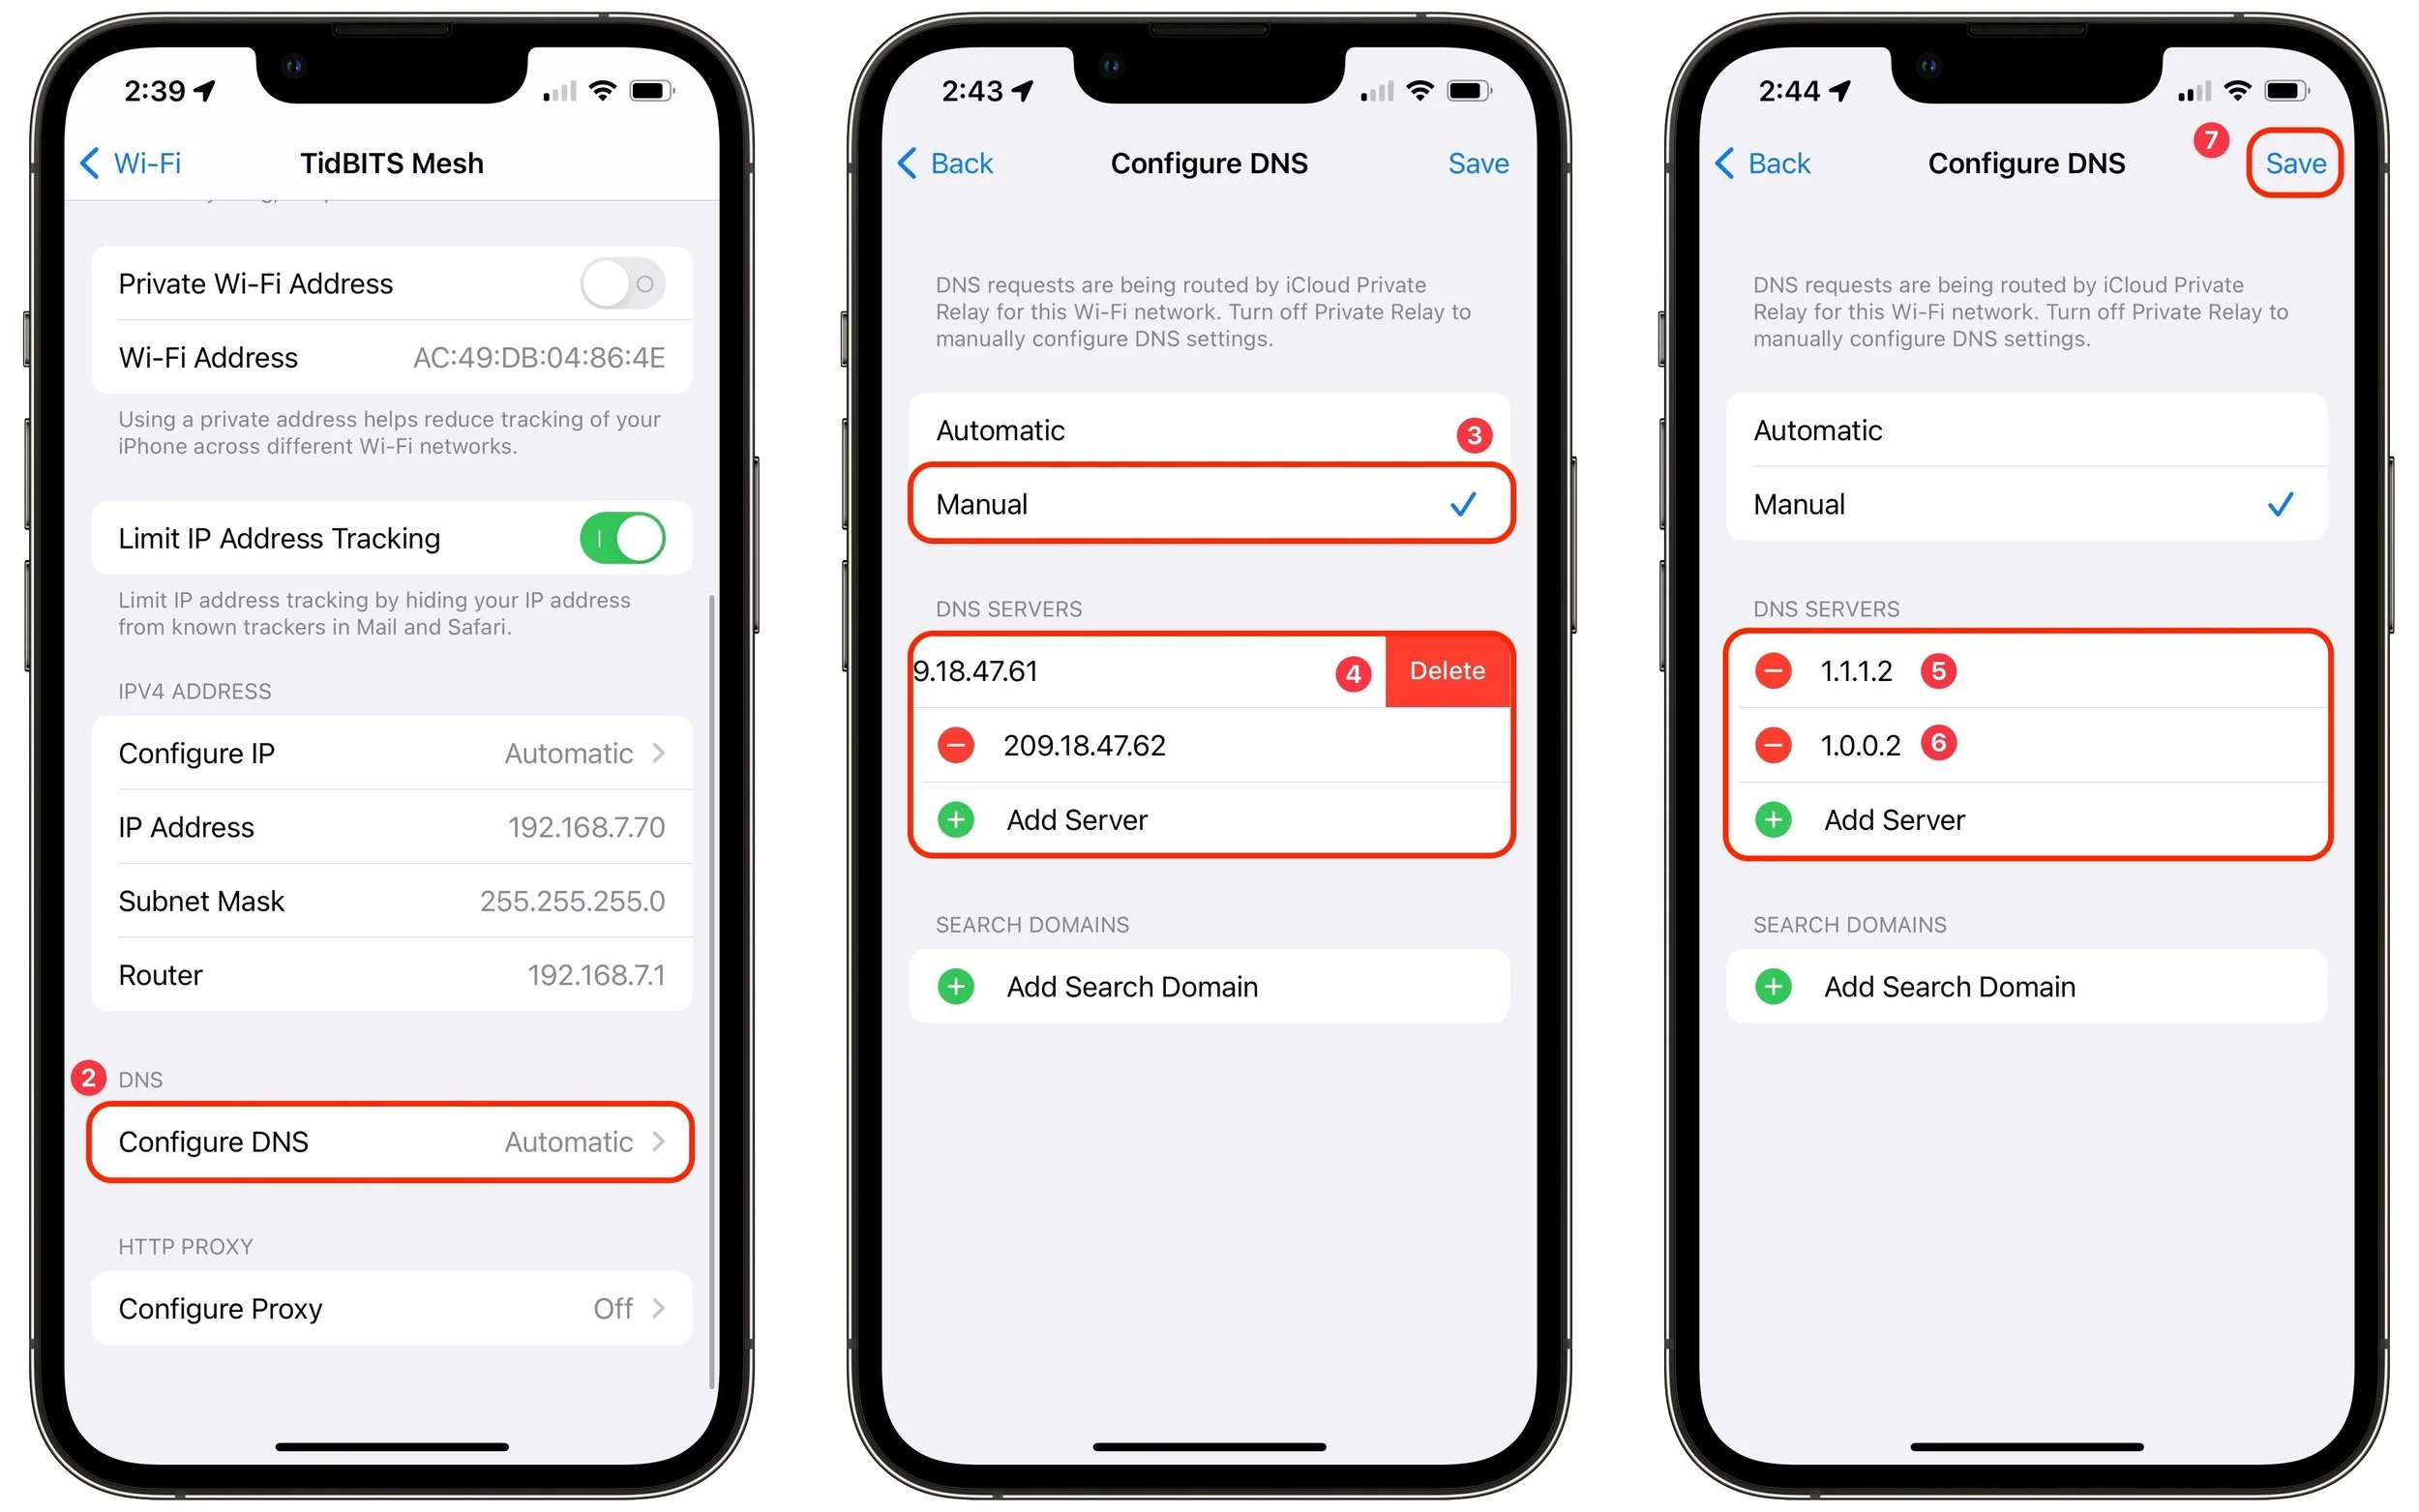
The steps for setting up DNS filtering in iOS and iPadOS are a bit different. For this example, we’ll use the Cloudflare malware filter, but again, you should replace the IP addresses below with the filter you want to use.
Open Settings > Wi-Fi and tap the “i” button next to your current Wi-Fi network.
Scroll down and tap Configure DNS, which is probably set to Automatic.
On the Configure DNS screen, tap Manual.
In the list of DNS servers, tap the red delete buttons next to any entries there.
Tap the green Add Server button and enter 1.1.1.2.
Tap the green Add Server button again and enter 1.0.0.2.
Tap Save in the upper-right corner.
That’s it! You should have no trouble using either Quad9 or Cloudflare, but if you need to revert to your previous DNS servers, it’s easy to do. On the Mac, just delete the manual entries you created—macOS will automatically use the DNS servers provided by your ISP. On an iPhone or iPad, select Automatic in the Configure DNS screen to replace the manually entered DNS servers with those from your ISP. In either case, if you’re not going to use DNS filters, it’s worth turning on iCloud Private Relay. We hope that Apple adds DNS filtering options to iCloud Private Relay so you could additionally choose to filter out malicious sites and adult content.
(Featured image by iStock.com/Funtap)
Copy and Paste Like a Pro with a Clipboard Utility
You use Copy and Paste, but did you know that, with a clipboard utility, you can paste previously copied items and filter or edit data on the clipboard? Here are three utilities that supercharge copying and pasting:

For our money, perhaps the most unheralded innovation of the computer age is Copy and Paste. No one thinks about the clipboard—that virtual shelf where copied text and images sit—because it just works. We all use Command-C to copy something and Command-V to paste it without having to retype the text, reimport the graphic, or whatever. Copy and Paste is a huge timesaver because it lets you reuse or build on work already done.
What if you could make Copy and Paste even more powerful? With the right clipboard utility installed on your Mac, you gain two major new features:
Use clipboard history to access previously copied data. Every time you copy something to the clipboard, it replaces whatever was there before. With a clipboard utility, though, you can see a list of items you’ve previously copied to the clipboard and paste any one of them, which is vastly easier than finding and copying the data again. Clipboard utilities even preserve your clipboard history across restarts.
Filter or edit the data on the clipboard before pasting. This capability is useful, for instance, if you copied styled text but want to paste plain text, if there’s a mistake in the contents of the clipboard that would be hard to fix after pasting, or if you want to replace all double spaces in the copied text with single spaces.
Which clipboard utility is right for you depends on what else you might want it to do, or you might even have one installed without realizing it. That’s because clipboard enhancements are a bit like blades in a Swiss Army knife: they tend to be bundled into other utilities. You won’t go wrong with any of these clipboard boosters: the dedicated clipboard helper Copy ’Em, the launcher LaunchBar, and the macro utility Keyboard Maestro. And while we’re highlighting these three, there are innumerable other great utilities that offer similar features.
Copy ’Em ($14.99) focuses on clipboard enhancements, bundling nearly every clipboard-related feature you could want into an attractive interface. It offers a full clipboard history, makes it easy to paste multiple items quickly or in a batch, can transform pasted text in various ways, and lets you organize clippings into groups. It also enables you to edit text clippings, search for text in your clippings, and ignore apps whose clipboard changes clutter your clipboard history. There’s even a separate version for the iPhone and iPad, should you want to share your clipboard history with your other devices. Other well-known clipboard utilities include CopyPaste ($30), Paste ($14.99 per year), and Pastebot ($12.99).
LaunchBar ($29) is a keyboard-focused launcher, so its primary feature is opening or switching to an application or file by typing a hotkey followed by a few letters from the name of the app or file. That’s hugely useful in its own right, but LaunchBar also maintains a filterable clipboard history across restarts, lets you paste a clipping as plain text, and can merge copied text with whatever is already on the clipboard. Other apps in this category include Alfred (with the optional £34 Powerpack), Butler ($20), and QuickSilver (donationware).
Keyboard Maestro ($36) is a macro utility, which means that it lets you string together a series of actions—copy this, switch apps, click there, paste, and switch back, for instance—and then invoke that series with a trigger such as a hotkey, menu command, timer, or system activity. Keyboard Maestro offers hundreds of actions and numerous triggers, but from the clipboard perspective, it provides a persistent clipboard history, multiple named clipboards, filtering of clipboard contents when pasting, removal of styles from pasted text, and a user-specified hotkey for anything you want to do.
Regardless of which of these utilities you choose, you’ll soon be juggling the contents of your clipboard like a pro…and wasting a lot less time!
(Featured image by iStock.com/LightFieldStudios)
Universal Control Arrives in macOS 12.3 and iPadOS 15.4
With macOS 12.3 Monterey and iPadOS 15.4, you can now use your Mac’s keyboard and pointing device to control up to three other Macs or iPads with Apple’s new Universal Control. Learn more at:
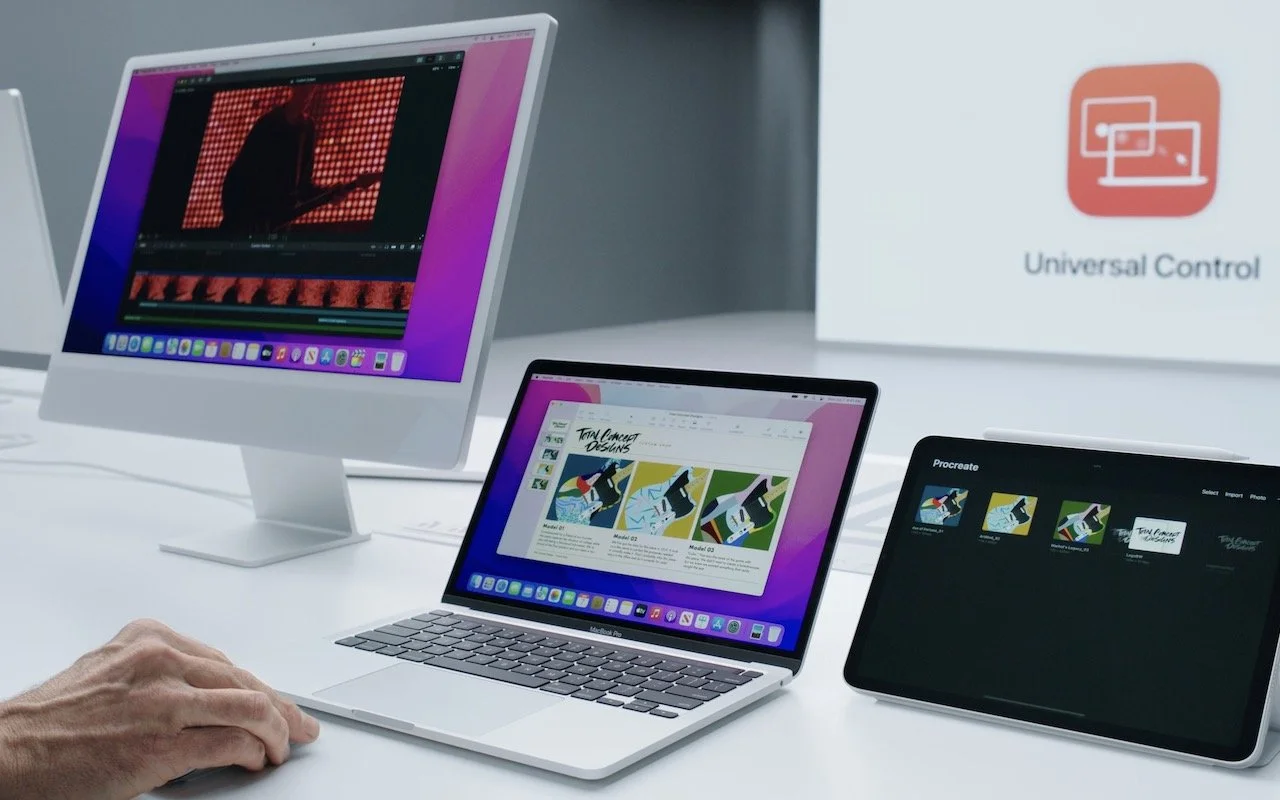
With the recent release of macOS 12.3 Monterey and iPadOS 15.4, Apple shipped Universal Control, the last major technology promised in its 2021 operating system upgrades. Universal Control enables you to use the keyboard and mouse or trackpad attached to one Mac to control up to three other Macs or iPads—you can even copy and paste or drag items between devices. It’s a great way to make more of your Apple devices while staying on task—no longer do you need to stop using your Mac to accomplish something on your iPad, and if you have both an iMac and a MacBook Air, it becomes trivially easy to use them simultaneously.
Universal Control can simplify grabbing a file from your MacBook Air while using your iMac, or it might make it easy to check something in an iPad-only app without switching from your familiar Mac keyboard and trackpad. For those who would benefit from more screen space, Universal Control simplifies keeping a Web browser window open on one Mac while you’re writing about it on another.
First, make sure all the Macs and iPads you want to use with Universal Control meet its system requirements. macOS 12.3 and iPadOS 15.4 are essential, and most (but not all) Macs and iPads that can run those versions are compatible. All the devices must be signed in to the same iCloud account, that account’s Apple ID must have two-factor authentication enabled, and no device can be sharing its Internet or cellular connection. Bluetooth and Wi-Fi must be turned on, and Handoff must be enabled in System Preferences > General on the Mac and in Settings > General > AirPlay & Handoff on the iPad. That may sound like a lot, but most of those are defaults.
Apple says everything must be within 30 feet (10 meters), but in nearly all cases, you’ll want the devices to sit next to one another so you can easily see what you are doing on all the screens.
The only trick with setting up Universal Control is that it must be initiated from a Mac. Open System Preferences > Displays, click the Universal Control button, and in the dialog that appears, enable all three switches. Only the first one is necessary; the other two make connecting in the future easier.
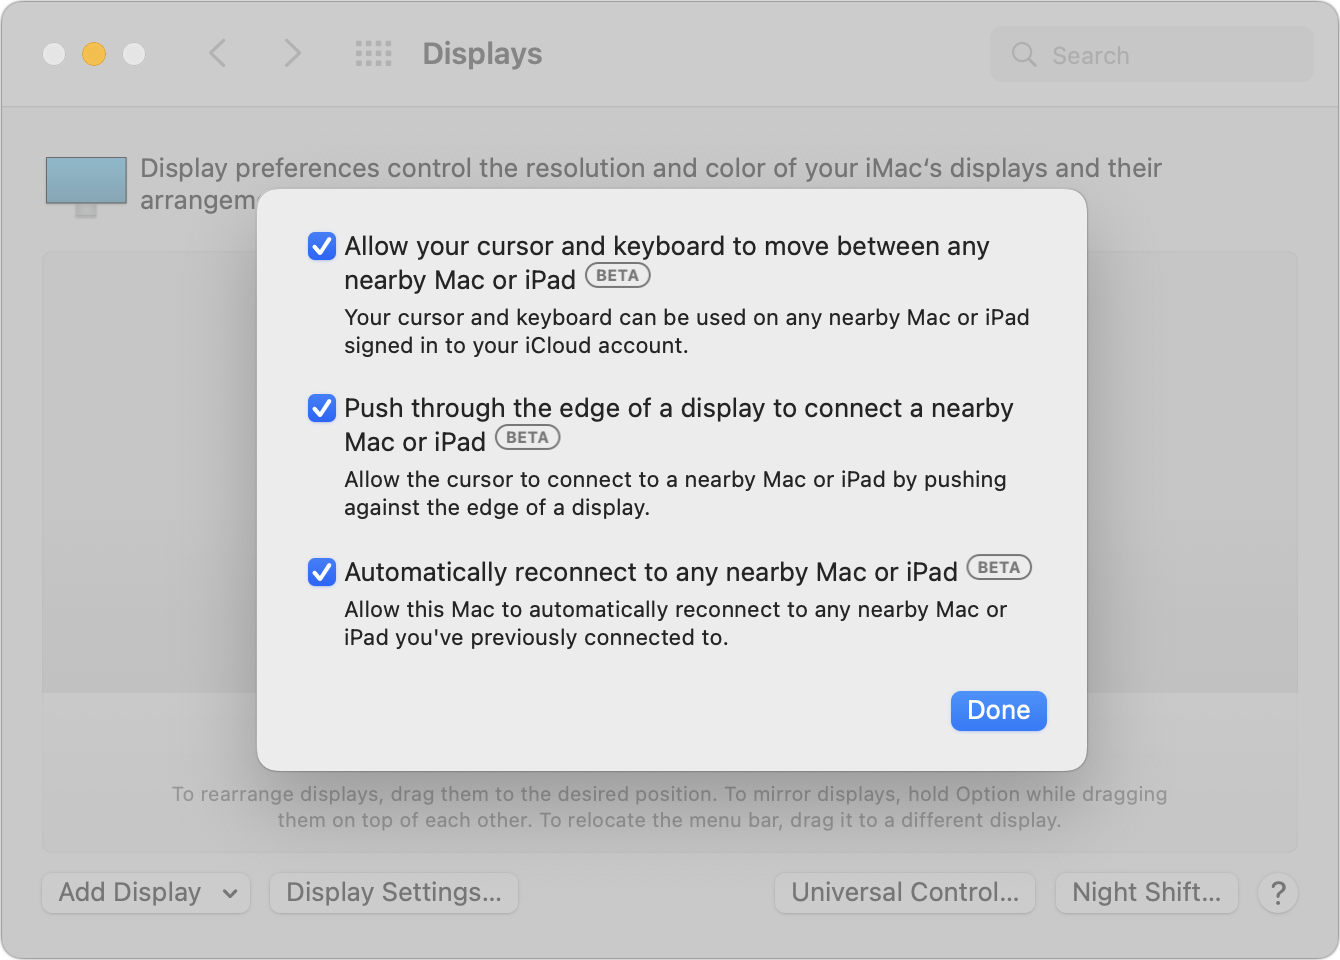
After you click Done, you’ll return to the Displays preference pane, where any available Macs and iPads should appear, much like they were external monitors. If they don’t show up, click the Add Display pop-up menu and select the device you want to control under “Link Keyboard and Mouse.” You can also select them in Control Center, after clicking Displays. As long as you’ve selected “Automatically reconnect to any nearby Mac or iPad,” you shouldn’t have to repeat this step.
(The “Mirror or Extend to” section of the Add Display pop-up menu is where you select devices to use as external displays for your Mac. Macs running Monterey appear here courtesy of AirPlay, as do Apple TVs; iPads appear thanks to Apple’s Sidecar technology.)

Drag the device screen icons to match where they sit on your desk. The screenshot above indicates that you’d move the pointer from the double-screen iMac to the right to control the MacBook Air and down from the middle of the iMac screens to control the iPad.
When your pointer moves to another device’s screen, everything you do from then on will affect apps on that Mac or iPad, with one caveat. After the pointer moves to another device, you usually need to click once to create “focus,” which means specifying which window should receive subsequent clicks and keystrokes. If you forget to do this (it will become second nature quickly) and start typing, keystrokes will go to the previous device.
To help you move data between your devices, Universal Control offers two addition-al features beyond clicking and typing:
Copy and paste: As you might expect, you can copy data on one device with Command-C, move the pointer to another device, and paste it into an app on the second device with Command-V.
Drag and drop: Alternatively, you can drag files and other types of data from one device to another. This works well between Macs, and you can also move data between Macs and iPads in many situations, such as dragging an Apple Pencil sketch from an iPad and dropping it in a graphics app on the Mac. If a drag doesn’t work, try copy and paste or fall back on sharing the data via AirDrop or iCloud Drive.
Keep in mind that once you’ve turned it on, Universal Control has no concept of primary and secondary devices. In practice, you’ll probably use one keyboard and pointing device to control everything, but that’s not necessary. You can use a trackpad and keyboard connected to any device to control any other device, switching whenever you’d like.
Since Apple labels Universal Control as a beta, you may experience occasional dropouts or rough edges. If it loses track of a device, try putting the device to sleep and waking it again, and if that doesn’t work, open the Displays preference pane and select the device from Add Displays again.
Controlling one Mac from another is extremely fluid because the pointer and keyboard act exactly as expected. However, if you haven’t previously used a trackpad and hardware keyboard with an iPad, you may find its approach somewhat surprising. It’s a hybrid between a traditional pointer and a touchscreen, so the pointer is attracted to Home screen icons and many other controls, transforming it into a selection highlight. Either way, Universal Control just works. Give it a try!
(Featured image by Apple)