Two Ways to Manage Your Email So You Can Find It Later
What’s the best way to manage your email so you can find specific messages later? There is no right answer, but filing messages in mailboxes works for some, whereas others prefer searching. A middle ground is often best.

We recently wrote about different ways to organize your files, which prompted some people to ask us about the best ways to manage email. Email may have competition from messaging services like Slack and Microsoft Teams, but for many people, it’s still where the most important communications take place. That’s especially true for anyone who has to work with numerous people outside their organization—there’s a reason why business cards nearly always contain an email address.
As with file organization, how you manage and organize your email is all about making it easier to find a specific message or conversation later. The big difference between files and email is that you usually care about how other people will be able to find and work with your files. With email, however, you’re the only person who has to sort through your messages. Imagine you run an ad agency that has the Belvedere Hotel as a client—your organizational structure for files needs to work for all your colleagues, but no one but you needs to find your email message about what should change in the next print ad campaign.
When managing email so you can find what you want later, most people gravitate to filing messages in mailboxes (sometimes called folders) or searching, though we find that a combination is usually best.
Find Email in Mailboxes
Many people have traditionally used a hierarchical filing structure to organize their email, creating a mailbox for each project. (There’s generally little benefit in creating mailboxes for people or date ranges because it’s easy to search for messages from specific people or between certain dates.)
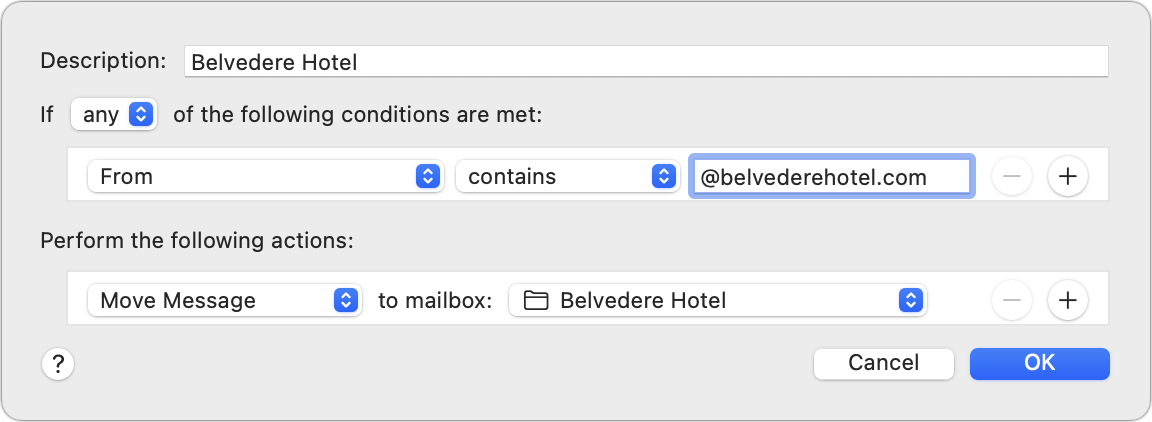
So, much as with files, you might have a top-level mailbox for Clients and a sub-mailbox for each client, including the Belvedere Hotel. You could make additional sub-mailboxes for different Belvedere Hotel projects, but unless you expect to receive a lot of email for each of those projects, increasing the depth of the hierarchy is often unnecessary and extra work.
It’s unnecessary because date sorting options usually make it easy to home in on the message you want even when the mailbox contains hundreds of messages. Plus, the more granular your filing approach, the more manual filing you’ll have to do to ensure that every message ends up in the right place. Worse, many messages will likely cross projects, as could happen in a discussion of a print ad when your contact mentions that they want to reuse the text and graphics in the next email blast too. Should it go in a Print Ads mailbox or an Email Blasts mailbox? Don’t waste time deciding—just leave it in a general Belvedere Hotel mailbox.
How do messages end up in these mailboxes? You can always file messages manually, and you’ll spend some time doing that, no matter what. However, whenever possible, you want to create rules (also known as filters) that file messages automatically. Rules look through every incoming message and take actions—including moving to a mailbox—on messages that match the criteria you specify. For sanity’s sake, you want to make your rules as general as possible.
For instance, you could make a rule that moved messages from your contact at the Belvedere Hotel to your associated mailbox. That would work initially, but it would fail if you regularly work with multiple people there or if someone else fills in while your contact is on vacation. So instead of creating a rule that looks for a specific email address or even a set of email addresses, set your rule to look for all messages from the belvederehotel.com domain.
Let’s assume a colleague asks you for details on the latest Belvedere Hotel print ad. How do you find that information? Here’s how we’d go about it:
Open the Belvedere Hotel mailbox, sort by date if necessary, and scroll through the list of recent messages. Most of the time, the message you need to find has arrived recently, and you’ll remember the sender and subject well enough to pick it out.
If you can’t identify the message quickly by scanning, search for it based on the sender or recipient, date, and keywords. Look first within the mailbox where you think the message is located, but if that fails, broaden the search to all your mailboxes.
The reason to start with a scan of the mailbox is that it’s usually the most efficient. However, if you know a message is old or can’t remember the sender, you may be better off starting with a search.
If you can’t easily build rules to move most of your email into the appropriate mailboxes, that’s a hint that a search-first approach might work better for you. You shouldn’t be spending a lot of your time filing email—that’s what computers are for!
Search for Email
When Google launched Gmail in 2004, the company introduced a new way of managing email that leveraged the company’s strength in search. The subsequent popularity of Gmail—which now has over 1.8 billion active users worldwide—means that a great number of people now default to searching when they want to find particular email messages, regardless of which email service they use.
A search-first approach can be fast and effective and doesn’t require that you file messages into mailboxes. For instance, if you always get email about Belvedere Hotel ad campaign details from the same person, it may be faster to search for email from that person first, rather than looking through a mailbox.
Searching rather than browsing for email works best for people whose work doesn’t break down neatly into categories or regularly cuts across multiple projects. But it’s not for everyone. For a search-first approach to be effective:
You must have the sort of brain that remembers details to use as search terms. If you’re more in the “I know it when I see it” camp, you may find searching less effective.
Your email must contain sufficiently unusual keywords that searching for a person and a keyword or two is likely to find the message you want.
You have to keep most messages. That may seem obvious, but if you delete a lot of incoming messages, you’ll likely remember messages you won’t be able to find.
Your email app must search quickly and accurately. Gmail is the gold standard, but other email apps have decent search capabilities.
Although we’re all familiar with searching in Google—and if you like searching the Web, you’ll probably like searching your email—a few tricks will make your email searches more likely to succeed:
Start with a focused search term—usually a person or unique keyword—that’s the most likely to give you the smallest number of results to scan for the message you want.
When searching for a person’s name, if your email app offers to autocomplete to that person’s email address, let it. This is because searching for “smith” is much less likely to work well than “johnqsmith1999@example.com.”

You can specify whether the person for whom you’re searching was the sender or the recipient, which helps reduce the number of results for people who appear regularly in your email.
If you’re looking for an attached file, you can usually specify that your search should return only messages that contain attachments, perhaps even just specific file types.
When you can’t remember much about the contents of the desired message, try to remember surrounding details, such as when the message might have been sent or who else might have received it, and add those terms to your search.
Precisely how you formulate these searches will vary by email app, but check these pages for details on using Mail, Outlook, and Gmail.
Choose the Best of Both Worlds
In reality, neither solely browsing through mailboxes nor relying entirely on search is likely to be satisfying. Those who file everything will find themselves needing to search within mailboxes at times, and those who prefer searching may find that using rules to store easily identified messages in associated mailboxes (mailing lists, for instance, or all email from your organization’s domain) makes searching easier.
(Featured image by iStock.com/anyaberkut)
Mail Gains Welcome Features in iOS 16, iPadOS 16, and macOS 13 Ventura
Mail in iOS 16, iPadOS 16, and macOS 13 Ventura has gained a handful of welcome new features, including Undo Send. Learn all about them at:

Email may not be as sexy a way to communicate as modern-day darlings like Messages, Slack, or Microsoft Teams, but it remains the workhorse of business and personal communications. While Apple’s Mail is a mature app that has long provided the necessary basics, there has been room for improvement. In iOS 16, iPadOS 16, and macOS 13 Ventura, Apple has given us some welcome enhancements, many of which have existed in other email systems for some time.
These features are extremely similar across all of Apple’s platforms, but they may differ in small ways. Don’t worry if you haven’t updated all your devices yet—you can still take advantage of these features on your iPhone or iPad even if you’re cautiously (and appropriately, for now) sticking to macOS 12 Monterey on your Mac.
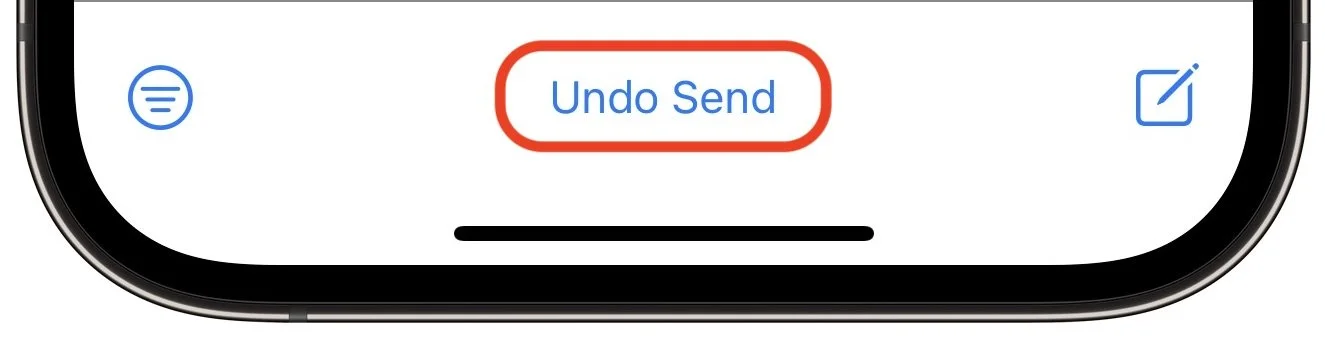
Undo Send
If you’re like us, it’s all too common to send an email and then immediately remember you wanted to add something or Cc someone. Mail now gives you a grace period during which you can unsend a message—10 seconds by default, but configurable to 20 or 30 seconds on the iPhone or iPad in Settings > Mail > Undo Send Delay, or on the Mac in Mail > Settings > Composing.
To unsend a message, tap Undo Send at the bottom of the screen (look in the sidebar on the Mac and iPad). On the Mac, it’s easier to press Command-Z immediately to undo the action. Either way, the message opens for editing again so you can make the desired changes and resend.
Send Later
It’s not always appropriate to send email messages as soon as you finish writing them. Some organizations have policies against sending email significantly outside of business hours to discourage unhealthy work schedules, and you may want to compose a message—a last-minute reminder for event participants, say—well in advance and then schedule it to arrive at an appropriate time. Mail now makes that possible.
To schedule a message for sending later, touch and hold the Send button on the iPhone or iPad, or click the menu next to the Send button on the Mac. It suggests an appropriate time later in the day or the next day, or you can use Send Later to set a specific date and time. Note that the device on which you’re scheduling the message must be online for the message to be sent, but the scheduled send works fine if the device is asleep.
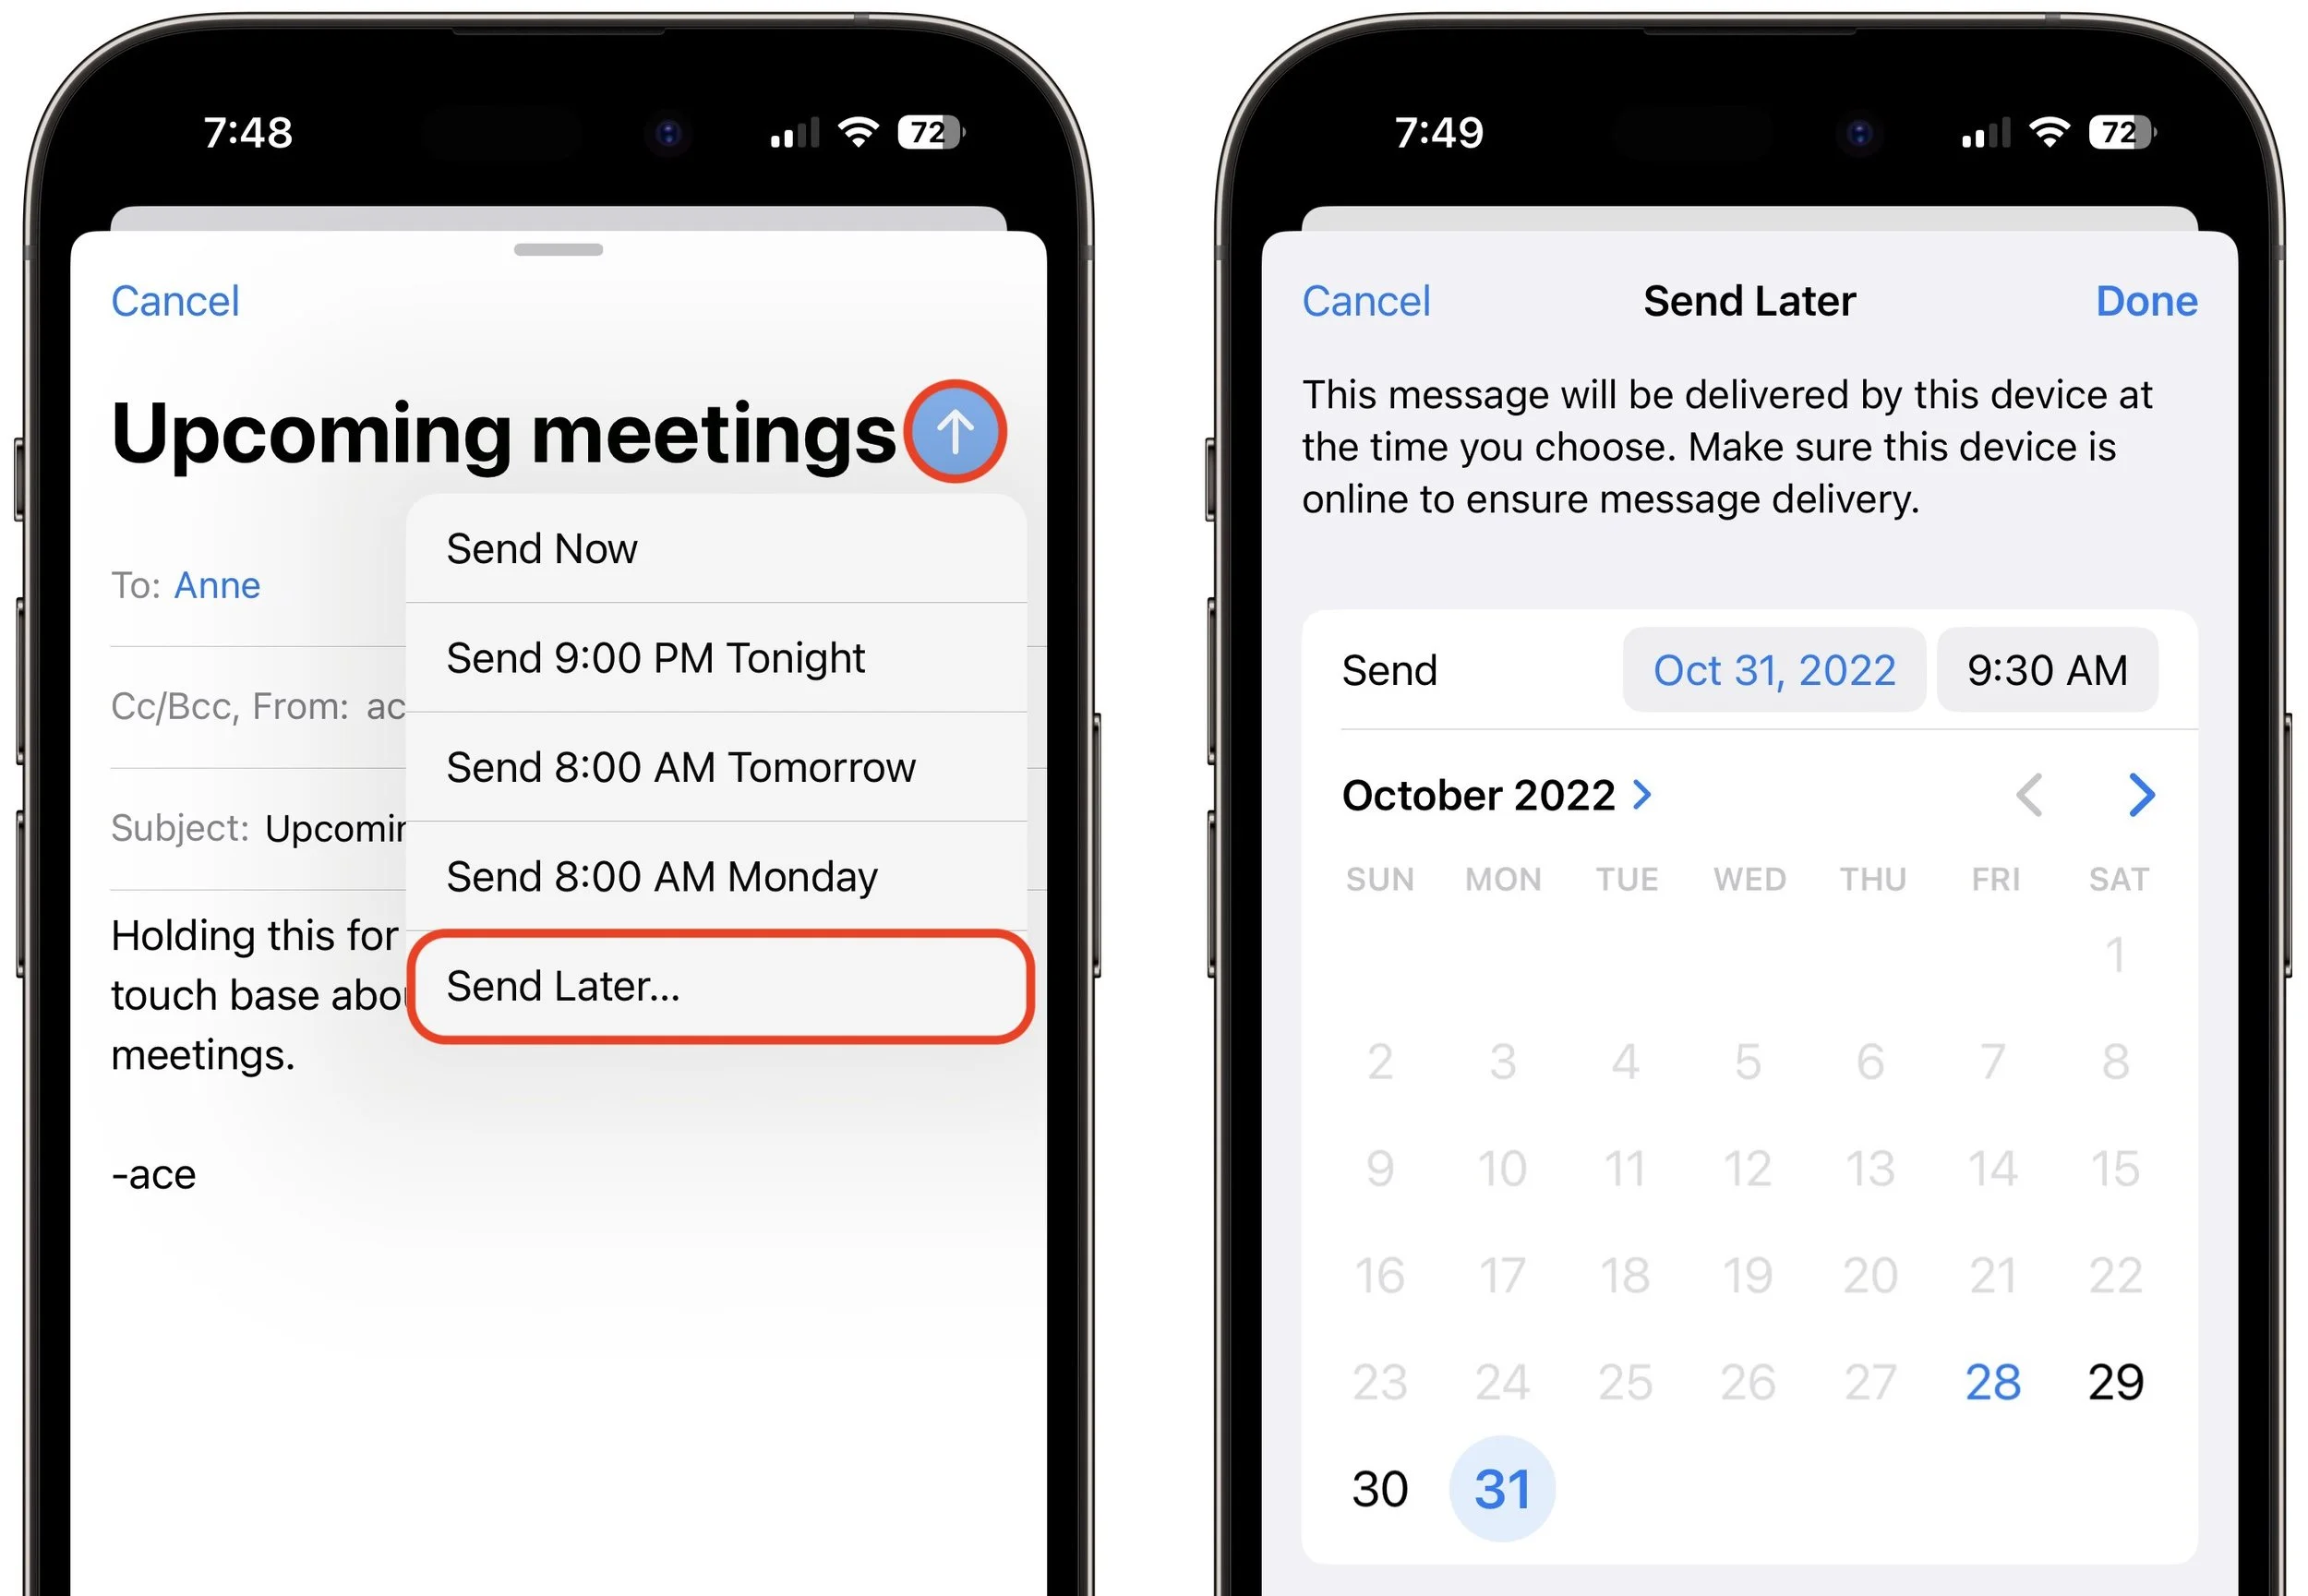
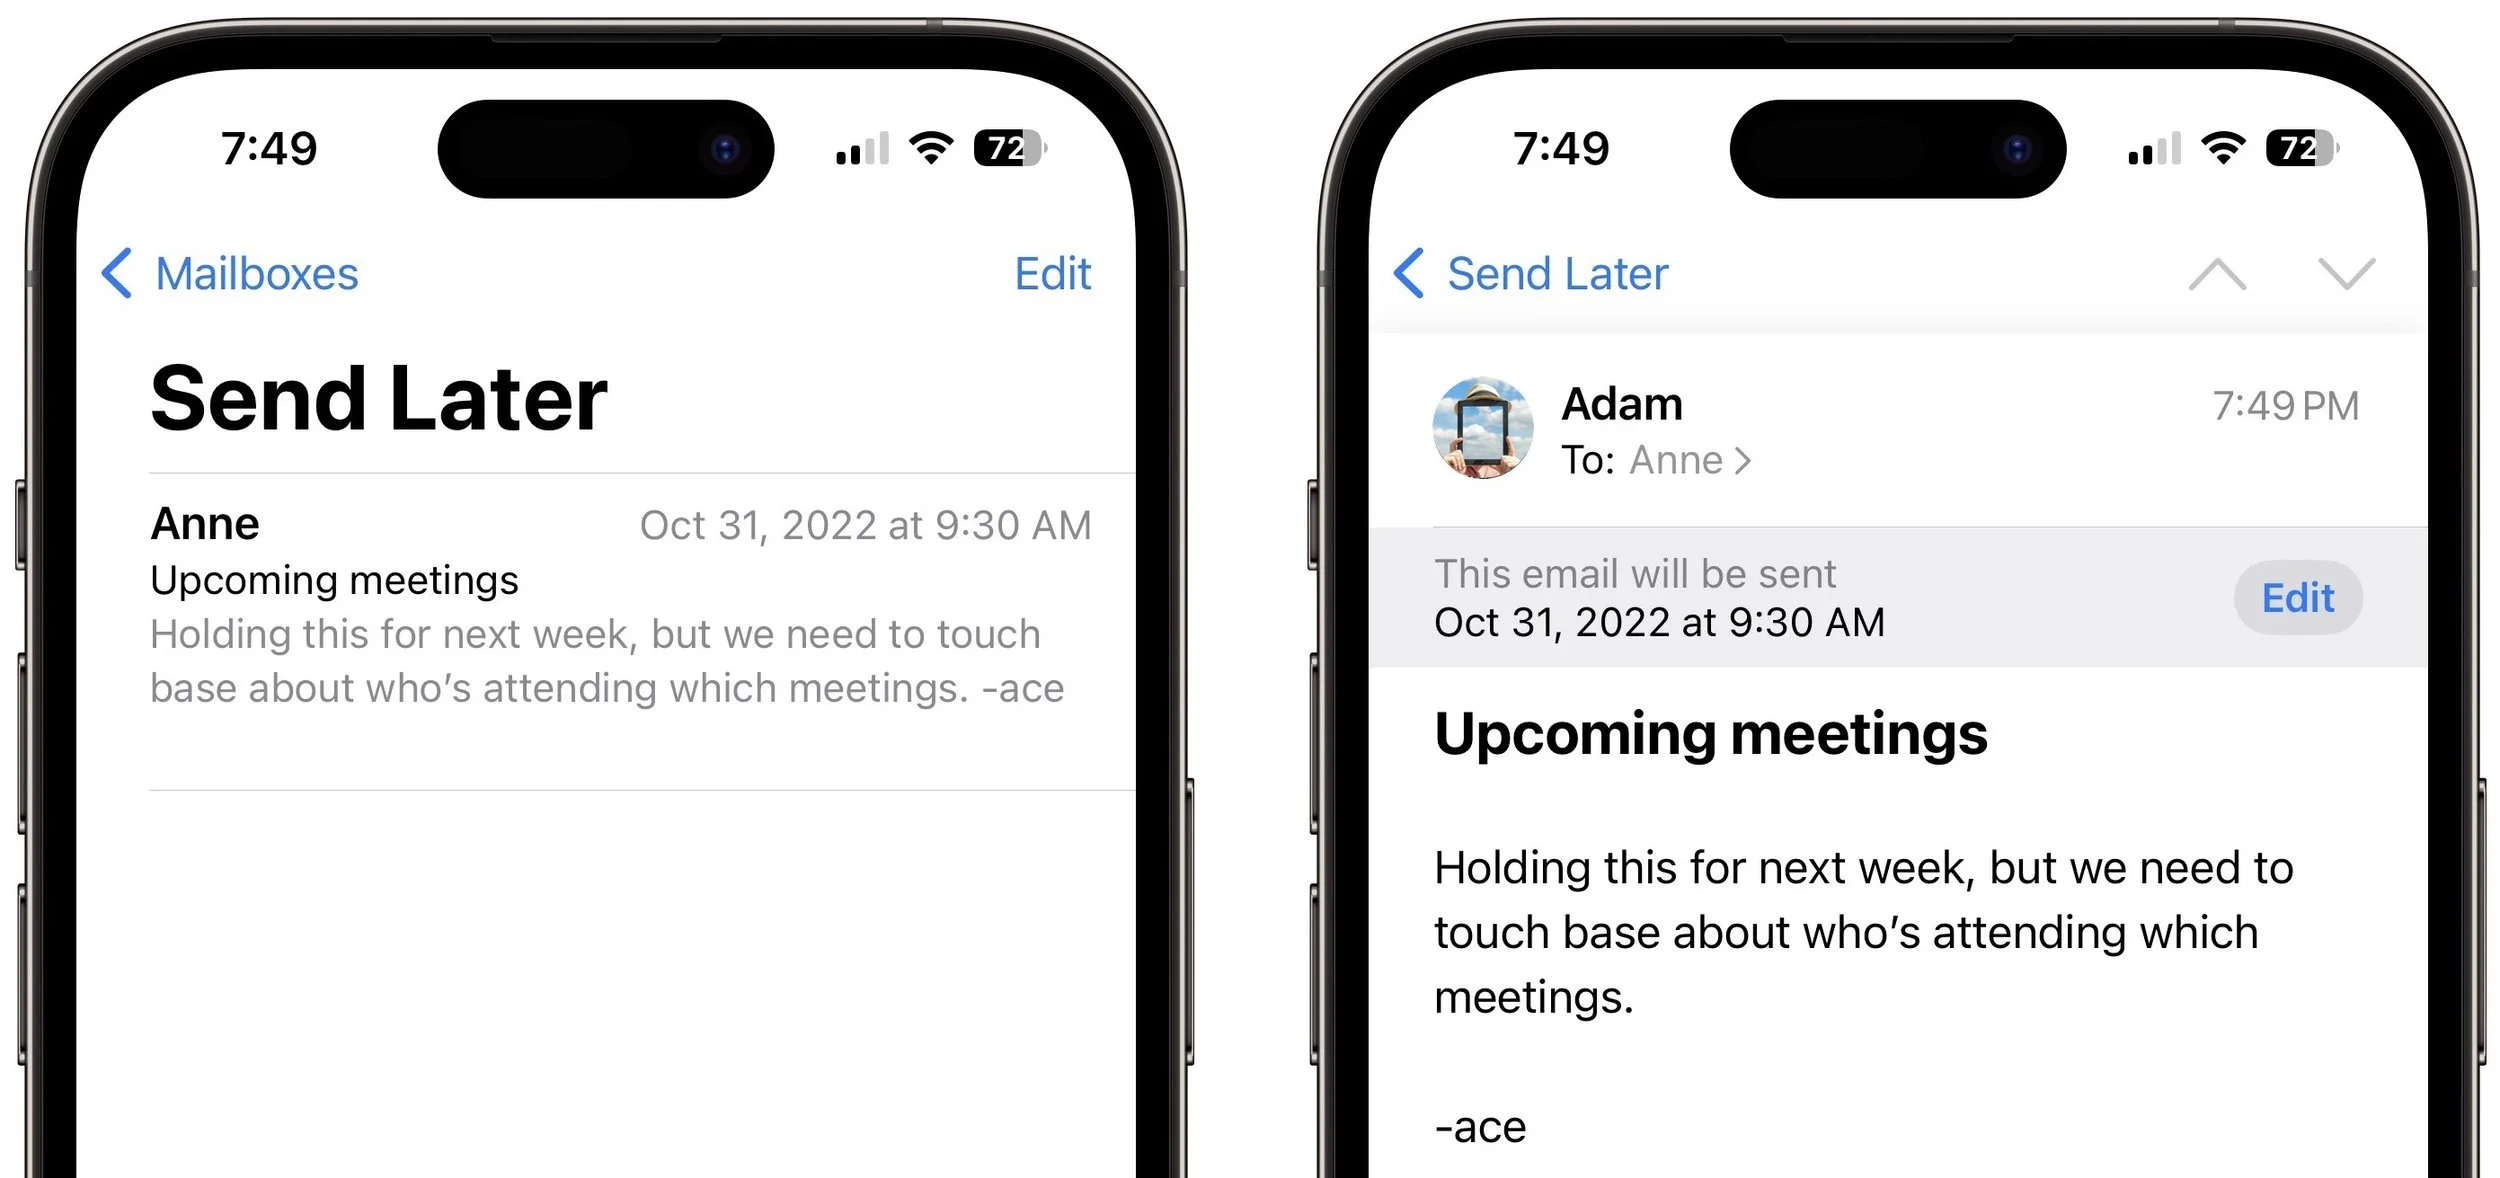
Scheduled messages live in a Send Later mailbox until they’re sent, so if you need to reschedule them, open the message and tap the Edit button in the scheduling banner at the top.
Get Reminders
Some people like to “snooze” email messages so they reappear at the top of the inbox at a later time that may be better. Mail can do this now with its built-in reminder feature, which also temporarily shows the message in a Remind Me mailbox and pops up a notification when the specified time arrives.
To set a reminder, swipe right on it (use two fingers on the Mac) and tap or click Remind Me to choose a reminder schedule of 1 hour, tonight, or tomorrow. You can also specify a precise time and date. If you can’t swipe on a Mac, you can instead Control-click the message and choose a reminder schedule; on an iPhone or iPad, you can also tap the Reply button and then Remind Me.
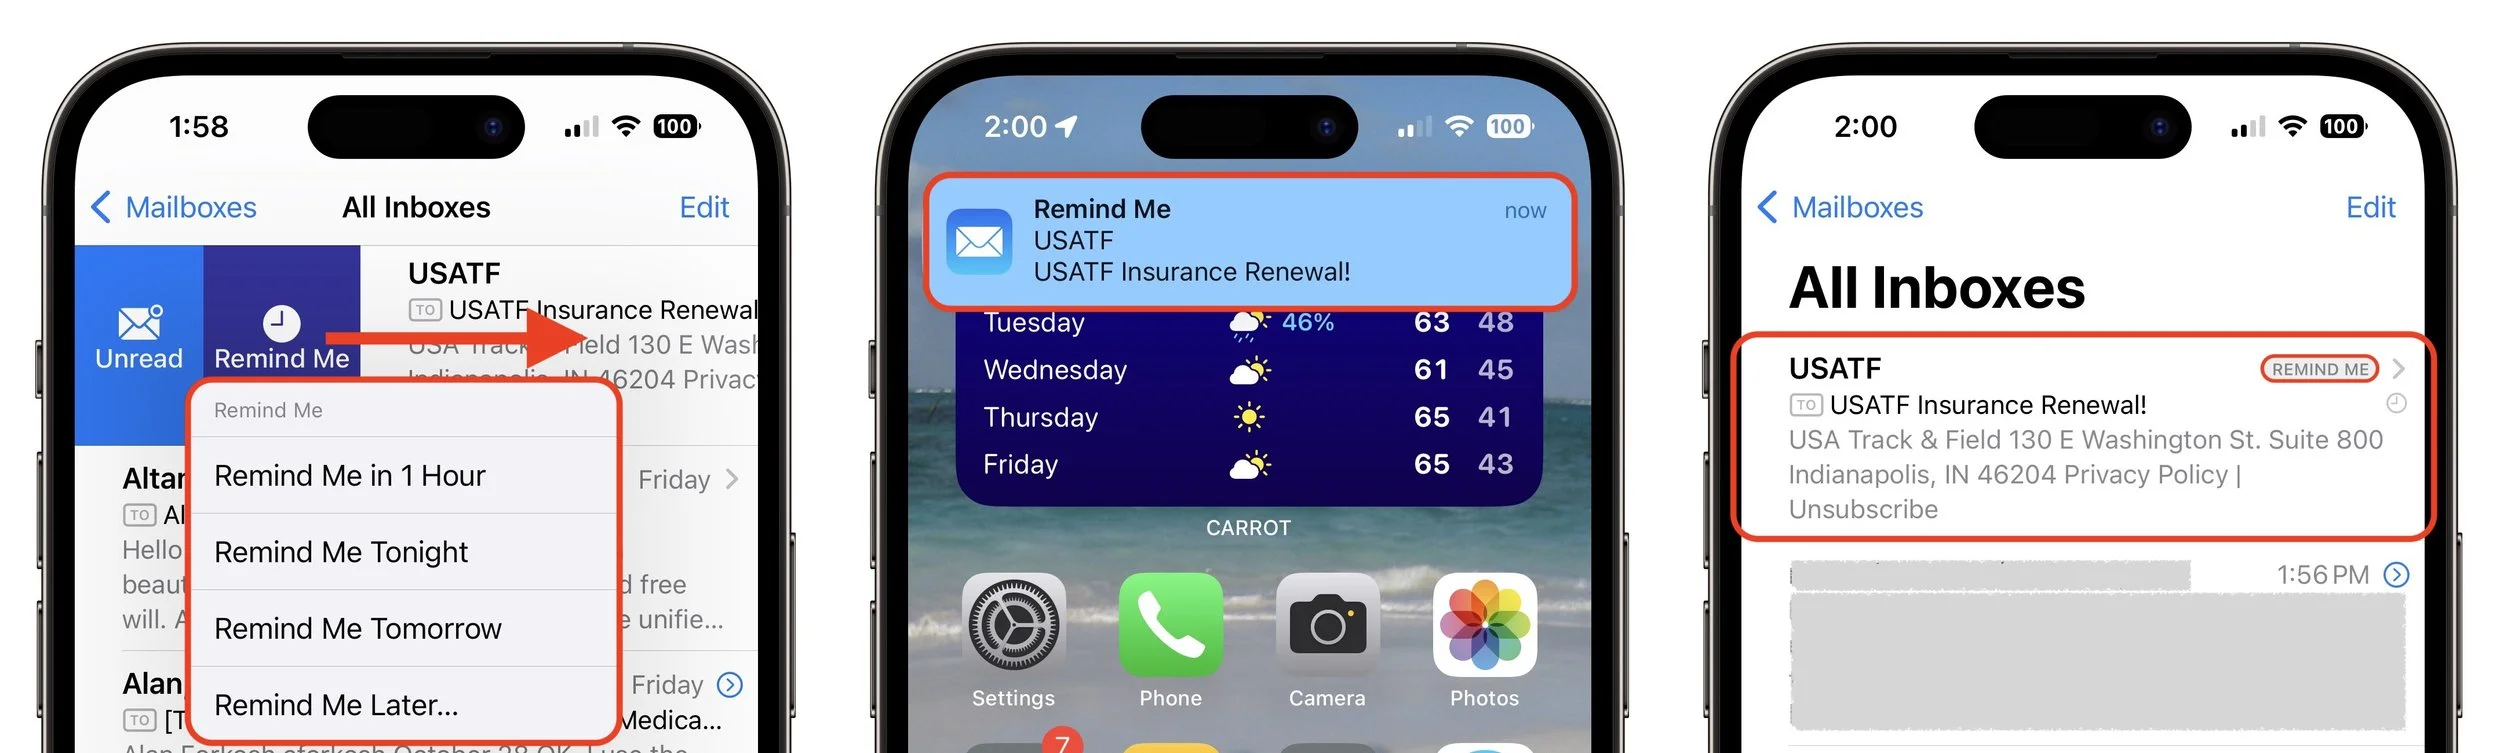
Note that this feature only repositions the message in the inbox, so if you’ve read it, for instance, but you have your inbox filtered to show only unread messages, you won’t see the moved message. It does get a little Remind Me tag in the message list.
Follow-ups
It’s bad enough when you ask someone a question in email, don’t get a response, and have to send a reminder. Worse is when you lose track of the question entirely until it becomes a problem. A new feature in Mail could help. When the app detects that you’ve asked a question, it starts a timer, and if you don’t get a response within 3 days, Mail brings your message back to the top of your inbox with a reminder to follow up. Tap that reminder to send another message to the original recipient.
You don’t have to do anything for the follow-up feature to work, other than compose messages that the feature determines are asking questions. However, there’s no guarantee it will work correctly on every appropriate message, and the feature has no way of knowing if your recipient replied in a completely new conversation or outside of email. If you find it annoying, you can turn it off on the Mac. Go to Mail > Settings > General and deselect “Enable message follow up suggestions.”
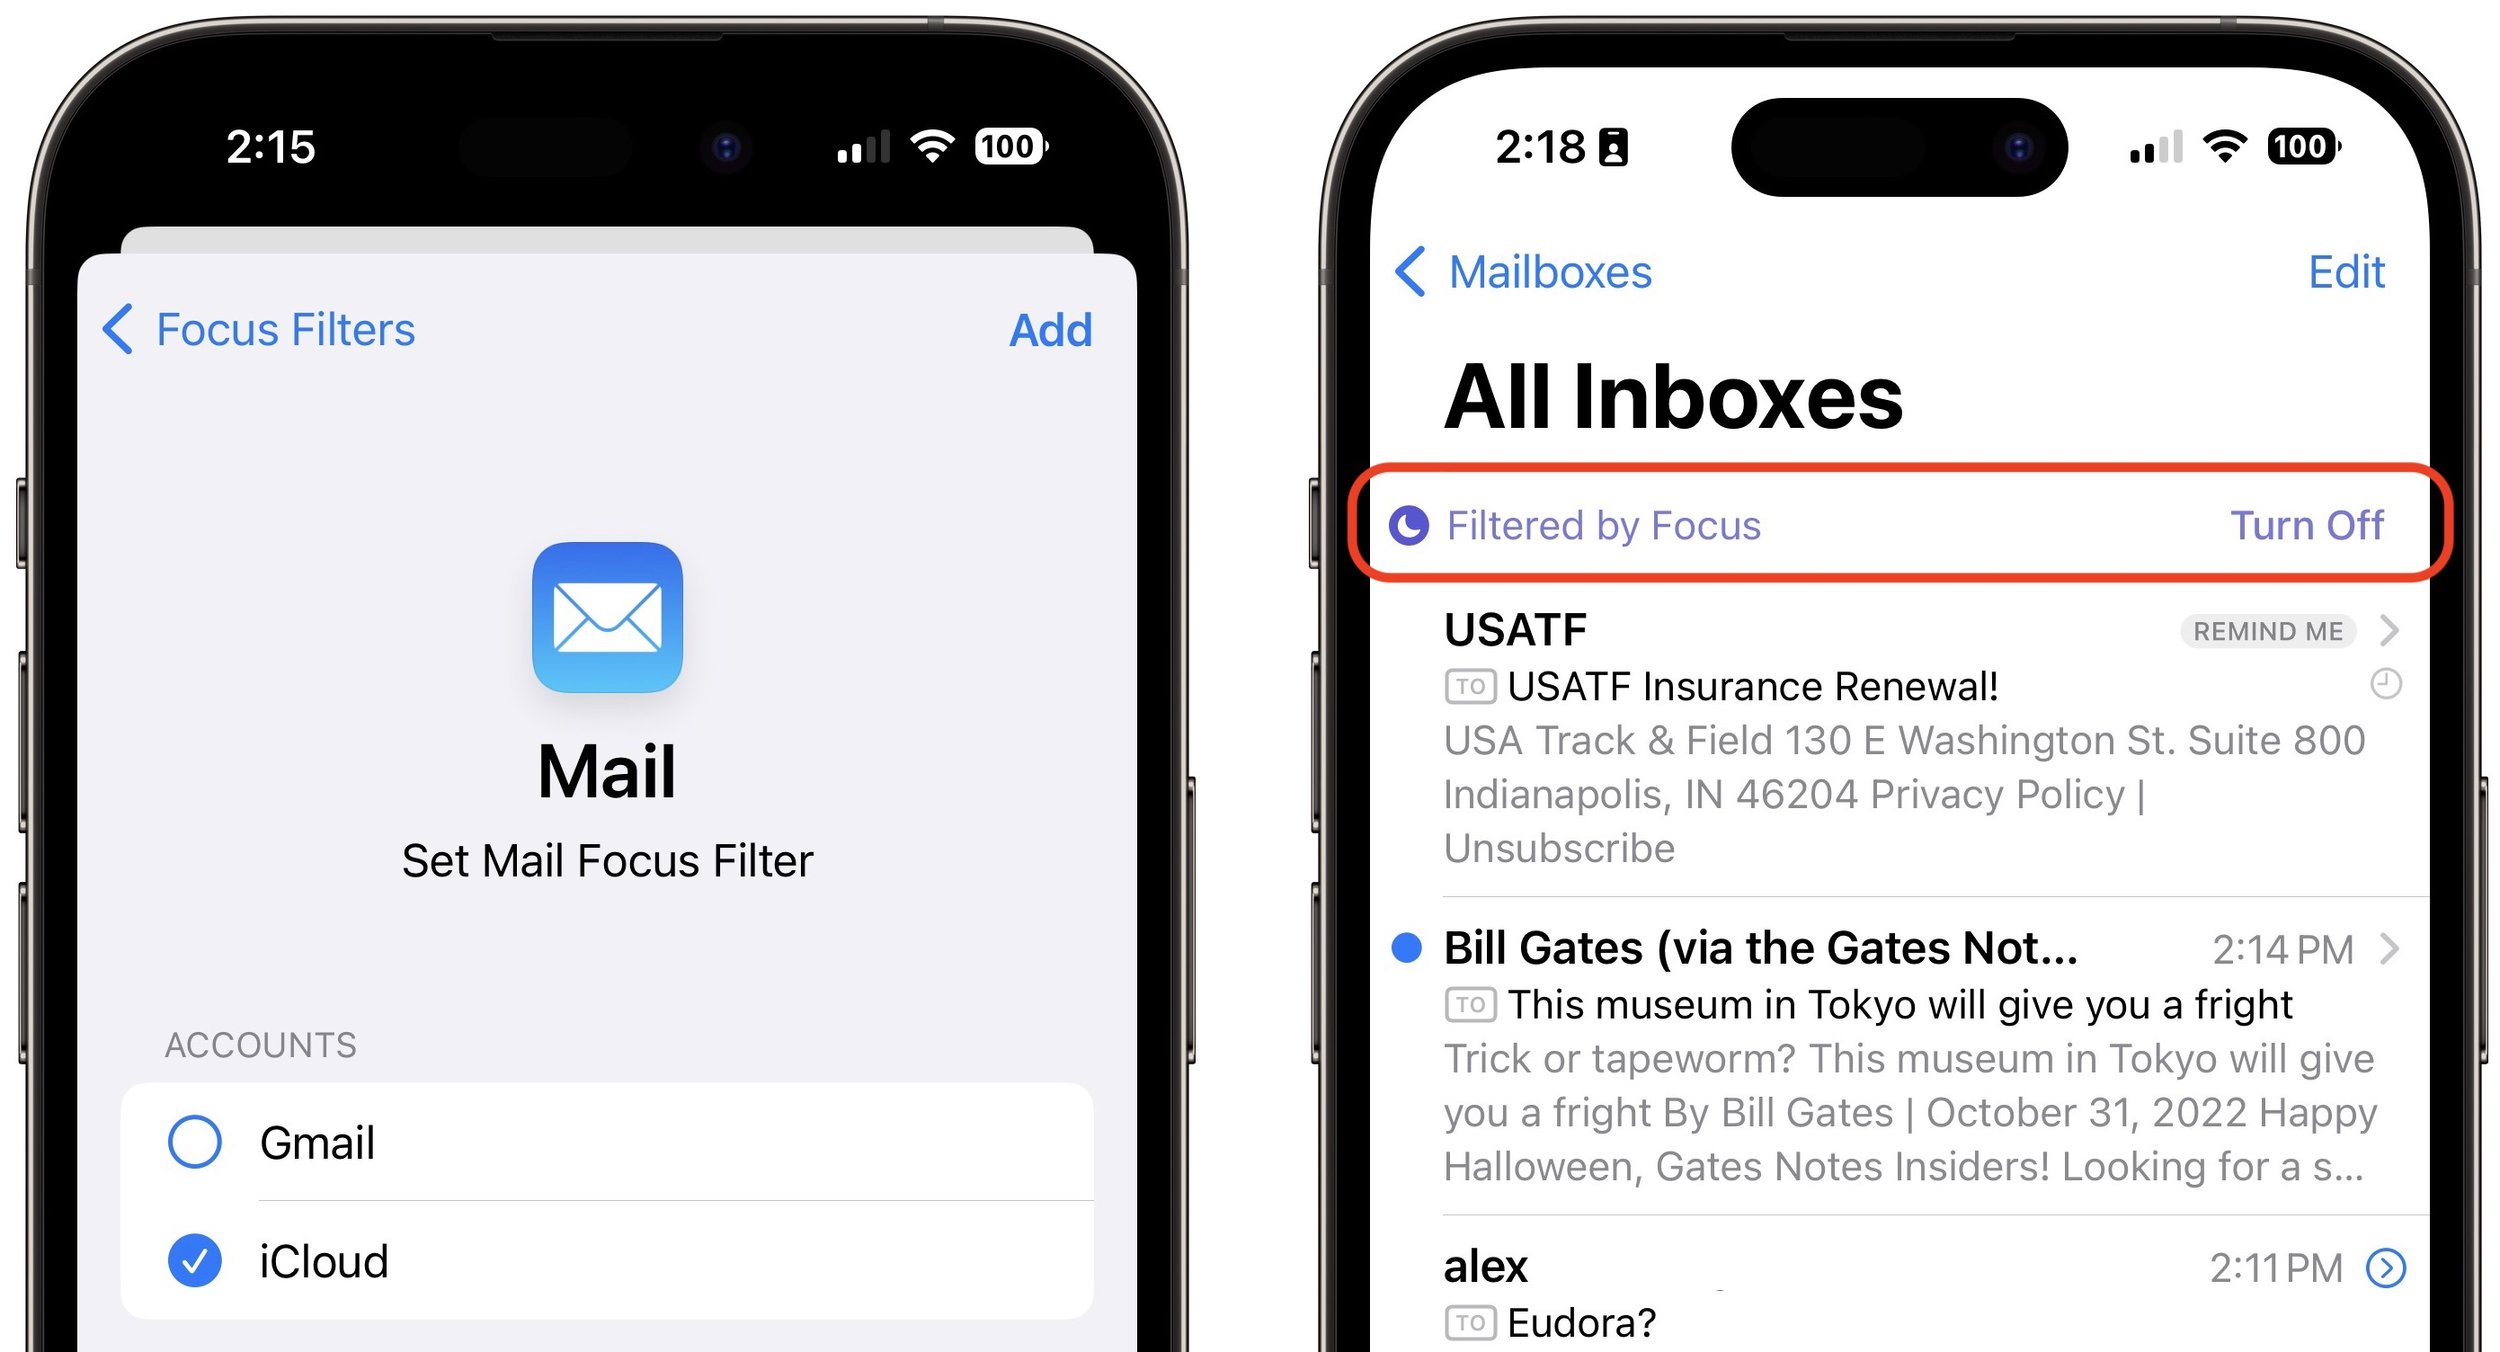
Focus Filters
Finally, Mail supports the new Focus Filters, which lets you hide content in specified apps when a certain Focus is active. For instance, if you have a Focus for Personal and another for Work, you might want to specify that your work email account appears only when the Work Focus is active and your personal email account appears only when the Personal Focus is active. It’s logically sensible—you don’t get distracted with personal email at work or work email at home—but it likely isn’t worth the effort unless you have trouble exercising self-control.
To add a Mail account to a Focus Filter, open Focus in Settings or System Settings, select a Focus, tap Add Filter, select Mail, and choose the desired account. After that, when you open Mail, you’ll see only messages from that account, with a Focus Filter banner explaining why and letting you turn it off temporarily.
(Featured image based on an original by iStock.com/Motortion)
What Your Organization Needs to Know About Email Blocklists
If your organization sends a lot of marketing or customer-focused email, you need to be careful about spam blocklists. Here’s what you need to know:

Spam remains one of the scourges of the Internet, although spam filters do a pretty good job of keeping most of it out of email inboxes. However, those spam filters can cause deliverability problems for organizations that send email for marketing or customer outreach. One way that happens is if the IP address—the unique numeric address of every computer on the Internet—of the server that sends your organization’s email lands on a blocklist.
Understanding Blocklists
Blocklist services are conceptually simple. They maintain lists of IP addresses that have been identified as sending spam. Receiving email servers subscribe to those blocklists, and for every connection that’s made, the server checks the blocklist in real-time to see if the incoming message originates from a blocked IP address. If it does, the receiving server rejects the connection, preventing the message from being delivered.
How do sending email servers end up on blocklists? There are several basic ways:
Traps: If you’ve purchased or scraped lists of email addresses (don’t do that!), you may have ended up with dormant addresses or addresses that the block-lists surreptitiously seeded to spammers. If those addresses receive email from you, the blocklist knows you’re not sending just to people who have opted into your mailings. Similarly, if there are many typos in the email addresses on your list, that can raise a flag.
Triggers: Certain words and links in your message can increase the likelihood that a spam filter will catch your message, and some spam filters report back to blocklists. If a draft message sounds spammy or overly promotional when you read it to yourself, that’s a hint that it might trigger a spam filter.
Reports: If too many people mark your messages as spam, that can put you on a blocklist. Sadly, some people use the Junk button instead of unsubscribing from mailings they’ve subscribed to.
Takeover: Although this problem is less common now than it was when more organizations ran their own mail servers, if a hacker compromises your server or account and uses it to send actual spam, that’s almost guaranteed to land you on one or more blocklists.
To avoid ending up on a blocklist, make sure you’re being fastidious about your mailing list. Only add people to it if they have legitimately signed up, make it easy for them to remove themselves with an Unsubscribe link at the end of every message, delete bouncing addresses right away, and avoid spammy language in your messages. It’s not hard—just be a good Internet citizen. And, of course, if you control your own mail server, pay special attention to its security to keep hackers out.
Is Your Organization Already on a Blocklist?
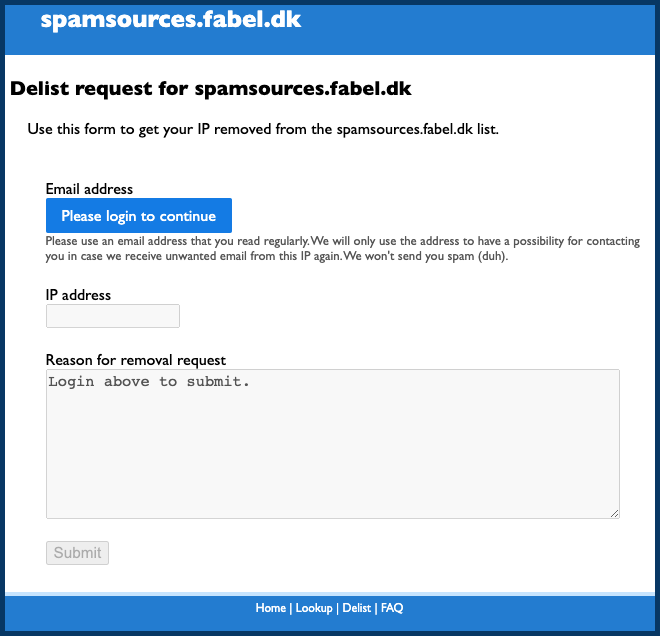
Let’s say your IP address has ended up on a blocklist even though you’ve been good. How would you know? You might hear that people who should have received your mailings didn’t or that your messages were marked as spam. Or you might see your deliverability numbers falling in your sending tool. Neither of those is reliable, though, so we recommend you use MXToolbox’s Blacklist Check, where you can type in your hostname or IP address to see if it’s on any of over 100 blocklists.
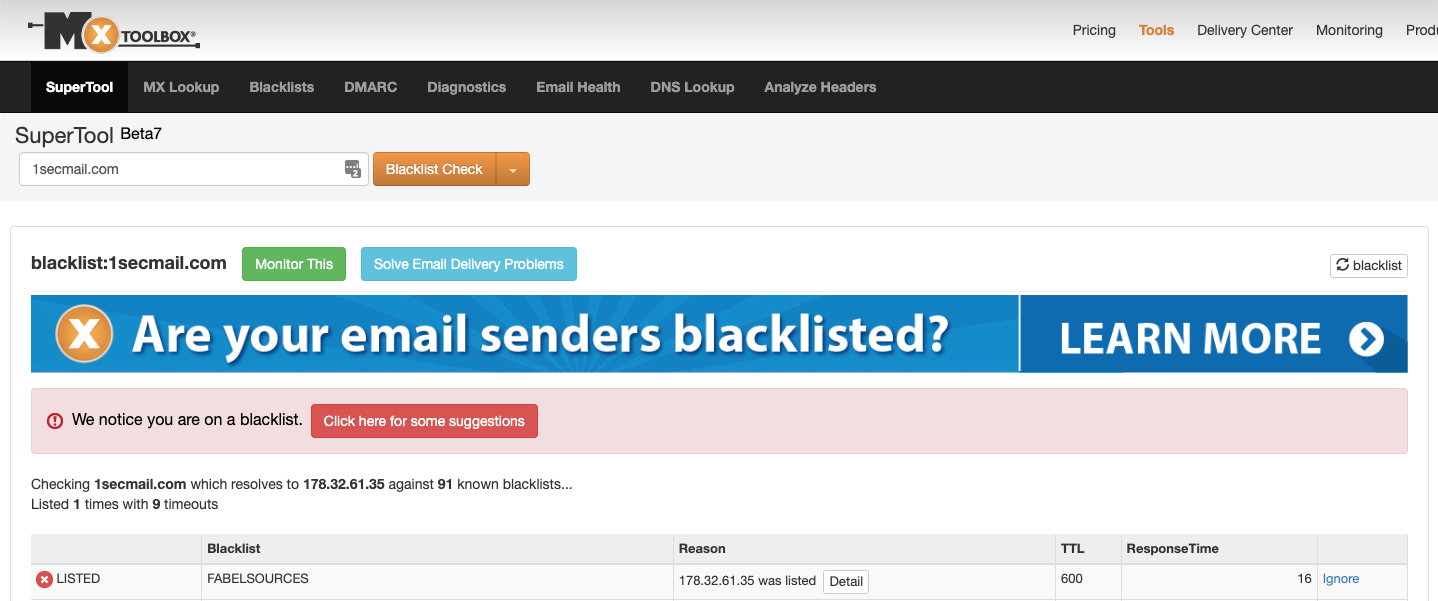
You can use MXToolbox for quick checks against 100+ blocklists whenever you want, but if you sign up for a free account, you can set up a monitor that checks your email server’s hostname or IP address against 30 common blocklists every week and emails you the results. (MXToolbox offers lots of other email and Internet-related tests that can help you monitor and troubleshoot your Internet presence.)
Getting off a Blocklist
Once your IP address is on a blocklist, your goal is to remove it as quickly as possible. Many blocklists automatically remove entries after a certain amount of time, but clicking the Detail button in the MXToolbox blocklist listing will tell you more about the blocklist and potentially how to request a manual delisting.
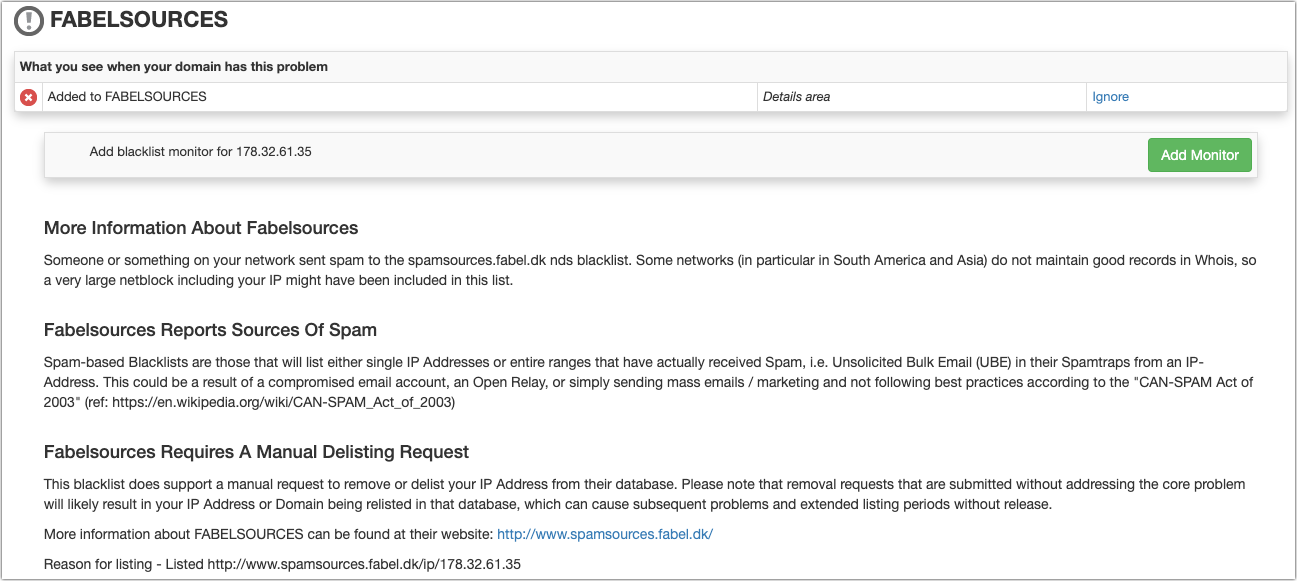
The precise steps will vary by blocklist, but the most important thing is that you resolve whatever issue caused your server to be added in the first place. Once that’s done, you’ll probably need to provide the IP address of the server and an explanation of what happened, either in a Web form or in an email to the blocklist admins.
We won’t lie—ending up on a blocklist can be stressful, particularly if your organization relies on sending customer-focused email. But if you keep your list clean and avoid sending spam-like messages, the occasional blocklist listing should be only a temporary blip in your operations.
(Featured image by iStock.com/ipuwadol)
Apple Is Driving the iPhone to eSIM: Here’s What You Need to Know
Apple has gone all-in on eSIM, eliminating the SIM tray from iPhone 14 models sold in the US. What’s eSIM? Glad you asked—read on for the details of the technology and why it’s better than SIM cards.

Perhaps the most surprising change in the iPhone 14 line, at least in the United States, was the shift from using removable SIM cards to eSIM.
SIM cards—SIM stands for Subscriber Identity Module—have been a fixture in the mobile phone world for many years because they provide the unique identification necessary to connect a subscriber and a plan with a phone. Because SIM cards are removable, you can use them to transfer an existing plan to a new phone, switch car-riers, or enable temporary service while traveling—all by inserting the appropriate SIM card.
But SIM cards are small, fussy, and require physical interaction, so the industry came up with eSIM, or embedded SIM, where a programmable SIM is integrated into the circuitry of the phone. With eSIM, you can also activate a plan, transfer a plan to a new phone, or change carriers, typically without interacting with customer service. You also don’t have to acquire a physical SIM, figure out how to open your phone’s SIM tray, or insert the tiny SIM card in the correct orientation without dropping or damaging it. Plus, without a SIM slot and tray, iPhones have one less spot where water could get in and one less moving part that could break, and Apple doesn’t have to provide a SIM tool that you’ll likely lose (and replace with a paperclip).
Apple’s eSIM Transition
eSIM support is widespread among US carriers but less so internationally, which is why models of the iPhone 14 sold outside the US retain the SIM tray. The main place where lack of eSIM support is likely to be an issue—at least for the near future—is international travel. Historically, it was easy to purchase a pre-paid SIM card for a local carrier in the airport upon arriving, but that will no longer work for a US iPhone 14. The iPhone is sufficiently popular that international carriers are adding eSIM support, but it’s still possible to travel to a country where you can’t get local service with an iPhone 14 due to the lack of a SIM tray. Apple maintains a list of international carriers that support eSIM in various ways, including with pre-paid plans for travelers, and offers advice on how to use eSIM when traveling. (eSIM isn’t available at all in mainland China, but Apple’s list includes worldwide service providers that sell pre-paid data plans you can use when traveling in China and other countries without eSIM support.)
Apple has been moving toward eSIM for several years, starting with the iPhone XS, iPhone XS Max, and iPhone XR in 2018. Those iPhones—and every model up to the iPhone 14—had both a SIM tray and eSIM, which enabled the use of two separate cellular plans, each with its own phone number. With the iPhone 13, Apple enabled Dual SIM support with eSIM alone, and some carriers started giving customers the option to activate their primary service with eSIM, leaving the SIM tray or the second eSIM available for a second plan. Apple says you can store and switch among up to eight or more eSIMs, two of which can be active at any time, but it’s unclear how that works—an update to iOS might be necessary.
Cellular-capable iPads have had eSIM support since the seventh-generation iPad, fifth-generation iPad mini, third-generation iPad Air, first-generation 11-inch iPad Pro, and third-generation 12.9-inch iPad Pro.
How to Activate an eSIM
Precisely how you activate an account with eSIM varies by carrier and your situation, but Apple describes three basic options:
eSIM Carrier Activation: Some carriers can assign a new eSIM to your iPhone, making it easy to switch to a new iPhone or enable an eSIM-based plan after setup. eSIM Carrier Activation involves following a few simple onscreen instructions where you basically acknowledge that activation is happening. Make sure you can place a phone call afterward, and if you’re switching from a SIM card, remove it and restart your iPhone.
eSIM Quick Transfer: If you’re transferring a SIM or eSIM from an old iPhone to a new one and you have both at hand, you may be able to use eSIM Quick Transfer. It will provide instructions during setup, or you can initiate it after setup with Settings > Cellular > Add Cellular Plan and either selecting a plan from a list or tapping Transfer From Another Device. You can also convert a physical SIM to an eSIM on the same phone if your carrier supports eSIM Quick Transfer; check to see if Settings > Cellular has a Convert to eSIM option. If so, tap it and follow the instructions.
Scan a QR code or use a carrier app: Carriers that don’t support eSIM Carrier Activation or eSIM Quick Transfer initiate setup by providing either a QR code you can scan—during setup or afterward—or a custom app. Either way, follow the iPhone’s instructions to complete the setup.
Although we’ve become accustomed to swapping SIM cards in and out of our iPhones such that eSIM feels new and confusing, it should be a better overall solution that’s easier to set up, less error-prone, and more secure. There may be some short-term annoyance for US iPhone 14 owners who travel internationally, but we anticipate that will dissipate over time as international carriers start supporting eSIM.
(Featured image by iStock.com/fz750)
The Best Apple Gifts for 2022
Looking for the perfect holiday gift for the Apple user in your life? With some products having long shipping times, it’s worth ordering sooner rather than later. Here are our suggestions for the top Apple gifts for 2022.
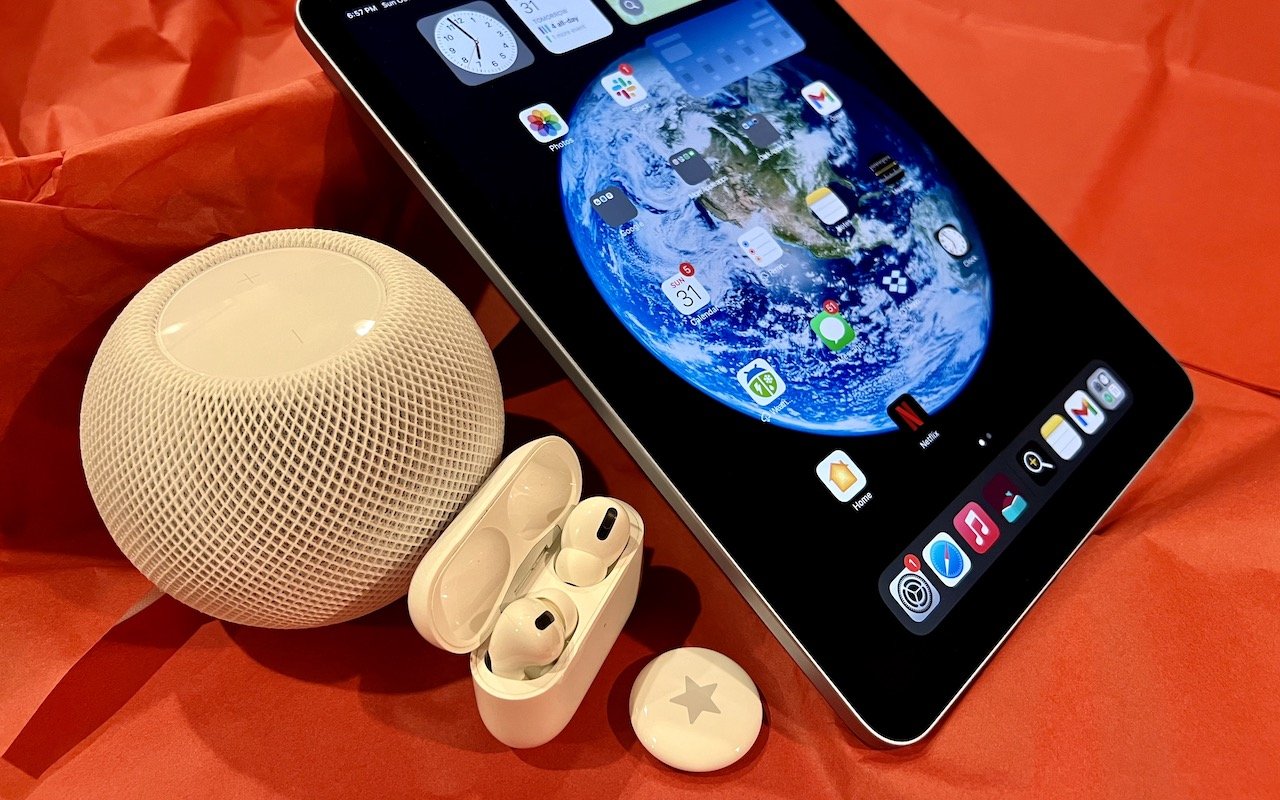
It may seem early to think about holiday shopping, but even as the global supply chain recovers from pandemic-related slowdowns, ship dates remain unpredictable. If you want to make sure you have an Apple something for that special someone, we recommend buying it soon. Here are our recommendations.
AirTag
Do you know someone who’s always misplacing their keys, purse, or backpack, or who’s planning a big trip? They might appreciate Apple’s AirTag tracker this holiday season. Attach one to a keyring (with a separate $29 AirTag Loop, $35 AirTag Leather Key Ring, or $39 AirTag Leather Loop) or drop it in a bag, and from then on, they can use the iPhone’s Find My app to see where they left their stuff. AirTag uses the Find My network, so even if the item is far away, passing Apple devices that detect it can securely share its location with you. That makes it especially helpful for tracking down checked luggage that hasn’t arrived at its proper destination. One AirTag costs $29, or you can get a pack of four for $99. You can even have Apple personalize each AirTag with custom text and emoji.

AirPods and AirPods Pro
Apple’s wireless earbuds keep getting better. In September, the company released the second-generation AirPods Pro, replacing the original model and supplementing the second-generation AirPods and third-generation AirPods. All three make excellent gifts. The second-generation AirPods cost $129, have a relatively long stalk, and boast up to 5 hours of listening on one charge. The $179 third-generation AirPods shrink the stalk, switch to a force sensor for controls, add support for spatial audio with dynamic head tracking, feature sweat and water resistance, have a MagSafe wireless charging case, and last up to 6 hours on a single charge. For $249, the second-generation AirPods Pro offer major upgrades to Active Noise Cancellation and Transparency mode, provide touch control for media playback and volume adjustments from the stem, and increase battery life to 6 hours. The AirPods Pro now come with a new charging case that’s sweat- and water-resistant, includes a lanyard loop, and can charge from a Lightning cable, MagSafe charger, Qi wireless charger, or Apple Watch charger. All three models support Hey Siri commands and automatically switch between Apple devices. See all the similarities and differences in Apple’s comparison tool.

HomePod mini
Although the original HomePod didn’t set the world on fire, the $99 HomePod mini has been significantly more popular. The grapefruit-sized HomePod mini may be small, but it produces great sound for its size and can do pretty much everything the larger HomePod could do. You can control it entirely via Siri, pair two for stereo sound, use it as a hub for your HomeKit home automation accessories, and even have it play the sound from your Apple TV. Put a HomePod mini in different rooms in the house, and you can use Intercom to communicate with family members with your voice. If you’re giving it as a gift, remember that it’s best when paired with an Apple Music subscription.

Apple TV 4K
The Apple TV hasn’t changed much over recent years, but this year’s new models are enough better and cheaper to warrant inclusion in this article. If someone on your list would benefit from a streaming media player, consider the new third-generation Apple TV 4K, which has a lot going for it. It now boasts a fast A15 Bionic chip, and the Siri Remote charges via USB-C. For someone who mostly wants to watch TV, the $129 Apple TV 4K (Wi-Fi) model is all they’ll ever need, with 64 GB of storage. For $149, the Apple TV 4K (Wi-Fi + Ethernet) has 128 GB of storage for those who want to load a lot of apps and games, and it includes a Gigabit Ethernet port and support for the Thread home automation protocol.

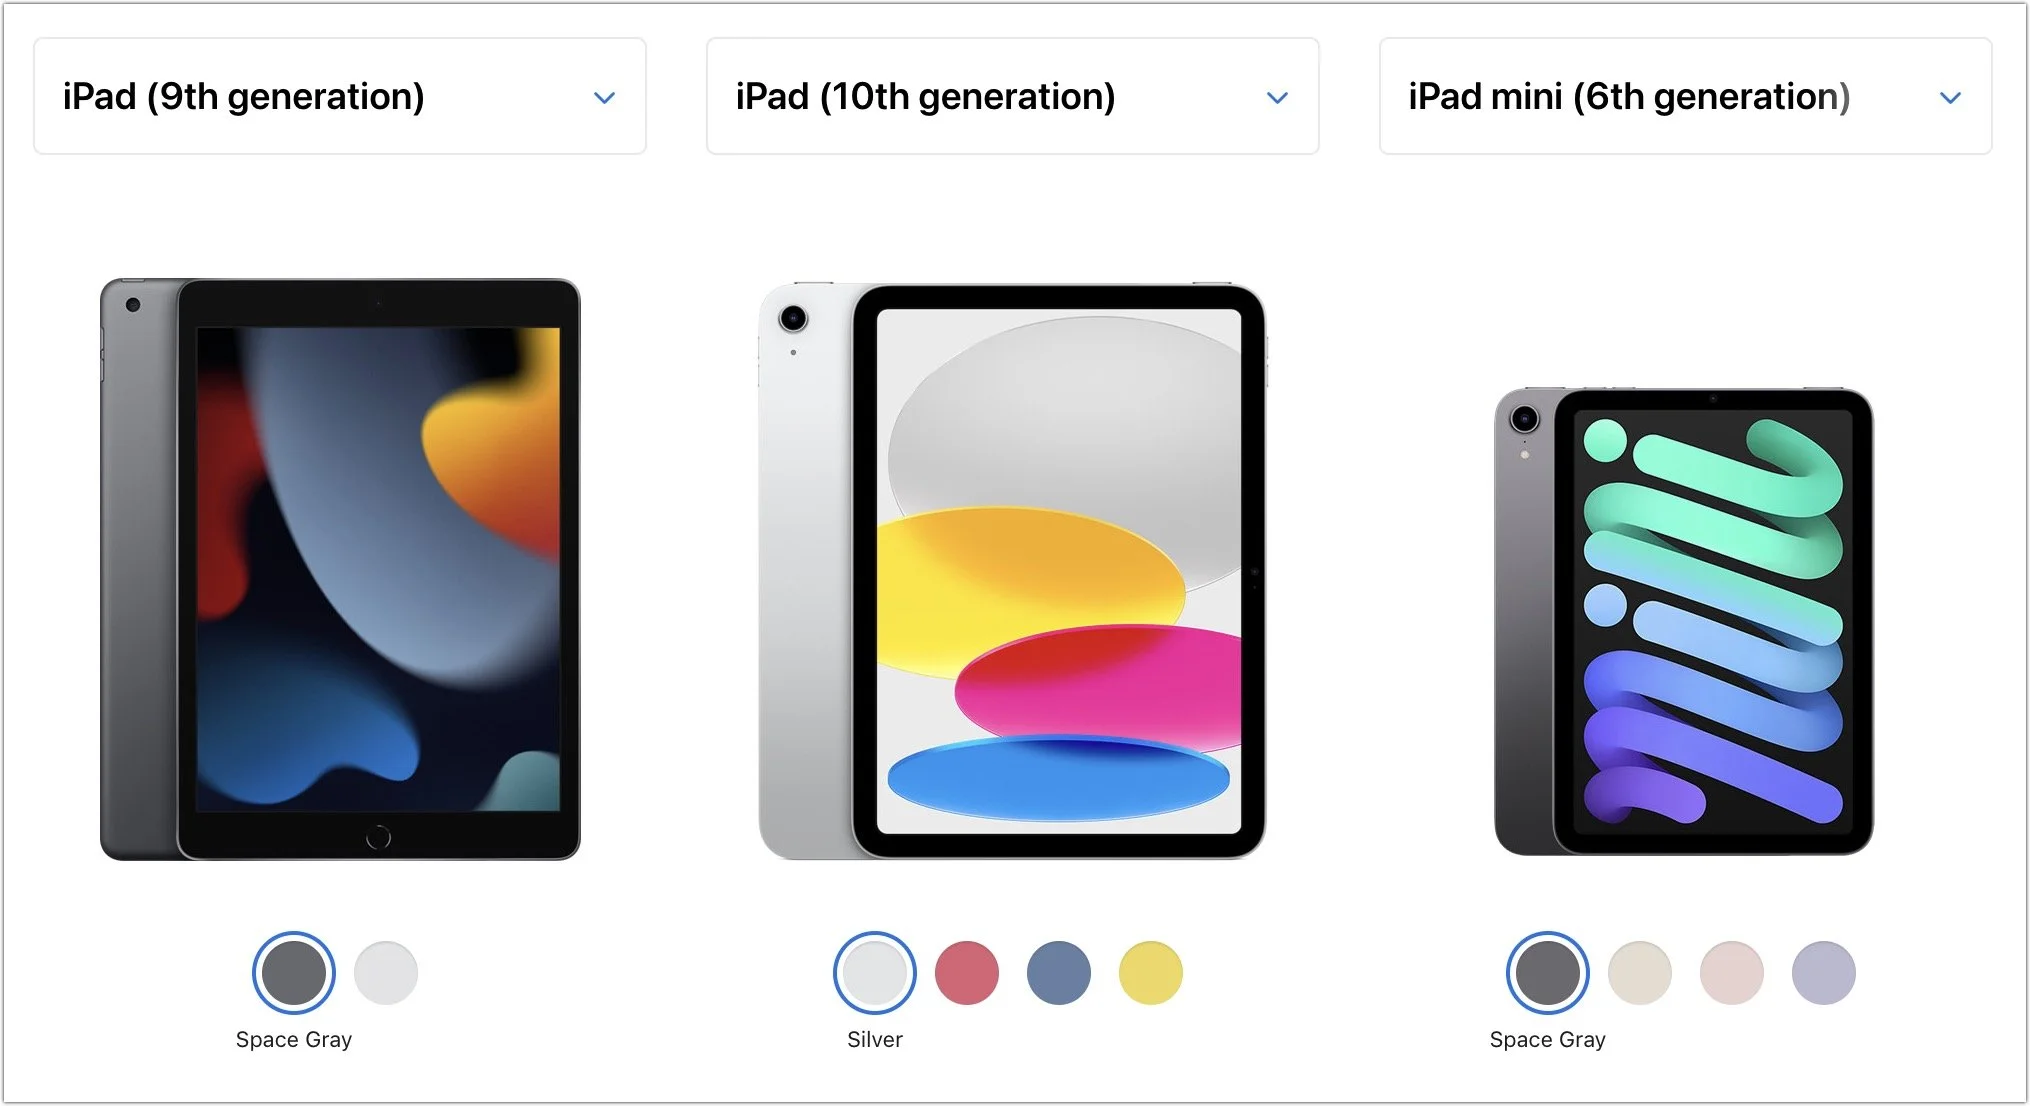
iPad, iPad mini, and iPad Air
If you’re looking to give an iPad as a gift, Apple has numerous options, with starting prices ranging from $329 to $599.
Ninth-generation iPad: The budget choice for a kid or an adult with basic needs is last year’s ninth-generation iPad, which remains an astonishing bargain at $329. It works with the first-generation Apple Pencil ($99), and those who need to write can add the $159 Smart Keyboard.
Tenth-generation iPad: This year’s redesigned tenth-generation iPad starts at $449, moving Touch ID to the top button, increasing the display size to 10.9 inches, and positioning the front-facing camera on the landscape edge. It pairs with the new $249 Magic Keyboard Folio and the first-generation Apple Pencil.
iPad mini: If you’re looking for something small, the diminutive sixth-generation iPad mini fits the bill at just $499. It’s compatible with the second-generation Apple Pencil ($129), but if you need a keyboard, you’ll have to look to a third-party manufacturer or use a standard Bluetooth wireless keyboard.
iPad Air: For the most power short of the pricey iPad Pro models, consider the fourth-generation iPad Air. It starts at $599 and can handle even the most intensive tasks, especially when coupled with a second-generation Apple Pencil and either a Magic Keyboard ($299) or Smart Keyboard Folio ($179).
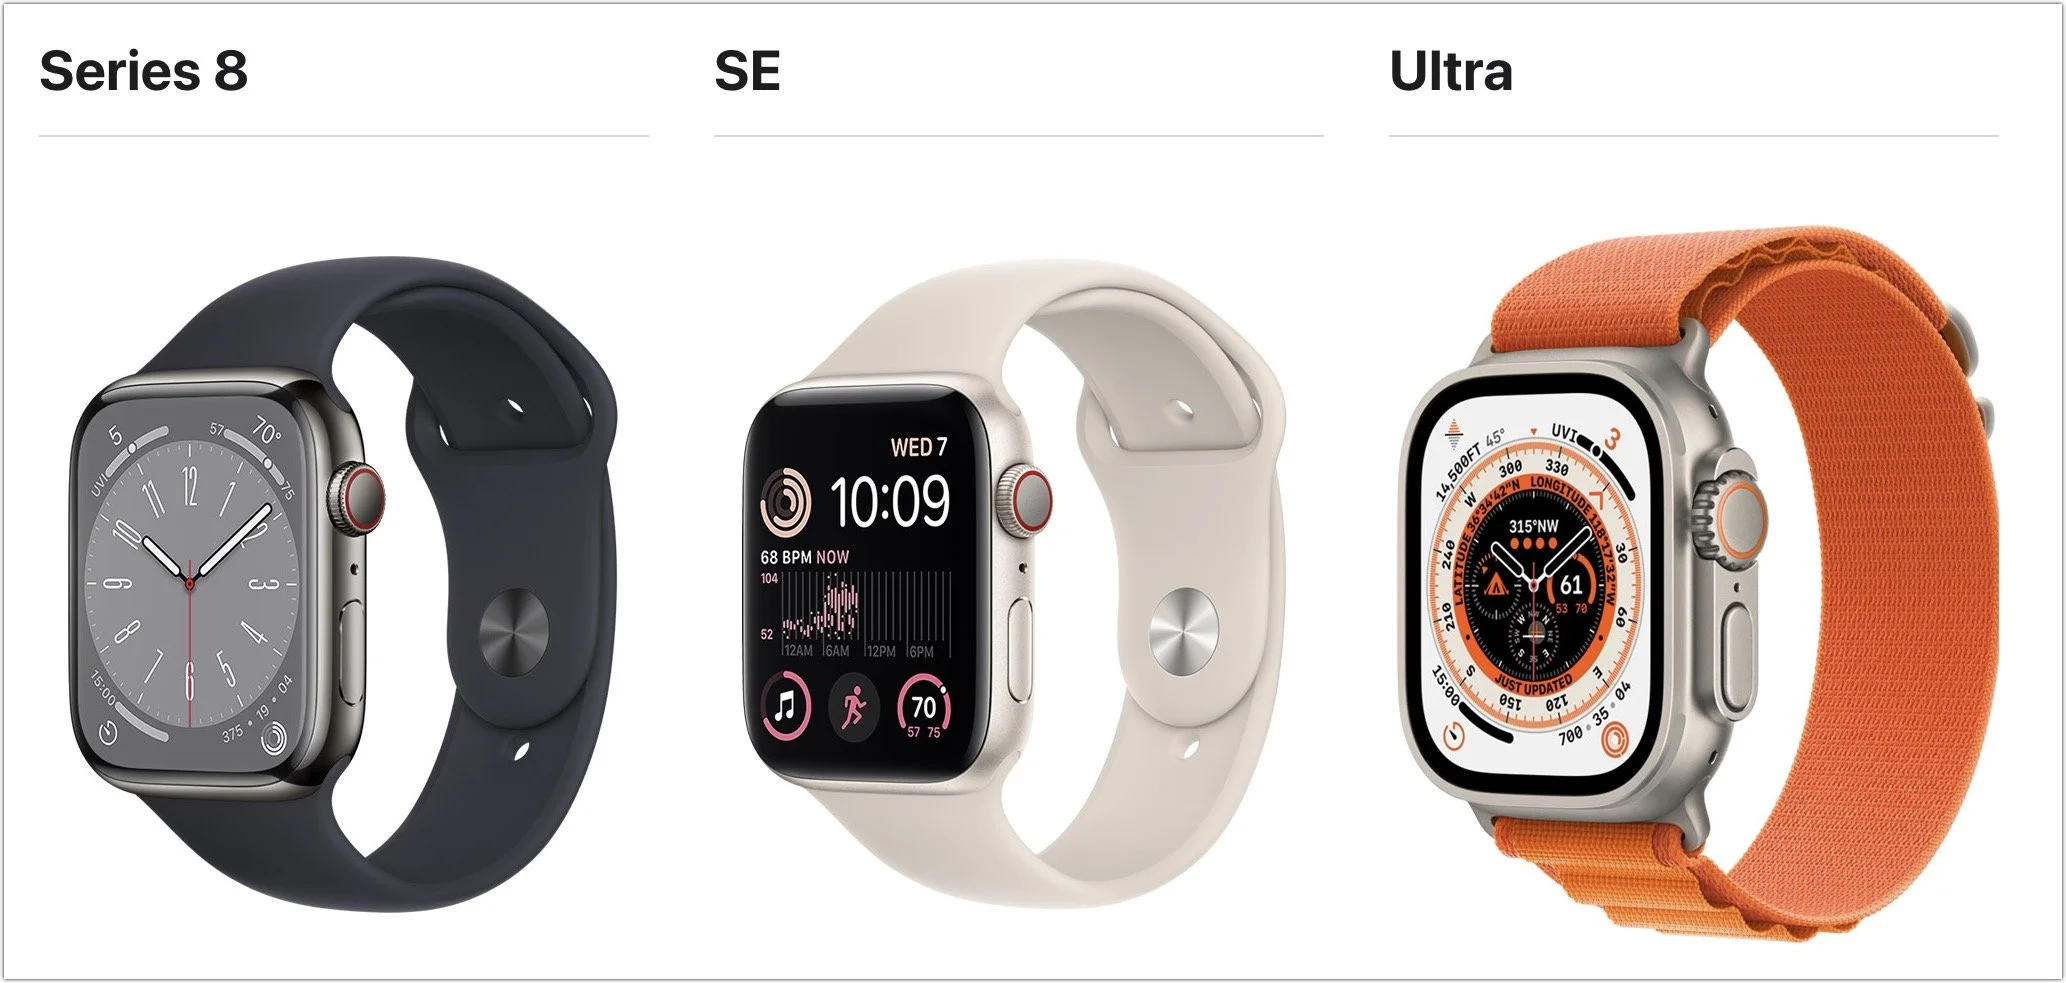
Apple Watch Gift Certificate
We love the Apple Watch, but be careful when considering it as a gift. There are three rather different models, and Apple provides a dizzying number of options for case size, material, and color, plus the band and color, making it difficult to know what would be most appreciated. Instead of guessing what your recipient would like, we encourage giving a certificate that’s good for a conversation about what to purchase. Then sit down with the recipient to run through all the decisions on the Apple Watch site.
There are three options this year: the updated Apple Watch SE (starting at $249), the new Apple Watch Series 8 (starting at $399), and the big, beefy, adventure-focused Apple Watch Ultra (starting at $799).
Thanks to a larger screen, faster chip, and Apple’s new iPhone and Apple Watch crash detection feature, the Apple Watch SE is more compelling than ever and all that most people need. Consider the Series 8 if you also want a larger Always-On display, blood oxygen sensor, and ECG capabilities, along with a new temperature sensor for cycle tracking. The Apple Watch Ultra puts all those features and more into a 49mm titanium case that features a new Action button that gives you quick access to app-specific commands. Its buttons are larger and easier to press, the Always-On display is brighter, the GPS works better in challenging conditions, and it has a depth gauge and water temperature sensor so it can serve as a dive computer. The Apple Watch Ultra boasts up to 36 hours of battery life in normal usage and up to 60 hours in a forth-coming extended battery optimization mode. It’s an impressive watch, but make sure you like how it looks on your wrist, given how much larger it is than other models. Apple has a helpful comparison tool.
Even though they are worthy gifts, we didn’t include any Macs in this article because they’re quite a bit more expensive and difficult to select without extensive discus-sion of the recipient’s needs. Let us know if you need help choosing the right Mac for someone on your list, but we’re partial to the M1- and M2-based MacBook Air and 24-inch iMac for many users.
(Featured image by Adam Engst)
Apple Releases New iPad, iPad Pro, and Apple TV
Apple has released a redesigned tenth-generation iPad with the new Magic Keyboard Folio, new M2 iPad Pro models, and a lower-cost Apple TV 4K with a faster processor and twice the storage. Read on for details:

In a series of press releases—no big video event this time—Apple has announced upgrades to the iPad, iPad Pro, and Apple TV. The new models are largely evolutionary, with changes that are welcome but unlikely to change your iPad or Apple TV experience. All are available to order now, with the new iPads arriving on October 26th and the new Apple TV hitting stores on November 4th.
One other note. iPadOS 16 and macOS 13 Ventura ship on October 24th. iPadOS 16 is probably safe to install soon, given the extent to which it’s similar to iOS 16, though the Stage Manager window management feature still has rough edges. Do not upgrade to Ventura until we’ve had a chance to evaluate its stability and compatibility.
New Tenth-Generation iPad Has iPad Air-like Design, Higher Price
The product receiving the most significant changes is the iPad, now in its tenth generation. Apple redesigned it to look and work more like the iPad Air, with squared-off sides, an all-screen design, a 10.9-inch display, USB-C instead of Lightning, and Touch ID in the top button. Also like the iPad Air, the iPad now has a 12-megapixel rear-facing camera and features Wi-Fi 6 plus 5G support in the cellular models for faster connectivity. Perhaps most interestingly, Apple finally repositioned the front-facing 12-megapixel camera along the landscape (long) edge of the iPad so you’ll be looking into the camera for video calls. Oddly, the new iPad Pro models didn’t also receive this improvement.

Despite the similarities, the iPad Air retains its technical superiority (and justifies its higher price) in two big ways. First, the tenth-generation iPad relies on the A14 Bionic chip that’s faster than the ninth-generation iPad’s older A13 Bionic but slower than the iPad Air’s higher-performance M1 chip. Second, the tenth-generation iPad remains compatible only with the first-generation Apple Pencil, presumably because Apple left the wireless charging hardware out to cut costs. Since the new iPad switches from Lightning to USB-C, you’ll need a $9 USB-C to Lightning adapter to pair and charge the Lightning-based Apple Pencil—that’s awkward.
Apple also introduced a new keyboard exclusively for the tenth-generation iPad, the Magic Keyboard Folio. It features full-size keys, a large trackpad, and a 14-key function row. The two-piece design separates the keyboard from the back cover, so you can fold the keyboard behind the iPad or detach it entirely when you’re not using it. The back cover has an adjustable stand for positioning the iPad at several angles. It’s available only in white.
The only problem is that all these changes come at a cost. Historically, the iPad has been Apple’s best value, with the ninth-generation iPad’s price starting at just $329. The new tenth-generation iPad now starts at $449 for the 64 GB Wi-Fi model. Add $150 if you prefer 256 GB of storage, and another $150 if you want cellular capabilities too. You can choose from blue, pink, yellow, and silver finishes.
So now, when pondering a full-size iPad, you have three options. The ninth-generation iPad remains available at $329 for those looking to pay the least. The tenth-generation iPad is now the middle choice at $449. And for those who want a better Apple Pencil experience, faster performance, and slightly better specs, the iPad Air starts at $599.
New iPad Pro Offers M2 Chip, Faster Wi-Fi, and Apple Pencil Hover
Apple has also updated the iPad Pro, but with fewer changes. Foremost among them is Apple’s M2 chip, which provides the iPad Pro with the ultimate in performance. The M2 enables users to capture ProRes video for the first time and to transcode ProRes video up to three times faster than before.
That said, only those already pushing the limits on the previous iPad Pro models should consider upgrading from the previous M1 models since the difference isn’t likely to be that noticeable for less demanding workflows. Similarly rarified is the move to Wi-Fi 6E, which supports wireless networking at up to 2.4 Gbps, or twice as fast as the previous generation. Apple also expanded the 5G networking for the cellular-capable models to support more 5G networks around the world.
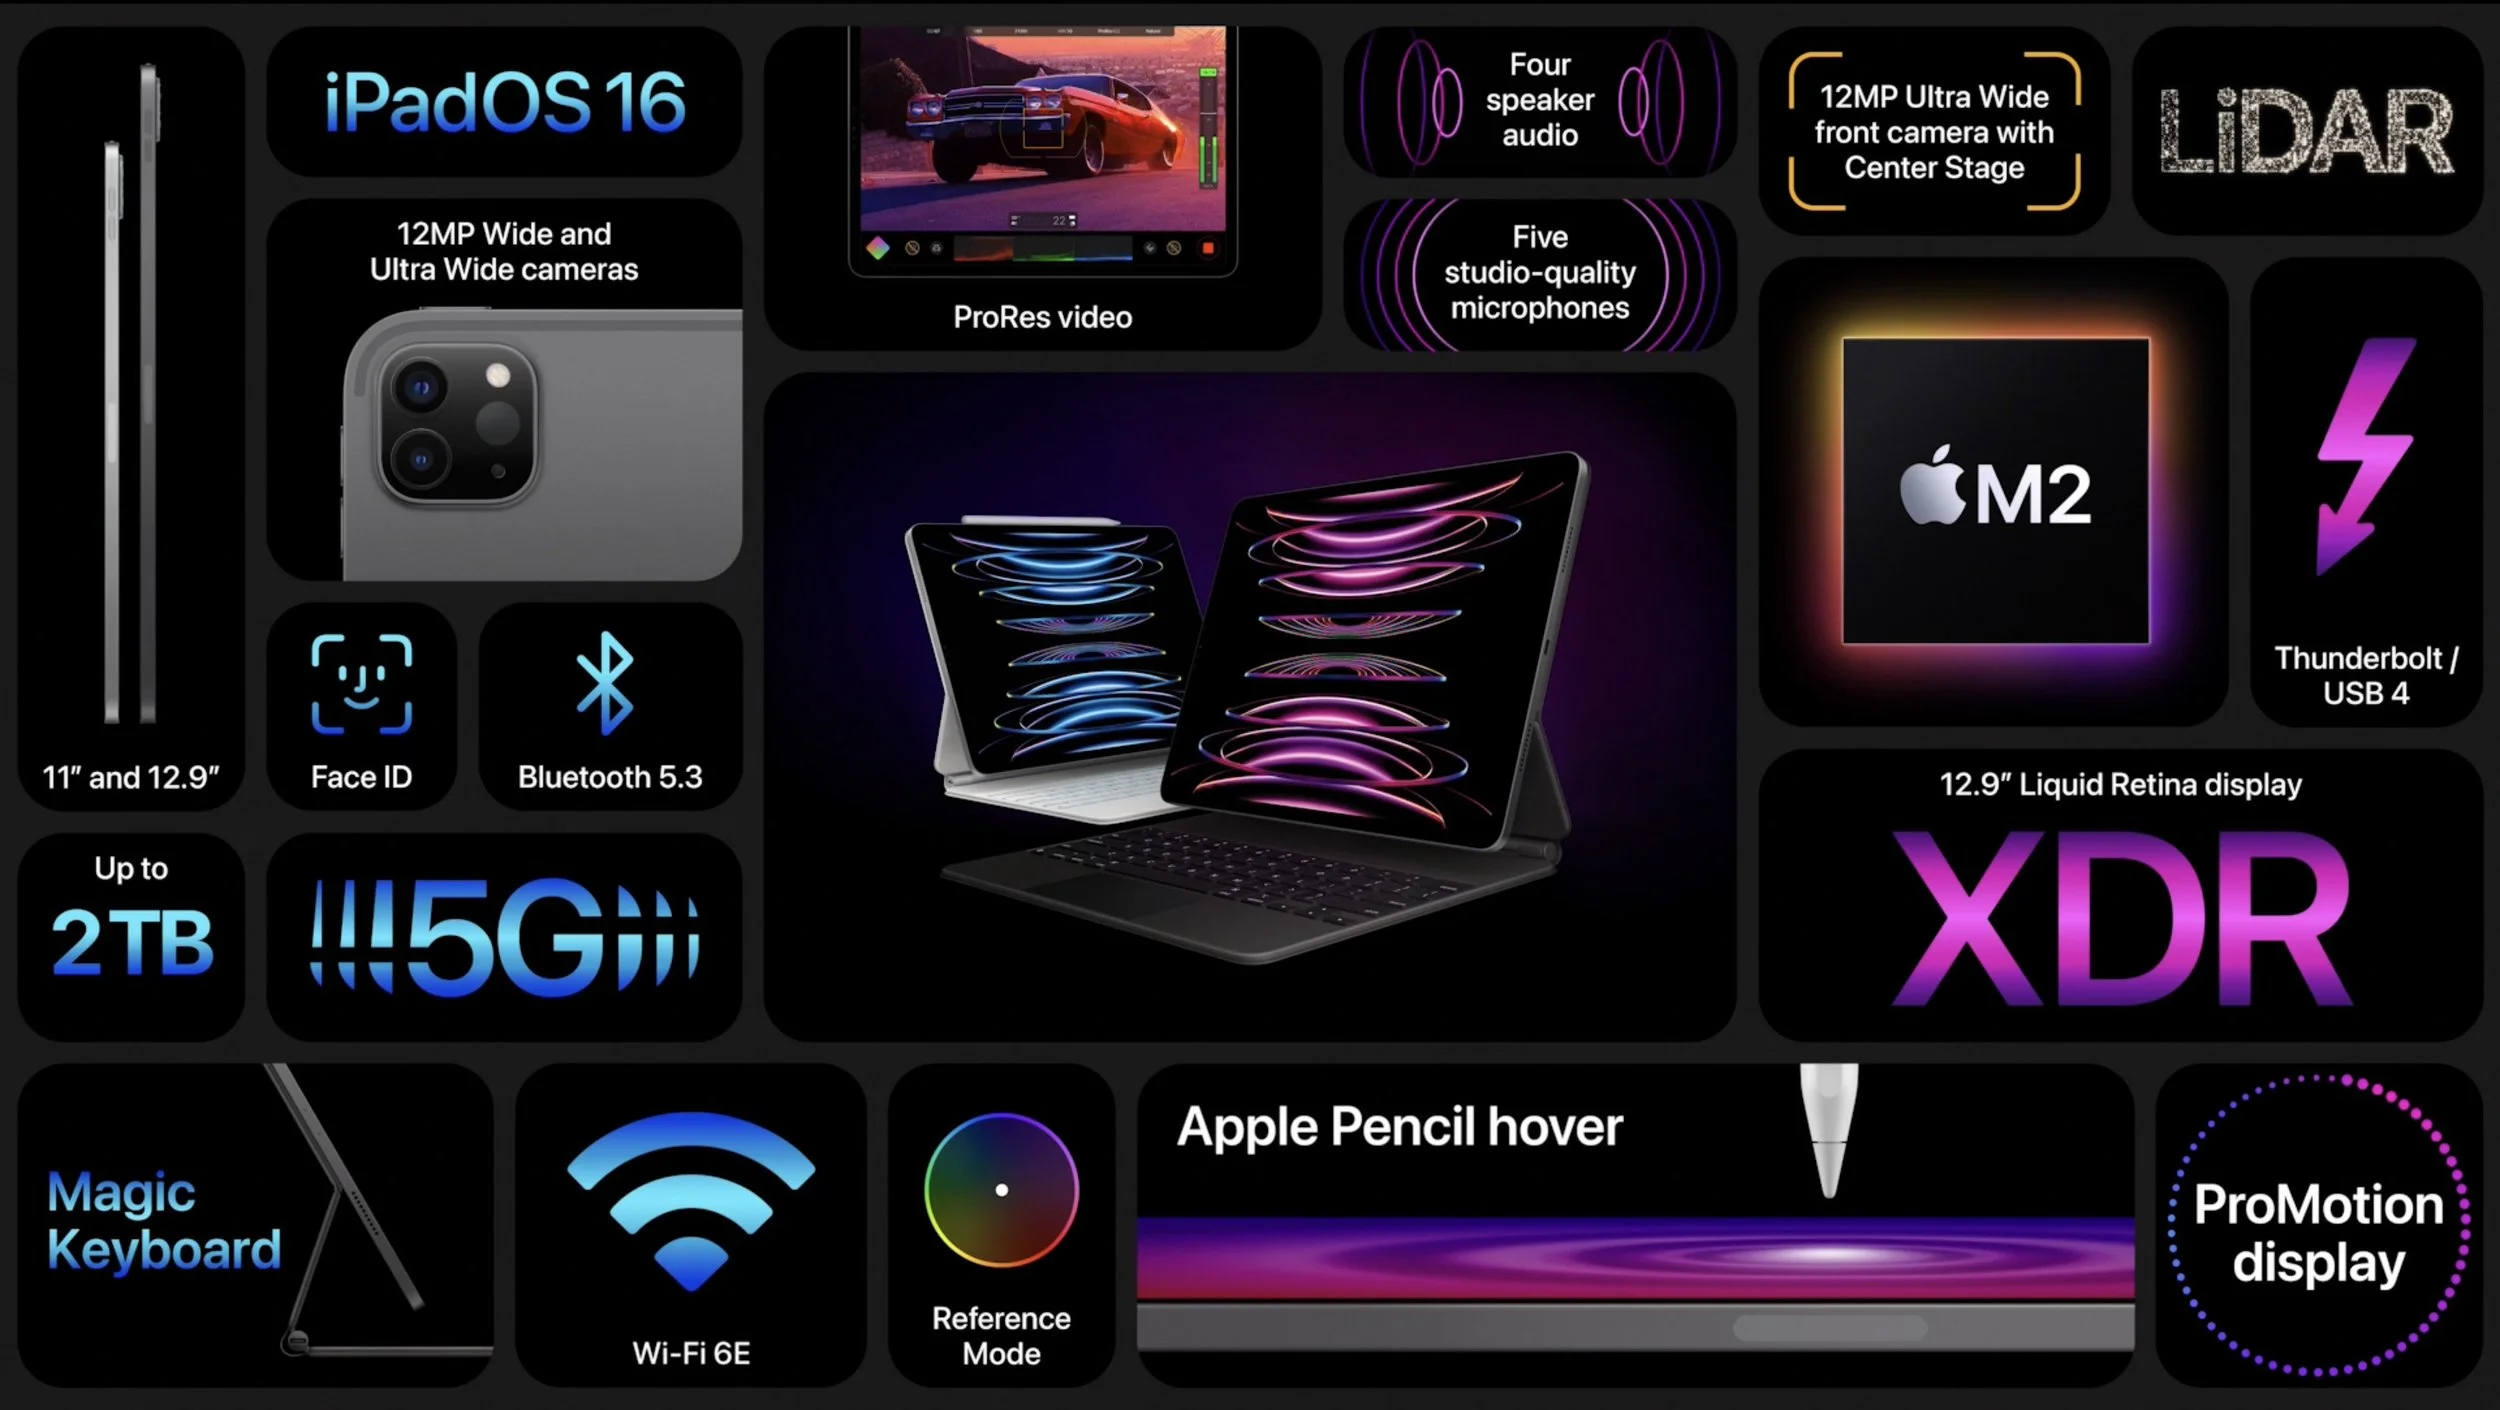
The new iPad Pro can also detect when the second-generation Apple Pencil is hovering up to 12 millimeters above the screen, displaying a circle that helps you position the tip of the Apple Pencil more precisely.

The new iPad Pro retains the same pricing, with the 11-inch model starting at $799 and the 12.9-inch model starting at $1099.
Increasingly, Apple is targeting the iPad Pro at video, audio, and graphics professionals interested in iPad-focused workflows. If that’s you, the new iPad Pro is worthwhile; those just looking for a high-performance iPad would be more economically served by the M1 iPad Air, which is $200 less expensive.
Third-generation Apple TV 4K Boasts Better Specs for Lower Prices
Along with the new iPads, Apple also refreshed its Apple TV lineup, introducing the third-generation Apple TV 4K and dropping the old Apple TV HD. The design remains essentially the same, with the big change being an upgrade from the previous model’s A12 Bionic chip to the faster A15 Bionic for faster performance and more fluid gameplay. Apple also doubled the storage and added support for HDR10+ to provide the best possible video quality across more TVs. Finally, the Siri Remote now charges via USB-C instead of Lightning.

The new Apple TV 4K comes in two models, much like previous generations, but this time there are differences beyond storage, which is important only for apps and games. The $129 Apple TV 4K (Wi-Fi) provides 64 GB of storage and supports only wireless networking, whereas the $149 Apple TV 4K (Wi-Fi + Ethernet) comes with 128 GB of storage, includes a Gigabit Ethernet port for faster wired connectivity, and supports the Thread mesh networking protocol for smart home accessories.
Those prices are $50 lower than the previous generation’s. For those who aren’t interested in Apple TV games, home automation, and wired networking, the $129 Apple TV 4K (Wi-Fi) is significantly more compelling than last year’s more expensive model.
(Featured image by Apple)
Five Best Practices for Organizing and Naming Computer Files
Having trouble finding files because they have vague names and are scattered across multiple folders? Read on for concrete advice on how to organize and name files for easy access.

We’ve had decades to get used to organizing computer files, but it’s still hard for many people. Part of the problem is imagining how you—or your colleagues, if you’re in a workgroup—will need to find the files in the future. Another part of the problem is mustering enthusiasm for renaming and reorganizing existing files to match an improved approach. Let’s see if we can help!
#1: Start Now and Catch Up Later
Don’t let your old files prevent you from starting a new organizational approach. The best time to begin is now; you can reorganize old files later.
An easy way to avoid being bogged down by old stuff is to move all your existing files and folders into a folder called “Unorganized” at the top level of wherever you store documents. Make sure to retain any hierarchy that those old files might have. If you’re still working with those files, they remain just as accessible as they were before.
One type of cleanup is often worth doing right away: If you have a lot of temporary or duplicate files from past projects that you can instantly identify as unnecessary, delete those now while they’re still familiar. That saves you or someone else the work of thinking about them again in the future.
#2: Pick an Organizational Structure
The most important question to ask yourself or your colleagues is what sort of organizational structure matches how you think about your data. There are four common approaches:
Project name: It’s hard to go wrong with using a project name as your primary organizational structure. For instance, an ad agency might have a top-level folder for each client, or a book publisher might have one for each title. A non-profit that organizes five annual events could have a folder for each event. Within each project folder, additional folders can separate files by category. You may also add some date-based structure to keep older files from getting in the way of current work. For instance, here’s how an ad agency might organize email marketing files for a hotel.

Date: Groups with many files that revolve around time periods may find it easiest to organize everything by year, month, and day. Date-based organization is a special case—you’ll know if it makes sense for your data and usage patterns. For instance, if a distributor creates different inventory reports for every supplier every day, a hierarchy like this might make working with files from the same time period easy. However, finding all the files for a particular supplier would be more difficult, although a file naming convention could help resolve that problem.

Project type: Large organizations with a lot of cross-departmental collaboration across numerous projects might find it easier to separate files by category first and name second. That way, everyone in the marketing and production departments working with scripts and audio files for radio spots, for instance, can find those files without having to see files related to social media ads. The downside is that finding related client projects is tricky unless you add that information into a file naming structure.

Department: For large organizations with siloed departments that seldom interact, each department can have its own hierarchy. That keeps the marketing department’s files separate from the accounting department’s, for instance, but can result in confusion when departments do collaborate. Plus, it can be difficult to bring data about a single project together, although again, a good file naming structure can help.

We often get questions about how best to organize images. If they’re tightly related to particular projects, the easiest approach is usually to store them alongside other files in that project. For example, photos for a cookbook might live with the layout files within a folder for each chapter.

For graphically intensive fields with a very large number of images to track across multiple projects, particularly when any given image might be used in multiple contexts, consider moving to a digital asset management app that stores all your images, providing access through hierarchical categories and keywords or tags. Digital asset management apps are essentially databases for images and other media, enabling you to search and sort far more flexibly than with a simple folder hierarchy.
#3: Decide on a Consistent File Naming Convention
Although an organizational structure is important to help you find files quickly and work with related files, your file naming convention is even more important. You should be able to identify a file merely by glancing at its file name, even if it was moved outside its folder hierarchy. That’s especially true if files are shared outside your organization, where the recipient won’t see the folder hierarchy above the file. You can see this problem illustrated below: you can tell exactly what this MailChimp.pdf file is from the folder structure, but would someone else have any way of knowing it’s a Belvedere Hotel-related invoice from 2022?

File names should be as specific and detailed as necessary for quick identification, preferably starting with a date or project name and including essential aspects of the organizational structure. Dates work well for any file that’s created on a regular basis—instead of the vague MailChimp.pdf, try 2022-09-29-Belvedere-invoice-MailChimp.pdf. Project names are better for one-offs, so instead of Chapter3.docx, use something like Second-Breakfasts-Ch03-recipes.docx. Note how both of those names integrate key aspects of organizational structure.
Three pieces of advice:
When you name files starting with the date, use the YYYY-MM or YYYY-MM-DD format to ensure that they sort well and can’t be confused with older or newer files.
Consistency is key. Stick to the conventions you decide to use and require that everyone else do so as well. Having one file name start with “Second-Breakfasts” and another with “2nd breakfasts” will cause confusion and annoyance.
When separating words, use a space, a hyphen (-), or an underscore (_). Spaces are the easiest to use but should be avoided for files destined for a website. We prefer hyphens because macOS interprets two words separated by an underscore as a single word when selecting, which can be irritating while editing file names.
#4: Identify Versions Clearly
Many files go back and forth between multiple people in a collaborative workflow. Building a versioning scheme into your file naming convention is essential to ensure that everyone knows which version is the most recent and who worked on which version. It’s tempting to use a single file, with each person renaming it as necessary, but we recommend archiving each version until the completion of the project to make it easy to see who did what and to recover from any file corruption or accidental deletion of data. When using a file server or shared folder, it’s best to make it clear when someone is actually working on the file to avoid collisions. Let’s assume in these steps that you and your editor are taking turns working on a Word file.
Alongside the file in question, create a folder called CHECKED OUT and another called OLD.
Move the file you’re working on into CHECKED OUT. Name the file however you like, but end it with your initials and the number 1, as in Second-Breakfasts-Ch03-layout-rte1.docx.
After you make your changes, move the file back into the main folder and alert your editor that it’s available.
When your editor wants to work on the file, they first make a copy of it in OLD to archive a version. Then they move the working copy into CHECKED OUT and rename it with their initials, incrementing the version number, as in Second-Breakfasts-Ch03-layout-afp2.docx.
They edit the file, moving it back to the main folder when done and alerting you.
You each then repeat Steps 4 and 5 as necessary, storing an archive copy in OLD, putting the working file in CHECKED OUT, renaming it with initials and the next version number, and then putting it back in the main folder when done.
On the final revision, rename the file one last time, replacing the initials and version number with “final,” as in Second-Breakfasts-Ch03-layout-final.docx.
If you’re instead sending files back and forth via email, there’s no need for the CHECKED OUT folder, but you should both keep a copy of each version in OLD, just in case.
#5: Know When to Browse and When to Search
If you have a solid organizational structure, you should be able to jump right to the files you need by navigating the folder hierarchy, and if you’ve designed your structure well, you’ll browse for files most of the time. However, if a consistent file naming convention enables you to fall back on searching in certain situations:
You need to find files across multiple folders. For instance, if you store files by client but want to see all the invoices for all clients, a search on “invoice” is more effective than looking in each client folder separately.
There are too many files to work with fluidly. Imagine that you have an automated system that generates dated reports for multiple suppliers in a particular folder. If they’re sorted first by date and then by supplier, a search could help you filter the folder’s contents to a single supplier.
You don’t entirely understand the organizational structure or trust that others have followed it. This scenario is most likely when you weren’t the person to set things up. Hopefully, you at least have consistent file names to look for with your searches.
Apart from these situations, if you find yourself regularly resorting to a search, that may be a hint that you should revisit the organizational structure and make sure it works the way you need.
As you can see, there are numerous approaches for organizing and naming your files, and what makes sense for one group may not for another. If you’re having trouble deciding on the best approach, feel free to ask us for suggestions.
(Featured image by iStock.com/everythingpossible)
Security Questions Your Organization Should Be Asking Itself
Securing an organization’s digital assets requires ongoing attention. This article poses questions your organization should be able to answer—and that will likely come up when purchasing cyber insurance or doing work for other, larger organizations.

We’re increasingly hearing from organizations that need to establish that they have sufficient security policies in place, either to meet the requirements of a larger client or to qualify for cyber insurance that insures against breaches and similar losses. Details vary, and we’re happy to work with you on the specifics, but here are some of the kinds of questions you may be asked. Of course, if you don’t have to prove that you’re doing the right thing to some other company, answering these questions for yourself can only improve your security readiness.
Do you enroll all organizational devices in a device management solution?
With device management, an IT department or managed services provider (MSP) maintains oversight and control over all organizational devices. That’s helpful for automating configuration and deployment, providing secure access to organizational resources, ensuring consistent security policies, managing app and operating system updates, tracking device inventory and status, and much more.
Do you have an organization-wide backup strategy with offsite backups?
Regular backups—with some being stored offsite—are essential if you need to recover from lost or stolen hardware, a natural disaster, or a ransomware attack. Even though ransomware isn’t currently a major problem in the Mac world, it wouldn’t hurt to start creating immutable backups using “write once, read many” tape or something like Retrospect’s Cloud Object Lock, a technology that ensures that cloud-based backups can’t be corrupted. Finally, have you tested restoration and recovery of key systems from your backup data? Backup is important, but only if you can re-store.
Do you have a policy for updates?
It’s essential to install security-related updates to operating systems and major apps, but how quickly that happens has to be weighed against problems that version changes can cause for important workflows. There’s no right answer here, but you want to make sure that you aren’t leaving your organization’s apps and devices vulnerable to known security exploits for longer than necessary.
Do you have a strong password management policy?
Short, easily guessed, or cracked passwords are one of the primary ways attackers breach corporate networks and systems. At minimum, your password management policy should require that all passwords be stored in a password manager, new passwords be generated by the password manager and meet minimum requirements for strength, and two-factor authentication be used when available.
Do you use an endpoint protection platform?
Endpoint protection is essentially software aimed at preventing and detecting malware on employee workstations, often with an organizational dashboard and management capabilities. Although the Mac doesn’t have nearly the exposure to malware that Windows does, it’s still important to keep computers free of malware that could hurt performance, exfiltrate data, or provide an entry point for future attacks. End-point protection is usually part of a larger managed systems approach that can also ensure that devices adhere to security policies like full disk encryption, run only approved software, stay up to date with security updates, and more.
Do you have a list of sensitive data on your network?
Exactly what counts as sensitive data will vary by organization, but anything related to network and corporate security qualifies, as does any personally identifiable information you may hold about or for clients. It’s not uncommon to store information about people that includes names, email addresses, phone numbers, and postal addresses, but you should be even more careful if you store Social Security numbers, credit card numbers, driver’s licenses, passports, financial records, or medical records. Knowing what you have is the first step; after that, consider what additional precautions you should take to protect such information.
Do you provide periodic anti-fraud and security training to employees?
Social engineering is another common way attackers gain access to corporate networks and systems. Does your organization require that all employees take regular training to learn how to identify phishing attacks, require appropriate approvals for unusual transactions or access requests, and report suspected incidents to the necessary people? If an administrative aide in the accounting department gets an email request from the CEO to pay an urgent invoice to a new vendor, will that person know how to respond?
Do you allow access to organizational email and systems from personal devices?
It’s tempting to allow users to access their email from personal devices or to have contractors use their personal email addresses for work communications. We recommend keeping as clear a line as possible between work and personal devices and accounts to reduce the security implications of such mixing. Particularly when there’s sensitive information in play, personal email addresses should never be used for work communications, and if personal devices are being used, they should be set up with two-factor authentication for organizational logins.
Do you have incident and disaster response plans?
Bad things happen, and it’s important to consider how you would respond to different types of security incidents and natural disasters. How will your organization maintain crucial business operations, communicate with employees, coordinate with partners (insurance, legal, PR, and clients), and more? Is your plan written down and updated regularly? Have you tested key aspects of your plan?
We know there’s a lot to think about regarding security in today’s world, and we’re always available to help if you’d like assistance answering any of the above questions.
(Featured image by iStock.com/Bulat Silvia)