What Should You Do about an Authentication Code You DIDN’T Request?
Receiving a two-factor authentication code you didn’t request shows that your security is working, but it’s also an indication that someone may have your password and be trying to break into your account.

We strongly encourage using two-factor authentication (2FA) or two-step verification (2SV) with online accounts whenever possible. The details vary slightly, but with either one, after you enter your password, you must enter an authentication code to complete the login. Although it’s always best to get such codes from an authentication app like 1Password (which enters codes for you), Authy, or Google Authenticator, many websites still send codes by the less secure SMS text message or email. They’re better than nothing.
But what if you receive a 2FA code that you didn’t request?
Don’t panic. Although receiving the code means that someone is trying to log in to your account and has your password, the extra authentication step has done its job and protected your account from being compromised.
Never share an authentication code with anyone! A hacker could attempt to break into your account, be foiled by two-factor authentication, and then email or text you with a trumped-up story about why you should send them the code. Authentication codes are short-lived, so if this is going to happen, it will happen right away.
Independently from the message with the code, go to the account website, log in, and change the password. As always, make sure the password is strong, unique, and stored in your password manager. If the account used an old password that was shared with other accounts, change passwords on those accounts as well.
There are a handful of scenarios that could generate such an authentication code:
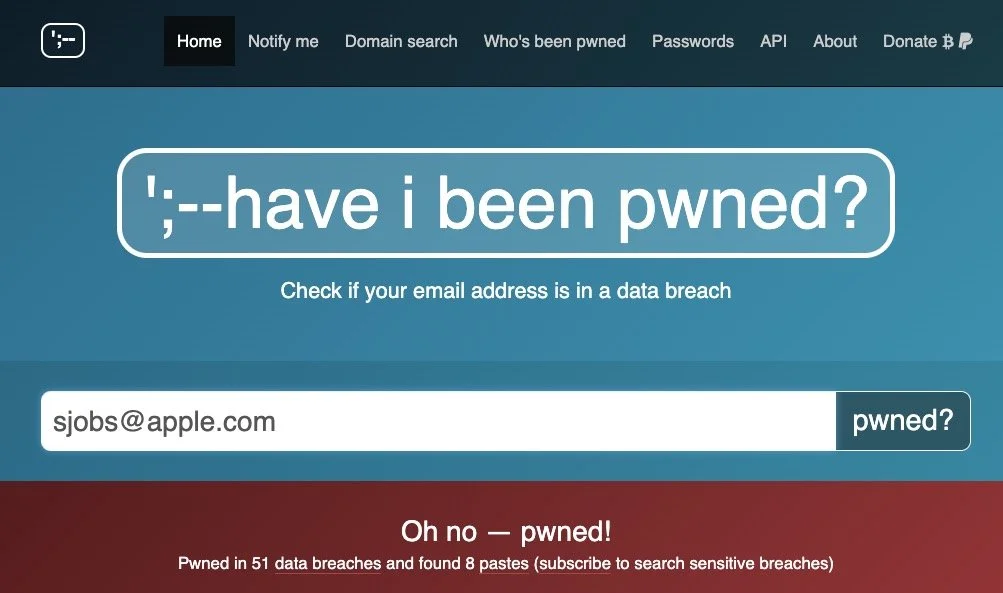
Stolen credentials: The most likely scenario, which the advice above addresses, is when your email address and password have been stolen, probably in a significant site breach. You can check the Have I Been Pwned site to see if your account is floating around on the “dark Web.” Password managers often perform similar checks. Changing the password on any breached sites is essential.
Identity theft: You started receiving authentication codes from TikTok, but you don’t remember creating a TikTok account. Someone might be trying to create an account to impersonate you but cannot complete the account creation without the authentication code. There isn’t much you can do to stop such attempts, although if an account has been created, you should be able to change the password (since it’s using your email address or phone number), log in, and either just let the account sit in your password manager or try to delete it.
Accidental or random triggering: If you have a common email address or phone number, someone could have accidentally entered your address or number instead of theirs while trying to create an account. It’s easy to type marsha32@example.com instead of marsha23@example.com or mistake the Boston 617 area code for the upstate New York 607 area code. If you’re sure you don’t have an account at the site in question and you only get one authentication code, you can probably ignore it.
Regardless of the cause, don’t ignore 2FA codes you didn’t request for sites where you have an account. It’s not hard to change a password, particularly if you use a password manager, and the extra piece of mind is worth the few minutes of work.
(Featured image based on an original by iStock.com/Kateryna Onyshchuk)
Legitimately Worried That You’re Being Targeted Online? Try Lockdown Mode
High-value targets like activists, journalists, and government employees with access to sensitive information should consider enabling Lockdown Mode on their Apple devices to protect against hacking or spying by sophisticated digital attackers.

Most people fall into one of two extremes when it comes to device security. Many believe they’re not interesting enough to be targeted by online attackers and thus don’t take sensible precautions, like making sure every website account is protected with a strong, unique password. (Most attacks these days are bots, so whether you’re interesting is irrelevant.) Then there are those who see a bogeyman around every corner and refuse to use a password manager or biometric authentication because of misplaced concerns about the security of the stored data. (Really, it’s OK.)
Today we want to focus instead on a very small third group: those who, because of who they are or what they do, have a legitimate reason to fear being targeted by sophisticated digital attacks. Such people might include activists trying to raise awareness about human rights abuses in oppressive regimes, political dissidents, muck-raking journalists covering organized crime or government corruption, senior executives in controversial business fields, high-profile government officials, and government employees with access to sensitive information.
For such people, using a password manager and relying on biometric authentication is table stakes. Government intelligence and law enforcement agencies often employ hacking software like Pegasus, which can be installed on target iPhones through zero-click exploits such as simply receiving a malicious text message. Pegasus can read text messages, snoop on calls, collect passwords, track location, access the iPhone’s camera and microphone, and harvest information from apps. Plus, both government agencies and organized crime rings employ hackers to target high-profile targets directly, often through social engineering (pretending to be someone they’re not to gain access to an account or device).
Apple is well aware of the risk to high-value individuals. In November 2021, the company filed a lawsuit against Pegasus maker NSO Group. More practically, Apple introduced Lockdown Mode in iOS 16, iPadOS 16, and macOS 13 Ventura, significantly reducing the attack surface that spyware or hackers could exploit by limiting or blocking specific apps, websites, and features.
Lockdown Mode Limitations
Before we explain how to turn on Lockdown Mode, it’s vital that you understand how it limits your Apple devices:
Messages: Most message attachment types are blocked other than certain images, video, and audio. Lockdown Mode also blocks links and link previews.
Web browsing: Safari blocks complex Web technologies, potentially causing some websites to load slowly or not operate correctly. It may also block Web fonts and images, so sites may not display as designed.
FaceTime: Incoming FaceTime calls are blocked unless you have previously called that person.
Apple services: Invitations to Apple services, such as invitations to join the Home app, are blocked unless you have previously invited that person.
Shared albums: Shared albums disappear entirely from the Photos app, and shared album invitations are blocked.
Device connections: If you want to connect an iPhone or iPad to a computer or accessory, the device must first be unlocked. Similarly, connecting an M-series Mac laptop to an accessory requires explicit approval.
Configuration profiles: Lockdown Mode prevents you from installing configuration profiles, and the device can’t be enrolled in Mobile Device Management.
The inconvenience these restrictions create is well worth the protection Lockdown Mode provides if you’re a sufficiently high-value target. But for the vast majority of Apple users, Lockdown Mode’s limitations would just cause confusion and annoyance.
Turning on Lockdown Mode
First, note that you must enable Lockdown Mode on each of your devices separately.
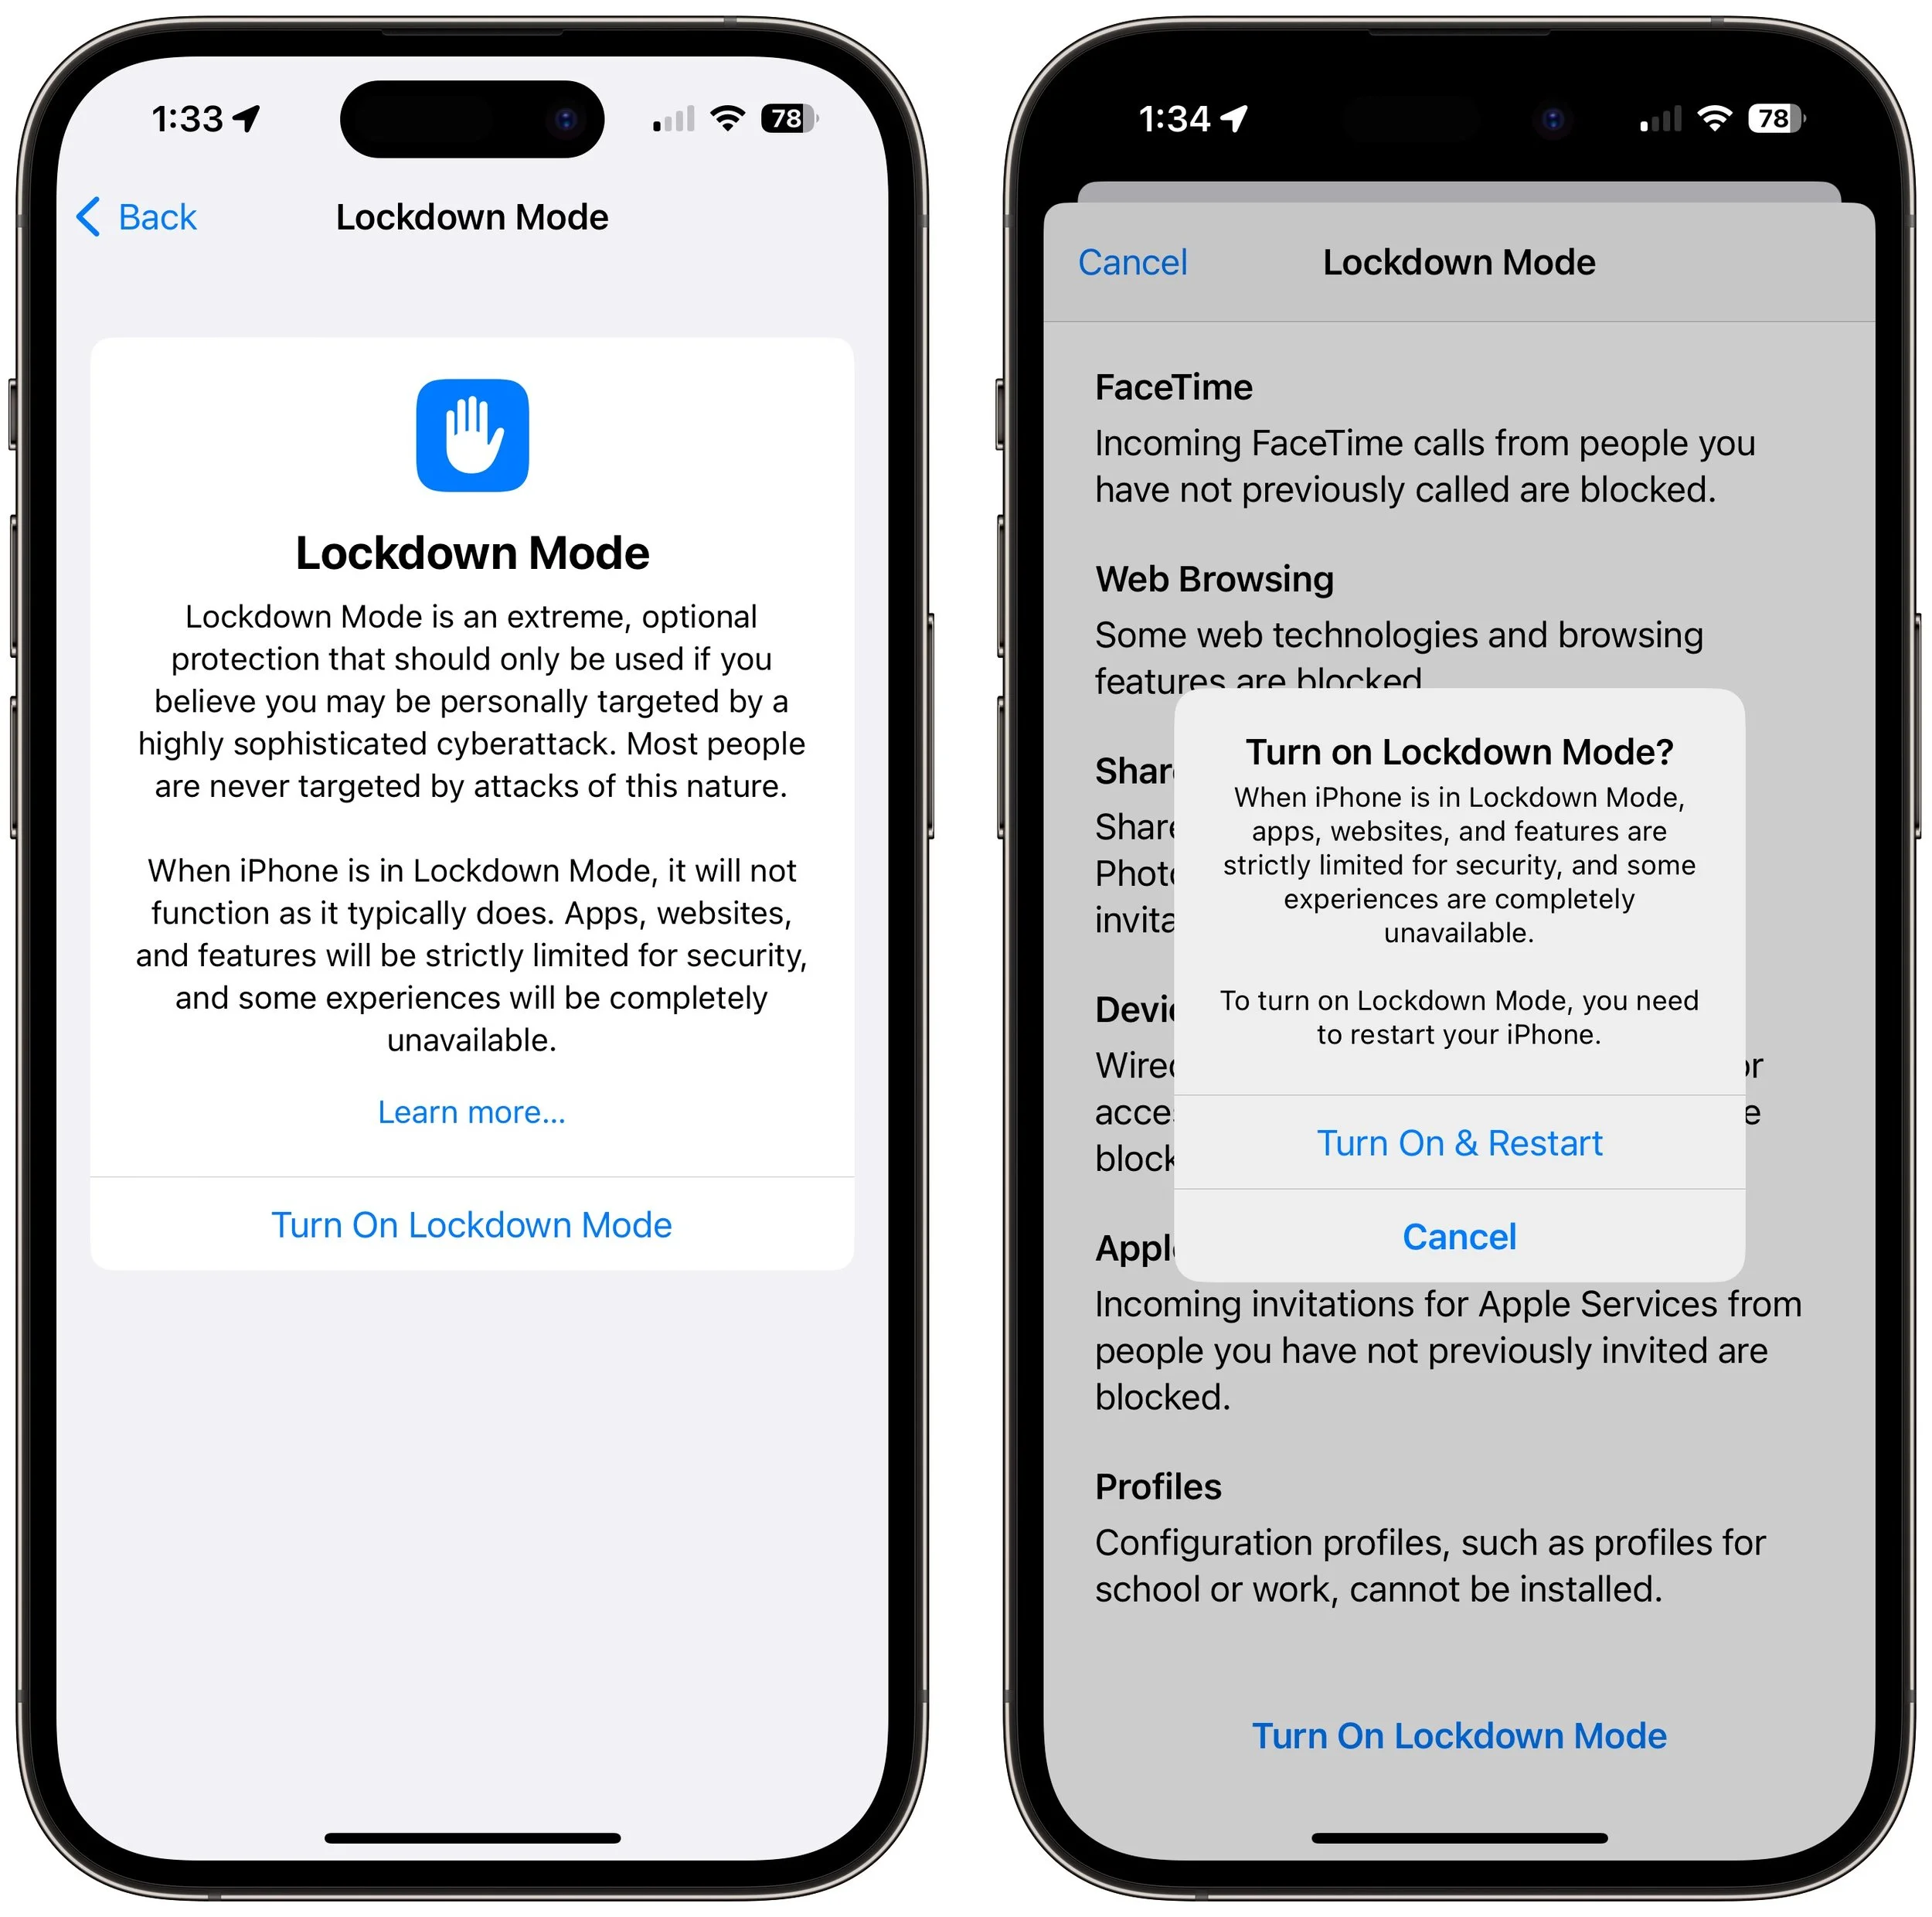
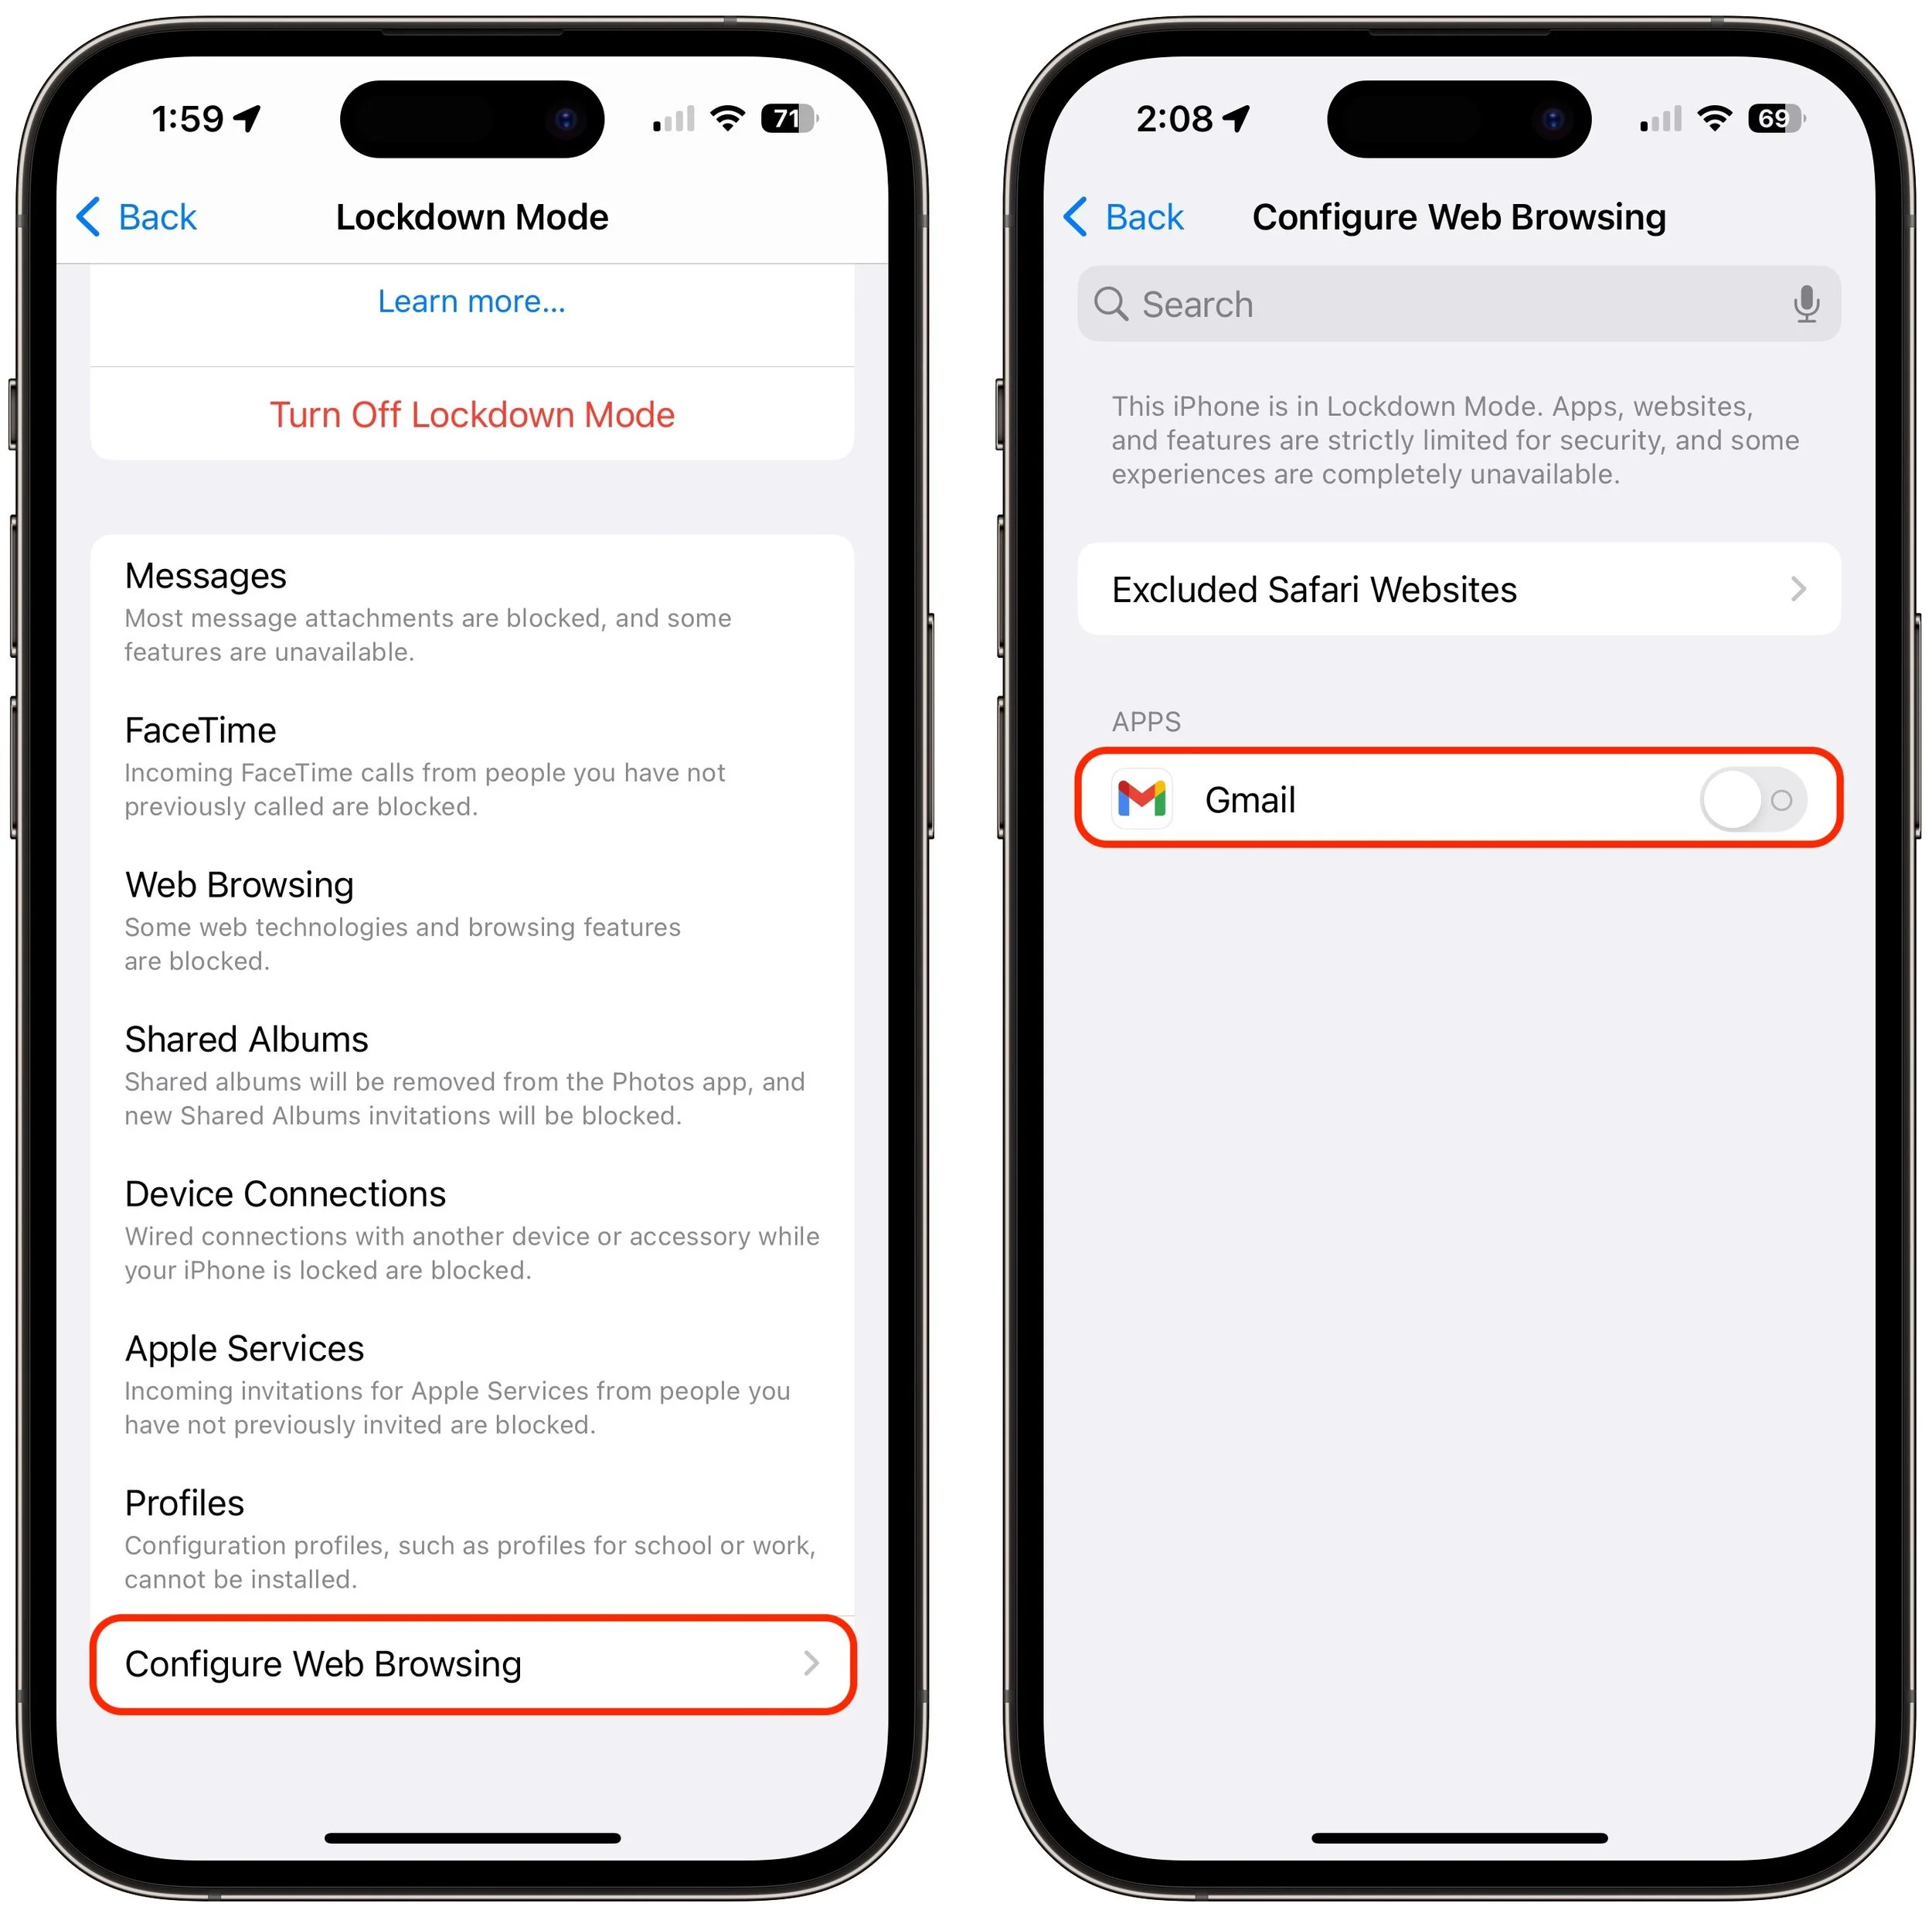
To enable Lockdown Mode on an iPhone or iPad, go to Settings > Privacy & Security > Lockdown Mode (at the bottom) and tap Turn On Lockdown Mode on two separate screens. For the last step, tap Turn On & Restart, and enter your passcode.
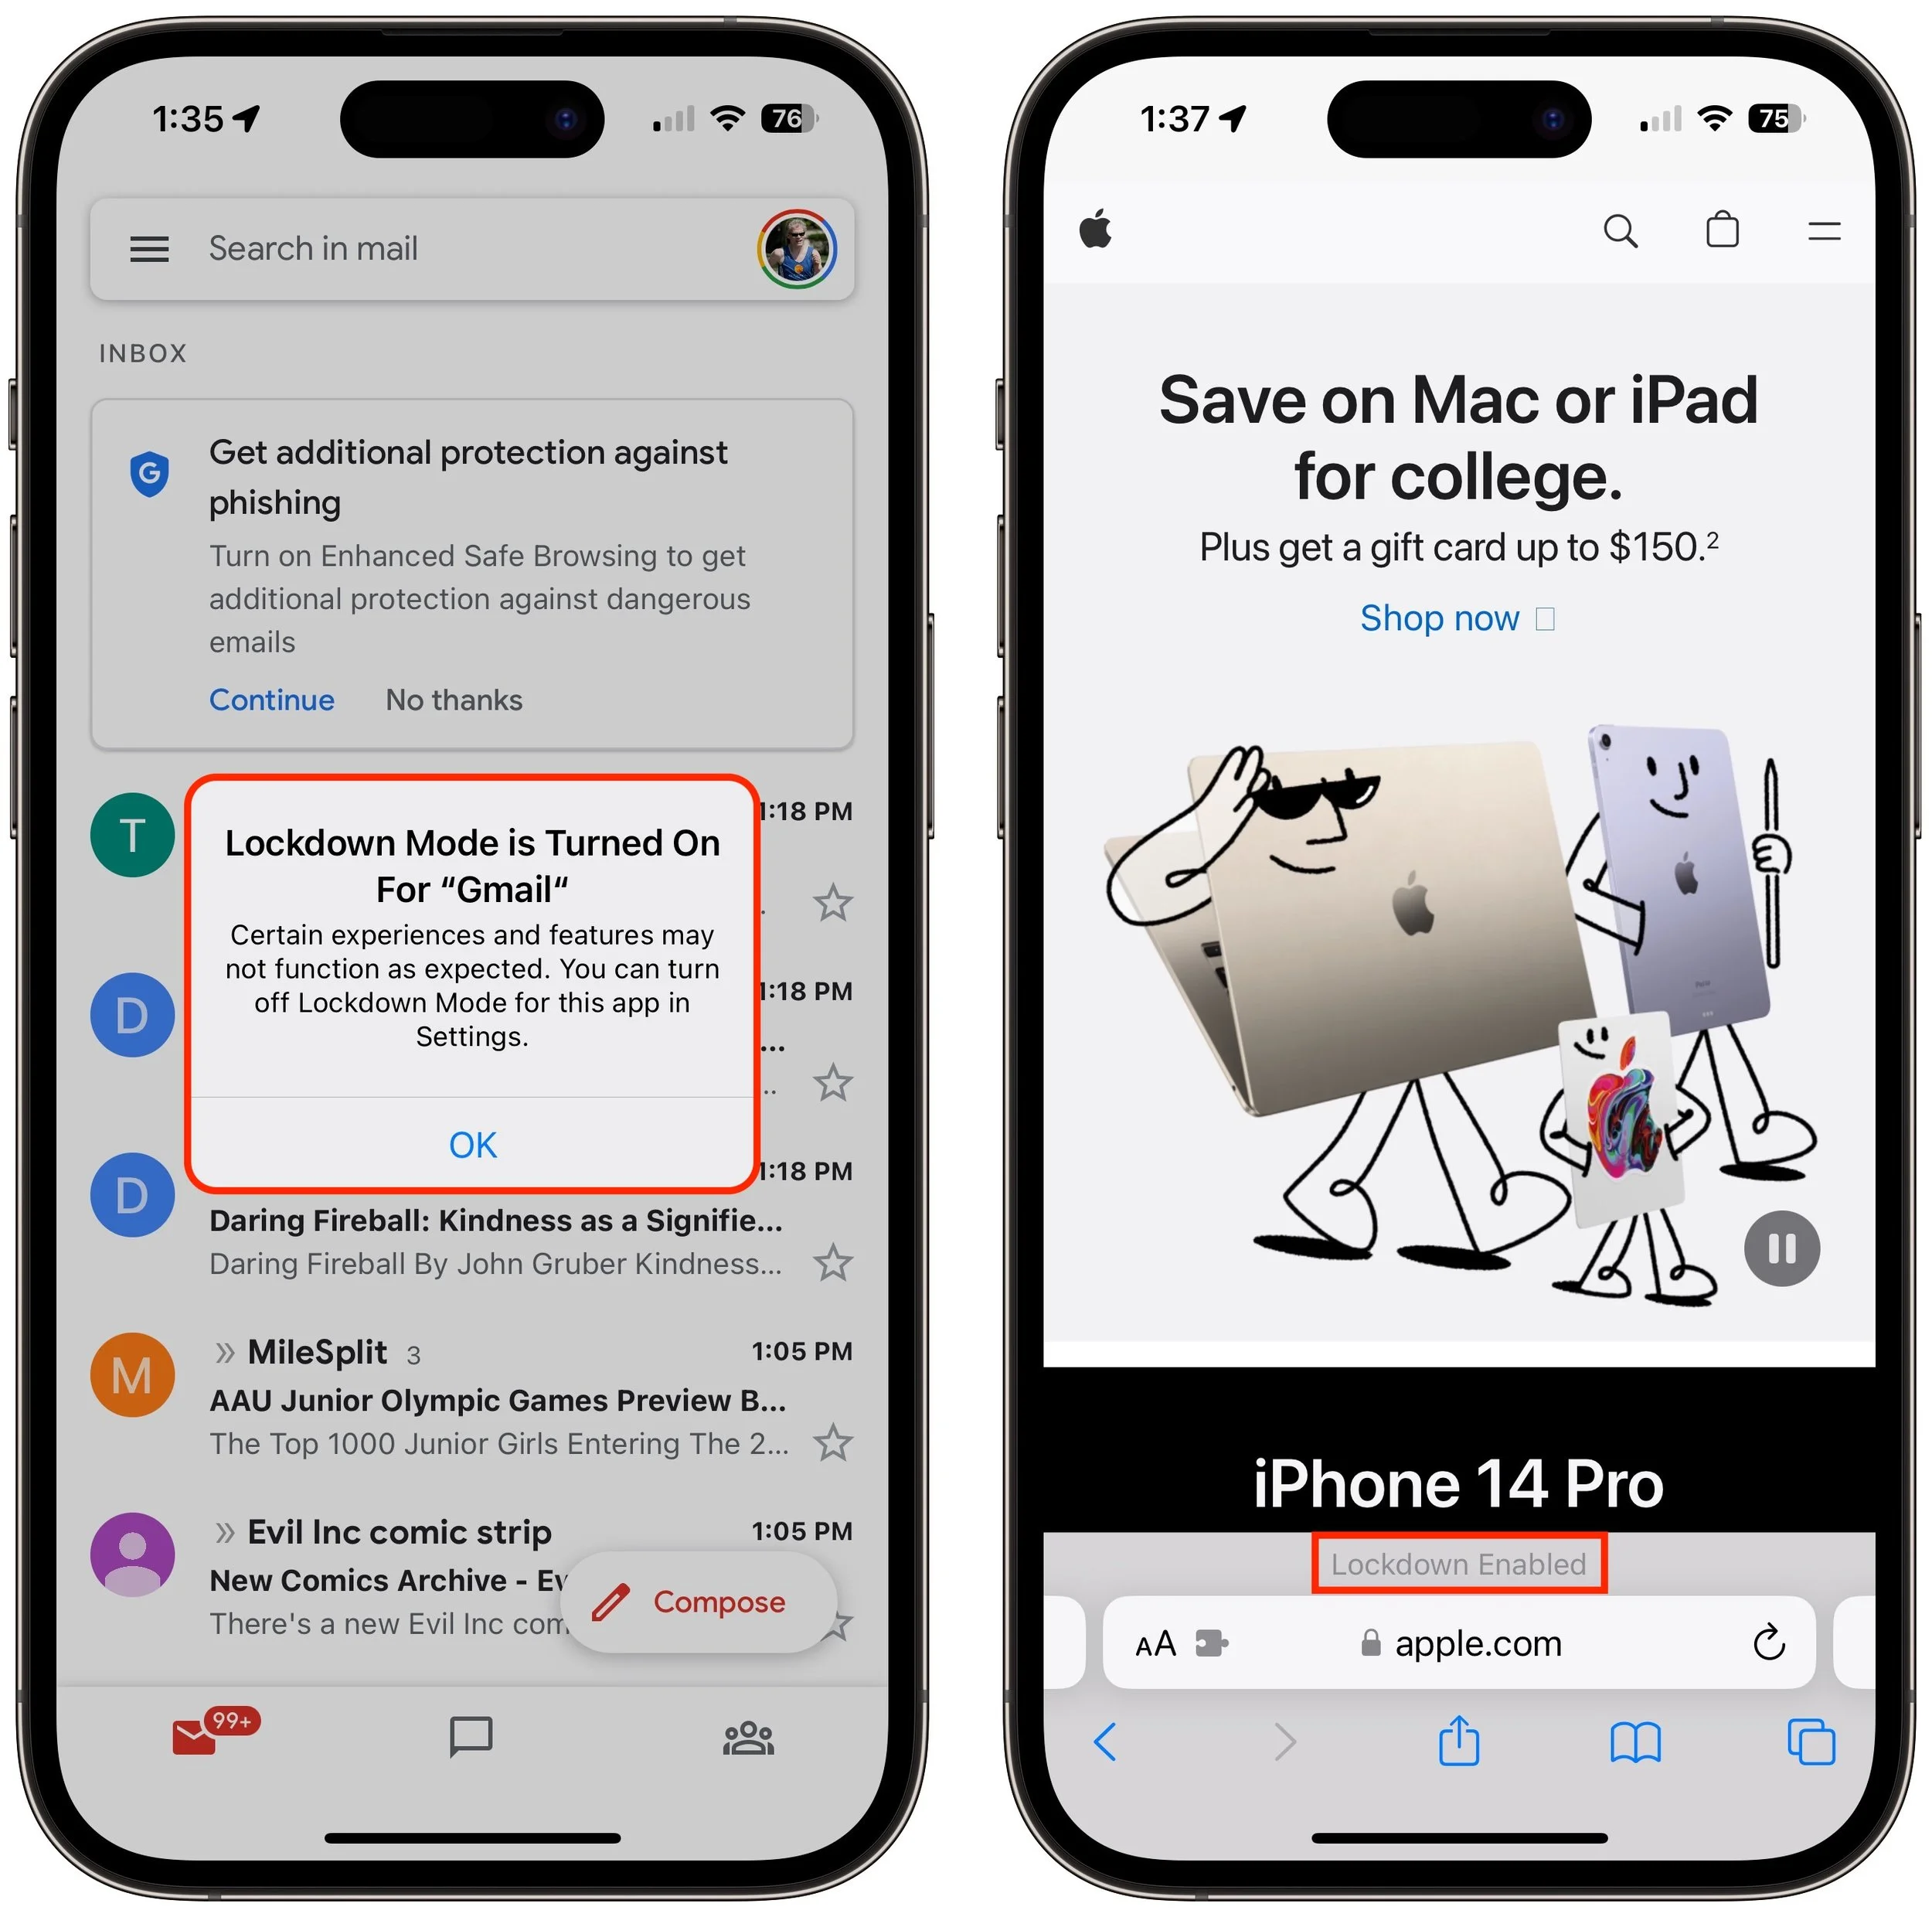
Once your iPhone restarts, it will work mostly the way you expect, apart from the above limitations. You may see notifications when an app has been limited in some way, and a banner appears in Safari to let you know you’re in Lockdown Mode.
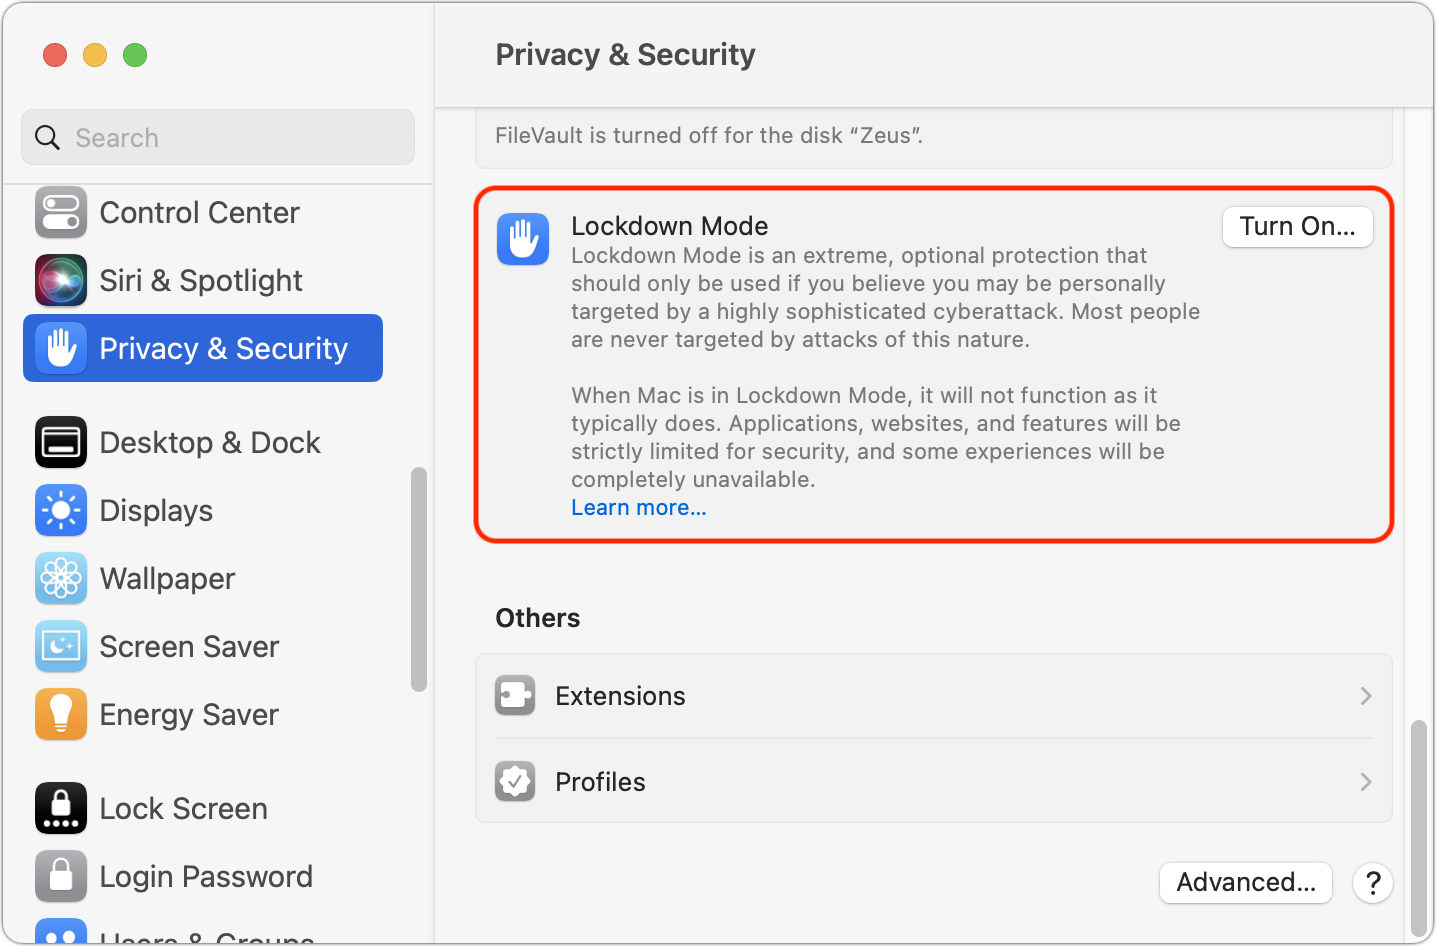
On a Mac, turn on Lockdown Mode by going to System Settings > Privacy & Security. Scroll down to Lockdown Mode and click Turn On. Authenticate, then click Turn On & Restart.
As with the iPhone and iPad, Lockdown Mode mainly makes its presence known by displaying a banner in Safari; you may also receive notifications when an app or feature is limited.
Allow Certain Apps or Websites in Lockdown Mode
If you discover that a particular app or website isn’t operating correctly in Lockdown Mode, you can exclude it from Lockdown Mode’s protections. You’ll have to decide if it’s worth the added risk. To manage exceptions on the iPhone or iPad, go to Settings > Privacy & Security > Lockdown Mode. Then scroll to the bottom, tap Configure Web Browsing, and on the next screen, turn off the switch for the desired app.
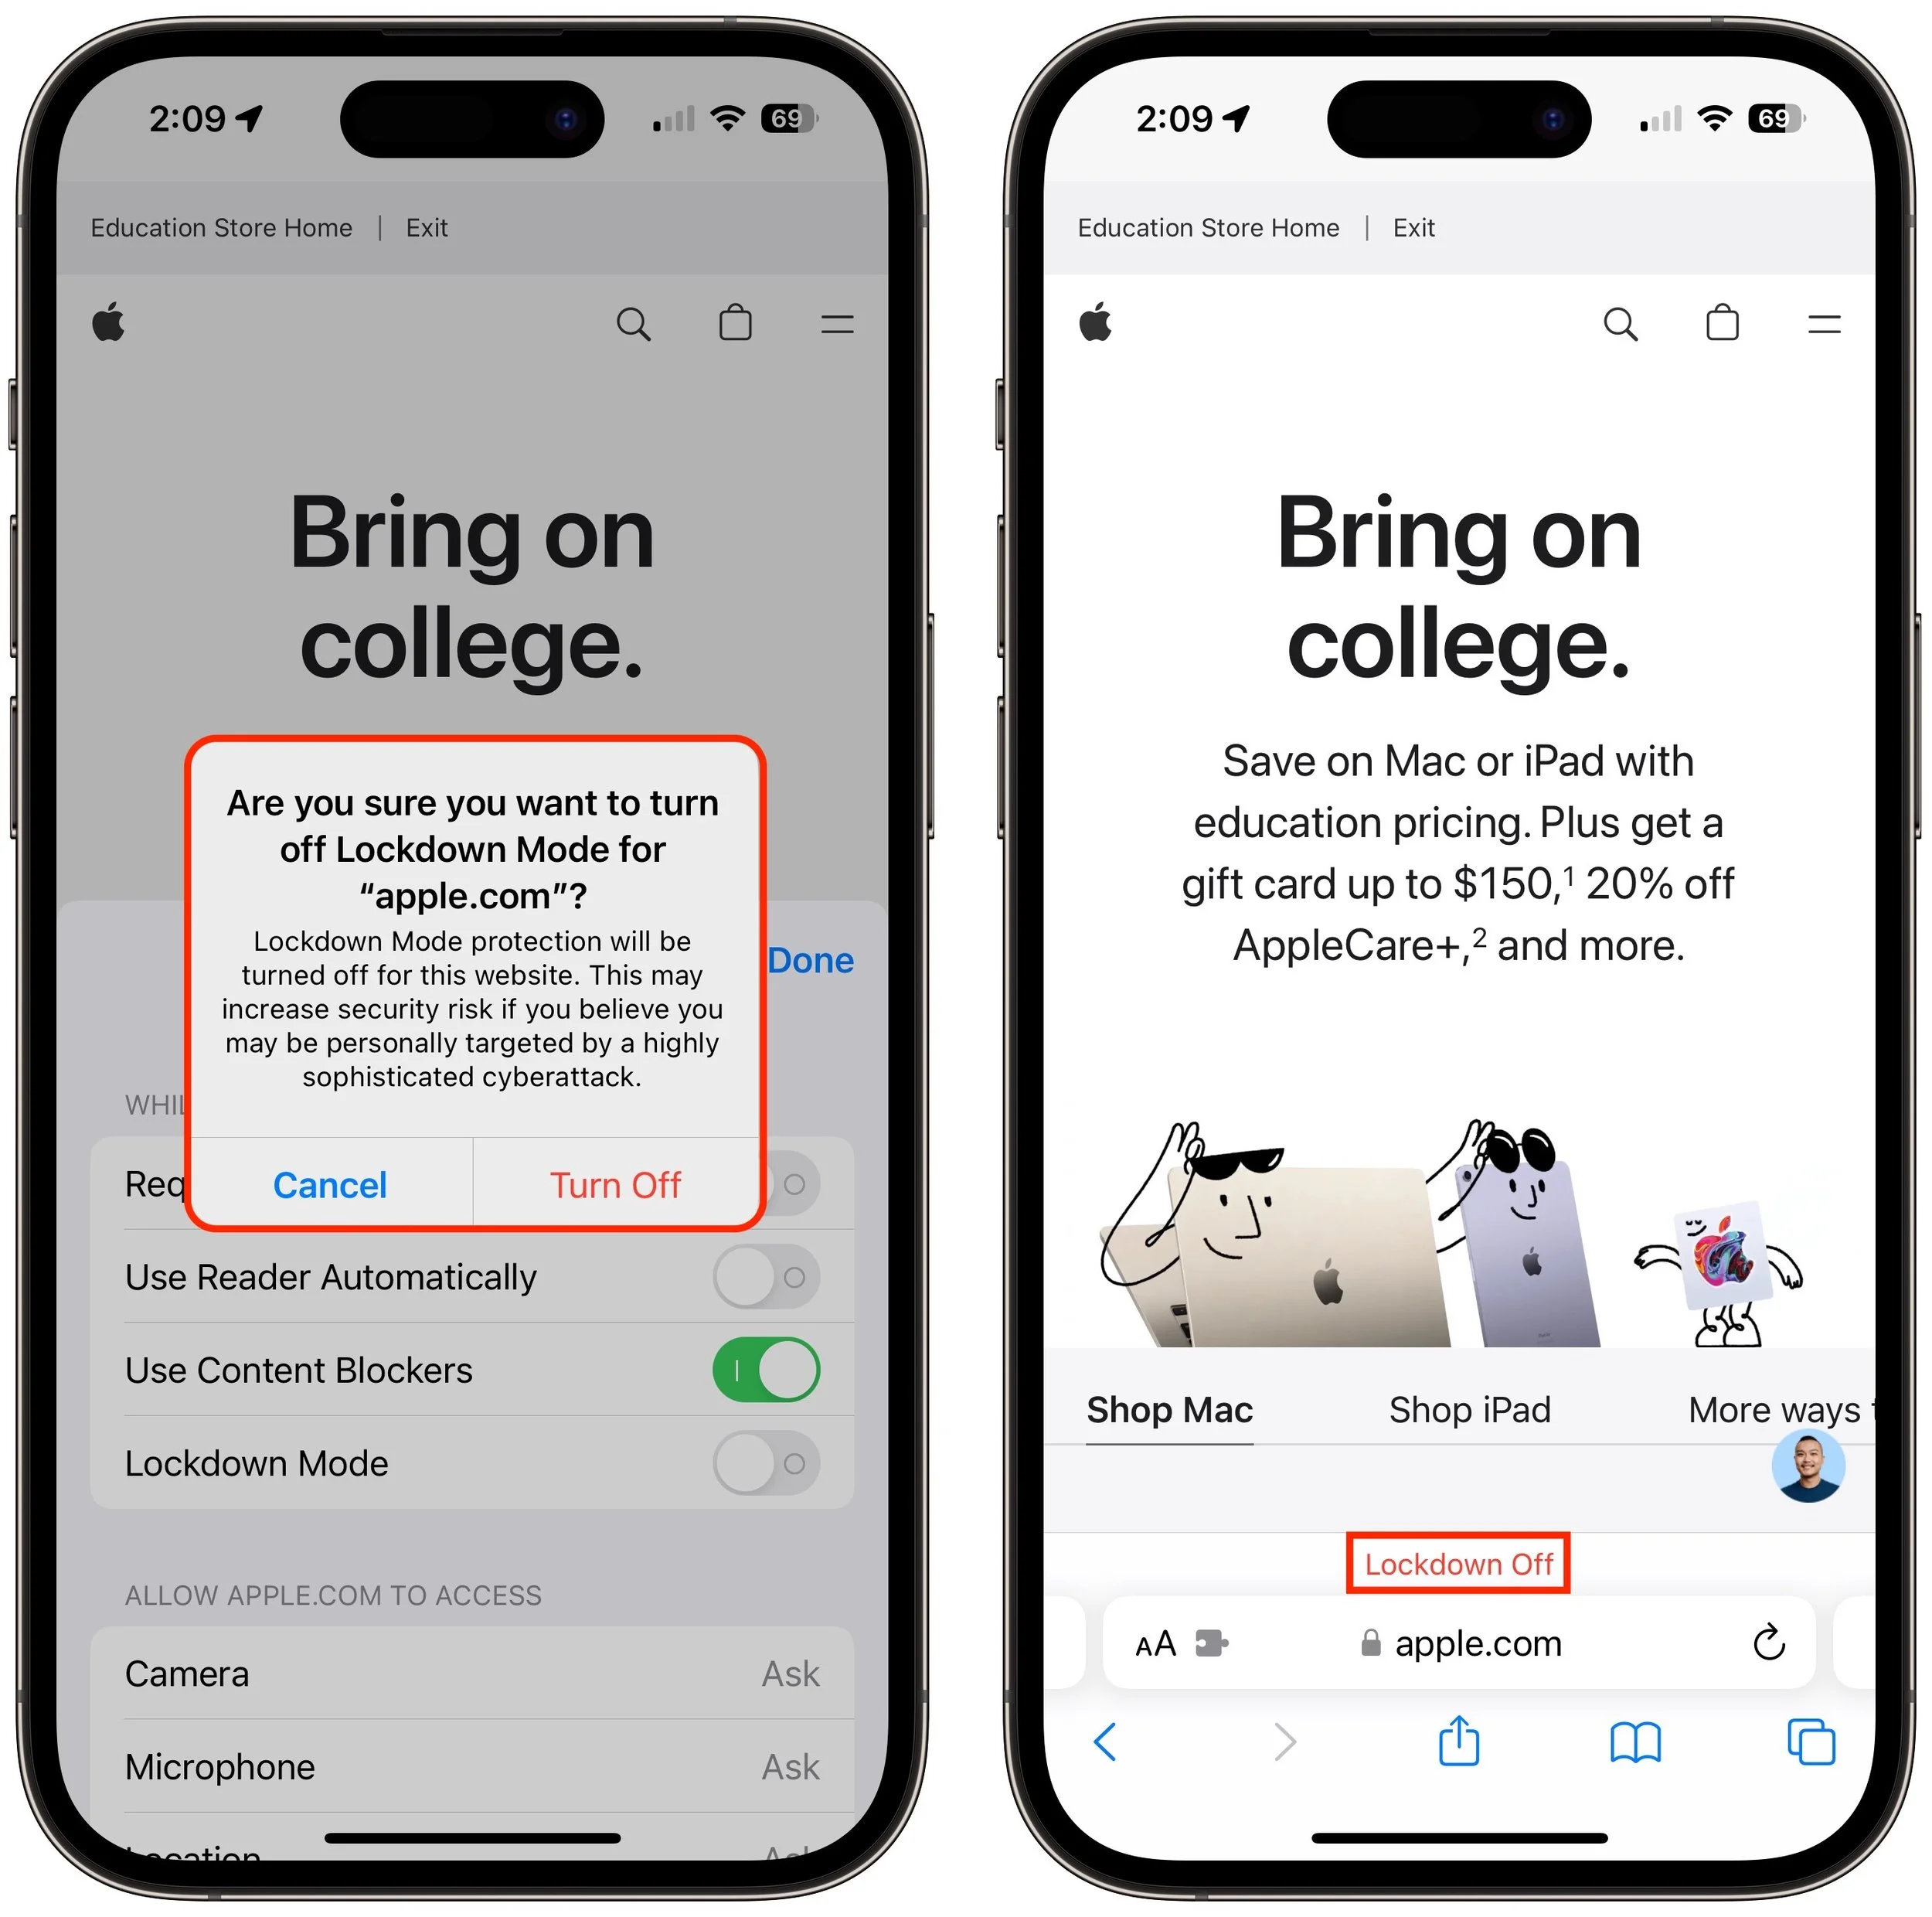
To exclude websites from Lockdown Mode, use Safari. Tap the AA button in the address bar, disable the Lockdown Mode switch, and tap Turn Off. The Lockdown banner changes to Lockdown Off to make sure you know that website is no longer being limited for your protection.
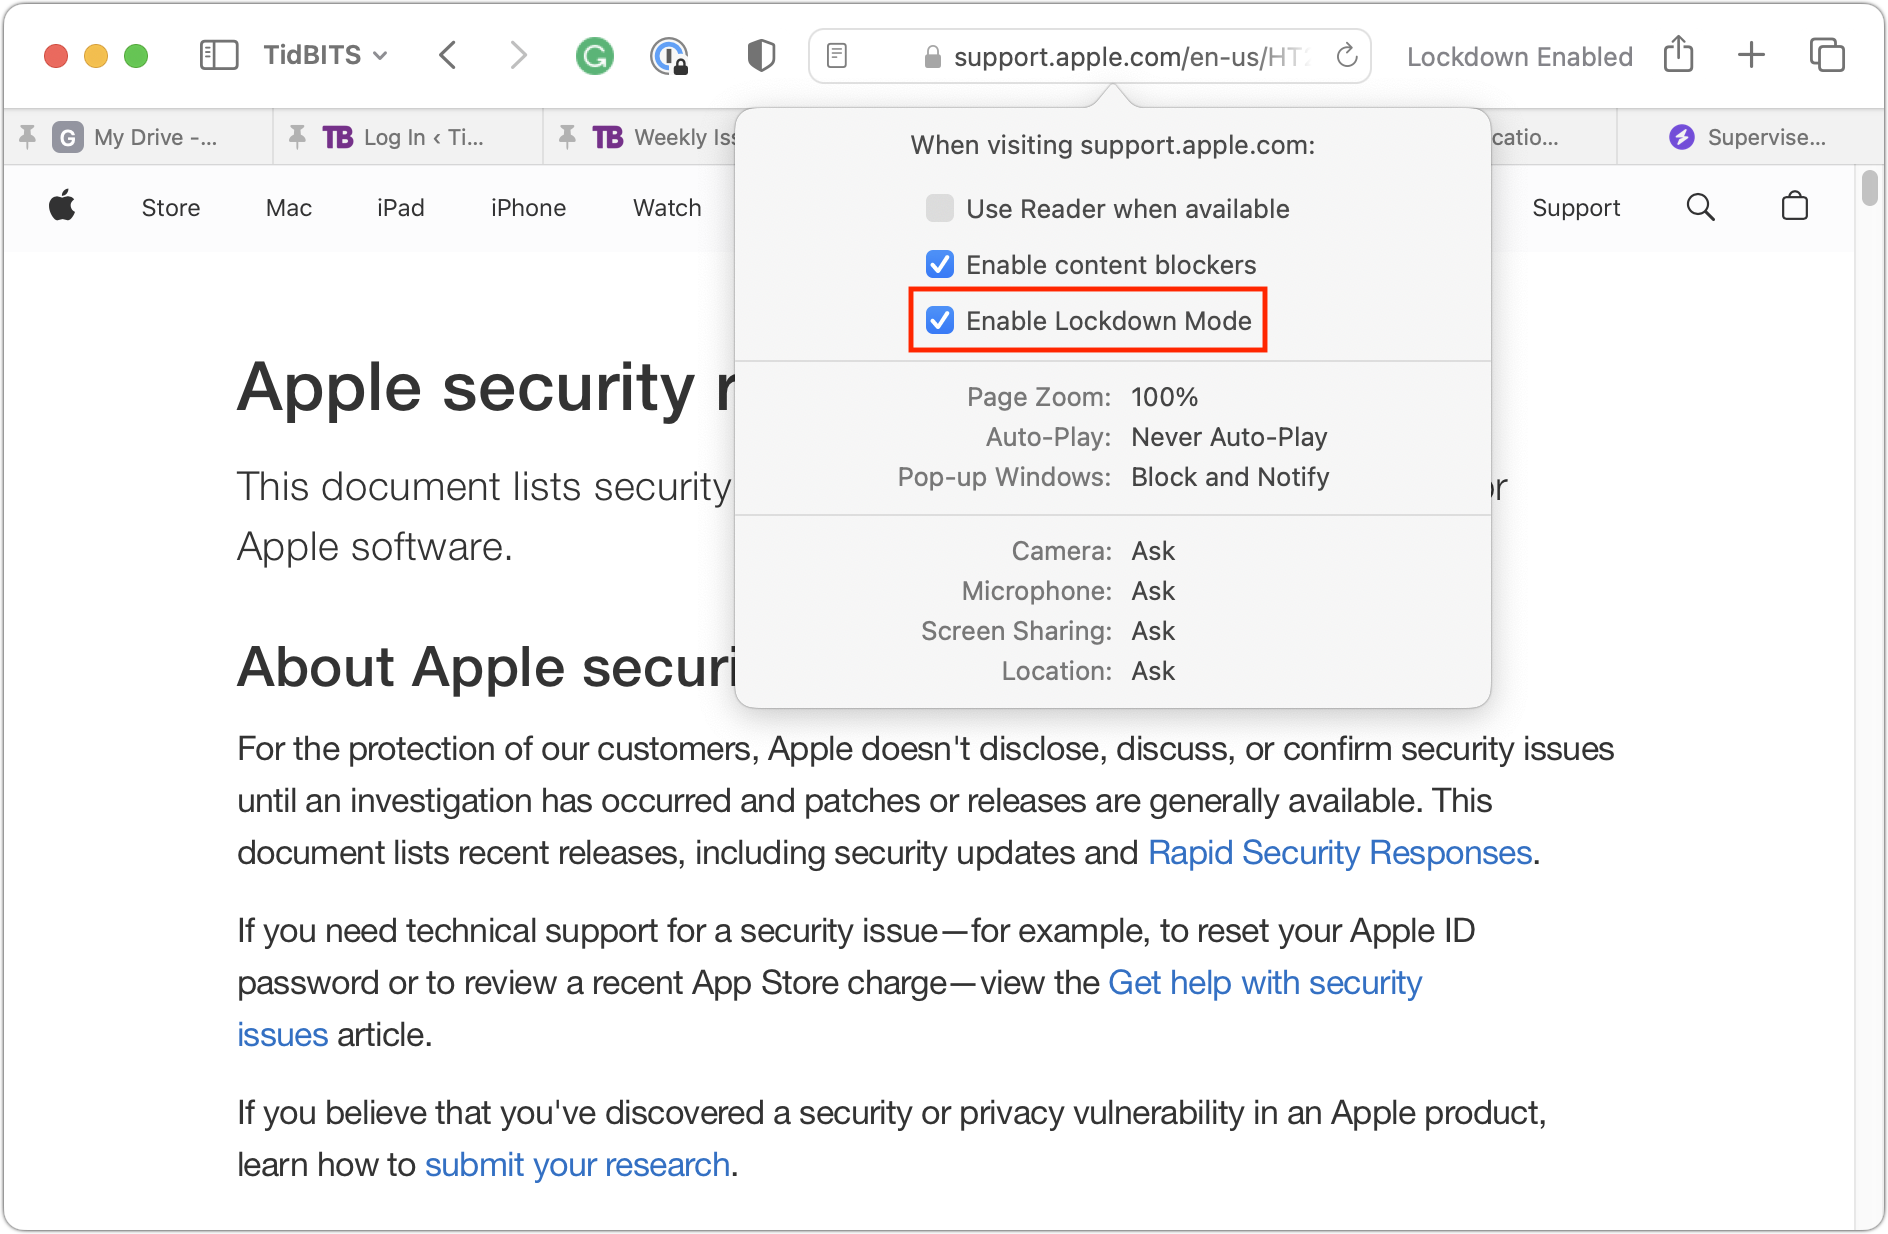
On the Mac, you can exclude websites in Safari, but not apps. While on the site you want to exclude, choose Safari > Settings for website.name. In the popover that appears, deselect Enable Lockdown Mode and then click Turn Off when prompted.
To reiterate, almost no one needs to enable Lockdown Mode. But if you qualify as a high-value target, it’s well worth using Lockdown Mode to reduce the chances that powerful forces will be able to compromise your iPhone, iPad, or Mac.
(Featured image based on originals by iStock.com/Tero Vesalainen and matias giamportone)
Use the Hidden Album in Photos to Hide Private Images
Although it’s safest to keep all NSFW images off your iPhone entirely, if you have photos that could be embarrassing or legally troublesome if the wrong person were to stumble across them, protect them using the Hidden album in Photos.

We’ve recently heard from people who have been embarrassed when they gave their iPhone to someone to swipe through some innocuous photos of a vacation, only to have the person swipe too far and end up at some NSFW (not safe for work) images. Ouch.
Embarrassment might be low on the list of problems such photos could cause. It’s not hard to imagine a male supervisor innocently sharing photos with a female employee but ending up embroiled in a sexual harassment situation if she were to stumble across the kinds of NSFW photos that regularly land politicians in hot water.
It’s safest to avoid taking NSFW photos to start, especially if the iPhone is a work-managed device. If that’s unrealistic, we recommend deleting any NSFW images from the iPhone as soon as feasible. A third option may be the best solution in the modern world—the Hidden album Apple provides in the Photos app on the iPhone, iPad, and Mac. On the iPhone and iPad, you’ll find it with other albums in the Utilities collection. On the Mac, it appears in the sidebar under Photos. (If you don’t see it, you may have hidden it—we explain how to unhide it below.)

There are four essential things to know about the Hidden album:
You don’t add photos to the Hidden album by dragging or using an Add to Album option. Instead, you choose Hide from a contextual menu. On the iPhone and iPad, touch and hold a photo (or a set of selected photos) and tap Hide in the menu that appears. Or tap the ••• button and choose Hide. On the Mac, select one or more photos, Control-click them, and choose Hide X Photos. To remove a photo from the Hidden album, use the same approach with the Unhide command.

Unlike regular albums, whose photos also appear in All Photos, photos in the Hidden album won’t appear anywhere else, including in searches. That’s the point of the feature.
You can hide or show the Hidden album on each of your devices independently. On the iPhone and iPad, control whether it shows up in the Utilities album collection with Settings > Photos > Show Hidden Album. In the Photos app on the Mac, control whether it appears in the sidebar using View > Show/Hide Hidden Photo Album. Obviously, if you’ve hidden the Hidden album, you must show it to look inside.
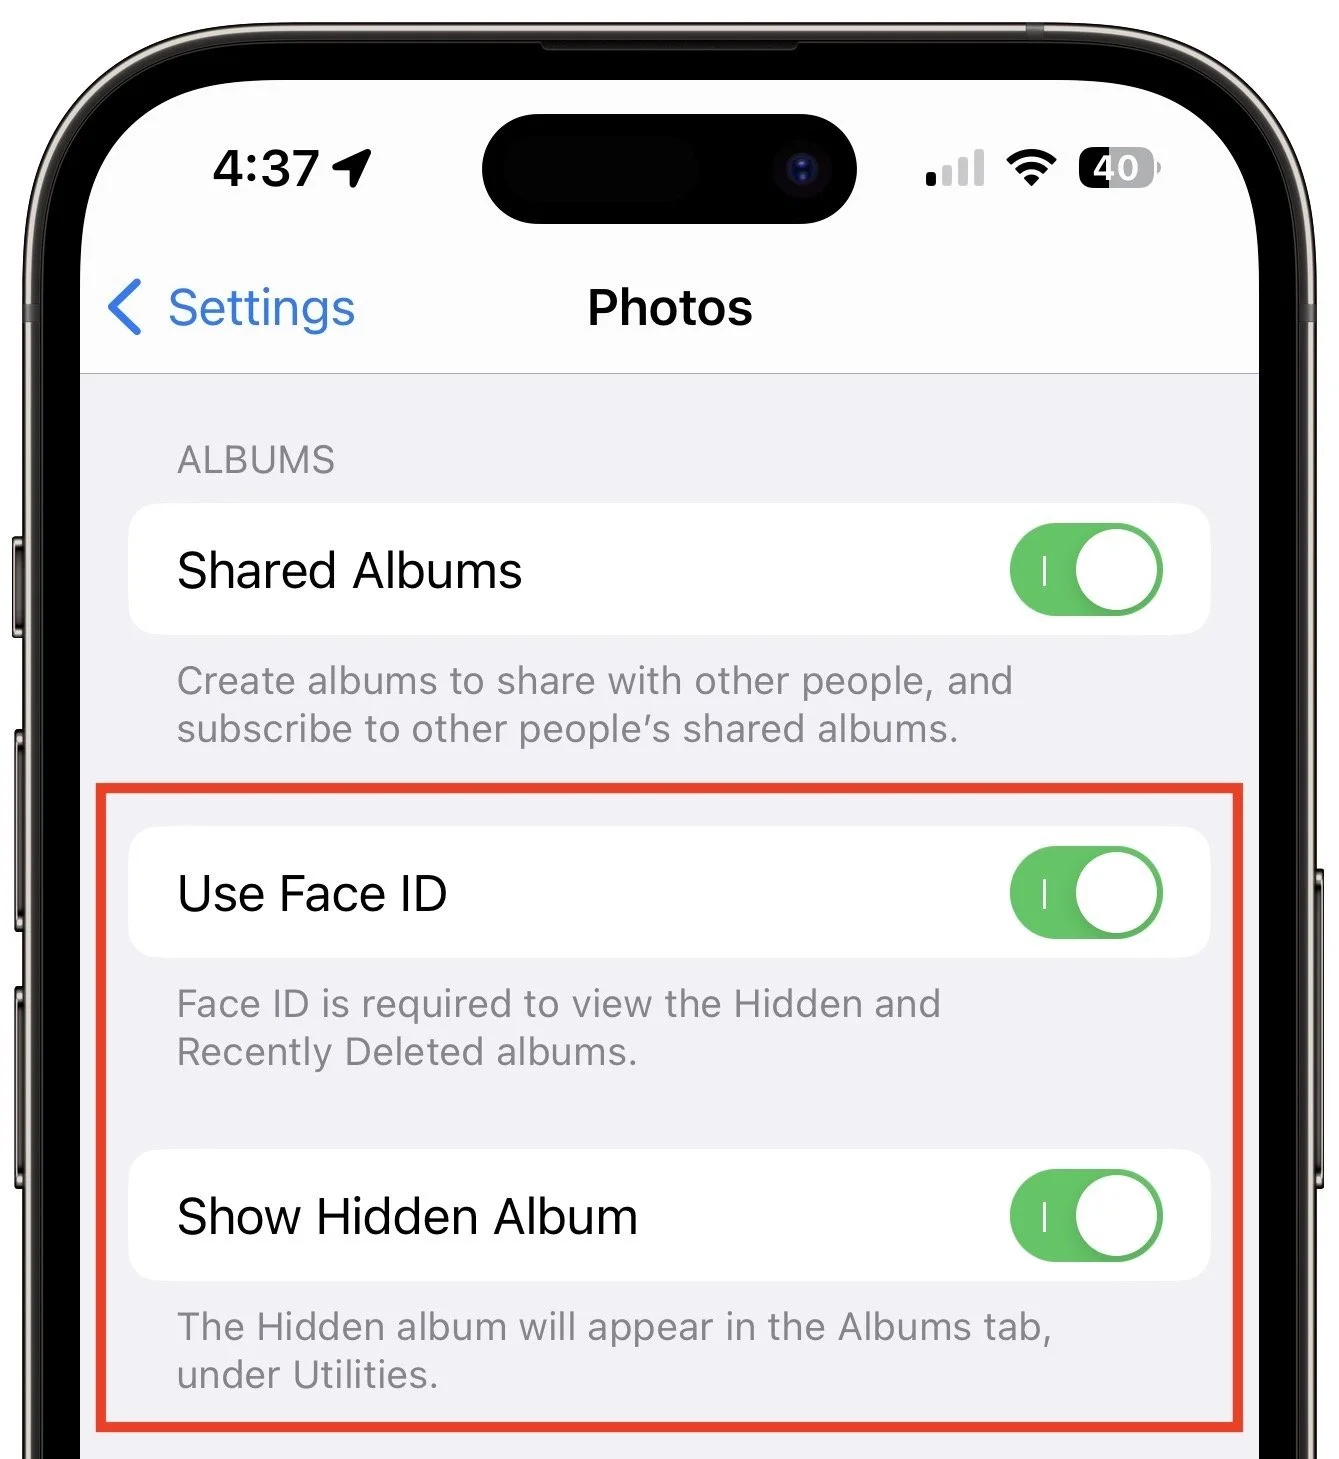
If you use the Hidden album, we strongly recommend protecting it (and the Recently Deleted album) with Face ID or Touch ID so only those with biometric access to your device can view it. On the iPhone and iPad, enable Settings > Photos > Use Face/Touch ID (see above). On the Mac, go to Photos > Settings > General and select “Use Touch ID or password.” Again, these settings are per-device, so what you set on the iPhone won’t automatically carry over to other devices. But really, turn it on everywhere.

Overall, the Hidden album is a welcome feature, and if you have any photos that could embarrass you if someone were to stumble across them, put them in the Hidden album and turn on the biometric protection.
(Featured image based on an original by iStock.com/AlexZabusik)
Web Workers of the World, Give Arc a Try
An elegant new browser called Arc makes using the Web more fun, especially for people who use a lot of websites and Web apps. Arc offers many productivity features and a rethink of how users can best organize their many bookmarks and tabs.
Although Web browsers have added productivity features over the years, most have not been overhauled to support modern usage patterns. We have bulging bookmarks bars, tabs by the trillions, and inefficient habits like using searches to load even regularly used websites. Arc, an innovative new Web browser for the Mac from The Browser Company, addresses these issues and could radically improve your productivity. It is a free download.
Based on Chromium, the open-source foundation under Google Chrome, Arc is in some ways a more capable, more attractive version of Chrome. It supports Chrome extensions, and Web apps designed to perform best in Chrome run equally well in Arc.
Spaces Give You Room to Work
What sets Arc apart from Chrome—and all other browsers—is how it enables users to organize their work into Spaces. Spaces are color-coded sidebars for different types of activities, so you can set them up based on what distinctions make sense to you. You might have Spaces for home and work, and perhaps another for a club or hobby. You could put all your news reading and social media into a Space or make a Space for financial or healthcare websites. If you’re a freelancer or consultant, you could create a Space for each client, and each Space can have its own Profile that maintains separate logins, history, saved passwords, extensions, and more.
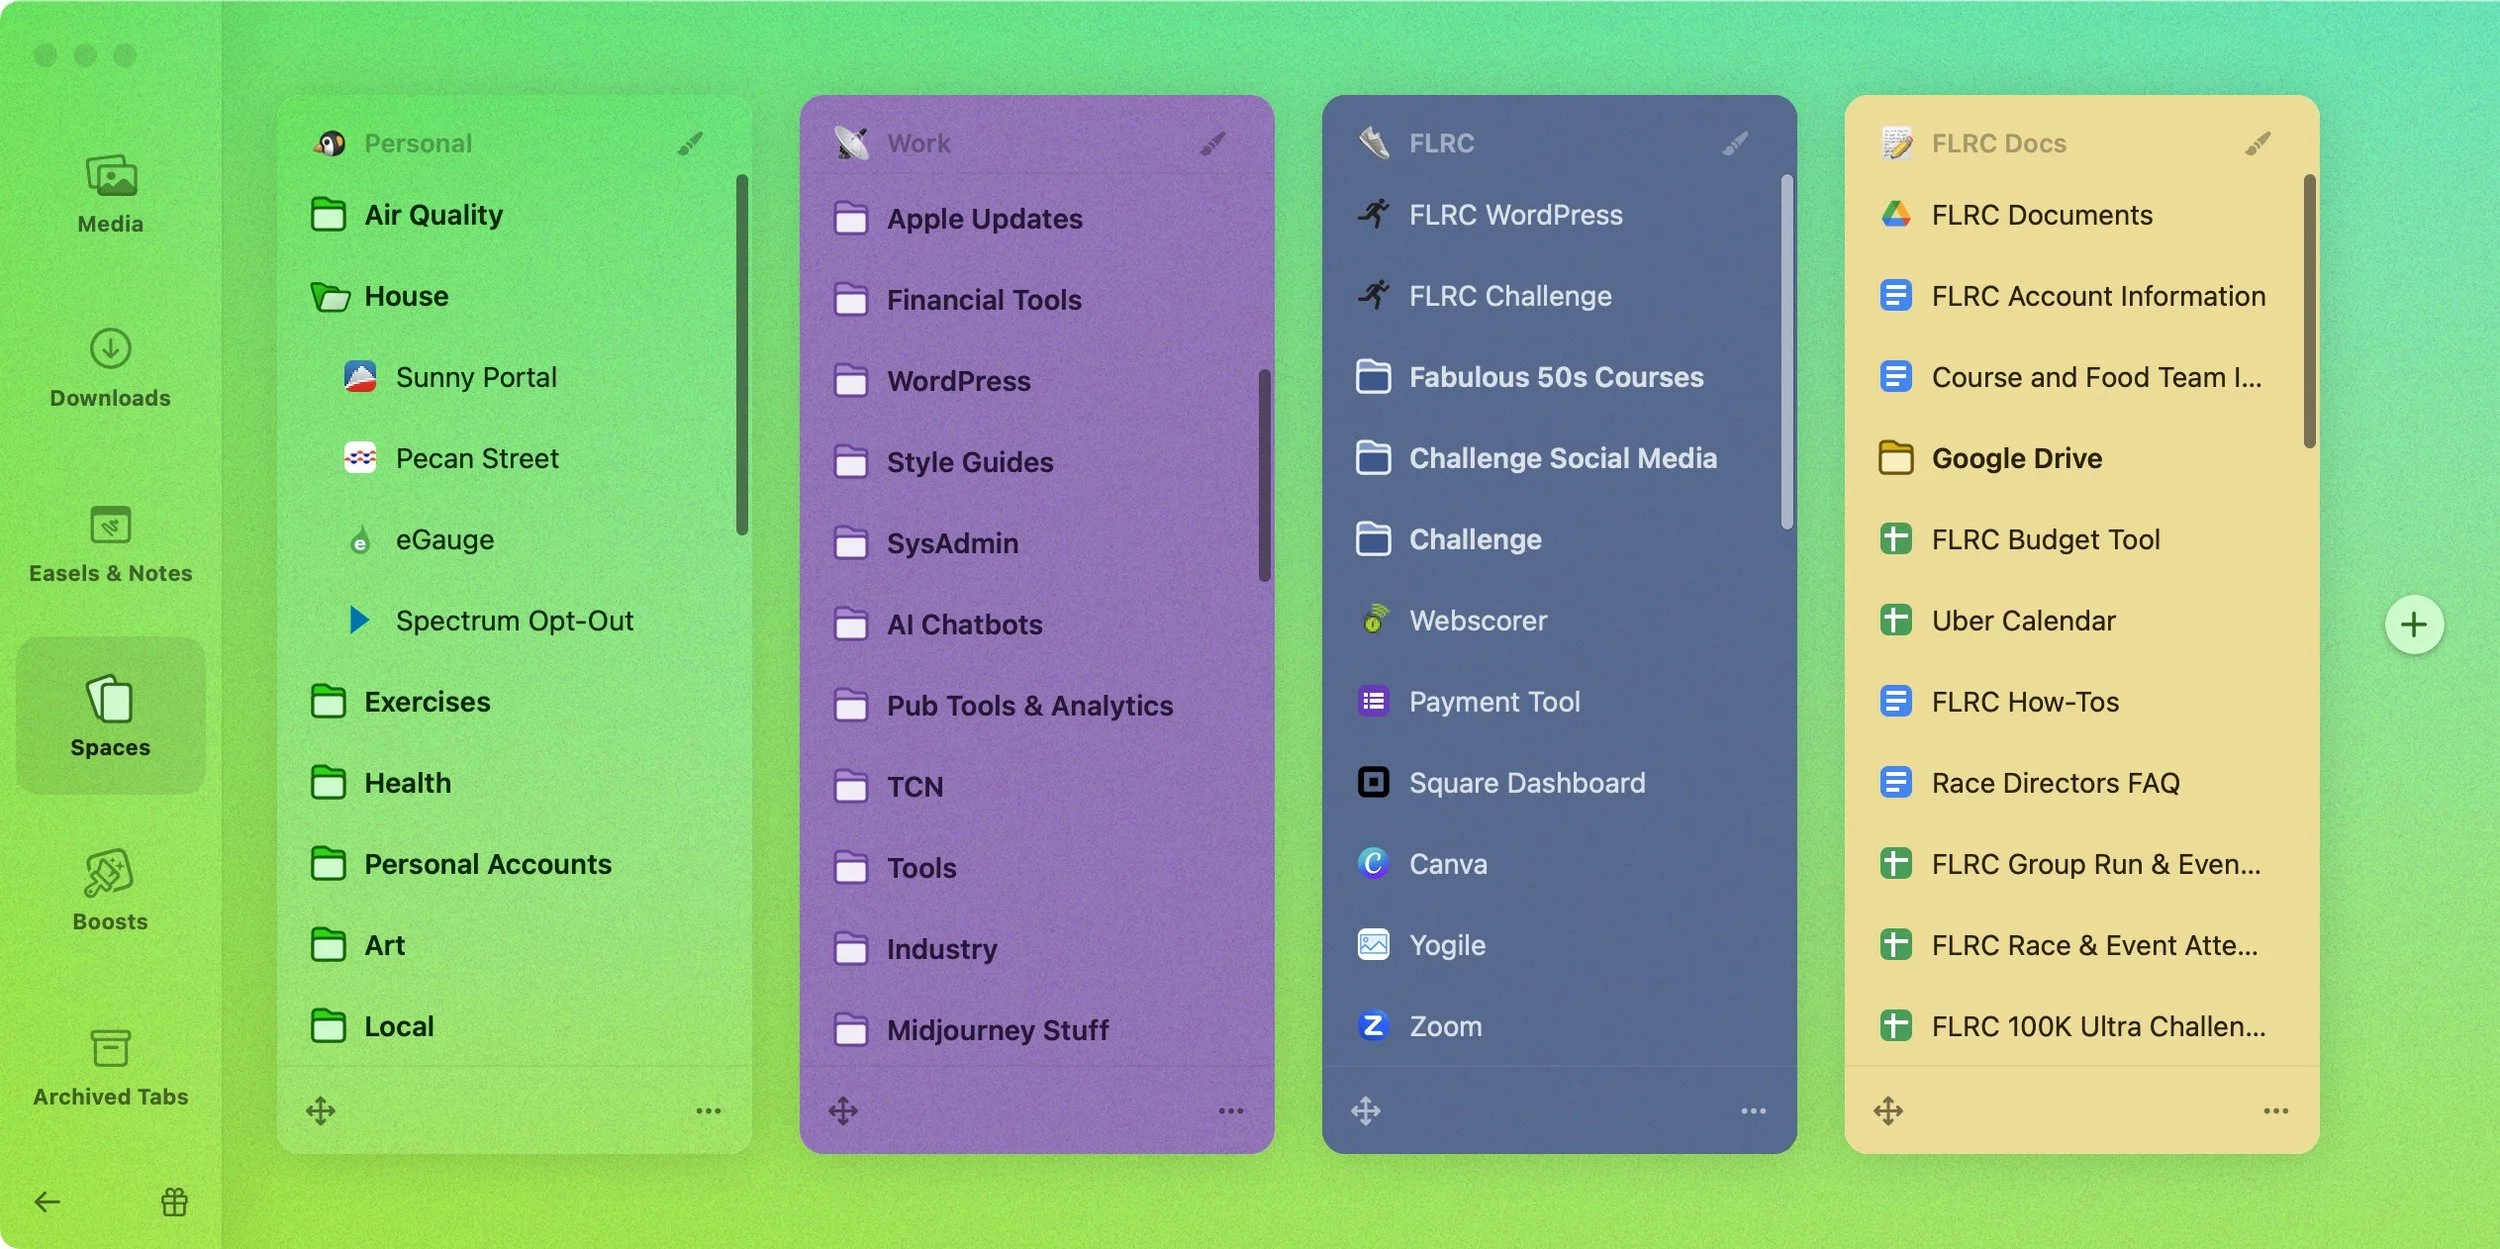
Space Sidebars Hold Pinned Tabs and Regular Tabs
Spaces are only the start of the clever ways Arc helps you focus on your work and load Web pages more efficiently. Each Space sidebar hosts its own persistent pinned tabs for Web apps, sites, and pages. Once you are logged in to a website and have a page open that you return to often, you can make that into a pinned tab—after which you can return to it with one click. Optional folders can hold related pinned tabs for additional organization.
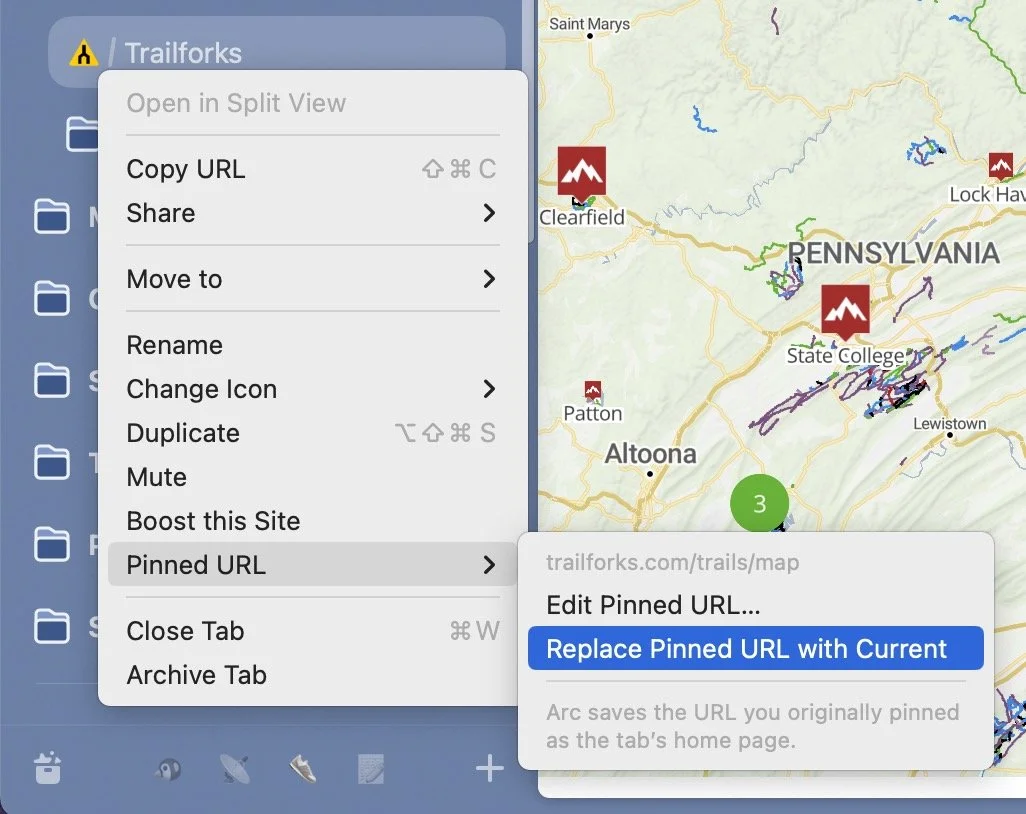
You can change the name and icon of pinned tabs so they’re easier to differentiate. A click on a pinned tab’s icon takes you back to the original pinned URL if necessary, and Control-clicking a pinned tab lets you update a pinned tab’s incorrect URL rather than recreating it. For example, if a pinned tab takes you to a website’s public home page, you should update it with the personalized dashboard page you see after logging in.
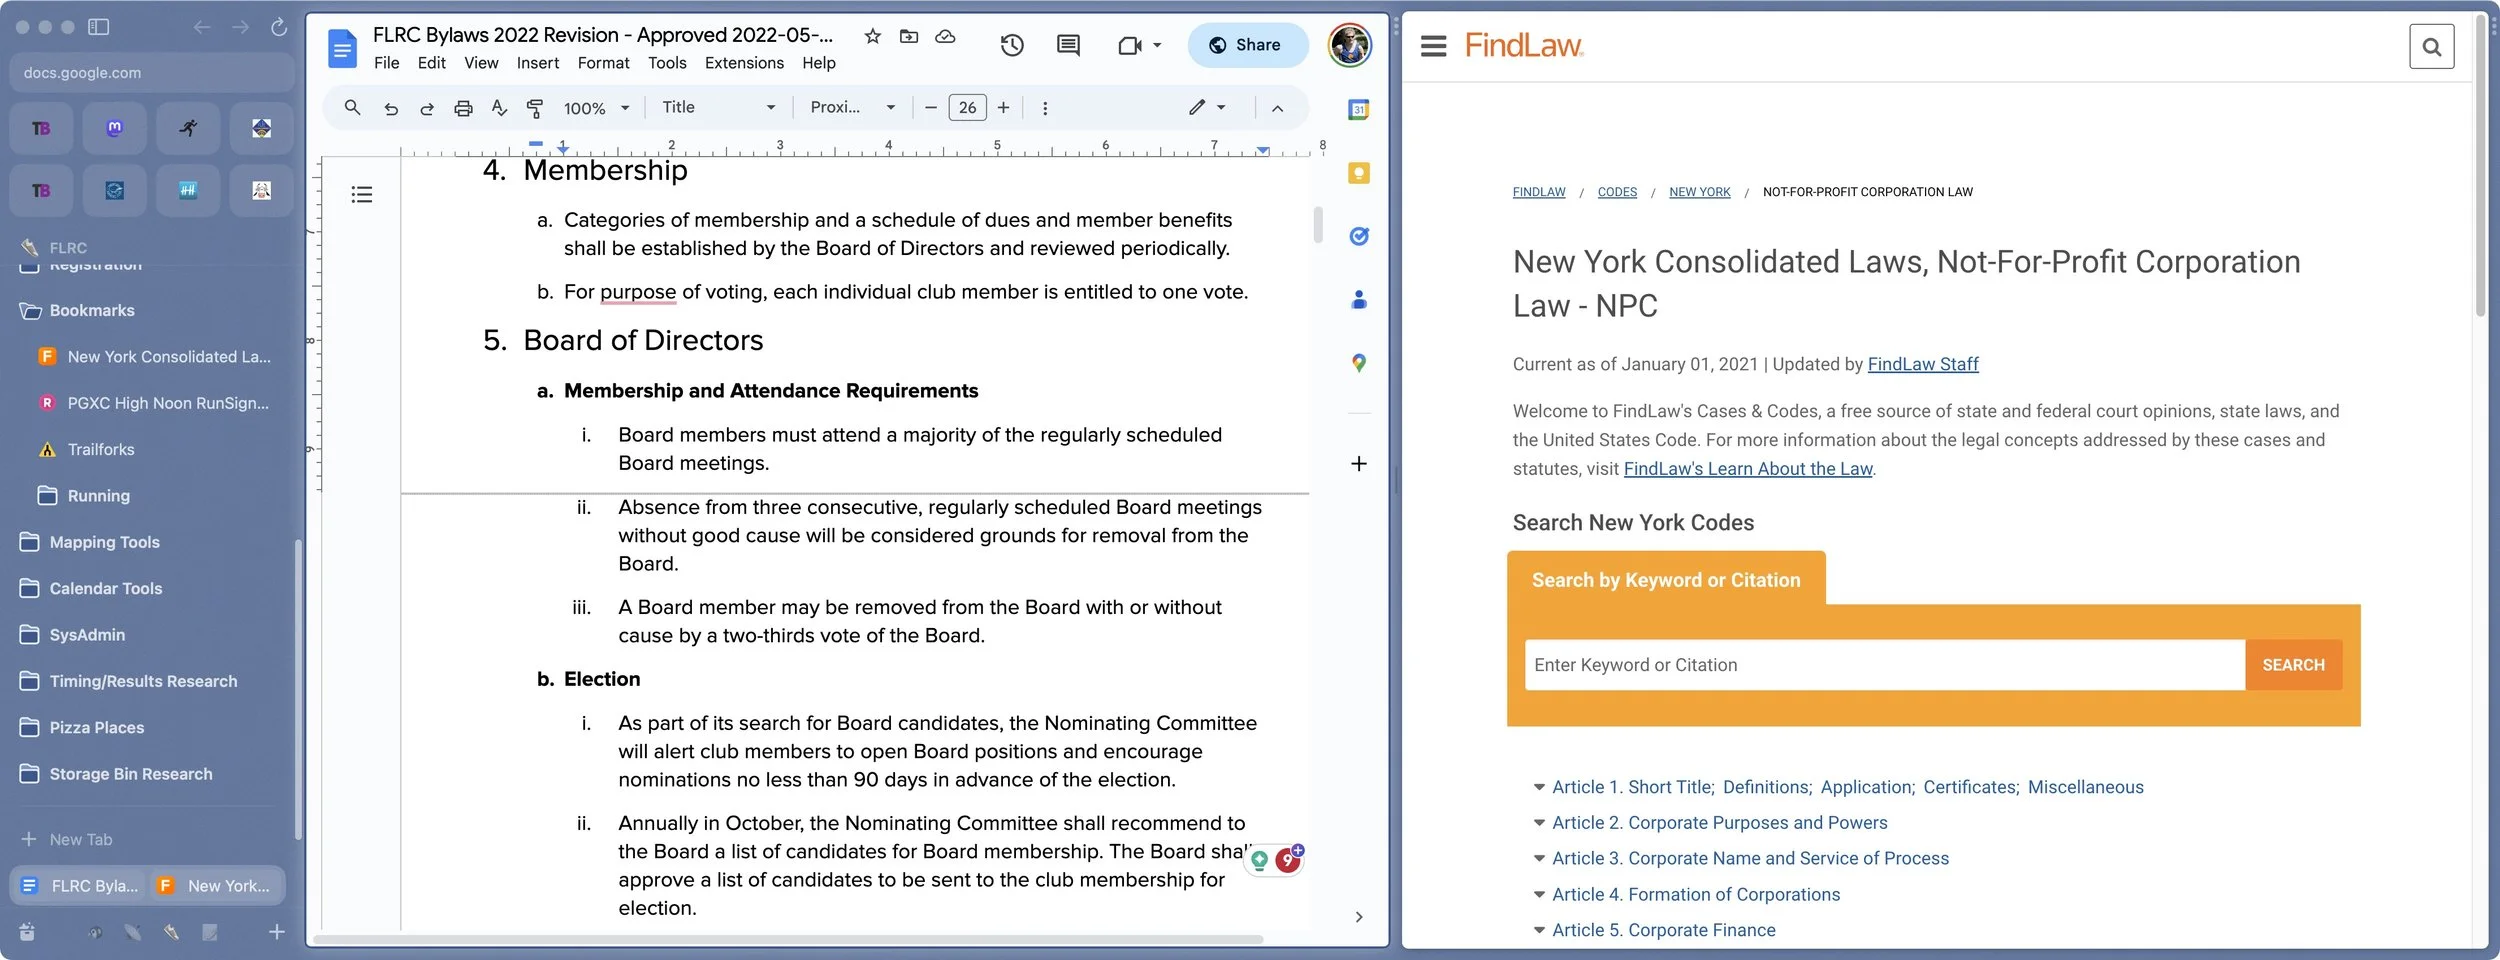
Think of pinned tabs as better bookmarks—they’re always visible in the sidebar rather than hidden in a menu, and you can switch among pinned tabs fluidly without losing your place, whereas using bookmarks constantly creates new tabs interspersed with all the old ones. If switching back and forth between two tabs is clumsy, for example, while you’re writing in one tab and researching in another, you can open them in Arc’s Split View. Option-click any tab to add it to a Split View; press Command-W to close the active tab.
Of course, many tabs don’t need to be persistent, and below your pinned tabs, you’ll see standard tabs that work like regular tabs in other browsers. Arc’s innovation here is that it automatically archives these tabs after a user-specified time to prevent tab overload.
For those who work on multiple Macs, Arc syncs your setup instantly between devices, ensuring that you can stop working on your iMac and pick up later on your MacBook Air without reloading tabs and finding sites. You need to set up an account for syncing and reporting bugs, but Arc has a solid privacy policy.
When a Tab Is Too Much: Peeks and Little Arc
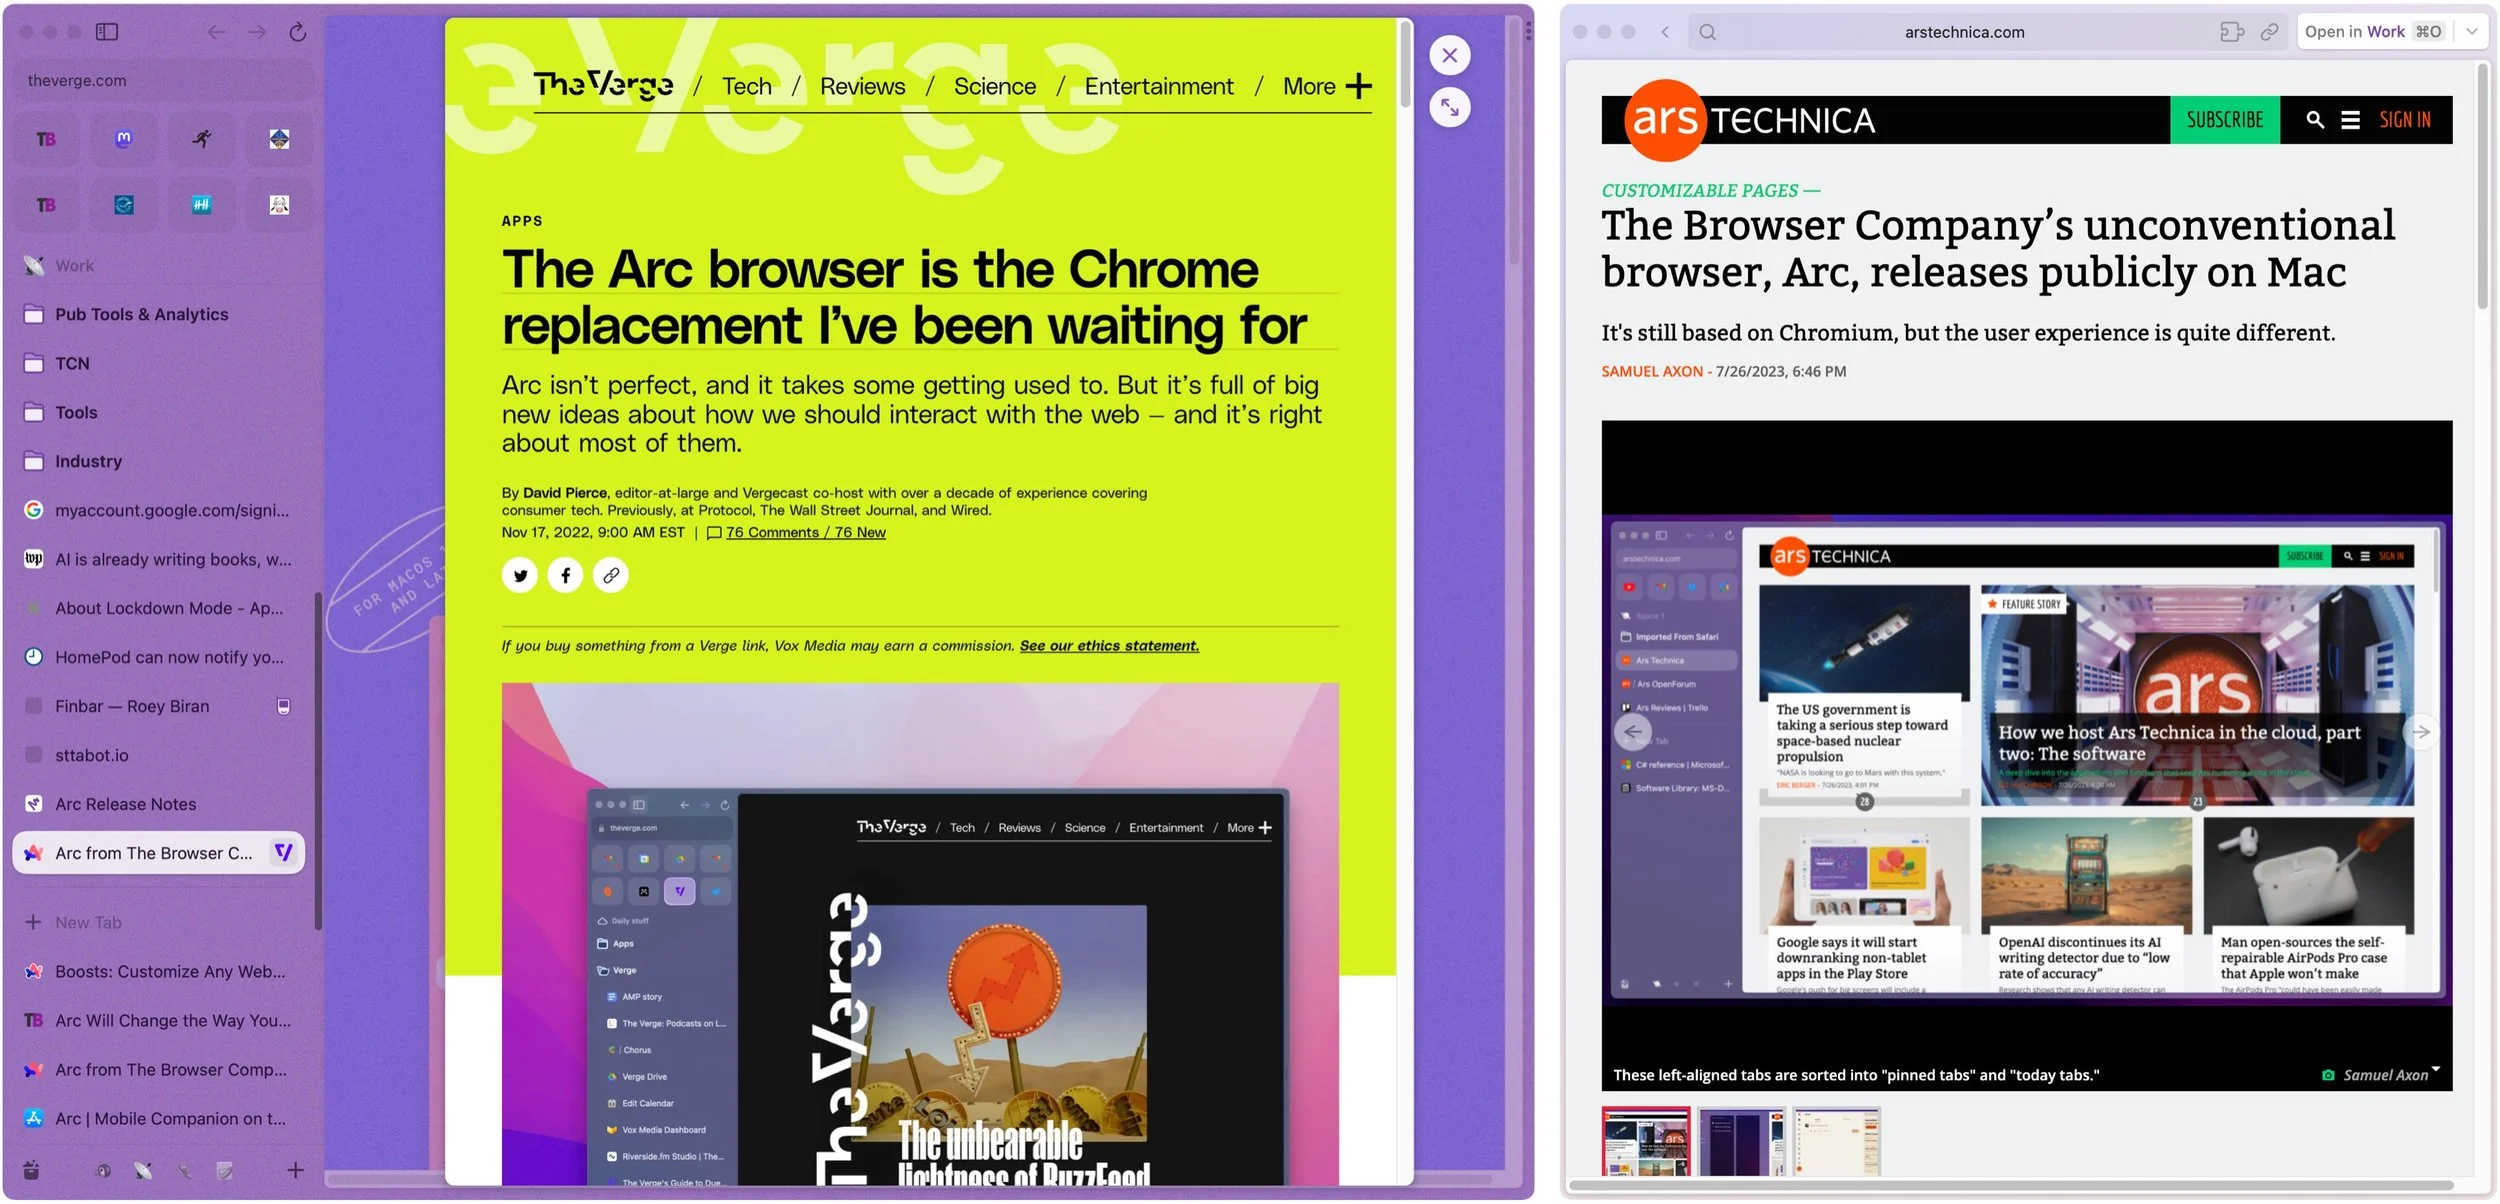
Arc understands that you often need to read a Web page only briefly. By default, when you are working in a pinned tab, if you click a link to another site, Arc opens it in a Peek—a sort of overlaid window (below left)—that you can close after reading or retain as a standard tab.
Another default setting opens links clicked in other Mac apps in Little Arc, a sidebar-free browser window that provides a focused look at a page without distracting you with everything else that’s open in Arc (below right). Again, when you’re done, you close the Little Arc window or open it in a Space.
Arc Allows Many Usage Styles
Like any good Mac app, it’s easy to use the mouse to get around, but Arc is wired with many easily discovered keyboard shortcuts that help increase productivity—it’s one of those apps that offers a lot to users who take the time to master a few nuances.
For example, to open a new tab in Arc, you can just click the New Tab item in the current Space’s sidebar to open the Command Bar and then type your URL or web search. Press Command-T also opens the Command Bar. Once you get used to using the Command Bar to search the Web, note that you can also type words in the name of an Arc command (try “downloads” to access the View Downloads command) to issue it quickly—this is often faster than looking for the command in Arc’s menus.
Another particularly useful keyboard shortcut is Control-Tab. Press it to switch back and forth between your two most recent tabs, or pause briefly to display a graphical switcher with the five most recent tabs—it works just like the Mac’s Command-Tab app switcher.

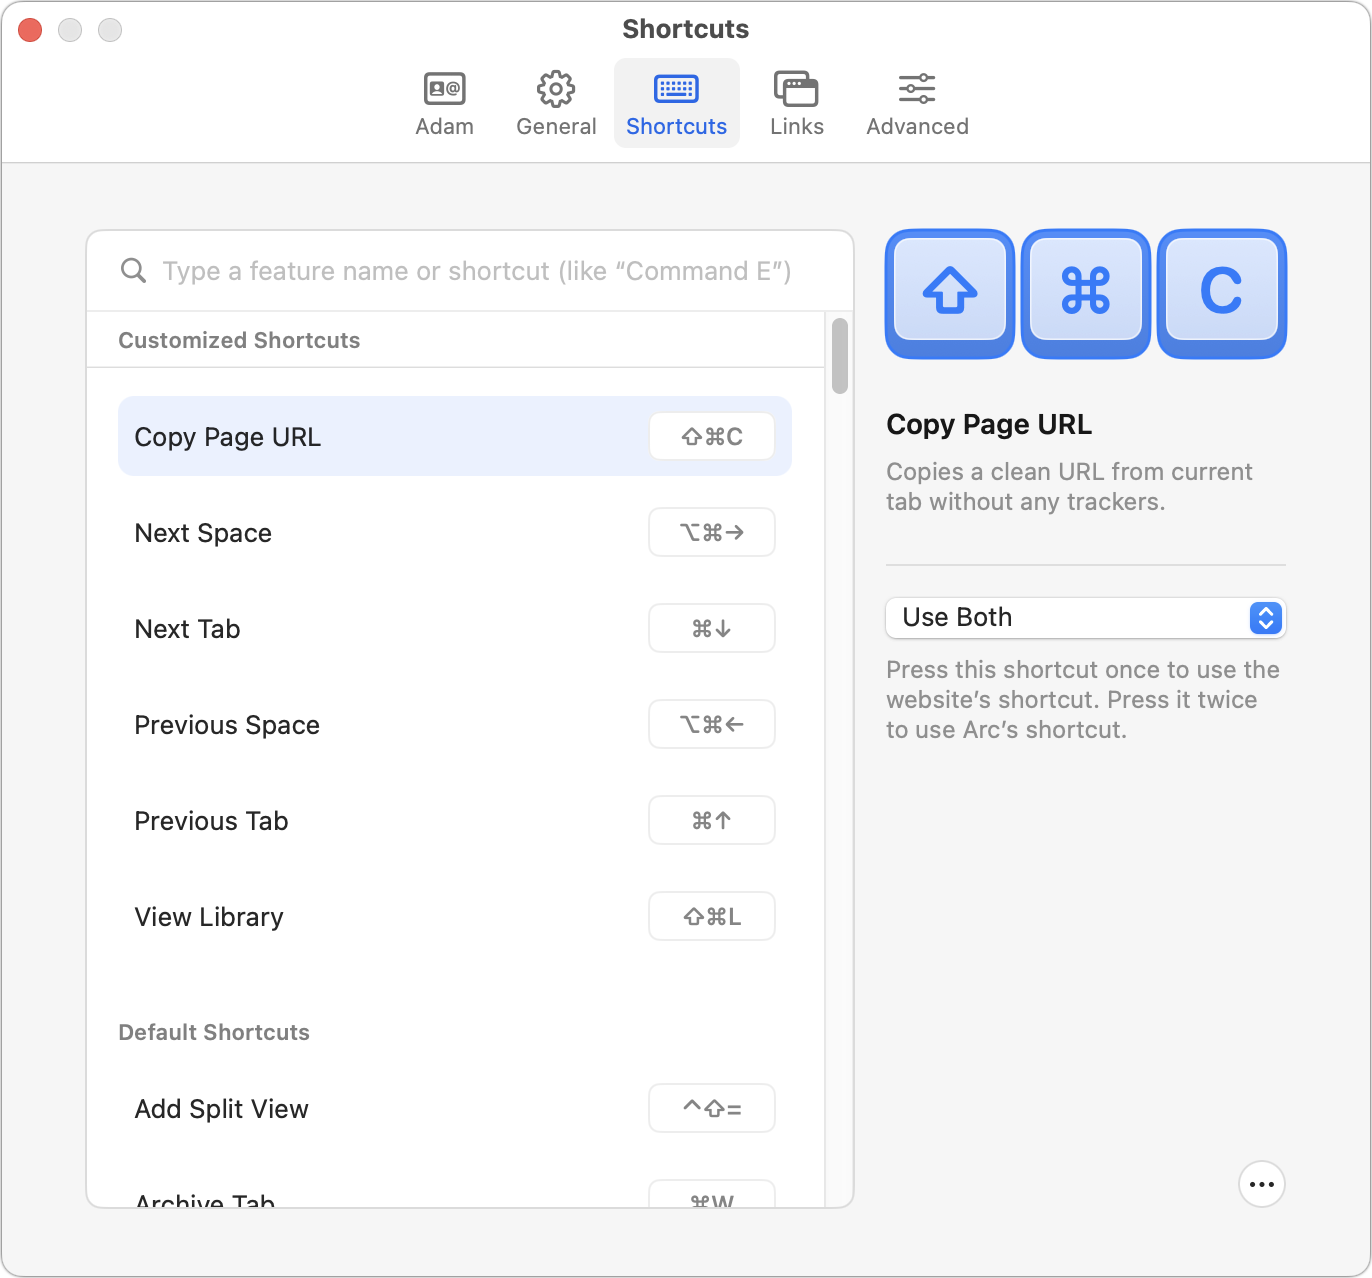
Arc offers many other clever shortcuts: One of our favorites is pressing Command-Option-N to open the Command Bar from within any app, generating a Little Arc window with the results. You can also press Command-Shift-C to copy the current page’s URL. This is great when your boss asks you to “toss me that URL in the chat” while in a video call. Bloggers will love pressing Command-Shift-Option-C to copy the current URL in Markdown format. And then there’s Command-Option-V, which creates a new tab from the contents of the clipboard, either by loading a URL or performing a search.
If Arc’s default keystrokes don’t work for you, you can customize them to be more memorable, with settings that control whether Arc or a website gets preference for conflicting shortcuts.
Arc Goes Beyond Basic Web Browsing
Arc has a few genuinely unusual features that we are enjoying experimenting with.
Boosts: A graphical editor lets you change how any website looks whenever you load it, enabling you to tweak website colors, fonts, font sizes, and more. You can even delete particular interface elements. Along with fun uses and fixing sites with significant design lapses, Boosts are an accessibility win, letting users with vision issues adjust websites for easier reading. A Boost Gallery lets you see what others have done.

Easels: A Capture command lets you take a snapshot of a portion of a Web page and add it to an Easel, a collaborative digital whiteboard you can share with other users. Captures can be static images that link back to their original pages—helpful for creating a mood board or for comparisons in online shopping—or HTML snippets that act like live windows into their original sites.

Getting Started with Arc
The main hurdle in adopting Arc is figuring out how best to use it. Be sure to import from your current browser when you first launch it, and then set up a few Spaces and organize your old bookmarks into pinned tabs. (Just drag a tab above the divider in the sidebar to pin it.) In a day or two, you should see how having your regularly used sites lined up in the sidebar for quick access saves time and makes you more productive.
Currently, Arc runs only on the Mac (macOS 12 Monterey and later), although The Browser Company makes an Arc Mobile Companion app for the iPhone and iPad. It’s not yet a full-fledged browser, but it syncs your Spaces and pinned tabs, making it easy to access your most-used sites on the go. A Windows version of Arc is in beta.
(Featured image based on an original by iStock.com/Bussarin Rinchumrus)
Tips for Getting Back to Work Faster After Restarting Your Mac
Do you avoid restarting your Mac because of how long it takes to set up your apps, documents, windows, and browser tabs again? These macOS and browser settings will restore your working environment after a restart.

All too often, Mac users put off installing updates because of the bother of having to set everything up again afterward. We get it—you’re busy, and it can take time to relaunch apps, reopen documents, and repopulate Web browser tabs.
There’s no avoiding some downtime when installing a full macOS update, which is why we recommend starting such updates at the end of the day or before you leave for lunch. That’s why Apple introduced Rapid Security Responses, which generally install in just 3–4 minutes, including a restart if necessary.
But with a bit of setup, you can pick up where you left off before a restart within a minute or two. There are three settings that can reopen apps, documents, and folders, and all Web browsers have options that reload all previously open tabs.
Apps, Documents, and Folders
If you always want certain apps running or documents open, you can ensure they open at login. In macOS 13 Ventura, open System Settings > General > Login Items (shown below); in macOS 12 Monterey and earlier, look in System Preferences > Users & Groups > User > Login Items.

You can add apps, documents, and even folders to the Open at Login list. To remove an unwanted item, select it and click the – button. If there’s anything you don’t recognize, Control-click it and choose Show in Finder to see where it’s located.
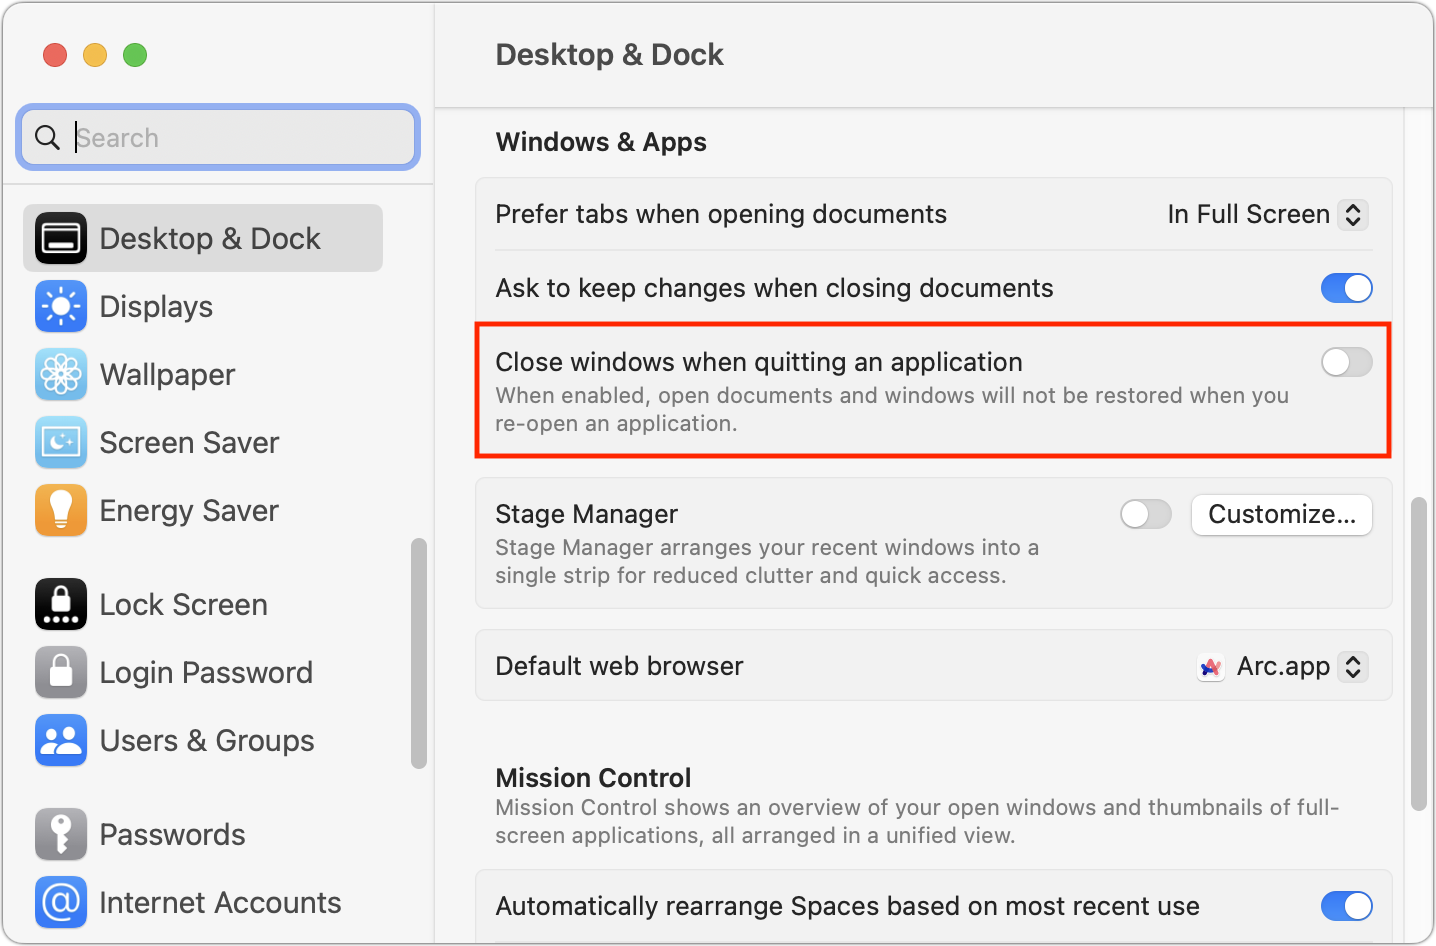
What if you have other apps or documents open that you want to return to immediately after relaunching an app? macOS offers another setting for that. In Ventura, look in System Settings > Desktop & Dock and scroll down to Windows & Apps. Deselect “Close windows when quitting an application” because reopening an app won’t restore its open documents and windows when that's on. In Monterey and earlier, find this setting in System Preferences > General.
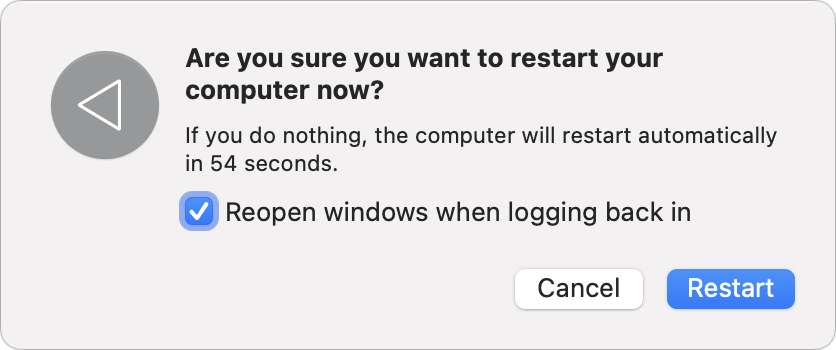
Choose Restart, Shut Down, or Log Out from the Apple menu to reveal the last and most important setting to ensure that your Mac environment is the same after a restart as it was before. In this dialog, select “Reopen windows when logging back in” and click Restart. macOS remembers this setting, so you shouldn’t have to select it each time.
As a bonus, if your Mac crashes or shuts down unexpectedly, it should come back as it was before the crash.
Web Browsers
The macOS settings above should work for most apps, but Web browsers are a special case. Open tabs aren’t quite the same as documents, and you might or might not want all those tabs to come back after relaunching your browser. Control the session settings in these popular Web browsers with the instructions below:
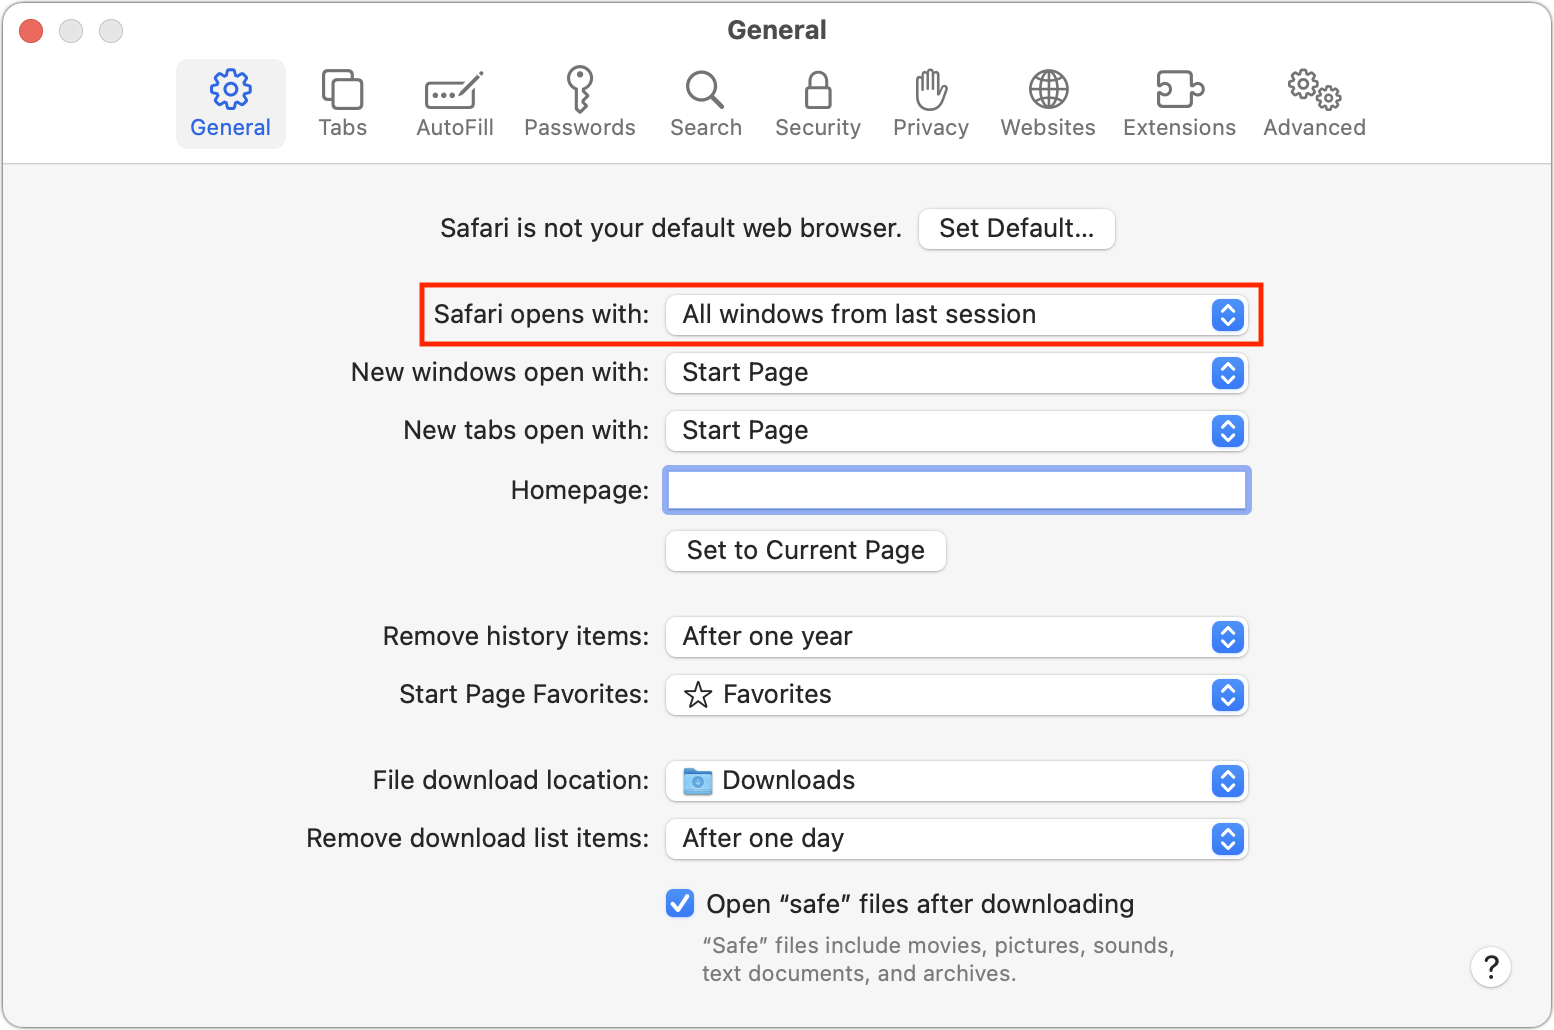
Safari: Recent versions of Safari always open with windows (and tabs) from your last session, though you can choose whether that includes all windows or just non-private ones in Safari > Settings > General.
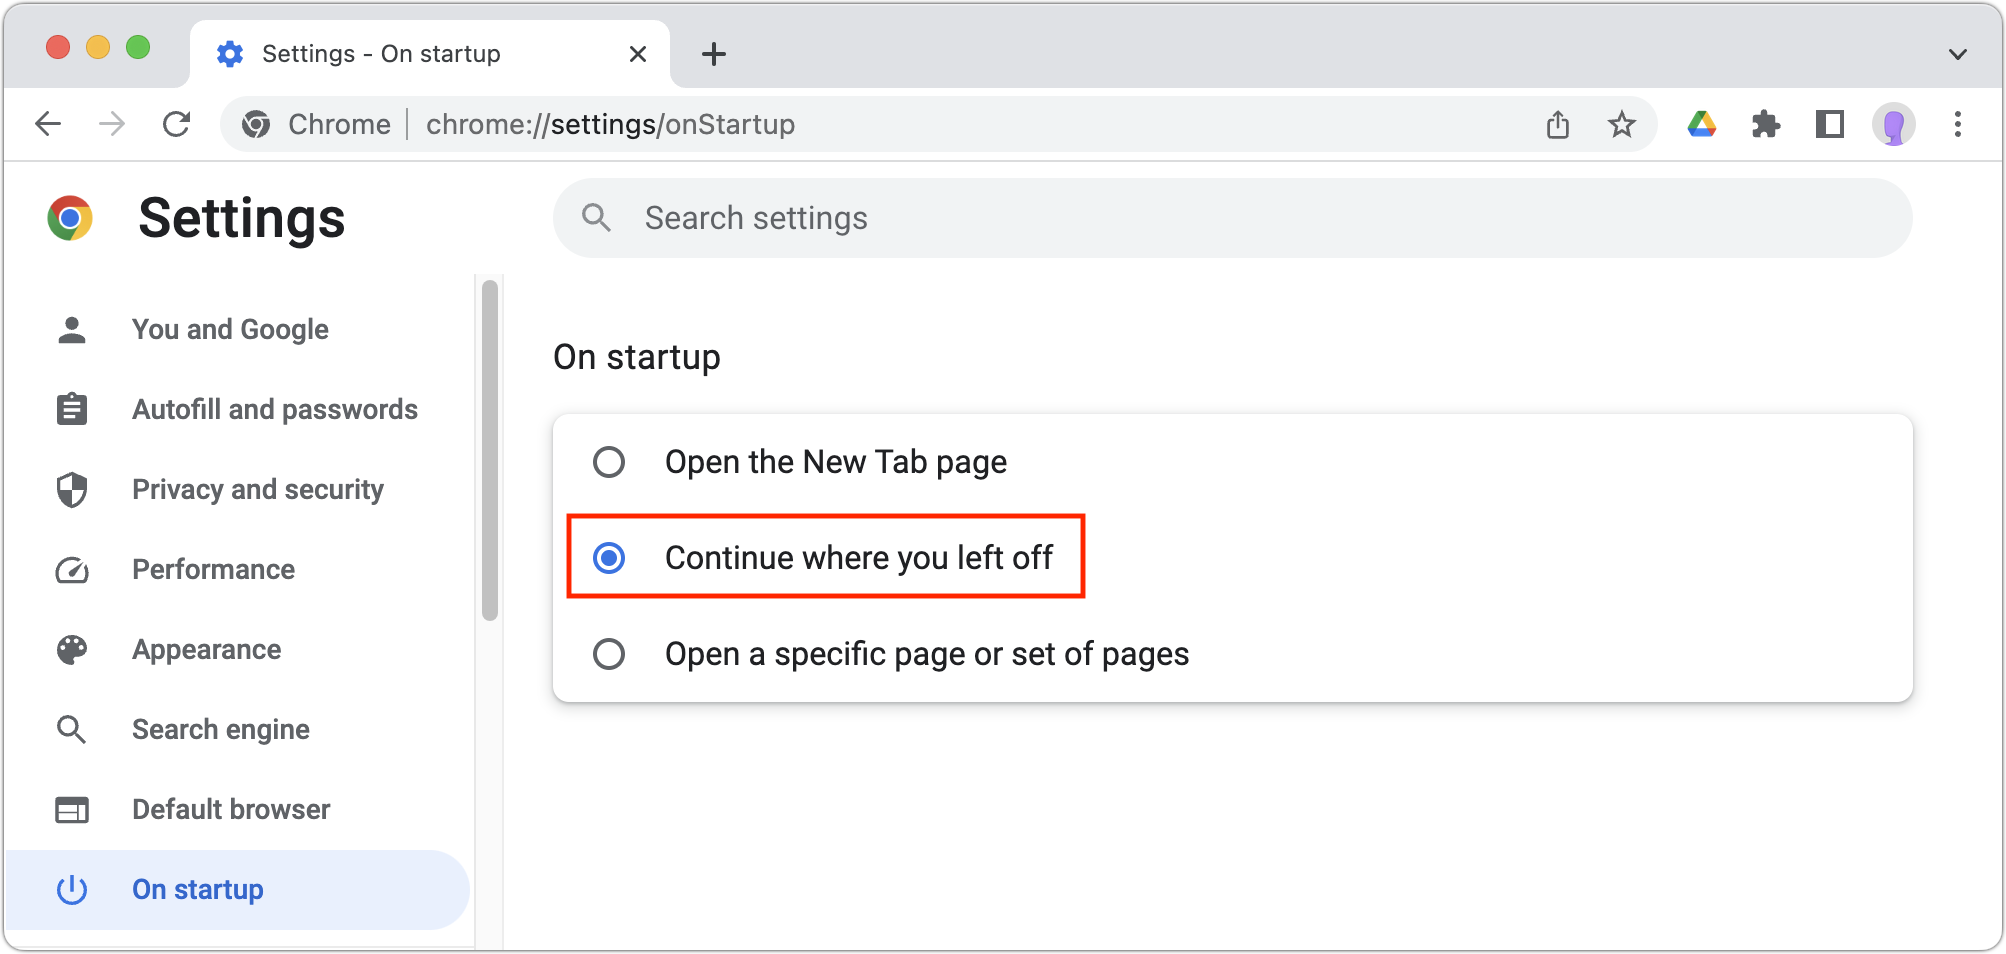
Google Chrome: For Google Chrome, you have additional options, but to make sure your open tabs are restored after relaunching the app, choose Chrome > Settings > On Startup, and select “Continue where you left off.”
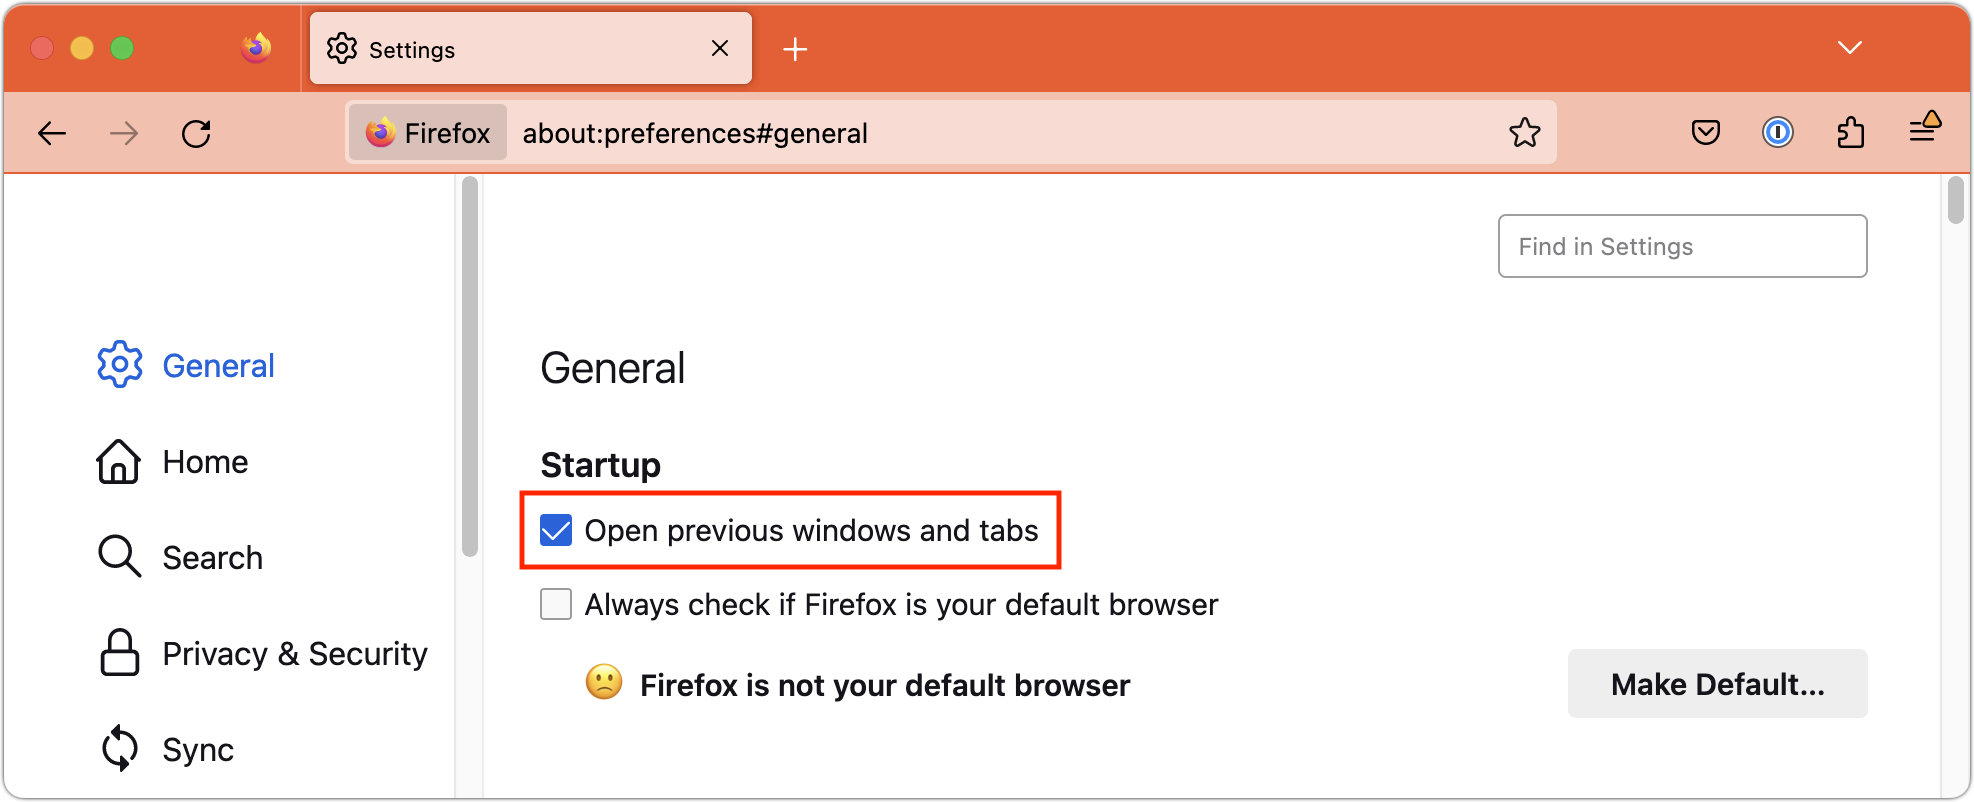
Firefox: Mozilla’s browser puts its session settings front and center. Choose Firefox > Settings > General and select “Open previous windows and tabs.”
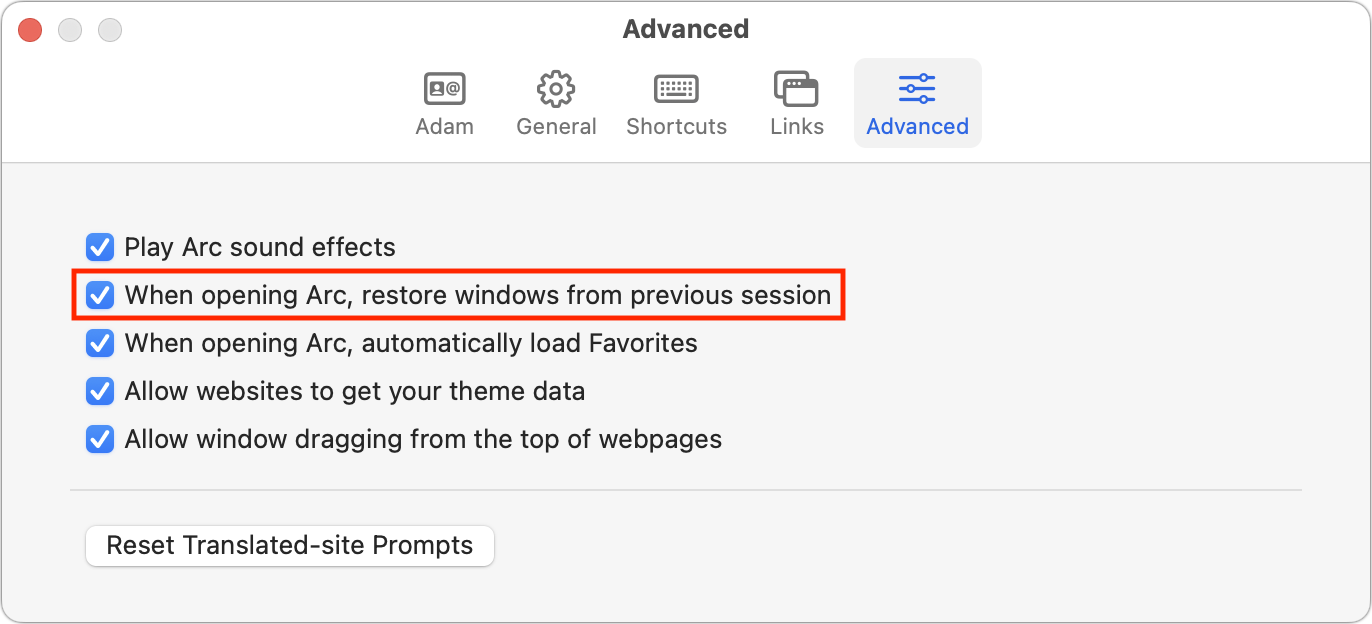
Arc: The new browser Arc encourages users to set up workspaces containing pinned tabs, both of which persist across sessions. However, to ensure all your windows and regular tabs load after relaunching, open Arc > Settings > Advanced and select “When opening Arc, restore windows from previous session.”
Brave: As a Chrome-based browser, Brave offers a setting similar to Chrome but in a different location. Find it in Brave > Settings > Get Started.

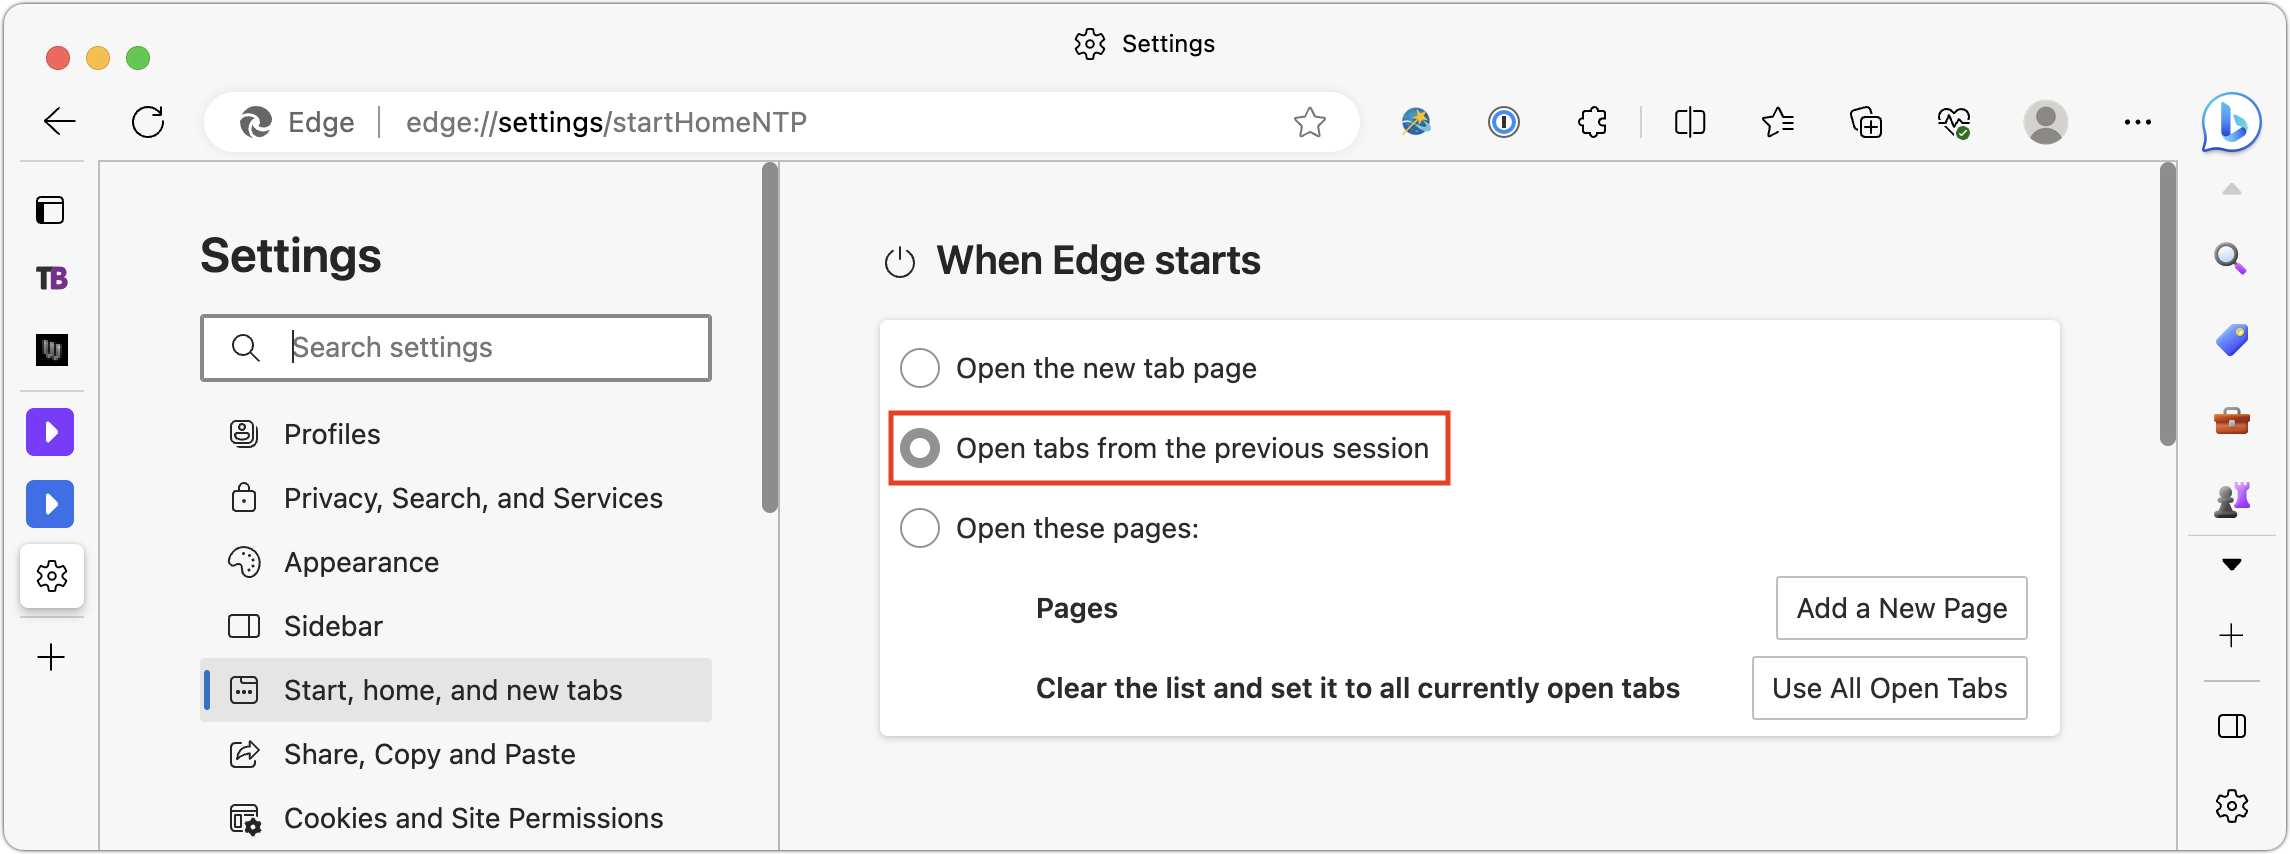
Microsoft Edge: Although it is also based on Chrome, Microsoft Edge stores its session setting in a different location, with a different name. Choose Microsoft Edge > Settings > Start, Home, and New Tabs, and then select “Open tabs from the previous session.”
Between these macOS and browser settings, you can ensure that a restart presents the minimum interruption possible, such that when your Mac finishes restarting, all your apps, documents, windows, and browser tabs will be the same as when you left off.
(Featured image by Adam Engst)
Improve Privacy by Removing Metadata from Office Documents and PDFs
You want to share a file, but you don’t want to share details it may have picked up while under construction—who worked on it and when, tracked changes, hidden text, and more. Find out how to remove private metadata from Office documents and PDFs.

When we share data with others, we do so intentionally—a law firm sending a client legal documents, for instance. But those documents shouldn’t include ancillary information that might reveal other, more sensitive details. Because all digital files contain metadata—additional information about the file or its contents—it’s worth knowing what you could share inadvertently and learning how to avoid doing so.
Much metadata is innocuous, like file type and file size. However, some common file types contain additional metadata that can reveal information that you might not want to share. In this situation, the most common file types are Microsoft Office documents and PDF files. Let’s look at each and how you can see what metadata is there and remove it before sharing.
Cleaning Metadata from Microsoft Office Documents
Metadata that you might want to remove from Microsoft Office documents falls into two broad categories: reviewer information, like comments and tracked changes, and document properties.
The first thing to do when removing metadata is to use File > Save As to make a copy of your file and work on the copy. This automatically removes or resets some metadata and allows you to delete other metadata without worrying about losing it from your original.
If you use change tracking in Word or comments in any Office app, you may want to remove those before sharing a document to prevent recipients from seeing internal conversations or information about who worked on the document.
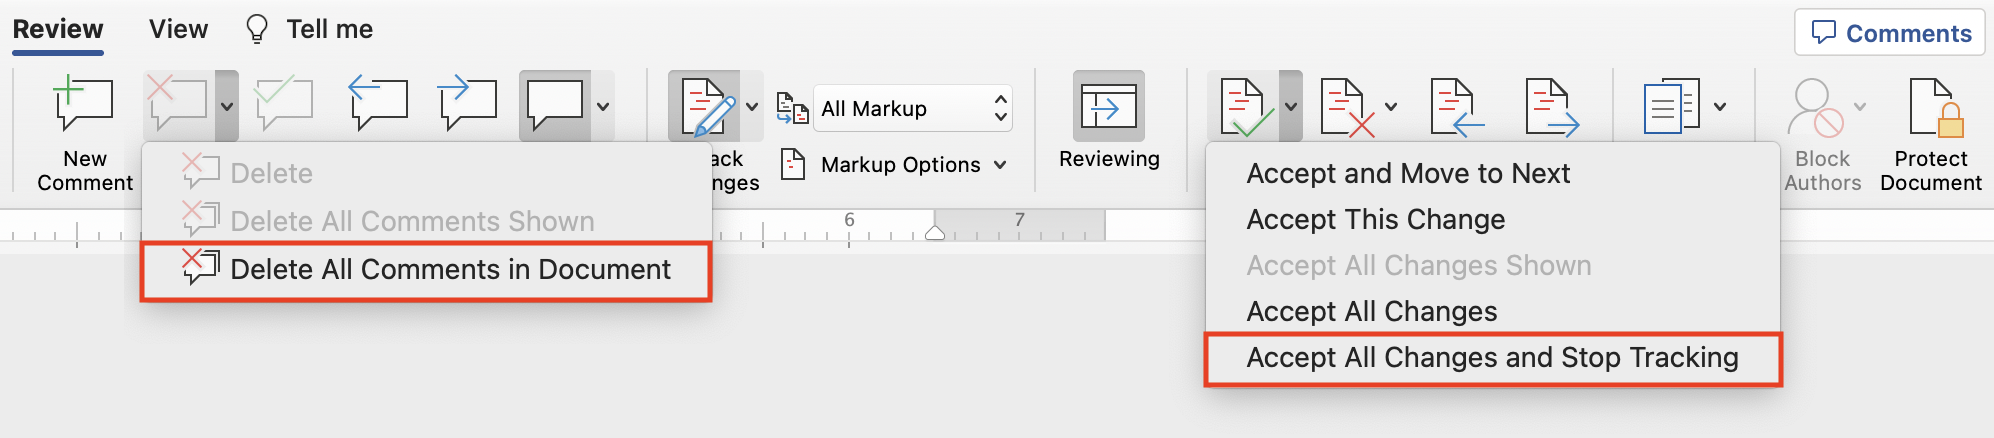
To remove change tracking and comments in Word, click Review in the toolbar. Next, click the arrow next to the Delete button in the comments section and choose Delete All Comments in Document. Finally, click the arrow next to Accept in the change tracking section and choose Accept All Changes and Stop Tracking. Browse through the document to make sure accepting all changes didn’t do something unexpected, and then save.
Excel and PowerPoint lack change tracking but let you add comments. Like Word, PowerPoint’s Review toolbar offers a similar menu associated with the Delete button; choose Delete All Comments in Presentation to clear the comments. In Excel, switch to the Review toolbar, choose Edit > Select All (comments can be deleted only from selected cells), and click the Delete button in the toolbar.
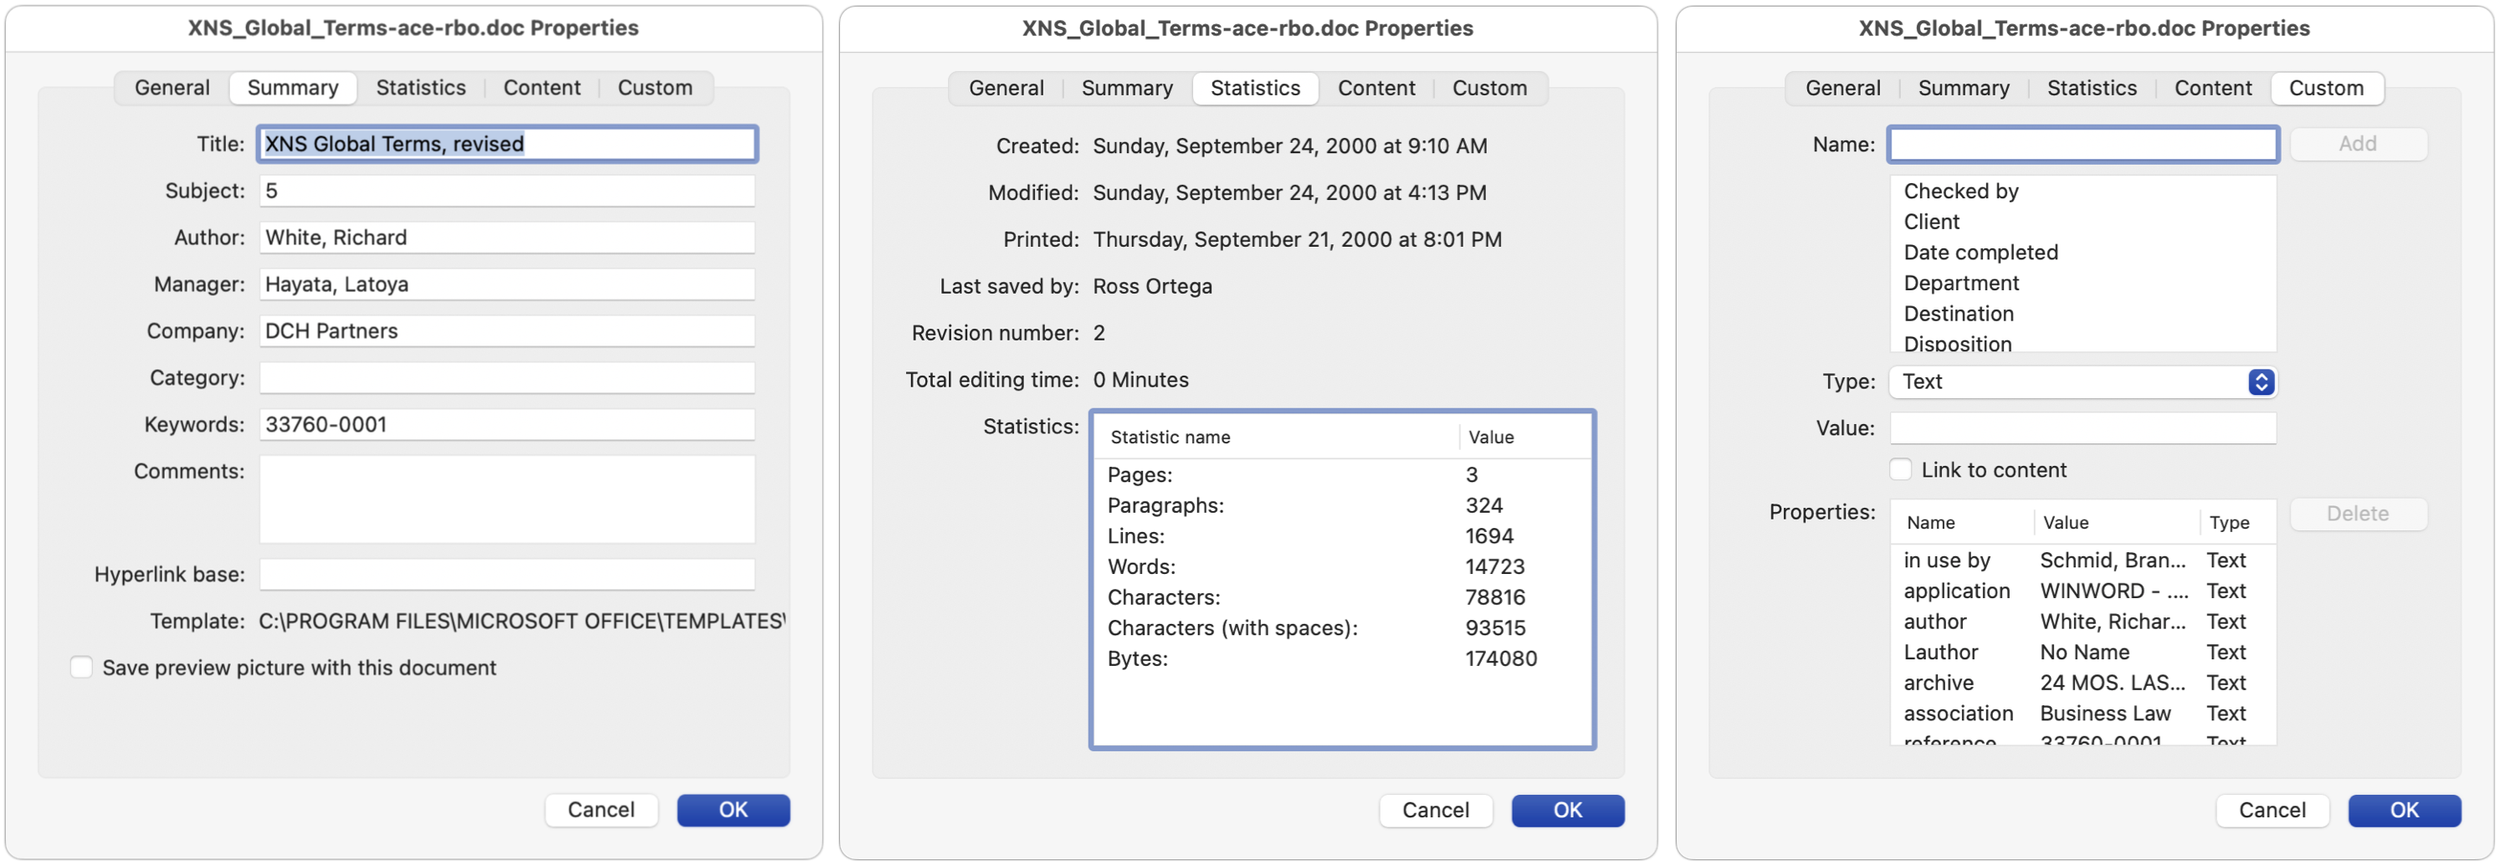
To see what metadata is in the document properties of a Word, Excel, or PowerPoint document, choose File > Properties, and look in the Summary, Statistics, and Custom tabs. Generally speaking, these won’t contain anything damning, but they may reveal information like the names of people associated with the document. Don’t assume there’s no metadata here just because you didn’t add anything manually—document control systems can add metadata you don’t expect.
The three Office apps offer different approaches to removing personal information in the Summary and Custom tabs, and the process is extremely different than in the Windows versions. (For Windows, refer to Microsoft’s instructions.) Here’s how you remove personal information:
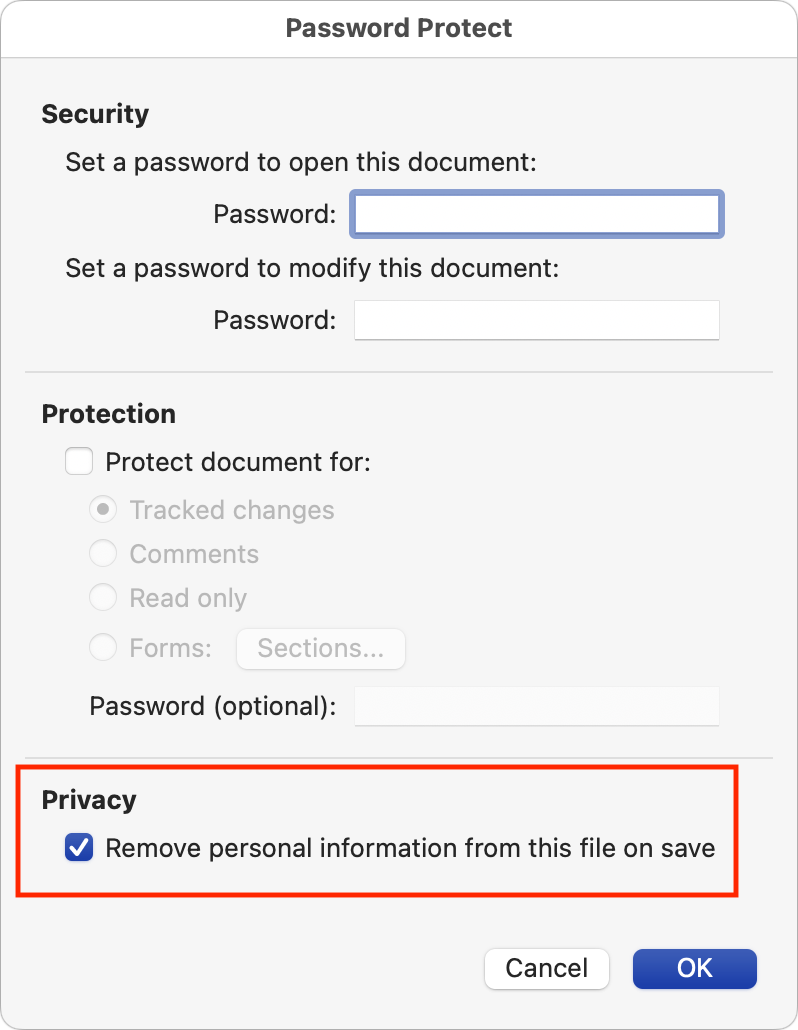
Word: Choose Tools > Protect Document, and in the Password Protect dialog, select “Remove personal information from this file on save.” Save the document, and then go back to File > Properties to make sure it removed everything that concerns you.
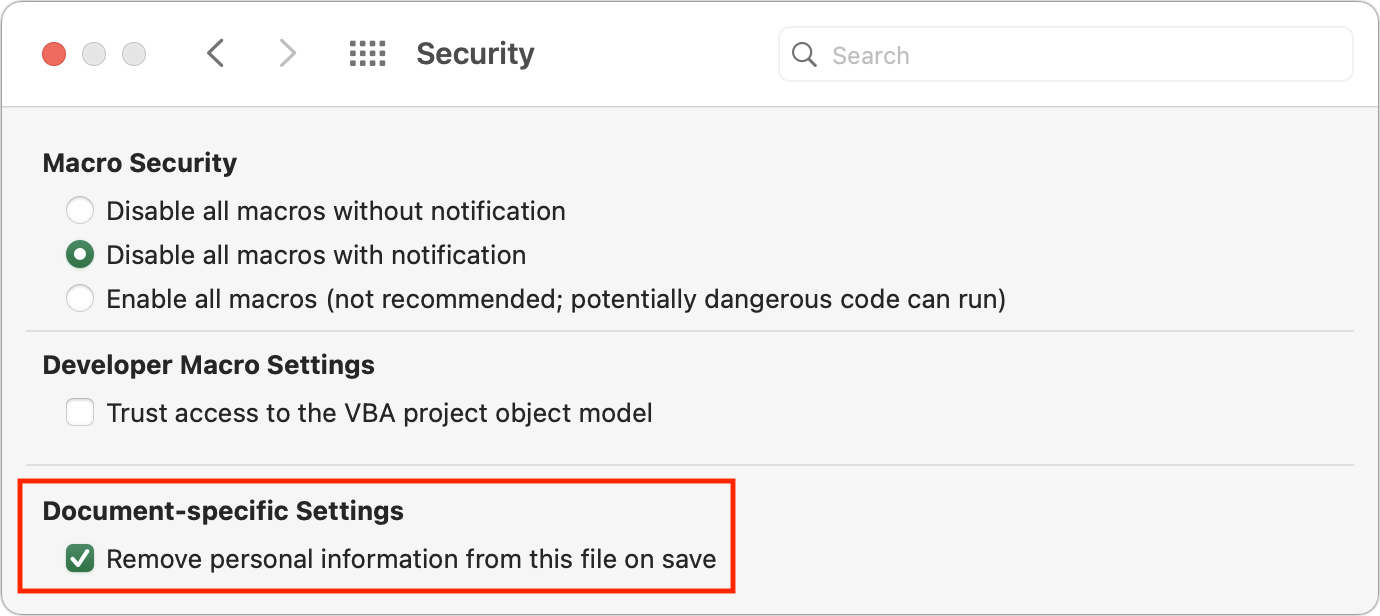
Excel: Choose Excel > Preferences > Security, and select the “Remove personal information from this file on save” checkbox. Then save the document and verify that the desired metadata is gone.
PowerPoint: PowerPoint appears to lack that checkbox, but you can choose File > Properties and manually delete all the information from the Summary and Custom tabs before saving the document.
Information in the Statistics tab is generally cleared or reset by using File > Save As, so you don’t need to do anything more to clear it.
If you’re truly concerned about not revealing additional information in shared Office documents, think about what might appear in headers and footers, footnotes, text that’s white (and thus invisible), hyperlinks, and macros. Finally, remember that you can hide text in Word, columns and rows in Excel, and slides in PowerPoint—that hidden content may reveal sensitive information if it’s allowed to remain in a shared document. In PowerPoint, you may also want to check for presenter notes you don’t want to share; choose View > Notes.
Cleaning Metadata from PDFs
Another way to remove a great deal of metadata from Office documents is to share a PDF of the document instead. By “printing” to PDF, anything that’s invisible automatically disappears. However, PDFs have their own metadata that you might want to review and remove. How you go about it depends on which apps you have available: Adobe Acrobat Pro or just Apple’s bundled Preview.
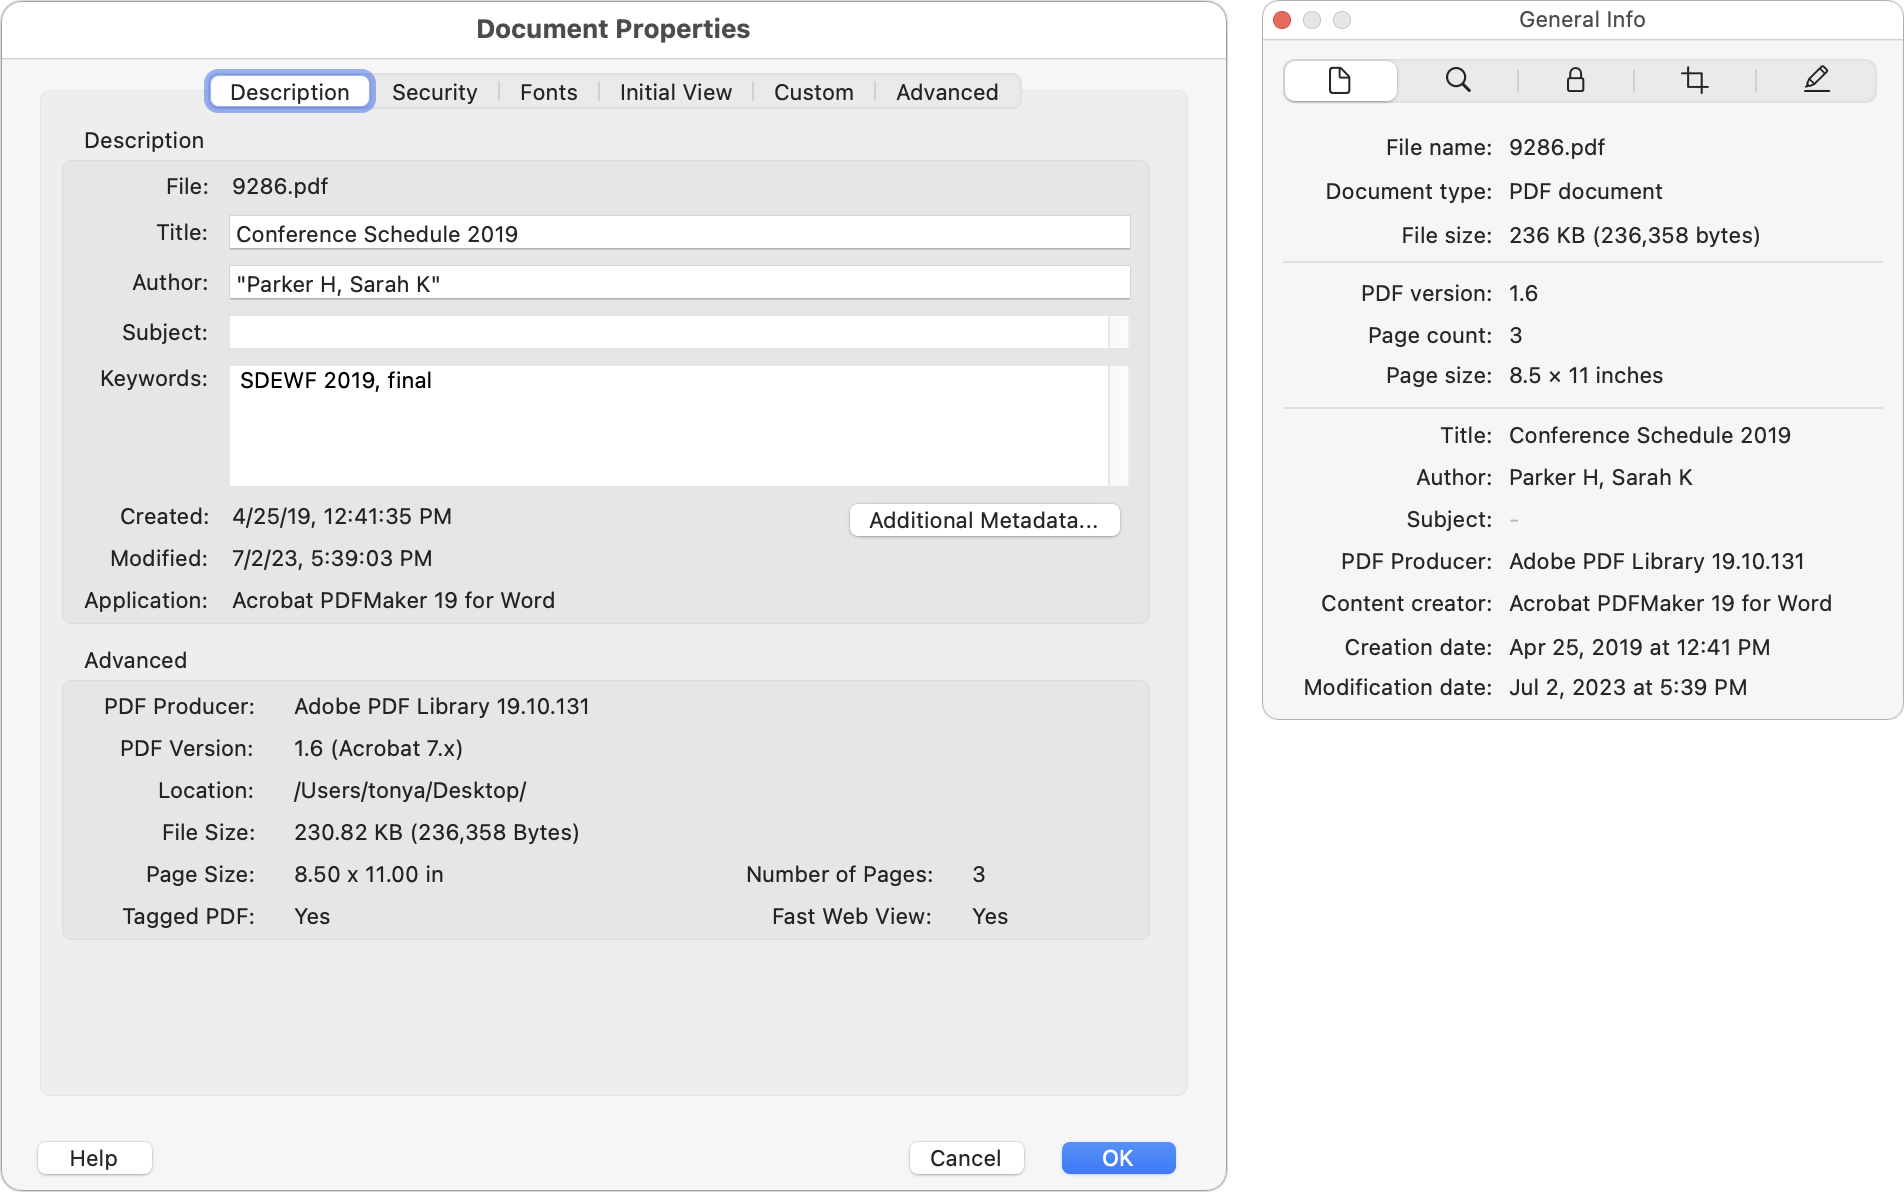
First, to view metadata in Acrobat Pro, choose File > Properties and click the Description tab (left). In Preview, choose Tools > Show Inspector and click the leftmost General Info tab (right).
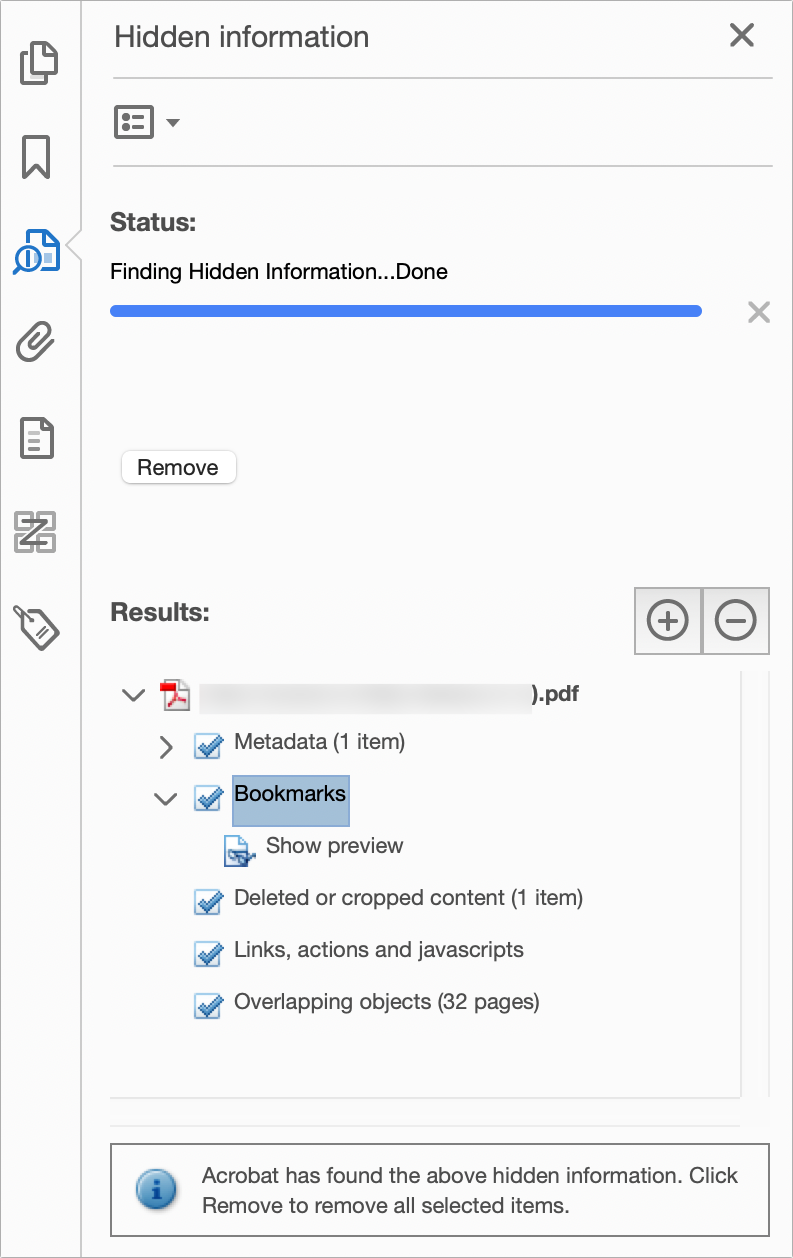
Adobe Acrobat Pro provides several tools for redacting content (replacing it with a black box) and removing hidden content and metadata. To access them, click the Tools tab at the top of the screen and click Redact to display a pair of buttons on the secondary toolbar. Redact Text & Images lets you redact content, but you’ll most likely want to use Sanitize Document, which removes metadata and a boatload of possible hidden data.

It’s easiest to click Remove All, but you might prefer to click Selectively Remove and look at what Acrobat Pro finds before clicking the Remove button in the Hidden Information tab.
For those who rely on Preview for working with PDFs, there’s a simple process for removing metadata and anything else lurking in a PDF that’s good enough for most situations.
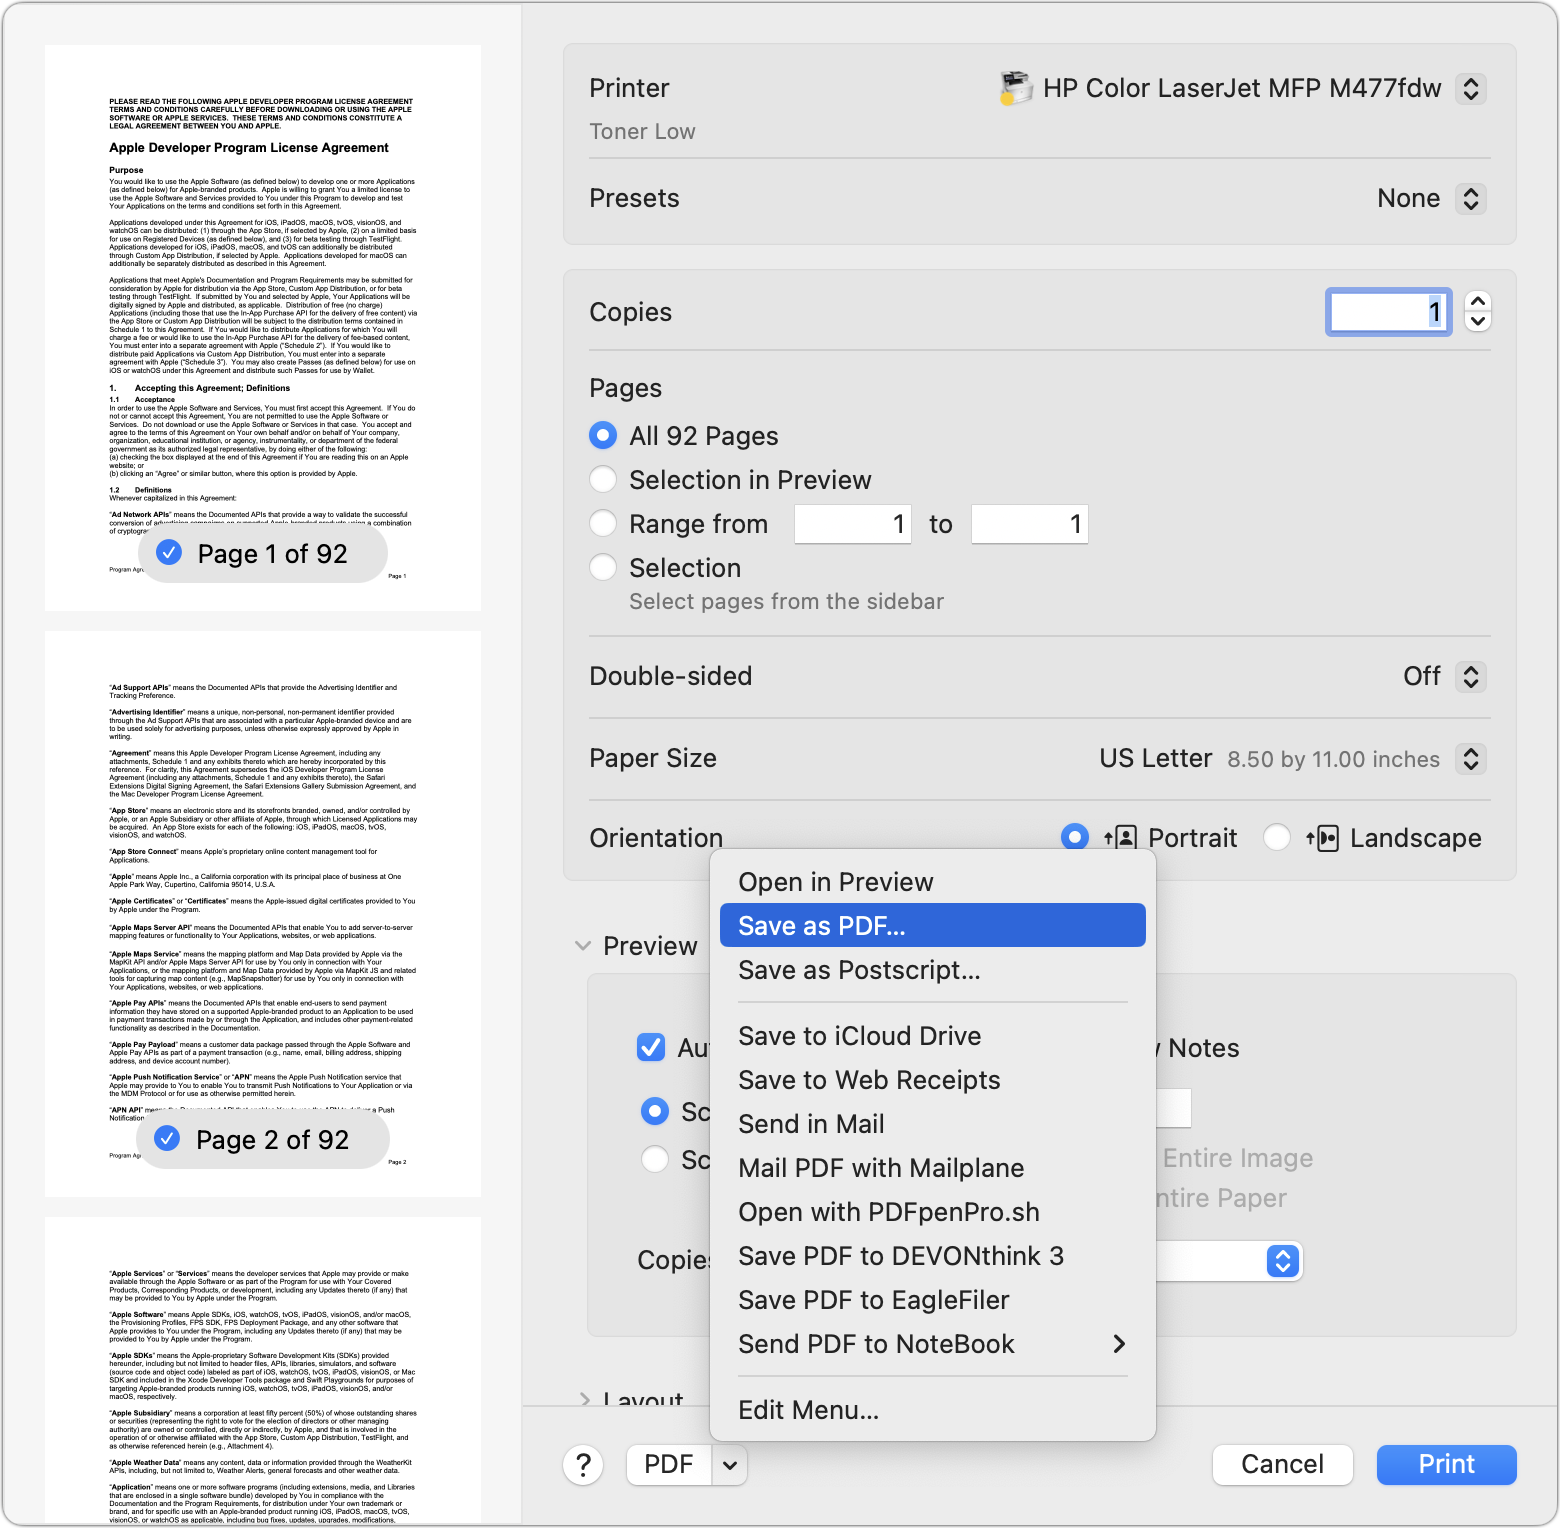
Choose File > Print, and then choose Save As PDF from the pop-up PDF menu at the bottom of the Print dialog. This may seem counterintuitive, but as with any other document type, printing in this way creates a PDF that contains only the visible information in the original, ensuring that all hidden data and metadata are removed.
Although all Mac users have Preview, there is another common option for removing metadata from PDFs—online tools. They’re easily found, but we urge caution. If you’re concerned about the recipient of your PDF being able to see metadata or hidden content, why would you trust a free online service with that information? If you want to head down this path, stick with sites headquartered in the European Union, which has stronger privacy regulations than other parts of the world. For instance, Metadata2Go, which displays all the metadata in a file, is in Germany, and Sejda, whose Edit PDF Metadata tool can remove all metadata, is based in the Netherlands.
One last thought. If you’ve gotten to this point and are thinking that you need an enterprise-wide solution to removing metadata, look for services like Adarsus’s MetaClean, which can automatically remove metadata from files sent as email attachments or stored on file servers.
(Featured image by iStock.com/Imilian)
The Hardware You’ll Need to Run Apple’s 2023 Operating Systems
Later this year, Apple will release macOS 14 Sonoma, iOS 17, iPadOS 17, watchOS 10, and tvOS 17. Here’s the hardware you’ll need to run these operating systems—and to support some of the whizzier features.

At Apple’s Worldwide Developer Conference in June, the company unveiled the upcoming versions of its operating systems: macOS 14 Sonoma, iOS 17, iPadOS 17, watchOS 10, and tvOS 17. They won’t be available until September or October of 2023, and even once they ship, we recommend waiting a few weeks before upgrading your smaller Apple devices and holding off on macOS upgrades for a couple of months.
Regardless, it’s worth considering how these operating systems might impact your plans to buy new hardware in the next six months. Any Apple device you purchase now—or have bought in the last five years—can run the new operating systems. But some devices that can run the current macOS 13 Ventura, iOS 16, and iPadOS 16 won’t be upgradable to their replacements later this year. More importantly, some older devices that can be upgraded won’t support all the new features.
Here’s what you’ll need and compatibility gotchas to keep in mind.
macOS 14 Sonoma
For macOS 14 Sonoma, Apple has dropped support for Mac models released before 2018. That works out to five models across the iMac, MacBook Pro, and MacBook product lines. If you rely on one of those Macs and want to run Sonoma, think about when it would make sense to buy a new Mac, perhaps in early 2024. By then, all new Macs will likely ship with Sonoma. These Macs can run Sonoma:
iMac: 2018 and later
iMac Pro: 2017
MacBook: None
MacBook Air: 2018 and later
MacBook Pro: 2018 and later
Mac mini: 2018 and later
Mac Pro: 2019 and later
Mac Studio: 2022 and later
The specific 2017 Mac models that are stuck at Ventura are:
iMac: 21.5-inch and 27-inch
MacBook Pro: 13-inch and 15-inch
MacBook: 12-inch
Unsurprisingly, some new features in Sonoma require sufficient processing power that they work only on Macs with Apple silicon—one of the M1 or M2 chips.
Game Mode: This special mode automatically gives games top priority on the CPU and GPU, lowering usage for background tasks. It also reduces latency for wireless accessories, like game controllers and AirPods, for improved responsiveness.
Just “Siri”: Although dropping “Hey” from the “Hey Siri” trigger phrase works on all iPhones with iOS 17 and iPads with iPadOS 17, it requires a Mac with Apple silicon or when using the AirPods Pro (2nd generation).
Made for iPhone hearing aids: Apple-compatible hearing aids can now be paired directly with Macs, but only those with an M1 Pro, M1 Max, M1 Ultra, or M2. That works out to the MacBook Pro (14-inch, 2021), MacBook Pro (16-inch, 2021), Mac Studio (2022), and all Macs with the M2.
Presenter Overlay: You can keep your image visible while sharing your screen on a video call, either in front of the shared screen or in a small movable bubble.
React with your hands: During video calls, 3D augmented-reality reaction effects like hearts, confetti, and fireworks can be triggered with hand gestures, but only on Macs with Apple silicon or when using Continuity Camera with an iPhone 12 or later.
Screen Sharing performance improvements: Apple has radically improved the performance of the Screen Sharing app over high-bandwidth connections, but it requires the advanced media engine in Apple silicon.
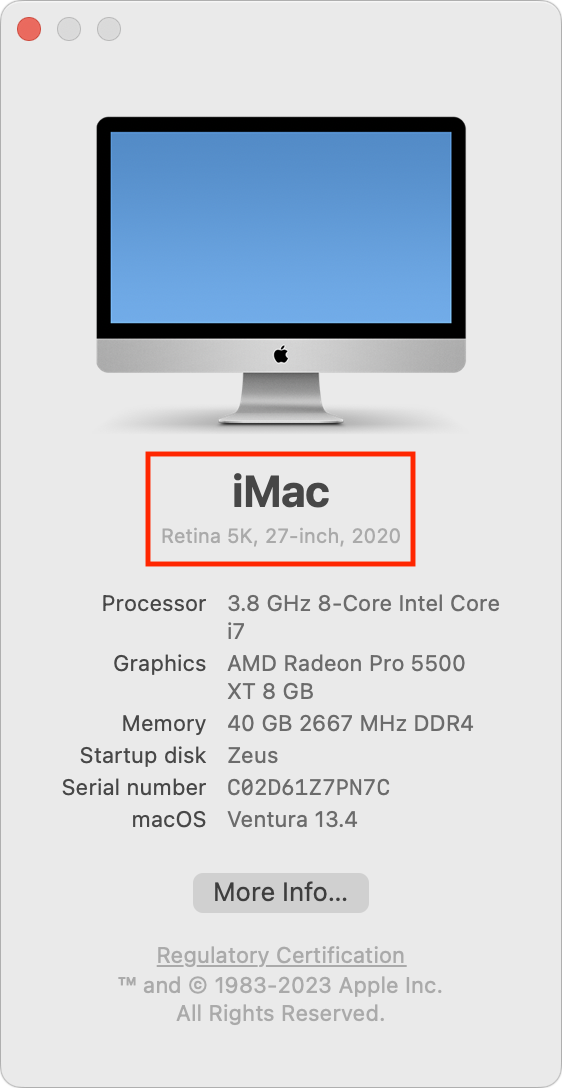
If you’re unsure which Mac you have, choose About This Mac from the Apple menu.
iOS 17
With iOS 17, Apple has maintained the same cutoff date as Sonoma, supporting all iPhone models released in 2018 and later. That means you’ll be able to run iOS 17 on these iPhones:
iPhone 14/Plus/Pro/Pro Max
iPhone 13/mini/Pro/Pro Max
iPhone 12/mini/Pro/Pro Max
iPhone 11/Pro/Pro Max
iPhone SE (2nd generation or later)
iPhone XR/XS/XS Max
Practically speaking, these iOS 16-compatible devices won’t be able to upgrade to iOS 17:
iPhone X
iPhone 8/8 Plus
Several new iOS 17 features have more restrictive system requirements.
Enhanced autocorrect: iOS 17 enhances autocorrect so it works better (and yes, it will let you use curse words), and it temporarily underlines autocorrected words so you can see which ones were changed. It requires an iPhone 12 or later.
Inline predictions: Similarly, inline predictions of what you’re going to type—so you can just accept the suggestion rather than tapping out all those letters—require an iPhone 12 or later.
Point and Speak: Those with vision disabilities might appreciate the Point and Speak feature that makes it easier to interact with physical objects that have text labels, but it works only on the Pro models of the iPhone 12, iPhone 13, and iPhone 14.
React with your hands: The hand-triggered video call reactions require an iPhone 12 or later.
If you can’t remember which iPhone model you have, go to Settings > General > About and look next to Model Name. This works for the iPad, too.

iPadOS 17
It’s more involved to determine whether your iPad can upgrade to iPadOS 17 because there are four different iPad model types with varying capabilities. These models can run iPadOS 17:
iPad Pro 12.9-inch (2nd–6th generation)
iPad Pro 11-inch (1st–3rd generation)
iPad Pro 10.5-inch
iPad Air (3rd–5th generation)
iPad (6th–10th generation)
iPad mini (5th & 6th generation)
While that list encompasses a lot of iPads, a simpler way to look at it is that only three iPad models that can run iOS 16 won’t be able to upgrade to iOS 17:
iPad Pro 12.9-inch (1st generation)
iPad Pro 9.7-inch
iPad (5th generation)
Because Apple extended overall iPadOS 17 compatibility somewhat further back than it did with iOS 17 and macOS Sonoma, quite a few iPadOS 17 features work only on select models:
Back-to-back Siri requests: Although all iPhones will let you issue multiple requests to Siri without reactivating it, on the iPad, the feature works only on an iPad Pro 12.9-inch (3rd generation and later), iPad Pro 11-inch (1st generation and later), iPad Air (3rd generation and later), iPad mini (5th generation and later), or iPad (8th generation and later).
Enhanced autocorrect: This improvement to typing requires an iPad Pro 12.9-inch (5th generation and later), iPad Pro 11-inch (3rd generation and later), iPad (10th generation), iPad Air (4th generation and later), or iPad mini (6th generation).
External display cameras: If you want to take advantage of an external display’s camera while it’s attached to the iPad, you’ll need an iPad Pro 12.9-inch (3rd generation and later), iPad Pro 11-inch (1st generation and later), iPad (10th generation), iPad Air (4th generation and later), or iPad mini (6th genera-tion).
FaceTime with Apple TV: Using an iPad’s mic and camera for FaceTime on an Apple TV 4K (2nd generation) requires an iPad Pro 12.9-inch (3rd generation and later), iPad Pro 11-inch (1st generation and later), iPad (8th generation and later), iPad Air (3rd generation and later), or iPad mini (5th generation and later).
Inline predictions: Getting suggestions about what to type next on the iPad requires an iPad Pro 12.9-inch (5th generation and later), iPad Pro 11-inch (3rd generation and later), iPad (10th generation), iPad Air (4th generation and later), or iPad mini (6th generation).
PDF AutoFill: iPadOS 17 will use machine learning to analyze PDFs, and if it detects a form, you can fill it out automatically using your contact information. But only if you’re using an iPad Pro 12.9-inch (3rd generation and later), iPad Pro 11-inch (1st generation and later), iPad Air (3rd generation and later), iPad mini (5th generation and later), or iPad (8th generation and later).
React with your hands: As with the iPhone and Mac, only some models let you trigger reactions with gestures: the iPad Pro 12.9-inch (5th generation and later), iPad Pro 11-inch (3rd generation and later), iPad (10th generation), iPad Air (4th generation and later), and iPad mini (6th generation).
Screen Distance: This health-related feature is supposed to encourage kids to hold the iPad farther away to reduce the likelihood of developing myopia. But how many kids read on an iPad Pro 12.9-inch (3rd generation and later) or iPad Pro 11-inch (3rd generation and later)?
watchOS 10
The Apple Watch has a simple upgrade story: every model compatible with watchOS 9 can also run watchOS 10. That means everything from the Apple Watch Series 4 up through the Apple Watch Ultra, including the Apple Watch SE. (Look in the Watch app on your iPhone if you can’t remember which model you have.)
Two of the new features promised for watchOS 10 work only on specific models:
The NameDrop feature that lets you transfer contact information wirelessly with just proximity works with all iOS 17-compatible iPhones, but it can communicate only with an Apple Watch SE, Apple Watch Series 6 or later, or Apple Watch Ultra.
The Time in Daylight feature that helps parents track whether their kids are spending the recommended 80–120 minutes per day outside requires an Apple Watch SE (2nd generation), Apple Watch Series 6 or later, or Apple Watch Ultra.
tvOS 17
As with the Apple Watch, the Apple TV upgrade situation is easy to understand: tvOS 17 will run on the Apple TV HD and Apple TV 4K (1st and 2nd generation), just as with tvOS 16.
However, note that the promised option to let you use the mic and camera from an iPhone or iPad for FaceTime calls on the Apple TV works only if you have an Apple TV 4K (2nd generation). That might be the first real reason to upgrade from an older Apple TV.
(Featured image by Apple)
Learn to Identify and Eliminate Phishing Notifications
Did you know that a phishing website can send you a notification right on your Mac? Learn how this could happen and how to prevent it in your favorite Web browser.

Email may be the most common form of phishing, but it’s not the only one. Modern Web browsers support a technology that enables websites to display system-level notifications just like regular apps. These push notifications have good uses, such as letting frequently updated websites inform users of new headlines, changed discussion threads, and more.
Unfortunately, push notifications can be subverted for malicious purposes, notably phishing. Here’s what happens. You visit a website that asks you if you’d like to receive notifications.
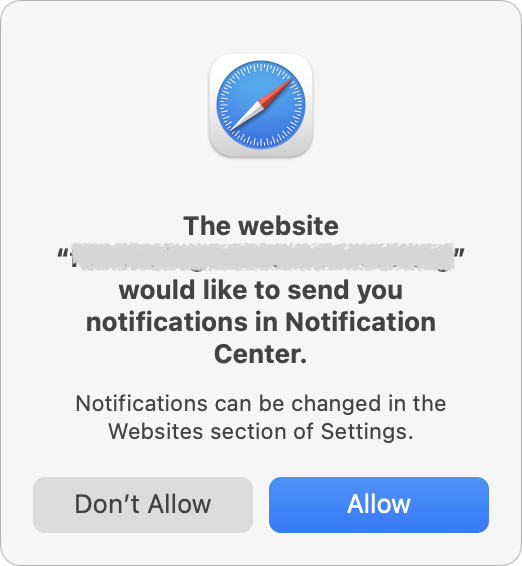
That request may be introduced with language that implies you must agree in order to get desired content, or it may be a bald-faced request to show notifications. If you agree, the website will be able to display alarming or deceptive phishing notifications even when it’s not open.
The goal is to trick you into clicking the notification, which will load a fake site that attempts to get you to enter login credentials or credit card information to facilitate identity theft.
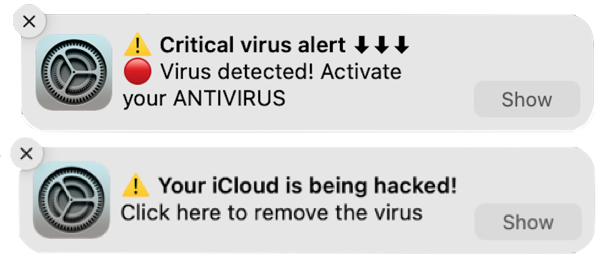
The danger of phishing notifications is that they come from the system, so they may seem more legitimate than email messages trying to sucker you into revealing personal information. Nevertheless, as you can see in the examples above, they may still look sketchy in ways reminiscent of phishing emails:
No legitimate website would use emoji or symbols in a notification, much less multiple ones.
Although there are no glaring spelling or grammar mistakes, the use of all caps in the top notification is a giveaway. Similarly, standard notifications wouldn’t use exclamation points.
The use of “Click here” is poor information design that’s unlikely to come from a professional programmer or Web designer.
Phishing notifications, although problematic, aren’t a malware infection, and anti-malware packages won’t detect or remove them. Luckily, they’re easy to control and block in Safari and other Web browsers.
Prevent Phishing Notifications
The easy way to ensure you don’t see phishing notifications is to allow only trusted websites to send notifications. In general, we recommend keeping that list small so you’re not frequently interrupted by unnecessary notifications.
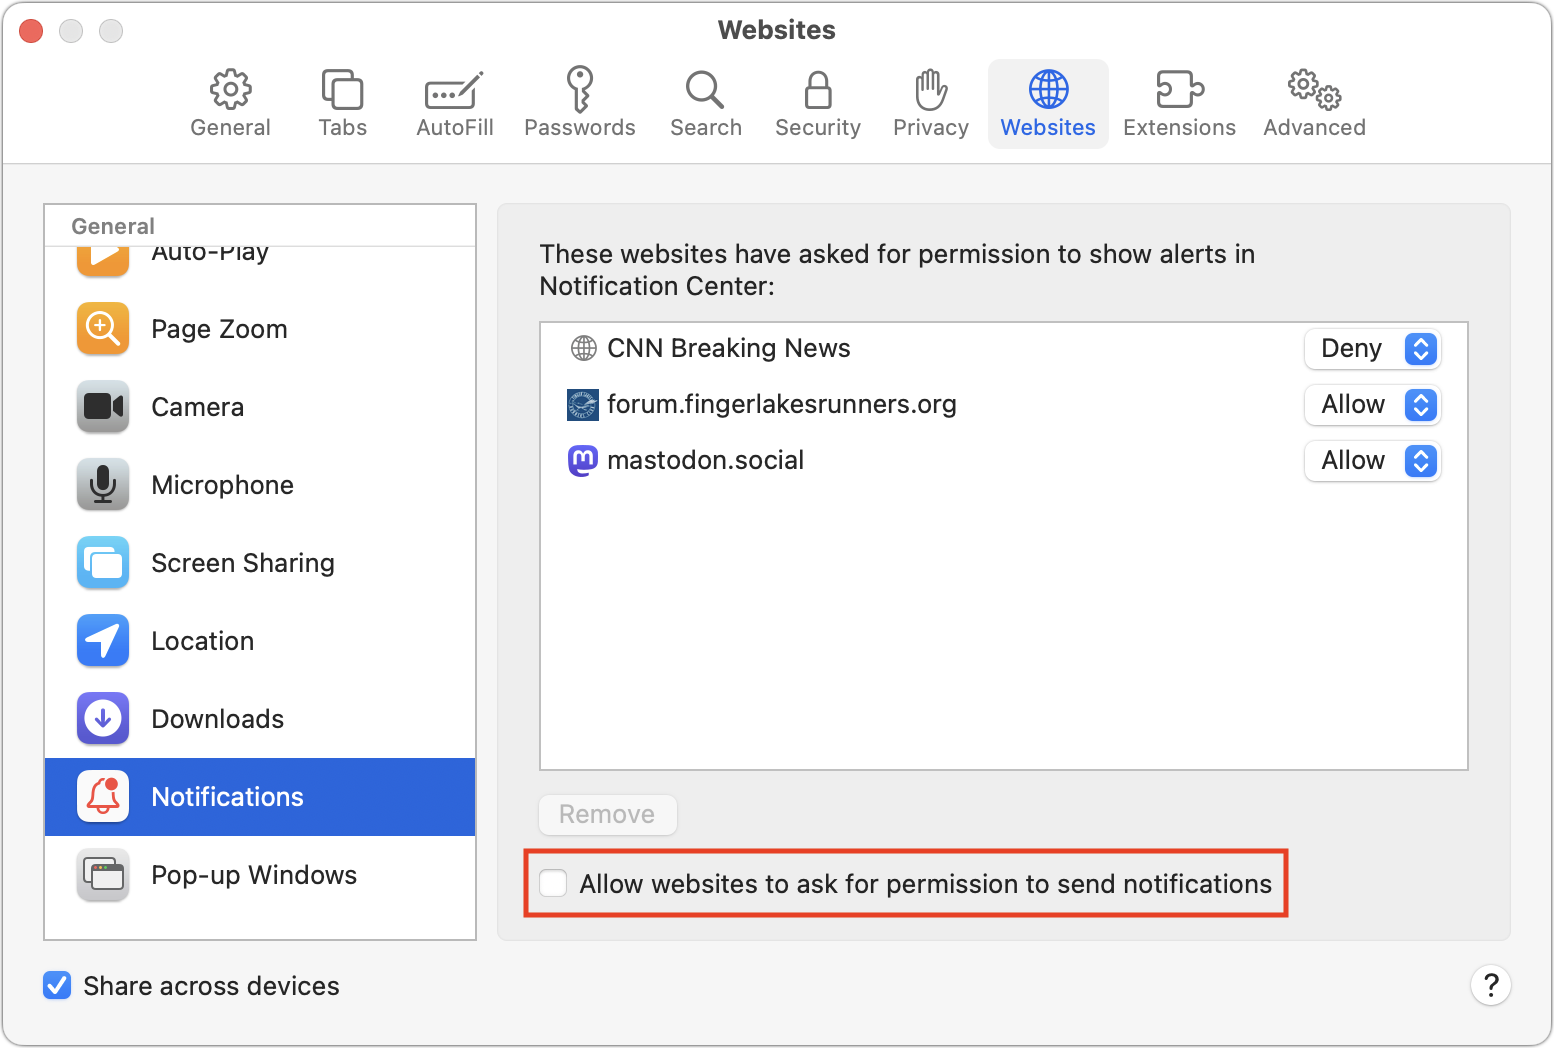
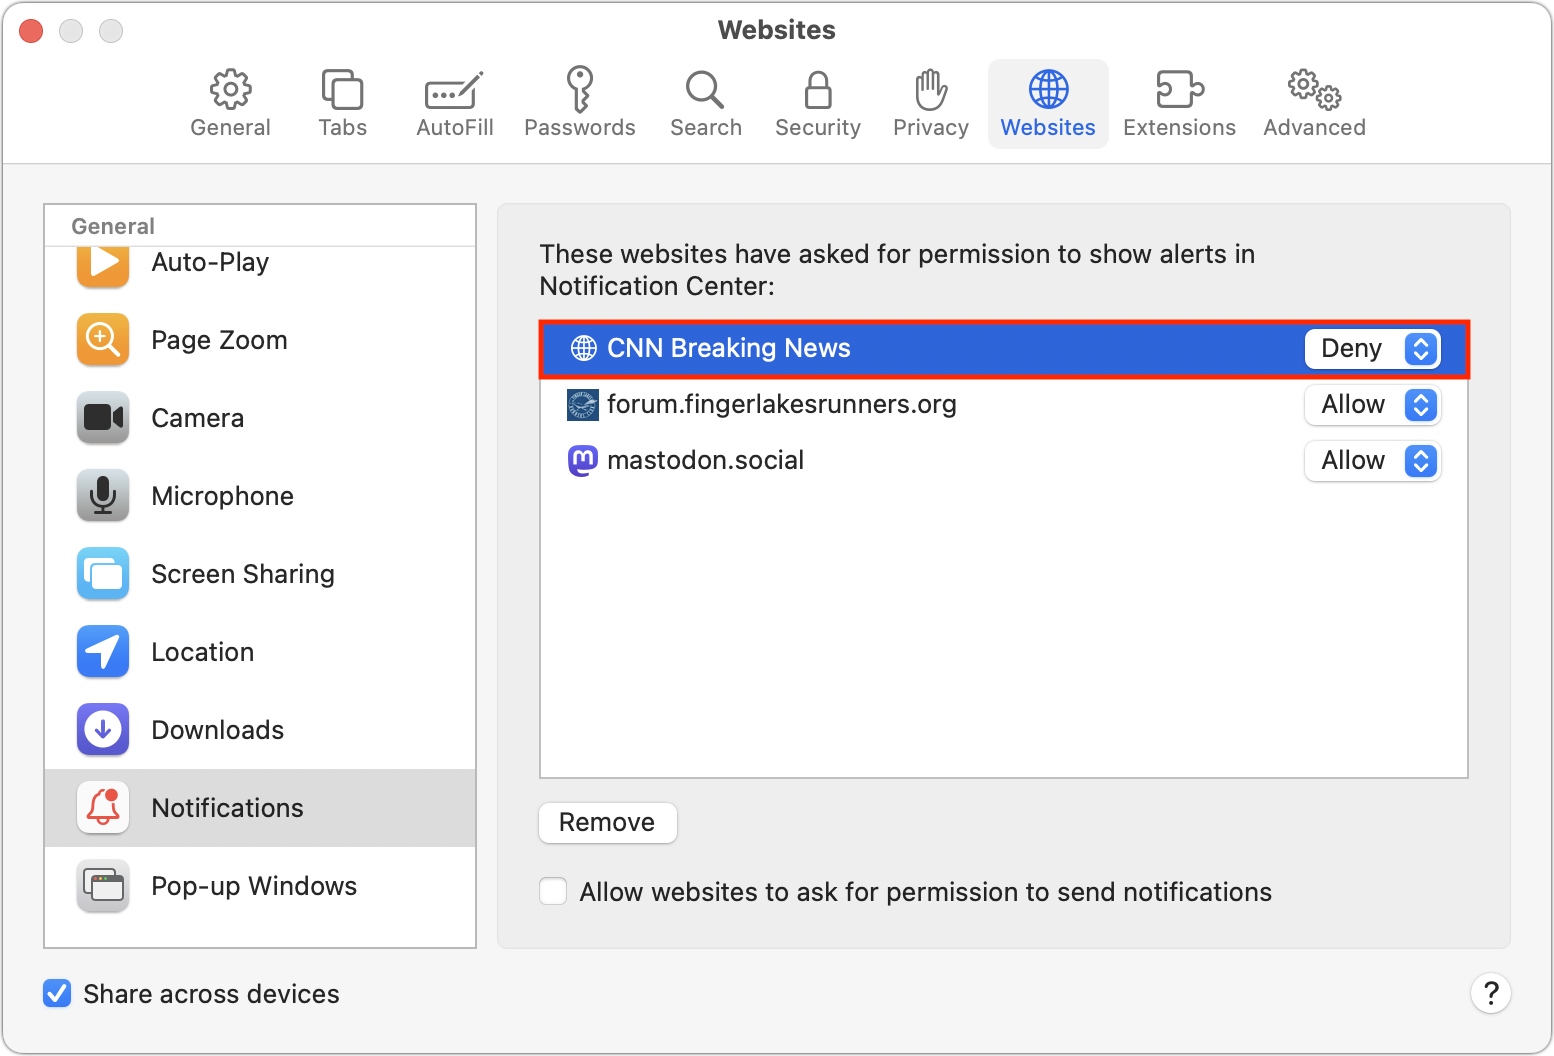
If you’re unsure that you’ll be able to identify malicious websites, you can enable a browser setting that prohibits all websites from asking for permission to send notifications. In Safari, choose Safari > Settings > Websites > Notifications, and deselect “Allow websites to ask for permission to send notifications” at the bottom.
Other browsers have similar options, and most will look like Google Chrome, as shown below:
Arc: Choose Arc > Settings > General > Notifications and select “Don’t allow sites to send notifications.”
Brave: Navigate to Brave > Settings > Privacy and Security > Site and Shield Settings > Notifications and select “Don’t allow sites to send notifications.”
Firefox: Go to Firefox > Settings > Privacy & Security > Notifications and select “Block new requests asking to allow notifications.”
Google Chrome: Navigate to Chrome > Settings > Privacy and Security > Site Settings > Notifications and select “Don’t allow sites to send notifications.”
Microsoft Edge: Choose Microsoft Edge > Settings > Cookies and Site Permis-sions > Notifications and turn off “Ask before sending.”
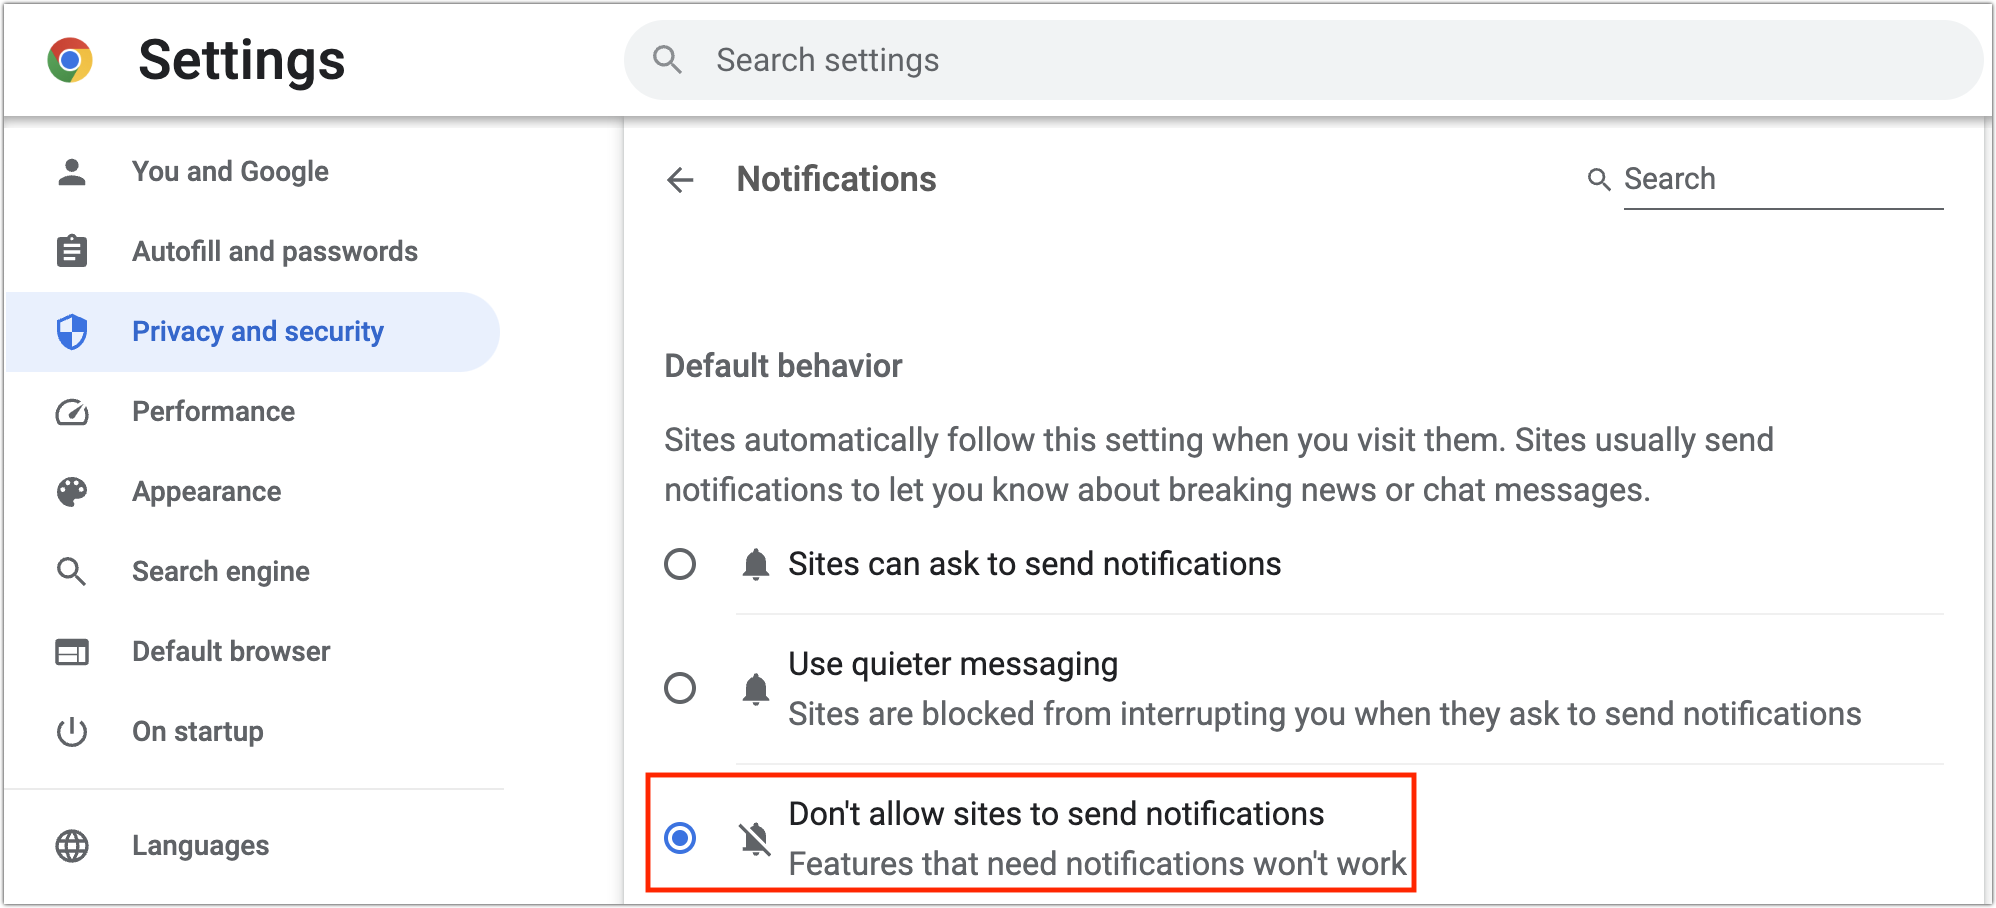
Browsers based on Chrome (everything except Firefox in the list above) offer a “Use quieter messaging” option that replaces the permission dialog with a bell icon next to the site name in the address bar—click it to allow notifications from that site.
Eliminating Phishing Notifications
Now you know how to prevent new sites from requesting permission to display notifications. What about sites that already have permission? It’s easy to block them in Safari’s Notifications settings screen. If you have any undesirable sites with Allow in the pop-up menu to the right of their name in the Notifications screen, choose Deny from that menu. You could remove the site instead, but that would allow it to ask for permission again.
Firefox’s interface is similar to Safari’s, but Chrome-based browsers have a different interface that separates the blocked and allowed sites. To block a website whose notifications you no longer want to receive, click the button to the right and choose Block. Again, you could remove undesirable sites if you prefer, but remember that if your notification settings ever change, doing so could allow the site to ask for permission once more.

Ultimately, it’s easy to avoid phishing notifications by paying attention as you browse the Web. Steer clear of websites that make an unexpected request to display notifications. Notifications aren’t necessary on hardly any websites, so there’s no harm in denying such requests unless you’re sure they’re legitimate.
(Featured image based on an original by iStock.com/tadamichi)