You Can Now Have Zoom Meetings on an Apple TV
Have you wanted to put Zoom meetings on a large-screen TV? You can now do that with tvOS 17 and the new Zoom app for Apple TV. It takes some getting used to due to the lack of a keyboard and any way to follow links, but it does work.

When Apple introduced tvOS 17 last September, an eagerly awaited feature was its support for FaceTime calls, using Continuity Camera on an iPhone or iPad to equip an Apple TV with the necessary camera and microphone. FaceTime on the Apple TV requires a second-generation Apple TV 4K or later and an iPhone running iOS 17 or an iPad running iPadOS 17.
The feature works pretty well. Setting up Continuity Camera is simple—you launch the FaceTime app on the Apple TV, select your user profile, confirm on the iPhone or iPad, and then position the iPhone or iPad in landscape orientation so the rear camera faces you. You can start FaceTime calls from the Apple TV or move a call in progress from an iPhone or iPad to the Apple TV. The video quality is excellent, the audio is surprisingly good even across the room, and Center Stage zooms and pans to keep you in the picture. You can also add reactions like hearts and fireworks with hand gestures. Or not.
But that’s not what we’re here to talk about today. Apple also said that other videoconferencing apps like Zoom and Webex would be coming to the Apple TV, which could make the Apple TV a compelling addition to offices and conference rooms everywhere. It’s also perfect for joining Zoom-based exercise classes or community meetings from the comfort of your living room. In December 2023, Zoom was the first out of the gate, shipping its Zoom for Home TV app for tvOS 17.
With Zoom available, the Apple TV becomes an interesting option for businesses and organizations that want to display video meetings on a large screen. In the past, it was possible to use AirPlay to share an iPhone or iPad screen to an Apple TV, but it was difficult to position the iPhone or iPad effectively, and there was no way to use the higher-quality rear-facing camera.
To get started, launch the Zoom app on the Apple TV. It first prompts you to connect your iPhone via Continuity Camera. Select the Apple ID account that matches the one logged in on the iPhone, bring the iPhone close, tap the notification that appears, and tap Accept. Then, turn the iPhone around and set it down on the base of the TV with the rear camera facing you.

Next, you’ll be prompted to pair it with your account, which you can do most easily by navigating to https://zoom.us/pair on another device and entering a code.

Once you’re connected to your account, you can create a new meeting or join an existing meeting.

Here’s where things get tricky. It’s easy to start a meeting—select New Meeting on the main screen—but inviting people is more arduous. Starting from the Contacts screen or choosing Invite from the More pop-up menu requires that you laboriously enter an email address to invite someone via email. Instead, we recommend that you first add people on the Personal Contacts screen in your account on the Zoom website. After that, you can select several people and invite them to the meeting. Unfortunately, in our testing, the email invitations didn’t always arrive.

The remaining option is to swipe up on the clickpad during a meeting to select the green shield button in the upper-left corner. That displays the meeting details, and a Join by Laptop button (the second screenshot below) shows the necessary URL, meeting ID, and passcode to share in another channel, like Messages or the phone. There’s no other way to share a link to a meeting that we could find.
Joining someone else’s meeting is difficult. Most Zoom meetings are shared via a link, and once you click or tap it in email, Messages, a calendar event, or on a website, the meeting starts. The Apple TV breaks that model—there’s no apparent way to load a Zoom link. FaceTime sidesteps this limitation by making it easy to move a call from the iPhone to the Apple TV—just put the iPhone close to the Apple TV, and a notification will suggest the move. Zoom offers no such option.
Instead, to join a Zoom call, you must manually enter the meeting ID and passcode. If you’ve been sent only the link, you’ll have to request the passcode separately (the numeric meeting ID can be extracted from the URL). Entering characters with the Siri Remote is slow and awkward, so we recommend using Siri, which recognizes spoken numbers well (hold down the Siri button on the side of the remote). You could also use an iPhone or iPad as a remote control for the Apple TV since you can type more effectively or use copy and paste on those devices. But if you’re already using your iPhone for Continuity Camera, for instance, you’ll need another device. Zoom does provide a Meeting History, which is helpful for recurring meetings, but you must still enter the passcode each time.

Once you start a call, touch the clickpad on the Siri Remote to display the Zoom menu at the bottom of the screen. You can then navigate using the clickpad (press the center to activate the selected command) and the Back button. Available options let you mute yourself, turn your video off and on, switch between the usual Zoom views, display Zoom reactions, manage participants, invite more people, turn on captions, and control the Continuity Camera video effects (Center Stage, Portrait Mode, and Apple’s gestural Reactions). Center Stage does an excellent job of following you around as you move. Portrait Mode just makes the background a little fuzzy; it’s not a strong effect. If you press the Back button to leave the Zoom app, your video pauses for others on the call.

Two common Zoom actions don’t translate fully to the Apple TV: chat and screen sharing. Incoming chat messages appear on the Apple TV in the corner, but only for 6 seconds, and longer messages are truncated after a handful of lines. There’s no way to keep them onscreen longer or get back to them. There’s no way to reply to chat messages. Zoom on the Apple TV does provide an option to share the screen, but that’s the screen of another device—there’s no app or desktop to share on the Apple TV, and no, you can’t share video.
Overall, the Zoom app for Apple TV feels like a 1.0. Most of the features that make sense are present, but fully adapting to a platform that lacks a keyboard or any way to follow links will take Zoom some time. If the company could add the capability to move an in-progress call from an iPhone or iPad to an Apple TV as FaceTime can, that would help a lot. Another possible concern is the need to have the Apple ID on the Apple TV match the one on the iPhone—all the possible logins could get confusing in a larger office.
Regardless, Zoom on the Apple TV works well enough to try out. Just make sure to run through the initial setup well before your meeting is due to start.
(Featured image based on an original by iStock.com/gorodenkoff)
Use iOS 17.3’s Stolen Device Protection to Reduce Harm from iPhone Passcode Thefts
In iOS 17.3, Apple has introduced Stolen Device Protection to discourage iPhone thefts enabled by a revealed passcode. It requires additional biometric authentication, and we recommend that everyone who uses Face ID or Touch ID enable it.

Last year, a series of articles by Wall Street Journal reporters Joanna Stern and Nicole Nguyen highlighted a troubling form of crime targeting iPhone users. A thief would discover the victim’s iPhone passcode, swipe the iPhone, and run. With just the passcode, the thief could quickly change the victim’s Apple ID password, lock them out of their iCloud account, and use apps and data on the iPhone to steal money, buy things, and wreak digital havoc.
In essence, Apple allowed the passcode, which could be determined by shoulder surfing, surreptitious filming, or social engineering, to be too powerful, and criminals took advantage of the vulnerability. It’s best to use Face ID or Touch ID, especially in public, but some people continue to rely solely on the passcode.
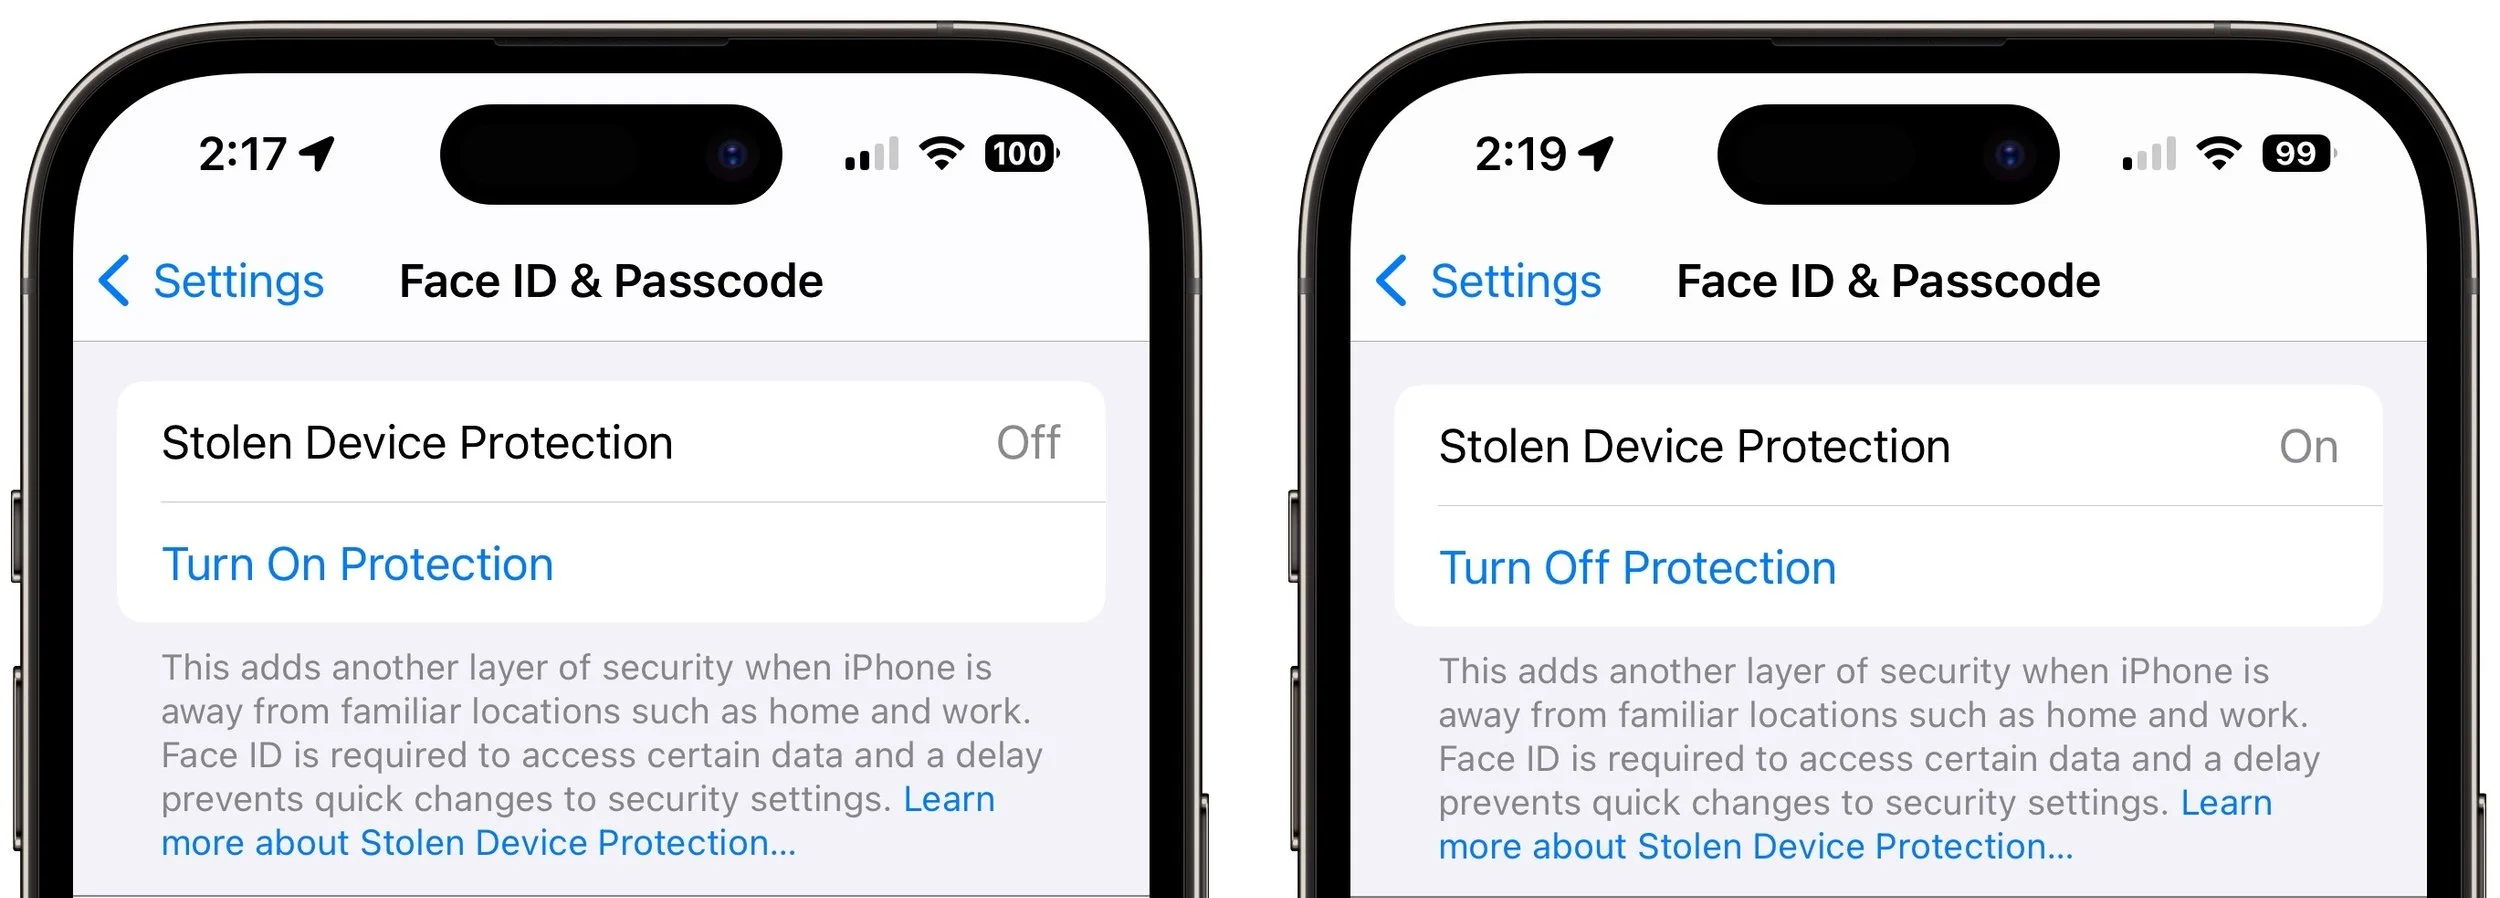
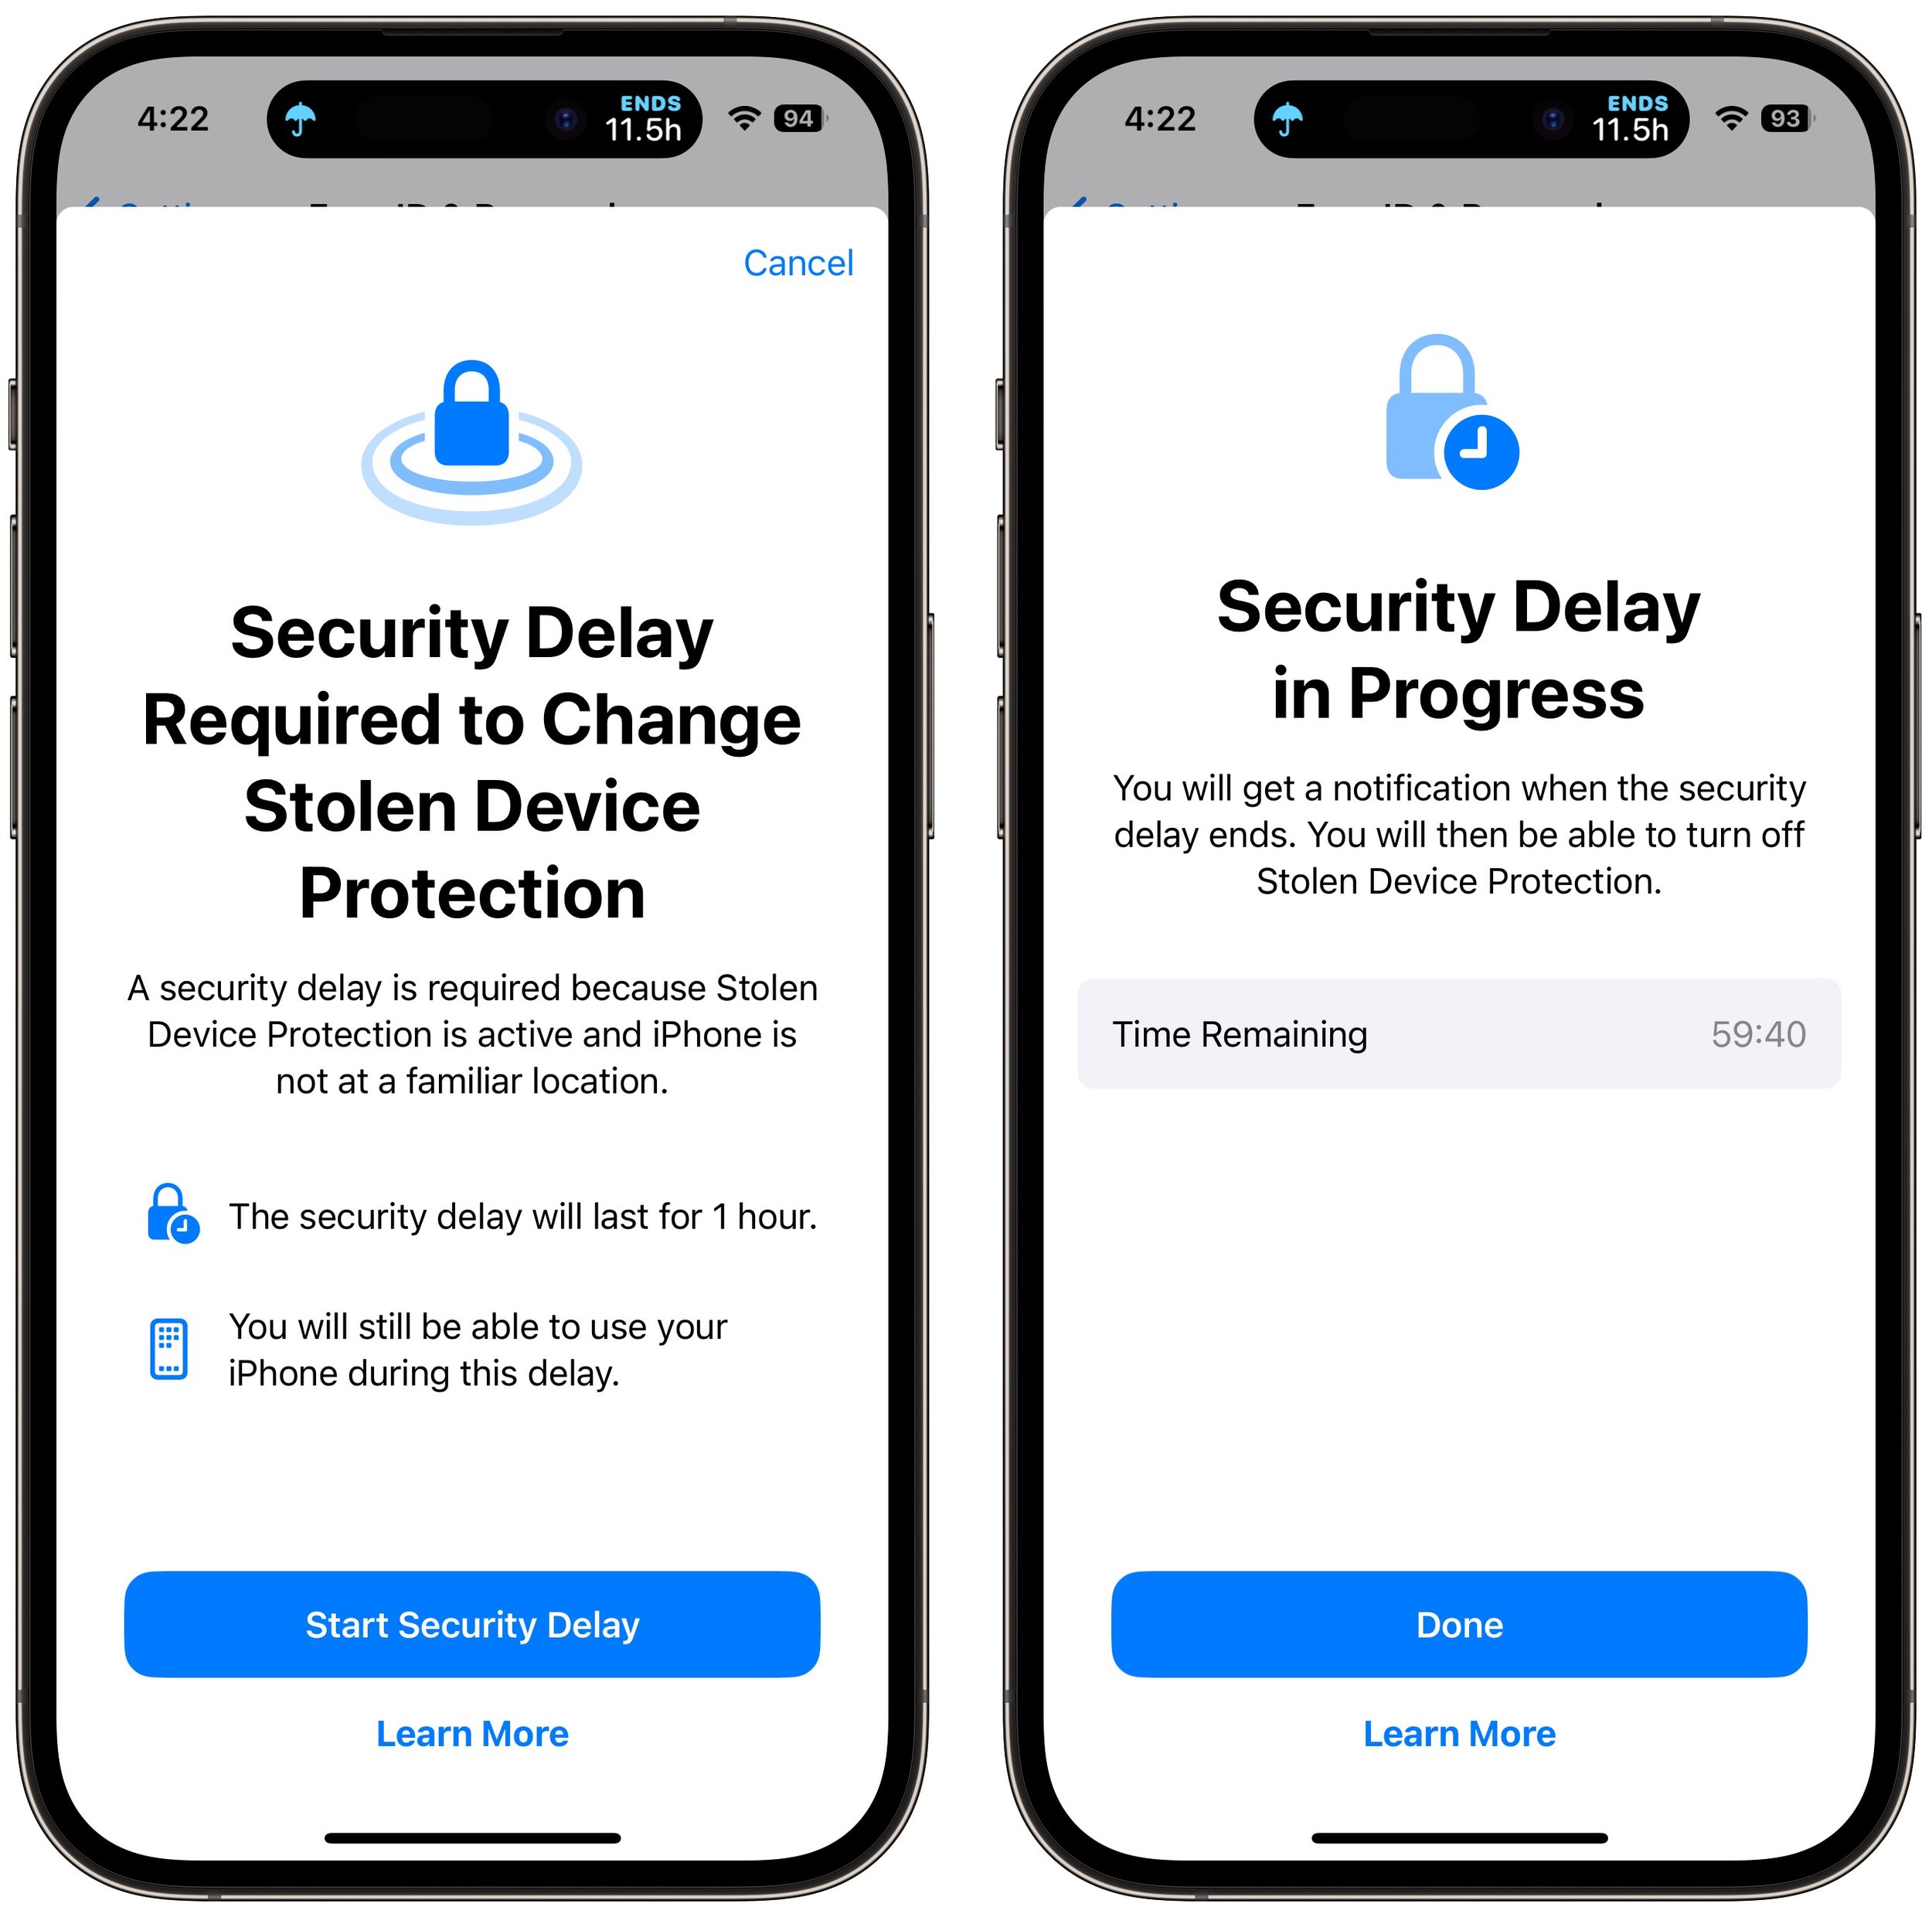
Apple has now addressed the problem for iPhone users with the new Stolen Device Protection feature in iOS 17.3. It protects critical security and financial actions by requiring biometric authentication—Face ID or Touch ID—when you’re not in a familiar location like home or work. The most critical actions also trigger an hour-long security delay before a second biometric authentication. We recommend everyone who uses Face ID and Touch ID turn on Stolen Device Protection. The feature is not available for the iPad or Mac, but neither is as likely to be used in places like the crowded bars where many iPhones have been snatched.
How Stolen Device Protection Works
The location aspect of Stolen Device Protection is key. When you’re in a “significant location,” a place your iPhone has determined you frequent, you can do everything related to security and financial details just as you have been able to in the past, including using the passcode as an alternative or fallback.
However, when you’re in an unfamiliar location, as you would likely be if you were out in public where someone might steal your iPhone, Stolen Device Protection requires biometric authentication to:
Use passwords or passkeys saved in Keychain
Use payment methods saved in Safari (autofill)
Turn off Lost Mode
Erase all content and settings
Apply for a new Apple Card
View an Apple Card virtual card number
Take certain Apple Cash and Savings actions in Wallet (for example, Apple Cash or Savings transfers)
Use your iPhone to set up a new device (for example, Quick Start)
Some actions have even more serious consequences, so for them, Stolen Device Protection requires biometric authentication, an hour security delay—shown with a countdown timer—and then a second biometric authentication. The delay reduces the chances of an attacker forcing you to authenticate with the threat of violence. You’ll need to go through the double authentication plus delay when you want to:
Change your Apple ID password (Apple notes this may prevent the location of your devices from appearing on iCloud.com for a while)
Sign out of your Apple ID
Update Apple ID account security settings (such as adding or removing a trusted device, Recovery Key, or Recovery Contact)
Add or remove Face ID or Touch ID
Change your iPhone passcode
Reset All Settings
Turn off Find My
Turn off Stolen Device Protection
There are a few caveats to keep in mind:
The iPhone passcode still works for purchases made with Apple Pay, so a thief could steal your passcode and iPhone and buy things.
Although Apple says it’s required, you can turn off Significant Locations to require the extra biometric authentication and security delay everywhere. That would eliminate the worry about a thief using Significant Locations to go to your most recent familiar spot in an attempt to sidestep the extra authentication.
If you plan to sell, give away, or trade in your iPhone, make sure to turn off Stolen Device Protection first. Once it’s out of your physical control, no one else will be able to reset it.
Turn On Stolen Device Protection
Before you get started, note that Apple says you must be using two-factor authentication for your Apple ID (everyone should be anyway), have a passcode set up for your iPhone (ditto), turn on Face ID or Touch ID, enable Find My, and turn on Significant Locations (Settings > Privacy & Security > Location Services > System Services > Significant Locations), although this last one doesn’t actually seem to be required.
Then, go to Settings > Face ID/Touch ID & Passcode, enter your passcode, and tap Turn On Protection. (If it’s enabled, tap Turn Off Protection to remove its additional safeguards.)
Once Stolen Device Protection is on and you’re in an unfamiliar location, the actions listed above will require either biometric authentication or two biometric authentications separated by the hour-long security delay.
There is one group of people who should not turn on Stolen Device Protection: those for whom Face ID or Touch ID don’t work. Most people have no trouble with Apple’s biometric technologies, but some people have worn off their fingerprints or have other physical features that confuse Touch ID or, less commonly, Face ID.
If that’s you, stick with our general recommendation for discouraging possible iPhone thefts: Never enter your iPhone passcode in public where it could be observed.
(Featured image by iStock.com/AntonioGuillem)
How to Search Directly in Your Favorite Websites from Safari’s Search Bar
Do you frequently use the internal search engine on a website? You can now search that site faster using Safari’s Quick Website Search feature, which automatically learns which sites you search.

We’re all accustomed to searching the Web generally in Safari by typing in the search field and pressing Return or tapping Go. Most of us are also familiar with the search suggestions that Safari shows below the search field as we type.
But did you know that Safari has a feature that lets you use the search field to search directly within your favorite websites, so you don’t have to wade through unnecessary search engine results or navigate somewhere manually before searching? It’s called Quick Website Search and is available for the Mac, iPhone, and iPad. It’s helpful for websites within which you search often. For example, we often search for technical information on Apple’s website. You might find the feature helpful for searching Amazon or another shopping site, a help center, or an events calendar.
All you have to do to prime Quick Website Search’s pump is search a website using its internal search option. Look for a magnifying glass or Search option, enter a term in the search field, and submit the search. It doesn’t matter what you search for—all you’re doing is teaching Safari how to search on that site, and it will remember the site from then on.
Later, to look for pages only from that site, enter three or four characters from its name (don’t accept any auto-completions!), a space, and then your search term. Don’t press Return or tap Go, however. Instead, pick the suggestion from the suggestion list under the “Search sitename” heading.

Safari then sends the search directly to the site in question, so instead of results from Google or your default search engine, you’ll see the results on the desired site.
The process is the same on the iPhone and iPad, although Safari on those platforms doesn’t remember websites you’ve searched as reliably.
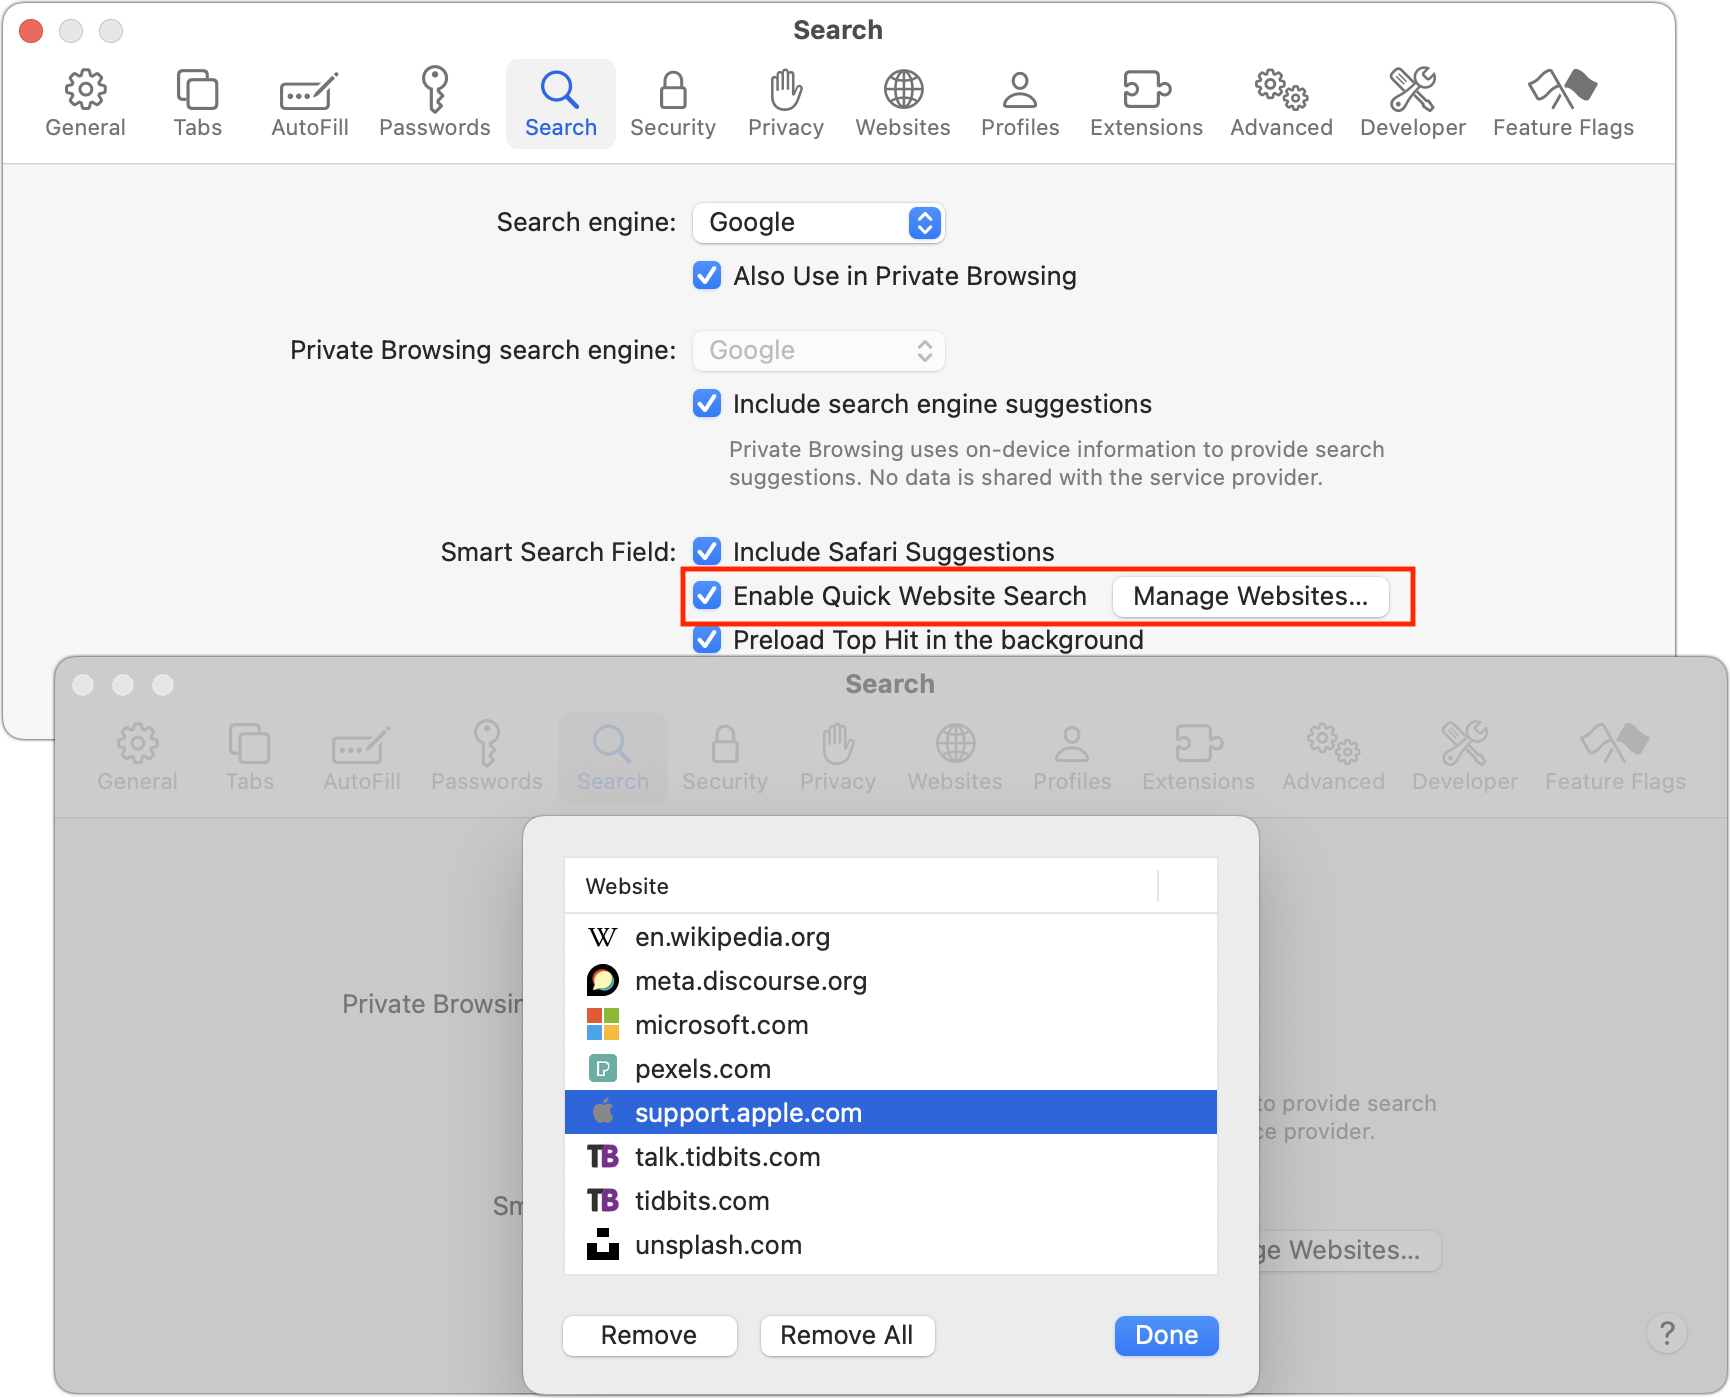
On the Mac, you can see which sites Quick Website Search has remembered and remove them by opening Safari > Settings > Search and clicking Manage Websites next to Enable Quick Website Search.
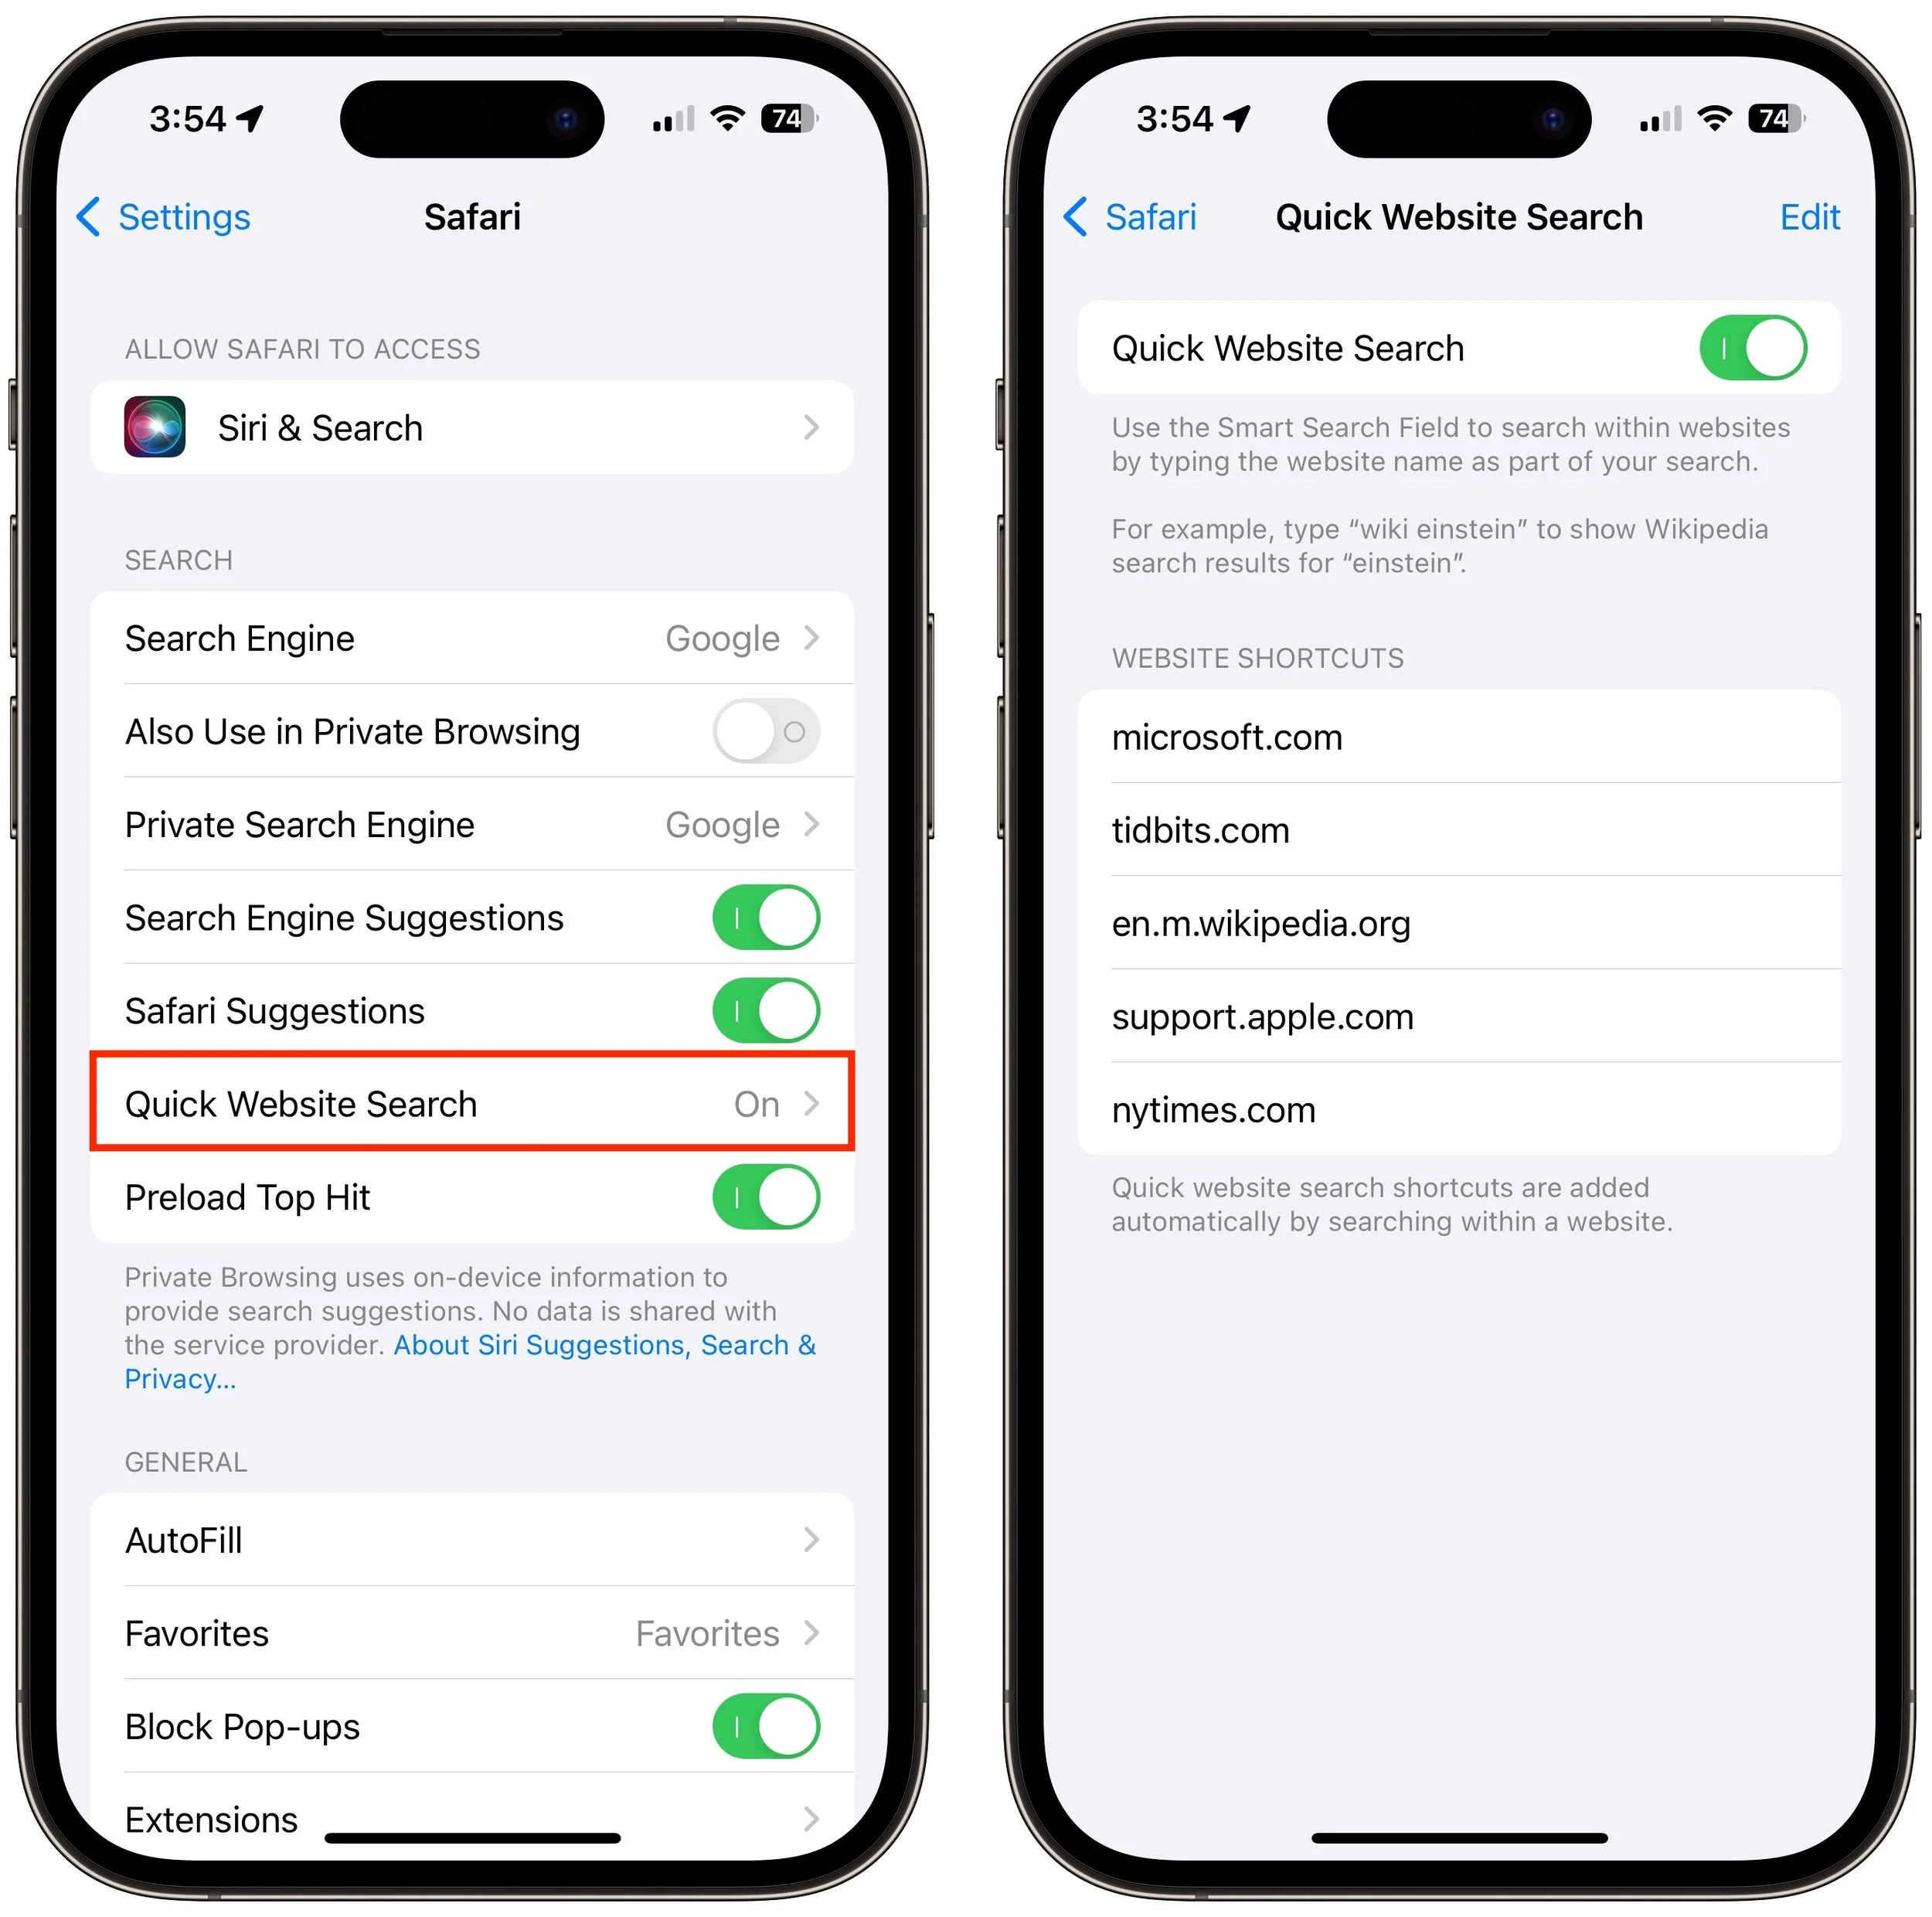
On the iPhone and iPad, open Settings > Safari > Quick Website Search to see and remove the remembered sites.
This way of searching within a website can be a big productivity win, so it probably won’t take long to get used to this new way of jumping into your most used websites’ internal search engines.
(Featured image based on an original by iStock.com/YiuCheung)
Help! My Account Has Been Hacked—What Should I Do?
If you notice strange behavior in your online accounts, you might have been hacked. It’s imperative that you act immediately to verify the breach, change passwords, lock accounts, and alert support personnel. We provide steps here.

How would you realize that one or more of your Internet accounts—email, social media, financial—have been hacked? (Some prefer the terms “compromised” or “breached”—you may hear them from support techs.) Unfortunately, there’s no tell-tale warning sign because “hacked” could mean any number of things. Here are some possible indications:
People you trust report receiving email that you didn’t send.
Social media friend requests are made to people you don’t know, or messages you don’t recognize are sent from your account.
Although you’re certain you have the correct password, you can’t log in to an account.
You become aware of your personal data appearing in places it shouldn’t.
Unknown charges or transfers appear in a bank or credit card account.
However, attackers will also try to fool you into thinking an account has been compromised to get you to enter passwords or financial information on a website designed to steal data. Don’t assume you’ve been hacked just because you received a phishing email saying so or because you see unexpected notifications claiming your computer is infected. No legitimate entity will ever send such email, and the only notification about malware you should ever see would come from anti-malware software you installed.
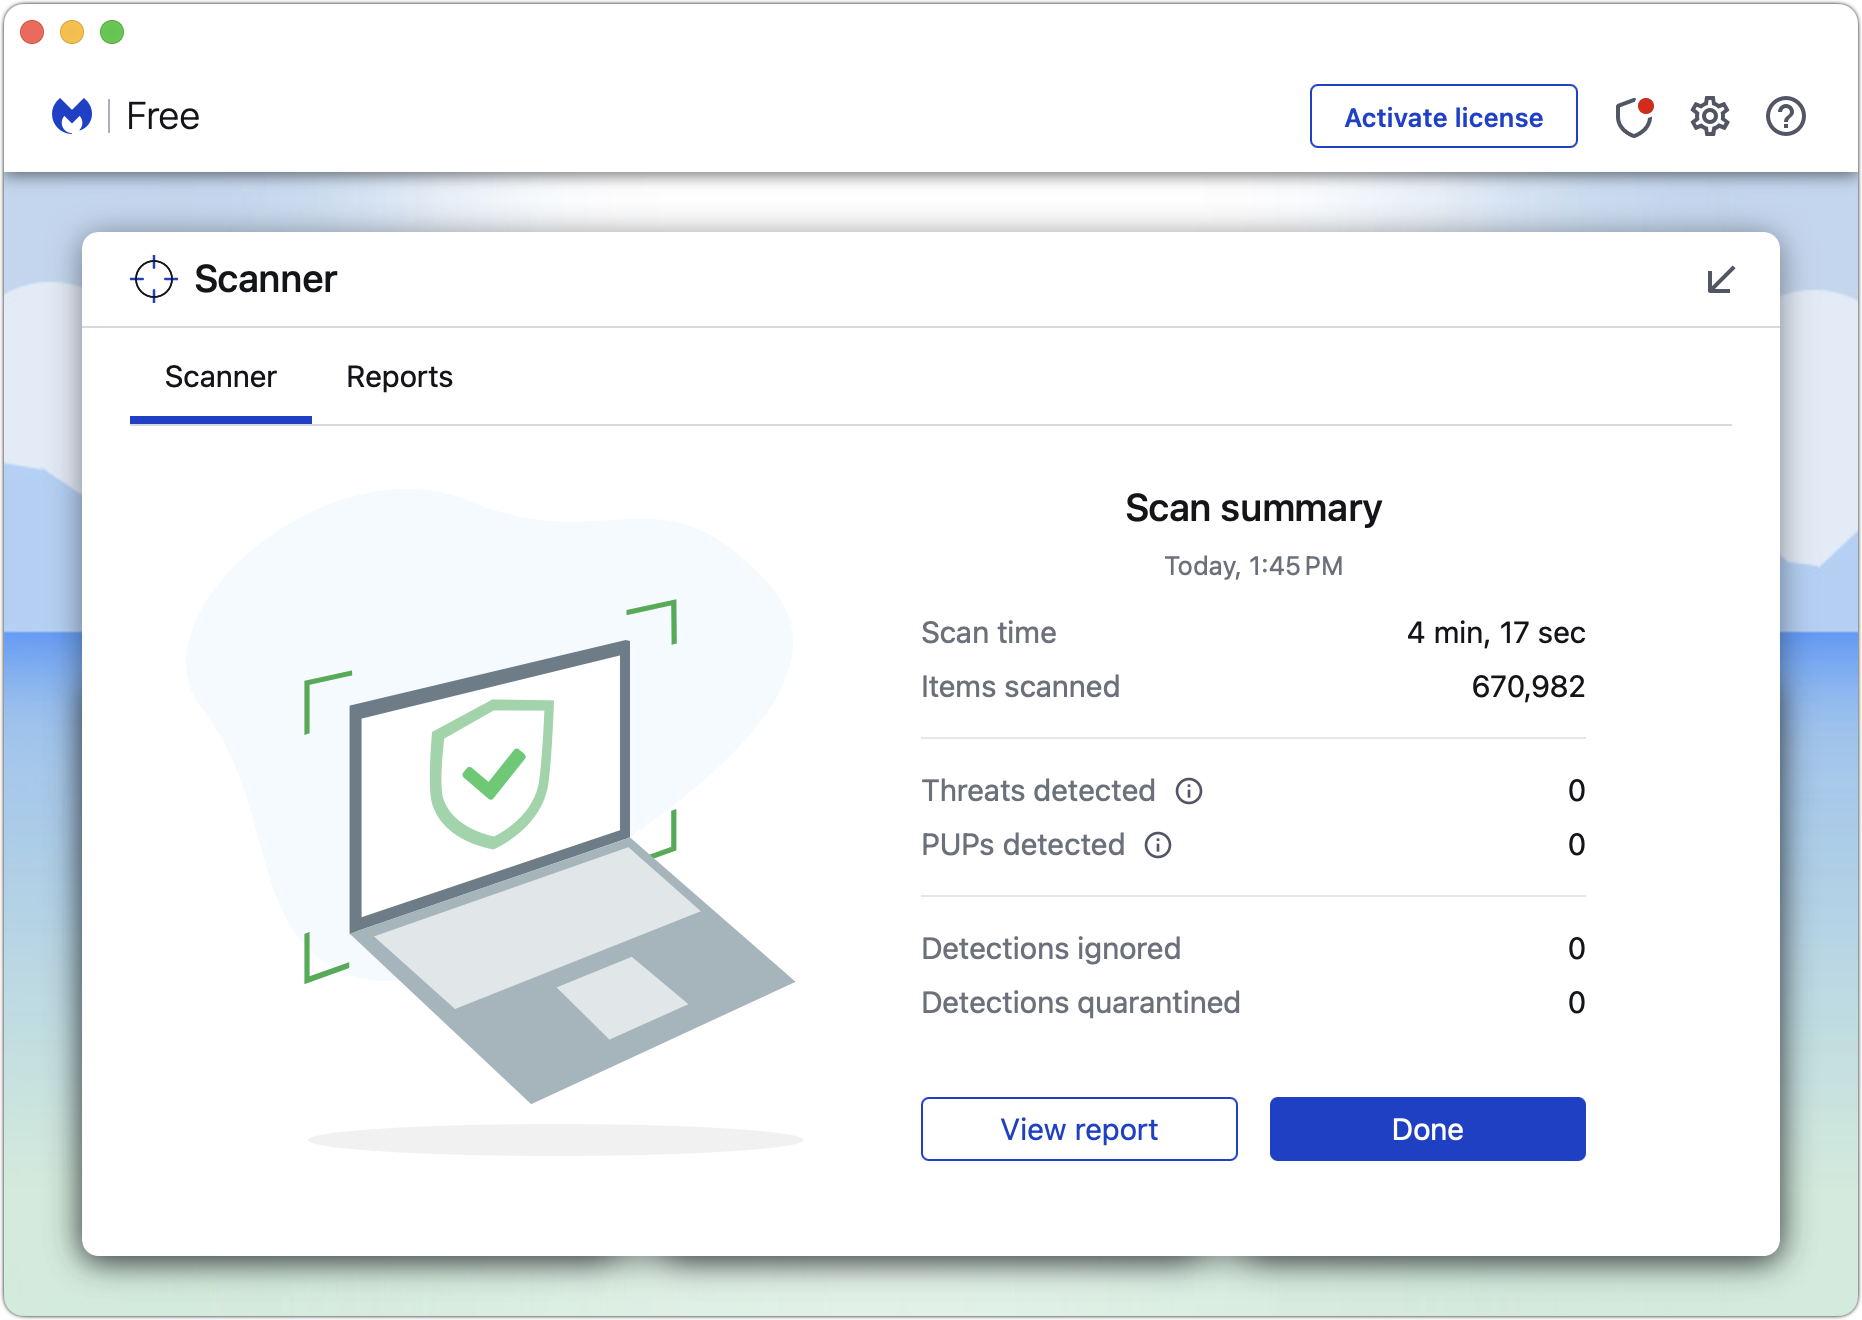
(Speaking of malware, dealing with that is a topic for another day—we’re focusing on online accounts in this article. Nonetheless, if one of your accounts has been compromised, it’s also worth scanning your Mac with the free version of Malwarebytes or VirusBarrier Scanner, just in case.)
First off, don’t panic. It’s important to take a deep breath, document everything you see with screenshots (press Command-Shift-5), and move quickly to regain control over whatever accounts were hacked and prevent others from falling prey to the attacker.
When you suspect an account has been compromised, try to verify the problem. Do the following:
Alert techs: If the account in question is for work, immediately alert your IT department and follow their instructions. If it’s a personal account, contact us. Tell whoever is helping you that you have screenshots you can send and be ready to forward any suspicious messages you have as well.
Gather evidence: Ask the person who told you about the problem to forward the message they received to another of your email addresses, or to a close friend or family member so you can see what’s being said in your name. Scrutiny of the fake message may reveal information about what has happened, though you may need help from someone with more technical experience.
Examine email: Since email account breaches are the most concerning (because they can be used to reset passwords elsewhere), scan your email for messages you didn’t send or replies to such messages. Along with the Inbox, look in the Sent mailbox and the Trash. Also, check your settings and filters to ensure incoming messages aren’t being forwarded elsewhere and then deleted.
Check social media: Connect to all your social media accounts—even those you don’t use regularly—and look for posts, friend requests, messages, or anything else that suggests an attacker has been impersonating you.
Audit accounts: Log in to important accounts and look for suspicious activity, such as login attempts from unfamiliar locations or IP addresses or changes to account settings.
If you find evidence to suggest that one or more of your accounts have been compromised, follow these steps:
Immediately change the passwords for any affected accounts. We always recommend using a password manager like 1Password to generate strong, random passwords.
Whenever possible, turn on two-factor authentication.
If available for the account in question, follow advice from the service. Apple, Facebook, Google, Instagram, Microsoft, and Twitter all have advice on how to respond, as will many other companies.
Review account settings for unauthorized changes, especially recovery options like backup phone numbers and email addresses.
Look through your accounts in your password manager and change the passwords for the most important ones and any that might be related.
If you can’t get into an account because the password has been changed, make sure you have sole control of your email account and then trigger a password reset.
For affected financial accounts, along with changing the password, immediately call the institution and ask for their help locking the account to prevent any transfers.
If your email account was used to send phishing messages to contacts, you should alert any friends, family, and colleagues who might have received the messages that your account was hacked and that the previous message wasn’t from you.
Security breaches are stressful, we know, but it’s imperative that you deal with them right away. The longer you wait, the more damage the attacker can cause, including stealing your money, impersonating you, scamming your friends and family, and compromising your employer’s systems. We’re here to help.
(Featured image by iStock.com/PUGUN SJ)
Turn Your Most-Used Sites into Safari Web Apps in macOS 14 Sonoma
Safari in macOS 14 Sonoma introduced Web apps—also known as site-specific browsers—that let you turn a website into what looks and feels like an independent app on your Mac.

The concept of site-specific browsers has been around for a long time, but in the version of Safari that comes with macOS 14 Sonoma, Apple brought it to the big time by making setup easier than ever.
Put simply, a site-specific browser is a Mac app that encapsulates a single Web app or site. The goal is to break a website out of a Web browser and turn it into what looks and works like a regular Mac app. Gmail the Web app can become Gmail the Mac app.
What kind of websites might you want to turn into a standalone app? Beyond Gmail, consider Google Docs, Netflix, Notion, QuickBooks, and any other Web-focused app that feels more natural as a standalone app. Additionally, a site-specific browser can be helpful for any website you use regularly throughout the day, such as a discussion site, news aggregator, or company intranet.
To create a Web app in Safari, open the desired page, choose File > Add to Dock, and give the app your desired name.
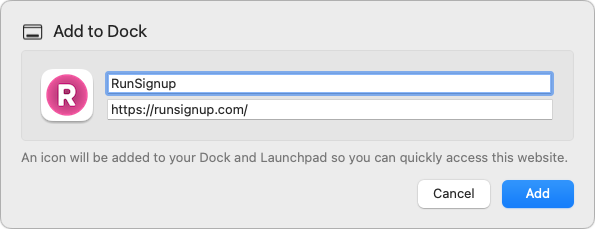
That’s it! Safari saves the Web app to the Applications folder in your Home folder (not the regular top-level Applications folder), adds it to the next open spot on the Dock and in Launchpad, and enables you to open it using Spotlight. The tab you had open in Safari remains open, so close that and launch the new Web app from the Dock.
Web apps look and feel just like Web pages in Safari, with a few exceptions:
If you click a link to another page on the same website as the Web app, the page opens within the window, but clicking a link to another website opens it in Safari as a new tab. There are a few special cases, too—double-clicking a document in a Google Drive Web app opens it in a new window within the Web app rather than in Safari.
Web apps have their own browsing history, cookies, website data, and settings, which aren’t shared with Safari.
Web app toolbars have only back and forward buttons and a Share button. They lack an address bar, bookmarks, tabs, and extensions, but you can switch back to Safari to get those—choose File > Open in Safari.
For websites that have notifications, the Web app’s icon in the Dock can show the number of unread notifications.
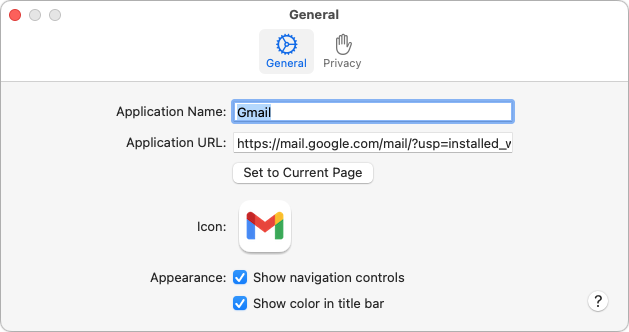
To tweak the name or appearance of the Web app, click the app’s name in the menu bar and choose Settings. The only option that isn’t obvious is the icon—if it’s too fuzzy or not what you prefer, click it and select a file in the dialog that appears. You can select either an image file or another app. (Hint: To find more icons, search for “AppName icon” in Google or Bing.)
Keep these tips about Web apps in mind:
You can remove a Web app from the Dock without deleting it from your drive.
To delete a Web app, drag its icon from your Home folder’s Applications folder to the trash.
To make the Web app launch at login, add it to your login items in System Settings > General > Login Items.
Web apps cannot receive incoming URLs on their own. In other words, if you have a Google Docs Web app and click a Google Docs link that someone sends you in email, it will open in your default Web browser, not your Google Docs Web app. However, you can use the $10 utility Choosy to redirect appropriate links to specific Web apps.
Overall, Apple has done a good job with Safari Web apps. They’re easy to create and provide most of what you’ll likely want in an app that encapsulates a website. Give them a try, but if you find yourself needing capabilities beyond what Safari provides, such as access to extensions, support for tabs, more control over how links open, and choices of different browser engines, check out alternative site-specific browser apps like Unite, Coherence X, and WebCatalog.
(Featured image based on an original by iStock.com/Armastas)
Improve Your Digital Security in 2024 with These New Year’s Resolutions
Get ready for a safer 2024 with New Year’s resolutions that will help you secure your devices, avoid scams, block malware, and enjoy the security and ease of use of password managers.

Happy New Year, and welcome to 2024! For many of us, starting a new year means reflecting on fresh habits we’d like to adopt. Although we support any resolutions you may have made to get enough sleep, eat better, exercise more, and reduce social media usage, allow us suggest a few more that will improve your digital security and reduce the chances that bad things will happen to you online.
Back Up All Your Devices
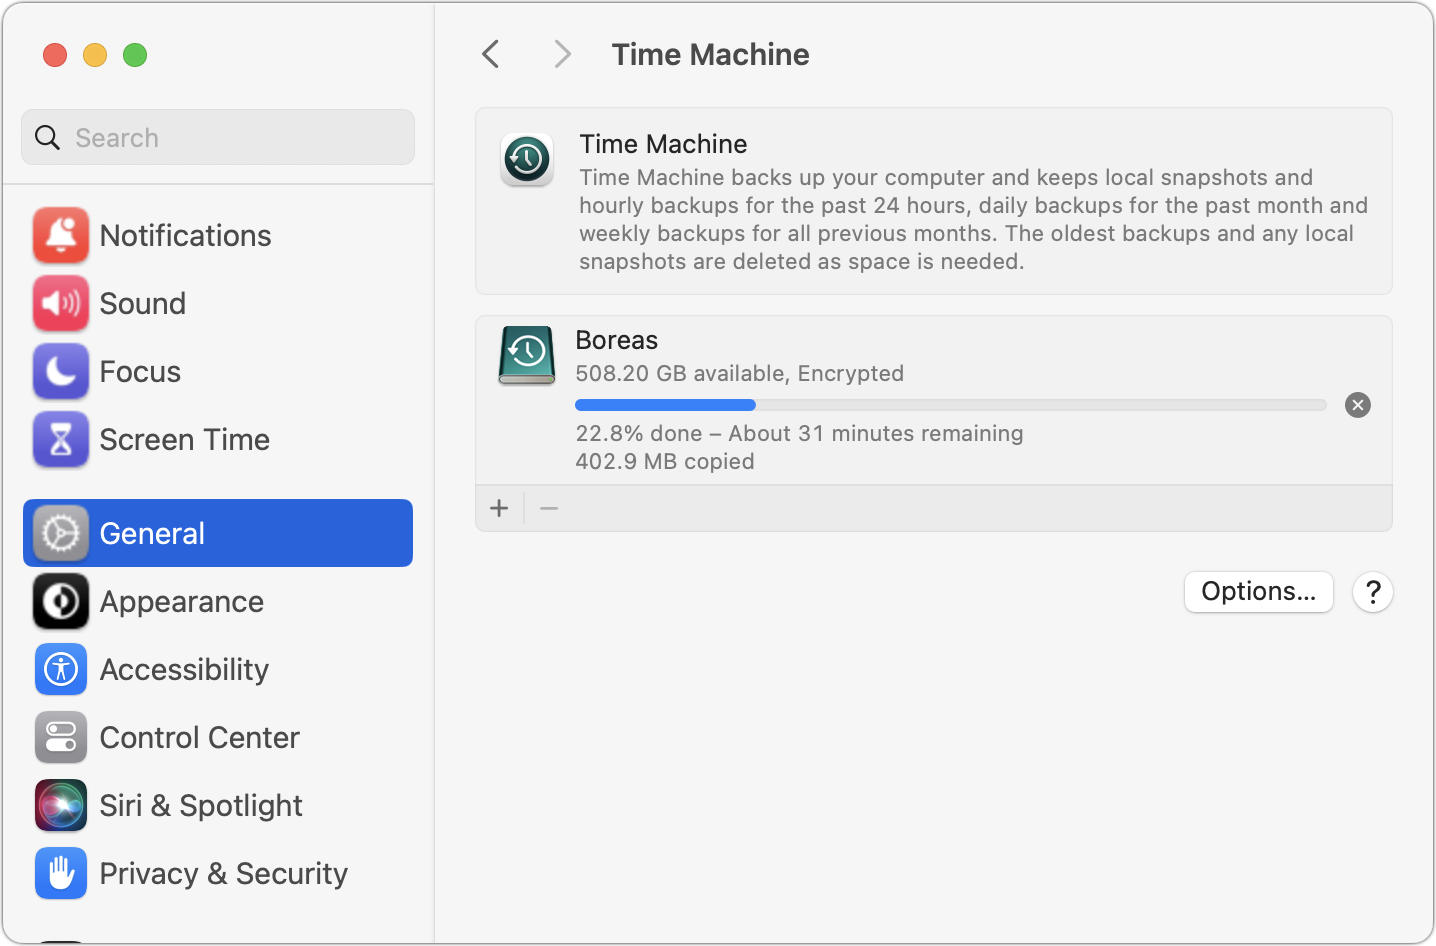
The most important thing you can do to stave off the slings and arrows of digital doom is to make regular backups. Bad things happen to good people, such as a Mac’s SSD failing, an iPhone accidentally falling off a boat, an Apple Watch breaking in a fall, or loss due to theft, fire, or flood. With a good backup strategy, you can recover from nearly any problem.
For the Mac, it’s easiest to back up with Time Machine to an external drive, but remember that an offsite or Internet backup is also essential. With iPhones and iPads, it’s easiest to back up to iCloud, which happens every night automatically if you turn it on in Settings > Your Name > iCloud > iCloud Backup, but you can also back up to your Mac if you don’t have sufficient iCloud storage space. Apple Watches automatically back up to their paired iPhones, so if you protect your iPhone, you can always restore your Apple Watch.
Keep Your Devices Updated
Another key thing you can do to protect your security is to install new operating system updates and security updates soon after Apple releases them. Although the details seldom make the news because they’re both highly specific and highly technical, you can get a sense of how important security updates are by the fact that a typical update addresses 10–30 vulnerabilities that Apple or outside researchers have identified. Some are even zero-day vulnerabilities that are already being exploited in the wild.
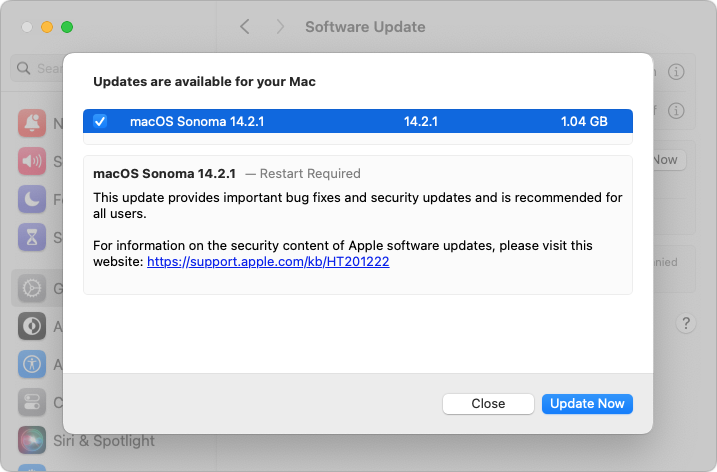
It’s usually a good idea to wait a week or so after an update appears before installing, on the off-chance that it has undesirable side effects. Although such problems are uncommon, when they do happen, Apple pulls the update quickly, fixes it, and releases it again, usually within a few days.
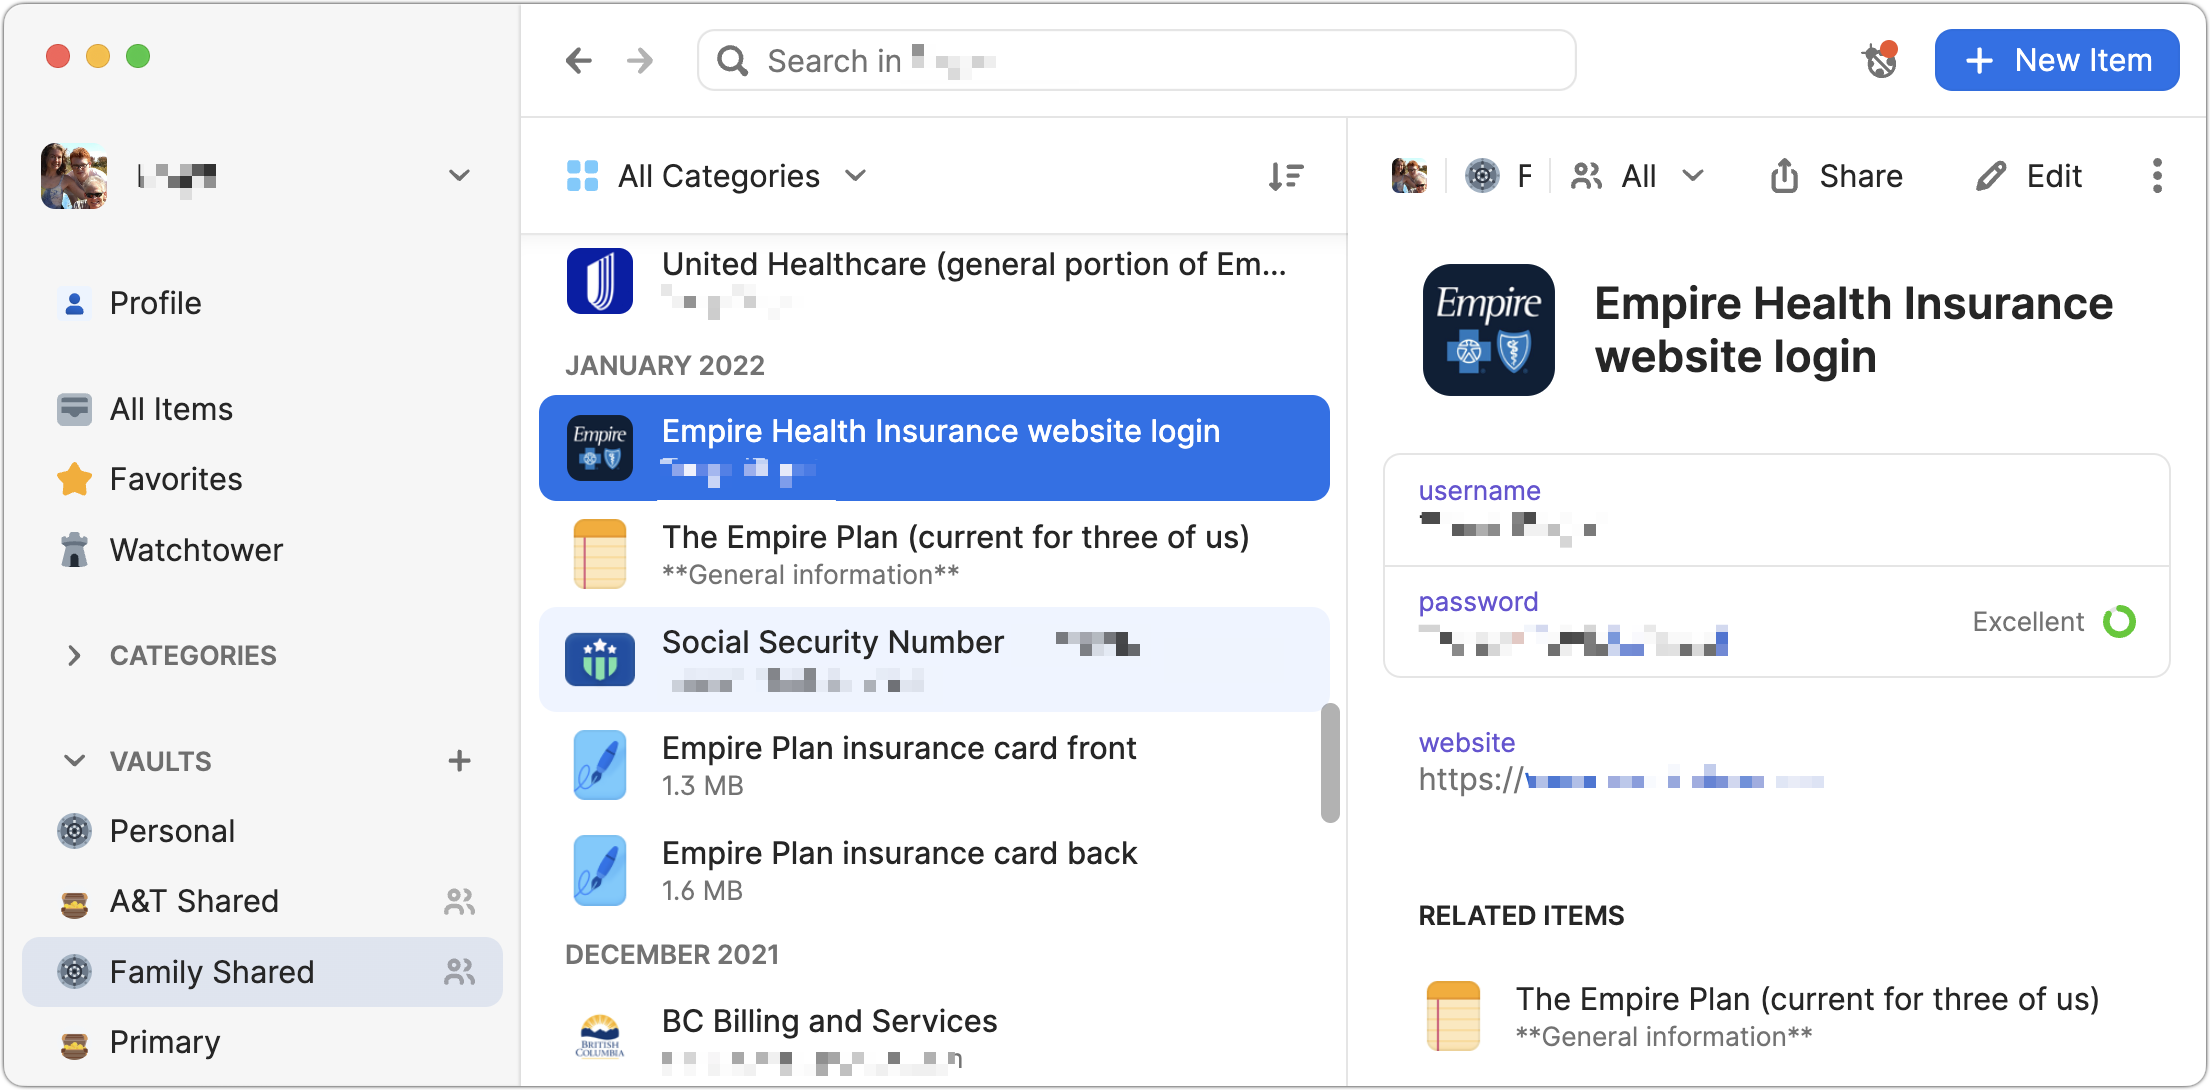
Use a Password Manager
We’ll keep banging the password manager drum until passkeys, the replacement for passwords, have become ubiquitous, which will take years. Until then, if you’re still typing passwords in by hand or copying and pasting from a list you keep in a file, please start using a password manager like 1Password or BitWarden. Even Apple’s built-in password manager and iCloud Keychain are fine, if not as fully featured as the others. A password manager offers five huge benefits:
It generates strong passwords for you. Mypassword1 can be hacked in seconds.
It stores your passwords securely. An Excel file on your desktop is a recipe for disaster.
It enters passwords for you. Wouldn’t that be easier than typing them in manually?
It audits existing accounts. How many of your accounts use the same weak password?
It lets you access passwords on all your devices. Finally, easy logins on your iPhone!
A bonus benefit for families is password sharing. It allows couples to share essential passwords or parents and teens to share specific passwords.
Using a password manager is faster, easier, more secure, and better. If you need help getting started, get in touch.
Beware of Phishing Email
Individuals and businesses frequently suffer from security lapses caused by phishing, forged emails that fool someone into revealing login credentials, credit card numbers, or other sensitive information. Although spam filters catch many phishing attempts, you must always be on guard. Here’s what to watch for:
Any email that tries to get you to reveal information, follow a link, or sign a document
Messages from people you don’t know, asking you to take an unusual action
Direct email from a large company for whom you’re an anonymous customer
Forged email from a trusted source asking for sensitive information
All messages that contain numerous spelling and grammar mistakes

When in doubt, don’t follow the link or reply to the email. Instead, contact the sender another way to see if the message is legit.
Never Respond to Unsolicited Calls or Texts
Although phishing happens mostly via email, scammers also use texts and phone calls. Thanks to weaknesses in the telephone system, such texts and calls can appear to come from well-known companies, including Apple and Amazon. Even worse, with so much online ordering, fake text messages pretending to help you track packages are becoming more common.

For texts, avoid following links unless you recognize the sender and it makes sense that you’d be receiving such a link. (For instance, Apple can text delivery details related to your orders.) Regardless, never enter login information at a site you’ve reached by following a link because there’s no way to know if it’s real. Instead, if you want to learn more, manually navigate to the company’s site by entering its URL, then log in.
For phone calls from companies, unless you’re expecting a call back from a support ticket you opened, don’t answer. Let the call go to voicemail, and if you feel it’s important to respond, look up the company’s phone number elsewhere and talk with someone at that number rather than the one provided by the voicemail.
Avoid Sketchy Websites
We won’t belabor this last one, but suffice it to say that you’re much more likely to pick up malware from sites on the fringes of the Web or that cater to the vices of society. The more you can avoid sites that revolve around pirated software, cryptocurrency, “adult” content, gambling, or sales of illicit substances, the safer you’ll be. That’s not to say that reputable sites haven’t been hacked and used to distribute malware, but it’s far less common.
If you are concerned after spending time in the darker corners of the Web, download a free copy of Malwarebytes or VirusBarrier Scanner and scan for malware manually.
Let’s raise a glass to staying safe online in 2024!
(Featured image by iStock.com/Bet_Noire)
Concerned by the Privacy or Results of Google Search? Try These Other Search Engines
Have you become disillusioned by Google due to its search quality or how it tracks your activity to serve targeted ads? You can try other search engines that promise to protect your privacy and provide independent search results.

Google is big. Google Search generated $225 billion in revenue in 2022, thanks in part to being the default search engine on all Apple devices. To retain that position—and continue to reap the ad revenue that it generates—Google pays Apple about $18 billion every year. Along with Apple, Google pays billions to phone manufacturers like Samsung, LG, and Motorola; major wireless carriers such as AT&T, T-Mobile, and Verizon; and browser developers like Mozilla and Opera.
So is Google Search’s 90% market share because it’s the best search engine or because Google has enough money to pay distributors for top placement?
Along with concerns about whether Google is the best search engine, some people worry about Google collecting information about them to show targeted ads alongside search results. The more information Google has on users, the argument goes, the better that ads can be targeted, and the more likely it is that users will click the ads, which generates money for Google from advertisers. Others worry that Google’s results may reflect certain types of bias.
If you’re perturbed by the privacy implications of Google knowing everything you search for, or if you’ve found Google’s search results less helpful than you’d like, you can easily switch to another search engine to see if you prefer its results and privacy stance.
How to Switch Search Engines
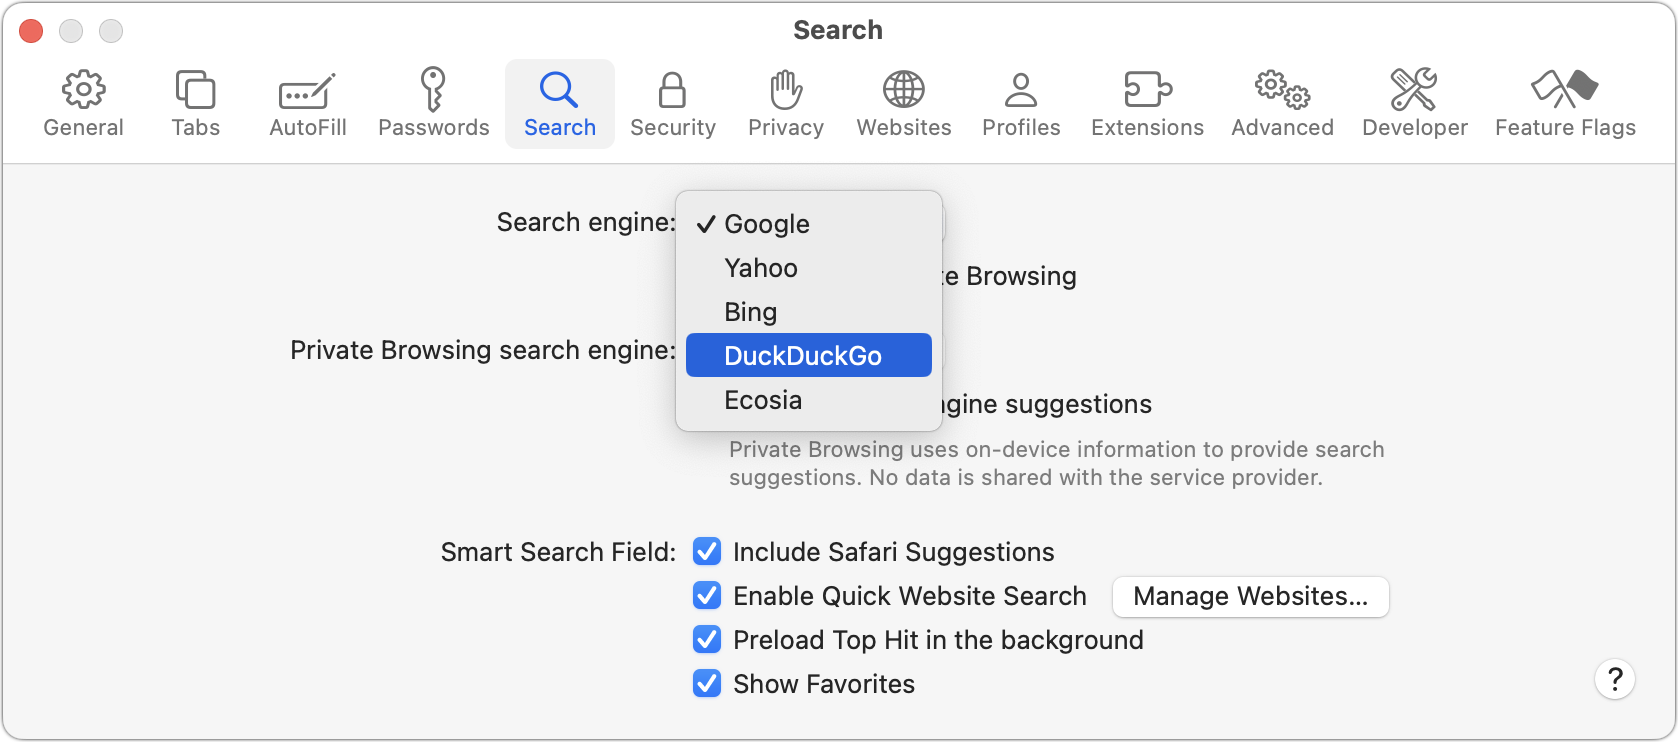
For many Apple users, the main place to choose a preferred search engine is in Safari’s settings. On the Mac, choose Safari > Settings > Search and choose the desired search engine from the Search Engine pop-up menu. You can choose a different one for Private Browsing windows if you want.
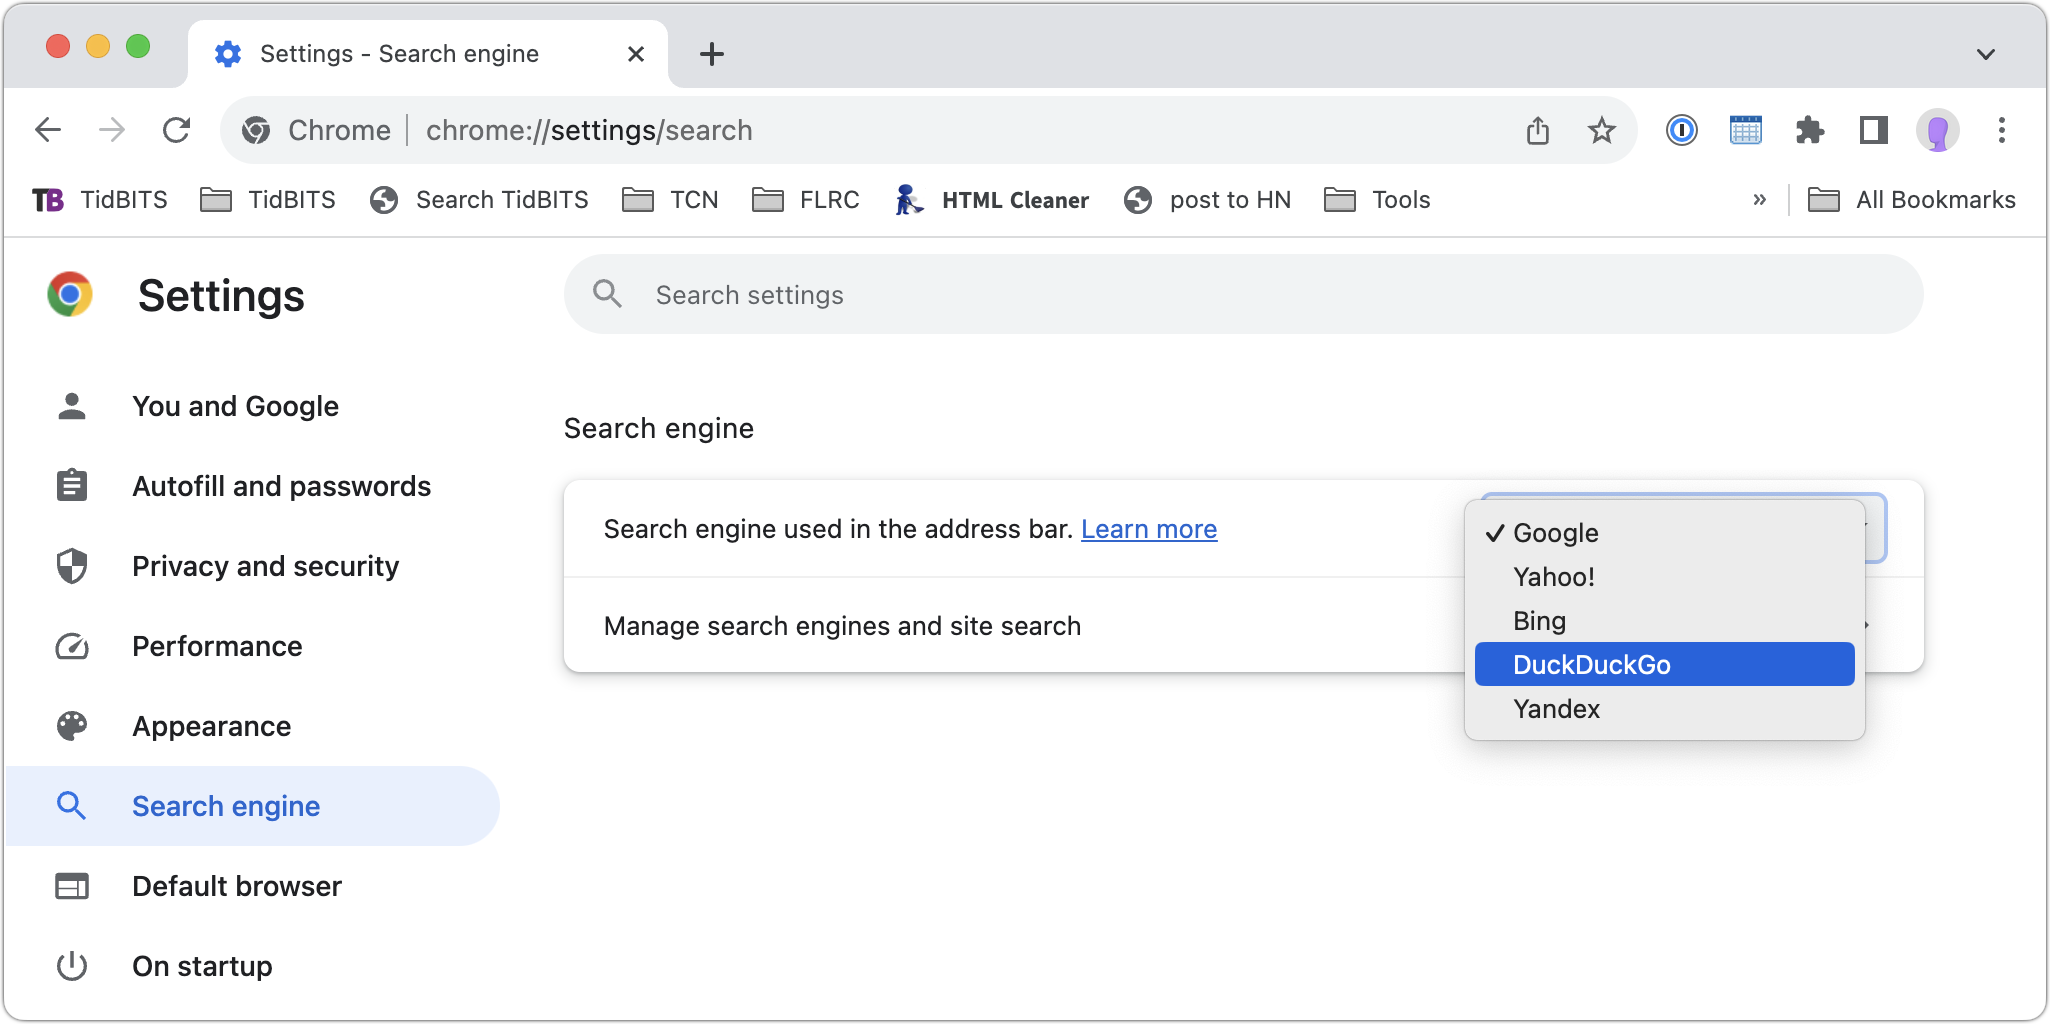
In Chrome-based browsers like Google Chrome, Arc, Brave, Microsoft Edge, and Opera on the Mac, open the settings and look for Search Engine. A pop-up menu lets you choose from some standard options, and additional choices let you add search engines like Brave Search that are too new (or not paying) to appear. Firefox offers similar options when you choose Firefox > Settings > Search.
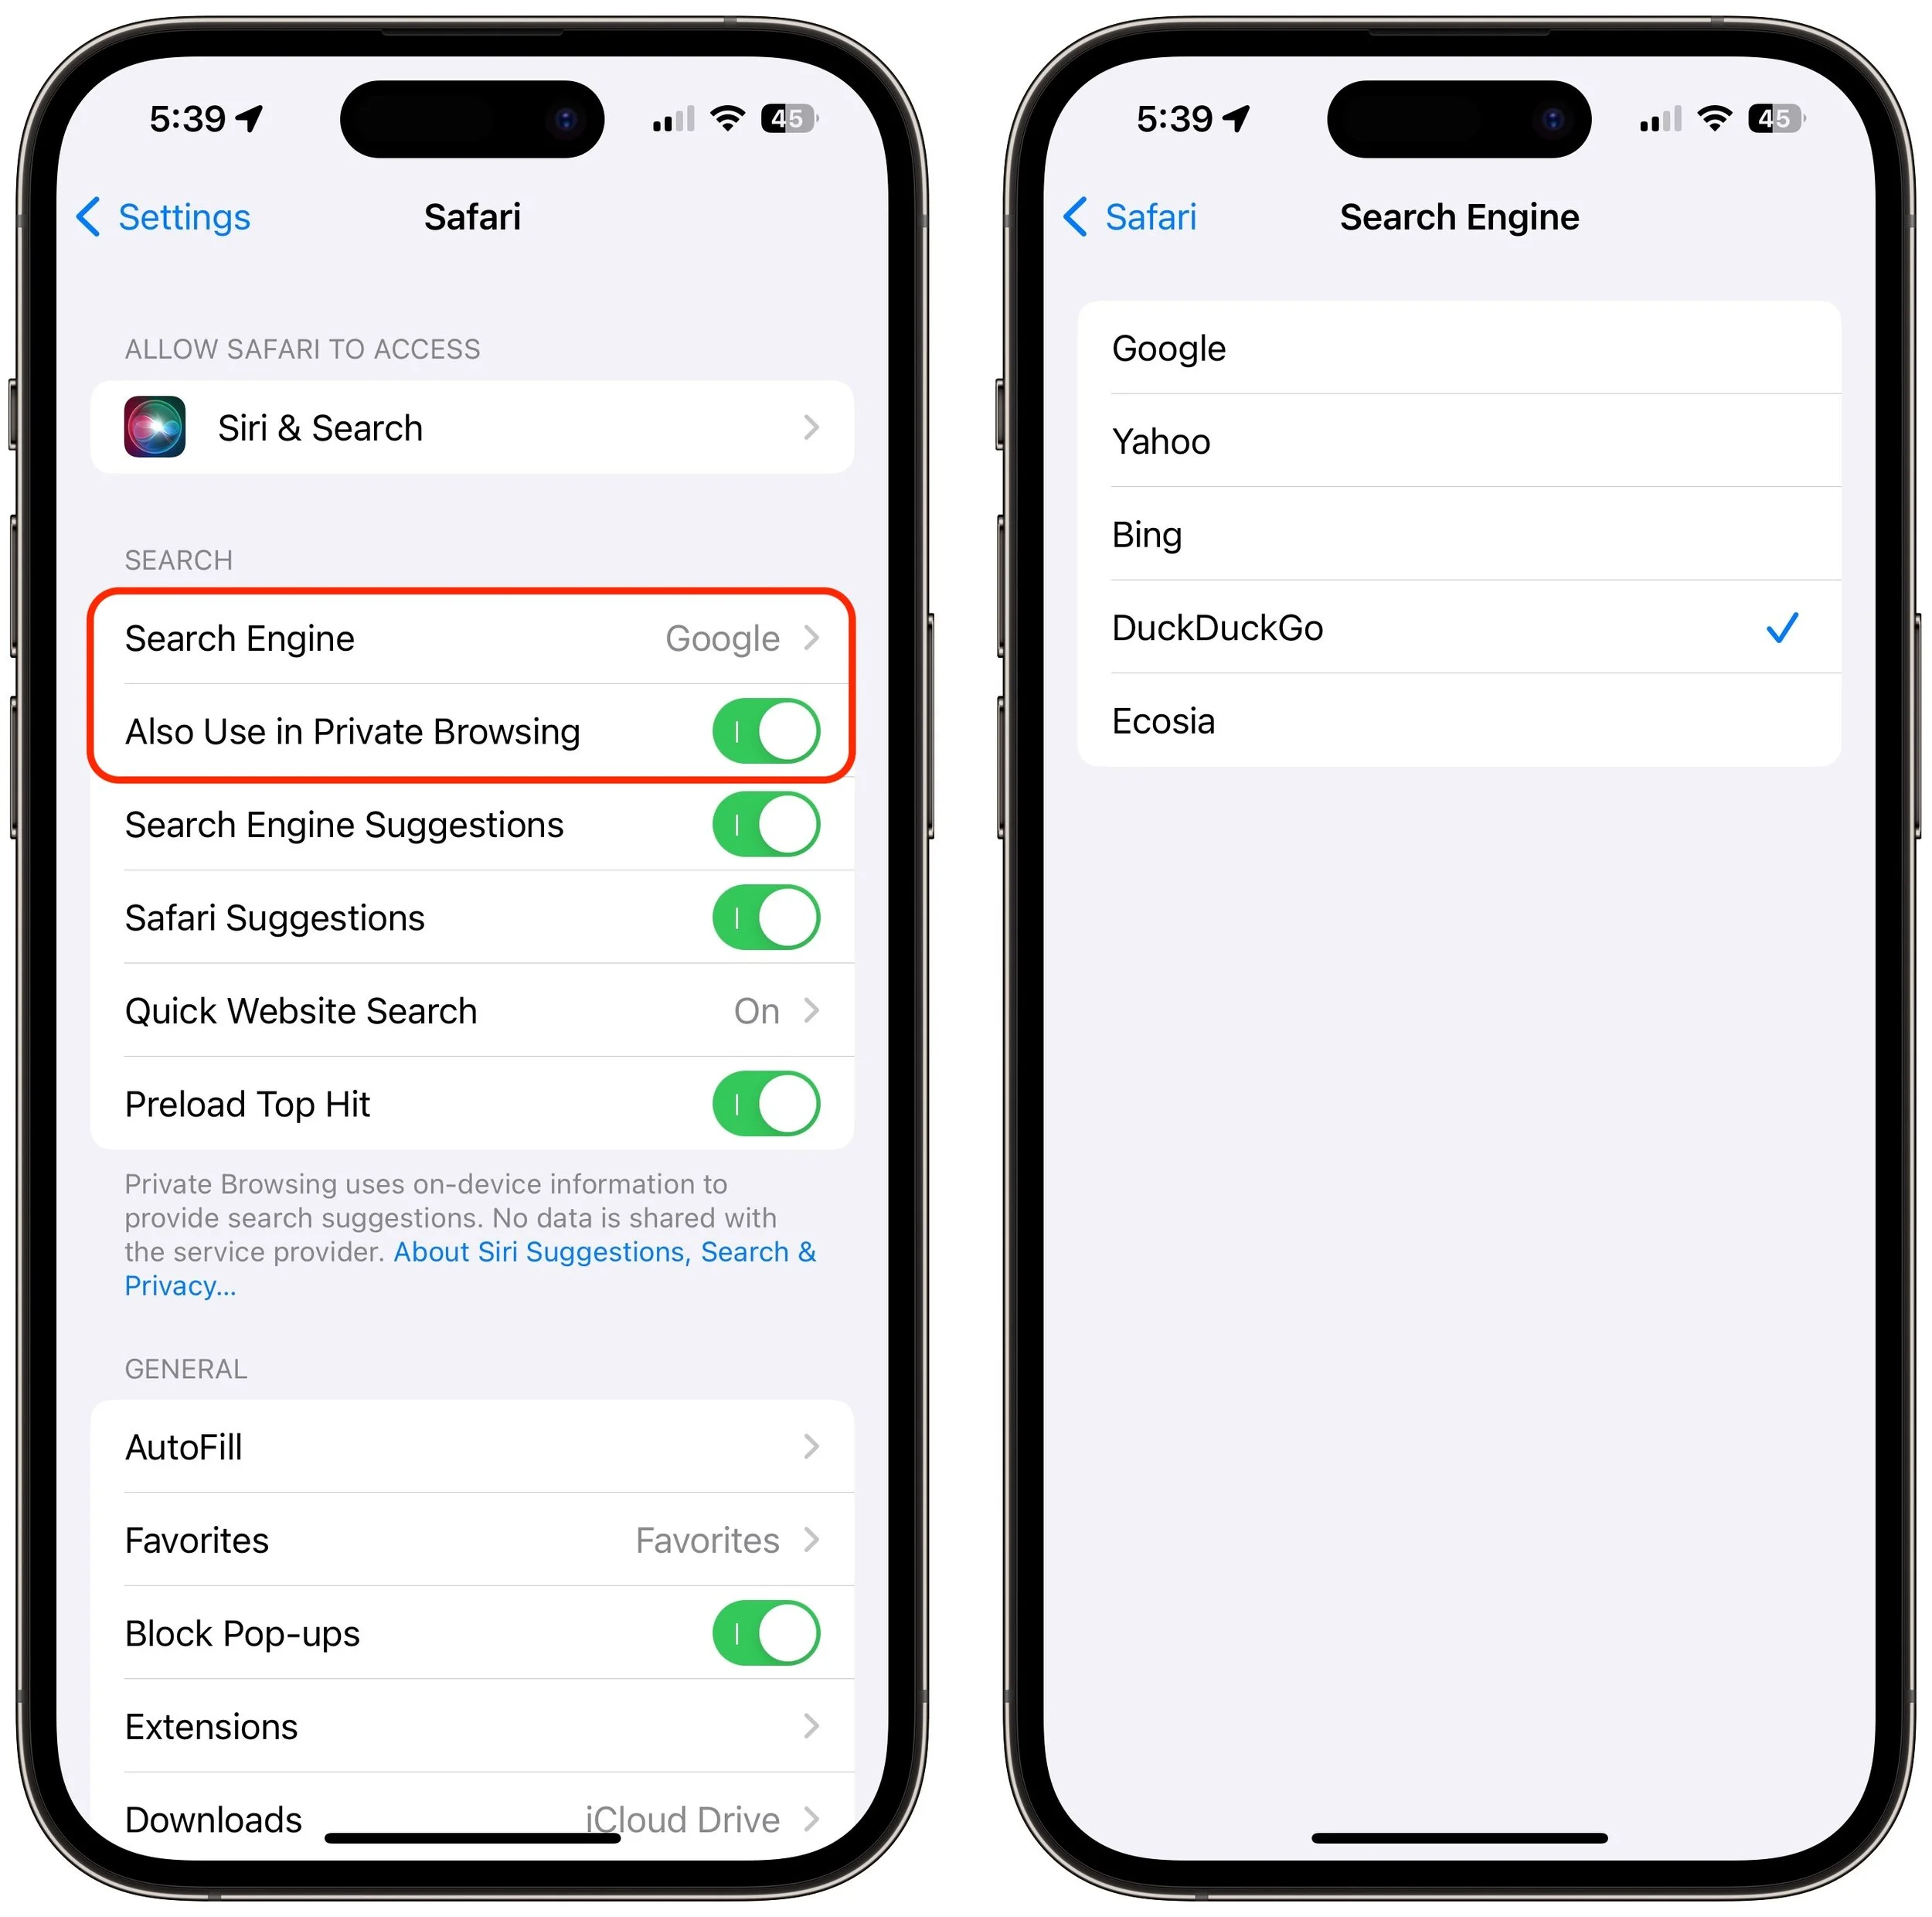
On the iPhone and iPad, go to Settings > Safari > Search Engine. Again, if you want a different search engine in Private Browsing tabs, turn off Also Use in Private Browsing and choose another option.
Top Alternative Search Engines
Conceptually, what search engines do is simple—they search a set of Web pages for matching keywords and return a list of them in order of relevance to the user. The hard part is dealing with the number of pages—estimates suggest Google indexes 50 billion pages and Bing 4.5 billion—and scaling the service to respond instantly to tens or hundreds of millions of queries per day. (Google processes 8.5 billion searches per day; Bing handles 400 million.) Beyond Google, here are the main search engines and what sets them apart. (You will also likely see Yandex, sometimes called “the Google of Russia.” Avoid it. For so many reasons.)
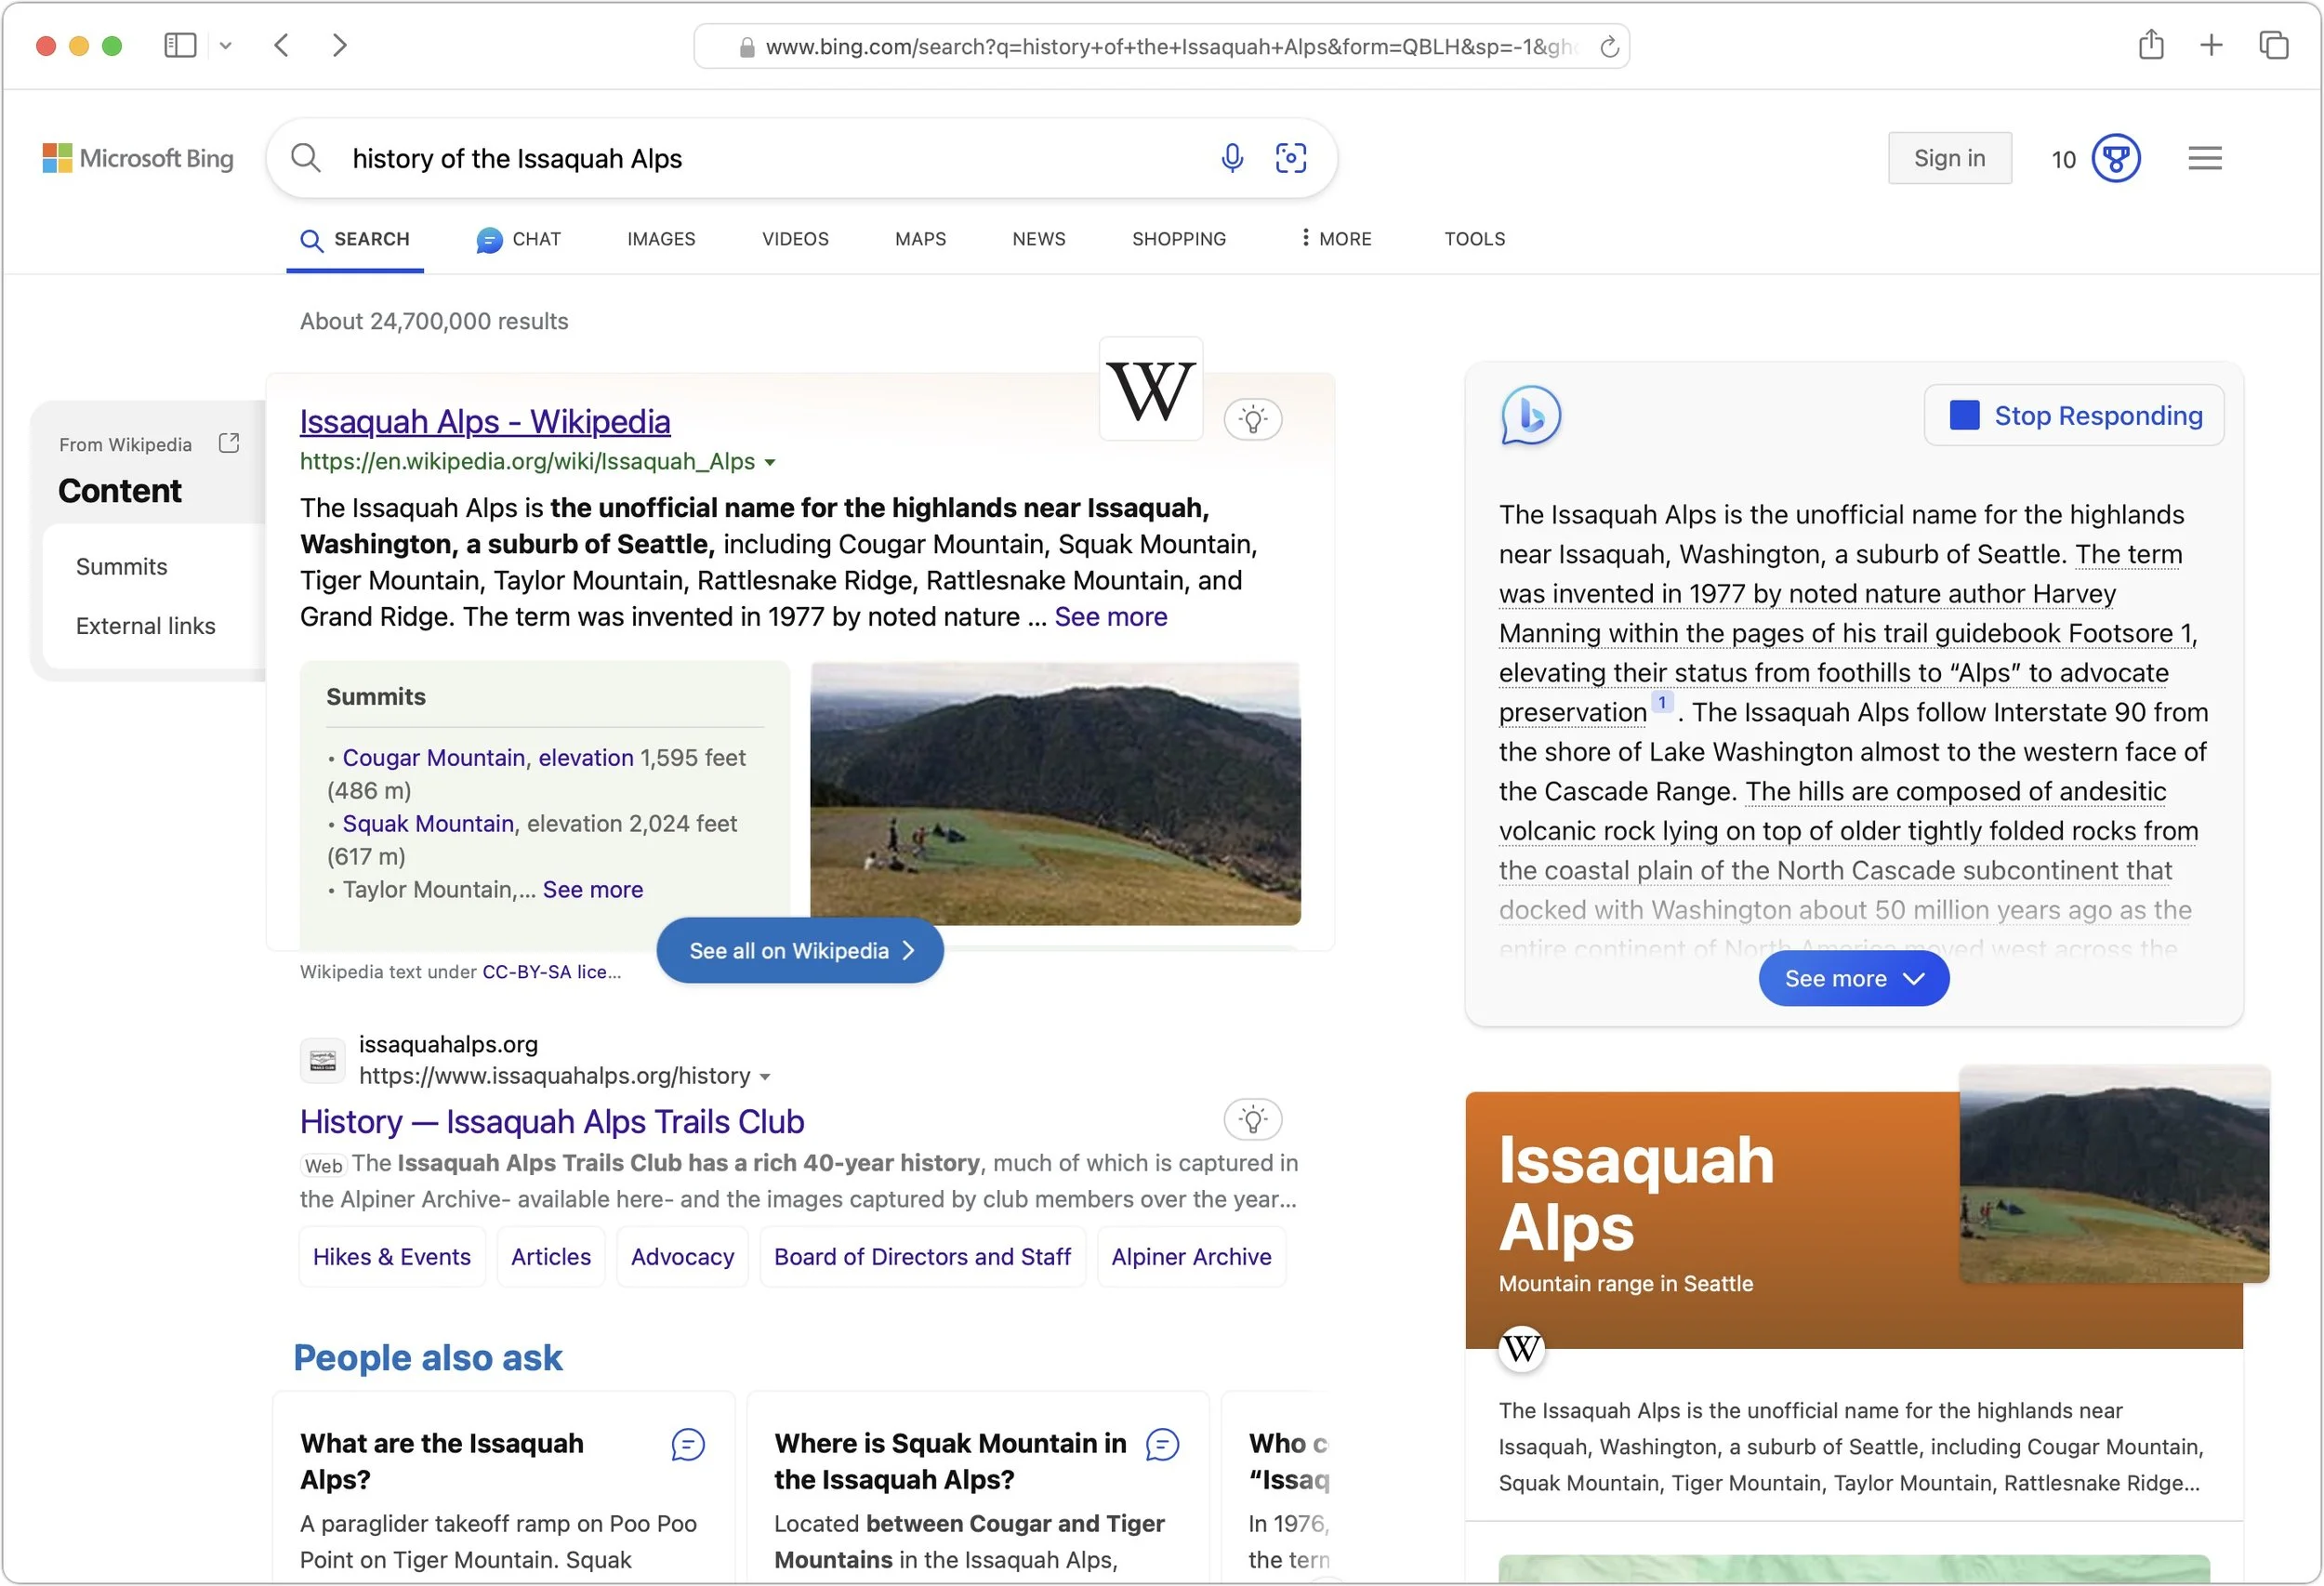
Bing: The second-most popular (though far, far behind Google) search engine in the world, Microsoft’s Bing sets itself apart with a busy, highly designed search results page that mixes a variety of results. It may work well for you, or you may find it overwhelming and difficult to parse. Microsoft is also putting a lot of effort into chat-based AI-powered results. Bing claims to offer more user privacy than Google, but it’s still tracking users to target ads better. If Bing has better privacy than Google, it may mostly be due to not being part of the larger Google data-collection empire.
Yahoo: Though it was the first Web search engine, Yahoo hasn’t run its own index since 2009. Today, Yahoo’s search results are powered by Microsoft Bing, so while the look of the search results page may differ, the results should be identical to Bing’s. Yahoo’s privacy stance is also similar to Bing’s.

DuckDuckGo: If privacy is paramount, DuckDuckGo is worth a look because it does not track or store user information at all. Instead, it chooses ads to display only by matching with search keywords. Although it uses Bing for some of its results, DuckDuckGo also incorporates information from numerous other sources, so it won’t seem like an exact clone of Bing.
Ecosia: The main reason to use the Berlin-based Ecosia is if you like Bing’s results (but not its layout) and want to support a “social business” that claims to be carbon-negative, offers full financial transparency, and protects users’ privacy. Founded in 2009, Ecosia today relies entirely on Bing’s search results and ads (clicks on which are how Ecosia earns money), and it claims to have planted over 188 million trees in 35 countries since its inception. It’s hard to argue with Ecosia’s environmental results, but as a search engine, it doesn’t feel special.
Brave Search: A truly independent search engine, Brave Search relies on its own created-from-scratch index (it leaned on Google and Bing for some results early on, but ceased in August 2023). It also emphasizes user privacy and doesn’t track users, searches, or clicks. Although Brave Search displays key-word-based ads by default, users can pay $3 per month for Brave Search Premium, which provides ad-free results pages. You’ll have to set Brave as the default search engine for most browsers manually; for Safari, all you can do is make a favorite to search.brave.com.
Kagi: Speaking of paid search engines, if you really want to avoid ads, Kagi is another independent search engine that rolls its own index and provides access only to subscribers, eschewing ads entirely. You can sign up for a 100-search test account, and if you like it, pay $5 per month for 300 searches or $10 per month for unlimited searches. As with Brave Search, you must manually set Kagi as the default search engine (there’s an extension for Safari).

The “best” search engine is the one that gives you the answers you want without trig-gering privacy worries or concerns about bias. If you want to see if something other than Google will work better for you, set it as your default search engine and try it for a few weeks.
(Featured image by iStock.com/Prykhodov)
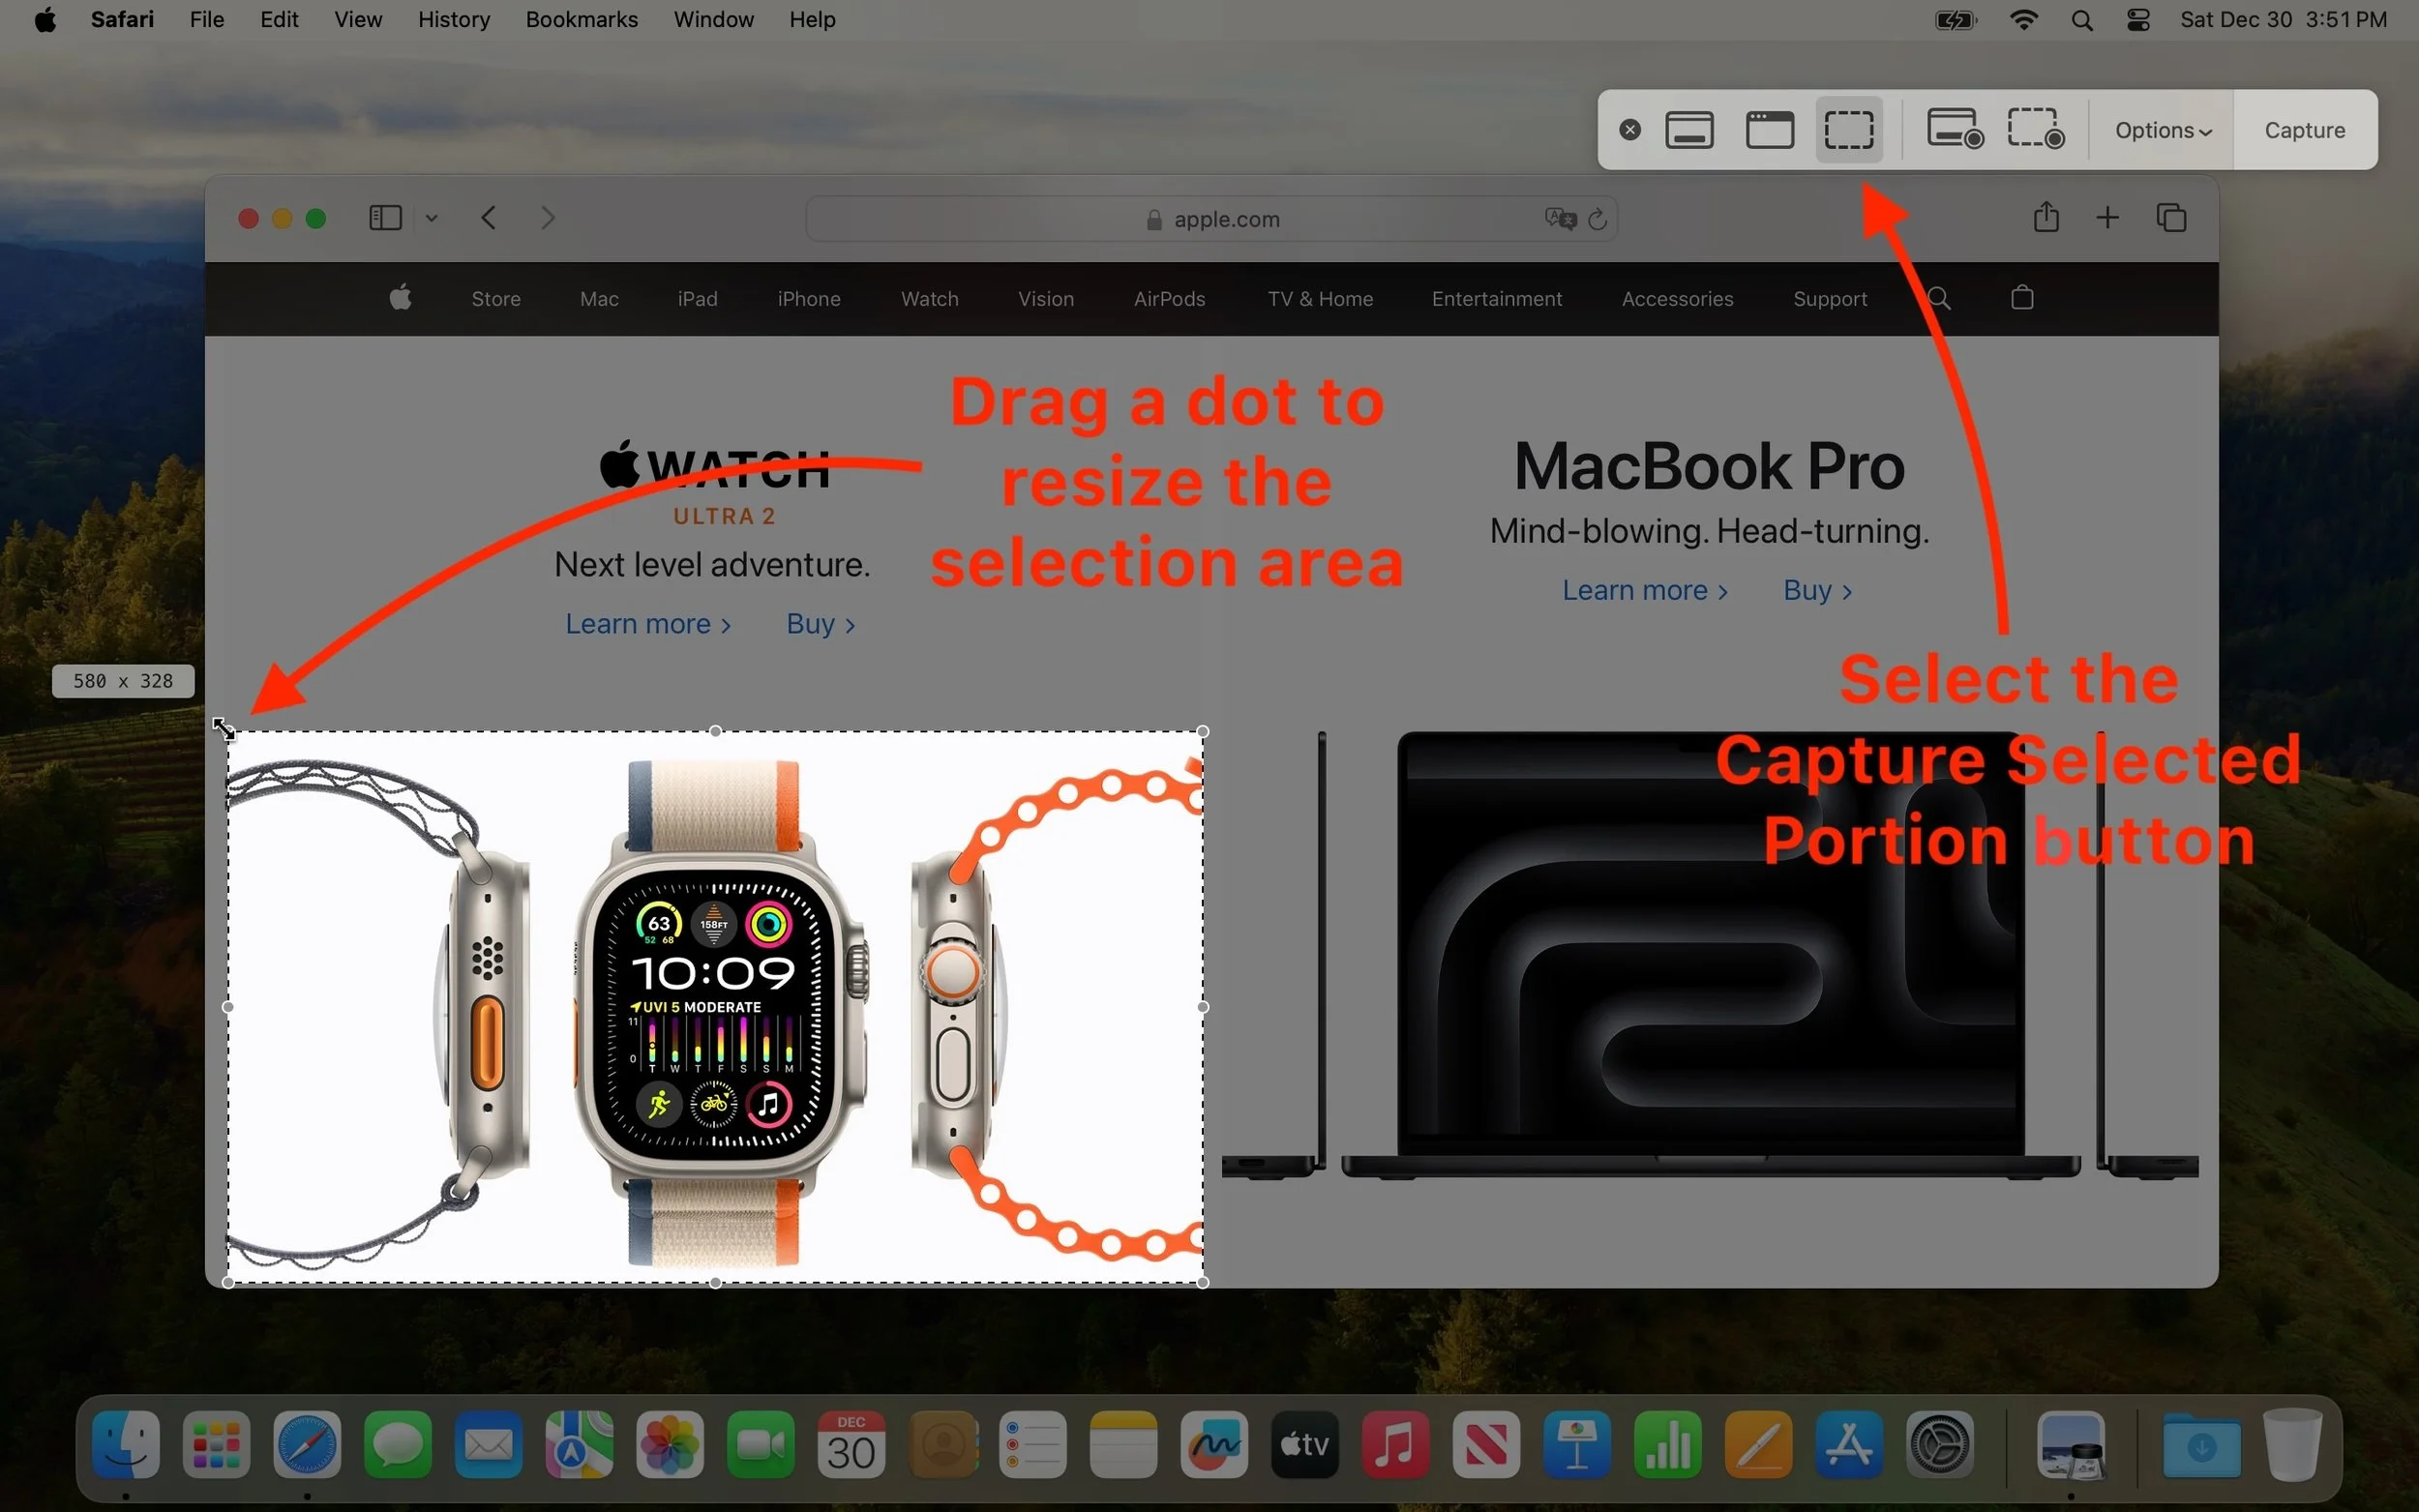
Everything You Need to Know about Taking Screenshots on the Mac
Screenshots and screen recordings are helpful for capturing things that happen on your Mac screen for later reference. The macOS screenshot control bar makes it easy to take screenshots and movies, and our handy guide helps you work with it.

Many people use screenshots to clip portions of their Mac screen for later reference. For example, you could save a screenshot of an error dialog to show tech support, store a confirmation number from a Web page, or keep a chat from social media. You can even record screen movies to show a developer how their app is misbehaving.
Years ago, Apple introduced a floating control bar that makes accessing features for taking screenshots and recording screen movies easier. The hardest thing about using the control bar is memorizing its keyboard shortcut: Command-Shift-5. (The even older shortcuts of Command-Shift-3 for full-screen screenshots and Command-Shift-4 for windows and portions of the screen also still work.)
Meet the Control Bar
Let’s take a quick tour of the control bar. The leftmost 🅧 button dismisses the bar (alternatively, press Esc). You can also drag next to the 🅧 to reposition the bar. You’ll use the following three buttons to take screenshots and the next two to record movies.
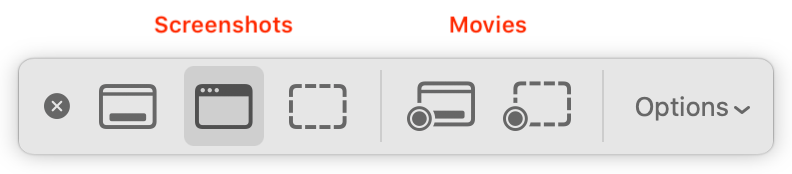
The Options button displays a pop-up menu. If you’ve selected a screenshot button, the menu offers screenshot-related choices; if you’ve clicked either movie button, you see recording choices.

You may also see a Capture or Record button off to the right; more on them shortly.
Using the Options Menu
The top area of this menu, labeled Save To, enables you to choose a destination for screenshots or movies. By default, it’s set to the Desktop folder, which makes it easy to work with your screenshots right away, but your desktop can quickly get cluttered if you take a lot of screenshots. Feel free to choose Other Location and specify a folder of your choice, such as the Screenshots folder shown above.
If you choose an app like Mail, Messages, or Preview, a copy of your screenshot or movie will immediately appear in that app. For screenshots, you can also choose Clipboard to put a copy in the clipboard so you can paste it. Holding down the Control key while capturing a screenshot also puts the screenshot in the clipboard.
The Timer options let you adjust something on the screen immediately before your screenshot or movie begins. You can choose a 5- or 10-second delay. Timers are handy for situations where invoking the control bar would change the screen in an undesirable way.
With movies, you can record your voice over the action on screen. Select the desired microphone in the menu.
The bottom portion of the menu offers special options:
With Show Floating Thumbnail, a small icon of a screenshot or movie appears temporarily in the lower-right corner of the screen after you take it. In the case of a screenshot, you can click this icon to mark it up, trash it, or share it; for a movie, you can crop it (useful if the start or end aren’t what you want), play it, delete it, or share it.
Remember Last Selection is a big help when generating a batch of screenshots or movies using the same selection rectangle.
To make your pointer appear in your screenshot, choose Show Mouse Pointer, and for movies, to display a circle where you click, choose Show Mouse Clicks.
Taking a Screenshot
Here’s how to take each type of screenshot:
Capture Entire Screen: Click the leftmost screenshot button and move the pointer off the control bar. Click the screen. (If your Mac has multiple screens, click the one you want.)
Capture Selected Window: To limit your screenshot to just one standalone interface element—a window, dialog, or menu—click the second button and then click the desired item. If you want to capture a dialog separately from an app window behind it, press Command and move the pointer over the dialog. (To eliminate the drop shadow, press and hold Option as you click.)
Capture Selected Portion: To take a screenshot of an arbitrary portion of the screen, use the third screenshot button . Click it and then resize and reposition the selection rectangle over the desired area—note that it shows you the pixel dimensions of the selection. (Reposition the rectangle by moving it with the hand pointer that appears when you hover over it, and resize it by dragging any selection dot.) Finally, click the Capture button at the right of the control bar or press the Return key to create the screenshot.
The name of the resulting image will be “Screenshot” plus the current date and time. It will also be in PNG format. If you prefer JPEG format for all your screenshots, you can change the default by pasting the command below into Terminal. Change things back by repeating the command, replacing JPG with PNG.
defaults write com.apple.screencapture type JPG
Recording a Movie
The two screen recording buttons are also easy to use:
Record Entire Screen: Click the first movie button and then the Record button at the right of the control bar. If you have two or more screens, clicking the Record button presents a menu from which you can choose which screen to record.
Record Selected Portion: Click the second movie button , then resize and reposition the selection rectangle over the recording area, just as with capturing a selection for a screenshot. When you’re ready, click the Record button.
When it’s time to stop recording, if you see a stop button on the menu bar to the right of the current app’s menu items, click it. If it’s hard to find, press Command-Shift-5 to bring up the control bar again, which will now offer a stop button. Or just press Command-Control-Escape.

Movies are named “Screen Recording” plus the date and time and will be in Quick-Time movie (.mov) format using the H.264 codec.
With screenshots and screen movies, the sky’s the limit for what you can capture or record, whether it’s a funny autocorrect chat mistake, an important reservation number, or a movie of a buggy app to share with tech support.
(Featured image uses a background by iStock.com/Altinosmanaj)