Sorry, Apple Isn’t Going to Update the 27-inch iMac with Apple Silicon
Sorry, 27-inch iMac lovers, but Apple isn’t going to release a 27-inch iMac with Apple silicon chips. We explain why and run down the upgrade options for those who need to move on.

Are you a 27-inch iMac owner wondering when Apple will release a new model with speedy Apple silicon? We hate to be the bearer of bad news, but the answer seems to be an unequivocal “Never.” Late last year, Apple confirmed to The Verge that it would not be making an Apple silicon version of the 27-inch iMac. Technically, that leaves open the possibility of a 32-inch iMac, for instance, but that feels like wishful thinking given the $5000 cost of Apple’s 32-inch Pro Display XDR. How did we get here, and where should 27-inch iMac owners look next?
Apple introduced the 27-inch iMac with 5K Retina display in 2014 and updated it several times before discontinuing it in 2022. It was hugely popular due to its large, gorgeous screen and a price that made the guts of the Mac seem cheap when paired with such a nice screen. An 8-year run isn’t bad, but once Apple introduced the powerful Mac Studio and the 27-inch Studio Display (also a 5K Retina display), the company felt there was no room for the 27-inch iMac in the lineup.
Apple isn’t necessarily wrong. One of the reasons 27-inch iMac owners are so attached to their Macs is that they can’t upgrade the computer and keep using that lovely screen, which remains one of the best available. Target Display Mode (which lets you use some much older iMacs as an external display for another Mac) never supported that model of iMac, and although the $80 Luna Display dongle does let you use a 27-inch iMac as a screen for another Mac, its tradeoffs may be hard to accept.
In the new world order, an Apple silicon Mac paired with a Studio Display provides a fast, capable Mac you can swap for a newer one when necessary and an extremely nice display you can use across multiple Macs. It’s not uncommon for an external display to last a decade or more, whereas many businesses upgrade their Macs every 3 to 5 years. A Studio Display could easily outlast two or three Macs.
“But, but, but,” we can hear you spluttering, “what about the 24-inch iMac with Apple silicon?” It may seem odd for Apple to drop the 27-inch model but keep a smaller iMac around. The reason is that the 24-inch iMac is meant to be a low-cost Mac that doesn’t skimp on display quality. It has a 4.5K Retina display that’s just a little smaller than the 27-inch iMac’s 5K Retina display while matching its quality. (Those numbers refer to the number of horizontal pixels on the screen—4,480 or 5,120—although the actual resolutions nearly everyone uses are half that to get crisp text at a readable size.) A Mac mini paired with an inexpensive external display would be cheaper than a 24-inch iMac, but you would have trouble getting a comparably good display for so little. The 24-inch iMac is perfect for a receptionist’s desk or a family’s kitchen computer, and its M3 chip will seriously outperform the Intel chips in the now-discontinued 27-inch iMac.
So, let’s assume you’ve been holding onto your 27-inch iMac, but it’s finally time to move on. The calculus of what to buy has changed due to the excellent performance of the Apple silicon Macs, even on the low end, and the existence of the Studio Display. Here’s what we recommend for different needs:
You’re on a very limited budget: Buy a 24-inch iMac. The screen isn’t quite as large, but the price/performance ratio is hard to beat for such a nice screen. The lowest-end model has fewer USB ports, which might be annoying.
You want a basic desktop Mac with a Retina screen: Choose between a Mac mini paired with a Studio Display or a 24-inch iMac, which is comparable to the low-end Mac mini. For higher performance needs, go for the Mac mini with an M2 Pro.
You want portability, too: The Studio Display works well with a MacBook Air (13-inch or 15-inch) for a budget solution or a MacBook Pro (14-inch or 16-inch) for a high-performance option. Using two screens also increases productivity.
You’re willing to pay more for performance: Things get interesting here because you can use a Studio Display with a Mac mini with M2 Pro, a Mac Studio with M2 Max, or a MacBook Pro with either M3 Pro or M3 Max. The MacBook Pro options are the most expensive but offer portability and a second screen.
You want the ultimate performance: Pair a Studio Display with a Mac Studio or a Mac Pro, both of which come with the M2 Ultra. The choice comes down to expandability: the Mac Pro offers PCIe slots and more ports.
Right now, the M-series chips are a little confusing. The original M1 is available only in an inexpensive 13-inch MacBook Air model sold exclusively through Walmart. The previous MacBook Air (13-inch only), Mac mini, Mac Studio, and Mac Pro all use variants of the M2, whereas the newer MacBook Air and MacBook Pro models sport M3 variants. Until recently, we expected Apple to standardize the rest of the line on the M3, but then the iPad Pro came out with an M4 because of yield issues with the M3 fabrication process.
It now seems probable that some models will skip the M3 entirely in favor of the M4, but don’t get too caught up in the latest and greatest. There’s more performance to be gained in the Pro, Max, and Ultra versions of the chips than in the next generation, so for now, the M2 Ultra remains the fastest chip for most processor-intensive tasks.
Regardless of what Mac and display combination best meets your needs, you’ll enjoy vastly better performance than was available with the 27-inch iMac, and the Studio Display is every inch as good a monitor. And maybe you can sell your 27-inch iMac on eBay.
(Featured image by Adam Engst)
How to Make Productive Use of Generative AI Chatbots and Artbots
Generative AI is all the rage, but what if you want to use it to create more than bad essays and surreal images? We explain how to make the most of AI chatbots and artbots, and how to benefit from AI-powered search engines.

Artificial intelligence dominates the tech news these days, but it’s hard to separate the hype from the reality. Every large company seems to have some major AI initiative in the works. Even Apple, which tends to stick to its own path, has started to tout features previously described as relying on “machine learning” as being “AI.” If you can get past the hype, AI has plenty of good uses now.
Despite Apple’s recent relabeling of features as using AI, when most people think about AI, they’re thinking of “generative AI” systems like OpenAI’s ChatGPT chatbot or Adobe’s Firefly artbot. These systems generate impressively good text and images from scratch based on user prompts. Ask ChatGPT to write an excuse for your sick kid, and you’ll get fluid, correct English. With Firefly, describe an image—“silhouettes of male and female runners with bright colors and black background”—and you’ll get images that match pretty well.

How do they accomplish this magic? Chatbots use statistical models to predict the next word based on training datasets that contain hundreds of billions of words—think autocomplete on radioactive steroids. Artbots work a little differently, but they also use statistical models to create images based on having been trained to identify numerous images.
Enough background. How can you make the most of today’s leading chatbots (ChatGPT, Claude, Copilot, Gemini, Meta AI, Pi, and Le Chat Mistral) and artbots (Adobe Firefly, Microsoft’s Copilot Designer, NightCafe, Meta AI, and Midjourney)?
Identify Good Uses of Generative AI
It’s essential to recognize that the effectiveness of generative AI for a particular task is highly individualized. What works for one person may not work for another due to varying skill levels, requirements, and preferences. With that in mind, here are three ways to evaluate tasks that might be a good fit for generative AI.
Skill levels: The less skillful or knowledgeable you are about a subject, the happier you’ll be with generative AI’s results. You can think of an AI chatbot as a C+ student—its work will get a passing grade, but it won’t fool an expert. But we’re all happy to do or receive C+ work in many parts of our lives—no one is above average in everything.
Requirements: Are you looking for something definitive—precisely what you have in mind—or would you be happy with an open-ended set of results? AI chatbots and artbots generate statistically likely results, so if you’re not caught up in things being just right, you’ll probably like what you get. Don’t expect them to read your mind, however.
Preferences: It’s best to think of an AI chatbot as an assistant, because you must be willing to go back and forth with it. And that means you have to be willing to work with an assistant who is dumber than they seem, entirely reactive, unpredictable, and inconsistent. (On the plus side, chatbots are also tireless, imperturbable, incredibly well-read, and non-judgemental.)
To sum up, the best tasks for generative AI are those where you know little or aren’t particularly skillful, don’t have specific expectations about what you’ll get, and are willing to interact with a potentially annoying helper.
Get Better Results from Generative AI
These recommendations will help you get better responses from AI chatbots:
Set the stage with detail and expectations: Unlike Web searches, chatbots work best when provided with more than essential keywords. Instead, tell the chatbot a little about yourself, provide background about the topic, and lay out your expectations. ChatGPT even lets you provide instructions to apply to all your chats. Additional detail helps the chatbot’s statistical model better predict what you want.
Iterate repeatedly and push harder: You don’t have to provide all that detail up front. Chatbots retain context—they know what has been said in the chat—so after your initial prompt, you can and should keep pushing the chatbot to refine and improve its answer. Don’t be shy to ask, “What’s missing from this?” or “How could this be improved?” While it’s always best to be polite, there’s no harm in asking a chatbot to do better. Pretend you’re a coach or therapist and keep asking probing questions.
Remember, unlike a search engine, where each search stands alone, working with an AI chatbot is a conversation. Right now, that’s less true of AI artbots, but we’re moving in that direction.
Good Uses for Generative AI
AI has innumerable possible uses, limited mostly by your imagination. Here are a few that have worked well for us:
Brainstorming: Have you ever needed to come up with a name for a program, product, or service and found your mind utterly blank? Or maybe you’re writing and can’t put your finger on precisely the word you want? Ask an AI chatbot! With a little direction, they’re great at coming up with a bunch of possible names or words. You may not get exactly what you want, but the chatbot’s suggestions will help you think in new directions.
Coding: An AI chatbot won’t turn you into a professional programmer, but it can help you write a small AppleScript to automate a task like adding sequentially numbered calendar events to every Monday for the rest of the year. Chatbots are also good at helping you use powerful but complex Unix tools for reformatting text like sed, awk, and grep. But perhaps our favorite real-world use is getting help with devilishly complicated spreadsheet formulas that do lookups as part of their calculations.
Talk to documents: Some AI chatbots (and services like ChatPDF) enable you to have conversations with long documents. That sounds weird, but it’s much easier to ask a few questions about how a hundred-page report affects your business, for instance, than to slog through the entire thing. Such systems provide page references to support their answers, so you can (and should) verify what you’re told.
Drafting difficult email: Some email messages are hard—no one likes having to reprimand an employee, express condolences to a business associate, or announce layoffs. But such messages are essentially genres—if you’ve seen one corporate merger announcement, you’ve seen them all. If you seed your prompt with plenty of appropriate details, an AI chatbot can generate a credible first draft that you can tweak to improve accuracy and make it sound like you instead of an overeager college student. Never send an AI-generated email without taking an edit pass.
Evaluating ideas: It’s always a good idea to talk through ideas and decisions, and conversations with AI chatbots can help you think about them. Should you ask for a raise or try for a promotion? What are the pros and cons of moving to a new location? Does it make more sense to rent or buy? An advantage of AI chatbots is that you can tell them to respond like a particular type of professional, such as a lawyer, financial advisor, or life coach. Of course, all chatbot responses are just statistically probable, so they won’t compete with those from actual professionals, but they’re a good start.
AI-Powered Searching
Finally, let’s look at AI-powered search engines like Perplexity and Arc Search (on the iPhone), and increasingly prominent AI-generated summaries in Google, Bing, and Brave Search. They blur the distinction between search engines and chatbots. Search engines focus on providing answers to questions, either link to or summarize their sources, and include the most recent information. In contrast, chatbots focus on conversation, generate answers from scratch, and always have some date after which their knowledge stops.
When might an AI-powered search engine be more effective than a traditional search engine’s list of links? Try one in situations like these:
Searches for easy but non-obvious answers: If you want to know who held the mile world record before Hicham El Guerrouj, for instance, an AI search engine will just tell you, rather than make you read a Wikipedia page about the world record progression. It could even tell you who has come the closest to his world record in the last decade, which would be difficult to determine otherwise.
Searches for answers to idle questions: If you don’t want to spend a long time reading source materials and don’t care much about the answer, an AI-powered summary will be efficient.
Searches that require assembling information from multiple sources: Imagine that you want to know how many people live in New York City, Boston, and Chicago. With a traditional search engine, you’d need to find each city’s population independently (or a list of major US city populations) and add them manually. An AI-powered search engine could find them all and add them for you.
Searches where you don’t quite know what you’re looking for: When you’re starting to explore a topic, an AI-powered search engine can suggest additional searches as you home in on aspects of the topic that especially interest you.
Google’s recent addition of AI-driven summaries quickly drew mockery for suggesting the addition of glue to pizza and encouraging the ingesting of rocks. But remember, humans say incorrect things all the time, often intentionally. In fact, both of those examples were triggered by jokes and could have come up in traditional searches as well, but in contexts that were clearly silly.
Regardless of whether information comes from an AI chatbot, an AI-powered search engine, a Facebook post, or the woman next to you on a plane, you have to discern whether it’s likely to be right. AI can be helpful in many ways, but it won’t do your thinking for you.
None of the text of this article was generated by AI.
(Featured image by iStock.com/Blue Planet Studio)
Tame the Tangle! Quick Cable Management Tips
Do you have a rat’s nest of random cables behind your Mac? Follow our quick tips to bring order to the mess, reduce the chance of accidents, and avoid degraded data signals.

Take a moment and look behind your Mac. Do you see a tangle of cables? The main downside of a mess of cables is that it’s a cluster of chaos that attracts dust bunnies. However, it’s possible for power cables—especially when tightly bundled or looped—to emit electromagnetic interference that can disrupt or degrade the signal carried by nearby data or network cables. They can also heat up, which is generally best avoided. Plus, the more tangled the cable nest, the more likely you’ll cause harm if you pull too hard while attempting to remove a cable from the tangle.
Also, consider cables that extend beyond your desk. Do you have power cables that run across the ground or Ethernet cables that loosely snake up into the ceiling? To protect both people and equipment, ensure that cables aren’t a tripping or catching hazard.
If your cables are a complete disaster, take some time to shut down your devices, disconnect all the cables, clean underneath, and reconnect them in an organized fashion, removing unused cables and replacing damaged or unnecessarily long cables with new ones.
To keep your cables under control going forward, follow these tips:
Select and reduce cables:
Buy and use cables that are only as long as they need to be.
When buying new cables, prefer braided cables, which catch less and last longer.
If you have many cables, try to trim the number with judicious use of docks or hubs.
Upgrade to wireless accessories, like the Magic Keyboard and Magic Trackpad, that only need to be plugged in occasionally to charge.
Pay attention to cable location:
Try to keep cables off the floor, but use a floor cord cover if it’s unavoidable.
Attach long runs of network cabling to the wall or floor to reduce the chance of accidents.
Run cables through raceways or inside cable trays to keep them together under desks.
Add adhesive cable clips to the back or underside of desks without cable man-agement options.
Ensure cables don’t interfere with workstation ergonomics, especially with mov-able sit/stand desks.
Keep power adapters away from other cables for better heat management.
Group your cables:
Use Velcro straps or cable ties to bundle power and data cables separately.
Avoid bundling too many power cables too tightly to avoid heat buildup.
Label cables with their type and use so you can easily distinguish between them.
Store extra cables in clear zip lock bags or bins, one per cable type.
Maintain your cables:
Throw out any damaged or suspect cables right away.
Periodically check and reorganize your cables, removing any that aren’t in active use.
You should be able to find a wide variety of cable management accessories, such as Velcro cable ties, cable labels, cable clips, and floor cord covers, at your preferred electronics retailer.
None of these suggestions are difficult to follow, and you’d be surprised how much you will appreciate having neatly organized cables in use and available when you need them.
(Featured image by Adam Engst)
Apple Introduces New iPad Air, iPad Pro, Apple Pencil Pro, and Magic Keyboard
Apple has released new 11-inch and 13-inch iPad Air and iPad Pro models, plus a new Apple Pencil Pro and Magic Keyboard for iPad Pro. We round up the new features and provide advice on what to consider for your next iPad.

After no new iPads throughout 2023, Apple has unveiled new 11-inch and 13-inch iPad Air and iPad Pro models, plus a more capable Apple Pencil Pro and a redesigned Magic Keyboard for iPad Pro. The company also refined the iPad lineup by dropping the ninth-generation iPad and reducing the price of the tenth-generation iPad to $349. Only the iPad mini was left untouched. We wouldn’t be surprised to see a new iPad and iPad mini before the end of 2024.
iPad Air Adds 13-inch Model and Moves to the M2 Chip
The 11-inch iPad Air has long been Apple’s mid-range iPad, offering more power and better specs than the iPad while leaving the high end to the iPad Pro. With this refresh, Apple significantly enhanced the lineup by adding a 13-inch model of the iPad Air, a screen size previously limited to the iPad Pro. Both iPad Air models now position their front-facing camera on the longer landscape edge, so you appear to others on landscape-orientation calls as if you’re looking directly at them rather than off to the side, as happened with the previous shorter portrait edge location. They continue to use Touch ID via a top-mounted sensor.
Apple switched the iPad Air from the M1 to the M2 chip, improving performance by 50%. Storage has also increased, with the base level jumping from 64 GB to 128 GB. For those needing more space, Apple now provides storage tiers of 256 GB, 512 GB, and 1 TB. Finally, Apple updated the iPad Air with the latest wireless technologies, Wi-Fi 6E and Bluetooth 5.3.

Those who want a keyboard can purchase the current Magic Keyboard for $299 (11-inch) or $349 (13-inch), and the new iPad Air models are compatible with the new $129 Apple Pencil Pro and the $79 USB-C Apple Pencil.
The 11-inch iPad Air starts at $599, and the 13-inch iPad Air at $799. Adding 5G cellular connectivity increases the price by $150. Moving to 256 GB bumps the price by $100, 512 GB adds $300, and 1 TB costs $500 more. You can choose from four subtle colors—blue, purple, starlight, and space gray—and you can order now with units arriving next week.
iPad Pro Gains M4 Chip and Ultra Retina XDR Display in Thinnest Apple Product Ever
While the new iPad Air models feel like modernized versions of the previous iPad Pro models, the new iPad Pro models break new ground. They boast new Ultra Retina XDR displays that leverage OLED technology that promises brighter highlights, deeper blacks, and faster response times. They’re noticeably better and brighter than the iPad Air Liquid Retina screens, which are already pretty good. Because Apple targets the iPad Pro at professional photographers and cinematographers who need the best display accuracy, there’s even a nano-texture glass option that reduces glare.
As with the iPad Air, the front-facing camera is now located on the longer landscape edge, along with the Face ID sensor. Surprisingly, the rear-facing camera isn’t as capable as the previous models, which sported Wide and Ultra Wide cameras and supported 2x optical zoom. The new models drop the Ultra Wide camera and retain just the 12-megapixel Wide camera. However, they now feature an adaptive True Tone flash that improves document scanning by stitching together multiple photos to eliminate the shadows that plague most camera-based scans.

In part because of the Ultra Retina XDR display, the new iPad Pro models are thinner than before, so much so that the 13-inch iPad Pro is the thinnest product Apple has ever made at 5.1 mm thick. More impressive is that the 13-inch model also shed nearly a quarter of a pound in weight—103 grams. Ignore the fact that the iPad Pro is now thinner and lighter than the iPad Air, and that the iPad Air is the mid-range iPad, but the MacBook Air is the low-end MacBook. Air is just a name now.
To power the Ultra Retina XDR display and make the iPad Pro models as thin as they are, Apple leapfrogged a chip generation, moving from the M2 to the new M4, which hasn’t appeared in any Macs yet. Apple says the M4’s CPU is 50% faster than the M2 in the previous models, and its GPU is up to four times faster.

For those who want a keyboard, the new iPad Pros are compatible only with the just-released Magic Keyboard for iPad Pro ($299 for 11-inch, $349 for 13-inch). As with the iPad Air, you can use either the new $129 Apple Pencil Pro or the $79 USB-C Apple Pencil.
Pricing for the 11-inch iPad Pro starts at $999, with the 13-inch iPad Pro at $1299. 5G cellular connectivity adds $200. Storage starts at 256 GB, up from 128 GB, and Apple offers tiers of 512 GB ($200 more), 1 TB ($600), and 2 TB ($1000). The nano-texture glass also adds $100 and is available only for models with 1 TB or 2 TB of storage. The only available colors are black and silver.
Apple Releases Apple Pencil Pro and Magic Keyboard for iPad Pro
For artists, students, and others who like precise stylus input, the new Apple Pencil Pro offers a variety of new sensors and capabilities. A sensor in the barrel detects a squeeze that brings up a tool palette, and a gyroscope notices when you roll the barrel to change the orientation of shaped pen and brush tools. A new haptic engine provides confirmation of actions like squeezing, double tapping, and snapping to a Smart Shape. When used with the iPad Pro, the Apple Pencil Pro pairs, charges, and is stored on the side using a magnetic interface. If you lose it, you can now locate it with Find My.

While the new iPad Air models work with the existing Magic Keyboard, the new iPad Pro models are compatible only with the new Magic Keyboard for iPad Pro. It retains the design that floats the iPad Pro above the keyboard but adds a function row of keys for features like screen brightness and volume. The palm rest is made of aluminum, and it has a larger trackpad with haptic feedback, so it feels more like using a MacBook. It attaches magnetically and uses the Smart Connector to connect power and data without Bluetooth—there’s also a USB-C connector in the hinge for charging.
Buying Advice
All these products are available for order now and will ship next week. Who should buy what? Apple’s comparison page can be helpful, but here’s our advice:
iPad: With the price drop to $349, the tenth-generation iPad becomes a remarkable deal, and it’s an ideal iPad for watching videos, browsing the Web, reading email, and other basic tasks.
iPad mini: If smaller is better for you, the iPad mini remains in the lineup, starting at $499. It performs slightly better than the iPad, but its size is the main reason to buy it.
iPad Air: The iPad Air is the workhorse of the iPad line, with sufficient performance to do nearly anything you want. The addition of the 13-inch model is particularly welcome because it’s $500 cheaper than the equivalently sized iPad Pro. Buy the iPad Air if you want to do more than the basics with your iPad.
iPad Pro: The technology in the iPad Pro is impressive, but so is the cost. As with the Mac lineup, the Pro models are mainly targeted at creative professionals who need the ultimate power and are willing to pay for it.
A related question surrounds upgrades. Generally speaking, upgrading to a new iPad may not be worthwhile if you have the previous model. However, once you’re two generations back, the performance increases tend to be significant. The caveat to that advice is that if an iPad isn’t doing what you want, it’s time to upgrade. For instance, if you have an M1 iPad Air that runs your drawing app slower than you’d like, it’s worth considering either an M2 iPad Air or an M4 iPad Pro, depending on how important performance is to you.
Regardless, contact us if you have any questions about what iPad makes the most sense for you.
(Featured image by Apple)
Did You Know Most Mac Apps Keep Versions of Your Documents as You Work?
If you ever regret making a change too long ago to revert using Undo, try the versioning capabilities in many macOS apps that let you view, copy data from, and revert to previous versions of a document.

We all make mistakes, which is why Undo exists. Immediately choose Edit > Undo or press Command-Z to undo your last change. Most Mac apps support multiple levels of Undo, so you can keep pressing Command-Z to revert change after change. However, suppose you delete a table in your Pages document, but 30 minutes and many changes later, you decide you want it back. Undo won’t help because you want to keep all the other interim changes, and Time Machine backups may not help because a backup may not have occurred at the right time.
Since OS X 10.7 Lion, Mac apps have been able to take advantage of a built-in Apple technology called versioning to save users from such situations. Apps that support versioning create a separate version of each document every time you save manually or the app auto-saves, at least once per hour. You can browse through all those versions in a Time Machine-like interface and copy data from a previous version or revert the current document to a previous state.
Some cross-platform apps, and those with a long history and legacy architecture, such as Microsoft Word, Excel, and PowerPoint, don’t support versioning, but most modern document-centric apps do. You can identify version-capable apps by the presence of a Revert To command in the File menu.
How Versioning Works
As you work, whenever a document is saved, either automatically by its app or because you chose File > Save or reflexively pressed Command-S, the previous version is added to a database of versions stored in a hidden folder on the same volume. When a file is deleted, all its versions are removed, too, so there’s no worry about wasting storage space on long-deleted files.
When you discover you need to recover some data from an older version of a file, you choose File > Revert To > Browse All Versions, which opens a Time Machine-like browser for exploring all the previous versions. On the right, you can click the arrows to scroll through previous versions, comparing them visually against the current one on the left. A few apps provide additional ways of comparing versions.

Once you’ve found the version you want, you can try copying the desired content and pasting it into the current version of your document on the left—depending on the app and type of document, you may not even have to leave the version browser.
If copying and pasting doesn’t work, you can instead click Restore to revert the document to that previous version. Unlike Time Machine, the version browser doesn’t ask if you want to overwrite the current version, so if you aren’t sure you want a wholesale reversion, press Option to change the button to Restore a Copy. That opens a separate copy of the document in the app so you can pick and choose what you want to move from the old version back into the current version.
More Versioning Details
Although versioning is easy to use, there’s quite a bit going on behind the scenes, which can generate some questions:
What about copies of a document? Copies of a document, such as you would make using File > Duplicate, File > Save As, or in the Finder, are different files from the versioning perspective and lose access to the original file’s versions.
Is iCloud Drive supported? iCloud Drive maintains its own version database, so although you may have to click a Load Version link to see a particular version when browsing past versions, they should all be accessible.
Are files shared between my Macs versioned? Versions are stored at the top level of the document’s volume, so while it works with files stored on an external drive that moves between Macs, files shared between Macs over a network or using a file-sharing service like Dropbox will have different versions on each Mac, based on where the file was open when it was saved.
Are there any privacy or security risks to versioning? The version database is completely locked down and better protected than regular documents on your Mac. Also, if you open a confidential file but close it without making any changes or saving, it won’t be added to the version database.
No one expects to make mistakes, but if you do, macOS’s versioning may save you from having to recreate work. Look for that File > Revert To menu in your favorite apps to see if they support versioning, and if they do, give it a try so you’ll know how to use it if you ever need it.
(Featured image by Adam Engst)
Audit Your Trusted Device Lists for Greater Security
We all accumulate “trusted devices” in our Apple, Google, and password manager accounts, but it’s important to remove devices you no longer use because they could be security risks.

One of the ways companies protect critical account information is by remembering the devices you use to log in as “trusted devices” or “authorized devices.” Those logins will usually have been protected by two-factor authentication or another mechanism that guarantees the device is being used by you, its owner. Subsequent logins from those devices may be more convenient for you due to requiring only a username and password, and trusted devices may automatically receive two-factor authentication codes. That’s how Apple ensures you are who you say you are when you log in to your Apple ID on a previously unseen device.
Although trusted devices can help increase your security, they can also reduce it. If an attacker were to gain access to one of your trusted devices, they would have a better chance of breaking into your accounts or masquerading as you when setting up new accounts. As a result, it’s important to audit your trusted devices occasionally and make sure you still control all of them. The first time you do this, you may be shocked to see that a Mac you last used years ago could still be receiving Apple ID verification codes. Removing unused trusted devices from an account makes it more secure with no downside.
We can’t provide a comprehensive list of services that track trusted devices, but many of you use two high-profile ones: Apple and Google. In addition, most password managers with online accounts also rely on trusted devices—we’ll look at 1Password here, but if you use another password manager, look through its settings to see if it maintains a list of trusted devices.
Remove Trusted Apple Devices
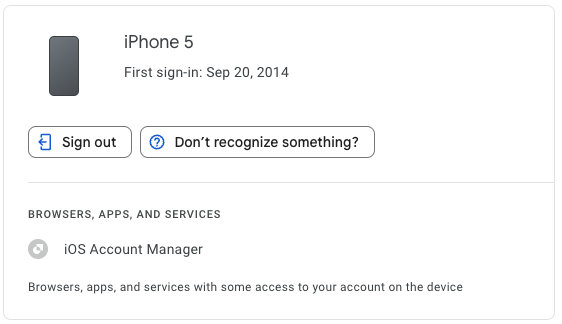
Apple gives you access to the list of all your current Apple devices in System Settings > Your Name on the Mac and in Settings > Your Name on the iPhone and iPad. (You can also log in to appleid.apple.com, click Sign-in and Security in the sidebar, and click Account Security.) Some of the devices shown may not be trusted devices—there isn’t much to worry about with a HomePod, and some old Macs may not be logged in. Click or tap any device to learn more about it—the 27-inch iMac in the screenshot below is trusted and can receive Apple ID verification codes.
Unfortunately, Apple doesn’t display the date the device was last used, which can help identify ancient devices. So look for any devices that you don’t immediately recognize as being in use—particularly Macs, iPhones, and iPads—and remove them from your account. Don’t worry about inadvertently removing a device you do use—at worst, you’ll have to log in to your Apple ID again the next time you use it.

Remove Trusted Google Devices
You can quickly load Google’s list of trusted devices by logging in to your Google account at myaccount.google.com/device-activity. To navigate there manually, go to your Google Account at myaccount.google.com, click Security in the sidebar, scroll down to find the Your Devices tile, and click Manage All Devices. Google says it keeps track of sessions (whenever you sign in) on trusted devices for only 28 days, but the sessions shown on “unknown device(s)” below are far older than that. Google helps by displaying the location and date of most sessions.

Click a session to learn more about it, including the date you first signed in on that device. For devices you no longer use, click Sign Out to remove access to your Google Account.
Remove Trusted 1Password Devices
To remove old trusted devices from 1Password, start by logging in to 1Password.com, clicking your name at the top right, and choosing My Profile—you can also navigate directly to my.1password.com/profile. As you can see, 1Password provides information about each trusted device and browser, showing its IP address, location, operating system version, and last access time.
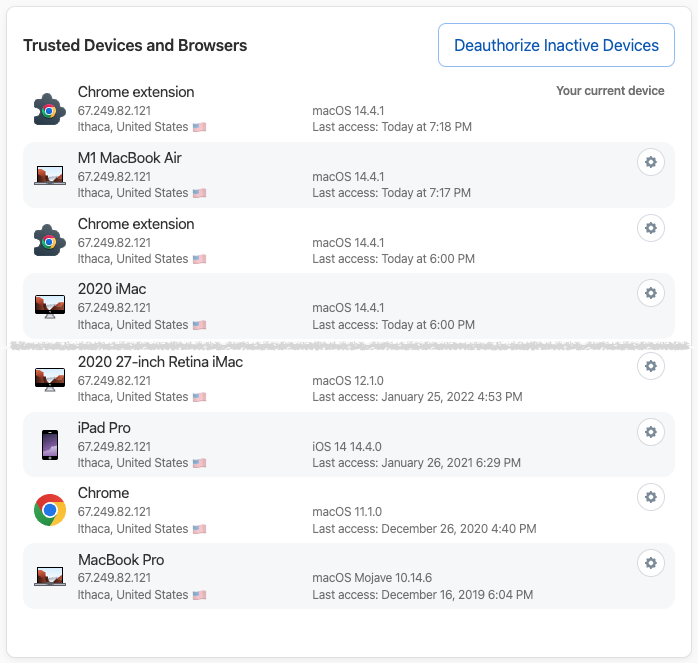
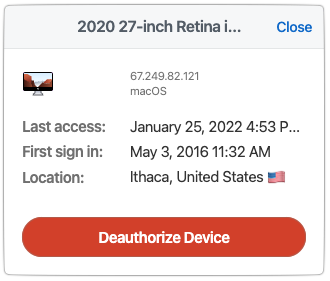
It’s easiest to click Deauthorize Inactive Devices, at which point 1Password will ask if you want to deauthorize all devices that haven’t been used in the last 60 days. If you prefer a more targeted approach, click the gear next to a device or browser you want to remove and click Deauthorize Device in the dialog that appears.
Again, the only harm that could come from deauthorizing a device you still use is that you will have to log in to 1Password again.
After you’ve audited your Apple, Google, and password-manager trusted devices—and any other accounts you may have that maintain such lists—there’s no need to check again right away. Once a month or once a quarter would be sufficient for most people.
That said, if you ever notice any unusual account activity, look at your trusted device lists to ensure you recognize everything. If there’s a device you don’t recognize or one that was used at an unfamiliar place or at a time when you were otherwise occupied, immediately remove it and change that service’s password.
(Featured image by iStock.com/Ildo Frazao)
Apple’s iCloud Keychain Password Management Is All Many People Need
Apple’s iCloud Keychain password manager keeps improving, and we now recommend it, especially for those not already using a third-party password manager. Here’s how to use iCloud Keychain to store and enter secure passwords.

We constantly recommend using a password manager like 1Password, BitWarden, or Dashlane. But many people resist committing to yet another app or paying for yet another service. Isn’t Apple’s built-in iCloud Keychain password management good enough?
The answer now is yes, thanks to two recent changes:
In iOS 17.3, Apple added Stolen Device Protection, which leverages biometric authentication—Face ID or Touch ID—to protect users against thieves who would surreptitiously learn someone’s passcode, steal their iPhone, and then take over their digital lives. One of the worst aspects of that attack was that the iPhone passcode was sufficient to access the user’s stored passwords, so the thief could get into everything.
Until mid-2023, Apple’s built-in password management worked only in Safari, which was problematic for users who rely on other browsers. Then Apple updated its iCloud Passwords extension for Google Chrome to work not just in Windows, but also in Mac browsers based on Google Chrome running in macOS 14 Sonoma. There’s also now an iCloud Passwords add-on for Firefox.
If you aren’t yet using a password manager, try iCloud Keychain.
Passwords Basics
Apple integrated iCloud Keychain into macOS, iOS, and iPadOS at a low level, so you mostly interact with your passwords in Safari. But first, make sure to enable iCloud Keychain so your passwords sync between your devices. On the Mac, you do that in System Settings > Your Name > iCloud > Passwords & Keychain. On an iPhone or iPad, it’s in Settings > Your Name > iCloud > Passwords and Keychain.
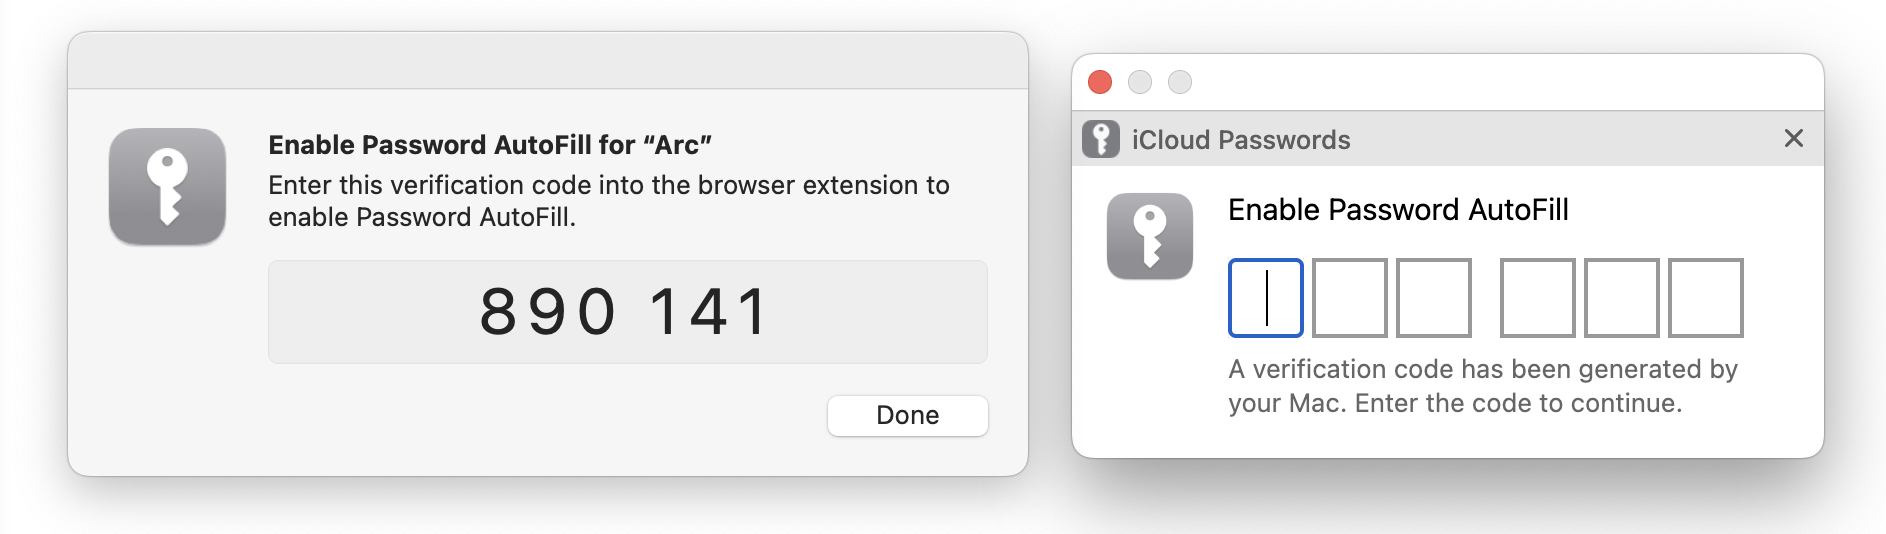
If you’re using a browser other than Safari, install the iCloud Passwords extension or add-on and activate it by clicking it in the toolbar and entering the verification code when prompted.
When it comes to website accounts, there are two main actions: creating a login and logging in to a site:
Create a new login: When you need to create an account on a new website, after you enter whatever it wants for email or username, Safari creates a strong password for you. Unfortunately, the iCloud Passwords extension or add-on on the Mac can’t generate passwords—you can either create a strong password manually or switch to Safari temporarily to let it create one. When you submit your credentials, you’ll be prompted to save them.
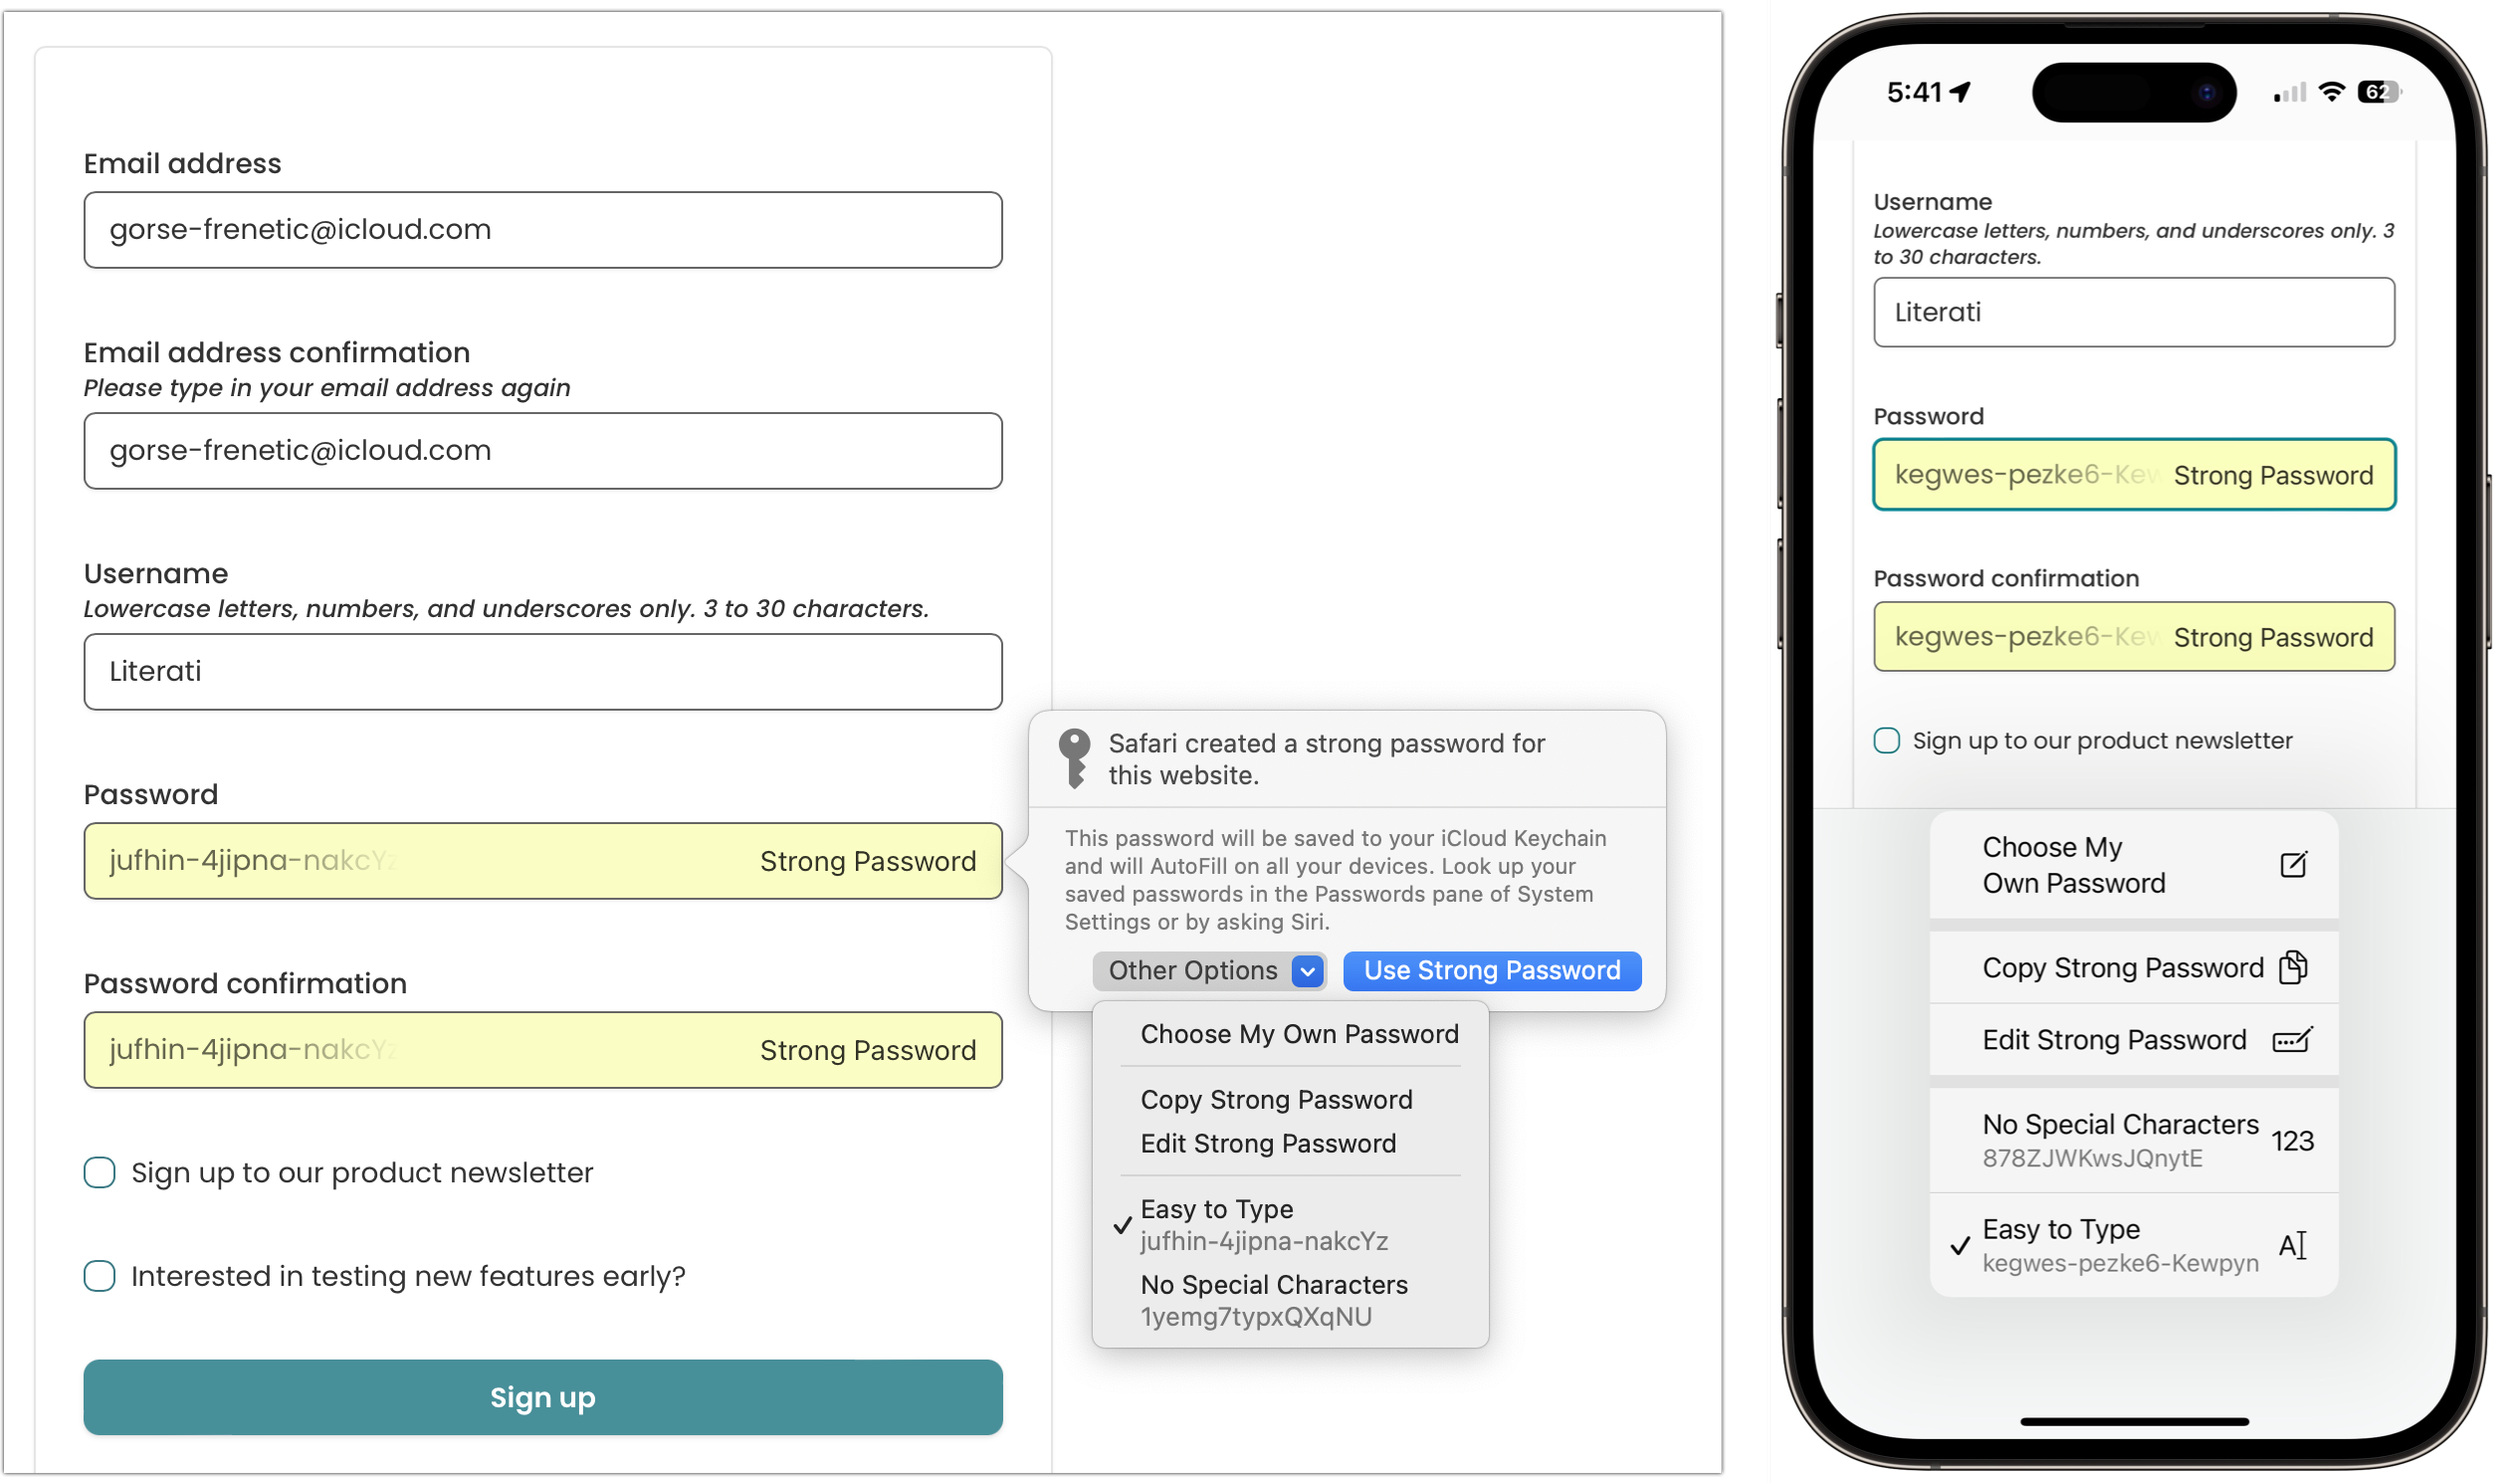
Autofill an existing login: The next time you want to log in to a site for which you’ve saved credentials, Safari or your other browser on the Mac displays a pop-up with logins matching the domain of the site you’re on. On the iPhone or iPad, you might get an alert at the bottom of the screen or have to pick a choice in the QuickType bar above the keyboard.
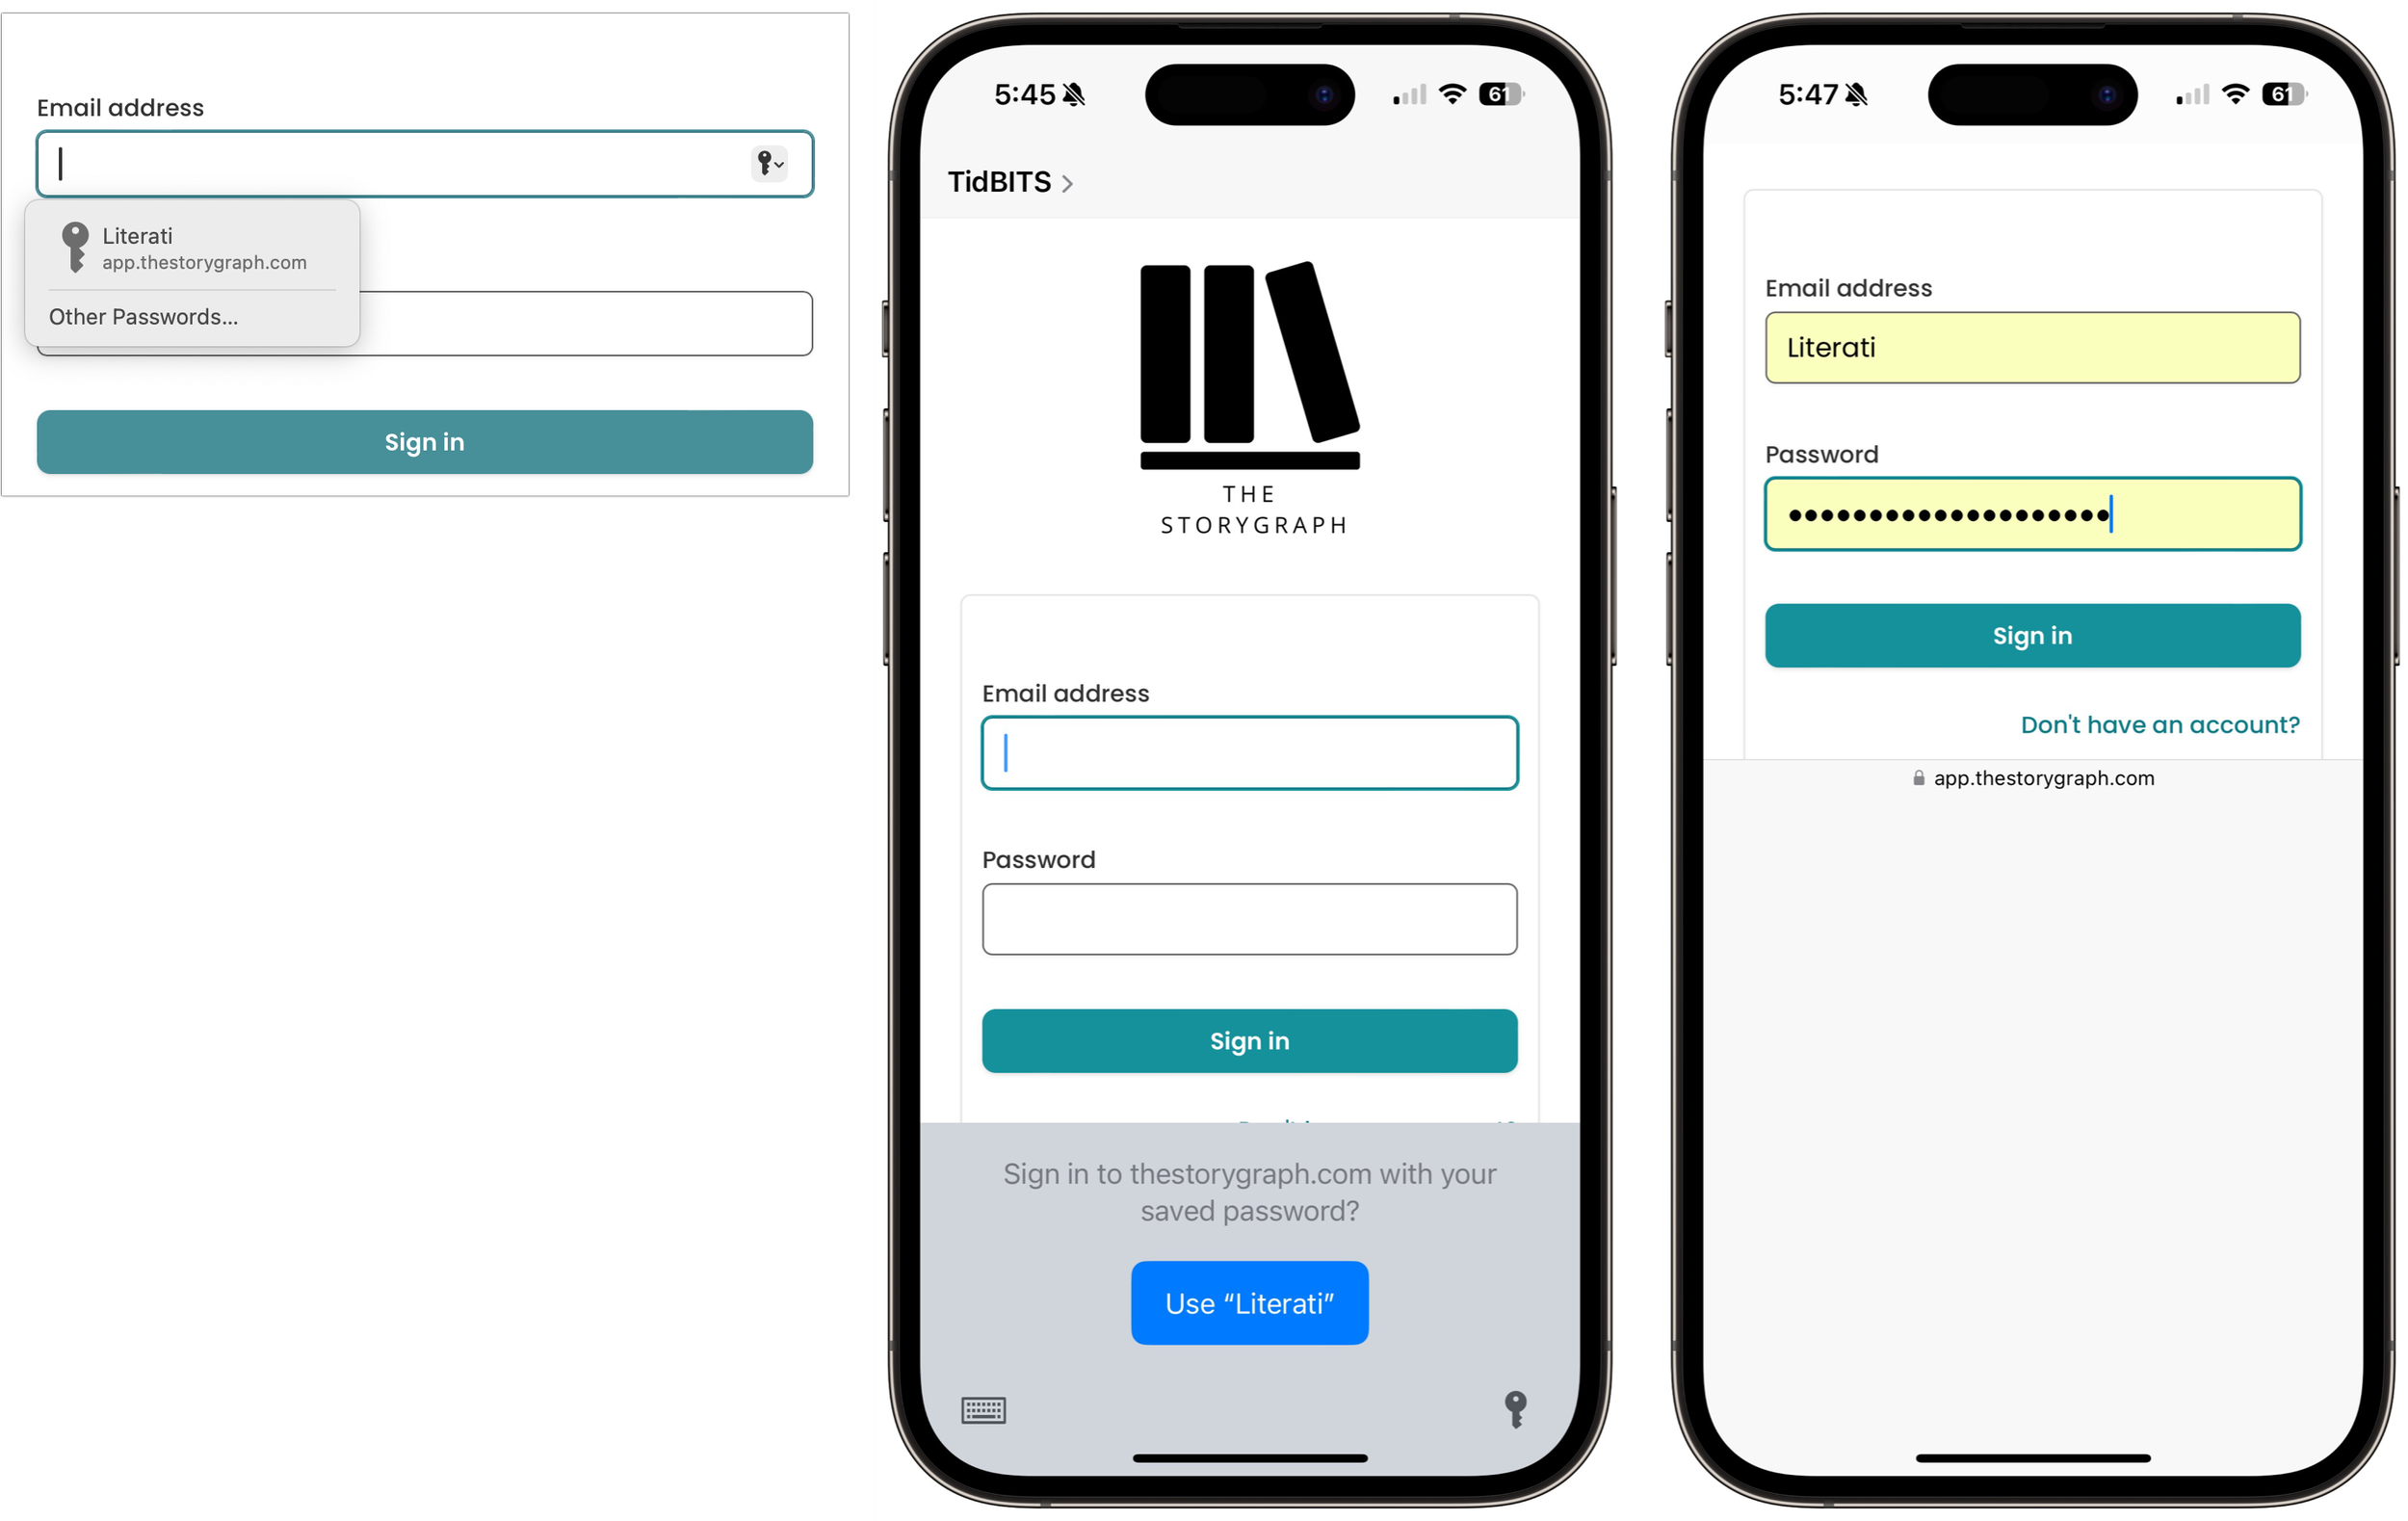
For basic usage, that’s it! However, iCloud Keychain can make mistakes. The site shown above asks for both an email address and a username and wants the email address for logging in, but iCloud Keychain remembered the username instead. Happily, Apple makes it easy to fix such unusual missteps. On the Mac, open System Settings > Passwords, or on the iPhone or iPad, open Settings > Passwords. Here’s where you find and edit your saved logins.
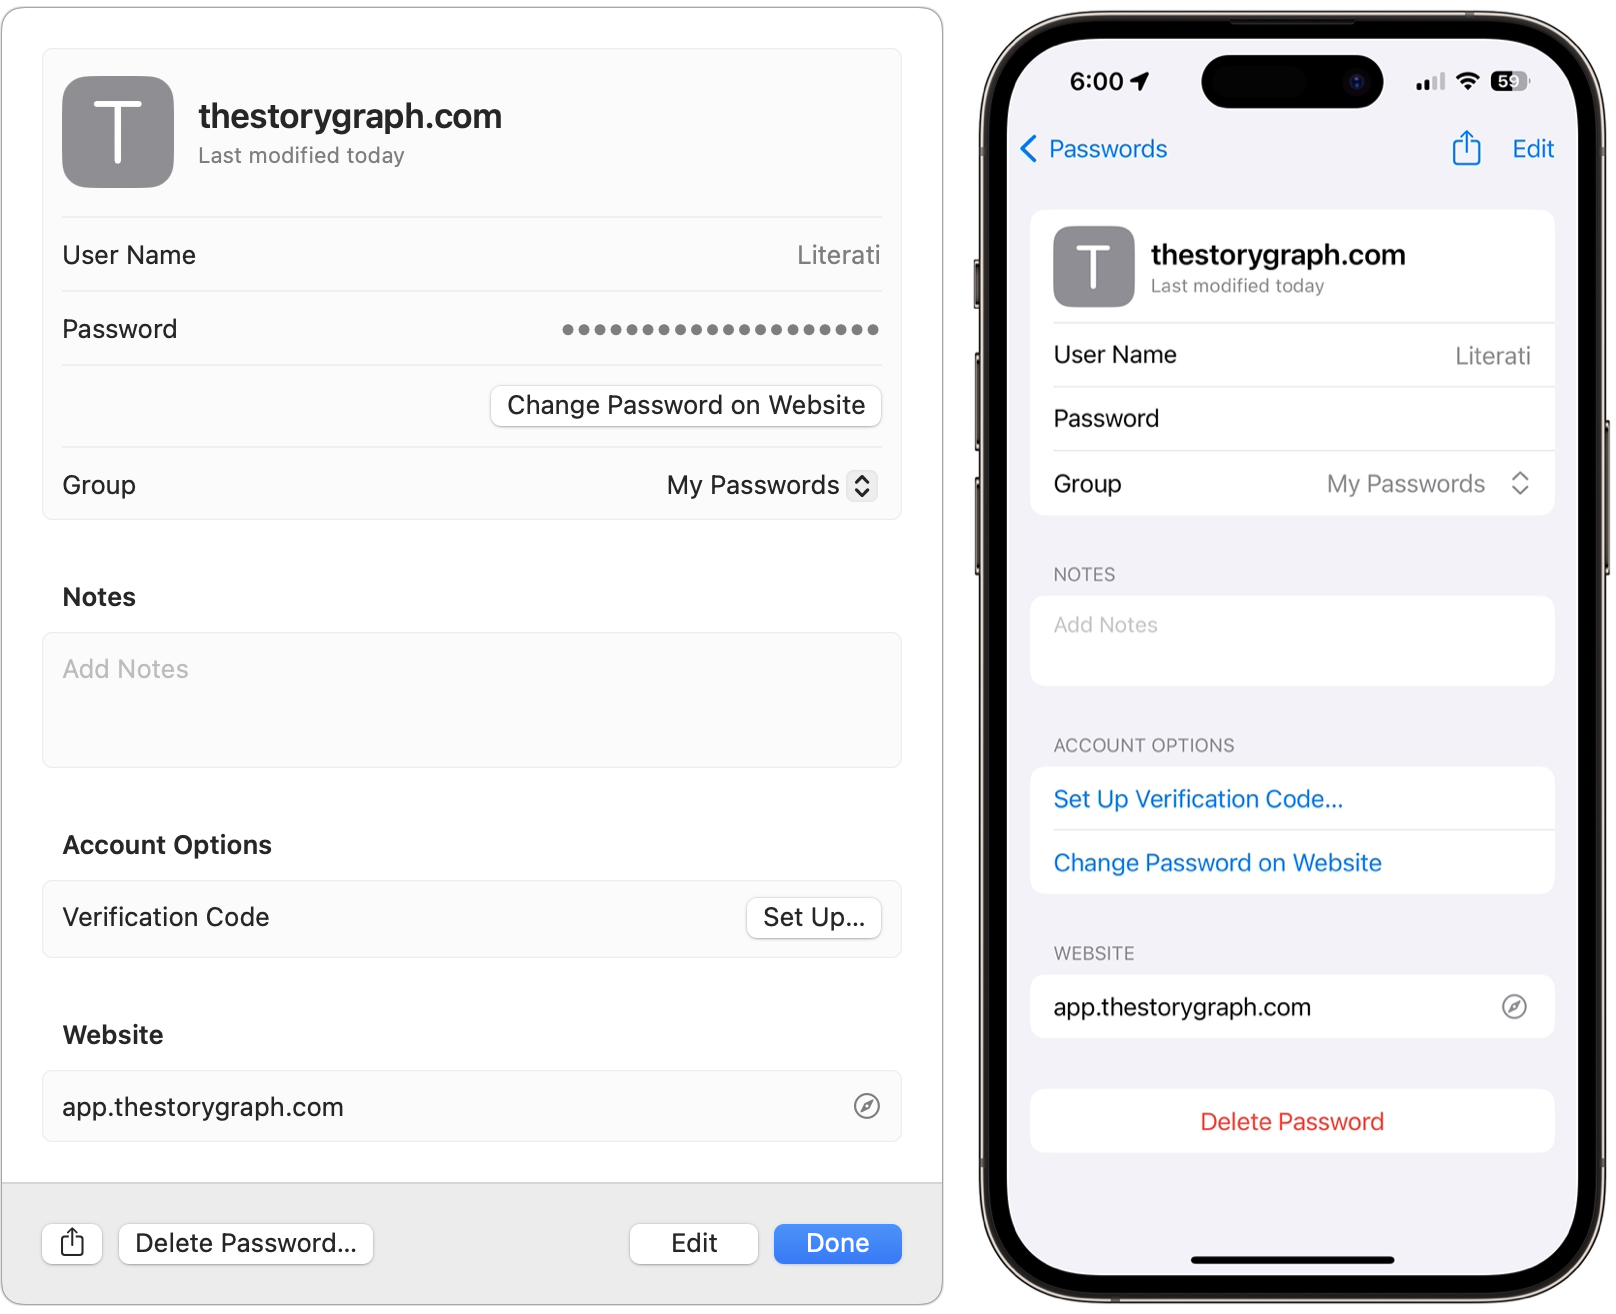
Open the desired login by double-clicking it on the Mac or tapping it on the iPhone or iPad, then click or tap Edit and make any desired changes.
iCloud Keychain provides additional features and options:
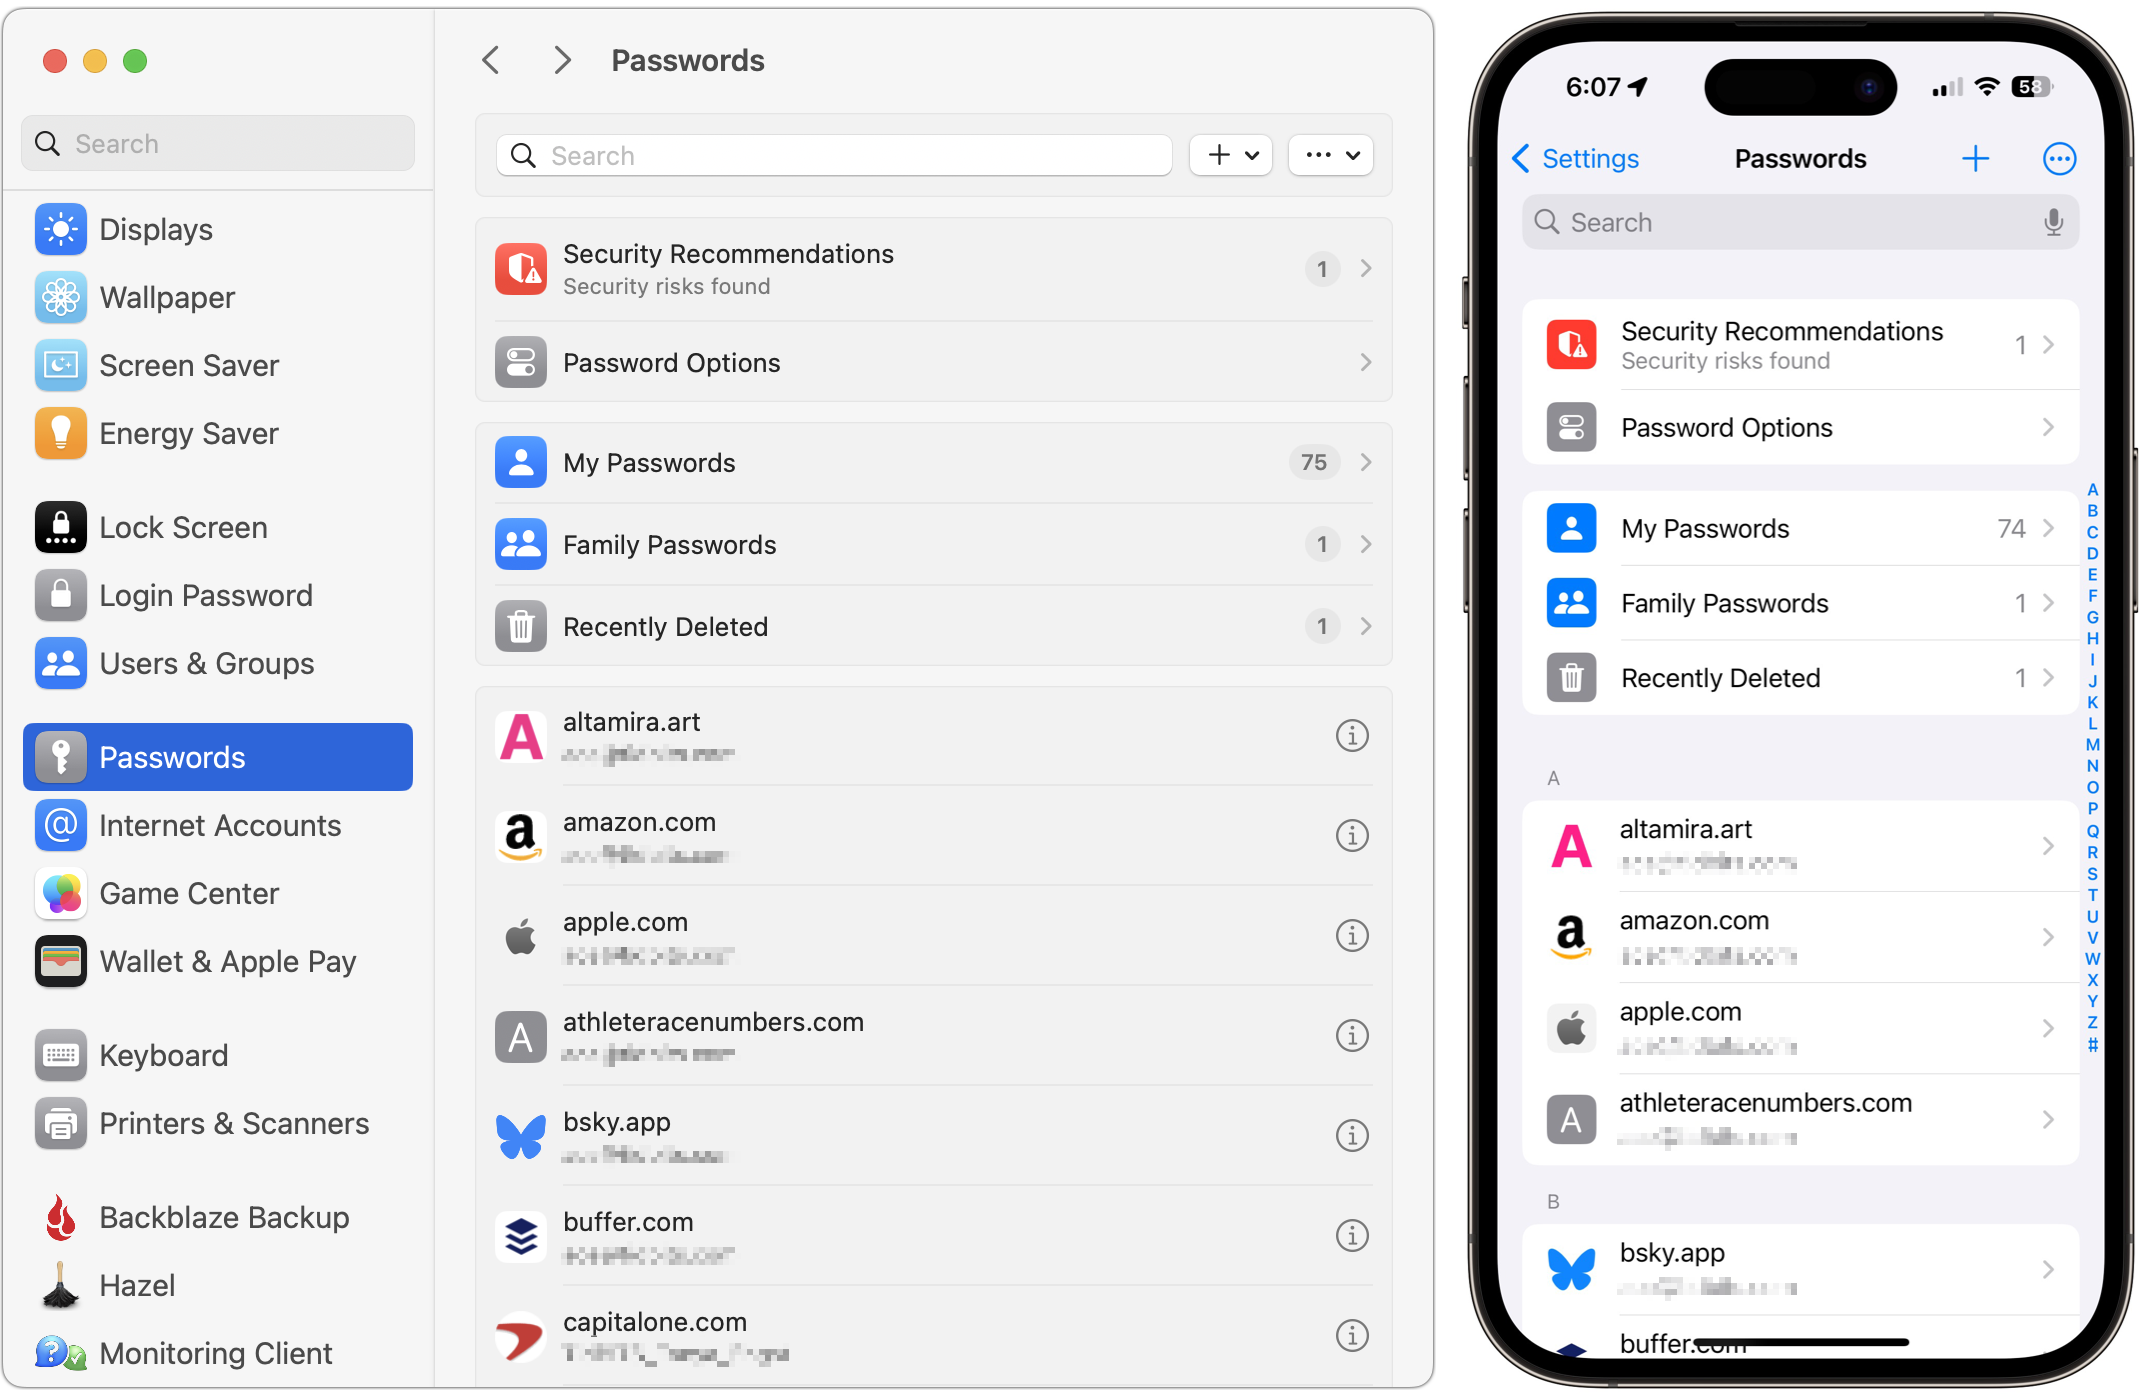
A search field at the top of the Passwords window or screen helps you find logins if scanning the full list is frustrating.
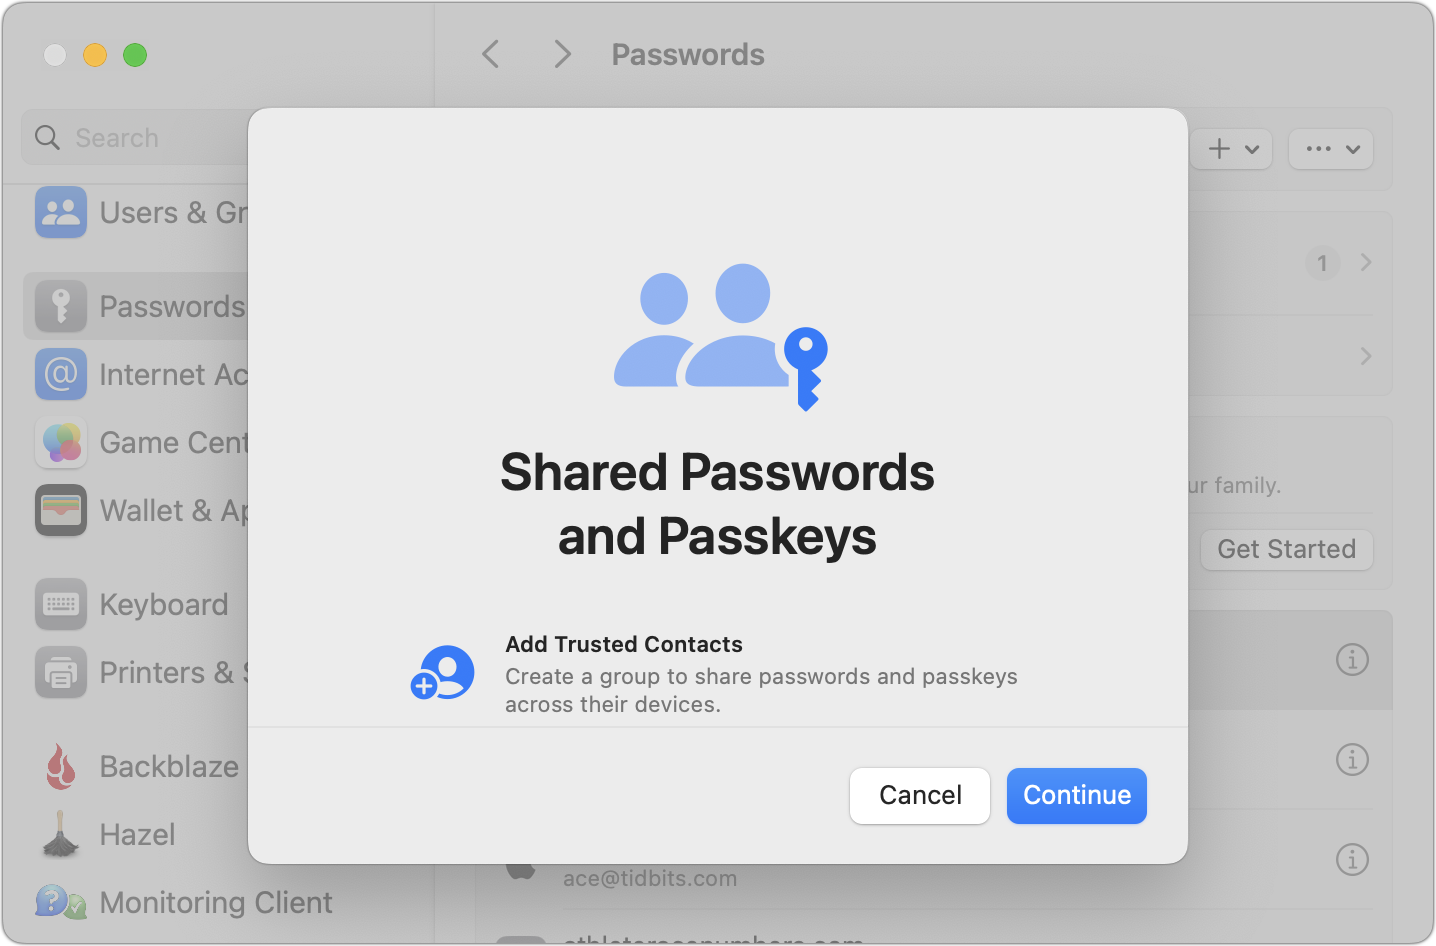
You can use commands in the + menu to create new passwords and shared groups. On the Mac, commands in the ••• menu let you import and export passwords; the iPhone and iPad use that menu to bulk-select passwords for deletion and show generated passwords.
Shared groups let you share a subset of passwords with family or colleagues. Choosing New Shared Group triggers an assistant that walks you through naming the group, adding people from Contacts, and choosing which passwords to share. You can move passwords between groups at any time.
The Security Recommendations screen displays logins exposed in known breaches and points out logins with weak passwords. Check those and update them as necessary.
In Password Options, you can turn off autofill, but why would you? Another option automatically deletes verification codes you receive in Messages after it inserts them with autofill.
On websites that support two-factor authentication, you can set up a login to autofill the verification code. During setup on the site, you’ll get a QR code you can scan with an iPhone or iPad if you’re using a Mac; if you’re using an iPhone or iPad, touch and hold the QR code and choose Add Verification Code in Passwords. Once you finish configuring the login, you’ll have to enter the six-digit verification code on the site to link it with the login.

Overall, iCloud Keychain provides the password management features that most people need, and it’s a massive security improvement over keeping a document of your passwords on your desktop.
(Featured image by iStock.com/loooby)
How to Sync Your Text Messages across All Your Apple Devices
One of the best parts of Apple’s tight platform integration is that you can view your text messages on all your devices. Or at least you can if you get everything set correctly.

Although many of us think of Messages as an iPhone app, Apple’s platform integration lets you read and reply to conversations in Messages on other Apple devices, including the Mac and iPad. All your devices must have the correct settings to make this work reliably. We regularly hear from users who don’t see all their messages on all their devices. If that’s you, check these settings:
Same Apple ID: Your devices all know they’re yours when they’re logged in to the same Apple ID. That’s not a problem for most people, but couples who share an Apple ID, for instance, can run into trouble here. To verify this, open Settings > Your Name in iOS and iPadOS, or System Settings > Your Name in macOS. The email address under your picture at the top of each of those screens should match. If it doesn’t, scroll to the bottom, tap or click Sign Out, and sign in again with the correct Apple ID.
Two-factor authentication: As with so many Apple services now, your Apple ID must be set up for two-factor authentication, which causes certain logins to be queried a second time on another device. Most people have two-factor authentication set up by now, but if not, turn it on using Apple’s instructions.
iCloud Keychain: Your devices must have iCloud Keychain turned on to share your Messages account information. It’s probably already on, but you can enable it if not. Turn it on for an iPhone or iPad in Settings > Your Name > iCloud > Passwords and Keychain > Sync this iPhone. On a Mac, the switch is in System Settings > Your Name > iCloud > Passwords & Keychain > Sync this Mac.
Messages in iCloud: This is the key setting—the previous three are just foundational requirements. Enable it for an iPhone or iPad in Settings > Your Name > iCloud > Show All > Messages in iCloud > Use on this iPhone. On the Mac, look in System Settings > Your Name > iCloud > Show More Apps > Messages in iCloud > Use on this Mac.

iMessage account: You’ve checked that you’re using the same Apple ID everywhere, but there’s a similar setting that’s also important. On your iPhone or iPad, go to Settings > Messages > Send & Receive and make sure you’re signed into iMessage with the same Apple ID—look at the bottom of the screen. Also, ensure you’re set to send and receive from your phone number and appropriate email addresses. It’s safest to send and receive from all the possibilities and start new messages from your phone number. On the Mac, verify that you have the same settings in Messages > Settings > iCloud.

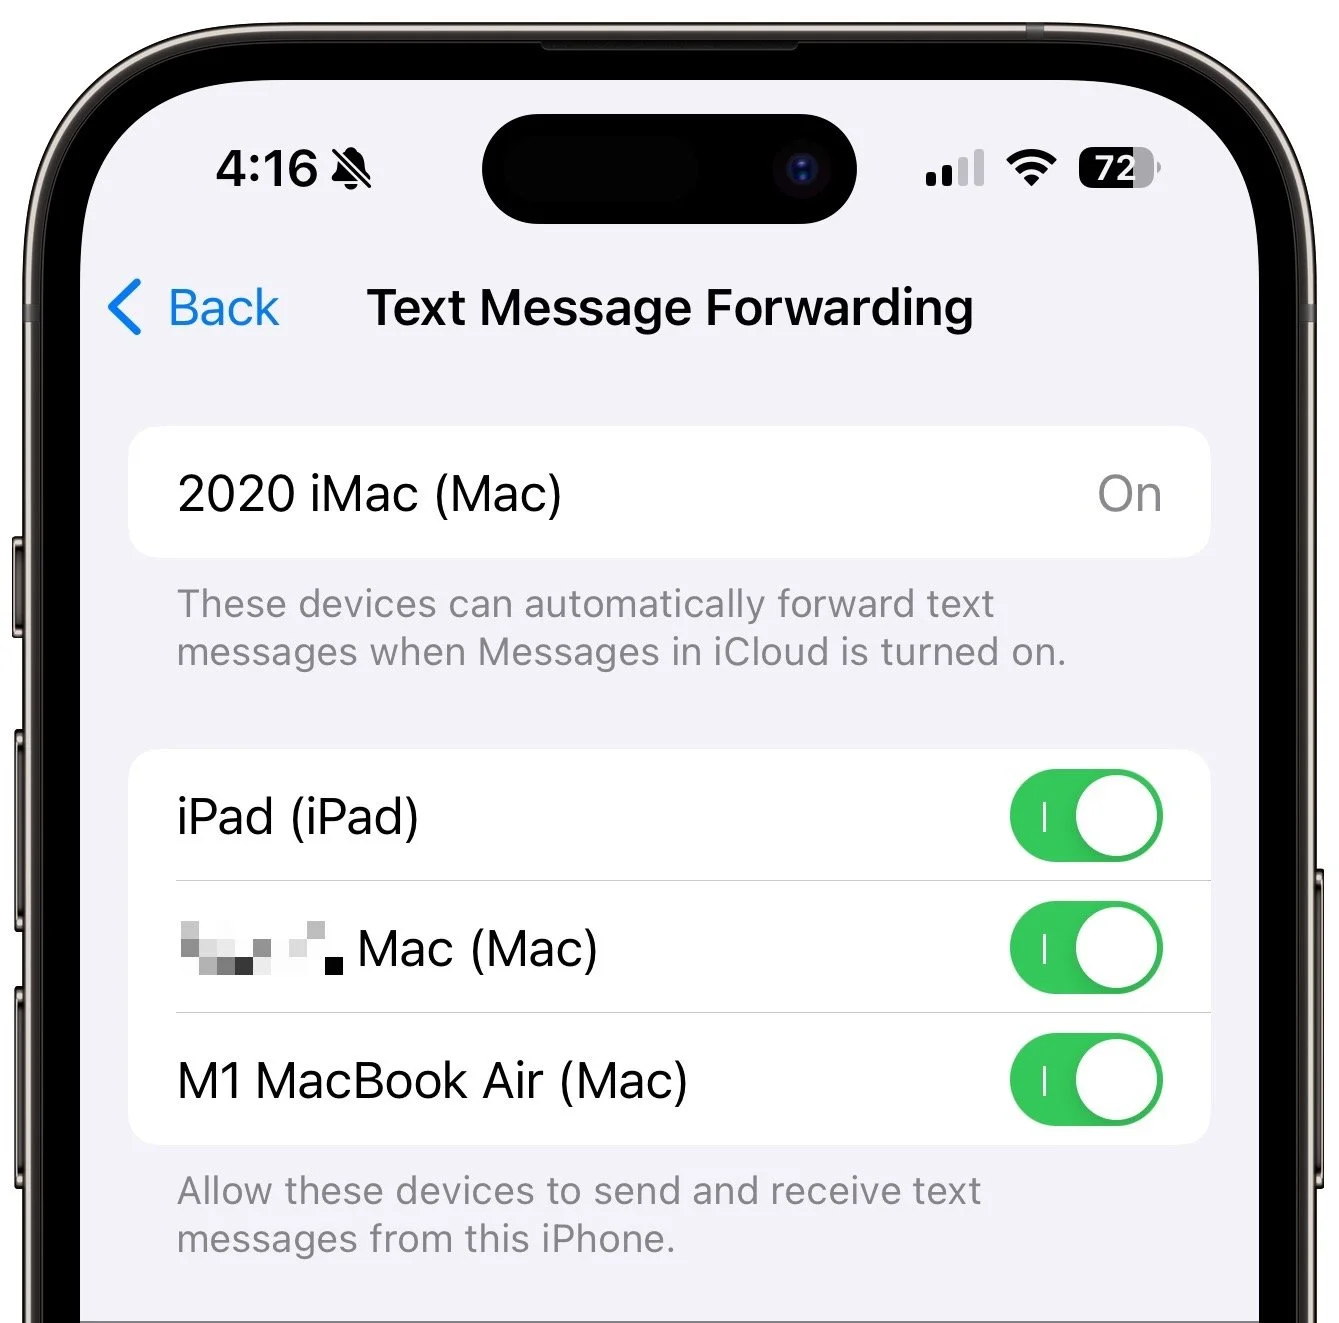
Text Message Forwarding: Turning on Messages in iCloud should keep message history synced across all your devices, including green bubble SMS/MMS text messages. However, it’s worth verifying that SMS/MMS messages are being sent to all your devices. On your iPhone, in Settings > Messages > Text Message Forwarding, select all the devices you want to receive text messages.
Although all the above settings may seem like a lot, most should already be set up correctly. We listed them all because when people have trouble with their messages syncing across all their devices, one or more of these are usually set wrong.
Even with everything configured correctly, there can be hiccups—nothing’s perfect. If messages fail to sync consistently, try these troubleshooting steps:
Use the Sync Now button in the Messages in iCloud settings on any device that hasn’t caught up. That likely won’t help instantly, but syncing should eventually catch up.
Restart the device—it’s always worth trying. On an iPhone or iPad, choose Settings > General > Shut Down (at the bottom), slide to power off, and then press and hold the side (iPhone) or top (iPad) button to turn the device back on. On a Mac, just choose Restart from the Apple menu.
When Messages in iCloud is working properly, though, you can carry on text message conversations using any of your devices at any time. It’s especially nice to switch to the Mac for easier typing when you’re in an involved conversation.
(Featured image by iStock.com/anyaberkut)