When Purchasing a Fireproof Safe, Pay Attention to the Details
If the wildfires in Los Angeles have you considering a fireproof safe to safeguard backups and important documents, make sure to research temperature ratings over time and be mindful of water and impact resistance.

The devastating losses caused by the Los Angeles wildfires have underscored the need to protect data from catastrophic events. A traditional offsite backup—periodically moving a hard drive to another location—might not have sufficed in areas affected by wildfires, where many structures were destroyed. An online backup using a service like Backblaze or CrashPlan is often a better solution, although it can become costly for multiple Macs, and some individuals and organizations are uncomfortable storing their data online, even with encryption.
What about a safe? Would storing one or more backup drives in a safe provide adequate protection? Possibly, but the details are critical. Some safes are designed solely to guard against theft, focusing on preventing thieves from opening the door. However, paper ignites at 451ºF (it chars around 387ºF), and most house fires reach temperatures between 800ºF and 1200ºF, so you may think that all you need to do is look for a “fireproof” safe. That’s a good start, but paper is actually much more resilient than magnetic and optical media.
Fireproof safes come with ratings that indicate the internal temperature they can maintain, with the most common being:
Class 350: Safes maintain an internal temperature of 350ºF, suitable only for paper.
Class 150: Safes keep the interior below 150ºF, which should protect magnetic media.
Class 125: Safes maintain temperatures under 125ºF, appropriate for optical media.
It is also important to determine how long the safe can maintain that temperature. Generally speaking, a fireproof safe is rated for 1 or 2 hours, indicating it can maintain the specified internal temperature for at least that duration. Time ratings represent minimums, not maximums, so the actual protection time may be longer.
In most cases, the protection time is likely to be longer. That’s because safes are tested in furnaces at temperatures that can be two to three times hotter than the average house fire. For example, Underwriters Laboratory (one of several independent testing labs) conducts tests at 1700ºF or 1850ºF. Additionally, while a house fire may burn for several hours, the average fire will consume everything near the safe within 20 minutes and then move on.
Wildfires are a different story. In extreme conditions, wildfire temperatures can range from 1500ºF to 2200ºF, approaching or exceeding the testing conditions. Wildfires also last longer, so a safe in a destroyed building may remain in embers for hours or even days before it can be recovered.
While temperature over time is the main factor to consider when researching a fireproof safe, also look for two other variables being mentioned as well:
Water resistance: Where there’s fire, there’s usually water. Thousands of gallons of water, some of which will undoubtedly affect the safe. Not all fireproof safes are waterproof, so verify whether a specific safe can withstand being doused by firefighters.
Impact protection: If the floor collapses, a safe on an upper story could fall a considerable distance. If you are considering such a location, ensure the safe can withstand the impact. To simulate realistic fire conditions, the test may involve withstanding a 30-foot drop onto a concrete floor, followed by reheating.
Finally, remember that if your safe is in a fire, the heat will cause its insulation to swell up, rendering the lock useless, regardless of its type. Typically, you will need to hire a locksmith to access the safe using instructions from the manufacturer.
If you’re going to trust your data to a fireproof safe, do your research to ensure that whatever you buy will meet your needs for fire, water, and impact protection. It won’t be cheap—depending on the size and other factors, a good fireproof safe can cost many hundreds or even thousands of dollars. However, this is one area where you definitely shouldn’t cut corners.
(Featured image based on originals by iStock.com/phive2015 and Hanna Plonsak)
Businesses, Don’t Overlook Email Backup
Cloud-based email services like Google Workspace and Microsoft 365 provide excellent uptime and availability. However, an independent email backup solution is essential to protect against accidental deletion, cyber threats, and other data loss concerns.

Cloud-based email services such as Google Workspace and Microsoft 365 dominate the market for organizational email for good reason. Dealing with the constant onslaught of spam and online attacks is hard, as those traumatized by running mail servers in the “good old days” can attest.
While email service providers excel at their primary functions of sending, receiving, and storing emails, they prioritize availability and uptime over backup and recovery. Depending solely on their built-in protection systems can leave organizations vulnerable to data loss. Although it’s exceedingly rare for email service providers to lose data due to system failures—all modern email systems are distributed and replicated in virtualized storage—they cannot safeguard against every risk. Here are some scenarios we’ve encountered where a separate email backup solution was useful:
Recover from human error: This is the big one. People often accidentally delete important messages or clean out old messages too aggressively, inadvertently including critical conversations in a mass deletion. Backups ensure that these messages can be retrieved.
Ease employee turnover: When employees leave, it’s essential to deactivate their email accounts for security reasons. However, information in their accounts may be vital for ongoing projects or legal purposes. Backups preserve this data for future access.
Mitigate cyber threats: Phishing attacks are commonplace today. If an employee falls victim to one, their email account could be compromised and data lost. Worse still, the attacker could install malware—even ransomware, though that’s not a significant real-world concern for Apple-only installations—that could result in email data loss. While training employees to recognize and avoid phishing attacks is crucial, backups provide an essential safety net for anyone who makes a mistake.
Facilitate data migration and archiving: Organizations often need to migrate email data from one system or user to another. While it’s rarely necessary or desirable to migrate everything—all the mail from the past year may be sufficient—it can be helpful to maintain archival access to historical communications.
In fact, both Google and Microsoft explicitly state that they store data for only a limited time and recommend employing a backup service. (The specifics may differ, but generally, you can retrieve a deleted email within 30 days, after which it may be recoverable for an additional 14 or 30 days.) Numerous companies provide email backup services, many of which are quite similar. The list below highlights some of the most common services, but we encourage you to reach out for recommendations based on your email service provider and organization size.
CloudAlly offers unlimited data retention and extends its backup capabilities beyond email to encompass platforms such as Box, Dropbox, and Salesforce.
CubeBackup focuses exclusively on Google Workspace and Microsoft 365. It provides a cost-effective solution by allowing users to utilize their own local or remote storage.
Backupify and Datto SaaS Protection are from the same company and offer the same backup capabilities, but they serve different market segments. Datto further enhances its branded services with a range of business continuity and data protection tools.
Dropsuite provides unlimited storage and also supports QuickBooks Online backup. It features a flexible backup cadence, with email backups up to 12 times per day.
MSP360 Managed Backup is a feature-rich solution that, while more complex and potentially more expensive than those from competitors, offers extensive customization and supports a wide range of storage providers.
Spanning goes beyond Google Workspace and Microsoft 365 with Salesforce backups. It offers highly granular restores, enabling the recovery of individual emails. Its FLEXspend feature simplifies backup expenditures when transitioning between platforms.
SpinBackup offers disaster recovery services at an affordable price point, and its developer, Spin.ai, provides a wide range of security solutions beyond backup, including data leak and ransomware protection.
Synology Active Backup includes free add-ons for Google Workspace and Microsoft 365 that back up cloud data to a Synology NAS. It’s an excellent solution for avoiding ongoing expenses.
As important as an email backup solution is for protecting against data loss, we urge you to proceed carefully when selecting one. If you end up with data that exists solely in a particular solution, legal retention requirements or the inability to export data in a non-proprietary format may lock you into paying for it indefinitely. Ideally, keep all data live so you can transition to a different solution to meet changing needs. Again, please contact us for help picking the most appropriate solution for your needs.
(Featured image by iStock.com/Rasi Bhadramani)
Apple’s January 2025 Releases Enhance Apple Intelligence Features
Apple’s third update to Apple Intelligence introduces changes to notification summaries (including disabling controversial news headline summaries), enhancements to Visual Intelligence on the iPhone 16, and Genmoji creation on the Mac.

Apple unveiled Apple Intelligence in October 2024 and expanded its extensive collection of AI-powered features with its December updates. The company’s January 2025 releases of macOS 15.3 Sequoia, iOS 18.3, and iPadOS 18.3 enhanced the feature set in several notable ways. Remember, Apple Intelligence features operate only on a Mac with Apple silicon, an iPhone 15 Pro or any iPhone 16, or an iPad with an A17 Pro or M-series chip.
Although Apple still considers Apple Intelligence to be in beta, the January operating system releases enabled it by default. From Apple’s perspective, this makes sense because so many features depend on Apple Intelligence, and the company aims to ensure a consistent user experience for everyone. Those features include:
Photos: Clean Up, natural language searching, and improved Memory movie creation
Text and Writing: Writing Tools with ChatGPT integration for any app
Communication: Priority messages in Mail, Smart Reply and summaries in both Mail and Messages
Notes and Phone: Audio transcription summaries
Creative Tools: Genmoji and Image Playground for image generation, Image Wand for Apple Pencil sketches
Focus: Intelligent Breakthrough & Silencing and Reduce Interruptions Focus
Notifications: Summaries for busy apps and conversations
Siri: Enhanced capabilities, but primarily ChatGPT integration
Camera: Visual Intelligence lookups (iPhone 16 only)
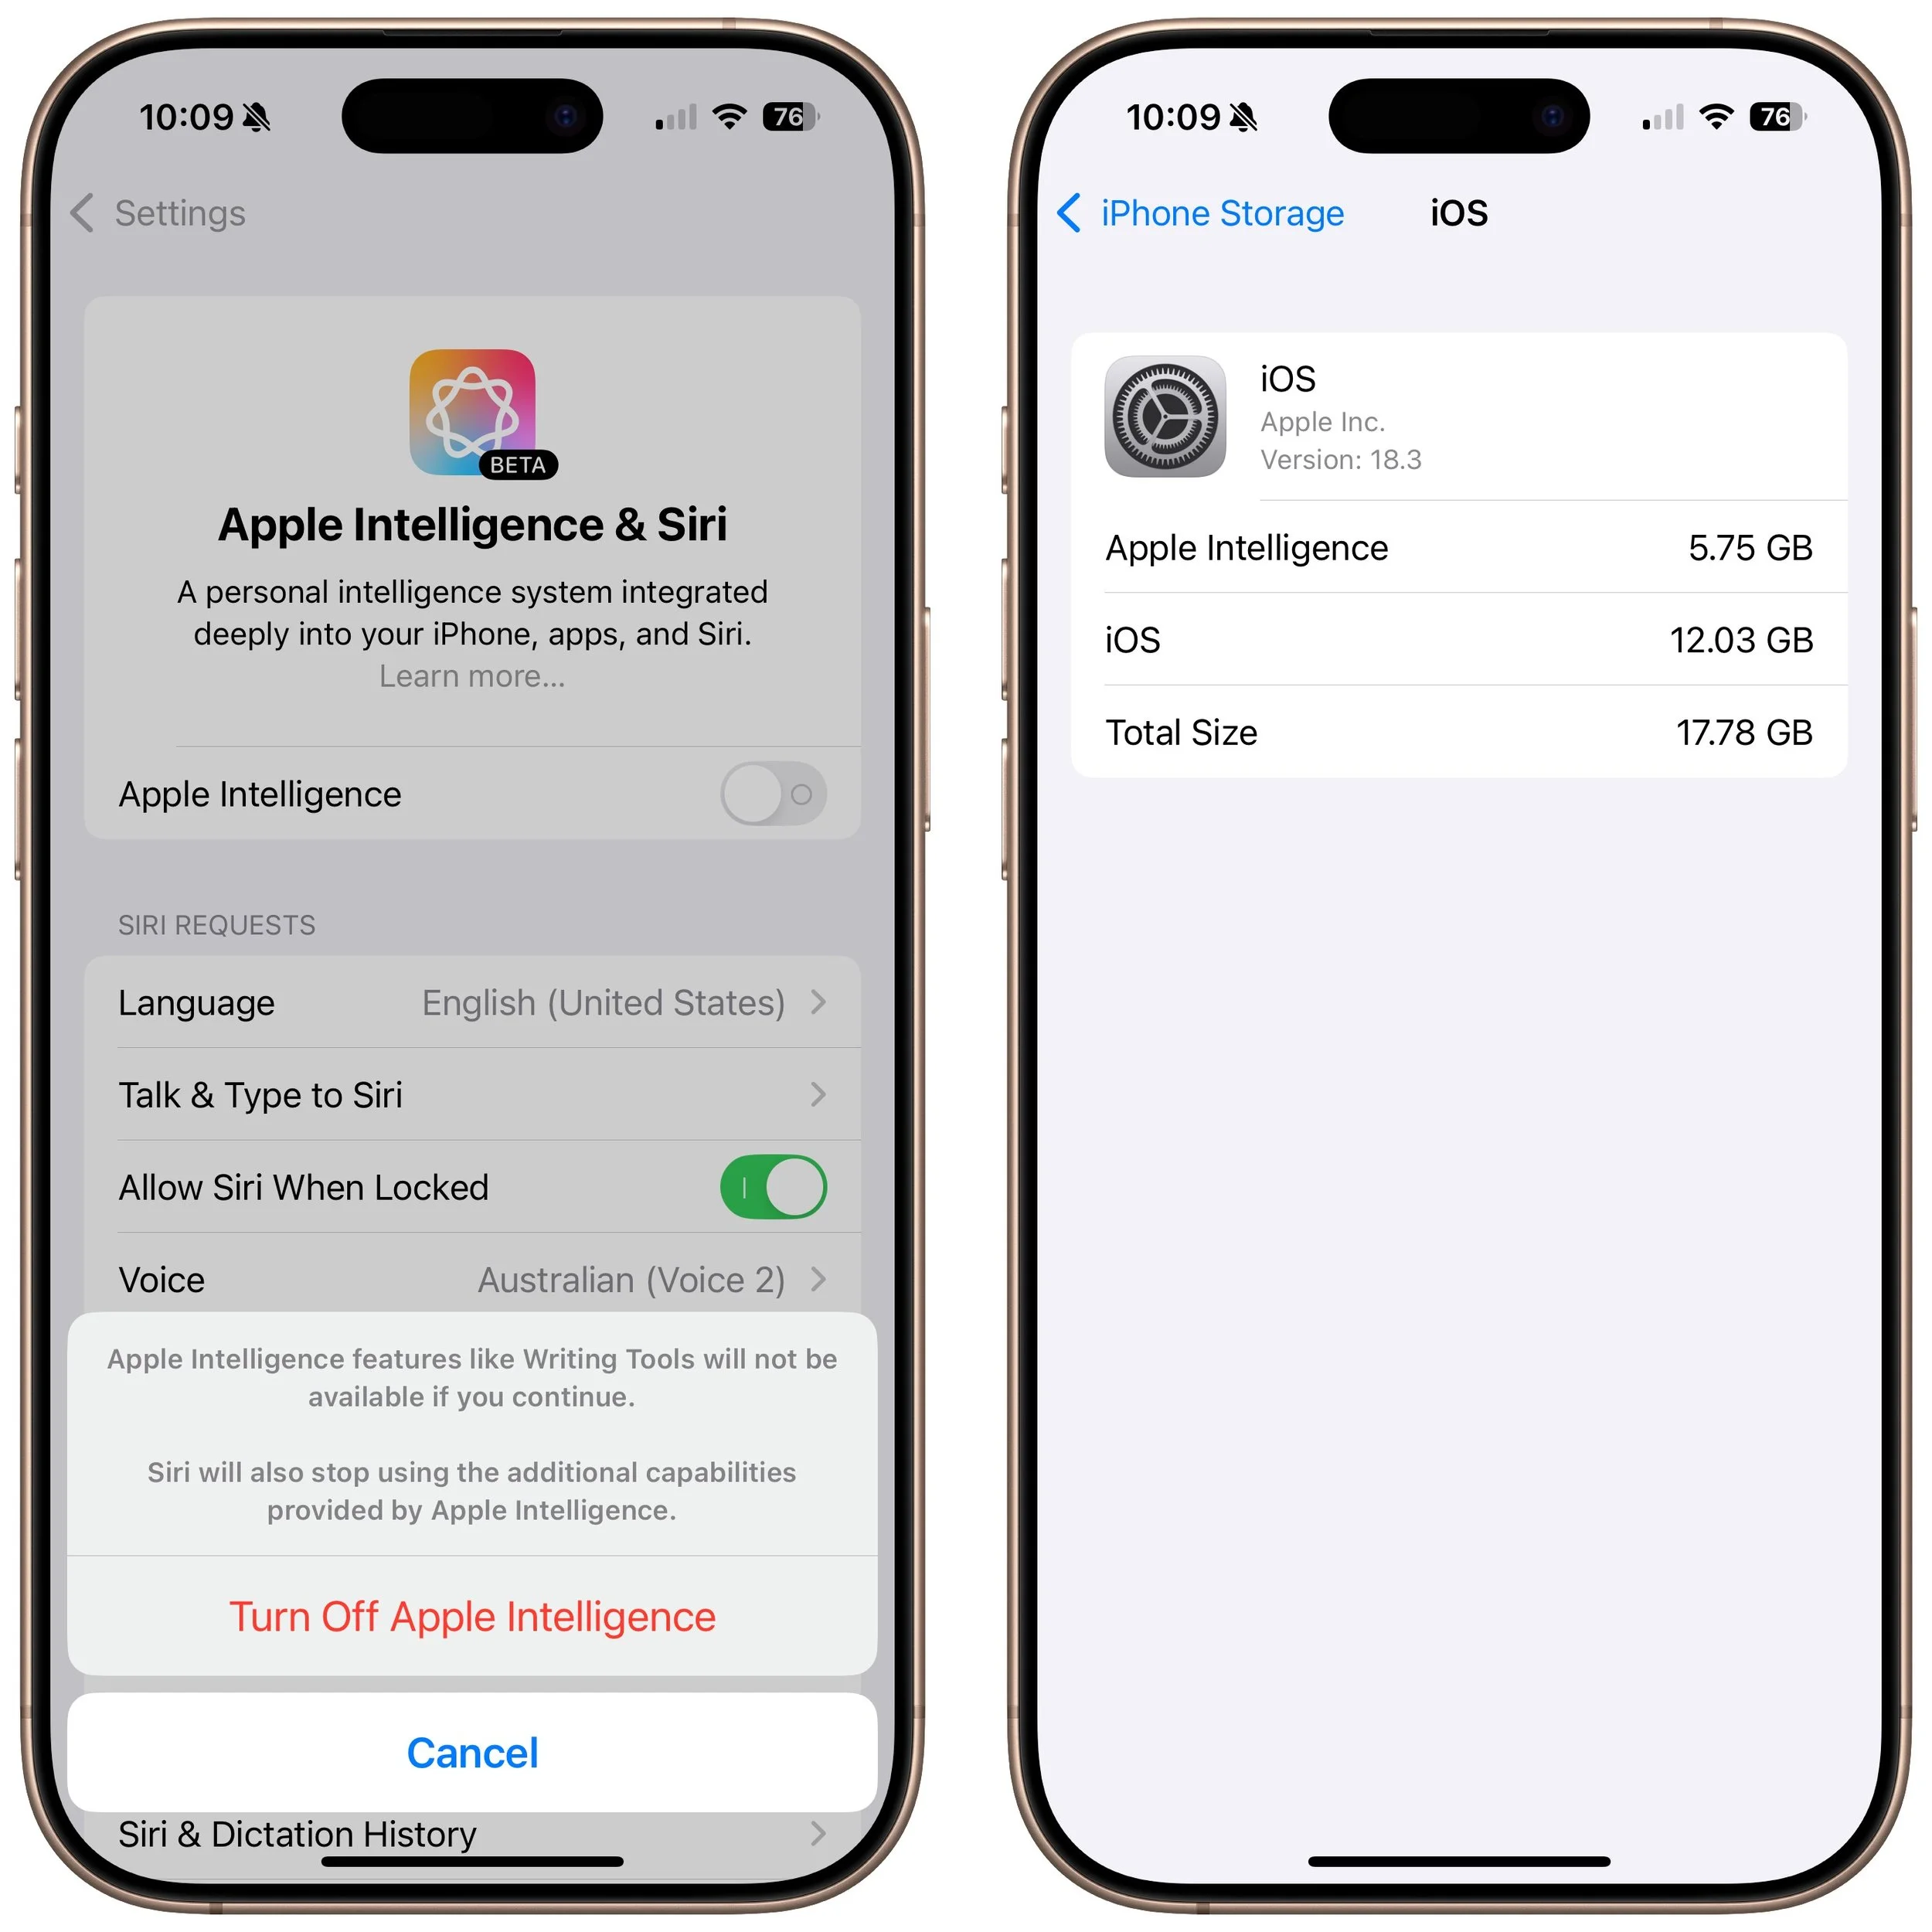
Apple Intelligence requires up to 7 GB of storage space (we see it occupying 5 GB in macOS 15.3 and 5.75 GB in iOS 18.3), so if your Mac, iPhone, or iPad is low on space, you may want to turn it off to free up room for photos, movies, and apps. Do that in the Apple Intelligence & Siri section of System Settings or Settings. However, you might not notice recovered space until your device decides to reclaim it. To check your space usage on a Mac, navigate to System Settings > General > Storage > macOS, and on an iPhone or iPad, go to Settings > General > iPhone/iPad Storage > iOS/iPadOS.
Assuming you intend to keep it enabled, what can you expect from this third update to Apple Intelligence features?
Changes to Notification Summaries
Notification summaries have proven to be Apple Intelligence’s most controversial feature. They have generated blatantly incorrect news summaries and misidentified spouses, resulting in complaints from major publications and widespread mockery. In response, Apple has temporarily turned off notification summaries for all apps in the App Store’s News & Entertainment category.
Apple also italicized all the text in notification summaries to better distinguish them from standard notifications. Previously, the only indicator of a summarized notification was a tiny icon.
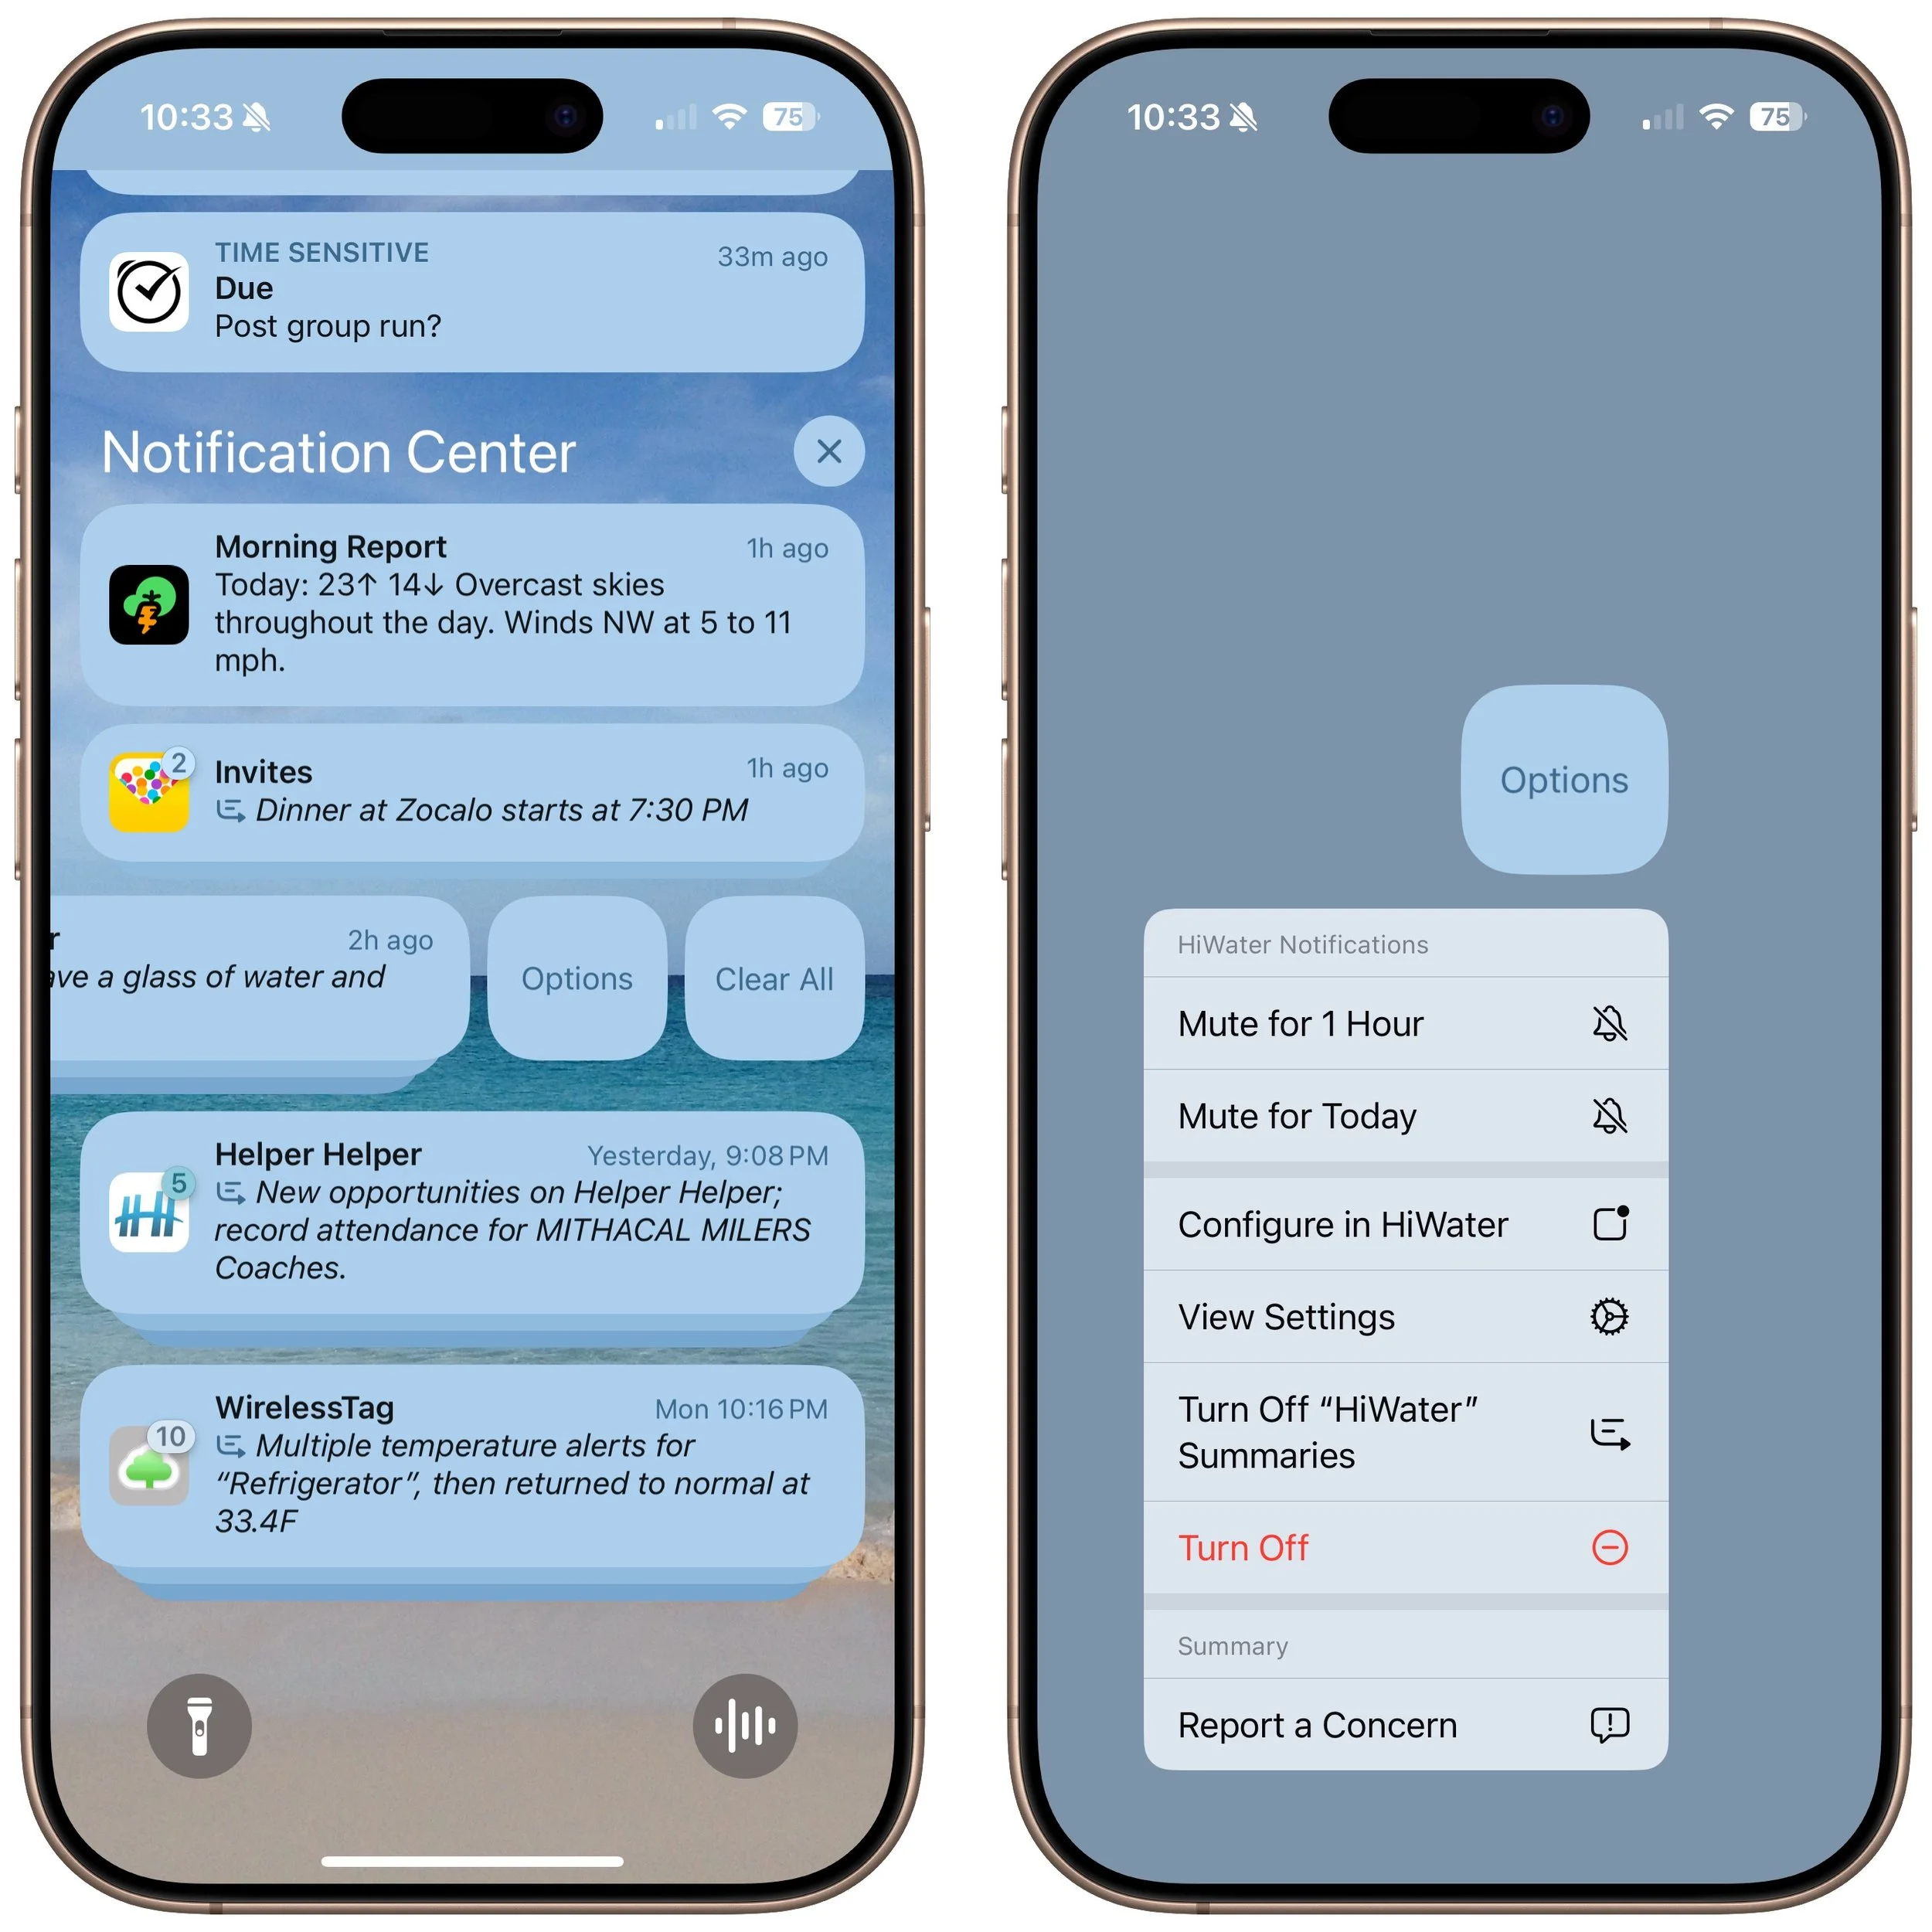
Finally, Apple made it easier to manage settings for notification summaries from the Lock Screen. On an iPhone, for instance, you can swipe right to reveal an Options button, tap it, and then tap Turn Off AppName Summaries. You can also report a concern with a summary—Apple solicits feedback as part of the Apple Intelligence beta.
Visual Intelligence Adds Scheduling and Plant and Animal Identification
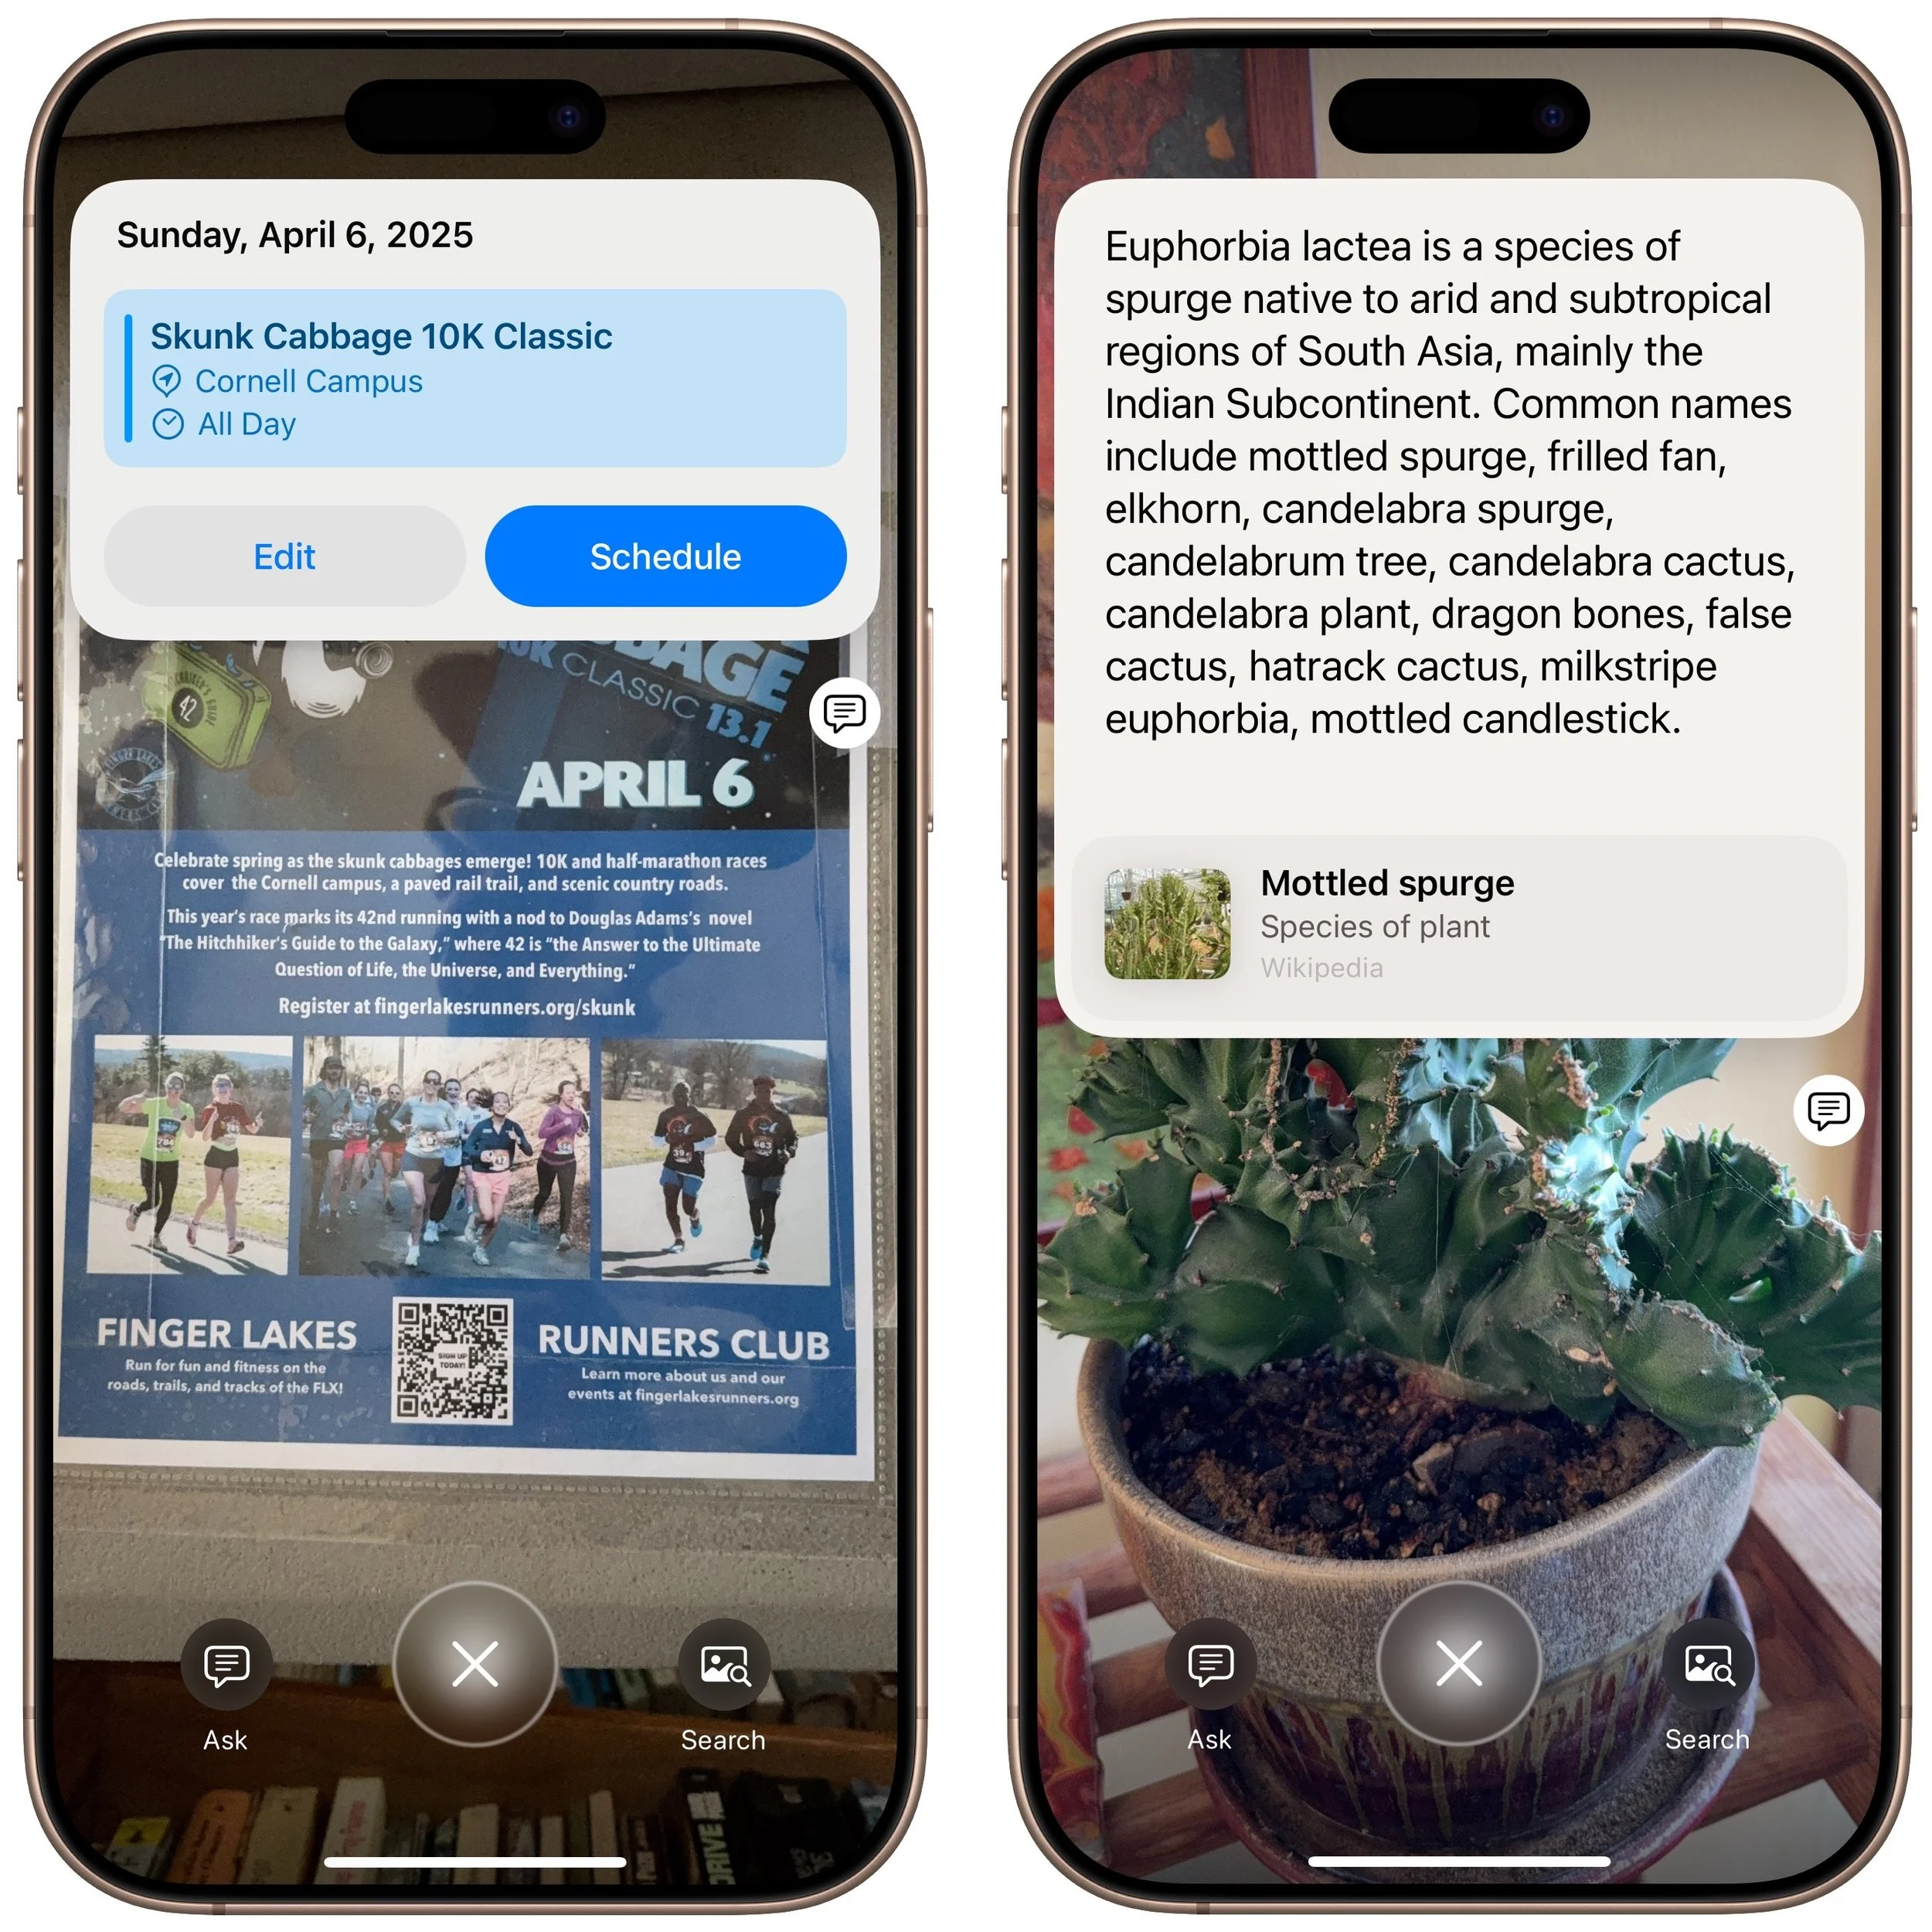
Apple Intelligence enhances the new Camera Control button on iPhone 16 models, enabling it to respond based on what’s in the viewfinder. Initially, it could only ask ChatGPT about what it saw or conduct a Google image search. Now, when you press and hold the Camera Control, Visual Intelligence can also detect whether you’re pointing at a poster or flyer and suggest creating a calendar event. Additionally, if it identifies a plant or animal within the frame, it will recognize it and provide more information with a tap.
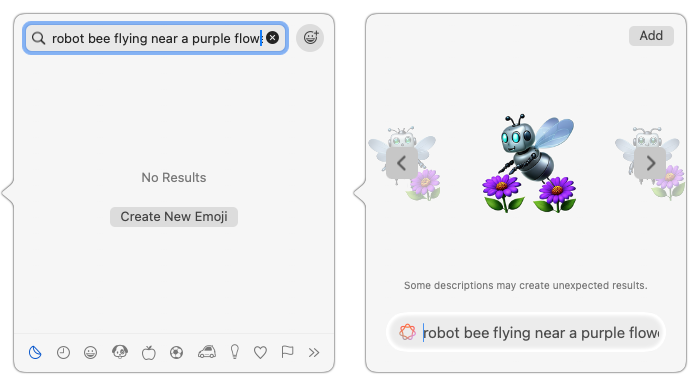
Genmoji Become Available on the Mac
iOS 18.2 and iPadOS 18.2 introduced the custom emoji Apple calls Genmoji, but macOS 15.2 did not include this feature. With macOS 15.3, the Mac has now caught up. The functionality remains the same—you describe what you want to see in a few words, and the Genmoji can be based on a picture of a person. The Genmoji you create are essentially stickers, but you can use them just like regular emojis.
To create one, open the emoji picker, type a few words of description, and click Create New Emoji. You can then experiment with different descriptions and scroll through Apple Intelligence’s variants before clicking Add to save your Genmoji and insert it wherever you’re typing.
We expect at least one more major release related to Apple Intelligence, likely in early March, coinciding with the .4 operating system updates. If Apple’s engineers meet their targets, these releases will enable Siri to access and leverage your personal information for more context-aware responses. Siri will also be able to perform actions within apps. Additionally, Apple has promised priority notifications to ensure that we are quickly alerted to the most critical messages while minimizing distractions from less important ones.
In the meantime, explore the Apple Intelligence features currently available and see if they enhance your Apple experience.
(Featured image by Apple)
Feel Free to Upgrade to macOS 15 Sequoia When You’re Ready
When should you upgrade to macOS 15 Sequoia? There’s no need to install it today, but we think it’s safe for those who want to take advantage of the new features and integration with Apple’s other operating systems.

While we typically advise caution when considering upgrades to the latest major macOS release, we believe Apple has sufficiently refined macOS 15 Sequoia to warrant an upgrade for those interested. You don’t need to upgrade immediately, but there are no significant reasons for most people to delay further.
The big win in upgrading now is that Apple has released betas of most of its promised Apple Intelligence features for Macs with Apple silicon. In other posts, we’ve looked at the artificial intelligence-driven features that arrived in macOS 15.1 and macOS 15.2, including:
Writing Tools for proofreading, rewriting, summarizing, and composing text
Clean Up in Photos for removing background objects, plus natural language searches
Audio recording in Notes, with transcription and summarization
Summaries replacing snippets in Mail message lists, plus summarization of long messages or threads
A Smart Reply feature in Mail and Messages for quick replies
Notification summaries that reduce distractions from chatty apps
Integration of ChatGPT with Siri
Image Playground for generating custom images based on your descriptions
Sequoia has been quite stable, with two caveats. First, there have been some networking issues related to Apple’s built-in firewall and VPNs; we don’t yet know if macOS 15.2 resolves these. Second, macOS 15.2 introduced a new bug that causes problems for backup apps trying to make bootable backups on Apple silicon Macs. Although that’s annoying and will likely be fixed shortly, Apple has been deprecating bootable backups for years in the name of security. The modern approach is to install macOS from macOS Recovery, then use Migration Assistant to restore from Time Machine or a data-only backup.
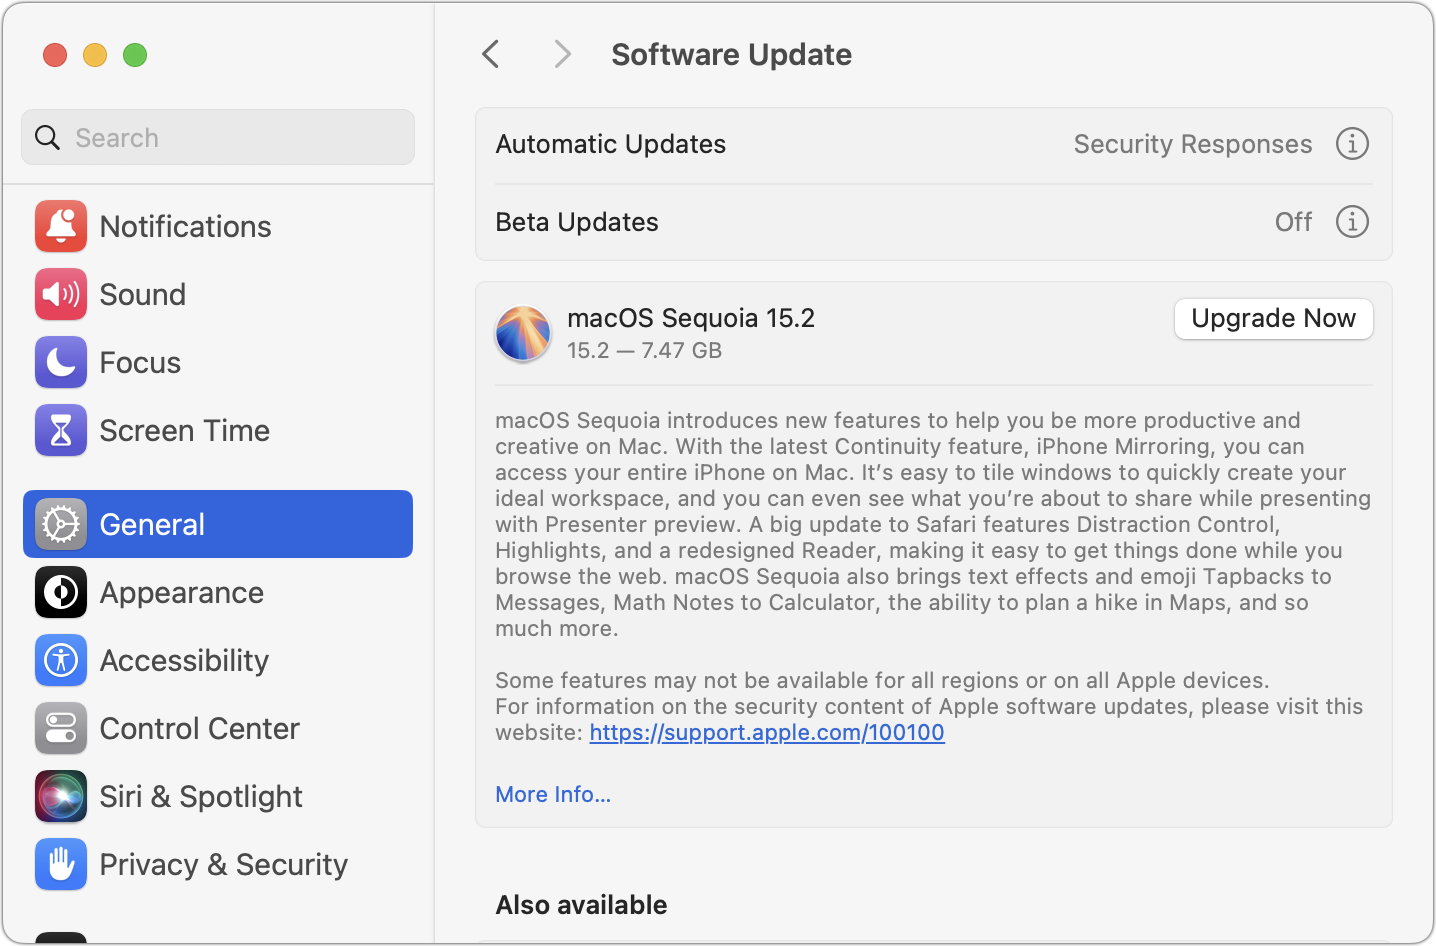
Apple will continue to release macOS updates in 2025. If past performance is any indication, you can expect macOS 15.3 in January, 15.4 in March, and 15.5 in May with a few new features, plus a few security and bug fix updates in between.
That said, you can put off the Sequoia upgrade as long as you’re running macOS 13 Ventura or macOS 14 Sonoma and are staying current with Apple’s security updates. Earlier macOS versions no longer receive security fixes, rendering them more vulnerable to attack. Possible reasons to continue delaying include:
You’re too busy. The upgrade process will take a few hours, plus some additional time to configure everything properly afterward. When you are ready to upgrade, aim for when a little downtime will be convenient.
You rely on incompatible software. The jump from Ventura or Sonoma to Sequoia isn’t a big one, so most modern apps should have been updated by now. But if a necessary app is known to have issues, you’ll either need to wait for an update or switch to an alternative that works.
Sequoia may not transform your experience of using a Mac, but it has new features you might appreciate beyond Apple Intelligence. The most noticeable is probably iPhone mirroring, which lets you use your iPhone in a window on your Mac. Also potentially interesting are its new window tiling features that let you quickly arrange windows, the standalone Passwords app, Highlights and Distraction Control in Safari, and collapsible headers in Notes.
Before You Upgrade
Once you’ve decided to upgrade to Sequoia, you have three main tasks:
Update apps: Make sure all your apps are as up-to-date as possible. If you regularly put off updates, now’s the time to let them complete so you have Sequoia-compatible versions.

Clear space: Sequoia may need as much as 25 GB of free space to upgrade, and the Sequoia installer itself is nearly 15 GB, so we recommend making sure you have at least 50 GB free. Don’t cut this close—you should always have at least 10–20% free space for virtual memory, cache files, and breathing room. Check in Sonoma or Ventura by choosing System Settings > General > Storage; in earlier versions of macOS, choose About This Mac from the Apple menu and click Storage. System Settings provides quick ways to free up space. Another easy option for iCloud Drive users is to Control-click large folders and choose Remove Download to “evict” the local versions of those files temporarily; Box, Dropbox, and Google Drive have similar features.
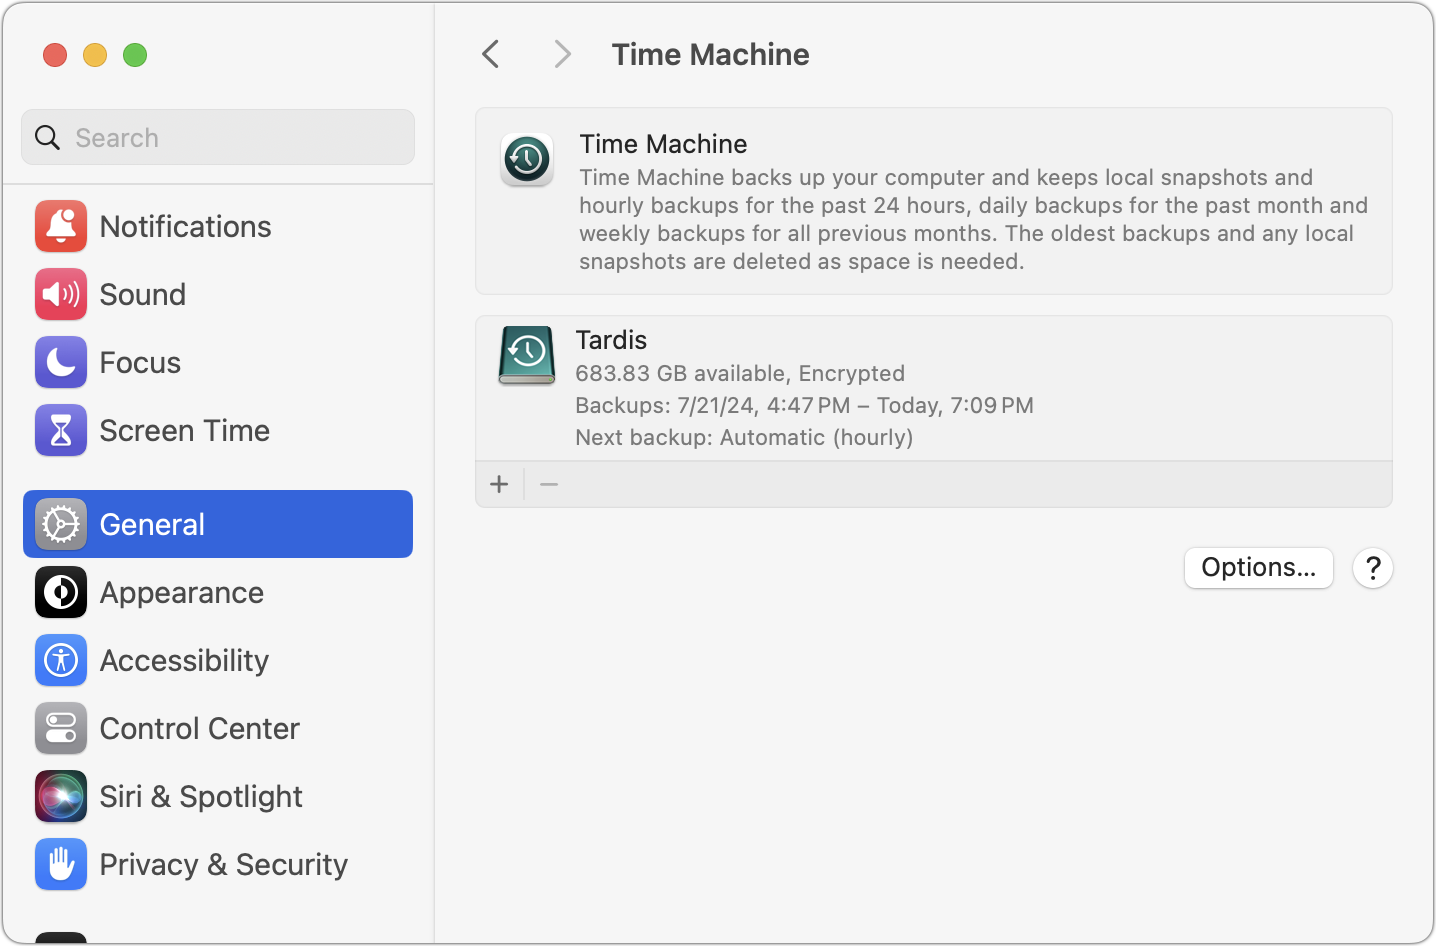
Make a backup: Never, ever install an update to macOS without ensuring you have at least one current backup first. In an ideal world, you’d have an updated Time Machine backup, a data-only duplicate, and an Internet backup. That way, if something goes wrong, you can quickly revert.
Upgrading
After completing those tasks, ensure you won’t need your Mac for a few hours. There’s no telling exactly how long the upgrade will take, so never start an upgrade if you need the Mac soon.
To initiate the upgrade, open System Settings > General > Software Update in Sonoma or Ventura (System Preferences > Software Update in previous versions of macOS), click the Upgrade Now button, and follow the instructions. If you’d like more guidance, check out Joe Kissell’s ebook Take Control of Sequoia.
After You Upgrade
Part of the reason to set aside plenty of time for your Sequoia upgrade is that there are usually cleanup tasks afterward. We can’t predict precisely what you’ll run into, depending on what version of macOS you’re running now and what apps you use, but here are a few situations we’ve noticed in the past:
macOS may need to update its authentication setup by asking for your Apple ID password, your Mac’s password, and, if you have another Mac, its password. Don’t worry that malware has compromised your Mac—these authentication prompts are fine.
Some apps may have to ask for various permissions even though you previously granted them. Again, that’s fine.
If you use your Apple Watch to unlock your Mac and apps (and you should; it’s great!), you may need to re-enable that in System Settings > Touch ID & Password (or Login Password on a non-Touch ID-enabled Mac). In older versions of macOS, it was in System Preferences > Security & Privacy > General.
If you use Gmail, Google Calendar, or other Google services, you may need to log in to your Google account again.
Websites that usually remember your login state may require you to log in again. However, if you’re using a password manager like Apple’s Passwords or 1Password, that’s easy.
You may have to re-enable text message forwarding to your Mac. You do this on your iPhone in Settings > Messages > Text Message Forwarding.
With all that housekeeping done, it’s time to check out all the new features in Sequoia!
(Featured image by Apple)
Mail on the iPhone Can Categorize Your Messages in iOS 18.2
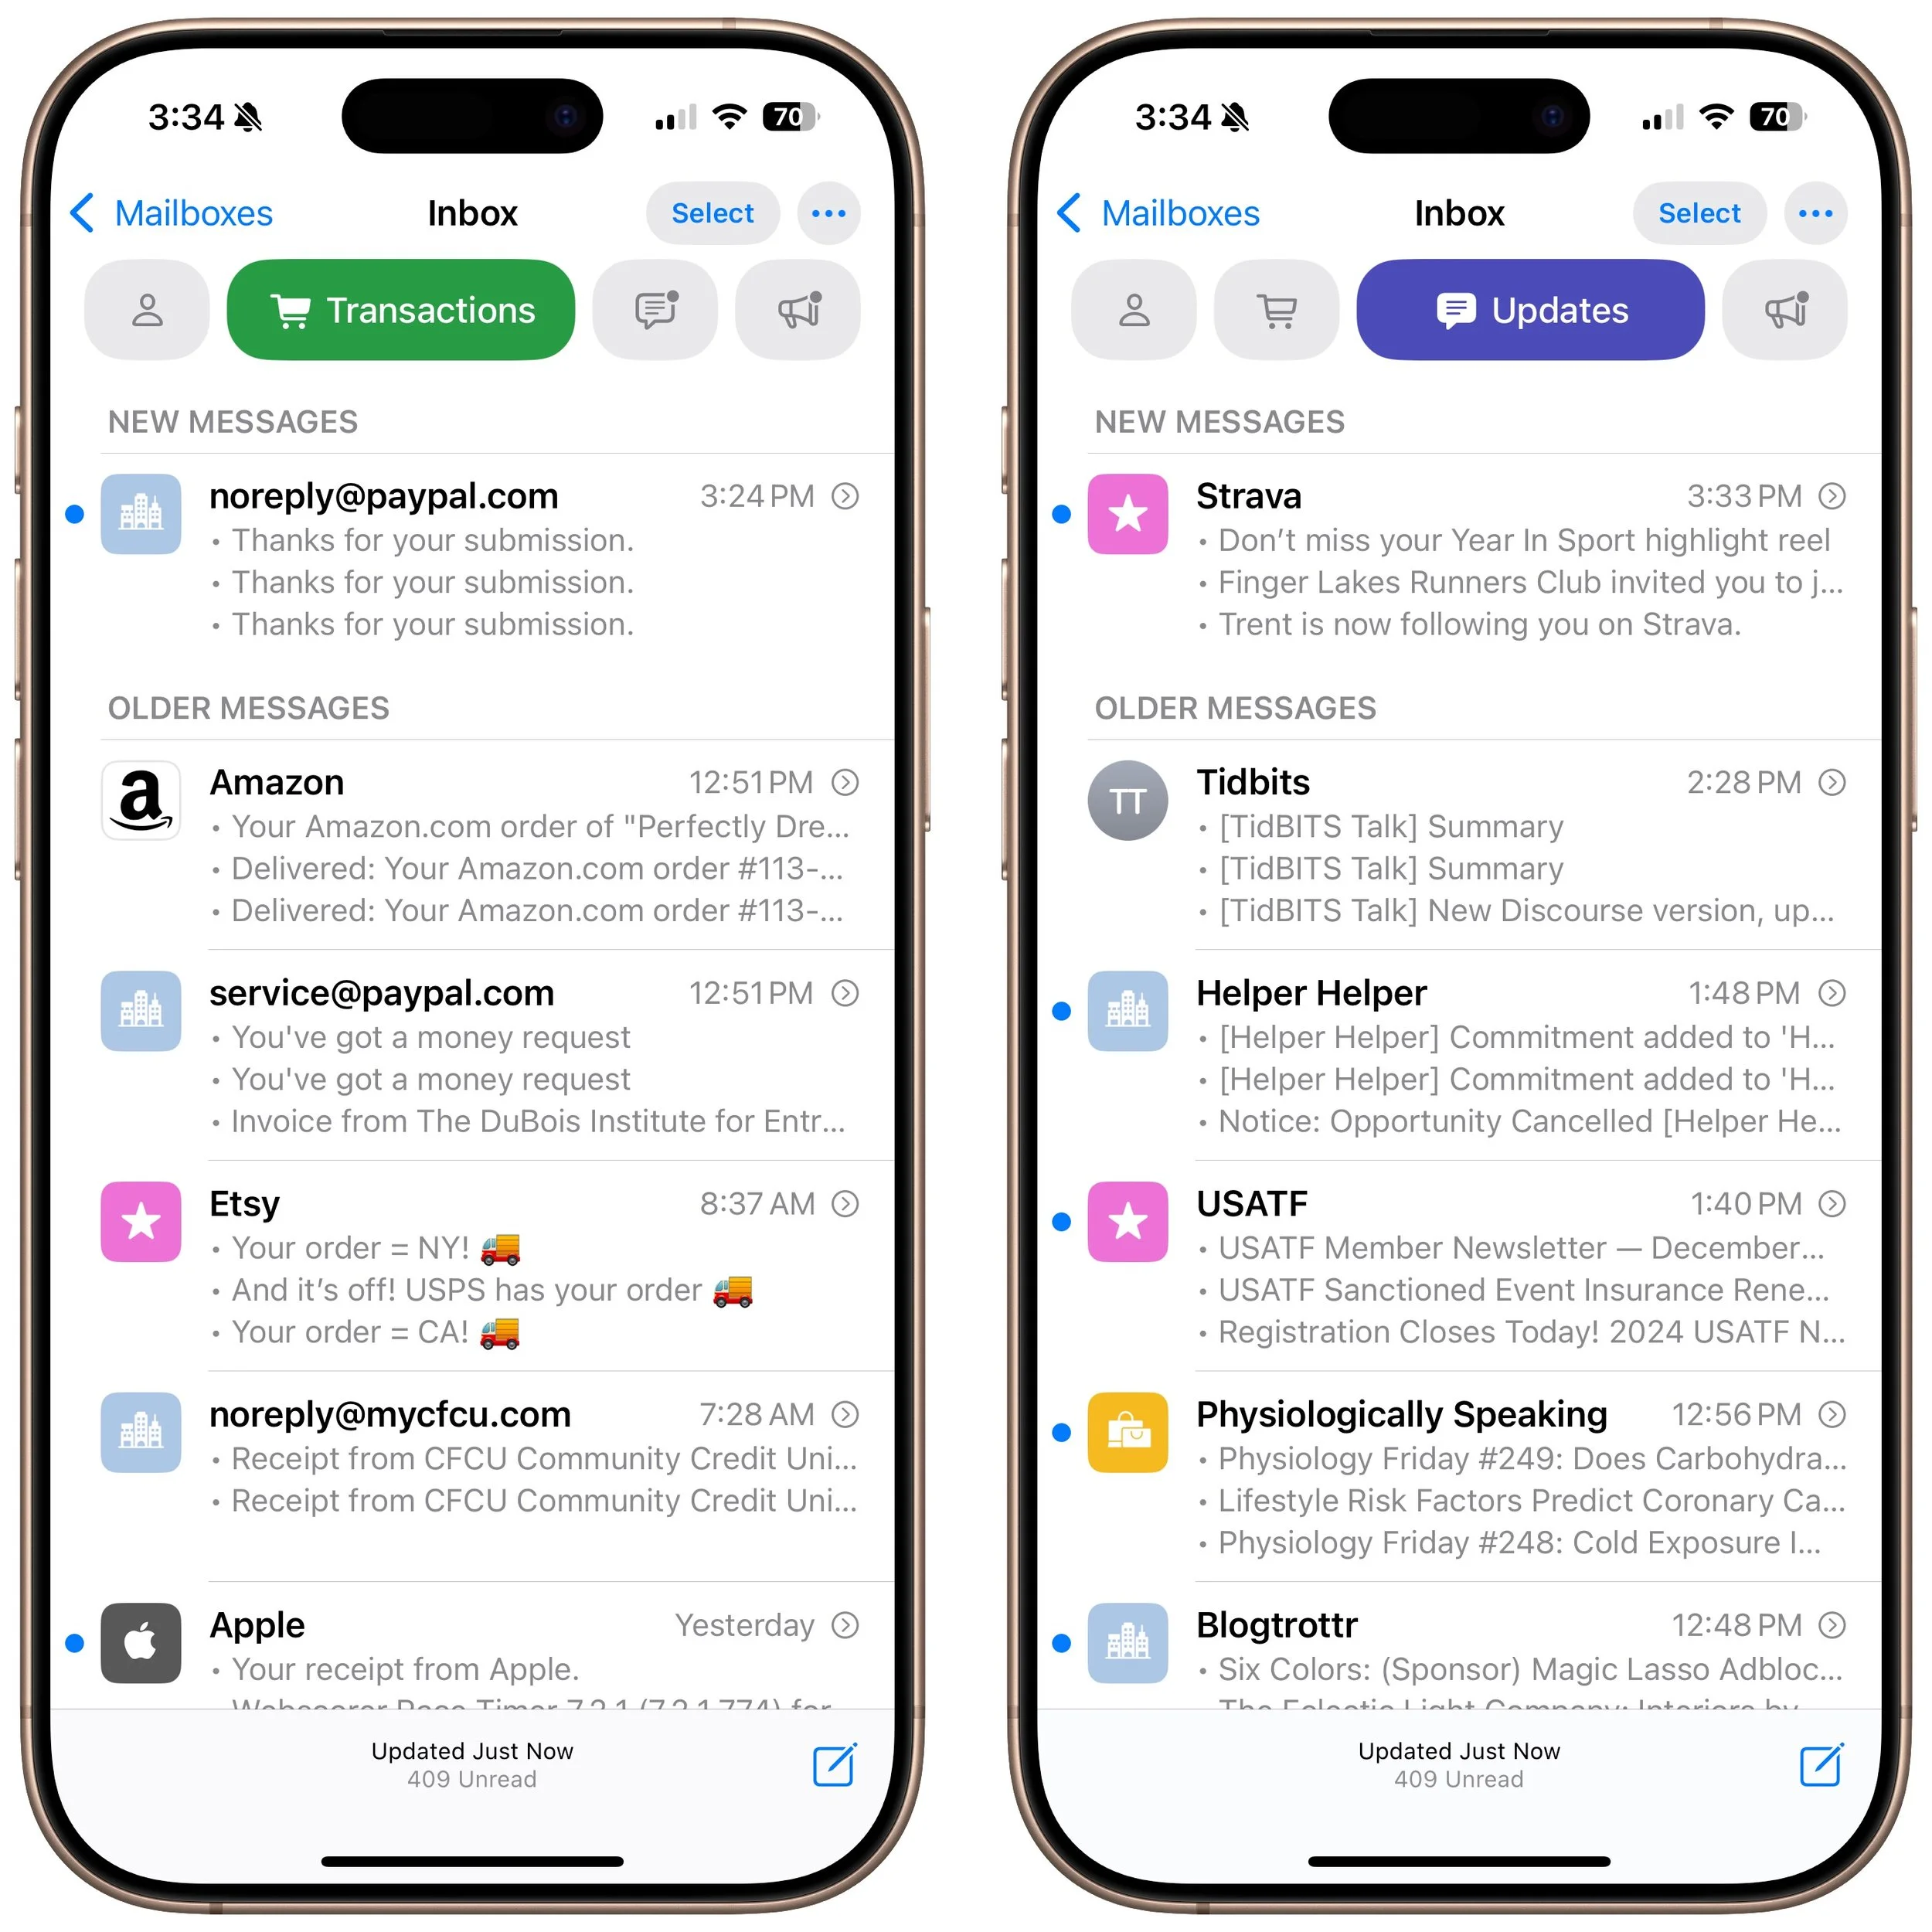
A noticeable change in iOS 18.2 is Mail Categories, which divides your incoming email into Primary, Transactions, Updates, and Promotions. It can be helpful, but you may want to adjust its settings, and if you still don’t like it, it’s easy to turn off.

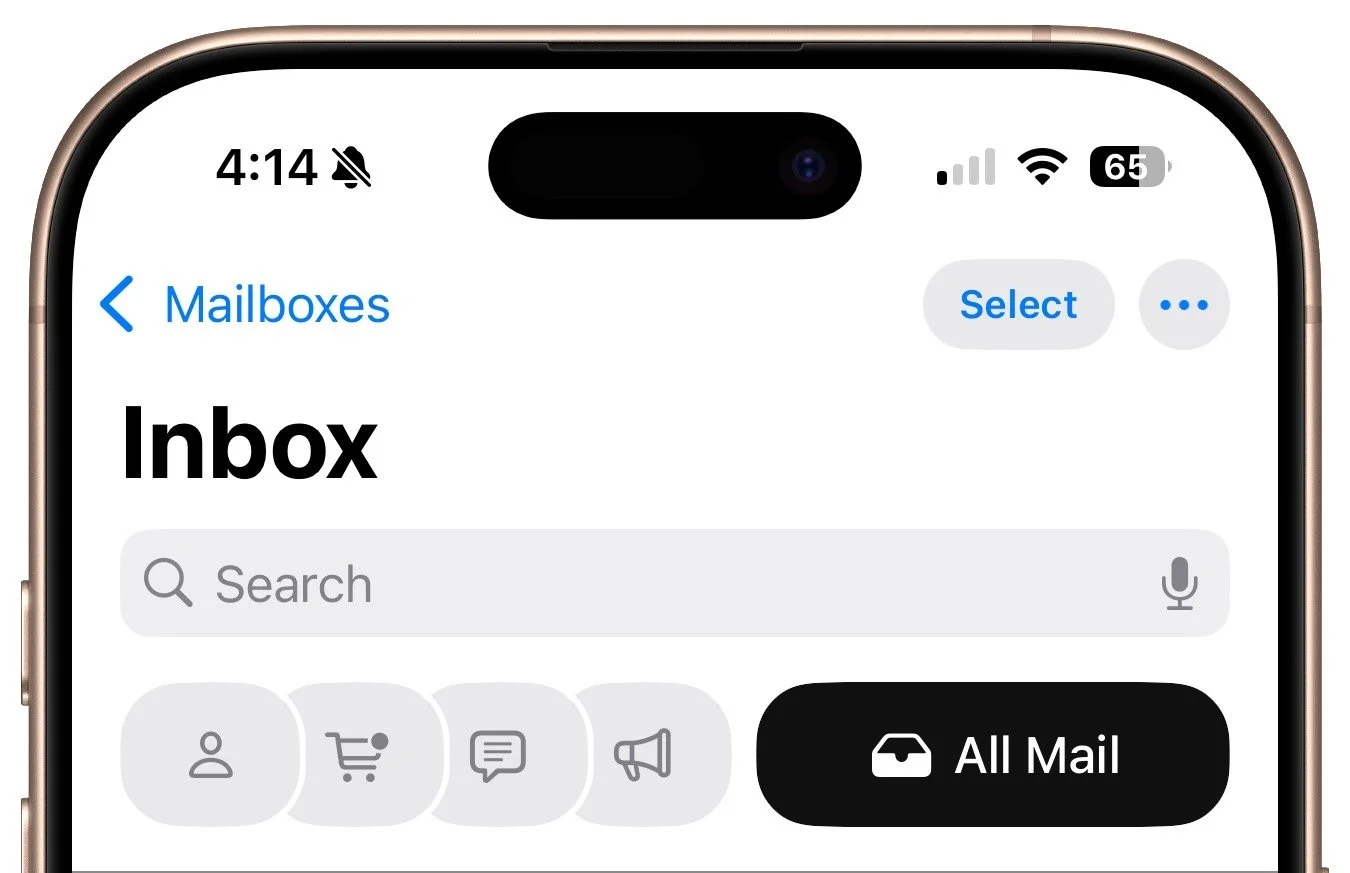
Apple slipped a significant new feature into Mail in iOS 18.2 that has nothing to do with Apple Intelligence: Categories. Like Gmail and other email apps, Mail can now automatically categorize messages into four buckets: Primary, Transactions, Updates, and Promotions. The idea is that categories make it easier to pay attention to important messages while collecting other messages for later processing. Tap the buttons at the top to switch between categories.
Oddly, Categories are currently available only on the iPhone. To maintain the same email experience across all Apple devices, you’ll have to wait for future versions of Mail on the iPad and the Mac.
Here are answers to questions we’ve heard about Mail Categories.
Can You Turn Mail Categories Off?
Apple turned Categories on by default in iOS 18.2, but not everyone appreciates the change. If you have your own organizational system, find the extra sections distracting, or just want to see all your email in one list, you can turn the feature off. Tap the ••• button at the top right of the Mail screen and select List View.
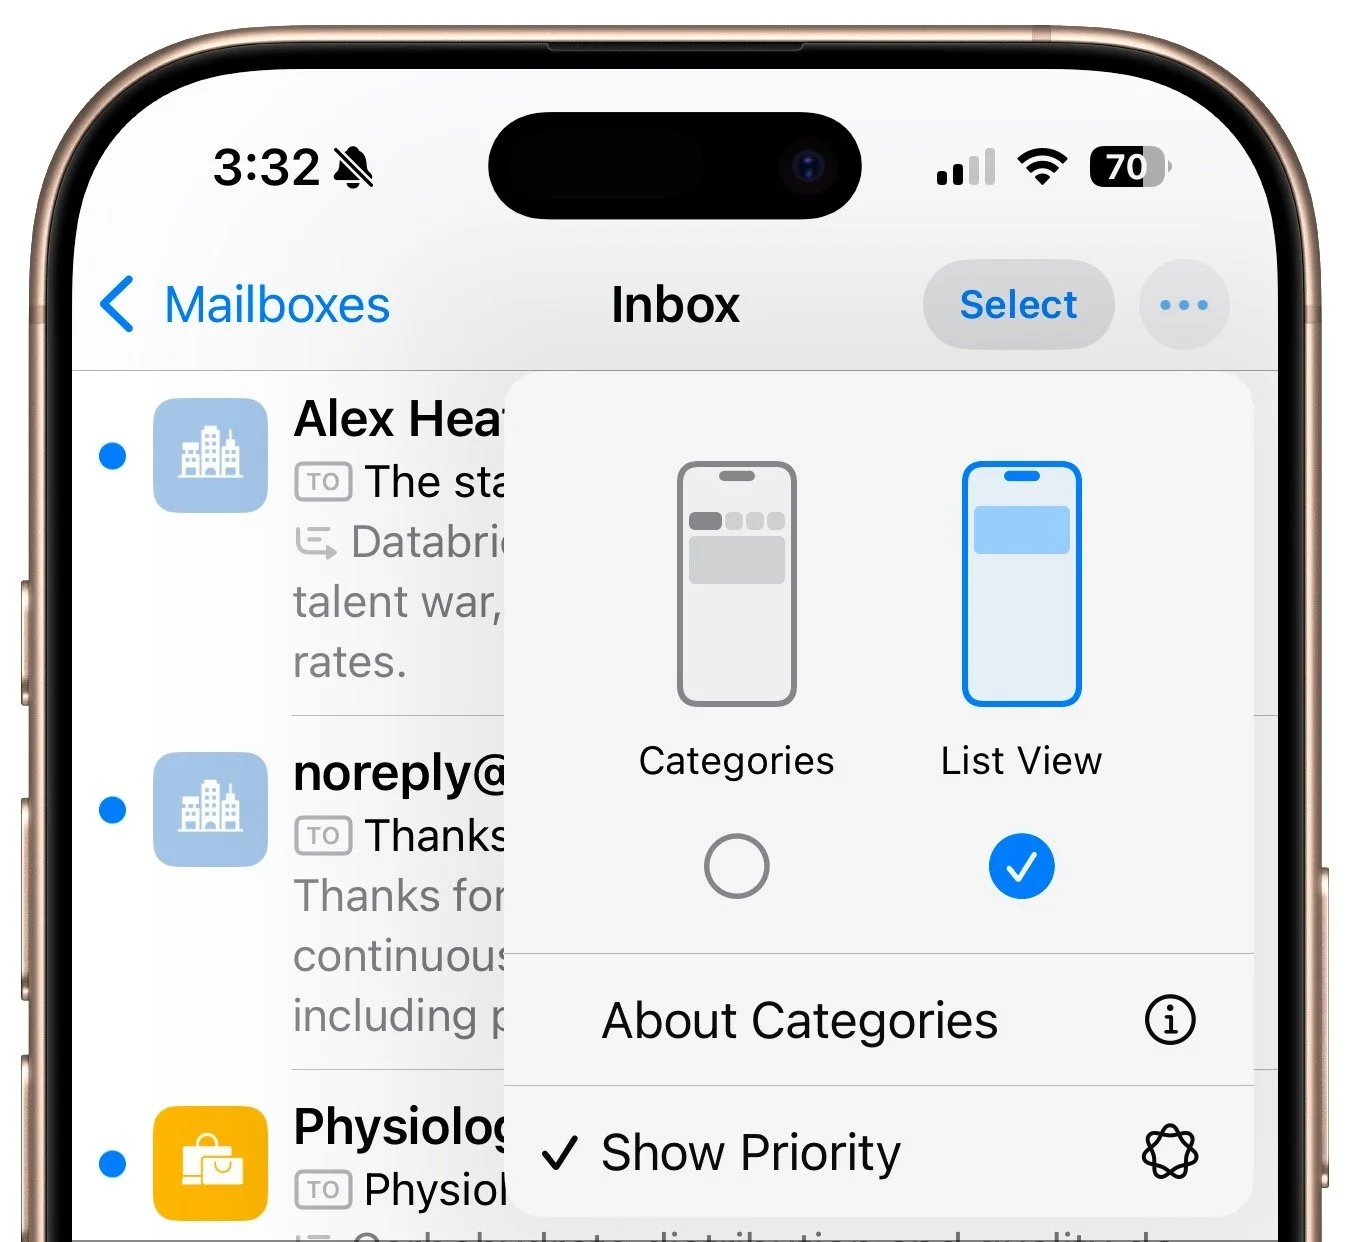
It's also possible to keep Categories turned on but still see all your messages in a simple chronological list. Swipe left on the line of buttons to switch to an All Mail category that shows exactly what you’d see in List View.
What Appears in Each Category?
With Categories turned on, Mail automatically separates your mail into four categories:
Primary: Personal messages, plus time-sensitive information from another category
Transactions: Order confirmations, receipts, and shipping notices
Updates: News, mailing lists, newsletters, and social media updates
Promotions: Sale announcements, new products, coupons, and anything commercial
These categories are built-in, so you can’t select some but not others. Nor can you add your own.
Is There a Way to Recategorize Messages?
Unfortunately, Categories isn’t very good at categorizing messages at the moment. (Perhaps it should use Apple Intelligence!) In particular, we see newsletters and other items that should be in Updates incorrectly showing up in Promotions. Fortunately, you can easily recategorize messages from particular senders so Mail can correctly categorize similar messages in the future. How you recategorize messages depends on whether a message is in Primary or another category. For messages in Primary, tap the left-pointing blue arrow at the bottom of the screen and then tap Categorize Sender. For messages in other categories, tap the ••• at the top right of the screen and then tap Categorize Sender.

In either case, tap the desired category on the next screen and confirm your action.
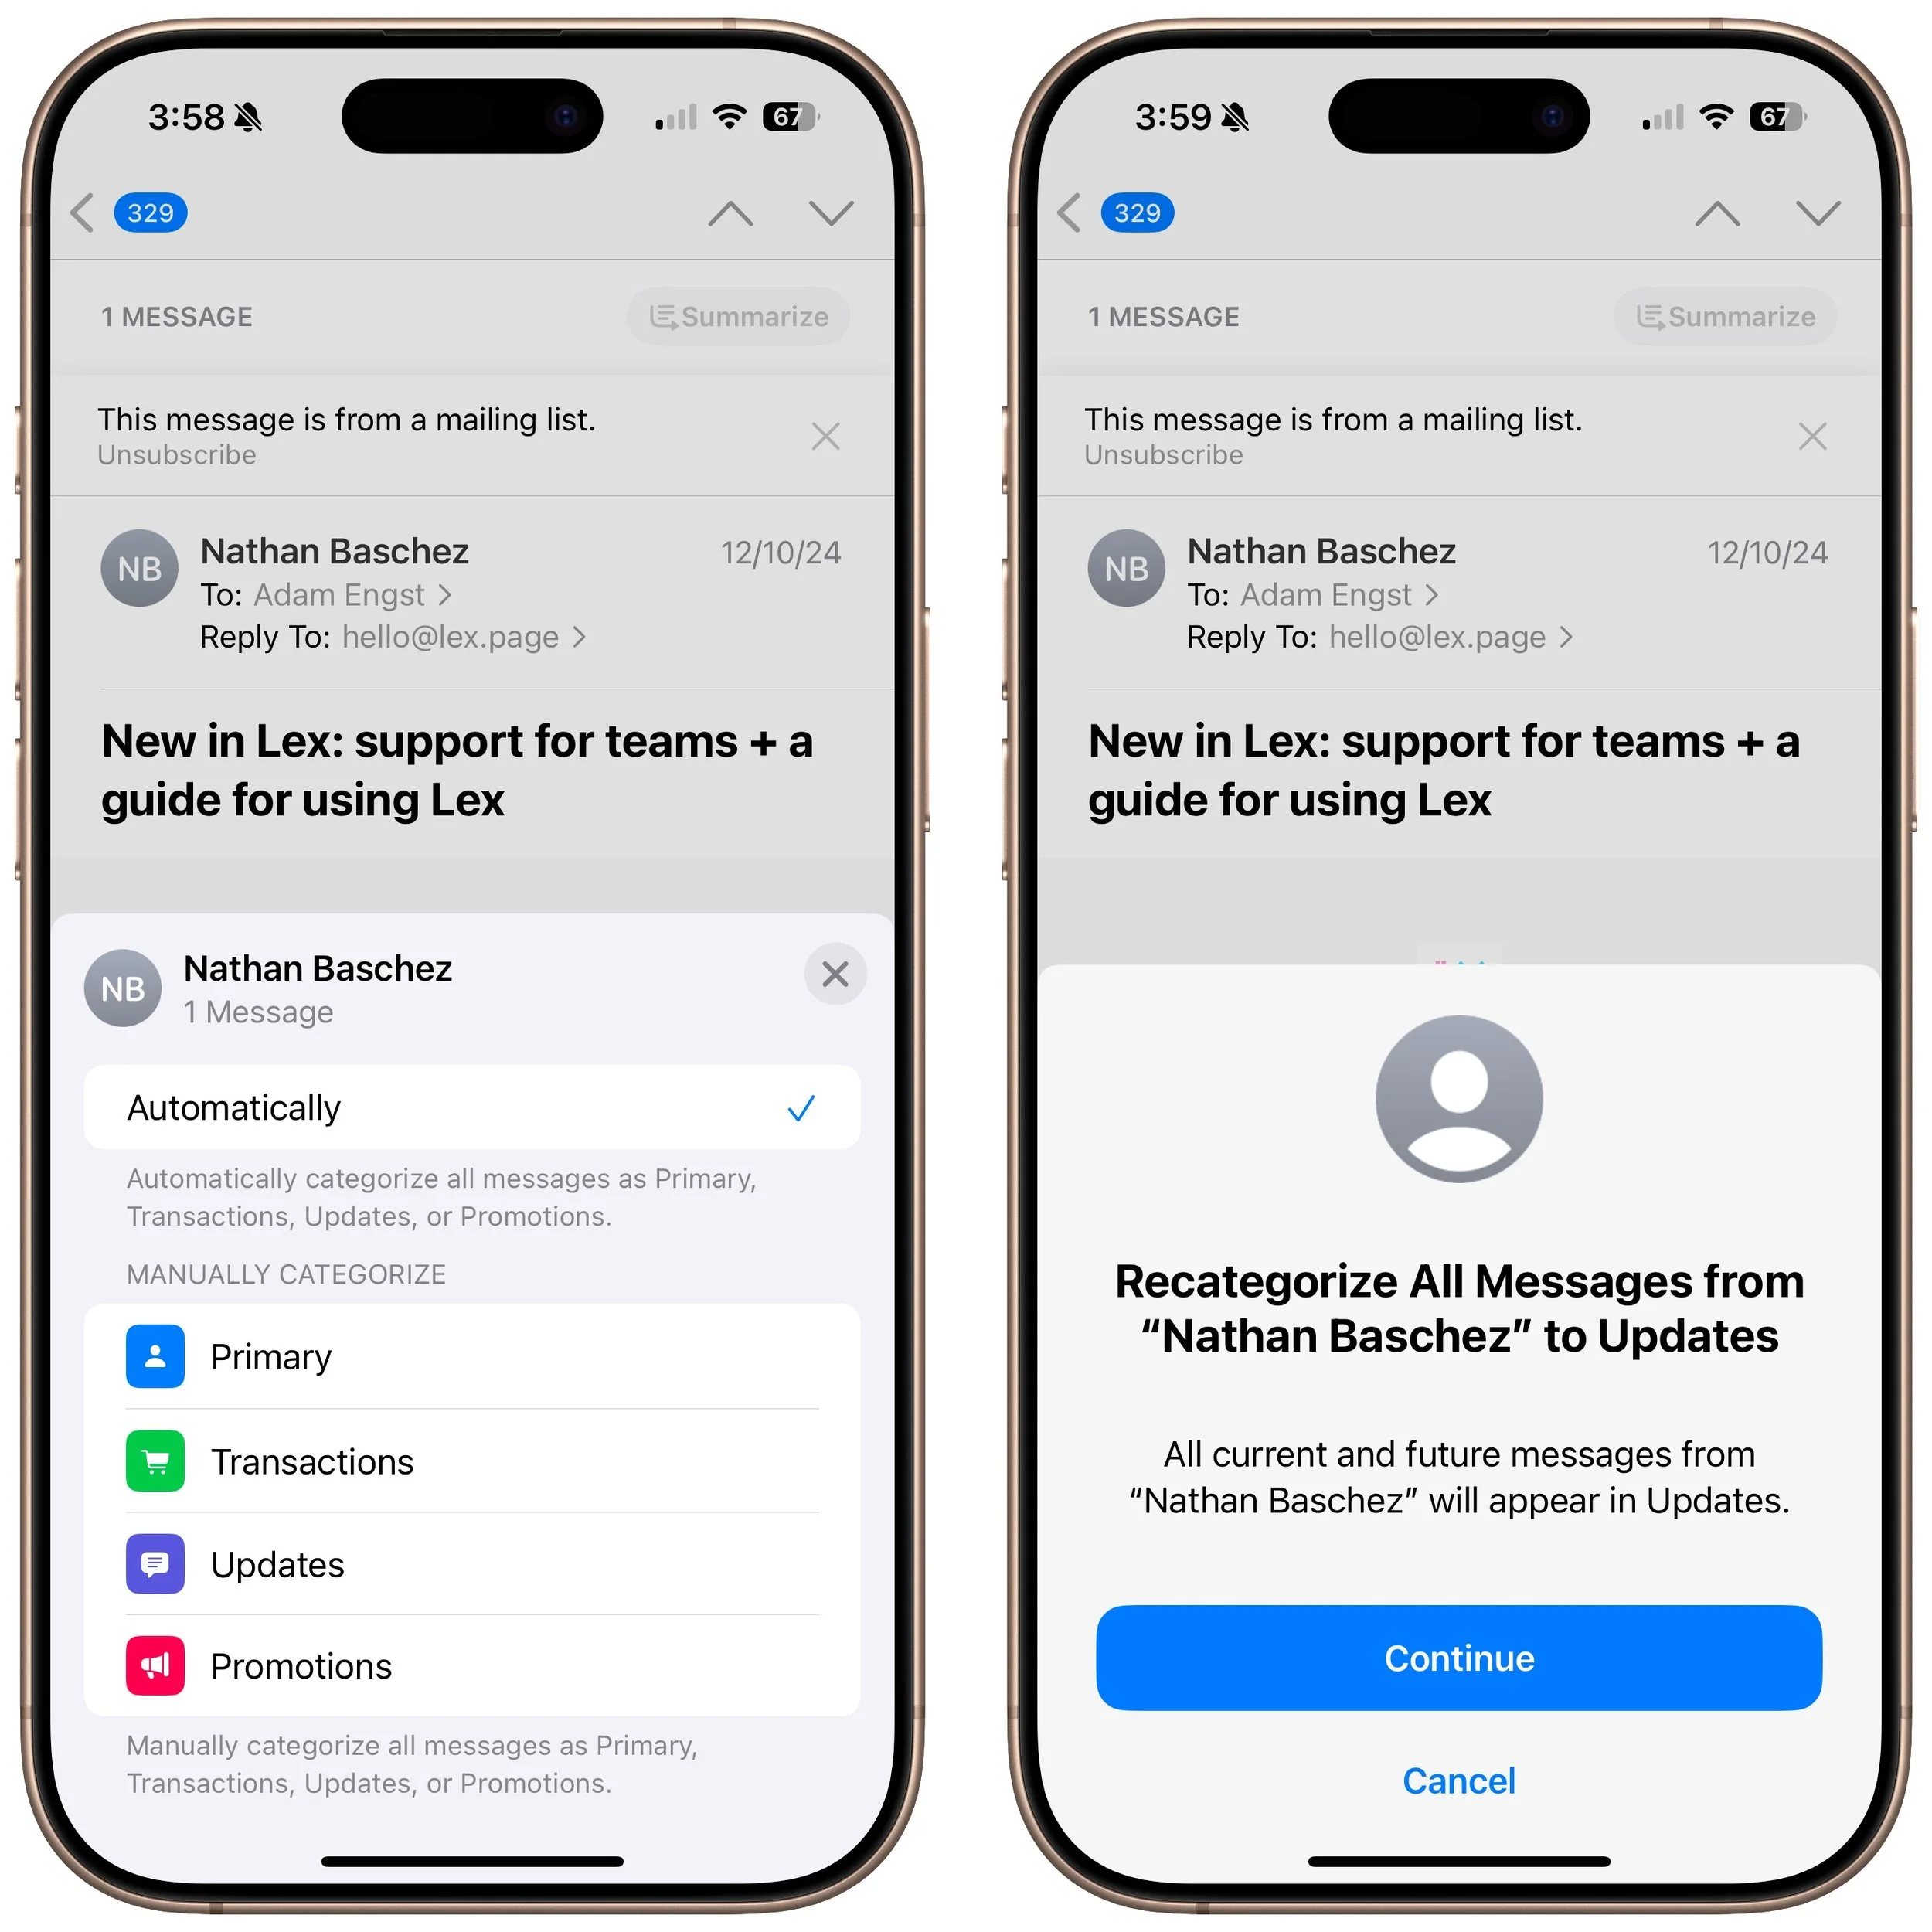
The main problem with recategorizing is that messages from discussion-based mailing lists may be identified by their senders, not the list, so you may have to recategorize every sender from the list separately.
Why Are Messages from the Same Sender Grouped?
When you open a message in Transactions, Updates, and Promotions, you may be surprised to see a digest view that displays all the other messages from that sender. It’s often a helpful way to keep like messages together. Opening a message shows the most recent message, but you can scroll to see the rest. Whether you scroll up or down depends on whether Settings > Apps > Mail > Most Recent Message on Top is turned on. Additionally, how many lines appear in the message view depends on what you’ve selected in Settings > Apps > Mail > Preview.
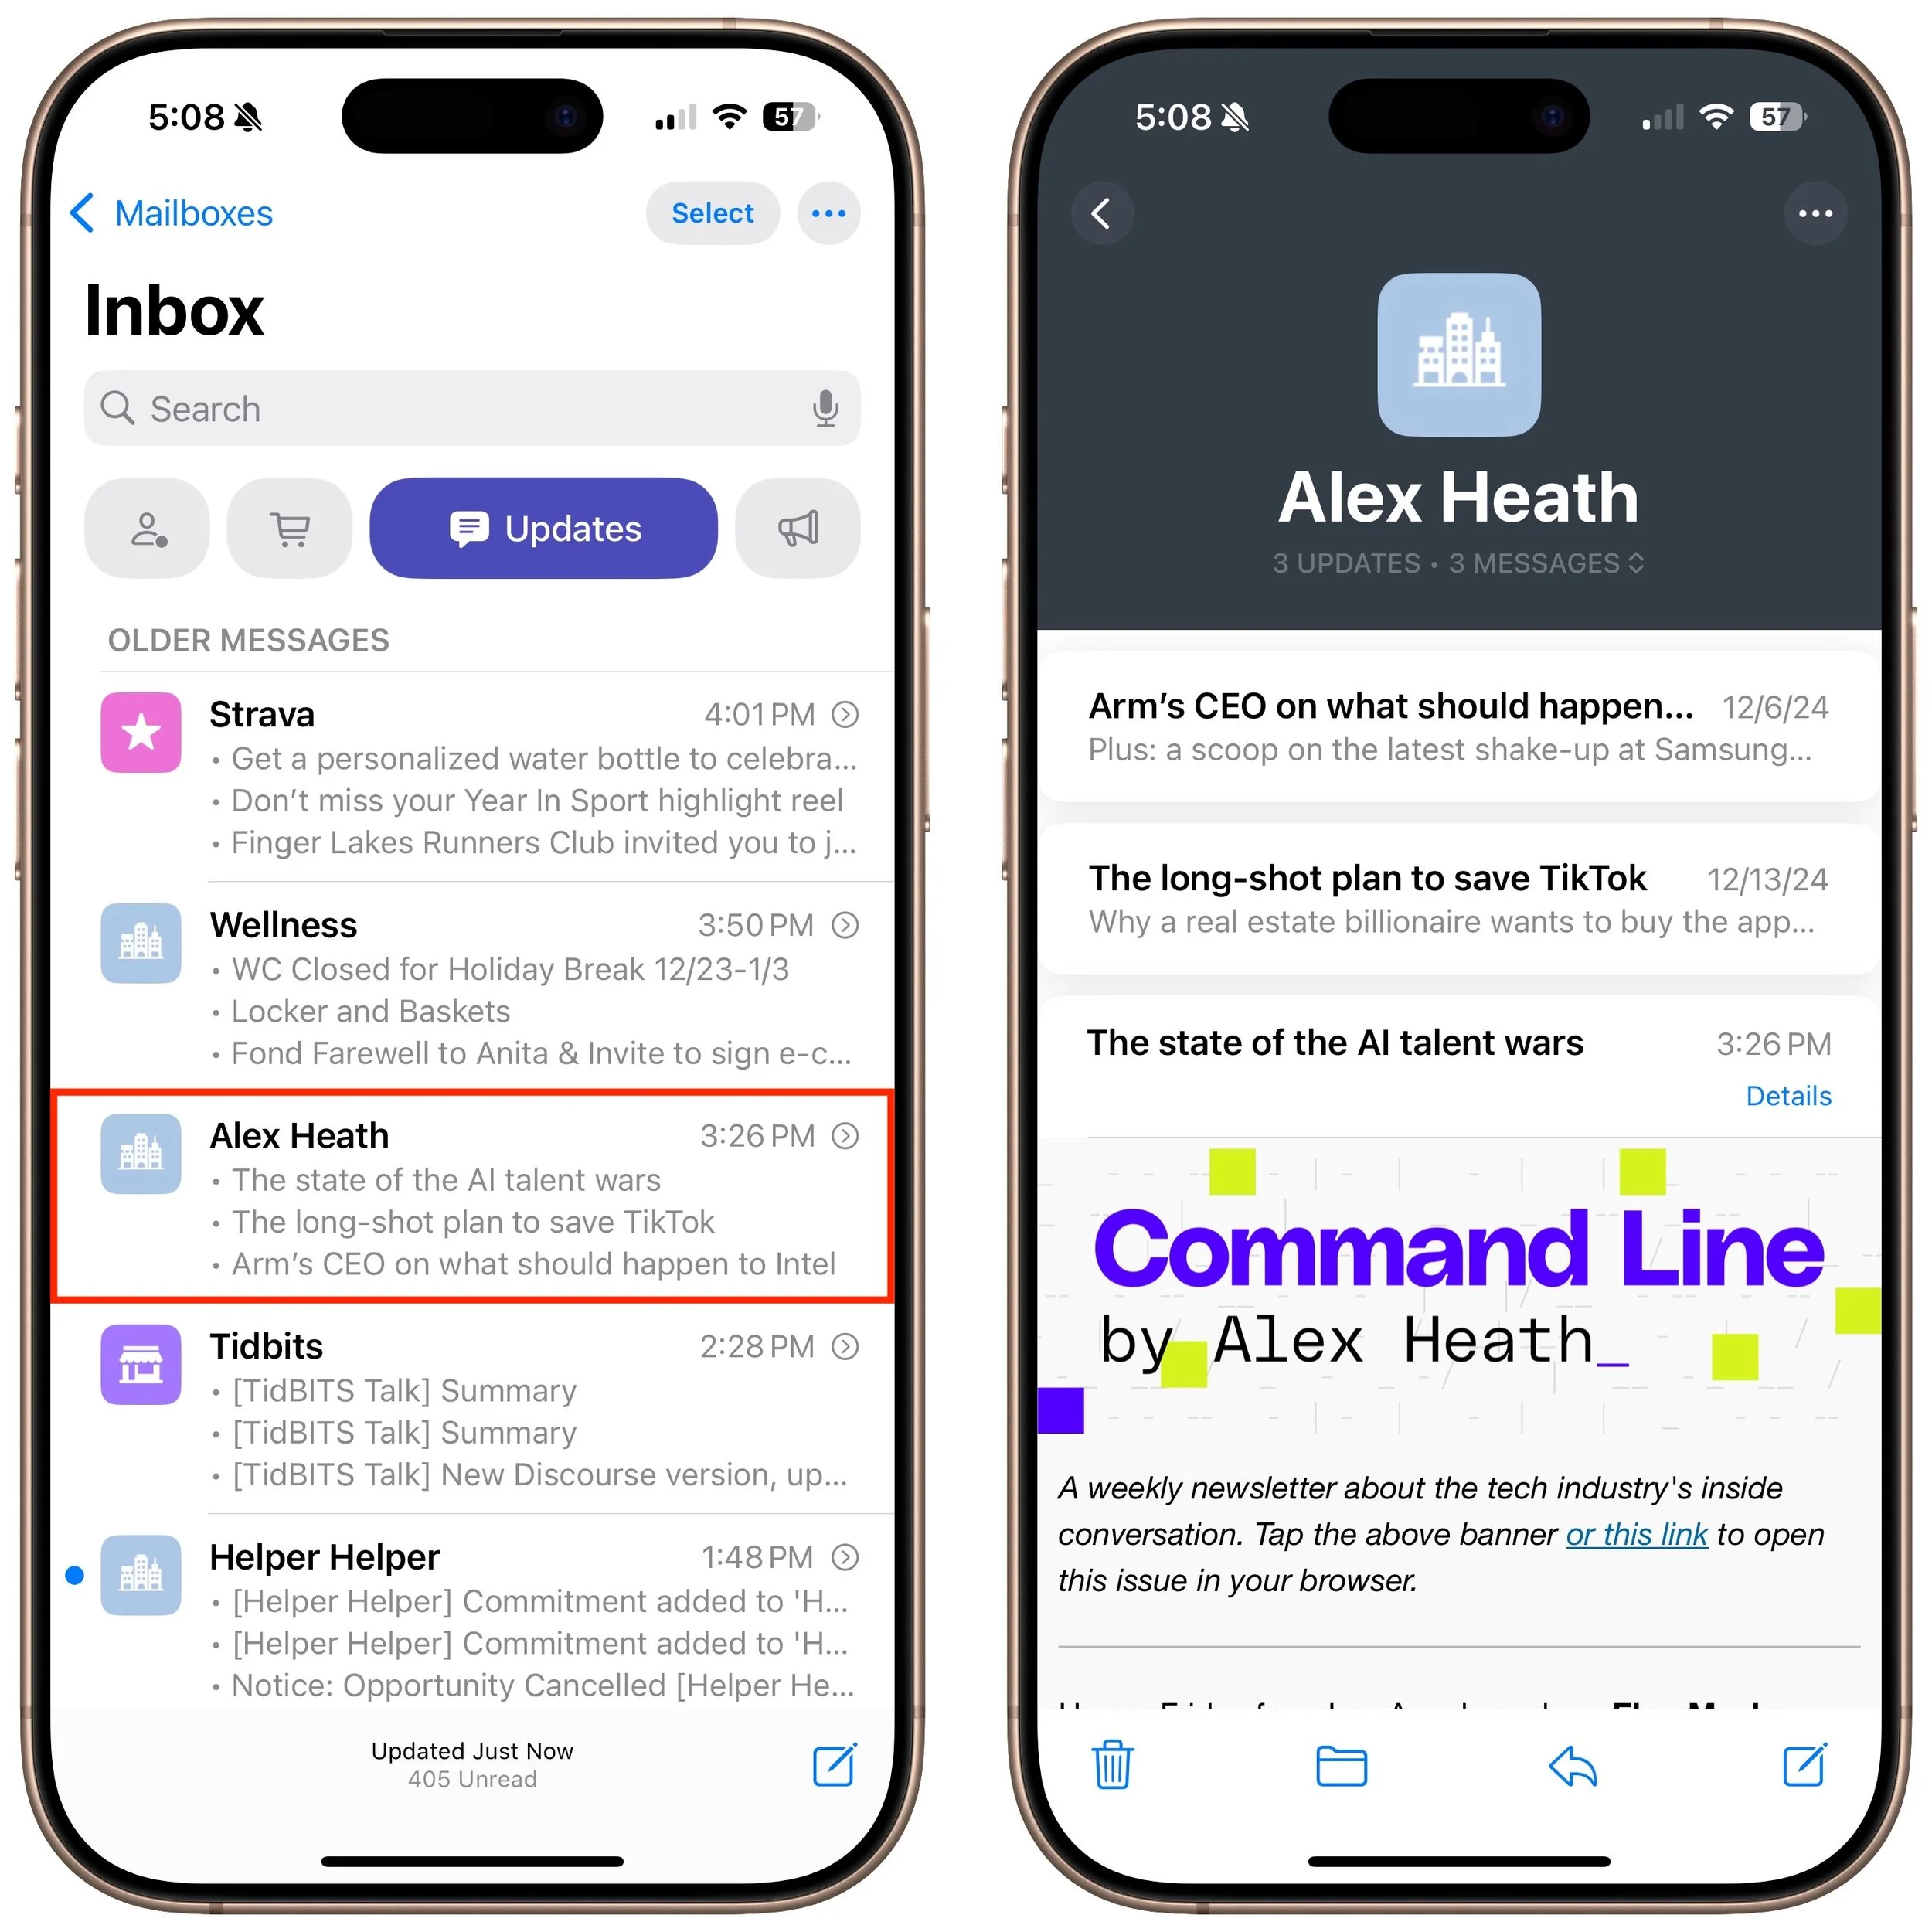
Not a fan of the sender groups? You can turn the feature off for each of Transactions, Updates, and Promotions by tapping the ••• at the top right and deselecting Group by Sender.
What Are Priority Notifications?
If you’re using an iPhone 15 Pro model or any iPhone 16 with Apple Intelligence turned on, you may see priority notifications on the Primary screen. It’s designed to surface the most important messages, as determined by Apple Intelligence. If you don’t like it, tap ••• in the upper right and deselect Show Priority.
Overall, Mail Categories feels like Apple is playing catch-up with other email apps. If it works with your email stream and you find it useful, that’s great. But if not, don’t hesitate to turn it off and return to your familiar email workflow.
(Featured image by iStock.com/Giulio Fornasar)
Improve Your Hearing with the AirPods Pro 2 and iOS 18
Apple’s AirPods Pro 2 can help you hear more—or less. We examine both possibilities and explain how easy it is to use the AirPods Pro to take a clinically validated hearing test and enjoy the new clinical-grade Hearing Aid feature.

For many, Apple’s AirPods are just another pair of earbuds: a convenient way to listen to media. But with the latest versions of iOS and automatically applied firmware updates, the AirPods Pro 2 have become significantly more interesting.
They have long had noise cancellation features, which we find helpful in open office environments and for turning down the volume on everything from airplanes to vacuum cleaners. The more recent addition of Adaptive mode, which bridges between Transparency and Noise Cancellation modes and changes with your surroundings, makes them useful in dynamic urban environments. The Loud Sound Reduction feature can be a godsend at concerts where the music would otherwise be painfully loud. Personalized Volume adjusts the volume of media in response to your environment, and although it can be a bit disconcerting, Conversation Awareness drops the media volume and reduces background noise when you start speaking to others.
However, the newest and most important feature of the AirPods Pro 2 comes with iOS 18.1: Hearing Health. Many people don’t realize they have hearing loss, so Apple now provides a clinically validated Hearing Test and a clinical-grade Hearing Aid feature that can compensate for mild to moderate hearing loss. Even if you don’t think you have any hearing problems, we recommend taking Apple’s hearing test so you have a baseline to compare against future tests.
Here’s how to check your hearing and get started with the hearing assistance and protection features. Before you start, make sure you’ve paired your AirPods Pro with your iPhone and haven’t been exposed to loud noises for at least 24 hours. (It can take that long for your hearing to return to normal.)
Take a Hearing Test
The Hearing Test has three parts: setup, the actual test, and presenting the results. In the setup phase, the iPhone guides you through finding a quiet place to take the test, inserting your AirPods Pro correctly, and testing the fit.
The fit test is important because the AirPods Pro silicone ear tips help block outside noise, allowing the earbuds to boost or lower the volume of particular sounds or frequencies to improve audio clarity. The AirPods Pro come with four sizes of ear tips, from extra small to large (medium is the default), and the fit test helps you determine which ear tip best combines efficacy and comfort.
To start the test, open the iPhone’s Settings app and tap the name of your AirPods Pro—that option appears only when the case is open or they’re in your ears. In the AirPods screen, tap Take a Hearing Test. The test involves tapping the screen every time you hear a pulse of three tones. As a game, it’s boring but not easy—most people will probably be able to hear the first few tones, but subsequent ones become significantly more difficult to discern. Don’t worry if you miss a tone because you’ll have multiple chances to hear each one. The test focuses first on one ear and then the other.
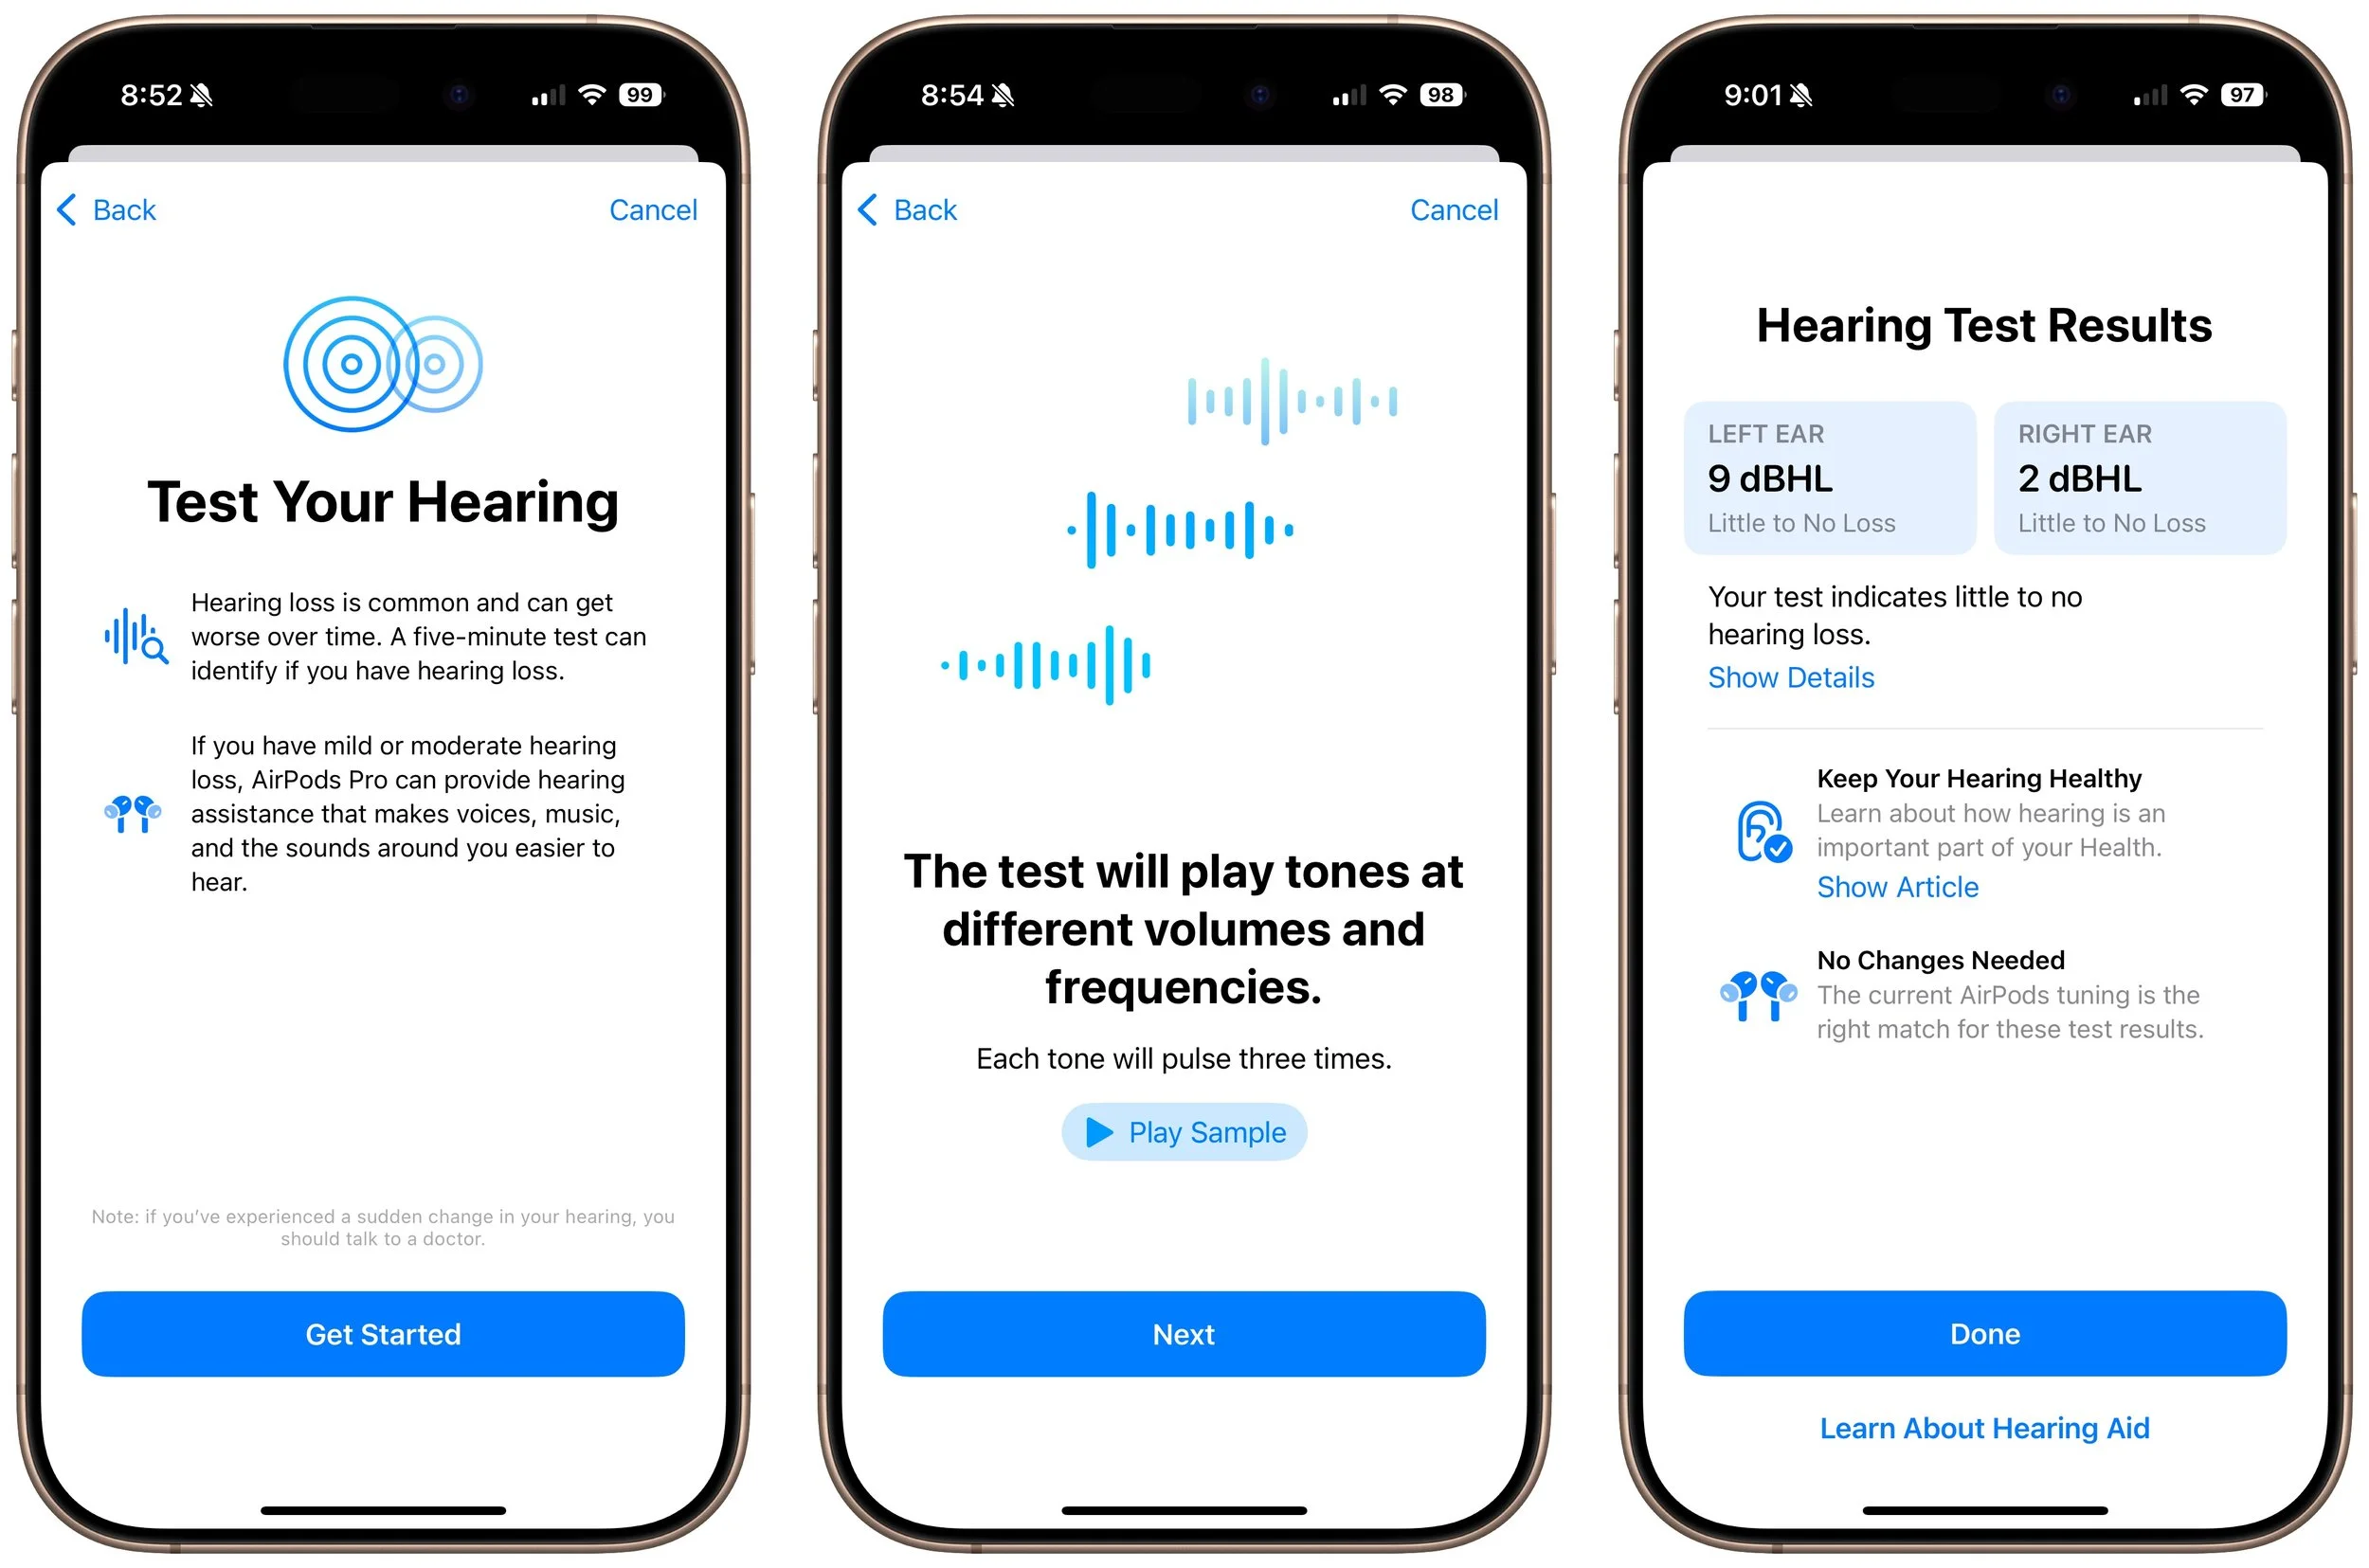
At the end, the test presents your results. dBHL stands for decibels Hearing Level and indicates the softest sounds you can hear at various frequencies. If you have little to no hearing loss—dBHL under 20—there’s no need to do anything more. dBHL numbers between 20 and 40 suggest mild hearing loss and indicate that you may have difficulty hearing soft or distant sounds, such as whispers or quiet conversations. Numbers from 41 to 55 indicate moderate hearing loss, which can make it difficult to understand normal speech, particularly in loud environments. For higher levels of hearing loss, or if you’re experiencing noticeable problems, consult an audiologist.
Turn On Hearing Assistance
If your hearing test suggests mild to moderate hearing loss, the AirPods Pro Hearing Aid feature can help. It uses the hearing test results to adjust what you hear to improve voice and audio clarity. You can turn it on at the end of the hearing test if indicated, or at any time in Settings > AirPods Pro > Hearing Assistance. (If your results indicate little to no hearing loss, the trick to turning on the Hearing Aid feature is to tap “Learn About Hearing Aid” at the end of the test or by selecting a hearing test result and then tapping Next.)
Apple has created a particularly flexible solution here. In the Hearing Aid section, you can control whether the AirPods Pro adjust external sounds for greater clarity. To tweak the specifics, tap Adjustments and use the amplification, balance, tone, and ambient noise reduction sliders. The Conversation Boost switch enhances face-to-face conversations by focusing on the person in front of you.
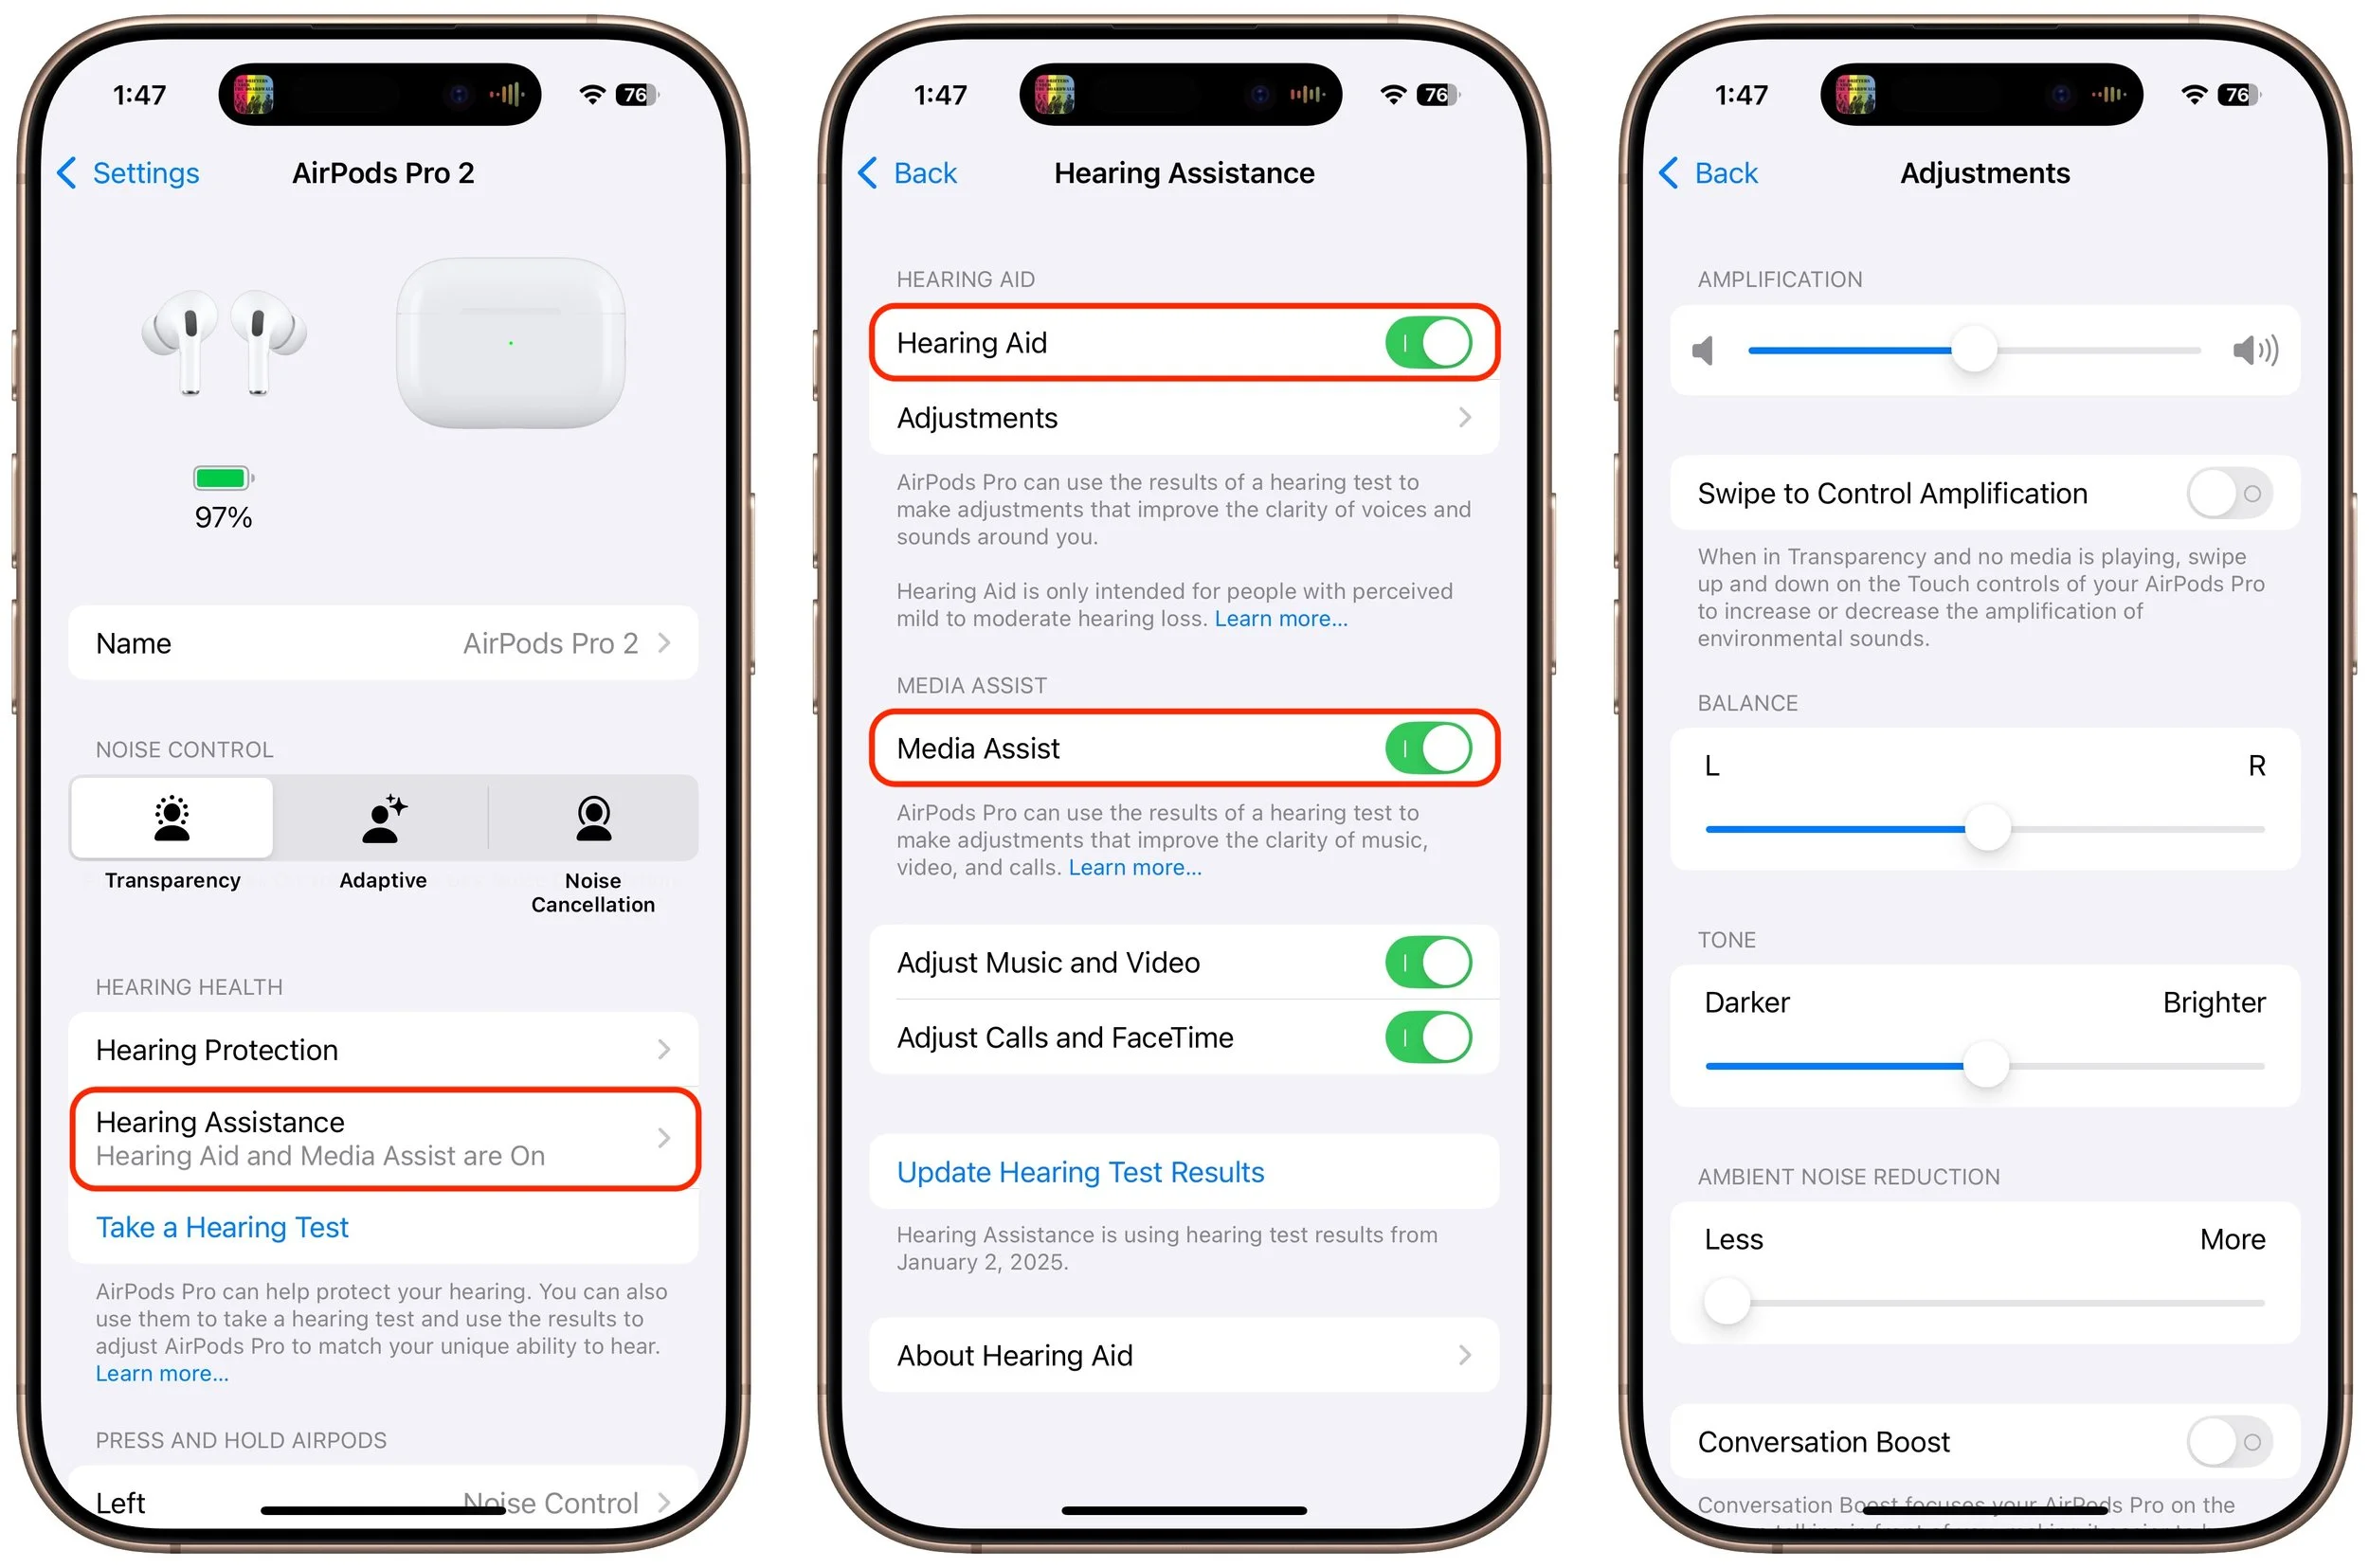
Also helpful is Media Assist, which uses your hearing test results to improve music, podcasts, and other audio played through the AirPods Pro. Separate switches let you apply it to Music and Video along with Calls and FaceTime.
Improve and Protect Your Hearing
If you own a pair of AirPods Pro 2, we highly recommend that you take a hearing test and try the Hearing Aid feature. Even if you have little or no hearing loss, you may find that the Media Assist option makes your music sound better. It’s easy to test—just play a song you love (turn it on from Control Center) and toggle Media Assist on and off while it plays.
Also, we’ve started wearing the AirPods Pro in situations where we might not have thought to in the past. It’s obvious that the Noise Cancellation mode would be helpful on an airplane, but we also use it to block unwanted noises to aid our concentration at work. We’ve also found that Transparency and Adaptive modes can be helpful on city streets and in loud restaurants. Plus, because Loud Sound Protection is automatically enabled in Transparency and Adaptive modes, it lets us enjoy front row seats at a concert without worrying about our hearing or suffering from ringing ears the next day.
We know that AirPods Pro aren’t for everyone. Many people prefer the AirPods 4, which provide some noise cancellation without blocking the ear canal with silicone ear tips. But they can’t compete with the AirPods Pro for noise cancellation and lack the new Hearing Health features. Between the Hearing Test and Hearing Aid features and how the AirPods Pro can protect and enhance hearing, we think they will become a more common sight among older adults who otherwise wouldn’t consider wearing earbuds in public. If you have questions or concerns about your hearing, give them a try.
(Featured image by iStock.com/Julija Matuka)
What You Can Do with the December Wave of Apple Intelligence Features
We look at the latest wave of Apple’s AI features and help you start using them for discussions with ChatGPT, creating images, making custom emoji, learning about your environment, and more.

The first set of Apple Intelligence features appeared in macOS, iOS, and iPadOS in October. Apple has now debuted the second set in the December releases of macOS 15.2 Sequoia, iOS 18.2, and iPadOS 18.2. Apple still considers them to be in beta, which is a nice way of saying that they may not work perfectly. However, they usually do what they promise.
Remember, Apple Intelligence features work only on a Mac with Apple silicon, an iPad with an A17 Pro or M-series chip, or an iPhone 15 Pro or any iPhone 16. Intel-based Macs and older iPhones and iPads can’t play. If you’ve been holding off on upgrading, this is a fine time to make the jump. Regardless, you must turn on Apple Intelligence, which you do on the Mac in System Settings > Apple Intelligence & Siri and in Settings > Apple Intelligence & Siri on the iPhone and iPad.
What can you look forward to with this second set of Apple Intelligence features?
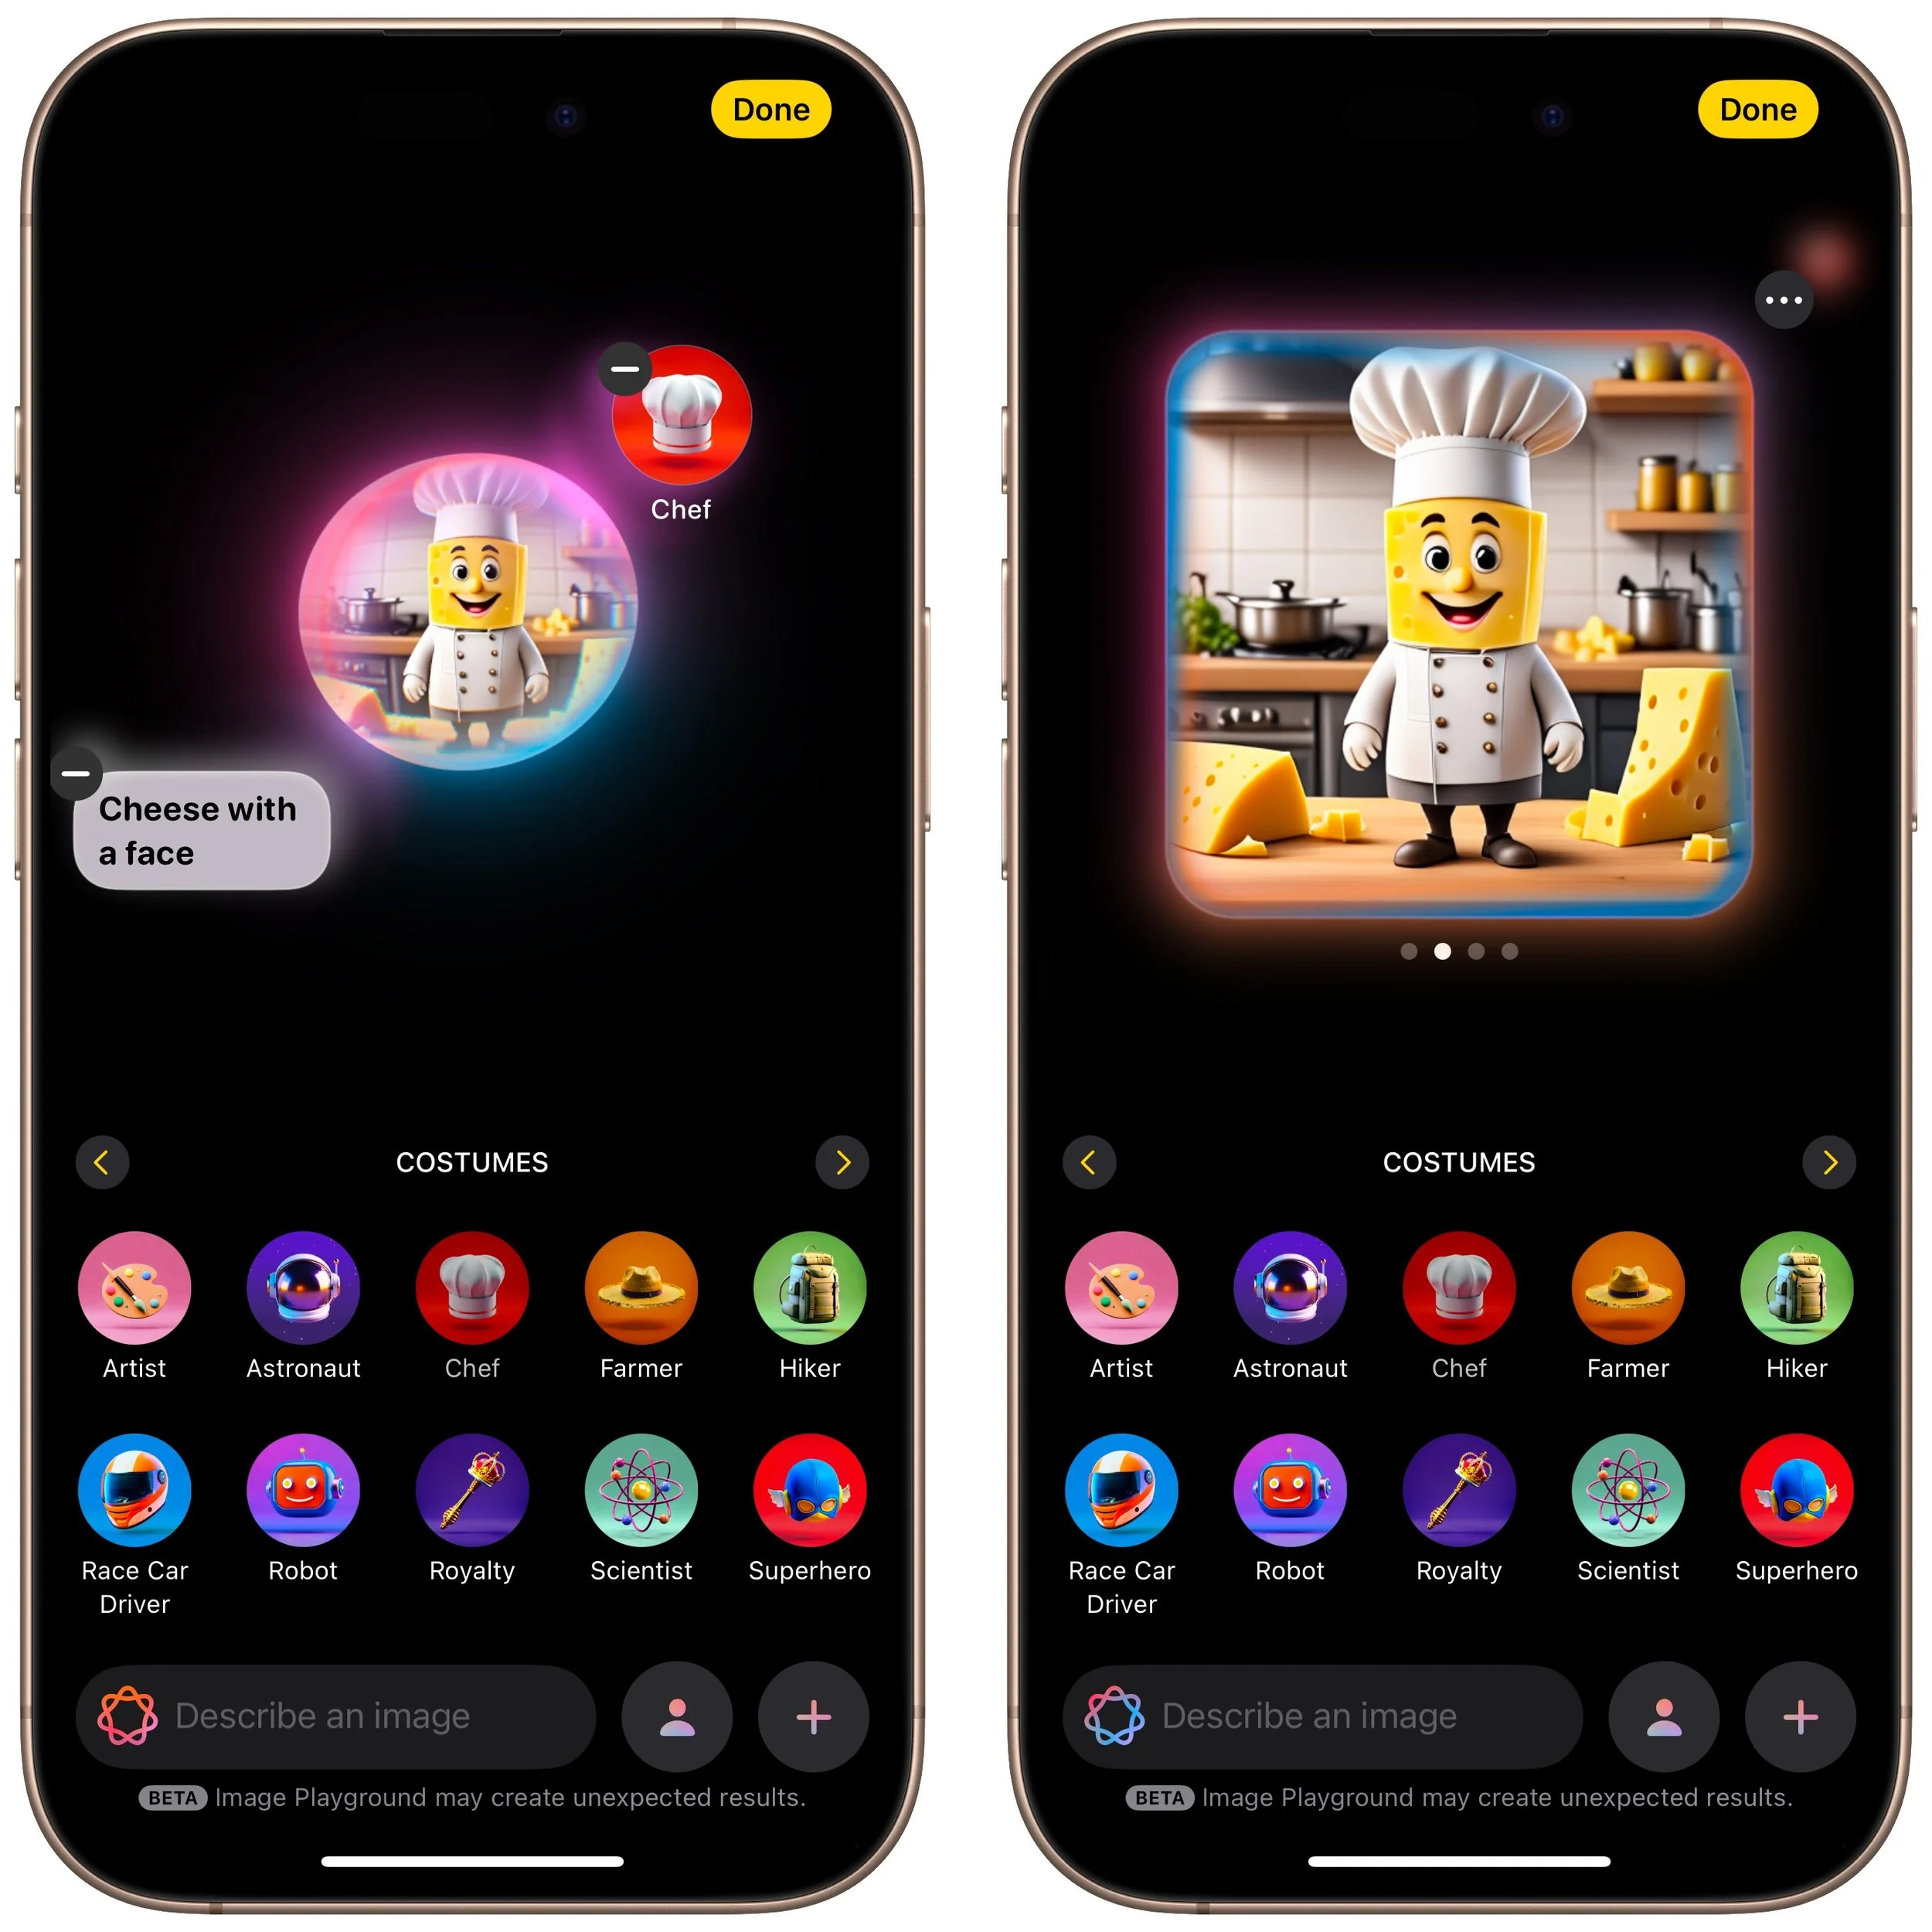
Image Playground Helps Make Fun Images
With Image Playground, Apple is dipping its toe into AI-driven image generation. The standalone Image Playground app lets you create amusing images with text descriptions, either starting from scratch or from a photo. You can choose from two styles: Animation, which Apple describes as “a modern 3-D animated look,” and Illustration, which “offers images with simple shapes, clear lines, and colorblocking.” (A third Sketch style will appear in a future release, and you can use ChatGPT in Writing Tools to create images in many other styles.) You can also create images directly in Messages, Freeform, Keynote, and other apps.
Once you’ve entered a few words of description or selected a person, you can embellish the image by tapping the buttons for suggested themes, costumes, accessories, and places. Each addition causes Image Playground to generate a new image, and swiping left on that image pushes it to try again. Tap the ••• button to save or share an image you like. Saved images become available on all your devices.
Genmoji Spice Up Chats on the iPhone
Less ambitious but potentially more fun are Genmoji, which are custom emoji that you create with text descriptions. Want to emote about the cold to a fellow musician? Create an emoji featuring two cellos wearing scarves.
To do this, switch to the emoji keyboard, tap the Genmoji button to the right of the search field, and describe your desired emoji. As with Image Playground, you can keep swiping left on the generated image to create more variations. When you get what you like, tap it to insert it into your chat or document.

Remember that a single emoji sent by itself in Messages is quite large; two or three emoji are medium-sized, and inserting any more than that or adding text causes them to display at the smallest size.
Created Genmoji are added to your emoji collection on all your devices, but they’re actually stickers. You can remove them by tapping the ⊕ button in Messages, tapping Stickers, and using touch-and-hold on a Genmoji to access the Remove button. You can’t create Genmoji in macOS right now, but Apple has promised that feature for a future release.
Image Wand Cleans Up Apple Pencil Sketches
In iPadOS 18.2, the Notes app now offers an Apple Intelligence-powered Image Wand tool for those taking notes with an Apple Pencil. Make a rough sketch with your Apple Pencil, select Image Wand, draw a circle around your sketch, and Image Wand will turn it into a polished image. If your circle also contains text, Image Wand considers it when building the final image.

Visual Intelligence Explains What You See
When you upgrade to iOS 18.2 on an iPhone 16, the Camera Control button gains a new capability: Visual Intelligence. Press and hold it (whenever the Camera app isn’t already open, since that will trigger video recording), and Visual Intelligence presents Ask and Search buttons on either side of the shutter button. Tapping Ask causes ChatGPT to describe the image and lets you pose follow-up queries, and tapping Search performs a Google reverse image search; tap any of the results to load it. (If you can’t immediately tap Ask or Search, press the Camera Control button again or tap the shutter button to freeze the image temporarily.)

Siri Channels ChatGPT
Perhaps the most anticipated enhancement to Apple Intelligence is the integration of ChatGPT into Siri. Unfortunately, if your goal is to converse fluidly with ChatGPT, you may be better off using OpenAI’s ChatGPT app, perhaps triggered by the Action button or a widget. The problem is that unless you explicitly direct a Siri query by starting with “Ask ChatGPT,” Siri may try to answer with its own Web search or trigger a command, leading to inexplicable and unhelpful responses. Even when you get Siri to ask ChatGPT for a response, there’s no option to have it read back to you aloud, as with ChatGPT’s Advanced Voice Mode.
If you want to use ChatGPT through Siri, turn the feature on in Settings > Apple Intelligence & Siri > ChatGPT. While you’re there, you’ll probably want to turn off Confirm ChatGPT requests, which otherwise ask if you want to use ChatGPT every time it comes up. Although it may not be obvious, once you’re in a conversation with ChatGPT, you can keep talking as long as the Siri animation continues around the edge of the screen. Unfortunately, you cannot scroll back to any previous response while Siri is channeling ChatGPT; for full transcripts, you must revert to the ChatGPT app or website.
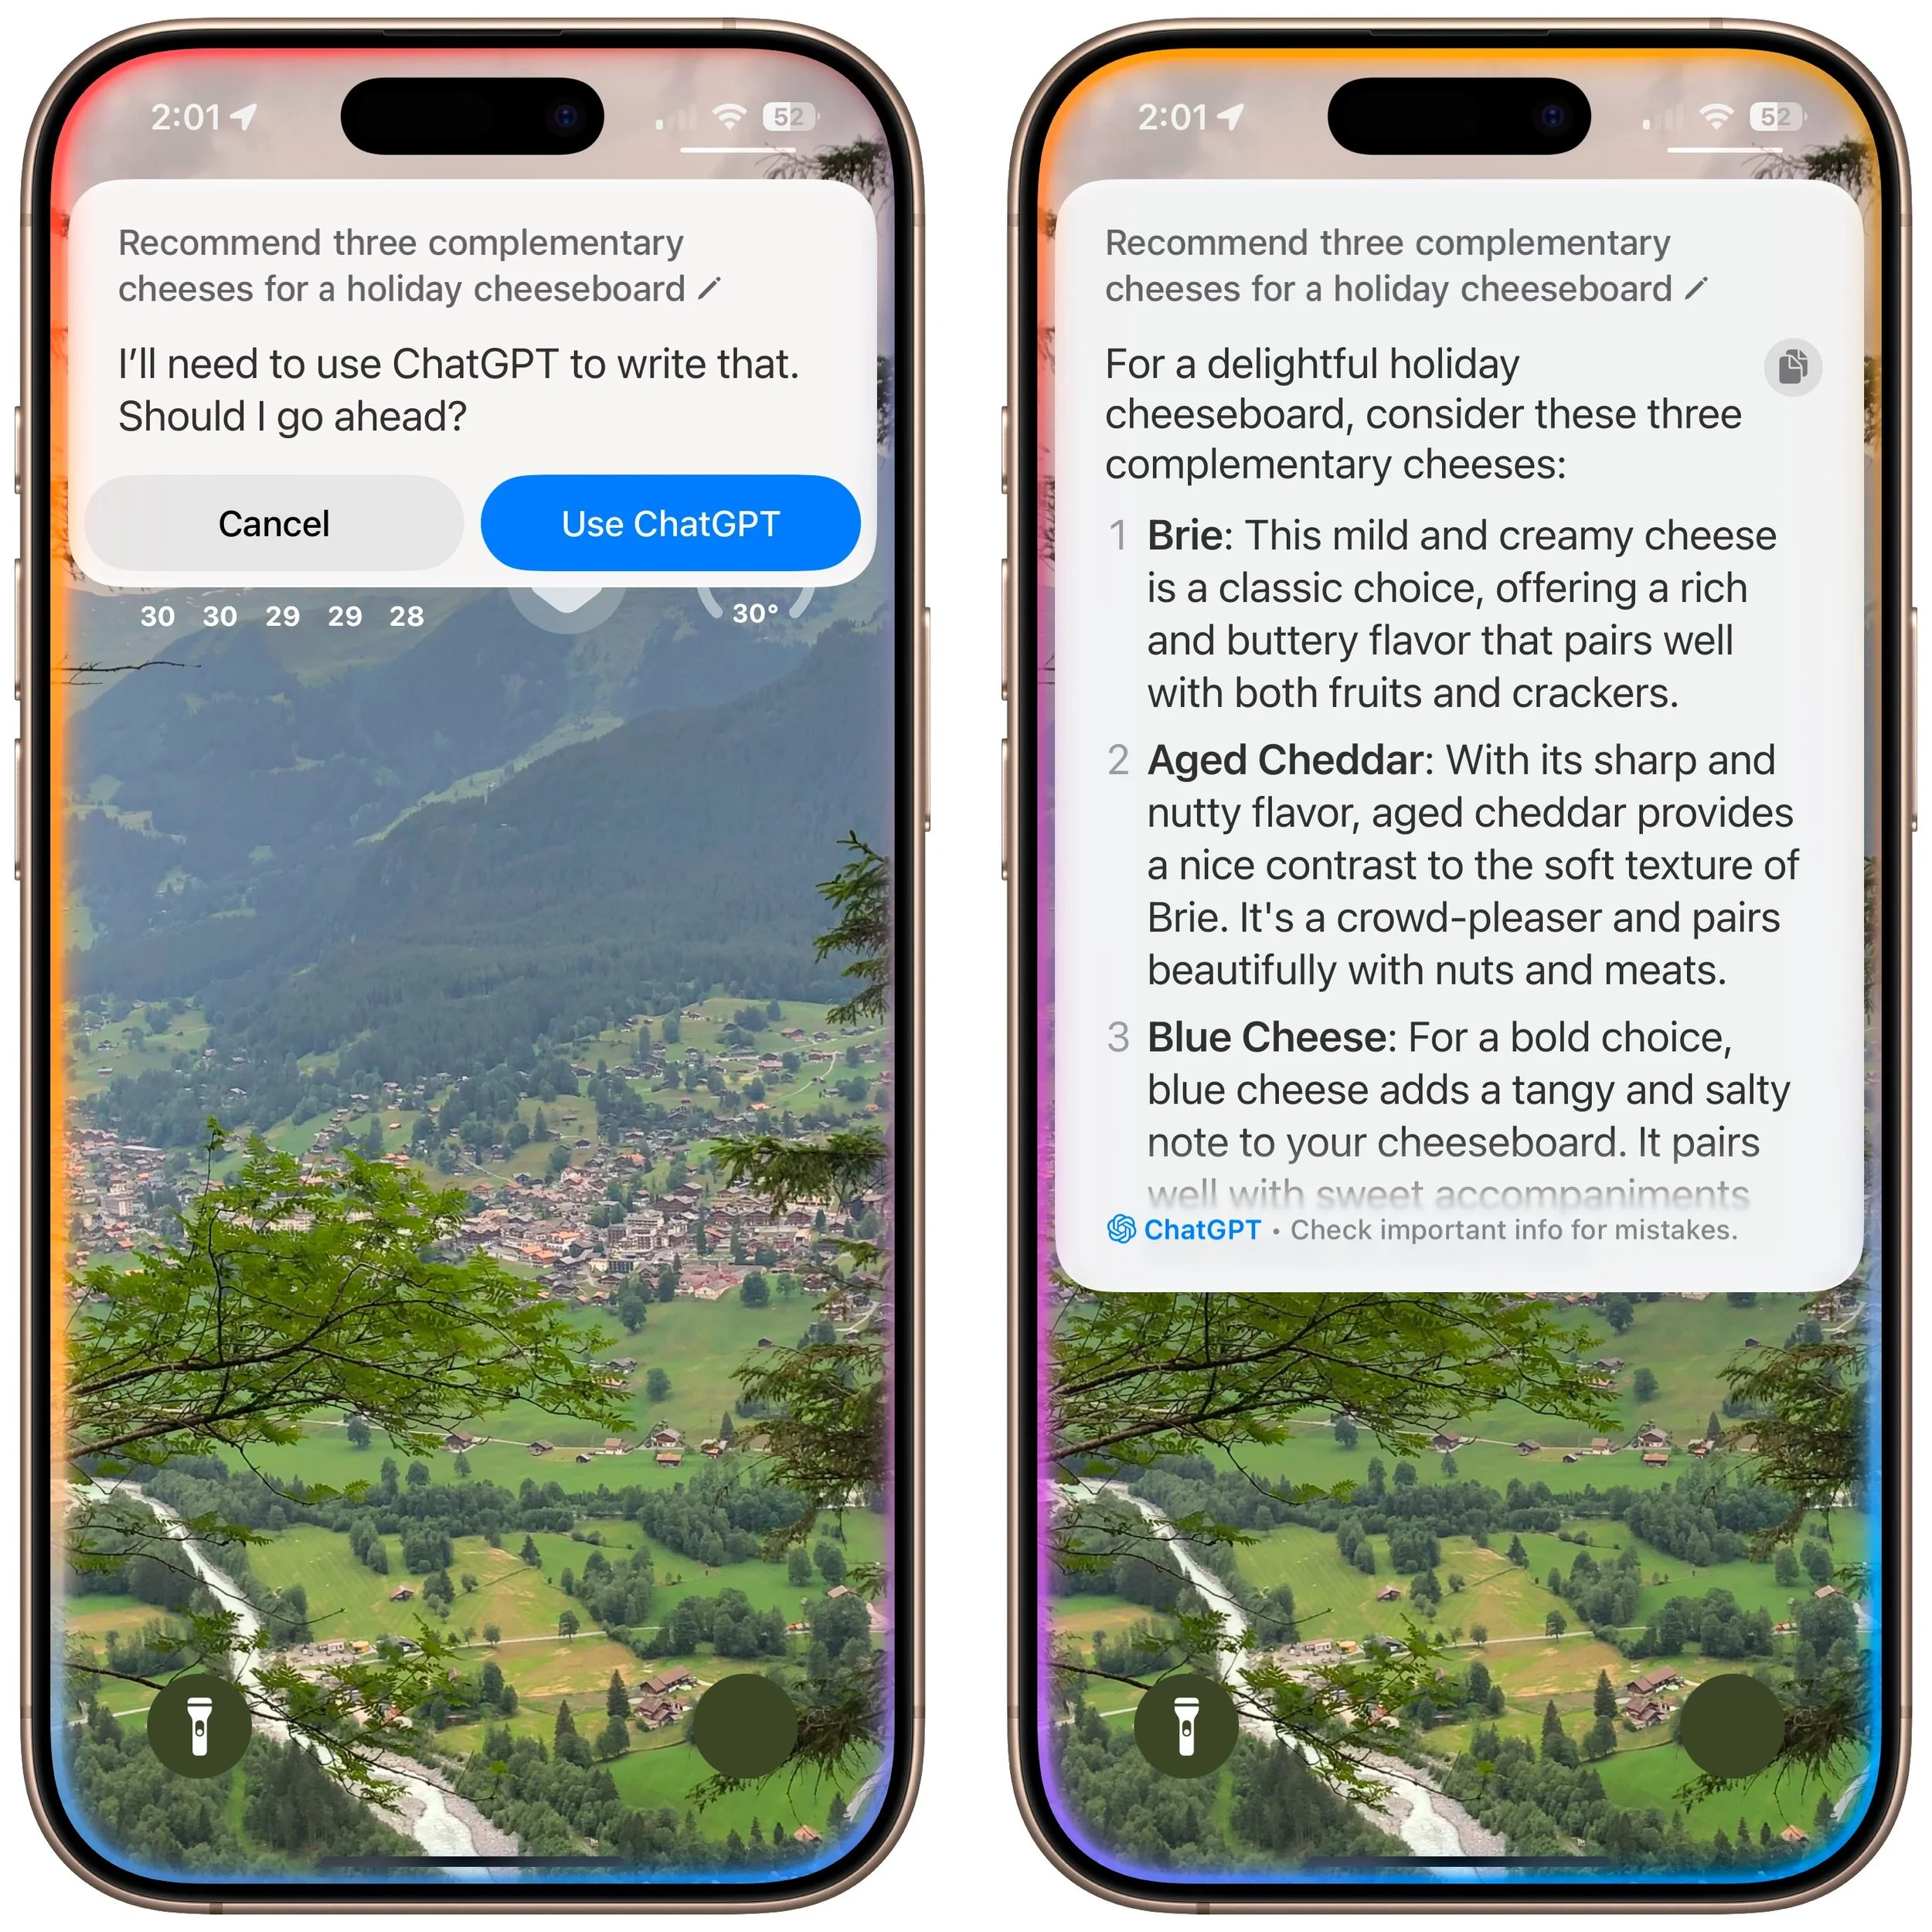
ChatGPT Enhances Writing Tools
The final place ChatGPT appears in Apple Intelligence is in Writing Tools, which may be more useful than its Siri integration. The new Compose option leverages ChatGPT to generate content wherever you’re writing, and you can also use it to create images using ChatGPT’s image-generation capabilities. Writing Tools also now allows users to request their own changes to selected text (including recasting it as a haiku, for example) instead of relying solely on the canned options to make the text friendlier, more professional, or more concise.
To do this, bring up Writing Tools in any app (by choosing Edit > Writing Tools > Show Writing Tools or Control-clicking selected text and choosing from the Writing Tools menu). Tap Compose and describe what you want ChatGPT to create. If it’s not quite what you want, which is likely, keep asking for refinements or go in a different direction.
What’s Next for Apple Intelligence?
Although this second wave of Apple Intelligence features largely fulfills Apple’s main promises, a few major additions remain for 2025. Most notable are significant changes to Siri that will enable it to take your personal context—your email, messages, and photos, for instance—into account. Siri will also gain onscreen awareness to include what you see in its responses. Finally, Apple is giving Siri access to hundreds of new actions in Apple and third-party apps, which should make it more capable of acting on your behalf. The other notable upcoming change is Priority Notifications, which will evaluate the notifications from all your apps and help you focus on the most important ones.
We also hope Apple will continue to refine and improve the existing Apple Intelligence features. While they’re well integrated into the overall Apple experience, they seldom measure up to ChatGPT, Claude, Gemini, and other leading AI systems.
(Featured image by Apple)
Use Quick Look to Preview Files and Folders in the Finder, Spotlight, and Open Dialogs
With a press of your Mac’s Space bar, you can use Quick Look to preview the contents of nearly any selected file, saving you time looking for the right file, comparing files, evaluating photos, and more. Try it in apps other than the Finder, too!

Finder icons sometimes hint at their file's contents, but if you find yourself opening file after file to look at the contents quickly, the Mac has a little-known feature just for you: Quick Look. To give it a spin, select a file in the Finder and press the Space bar or Command-Y. If Quick Look supports that type of file, it instantly displays a standalone window showing the contents of the file without opening it in its native app. Press the Space bar again to close the window.
If the document you’re previewing has multiple pages, you’ll see thumbnails along the right side that you can scroll through using your mouse or trackpad, or by pressing the Page Up/Page Down keys. But you aren’t limited to just viewing a file: click the Open With button to open the file in its default app, or click the Share button in the upper right to send it to someone else via email, Messages, or another sharing service. PDFs and images will also show the Markup button that lets you annotate the file directly, and images have a Rotate button.

If you need to scan through a set of files in a folder, you can press the arrow keys while the Quick Look window remains open—how you move among the files depends on the Finder window’s view. In List view, for instance, using the Up and Down arrow keys can be a great way to browse through a collection of pictures. You can even interact with the Finder while using Quick Look, which means you can delete an unwanted photo by pressing Command-Delete while previewing it.
Quick Look works well for evaluating or comparing multiple files. Select a bunch of files and press the Space bar to open them all in Quick Look. The Left and Right arrow keys let you cycle through your selection; there are also Back and Forward arrow buttons at the top left of the Quick Look window. To the right, you’ll see a Thumbnail button that displays the selected files in a grid—click any thumbnail to focus on just that item.

To remove the distraction of your desktop, click the Zoom button in a Quick Look window. If you have multiple files selected, you can even start a simple slideshow from the zoomed Quick Look window—it’s a quick way to show off a folder of images. Another way to get to a zoomed Quick Look window is to select the files in the Finder and press Option-Space.
What file types does Quick Look work with? Not everything, but out of the box, Quick Look supports text files, RTF files, HTML files, images, audio, video, PDFs, iWork documents (Keynote, Numbers, and Pages), Microsoft Office files, fonts, and more. Third-party apps can extend Quick Look to support proprietary formats, and developers have released independent Quick Look extensions. Many people appreciate these three extensions:
Folder Preview (free) displays the contents of folders in Quick Look.
BetterZip (free for viewing) lets you look inside Zip archives and other compressed files.
Peek ($7.99) not only supports 530 file types but also lets you copy, search, navigate, and more directly within the Quick Look window.
Although it’s best known in the Finder, Quick Look is available elsewhere on the Mac, including the examples below, so it’s always worth selecting what you want to preview and pressing the Space bar to see if it works.
Spotlight: Preview search results to see if they’re what you want
Open dialogs: Preview files before you open them
Time Machine: Preview versions of files before restoring them
File transfer apps: Preview files on remote servers before downloading
Messages: Preview files added to conversations before opening them
Mail: Preview attachments to email messages
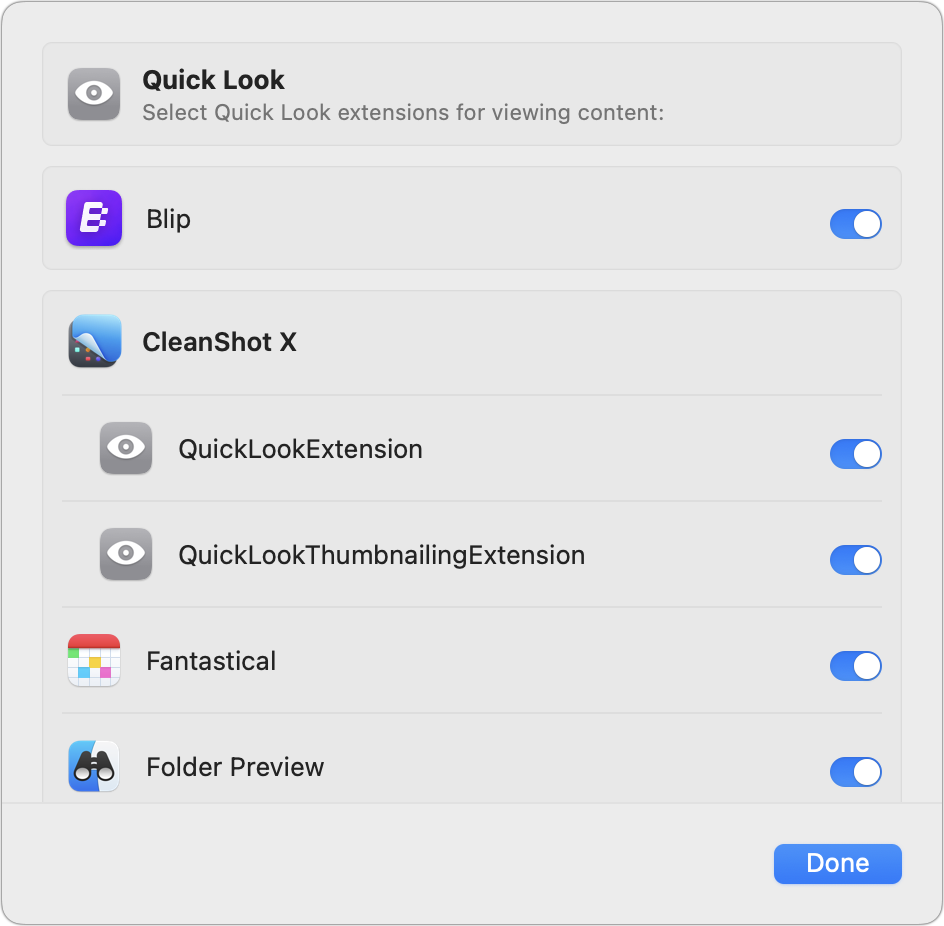
To manage your Quick Look extensions, open System Settings > General > Login Items & Extensions, scroll to the bottom, and click the ⓘ button next to Quick Look.
Finally, note that if your Mac has a trackpad, you can invoke Quick Look by force-touching a Finder icon (press deeply until you feel a click) instead of pressing the Space bar.
Quick Look takes just moments to learn, but it can save you hours of time poring through files on your Mac!
(Featured image by iStock.com/megaflopp)