Heat Wave Survival Guide for Your Apple Devices
Think your Apple devices can handle the summer heat? Think again. Discover how high temperatures can damage your iPhone, iPad, and Mac—and what you can do to keep them safe.

A massive heat dome earlier this summer exposed large swaths of the United States to heat index values approaching or exceeding 120ºF, underscoring the importance of protecting our devices from heat damage. Overheating can degrade performance, in-terrupt charging, disable features, and cause general device instability.
When Temperature Becomes a Problem
You might be surprised by how sensitive electronic devices are to high temperatures. Apple says that most Apple devices—whether we’re talking about an iPhone or iPad, AirPods, Apple Watch, or Mac—work best in ambient temperatures under 95ºF (35ºC). The Apple Watch Ultra is a notable exception, capable of operating in temper-atures up to 130ºF (55ºC), but even then, Apple recommends charging at a lower temperature.
These temperature limits are frequently surpassed in everyday situations. A parked car in direct sunlight can reach 130ºF (54ºC) within an hour, even with windows cracked open, and continue climbing from there. Just as you’d never leave children or pets in a parked car, your iPhone, iPad, or MacBook shouldn’t be left behind dur-ing a trip to the beach. Even when powered off, Apple devices shouldn’t be stored in temperatures above 113ºF (45ºC).
The risk isn’t limited to vehicles. Poorly ventilated homes and offices without air conditioning can become surprisingly hot, particularly affecting computers that run continuously and lack proper airflow. If you have a second-generation HomePod or HomePod mini—both of which have temperature and humidity sensors—you can ask Siri, “What’s the temperature in here?”
How Heat Hurts Your Devices
An often overlooked point is that electronic devices generate significant heat during operation, and high ambient temperatures make it harder for them to shed that heat effectively, increasing the risk of thermal throttling or shutdown. Under heavy work-loads, internal components like an iMac’s CPU can reach temperatures as high as 212ºF (100ºC)—literally the boiling point of water.
Temperatures that exceed component design specs can have the following detri-mental effects:
Chip instability: As heat rises, electrons vibrate more intensely (thermal noise), leading to increased error rates and timing issues in chips. This can re-sult in unpredictable behavior or system crashes.
Battery degradation: While lithium-ion batteries actually perform well in high temperatures, the accelerated chemical reactions inside them can reduce their long-term lifespan.
Physical damage: Repeated heating and cooling cycles can create microscop-ic stress fractures as different materials expand and contract at varying rates, potentially leading to component failure.
While some heat-related issues resolve themselves once devices cool down, others can cause permanent damage. Prevention is crucial.
Your Mac will typically warn you of dangerous temperatures by ramping up its cool-ing fans. (The fanless MacBook Air can’t provide this warning.) If you notice your Mac’s fans running at a high speed for several minutes:
Close unnecessary apps, especially those that heavily tax the CPU.
If the fans continue at full speed, restart to eliminate problematic background processes.
If restarting doesn’t quiet the fans, shut down your Mac and let it cool off.
An overheated Mac may exhibit erratic behavior or shut down unexpectedly. Be par-ticularly cognizant of potential heat-related issues during initial device setup, restor-ing from backup, using graphics-intensive apps or games, and streaming high-quality video, all of which can drive up internal temperatures on their own.
Without cooling fans, iPhones and iPads rely on other methods to manage high tem-peratures. When these devices detect dangerous heat levels, they’ll display a warning and automatically protect themselves through various measures. Apple says you might notice some of the following behaviors with an overheating iPhone or iPad:
Slowed or interrupted charging (including wireless charging)
Automatic display dimming—it might even go entirely dark
Weakened cellular signals as radios enter a low-power state
Disabled camera flash and other features
Reduced performance, especially in graphics-heavy apps
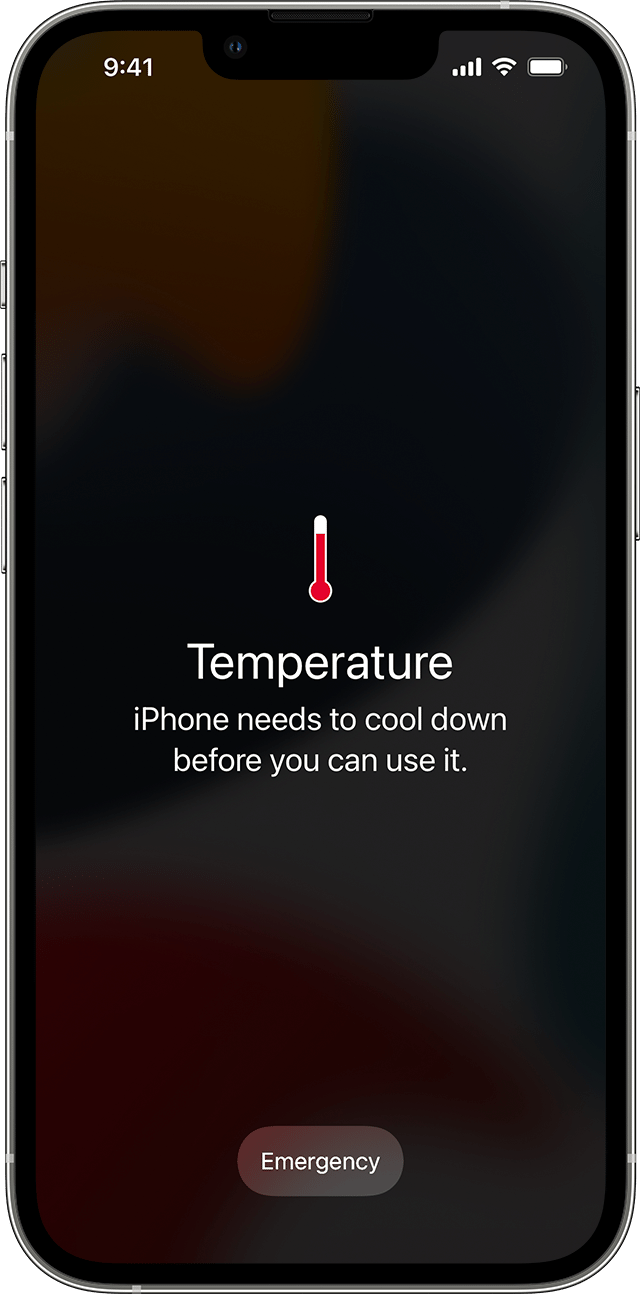
Navigation deserves special mention: if your iPhone overheats during GPS navigation, it may display a “Temperature: iPhone needs to cool down” alert instead of the map view. Don’t worry—you’ll still receive voice guidance, and the screen will briefly ac-tivate to show important turns.
Apple Watches will also display a special warning screen if they get too hot.

Preventing Heat Damage
Protecting your Apple devices from heat damage mostly comes down to following these common-sense guidelines:
Limit high-temperature use: When ambient temperatures exceed 95ºF (35ºC), as happens outside in Phoenix from May through September, minimize device usage or, ideally, avoid it entirely.
Never leave devices in parked cars: The greenhouse effect can quickly cre-ate dangerous temperatures. If it happens accidentally, allow the device to cool completely before use.
Ensure proper ventilation:
Keep Mac ventilation ports unobstructed.
Avoid using laptops on soft surfaces like beds or pillows.
Periodically clean ventilation ports with compressed air.
Never cover an open laptop’s keyboard.
Don’t stack items on top of a Mac mini or Mac Studio.
Watch server areas: Monitor temperatures in server closets and ensure ade-quate cooling through ventilation, fans, or air conditioning.
Remember: if you’re feeling uncomfortably hot, your devices probably are too. The temperatures that stress electronics tend to be similarly stressful for humans, mak-ing your comfort a good gauge of potential risk to your devices.
(Featured image based on an original by iStock.com/margouillatphotos)
Advice for Good Office Ergonomics
Don’t let poor ergonomics get in the way of getting your work done. Get expert advice on adjusting your chair, positioning your display, and arranging your desk to prevent discomfort and boost productivity at your Mac.

Let’s look at how to keep your body comfortable and healthy when you interact physically with your Mac. In a word: ergonomics. You’ll find it easier to focus and be productive if nothing hurts. Plus, you want to avoid long-term problems like carpal tunnel syndrome and chronic neck strain.
While some workplace setups may be outside your control, there are usually ways to improve your ergonomics. Here’s what to check and adjust to make your workspace more comfortable and productive. We also recommend working through the Cornell Ergonomic Workstation Advisor, a 35-question worksheet.
Chair Setup
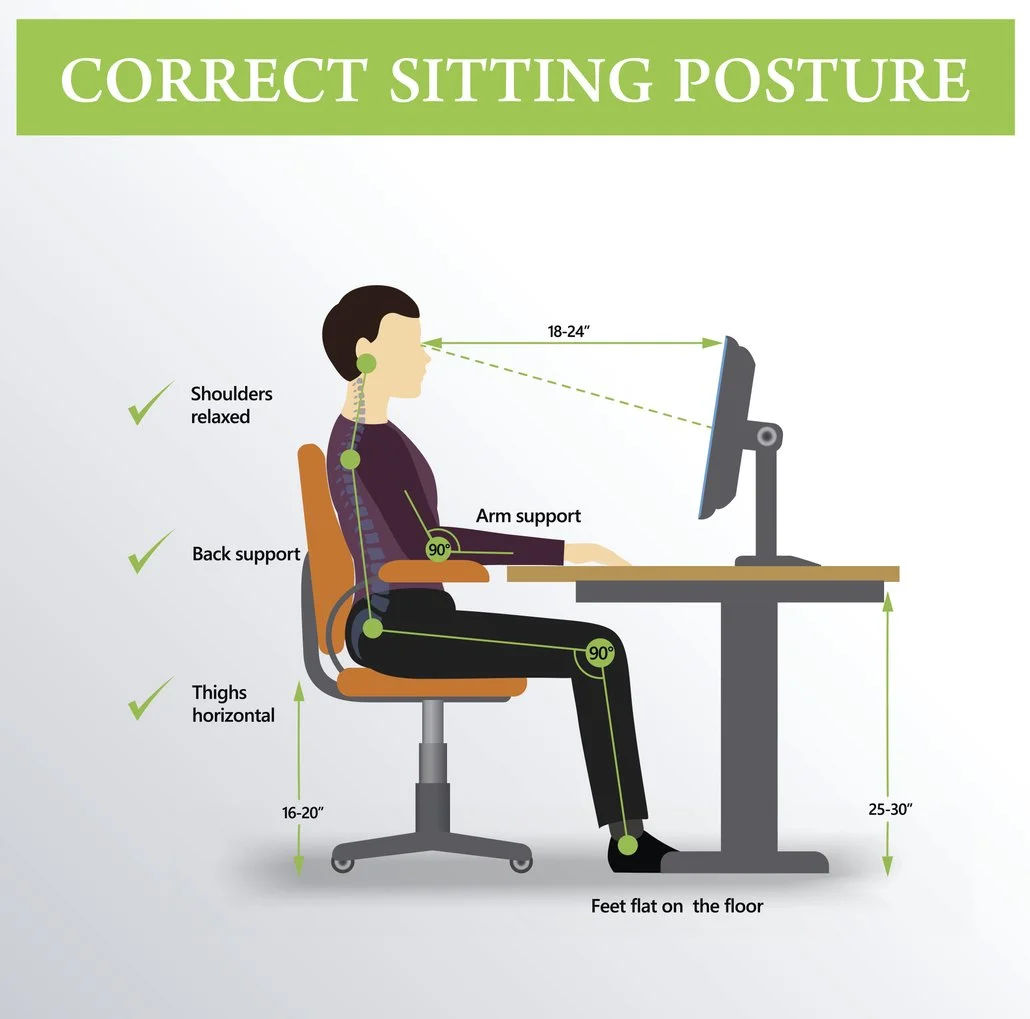
Your chair is the linchpin of an ergonomic office setup. Adjust the seat height so your feet rest flat on the floor and your knees are at roughly 90º–120º. Use a stable footrest if you can’t put your feet flat on the ground without compressing your thighs. Note that if you are smaller or larger than average, you may need a chair designed for your size.
You should be able to sit up straight comfortably, which may be aided by a lower back support. If your chair lacks one, consider adding a firm bolster or even a rolled towel for more support. Make sure armrests support your elbows without forcing you to raise your shoulders.
Once your chair is adjusted correctly, it’s time to consider the desk surface, which affects the placement of your display, keyboard, and mouse or trackpad.
Screen Position and Height
When it comes to your Mac’s display, there are two vital measurements to reduce neck and shoulder strain: the distance from your eyes and the height off the desk surface.
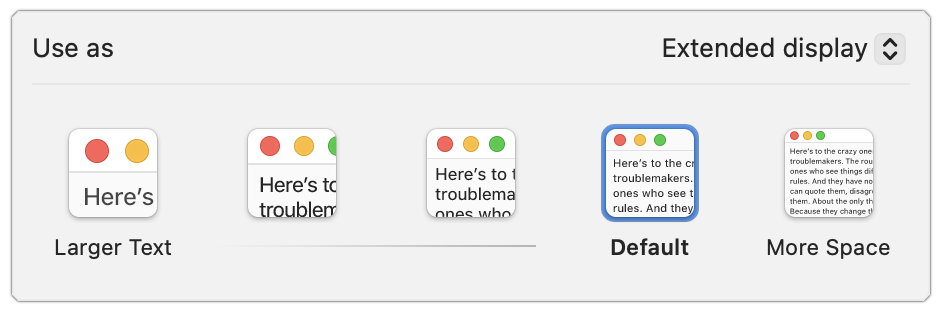
Roughly speaking, the display should be positioned at arm’s length, or 18–36 inches (45–91 cm) away. However, that depends on your vision—if the text isn’t clear at the recommended distance, you should either have your prescription checked or move the display until you can read it easily. If you find yourself bringing it too close, use the Larger Text options in System Settings > Displays to make the text readable at a reasonable distance.
For height, with modern large displays, aim to have your eye level about a quarter of the way down the display, so that three-quarters of the display is below your eye level. That generates a slight downward gaze to the center of the screen. If you wear bifocals, position the display a little lower to account for how you raise your head to look through the different viewing zones in your lenses.
Some displays have highly configurable stands, making it easy to adjust their height. For those that offer only tilt adjustments, you can raise the screen by placing a properly sized book or printer paper underneath it; just make sure it’s stable. If your desk doesn’t lend itself to the necessary positioning, a monitor arm could make it easier to adjust.
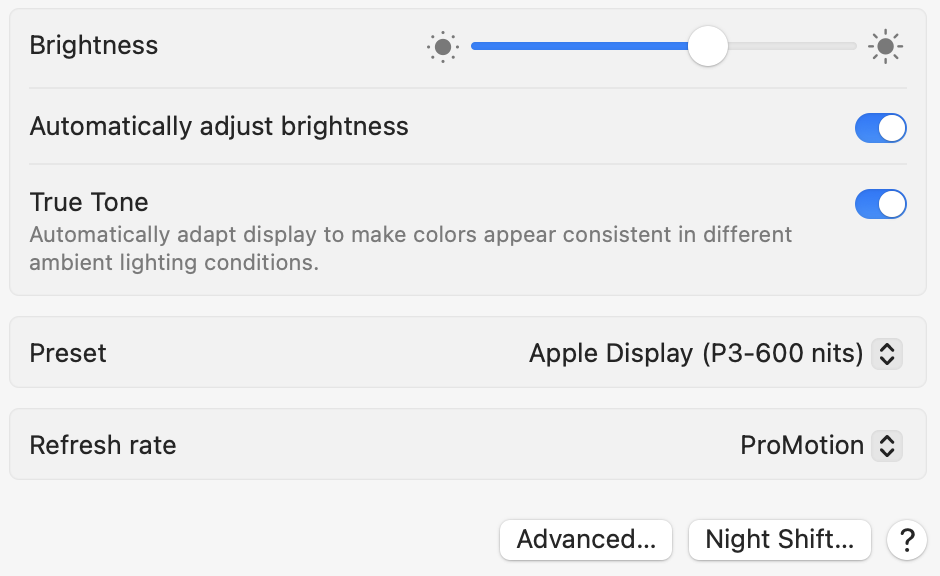
It’s important to minimize glare from lights above you or windows behind you. Tilting the top of the display slightly away from you can reduce glare and enhance comfort, but more significant adjustments may be necessary to avoid harsh natural light. If you need bright light for reading physical documents, opt for task lighting and keep the room lighting indirect. Regardless, you should always adjust the Mac’s brightness to match the room lighting; the Automatically Adjust Brightness switch in System Settings > Displays can help. If you use your Mac before bed, turning on Night Shift may improve sleep.
What about multiple displays? Depending on their size, you may inadvertently create a situation where the text is too far away to read comfortably, causing you to lean in. Nor do you want to be working with your head turned all the time.
If you have a primary display, position it in front of you and put the secondary display off to the side, angled in. If you have two identical displays, angle them in slightly to create a visual arc and sit so that you can work comfortably on the inner halves of each screen. Those connecting a laptop to two displays can keep it below them. However you arrange your displays, click Arrange in System Settings > Displays to rearrange the virtual screens so they match your physical layout.

Keyboard and Mouse/Trackpad Placement
For comfortable typing and mousing, your hands should be level and straight, with your elbows comfortably close to your body and your shoulders relaxed. To make that happen, the keyboard and pointing device should be at elbow height when you’re sitting and close enough that you don’t need to lean forward. The mouse or trackpad should be as close to the keyboard as possible so you don’t have to reach for it.
Getting the height of the keyboard and pointing device right—while also keeping the display at the right height—can be tricky because many desks aren’t very adjustable. If the desk is too high and can’t be lowered, consider an adjustable keyboard tray to reposition the keyboard and mouse/trackpad at the correct height.
It’s also important that you don’t compress your wrist by pressing down on the desk surface or even a soft wrist rest. To rest your hands when you’re not typing, use a cushioned palm rest in front of your keyboard.
Special Considerations for Laptops
Unfortunately, it’s impossible to maintain good ergonomics on a laptop because there’s no separation between the keyboard and the display. That’s fine for shorter work sessions and when you have no control over your environment, such as on an airplane or in a coffee shop. But if you work on a laptop all day long, choose one of two basic options to improve your ergonomics:
Continue to use the laptop’s keyboard and trackpad at a good typing height, but add an external display at the ergonomic viewing height. You can continue to use the laptop’s display for ambient apps—such as Messages, Calendar, and Music—that you glance at and use briefly.
Elevate the laptop so its display is at the correct viewing height, and add an external keyboard and mouse/trackpad at the correct typing height. A wide variety of laptop stands are available for this purpose.
The first approach may be more expensive, but it can increase productivity by allowing you to view more content on the screen at once.
Movement and Breaks
No matter how ergonomic your setup is, it’s terrible for the human body to remain in one position for extended periods. Research suggests that sitting for more than 8 hours daily, especially without physical activity, is associated with cardiovascular disease, diabetes, obesity, cancer, depression, and even cognitive decline. Luckily, it’s easy to reduce these risks:
Change positions frequently; chairs that allow movement can help activate muscles and improve circulation.
Take regular breaks every 30–60 minutes. Standing or walking for 5 minutes is ideal, but even a minute or two helps. Even if you work at a standing desk, you must still move around.
Consider a sit-stand desk that allows you to switch between sitting and standing.
Look away from your screen at least every 20 minutes for 20 seconds, focusing on an object at least 20 feet away.
Exercise regularly to counterbalance being sedentary—experts recommend a weekly regimen of 150–300 minutes of moderate exercise or 75–150 minutes of vigorous exercise.
Remember: Small ergonomic adjustments can make a big difference in comfort. If you experience persistent discomfort in an office environment, consult with your supervisor or HR department about your ergonomic equipment options. Your organization may also provide access to an ergonomics expert who can come to your workspace and ensure that your chair and other workspace items are adjusted for optimal comfort.
(Featured image by iStock.com/dragana991)
Stay Connected Off the Grid: How to Use Messages via Satellite in iOS 18
When storms knock out cell networks or hiking takes you off-grid, you can now text via satellite if you have an iPhone 14, 15, or 16 running iOS 18. Learn how Messages via satellite lets you stay connected when cell networks fail or aren’t available.

If you own an iPhone 14, 15, or 16 and are in the US, Canada, or Mexico, you now have access to a feature that could make all the difference the next time you find yourself staring at the dreaded SOS icon in your status bar. With iOS 18, Apple introduced Messages via satellite, a technology that lets you send and receive text messages even when you’re completely out of range of cellular and Wi-Fi networks. While it’s not a substitute for your usual messaging habits, it’s a powerful tool for minor emergencies, remote travel, or moments when the infrastructure fails you.
Why Messages via Satellite Matters
Cellular coverage is nearly ubiquitous—until it isn’t. It’s all too easy to find yourself without a signal in rural areas, and increasingly frequent natural disasters like hurricanes and wildfires can disrupt cell networks for days or even weeks. In those situations, the ability to communicate can range from a minor convenience to a literal lifesaver.
Apple’s satellite connectivity, first introduced with Emergency SOS and Find My features in iOS 16 and expanded to Roadside Assistance with iOS 17, has already proven its worth in real-world emergencies, most notably during the Maui wildfires. Now, with iOS 18 and a compatible iPhone, you can use Messages to let someone know you’re safe during a storm, get help from a friend if your bike gets a flat in a remote area, check in with family while hiking in rural regions, and stay in touch during large-scale network outages, all without a cell tower within range.
Who Can Use Messages via Satellite?
Messages via satellite is available on all iPhone 14, iPhone 15, and iPhone 16 models, and it currently works only in the US, Canada, and Mexico. The feature is included for free for two years after activating a supported device, and Apple has already extended this window once without indicating any plans to charge for the service.
Messages via satellite works best when both you and your recipient are running iOS 18 or later. However, SMS fallback is available for non-iPhone users and those on older iOS versions. If you haven’t messaged someone recently, you may be prompted to use SMS instead of iMessage. The best approach may be to send them a regular iMessage while you’re still online to “prime” the conversation for satellite use.
How to Access Messages via Satellite
Apple designed Messages via satellite for use only when you truly need it. You can’t just switch it on whenever you want—your iPhone will offer the option only when there’s no cellular or Wi-Fi connection available. When this happens, the SOS icon in your status bar indicates that Messages via satellite can be used. It may or may not have a satellite icon next to it.
To get started, open the Messages app. If you’re in SOS mode, you’ll see a prompt to enable satellite messaging. Alternatively, go to Settings, where a Satellite option will appear under Battery. Apple also provides a Satellite Connection demo (accessible from Control Center) so you can practice connecting your phone to a satellite even when you have connectivity. We recommend trying this demo at least once—don’t try Messages via satellite for the first time when you actually need it.
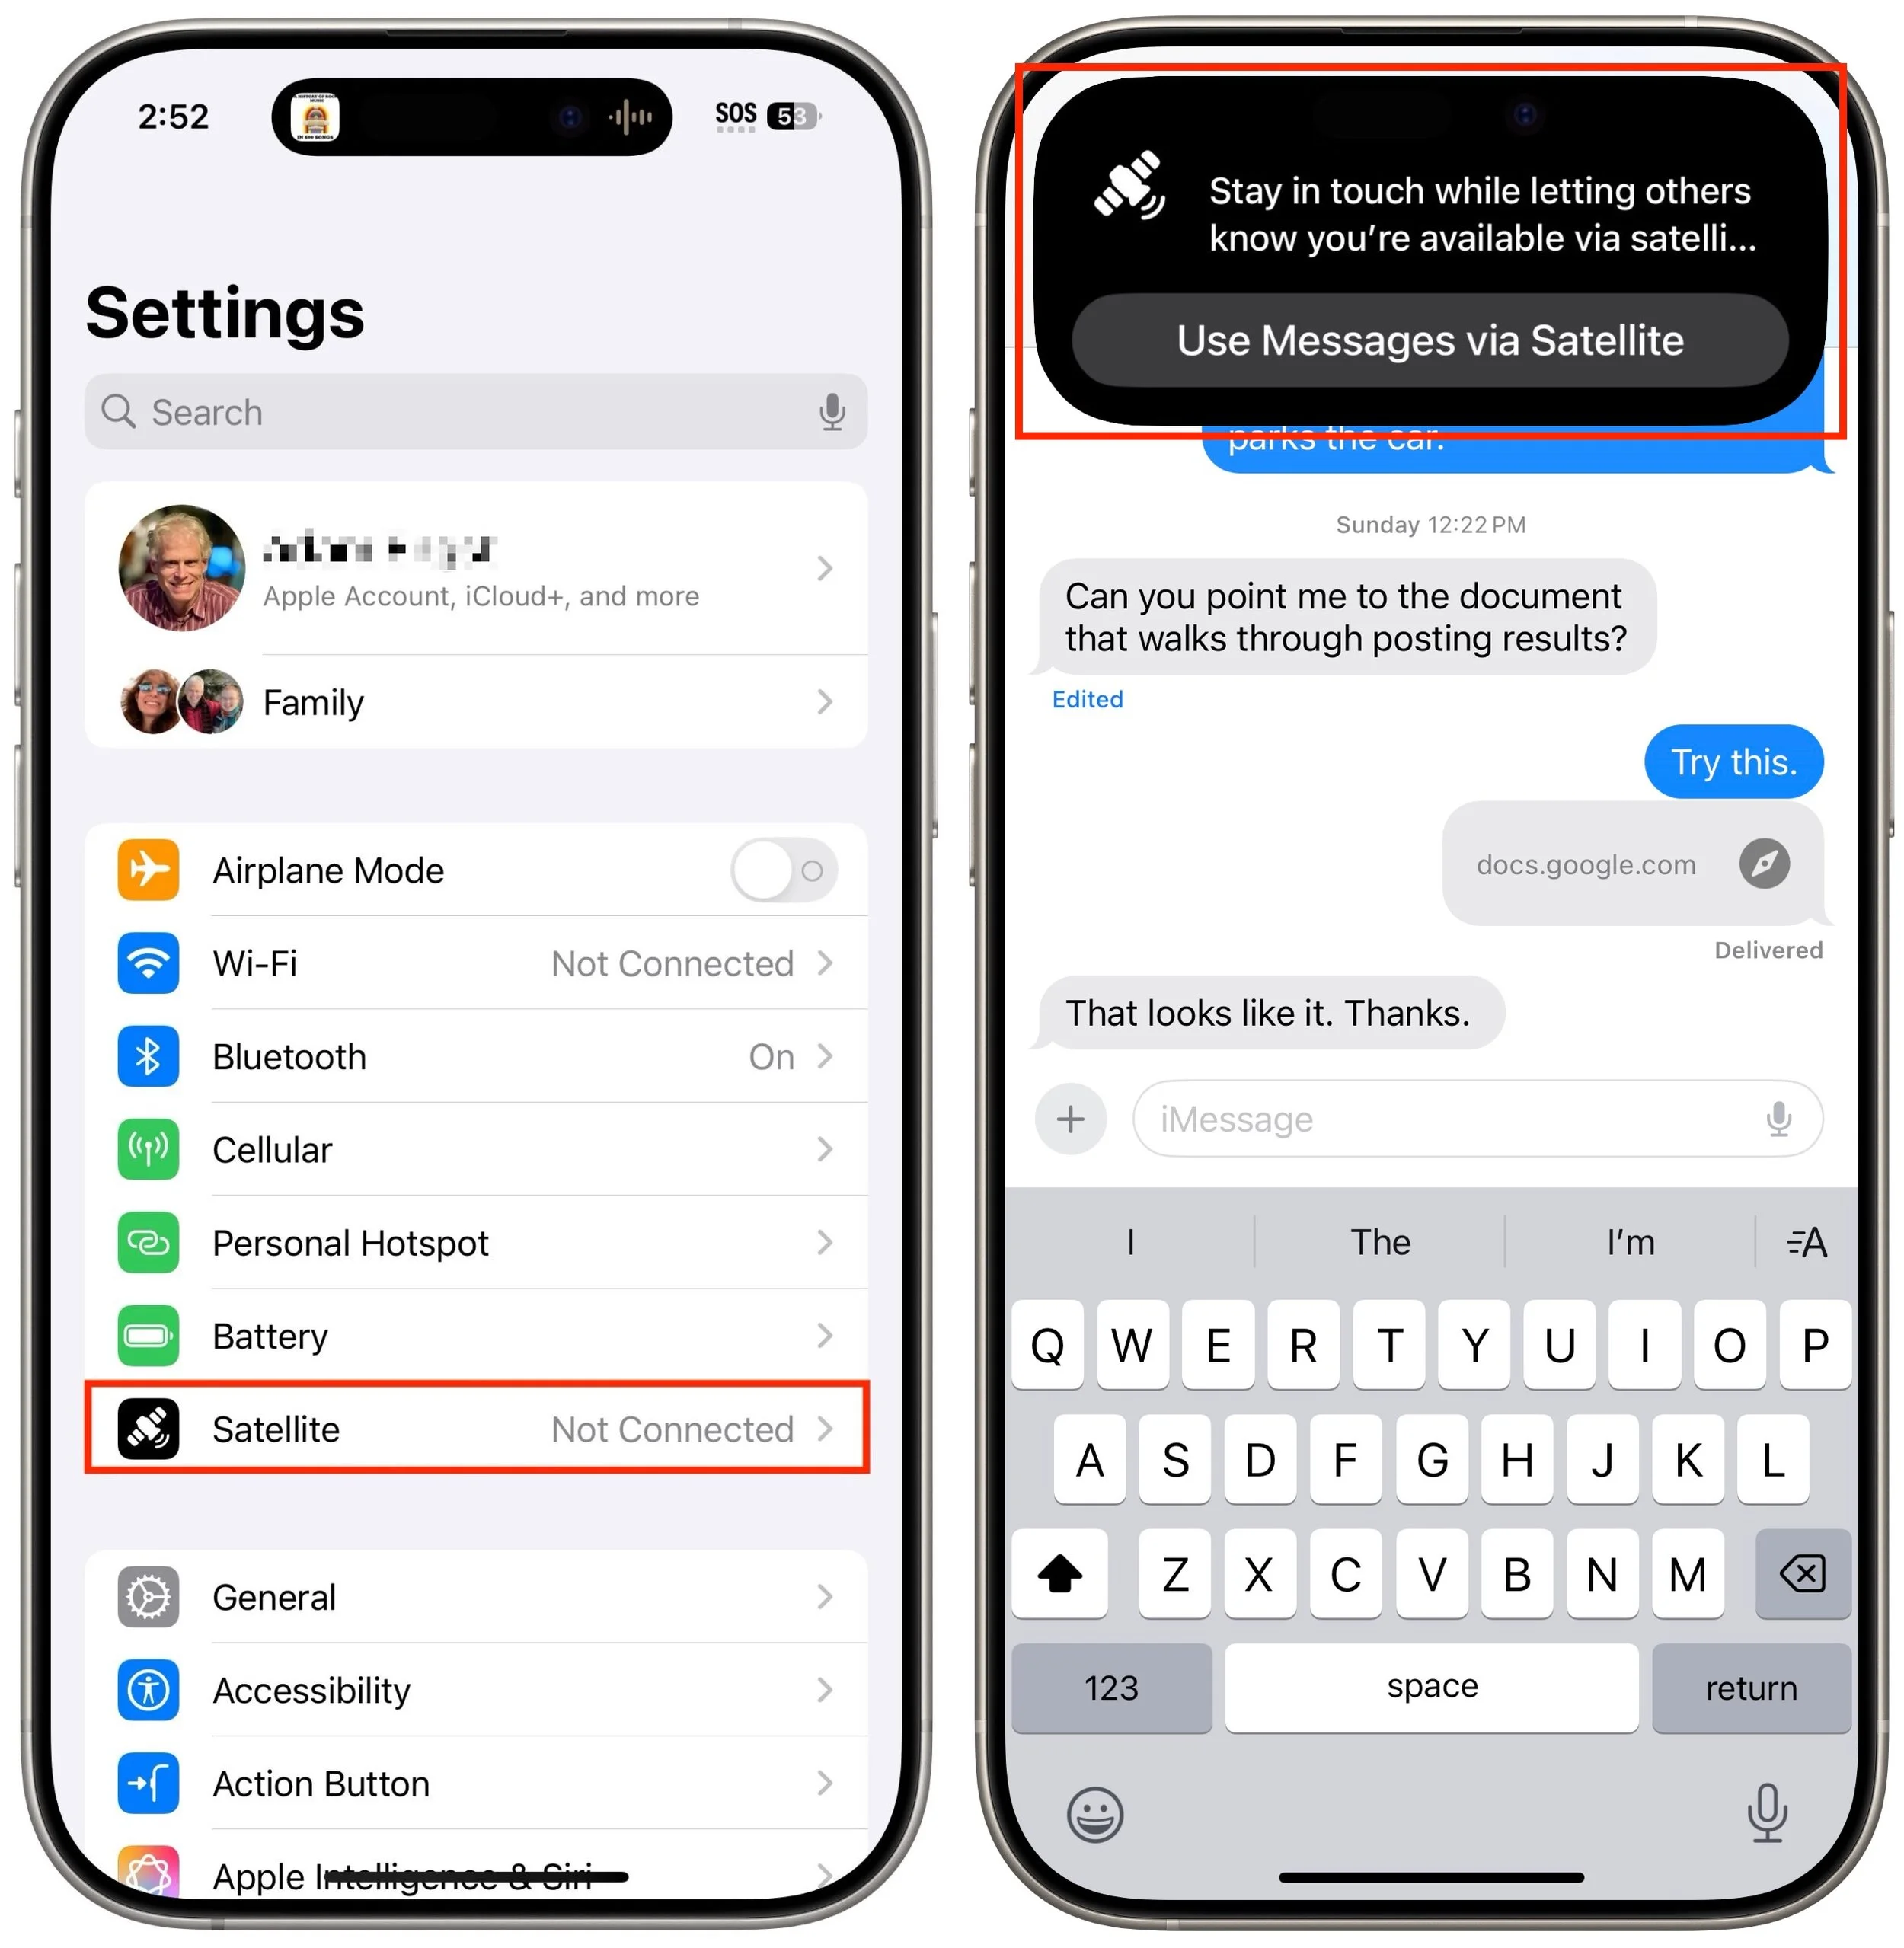
Once you’re ready to send a message, follow the on-screen instructions to point your iPhone at the sky. The phone will guide you to align with an available satellite, and you’ll see a green haze on the connection screen or a checkmark in the Dynamic Island when you’re connected. If you lose the connection, you’ll need to realign, as satellites move quickly across the sky. (Yes, you might look a bit eccentric waving your phone around in a field, but that’s a small price to pay for satellite connectivity.)

What You Can—and Can’t—Do
Messages via satellite has impressive capabilities, but it does come with some restrictions and quirks:
Text-only chats: You can send and receive text messages using iMessage or SMS. No photos, videos, audio messages, stickers, or other attachments are supported. However, emoji and tapbacks work.
Message length limits: iMessage conversations are restricted to 500 characters per message, while SMS messages are capped at 140 characters. If you go over these limits, the send button becomes disabled.
No group chats: Group conversations aren’t supported, even if everyone is using iMessage.
No location sharing in Messages: While you can’t send your location directly in a satellite message conversation, you can update your Find My location via satellite, which can then be viewed by those you’ve shared it with.
Slower delivery: Messages take longer to send and receive, anywhere from 30 to 60 seconds per message. You must stay connected to the satellite to receive replies.
Incoming message restrictions: Only emergency contacts and members of your Family Sharing group can initiate messages to you while you’re offline, and only via SMS. Their messages are delivered once you establish a connection to a satellite.
End-to-end encryption: iMessage conversations via satellite are end-to-end encrypted, but SMS messages are not.
Practical Tips for Using Messages via Satellite
To make the most of Messages via satellite when you need it, keep these tips in mind:
Practice connecting: Try Apple’s Satellite Connection demo before you need it. Familiarity with the process will save you time and stress in a real-world situation.
Update emergency contacts: Make sure your emergency contacts and Family Sharing members are current. They are the only people who can reach you first when you’re off the grid.
Prime important contacts: If you anticipate needing to reach someone while offline, send them a message while you still have coverage. This helps ensure the conversation is ready for satellite use.
Stay connected for replies: Keep your phone pointed at the satellite until you get a response. Dropping the connection will interrupt the flow of messages.
Don’t expect instantaneous service: Patience is key—sending and receiving messages via satellite is much slower than what you’re used to.
Messages via satellite is a significant step forward in making iPhones more useful in challenging situations. While we certainly hope you don’t need it every day, it’s a feature that’s good to have in your back pocket. The next time you see the SOS icon on your iPhone, don’t panic. Open Messages, follow the prompts, and stay connected when it matters most. It’s not magic, but it’s close enough for most practical purposes.
(Featured image by iStock.com/Jacob Wackerhausen)
Upgrade Soon: Intel-based Macs and Apps Are On Their Way Out
Still using an Intel-based Mac or app? With Apple’s recent announcement of end dates for both macOS and Rosetta 2 support, it’s time to plan your transition to Apple silicon.

In 2020, Apple introduced the M1 chip, the first of the family of Apple silicon chips that now power the entire Mac lineup. At the time, Apple said it would “continue to support and release new versions of macOS for Intel-based Macs for years to come.”
Since then, it has become clear that Macs with Apple silicon are notably better than Intel-based Macs in nearly every way, and we’re now up to the impressive M4 chip family. Nonetheless, some people continue to hold onto their Intel-based Macs. Now we know precisely when those Macs will ride off into the sunset. Intel-based Macs had a good run, but it’s time to move on to Macs with Apple silicon.
macOS Support for Intel-based Macs
During WWDC 2025, Apple announced that macOS 26 Tahoe will be the last version of macOS to support Intel-based Macs, specifically these four models:
16-inch MacBook Pro from 2019
13-inch MacBook Pro with four Thunderbolt ports from 2020
27-inch iMac from 2020
Mac Pro from 2019
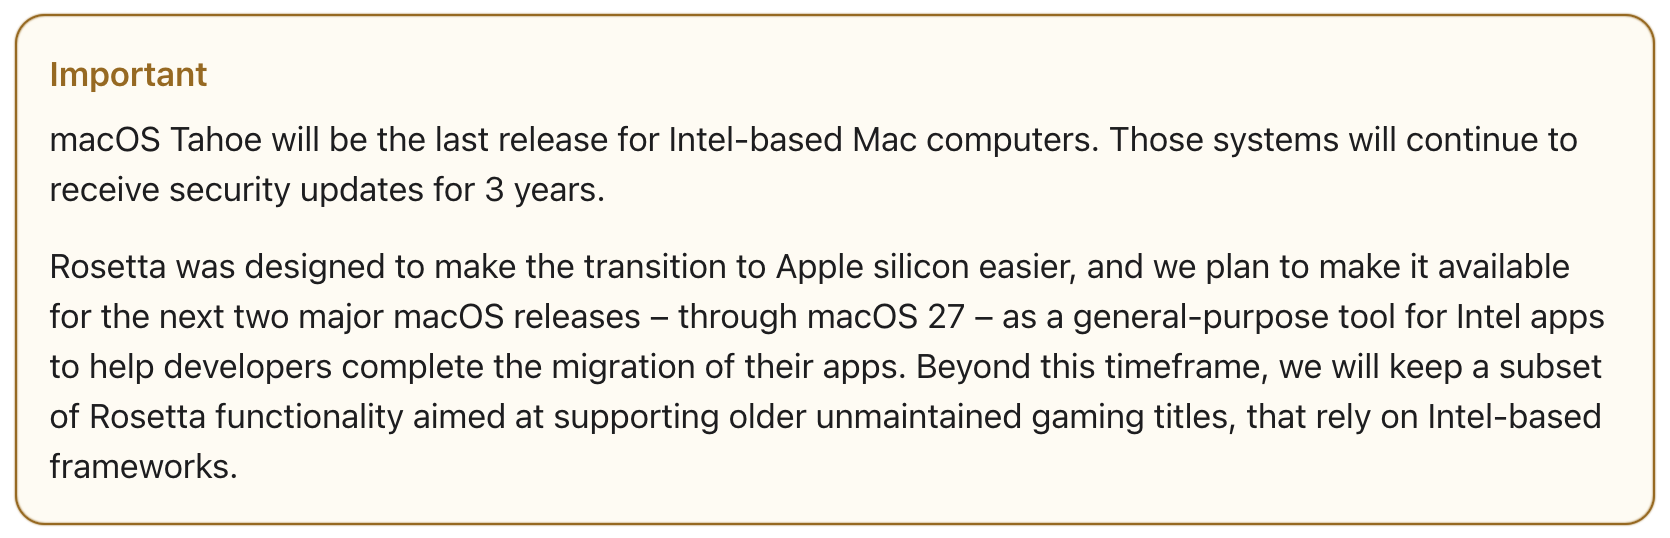
macOS 27, expected in 2026, will run only on Macs with Apple silicon. However, the Intel-based Macs listed above will continue to receive security updates for macOS 26 for another two years. That means that all Intel-based Macs will have lost security viability by 2028.
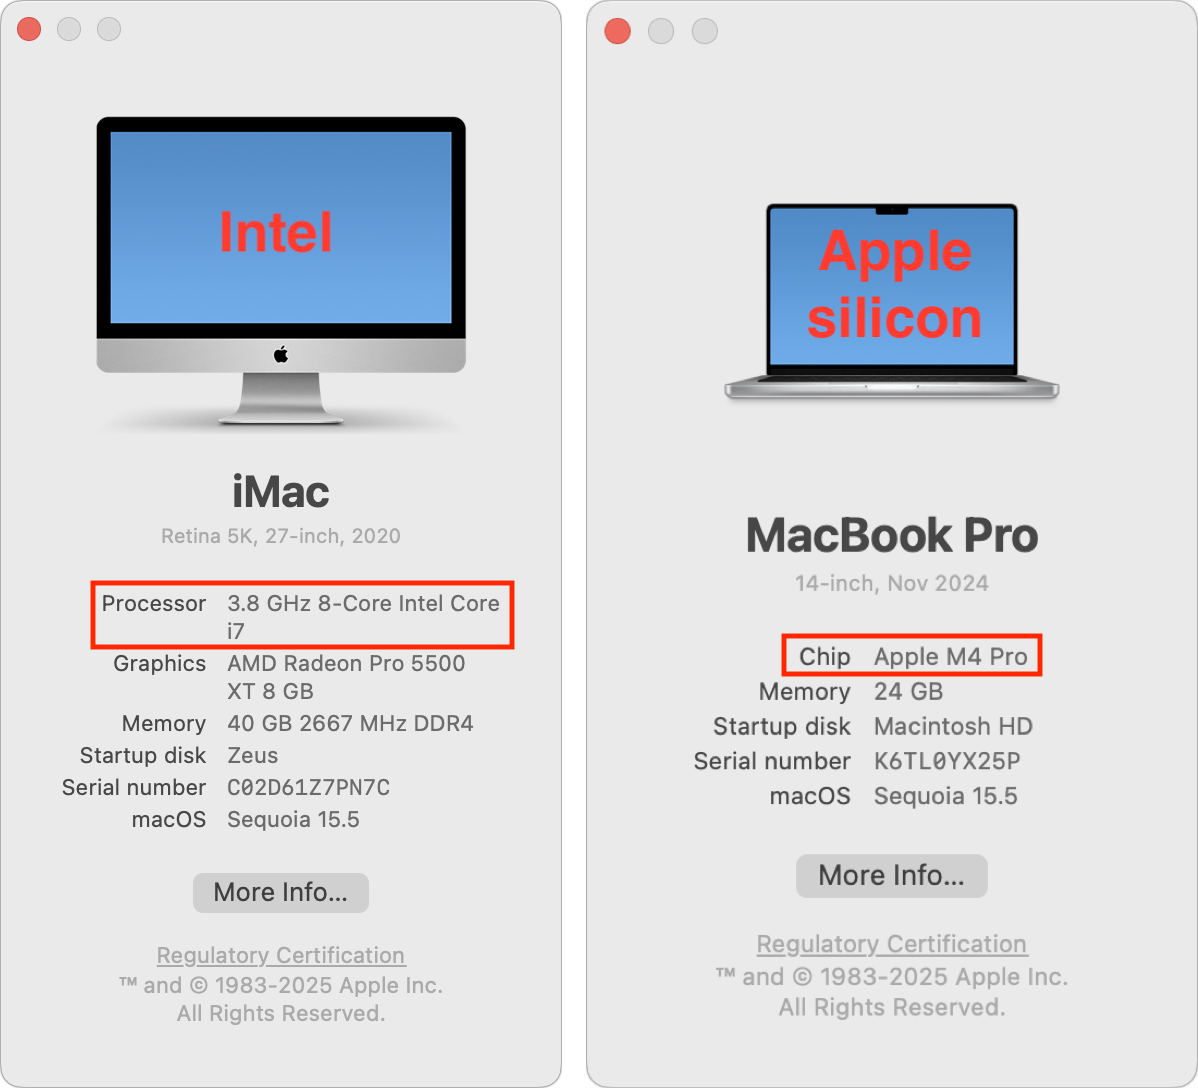
How can you determine the type of Mac you have if you’re unsure? Choose About This Mac from the Apple menu and look at the Processor or Chip line.
Rosetta 2 Support for Intel-based Apps
There’s another aspect to Apple’s waning support for Intel-based Macs: Rosetta 2. The Rosetta translation environment allows apps written for Intel-based Macs to run on Macs with Apple silicon. The process is almost transparent because macOS downloads Rosetta the first time it needs it, and after that, Intel-based apps just work. They may be slower than native Apple silicon apps, but Apple’s M-series chips are so fast that the translated apps often run faster than on Intel-based Macs.
During WWDC, Apple published documentation clarifying the future of Rosetta. Apple plans to keep Rosetta available in its current state in macOS 26 and next year’s macOS 27. After that, however, Apple says it “will keep a subset of Rosetta functionality aimed at supporting older unmaintained gaming titles that rely on Intel-based frameworks.”
Given that Apple silicon has been the future since 2020, nearly all developers have updated their apps to run natively on the M-series chips. Very few actively maintained apps still require updates; Rosetta is primarily useful for those who rely on obsolete apps or older versions of current apps.
How can you find out whether an app you rely on is Intel-based? Open System Information (it’s in your Applications folder, nested in the Utilities folder), click Applications in the sidebar, click the Kind column header, and then scroll to find all the apps listed as Intel. To find out where one of these apps is stored on your Mac, select its listing and look at the Location field at the bottom of the window.

What All This Means
There’s a difference between what’s possible and what’s recommended.
Apple’s announcements draw a line in the sand at 2028 for when it will be too dangerous to continue using the last batch of supported Intel-based Macs. Older Intel-based Macs will cease to receive security updates even sooner—two years after they are no longer supported by macOS. If budget or compatibility with obsolete software or hardware prevents you from upgrading to a Mac with Apple silicon, it is possible to limp along with an Intel-based Mac for a bit longer.
Similarly, Rosetta will make it possible for you to continue using an obsolete Intel-based app on a Mac with Apple silicon through macOS 27, which will cease to receive security updates in 2029. Old games may continue to work for longer.
If we don’t sound enthusiastic about those possibilities, we’re not. Even the very first M1-based Macs outperform Intel-based Macs, and the performance difference is far wider with today’s M4, M4 Pro, and M4 Max chips. You aren’t doing yourself any favors by hanging onto an Intel-based Mac if you can afford to buy a new one.
Because so much time has passed, it’s likely that any Intel-based app that has not already been updated to run on Apple silicon will never be updated, so we recommend that you start looking for a replacement.
With both hardware and software, the longer you wait, the more problems you’re likely to encounter when upgrading. In part, that’s because both professional and community expertise fades with time—people who solved the problems you’ll encounter did so years before and may no longer remember the details. We also often see small conversion utilities built to help with transitions, but those tend to disappear or stop working after most people have moved on.
Most businesses upgrade their Macs every three to five years because the frequency of problems in that time frame increases to the point where employee downtime and maintenance and consulting costs outweigh the cost of upgrading. That financial equation is less evident to individuals, but it applies similarly.
So if you’re still using an Intel-based Mac or app, you now have a firm end date. But seriously, don’t wait that long.
(Featured image by Apple)
Choosing the Best AI Chatbot for Your Needs
Want to harness AI but feel overwhelmed by all the choices? Skip the lesser-known options and focus on the major players. Here’s our guide to choosing the right chatbot for your needs, whether they involve writing, research, coding, or more.

Questions about AI from our clients keep coming in, with many asking which tools to choose. It’s understandable confusion—the number of AI chatbots has skyrocketed, and lesser-known ones are often highlighted or promoted on social media as the next big thing. The rapid pace of change in the field can be overwhelming, with major announcements happening every month.
For those who don’t want to spend time getting to know all the different AI tools, here’s our advice on the best options right now. This isn’t an area to go for an underdog—if you want to get serious work done, stick with one of the major systems. That means choosing from these five, which make up about 90% of the market:
ChatGPT from OpenAI
Gemini from Google
Claude from Anthropic
Copilot from Microsoft
Perplexity from Perplexity AI
That’s roughly the order in which we recommend you choose, although there are particular areas where one outperforms the others. Realistically, though, you’ll be fine with any of them, so the decision may come down to which feels the best during your interactions on the Web and through the system’s mobile app.
Although you can test all five chatbots for free, you’ll get much better results if you pay for an account to unlock unlimited access to all models and features. The free accounts use older, less advanced models and will cut you off if you try to use them too much in a day. All these chatbots cost $20 per month, other than the full version of Microsoft 365 Copilot, which is $30 per month and requires an annual commitment.
Let’s explore different usage scenarios that could make one chatbot a better fit for your needs.
General Purpose Usage: ChatGPT and Gemini
If you’re unsure about what you want to do with a chatbot but want to explore all options, the best overall choice is ChatGPT, with Gemini as a close runner-up. Both excel at generating text and images, can include content from real-time Web searches in their responses, offer a voice mode that lets you speak and hear responses, provide a choice between fast and advanced models, and can conduct in-depth research.
Writing and Editing: ChatGPT and Claude
ChatGPT is regarded by many as the top choice for writing, thanks to its fluency across different styles. It provides excellent rewriting and summarizing capabilities, and its GPT-4.1 model is currently the favored option in the AI-enhanced Lex word processor, which merits honorable mention for those who do a lot of writing. Claude also performs well with writing, especially when you’re interested in a deep understanding of structure, tone, and intent. If your writing mostly happens in Microsoft Word and Outlook, the Copilot add-on offers useful integration. Likewise, if you live in Google Docs, you might prefer Gemini for its integration.

Research and Current Information: Perplexity and ChatGPT
Many people think of—and interact with—chatbots as souped-up search engines. That’s not entirely helpful because chatbots can do vastly more than search the Web, but incorporating current information from the Web is essential for many tasks. Although most chatbots can now access the Web, you’ll get the best results from Perplexity and ChatGPT, with Gemini being a close second. Claude had the weakest search in our experience.

Image and Video Generation: ChatGPT
ChatGPT shines here as the front end for OpenAI’s DALL-E 3. What makes it stand out from most other chatbots is its prompt understanding—how well it translates your request into a desired image—and its ability to do “inpainting.” Before DALL-E 3, most artbots refined images by changing the prompt and starting over each time, which often led to frustrating results when all you wanted was a specific change. With inpainting, you can ask ChatGPT to modify an image—such as changing a person’s hair color—without affecting the rest of the picture. Although generating videos with a chatbot is mostly a gimmick right now, using Sora through ChatGPT will also provide the best results.

Voice Mode: ChatGPT and Gemini
One of the most impressive tricks of chatbots is their ability to engage in natural conversations with you about nearly any topic. ChatGPT’s Voice Mode is generally regarded as the best, and its speech can be highly realistic, down to pauses, occasional “um” insertions, and varied inflection. Gemini is also good, and both are noticeably better than Claude at this time. When you use voice mode in the chatbot’s iPhone app, you can turn on the camera and ask it questions about what it sees.

Coding and Data Analysis: Claude and ChatGPT
Here’s where Claude takes top honors. Many developers say that Claude does the best job of helping you write code, providing a nuanced understanding of existing code and top-notch capabilities for solving complex coding problems. ChatGPT also performs well with coding if your needs tend more toward smaller and more specialized development environments like AppleScript, shell scripts, and Shortcuts.

Deep Research: Perplexity, ChatGPT, and Gemini
Most chatbot responses are quick and relatively brief, but if you want a much more detailed answer on a topic, enable a “deep research” option. That causes the chatbot to break the task into smaller steps, perform each one in order, and assemble the result into a detailed report. It might take 10–15 minutes or longer. Perplexity, ChatGPT, and Gemini are the top tools in this area and are worth trying for a range of possibilities, from gift ideas and travel plans to background information on home projects.

Choosing Your AI Assistant
If you’re just getting started with AI chatbots, we recommend beginning with ChatGPT. It’s the most well-rounded option, excelling in most categories and providing a solid foundation for exploring what AI can do for you. It’s also easy to start with Perplexity even without subscribing to the Pro plan, especially if you want to use the chatbot primarily as a research assistant. Gemini and Microsoft Copilot may be better options if you’re heavily invested in the Google or Microsoft ecosystems, though Copilot costs more than the others. Claude isn’t quite as consumer-focused as the others, but it may be your best option if you plan to do extensive coding and data analysis.
Keep in mind that these tools are advancing rapidly, with new features and capabilities emerging on a monthly basis. The best approach is to choose one that feels comfortable and learn how to use it well, rather than constantly switching between options. All are quite capable, and the differences are often less important than your familiarity with their particular quirks and capabilities.
(Featured image by Adam Engst)
Combat Smart TV Privacy Abuses with an Apple TV
While you’re watching TV, your smart TV is watching you. Find out how manufacturers track your viewing habits and learn simple steps to protect your privacy with an Apple TV.

If you own a smart TV or are shopping for a new one, you should be aware of a troubling trend: modern TVs have evolved from simple screens into sophisticated surveillance devices. You can protect your privacy by using an Apple TV as your streaming device rather than relying on built-in smart TV features.

If you have an older non-smart TV that meets your needs, you’re in luck—an Apple TV provides streaming capabilities while avoiding the privacy concerns that plague modern TVs. For everyone else, here’s what you need to know about how TV manufacturers are monetizing your viewing habits and how an Apple TV protects you.
Data Mining: How TV Makers Profit from Your Viewing Habits
Arguably, the longevity of large-screen TVs has contributed to this trend. In the past, TV manufacturers focused on selling as many TVs as possible. Consumers see less need to upgrade when a modern 55-inch TV offers little beyond what a 15-year-old TV of the same size can provide. Sure, it might be a bit brighter, have better color accuracy, or provide higher refresh rates, but for most people watching streaming video in a dark room, such changes aren’t very noticeable.
In response, TV manufacturers have lowered prices to boost sales and turned to alternative revenue streams, including collecting and selling viewer data and displaying ads. Data can be sold to companies like Nielsen, a data and marketing measurement firm, and leveraged to provide advertisers with targeted audiences. Smart TV ad revenue is estimated to reach $46 billion worldwide this year, up 20% after another 20% increase in 2024. These ads appear on the smart TV’s home screen and in free, ad-supported streaming channels.
TV manufacturers track viewing habits using a technology called automatic content recognition (ACR). Software loaded on the smart TV captures frame-by-frame screenshots of content, creates a fingerprint for each frame, and then matches the fingerprint against an online database to determine what you’re watching. It works with all types of viewing, from standard TV to gaming. Since that data is tied to your specific household, companies can create audience segments and either use it for their own advertising or sell it to third parties. One analyst suggests you’re worth about $20 per year.
Wait, it gets worse! Many smart TVs feature microphones to enable voice commands, and some also include cameras to support video calling capabilities. Manufacturers can use captured audio and video to monitor viewer engagement—are you actually watching the show, or is it just playing in the background? That data also feeds into the profile that the TV manufacturers maintain about you.
If all this feels creepy to you, you’re not alone. Most annoyingly, apart from the opportunity to buy a cheap TV, there’s essentially no ongoing benefit to you in having your viewing habits packaged and resold. At most, you might get to ignore slightly more targeted ads.
Protect Your Viewing Privacy with an Apple TV
If you currently have a smart TV or are looking to replace an older TV, there’s an easy solution: use an Apple TV instead of the smart TV’s built-in apps or a similarly problematic media streaming box from the likes of Amazon, Google, and Roku. Although Apple isn’t perfect when it comes to privacy, the Apple TV provides a complete streaming solution that doesn’t share your viewing data with advertisers and data brokers. Here’s how:
No ACR tracking: Apple has confirmed that the Apple TV doesn’t use ACR at all.
No built-in advertising: Unlike Roku OS and Samsung’s webOS, the Apple TV doesn’t display ads on the home screen or in the screensaver.
Privacy-first setup process: During setup, you’re given the opportunity to disable Siri, location services, and analytics.
Limited data collection: Even when you do allow Apple to collect data, it’s done in ways that guarantee anonymity and used only in aggregate. No personal information is ever shared with Apple.
Strong third-party app tracking controls: tvOS apps must ask for permission to track you, just like iOS apps. You can (and should) always reject such requests or prevent them from asking at all by going to Settings > Privacy > Tracking > Allow Apps to Request to Track.
Even with an Apple TV, you’ll need to take a few additional steps to protect your privacy since smart TVs can still track content playing through HDMI connections:
Disable ACR tracking: Turn off ACR in your TV’s settings to prevent it from analyzing what you’re watching. This setting can be tricky to find since TV manufacturers deliberately make it difficult and use different names. Consumer Reports provides instructions for many TV models and streaming media devices.
Consider blocking Internet access: For maximum privacy, you can prevent your TV from connecting to your Wi-Fi network and accessing the Internet, though this comes with trade-offs. While it ensures that no data leaves your TV, you’ll miss out on bug fixes, security updates, and certain features like picture calibration. You may also encounter connection error messages, and some TVs require occasional Internet connectivity for validation purposes. You may have to connect periodically to keep it working.
By turning off ACR, disconnecting the smart TV from the Internet, and using an Apple TV instead of a smart TV’s built-in apps or other streaming devices, you can enjoy your favorite shows without feeling like you’re being watched.
(Featured image by Apple)
Consider Personal Cyber Insurance
With Americans losing $12 billion to fraud in 2024, personal cyber insurance is becoming essential. Learn what it covers, what to look for in a policy, and how it complements good security practices.

As digital threats become increasingly sophisticated, individuals need protection just as much as businesses do. According to the Federal Trade Commission, Americans lost $12 billion to fraud in 2024, with a significant portion coming from digital scams. While we’d all like to think we’re too savvy to fall for such schemes, even security experts can become victims: Troy Hunt, creator of the Have I Been Pwned site that tracks data breaches, recently fell prey to a sophisticated phishing attack.
As cyber threats evolve and become more convincing, personal cyber insurance is becoming increasingly common, either as a standalone policy or as an add-on to a standard homeowner’s or renter’s policy. It can help you recover from cyberattacks, online fraud, ransomware, identity theft, social media hijacking, cyberbullying, and similar threats.
The financial impact of these incidents can be significant. The average loss from identity theft is between $500 and $1,500; however, sophisticated scams can result in far greater damages. For example, an individual lost $30,000 to a “pig-butchering” scheme, though they fortunately recovered $25,000 through their cyber insurance policy.
What Personal Cyber Insurance Covers
Although the specifics vary by policy, personal cyber insurance typically protects in three key areas:
Financial protection:
Identity theft recovery: Coverage for expenses related to restoring your identity, including legal fees, lost wages, and document replacement
Fraud reimbursement: Recovery of money stolen through cyber attacks, including unauthorized charges, stolen bank funds, and deceptive transfer fraud
Cyber extortion coverage: Payment for ransom demands and professional negotiation services if your data is held hostage
Technical support:
Data breach response: Professional IT services to recover compromised data and restore systems
Device recovery: Assistance with cleaning infected devices and replacing damaged smart home systems
Credit monitoring: Ongoing surveillance of your credit reports and financial accounts
Personal assistance:
Cyberbullying support: Coverage for counseling, private tutoring, and reputation management
Legal assistance: Access to legal professionals specializing in cyber-related incidents
Identity restoration: Dedicated help with replacing documents and clearing fraudulent records
However, as with other forms of insurance, it’s important to be aware of common exclusions that cyber insurance won’t cover:
Prior incidents: Cyber policies won’t cover known compromises that occurred before the policy’s start date.
Intentional acts: Self-inflicted losses or intentional policy violations are not covered.
Business-related incidents: Coverage is for personal activities only unless otherwise specified.
Cryptocurrency scams: Most policies don’t cover cryptocurrency losses.
Poor security practices: Failing to maintain basic security measures may void coverage.
Physical device damage: Standard damage to devices is typically covered by homeowner’s or renter’s insurance.
Getting Personal Cyber Insurance
For many people, the easiest way to get personal cyber insurance is as an endorsement (an add-on) to an existing homeowner’s or renter’s policy. That’s the case with State Farm, for instance. These endorsements are often quite affordable, with fees as low as an additional $25 per year, and they provide coverage up to $100,000.
Those who need a dedicated cyber insurance policy can look into the broker-sold Cyberboxx Home, which NFP sells directly as DigitalShield in many states, and Allstate Identity Protection, which focuses on identity theft. Prices start around $65 per year.
For most people, the most straightforward and economical approach is adding an endorsement to an existing policy. Contact your insurance broker and see what they can provide—even if your policy doesn’t offer what you want, they may be able to put together similar coverage for you. Of course, if you don’t yet have an insurance policy or are looking to switch providers, it’s worth reviewing exactly what’s covered, along with costs and coverage limits, when comparing policies or insurers.
Don’t Ignore Key Security Practices
Having cyber insurance doesn’t allow you to skimp on security. Even if an insurance policy recompenses you for lost money, having your identity stolen or being tricked into transferring funds to a scammer will be a huge hassle. Worse, being sufficiently negligent could prevent you from receiving coverage.
To reduce the chance that you’ll need to file a cyber insurance claim—and to ensure your policy remains valid—follow these essential security practices, which we’ve recommended many times:
Use strong, unique passwords with a password manager.
Enable two-factor authentication wherever available.
Keep all devices and software updated.
Maintain backups of important data.
Be cautious with unexpected links or attachments.
Monitor financial accounts regularly.
While personal cyber insurance can’t prevent attacks, it provides crucial financial protection in our increasingly digital world. As scammers ramp up the sophistication of their tactics, having a safety net becomes ever more important.
(Featured image by iStock.com/inkoly)
Choosing the Best Mac for a College-Bound Student in 2025
Which Mac is best for a college student in 2025? Our short answer is either the 13-inch or 15-inch M4 MacBook Air. However, students with substantial processing needs (such as audio or video editing) might want to consider the 14-inch MacBook Pro.

Is your child heading off to college soon? Now is a good time to consider getting them a new Mac, especially if their current computer is old or unreliable, is shared with other family members, or was a school loaner. If you haven’t been keeping up with Apple’s Mac lineup, you might be unsure which model is the best choice.
First, check with the college before making a purchase. Although less common than in the past, some college departments have specific requirements based on the software used by students in their classes. Generally, these requirements focus on processor type, amount of RAM, and storage space. Current Macs should meet or exceed all of these requirements. A more significant issue arises if the college requires a Windows machine; in that case, determine whether the requirement is based on specific Windows-only software or simply a preference by the IT staff to maintain a uniform support environment. Second, see if the college offers educational pricing—most do—to save a few hundred dollars off the prices listed below. Regardless, Apple often has a Back to School offer.
Choose a laptop instead of a desktop Mac. Students lead mobile lives and need to work in various locations on campus, so having to head back to the dorm to use an iMac or Mac mini will be limiting. Plus, they often need to work during breaks, so they need a Mac that’s easy to carry home. A student accustomed to taking notes on an iPad with a keyboard and Apple Pencil might manage to use that alongside a desktop Mac, but most students should opt for laptops.
In the past, deciding on the best model for a given student was more challenging, but Apple’s speedy and power-efficient M-series chips make the decision easier. We see three primary scenarios:
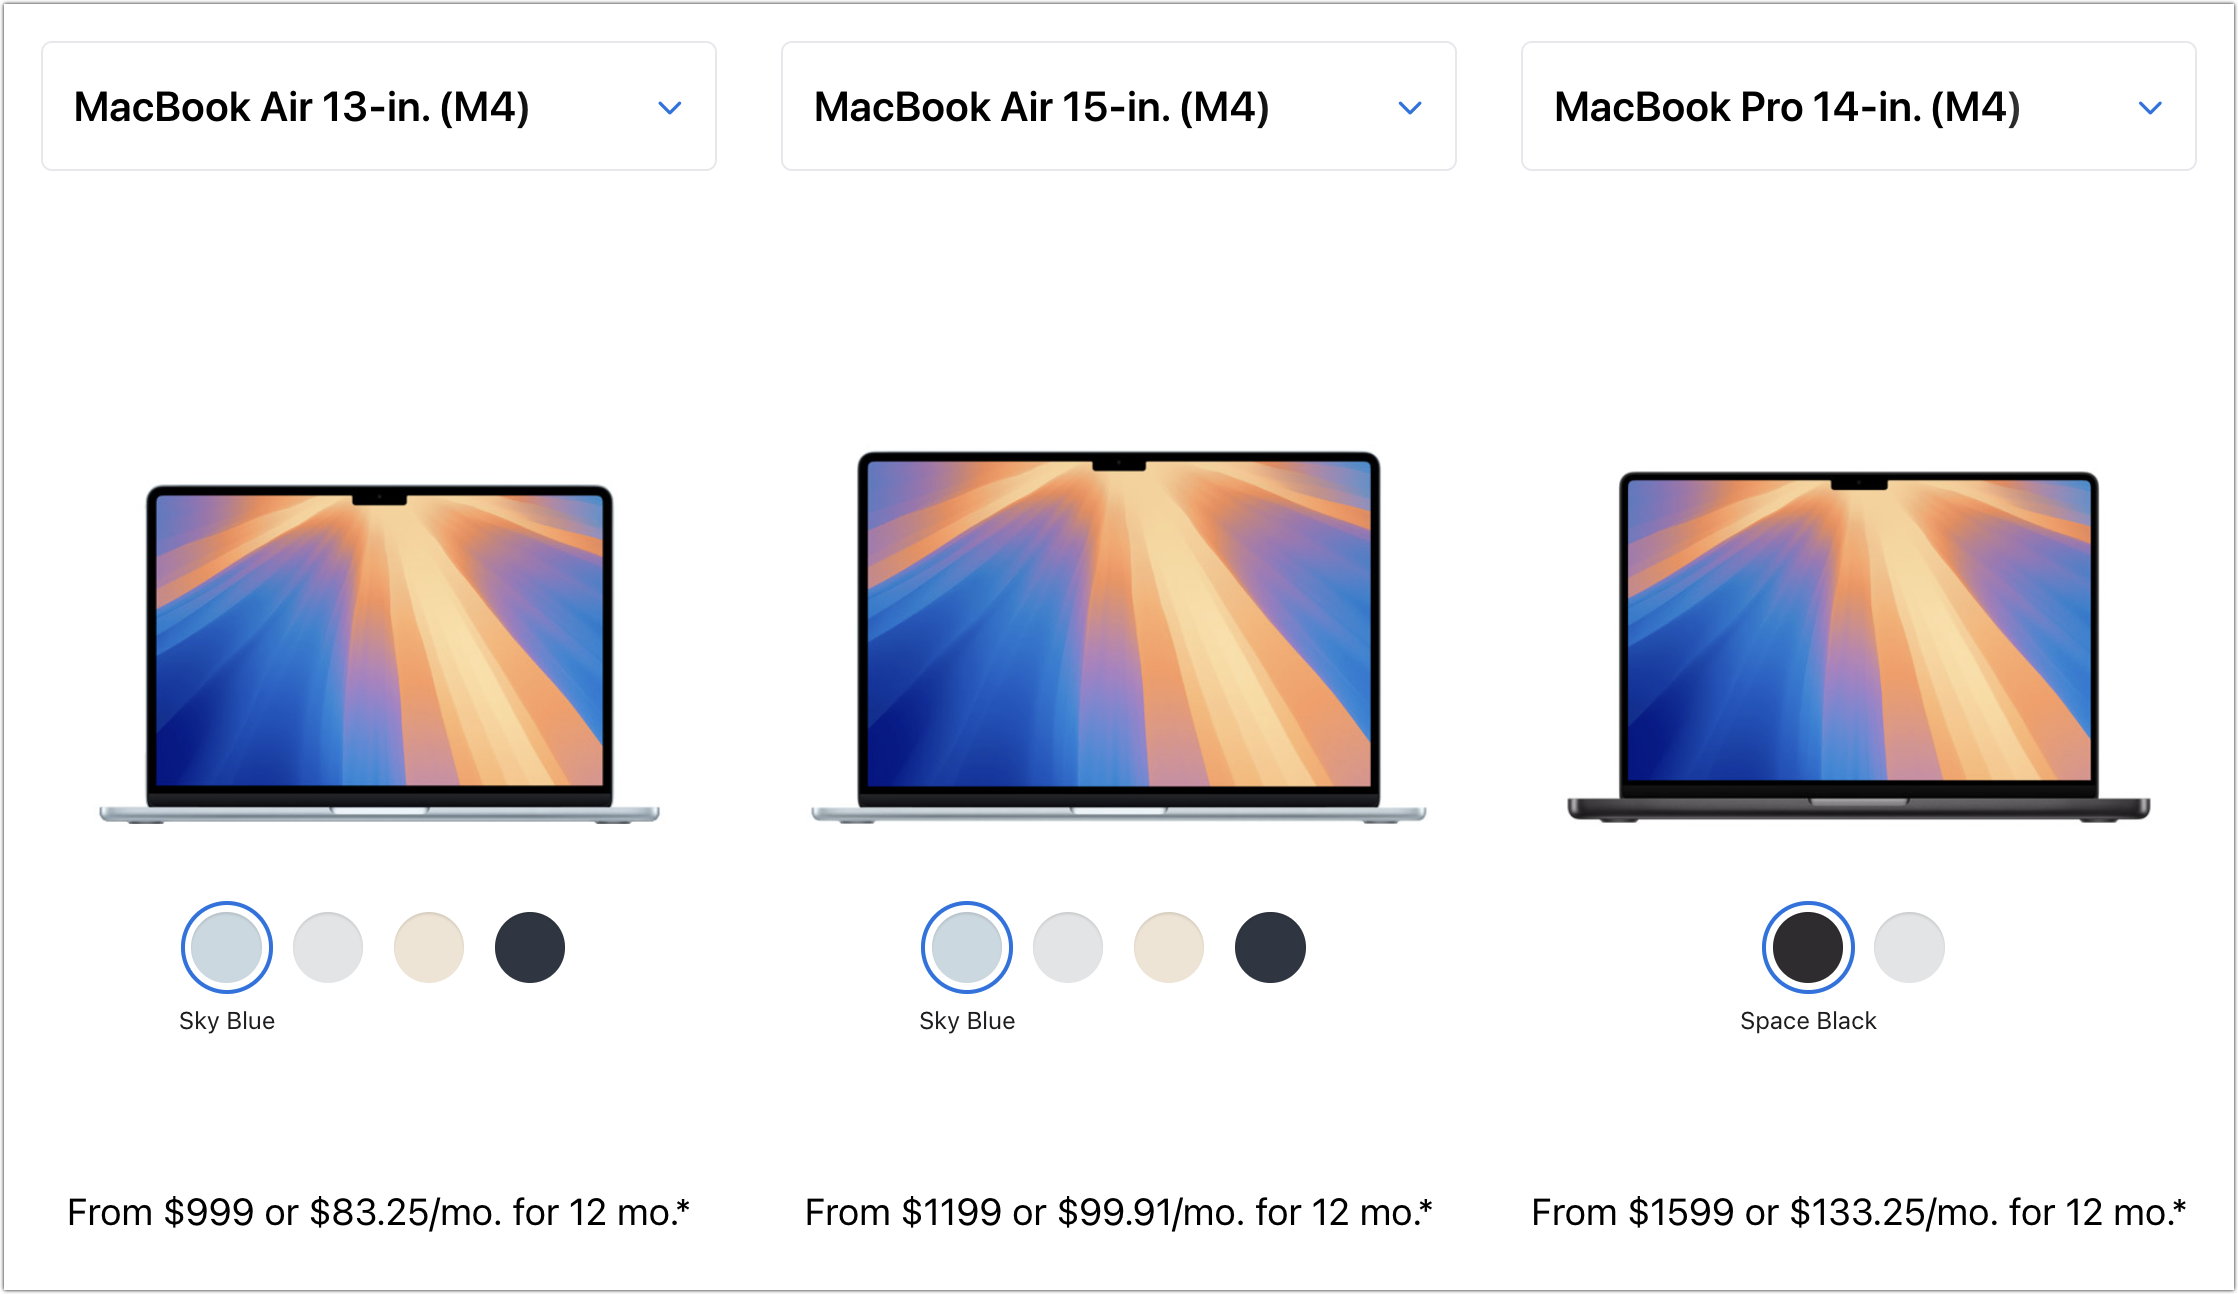
Most students: Buy Apple’s MacBook Air, the company’s lightest and least expensive laptop. Within the MacBook Air lineup, there are three options. The most affordable is the 13-inch M1 MacBook Air from 2020, which costs $649 and is exclusively available at Walmart. Purchase it only if budget is the primary concern. The other options include the 13-inch or 15-inch M4 MacBook Air models introduced in March 2025. The 13-inch M4 MacBook Air features a 13.6-inch screen, much faster performance than the M1, a memory ceiling of 32 GB, and up to 2 TB of storage, starting at $999. For those interested in a larger display, the 15-inch M4 MacBook Air is a great choice, beginning at $1,199. Otherwise, it’s nearly identical to its smaller sibling.
Better specs: If performance is more important than price—especially if your student will be working on processor-intensive tasks like video editing—consider the 14-inch MacBook Pro. It features a powerful M4, M4 Pro, or M4 Max chip, and the M4 Pro and M4 Max models can be configured with significantly more memory. While its 14.2-inch screen is physically slightly smaller than that of the 15-inch MacBook Air, it offers a somewhat higher resolution. The price starts at $1,599 but increases quickly with the M4 Pro and M4 Max chips. (There’s also a 16-inch MacBook Pro, which is available only in M4 Pro and M4 Max configurations and exceeds the needs of most students.)
Windows compatibility: The only downside of the transition to Apple silicon is that it’s more challenging to run Windows using virtualization software like Parallels Desktop (available at half price for students) or VMware Fusion (free for personal use). If Windows compatibility is a bonus but not essential, either of those with the Arm version of Windows 11 should work for most apps. However, if Windows compatibility is crucial, your options are a used Intel-based MacBook Pro or—much as we hate to say it—a PC laptop that runs Windows natively.
No matter which laptop you choose, you’ll need to select a processor, memory size, and storage capacity:
Processor: With the 13-inch M1 MacBook Air, you’re limited to the M1 chip with an 8-core CPU and a 7-core GPU. The 13-inch M4 MacBook Air models always come with a 10-core CPU, but you can pay $100 to upgrade from an 8-core GPU to a 10-core GPU. The 15-inch M4 MacBook Air comes standard with a 10-core GPU. Although the performance difference isn’t likely noticeable with everyday apps, it might be worth upgrading for $100, just in case. The 14-inch MacBook Pro offers a choice between the M4, M4 Pro, and M4 Max; the decision ultimately comes down to balancing potential performance needs against increased costs. Few students will need—or even notice—an M4 Pro, and even fewer will need an M4 Max.
Memory: The 13-inch M1 MacBook Air from Walmart comes with only 8 GB of memory, which is sufficient for most college students. The M4 MacBook Air models start at 16 GB and offer options for 24 or 32 GB. With the 14-inch MacBook Pro, the memory capacity varies with the chip. The M4 chip offers 16, 24, or 32 GB, similar to the MacBook Air. The M4 Pro comes standard with 24 GB, but you can choose to upgrade to 48 GB. The M4 Max has a standard memory spec of 36 GB, with upgrade options to 48, 64, or 128 GB. Students can typically stick with 16 GB or choose 24 GB for more demanding tasks—few will require 32 GB or more.
Storage: For all MacBook Air models, 256 GB is the minimum storage option, and you can upgrade to 2 TB on all devices sold by Apple. The 14-inch Mac-Book Pro starts at 512 GB and provides upgrades up to an impressive 8 TB. Choose the storage capacity based on two factors: budget (storage can get expensive quickly) and anticipated usage (audio and particularly video production can consume a lot of space, as can large quantities of photos, but most other uses don’t require as much). Keep in mind that connecting an external Thunderbolt SSD or hard drive is an easy way to offload large files that don’t always need to be readily available. Large files can also be kept in cloud-based storage.
For most students, the best choice for a Mac that is likely to last throughout four years of college is the 13-inch or 15-inch M4 MacBook Air, equipped with a 10-core GPU, 16 GB of memory, and 512 GB of storage. While the 15-inch model has a larger screen, it’s also heavier and takes up more space in a backpack, so consider portability when making your final decision. Be sure to budget for AppleCare+ as well; it’s almost guaranteed that some mishap will occur with a student laptop, and AppleC-are+ covers up to two incidents of accidental damage each year.
We recommend talking with your child to learn more about what they think they’ll need—and make sure to compare it to the college’s recommendations—but if you have any questions afterward, feel free to reach out to us.
(Featured image by iStock.com/Zbynek Pospisil)