Apple Adds M5 Chip to MacBook Pro, iPad Pro, and Vision Pro
Apple has brought its new M5 chip to the MacBook Pro, iPad Pro, and Vision Pro, boosting performance but changing little else. The updates maintain existing designs and price points.

Apple’s fall harvest has yielded the new M5 chip, leading to updates for the entry-level 14-inch MacBook Pro, the iPad Pro lineup, and the Vision Pro. All three benefit from the M5’s significant performance boosts, but remain mostly unchanged otherwise. Availability starts on October 22. We anticipate that Apple will release M5 versions of the iMac, Mac mini, and MacBook Air in the coming months, along with M5 Pro and M5 Max chips in early to mid-2026.
With the M5 chip, Apple continues to focus on boosting AI performance. Its new 10-core GPU promises up to four times the peak GPU compute performance of the previous M4 chip—an impressive leap. The GPU also provides enhanced graphics capabilities and ray tracing that deliver results up to 45% faster than the M4. The 10-core CPU, with six efficiency cores and four performance cores, provides up to 15% faster multithreaded performance than the M4, a more typical performance increase between chip generations. Additionally, Apple increased unified memory bandwidth from 120 GBps to 153 GBps, which speeds up many different operations.
14-inch MacBook Pro
The most mainstream of the updated devices is the entry-level 14-inch MacBook Pro, which benefits from the improved performance of the M5 chip. Apple claims improvements in various tasks ranging from 20% to 80% compared to the M4 model it replaces. Even more compelling is the comparison with the M1-based 13-inch MacBook Pro, where the M5 MacBook Pro is 2 to 7 times faster.
Apple also increased SSD performance by up to 2x, which we suspect should give the new M5 model read/write speeds comparable to those of the M4 Pro and M4 Max models of the MacBook Pro.
The final update is that the M5 MacBook Pro can now be equipped with 4 TB of storage, a $1,200 option previously reserved for the M4 Pro and M4 Max models. They remain for sale, and although Apple didn’t share any benchmarks, we suspect they will continue to outperform the M5 model at most tasks.
Otherwise, the new M5 MacBook Pro continues to feature three Thunderbolt 4 ports, an HDMI port, an SDXC card slot, and MagSafe 3 charging. Its 14.2-inch Liquid Retina XDR display with ProMotion remains unchanged, as does the physical design. Pricing is also the same, starting at $1,599 for 16 GB of unified memory and 512 GB of storage.
For now, the M5 model of the 14-inch MacBook Pro is notably more capable than the M4 models of the MacBook Air, which was less true of the M4 MacBook Pro it replaces. That said, you won’t go wrong with the more affordable MacBook Air or the higher performance of the M4 Pro and M4 Max models of the MacBook Pro.
11-inch and 13-inch iPad Pro
The M5 models of the 11-inch and 13-inch iPad Pro deliver similar performance improvements over the previous M4 models, with Apple highlighting up to 2x faster AI image generation and up to 2.3x faster AI video upscaling. The enhancements are even more pronounced when compared to the M1 iPad Pro models, where benchmarked tasks are 2x to 7x faster. Additionally, the M5 iPad Pro models feature up to 2x faster storage, although they are limited to 2 TB.

Apple didn’t stop there. The 256 GB and 512 GB configurations have 50% more unified memory, increasing from 8 GB to 12 GB, while the 1 TB and 2 TB configurations have 16 GB. The new models also feature enhanced external display support, enabling them to drive external 4K displays at up to 120 Hz with Adaptive Sync, which reduces latency and enhances gaming performance. Lastly, Apple introduced fast charging that provides 50% power in 30 minutes with an appropriate charger.
Two other notable changes probably won’t be evident to most users. The M5 models of the iPad Pro utilize Apple’s new C1X cellular modem and N1 wireless network chip, which enable Wi-Fi 7, Bluetooth 6, and Thread networking. Apple claims faster cellular and Wi-Fi performance, along with lower power consumption, but official battery life estimates remain unchanged.
Otherwise, the new iPad Pro models remain nearly identical to their predecessors. They retain the same Ultra Retina XDR display, cameras, ports, and accessory ecosystem (Magic Keyboard and Apple Pencil). The case and industrial design are the same.
Pricing for the 11-inch iPad Pro starts at $999 for Wi-Fi models and $1,199 for Wi-Fi + Cellular models. The 13-inch iPad Pro starts at $1,299 with Wi-Fi and $1,499 for Wi-Fi and cellular connectivity.
Creative professionals already using a previous generation of the iPad Pro may consider upgrading, but for most people, we recommend either the low-cost iPad or the mid-range iPad Air.
Vision Pro
In the first hardware update to its Vision Pro “spatial computer,” Apple replaced the M2 chip with the more powerful M5. This upgrade boosts performance, allowing the Vision Pro to render 10% more pixels, resulting in a sharper image with crisper text and more detailed visuals. The M5 also increases the Vision Pro’s maximum refresh rate to 120 Hz from 100 Hz, helping to reduce motion blur. Battery life receives a slight boost, providing an additional 30 minutes of general use (up to 2.5 hours) and video playback (up to 3 hours). The only other change is a new Dual Knit Band, which Apple says is more comfortable.

Apart from the M5 and Dual Knit Band, the Vision Pro remains unchanged in form, function, and philosophy. Nor did Apple lower the Vision Pro’s price, which is still $3,499. Although these changes undoubtedly improve the Vision Pro experience a bit, they won’t change anyone’s purchasing decision.
(Featured image by Apple)
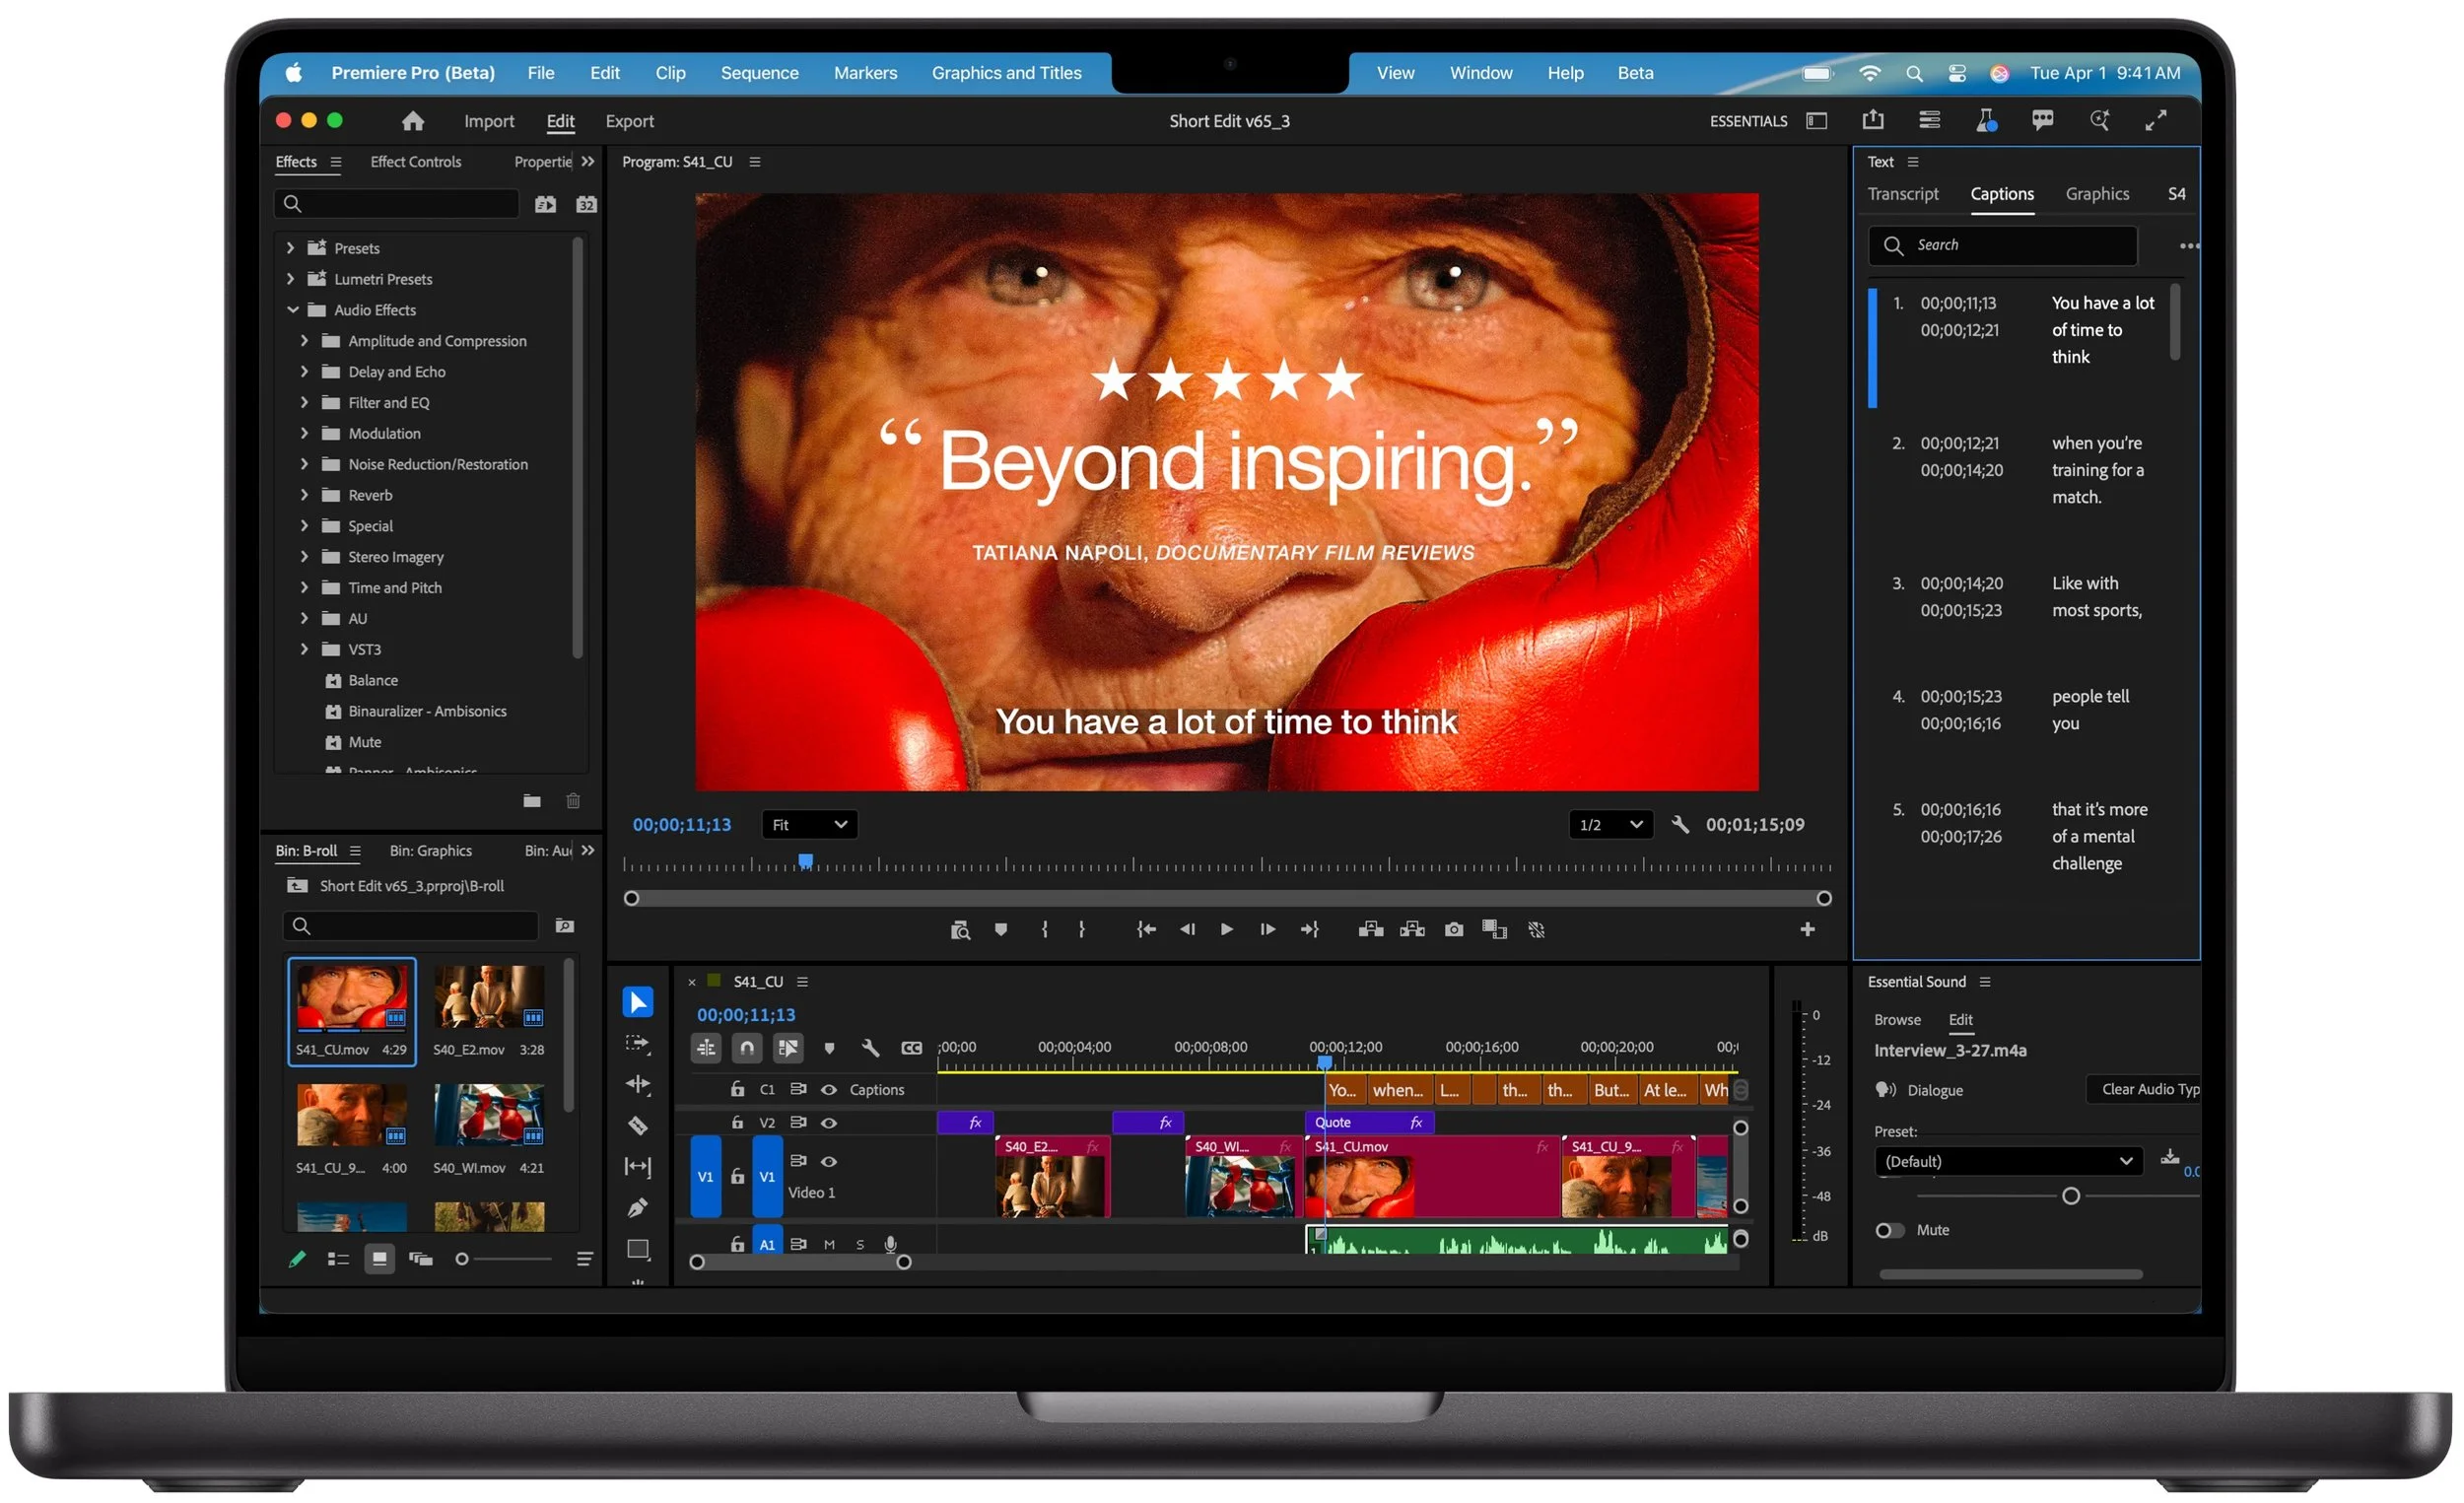
Ten Useful New Features in iOS 26’s Phone App
iOS 26 supercharges the Phone app with call screening, live translation, and hold music detection. But that’s not all! You can make calls from a Mac or iPad, share your screen during calls, see a contact’s call history, and more.

Although it’s easy to joke about how little we use our iPhones for actual phone calls, telephony remains a core feature that everyone depends on to some degree. In iOS 26, Apple put significant effort into improving the phone experience, delivering the most notable upgrade to the Phone app in years. Here’s what you’ll find.
Unified View
The Phone app has traditionally featured a toolbar with buttons for Favorites, Recents, Contacts, Keypad, and Voicemail, along with a separate Search field. iOS 26 retains this layout as Classic view (below, left) and introduces a new Unified view (below, right) that aims to simplify the interface by reducing the toolbar to four buttons: Calls, Contacts, Keypad, and Search, with the Calls screen combining favorites and recent calls. You can switch between these views by tapping the Filter button in the top-right corner and choosing the preferred layout. The Filter menu also lets you specify which calls appear below, including voicemail.

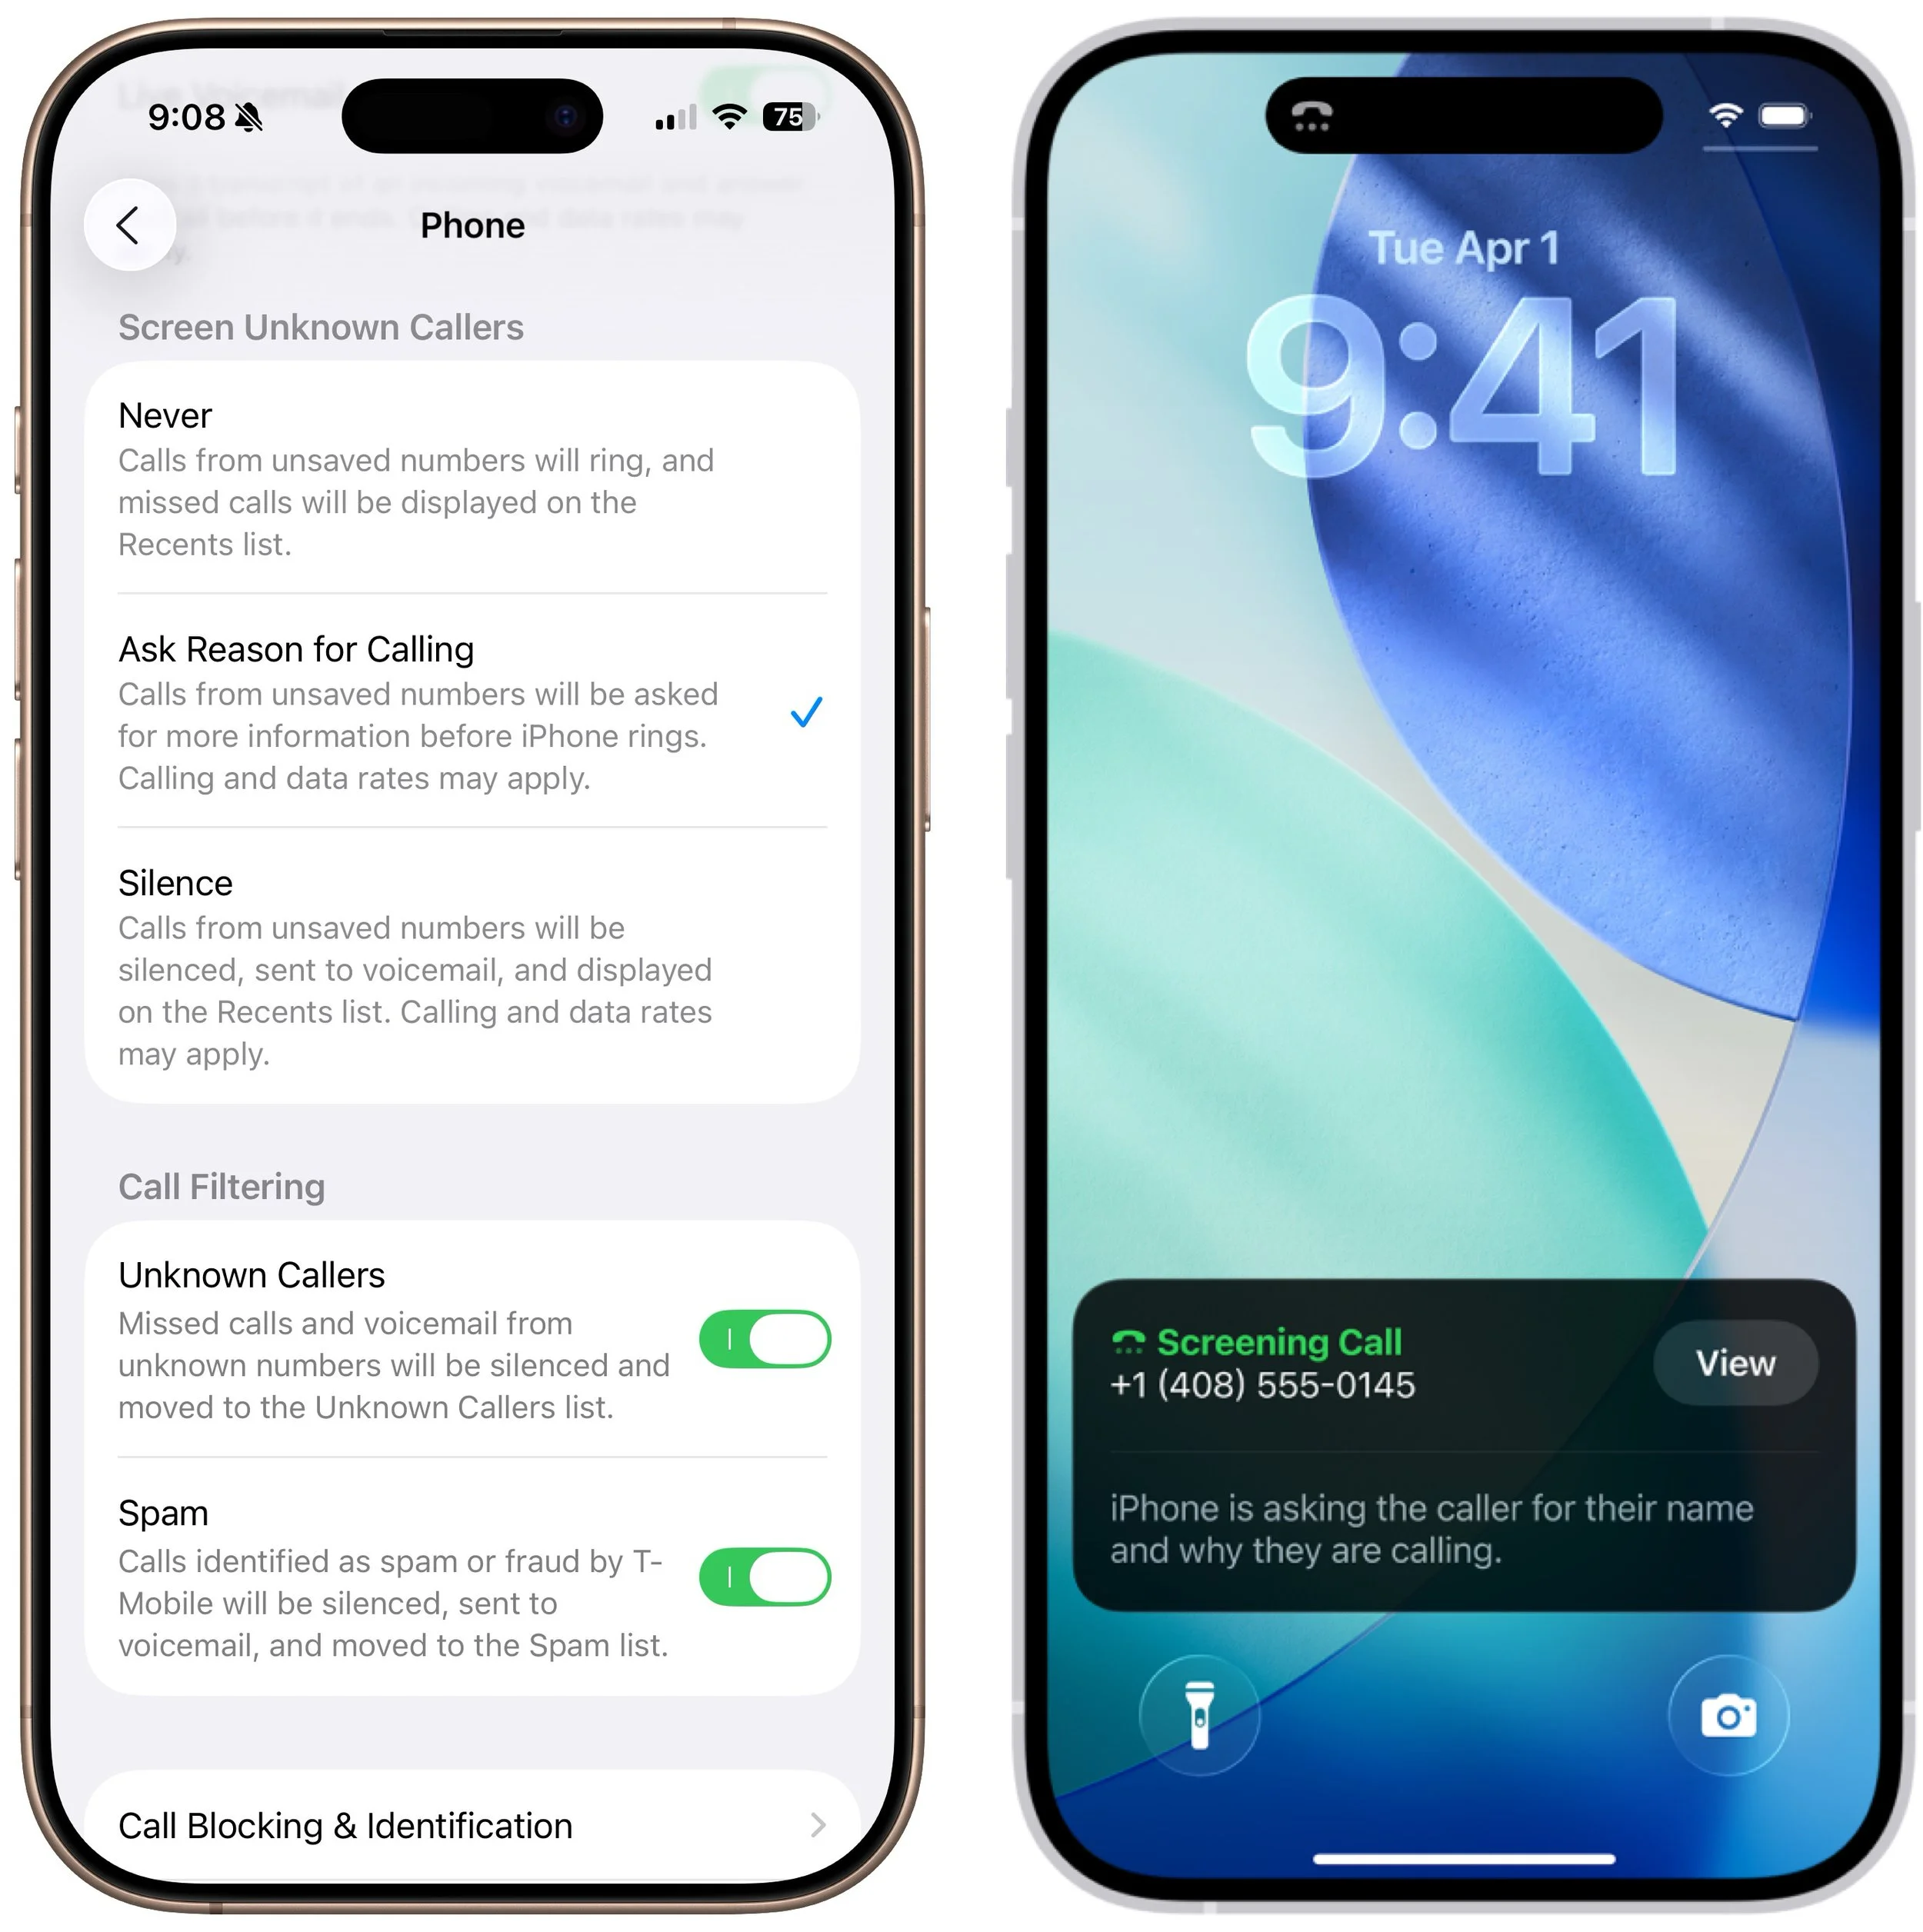
Call Screening
A new Call Screening feature, configurable in Settings > Apps > Phone > Screen Unknown Callers, intercepts incoming calls from unknown numbers and prompts the caller to “state their name and reason for calling” before the iPhone even rings. If the caller responds, you’ll see a transcript or snippet of their response, allowing you to decide whether to answer or ignore the call. In our experience, it mainly causes spammers and telemarketers to hang up instantly, which is equally effective.
Unknown Call Lists
The Phone app has long been able to silence calls from unknown numbers—those not in your contacts or numbers you haven’t called—and send them directly to voicemail. This feature, now called Unknown Callers, remains available in Settings > Apps > Phone > Call Filtering, as does the previous Silence Junk Callers option, now called Spam. What’s new is that when these options are turned on, lists for Unknown Callers and Spam appear in the Filter menu, so they don’t clutter your Calls list. You can delete calls from unknown callers, mark their numbers as known, or add them to Contacts so they aren’t silenced next time.

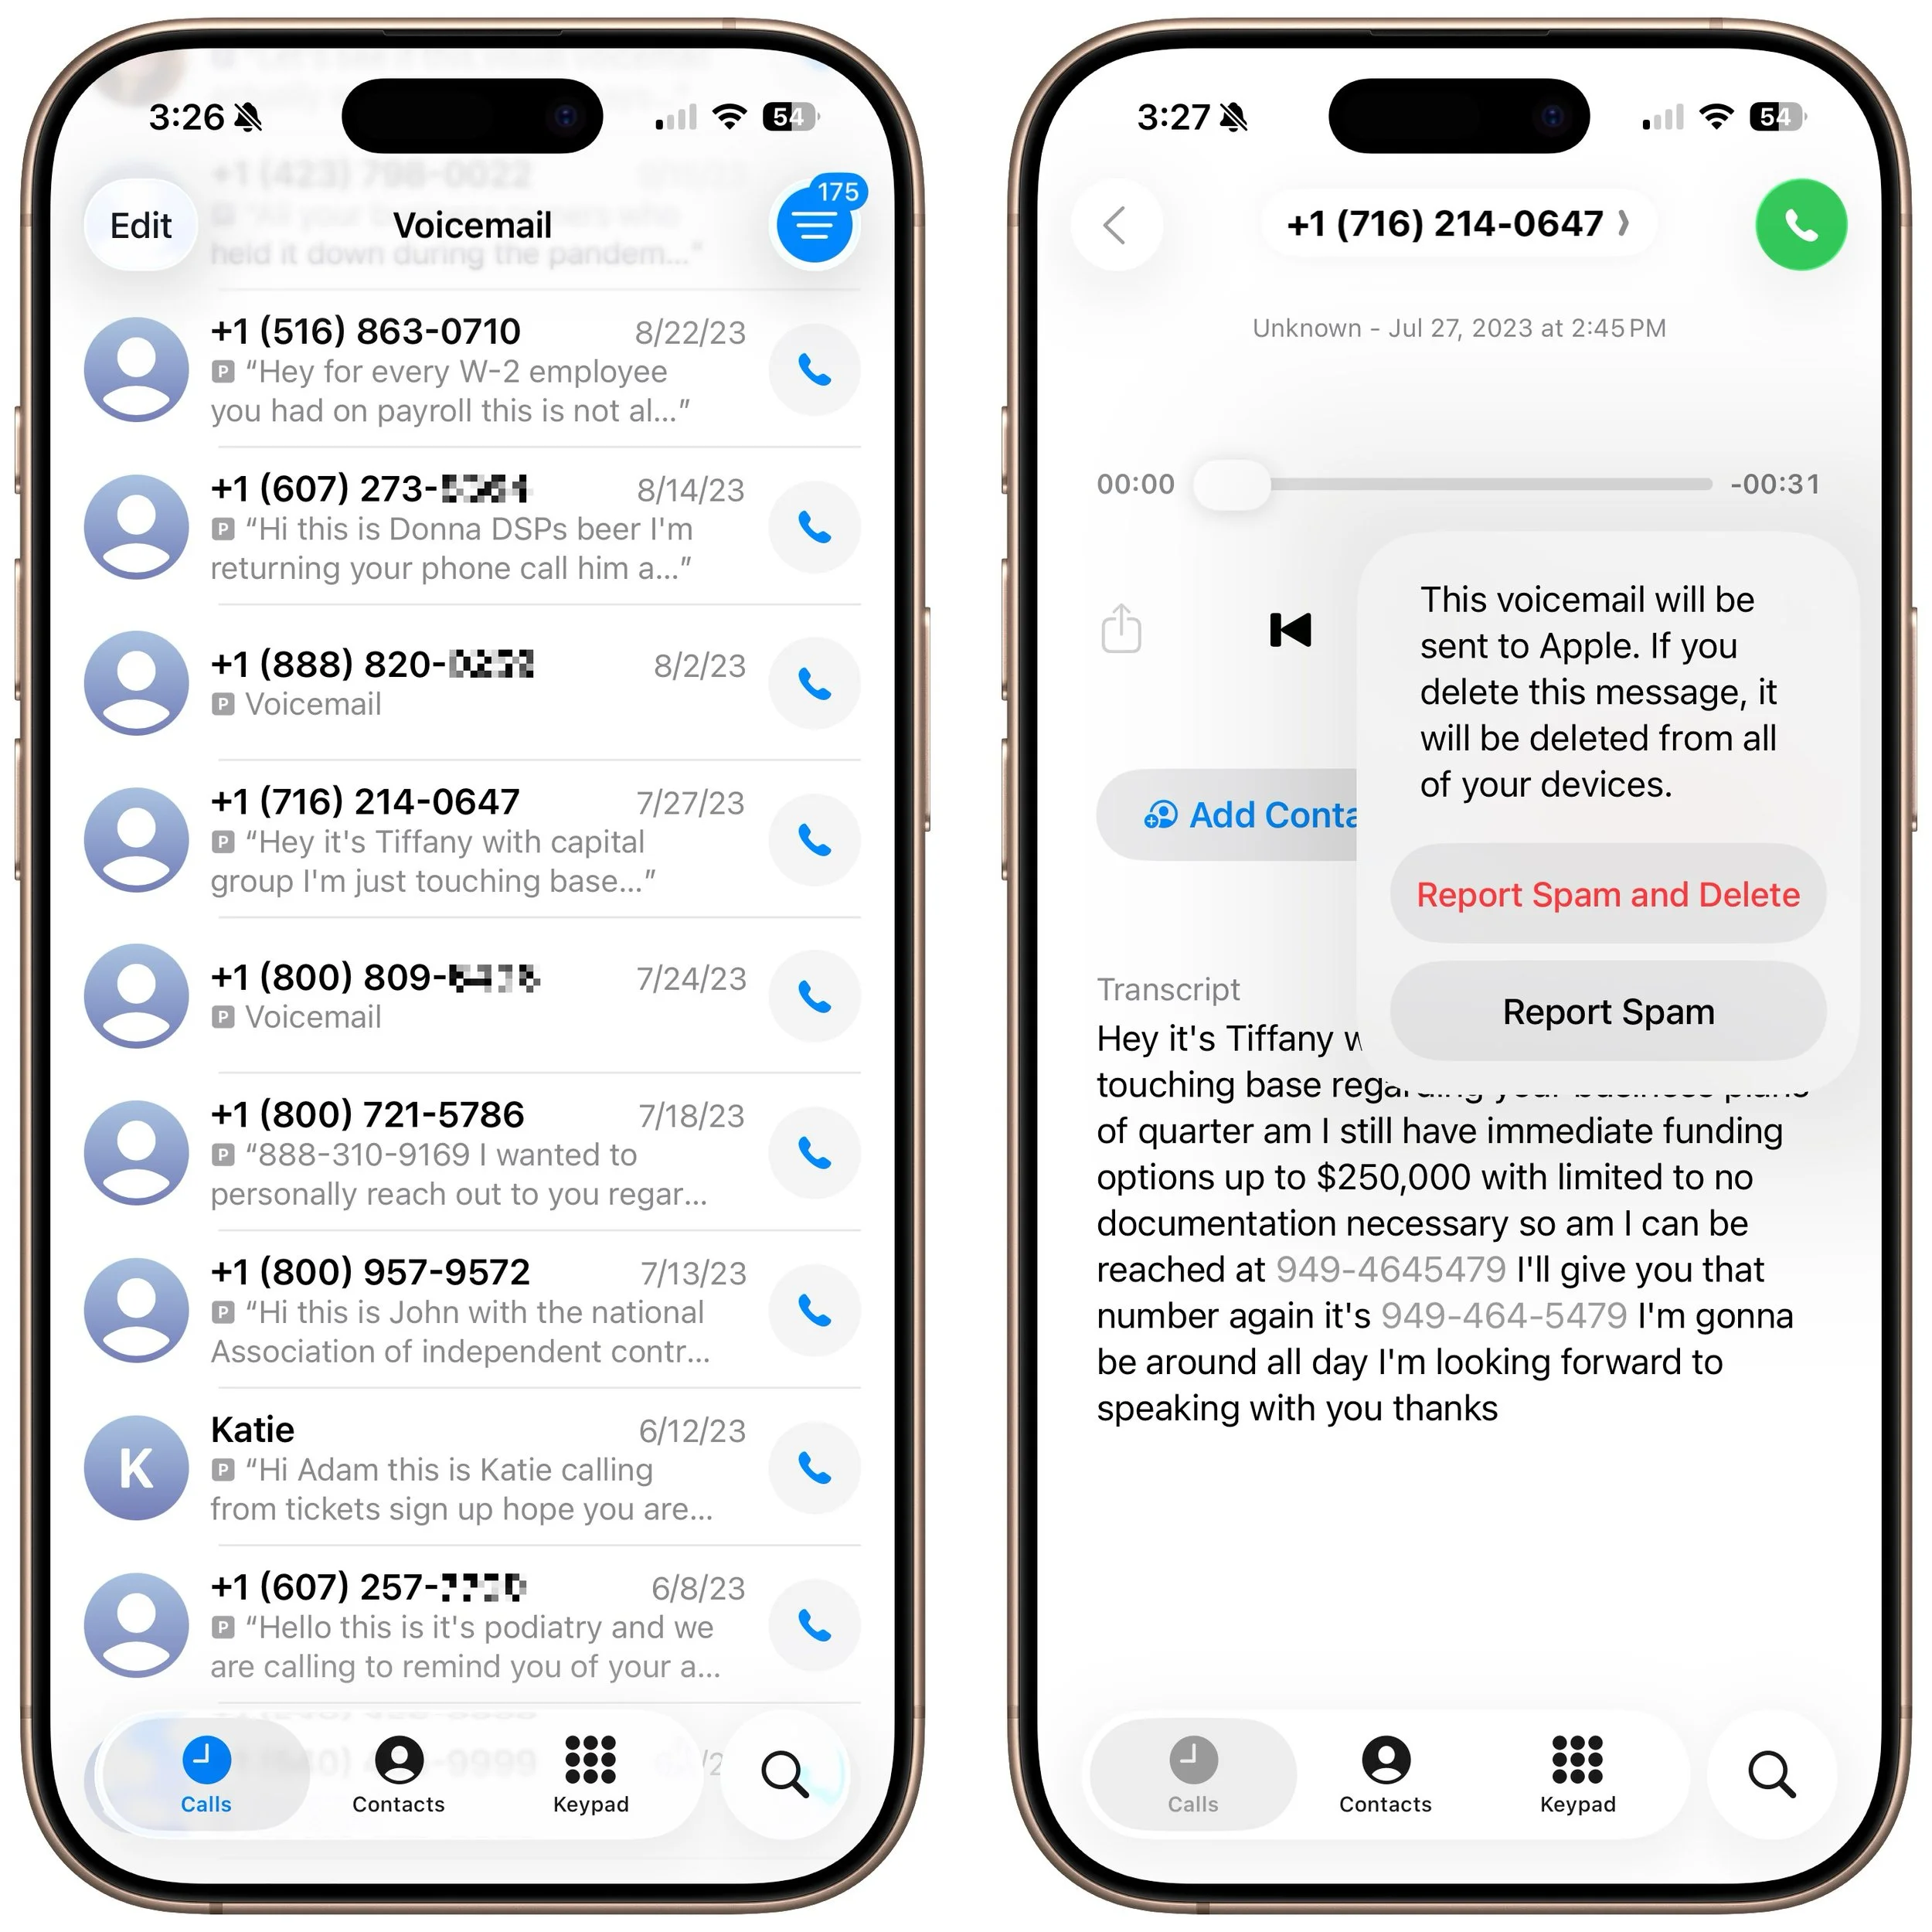
Spam Voicemail Reporting
With most spam calls going to voicemail, your inbox may fill up with unwanted messages. You’ve always been able to delete them, but now, when you view a voicemail from an unknown number, a Report Spam button appears. Tap it to report the voicemail to Apple and delete it. We don’t know if reporting spam voicemails will make any difference, but it’s more satisfying than just deleting them.
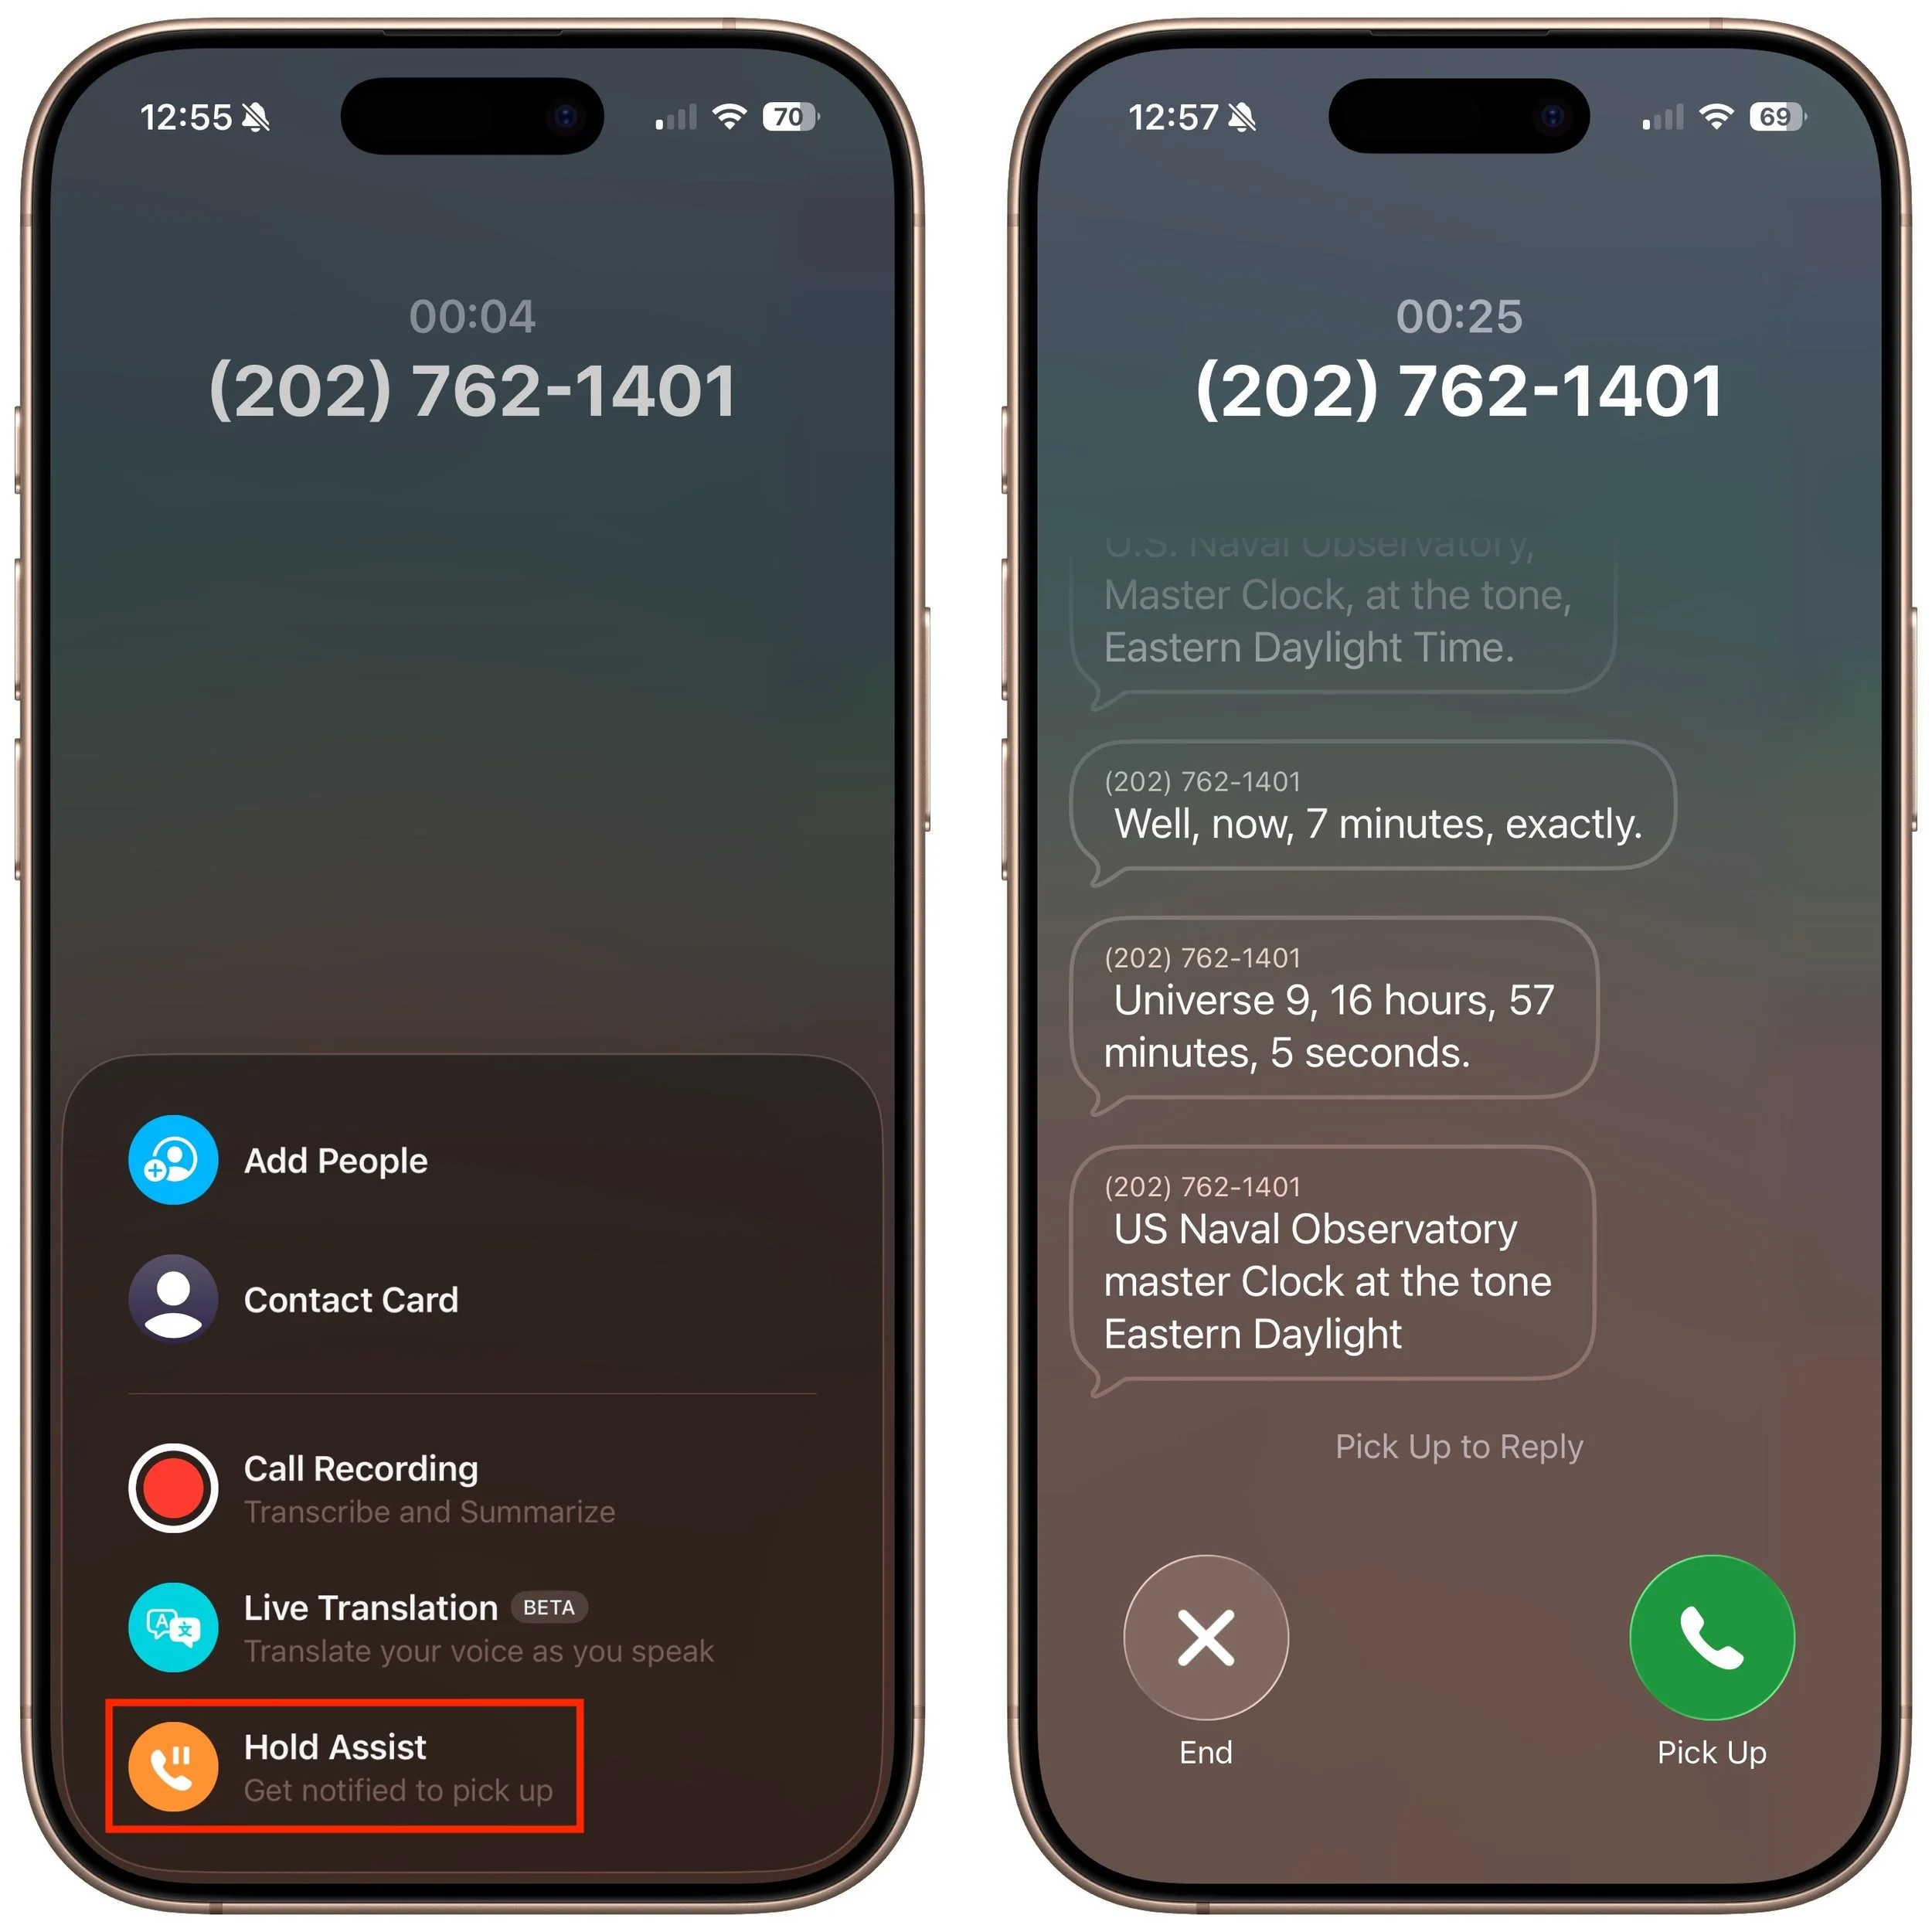
Hold Assist
The Phone app’s new automatic Hold Assist feature is somewhat hard to test, but we hope it works when you need it. When Hold Assist Detection is enabled in Settings > Apps > Phone, Apple says that if you’re placed on hold by a customer service agent, the Phone app can detect hold music, silence it, and notify you when the agent comes back on the line. You can also manually tap the More button, tap Hold Assist, and then see a transcript of the hold message while you wait. Tap Pick Up when you’re ready to talk.
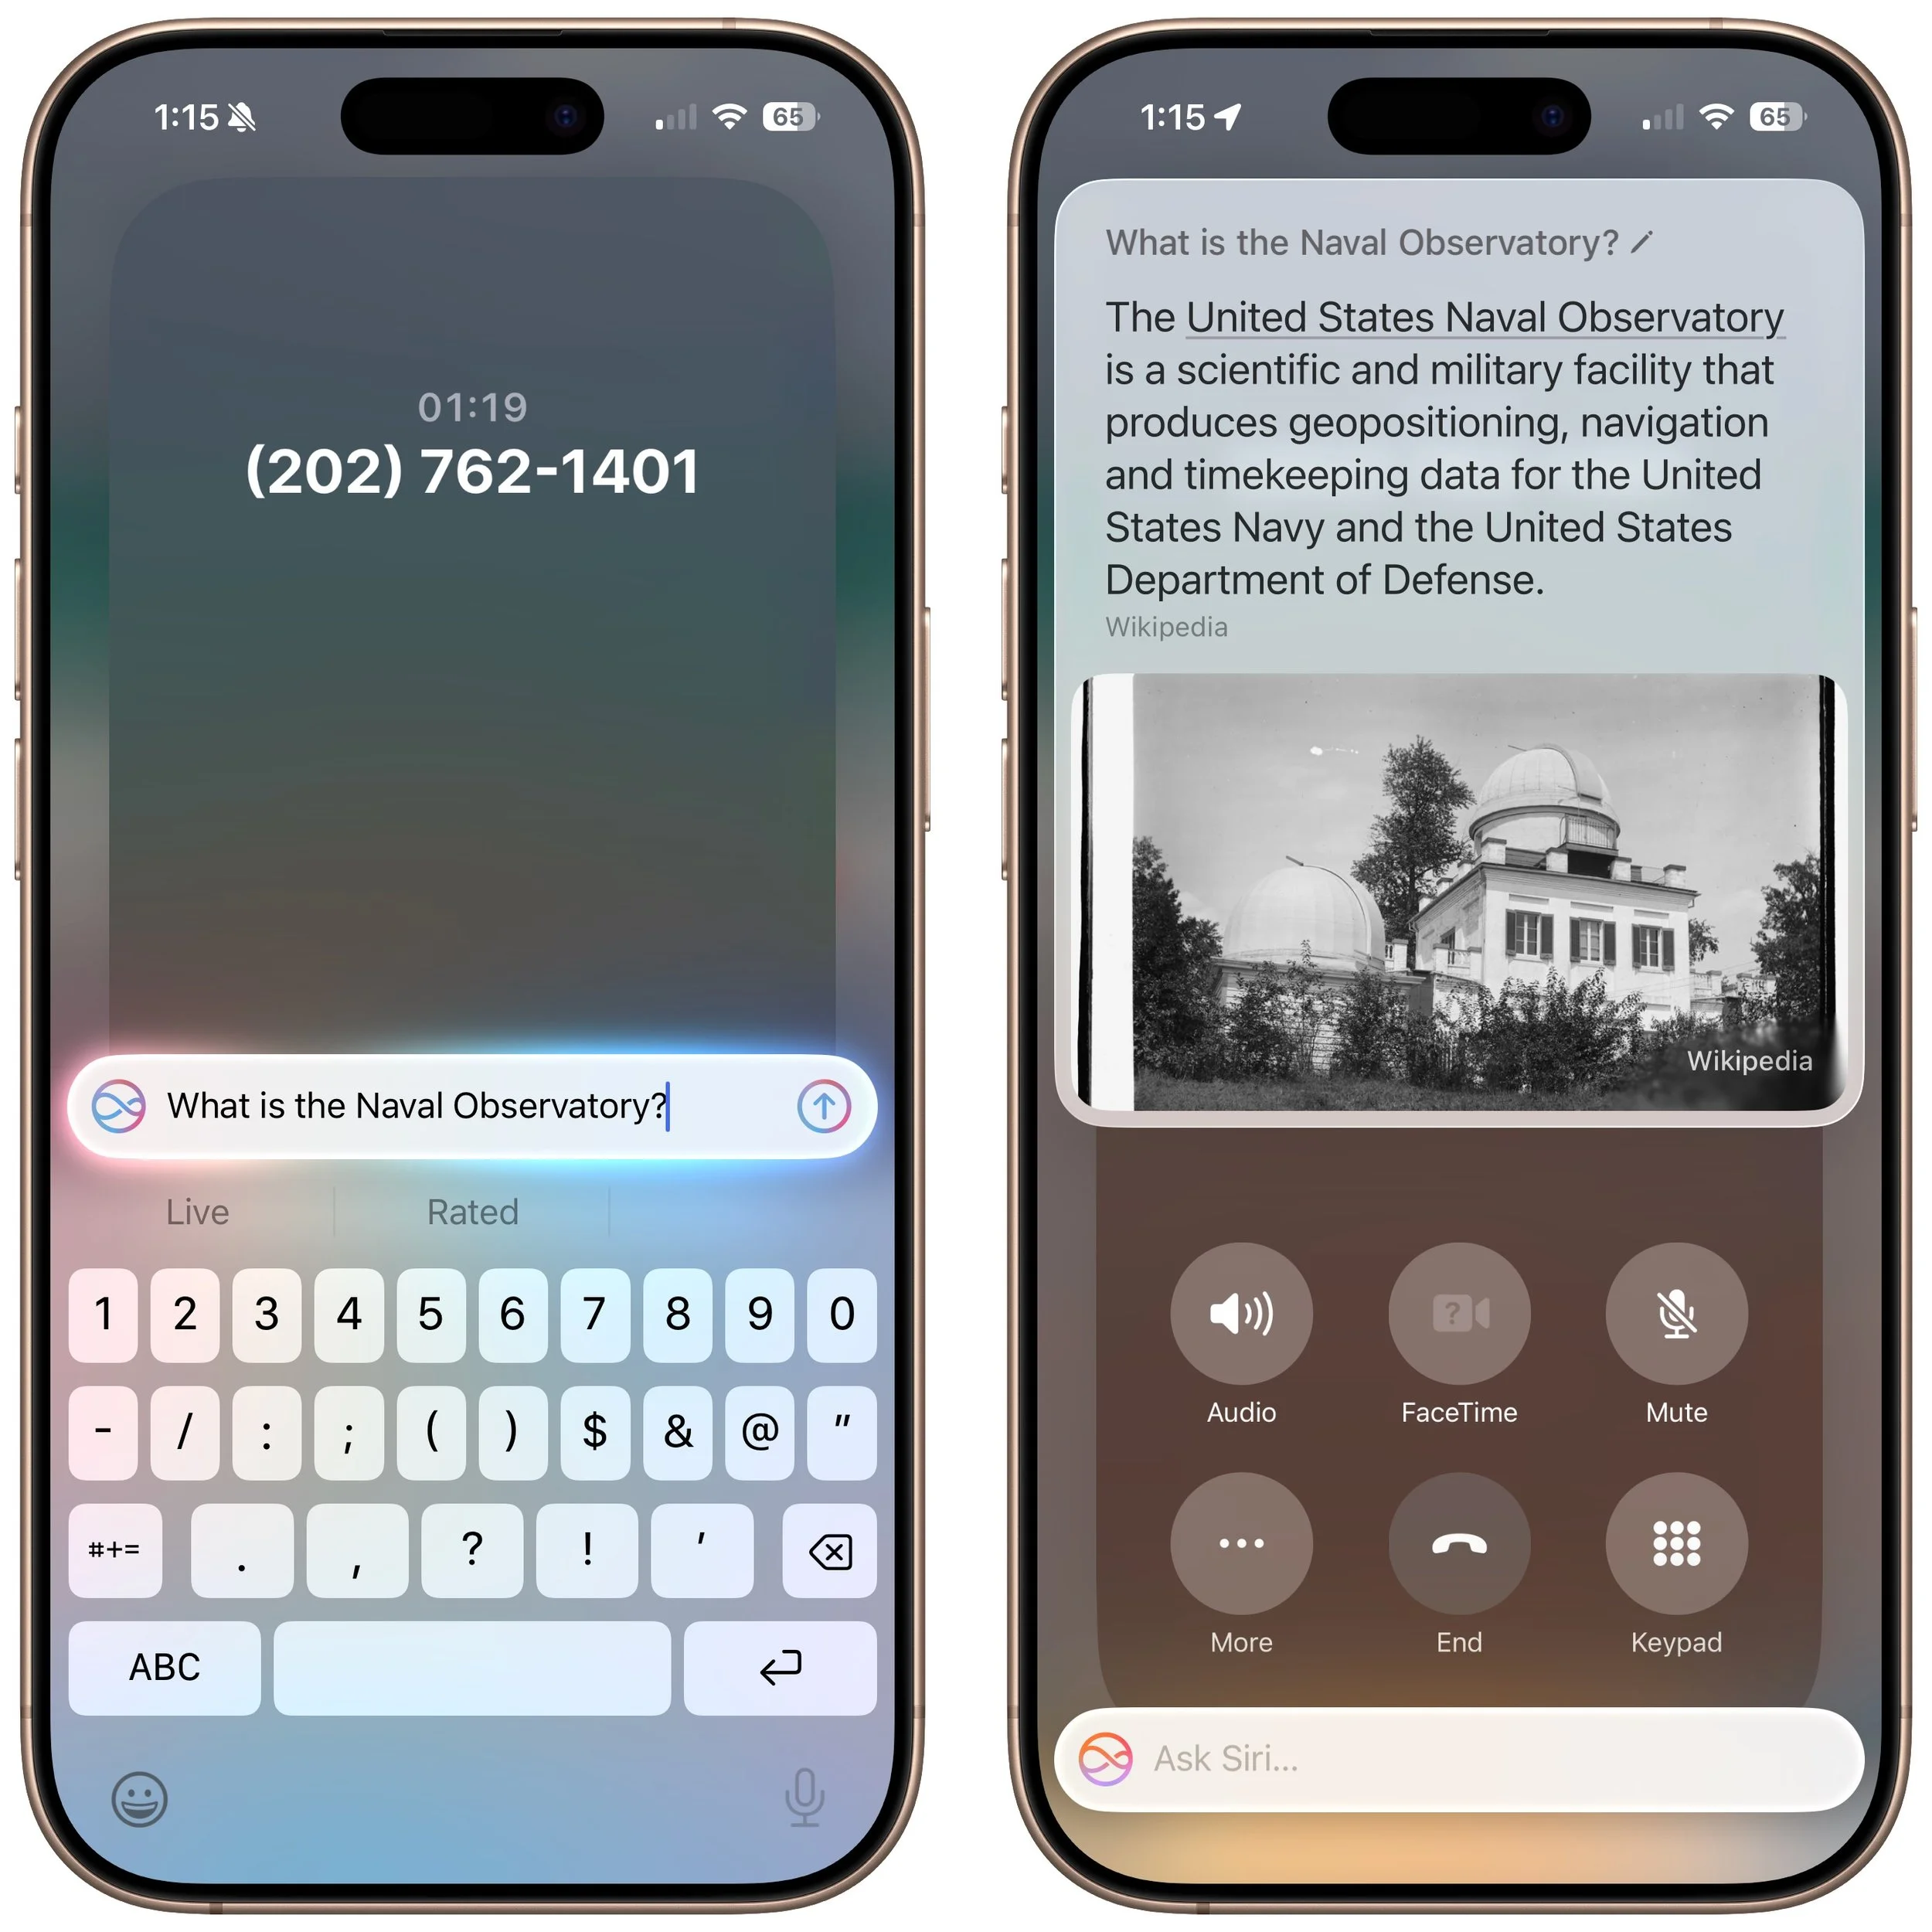
Live Translation in Calls
If you need to call someone who speaks a different language (as long as it’s English, French, German, Portuguese, or Spanish), the new Live Translation feature might be helpful. Once you’re on the call, tap the More button, then tap Live Translation, and choose the languages for From and To. We highly recommend testing this feature before you actually need it, as it can take a few minutes to download a new language for the first time. After that, tap Start Translation to hear spoken translations and have your voice translated for your caller. You’ll also see a transcript of both sides of the conversation.
Type to Siri During Calls
If you desperately need to use Siri during a phone call, you can now activate Type to Siri. Make sure it’s turned on in Settings > Apple Intelligence & Siri > Talk & Type to Siri, and then double-tap the bottom edge of the iPhone to open a Siri text entry field.
Screen Sharing and SharePlay in Calls
When you’re on a call with someone using iOS 26, iPadOS 26, or macOS 26, you can now initiate Screen Sharing or SharePlay with that person during the call. Access these features from the More button. Screen Sharing can be helpful for explaining how to perform an action on the caller’s device or troubleshoot a problem, and SharePlay lets you and the caller listen to the same audio or watch the same video in a supported app.
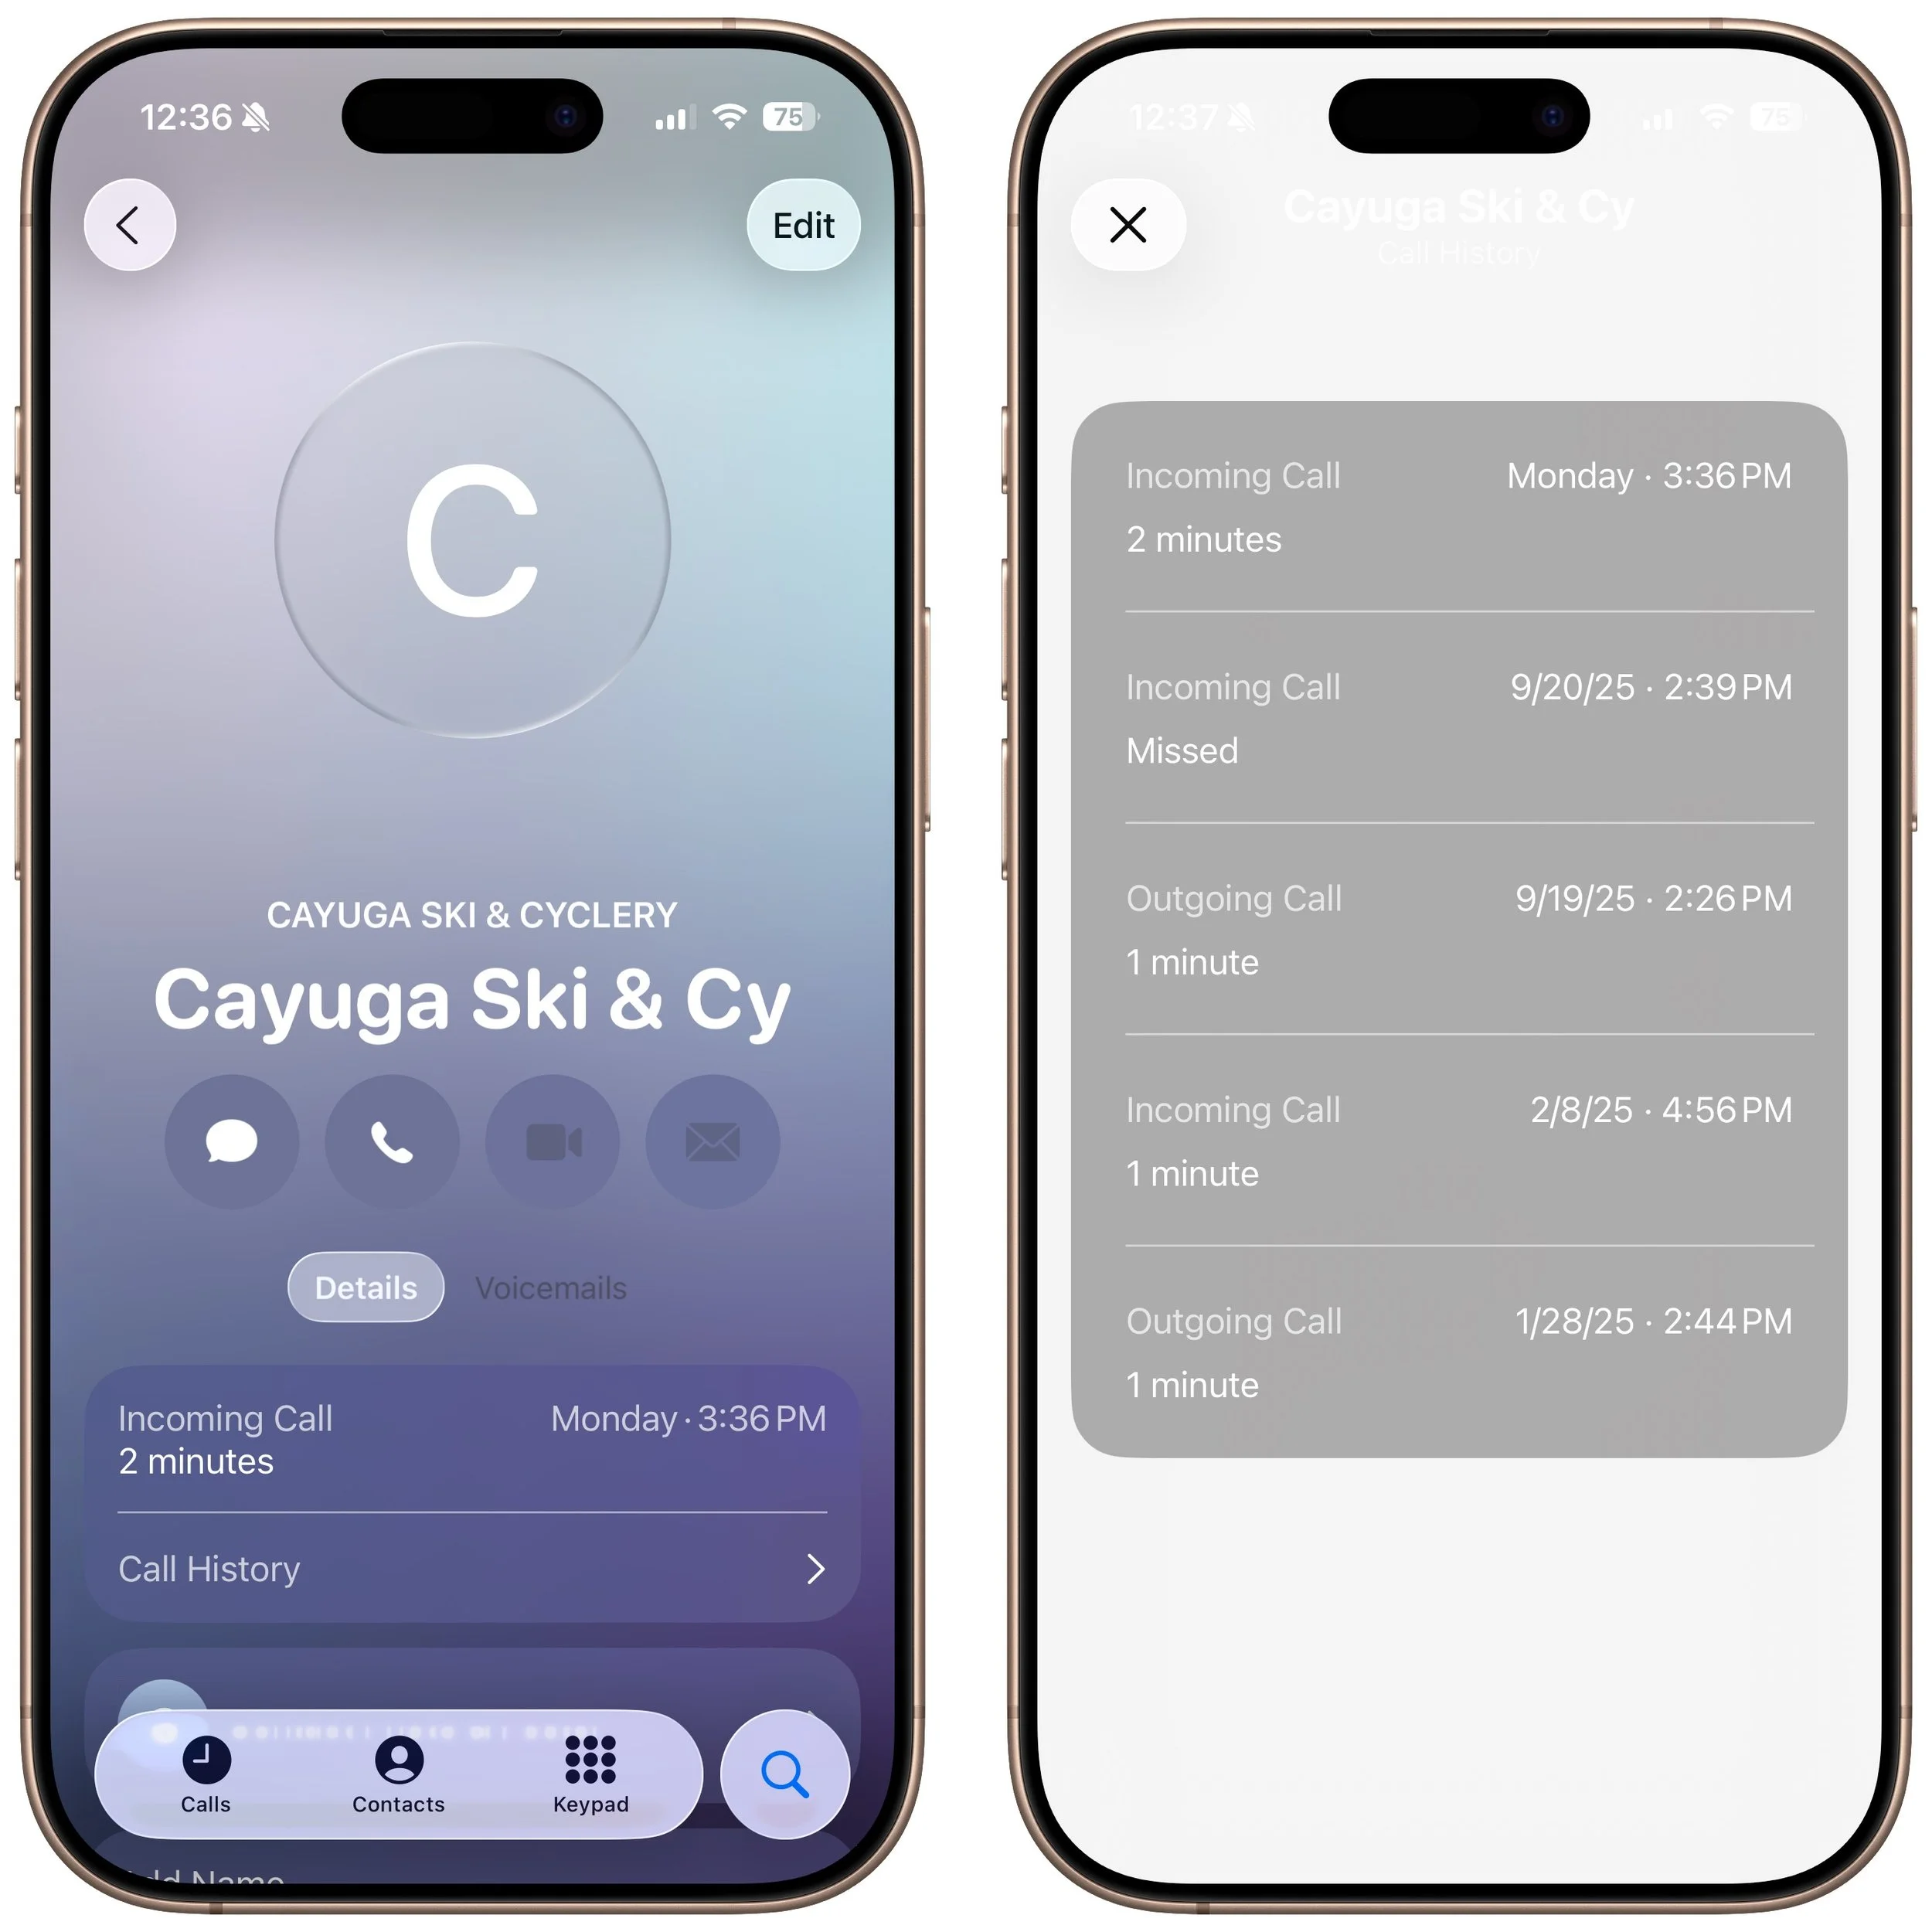
Call History
When you view a contact from within the Phone app (not the Contacts app), a Call History option appears, and tapping it shows your call history with that number, which could go back years.
Phone App Comes to macOS, iPadOS, and visionOS
Wait, did we just say you could be on a call with someone using the Phone app on a Mac or iPad? Exactly! With macOS 26, iPadOS 26, and even visionOS 26, the Phone app has expanded to the iPhone’s sibling platforms. It looks and works very similarly, with the benefit of displaying more information at once. To use one of these Phone apps, your iPhone must be on the same Wi-Fi network and signed in to the same Apple Account.

(Featured image based on an original by iStock.com/sergeyryzhov)
What’s Liquid Glass, and What to Do If You Don’t Like It
Apple’s new Liquid Glass interface brings semi-transparent, floating controls to all your devices. Here’s what that means and how to customize it to optimize your experience.

If you’ve been following Apple’s recent product releases, you’ve probably heard the term “Liquid Glass.” That’s what Apple calls its newest design language, a combination of an aesthetic look and functional philosophy for the user interface in iOS 26, iPadOS 26, and macOS 26 Tahoe, in particular, but also in watchOS 26, visionOS 26, and tvOS 26 (we think of them collectively as OS 26). Apple describes Liquid Glass as a “translucent material that reflects and refracts its surroundings, while dynamically transforming to help bring greater focus to content.” The company claims that Liquid Glass “makes apps and system experiences more expressive and delightful while being instantly familiar.” Apple even has an intro video.
Beyond the marketing speak, that means most of the controls you’ll interact with in Apple’s new operating system will be semi-transparent and appear to float above the content, blurring what’s underneath and adjusting to the underlying content’s color. That may make it easier for you to focus on your content, or it may make the interface harder to read. Liquid Glass also features subtle animations that may seem fun or make everything feel a little squishy.
Like many of Apple’s interface changes over the years, Liquid Glass has sparked strong reactions—some love it, while others dislike it. While we’ll explore the pros and cons below, it’s worth acknowledging upfront that Liquid Glass represents Apple’s vision for the future of its interfaces. Although you can adjust various settings to make it more comfortable to use (which we’ll cover shortly), Liquid Glass will be part of all Apple operating systems going forward. The good news is that, as with previous major interface changes, such as Aqua in Mac OS X and iOS 7, we’ll all adapt to it over time as Apple continues to refine and enhance the experience.
Liquid Glass Pros
Although Liquid Glass might appear to be just a fashionable cosmetic update, Apple’s designers had some serious objectives:
Cross-device platform consistency: Many Apple users own an iPhone, iPad, Mac, Apple Watch, and Apple TV. The interfaces for these operating systems have all evolved somewhat independently due to differences in their development, usage, and screen sizes. Liquid Glass is Apple’s effort to unify the design language across its devices, making each device feel like part of a cohesive design philosophy.
Focus on content: Between the translucent look that refracts the content behind it and by having interface elements morph and fade when not in use, Apple designed Liquid Glass to help you focus on your content rather than cluttering the screen with controls.
Modern look and feel: While longtime Apple users may prioritize functionality and familiarity, one of Apple’s main goals is to attract new users by convincing them to switch from Android and Windows or encouraging them to start with Apple devices. Liquid Glass draws inspiration from futuristic devices seen in science fiction shows and movies, which might especially appeal to younger users who have grown up with these visual references.
Fluid animations: By adding subtle animations to Liquid Glass, Apple makes the interface come alive in a way that wouldn’t be possible otherwise. Again, that may attract new users or impress possible switchers.
Personalization: Some people have a strong aesthetic desire to see their interfaces be clear or tinted rather than have every icon in its own bold color. With Liquid Glass, you can customize your icons, widgets, and folders to work better in dark mode, be clear, or have any tint you prefer.
Technical showcase: Liquid Glass’s complex real-time blurring and lighting effects require a significant amount of processing power, but Apple’s A-series and M-series chips are up to the task. This is another case of competitive advantage—Apple is showing off by saying, “Our devices have so much power that we can use it to make the interface snazzy looking.”
Liquid Glass Cons
Just because Apple describes Liquid Glass as “delightful” doesn’t mean everyone will agree. Many users dislike change, and numerous user experience experts have criticized aspects of Liquid Glass. Some of the concerns include:
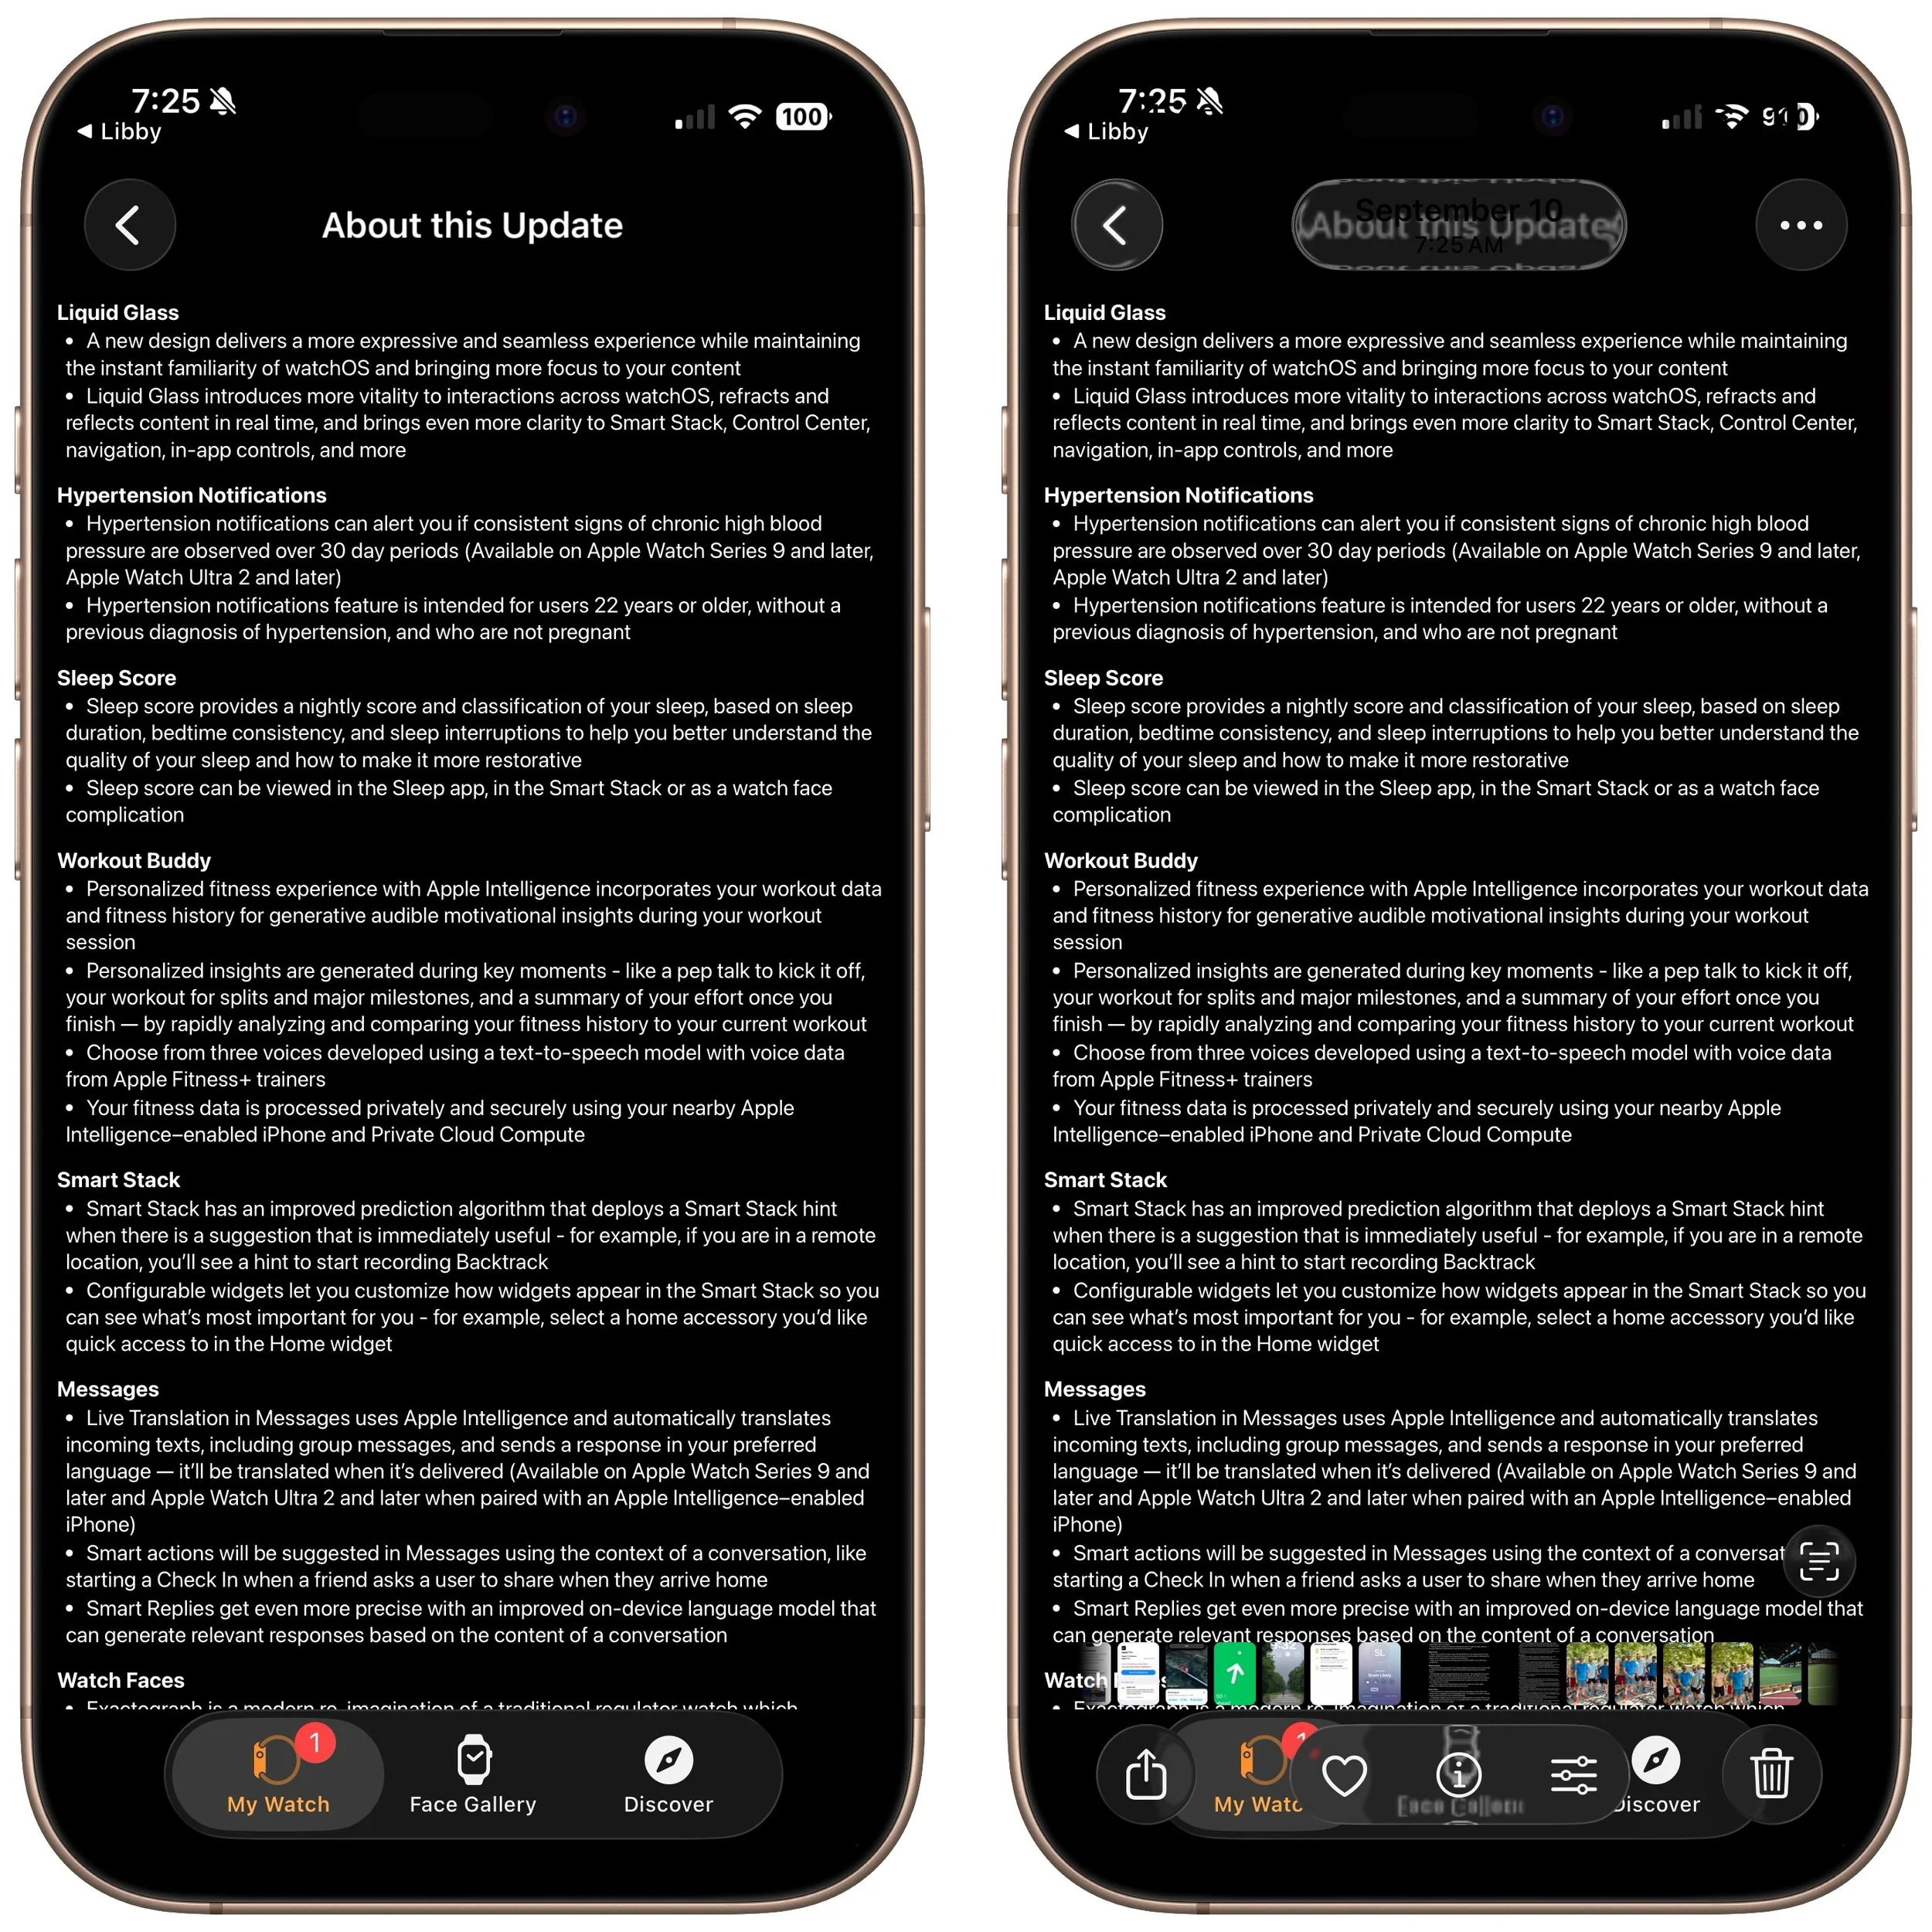
Readability: When Liquid Glass displays light gray text on a clear control positioned over a dark background with additional text, it becomes almost unreadable. While this is an extreme case, many floating translucent controls over backgrounds can cause legibility issues, especially for those whose vision isn’t perfect. As you can see in this screenshot of iOS 26’s release notes (below, left), the Liquid Glass controls in Photos are notably awkward (below, right).
Learning curve: Apple can say that the interface changes in Liquid Glass are for the better, but there’s no denying that everyone will need to learn something new. That’s easier for some users than others, and many people will be boggled by controls moving around.
Matter of taste: Not everyone shares Apple’s design aesthetics. Some people find Liquid Glass to be cartoonish or distracting.
Inconsistent design: While Liquid Glass aims to create a uniform design language across all Apple platforms, it will take time for even Apple to update everything. Some third-party apps will never receive updates, and some developers may refuse to modify their interfaces to support Liquid Glass. We’ll be dealing with inconsistent interfaces for several years.
Performance issues: On some older devices, Liquid Glass may feel sluggish or drain the battery more quickly due to heavy GPU usage. Although Apple doesn’t intend to create a bad user experience for anyone, performance issues may nudge some people to upgrade sooner than they planned.
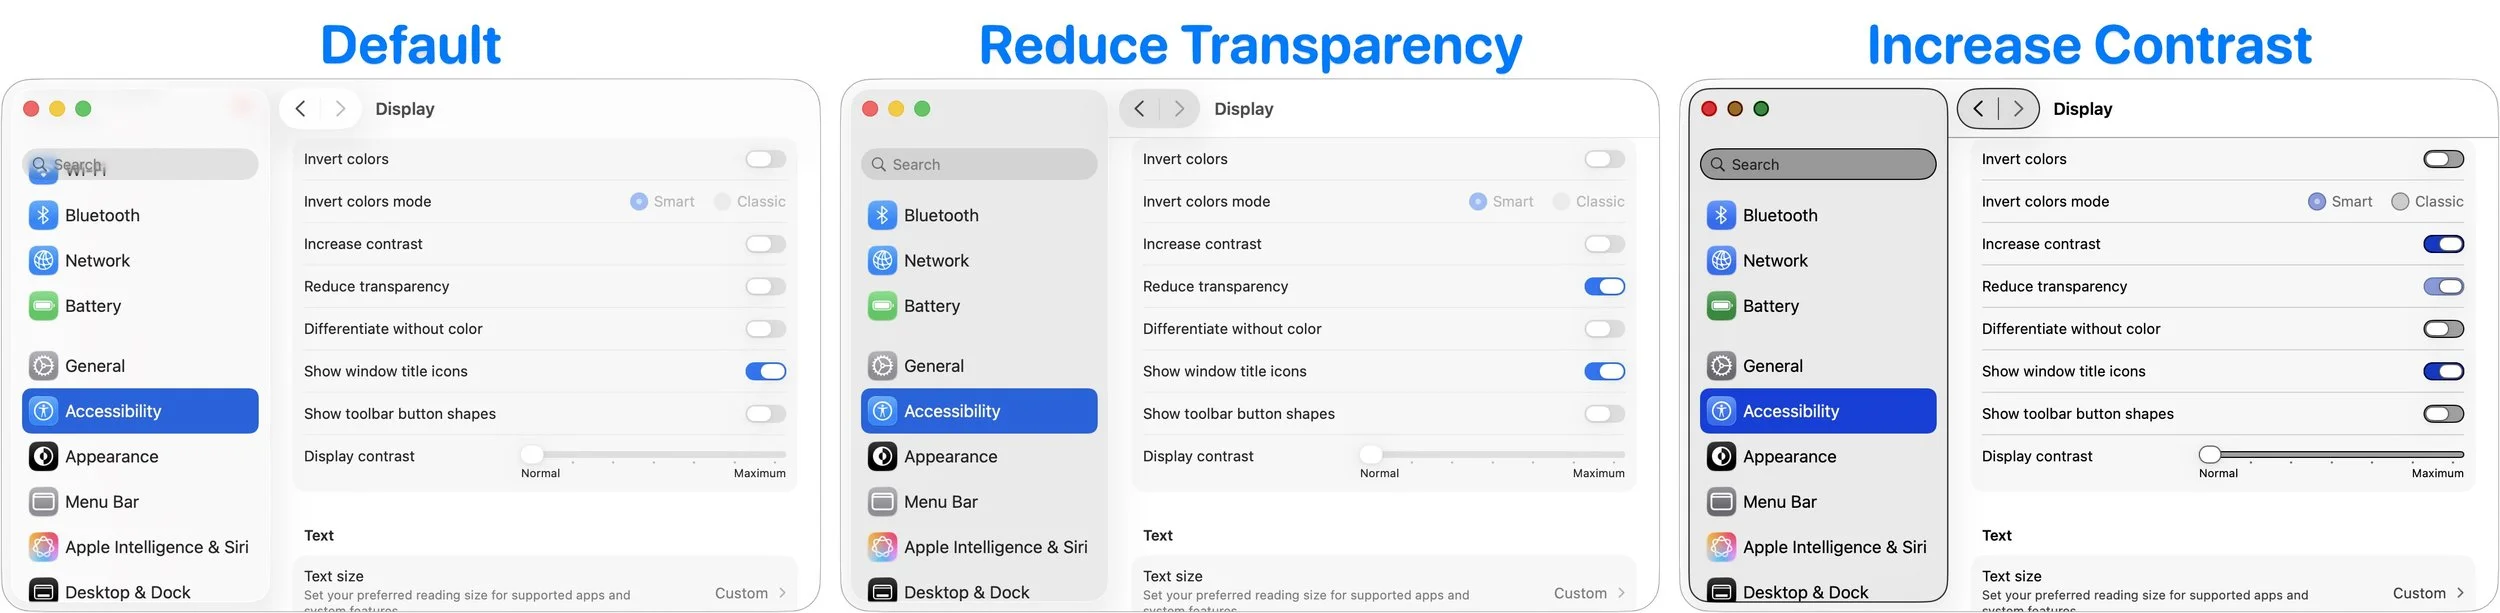
Liquid Glass to Solid Metal
You can’t turn off Liquid Glass, but three Accessibility settings will make it less liquid and less glassy on the iPhone, iPad, and Mac. There are also a few additional settings that may make the iPhone and iPad easier to use. All these settings are independent, so you can mix and match to find the combination that gives you the look you prefer. (Paths are for the iPhone and iPad; on the Mac, start with System Settings and note slight naming differences.)
Reduce Transparency: Turning on Settings > Accessibility > Display & Text Size > Reduce Transparency significantly improves Liquid Glass readability by making translucent panels opaque, adding solid backgrounds, and reducing blur. On the Mac, this setting restores the solid menu bar. However, Reduce Transparency may make certain aspects of the interface look awkward, such as when a previously transparent toolbar suddenly covers a much larger part of the screen.
Increase Contrast: Enabling Settings > Accessibility > Display & Text Size > Increase Contrast makes interface elements stand out more by sharpening borders and reducing the tendency for controls to meld with the background. Keep in mind that Increase Contrast can also significantly alter the colors of many interface elements.
Reduce Motion: If Liquid Glass’s animations, blurring, and parallax effects make you a little queasy, turn on Settings > Accessibility > Motion > Reduce Motion. While you’re here, turn on Prefer Cross-Fade Transitions to minimize motion for interface controls that slide in and out. A warning—without transitions, some parts of the iPhone and iPad experience might seem abrupt.
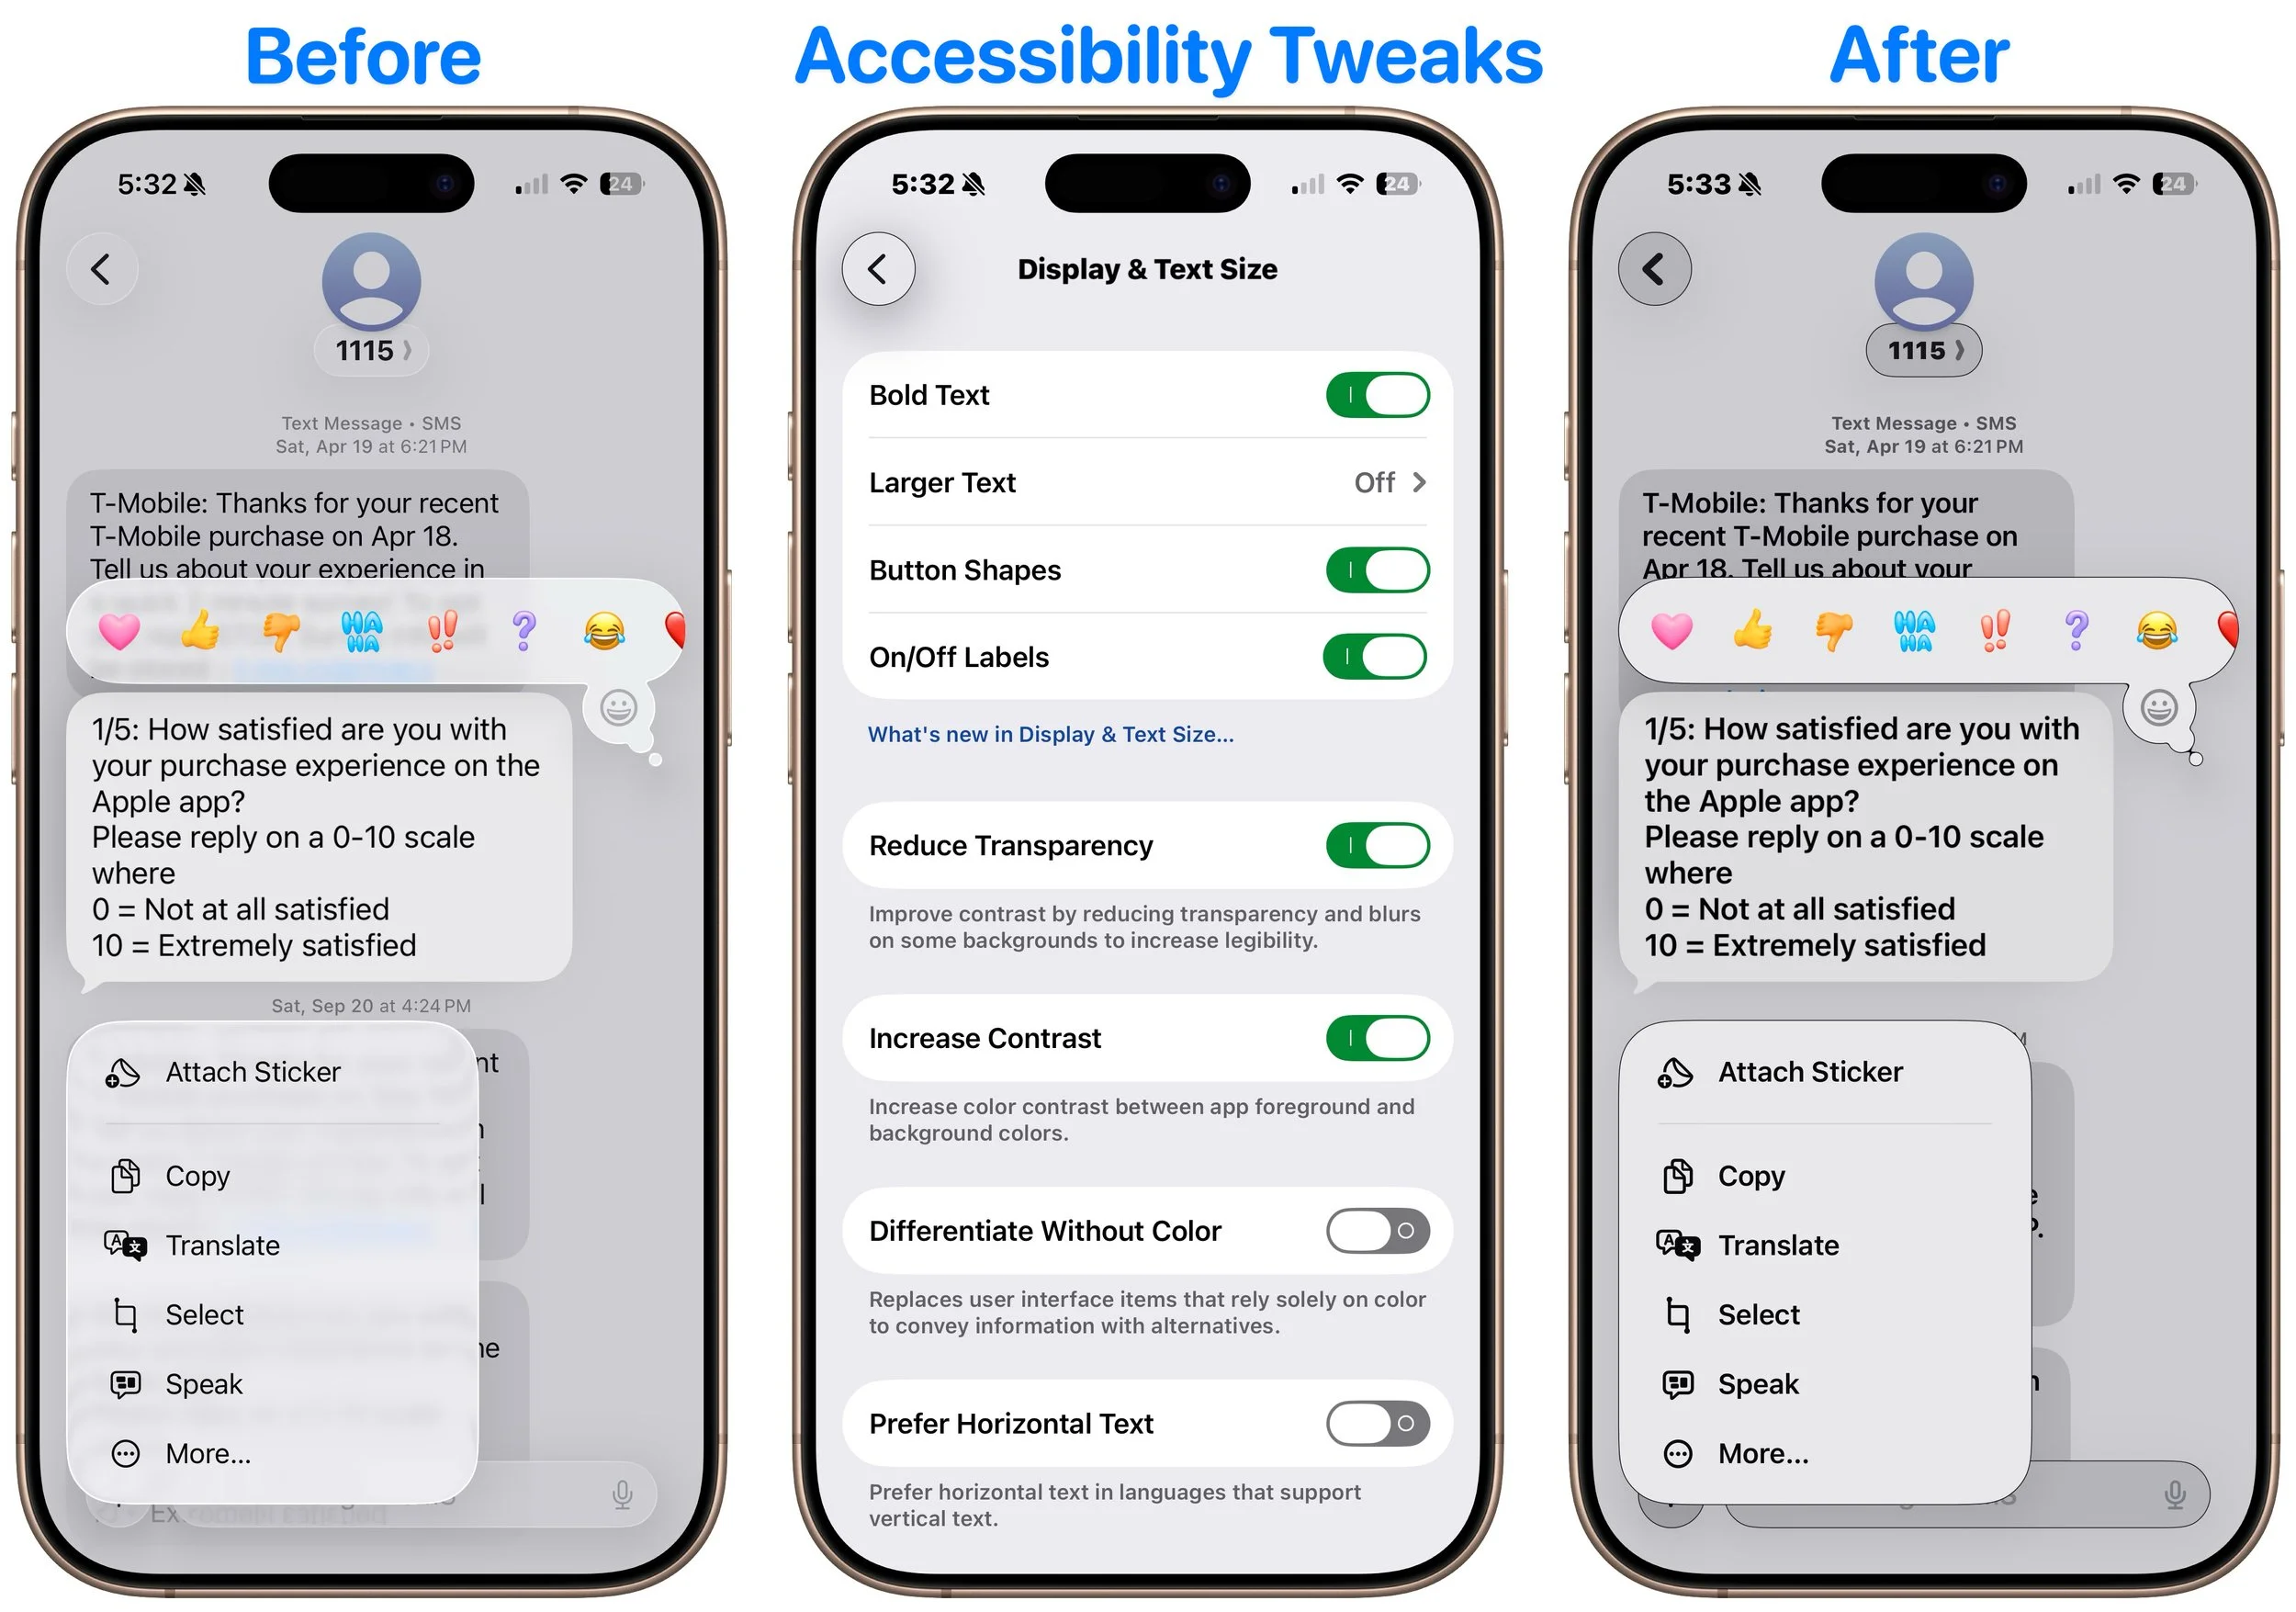
The next three settings are exclusive to the iPhone and iPad, and you’ll find them in Settings > Accessibility > Display & Text Size:
Bold Text: Flipping this switch makes all interface text bold, which can make it much easier to read, particularly when transparency renders thin glyphs nearly invisible.
Button Shapes: It’s harder to find controls that benefit from turning Button Shapes on, but if you want a true button instead of blue text or underlines that show a label is clickable, turn this on.
On/Off Labels: Turning this setting on displays small | and O labels for On and Off on all switches to help clarify if the change from gray (Off) to colored (On) isn’t clear.
Again, Liquid Glass is the foreseeable future of Apple interface design, and while it’s far from perfect right now, we anticipate Apple improving and refining it over the next few releases. You can help nudge that process in the direction you want by submitting feedback to Apple.
(Featured image by Apple)
Follow This Advice Before Switching to a New iPhone 17
It’s exciting to get a new iPhone, but don’t dive in willy-nilly. Instead, take a few minutes to read our advice on what you should do before and after transferring your data from your old iPhone.
Are you considering getting one of the new iPhone 17 models? While it’s always tempting to unbox a new device and dive right in, taking a methodical approach to setup will save you from potential frustrations down the road. When you’re ready to transfer your data—and, for many people, that means much of your digital life—to the new iPhone, follow these step-by-step instructions. For visual learners, Apple provides helpful setup videos as well.
Before anything else, ensure that both your current iPhone and Apple Watch (if you have one) are running the latest versions of iOS and watchOS. Remember that these updates can take some time to install, so don’t leave them for the last minute.
Ensure you have your login details ready: you’ll need your iPhone and Apple Watch passcodes, along with your Apple Account credentials.
Back up your old iPhone to iCloud or your Mac. If you choose to back up to a Mac, make sure you encrypt the backup; otherwise, it won’t include passwords, Wi-Fi settings, browsing history, Health data, and call history. For safety, consider backing up to both. We recommend iCloud backups because they are more straightforward and avoid issues like unreliable USB cables. If you don’t typically back up to iCloud, Apple offers temporary iCloud storage for 21 days when transferring to a new iPhone. To start an iCloud backup, go to Settings > Your Name > iCloud > iCloud Backup and tap Back Up Now.
If you have an Apple Watch, you can transfer it to the new iPhone during the setup process. If the automatic transfer doesn’t work for some reason, you can unpair the Apple Watch manually from the old iPhone and pair it again to the new one. If you choose the manual route with a cellular Apple Watch, you’ll be prompted to keep or remove your cellular plan. Assuming that you intend to keep your Apple Watch and repair it with your new iPhone, be sure to keep the plan.
Your phone number should transfer automatically during activation if you ordered your new iPhone through Apple and linked it to your cellular carrier account during purchase. The same is true if you bought directly from your carrier. iPhones sold in the US rely exclusively on eSIM, and rumors suggest the iPhone 17 will also go eSIM-only in countries other than China, meaning that transferring the SIM card from the old iPhone to the new one should be a thing of the past for most people.
Transfer your data, settings, apps, and purchased content using one of these three methods. None of them will be quick, despite the first one’s name, so start the transfer only when you have plenty of time.
Quick Start: With the Quick Start feature, content from your old iPhone copies directly to your new one. We recommend this method because it’s more likely to preserve app logins, which is less certain when restoring from an iCloud backup. Make sure both iPhones are charged above 50% or plugged into power before starting. Put your iPhones next to each other, use the old iPhone to scan the animation on the new one, and then follow the remaining steps that appear.
iCloud: This method allows the new iPhone to download your content from the old iPhone’s iCloud backup, making it ideal if the old iPhone is not available. After connecting to a Wi-Fi network on the new iPhone and tapping the From iCloud Backup button, select the correct backup—probably the most recent one you just created. Keep your new iPhone plugged into power to ensure all your content syncs during this process.
Finder or iTunes: Use this method to restore your old iPhone’s data from a backup saved to your Mac. Connect your new iPhone to your Mac using an appropriate cable. Then, open a Finder window (or iTunes if your Mac is still running macOS 10.14 Mojave or earlier) and select your device in the sidebar on the left. Next, click Restore Backup and select the correct backup—likely the newest one.
Complete post-transfer tasks. Some app data needs to sync, so open the Mail, Contacts, and Calendar apps to check for your information; it may take a few minutes to populate. Verify you can make and receive calls. If necessary, pair your Apple Watch with the new iPhone. Also, pair your Bluetooth accessories—including AirPods—with your new device. Apps might ask for notification permissions again, and you might need to download content and in-app purchases.
If you use two-factor authentication with an app like 1Password, Authy, or Google Authenticator, confirm that your codes appear on the new iPhone. Many apps now sync codes automatically once you log in, but don’t assume—verify before wiping the old phone.
Finally, if needed, set up single sign-on for work or school. Most enterprise authentication systems now support automatic device migration, but check with your IT department about their specific requirements. For systems that require manual activation, you’ll need to activate your new iPhone and deactivate the old one. Go to the standard single sign-in login page for your organization, find the link to manage your logins, click it, and follow the instructions.
Although Apple works hard to make transferring from an old iPhone to a new one as smooth as possible, some things may not transfer perfectly. We strongly recommend keeping your old iPhone for a week or so to ensure the new one can do everything the old one did. During that time, thoroughly test the new iPhone, checking each app you need.
(Featured image by Adam Engst)
Watch What You Say in AI-Recorded Meetings
In virtual meetings, AI recording tools often capture and share everything—even those casual chats that occur after most attendees have left. Learn how to avoid having sensitive conversations broadcast to your whole team.

You’re in a meeting with colleagues, and after everyone else has trickled out, you talk about a sensitive topic with a trusted friend. That would typically be no problem with an in-person meeting, but with a modern virtual meeting, where an AI records a transcript, summarizes what was said, and automatically emails it to all participants, you might not want everyone to know about your coworker conflicts, job search, health issues, relationship troubles, or countless other confidential matters.
This issue affects all major videoconferencing platforms—Zoom, Microsoft Teams, Google Meet, and others. Many organizations also use standalone AI recording tools that can join meetings as participants, such as Otter.ai, Fireflies.ai, and tl;dv.
No one should feel ashamed of using AI-generated meeting summaries, nor should these tools be categorically avoided. They’re undeniably helpful, allowing people to focus on the discussion instead of taking notes or worrying about forgetting action items. We know people who consider them life-changing.
However, the fact remains: unlike a person tasked with taking notes, these tools record everything, including pre-meeting chatter, small talk, and personal asides that a person would know not to include. Making matters worse, AI notetakers are often configured to distribute transcripts and summaries automatically to all attendees—including those who were invited but didn’t attend. While this helps people catch up on missed meetings, it can cause problems if the absent individuals were themselves the topics of discussion. And we won’t even get into the potential legal and HR implications of certain conversations being made public.
Practical Solutions
Given the utility of AI-generated meeting summaries, what can you do to reduce the chances of potentially embarrassing or problematic conversations being shared inappropriately?
Warn attendees: Although most videoconferencing tools alert users that recording is happening, everyone is used to these notifications. For a more explicit warning, the meeting host can remind everyone that summaries will be shared with all attendees.
Pause/resume recording: While not all videoconferencing and AI recording tools offer the option to pause and resume, it can be useful. The meeting host can wait to start recording until everyone has arrived and the pre-meeting chatter has died down, and then stop it once the last agenda item has been discussed. The challenge is that this requires the host to remember to start and stop at the right times, and any valuable conversation before or after these points will be lost.
Restrict distribution: Another option is to configure the system so meeting summaries are sent only to the host, who can then review and edit them if needed before sharing with the rest of the attendees. The drawbacks here are the extra work for the host and the delay in participants receiving the notes, which can hold them back from starting on action items.
Watch what you say: Just as with social media posts, it’s important to think before you say something you might regret. If you assume that everything you say could be shared with your entire organization—including HR and your boss—you’ll be much less likely to get into trouble. Of course, this requires everyone to be sufficiently self-aware to avoid problematic topics.
Use private channels: If you anticipate needing to discuss sensitive information with a remote colleague—the kind of thing you’d shut your office door to keep passersby from overhearing—use a private channel like a personal meeting room, direct message, or phone call. And if someone starts to say something problematic in a group meeting, gently suggest moving it to a private channel.
Although having AI-generated summaries of conversations you thought were private circulated to others may feel like a modern problem, variants have been around for a long time: the romantic message misaddressed to the company-wide email list, the list of layoffs left in the copy machine, or even a conversation that continues across stalls in the bathroom without realizing someone else has come in. Ultimately, all we can do is be mindful of what we say and who might hear it.
(Featured image by iStock.com/ArnoMassee)
Apple Unveils New iPhone 17 Lineup, Updated Apple Watches, and AirPods Pro 3
Apple’s September harvest brings the new iPhone 17 lineup and the iPhone Air, three new Apple Watch models, and the AirPods Pro 3, plus release dates for iOS 26 and macOS 26 Tahoe. Get the details and our upgrade advice.

In the tech world, September brings the fruits of Apple’s harvest: new iPhones, Apple Watches, and AirPods. At its recent Awe Dropping event, Apple introduced the new iPhone 17 lineup, the ultra-thin iPhone Air, the Apple Watch SE 3, Apple Watch Series 11, Apple Watch Ultra 3, and the AirPods Pro 3.
These are updates to mature product lines, so the changes from last year’s versions may not be enough to persuade you to upgrade. However, this year’s releases are attractive for anyone wanting to replace an old iPhone, Apple Watch, or set of AirPods that is showing its age or suffering from weak battery life. Pre-ordered products will be delivered and become available in stores on September 19.
After the announcement, Apple revealed on its website that all its next-generation operating systems—macOS 26 Tahoe, iOS 26, iPadOS 26, watchOS 26, and visionOS 26, and likely tvOS 26 and HomePod Software 26—will ship on September 15. Wait a week or two before upgrading essential devices to avoid any last-minute bugs, and hold off on Tahoe for a few months or until you’re confident your necessary Mac apps are compatible. Regardless of when you upgrade, make a backup right before, in case an unexpected problem forces you to erase and restore.
Let’s look at the new products.
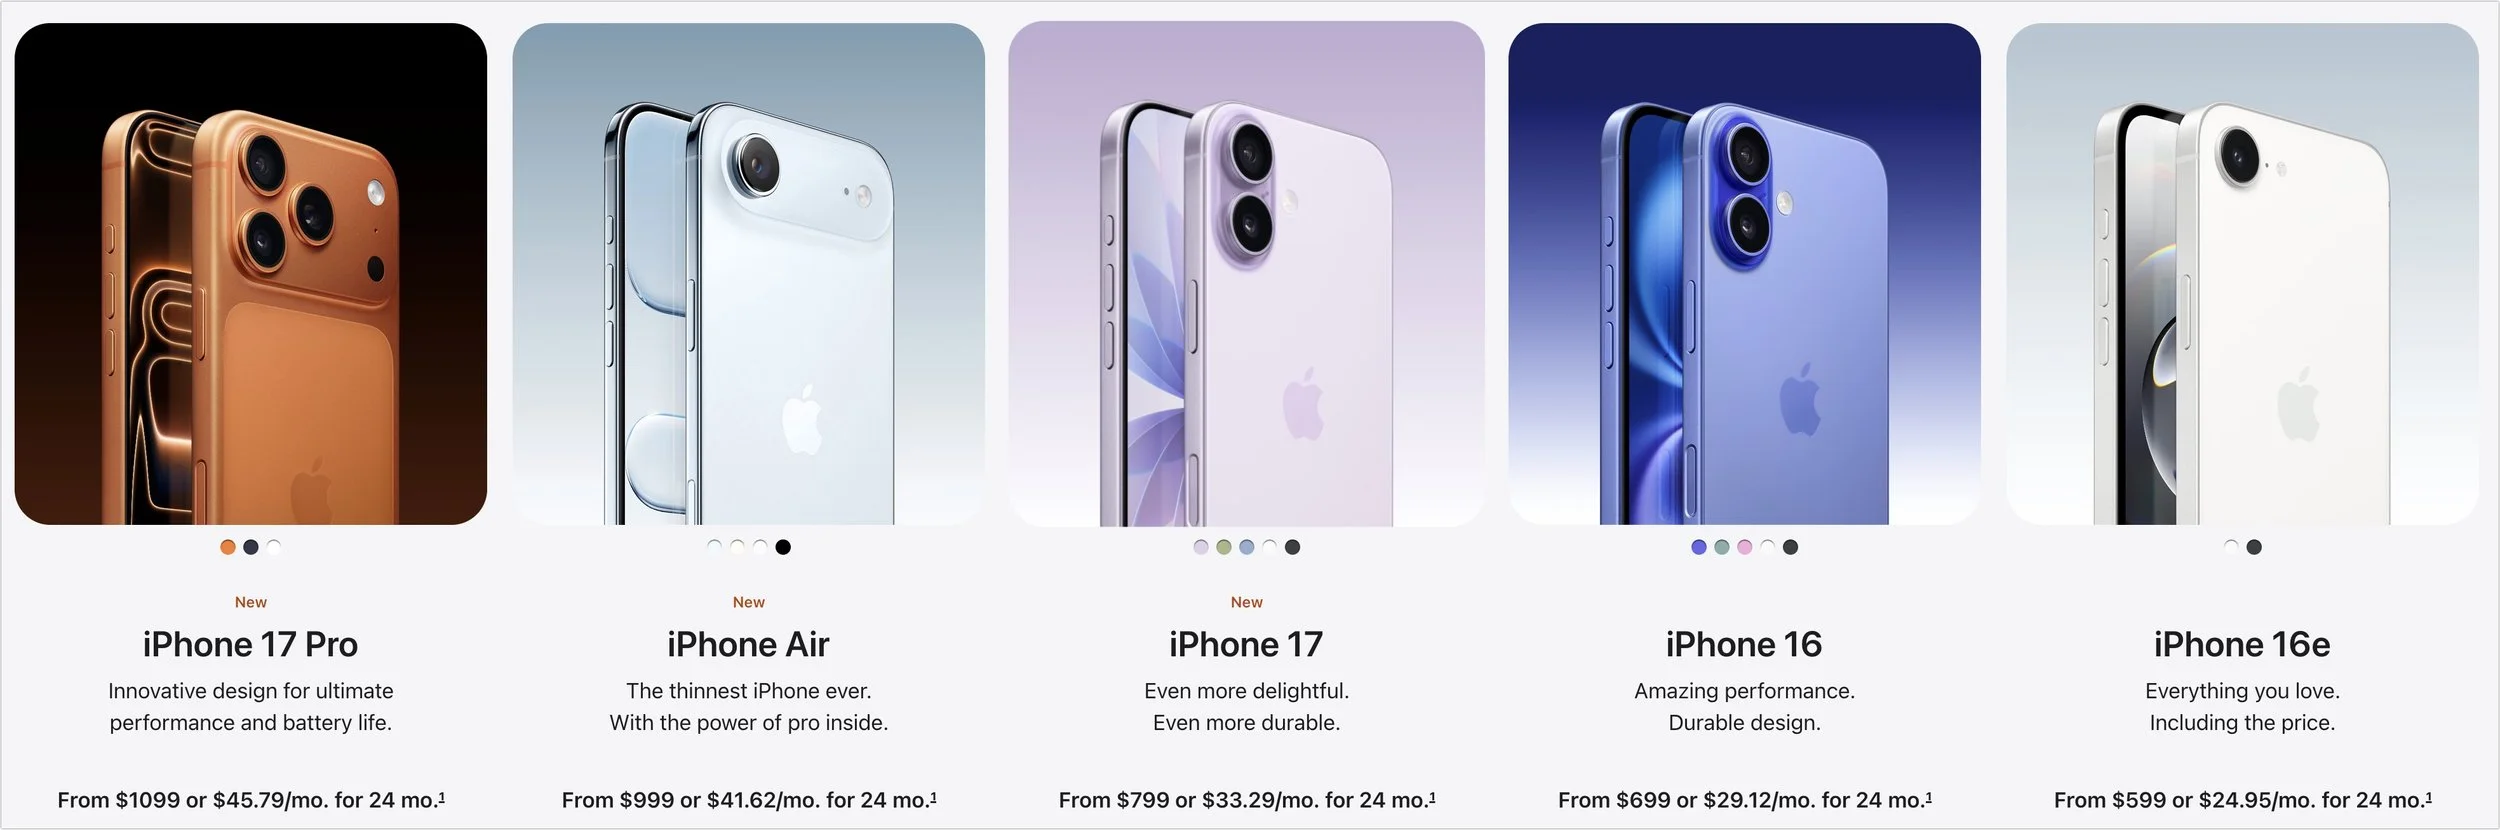
iPhone Air and iPhone 17 Lineup
As with the last few years, the best bang for your iPhone buck comes from the new iPhone 17, which gains even more features previously exclusive to the Pro models and is available in black, white, mist blue, sage, and lavender. Apple replaced the Plus model with the ultra-thin iPhone Air, available in space black, cloud white, light gold, and sky blue. Lastly, the company enhanced the iPhone 17 Pro and iPhone 17 Pro Max to make them even more compelling to professional photographers and videographers. These models come in three anodized aluminum colors: silver, deep blue, and cosmic orange.
Notable features shared by all the new models include:
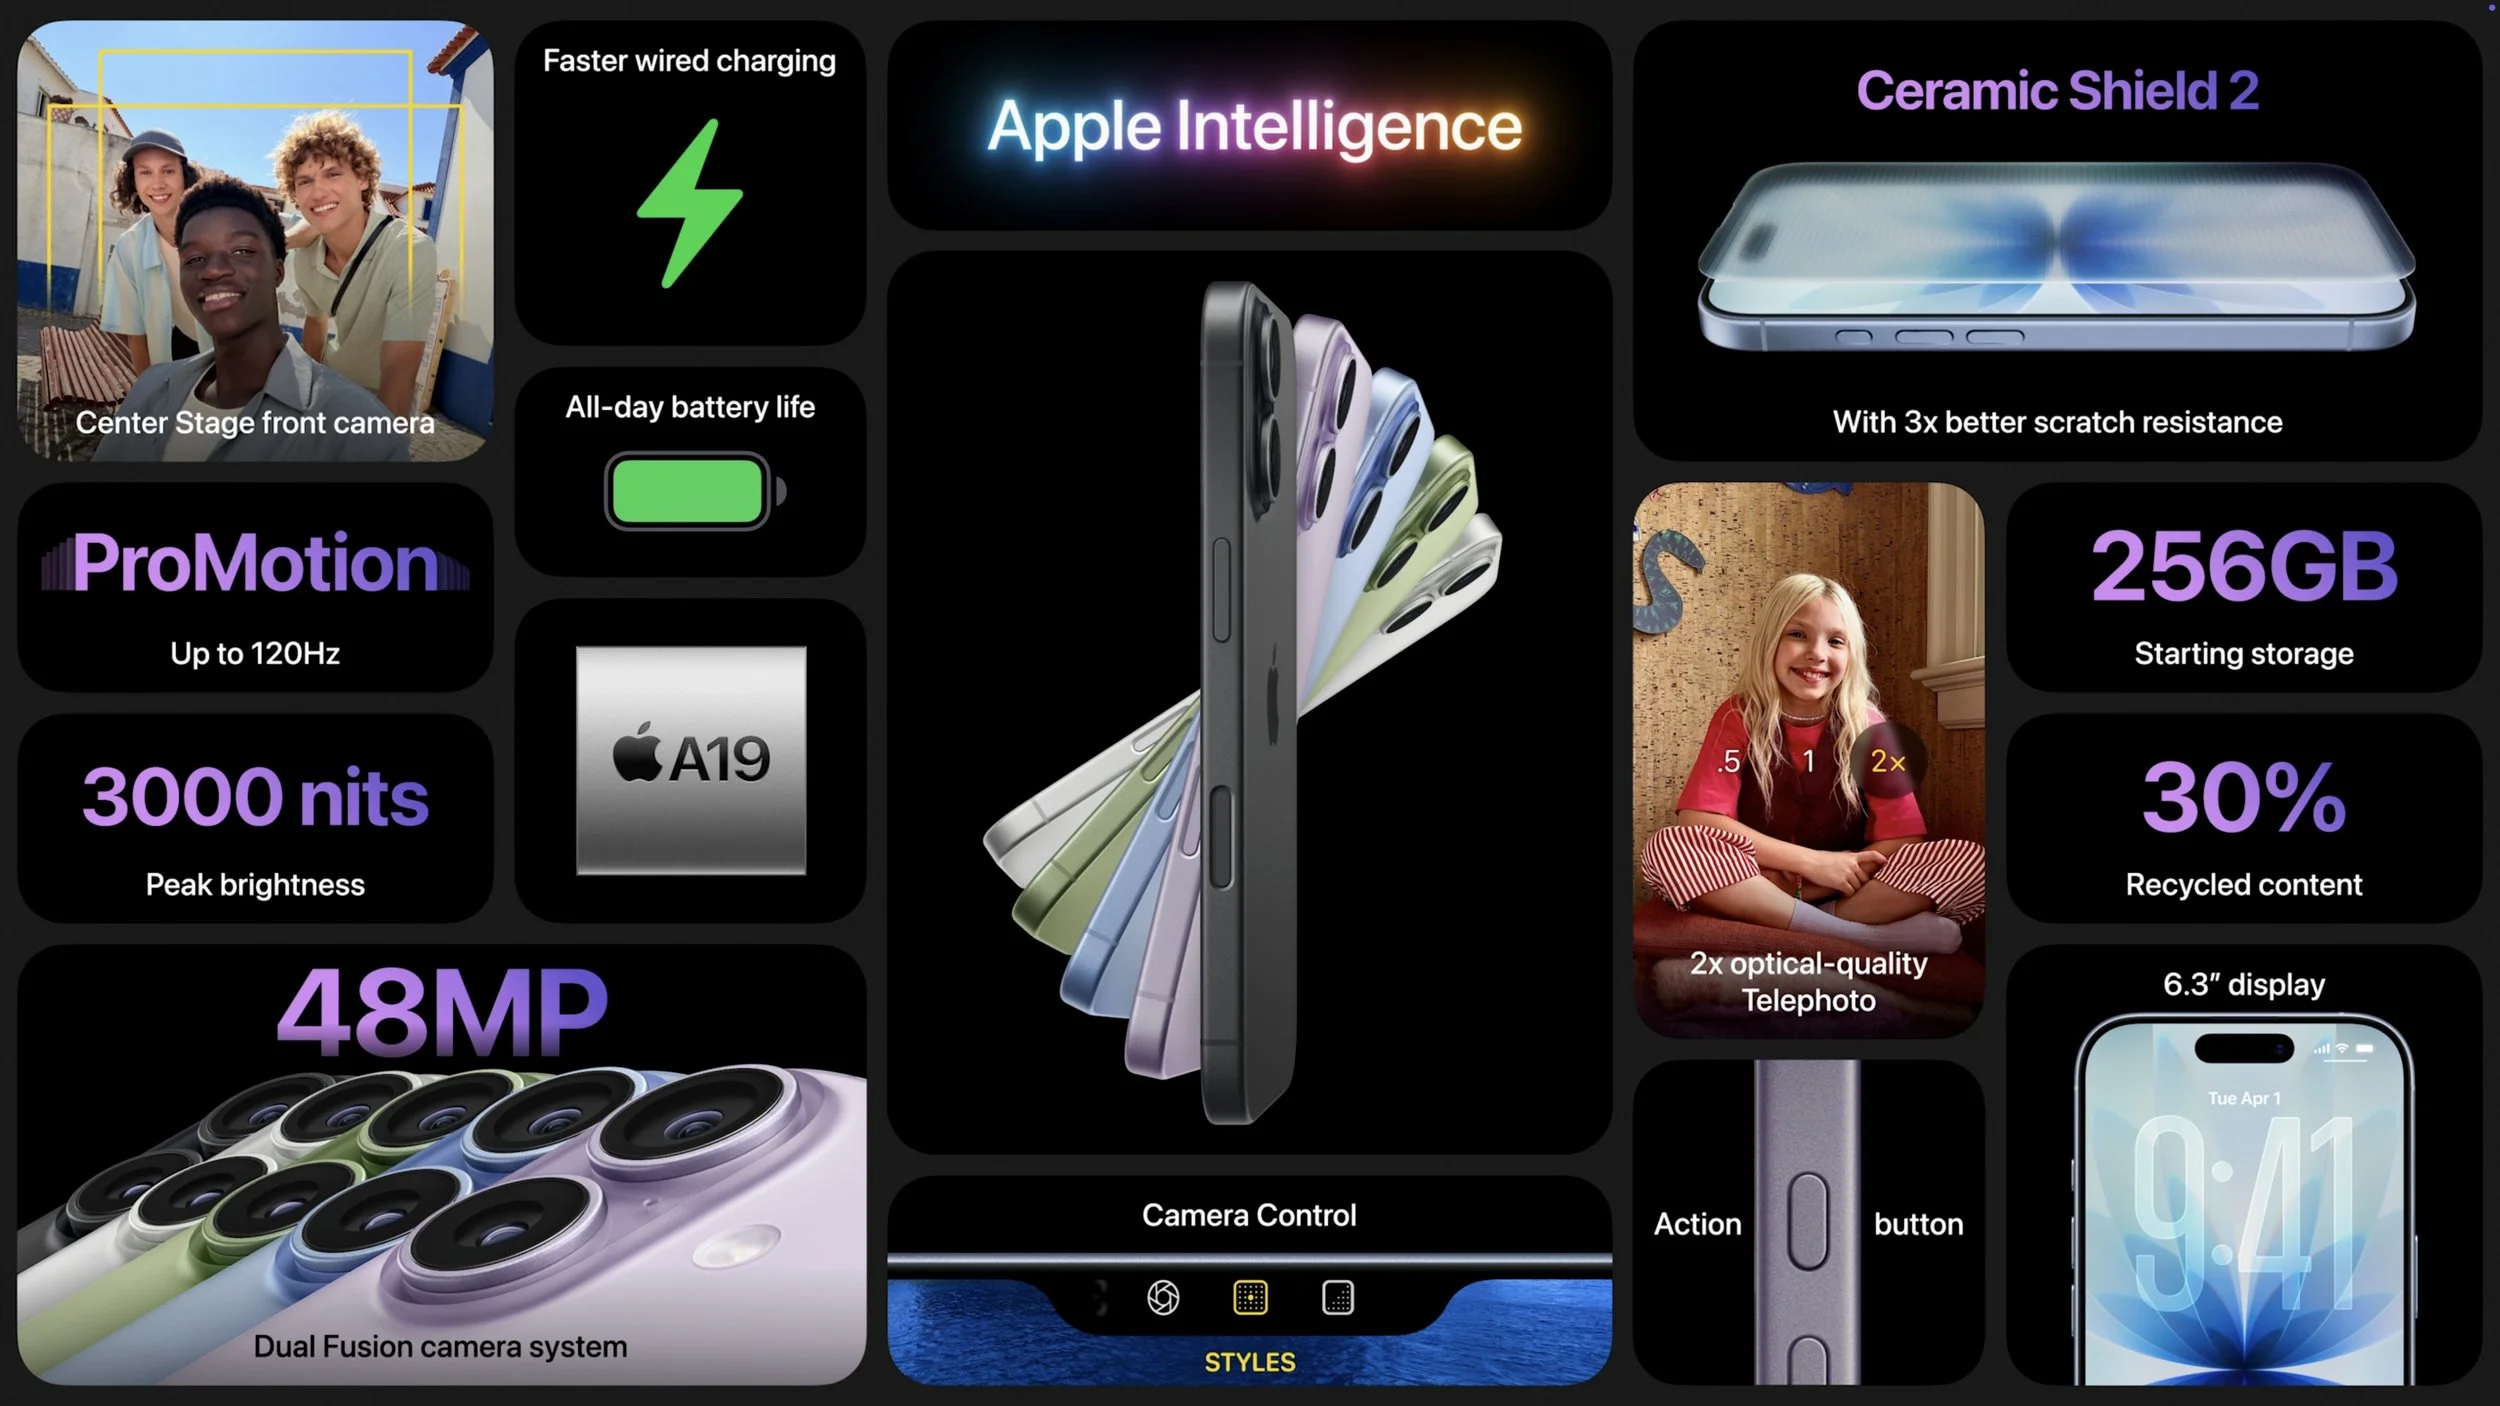
Center Stage front camera: Powered by a new square sensor, the new selfie camera automatically reframes shots to keep multiple people in view without rotating the phone. The 18-megapixel sensor also promises higher-resolution photos and stabilized video. You can even now record video using both the front and rear cameras at the same time.
A19 and A19 Pro: The latest generation of Apple silicon boosts CPU and GPU performance, with the A19 Pro adding neural accelerators to each GPU core for faster AI processing. The A19 powers the iPhone 17 and iPhone Air; the iPhone 17 Pro models rely on the A19 Pro.
Enhanced scratch and crack resistance: Apple made much of its new Ceramic Shield 2 coating, which reportedly provides three times better scratch resistance for the front glass. The iPhone Air and iPhone 17 Pro models also feature Ceramic Shield 2 for the back glass, where Apple says it’s four times more resistant to cracks.
Better battery life: All the iPhone 17 models have improved battery life compared to last year’s models, and although the iPhone Air has less internal space for the battery, it still offers the same battery life as last year’s iPhone 16 Plus.
Brighter displays: All models now support 3000 nits of brightness outdoors, making them easier to read in sunlight.
More storage: 256 GB has become the new standard in storage levels. You can upgrade to 512 GB on the iPhone 17, choose 512 GB or 1 TB on the iPhone Air and iPhone 17 Pro models, and go up to 2 TB on the iPhone 17 Pro Max.
N1 wireless chip: All new models now rely on an Apple-designed N1 chip that provides Wi-Fi 7, Bluetooth 6, and Thread networking. You won’t notice this—wireless should just work.
More specifically, the iPhone 17 gains a new 6.3-inch display, up from the 6.1-inch screen in the iPhone 16. The display also supports ProMotion adaptive refresh rates up to 120 Hz and includes always-on functionality. Additionally, the display can scale its refresh rate down to 1 Hz to preserve battery life. The iPhone 17’s Dual Fusion camera system is also a significant upgrade from the previous generation, moving from a 12-megapixel Ultra Wide camera to a 48-megapixel Ultra Wide camera that delivers more detail in landscapes and macro photos.
Thanks to a titanium frame, the iPhone Air measures just 5.6 mm thick, making it the thinnest iPhone ever. However, its 6.5-inch screen places it between the iPhone 17 and 17 Pro (6.3-inch) and the iPhone 17 Pro Max (6.9-inch) — it’s slim but not small. To make space for the internal components and battery, Apple replaced the traditional asymmetrical camera bump with a wider “plateau” that runs across the entire back of the iPhone Air. The biggest compromise in the iPhone Air, which may drive many potential buyers toward the iPhone 17 or 17 Pro, is the single 48-megapixel Fusion camera system, which lacks the Ultra Wide camera found in other models or the Telephoto camera in the iPhone 17 Pro. Its photos are likely fine, but they won’t match the quality of those taken with other iPhones if you want to zoom in or out. Lastly, the iPhone Air uses Apple’s new C1X cellular modem chip, which improves upon the C1 introduced in the iPhone 16e. We still don’t know how it compares to the Qualcomm chips in the iPhone 17 models.

The iPhone 17 Pro and Pro Max trade last year’s titanium frames for aluminum that provides better thermal conductivity with only a 7-gram weight gain. Heat dissipation was a focus this year, with Apple also adding a vapor chamber—that’s right, there’s water inside. All three of the iPhone 17 Pro’s Fusion cameras are now 48 megapixels, up from 12 megapixels for the Telephoto camera in last year’s models. You can now enjoy 4x optical-quality zoom with 48-megapixel shots and 8x optical-quality zoom with 12-megapixel images. Professionals will also appreciate ProRes RAW capture and Genlock synchronization support.

In terms of prices, the iPhone 17 starts at $799, the iPhone Air at $999, the iPhone 17 Pro at $1099, and the iPhone 17 Pro Max at $1199. If those prices are too steep for your budget, the iPhone 16e ($599), iPhone 16 ($699), and iPhone 16 Plus ($799) remain for sale.
Should you upgrade? Probably not from one of last year’s models or an iPhone 15 Pro, all of which support Apple Intelligence. With an older iPhone, the decision largely depends on whether you want a larger screen and a better camera (all three have the helpful Camera Control that debuted last year). Also consider how weak your current battery is—that’s often what prompts people to upgrade. You can’t go wrong with an iPhone 17, and even though the iPhone 17 Pro is pricey, you’ll get the best cameras and top performance. Even if it sacrifices some photo quality, the iPhone Air certainly makes a design statement.
Apple Watch SE 3, Apple Watch Series 11, Apple Watch Ultra 3
Last year saw only the release of the Apple Watch Series 10, featuring a thinner case and larger screen, while this year brings new models across all three Apple Watch lines: the Apple Watch SE 3, the Apple Watch Series 11, and the Apple Watch Ultra 3.
Apple Watch SE 3: The new entry-level model improves on its predecessor with a welcome always-on display. Its new S10 chip enables features like double-tap and wrist flick gestures, along with on-device Siri processing. It provides sleep apnea notifications, and the addition of temperature sensing allows cycle tracking. Fast charging and the ability to play media through the built-in speaker round out the major upgrades, along with 5G cellular capabilities for better connectivity. It’s available in midnight and starlight colors, starting at $249 (cellular adds $50). The Apple Watch SE 3 is a solid option with many fewer compromises than in the past, though it still lacks the ECG app, blood oxygen monitoring, and hypertension detection. It also has a smaller, less-bright display and a shorter battery life (18 versus 24 hours).

Apple Watch Series 11: There are few changes from last year’s Series 10. A new ceramic coating improves scratch resistance, and 5G connectivity for cellular-enabled models may provide better wireless performance with less battery drain. The battery life is now rated at up to 24 hours. Apple also touted the new hypertension detection and sleep score, but both are features of watchOS 26 and will be available on some earlier models as well. The Apple Watch Series 11 is available in aluminum (jet black, silver, rose gold, and space gray) and titanium (natural, gold, and slate) finishes starting at $399 (cellular adds $100).

Apple Watch Ultra 3: The most technologically impressive change is support for Messages, Find My, and Emergency SOS via satellite, much like the iPhone 14 and later. There are caveats—you’ll need a cellular plan for Messages and Find My via satellite to work, and sending and receiving SMS/MMS messages requires a powered-on iPhone connected to the Internet, though it doesn’t need to be nearby. It also supports 5G cellular. Another enhancement is a larger display that’s easier to see at off angles and can refresh once per second to show a ticking seconds hand. It also offers up to 42 hours of battery life and up to 72 hours in Low Power Mode. The Apple Watch Ultra 3 is available in natural or black titanium, starting at $799.
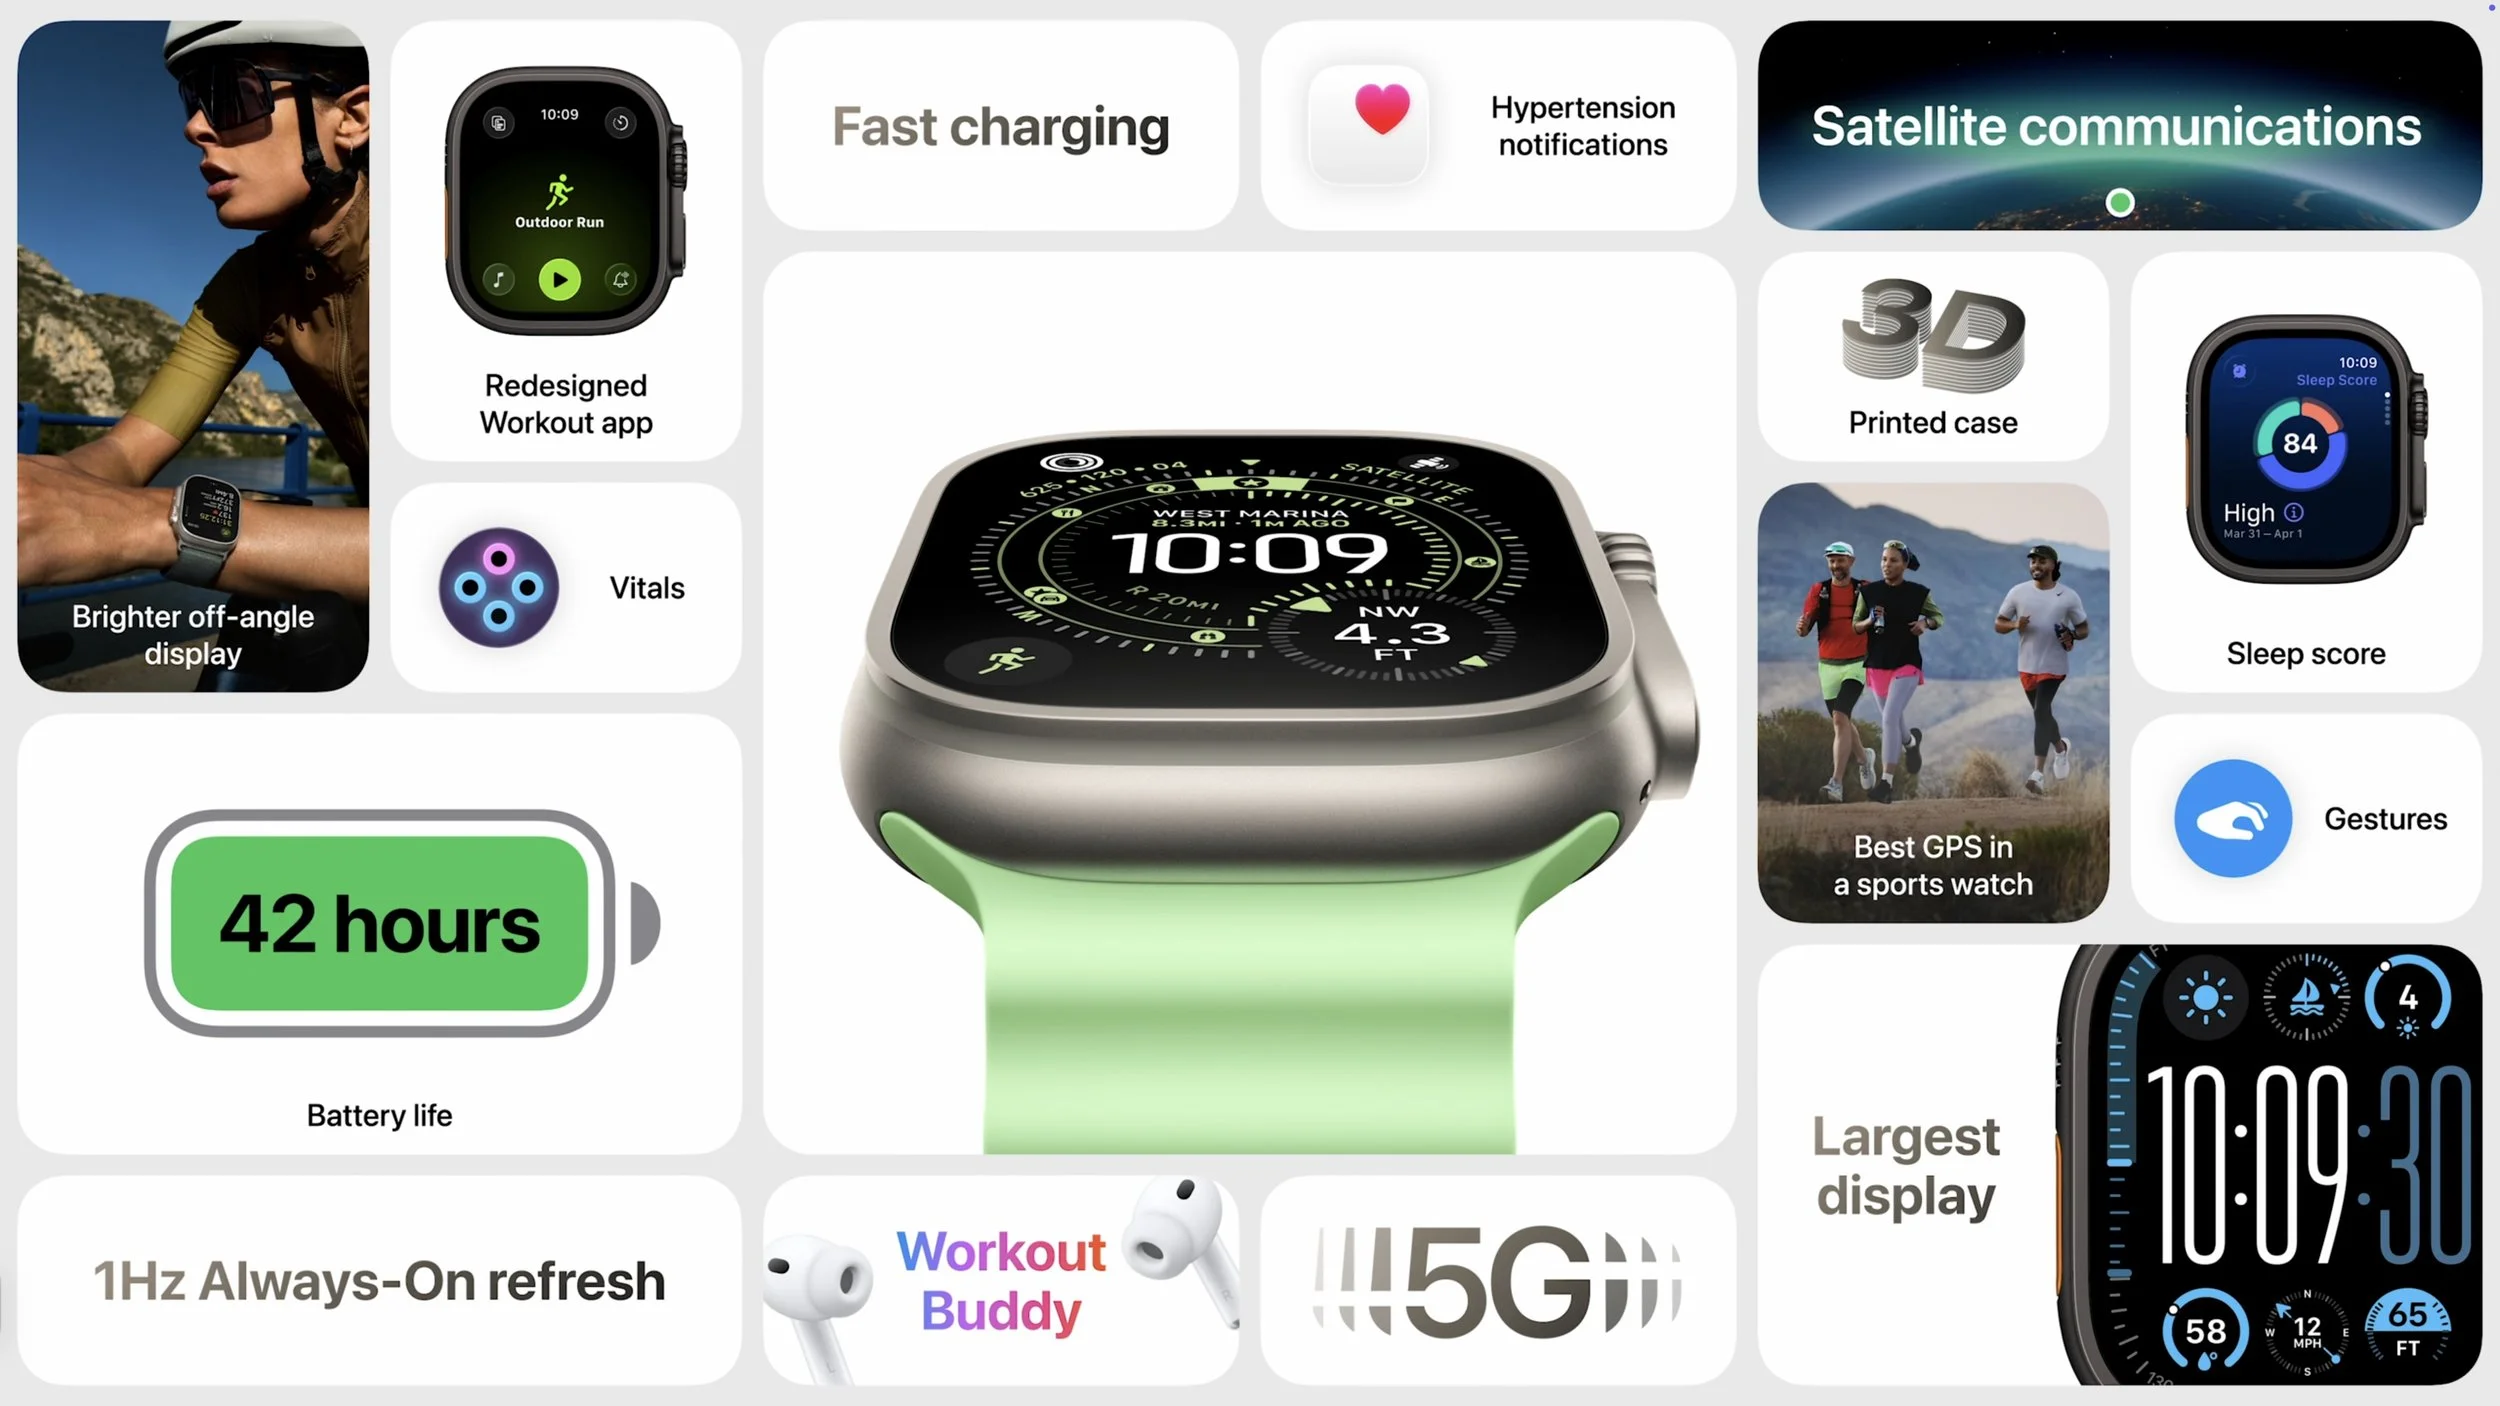
It’s difficult to recommend upgrading from an Apple Watch Series 9 or Series 10—the Series 11 is just too similar. However, the Apple Watch SE 3 offers real-world improvements over previous Apple Watch SE models and may also be sufficient for many users upgrading from an old Series 4 or similar. The main reason to upgrade to the Apple Watch Ultra 3 is for satellite connectivity; if you frequently go off-grid, it might be worth trading in an older Apple Watch Ultra.
AirPods Pro 3
The smallest new product Apple announced might be one of the most popular: the upgraded AirPods Pro 3. Apple’s premium earbuds have gained many fans due to their excellent noise cancellation, which effectively blocks out sounds like airplane engines, construction machines, and more—they even let you enjoy loud concerts without worrying about your hearing.
The new AirPods Pro 3 feature an internal redesign and new foam-infused eartips to provide twice the noise cancellation of the AirPods Pro 2 and four times that of the original AirPods Pro. Apple also slightly reduced their size, improved stability, and now offers five sizes of eartips, all designed to make the AirPods Pro 3 more comfortable. Those who exercise with AirPods will appreciate the new IP57 sweat and water resistance, along with heart rate tracking during workouts. The AirPods Pro 3 can even detect your movements and automatically start up to 50 workout types in the Fitness app on your iPhone. Finally, Apple boosted battery life to 8 hours with noise cancellation active (up from 6 hours) and up to 10 hours in Transparency mode.

The most impressive AirPods demo during Apple’s event was Live Translation, which enables real-time translation of face-to-face conversations in English, French, German, Portuguese, and Spanish initially, with Italian, Japanese, Korean, and Chinese coming later this year. If the other person isn’t wearing supported AirPods, you can use your iPhone as a horizontal display to show your speech in their language. Live Translation is powered by computational audio on an Apple Intelligence-enabled iPhone running iOS 26, and it also works on the AirPods Pro 2 and AirPods 4 with Noise Cancellation.
The AirPods Pro 3 remain priced at $249 with a wireless charging case. If noise cancellation is important to you, they’re an easy upgrade, especially if you’re coming from regular AirPods or the original AirPods Pro.
(Featured image by Apple)
What Is Safe Mode, and When Should You Use It?
Having Mac problems? Before trying more complex solutions, restart in safe mode—your Mac’s stripped-down troubleshooting environment. It disables non-essential software and clears system caches to help identify and resolve common issues.

Although Macs are highly reliable, unusual problems can still rear their ugly heads. Often, these issues are caused by software you’ve installed or accessories you’ve connected. If you’re experiencing Mac misbehavior that isn’t easily fixed by restarting, updating software, or unplugging a dodgy device, try safe mode. (Seriously, before checking if safe mode will help with a problem, you should always restart, ensure you’re running the latest version of macOS and any involved apps, and unplug non-essential peripherals.)
Safe mode is one of macOS’s key troubleshooting tools, though many users don’t know when or how to use it. By starting up your Mac with minimal required software and services, safe mode can help identify and resolve various system issues.
How to Enter Safe Mode
The process for entering Safe Mode varies depending on whether you have a Mac with Apple silicon or an Intel-based Mac.
For Macs with Apple silicon:
1. Shut down your Mac.
2. Press and hold the power button until the startup options appear.
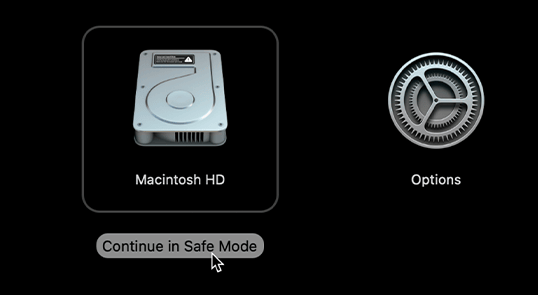
3. Select your startup disk.
4. Hold the Shift key and click Continue in Safe Mode.
5. Log in (you may need to do this twice). You’ll see “Safe Boot” in red in the menu bar on the login screen.

For Intel-based Macs:
Restart your Mac.
Press and hold the Shift key until you see the login window.
(If you have a firmware password, you must remove it in Recovery before starting up in safe mode.)
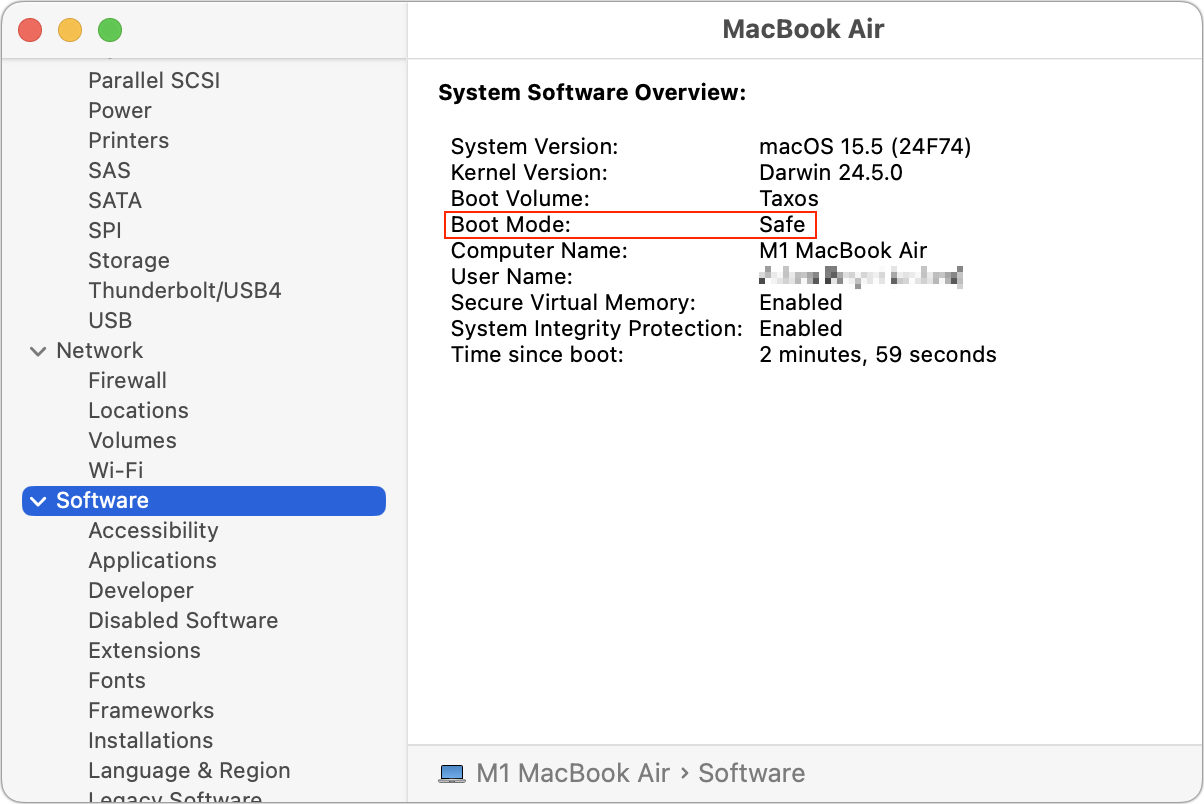
To verify that you’re in safe mode, click the Apple menu while holding the Option key, select System Information, and look for “Boot Mode: Safe” under Software. To exit safe mode, just restart your Mac normally.
What Safe Mode Does
When your Mac boots in safe mode, it performs several important functions designed to eliminate troubleshooting variables:
Prevents non-essential software from loading, including third-party login items, kernel extensions, system extensions (the modern replacement for kernel extensions), and fonts not installed by macOS
Clears some system caches, including font caches and the kernel cache
Apple also says that safe mode performs a basic check of your startup disk, but research from the community suggests that this check is no different from the one performed during a normal boot. If you suspect disk-related problems, use the First Aid feature of Disk Utility to conduct a more comprehensive (and much slower) test.
This minimal environment helps identify whether the problems are caused by software that loads during startup or by core system components. Safe mode also prevents many customizations and modifications from taking effect, making it easier to determine if third-party software is the cause of the issues.
However, the downside of using safe mode is that some macOS features may not work. According to Apple, these include “video capture, graphics performance, file sharing, Wi-Fi, accessibility, audio devices, and devices connected via USB, Thunderbolt, or FireWire.” In practice, some of these will work fine, but the main point is that you might not be able to do everything you want while in safe mode. It’s designed for troubleshooting, not regular use.
When to Use Safe Mode
Safe Mode is beneficial in several common scenarios:
Identifying extension conflicts: If your Mac is misbehaving, booting in safe mode can help determine if third-party kernel or system extensions are the cause.
Troubleshooting startup problems: If your Mac doesn’t start normally, safe mode might help you get in and address the issue.
Installing updates: Although this is less necessary in recent versions of macOS, if a macOS update fails to install properly, trying again in safe mode often resolves the issue.
Fixing update issues: Problems that appear after a macOS update—likely caused by outdated third-party software incompatible with the new version of macOS—can often be resolved by starting in safe mode.
Performance problems: If your Mac is running slowly, safe mode can help identify whether login items or extensions are causing the issue.
General diagnostics: Safe mode is a worthwhile initial step for diagnosing issues before attempting more complex solutions.
What Comes After Safe Mode
Once you’re in safe mode, it’s up to you to reproduce the problem you experienced earlier. Then, there are two possibilities:
The problem persists in safe mode: While this result is not ideal, safe mode has still provided you with more troubleshooting information by eliminating third-party login items, extensions, and fonts from consideration, along with clearing certain caches. Since those aren’t the cause, try testing in a clean user account, disconnecting remaining peripherals, and reinstalling macOS.
The problem goes away in safe mode: Great! First, restart your Mac to see if the problem has disappeared, as would be the case if it were related to corrupt caches. If the problem returns after restarting, you can narrow down the cause to third-party login items, extensions, or fonts. Remove third-party log-in items in System Settings > General > Login Items & Extensions. (We recommend taking a screenshot with Command-Shift-5 first, so you can remember how you were set up.) You can also disable extensions in System Settings > General > Login Items & Extensions by toggling their switches. Restart and test again. If that still doesn’t fix it, try testing in a clean user account to rule out any software issues tied to your main account.
The beauty of safe mode is that it’s easy to enter and entirely non-destructive. It may not help identify all possible problems, but it’s always worth trying after the simple steps of restarting your Mac, updating associated software, and unplugging non-essential peripherals.
(Featured image based on an original by iStock.com/Armastas)
Watch Out for Modern Tech Support Scams
Think you can spot a tech support scam? Today’s fraudsters are using everything from spoofed caller ID to manipulated search results. Here’s what to watch for and how to stay safe.

Although Apple’s products and services generally live up to Steve Jobs’s phrase “it just works,” problems do occur, opening the door to scams targeting users seeking tech support. As professional providers of technical support, we’ve seen firsthand how these frauds have evolved from simple pop-ups to disturbingly convincing operations and how easy it is to fall for them if you’re caught off guard. Here’s what to watch for and how to protect yourself.
Tech Support Scam Tactics
Tech support scams have evolved over the years, but the playbook remains the same: get you on the phone, make you panic, and extract money or sensitive information. Here’s what you need to watch out for, based on what clients are reporting to us:
Phishing texts claiming suspicious activity: You receive a text purporting to be from Apple, warning of “unusual activity” or an “unauthorized Apple Pay transaction” and urging you to call an Apple Support number. The message looks official, but the number connects you to a scammer, not Apple.
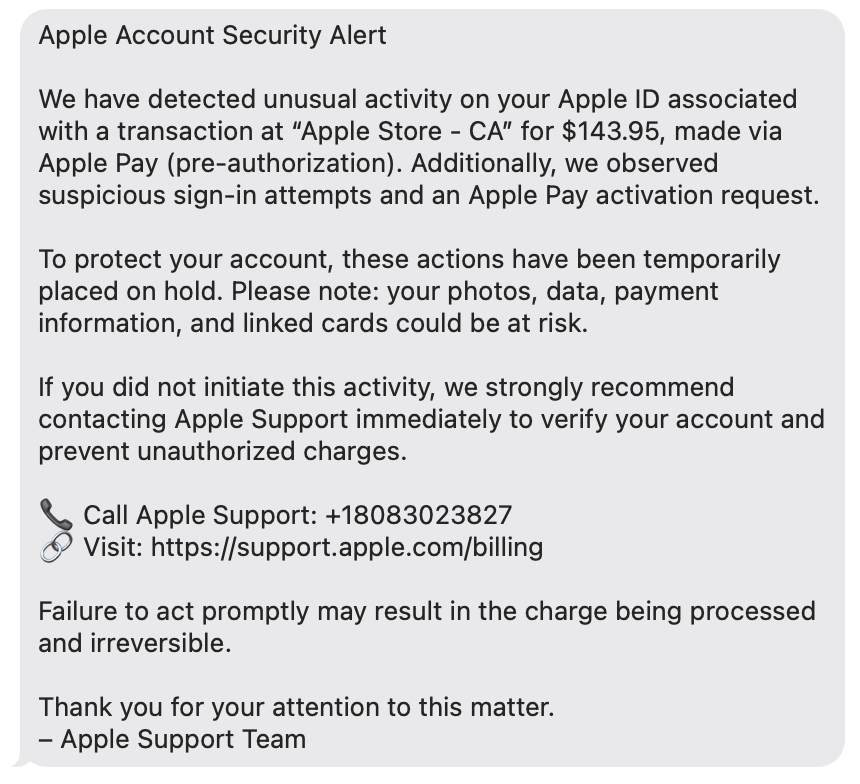
Robocalls and emails about iCloud changes or breaches: In this scam, you receive an automated call or email purporting to be from Apple, often with the caller ID spoofed to Apple’s actual support number. You’re told to press a number or call back, and once you’re talking to a scammer, they try to get you to grant remote access and change your password so that they can take over your account.

Fake support numbers in Google search results: A particularly sneaky scam manipulates Google search results and ads. When you search for support (e.g., “Apple help,” “HP support”), you may see ads or top results that appear official. As Malwarebytes Labs reports, clicking these can inject a fake support number directly into the search field on the company’s real website. Call that number, and you’re routed to a scammer who may demand remote access, payment for bogus repairs, or your personal data.

Pop-ups, ads, and emails mimicking Apple: Fake pop-ups, ads, or emails warn of urgent issues, such as the egregiously expensive Apple TV subscription in the example below, and provide numbers to call to rectify the situation. As always, provided phone numbers lead to scammers.

How to Protect Yourself from Tech Support Scams
In an ideal world, you’d be able to identify every scam for what it is and simply move on with your life. Unfortunately, because technical problems make many of us anxious, the scams can cause people to panic and lose their critical thinking skills. To stay safe, remember these rules:
Never respond to unsolicited tech support contacts: Ignore phone calls, texts, emails, or pop-ups claiming to be from Apple, Microsoft, Google, Amazon, or any other company.
Don’t trust caller ID or search results: Scammers can spoof numbers and manipulate search results or ads. Always confirm contact info directly from the company’s official website—type the URL yourself or use a bookmark.
Be wary of urgent demands: Real tech support doesn’t threaten you or create artificial urgency.
Never allow remote access unless you initiated the contact: If you didn’t reach out to a trusted provider, don’t let anyone access your device.
Use only official support channels: When you do need support, contact the company directly. For Apple, use support.apple.com or call 1-800-275-2273 in the United States (look here for other countries’ phone numbers).
If you work with us and we need to call you (for example, because of proactive monitoring), we’ll always identify ourselves clearly. If you’re unsure, hang up and call us back at a number you already have—we won’t be offended.
How to Recover from Being Scammed
What should you (or someone you’re helping) do after falling for a tech support scam? First, we’re here to help for real, so don’t be shy or embarrassed about contacting us for assistance. There are three main areas to focus on:
Change passwords: Immediately change any passwords that you may have shared or entered during a remote access session. If you use the same passwords on any other websites, change those passwords too. Wherever possible, turn on two-factor authentication. A password manager like 1Password or Apple’s Passwords makes all this easier.
Run anti-malware software: If you already have legitimate anti-malware software, run it to make sure the scammer didn’t install anything malicious on your Mac. If you don’t have up-to-date anti-malware software, contact us to see what we currently recommend.
Protect your finances: If you paid for any bogus services, call your credit card company and reverse the charges; you’ll also undoubtedly get a new credit card number. Monitor financial accounts for unauthorized transactions and document any suspicious activity.
Finally, if you do fall prey to a scam, watch out for subsequent “refund scams.” Months after the initial incident, you might get a call offering a refund or compensation, or claims that the scam company is being investigated. These are almost always also scams designed to extract more money or information. If anyone contacts you about a previous tech support interaction, verify their legitimacy independently via official channels.
(Featured image by iStock.com/Supatman)