Troubleshooting Steps for When Your Mac Won’t Print
Unable to print? Look for a solution in our comprehensive troubleshooting steps.
There’s little more frustrating than being unable to print a document when you need it. You choose File > Print, and nothing happens. Or, worse, macOS looks like it’s printing, so you focus on some other task, only to realize 20 minutes later that nothing has come out of the printer. Now what? Try these troubleshooting steps.
Check the Printer’s Print Queue App
Whenever you print, the printer’s Print Queue app appears in your Dock, named for the printer. (If it doesn’t, open System Preferences > Printers & Scanners, select the desired printer and click Open Print Queue.)
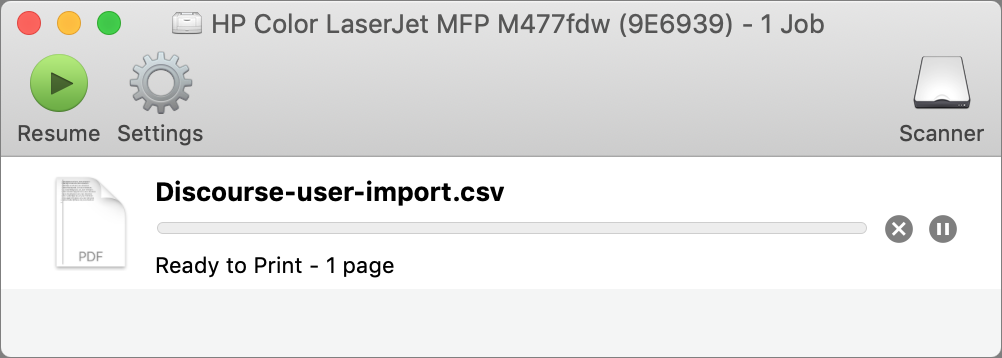
In the Print Queue app, look at the status of the printer and the print job. First off, if you print to multiple printers, does the app correspond with the correct printer? If not, cancel the job by clicking the X button to its right, quit the Print Queue app, print again, and choose the correct printer from the Printer pop-up menu in the Print dialog.
The Print Queue app may also display a useful error message that tells you what’s wrong, such as the printer being offline or not connected. You may also see old print jobs stuck in the queue that are blocking the current job—delete them by clicking the X next to their names.
If something has caused the printer to be paused, click the green Resume button. That won’t work if the printer has paused itself due to a paper jam or low supplies—in such a case, resolve the problem first.
Check the Printer and Its Connection
Error messages may have given you a hint about problems with the printer itself, but they’re not always helpful. Verify the following:
Is the printer turned on? Doh! If necessary, turn it on. Also, try turning it off and back on—this resolves a surprising number of printing problems.
Is the printer connected? It should be connected via either USB or your Wi-Fi or Ethernet network—make sure the cables are plugged in and it’s on the same network as your Mac. Consider restarting your router if there seem to be communication issues.
Does the printer have paper in it? No paper, no printout.
Is there a paper jam? Printers usually squawk about paper jams. Clear it before trying again.
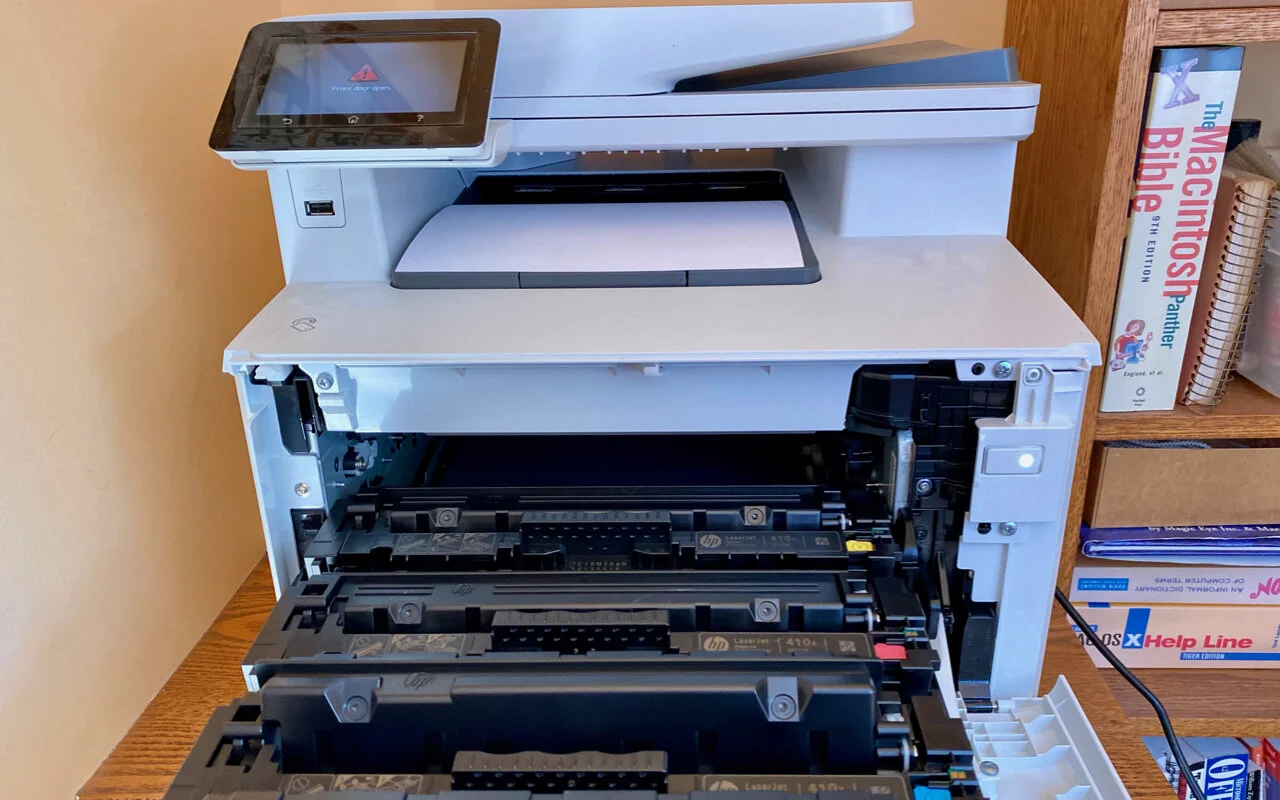
Are any ink or toner cartridges empty? Some printers are notorious for refusing to print if even one ink cartridge is empty, or even low. That can be true even if you’re printing only in black and a color cartridge is empty.
There’s one final check of the printer you can perform: printing a test page directly from the printer (check your printer’s manual for instructions). If that fails, the printer may need servicing.
Check Your Mac’s Printing Setup
The final place to look for a solution to printing problems is in your Mac’s printing subsystem. Problems here can be specific to your document or to its app, or they can be related to the printer driver.
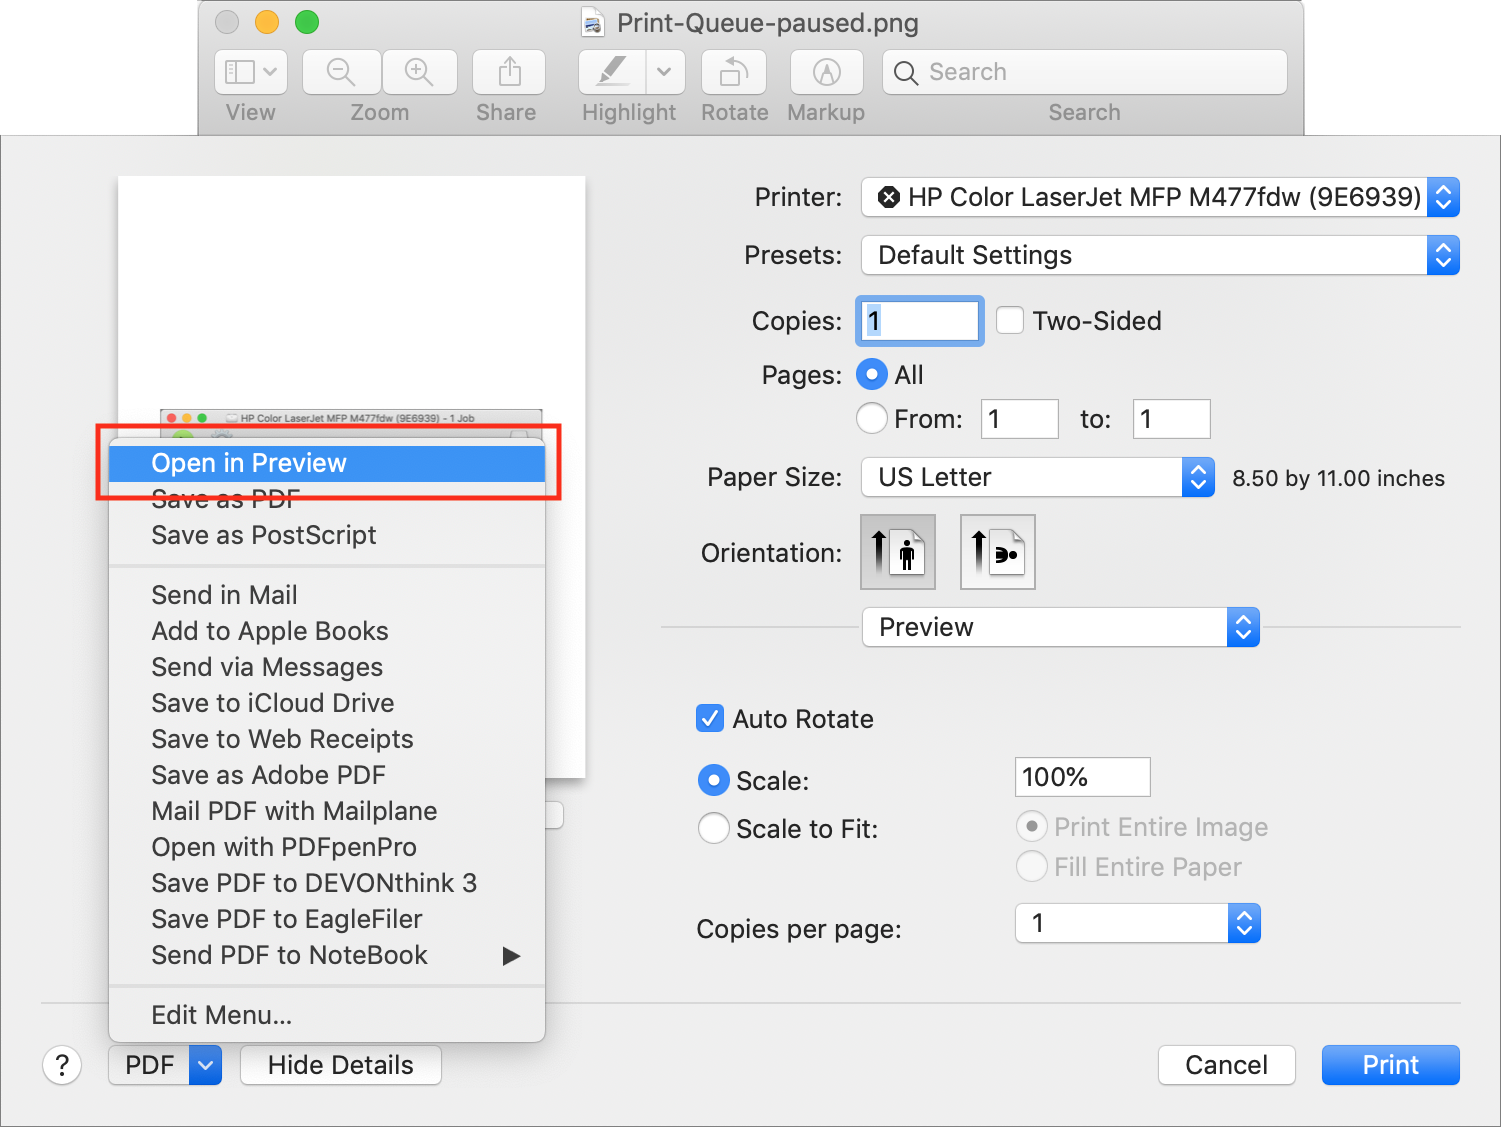
For your first test, try opening your document in Preview as a PDF (in the document’s Print dialog, choose PDF > Open in Preview) and printing it from Preview.
If that works, you know that your Mac can print, so the problem has to do with either the document or the app. To isolate the problem to the document or the app, print another simple document from the app. If that does print, you know the problem is with your document, but since you’ve already gotten a PDF to print of that document, your immediate problem may be already solved. If the problem is with the app, you’ll eventually need to solve it, of course. But most of the time, the problem actually lies with your printer driver.
It’s uncommon for driver updates to come outside of macOS updates these days, but check System Preferences > Software Update just to make sure. You can also check the printer manufacturer’s Web site for updates; Google on “printerNameAndModel Mac driver” to find what’s available. Compare that against what you see when you select the printer in System Preferences > Printers & Scanners and click the Options & Supplies button. If there’s a newer version, download and install it.

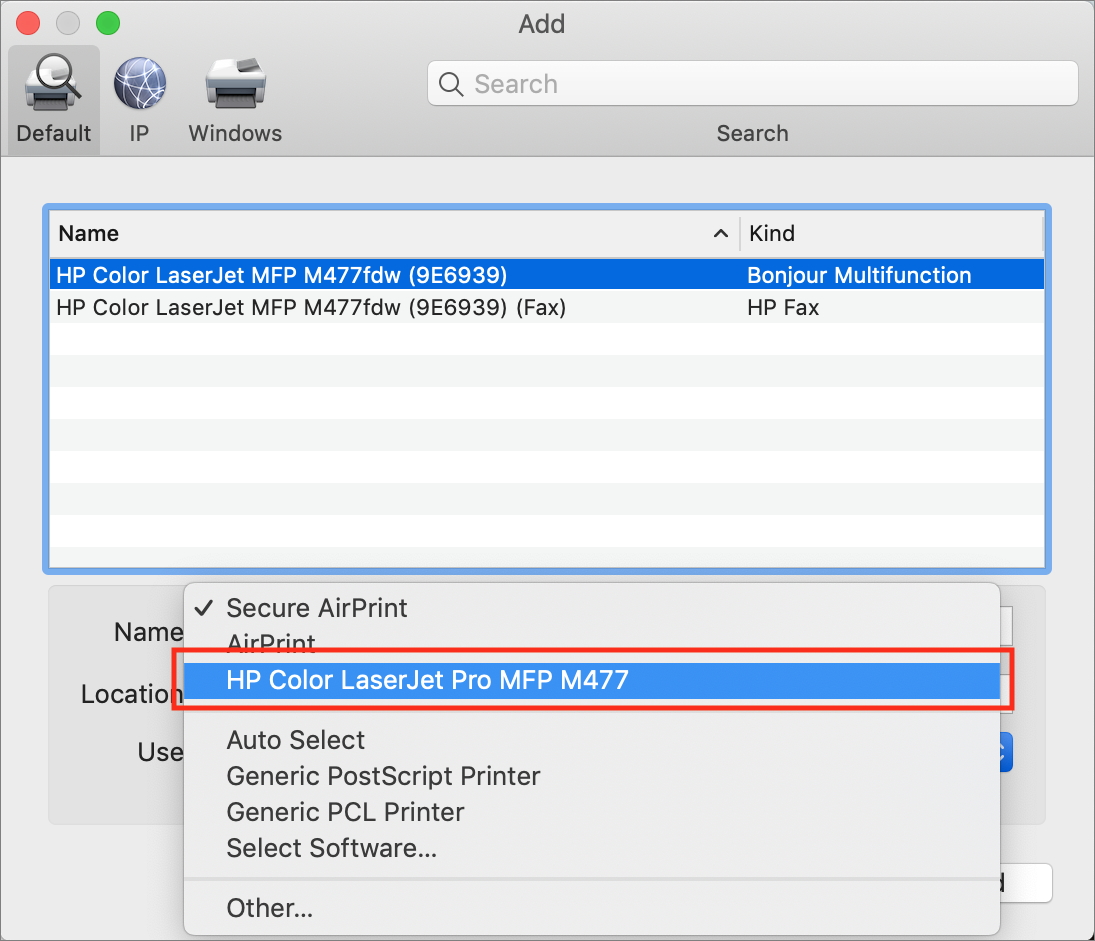
If installing a new version doesn’t work, try deleting the printer from Printers & Scanners and re-adding it. Select the printer in the list and click the – button at the bottom to delete it. Then click the + button and add it back.
No luck? Try deleting the driver and adding it again, but choose a different option from the Use pop-up menu at the bottom. Start with the name of the printer itself instead of Secure AirPrint to ensure you’re using the manufacturer’s driver instead of Apple’s. If that doesn’t make a difference, try again with Generic PostScript Printer or Generic PCL Printer—beware that they may not provide full functionality beyond basic printing. For the ultimate in trying something different, if it supports your printer, try installing an independent driver from the open-source Gutenprint project.
One note: if possible, avoid using the Printer Sharing feature that’s been in macOS for years. It works, but it requires that the Mac doing the sharing be turned on and awake whenever anyone using the shared printer wants to print.
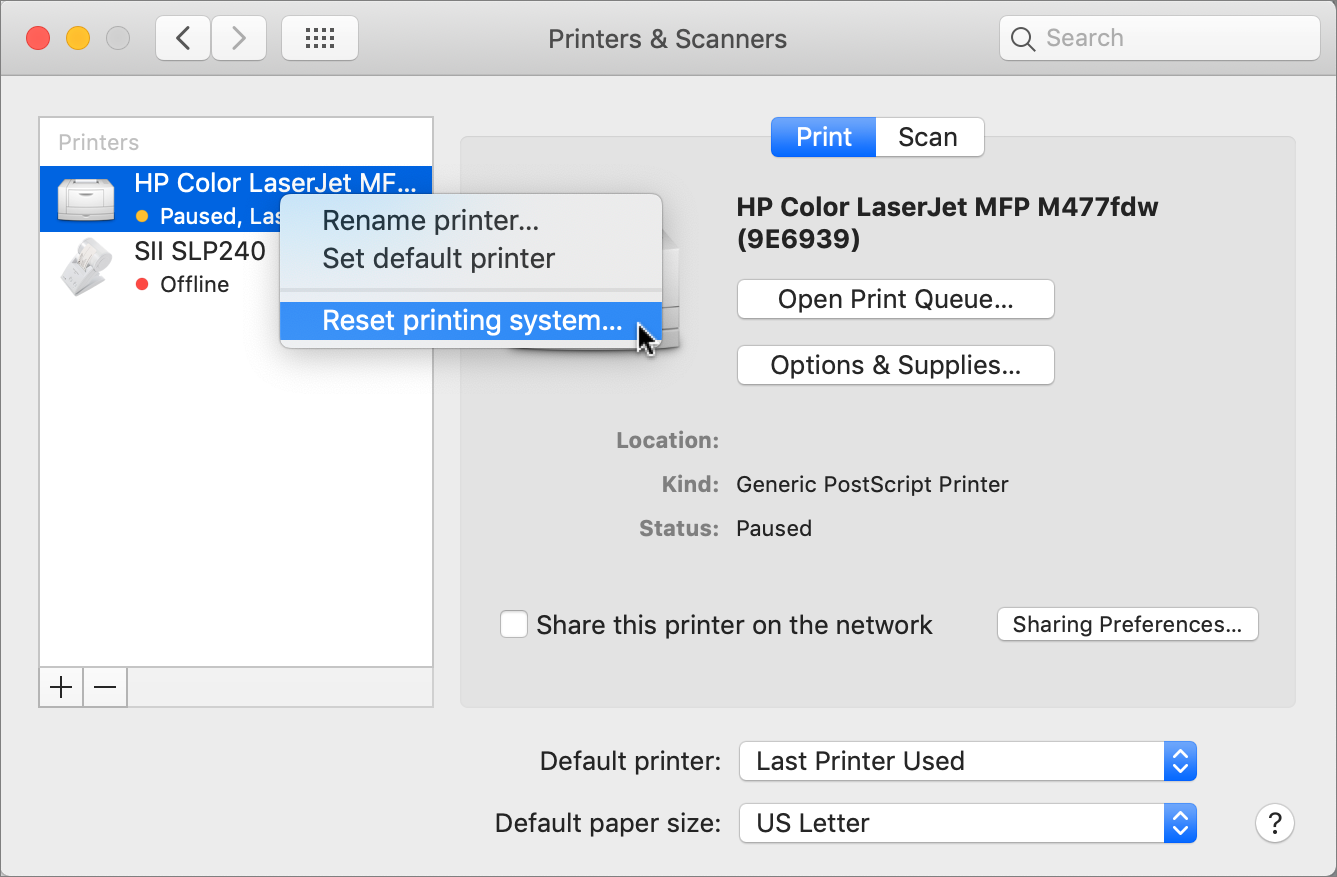
If you’re still stuck, go nuclear. Go back to the Printers & Scanners preferences, Control-click any printer, and choose Reset Printing System. As the warning dialog tells you, doing so will delete all your existing printers, scanners, and faxes, and any pending print jobs. You’re basically resetting your printing system to factory defaults, after which you’ll have to add printers back again.
One of these solutions will almost certainly solve your problem, but if not, give us a ring!
You can also call to schedule an onsite appointment with one of our technicians if you are in need of further assistance.
(Featured image by Adam Engst)
Strategies for Moving from Mojave to Catalina
Considering upgrading to Catalina? Or maybe you have a new Mac that came with it already installed? Read on for strategies for downgrading to Mojave or running both Catalina and Mojave.

For some Mac users, macOS 10.15 Catalina is no longer a choice. That’s because the new 16-inch MacBook Pro and the 2019 Mac Pro that Apple released late last year ship with Catalina installed and can’t run any previous version of macOS.
But for most people, it’s time to consider an upgrade to Catalina. Most backup software now works with Catalina’s bifurcated drive approach that puts the system on a separate, read-only volume from your data and apps. We’ve all had several months to come to terms with the fact that old 32-bit apps won’t even launch in Catalina. And Apple has shipped several updates that bring Catalina to version 10.15.3, addressing most of the complaints users had with the initial release.
If you are ready to try Catalina but still want to use 10.14 Mojave, we have some advice for how to make that happen. This could be the case for someone who has purchased a new Mac that does support Mojave but came with Catalina installed, for someone who wants to test Catalina while still using Mojave, or for someone who wants to move on to Catalina but has a 32-bit app that they aren’t ready to say good-bye to.
Downgrade from Catalina to Mojave on Some New Macs
Apple has started installing Catalina on new Macs other than the 16-inch MacBook Pro and 2019 Mac Pro, but since these older Macs can still run Mojave, it’s possible—if a bit tricky—to downgrade them to Mojave.
System engineer Armin Briegel has worked out a way of downgrading new Macs to Mojave. First, you create a Mojave Installer USB drive. To use that drive to boot a Mac with a T2 security chip, you must allow external booting from the Security Utility on the Recovery partition. Once you’ve booted from your Mojave Installer drive, use Disk Utility to erase the entire internal drive. Then install Mojave.
Use Virtualization to Keep 32-bit Apps Running
For some people, what’s keeping them on Mojave is a single 32-bit app that will never be updated in an appropriate fashion. Quicken 2007 falls into this category, as does the ScanSnap Manager app for the ScanSnap S1300, S1500, and S1500M scanners. Sure, you can get a current version of Quicken, but it may not do precisely what you want, and Fujitsu would be happy to sell you a new ScanSnap scanner that does come with 64-bit software, but then you’ll have to figure out what to do with your old scanner.
So if you’re ready to upgrade to Catalina in general but need to maintain access to one or two apps, one solution is virtualization software: either Parallels Desktop or VMware Fusion. Both apps let you run nearly any operating system—including older versions of macOS like Mojave—in a virtual machine. In essence, they fool the guest operating system, whether it’s Mojave or Windows, into thinking it’s running normally on a computer, when it’s actually running in a virtual environment.
These apps cost about $80, and while there’s a bit of work in setting them up (the screenshot below shows the option for installing Mojave in Parallels Desktop during setup), once you have them configured, it’s easy to run older apps alongside newer ones with little or no performance hit. This approach is also perfect for a 16-inch MacBook Pro or Mac Pro that can’t run Mojave in any other way.

Install Catalina and Mojave on Separate APFS Volumes and Switch Boot
Finally, there’s one other option that lets you switch back and forth between Mojave and Catalina, assuming your Mac supports Mojave. You can create an APFS volume on your internal drive and install another version of macOS on that. It’s easy, and Apple provides full instructions. The only problem with this approach is that you’ll have to restart to switch operating systems, whereas both are available simultaneously with the virtualization solution.
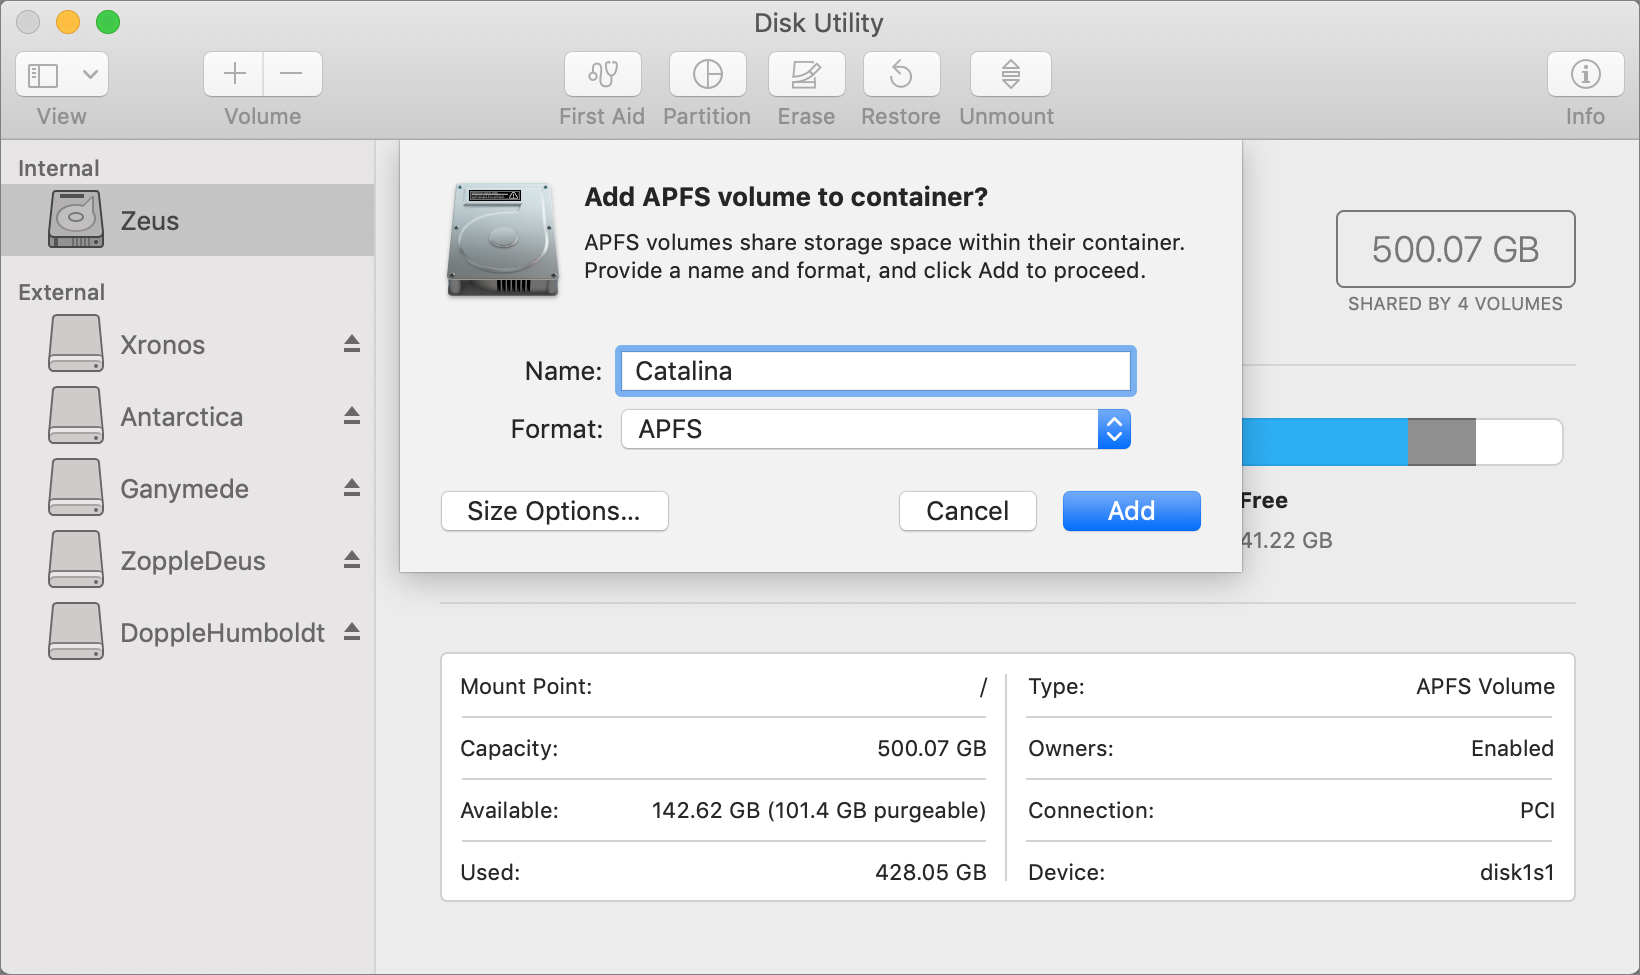
First, make sure you have at least one current backup of your Mac, since it’s foolhardy to adjust your drive structure without one. Next, in Disk Utility, select your internal drive, choose Edit > Add APFS Volume, and click Add. We recommend naming the drive such that it will be clear what’s on it.
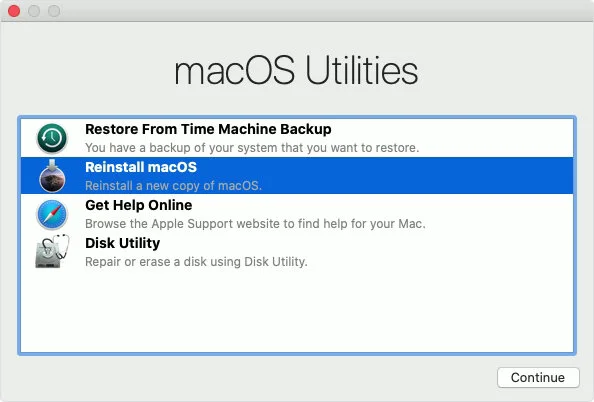
Then boot into macOS Recovery and install the desired version of macOS on your new volume. The keys you hold down to get into Recovery determine which version of macOS you’ll get:
Command-R reinstalls the latest version of macOS that was installed on your Mac.
Command-Option-R upgrades to the latest version of macOS that’s compatible with your Mac.
Command-Shift-Option-R reinstalls the version of macOS that came with your Mac, or the closest version still available.
Choose Reinstall macOS from the macOS Utilities window and proceed from there.
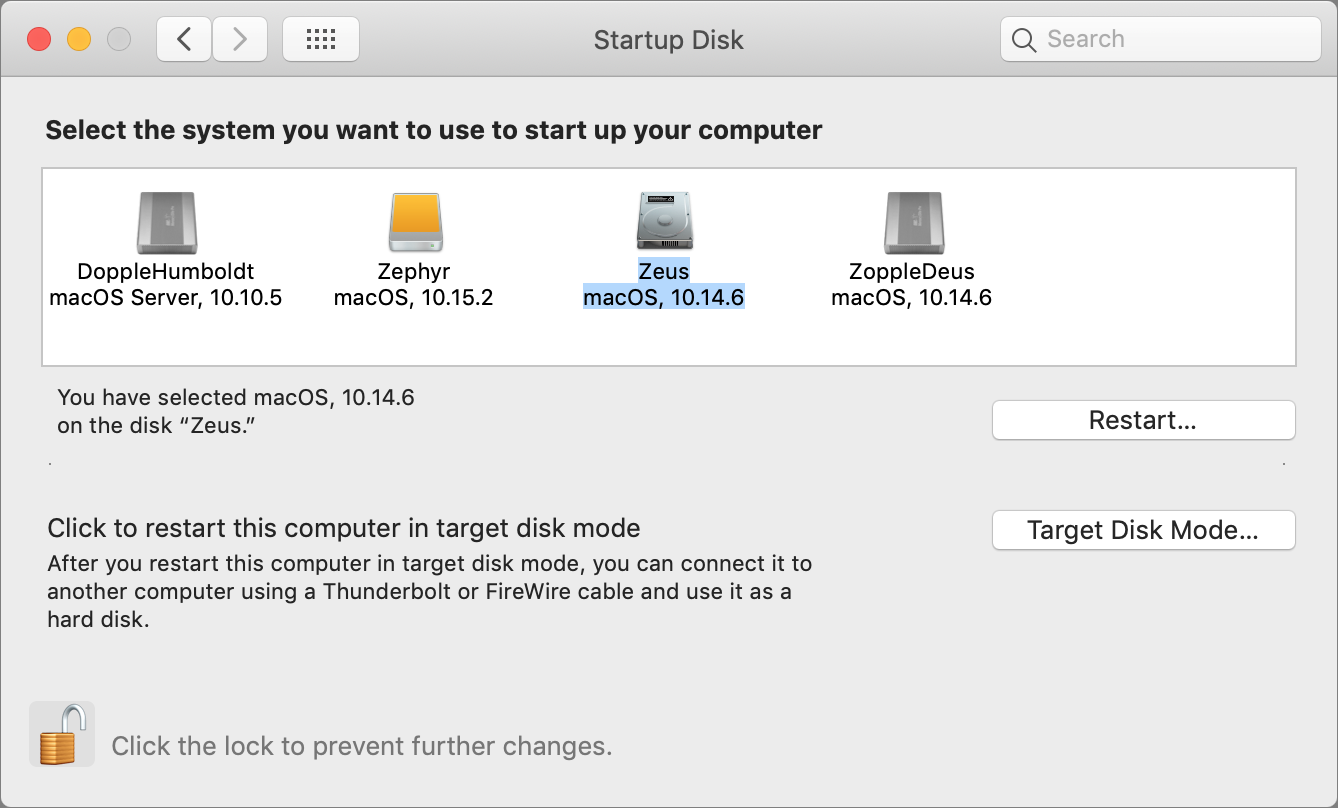
Once the installation is complete, to switch from one version of macOS to another, open System Preferences > Startup Disk, choose the desired volume to boot from, and then click Restart. Or, press Option at startup and select the desired volume from the Startup Manager screen.
Needless to say, the decision about when and how to upgrade to Catalina isn’t a trivial one, so feel free to contact us to discuss your particular situation or to get help with any of the procedures that we’ve described in this article.
(Featured image by Apple)
To Prevent Spearfishing, Set a PIN or Passcode on Your Cell Phone Account
It’s shockingly easy for someone to take over your cell phone number. Once they’ve done that, they can reset passwords on many of your online accounts. Read on to learn how to protect your cell number with a PIN or passcode.

Spearfishing. It’s no longer just a tropical ocean sport that could provide seafood for dinner. In today’s tech world, spearfishing is when someone targets you specifically, usually with the goal of taking over your online accounts. Once that’s done, the attacker will try to siphon money from your bank account, impersonate you in an attempt to deceive family or colleagues into sending money, or attempt to ruin your reputation.
You’re probably thinking, “No one would ever target me. I’m not interesting enough.” It is true that the people who should worry the most about spearfishing attacks are high profile or have a high net worth, but modern online criminals aren’t that fussy. In particular, they’re more likely to go after older people. Why older people? Older people tend to be relatively well off and less likely to notice the symptoms of a spearfishing attempt. You should also be concerned if you’re a politician or journalist, have ever been involved in an ugly divorce or legal battle, or can easily think of people who have it in for you.
As we’ve said many times, it’s imperative that you use a secure password manager like 1Password or LastPass to create, store, and enter a strong, unique password for each of your online accounts. Plus, we strongly recommend using two-factor authentication—where you have to enter a one-time code in addition to your password—on all accounts that support it, particularly important ones like your email and banking accounts. But even if you do all that, you may be vulnerable to another tactic favored by spearfishers—the cell phone SIM takeover.
Here’s how it works. Every cell phone, including every iPhone, has inside it a SIM card that gives it a phone number. Swap that SIM into a different phone and it will adopt the SIM card’s number. The problem is that support reps at cellular carriers like AT&T, Sprint, T-Mobile, and Verizon can also move your phone number from one SIM card to another. That makes it possible for you to lose your iPhone, buy a new one, and have your phone number associated with the new one. It also lets you port the phone number to a different carrier, if you wish to switch.
All an attacker has to do is call your cellular provider, pretend to be you, say that they’ve lost their iPhone, and ask to have the number ported to a new device (one they control). It’s likely that the support person will ask a few simple questions to verify your identity, but a clever attacker will likely know your address and be able to learn details like your mother’s maiden name, first-grade teacher’s name, and favorite color, all thanks to Facebook. Criminals can acquire even information like your Social Security number through other data breaches.
Once the attacker controls your cell phone number, they can try to reset the password on various accounts, receiving any verification codes that would normally have been texted to your phone. They’ll probably focus on your email account first because, with control over it, they can reset passwords elsewhere even more easily. And once the attacker has access to your accounts, it’s game over, and you’ll be faced with the difficult and complex task of retaking control and mitigating damage.
How can you protect yourself from such an attack? Whenever possible, it’s better to generate authentication codes with an app such as 1Password, Authy, or LastPass. That removes some of your exposure, but for better or worse, your cell phone number is still the most basic form of identity for many things.
The most important thing to do, then, is to set up an additional PIN or passcode that the carrier will ask for before making any changes to your account. You’ll also have to provide it when logging in to your cellular account online. Such a PIN or passcode is different from a two-factor authentication code that changes continuously—you set your PIN or passcode just like you do for your iPhone or ATM card. And, of course, make sure to store that PIN or passcode in your password manager alongside your other credentials so you don’t forget it.
Learn more about how each of the major carriers supports PINs and passcodes at the links below, and if your carrier isn’t listed, call the company’s support line:
AT&T
Sprint
T-Mobile
Verizon
Don’t put this off—if you don’t already have a PIN or passcode on your cellular account, set it up right away.
(Featured image by Gerd Altmann from Pixabay)
Here’s How to Mark Up Photos and Screenshots with Text and Graphics in iOS 13
Ever needed to circle an item on an expense receipt, add some text to a photo, or sign a PDF…on your iPhone or iPad? iOS 13’s Markup tools are surprisingly capable—learn more about what they can do here:

Ever wanted to take a photo of a receipt and circle the item for which you should be reimbursed? Or perhaps you’d like to put some text or a speech balloon on a photo? You can do all that and much more using iOS 13’s Markup tools. They’re available when you take a screenshot, in Files and Photos, and even for image and PDF attachments in Mail. Here’s what you can do.
Accessing iOS 13’s Markup Tools
How you invoke the Markup tools varies a bit by app. Here are some common techniques:
After you take a screenshot, tap its thumbnail preview.
In Files, tap an image file or PDF to view it, and then tap the Markup button in the upper-right corner.
In Photos, tap Edit to start editing a photo, tap the More button in the upper-right corner, and then tap Markup in the activity view that appears.
In Mail, press and hold an image in an email message until an activity view appears, and then tap Markup and Reply.
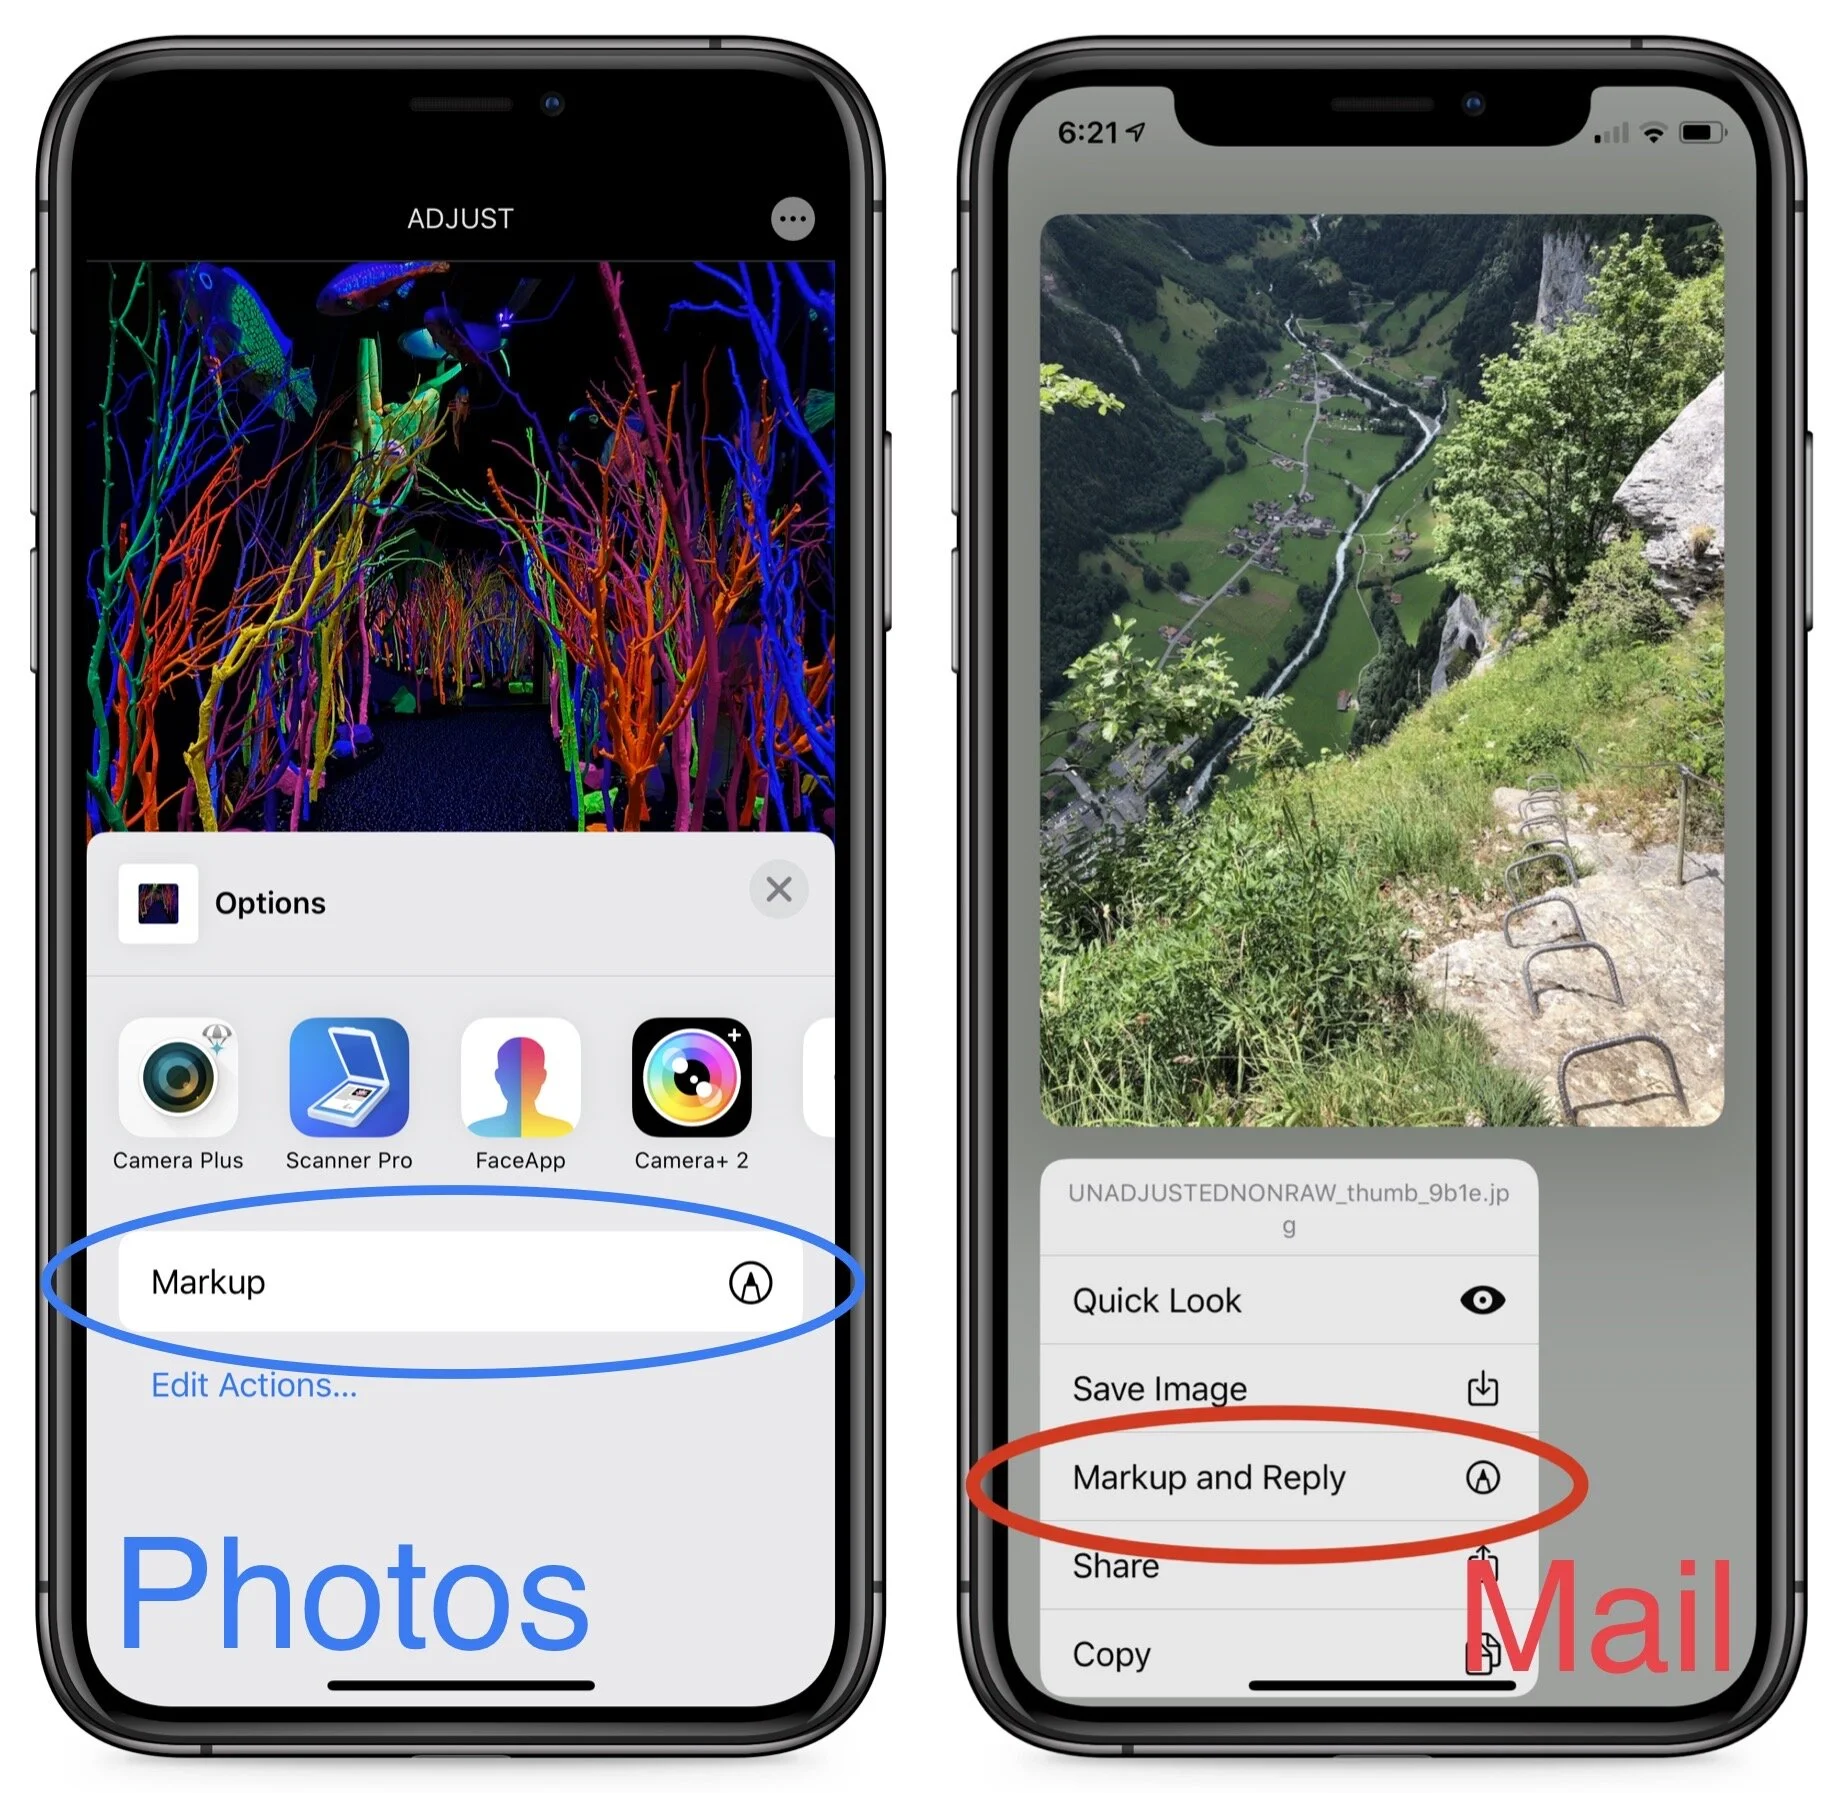
In other apps, look for the Markup button or an activity view that might have a Markup option on it.
Using the Markup Tools
The iOS Markup tools are surprisingly powerful, so much so that you might find them just as capable as a basic graphics app on the Mac. Before we get into the details, however, note the buttons at the top of the screen. Exactly what you’ll see depends on context, but you can learn the basics from this rundown of the buttons in Photos.
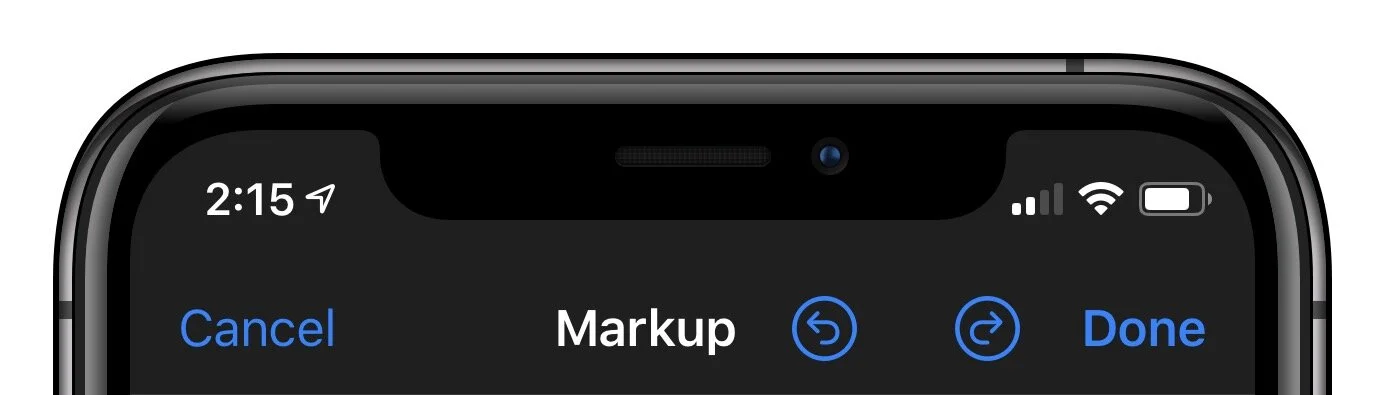
Tapping Cancel throws away all your changes and exits Markup. Tapping Done saves your changes and exits. Tapping Undo (the left-pointing arrow) undoes the last action, and Redo (the right-pointing arrow) redoes what you undid.
Drawing Tools
When you first enter Markup, it presents you with the drawing tools at the bottom of the screen, with the Add Annotations button at the right. The tools include:
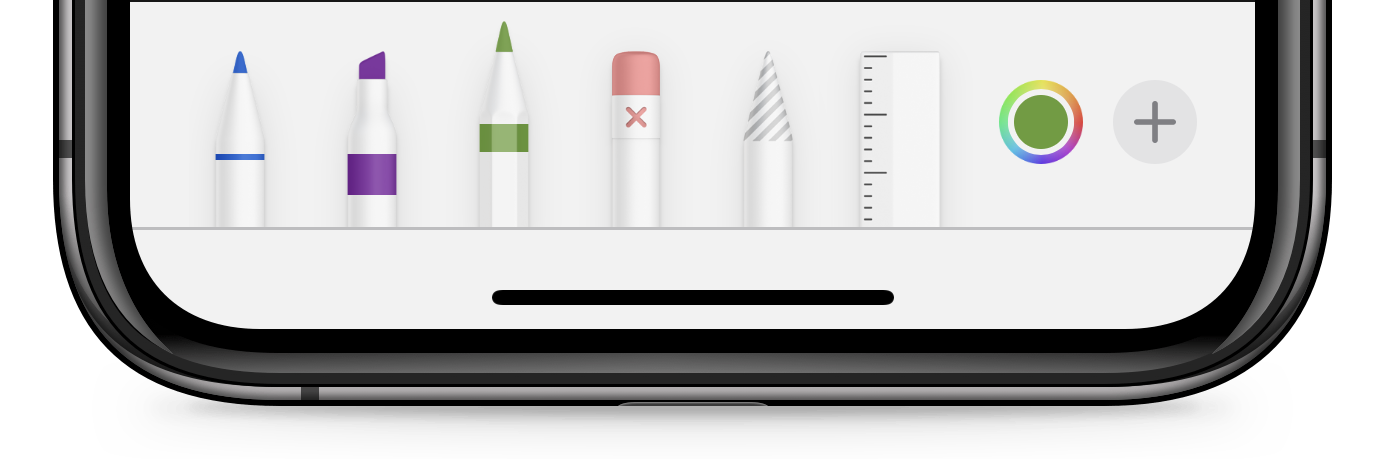
Pen, Marker, and Pencil: The first three tools simulate their real-world counterparts. Tap the selected tool to change the line thickness or opacity.
Object Eraser: When this tool is selected, a tap on something you’ve drawn erases it. You can also tap Undo to erase the last-drawn bit or to reverse the last erasure. When this tool is selected, tap it again to switch it to a Pixel Eraser, which works like a traditional pencil eraser on what you’ve drawn.
Lasso: Tap this tool and then drag out a selection to select something you’ve drawn. Once you’ve selected an object, drag to move it. You can also change the color of a selected object.
Ruler: Frustrated by your inability to draw a straight line? Tap the ruler to display it, use one finger to move it, and one finger on each end to rotate it. Once it’s positioned, draw along either edge to get a straight line.
Color: Tap the Color button to choose a color for the currently active pen, marker, or pencil.
Annotation Tools
To access the rest of the Markup tools, tap the Add Annotations button at the right. It displays a popover with four or five options: Text, Signature, Magnifier, a set of shapes, and sometimes Opacity.
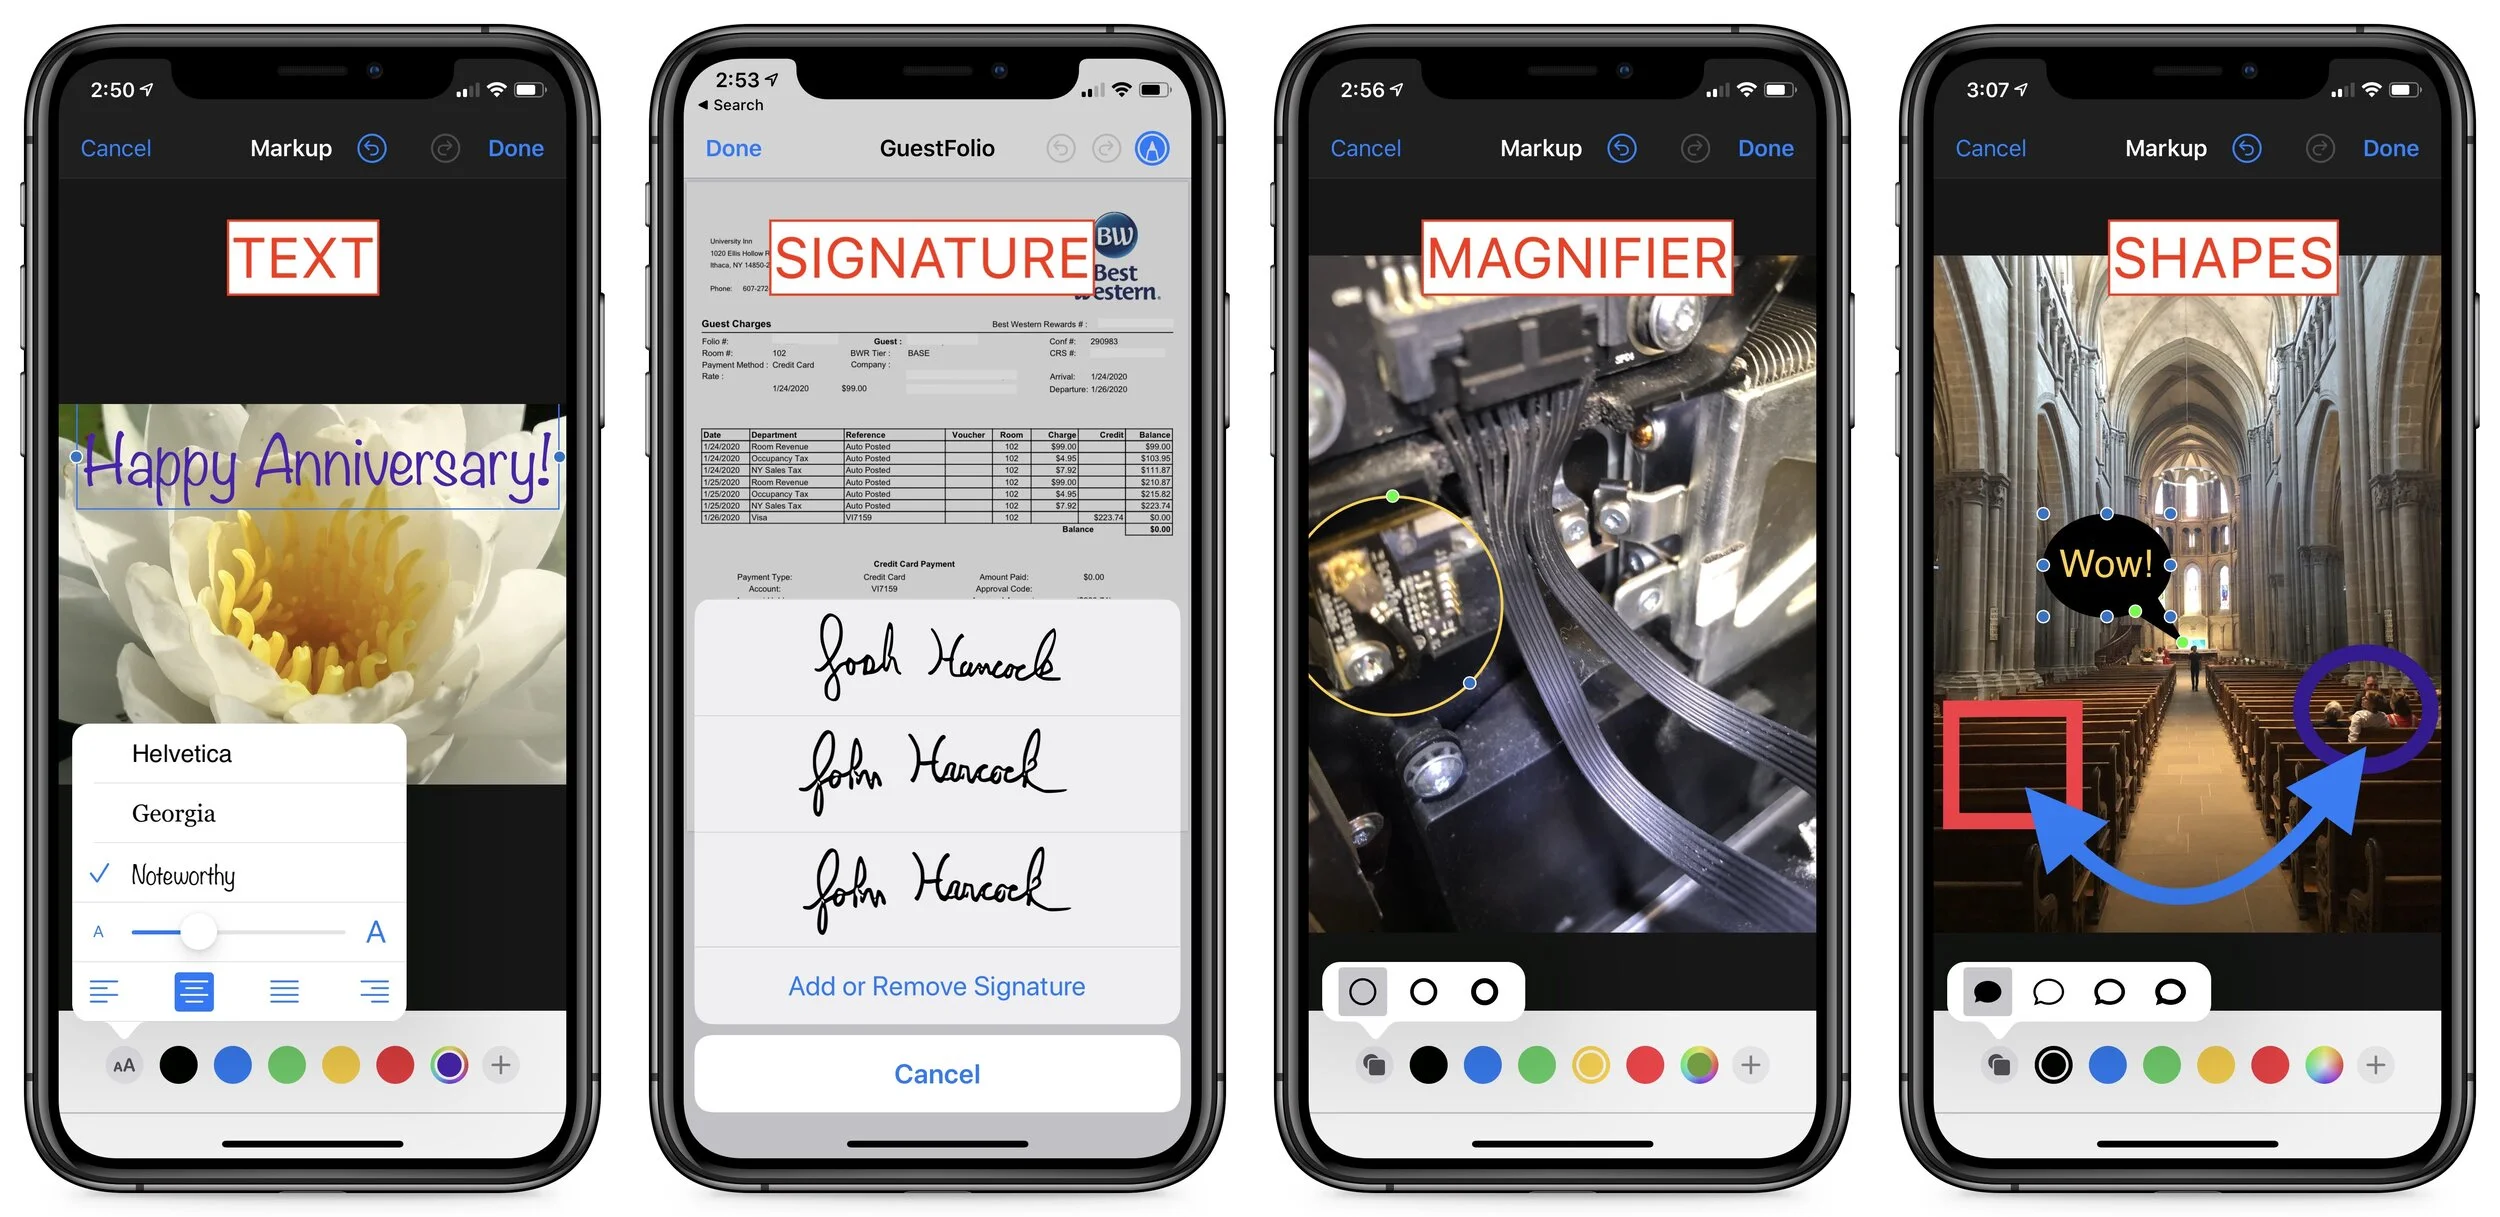
Text: Tapping Text in the popover inserts a text box on the image. Tap it to select it, after which you can drag it around, resize it by dragging its blue handles, or change its color by tapping a color button at the bottom. You can also or change its font, size, and justification via the Attributes button at the left of the toolbar.
Signature: The Signature option gives you a menu of any signatures that you’ve added in Preview on the Mac, or it lets you add or remove a new one. Tap any signature to insert it. This feature is most useful when signing PDFs.
Magnifier: Much like the Loupe in Preview on the Mac, a magnifier zooms a small, circular portion of the image. When a magnifier is selected, you resize it by dragging the blue handle and adjust the zoom level by dragging the green handle.
Shapes: Tap one of four shapes to insert a rectangle, oval, speech balloon, or line. Once it’s inserted, you can drag it around, resize it with a blue handle, or adjust line curvature and speech balloons in other ways with a green handle. Tap the Attributes button at the left of the toolbar to change the object’s fill, line thickness, and arrow styles. You can also tap a color button to change the current object’s color.
Opacity: This option appears for screenshots, but not for most other images. It provides a single slider that lets you adjust how transparent the image is, which might be useful when layering text or graphics on top of it.
Apple has packed an impressive level of functionality into iOS 13’s Markup tools. While they’re easy to use, it’s worth playing with them with some throwaway images so you know what you can do when it comes time to mark up a receipt or sign a PDF.
(Featured image by Marek Levak from Pexels)
Learn How to Examine Your iPhone’s Battery Usage
Is your iPhone battery draining faster than you think it should? iOS 13’s Battery screen can shed light on the situation, whether it’s a dying battery or a rogue app. Learn more here:

A common question we hear is, “Why is my iPhone/iPad battery draining so fast?” Luckily, Apple provides tools that help you see exactly how your iPhone uses its battery over the last 24 hours and—with less detail—over each of the last 10 days. Plus, you can tweak settings that will improve battery life, both in the here-and-now and for as long as you have your iPhone. To access these tools, go to Settings > Battery.
Useful Battery-Related Options
Before we get into what you can learn from the Battery screen, there are two options worth noting:
First, on the main screen, you’ll find the Low Power Mode switch. If you’re worried about running out of power before you can recharge on a particular day, enable Low Power Mode. iOS automatically offers to enable it if your battery drops to 20%, and that’s a good idea unless you can plug in soon. Low Power Mode mostly disables background activity like mail fetching and photo syncing. (If you want to enable Low Power Mode regularly, make that easy by adding it to Control Center via Settings > Control Center > Customize Controls.)
Second, tap Battery Health, and in that screen, enable Optimized Battery Charging. It lets iOS 13 learn from your schedule to ensure that your iPhone spends less time fully charged unnecessarily, which can cause the battery to age more quickly. Leave this option off if you don’t charge on a regular schedule.

About That Maximum Capacity Percentage
Whenever we hear complaints about iPhone batteries, the first place we look is in the Battery Health screen to make sure the battery is healthy. Apple says that iPhone batteries are designed to retain up to 80% of its original capacity after 500 charges. The higher the Maximum Capacity number, the better. Usually, anything above 90% is OK, although we start to hear of problems when the Maximum Capacity is in the upper 80s, and numbers below 85% are fairly likely to cause problems. The only solution to a battery with a low Maximum Capacity is replacement; contact us for our advice on the best way to do that.
Identifying Battery Hogs
Assuming the battery’s Maximum Capacity is high enough, the next place to look for what might be causing excessive battery drain is in the Battery Usage By App section of the Battery screen; look below the graphs, and tap Show Activity for more details.
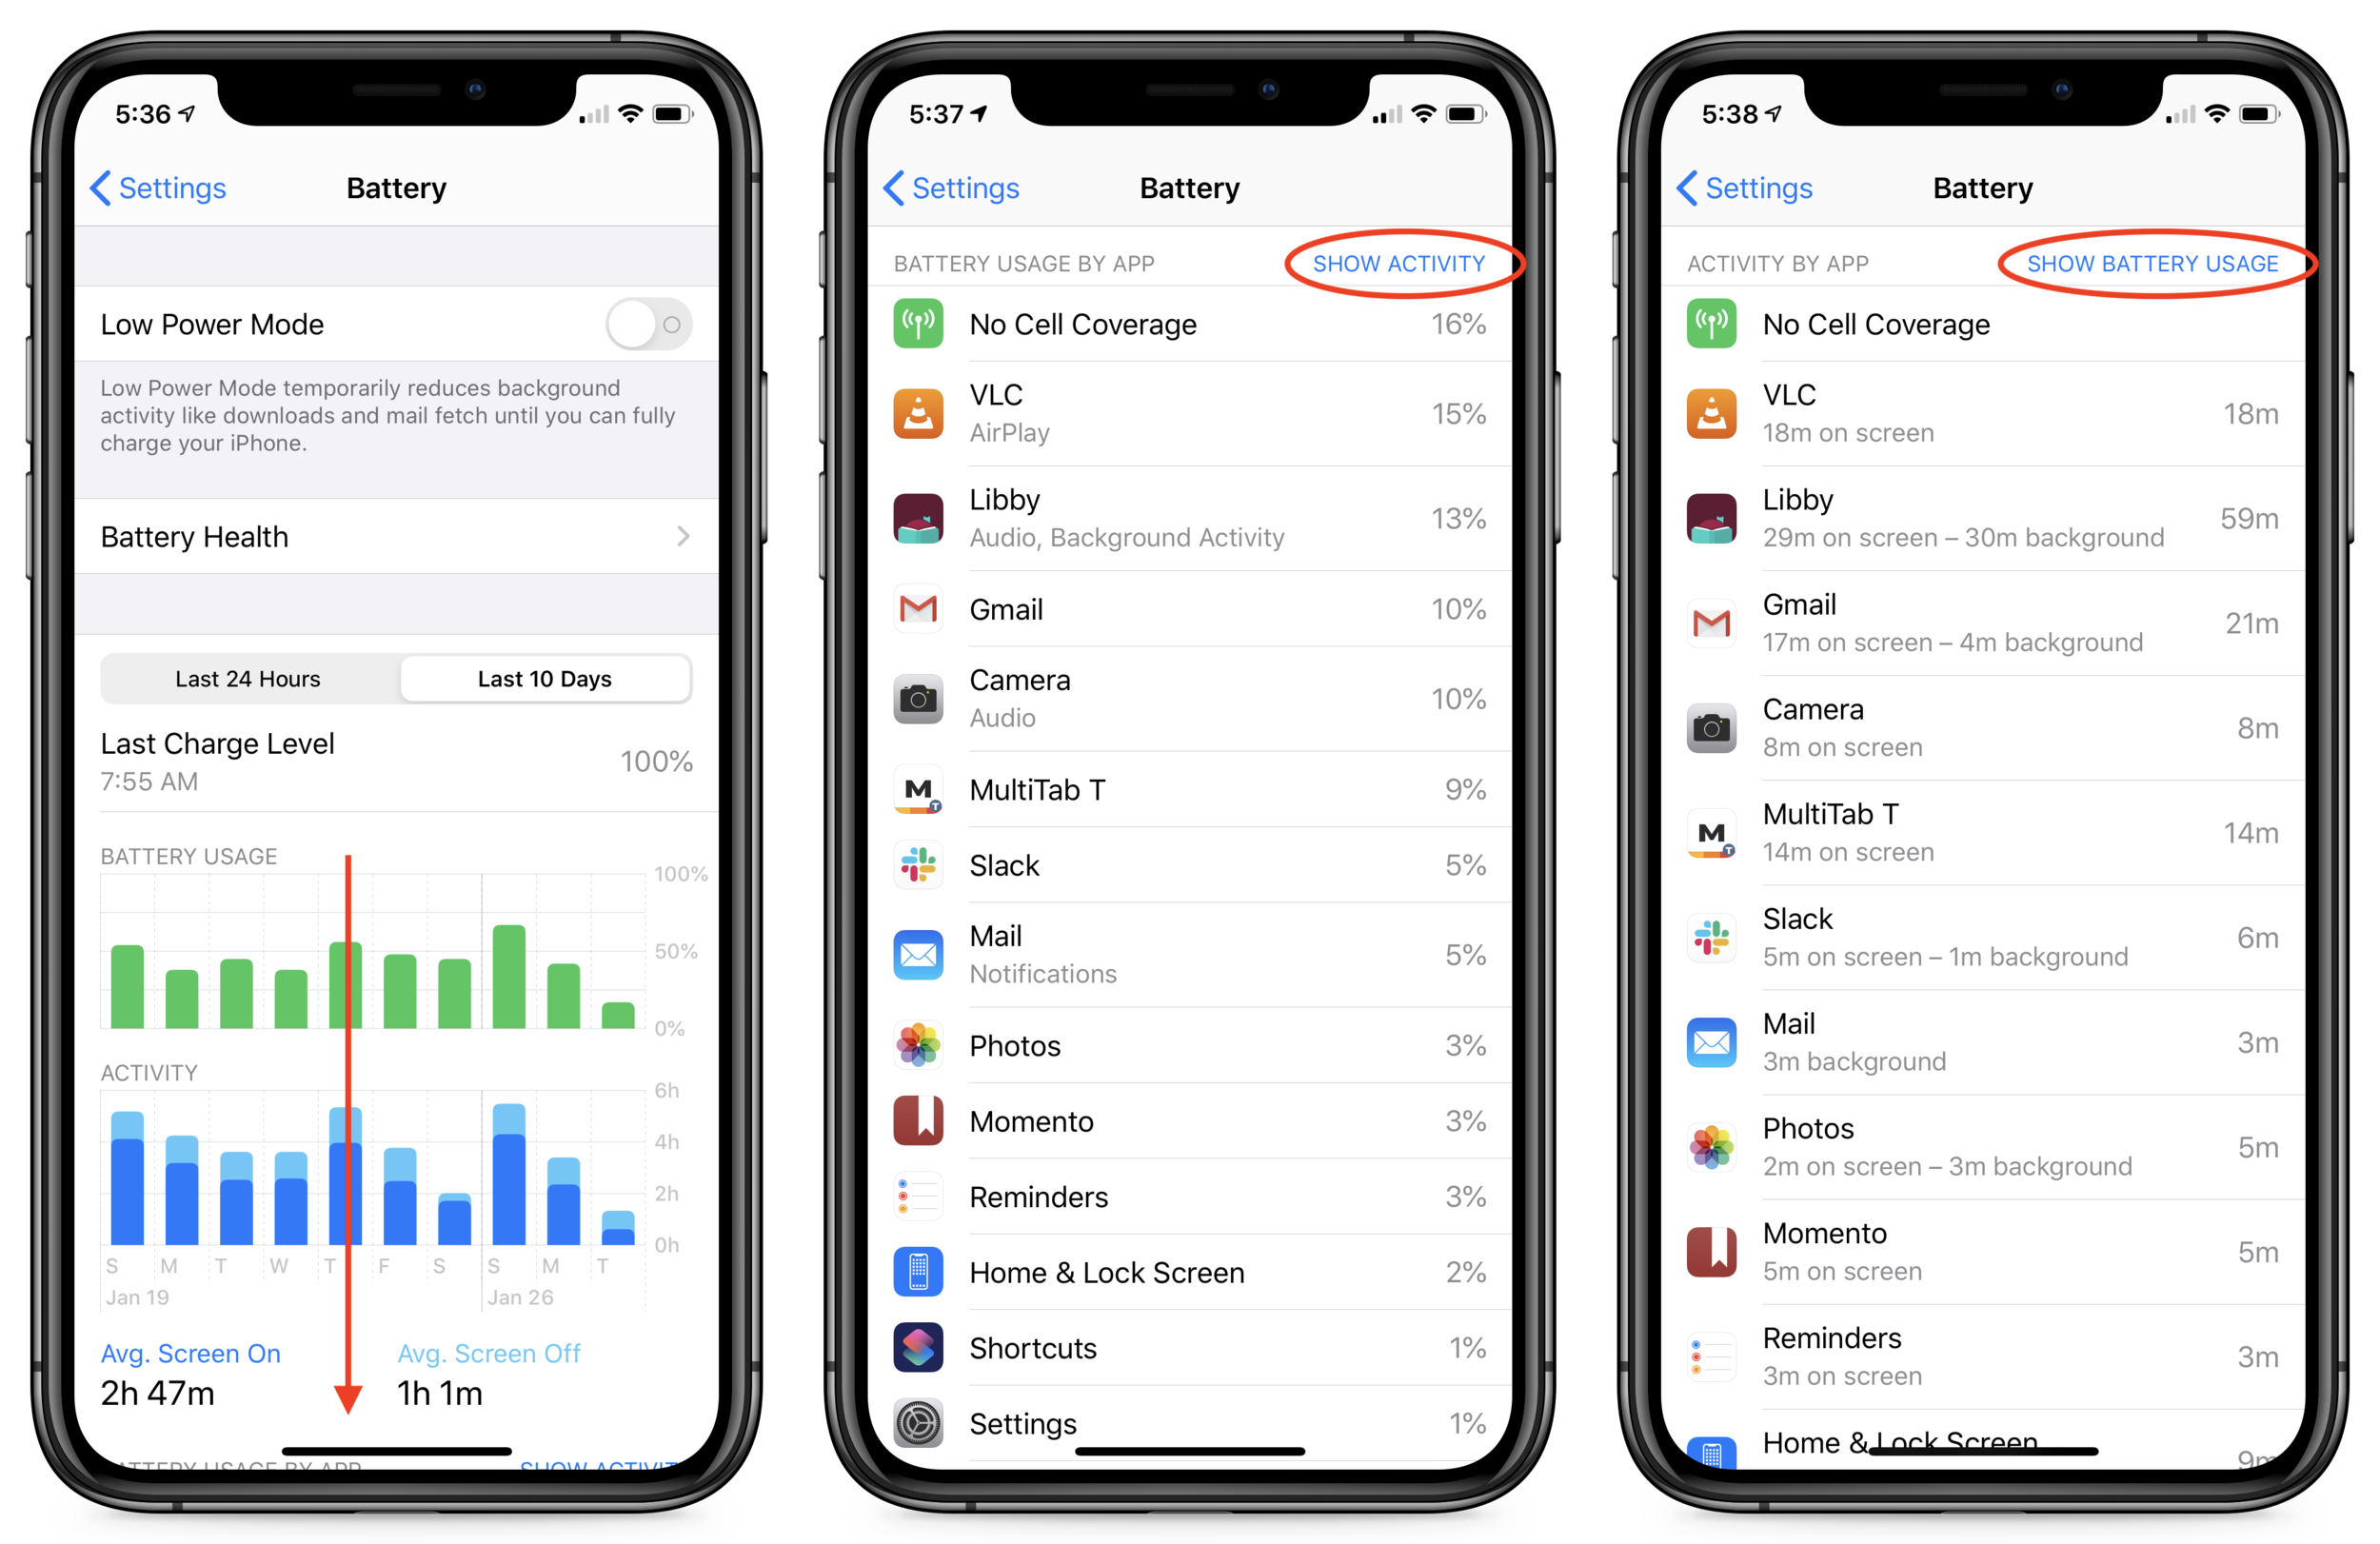
Scrutinize the entries at the top because they’ve used the lion’s share of your power. In the screenshot above, No Cell Coverage (which causes the iPhone to waste power searching for cell towers) was the worst offender. You can’t do anything about that (unless it’s indicative of putting the iPhone somewhere it can’t receive a signal or a failing cellular radio).
For the apps underneath, make sure they’re not working too much in the background unnecessarily. “Unnecessarily” is key—if you see Photos at the top of your list and Show Activity reveals a lot of background activity, it’s probably related to it uploading or downloading a lot of images from iCloud Photos. But if you can’t imagine why a particular app is sucking down precious power, it’s time to force quit the app or power cycle the iPhone. And if the problem continues, it might be time to reset the iPhone and restore from backup, just to clean things up.
Analyzing Battery Usage
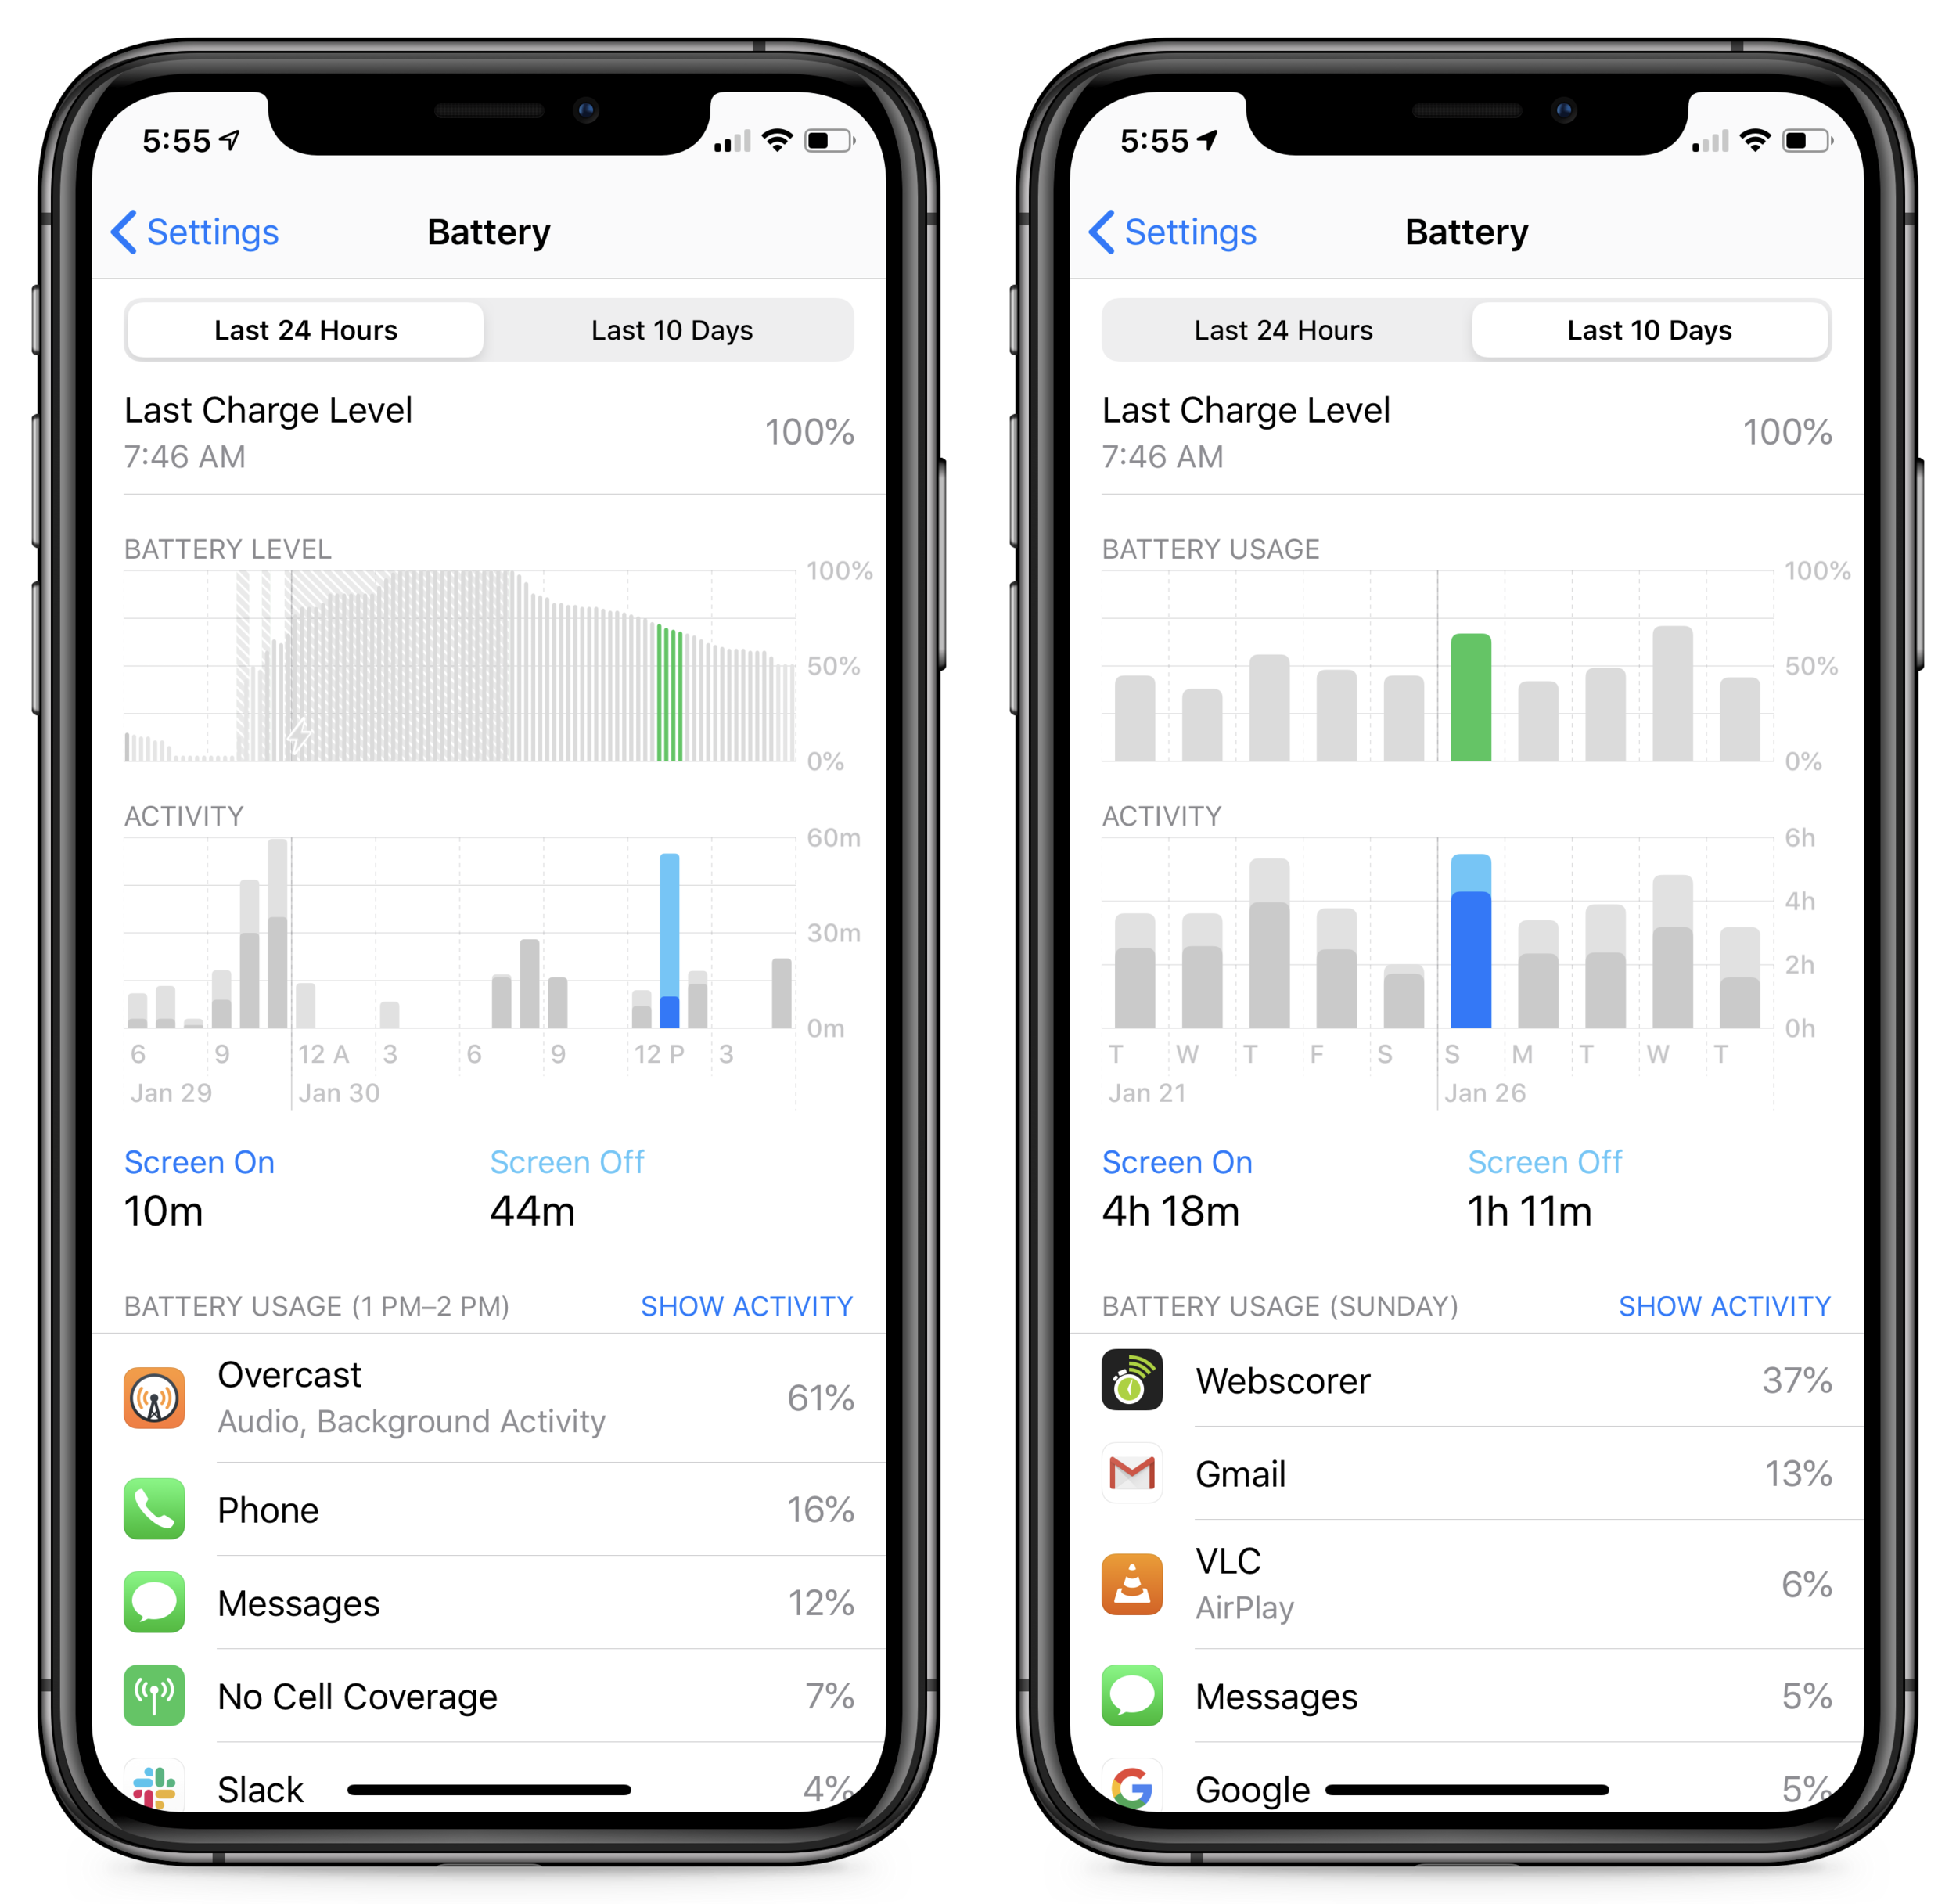
For figuring out which app might be causing unusual battery drain, it’s usually best to keep the time frame in the Last 24 Hours, but if you’re trying to track down a pattern of app behavior, it can be useful to switch to the Last 10 Days using the toggle above the graphs.
Most people don’t realize these graphs aren’t just pretty pictures. You can tap in the graphs to select 1-hour chunks of time in the Last 24 Hours graphs, or 1-day chunks in the Last 10 Days graphs. When you do that, the Battery Usage By App list changes to focus on just the apps used in the selected time period. That’s helpful for tracking down exactly what was happening when the battery drain took place.
We’d like to say that you can use these tools to figure out nearly anything that’s causing your battery to drop precipitously, but there are issues that the Battery screen doesn’t expose. For instance, after you upgrade to a new version of iOS or switch to a new iPhone, background tasks will likely work hard for a while indexing all the content on the device. Most issues like that should go away quickly, though.
Regardless, it’s worth looking in the Battery screen whenever you feel that your battery life isn’t what it should be. Whether it’s a rogue app or the revelation that you need a new battery, it will provide some guidance. And if you’re still in the dark, let us know, and we’ll see what we can do to help.
(Featured image by Tyler Lastovich from Pexels)
Use Guided Access to Let Kids and Others Use Your iPhone Temporarily
Never, ever share your iPhone or iPad passcode with anyone who you don’t trust implicitly. Instead, you can give people limited access to a single app with Guided Access. Learn more here:

Let’s get one thing straight. You know that you should never, ever share your iPhone or iPad passcode with anyone you don’t trust implicitly, like a spouse or adult child, right? That’s because, with your iOS passcode, someone could change your Apple ID password, and if you use iCloud for email, completely steal or otherwise abuse your online identity. (Scared? Good. If you’ve given anyone your passcode, go change it right now. We’ll wait.)
So if sharing your passcode is such a terrible idea, how do you let someone else use your iPhone or iPad temporarily? Perhaps you want to let your kid play a game in the car while you focus on tricky winter driving. Or maybe you time running races with an iPhone app and want someone to do the timing without giving them full access to your iPhone. Whatever the reason you want to give someone limited access to a single app in iOS 13, the solution is Guided Access.
Enabling and Configuring Guided Access
To turn Guided Access on, navigate to Settings > Accessibility > Guided Access (it’s near the bottom), and flick the switch. While you’re here, check out the remaining settings:
Passcode Settings: Create a passcode for getting out of Guided Access here (it can be different than your normal one), and choose whether you can use Touch ID or Face ID to exit as well.
Time Limits: You don’t set time limits here, but you can set audio and spoken warnings before the time runs out.
Accessibility Shortcut: Enable this if you also use triple-click for another Accessibility Shortcut like Magnifier.
Display Auto-Lock: Choose how long the device can be inactive before the screen turns off. If the Guided Access user wakes up the device, they’ll still be in Guided Access.
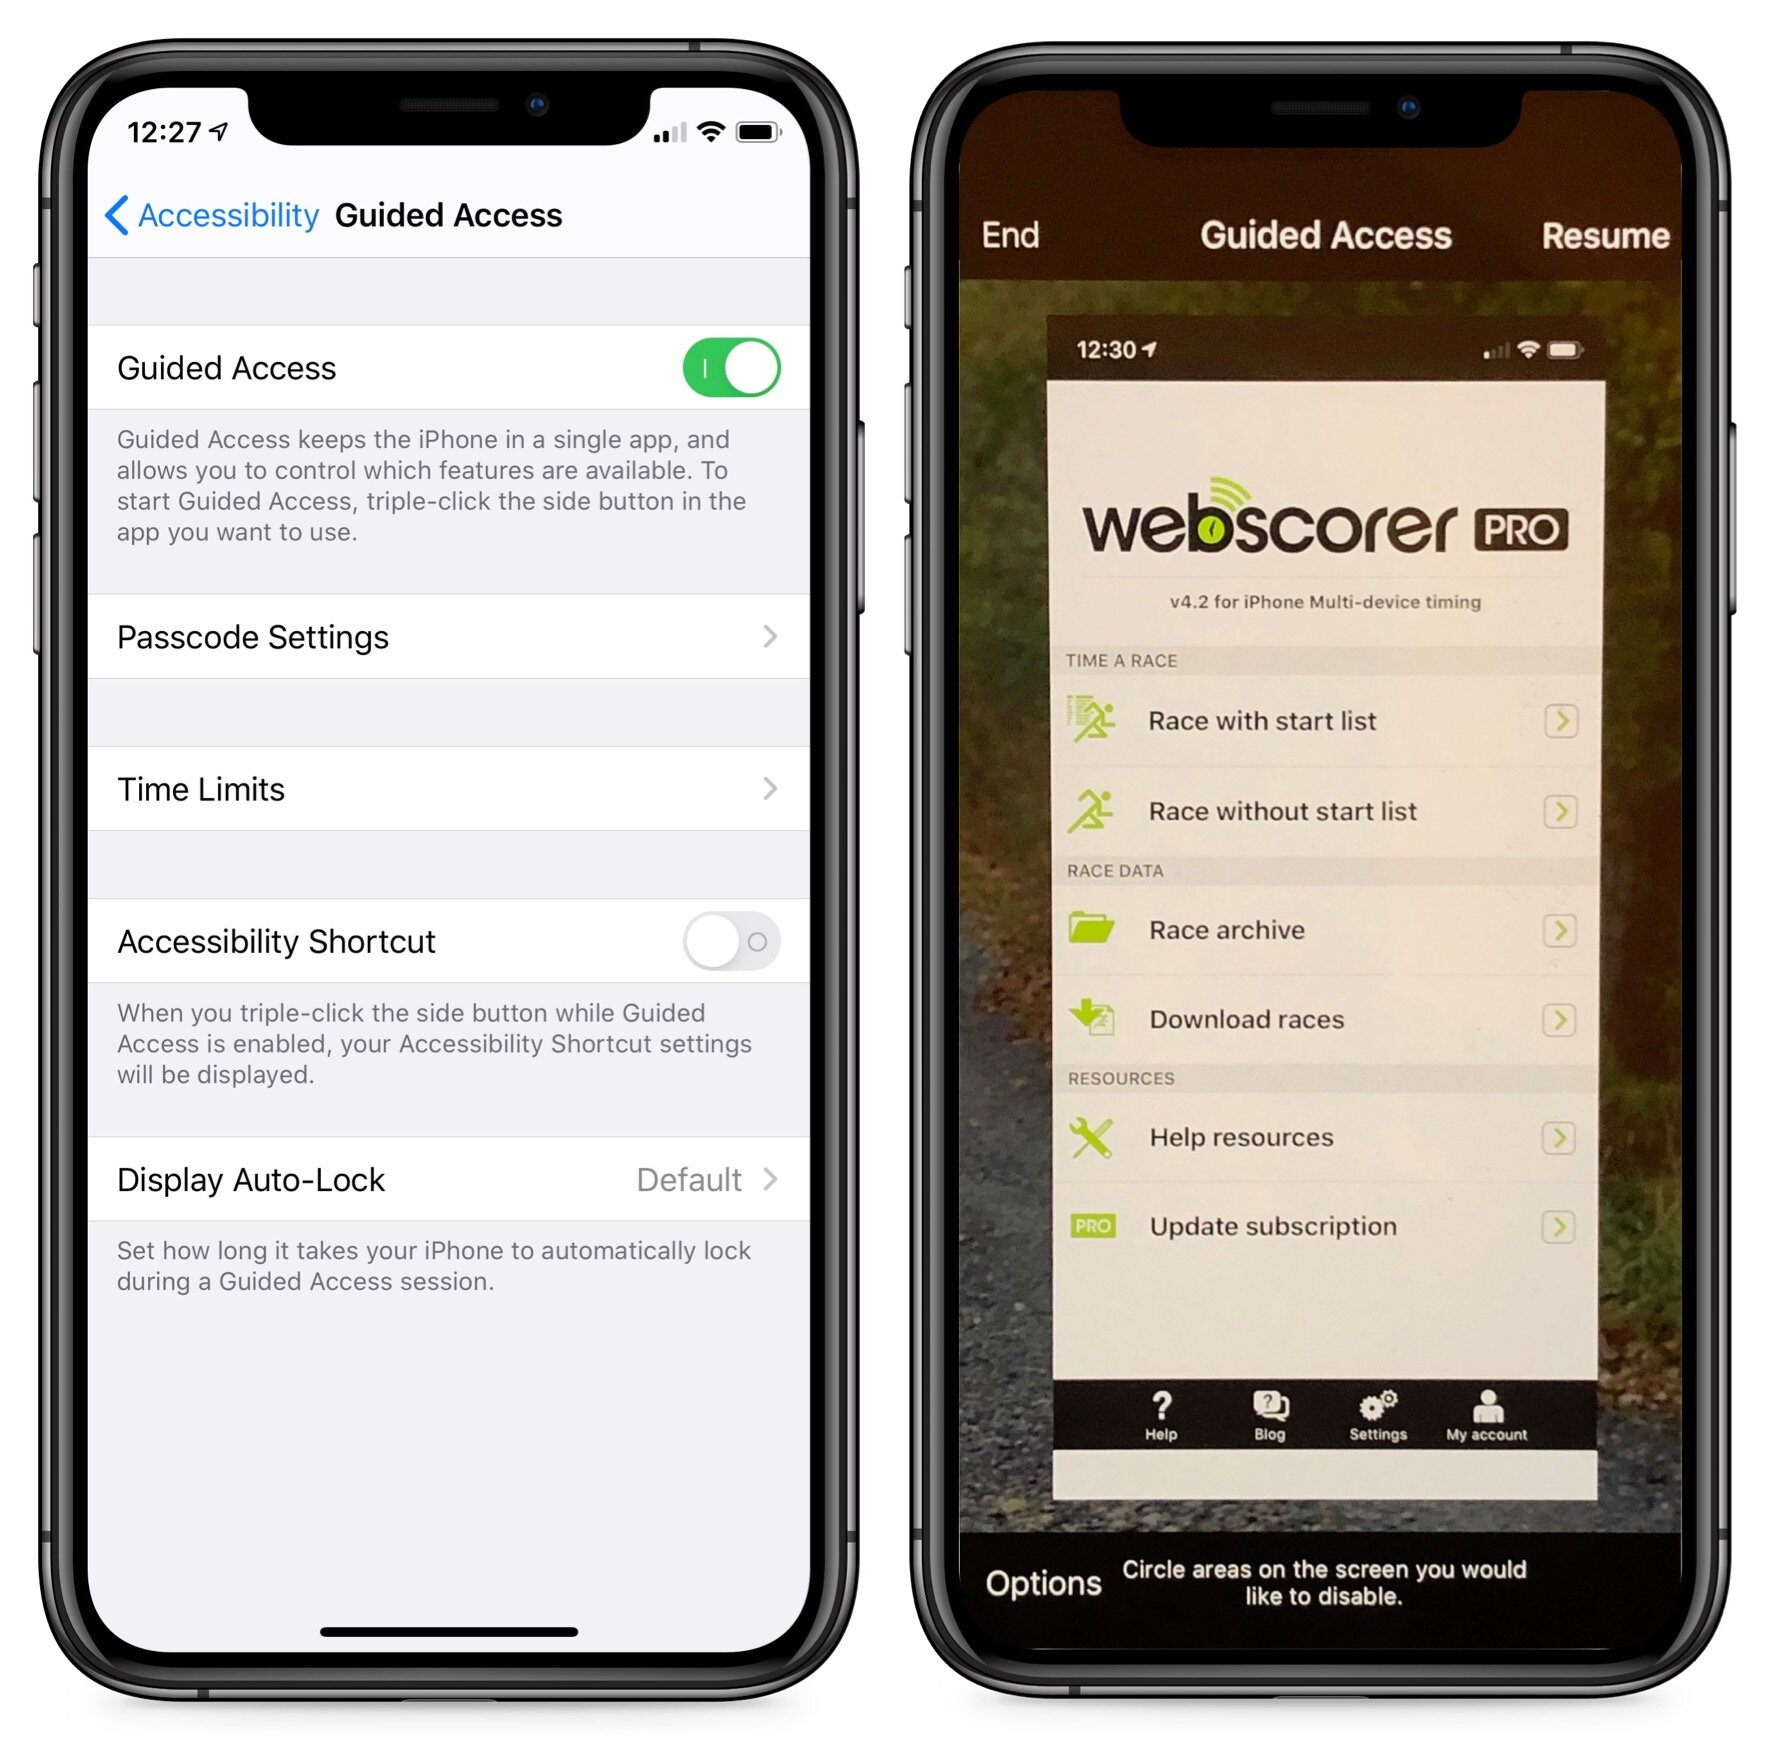
With those settings configured, switch to the desired app and triple-click the side or Home button, and if necessary, tap Guided Access in the Accessibility Shortcut list. You can do five things:
Set session-specific options: Tap Options in the lower-right corner to access various switches. If they’re disabled:
Side Button or Sleep/Wake Button: The user can’t put the device to sleep.
Volume Buttons: The user can’t change the volume.
Motion: The screen doesn’t change from the orientation (portrait or landscape) it was in when you started Guided Access.
Touch: The user can’t do anything with the screen at all—probably most appropriate for letting a young child watch a video.
Dictionary Lookup: Prevents word lookups in some apps.
Set time limits: At the bottom of the Options list, tap Time Limit and set an amount of time after which the device can’t be used until you enter the Guided Access passcode.
Disable specific areas on the screen: Draw circles around parts of the screen you want to make off-limits to the user. After making a circle, you can move it by dragging it, resize it by dragging any of its handles, or remove it by tapping its X button.
Start/Resume Guided Access: In the upper-right corner, tap Start. If you haven’t yet set a passcode, you’ll be prompted to do that.
Exit the setup screen: In the upper-left corner, tap End.
Using Guided Access
Once you tap Start, iOS tells you it’s entering Guided Access and lets you use the current app with the restrictions you’ve applied. If you decide that the restrictions aren’t right, triple-click the side or Home button to return to the setup screen. When you’re done, tap Resume in the upper-right corner.
To leave Guided Access, triple-click the side or Home button, enter the passcode, and in the setup screen, tap End in the upper-left corner.
That’s it! Once you understand the various limitations of Guided Access, you’ll be able to turn it on and off quickly whenever you need to let someone use your iPhone or iPad for a while.
(Featured image by mohamed Abdelgaffar from Pexels)
What to Put at the End of Your Email Messages
Ever wondered about the best way to close an email message or what’s appropriate to put in an email signature? Here’s our advice:

Email has been around for decades, but there are no hard-and-fast rules for how you should close a message with either the signoff or the signature block. If you’ve always wondered about the best ways to finish off a message or are uncomfortable with what you’ve been doing, here’s our advice.
Use the form of your name that you want the recipient to use. If your given name is Mohammed, but everyone calls you Mo, use that for signing most of your messages. Otherwise, they’ll have no idea you prefer the shorter version. (The reverse is true too; if you’re not sure how to address someone, look at their signoff for a hint.)
However, for formal correspondence with people or organizations who would usually refer to you as Ms. So-and-so, stick with Elizabeth instead of Betty.
Match the formality of your closing to that of your recipient. When writing business email to someone you don’t know, it’s best to stay formal at first with closings like “Sincerely” or “Yours truly.” Once you know the person a little better, you could move on to “Kind regards” or “Best wishes.”
With friends, family, and people you know well, try “Cheers,” “Talk soon” (if you mean it), or even a quick “Later.” Finally, it’s never inappropriate to use “Thanks!” if you truly are thanking them for something.
Create context-specific signature blocks. We all wear many different hats in today’s world. Your email signature should match the role you’re in for the particular email message. For instance:
Work email should probably include at least your title, department, and formal organization name. If you work for a large organization, you may have been provided with a template for your signature. If much of your communication takes place outside of email, include your phone number and postal address.
If you serve on a nonprofit board or have a side gig—like as an author or musician—messages you send in those contexts need their own focused signatures with appropriate links.
For email to friends and family, there’s no need for a signature at all.
Avoid clever sayings and inspirational quotes. Although it’s tempting to instill some personality into your signature with a quote, don’t do it. The quote might be entertaining the first time someone sees it, but after that, it’s just one more thing to ignore. Part of combatting email overload is to keep messages short and to the point, so you want your signature to have less text than the message itself.
No fancy formatting or pictures. Along the same lines of avoiding quotes, keep your signature simple. Stick to plain text and links, and don’t insert your company’s logo or a picture of your pony just because you can. Just imagine how awkward it would be if someone were to look at a long email thread and see your signature repeated ad infinitum, taking up more space than your actual messages.
Don’t assume anyone will read your signature. Keep in mind that some email apps automatically hide signatures so your recipients may not see it at all. There’s usually a way to view a hidden signature, but never assume that everyone will see it.
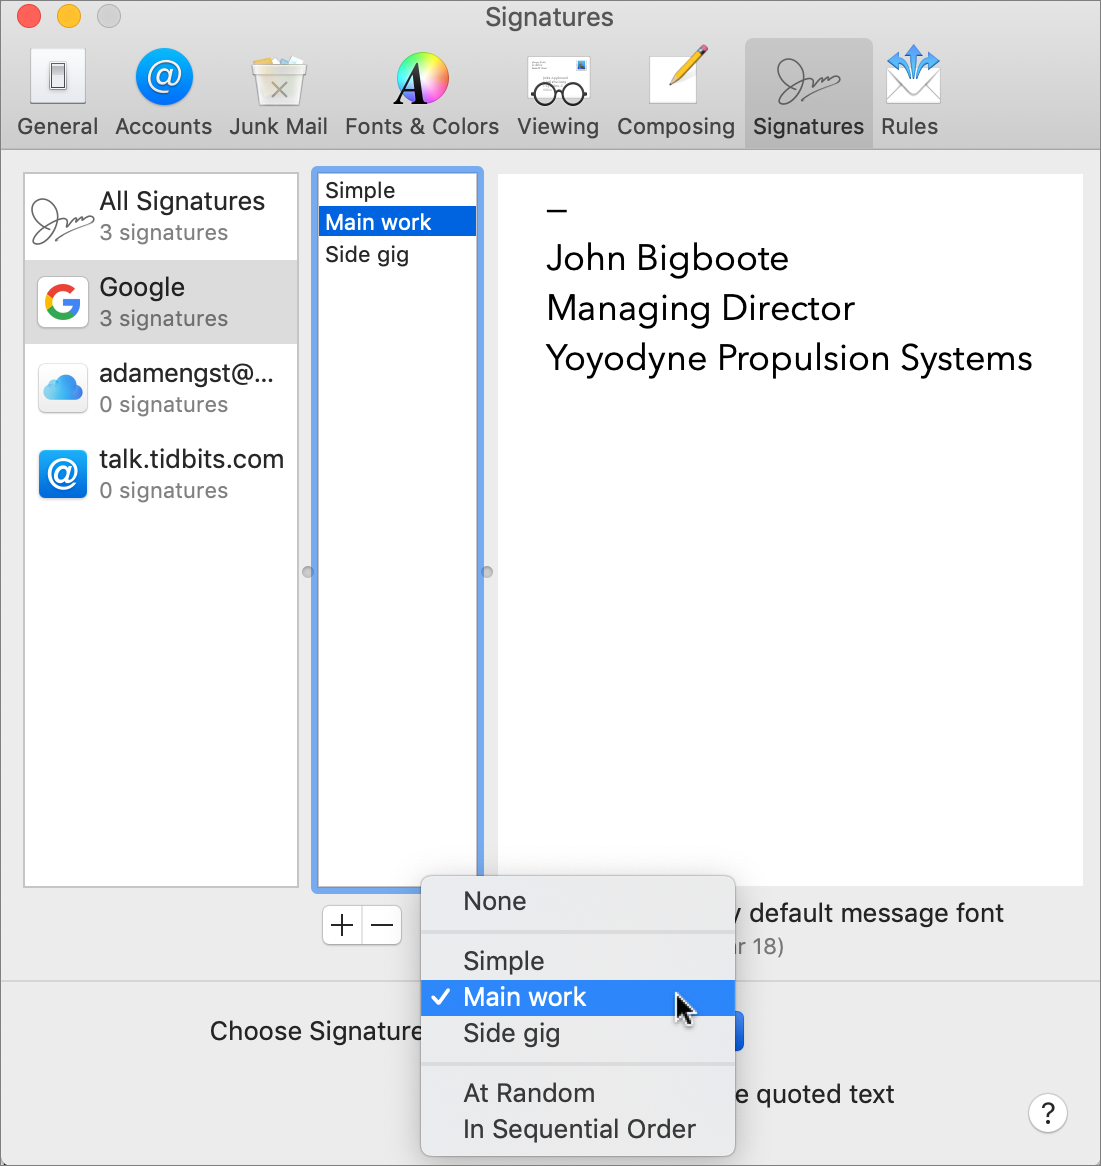
Consider automation tools for inserting signoffs and signatures. Many email programs, including Mail on the Mac, let you create multiple signatures and attach them to messages you send from specific email addresses. For even more flexibility, think about using a macro utility like Keyboard Maestro or a text expansion tool like TextExpander to insert custom signoff and signature combinations. Such options are commonplace on the Mac but much less so in iOS or iPadOS.
(Featured image by John-Mark Smith from Pexels)
Exercise (Some) Control over How Much Your Location Is Tracked
The New York Times has revealed that iPhone apps are constantly reporting our every movement to a shadowy collection of location-data companies. If that creeps you out (as it should!) read on to learn how to protect your location privacy.

The New York Times recently published a bombshell article revealing just how completely our every movement is tracked by companies in the business of selling our locations to advertisers, marketers, and others. Anonymous sources provided the Times with a dataset from a single location-data company that contained 50 billion pings from the phones of more than 12 million Americans over several months in 2016 and 2017.
This data enabled the Times reporters to track numerous people in positions of power, including military officials, law-enforcement officers, and high-powered lawyers. They were able to watch as people visited the Playboy Mansion, some overnight, and they could see visitors to celebrity estates. Once they identified any particular phone, they could track it wherever it went. Imagine what that data could be used for in the wrong hands.
No one intends to let unknown companies track their locations constantly. But code built into smartphone apps does just that, often without our knowledge. Many of the apps that request access to location services have an entirely legitimate reason for doing so—for example, Google Maps can’t provide navigation directions unless it knows where you are. But others want location access for less practical reasons—do you really want to let a coffeeshop app know your location at every moment in exchange for the occasional free latte? And some apps—notably weather apps—may have a legitimate need for location information but use that data for far more than users expect.
Even if you’re not too perturbed about companies you’ve never heard of knowing your exact whereabouts at all times (mostly to serve you more targeted advertising), there’s no guarantee this data couldn’t fall into the hands of foreign governments, organized crime, or hackers willing to sell your movement patterns to an aggrieved employee, corporate spy, or jealous ex-lover.
Steps You Can Take to Protect Your Location Privacy
Luckily, Apple provides controls in iOS that let you limit your exposure. For most people, going completely dark isn’t realistic. Too many iPhone capabilities require location services, ranging from turn-by-turn directions, to geotagging photos, to using Find My to see if your kid has left the soccer tournament yet.
Nevertheless, going dark is a possibility: go to Settings > Privacy > Location Services and disable the Location Services switch at the top. That turns off location services for all apps, although iOS will turn them back on temporarily if you use Find My iPhone to enable Lost Mode.
Here’s what we recommend instead.
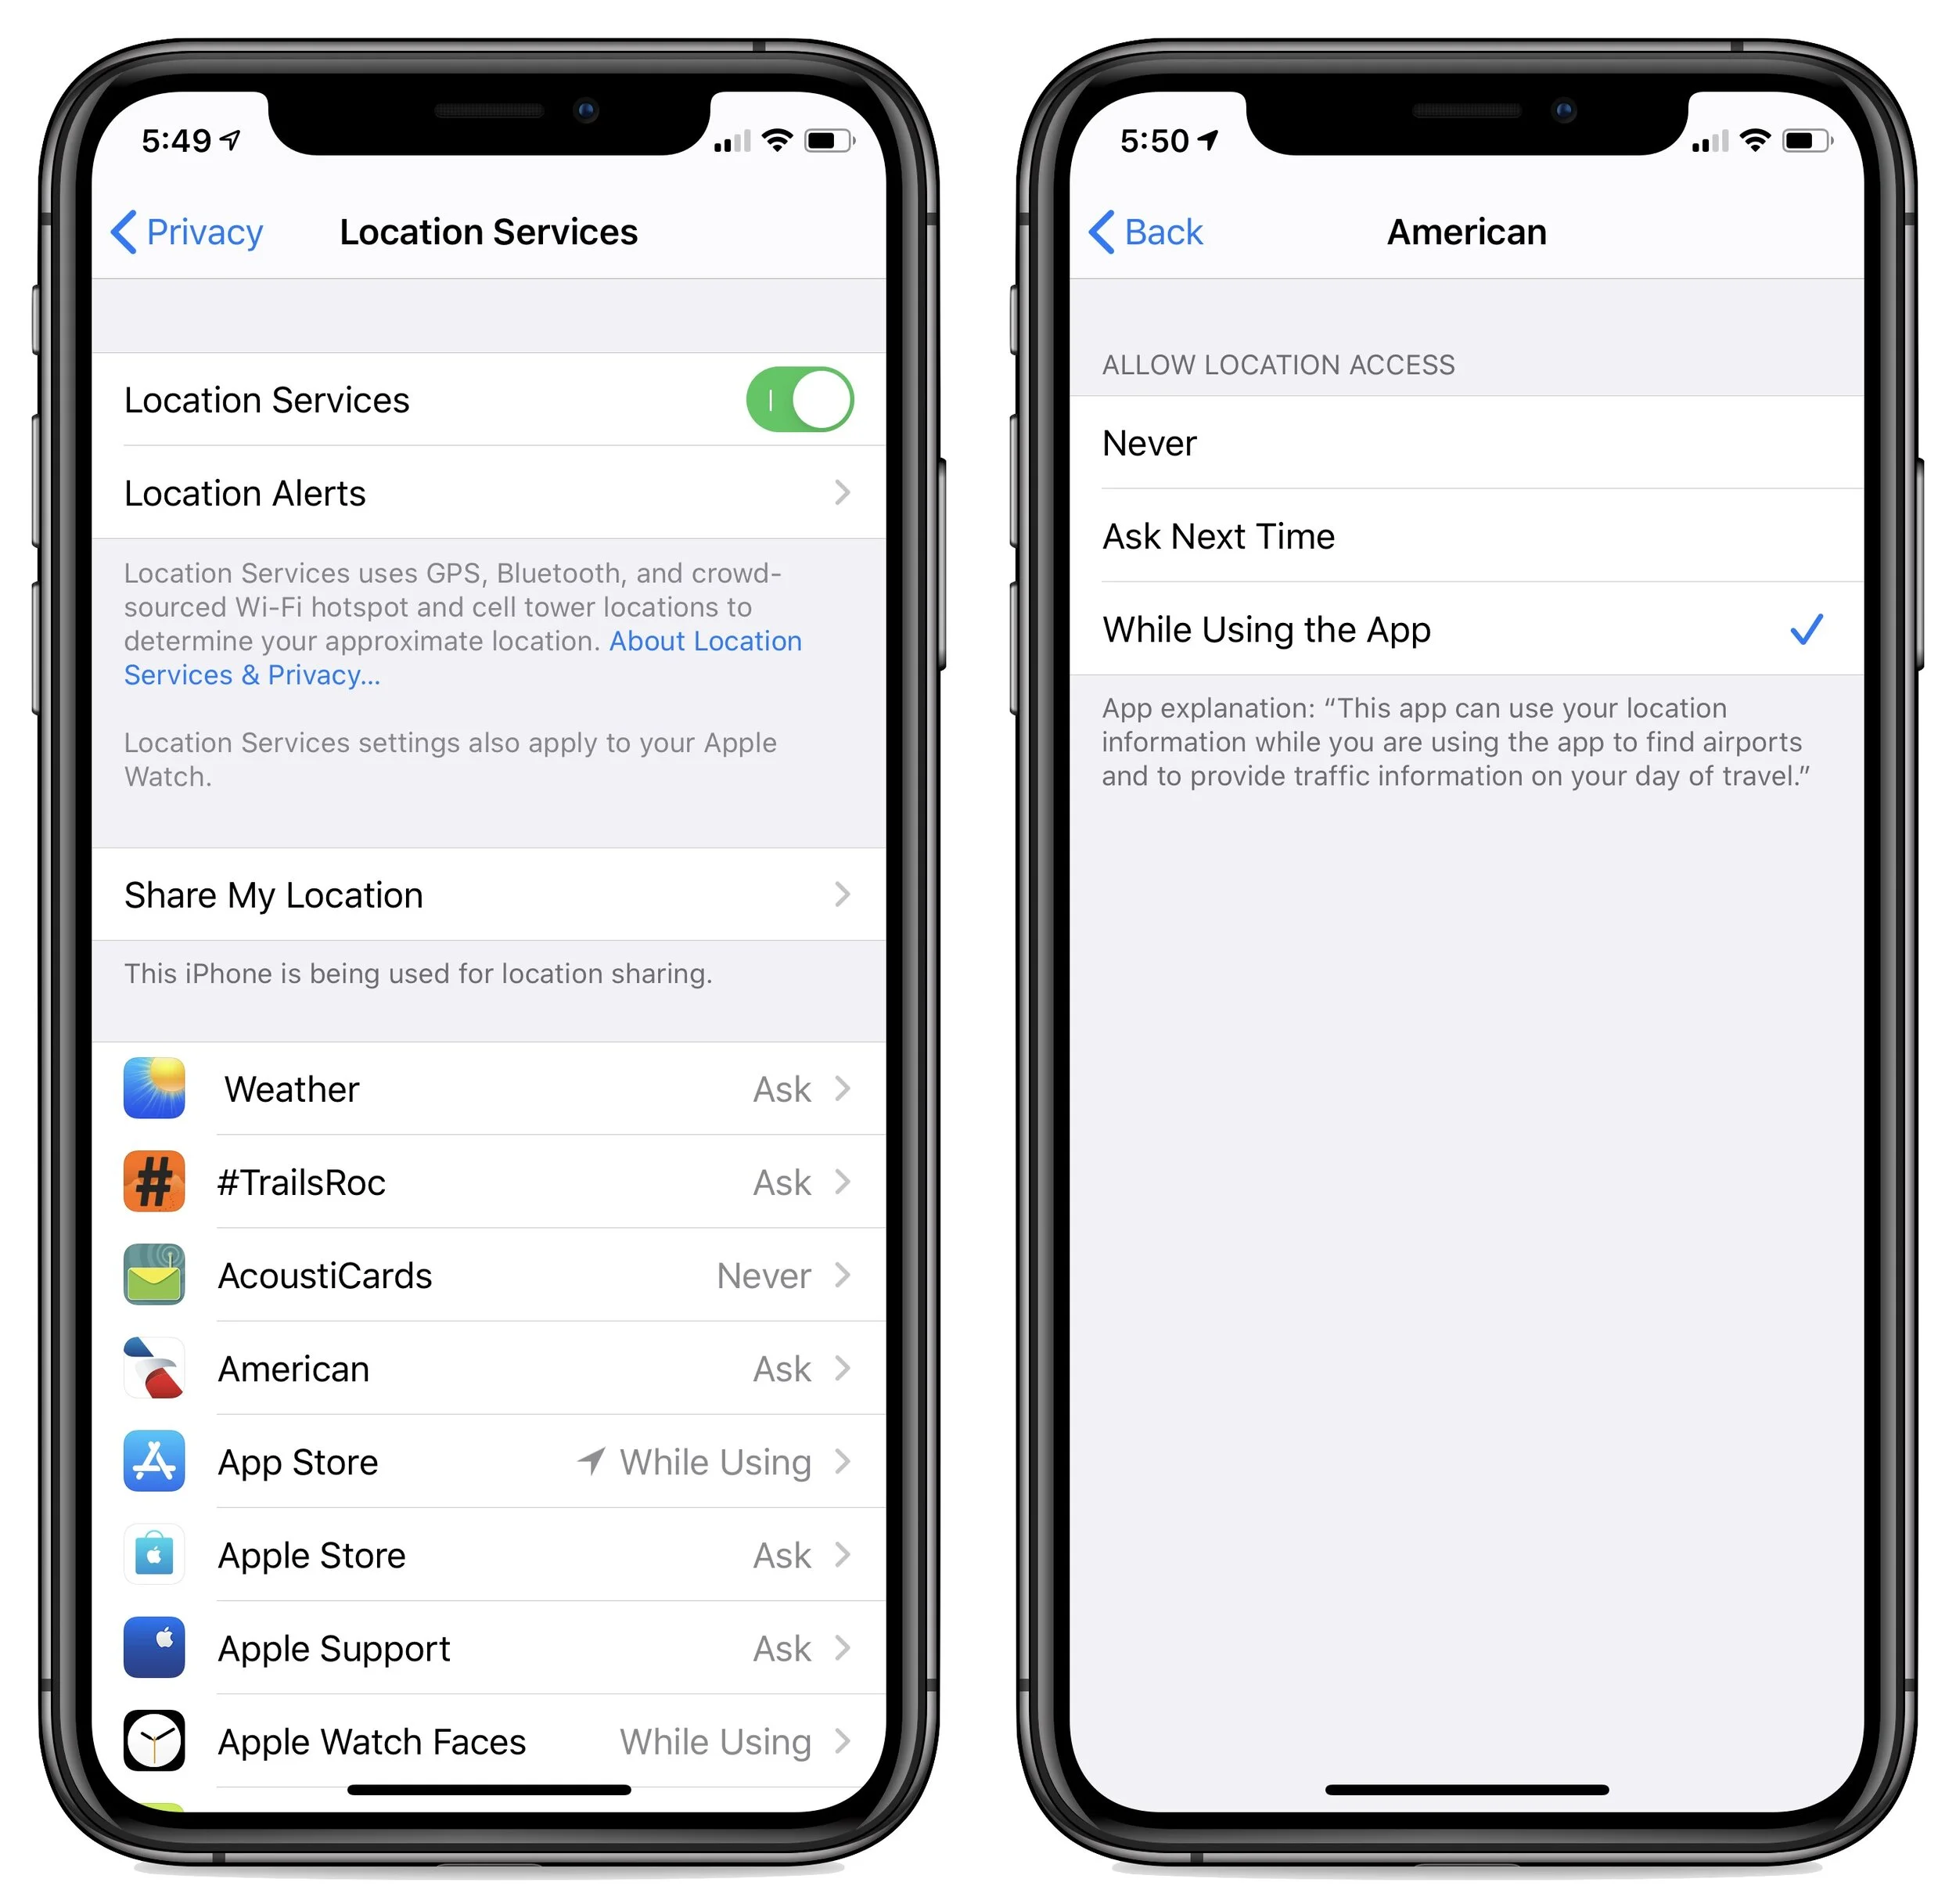
Go to Settings > Privacy > Location Services and scroll down to see a list of every app on your iPhone that would like to know your location. (The same is true on the iPad, but fewer people use their iPads as much while out and about.)
For each app in the list, tap the app’s name to bring up the Allow Location Access screen, which has up to four options:
Never: Prevent this app from ever determining your location.
Ask Next Time: The next time the app wants permission to track you, make it ask again.
While Using the App: Allow the app to track your location as long as you’re actually using it.
Always: Let the app track your location at all times, even when you’re not using it.
Tap one of the options to select it, and then tap Back to return to the list.
We can’t tell you exactly how to configure each app since everyone has a different set and different levels of privacy worry. However, here is some advice:
Apps and other entries from Apple are generally safe because Apple has an extremely strong privacy stance and excellent security against hacks. But, down in System Services at the bottom, we’d turn off Location-Based Apple Ads and Popular Near Me—even if Apple is collecting this data anonymously, it’s still being used to sell things to you, not to provide useful services to you.
For most apps, change the Allow Location Access setting to Ask Next Time to force each app to prompt you again. If it asks at a point where it’s reasonable that it would need to know your location, such as Yelp wanting to show you nearby restaurants, grant it. If you don’t understand why it’s asking, or if the request seems weak (“To show you which wines are available for purchase in your area.”), deny the request.
With apps that obviously need location services, such a parking app that needs to know which area you’re in, change the setting to While Using App and see if that meets your needs.
Only if you clearly need to allow a particular app to track your location in the background—turn-by-turn navigation apps are the most common—should you change that setting to Always. Almost no apps should be given such power, and many won’t even provide the option.
There’s one unusual item in the list: Safari Websites. It’s a master switch that lets Web sites loaded in Safari ask for your location. That’s probably not a major privacy concern, but few Web sites provide sufficiently useful location-based features (mostly for finding nearby chain store outlets) that it’s worth bothering.
In the end, go with your gut. If thinking about a particular app or company potentially recording your location constantly gives you the creeps, turn it off and either find an alternative or do without. Legislation may be the only solution in the end, but for now, we can take steps like these to protect ourselves.
(Featured image based on an original by Garik Barseghyan from Pixabay)