Beware the Bulging Battery! (And What to Do If Yours Expands)
If your iPhone, iPad, or MacBook is bulging, unplug it and shut it off immediately—the problem is the battery. Then read this article for details on what happened and how to deal with it.
We’ve been seeing a spate of bulging batteries of late, both in Mac laptops and iPhones. A bulging battery is a Very Bad Thing™ and must be dealt with immediately because it could catch fire or even explode. As lithium-ion batteries age, the chemical reactions that produce power no longer complete fully, resulting in the creation of gasses that can cause the battery to swell. Additionally, manufacturing errors or damage to the membranes that separate the internal layers of the battery can also lead to swelling.
What to Look For
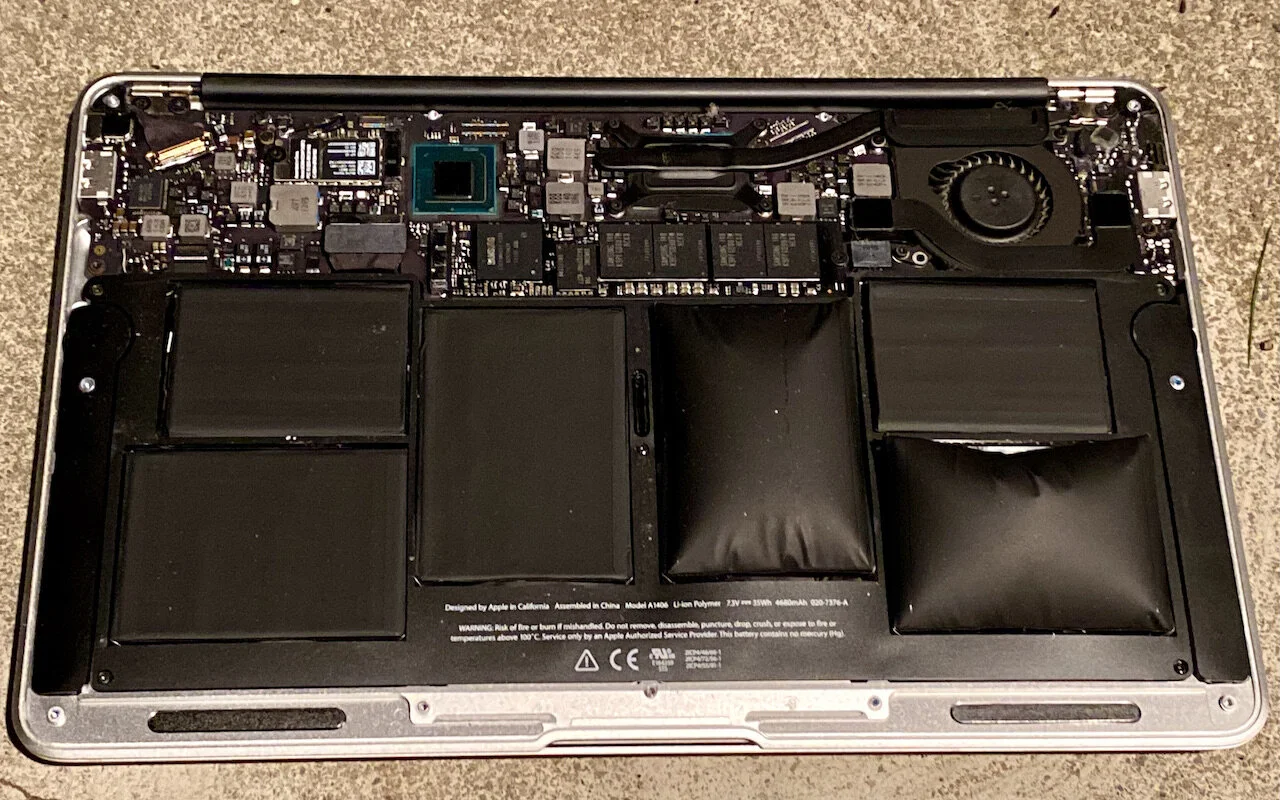
With Mac laptops, a variety of problems—some rather subtle—can indicate that the internal battery is swelling, including the screen not closing properly, a gap between the upper and lower parts of the case, a failure to sit perfectly flat, problems clicking the trackpad, or keyboard keys malfunctioning.

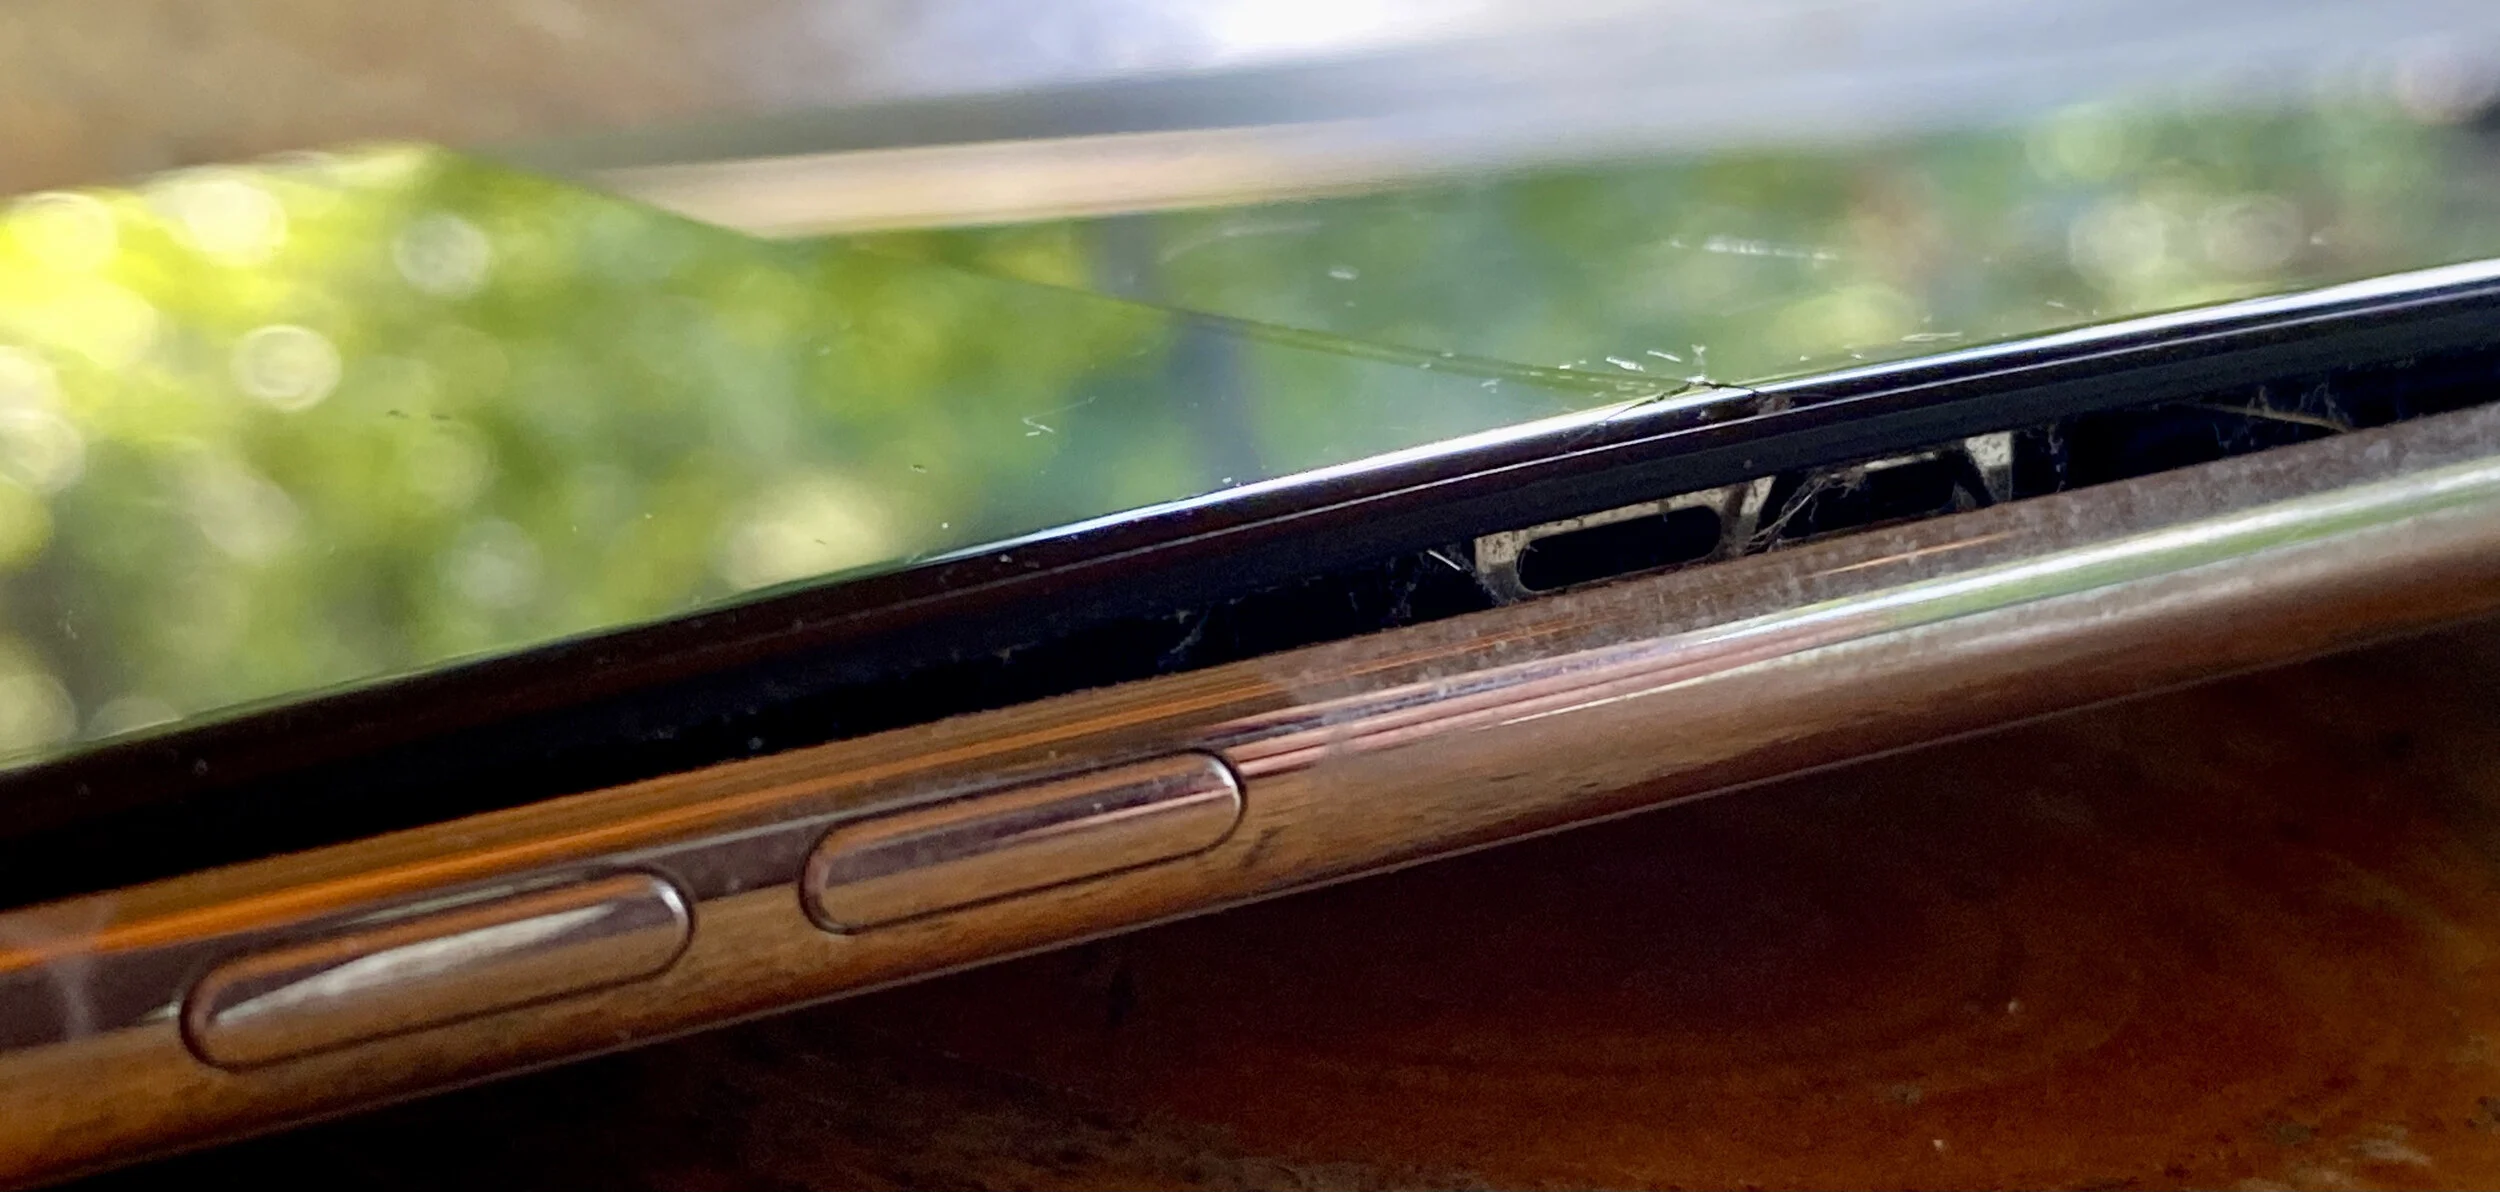
With an iPhone or iPad, a swollen battery is usually obvious because it starts to warp the case and can even crack the screen—it all depends on where the swelling takes place and what part of the device gives way first.
What to Do
When you discover a bulging battery, unplug the device immediately and turn it off as soon as you can. Continued charging or use could lead to a fire or explosion. However, if the device is still functional and you need to copy data off or let a final backup run, try to put it in a place where it’s less likely to cause problems—on a concrete, stone, or tile surface, for instance, and preferably outside as long as it’s not wet, hot, or in the sun.
In some cases, as with older MacBooks, it’s relatively easy to disassemble the case and remove the battery. If you feel comfortable doing that, you may be able to reduce the chances of further damage. It’s much harder to work on iPhones and iPads.
Make sure you’re somewhere well-ventilated and safe, with easy access to outside and preferably a foam-based fire extinguisher at hand. If a fire does start, water will also put it out—make sure to have plenty on hand. Be sure to wear eye protection and gloves. Also, make sure you have somewhere safe to store the battery once removed, such as a metal can with a lid or with sand in it. Finally, be super careful around the battery, and whatever you do, do not puncture the swollen cell—some of the gases could be harmful.
Once you’ve removed the battery from the device, you must take it somewhere for recycling. Under no circumstances should you send it via the mail or put it in the regular garbage. Although various companies—including Apple, Best Buy, Home Depot, and Lowes—recycle batteries, call your local store first to see if they take swollen batteries (they may not be equipped to do so safely). Better yet, check with your county or municipality to see where you should take hazardous waste.
For additional details and advice, see iFixit’s guide and the many comments.
Getting Your Device Fixed
The best-case scenario is that you have AppleCare+ on the device such that Apple will fix it for you. However, that’s a bit unlikely because batteries usually bulge only on older devices. Regardless of AppleCare status, Apple offers battery service and recycling, and if you have an Apple Store or Apple Authorized Service Provider nearby, that’s a good option. Independent repair shops can also likely do this work; make sure they have plenty of experience with your device and offer a warranty for their parts and labor.
Although it’s possible to replace batteries yourself—refer to the iFixit site for instructions and links to replacement batteries—it can be finicky work, particularly in iPhones and iPads, and you may not save that much money in the end.
Sadly, particularly with an older iPhone, the damage from the bulging battery may prevent a repair from being worthwhile. The iPhone X pictured above still worked fine even though the swollen battery broke its screen, but it wasn’t worth the money to replace the battery and the screen for a 4-year-old iPhone. In such cases, recycle the entire unit with the appropriate hazardous waste facility.
(Featured image by Adam Engst)
Apple’s 2021 Crop: Four iPhones, Two iPads, and an Apple Watch
At its California Streaming event, Apple introduced the new iPhone 13 lineup, the Apple Watch Series 7, a redesigned iPad mini, and an upgraded iPad. Read on for details and our upgrade recommendations:

September is traditionally when new iPhones are ripe for the picking, and this year’s crop is no exception. At its California Streaming event on September 14th, Apple unveiled four iPhone 13 models. Apple also announced the expected Apple Watch Series 7, but entirely unanticipated were an upgrade to the iPad and a redesigned iPad mini.
Left to the fine print in Apple’s press releases was the fact that iOS 15, iPadOS 15, and watchOS 8 will become available for download on September 20th. As we’ve said before, you should wait at least a week or two before installing them on essential devices, just in case some unpleasant bug manifests itself. Regardless of when you upgrade, make a backup right beforehand, just in case something goes wrong and you need to erase and restore.
Let’s look at each of the new products.
iPhone 13 Models Evolve from Their iPhone 12 Equivalents
Some new iPhones are revolutionary, others are evolutionary. The iPhone 13, iPhone 13 mini, iPhone 13 Pro, and iPhone 13 Pro Max fall into the latter category, improving on their iPhone 12 equivalents in numerous ways while maintaining the same industrial design (albeit with a smaller front notch) and core capabilities. There’s no shame in that, and these are without a doubt the best iPhones Apple has ever made. So what’s new?

Most of Apple’s attention went into improving the cameras and photo- and video-related functionality. The rear-facing dual-camera systems in the iPhone 13 and iPhone 13 mini have larger pixels and the sensor-shift optical image stabilization that was previously available only in the iPhone 12 Pro Max, providing better images in low-light photos and videos. The triple-camera systems in the iPhone 13 Pro and iPhone 13 Pro Max receive new sensors and lenses that also improve low-light performance and enable 3x zoom (up from 2x and 2.5x in the iPhone 12 equivalents). The new ultra-wide camera in the Pro models also significantly improves macro photography, capturing tiny subjects with a minimum focus distance of 2 centimeters.
All the iPhone 13 models offer three new and improved computational photography features: Photographic Styles, Smart HDR 4, and Cinematic mode. With Photographic Styles, the camera system automatically applies your photographic preferences (a bit like custom filters) to photos in real-time. Smart HDR 4 provides improved color, contrast, and lighting for each subject in group photos.
Cinematic mode brings to iPhone videos a cinematic technique called rack focus that emphasizes people or objects in a shot by focusing on them while blurring the rest of the scene. When enabled, Cinematic mode makes focus changes automatically during shots, for example in response to a person looking in a different direction or someone walking into the scene. You can also manually change the focus during or after capture.

Beyond the cameras, Apple put effort into several other important iPhone subsystems:
A15 Bionic: Apple says the new A15 Bionic chip is the fastest smartphone chip ever, though it never said how much faster it is than last year’s A14 Bionic. Nevertheless, the A15 Bionic provides stellar performance that enables the near-magical computational photography features like Cinematic mode.
Improved displays: The iPhone 13 and iPhone 13 mini have a brighter Super Retina XDR display with a higher contrast ratio for true blacks, all while being more power-efficient. The display in the iPhone 13 Pro and iPhone 13 Pro Max is brighter yet and supports Apple’s ProMotion technology that dynamically changes the screen refresh rate as needed from 10 Hz to 120 Hz, either preserving battery life or offering smooth video for games and movies.
Longer battery life: Apple improved battery life with more power-efficient components, larger batteries, and technologies like ProMotion and Smart Data mode (which switches to LTE when 5G isn’t needed). The iPhone 13 mini and iPhone 13 Pro offer 1.5 hours more battery life than their predecessors, while the iPhone 13 and iPhone 13 Pro Max provide 2.5 hours more than theirs.
5G in more countries: The iPhone 13 models support more 5G bands for broader coverage and faster performance. Apple says that 5G support on the iPhone 13 will include 200 carriers in 60 countries and regions by the end of the year.
All four iPhone 13 models now start at 128 GB of storage, and the Pro models offer a new 1 TB tier for those shooting a lot of video. Here are the 128 GB prices; add $100 for 256 GB, $300 for 512 GB, and $500 for 1 TB:
iPhone 13 mini: $699
iPhone 13: $799
iPhone 13 Pro: $999
iPhone 13 Pro Max: $1099
You can pre-order starting at 5 AM Pacific on September 17th, with delivery and in-store availability on September 24th. The iPhone 13 and iPhone 13 mini come in five colors: pink, blue, midnight, starlight, and (PRODUCT)RED. In contrast, the iPhone 13 Pro and iPhone 13 Pro Max come in graphite, gold, silver, and sierra blue. The second-generation iPhone SE ($399), iPhone 11 ($499), and iPhone 12 ($599) remain for sale as well.
Generally speaking, we wouldn’t recommend upgrading from an iPhone 12 model unless you’re switching to the iPhone 13 mini to get a smaller form factor or to one of the Pro models for the ultimate camera capabilities. It’s easier to recommend an upgrade from an iPhone 11 model or earlier, given the easier-to-hold squared-off industrial design and innovations like 5G and MagSafe that debuted with the iPhone 12 and continue in the iPhone 13.
Apple Watch Series 7 Is Bigger, Brighter, and Incrementally Better
Much as with the iPhone 13, the new Apple Watch Series 7 doesn’t offer any new sensors or surprising new features. Instead, it improves on last year’s Series 6 in subtle yet welcome ways. Most notably, it boasts a larger display with nearly 20% more screen area than the Series 6 and over 50% more than the Series 3.

The larger screen can display about 50% more text than on the Series 6, making it easier to read text messages or emails with less scrolling. Apple also took advantage of the extra real-estate to add a full keyboard in watchOS 8, enabling you to enter text by either tapping or sliding your finger from letter to letter using Apple’s QuickPath technology.

A couple of new watch faces take advantage of the larger display. The dynamic Contour face animates throughout the day, pushing the dial to the edge of the display and emphasizing the current hour. Plus, a new Modular Duo face leverages the extra space to provide a pair of large, data-rich complications.

A physical consequence of the larger display is that the Series 7 comes in 41 mm and 45 mm sizes, replacing the 40 mm and 44 mm Series 6 models. However, existing bands remain compatible. The front crystal has a stronger and more robust geometry that’s over 50% thicker than on the Series 6, making it more crack-resistant. It’s also now IP6X dust-resistant for dirty environments, and it retains its WR50 water-resistance rating for swimming (but not scuba diving).
When your wrist is down, the Series 7’s always-on display is 70% brighter indoors, making it easier to check the time discreetly. Despite this, it continues to provide 18-hour battery life, and it charges 33% faster than the Series 6, thanks to a new charging architecture and Magnetic Fast Charger USB-C Cable. Charging for 45 minutes will get you an 80% charge, and 8 minutes of juicing up before bed is enough for 8 hours of sleep tracking.
There are a few new fitness-related features, such as automatic detection of Outdoor Cycle workouts and better fall detection algorithms during workouts—including cycling—but most of them come with watchOS 8 and will work on older Apple Watch models as well.
Pricing for the Apple Watch Series 7 will start at $399, although it’s easy to spend a lot more on different case materials, bands, and Hermès models. The aluminum models will come in five colors: midnight, starlight, green, a new blue, and (PRODUCT)RED; the stainless steel and Apple Watch Edition models continue in existing colors. There will also be new band colors. Apple hasn’t provided a date when you can order a Series 7, saying only “later this fall.”
We can’t recommend an upgrade from the Apple Watch Series 6 or Series 5, but if you’re limping along with an older watch whose battery is getting weak, the Series 7 will be a compelling upgrade.
Upgraded iPad Gets Better Camera, True Tone, and More Storage
The base-model iPad has long been Apple’s best value, and with the changes the company brought to the ninth-generation iPad, it’s even more so. Apple improved the ninth-generation iPad in four ways:
New front-facing FaceTime HD camera: This is the big one. Apple replaced the anemic 1.2-megapixel front-facing FaceTime HD camera with a 12-megapixel ultra-wide camera that supports the Center Stage technology previously available only on the iPad Pro. Center Stage zooms and pans to keep whoever is on camera centered and in focus. And yes, the front-facing camera is now nominally better than the 8-megapixel rear-facing camera, which is a little weird.
A13 Bionic chip: It’s not the latest and greatest, but the A13 Bionic is a generation newer than the previous iPad’s A12 Bionic, and it should provide plenty of performance.
True Tone display: Another feature swiped from the iPad Pro, True Tone automatically adjusts the display’s color temperature based on the ambient lighting conditions, making the screen easier to read in different environments.
64 GB base storage: Previously, the iPad started at 32 GB of storage, which wasn’t enough to do much. Apple has now doubled the base storage level to 64 GB.

Despite these improvements, the price for the basic iPad remains $329 ($299 for education) in silver and space gray. It jumps to $479 for 256 GB of storage, and another $130 gives you 4G LTE connectivity at either storage level. Overall, the ninth-generation iPad is a better value than ever, and if you’re buying an iPad for anyone who doesn’t need lots of power, it’s a no-brainer. It’s available now.
Redesigned iPad mini Mimics iPad Air
Even more surprising than the upgraded iPad was the redesigned sixth-generation iPad mini. It resembles nothing so much as a smaller iPad Air, with the same squared-off case design, an edge-to-edge 8.3-inch Liquid Retina display, Touch ID in the top button, and USB-C charging and connectivity. It’s powered by the same new A15 Bionic chip that’s in the iPhone 13 Pro.
Apple also significantly improved the iPad mini’s cameras, outfitting it with a pair of 12-megapixel cameras. The rear-facing camera can now shoot video in 4K resolution, and the front-facing camera supports Center Stage. For ultimate portable connectivity, you can now get the iPad mini with optional 5G wireless connectivity.

The main place where the sixth-generation iPad mini falls behind the iPad Air is in accessories. It does support the second-generation Apple Pencil, which sticks magnetically to the side, but it lacks the Smart Connector that enables Apple’s well-regarded keyboards. You can still use Bluetooth keyboards, but they don’t provide as integrated an experience.
Storage options remain the same, but Apple dropped the price by $30, making it $499 for a 64 GB configuration and $649 for 256 GB. Add $150 to either configuration for 5G wireless connectivity. The iPad mini comes in space gray, pink, purple, and starlight, and it’s available now.
Realistically, you’re buying an iPad mini only if you value its diminutive size over all else. It may not be worth upgrading from a fifth-generation iPad mini unless it no longer meets your needs in some way, but anyone who wants full iPad power in a small form factor will appreciate the redesigned sixth-generation iPad mini.
(Featured image by Apple)
When Should You Upgrade to macOS 12 Monterey, iOS 15, iPadOS 15, watchOS 8, and tvOS 15?
Apple is gearing up to release macOS 12 Monterey, iOS 15, iPadOS 15, watchOS 8, and tvOS 15. We take a brief look at the features worth upgrading for and suggest when to upgrade each of your Apple devices.

September is here, which means that Apple will soon start releasing major upgrades for all its operating systems. Apple previewed these releases at its Worldwide Developers Conference in June, and many people have been testing the public betas since. Once Apple judges macOS 12 Monterey, iOS 15, iPadOS 15, watchOS 8, and tvOS 15 to be ready for prime time, the question arises—when should you install them?
(Note that we say when and not if. There’s no harm in delaying a major operating system upgrade until Apple has sanded off rough edges that slipped through testing. But waiting too long puts you at risk from security vulnerabilities, increases compatibility annoyances, and prevents you from taking advantage of new features. Plus, when you buy a new Mac, iPhone, or iPad after these operating systems have shipped, you’ll get the latest version, which could pose problems for your existing apps. It’s best to be prepared if you have to replace a device unexpectedly.)
In the past, we’ve offered separate takes on when you should install each of Apple’s operating systems, but many of this year’s new features are spread across multiple operating systems. For instance, the marquee feature of this season’s releases is SharePlay, which promises to let users watch videos, listen to audio, share screens, and more, all while on a FaceTime call that could involve an iPhone, iPad, Mac, or Apple TV. SharePlay sounds technically impressive—we’ll let you decide if it interests you—but it’s not a reason to upgrade right away. Apple has already announced that SharePlay is delayed and won’t ship until later in the year.
So here’s the general upgrade order that we suggest, starting with the iPad. Remember, always make a backup before upgrading a Mac, iPhone, or iPad so you can revert right away if necessary.
iPadOS 15
Upgrade your iPad to iPadOS 15 first. For the most part, iPadOS is a superset of iOS, so why should you upgrade your iPad before your iPhone? The big reason is that Apple has again taken a swing at improving iPad multitasking, and the changes are worth investigating. People who rely heavily on iPads will likely appreciate the new multitasking features, and those for whom the iPad is less important have nothing to lose by upgrading shortly after release.
Particularly welcome is a Multitasking menu at the top center of every window that lets you create a full screen, Split View, Slide Over, and in some cases (like Mail), a center window. There’s also a shelf at the bottom of the screen that shows open windows within an app. You can create Split View spaces by dragging one app from the App Switcher onto another. Finally, a list of keyboard shortcuts appears when you press and hold the Command key on an external keyboard. At long last, discoverability comes to multitasking!

Apple migrated some iOS 14 improvements to iPadOS 15. Widgets can now appear anywhere on the Home screen, and a new larger widget size lets apps display more information. Also coming to iPadOS 15 is the App Library, which automatically organizes all your apps into categories and enables you to avoid cluttered Home screens.
If you’re a Notes user, you’ll appreciate the new Quick Note feature, which lets you create a note with a swipe up from the corner of the screen using your finger or an Apple Pencil. Quick Note can automatically pull in highlighted text or links to a website or app, and it’s easy to add more with the Apple Pencil or keyboard.
Other welcome changes include a Focus mode that reduces distractions; voice searching and tab groups in Safari; FaceTime improvements; Live Text that allows you to search for, select, copy, and translate text in photos (on iPads with an A12 Bionic chip or later); and increased city detail in Maps.
iOS 15
It’s usually safe to upgrade iOS fairly quickly because Apple puts significant effort into ensuring that the new iOS version is a good experience for those who buy the new iPhones that come with it. However, because iPhones are so crucial to our everyday lives, it’s probably worth delaying the upgrade to iOS 15 for a few weeks, just in case. After that, you can install it and enjoy the new features.
Although SharePlay won’t arrive on day one, FaceTime still gets welcome improvements inspired by competing videoconferencing systems. There’s finally a grid view, Portrait mode for blurring the background, different mic modes for focusing on your voice or on sound in the room, the capability to include Windows and Android users, and FaceTime Web links for scheduling and sharing calls.

Messages will collect links, images, and other content that your friends have sent you in a new Shared with You section, which you’ll also find in other Apple apps like Photos, Safari, Apple News, Music, and Podcasts. Plus, when someone sends you multiple photos in Messages, they appear as either a collage or a stack that you can swipe through. There are also new Memoji options to try if you’re into that.
Other new features are similar to those in iPadOS 15, including Focus mode, voice searches and tab groups in Safari, Live Text in Camera and Photos, and improved city detail in Maps, which also gains immersive walking instructions.
watchOS 8
Once you upgrade your iPhone to iOS 15, go ahead and upgrade your Apple Watch to watchOS 8 right away. You may not even notice the difference since none of the changes will force changes in your existing usage patterns.
New features include Portrait mode photos on your watch face, Memories from Photos pushed to your watch, the capability to share photos via Messages and Mail, integration with HomeKit security cameras, more control over scenes and devices in the Home app, digital keys for HomeKit locks, a new Mindfulness app that replaces the Breathe app, a Pilates option in the Workout app, tracking of your sleeping respiratory rate, and a Find Devices app for locating lost devices from your wrist.

tvOS 15
Why put tvOS ahead of macOS? The decision to upgrade to tvOS 15 is easy for most people. It’s unlikely to cause problems for your Apple TV, and the new features won’t get in the way of basic TV watching. Plus, if you have automatic updates turned on in Settings > Software Updates, it will install automatically at some point after release.
You might not want to wait for the automatic update, though. There are plenty of small but welcome improvements, such as the capability to sign in to Apple TV apps using Face ID or Touch ID on your iPhone. The playback interface has a redesigned scrubber that displays more information. The Apple TV will automatically detect nearby AirPods and show a notification to connect them, saving you a manual step. If you have AirPods Pro or AirPods Max, you can listen to Apple TV audio with dynamic head tracking. The TV app will include a “For All of You” row based on the interests of everyone in the house (via Family Sharing). Finally, you can ask a HomePod to play a particular show on the Apple TV and even use one or two HomePod mini speakers as the default audio output.

macOS 12 Monterey
The hardest upgrade decision revolves around your Mac, as always. For the most part, macOS 11 Big Sur has been relatively solid, with fewer complaints than plagued macOS 10.15 Catalina. Some beta testers believe that macOS 12 Monterey is more of a refinement upgrade without the major architectural changes that marked Big Sur and Catalina. That would suggest more stability and the possibility of an easier and earlier upgrade.
Plus, Monterey has some unique features. Most notable is Universal Control, which lets you work seamlessly between multiple Macs and your iPad, connected wirelessly or via USB. You can move the pointer from a Mac to the iPad, type into iPad apps with your Mac’s keyboard, and even drag and drop content from one Mac to another. Another welcome addition is the option to use AirPlay to display video, play audio, or present content from another Apple device to a Mac, something that has previously been possible only in the other direction. Finally, Monterey brings the Shortcuts automation app to the Mac, making it easier to automate repetitive tasks without learning AppleScript or using the aging Automator.

Apart from those features, you’ve already read about most of the changes. They include FaceTime improvements, support for Focus mode, Shared with You collections in Apple apps, tab groups (but not voice searching, sadly) in Safari, a Quick Note hot corner activation option, Live Text, and Maps enhancements.
You may find some of these features compelling, but we recommend waiting to upgrade to Monterey for at least a few months. App compatibility isn’t usually a big problem with the other operating systems, but most of us rely on specific Mac apps—sometimes older versions—to get our work done. Even once you’re confident your apps will work properly in Monterey, there may be workflow or intra-office compatibility concerns if some people upgrade and others don’t. And, of course, unanticipated bugs could crop up at professionally inconvenient times—important work takes place on Macs! So please, do not upgrade to Monterey without checking with us first. With luck, the start of the new year will have brought both the bug fixes and app updates necessary to give the green light.
(Featured image by Apple)
Solve Networking Puzzles with Powerline Networking and MoCA
Wi-Fi and Ethernet are sufficient for most networking needs, but if you can’t extend a network to a particular spot, consider powerline networking, which runs over electrical cables, or MoCA, which runs on cable TV coax. Details here:

For most homes and offices, a standard or mesh Wi-Fi network works fine for providing Internet access throughout the building. And when higher throughput is necessary, it’s usually not that difficult to pull Ethernet cable from room to room.
But some buildings seem almost impervious to networking—imagine thick brick walls that both block Wi-Fi signals and make it nearly impossible to pull wire from one room to another. It may not be the entire building—you may just have trouble extending a network into a remote attic or basement room, or to a freestanding outdoor structure.
Where there’s a will (and enough money), there’s a way, of course, but there are two affordable alternatives for bringing network access to tricky spots: powerline networking and MoCA.
Powerline Networking
As you might expect from the name, powerline networking uses technical magic to piggyback data on top of the standard electric cables that are undoubtedly already in every room of your home or office. It has been around for years but was long considered slow and unreliable. Modern iterations of the technology, called HomePlug, have solved many of those problems and offer up to 2 gigabits per second (Gbps) of throughput.
You need a pair of powerline adapters to create a network, and all you have to do is plug them in. However, there are a few things to keep in mind:
Powerline adapters must plug directly into a wall socket. You can’t connect them to a power strip or an uninterruptible power supply because the surge protection blocks the frequencies they use for transmitting data.
It’s often said that powerline adapters must be on the same circuit, but it’s impossible to predict exactly what that means with the wiring in your particular building. The only way to know for sure is to test to make sure the adapters pair up and provide acceptable throughput. (Depending on the wiring, they may work, but at slower speeds.)
If you’re in an apartment or a building with electrical wiring that might extend outside of your space, you can enable security to ensure that other powerline adapters can’t join your network.
The simplest powerline adapters provide just an Ethernet port, but others may offer an additional Ethernet jack, a pass-through electric outlet, and even a built-in Wi-Fi extender. Regardless, they’re inexpensive, with prices for a two-pack well under $100.
MoCA
Its name may sound like a tasty hot drink, but MoCA stands for Multimedia over Coax Alliance, and it’s a standard for using coaxial cables for networking. This isn’t a new idea: those who were around the tech world in the 1980s and 1990s may remember 10BASE2 Ethernet, also known as thin Ethernet, which used thin coaxial cable. However, 10BASE2 Ethernet ran at only 10 megabits per second (Mbps), where-as MoCA offers throughput of up to 2.5 Gbps. MoCA’s win is that it runs over the coaxial cables installed in many buildings, primarily homes, to distribute cable TV. If you already have coaxial cable in your walls, why not use it for networking?
Security remains an issue if your coax cables also carry cable TV or broadband Internet and thus extend beyond your control. The problem is that MoCA signals are quite powerful and can travel farther than intended, such as to neighboring houses. The simple solution is a point-of-entry filter added where the coax enters your house—it prevents MoCA signals from leaving your house. You may also be able to configure a MoCA security key to keep your traffic private, but not all MoCA devices support security.
As with powerline networking, setting up a MoCA network generally requires at least two adapters, although some routers have built-in MoCA capabilities. MoCA adapters usually provide one or two Ethernet ports, although it’s also possible to get Wi-Fi network extenders that support MoCA. The hardware is a bit more expensive than powerline gear, with prices for a two-pack in the $120 to $150 range.
Choosing Wires
Both powerline networking and MoCA require that you have properly configured wires in your walls, so there are no guarantees with either. Your building’s electrical system may be too complex for powerline networking, and even if you have coax cables, there’s no way of knowing if they were installed well or have suffered damage over the years.
But neither is particularly expensive, so as long as you purchase from a vendor that allows returns, you should be able to test either one easily. And if you’re looking for a recommendation about particular brands to get or avoid, contact us.
(Featured image by iStock.com/architectphd)
Need to Share Files Securely? Try Password-Protected ZIP Archives
It’s good to be cautious about attaching sensitive files to email—if either your or your recipient’s email account were to be compromised, confidential information could be revealed. Instead, send password-protected ZIP archives. Here’s how:

Imagine you’re staring at a file or folder—perhaps confidential employee information that you need to send to your accountant. If attaching it to an email message makes you think, “That doesn’t seem like a good idea,” award yourself a gold star!
Sending sensitive files via email is a bad idea, partly because the email could be intercepted in transit (possible but highly unlikely), but more because the files then live in both your and your recipient’s email accounts in an unprotected form. If an attacker were to gain access to either of your email accounts, they might scan for patterns like credit card numbers, ID numbers, phone numbers, and postal addresses and find them even in attachments.
There are ways of encrypting email messages so they can be read only by the recipient and never exist in an unencrypted form other than while being created or read, but they’re difficult to set up and fussy to use. For most people, most of the time, encrypted email is overkill.
For a more straightforward solution to exchanging information securely via email, use password-protected and encrypted ZIP archives. They’re easy to create on the Mac, either using a simple command in Terminal or with a third-party utility. And better yet, any Mac user can expand them using the built-in Archive Utility simply by double-clicking and entering the necessary password.
Create Encrypted ZIP Archive Using Terminal
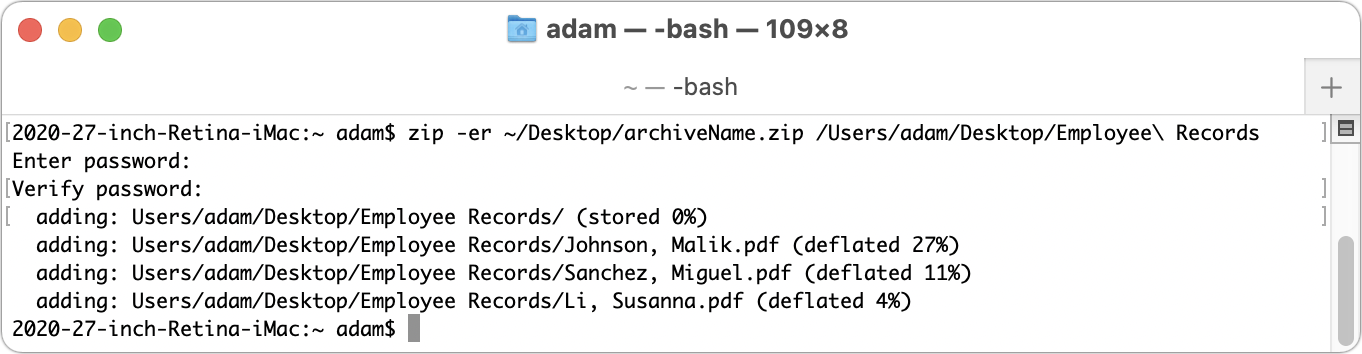
Although many Mac users are intimidated by using the Unix command line in Terminal, making an encrypted ZIP archive is easy enough for anyone. All it takes is typing a single command, dragging a file or folder to Terminal, and entering a password twice. Follow these steps, which make an encrypted ZIP archive on your Desktop:
In your Applications folder, open the Utilities folder and double-click Terminal to launch it.
Type (or copy and paste) this command, replacing “archiveName” with whatever you want to name the ZIP file and making sure to type a space after the last letter—the “p” in “zip”. (The tilde ~ character is Shift-backtick, and it’s the key to the left of the numeral 1 key.)
zip -er ~/Desktop/archiveName.zip
Drag the file or folder you want to protect into the Terminal window to complete the command.
Press Return, and when prompted, enter the desired password twice—the second time is for confirmation.
Create Encrypted ZIP Archive Using Archiver
If you have trouble with the command-line method or plan to create encrypted ZIP archives regularly, it’s worth using a Mac app that simplifies the process even more. There are various apps, but a particularly straightforward one for those running macOS 11 Big Sur is Archiver ($19.99, with a free trial). Download it and then follow these steps to create an encrypted ZIP archive:
1. Launch Archiver.
2. Drag a file or folder to the Archiver window and click the Archive button in the toolbar.

3. Select the archive format (use ZIP), click the Encrypt checkbox, enter the password twice, and click the Archive button in the toolbar.
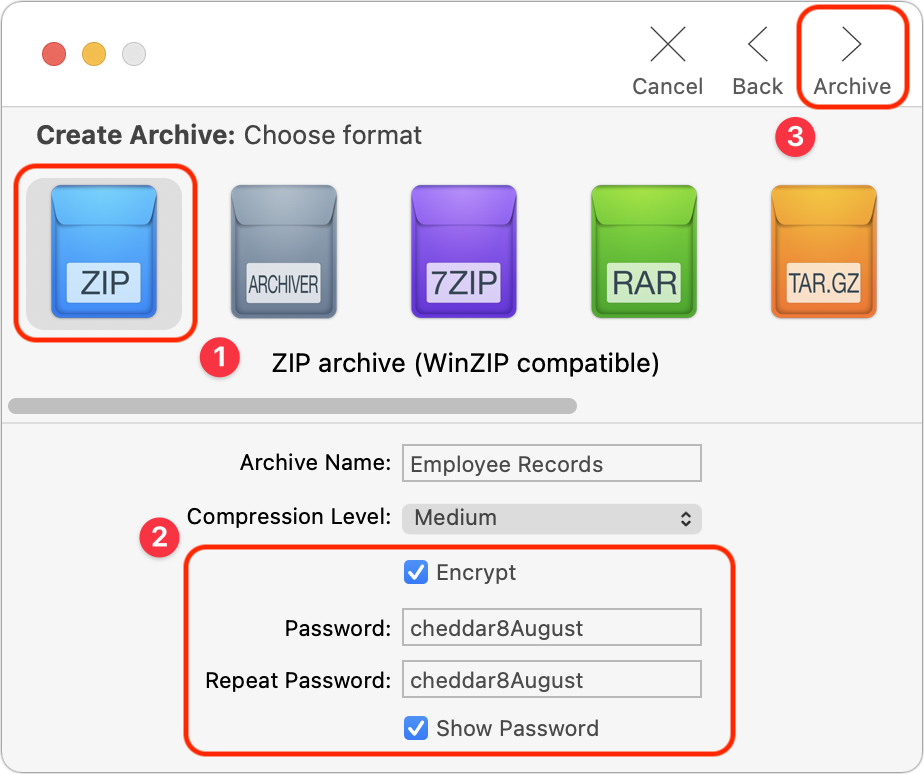
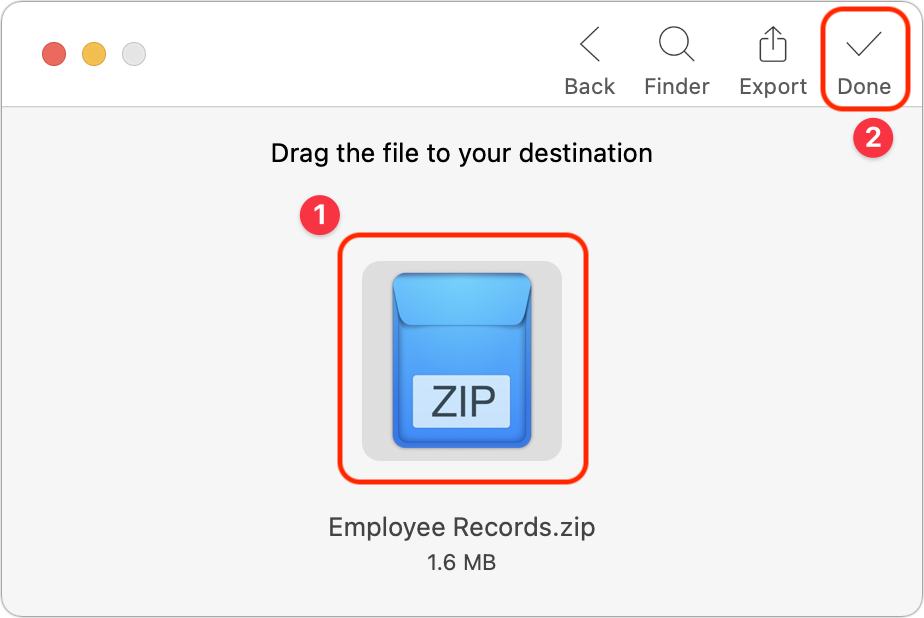
4. Drag the ZIP archive to the Desktop or another folder and click the Done button.
Decrypting a ZIP Archive
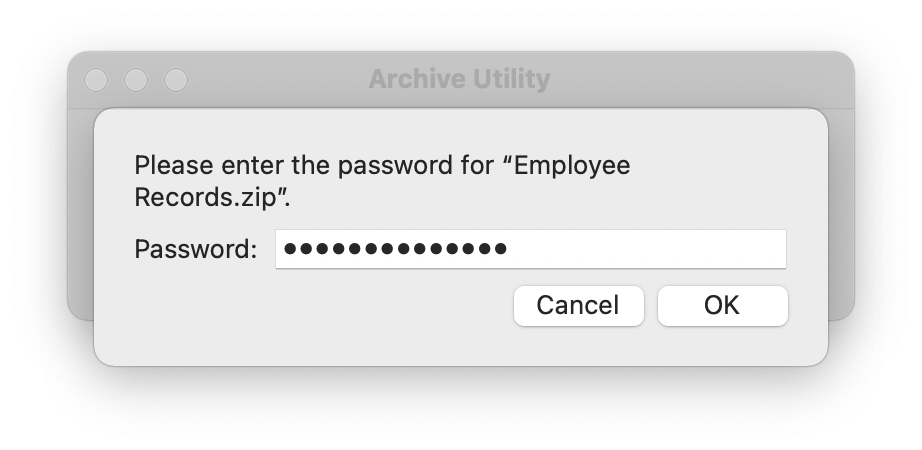
As noted earlier, decrypting a password-protected ZIP archive on the Mac is as simple as double-clicking it and entering the password when prompted.
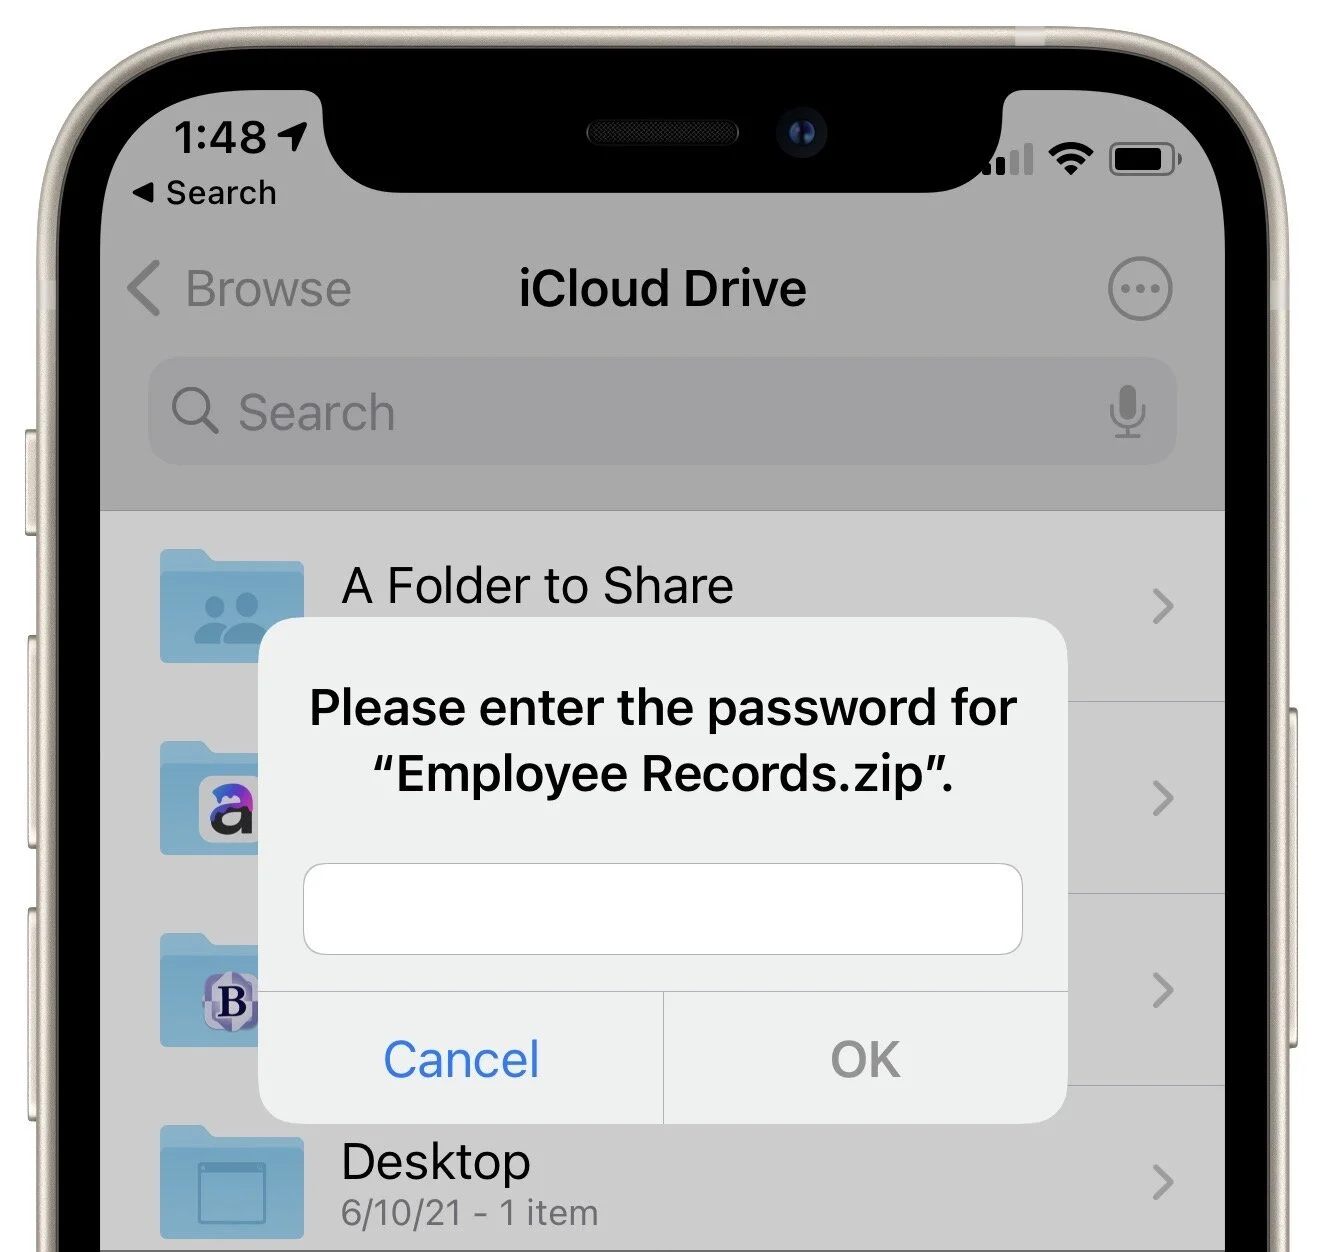
What about iOS or iPadOS? Never fear, since the Files app can also decrypt ZIP archives; just tap the archive to open it and enter the password when prompted.
A Word about Passwords
It’s important to think briefly about how you’re going to communicate the password to your recipient. Don’t send it in email or else anyone who compromises either your email account or your recipient’s account could decrypt the ZIP archive.
Instead, use what’s called an “out of band” communication channel. In other words, if you’re going to send the ZIP archive via email, communicate the password in a phone call or text message. That would keep the password safe if either of your email accounts were compromised.
If you’re sending password-protected ZIP archives to a particular person regularly (and the files don’t contain state or corporate secrets), you could agree on a system for generating passwords so you don’t have to communicate each one individually. For instance, you could combine a random word and the current month, so the password would be “cheddar9September” one month and “cheddar10October” the next.
As you can see, you can use this technique with so little extra effort that it’s worth ensuring a higher level of security whenever you need to share confidential information.
(Featured image by iStock.com/brijith vijayan)
Frequently Asked Questions Surrounding Apple’s Expanded Protections for Children
Apple’s recently announced expanded protections for child safety have generated a firestorm of criticism and confusion. We attempt to answer some of the most common questions we’ve received.

Apple’s recent announcement that it would soon be releasing two new technologies aimed at protecting children has generated a firestorm of media coverage and questions from customers. Unfortunately, much of the media coverage has been based on misconceptions about how the technology works, abetted by uncharacteristically bungled communications from Apple. It’s not inconceivable that Apple will modify or even drop these technologies in the official release of iOS 15, iPadOS 15, and macOS 12 Monterey, but in the meantime, we can provide answers to the common questions we’ve been hearing.
What exactly did Apple announce?
Two unrelated technologies:
Messages will gain features that warn children and their parents when sexually explicit photos are received or sent. Such content will be blurred, the child will be warned and given the option to avoid viewing the image, and parents may be alerted (depending on the age of the child and settings).
Photos uploaded by US users to iCloud Photos will be matched—using a complex, privacy-protecting method that Apple has developed—against known illegal photos considered Child Sexual Abuse Material, or CSAM. If a sufficient number of images match, they’re verified by a human reviewer at Apple to be CSAM and then reported to the National Center for Missing and Exploited Children (NCMEC), which works with law enforcement in the US.
Does this mean Apple is scanning all my iPhone photos?
Yes and no. Messages will use machine learning to identify sexually explicit content in received and sent images. That scanning takes place entirely on the iPhone—Apple knows nothing about it, and no data is ever transmitted to or from Apple as a result. It’s much like the kind of scanning that Photos does to identify images that contain cats so you can find them with a search. So scanning is taking place with this Messages feature, but Apple isn’t doing it.
The CSAM detection feature operates only on images uploaded to iCloud Photos. (People who don’t use iCloud Photos aren’t affected by the system at all.) On the device, an algorithm called NeuralHash creates a hash and matches it against an on-device database of hashes for known illegal CSAM. (A hash is a one-way numeric representation that identifies an image—it’s much like how a person’s fingerprint identifies them but can’t be used to re-create that person.) NeuralHash knows nothing about the content of any image—it’s just trying to match one hash against another. In this case, it’s matching against existing image hashes, not scanning for a type of content, and Apple is notified only after enough image hashes match.
It’s also important to note that this is different from how companies like Facebook, Google, and Microsoft scan your photos now. They use machine learning to scan all uploaded photos for CSAM, and if they detect it, they’re legally required to report it to the NCMEC’s CyberTipline, which received 21.7 million CSAM reports from tech companies in 2020, over 20 million from Facebook alone. Because Apple does not scan iCloud Photos in the US like other companies scan their photo services, it made only 265 reports in 2020.
What happens if the CSAM detection feature makes a mistake?
This is called a false positive, and while vanishingly improbable, it’s not mathematically impossible. Apple tested 100,000,000 images against NeuralHash and its CSAM hash database and found 3 false positives. In another test using 500,000 adult pornography images, NeuralHash found no false positives.
Even if NeuralHash does match an image hash with one in the known CSAM hash database, nothing happens. And nothing continues to happen until NeuralHash has matched 30 images. Apple says that the chances of there being 30 false positives for the same account are 1 in 1 trillion.
I have terrible luck. What if that happens with my account?
Once at least 30 images have matched, the system enables Apple to decrypt the low-resolution previews of those images so a human can review them to see if they are CSAM. Assuming they are all false positives—remember that possession of CSAM is illegal in the US—the reviewer sends them to Apple engineers to improve the NeuralHash algorithm.
Could non-CSAM images end up in Apple’s CSAM hash database?
It’s extremely unlikely. Apple is constructing its database with NCMEC and other child-safety organizations in other countries. Apple’s database contains image hashes (not the actual images; it’s illegal for Apple to possess them) for known illegal CSAM images that exist both in the NCMEC database and at least one other similar database. So multiple international organizations would have to be subverted for such image hashes to end up in Apple’s database. Each source database will have its own hash, and Apple said it would provide ways for users and independent auditors to verify that Apple’s database wasn’t tampered with after creation.
Plus, even if a non-CSAM image hash were somehow added to Apple’s database and matched by NeuralHash, nothing would happen until there were 30 such images from the same account. And if those images weren’t CSAM, Apple’s human reviewers would do nothing other than pass the images to engineering for evaluation, which would likely enable Apple to determine how the database was tampered with.
Couldn’t a government require Apple to modify the system to spy on users?
This is where much of the criticism of Apple’s CSAM detection system originates, even though Apple says the system will be active only in the US. On the one hand, Apple has said it would resist any such requests from governments, as it did when the FBI asked Apple to create a version of iOS that would enable it to break into the San Bernardino shooter’s iPhone. On the other hand, Apple has to obey local laws wherever it does business. In China, that already means that iCloud is run by a Chinese company that presumably has the right to scan iCloud Photos uploaded by Chinese users.
It’s conceivable that some country could legally require Apple to add non-CSAM im-ages to a database, instruct its human reviewers to look for images the country finds objectionable, and report them to law enforcement in that country. But if a country could successfully require that of Apple, it could presumably force Apple to do much more, which hasn’t happened so far. Plus, the CSAM detection system identifies only known images—it’s not useful for identifying unknown images.
Is Apple heading down a slippery slope?
There’s no way to know. Apple believes this CSAM detection system protects the privacy of its users more than scanning iCloud Photos in the cloud would, as other companies do. But it’s highly unusual for a technology that runs on consumer-level devices to have the capacity to detect criminal activity.
(Featured image by iStock.com/metamorworks)
Ransomware Is on the Rise: Learn How to Protect Your Macs
The scourge of ransomware isn’t yet common on the Mac, but it makes sense to prepare for the possibility—before your organization is hit with a ransom demand. Read on for our advice on how to protect your systems:

In cybercriminal circles, ransomware is all the rage. Once it has infected a computer, it encrypts all the files and then presents a ransom demand—pay up to get the decryption software necessary to recover the data.
Ransomware has been in the news all year, with the Colonial Pipeline attack in particular spending weeks in the headlines. Attacks rose 485% in 2020 and show no signs of abating. The amounts demanded by the attackers are increasing, too, with PC manufacturer Acer and Apple supplier Quanta both hit with $50 million demands. Worse, some ransomware attackers are adding an extortion component where they threaten to reveal confidential data if the victim doesn’t pay. It’s scary, we know.
First, the good news. Although there are several examples of ransomware that target the Mac, none of them have been particularly well done or (as far as we know) successful. Right now, the chances of Macs falling prey to ransomware are very low, and there’s no reason to panic.
However, complacency is dangerous. There’s a trend toward “ransomware as a service” (RaaS). The RaaS operators maintain the ransomware malware, offer a payment portal for victims, and provide “customer service” for victims who don’t know how to pay with Bitcoin or other cryptocurrencies. Affiliates spread the ransomware and split the revenues with the operators. It’s a tidy little cybercriminal enterprise, and separating the malware development and network penetration tasks has made it significantly easier for more criminals to leverage ransomware. It’s only a matter of time before they turn their attention to Macs.
For the most part, protecting your Macs from ransomware is no different than protecting against any number of other security problems. Follow this core advice:
Keep Macs and apps up to date: Always install macOS and security updates, and keep other apps up to date. With every update, Apple addresses numerous security vulnerabilities, fixing the vast majority of them before attackers can exploit them with malware. Every so often, however, Apple’s security notes include this sentence: “Apple is aware of a report that this issue may have been actively exploited.” That means there may be malware that targets that vulner-ability; install such updates immediately!

Use strong passwords with a password manager: You’ve heard it from us before, and you’ll hear it again, but it’s essential that everyone in your organization use strong, unique passwords through a password manager like 1Password, LastPass, or even Apple’s iCloud Keychain. Just one weak password could allow attackers to infiltrate a computer or server and install ransomware.

Be suspicious of links and attachments: Ensure that everyone in your organization is careful about opening attachments or clicking links in email messages from unknown people or that seem off in some way. Phishing attacks are one of the primary ways of distributing malware. (If your group needs training in phishing awareness, contact us.)

Never download pirated software! Even aside from the fact that it’s ethically problematic, the most recent piece of Mac ransomware—ThiefQuest—was initially found in a malicious installer purporting to be for the LittleSnitch network security utility (ironic, eh?). Get apps only from the developers’ official sites or the Mac App Store.
Make frequent backups: Backups are essential so, even if you do fall prey to ransomware, you can restore data from before the infection point. The caveat is that some of your backups must be isolated from the Macs in question—some ransomware intentionally tries to encrypt or delete connected backups.
Monitor for ransomware: Although ransomware usually tries to stay below the radar while it’s encrypting files, the free RansomWhere utility can identify processes that quickly create encrypted files. It will likely incorrectly flag some legitimate behavior too (like in the screenshot below), but it’s still a helpful tool.

Have anti-malware software: For the most part, if you’re careful about following the advice above, you’ll be fine. But it’s a good idea to have a current anti-malware app around and run it occasionally—if you don’t already have one, try the free version of Malwarebytes. If you—or your users—aren’t good about the basic precautions, you might want to run anti-malware software all the time or set up broader network protections.
Have a disaster management plan: Every business should think about how it would react to a fire, flood, earthquake, or other disaster. When building a disaster management plan, be sure to include ransomware. How would you shut down infected systems, rebuild them from scratch, and restore uninfected files?
Setting up a backup strategy that protects against ransomware requires a little more thought. As noted, ransomware often tries to render backups useless in one way or another. You need to have versioned backups that allow you to restore from before the ransomware infection, and those backups need to be isolated from the computers and network being backed up. Techniques that help include:
Isolate backup drives: Rotate multiple Time Machine drives, with at least one that’s always disconnected. However, this strategy assumes you’ll detect a ransomware infection before you’ve rotated all the drives. Ransomware could lie undetected for weeks or months before activating. Manually run current anti-malware software before connecting any backup drive.
Use Internet backup: Set up an Internet backup system that will maintain versions of backed-up files, such as Backblaze with its Extended Version History feature. Retrospect 18 also supports object locking on cloud storage systems, which provides immutable storage. It ensures that no one—even someone who acquires root credentials—can delete the backups during the retention period.
Consider tape backups: Long ago, tape backups were the go-to solution for network backups, but as the price-per-gigabyte of hard drives dropped precipitously and Internet backups became feasible, tape has largely fallen by the wayside. But tape backups are still an option. They can hold a lot of data and are easily kept offline in a separate location. Plus, some tape drives can even operate in a write-once, read-many (WORM) mode that guarantees data can’t be erased or overwritten. Tape requires more human interaction than other backup methods, but it’s still a cost-effective way to protect hundreds of terabytes of data against ransomware.
Again, there’s no reason to panic about ransomware, but if it could significantly damage your business, you should take steps to reduce the chance of getting hit and ensure that you could restore your data if your computers were to get infected. There is no single approach that’s ideal for everyone, but we can help you think about what’s involved and develop a strategy that balances protection, cost, and effort.
(Featured image by iStock.com/chainatp)
Share Files, Photos, and other Data between Apple Devices with AirDrop
Apple’s AirDrop lets you easily share photos and files with nearby Apple users and devices. Our article explains how to use this helpful feature with the Mac, iPhone, and iPad.

It’s common to want to share files, photos, and other data between your devices—or with friends and family. When the desired person or device isn’t nearby, it’s easiest to use Messages or Mail. But what if you want to move a file between two of your Macs, from your iPhone to your Mac, or to your friend who’s across the table? For transfers within immediate proximity, Apple provides AirDrop, a quick and easy way to move data between devices.
Make Sure AirDrop Is Ready to Go
First off, AirDrop requires both Wi-Fi and Bluetooth, so make sure both are enabled. If you use wired Ethernet on your Mac, enable Wi-Fi as well, but put the Wi-Fi service beneath the Ethernet service in System Preferences > Network (click the down-pointing arrow under the list and choose Set Service Order).
Next, make sure other devices can discover you. On the Mac, choose Go > AirDrop and, near the bottom of the Finder window that appears, choose Everyone from the pop-up menu. (If you’re out in public and random people keep trying to send you files, which would be weird, choose Contacts Only instead.) On an iPhone or iPad, go to Settings > General > AirDrop and select Everyone.

Send a File or Photo via AirDrop
Apple has integrated AirDrop into the standard sharing mechanism in macOS, iOS, and iPadOS, so sharing via AirDrop works the same as sharing via most other apps.
In the Finder on the Mac, the easiest approach may be to select AirDrop in a Finder window’s sidebar and then drag files to the icon representing the destination device (below left). You can also select one or more files and choose File > Share > AirDrop or Control-click them and choose Share > AirDrop, both of which present a dialog from which you can select the destination (below right). The right-hand dialog is also what you’ll see if you use the Share option in Photos or any other app.
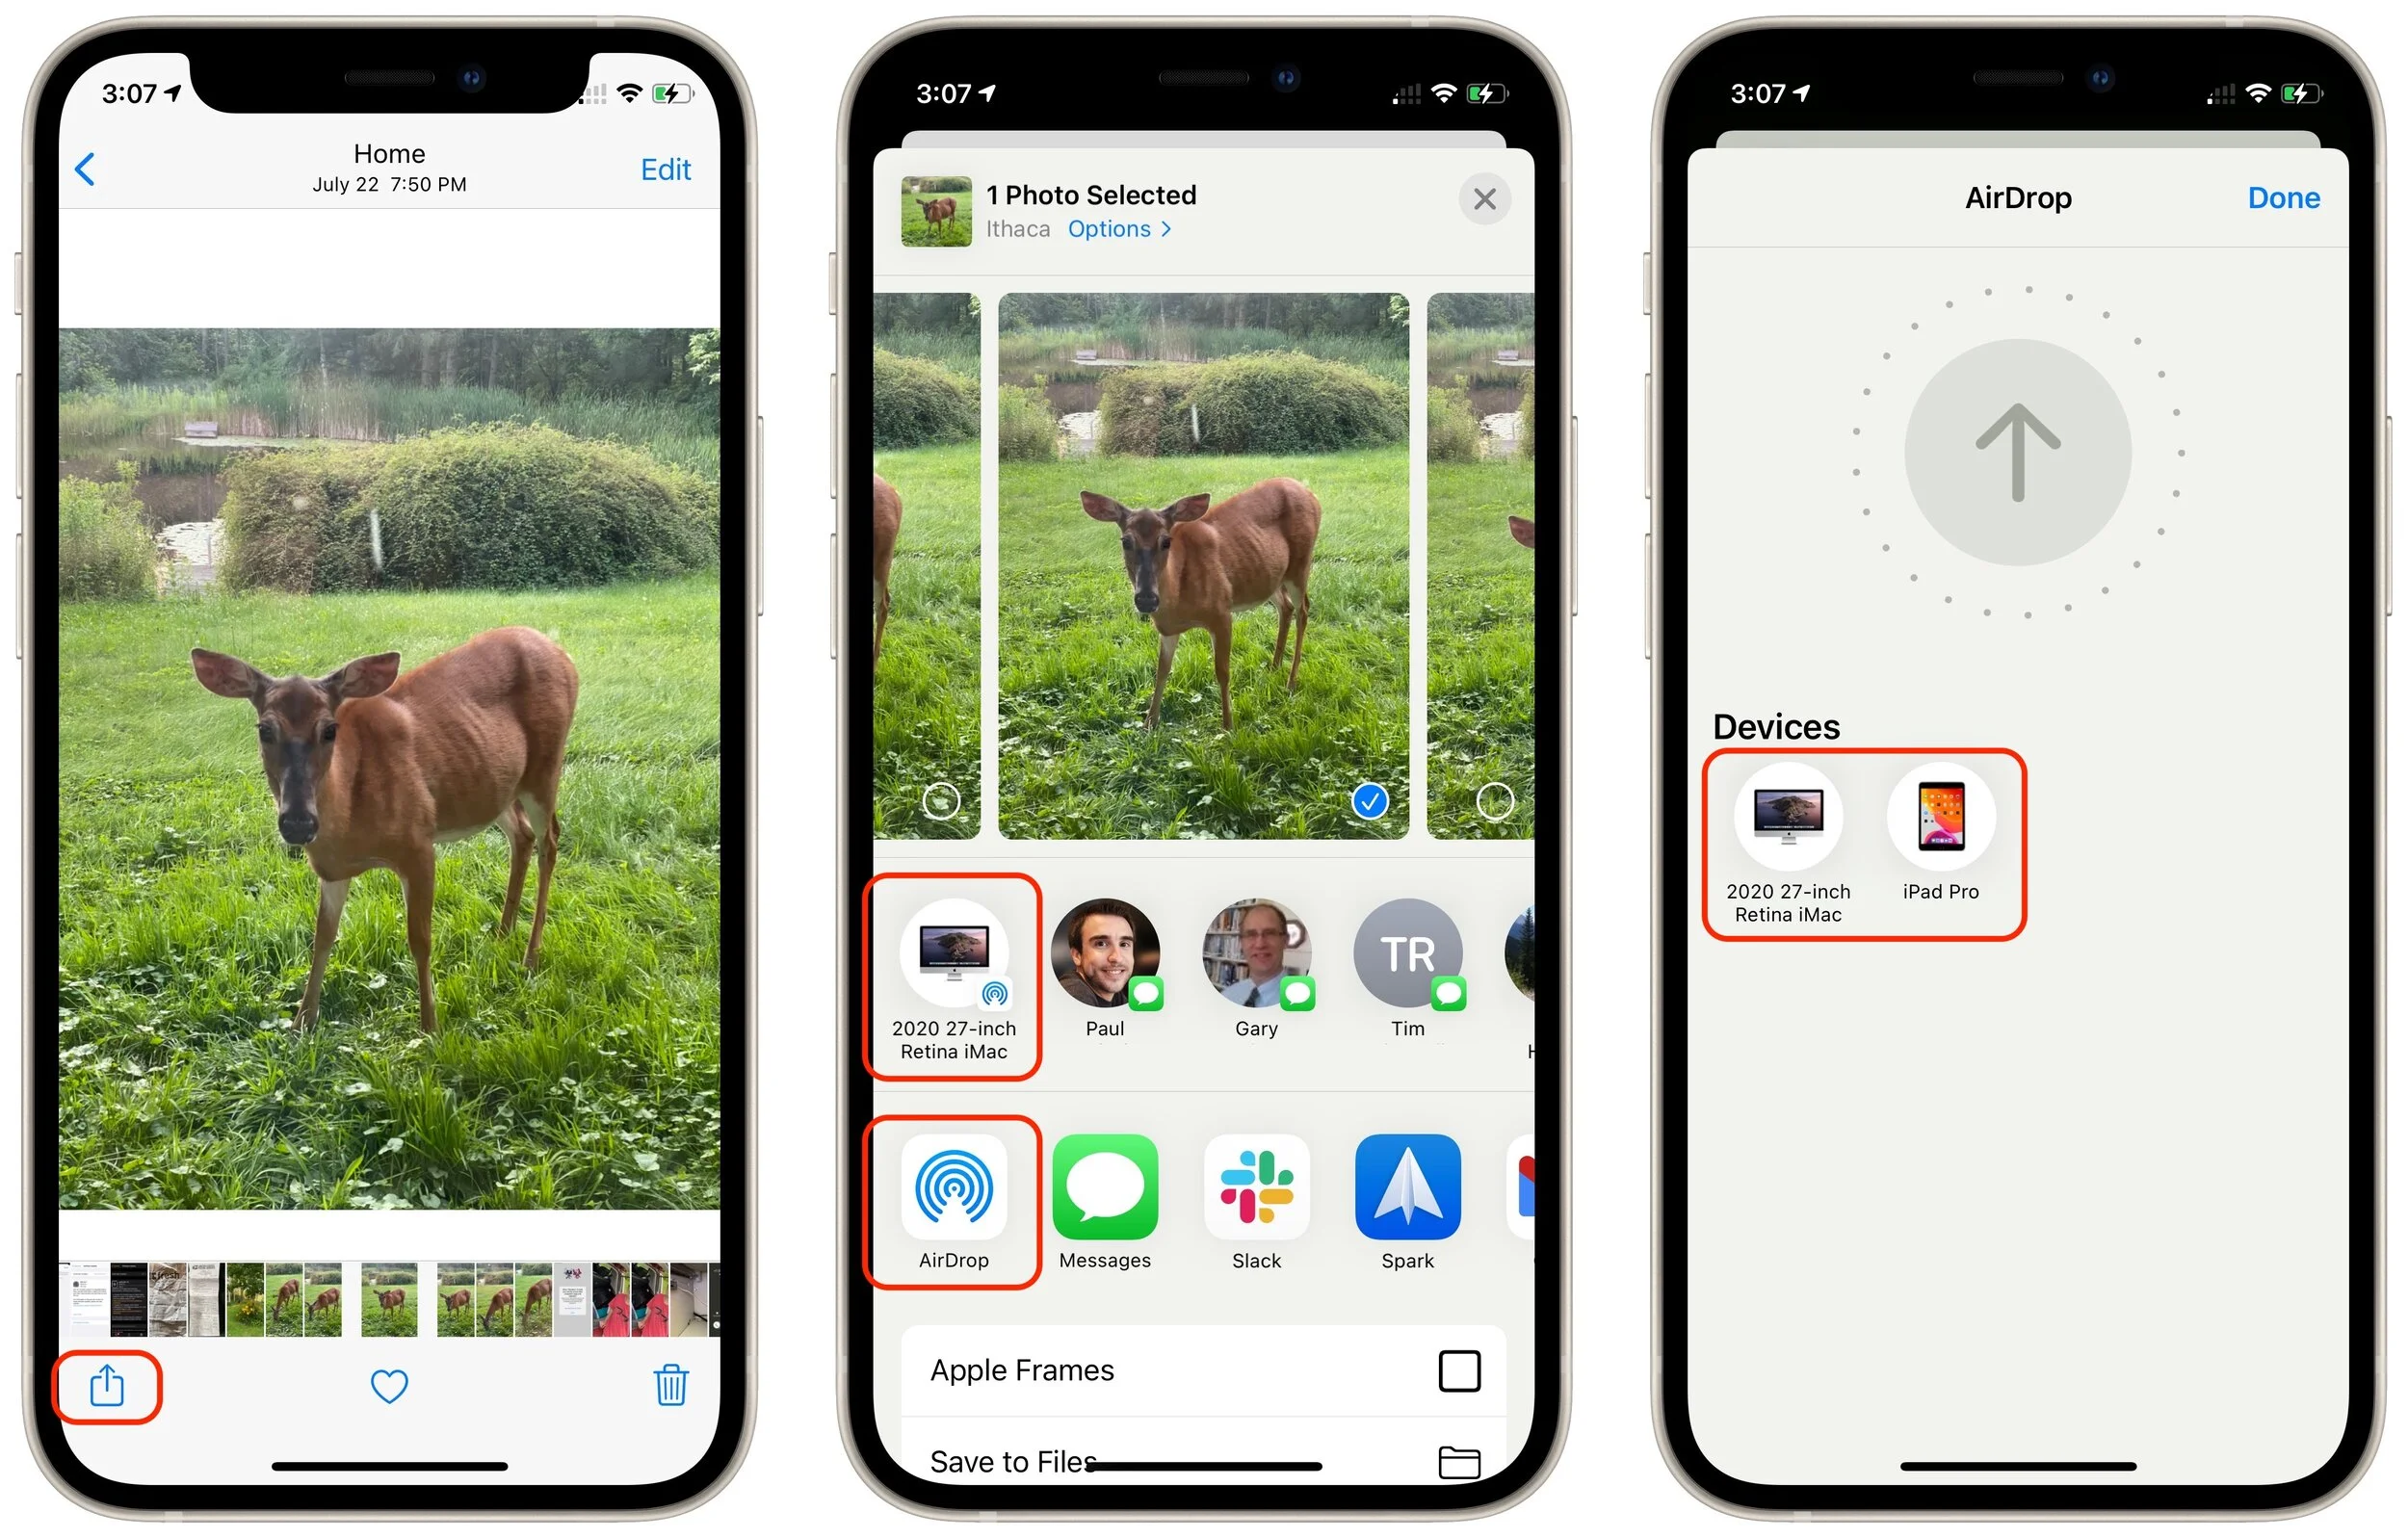
On an iPhone or iPad, when you’re viewing the item you want to share, tap the Share button to bring up the Share sheet. You may be able to tap the AirDrop icon for the desired destination directly in the top row, but if it doesn’t show what you want, tap the general AirDrop icon in the second row to display the AirDrop screen with icons for all available destinations. Either way, tap the destination to send the file.
Receive Data via AirDrop
On the receiving side, AirDrop is utterly simple, particularly when transferring files between your devices, though the experience varies a little depending on the direction and file type.
Receiving on a Mac: If you’re transferring between your own devices, you don’t need to do anything; the file will appear in the Downloads folder of the destination Mac. Files sent from other people will appear there too, but you’ll get a prompt asking you to accept or decline the file, and if you accept, an option to open it in the appropriate app.

Receiving on an iPhone/iPad: Receiving on an iPhone or iPad is similar, with one additional step. Unless iOS/iPadOS knows where the file should go (images always import into Photos automatically, for instance), it prompts you with a list of apps that can open the file. Files you transfer between your own devices are accepted automatically; for files from other people, you must tap the Accept button first.

Troubleshooting
AirDrop has been around since Mac OS X 10.7 Lion in 2011 and has seen significant updates since then. So if you had trouble getting AirDrop to work years ago, it’s worth revisiting the feature. That said, problems can still crop up:
If a Mac doesn’t appear as an AirDrop destination, make sure it has Wi-Fi active. Ethernet is not sufficient. Also, if the Mac’s firewall is active, check that it allows incoming connections. Open System Preferences > Security & Privacy > Firewall > Firewall Options and deselect “Block all incoming connections.”
If an iPhone doesn’t appear as an AirDrop destination, make sure Personal Hotspot is turned off in Settings > Personal Hotspot.
Because AirDrop relies on Bluetooth and Wi-Fi, interference with either, or a separation between devices of more than 30 feet (9 meters), can cause performance and reliability to suffer.
For best results, make sure you’re using recent Apple hardware running the latest versions of macOS, iOS, and iPadOS. Apple has improved AirDrop over the years, and it works significantly better than it did years ago. Technically, AirDrop requires a Mac introduced in 2012 (excluding the 2012 Mac Pro) or later running OS X 10.10 Yosemite or later. On the mobile device side, the iPhone, iPad, or iPod touch must be running at least iOS 7.
If you’re prompted to accept transfers between your own devices, that’s an indication that the devices aren’t logged in to the same iCloud account.
Although AirDrop has no explicit size limit, very large files (over 500 MB) will take a long time to transfer and are more likely to fail due to network issues during the transfer.
If you can’t find a transferred file in the destination Mac’s Downloads folder, remember that it retains its original creation and modification dates, so it might be sorting differently than you expect.
Next time you need to move data between nearby Apple devices, give AirDrop a try!
(Featured image by iStock.com/jroballo)