Get Some Color (On Your Mac) This Summer with the Color Picker
Have you found the macOS color picker confusing? Here’s how to find, set, and share colors.

If you’re over 40, you probably remember the point in The Wizard of Oz where the movie switches from black-and-white to Technicolor (and if not, go see it!). It wasn’t the first color film, but the vibrant images of Dorothy’s ruby slippers, the yellow brick road, and the Emerald City helped make the movie a classic.
On the Mac, whenever you want to fill a drawing with color, colorize some text, or format spreadsheet cells in color, you need to use the Colors window, commonly called the color picker. Like many long-standing elements of the Mac experience, most people have seen and used it, but don’t realize how much it can do. How you bring it up varies by app but usually entails clicking a color button associated with styles or formats.
The Colors window has three sections: buttons for the color pickers at the top, their individual controls in the middle, and user-specified swatches at the bottom.
Color Pickers
Click the buttons at the top to switch between these pickers:
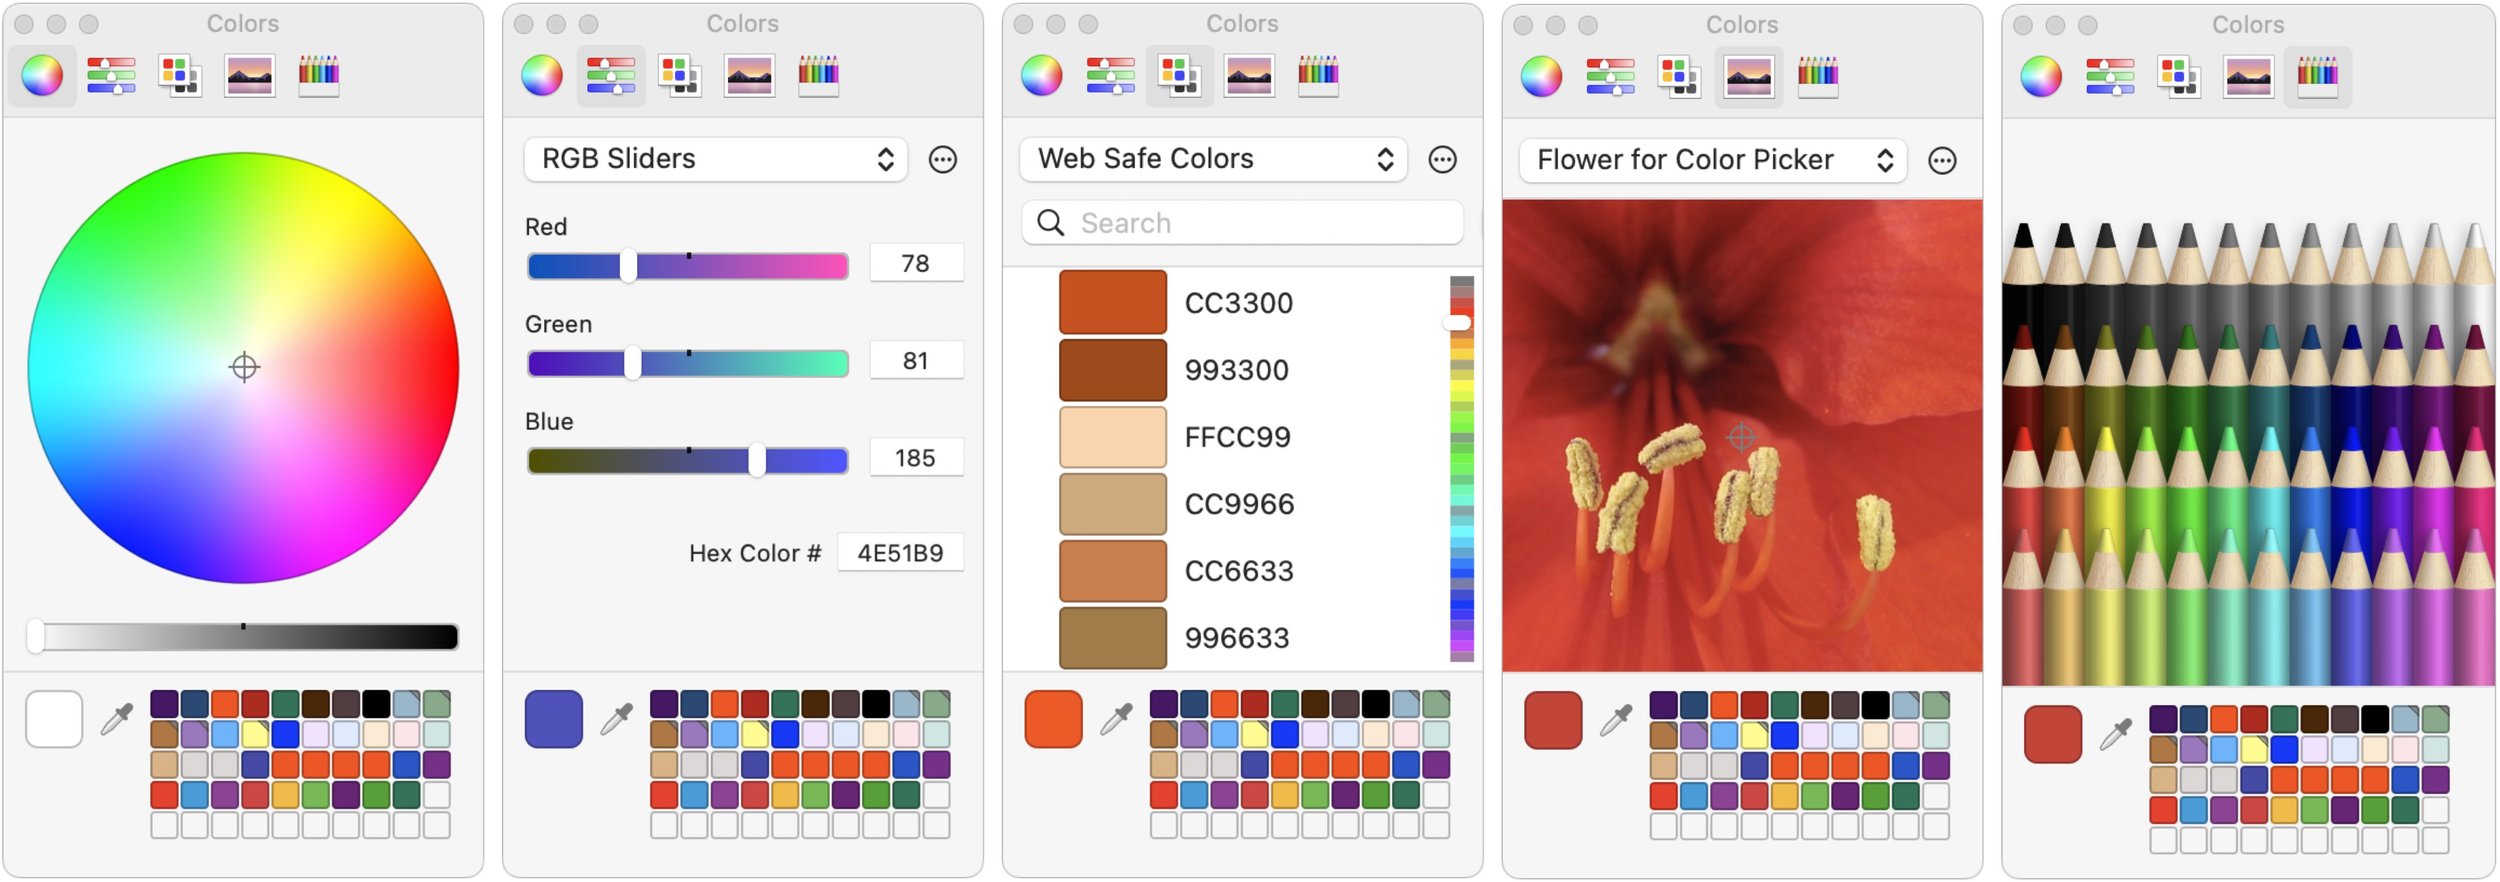
Color Wheel: This picker is useful for exploring a wide range of colors. Pay attention to the brightness slider at the bottom, which changes the colors in the wheel above.
Color Sliders: Use these sliders to specify particular grayscale brightnesses or RGB, CMYK, or HSB colors by number. You can also enter a hex color num-ber directly. Or, you can find a color with another picker or the eyedropper tool and then look up its exact values here. Desktop publishers use this feature a lot, as do Web designers trying to determine hex colors. When matching colors with outside sources, click the gear button to choose the appropriate industry standard color palette before picking a color.
Color Palettes: This picker shows color swatches from different custom palettes. Use the ••• button to make, add, rename, and delete palettes. (Find them in ~/Library/Colors.) The utility of these palettes is that you can share your own color collections, enabling coworkers to use identical colors easily, or you can download and import palettes for different uses, such as land-use categories for maps.
Image Palettes: Click the ••• button here to load a new image, after which you can select any color in that image by clicking it. This picker could be useful for matching colors in a layout with those in a photo.
Pencils: They used to be crayons, but then Apple got sophisticated. Or stopped licensing the names from Crayola.
Within each color picker, it’s usually obvious how to select different colors. Click the wheel, move the sliders, enter red-green-blue percentages, and so on. The selected color, which should be applied to the selection in your drawing or text, appears in the large square color well at the bottom left. If your selection doesn’t pick up the desired color, try dragging the color well in the lower section to a corresponding color box in your app.
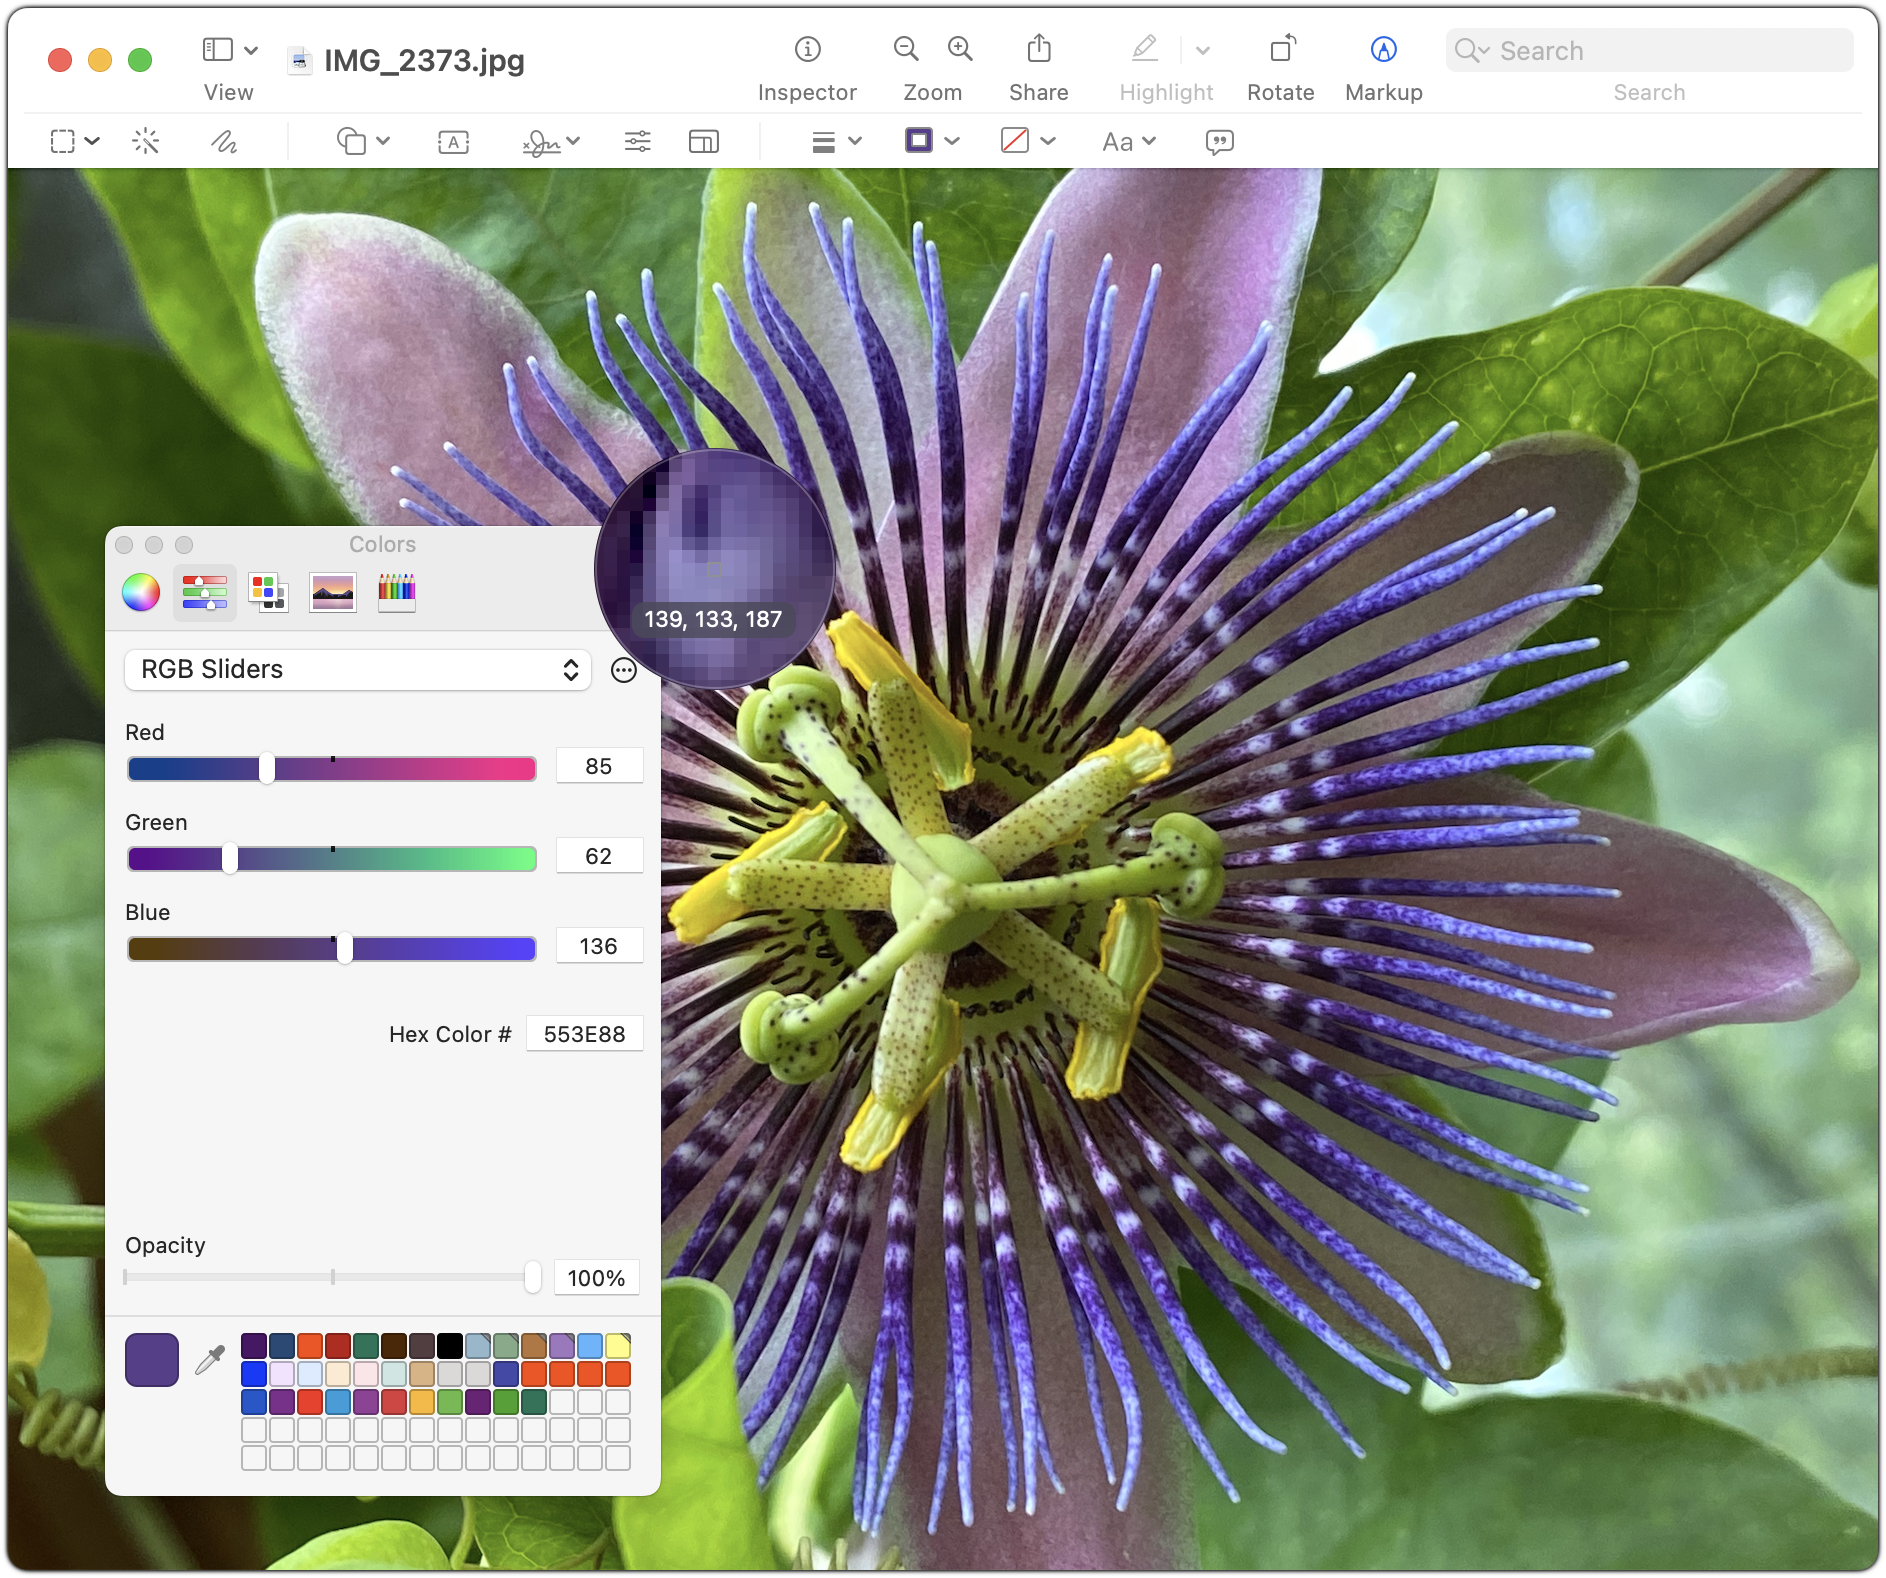
Eyedropper
The Colors window offers another extremely useful way to select a color: the eyedropper. Find it in the bottom portion of the window, and click it to see a circular loupe that magnifies anything under it. Move the loupe until the single pixel in the middle is over the color you want, and then click. If you press the Space bar while the loupe is showing, the loupe displays the RGB values of that pixel.
Swatch Drawer
What are those little squares to the right of the eyedropper? That area is called the swatch drawer, and it’s where you store particular color swatches that you want to use repeatedly. To create a swatch, drag the color from the big color well into a swatch square. You can pick a color swatch up and move it around, so you can arrange your swatches in a way you’ll remember. Swatches you store here become available in all Mac apps, so it’s a great way to ensure you’re using the same colors everywhere.
To use a swatch, just click it. It immediately becomes the selected color in the color well and is applied to whatever object you’re editing.
To remove a swatch, drag it to the right of the swatch squares and let go just inside the right edge of the Colors window (if this doesn’t work, expand the window to the right as much as possible before another column of squares appears, then try again).
By default, you see twenty swatch squares in two rows, but the swatch drawer has room for hundreds of squares! Expand just the drawer vertically by dragging the divider line at its top, or expand the entire window vertically or horizontally by dragging any edge or corner.
Now that we’ve looked into the heart of the color picker to provide you with more knowledge, we hope you’ll find the courage to use colors more confidently in your everyday Mac work!
(Featured image by iStock.com/barbdelgado)
The Hardware You’ll Need to Run Apple’s 2022 Operating Systems
Later this year, Apple will release macOS 13 Ventura, iOS 16, iPadOS 16, and watchOS 9. Here’s the hardware you’ll need to run these operating systems—and to support some of the whizzier features.

At Apple’s Worldwide Developer Conference in June, the company threw back the curtains on macOS 13 Ventura, iOS 16, iPadOS 16, and watchOS 9. These operating systems won’t be available until September or October of 2022, and we usually recommend waiting some time to upgrade—particularly for macOS.
Even so, it’s not too early to think about how these operating systems might impact your plans to buy new hardware in the next six months. Any Apple device you buy now—or have bought in the last few years—will be able to run the new operating systems. But some devices that can run the current macOS 12 Monterey, iOS 15, iPadOS 15, and watchOS 8 won’t be able to upgrade to their replacements later this year. And some older devices that can upgrade won’t support all the new features.
Here’s what you’ll need and compatibility gotchas to keep in mind.
macOS 13 Ventura
For macOS 13 Ventura, Apple has dropped support for every Mac model released before 2017. That’s in contrast to macOS 12 Monterey, which supported previous generation Macs that came out as early as 2013. If your Mac predates 2017 and you want to run Ventura, think about when it would make sense to buy a new Mac, perhaps in early 2023.
iMac: 2017 and later (late 2015 supported by Monterey)
iMac Pro: 2017 and later
MacBook: 2017 and later (early 2016 supported by Monterey)
MacBook Air: 2018 and later (early 2015 supported by Monterey)
MacBook Pro: 2017 and later (early 2015 supported by Monterey)
Mac mini: 2018 and later (late 2014 supported by Monterey)
Mac Pro: 2019 and later (2013 supported by Monterey)
Mac Studio: 2022
If you’re unsure which Mac you have, choose About This Mac from the Apple menu and look in the first line under the macOS version.

iOS 16
With iOS 16, Apple has maintained the same basic timeframe, supporting all iPhone models released in 2017 and later but dropping everything earlier, along with all iPod touch models. That means you’ll be able to run iOS 16 on these iPhones:
iPhone 13/mini/Pro/Pro Max: A15 Bionic
iPhone 12/mini/Pro/Pro Max: A14 Bionic
iPhone 11/mini/Pro/Pro Max: A13 Bionic
iPhone SE (2nd generation or later): A13 Bionic
iPhone XR/XS/XS Max: A12 Bionic
iPhone X: A11 Bionic
iPhone 8/8 Plus: A11 Bionic
We included each model’s chip family in the list above because that becomes important for particular features we’ll discuss later.
Practically speaking, these iOS 15-compatible devices won’t be able to upgrade to iOS 16:
iPod touch (all models)
iPhone SE (1st generation)
iPhone 6s/6s Plus
iPhone 7/7 Plus
iPadOS 16
Things get more complicated with iPadOS 16 due to there being four different iPad model types with varying capabilities. As with the iPhone models, we’ve included the chip families for reference.
iPad Pro 12.9-inch (1st–5th generation): A9X, A10X Fusion, A12X Bionic, A12Z Bionic, M1
iPad Pro 11-inch (1st–3rd generation): A12X Bionic, A12Z Bionic, M1
iPad Pro 10.5-inch: A10X Fusion
iPad Pro 9.7-inch: A9X
iPad Air (3rd–5th generation): A12 Bionic, A14 Bionic, M1
iPad (5th–8th generation): A9, A10 Fusion, A10 Fusion, A12 Bionic, A13 Bionic
iPad mini (5th and 6th generation): A12 Bionic, A15 Bionic
While that’s a long list, a simpler way to look at it is that only two iPad models that can run iOS 15 now won’t be able to upgrade to iOS 16:
iPad mini (4th generation)
iPad Air (2nd generation)
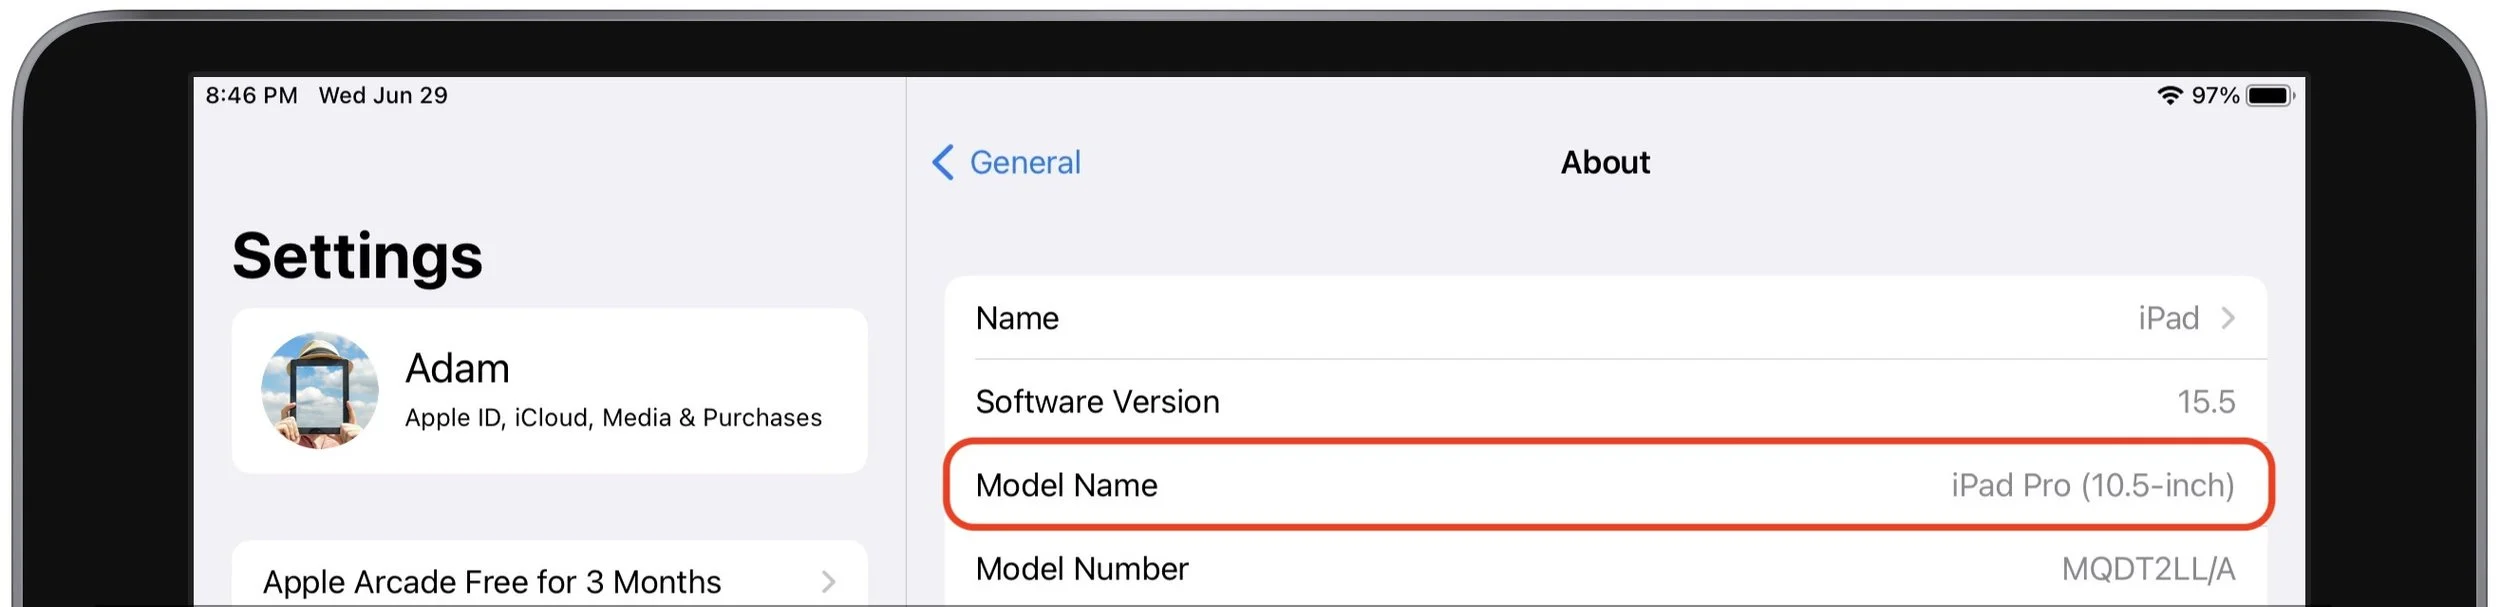
If you’re unsure which iPad model you have (this goes for the iPhone, too), look in Settings > General > About > Model Name.
watchOS 9
The upcoming watchOS 9 has a simple upgrade story. It supports the Apple Watch Series 4 through the Apple Watch Series 7, including the unnumbered Apple Watch SE. (Look in the Watch app on your iPhone if you can’t remember which model you have.) The only current model that won’t be able to upgrade is the Apple Watch Series 3. Although that model is quite old, dropping support for it is somewhat awkward since Apple continues to sell it even today as a low-cost option. If you’re planning to buy an Apple Watch soon, avoid the Series 3.
Feature-Based System Requirements
For some new features in iOS 16 and iPadOS 16, Apple has drawn a line in the sand at the A12 Bionic chip. These features will work on an iPhone or iPad with an A12 Bionic or later, but not on older devices that can still run iOS 16 and iPadOS 16. Some will also work on the Mac. These features include:
Lifting the subject of a photo from its background (also works on all Ventura-compatible Macs)
Live Text support in videos (also works on all Ventura-compatible Macs)
Spotlight search for images by location, people, scenes, text, and contents
Using dictation alongside the onscreen keyboard
Inserting emojis using dictation (in Ventura, requires a Mac with Apple silicon)
Enhanced Siri support for asking an app what voice commands it supports, hanging up calls, inserting emojis in texts, and working offline (these features won’t be available on the Mac in Ventura)
Recognition of birds, insects, and statues in Visual Lookup (also works on all Ventura-compatible Macs)
Some additional features have idiosyncratic system requirements:
Live Captions that automatically generate text for any audio require an iPhone 11 or later, an iPad with A12 Bionic or later, or a Mac with Apple silicon.
Detection Mode in the Magnifier app, which can identify objects like doors, requires an iPhone 12 Pro or iPhone 13 Pro, an iPad Pro 12.9-inch (4th and 5th generation), or an iPad Pro 11-inch (2nd and 3rd generation).
The Camera app will let you blur the foreground in Portrait photos and improves the quality of Cinematic mode videos, but only for the iPhone 13 lineup.
The capability to use an iPhone as a webcam requires an iPhone XR or later.
When using an iPhone as a webcam, the Center Stage and Desk View features (the latter lets you show the other party what’s in front of you on your desk) require an iPhone 11 or later.
The new Studio Light feature that dims the background and lights up your face to simulate external lighting needs an iPhone 12 or later.
The Health app’s capability to scan medicine labels requires an iPhone XR or later.
Dictation can add punctuation automatically if you’re using an iPhone 11 or later, an iPad with an A12 Bionic or later, or a Mac with Apple silicon.
You can shrink iPad user interface elements to be smaller to fit more onto the screen with M1 iPads.
iPadOS 16 supports virtual memory swapping to provide up to 16 GB of memory to demanding apps, but only on M1 iPads.
The new Stage Manager windowing feature requires an M1 iPad in iPadOS 16 but will work with all Ventura-compatible Macs.
It can be disappointing when your fully functional Mac, iPhone, or iPad doesn’t support some snazzy new feature, but it’s better that Apple lets that device upgrade to the latest operating system rather than kicking it off the upgrade train just because it doesn’t have enough processor power for everything.
(Featured image by Apple)
11 Features to Look Forward to in Apple’s 2022 Operating Systems

It’s that time of year again. Apple CEO Tim Cook and numerous Apple employees took the virtual stage again at the company’s Worldwide Developer Conference keynote on June 6th to share what we can expect to see later this year in macOS 13 Ventura, iOS 16, iPadOS 16, and watchOS 9. (Almost no mention was made of tvOS or the HomePod, but Apple will undoubtedly move them forward in small ways as well.)
The announcements came thick and fast, and like last year, many of the technologies cut across several of Apple’s operating systems. Before we dive in, however, remember that some older devices won’t be able to upgrade. Here are the basic system requirements, though certain features won’t be available on all devices:
macOS 13 Ventura: iMac, iMac Pro, MacBook, and MacBook Pro from 2017 and later. MacBook Air and Mac mini from 2018 and later. Mac Pro from 2019 and later. Mac Studio from 2022.
iOS 16: Second-generation iPhone SE, iPhone 8, and later
iPadOS 16: Fifth-generation iPad and later, fifth-generation iPad mini and later, third-generation iPad Air and later, and all iPad Pro models
watchOS 9: Apple Watch Series 4 and newer, including the Apple Watch SE
Here are the promised new features we think will have the most impact on your Apple experience. Assume that these features are available on the Mac, iPhone, and iPad unless otherwise specified.
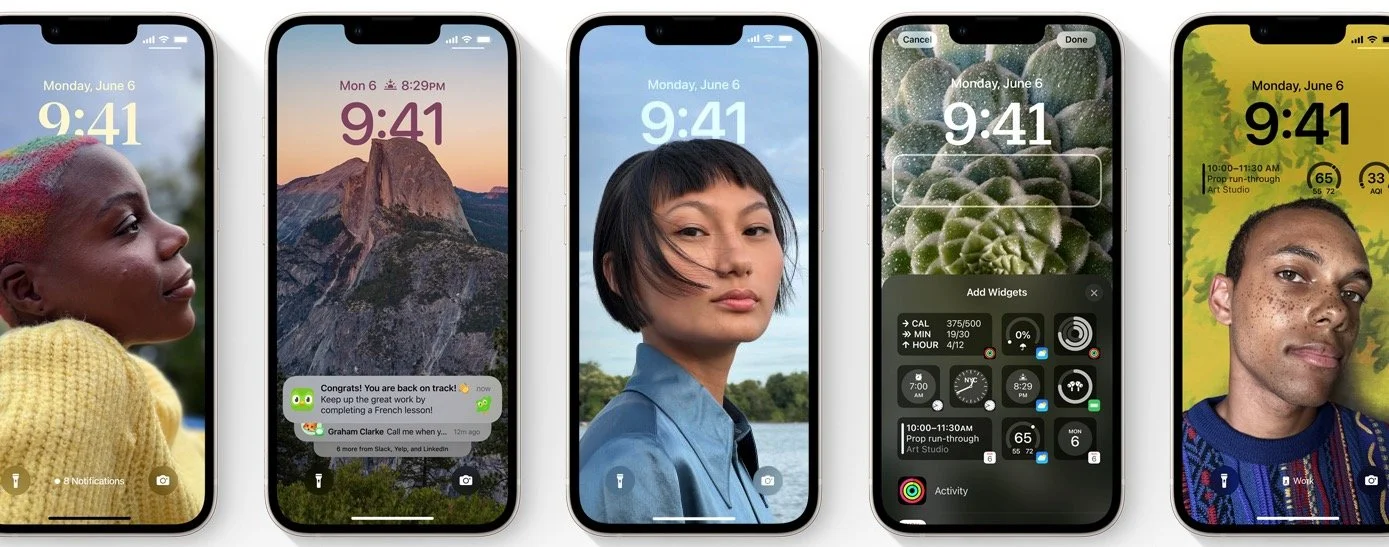
Customizable iPhone Lock Screen
We’ve been able to put a photo on the iPhone’s Lock screen for years, but that’s it. With iOS 16, Apple is opening up lots of customization options along the lines of what you can do to Apple Watch faces. To start, you can customize the font, color, and placement of various options, just like a watch face. Photos dynamically display in front of the time, and you can have a set of photos shuffle throughout the day. Widgets from Apple and third-party developers provide at-a-glance information so you can check the weather, say, without even unlocking your iPhone. Notifications now scroll up from the bottom, and Live Activities help you stay up on the music that’s currently playing or the latest score in the big game.
Messages Gains Editing, Undo Send, and Mark as Unread
At long last, Messages will let us edit messages after sending, undo sending to call a message back, and mark messages as unread. The first two features are essential for clear communication, especially when you’re fixing auto-correct failures, and being able to mark messages as unread ensures that you won’t forget to respond to something that you read when you’re not in a position to reply.

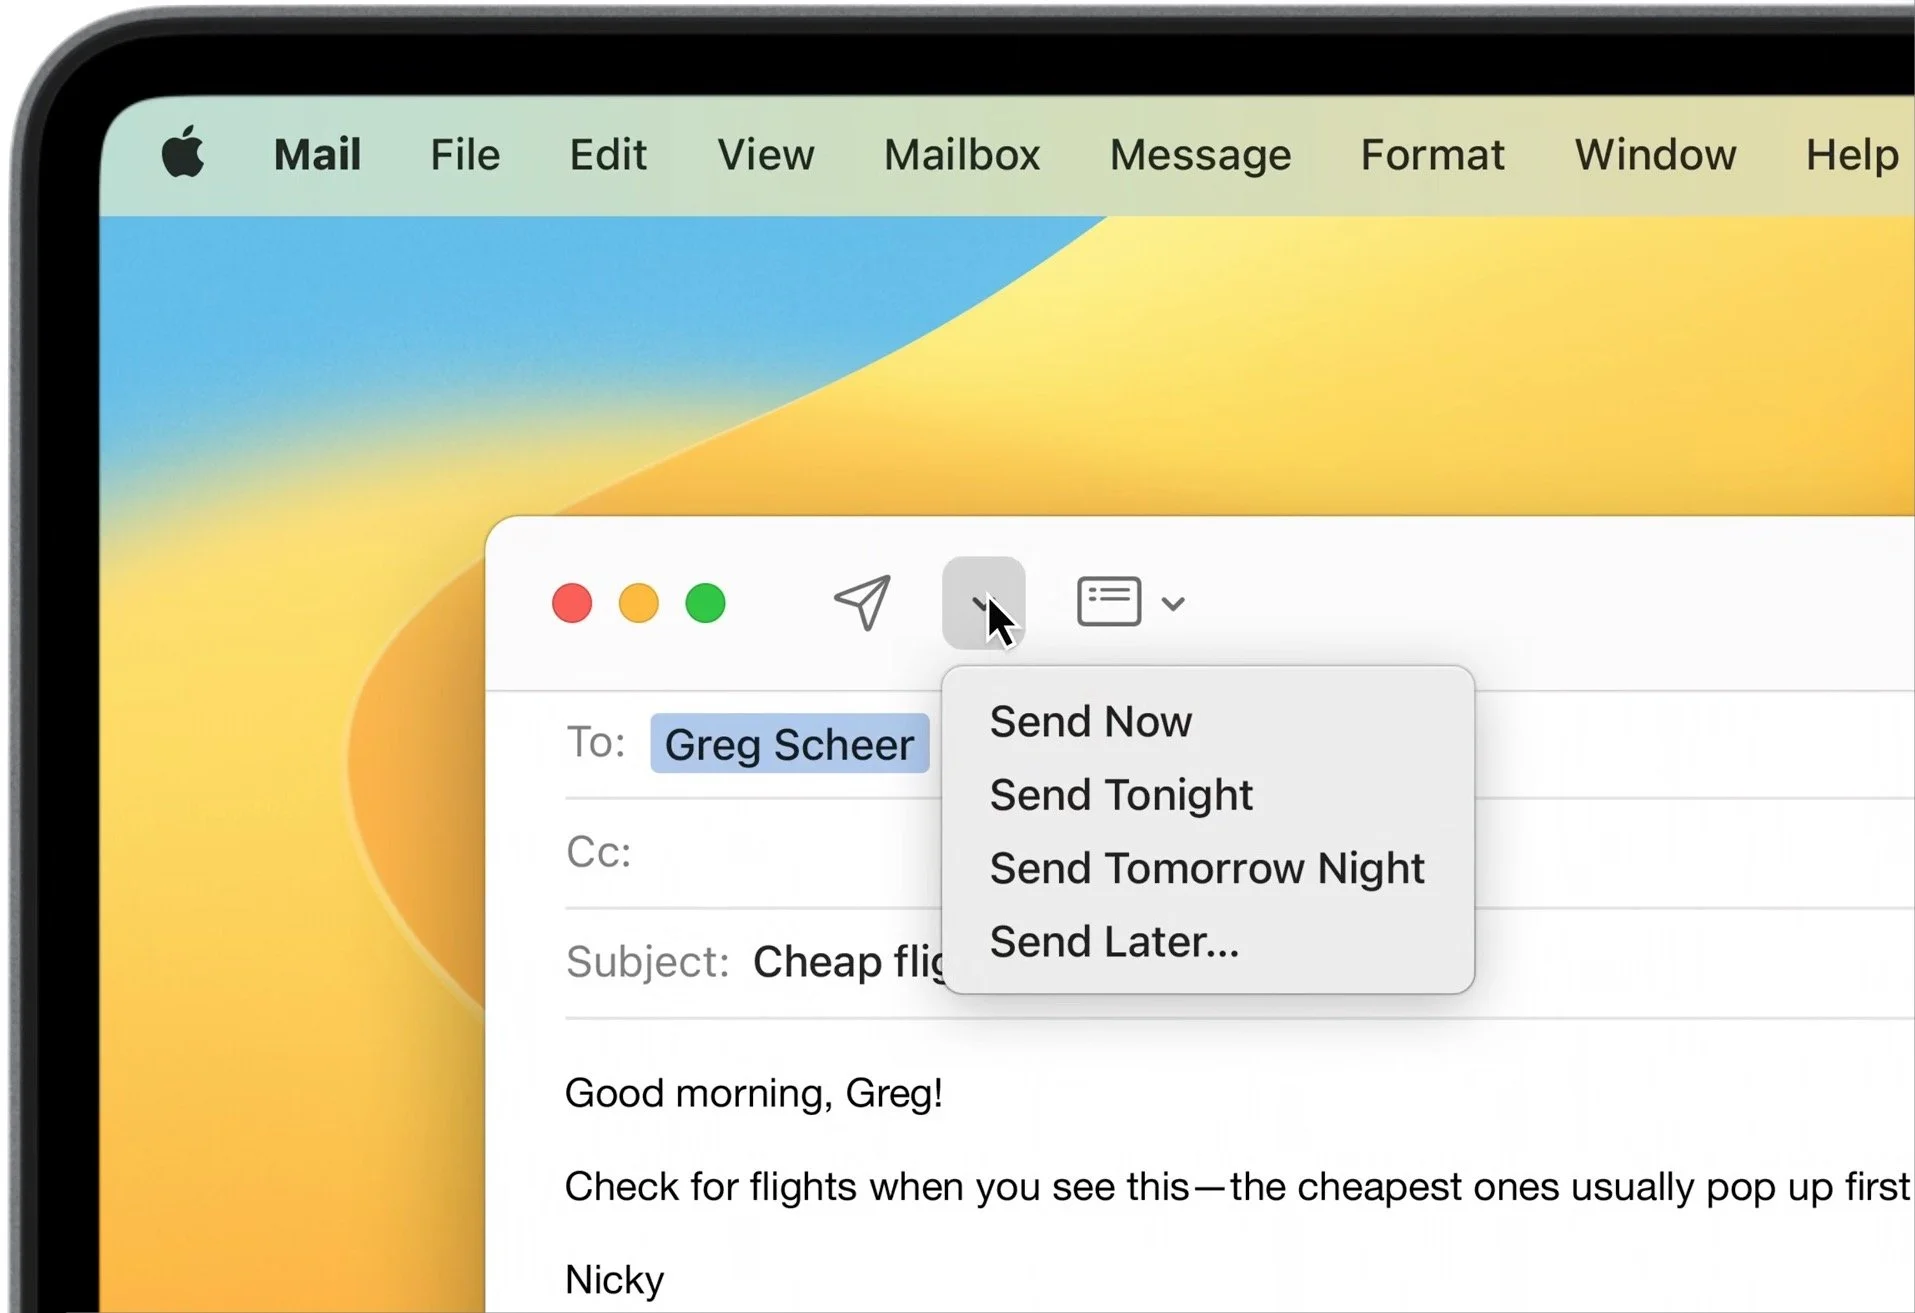
Mail Adds Undo Send, Scheduled Send, Follow-up, and Remind Me
It’s surprising that Apple hasn’t spent more time on Mail in recent years, but that’s changing in 2022, when it will gain some welcome features that are commonplace in other email apps. You’ll be able to undo sending, which is helpful when you remember something to add to a message within 10 seconds after clicking the Send button. For more specific timing, scheduled send lets you specify when a message should go out. This is helpful when you are working on the weekend or late at night but don’t want your coworkers to feel that they need to reply right away. Mail will also move sent messages that haven’t received replies to the top of your inbox so you can follow up, and you can set a reminder to come back to messages that you’ve opened but not dealt with (many of us just mark those as unread).
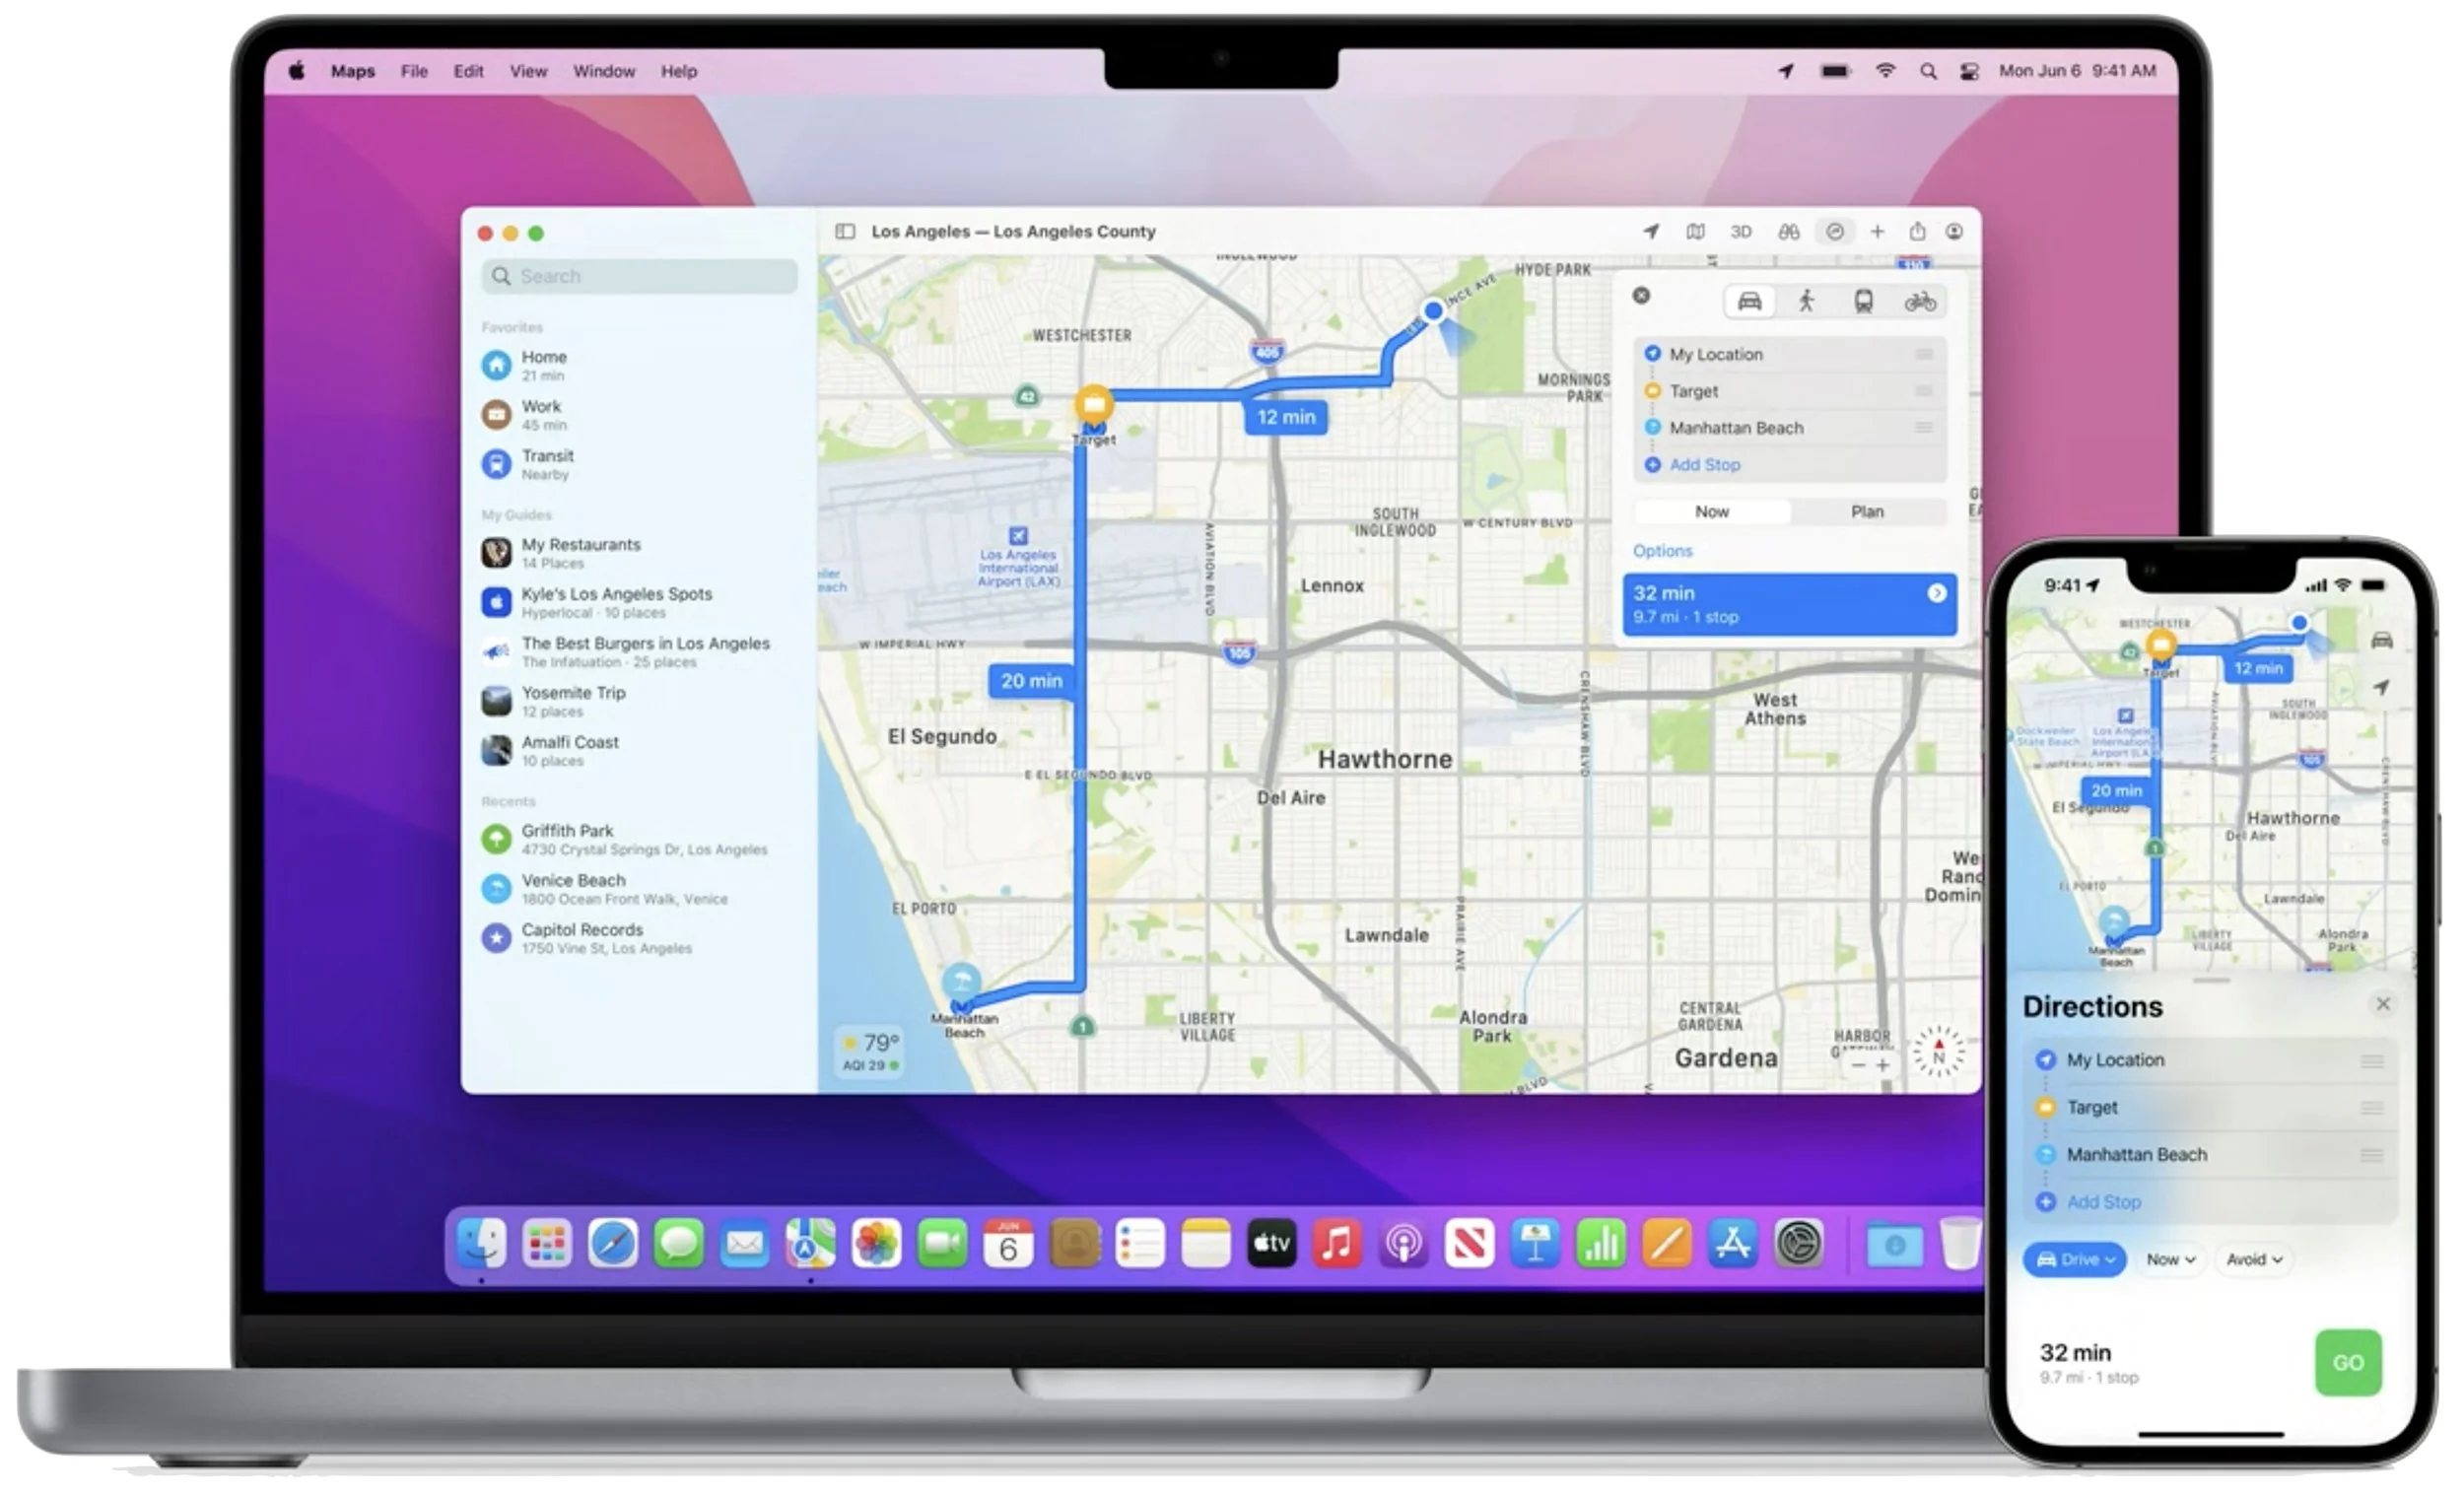
Multi-Stop Routing in Maps
No longer are you limited to a single destination when creating a route in Maps. You’ll be able to specify up to 15 stops on a route, making it easy to build a trip that includes a swing by your favorite diner, a quick visit with an old friend, and a pilgrimage to the World’s Largest Bull in Iowa.
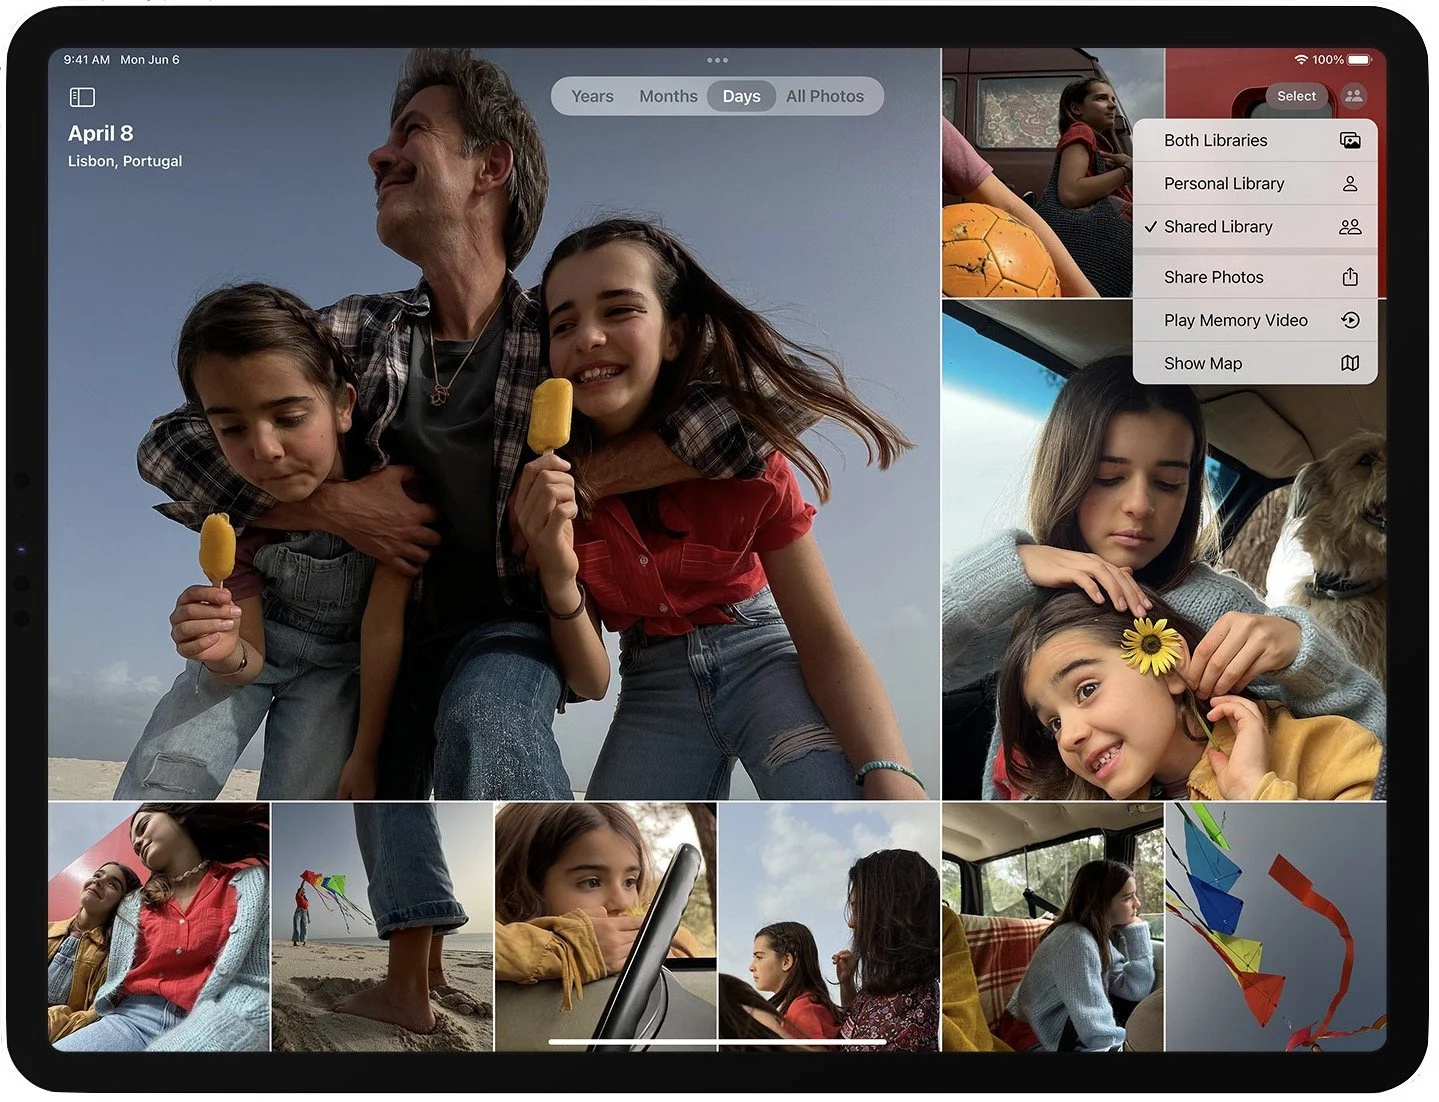
iCloud Shared Photo Library Improves Family Photo Sharing
Apple’s latest attempt to help families share photos looks like the best yet—certainly better than the shared Family album that’s created for Family Sharing groups now. It will be a completely separate iCloud photo library shared with up to five other people. You’ll be able to populate it with all your existing photos or a subset based on start date or who’s in them. Everyone will have equal permission to add, edit, favorite, caption, and delete photos, so maintaining and improving it becomes a group activity. Sharing new photos will be easy with a switch in the Camera app, automatic sharing based on proximity to family members, and sharing suggestions in Photos.
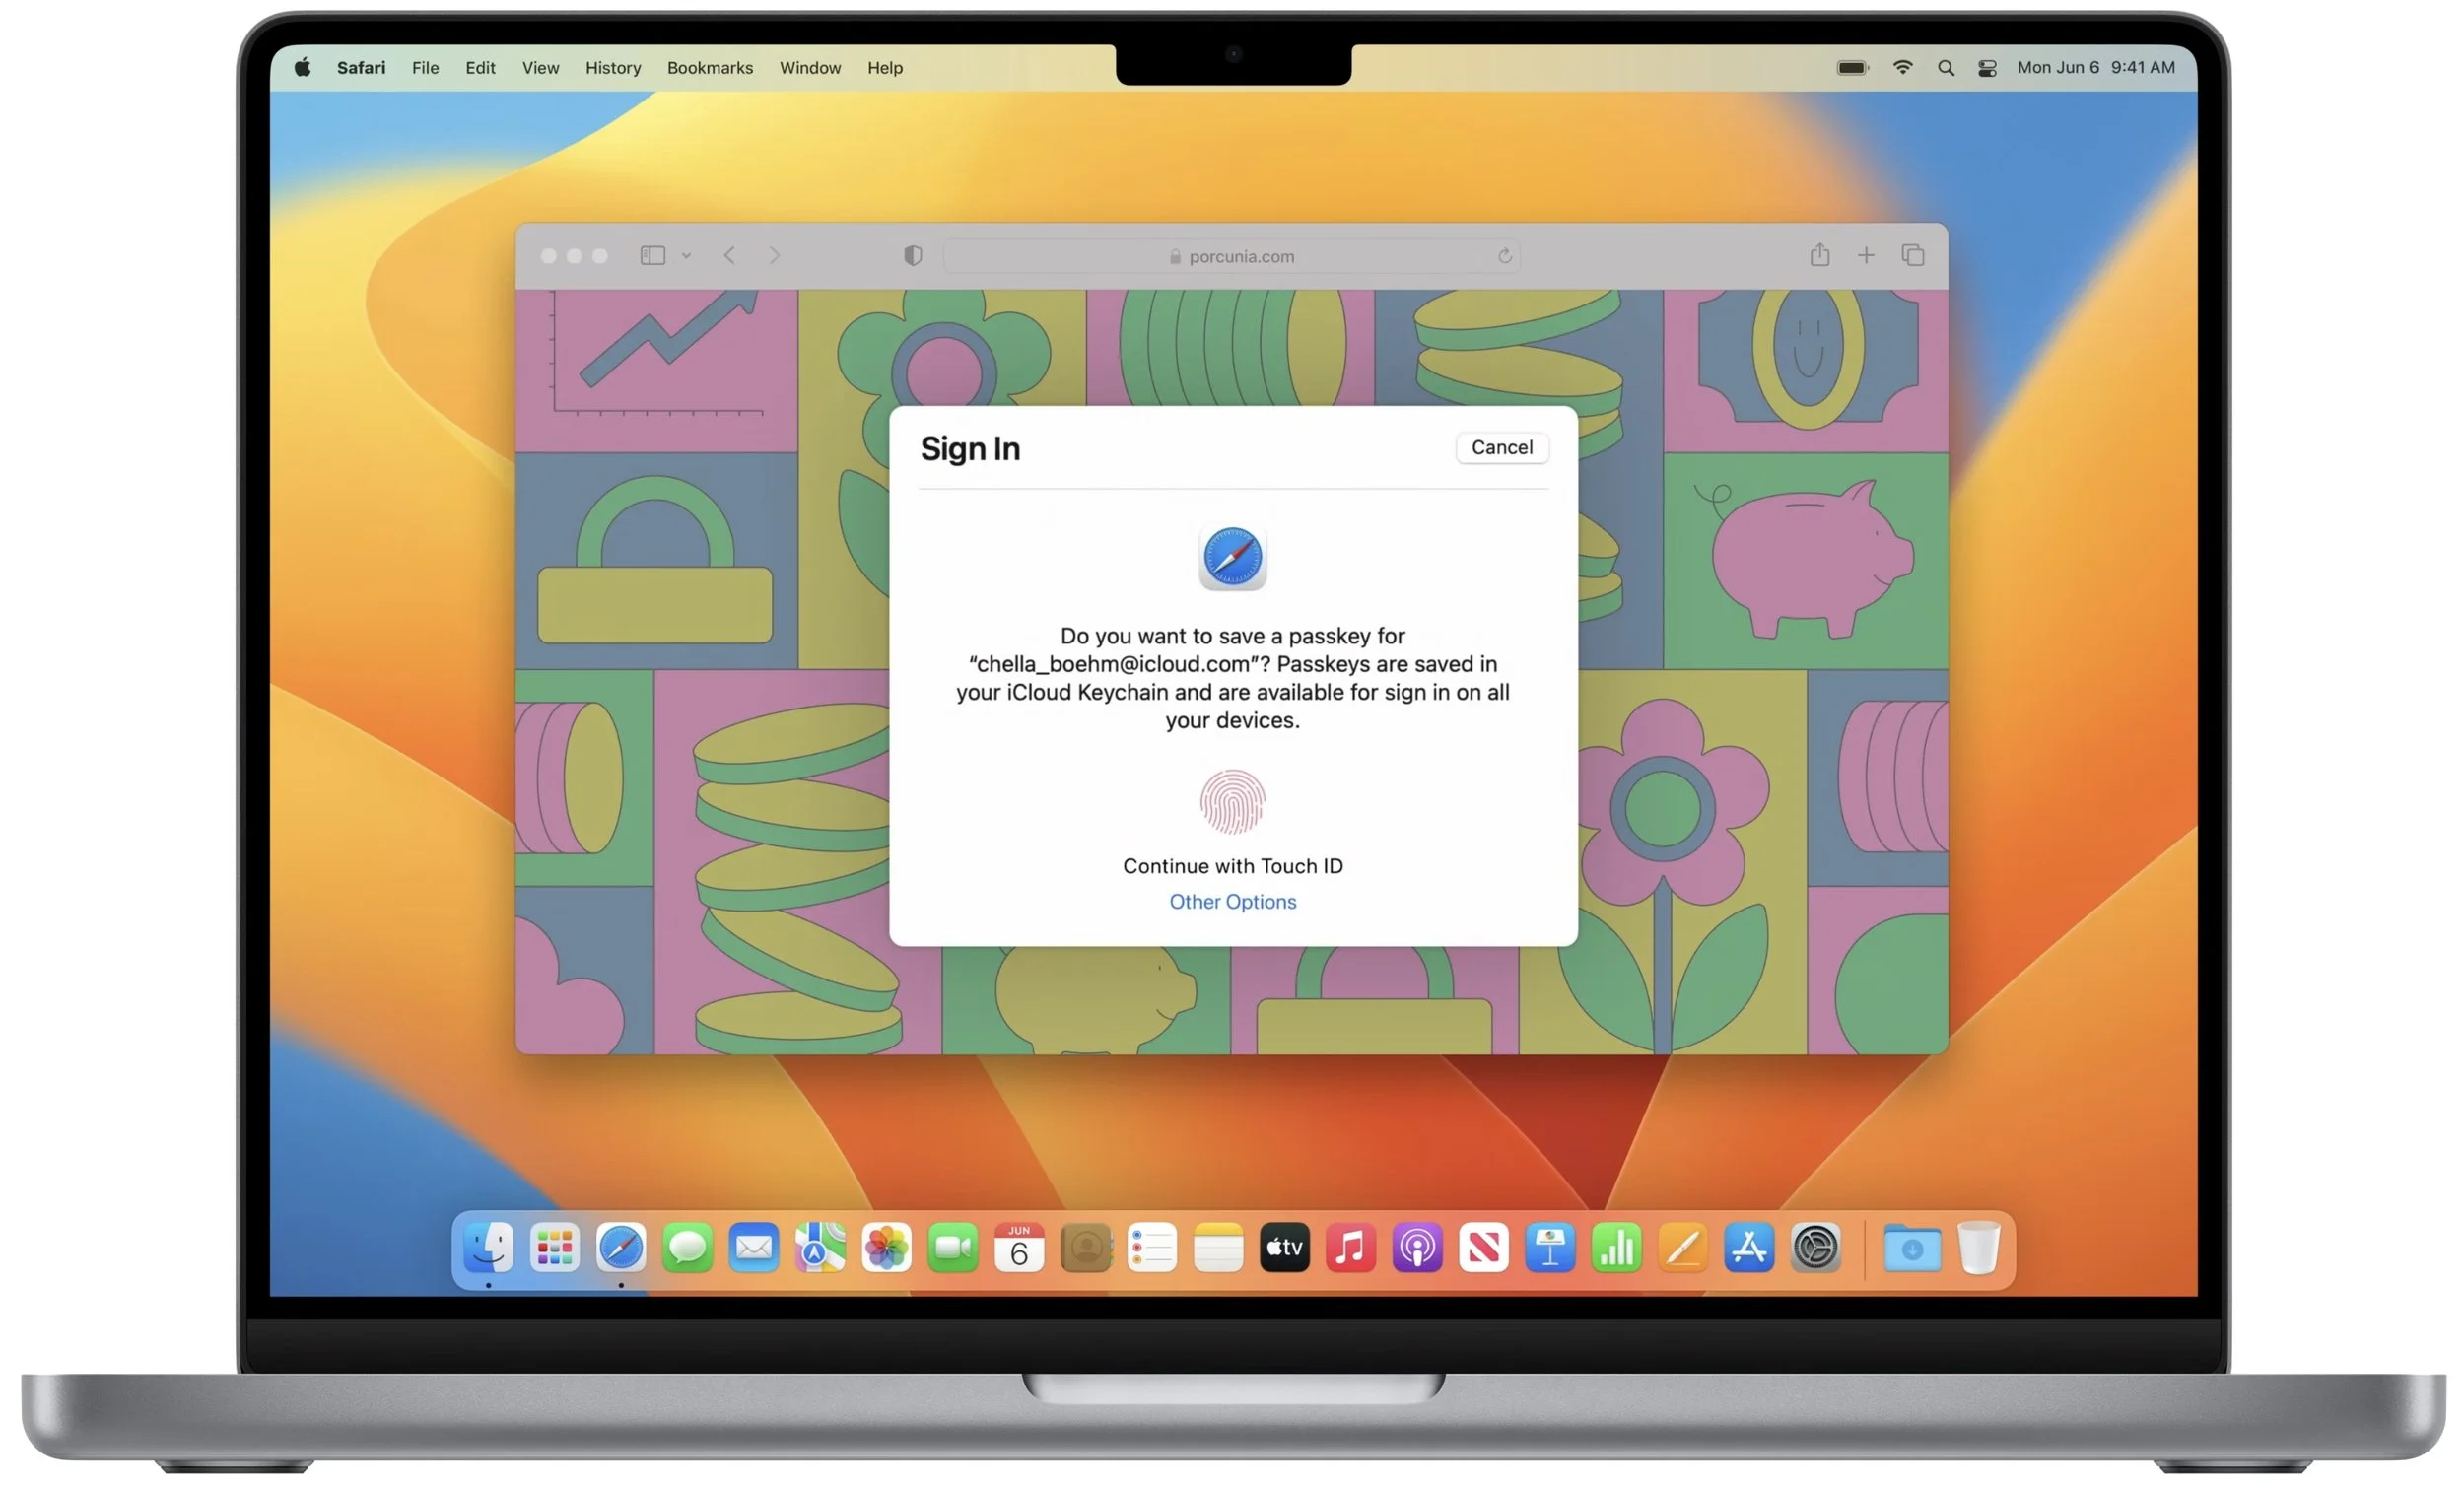
Passkeys Aims to Replace Passwords… Eventually
Apple’s new Passkeys technology, which is associated with the work of an industry consortium called the FIDO Alliance to ensure cross-platform support, aims to replace passwords for websites and apps with private passkeys that are stored only on your device and accessed by Touch ID or Face ID. Passkeys are easier to use than passwords and significantly safer because they can’t be stolen from websites and each one is specific to the site for which you create it. They’ll be available on all your Apple devices, syncing end-to-end encrypted through iCloud Keychain.
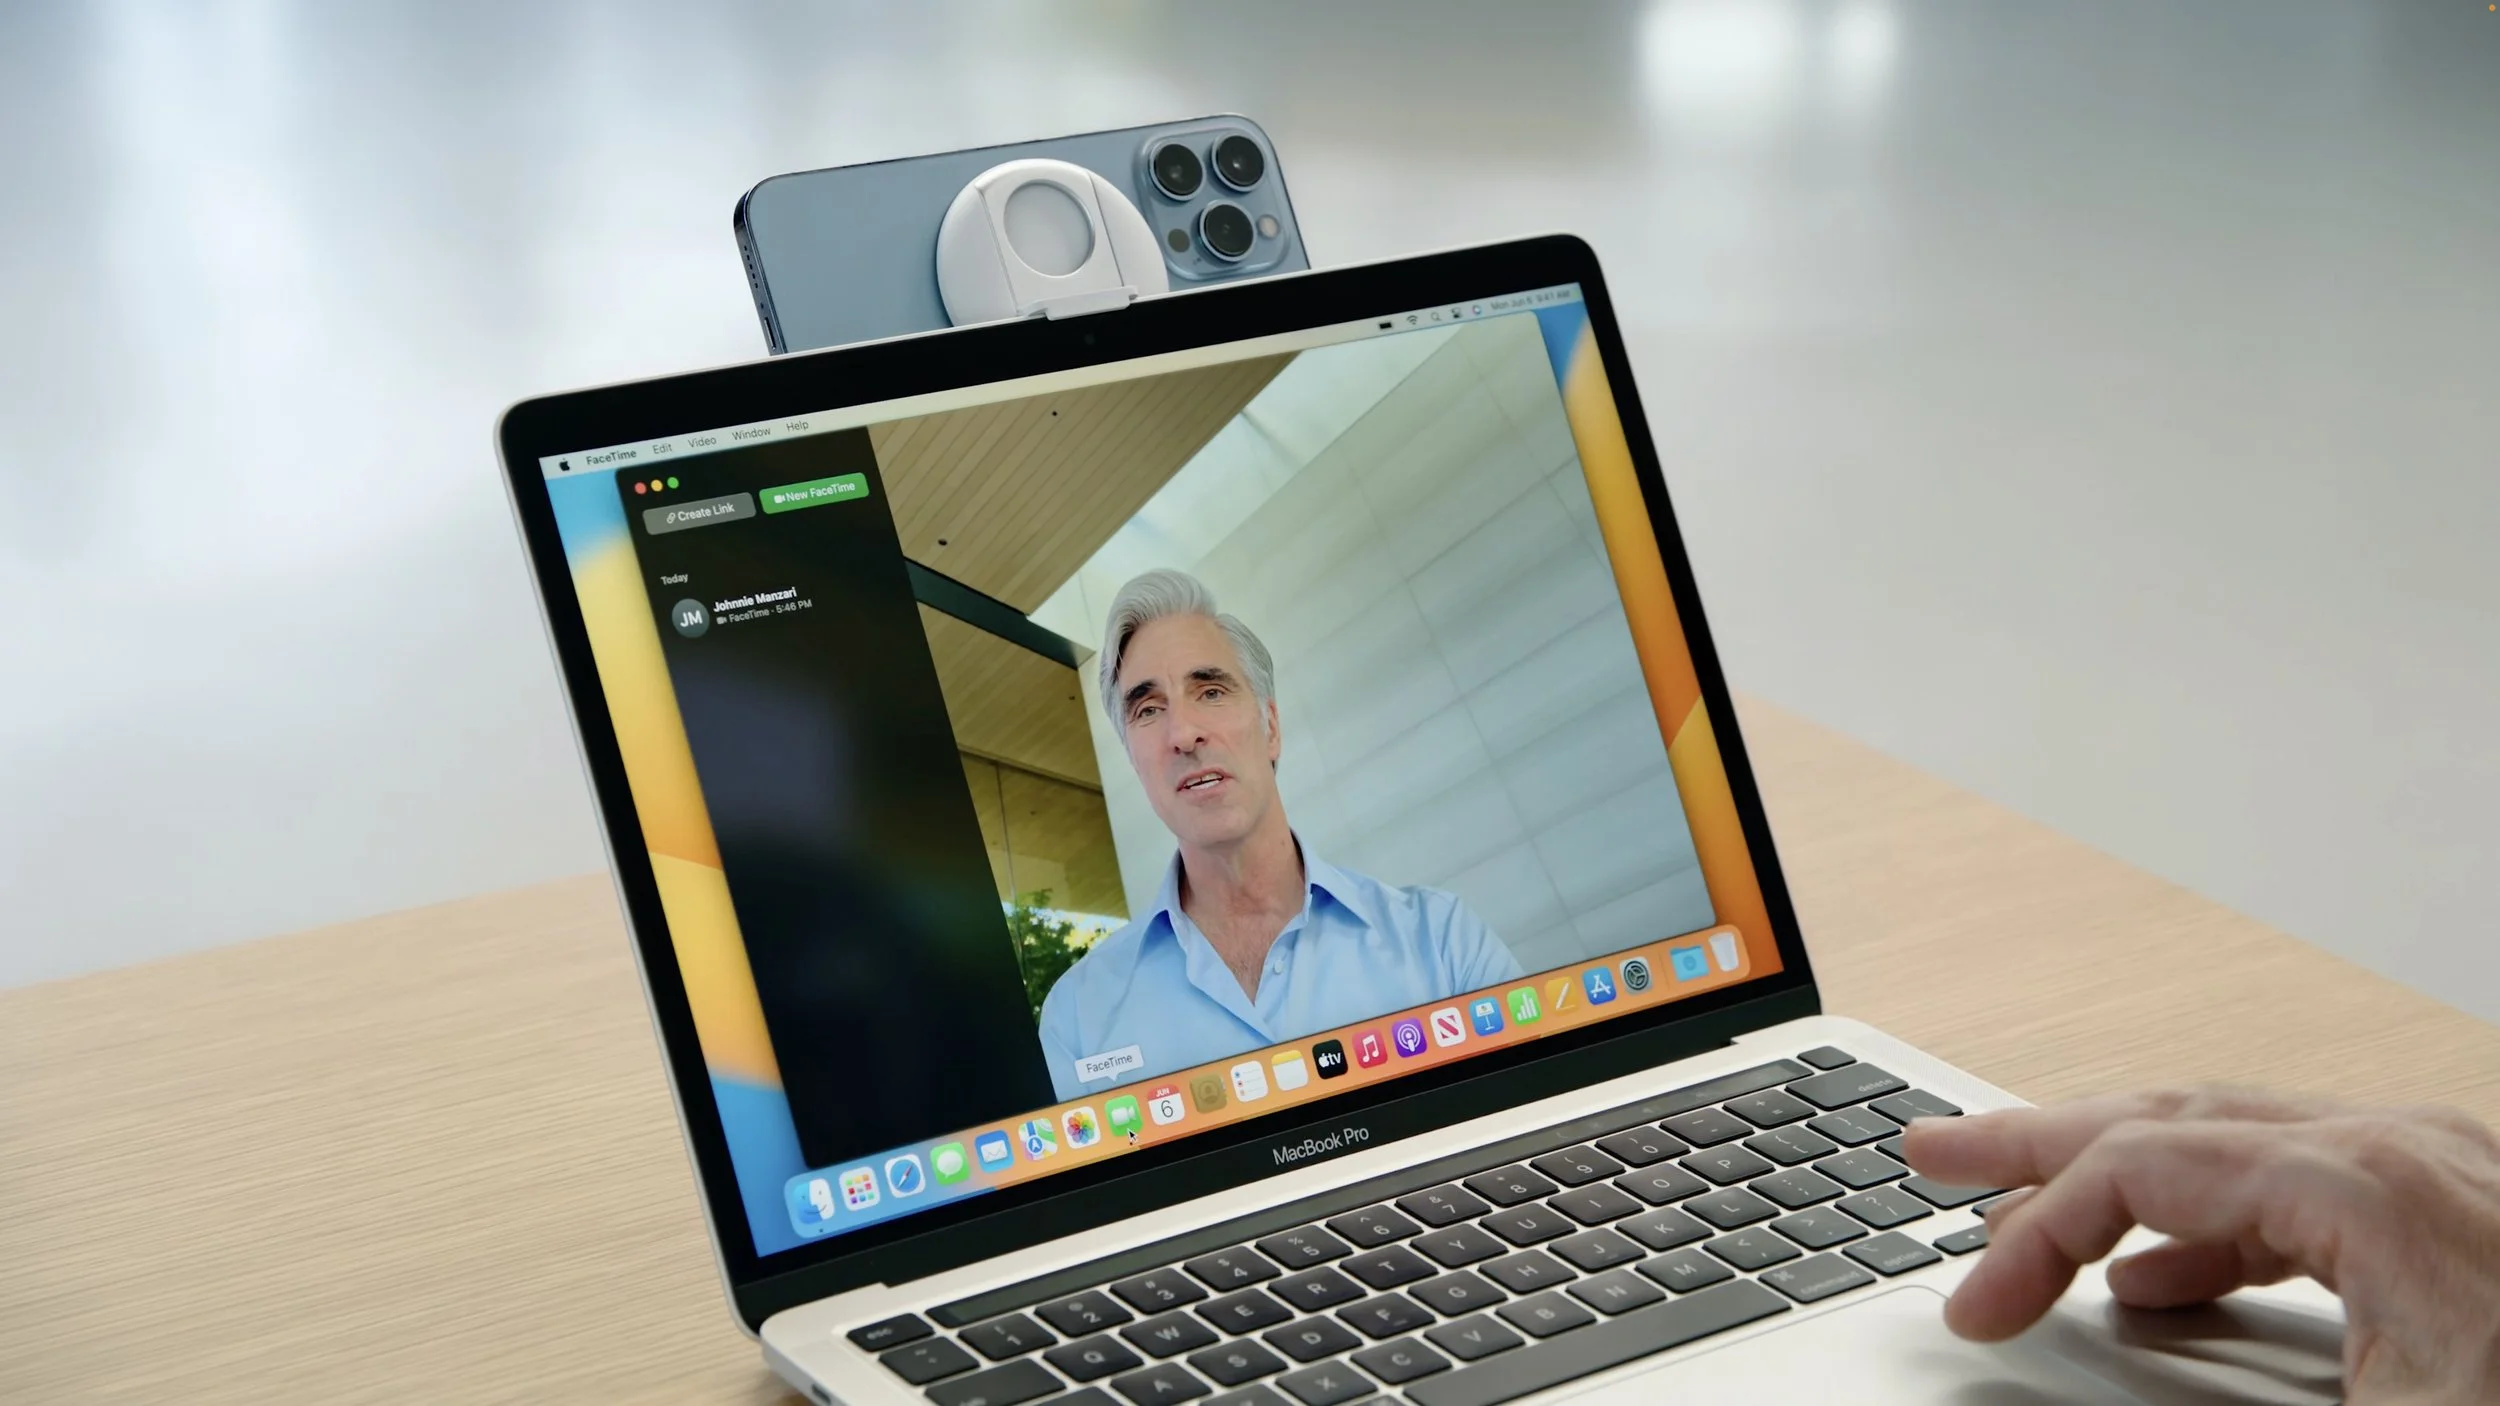
Use Your iPhone as a Webcam for Your Mac
Mac webcams are nowhere near as good as the rear-facing cameras in your iPhone, so Apple is helping us improve our videoconferencing by using an iPhone as a webcam and microphone. The feature, called Continuity Camera, works wired or wirelessly and can automatically switch to using your iPhone as a webcam when you bring it close to your Mac. It provides Portrait mode to blur the background, Center Stage so you can move around, Studio Light to dim the background and illuminate your face, and even Desk View to show what’s on your desk in front of your Mac. Apple says Belkin will be making clips to attach your iPhone to your Mac.
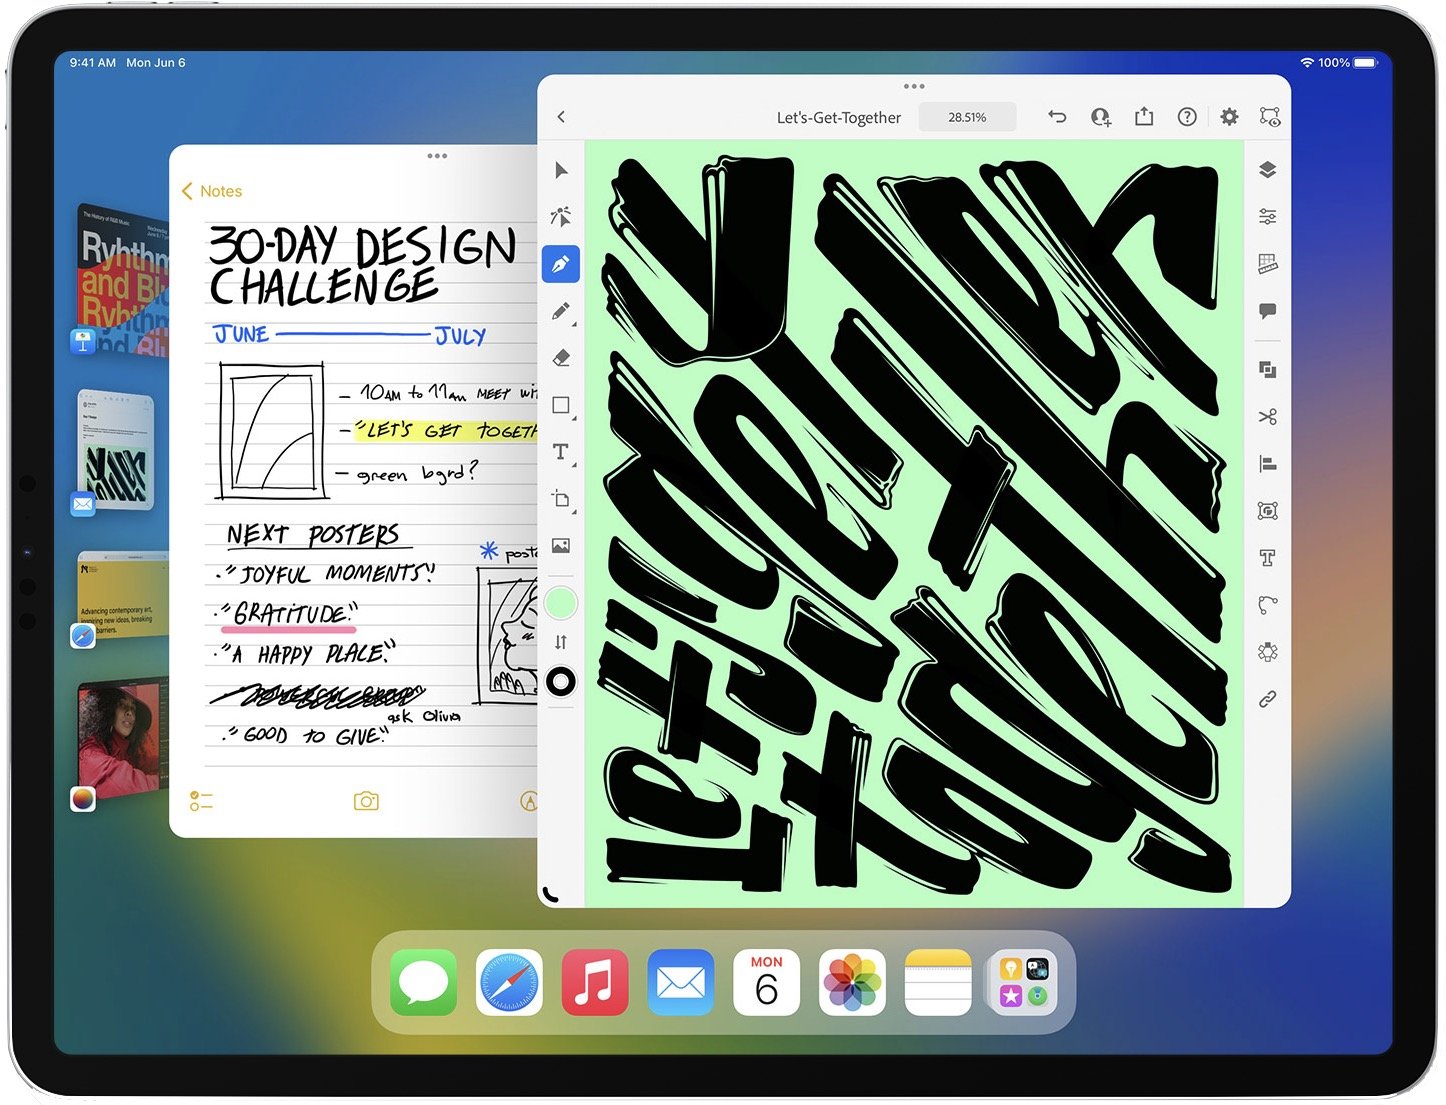
Stage Manager Offers New Window Management Approach
We’re not yet sure what to make of Stage Manager, which is Apple’s new approach to window management on the iPad and Mac. It puts one app in the center of the screen while keeping other apps off to the side, making it easy to flip between apps or show multiple apps at once. It doesn’t replace traditional window management—you have to turn it on in Control Center—so you won’t be forced to change, but it might be welcome, especially on the iPad, where it also enables the use of an external display.
Simultaneous Dictation, Touch Selection, and Keyboard Editing
On the iPhone and iPad, you’ve been able to tap a microphone button to invoke Dictation, a huge boon when you want to send a message without typing. In iOS 16 and iPadOS 16, Apple has radically improved Dictation, so you can now simultaneously talk, type, edit on the keyboard, select text via touch, and use the Apple Pencil (on an iPad). Dictation will also automatically add commas, periods, and question marks as you dictate, and you can insert emojis with voice commands. Sadly, it seems that the Mac gets only the punctuation and emoji capabilities.

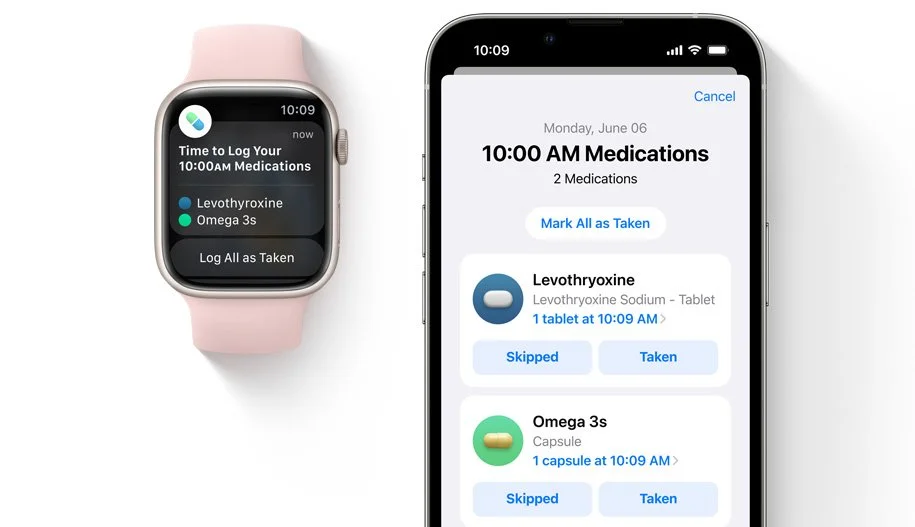
Medications App on the Apple Watch
Many of us have to take medications, vitamins, and supplements regularly. To help us better manage our health, Apple is adding the Medications app to watchOS 9. You’ll be able to enter your meds in the Health app on the iPhone, be alerted to any critical interactions between drugs, and have your Apple Watch notify you to take the right pills at the right times.
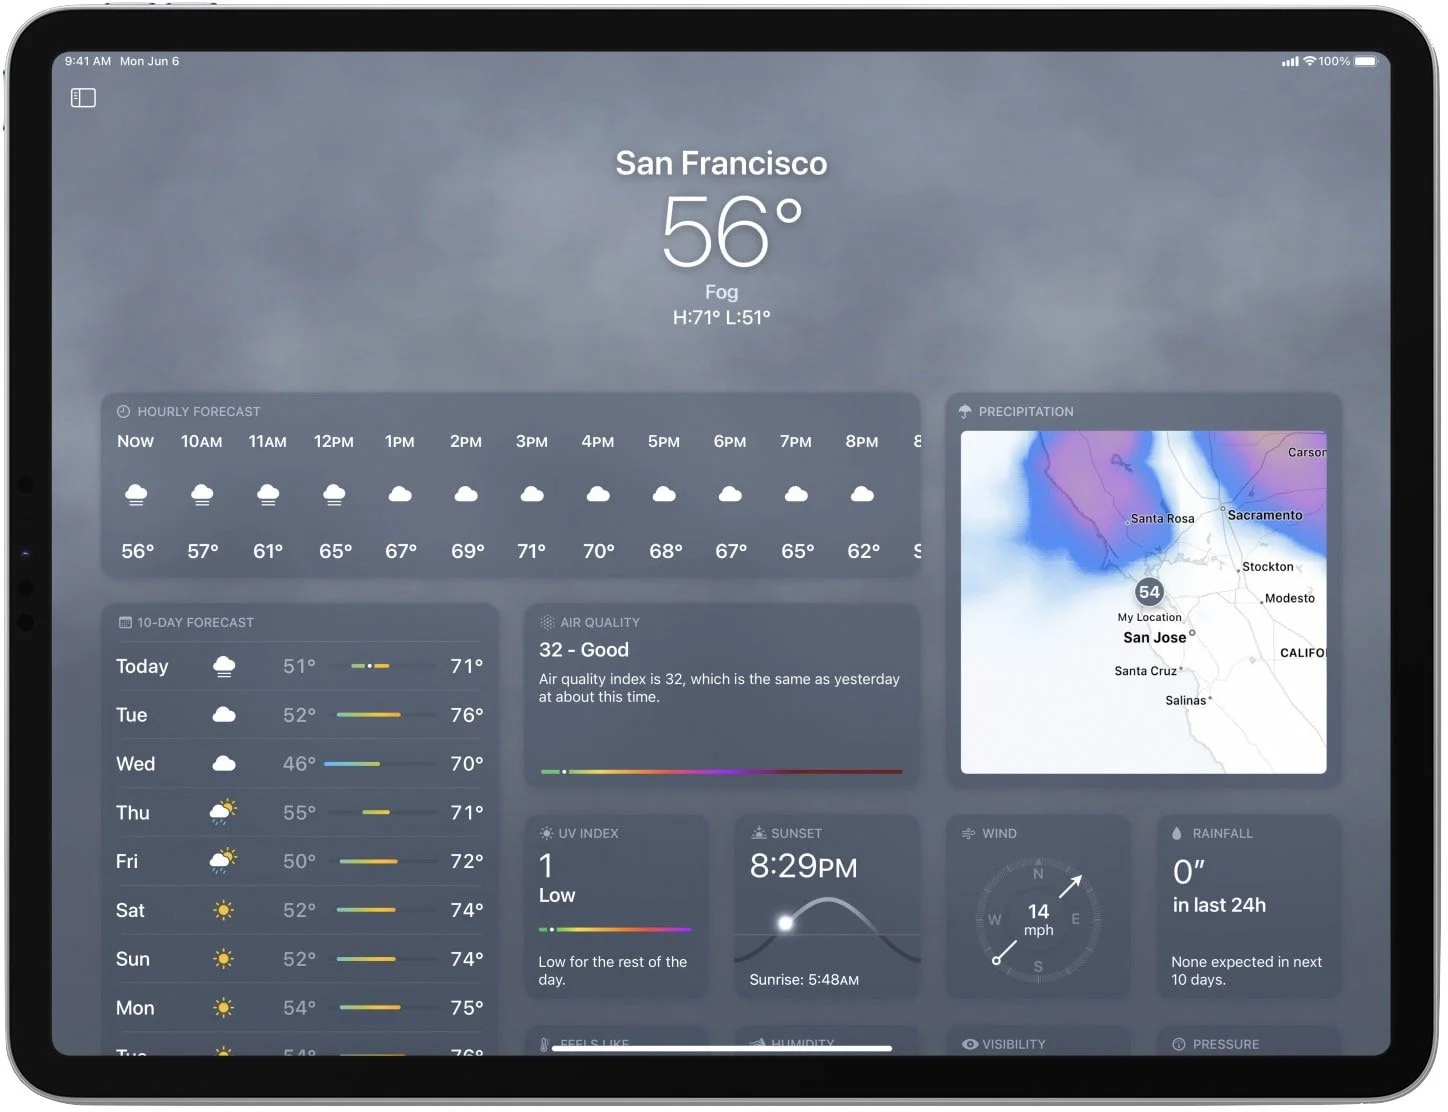
Weather App Appears on the iPad and Mac
Finally, because our list goes to 11, Apple says it’s bringing the Weather app to the iPad and the Mac. Since Weather has been on the iPhone since the beginning, it’s hard to fathom what took Apple so long. If you haven’t already jumped ship for one of the 17,000 other weather apps out there, you’ll be able to enjoy using Apple’s built-in app in iPadOS 16 and macOS 13 Ventura.
Apple’s upcoming operating system releases boast many other new features, and we plan to explore more of them once everything ships in a few months. We’ll let you know when it’s time to update!
(Featured image by Apple)
Apple Previews M2-Based MacBook Air and Updated 13-Inch MacBook Pro
At its WWDC22 keynote, Apple unveiled a completely redesigned MacBook Air and an updated 13-inch MacBook Pro, both powered by the next-generation M2 chip. Read on for details:

During its Worldwide Developer Conference keynote on June 6th, Apple took a brief break from showing off new features in upcoming operating systems to throw back the curtains on its new M2 chip and a pair of laptops that use it: an all-new MacBook Air and an updated 13-inch MacBook Pro. Apple said that both laptops will be available in July.
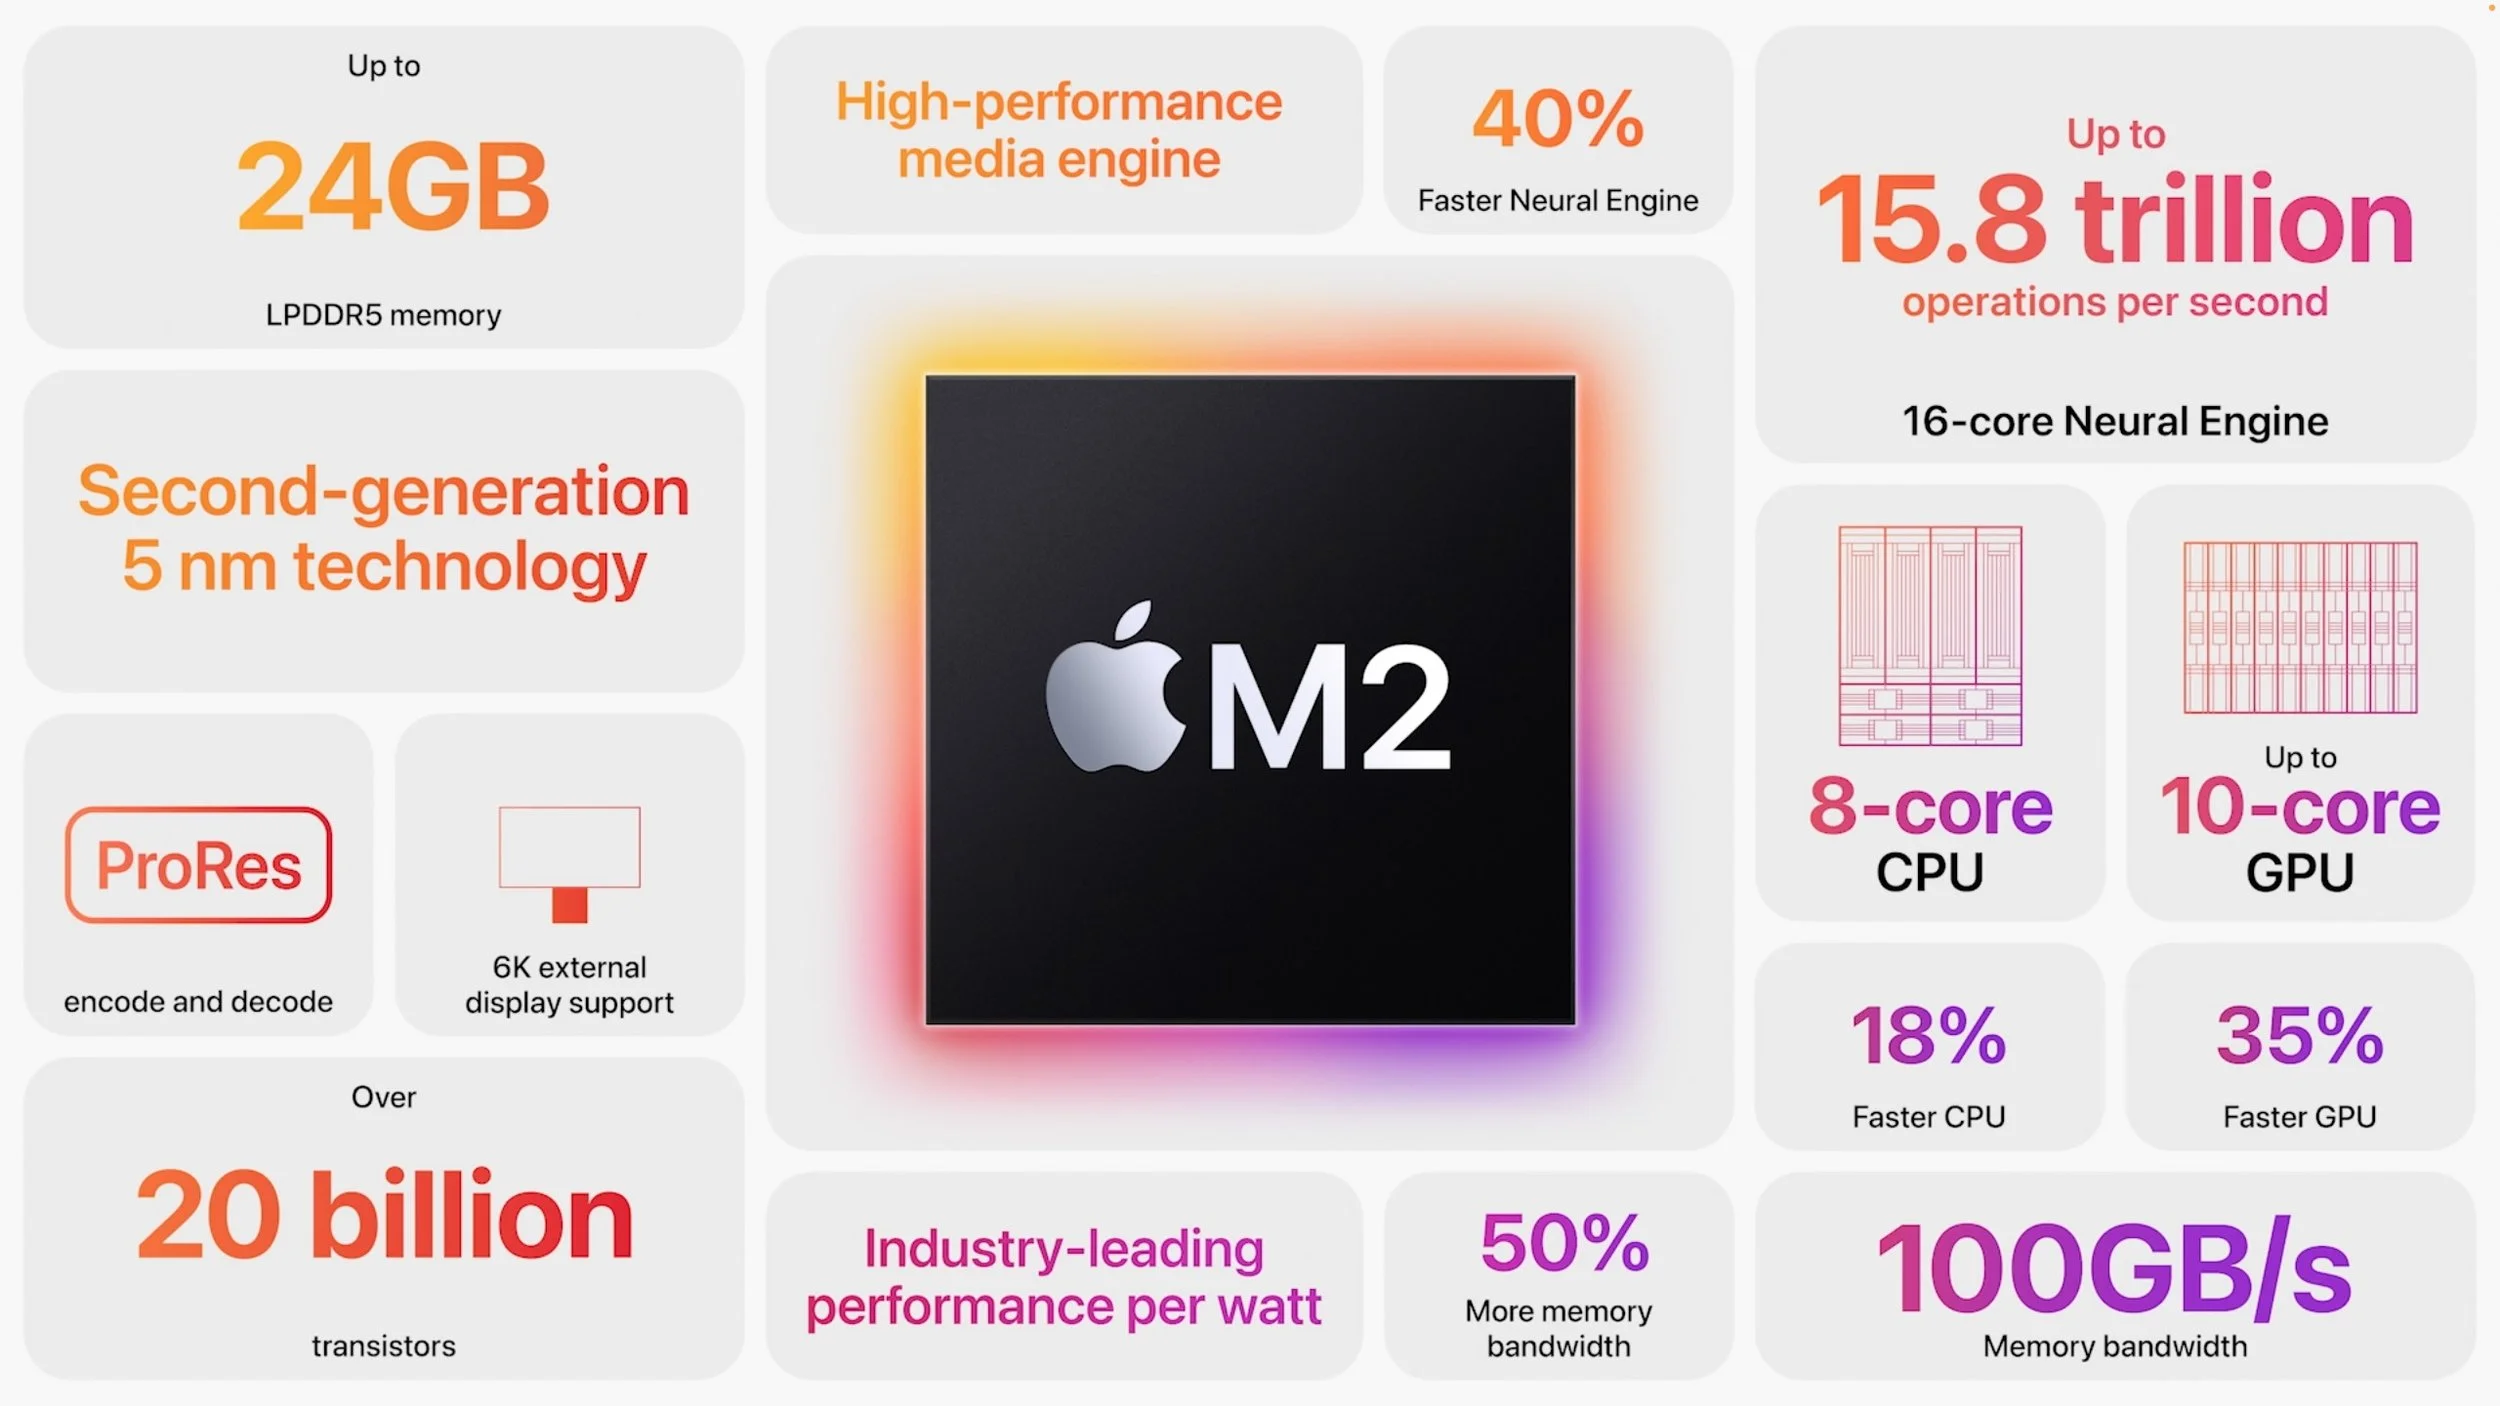
Next Generation M2 Chip Boosts Performance, Offers More Memory
Although we’re still wrapping our heads around the insane performance offered by a Mac Studio with the M1 Ultra chip, Apple is already introducing the next generation of chips to power the Mac line, beginning with the M2. It includes an 8-core CPU and 10-core GPU, and builds on the capabilities of the M1, increasing CPU performance by 18%, GPU performance by 35%, and Neural Engine performance by 40%. It also offers up to 24 GB of unified memory (16 GB max in the M1) and expands memory bandwidth by 50%. Impressive numbers, but still well under the capabilities of the M1 Pro. We expect Apple to release an M2 Pro, M2 Max, and M2 Ultra within the next year or so.
New MacBook Air Brings Complete Redesign
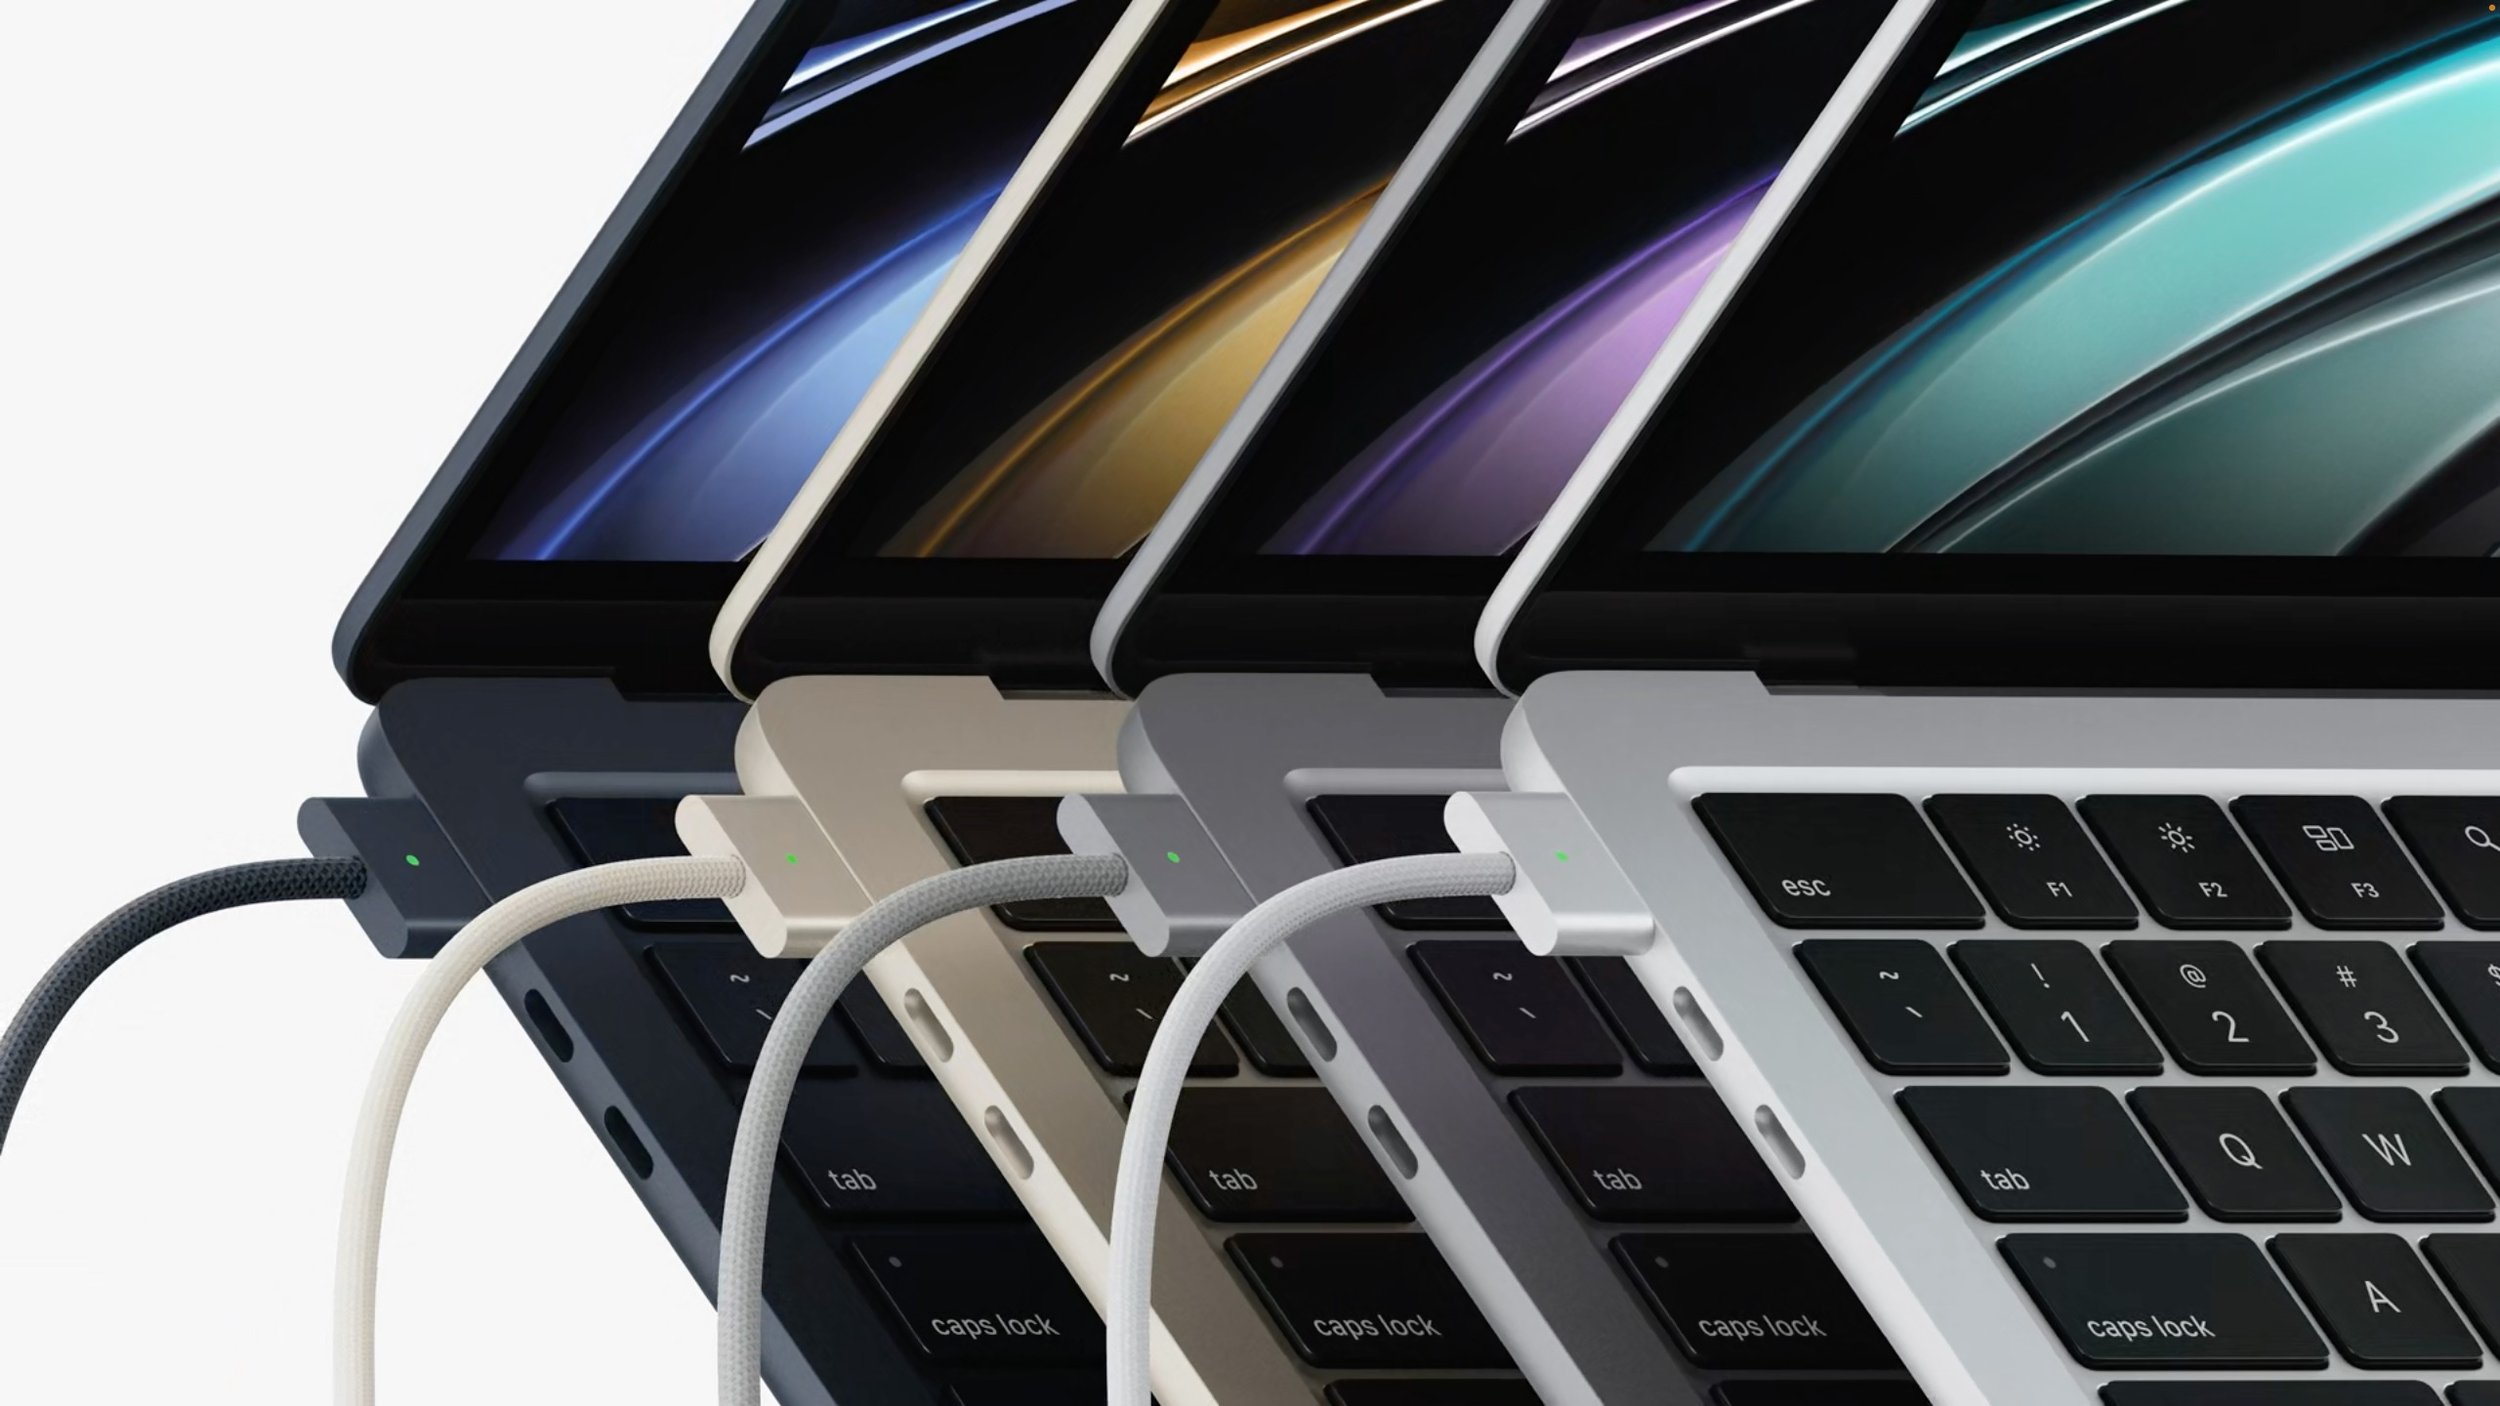
Apple claims the MacBook Air is the world’s best-selling laptop, which isn’t surprising, given the model’s svelte size, zippy performance, and reasonable price point. For this revision, Apple changed the previous wedge-shaped design to a squared-off look that echoes recent Apple products like the 24-inch iMac and iPhone 13. It’s otherwise similar in size to the previous model, though just a touch thinner and lighter. It’s the same width and a bit deeper, likely because it boasts a 13.6-inch screen and a full-height function key row with Touch ID. Happily, it now charges using Apple’s MagSafe 3 technology. You can get the new MacBook Air in four finishes: silver, space gray, starlight, and midnight.
The new MacBook Air’s screen isn’t just bigger, it’s also better. It has a slightly higher resolution of 2560x1664, it’s brighter, and it supports up to 1 billion colors. In other words, it’s gorgeous, and you can supplement it with an external display up to 6K in resolution. Embedded at the top of the screen is a better webcam with a 1080p resolution instead of the previous 720p resolution. Apple also enhanced its audio capabilities with a four-speaker sound system and a three-mic array with directional beamforming.
The price of the M2-based MacBook Air starts at $1199, but additional processing power, memory, and storage are available:
Chip: Choose from either an M2 with an 8-core CPU and 8-core GPU or one with an 8-core CPU and 10-core GPU ($100).
Memory: 8 GB of unified memory is standard, but you can opt for 16 GB ($200) or 24 GB ($400).
Storage: The base level of SSD storage is 256 GB, with upgrades to 512 GB ($200), 1 TB ($400), or 2 TB ($800).
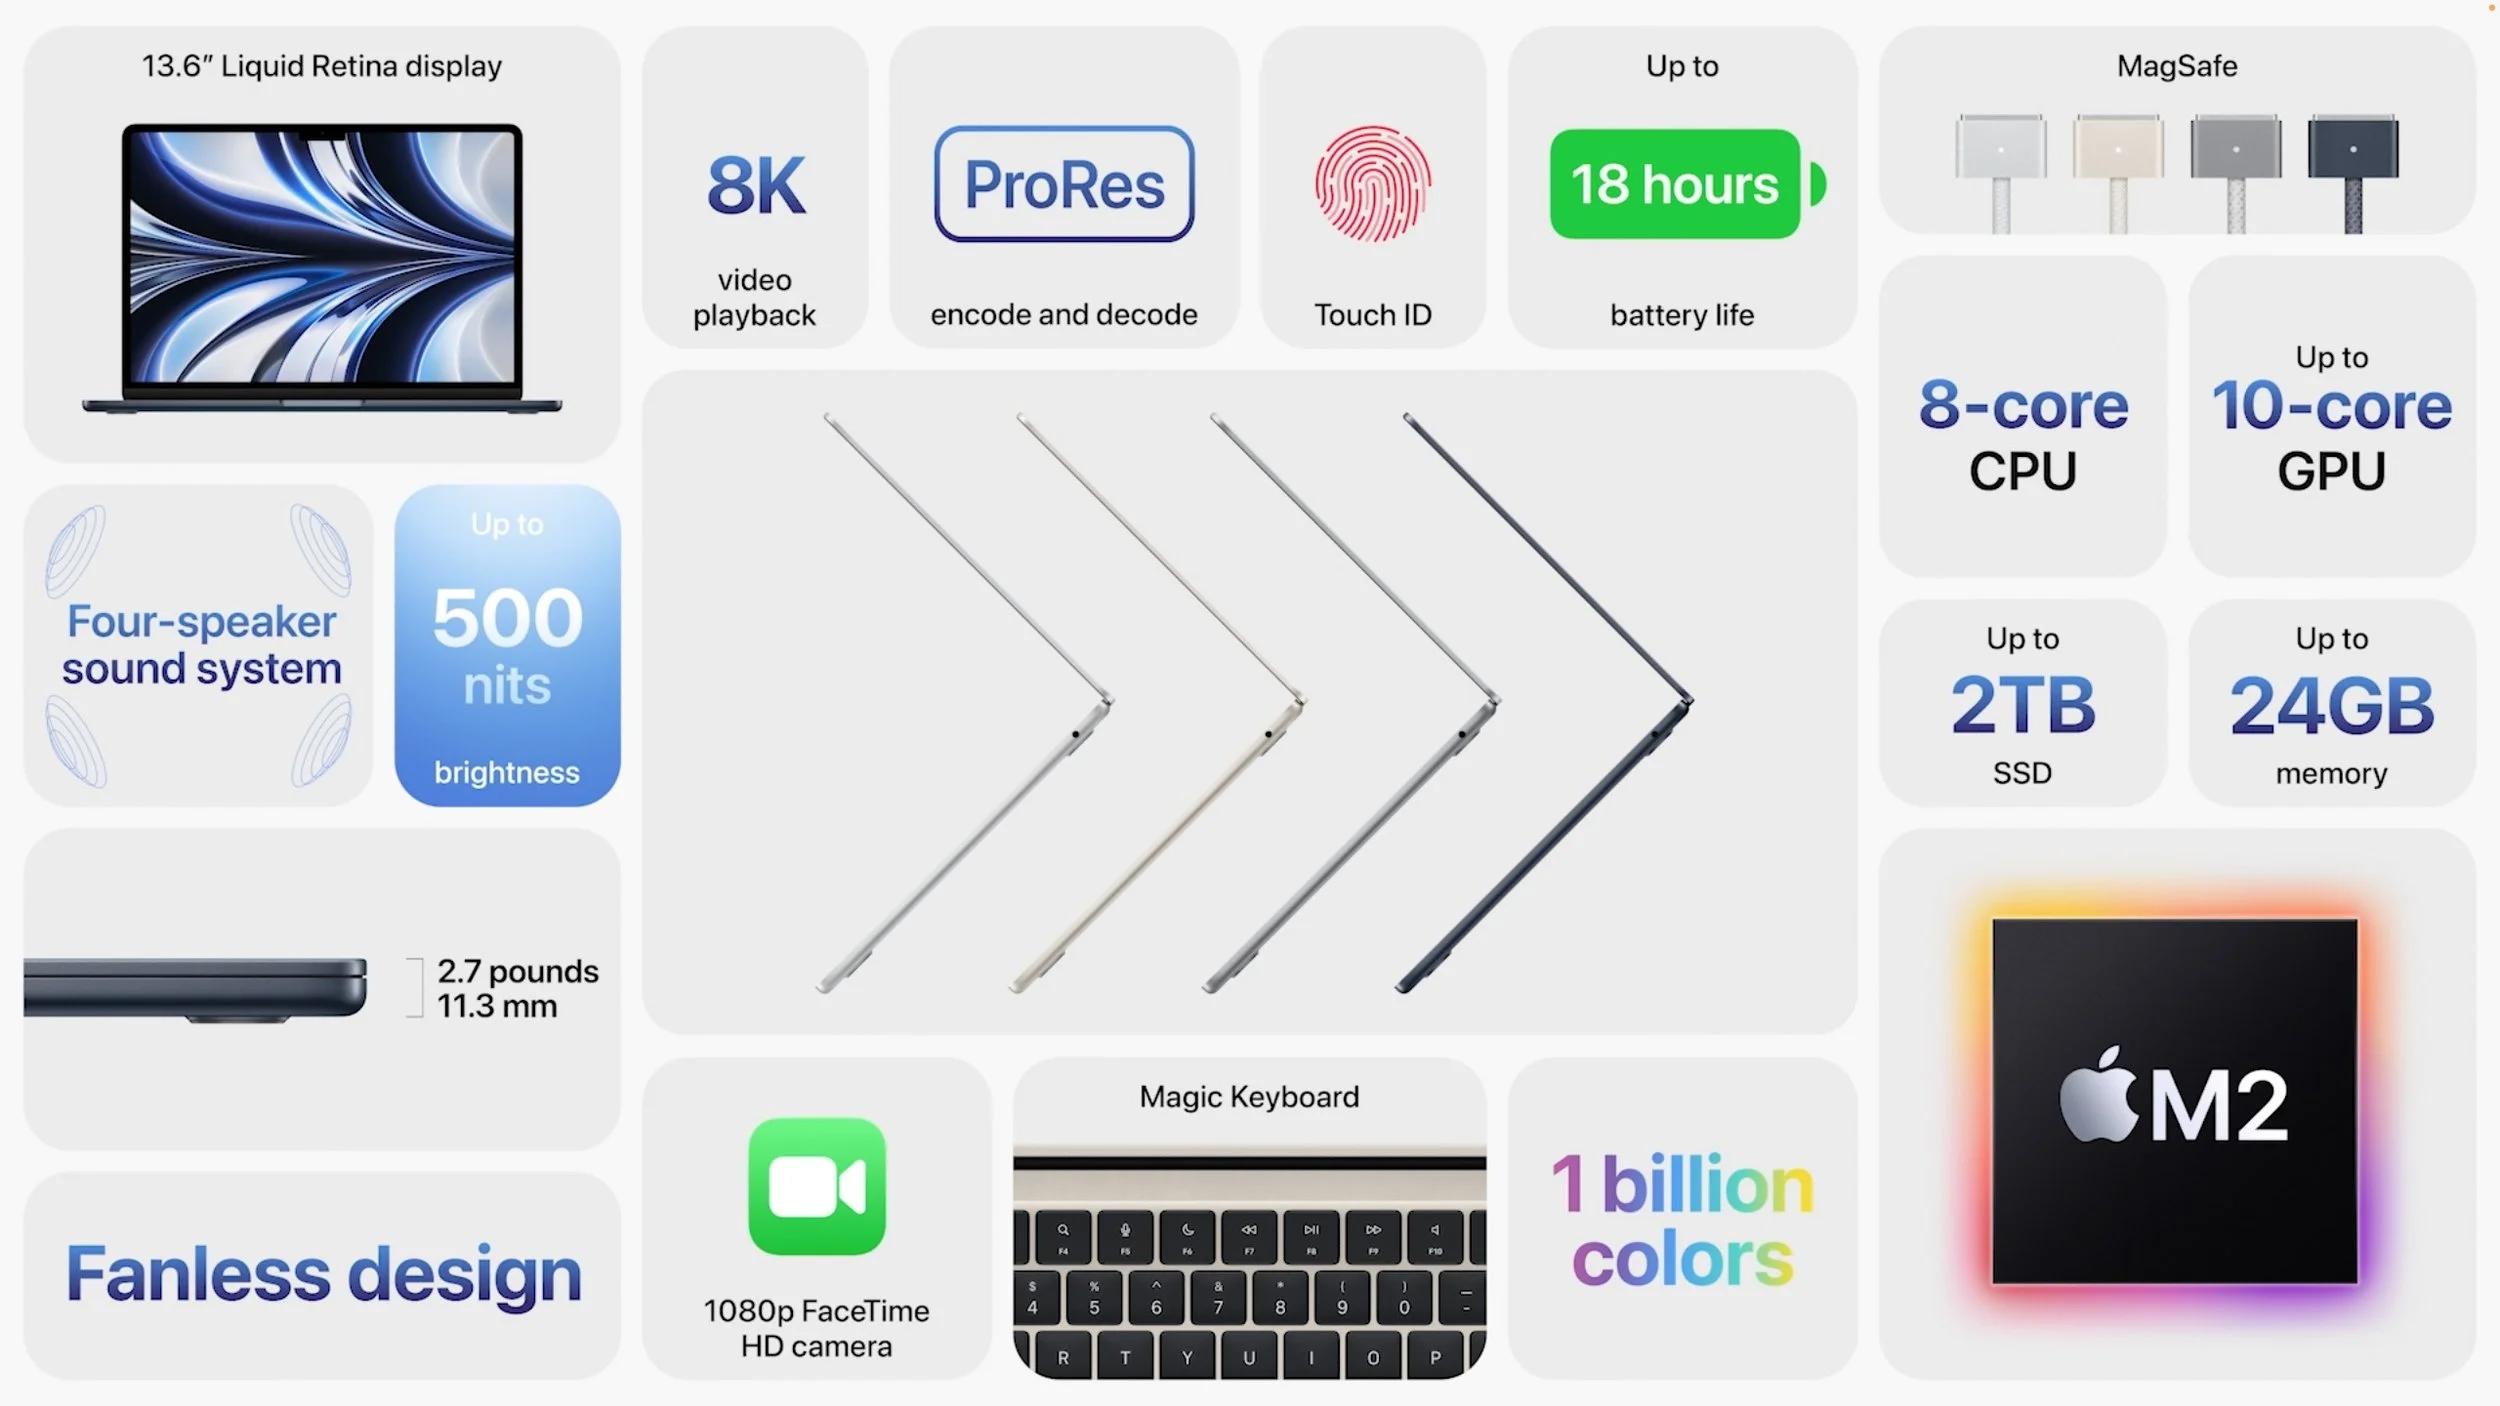
Like the previous M1-based MacBook Air, the new model sports two Thunderbolt/USB 4 ports on the left side (next to the MagSafe port) and a 3.5 mm headphone jack on the right side. It also supports Wi-Fi 6 wireless networking and Bluetooth 5.0.
It comes with a 30-watt USB-C power adapter, or you can pay $20 more for either a 35-watt power adapter with two USB-C ports or a 67-watt USB-C power adapter that supports the M2-based MacBook Air’s fast charging capabilities. If you opt for the higher-end M2 chip and at least 512 GB of storage, you get one of the more-capable power adapters for free.
Although the new MacBook Air is a little more expensive than a comparably configured M1-based MacBook Air, it sports better performance, more memory, a bigger and better screen, a better webcam, a larger function key row, better speakers, and MagSafe 3. Nevertheless, if you’re working on a tight budget, the least expensive M1-based MacBook Air remains available for $999, and it’s still a fine machine.
In the end, it’s hard to go wrong with the new M2-based MacBook Air when upgrading from an Intel-based Mac laptop or supplementing your desktop Mac with a laptop. It’s small, light, powerful, and cost-effective, if not a significant enough jump to warrant upgrading from an M1-based MacBook Air.
Updated 13-inch MacBook Pro Gains M2 Chip
While the new MacBook Air is a complete redesign, the updated 13-inch MacBook Pro is unchanged from its M1-based predecessor, apart from the move to the M2 chip. Since that’s the same chip that’s in the MacBook Air and the price is identical for comparable configurations, the question becomes why you’d buy the 13-inch MacBook Pro instead of the new MacBook Air.
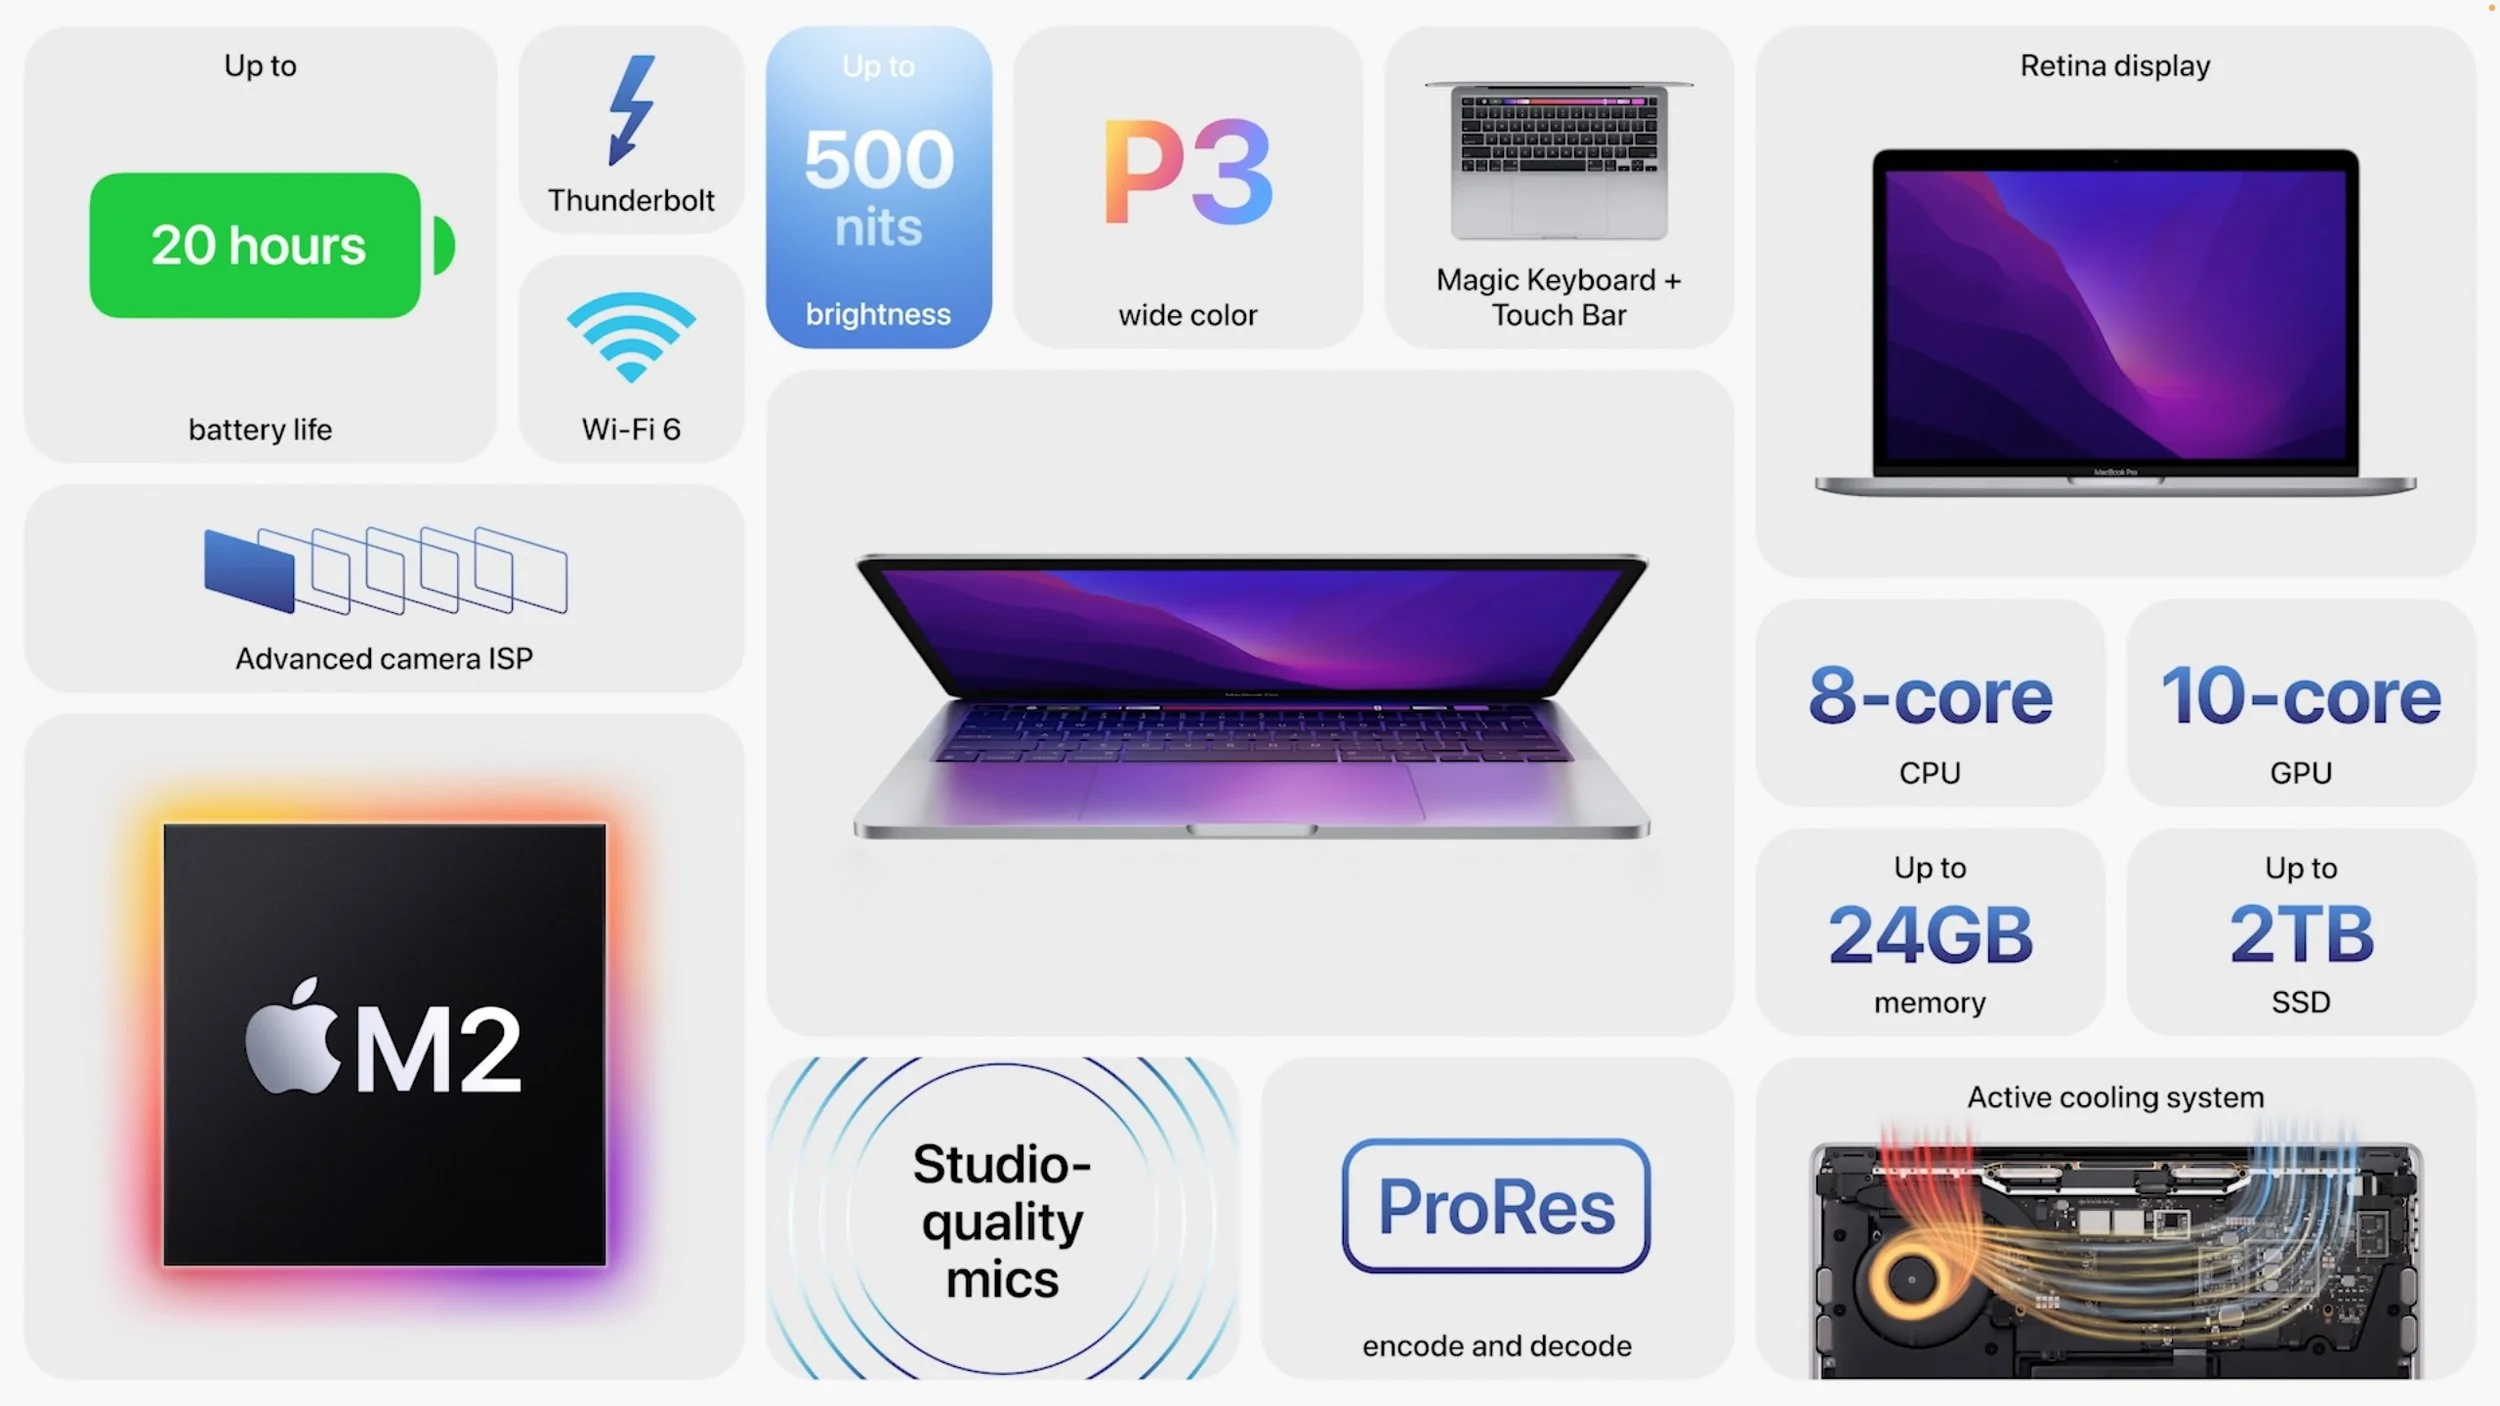
On the plus side, the 13-inch MacBook Pro has cooling fans that enable it to maintain peak performance for sustained loads—the fanless MacBook Air will throttle itself to avoid overheating if you push it for too long. The MacBook Pro’s battery life is likely a little longer, given that it has a large battery. Finally, it has a Touch Bar instead of a function key row, which some may like.
However, the new MacBook Air’s slightly larger screen supports more colors (1 billion versus millions), and the MacBook Air has a better webcam and potentially better speakers. It’s also a little thinner and lighter.
In balance, we recommend the MacBook Air unless you love the MacBook Pro’s Touch Bar, which seems to be on the way out. The 13-inch MacBook Pro starts at $1299 for an 8-core CPU, 10-core GPU M2-based model with 8 GB of unified memory and 256 GB of SSD storage. The build-to-order options are the same as for the MacBook Air.
(Featured image by Apple)
Copy and Paste between Your Apple Devices with Universal Clipboard
Did you know that you can copy and paste content between your Mac, iPhone, and iPad using Universal Clipboard? It should just work, but if not, read on to learn which underlying settings you should adjust.

Everyone is accustomed to using the Copy and Paste commands on the Mac, but fewer people know that you can also copy and paste between your Mac and your iPhone and iPad. Apple calls this feature Universal Clipboard, and it’s so deeply integrated into macOS, iOS, and iPadOS that it can be easy to miss. You won’t find a switch for Universal Clipboard or any other mention of it in System Preferences or Settings.
To use Universal Clipboard, all you have to do is copy some content—a bit of text, an image, a video—on one device, switch to another device, and paste it into an app that can accept the copied content. It’s a great way to move data between your devices. (When going from Mac to Mac, you can also copy and paste en-tire files in the Finder.)
Or at least there’s no fuss if you have the right settings enabled on all your devices—miss even one of these and Universal Clipboard won’t work. Here are the necessary supporting conditions:
Apple ID: Each device must be signed in to iCloud using the same Apple ID. Ensure this is the case in System Preferences > Apple ID on the Mac and in Settings > Your Name on the iPhone and iPad.
Bluetooth: Each device must have Bluetooth turned on. On the Mac, look in System Preferences > Bluetooth (or Control Center, or the Blue-tooth menu); on an iPhone or iPad, check Settings > Bluetooth (or Con-trol Center).
Wi-Fi: Each device must have Wi-Fi turned on and connected to the same Wi-Fi network. It’s unlikely this wouldn’t be the case, but you can verify it in System Preferences > Wi-Fi (or Control Center, or the Wi-Fi menu); on an iPhone or iPad, check Settings > Wi-Fi (or Control Center).
Handoff: Each device must have Handoff enabled. Check that on the Mac in System Preferences > General and on an iPhone or iPad in Settings > General > AirPlay & Handoff. There’s almost no reason to disable Handoff, so it should be on.
Recent devices: Your devices must be relatively recent—from the last 7–10 years—and running at least macOS 10.12 Sierra or iOS 10. In other words, don’t expect Universal Clipboard to work on some ancient Mac-Book or iPad.
If those settings are all correct, but Universal Clipboard still isn’t working, restart your devices and verify that they all have Wi-Fi and Internet connectivity when they come back up.
Most of the time, however, Universal Clipboard just works. It normally transfers the data between devices almost instantly, although if you copy a particularly large image or video on one device and switch to another, you may see a progress dialog while it finishes moving the data. In the screenshot below, Universal Clipboard didn’t even have time to calculate the time remaining before it finished pasting a photo.

Remember that Universal Clipboard simply populates each device’s clipboard just as though you had copied from that device. As soon as you copy something else on any device, it immediately replaces whatever came in from Universal Clipboard. Plus, if you copy something but don’t paste it on another device right away, the clipboard on that device may revert to its previous contents after about 2 minutes.
(Featured image by iStock.com/voyata and Sielan)
The Best Characters to Use When Naming Files and Folders
You might think that you can name a file or folder any way you want, but macOS and Windows have restrictions on which characters you can use, and the prevalence of cloud sharing services makes it all the more important to avoid prohibited characters.
Back in the early 1980s, DOS filenames couldn’t be more than 8 characters long with a period and a 3-character extension. That was limiting, so when Apple developed the Mac operating system in 1984, it allowed longer names and eliminated the need for an extension, although Mac OS X’s Unix roots meant a return of the filename exten-sion in 2001. Since then, filename restrictions have loosened to the point where it’s easy to think that they no longer exist.
If only that were true! In some ways, the situation has become even cloudier, thanks to additional limitations from file-sharing services like Dropbox, OneDrive, and Box. (Google Drive’s native Web interface reportedly has no naming limitations, but files whose names contain Windows or macOS forbidden characters may not sync via Google Drive’s desktop software.) Plus, people tend to move files between operating systems more than ever before—if you’re sending a file from your Mac to a Windows user through Dropbox, you need to make sure that all three can deal with the filename.
At least length isn’t something that you generally have to think about these days, since both macOS and Windows—and the cloud services—accept filenames up to 255 characters in length. Technically speaking, Windows limits directory paths (the enclosing folder names along with the filename) to 255 characters, but even still, that shouldn’t be difficult to avoid.

What could go wrong if you run afoul of a naming restriction? macOS and Windows may simply not let you type the character—for example, you can’t put a colon in a Mac filename. Putting a period at the start of a Mac or Unix filename will hide the file. Cloud sharing services might rename the file, or you might encounter syncing issues where files don’t appear where they should. Certain characters can also cause trouble when files are used at the command line.
Here are the characters to avoid and the operating systems and services that prohibit them:
: (colon): macOS, Windows, Dropbox, OneDrive, Box
. (period): macOS (at the start of a name), Dropbox
/ (forward slash): macOS, Windows, Dropbox, OneDrive, Box
\ (backslash): Windows, Dropbox, OneDrive, Box
< (less than): Windows, Dropbox, OneDrive, Box
> (greater than): Windows, Dropbox, OneDrive, Box
" (double quote): Windows, Dropbox, OneDrive, Box
| (vertical bar or pipe): Windows, Dropbox, OneDrive, Box
? (question mark): Windows, Dropbox, OneDrive, Box
* (asterisk): Windows, Dropbox, OneDrive, Box
^ (caret): Windows (using FAT-formatted drives)
In addition, avoid using special characters like the © (copyright) symbol or emoji 🤷 in filenames. They might work locally, but all bets are off if you share the files in any way.
A few other recommendations:
Avoid unusual punctuation; in particular, note that OneDrive renames filenames containing:
, (comma) to ^J
# (number sign) to ^N
& (ampersand) to ^O
~ (tilde) to ^F
Never start or end file or folder names with a space, and avoid spaces in file-names that will be uploaded to a Web or SFTP server.
Avoid putting more than one period in a filename, and don’t put a period after a filename extension.
Never assume that names are case sensitive—always make sure that similarly named items differ by more than just case.
If all that seems like a lot to keep in mind, here’s the simple rule that will ensure your filenames will work everywhere:
Name files only with uppercase (A-Z) and lowercase (a-z) letters, digits (0-9), and the hyphen (-) and underscore (_), plus a single period (.) and extension.
(Featured image by iStock.com/cosmin4000 and smartstock)
Take Advantage of CarPlay in Rental Cars While Traveling
An iPhone is an essential tool when traveling these days, and if you’re lucky enough to rent a car that supports CarPlay, you can use Maps and Music through the car’s touchscreen and speakers. Learn more at:

Renting a car has become more interesting in recent years due to changes automakers have been making to car electronics. For example, Apple’s CarPlay is becoming a common feature on rental cars. That lets you run Apple Maps or Google Maps on your iPhone while displaying the map on the car’s built-in screen and routing spoken directions through the car’s speakers. It’s way better than trying to prop your iPhone on the dash for navigation directions.
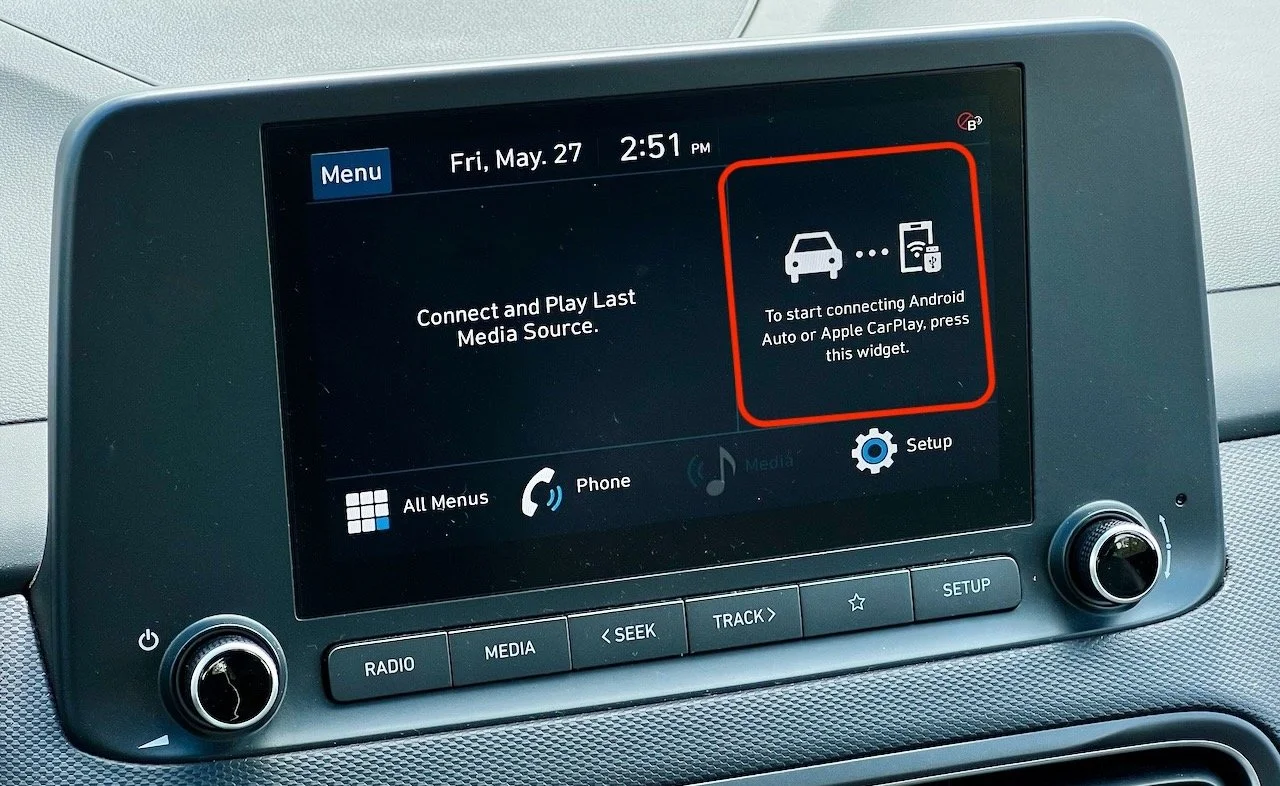
Although there are no guarantees, rental cars are usually recent models, so it’s likely that if one has a screen, it will support CarPlay. Look for some indication on the screen, see if the car is in Apple’s list of supported models, or check the car’s manual in the glove compartment. (Car manuals are universally terrible, but search for CarPlay in the index.) It might even be worth asking at the rental car desk if it’s possible to get a CarPlay-enabled car.
CarPlay setup should be easy. It will add only a few minutes to the time you already spend adjusting seats and mirrors and familiarizing yourself with the car’s controls. Start by plugging your iPhone into the car’s USB jack with a Lightning cable to see if that’s sufficient to start pairing. If the car supports only wireless CarPlay, you’ll instead tap a button on the screen or hold down the voice control button on the steering wheel to initiate pairing.
You may be prompted to transfer contacts and favorites to the car for access via Bluetooth, but don’t bother—you can access everything you need on your iPhone via CarPlay. There’s no worry about CarPlay revealing any of your information to later car renters.

(It’s worth keeping a Lightning cable in the car for the entire trip because GPS navigation drains iPhone batteries quickly. Keep the iPhone plugged in to ensure you have power for other activities. Remember, CarPlay just sends the iPhone’s display and audio to the car—the iPhone is still doing all the navigational work, so CarPlay won’t do you any good if your iPhone is drained.)
Once configured, CarPlay will likely display a map on screen—that’s Apple’s Maps. Assuming you want to leave the rental car agency and get on the road, bring up directions to your destination in Maps on the iPhone, and everything will start appearing directly on the car’s screen. If you don’t hear spoken directions, make sure the car stereo’s volume is turned up.
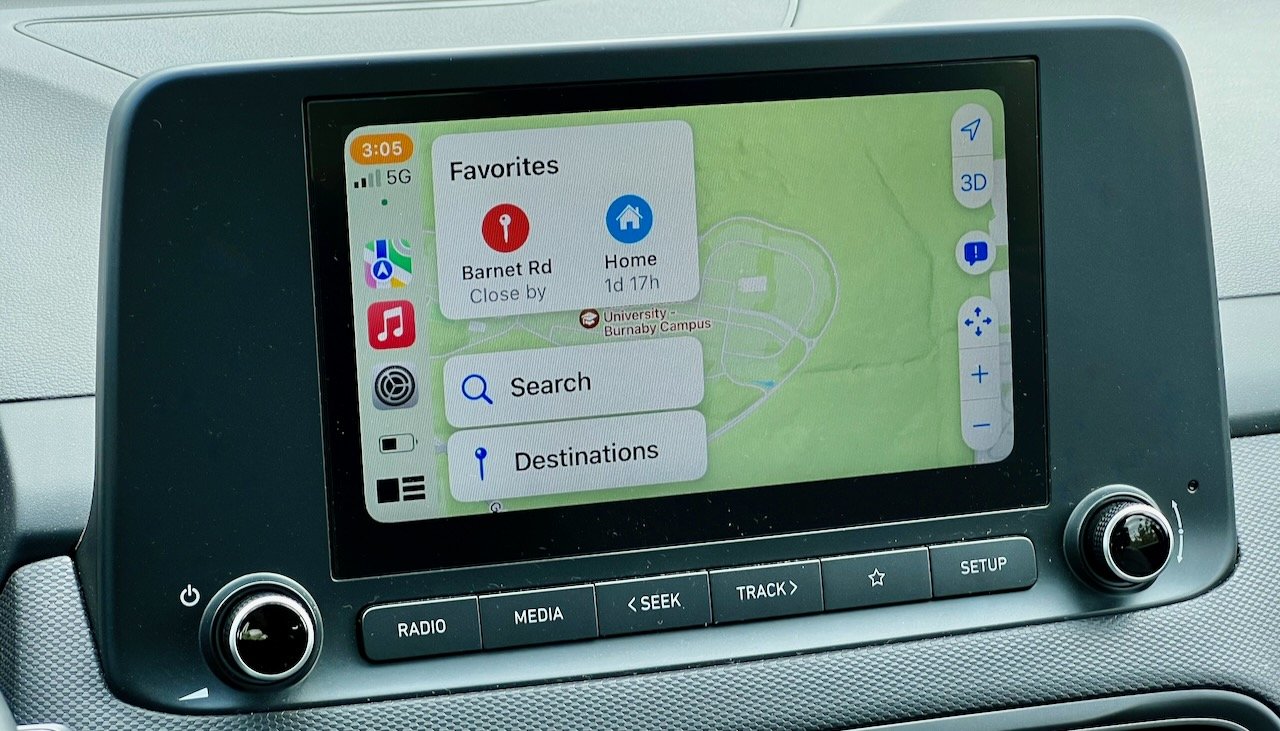
You can control CarPlay with the car’s touchscreen or Siri: use “Hey, Siri,” press the voice control button on the steering wheel, or touch and hold a button on the car’s screen. That’s helpful for playing music from your iPhone instead of suffering with random radio stations. Stick with searching for new destinations in Maps when you’re not driving, however, since using any unfamiliar car interface distracts from driving safely, especially when you’re in a new location.
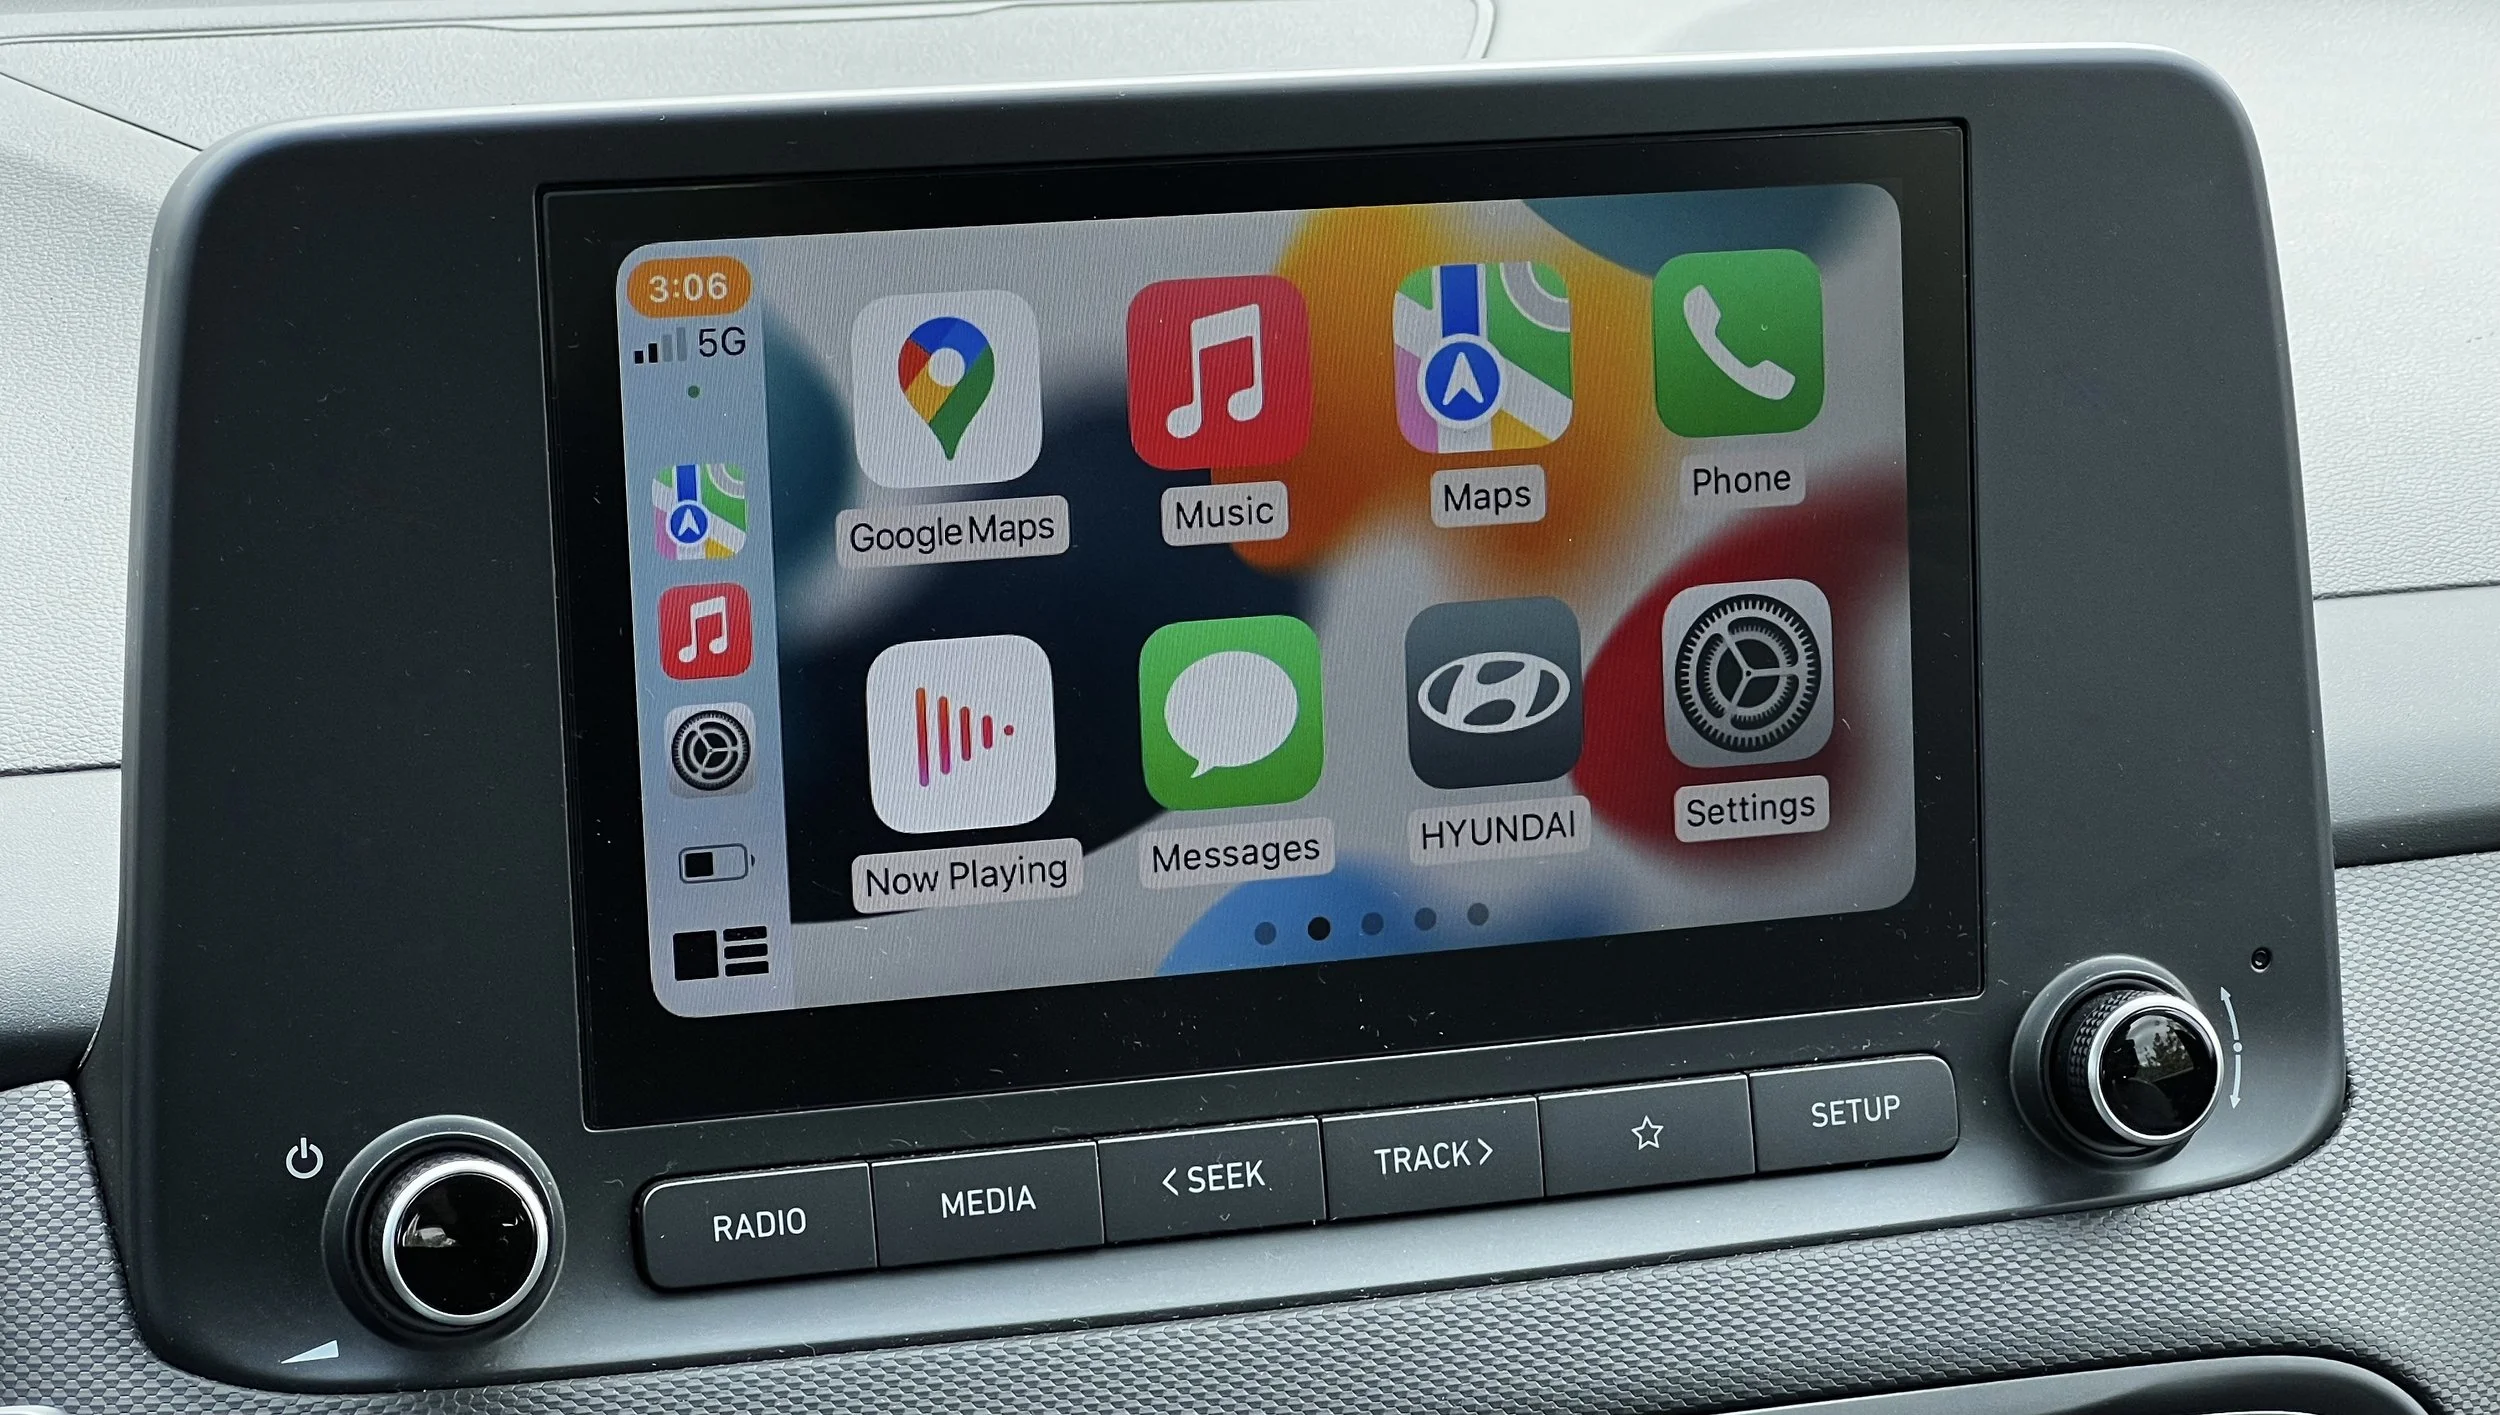
The icons on the left sidebar of the CarPlay display give you access to recent mapping and audio apps, plus Settings. Tap the bottom icon to switch to a tile view that shows the map, Now Playing, and favorite destinations.

If you’re staying in the same location for several days, set its address as a favorite in Maps so it’s easy to navigate back to it merely by tapping a button on the car’s touchscreen. Although Maps works well, if you prefer Google Maps, you can now use that instead. Just start navigating in Google Maps, and CarPlay should automatically bring it up—you can also tap the bottom icon when in tile view to switch to a Home screen-like view of all apps and tap Google Maps there. If you have to swipe left to find the app you want, adjust the icon order on the iPhone in Settings > General > CarPlay > Car Name > Customize.
On subsequent trips, CarPlay should connect automatically and be available for use within a minute or two of starting the car. If it doesn’t, you may need to restart the phone, turn the car off and on again, or even start over by deleting the connection from the car and using Settings > General > CarPlay > Car Name > Forget This Car. You may need to delete the Bluetooth pairing from the car first.
There’s much more to CarPlay, but you’re traveling, so spend your time relaxing and enjoying the trip rather than fussing with technology!
(Featured image by Tonya Engst)
Business Uses of the Apple TV—Really!
Although most people see the Apple TV as a consumer-focused device, it’s also extremely useful for digital signage and presentation display in business settings. Learn more at:

Many people have an Apple TV in the living room, hooked to a large-screen TV. It’s a great streaming media box for Apple TV+, Netflix, Amazon Prime Video, and a slew of other services. It even supports a bunch of games. Don’t let the Apple TV’s consumer focus fool you, though. It’s also a highly useful device for businesses in two important ways: digital signage and presentation display.
Apple TV for Digital Signage
For businesses that need to post signs, it’s easy to print something out and stick it on the wall. But that can get out of hand quickly, and once you have more than a couple of sheets of paper posted, people won’t read them. And, let’s face it, a piece of paper taped to the wall isn’t exactly eye-catching. Professional-level design and large-format printing can help, but then costs start going up quickly, and print signs aren’t easy to update.
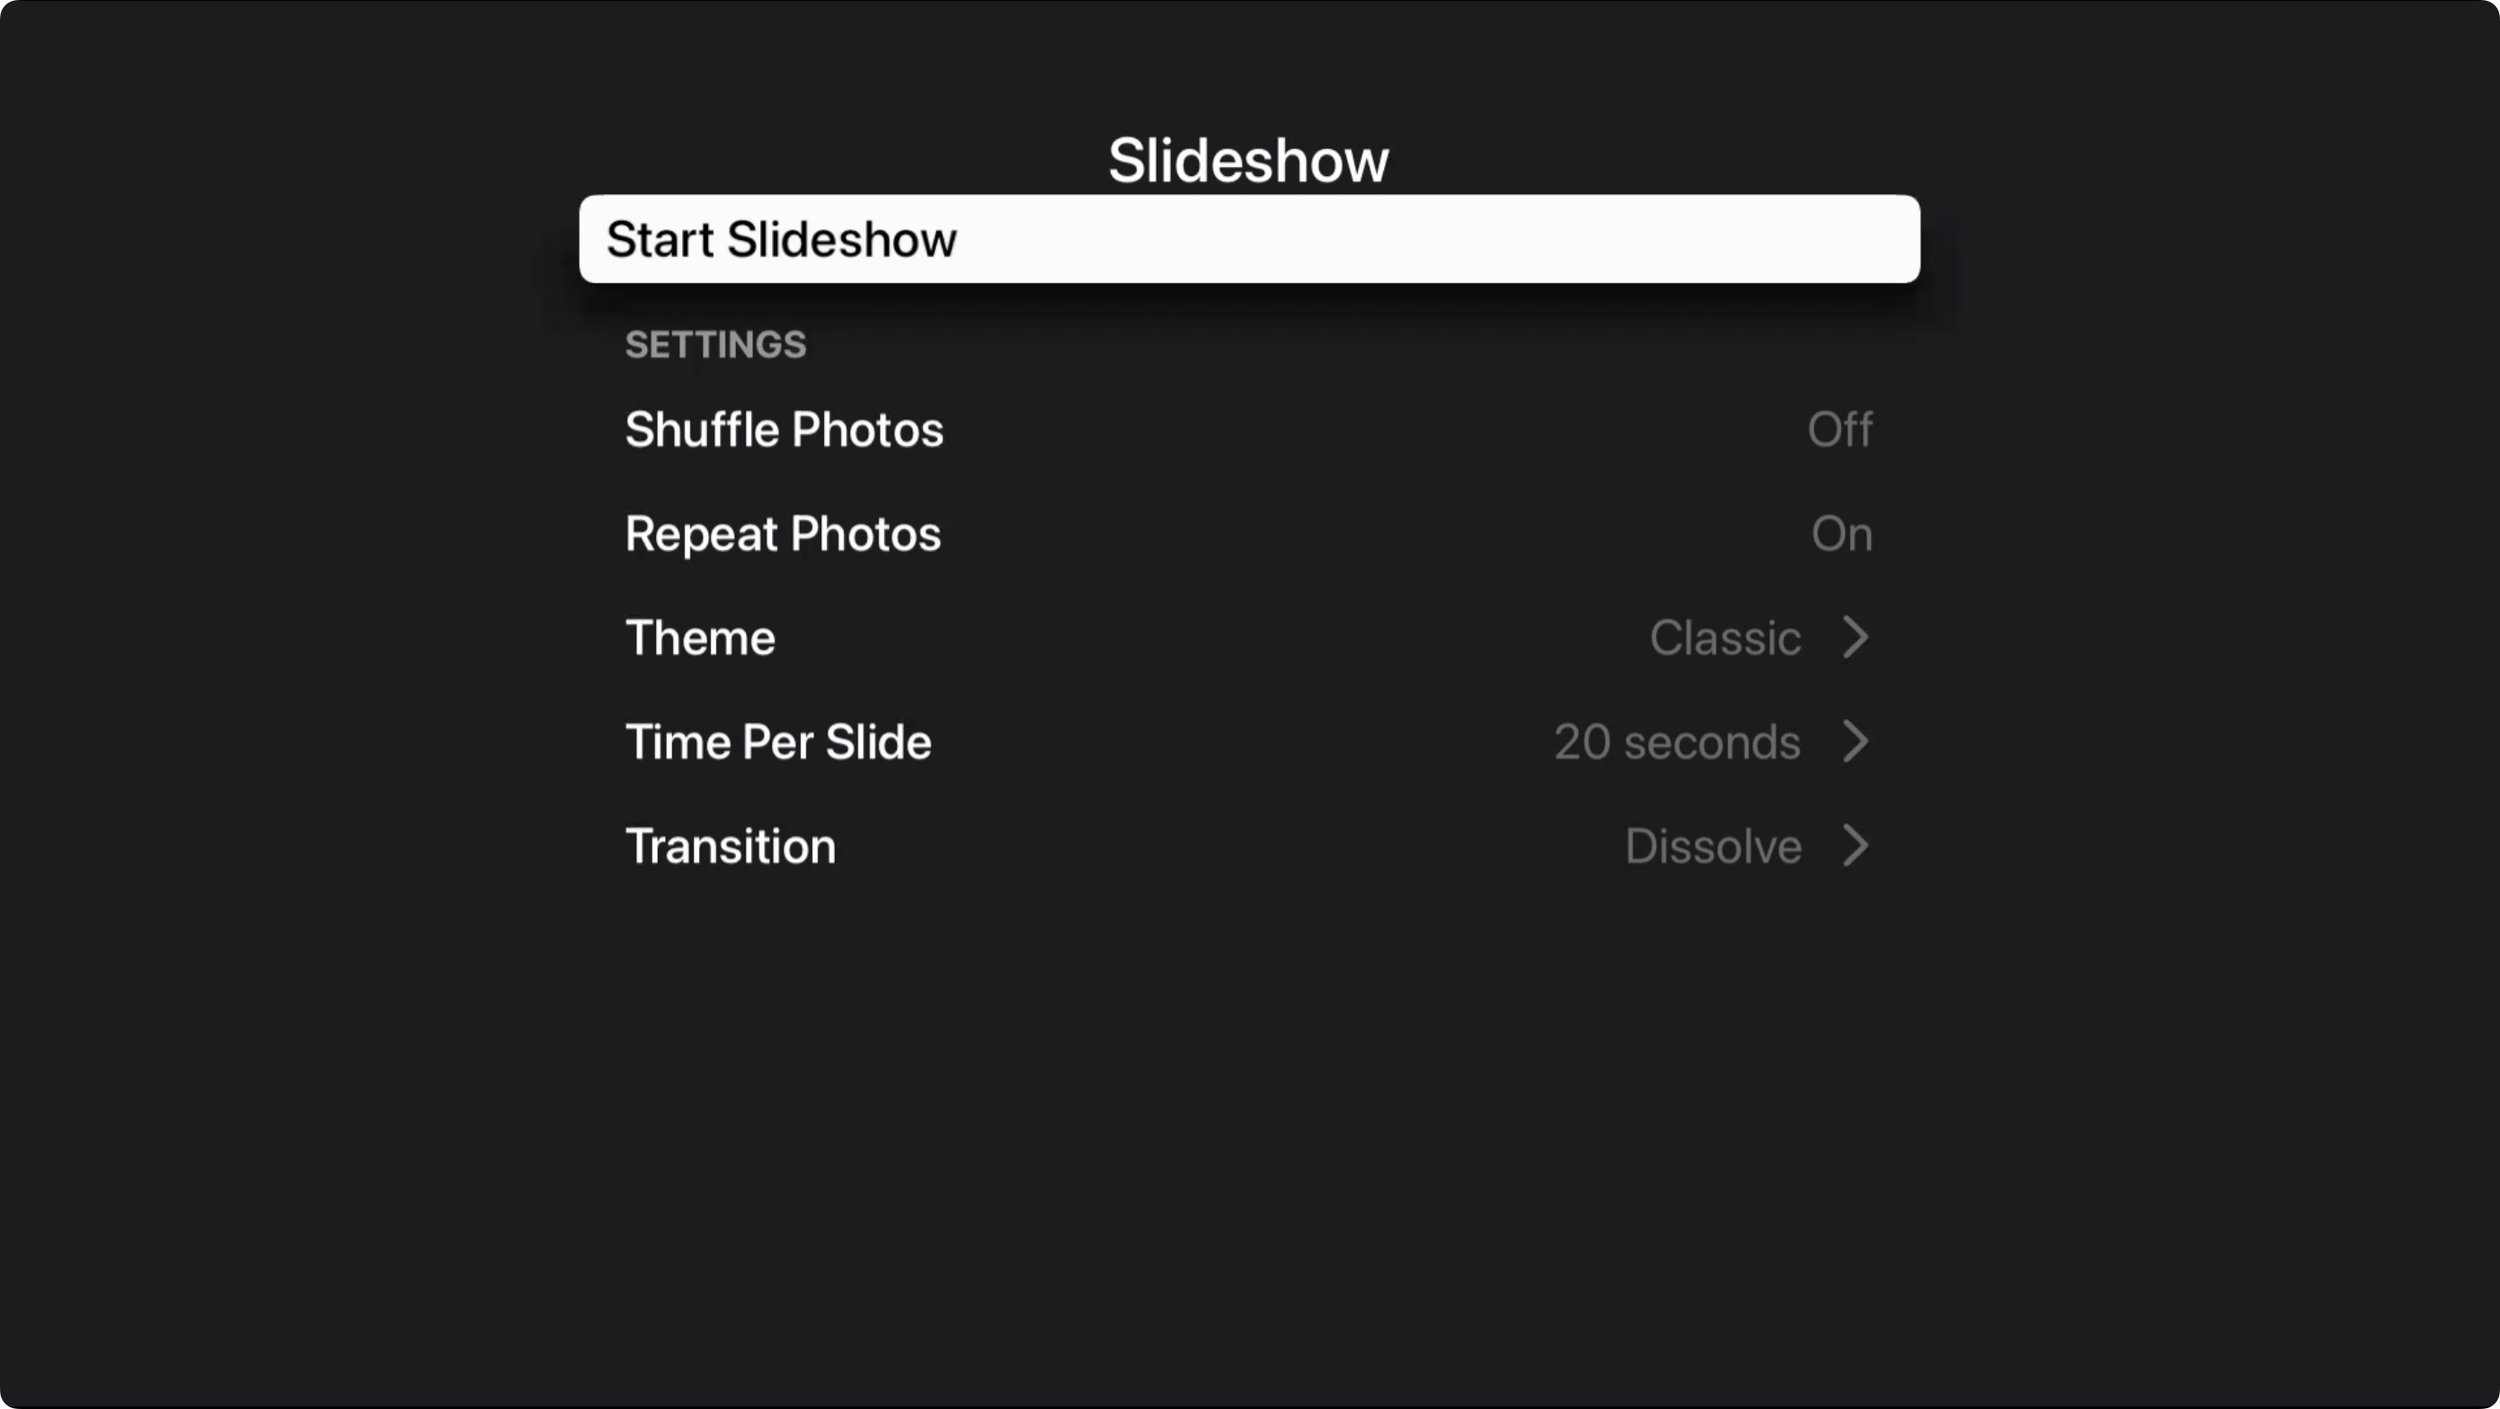
An Apple TV coupled with an inexpensive TV might be a better solution. Conceptually, a digital sign is just one or more graphics displayed on a screen, rotating as necessary—it’s a slideshow. For a one-off solution, you could add some images to Photos and display them as a slideshow or as a screen saver. If you go this route:
Make your images 1920 pixels wide by 1080 pixels high, assuming that your Apple TV’s resolution is set to 1080p in Settings > Video & Audio > Resolution. (If not, match whatever you’re using there.)
Avoid putting content within 60 pixels of the top and bottom of the screen and within 80 pixels of either side. Content can be difficult to read near the edge, and it may be cropped due to overscanning on older TVs.
It’s safest to set up a clean Apple ID for the Apple TV to ensure that Photos contains no personal snapshots.
After creating images on your Mac, add them to a shared album in Photos that’s shared with the Apple TV’s dedicated Apple ID.
On the Apple TV, open the Photos app, go into Shared, select the album, and start the slideshow or set the album as a screen saver. If Shared doesn’t appear, turn it on in Settings > Users and Accounts > Your Name > Shared Albums.
If you use the Set As Screensaver option, you must still configure it in Settings > General > Screen Saver.
For either the slideshow or the screen saver, set the theme to Classic for a simple, full-screen display. Make sure Repeat Photos is on (slideshow only), set the Time Per Slide to 20 seconds, and stick with a simple Transition.
For more capabilities when creating and switching among slides, turn to a digital signage app. Searching on the Apple TV’s own App Store will reveal numerous digital signage apps, including DigiBoard TV and ez plus.
If you have multiple Apple TVs running digital signage, such as in a hotel, you’ll want to manage them via an MDM solution like Addigy, Hexnode, Jamf Pro, Kandji, or SimpleMDM (to name just a few that support Apple TV management). Details vary, but it’s important to be able to lock the Apple TV to a single digital signage app that will be the only thing that runs and that automatically launches whenever the Apple TV reboots after updating tvOS or after a power failure. (You can also set this mode via Apple Configurator if you don’t have an MDM solution.)
For industrial-strength digital signage, look to systems like Carousel and Kitcast. They offer significant feature sets but charge $20–$25 per screen per month, making them appropriate mostly in larger business scenarios.
Apple TV for Presentations
The other notable business capability of the Apple TV is displaying presentations on a large-screen TV via AirPlay, which lets you avoid the cabling issues and extra hardware associated with projectors. To enable that, Apple added Conference Room Display mode to tvOS to make it easier for people to connect to the Apple TV via AirPlay.
First, make sure AirPlay is on in Settings > AirPlay and HomeKit. Then, in Settings > AirPlay and HomeKit > Conference Room Display, enable Conference Room Display. Once it’s on, you can:
Require a PIN on every use of AirPlay. Enable this setting if you’re concerned about someone sending inappropriate content to the TV.
Set a custom message for the onscreen alert that encourages people to use AirPlay whenever the Apple TV is in Conference Room Display mode.
Choose a custom photo as the background whenever the Apple TV is in Conference Room Display mode.
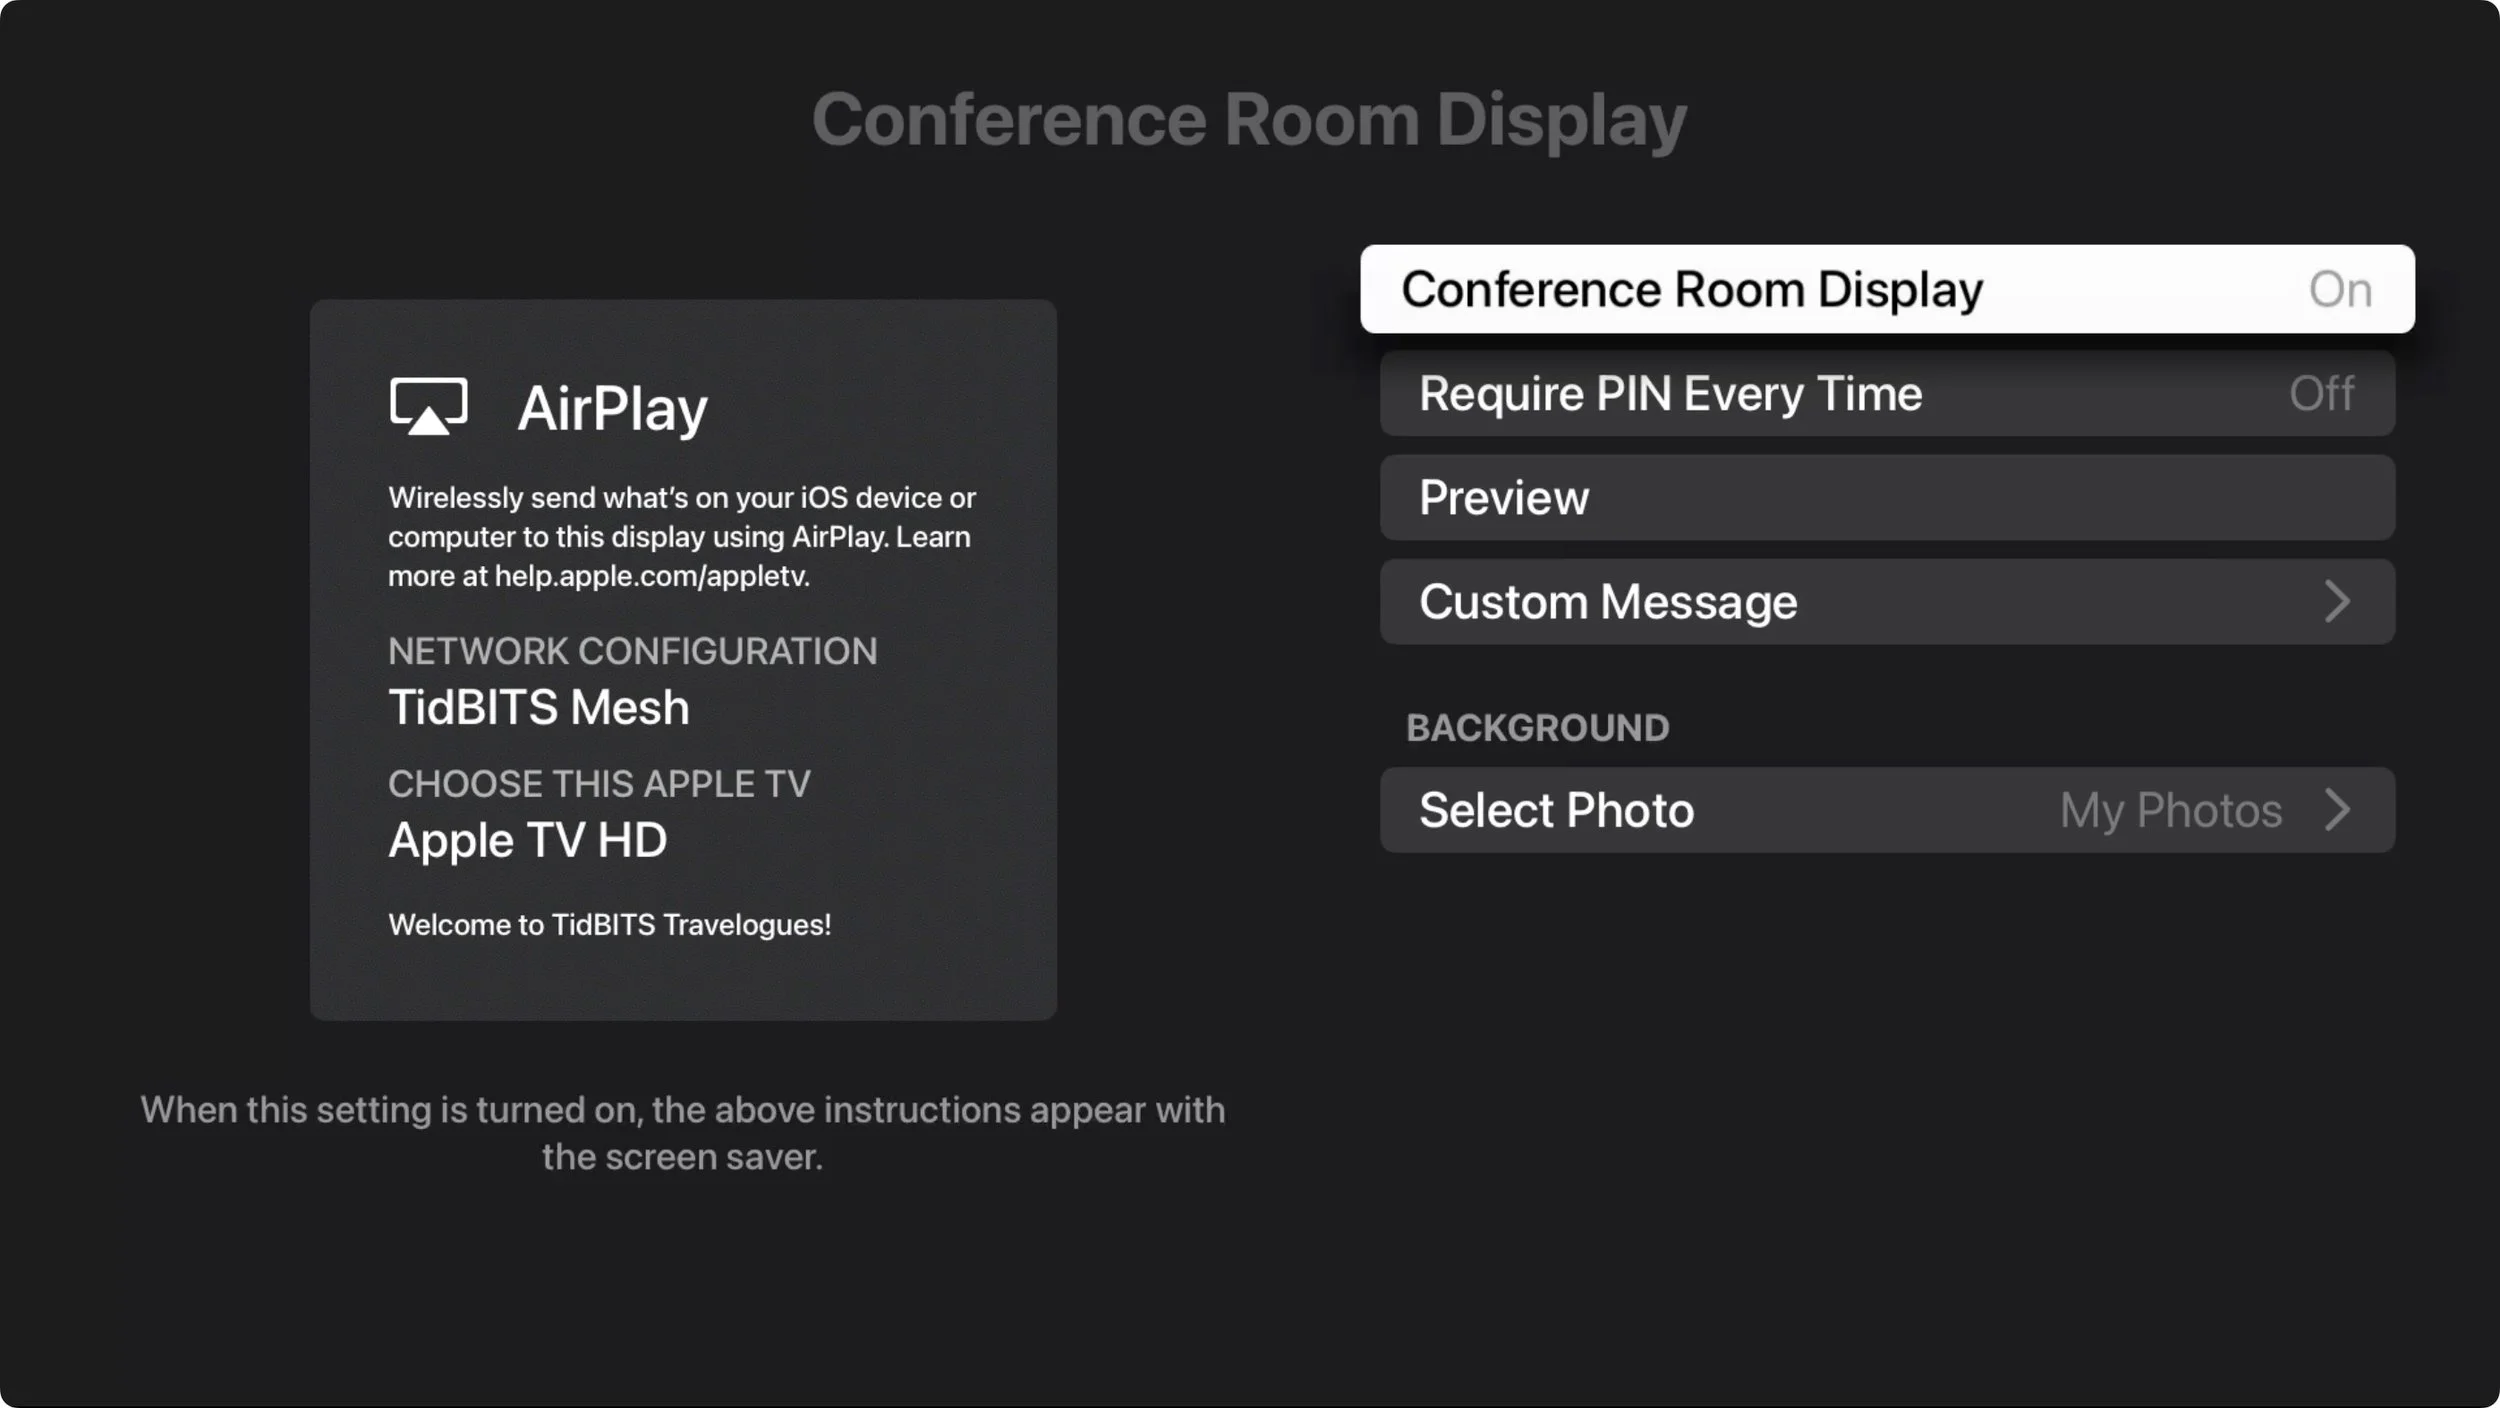
From then on, when you turn on the Apple TV, it will open to the Conference Room Display screen and alert. Note that the screen saver plays while in Conference Room Display mode, although the alert may obscure any digital signs you want to display using the screen saver.

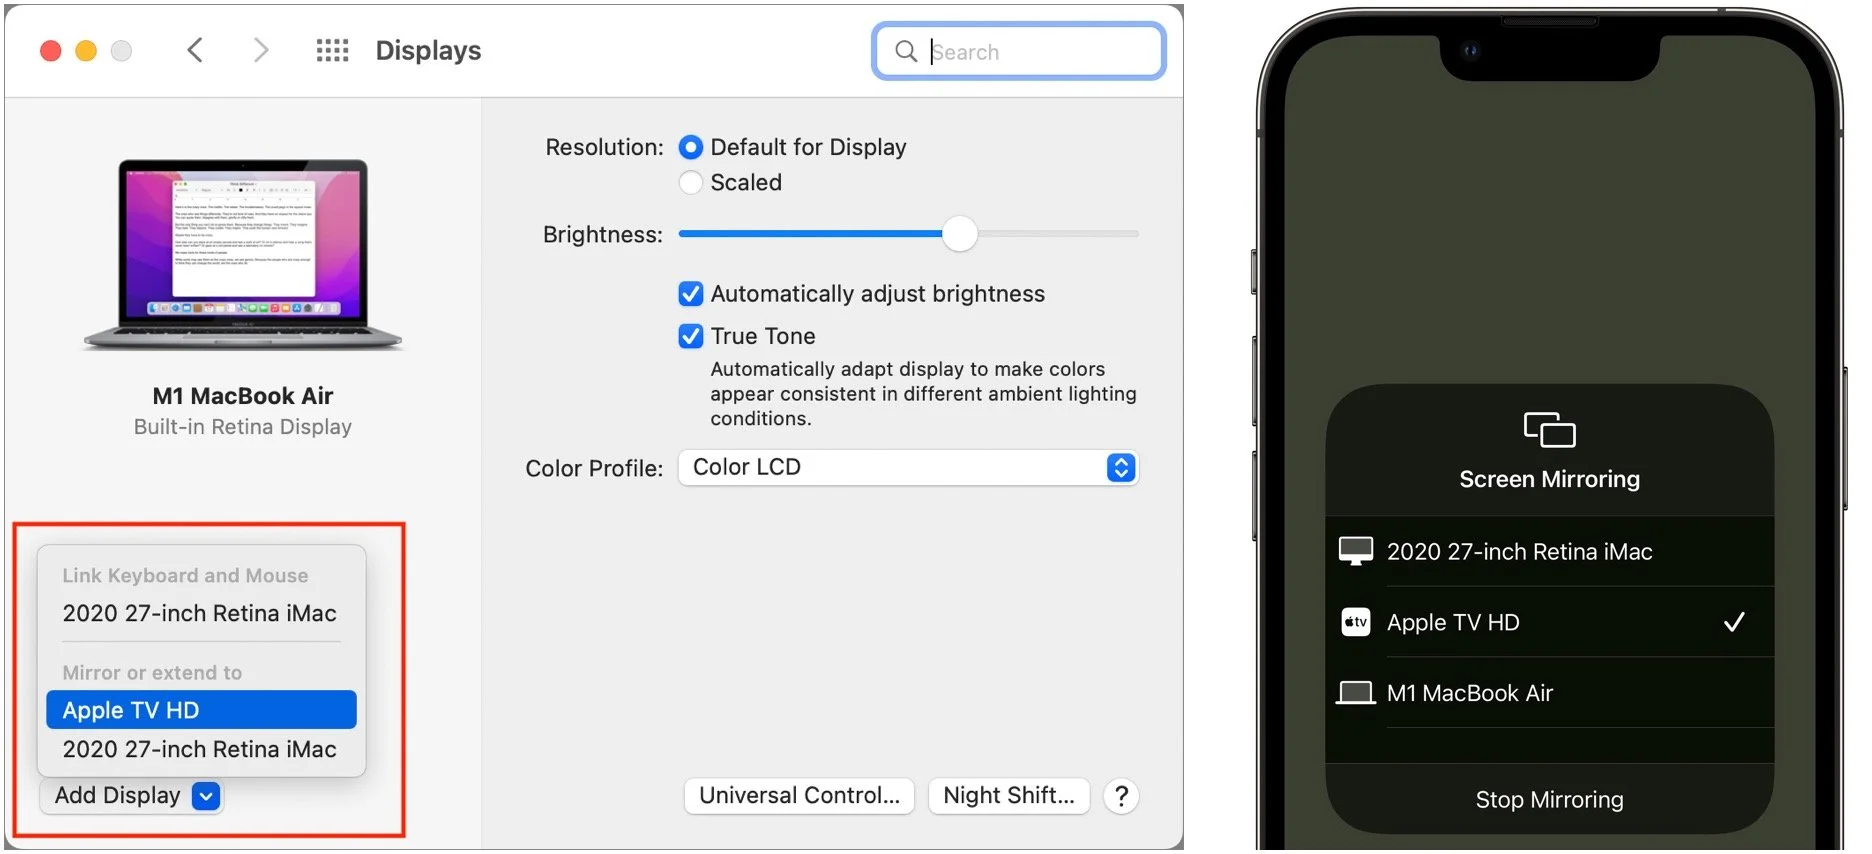
AirPlay is the key for sharing screens, displaying Keynote or PowerPoint presentations, or playing videos on an Apple TV in Conference Room Display mode. From a Mac, go to System Preferences > Displays and choose the Apple TV from the Add Display pop-up menu. From an iPhone or iPad, go into Control Center, tap the Screen Mirroring button, and select the Apple TV from the list.
What if someone wants to play a presentation from a Windows PC or share its screen? The solution, though it requires advance setup, is the $17.99 AirParrot, which enables PCs to share screens with Apple TVs.
This is a high-level overview of how you can leverage an Apple TV for digital signage and presentation display—there are lots of details that may be important in your particular situation. If you need help creating an ideal configuration, don’t hesitate to ask us.
(Featured image by iStock.com/necati bahadir bermek)