When Should You Upgrade to macOS 13 Ventura, iOS 16, iPadOS 16, watchOS 9, and tvOS 16?
Apple is gearing up to release macOS 13 Ventura, iOS 16, iPadOS 16, watchOS 9, and tvOS 16. We take a brief look at the features worth upgrading for and suggest when to upgrade each of your Apple devices.

September is here, which means that Apple will soon start releasing major upgrades for all its operating systems. Note that we say “start.” Apple will release iOS 16 and watchOS 9 alongside new iPhones and Apple Watch models in September. However, Apple has now acknowledged that iPadOS 16 will ship later in the fall—perhaps in October—as version 16.1, likely in conjunction with iOS 16.1 and possibly alongside macOS 13 Ventura. tvOS 16 isn’t interesting enough to worry about much either way.
Apple previewed these releases at its Worldwide Developers Conference in June, and many people have been testing the public betas since. Once Apple judges each of its operating systems to be ready for public consumption, the question arises—when should you upgrade?
Note that we say when and not if. There’s no harm in delaying a major operating system upgrade until Apple has sanded off rough edges that slipped through testing. But waiting too long puts you at risk from security vulnerabilities, increases compatibility annoyances, and prevents you from taking advantage of new features. Plus, when you buy a new Mac, iPhone, or iPad after these operating systems have shipped, you’ll get the latest version, which could pose problems for your existing apps or compatibility with older hardware or workflows. It’s best to be prepared if you have to replace a device unexpectedly.
Given that we don’t know precisely when each operating system will come out, here’s our recommendation for the general upgrade order that we anticipate and how long we suggest waiting after the release appears. Remember, always make a backup before upgrading a Mac, iPhone, or iPad so you can revert if necessary.
iOS 16
It’s usually safe to upgrade iOS fairly quickly because Apple puts significant effort into ensuring that the new iOS version is a good experience for those who buy the new iPhones that come with it. However, because iPhones are so crucial to our everyday lives, it’s worth delaying the upgrade to iOS 16 for a few weeks, just in case. After that, you can install it and enjoy the new features.
You’ll likely enjoy iOS 16’s customizable Lock screen, which lets you specify the font, color, and placement of various options, all of which appear with photos that can shuffle throughout the day. Widgets can now appear on the Lock screen too, providing at-a-glance weather and other info even without unlocking your iPhone. The new dictation capabilities that let you talk, select, and type without switching modes may also be game-changing for some, and dictation will even add punctuation automatically and let you enter emojis with voice commands.
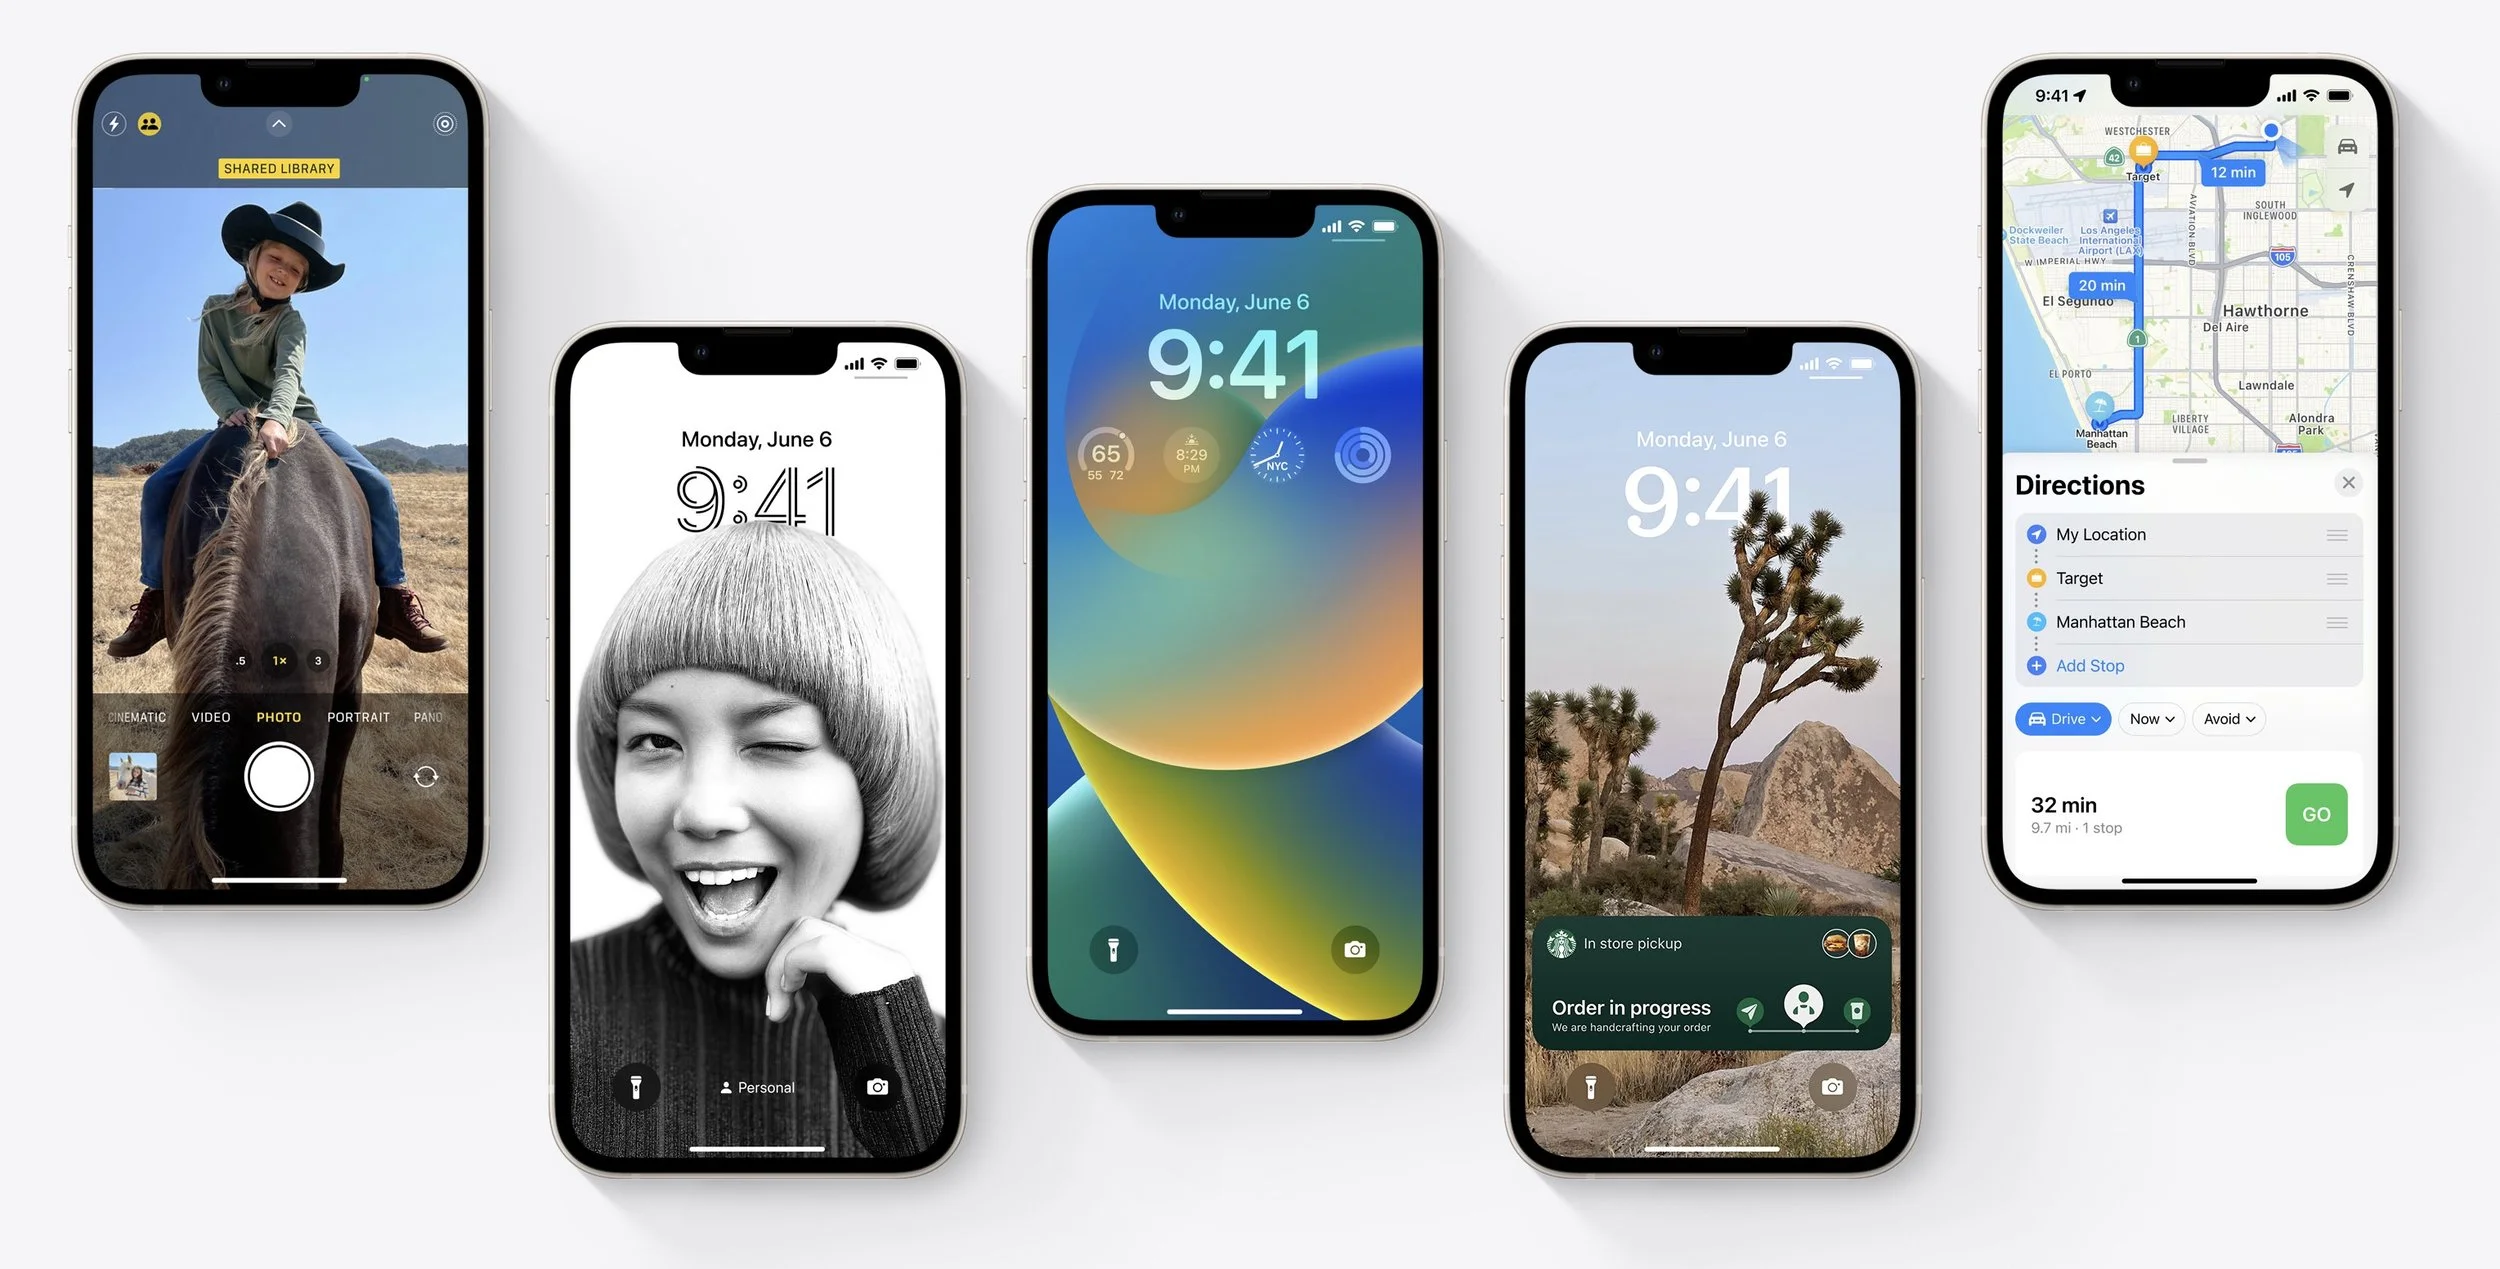
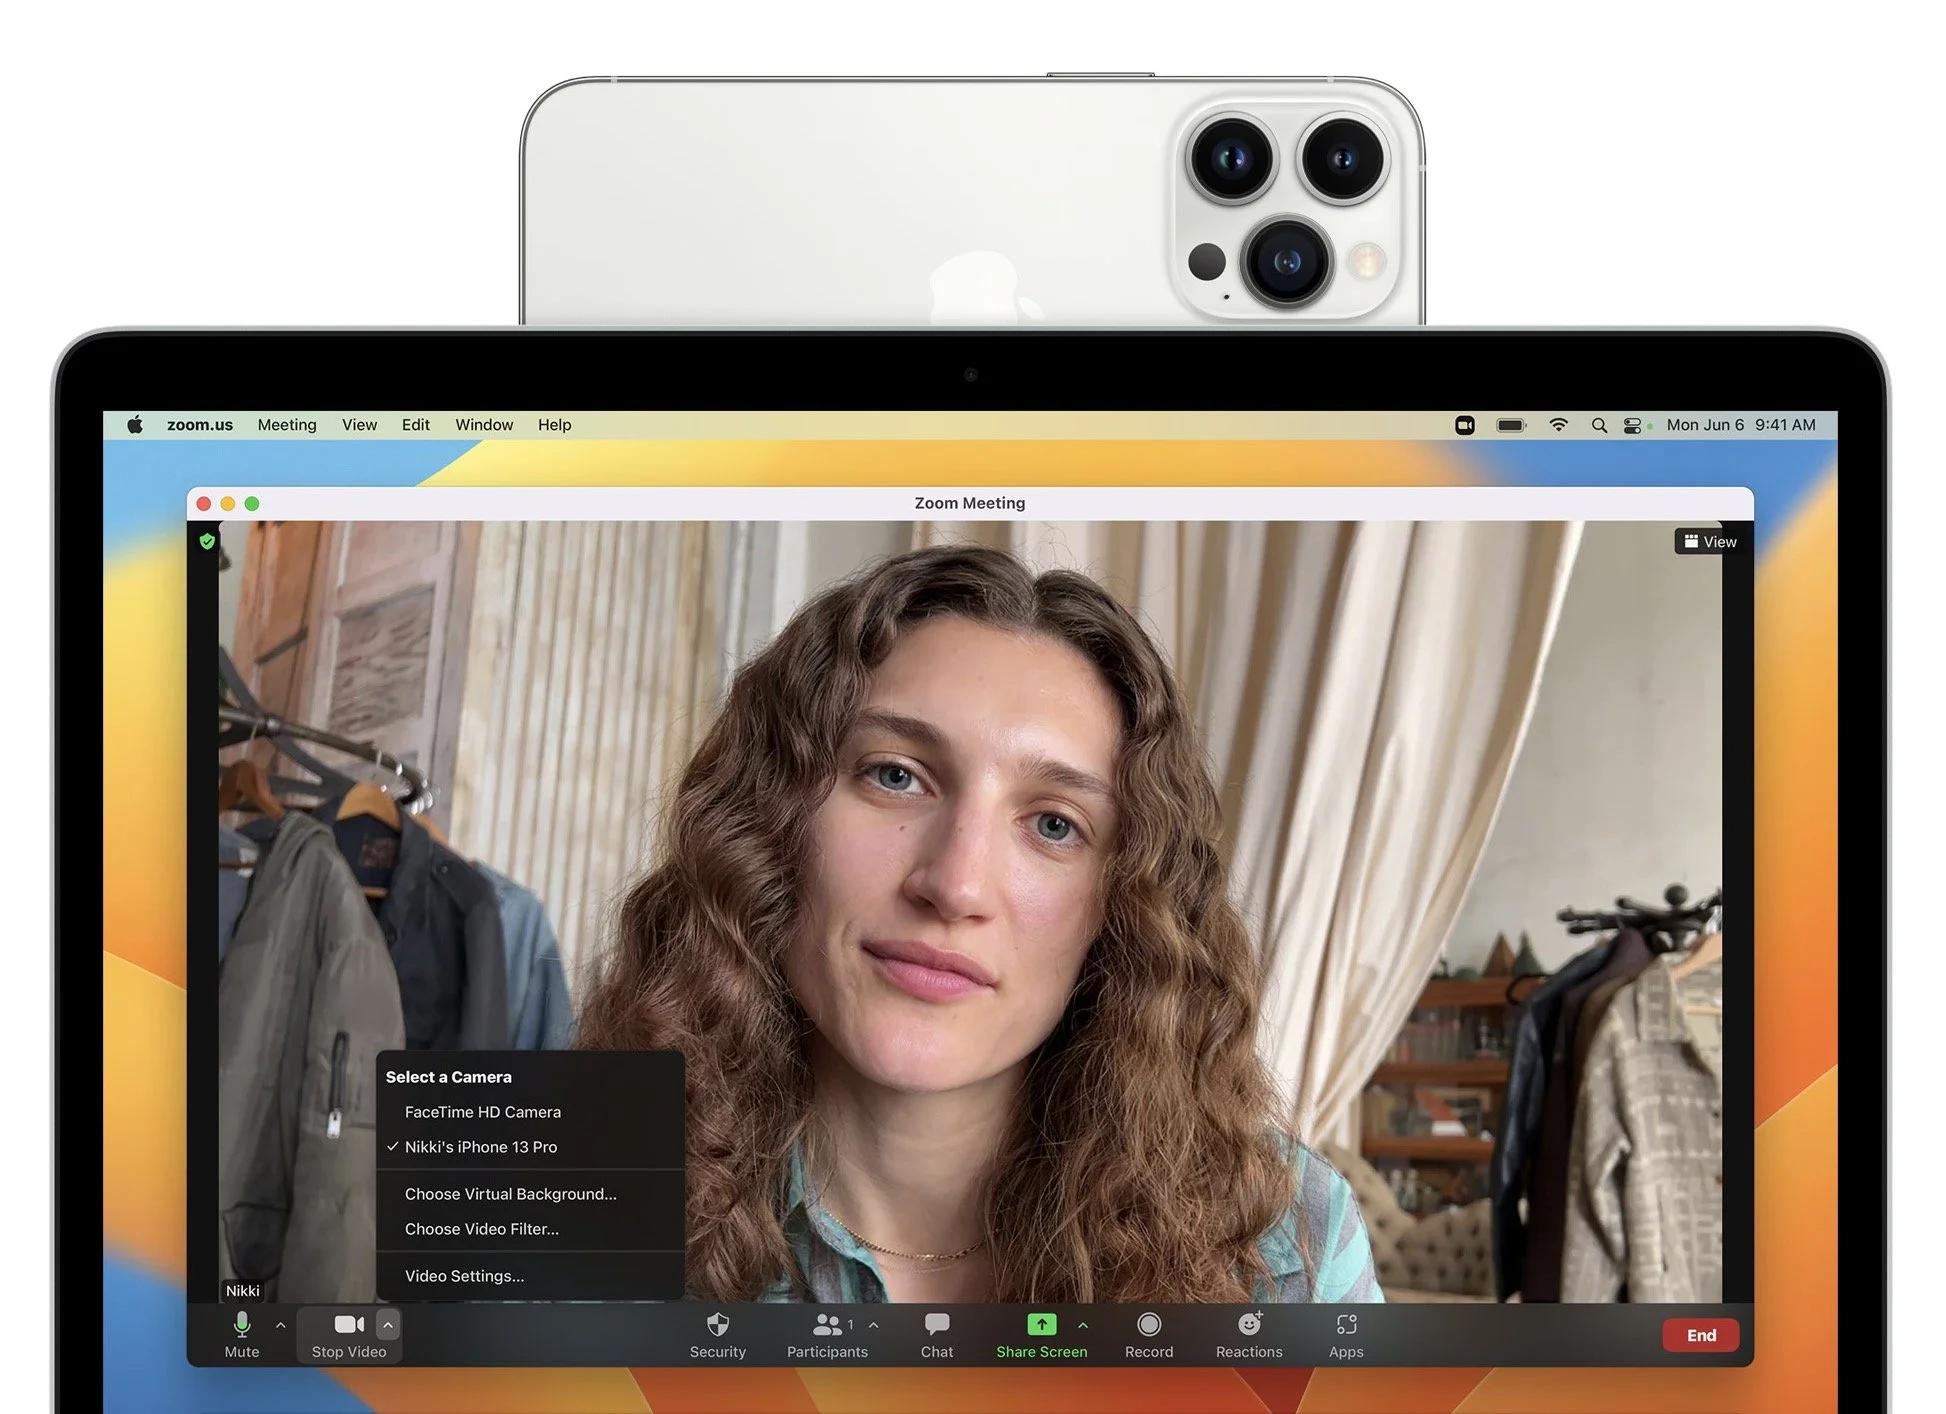
However, some features may not be fully available at the start due to Apple’s tight integration of operating systems. Messages will finally let you edit messages after sending, undo sending, and mark messages as unread—but editing and unsending won’t work for messages sent to people running anything earlier than iOS 16, iPadOS 16, and Ventura. We’re unsure if Apple will enable iCloud Shared Photo Library, which lets you automatically share an entire library of photos with family members or friends, until iPadOS 16 and Ventura are out as well. Similarly, the Continuity Camera feature of iOS 16, which lets you use your iPhone as a webcam for your Mac’s videoconferencing apps, won’t be available until Ventura ships.
watchOS 9
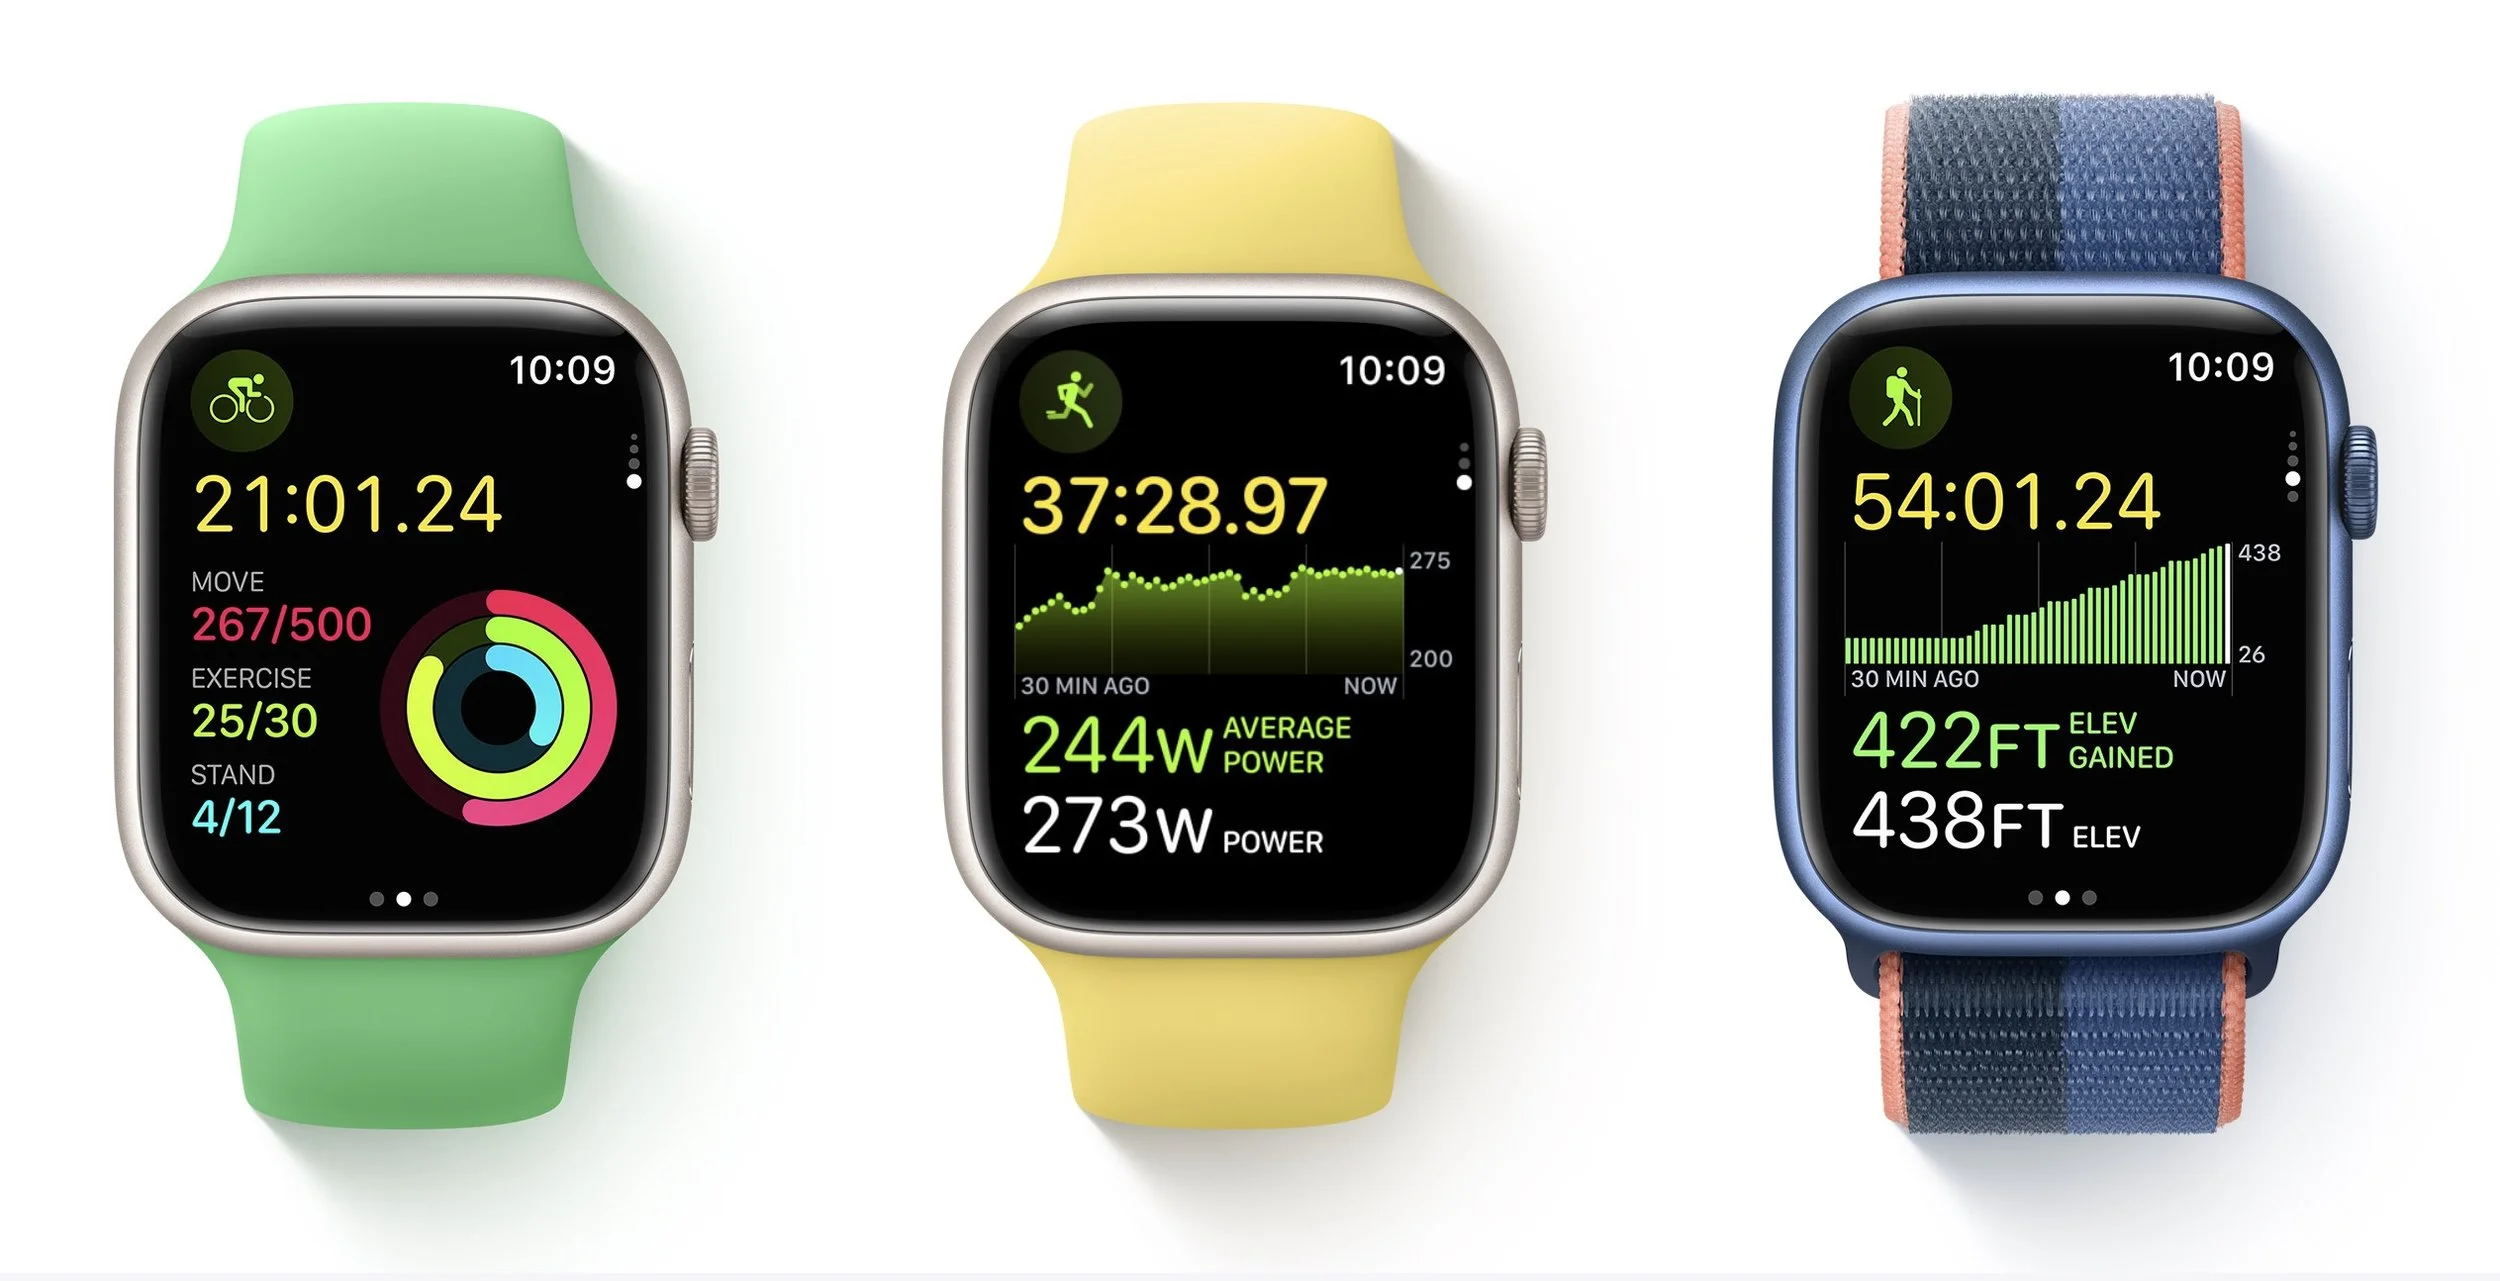
Once you upgrade your iPhone to iOS 16, there’s no reason to delay upgrading your Apple Watch to watchOS 9. You may not even notice the difference since none of the changes are likely to force changes in your usage patterns.
New features include new views and more metrics in the Workout app, including a display of heart rate zones and pace feedback. You can customize workout and recovery intervals, race against previous routes, get running form metrics, and see your running power. Also new is a Medications app that helps you remember to take medications and log them from reminders. And, of course, there are more watch faces.
tvOS 16
We don’t know when Apple will release tvOS 16, but the changes are so minimal that it doesn’t matter much. tvOS 16 will support more Bluetooth gaming controllers, provide full support of the Matter smart home standard, and offer more integration with your other Apple devices, such as with workouts in Apple Fitness+.

Unless something in that list encourages you to upgrade as soon as it’s out, we suggest letting your Apple TV (the fourth-generation model and later) upgrade itself when it gets around to it, assuming you have automatic updates turned on in Settings > Software Updates.
iPadOS 16
iPadOS 16 may not be available until October, but once it ships, our general advice is that it’s fine to update. For the most part, iPadOS is a superset of iOS, so if anything, Apple should have had some time to fix any early bugs that cropped up in iOS 16 before releasing iPadOS 16.
The big new feature in iPadOS 16—if you have an M1-equipped iPad like the latest iPad Air or iPad Pro—is Stage Manager, which brings a structured windowing system to the iPad and Mac. Stage Manager lets you stack up to four apps in an overlapping view, providing additional sets of apps off to the side in a sort of secondary Dock. If you connect your iPad to an external display (along with a keyboard and pointing device), it offers another separate workspace, so you can work more fluidly in multiple apps at once.

If you want to see more on screen, a new display scaling mode shrinks interface elements and content. It may make Stage Manager and Split View more helpful. You’ll also likely enjoy a better search in Mail, plus options to undo sending, schedule sending, follow up on sent messages, and add rich links. (These Mail features are shared with iOS 16 and Ventura.) Last but not least, the iPad finally gets its own Weather app.
macOS 13 Ventura
The hardest upgrade decision revolves around upgrading your Mac to macOS 13 Ventura, and that assumes you can upgrade at all, given that Apple has dropped support for all Macs released before 2017. The main new feature that you might find compelling is Stage Manager, although most longtime Mac users probably already feel comfortable with their window management skills. If you spend a lot of time in video calls, the new Continuity Camera feature that lets you use your iPhone (running iOS 16, natch) as a high-quality webcam with support for Center Stage—which enables the camera to follow you as you move around—may also be attractive. And, of course, you’ll get the new Messages, Mail, and iCloud Shared Photo Library features that Apple added to iOS 16 and iPadOS 16.
We always encourage caution when upgrading to a new version of macOS. Wait at least a few months before upgrading your primary Mac to Ventura. App compatibility isn’t usually a long-term problem with iOS and iPadOS, but many people rely on older Mac apps that may not work in the latest version of macOS. Even once you’re confident that your apps will work properly in Ventura, there may be workflow or intra-office compatibility concerns if some people upgrade and others don’t. And, of course, unanticipated bugs could crop up at inconvenient times—important work takes place on Macs! Please, do not upgrade to Ventura without checking with us first. With luck, the start of the new year will have brought both the bug fixes and app updates necessary to give the green light.
(Featured image by Apple)
Use Your iPhone to Identify Plants, Wildlife, and Birds with Seek and Merlin
Ever wondered what that pretty flower was that you saw on your walk or felt curious about an unusual visitor to your birdfeeder? With the free Seek and Merlin iPhone apps, you can identify plants, wildlife, and birds—learn how at:

Now and then, we run across iPhone apps that feel magical, and we want to share two of them: Seek and Merlin. They both use machine learning to help you identify something from the natural world using your iPhone. If you’re at all curious about the plants, wildlife, and birds you encounter outside, you’ll want to download these free apps.
Seek from iNaturalist
You’re out for a walk and see a particularly pretty flower or a tree with an unusual leaf shape. In the past, you’d probably wonder what it was and move on, or if you were really motivated to identify it, you might take a photo and consult a master gardener or arborist.
Instead, download the Seek app, created by the team behind iNaturalist, a social network that encourages members to share their photographs of living things to docu-ment organisms in time and space. iNaturalist is a joint initiative of the California Academy of Sciences and the National Geographic Society, and it maintains a massive database of identified images of plants and wildlife.
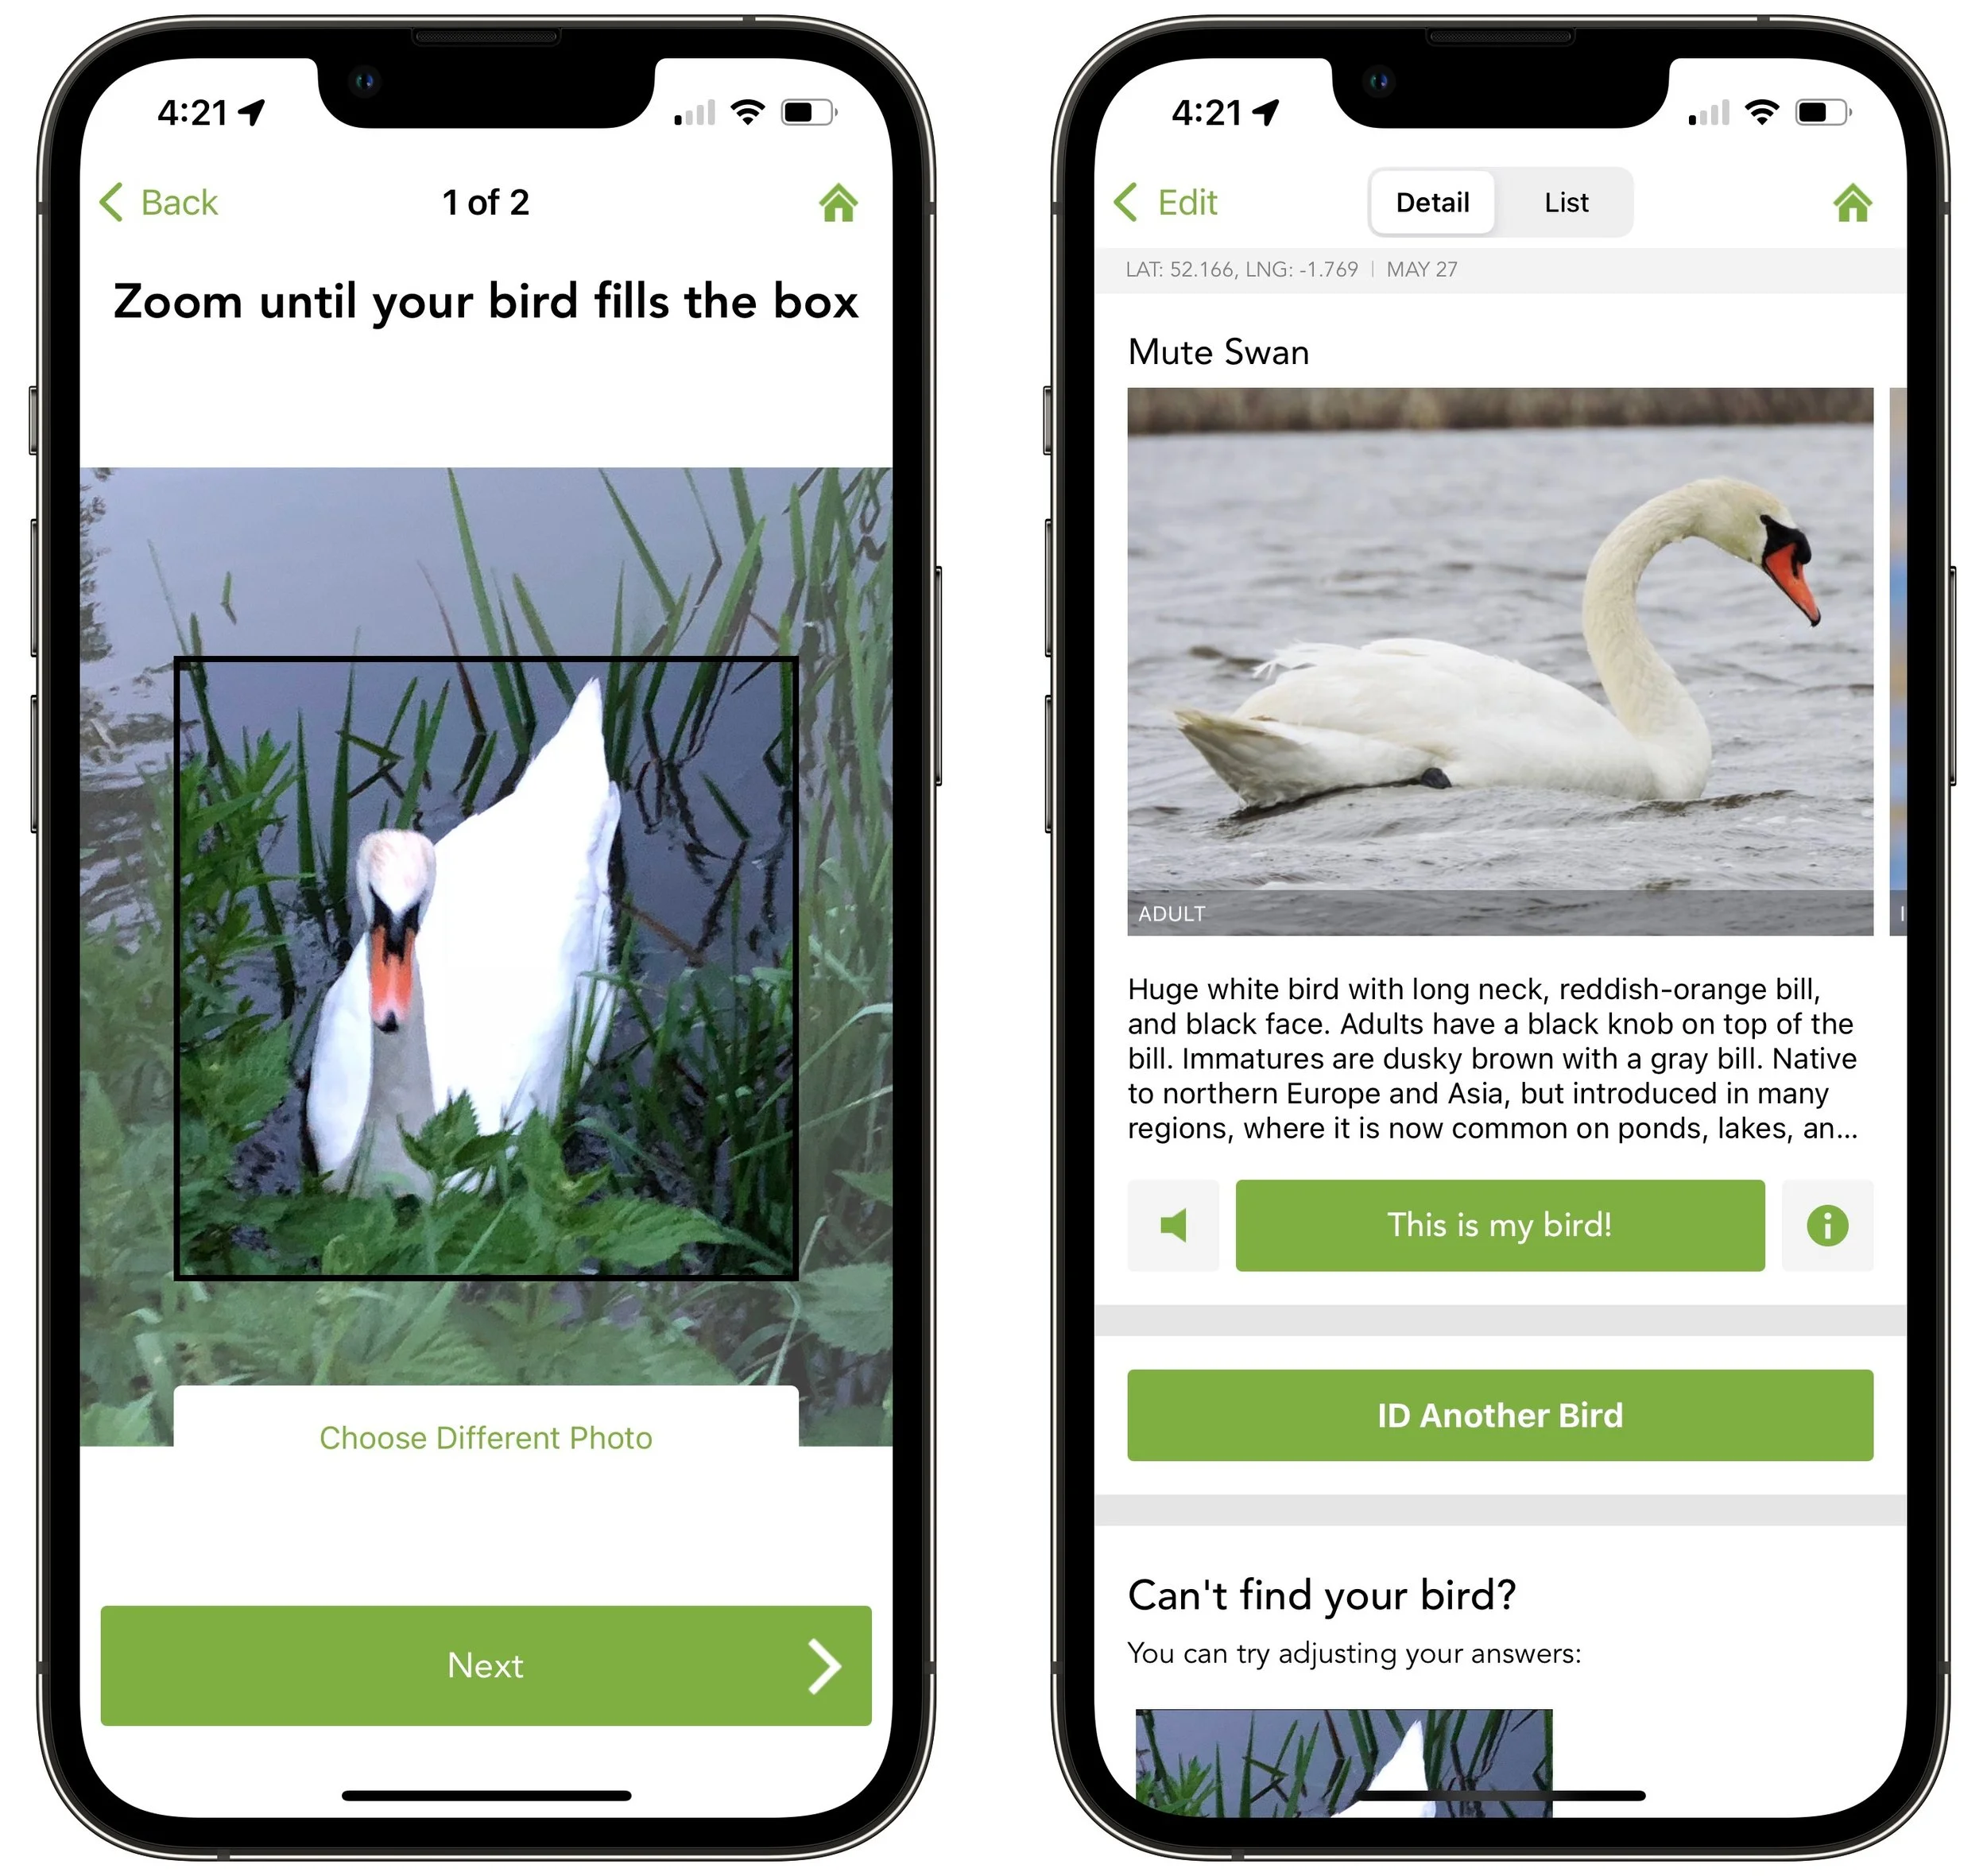
To start using Seek, which doesn’t require an account, tap the green camera button on any screen. Then point the camera at something you want to identify and watch as the ID meter at the top of the screen works its way through the taxonomic ranks: kingdom, phylum, class, order, family, genus, and species. Once Seek fills all seven dots—indicating that it knows the species—you can tap the camera button again to take a photo and add the organism to your observations. Seek then presents a page with additional information about the organism.

Beyond plants, Seek can identify amphibians, fungi, fish, reptiles, arachnids, birds, insects, mollusks, and mammals. It can be more difficult to get a spider or rodent to hold still while you point the camera at it, but you can also take a regular photo and have Seek identify it instead—just tap Photos at the bottom of the camera screen to select a photo from your library. If Seek recognizes the organism, it lets you add it to your observations, but it often has more trouble getting to the species level with a photo.

If you’re a parent, Seek’s challenges and badges might make the app especially fun to use with your child. A new challenge appears each month and asks you to identify a set of species near your location. You can also try past challenges, though you’ll have the most luck with ones from a similar season.

Merlin from Cornell University’s Lab of Ornithology
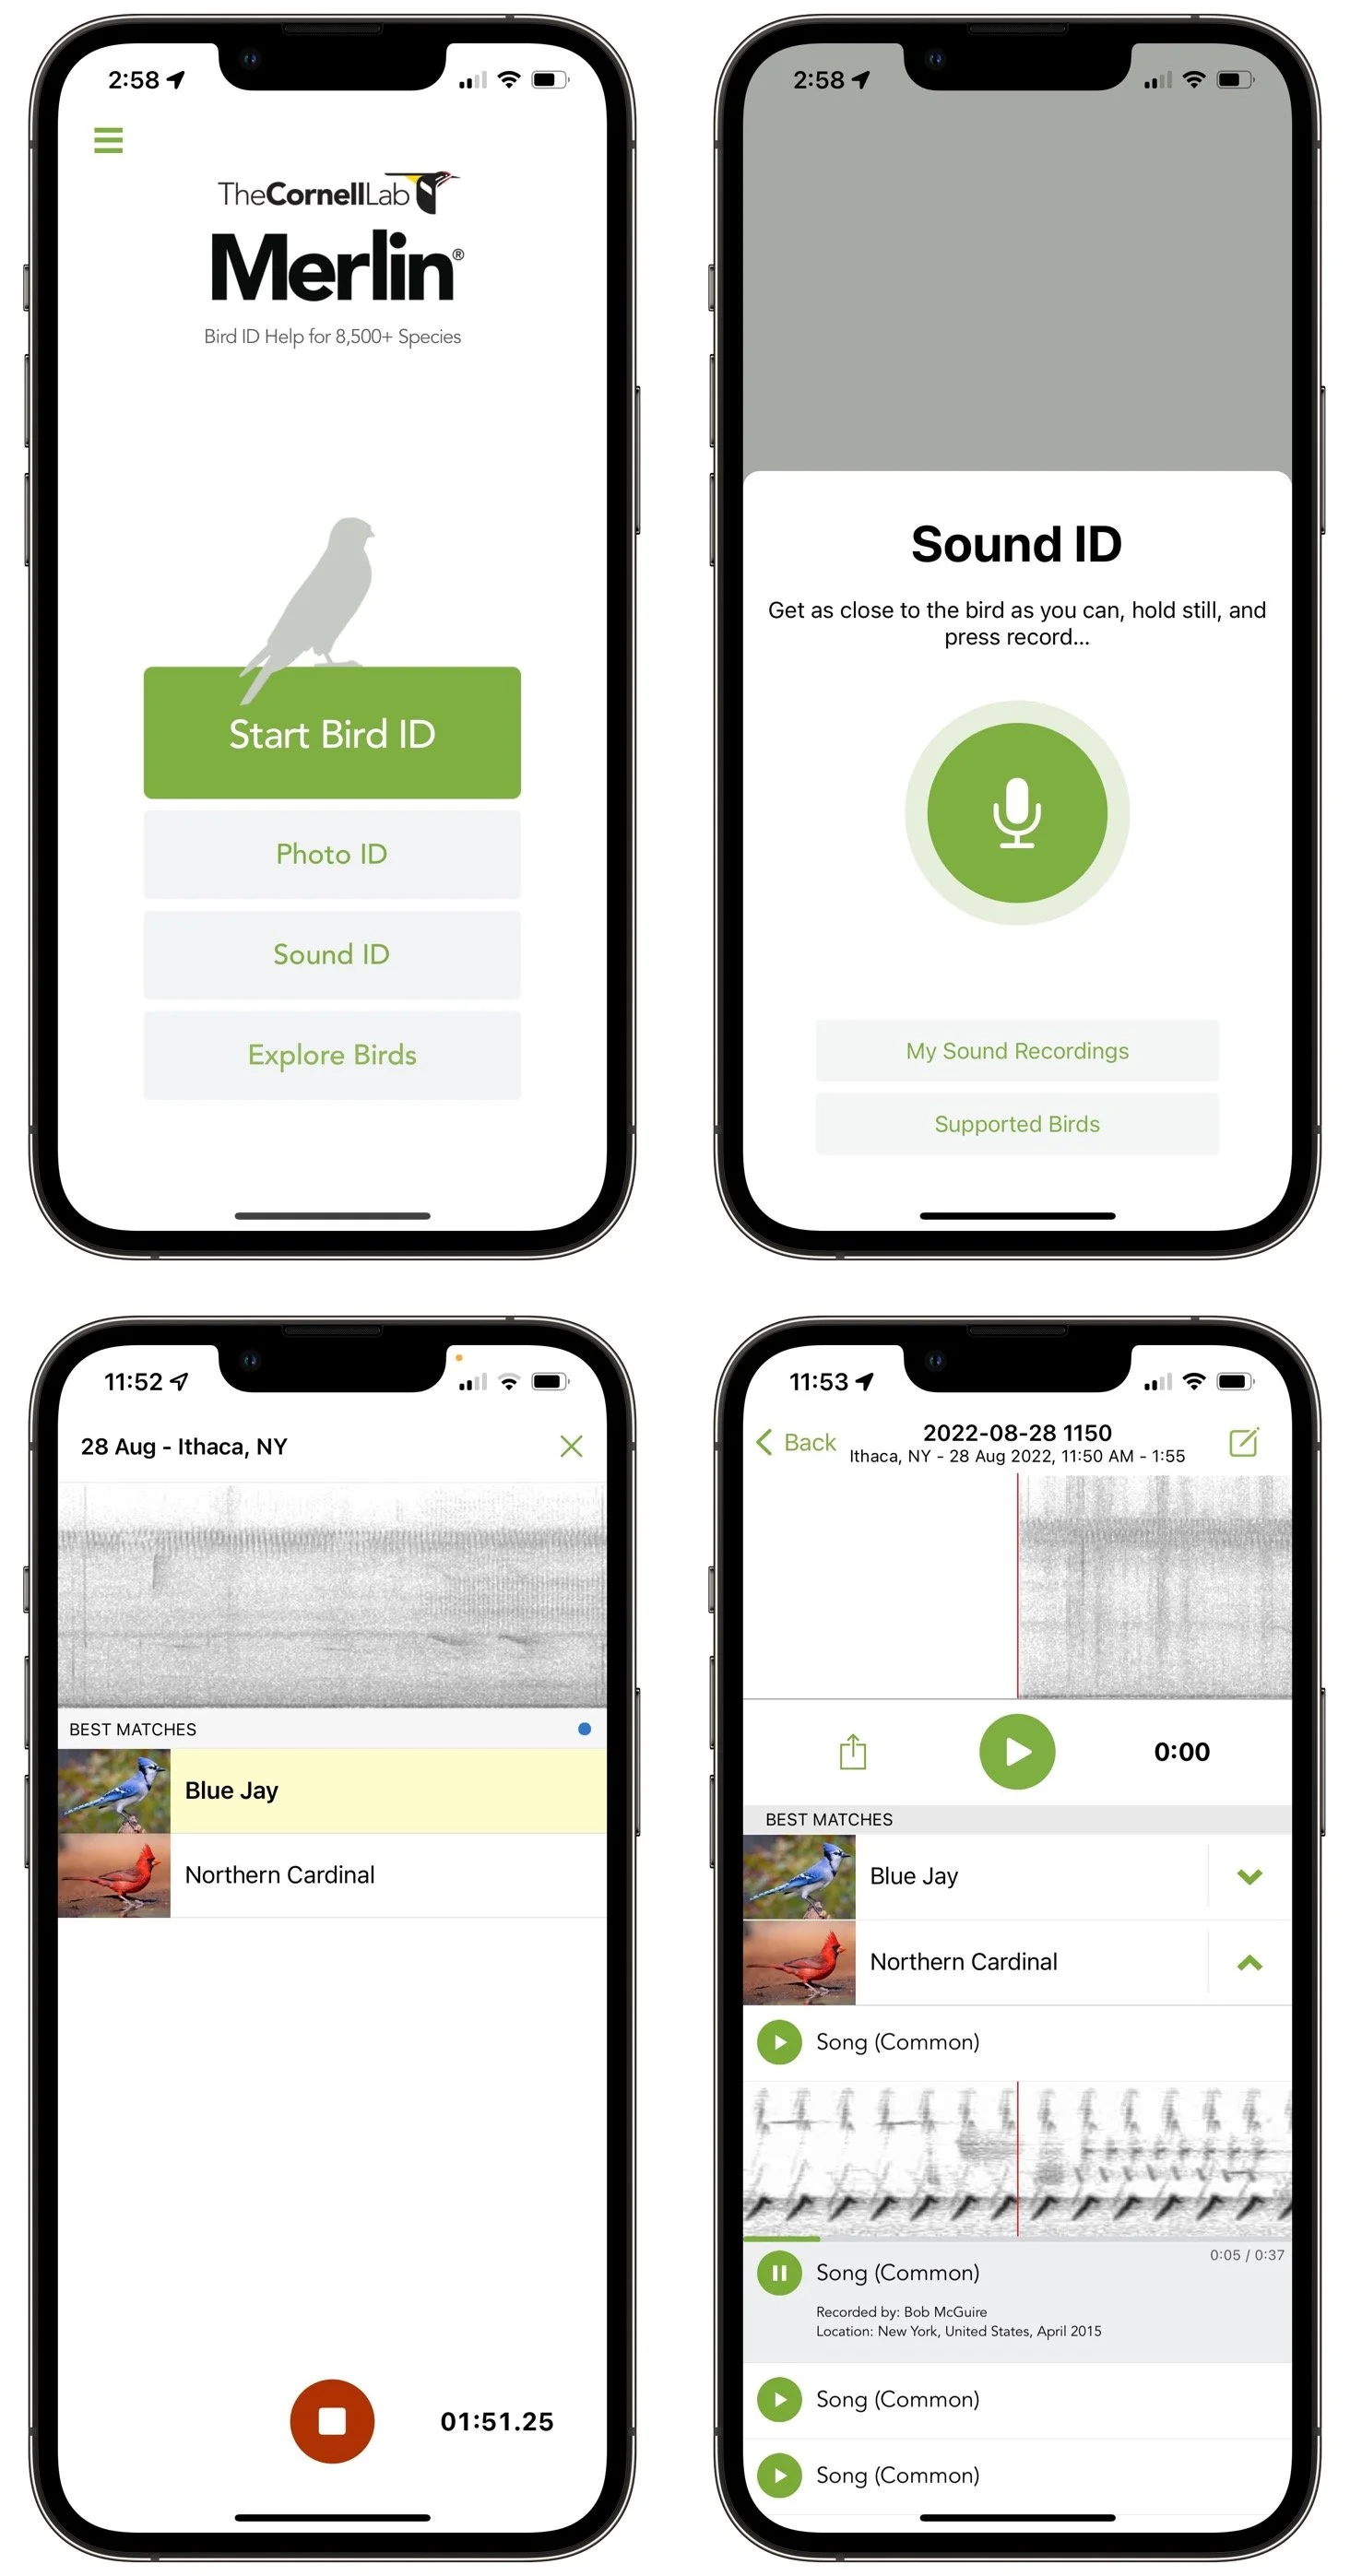
Although Seek can identify birds using its camera, if you’re intrigued to learn more about birds in particular, check out the Merlin app, created by the Cornell Lab of Ornithology. It can identify over 8500 species of birds using images or 685 species by listening to bird songs. Since birds can be difficult to see, much less photograph, Merlin’s capability to identify birds by listening to songs around you is hugely helpful.
To get started with Merlin, tap the Sound ID button on the main screen and then tap the microphone button. The app starts recording, and as it identifies bird songs nearby, it adds them to a list. It’s likely that you’ll hear multiple birds, and as Merlin continues to hear their songs, it highlights the species singing. After you tap the red stop button, Merlin saves your recording. You can then compare Merlin’s recordings with the one you made, and if they match, tap a button to add the bird to your list.
Merlin is also happy to identify a bird from a photo, which you can take from within the app or pull out of your Photos library. (Tip: When viewing your library from within Merlin, search for “bird” to find just the photos you might want to identify.) After you use a two-finger pinch-out gesture to zoom the photo to fit in the box, tap the Next button and confirm the photo’s location and date to see details about the bird. Again, if it’s right, tap the This Is My Bird button to add it to your list.
Just as Seek connects to iNaturalist for additional online capabilities, Merlin can connect to an online eBird account where you can manage your sightings and more. There’s also an eBird app that makes sightings public, provides rankings, and incor-porates sightings into cutting-edge research projects.
Whether you’re a parent looking for something to do with your child outdoors, an environmentalist with an abiding interest in the natural world, or just someone who would like to identify a pretty flower or unusual visitor to your birdfeeder, Seek and Merlin are well worth downloading. Both are easy to use and require no upfront commitment, but be warned that you may find them surprisingly addictive!
(Featured image by iStock.com/mbolina)
Read This Article Before Transferring Your Data to a New iPhone
It’s exciting to get a new iPhone, but take a few minutes to read our advice on what you need to do before—and after—transferring your data from your old iPhone.

Are you among the millions of people planning to get a new iPhone 14? It’s exciting, we know, but don’t move too fast when getting started with your new iPhone, or you might cause yourself headaches. Instead, follow these instructions once you’re ready to transfer your data to the new iPhone:
1. Make sure you know your Apple ID and password! You will likely have to enter them at least once during this process.
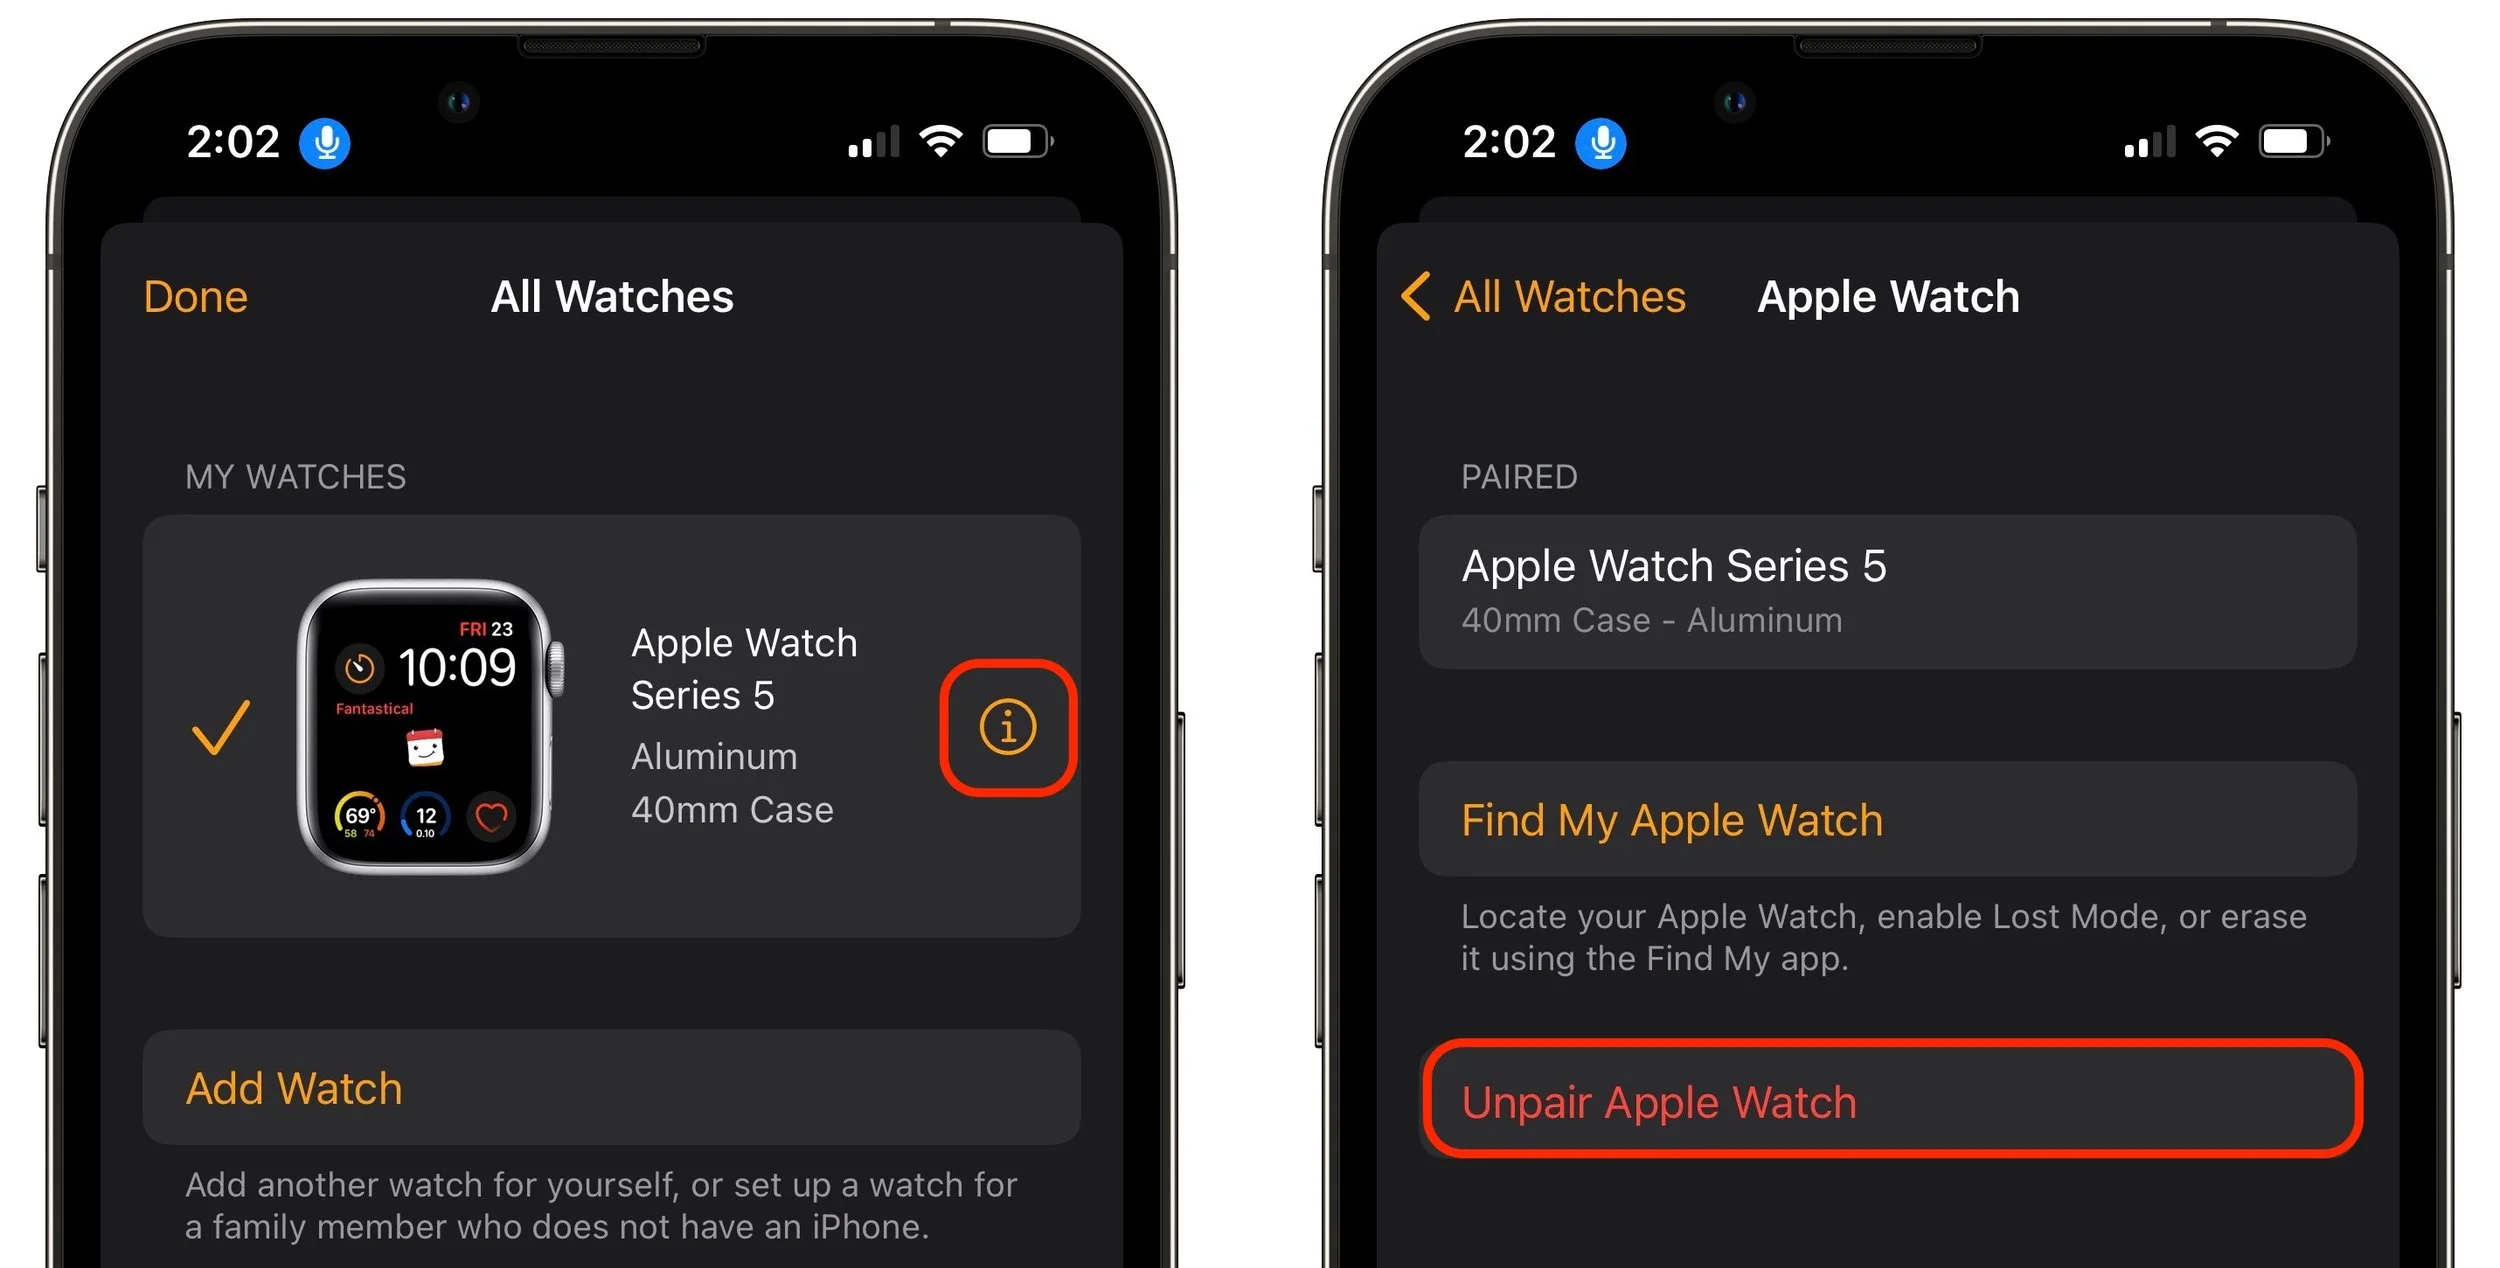
2. If you have an Apple Watch, it’s safest to unpair it from your old iPhone, which automatically backs up your Apple Watch. (In theory, unpairing shouldn’t always be necessary, but it never hurts.)
There are two caveats when unpairing. First, if you have a cellular Apple Watch, you’ll be asked if you want to keep or remove your plan. Assuming that you’re keeping your Apple Watch to repair with your new iPhone, keep the plan. Second, if you use a transit card in the Wallet app, Apple recommends removing your transit card from your Apple Watch before unpairing.
Using the Watch app on your old iPhone, go to the My Watch tab, tap All Watches (at the top left of the screen), tap the ⓘ button next to your Apple Watch, and tap Unpair Apple Watch.
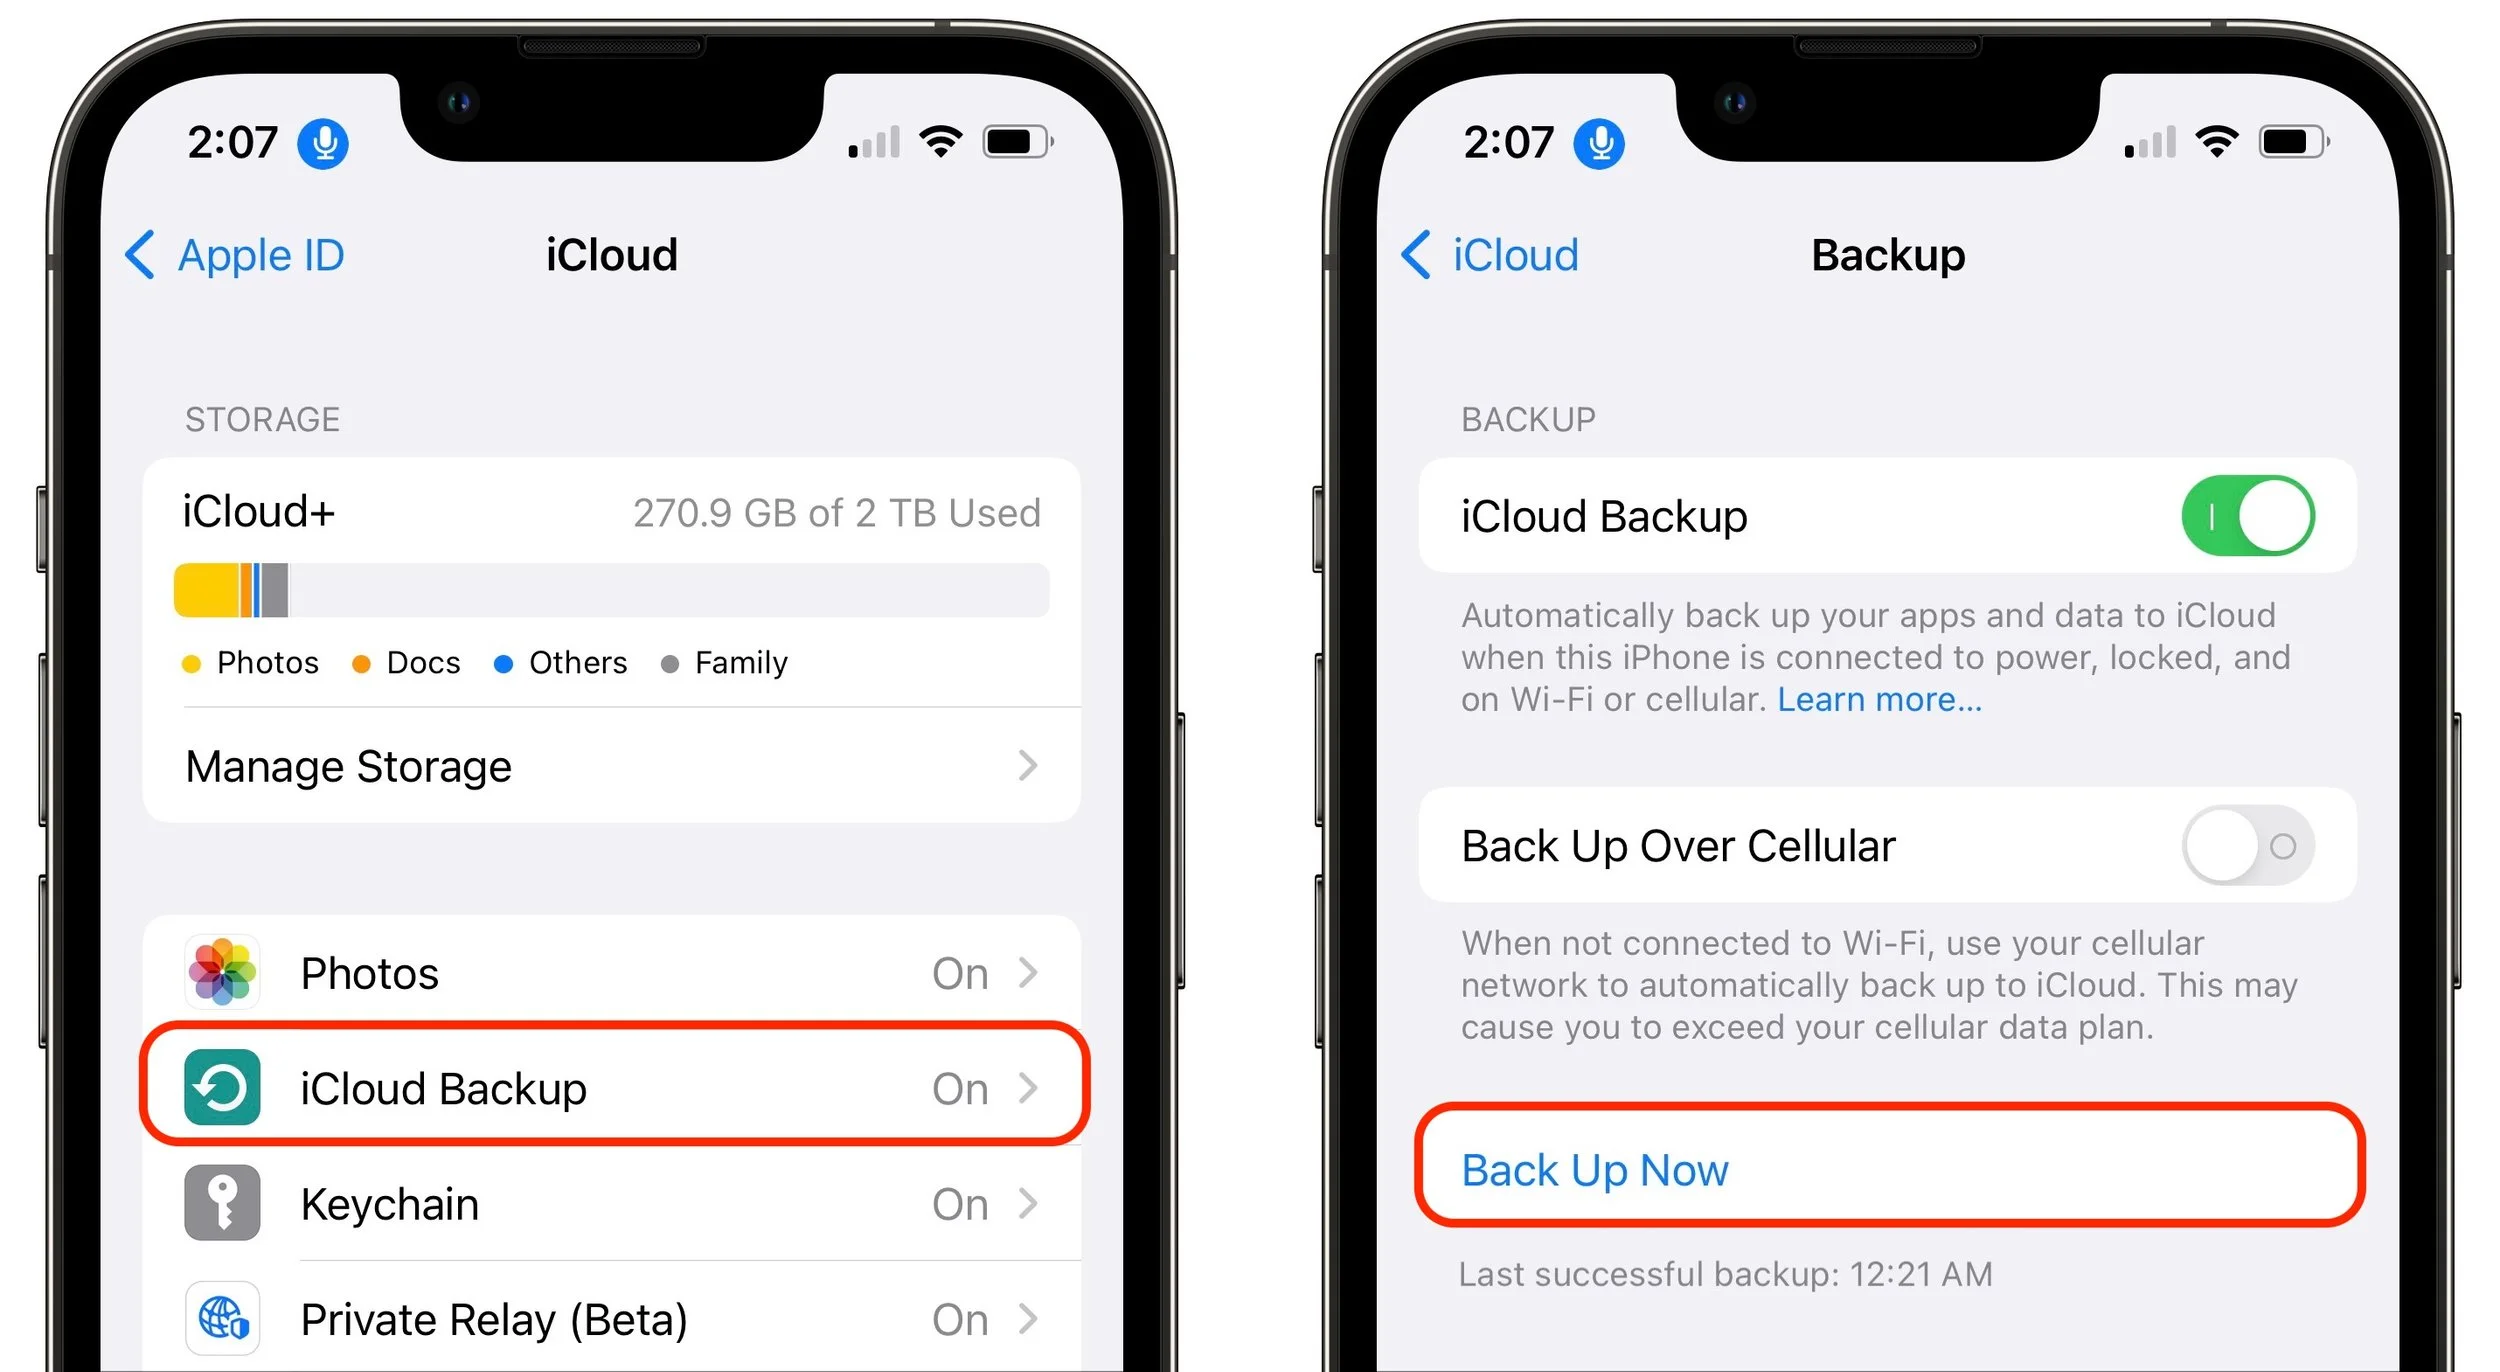
3. Make a backup of your old iPhone to iCloud or your Mac. (If you back up to a Mac, be sure to encrypt the backup, or else it won’t include saved passwords, Wi-Fi settings, browsing history, Health data, and call history.) Or back up to both, for safety’s sake. We prefer iCloud backups because they’re easier and don’t introduce additional variables. Apple will even give you temporary iCloud storage to make a backup when moving to a new iPhone. To initiate an iCloud backup, go to Settings > Your Name > iCloud > iCloud Backup and tap Back Up Now.
4. You may need to transfer your SIM card from your old iPhone to your new one. However, that’s highly unlikely if you ordered through Apple and connected to your cellular carrier account during purchase; if you did that, activating the new iPhone should cause it to take over your phone number. Even if that isn’t the case, it’s better to contact your carrier and get them to activate the new SIM in the new iPhone because old SIMs don’t always support all current cellular features, such as full 5G support.
5. Transfer your data, settings, apps, and purchased content in one of these three ways. None of them will be quick, so do the transfer when you have time:
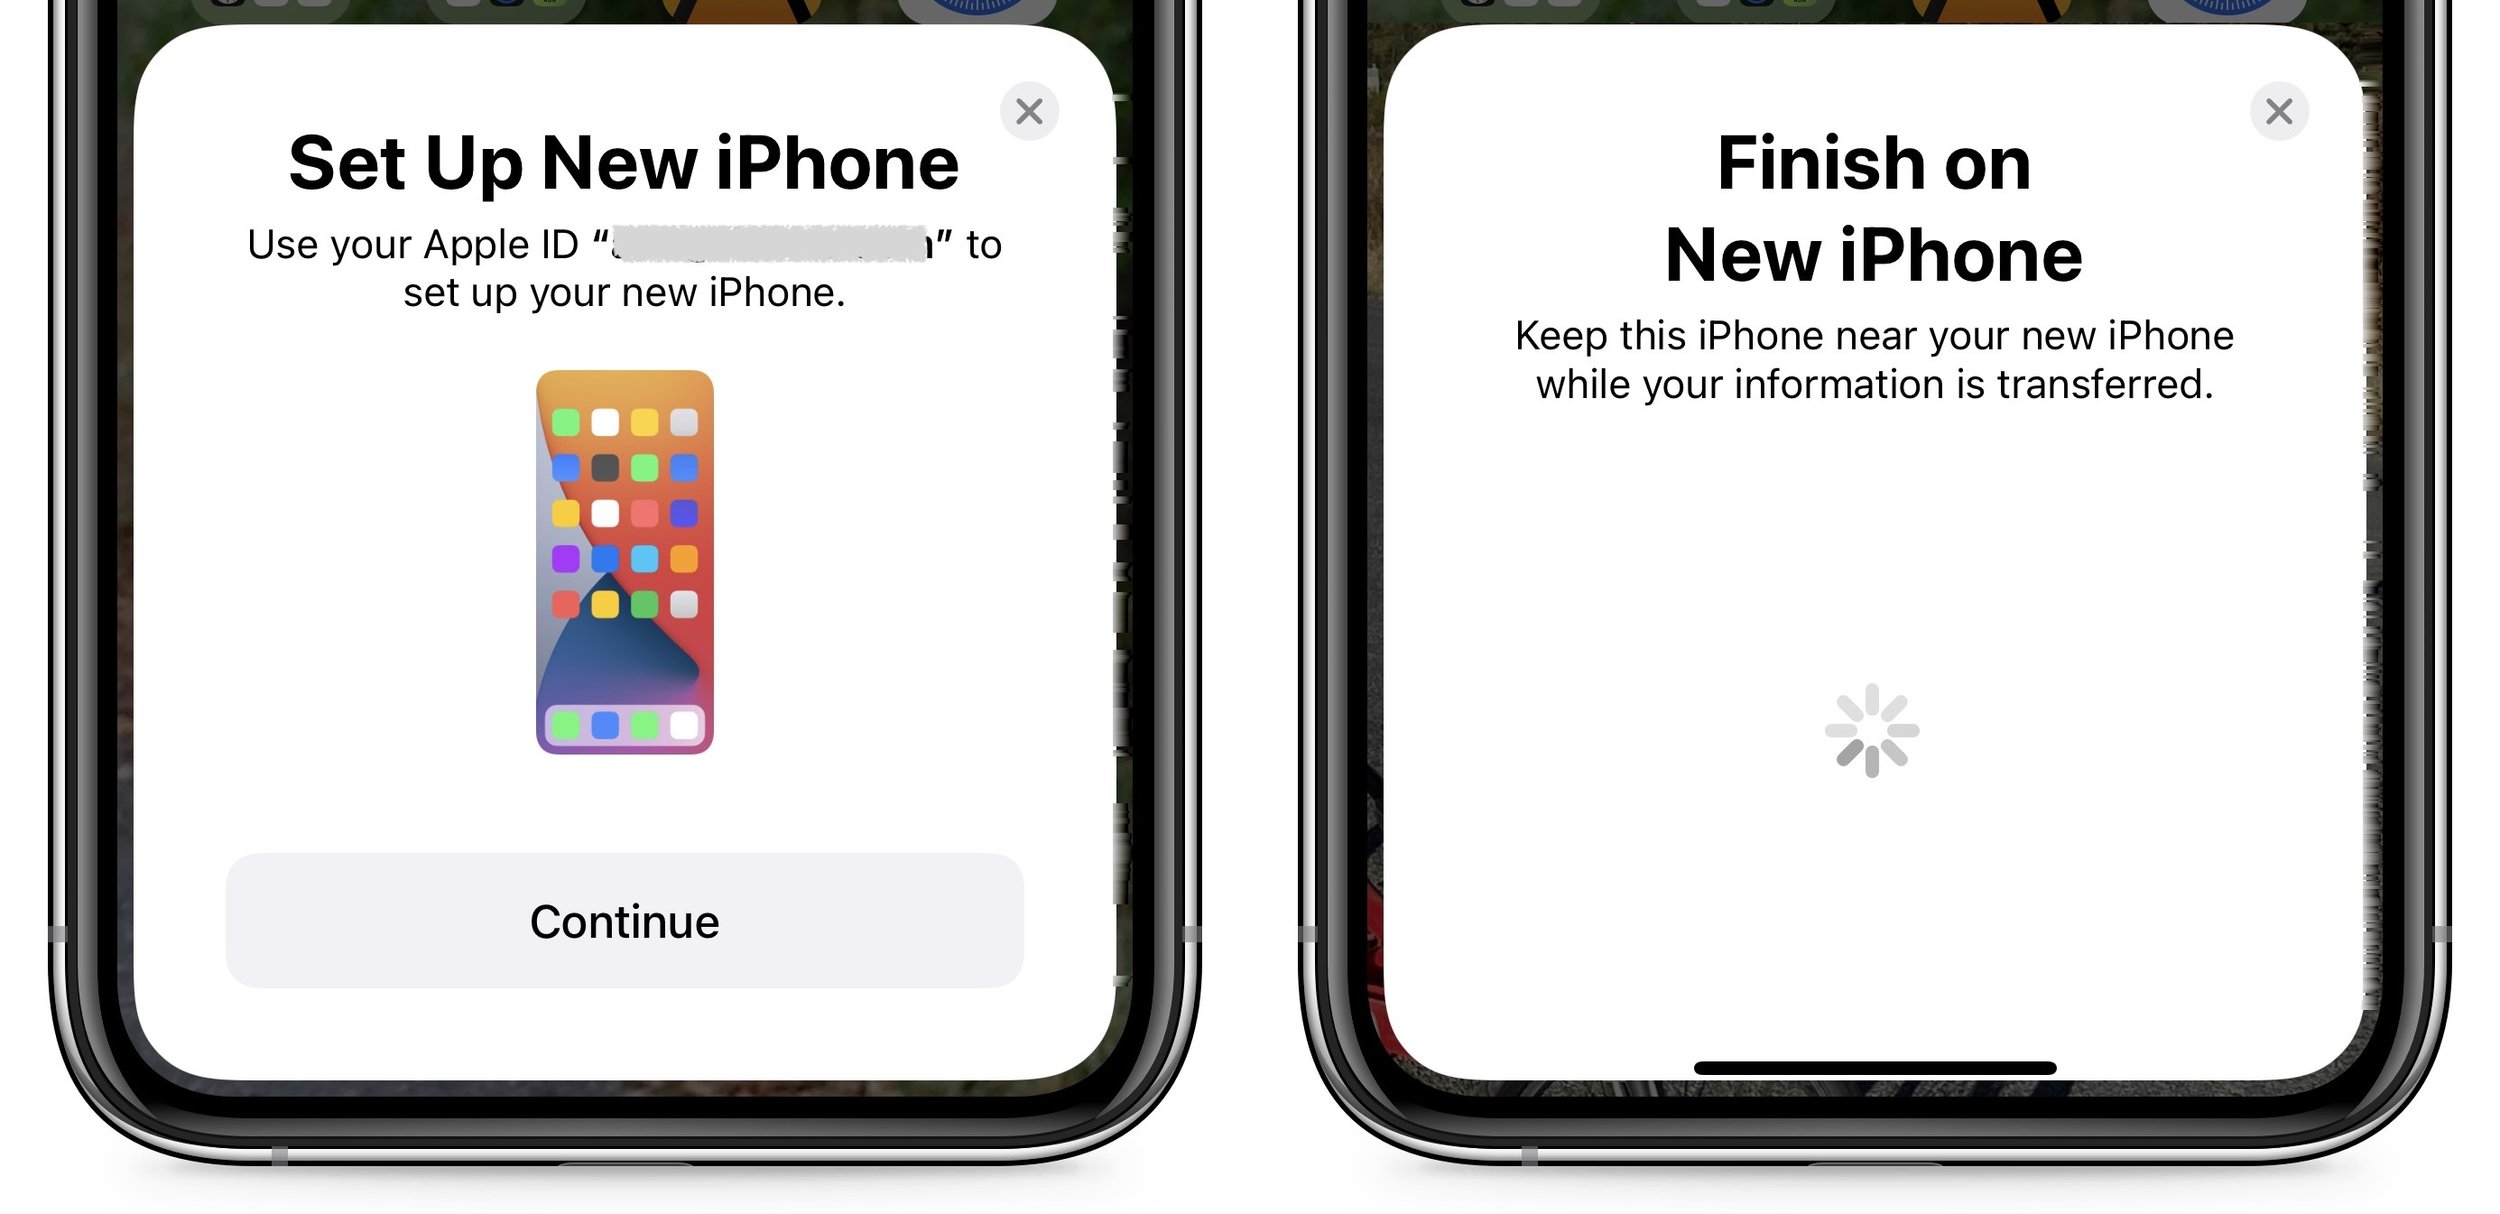
Quick Start: With the Quick Start feature, content from your old iPhone copies directly from your old iPhone to your new one. We recommend this technique because it generally preserves app logins, something that’s less true when restoring from an iCloud backup. Put your iPhones next to each other (and plugged into power), use the old iPhone to scan the animation on the new one, and then follow the rest of the steps.
iCloud: With this technique, the new iPhone will download your content from your old iPhone’s iCloud backup. Once you’ve joined a Wi-Fi network on the new iPhone and tapped the Restore from iCloud Backup button, you’ll have to select the correct backup—likely the most recent one you just made. Keep your new iPhone plugged into power the entire time to ensure that all your content syncs during this step.
Finder or iTunes: With this approach, you’ll restore your old iPhone’s content from a backup made to your Mac. Connect your new iPhone to your Mac using an appropriate cable, open a Finder window (or iTunes on an old Mac), select your device, click Restore Backup, and choose the appropriate backup—likely the most recent one.
6. Perform post-transfer tasks. Ensure that you can make and receive a phone call. Pair your Apple Watch with the new iPhone if necessary. You’ll also need to pair your Bluetooth accessories—including AirPods—with your new iPhone. Plus, some app data needs to sync to your new iPhone, so open the Mail, Contacts, and Calendar apps and check if they have your data. It could take a few minutes for them to fill up. Apps may ask for notification permissions again, and you may need to download content and in-app purchases.
7. Finally, and this post-transfer task is becoming increasingly important, if you use two-factor authentication with an app like 1Password, Authy, or Google Authenticator, make sure that you can get your 2FA codes using your new iPh-one. 1Password and Authy should be good about providing access to your 2FA codes from multiple devices—just log in to your account from each device—but Google Authenticator may require some additional setup since it didn’t originally offer any way to transfer codes to a new phone or among multiple devices.
Although Apple works hard to make the process of transferring from an old iPhone to a new one as painless as possible, some things may fail to transfer seamlessly. For that reason, we strongly recommend holding onto your old iPhone for a week or so to ensure the new one can do everything the old one could. During that time, put the new iPhone through its paces with an eye toward checking every app you need.
(Featured image by Adam Engst)
Follow These Steps before Bringing Your Mac in for Repair
It’s no fun to have to get your Mac repaired, but if that’s necessary, read our advice about steps to take beforehand to ensure the safety and security of your data.

It has finally happened. Keys on your MacBook Pro aren’t responding, there’s a crack on the screen, or the battery no longer holds enough of a charge to make it useful. A repair is in your future, which entails bringing the Mac to an Apple Store or Apple Authorized Service Provider or shipping it back to Apple. Regardless of what repair approach you take, there are some steps that we—and Apple—highly recommend that you follow first.
Why? Three reasons:
You need to protect yourself from data loss. The Mac could be lost or damaged while it’s out of your control, or the repairs might require replacing the Mac’s internal drive or logic board (or even the entire computer), even if you don’t anticipate that as a fix.
You need to protect your data from prying eyes. This is especially true if you store passwords in an insecure way. But you’re using a password manager, aren’t you?
Apple needs to be able to use the Mac sufficiently to determine that it works.
Here’s what you should do, if possible. Depending on what’s wrong with your Mac, you may not be able to perform all—or any—of these tasks. If that’s the case, complete as many as you can.
Back Up Your Mac
The one thing you must do is make a backup of your data, or preferably two. There’s no guarantee that you’ll get the same Mac back with the same internal storage. Since you’re already backing up (right?!?), this should mostly be a matter of updating your backups.
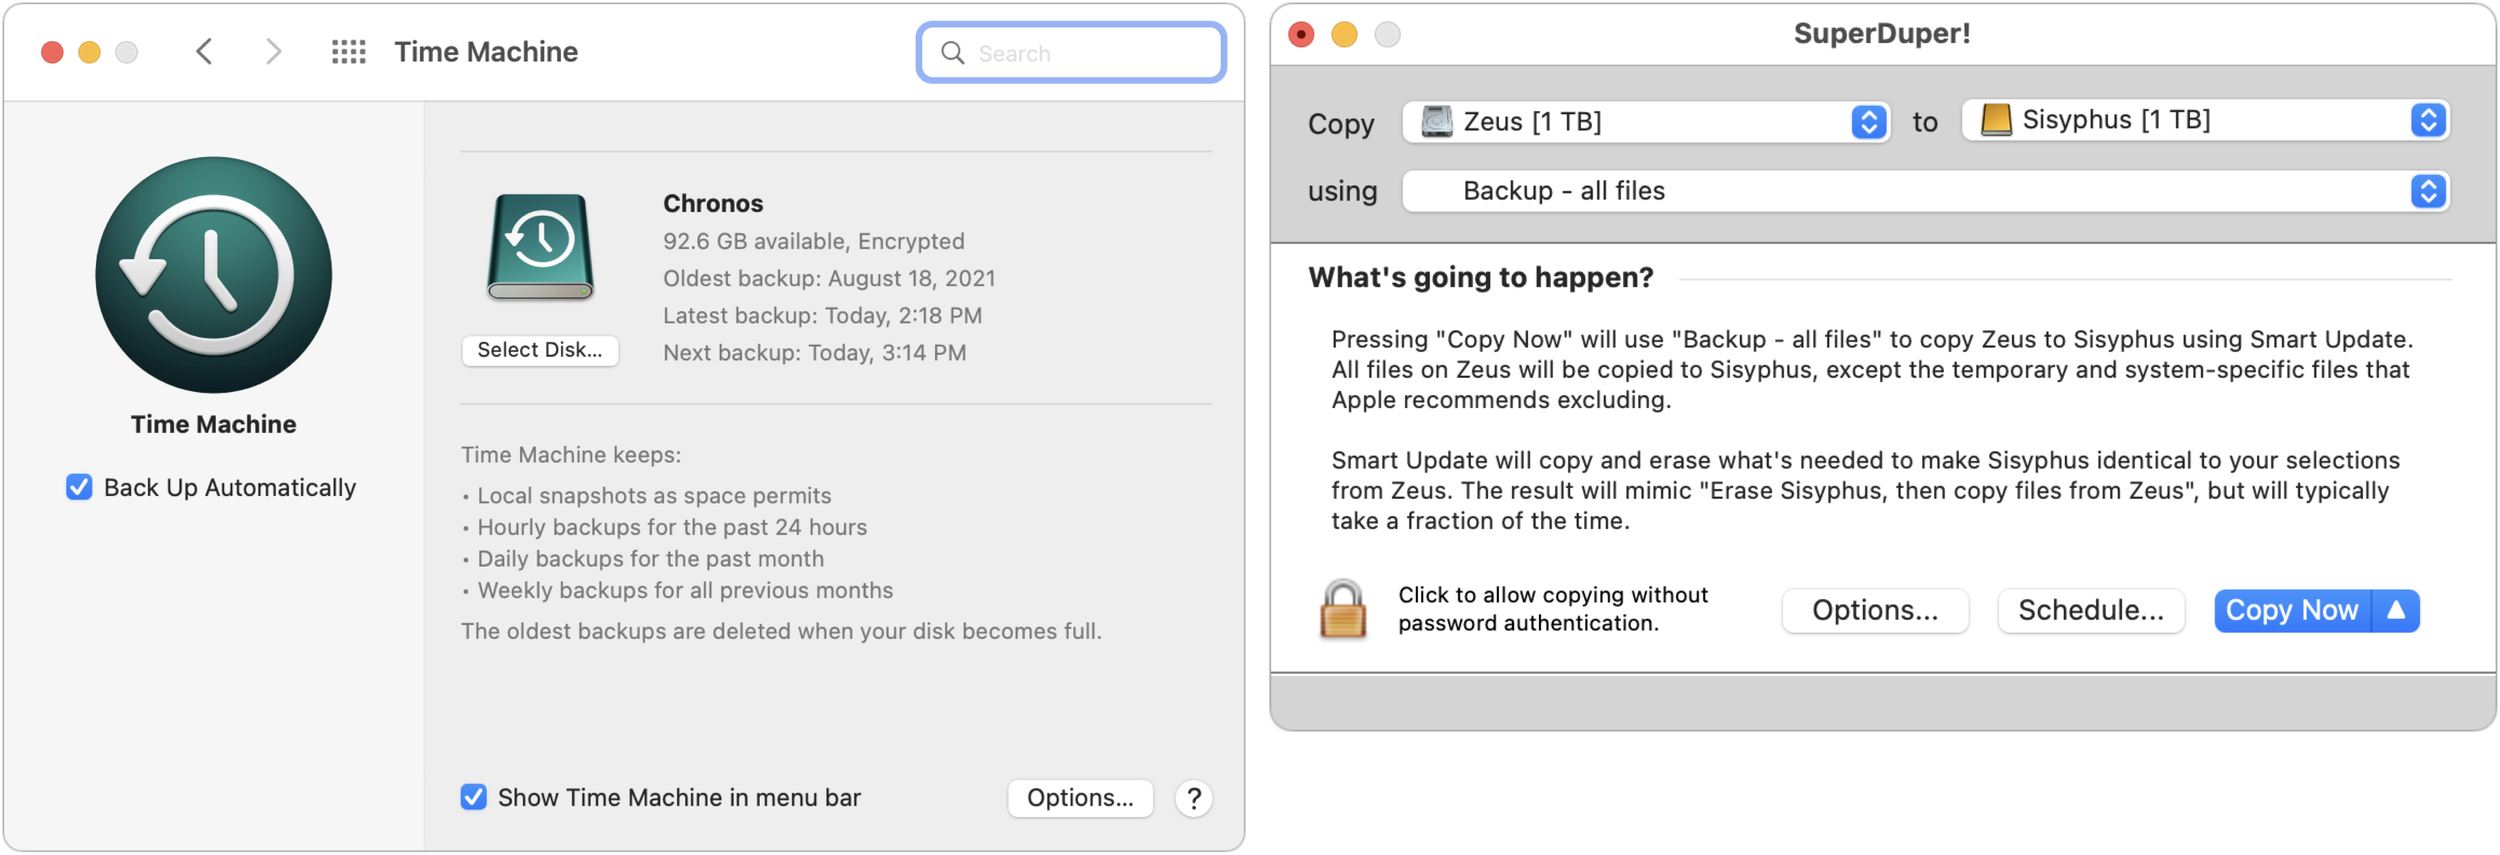
We recommend both using Time Machine and making a duplicate using an app like SuperDuper or Carbon Copy Cloner. That second backup protects you against the first failing when you try to restore—it’s uncommon but not unknown. (A third backup to an online service like Backblaze is also a good idea, but it won’t help in this scenario unless something happens to both your other backups.)
If your Mac laptop boots but can’t be used due to a broken keyboard or trackpad, remember that you can attach an external keyboard and mouse. Also, if a broken screen prevents you from using it, try using Target Disk Mode to make your backup to an-other Mac.
Enable Guest Access
For some problems, the repair technician may need to verify that your Mac functions normally after the repair—imagine trying to verify that each of the keys on the keyboard work. Don’t give a repair tech your admin password if possible because that gives them full access to all your data.
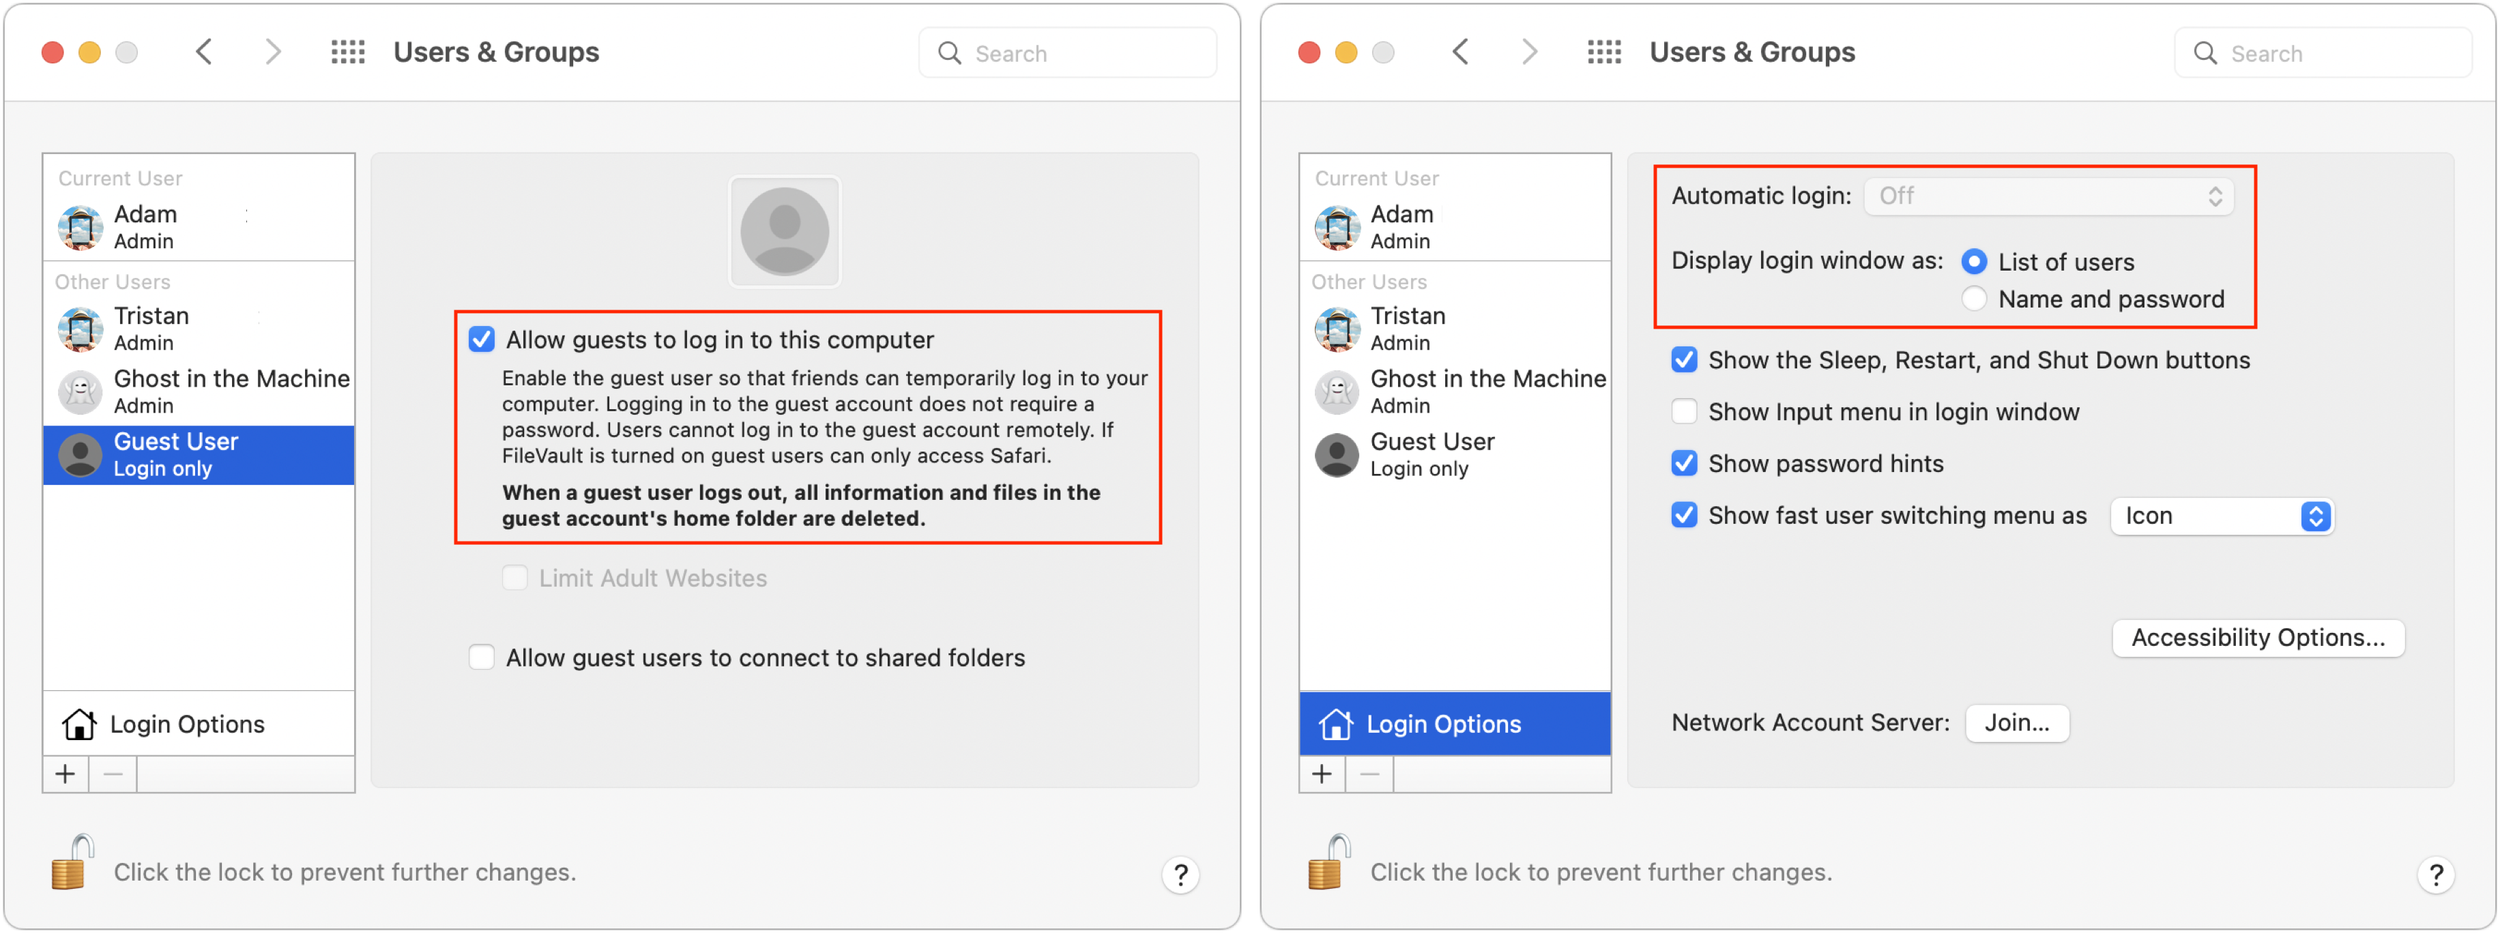
Instead, head to System Preferences > Users & Groups. Click the lock icon at the lower left of the preference pane to unlock the pane. Click Guest User in the sidebar and then select “Allow guests to log in to this computer.” Also, click Login Options and make sure Automatic Login is turned off (it’s locked off when FileVault is enabled, which we strongly recommend) and Display Login Window As is set to List of Users.
Turn Off Find My Mac
Apple says it can’t repair a Mac that has Find My Mac enabled, presumably due to Activation Lock preventing certain types of fixes, although some people have pointed out that this requirement is also useful for proving that you own the Mac and know the necessary Apple ID password.
Regardless, it’s easy to turn off. Open System Preferences > Apple ID > iCloud and deselect the checkbox next to Find My Mac. Make sure to turn it back on when you get your Mac back.

Turn Off Your Firmware Password
Few people have enabled a firmware password, and Macs with Apple silicon don’t support them, but if you have an older Intel-based Mac with a firmware password enabled, you’ll need to turn it off before the Mac can be repaired.
To do this, start up in macOS Recovery, choose Utilities > Startup Security Utility or Firmware Password Utility, click Turn Off Firmware Password, and enter the firm-ware password when prompted. Quit the utility and then restart the Mac.
Deauthorize Your Computer for iTunes Store Purchases
You don’t have to deauthorize your Mac before sending it in for repair, but it could save some headaches later on. Certain types of repairs might change the identity of the Mac in such a way that it’s no longer authorized but takes up one of your five authorizations. Authorizing another Mac could require that you first deauthorize all your computers, which you can do only once per year. Luckily, deauthorizing a Mac is easy to do.
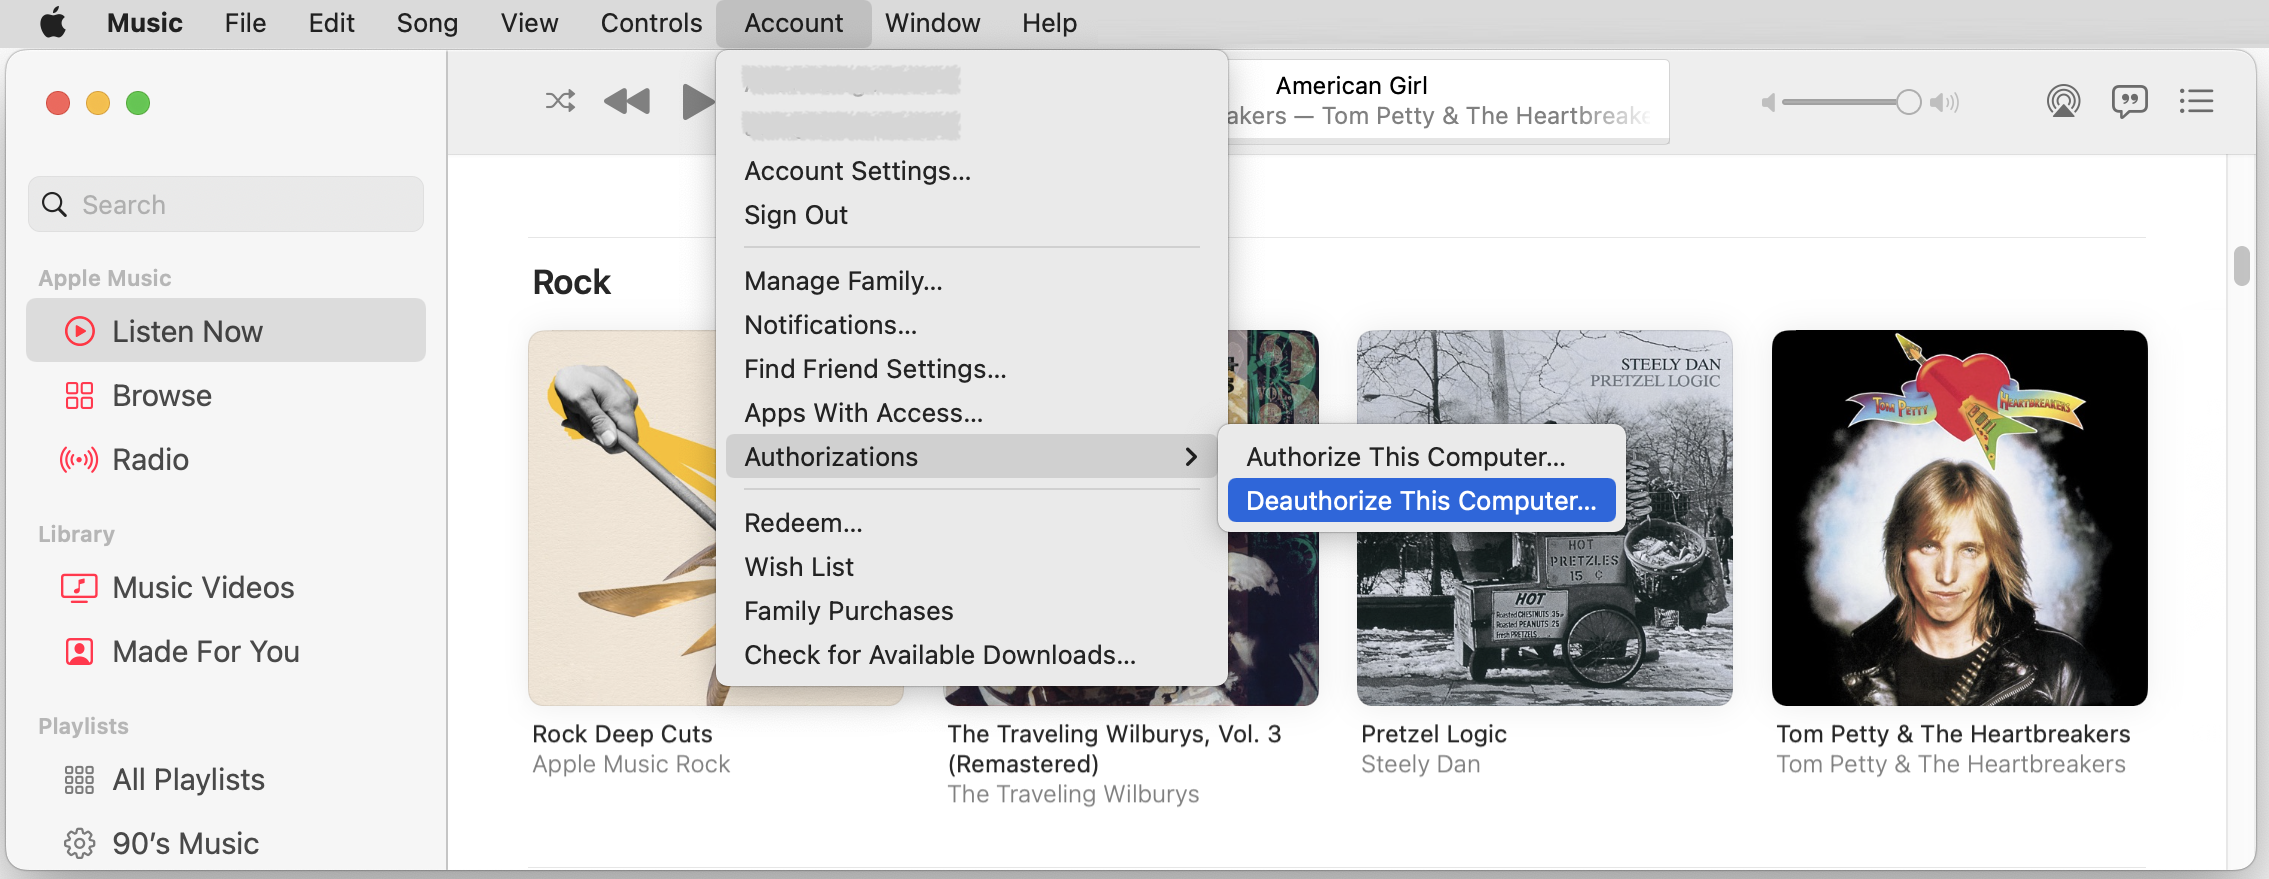
In either the Music app or the TV app, choose Account > Authorizations > Deauthor-ize This Computer. Sign in with your Apple ID, and click Deauthorize when prompted. The same submenu lets you authorize the Mac again when you get it back.
For Extra, Extra Security
Those whose Macs contain truly sensitive data (you know, patient records, corporate trade secrets, space laser access codes, etc.) may wish to take additional steps to ensure that there’s no way that data could be compromised. The first step is to turn on FileVault, which encrypts the entire contents of the Mac’s internal storage. This is quick and easy on Macs with T2 chips or Apple silicon, where it piggybacks on the fact that internal storage is already encrypted. On older Macs, encrypting a large drive can take many hours.
In an ideal world, of course, you would have turned on FileVault as soon as you started using the Mac. If that’s not the case, turn it on now—we’ll wait. That may be sufficient if your data is sensitive but not life-changingly sensitive. If you’re storing the equivalent to the keys to Fort Knox, take the next step, which is to erase the Mac after making your backups. The best way to do this varies:
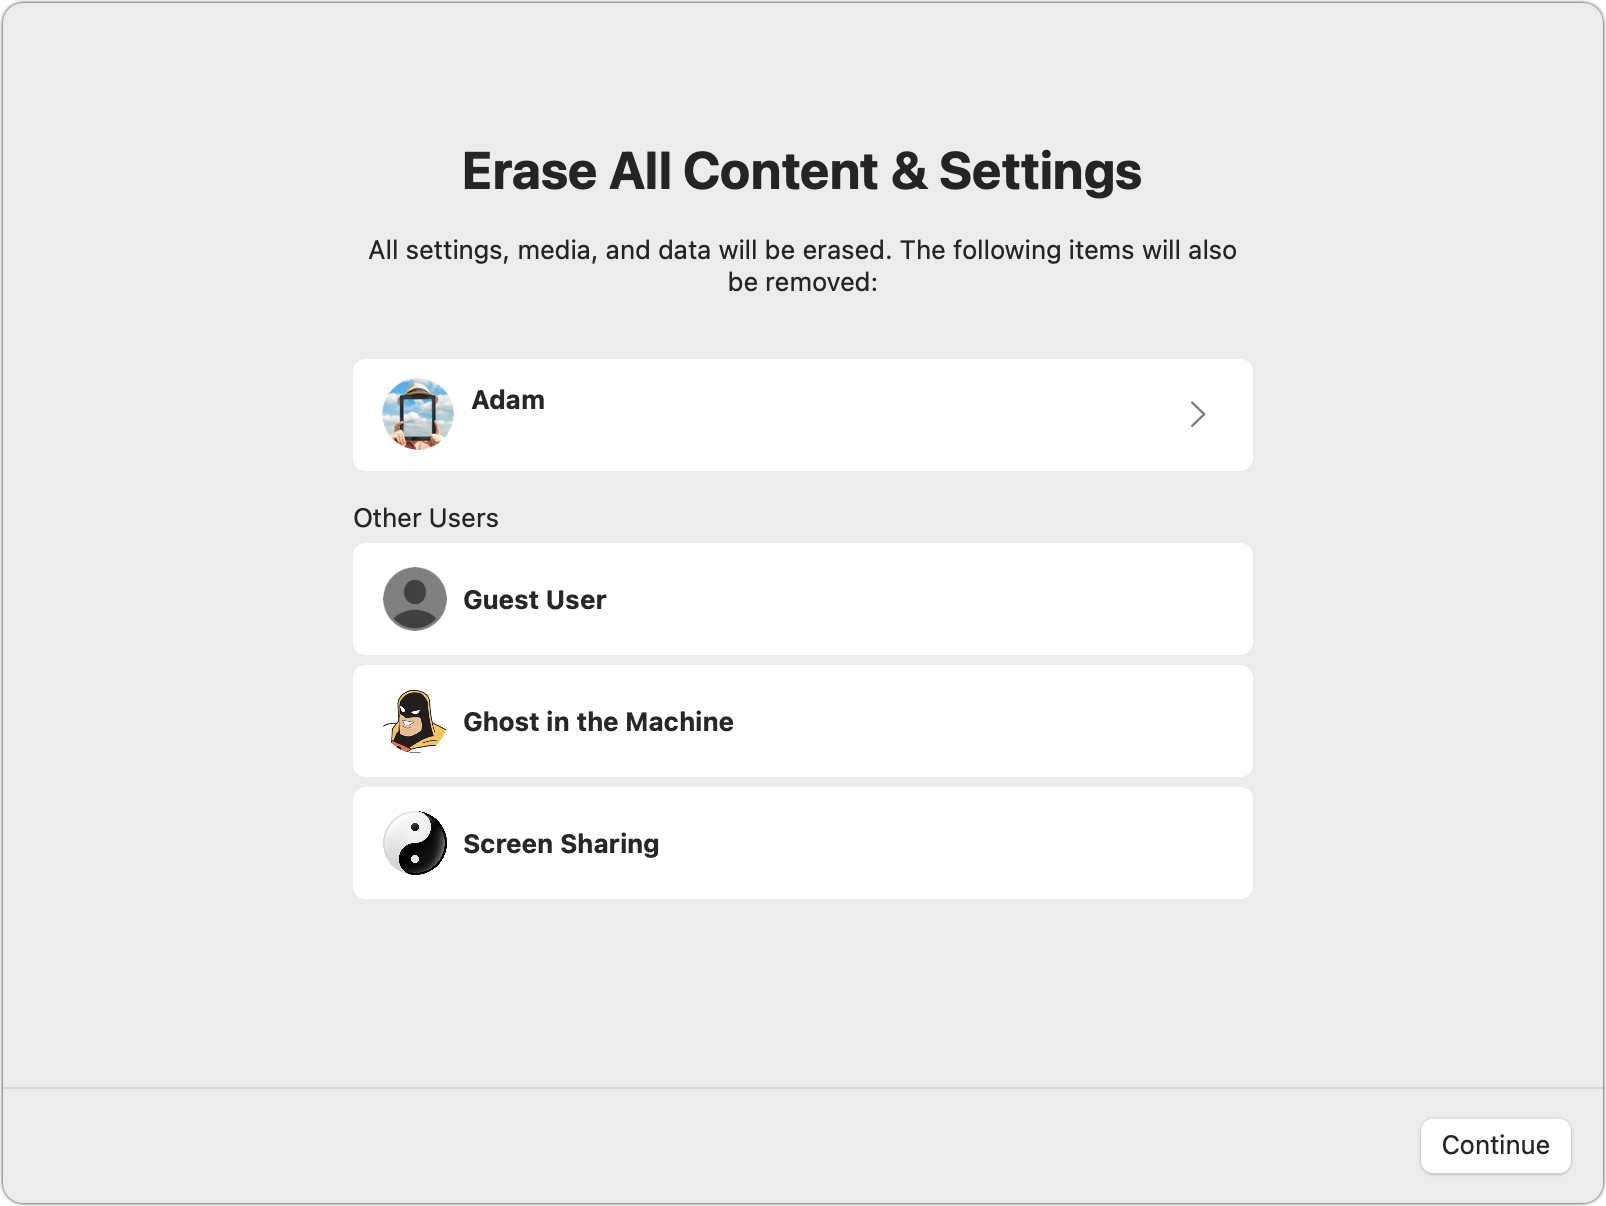
Newer Mac: On a Mac with a T2 chip or Apple silicon running macOS 12 Monterey, open System Preferences, click the System Preferences menu in the menu bar, and choose Erase All Content and Settings to launch Erase Assistant. This approach “erases” all your data by destroying the encryption keys necessary to decrypt the data; it’s extremely quick and secure.
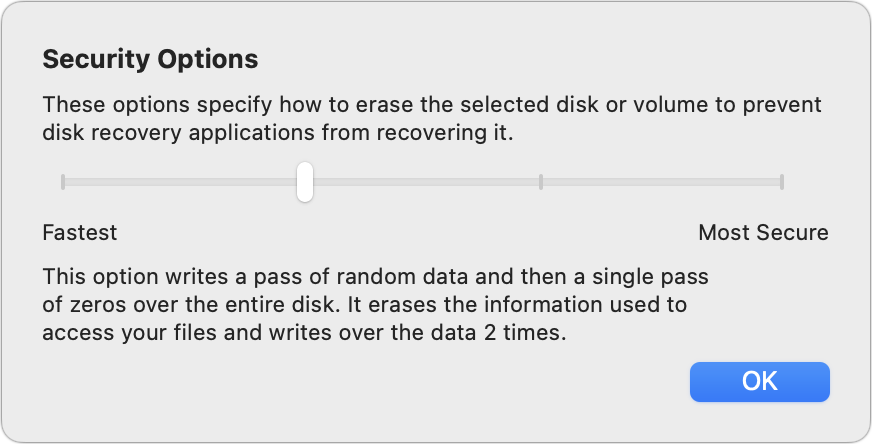
Older Mac: For a Mac without even a T2 chip or one running an earlier version of macOS, boot into macOS Recovery and use Disk Utility to erase the internal drive and reinstall macOS. If you’re erasing a hard drive, click the Security Options button and choose how many passes of random data and zeroes to write to the drive: two, three, or seven. These extra passes take a long time, and the option isn’t available for SSDs, which can’t be securely erased other than by turning off FileVault.
Needless to say, when you get the Mac back, you’ll need to restore from your backup. That will be time-consuming, but it’s a small price to pay for peace of mind.
Don’t go overboard, though—almost no one needs to worry about this level of security, and if you do, you probably work for an employer with policies and practices to protect data. For the rest of us, it’s just a matter of being sensible and cautious by making a backup, enabling guest access, and turning off Find My Mac.
(Featured image by iStock.com/Rawf8)
15 Ways to Solve Call Failures on Your iPhone
Having problems making or receiving calls on your iPhone? We’re confident that something in this long list of fixes will resolve your problem.

Sure, we know that phone calls aren’t the most common thing people do on their iPhones—especially anyone under 30—but it’s still important to be able to make and take calls. There are a wide variety of reasons that outgoing or incoming calls might fail, so the solutions vary equally as widely. Some may seem a little scattershot, but most are easy to try and set back if they don’t help.
1. Try another location: This can’t come as news, but sometimes you’re in a bad spot for cellular coverage. Move to another area and try again.
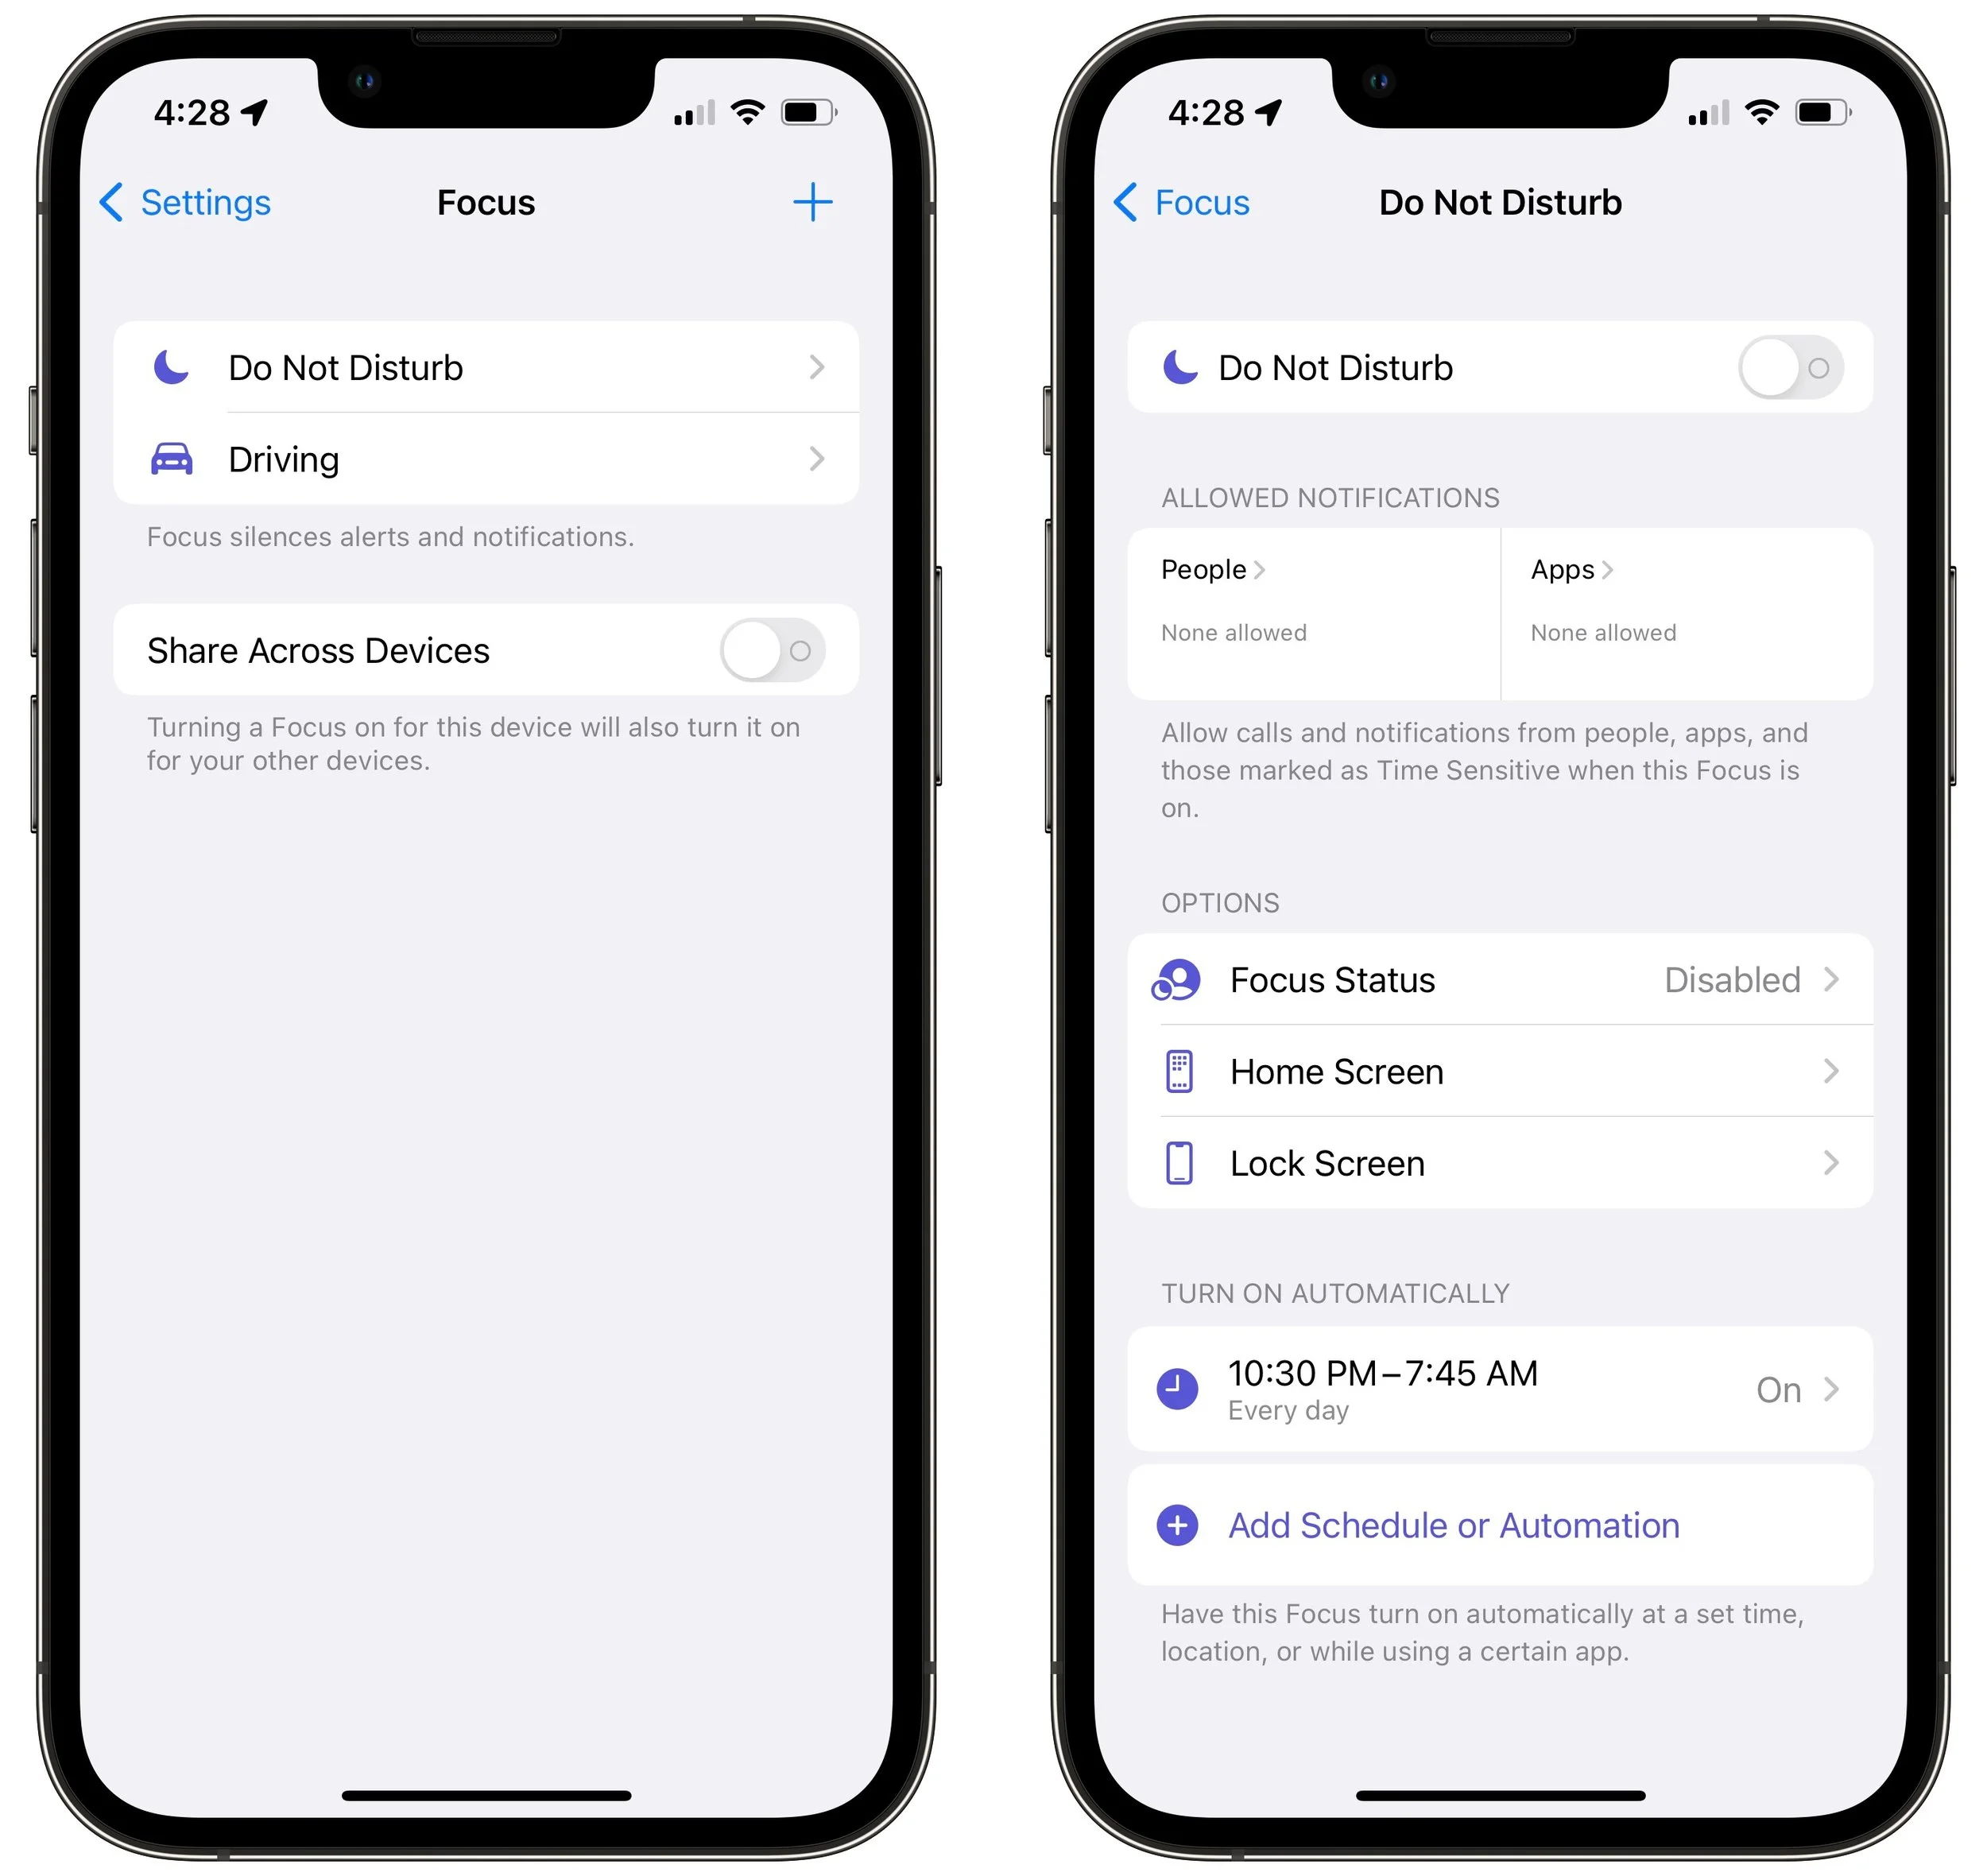
2. Check Do Not Disturb in Focus: The Focus feature won’t prevent you from making a call but can prevent you from receiving one. Go to Settings > Focus > Do Not Disturb and make sure Do Not Disturb is off. Also, check any other Focus you created that could be blocking calls.
3. Toggle Airplane mode: Although the Phone app should alert you if you try to make a call while in Airplane mode, the entire point of the feature is to block cellular access. If Airplane mode is on, turn it off, and if it’s off, turn it on briefly and back off to reset the iPhone’s radios. Note that the Wi-Fi Calling feature may let you make a call even if Airplane mode is on.

4. Turn off Silence Unknown Callers: This feature can be a boon for avoiding telemarketers and spam calls, but it also prevents legitimate unknown calls from ringing through. Either turn it off in Settings > Phone or pay more attention to adding new numbers to Contacts.
5. Unblock the contact: In theory, you should still be able to place calls to blocked numbers, but incoming calls from blocked numbers will be sent directly to voicemail. Look for blocked contacts in Settings > Phone > Blocked Contacts and swipe left on a contact to unblock it.

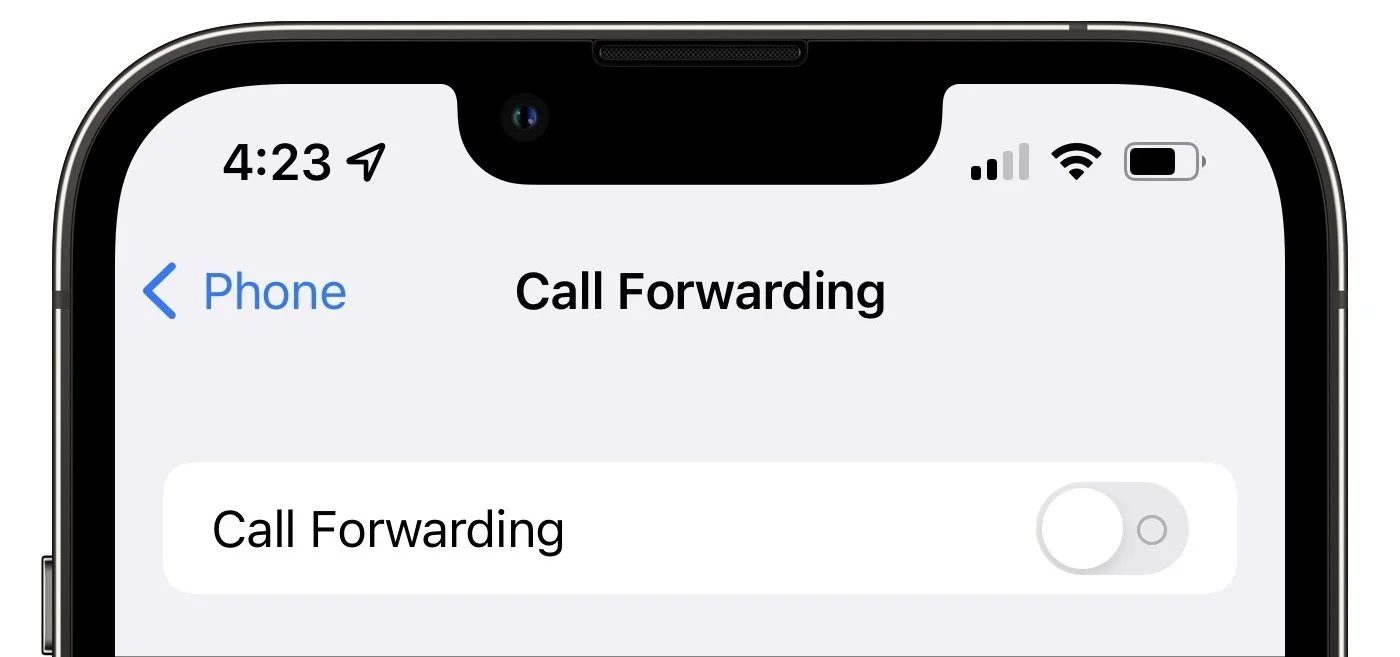
6. Disable call forwarding: Needless to say, if you’re forwarding your calls, you won’t be receiving them. Go to Settings > Phone > Call Forwarding and make sure the switch is off.
7. Toggle Dial Assist: The Dial Assist feature determines the correct international or local prefix when dialing, so if it gets confused, all bets are off. It can’t hurt to go to Settings > Phone, turn off Dial Assist, make a call, and then turn it back on again.
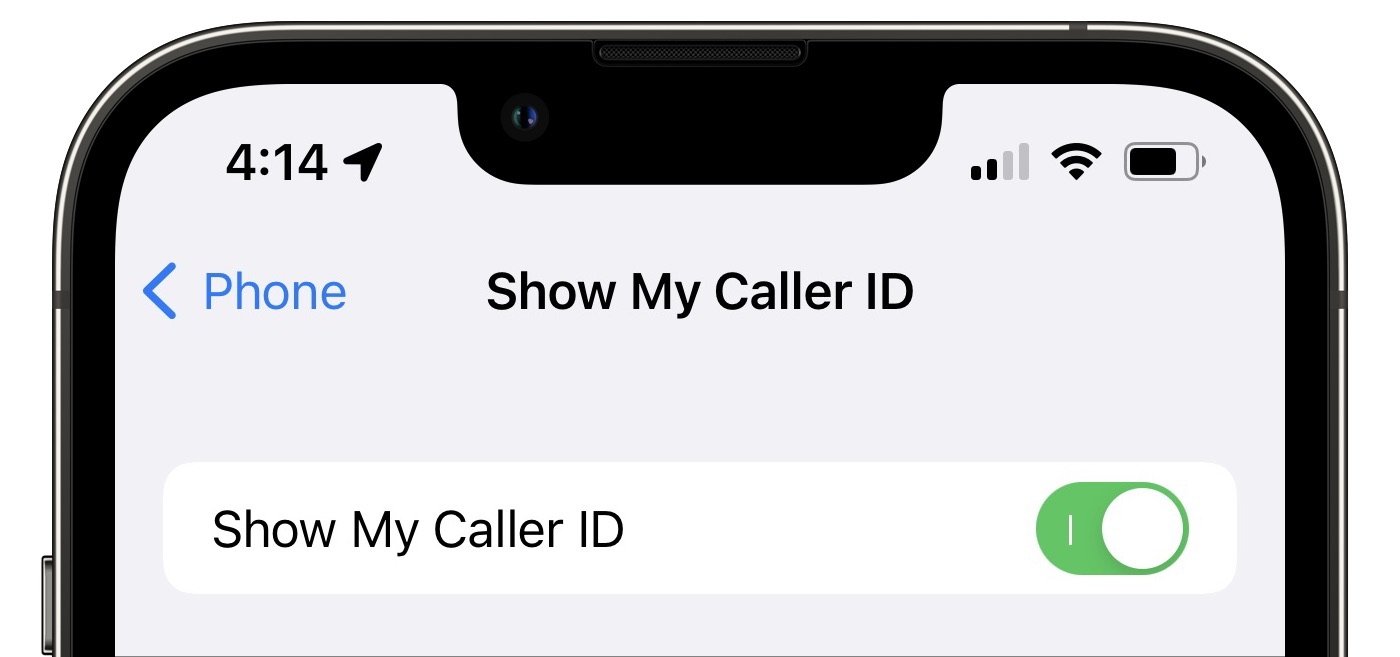
8. Show Caller ID: Some phone systems refuse to accept calls that aren’t associated with caller ID information. Check that Show Caller ID is turned on in Settings > Phone > Show My Caller ID.
9. Check for a carrier settings update: Carrier updates are always worth installing because they can improve network connectivity and performance and add new features like 5G or Wi-Fi Calling. If you dismiss a carrier update installation notification, you can install it later by going to Settings > General > About and following the onscreen instructions.
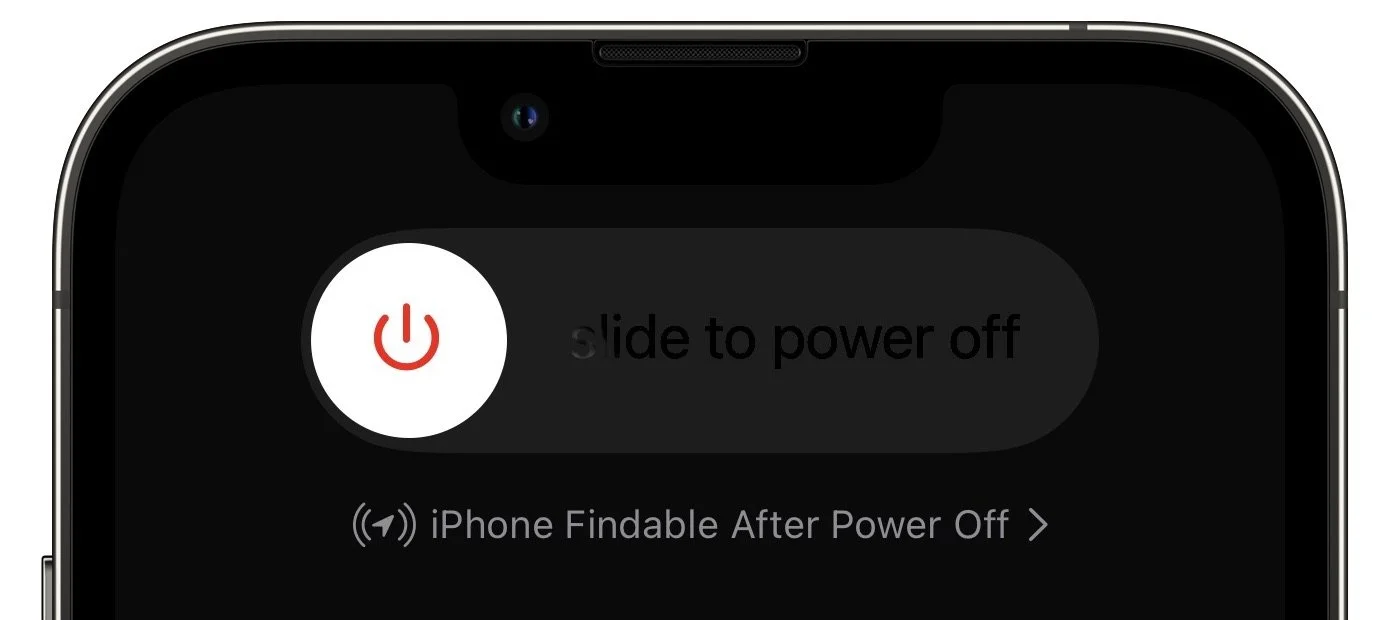
10. Restart the iPhone: When in doubt… We know it’s a cliché, but restarting the iPhone really does solve many inexplicable problems. The easiest way to do this is to go to Settings > General > Shut Down (at the bottom) and then drag the slider. Press the side (Sleep/Wake) button on the iPhone to turn it on.
11. Update iOS: It’s very unlikely that an iOS version would have a bug that caused problems with phone calls, but updating iOS creates enough of a clean slate that it can resolve quirky problems. Besides, it’s good to stay up-to-date for security reasons. Look in Settings > General > Software Update for any available updates.
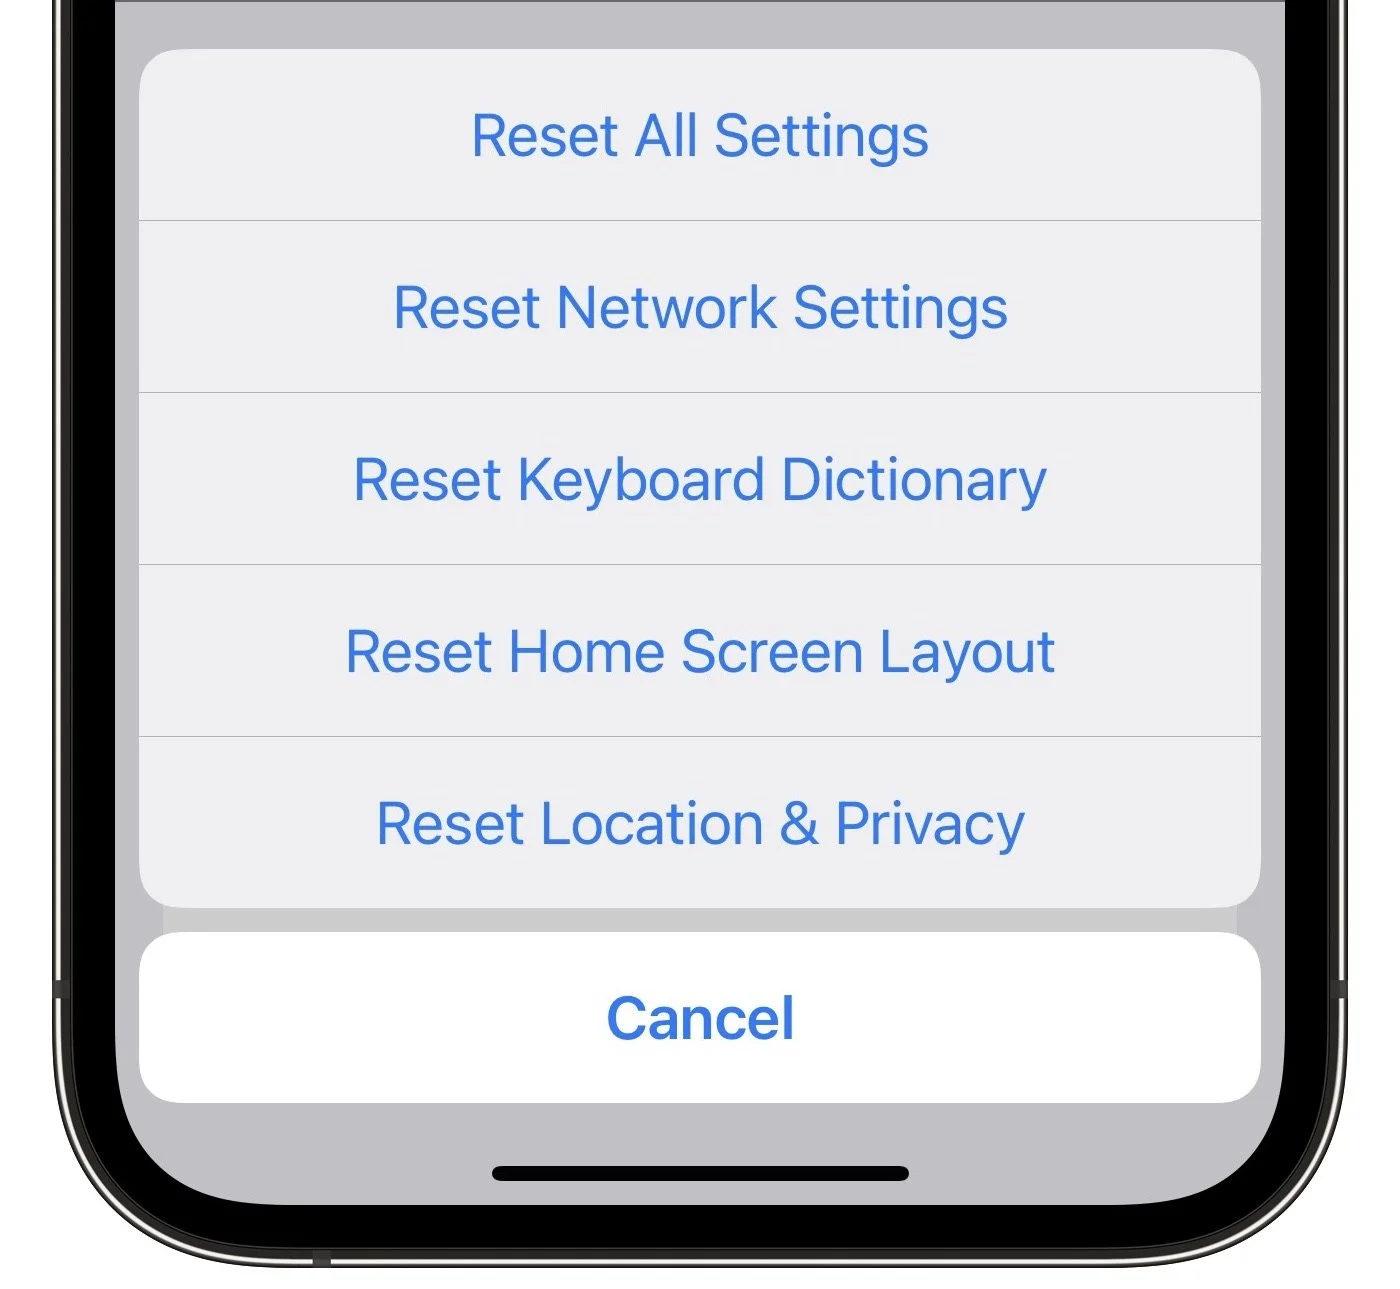
12. Reset network settings: Leave this option for late in the troubleshooting process because it will erase your saved Wi-Fi passwords, preferred networks, and VPN settings, which will be annoying to recreate. If it becomes necessary, invoke it in Settings > General > Transfer or Reset iPhone > Reset > Reset Network Settings.
13. Eject and reinsert SIM card: If all outgoing and incoming calls fail, it’s worth using a paperclip or SIM extraction tool to pop your SIM card out and reinsert it. Be very careful when doing this because the card is small and easily dropped.
14. Contact your carrier: If all else fails, contact your carrier. (Yes, we see the irony here—you may have to use another phone.) There may be a problem with your account, a service outage in your area, or some other problem in their system. You might even need a new SIM card.
15. Contact Apple support: If none of these work, your iPhone could be broken and need repair. Contact Apple support and see what they say—a replacement iPhone will almost certainly fix the problem.
We’re confident that something on this list will resolve your problem!
(Featured image by iStock.com/fizkes)
iCloud, Google Calendar, Microsoft Exchange: Choosing a Personal Calendar Service
What’s the best calendar service for personal calendars? It depends on whether everyone in your family is all-Apple or if some use Chromebooks, Android phones, or Windows PCs. Read on!

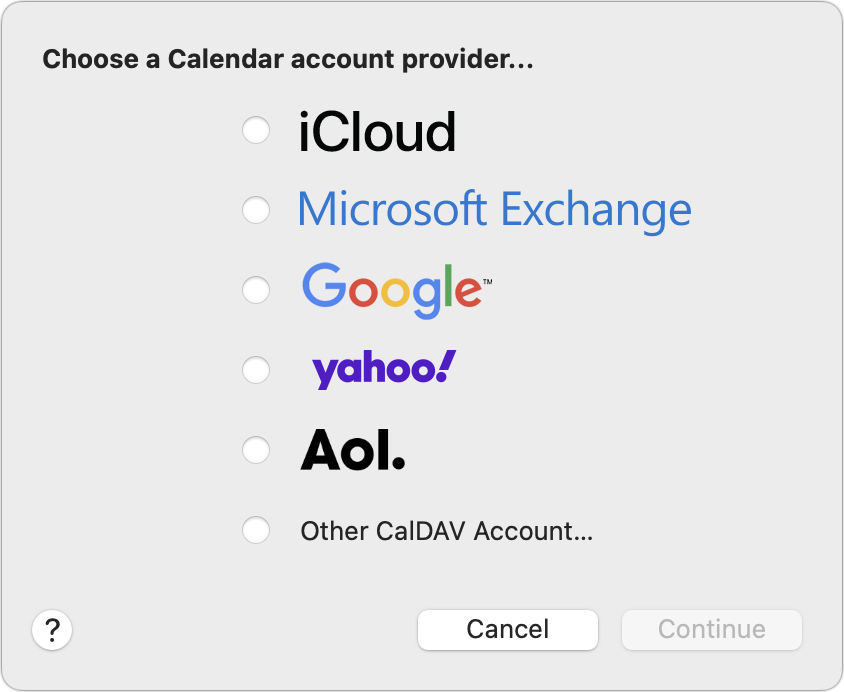
We Mac, iPhone, and iPad users have an embarrassment of riches when it comes to calendaring flexibility. Apple provides free calendar services via iCloud, and the Calendar app lets you add calendar accounts from a wide variety of providers. Most notable among them are Microsoft Exchange and Google Calendar, which are commonly used in the business world.
Since you can add multiple calendar accounts to the Calendar app, there’s no problem bringing your entire scheduling life together, even if your work uses Exchange and your kid’s school uses Google. But which service should you use for your primary personal calendars, which you likely need to share with your immediate family to ensure everyone is on the same scheduling page? There’s no one answer, but here’s our take.
Start by considering the platforms used by the people with whom you share calendars. Although it’s easy to share iCloud calendars with other Apple users, sharing an iCloud calendar outside the Apple ecosystem requires making it a read-only public calendar, which may not be appropriate for usability and privacy reasons. You can work around this limitation in different ways, depending on the platforms in play:
All Apple: If you and your family all use Apple devices, the answer is easy—stick with iCloud calendars. You can easily invite people to your shared calendars, and everyone can both see and edit events on those calendars using a Mac, iPhone, or iPad.
Apple and Google: What if your child’s only computing device is a school Chromebook or your spouse relies on an Android phone? In such a scenario, centralize your personal calendars on Google Calendar, where calendars can be shared read/write. If you don’t already have a free Google account, make one, log in to Google Calendar, and create and share the calendars from there.
Apple and Windows: Perhaps a member of your family relies on a Windows laptop. If that person installs iCloud for Windows, they can access iCloud calendars shared with their iCloud account. (Anyone can sign up for a free iCloud account, even if they don’t have an Apple device.)
Apple, Google, and Windows: Going for the trifecta, what if different members of your family rely on Apple devices, Android phones, and Windows PCs? The compromise option here is to fall back on Google Calendar, since both Apple devices and Windows PCs can access calendars shared from Google Calendar.
That’s the overview. Briefly, here’s how you share those calendars in iCloud and Google Calendar.
Sharing to iCloud Calendars
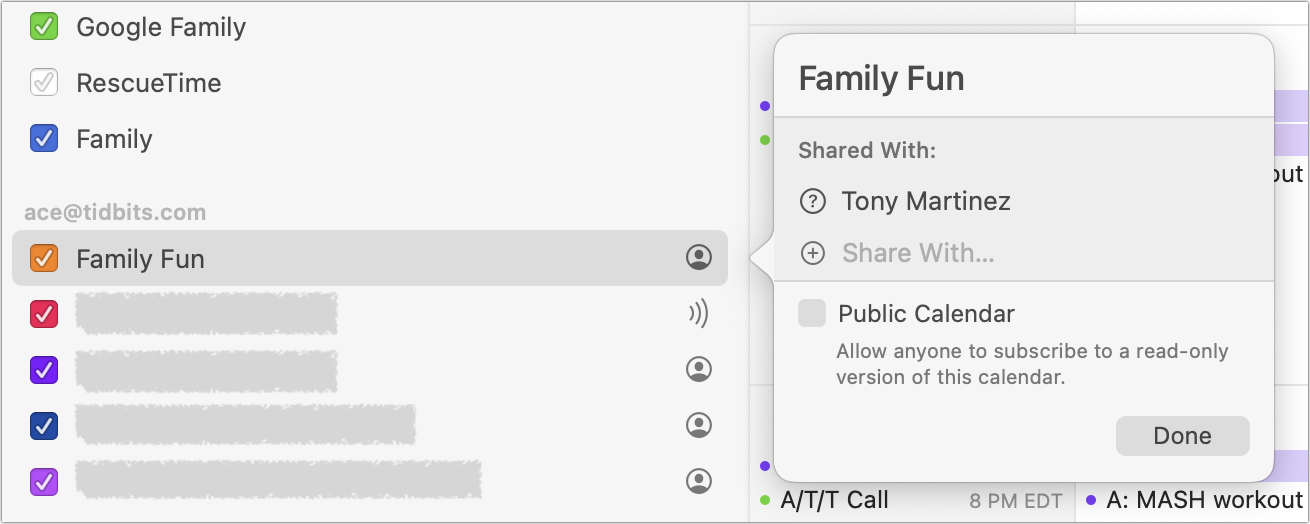
To share an iCloud calendar, open the Calendar app on your Mac. Control-click the calendar you want to share, and choose Share Calendar. In the Share With field of the dialog that appears, start typing the name of the person with whom you want to share, select their iCloud account from the suggestions, and click Done to send the invite.
Subscribing to a shared iCloud calendar is usually just a matter of clicking a link in an email, giving the calendar a name, and adding it to your iCloud account.
Sharing Google Calendars
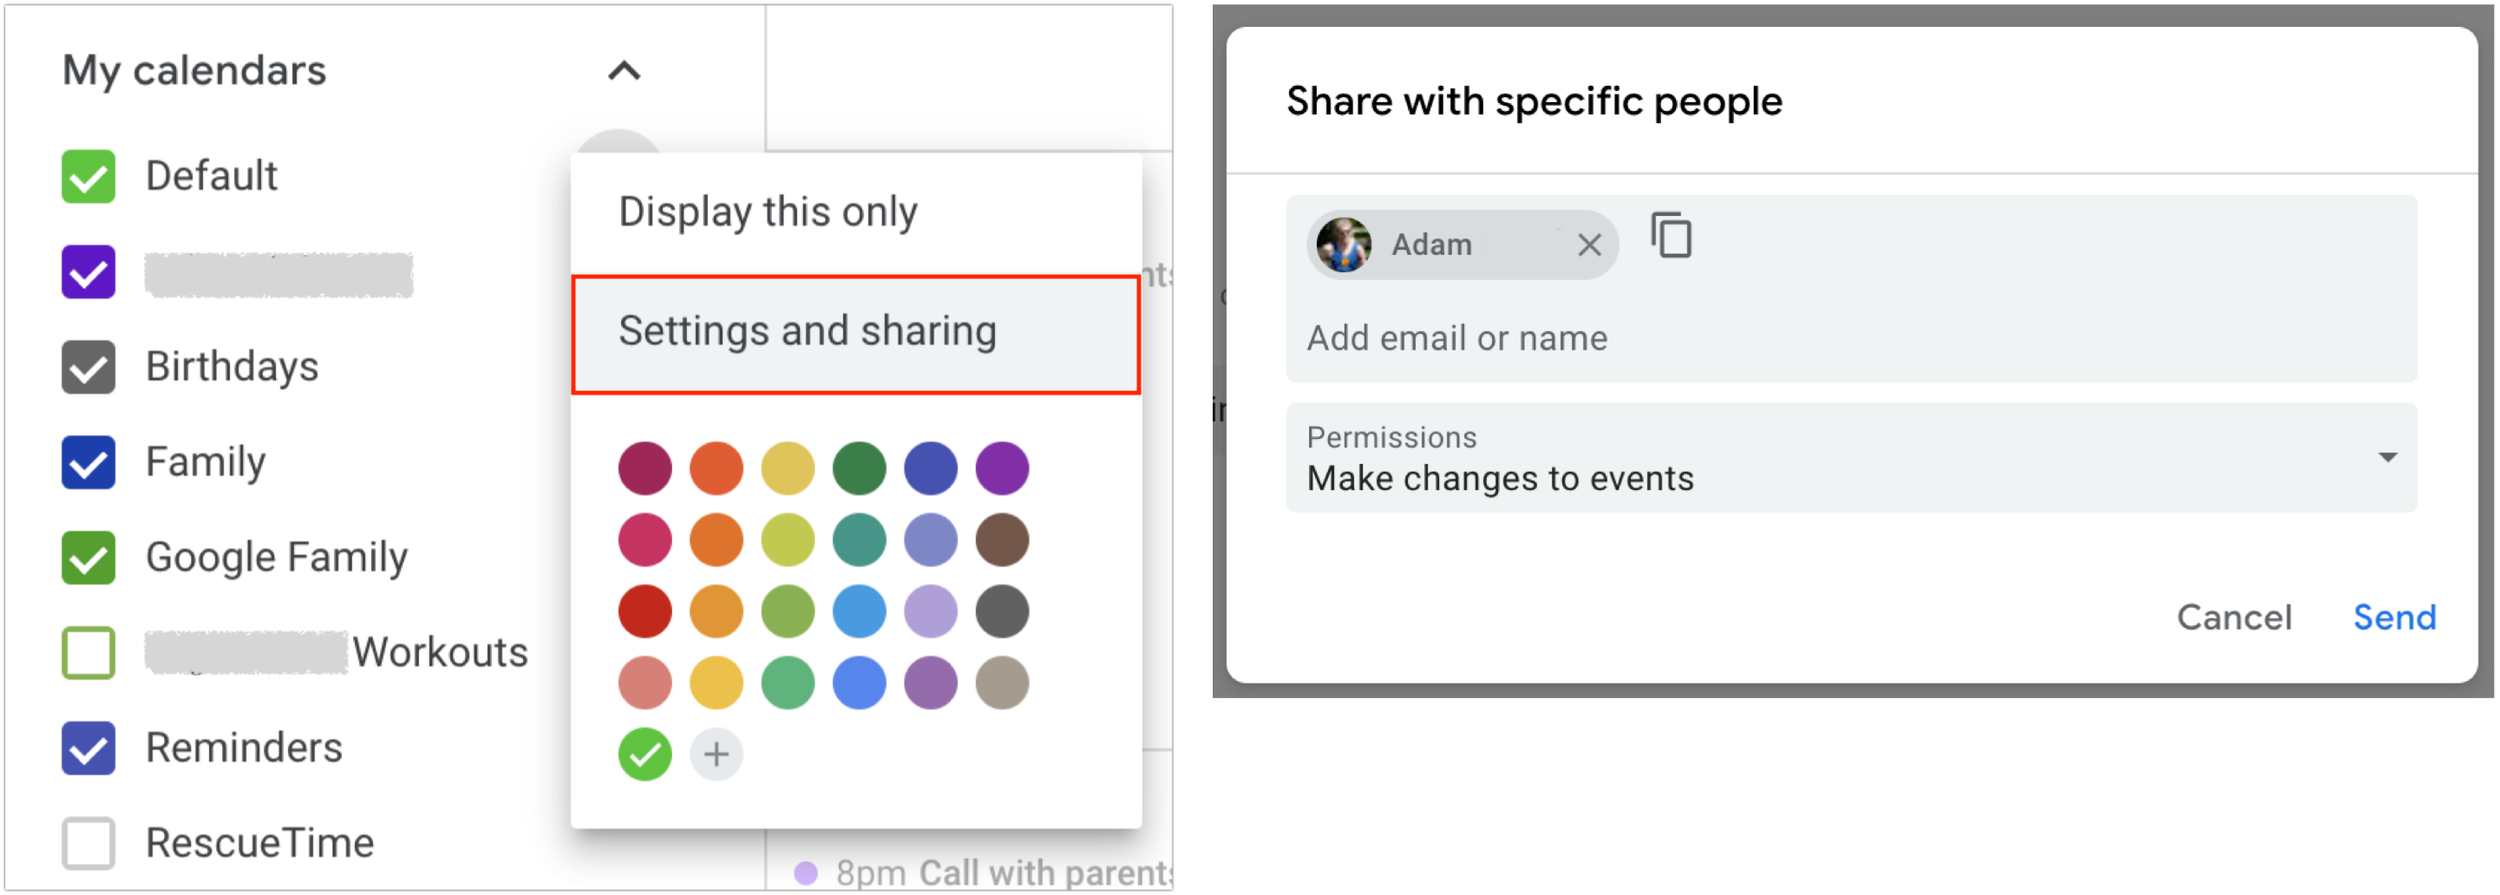
To share a Google calendar, visit calendar.google.com in a Web browser. Hover the pointer over a calendar name in the sidebar, click the stacked dot button that appears, and choose Settings and Sharing. In the Settings screen, scroll down to Share With Specific People, click Add People, and enter enough of someone’s name that you can select their email address. Then adjust the permissions as desired.
There are too many variables to get into the details of subscribing to shared calendars in Google Calendar and Microsoft Outlook, but check those links for advice on getting started. And of course, if you’re having trouble working your way through all the combinations of sharing and subscribing, don’t hesitate to give us a call.
(Featured image by iStock.com/NicoElNino)
Choosing the Best Mac for a College-Bound Student in 2022
Which Mac is best for a new college student? Short answer: the new M2 MacBook Air. Read on for the longer explanation and how we recommend configuring it.

Do you have a child starting college soon? It’s likely that your kid has been relying heavily on a computer throughout high school, but if it was a school-provided laptop or shared family computer, now’s the time to get them something of their own. And even if they had their own laptop throughout high school, if it’s old or unreliable, college is a good excuse to bring them up to date. If you haven’t been paying close attention to Apple’s Mac lineup, you might wonder which model makes the most sense.
First, don’t buy anything without first checking with the college. Many college de-partments have specific requirements based on the software students use in their classes. Generally, these revolve around processor type, amount of RAM, and storage space. Luckily, current Macs should meet the requirements. Second, see if the college provides access to education pricing—most will—to save a few hundred dollars.
Colleges often specify—and students usually prefer—laptops instead of desktop machines. Although the 24-inch iMac is an excellent machine with a gorgeous screen, it’s too big and unwieldy for the transient lifestyle of the typical college student. The same applies to a Mac mini or Mac Studio with an external display. A laptop is much easier to pack during moves, and it can travel to class every day. A student who’s accustomed to taking notes on an iPad with a Smart Keyboard and Apple Pencil might be able to use that along with a desktop Mac, but most students should focus on Apple’s laptops.
In the past, it was harder to decide which model was best for a given student, but with Apple’s move to the M1 and M2 chips, which significantly outperform the Intel processors used in previous models, the decision is easier. We see three primary scenarios:
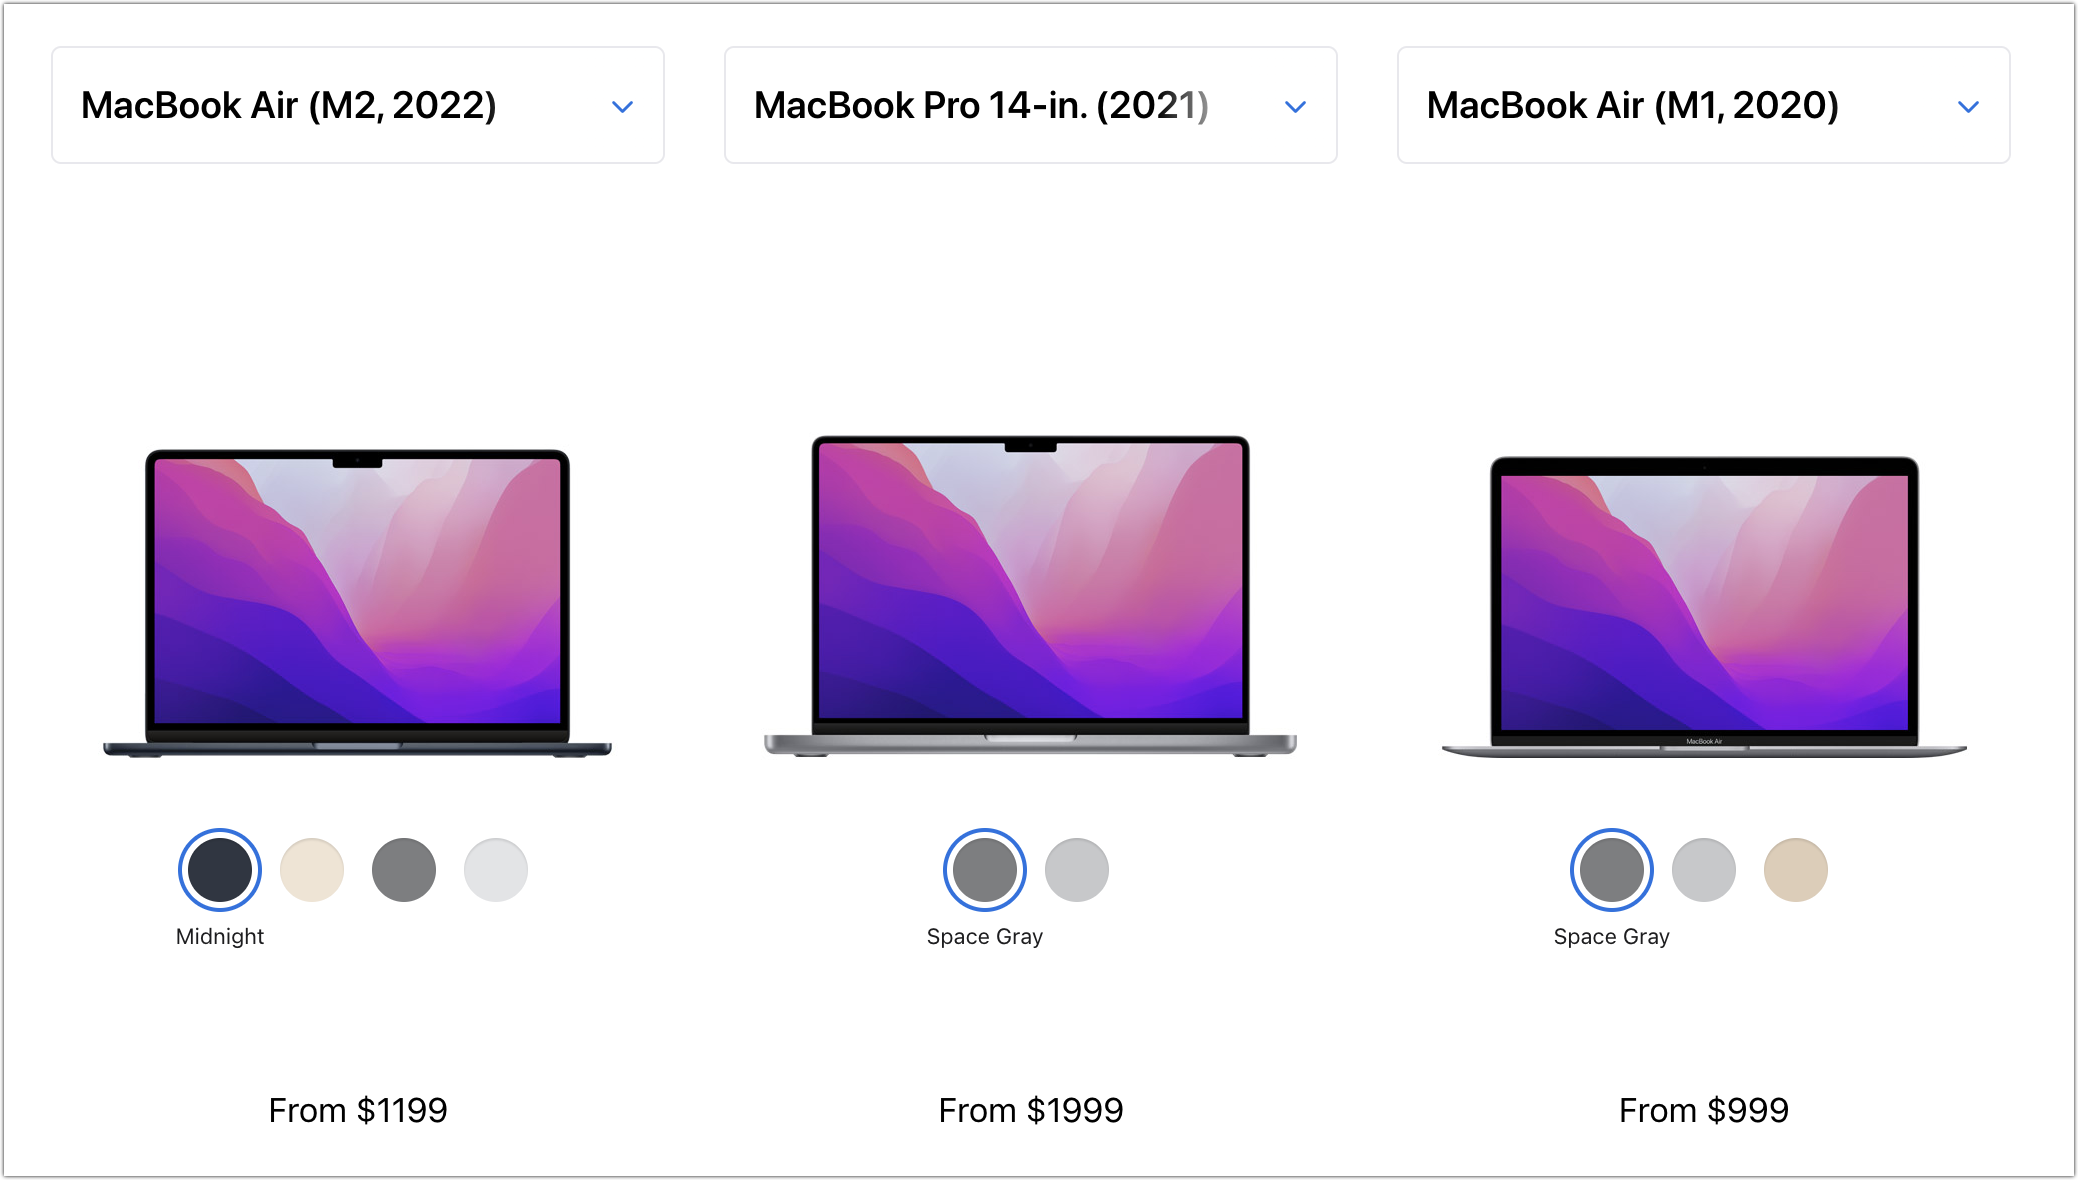
Most students: Buy Apple’s MacBook Air. It’s Apple’s smallest, lightest, and least expensive laptop, but thanks to its M1 or M2 processor, it has fabulous performance for everyday tasks. Although the M1 MacBook Air from 2020 remains available for those who need the most cost-effective option (starting at $999), the new M2 MacBook Air is a better choice for most people, thanks to its bigger-brighter-better 13.6-inch screen, faster performance, 24 GB memory ceiling, and higher-resolution webcam. It starts at $1199.
Better specs: If performance is more important than cost—particularly if your student will be working with processor-intensive tasks like video editing—look to the 14-inch MacBook Pro. It features an M1 Pro chip that’s more powerful than the base-level M2 and is configurable with an even faster M1 Max chip. Its screen is bigger, and it can take up to 32 GB of memory. Its price starts at $1999.
Windows compatibility: The only downside of the transition to Apple silicon is that it’s no longer easy to run Windows using virtualization software like VMware Fusion (free for students) or Parallels Desktop. On M1 and M2 Macs, it is possible to run Parallels Desktop and Windows for ARM Insider Preview, but we can’t recommend that anyone rely on that combination yet. If Windows compatibility is paramount, your choices are a used Intel-based MacBook Pro or—much as we hate to say it—a PC laptop that runs Windows natively.
Regardless of which laptop you decide on, you’ll have to pick a processor, an amount of RAM, and storage capacity:
Processor: With the M1 MacBook Air, you’re limited to the M1 chip with an 8-core CPU and 7-core GPU, so there is no choice to make. However, with the M2 MacBook Air, the M2 chip always has an 8-core CPU, but you can pay $100 to upgrade from an 8-core GPU to a 10-core GPU. The performance difference isn’t likely to be noticeable with everyday apps, but for $100, it might be worth it, just in case. The 14-inch MacBook Pro has three M1 Pro options and two more M1 Max options, and choosing among them is probably best done by weighing likely performance needs against the increased cost.
Memory: The M1 MacBook Air offers the choice of 8 GB or 16 GB. 8 GB is acceptable for most college students, but we’d encourage 16 GB to reduce the chance that memory becomes a limiting factor in performance. The M2 MacBook Air lets you choose from 8 GB, 16 GB, or 24 GB, and again, we’d default to 16 GB unless there’s some particularly memory-hungry software in play. With the 14-inch MacBook Pro, 16 GB is standard and fine for most tasks, but 32 GB is available if you think it will be necessary, and for seriously intensive work, the M1 Max chip in the 14-inch MacBook Pro offers a 64 GB option.
Storage: For both MacBook Air models, 256 GB is the lowest storage level, and you can upgrade to 2 TB. The 14-inch MacBook Pro starts at 512 GB and offers upgrades up to a whopping 8 TB. Choose the amount of storage based on budget—it gets expensive fast—and anticipated usage—audio and especially video can consume a lot of space, as can large numbers of photos, but most other uses don’t. Remember that it’s easy to connect an external Thunderbolt SSD or hard drive to offload large files that don’t have to be kept available at all times.
To our thinking, the most obvious choice for a Mac that’s likely to last for four years of college would be the new M2 MacBook Air with a 10-core GPU, 16 GB of memory, and 512 GB of storage. Be sure to budget for AppleCare+, too; it’s almost guaranteed that some mishap will befall a student laptop, and AppleCare+ covers up to two incidents of accidental damage every year.
You’ll need to have some conversations with your child to find out what they think they’ll need—and be sure to double-check that against the college’s recommendations—but if you have any questions after that, don’t hesitate to contact us.
(Featured image by Apple)
Manage Email Faster in Mail by Swiping
We can’t reduce your email load, but we can show you how to process it faster by swiping on items in Mail’s message list on your iPhone, iPad, or Mac. Details at:

We all get too much email, and while Mail can’t help you get less (other than by making it easy to unsubscribe from mailing lists), it does provide shortcuts for processing your mail more quickly. Regardless of whether you’re using iOS, iPadOS, or macOS, you can swipe on messages in the message list to perform various actions—some of which you can customize. It’s an efficient way to work through email quickly.
Swiping on the iPhone and iPad
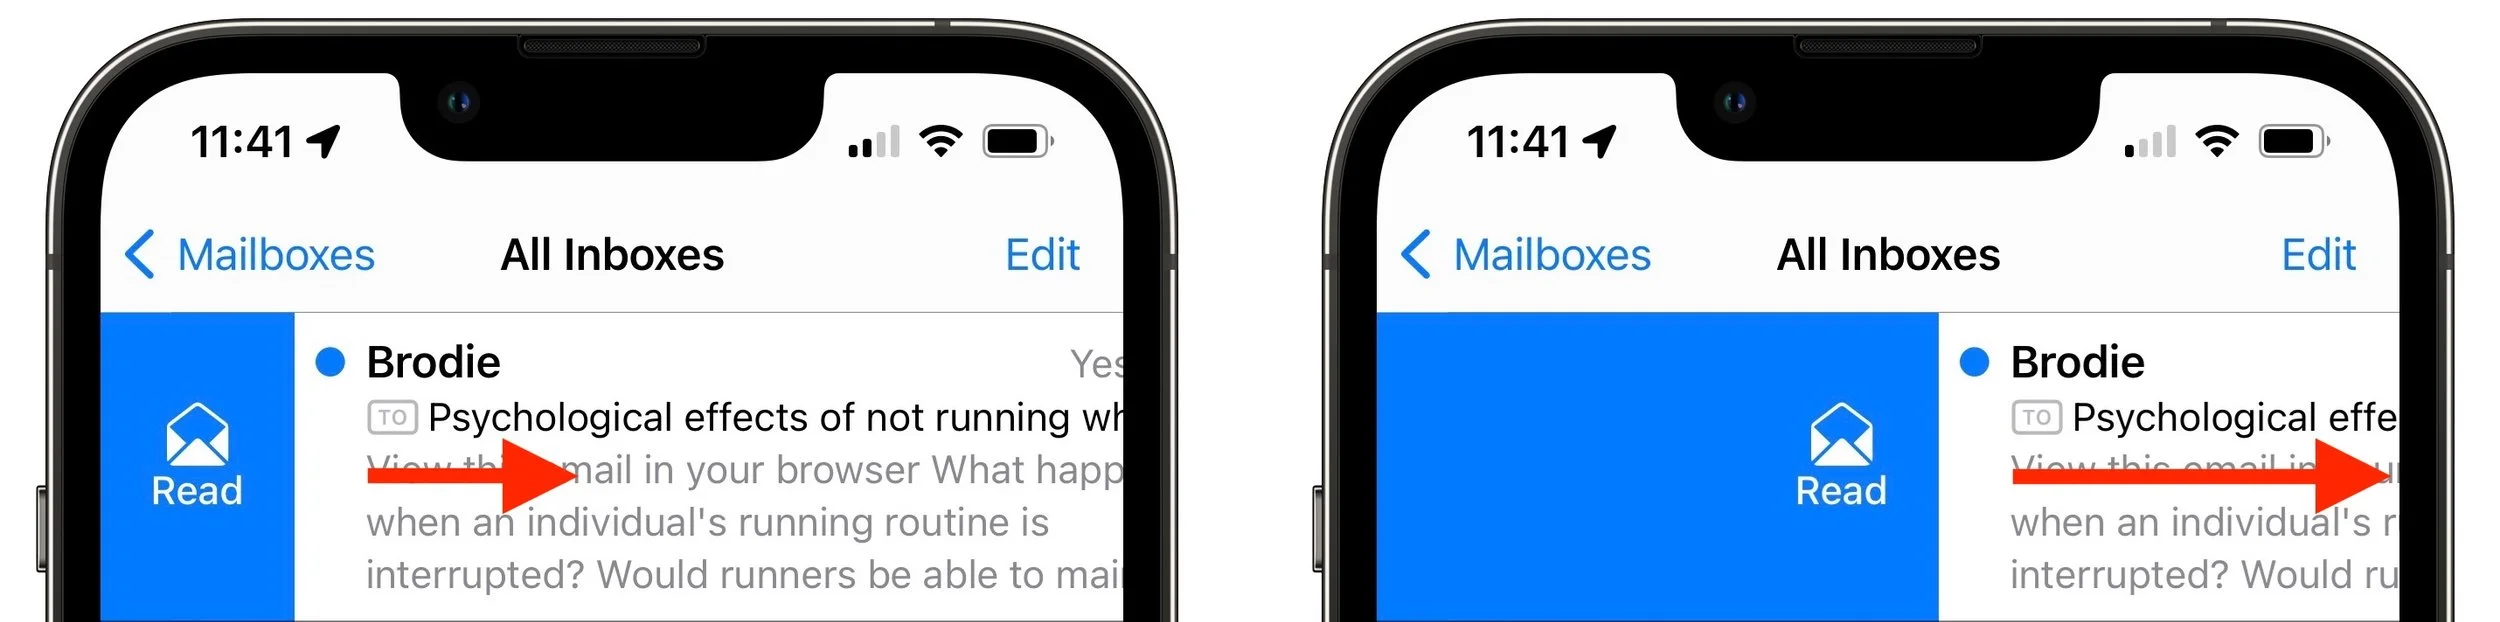
In iOS and iPadOS, when you swipe a short distance right on an unread message (from left to right), Mail displays a Read button. You can either stop swiping and tap it or keep swiping to the right to mark the message as read. If the message has already been read, that button changes to Unread. This swipe is great for those who like marking messages as unread to keep them around for later processing.
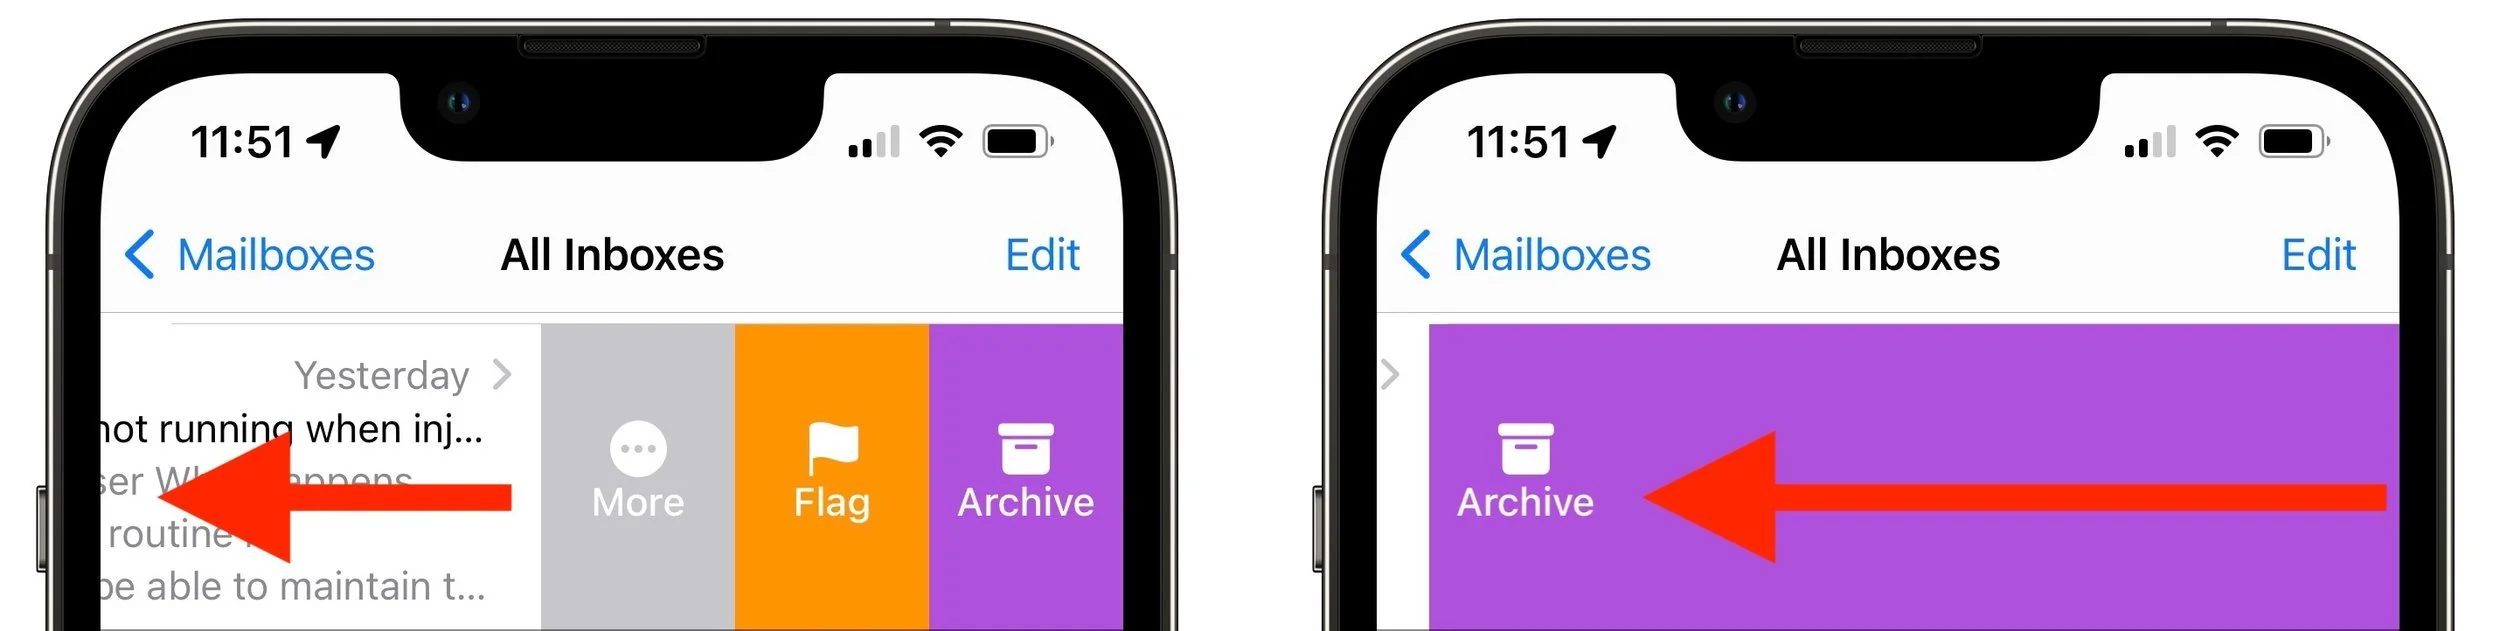
Swipe left (from right to left) a short distance, and you get three buttons, More, Flag, and Archive. (If you see Trash instead of Archive, that’s fine. We talk more about configuring which buttons you see shortly.) Tap Archive to store the message in an Archive mailbox (or All Mail for Gmail users), which is good for getting it out of your face without deleting it. Flag marks the message with a flag so you can find it again easily in Mail’s Flagged mailbox—some people do this to track messages that need replies or other actions. You can also swipe all the way to the left to archive the message with one motion.
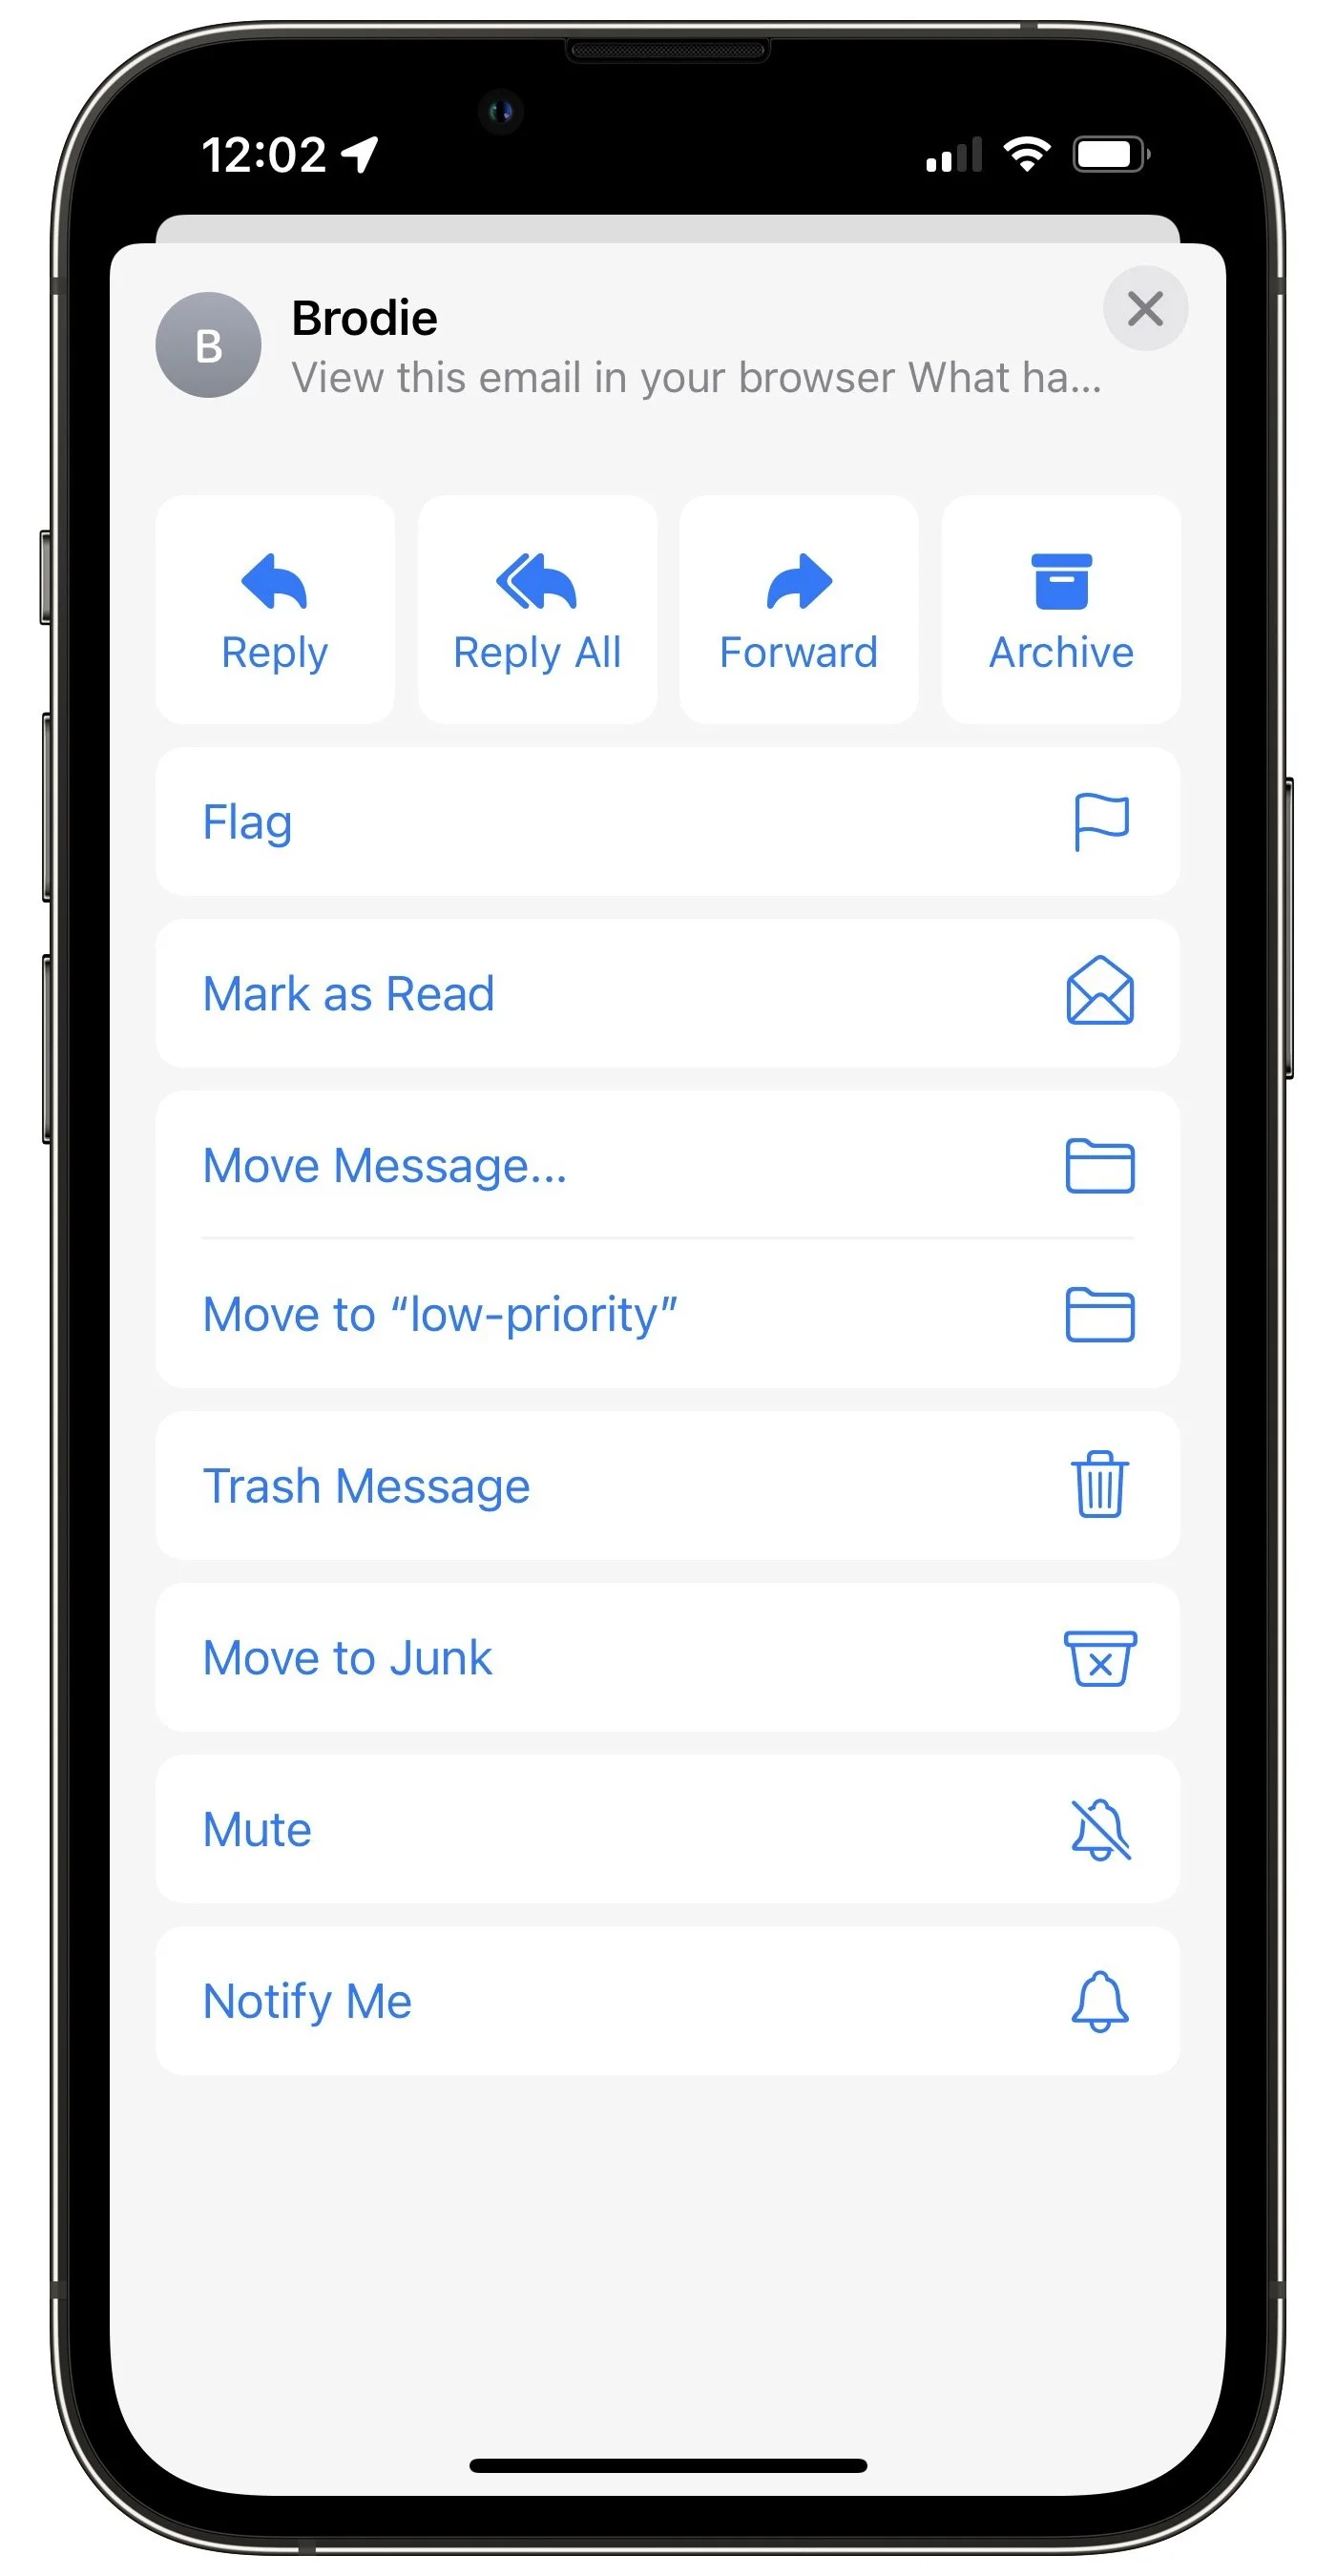
If you tap More, you get a bunch of additional options (depending on the message) that include Reply, Reply All, Forward, Archive, Flag, Mark as Read, Move Message (for filing in another folder), Trash Message, Move to Junk, Mute (to silence notifications from the thread), and Notify Me (which alerts you when anyone replies to the message).
Do you prefer to have your full swipes manage mail in a different way than the default? Go to Settings > Mail > Swipe Options and choose which button appears when you swipe right or left. You can select only one unique action for the middle swipe left button and for the swipe right action.
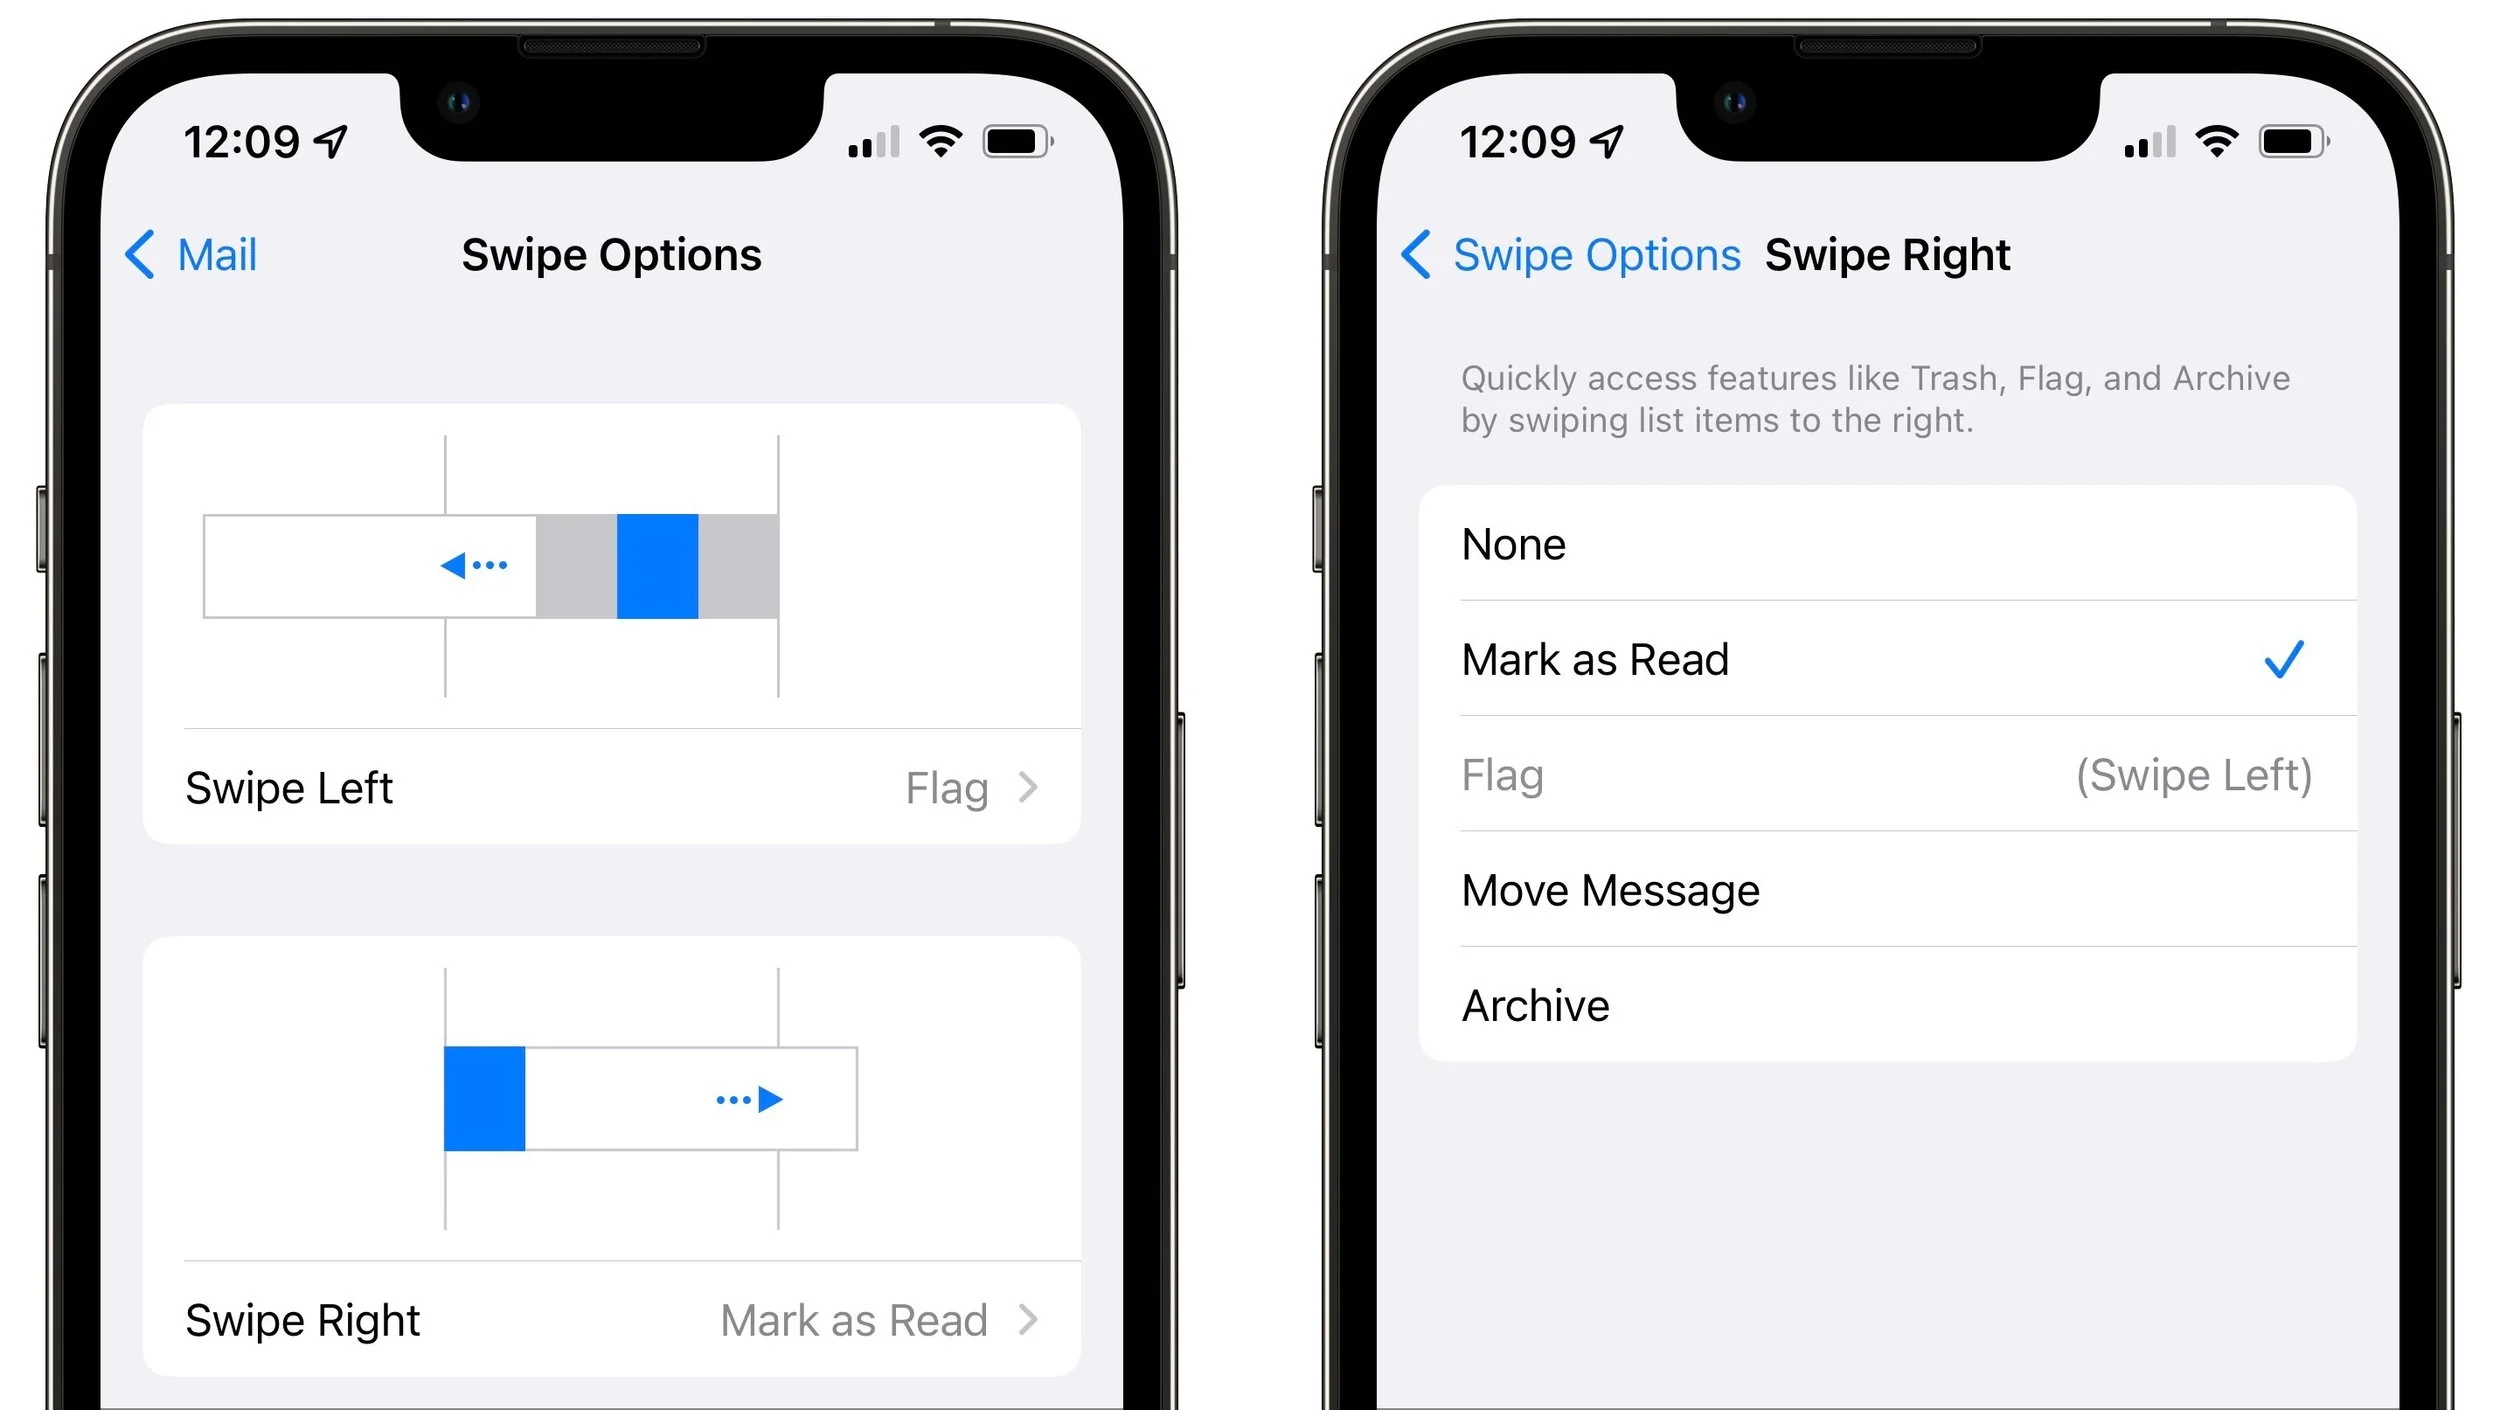
If you prefer to delete messages instead of archiving them, select Archive in the Swipe Right settings and it will become Trash automatically if the account requires swiping left to offer the Archive button. If you use Gmail or some other email providers, you can reverse these settings (so swiping left offers Trash and swiping right gives you Archive) by navigating to Settings > Mail > Accounts > YourAccount > Account > Advanced and selecting Deleted Mailbox under Move Discarded Messages Into.
Remember that you can undo an errant swipe action by swiping left anywhere on the screen with three fingers or by shaking the iPhone or iPad, assuming you’ve left that setting enabled in Settings > Accessibility > Touch.
Swiping on the Mac
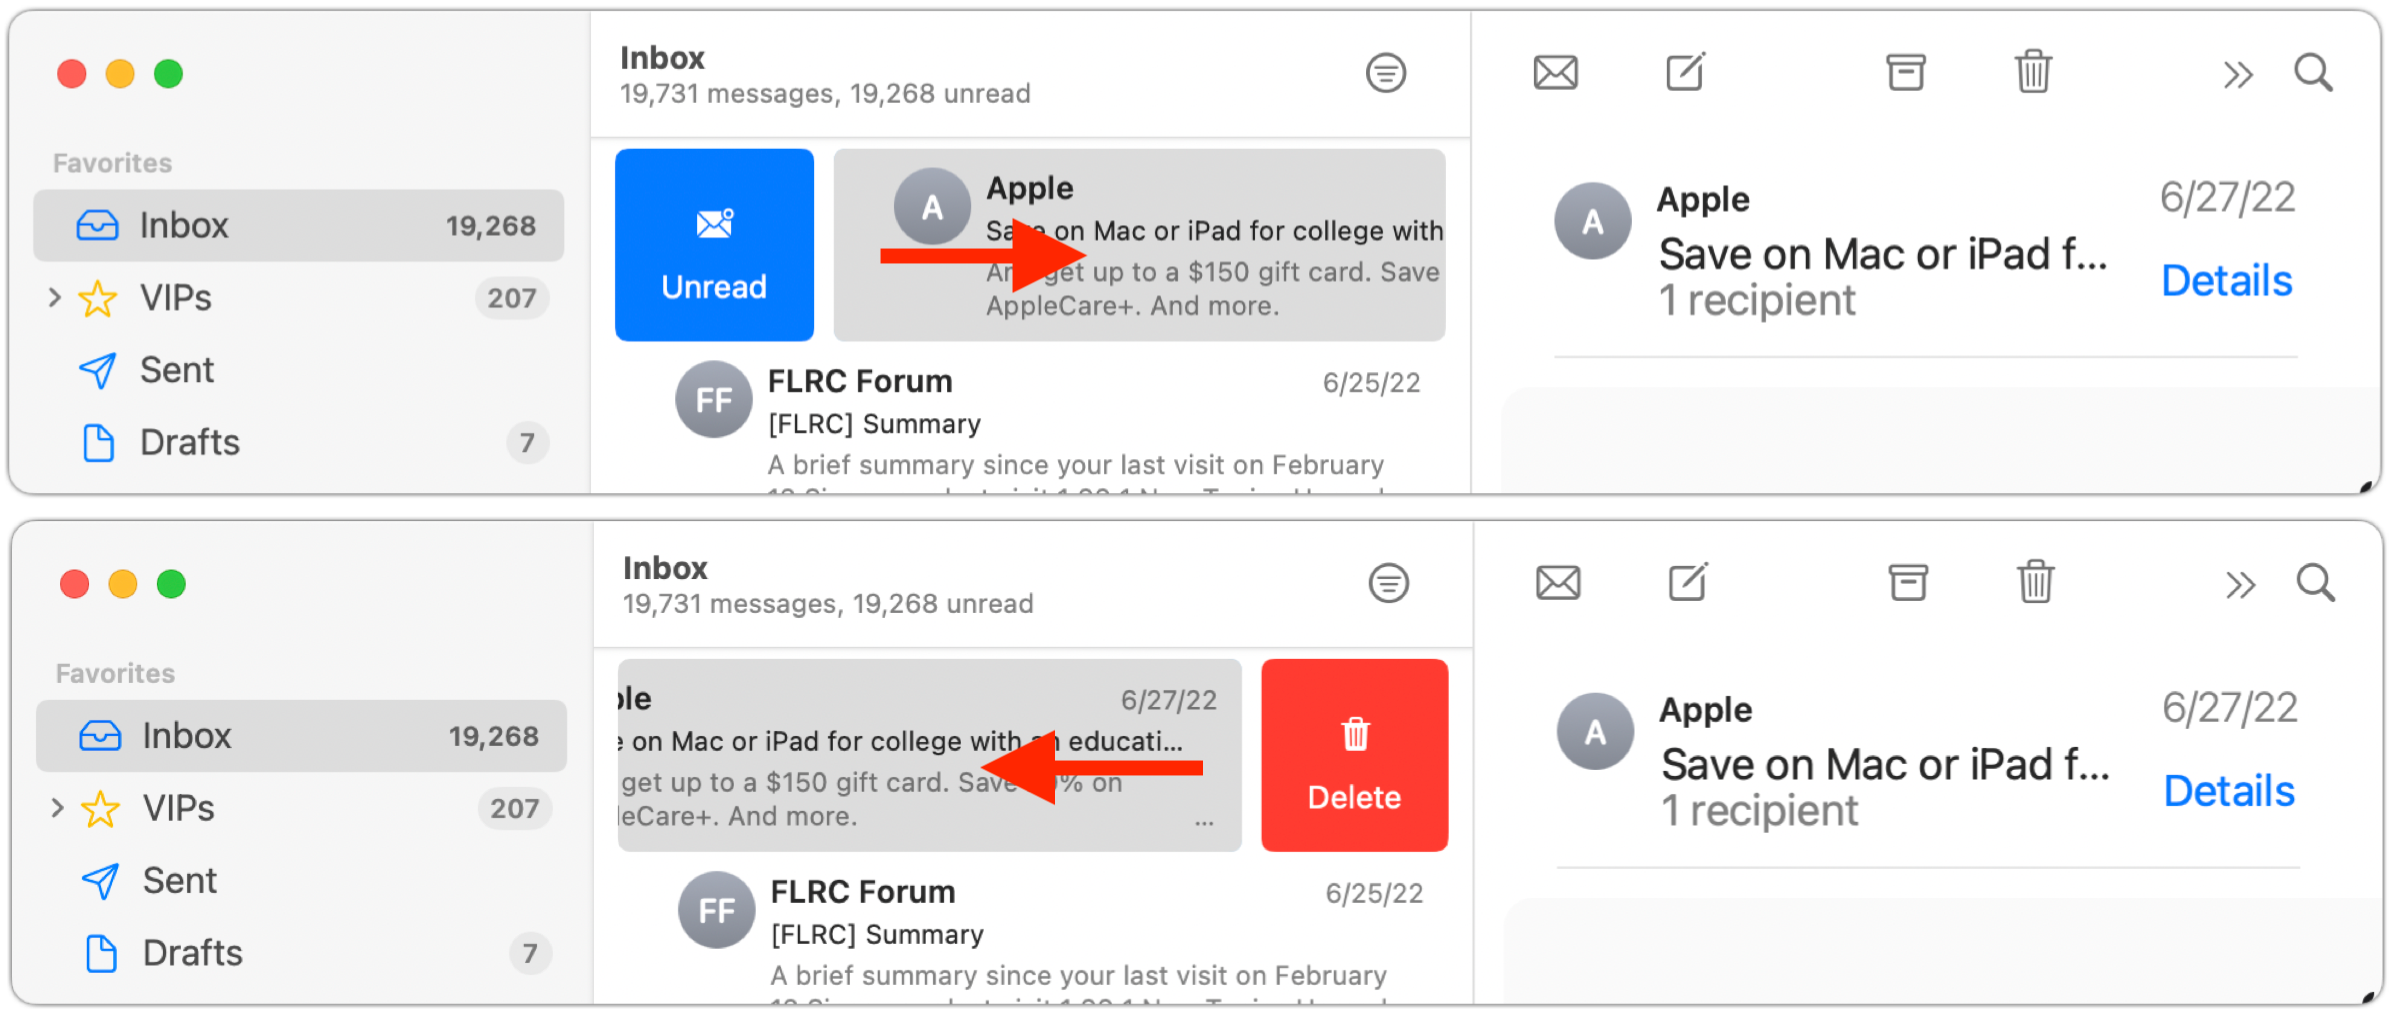
On the Mac, swiping works similarly, but fewer options are available. You can swipe right with two fingers to mark a message as read or unread, depending on its current status, or you can swipe left to delete or archive the message. Short swipes reveal a button you can click; long swipes perform the action without needing an additional click.
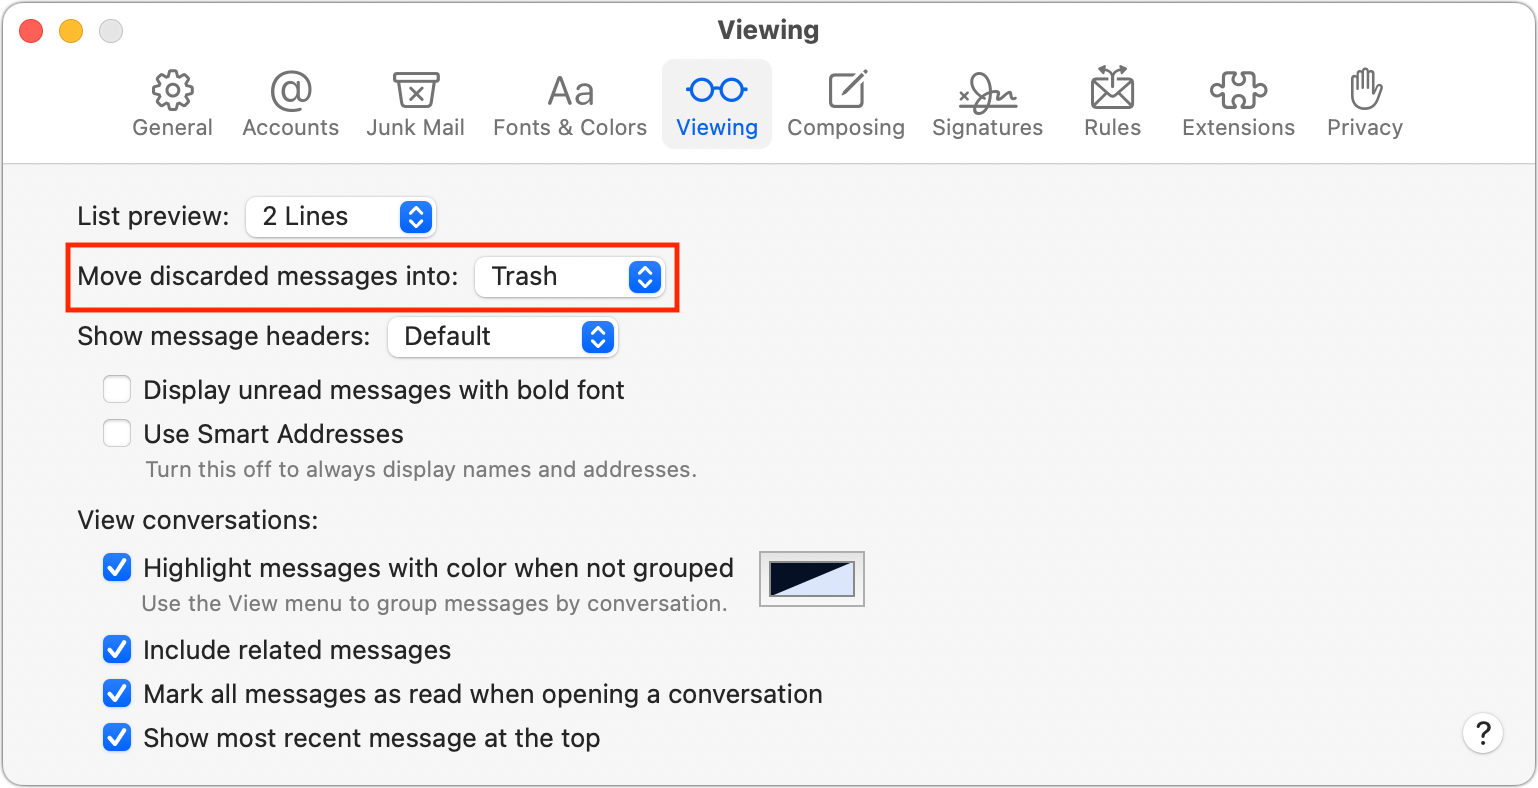
As with Mail in iOS, you can toggle the delete/archive setting by choosing Mail > Preferences > Viewing. Choose Trash or Archive from the Move Discarded Messages Into pop-up menu.
That’s it! Take a few minutes to practice swiping, and before long, you’ll be marking, flagging, and archiving messages with just a flick of the finger.
(Featured image by iStock.com/Pheelings Media)