Apple Releases New iPad, iPad Pro, and Apple TV
Apple has released a redesigned tenth-generation iPad with the new Magic Keyboard Folio, new M2 iPad Pro models, and a lower-cost Apple TV 4K with a faster processor and twice the storage. Read on for details:

In a series of press releases—no big video event this time—Apple has announced upgrades to the iPad, iPad Pro, and Apple TV. The new models are largely evolutionary, with changes that are welcome but unlikely to change your iPad or Apple TV experience. All are available to order now, with the new iPads arriving on October 26th and the new Apple TV hitting stores on November 4th.
One other note. iPadOS 16 and macOS 13 Ventura ship on October 24th. iPadOS 16 is probably safe to install soon, given the extent to which it’s similar to iOS 16, though the Stage Manager window management feature still has rough edges. Do not upgrade to Ventura until we’ve had a chance to evaluate its stability and compatibility.
New Tenth-Generation iPad Has iPad Air-like Design, Higher Price
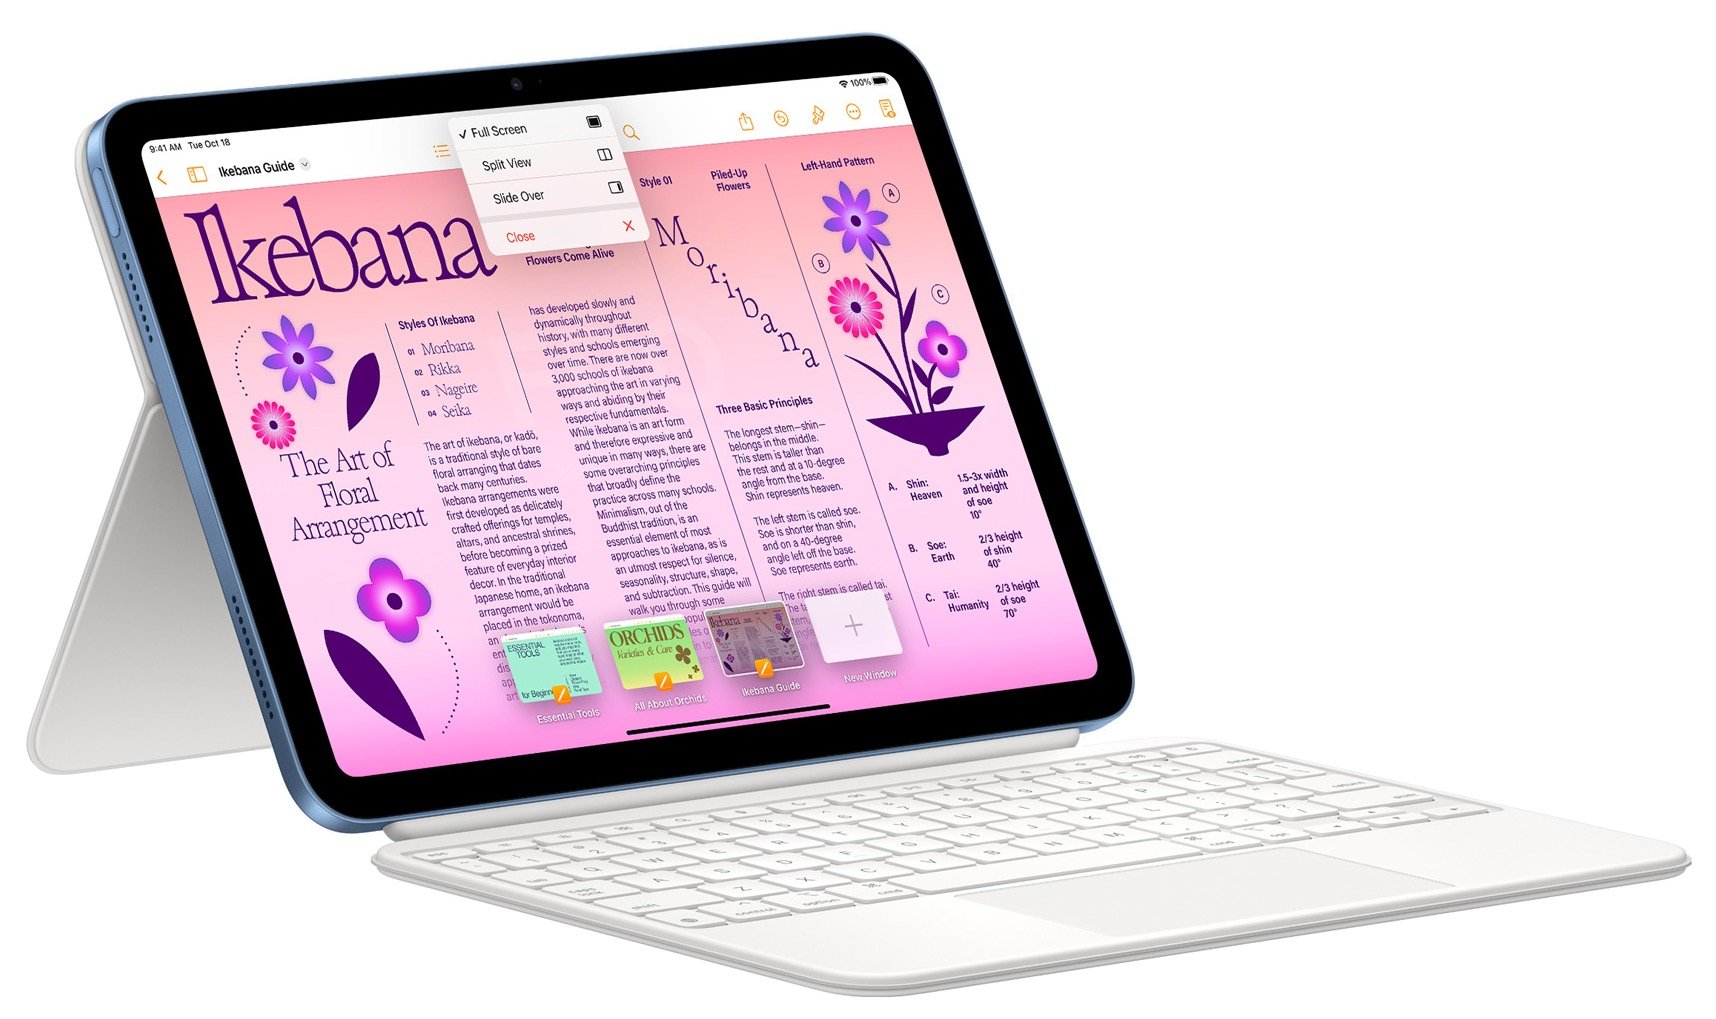
The product receiving the most significant changes is the iPad, now in its tenth generation. Apple redesigned it to look and work more like the iPad Air, with squared-off sides, an all-screen design, a 10.9-inch display, USB-C instead of Lightning, and Touch ID in the top button. Also like the iPad Air, the iPad now has a 12-megapixel rear-facing camera and features Wi-Fi 6 plus 5G support in the cellular models for faster connectivity. Perhaps most interestingly, Apple finally repositioned the front-facing 12-megapixel camera along the landscape (long) edge of the iPad so you’ll be looking into the camera for video calls. Oddly, the new iPad Pro models didn’t also receive this improvement.

Despite the similarities, the iPad Air retains its technical superiority (and justifies its higher price) in two big ways. First, the tenth-generation iPad relies on the A14 Bionic chip that’s faster than the ninth-generation iPad’s older A13 Bionic but slower than the iPad Air’s higher-performance M1 chip. Second, the tenth-generation iPad remains compatible only with the first-generation Apple Pencil, presumably because Apple left the wireless charging hardware out to cut costs. Since the new iPad switches from Lightning to USB-C, you’ll need a $9 USB-C to Lightning adapter to pair and charge the Lightning-based Apple Pencil—that’s awkward.
Apple also introduced a new keyboard exclusively for the tenth-generation iPad, the Magic Keyboard Folio. It features full-size keys, a large trackpad, and a 14-key function row. The two-piece design separates the keyboard from the back cover, so you can fold the keyboard behind the iPad or detach it entirely when you’re not using it. The back cover has an adjustable stand for positioning the iPad at several angles. It’s available only in white.
The only problem is that all these changes come at a cost. Historically, the iPad has been Apple’s best value, with the ninth-generation iPad’s price starting at just $329. The new tenth-generation iPad now starts at $449 for the 64 GB Wi-Fi model. Add $150 if you prefer 256 GB of storage, and another $150 if you want cellular capabilities too. You can choose from blue, pink, yellow, and silver finishes.
So now, when pondering a full-size iPad, you have three options. The ninth-generation iPad remains available at $329 for those looking to pay the least. The tenth-generation iPad is now the middle choice at $449. And for those who want a better Apple Pencil experience, faster performance, and slightly better specs, the iPad Air starts at $599.
New iPad Pro Offers M2 Chip, Faster Wi-Fi, and Apple Pencil Hover
Apple has also updated the iPad Pro, but with fewer changes. Foremost among them is Apple’s M2 chip, which provides the iPad Pro with the ultimate in performance. The M2 enables users to capture ProRes video for the first time and to transcode ProRes video up to three times faster than before.
That said, only those already pushing the limits on the previous iPad Pro models should consider upgrading from the previous M1 models since the difference isn’t likely to be that noticeable for less demanding workflows. Similarly rarified is the move to Wi-Fi 6E, which supports wireless networking at up to 2.4 Gbps, or twice as fast as the previous generation. Apple also expanded the 5G networking for the cellular-capable models to support more 5G networks around the world.
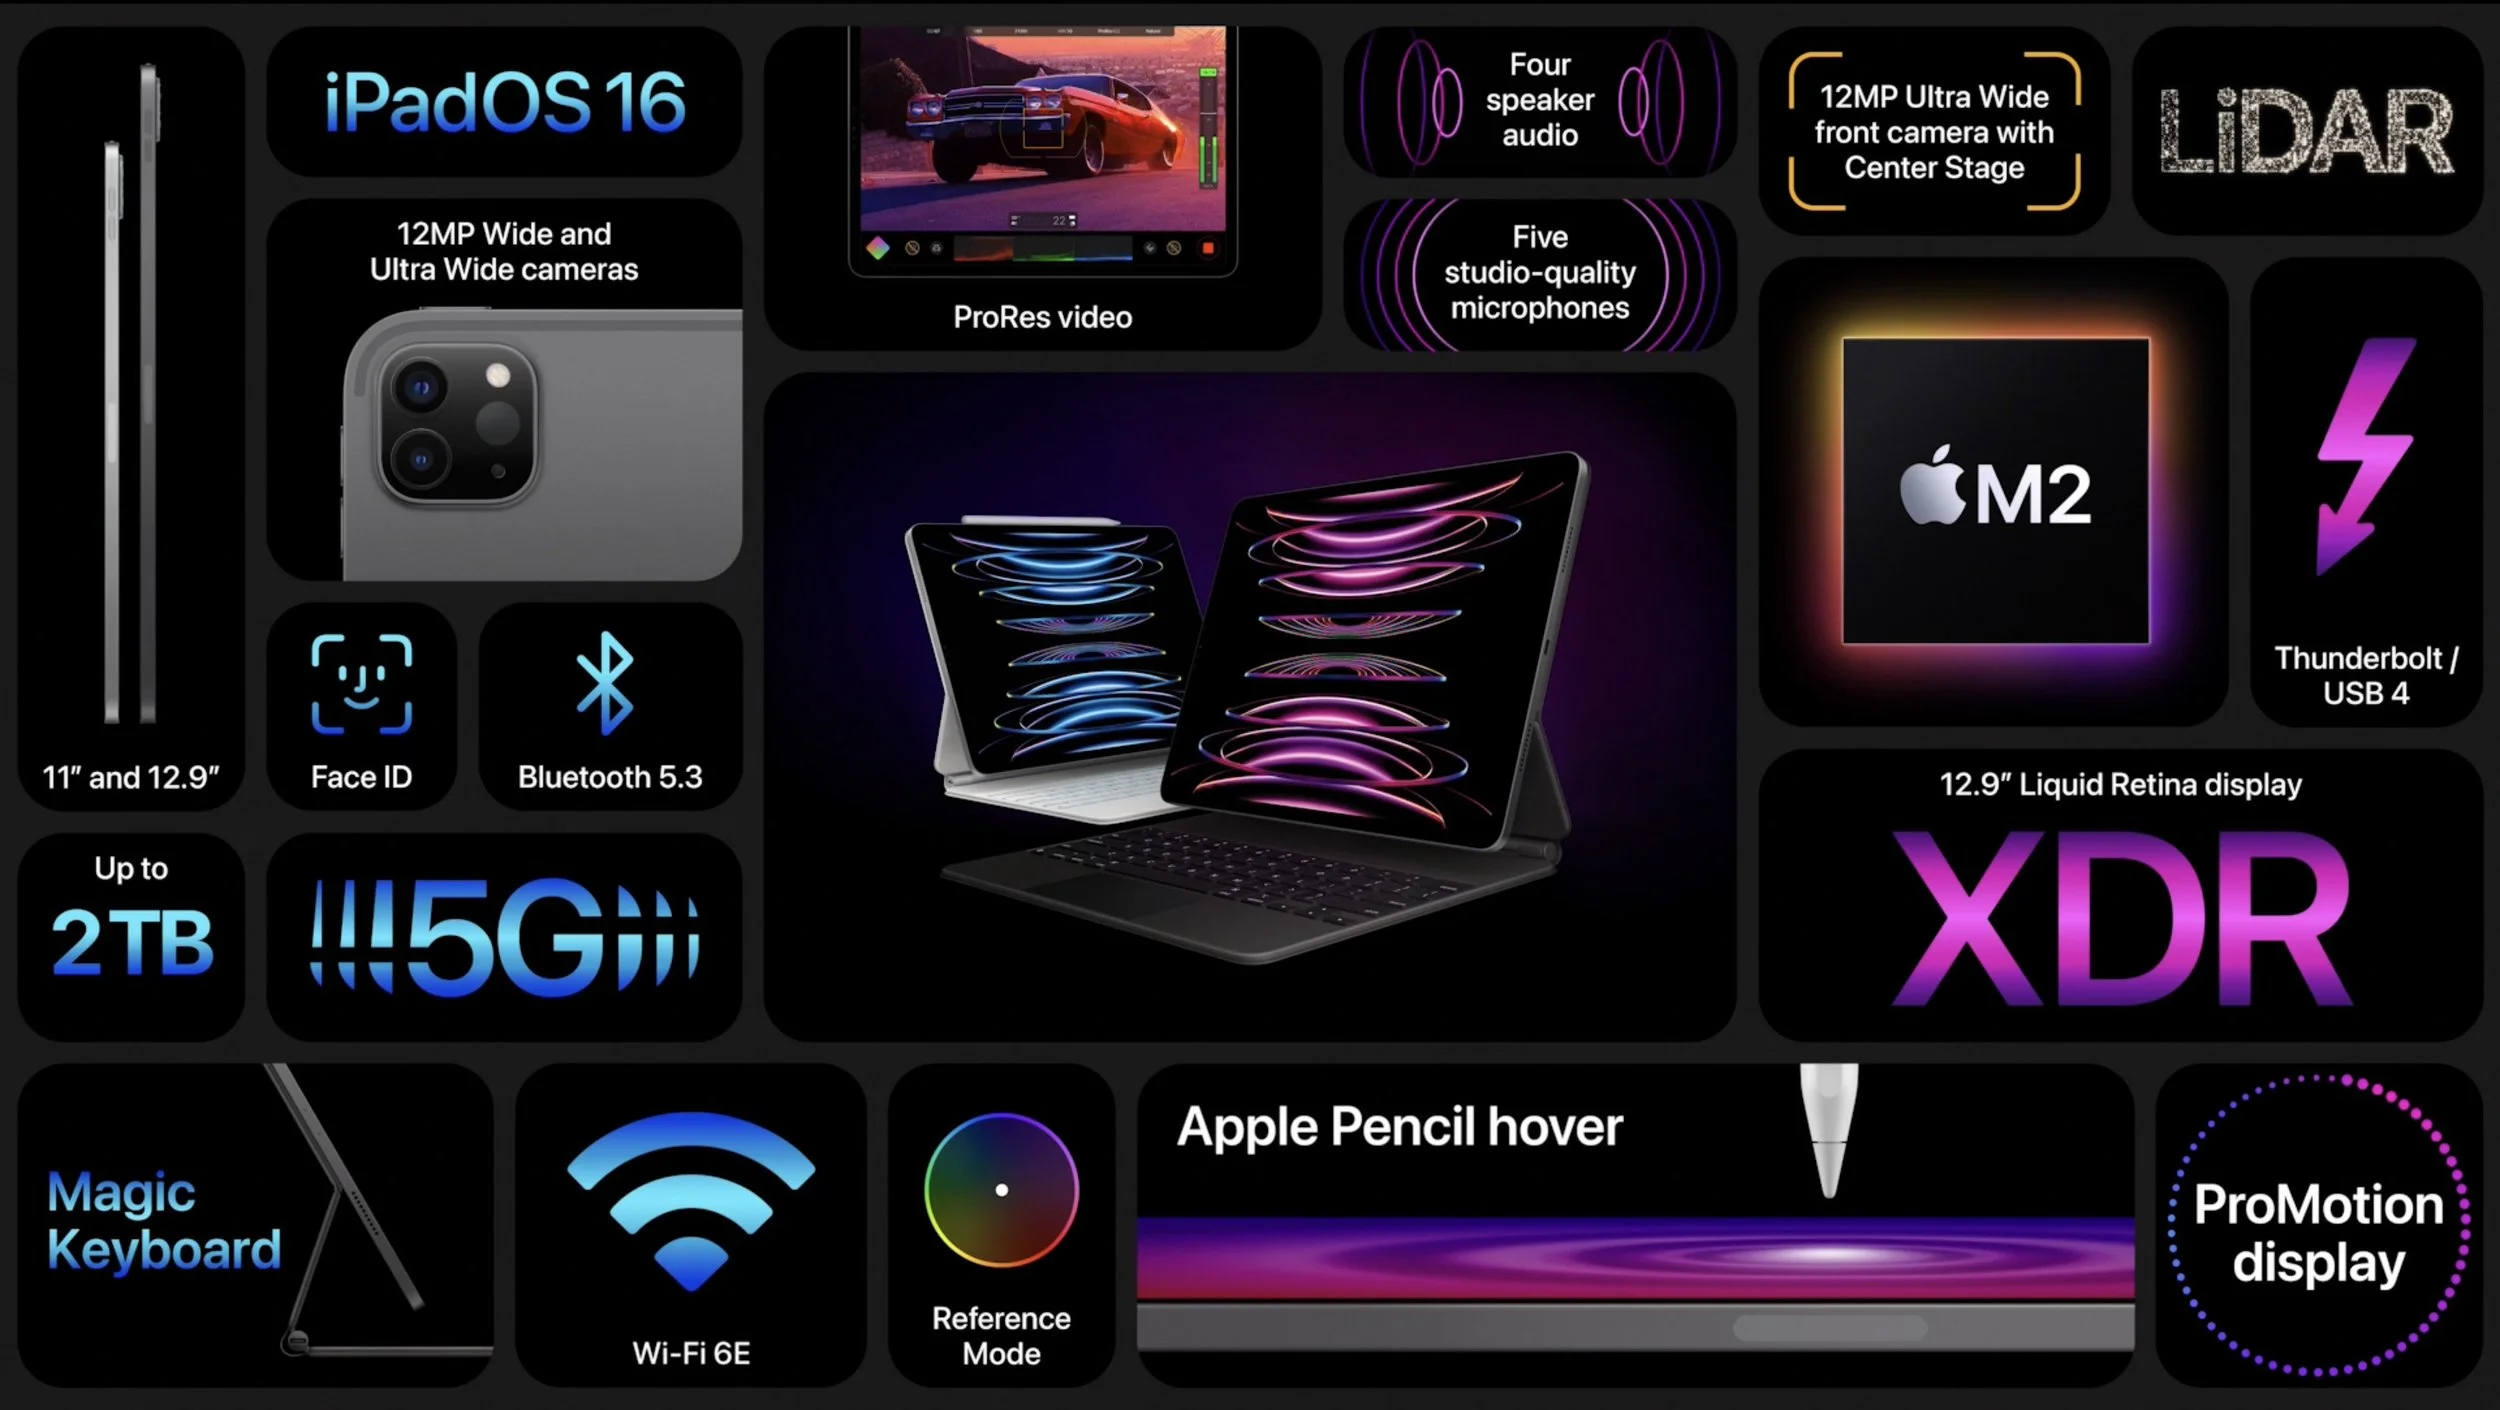
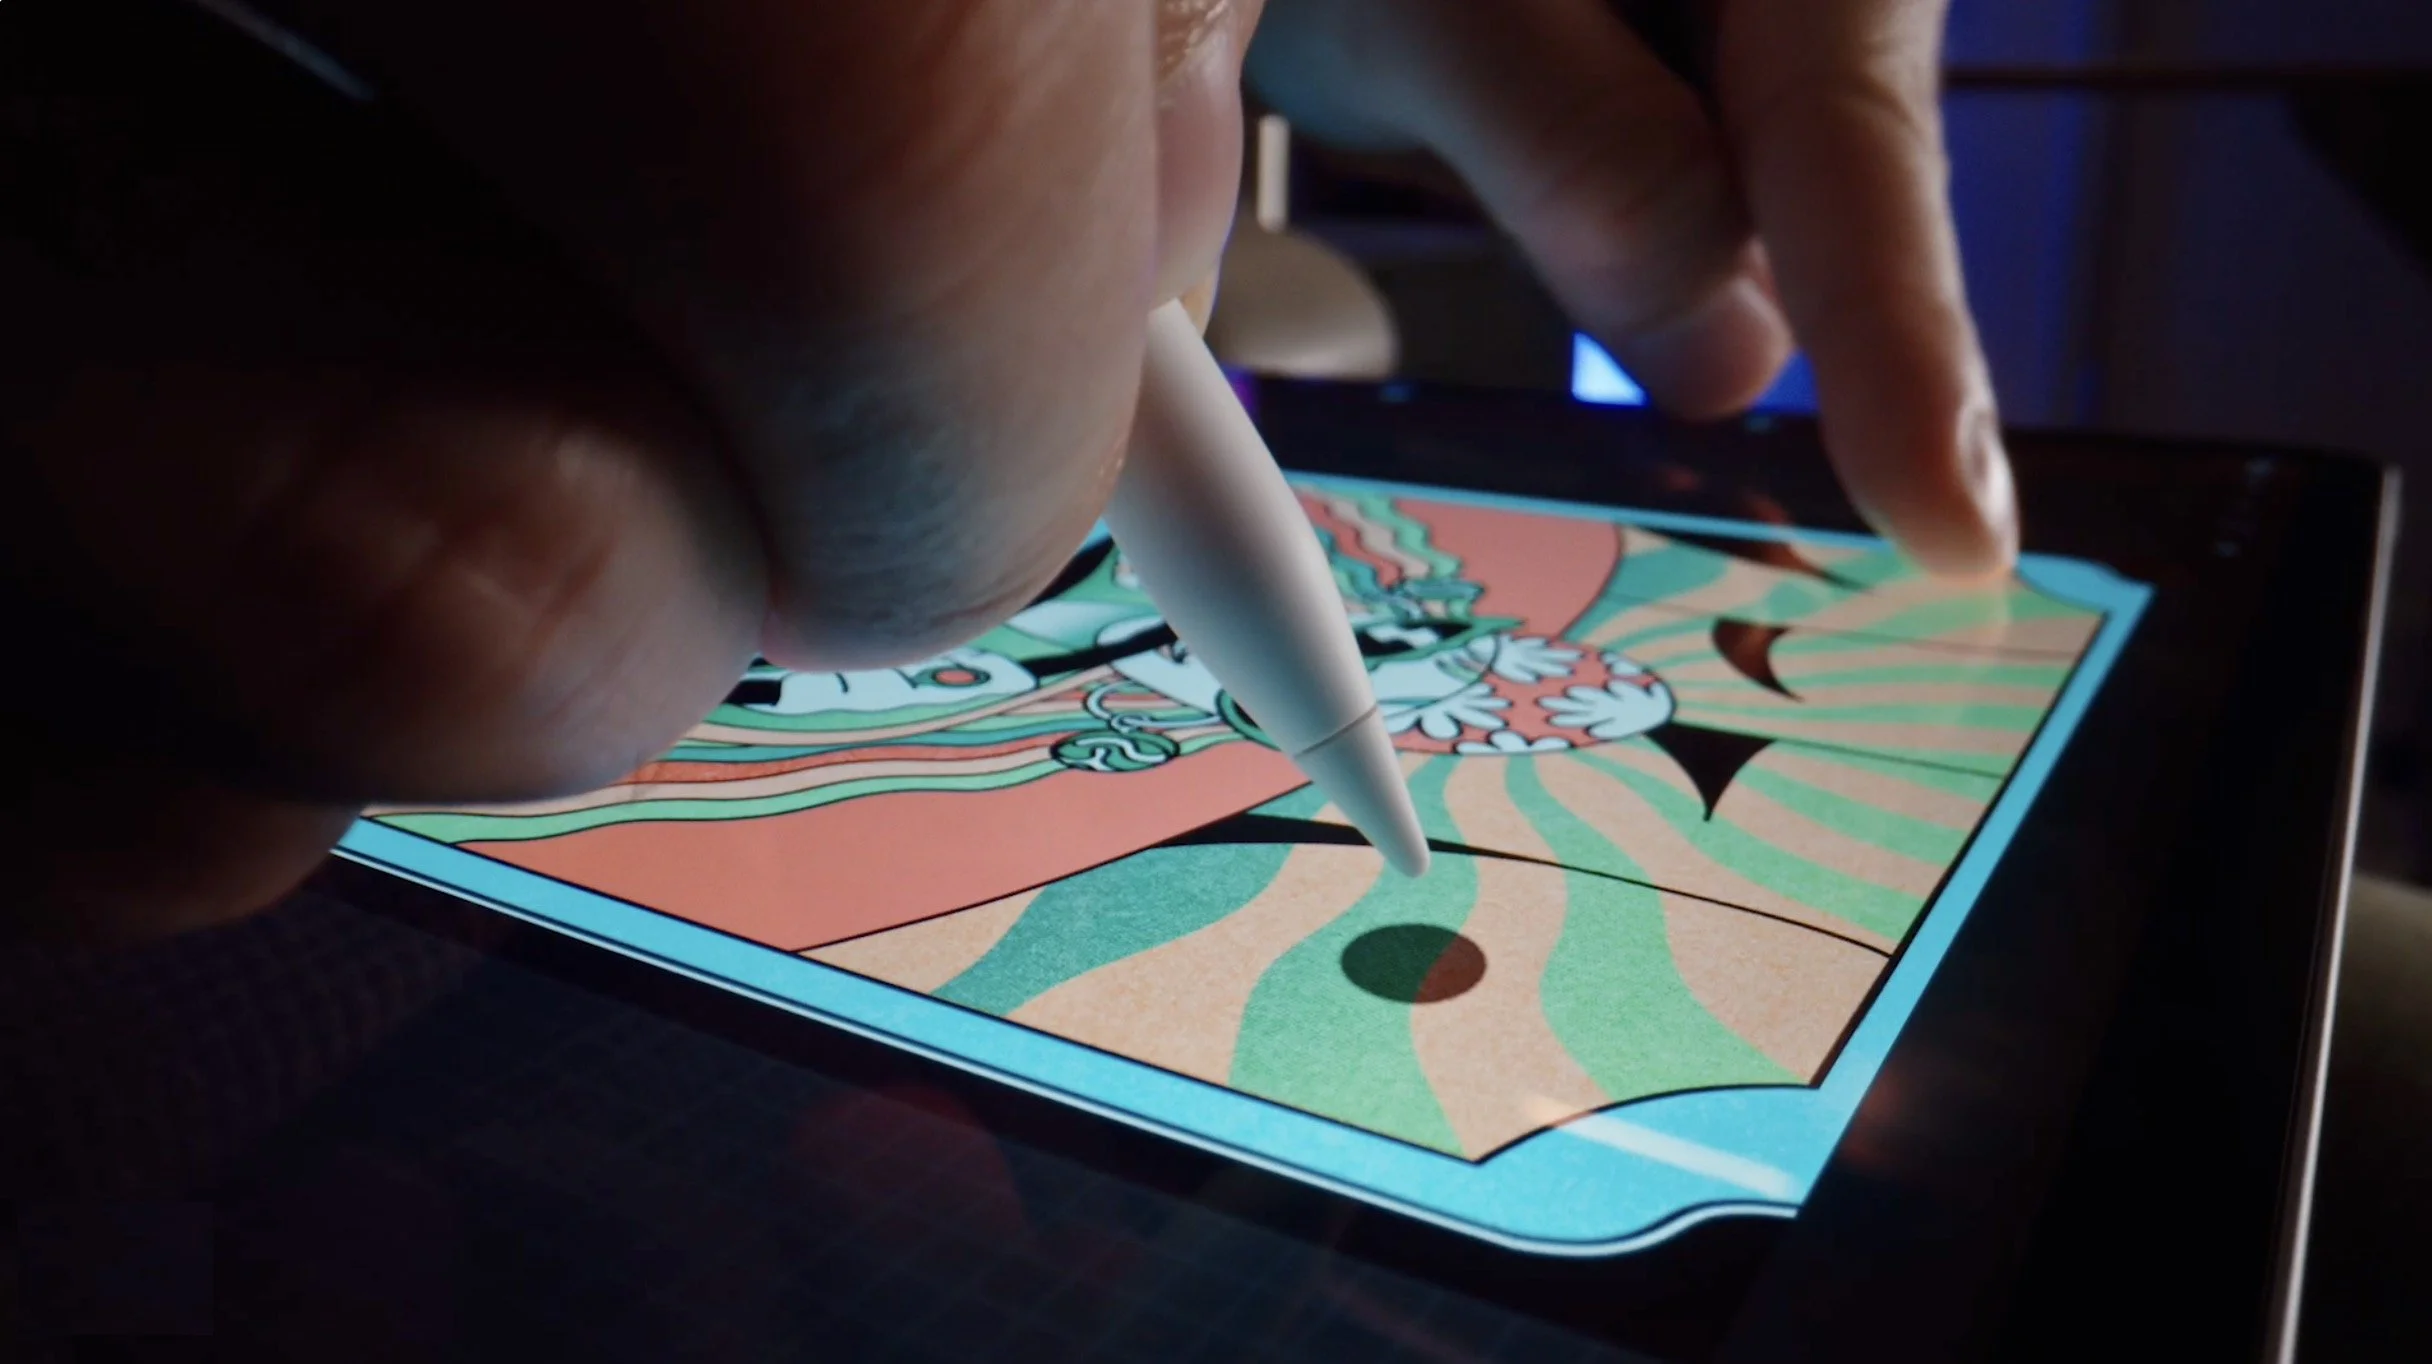
The new iPad Pro can also detect when the second-generation Apple Pencil is hovering up to 12 millimeters above the screen, displaying a circle that helps you position the tip of the Apple Pencil more precisely.
The new iPad Pro retains the same pricing, with the 11-inch model starting at $799 and the 12.9-inch model starting at $1099.
Increasingly, Apple is targeting the iPad Pro at video, audio, and graphics professionals interested in iPad-focused workflows. If that’s you, the new iPad Pro is worthwhile; those just looking for a high-performance iPad would be more economically served by the M1 iPad Air, which is $200 less expensive.
Third-generation Apple TV 4K Boasts Better Specs for Lower Prices
Along with the new iPads, Apple also refreshed its Apple TV lineup, introducing the third-generation Apple TV 4K and dropping the old Apple TV HD. The design remains essentially the same, with the big change being an upgrade from the previous model’s A12 Bionic chip to the faster A15 Bionic for faster performance and more fluid gameplay. Apple also doubled the storage and added support for HDR10+ to provide the best possible video quality across more TVs. Finally, the Siri Remote now charges via USB-C instead of Lightning.

The new Apple TV 4K comes in two models, much like previous generations, but this time there are differences beyond storage, which is important only for apps and games. The $129 Apple TV 4K (Wi-Fi) provides 64 GB of storage and supports only wireless networking, whereas the $149 Apple TV 4K (Wi-Fi + Ethernet) comes with 128 GB of storage, includes a Gigabit Ethernet port for faster wired connectivity, and supports the Thread mesh networking protocol for smart home accessories.
Those prices are $50 lower than the previous generation’s. For those who aren’t interested in Apple TV games, home automation, and wired networking, the $129 Apple TV 4K (Wi-Fi) is significantly more compelling than last year’s more expensive model.
(Featured image by Apple)
Five Best Practices for Organizing and Naming Computer Files
Having trouble finding files because they have vague names and are scattered across multiple folders? Read on for concrete advice on how to organize and name files for easy access.

We’ve had decades to get used to organizing computer files, but it’s still hard for many people. Part of the problem is imagining how you—or your colleagues, if you’re in a workgroup—will need to find the files in the future. Another part of the problem is mustering enthusiasm for renaming and reorganizing existing files to match an improved approach. Let’s see if we can help!
#1: Start Now and Catch Up Later
Don’t let your old files prevent you from starting a new organizational approach. The best time to begin is now; you can reorganize old files later.
An easy way to avoid being bogged down by old stuff is to move all your existing files and folders into a folder called “Unorganized” at the top level of wherever you store documents. Make sure to retain any hierarchy that those old files might have. If you’re still working with those files, they remain just as accessible as they were before.
One type of cleanup is often worth doing right away: If you have a lot of temporary or duplicate files from past projects that you can instantly identify as unnecessary, delete those now while they’re still familiar. That saves you or someone else the work of thinking about them again in the future.
#2: Pick an Organizational Structure
The most important question to ask yourself or your colleagues is what sort of organizational structure matches how you think about your data. There are four common approaches:
Project name: It’s hard to go wrong with using a project name as your primary organizational structure. For instance, an ad agency might have a top-level folder for each client, or a book publisher might have one for each title. A non-profit that organizes five annual events could have a folder for each event. Within each project folder, additional folders can separate files by category. You may also add some date-based structure to keep older files from getting in the way of current work. For instance, here’s how an ad agency might organize email marketing files for a hotel.

Date: Groups with many files that revolve around time periods may find it easiest to organize everything by year, month, and day. Date-based organization is a special case—you’ll know if it makes sense for your data and usage patterns. For instance, if a distributor creates different inventory reports for every supplier every day, a hierarchy like this might make working with files from the same time period easy. However, finding all the files for a particular supplier would be more difficult, although a file naming convention could help resolve that problem.

Project type: Large organizations with a lot of cross-departmental collaboration across numerous projects might find it easier to separate files by category first and name second. That way, everyone in the marketing and production departments working with scripts and audio files for radio spots, for instance, can find those files without having to see files related to social media ads. The downside is that finding related client projects is tricky unless you add that information into a file naming structure.

Department: For large organizations with siloed departments that seldom interact, each department can have its own hierarchy. That keeps the marketing department’s files separate from the accounting department’s, for instance, but can result in confusion when departments do collaborate. Plus, it can be difficult to bring data about a single project together, although again, a good file naming structure can help.

We often get questions about how best to organize images. If they’re tightly related to particular projects, the easiest approach is usually to store them alongside other files in that project. For example, photos for a cookbook might live with the layout files within a folder for each chapter.

For graphically intensive fields with a very large number of images to track across multiple projects, particularly when any given image might be used in multiple contexts, consider moving to a digital asset management app that stores all your images, providing access through hierarchical categories and keywords or tags. Digital asset management apps are essentially databases for images and other media, enabling you to search and sort far more flexibly than with a simple folder hierarchy.
#3: Decide on a Consistent File Naming Convention
Although an organizational structure is important to help you find files quickly and work with related files, your file naming convention is even more important. You should be able to identify a file merely by glancing at its file name, even if it was moved outside its folder hierarchy. That’s especially true if files are shared outside your organization, where the recipient won’t see the folder hierarchy above the file. You can see this problem illustrated below: you can tell exactly what this MailChimp.pdf file is from the folder structure, but would someone else have any way of knowing it’s a Belvedere Hotel-related invoice from 2022?

File names should be as specific and detailed as necessary for quick identification, preferably starting with a date or project name and including essential aspects of the organizational structure. Dates work well for any file that’s created on a regular basis—instead of the vague MailChimp.pdf, try 2022-09-29-Belvedere-invoice-MailChimp.pdf. Project names are better for one-offs, so instead of Chapter3.docx, use something like Second-Breakfasts-Ch03-recipes.docx. Note how both of those names integrate key aspects of organizational structure.
Three pieces of advice:
When you name files starting with the date, use the YYYY-MM or YYYY-MM-DD format to ensure that they sort well and can’t be confused with older or newer files.
Consistency is key. Stick to the conventions you decide to use and require that everyone else do so as well. Having one file name start with “Second-Breakfasts” and another with “2nd breakfasts” will cause confusion and annoyance.
When separating words, use a space, a hyphen (-), or an underscore (_). Spaces are the easiest to use but should be avoided for files destined for a website. We prefer hyphens because macOS interprets two words separated by an underscore as a single word when selecting, which can be irritating while editing file names.
#4: Identify Versions Clearly
Many files go back and forth between multiple people in a collaborative workflow. Building a versioning scheme into your file naming convention is essential to ensure that everyone knows which version is the most recent and who worked on which version. It’s tempting to use a single file, with each person renaming it as necessary, but we recommend archiving each version until the completion of the project to make it easy to see who did what and to recover from any file corruption or accidental deletion of data. When using a file server or shared folder, it’s best to make it clear when someone is actually working on the file to avoid collisions. Let’s assume in these steps that you and your editor are taking turns working on a Word file.
Alongside the file in question, create a folder called CHECKED OUT and another called OLD.
Move the file you’re working on into CHECKED OUT. Name the file however you like, but end it with your initials and the number 1, as in Second-Breakfasts-Ch03-layout-rte1.docx.
After you make your changes, move the file back into the main folder and alert your editor that it’s available.
When your editor wants to work on the file, they first make a copy of it in OLD to archive a version. Then they move the working copy into CHECKED OUT and rename it with their initials, incrementing the version number, as in Second-Breakfasts-Ch03-layout-afp2.docx.
They edit the file, moving it back to the main folder when done and alerting you.
You each then repeat Steps 4 and 5 as necessary, storing an archive copy in OLD, putting the working file in CHECKED OUT, renaming it with initials and the next version number, and then putting it back in the main folder when done.
On the final revision, rename the file one last time, replacing the initials and version number with “final,” as in Second-Breakfasts-Ch03-layout-final.docx.
If you’re instead sending files back and forth via email, there’s no need for the CHECKED OUT folder, but you should both keep a copy of each version in OLD, just in case.
#5: Know When to Browse and When to Search
If you have a solid organizational structure, you should be able to jump right to the files you need by navigating the folder hierarchy, and if you’ve designed your structure well, you’ll browse for files most of the time. However, if a consistent file naming convention enables you to fall back on searching in certain situations:
You need to find files across multiple folders. For instance, if you store files by client but want to see all the invoices for all clients, a search on “invoice” is more effective than looking in each client folder separately.
There are too many files to work with fluidly. Imagine that you have an automated system that generates dated reports for multiple suppliers in a particular folder. If they’re sorted first by date and then by supplier, a search could help you filter the folder’s contents to a single supplier.
You don’t entirely understand the organizational structure or trust that others have followed it. This scenario is most likely when you weren’t the person to set things up. Hopefully, you at least have consistent file names to look for with your searches.
Apart from these situations, if you find yourself regularly resorting to a search, that may be a hint that you should revisit the organizational structure and make sure it works the way you need.
As you can see, there are numerous approaches for organizing and naming your files, and what makes sense for one group may not for another. If you’re having trouble deciding on the best approach, feel free to ask us for suggestions.
(Featured image by iStock.com/everythingpossible)
Security Questions Your Organization Should Be Asking Itself
Securing an organization’s digital assets requires ongoing attention. This article poses questions your organization should be able to answer—and that will likely come up when purchasing cyber insurance or doing work for other, larger organizations.

We’re increasingly hearing from organizations that need to establish that they have sufficient security policies in place, either to meet the requirements of a larger client or to qualify for cyber insurance that insures against breaches and similar losses. Details vary, and we’re happy to work with you on the specifics, but here are some of the kinds of questions you may be asked. Of course, if you don’t have to prove that you’re doing the right thing to some other company, answering these questions for yourself can only improve your security readiness.
Do you enroll all organizational devices in a device management solution?
With device management, an IT department or managed services provider (MSP) maintains oversight and control over all organizational devices. That’s helpful for automating configuration and deployment, providing secure access to organizational resources, ensuring consistent security policies, managing app and operating system updates, tracking device inventory and status, and much more.
Do you have an organization-wide backup strategy with offsite backups?
Regular backups—with some being stored offsite—are essential if you need to recover from lost or stolen hardware, a natural disaster, or a ransomware attack. Even though ransomware isn’t currently a major problem in the Mac world, it wouldn’t hurt to start creating immutable backups using “write once, read many” tape or something like Retrospect’s Cloud Object Lock, a technology that ensures that cloud-based backups can’t be corrupted. Finally, have you tested restoration and recovery of key systems from your backup data? Backup is important, but only if you can re-store.
Do you have a policy for updates?
It’s essential to install security-related updates to operating systems and major apps, but how quickly that happens has to be weighed against problems that version changes can cause for important workflows. There’s no right answer here, but you want to make sure that you aren’t leaving your organization’s apps and devices vulnerable to known security exploits for longer than necessary.
Do you have a strong password management policy?
Short, easily guessed, or cracked passwords are one of the primary ways attackers breach corporate networks and systems. At minimum, your password management policy should require that all passwords be stored in a password manager, new passwords be generated by the password manager and meet minimum requirements for strength, and two-factor authentication be used when available.
Do you use an endpoint protection platform?
Endpoint protection is essentially software aimed at preventing and detecting malware on employee workstations, often with an organizational dashboard and management capabilities. Although the Mac doesn’t have nearly the exposure to malware that Windows does, it’s still important to keep computers free of malware that could hurt performance, exfiltrate data, or provide an entry point for future attacks. End-point protection is usually part of a larger managed systems approach that can also ensure that devices adhere to security policies like full disk encryption, run only approved software, stay up to date with security updates, and more.
Do you have a list of sensitive data on your network?
Exactly what counts as sensitive data will vary by organization, but anything related to network and corporate security qualifies, as does any personally identifiable information you may hold about or for clients. It’s not uncommon to store information about people that includes names, email addresses, phone numbers, and postal addresses, but you should be even more careful if you store Social Security numbers, credit card numbers, driver’s licenses, passports, financial records, or medical records. Knowing what you have is the first step; after that, consider what additional precautions you should take to protect such information.
Do you provide periodic anti-fraud and security training to employees?
Social engineering is another common way attackers gain access to corporate networks and systems. Does your organization require that all employees take regular training to learn how to identify phishing attacks, require appropriate approvals for unusual transactions or access requests, and report suspected incidents to the necessary people? If an administrative aide in the accounting department gets an email request from the CEO to pay an urgent invoice to a new vendor, will that person know how to respond?
Do you allow access to organizational email and systems from personal devices?
It’s tempting to allow users to access their email from personal devices or to have contractors use their personal email addresses for work communications. We recommend keeping as clear a line as possible between work and personal devices and accounts to reduce the security implications of such mixing. Particularly when there’s sensitive information in play, personal email addresses should never be used for work communications, and if personal devices are being used, they should be set up with two-factor authentication for organizational logins.
Do you have incident and disaster response plans?
Bad things happen, and it’s important to consider how you would respond to different types of security incidents and natural disasters. How will your organization maintain crucial business operations, communicate with employees, coordinate with partners (insurance, legal, PR, and clients), and more? Is your plan written down and updated regularly? Have you tested key aspects of your plan?
We know there’s a lot to think about regarding security in today’s world, and we’re always available to help if you’d like assistance answering any of the above questions.
(Featured image by iStock.com/Bulat Silvia)
New Messages Features in iOS 16: Mark as Unread, Edit Messages, Undo Send, Report Junk, and More
Messages in iOS 16 gains a slew of useful features: marking conversations as unread, editing sent messages, unsending messages, and more. They’re great, but some require your recipients to upgrade to iOS 16 for the full experience. Learn more at:

After years of user requests, Apple has finally beefed up Messages with a few welcome features—options to mark conversations as unread for later reference, edit messages after they’ve been sent, and undo sending entirely. Plus, when you delete junk texts in Messages, you can now report them to Apple and your carrier, and you can find inadvertently deleted conversations in Recently Deleted. Finally, there’s a Tapback improvement for SMS messages to Android users.
Before we begin, beware that editing messages and Undo Send work the way you expect only if your recipient is also using iMessage (blue bubble friends) with iOS 16 (or iPadOS 16 or macOS 13 Ventura, once those come out later in 2022). Instead of an edited message, a device running any other operating system will display a second message with the edited text. An unsent message can’t be called back from a recipient not running iOS 16—it will remain in the conversation with no indication that you tried to unsend it.
Mark as Unread
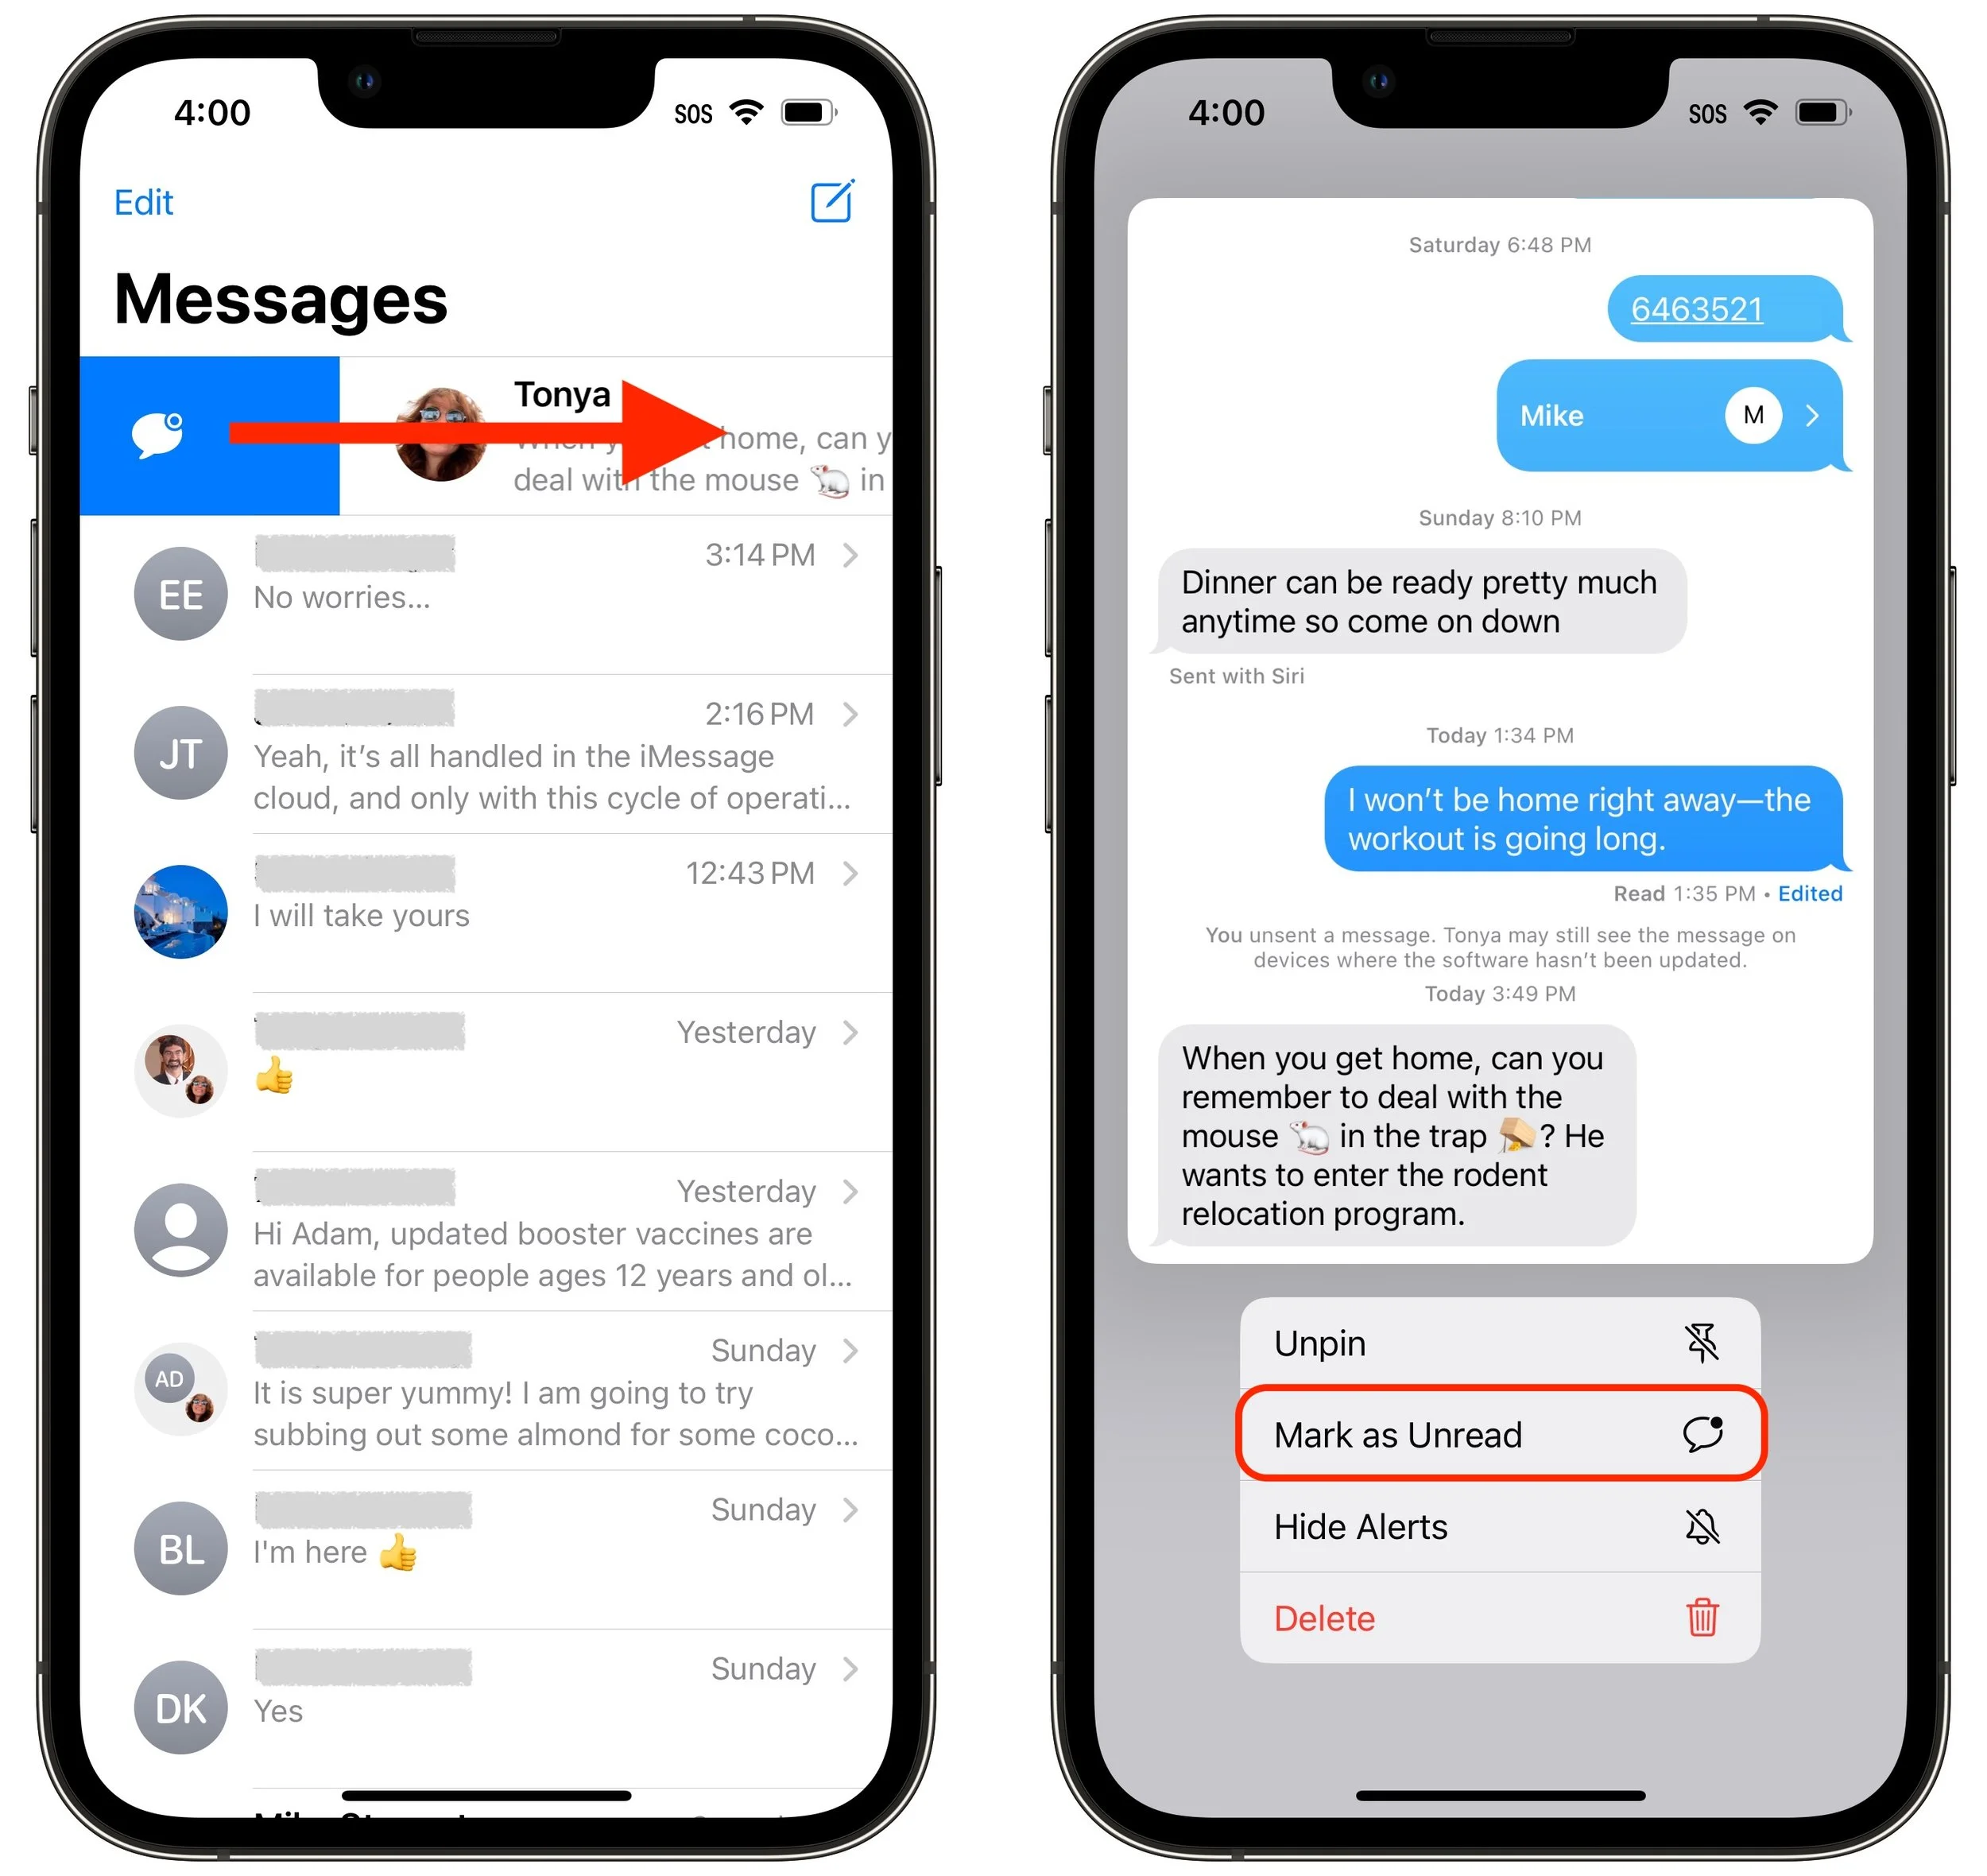
There are two types of people in the world: those who use red icon badges as reminders and those who ignore them entirely. The same applies to the blue dots that appear next to conversations in Messages to indicate unread posts. If an icon badge or blue dot is your nudge to do something, you’ll like Messages’ new capability to mark messages as unread. That way, if you receive a message while you’re busy, you can pretend that you haven’t read it so the red icon badge and blue dot remind you to deal with the message later.
Note that Mark as Unread works at the conversation level, not the message level. To mark a conversation as unread after looking at it, return to the message list and swipe all the way right on the conversation. For a pinned conversation, press and hold the conversation and tap Mark as Unread.
Edit Messages
We’ve all been the victims of auto-correct or dictation errors that render a message embarrassing, confusing, or inexplicable. With Messages in iOS 16, you can fix such errors within 15 minutes after sending, and if necessary, you can do it up to five times.
To edit a message during that 15-minute window, press and hold the message, then tap Edit. Your message opens for editing. Make your changes and then tap the blue checkmark; if you change your mind, tap the gray X.
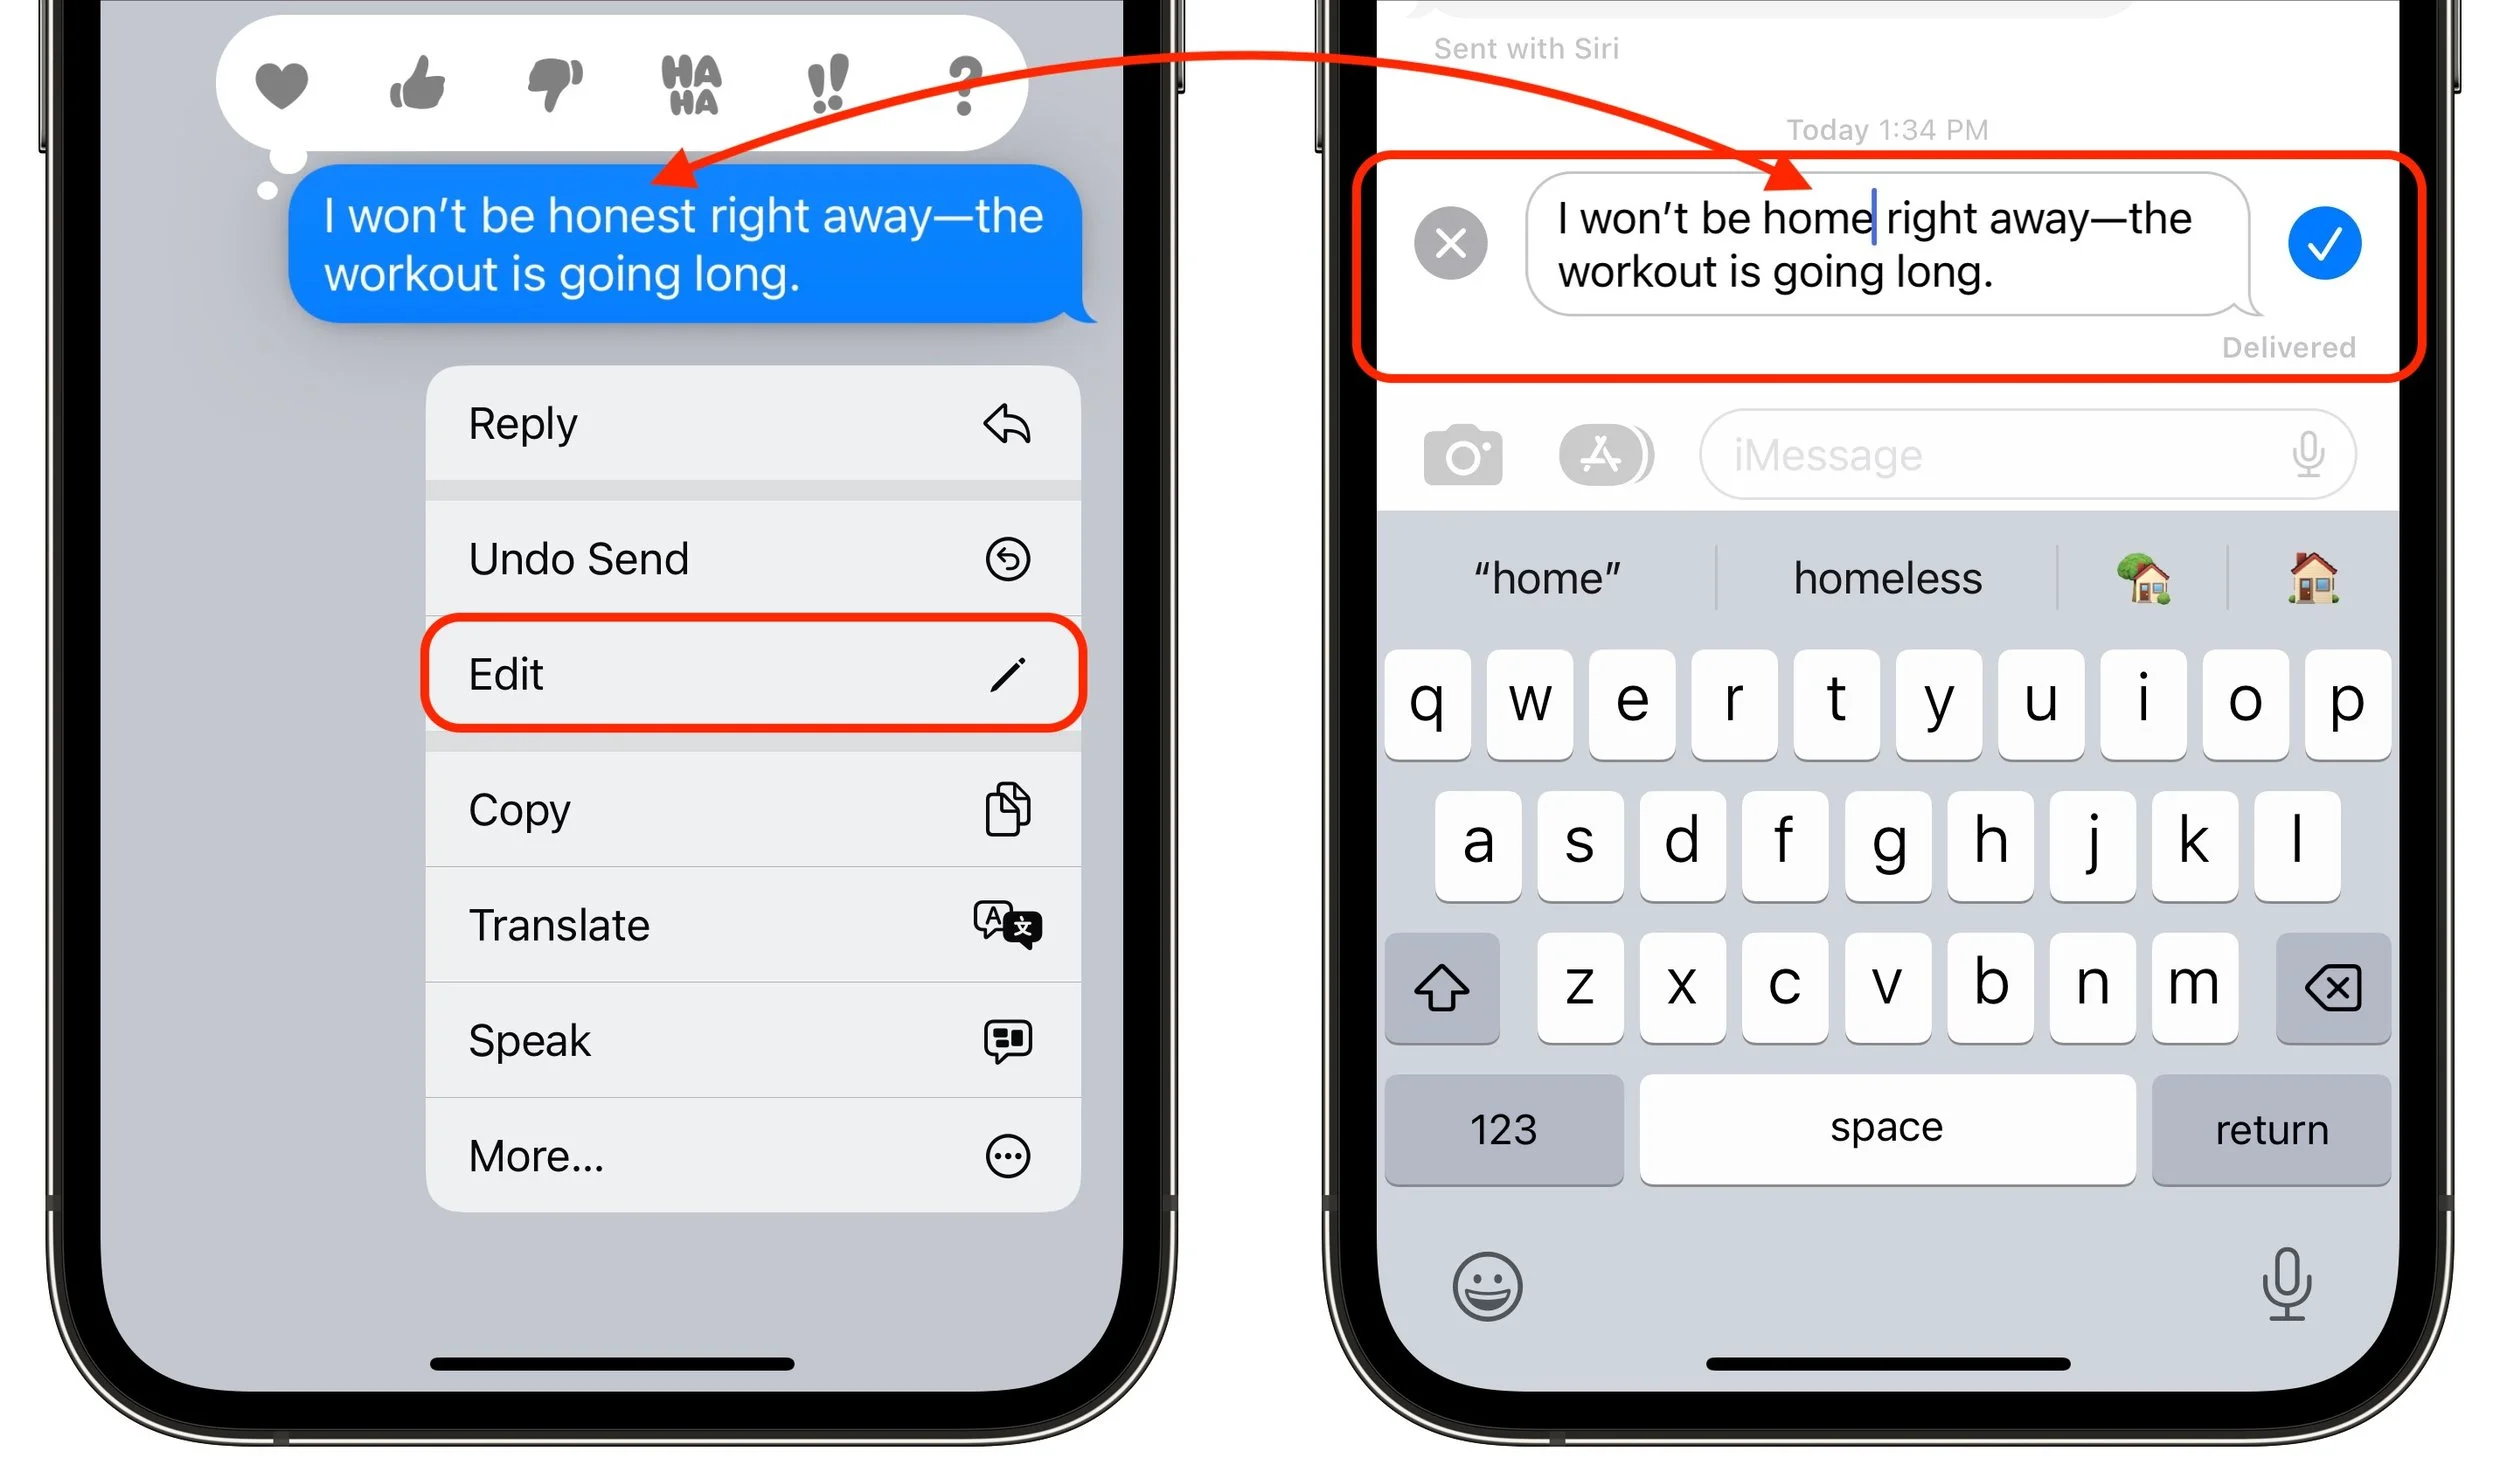
It’s important to note, however, that the recipient could have seen the message before you edited it, and even if they didn’t, such messages are marked with Edited in the conversation. If they tap Edited, they can see previous versions of the message. In other words, you can fix mistakes, but you can’t pretend they never happened.

Undo Send
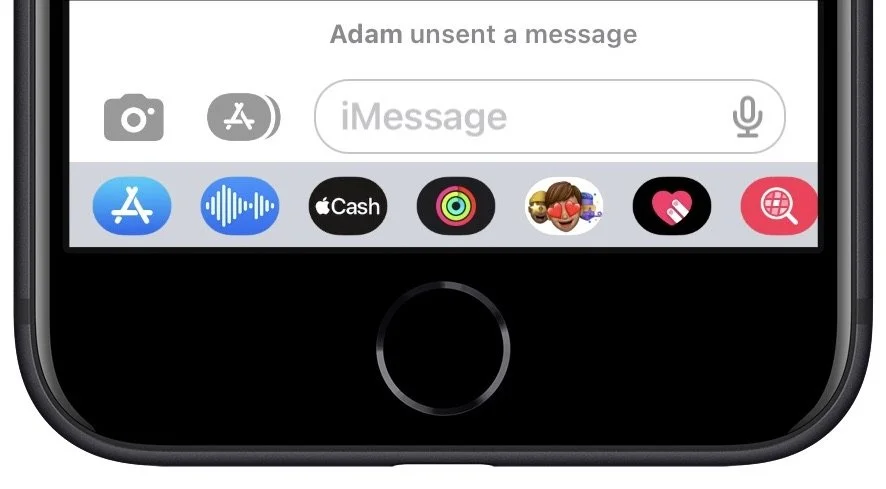
Have you ever sent something in Messages that you wanted to call back? We’ve certainly sent the right message to the wrong person and inadvertently sent gibberish with errant taps on the keyboard. With iOS 16, if you realize you’ve made such a mistake within 2 minutes, you can undo sending, which deletes the message from the recipient’s iPhone, replacing it with a message saying that you unsent it. However, if the recipient isn’t using an iPhone or has any Apple device logged into iMessage that’s not running iOS 16, iPadOS 16, or macOS 13 Ventura, the message will not be deleted on that device, with no indication that you tried to recall it.
To unsend a message within that 2-minute window, press and hold the message, then tap Undo Send. It disappears instantly, and you see a warning about it working only with compatible devices.

Meanwhile, even if the recipient is running iOS 16, they still could have read the message before you unsent it, and if they didn’t see it, they would still see a message saying that you unsent it. In short, you still need to think before you send!
Report Junk
There’s no way to know how effective reporting junk messages is in preventing future spam from that person or phone number, but it feels good. (We like to imagine an Apple satellite’s space laser vaporizing the offender’s phone.) If you get a junk text, either via iMessage (blue bubble) or SMS/MMS (green bubble), swipe all the way left on it. Then tap Delete in the prompt that appears, and Report Junk in the next one.

Recently Deleted
What if you inadvertently delete the wrong conversation or message? You can now access those for up to 30 days in Recently Deleted. Tap Edit in the upper-left corner, tap Show Recently Deleted, select the messages to restore, and tap Recover in the lower-right corner.

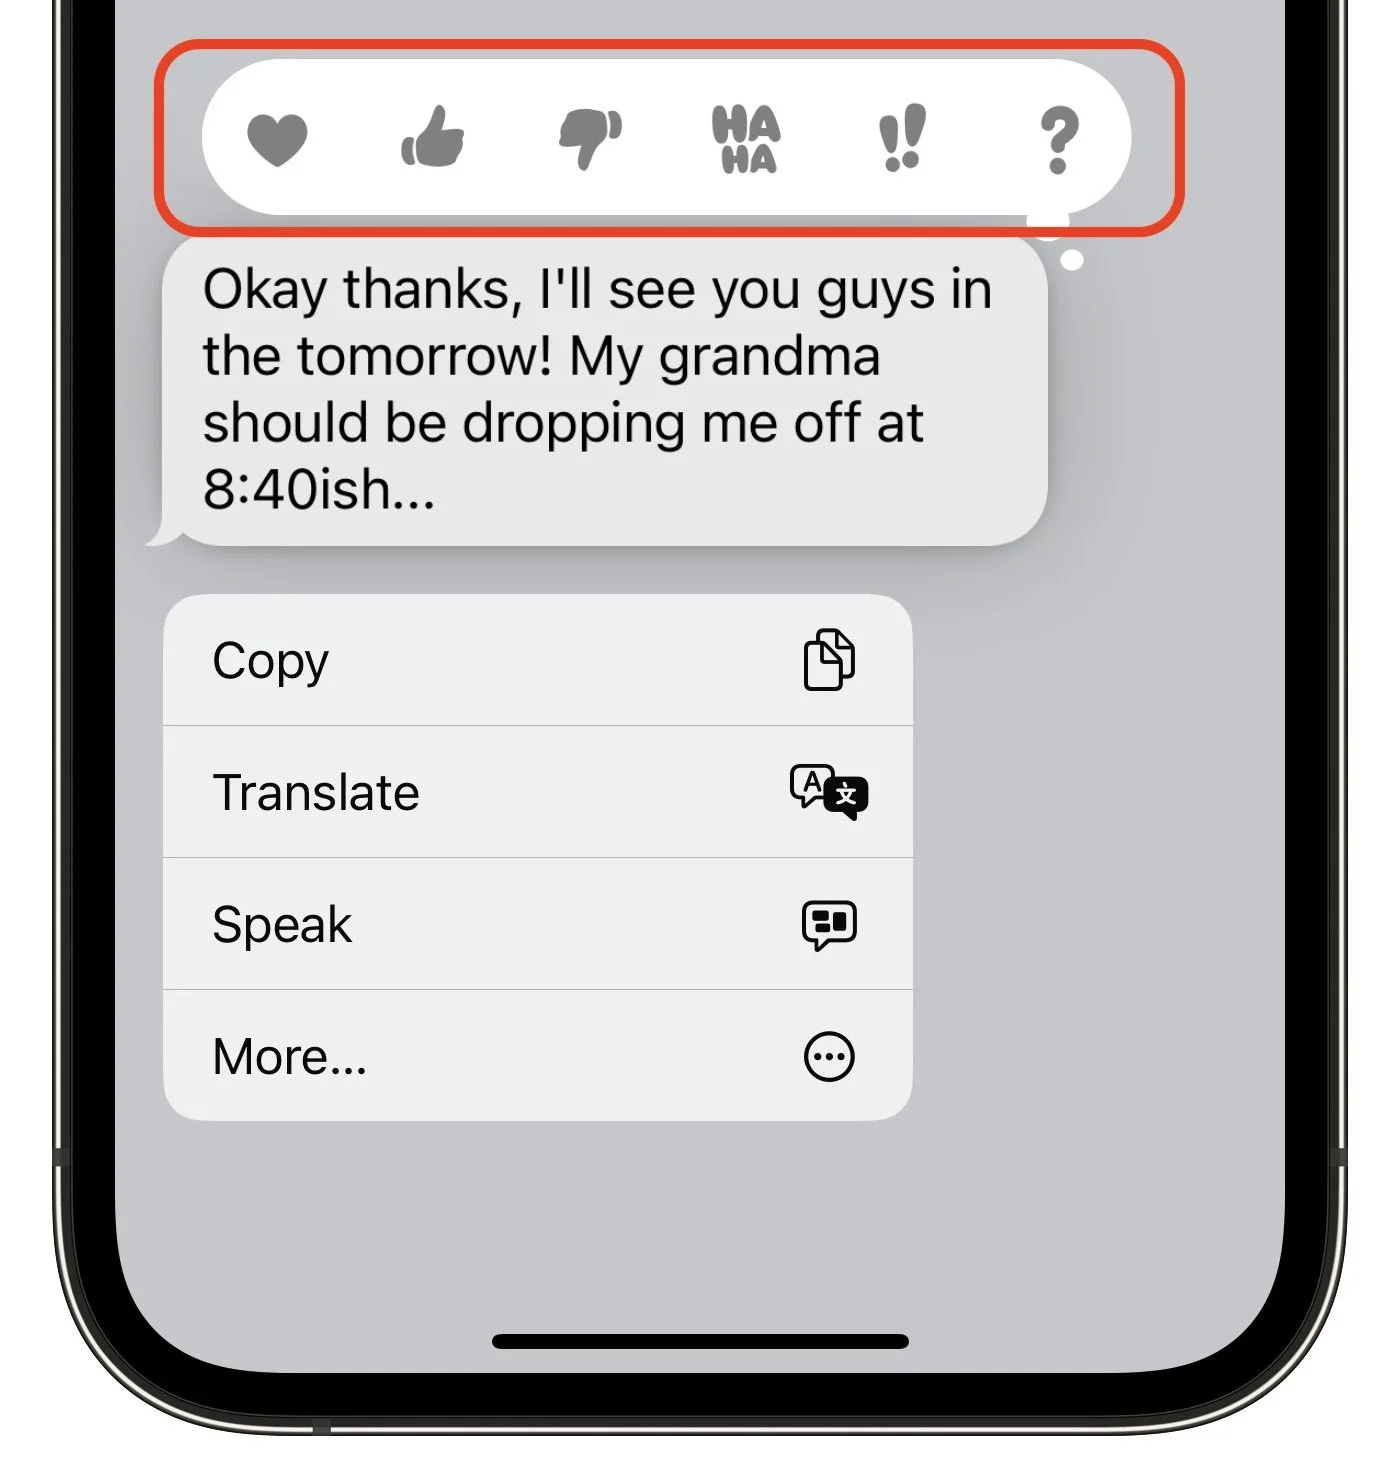
SMS Tapbacks on Android
Finally, Apple has tweaked Messages so you can use the Tapback feature (press and hold a message, and then tap one of the response icons above it) to send a corresponding emoji to messages sent by Android users with SMS. This small change helps to provide a consistent experience for both iPhone and Android users.
Although it’s too bad that message editing and Undo Send work only with other iOS 16 users, there’s no avoiding the need for support at both the system level (which eliminates SMS messages sent to non-iPhone users) and the app level (which eliminates older versions of Messages). Nevertheless, they and the other new Messages features are useful now and will become all the more so as more iPhone, iPad, and Mac users upgrade.
(Featured image by iStock.com/ViewApart)
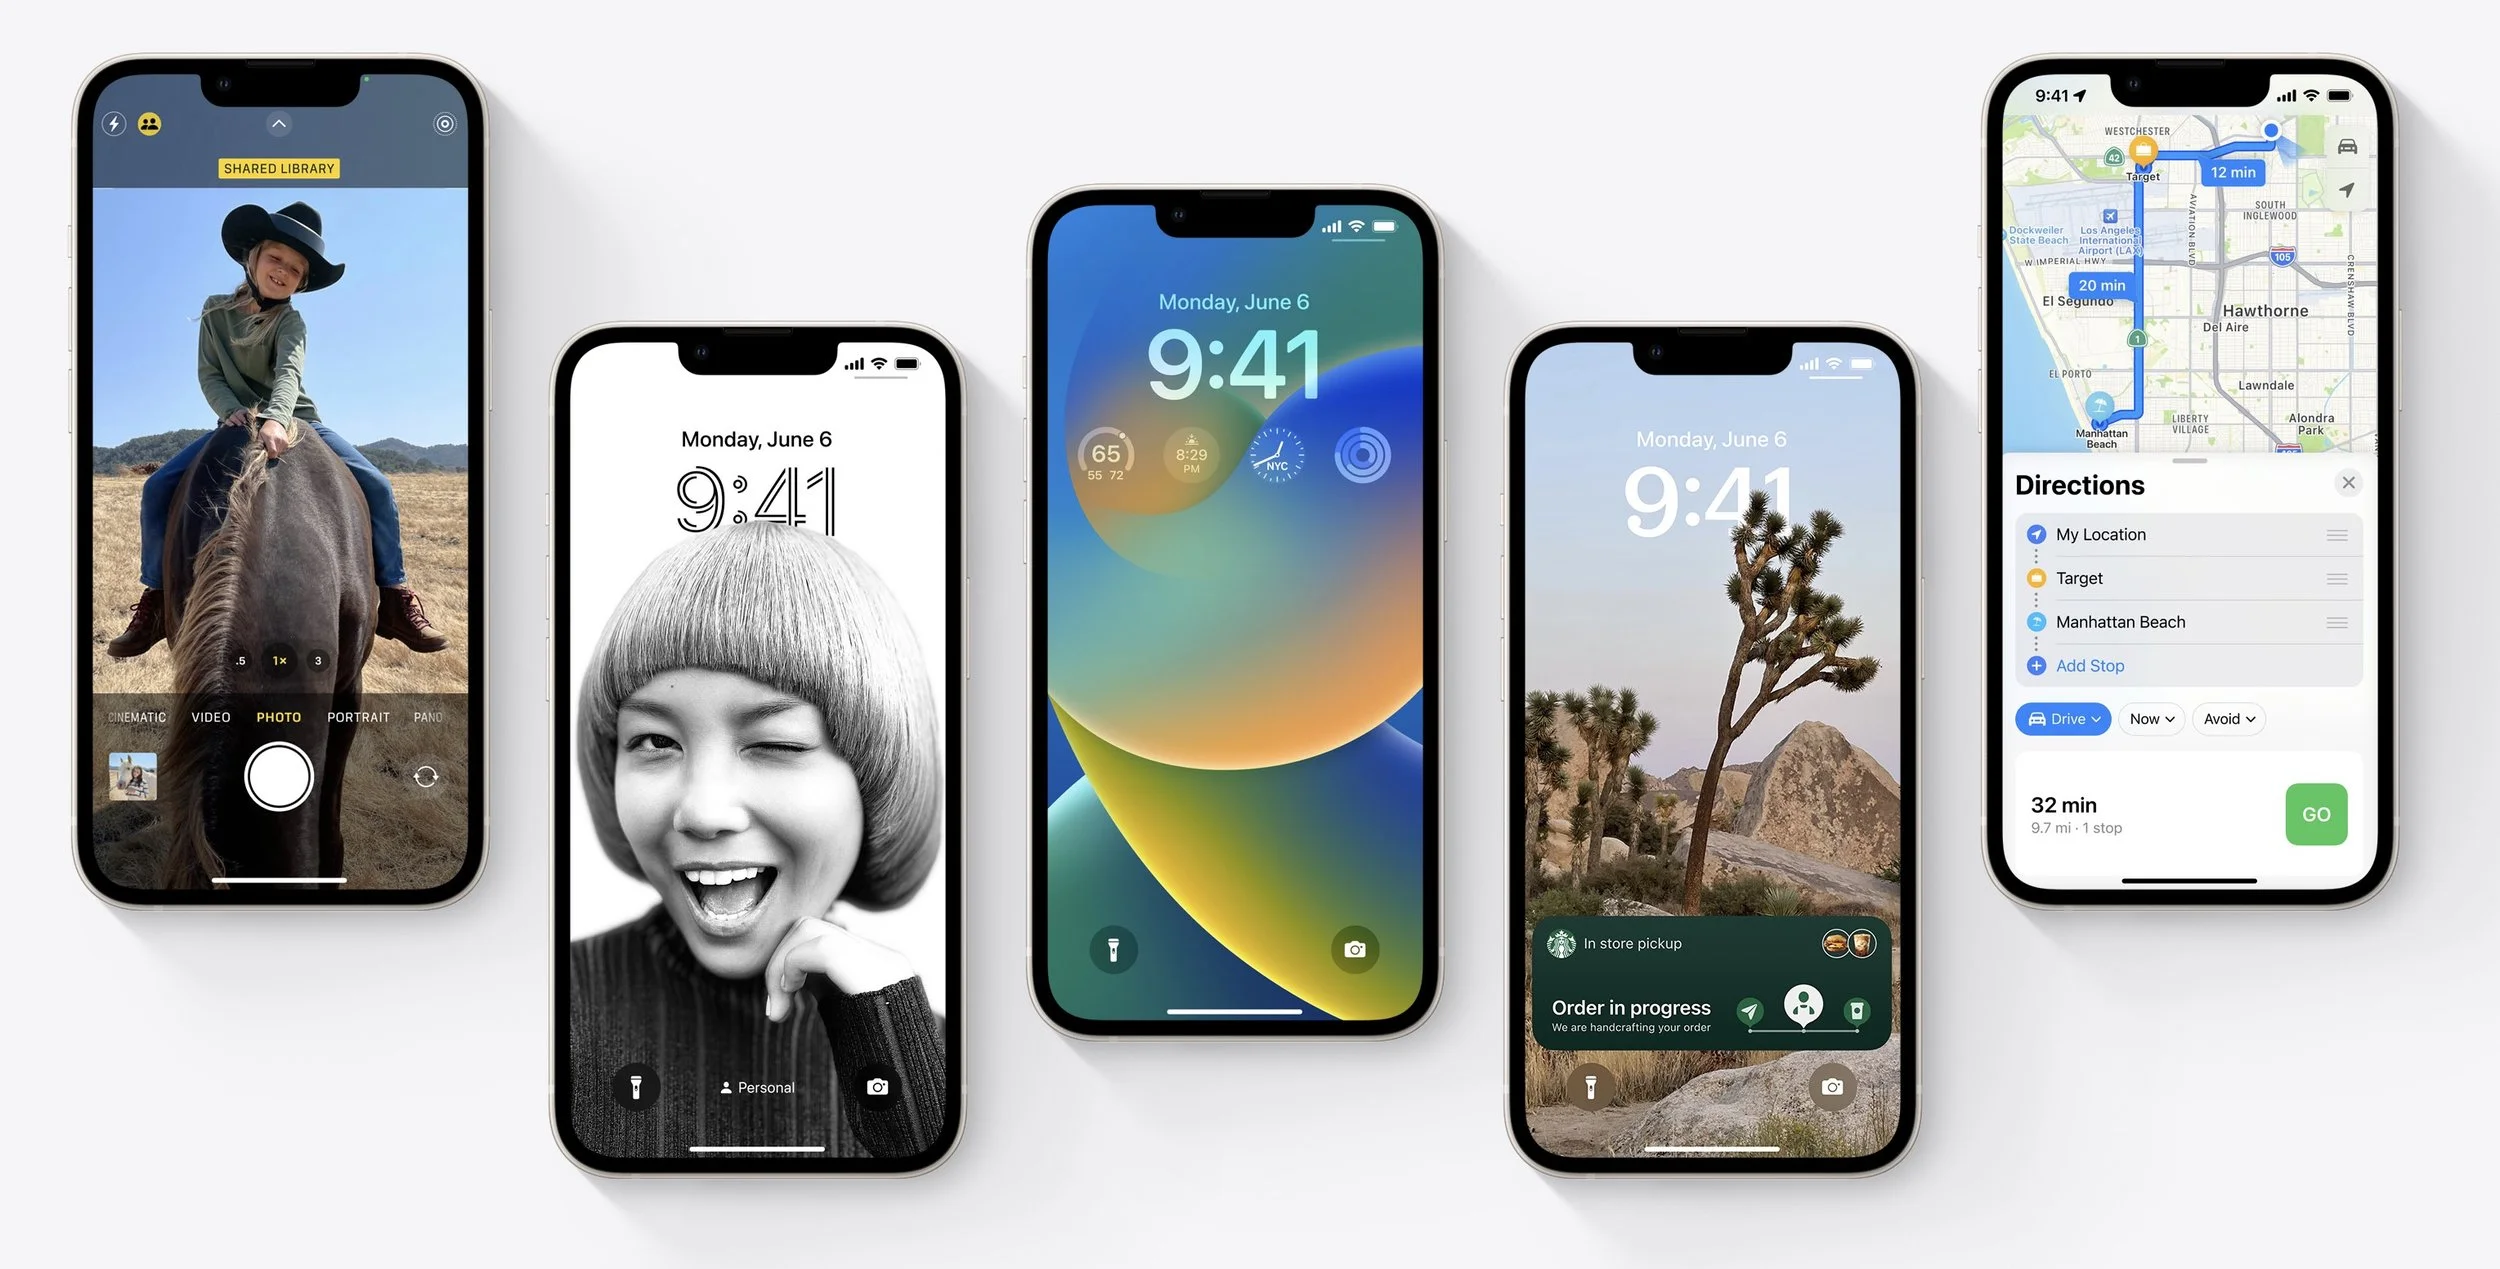
The Many New Lock Screen Customizations in iOS 16
iOS 16’s marquee feature is customizable Lock Screens—read on to learn how to make multiple Lock Screens, each with its own wallpaper, clock font and color, and interactive widgets.
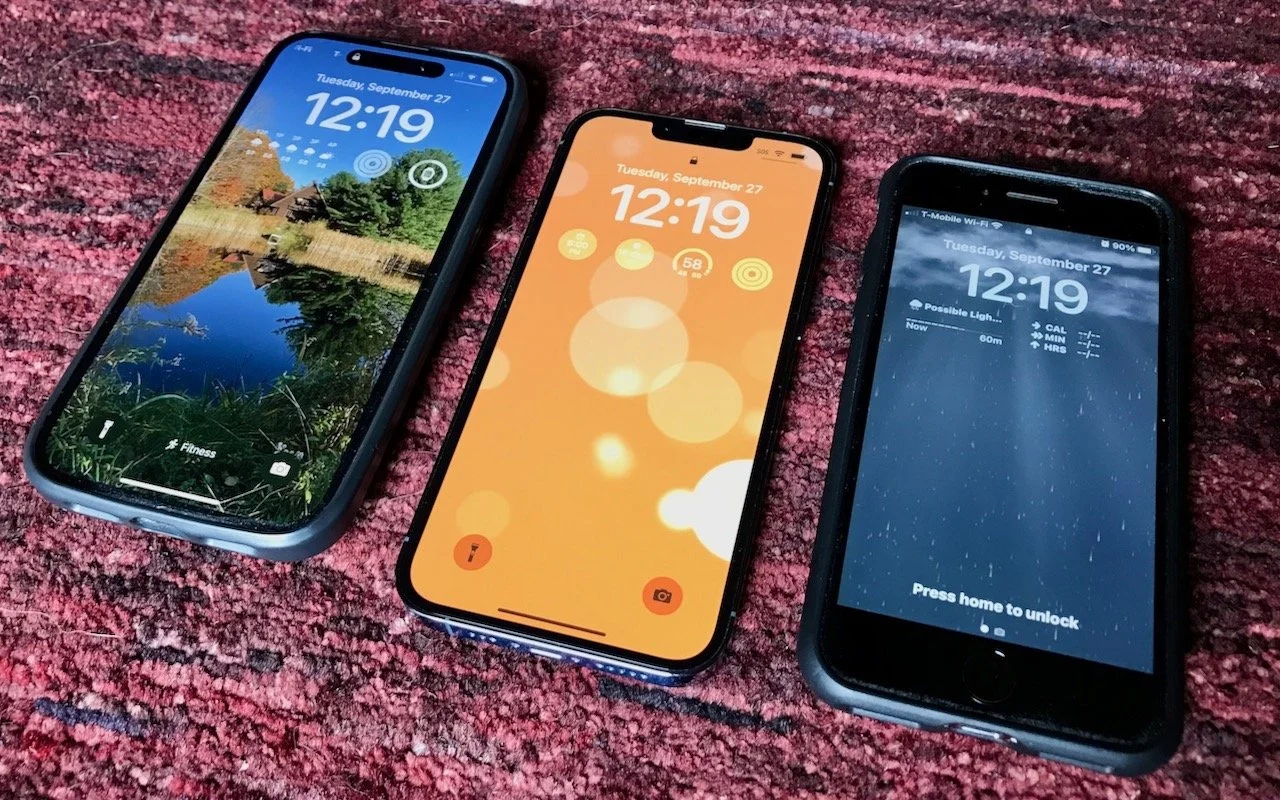
iOS 16 has been out for a bit now, and it’s likely safe to upgrade as long as you don’t rely on obsolete apps that might not be compatible. When you take the plunge, the first new feature to check out is the capability to create, customize, and switch among multiple Lock Screens, each with its own wallpaper, clock font, and widgets. It’s reminiscent of how you customize Apple Watch faces. Plus, you can now link a Lock Screen to a Focus so you know when that Focus is active.
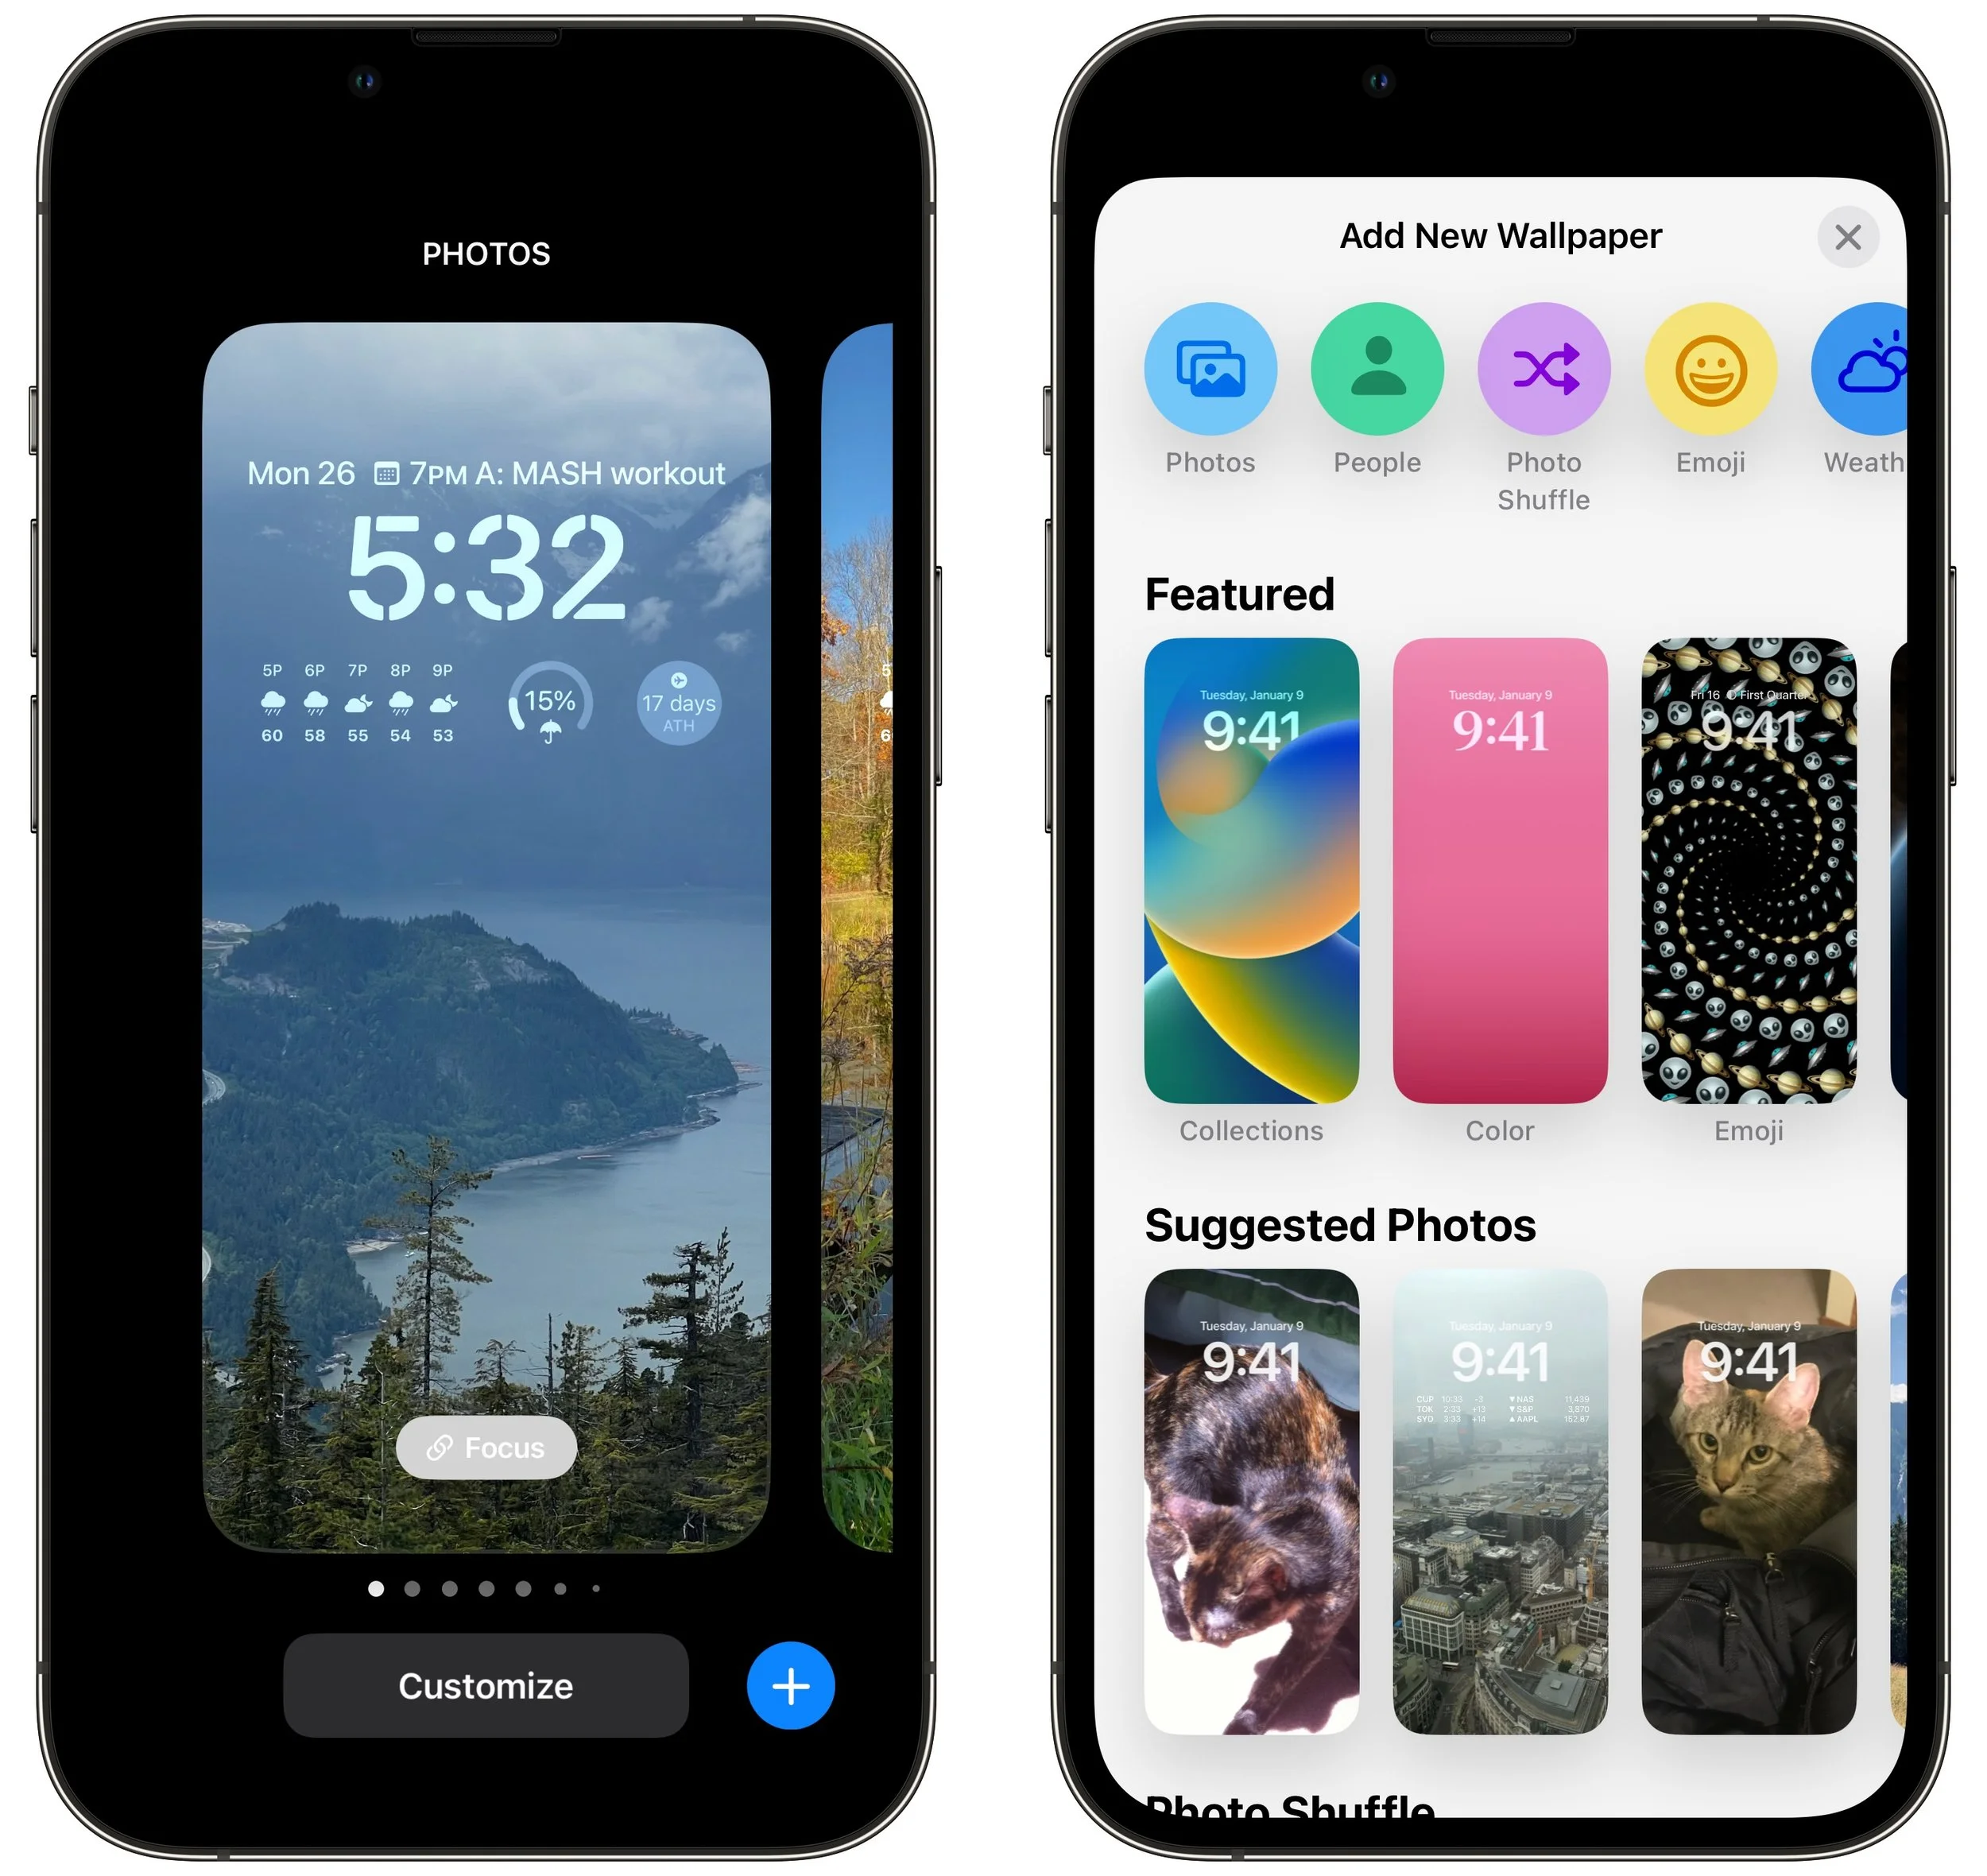
To get started, touch and hold the Lock Screen until the Lock Screen switcher appears. (Your iPhone must be unlocked at this point, which can be a bit tricky with a Touch ID-based iPhone—gently touch the Home button to authenticate, but don’t press it or you’ll open the Home Screen.)
Tap the blue plus button to create a new Lock Screen—see below for how to configure it. Once you have several Lock Screens, swipe left and right to pick one, and tap it to make it active. You can customize aspects of a Lock Screen after creating it by tapping the Customize button, and if you don’t like what you’ve done, delete it by swiping up and tapping the trash button.
Wallpapers
iOS 16 offers seven types of wallpapers, which you select while creating a Lock Screen by tapping buttons at the top or samples in a visual gallery below.
Photos: Most people will choose a photo for their wallpaper. iOS 16 uses machine learning to identify images that are likely to work well, separating them with image-selection filters into four categories: People, Pets, Nature, and Cities. You can also scroll through all your photos or particular albums and search for photos. Some people and pets will float above the clock (unless you add widgets), but you can toggle that with the Depth Effect option accessible in the ••• button.
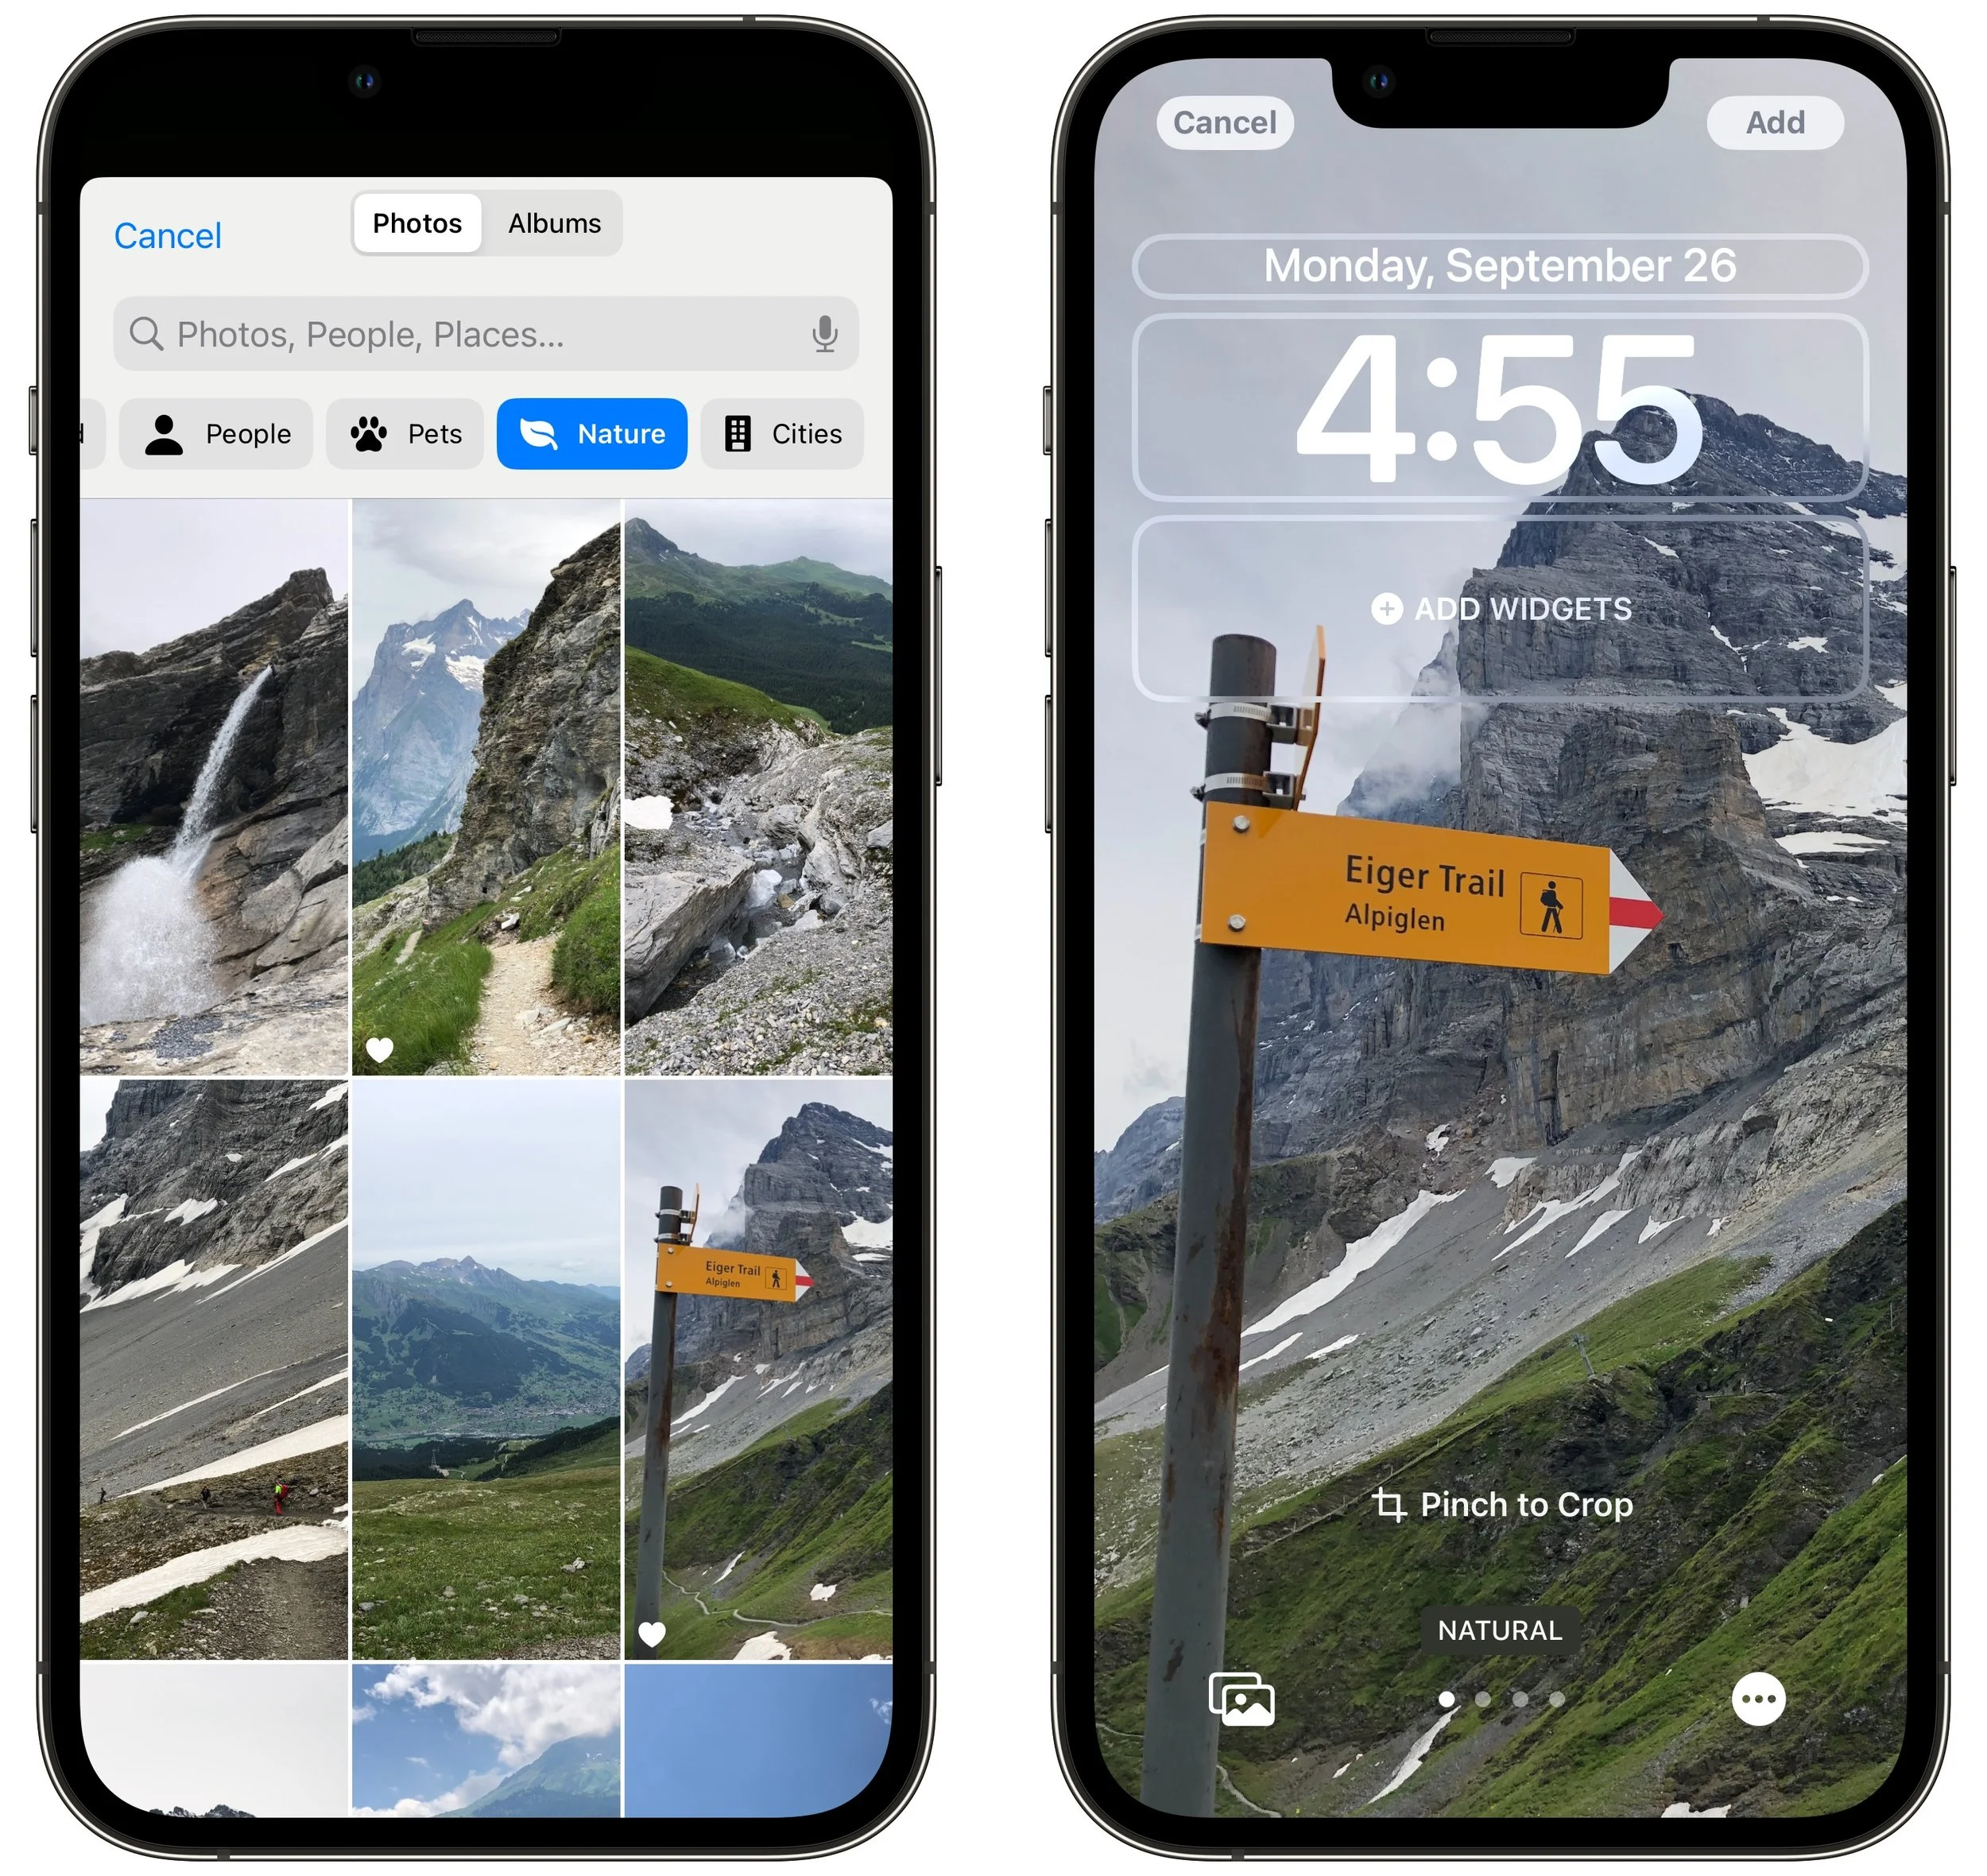
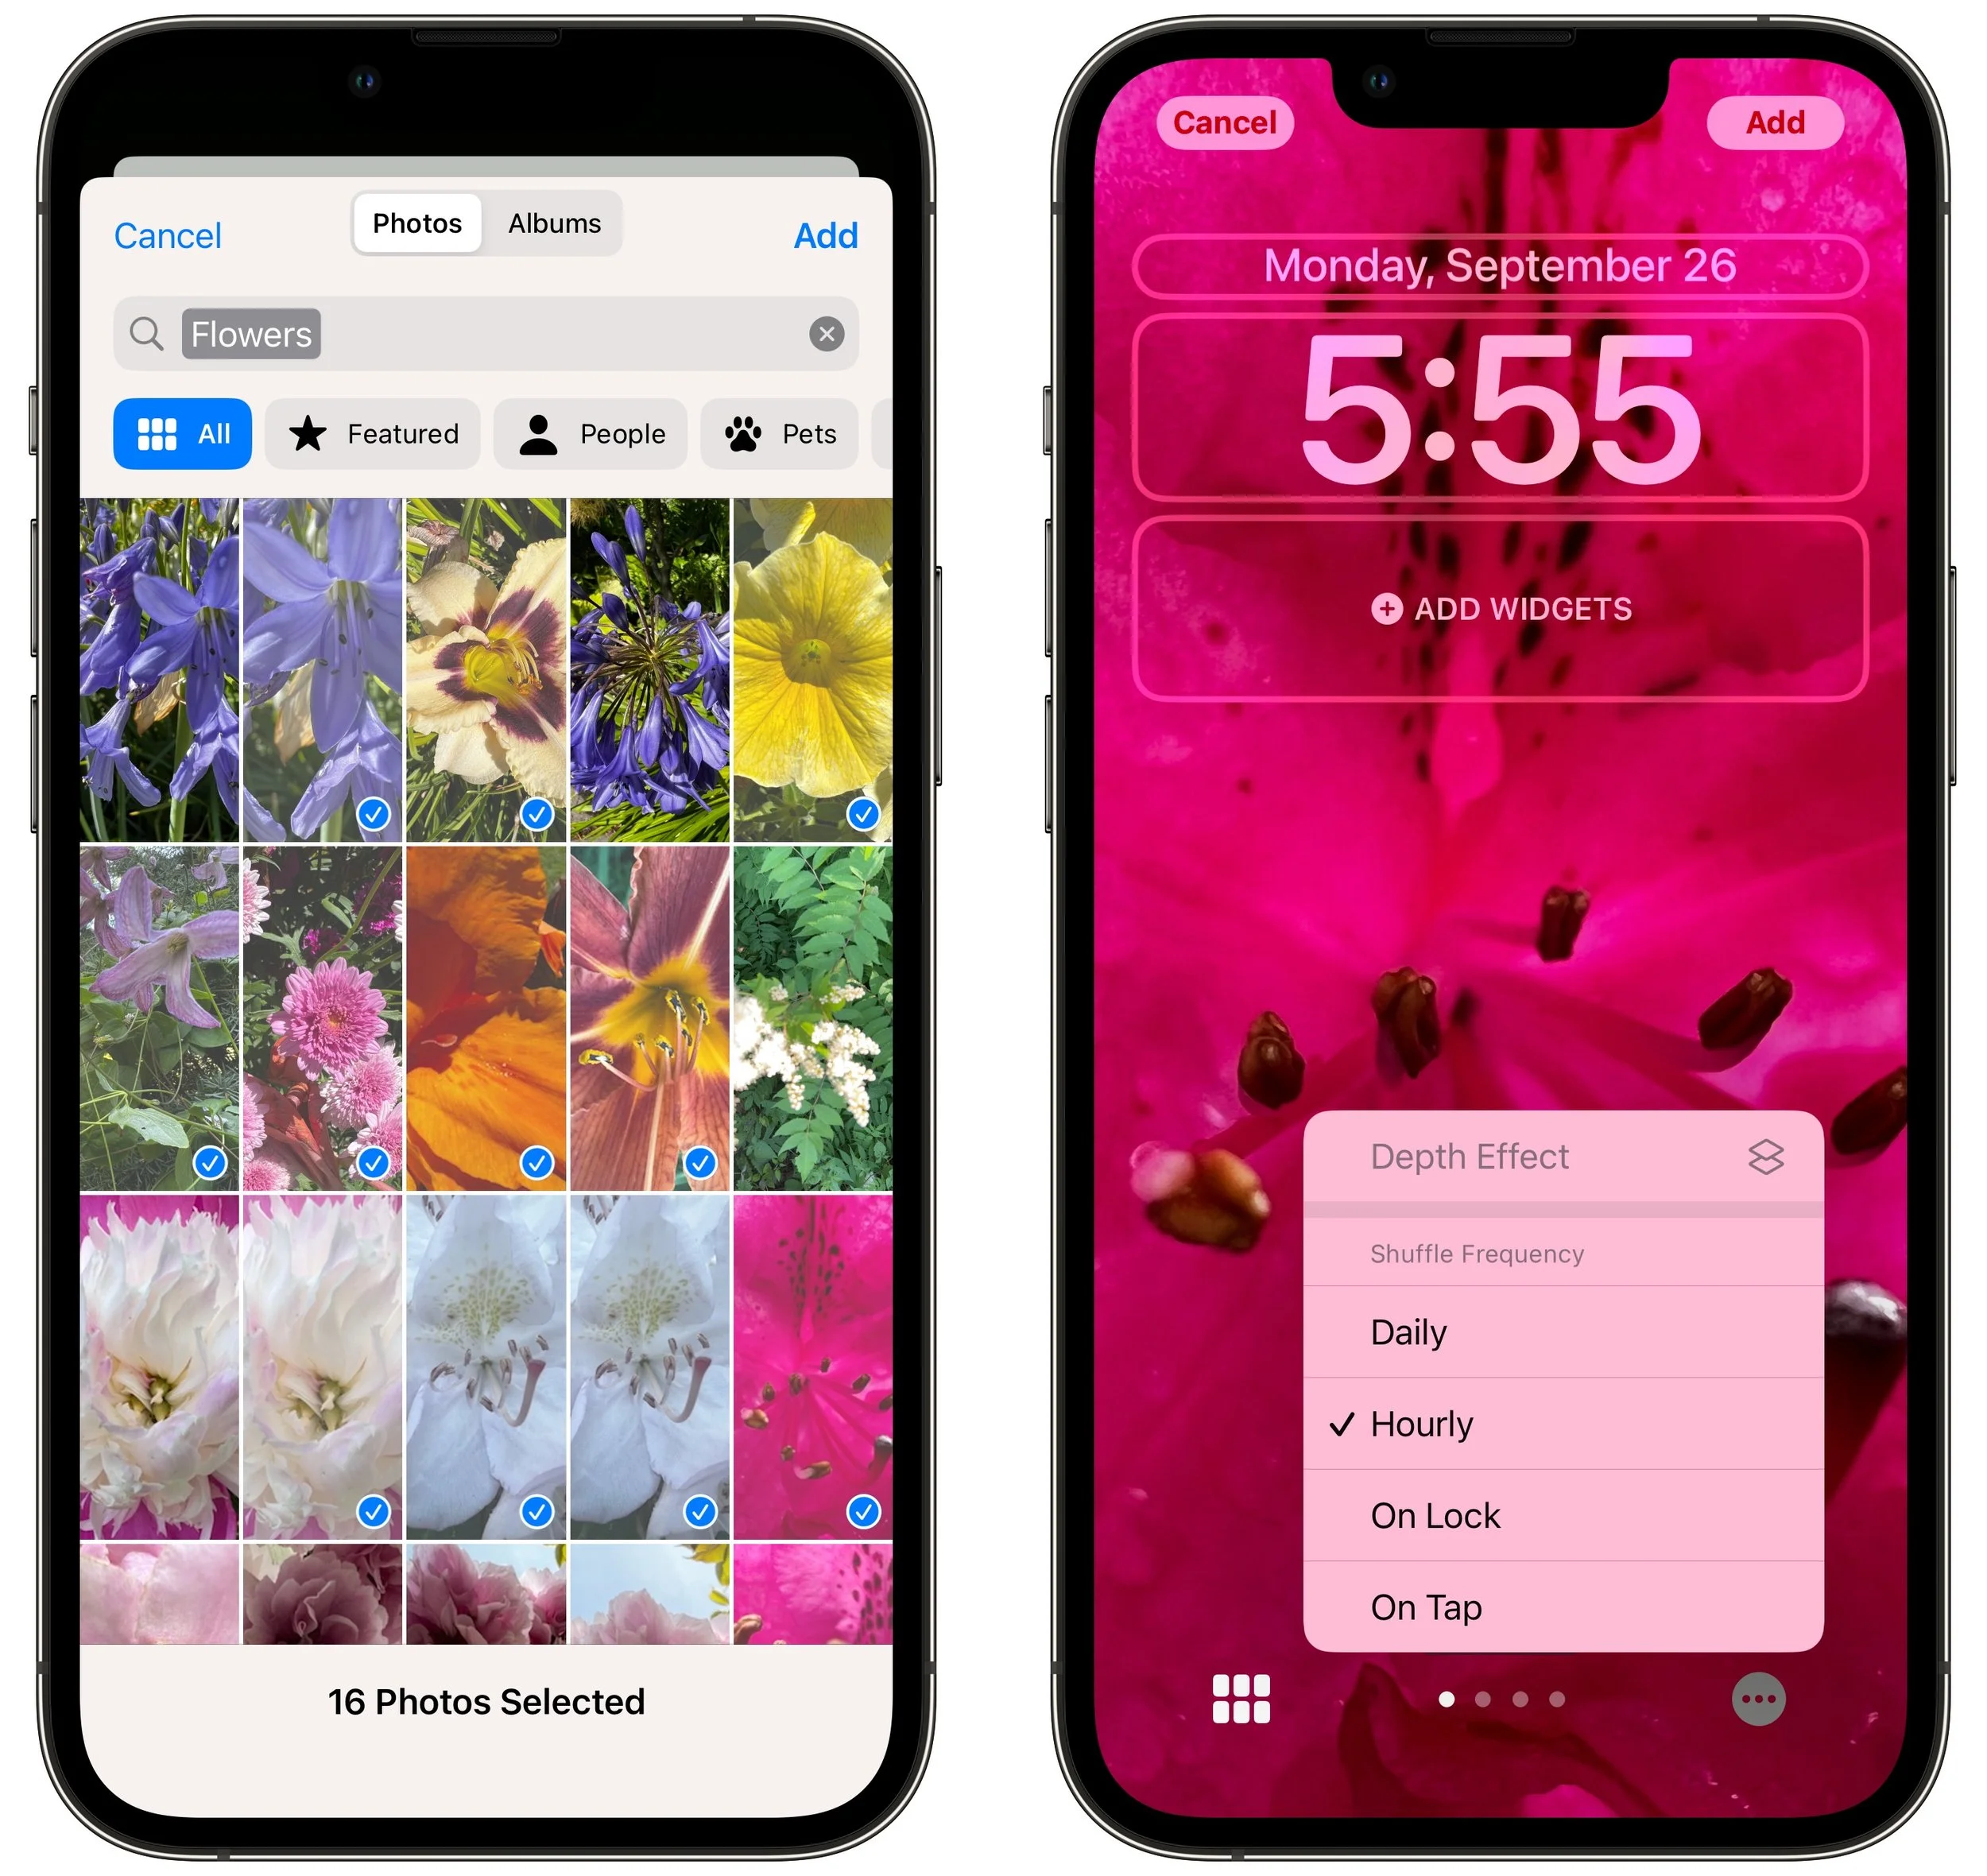
Photo Shuffle: Having trouble deciding which photo you prefer? The Photo Shuffle wallpaper automatically selects and switches between photos for you, letting you specify which categories to use, which people to include, and even which individual photos to show or hide (tap the ••• button to remove a sug-gested photo from the rotation). You can set the photo to rotate with a tap on the Lock Screen, whenever you lock your iPhone, hourly, or daily.
Emoji: This wallpaper tiles up to six emoji in several different grid sizes and layouts, and you can change the background color by tapping the ••• button. Thanks to Apple’s quality emoji art, the Emoji wallpaper is surprisingly attractive.

Weather: Those who work in windowless offices might particularly appreciate the Weather wallpaper, which changes to reflect the current weather conditions (and time of day) in your location.

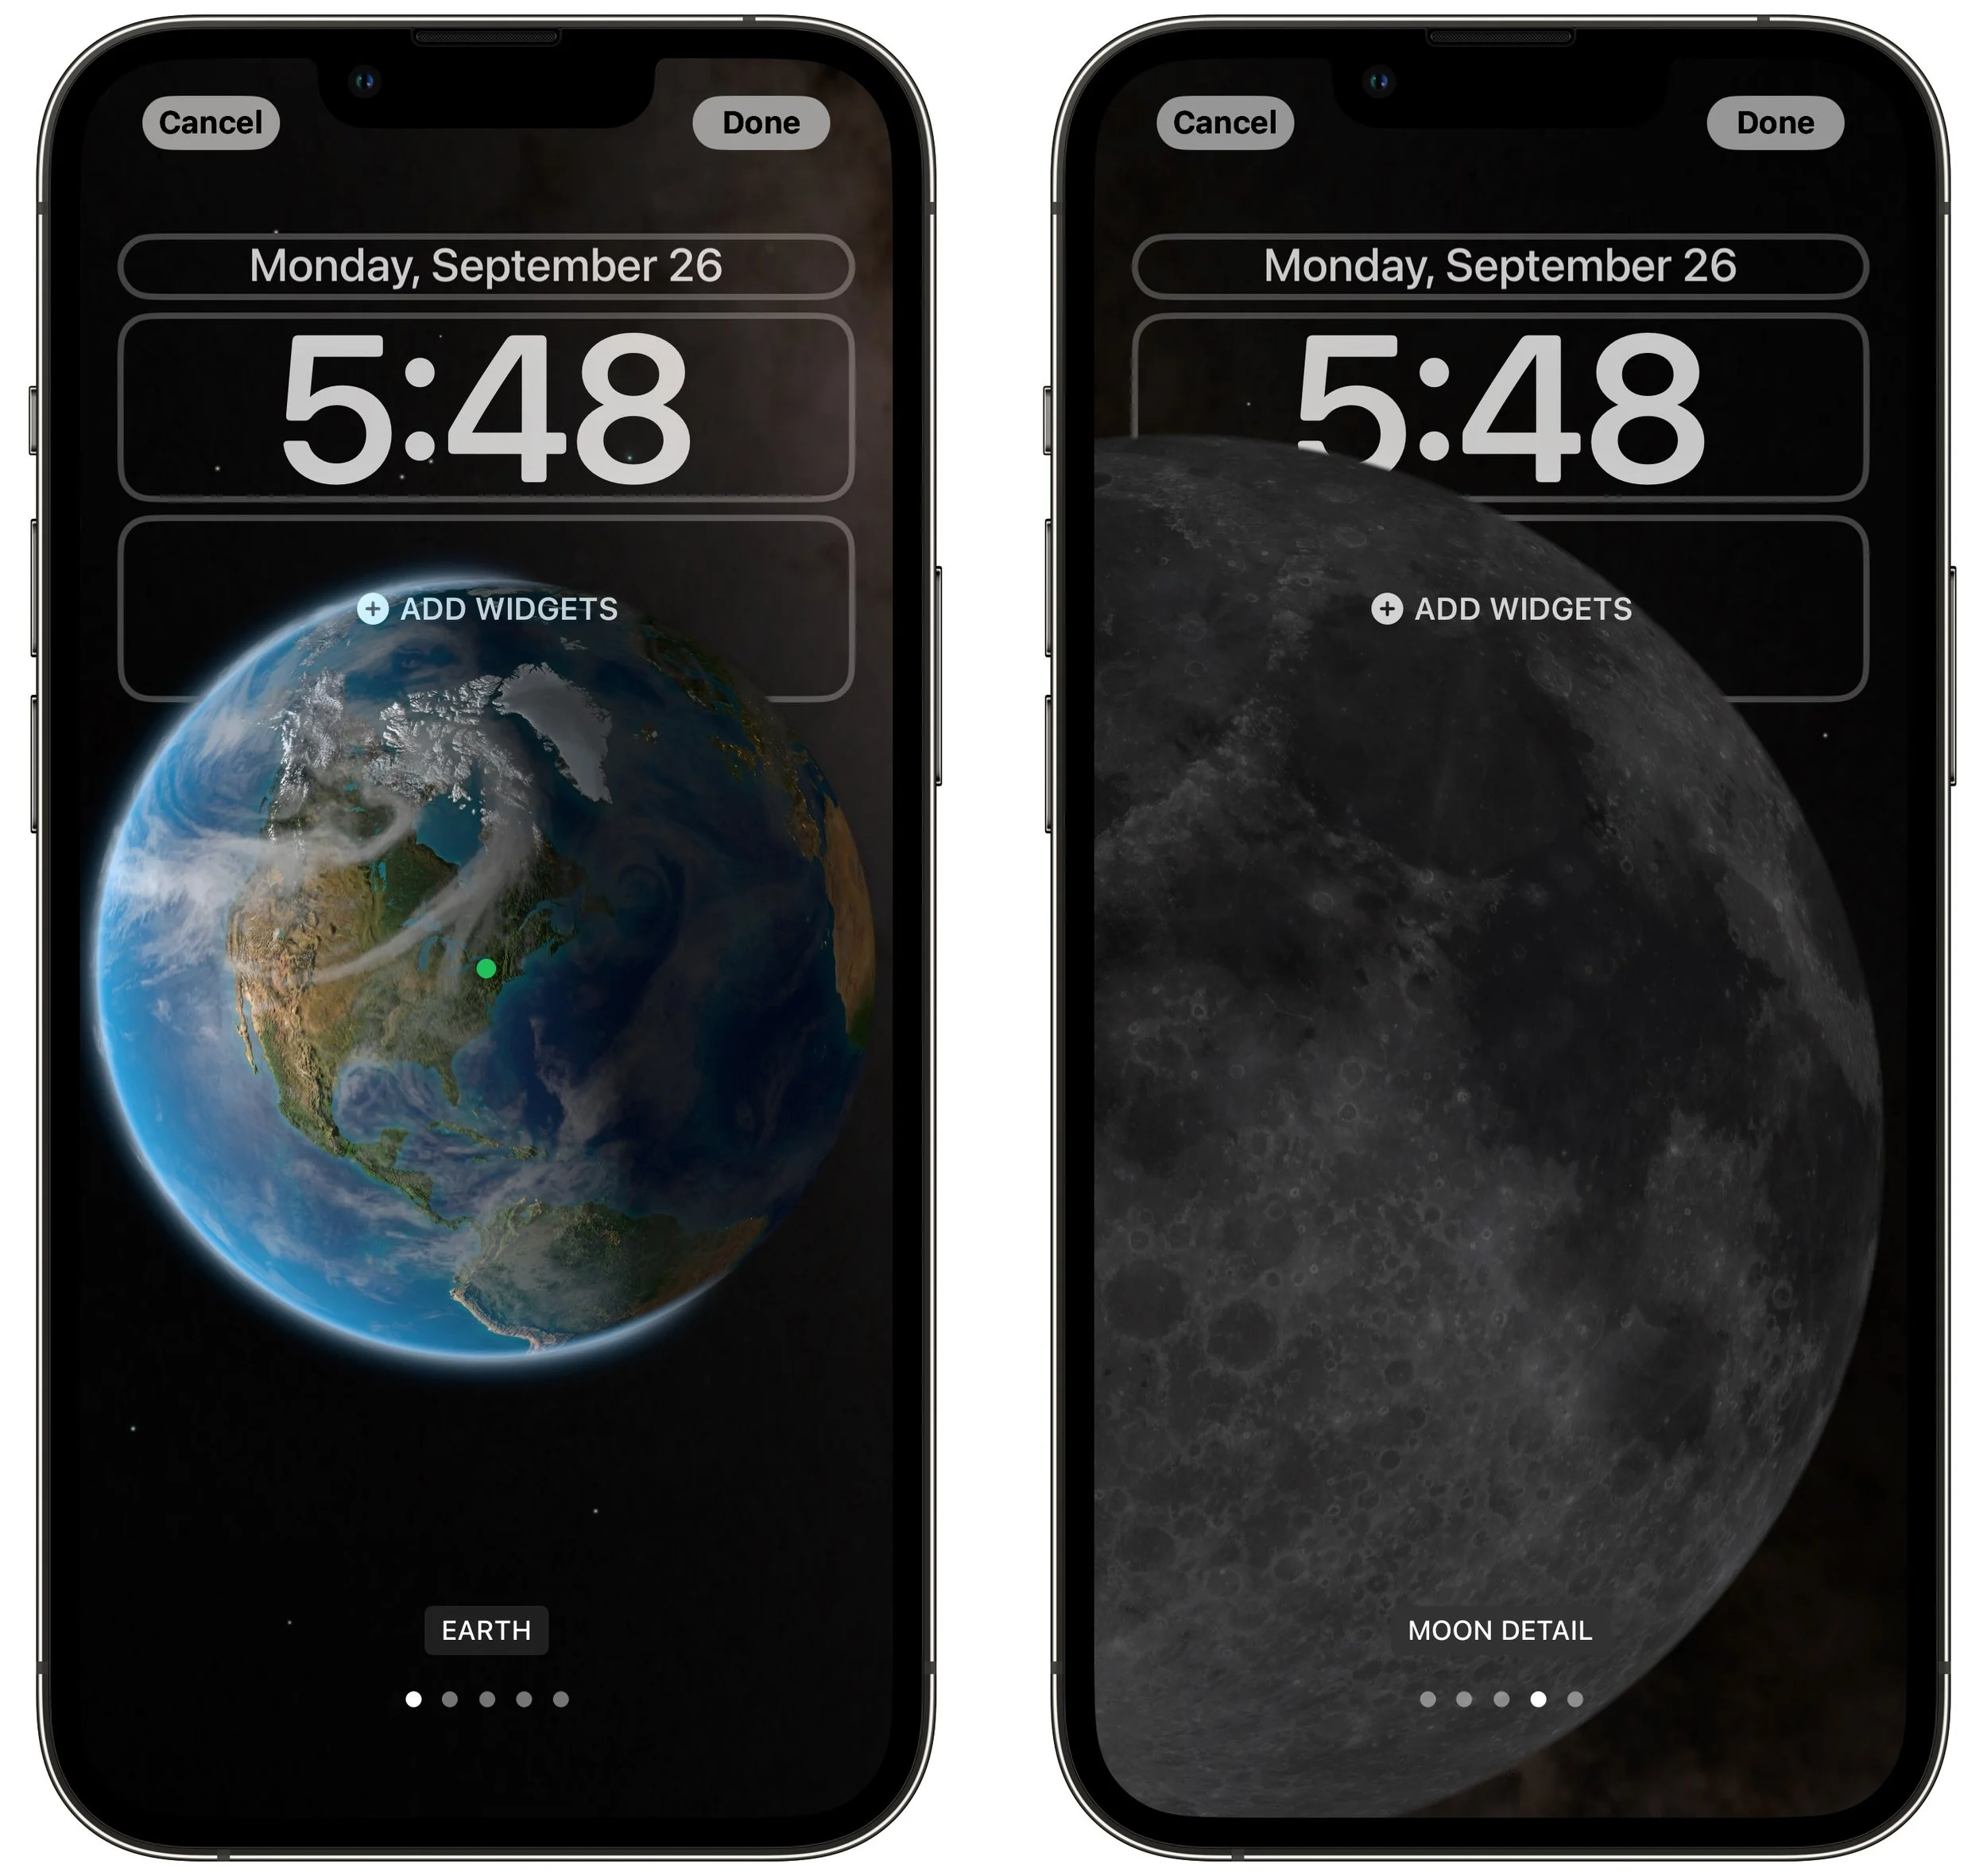
Astronomy: For a broader perspective, the Astronomy wallpaper lets you look at the Earth, Moon, or solar system whenever you pick up your iPhone. Swipe to pick your preferred celestial body and zoom level.
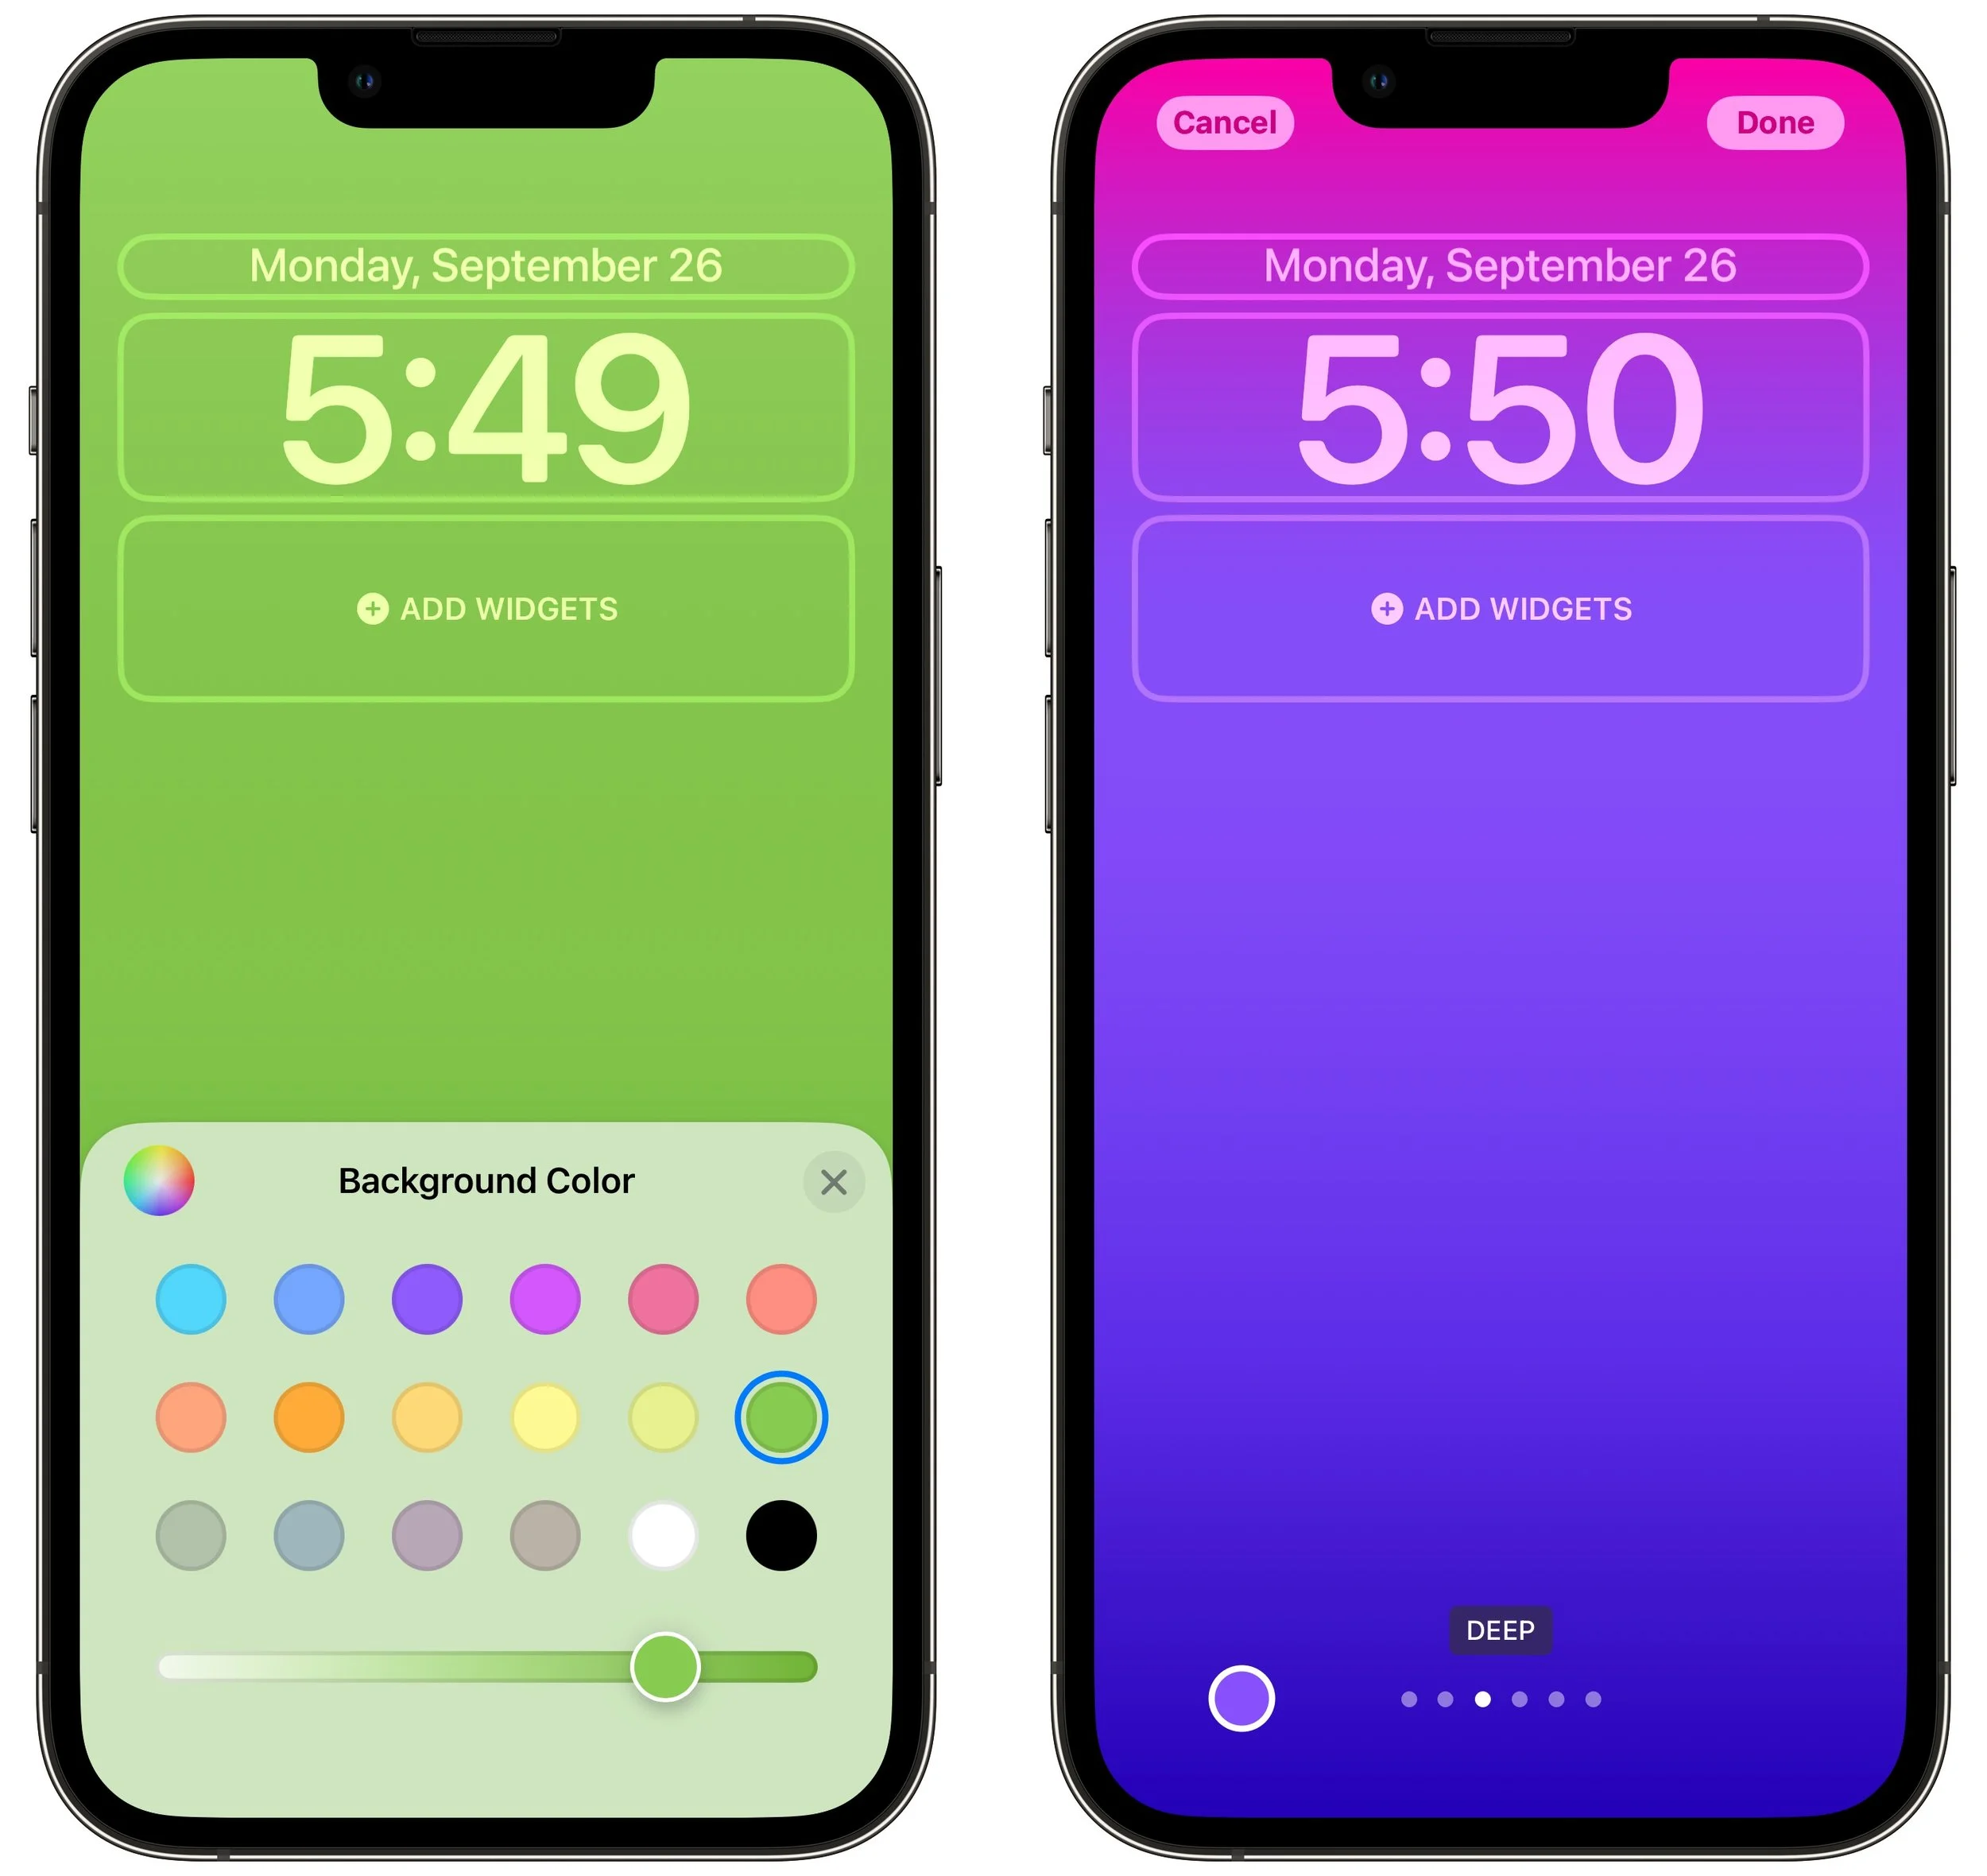
Color: Want something simpler? The Color wallpaper lets you choose a background color gradient from the color picker. Swipe to apply different effects.
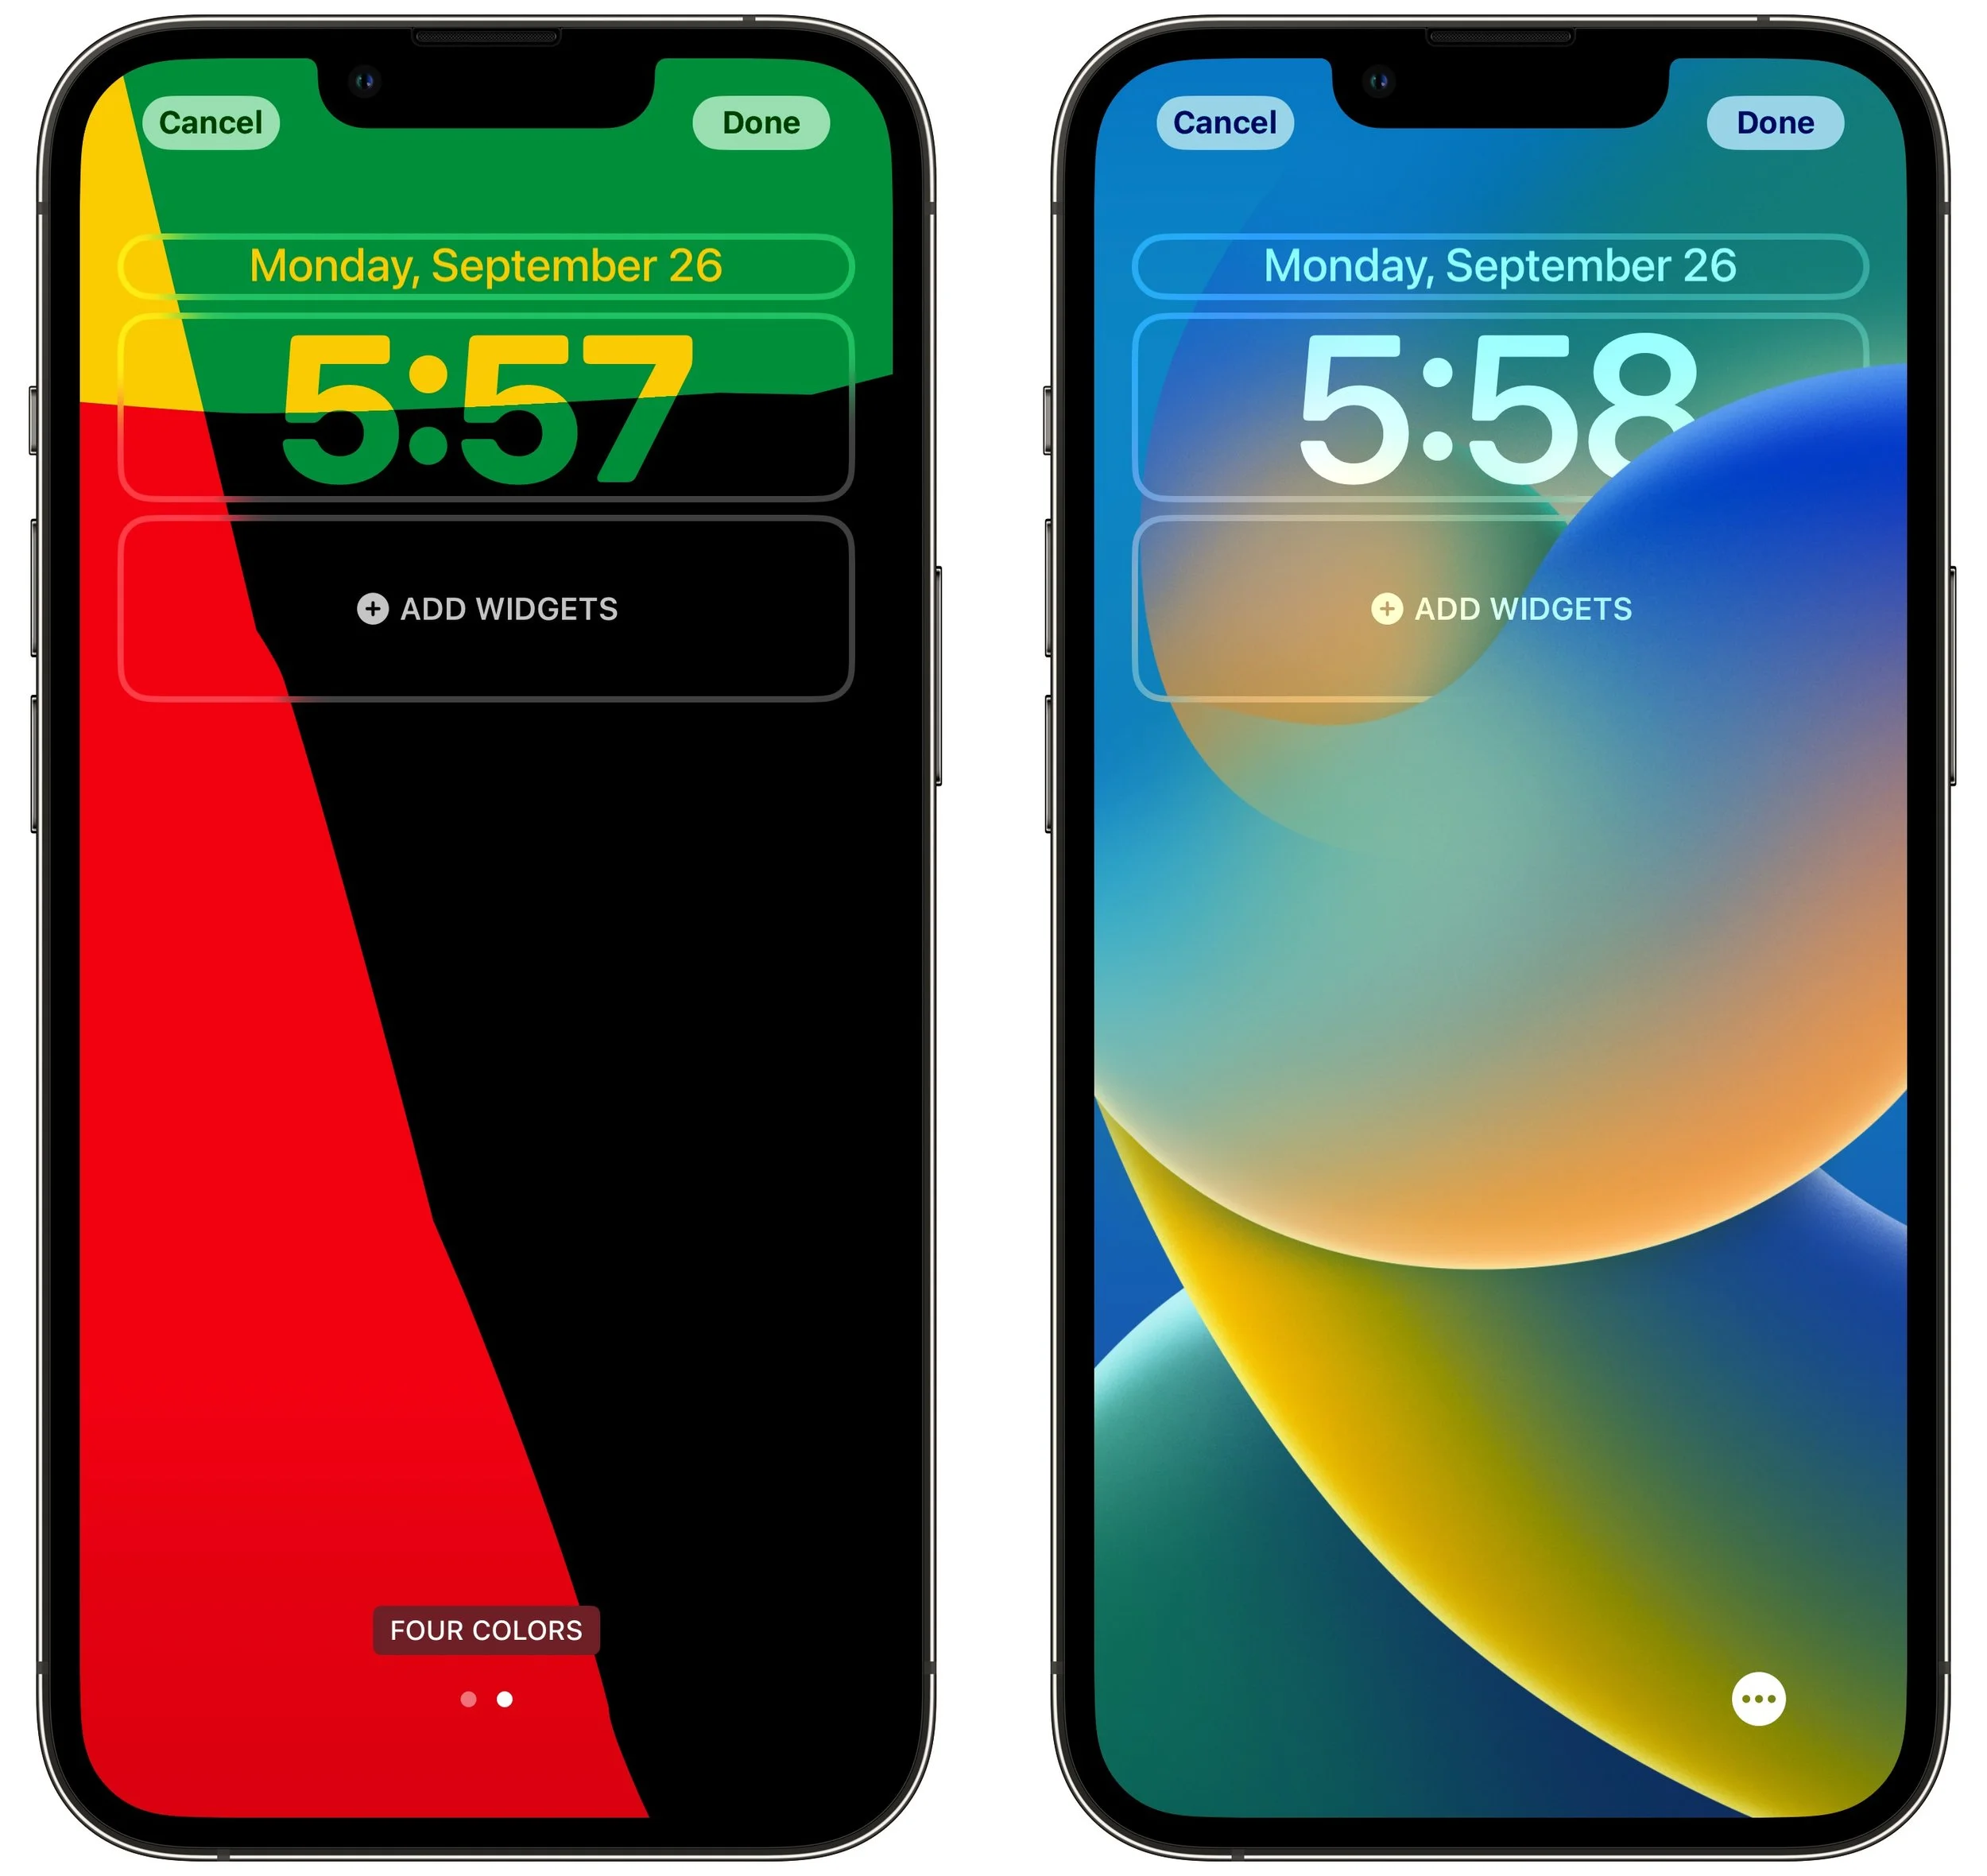
Collections: This category, which appears only in the gallery, provides Apple-designed graphics such as Unity, Pride, and the clownfish wallpaper from the original iPhone.
Take some time to explore all the wallpaper types and their options—the combinations are nearly endless. There’s no downside to creating and switching among different Lock Screens as the mood strikes you.
Clock font and color
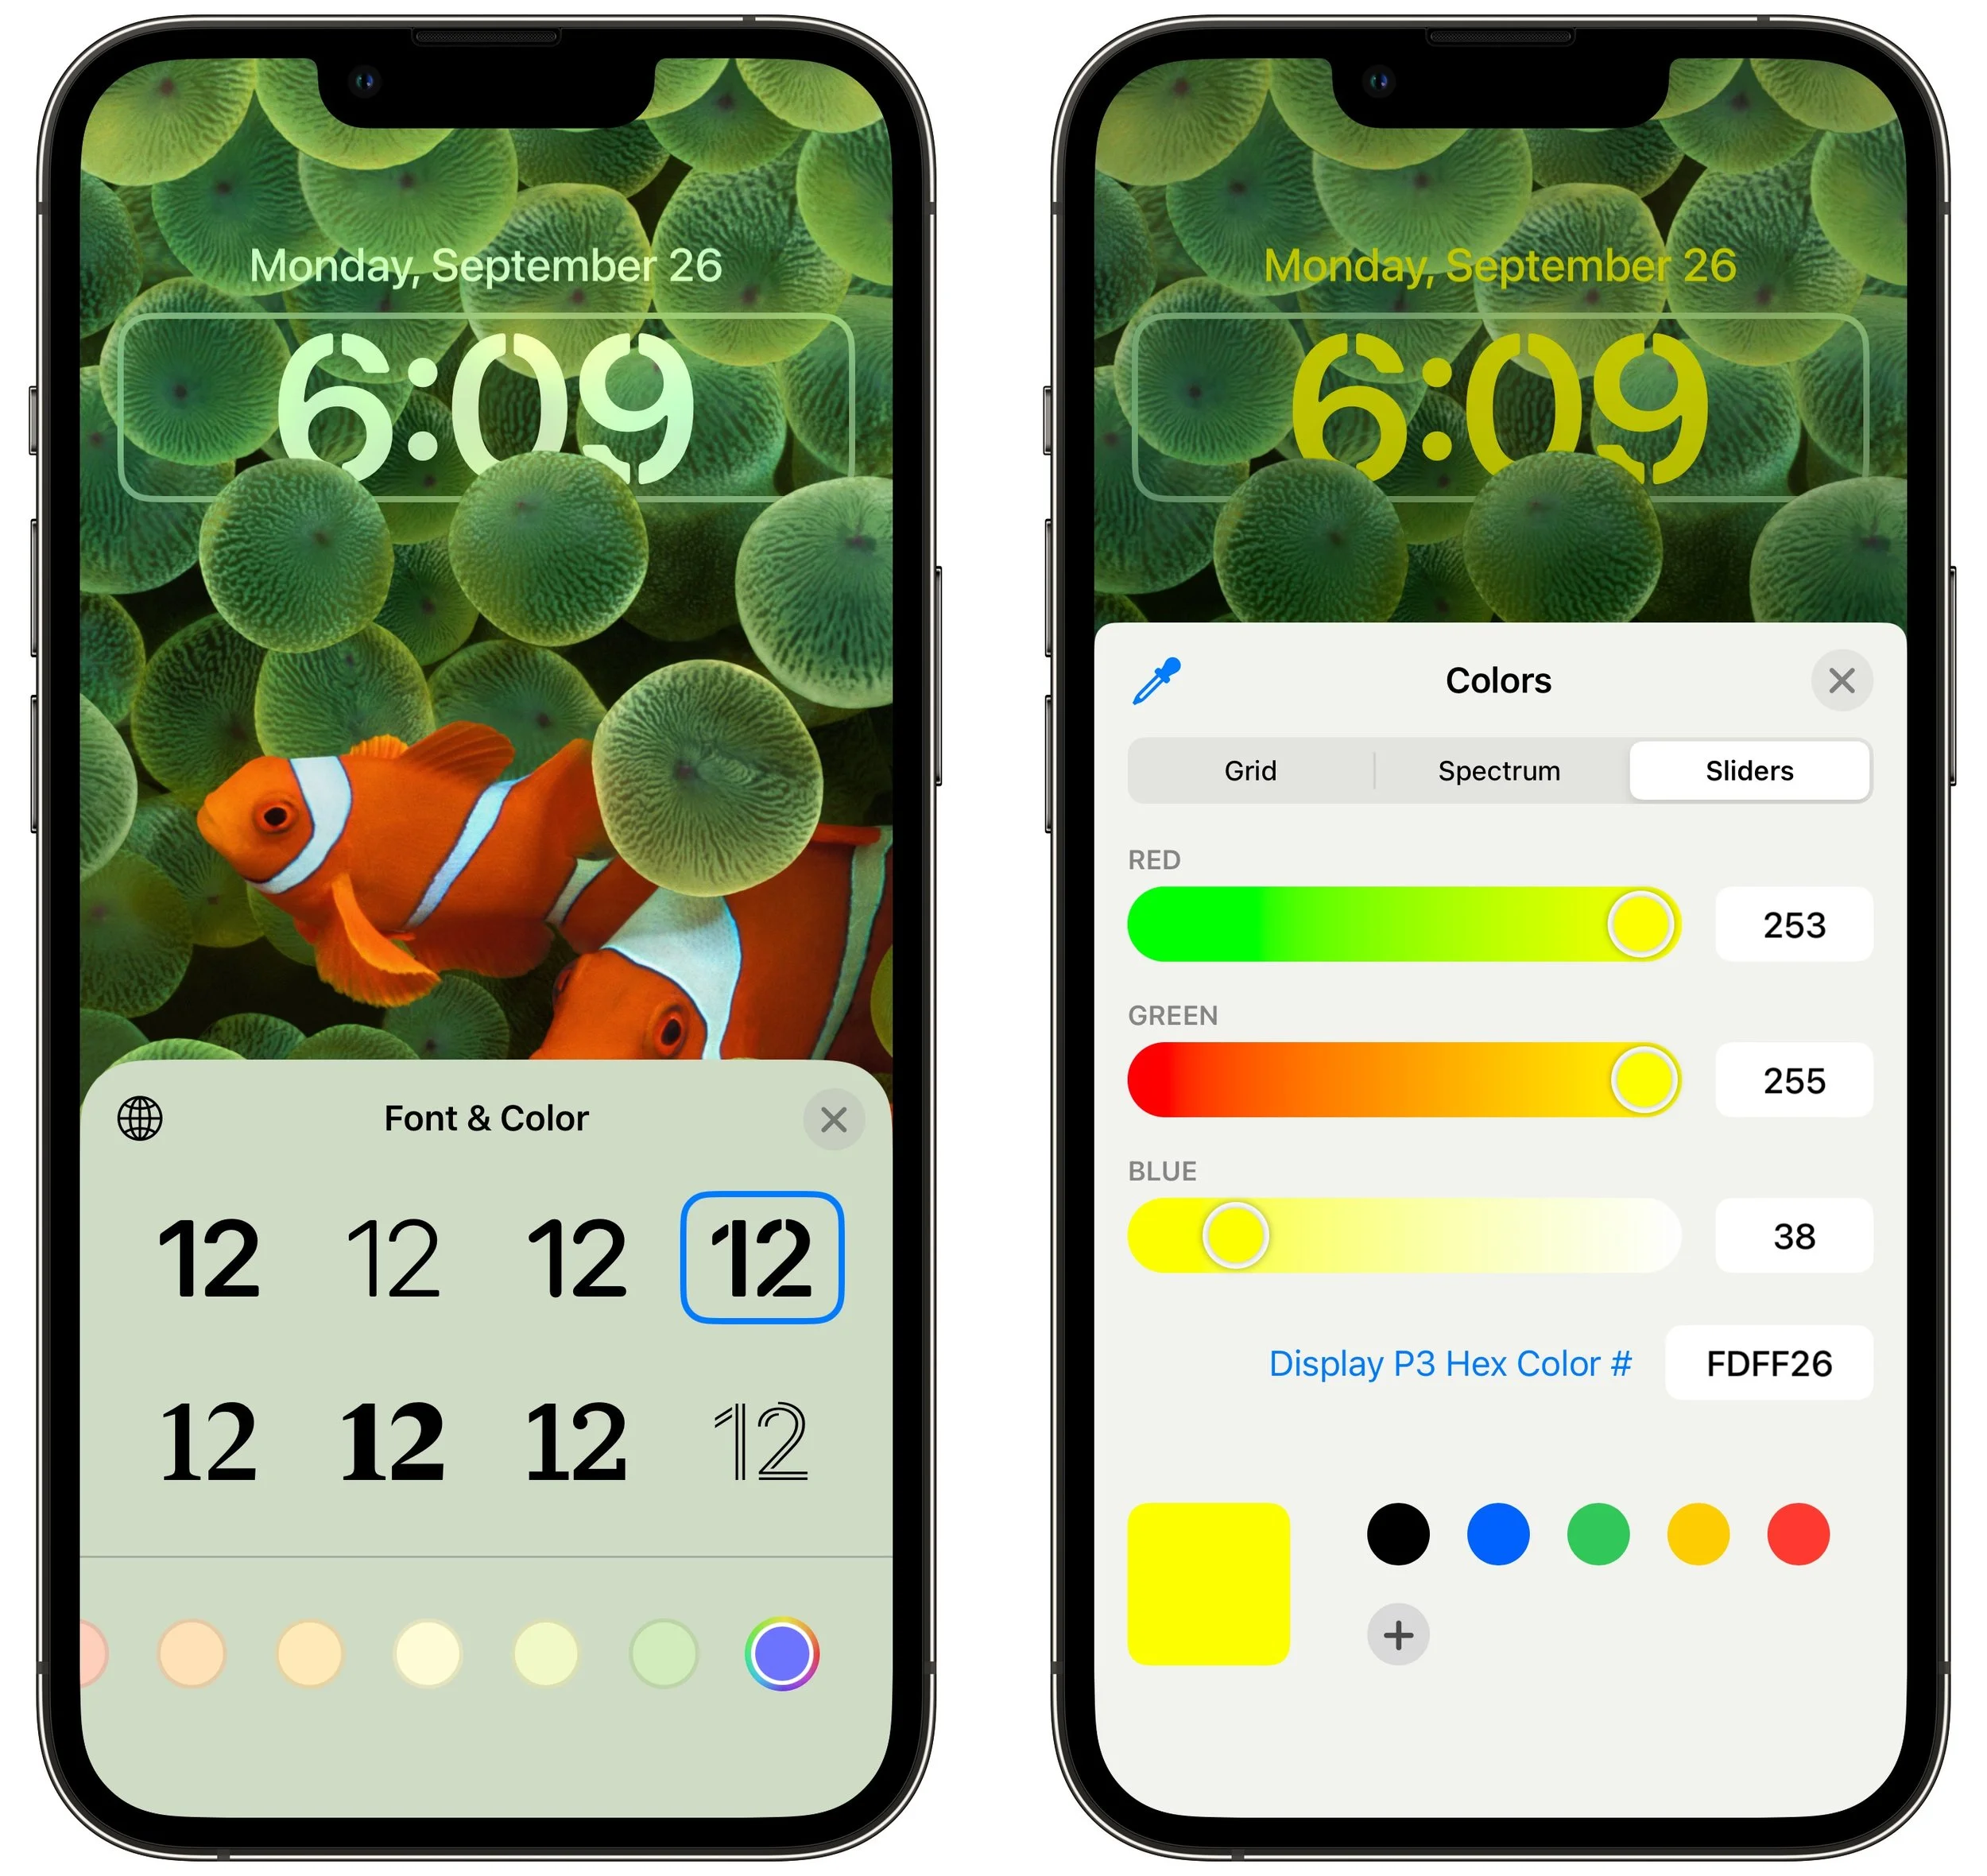
Once you decide on a wallpaper for a Lock Screen, you can customize the clock font and color by tapping the clock. There are only eight font options, but you should be able to find one you like. With color, Apple provides some suggestions below the font choices, but if you scroll all the way to the right and tap the color wheel, you can use iOS 16’s color pickers to select any color. The goal is to make sure it’s readable against the background image you’ve chosen.
Widgets
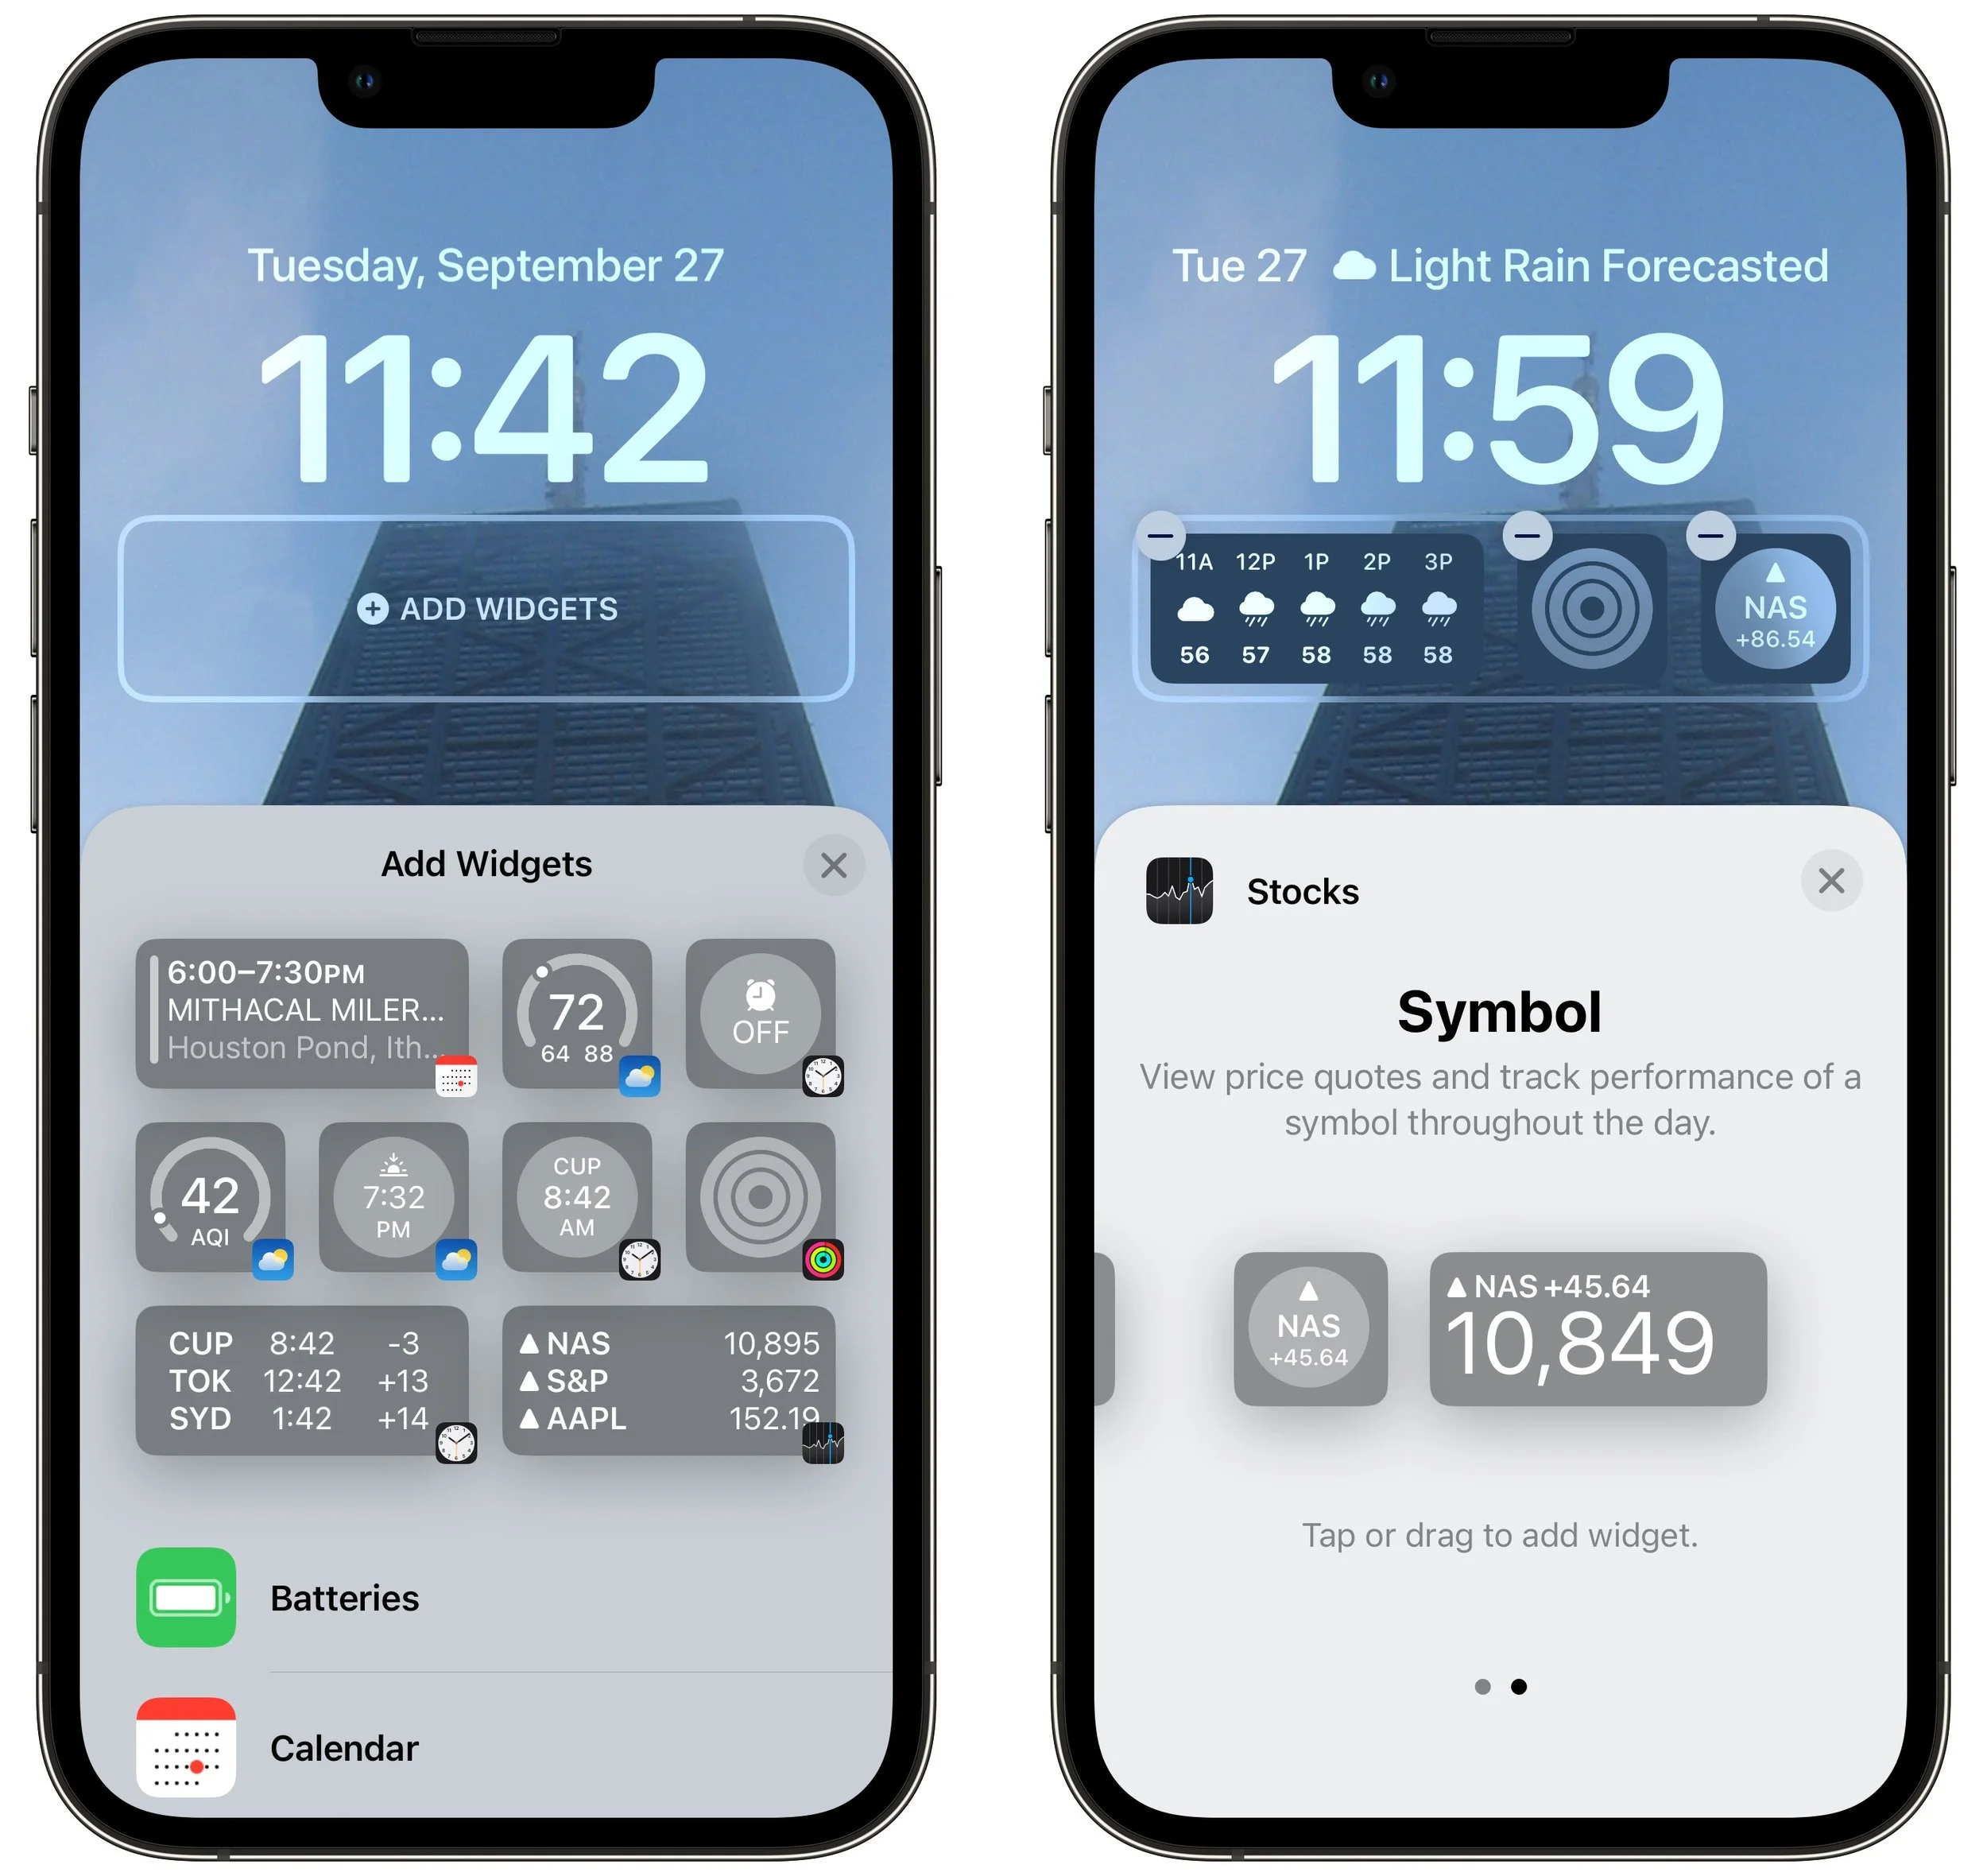
Beyond the eye candy of wallpapers and the customizable clock, widgets make the iOS 16 Lock Screen more useful than ever. Some iPhone users are accustomed to having flashlight and camera buttons on the Lock screen—everyone can now add widgets to two distinct zones on the Lock Screen, above and below the clock. The widget zone above the clock holds only a single line of text or other controls, and it always displays alongside the date, which shrinks if necessary. The zone below the clock is taller and can hold two sizes of widgets: small ones that occupy a single slot and large ones that take over two slots. You can mix and match small and large widgets to fill—or not—the four available slots.
To add widgets, tap the desired zone and tap widgets in the panel that appears. Suggestions appear at the top, but if you scroll down, you can see a list of all the apps that offer widgets. Tap an app to see its widgets—swipe to see the full set it offers. Once you’ve added a widget, you may be able to tap it again to configure it—such as by specifying tickers for the Stocks widget. To rearrange widgets, drag them but be aware that this works poorly at the moment; it may be easier to delete the widgets (tap the ⊖ button) and add them again in the desired order.
Focus
Focus subsumed Do Not Disturb in iOS 15. Although Focus is far more flexible and customizable than Do Not Disturb, that power also makes it hard to predict when notifications will be blocked, since it can be difficult to know when a Focus is active. With iOS 16, Apple has made Focus more obvious by letting you link a Focus to a Lock Screen.
When you’re in the Lock Screen switcher, a Focus button appears toward the bottom of each Lock Screen. Tap it and select a Focus to link them.
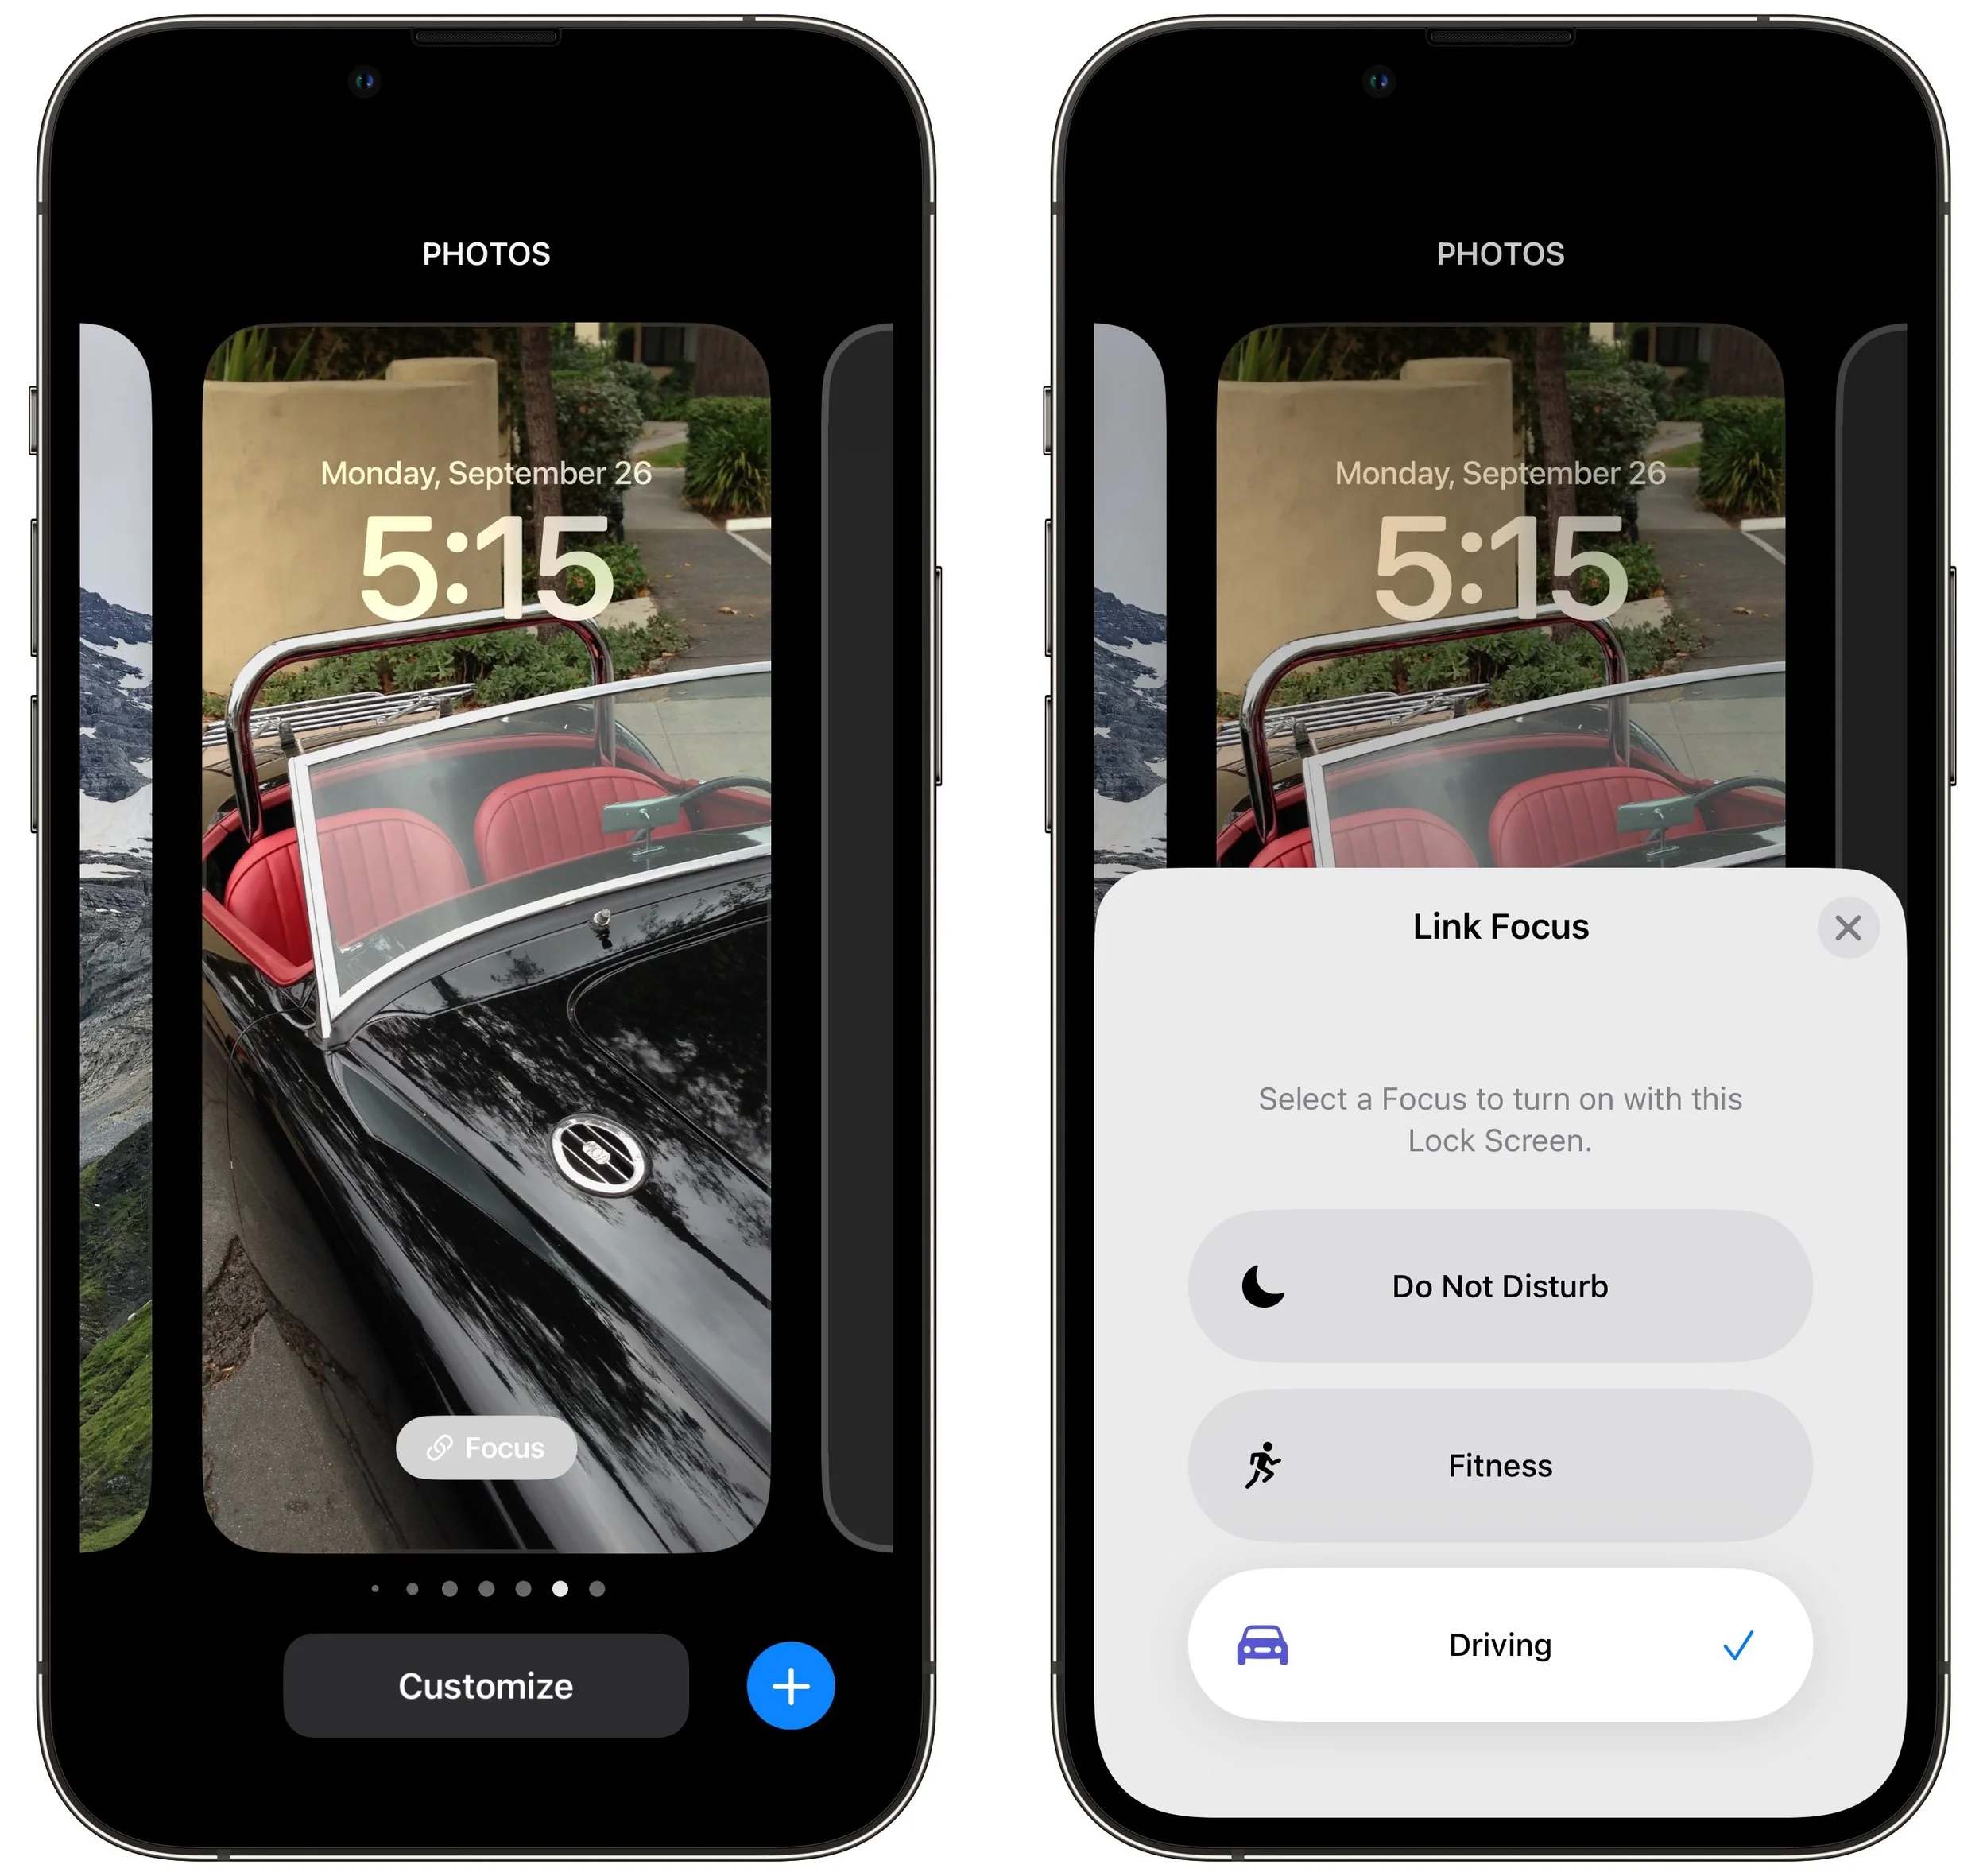
Two things become true once you’ve linked a Focus to a Lock Screen:
When you activate that Focus in Control Center, or its settings cause it to activate automatically, iOS 16 switches to the linked Lock Screen. That’s handy if you have a manually triggered Focus for family time, for instance, or an automatically activated Focus for Driving.
When you switch to a particular Lock Screen, its linked Focus activates and starts blocking notifications. It’s probably easier to activate a Focus in Control Center, but switching Lock Screens has the same effect.
It may take a few weeks to figure out what Lock Screens you prefer and customize them to your liking, but we think you’ll enjoy this new feature.
(Featured image by Adam Engst)
Apple’s 2022 Harvest: Four iPhones, Three Apple Watches, and New AirPods Pro
At its Far Out event, Apple introduced the iPhone 14 lineup, three new Apple Watches—including the Apple Watch Ultra—and the second-generation AirPods Pro. All are worth a look for Apple users; read on for details:

Apple’s September crop has ripened, and the company has once again picked a basket of new and updated hardware for us. At its Far Out event on September 7th, Apple unveiled four iPhone 14 models, three new or updated Apple Watch models, and the second-generation AirPods Pro.
After the announcement, Apple said that iOS 16 and watchOS 9 would become available on September 12th, with iPadOS 16.1 and macOS 13 Ventura to arrive in October. As we’ve said before, wait a week or two before installing iOS 16 and watchOS 9 on essential devices to avoid any last-minute bugs. Regardless of when you upgrade, make a backup right before, in case something goes wrong and you need to erase and restore.
Let’s look at each of the new products.
iPhone 14 Models Show Both Evolution and Innovation
With the new iPhones, Apple made a clean split between the regular and Pro models. On the lower end, Apple has the 6.1-inch iPhone 14 and the 6.7-inch iPhone 14 Plus—there is no iPhone 14 mini. On the high end, Apple pulled out all the stops for the iPhone 14 Pro and iPhone 14 Pro Max, again in those 6.1-inch and 6.7-inch sizes. Design-wise, the models are extremely similar to the iPhone 13, with squared-off sides and only very slight size changes.
For the most part, the iPhone 14 and iPhone 14 Plus aren’t meant to be technologically exciting, relying on the same A15 Bionic chip as last year’s iPhone 13 models. As it usually does, Apple put more attention into the cameras, switching to a new rear-facing 12-megapixel main camera with a larger aperture for better low-light performance and a new front-facing TrueDepth camera that boasts autofocus for the first time. Apple also introduced a new Photonic Engine that leverages hardware and software to improve mid- and low-light performance for all its cameras. On the video side, a new Action mode provides advanced stabilization for smoother action videos, and Cinematic mode now supports 4K video at 24 fps and 30 fps.

More innovative—and present in both the regular and Pro models—are a pair of technologies we sincerely hope you never have to use. Crash detection relies on a variety of sensors in the iPhone to detect the changes in acceleration, air pressure, and sound that accompany car crashes. In the event of a crash, the iPhone’s Emergency SOS feature offers to call emergency services and notify your emergency contacts.

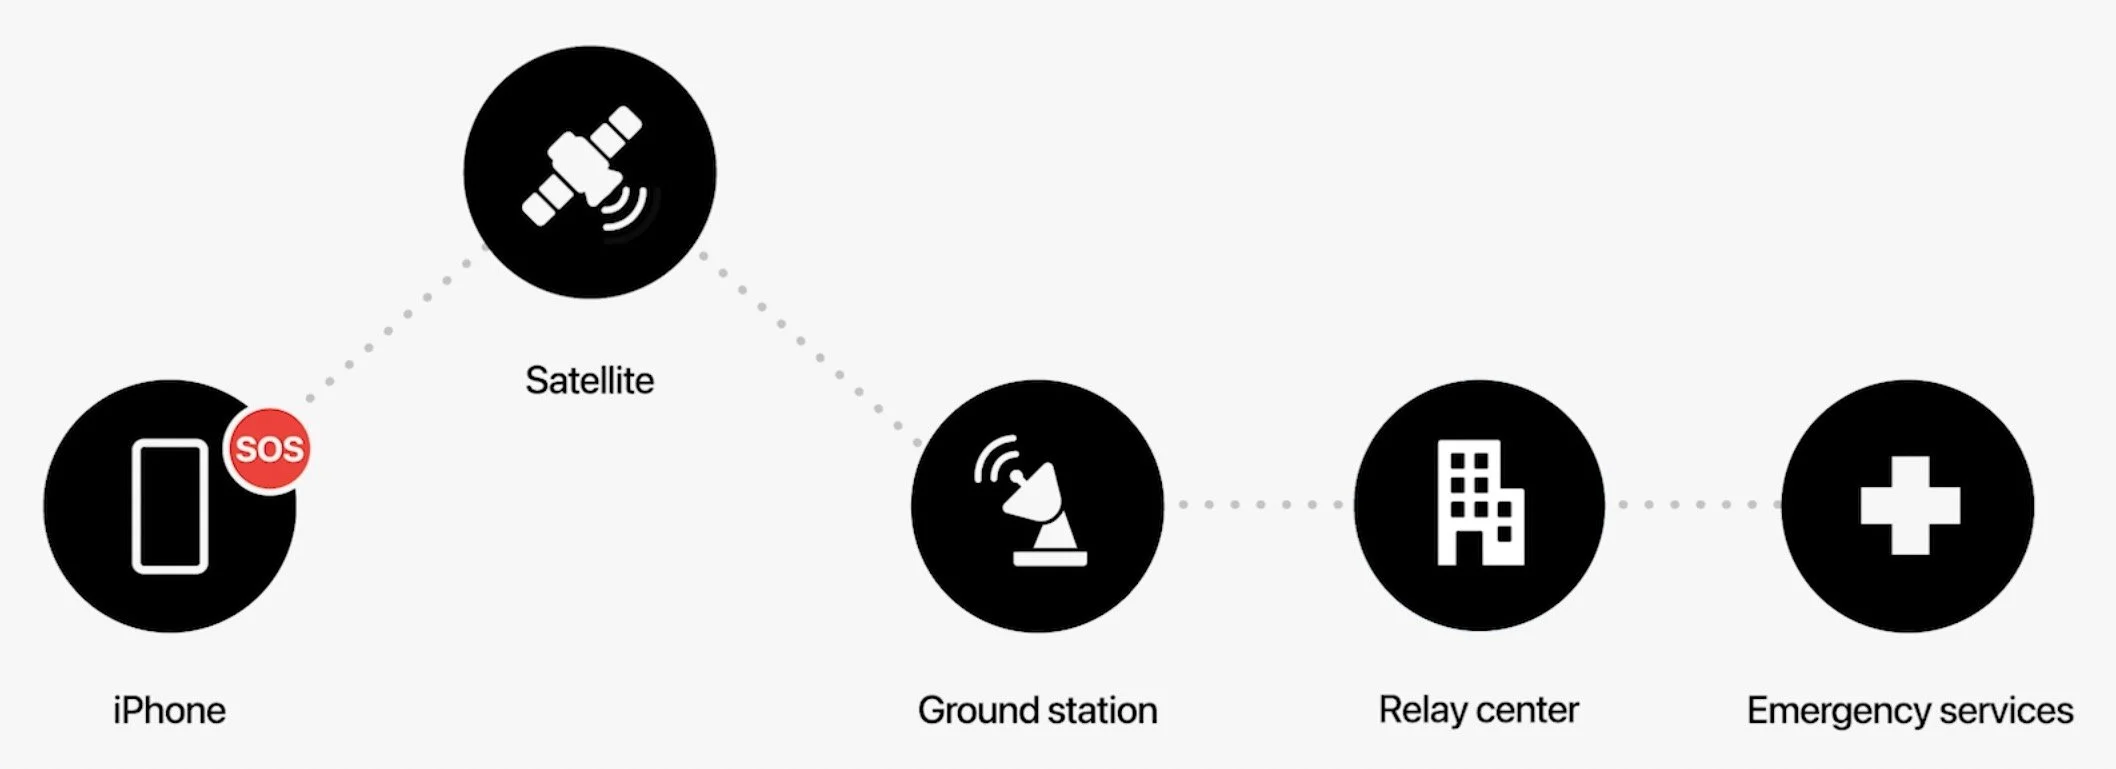
Even more technologically impressive is Emergency SOS via satellite, which enables very low bandwidth text message communication with emergency services using satellites when there’s no cellular coverage. The feature will help you point your iPhone at fast-moving satellites overhead, and it asks vital questions to distill key facts for emergency responders because even short messages may take over a minute to get through. More commonly, you’ll be able to manually share your location via satellite using Apple’s Find My system when you’re without cellular or Wi-Fi connectivity. All this is coming in November 2022 and will be available only in the US and Canada at first.
Apple's final change to both the regular and Pro models—at least in the US—is a switch to eSIM. None of the iPhone 14 models sold in the US will have SIM slots. Most carriers support eSIM at this point, and when traveling to other countries, US iPhone 14 users will need to find roaming plans that support eSIM instead of buying and installing a local SIM card.
The iPhone 14 Pro and iPhone 14 Pro Max boast more exciting changes. The most obvious change is the switch to an Always-On display, much like recent models of the Apple Watch. You’ll be able to view the new Lock screen imagery and widgets at all times without even touching your iPhone. Thanks to a 1 Hz display refresh rate and intelligent dimming of wallpaper, it won’t hurt battery life. And when you’re actively using the iPhone 14 Pro, the screen will be brighter than ever for easier reading in direct sunlight.

Apple also shrunk the Face ID and TrueDepth camera sensor package that occupies a notch on the regular iPhone 14 models and older iPhones. On the iPhone 14 Pro, it’s now a small black lozenge at the top of the screen that can’t display anything but is integrated into a new feature called the Dynamic Island. Alerts and notifications, and a new dynamic notification type called Live Activities, appear to zoom out of and back into the black lozenge, and Live Activities appear on either side. It’s a clever design trick to make you think that portion of the screen is being used.

The Dynamic Island and Always-On display are made possible in part by Apple’s new A16 Bionic chip, which offers more performance and better efficiency than any other smartphone processor. The A16 Bionic handles the most demanding workflows and graphics-intensive games, and it also powers the iPhone 14 Pro’s computational photography features, performing up to 4 trillion operations per photo.
On that topic, the iPhone 14 Pro introduces even more powerful cameras. The main rear-facing camera is now a 48-megapixel camera with a quad-pixel sensor that combines four pixels into one for most photos, improving low-light capture and reducing file size to the equivalent of a 12-megapixel camera. However, the iPhone 14 Pro can also shoot ProRAW photos with the full 48 megapixels to capture unprecedented detail for later processing. The quad-pixel sensor also enables a 2x optical zoom in addition to the improved telephoto camera’s 3x optical zoom. The new 12-megapixel ultra wide camera provides sharper macro shots, and the new front-facing TrueDepth camera offers better low-light performance and autofocus for improved selfies. Apple also enhanced the Adaptive True Tone flash to change its pattern based on the focal length, distributing the light where it’s most needed. Finally, the iPhone 14 Pro gains the same Action mode and Cinematic mode video improvements found in the other iPhone 14 models.

All four iPhone 14 models start at 128 GB of storage, and the Pro models offer a 1 TB tier for those shooting a lot of ProRAW photos or video. Here are the 128 GB prices—add $100 for 256 GB, $300 for 512 GB, and $500 for 1 TB:
iPhone 14: $799
iPhone 14 Plus: $899
iPhone 14 Pro: $999
iPhone 14 Pro Max: $1099
You can pre-order starting at 5 AM PDT on September 9th, with delivery and in-store availability on September 16th, except for the iPhone 14 Plus, which ships on October 7th. The iPhone 14 and iPhone 14 Plus come in five colors: midnight, blue, starlight, purple, and (PRODUCT)RED. The iPhone 14 Pro and iPhone 14 Pro Max come in deep purple, silver, gold, and space black. The third-generation iPhone SE ($429), iPhone 12 ($599), iPhone 13 mini ($599), and iPhone 13 ($699) remain for sale as well.
Generally speaking, we wouldn’t recommend upgrading from an iPhone 13 that’s serving you well unless you’re switching to the iPhone 14 Plus to get a larger form factor or to one of the Pro models for the ultimate in camera capabilities. It’s easier to recommend an upgrade from an iPhone 12 model or earlier, given the improved camera capabilities.
Apple Watch Line Expands with Apple Watch Ultra
This year, Apple introduced not just one new Apple Watch, but three! The second-generation Apple Watch SE provides a better entry-level option, the Apple Watch Series 8 takes over as the flagship model, and the Apple Watch Ultra brings new capabilities to extreme athletes, adventurers, and the rest of us wannabes.
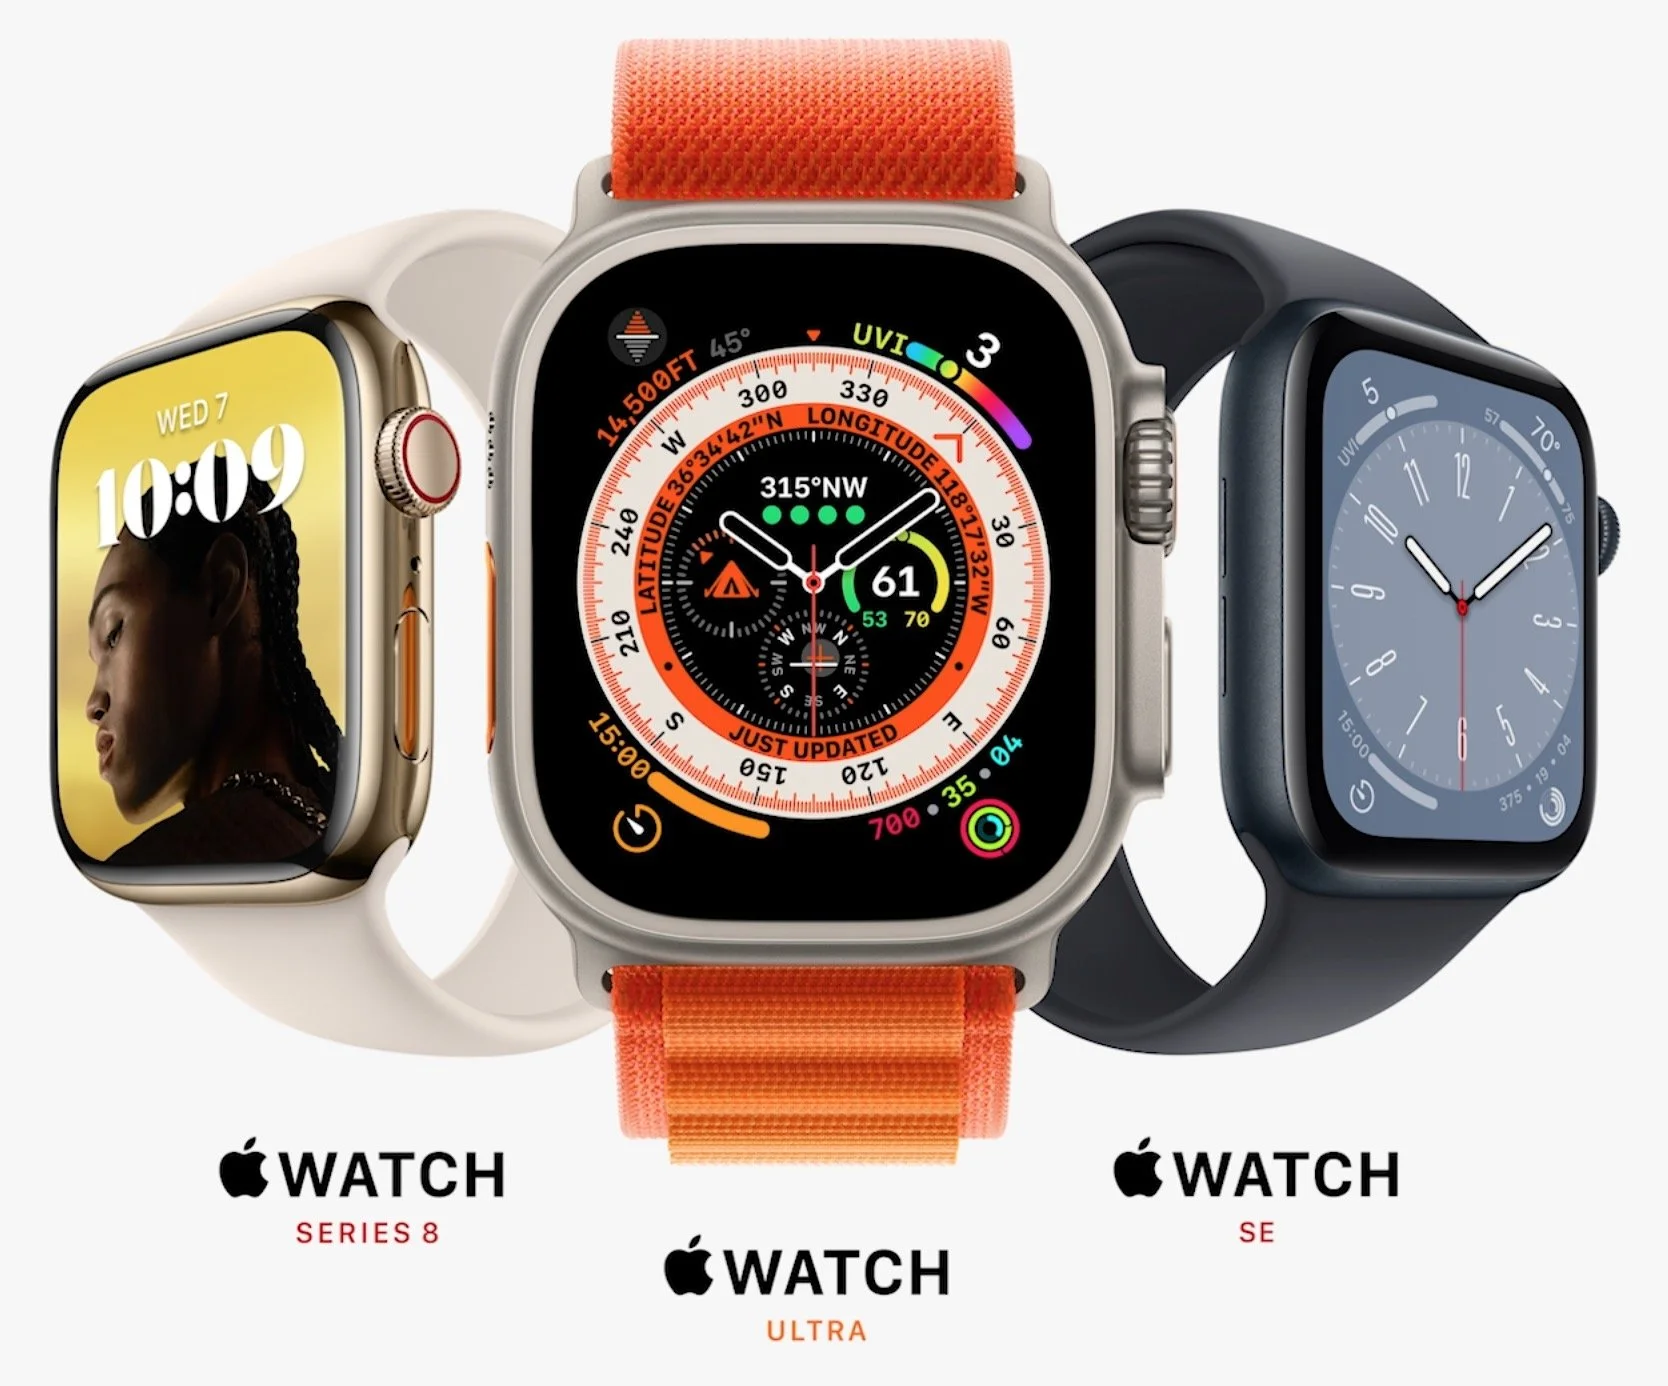
The second-generation Apple Watch SE doesn’t change much from the first-generation model. It has a 30% larger screen in the same 40mm and 45mm case sizes, it boasts the same S8 chip that powers this year’s Apple Watch Series 8, and it has new motion sensors that enable it to detect car crashes, just like the iPhone 14. But it still lacks the more-capable models’ Always-On display, blood oxygen sensor, ECG capability, and fast charging. It costs $249 for a GPS-only model or $299 for the GPS+Cellular model. The case is aluminum, and you can choose from midnight, starlight, and silver colors. You can order now for delivery on September 16th.
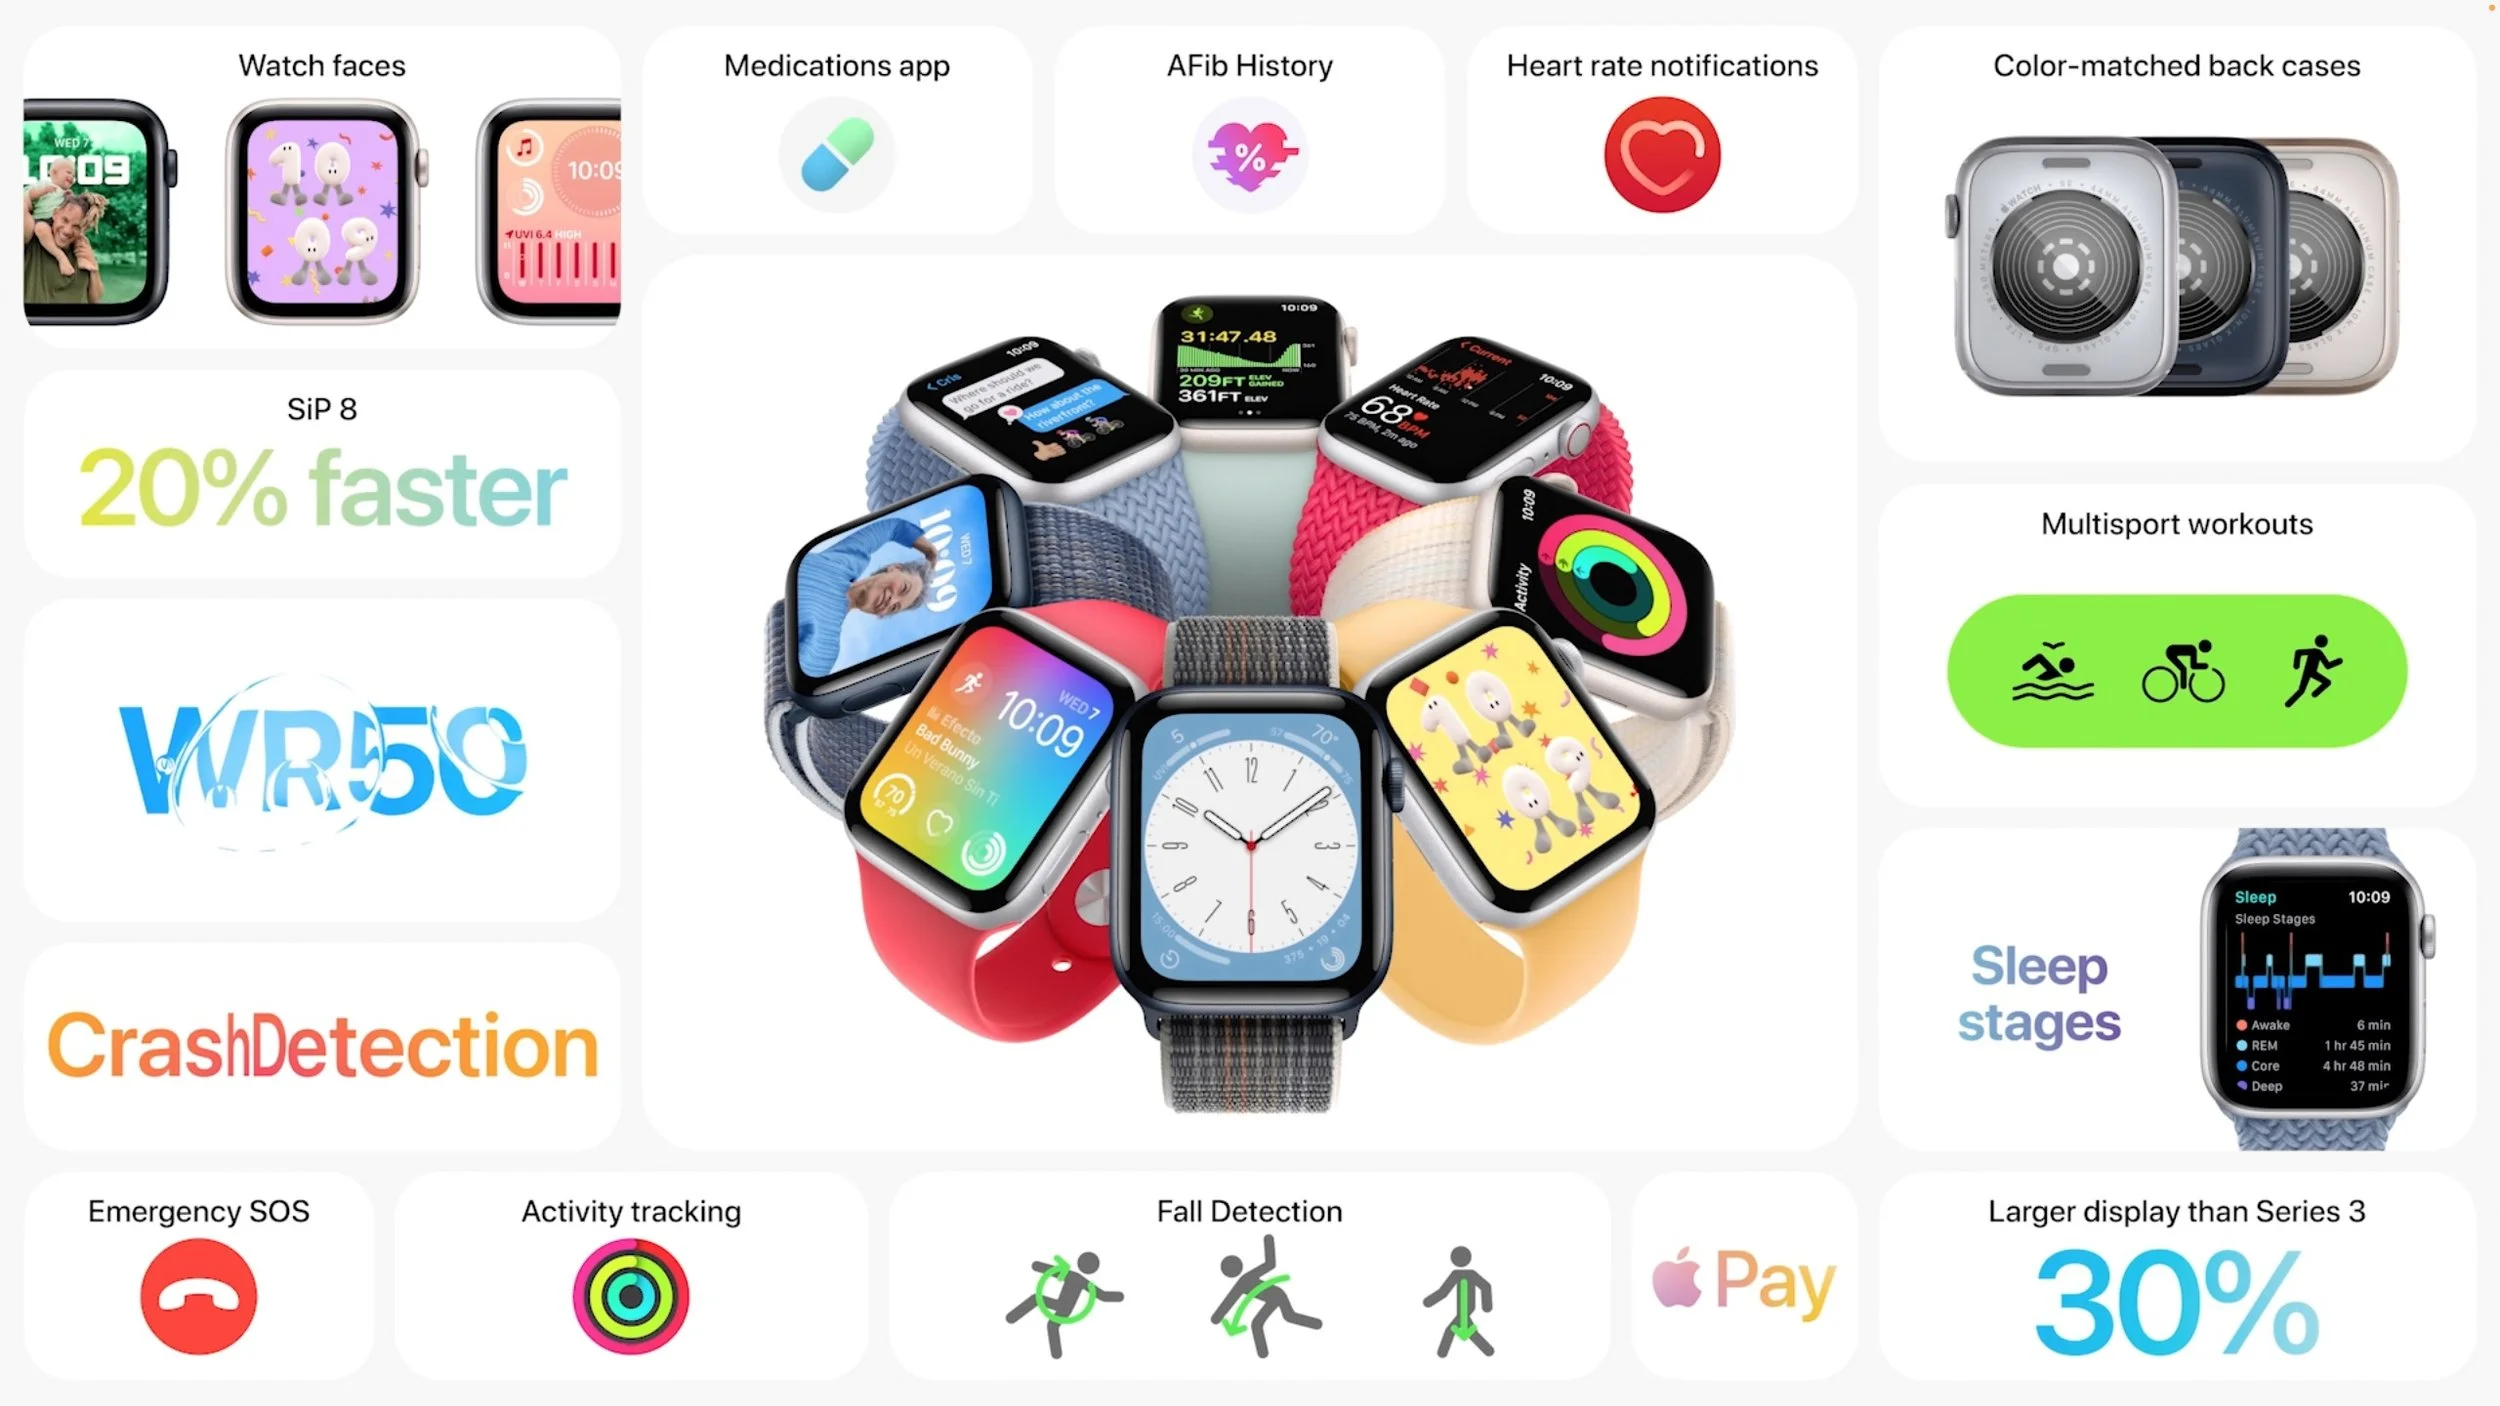
The Apple Watch Series 8 doesn’t change physically from the Series 7, but it gains a temperature sensor that Apple leverages for cycle tracking capabilities. We’re hoping Apple can get FDA approval to use the temperature sensor for other health-related options in the future—wouldn’t it be great if your Apple Watch could warn you that you might be getting sick? The Series 8 also gets the new motion sensors to detect car crashes, and travelers will be able to add a cellular Series 8 to an iPhone’s international roaming plan—likely for an additional fee—if the carrier in question supports it. The aluminum case comes in four colors—midnight, starlight, silver, and Product(RED)—and starts at $399 for GPS-only and $499 for GPS+Cellular. The stainless steel case comes in silver, gold, and graphite and starts at $699. Again, order now for delivery on September 16th.

Most interesting is the new Apple Watch Ultra. It’s a completely new design with a 49mm titanium case and a flat sapphire front crystal embedded in the case to protect against side impacts. At 14.4 millimeters, it’s thicker than the other two models, which are only 10.7 millimeters, so it may look ungainly on people with smaller wrists. It features a new Action button that apps can use for their own purposes, along with a larger Digital Crown and side button to make it easier to control with gloves. The Always-On screen is brighter than ever, making it readable in direct sunlight. The larger size also gives it better battery life, with 36 hours in normal usage and up to 60 hours with an extended battery optimization mode Apple says is still coming.

Apple beefed up other specs in the Apple Watch Ultra as well. A new dual-frequency GPS works better in conditions that can block GPS signals. It includes dual speakers and a three-mic array for better audio output and input, even in windy conditions. If you need help being found in the wilderness, it boasts an 86-decibel siren that can be heard up to 180 meters away. It’s IP6X dust resistant and meets the US military standard MIL-STD 810H for environmental conditions. You can even take it diving down to 100 meters, and with the Oceanic+ app coming in a few months, the Apple Watch Ultra can act as a full dive computer.

On the software side, the Apple Watch Ultra includes a new Wayfinder watch face that displays a compass and has a Night mode that switches to red on black for easier reading in the dark. A redesigned Compass app provides multiple views, a backtrack capability to retrace your steps, and waypoints for easier navigation.
The Apple Watch Ultra offers a choice of three bands: Alpine (nylon with a G-hook clasp), Ocean (a stretch elastomer with extensions to fit over wetsuits), and Trail (a nylon sport loop with a tab for easier adjusting). You can order now for $799, and it will ship on September 23rd.
Second-Generation AirPods Pro Improves on Previous Generation
Finally, Apple announced the second-generation AirPods Pro. Both the earbuds and the charging case look essentially the same, with the main subtle external change being that you can now adjust the volume with light swipes up and down on the stems of the AirPods Pro. A new extra small ear tip should make the AirPods Pro fit more people’s ears.
Instead, Apple focused its efforts on the internals of the AirPods Pro. A new H2 chip, coupled with a new low-distortion driver and custom amplifier, promises a better audio experience. The H2 chip also improves the Active Noise Cancellation feature, cutting out up to twice as much ambient noise, and the new Adaptive Transparency mode lets you hear what’s happening around you while simultaneously reducing noise from harsh sounds in the environment. When used with iOS 16, you’ll also be able to use Personalize Spatial Audio to customize what you hear based on the size and shape of your head and ears.
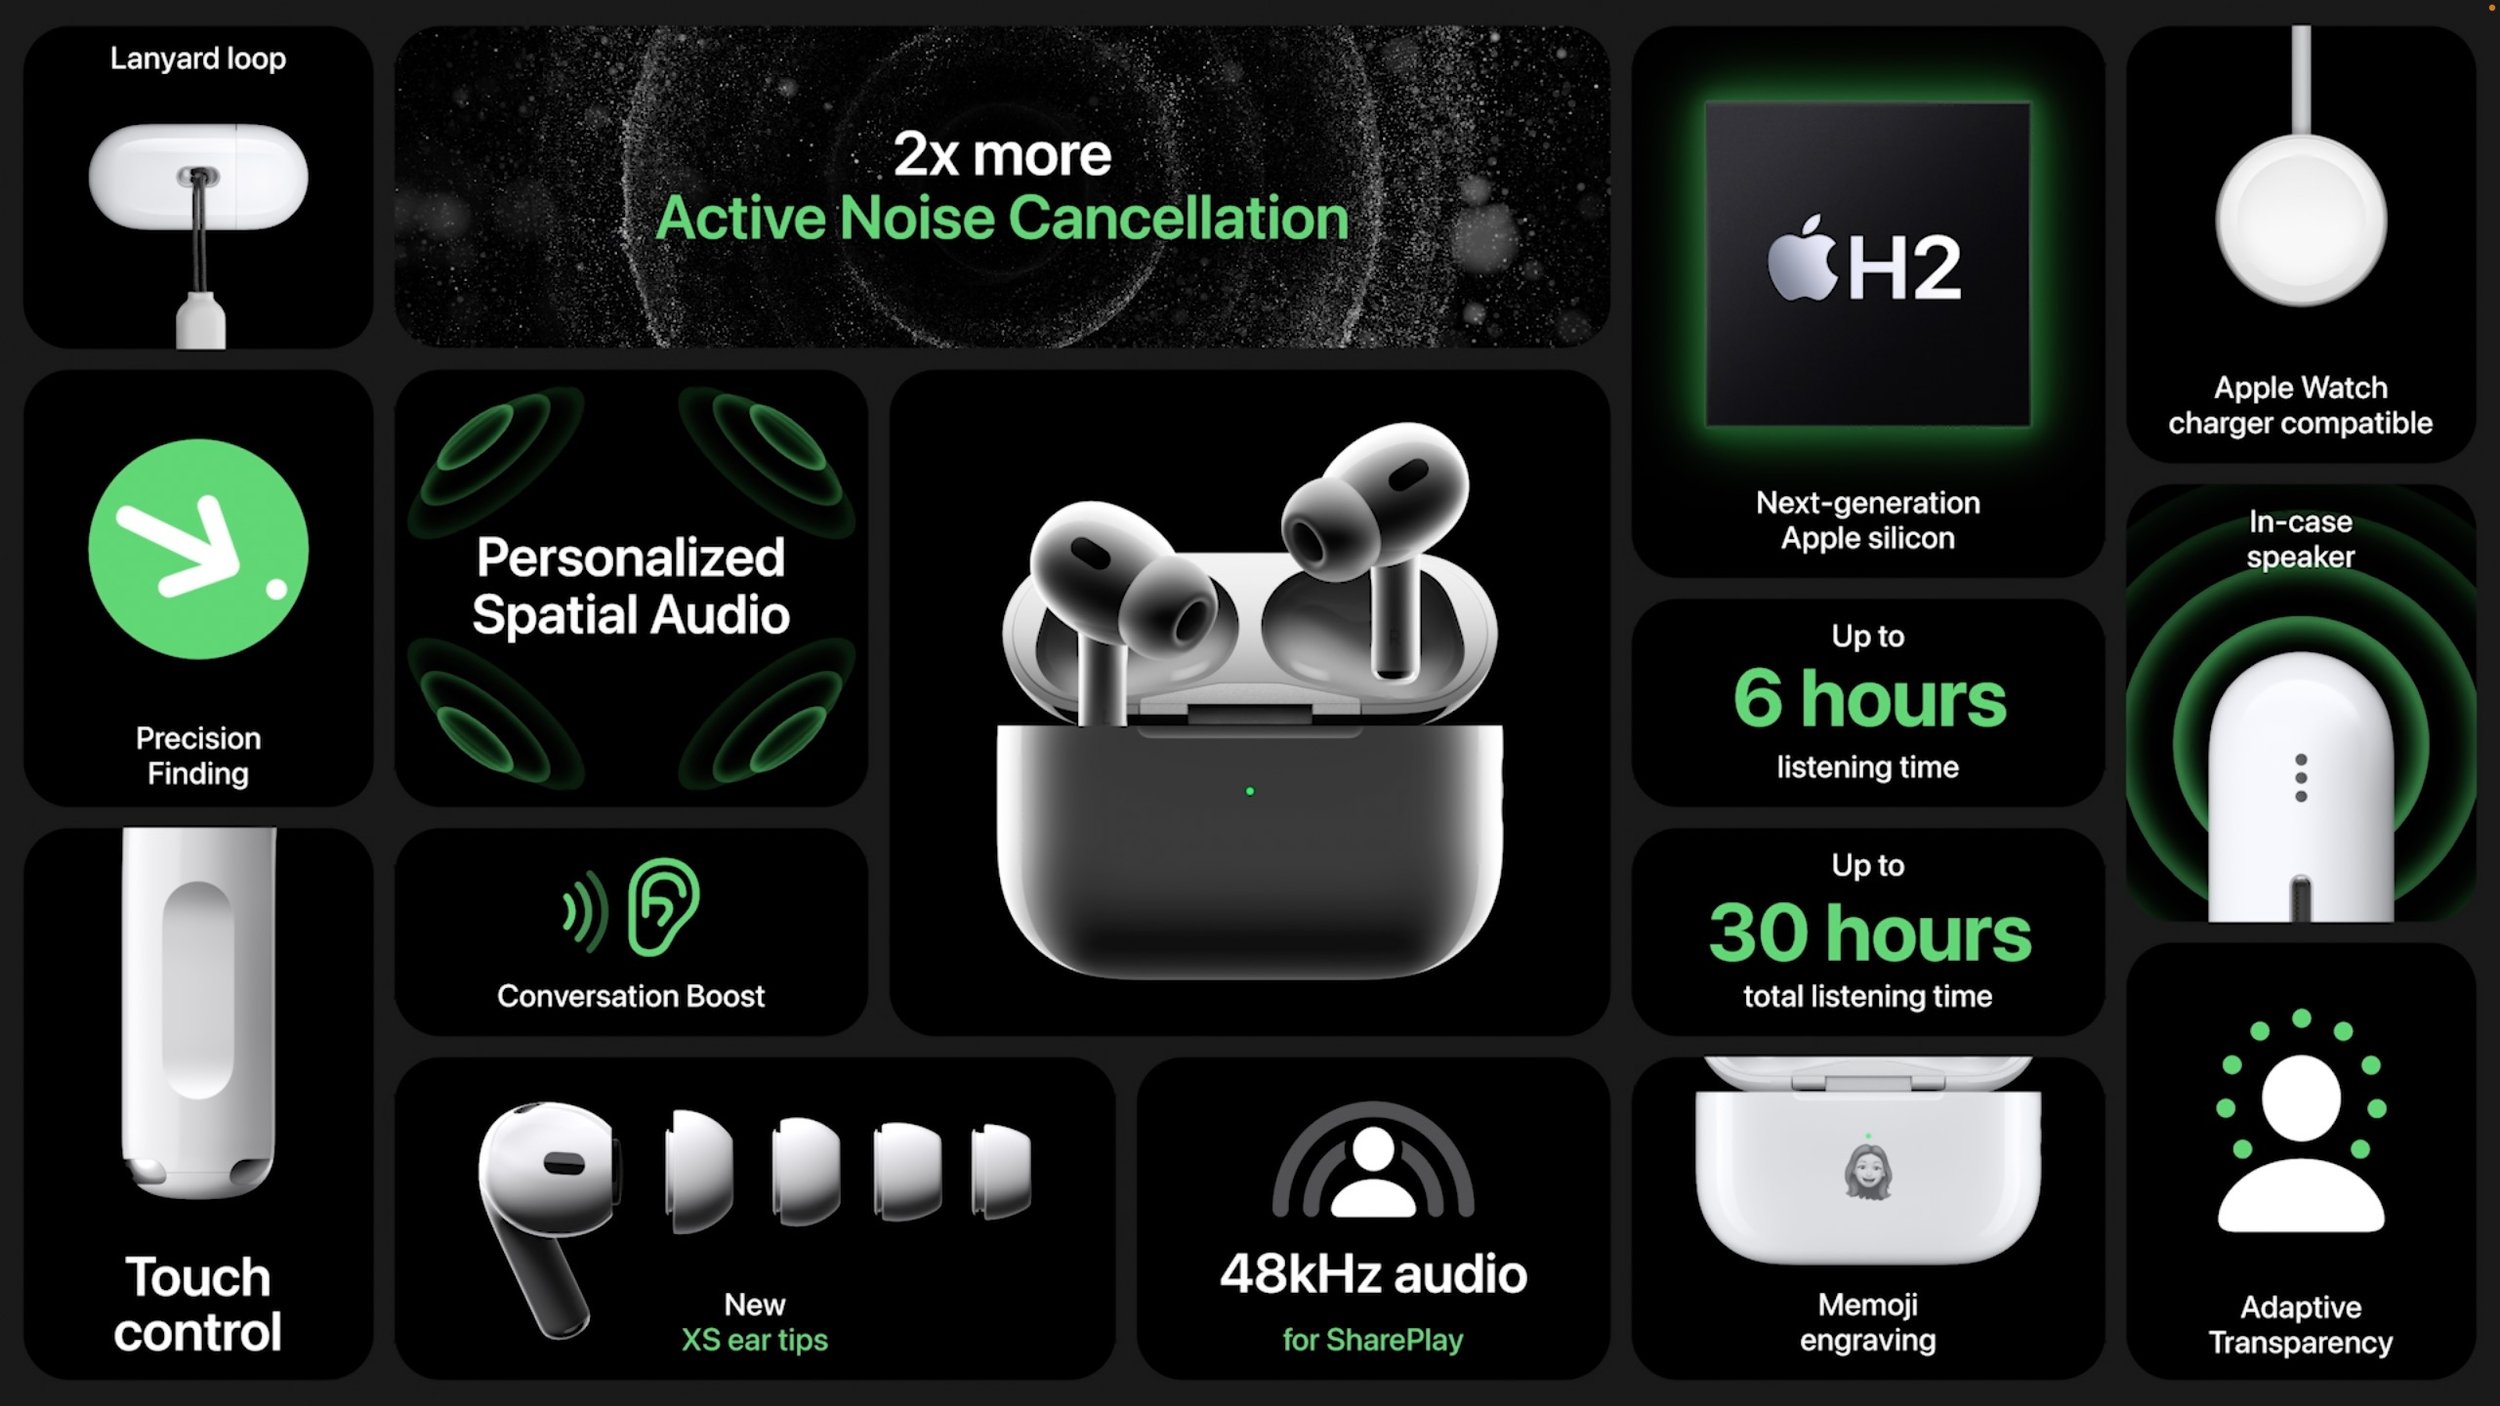
Perhaps most welcome is the additional 1.5 hours of listening time with Active Noise Cancellation that the new AirPods Pro offer. The charging case provides four additional charges for a combined total of 30 hours of listening time, 6 hours more than the previous model. You can now charge the case from an Apple Watch charger, a MagSafe charger, a Qi charger, or a regular Lightning cable. The new case is sweat- and water-resistant, includes a lanyard loop, and can be found when lost more easily thanks to a built-in speaker and support for Precision Finding in the Find My app when used with a compatible iPhone.
Pricing for the second-generation AirPods Pro remains the same at $249. You can order starting September 9th, and they’ll arrive starting September 23rd.
(Featured image by Apple)
Wi-Fi Calling and Wi-Fi Assist: What Are They and How Are They Different?
Wi-Fi Calling and Wi-Fi Assist. They sound similar and share a goal of providing connectivity when you need it. But they go about doing that in opposite ways—learn more here:

Two similar-sounding iOS features generate quite a bit of confusion. Wi-Fi Calling and Wi-Fi Assist both aim to improve your connectivity by using the best network available, but they achieve that goal in diametrically opposed ways. Wi-Fi Calling leverages your Wi-Fi connectivity to replace weak or nonexistent cellular coverage, whereas Wi-Fi Assist uses your cellular data connection when the Wi-Fi connection is poor. Here’s what you need to know.
Wi-Fi Calling
Of the two technologies, Wi-Fi Calling is more commonly used and more helpful. It enables you to make or receive a phone call if you have a Wi-Fi connection in an area with little or no cellular coverage. That’s a huge win—cellular coverage in cities often doesn’t work below ground and can be blocked by thick walls in old buildings too. And in rural areas, weak coverage is a common problem. Your wireless carrier must support Wi-Fi Calling for it to work, but most do—check the full list for your carrier.
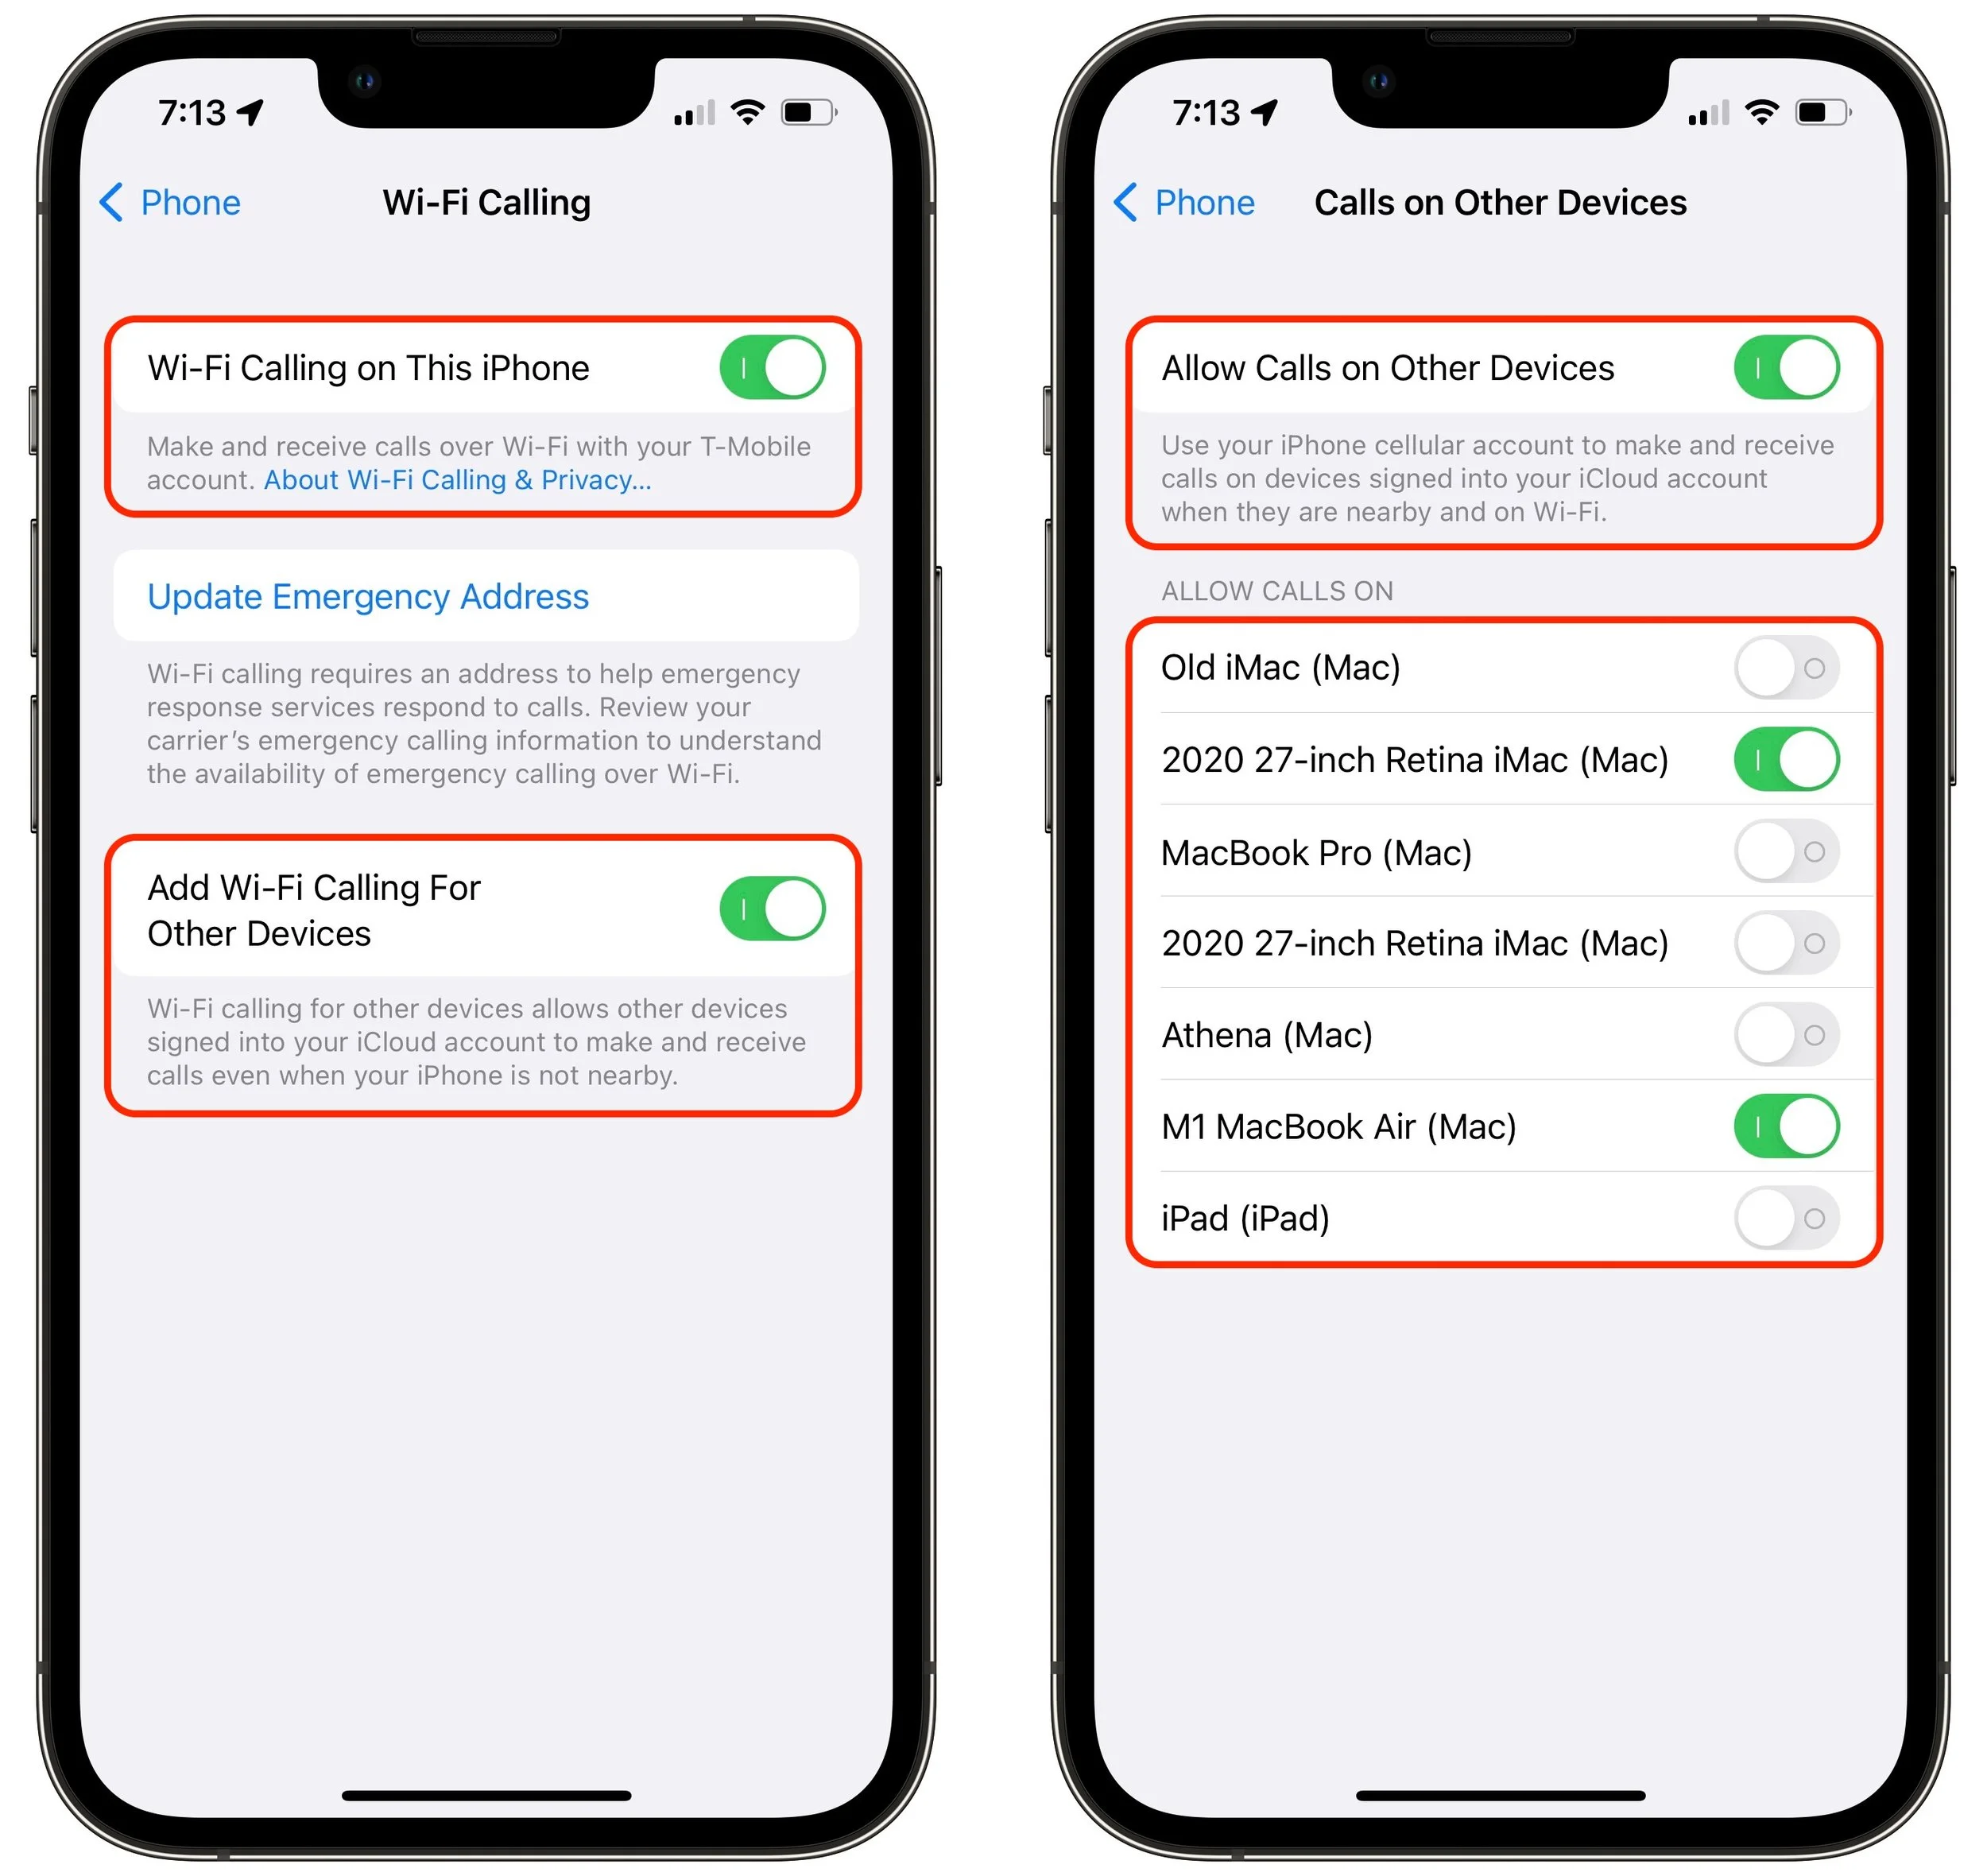
To enable Wi-Fi Calling, go to Settings > Phone > Wi-Fi Calling, and enable the Wi-Fi Calling On This Phone switch. You’ll likely need to enter or confirm your address for emergency services. Normally when you call emergency services, your iPhone provides the dispatcher with your location based on cell tower triangulation; using Wi-Fi prevents that, so the system falls back to your address. For this reason, the iPhone tries to use the cellular network for emergency calls whenever possible. When Wi-Fi Calling is active, you’ll see “Wi-Fi” after the carrier name in the status bar.

The other utility of Wi-Fi Calling is that it lets you take and make phone calls on iPads and Macs that lack cellular capabilities, even when your iPhone isn’t nearby. It’s a little more complicated to enable, requiring the following settings:
In Settings > Phone > Wi-Fi Calling, turn on Add Wi-Fi Calling For Other Devices.
In Settings > Phone > Calls on Other Devices, turn on Allow Calls on Other Devices.
Still on that screen, turn on each device you want to use with Wi-Fi Calling. (Each device must be signed in to the same Apple ID.)
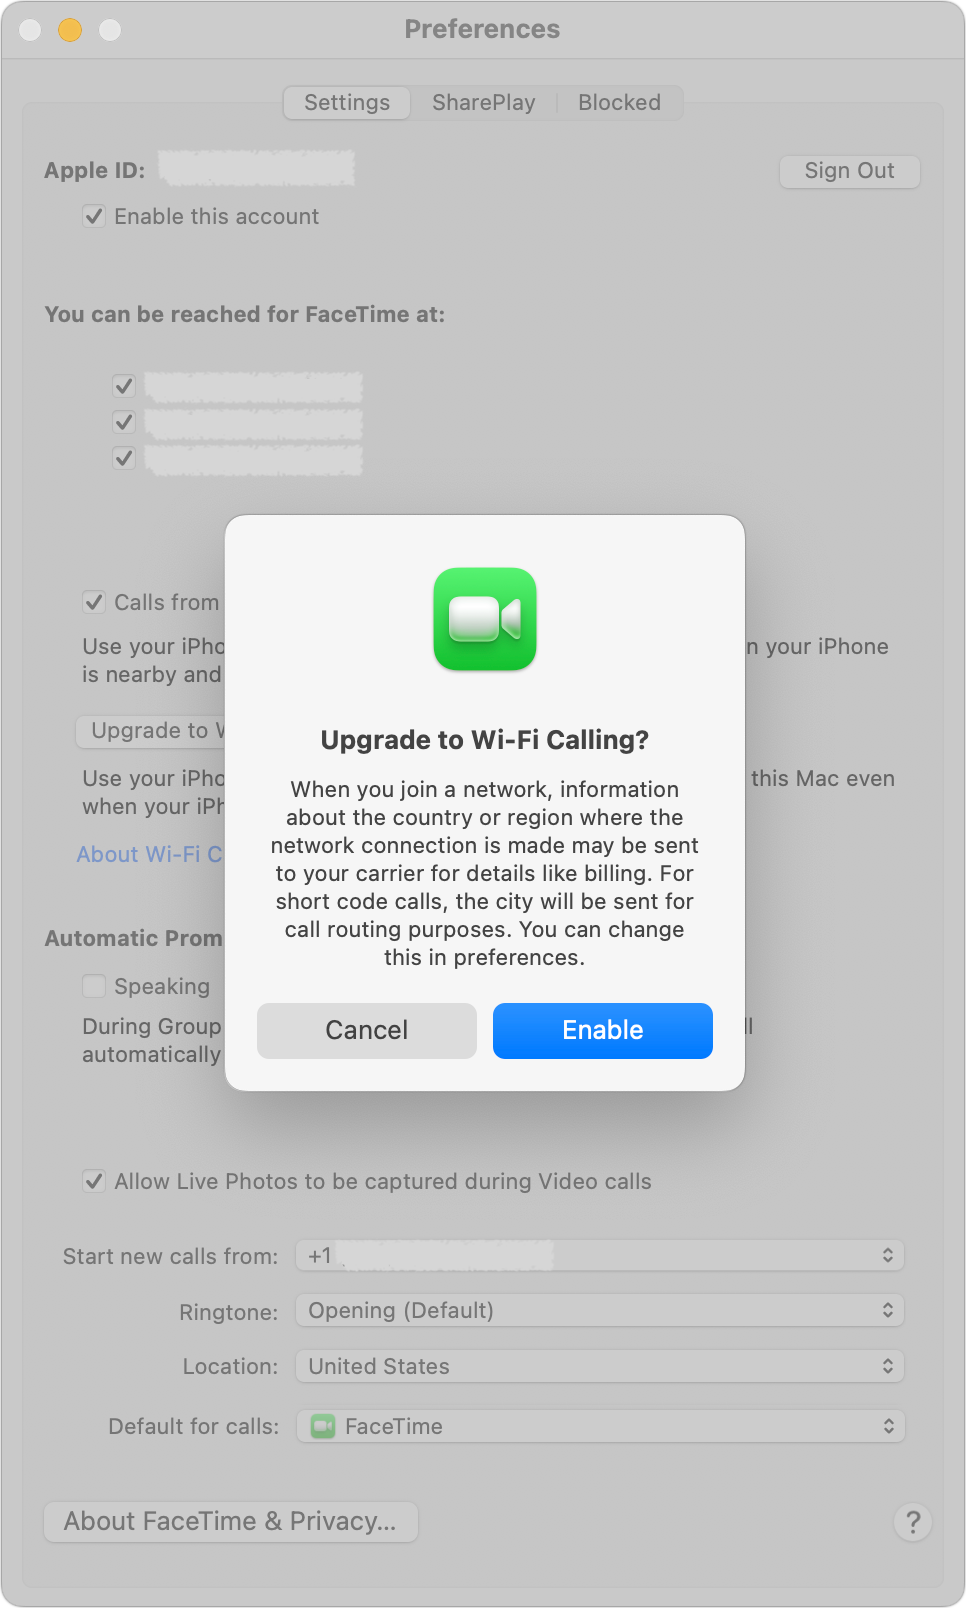
On your iPad or iPod touch, go to Settings > FaceTime and turn on Calls from iPhone. On your Mac, open the FaceTime app, choose FaceTime > Preferences, then enable Calls from iPhone and click Upgrade to Wi-Fi Calling. You’ll need to approve the action or enter a code on the iPhone to confirm.
Once you have everything set up, calls should come through to all the devices you’ve added, and you can start new calls from the FaceTime app by entering a contact or phone number and using the phone button. The only downside? Multiple nearby devices can announce incoming calls, which may be annoying.
Wi-Fi Assist
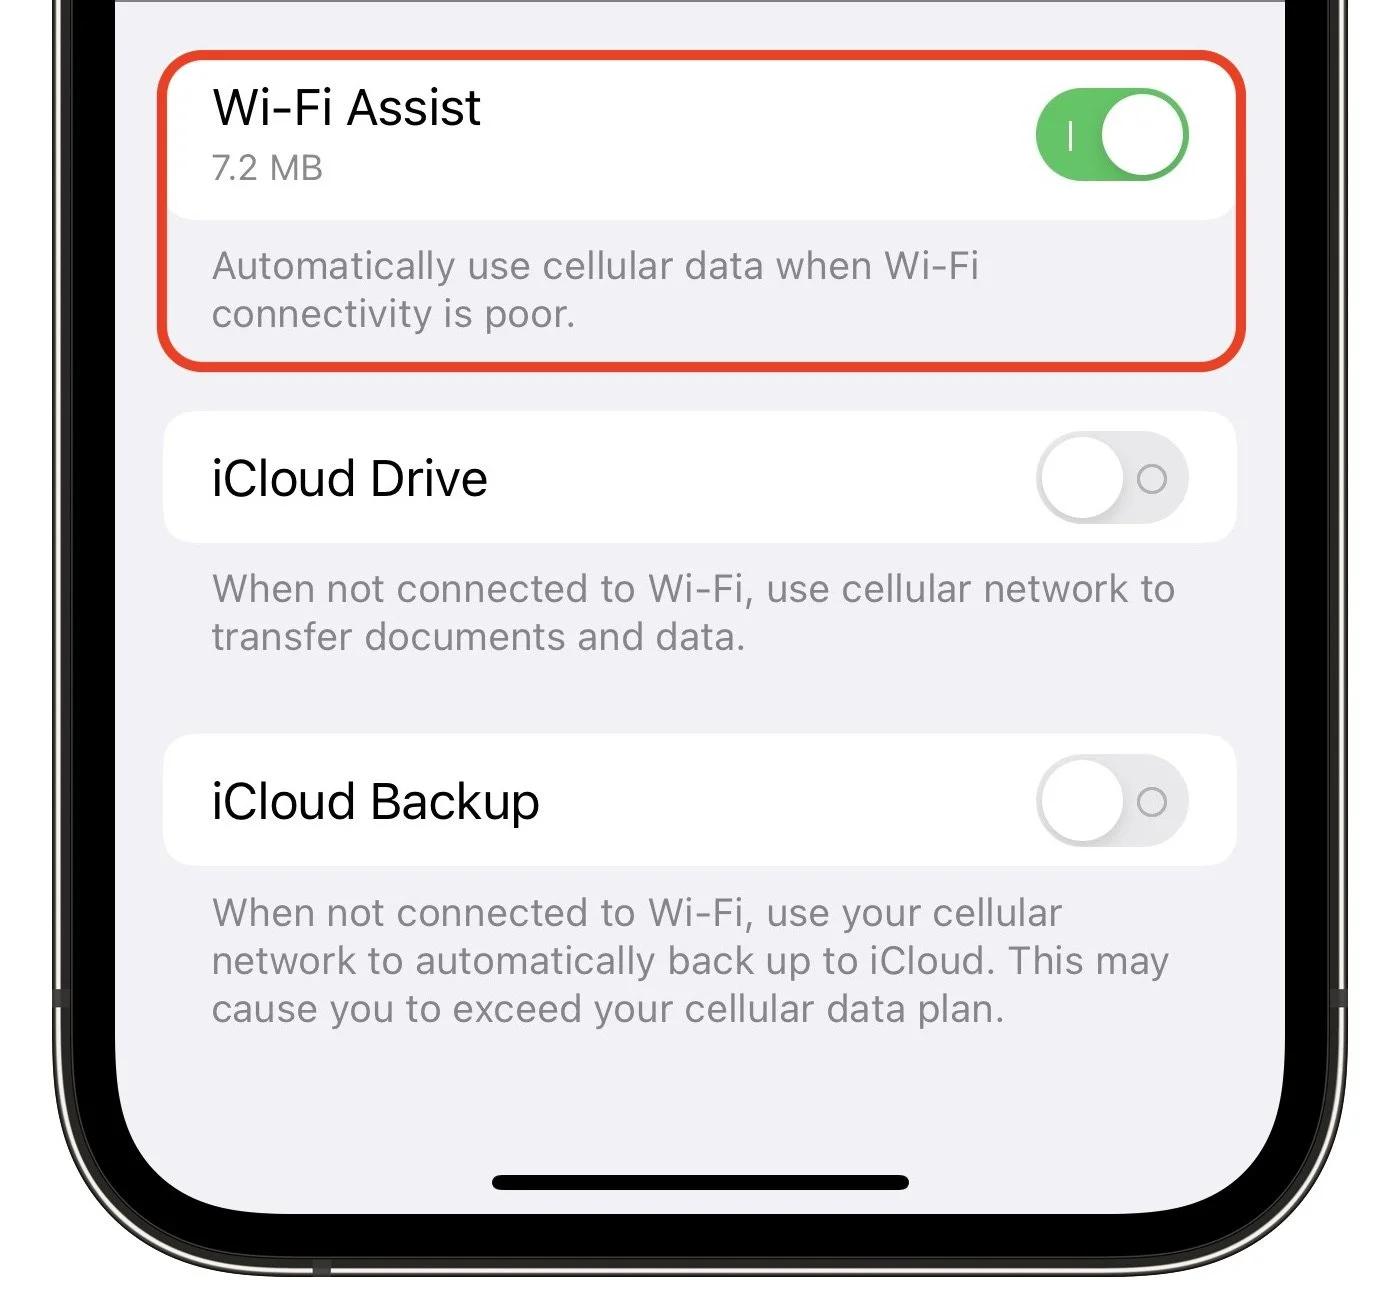
Wi-Fi Assist solves a less common problem than Wi-Fi Calling, but it’s such a useful fix that Apple turns it on by default. In short, when you have a poor Wi-Fi connection to the Internet, Wi-Fi Assist automatically switches your connection to cellular. So, if a Web page doesn’t load or a search in Maps isn’t getting results, Wi-Fi Assist kicks in to ensure the task completes over your cellular connection.
The only downside to Wi-Fi Assist is that you could end up using more cellular data than you expect. That’s likely a problem only if your plan provides extremely limited cellular data or charges significant amounts for additional usage, as might be the case with a pre-paid SIM while traveling. To ensure that doesn’t happen, go to Settings > Cellular, scroll all the way to the bottom, and turn Wi-Fi Assist off. (That screen also tells you how much cellular data Wi-Fi Assist has used; even when it’s on, it’s un-likely to consume much.)
There are a few caveats:
Wi-Fi Assist won’t automatically switch to cellular if you’re data roaming (using a carrier other than your main one for cellular data).
Wi-Fi Assist works only with foreground apps, not those that download in the background.
Wi-Fi Assist doesn’t work with some apps that stream audio or video, or that download significant amounts of data.
In short, Wi-Fi Calling and Wi-Fi Assist are helpful features that attempt to enable your iPhone to work normally for phone calls and Internet-related tasks by switching between Wi-Fi and cellular as necessary to ensure solid connectivity.
Of course, if you have neither cellular coverage nor Wi-Fi connectivity, you’re just stuck and will have to amuse yourself offline for a while!
(Featured image by iStock.com/ipopba)
When Should You Upgrade to macOS 13 Ventura, iOS 16, iPadOS 16, watchOS 9, and tvOS 16?
Apple is gearing up to release macOS 13 Ventura, iOS 16, iPadOS 16, watchOS 9, and tvOS 16. We take a brief look at the features worth upgrading for and suggest when to upgrade each of your Apple devices.

September is here, which means that Apple will soon start releasing major upgrades for all its operating systems. Note that we say “start.” Apple will release iOS 16 and watchOS 9 alongside new iPhones and Apple Watch models in September. However, Apple has now acknowledged that iPadOS 16 will ship later in the fall—perhaps in October—as version 16.1, likely in conjunction with iOS 16.1 and possibly alongside macOS 13 Ventura. tvOS 16 isn’t interesting enough to worry about much either way.
Apple previewed these releases at its Worldwide Developers Conference in June, and many people have been testing the public betas since. Once Apple judges each of its operating systems to be ready for public consumption, the question arises—when should you upgrade?
Note that we say when and not if. There’s no harm in delaying a major operating system upgrade until Apple has sanded off rough edges that slipped through testing. But waiting too long puts you at risk from security vulnerabilities, increases compatibility annoyances, and prevents you from taking advantage of new features. Plus, when you buy a new Mac, iPhone, or iPad after these operating systems have shipped, you’ll get the latest version, which could pose problems for your existing apps or compatibility with older hardware or workflows. It’s best to be prepared if you have to replace a device unexpectedly.
Given that we don’t know precisely when each operating system will come out, here’s our recommendation for the general upgrade order that we anticipate and how long we suggest waiting after the release appears. Remember, always make a backup before upgrading a Mac, iPhone, or iPad so you can revert if necessary.
iOS 16
It’s usually safe to upgrade iOS fairly quickly because Apple puts significant effort into ensuring that the new iOS version is a good experience for those who buy the new iPhones that come with it. However, because iPhones are so crucial to our everyday lives, it’s worth delaying the upgrade to iOS 16 for a few weeks, just in case. After that, you can install it and enjoy the new features.
You’ll likely enjoy iOS 16’s customizable Lock screen, which lets you specify the font, color, and placement of various options, all of which appear with photos that can shuffle throughout the day. Widgets can now appear on the Lock screen too, providing at-a-glance weather and other info even without unlocking your iPhone. The new dictation capabilities that let you talk, select, and type without switching modes may also be game-changing for some, and dictation will even add punctuation automatically and let you enter emojis with voice commands.
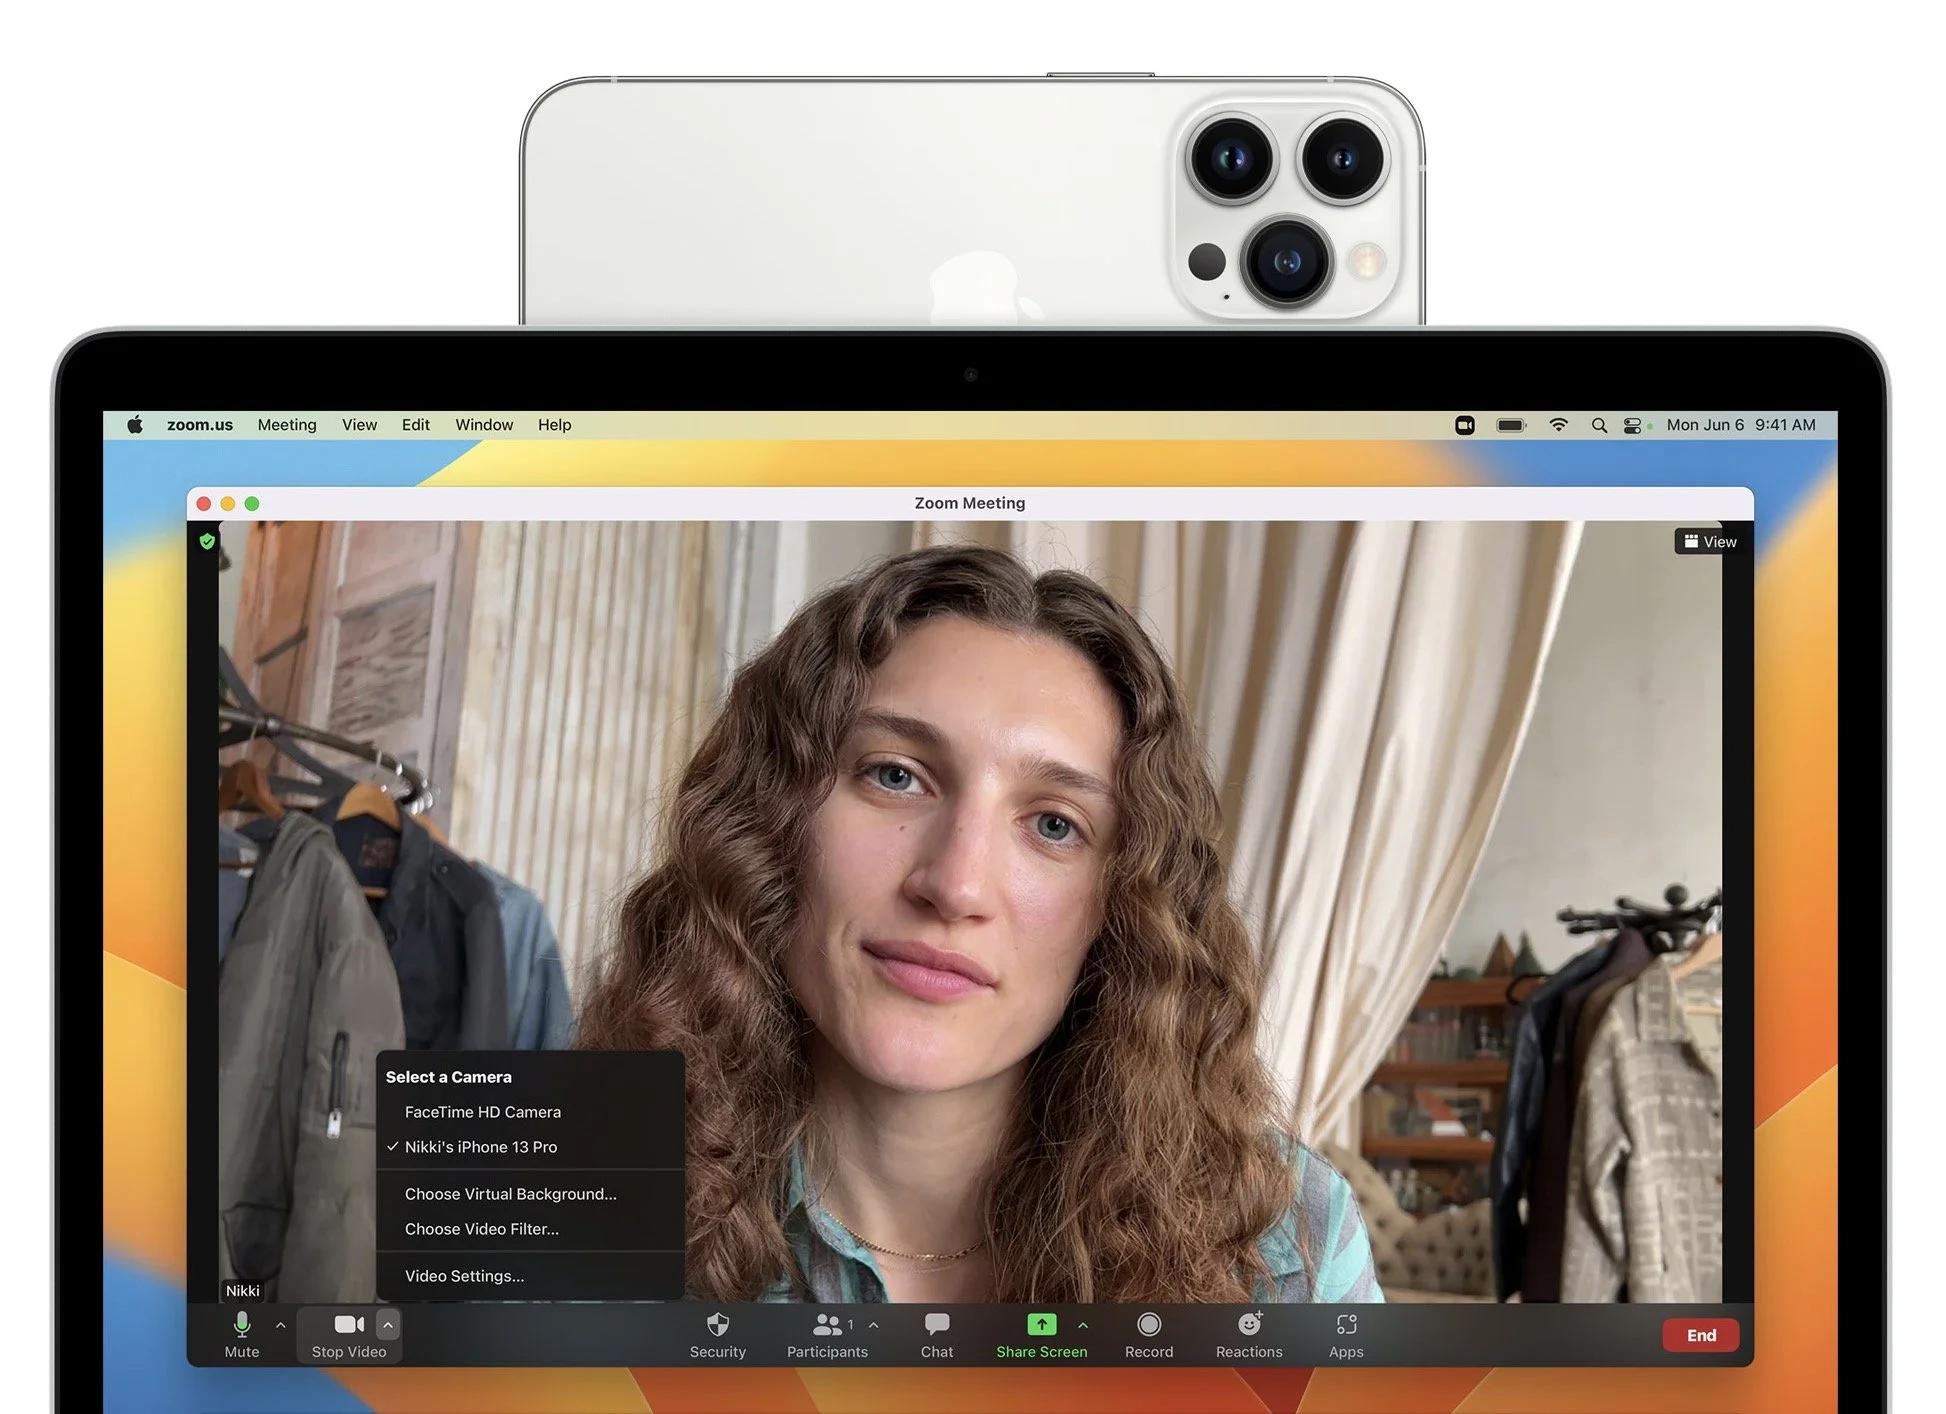
However, some features may not be fully available at the start due to Apple’s tight integration of operating systems. Messages will finally let you edit messages after sending, undo sending, and mark messages as unread—but editing and unsending won’t work for messages sent to people running anything earlier than iOS 16, iPadOS 16, and Ventura. We’re unsure if Apple will enable iCloud Shared Photo Library, which lets you automatically share an entire library of photos with family members or friends, until iPadOS 16 and Ventura are out as well. Similarly, the Continuity Camera feature of iOS 16, which lets you use your iPhone as a webcam for your Mac’s videoconferencing apps, won’t be available until Ventura ships.
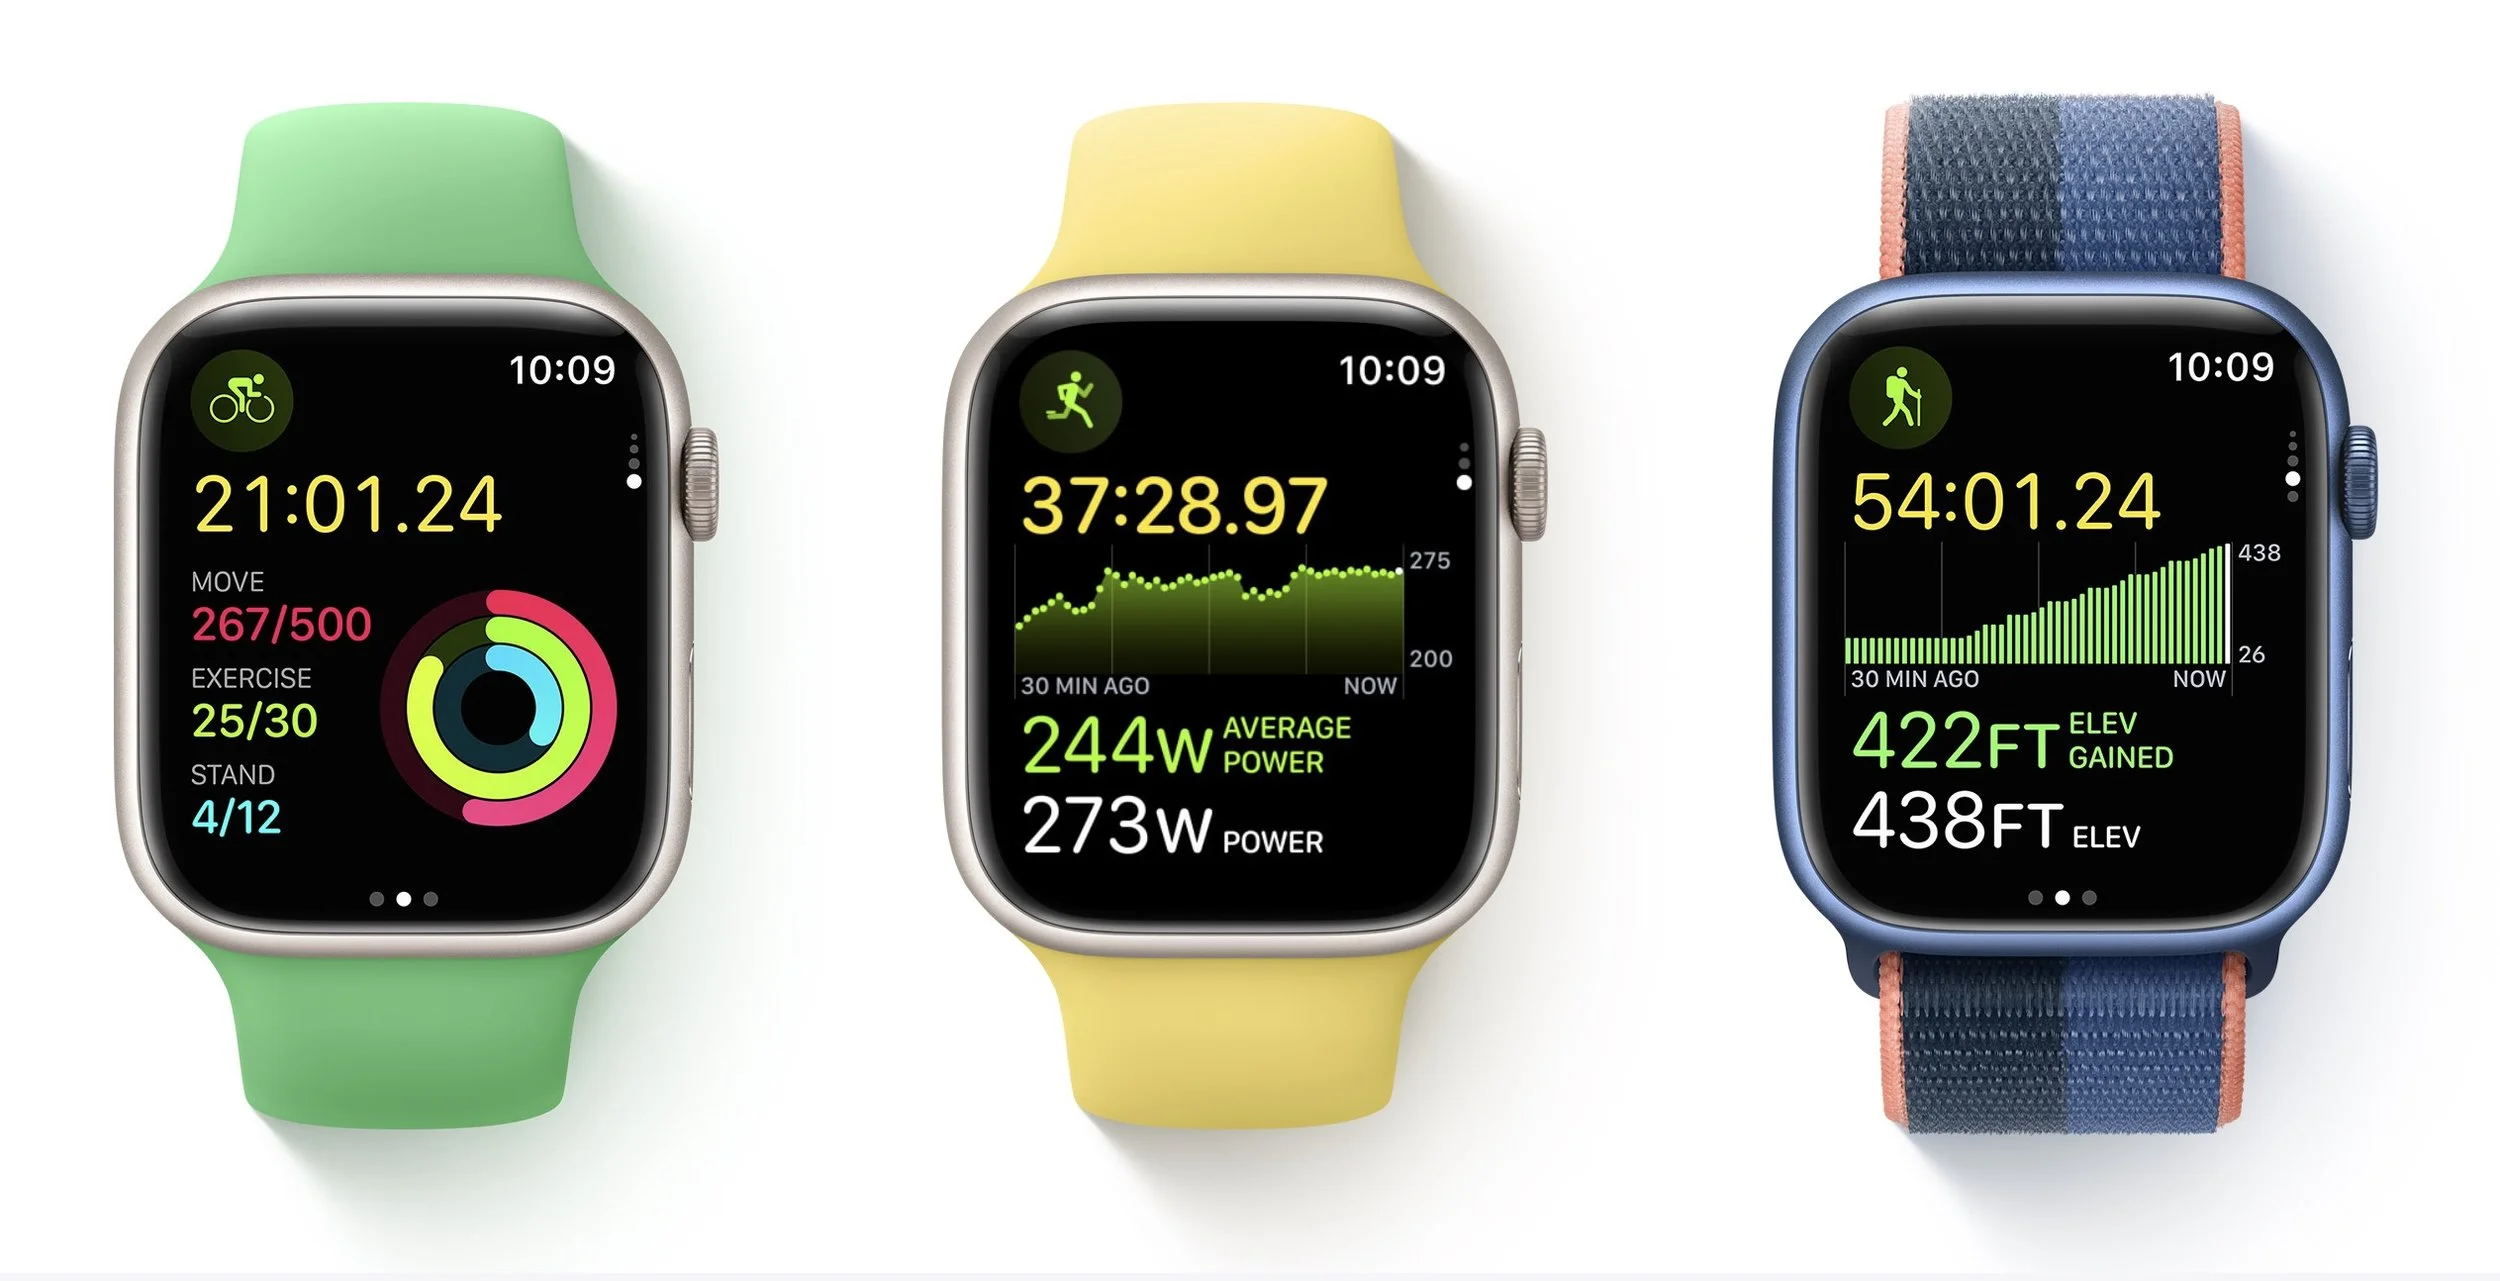
watchOS 9
Once you upgrade your iPhone to iOS 16, there’s no reason to delay upgrading your Apple Watch to watchOS 9. You may not even notice the difference since none of the changes are likely to force changes in your usage patterns.
New features include new views and more metrics in the Workout app, including a display of heart rate zones and pace feedback. You can customize workout and recovery intervals, race against previous routes, get running form metrics, and see your running power. Also new is a Medications app that helps you remember to take medications and log them from reminders. And, of course, there are more watch faces.
tvOS 16
We don’t know when Apple will release tvOS 16, but the changes are so minimal that it doesn’t matter much. tvOS 16 will support more Bluetooth gaming controllers, provide full support of the Matter smart home standard, and offer more integration with your other Apple devices, such as with workouts in Apple Fitness+.

Unless something in that list encourages you to upgrade as soon as it’s out, we suggest letting your Apple TV (the fourth-generation model and later) upgrade itself when it gets around to it, assuming you have automatic updates turned on in Settings > Software Updates.
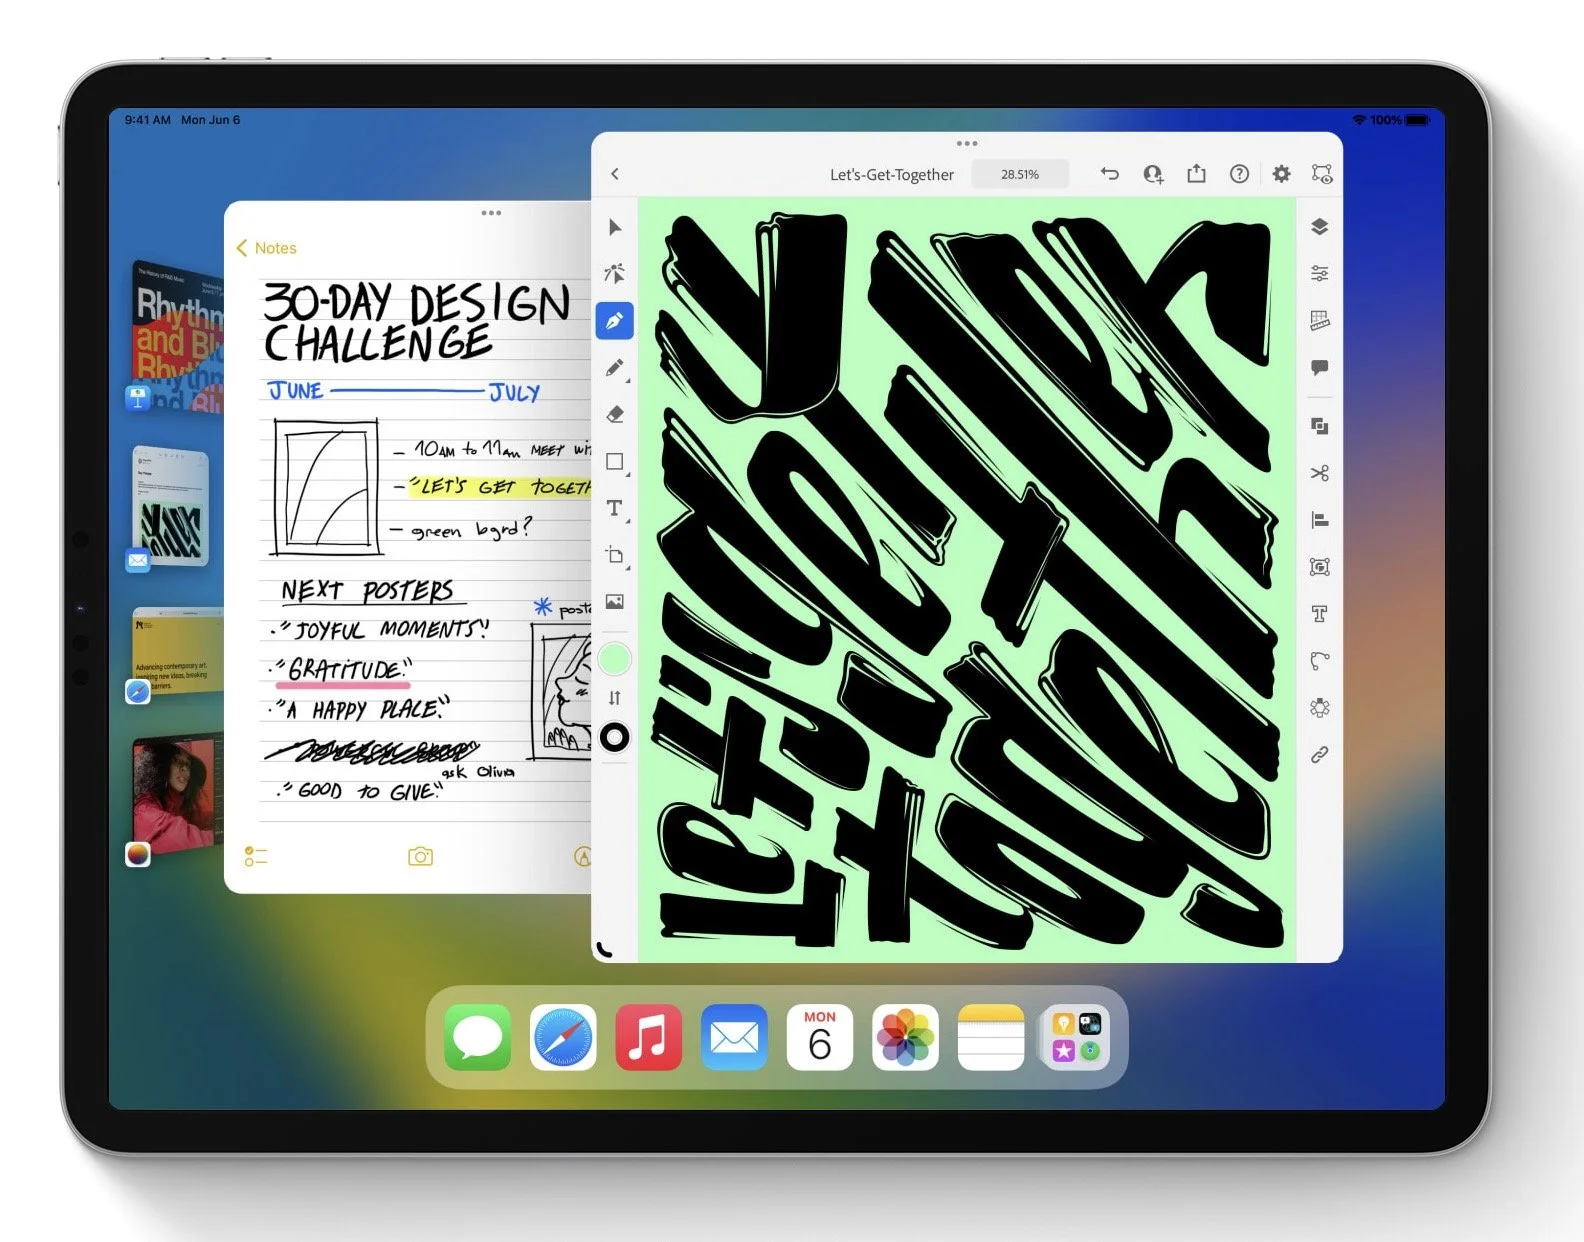
iPadOS 16
iPadOS 16 may not be available until October, but once it ships, our general advice is that it’s fine to update. For the most part, iPadOS is a superset of iOS, so if anything, Apple should have had some time to fix any early bugs that cropped up in iOS 16 before releasing iPadOS 16.
The big new feature in iPadOS 16—if you have an M1-equipped iPad like the latest iPad Air or iPad Pro—is Stage Manager, which brings a structured windowing system to the iPad and Mac. Stage Manager lets you stack up to four apps in an overlapping view, providing additional sets of apps off to the side in a sort of secondary Dock. If you connect your iPad to an external display (along with a keyboard and pointing device), it offers another separate workspace, so you can work more fluidly in multiple apps at once.
If you want to see more on screen, a new display scaling mode shrinks interface elements and content. It may make Stage Manager and Split View more helpful. You’ll also likely enjoy a better search in Mail, plus options to undo sending, schedule sending, follow up on sent messages, and add rich links. (These Mail features are shared with iOS 16 and Ventura.) Last but not least, the iPad finally gets its own Weather app.
macOS 13 Ventura
The hardest upgrade decision revolves around upgrading your Mac to macOS 13 Ventura, and that assumes you can upgrade at all, given that Apple has dropped support for all Macs released before 2017. The main new feature that you might find compelling is Stage Manager, although most longtime Mac users probably already feel comfortable with their window management skills. If you spend a lot of time in video calls, the new Continuity Camera feature that lets you use your iPhone (running iOS 16, natch) as a high-quality webcam with support for Center Stage—which enables the camera to follow you as you move around—may also be attractive. And, of course, you’ll get the new Messages, Mail, and iCloud Shared Photo Library features that Apple added to iOS 16 and iPadOS 16.
We always encourage caution when upgrading to a new version of macOS. Wait at least a few months before upgrading your primary Mac to Ventura. App compatibility isn’t usually a long-term problem with iOS and iPadOS, but many people rely on older Mac apps that may not work in the latest version of macOS. Even once you’re confident that your apps will work properly in Ventura, there may be workflow or intra-office compatibility concerns if some people upgrade and others don’t. And, of course, unanticipated bugs could crop up at inconvenient times—important work takes place on Macs! Please, do not upgrade to Ventura without checking with us first. With luck, the start of the new year will have brought both the bug fixes and app updates necessary to give the green light.
(Featured image by Apple)