Website Owners: Identifying Copyright Infringement Link Insertion Scams
If you receive what looks like a copyright infringement message complaining about an image on your website, don’t panic—it might be a scam. We help you identify such scams and explain what to do if the message turns out to be real.

We regularly warn Internet users about online scams and phishing attacks. Most of these are relatively easy to identify and avoid once you’re aware of telltale signs. Unfortunately, we’ve encountered a newer type of scam that’s more difficult to identify, partly because it plays on fears of legal action.
Website owners are the target of this scam email, which purports to come from a lawyer. The message states that an image on your site has been used without permission. Such a claim is all too believable for many, especially those who may not have been as careful about usage permissions in the distant past as they are today. The message includes a link to the image, a link to the purportedly infringing page, and a threat to initiate legal action if certain actions aren’t taken within five business days
Unusually, the email doesn’t ask you to take down the infringing image or pay a retroactive licensing fee. Instead, it says you must credit the image’s copyright holder and include a link. Such a simple request seems like a huge win—instead of paying a licensing fee or worrying about being sued, you can twiddle a little HTML and move on with your life.
Don’t do it! This is what’s called a “link insertion scam.” It exploits the search engine optimization principle that links on reputable sites provide legitimacy to linked sites, helping them move up in the search rankings. Unfortunately, the reverse is also true; linking to a scammer from your website will cause Google and other search engines to penalize your site in the search rankings.
Unfortunately, these copyright infringement scams look legitimate at first glance, as you can see in this example. The From and Subject lines don’t seem forged or malformed, and there are no obvious grammatical errors or indications that the writer doesn’t speak fluent English. And when you click the link in the signature, you end up at what appears to be the website of a real law firm. What should you do if you receive a message like this?

First, don’t panic. Just because the message looks legitimate doesn’t mean it comes from a real lawyer. Also, don’t call your lawyer unless they’re willing to work for free. You can save stress, time, and money by evaluating the message yourself.
A few details in the message suggest that it’s not real:
The domain in the From line’s email address—elitejusticeadvisors.biz—sounds sketchy and doesn’t match the company name.
The Subject line of “DMCA Copyright Infringement Notice” sounds official, but those familiar with the DMCA will know that it can be used only for a formal notice-and-takedown process, not to make demands for attribution or payment. But most people won’t know that.
The message is addressed to the generic “Dear owner of,” whereas legitimate messages from a lawyer would be addressed to a specific entity.
The required link URL points to a telecom news site in Sri Lanka, and it’s odd that an Arizona lawyer would be working for such a client.
The example of the purportedly infringing image is hosted at Imgur, a consumer image-hosting site known for funny pet pictures and cringeworthy GIFs. Legal firms would always use some sort of case management site.
Those details may feel wrong, but they’re insufficient to prove it’s a scam. You’ll need to dig deeper. Here are some ways you can do that:
Investigate the domain: Do a Web search on the domain in question: elitejusticeadvisors.biz. Because others have written about this scam, articles identifying it as a scam will appear on the first page of the results.
Search for the lawyer and firm: The lawyer’s name is too generic to yield revealing results, but if you do a Web search on “Dean Parker Commonwealth Legal Services,” you’ll once again see that others have identified it as a scam.
Check a state bar association directory: Most state bar associations or state courts have a searchable directory of licensed legal professionals. A quick search of the State Bar of Arizona’s member directory reveals that no “Dean Parker” is licensed in Arizona.
See if the headshot matches a real person: If the website provides a headshot, you can copy the image (Control-click it and choose Copy Image) and paste it into the TinEye reverse image search engine. Since all the results say “generated.photos,” it’s a good bet that the image was AI-generated.

Search for the company’s full name and address: As with the name of the lawyer, the generic-sounding name of the law firm will probably match other companies. However, if you search for the full name and address, you’ll likely turn up articles about it being fake.
Visit the address virtually: With Apple Maps and Google Maps, you can verify that a business is present at a location (or not) and often view the offices using Google Street View. Both mapping tools show no law firm at the provided address. Additionally, the building does not have a fourth floor, as specified in the address.

Ask ChatGPT: Now that ChatGPT has access to current Web information, it’s worth pasting the complete contents of the message into a ChatGPT conversation and asking it to tell you about the message. Start generally, but then ask if it thinks the message might be a scam, and if so, to suggest ways you could verify your suspicions.
Some of the above search suggestions identify the scam only because the scammer has reused the same company name, lawyer name, physical address, and website. If you were the first to be targeted by a new scam, the state bar association search and physical address check would be the most likely to expose it.
Let us leave you with an important caveat. You shouldn’t assume that all copyright infringement messages are scams. A legitimate DMCA takedown notice will ask you to remove the content, and a real copyright infringement message—probably from a company that specializes in such matters rather than a lawyer—will likely demand payment. In both cases, take down the offending image right away. If you really were using an image without permission, some payment may be required, and if the amount feels excessive, contact a lawyer specializing in copyright infringement cases. They may be able to negotiate a lower payment or point out issues that will make the claim go away.
(Featured image based on an original by iStock.com/Olivier Le Moal)
Perturbed by Location Tracking Revelations? Here’s How to Protect Yourself
If you don’t like the idea of private companies being able to track your every move in the physical world, follow our advice to block iPhone and iPad apps from surreptitiously sharing this information.
Recent news reports have revealed that a little-known company called Babel Street can track iPhone and Android user locations. Babel Street does this by leveraging data from mobile advertising data brokers. Investigators from data removal firm Atlas Privacy discovered they could use Babel Street’s Locate X tool to identify patients at a Florida abortion clinic, jurors in a New Jersey trial, attendees at a Los Angeles synagogue and a Dearborn mosque, and even children in a Philadelphia school.
Much of this is possible because people use apps that reveal their location to data brokers, who package the information and resell it to companies like Babel Street. Apple does have an advantage here—Atlas estimated they could locate roughly 80% of Android phones but only 25% of iPhones. That’s due to Apple’s App Tracking Transparency feature, introduced in iOS 14.5, which requires apps to get permission from users before tracking them for third-party advertising purposes. Unfortunately, many people unthinkingly grant such permissions, and location and identification data can also leak out in other ways.
Although it’s difficult to avoid being tracked by data brokers entirely, you can drastically reduce the likelihood and frequency of tracking, which helps ensure that any location information that does become available isn’t sufficient to identify you personally. Your employer may also consider your location to be sensitive information and want you to restrict it to the extent possible. To achieve this, you’ll need to adjust settings in several parts of Settings > Privacy & Security on your iPhone (and iPad, if you regularly use it in multiple locations).
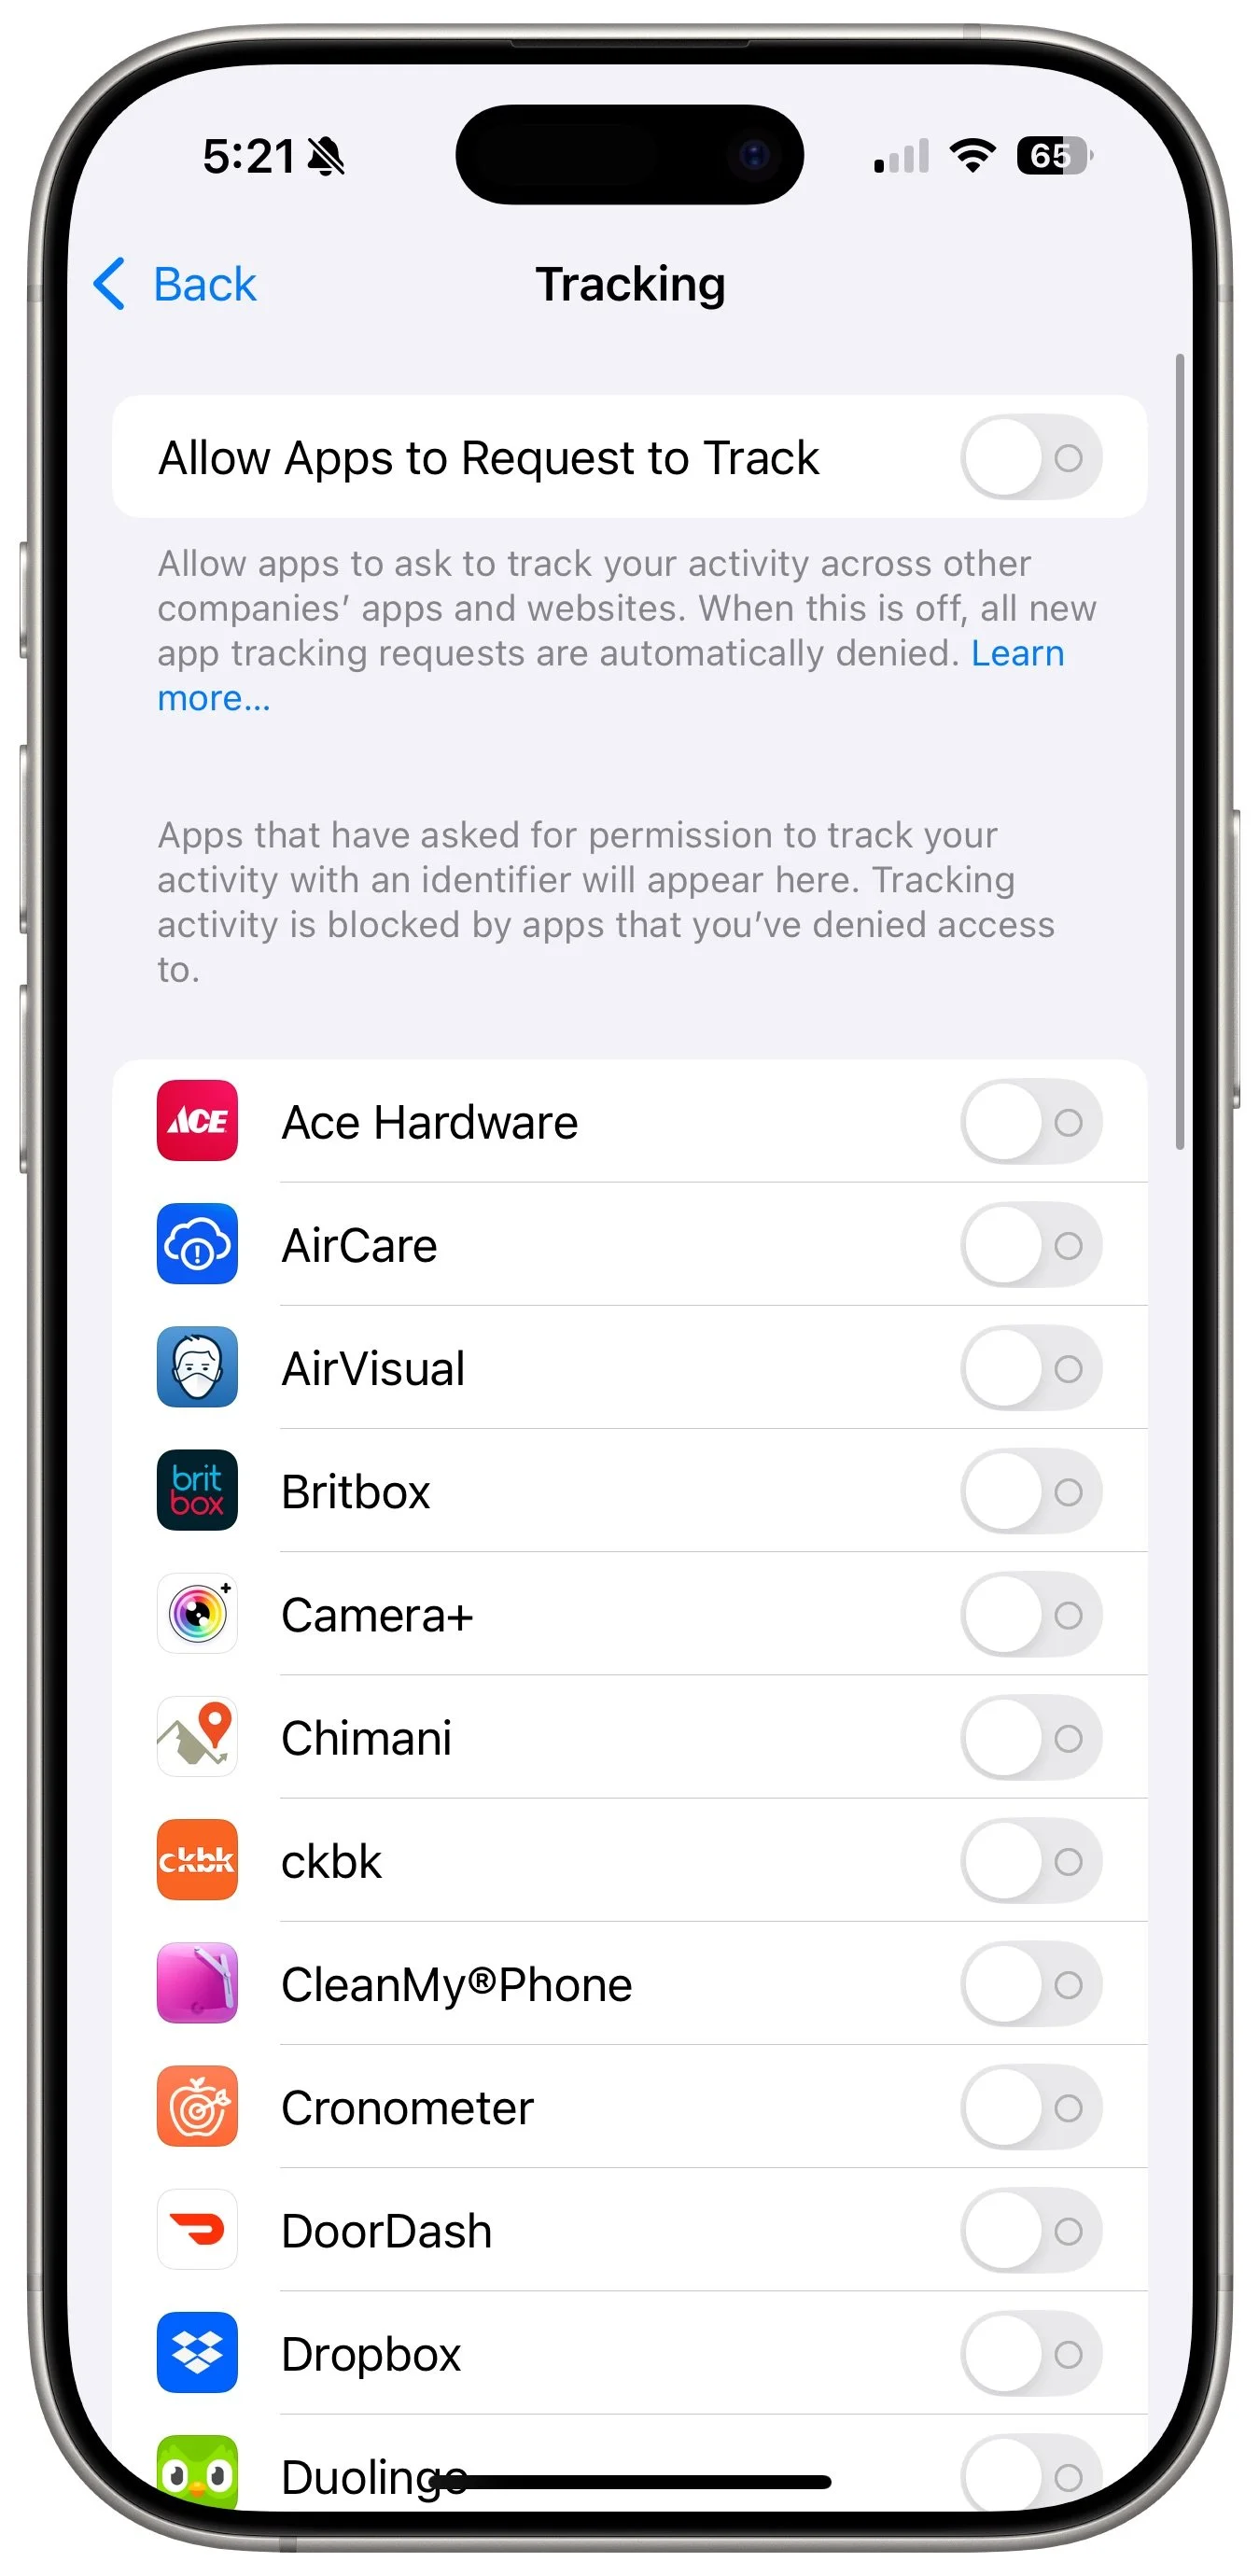
Turn Off Allow Apps to Request to Track
You’ll find the most important setting in Settings > Privacy & Security > Tracking. At the top of the screen is a switch labeled Allow Apps to Request to Track. Make sure that is off! If it has been on in the past, apps that have requested permission will appear below.
By preventing apps from even asking if they can track you, you keep them from sharing a unique identifier associated with your iPhone with other apps and websites. Otherwise, advertisers can follow you from app to app and website to website, gathering information about you—often including your physical location—as you go about your life.
Don’t let apps persuade you to turn this setting on or allow them to track you. Apple’s rules explicitly forbid them from reducing functionality to those who refuse to allow tracking.
Allow Location Access Only for Apps That Need It
While you can turn off Allow Apps to Request to Track with a single switch, preventing apps from seeing your location requires more targeted work. Although Settings > Privacy & Security > Location Services has a big Location Services switch, turning that off will drastically reduce the utility of your iPhone. You won’t be able to get directions from Maps, tag photos with their location, share your location with family members, and much more.
Instead, for each app in the list, determine what level of location access you want to grant based on its function and description of why it needs access. Grant the minimal level of access necessary, which varies by app. Navigation apps need location access to work at all. Camera apps need it to geotag photos. Weather apps use it to provide custom weather reports and extreme weather notifications. But do you want to give a social media app access to your location at all times?
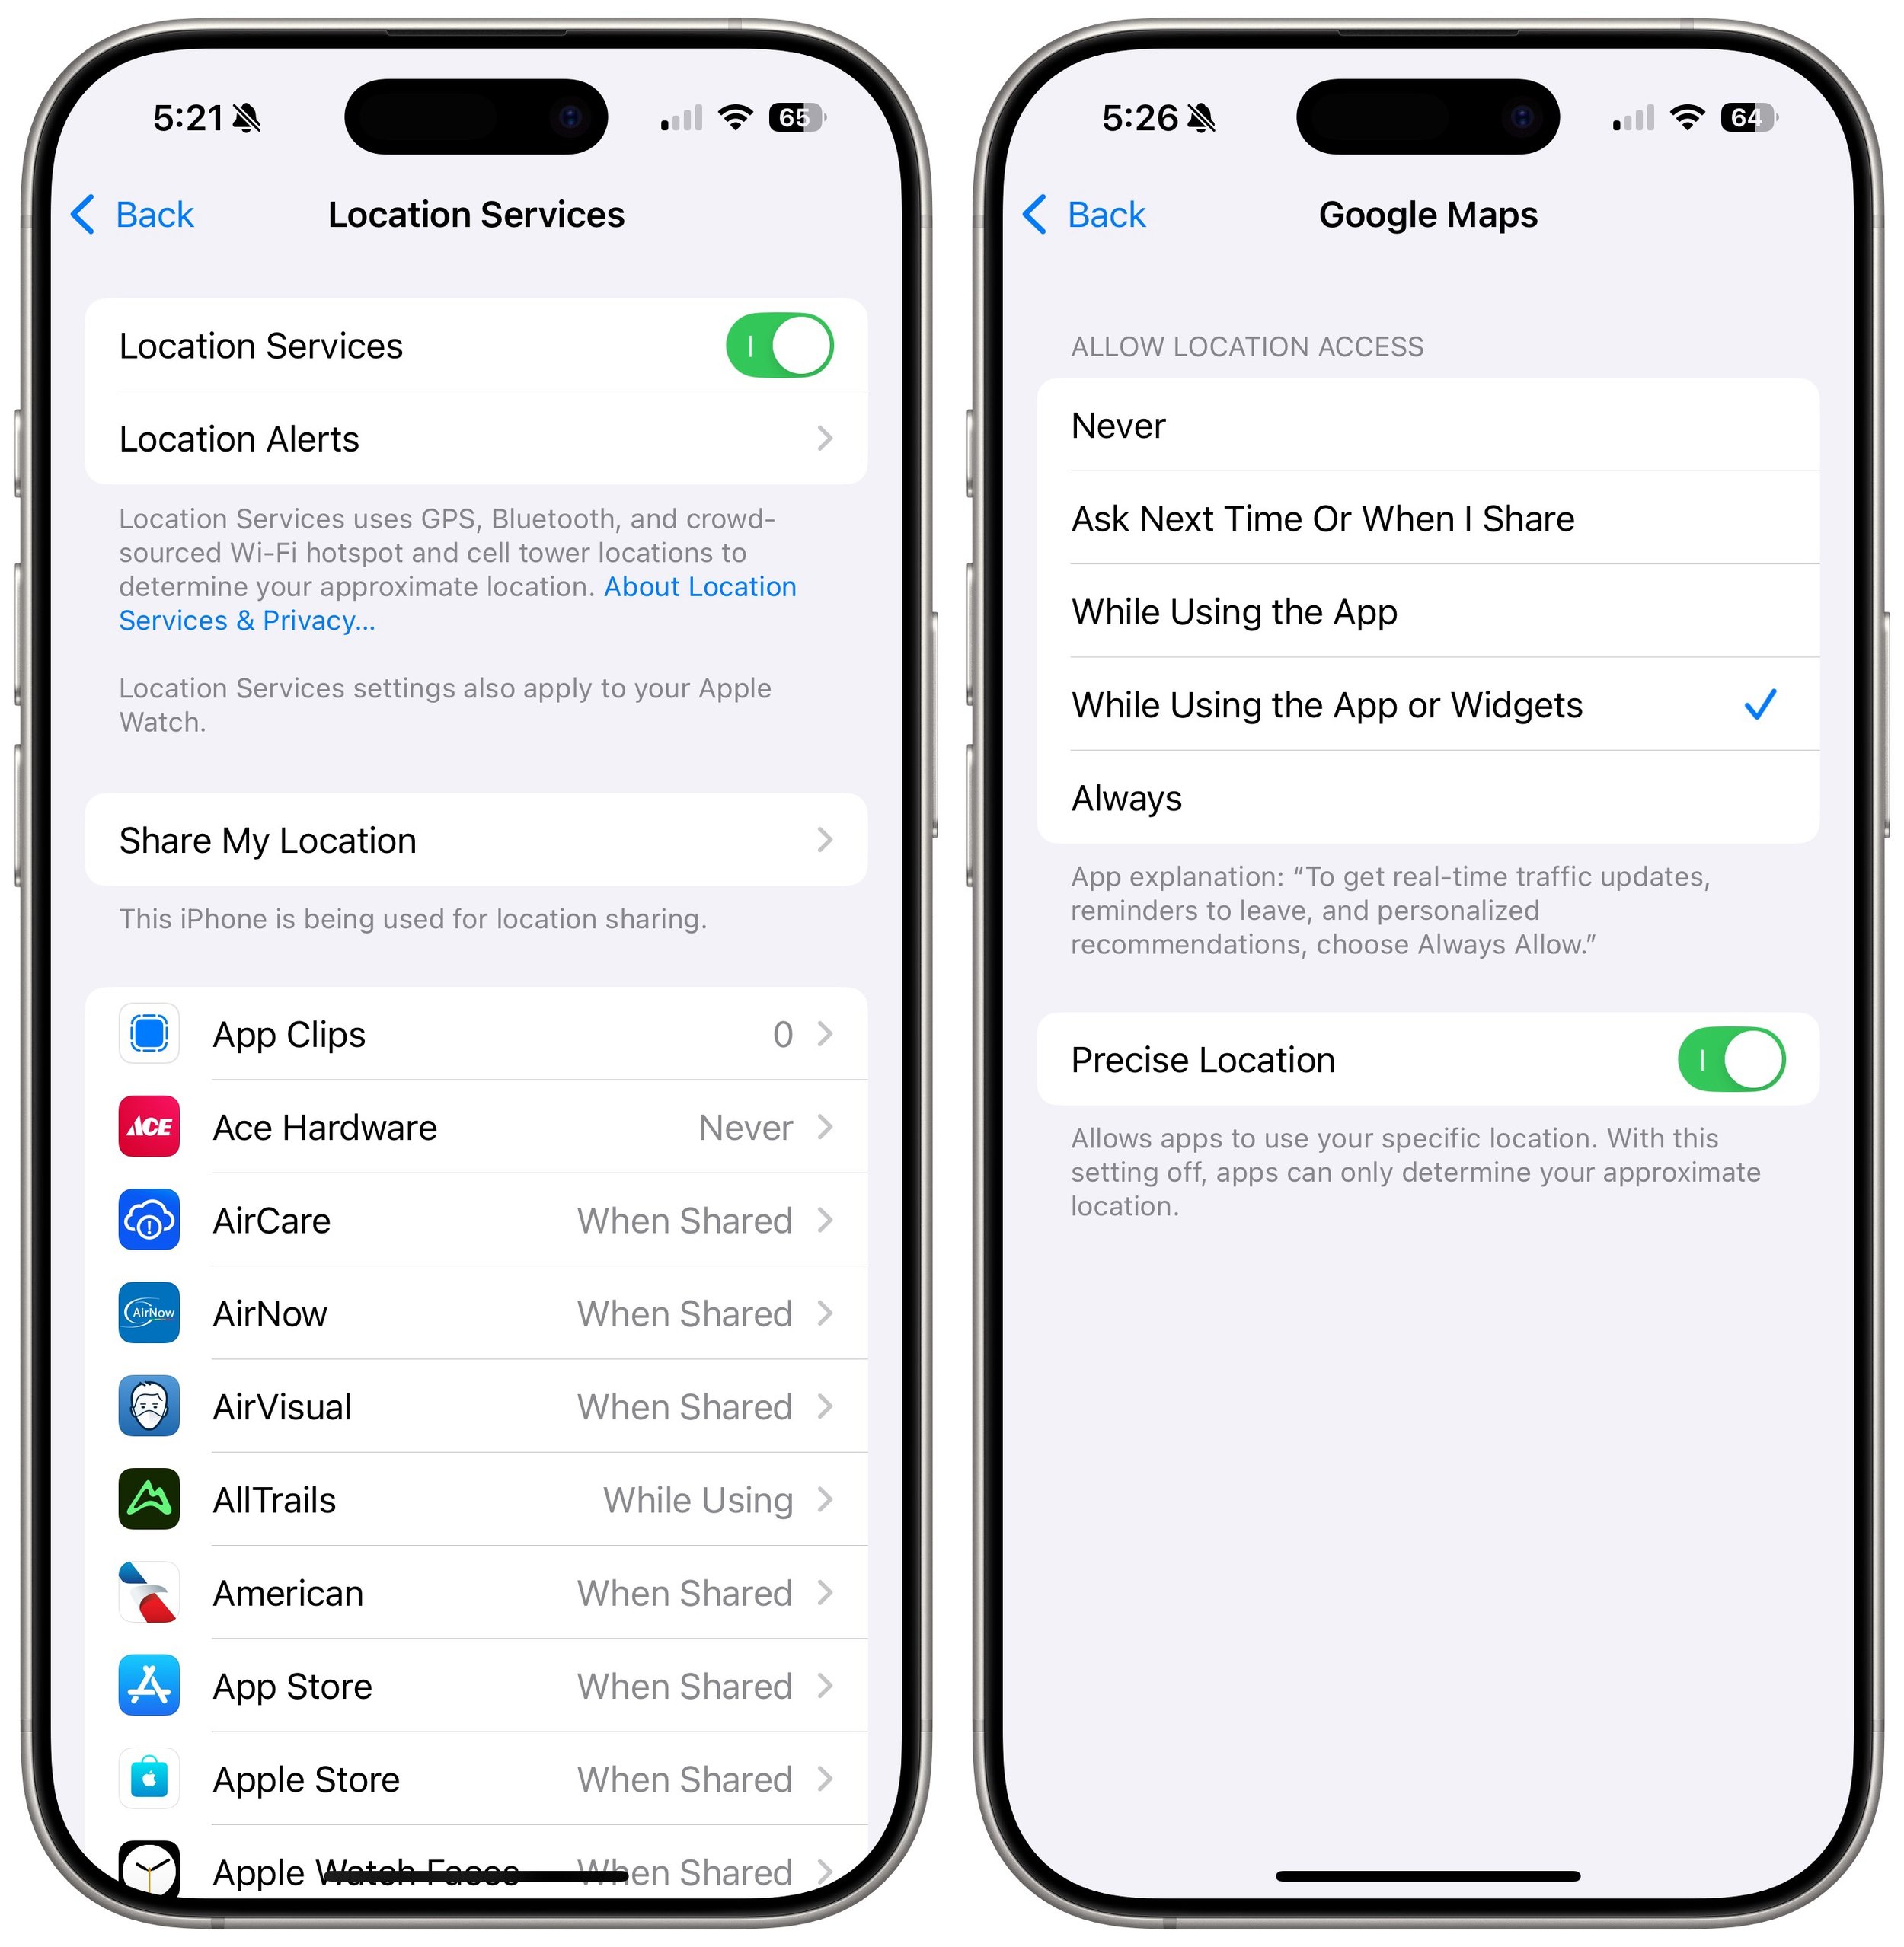
Apple provides five location access levels:
Never: Choose Never for any app with questionable explanations of why location access is requested.
Ask Next Time or When I Share: If you’re unsure if you want to allow or deny location access for an app, select this option. The app will prompt you the next time it wants your location, enabling you to make an informed decision based on your actions.
While Using the App: For most apps you want to allow to see your location, choose While Using the App. It’s entirely reasonable that a location-requiring app be allowed to determine your location while you’re using it.
While Using the App or Widgets: This option only appears for apps with widgets; choose it only if you use a widget that needs location access.
Always: Grant Always access only to apps that generate location-related notifications when the app is not open. The most common example is a weather app that provides notifications of incoming storms.
The Precise Location option becomes available if you allow location access for an app. Turn it on only if the app needs to know your location within 15 to 200 feet (5 to 60 meters). An Uber or Lyft driver will need to know where to pick you up, for instance, so those apps should have Precise Location turned on, as should navigation and camera apps. For most others, turn off Precise Location. Your approximate location—a variable radius between 2.5 to 12 miles (4 and 20 kilometers)—is usually sufficient to locate you in the right part of the world.
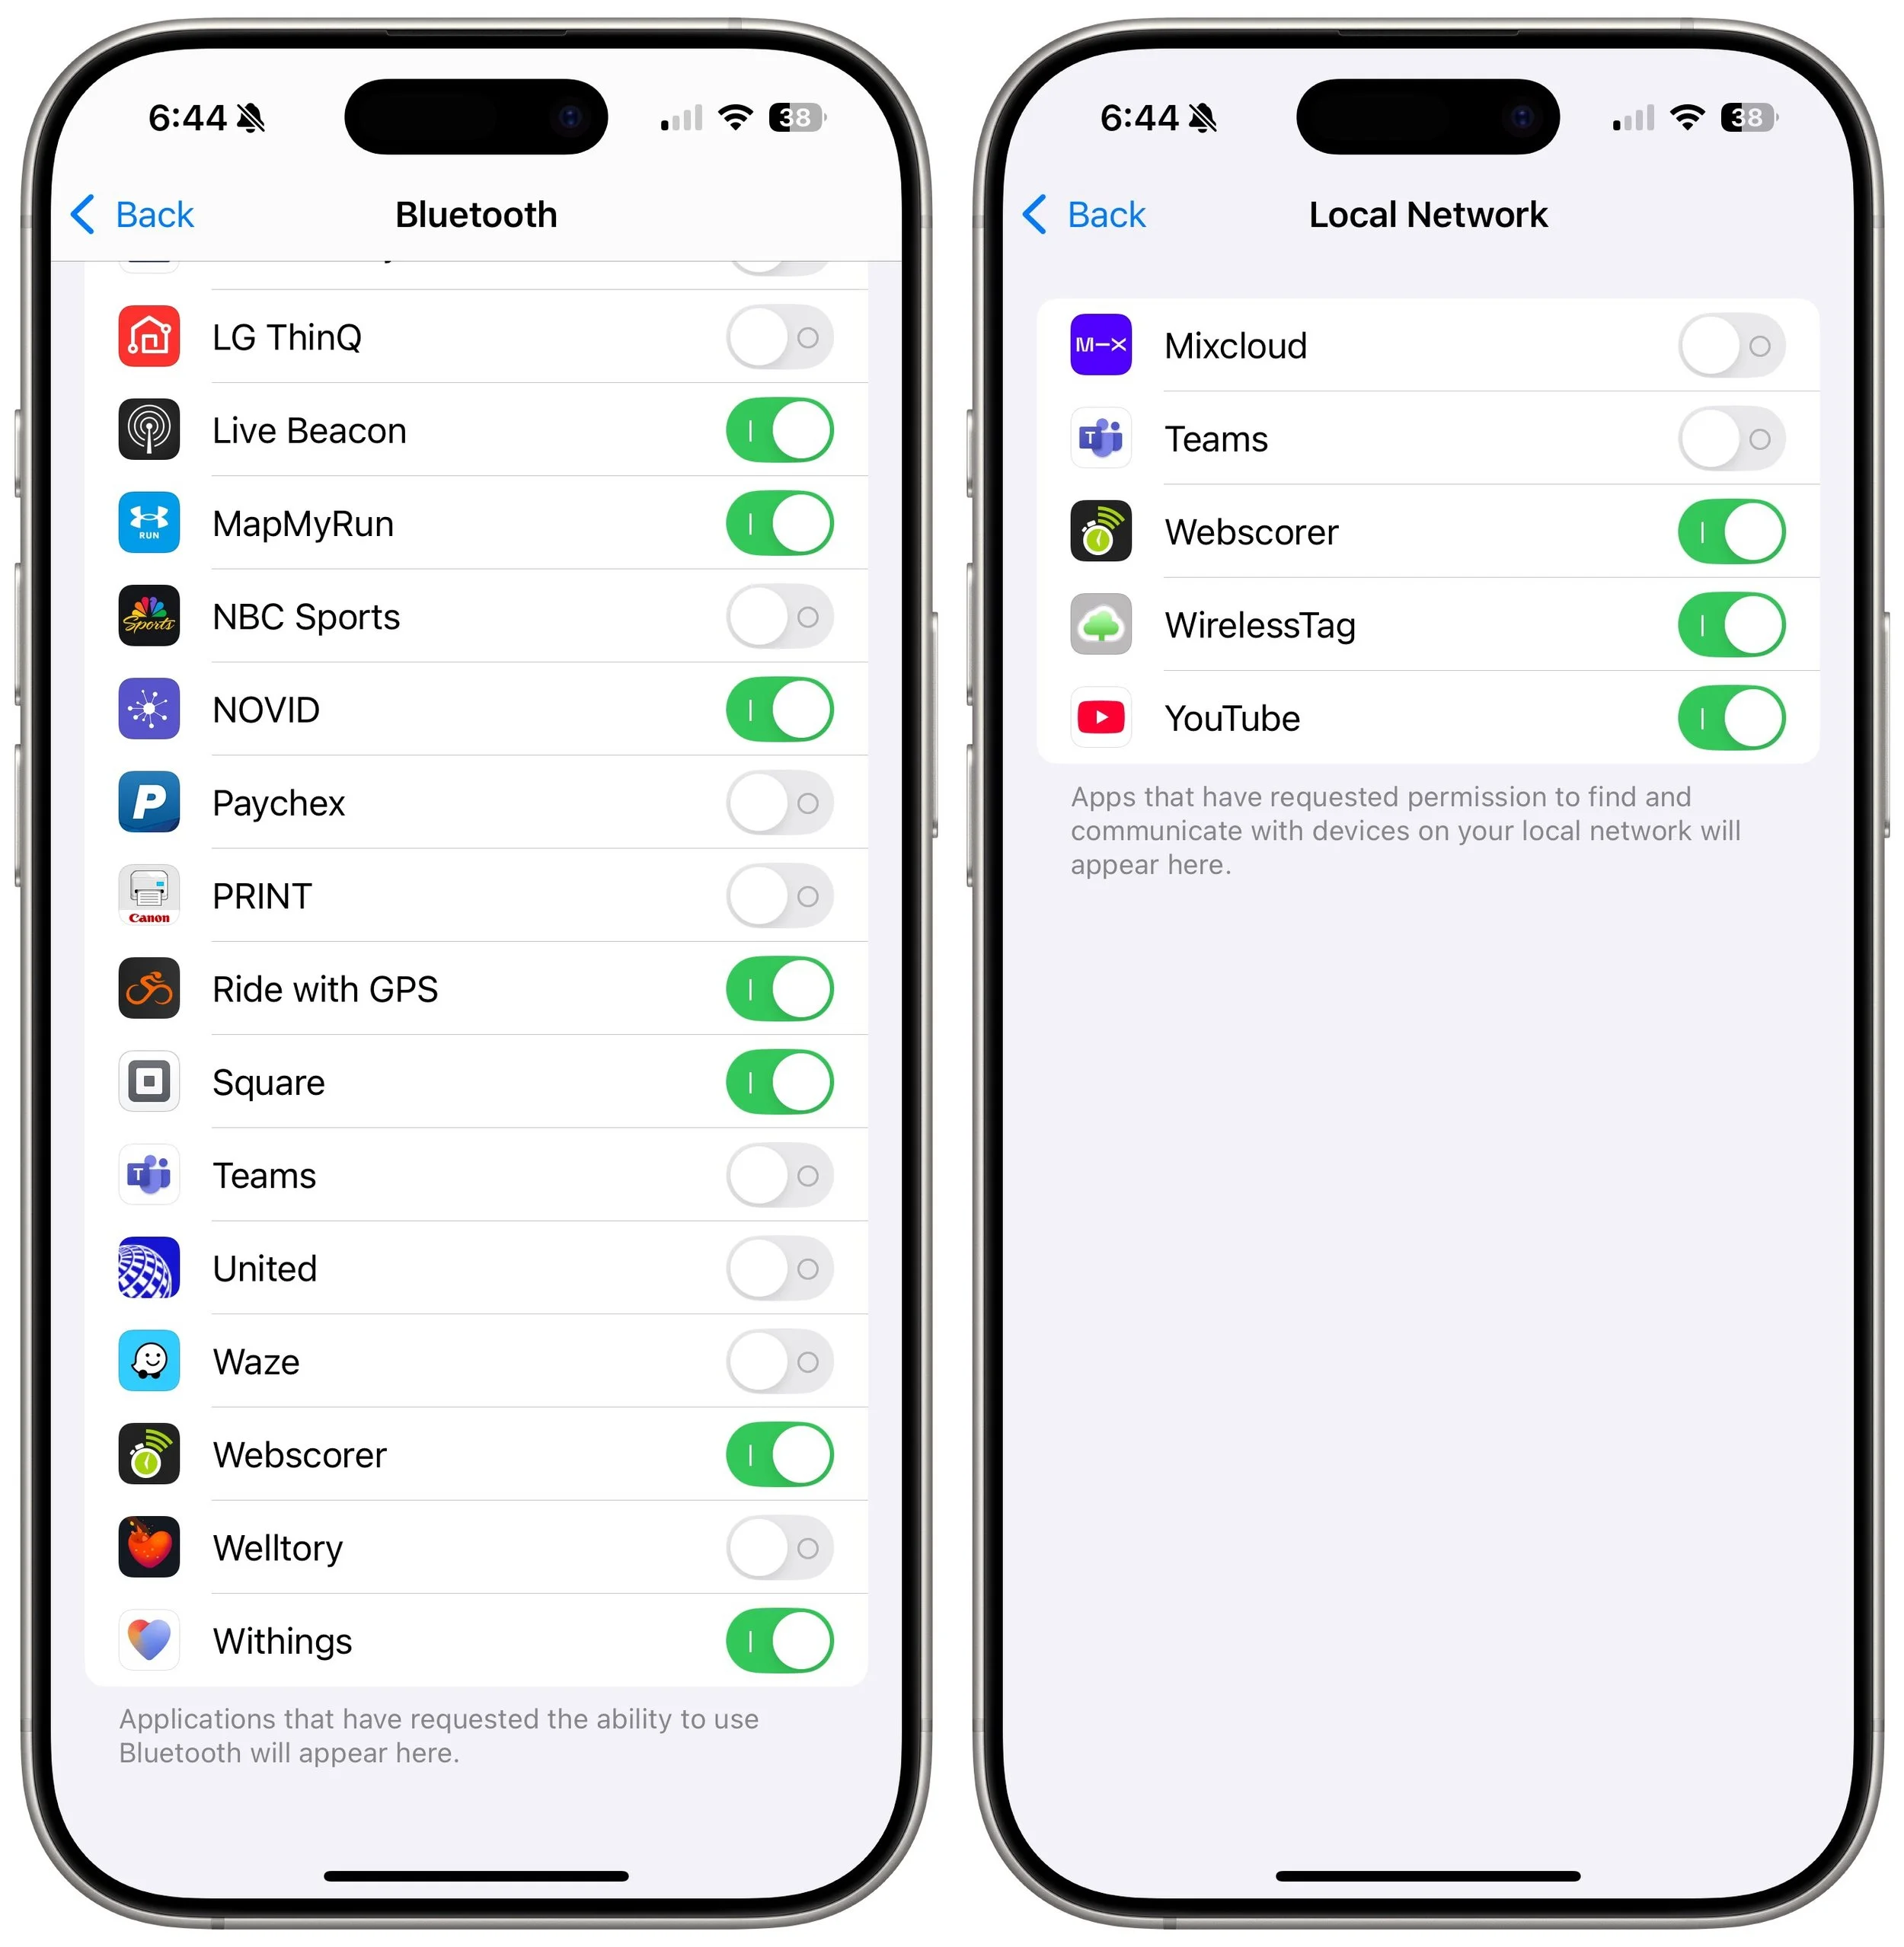
Block Bluetooth and Local Network Access for Apps That Don’t Need It
Apps can use Bluetooth to infer your general location through interactions with other Bluetooth devices and movement patterns, so Apple requires apps to ask to use Bluetooth. As a result, just as with location, you should go through the apps listed in Settings > Privacy & Security > Bluetooth and revoke permission from any that don’t seem as though they should need it. Most will be legitimate—an app designed to communicate with a Bluetooth-connected device, for instance. Any app that needs access to Bluetooth and doesn’t have it should prompt you when you next open it.
Similarly, Apple now requires apps to request permission to use your local network. For the most part, these requests are reasonable—apps may need to discover network-connected devices like routers, printers, speakers, smart home gadgets, and more. Or games may need to discover other players on the network. However, because your network can reveal information about your location, it’s best to revoke access for any apps that don’t seem as though they should need it. There’s no harm in doing so; they’ll ask again if they need access.
Ultimately, all we can do is stay vigilant about what we’re allowing on our devices, encourage Apple to add even more privacy protections, and lobby our elected representatives for legal protection. It’s unconscionable that private companies can gather extensive location data on hundreds of millions of citizens.
(Featured image by iStock.com/Chayada Jeeratheepatanont)
Apple Brings the M4 Chip Family to the iMac, Mac mini, and MacBook Pro
Apple has started moving the Mac lineup to the M4 family of chips with the updated iMac, redesigned Mac mini, and enhanced MacBook Pro. They’re great machines, particularly for those who need to upgrade from an Intel-based Mac.

Apple has concluded a three-day release of the first Macs to use the M4 chip family, which debuted earlier this year with the iPad Pro. The updated iMac and MacBook Pro retain the same industrial designs as in the past, while Apple took a shrink ray to the Mac mini.
These are highly compelling Macs, with the M4, M4 Pro, and M4 Max chips providing best-in-class performance; the iMac and MacBook Pro gaining an iPhone-like 12-megapixel Center Stage camera; Thunderbolt 5 offering faster data transfers; and a nano-texture glass option available for those battling glare and screen reflections. If you’re pondering your next Mac, here’s what you can look forward to.
iMac Adds M4 Chip, 12MP Center Stage Camera, and Nano-Texture Glass
Apple’s colorful all-in-one iMac is popular as a public-facing Mac or household workhorse. The M4 chip packs even more power into the iMac’s svelte frame without changing its low starting price of $1499 ($1299 for a two-port model with several odd limitations). To ensure optimal performance with Apple Intelligence, the company increased the base memory from 8 GB to 16 GB, and you can up that to 24 GB for $200 more or 32 GB for $400.

The iMac still boasts a 24-inch 4.5K Retina display that provides crisp text and vibrant graphics. For $200, you can get it with nano-texture glass that cuts down on reflections and glare from windows or bright lights. Apple also replaced the 1080p FaceTime HD webcam at the top of the screen with a new 12-megapixel Center Stage camera that pans and zooms to keep you in the frame as you move around during video calls. (Not having to sit perfectly still makes those lengthy virtual meetings easier to handle.)
Lastly, the M4 chip supports Thunderbolt 4, so the higher-end model of the M4 iMac gives you four Thunderbolt 4 ports instead of the two Thunderbolt and two USB 3 ports in the previous model.
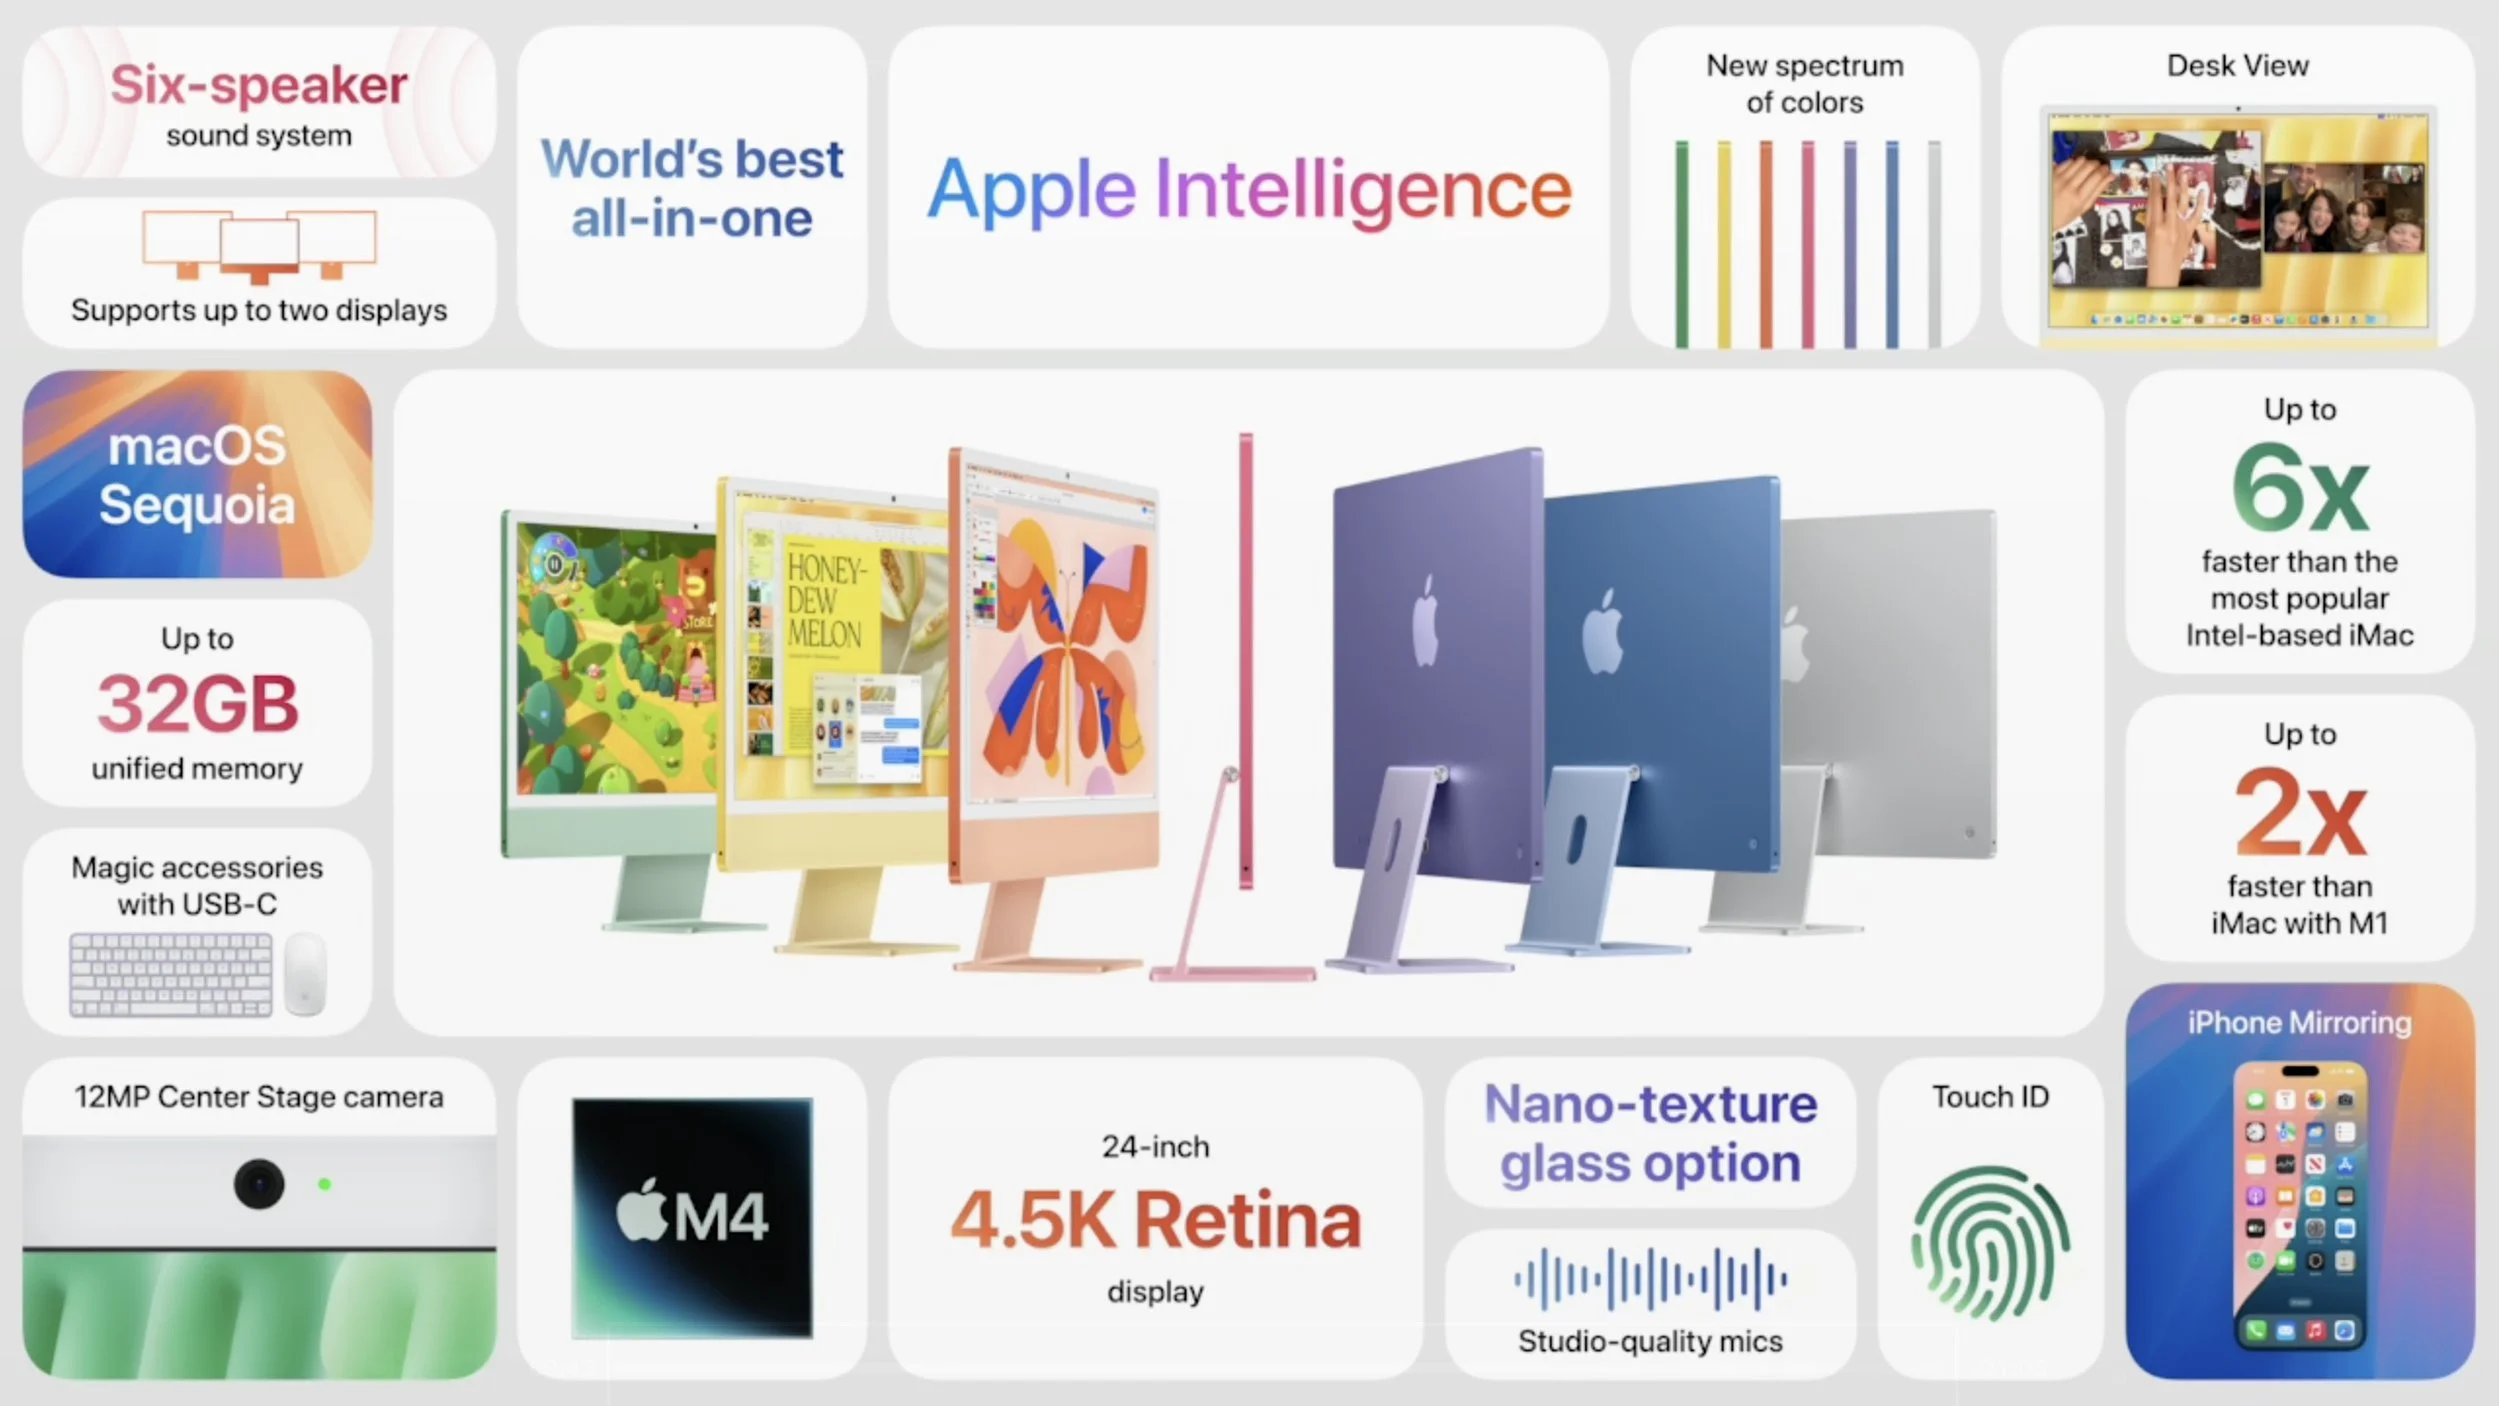
Along with the new colors, Apple is shipping color-matched versions of the Magic Keyboard, Magic Trackpad, and Magic Mouse. They all now charge using USB-C rather than the outdated Lightning. Apple left the Magic Mouse’s charging port on the bottom, which prevents it from being used while plugged in.
While the M4 is roughly twice as fast as the M1, most current users probably won’t benefit greatly from upgrading, and it’s even less of an improvement over the previous M3 iMacs. However, for anyone upgrading from an Intel-based Mac or transitioning from a PC, the new M4 iMac is an extremely attractive option.
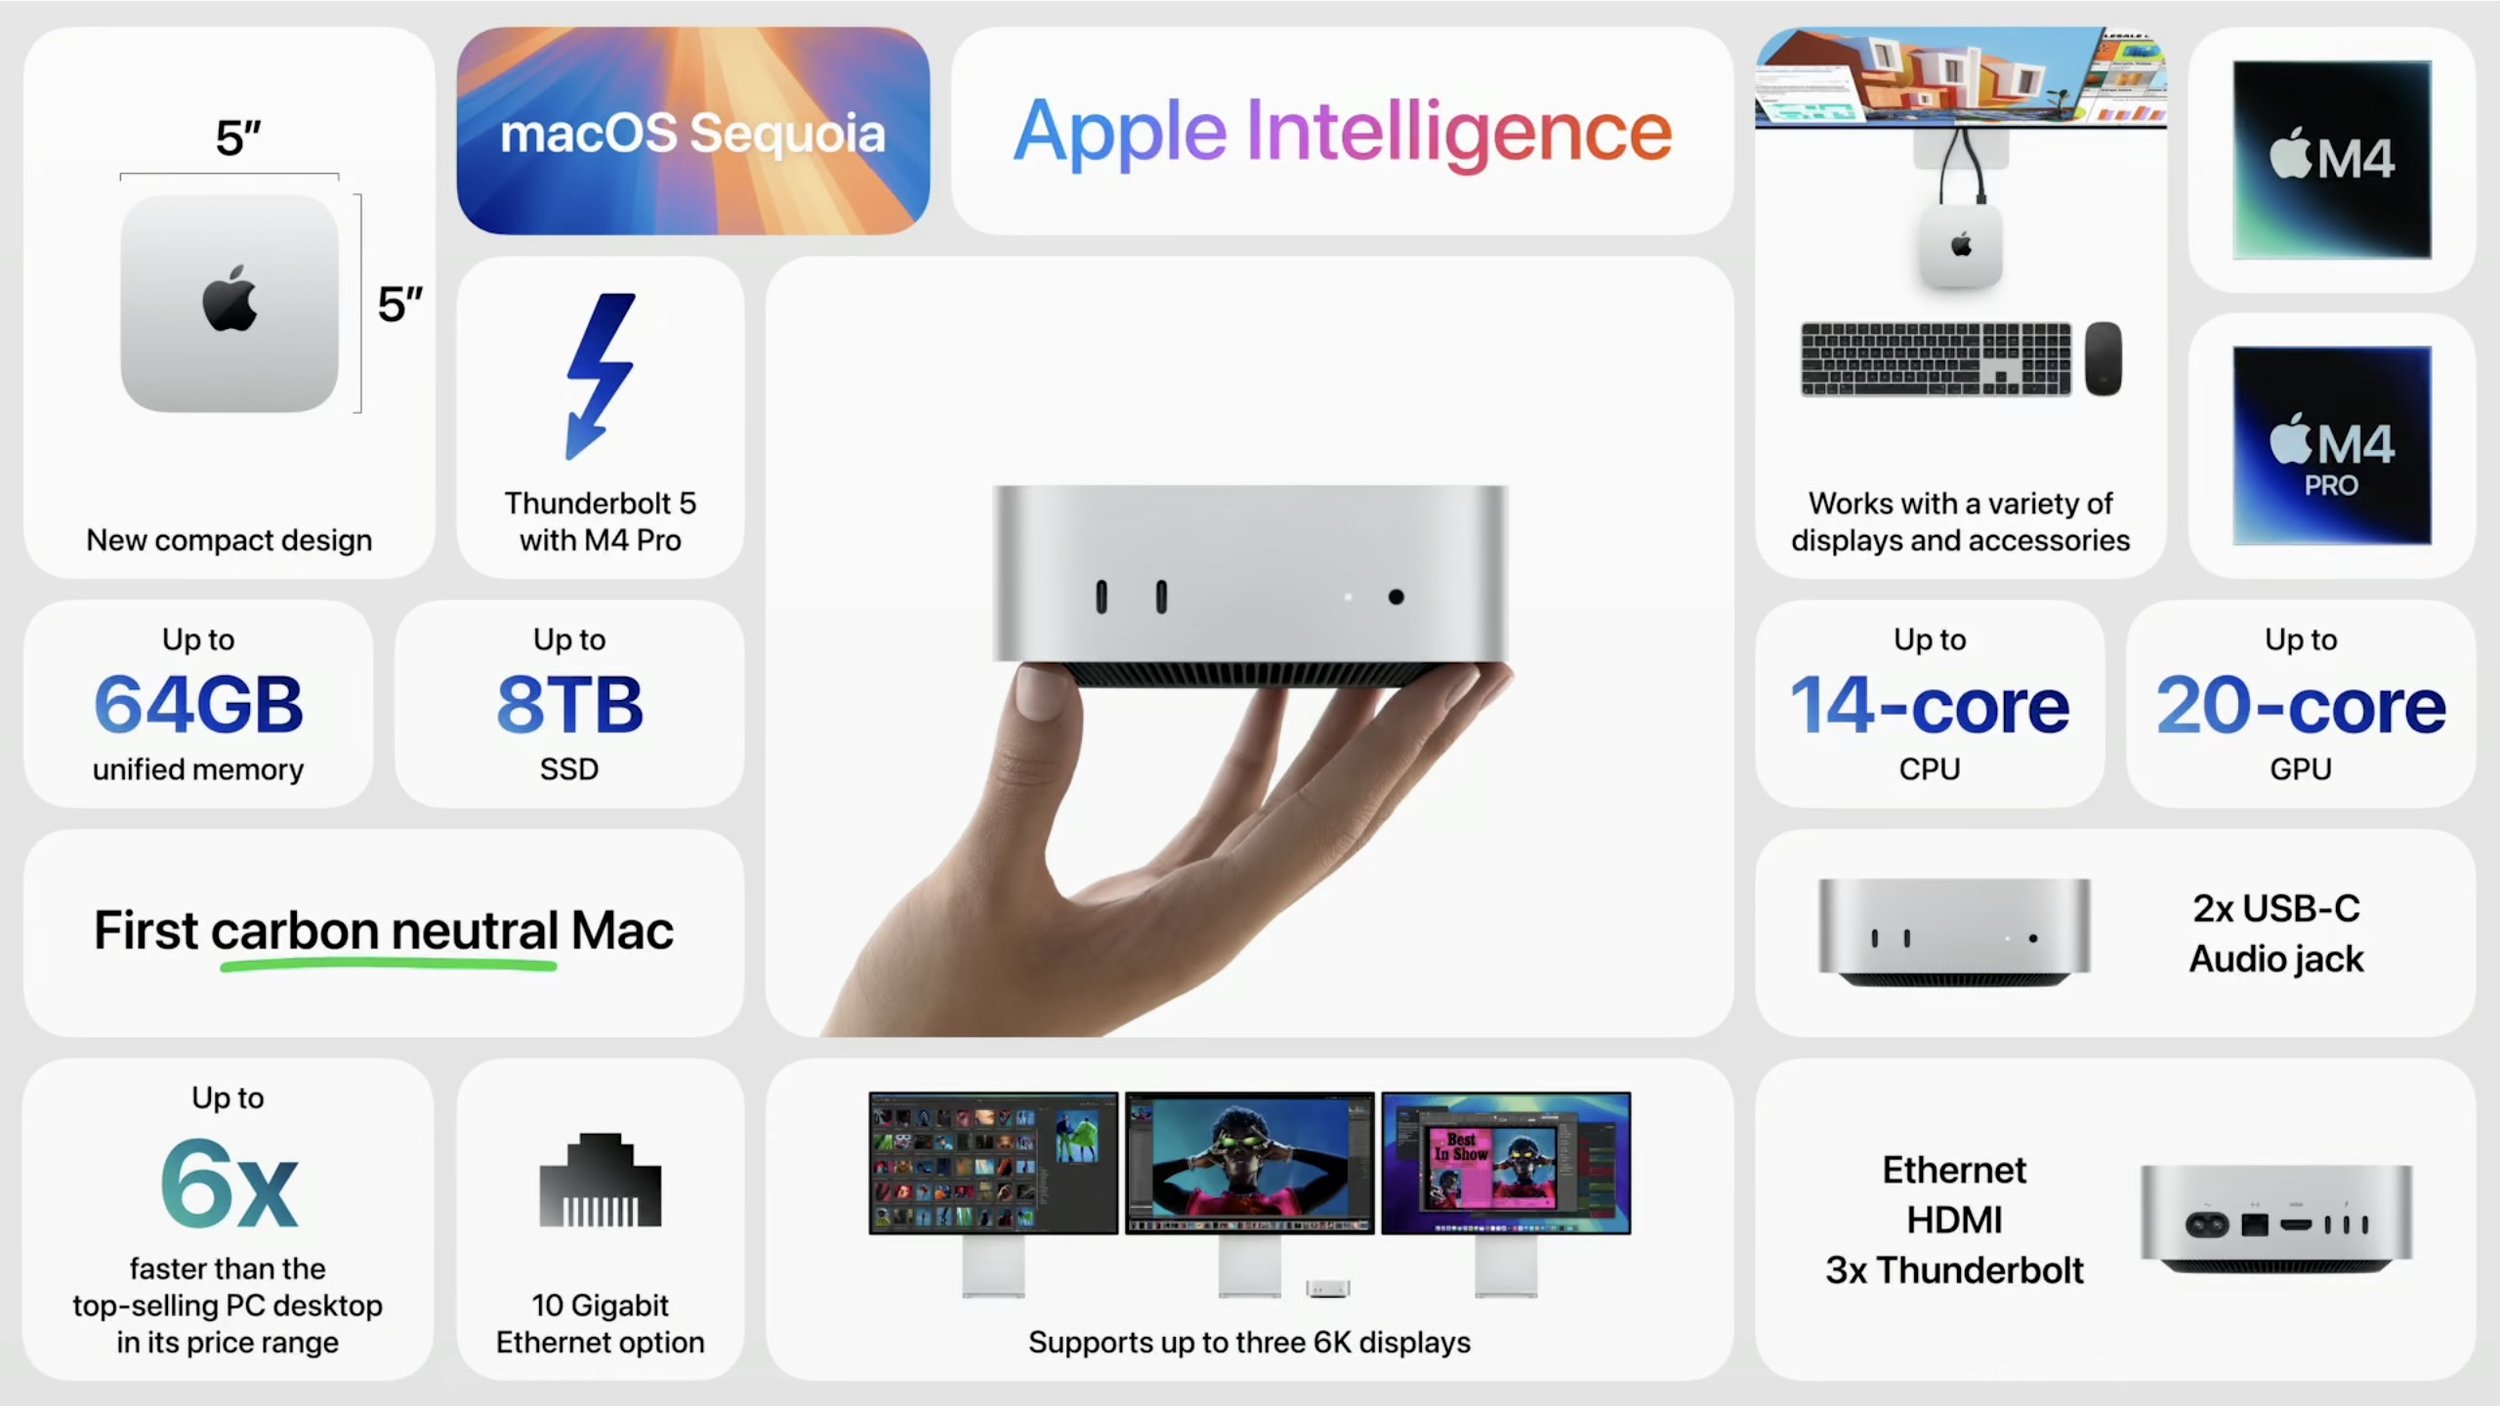
Smaller Mac mini Gains M4 and M4 Pro Chips, Plus Thunderbolt 5
The entire point of the Mac mini is the “mini” part—it’s supposed to be small and inexpensive. With the new M4 Mac mini, Apple has reduced its footprint even more, dropping its depth and width from 7.7 to 5.0 inches. To maintain airflow, Apple had to add some height, so it’s now 2.0 inches tall, up from 1.4 in the previous model.

The price for the base M4 model remains $599, and it now includes 16 GB of memory and 256 GB of storage. The M4 Pro model has increased by $100, now starting at $1,399 for 24 GB of memory and 512 GB of storage. You’ll still need to supply your own keyboard and mouse, but Apple updated the Magic Keyboard, Magic Trackpad, and Magic Mouse to charge using USB-C rather than Lightning.
As with the iMac, the M4 model is roughly twice as fast as the M1 version of the Mac mini, and Apple says the M4 Pro is two to three times as fast as the M2 Pro it replaces. It’s probably not worth upgrading for performance alone unless you’re coming from an Intel-based Mac or relying on resource-intensive apps.
Apple also positioned two USB-C ports and a headphone jack on the front panel for easy access. That’s a win unless you connect speakers to the headphone jack, at which point your Mac mini will always have a cable sticking out. The back side features Gigabit Ethernet for networking, HDMI for a display, and three Thunderbolt ports for connectivity. On the M4 model, those ports are Thunderbolt 4; on the M4 Pro model, they use Thunderbolt 5 to provide high-speed data transfers up to 120 gigabits per second.
Finally, those who need lots of screen real estate will appreciate the fact that the M4 Mac mini can support up to three external displays.
As much as the new Mac mini is an impressive and inexpensive package, it has a few trade-offs compared to the previous model. Along with the M4 Pro model’s price increasing by $100 and the possible annoyance of plugging speakers into the front, the previous M2 Pro Mac mini had four Thunderbolt ports, one more than in the new version. Plus, it had two USB Type-A ports, which remain popular despite the ascendance of USB-C. But the strangest thing? The power button is on the bottom, so you must pick up the Mac mini to turn it on or off.

Even if current Mac mini users don’t have much incentive to upgrade, the M4 Mac mini is compelling for anyone still using an Intel-based Mac. In particular, those still using 27-inch iMacs would do well to consider an M4 Mac mini and Apple Studio Display—the performance gains will be incredible.
Powerful MacBook Pros Leverage M4, M4 Pro, and M4 Max Chips, Add 12MP Center Stage Camera and Thunderbolt 5
Apple’s final announcement of the week put all the pieces together. The new 14-inch and 16-inch MacBook Pro models feature:
A choice of the M4, M4 Pro, or M4 Max chip, with a dizzying array of processor core and memory options that provide everything up to insanely great performance
A 12-megapixel Center Stage camera that enhances video calls by panning and zooming to keep you in the frame as you move around
A nano-texture glass option to make the screen easier to read outside in bright sunlight
Thunderbolt 5 in the M4 Pro and M4 Max models for high-speed data transfers
Along with those improvements from the iMac and Mac mini releases, Apple also added some welcome tweaks specific to the MacBook Pro:
All models of the M4 MacBook Pro feature brighter Liquid Retina XDR screens rated at 1000 nits outdoors, up from 600 nits.
The M4 14-inch MacBook Pro now includes three Thunderbolt 4 ports, a step up from the two ports in the M3 version.
The M4 14-inch MacBook Pro can now drive two external displays along with its built-in screen. The M3 version could do that only if you closed the lid.
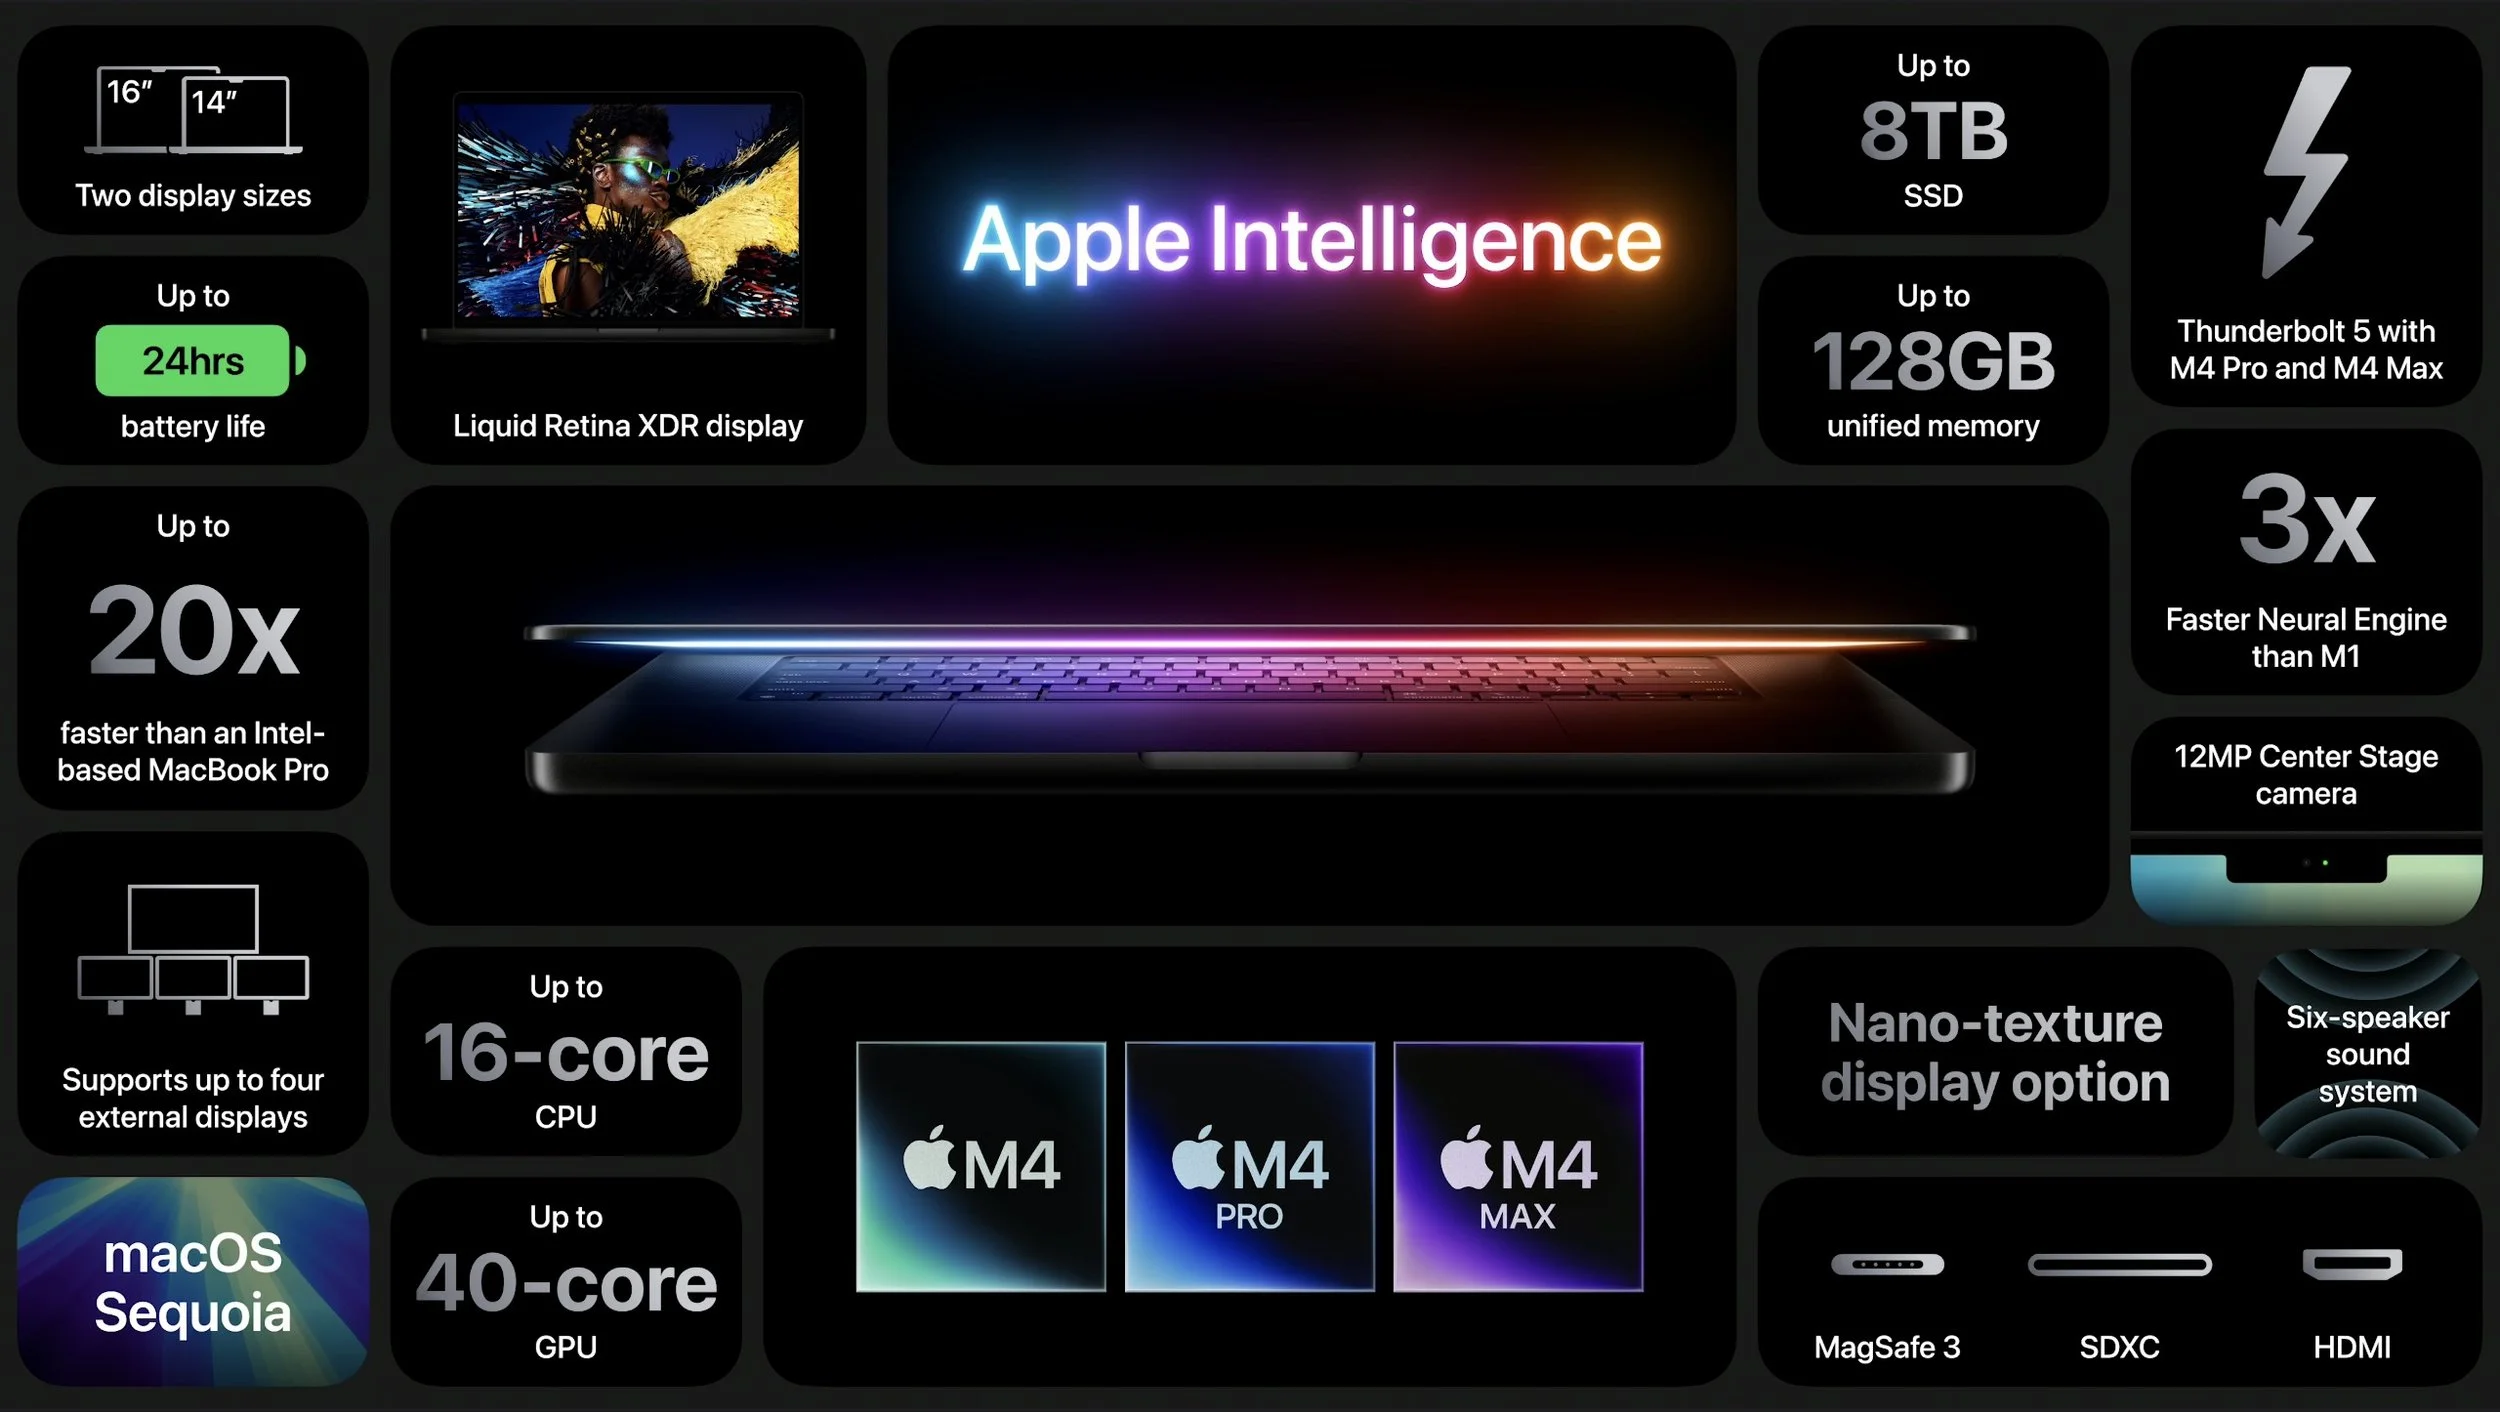
The 14-inch MacBook Pro starts at $1,599 with an M4, $1,999 with an M4 Pro, and $3,199 with an M4 Max. The 16-inch MacBook Air starts at $2,499 with an M4 Pro and $3,499 with an M4 Max.
These new MacBook Pro models are nearly ideal. (More ports would always be welcome, but a Thunderbolt hub will help.) The only hurdle is the price, which increases rapidly as you choose faster M4 chips, more memory, and additional storage. You can’t swap chips or expand memory later, but you can save some money by putting less storage onboard and expanding capacity with inexpensive external SSDs.
MacBook Air Models Now Start with 16 GB of Memory
Finally, we can expect Apple to upgrade the MacBook Air, Mac Studio, and Mac Pro to the M4 family sometime next year. Until then, however, Apple has quietly raised the base level of memory for its M2 and M3 models of the MacBook Air from 8 GB to 16 GB. That’s likely to ensure optimal performance for Apple Intelligence, which is rather resource-intensive. Whatever the reason, the M2 MacBook Air still starts at $999 and the M3 model at $1,099, both with 16 GB of memory and 256 GB of storage. They’re great little machines, but if you can wait, the M4 version can’t be too many months away.
(Featured image based on originals by Apple)
First Wave of Apple Intelligence Features Appear in macOS 15.1 Sequoia, iOS 18.1, iPadOS 18.1
Apple Intelligence is here! These initial features won’t upend your Apple experience, but welcome additions include notification summaries in Messages, message list summaries in Mail, Clean Up in Photos, and audio transcripts and summaries in Notes.

Is it time to make your Apple devices smarter? Apple has just released macOS 15.1 Sequoia, iOS 18.1, and iPadOS 18.1 with an initial collection of Apple Intelligence features and a promise of more coming in December. The company is making a big deal about Apple Intelligence, calling it out as a key feature of the recent updates to the iPad mini, iMac, Mac mini, and MacBook Pro.
You may need some of that new hardware to take advantage of Apple Intelligence. Its features work only on a Mac with Apple silicon, an iPad with an A17 Pro or M-series chip, or an iPhone 15 Pro or any iPhone 16. Intel-based Macs and older iPhones and iPads can’t play.
Although we have no problem with recommending that you upgrade your iPhone and iPad to iOS 18.1 and iPadOS 18.1, we recommend more caution when it comes to upgrading your Mac to macOS 15.1 Sequoia. There aren’t any general showstoppers, but you shouldn’t upgrade until you’re confident your particular workflows are fully compatible.
What will Apple Intelligence do for you if you upgrade? Here’s what you need to know.
Writing Tools Everywhere
The Apple Intelligence Writing Tools will help you craft and polish your prose—or just make your email sound more professional. Writing Tools provides three core functions:
Proofread: The Proofread tool will significantly reduce spelling, punctuation, and grammar mistakes in your text. While it may not match up with a human proofreader, using it will make your text cleaner.

Rewrite: If you’re unhappy with the tone of your text, use the Rewrite tool to improve it or make it friendlier, more professional, or shorter. Even if you don’t adopt the complete rewrite, some of its phrases or word choices might take your writing up a notch.
Summarize: A straight summary might be useful for condensing text, and specialized summaries can list key points, make a list, or create a table. These features are probably most useful when working with text you’ve been given and need to edit into shape.
Writing Tools are available in nearly all apps that accept text. Either look for an Edit > Writing Tools menu or Control-click a text selection and look in the Writing Tools submenu. Right now, Apple apps like Mail and Notes provide proofreading controls that let you see (and revert) each change independently. With the Rewrite and Summary tools and Proofread in other apps, you have to compare the original and the rewrite manually, with your only options being to replace the selected text or copy the suggested revision.
Photos Enhancements
Photos benefits from Apple Intelligence in three ways as well:
Clean Up: Many a great photo suffers from a random bystander or distracting telephone pole. Clean Up removes people and objects from your photos, either identifying them automatically or working from your manual selection. It’s not perfect, but Clean Up is a hugely welcome addition to Photos.

Descriptive search: We’ve been able to search for objects in photos for several years now, but with Apple Intelligence, you’ll be able to find photos and videos based on more extensive and natural descriptions, like “Halloween in 2014.”
Descriptive memory movies: The Memories feature in Photos automatically creates movies based on photos it thinks you might want to see together. With Apple Intelligence, you can describe the photos you’d like it to include.
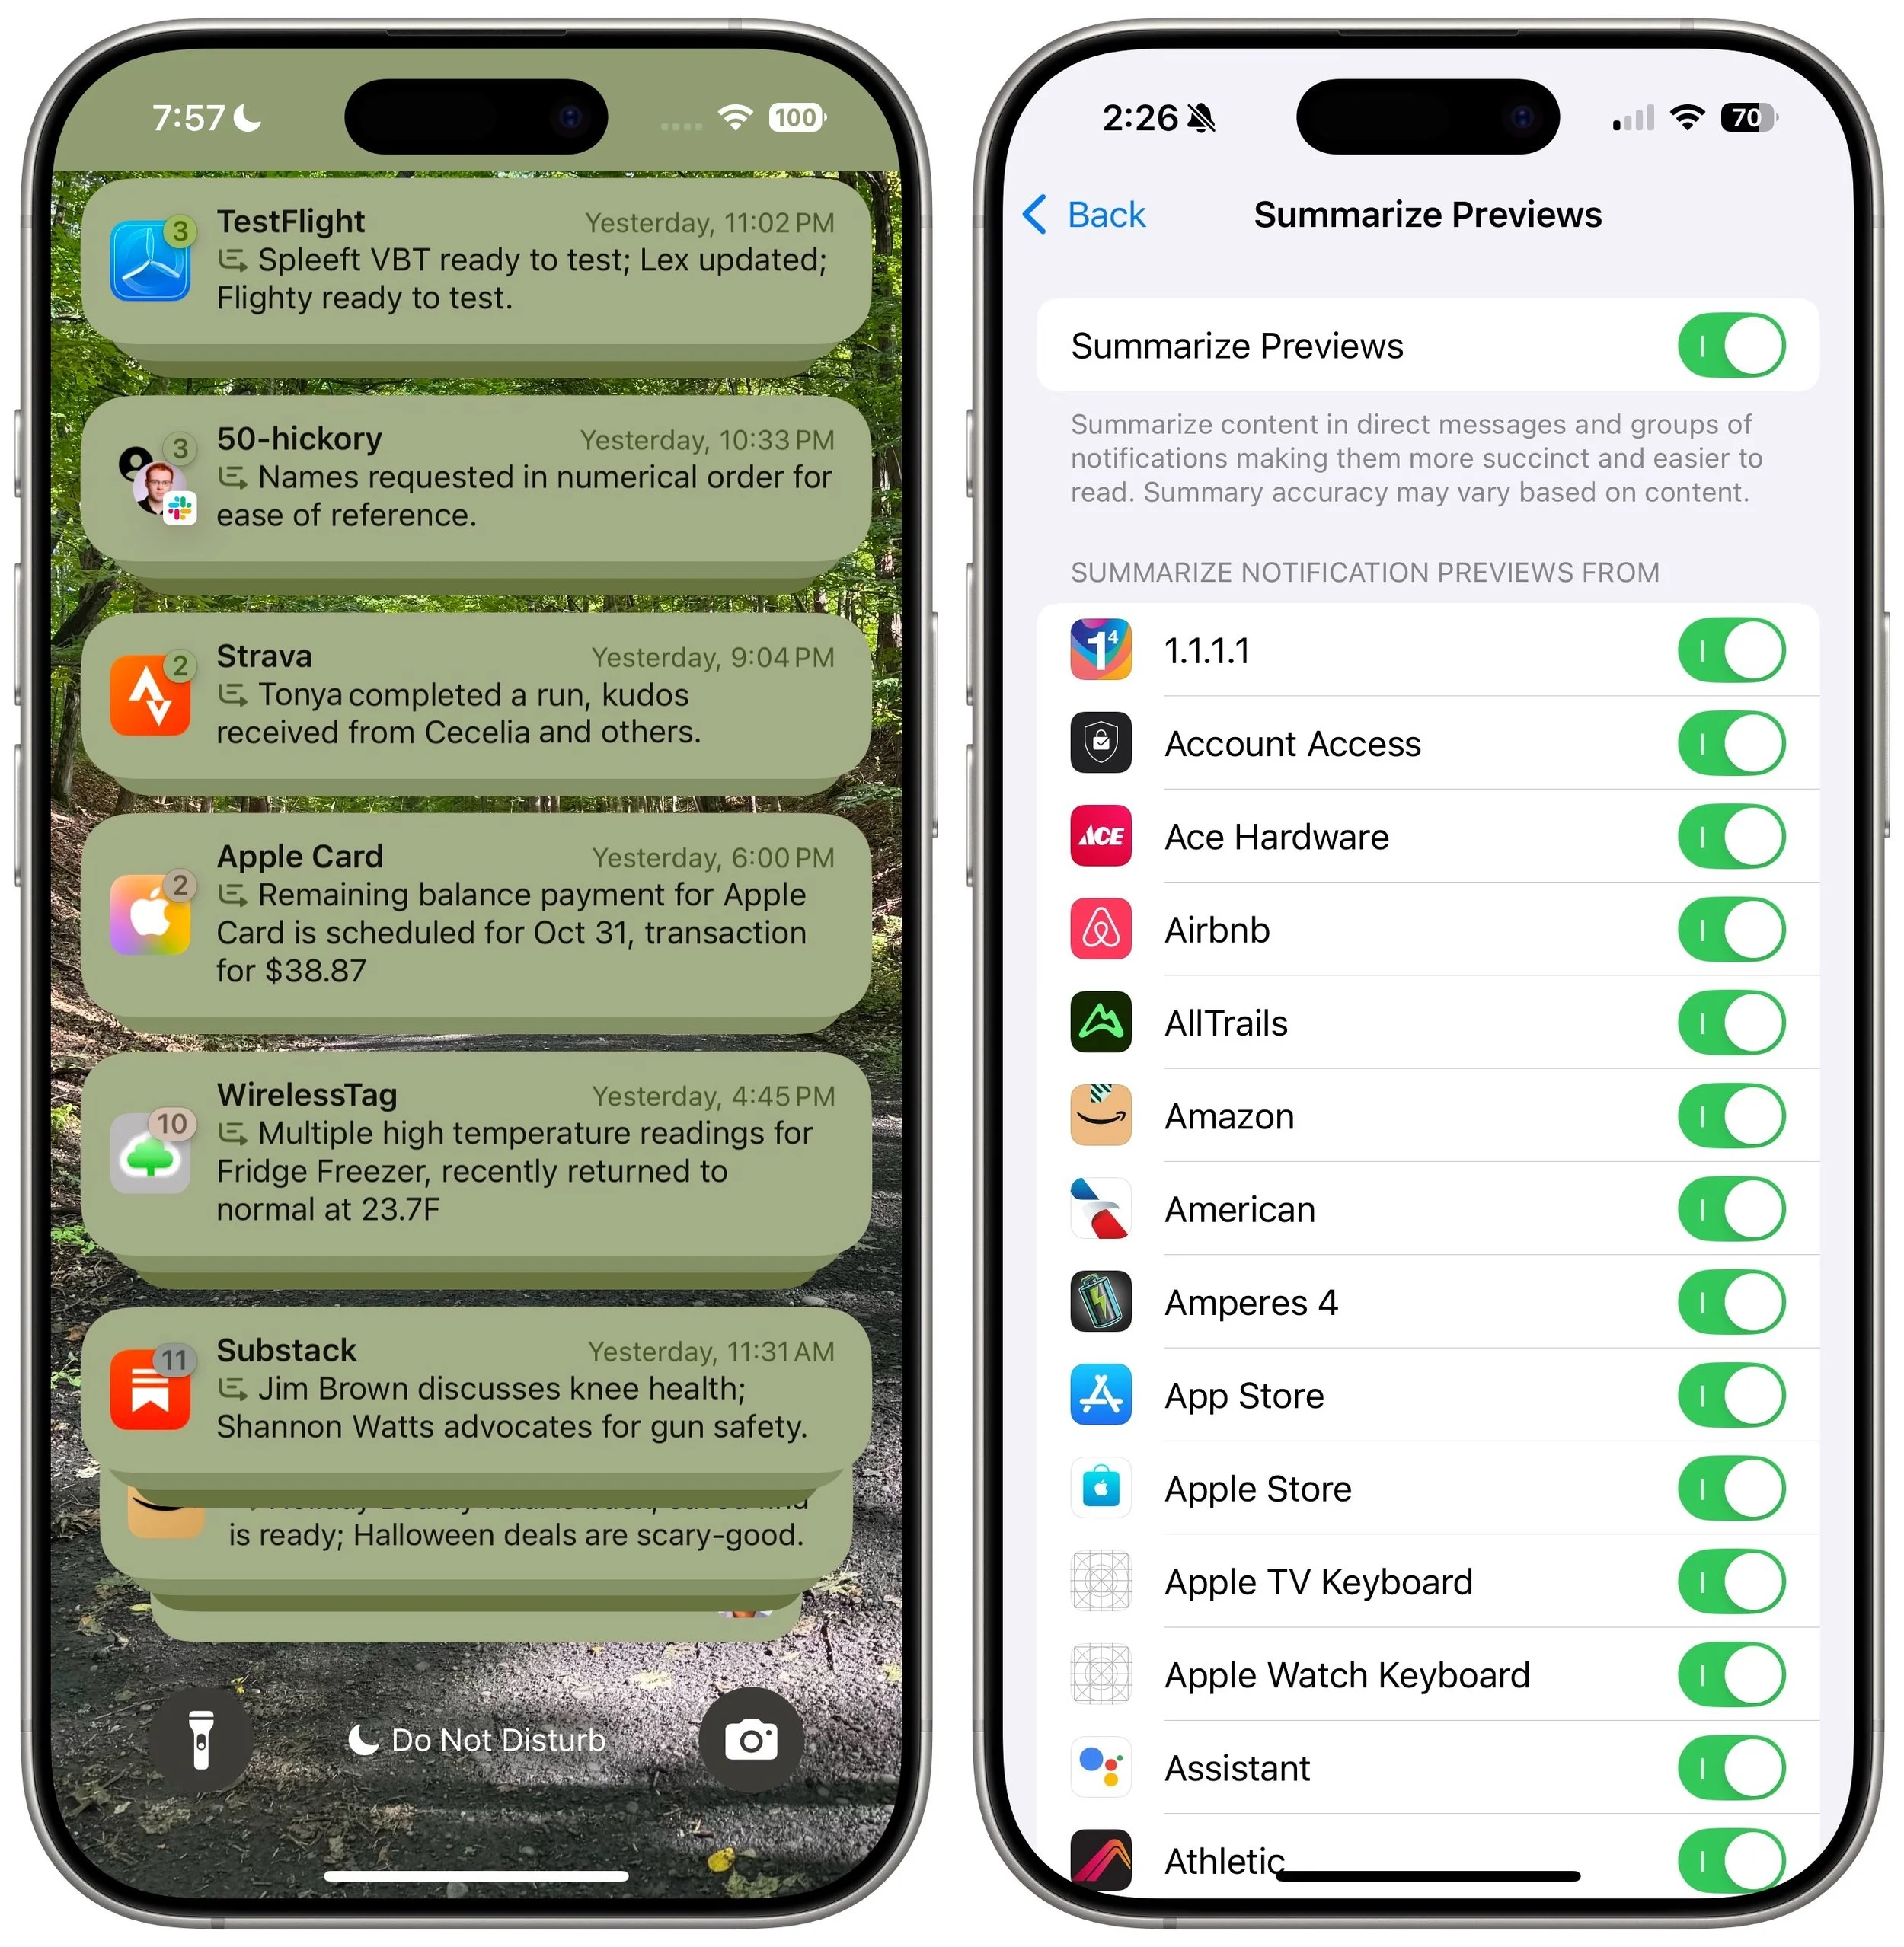
Notification Summaries
Apple has long been sensitive about how distracting our devices can be due to numerous apps posting notifications throughout the day. Apple Intelligence tries to help by summarizing lengthy individual notifications and groups of notifications. Notification summaries probably won’t rock your world, but it can be nice to have a sense of what’s going on with a group of notifications before you wade into an involved conversation. If you don’t like the summaries for particular apps, turn them off in Settings > Notifications > Summarize Previews.
Mail (and Messages) Enhancements
Speaking of summaries, in Mail, the most welcome Apple Intelligence change is to replace each first-line snippet in message lists with summaries of the message or conversation content. It makes scanning email for important messages easier.

Other Apple Intelligence changes include moving priority messages—those that require a quick reply—to the top of the message list and the option to summarize long messages or conversations using a Summarize button at the top of the message pane. Both Mail and Messages also offer a Smart Reply feature that suggests reasonable replies. They’re like tapback responses on steroids.
Audio Recording, Transcription, and Summarization
Apple Intelligence offers major advances for the Notes and Phone apps: audio recording, transcription, and summarization. Be aware that the Phone app alerts participants when you start recording—just joke, “For quality assurance…” before tapping the record button.
The big win comes with Notes (on the iPhone, iPad, and Mac), which can record a meeting and provide a transcript for later searching and summarization. The clearer the audio, the better. It stumbles on many names and doesn’t differentiate between speakers, but transcripts can be hugely helpful. You can keep a transcript in its recording (left), where you can jump around in the audio by tapping the associated text, or you can use the ••• button to export it to its enclosing note (middle) or tap a button to get a summary (right).
Siri Enhancements
Apple has promised a lot for Siri but hasn’t delivered much. A new interface replaces the animated circle with a glowing light and the option to type your query rather than speak it. However, the only functional improvement from Apple Intelligence so far seems to be Siri’s awareness of the iPhone, iPad, and Mac user guides. If you’re unsure how to accomplish a built-in task, try asking Siri.

What’s Coming Next
Welcome though they may be, the initial wave of Apple Intelligence features won’t set the world on fire. But Apple has big plans for Apple Intelligence, with new features slated for release in December 2024 and more coming in 2025. Things you can look forward to in a few months include:
ChatGPT will make its promised appearance, bringing world knowledge into Writing Tools and Siri.
You can jazz up your conversations in Messages with original Genomoji merely by describing the emoji you’d like to see. “Penguin on a surfboard,” anyone?
The Image Playground feature will let you generate original images in various styles, though none are photorealistic on purpose—no deepfakes from Apple.
Image Wand will enhance your Apple Pencil sketches by turning them into polished images, and if you circle an empty space, Image Wand will create an image from the surrounding area.
Writing Tools will let you describe a specific change you want to apply to your text, like adding more descriptive words to a blog post. We hope Apple puts more thought into the workflow so it’s easier to compare the before and after.
The Camera Control button on the iPhone 16 line will tap Apple Intelligence to help users learn about objects and places in the iPhone’s viewfinder.
Further out, Apple says that Priority Notifications will surface your most important notifications, and Siri will learn how to draw from your personal context, take action in numerous apps, and gain awareness of onscreen information. We’re still curious to see how Apple will integrate a more intelligent Siri into the HomePod and Apple TV.
(Featured image by Apple)
How to Minimize Downtime and Lost Work from Tech Failures
Macs may be more reliable than ever, but they still suffer from hardware and software failures. Follow our advice to minimize the impact of inevitable failures.

Macs are much more reliable than in the past, but it remains the case that computers and apps can fail in a wide variety of ways. And they’ve become so integral to daily life that an occasional failure is almost inevitable. Unfortunately, if you aren’t prepared for that eventuality, you may lose work and suffer from unnecessary downtime. A little forethought can significantly minimize the impact of app crashes, lost connectivity, storage failures, and overall hardware hiccups.
App Failures
The most common problems occur in apps, where you have to worry about crashes and file corruption. (Cosmetic bugs and broken features are annoying, but apart from reporting them, there’s nothing you can do about them and they shouldn’t cause you to lose work.) To protect yourself from crashes and corruption, we recommend the following:
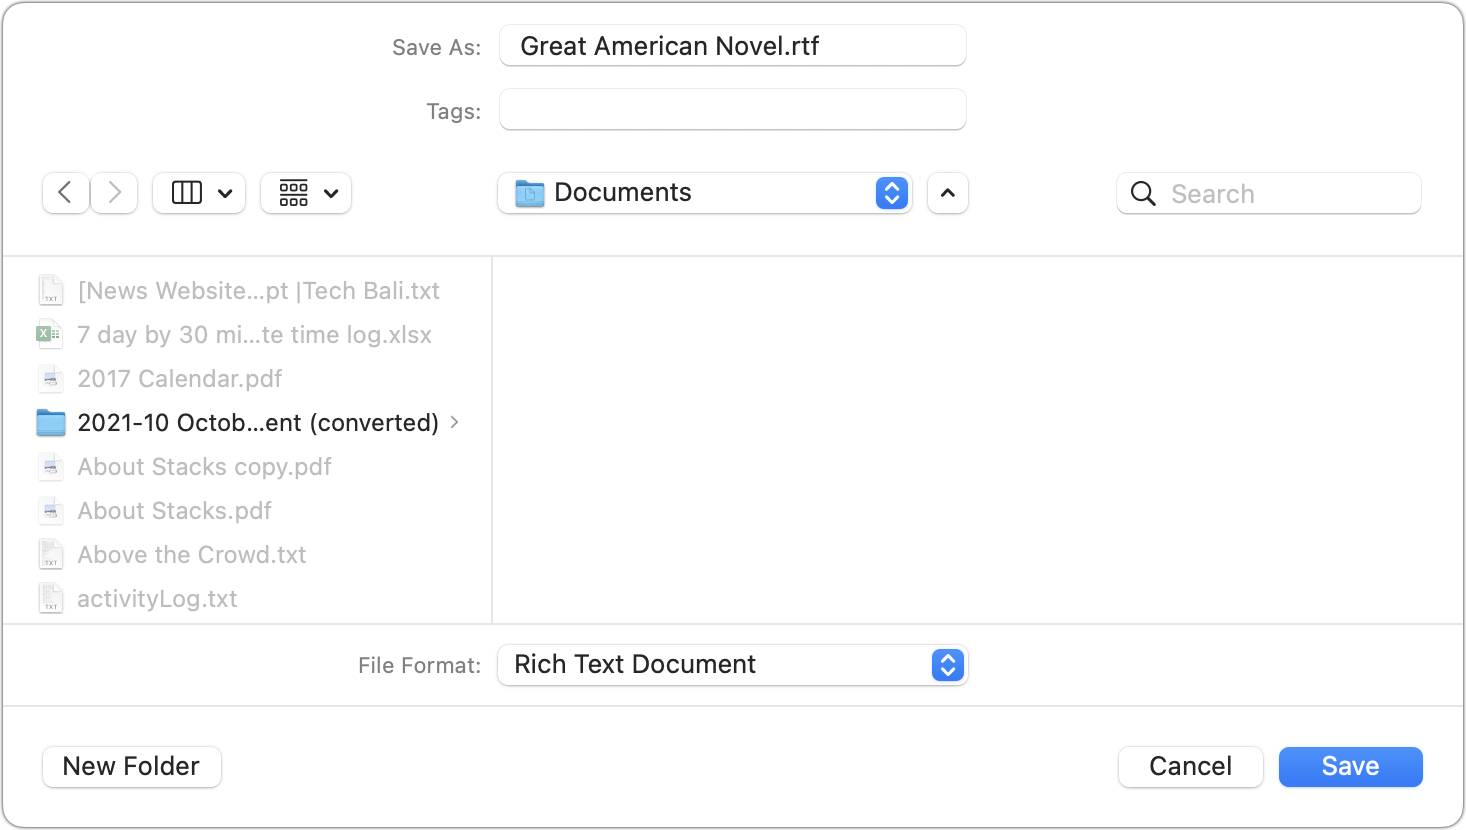
Save new files immediately: Although many apps auto-save, not all do. Whenever you start a new file, save it immediately and frequently as you work. That way, a crash can’t cause you to lose everything you’ve done.
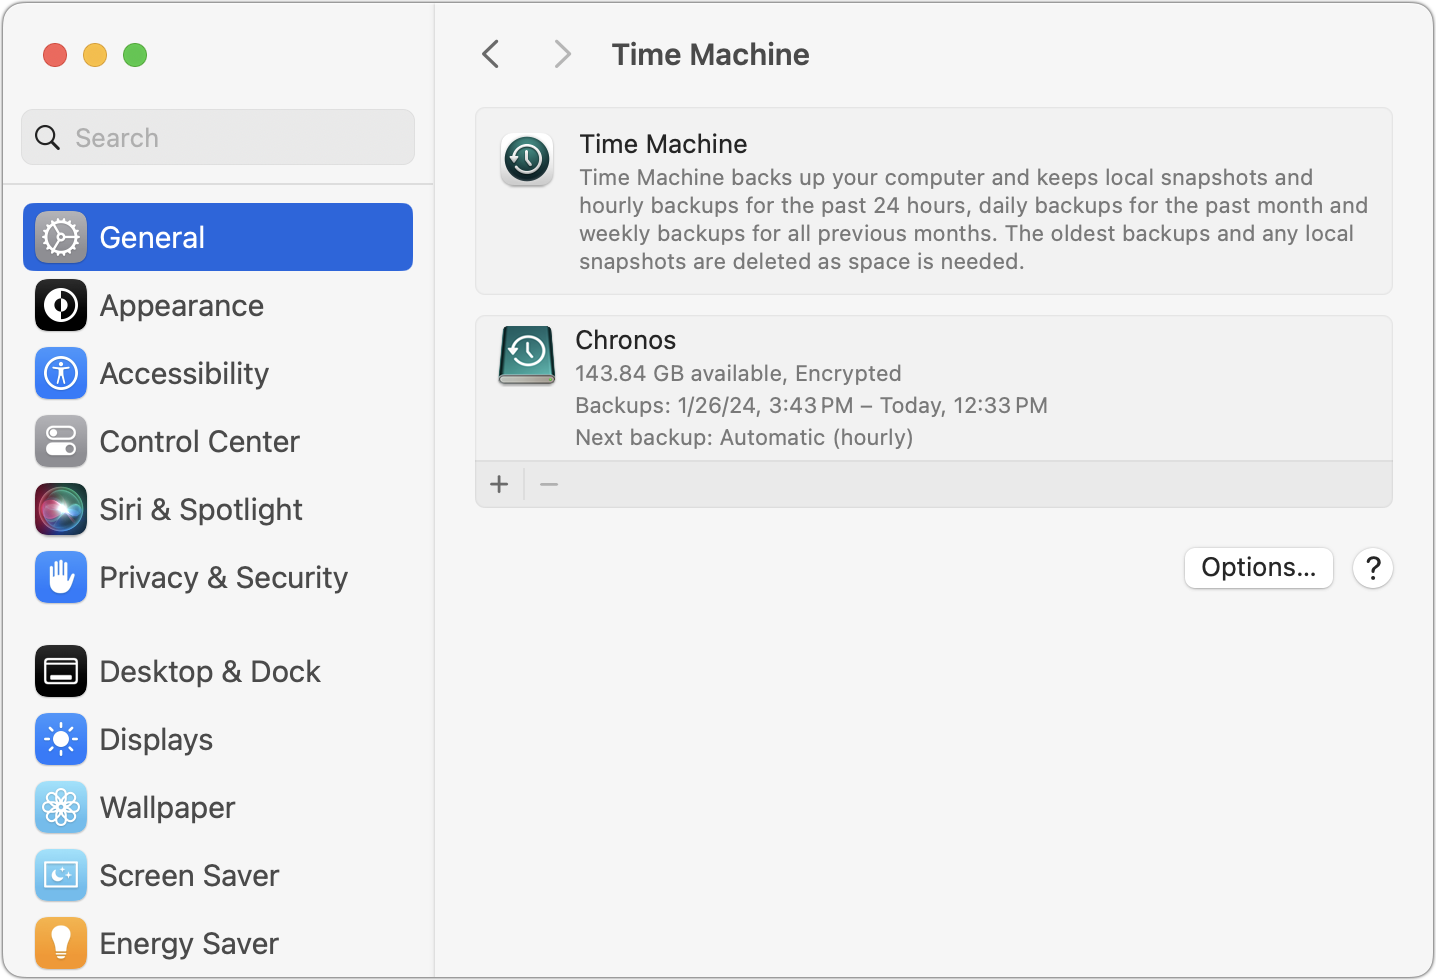
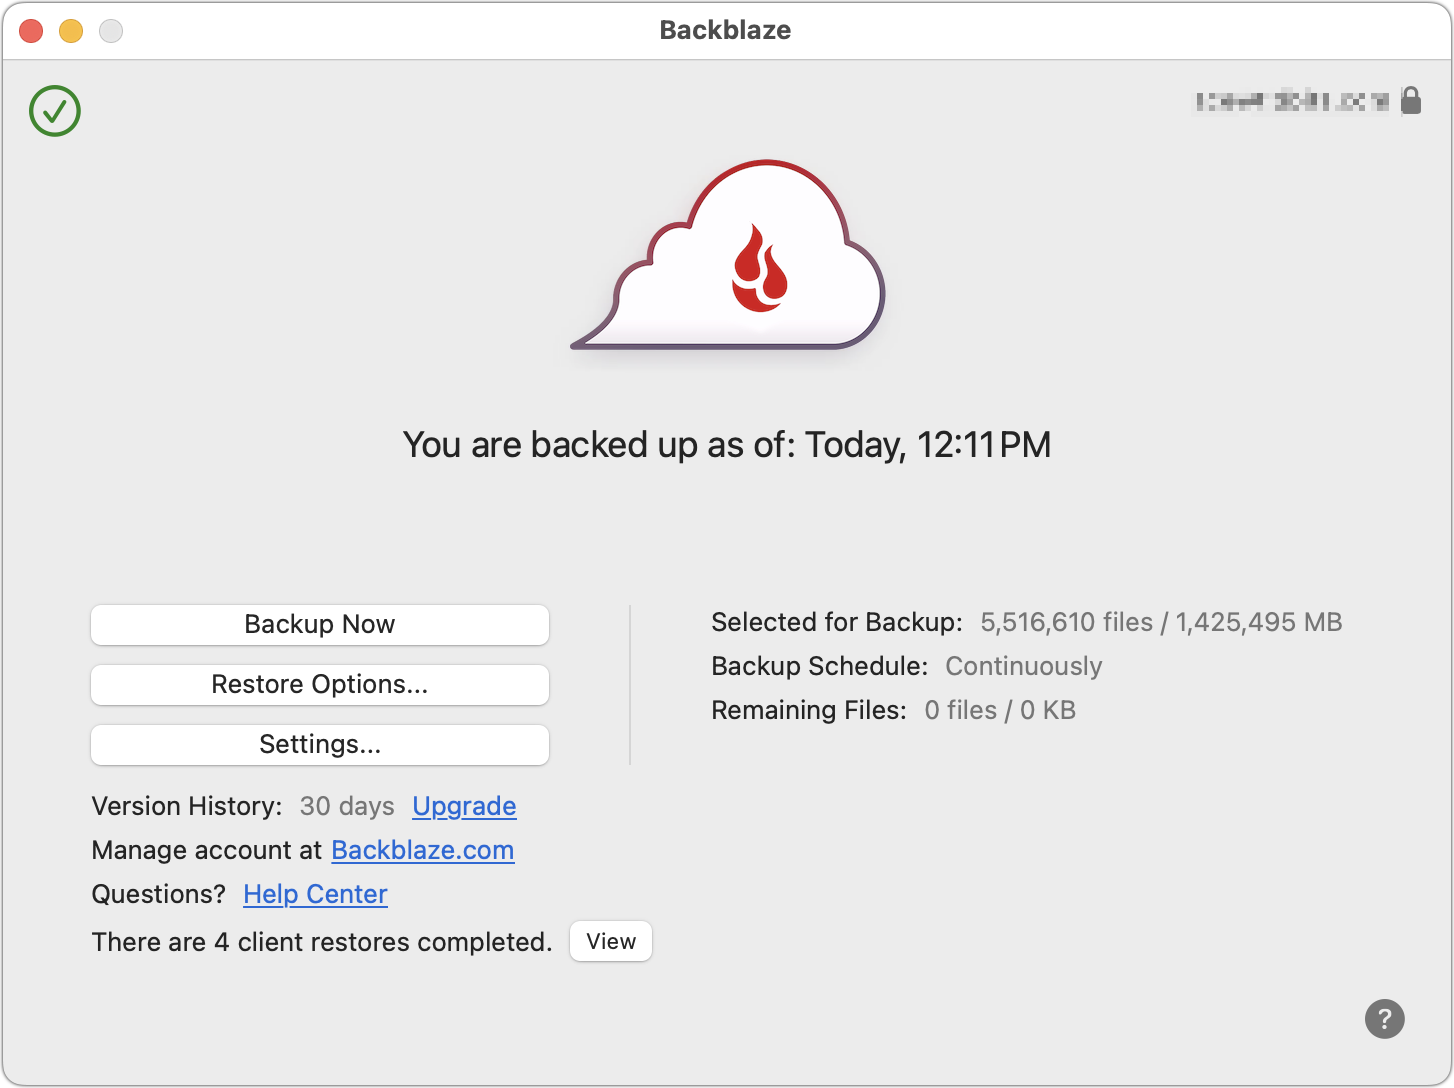
Use always-on backup software: Backup software like Time Machine and Backblaze run throughout the day, making versioned backups that let you restore earlier versions of a file. Those backups can be a lifesaver if your document becomes corrupted.
Make manual versions of critical files: For documents where losing work would threaten your continued employment, we recommend making manual versions at least daily, preferably on a cloud storage service. Append a version number to each file, and keep all the versions until you complete the project.
Connectivity Failures
As more of our work has moved online or requires access to online resources, always-available connectivity has become necessary. Many people feel incapable of getting things done without Internet access. Here are some workarounds:
Be able to switch between Wi-Fi and Ethernet: If one method of connecting to your local network fails, switching to the other can let you get on with your work with minimal interruption. A wireless access point failure could send you to wired Ethernet, or Ethernet cable damage could make Wi-Fi the only option. One shortcut for this is to keep both network adapters active in System Settings > Network, so the Mac can use either.

Turn on a personal hotspot: If your Internet connection goes down, the fastest way to get your Mac back online may be to connect to your iPhone’s personal hotspot. Set it up in Settings > Cellular > Personal Hotspot and choose it from your Mac’s Wi-Fi menu.

Identify a public hotspot: Assuming you have a Mac laptop, the better part of valor may be to go somewhere with Internet access, whether a coffee shop, the public library, or the house of a friend or family member. If your problem falls outside business hours, you might even be able to access a public network from a nearby parked car.
Purchase backup networking hardware: Organizations should maintain backups of their networking gear. In the event of hardware failure, being able to swap a backup router, access point, switch, or cable into place will minimize downtime. Make sure to record your networking configurations so you can configure the new devices quickly.
Storage Failures
Historically, the most failure-prone aspect of a Mac was its hard drive because of its moving parts and insanely tight tolerances. Flash storage used by solid-state drives is far more reliable and resilient to physical bumps and drops. However, it’s still in constant flux as macOS and apps constantly read and write data, so software bugs can result in directory errors and other forms of corruption. We recommend a three-part backup strategy to protect against storage failures—make sure to dedicate drives for backups rather than using them for general storage.
Back up with Time Machine: Time Machine works well and is tightly integrated into macOS. Use it to create versioned backups of your data so you can restore either individual files or your entire drive.
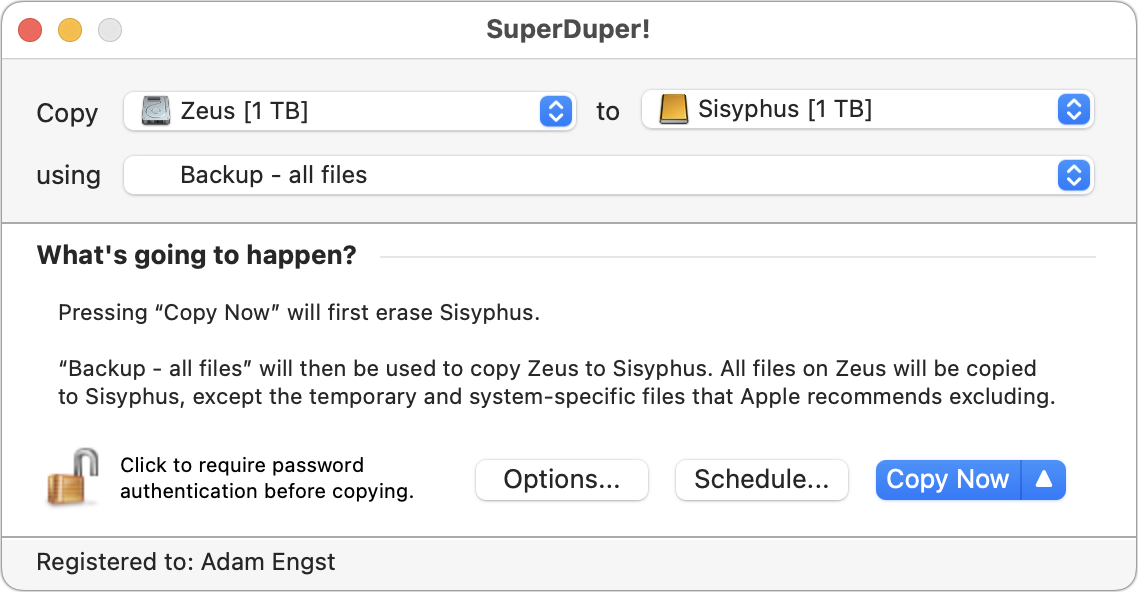
Make nightly duplicates: Bootable duplicates that could take over for a dysfunctional boot drive used to be an essential part of a Mac backup strategy, but the difficulty of making them and booting a Mac from an external drive has reduced their utility. Nevertheless, the fastest and easiest way to restore data is often by copying it from a duplicate. Duplicates also provide secondary backups if something were to go wrong with your Time Machine drive. Carbon Copy Cloner and SuperDuper are the most popular backup apps for duplicates.
Overall Mac Failures
Macs may be reliable, but they’re still vulnerable to physical damage, particularly laptops you carry with you all the time. Bumps and drops can damage a screen or internal connectors that connect the keyboard and trackpad. You can do a few things to minimize the impact of a broken Mac.
Use the desktop/laptop approach: Although Mac laptops are powerful and expandable enough for all but the most intensive tasks, supplementing a powerful desktop Mac with a less expensive laptop gives you more flexibility and provides a backup if your primary Mac fails.
Maintain an extra keyboard, trackpad, and display: Getting your work done requires a functional keyboard, trackpad or mouse, and monitor. If any of those accessories were to fail, having an extra one around would let you get back to work with minimal fuss.
Keep an old or extra Mac as a backup: Those relying on a single Mac should consider keeping an older Mac around as a backup if you have to send your current Mac to Apple for repair. This approach works only if your old Mac can run your current apps. An organization might maintain a backup Mac that could be temporarily swapped in for any employee’s broken Mac.
Borrow a Mac from a colleague, friend, or family member: If you don’t have an extra Mac that’s sufficiently capable for your work needs, perhaps someone you know does. It’s easy to create a new user account that will keep your data and theirs separate and private. Start in System Settings > Users & Groups.
Remember Apple’s 14-day return policy: If all else fails, remember that you can buy a Mac from Apple (in person or online) and return it with its included accessories and packaging within 14 days for a full refund. It’s a generous policy that shouldn’t be abused, but it could be a lifesaver if you’re under deadline when your Mac dies.
Of course, you’re welcome to call us for advice about working around any of these tech failures, but these suggestions should get you back in the saddle quickly and with minimal loss of work.
(Featured image by iStock.com/fizkes)
In iOS 18 and iPadOS 18, Control Center Is Now Highly Customizable
The new Control Center in iOS 18 and iPad OS 18 is vastly more customizable and has more options. Our article tells you what’s on offer and how to use it.

Control Center has been a part of our iPhone and iPad experience for over a decade, first appearing in iOS 7 in 2013. It provides direct access to important controls so we don’t have to hunt through Settings or apps. On the whole, it has been a welcome addition.
Although Control Center has changed a bit over the years, it provided relatively minimal customization options until iOS 18 and iPadOS 18. Previously, in Settings > Control Center, you could choose which controls appeared and in what order, though a few essential controls always appeared at the top.
With this year’s operating system updates for the iPhone and iPad, Apple decided to give us nearly free rein to personalize Control Center, even allowing us to add multiple pages of controls. While some people will go wild and utterly reimagine what Control Center can do for them, we expect most to employ more modest tweaks that make it slightly easier to use.
Here’s what you can do in iOS 18 and iPadOS 18:
Learn the basics of getting around in Control Center:
Open Control Center: Swipe down from the upper-right corner of the screen.
Move between Control Center pages: During the initial swipe to open Control Center, keep swiping down to navigate to later Control Center pages, represented by tiny icons on the right side of the screen. Once Control Center is open, swipe up or down anywhere on the screen to move between pages or tap the icons.
Use controls: Tapping an icon in Control Center usually either toggles a setting (like Orientation Lock and Silent Mode) or opens an app (like Magnifier or Wallet). Many display additional options when you touch and hold them (tap the Focus icon to toggle Do Not Disturb; touch and hold it to access more options, each of which offers even more settings). A few controls allow direct manipulation (like Now Playing, Volume, and Brightness).

Add, organize, and remove items from Control Center:
Enter and leave editing mode: Tap the + icon in the upper-left corner, or touch and hold on any empty part of the Control Center screen, much like you enter wiggle mode on the Home Screen. You can swipe between screens in editing mode as well. When you’re done, tap any empty area to leave editing mode.
Add a control: In editing mode, tap Add a Control at the bottom of the screen, search or browse for available controls, and tap the one you want to add to the current screen. Note that many apps now provide controls, vastly increasing the actions available from Control Center.
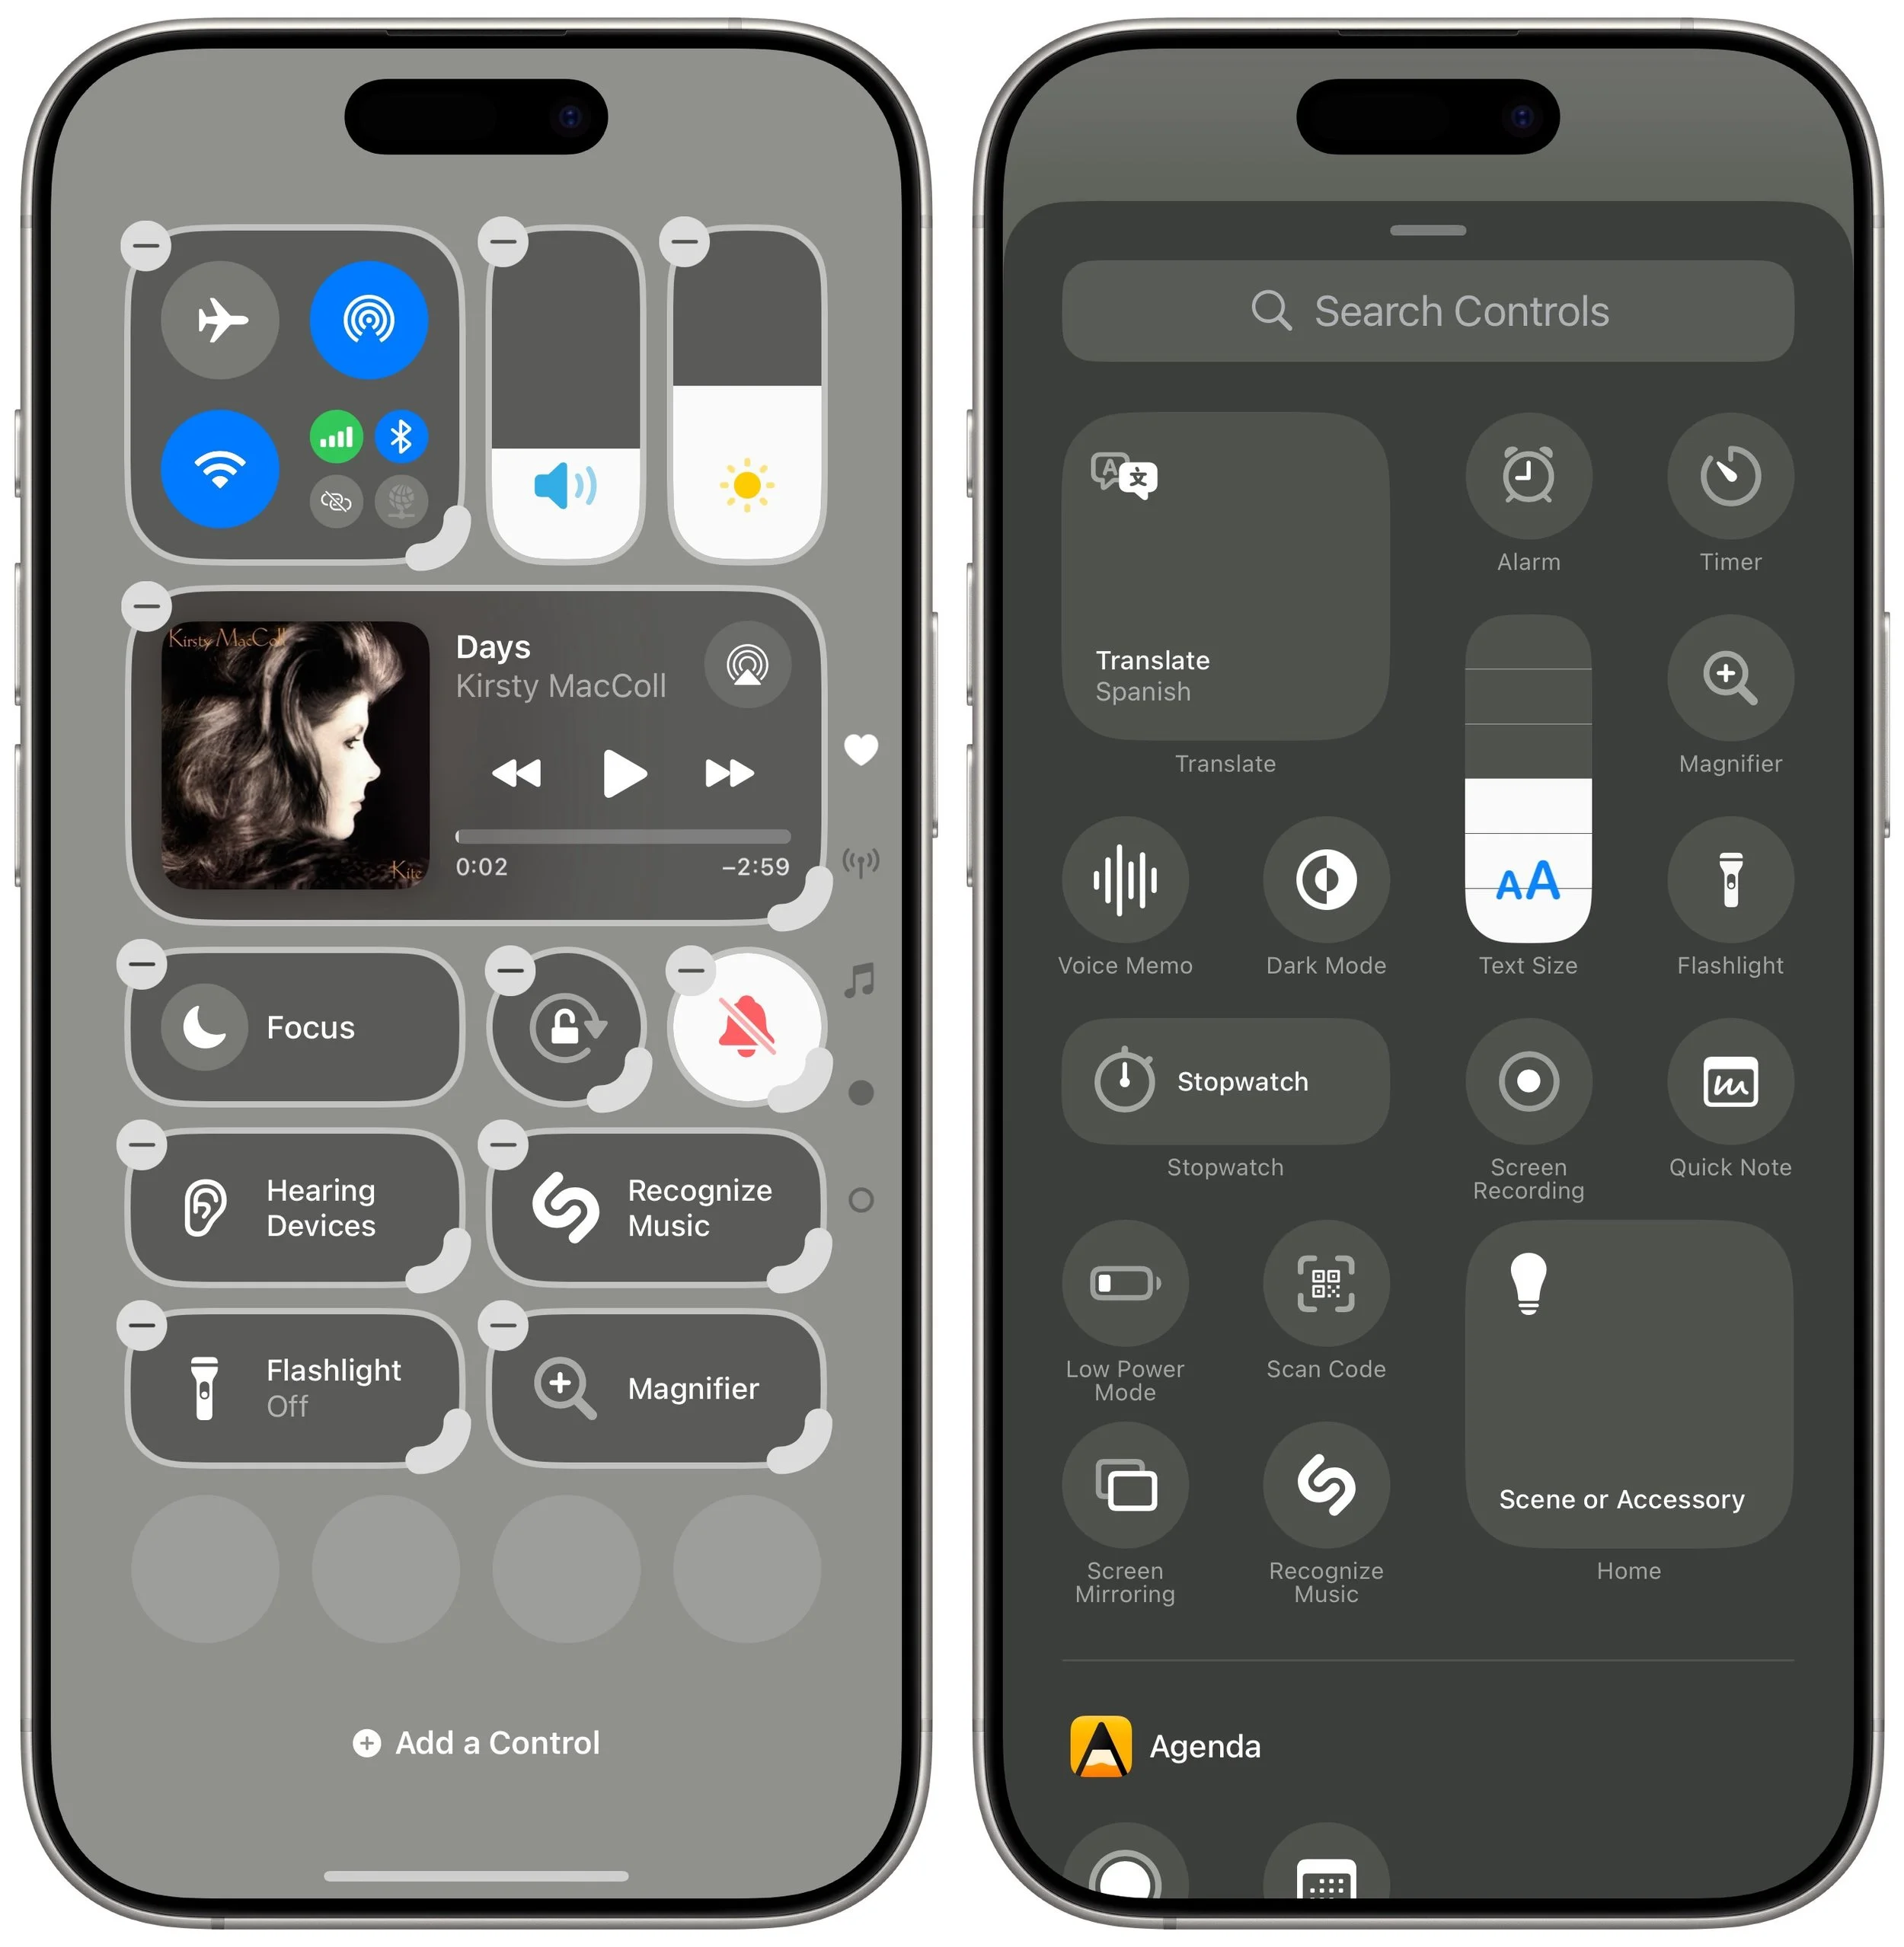
Move a control: Touch and hold a control and drag it to the desired location. While holding the control, drag it to the bottom or top of the screen to move it to a different page.
Add a new page: When you’re in editing mode, a new empty page always appears at the bottom. To make it stick around after you exit editing mode, add or move a control to it.
Resize a control: If a control has a curved resize handle on the lower-right corner of its icon, drag that handle to make the control larger or smaller. Most offer only 1-slot, 2-slot, and 4-slot sizes, with the latter two adding the name—we’re partial to the 2-slot size because we have trouble recognizing little icons. (Control Center would benefit from an option to display names under 1-slot icons as it does on the Add a Control screen.) A few controls, notably Now Playing, are more malleable—it offers two 4-slot sizes, an 8-slot size, a 16-slot size, and a full-page 32-slot size.

Delete a control: To remove a control, tap the – button in the upper-left corner of the icon.
Reset the layout to the default: It’s easy to go overboard and end up with a mad scientist layout. To return to the default set of controls, go to Settings > Control Center > Reset Control Center.
Take advantage of extra Control Center tips and settings:
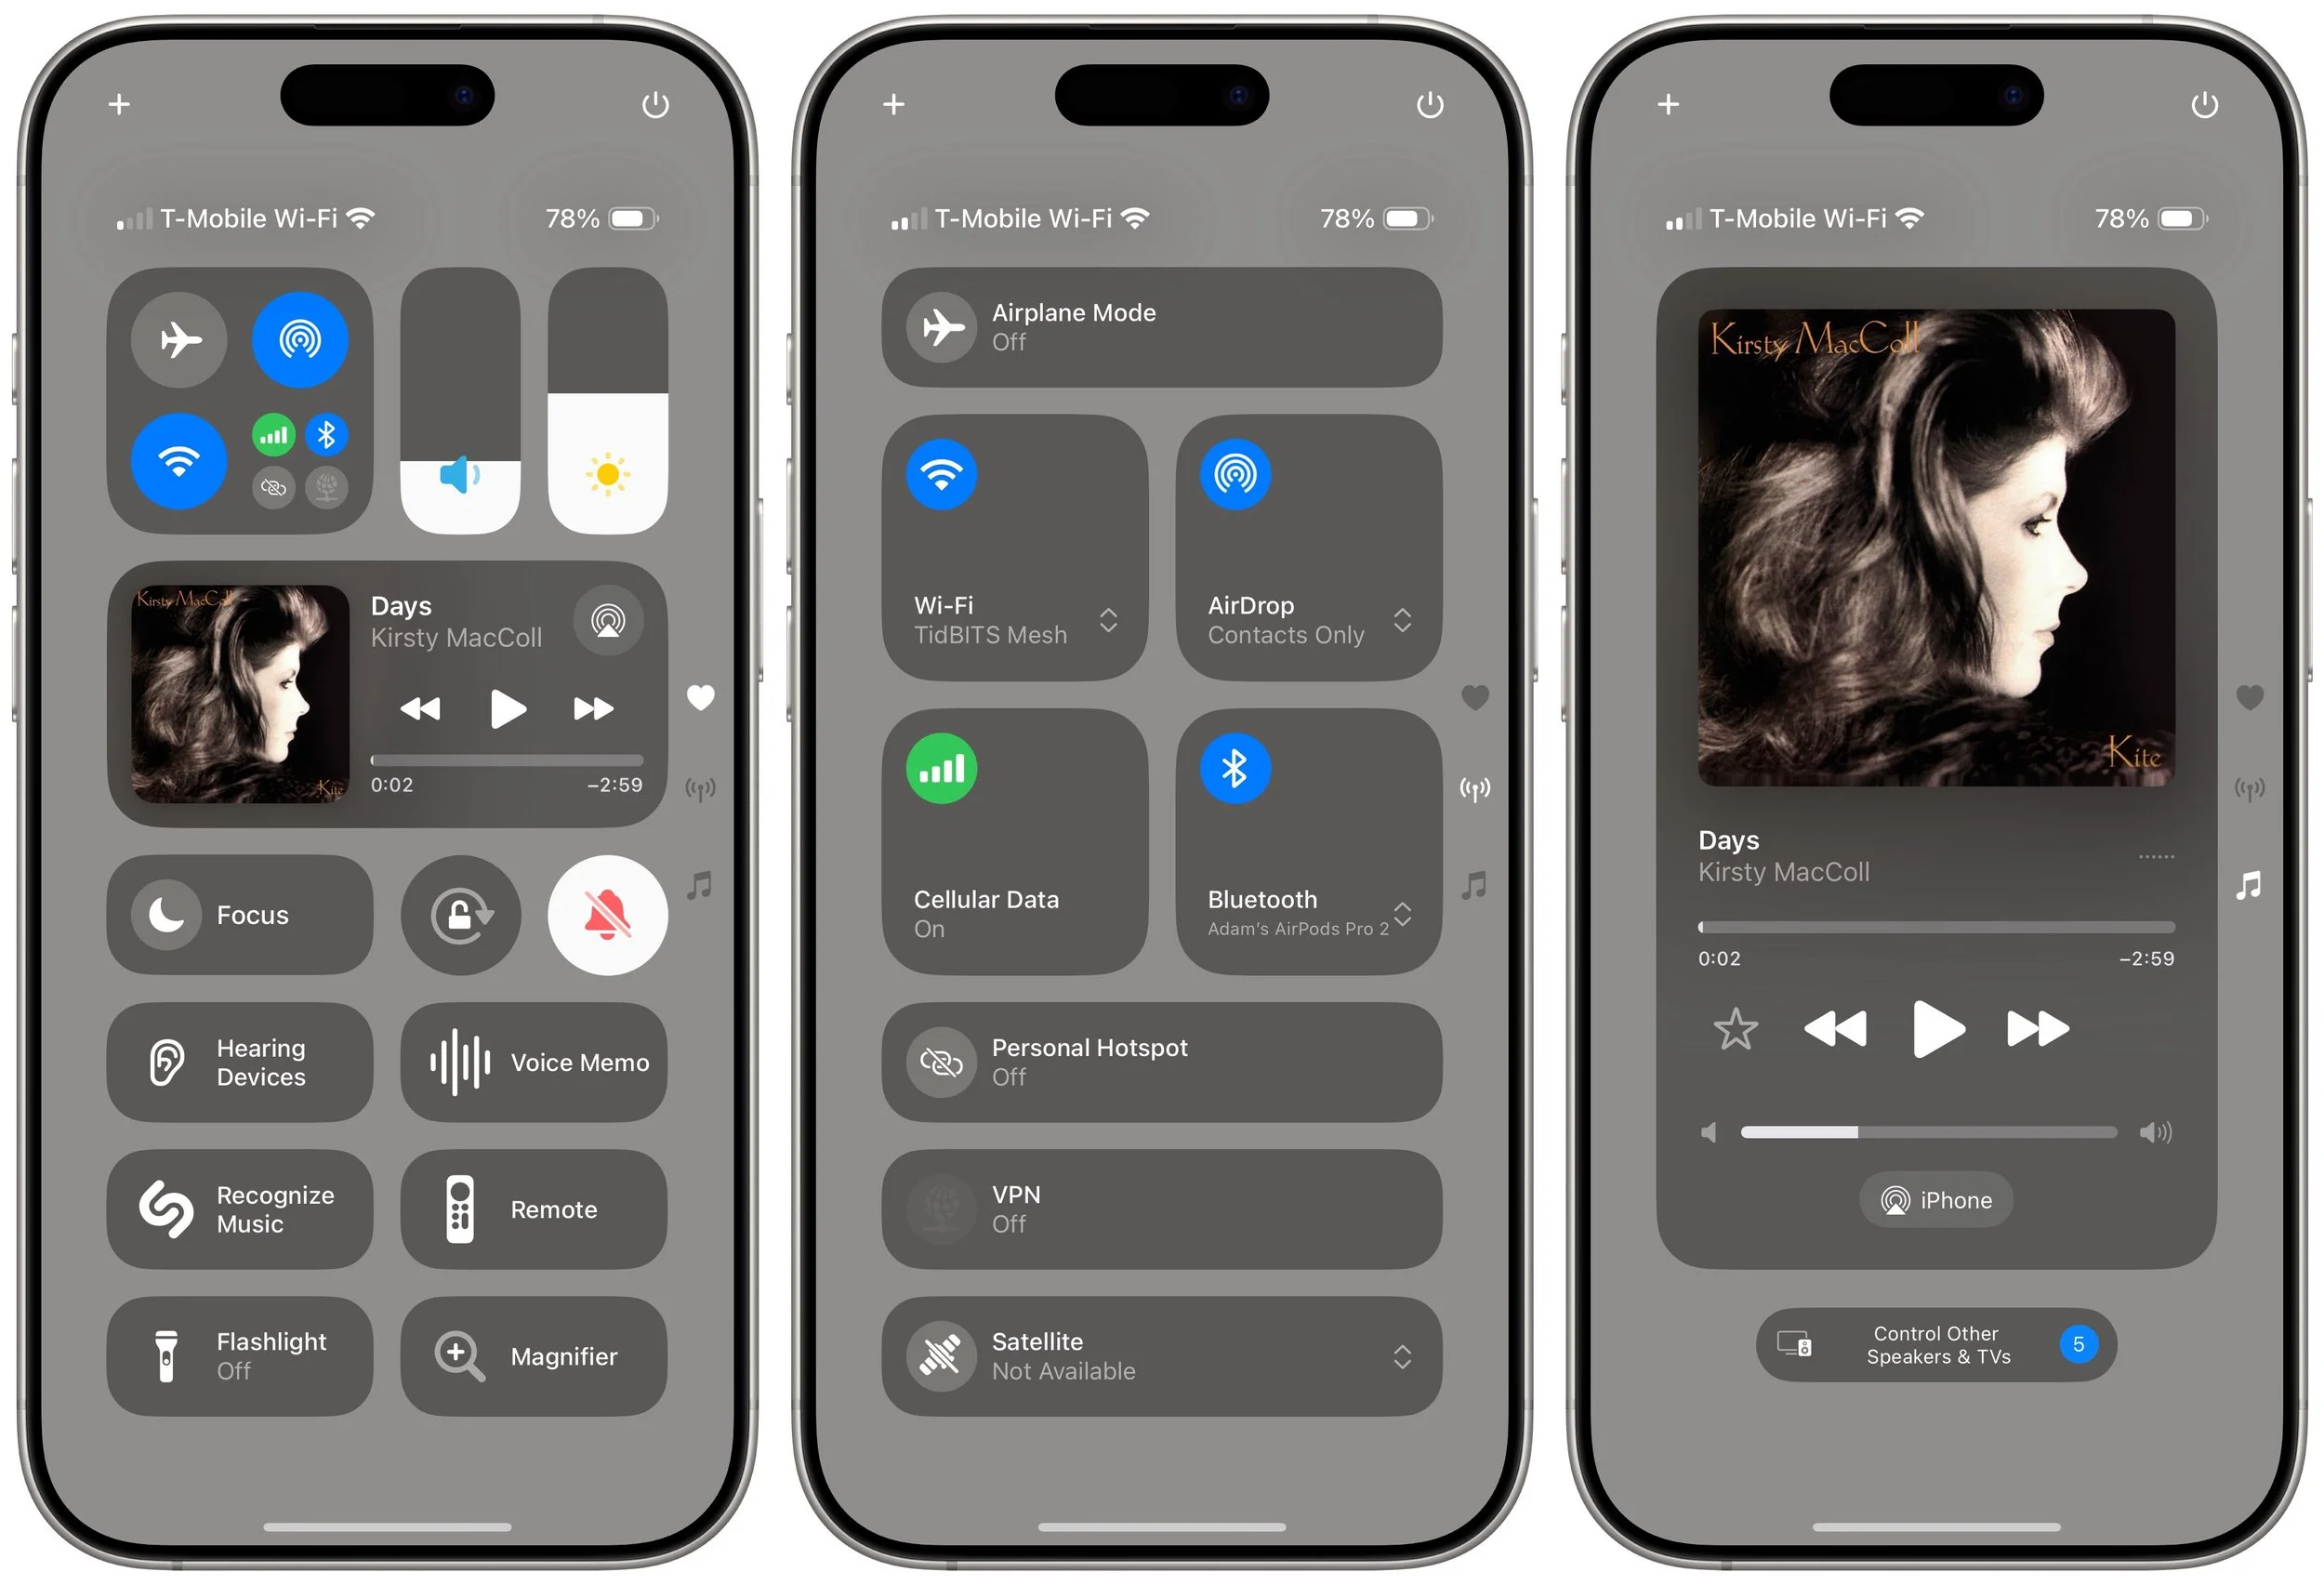
Check privacy status alerts: In the middle of the screen, you may see one or more small icons and an app name ➊. That indicates the app has permission to do things like track your location, use the camera, or record with the mic. Tap that area to see more details.
Power down the device: Touch and hold the power button at the upper-right corner of the screen ➋. It’s similar to holding the physical side button and one of the volume buttons for a few seconds, except the physical buttons also provide sliders for viewing your Medical ID and making an Emergency SOS call. Even if you cancel the power-off action, you must enter your passcode to re-enable FaceID.
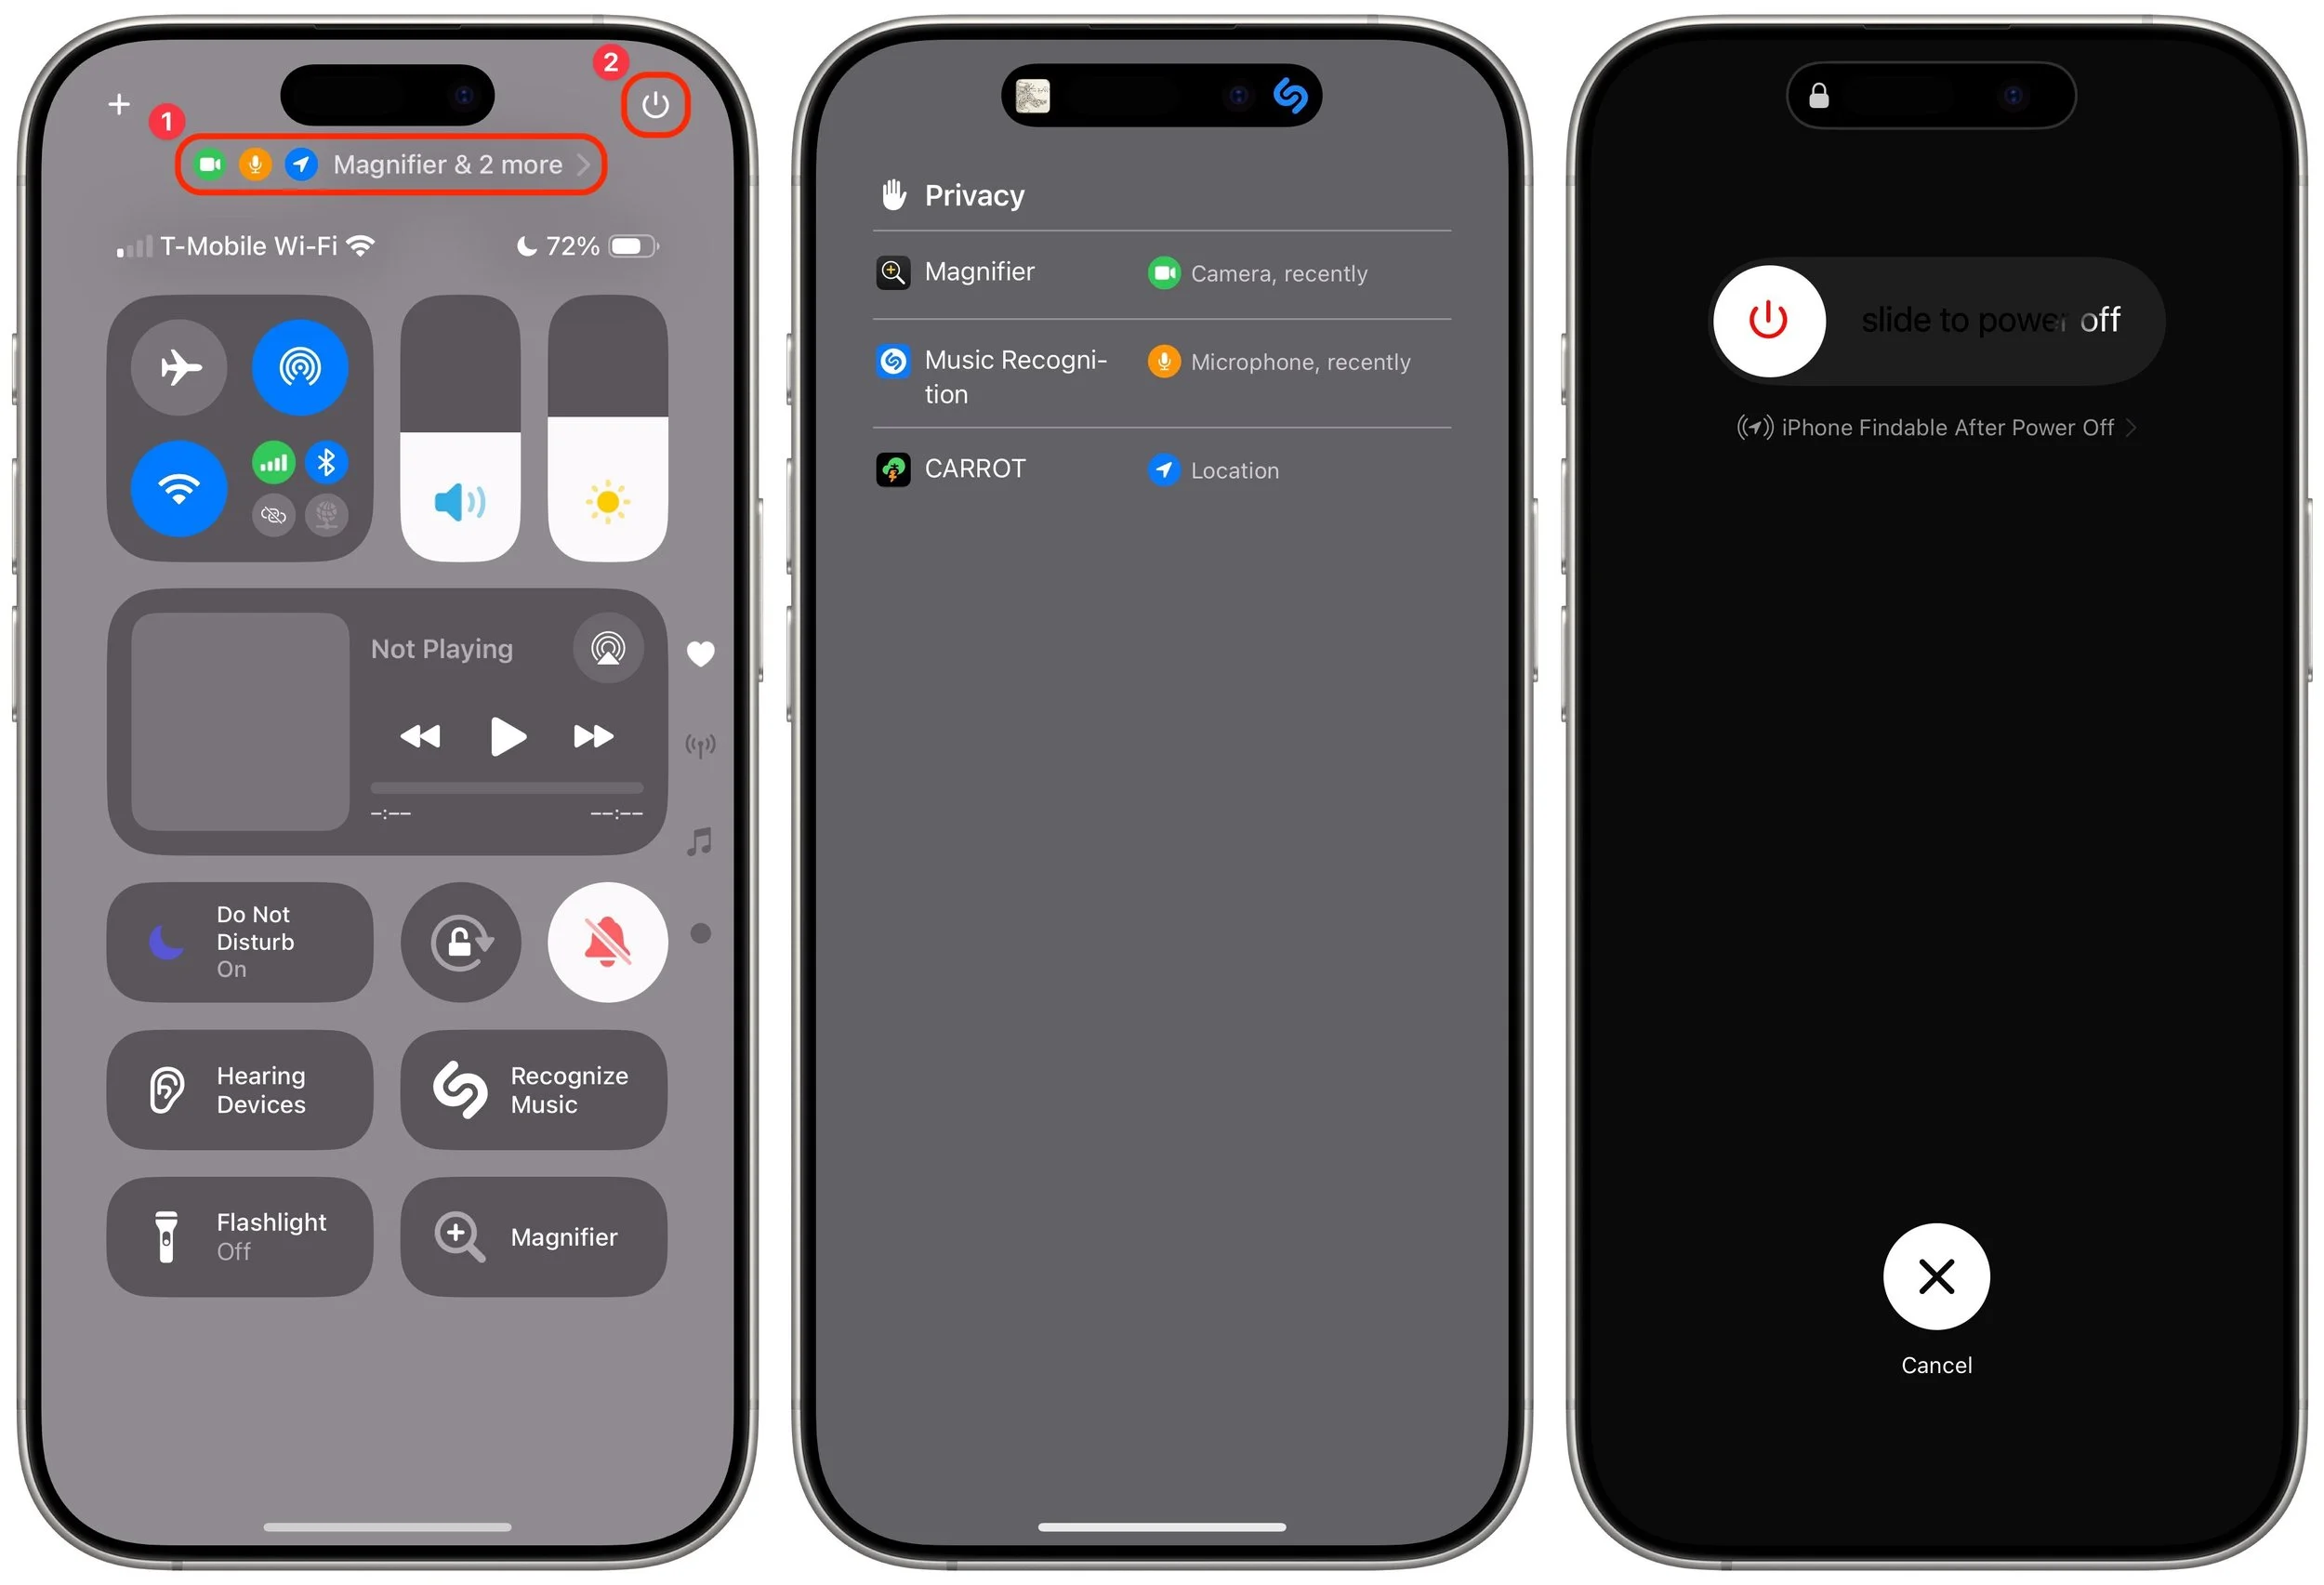
Turn off Control Center access in apps: If you accidentally invoke Control Center in apps because you want to swipe near the top right of the screen, go to Settings > Control Center and turn off Access Within Apps.
It’s easy to become overwhelmed with Control Center’s customization possibilities. There’s no harm in sticking with the default layout, but our initial advice is to think about what you use Control Center for now and make sure those actions are well-represented by icons on the first page. Also, if you have trouble remembering what particular icons do, resize them to the 2-slot size so you can see their names. Later on, you can look through the full list of available controls and add those that seem appealing.
(Featured image by iStock.com/yacobchuk)
Setting Up and Managing iCloud+ Storage
Although it may not be exciting, having more iCloud+ storage significantly improves the experience for those with multiple Apple devices. We explain what iCloud+ provides, how much you should get, and how to get started.

Apple’s online iCloud storage underpins many of the company’s services, including iCloud Photos, iCloud Drive, iCloud Backup (for iPhones and iPads), iCloud Mail, and Messages in iCloud. Numerous independent apps also rely on iCloud storage to sync data between devices.
Apple gives everyone 5 GB of storage for free, which is enough for core services, like iCloud Keychain, and to try the other services. However, those who wish to take full advantage of iCloud Photos and iCloud Drive, in particular, must subscribe to iCloud+. Along with extra storage, iCloud+ subscribers can use:
iCloud Private Relay, which blocks tracking of Safari traffic, DNS queries, and most non-HTTP Web traffic
Hide My Email, which creates random, unique email addresses that automatically forward to your inbox
Custom Email Domains, which lets you register your own custom email domain and use it in a personalized email address
For now, though, we’ll focus on storage. Apple’s iCloud+ rates are similar to those for storage at Google Drive and Microsoft OneDrive, though the specifics vary slightly by service. Apple charges:
50 GB: $0.99 per month
200 GB: $2.99 per month
2 TB: $9.99 per month
6 TB: $29.99 per month
12 TB: $59.99 per month
Audit Your Storage Needs
How much you should get depends on how much data you wish to upload to start and how quickly you expect that amount to grow. For most people, iCloud Photos consumes more storage space than anything else, although syncing your Desktop and Documents folders between Macs using iCloud can also chew up space.
If you’re not currently using iCloud, use File > Get Info to determine the size of your Photos Library (located in your Pictures folder), and do the same for your Desktop and Documents folders if you want to sync them. You can also anticipate iPhone and iPad backups consuming up to 20 gigabytes or more.
Remember that you can share iCloud+ storage space with people in your Family Sharing group. Checking how much space others in your family would also like to use is worthwhile.
Get Started with iCloud+
Subscribe to iCloud+ in Settings/System Settings > Your Name > iCloud > Upgrade to iCloud+. (In pre-2024 versions of Apple’s operating system, tap Manage Account Stor-age and Change Storage Plan.)
Then, you can turn on iCloud Photos in Photos > Settings > iCloud on the Mac or Settings > Apps > Photos on the iPhone and iPad. (We recommend having one Mac use “Download Originals to this Mac” so you have a local copy of everything.) If it’s compelling for you, turn on Desktop and Documents folder syncing in System Settings > Your Name > iCloud > iCloud Drive on each of the Macs you want to participate—you don’t need to do anything on iPhones or iPads because everything from your Macs automatically appears in the iOS Files app. The initial sync, which uploads and deduplicates everything, can take days, depending on the upstream bandwidth of your Internet connection.

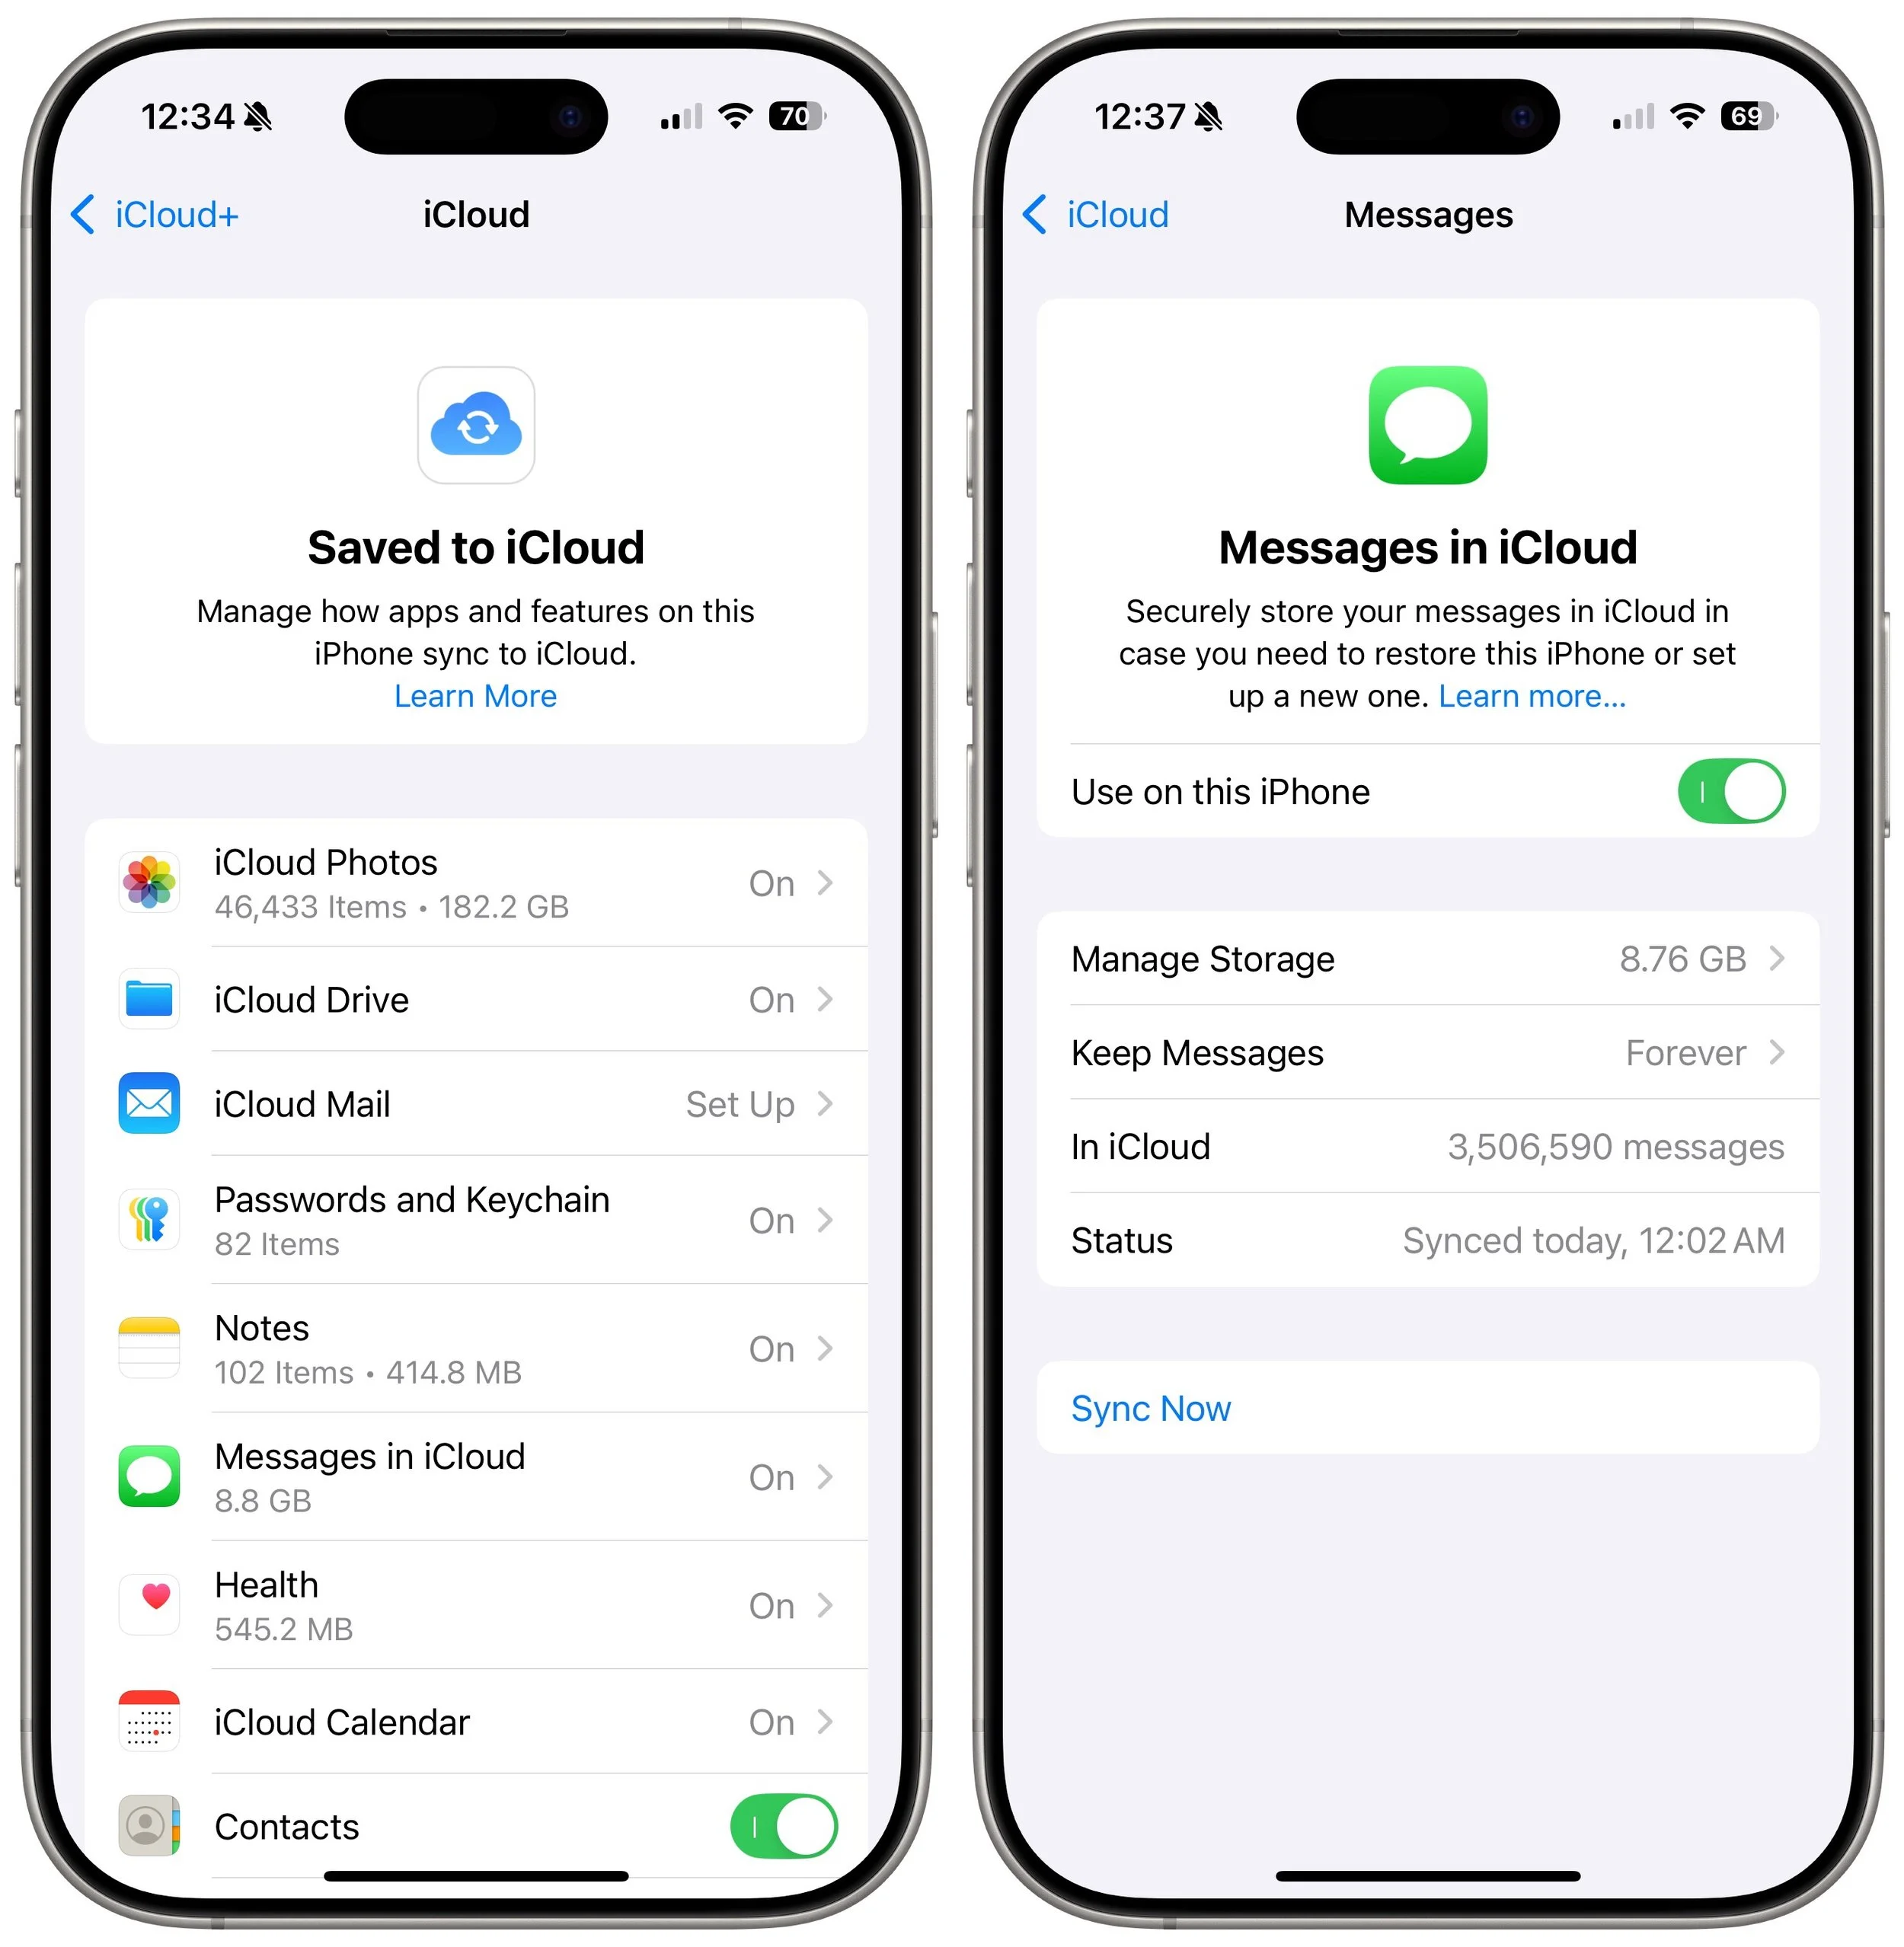
Once you’re set up, you can see and manage all the apps and services using iCloud. Go to Settings/System Settings > Your Name > iCloud, and next to Saved to iCloud, tap See All. Tap any app to see more information and change its settings.
Running Low on Storage Space
Like a physical drive, your iCloud account can run out of space. When that happens, you can delete data or pay for more space. To see how much you’re using and how that breaks down across different apps, open Settings/System Settings > Your Name > iCloud and, at the top, tap Storage or click Manage. You can then drill down to see more details about each app. For Photos, iCloud Drive, Backups, and Messages, Apple provides suggestions for removing large files to save significant amounts of space quickly. Most other apps offer only an option to delete all your data. Generally speaking, you should delete an app’s data only if you don’t anticipate ever using the app again.

As you get close to your space limit, your devices will prompt you to upgrade so you don’t encounter failures caused by a lack of space. Unsurprisingly, Apple makes it easy to upgrade to a larger tier.
Although there’s nothing exciting about online cloud storage, having more iCloud+ storage significantly improves the experience for those with multiple Apple devices who would appreciate a seamless photo experience with iCloud Photos, accessing their files anywhere, and backing up their iPhones and iPads without needing to con-nect to a Mac. iCloud storage works well and is reasonably economical for what you get.
(Featured image with background by iStock.com/wing-wing)
Passwords Becomes a Real App in macOS 15 Sequoia, iOS 18, and iPadOS 18
Apple’s new Passwords app in macOS 15, iOS 18, iPadOS 18, and visionOS 2 makes the company’s longstanding password storage and syncing features more straightforward and easy to use. It’s password management for the rest of us!

Although we’re still fans of 1Password, and there are plenty of other good password managers out there, like BitWarden and Dashlane, Apple has finally removed the last hurdle to using its built-in password management capabilities.
Starting in macOS 15 Sequoia, iOS 18, iPadOS 18, and visionOS 2, Passwords is now a real app rather than being trapped inside Safari, System Settings, and Settings. If you have resisted using a password manager or don’t wish to continue subscribing to an alternative, give Apple’s Passwords a try. It makes creating, maintaining, and entering passwords faster, easier, and more secure than doing it by hand. Those already using a password manager can export their accounts and import into Passwords.
What You’ll Find in Passwords
We’ll focus on the Mac version here, but the other versions are nearly identical apart from their screen sizes.
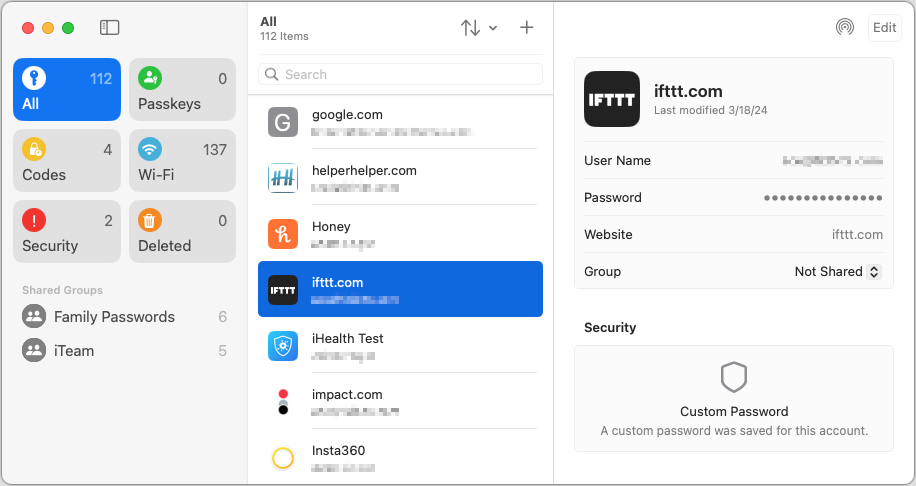
The left-hand sidebar, reminiscent of Reminders, provides categories of accounts:
All: Select All to see all your accounts, regardless of what shared group they may be in.
Passkeys: If you have any passkeys for large websites like Apple, Google, and others, they’ll appear here.
Codes: Passwords can create, store, and enter two-factor authentication codes for sites that support them. If you need to look one up manually because Pass-words couldn’t autofill it, you’ll find the associated account here.
Wi-Fi: This category contains stored passwords for all the known Wi-Fi networks on your device. Because known Wi-Fi networks aren’t synced between devices, the number of these will vary between your devices.
Security: If you have any accounts with weak passwords, accounts you previously shared and stopped sharing, or accounts whose passwords were leaked in a security breach, they’ll appear here. Edit these accounts and click the Change Password button to start the process; when the password changes, they’ll disappear from this category.
Deleted: Any accounts you delete stay here for 30 days before being deleted for good. You can delete any of these accounts immediately or restore them to their previous group.
Shared Groups: If you use Family Sharing, you automatically get a Family Passwords group to simplify sharing important accounts with your family members. But you can also share accounts with other groups of Apple device owners. To move an account to a group, choose it from the Group pop-up menu.
The middle pane lists the accounts in the selected category. You can sort the list using the menu with vertical arrows, search for a specific account, and manually add a new one with the + button. Otherwise, scroll through the list and click an account to view it in the right-hand pane.
At the top of the right-hand pane is an AirDrop button and an Edit button. Click AirDrop to share an account with someone nearby or Edit to make changes or set up a two-factor verification code. If you want to copy information, click the User Name, Password, Verification Code, or Website item to get a Copy menu. The password becomes visible when you mouse over it. Clicking Website also offers an Open Website option and lets you add more sites where the password should autofill.
Setup Requirements
Most people shouldn’t need to do anything to start using Passwords. However, if you have trouble, check the following items:
Turn on Password AutoFill: If your device isn’t entering passwords for you, turn on AutoFill Passwords and Passkeys in Settings/System Settings > General > AutoFill & Passwords. Also, ensure that Passwords is enabled in the AutoFill From section if multiple password managers are installed.
Turn on iCloud Keychain: If you want your passwords to sync securely among your devices, which makes life a lot easier, go to Settings/System Settings > Your Name > iCloud > Passwords and turn on Sync This Device.
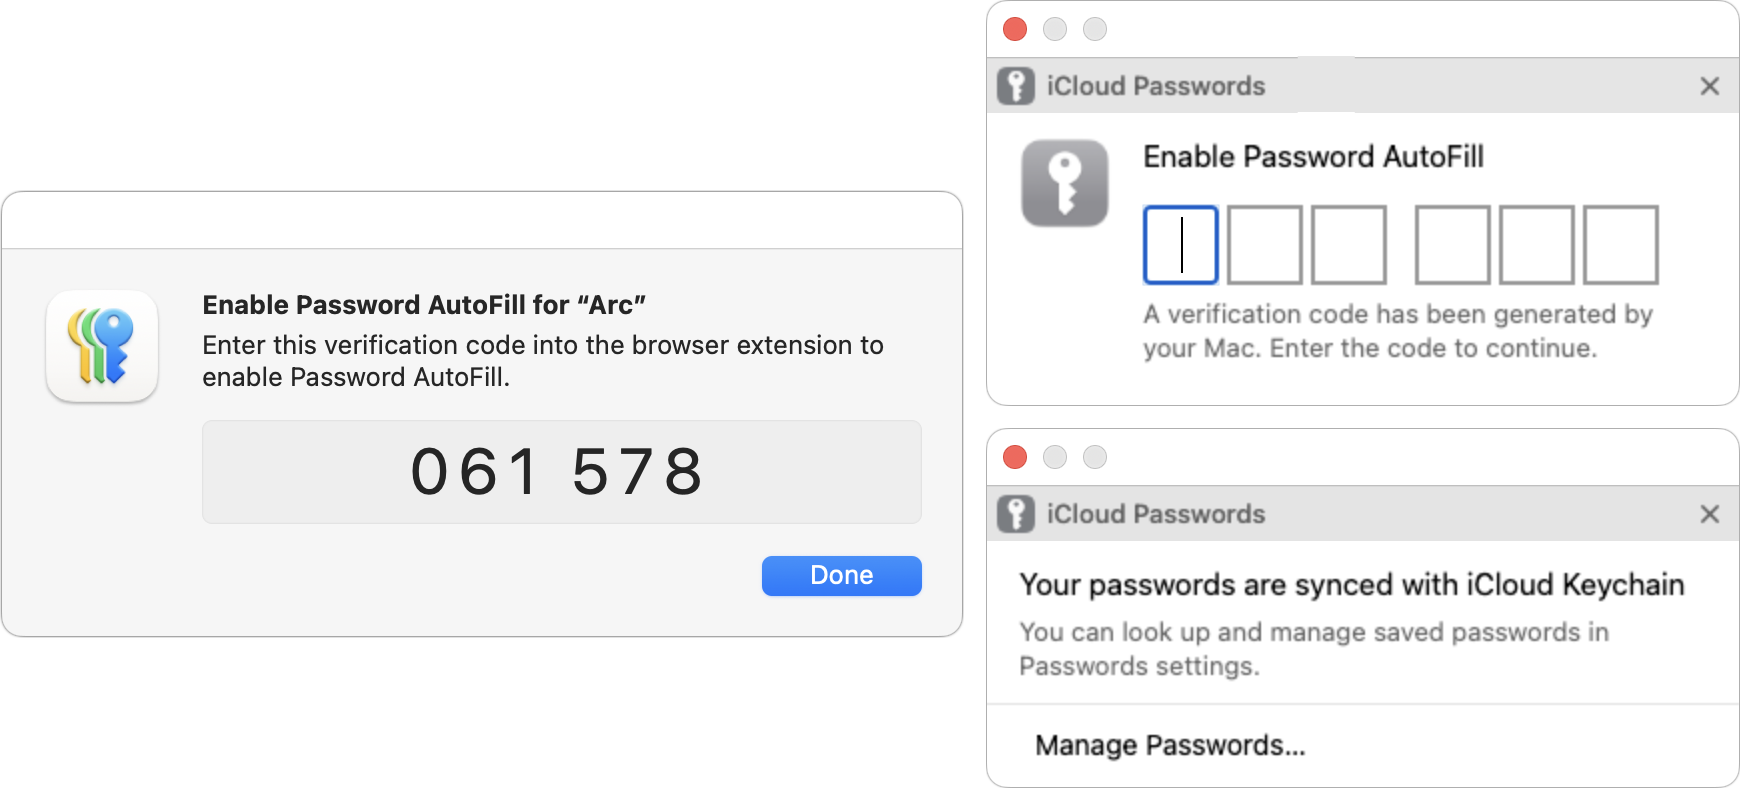
Set up iCloud Passwords for other browsers: Apart from Safari, Chromium-based Web browsers (Arc, Brave, Google Chrome, Microsoft Edge, etc.) can access and autofill your saved passwords if you install Apple’s iCloud Passwords Chrome extension. (There’s also now an iCloud Passwords add-on for Firefox.) The overall experience is not as seamless as in Safari, requiring a once-per-launch code, and you have to create new accounts in Safari or manually in Passwords, but it works.
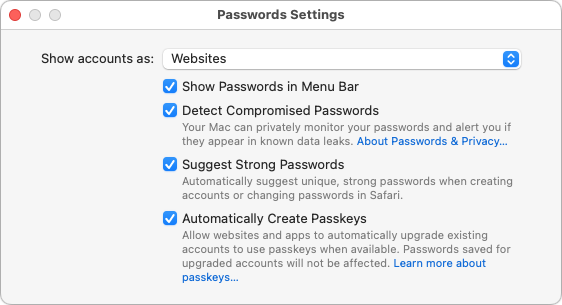
Configure settings: Choose Passwords > Settings (or look in Settings > Apps > Passwords for iOS 18 and iPadOS 18) to access options. Generally speaking, it’s fine to keep them all turned on.
If you have additional questions, check Apple’s documentation for detailed instructions for all the platforms on which Passwords runs. But realistically, Passwords is easy to use, and although the app itself is new, the underlying password management features and syncing have been in place for years, so they’re stable and reliable.
(Featured image by iStock.com/designer491)