Why Passkeys Are Better than Passwords (And How to Use Them)
Passkeys are finally gaining mainstream traction, with support from Apple, Google, Microsoft, and numerous major websites. Find out why they’re more secure than passwords and how to start using them.

No one likes passwords. Users find managing them annoying, and website managers worry about login credentials being stolen in a data breach. The industry has developed a better solution: passkeys.
Passwords versus Passkeys
Traditional multi-factor authentication involves three methods of authentication, at least two of which are required for protection. They include something you know (a password), something you have (usually a code from an authenticator app or text message), and something you are (biometric authentication). Most systems primarily use the first two, but that leaves room for attack because someone could acquire your password and an authentication code through nefarious means.
Passkeys change the model. Instead of how passwords and codes use words and numbers that can be copied and shared, passkeys are pairs of cryptographic keys: a public key and a private key. Websites keep the public key, and the private key is stored securely within an encrypted vault, such as in iCloud Keychain or a 1Password vault. Authenticating with a website requires providing the private key that matches the account’s public key, something that Apple users with modern devices can usually initiate with Touch ID or Face ID.
Instead of generating security with something you have and something you know, passkeys rely on possession (do you have the device?) and presence (are you physically in front of the device?). This approach is fundamentally more secure than passwords because the private key can’t be phished, copied, or used remotely, and you must be physically present to unlock your device. Nor can you be tricked into providing a passkey to a malicious website. (Neither approach protects against physical coercion.)
Where Can You Use Passkeys?
In practice, since you use passkeys primarily to sign into websites, passkeys are stored alongside account details in your password manager. For Apple users, Safari (in iOS 16 or macOS 13 Ventura and later) with Apple’s Passwords app provides the most integrated passkey experience. However, most independent password managers, such as 1Password, Bitwarden, and Dashlane, also enable you to store, share, and enter passkeys and can take over for or work alongside Apple’s Passwords. They provide consistent passkey functionality across all major Web browsers, although experiences may vary slightly due to differences in how they handle authentication prompts and platform integration.
You’ll also find robust support in the Password Manager built into Google Chrome and other Chromium-based browsers, including Arc, Brave, Edge, Opera, and Vivaldi. Firefox’s native passkey support is more limited, but third-party password managers work well with Firefox.
Although website support for passkeys was initially slow, an increasing number of sites now support them. That includes the big three of Apple, Google, and Microsoft, of course, as well as Amazon, Best Buy, Discord, eBay, GitHub, Intuit, Netflix, Notion, PayPal, Robinhood, Stripe, Target, Walmart, and WhatsApp.
Setting Up Passkeys
The process of setting up passkeys varies a little by website, but is generally remarkably easy. You may be prompted to create a passkey while signing in, or you may need to navigate to the security options associated with your account.
Google offers both approaches. Setting up a passkey for a Google Account can be as simple as agreeing to do so while logging in. If you’re already logged in, Google’s Passkeys and security keys page lets you make one. Once you click Create a Passkey, you’ll be prompted to save it in either Apple’s Passwords or another password manager like 1Password. That’s it.
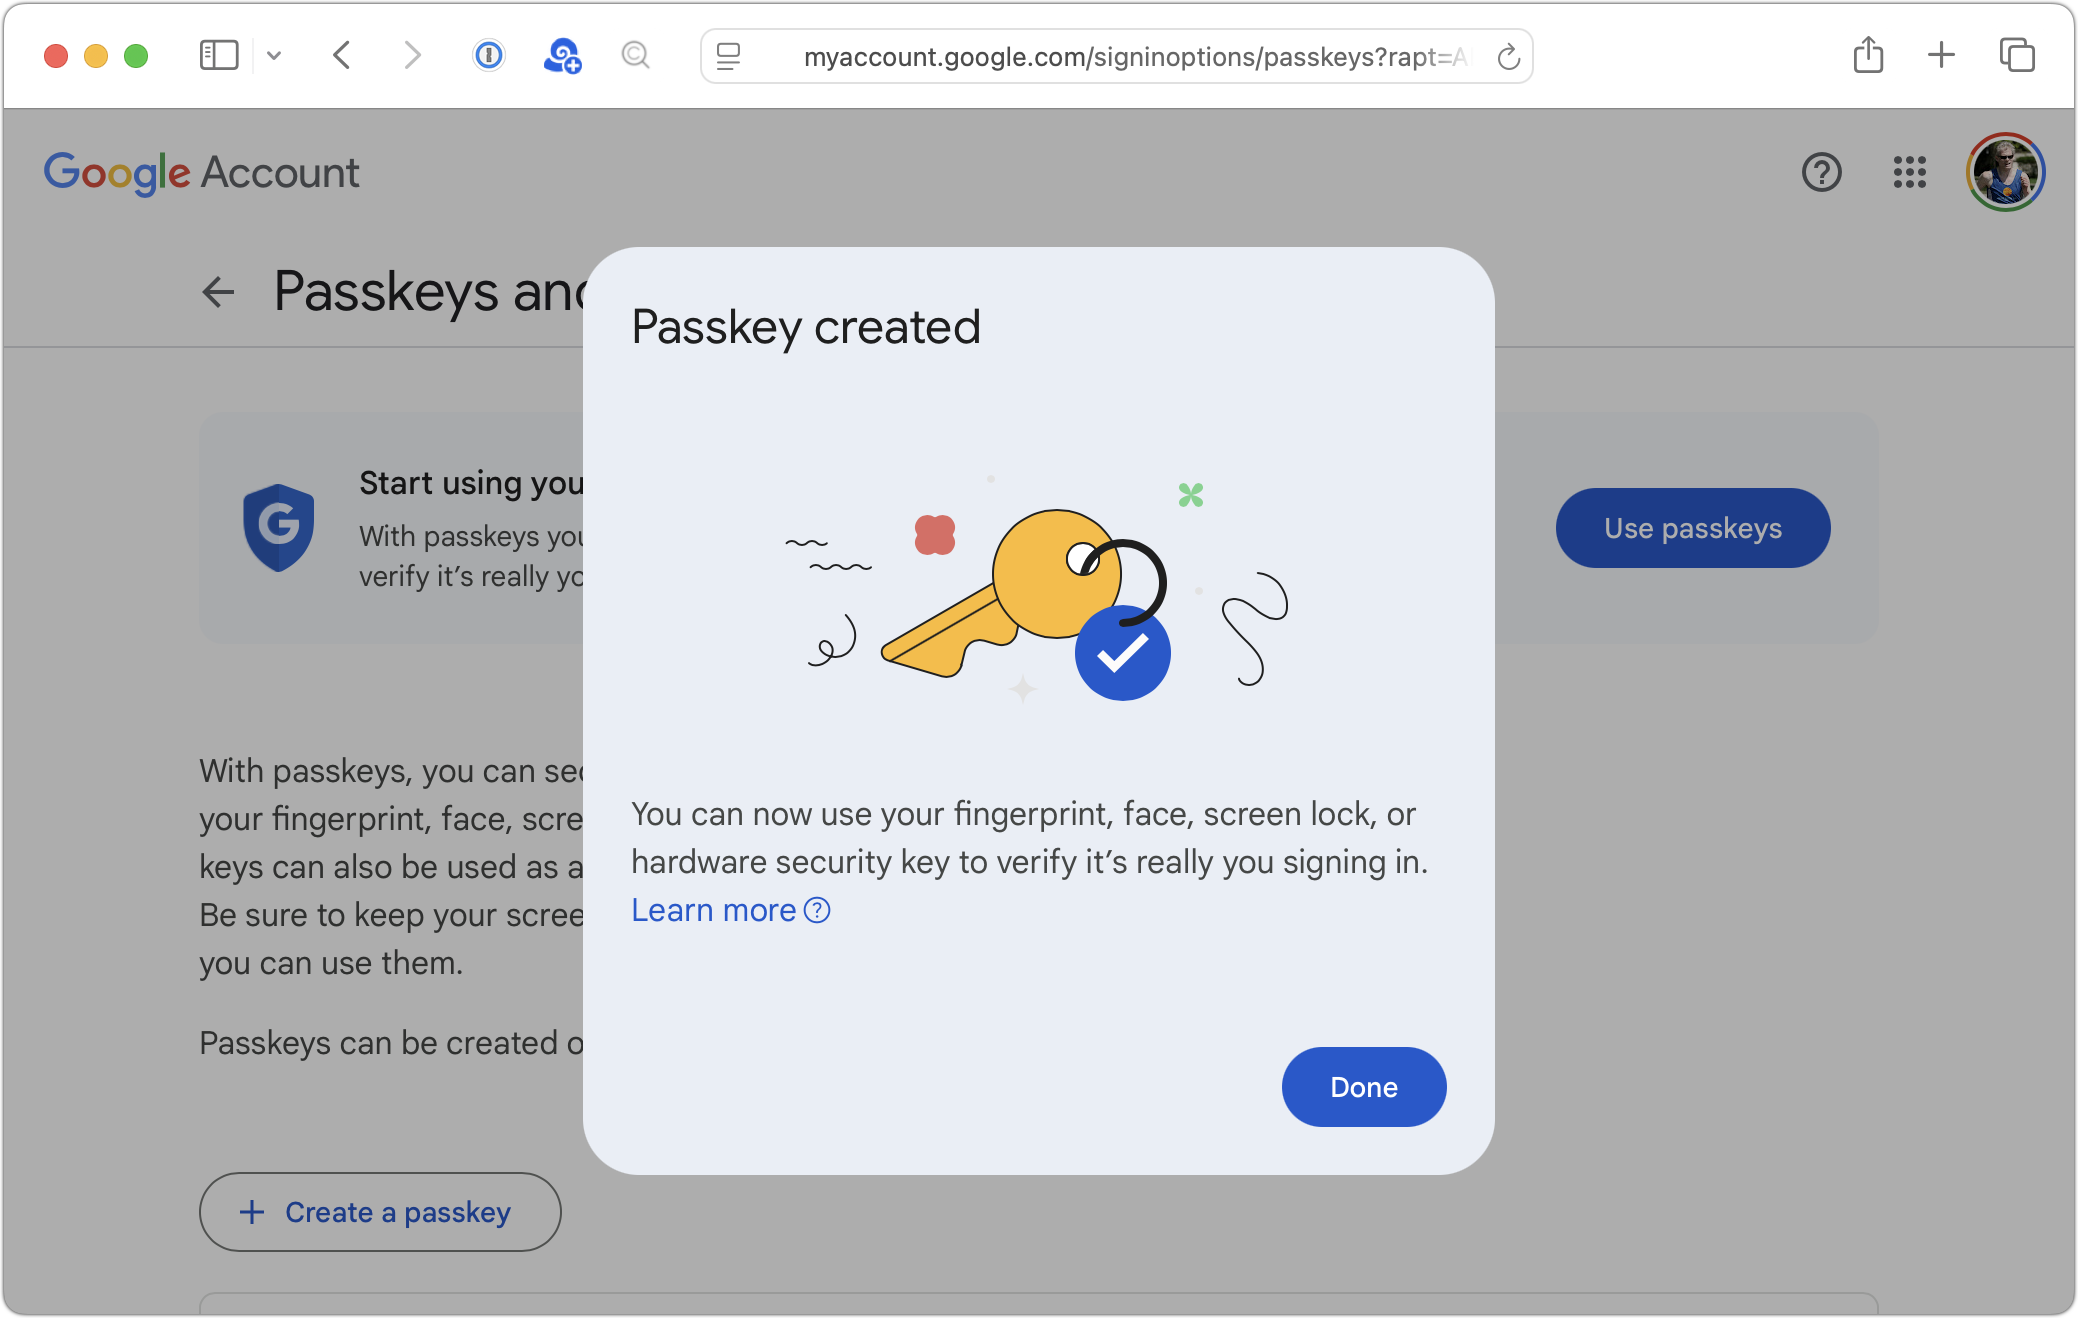
Note that if you use both Passwords and another password manager, you can save the passkey in only one, and only that one can use it to sign in later. However, most sites that support passkeys let you add multiple passkeys, so you could save separate passkeys in different password managers.
Signing in with Passkeys
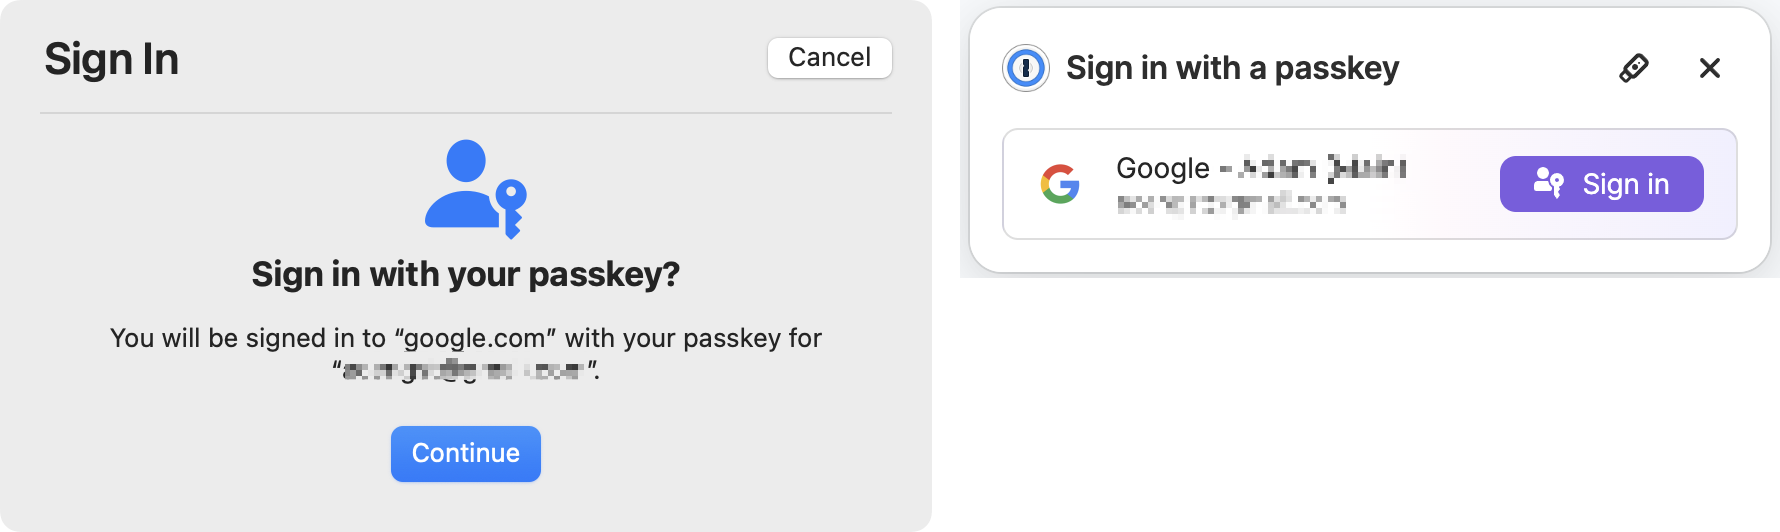
Similarly, using a passkey to sign in is trivially simple. You navigate to the website’s login page, enter your username, choose the passkey sign-in option if necessary, and then authenticate.

Exactly how you authenticate depends on the device you’re using and your password manager. On the Mac, Passwords will ask you to use Touch ID if available (above) or a dialog otherwise (below, left). 1Password, once unlocked for the session, presents a dialog with a Sign In button (below right).
On the iPhone and iPad, an authentication dialog appears at the bottom of the screen asking if you want to sign in with your passkey. Tap Continue and authenticate with Face ID or Touch ID (with a fallback to your passcode if necessary).
Unsurprisingly, Apple makes it particularly easy to sign in to Apple websites like iCloud.com using a passkey. As soon as you navigate to such a site in Safari, the device prompts you to sign in using your current Apple Account username and an implicit passkey.
When using other browsers or another Mac that lacks access to your passkey, selecting the passkey sign-in option displays a QR code that you need to scan with an iPhone or iPad that has the passkey stored on it.
Managing and Sharing Passkeys
As noted, passkeys are stored in accounts managed by a password manager. In fact, passkeys are currently stored alongside passwords in each account. There’s nothing to see or edit, although you can delete passkeys like any other data. Although deleting the passkey on your device guarantees that it can’t be used to sign in again, it’s best to also delete the passkey at the website where you created it to avoid confusion.
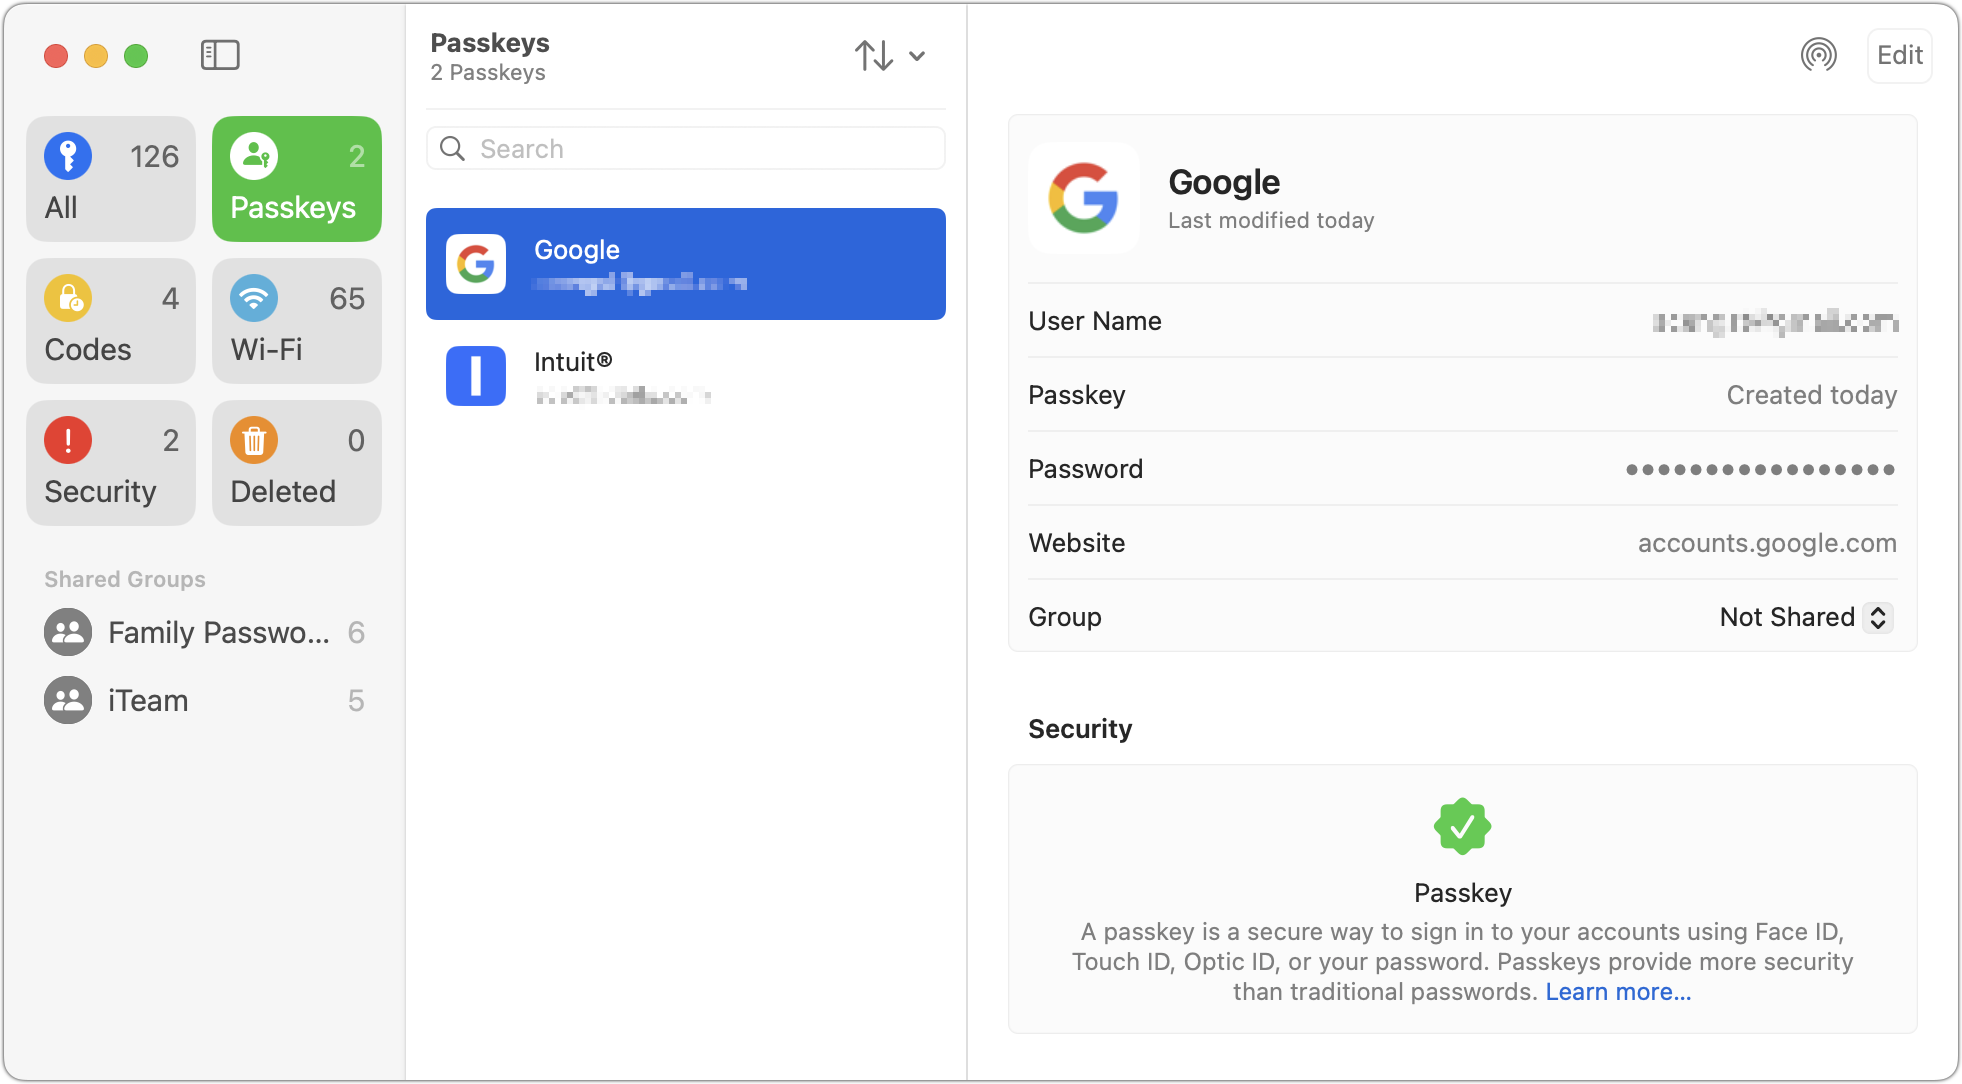
Passkeys are automatically synced among all your devices by the password manager so you can take advantage of them everywhere, but note that syncing is specific to just one password manager—for instance, iCloud Keychain doesn’t sync with 1Password or other third-party managers. The authentication method varies by device, but the overall experience remains the same.
You can also share passkeys with other people in your family or workgroup, just as you would with password-only accounts. They can log in to your passkey-protected accounts because they can prove possession (they have the passkey) and presence (they’re authenticating). In essence, you’re saying, “This person is authorized to act as the account holder.”
Passkey Concerns
Although passkeys are a big step forward in usability and security compared to passwords, they’re not without limitations or concerns, which have slowed adoption:
Account recoverability: Because passkeys are tied to devices, if a user loses all their devices and doesn’t have a cloud backup option (such as registering a new iPhone to an existing Apple Account or adding a new device to a 1Password account), it’s impossible to recover an account. This is primarily a concern for those who have only a single device and no one with whom to share.
Sharing hurdles: If you want to give someone else passkey access to an account—perhaps a shared bank account—you must log in on their device and then create an additional passkey that is stored on their device.
Lack of portability: Although passkeys can be synced between devices using the same platform (iCloud Keychain, 1Password account, etc.), there’s no way to export a passkey from one platform and import it into another. You have to recreate passkeys from scratch for each platform. Vendors are working on the problem, but as you can imagine, enabling export/import opens up security concerns.
User confusion: People are, understandably, still unfamiliar with passkeys, leading many to avoid them on principle. It hasn’t helped that using passkeys is slightly different on every website. The industry is working to standardize the user experience, but we’re not there yet.
Passwords still exist: No major websites allow passkey-only accounts. Since all accounts still have passwords that can be stolen, passkeys aren’t increasing security nearly as much as they could.
Enterprise support: Large organizations want to know if a passkey was generated on a secure device, if it can be revoked or rotated, and if the user employing the passkey has truly been verified. Support for these requirements is still evolving.
Digital inheritance: When passkey-only accounts become commonplace in the future, passkeys may be more challenging to manage in situations involving the user’s death. For now, the solution is to share passkey-protected accounts with family members in advance using a password manager. The industry would do well to establish standards around this inevitability.
Nonetheless, the perfect shouldn’t be the enemy of the good. Passkeys improve on passwords in both usability and security, and the best way to get to an easier, more secure future is to start using passkeys wherever possible today.
(Featured image by iStock.com/tanit boonruen)
Why Every Business Needs an AI Policy
Shadow AI is commonplace in workplaces, with half of employees using unauthorized AI tools and many sharing sensitive data. Learn why your business needs a formal AI policy to harness the benefits of AI while safeguarding against its significant risks.

Are employees at your company surreptitiously using artificial intelligence tools like ChatGPT, Claude, Copilot, and Gemini for everyday business tasks? It’s likely. An October 2024 Software AG study found that half of all employees use “shadow AI” tools to enhance their productivity, and most would continue using them even if explicitly banned by their employer.
Increased productivity is a good thing, but unsanctioned and unregulated AI use poses risks. A February 2025 TELUS Digital survey found that 57% of enterprise employees admit to entering high-risk information into publicly available chatbots. This includes personal data about employees or customers, product or project details, and confidential financial information like revenues, profit margins, budgets, and forecasts.
A clear AI policy will help a business minimize the risks of using AI tools. These risks include leaks of confidential information, compliance failures, accidental copy-right violations, and reputational damage. As AI becomes a routine part of knowledge work, every business—even small firms—must establish an AI policy to maximize the benefits of using AI while safeguarding the company, its employees, and its clients.
Risks Addressed by a Formal AI Policy
Unauthorized AI use can create several types of problems:
Data security: Employees routinely paste sensitive data—including customer information, financial records, and unreleased products—into public AI tools, thereby losing control over how that data is used. That can make security audits nearly impossible and drive IT staff crazy. Notably, the free versions of ChatGPT (by default, it can be turned off) and Google’s Gemini can incorporate user data into their training models, making it possible that the information could be included in a discussion with someone else.
Legal and compliance risks: Sharing protected information with noncompliant AI systems could result in penalties during regulatory audits, even if no actual data breach or harm occurs. For instance, using such systems to summarize patient records could violate HIPAA, while using them to analyze customer data could run afoul of the California Consumer Privacy Act (CCPA).
Unintentional discrimination: Without clear guidelines, the use of AI can lead to unintentional discrimination in hiring, customer service, and decision-making. This may violate ethical standards and expose the company to legal liability.
Employee confusion: The lack of a coherent AI policy leads to inconsistent practices and uncertainty about acceptable tools and proper procedures, resulting in reduced productivity and increased anxiety about AI use.
Essential Elements of an AI Policy
The specifics of an AI policy vary by the type and size of company, but at minimum, most AI policies should include the following:
Permitted AI uses and tools: Clear guidelines on the types of tasks employees may undertake with AI assistance and a list of approved AI platforms for business activities
Data privacy and legal compliance: Rules for safeguarding confidential, personal, and proprietary information when using AI, coupled with rules that ensure adherence to relevant industry-specific regulations and privacy laws
Human oversight and transparency: Requirements that employees thoroughly review AI-generated content before use and disclose AI involvement when appropriate in client-facing or public materials
Risk reporting and incident response: Clear instructions for reporting AI-related errors, security incidents, or potential misuses
Ownership and intellectual property clarifications: Statements affirming that work products created with AI assistance belong to the company. These statements should also address any intellectual property considerations.
Building Your AI Policy
If your company doesn’t already have an established process for generating policies, AI tools can themselves provide a starting point when used thoughtfully. Here’s an approach:
Prompt an AI tool like ChatGPT or Claude to generate a basic AI policy template. Be explicit about your company’s size, industry, and other relevant details, and be sure to specify that it must cover the elements listed above—you can paste them in. Iterate as necessary until the template has all the required sections.
Review the generated template carefully, removing generic content and noting areas that need company-specific details.
Ask for feedback on the draft from key stakeholders, including:
Leadership to align with company goals and values
IT team to verify technical feasibility and security measures
Legal counsel to ensure compliance with relevant regulations
Department heads to confirm that it will be practical to implement the policy
Incorporate the feedback to create a policy that reflects your company’s specific needs while maintaining necessary protections.
Remember: An AI-generated template is for starting the conversation. The final policy must be tailored to your organization’s specific needs and thoroughly vetted by relevant stakeholders.
The rise of AI tools in the workplace isn’t just a trend—it’s a fundamental shift in how work gets done. Whether your employees are already using AI tools without oversight or are hesitant to use them due to uncertainty, now is the time to establish a formal AI policy. Start with the template approach outlined above, engage your stakeholders, and develop guidelines that work for your organization. A well-crafted AI policy will help your business harness the benefits of AI while minimizing its risks.
(Featured image by iStock.com/girafchik123)
Consider Business Cyber Insurance
Cyber insurance can protect your business from crippling financial losses after a security breach. Learn what’s covered, what’s not, and how to shop for the right policy for your company.

When discussing digital security, we typically focus on preventive measures, such as using strong passwords with a password manager, enabling multi-factor authentication, keeping systems up to date, maintaining regular backups, and training employees to recognize potential security threats. While these practices are essential, they don't guarantee complete protection.
No one is immune to online attacks—the most security-conscious organizations and individuals can still become victims. Even security experts occasionally click something they shouldn’t have or forget to keep a little-used system up to date. A single employee opening a convincing phishing email, a momentary lapse in judgment, or a zero-day vulnerability can lead to devastating consequences.
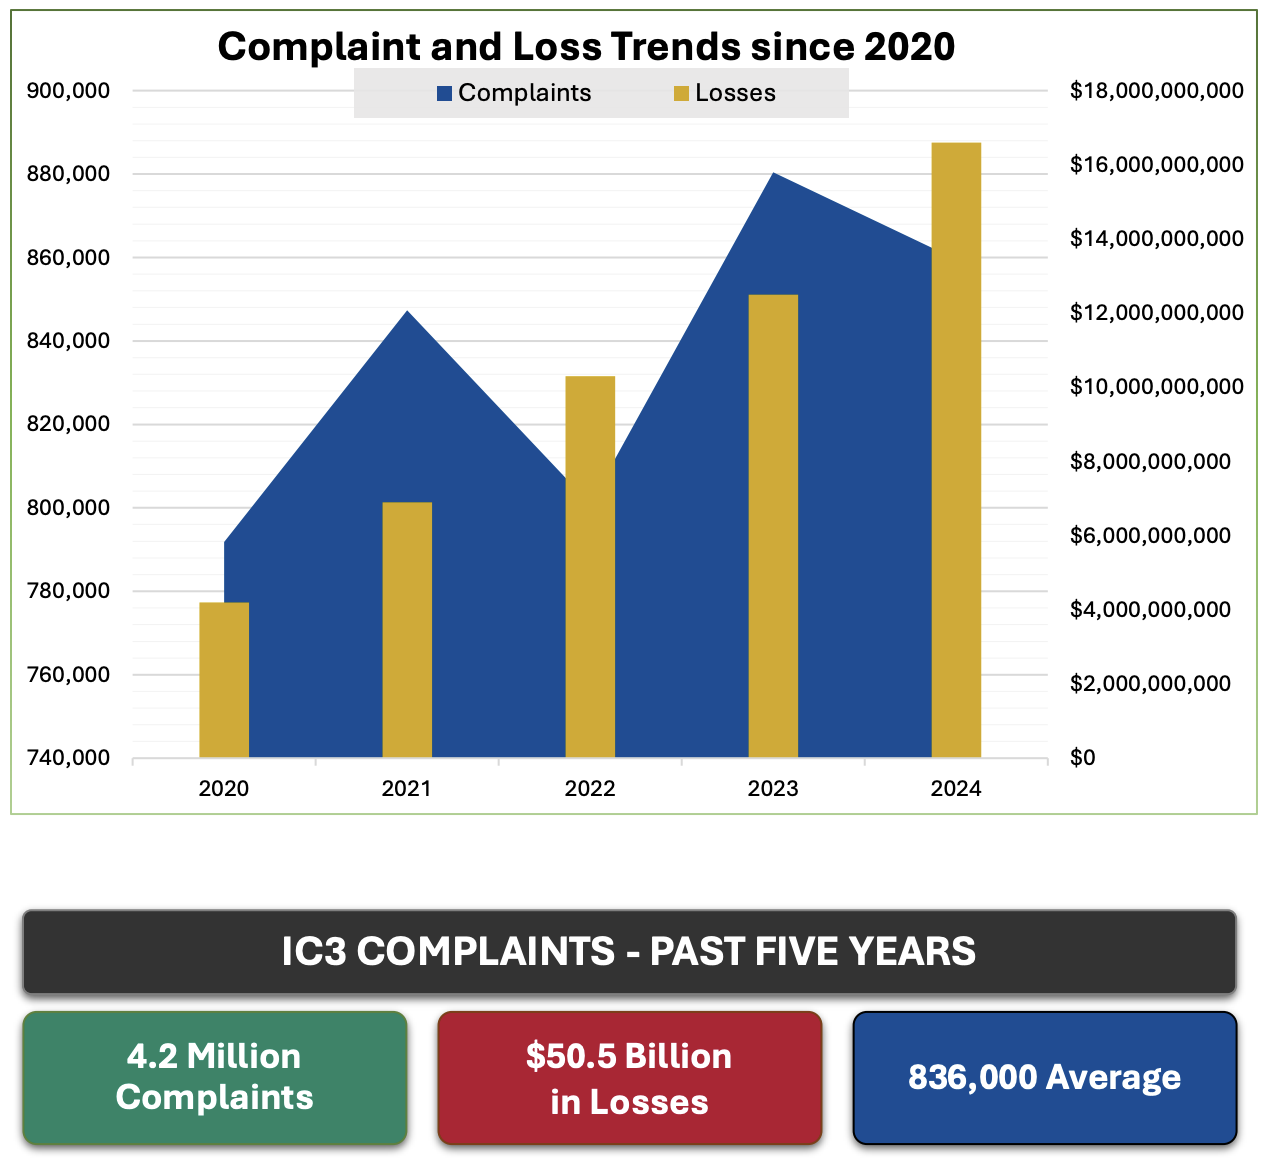
According to the FBI’s Internet Crime Complaint Center (IC3), cybercrime-related losses from 2020 through 2024 are estimated at $50.5 billion, with IC3 receiving 4.2 million complaints. Most concerning is the rising trend in the frequency and severity of these attacks.
Given these statistics and the reality that perfect security is impossible, many are looking to protect themselves from possible financial losses. Just as fires and accidents make home and auto insurance necessary, these ever-increasing threats from phishing, malware, and other forms of digital attack make cyber insurance an important consideration for both companies and individuals. We’ll focus on businesses here and explore personal cyber insurance in a future article.
What Is Business Cyber Insurance
Cyber insurance for businesses helps companies recover from security breaches and online attacks. Unlike traditional business insurance policies, cyber insurance focuses on the risks of using technology to operate or to store sensitive data online. Businesses of all sizes are vulnerable, but small and medium-sized businesses are often targeted because they lack the robust security infrastructure of larger enterprises.
Industries that are especially at risk include healthcare, financial services, retail, and professional services, but no sector is immune. You may have cause for additional concern if your company collects customer information, processes payments, or maintains a significant online presence, but realistically, every business that uses email or conducts online banking is vulnerable.
What’s Covered
A business cyber policy typically includes two core types of coverage:
First-party coverage: This coverage responds to direct costs incurred by your company, including legal expenses, data breach response and notification costs, ransomware payments and recovery expenses, business interruption losses, data restoration, system replacement, and crisis management.
Third-party coverage: Also known as liability insurance, this coverage protects you against claims from others affected by the breach, including legal defense costs, settlements, regulatory fines and penalties, and PCI-related fines associated with credit card processing.
What’s Not Covered
However, it’s essential to be aware of common exclusions to business cyber insurance, the most important of which are:
Weak security processes: Insurance doesn’t exempt you from maintaining a strong security stance—if you aren’t requiring strong passwords, providing security training, and correcting known vulnerabilities, the policy won’t cover you. Insurers will likely require verification of minimum cybersecurity practices before providing coverage.
Prior breaches: Just as health insurance may not cover pre-existing conditions, cyber insurance typically does not cover events that occurred before the policy was taken out.
Insider attacks or misconduct: Deliberate or fraudulent acts by company leadership or employees generally aren’t covered. Employees are a company’s greatest resource, but they can also be its greatest weakness.
Shopping for Business Cyber Insurance
How much will business cyber insurance cost? It varies based on your company size and revenue, industry sector, type and amount of sensitive data stored, security practices, coverage limits and deductibles, and claims history. That said, small businesses with yearly revenues under $1 million typically have annual premiums ranging from $500 to $2,000. Mid-sized firms often pay between $2,000 and $10,000, and large companies can expect premiums in the tens of thousands.
It’s common—and entirely understandable—to hesitate to purchase cyber insurance due to concerns about the cost. However, the potential financial impact of an incident is often significant. IBM’s 2024 Cost of Data Breach Report found that the average cost of a data breach was $4.9 million globally, but $9.4 million in the United States. Although IBM doesn’t break out costs by company size, those costs are likely for larger companies. Nonetheless, a Financial Times report notes that users at small and medium-sized businesses were twice as likely to encounter threats as those at large companies.
Choosing the right cyber insurance broker is as important as selecting the policy itself, and you’ll want to involve your security team in the search. Look for someone specializing in cyber coverage who has technical expertise in cybersecurity practices, strong relationships with underwriters, and a track record of providing active claims support. A good broker will not only find competitive pricing but also help tailor coverage to your specific risks and ensure you’re prepared to meet underwriting requirements.
When comparing cyber insurance options, pay attention to the details. Confirm that the policy addresses risks specific to your situation and provides sufficient financial protection for your potential exposure. Pay close attention to exclusions—there will be more than those listed above. Research the insurer’s claims process and reputation for responsiveness, as timely support during an incident is crucial. Finally, inquire about additional risk management services offered by the insurer that may provide valuable preventative resources to complement your coverage.
Start Researching Cyber Insurance Now
Unfortunately, the frequency and risk of cyber attacks are on the rise. Proactive security measures are key, but a single mistake or oversight could have dire outcomes. Cyber insurance provides an important safety net in the event of a breach or attack that evades your best efforts.
We won’t pretend that finding and purchasing cyber insurance is simple, but we can help with finding a good cyber insurance broker, evaluating the policy, answering application questions, and ensuring that your company meets the necessary security requirements.
(Featured image by iStock.com/Who_I_am)
Use AirPlay to Mirror or Extend Your Mac’s Display
Want to demo something on a big screen? AirPlay can mirror your Mac’s display—or just specific windows—to an Apple TV-equipped TV or another Mac. It’s perfect for presentations, sharing content with a group, or increasing your screen space.

Apple’s AirPlay is one of those low-level technologies that’s more capable than many people realize. In addition to allowing you to stream video and audio from an iPhone, iPad, or Mac to an Apple TV connected to a large-screen TV, AirPlay also enables you to use that TV as an external Mac display, either mirroring what’s on your Mac’s screen or extending the desktop. It even allows you to turn one Mac into a display for another.
The big win of connecting to a TV comes when you want to demo something from your Mac to a group—it’s a compelling reason to have an Apple TV-equipped screen in a conference room—or when you want to use one Mac’s display from another without the hassle of rearranging cables. In this article, we focus on these external display features, which are helpful to both individuals and businesses alike. There are three ways to use AirPlay to enable another display: mirroring the entire screen, mirroring selected apps or windows, and extending the desktop.
Set Up AirPlay to Receive Video
First, ensure that all devices have Wi-Fi turned on and are connected to the same network. If you’re using AirPlay to a Mac, note the minimum system requirements (primarily macOS 12 Monterey or later). Additionally, if you’re using your own devices, it’s best to be signed in to the same Apple Account.
Second, make sure the screen to which you want to mirror is accessible:
On an Apple TV, the settings are likely already enabled; however, if not, navigate to Settings > AirPlay and HomeKit and turn on AirPlay. You can also set who can gain access (everyone, anyone on the same network, or only people sharing this home) and require a password. For an office environment, you can turn the Apple TV into a conference room display that provides connection instructions with the screen saver, requires a PIN, and allows you to set a custom message and background photo. Also, note the AirPlay Display Underscan option, which you can turn on to reduce the chance of the screen being cropped or turn off to eliminate black bars. Auto tries to choose for you—in our testing, cropping was sometimes unavoidable.

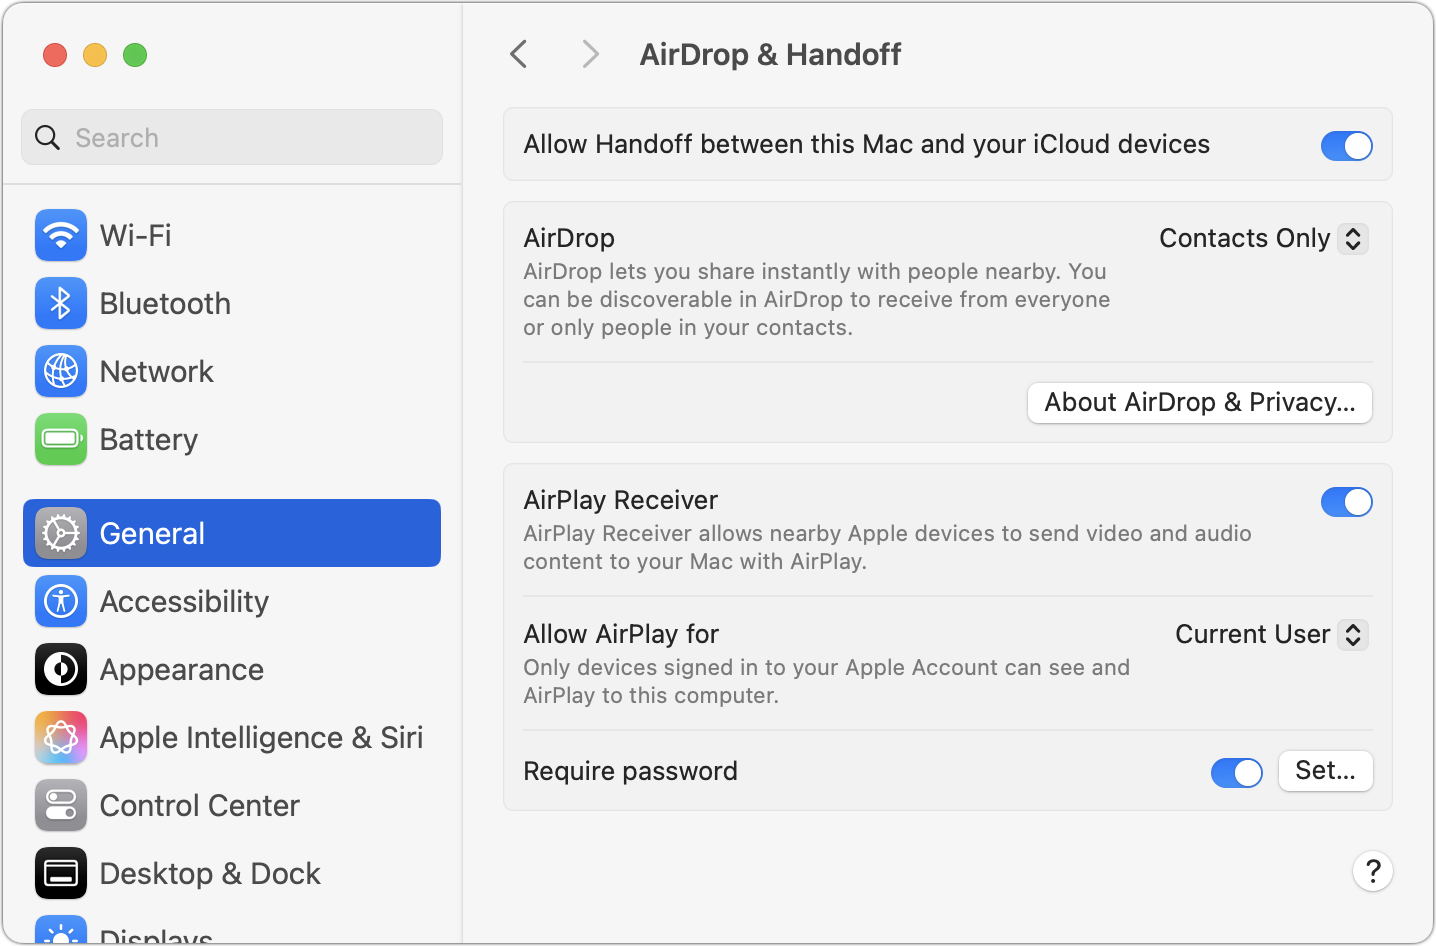
On a Mac, go to System Settings > General > AirDrop & Handoff and turn on AirPlay Receiver. The “Allow AirPlay for” menu lets you specify who can access it, and you can require a password.
Mirror Your Mac’s Screen
Apple’s recommended method for mirroring your screen is to open Control Center by clicking its icon at the right side of the menu bar, click Screen Mirroring, and select the desired Apple TV or Mac from the list. Once you do that, your Mac’s screen will appear on the external display.

However, it may not display at a usable resolution. You control the resolution in System Settings > Displays, and you can jump there by clicking Display Settings in either of the two rightmost windows shown above. In the Displays settings screen, from the Optimize For pop-up menu, choose either your Mac or the external display. If you choose the external display, you can select from all available resolutions.
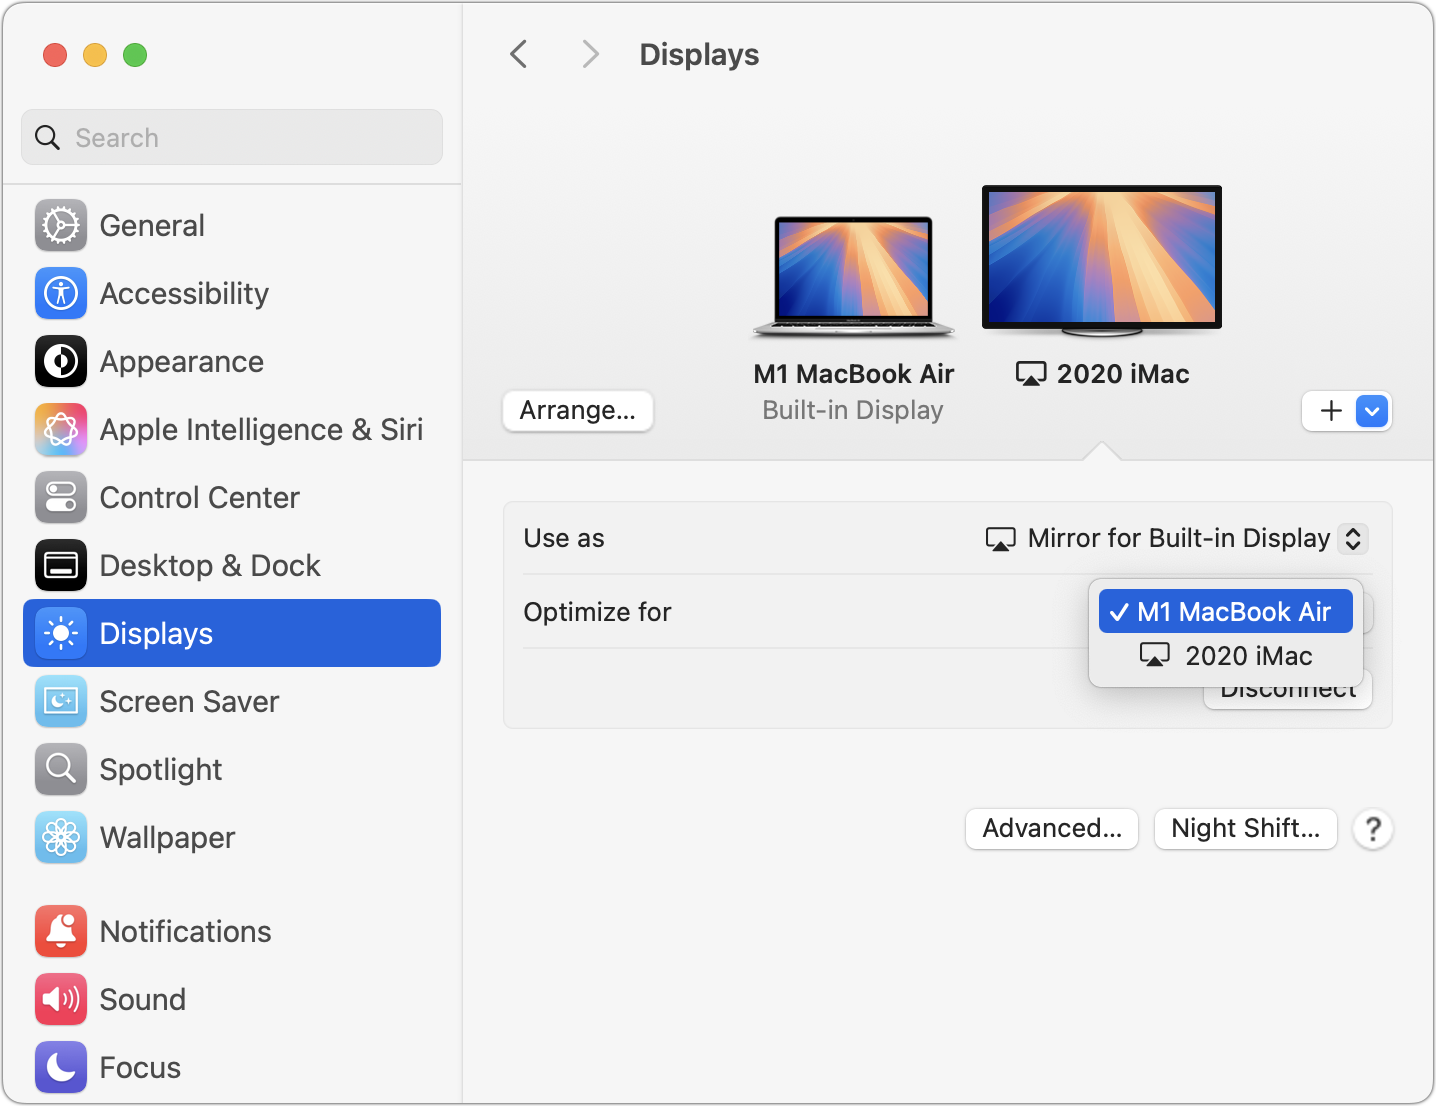
If you’re mirroring to a Mac with multiple displays, a small, dark lozenge in the upper-left corner of the destination screen provides a menu from which you can choose which display to use.
Mirror Selected Apps or Windows
Mirroring your entire desktop is often overkill when all you want to share with the group is one or two windows. As of macOS 15.2 Sequoia, that’s now possible. An added benefit is that you don’t have to worry about others seeing your messy desktop or potentially sensitive information in other windows.
To mirror one window or all the windows in an app, open Control Center, click Screen Mirroring, select the destination display, and then click Change or Choose Content. In the dialog that appears, select Window or App and click Choose Window or App.

Then select the desired window and click either Mirror This Window or Mirror All Application Windows.

You’re not limited to windows from a single app. You can add additional windows by clicking the purple Screen Mirroring menu in the menu bar, clicking Add Windows, and selecting another window. (If you want to stop mirroring one and start mirroring another, select the current window to see a Stop Mirroring This Window button.)
Extend Your Mac’s Desktop
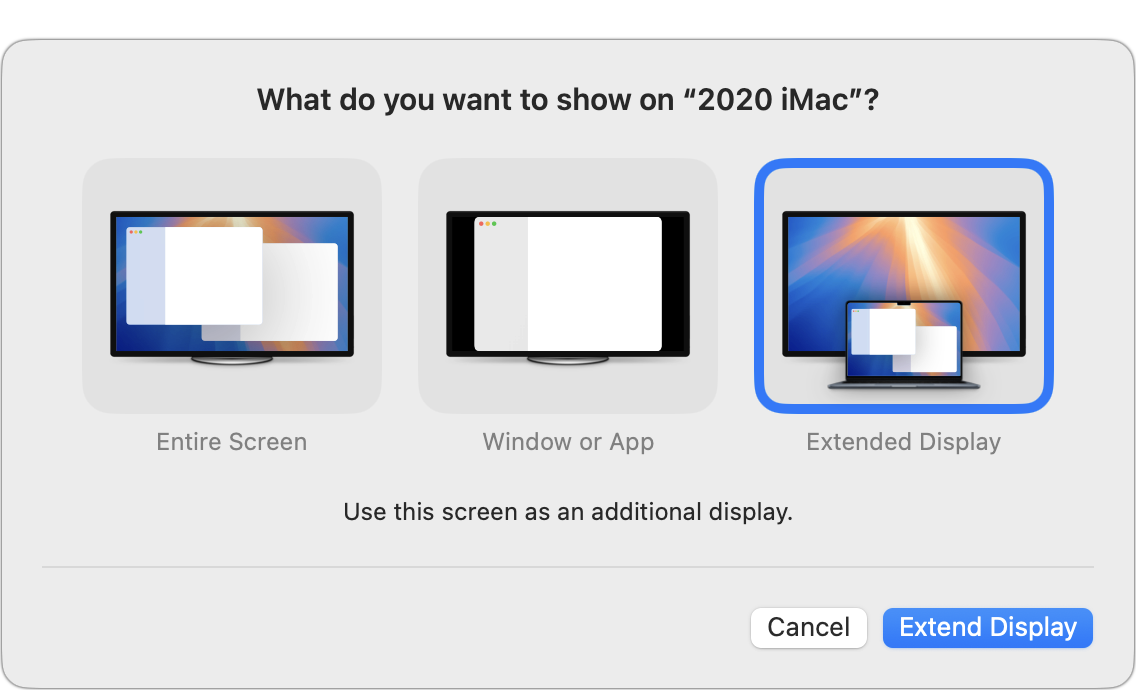
Mirroring is useful for presentations or working with a group, but if you instead want to boost your productivity with additional screen real estate, you can opt to extend your Mac’s desktop to another Mac or TV.
To do so, open Control Center, click Screen Mirroring, select the destination display, click Change, and in the dialog that appears, select Extended Display and click Extend Display.
This option often requires additional configuration to get everything looking the way you want. Open System Settings > Displays and click the second display. First, you may want to select a different resolution to see more or less content on the second display. Clicking Show All Resolutions expands the list, but many of the additional resolutions won’t be ideal. Unfortunately, some desirable resolutions are marked with a “low resolution” tag—they’ll be fuzzier than ideal.
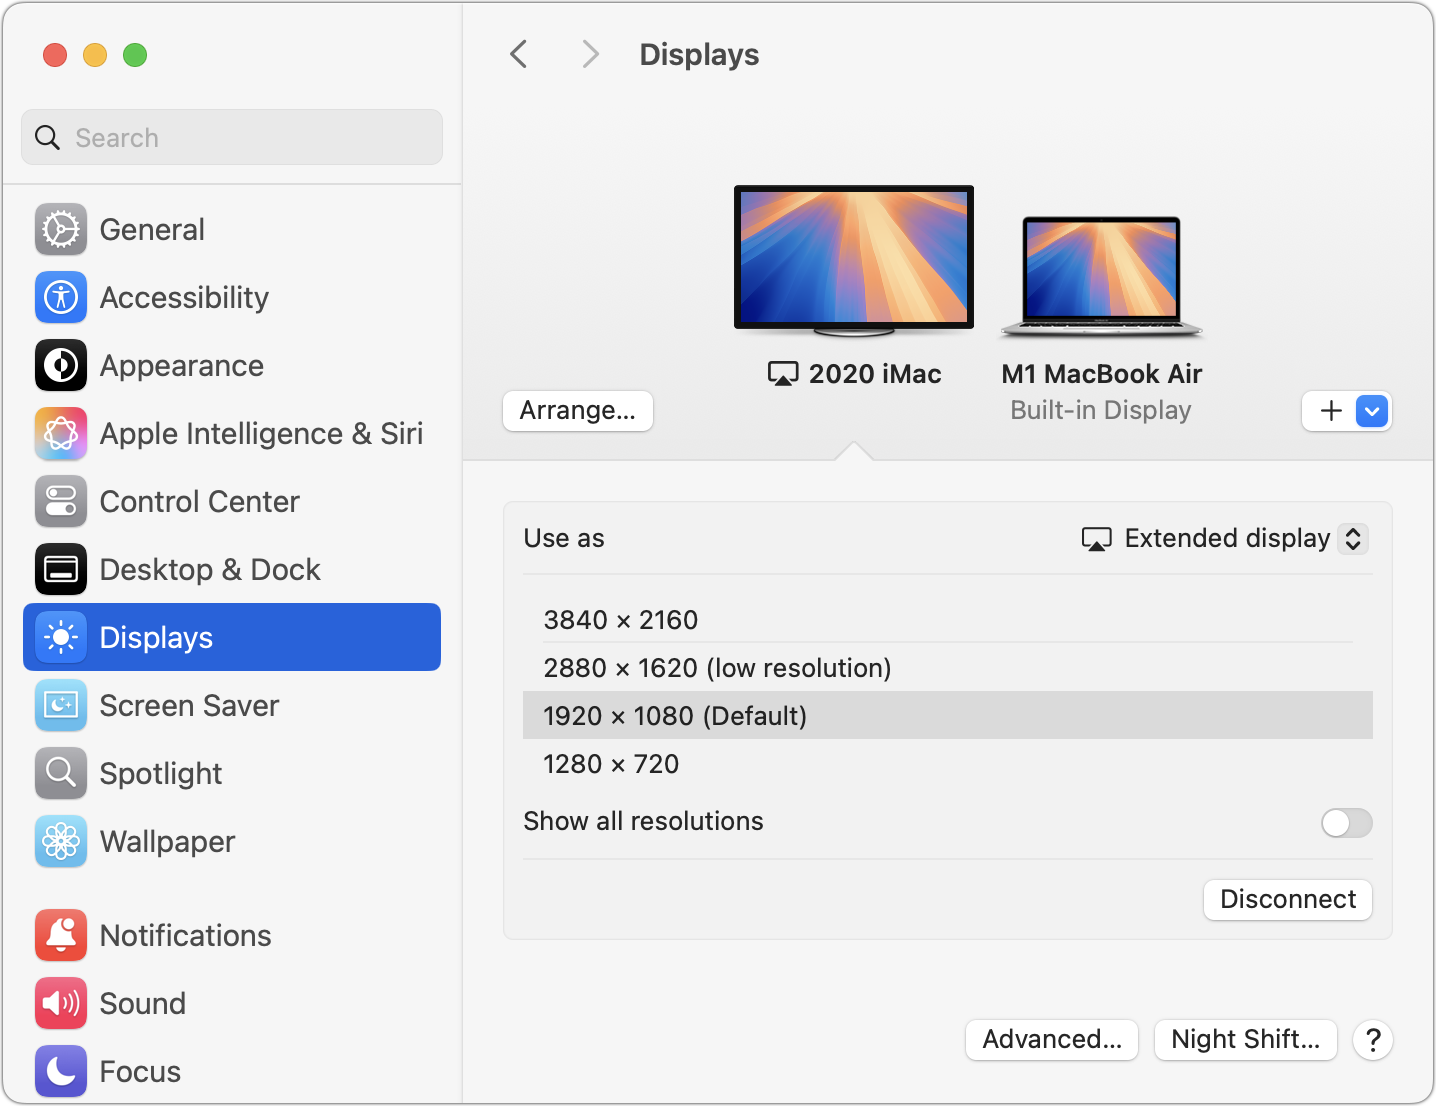
Once you have your desired resolution, you need to arrange the screens appropriately. It’s usually best to match the real-world positioning, so if your second display sits to the left of your Mac, move its representation there so dragging windows and other items on the extended desktop works as you expect. Click the Arrange button, drag the second display into the desired location, and click Done.

Regular Use and Stopping Mirroring
Although it’s simple to start mirroring or extending your desktop and to switch among the various modes, you’ll probably use one of the modes most of the time. The good news is that macOS remembers your previous choice, so if you mirror your entire screen or extend your desktop, clicking Screen Mirroring in Control Center will default to that option the next time you invoke it. Mirroring windows always requires that you pick the window to share.
Regardless of how you’re mirroring your screen, you can stop by clicking Stop Mirroring in the purple Screen Mirroring menu in the menu bar. Alternatively, open Control Center, click Screen Mirroring, and click Stop Mirroring. Or click the Disconnect button in Displays.
On the remote Mac, that small, dark lozenge also provides an X button that ends screen mirroring when clicked from the remote Mac. Turning off the remote Apple TV also works.
Using AirPlay to mirror or extend your Mac’s display to another Mac or TV may not be something that you use on an everyday basis, but it’s a big win when you need to share content with a group, do a presentation, or ramp up your productivity without rearranging cables.
(Featured image by iStock.com/Ratchapon Supprasert)
Working with Time Zones in Apple’s Calendar Apps
Managing time zones in Apple’s calendar tools is straightforward if you remember two key points. Our article clarifies your options and explains how to handle common scenarios.

Calendar events are usually straightforward. For instance, if you schedule a meeting for 3 PM on Thursday, an alert will remind you to leave 30 minutes beforehand.
However, since we live in an increasingly global world, we occasionally have to consider time zones when scheduling meetings. Business travelers have long needed to keep track of meeting times as they move across time zones, and the number of online meetings spanning the globe has skyrocketed since the pandemic. Whether you’re scheduling appointments on the other side of the country or collaborating with a remote team, it’s essential to be able to work effectively with time zones on your iPhone, iPad, and Mac. Here’s what you need to know.
Fact 1: All Events and Reminders Have Time Zones
The first thing to understand is that every calendar event and reminder has an associated time zone. However, that’s not always obvious—you won’t see any options for adjusting time zones in Calendar on the Mac unless you enable an advanced setting, and reminders never show their time zone.
By default, events use the local time zone of the device on which you create them, which is usually appropriate. However, you can adjust an event’s time zone to make sure you’re notified at the right time after traveling.
Unlike calendar events, timed reminders in the Reminders app are permanently linked to the time zone in which they were created, and this setting cannot be altered. When traveling across time zones, reminders’ local times will adjust accordingly, triggering alerts at unexpected times.
Fact 2: Time Zone Display Can and Will Change
The second point to grasp is that calendar apps display the times of events based on two factors:
Device time zone: Apple devices typically set their time zone automatically based on location. If you live in Virginia and fly to Oregon, your iPhone will switch from Eastern Time to Pacific Time as soon as you take it out of airplane mode, and your Mac will do the same once it connects to the Internet. You can manually set the device time zone in Settings/System Settings > General > Date & Time, but that’s seldom necessary.
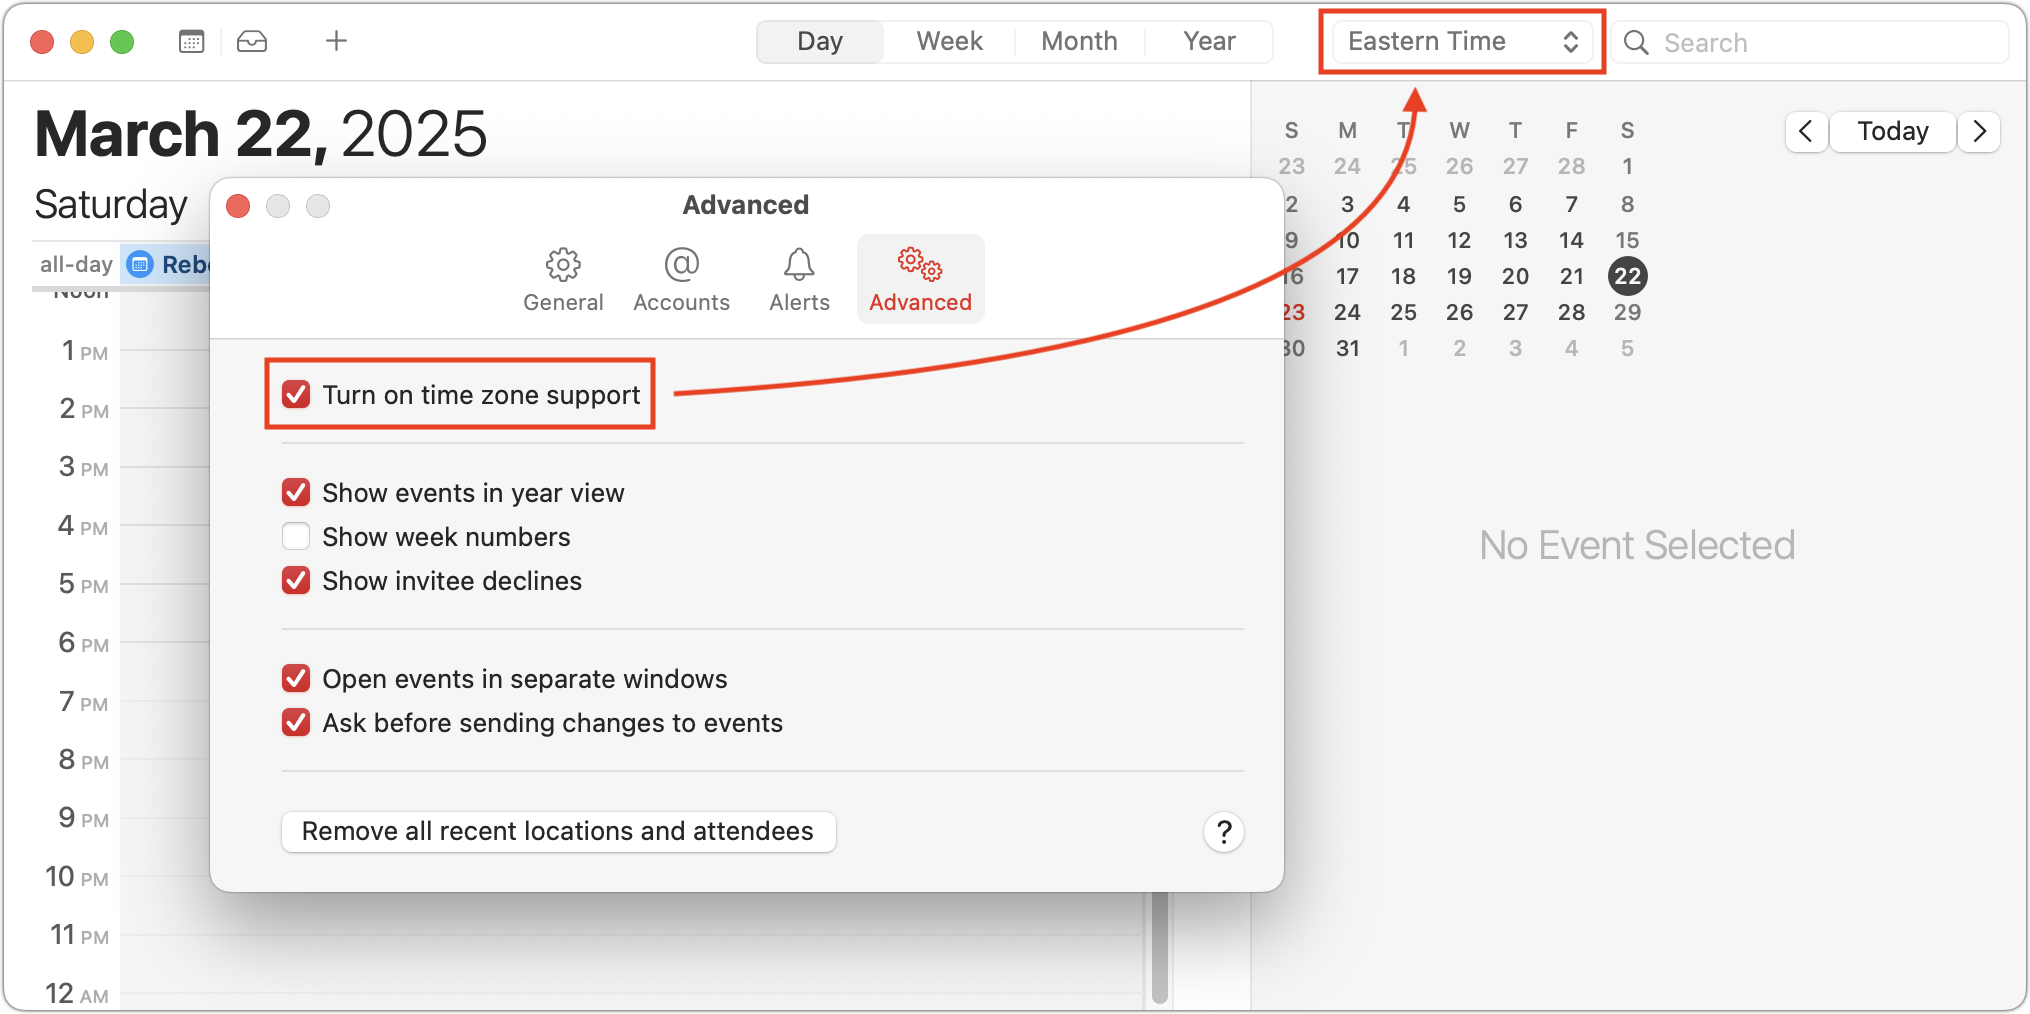
Calendar time zone overrides: You can make the Calendar app display events as if you were in a different time zone. This feature can help you confirm that events scheduled in another time zone show up at the correct times. On the iPhone or iPad, enable Settings > Apps > Calendar > Time Zone Override. Be careful not to forget about this override, or it may lead to confusion later. On the Mac, go to Calendar > Settings > Advanced, select “Turn on time zone support,” and choose a time zone from the pop-up menu that appears near the upper-right corner of the window.
When an event’s time zone differs from your device’s current time zone or the time zone override setting, Calendar will indicate the discrepancy. For example, an event at 2 PM Eastern Time event viewed on a device set to Pacific Time will display as 11 AM, with the original time zone noted in parentheses.

Working with Event Time Zones
When creating events where the time zone might be significant, you have three options:
Stick with the local time zone: Since all events are associated with a time zone, if you do nothing when creating an event, it will default to your current time zone. This is appropriate when the event will be shared with someone in another time zone through an invitation or shared calendar. However, it poses issues when creating events related to a trip.
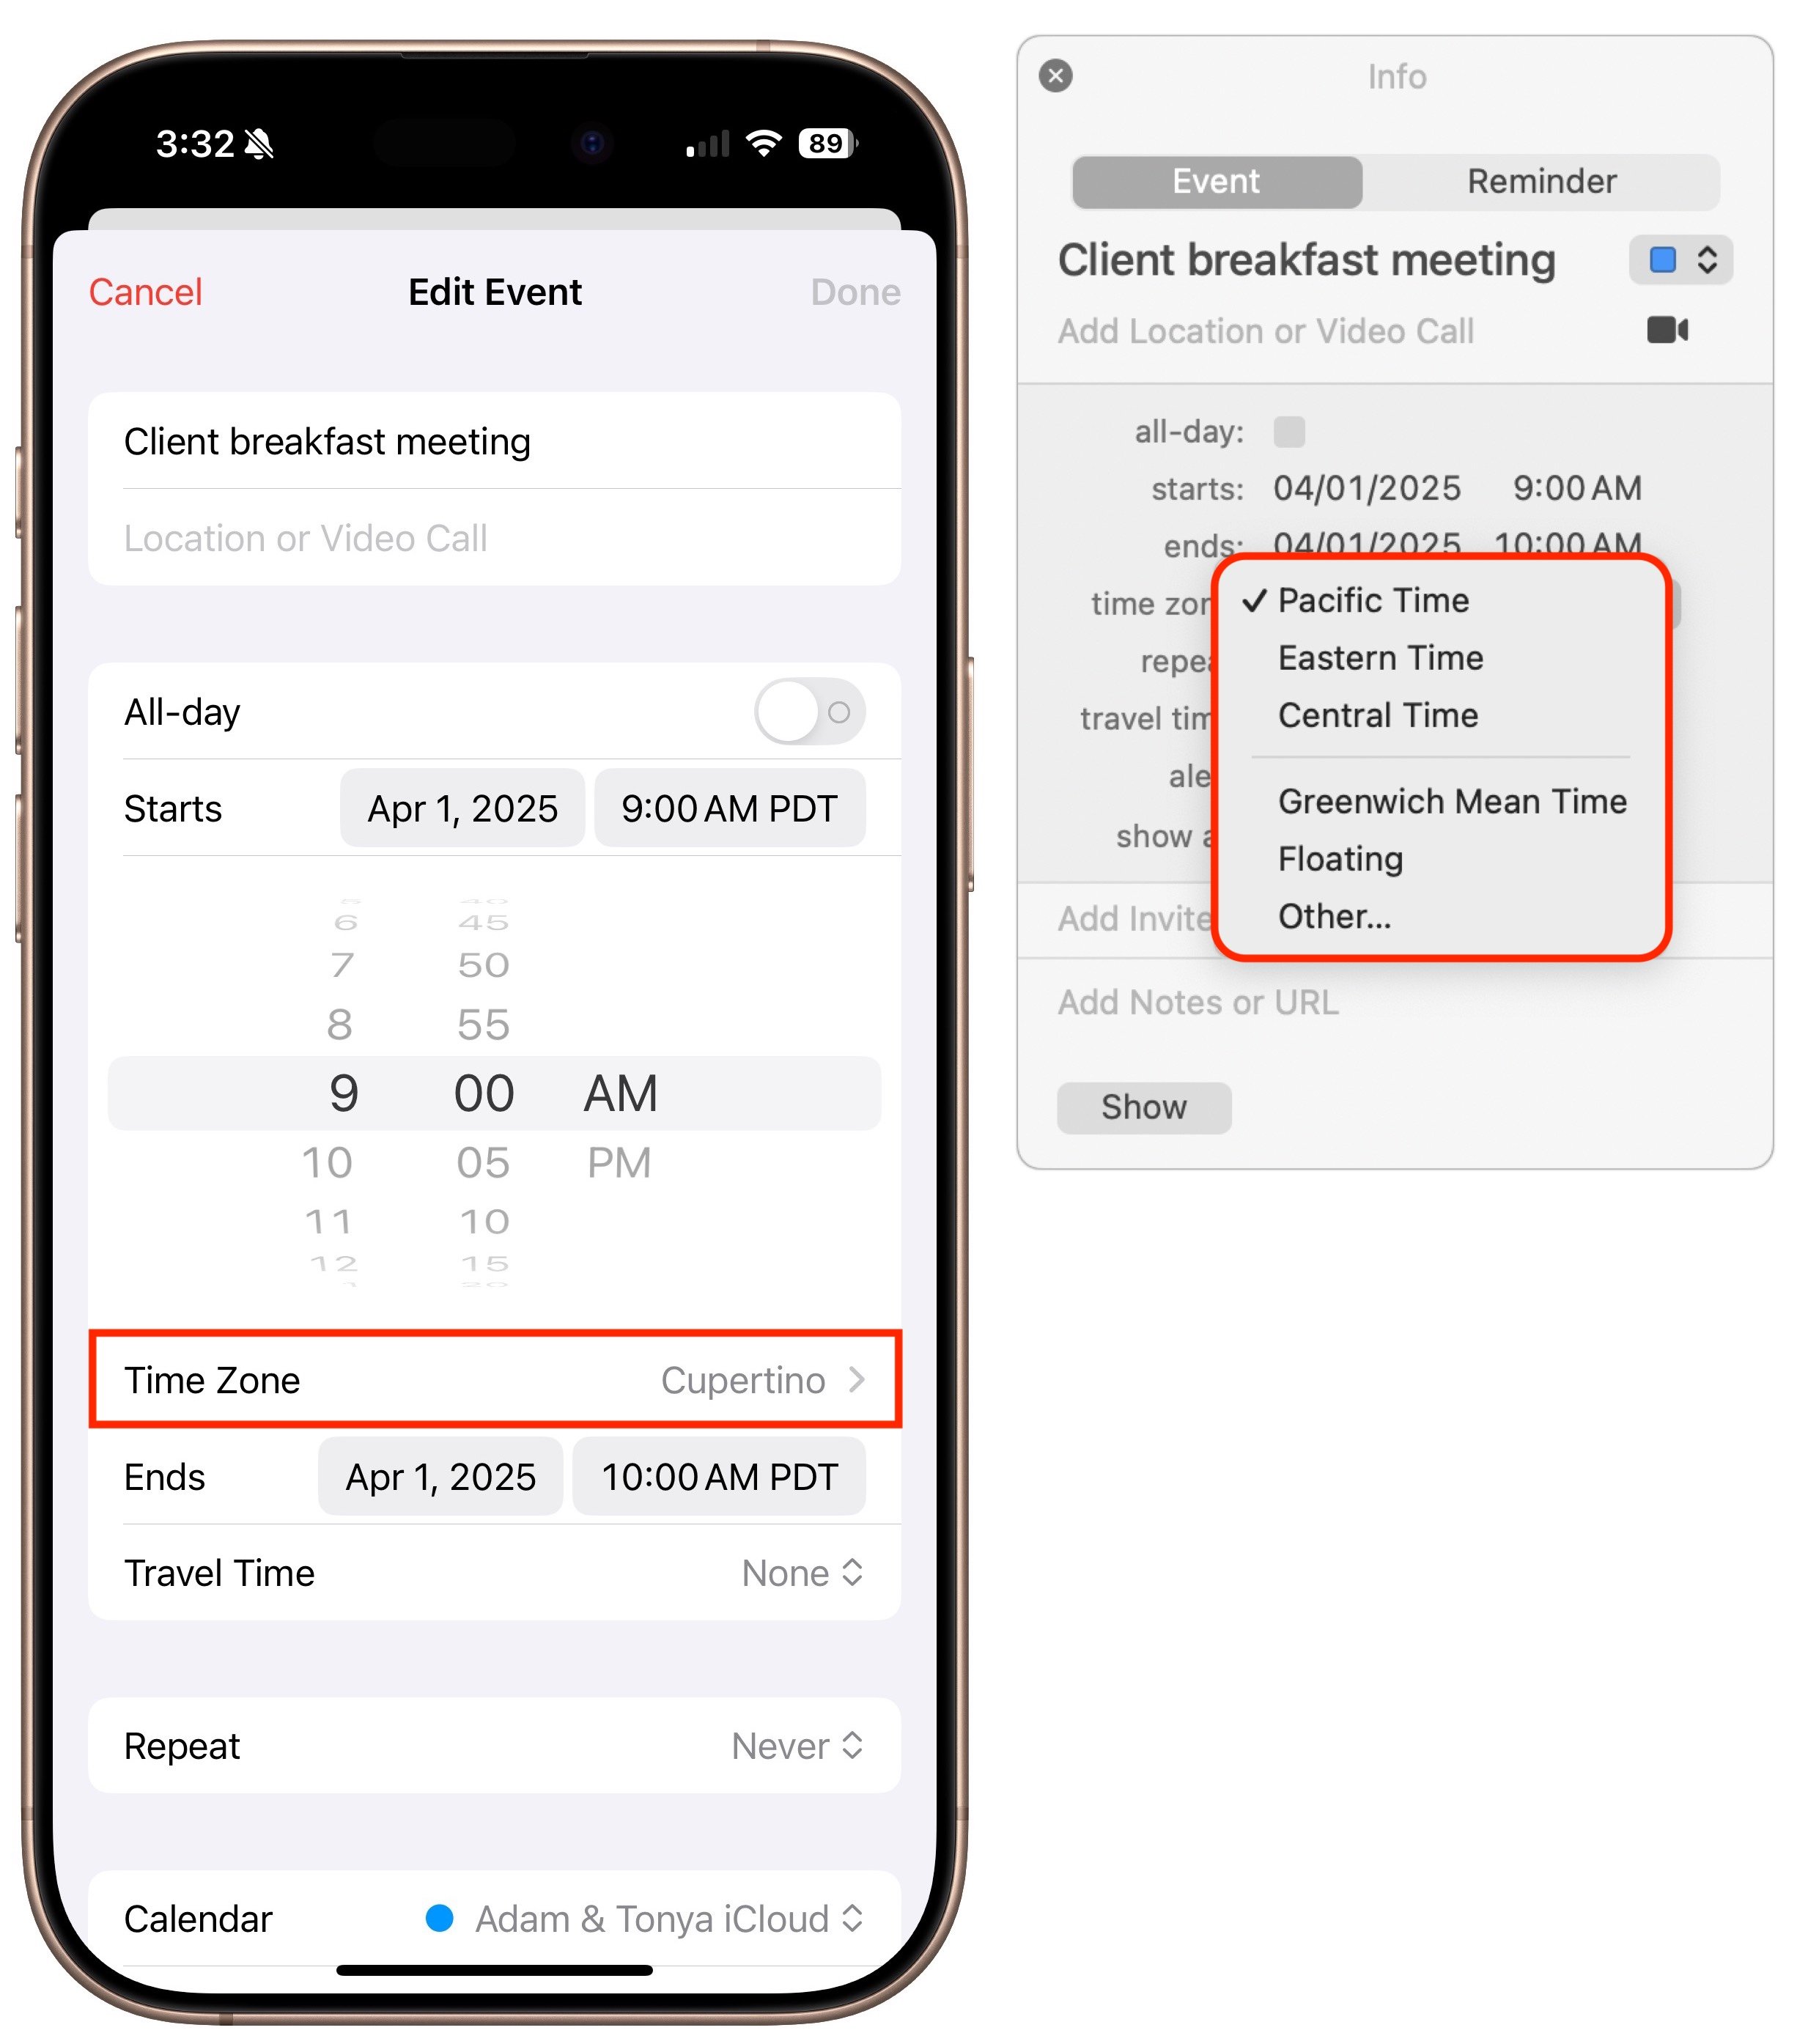
Change to a remote time zone: When scheduling your future self in another time zone—perhaps for business meetings or conference sessions—you can set those events to the time zone of your destination, ensuring they appear at the correct time once you arrive. On the iPhone and iPad, choose the time zone when setting the start time. On the Mac, with time zone support enabled, select it from the Time Zone menu.
Switch to the floating time zone: For travelers who frequently cross time zones, Apple supports a special “floating time zone” that ensures events appear at the same local time regardless of location. For example, a noon lunch meeting set with a floating time zone will always appear at noon, whether you’re in Boston or Denver. However, the floating time zone does have its limitations. While all Apple devices synced through iCloud honor the floating time zone, you can create events with it only on the Mac, not on the iPhone, iPad, or iCloud.com. Additionally, syncing events through Google Calendar or Microsoft Exchange should work, but if you edit an event on the Web or with non-Apple apps, it will revert to the local time zone.
Common Time Zone Scenarios
Now that you understand that events are always associated with time zones, how they appear in Calendar, and how to specify particular time zones for events, let’s look at some common time zone scenarios:
When traveling to another time zone: For events during an upcoming trip, you can either manually set the event’s time zone to match your destination or use the floating time zone. The manual approach ensures that events appear at the correct local time once you arrive, although it may be confusing to visualize before departure. The floating time zone maintains the same “wall clock time” regardless of your location, making it easier to plan your schedule before you leave.
Creating events while away: Conversely, when scheduling an appointment back home while traveling, set the event time zone to your home time zone. The event will appear on your calendar at the correct adjusted time. The floating time zone works well as an alternative for personal events that should take place at the same local time, no matter where you are.
Trips with multiple time zones: For complex itineraries involving flights and travel transitions with departure and arrival times in different zones, the Calendar app on the iPhone and iPad allows you to create events that start and end in different time zones. Tap the Time Zone option beneath the Start and End time pickers to set different time zones. Although you cannot create these multi-zone events on the Mac, they will display correctly on all your synced devices.
Remote scheduling: When inviting people from different time zones to an event or scheduling meetings with team members in various locations, create the event in your local time zone. The invitations and shared events will automatically adjust to each recipient’s time zone. When searching for optimal meeting times across multiple time zones, use a tool like World Time Buddy, which provides visual guidance for overlapping business hours.
Reminders can be tricky: Since reminders always use the time zone where they were created, their local times will shift as you travel, leading to notifications at unexpected times. The only workaround is to edit their times manually when you arrive at your destination and again when you return home. Alternatively, consider using an app like Due that keeps reminders consistent with “wall clock time.”
Scheduling global events: When planning a webinar or other online event that people in many different time zones might attend, use a tool like Every Time Zone to identify suitable times across various regions. After creating the event at the selected time, drag it from Calendar to the desktop to generate an ICS file for sharing with participants. This file will reflect your local time zone, and when attendees double-click it to import, their calendar app will display it at the appropriate time for them.
Although we’ve focused on Calendar on the iPhone, iPad, and Mac here, the same concepts—except for the floating time zone—apply to other apps like Microsoft Outlook and Google Calendar. By keeping these time zone concepts in mind, you can avoid calendar confusion and ensure that you don’t miss important meetings, regardless of where in the world you find yourself.
(Featured image by iStock.com/STILLFX)
Security Precautions to Take While Traveling
Security at home is one thing, but what about when you’re on the road? Many of the same precautions apply, but depending on your level of concern and where you’re going, additional techniques can help keep you and your data safe.

When we think about digital and device security, we mostly think about the fixed locations where people spend most of their time—home, school, and work. But what about when you’re traveling? Some security concerns remain the same when you’re on the road, but new ones crop up.
We’ll assume that you already keep your devices up to date, use FileVault on Macs, have at least a six-digit iOS passcode, have strong password habits, and use multi-factor authentication wherever possible. Other options are more specific to travel.
As with our more general article about increasing security last month, we’ve divided our list of suggestions into two parts: things that everyone should do and measures that only people who worry about being specifically targeted should employ.
Sensible Travel Security Precautions for Everyone
These suggestions are appropriate for everyone who travels, and they’re aimed primarily at avoiding relatively common problems: loss, theft, data loss, and generalized snooping:
Focus on physical security: As a tourist, you may be targeted by thieves, so it’s important to keep your iPhone in a secure pocket whenever you’re not using it. Carry an iPad or laptop in a bag that can’t be snatched, or leave them locked or at least concealed in your hotel room.
Enable Find My for all your devices: You should have already done this, but if not, enable Find My to improve your chances of finding a device you lose or accidentally leave behind. It might help if the device is stolen, but local police cooperation for recovering stolen items can vary widely. Don’t attempt to recover a stolen device yourself.
Put AirTags in your luggage and laptop bags: AirTags can help you track down lost luggage—you can now share their locations with airlines—and prevent you from accidentally leaving bags behind. An AirTag may also help with locating a stolen item, but always work with local law enforcement.
Enable biometric authentication and Stolen Device Protection: Using Face ID or Touch ID wherever possible and having Stolen Device Protection enabled on your iPhone in Settings > Face/Touch ID & Passcode is even more important when traveling.
Use a VPN or iCloud Private Relay: Because you may be using Wi-Fi networks whose security you know nothing about, it’s best to use a VPN like Mullvad VPN, NordVPN, or ProtonVPN to encrypt all your traffic. At a minimum, use iCloud Private Relay, which requires an iCloud+ subscription and won’t encrypt traffic from most non-Apple apps.
Use iCloud Photos or another backup option: To ensure you don’t lose precious vacation photos, use iCloud Photos so all your photos are uploaded to the cloud whenever you have access. This will almost certainly require an iCloud+ subscription for sufficient storage space. If Wi-Fi and cellular are too slow or unavailable, consider an external SSD to which you can manually export photos and videos for backup. To speed up the process, you could create a shortcut that automatically copies all photos taken that day.
Use iCloud Backup: It’s best to use iCloud Backup to back up your entire iPhone every night. That way, if your iPhone is lost or destroyed, you may be able to buy a replacement and restore from backup in relatively little time. You will probably need an iCloud+ subscription to have enough backup space.
Practice dealing with a lost or stolen device: If the worst happens and you lose one of your devices while traveling, you need to know what to do. Immediately go to Find My on another device or iCloud.com and mark the device as lost. If there’s a chance of getting it back, stop there. However, if you believe the device was stolen, your data is at risk, and tracking it is no longer useful, use Erase This Device in Find My to wipe it. Activation Lock will remain enabled to prevent anyone from reusing the device.
Increasing Travel Security for People Who May Be Targeted
Not all travel is fondue and gamelans. If you’re a journalist, activist, government employee, or corporate executive with access to sensitive data, you could be a target while traveling. This is particularly true if you are headed to countries like China, Russia, or others with authoritarian governments and powerful intelligence agencies. Along with the suggestions above, we recommend:
Be aware of local laws and government practices: It’s important to read up on regional laws regarding data access and potential government capabilities at your destination. Knowing what to expect can help you reduce your risks and take appropriate precautions.
Use caution with cellular access: Even if your carrier allows roaming, consider using a dedicated eSIM for international travel, separate from your personal one. That way, you can use local cellular networks without revealing your home number. Be aware that your traffic may be monitored.
Enable Lockdown Mode: If you’re concerned about your iPhone or iPad being targeted by local law enforcement or government intelligence agencies, turn on Lockdown Mode in Settings > Privacy & Security > Lockdown Mode. To increase security, it blocks most attachment types in Messages, complex Web technologies, incoming FaceTime calls from unknown callers, non-secure Wi-Fi network connections, and incoming invitations to Apple services. Plus, it excludes location information from shared photos, requires approval to connect accessories, and more.
Reduce and protect your use of cloud services: While using a VPN is essential, you should still avoid using cloud services much if government entities might have access to stored files. If you need to upload files, encrypt them first using the free and open-source Cryptomator.
Know how to disable Face ID and Touch ID: If you find yourself in a situation where you believe you may be compelled to unlock your iPhone or iPad with your face or fingerprint, press and hold the side or top button and either volume button to display the power off slider. This temporarily disables biometric authentication, requiring your passcode for the next unlock.
Use dedicated travel devices and accounts: If you’re traveling to a potentially hostile part of the world, we strongly recommend carrying only devices—preferably iPhones or iPads, which are more secure than Macs—configured to contain none of your personal data or regular accounts. Keep them with you at all times, assume they could be confiscated, and be aware you might be compelled to share passcodes or other account information. Create a separate Apple Account for such devices.
Best of luck in your travels! With just a little preparation, you can reduce the chances that something bad will happen during a vacation. If you’re traveling on business to somewhere more concerning, putting in additional effort could prevent truly problematic things from happening.
(Featured image by iStock.com/metamorworks)
Keep Your Browsing Organized with Browser Profiles
Tired of juggling work and personal tabs in one browser? Learn how browser profiles can keep your online life organized and distraction-free, plus get step-by-step tips for setting them up in Safari, Chrome, and Firefox.

As more of our lives shift online, it becomes increasingly important to establish boundaries between different aspects of our digital activities. Many people maintain separate work and personal email addresses for this reason. But you don't have to stop there.
Modern Web browsers offer profiles, a powerful but often overlooked feature. Whether you're juggling work and personal browsing or managing multiple projects, browser profiles can make your digital life more organized and efficient.
Why Use Browser Profiles?
The overarching reason to use browser profiles is to make it easier to focus on one thing at a time. Imagine you’re working on a bathroom remodel at home while negotiating a new contract with an important client at work. You probably don’t want to be distracted by tabs showcasing countertop surfaces when you should be estimating client deliverable dates. That’s especially true if you use the same Web apps—Gmail, Google Docs, Slack, Trello—to manage both personal and professional projects.
By setting up separate browser profiles, you can keep your work and personal browsing completely separate. That includes different bookmarks, sets of tabs, and account logins for the same websites. When you open Google Docs in your personal profile, you will find sheets that track the timeline for your bathroom remodel in your personal account; switch to your work profile to view only documents in your work account.
Other common uses for browser profiles include separating clients—particularly when managing accounts for them—keeping research projects or hobbies distinct, and maintaining a clean browser environment for testing.
What’s Stored in a Browser Profile?
Each browser profile maintains its own distinct set of browsing data and settings. While specifics may vary slightly among browsers, options include:
Bookmarks/favorites: Saved websites, possibly in hierarchical folders
Browsing history: The chronological list of websites you have visited
Saved passwords: Login credentials for websites if you rely on the browser rather than an independent password manager
Extensions and their settings: Which browser extensions are installed and how they’re configured
Cookies and site data: These store website preferences, login status, and site-specific information
Stored forms and autofill data: Saved addresses, payment methods, and other form data
Browser settings and preferences: Search engine preferences, home page and startup settings, theme and appearance options, and privacy and security settings
Open tabs and windows: Including tab groups and recently closed tabs
When you switch between profiles, you get a completely fresh browser environment with its own set of everything listed above. You can log in to the same website using different accounts in various profiles, and your activity in one profile won’t impact or be visible in another.
Setting Up and Switching Between Profiles
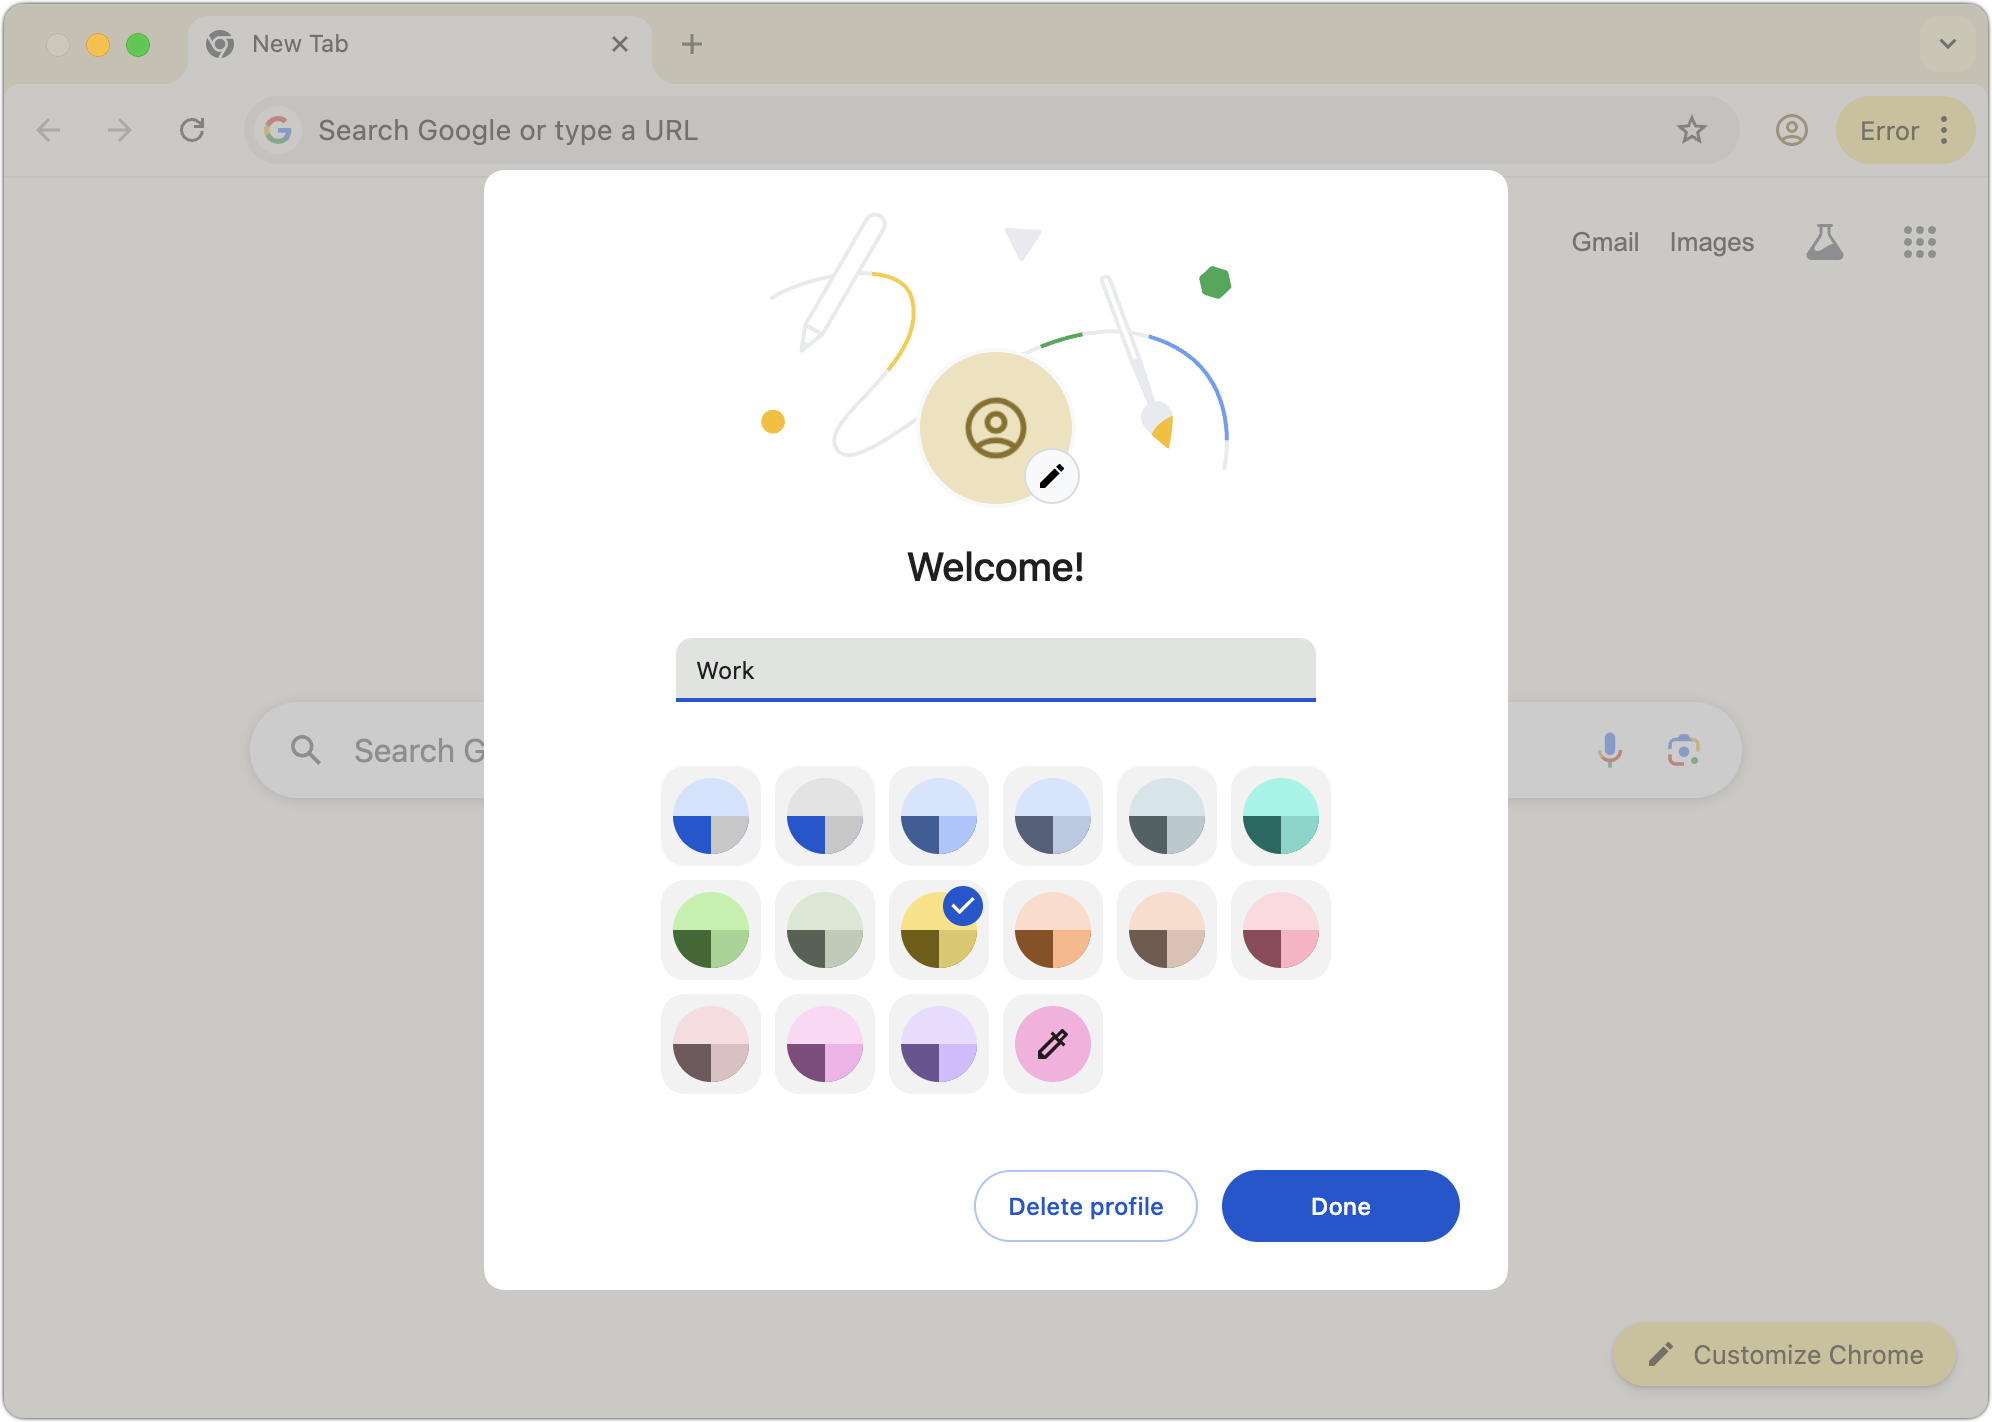
Getting started with profiles is simple. Here’s how to create and switch between them in Safari (in macOS 14 Sonoma and later), Google Chrome, and Firefox. Before you get started, though, a few tips:
Give profiles descriptive names and distinct colors so they’re easy to identify.
Keep the number of profiles manageable because too many can become con-fusing.
If you create profiles for clients or projects, periodically review and tidy up unused ones.
Keep in mind that profiles are intended for organization and efficiency, not security—anyone with access to your Mac can switch to any profile.
Chrome and Firefox profiles are stored on a particular computer—they won’t sync with another copy of those browsers on another computer.
Safari
Safari profiles share more data than those in Google Chrome and Firefox, and unlike the other two, Safari profiles automatically sync between devices. All bookmarks and saved passwords are accessible to all profiles, although you can choose a separate primary bookmark folder for each profile. Note that Safari stores its current settings in a permanent Personal profile that becomes visible only after you create a new one. To create a new profile in Safari:
1. Choose Safari > Settings > Profiles.
2. If this is your first new profile, click Start Using Profiles. Otherwise, click + to create a new profile.
3. Enter a name, and choose a symbol and color.
4. Select a folder within your bookmarks to hold the profile’s primary bookmarks.
5. Click Create Profile.
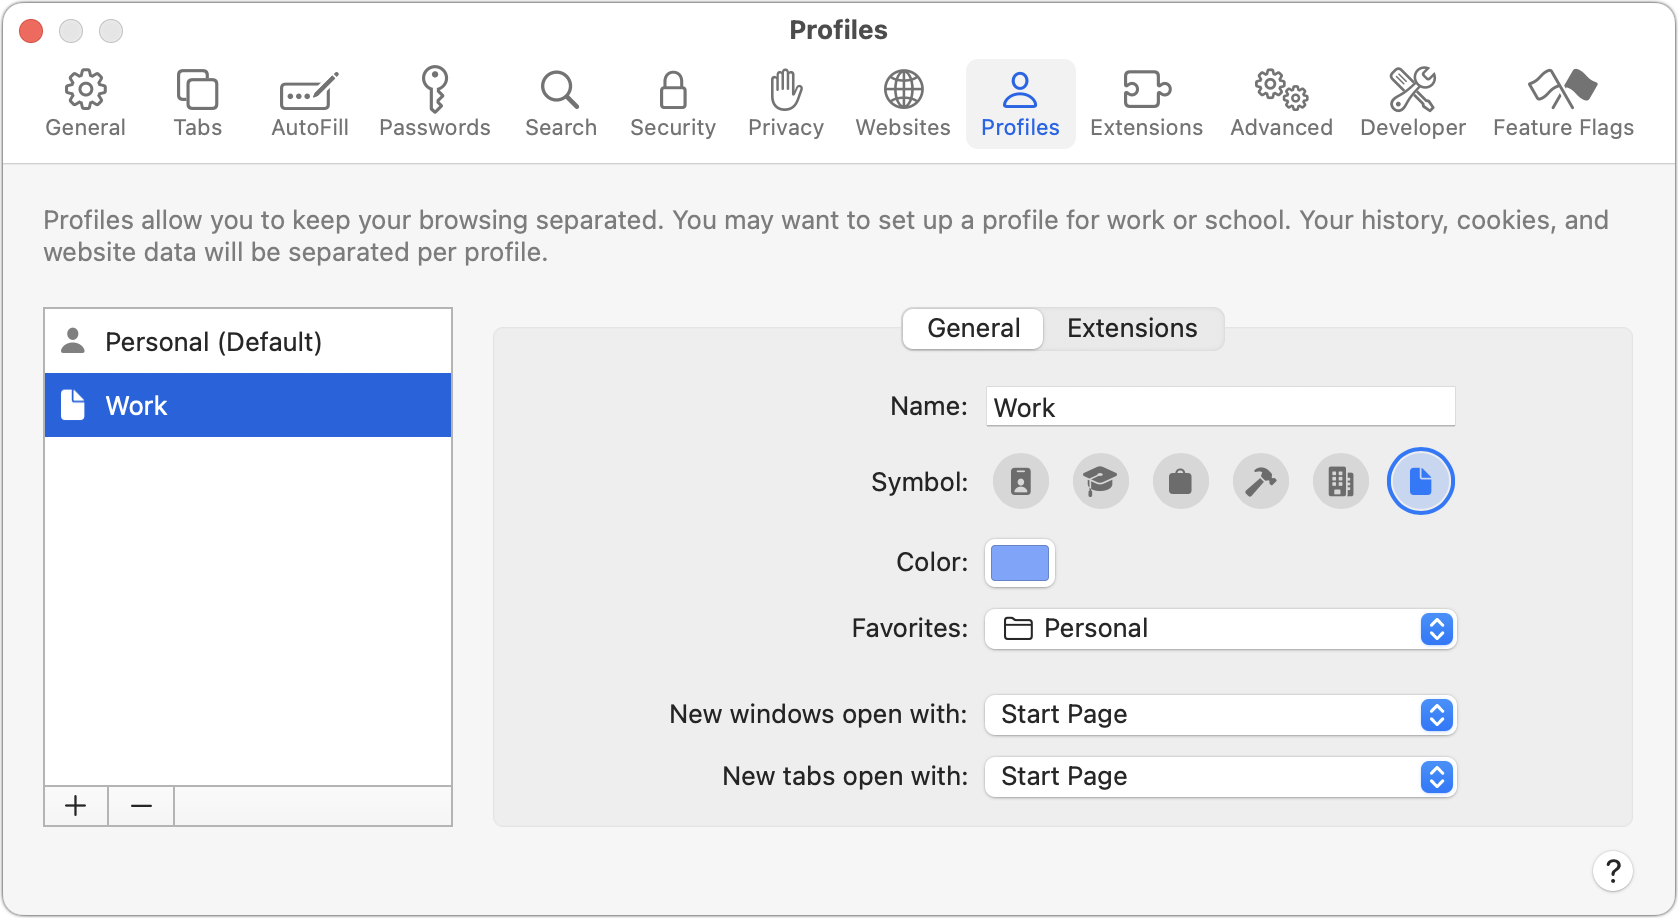
6. Choose how new windows and tabs open.
7. Click the Extensions tab, and select the extensions you want to use with the profile.
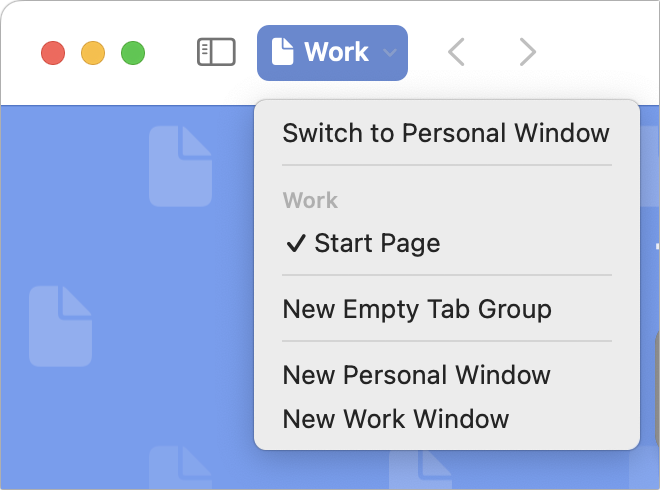
Every window in Safari is associated with a profile, so switching between them can be as simple as clicking another window or using the Window menu. At most, you have to open a new window for the desired profile:
Choose File > New Profile Window. If you have three or more profiles, the command becomes File > New Window > New Profile Window.
With the sidebar closed, click the profile button and choose New Profile Window to create a new window. When viewing the Start page, you can choose Switch to Profile Window to change the profile for the current window.
Google Chrome
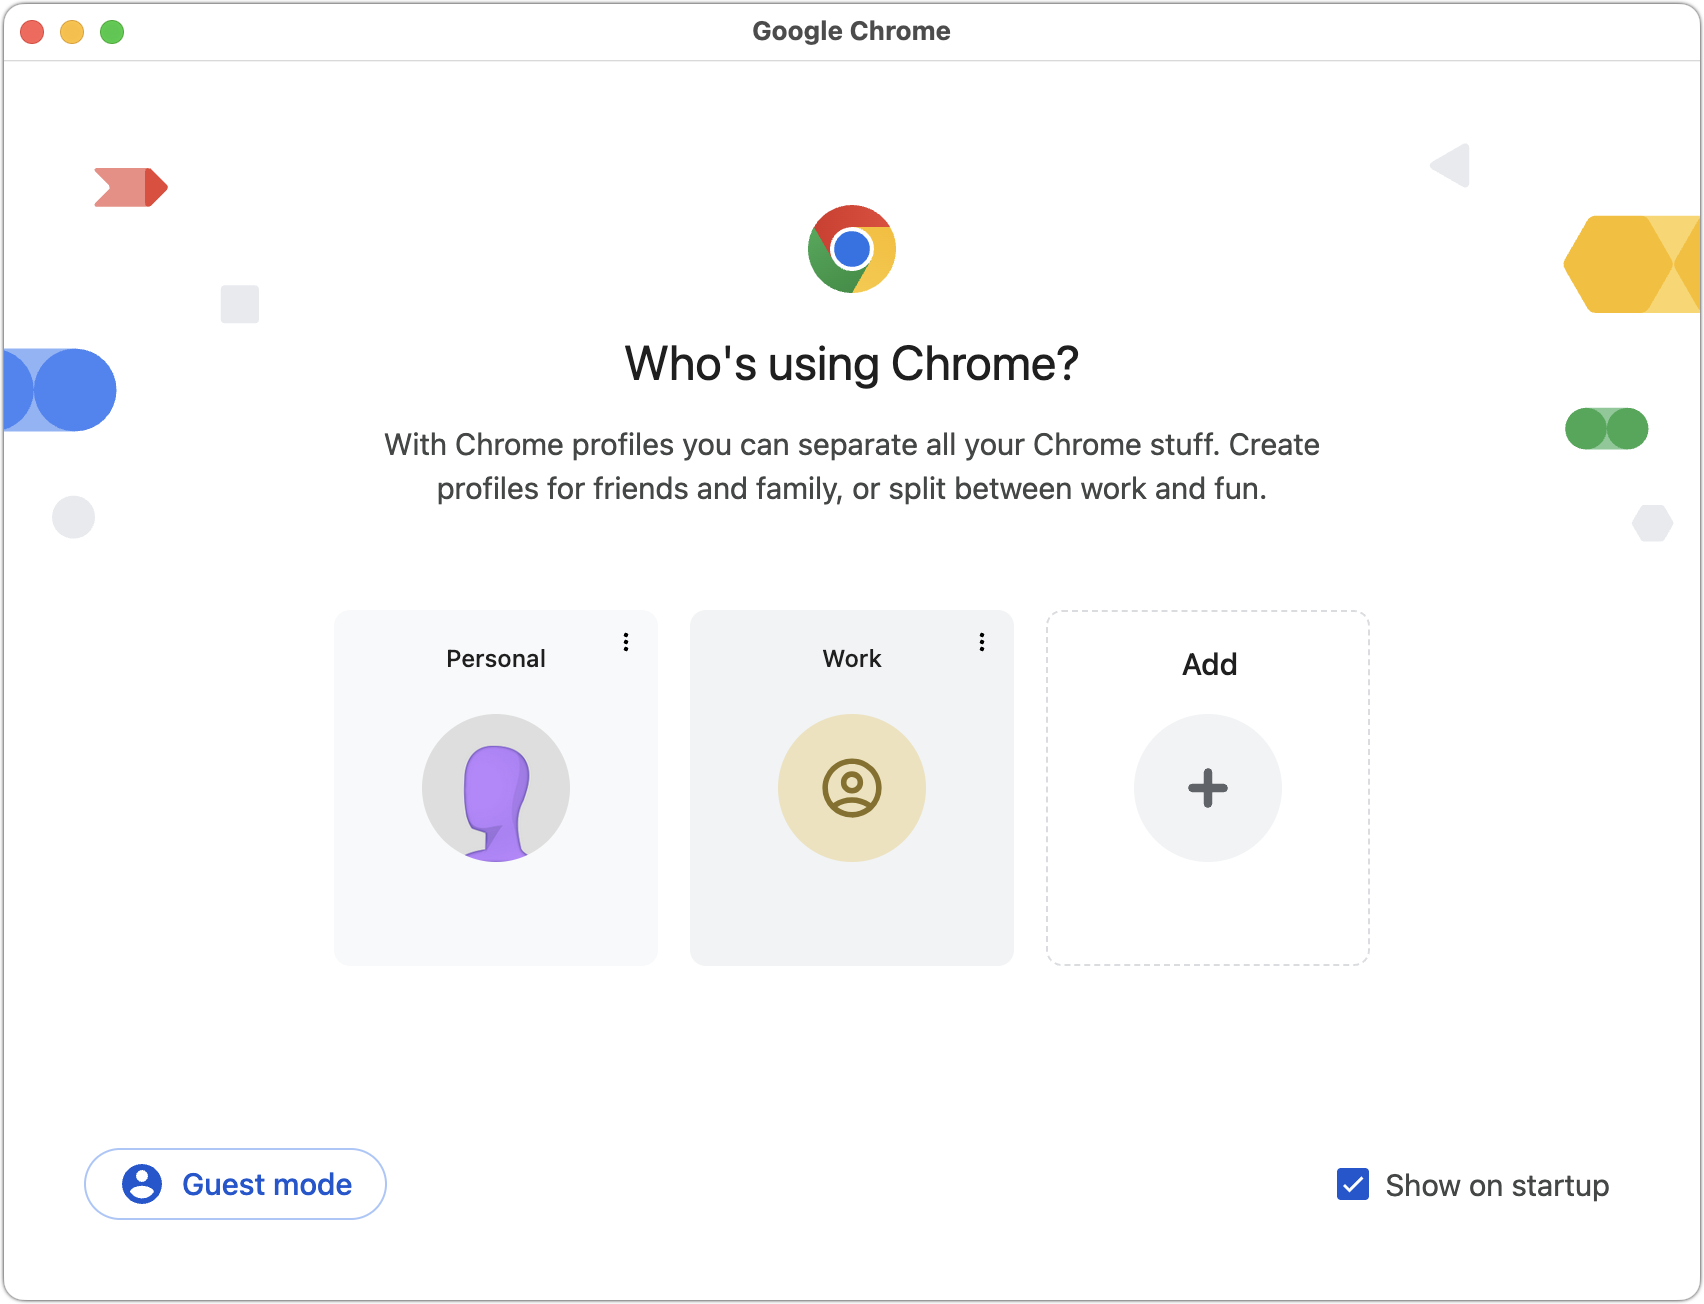
Google Chrome has had browser profile support for many years. Like Safari, you start with a default profile. To create a new profile in Chrome:
1. Choose Profiles > Add Profile. Click to continue without an account or sign in with a different Google account.
2. Enter a name and pick an icon for the profile.
3. If desired, choose Chrome > Settings to adjust settings and active extensions for the new profile.
Every window is associated with a profile, so switching is often just a matter of clicking the desired window or choosing it from the Window menu. To open a window for a different profile:
Choose Profiles > MyProfile.
Click the profile icon in the toolbar and choose the profile you want.
Once you have multiple Chrome profiles, the app will ask you which to open on each launch. From this screen, you can also remove a profile by clicking the vertical dot menu and choosing Delete. If you deselect “Show on startup,” Chrome will open the last used profile at startup. You can always access this screen by clicking the profile icon in the toolbar and choosing Manage Chrome Profiles.
Firefox
Although Firefox was the first browser to support profiles, they remain poorly integrated into its interface and can be confusing because each opens in another instance of Firefox— a new Firefox icon appears in the Dock for each. To create a new profile in Firefox:
1. Type about:profiles in the address bar to open the About Profiles page.
2. Click Create a New Profile.
3. Name your profile and optionally select a custom location for profile storage.
4. On the About Profiles page, in the listing for your new profile, click “Launch profile in new browser” to open a new instance of Firefox with it.
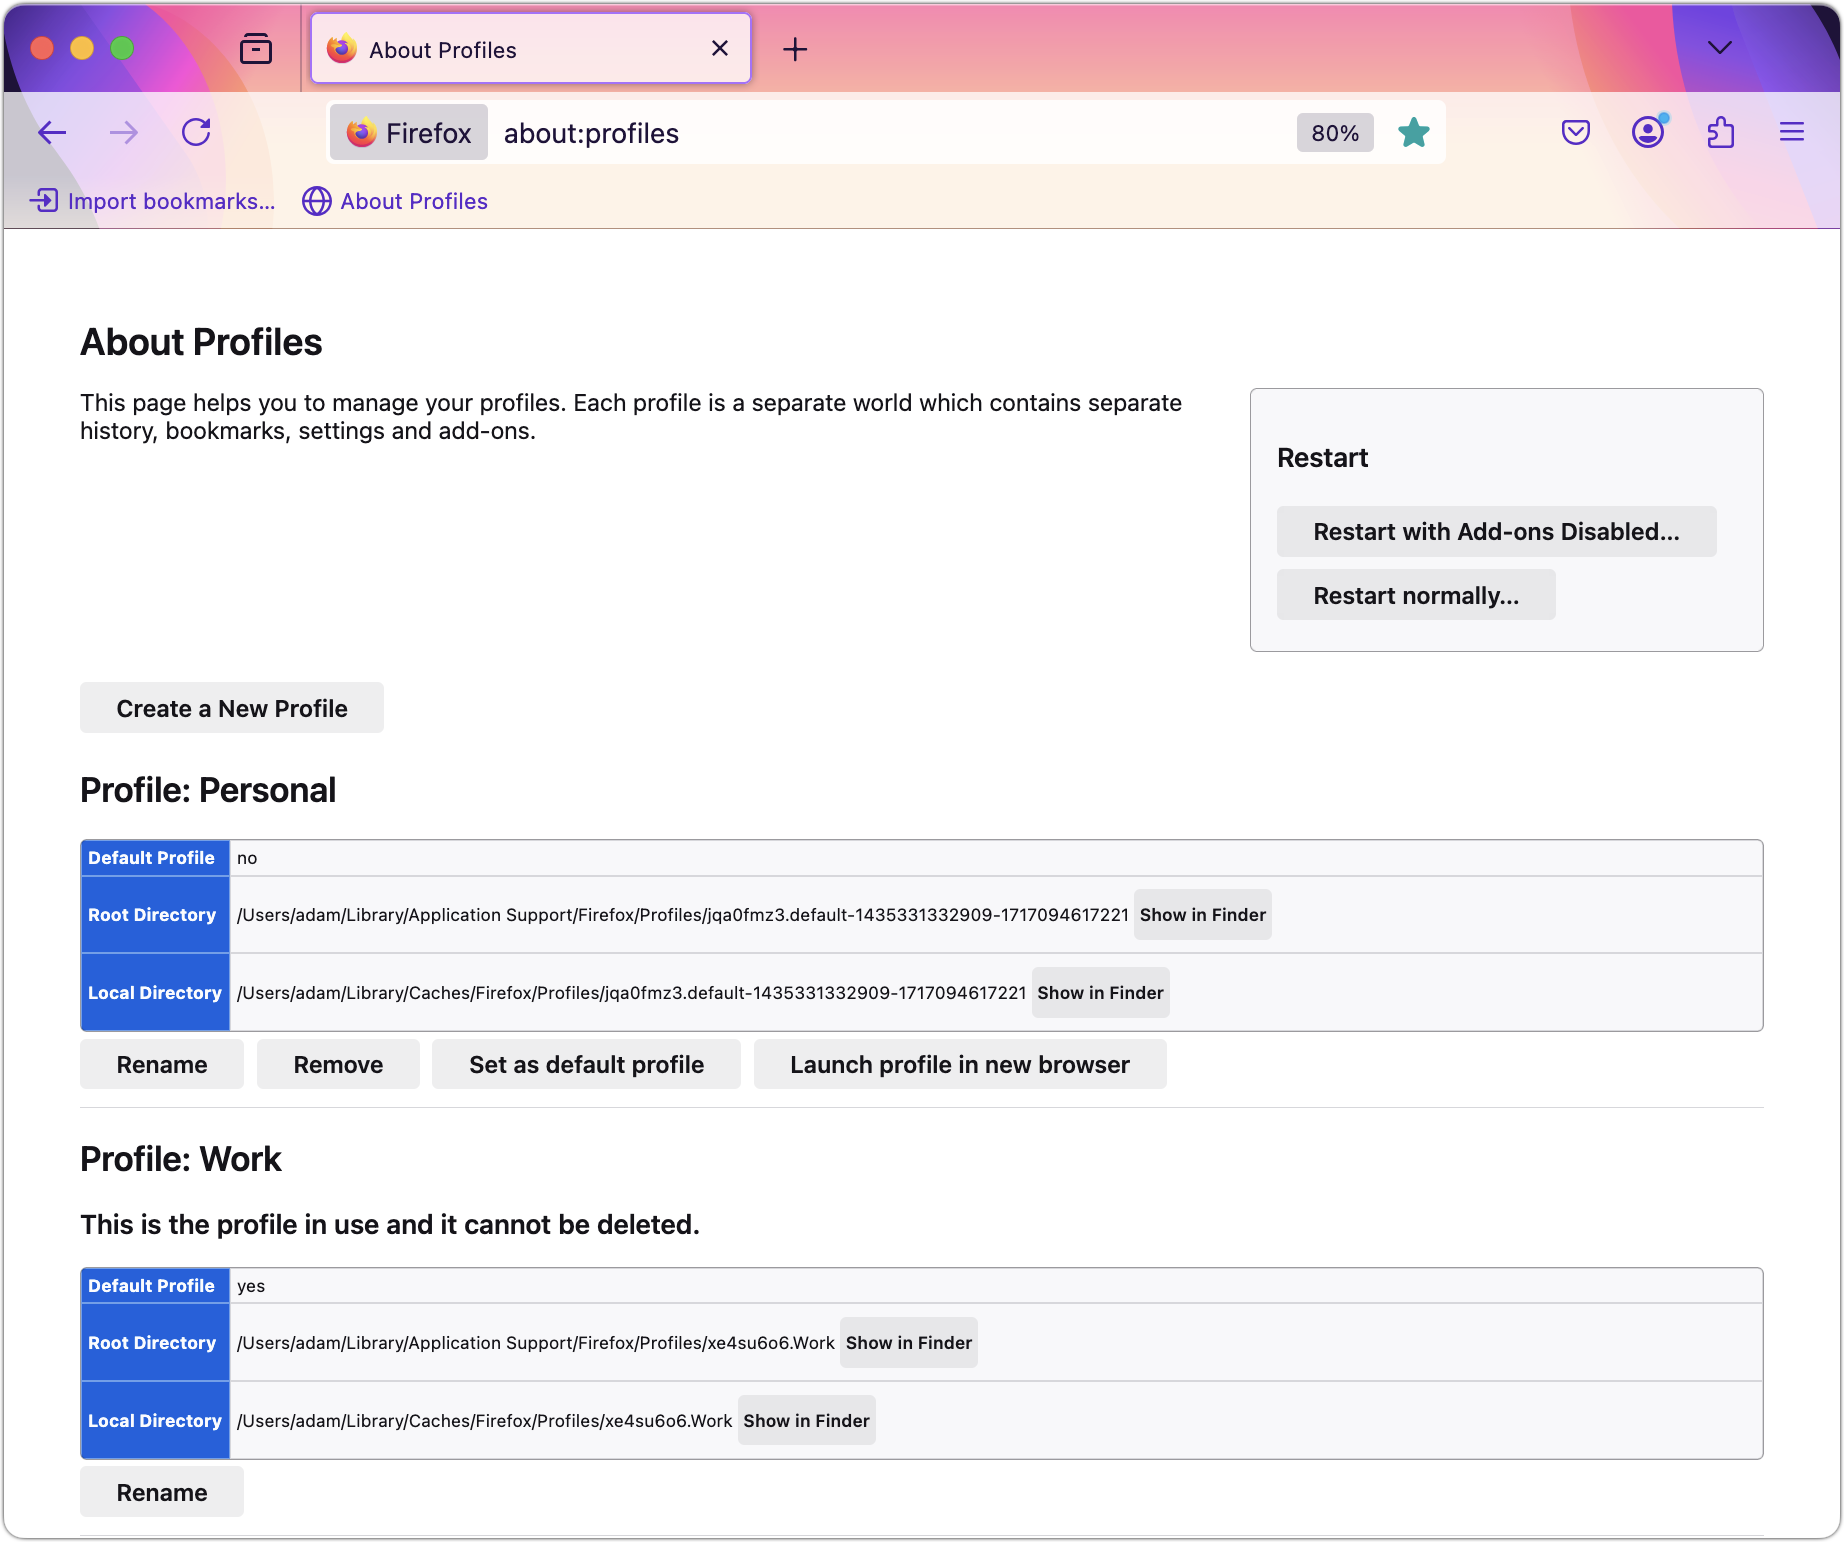
5. Configure this new instance of Firefox as desired.
Opening a new profile instance can be tricky since it’s essentially like opening another app, but there’s only one Firefox icon in your Applications folder. While there are command-line tricks to make switching easier, this is the simplest approach:
1. Type about:profiles in the address bar to open the About Profiles page.
2. In the listing for the profile, click “Launch profile in new browser.”
To simplify this process, open the About Profiles page in each profile and drag its proxy icon to the Bookmarks toolbar. That way, you can click the bookmark in the toolbar for quick access to About Profiles.
Once multiple profile instances are open, you can switch between them by clicking their windows or Dock icons.
Be Careful with External Links
Browser profiles struggle with one scenario: opening links from other apps. Imagine you’re busy in your Work profile but take a quick break to check your personal email. You receive a link from your bathroom designer with possible lighting options, so you click it. Since your browser is using your Work profile, the link opens there, and you have to transfer it manually to your Personal profile or risk muddying your organization.
However, this is a minor obstacle, given how beneficial browser profiles can be for organizing your online activities, whether you’re juggling multiple projects or simply keeping your work and personal browsing distinct.
(Featured image generated by ChatGPT)
Run a Business? Sign Up with Apple Business Connect
Discover how Apple Business Connect helps businesses stand out in apps like Maps, Spotlight, Calendar, and Wallet. From custom Place Cards to branded email, Apple Business Connect can enhance your brand and help you reach your audience more effectively.

Every company today conducts business online, by sending email, if nothing else. That’s true even if your firm operates primarily in the physical world—customers undoubtedly find you by browsing in Apple Maps, searching in Spotlight, and asking Siri for directions. If you sell products, you probably take Apple Pay.
Apple Business Connect is a free program designed to help businesses enhance their brands everywhere they appear on Apple devices, including Maps, Wallet, Siri, Calendar, Messages, Spotlight searches, and more. Once you sign up for Apple Business Connect (we’ll resist the temptation to say it’s as easy as ABC) and are verified by Apple, you can:
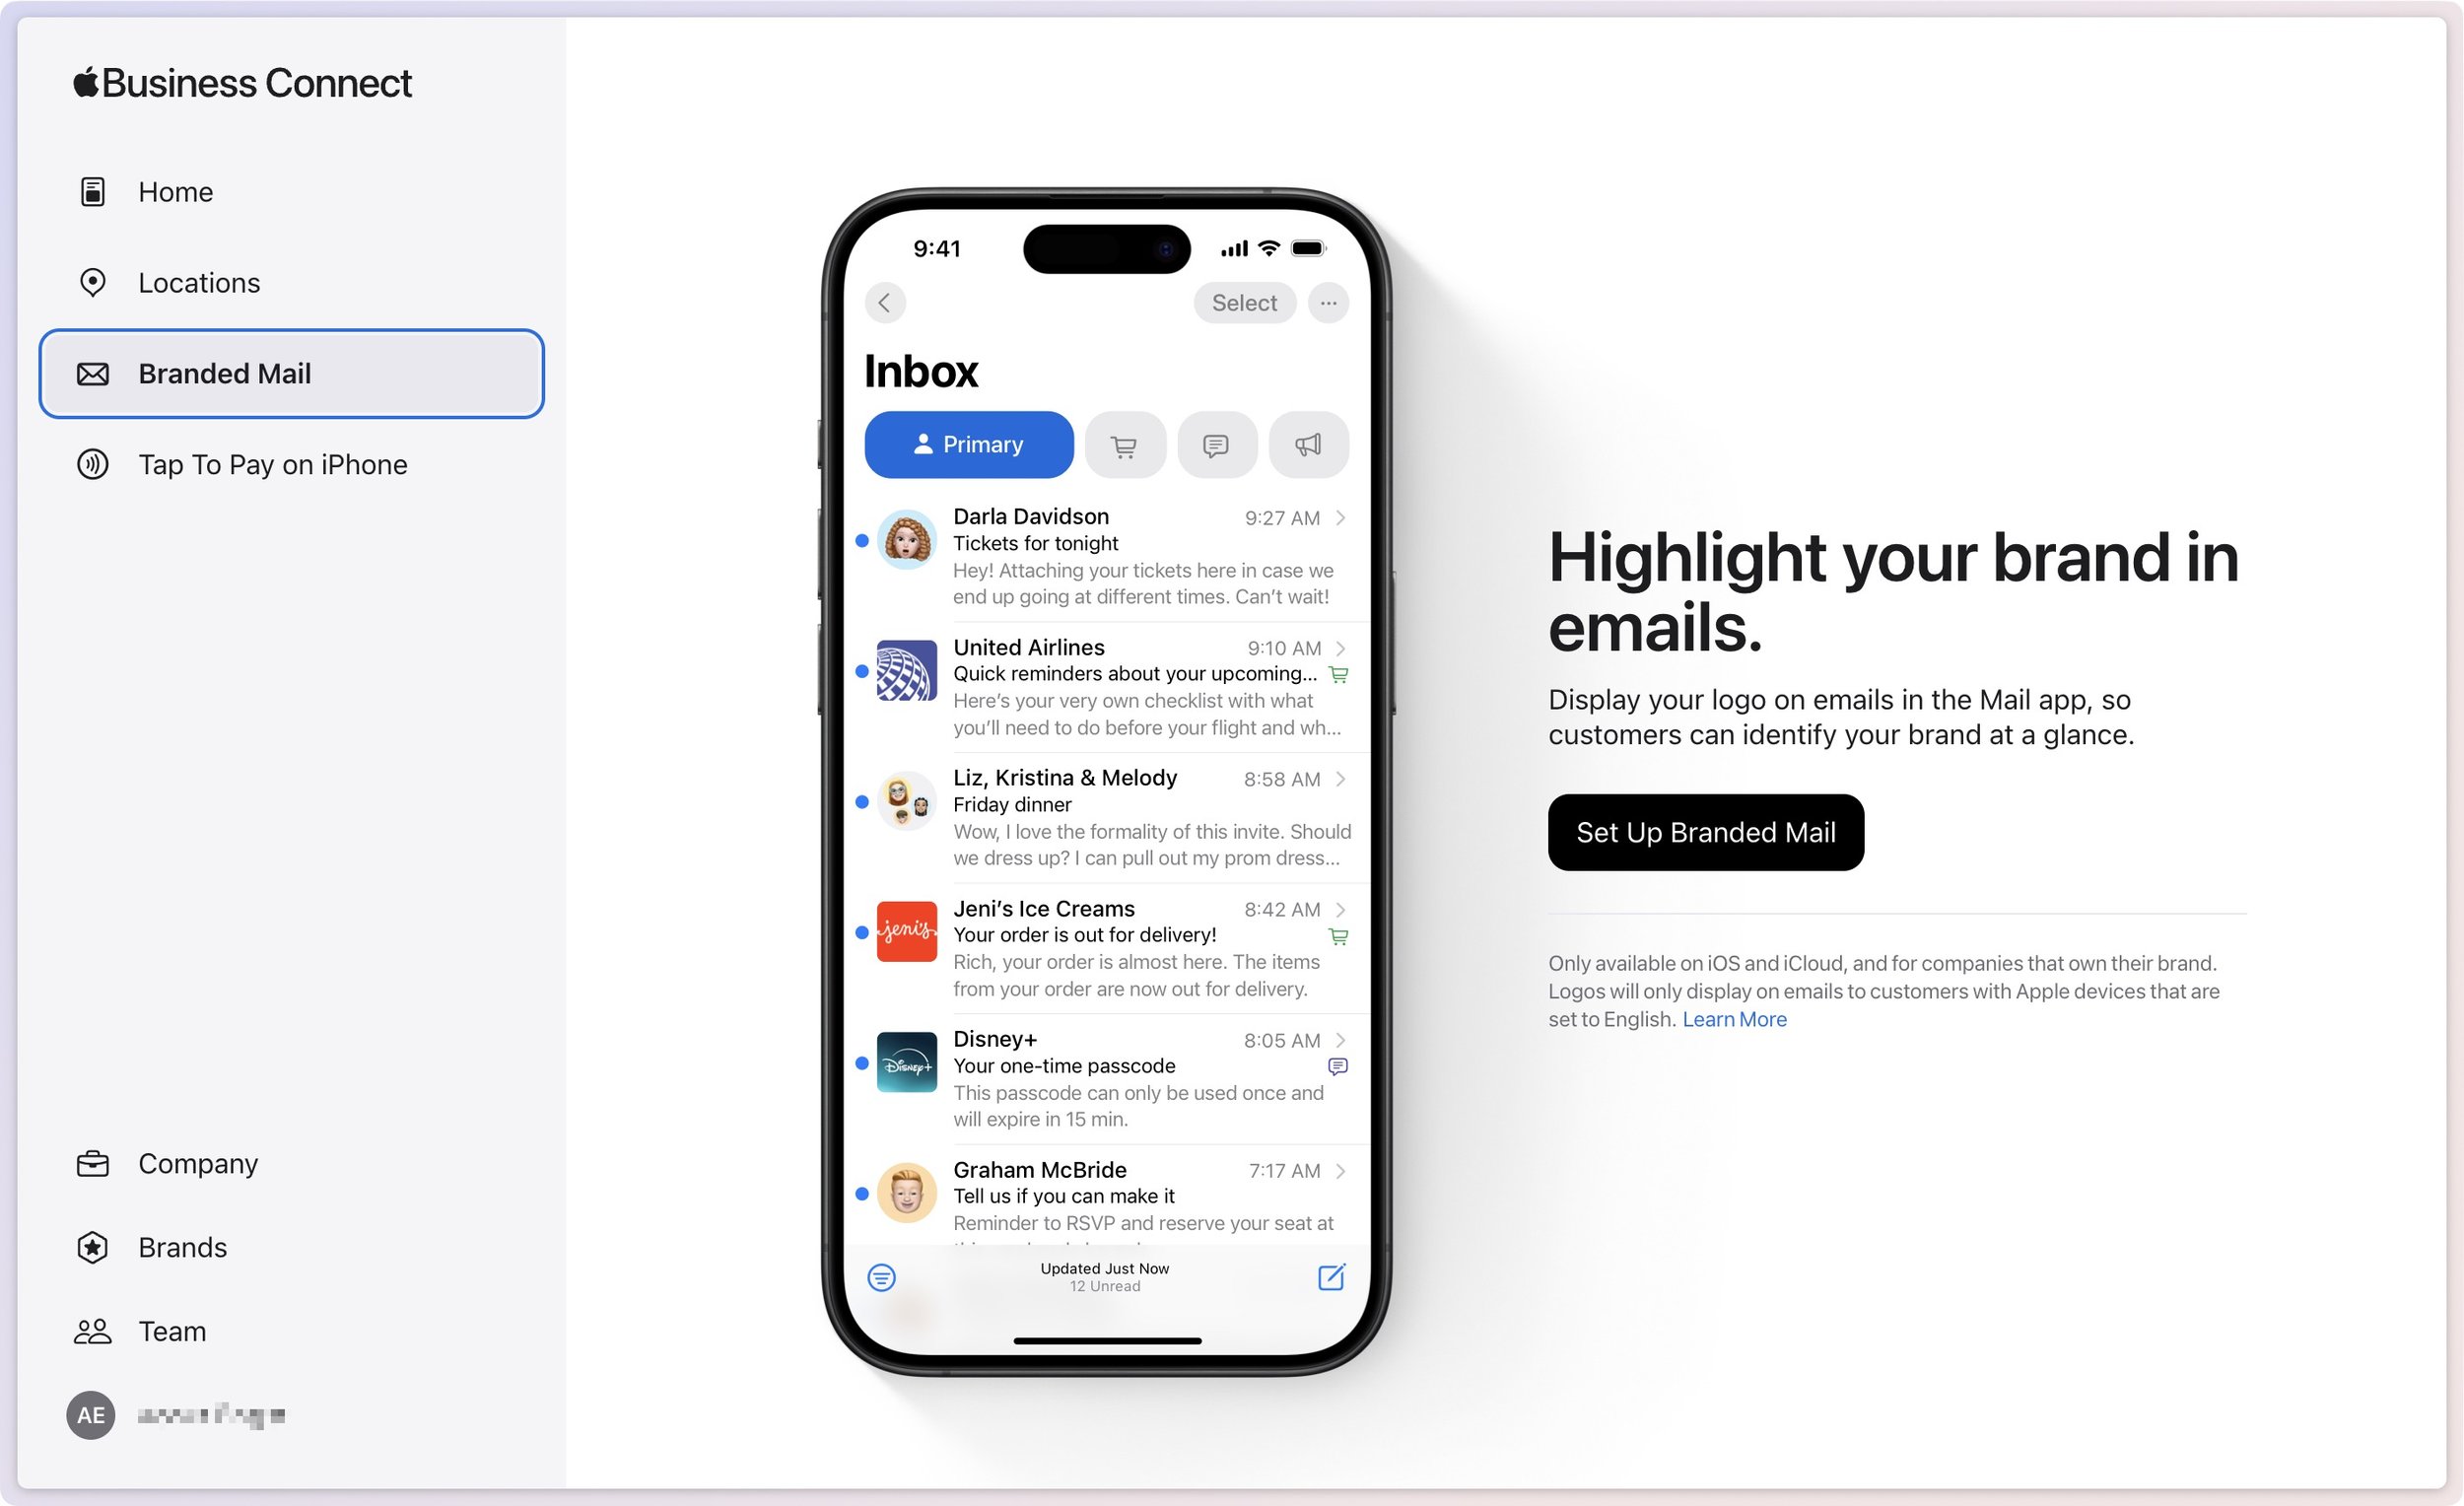
Set up Branded Mail: With Branded Mail, email sent from specific addresses or your entire domain will be branded with your logo in the Mail app on Apple devices, helping users identify your brand.
Configure location information: Simple addresses don’t always connect with store entrances, so you can precisely specify the entrance to each of your locations.
Customize Place Cards: When customers find you in Maps, add your address to Calendar, or ask for your location from Siri, Apple displays a Place Card. With Apple Business Connect, you can customize the Place Card.
Add custom action links: Your Place Card can contain custom action links that point to your website or other Web-accessible platforms. For instance, a restaurant might add custom action links for Menu, Reservations, Takeout, etc.
Create Showcases: A Showcase is a module on the Place Card that lets you highlight sales, deals, new items, or other promotional content. If someone is looking for you, why not promote your latest offerings?
Get Insights: Apple records valuable information about customer search behavior, including search locations, discovery methods, and actions customers take after finding your business.
Add Tap to Pay on iPhone: For those who don’t already have a point-of-sale system, Tap to Pay on iPhone lets you accept contactless payments on an iPhone without an extra terminal or hardware.

Apple has also announced Business Caller ID, slated to ship in 2025, which will display your brand’s name, logo, and even a specific department when you call someone using an iPhone. That should help people realize that a call from your company is legitimate and not some telemarketer, making them more likely to pick up.
Getting started with Apple Business Connect is simple, but verification can take up to a week. It’s best to work through Apple’s clear documentation for registering your business, but the basics are:
Sign in with your Apple Account (use your Apple Business Manager account if you have one).
Enter your company details.
Set up a brand by giving its name, category, geographic location, and logo.
Turn on Branded Mail by adding a domain or email address, and verifying your company.
Add a location by specifying its address and hours.
Create a Place Card, add a Showcase, and create custom actions.
Needless to say, Apple Business Connect only impacts how you appear to people using Apple devices and apps. For everyone else, we recommend setting up a Google Business Profile, which provides similar features, though primarily for businesses with physical locations and upsells for advertising on Google.
However, it’s absolutely worth working with Apple Business Connect to enhance how you and your brand appear to customers. If you need help setting it up, contact us.
(Featured image based on an original by Apple)