How to Ensure You Don’t Miss Reminders
Apple’s Reminders app offers more than simple notifications—from location-based alerts to the new alarm feature in iOS 26.2, here’s how to make sure you never miss an important task.

Recording a task in Apple’s Reminders app on your Mac, iPhone, or iPad is just the first step—the app captures what you need to do—but what matters more is being reminded to take action at the right moment. (The most important step, of course, is following through, but that’s on you.)
Here’s how to configure Reminders to get your attention at the right moment, whether through time-based alerts, location triggers, or when you chat with someone in Messages. Particularly helpful is the new alarm feature in iOS 26.2 that ensures you can’t miss time-based alerts. We’ll focus on the iPhone here, but the iPad and Mac interfaces are similar.
Time-Based Notifications
The most straightforward way to be reminded is at a specific date and time. When creating or editing a reminder, turn on the Date and Time switches to set when you want to be notified. You can also enter natural language times in the title, such as “tomorrow at 3 PM”—tap the autocomplete suggestion to convert it to the actual notification time. Voice commands via Siri also work especially well, such as “Siri, remind me to call my mother at 8 PM.” When the time arrives, you’ll receive a standard notification banner on your iPhone, iPad, Mac, or Apple Watch.
For recurring tasks, after setting a date, select an option from the Repeat menu: daily, weekly, monthly, yearly, or custom intervals. Recurring reminders are perfect for routine tasks such as taking out the recycling or submitting weekly reports. (Medication reminders are often used as an example of recurring reminders, but they’re more effectively handled in the Health app.)
Early Reminders
Although reminders are seldom as time-sensitive as calendar events, where you can set multiple alerts ahead of the actual event, it can still be helpful to receive an additional notification to prep for the reminder’s time. For instance, you might want an early notification a week before “Cancel free trial subscription” to evaluate whether you want to keep the service.
After setting a date and time for a reminder, choose an item from the Early Reminder menu to receive an additional notification minutes, hours, or even days before the scheduled time. This gives you a heads-up that something is coming due without replacing the original notification at the scheduled time.
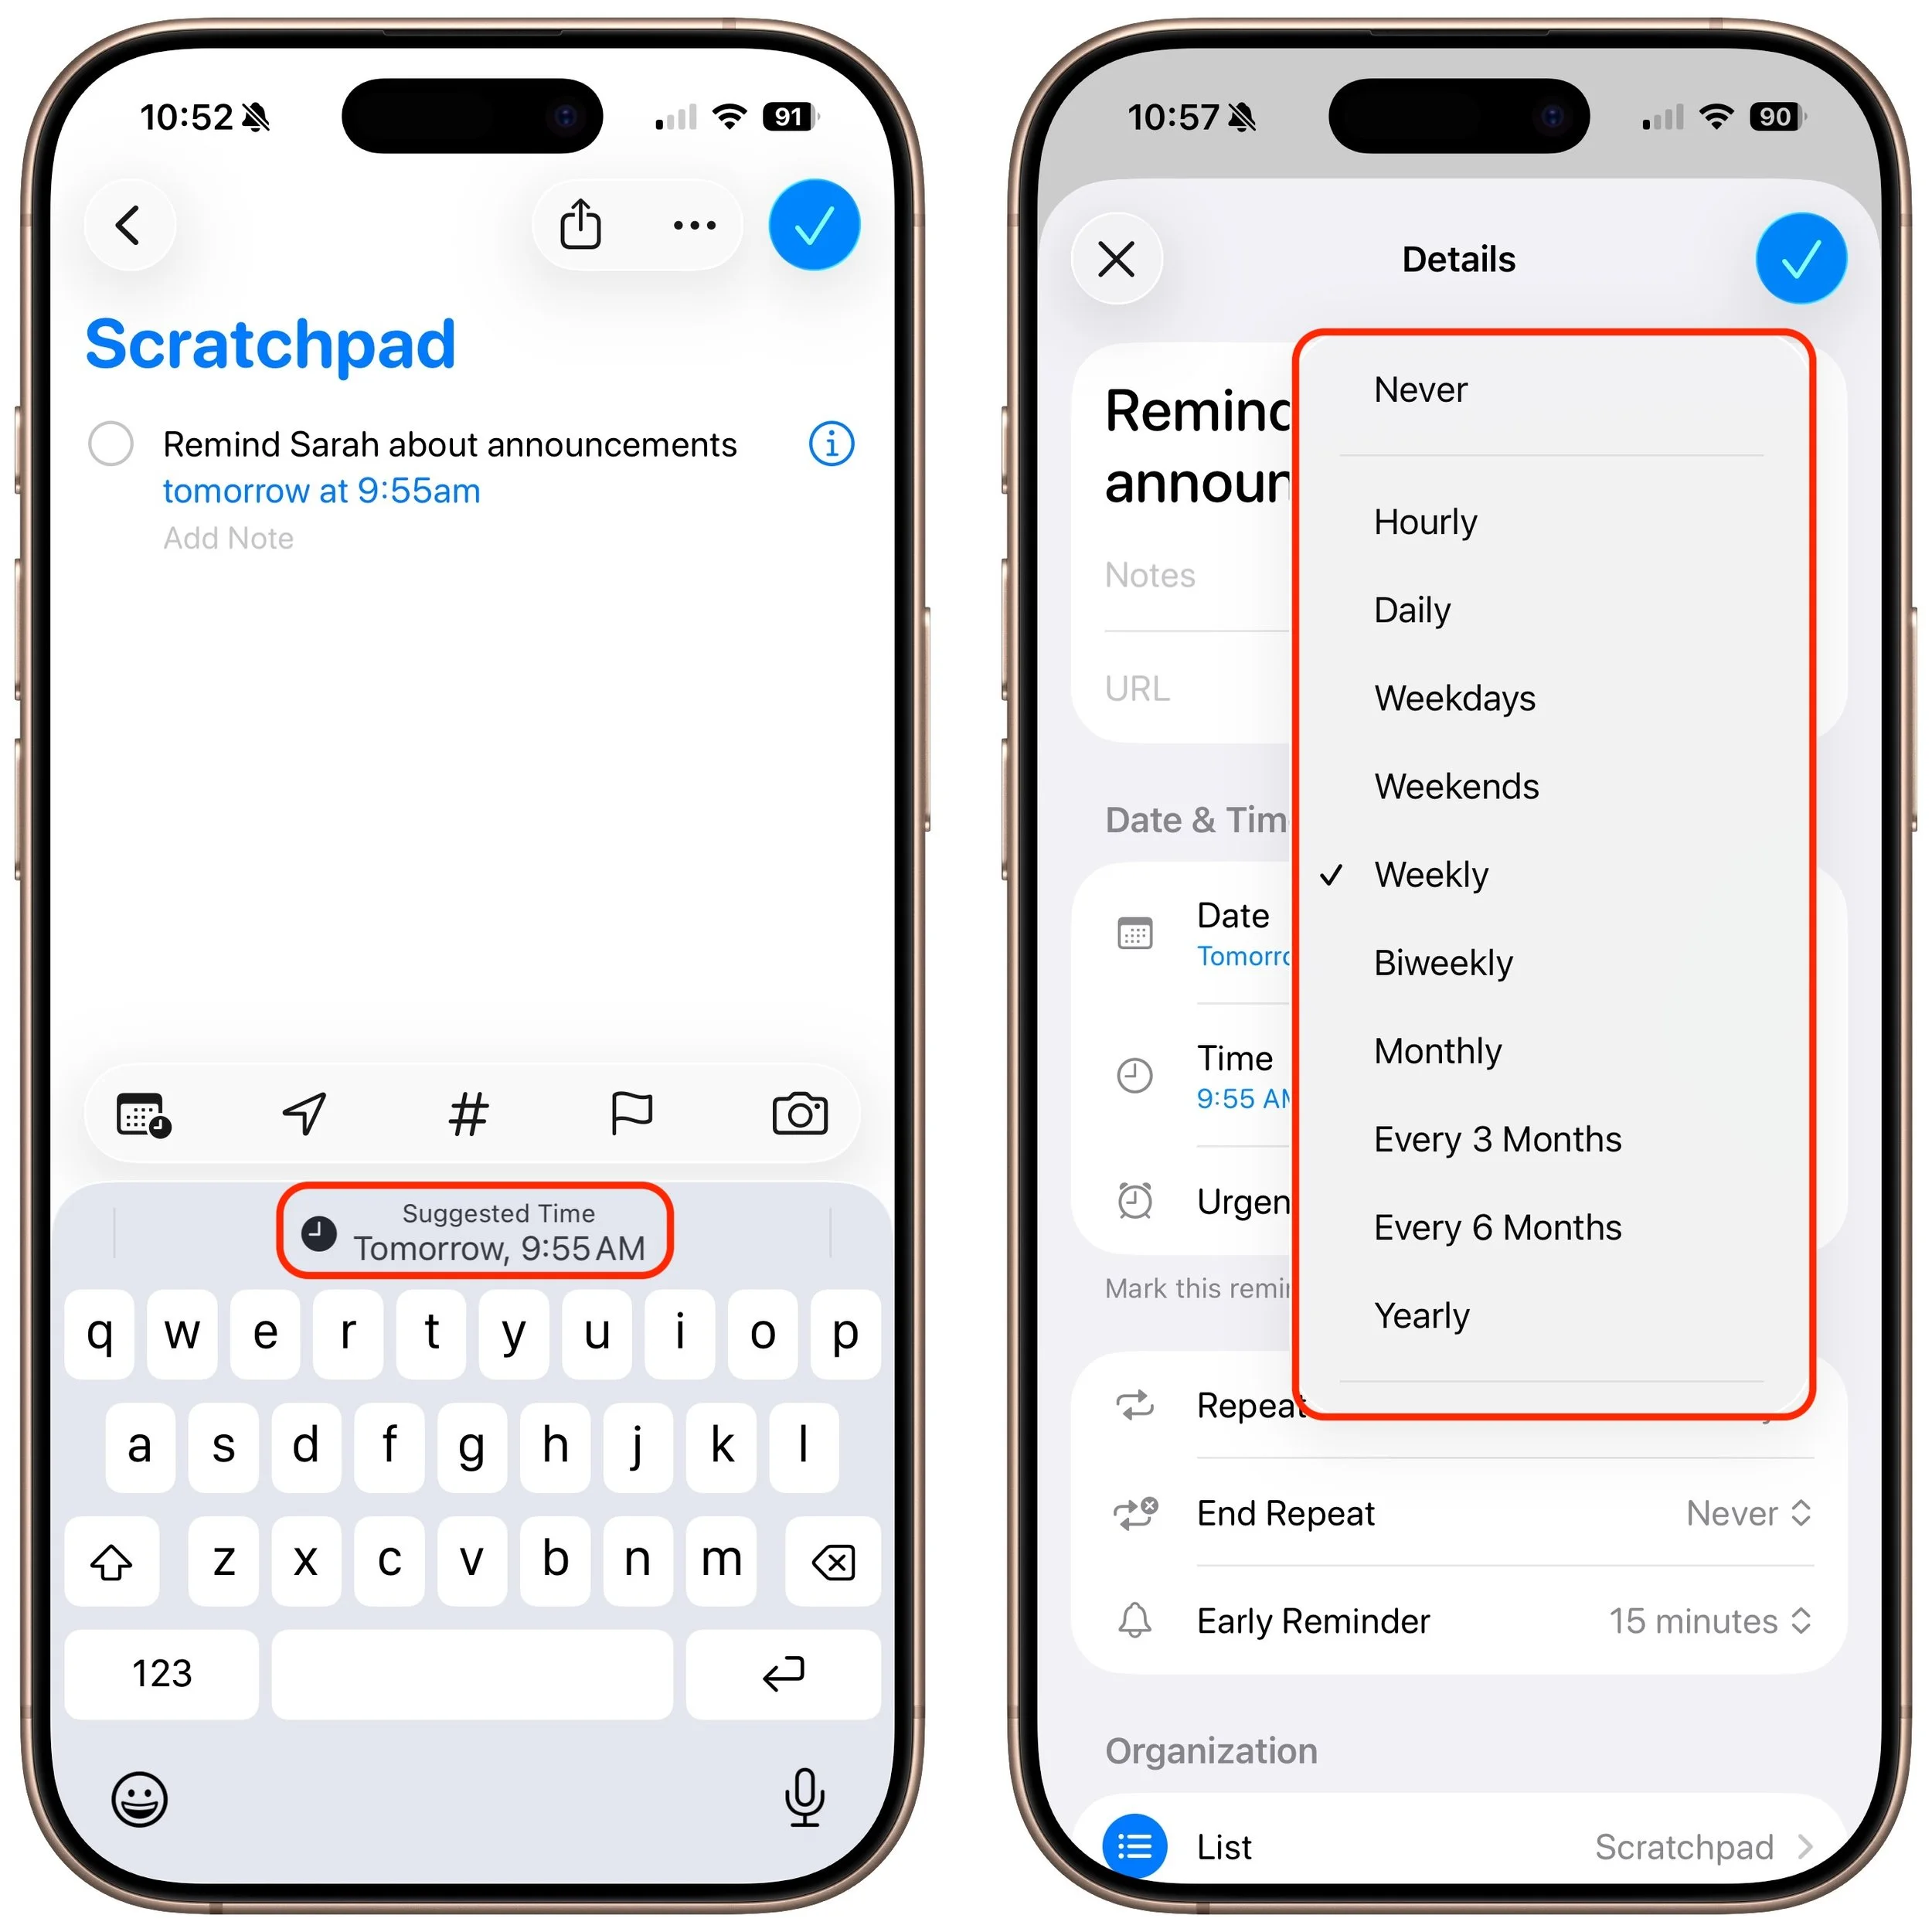
Alarms in iOS 26.2 and iPadOS 26.2
For most reminders, it isn’t important that you start the task as soon as the notification appears. It doesn’t matter exactly when you cancel the free trial, as long as it happens before the renewal date, so a notification that remains on the Lock Screen is sufficient. But for other tasks, missing a notification would be a big problem. If the turkey needs to go in the oven at 2 PM so it’s ready for Thanksgiving dinner, you don’t want to get distracted by the football game and miss the notification.
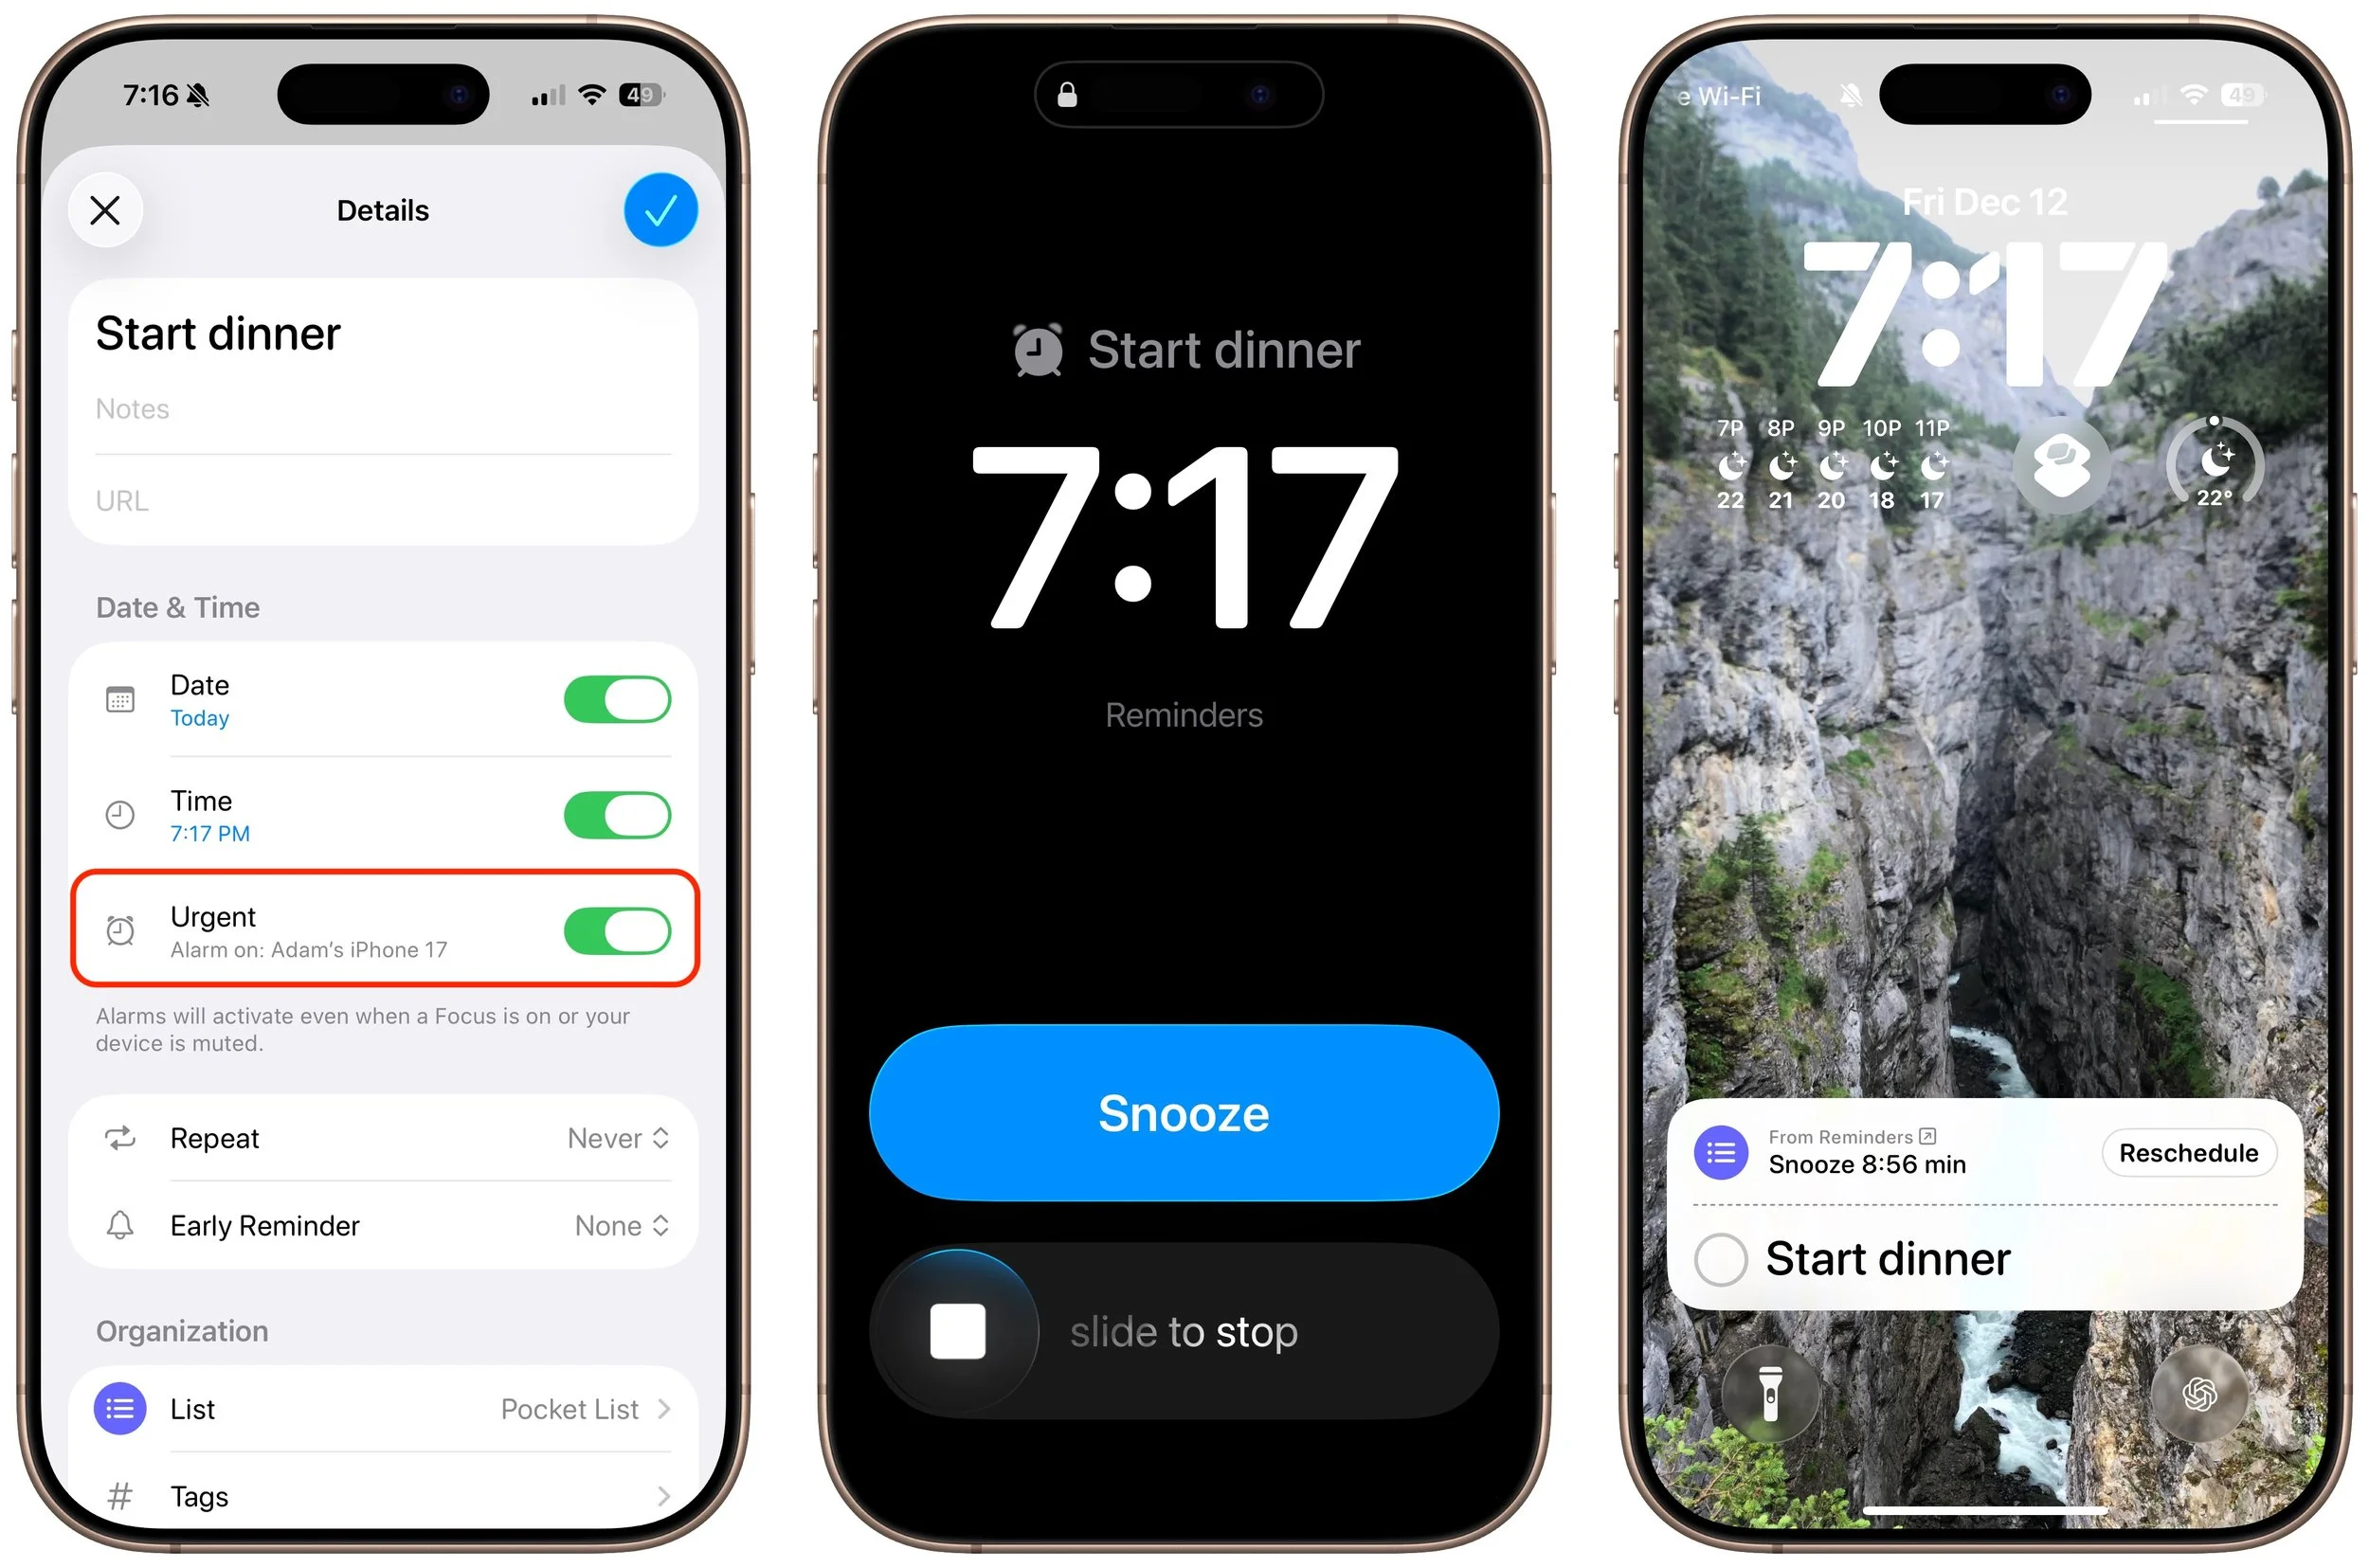
To help, Apple added an alarm feature in iOS 26.2 and iPadOS 26.2 that lets Reminders trigger full-screen alarms that behave like those in the Clock app. It’s essential for critical reminders that absolutely cannot be missed. Alarms only work for the person who created the reminder, even if the reminder is on a shared list.
To enable an alarm for a reminder, set a date and time, then turn on the Urgent switch. (It doesn’t appear to be possible to enable Urgent via Siri.) When the reminder comes due, instead of a simple notification banner, you’ll see (and hear) an alarm on your iPhone (and Apple Watch) with options to dismiss or snooze it for 9 minutes. The alarm will continue to sound until you respond, making it much harder to ignore than a standard notification. You can even reschedule snoozed alarms if necessary.
This feature can be a lifesaver for time-sensitive tasks like picking up a prescription before the drugstore closes, joining crucial meetings, or any reminder where a simple banner notification isn’t enough. We hope Apple adds alarms to the Calendar app as well.
Location-Based Reminders
Reminders can also be triggered based on where you are. Location-based reminders are ideal for tasks like “Pick up dry cleaning” when you’re near the cleaners or “Defrost the chicken for dinner” when you arrive home.
Turn on the Location switch when creating a reminder to choose from options like:
Current location
Saved locations like Home and Work
Custom locations
Getting In or Getting Out (of a car; these options require a CarPlay or Bluetooth connection to your vehicle)
For the location options, you can request alerts when you arrive or leave. To set a custom location, search for an address or point of interest. You can adjust the geofence radius to control how close you need to be for the reminder to trigger.

When Messaging Someone
If you associate something you want to remember with a particular person, Reminders can notify you when you’re communicating with them in Messages. It’s perfect for things you want to mention but aren’t important enough to warrant starting a conversation—“Ask John about their new puppy.”
When editing a reminder, enable When Messaging and select a contact. The next time you open a Messages conversation with that person, a notification will appear reminding you of the task.
Choosing the Right Alert Method
Each notification type serves different purposes:
Time-based notifications work well for scheduled tasks and deadlines, with early reminders for advance warning and alarms for critical tasks that can’t be missed.
Location-based reminders are ideal for errands and place-specific tasks.
When Messaging ensures you remember to discuss something with a specific person.
By combining these options, you can ensure that essential tasks receive the attention they deserve and are delivered in the way most likely to prompt action.
(Featured image by iStock.com/champpixs)
Five Invisible Characters That Still Matter in Word Processing and Layout
Spaces, tabs, and returns seem simple—but using the wrong invisible character can wreck your document’s layout. Learn when to use non-breaking spaces, tabs, and soft returns to create cleaner, more professional documents.

In earlier eras of word processing, users were much more likely to encounter explanations of document structure—not because everyone had to become an expert, but because knowledge was shared differently. Software shipped with detailed manuals, user groups and training classes focused on how documents worked under the hood, and power users routinely shared mental models and tips. (Who remembers being turned onto WordPerfect’s Reveal Codes?) Today’s writing tools are simpler to use and much better at hiding complexity, but that also means fewer opportunities for users to learn that invisible characters even exist, much less that they have different attributes and consequences.
We’ll look at five invisible characters that shape how text behaves: the regular space, non-breaking space, tab, hard return, and soft return. You already use regular spaces and hard returns, but understanding the other three—and when to employ them—can help you create cleaner, more professional documents and troubleshoot layout problems.
How to See Invisible Characters
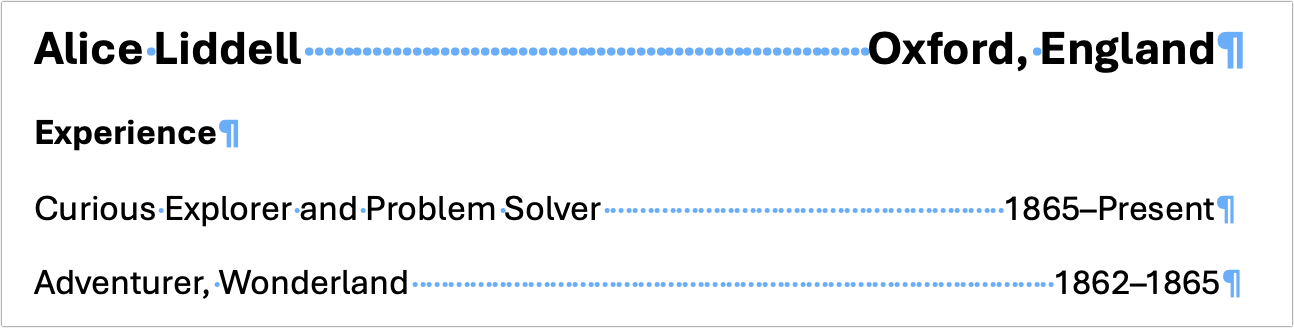
Nearly every text editor, word processor, and page layout app includes an option to show “invisibles” (the term may vary, but the concept is the same). When Show Invisibles is enabled, you’ll see dots, arrows, paragraph marks, and other symbols that represent normally invisible characters. They typically appear in a color different from the default text color, such as the blue characters in the screenshot below.

Regular Spaces Versus Non-Breaking Spaces
Everyone knows what a space is—it’s a breakable separator between words. By “breakable,” we mean the next word can wrap down to the next line of text. A regular space expresses the default intent: separate words and allow normal line wrapping.
However, there are situations when you want two words to stay together because it could be confusing if the second one wraps down to the next line. In those situations, you can use a non-breaking space—inserted by pressing Option-Space on the Mac or (usually) Control-Shift-Space in Windows, and represented in HTML by . Word processors usually distinguish non-breaking spaces from regular spaces when showing invisibles—for example, Microsoft Word uses a small open circle for non-breaking spaces and a dot for regular spaces.
When would you use non-breaking spaces?
Numbers with units: The most common use of non-breaking spaces is to keep numbers with their units, such as “1 TB” or “72 ºF.”
Names with titles, and initials with surnames: Non-breaking spaces are also useful for names with titles, such as “Mr. Spock,” and for people who go by their initials, such as “J. K. Rowling.”
Short phrases that function as a single unit: Some short phrases are conceptually one piece and should not be split across lines. This includes dates (“January 19”), times (“9:41 AM”), version numbers (“iOS 26”), and textual references (“Figure 4”).

If you are using page layout software, check whether it has character styling that keeps words together, such as Adobe InDesign’s No Break style.
Tabs Versus Spaces
Because spaces separate words, many people overuse them to increase visual separation between words and to align text, such as in a résumé with a job title on the left and the associated dates on the right.
Unfortunately, spaces work poorly for aligning text because most fonts are proportional, meaning a lowercase i is thinner than an uppercase W. Therefore, spaces can’t align text perfectly—not because spaces differ in width, but because the characters before them do. Ragged alignment in a printed document is easily noticeable and looks unprofessional.
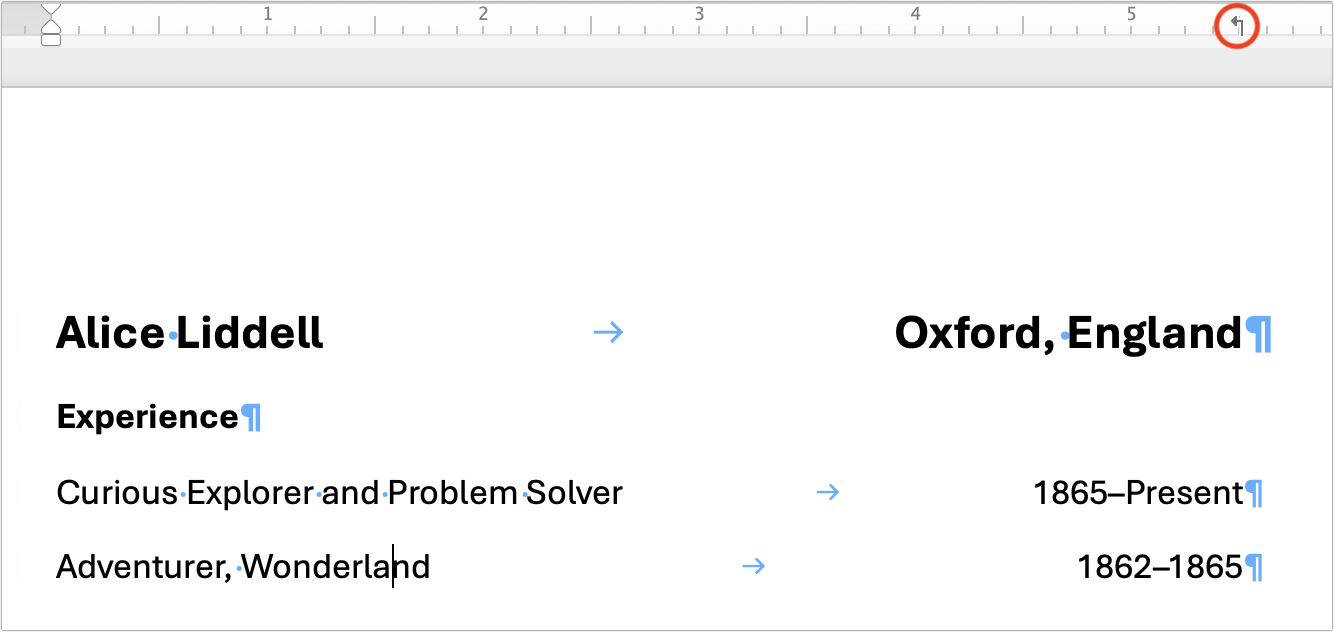
The simple solution is to use a tab, which aligns to a fixed position marked by a tab stop. Pressing the Tab key inserts a tab to the next tab stop, which can usually align text to the left, right (shown below), center, or decimal point. Most apps have a few default tab stops, and you may never need anything different. However, you can usually customize the behavior and location of the tab stops. First, put your insertion point in the paragraph you want to work in, or select a swath of paragraphs. Then, either use the ruler to customize the stops or use dedicated tab controls, such as in Microsoft Word’s Format > Paragraph > Tabs dialog. More advanced users will want to customize tab stops within paragraph styles.
Although we can now use tables and layout tools for much of what tabs were necessary for in the early days of word processing, tabs remain useful in some situations, such as:
Horizontal placement: If you want your signature to appear below a letter on the right, you could right-align the entire line, but a right-aligned tab stop gives you more control over where the signature appears.
Simple lists: For a short contact list that includes name, phone, and email, setting a few tab stops could be easier than inserting and formatting a table.
Quick outlines: When creating a quick outline, such as an agenda with left-aligned times and indented session titles, use tabs to create indentation. This preserves the outline structure and makes it easier to adjust later.
If you’re trying to align text rather than separate words, a tab expresses that intent far better than spaces ever can.
Hard Returns Versus Soft Returns
Most people understand hard returns, which separate one paragraph from the next. Pressing Return (Mac) or Enter (Windows) creates a hard return. For example, you’d put a return between a heading paragraph and the following body paragraph. Less well-known are soft returns, which start a new line within a paragraph, but do not end the paragraph. An important side effect of a soft return is that whatever paragraph formatting is applied to the paragraph will continue to apply to the new line. To type a soft return, type Shift-Return or Shift-Enter. (In HTML, paragraphs are marked with a pair of <p></p> tags, while soft returns use the <br> tag.)
The most common reasons to use soft returns include:
Multi-line formatting: Some blocks of text are conceptually single paragraphs displayed across multiple lines. Think of postal addresses, poetry, and song lyrics.
Maintain numbering or outline level: In lists and outlines, hard returns increment a list number or add a new outline entry, whereas soft returns insert a line break without creating a new number or outline entry. (HTML uses <li></li> tags to denote list items, but you can still use <br> tags within list items.)
Narrow layouts: Soft returns are often necessary to force text down to the next line in columns, sidebars, captions, and callouts. They are a helpful supplement to non-breaking spaces.
Intentional formatting: In multi-line headings, captions, and labels, aim to keep lines roughly equal in length, with the last line slightly longer than the others. Use soft returns to adjust line lengths as needed.
In short, use hard returns to separate paragraphs that are standalone units of text. Use soft returns to add line breaks within a chunk of text that is conceptually a single paragraph.
When Invisible Characters Cause Problems
Understanding non-breaking spaces, tabs, and soft returns is important because they can appear in your text without you noticing. Someone might have intentionally added them, or you might have accidentally included them by copying and pasting from PDFs or the Web. Some common invisible character issues you might encounter while formatting include:
Short lines: If a line appears unusually short, it could be caused by a soft return moving text to the next line or a non-breaking space causing two words to wrap down together.
Fragile alignment: If aligned text shifts when you change fonts or alignment, it’s usually because spaces are being used instead of tabs.
Text gaps: If there’s unexpected white space between words, check if a tab is there instead of a space.
Broken list numbering: In an automatically numbered list, broken numbering may be explained by a soft return being used instead of a hard return. Fix it by deleting the return between the misnumbered line and the one above, pressing Return to insert a new hard return, and repeating as needed.
Remember, you don’t have to type with invisible characters showing, but if your text has mysterious white space or odd line wrapping, you can likely resolve those problems quickly by viewing invisible characters and making sure they are doing what they should.
(Featured image by iStock.com/Fabio Principe)
Stay Safe in 2026 with These New Year’s Resolutions
Kick off 2026 with smart security habits: back up every device, stay current on software updates, outsmart phishing attempts, avoid sketchy sites, and streamline your logins with a password manager.

We’re approaching the end of 2025, so we encourage you to consider your New Year’s resolutions. For many people, the new year offers an opportunity to reflect on habits we’d like to adopt or solidify. Although we support reducing social media use and making other positive lifestyle changes, we’d like to suggest a few additional resolutions to improve your digital security and reduce the risk of bad things happening to you online.
If you read through this list and think, “I’m already doing all that,” then you’re done. Keep up the good work!
Back Up All Your Devices Regularly
The most important thing you can do to avoid digital disasters is to back up your data regularly. Bad things happen to good devices, like a Mac’s SSD failing, an iPhone falling into a pool, or data being lost due to theft, fire, or flood. With a solid backup plan, you can recover from nearly any problem.
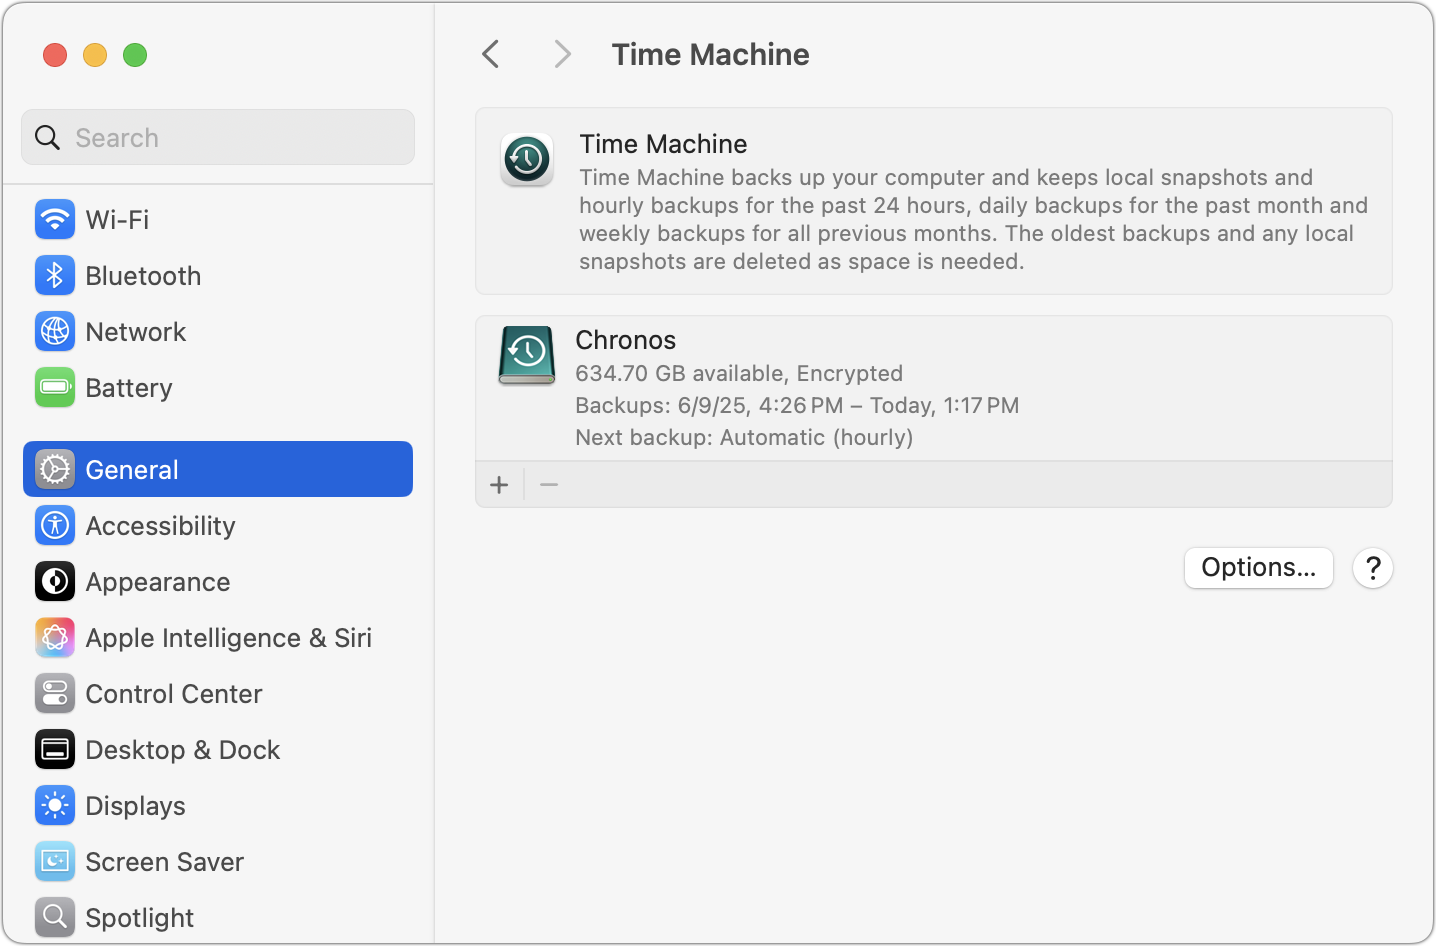
For the Mac, the easiest way to back up is to use an external drive with Time Machine, but an off-site or Internet backup is also essential. Backblaze is a good choice, but there are numerous online backup services. For iPhones and iPads, it’s simplest to back up to iCloud, which automatically happens every night if you turn it on in Settings > Your Name > iCloud > iCloud Backup. You can also back up iPhones and iPads to your Mac if you do not have enough iCloud storage space. Apple Watches automatically back up to their paired iPhones, and that Watch data is included in iPhone backups, making restores straightforward. Whatever your setup, restore a few files periodically as a test to make sure your backups are working.
Always Install Security Updates
An important step to enhance your security is to install new operating system updates and security updates promptly after Apple releases them. While the specifics rarely make headlines because they are highly technical and detailed, you can gauge the significance of security updates by noting that a typical update fixes 10–30 vulnerabilities identified by Apple or external researchers. Other security updates include only one or two fixes, as they’re aimed at addressing zero-day vulnerabilities currently being exploited in the wild.

It’s usually wise to wait a few days after an update appears before installing it, in case it causes any undesirable side effects. Although such problems are rare, when they do happen, Apple quickly pulls the update, resolves the issue, and releases a new version, typically within a few days.
Use a Password Manager
We’ll keep emphasizing the importance of a password manager until passkeys—the replacement for passwords—become widespread, which will take years. Until then, if you’re still typing passwords manually or copying and pasting from a list stored in a file, please start using a password manager like 1Password or Apple’s Passwords, which is now pretty good. A password manager provides six significant benefits:
It generates strong passwords for you. Password1234 can be hacked in seconds.
It stores your passwords securely. Anyone walking by your unlocked Mac can read an Excel file on your desktop.
It enters passwords for you. Wouldn’t that be easier than typing them in?
It audits existing accounts. How many of your accounts use the same weak password, which has likely been stolen in multiple breaches?
It lets you access passwords on all your devices. Logging in to websites is just as easy on the iPhone and iPad!
It can store and enter two-factor authentication codes. Whenever possible, protect important accounts with two-factor authentication so even a stolen password won’t provide access.
A bonus benefit for families is password sharing. It allows couples to share essential passwords or parents and teens to share specific passwords.
Using a password manager is quicker, simpler, and more secure. If you need assistance getting started, reach out.
Beware of Phishing Email
Individuals and businesses often experience security breaches due to phishing, which involves fake emails that trick someone into revealing login details, credit card numbers, or other sensitive data. While spam filters catch many of these attacks, you must stay alert. Here’s what to watch out for:
Any email that tries to get you to reveal information, follow a link, or sign a document
Messages from unfamiliar people, asking you to take an unusual action
Direct email from a large company for whom you’re an anonymous customer
Forged email from a trusted source requesting sensitive information
Urgent threats like “account locked,” “unauthorized charge,” or “action required”
All messages that contain numerous spelling and grammatical mistakes
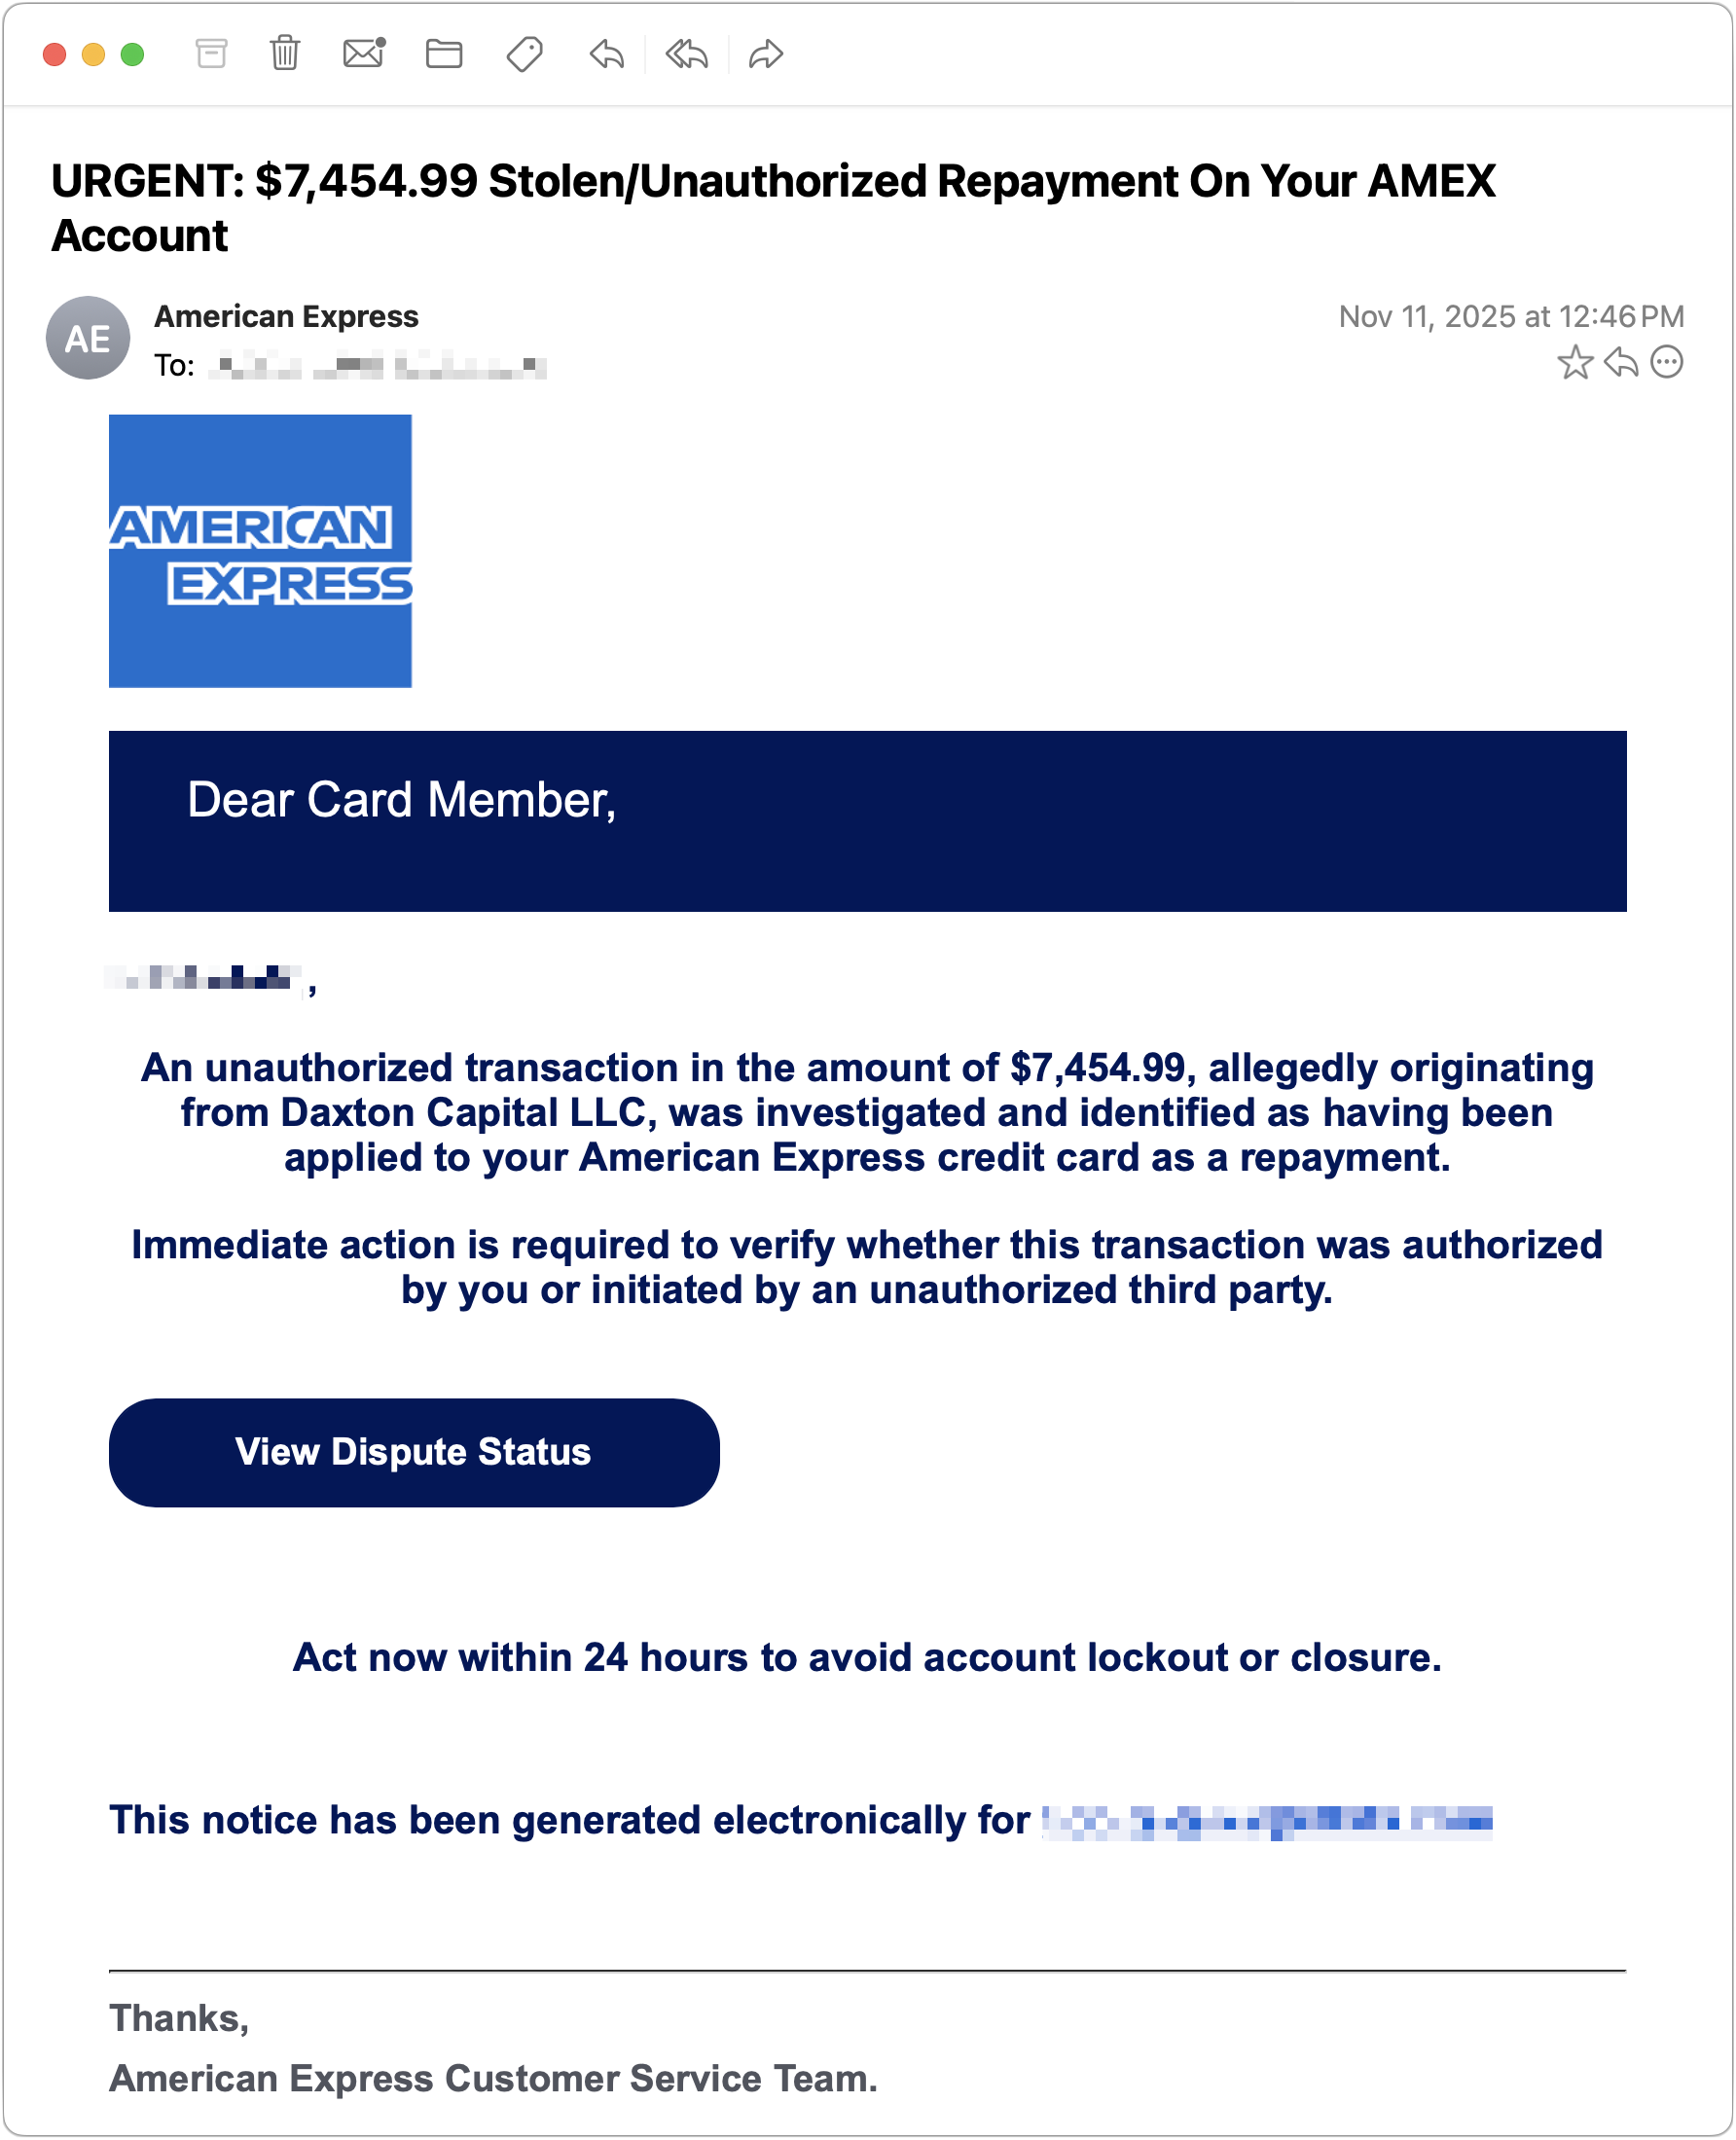
When unsure, avoid clicking the link or replying to the email. Instead, reach out to the sender via another method to verify the message’s authenticity. Legitimate companies—especially Apple, financial institutions, and cellular carriers—will never ask for your password or two‑factor codes by email, text, or voice.
Never Respond to Unsolicited Calls or Texts
Phishing attacks increasingly take place via texts and phone calls—and even some via deepfake audio and video. Because of weaknesses in the telephone system, these messages and calls can appear to come from trusted companies like Apple and Amazon. Other common scams warn about unauthorized logins or payments to trick recipients into calling scammers, advertise fake deliveries with malicious tracking links, or send fake two-factor authentication messages that prompt recipients to click a link to “secure” their account.
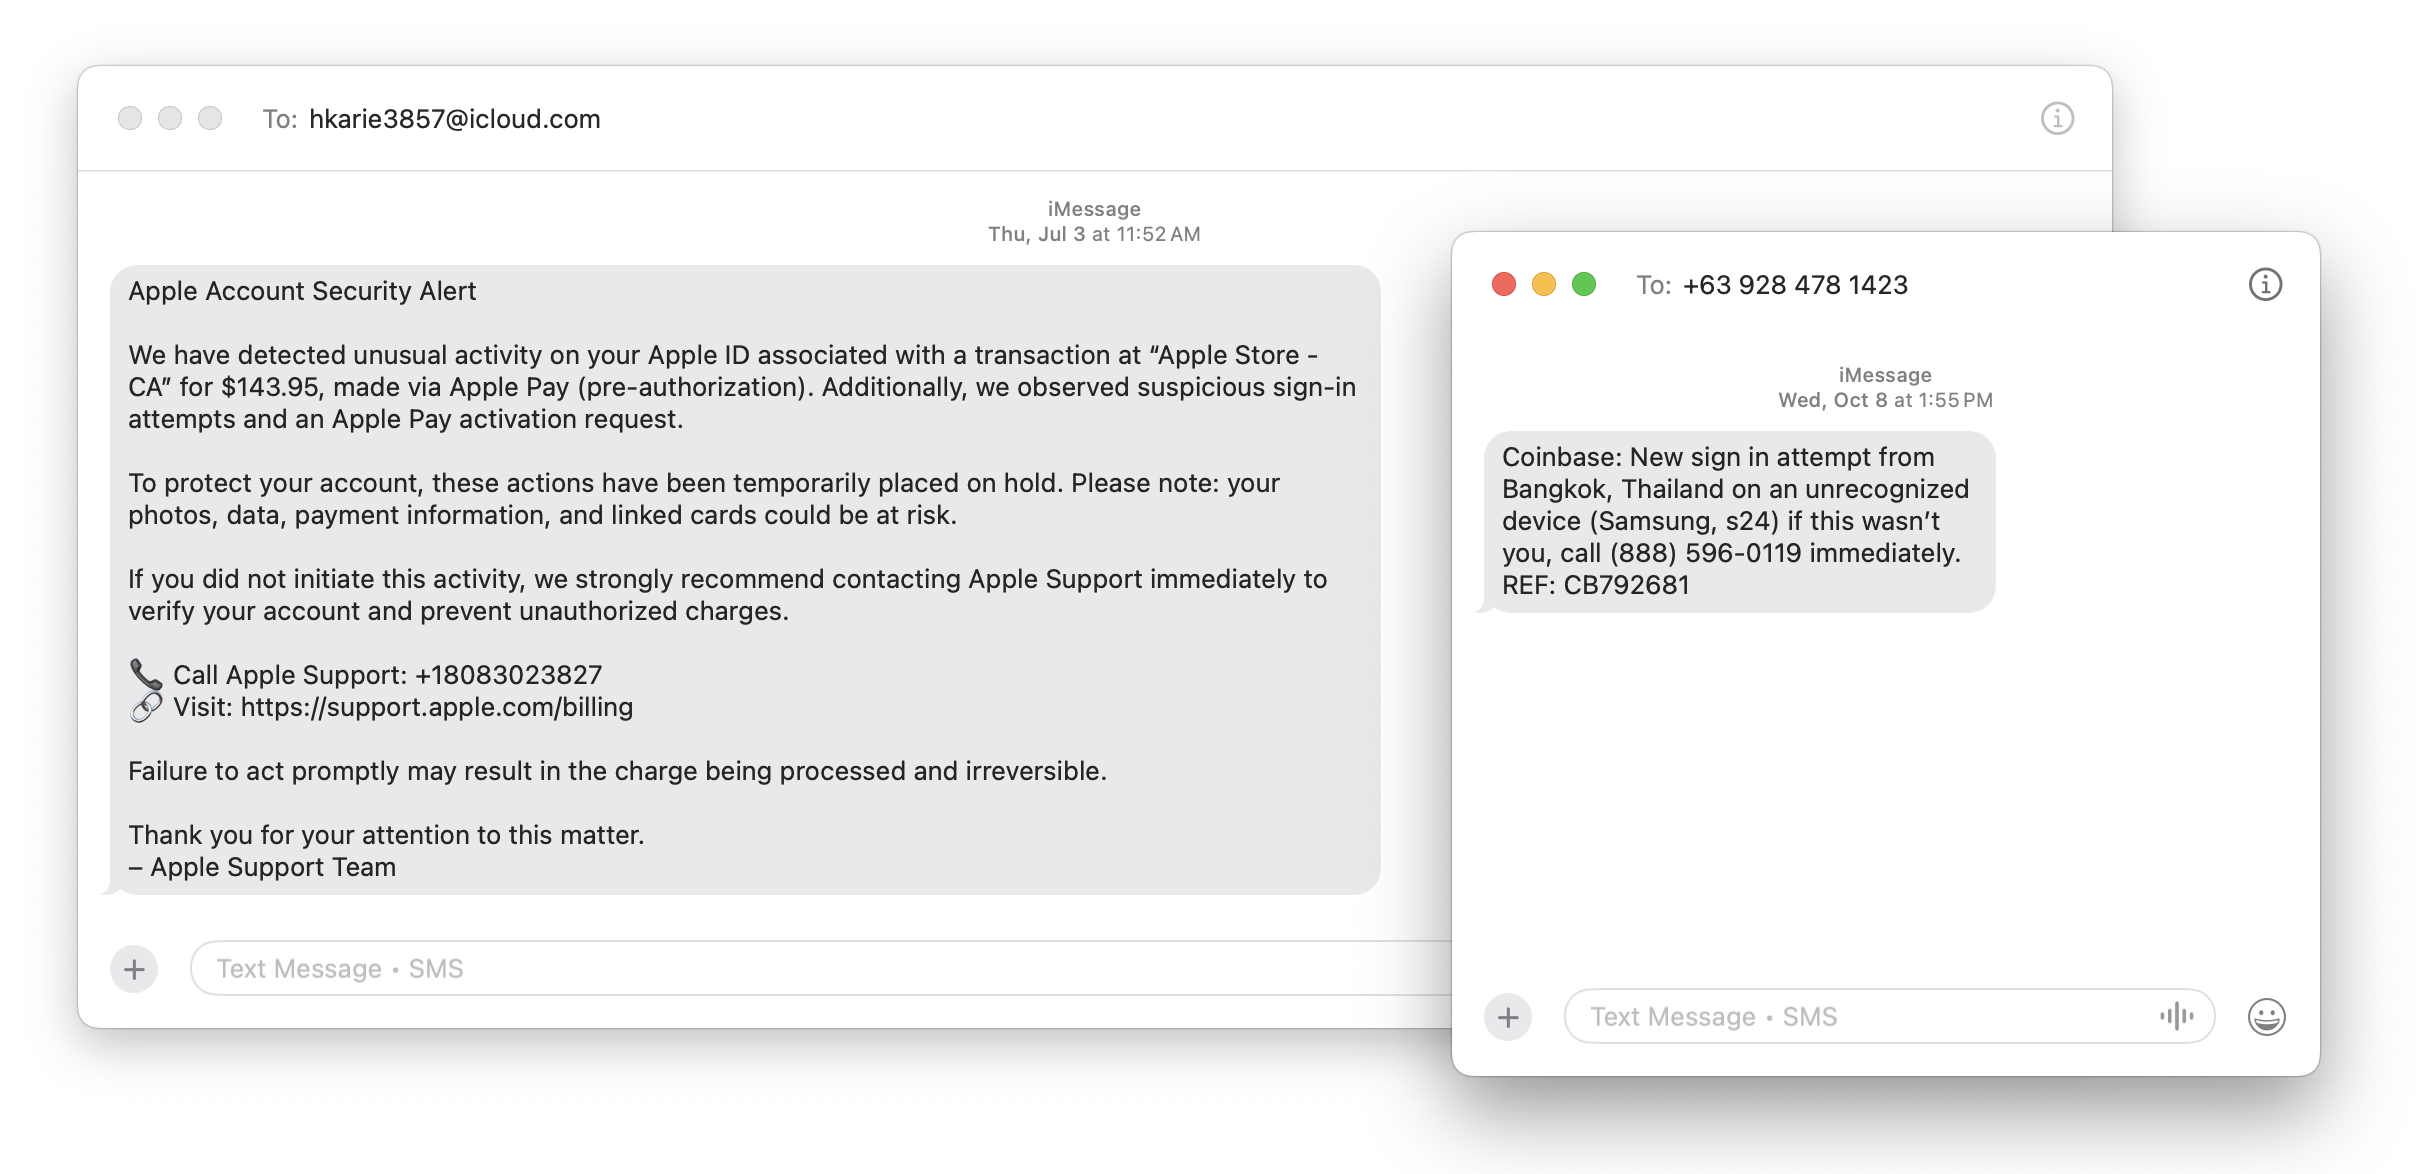
Avoid clicking links in texts unless you recognize the sender and it makes sense for you to receive that link. (For example, Apple might send text messages with delivery details for a recently placed order.) Never enter login information on a website you reach through a link because you can’t be sure it’s legitimate. Instead, if you’re interested in more details, go directly to the company’s official website by typing its URL into your browser, then log in from there.
For calls from companies, unless you’re expecting a callback regarding a support ticket you opened, don’t answer—caller ID can be spoofed. Let the call go to voicemail, and if you believe it’s important to respond, look up the company’s phone number from a reliable source and contact someone at that number instead of using the one provided by voicemail.
Avoid Anything Associated with Sketchy Websites
We won’t dwell on this last point, but it’s worth noting that you’re much more likely to encounter malware on fringe websites or those that cater to societal vices. The more you can steer clear of sites that deal with pirated software, cryptocurrency, adult content, gambling, or the sale of illicit substances, the safer you’ll be. That’s not to say reputable sites haven’t been hacked and used to spread malware, but such cases are far less frequent.
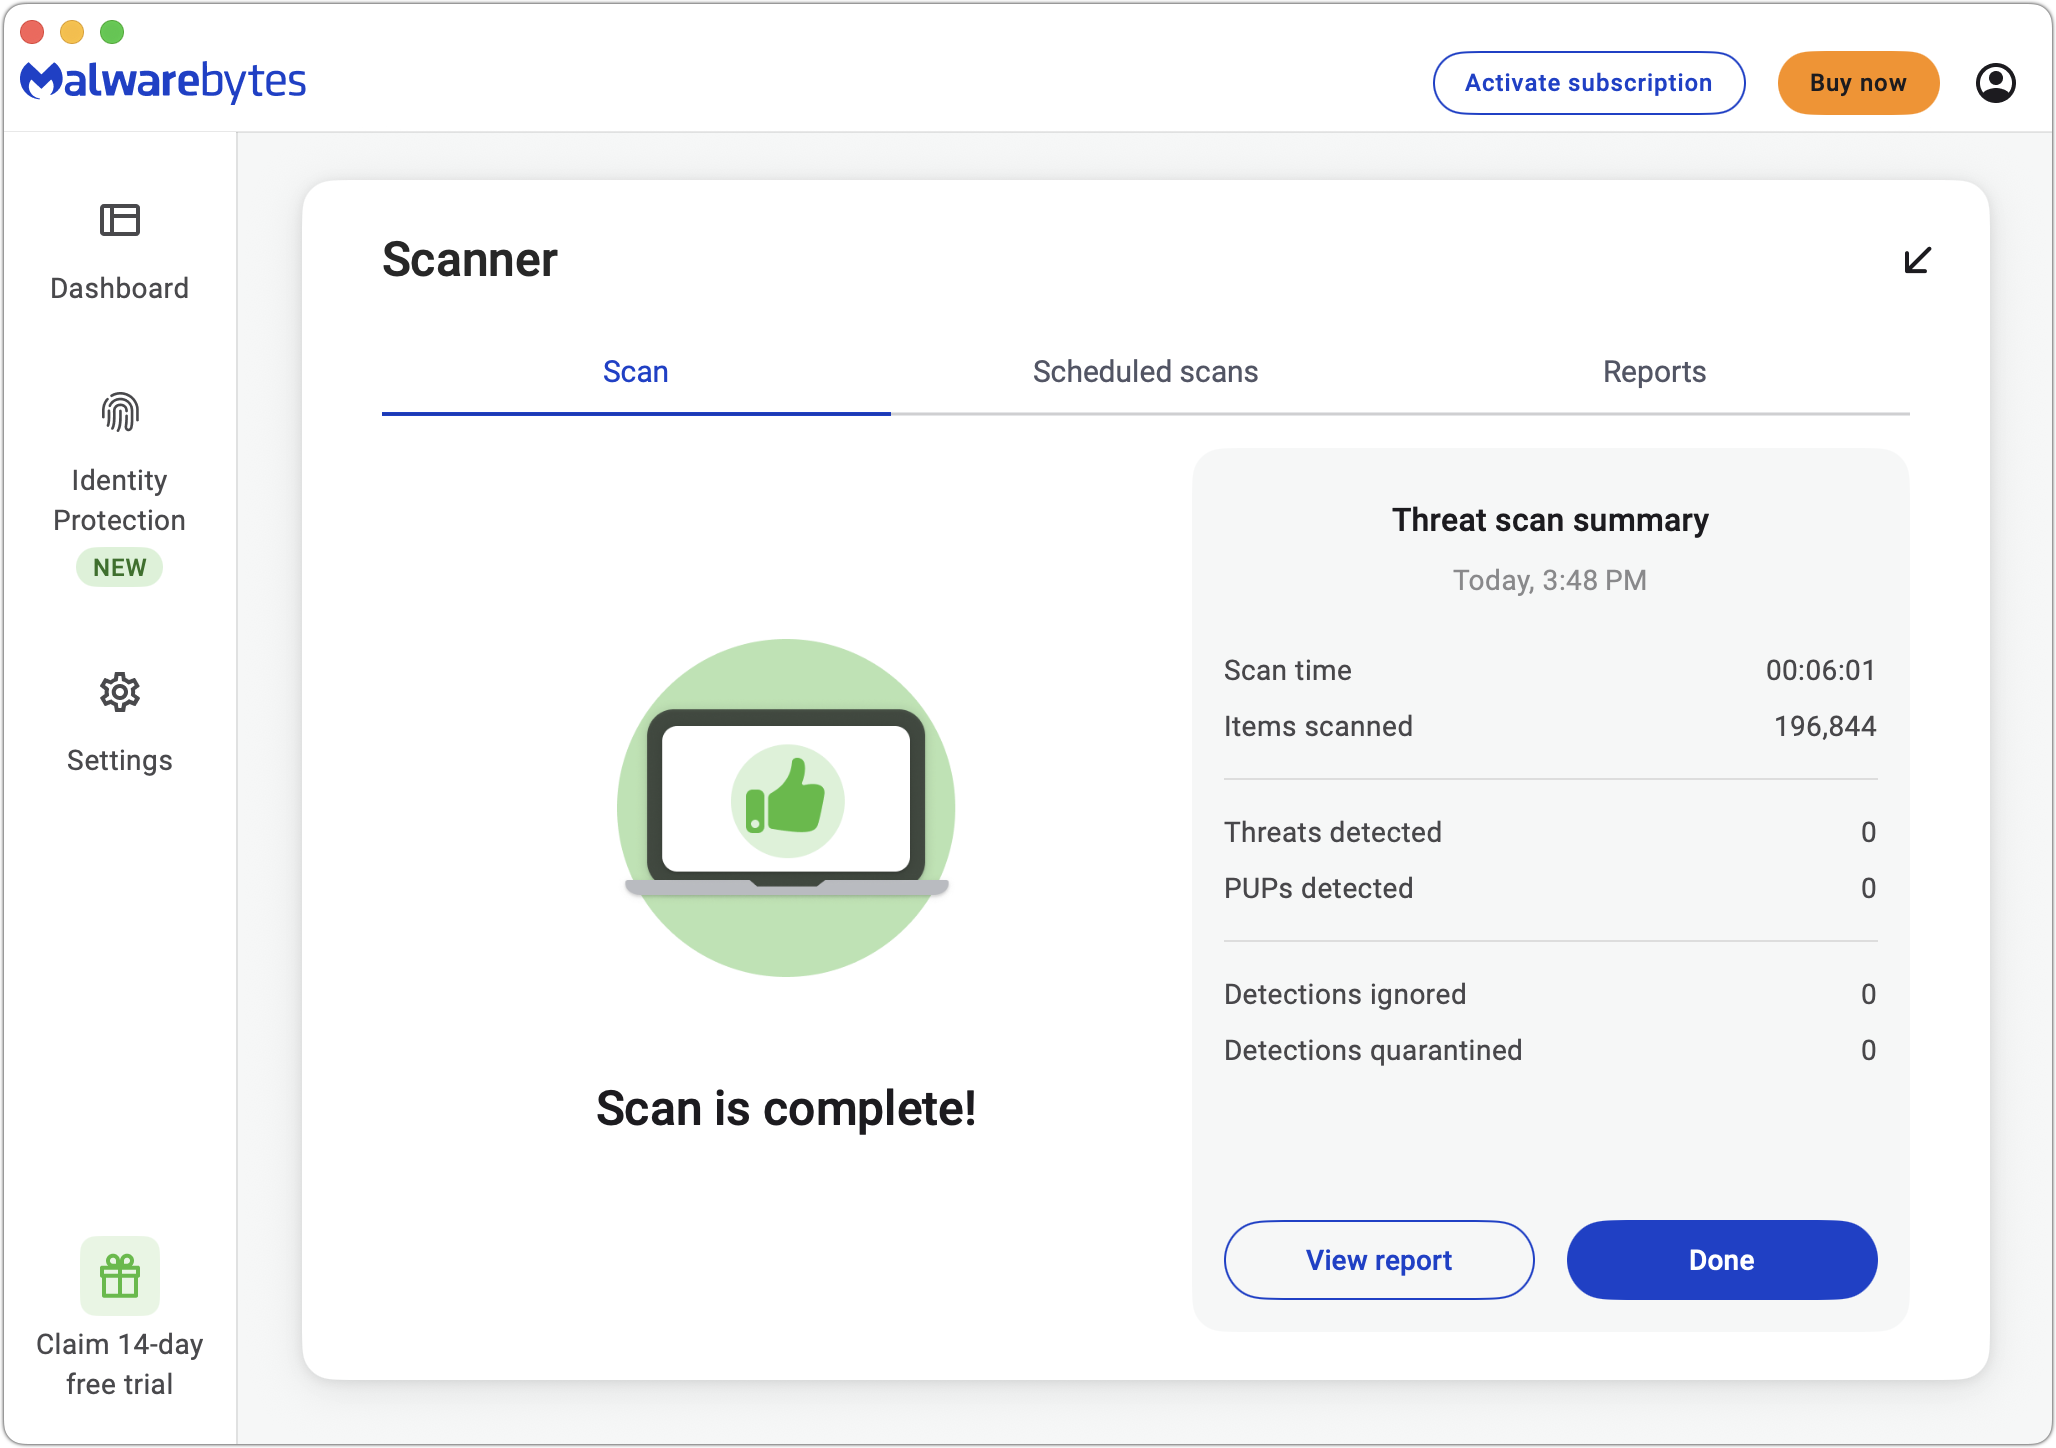
Don’t call numbers from pop‑ups or ads, don’t grant remote access, and don’t pay for any service you didn’t seek out unprompted. Instead, go directly to the company’s official site (type the URL) or contact us for help. And never paste commands into Terminal from websites or “verification” pages—you could install malware without realizing it. If you’re worried after spending time in the darker corners of the Web, stop by GeekHampton and we’ll get Malwarebytes set up for you and run a full scan to make sure your Mac is clean.
Let’s raise a glass to staying safe online in 2026!
(Featured image by iStock.com/Marut Khobtakhob)
New Features in iOS 26.1
Struggling with Liquid Glass transparency or accidental camera launches? iOS 26.1 addresses both and adds a safer slide to stop alarm control, swiping to switch songs in Music, Background Security Improvements, and more Live Translation languages.
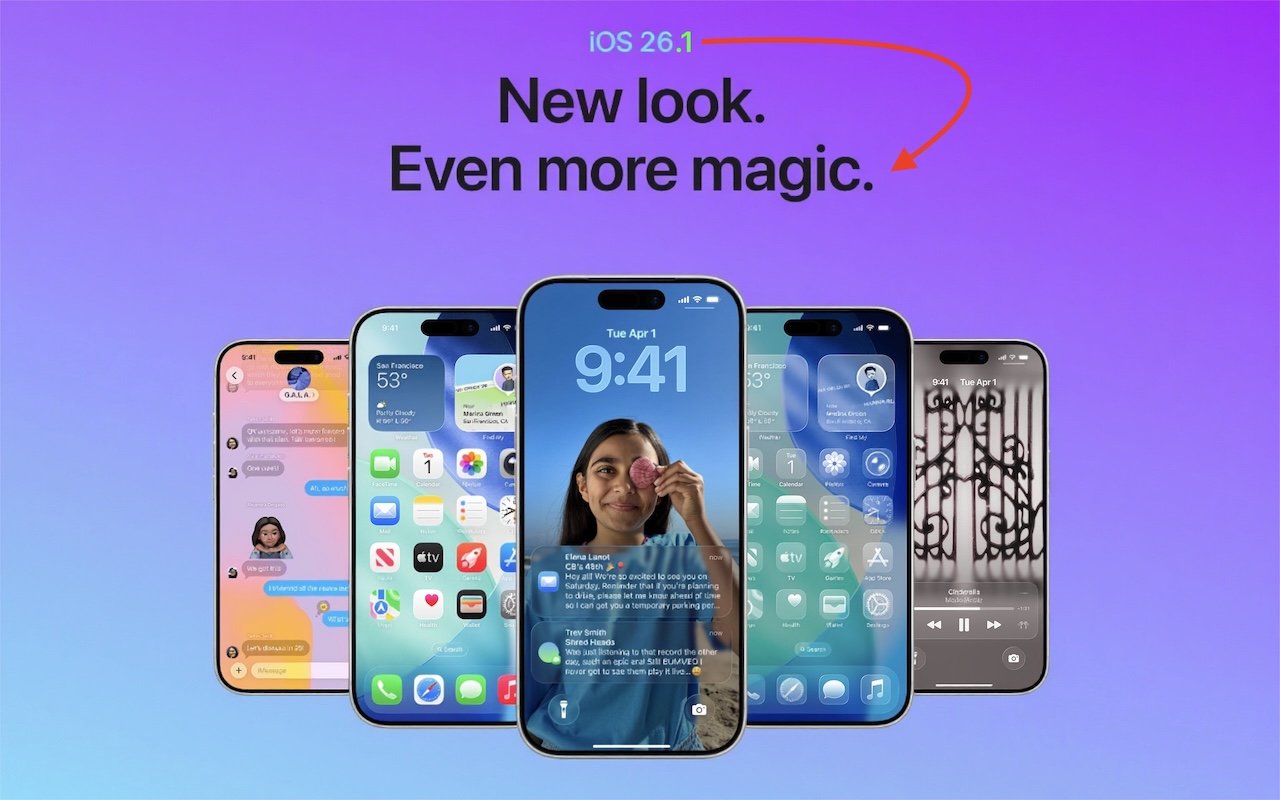
The first feature update to iOS 26 is now available—go to Settings > General > Software Update to install iOS 26.1. It doesn’t introduce any game-changers, but there are a few new options and tweaks worth knowing about.
Tinted Option for Liquid Glass
For many people, Liquid Glass’s aggressive transparency can make some interface elements, especially notifications, difficult to read. Until now, your best bet for improving readability was to turn on Settings > Accessibility > Display & Text Size > Reduce Transparency. In iOS 26.1, Apple bowed to user feedback and added a new Tinted view in Settings > Display & Brightness > Liquid Glass, which adds a subtle tint and increases the opacity of many Liquid Glass interface elements. In the screenshot below, the left image uses the default Liquid Glass Clear view, the middle one uses the Tinted view, and the right one uses Clear with Reduce Transparency. You can decide which you like best.

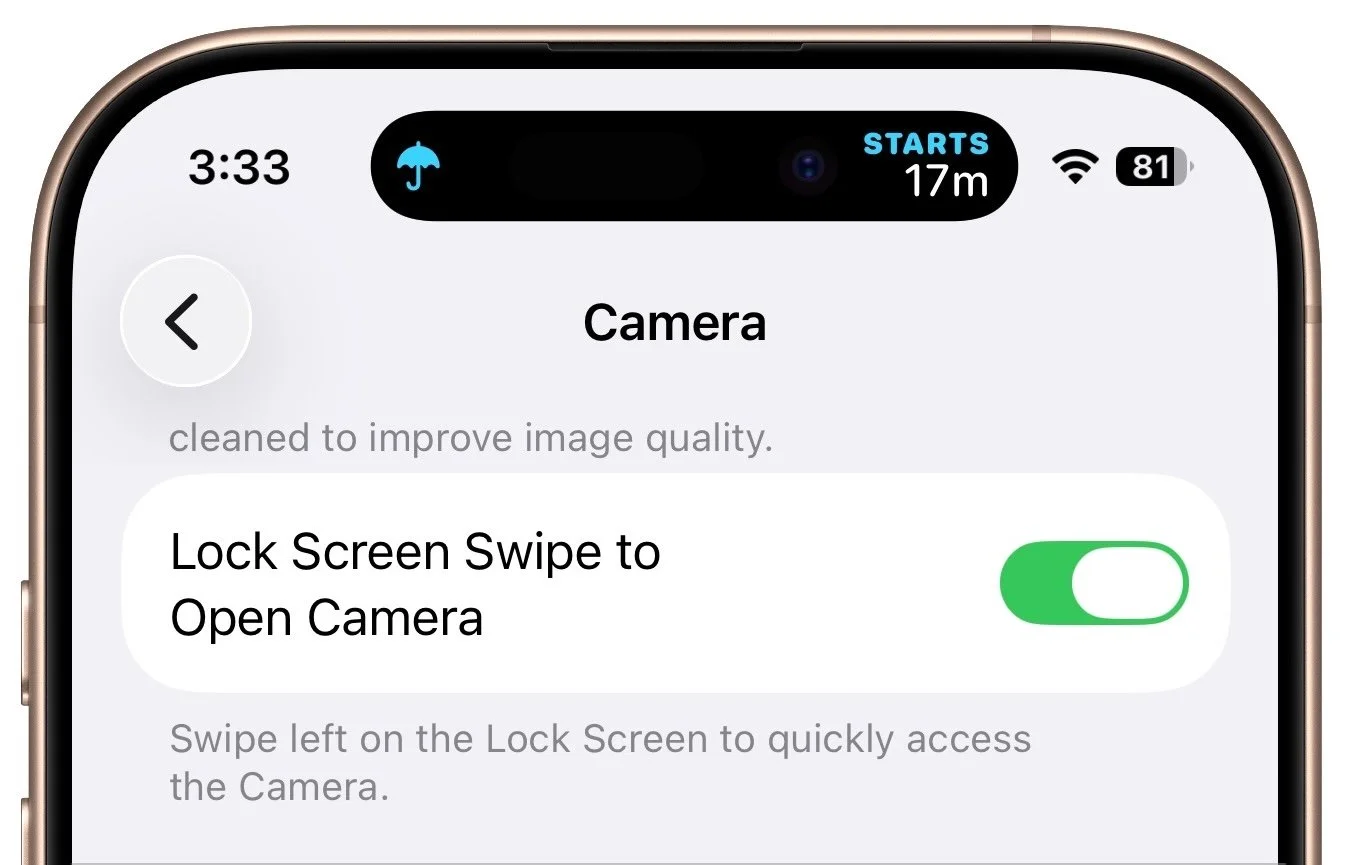
Disable Lock Screen Camera Swipe
For many years, a fast way to get to the Camera app has been to swipe left on the Lock Screen. With new iPhones featuring the Camera Control button for quick access to the Camera app, Apple has given us the option to disable the Lock Screen left swipe. If you find yourself accidentally opening the Camera app from the Lock Screen, you can now prevent that from happening by turning off Settings > Camera > Lock Screen Swipe to Open Camera.
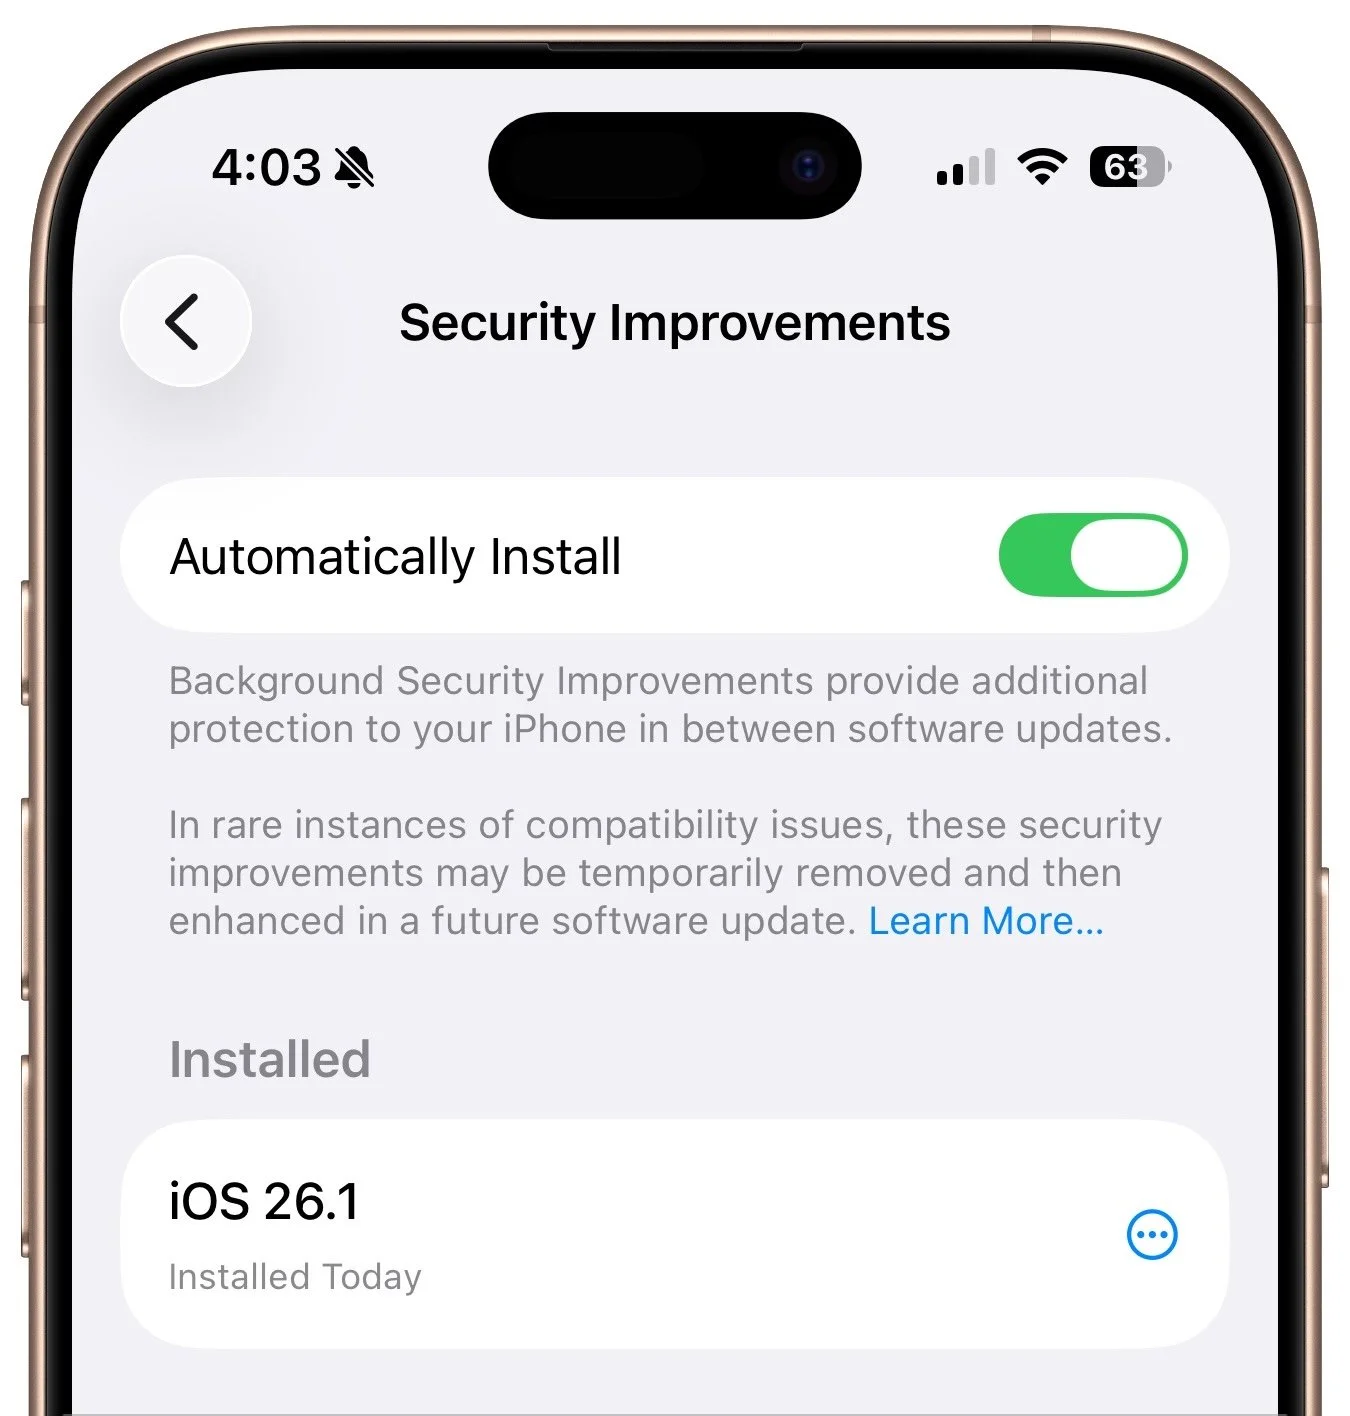
Background Security Improvements
Several years ago, Apple introduced Rapid Security Responses, focused security updates that aimed to reduce update hesitancy with small downloads, automatic installation, and easy reversal. For unknown reasons, Apple used them only a couple of times before reverting to traditional operating system updates. Now, Rapid Security Responses seem to have returned under a new name: Background Security Improvements. They’re enabled by default in Settings > Privacy & Security > Background Security Improvements > Automatically Install. If you prefer to approve these updates in advance, you can turn that off. (A similar setting is available for macOS 26.1.)
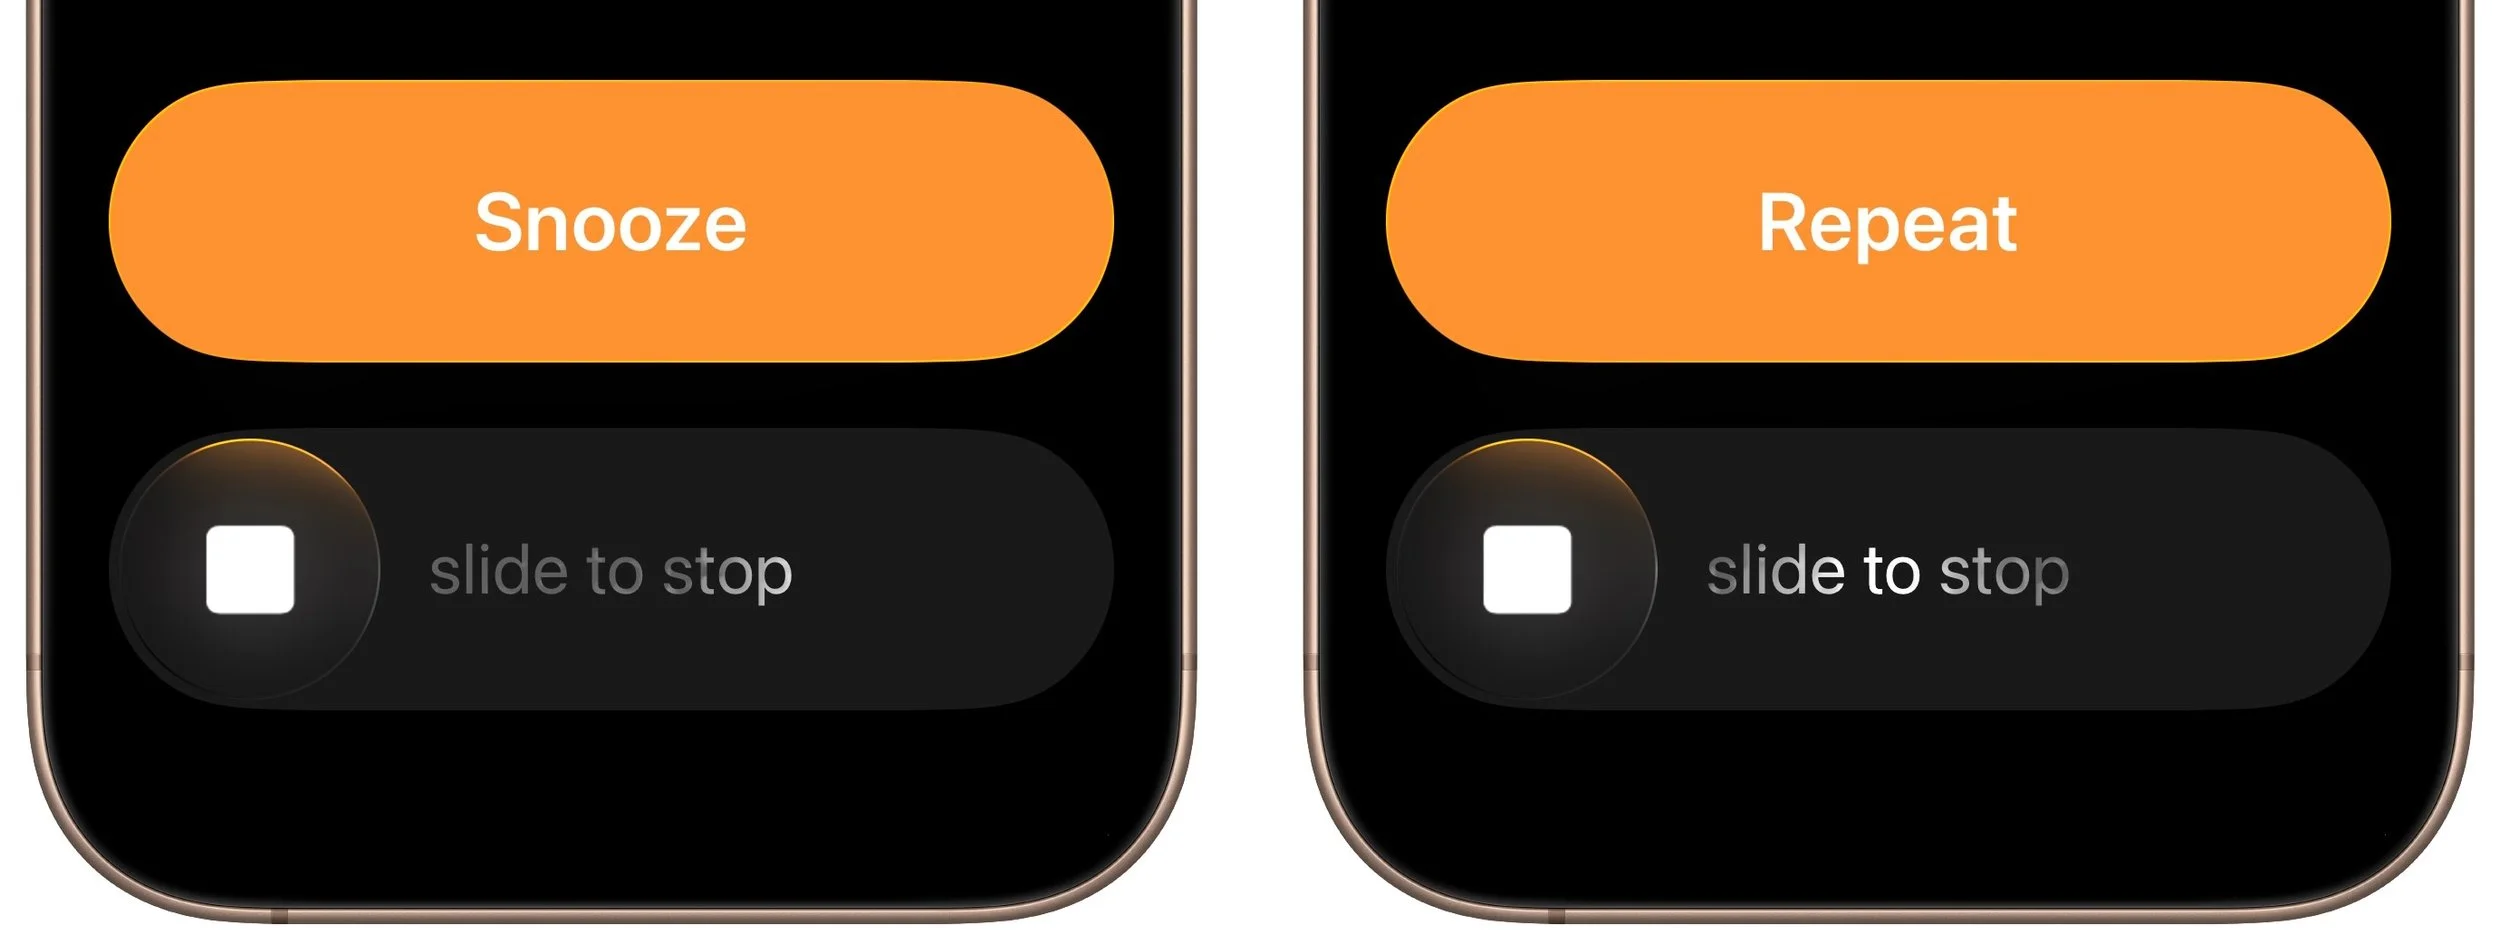
Slide to Stop Alarms and Timers
In iOS 26, Apple increased the size of the buttons that appear when alarms or timers go off, but the large Stop button was easy to hit when you meant to tap Snooze (for alarms) or Repeat (for timers). Apple made that mistake much less likely in iOS 26.1 by requiring you to slide the on-screen control to stop the alarm or timer.
Swipe Between Songs in Music
Sure, you could just tap a song in the album or playlist you’re viewing, but iOS 26.1 adds a subtle way to move to the next or previous track: swipe left (next) or right (previous) on the MiniPlayer at the bottom of the screen.
More Languages for Live Translation
iOS 26 introduced Live Translation with the AirPods 4 with Active Noise Cancellation, AirPods Pro 2, and AirPods Pro 3. Initially, it supported English (US and UK), French, German, Portuguese (Brazil), and Spanish (Spain). In iOS 26.1, Apple added Chinese (Mandarin, simplified and traditional), Italian, Japanese, and Korean. To avoid delays in getting new languages when you are out and about, download the languages you expect to need ahead of time, when you have a fast Internet connection. Go to Settings > Bluetooth and tap the ⓘ next to your AirPods. Scroll to and tap Languages, then select the desired language. For actual use, open the Translate app, tap Live, and select the two languages you want to translate between.
There are a few other tweaks that most people won’t notice, such as support for the new AutoMix transitions between songs in Music when playing over AirPlay, better FaceTime audio quality in low-bandwidth conditions, manual logging of workouts in the Fitness app, and improvements when recording audio with external USB mics.
If you’re already running iOS 26, we recommend updating to iOS 26.1—the changes (and numerous security fixes) are worthwhile. If you haven’t upgraded from iOS 18 yet, now’s a fine time to make the jump.
(Featured image based on an original by Apple)
Make the Most of Visual Intelligence on the iPhone
With its visual intelligence feature, Apple Intelligence brings super-powers to your iPhone’s camera and screen. Just point and hold to identify objects, translate text, create calendar events, and get answers about anything you see.

The “visual intelligence” aspect of Apple Intelligence leverages the artificial intelligence capabilities of your iPhone to make what you see through the iPhone’s camera or on its screen interactive and actionable in ways that weren’t previously possible. It’s one of the most useful aspects of Apple Intelligence.
Triggering Visual Intelligence
We offer numerous examples of visual intelligence’s superpowers later in this article, but first, let’s make sure you know how to activate its two modes: camera mode and screenshot mode. Use camera mode to learn more about the world around you; use screenshot mode for help with something on your iPhone’s screen. Here’s how to trigger each mode:
Camera mode: Press and hold the Camera Control button on all iPhone 16 models (except the iPhone 16e), all iPhone 17 models, and the iPhone Air. Press the Camera Control again or tap the shutter button to lock the image for visual intelligence. On the iPhone 15 Pro, iPhone 15 Pro Max, and iPhone 16e, which support Apple Intelligence but lack the Camera Control, use the Action button, a Lock Screen button, or a Control Center button.
Screenshot mode: Simultaneously press the side button and volume up button to display an interactive preview of what was on the screen.
Visual intelligence analyzes the content of your image and provides relevant action buttons based on what it detects. While the Ask and Search options are always available, other buttons appear contextually depending on the content.
Ask: Tapping the Ask button lets you pose a question about the image to ChatGPT. (But we’ve found that Apple won’t pass on health-related questions or queries with certain types of sensitive data.)
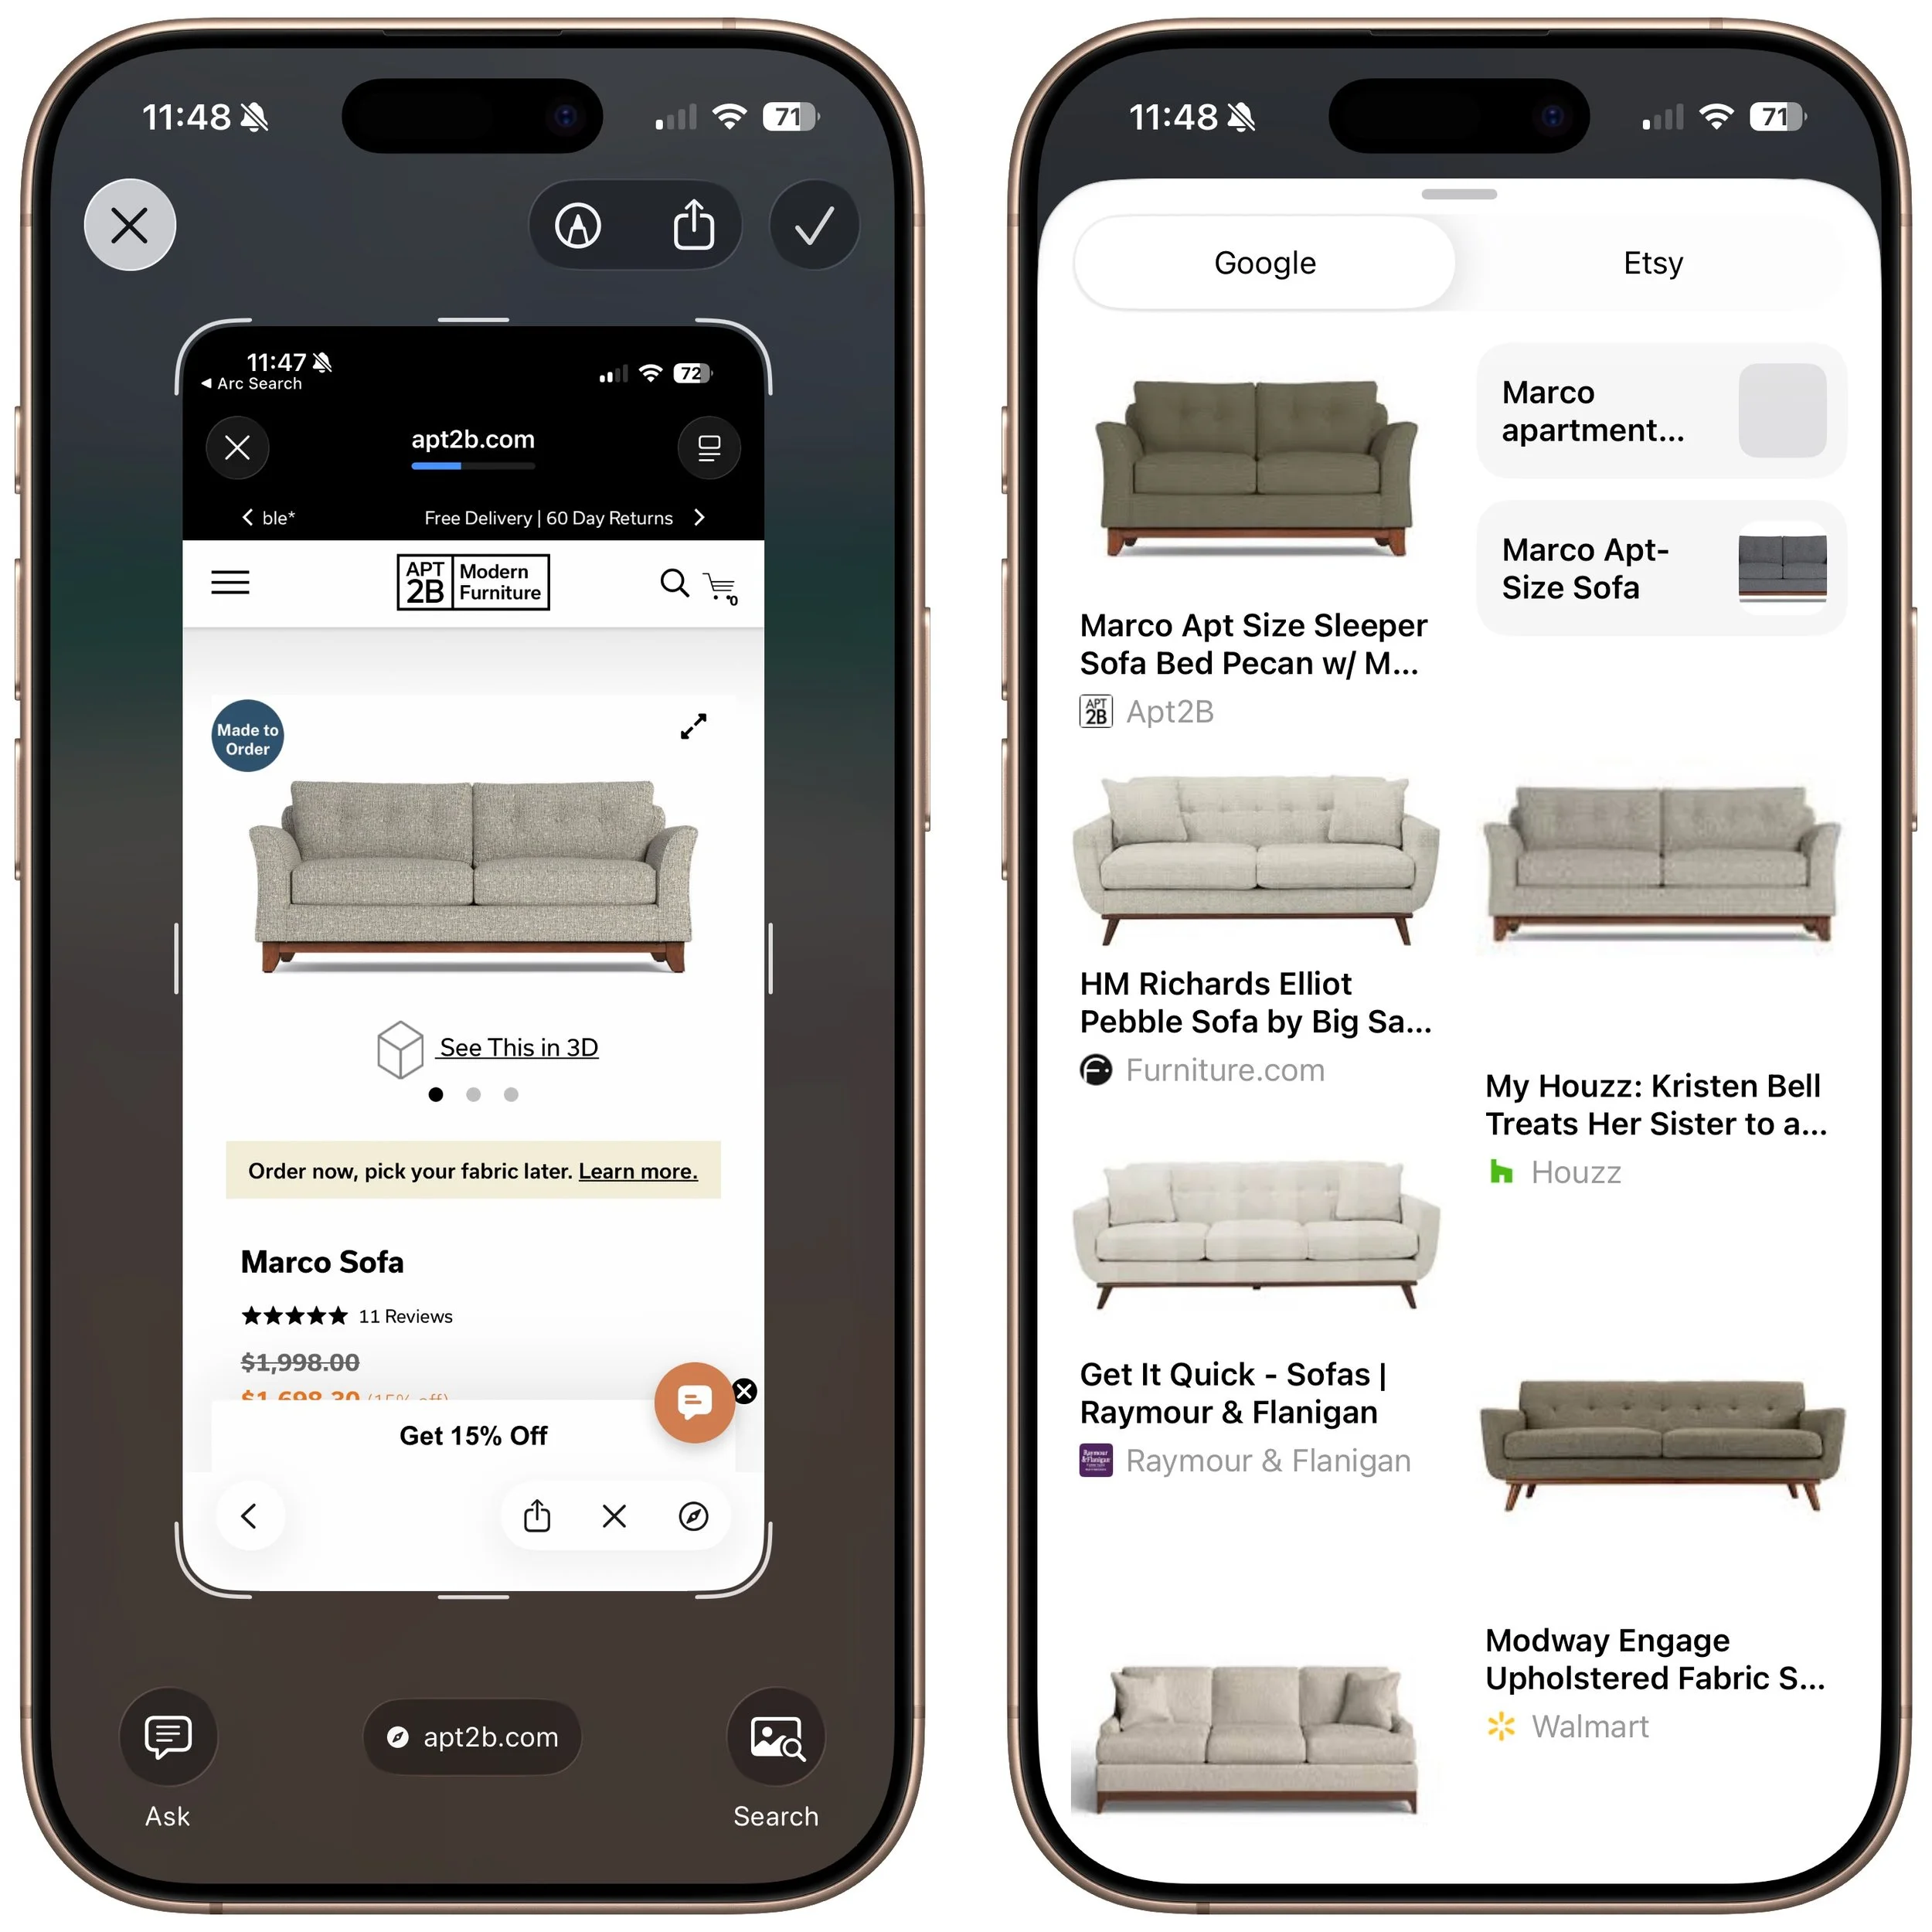
Search: Tapping the search button conducts a Google Image search for similar items. It may also display tabs for search results from other apps, such as Etsy or eBay.
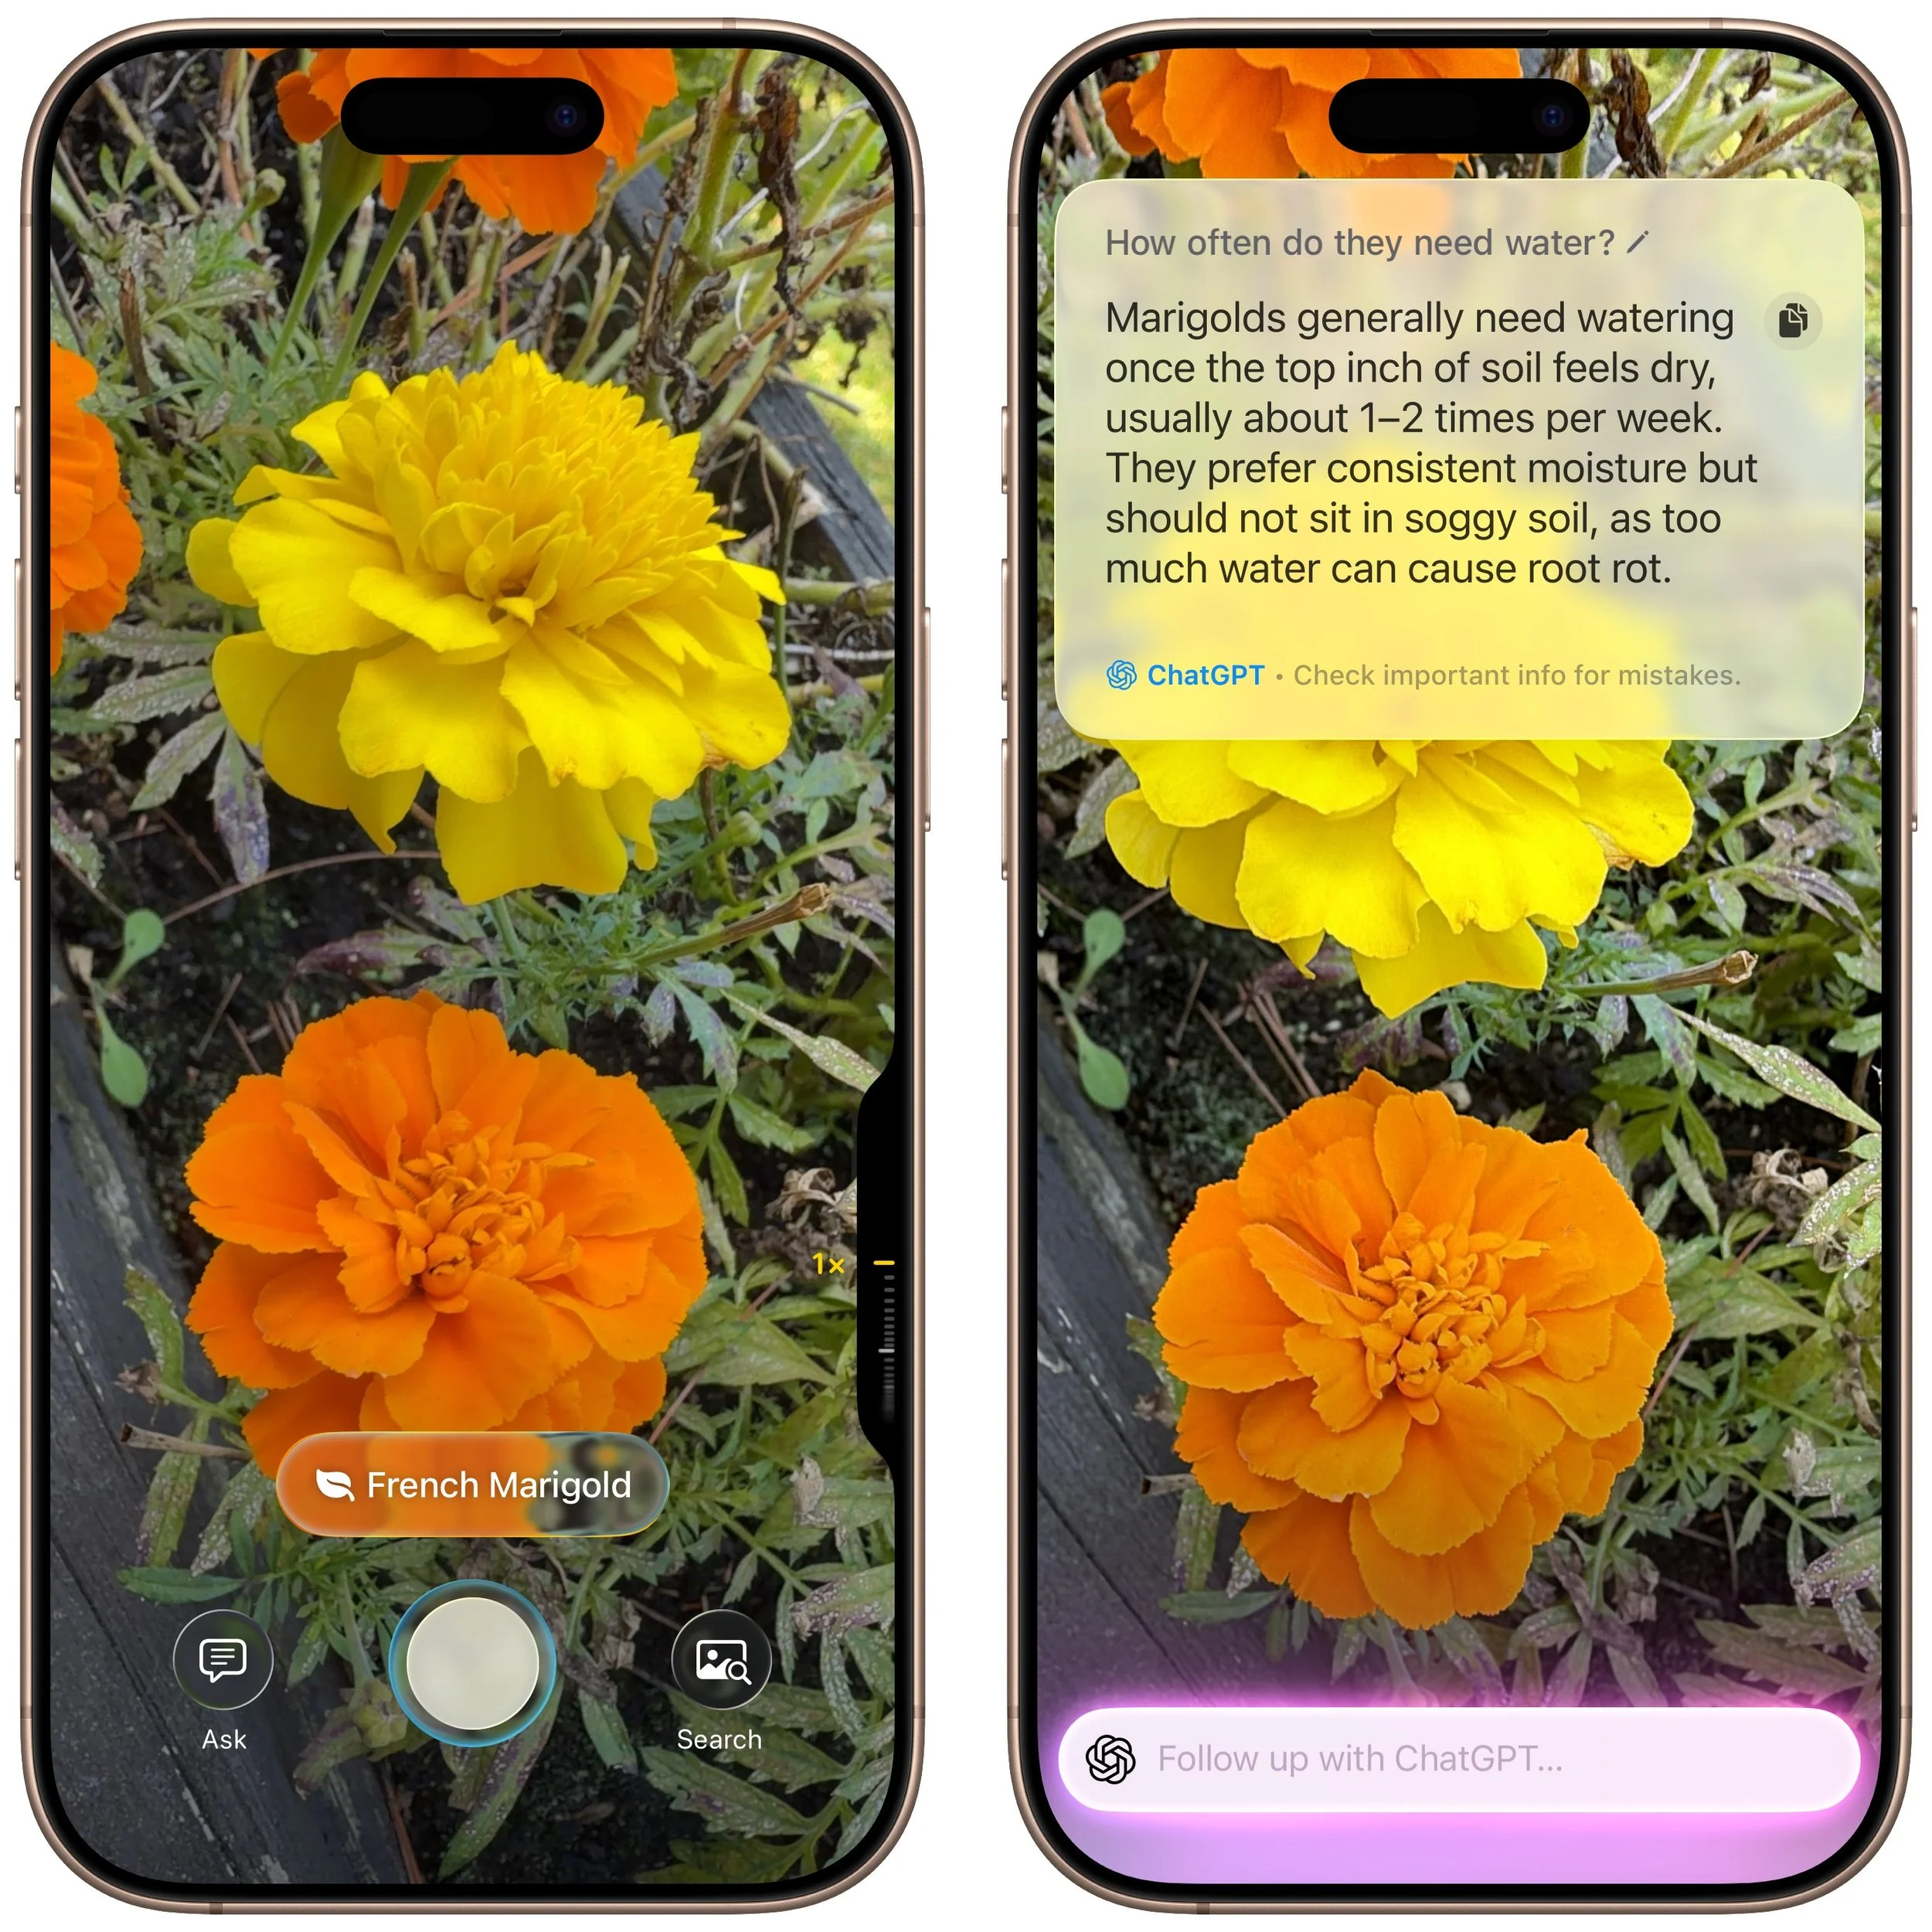
Recognized objects: When visual intelligence identifies an object, such as a specific plant or animal, it displays a button that brings up more details.
Text: When it detects blocks of text, visual intelligence provides buttons to summarize the text, read it aloud, or translate it.
Dates: If it detects a date in text, visual intelligence displays an Add to Calendar button.
Contact info: When details like email addresses or phone numbers appear in the image, visual intelligence can help you call or message the number, or send email.
Addresses: When it identifies a physical address in text, visual intelligence displays a button that opens the address in Maps.
URLs: This works in the virtual world as well—a URL embedded in an image prompts visual intelligence to display a button that opens the website in Safari.
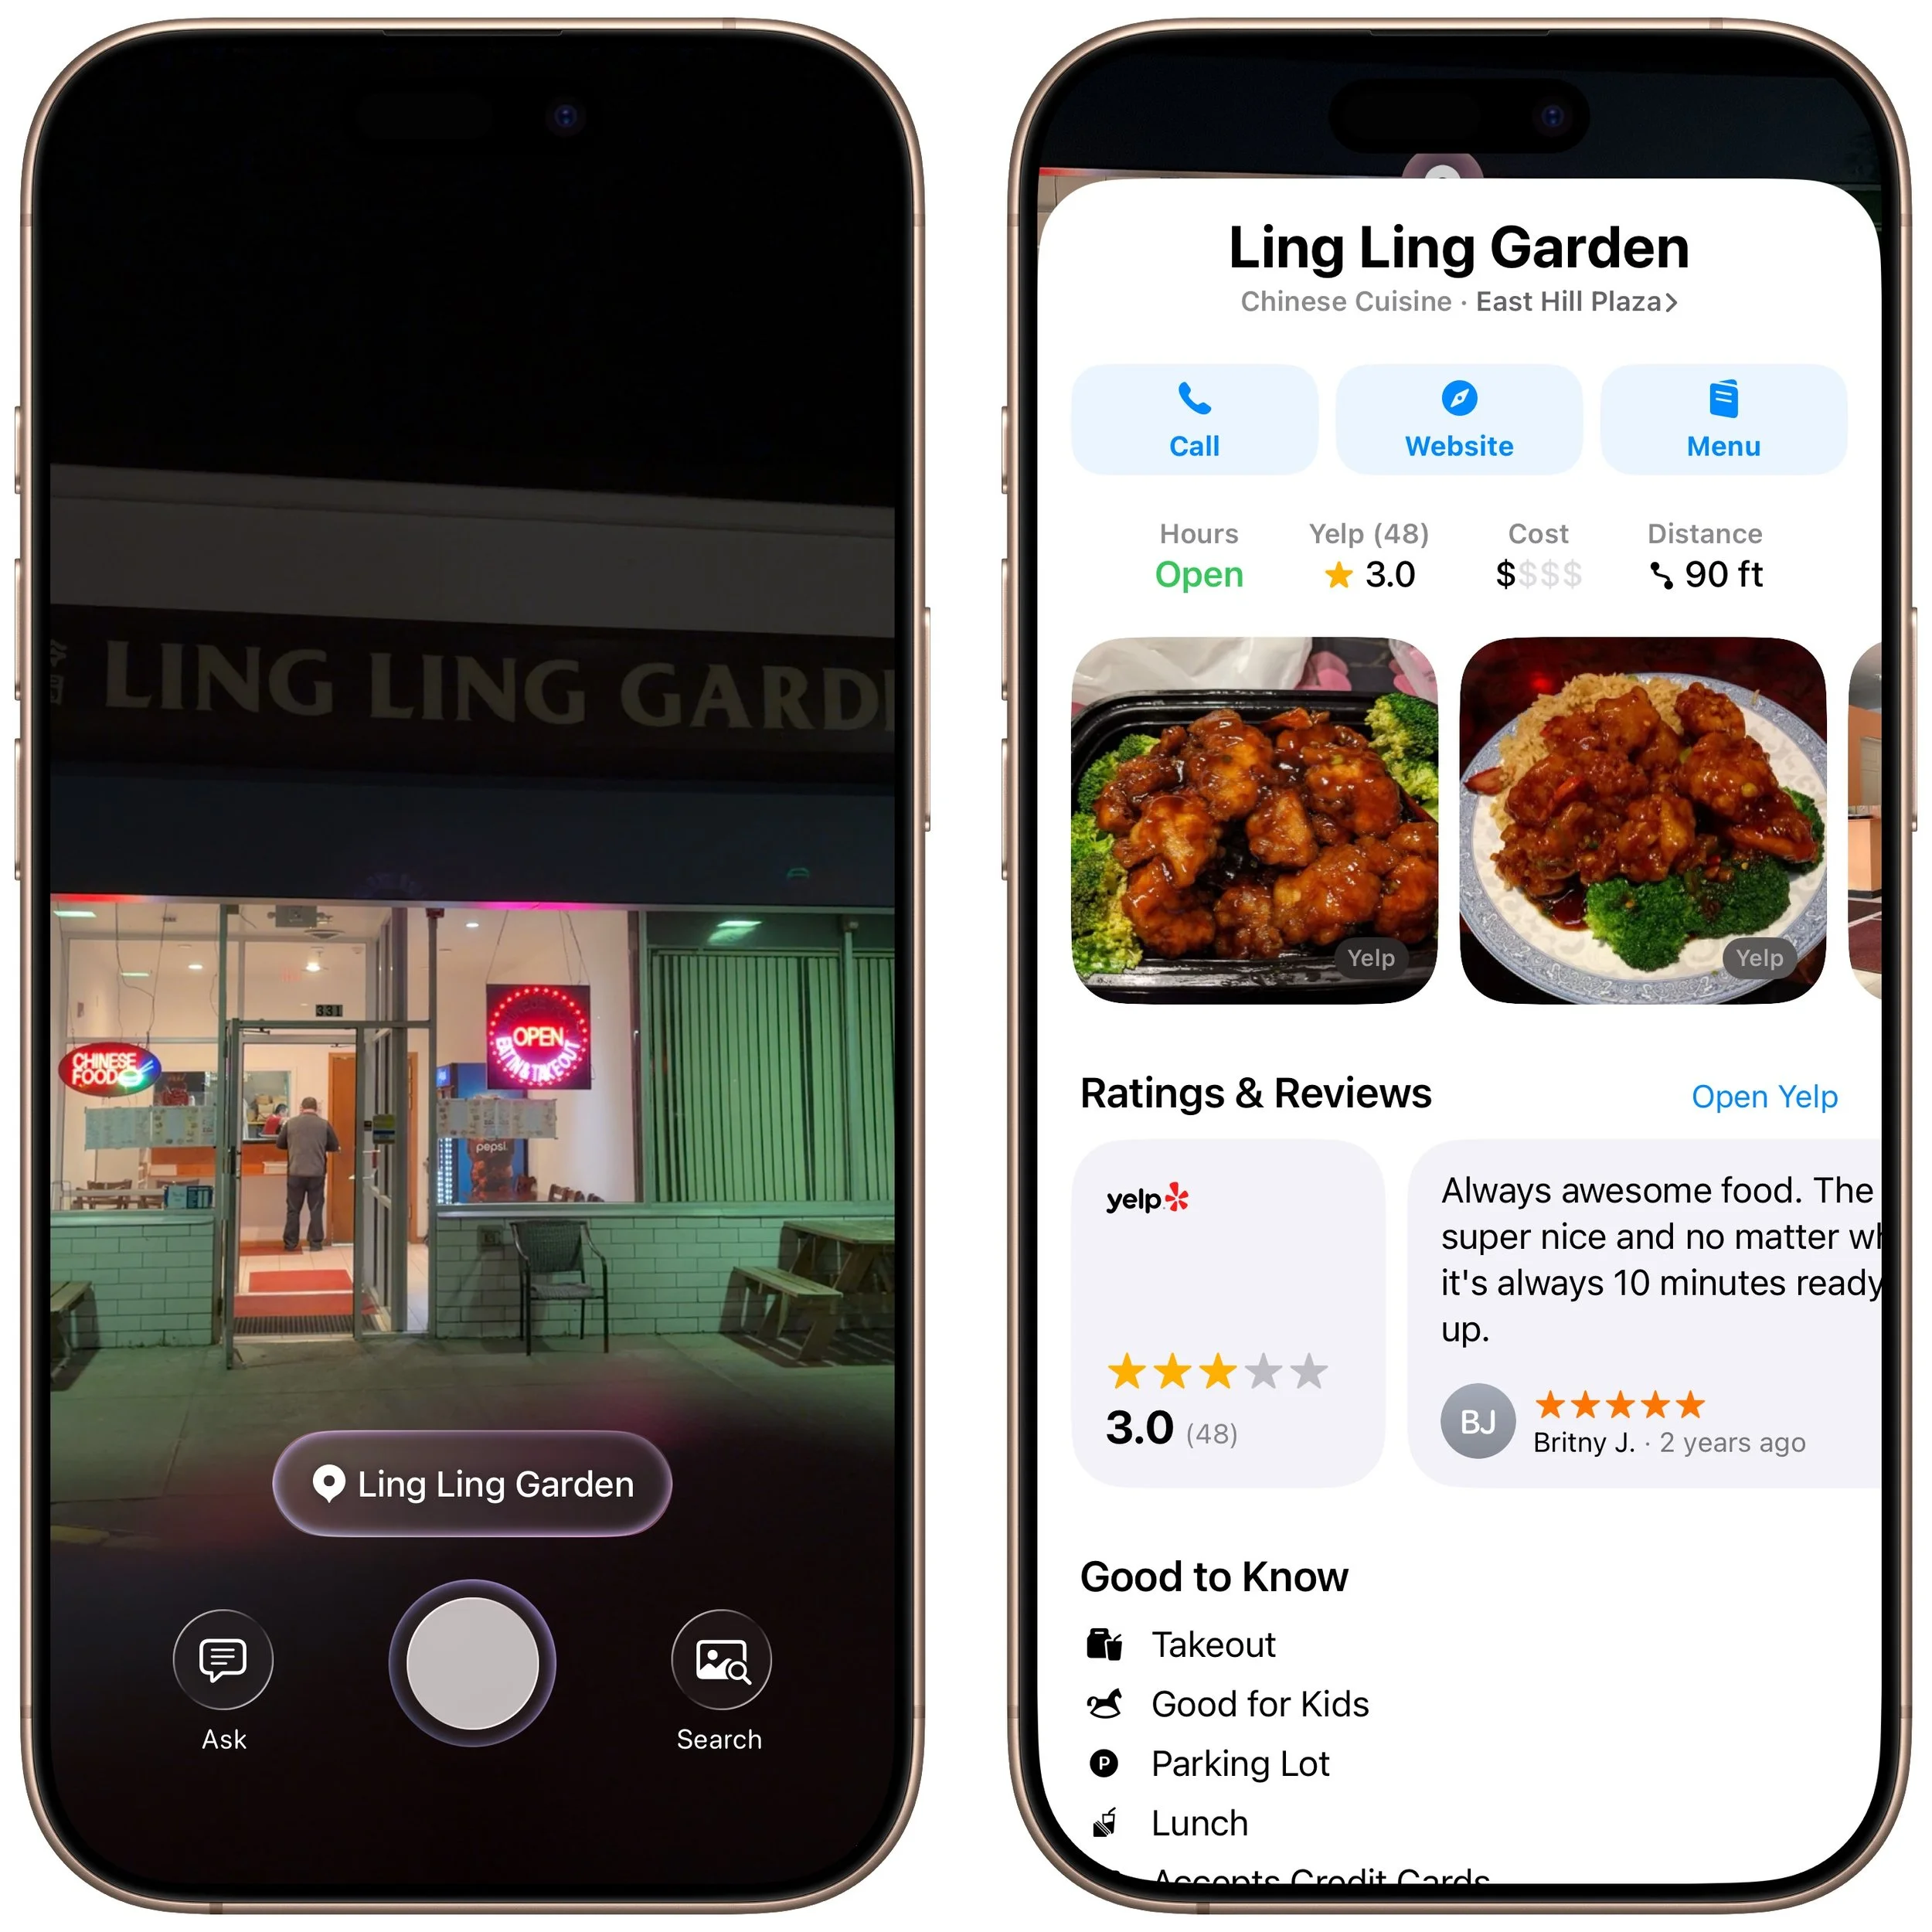
Businesses and locations: When you capture an image of a business or other location that’s known in Maps, visual intelligence can show hours, menus, reviews, and more.
Real-World Uses for Visual Intelligence
It can be challenging to think of uses for visual intelligence at first, simply because it’s a new way of engaging with the world around you and what you see on your iPhone. We’re used to taking pictures of event flyers we want to attend, doing Google searches for things we see, asking questions of chatbots, and using specialized apps to identify plants and animals—visual intelligence can do all that and more. Here are a few practical ways to use visual intelligence today:
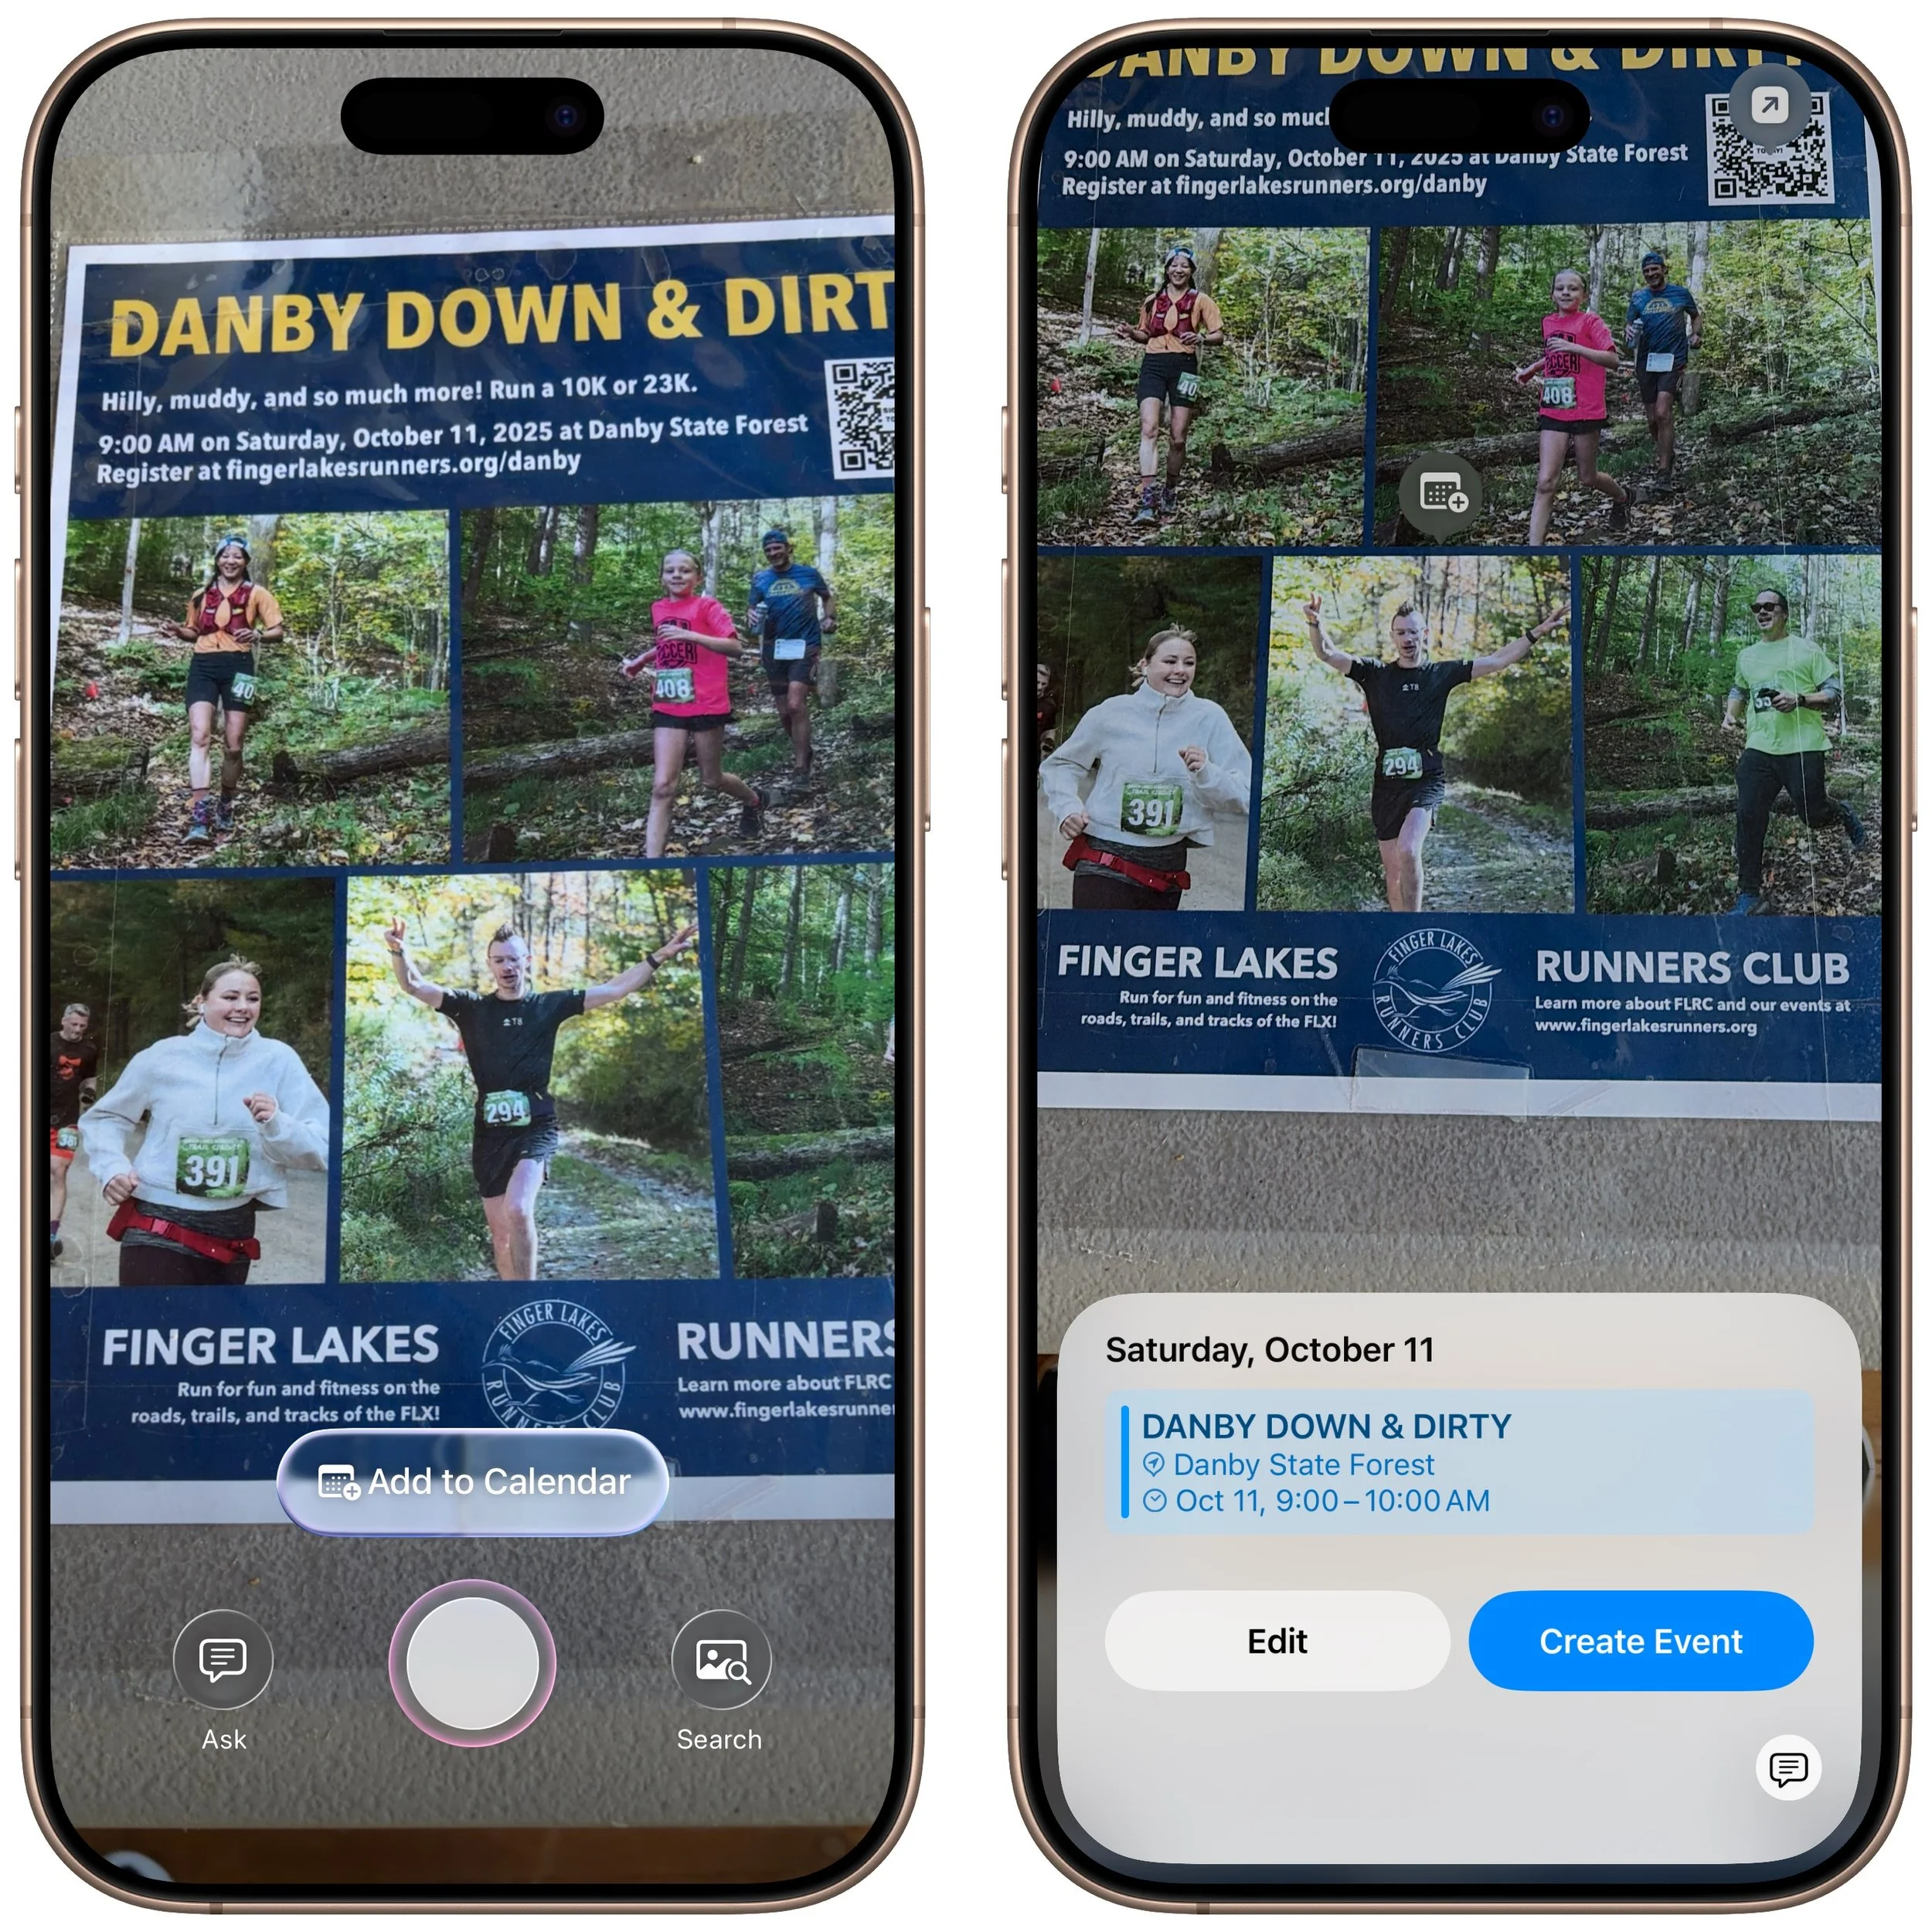
Create calendar events: Create calendar events from posters, flyers, invitations, or Web pages. When you point the camera at a poster or take a screenshot of an event page, an Add to Calendar button allows you to create an event directly from the on-screen details.
Find business information: Point the camera at a business to retrieve details such as hours, menu/services, phone number, and website. It’s the same information you’ll find in Maps, but it’s easier to pull up using visual intelligence.
Search for products: Shopping for something? Once you find an example of what you like—such as this mid-century modern sofa—take a screenshot, circle the picture with your finger, and browse the search results for similar items.
Summarize and read text aloud: When you’re faced with a large amount of text, especially if the font size is difficult to read, visual intelligence can provide a summary or even read it aloud. The option to have text read aloud can be particularly helpful for those with low vision.

Translate text: iOS offers multiple ways to translate text in unfamiliar languages, including the Translate app, but visual intelligence is often the fastest way to get a quick translation of a sign or placard.
Quick object identification: We’ve all wondered what some plant or animal is—using visual intelligence, you can point your camera at it to find out quickly. Just tap the name that appears to get more details.

Research questions: Sometimes, you know what you’re looking at but have questions about it. Instead of starting a new search, you can use visual intelligence, tap the Ask button, and pose your question to ChatGPT. Tap the response to ask a follow-up question. If you connect Apple Intelligence to your ChatGPT account in Settings > Apple Intelligence & Siri > ChatGPT, your conversations will be saved in ChatGPT, where you can review and continue the discussion.
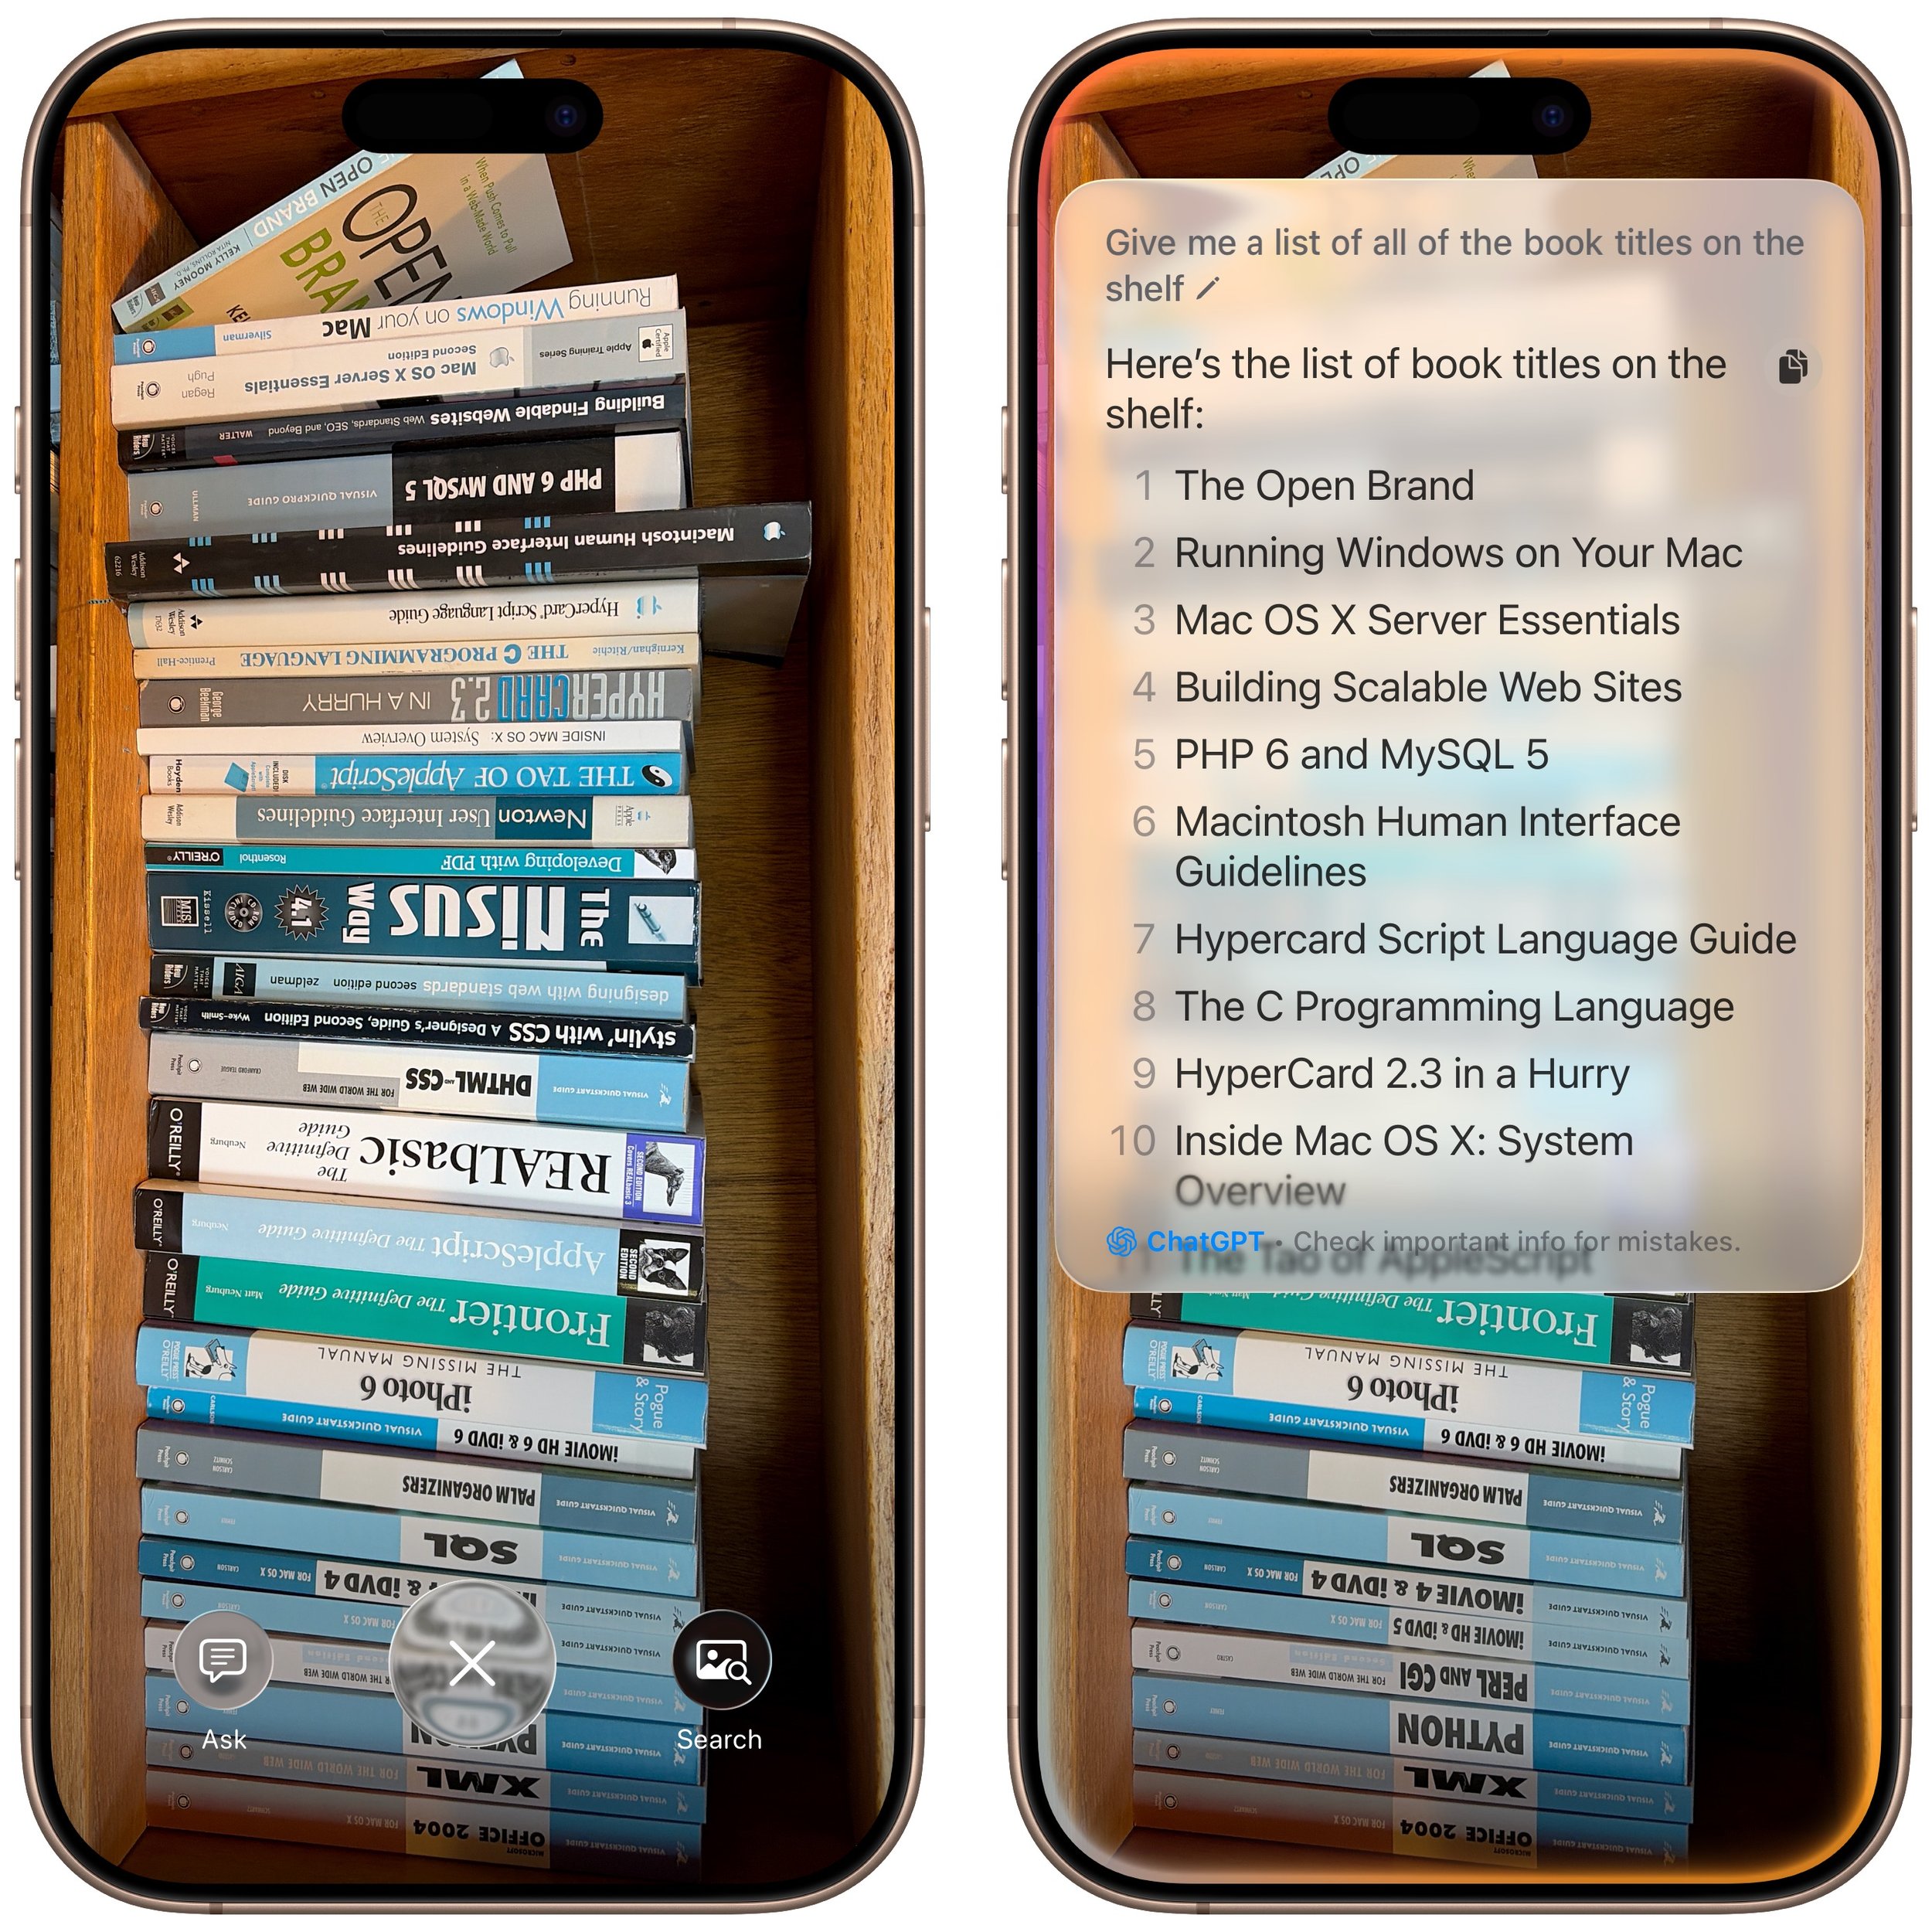
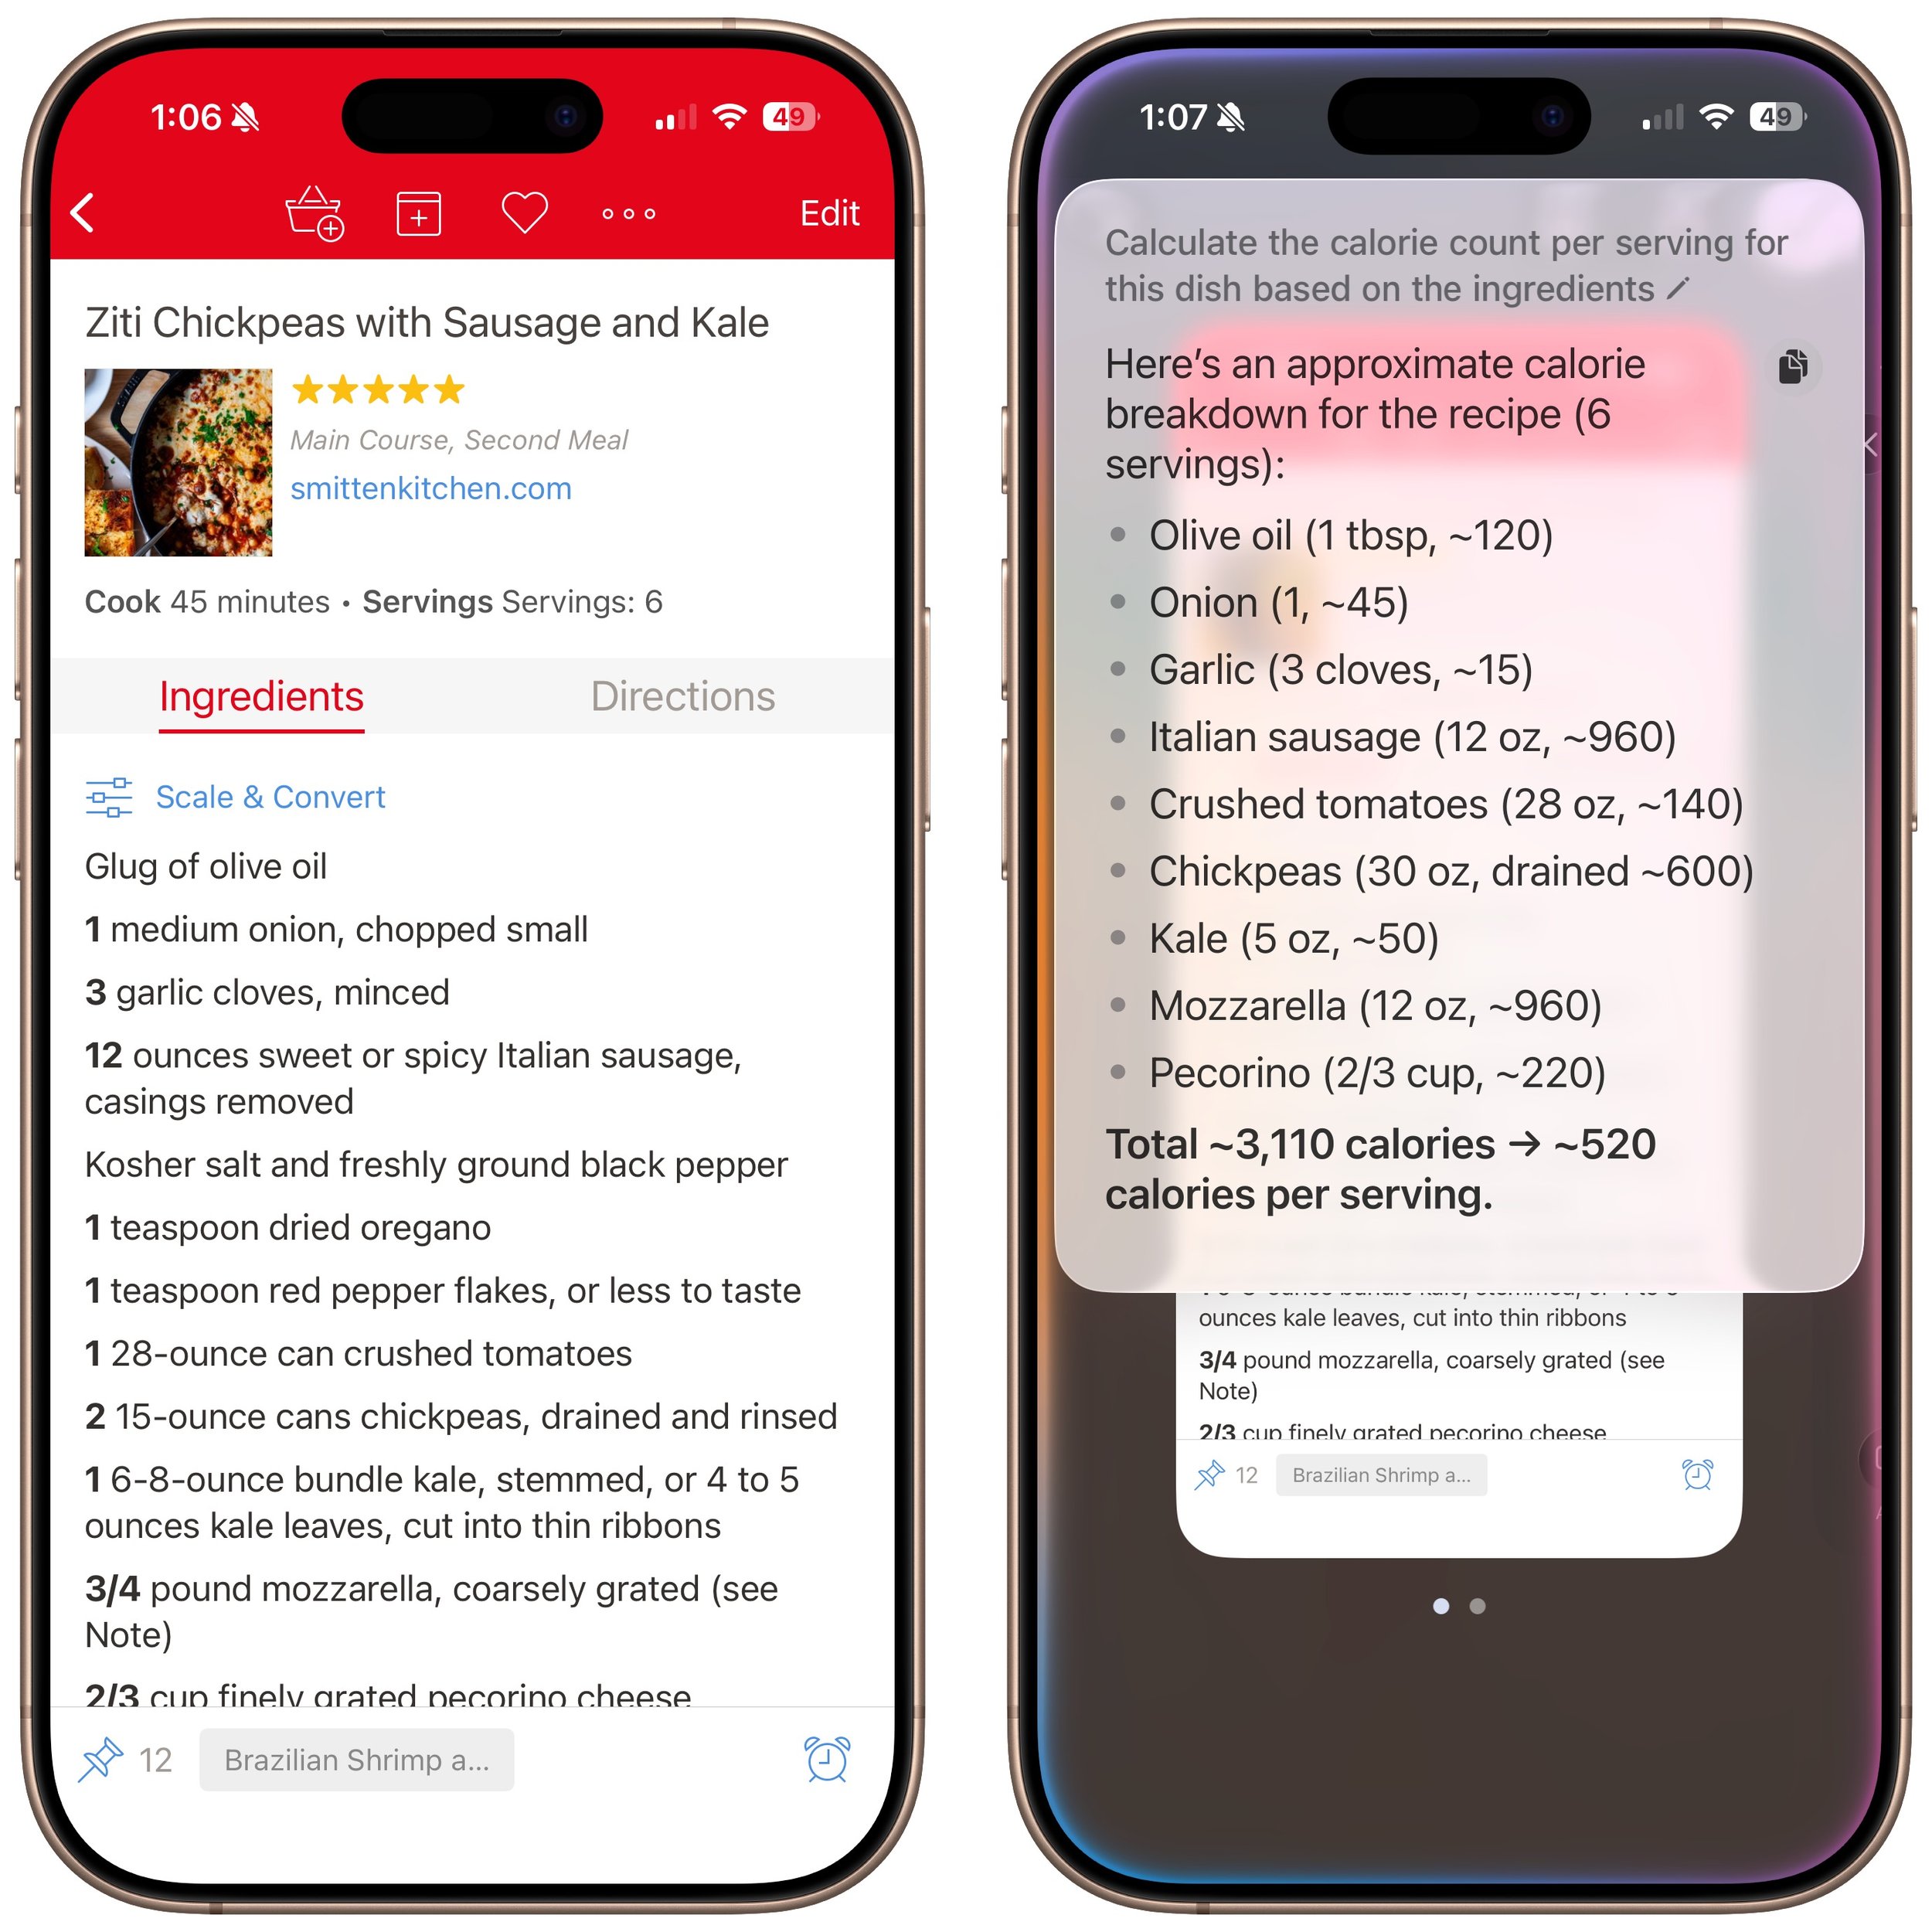
Manipulate real-world data: Anything that can be photographed or captured in a screenshot can be used as data for other manipulations. For example, you could take a picture of a bookshelf and ask for a list of all the titles, or take a screenshot of a recipe and request the calorie count per serving.
How does visual intelligence compare to apps like ChatGPT, Claude, Gemini, and others? It outdoes them in two ways but falls short in one. Thanks to its deep integration with iOS and the iPhone’s Camera Control, it’s easier to activate visual intelligence than any other app. It also transfers data more effectively to other apps, such as sending URLs to Safari, phone numbers to Phone or Messages, addresses to Maps, and more. However, chatbot apps—which can also analyze photos and screenshots—are more conversational, offer more detailed information, and are willing to discuss potentially sensitive topics that Apple won’t touch, such as health and politics. We use visual intelligence for straightforward tasks, but for more complex situations, we often turn to a chatbot app instead.
(Featured image by Apple)
Notable User Interface Changes to Expect in macOS 26
From transparent menu bars to customized folders, macOS 26 Tahoe introduces the most significant visual update in years. Discover the key interface changes that will influence your daily Mac use... and which you can turn off.
macOS 26 Tahoe is a larger visual leap than any recent upgrade. Although we don’t yet recommend that everyone upgrade, we want to show you some of the user interface changes that will impact your everyday experience of using the Mac.
Liquid Glass Changes
Many of these changes stem from Apple’s new Liquid Glass design language, which we’ve previously covered in more detail. Familiar macOS interface elements with a new Liquid Glass appearance include:
Rounded corners: You may be surprised by the more rounded corners in many interface elements, including windows. There’s no option to adjust the corner radius.
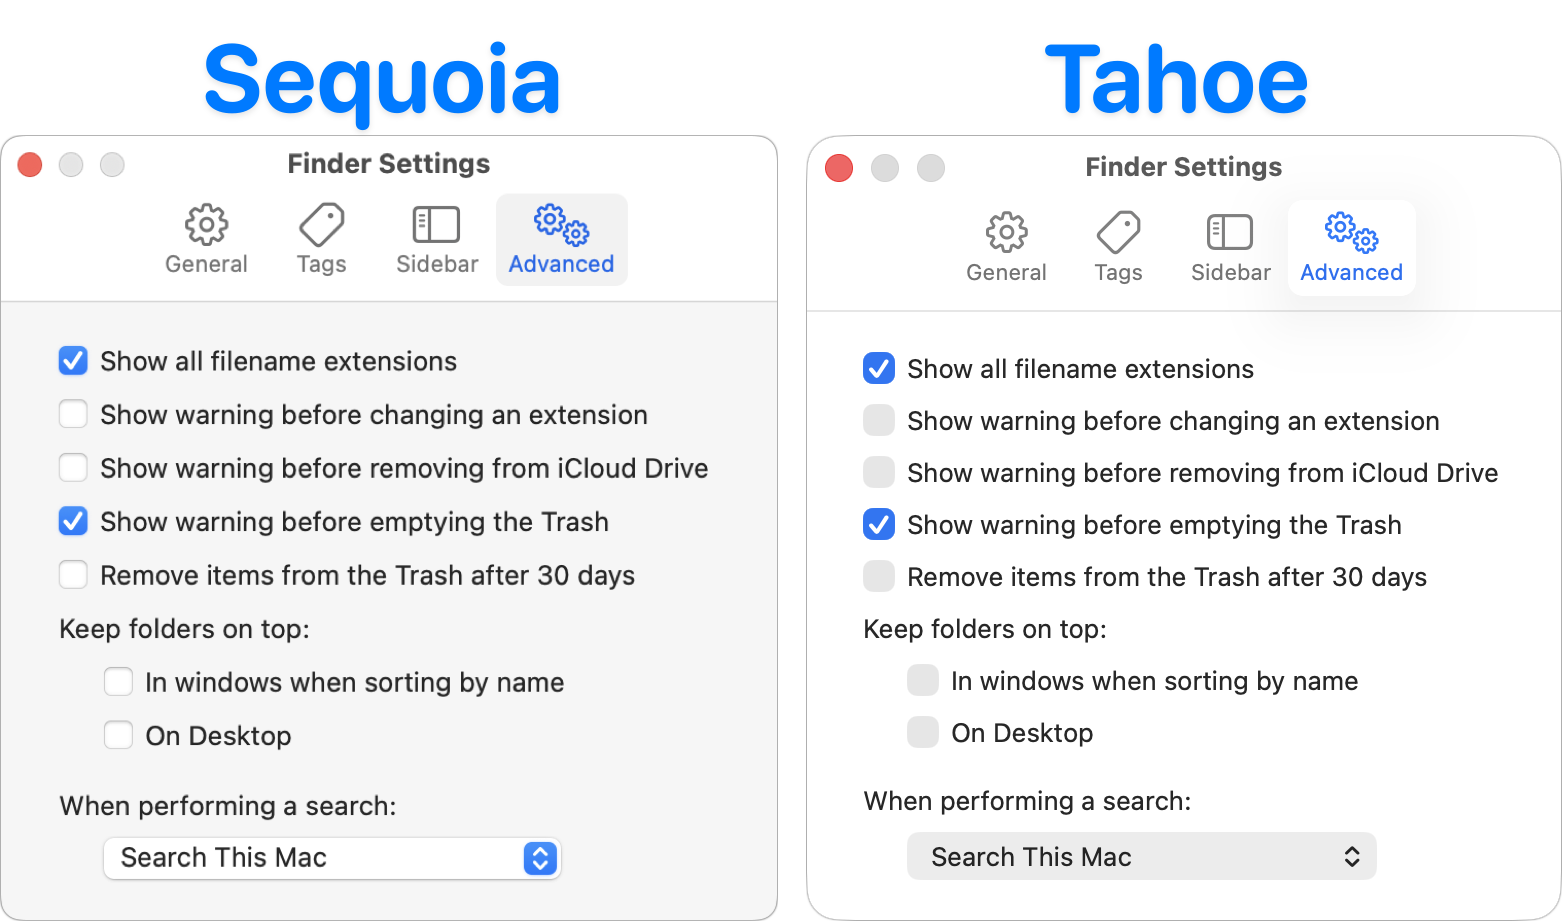
Menu bar: Tahoe’s menu bar is now transparent, allowing app windows or desktop wallpapers to show through, which can make it less visually prominent at the top of the screen. To make it opaque, go to System Settings > Accessibility > Display > Reduce Transparency. This setting also affects many other transparent interface elements.
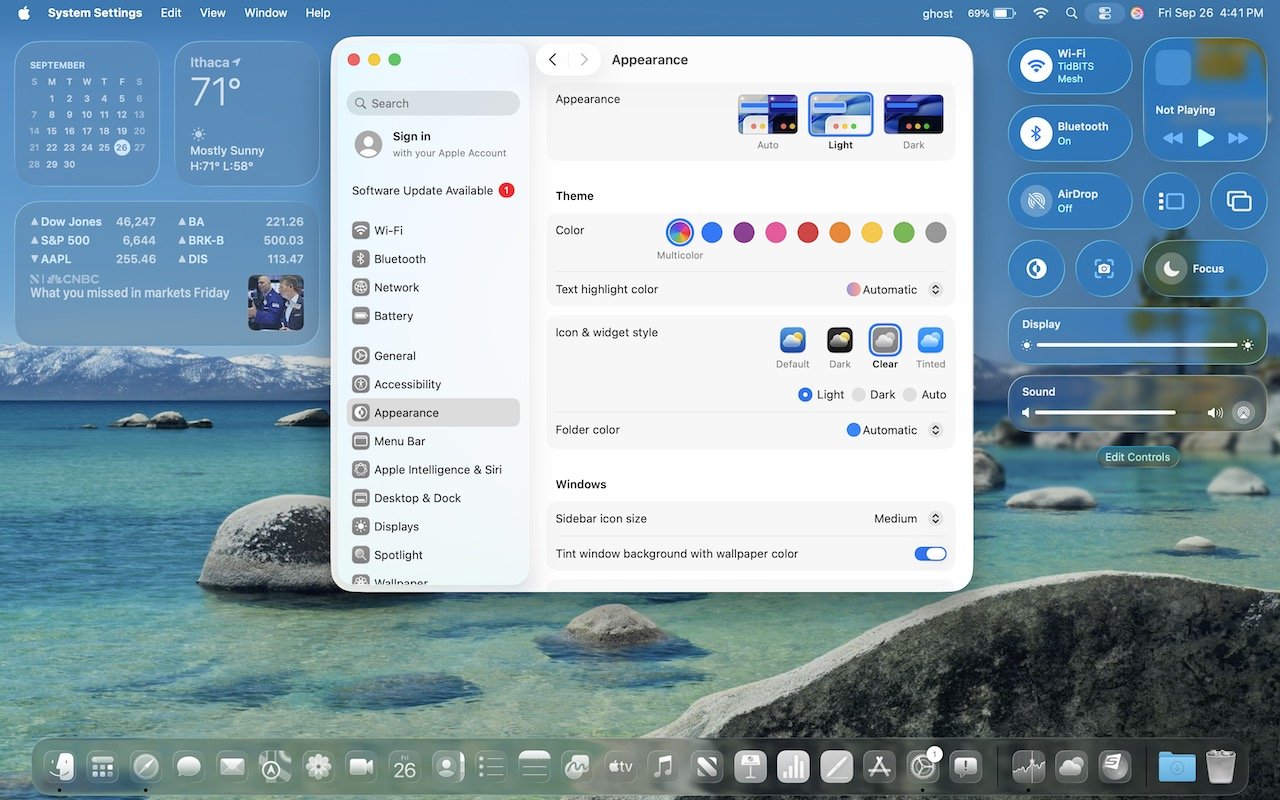
Icon style: Many developers are updating their icons to conform to Apple’s Liquid Glass guidelines. A more notable change is that users can now switch to dark mode icons, clear icons, or tinted icons in any color. Make these changes in System Settings > Appearance > Icon & Widget Style.

Widget style: Desktop widgets are now mostly transparent when any window is open on the desktop, and they become solid only when the last window is closed or hidden. You can adjust this setting in System Settings > Desktop & Dock > Dim widgets on desktop. Widgets also adopt the same clear or tinted style used by icons.
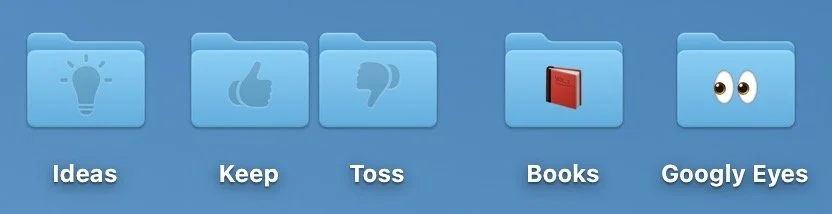
Customized folders: Folders start out blank, but you can Control-click one, choose Customize Folder, and pick an icon (monochrome) or emoji (colored) to brand the folder.
Sidebars: Although they’re less transparent than other items, sidebars become subtly tinted based on what’s under them. That occasionally results in some awkward overlays, such as in System Settings > Wallpaper, where the thumbnails can scroll underneath the sidebar.
Safari
With Safari, Apple’s Liquid Glass interface causes the toolbar controls and the tab bar at the top to float over the page content underneath. On some sites, this can be distracting or make tab titles hard to read (below, top). If that bothers you, turning on System Settings > Accessibility > Display > Reduce Transparency separates the controls from the content more clearly, but also gives them a gray background (below, bottom).
Control Center
In Tahoe, Control Center not only receives a Liquid Glass makeover but also gains notable new features. Similar to iOS and iPadOS, you can now fully customize the buttons, sliders, and other interface shortcuts in Control Center, removing those you don’t need and adding others. To get started with personalization, click Edit Controls at the bottom of Control Center.
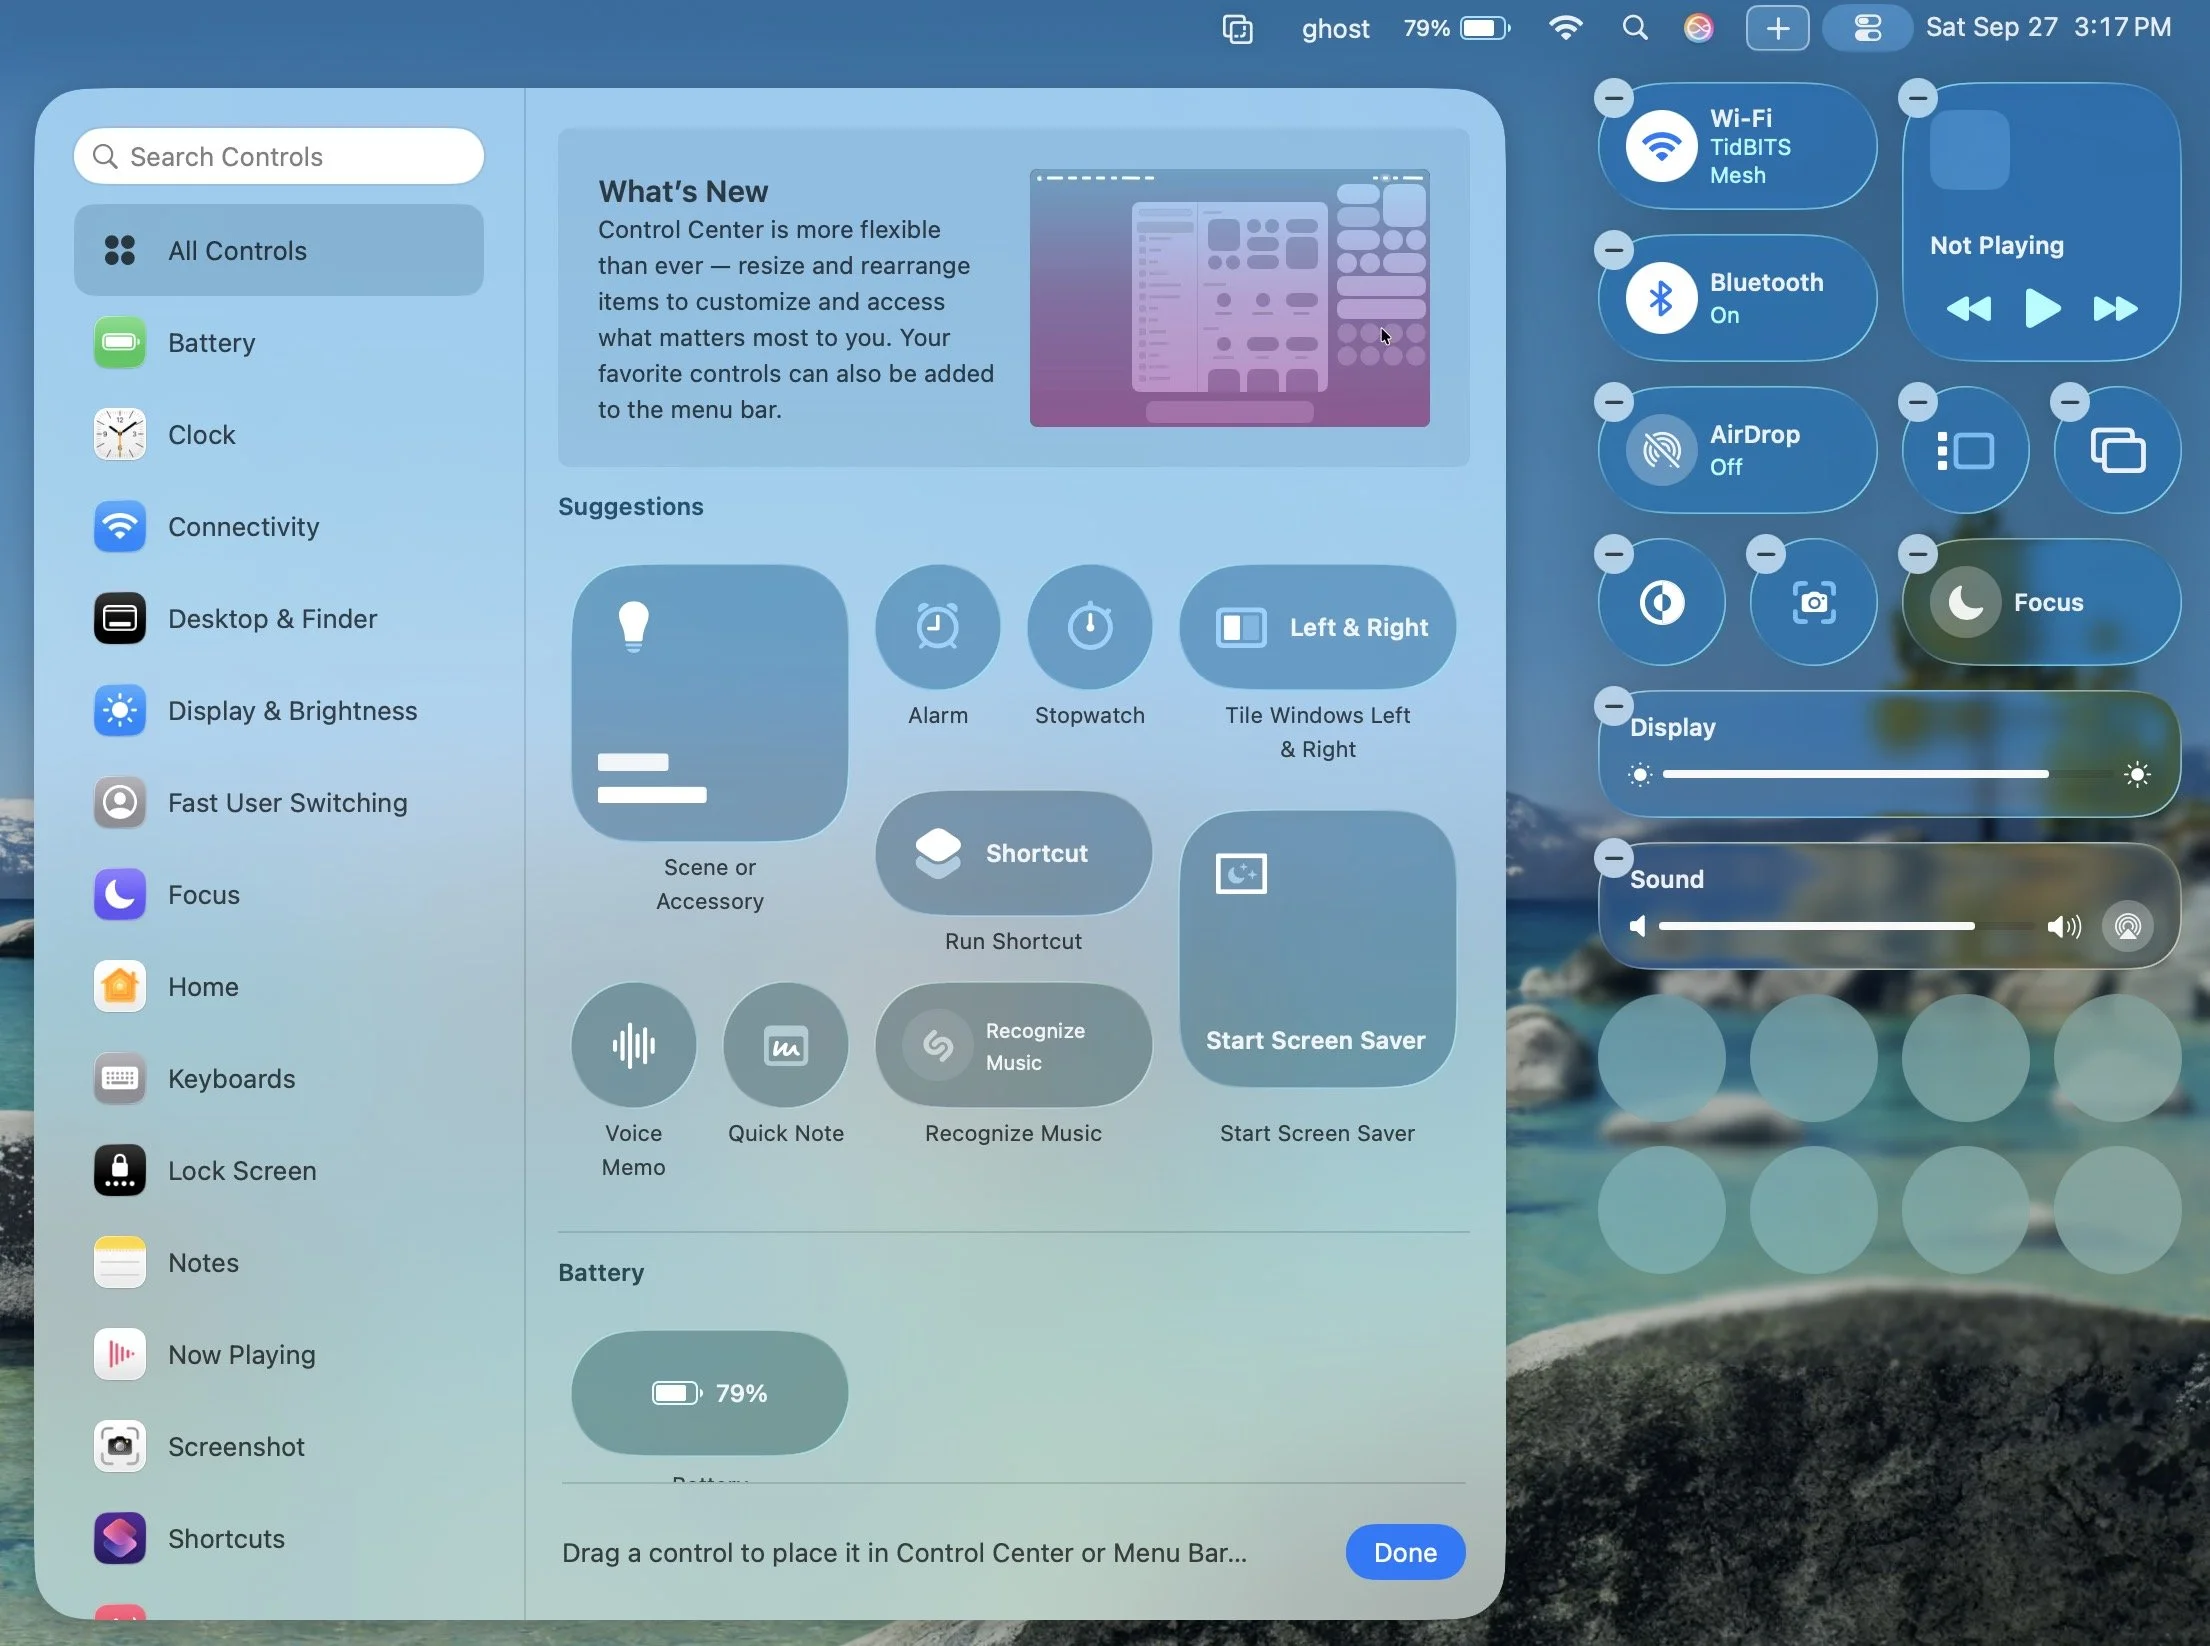
The selection of commands is impressive enough on its own, but Apple also promises that independent developers will be able to offer controls for their apps. Clicking the + button in the menu bar provides the equivalent of additional Control Center pages from iOS: another menu bar icon that displays a different set of Control Center items. You can have as many of these extra Control Center pages as you want.
Lastly, note that you can add many items from Control Center directly to the menu bar, where they can function as toggles or quick access shortcuts.
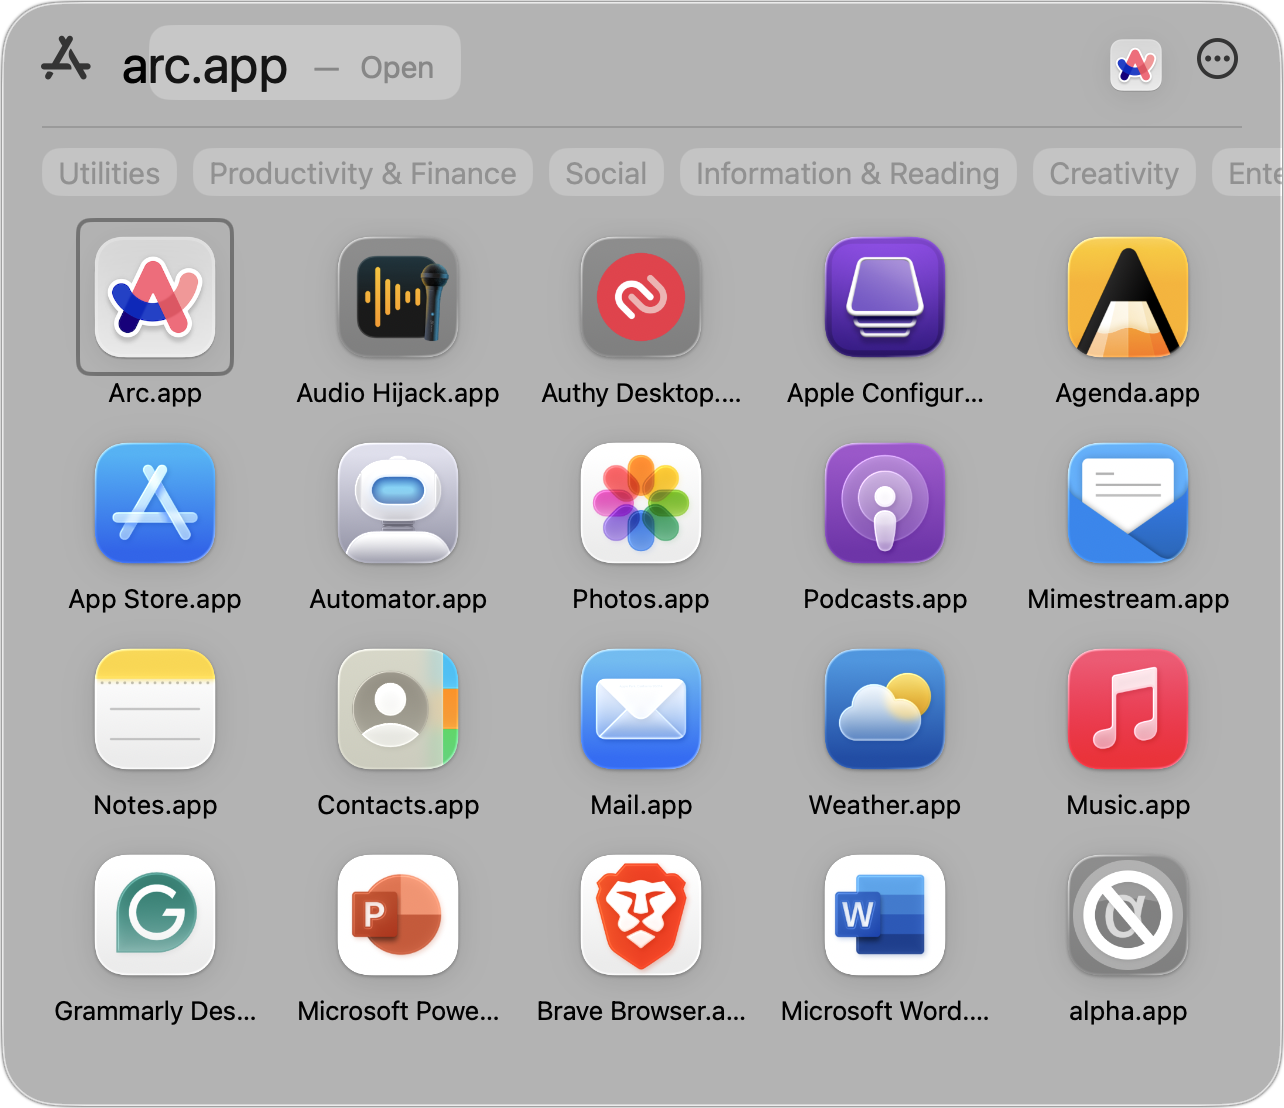
Spotlight
Apple revamped Spotlight in Tahoe, adjusting its interface (yes, it’s transparent by default, too) and introducing clipboard history. When you activate Spotlight with Command-Space and move the pointer, four buttons appear to filter your search by apps, files, shortcut actions, and clipboard history—Command-1 through 4 serve the same purpose.

Previously, Spotlight separated different result types vertically; now you can click buttons just below the search box to filter results by category. Spotlight also remembers past searches, allowing you to use the arrow keys to browse backward and forward through your search history.
Spotlight’s new Apps view, which gets its own icon on the Dock, also replaces the longstanding but little-used Launchpad. If you want a full-screen grid of app icons, similar to Launchpad, consider Launchie, AppHub, or AppGrid Launcher.
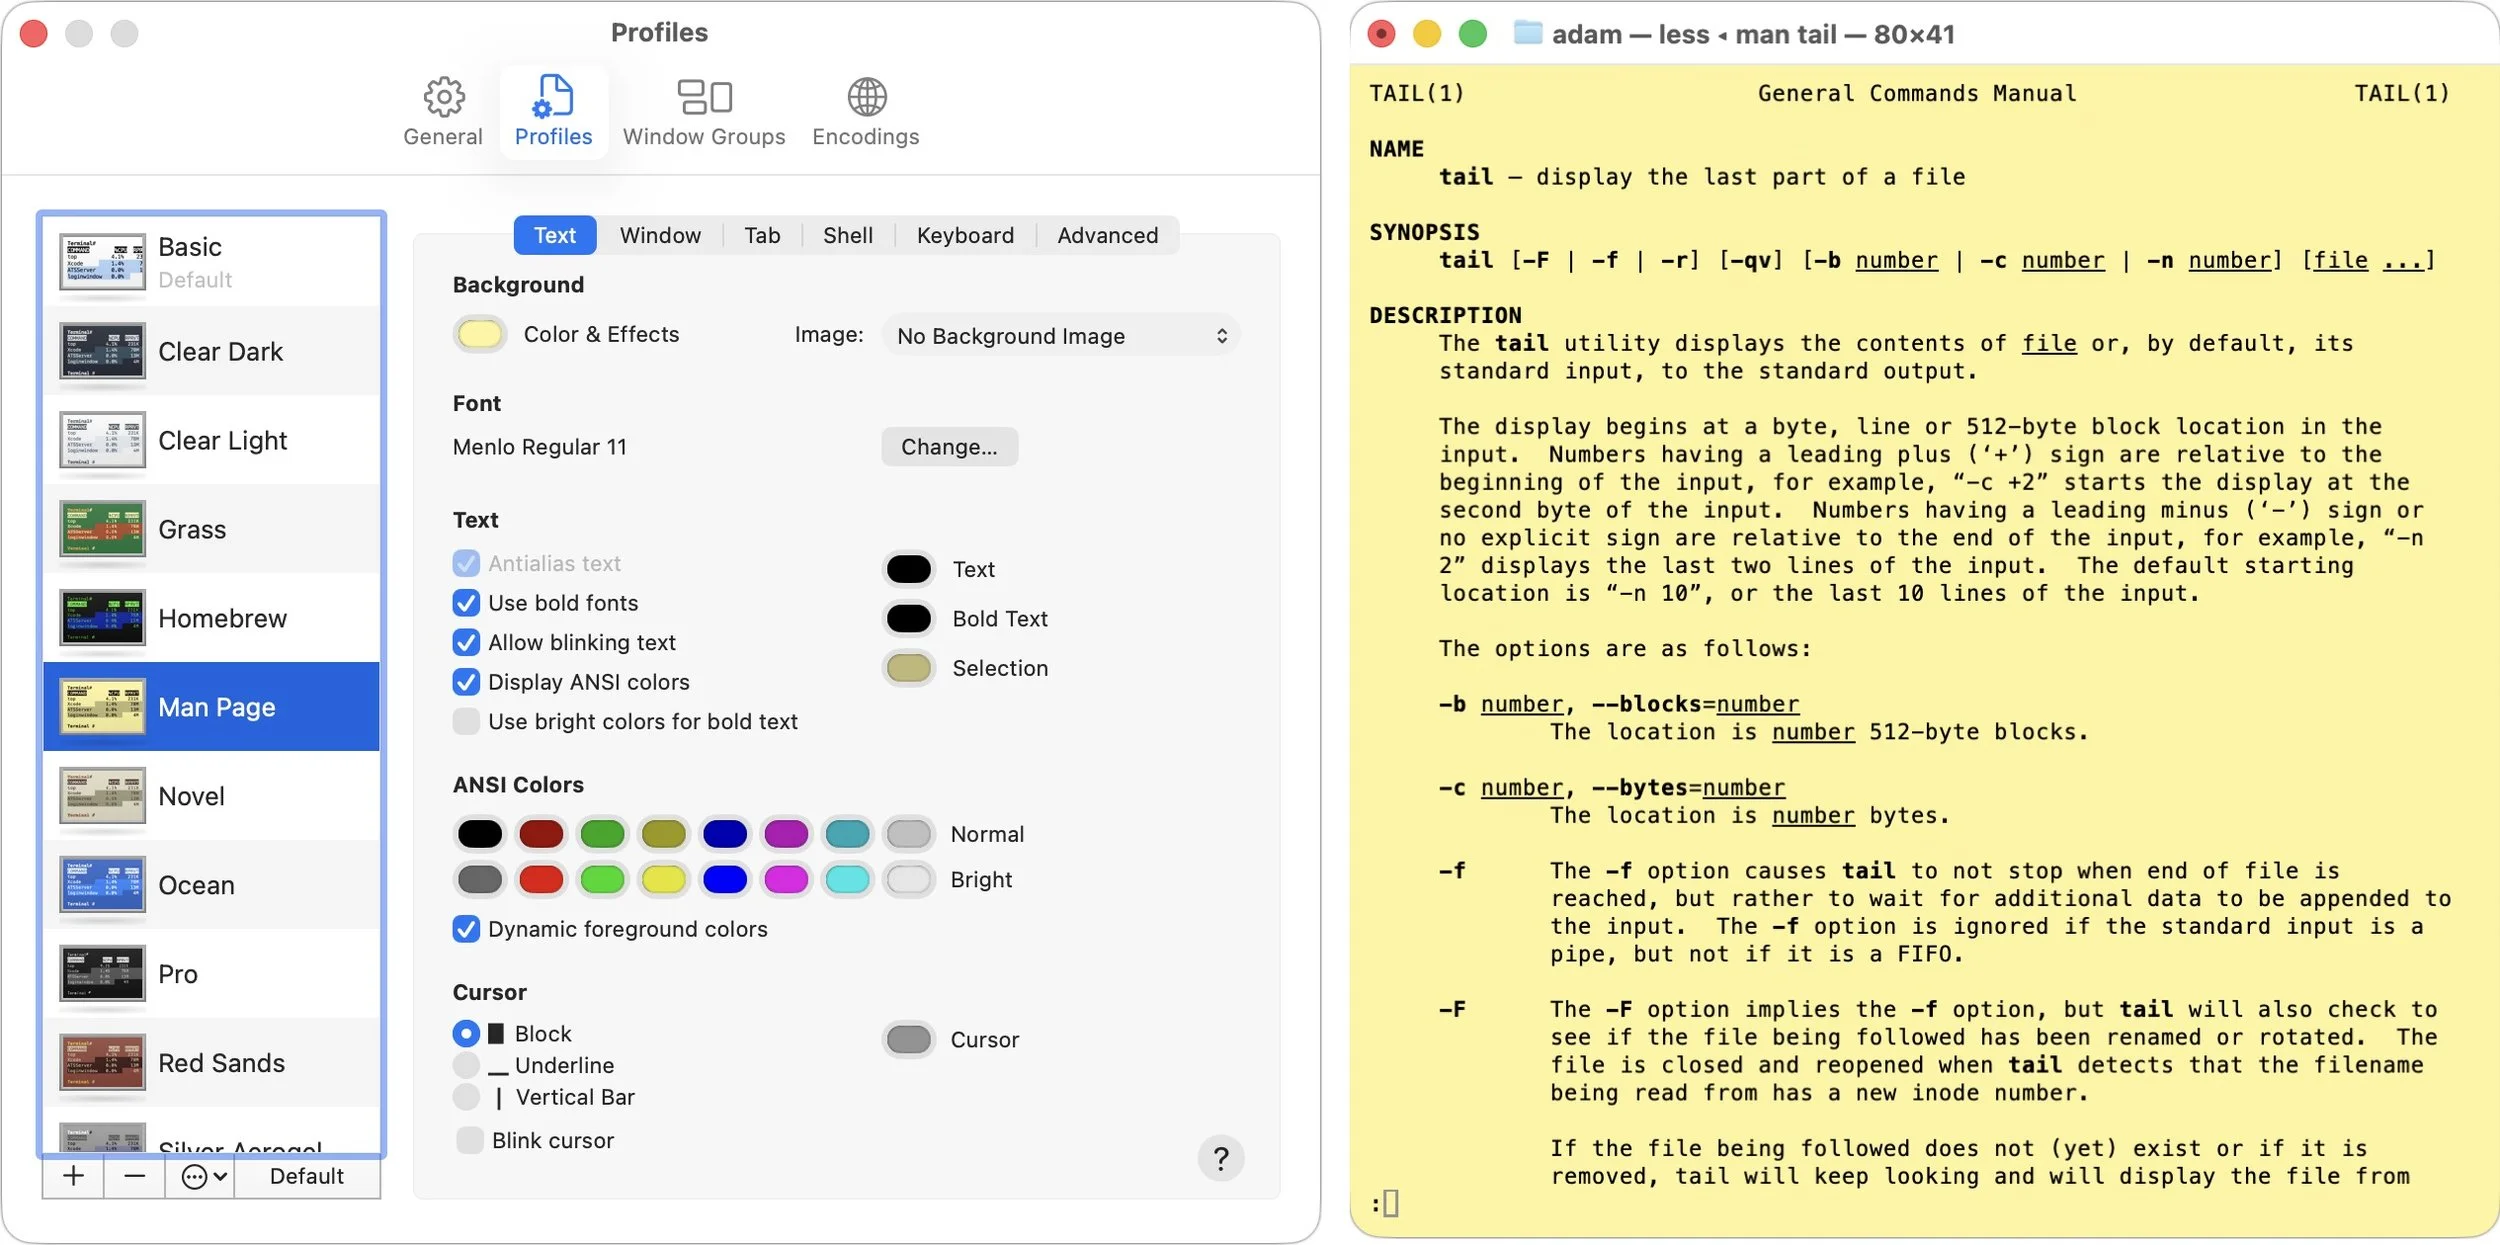
Terminal
Although many people never open the Terminal app, which gives access to the Unix command line hidden in macOS, Apple has finally updated it to allow for more customization. Fortunately, Terminal still features completely opaque windows—transparency won’t make reading command-line output any easier. Each profile offers various customization options beyond appearance, so those who frequently use Terminal can tailor it to their preferences.
While we don’t want to downplay the impact these visual changes may have on your Mac experience, we’ve also found they’re easy to get used to or turn off. After using Tahoe for a few weeks, most of these changes will become the new normal. Apple will undoubtedly continue to polish Liquid Glass over the next year, refining its smoothness and eliminating awkward bits.
(Featured image by Apple)
Apple Adds M5 Chip to MacBook Pro, iPad Pro, and Vision Pro
Apple has brought its new M5 chip to the MacBook Pro, iPad Pro, and Vision Pro, boosting performance but changing little else. The updates maintain existing designs and price points.

Apple’s fall harvest has yielded the new M5 chip, leading to updates for the entry-level 14-inch MacBook Pro, the iPad Pro lineup, and the Vision Pro. All three benefit from the M5’s significant performance boosts, but remain mostly unchanged otherwise. Availability starts on October 22. We anticipate that Apple will release M5 versions of the iMac, Mac mini, and MacBook Air in the coming months, along with M5 Pro and M5 Max chips in early to mid-2026.
With the M5 chip, Apple continues to focus on boosting AI performance. Its new 10-core GPU promises up to four times the peak GPU compute performance of the previous M4 chip—an impressive leap. The GPU also provides enhanced graphics capabilities and ray tracing that deliver results up to 45% faster than the M4. The 10-core CPU, with six efficiency cores and four performance cores, provides up to 15% faster multithreaded performance than the M4, a more typical performance increase between chip generations. Additionally, Apple increased unified memory bandwidth from 120 GBps to 153 GBps, which speeds up many different operations.
14-inch MacBook Pro
The most mainstream of the updated devices is the entry-level 14-inch MacBook Pro, which benefits from the improved performance of the M5 chip. Apple claims improvements in various tasks ranging from 20% to 80% compared to the M4 model it replaces. Even more compelling is the comparison with the M1-based 13-inch MacBook Pro, where the M5 MacBook Pro is 2 to 7 times faster.
Apple also increased SSD performance by up to 2x, which we suspect should give the new M5 model read/write speeds comparable to those of the M4 Pro and M4 Max models of the MacBook Pro.
The final update is that the M5 MacBook Pro can now be equipped with 4 TB of storage, a $1,200 option previously reserved for the M4 Pro and M4 Max models. They remain for sale, and although Apple didn’t share any benchmarks, we suspect they will continue to outperform the M5 model at most tasks.
Otherwise, the new M5 MacBook Pro continues to feature three Thunderbolt 4 ports, an HDMI port, an SDXC card slot, and MagSafe 3 charging. Its 14.2-inch Liquid Retina XDR display with ProMotion remains unchanged, as does the physical design. Pricing is also the same, starting at $1,599 for 16 GB of unified memory and 512 GB of storage.
For now, the M5 model of the 14-inch MacBook Pro is notably more capable than the M4 models of the MacBook Air, which was less true of the M4 MacBook Pro it replaces. That said, you won’t go wrong with the more affordable MacBook Air or the higher performance of the M4 Pro and M4 Max models of the MacBook Pro.
11-inch and 13-inch iPad Pro
The M5 models of the 11-inch and 13-inch iPad Pro deliver similar performance improvements over the previous M4 models, with Apple highlighting up to 2x faster AI image generation and up to 2.3x faster AI video upscaling. The enhancements are even more pronounced when compared to the M1 iPad Pro models, where benchmarked tasks are 2x to 7x faster. Additionally, the M5 iPad Pro models feature up to 2x faster storage, although they are limited to 2 TB.
Apple didn’t stop there. The 256 GB and 512 GB configurations have 50% more unified memory, increasing from 8 GB to 12 GB, while the 1 TB and 2 TB configurations have 16 GB. The new models also feature enhanced external display support, enabling them to drive external 4K displays at up to 120 Hz with Adaptive Sync, which reduces latency and enhances gaming performance. Lastly, Apple introduced fast charging that provides 50% power in 30 minutes with an appropriate charger.
Two other notable changes probably won’t be evident to most users. The M5 models of the iPad Pro utilize Apple’s new C1X cellular modem and N1 wireless network chip, which enable Wi-Fi 7, Bluetooth 6, and Thread networking. Apple claims faster cellular and Wi-Fi performance, along with lower power consumption, but official battery life estimates remain unchanged.
Otherwise, the new iPad Pro models remain nearly identical to their predecessors. They retain the same Ultra Retina XDR display, cameras, ports, and accessory ecosystem (Magic Keyboard and Apple Pencil). The case and industrial design are the same.
Pricing for the 11-inch iPad Pro starts at $999 for Wi-Fi models and $1,199 for Wi-Fi + Cellular models. The 13-inch iPad Pro starts at $1,299 with Wi-Fi and $1,499 for Wi-Fi and cellular connectivity.
Creative professionals already using a previous generation of the iPad Pro may consider upgrading, but for most people, we recommend either the low-cost iPad or the mid-range iPad Air.
Vision Pro
In the first hardware update to its Vision Pro “spatial computer,” Apple replaced the M2 chip with the more powerful M5. This upgrade boosts performance, allowing the Vision Pro to render 10% more pixels, resulting in a sharper image with crisper text and more detailed visuals. The M5 also increases the Vision Pro’s maximum refresh rate to 120 Hz from 100 Hz, helping to reduce motion blur. Battery life receives a slight boost, providing an additional 30 minutes of general use (up to 2.5 hours) and video playback (up to 3 hours). The only other change is a new Dual Knit Band, which Apple says is more comfortable.

Apart from the M5 and Dual Knit Band, the Vision Pro remains unchanged in form, function, and philosophy. Nor did Apple lower the Vision Pro’s price, which is still $3,499. Although these changes undoubtedly improve the Vision Pro experience a bit, they won’t change anyone’s purchasing decision.
(Featured image by Apple)
Ten Useful New Features in iOS 26’s Phone App
iOS 26 supercharges the Phone app with call screening, live translation, and hold music detection. But that’s not all! You can make calls from a Mac or iPad, share your screen during calls, see a contact’s call history, and more.

Although it’s easy to joke about how little we use our iPhones for actual phone calls, telephony remains a core feature that everyone depends on to some degree. In iOS 26, Apple put significant effort into improving the phone experience, delivering the most notable upgrade to the Phone app in years. Here’s what you’ll find.
Unified View
The Phone app has traditionally featured a toolbar with buttons for Favorites, Recents, Contacts, Keypad, and Voicemail, along with a separate Search field. iOS 26 retains this layout as Classic view (below, left) and introduces a new Unified view (below, right) that aims to simplify the interface by reducing the toolbar to four buttons: Calls, Contacts, Keypad, and Search, with the Calls screen combining favorites and recent calls. You can switch between these views by tapping the Filter button in the top-right corner and choosing the preferred layout. The Filter menu also lets you specify which calls appear below, including voicemail.

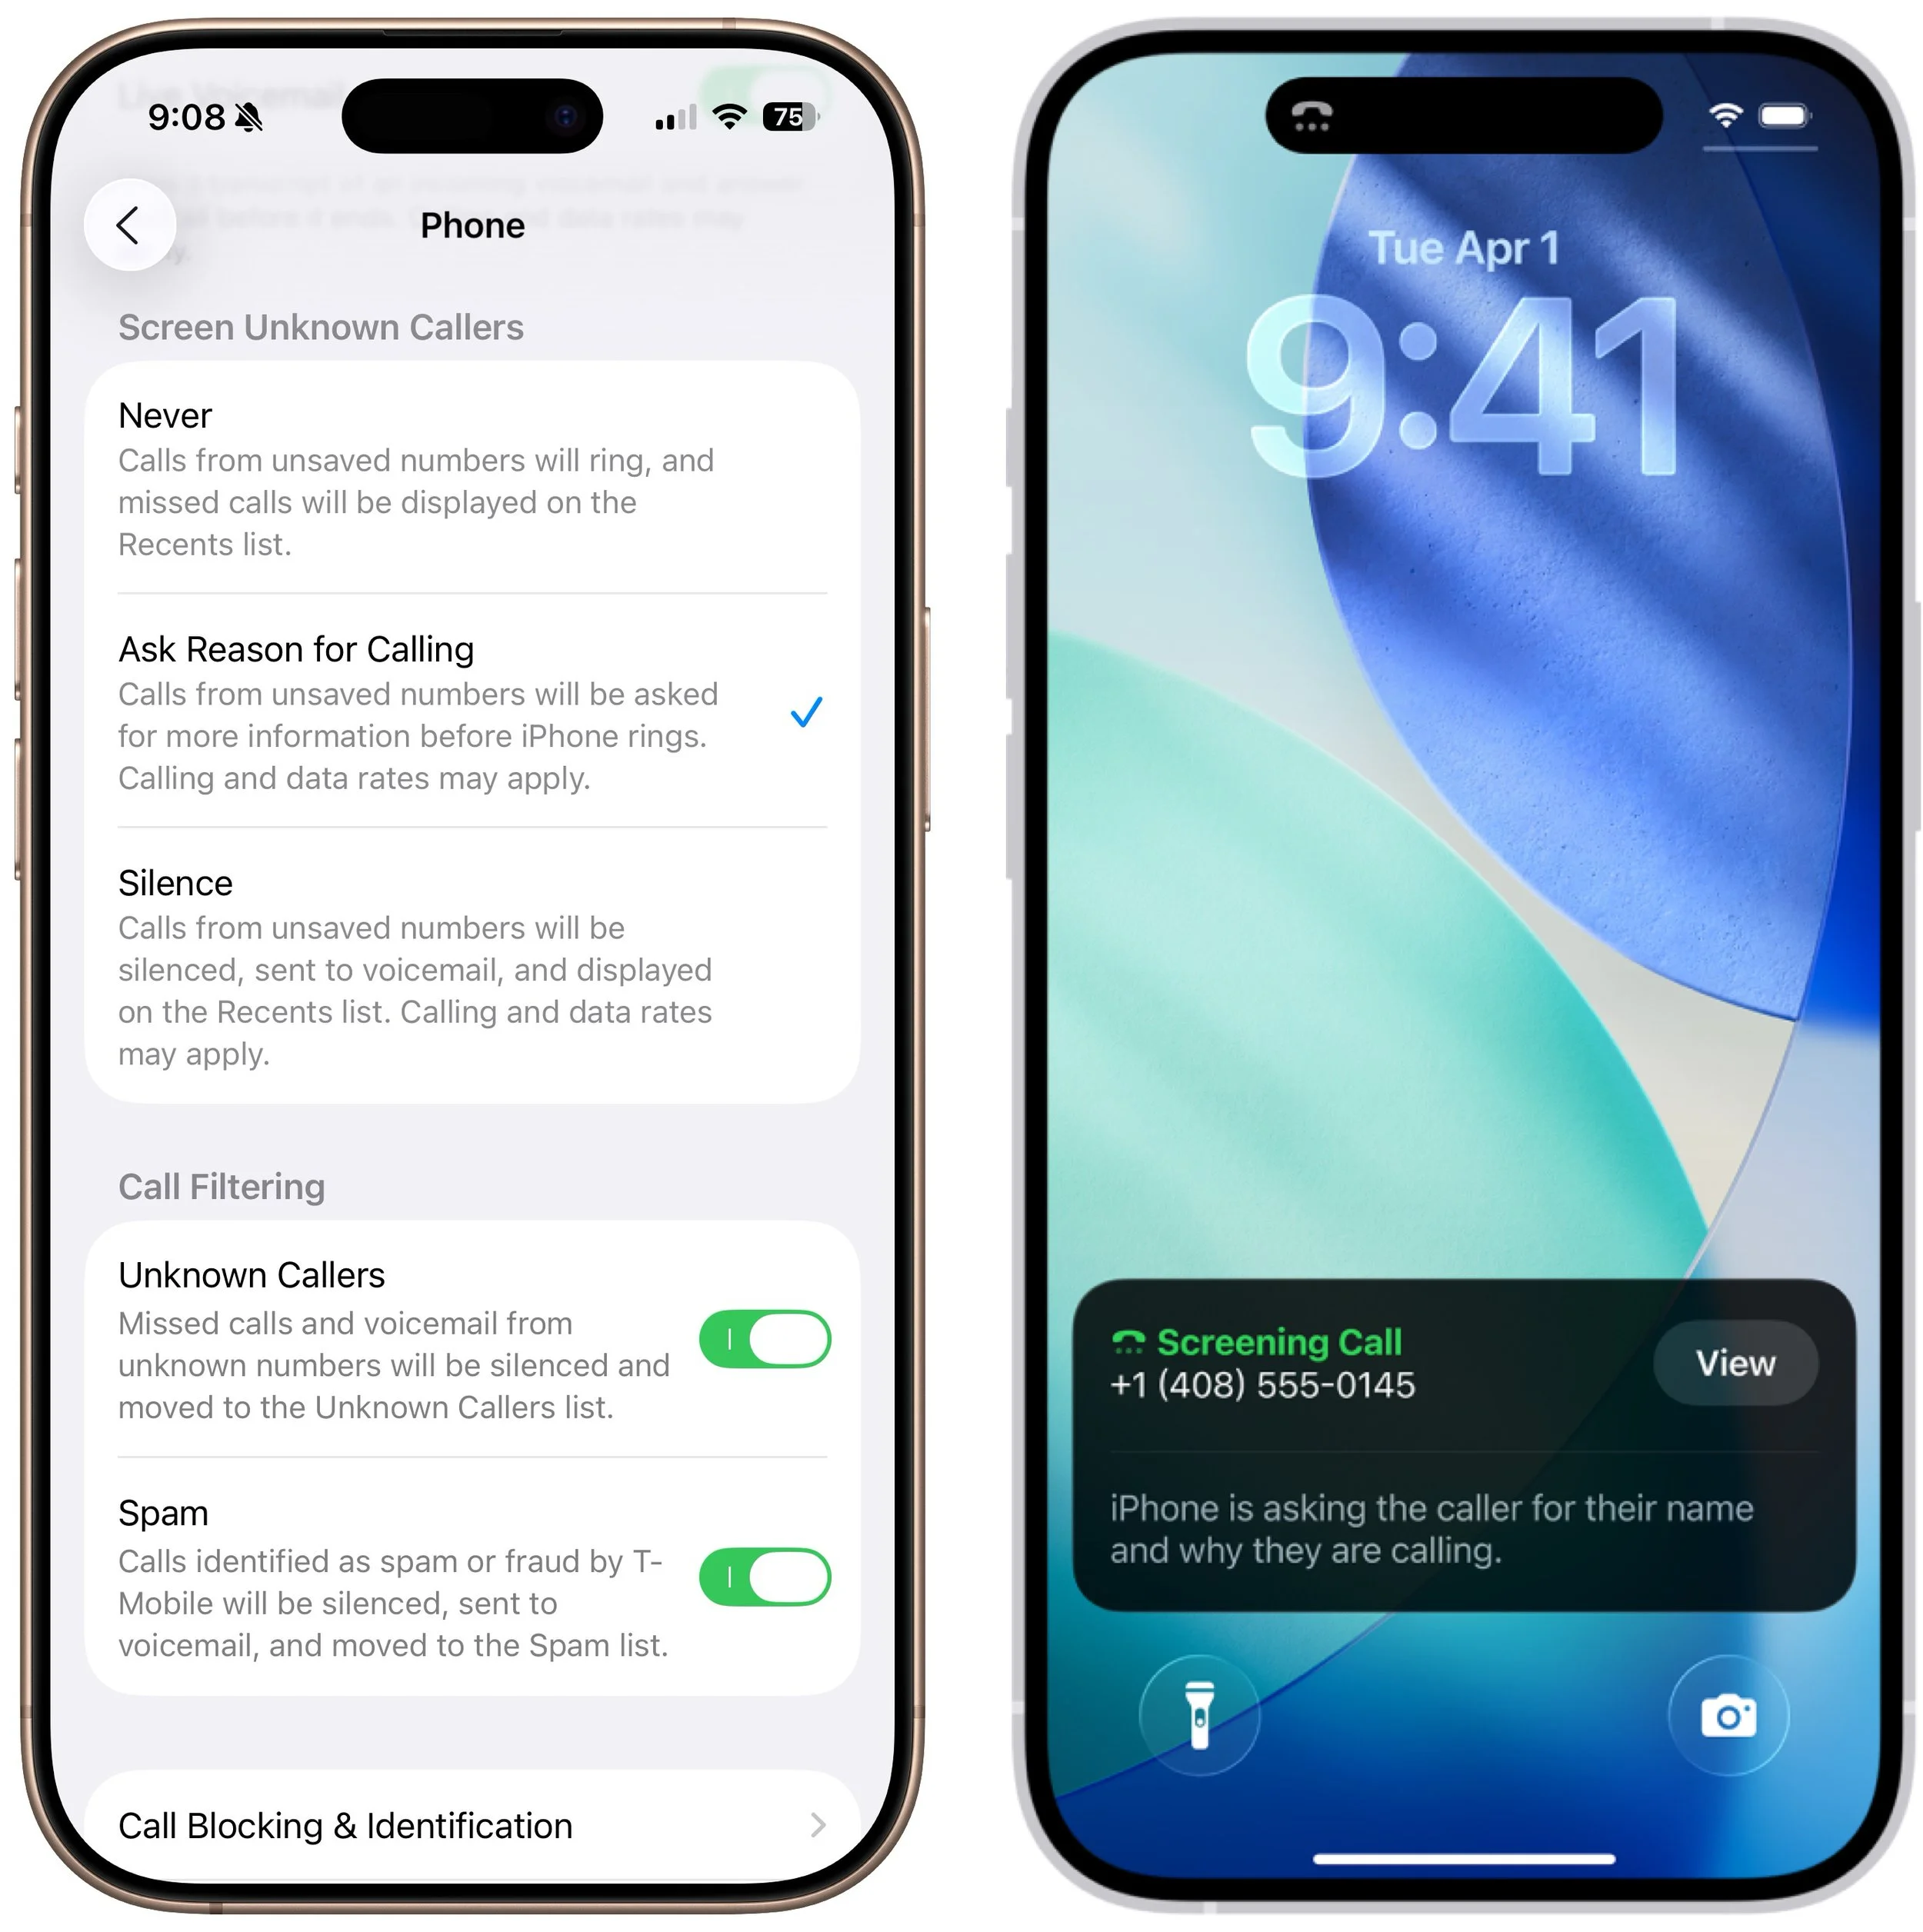
Call Screening
A new Call Screening feature, configurable in Settings > Apps > Phone > Screen Unknown Callers, intercepts incoming calls from unknown numbers and prompts the caller to “state their name and reason for calling” before the iPhone even rings. If the caller responds, you’ll see a transcript or snippet of their response, allowing you to decide whether to answer or ignore the call. In our experience, it mainly causes spammers and telemarketers to hang up instantly, which is equally effective.
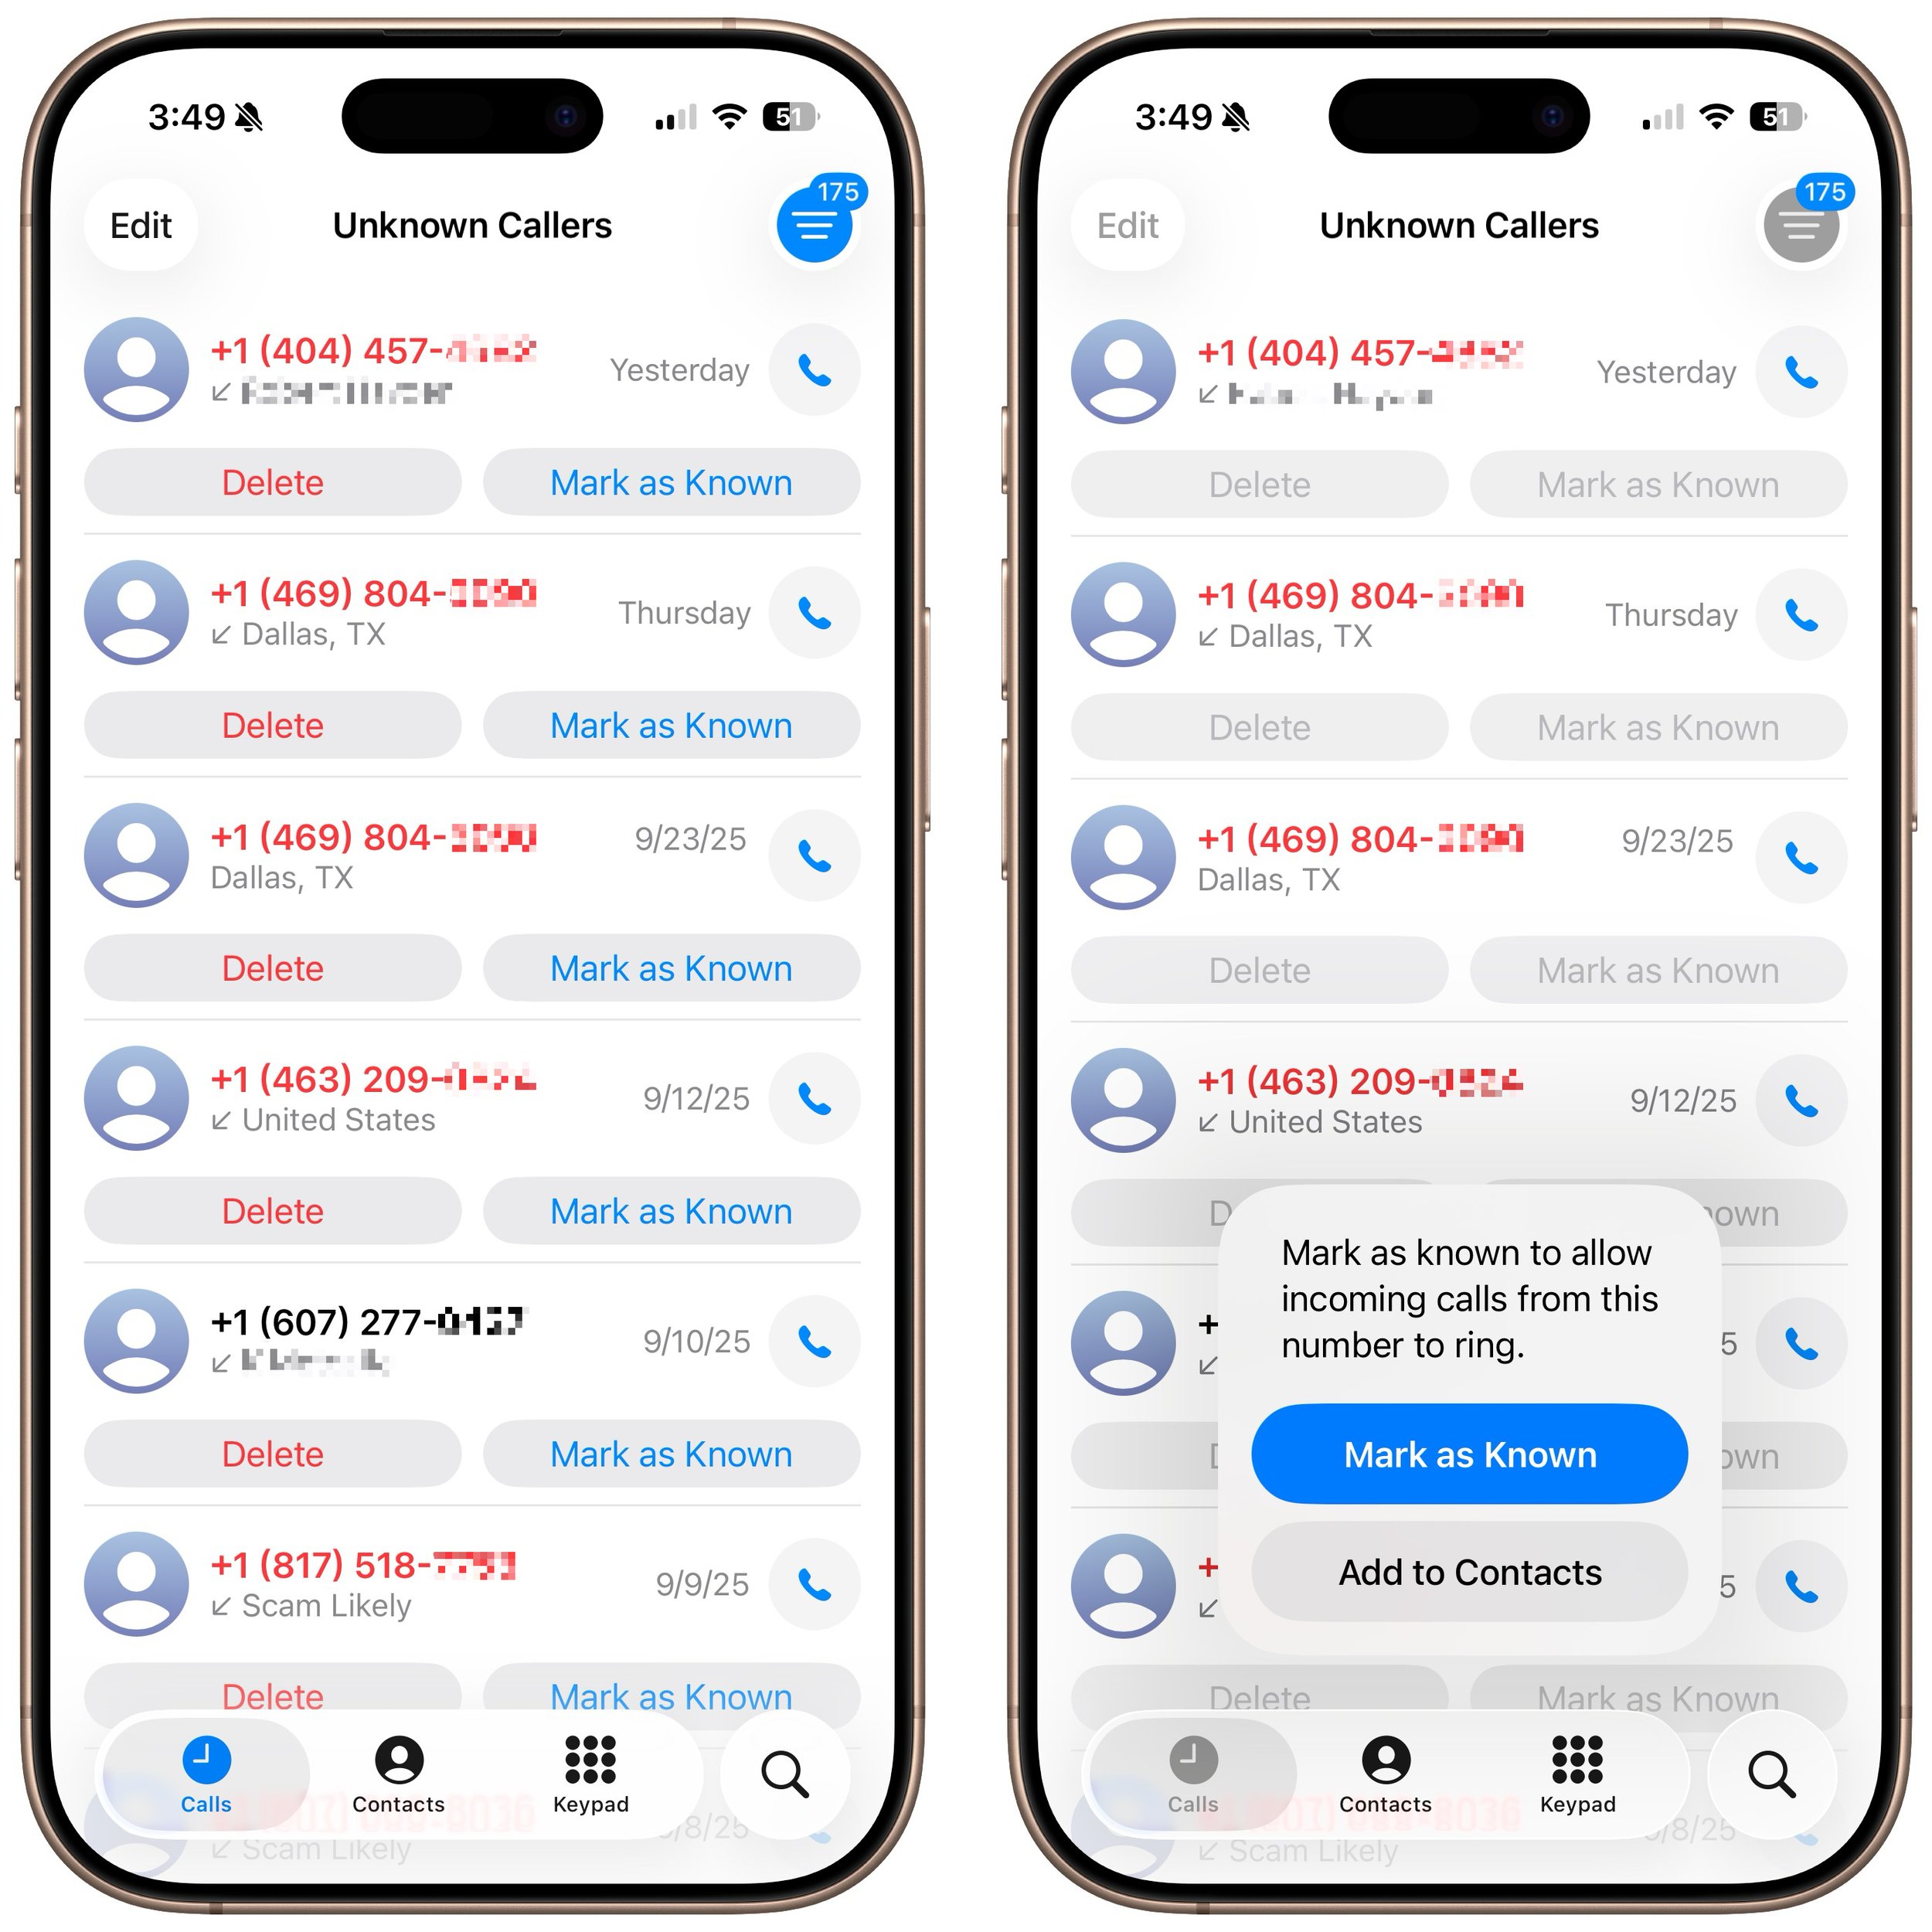
Unknown Call Lists
The Phone app has long been able to silence calls from unknown numbers—those not in your contacts or numbers you haven’t called—and send them directly to voicemail. This feature, now called Unknown Callers, remains available in Settings > Apps > Phone > Call Filtering, as does the previous Silence Junk Callers option, now called Spam. What’s new is that when these options are turned on, lists for Unknown Callers and Spam appear in the Filter menu, so they don’t clutter your Calls list. You can delete calls from unknown callers, mark their numbers as known, or add them to Contacts so they aren’t silenced next time.
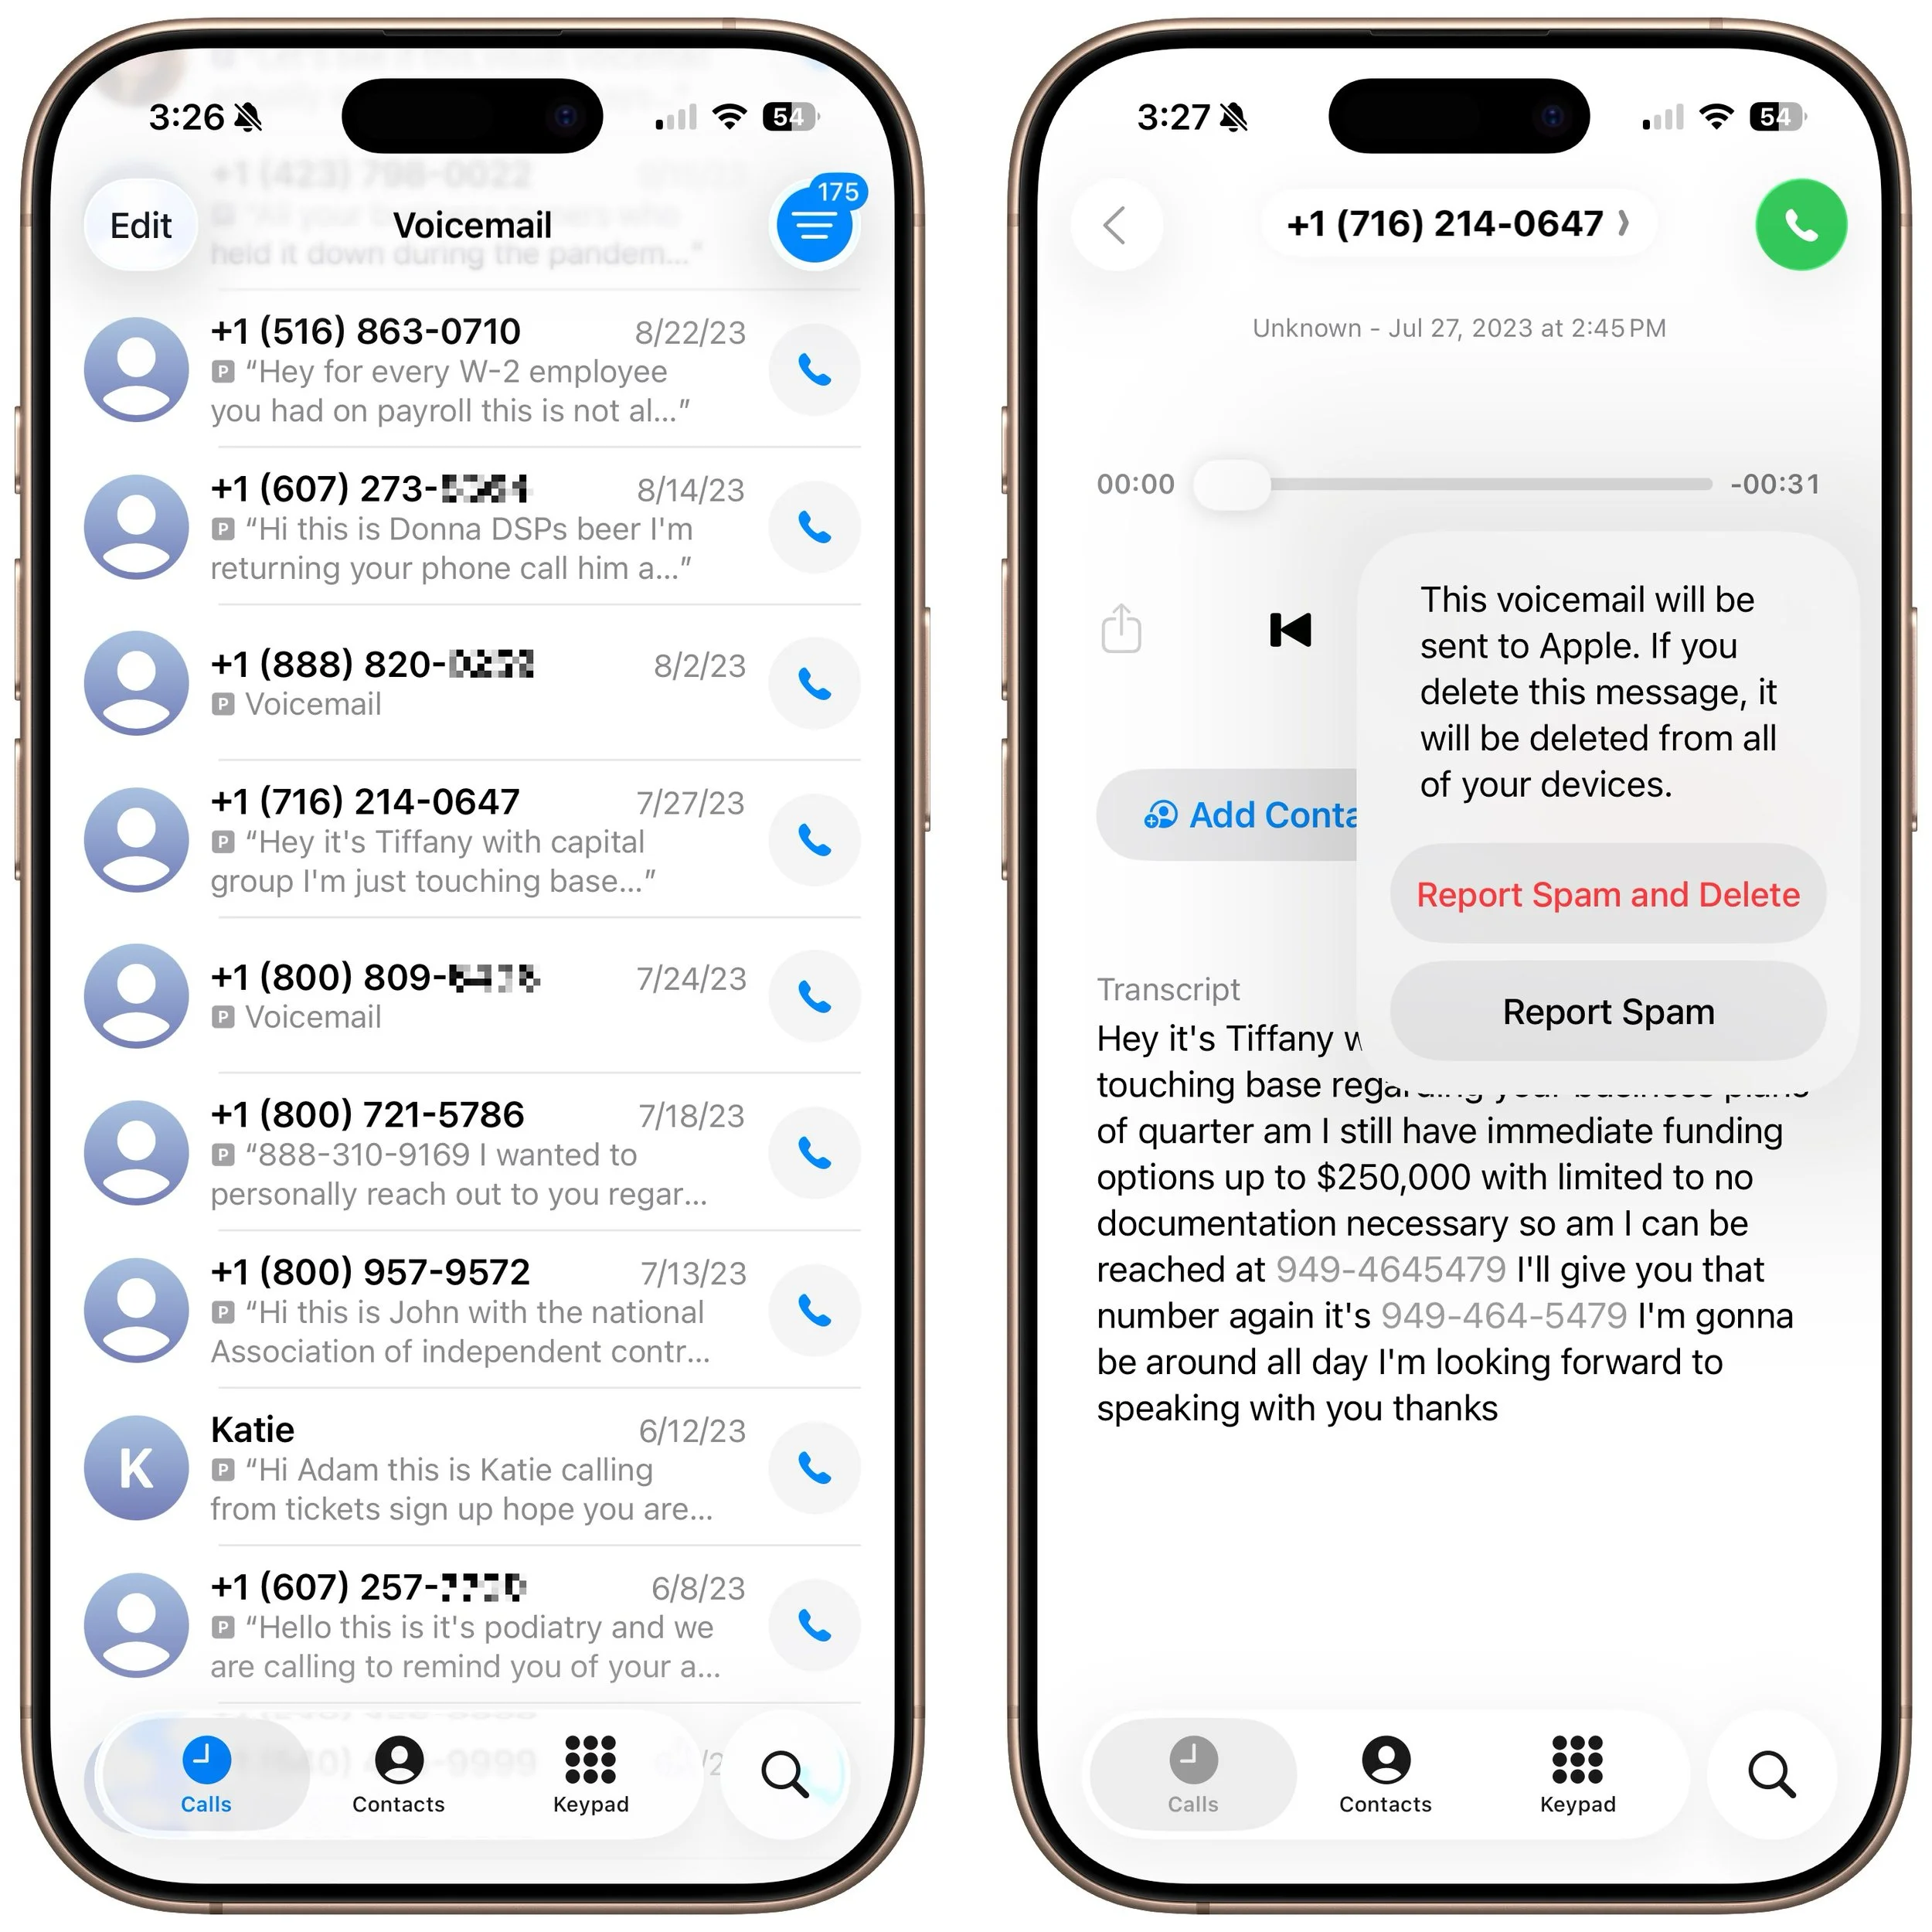
Spam Voicemail Reporting
With most spam calls going to voicemail, your inbox may fill up with unwanted messages. You’ve always been able to delete them, but now, when you view a voicemail from an unknown number, a Report Spam button appears. Tap it to report the voicemail to Apple and delete it. We don’t know if reporting spam voicemails will make any difference, but it’s more satisfying than just deleting them.
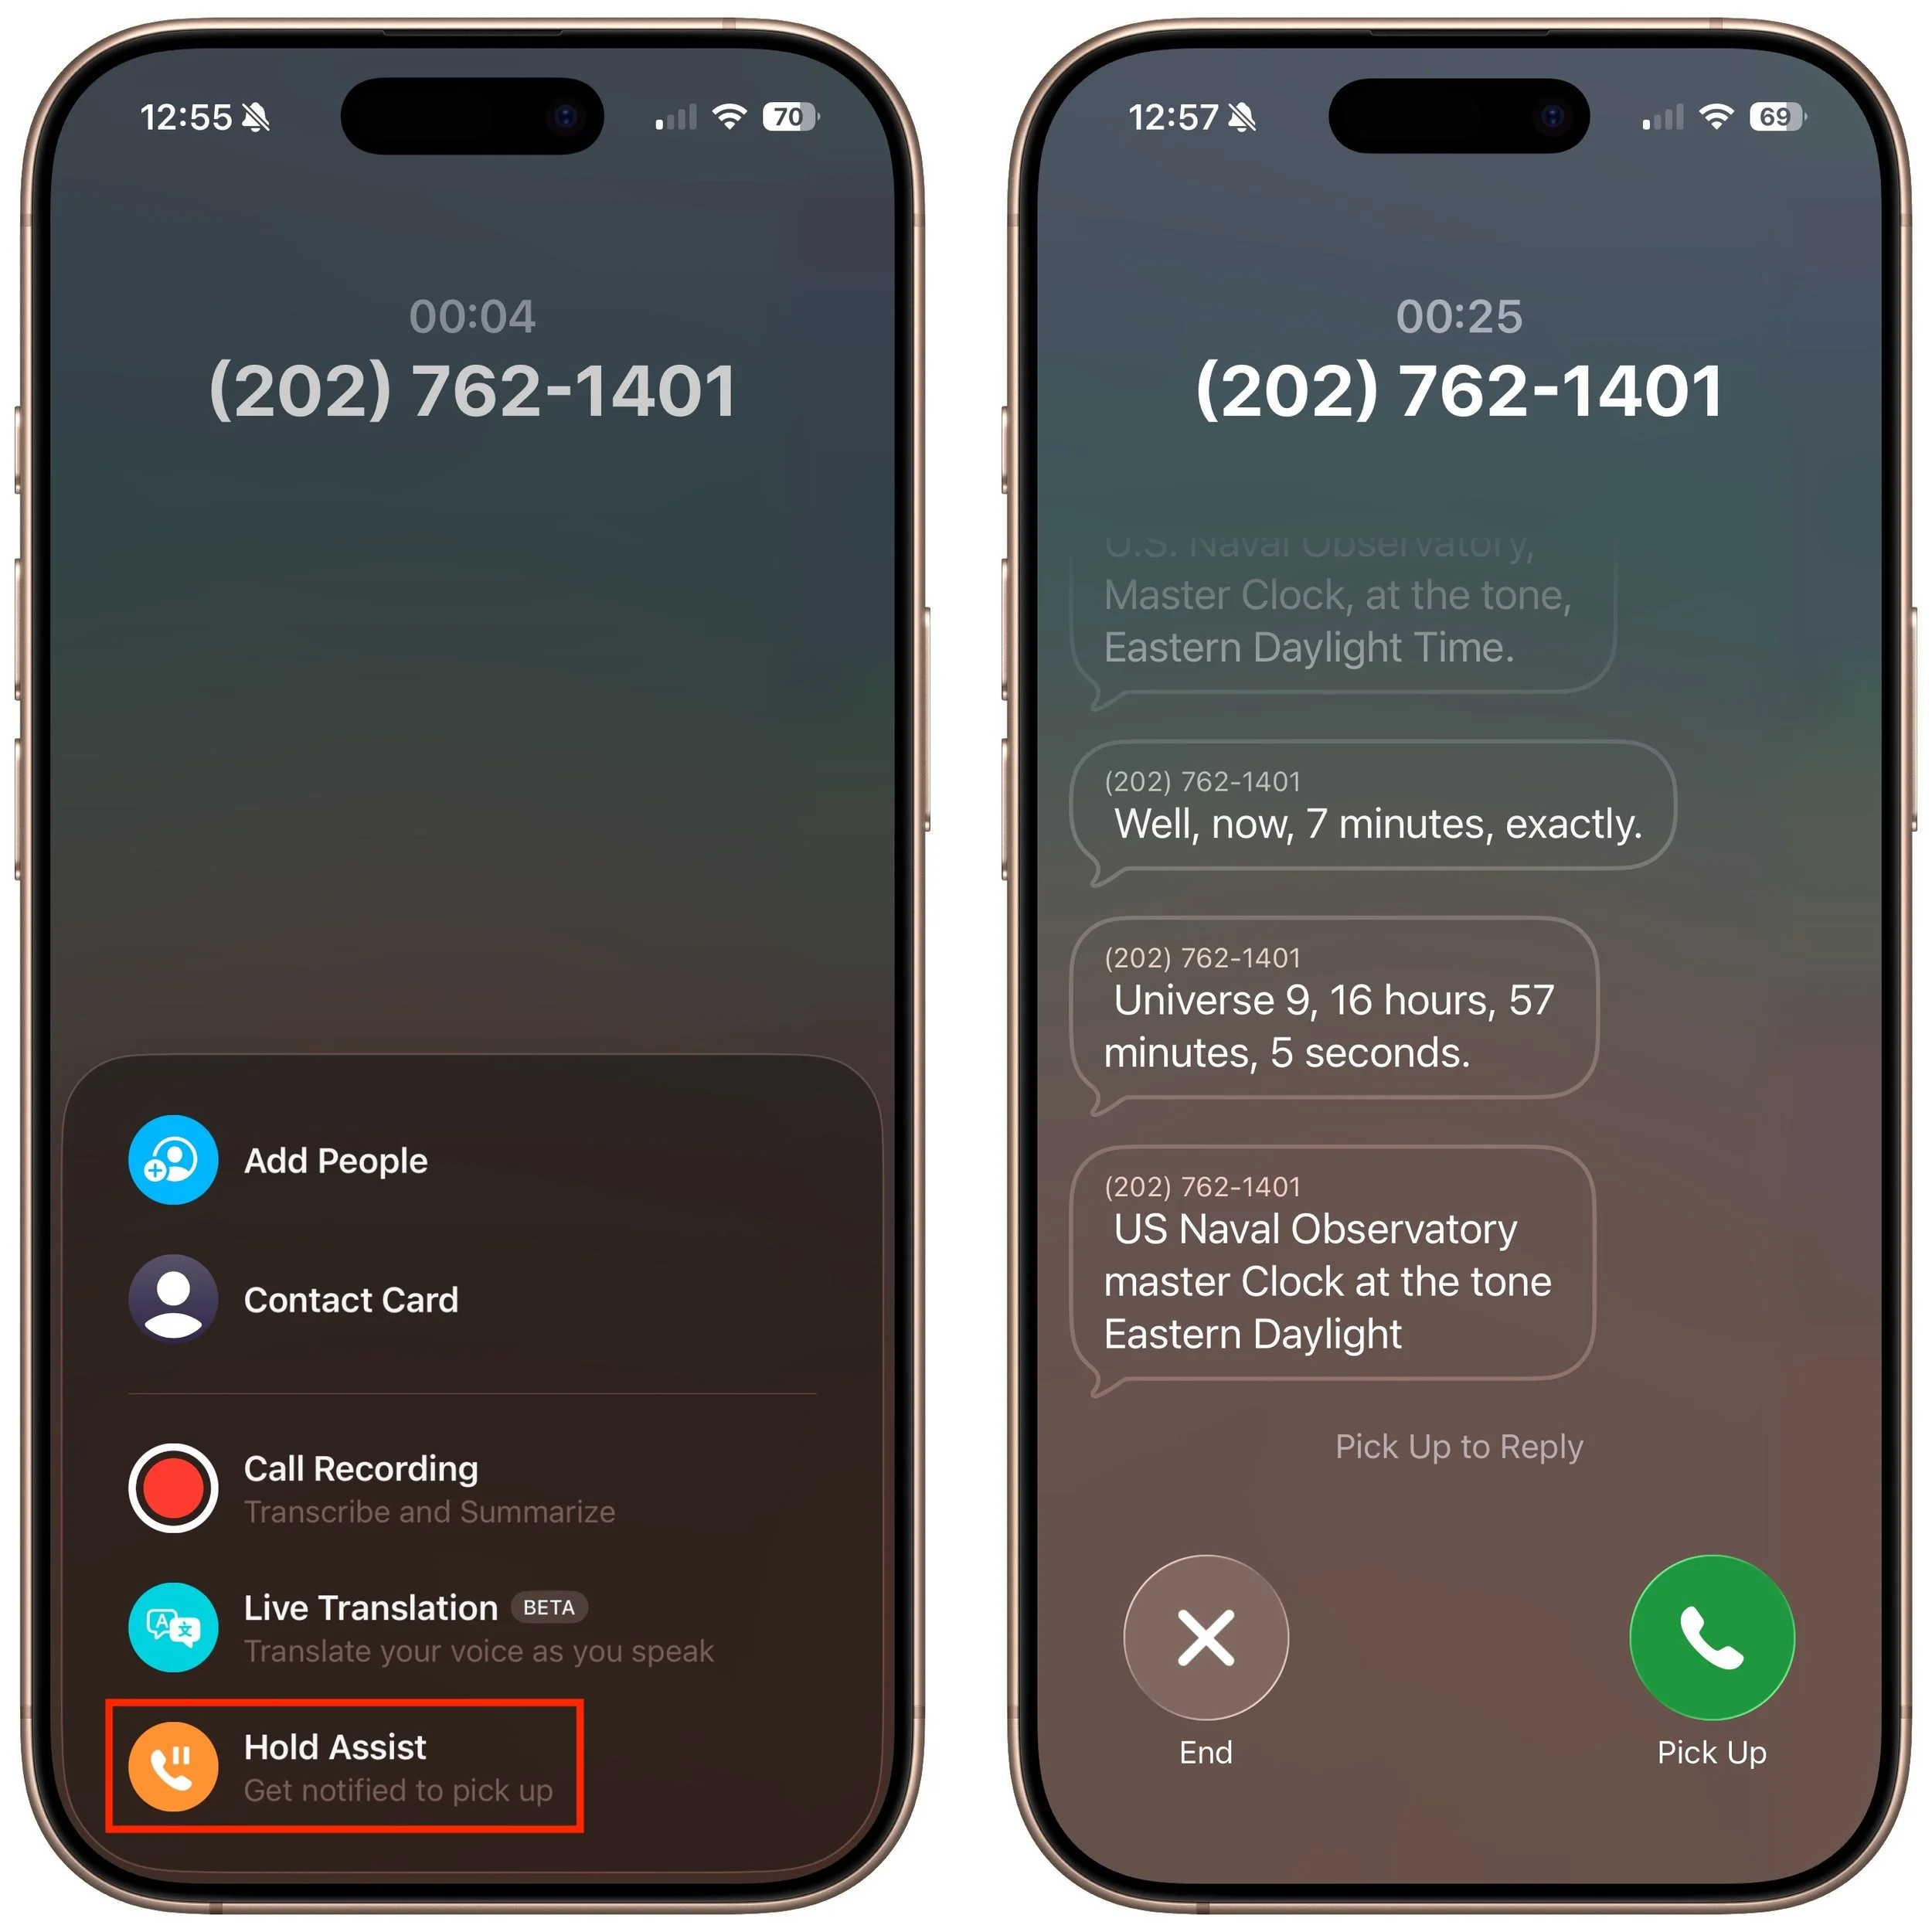
Hold Assist
The Phone app’s new automatic Hold Assist feature is somewhat hard to test, but we hope it works when you need it. When Hold Assist Detection is enabled in Settings > Apps > Phone, Apple says that if you’re placed on hold by a customer service agent, the Phone app can detect hold music, silence it, and notify you when the agent comes back on the line. You can also manually tap the More button, tap Hold Assist, and then see a transcript of the hold message while you wait. Tap Pick Up when you’re ready to talk.
Live Translation in Calls
If you need to call someone who speaks a different language (as long as it’s English, French, German, Portuguese, or Spanish), the new Live Translation feature might be helpful. Once you’re on the call, tap the More button, then tap Live Translation, and choose the languages for From and To. We highly recommend testing this feature before you actually need it, as it can take a few minutes to download a new language for the first time. After that, tap Start Translation to hear spoken translations and have your voice translated for your caller. You’ll also see a transcript of both sides of the conversation.
Type to Siri During Calls
If you desperately need to use Siri during a phone call, you can now activate Type to Siri. Make sure it’s turned on in Settings > Apple Intelligence & Siri > Talk & Type to Siri, and then double-tap the bottom edge of the iPhone to open a Siri text entry field.
Screen Sharing and SharePlay in Calls
When you’re on a call with someone using iOS 26, iPadOS 26, or macOS 26, you can now initiate Screen Sharing or SharePlay with that person during the call. Access these features from the More button. Screen Sharing can be helpful for explaining how to perform an action on the caller’s device or troubleshoot a problem, and SharePlay lets you and the caller listen to the same audio or watch the same video in a supported app.
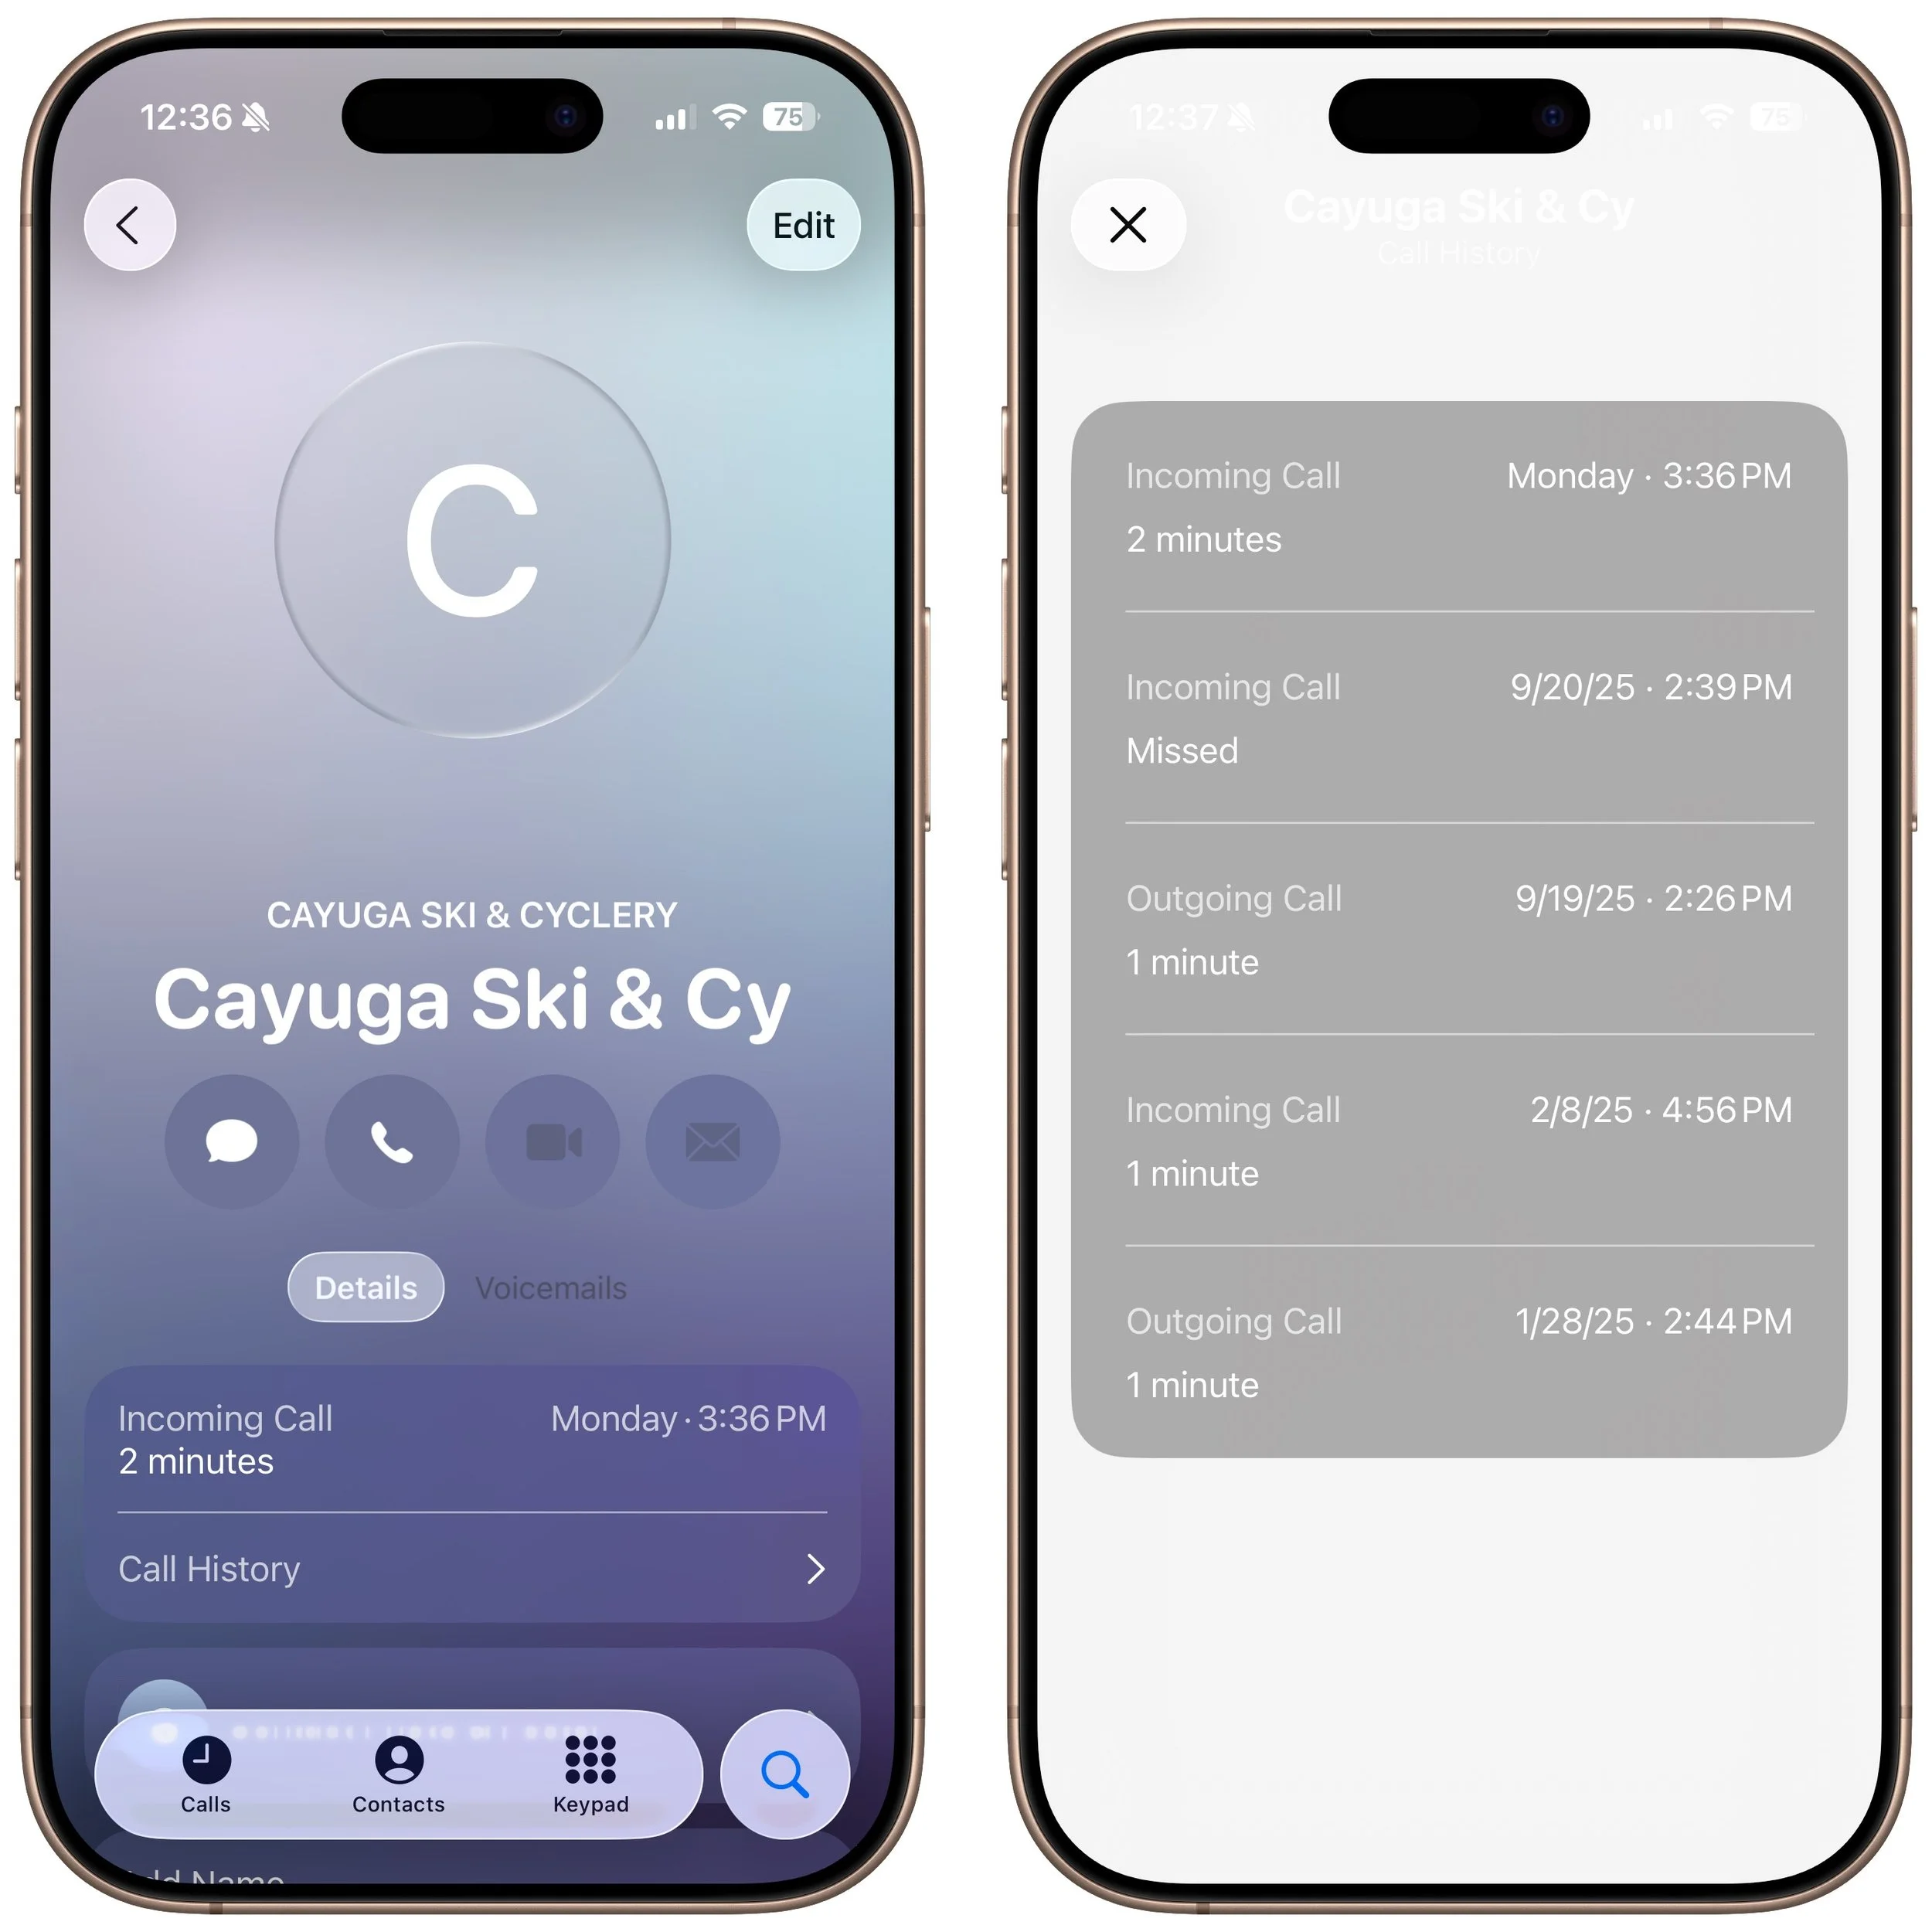
Call History
When you view a contact from within the Phone app (not the Contacts app), a Call History option appears, and tapping it shows your call history with that number, which could go back years.
Phone App Comes to macOS, iPadOS, and visionOS
Wait, did we just say you could be on a call with someone using the Phone app on a Mac or iPad? Exactly! With macOS 26, iPadOS 26, and even visionOS 26, the Phone app has expanded to the iPhone’s sibling platforms. It looks and works very similarly, with the benefit of displaying more information at once. To use one of these Phone apps, your iPhone must be on the same Wi-Fi network and signed in to the same Apple Account.

(Featured image based on an original by iStock.com/sergeyryzhov)