
Erase Image Content in Preview with Copied Color Blocks
Have you ever needed to remove some content from a screenshot or other illustration? There’s no need for a fancy graphics app—you can do it quickly in Preview with this little-known trick.
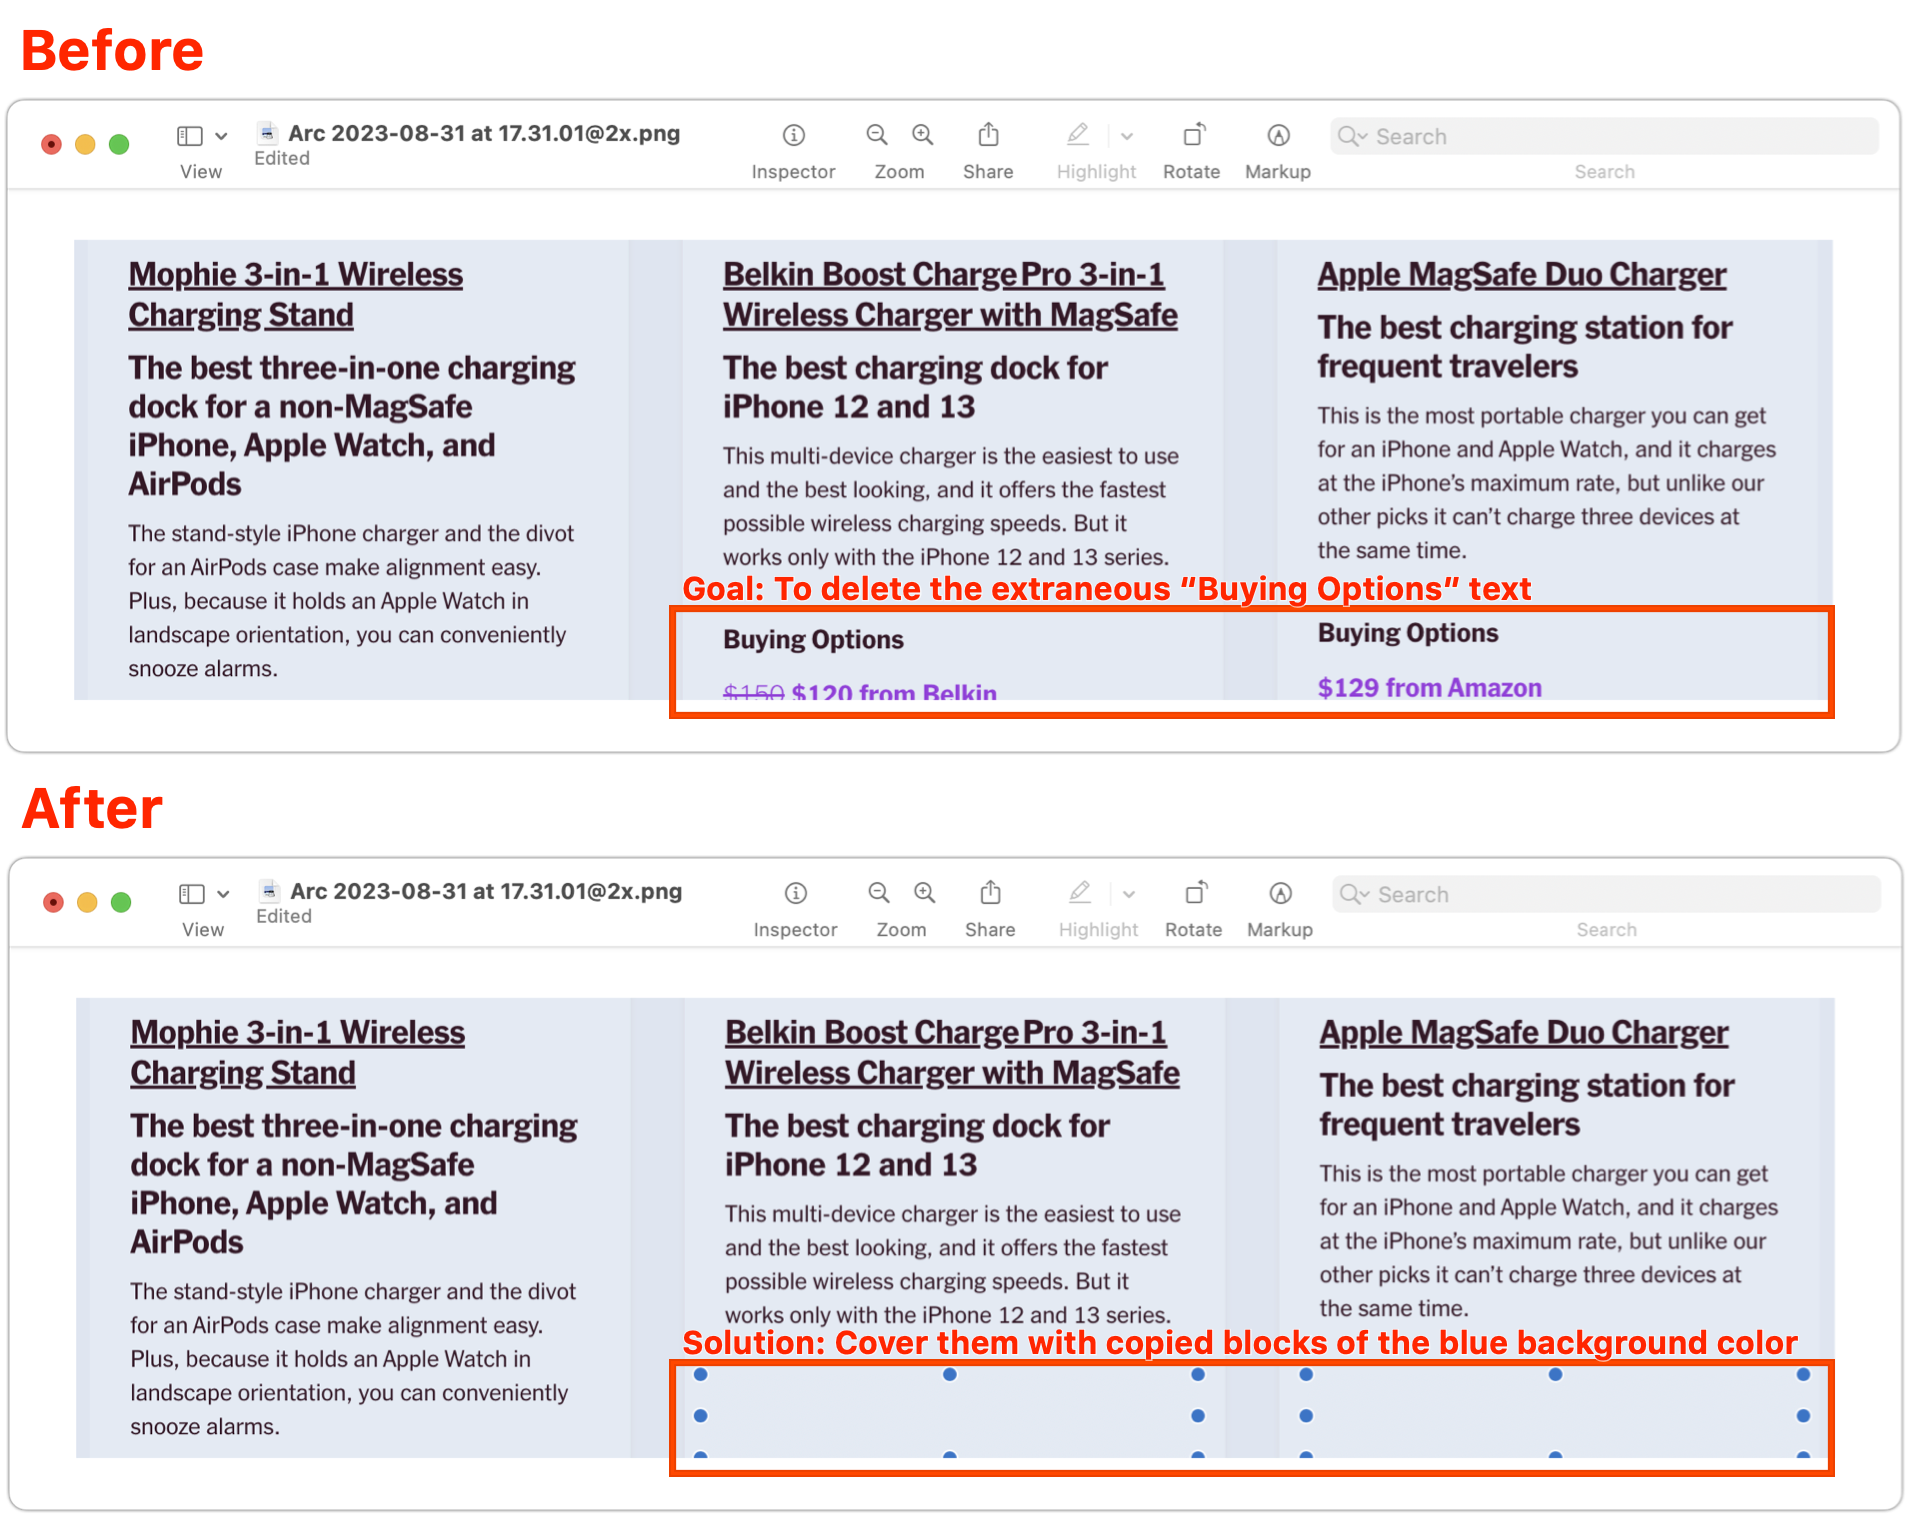
Apple’s Preview is a surprisingly capable graphics editor for making quick changes to screenshots and other illustrations, but it lacks a built-in way to delete content while leaving the background. Here’s the workaround—select a rectangle of the background color, copy it, paste it, and then move it over the undesirable content—as shown in the After screenshot below, where blue selection dots denote the pasted box. As you resize the box, press Shift to prevent it from resizing proportionally, which helps you make it the shape you want. If you need a second box of the same color, Option-drag the first box to copy it. When you save and close, your boxes will be merged into the image, permanently removing the content underneath, so make sure they’re in the right spot before moving on.
(Featured image based on an original by iStock.com/Seetwo)
Beware Executive Imposter Scams Aimed at New Employees
We’re seeing an uptick in scam emails and texts to new hires purporting to be from corporate executives. The best defense is awareness, so we recommend adding security training to your onboarding process.

We’re hearing about new hires who receive an email or text from someone claiming to be the CEO of their new company, asking the employee to carry out some small task like sharing personal information, purchasing a gift card for a client, or wiring funds to another business. The new employee, eager to make a good impression and lacking the context of what’s reasonable, is tempted to do as asked. (The scammers seemingly gather the necessary information by scraping LinkedIn for job changes and corporate titles, then cross-referencing with email addresses and phone numbers stolen in data breaches.) To reduce the chances of such a scam succeeding, train new employees during onboarding not to trust unsolicited messages from unfamiliar addresses or numbers, be wary of unusual requests, and check with a trusted source within the company before replying in any way.

(Featured image by iStock.com/Ton Photograph)
How to Protect Your Child’s Hearing from Too-Loud Headphone Audio
Too-loud headphone volume causes hearing loss, but Apple makes it easy to reduce loud sounds played through headphones and prevent kids from bypassing the volume limits.

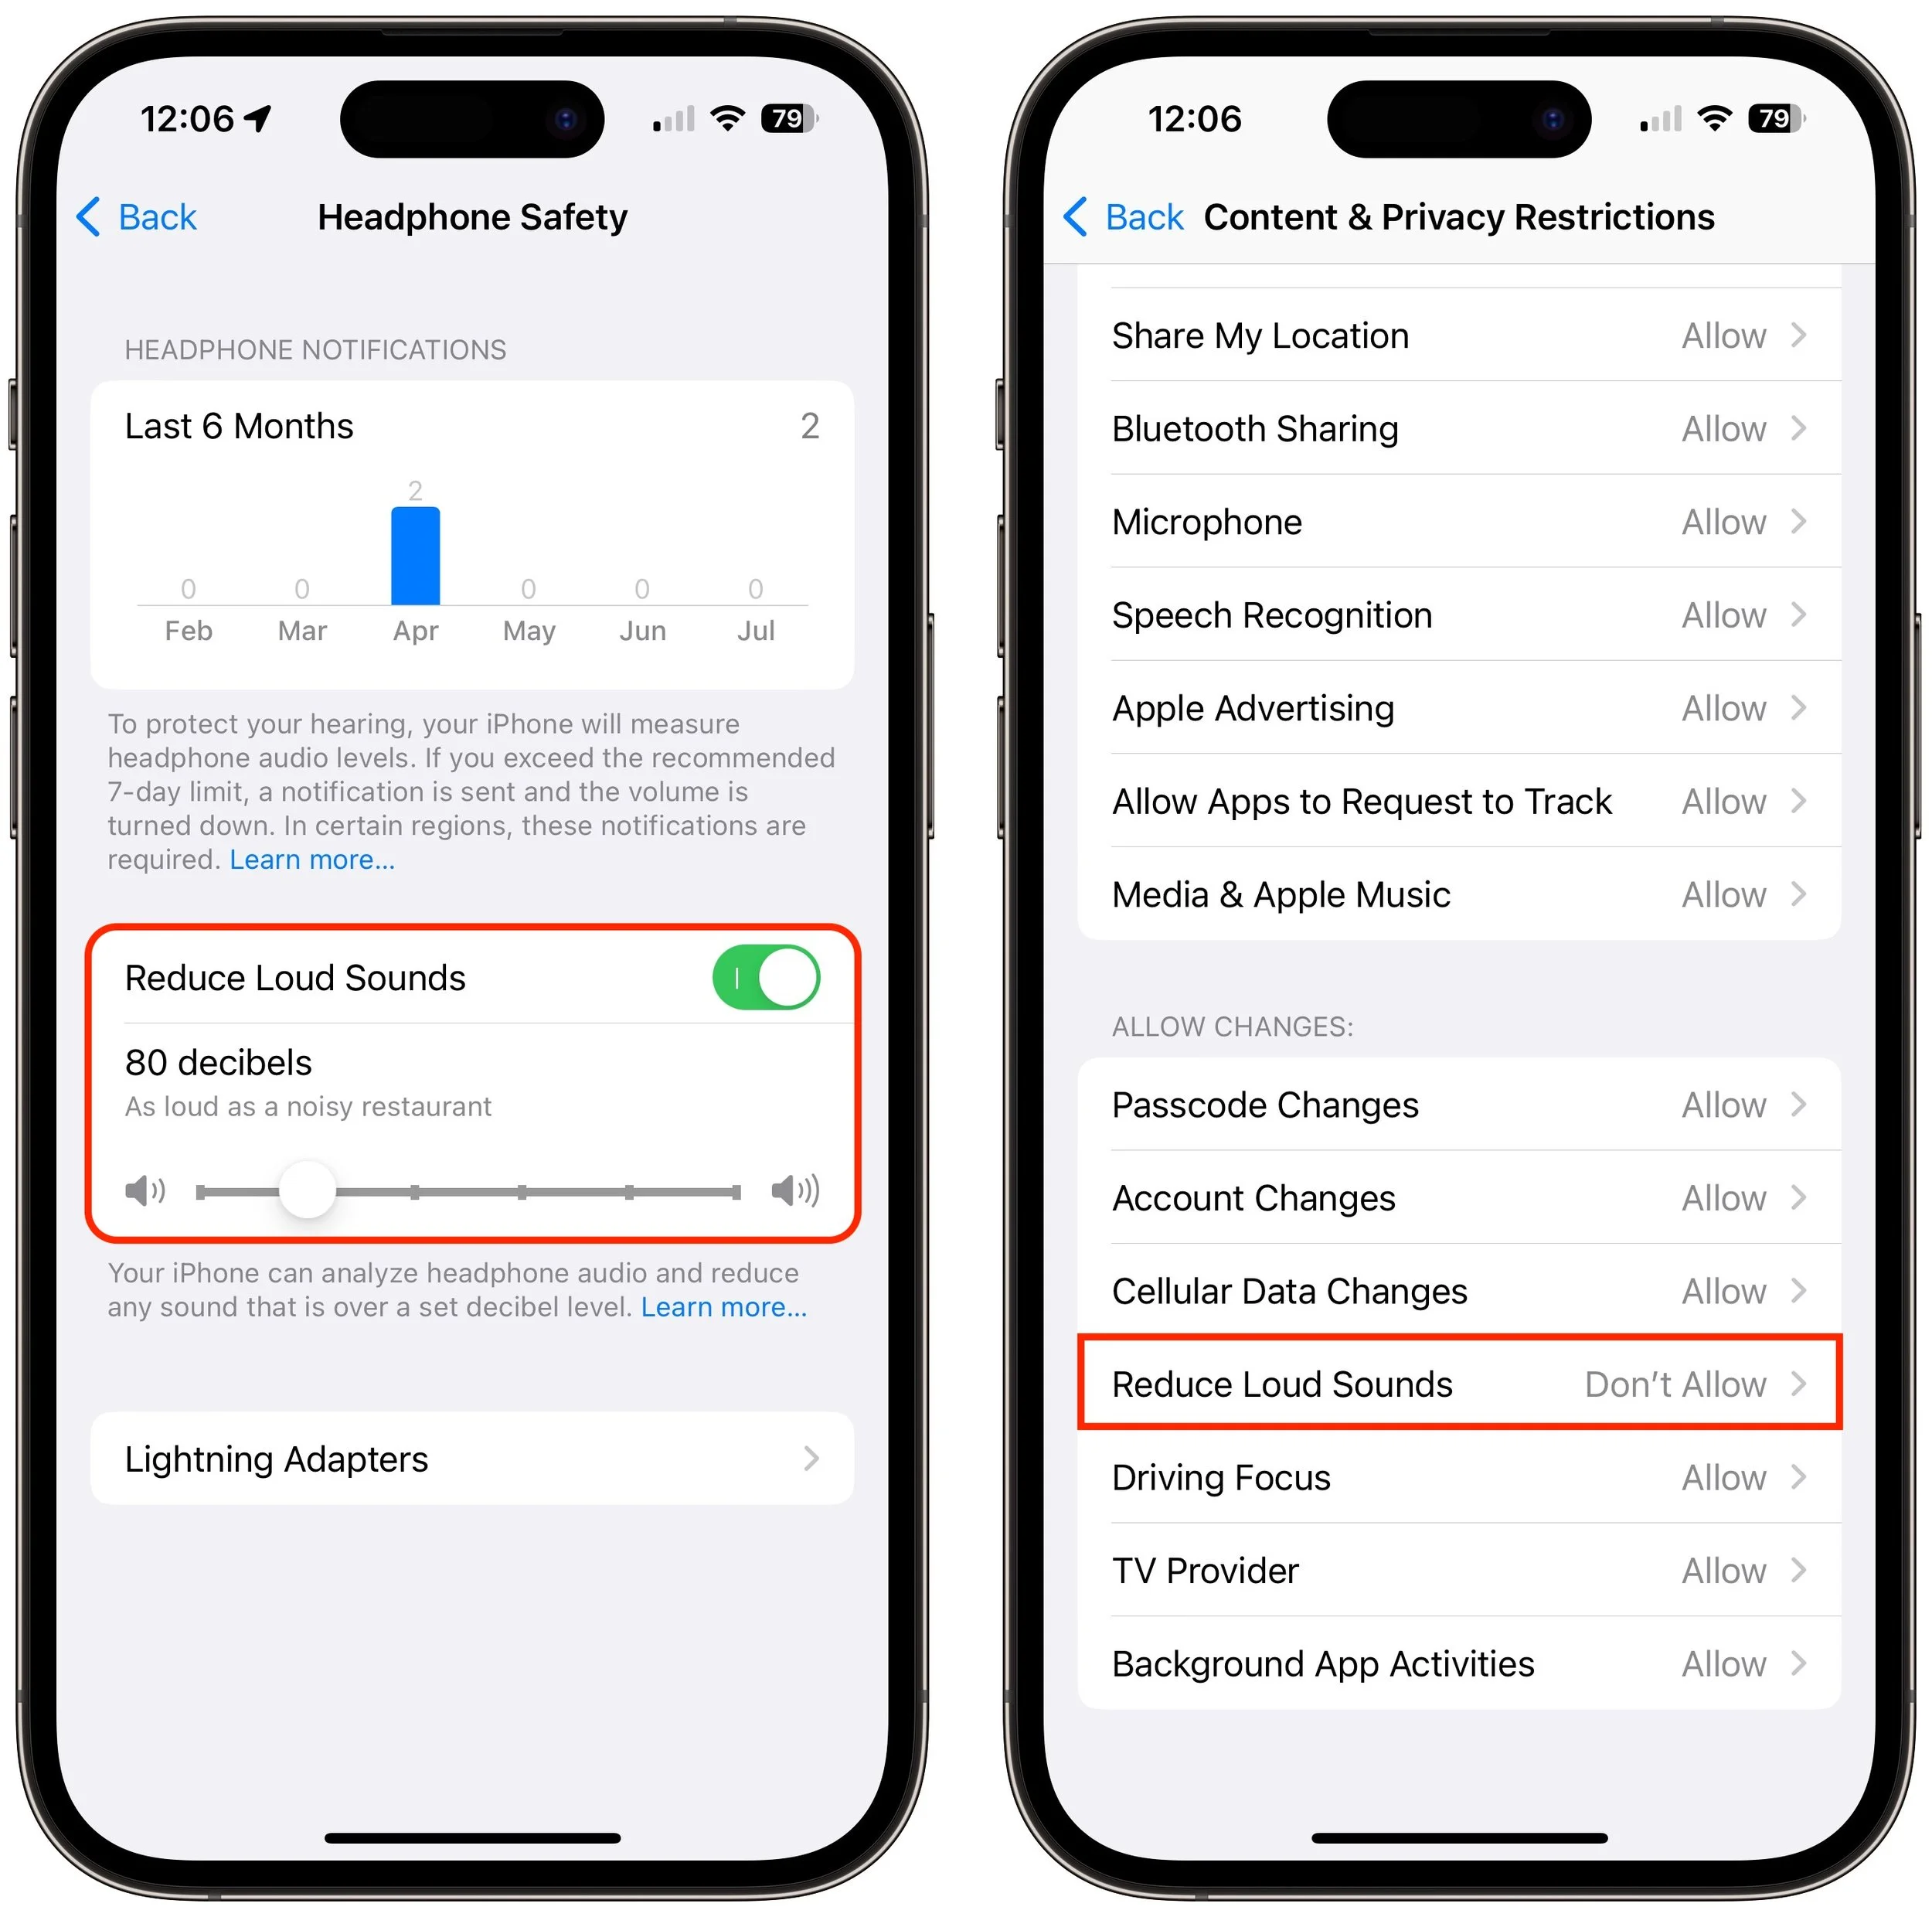
Loud sounds are harmful to everyone, and many parents worry that their children are at risk for hearing loss due to too-loud headphone audio from iPhones and iPads. To lower the likelihood of this happening, Apple provides a Reduce Loud Sounds option in Settings > Sounds & Haptics > Headphone Safety for both iOS and iPadOS. Select it and set a limit, with 80–85 decibels generally considered safe. To keep kids from increasing the limit, go to Settings > Screen Time and set a Screen Time passcode. Then navigate into Content & Privacy Restrictions, enable the switch at the top, and then scroll down and set Reduce Loud Sounds to Don’t Allow. After that, the headphone output from all apps will be capped at the decibel level you specified.
(Featured image by iStock.com/Ivan Zhdanov)
Look Up Apple Device Details in Mactracker
If you ever need to look up technical details about an Apple product, look no further than the Mactracker app, which provides specifications for every Mac, iPhone, iPad, and iPod ever made. It’s an indispensable free download.
It’s difficult for even those who work with Apple devices daily to remember all the details. What processors were available with the 2020 iMac? What resolutions did the Apple Thunderbolt Display support? What are the differences between the fifth and sixth generations of the iPad mini? To find the answers to these and many other questions quickly, turn to Ian Page’s free Mactracker app, an indispensable repository of information about Apple products. Versions are available for the Mac and the iPhone and iPad.
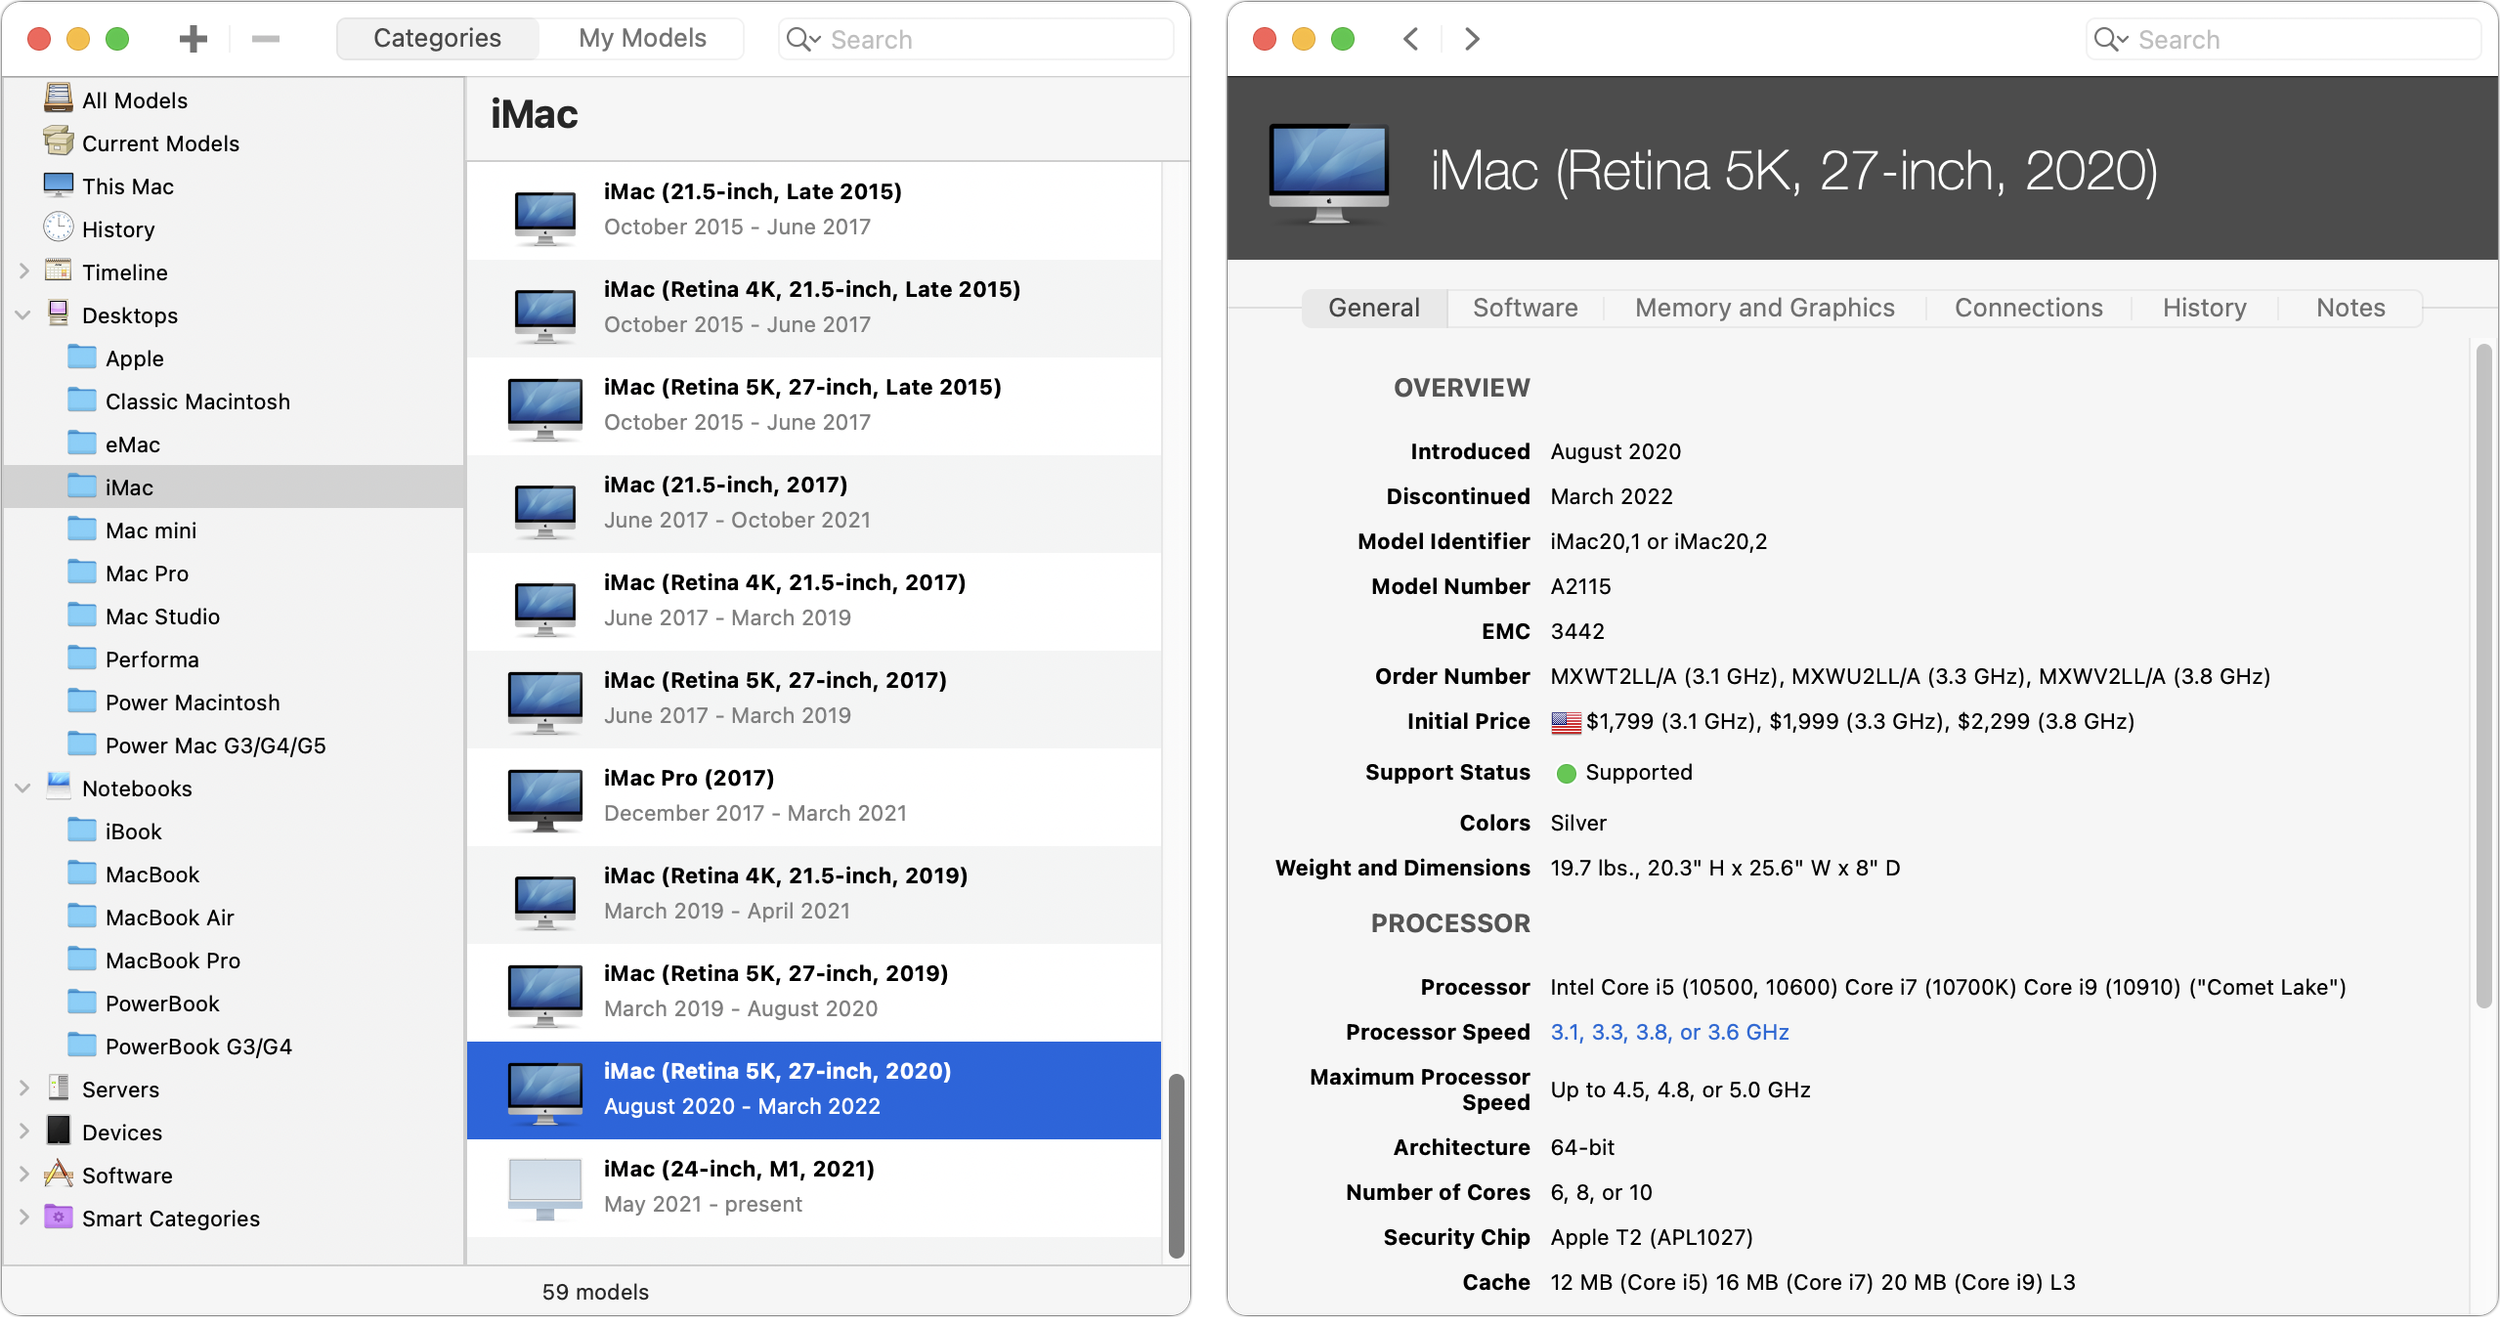
(Featured image based on an original by iStock.com/Shahid Jamil)
Keep Your Apple Devices Cool in the Summer Heat
As many parts of the world struggle with record heat waves, remember that excessive heat—operating temperatures over 95ºF/35ºC—is harmful to portable electronic devices like the iPhone, iPad, and Apple Watch. Keep your digital friends cool!

June 2023 was the hottest month on record for the planet, at least until July 2023. Among the many ill effects of such heat are what it does to iPhones, iPads, Macs, Apple Watches, and other digital devices. Excessive heat shortens the overall lifespan of lithium-ion batteries and increases the likelihood of both transient errors and hardware failures—iPhones warn you when they’re getting too hot because of these issues. Apple recommends using nearly all its devices in conditions no hotter than 95ºF/35ºC and storing them in locations that don’t exceed 113ºF/45ºC. (The exception is the adventurous Apple Watch Ultra, which can be worn in temperatures up to 130ºF/55ºC.) The most common place to avoid is a car parked in the sunshine on a hot day, which can easily exceed 130ºF within an hour and rise from there. So don’t leave your iPhone in the car during an afternoon at the beach!
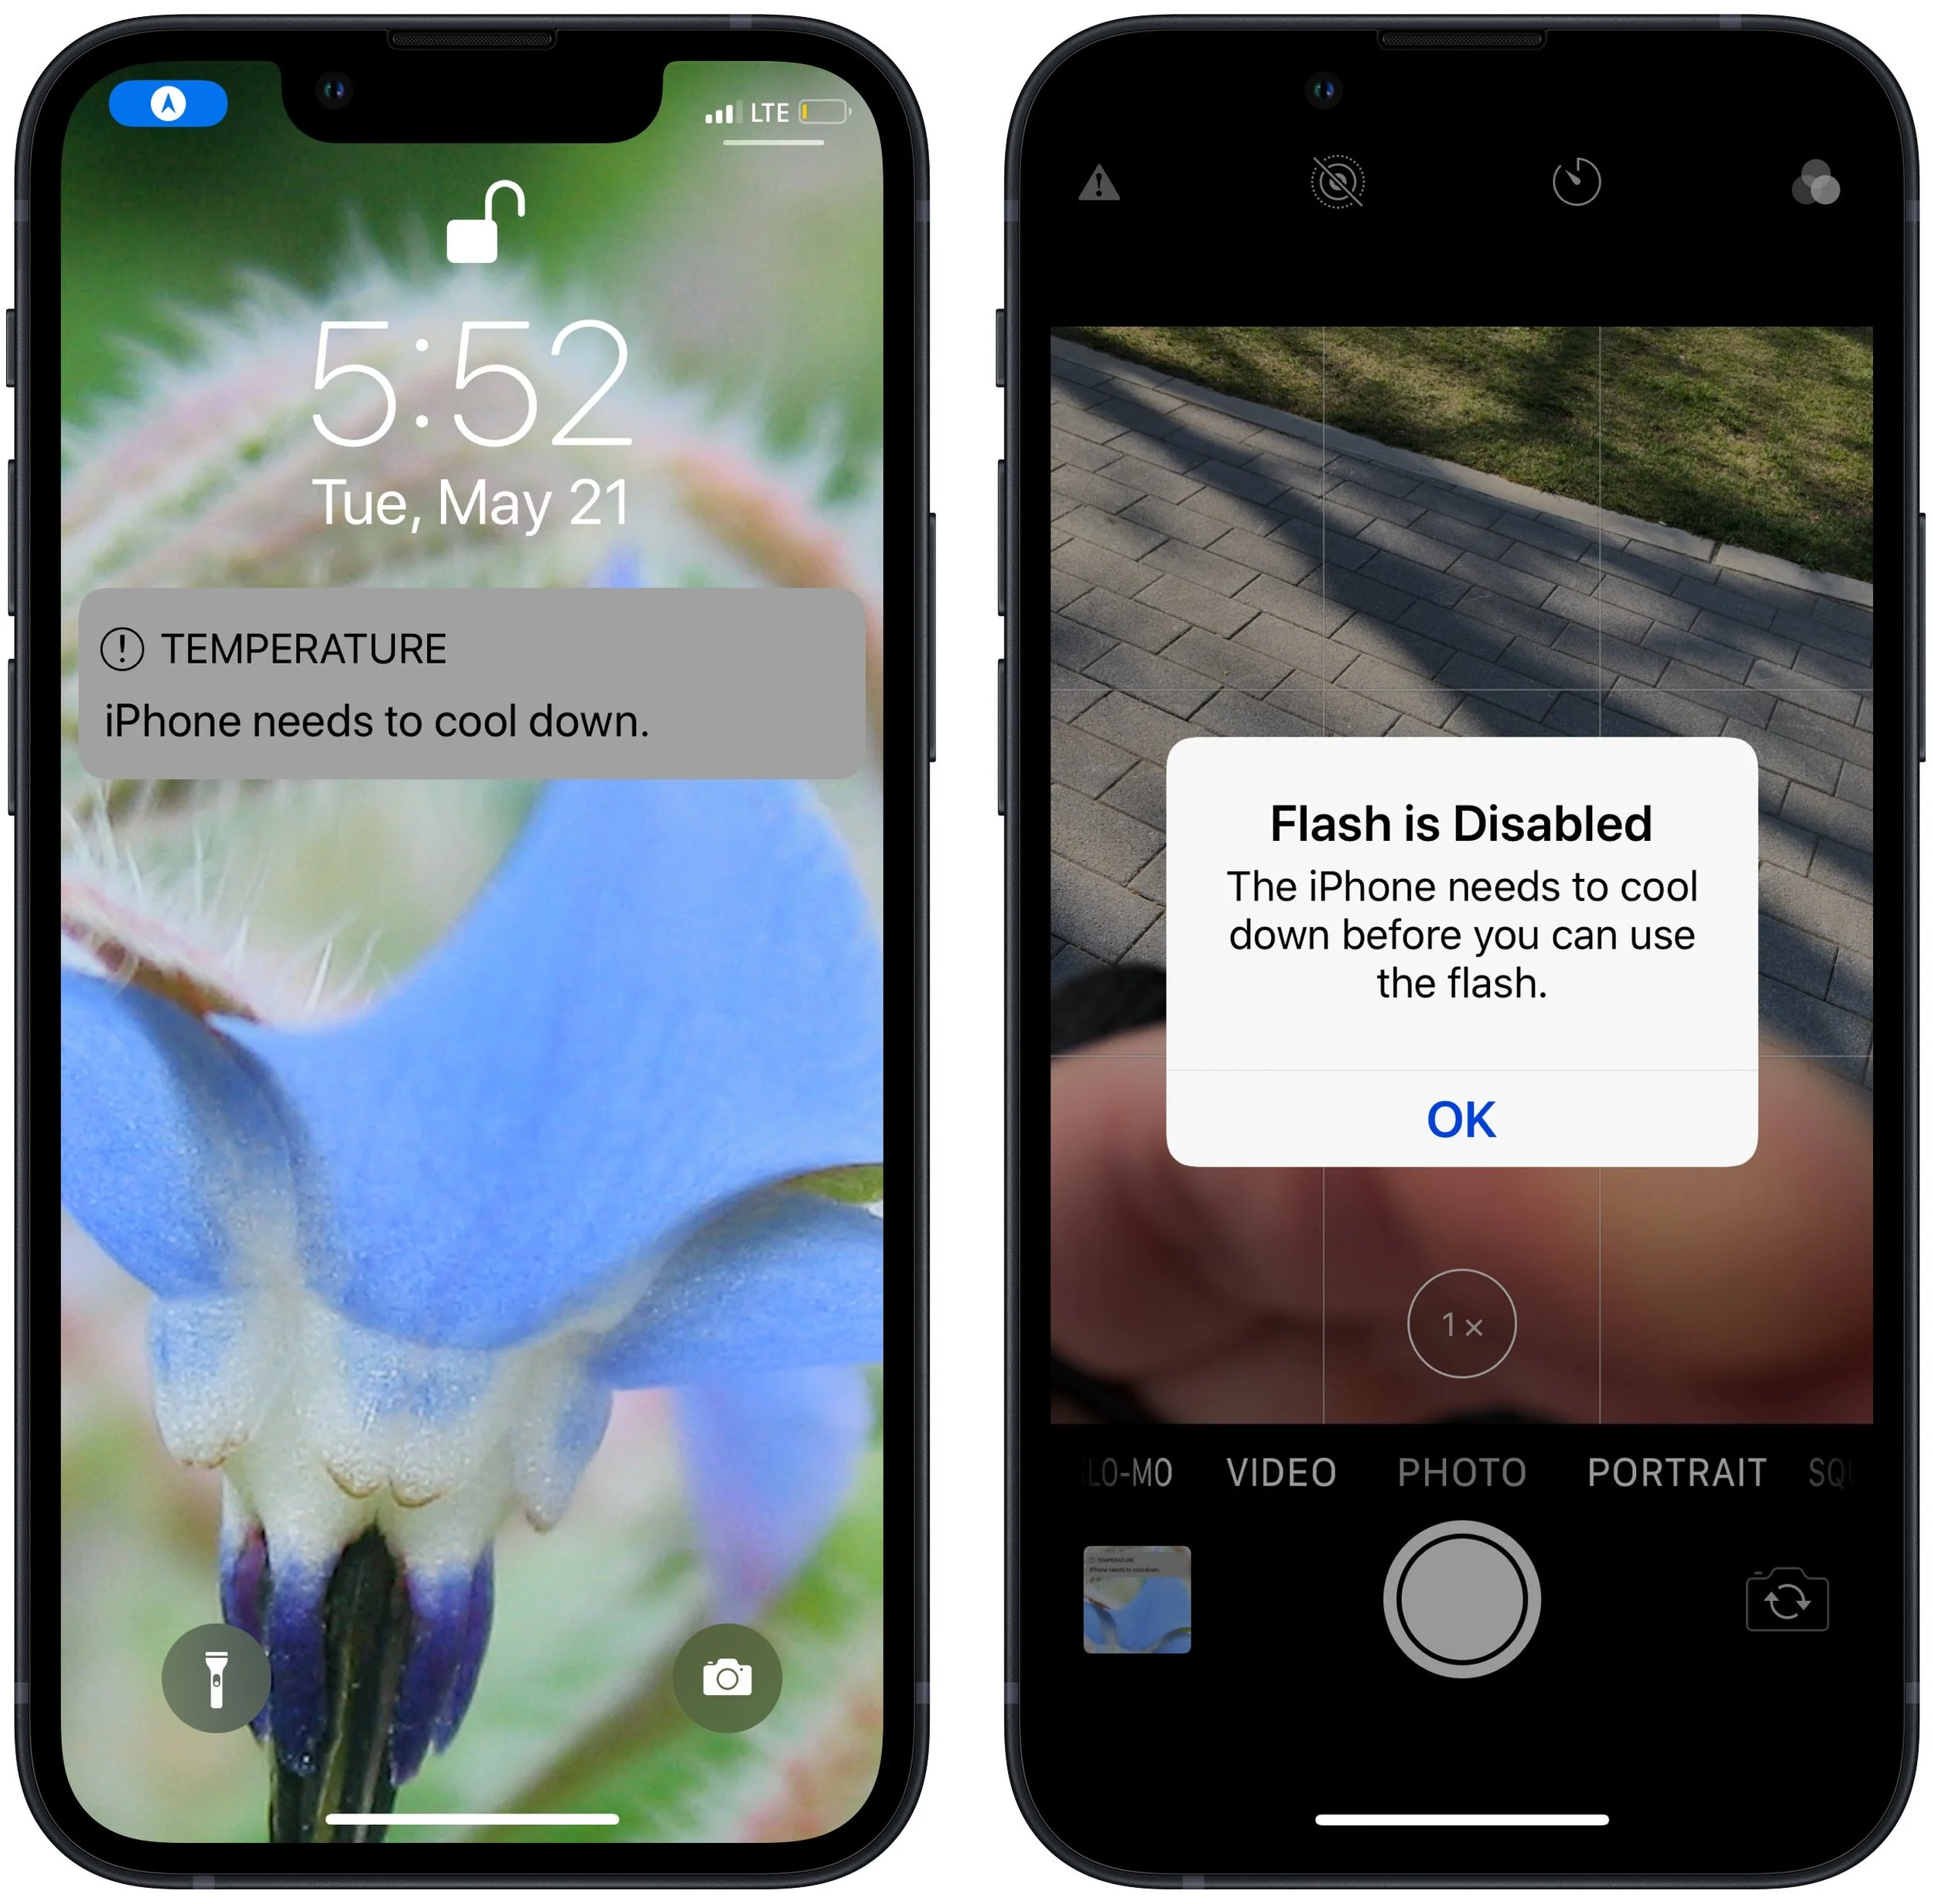
(Featured image by iStock.com/Jorge Garcia Argazkiak)
Clean Up Your Mac’s Desktop with Sort Options
We can’t help with a messy office desk, but if your Mac’s desktop is a confusing mess of randomly placed icons, using the Finder’s sort options will make it nice and orderly.
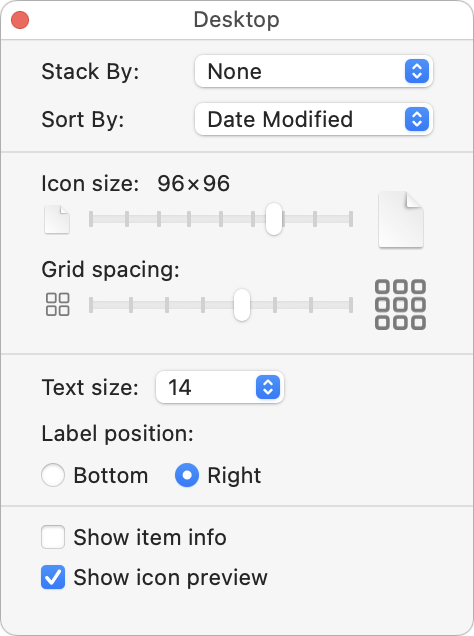
When we help someone with their Mac for the first time, we often notice that their desktop is a disaster. Icons are scattered willy-nilly and often piled on top of one another, making it hard to locate anything. For most people, the solution is easy—sort the contents of the desktop. In the Finder, choose View > Show View Options. We recommend choosing Date Modified from the Sort By pop-up menu to put your most recently used files in the upper-right, but other criteria might work better for you. If you have so many icons that they overlap, try reducing the icon size or grid spacing. You could also choose Date Modified from the Stack By pop-up menu to collect icons into stacks by date.
(Featured image by iStock.com/Liudmila Chernetska)
Consider Moving Your Mac’s Dock to the Side of the Screen
The default location of the Dock on the bottom of a Mac screen isn’t ideal because it takes valuable space that could contain content. Try hiding the Dock automatically or moving it to the side of the screen.

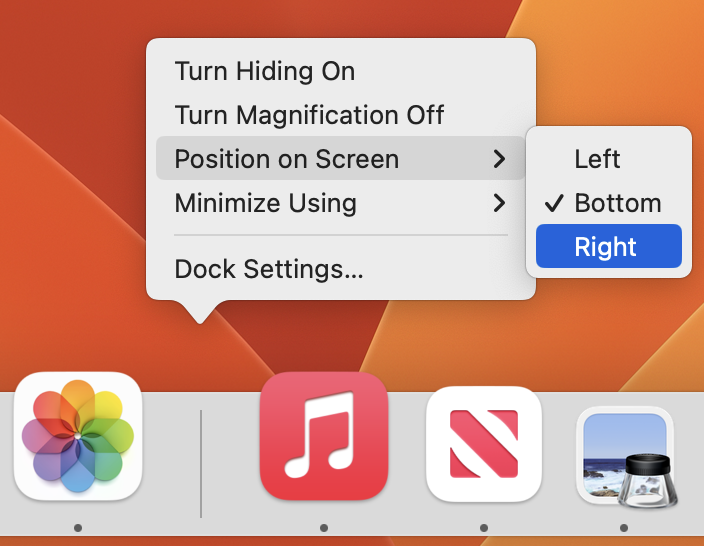
For most of us, our Mac’s screen is wider than it is tall, so longer Web pages and documents often benefit from more room from top to bottom. To maximize the amount of usable vertical space and reduce the need to scroll as much, you can set the Dock to hide automatically and appear only when you move your pointer to the bottom of the screen. A better approach is to position your Dock on the side of your screen where it’s less likely to use space you’d prefer to have available for content. Many people prefer the right side, but you can also try the left to see how it works for you. The easy way to move the Dock is to Control-click its separator bar and choose the desired side from the Position on Screen menu.
(Featured image based on an original by iStock.com/MikeLaptev)
Convert Image Formats Directly in the Finder
A hidden feature of the macOS Finder lets you quickly convert selected images from their original format to JPEG, PNG, or HEIF. If you regularly need to convert images between formats, it could save you some time.
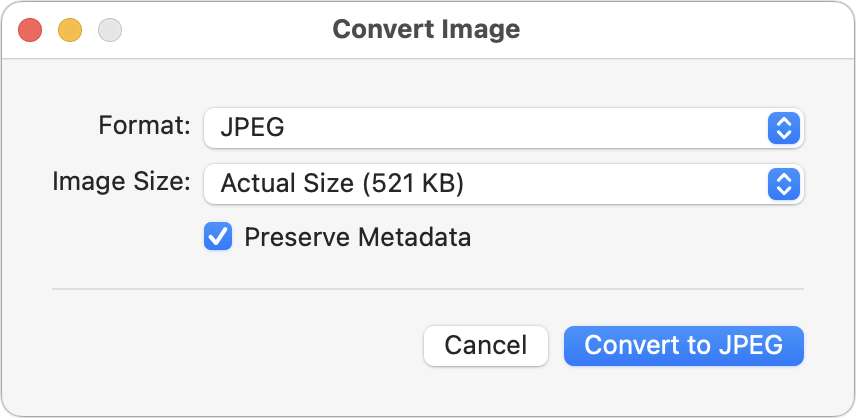
If you need to convert images to JPEG, PNG, or (unlikely) HEIF, try this hidden Finder feature: Control-click an image in one of those formats or other common image formats like TIFF, GIF, or PSD, and choose Quick Actions > Convert Image. A dialog lets you choose the destination format, the image size, and whether you want to preserve metadata. For straight conversions, stick with Actual Size, but if your goal is to shrink the file as well, you can choose a smaller image size. Leave Preserve Metadata selected unless you want to remove things like location metadata for privacy reasons. You can even select multiple files to convert them all at once.
(Featured image based on an original by iStock.com/marekuliasz)