M1-based iPad Pro Gains Thunderbolt and Liquid Retina XDR Display
Apple’s “Spring Loaded” event was indeed loaded with announcements, including the M1-based 24-inch iMac, M1-based iPad Pro, AirTag item tracker, updated Apple TV 4K with redesigned Siri Remote, and more:
Unlike the 24-inch iMac, there are no major industrial design changes in either iPad Pro model, but Apple has made significant upgrades under the hood, most notably switching from the previous A12Z Bionic chip to the M1 chip that now powers an increasing number of Macs. The M1 chip offers roughly 50% greater performance, significantly differentiating the 11-inch iPad Pro from the highly capable fourth-generation iPad Air introduced late last year.
Apple also updated the iPad Pro’s port from USB-C to Thunderbolt/USB 4, allowing users to take advantage of higher-performance hardware, such as external storage devices and high-resolution external displays. You can even connect Apple’s Pro Display XDR at its full 6K resolution. As welcome as Thunderbolt is, iPadOS could use enhancements to enable users to take full advantage of it.

For those who need constant connectivity while out and about, the cellular models of the iPad Pro now support 5G wireless networking, including the millimeter-wave version that offers the greatest throughput. Although 5G coverage is still extremely spotty, it’s only getting better, and supporting it will help future-proof these iPad Pro models.
Both iPad Pro models also receive a new 12-megapixel Ultra Wide TrueDepth camera on the front. Along with help from the M1 chip’s machine-learning capabilities, it enables a new feature called Center Stage that recognizes you in video calls and pans and zooms to keep you in the frame as you move around. It will work with FaceTime, of course, and Apple says third-party services will also be able to support it.
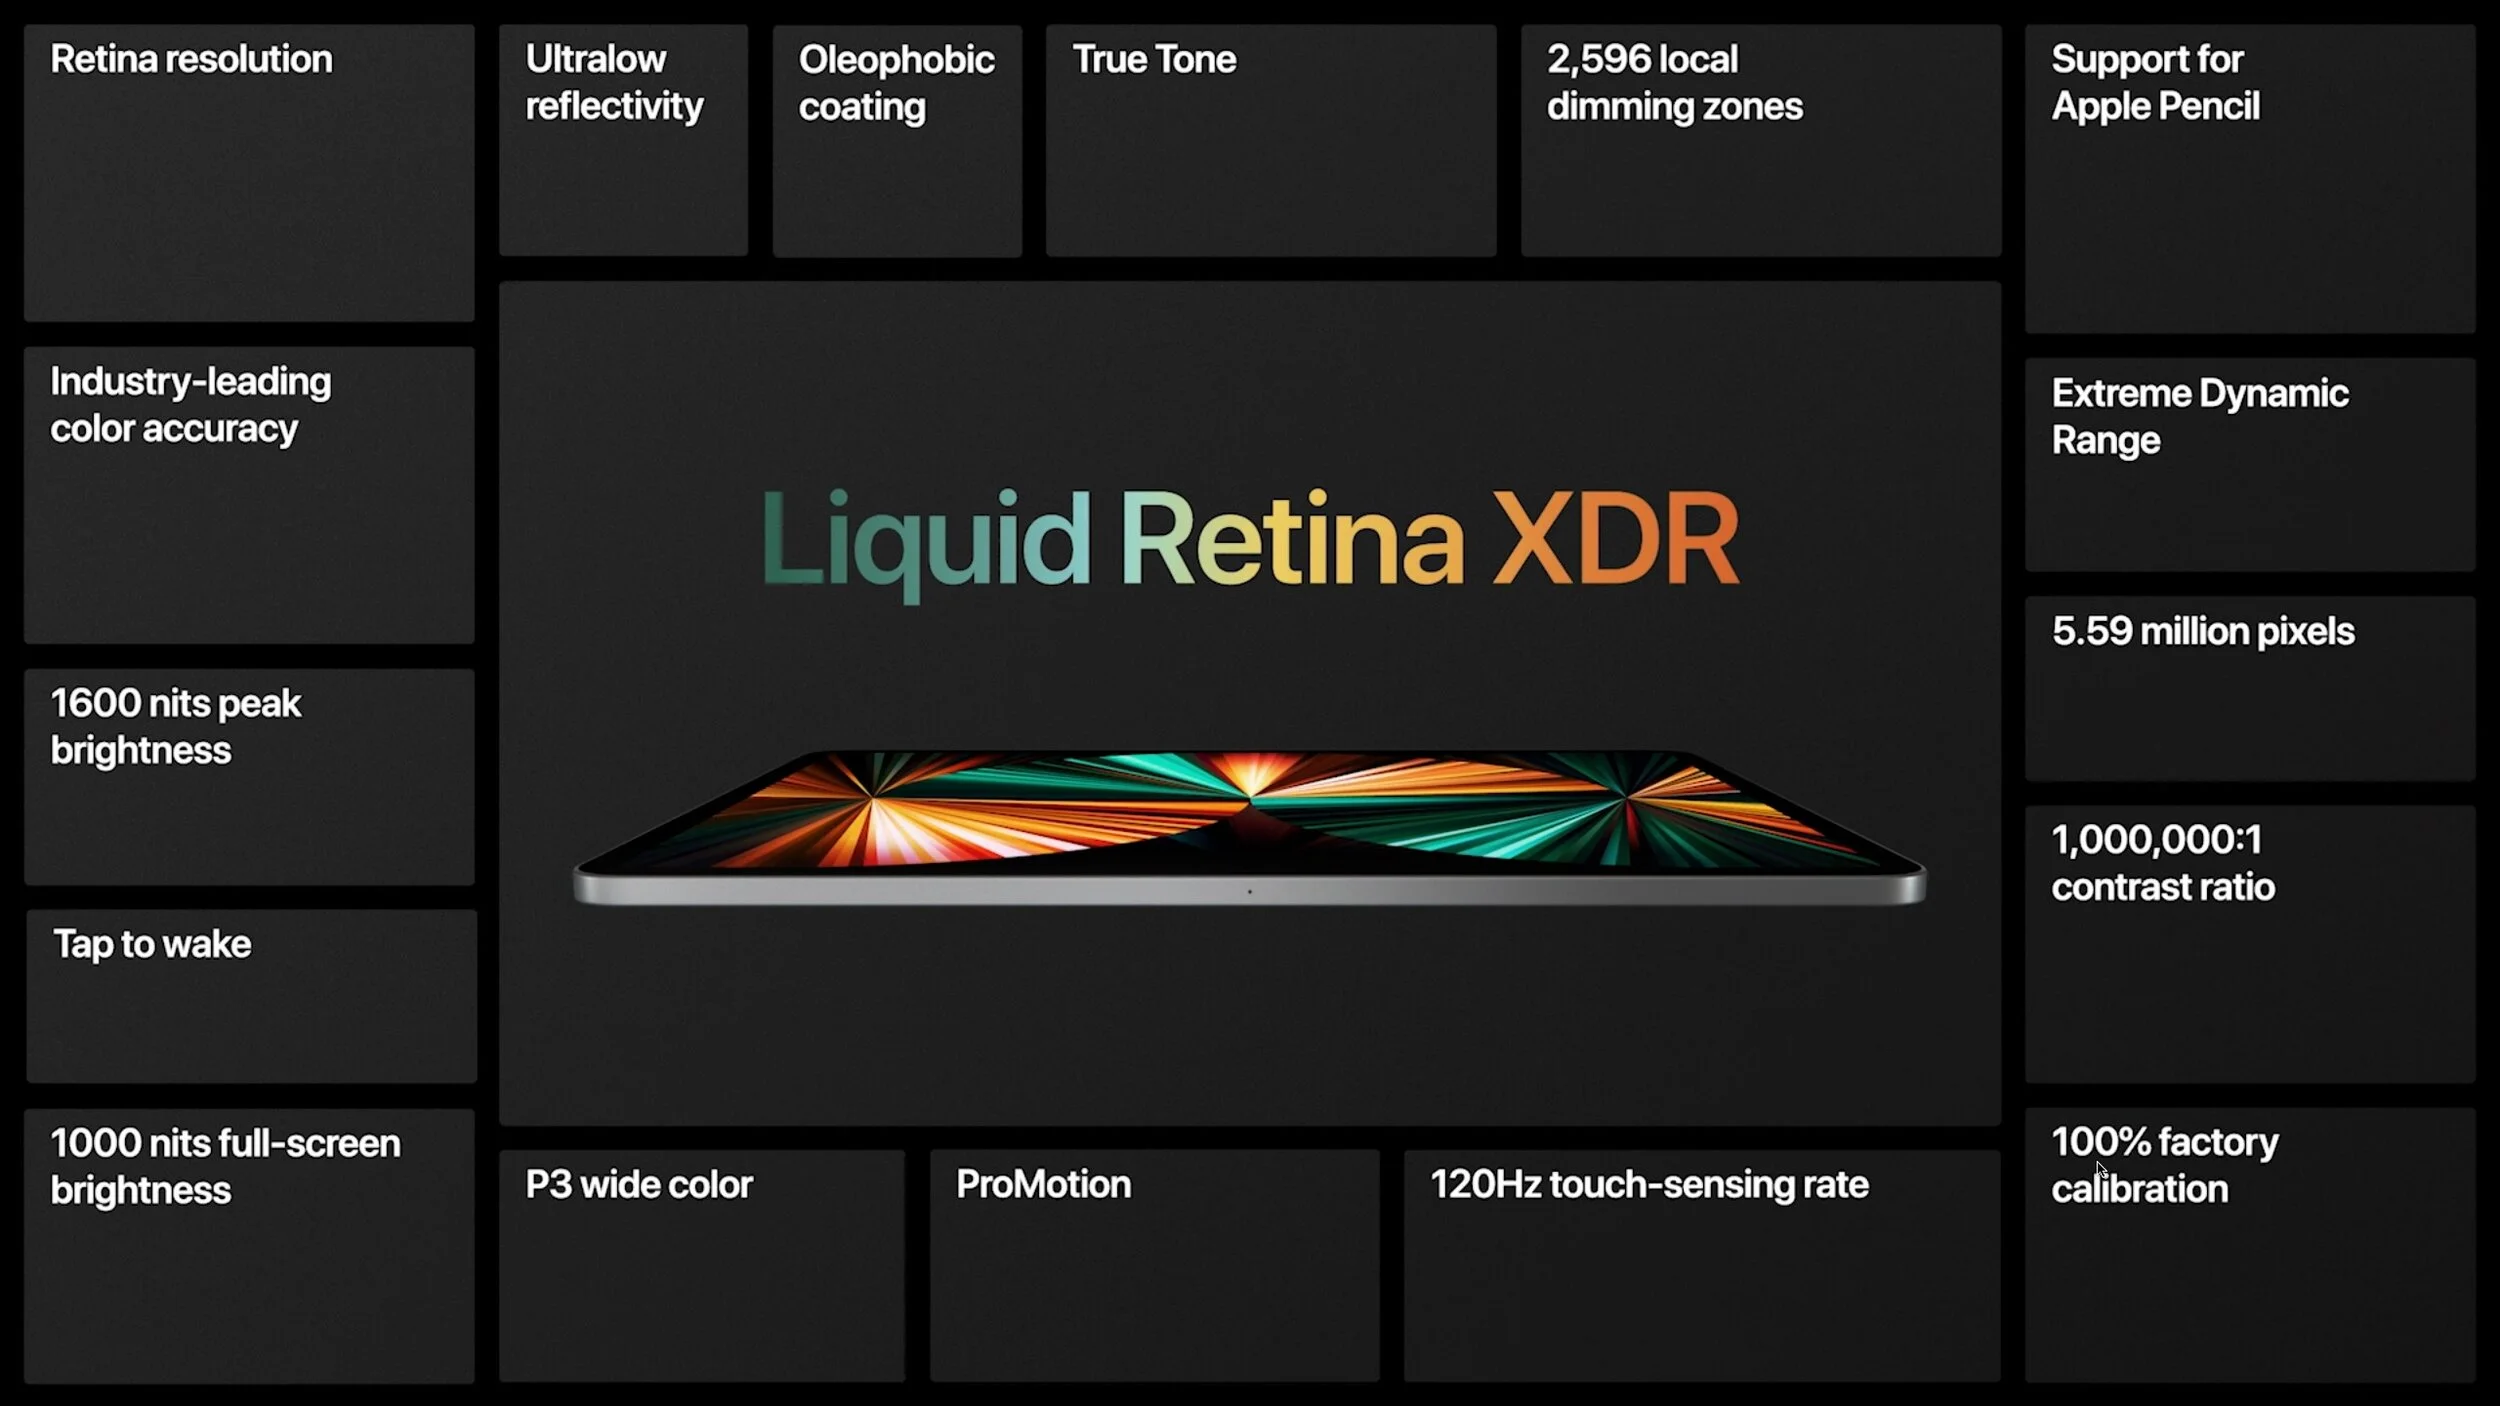
Last but far from least is a new display for just the 12.9-inch iPad Pro. Based on the technology behind Apple’s $5000 Pro Display XDR, the 12.9-inch iPad Pro’s Liquid Retina Display XDR is lit by more than 10,000 miniature LEDs, combined into nearly 2600 dimming zones. (The previous model’s screen had 72 LEDs.) The result is a display that’s brighter and offers more contrast than before, making it ideal for photo or video editing. If you think screen quality is the deciding factor between the 11-inch and 12.9-inch iPad Pros, we encourage you to compare them in person with the same images or videos.
Pricing has changed a little for the iPad Pros. The 11-inch model continues to start at $799 with 128 GB of storage. However, the 12.9-inch model is $100 more expensive than previously, thanks to the Liquid Retina XDR display, starting at $1099 for 128 GB. Both are upgradeable to 256 GB ($100), 512 GB ($300), 1 TB ($700), or 2 TB ($1100), and note that the models with 512 GB and less come with 8 GB of unified memory, whereas the 1 TB and 2 TB models have 16 GB of memory. Adding 5G cellular now costs $200, up $50.
Call or come by the store if you’d like to know more about Apple’s newest announcement or if you’d like to get your hands on one of their new products.
(Featured images by Apple)
NEW M1-Based 24-inch iMac Released in Spring Colors
Apple’s “Spring Loaded” event was indeed loaded with announcements, including the M1-based 24-inch iMac, M1-based iPad Pro, AirTag item tracker, updated Apple TV 4K with redesigned Siri Remote, and more:
Apple has continued replacing Macs at the lower end of the product line with new models featuring the company’s homegrown M1 chip. While the first Macs to get the M1—the MacBook Air, 13-inch MacBook Pro, and Mac mini—didn’t receive any design changes, Apple radically overhauled things for the new M1-based 24-inch iMac.
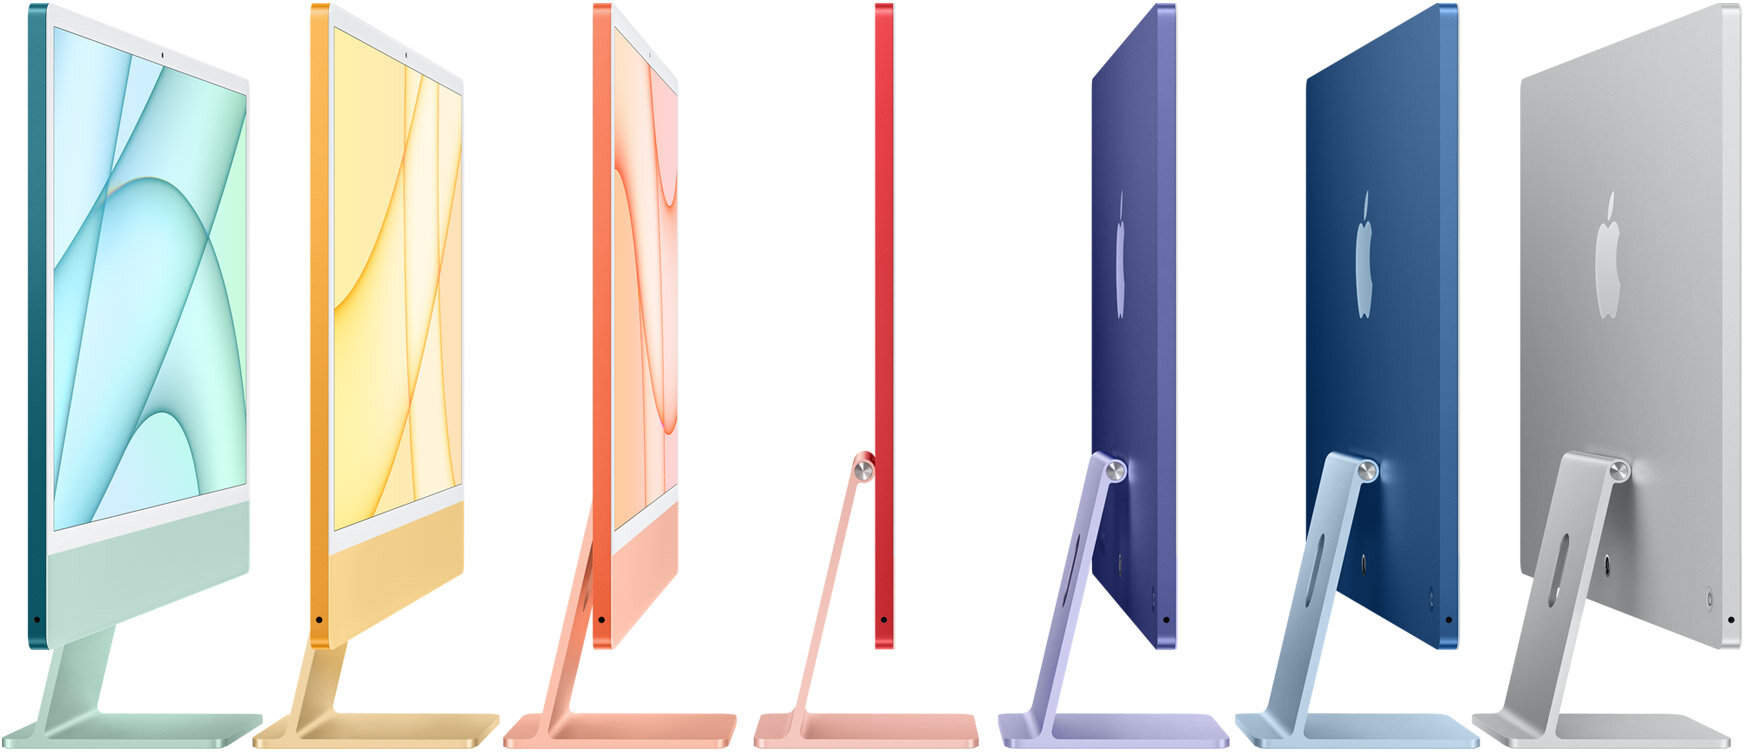
At 11.5 mm thick, the 24-inch iMac is thinner than the original iPhone. It comes in seven colors: green, yellow, orange, pink, purple, blue, and silver. The back of the iMac—which is often visible, such as on a receptionist’s desk—is a bold, vibrant color, whereas the front uses a muted version of the color and a light gray bezel. It looks like a 24-inch iPad clipped to an aluminum stand. It’s so thin that there’s no room for a standard power jack, so it comes with an external power adapter that includes an optional Ethernet jack.
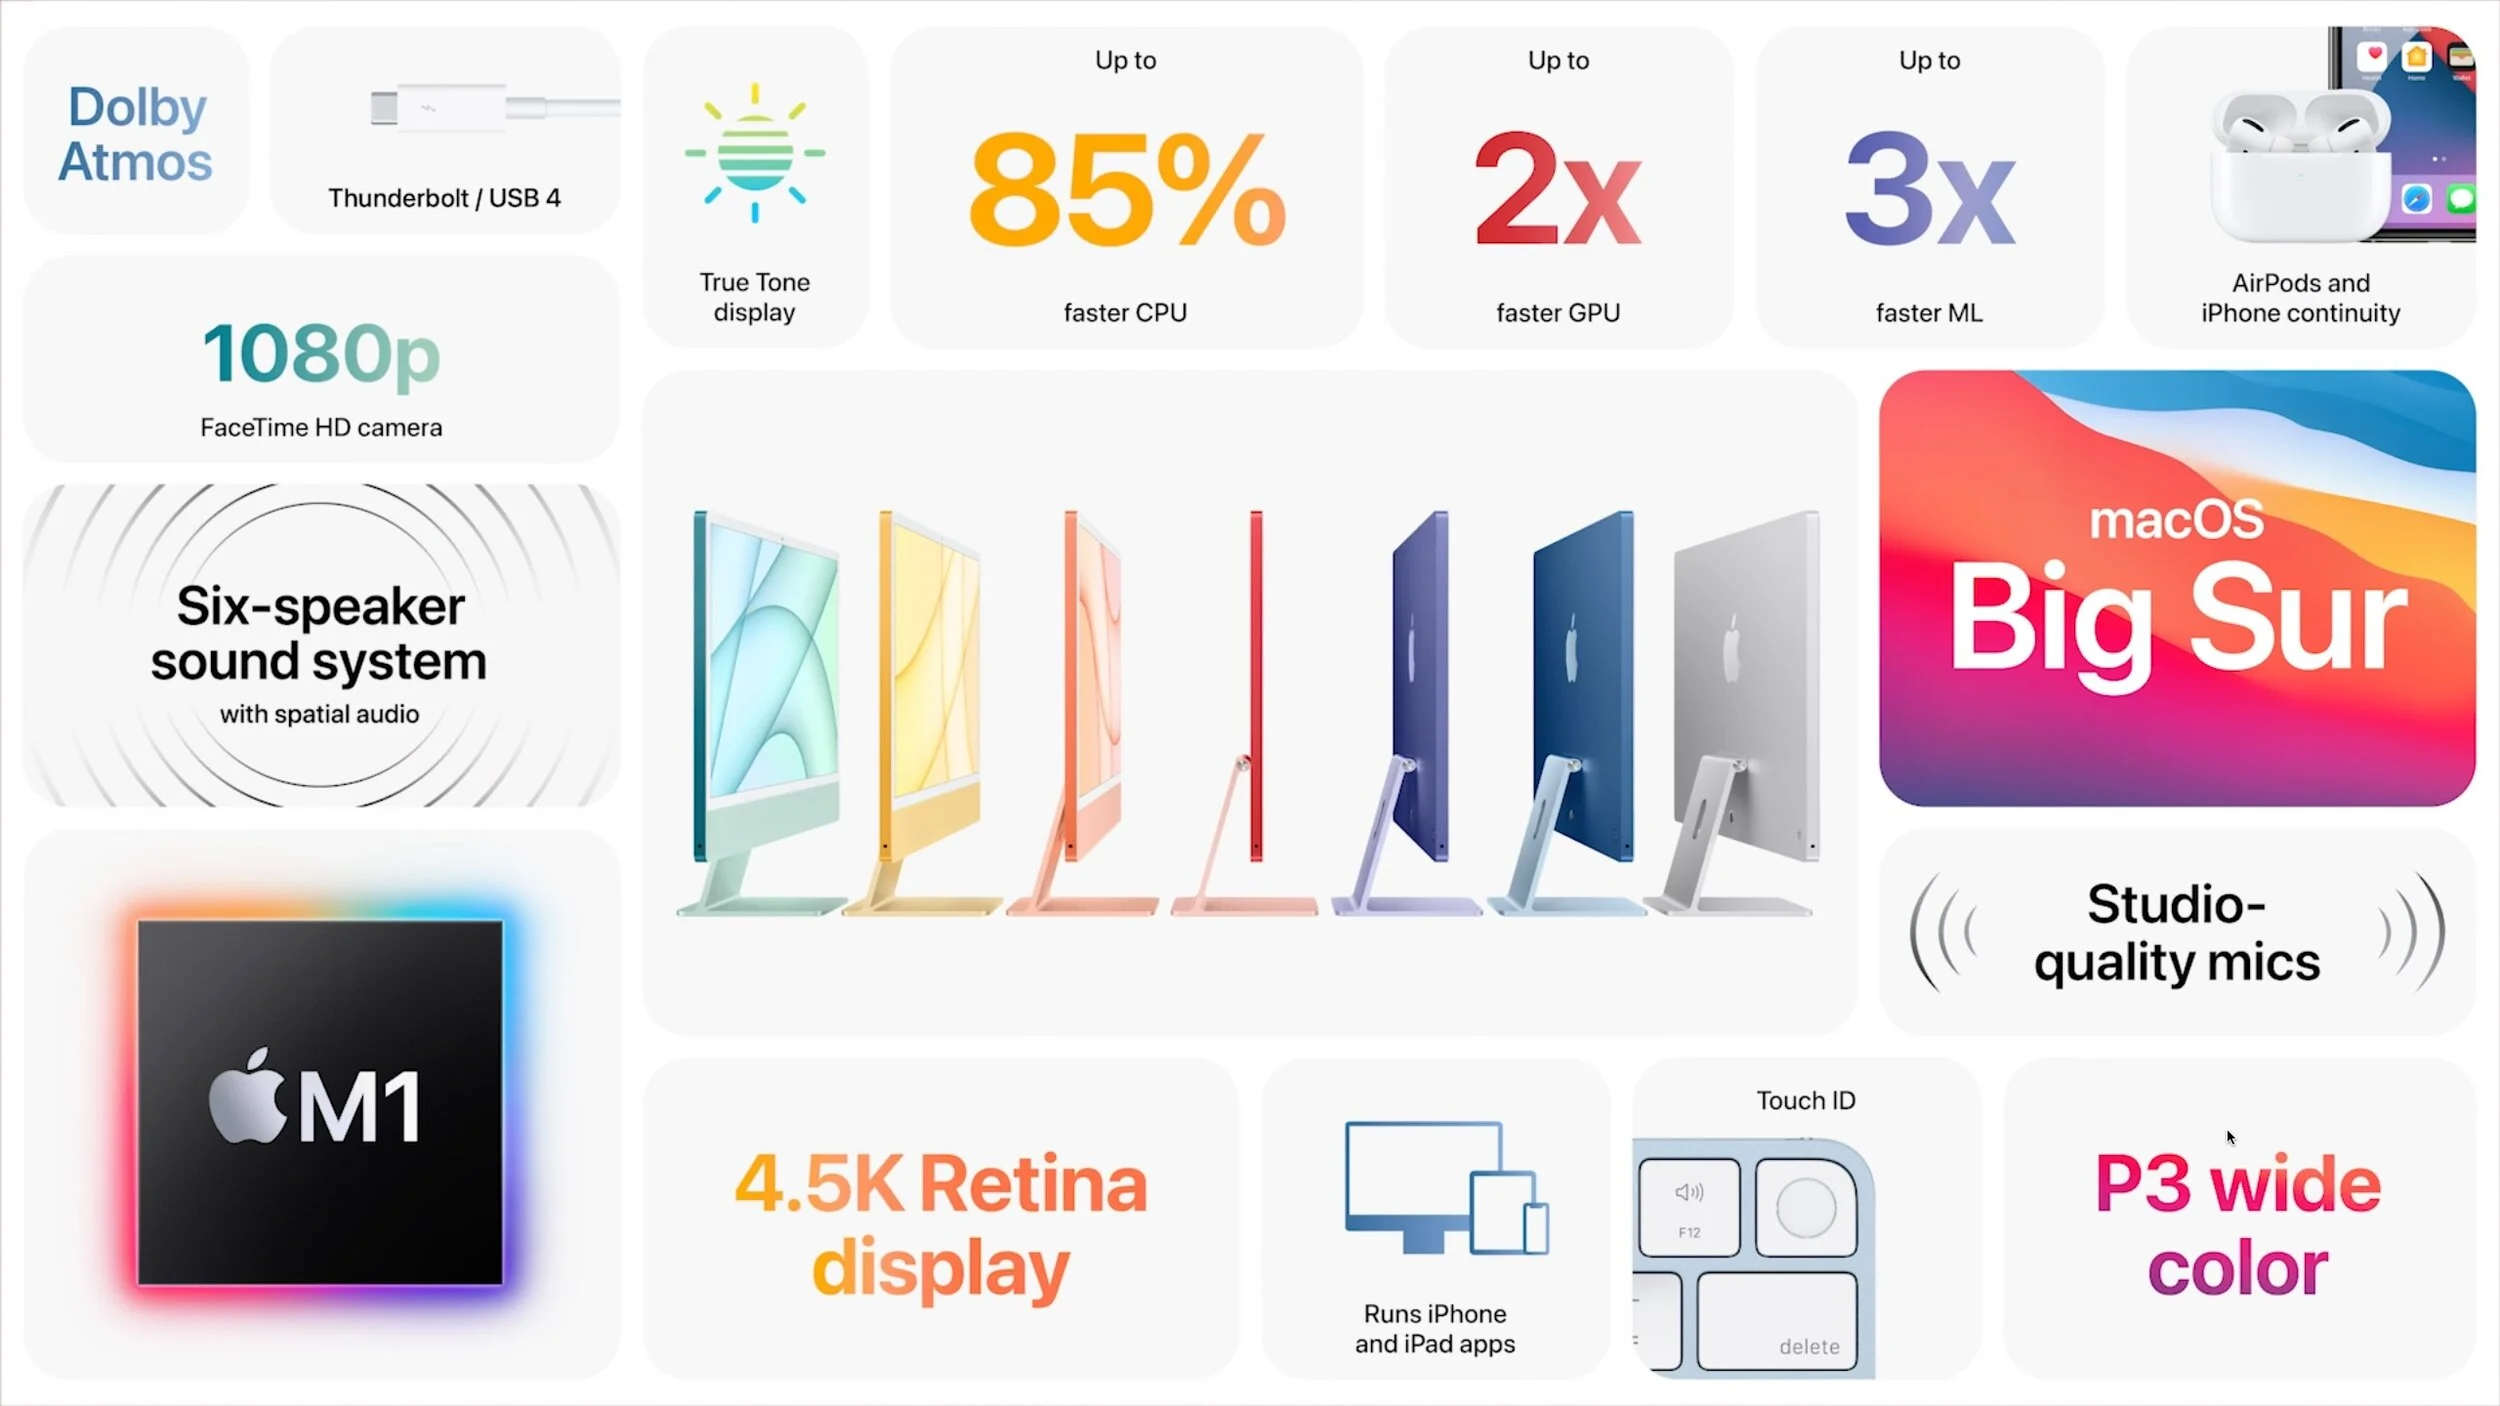
Behind the iMac’s “chin” is the guts of the computer, most notably the same M1 chip as in other M1-based Macs. Overall performance will be stellar thanks to the M1’s 8-core CPU and 8-core GPU, but you can tweak the price/performance curve slightly by choosing a 7-core GPU instead and by picking either 8 GB or 16 GB of unified memory.
The screen, which actually measures 23.5 inches diagonally, offers 4480-by-2520 resolution, making it a 4.5K Retina display, between the 4K display on the now-discontinued 21.5-inch iMac and the 5K display on the 27-inch iMac. It’s topped by a 1080p FaceTime HD camera that, with help from the M1 chip’s image signal processor—and advanced microphones and speakers—should offer excellent out-of-the-box videoconferencing quality.
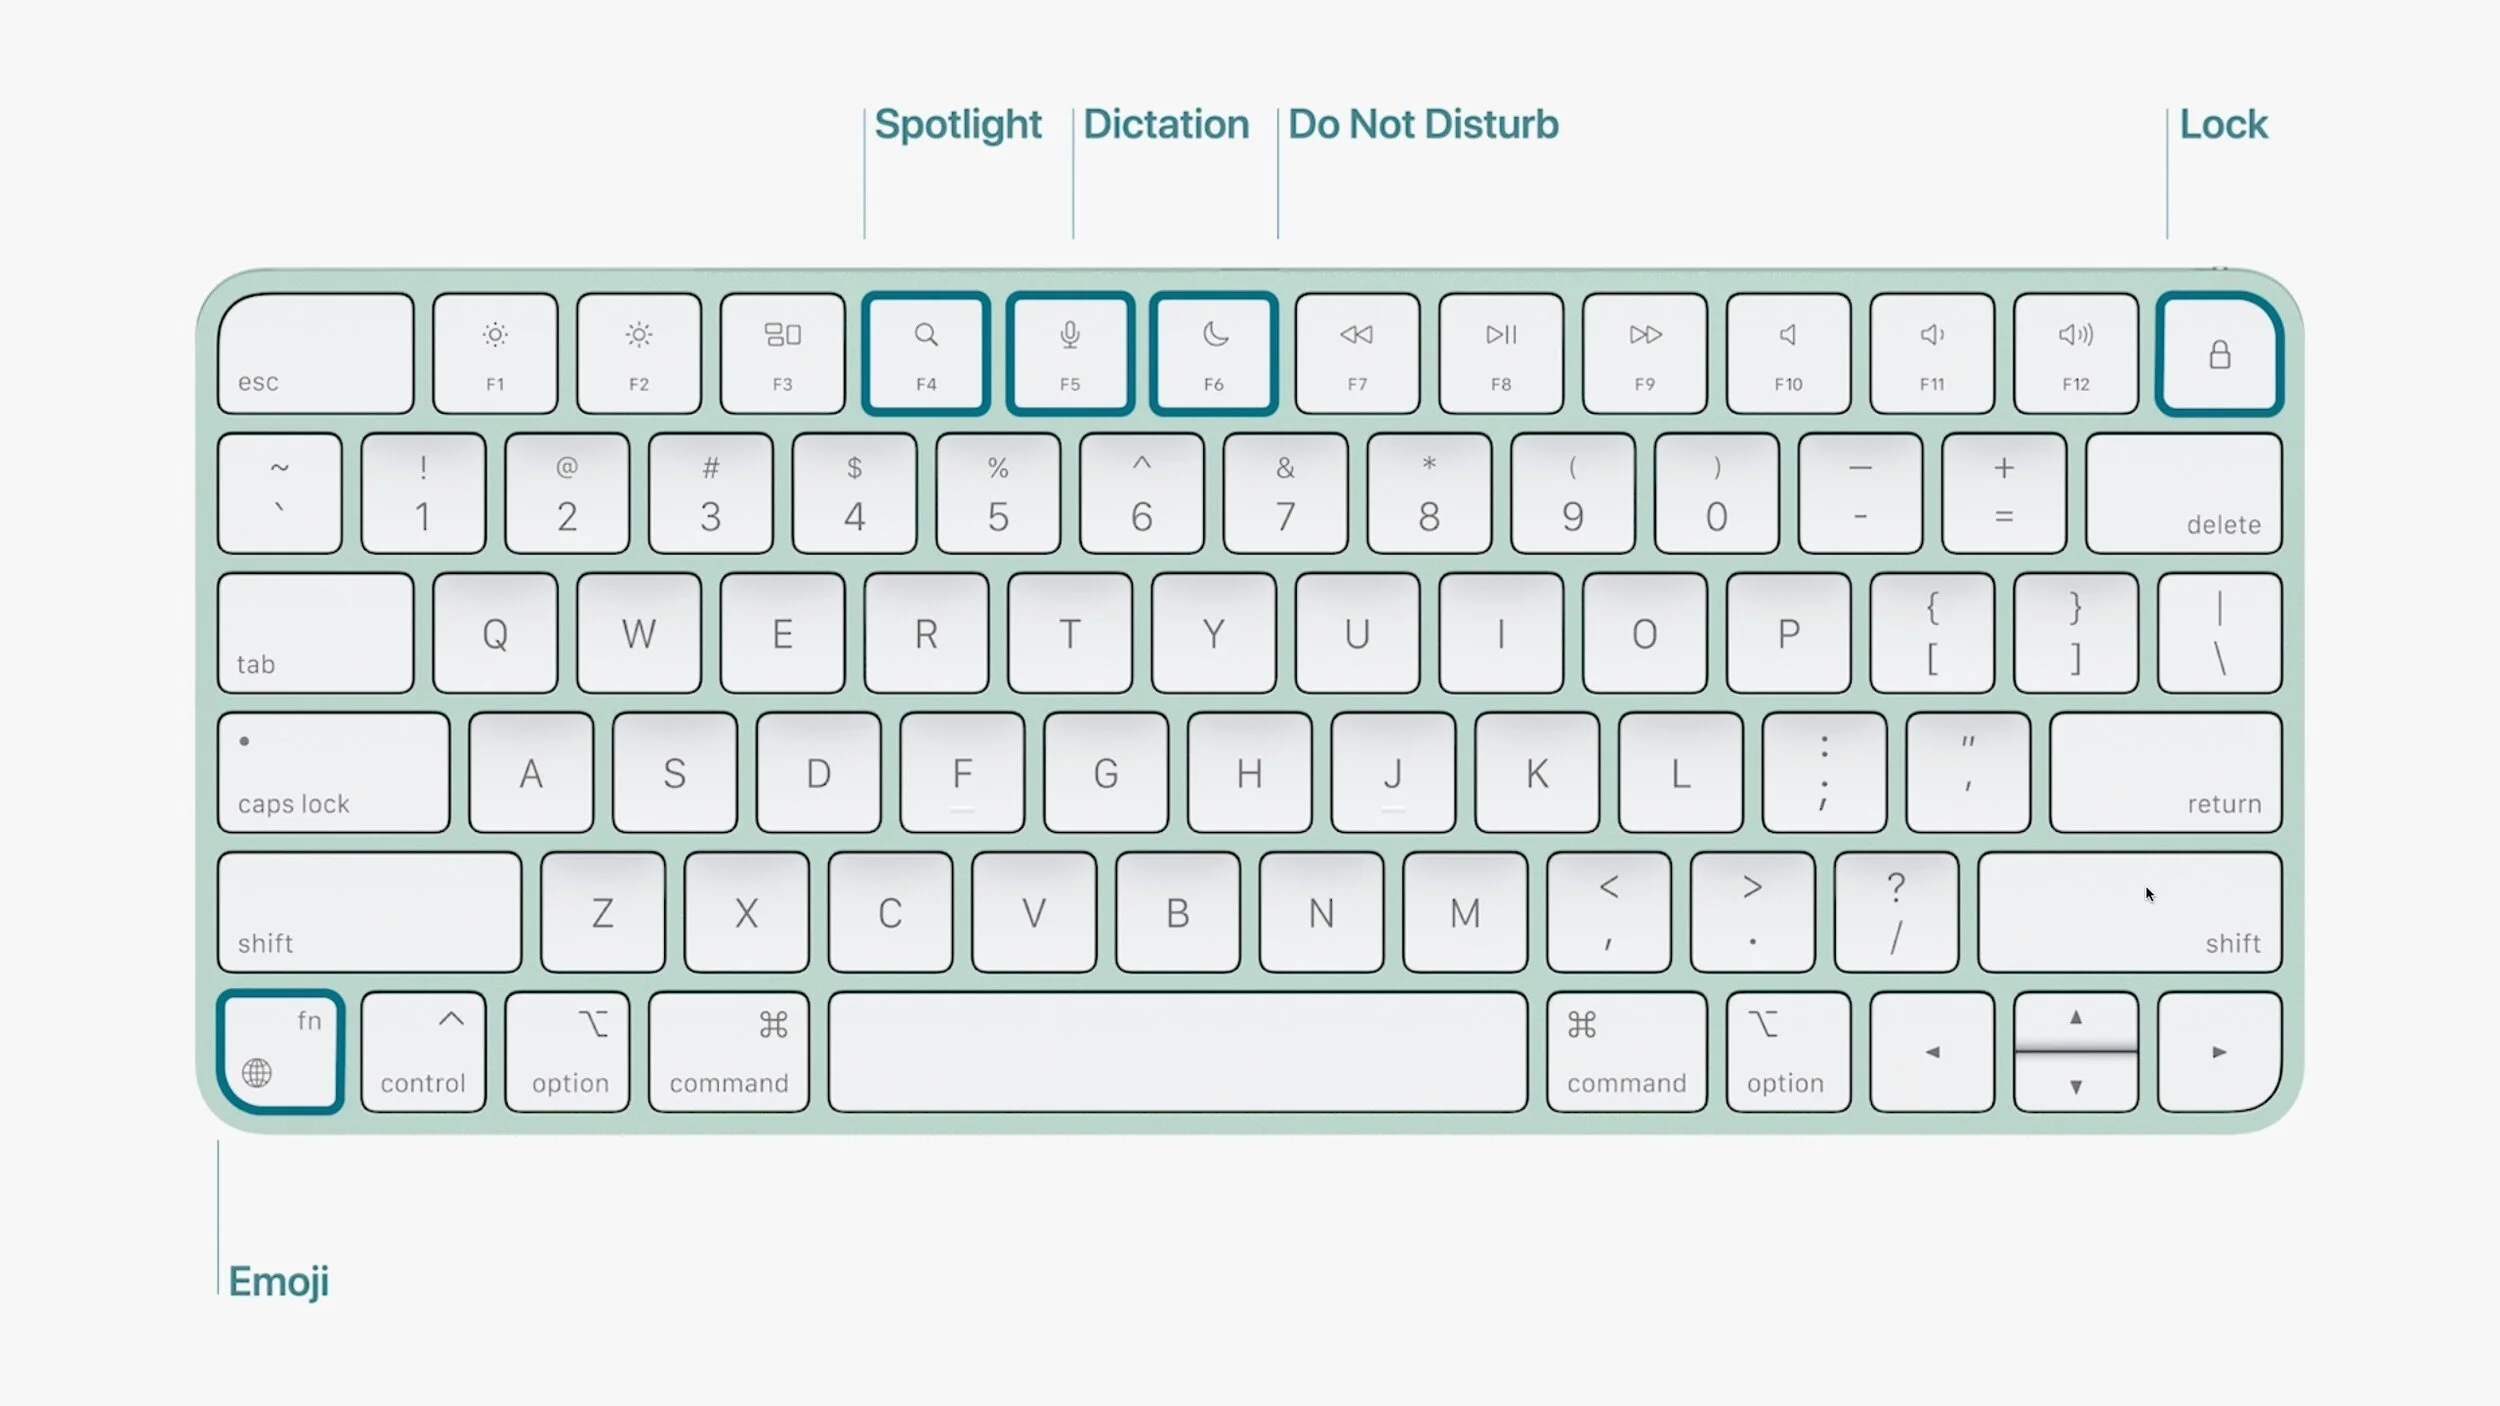
Apple introduced three new color-matched versions of the Magic Keyboard as well. One adds dedicated keys for Spotlight, Dictation, Do Not Disturb, Lock, and Emoji; the second trades the Lock key for the first Touch ID sensor on a standalone keyboard; and the third includes both Touch ID and a numeric keypad. They come with color-matched models of the Magic Mouse, or you can upgrade to a color-matched Magic Trackpad instead.
Three models of the 24-inch iMac are available:
● $1299 gets you that 7-core GPU, two Thunderbolt ports, 256 GB of storage that’s upgradable to 1 TB, optional Gigabit Ethernet, and a standard Magic Keyboard. It’s available in only blue, green, pink, and silver.
● $1499 gets you the 8-core GPU, 256 GB of storage upgradeable to 2 TB, two Thunderbolt ports and two USB 3 ports, standard Gigabit Ethernet, and a Magic Keyboard with Touch ID. And you can pick from all seven colors.
● $1699 gets you the 8-core GPU, 512 GB of storage upgradeable to 2 TB, two Thunderbolt ports and two USB 3 ports, standard Gigabit Ethernet, and a Magic Keyboard with Touch ID. And you can pick from all seven colors.
Our take is that the new 24-inch iMac is a fabulous Mac for a family, student, or front-office worker where everyone will appreciate its striking color and design. It may not offer everything a pro wants, but the Intel-based 27-inch iMac remains available, and Apple will be releasing even more powerful Macs based on Apple silicon for professionals, likely later this year.
Call or come by the store if you’d like to know more about Apple’s newest announcement or if you’d like to get your hands on one of their new products.
(Featured images by Apple)
Archive Email to Avoid Mail Quotas, Improve Performance, and Reduce Clutter
Would you be distraught if you lost your email? Do you need to reduce server usage to stay under a mail quota? Or perhaps you need a copy of a previous employee’s communications. The answer is email archiving, and you can learn more about it here:

Email is a major part of all our lives, both personally and professionally, and as such, it can add up. Before you know it, you have years of email stored away—potentially tens or even hundreds of thousands of messages. Most of the time, that’s fine. Email doesn’t take up any physical space and not even that much digital space in the scheme of things.
However, there are situations where you might want to archive email, by which we mean download it from the server and store it for posterity on your Mac, possibly outside your email app. Some of those reasons include:
Insufficient server space: Institutional email accounts sometimes have in-flexible mail quotas, and although you can pay for more storage on many large email providers, you might prefer instead to clear out old mail that you don’t refer to anymore.
Reduce clutter: Even if you have sufficient server space, archiving mail—particularly mail from ancient completed projects—might reduce the mental load of having it in your email app.
Poor email client performance: Although good email apps should be able to handle hundreds of thousands of messages, it’s possible that reducing the amount of email in your account would help if you’re experiencing slow-downs.
Switching email providers: If you choose to stop using a particular email account, you might want to download all the mail in it first.
Leaving a job or graduating from school: If you have a work or school email account that will be shut down after you leave, you might want to ar-chive all that email beforehand.
Preserving a former employee’s business communications: From the opposite perspective, if an employee of yours leaves, you might want to archive their work email account so you have an easily searched record of what they said to clients or suppliers.
Local backup: Although most email providers and businesses back up their servers (and probably better than most users), it’s not inconceivable that you could lose mail stored remotely. Archiving email locally—perhaps on an annual basis—ensures the long-term preservation of your email communications.
So how should you archive your email? There are two general approaches:
Store email in a local mailbox: The most straightforward approach is to store email in a local mailbox on your Mac using your existing email app. It’s free and keeps your mail together, but it makes switching to another email app more complicated, and it’s fussy to move local mailboxes to other Macs. Plus, it may require some effort to keep an archive up to date.
Archive email in a dedicated app: You’ll have to pay for an archiving app, but these apps will work with multiple email apps. This may provide more powerful searching capabilities, and often integrate email with other archived data. It’s also easier to move archived data between Macs or even keep it available on a server for access on multiple machines.
Store Email in a Local Mailbox
For simple archiving, it’s easy to create local copies of messages or mailboxes you want to preserve locally. The main thing to keep in mind here is the difference between moving and copying.
Move: When you move a message from the server to a local mailbox, you’re deleting it from the server. Move messages when you want to clear space on the server.
Copy: When you copy a message, the original message stays on the server, and a copy appears in the local mailbox. Copy messages if you want a local backup of important messages or mailboxes but also want to keep them available online.
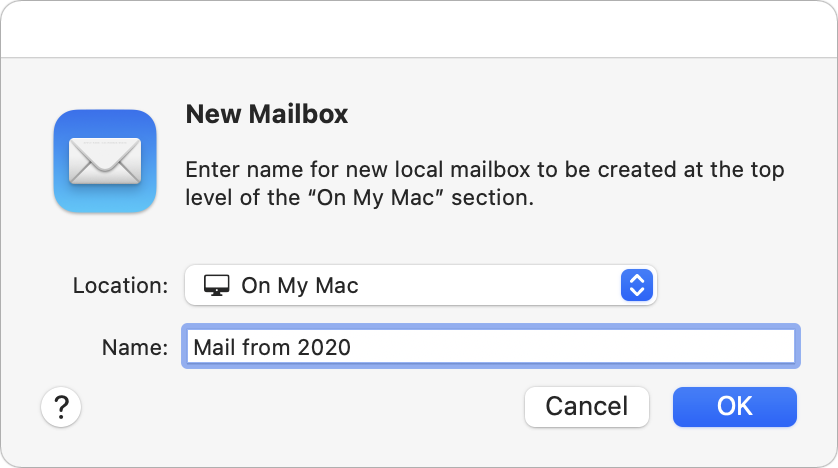
How you do this varies slightly by app, but let’s look at Apple’s Mail—other apps will be similar. The first step is to create a local mailbox. Choose Mailbox > New Mailbox and then choose On My Mac from the Location pop-up menu when naming it.
Then, to move or copy mail:
Move messages locally: Select messages and, from the Message > Move To menu, choose the desired On My Mac mailbox. You can also Control-click a selection to access the Move To menu or drag the messages from a server-based mailbox to a mailbox under On My Mac.
Copy messages locally: Select messages and, from the Message > Copy To menu, choose the desired On My Mac mailbox. Alternatively, Control-click a selection to access the Copy To menu, or Option-drag the messages to an On My Mac mailbox. Also note that you can copy an entire mailbox by dragging it from an online account in Mail’s sidebar to the On My Mac section of the side-bar.
You can also select a mailbox and choose Mailbox > Export Mailbox to save all the data to a local file in .mbox format suitable for importing into other email and archiving apps.
Archive Email in a Dedicated App
When it comes to archiving email in an app dedicated to that purpose, the details vary, so let’s focus on giving you some choices for the leading Mac archiving apps. Once you know what you want, you can more easily pick among them:
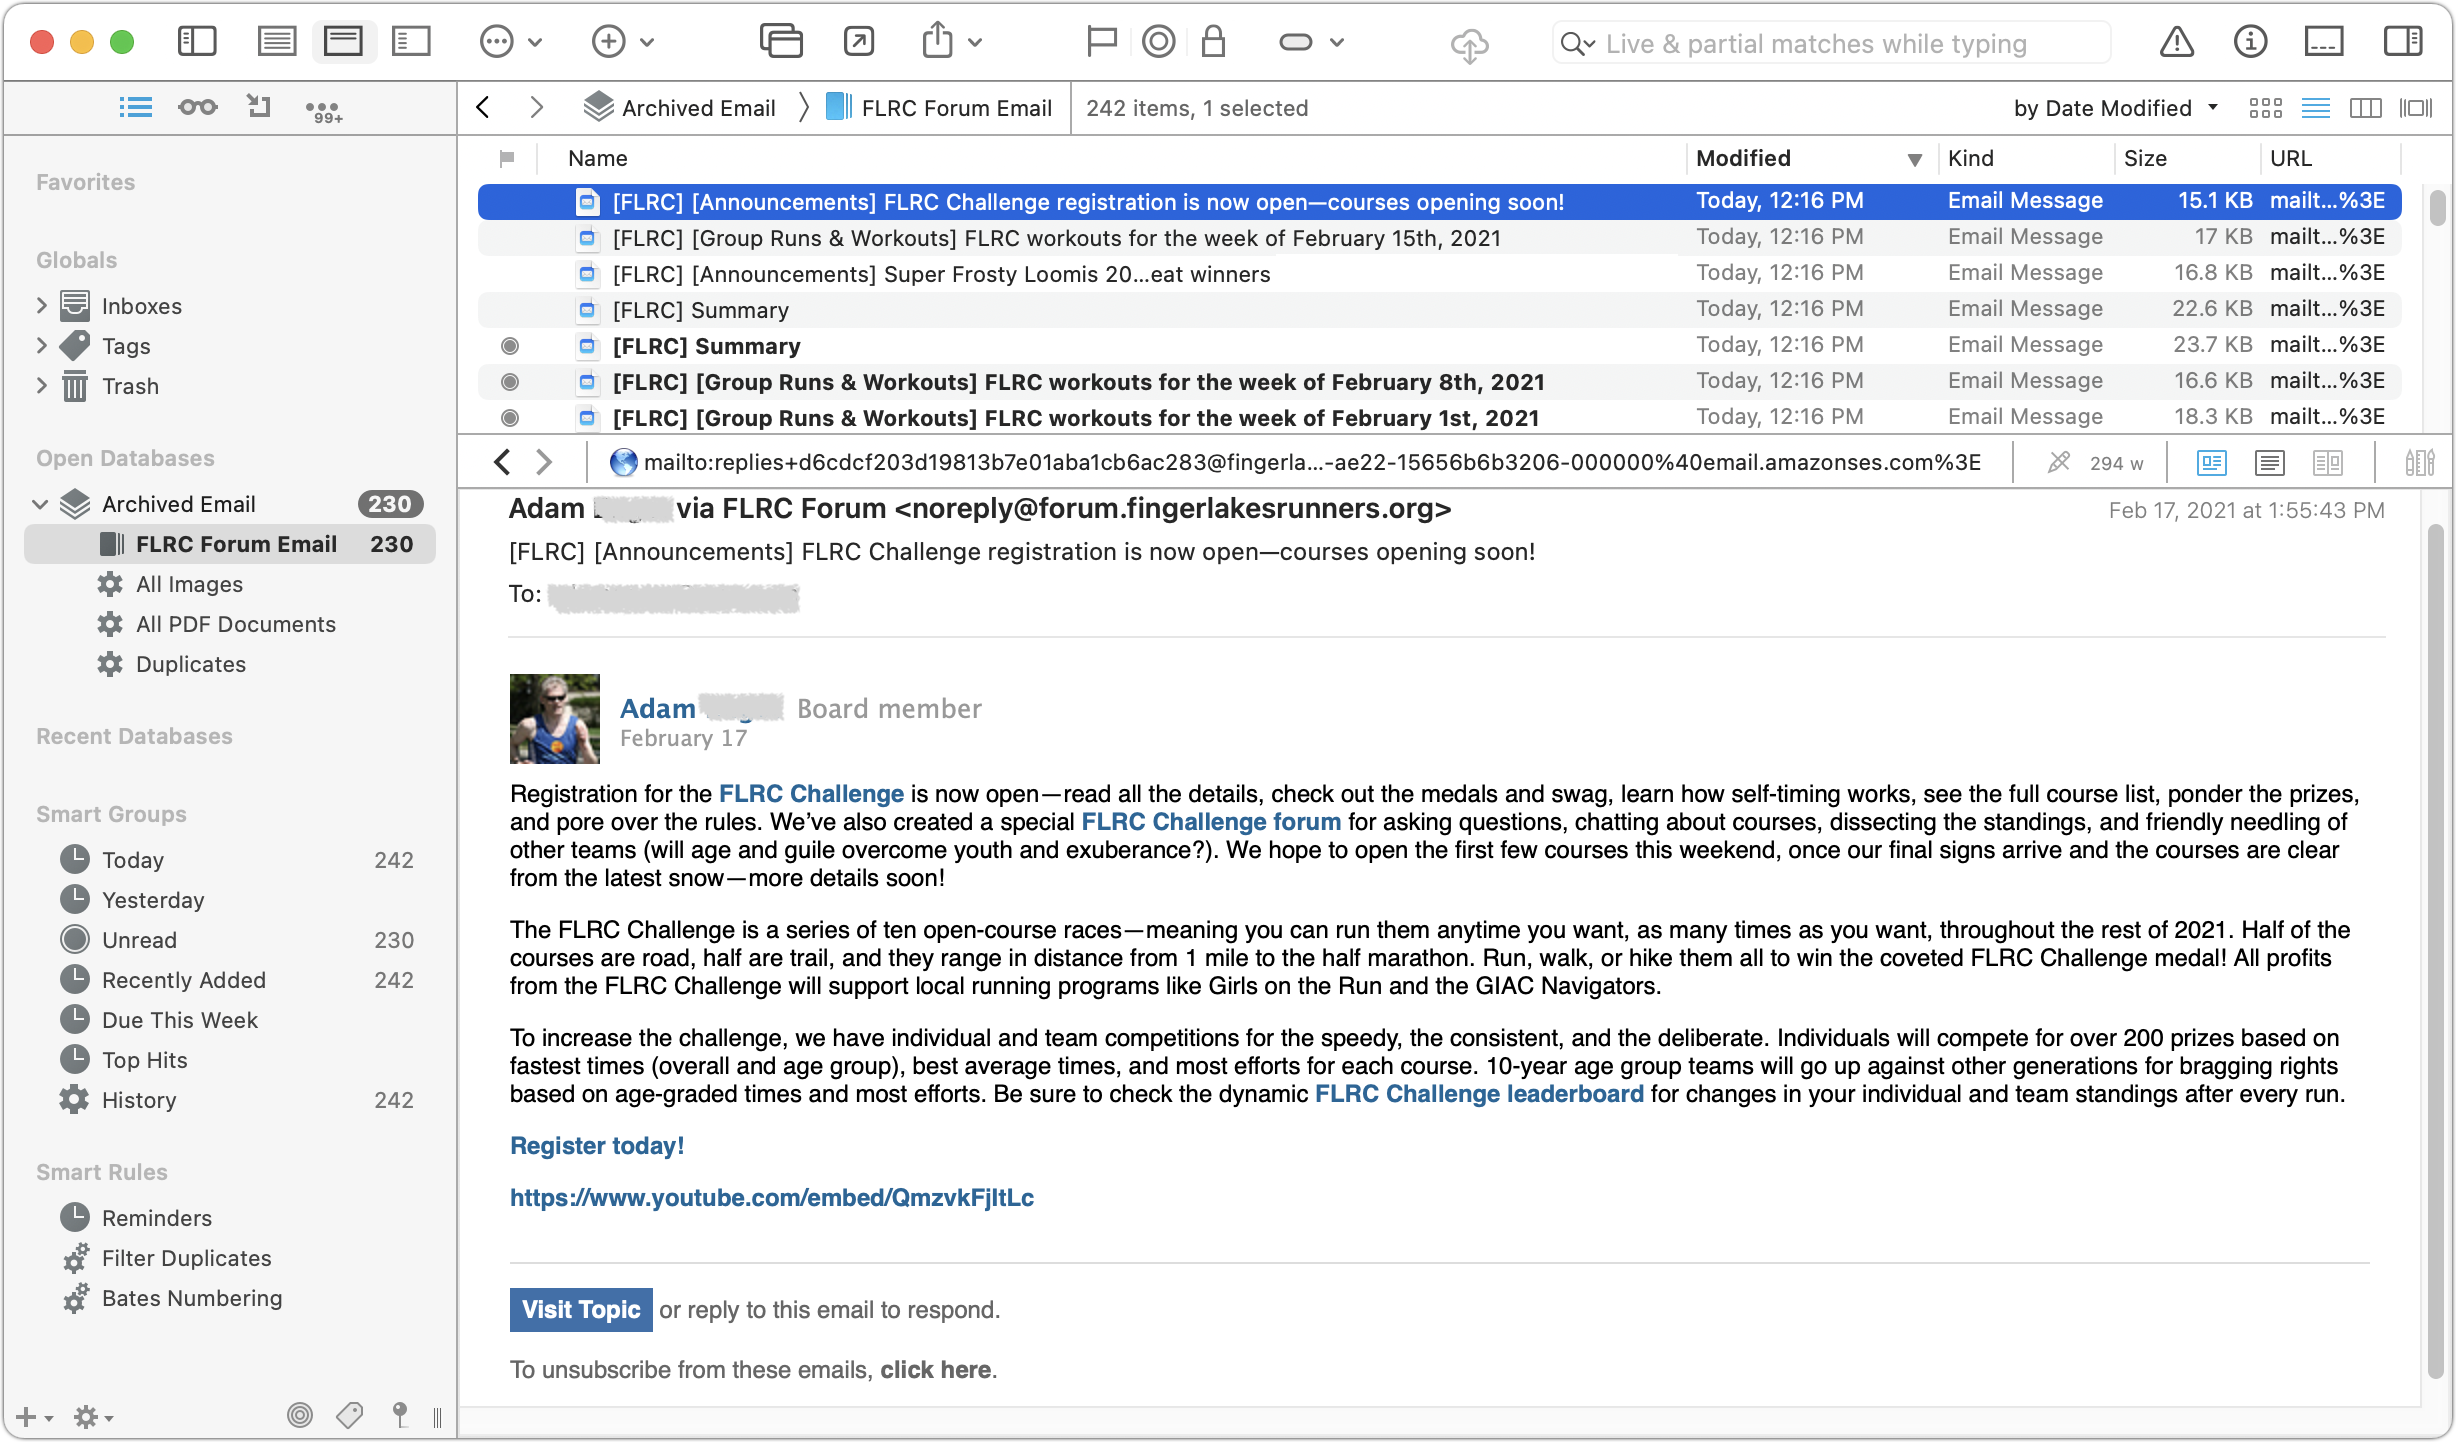
DEVONthink Pro ($199): The most powerful (and expensive) of these apps is undoubtedly DEVONthink Pro. It can import directly from Apple’s Mail and Microsoft Outlook and supports importing .mbox files exported from other email apps. Its integration with Mail and Outlook lets you continually archive new messages without worrying about duplicates. DEVONthink is a general-purpose information management app that also lets you import, organize, and search for files of any kind, scan documents with optical character recognition, and much more. The $499 DEVONthink Server lets multiple people access the shared data over the Web.
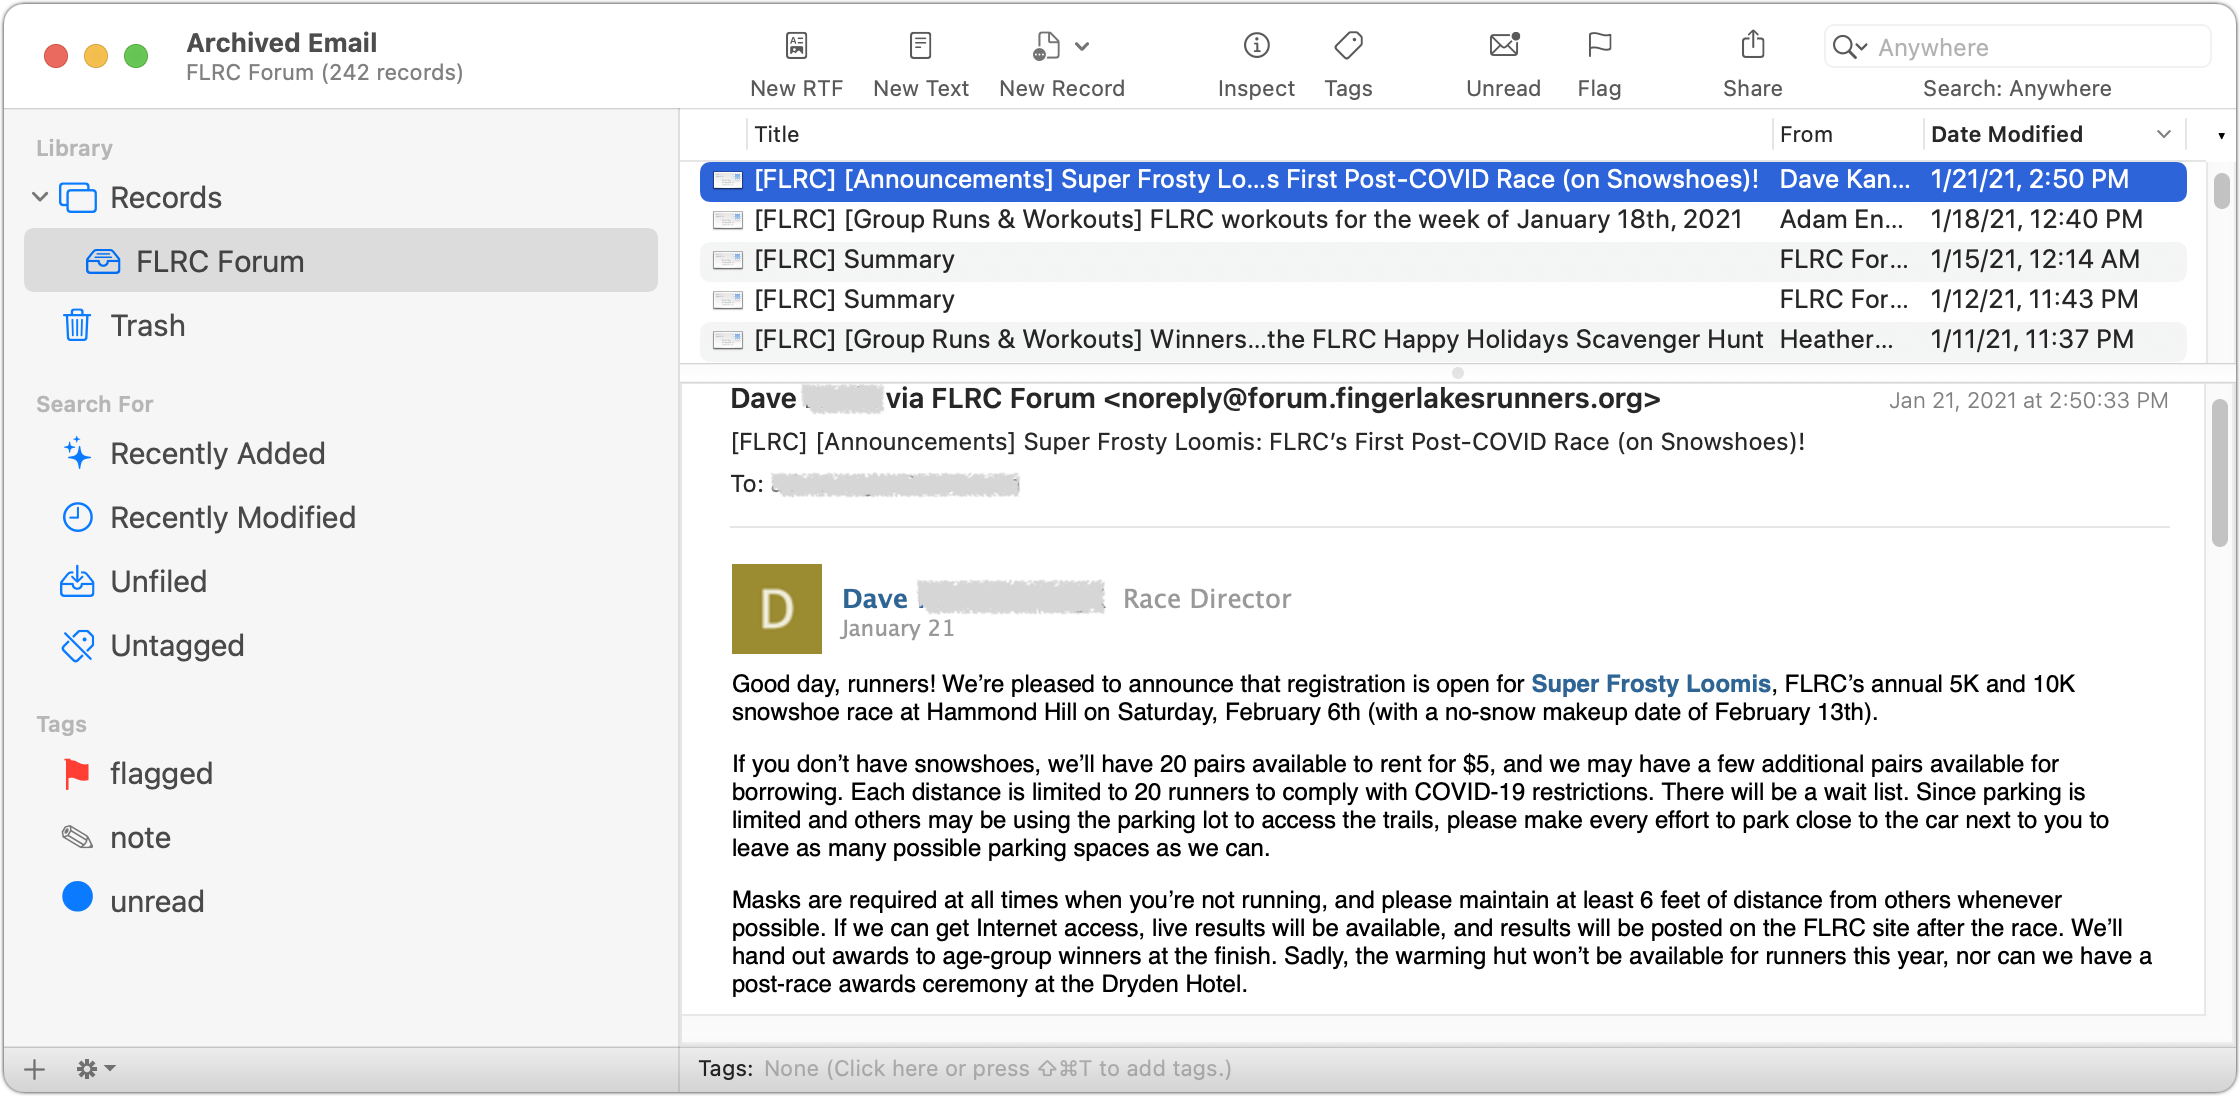
EagleFiler ($49.99): Another general-purpose archiving app, EagleFiler supports direct imports from Mail and Outlook, and it can also import .mbox files exported from numerous other email apps. With Mail, EagleFiler can skip previously imported messages and includes an option to remove duplicate messages from mailboxes. It makes it easy to search archived email and lets you reply (using your standard email app) to archived messages. Beyond email, you can import, organize, search, and view any kind of file, and everything is stored in its original format in a standard Finder folder.
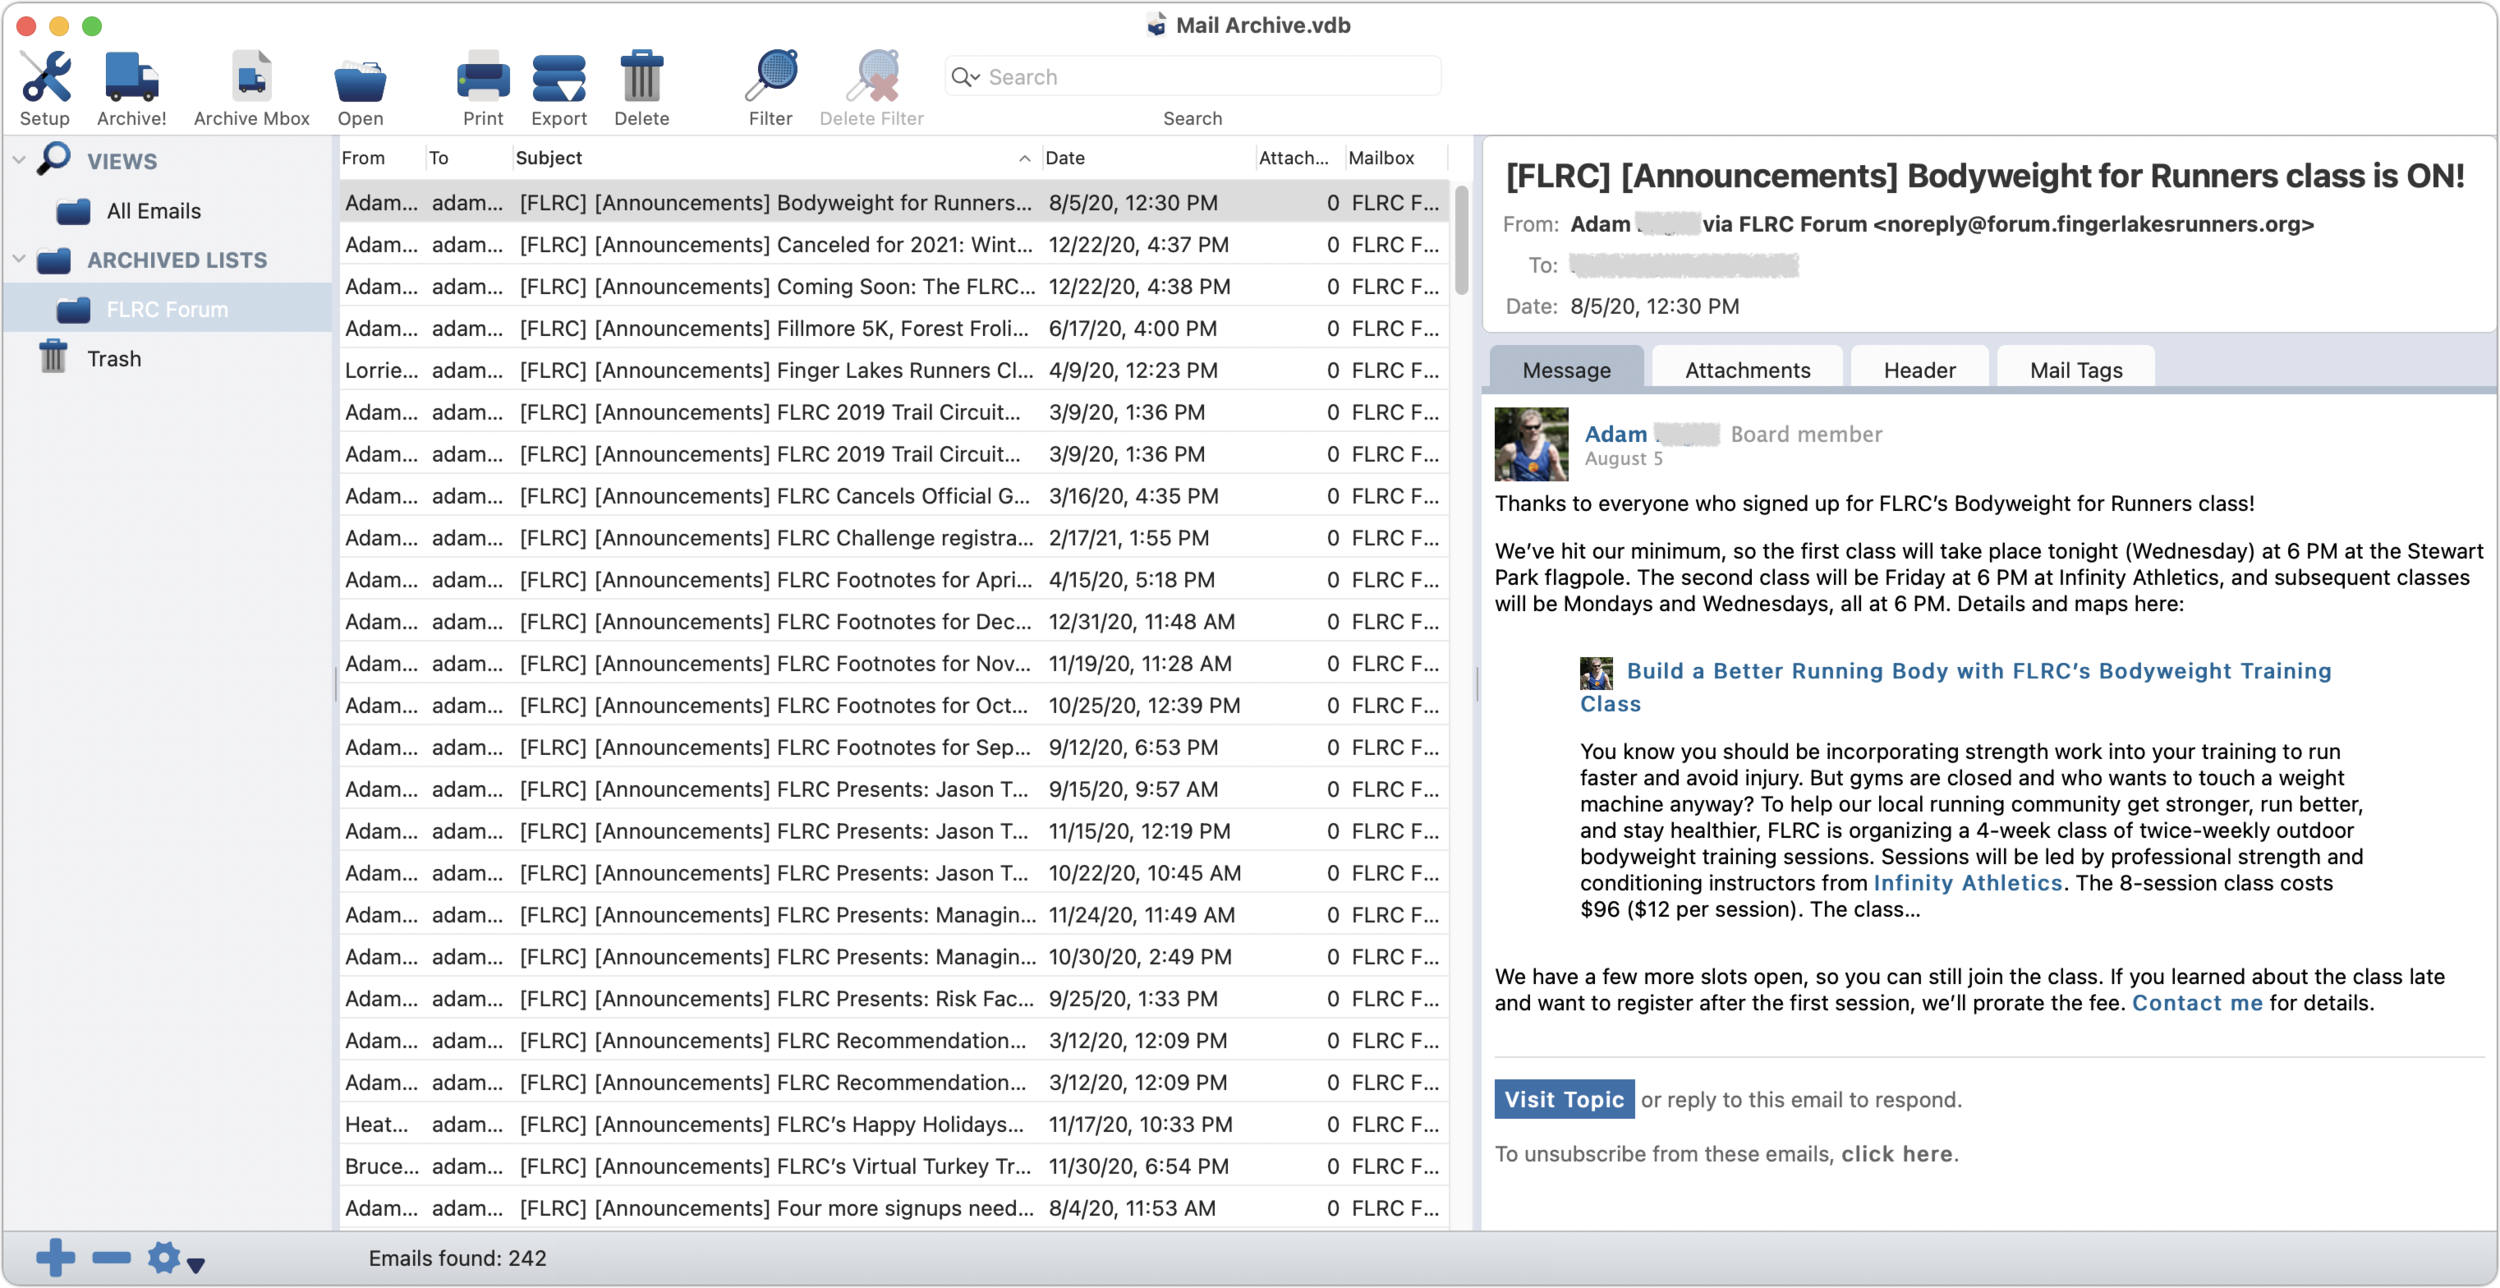
Mail Archiver X ($49.95): Mail Archiver X focuses on email, supporting major email clients like Mail, Outlook, Postbox, and Thunderbird along with .mbox files, and it can even archive email directly from your IMAP or Gmail account. You can set up Mail Archiver X to archive email on a schedule, automatically skipping previously archived messages. It lets you store messages in its internal database format, FileMaker (if you have a license), or PDF.
MailSteward ($24.95/$49.95/$99.95): All the basics are here—support for Mail and Postbox plus .mbox files, scheduling of imports, importing into a relational database, automatic skipping of duplicates (and later identification of them if necessary). The three editions of MailSteward let you pick how much power you need. The Lite edition may be all most people need, but the standard edition adds automatic scheduling, saved searches, and database exporting and merging. The Pro version is necessary only for very large archives over 250,000 messages—it trades MailSteward’s SQLite database for MySQL.

We realize there’s a lot to think about here, but no one solution fits all. If you’d like advice on which app would be best for your particular needs and help setting it up, don’t hesitate to contact us by emailing our support email or calling the store to speak to a Geek.
(Featured image by Gerhard G. from Pixabay)
How to Avoid Embarrassment During Online Presentations or Screen Sharing
When sharing your screen online, would you be embarrassed if your clients, colleagues, or bosses saw what’s on your Mac—your desktop picture, screen saver, browser tabs, email notifications, or Messages conversations? Here’s what to watch out for.

Along with the now-ubiquitous videoconferencing, screen sharing and online presen-tations have become vastly more common during the pandemic. This isn’t yet anoth-er article about how to give a better presentation or feel more confident. (Although those might happen too.) The goal of this article is to help you avoid situations that could embarrass you in front of clients, colleagues, or bosses. Follow this advice and you could avoid an unfortunate happenstance that might even cause you to be fired.
Here’s the problem. Even more so than before the pandemic, our Macs feel like per-sonal spaces. Just as you’d add a houseplant and a special photo to your desk at work, you’ve probably personalized your Mac in a variety of ways. Custom desktop wall-paper, for instance, or a screensaver that displays favorite photos. Plus, you may car-ry on personal conversations, possibly even intimate ones, if you catch our drift, us-ing the same Mac that you use for communicating with those aforementioned clients, colleagues, and bosses.
We’re not here to admonish you or nag about inappropriate behavior. (Though we will encourage you to consider some sage advice from a friend’s mother, who noted drily that you should never put anything on the Internet that you don’t want to appear on the front page of the New York Times. And that was before Twitter.)
No, as we said, the goal here is to help you avoid the embarrassment caused by peo-ple who are viewing your screen seeing things they shouldn’t see, something that the New York Times has also covered. Some areas of concern include:
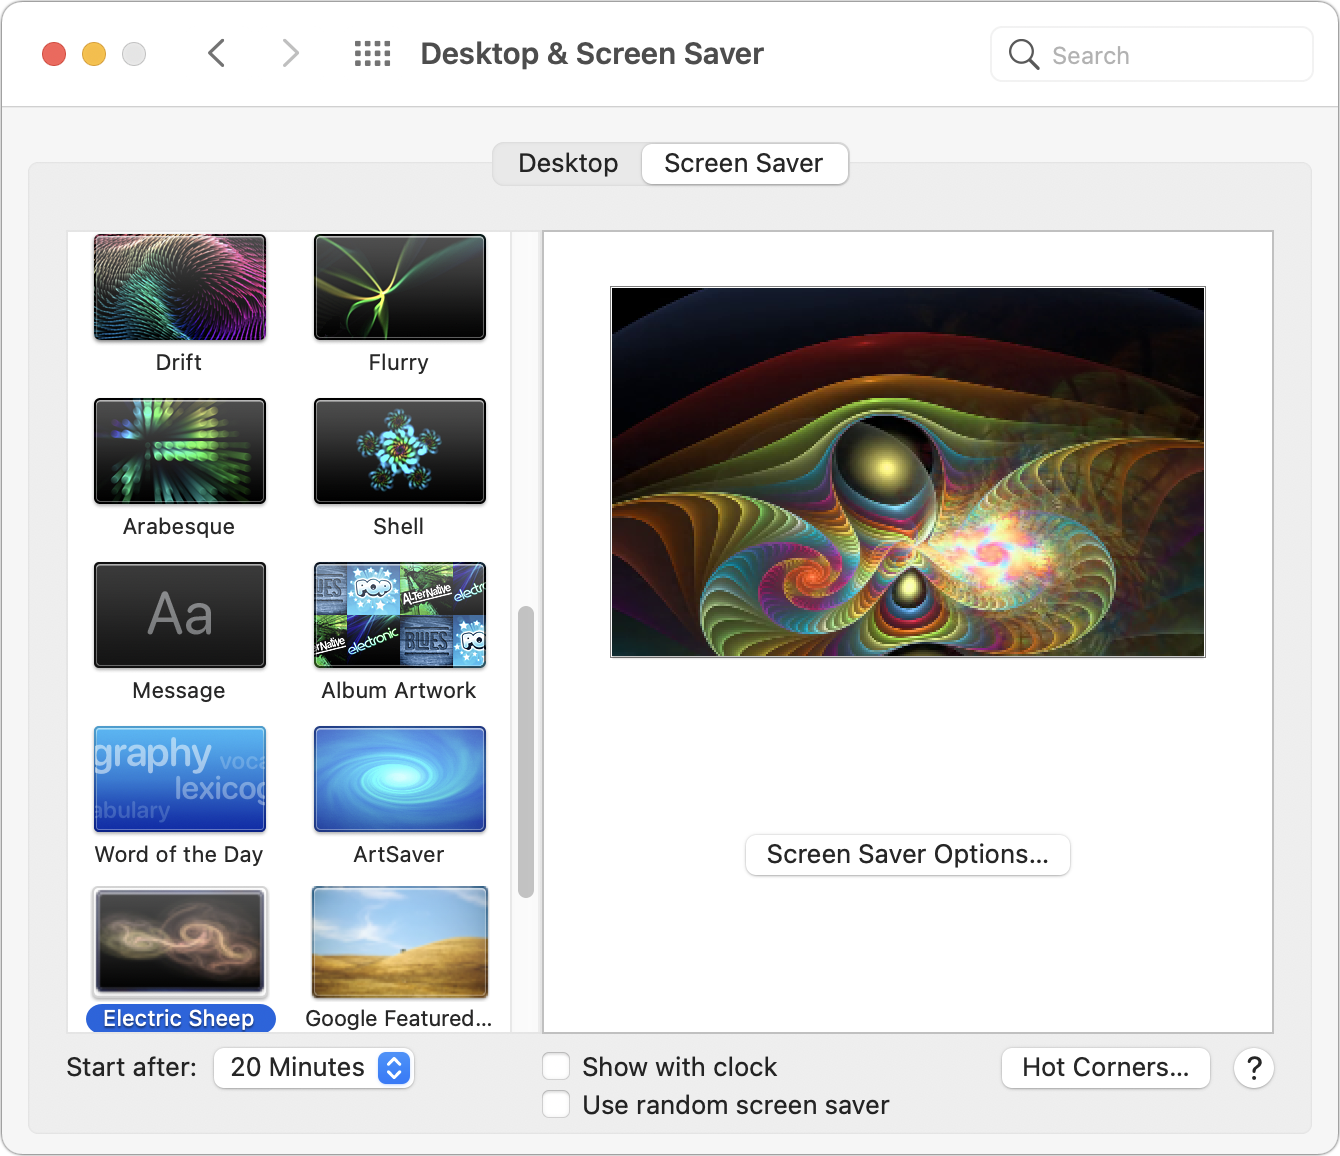
Desktop & Screen Saver: Jobs have been lost by inappropriate selections for desktop wallpaper and photo screen savers. Make sure, if you’re ever going to share your screen, that randomly chosen desktop pictures and folders of screen saver photos don’t contain anything that could be problematic. To be safe, choose an Apple-provided desktop picture and a pattern-based screen saver in System Preferences > Desktop & Screen Saver.
Icons on the Desktop: We all toss files on the desktop, but if preview icons or even filenames could cause trouble—you might not want your boss seeing Resumé.doc—corral them in another folder before you share your screen. Al-so note that many videoconferencing apps can limit their screen sharing to particular windows rather than the entire screen, which prevents people from seeing your desktop.
Web browser tabs: Limiting screen sharing to a particular window won’t help if it’s a Web browser window with multiple tabs. Even if you avoid acci-dentally navigating to a tab with NSFW content, its title alone might be prob-lematic. For safety, always start a new browser window when sharing Web content.
Open apps and documents: As with icons on the desktop when sharing your entire screen, you may not want just anyone seeing what other apps and doc-uments you have open. Again, stick to sharing a specific window. To avoid mistakes when selecting the window to share, we recommend hiding or quit-ting all unrelated apps before sharing your screen.
Document comments: When collaborating on a document, some people are less than politic with their in-document comments. If comments are visible when you’re sharing a document with people who wouldn’t otherwise see them, hard feelings could ensue. Make sure to hide or resolve such comments before sharing.
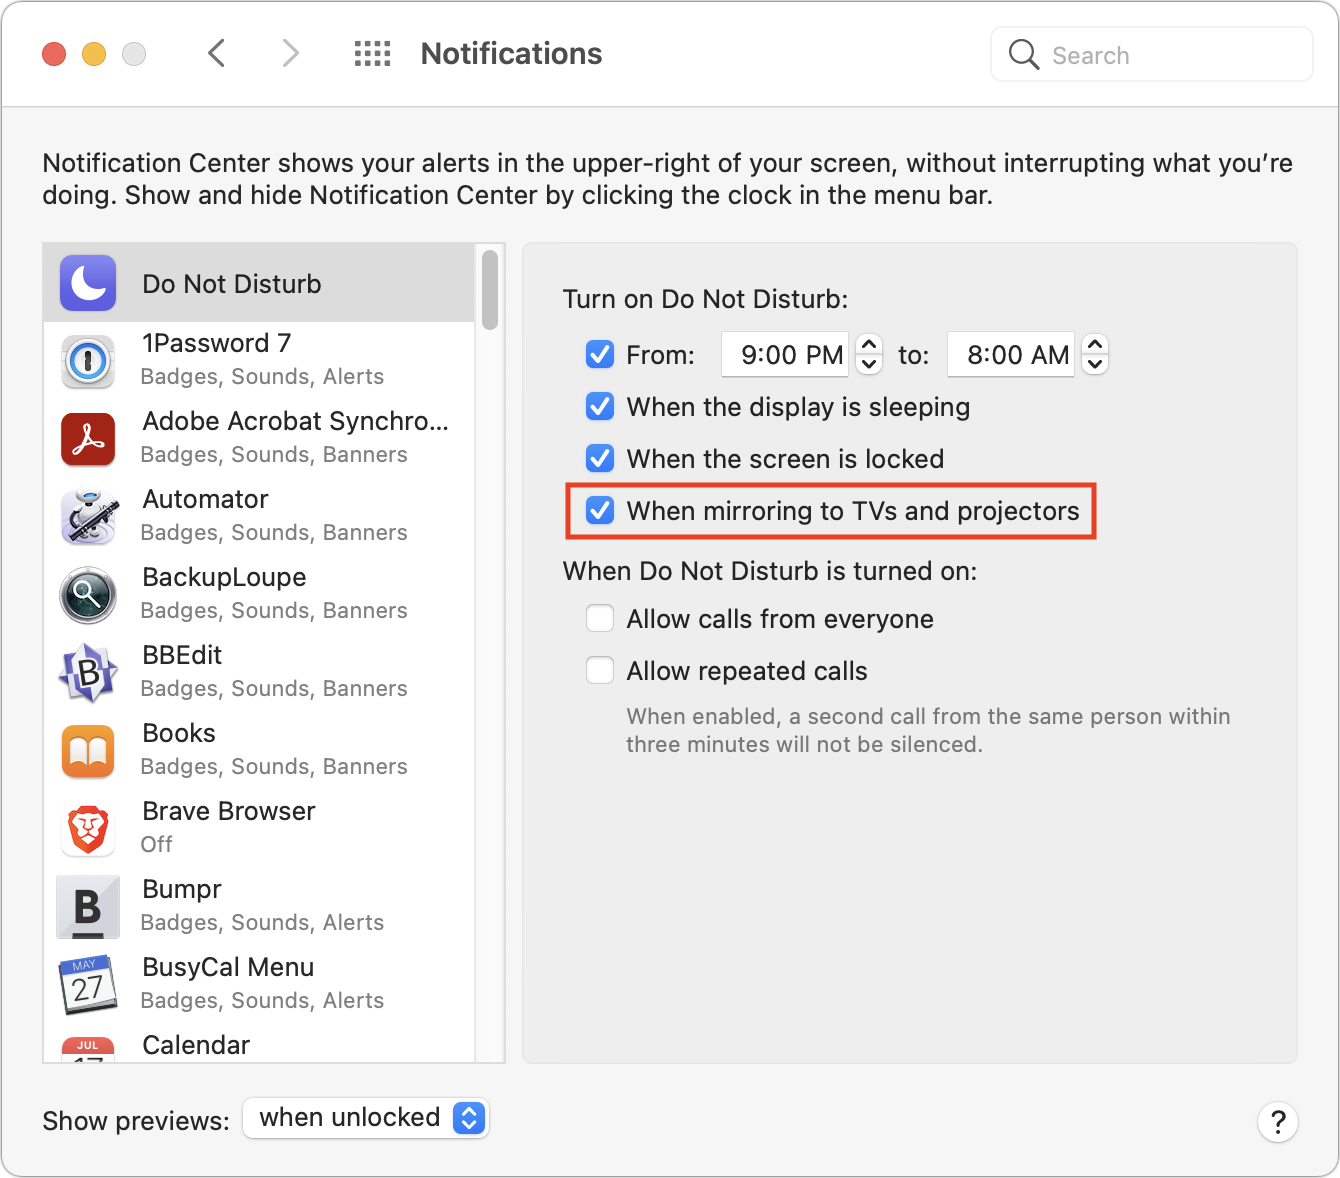
Notifications: Even if you have hidden or quit Calendar, Messages, Mail, and similar apps, their notifications could still appear at an inopportune time. You might not want colleagues to know about an ob-gyn appointment, meeting with a potential employer, or racy conversations with a coworker. The solu-tion is Do Not Disturb, easily enabled from Control Center in macOS 11 Big Sur and by scrolling up in Today view in Notification Center in earlier ver-sions of macOS. Also, although it won’t help with online screen sharing, it’s a good idea to enable the “When mirroring to TVs and projectors” option in Sys-tem Preferences > Notifications > Do Not Disturb.
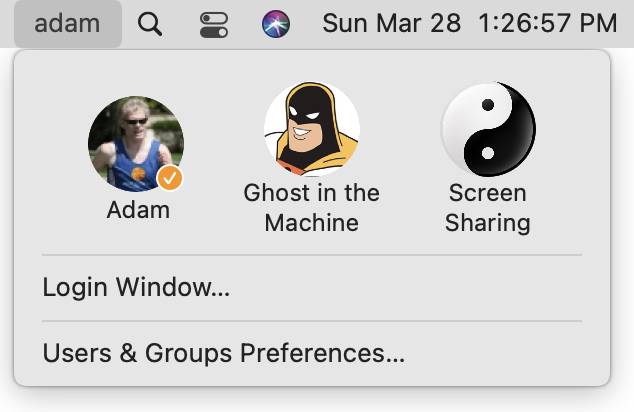
This may all sound a little overwhelming, but there is one trick that will help you avoid most of these problems at once. In System Preferences > Users & Groups, cre-ate a new user account dedicated to screen sharing and presentations. In that user ac-count, you can be sure to have innocuous desktop pictures, screen savers, clean Web browser windows, and permanent Do Not Disturb. The hardest part will be figuring out the best way to share documents you use in presentations between your ac-counts (try the /Users/Shared folder or an online file sharing solution like Dropbox). Then, before you start a call when you’ll need to share your screen, choose your new account from the Fast User Switching menu from the right side of the menu bar (set up that menu in System Preferences > Users & Groups > Login Options).
One final piece of advice. When you’ve accomplished what you need to by sharing your screen, stop sharing it and switch back to video. That way, you can’t accidental-ly do something in the shared window that might be embarrassing. Similarly, when a meeting is over or you’re dropping off for a while, it’s best to leave the call. Stopping video and muting audio are good tools, but it’s easy to click in the wrong spot acci-dentally and think you’re safe when, in fact, your mic or camera is still live.
(Featured image by Andrea Piacquadio from Pexels)
Try iCloud Drive Folder Sharing Instead of Paying More for a File Sharing Service
Tired of paying Dropbox or a similar service when you have plenty of space on iCloud Drive? With iCloud Drive Folder Sharing, you can share folders just like any other file sharing service.

Dropbox, Google Drive, and Microsoft OneDrive all have their place, but as of March 2020, Apple users no longer have to venture outside the Apple ecosystem for online folder sharing. Before then, you could share a single file in iCloud with anoth-er iCloud user, but nothing more. With iCloud Drive Folder Sharing, you can share an entire folder, complete with permissions that control what your collaborators can do with the contents of the folder.
Pros and Cons
Why use iCloud Drive Folder Sharing instead of the more established services? Cost is the main one. Say you’re already paying Apple $9.99 for 2 TB of storage so you can use iCloud Photos with a large library. Why pay one of the other services another $9.99 per month—$240 per year—when you can get the same capabilities using iCloud? (Dropbox used to be entirely usable at its free level for those who didn’t need much shared storage, but users at that tier are also limited to just three devices, rendering it problematic for anyone with an iPhone, iPad, and desktop and laptop Macs.)
The main reason not to use iCloud Drive Folder Sharing is if the people with whom you want to share documents aren’t Apple users. Such people can get a free iCloud account if they create an Apple ID and then access iCloud Drive in a Web browser. Windows users can instead install iCloud for Windows to access it in Windows Ex-plorer. But that may be too much effort for many.
iCloud Drive Folder Sharing on the Mac
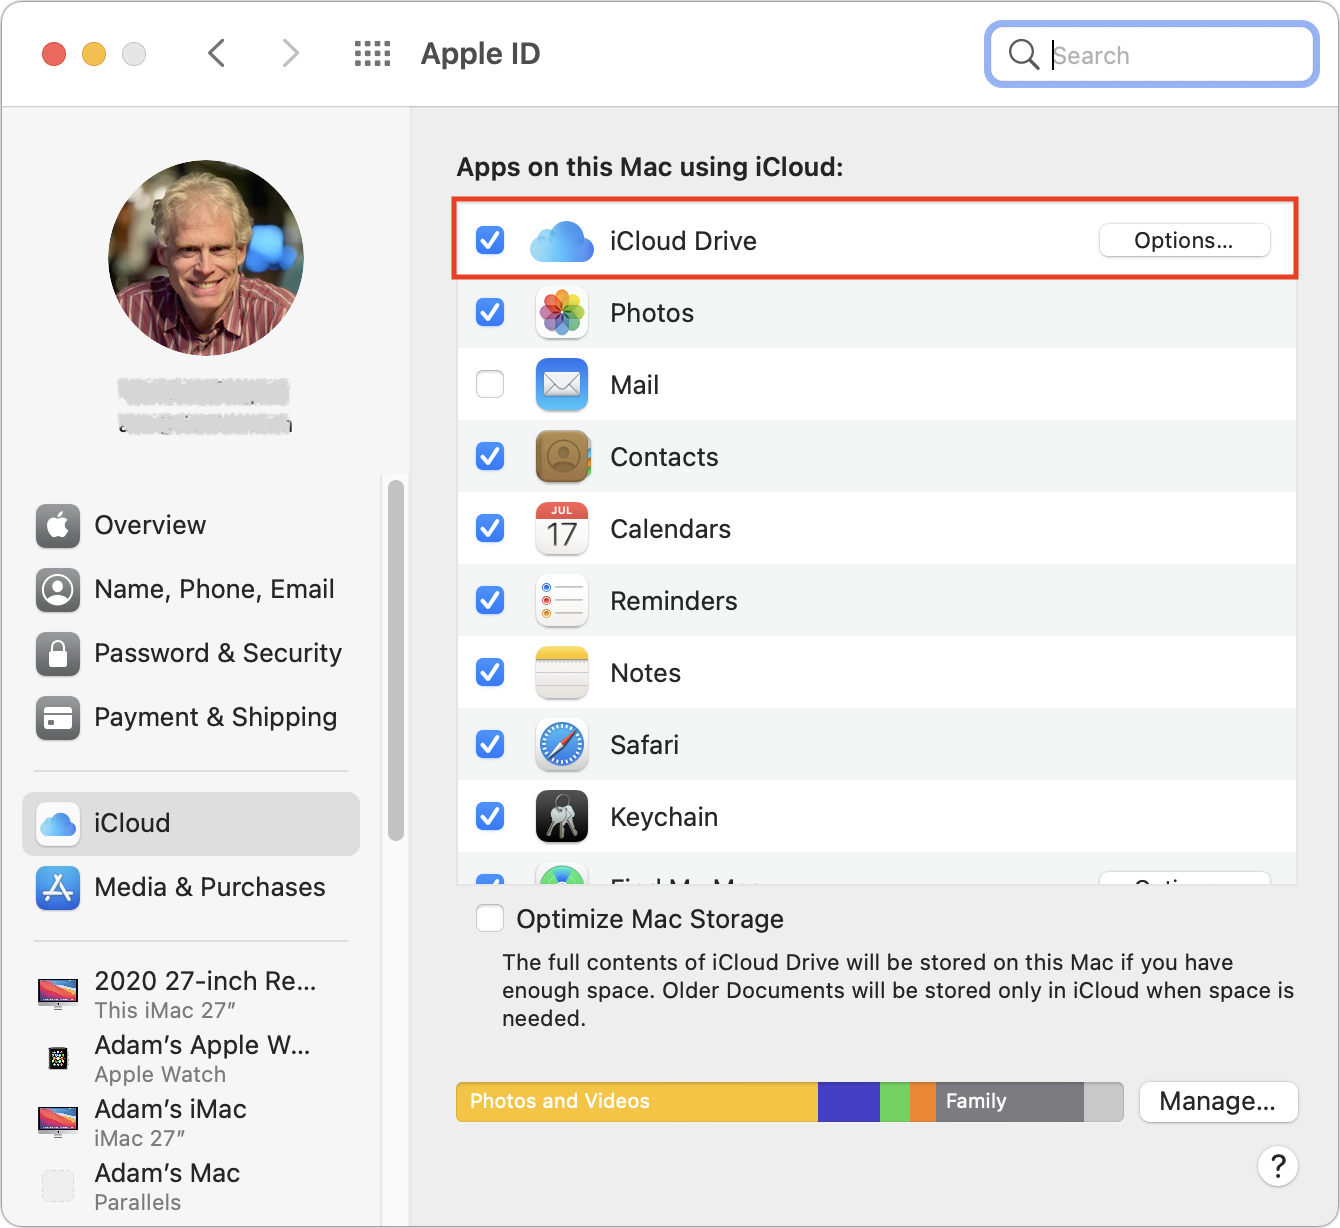
First off, make sure iCloud Drive is selected in System Preferences > Apple ID > iCloud. If you have plenty of storage, leave Optimize Mac Storage unchecked. It’s worthwhile only if your Mac’s internal drive is nearly full.

On the Mac, iCloud Drive creates a special folder to hold all the data mirrored to iCloud. You can access it by choosing Go > iCloud Drive in the Finder. It’s usually available in the sidebar of Finder windows too. If not, open Finder > Preferences > Sidebar and select iCloud Drive.
You’ll likely see quite a few folders in iCloud Drive already, with names and icons matching apps that synchronize their data and files via iCloud. These folders exist purely for you and your apps—you can’t share them. However, you can create and share other folders within iCloud Drive.
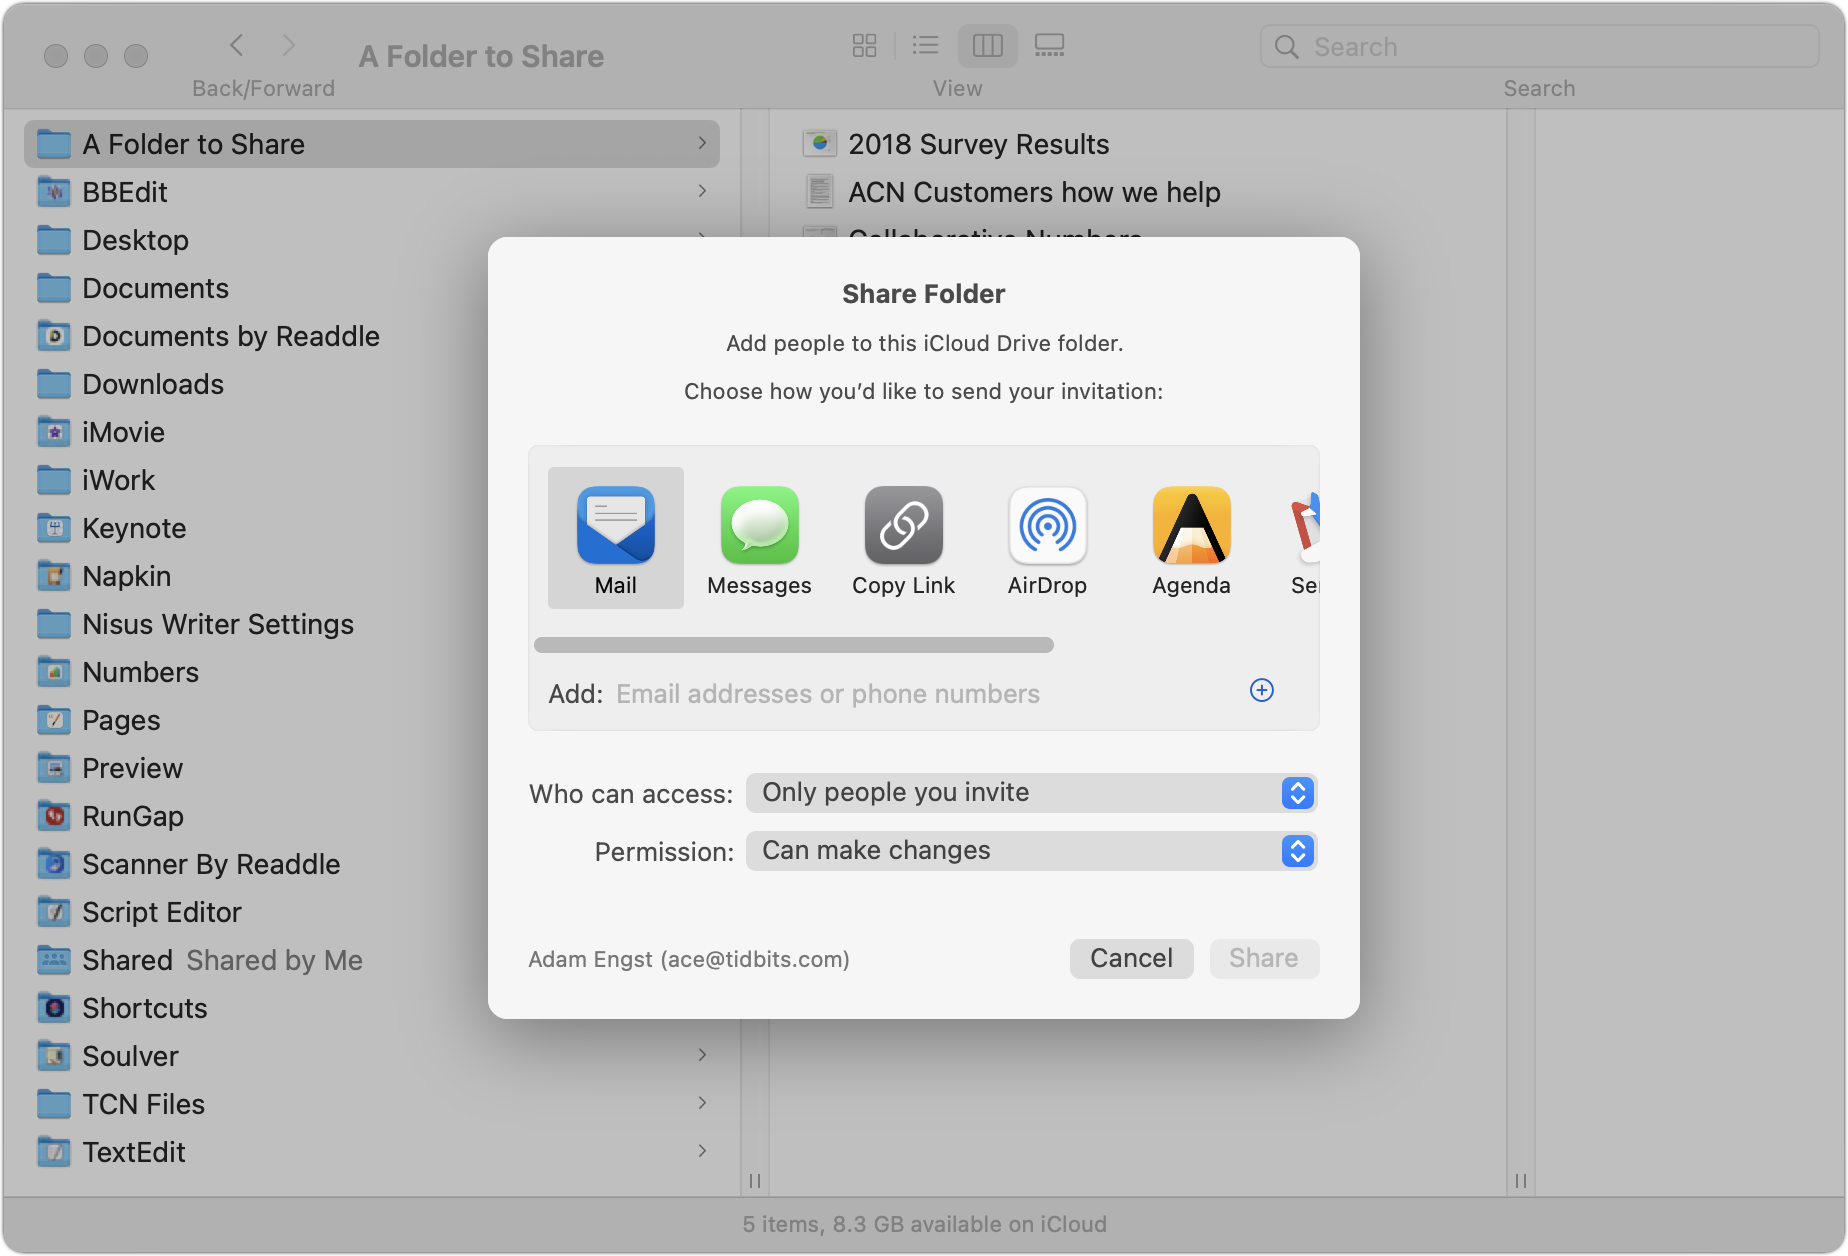
To share a folder you’ve created, Control- or right-click it and choose Share > Share Folder to display a Share Folder dialog. You need to do three things here:
From the Who Can Access pop-up menu, choose between “Only people you invite” and “Anyone with the link.” With the latter, you’re opting for security only through obscurity, so avoid that option if the data in the folder is confi-dential or important.
From the Permission pop-up menu, choose between “Can make changes” and “View only.” Think carefully about this choice—view-only users can still copy files out of the folder and change them locally on their computers. However, they won’t be able to change your versions of shared files or add new files to the folder.
Despite its position at the top of the dialog, choose the manner of sending the invitation last. If you’re sharing only with people you invite, you can select a sharing method and enter their email addresses or phone numbers. For folders shared with anyone who has the link, you don’t need to enter information for specific users.
When the people with whom you’re sharing the folder receive the sharing invitation or link and open it, the shared folder is added to their iCloud Drive folder. Its icon will have silhouettes of multiple people to indicate it’s a shared folder.
What if you need to invite more people, change permissions, get the sharing link again, or stop sharing entirely? Control- or right-click and choose Share > Manage Shared Folder (there’s also a Copy Link option there). A new dialog appears.
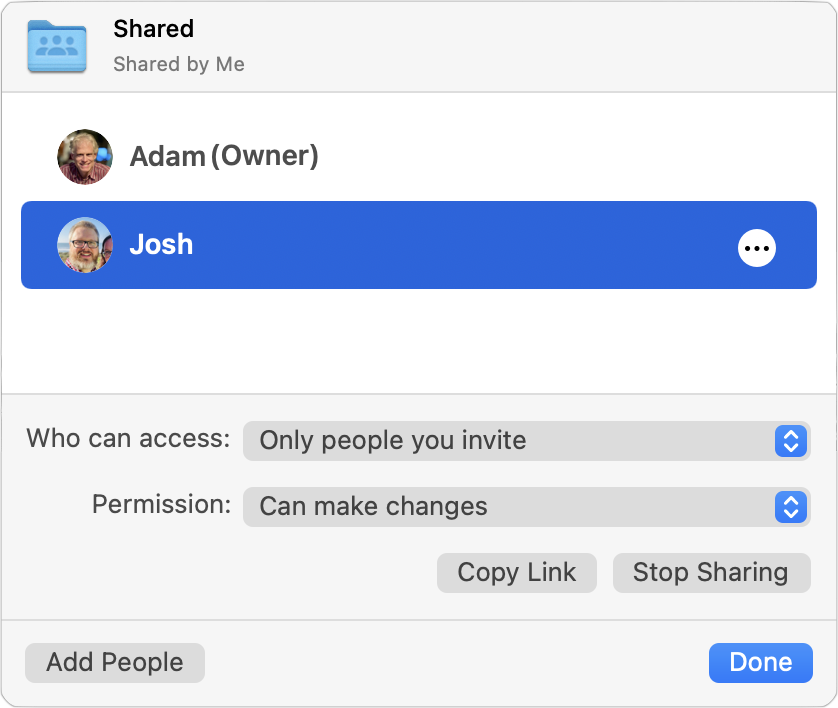
Most of the controls here are self-explanatory, but note that you can revoke a per-son’s access and change their permission level by clicking the ••• button in the row next to their name.
iCloud Drive Folder Sharing in iOS/iPadOS
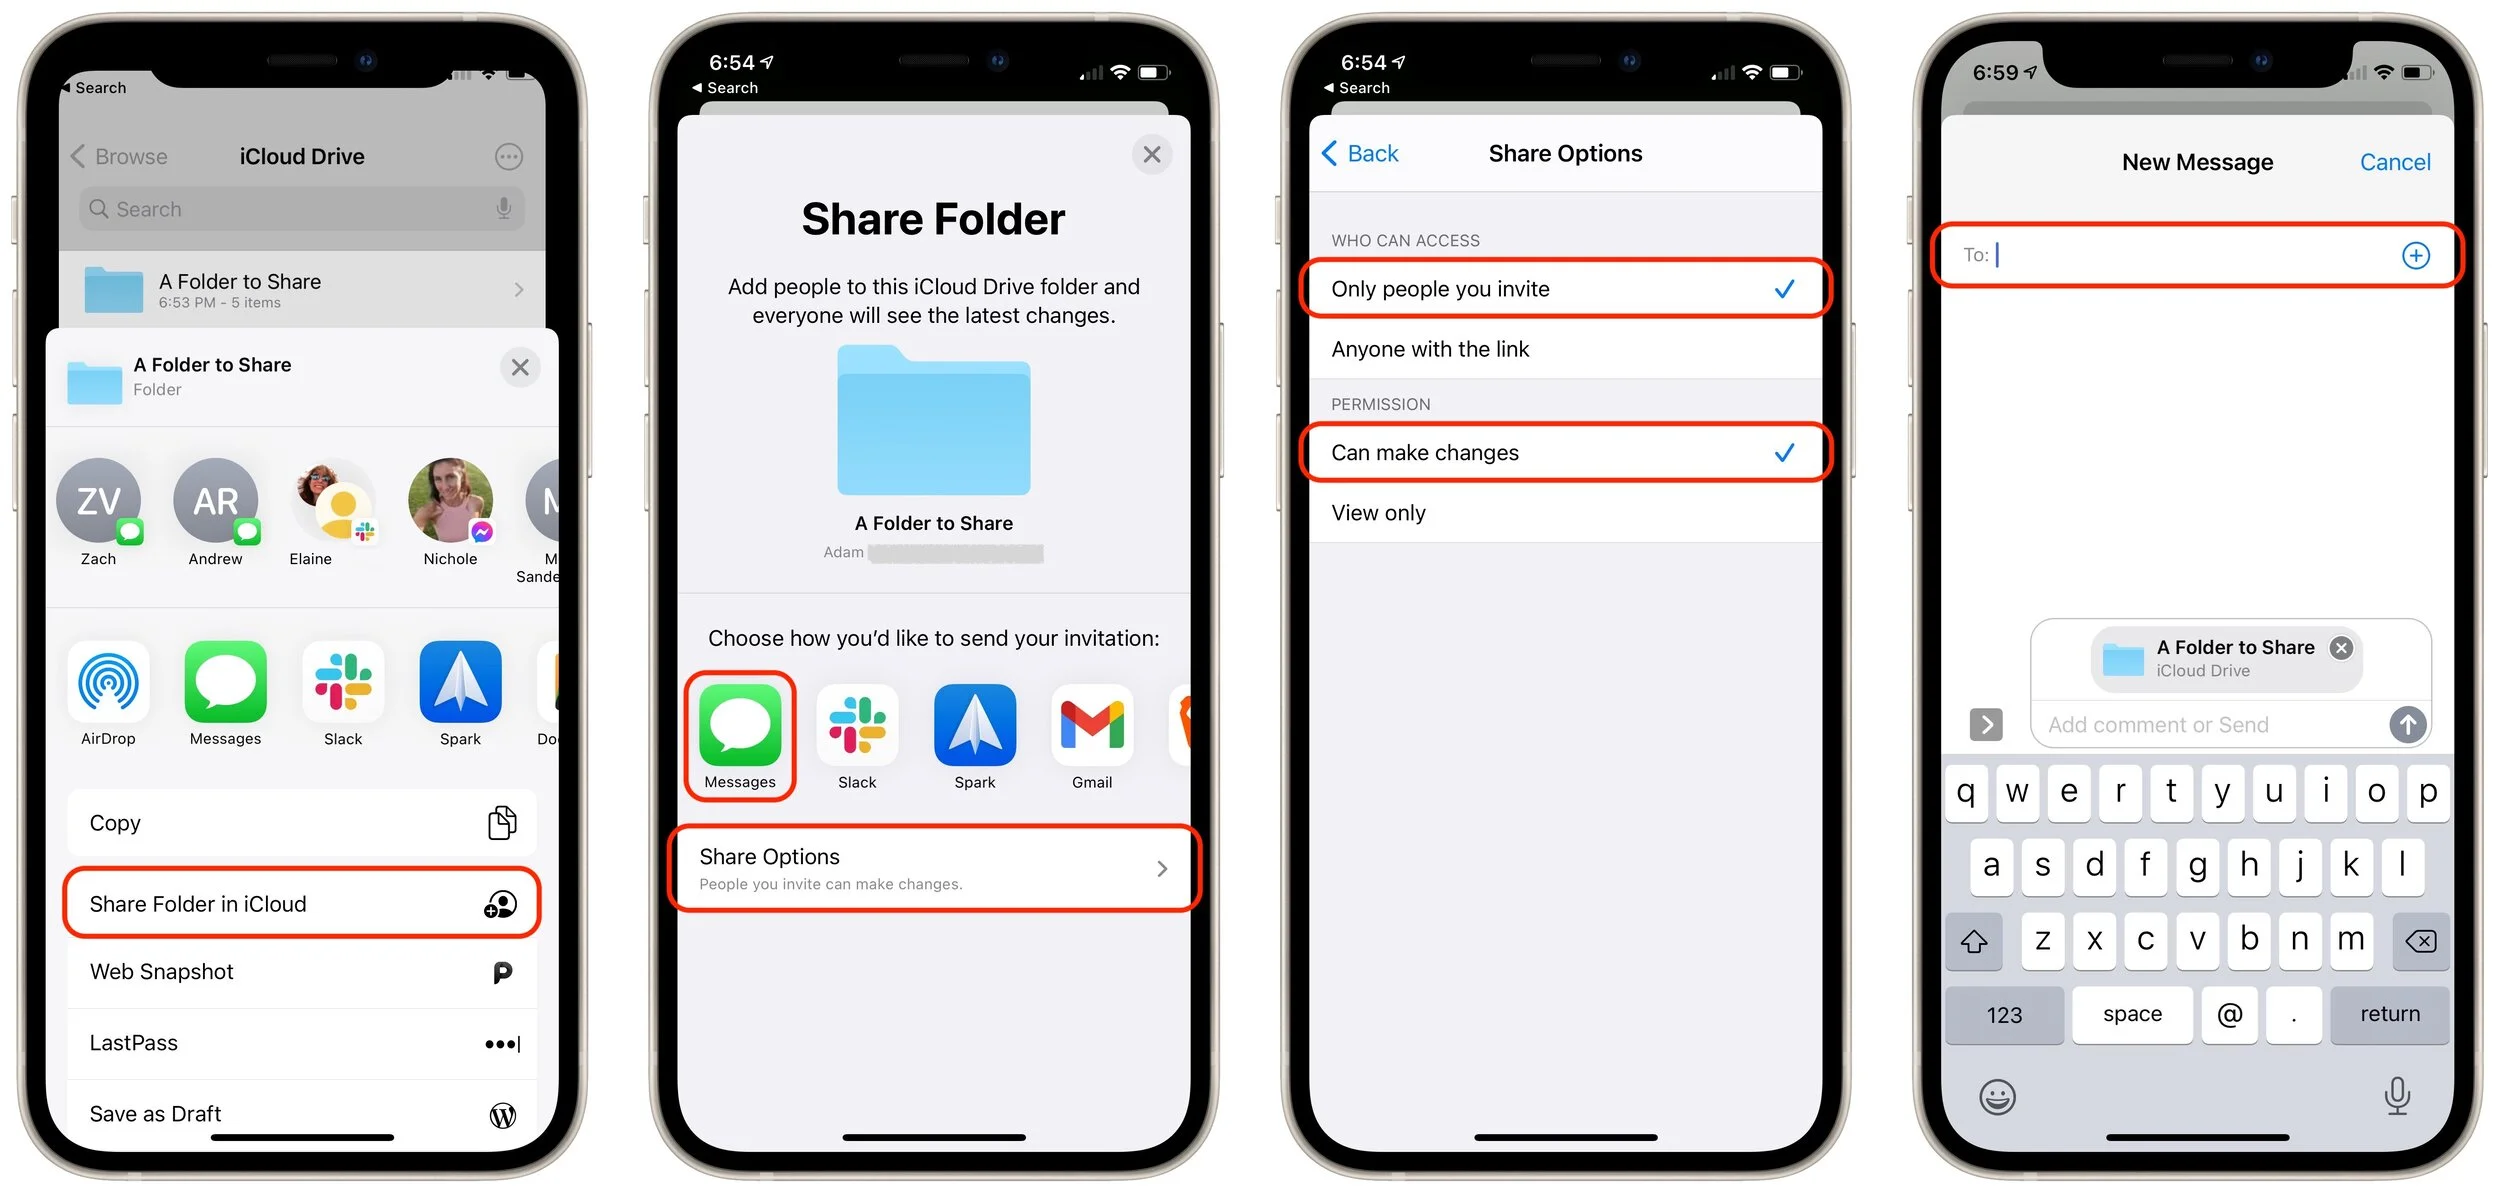
The process is similar in iOS and iPadOS. Follow these instructions in the Files app:
Press and hold on the folder you want to share.
In the sheet that appears, tap Share.
In the Share sheet that appears, tap Share Folder in iCloud.
On the Share Folder screen, first tap Share Options and set Who Can Access and Permission.
Tap Back to return to the Share Folder screen, and tap the app through which you want to send your invitation (Messages below).
Enter the name of your recipient or pick them from your contacts list.
Enter a message to your recipient and send them the link to the shared folder.
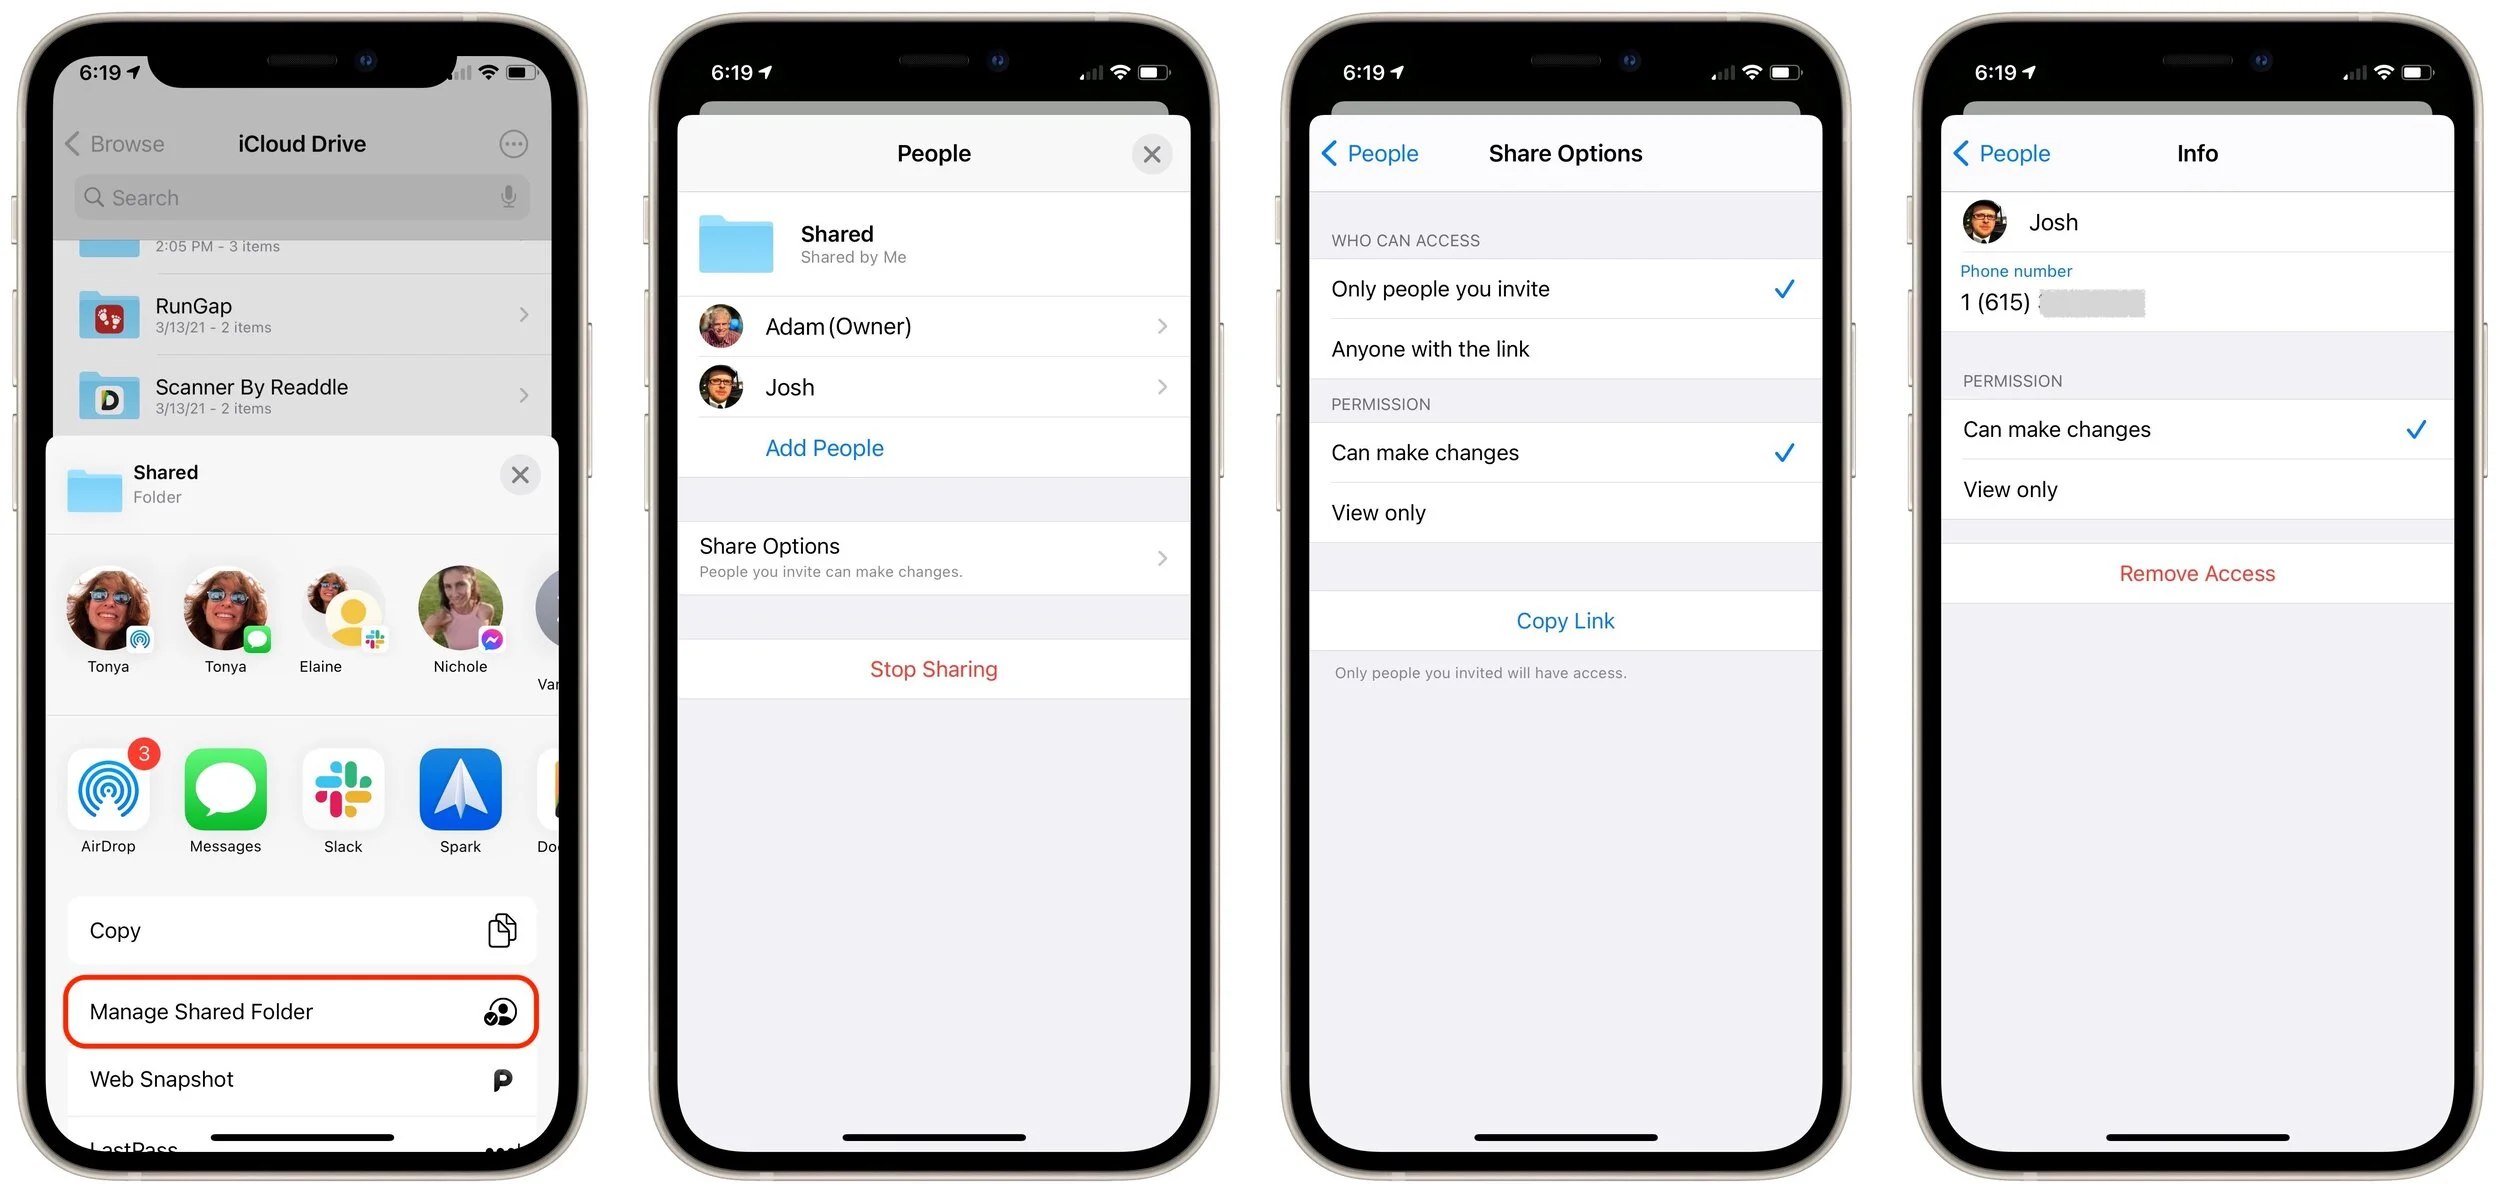
Managing a shared folder in the Files app is similar. Once you press and hold on an already shared folder and tap Manage Shared Folder in the Share sheet, you can do the following:
Tap Share Options to change Who Can Access and Permissions options, or to copy the link to the shared folder.
Tap a person’s name to change their permissions or remove access entirely.
Tap Stop Sharing to stop sharing the folder.
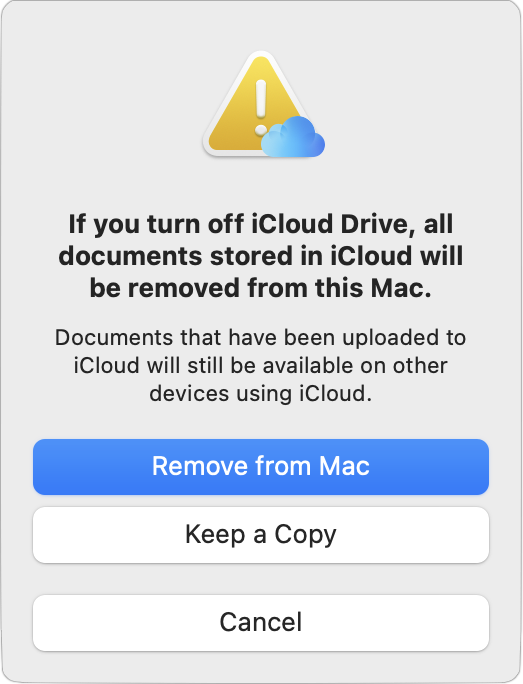
One final tip. Although iCloud Drive generally works well, we’ve occasionally seen it get stuck syncing on the Mac. You may see files or folders fail to sync between devic-es or have a file or folder permanently display the little cloud icon in the Finder that indicates iCloud Drive is updating. To resolve such problems and reset the local state of iCloud Drive, first make a copy of any critical files to the desktop, just in case. Then open System Preferences > Apple ID > iCloud, deselect iCloud Drive, click Re-move from Mac when prompted, and then select iCloud Drive again. Give it some time to resync with iCloud and download new copies of your files.
(Featured image by sendi gibran on Unsplash)
Make Better Documents and Edit More Easily with Show Invisibles
Ever wondered if there’s a way to see the spaces, tabs, and returns that are typically invisible in your word processing and page layout documents? There almost certainly is—read on for our guide to the most popular Mac apps.

Some of the trickiest editing and proofreading problems are related to characters you can’t typically see on the screen: spaces, tabs, and returns. Just because they’re invis-ible doesn’t mean they don’t affect the look of a document, often in negative ways. For instance:
An extra space can cause an awkward jump from one word to the next, or it could push punctuation away from the final word in a clause or sentence. And yes, current convention among professional publishers and typographers calls for one space after a period, not two.
The wrong number of tabs might not be obvious until you add or remove text from the line, at which point having too many or too few tabs will suddenly mess up the formatting.
An extra return causes a line break, something that you might overlook if the return falls naturally where the line would break on its own, but as you add or remove text, the line break could become embarrassing.
These and similar errors are easy to make or to encounter in copied and pasted text. They’re equally easy to fix, but only if you know why they’re happening. To help you identify them, most Mac word processors, page layout programs, and text editors have a command or option called something like “Show Invisibles.”
As you would expect from the name, Show Invisibles replaces previously invisible characters with something you can see. Spaces are generally replaced with a vertical-ly centered dot, tabs with some sort of right-pointing arrow, and returns with some-thing that’s formally known as a pilcrow but more commonly called a paragraph mark. Here’s what they look like in Pages.

Revealing invisible characters is tremendously helpful, but it can also clutter up the display and make text harder to read. So every app that lets you show invisibles also makes it easy to hide them again so you can focus on your text.
Note that even if you can see invisible characters on the screen, they will not show in a printout of the document.
Precisely where you find the Show Invisibles command—and what it’s called—varies from app to app. Here’s where to look in some popular Mac word processing, page layout, and text editing apps:
Pages: In Apple’s Pages, you can reveal invisible characters by choosing View > Show Invisibles. To hide them, choose View > Hide Invisibles—the command changes based on whether or not they’re showing.
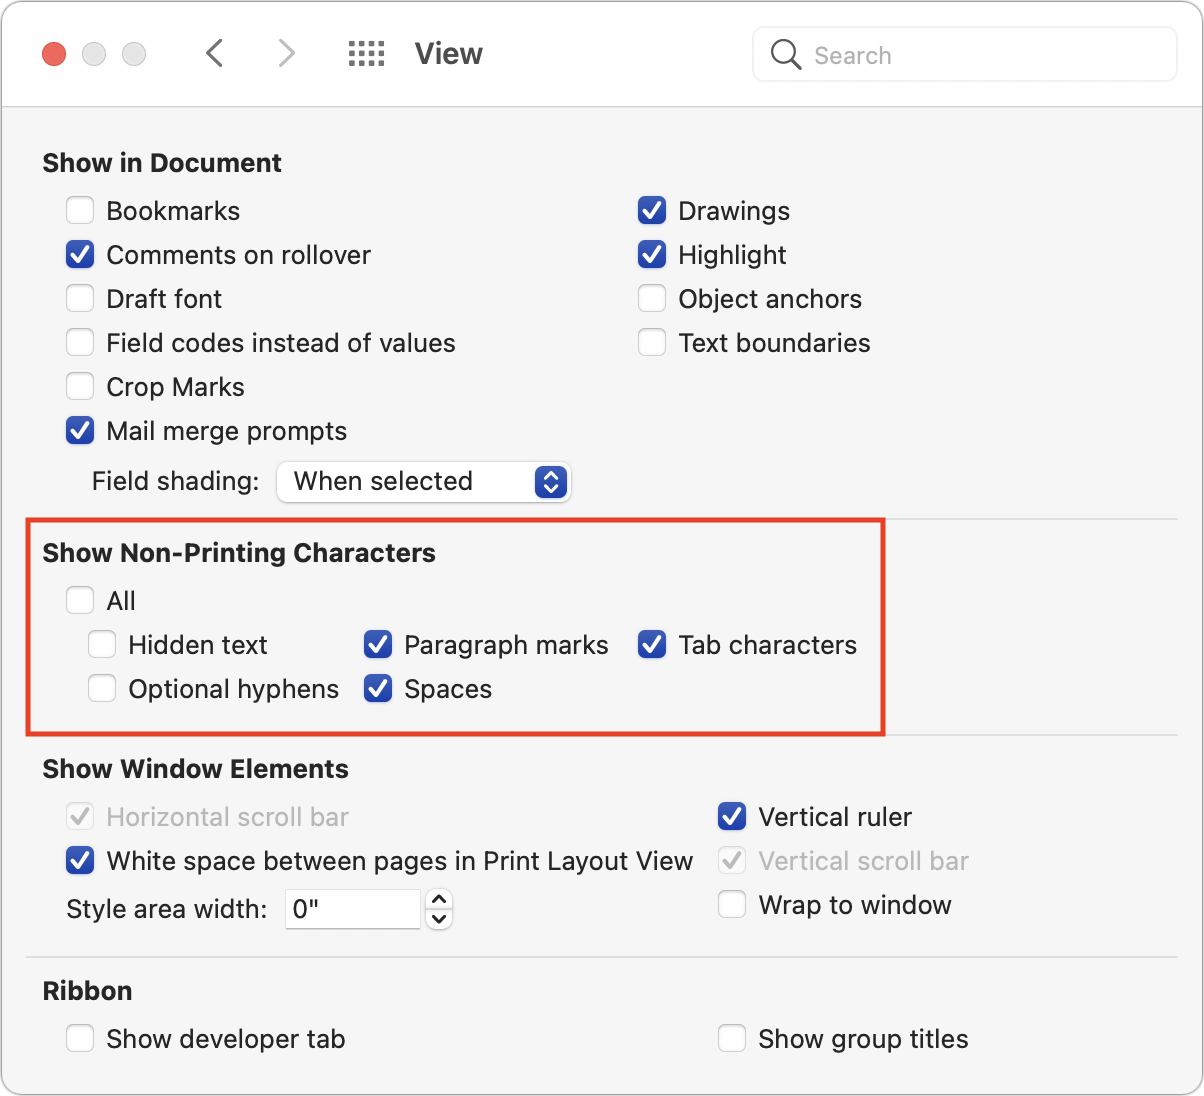
Microsoft Word: In Microsoft’s near-ubiquitous word processor, the primary way you show and hide invisibles is by clicking the ¶ button in the Home toolbar. Click it once to show and again to hide. However, if you always want certain invisible characters to appear, you can select them individually in Word > Preferences > View > Show Non-Printing Characters.
Nisus Writer Pro: In this highly capable, long-standing alternative to Mi-crosoft Word, choose View > Show Invisibles. When selected, it gains a checkmark. Choose it again to conceal the characters and remove the checkmark.
Scrivener: In this word processor aimed at long-form writing and screenwrit-ing, choose View > Text Editing > Show Invisibles. Choose it again to hide them.
Adobe InDesign: In Adobe’s market-leading page-layout app, choose Type > Show Hidden Characters. The command changes when selected. Hide them again by choosing Type > Hide Hidden Characters.
Affinity Publisher: In this inexpensive but surprisingly full-featured compet-itor to InDesign, the command you’re looking for is Text > Show Special Char-acters. When you choose this command, it gains a checkmark. Choose it again to hide invisible characters and remove the checkmark.
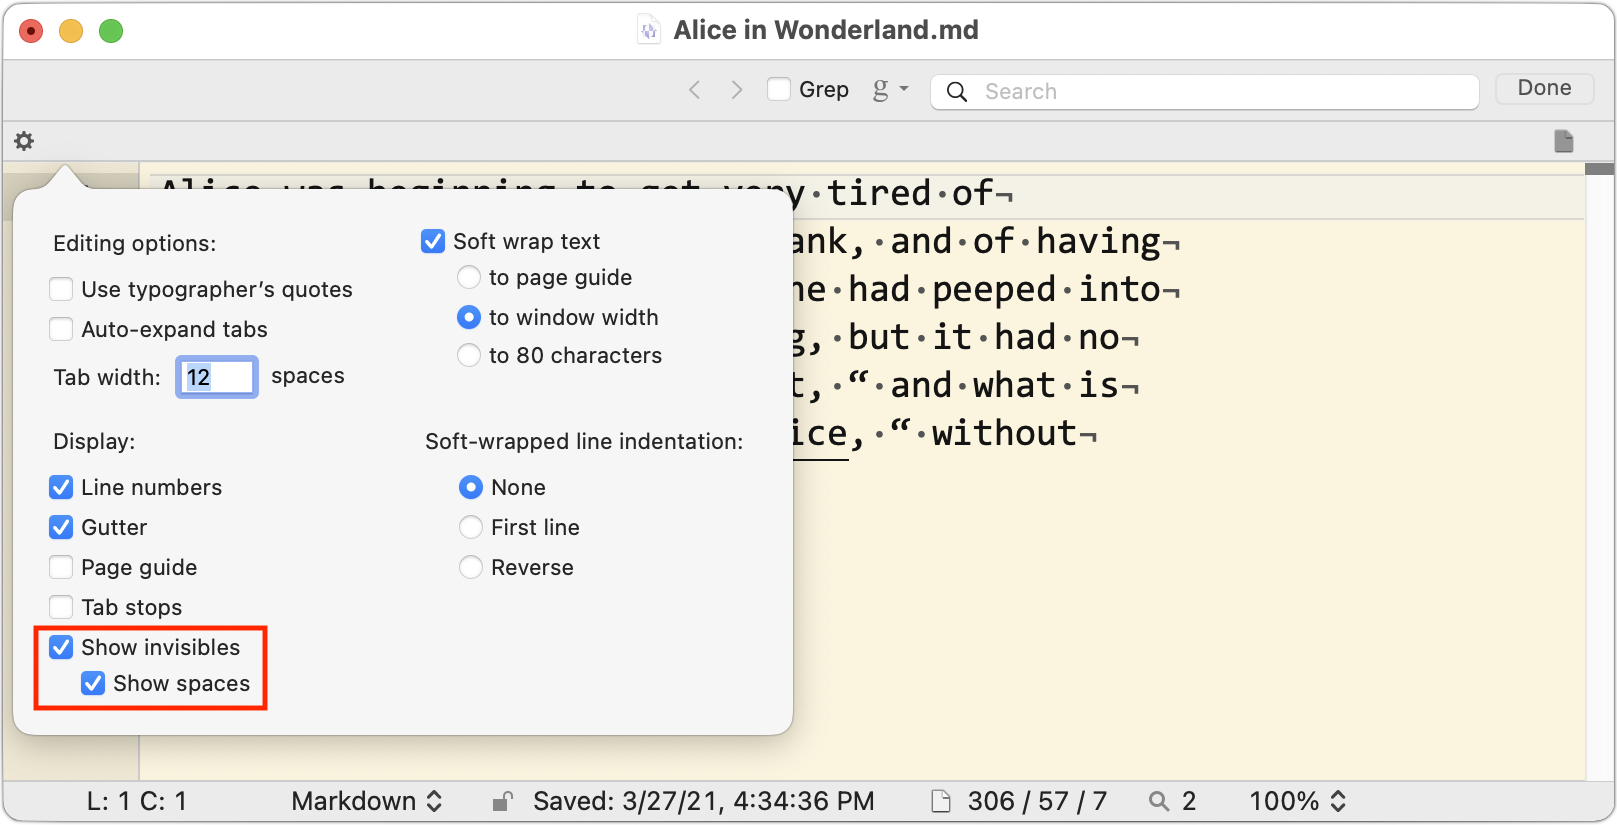
BBEdit: This text-editing powerhouse aimed at developers, bloggers, and Web designers lets you show tabs and returns, spaces, or both. Either choose the Show Invisibles and Show Spaces commands in View > Text Display or click the tiny gear icon in the upper left of the window and select the appropriate checkboxes.
Not all text-focused apps offer a way of displaying these invisible characters. For in-stance, we know of no way of doing this in Apple’s TextEdit. Nor is it possible in the online word processor Google Docs, although you can achieve a similar effect tem-porarily by choosing Edit > Find and Replace, selecting Match Using Regular Expres-sions, and then searching (one at a time) for a space, for \t for tabs, and for \n for re-turns.
Even if you’re using an app not mentioned above, our descriptions of their approach-es should give a sense of what to look for in the interface or the app’s documentation. Enjoy your newfound ability to see beyond the visible!
(Featured image by Aleksandar Pasaric from Pexels)
What to Do If You Run Low on iCloud Storage Space
Running low on iCloud storage space? Rather than automatically paying Apple for a larger iCloud plan, check out these tips on how to recover gigabytes of wasted space.

By default, Apple gives every iCloud user 5 GB of storage space. That disappears quickly, given how it’s shared between iCloud Mail, iCloud Drive, iCloud Photos, Messages, and iCloud-enabled apps.
Apple will, of course, sell you more iCloud space. $0.99 per month gets you 50 GB, $2.99 per month provides 200 GB, and for $9.99 per month, you can use a whopping 2 TB. The latter two plans can even be shared with others in your Family Sharing group.
As we’ve noted elsewhere, using iCloud Photos almost certainly requires you to pay for extra storage. But if you’re paying $2.99 per month and nudge up against the 200 GB limit, you may not be enthused about increasing your payment to $9.99 per month when you’re unlikely to need anywhere near 2 TB.
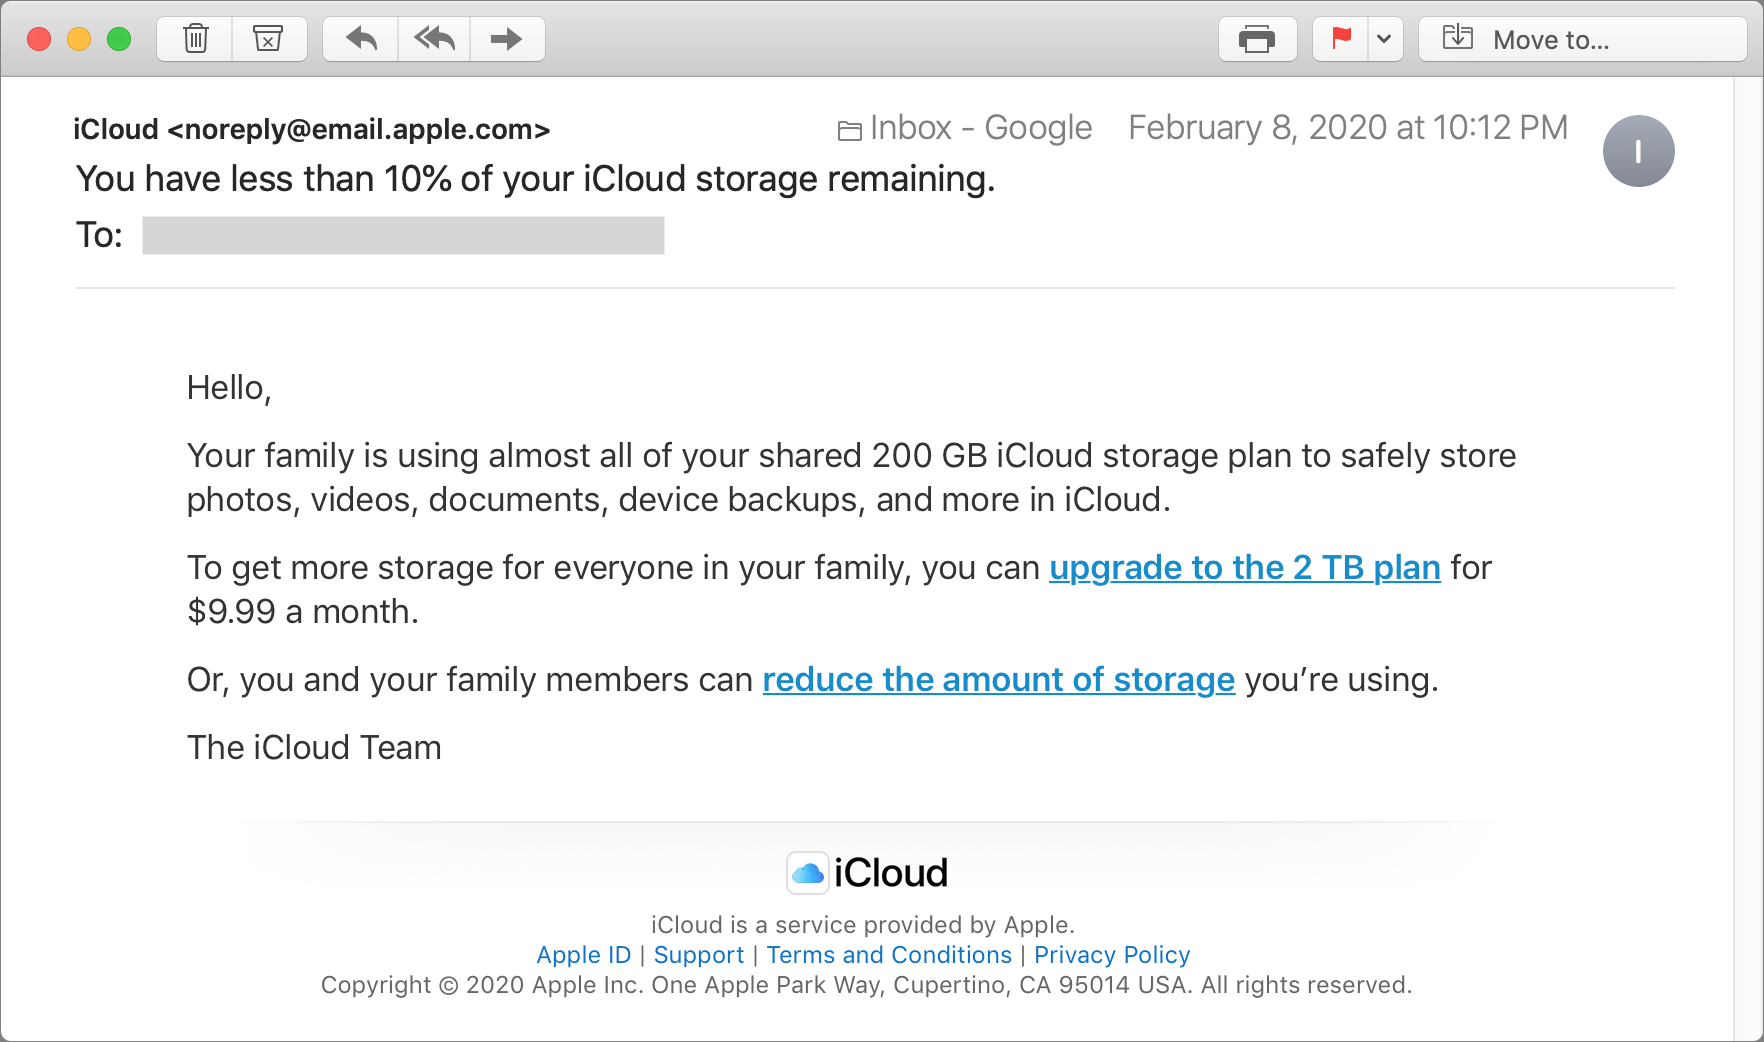
That said, you don’t want to run out of storage space. Email to your iCloud email address will be rejected, photos won’t upload from your iPhone, and app data will fail to sync. Happily, Apple alerts you when you’re running low on space, before things get bad.
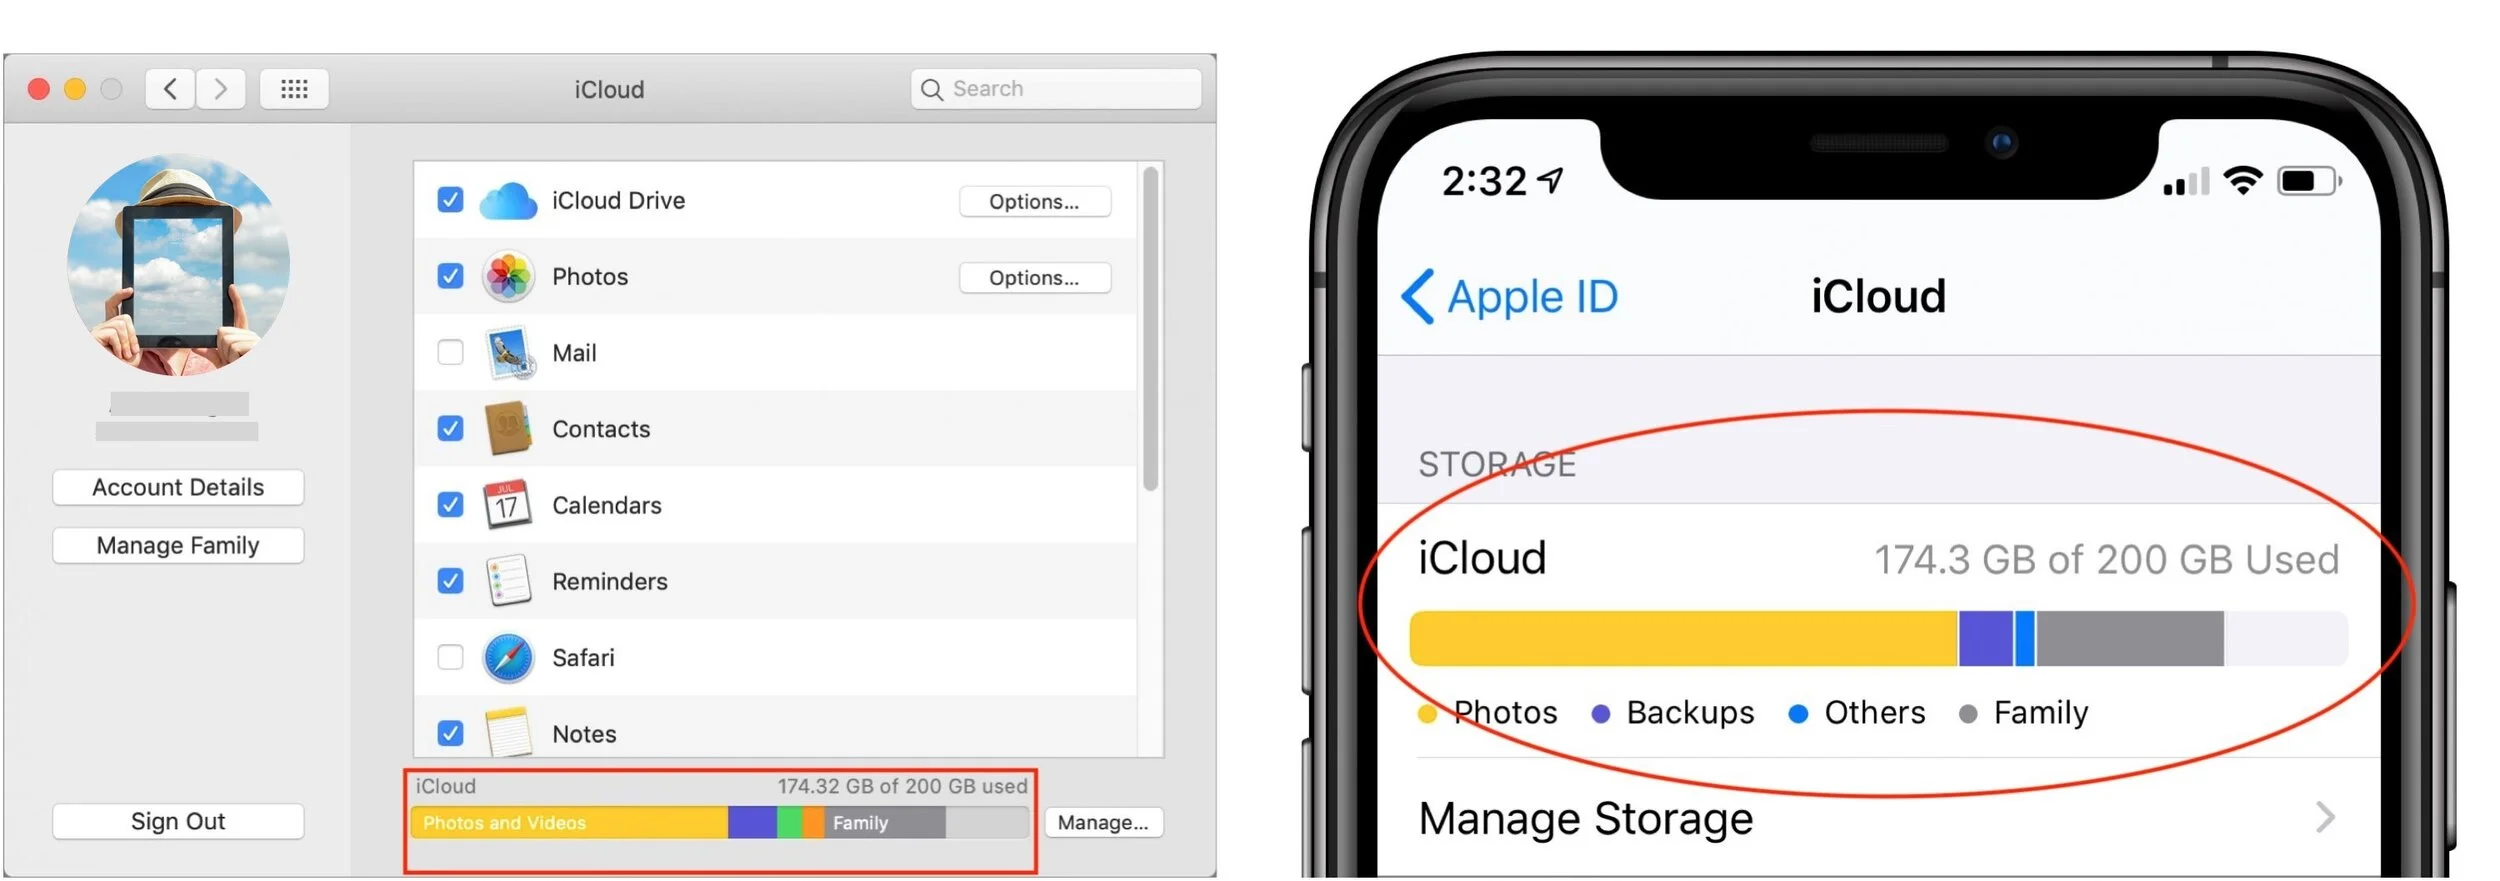
It’s often easy to recover space that’s not being used in a helpful way. First, check how much space you have and how much you’re using. In macOS 10.14 Mojave, look at the graph at the bottom of System Preferences > iCloud. In 10.15 Catalina, the graph is in System Preferences > Apple ID > iCloud. In iOS, you’ll find a similar graph at Settings > Your Name > iCloud.
Then, to clear space, work through these five approaches.
1. Remove Unnecessary iCloud Device Backups
The biggest win comes from deleting iCloud device backups for devices you no longer use. It’s common for these to stick around, so if you recently upgraded from an iPhone X to an iPhone 11 Pro, the iPhone X backup is probably still consuming gigabytes.
Navigate to Settings > Your Name > iCloud > Manage Storage > Backups to see what you have. If you find backups for a previous iPhone or iPad, tap it and then tap Delete Backup.

2. Delete Unnecessary Data from iOS Apps
While you’re in the iCloud Storage screen (the leftmost screenshot above), look through the other apps at the top of the list. The Photos app will likely be using the most storage, but all you can do to minimize its space usage is delete unnecessary screenshots, duplicate photos, and accidental videos from Photos. That will likely require lots of manual effort.
However, some other apps—think about third-party camera or video apps—may be using space unnecessarily. Investigate any apps reporting a lot of usage in the iCloud Storage screen, and if possible, clear out the unnecessary data.
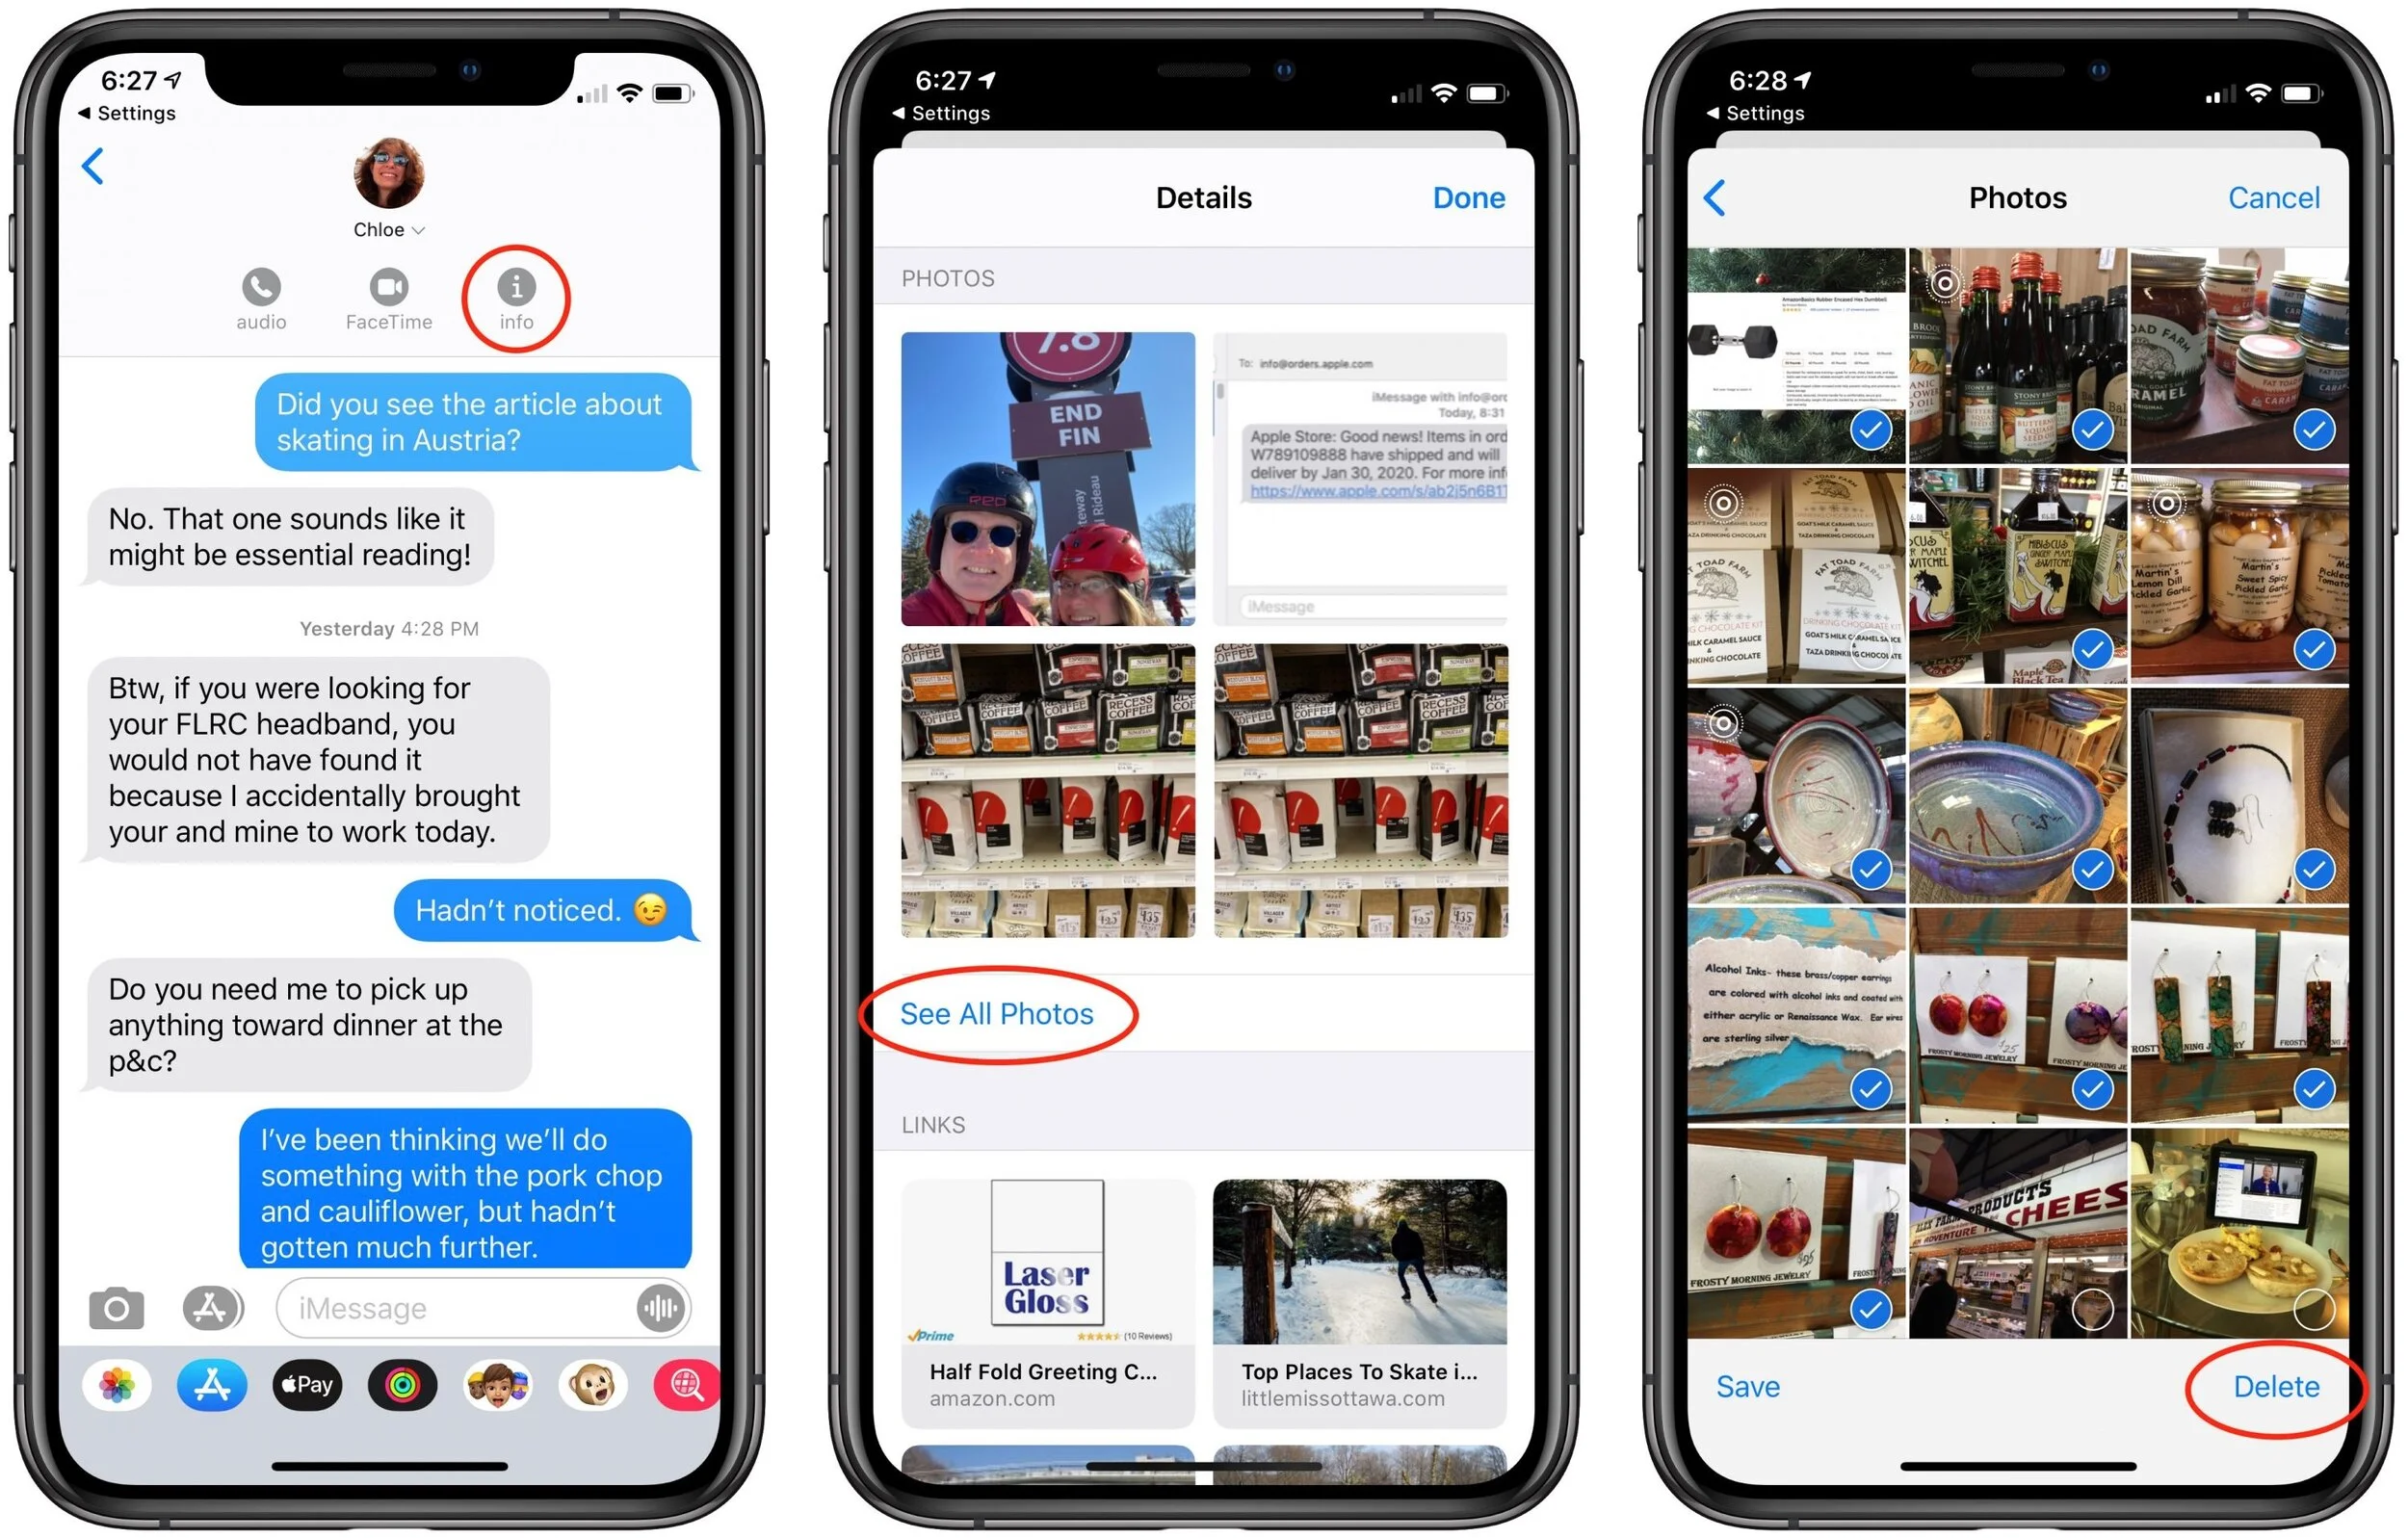
Finally, consider Messages. If you regularly trade photos and videos in chats, it could be another place you can save significant space. In the iCloud Storage screen, tap Messages > Top Conversations to see which conversations are the largest. Tap one to switch to Messages, tap the person’s avatar at the top of the conversation, tap the Info button, scroll down to see the photos, and tap See All Photos. Tap Select, tap photos you have no desire to keep within that Messages conversation, and then tap Delete at the bottom-right of the screen.
3. Avoid Backing Up Apps with Massive iCloud Data Stores
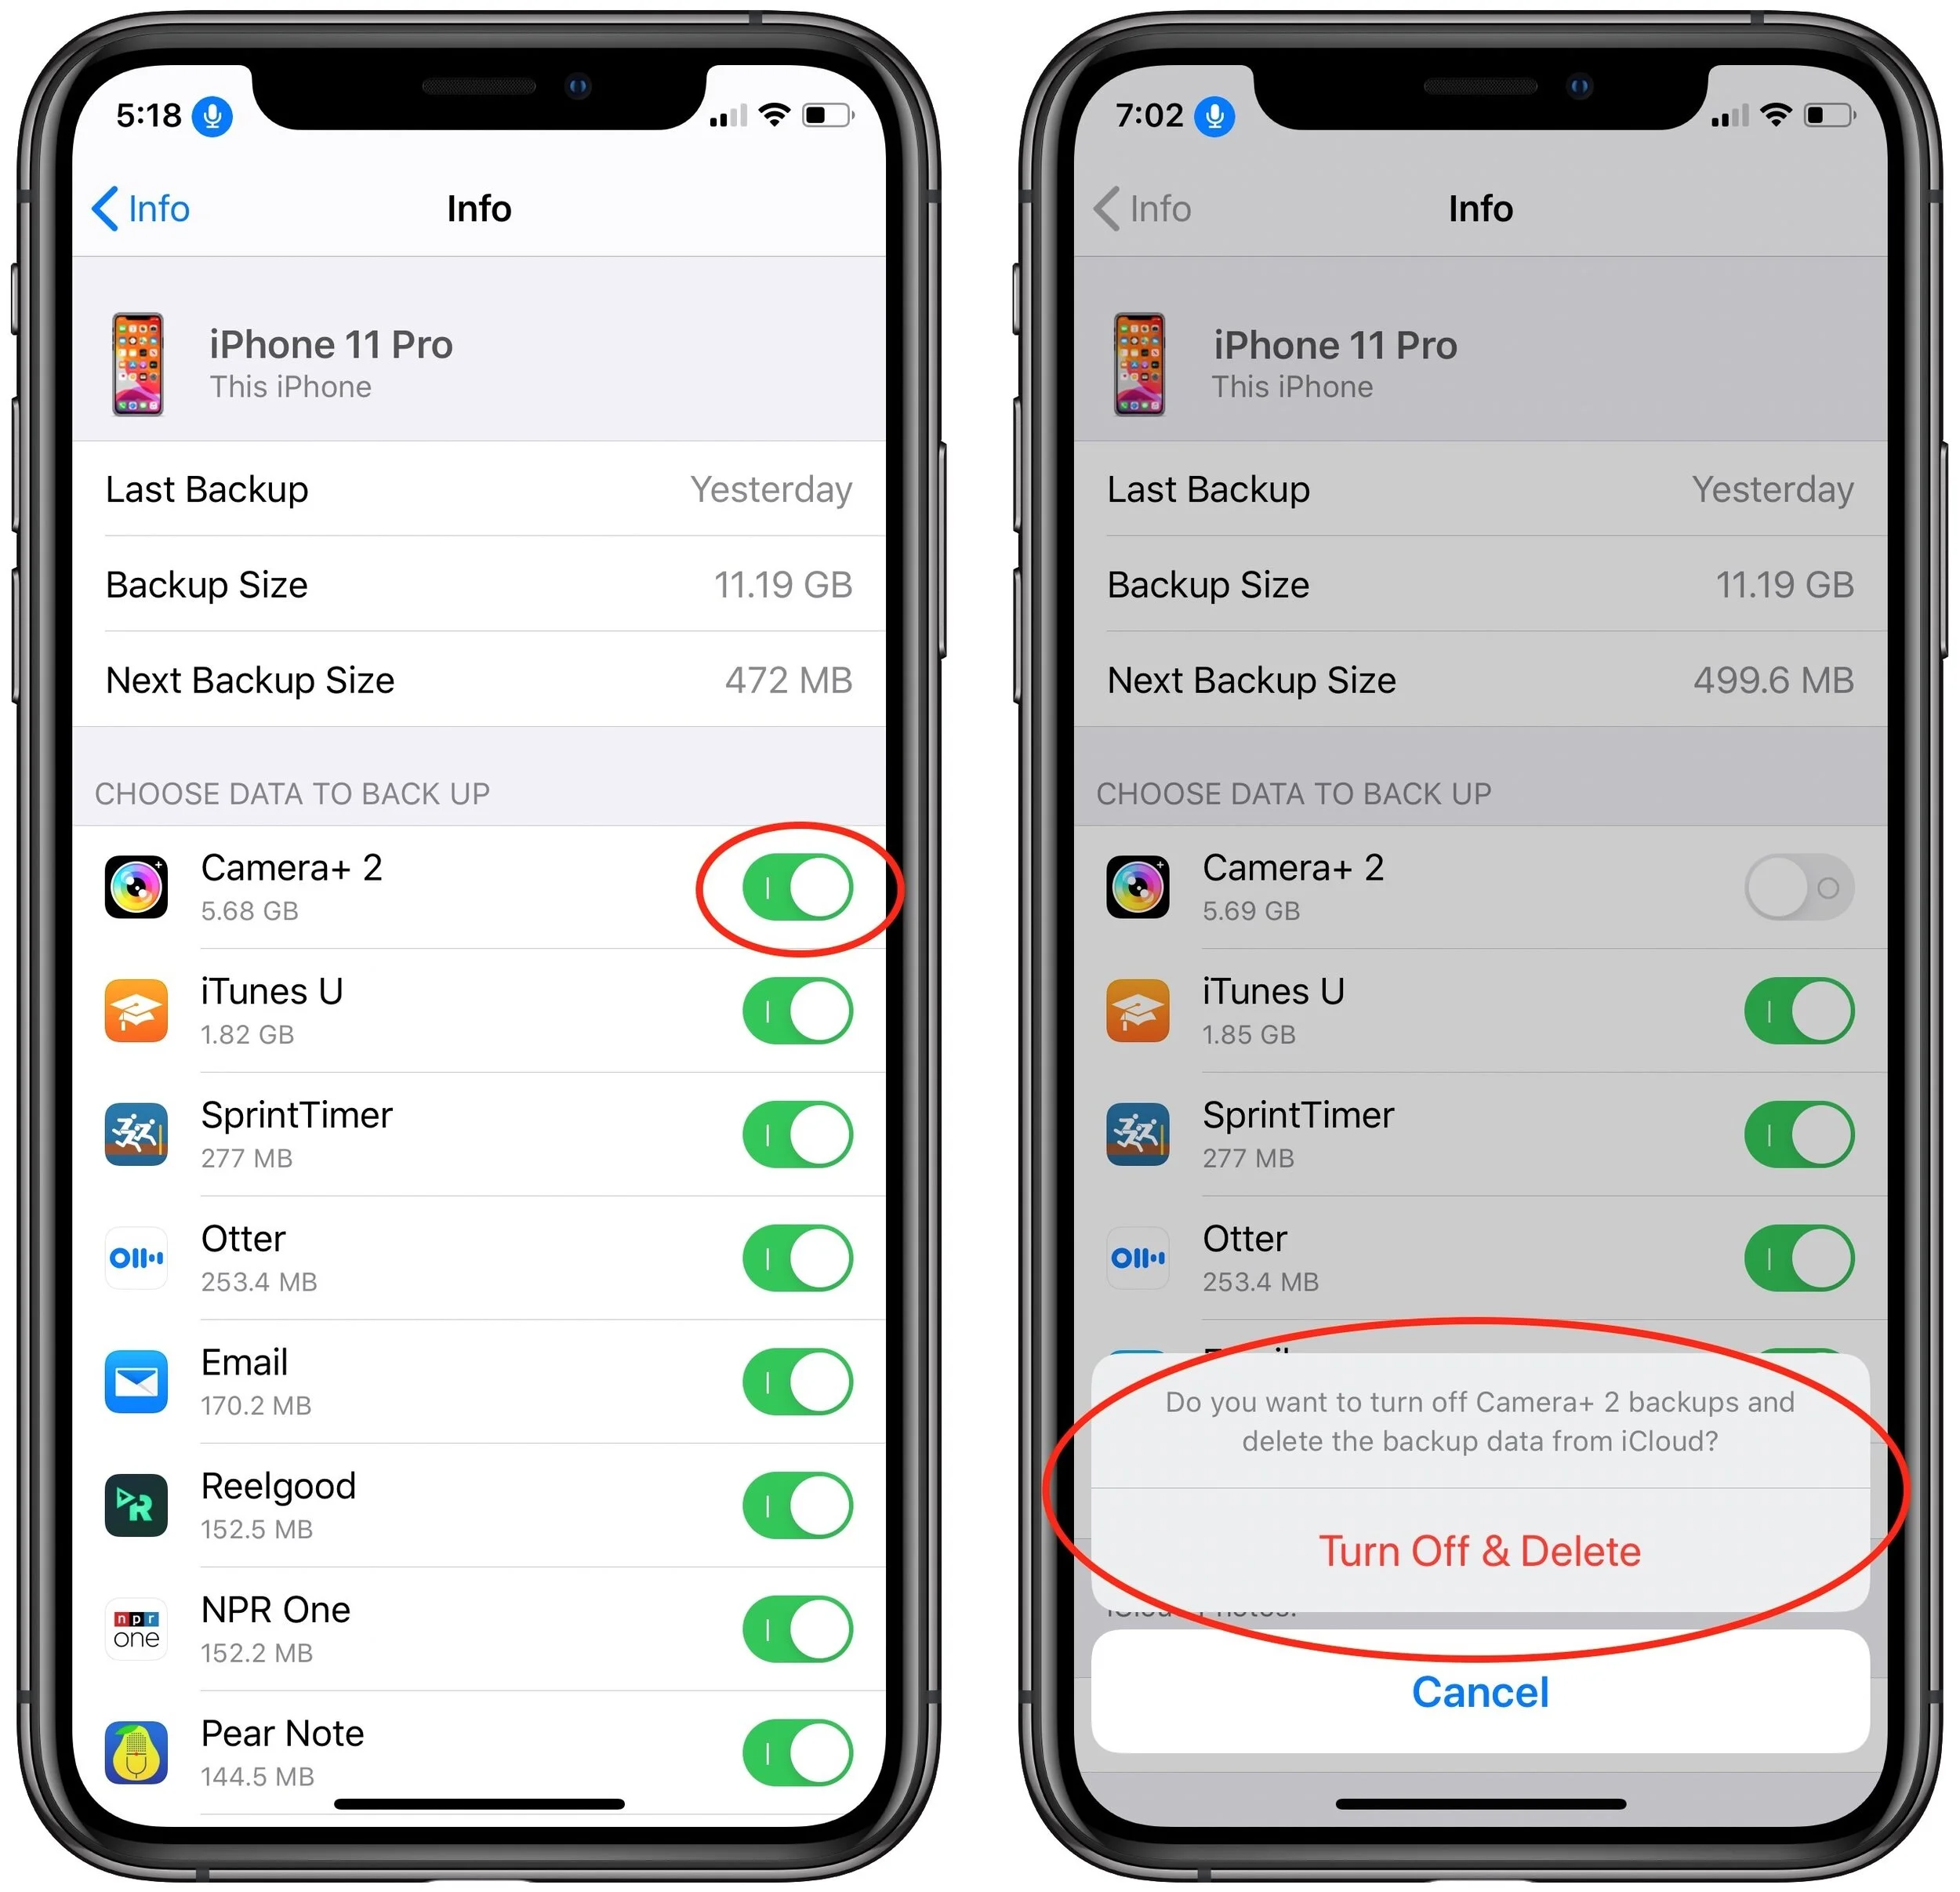
If one of your apps is storing a lot of data that you don’t want to delete, but that you don’t care if it were to be lost, you can prevent it from being backed up by iCloud Backup and reduce the size of your backups.
To find such apps, navigate to Settings > Your Name > iCloud > Manage Storage > Backups and tap the name of the device you’re on. That screen shows which apps consume the most space in your backup. Tap the toggle switch next to an app to stop backing it up and delete its data from your backup.
4. Scan for and Delete Large Files in iCloud Drive
It’s hard to know if you’re likely to be using lots of space in iCloud Drive—it all depends on what iCloud-savvy apps you use and if you store other files in iCloud Drive via the Mac’s Finder or the Files app in iOS.
There’s no need to guess, however, thanks to free Mac apps that help you identify especially large files and folders. Our favorites are GrandPerspective and OmniDiskSweeper. GrandPerspective uses a graphical view so you can see at a glance where your space is going, whereas OmniDiskSweeper opts for a classic text-based approach that gives you hard numbers. In GrandPerspective, choose File > Scan Folder and select iCloud Drive in the sidebar of the Open dialog. For OmniDiskSweeper, choose File > Size Folder.
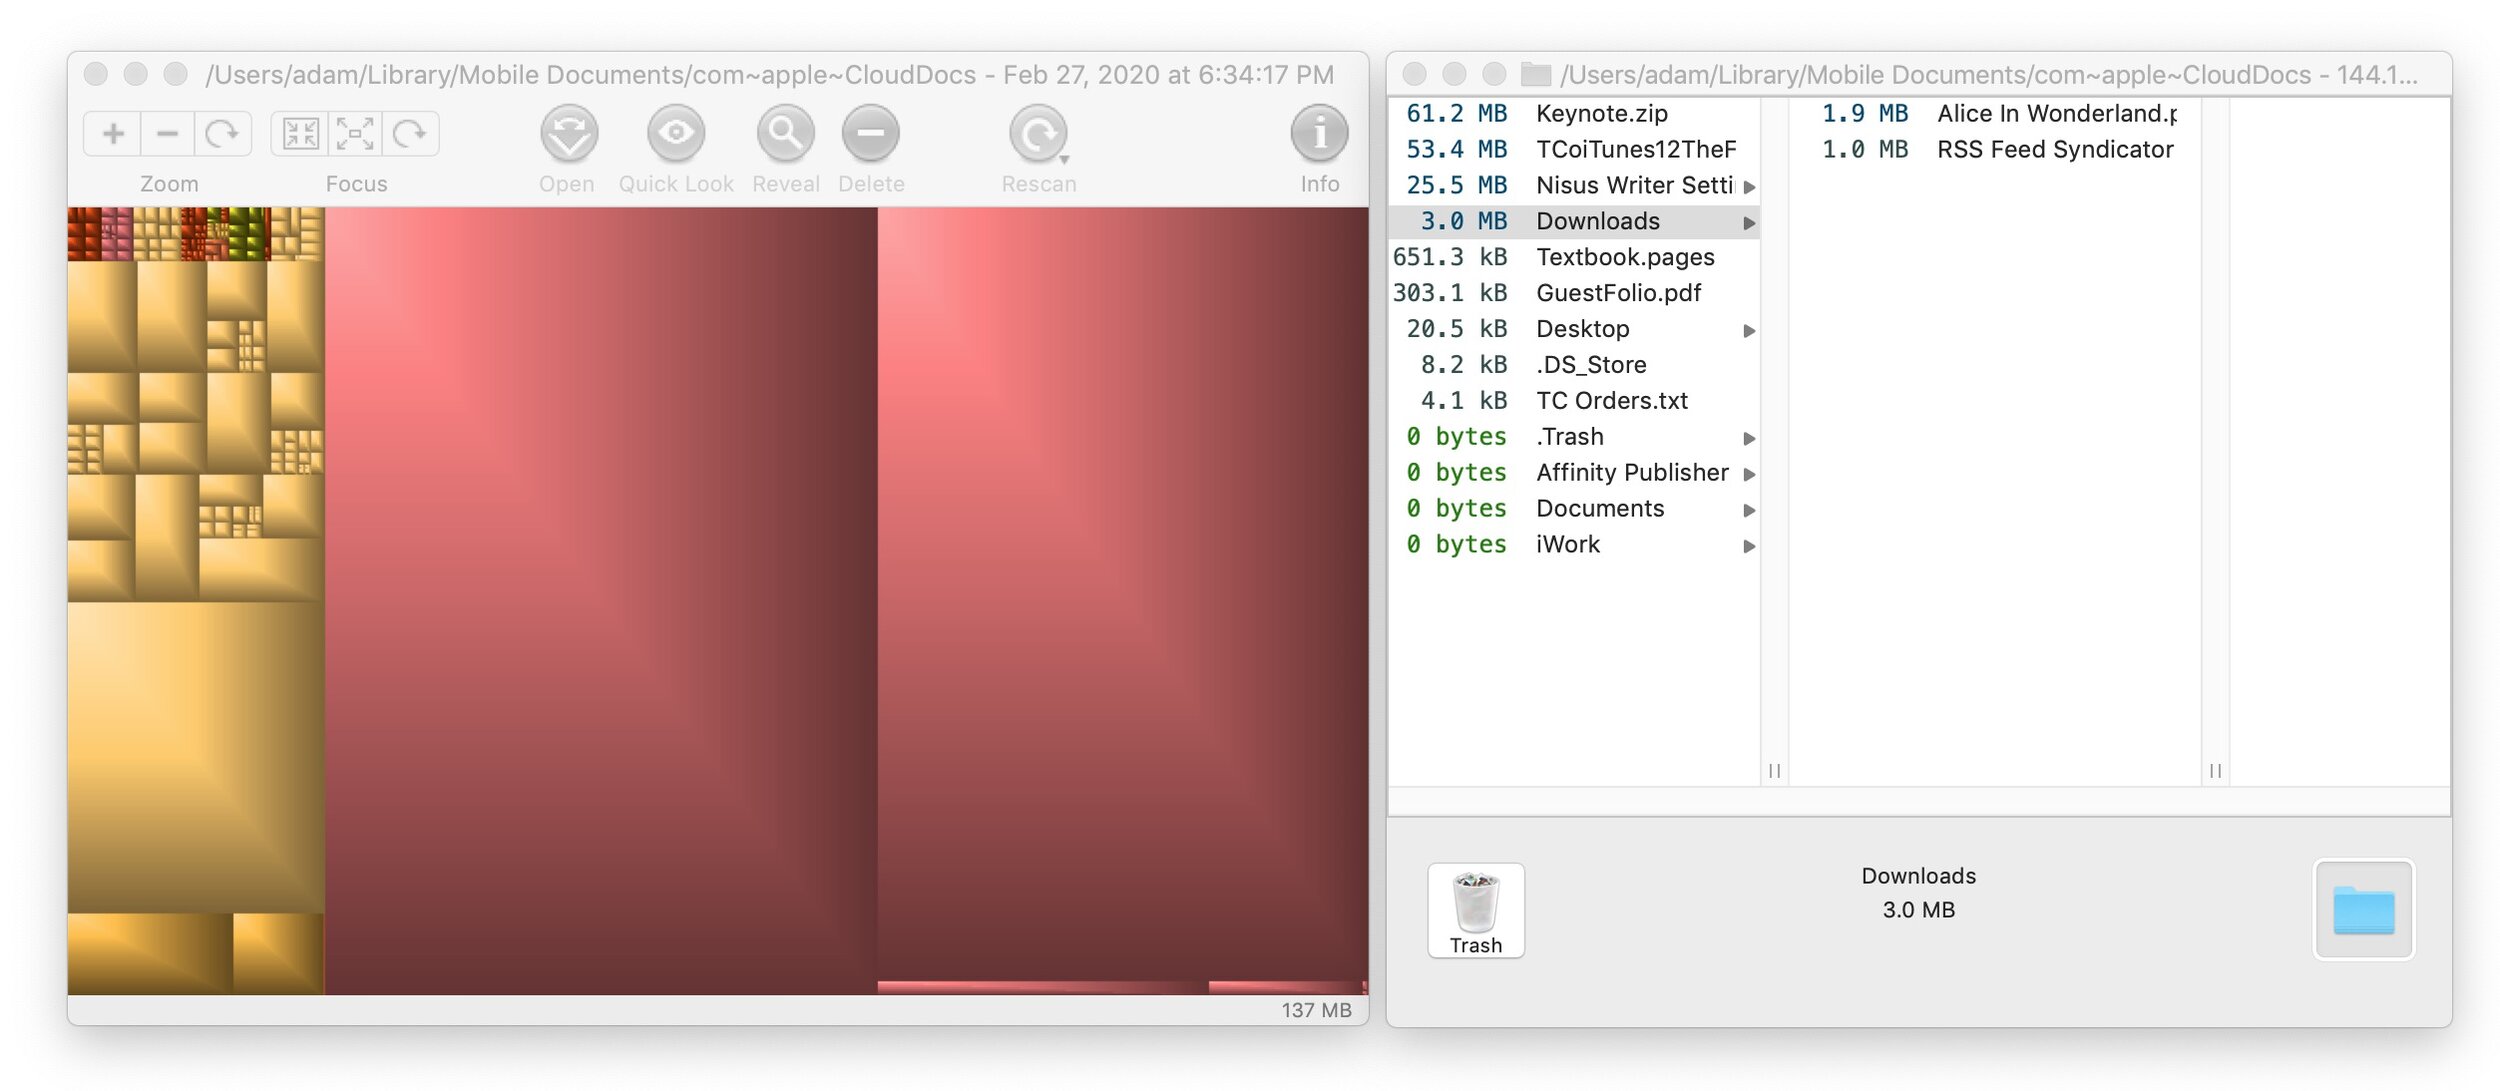
Whichever app you use, it’s easy to select large files or folders and click Delete (GrandPerspective) or Trash (OmniDiskSweeper). You may have to set an option in GrandPerspective > Preferences to enable deletions if its Delete button is disabled.
5. Delete Old Email from iCloud Mail
All the email you store at iCloud counts against your free space, so it can be worth clearing out unwanted old messages (and their large attachments). To delete individual messages using Apple’s Mail, just select them and click the Trash button in the toolbar. Some messages are much bigger than others, however, and to find them, choose View > Sort By > Size. That puts the largest messages at the top.
Of course, deleting messages normally just moves them to the Trash mailbox; to reclaim the space they occupy on iCloud, choose Mailbox > Erase Deleted Items > AccountName. Once you do that, the messages are gone for good.
If you want to remove an entire mailbox and its contents, select it in the sidebar and choose Mailbox > Delete Mailbox. That deletes all of its messages immediately and can’t be undone.
When you put all these space-clearing techniques together, you’ll likely be able to clear enough cruft that you won’t have to pay Apple for more iCloud storage space. But if you’re uncomfortable deleting such data, there’s no shame in upgrading to a larger iCloud storage plan.
You can also stop by GeekHampton and we can assist you with the process and ensure a smooth transition.
(Featured image by stokpic from Pixabay)
How to Choose Between iCloud Photos and My Photo Stream
Apple provides two ways of moving photos from your iPhone to your Mac: iCloud Photos and My Photo Stream. Which should you choose? We run through the pros and cons of each.

For quite a few years, Apple enabled users to download their iPhone or iPad photos to their Macs with a service called My Photo Stream. It wasn’t perfect, but it was free, and it did a decent job of ensuring that photos you took on your iPhone or iPad would end up on your Mac.
Then Apple introduced iCloud Photo Library, later renamed to iCloud Photos, which is a full-featured cloud-based photo syncing service. However, because it stores all your photos in the cloud, most people need to purchase more storage from Apple to use it.
As a result, Apple has kept My Photo Stream around, at least for most existing users. (The company says, “If you recently created your Apple ID, My Photo Stream might not be available. If My Photo Stream isn’t available, use iCloud Photos to keep your photos and videos in iCloud.” Huh.) For those who have a choice, which should you use? (On the Mac, you make that choice in Photos > Preferences > iCloud; in iOS, look in Settings > Photos.)

Cost and Storage Details
The key advantages of My Photo Stream over iCloud Photos are that My Photo Stream is completely free and the storage it uses doesn’t count against your iCloud limits.
On a pure price basis then, My Photo Stream wins. However, it suffers from other limitations that make it less compelling:
My Photo Stream stores your photos on your iOS devices in a lower resolution to save space and transmission time. On the Mac, however, your photos download in full resolution. In contrast, iCloud Photos lets you choose on each device whether you want original images or optimized versions to save space—full-resolution originals are always stored in iCloud itself.
My Photo Stream manages only the last 30 days of photos and only the last 1000 photos. That’s fine for just transferring photos from your iPhone to your Mac for permanent storage, but your other devices will be able to display only your most recent photos. iCloud Photos stores all your photos as long as you have sufficient space.
When you edit a photo while using My Photo Stream, the edits apply only to the photo you edited, not to versions synced with other devices. With iCloud Photos, all edits you make—on any of your devices—sync to all the rest of your devices.
Supported Formats
There’s another big gotcha with My Photo Stream. It supports only photos and images in JPEG, PNG, and TIFF formats, plus most raw formats. That doesn’t sound terrible until you realize that it doesn’t include Live Photos or any video formats. That’s right—My Photo Stream won’t sync your Live Photos or videos from your iPhone to your Mac at all! You’ll have to move them over manually in some other way.
In comparison, iCloud Photos supports the same still image formats as My Photo Stream and adds GIF, HEIF, and more raw formats, along with Live Photos. Plus, it supports MP4 and HEVC videos. In other words, iCloud Photos will sync all your images and videos, regardless of format.
Supported Devices
Finally, My Photo Stream works on the Mac, iPhone, iPad, iPod touch, and Apple TV, and with Windows-based PCs. iCloud Photos extends that list to include the Apple Watch and the iCloud.com Web site. Apple Watch support likely isn’t a dealbreaker for most people, but it can be useful to be able to see all your photos in a Web browser on any computer.
Making the Choice
Technically speaking, you can have both My Photo Stream and iCloud Photos turned on. However, if you’re using iCloud Photos, My Photo Stream doesn’t get you anything, so you should turn it off.
If you’re trying to save money and have more than 5 GB of photos, My Photo Stream works to bring most of your iPhone photos down to your Mac for permanent storage in the Photos app. Just beware that it won’t sync your Live Photos or videos, and any other iOS devices you have will be limited to seeing the last 30 days or 1000 photos.
For most people, though, iCloud Photos is the way to go. It’s easily worth $12 or $36 per year for 50 GB or 200 GB of storage, it syncs all your photos and videos among all your devices, and it even syncs edits.
If you need some assistance or step by step instructions please don’t hesitate to pay us a visit. We would be happy to help.
(Featured image based on originals by Jon Tyson on Unsplash and OpenClipart-Vectors from Pixabay)