How to Digitize Your Signature So You’re Ready for Online Document Signing
Did you know that Apple makes it easy to digitize your signature so you can sign digital documents without having to print them first? Use these instructions to make your signature available on all your Apple devices.

Over the last decade, and particularly during the last year of pandemic life, documents have become more likely to arrive in email or as downloads than on paper. If you need to return a signed document on paper, it’s easy to print and sign it before popping it in the mailbox. But what if you need to send it back via email or another online method? You could print, sign, scan, and return the scanned document, but that’s both tedious and wasteful.
Happily, Apple has made it easy to digitize your signature such that you can quickly apply it to digital documents without them ever hitting paper. It’s not difficult to set up, and once your signature is in the system, it remains available for repeated use. Even better, it syncs automatically to all your other Apple devices signed in to the same iCloud account, so it’s available wherever you need it. The process varies a little depending on which Apple devices you have available.
Create Your Signature on an iPad or iPhone
You can create a signature on an iPad or iPhone with your finger or a rubber-tipped stylus, but you’ll get the best results with an Apple Pencil on an iPad. Follow these steps:
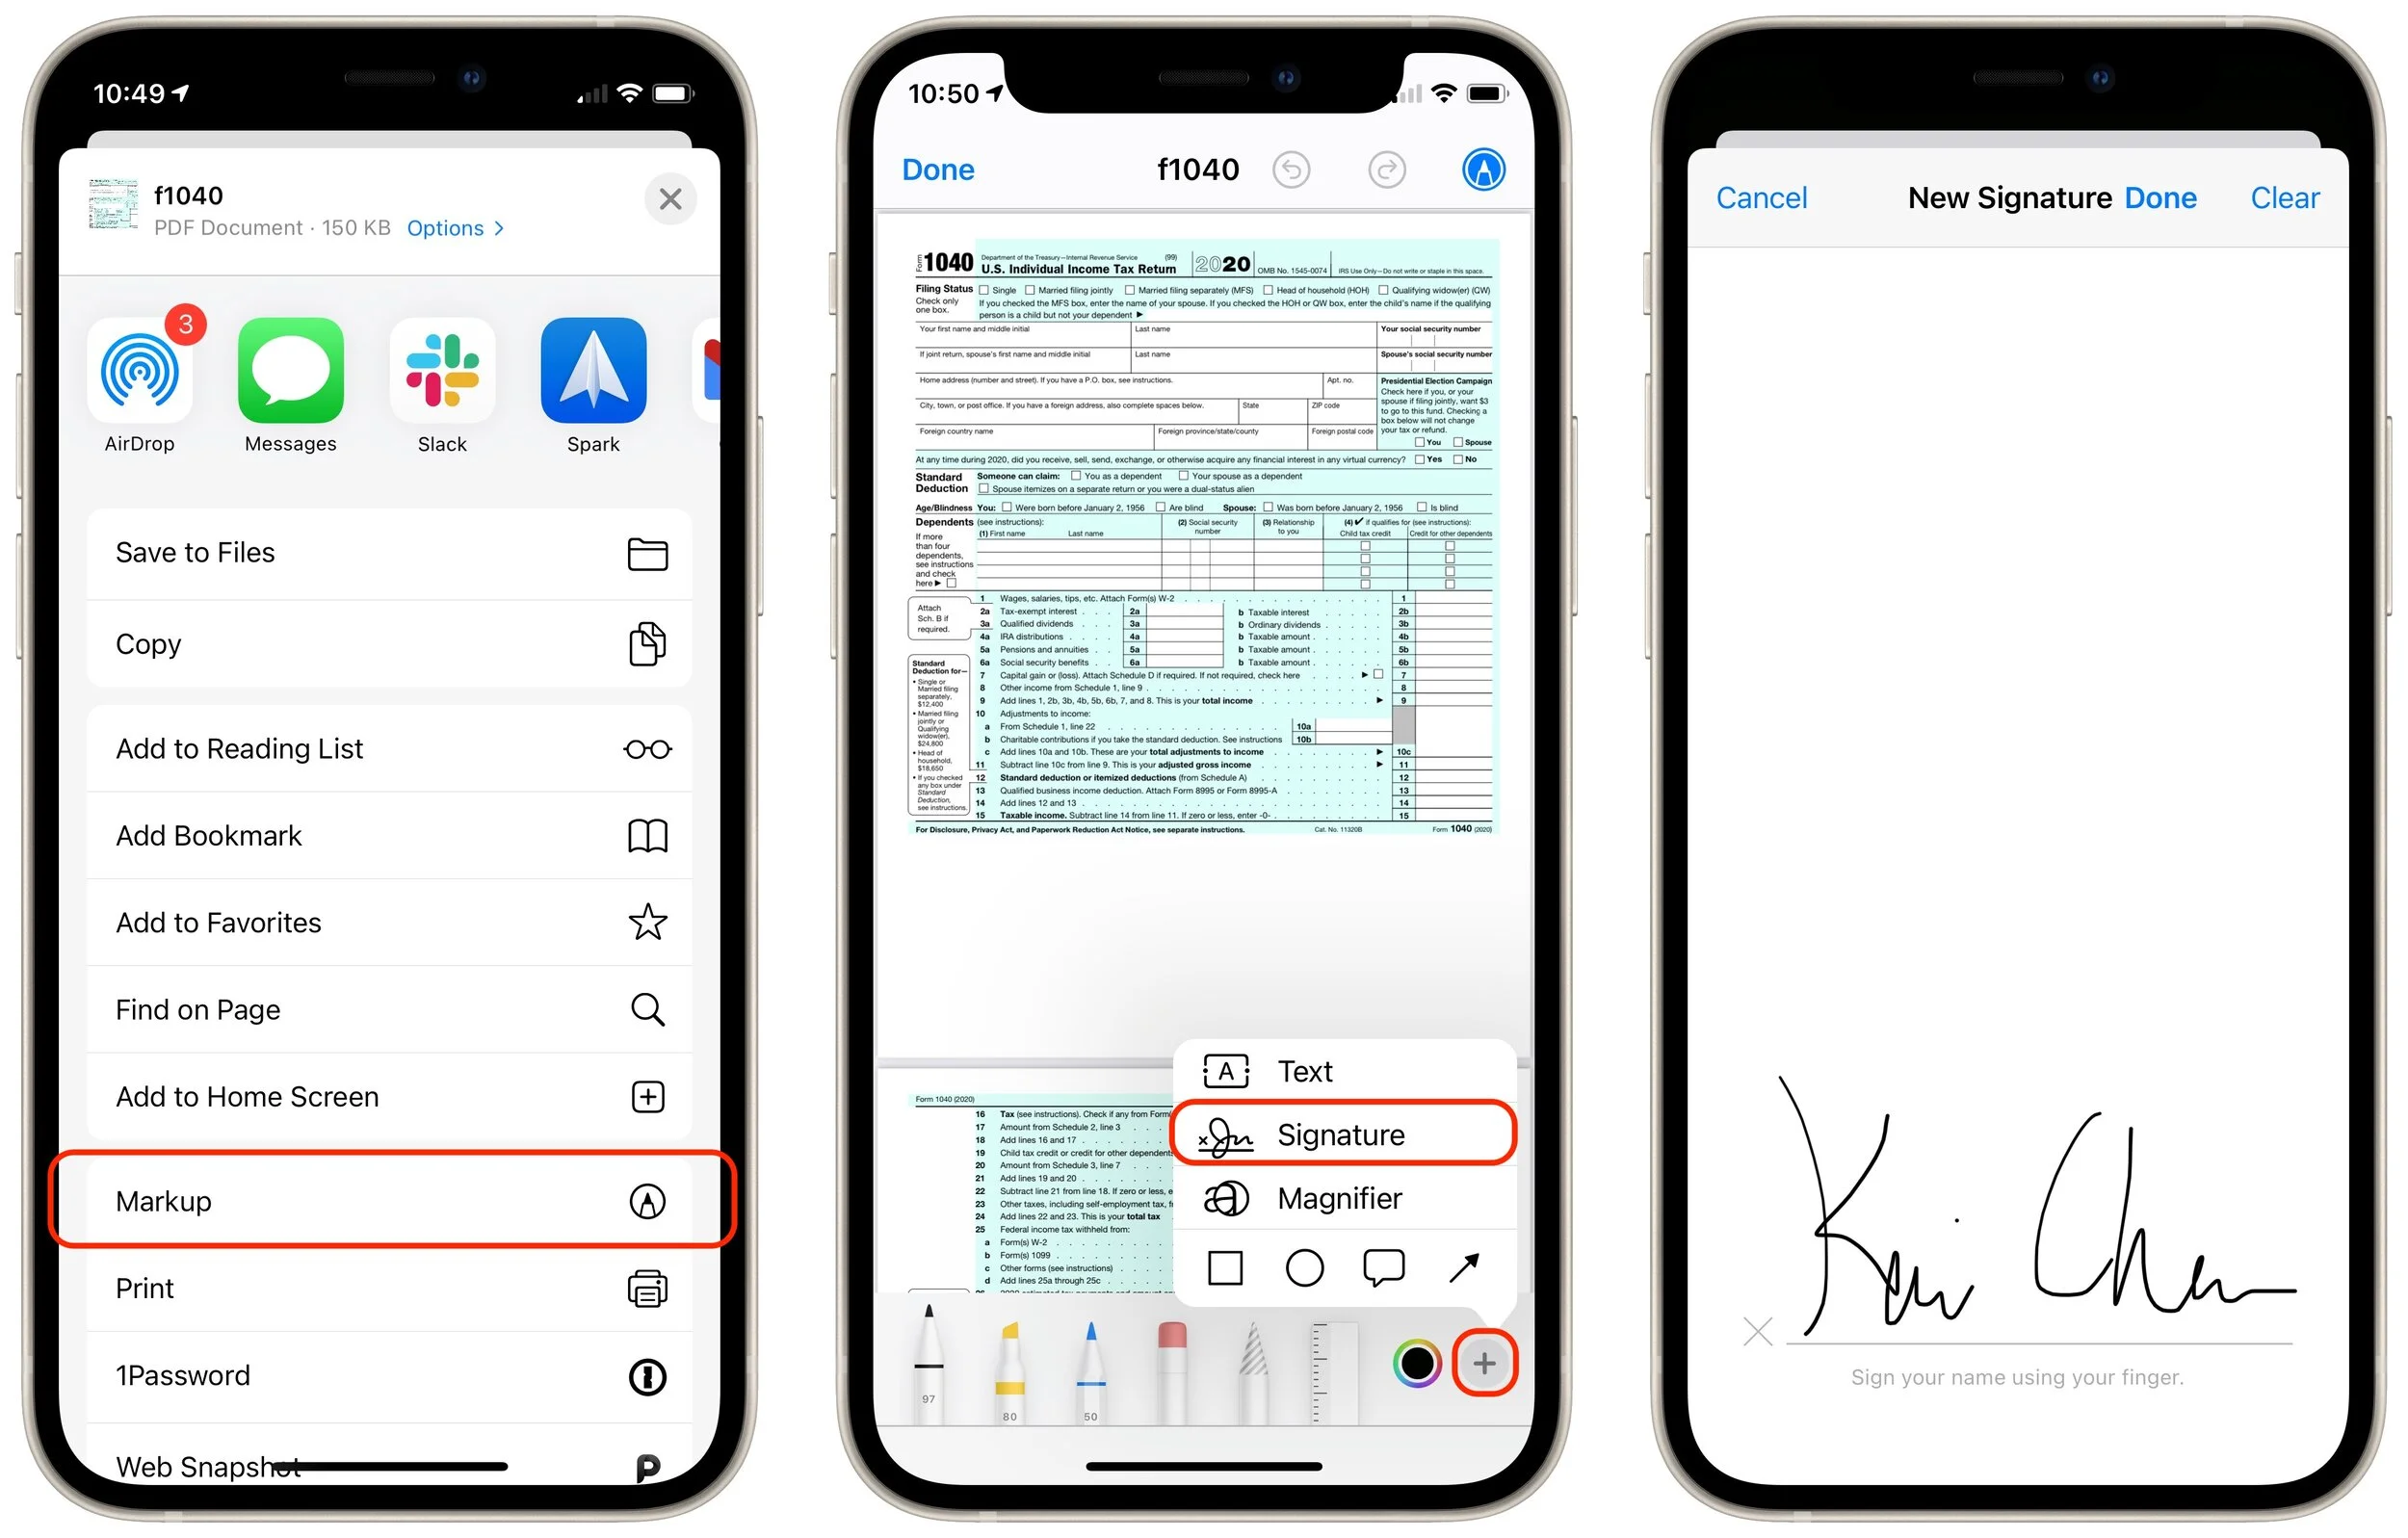
1. Open any PDF in any app, such as this IRS Form 1040 in Safari.
2. Tap the share icon and tap Markup in the share sheet.
3. In the Markup toolbar, tap + and then Signature.
4. Tap Add or Remove Signature and then tap + to add a signature.
5. In the New Signature panel, sign your name. (You can rotate an iPhone to landscape orientation if that’s easier.)
6. If you don’t like your signature, tap Clear and try again.
7. When you have a good signature, tap Done.
8. Close the PDF—there’s no need to save it.
Create Your Signature on a Mac
On a Mac, you create signatures in Preview in one of several different ways. You’ll get the best results from using the camera to scan your signature on a piece of paper, with an iPad and Apple Pencil as the next best. The trackpad approach is the least successful.
1. Open any PDF in Preview, such as the aforementioned IRS Form 1040.
2. Choose Tools > Annotate > Signature > Manage Signatures. (You can also click the Signatures button on the Markup toolbar.)
3. Click Create Signature.
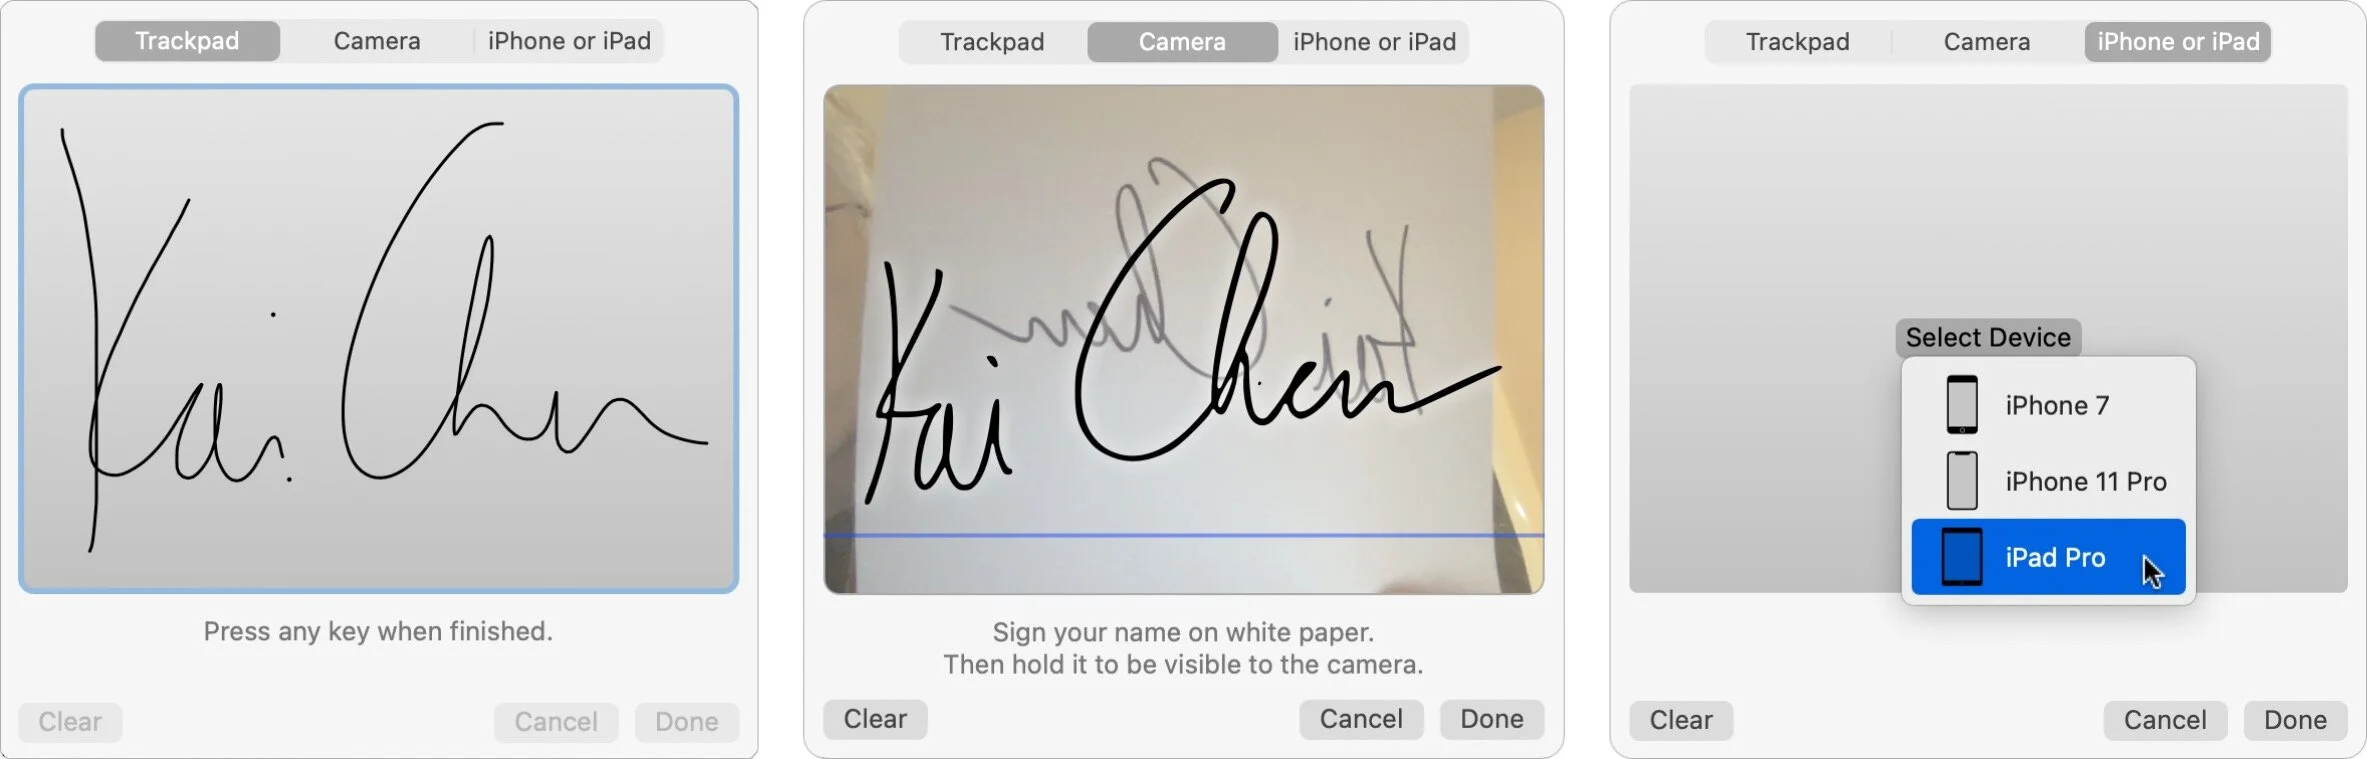
4. Click Trackpad, Camera, or iPhone or iPad to create your signature:
Trackpad: Click the Click Here to Begin button and sign your name with your finger or a rubber-tipped stylus—after you click, lift your finger or stylus and start writing your signature at the left side of the trackpad. Press any key on the keyboard when you’re done, or click Clear and try again if necessary. (Tip: press any key to start and clear too.)
Camera: Sign your name with a black pen on a white piece of paper. Hold it up to the camera, just above the blue line, for automatic recognition. If necessary, click Clear and try again. For best results, use a full-size piece of paper and a fairly thick pen, like a Sharpie.
iPhone or iPad: Click Select Device and pick an available iPhone or iPad. The entire screen of the device becomes a signing surface—you can use whichever orientation is easier. Sign your name using your finger, a rubber-tipped stylus, or for best results, an Apple Pencil on an iPad. Tap Clear if you need to try again.
5. When you’re finished, click Done.
6. Close the PDF.
Although most of us have only one signature, Apple lets you create and sync as many signatures as you like. That could be useful if you have to sign documents for your boss or a member of your family (with their permission, of course).
Once you’ve digitized your signature, you can add it to any PDF form that you receive, either using Markup from an iPhone or iPad share sheet, or in Preview or the Markup tools on a Mac.
(Featured image by energepic.com from Pexels)
What Is This “App Tracking Transparency” Apple Added to iOS 14.5?
New in iOS 14.5 is a privacy-protecting feature called App Tracking Transparency, which forces apps to ask you for permission to track your activities across other apps and websites. Learn more about why you should never allow tracking here:
You’ve likely seen mention of the dispute between Apple and Facebook. It revolves around App Tracking Transparency (ATT), a technology Apple released in iOS 14.5.
The goal of ATT is to give iPhone and iPad users more control over the extent to which app makers can track their data and activities across apps and websites owned by other companies. Before App Tracking Transparency, nothing prevented companies from sucking a vast amount of data about your everyday activities and connecting it to other data to build an insanely detailed picture of who you are and what you do. Apple has written A Day in the Life of Your Data white paper and released the Tracked TV ad to give you a sense of how apps track you. We like to think of app tracking as a fleet of tiny drones constantly hovering over your head, recording your every waking moment for their corporate masters.
Facebook is particularly perturbed by the introduction of App Tracking Transparency because the company makes billions of dollars every year by gleaning as much as it can about you and then selling advertising access to you to companies that want to target people like you. For instance, Facebook knows if you’re a New York City lawyer and divorced mother of two who loves dogs, donates to the Sierra Club, and has Crohn’s disease. Although App Tracking Transparency won’t prevent Facebook from tracking your behavior across its own apps, at least it won’t be able to track you across other companies’ apps and websites.
Once you upgrade to the latest version of iOS and iPadOS, App Tracking Transparency requires that apps ask for permission to track you. However, depending on your current privacy settings, you may never see those requests. In Settings > Privacy > Tracking, if Allow Apps to Request to Track is turned off, you won’t receive any permission requests, and apps won’t be able to track you. Turn that setting on, and you’ll start getting alerts that ask for permission.
Put bluntly, there is absolutely no reason to allow any app to track you. Apple explicitly says that apps may not withhold features from those who opt out of tracking. So if you turn on the Allow Apps to Request to Track setting, tap Ask App Not to Track whenever you’re prompted. If you accidentally tap Allow, you can always go back to Settings > Privacy > Tracking and turn off the switch to rescind permission.
You might want to enable Allow Apps to Request to Track to see which apps were likely violating your privacy before and are still willing to do so even after App Tracking Transparency has exposed their sleazy business practices. Frankly, we’d encourage you to think about whether you want to use apps from such companies—perhaps the best reason to allow the requests is to identify privacy-abusing apps that you’ll then delete.
Early statistics from analytics company Flurry suggest that 94%–96% of users in the United States have opted out of app tracking, either by tapping Ask App Not to Track or by disabling the Allow Apps to Request to Track. We’re surprised the number is so low.
(Featured image by Glen Carrie on Unsplash)
AirTag Basics and How to Protect Yourself from Stalking
Apple’s new AirTags are great for finding your keys or bag, but they also come with some security and privacy implications—someone could try to track you with a hidden AirTag. Read on to learn how Apple helps you detect such a problem.
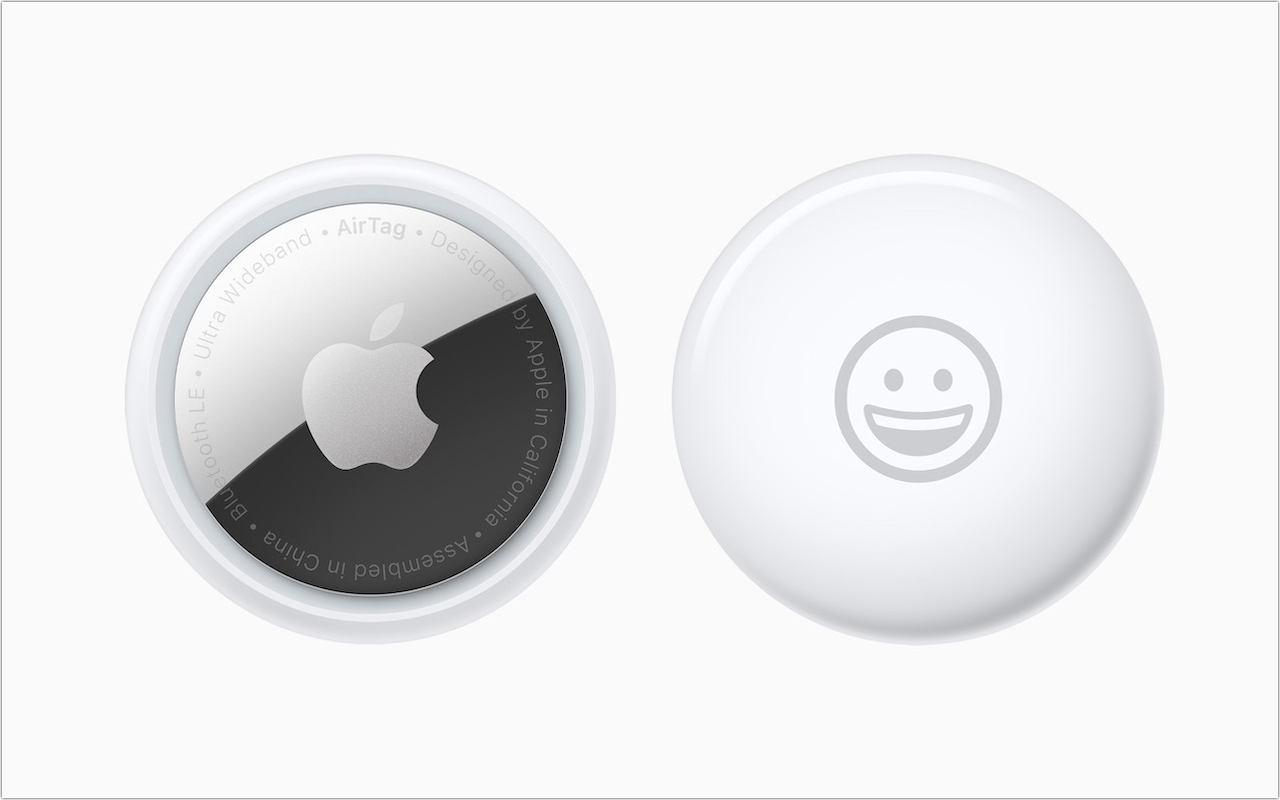
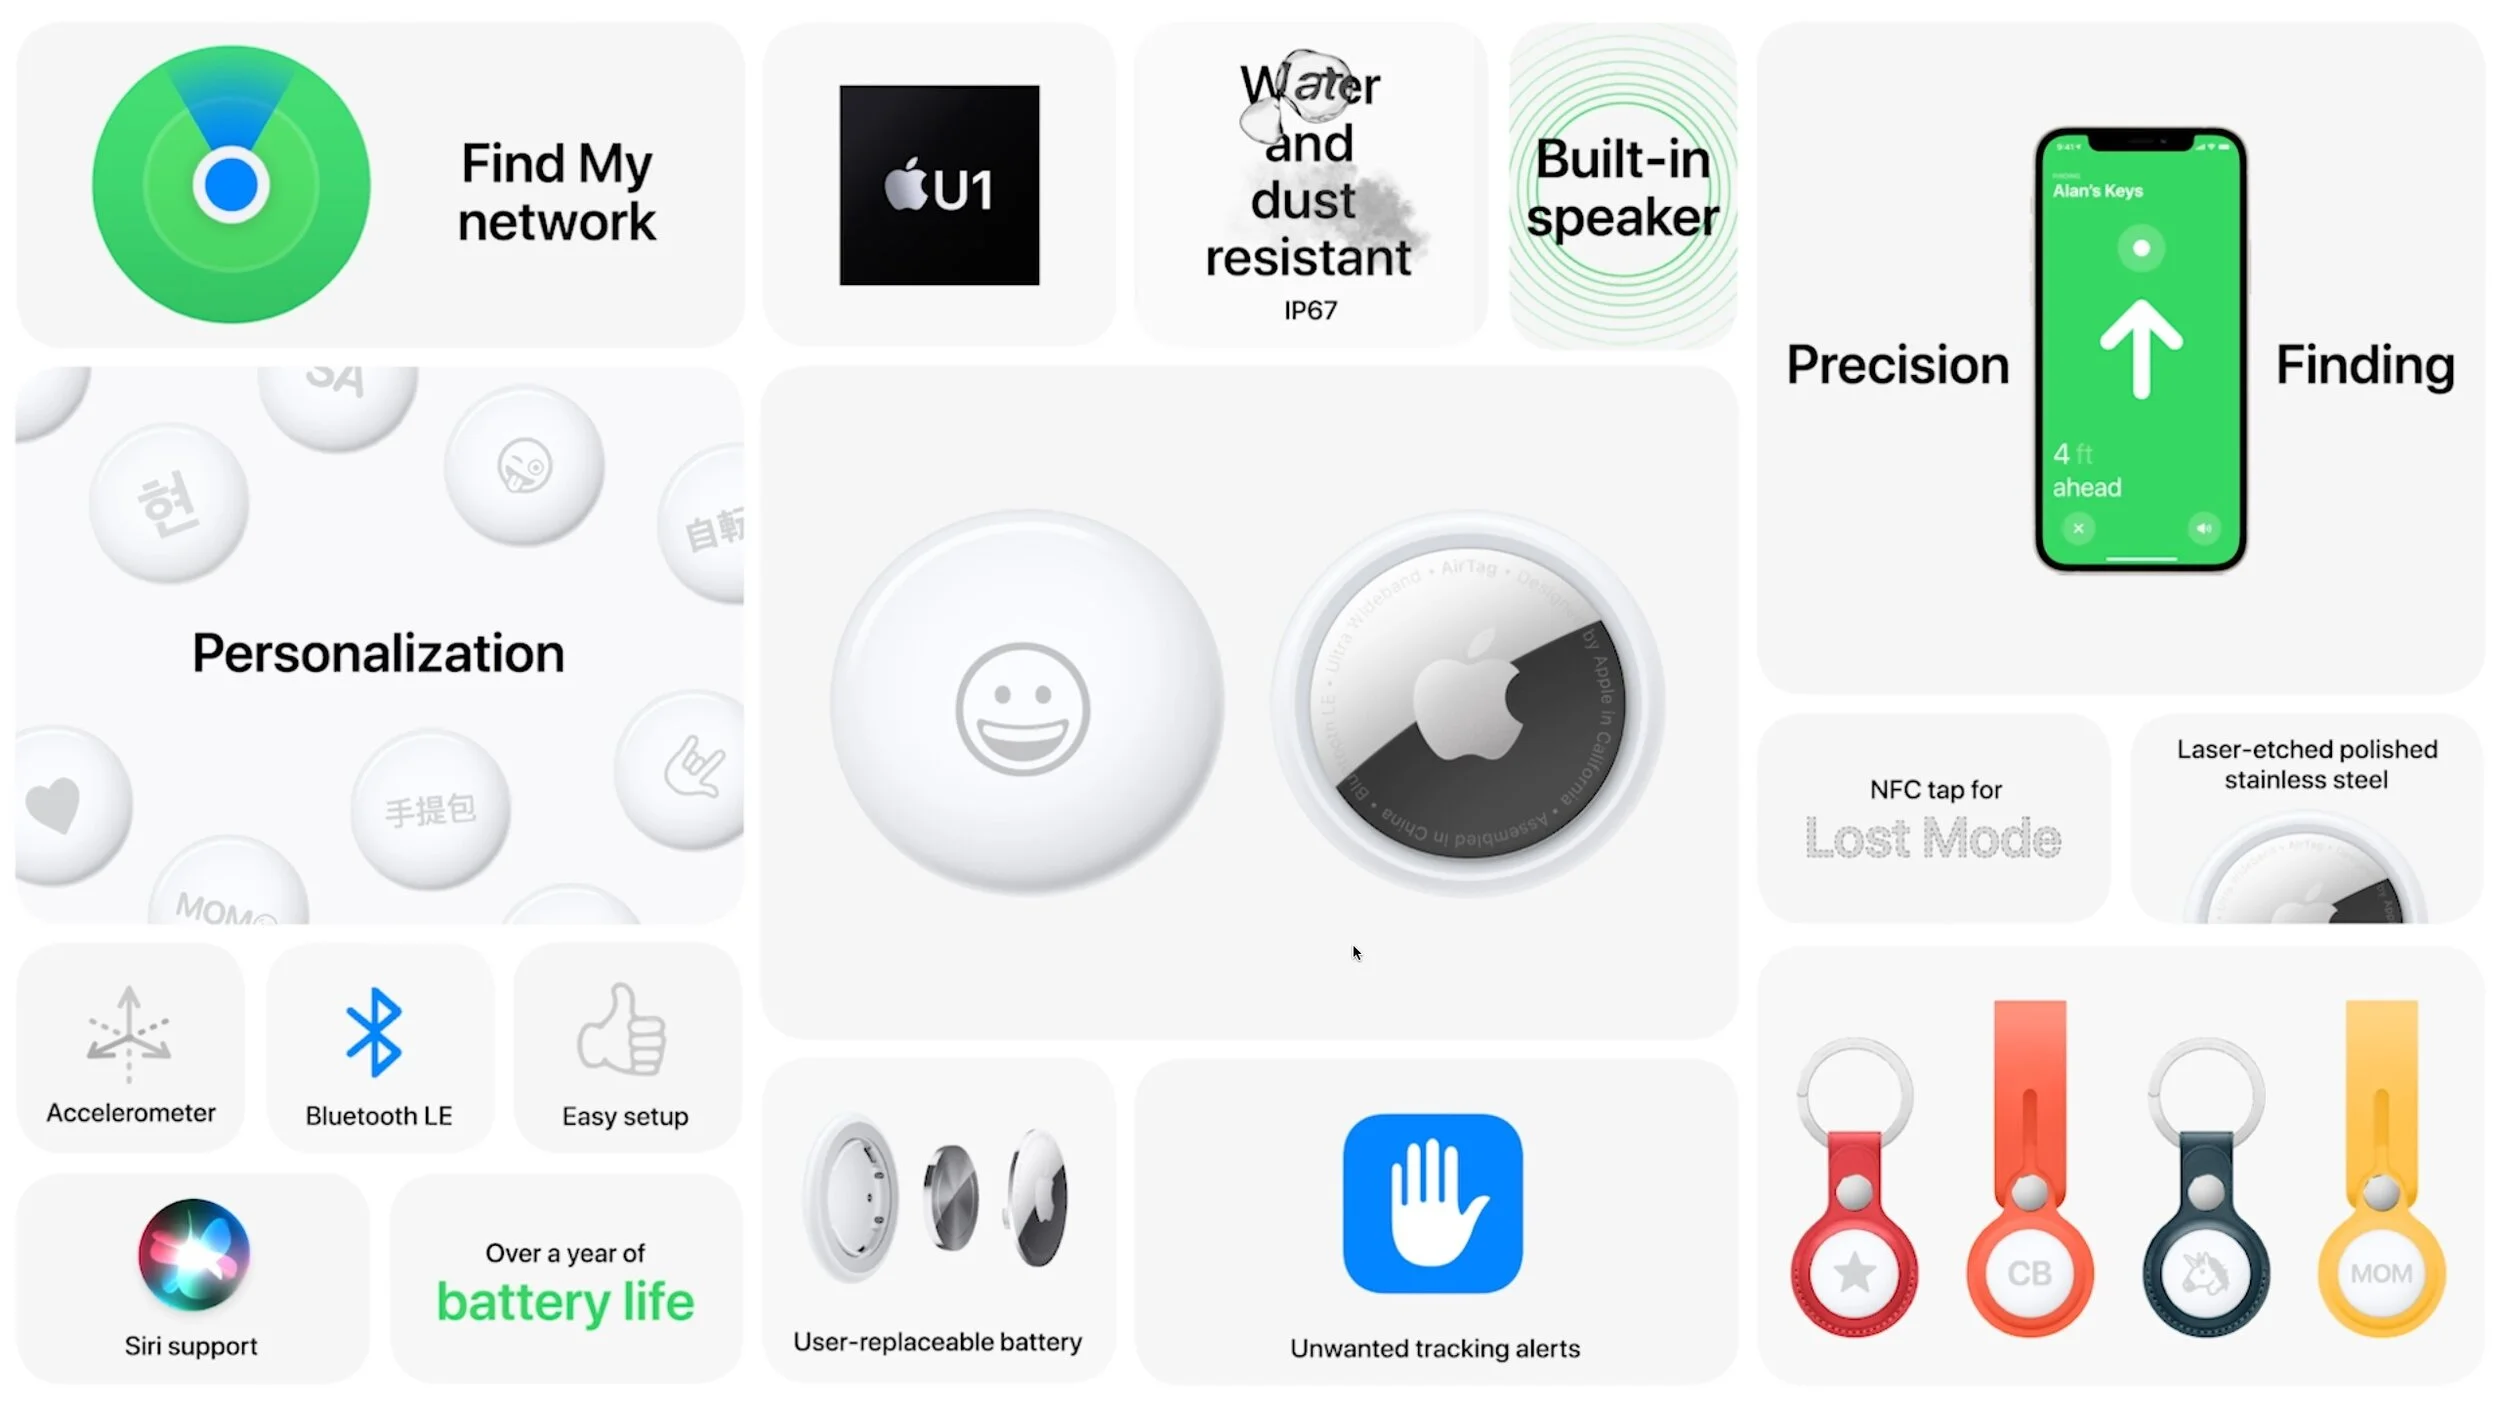
Apple’s new AirTag tracking device is an amazing bit of technology—it’s an elegant disc about the size of a stack of four US quarters that communicates its location with other Apple devices using Bluetooth and Ultra Wideband. Pair an AirTag with your iPhone and put it in your laptop bag, and from then on, you can use the Find My app to find your bag no matter where you’ve left it.
The key to the system is Apple’s Find My network of hundreds of millions of Apple devices, which detect nearby AirTags and report their location to Apple’s servers. It’s all completely private and secure, so only the owner of an AirTag can see where it is. All the devices in the Find My network are anonymous, and location data is encrypted at every step of the way. Not even Apple can locate an AirTag or determine the identity of the device that helps find it.
Plus, if you have an iPhone 11 or iPhone 12 with support for Ultra Wideband, the Find My app can use Precision Finding to give you the direction and distance of your nearby items. (“You’re getting warmer!”) If you need more help to locate an AirTag that’s out of sight, you can make it play a sound.
At $29 for one or $99 for a pack of four, AirTags are an inexpensive way to keep track of keys, purses, suitcases, kids’ backpacks, and more. You could even attach one to your dog’s collar, but it would likely be helpful only in urban areas where people with iPhones would come close enough to your rambling pet.
With great power comes great responsibility, though. There are always those who will attempt to use AirTags to track other people’s movements surreptitiously, perhaps a jealous spouse, a vindictive ex, or someone with a creepy crush. It wouldn’t be hard to hide an AirTag in someone’s car, in a seldom-used purse pocket, or in the lining of a coat.
Apple is fully aware of these possibilities and has built three safeguards into the AirTags and the Find My network. Given the potential for abuse, it’s essential that everyone knows what an AirTag is (done!) and how to determine if someone may be using one to track another person (read on!).
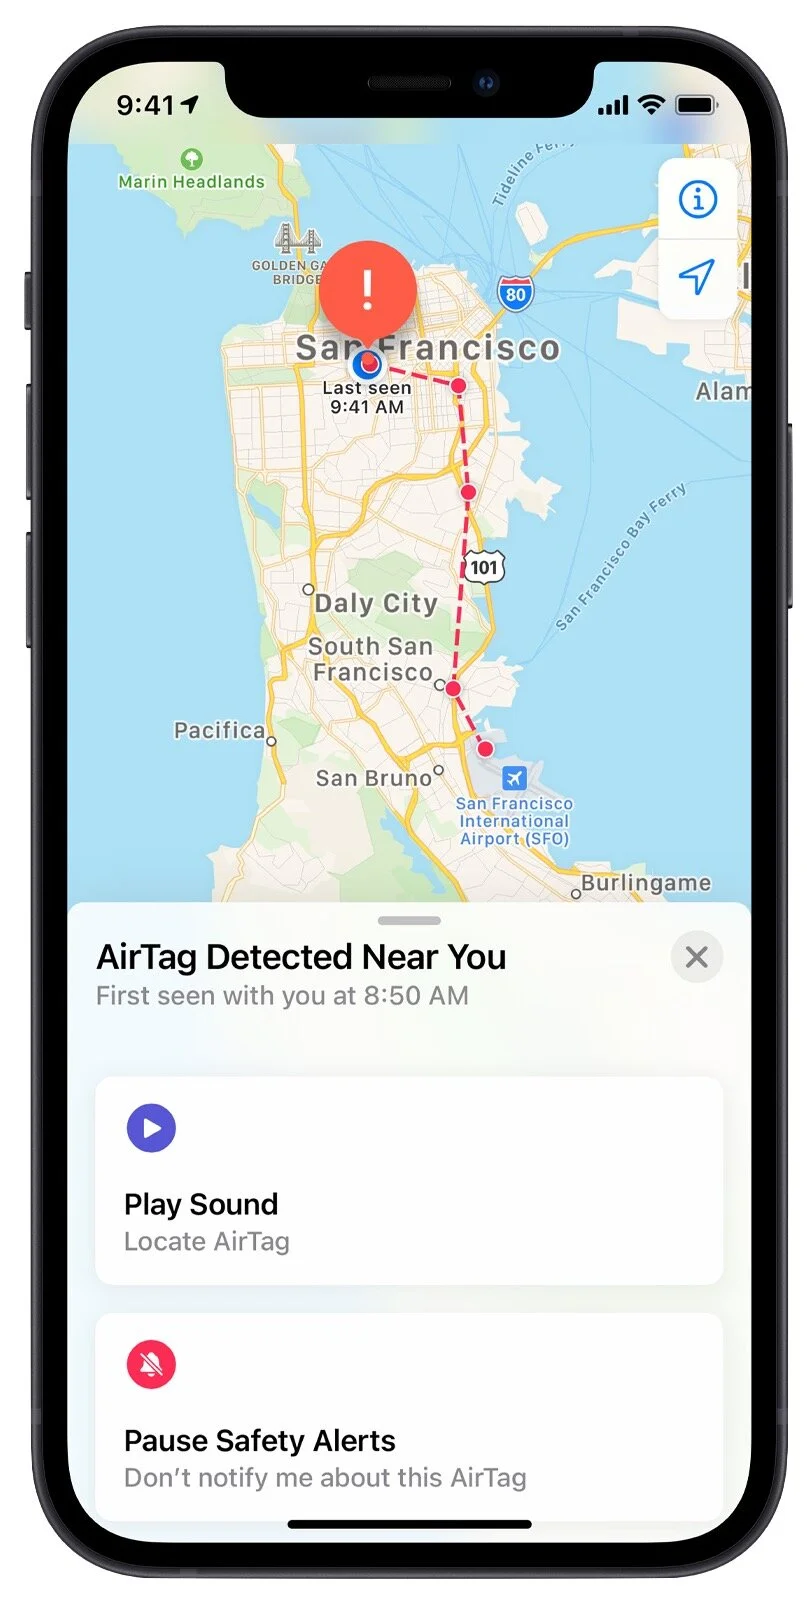
Safety Alerts: If you get an “AirTag Found Moving With You” alert on your iPhone, you know that there’s an AirTag separated from its owner that’s traveling with you. Most likely, it’s in something you’re borrowing or attached to an item that someone left in your car. If you can’t easily find the AirTag, you may be able to make it play a sound. (That won’t work if the owner is in range or if it has been with you overnight such that its identifier has changed since the alert.) If you know why it’s there, you can pause the safety alerts for a day or disable them permanently for those in your Family Sharing group. If the owner has marked it as lost, you can tap Learn About This AirTag to discover its serial number and contact information for the owner. If there’s no good explanation for why the AirTag is with you, you can remove its battery to prevent it from reporting your location.
Safety Sounds: If an AirTag is separated from its owner for 3 days, it will make a sound the next time it moves. There is some concern that 3 days may be too long and that the sound starts only after the AirTag moves. Apple has said it may change the time or tweak the system if the sound isn’t achieving its goal of tattling on maliciously placed AirTags.
NFC identification: Let’s say you find an AirTag after a safety alert or sound. Hold an iPhone or other NFC-capable smartphone to the white side of the AirTag and tap the notification to load a website with the AirTag’s serial number and the last four digits of the owner’s phone number (which may help you or the police identify them). If the owner has marked it as lost, you’ll also see their phone number or email address.
The safety alerts appear only on iPhones, of course, but there are two other requirements that must be true as well. First, the iPhone must be running iOS 14.5 or later to display the alerts, so make sure you update. Second, in Settings > YourName > Find My > Find My iPhone, the Find My network option must be enabled. If you don’t want your iPhone to participate in the Find My network, you can turn that option off, but doing so means you’ll never receive a safety alert either.
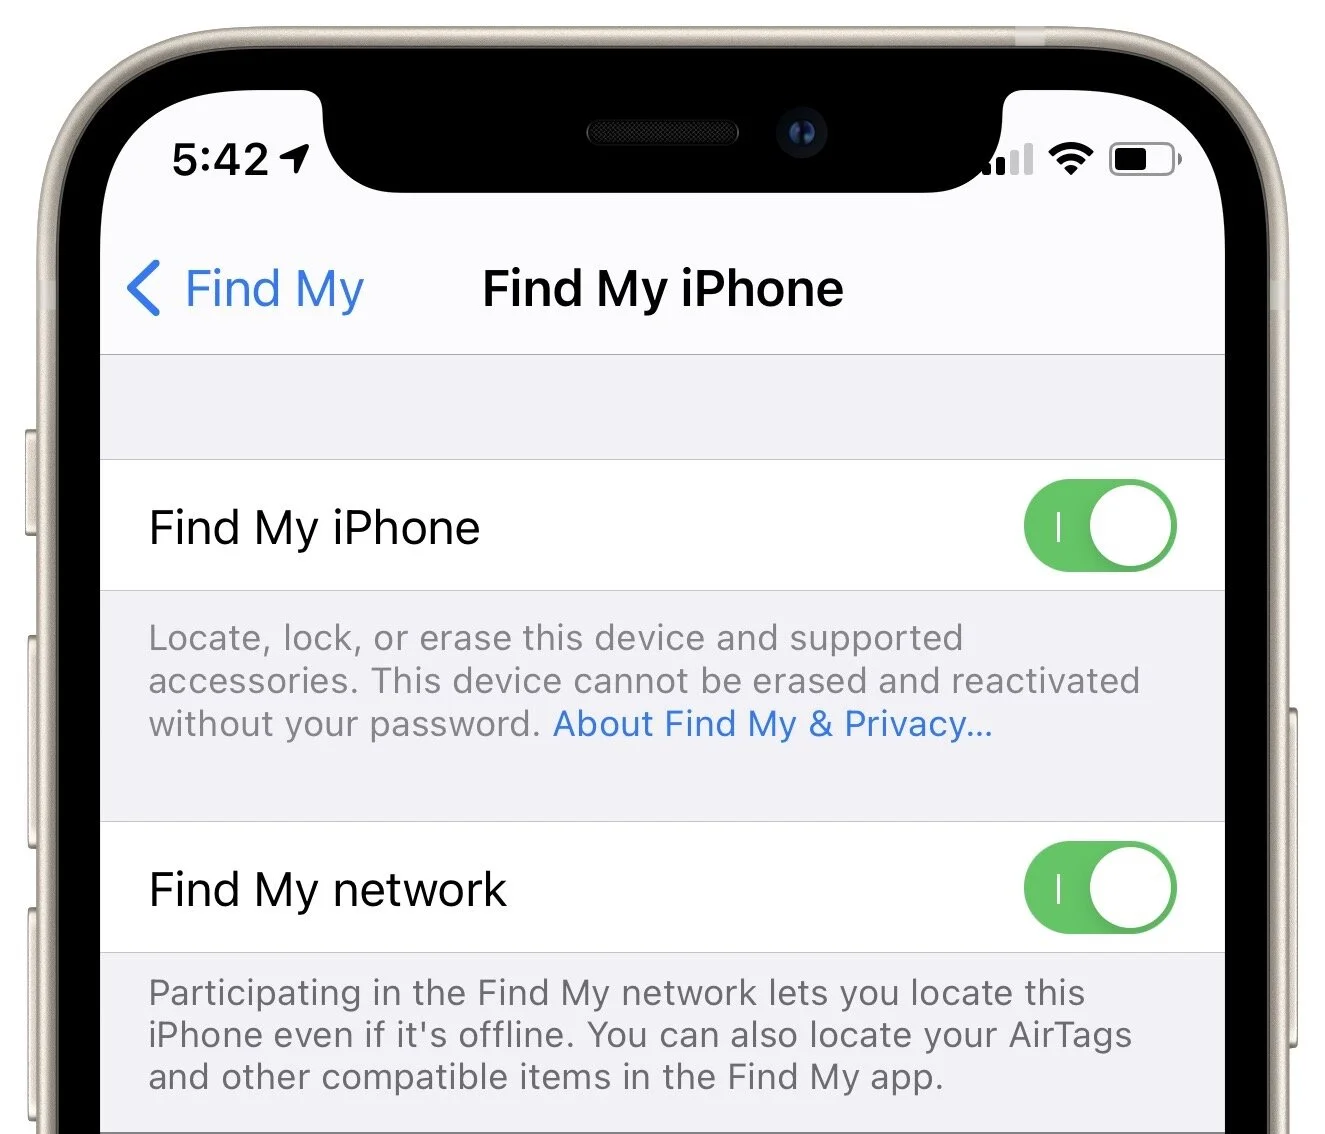
(A quick aside: the Find My iPhone option in that screen is necessary to locate your iPhone if it’s lost or stolen. It also enables Activation Lock, which prevents a thief from erasing and reactivating your iPhone unless they can find your Apple ID password. Always leave Find My iPhone enabled. The Find My network can also help locate iPhones, iPads, Macs, and Apple Watches that are offline and can’t report their location to Find My on their own.)
The ultimate takeaway is that if you ever get a safety alert, hear an AirTag making a sound, or find an unexpected AirTag, hold your iPhone or an NFC-capable Android phone to the white side of the AirTag to load a Web page with more information. If you have reason to believe you’re being stalked, contact local law enforcement and give them the AirTag’s serial number, which they can use, with Apple’s help, to identify the AirTag’s owner.
(Featured image by Apple)
Are You Incurring Technical Debt? Avoid It by Staying Current
Are you incurring technical debt by running ancient apps on elderly hardware? It might seem like a cost-saving move, but it’s usually a false economy based on the loss of productivity, unscheduled upgrades, and higher support costs.

Have you heard the term technical debt? It’s what you incur whenever you delay upgrading software and hardware for too long. It’s like forgetting to brush your teeth regularly and putting off dental checkups. There may be no immediate downside, but the ongoing maintenance and low cost of regular cleanings will likely save you from painful and expensive fillings and root canals.
It’s easy to start down the path toward technical debt. Perhaps you rely on an out-of-date productivity package, an industry-specific program that gets infrequent updates, or an accounting package that isn’t being developed for the Mac anymore. There’s no reason you have to act as soon as you realize you’ve been painted into a technical corner, but the longer you put off the upgrade, the faster the technical debt meter increases.
Here’s what happens. Because of the old app you need, you can’t upgrade to a new version of macOS. No problem, except that prevents you from running the app on a new Mac, since new Macs seldom support older versions of macOS. That’s not a problem either, until the old Mac dies and you need to replace it. Or, perhaps the Mac doesn’t fail, but it becomes clear that it’s far slower than any Mac you could purchase today. Worse, when you are forced to replace that Mac due to poor performance or hardware failure, you’re suddenly faced with an additional expense for new software on top of the new hardware. Old software is a ticking time bomb.
There’s another aspect to technical debt that you have to keep in mind. The older your systems are, the more work it will take to keep them running. That work may come out of time you could spend on other projects or with your family, or it could end up generating consulting expenses. Is it sensible to avoid the monthly cost of Adobe Creative Cloud if it means that you’re paying a consultant regularly to solve the kinds of problems that become ever more common with an older Mac that can still run the ancient Adobe Creative Suite 6?
In short, the deeper your technical debt, the more you’ll eventually pay in three categories:
Loss of productivity: Modern Macs are vastly faster than models from years ago, and new app features can provide significant productivity boosts as well.
Unscheduled upgrades: Murphy’s Law ensures that an old Mac or peripheral will fail at the worst possible time, usually when you’re facing a deadline or when the expense is hard to swallow.
Support costs: Just as taking care of your teeth reduces the likelihood of dental surgery in the future, keeping up with upgrades eliminates the need for long hours of heroic data migration or recovery later.
We’re not saying that you have to buy the latest and greatest immediately. But you can employ some smart strategies to ensure that you never fall too deep into technical debt. Before we get into them, be aware that everything we’re going to discuss here will cost money. Sorry, but technology is essential to modern life and business—it’s not a luxury. However, follow our advice, and you will have more predictable costs and may even pay less overall.
Software
In the past, you paid for a software license once and could choose to pay a (usually discounted) upgrade fee every year or two. Licenses were typically expensive—it wasn’t uncommon for apps to cost hundreds or thousands of dollars. Such licenses still exist, but many apps have moved to a subscription model, where you pay monthly or annually. The overall cost is usually roughly similar to the licenses plus upgrades of yesteryear, but many people dislike subscriptions because they feel locked in.
We empathize—subscriptions add up for us too—but on the plus side, they offer a predictable cost and guarantee that you’ll always have the latest version, usually along with free technical support.
For software still sold on a license basis, we recommend assuming that you’ll upgrade at least every two or three years. Any longer than that and you’ll have to start making accommodations that will cut into productivity or increase support costs.
The worst-case scenario to avoid is depending on an app or system that’s so old that you have to buy used hardware to replace anything that fails. Bite the bullet and pay for a new app, transition consulting, and hardware, or else you’ll find yourself paying non-stop to keep an ancient system running.
Hardware
Smart businesses upgrade their Macs on a schedule rather than dealing with each computer on an individual basis. Research has shown that the sweet spot to swap out a Mac is in the 3–5 year timeframe. Hardware problems start to increase after that point, performance lags compared to current machines, and resale value drops.
If you don’t already have one, make an inventory of all your Macs, including the date they were purchased, and use it to work up a replacement schedule. Larger companies tend to do this programmatically—they pay less attention to what each employee does or what their needs are—but there’s no reason you can’t prioritize some systems over others to optimize performance and smooth out the overall expense.
It may make sense to shuffle some Macs around instead of treating each one independently. For instance, if one employee does a lot of video work, upgrading them every year to the most powerful Mac available might improve their productivity significantly, and their old Macs can be handed down to other employees.
Maintenance
Regular maintenance also plays a role in avoiding technical debt. It’s essential to keep up with Apple’s operating system and security updates, for instance, because failing to do so could result in a breach that would be costly to remediate.
Monitoring software can also be useful in providing early warning of failing drives, reporting on backup status, clarifying which of your Macs are up-to-date, and much more. Contact us if you’re interested in learning more about a service like this.
Don’t dismiss physical maintenance as a way of reducing technical debt. Keeping Macs free of dust can prevent them from running hot, which shortens the lifespan of various components. Ensuring that every Mac has at least a surge protector, if not an uninterruptible power supply, can also go a long way toward protecting sensitive electronics from damaging power surges and sags.
In the end, avoiding technical debt just means making a plan for regular upgrades and maintenance and sticking to it. Do that and you’ll both have predictable expenses and save money in the long run. And hey, make that dentist appointment too, eh?
(Featured image by Anna Shvets from Pexels)
Nine Reasons to Put Your Mac’s Pointer in a Corner
Did you know that you can invoke a wide variety of special views on the Mac simply by tossing your mouse pointer into a corner of the screen? Read on to learn everything you can do with hot corners.

If your Mac is like ours, it’s a busy place, with oodles of open windows and lots of icons lying around. If you want to display the Desktop or see a single app’s windows, you may find yourself clicking around or using keyboard shortcuts, but did you know that you can access many of the Mac’s special views with just a flick of your wrist—no click necessary?
A long-standing but little-known feature called Hot Corners makes this possible. The key to unlocking Hot Corners is in System Preferences, in either the Desktop & Screen Saver or Mission Control pane. In either one, click the Hot Corners button to set up your hot corners.

The Hot Corners dialog displays a pop-up menu for each of the four corners of your screen. Choose an action in one of those menus, and that’s what happens when you move your pointer to that corner. A hyphen, the default, means nothing happens.

Here’s the scoop on each action. To exit these special views, switch to another app, press the Escape key, put the pointer back in the hot corner again, or just move the mouse.
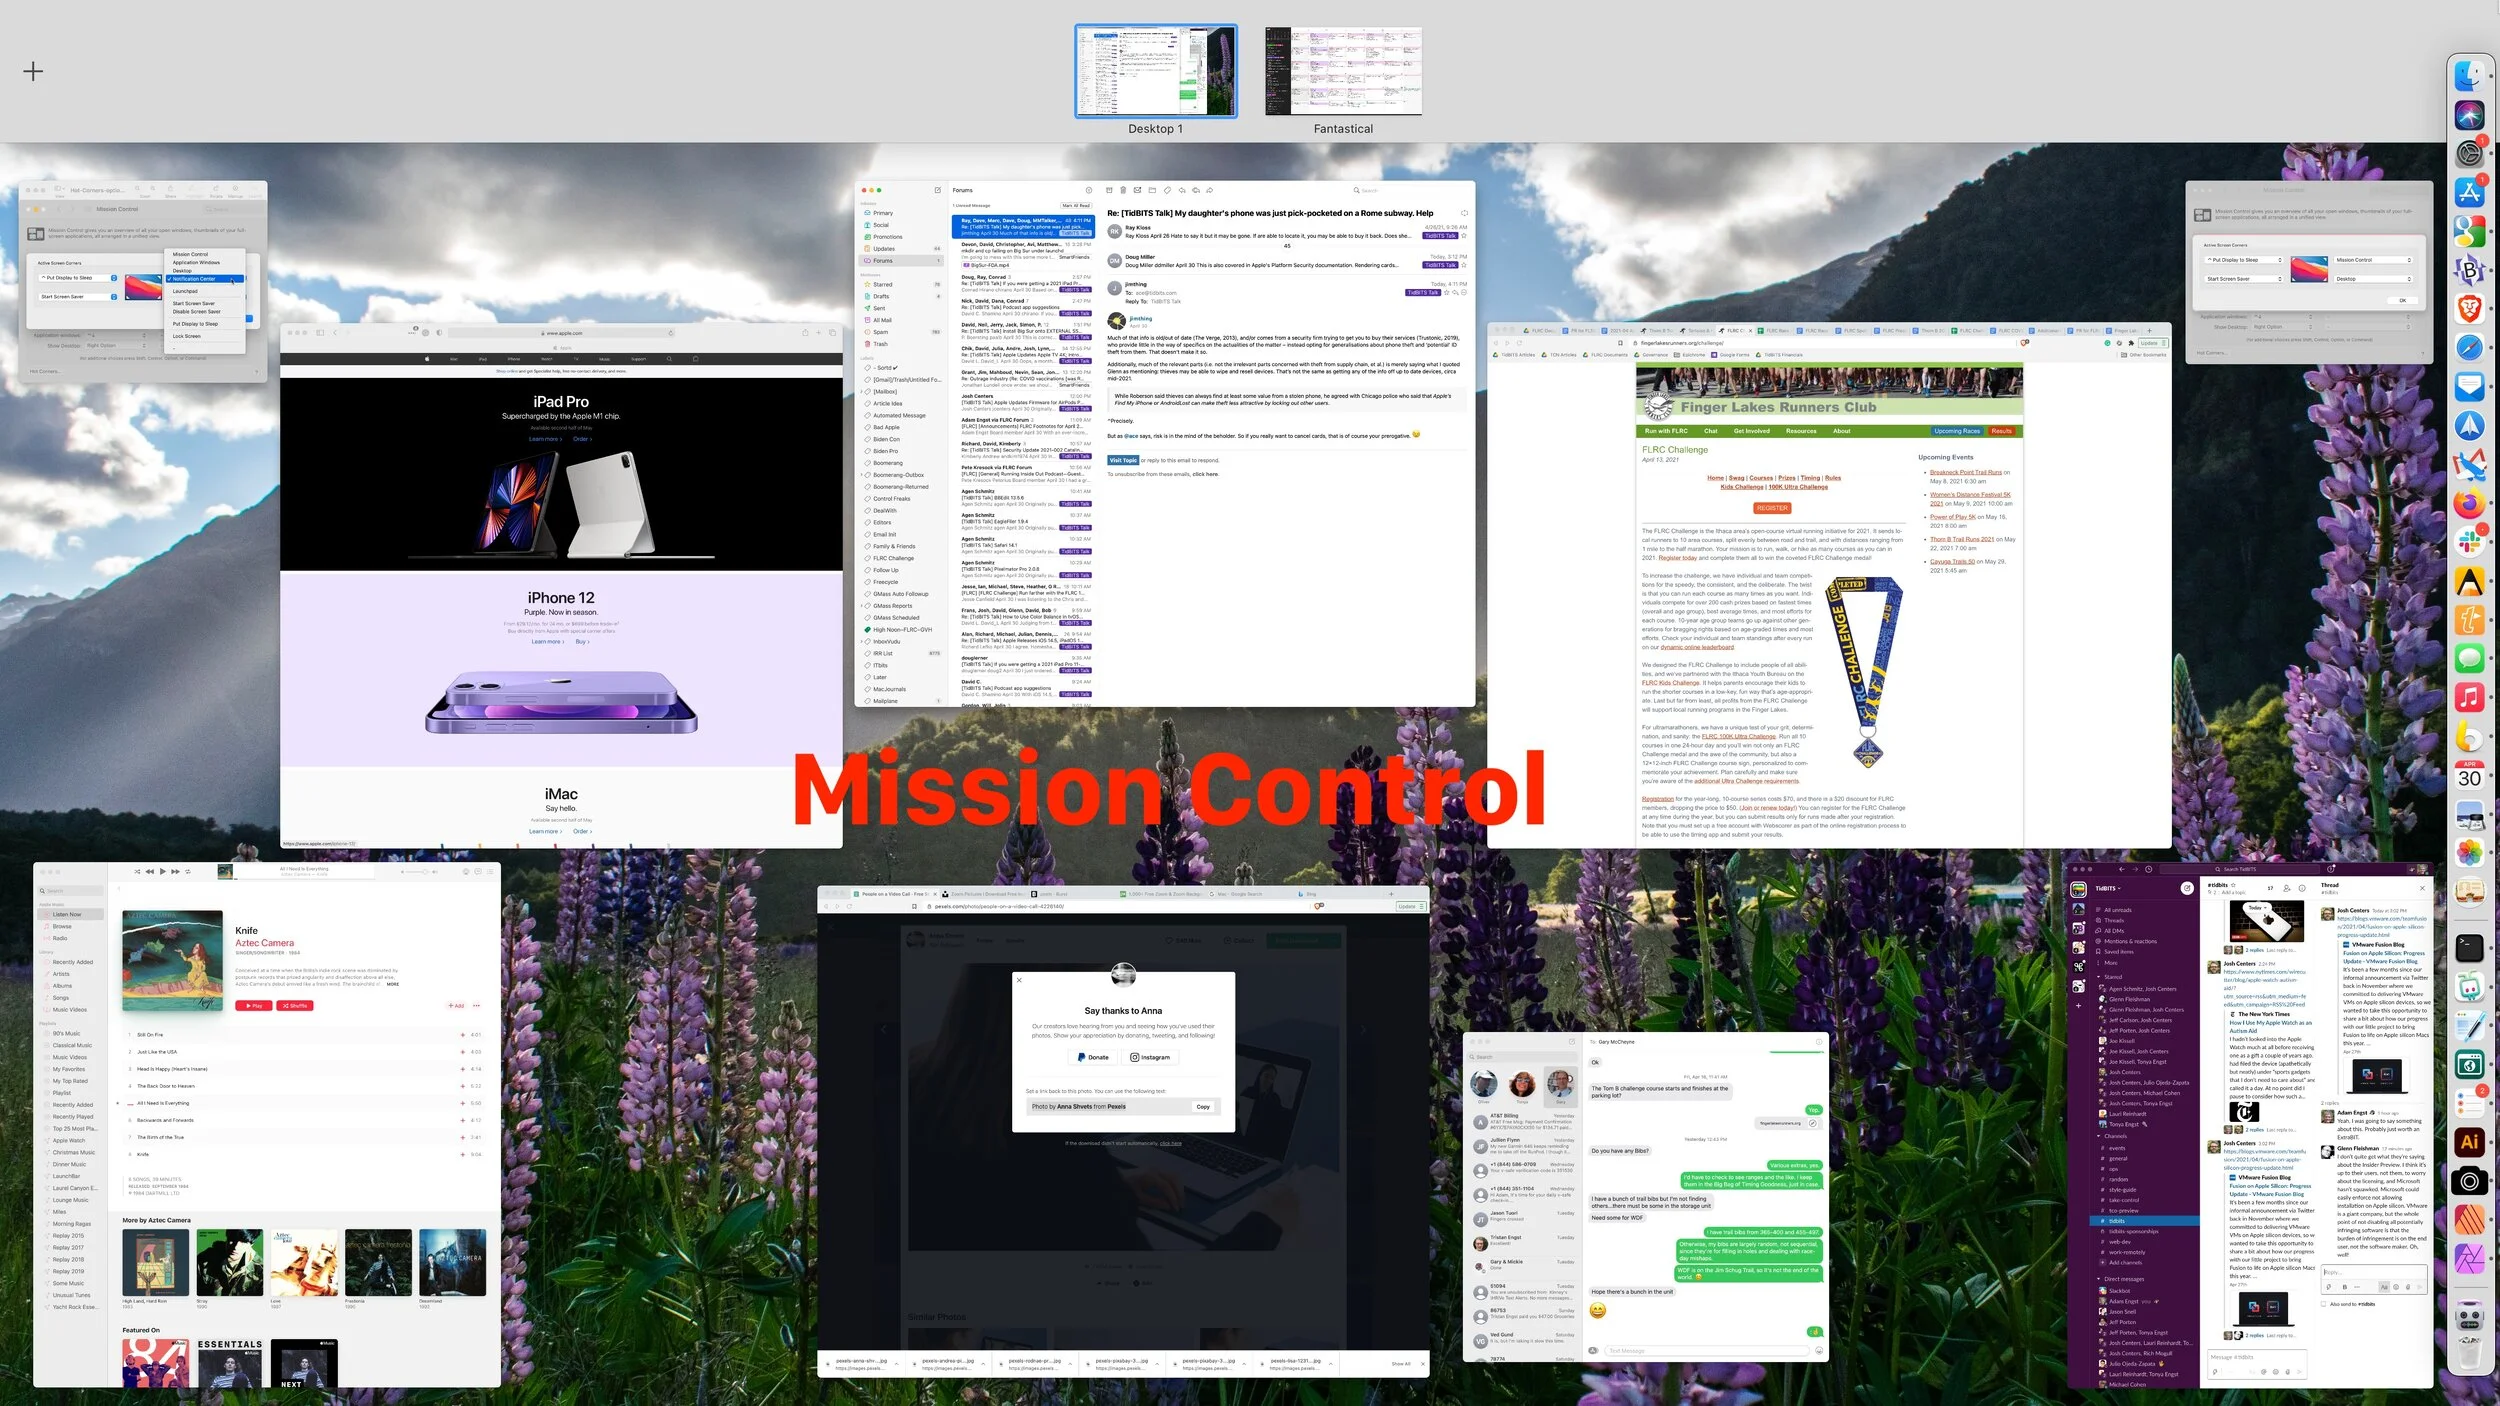
Mission Control
Use a hot corner to enter this bird’s-eye view of all your Mac’s open windows. Once you’re in Mission Control, you can switch to any window by clicking it. (Preview a window by hovering over it and pressing the Space bar.) You can also set up spaces in Mission Control—a space is a view that contains only windows from the apps assigned to that space. Click the plus sign in the top-left corner and then drag windows up into the new space. Switch to a space by clicking it in the top bar.
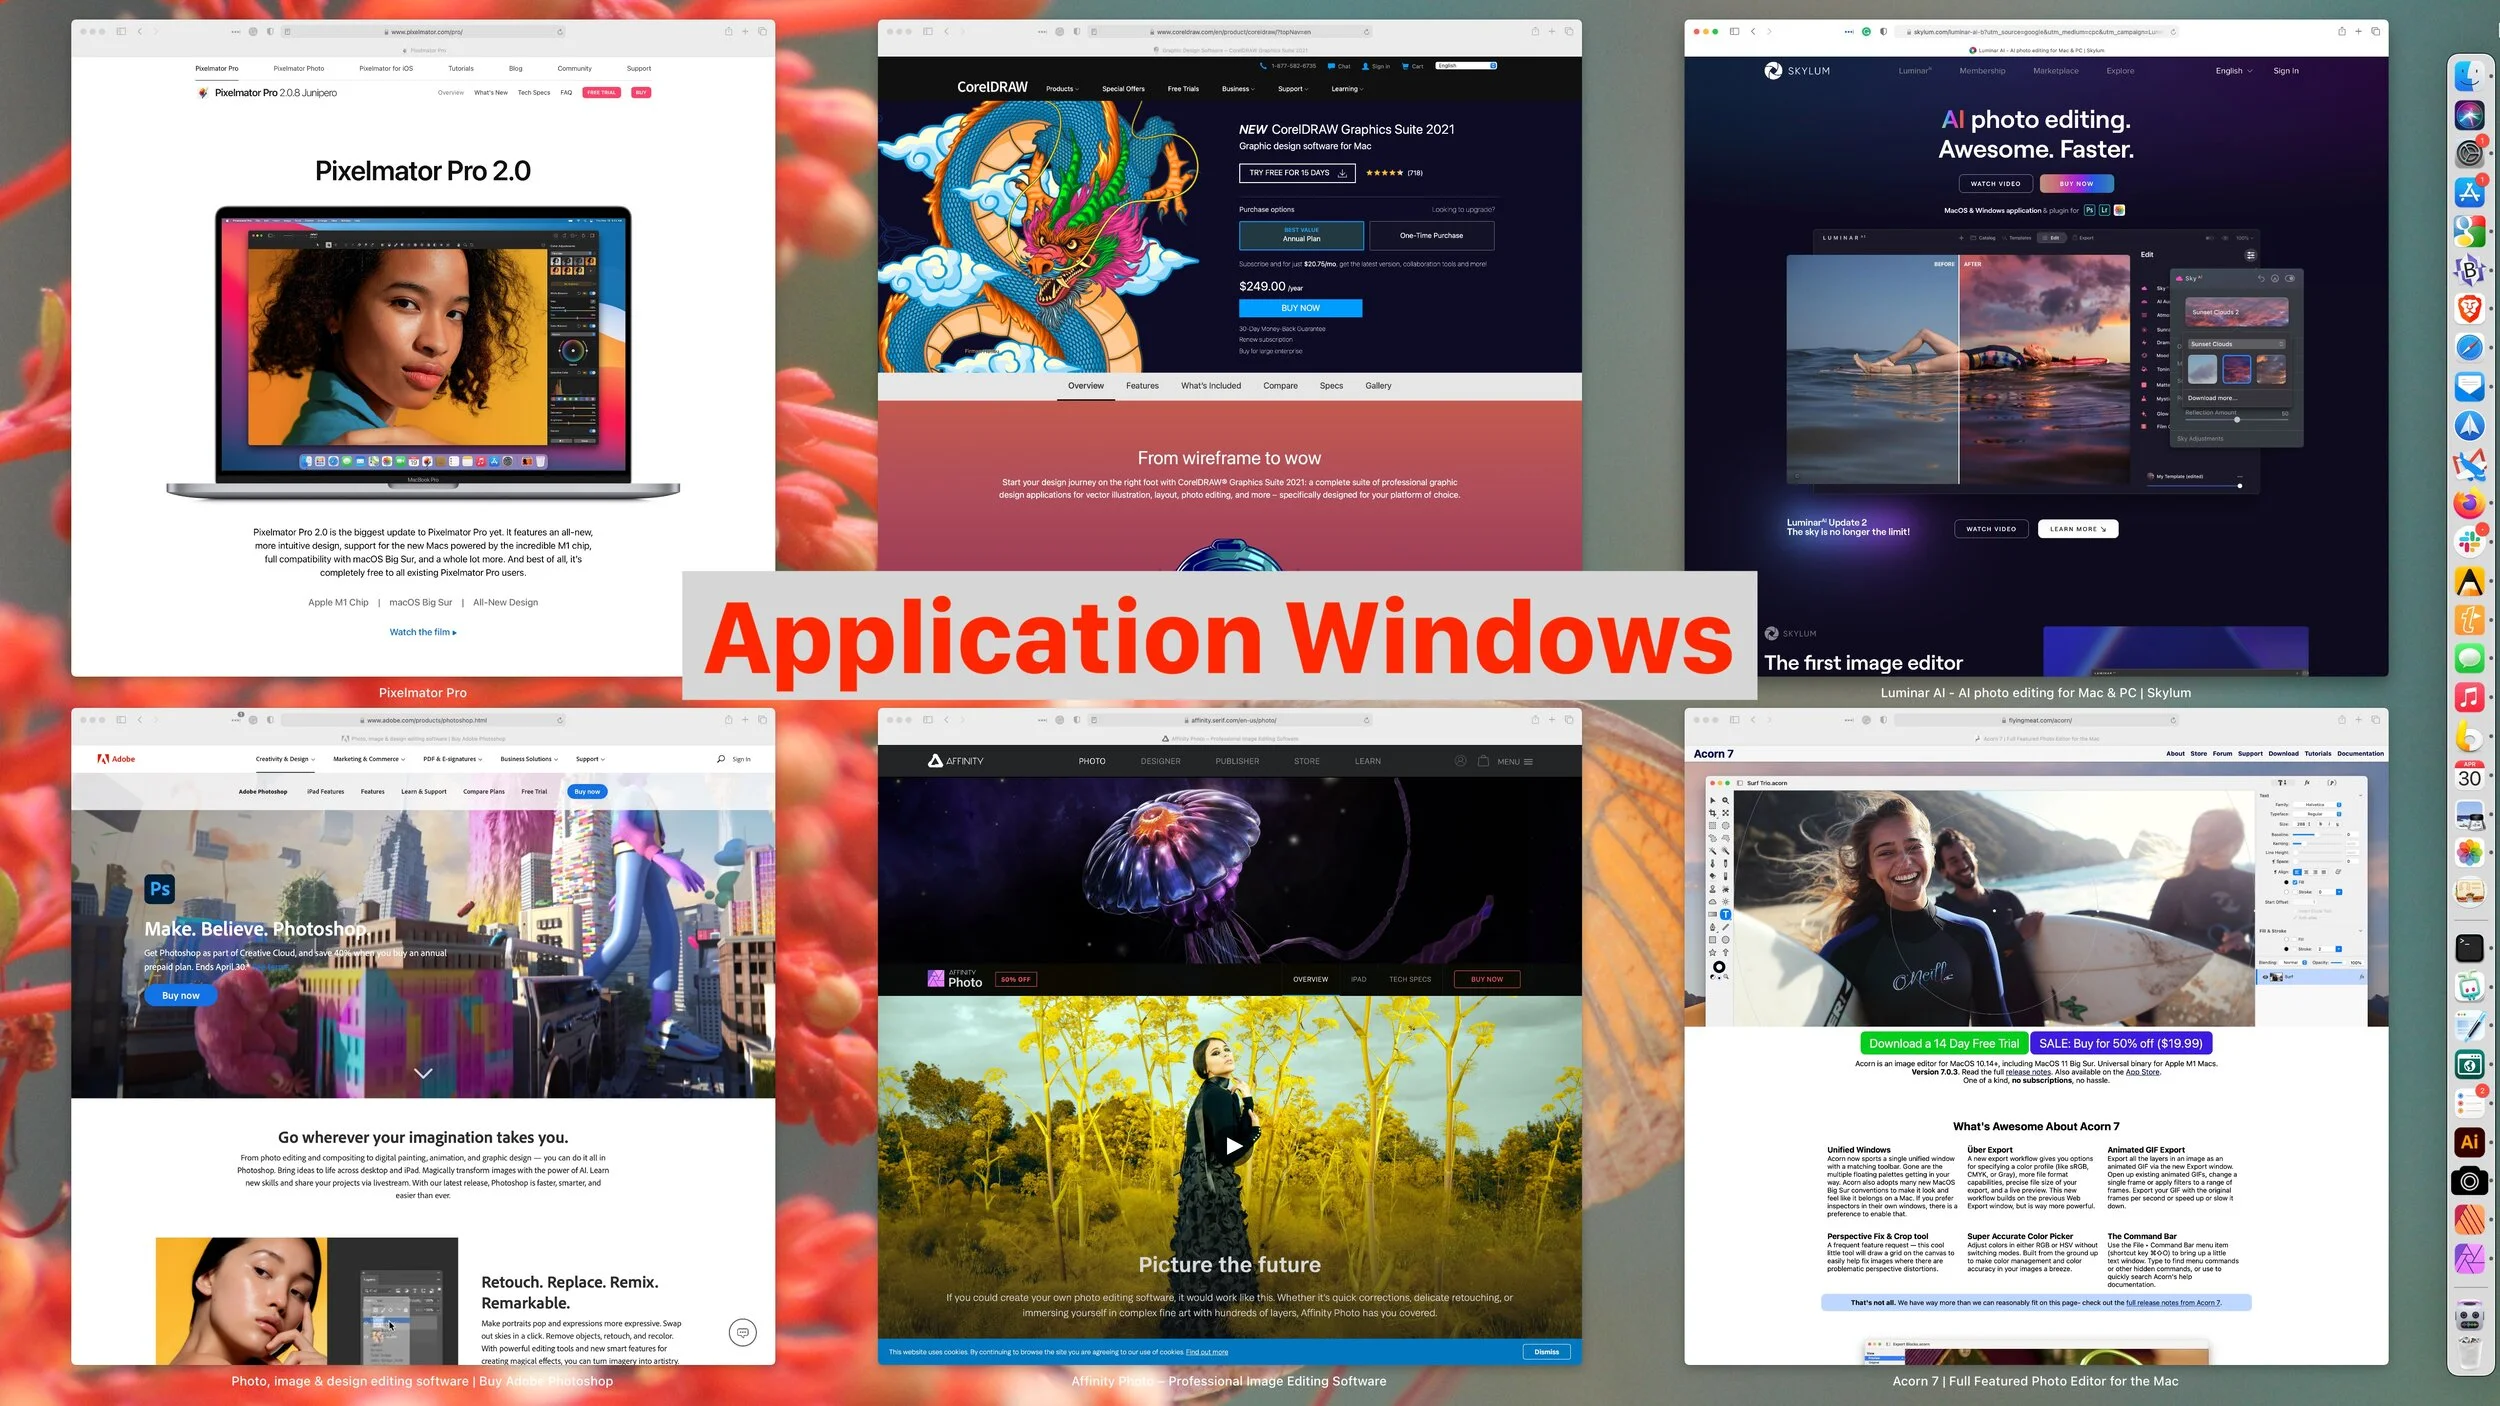
Application Windows
For an overview of all open windows for a particular app (Safari, in this case), use a hot corner to invoke Application Windows. This view displays thumbnails of all open windows in the current app. For some apps, like Pages, you’ll also see thumbnails of recently opened documents at the bottom of the view. Click any thumbnail to switch to it.
Desktop
If you like storing documents for in-progress projects on your Desktop, you’ll love the hot corner that invokes Desktop view. It moves all open windows aside, letting you focus on the icons on the Desktop. The windows return when you switch to an app.
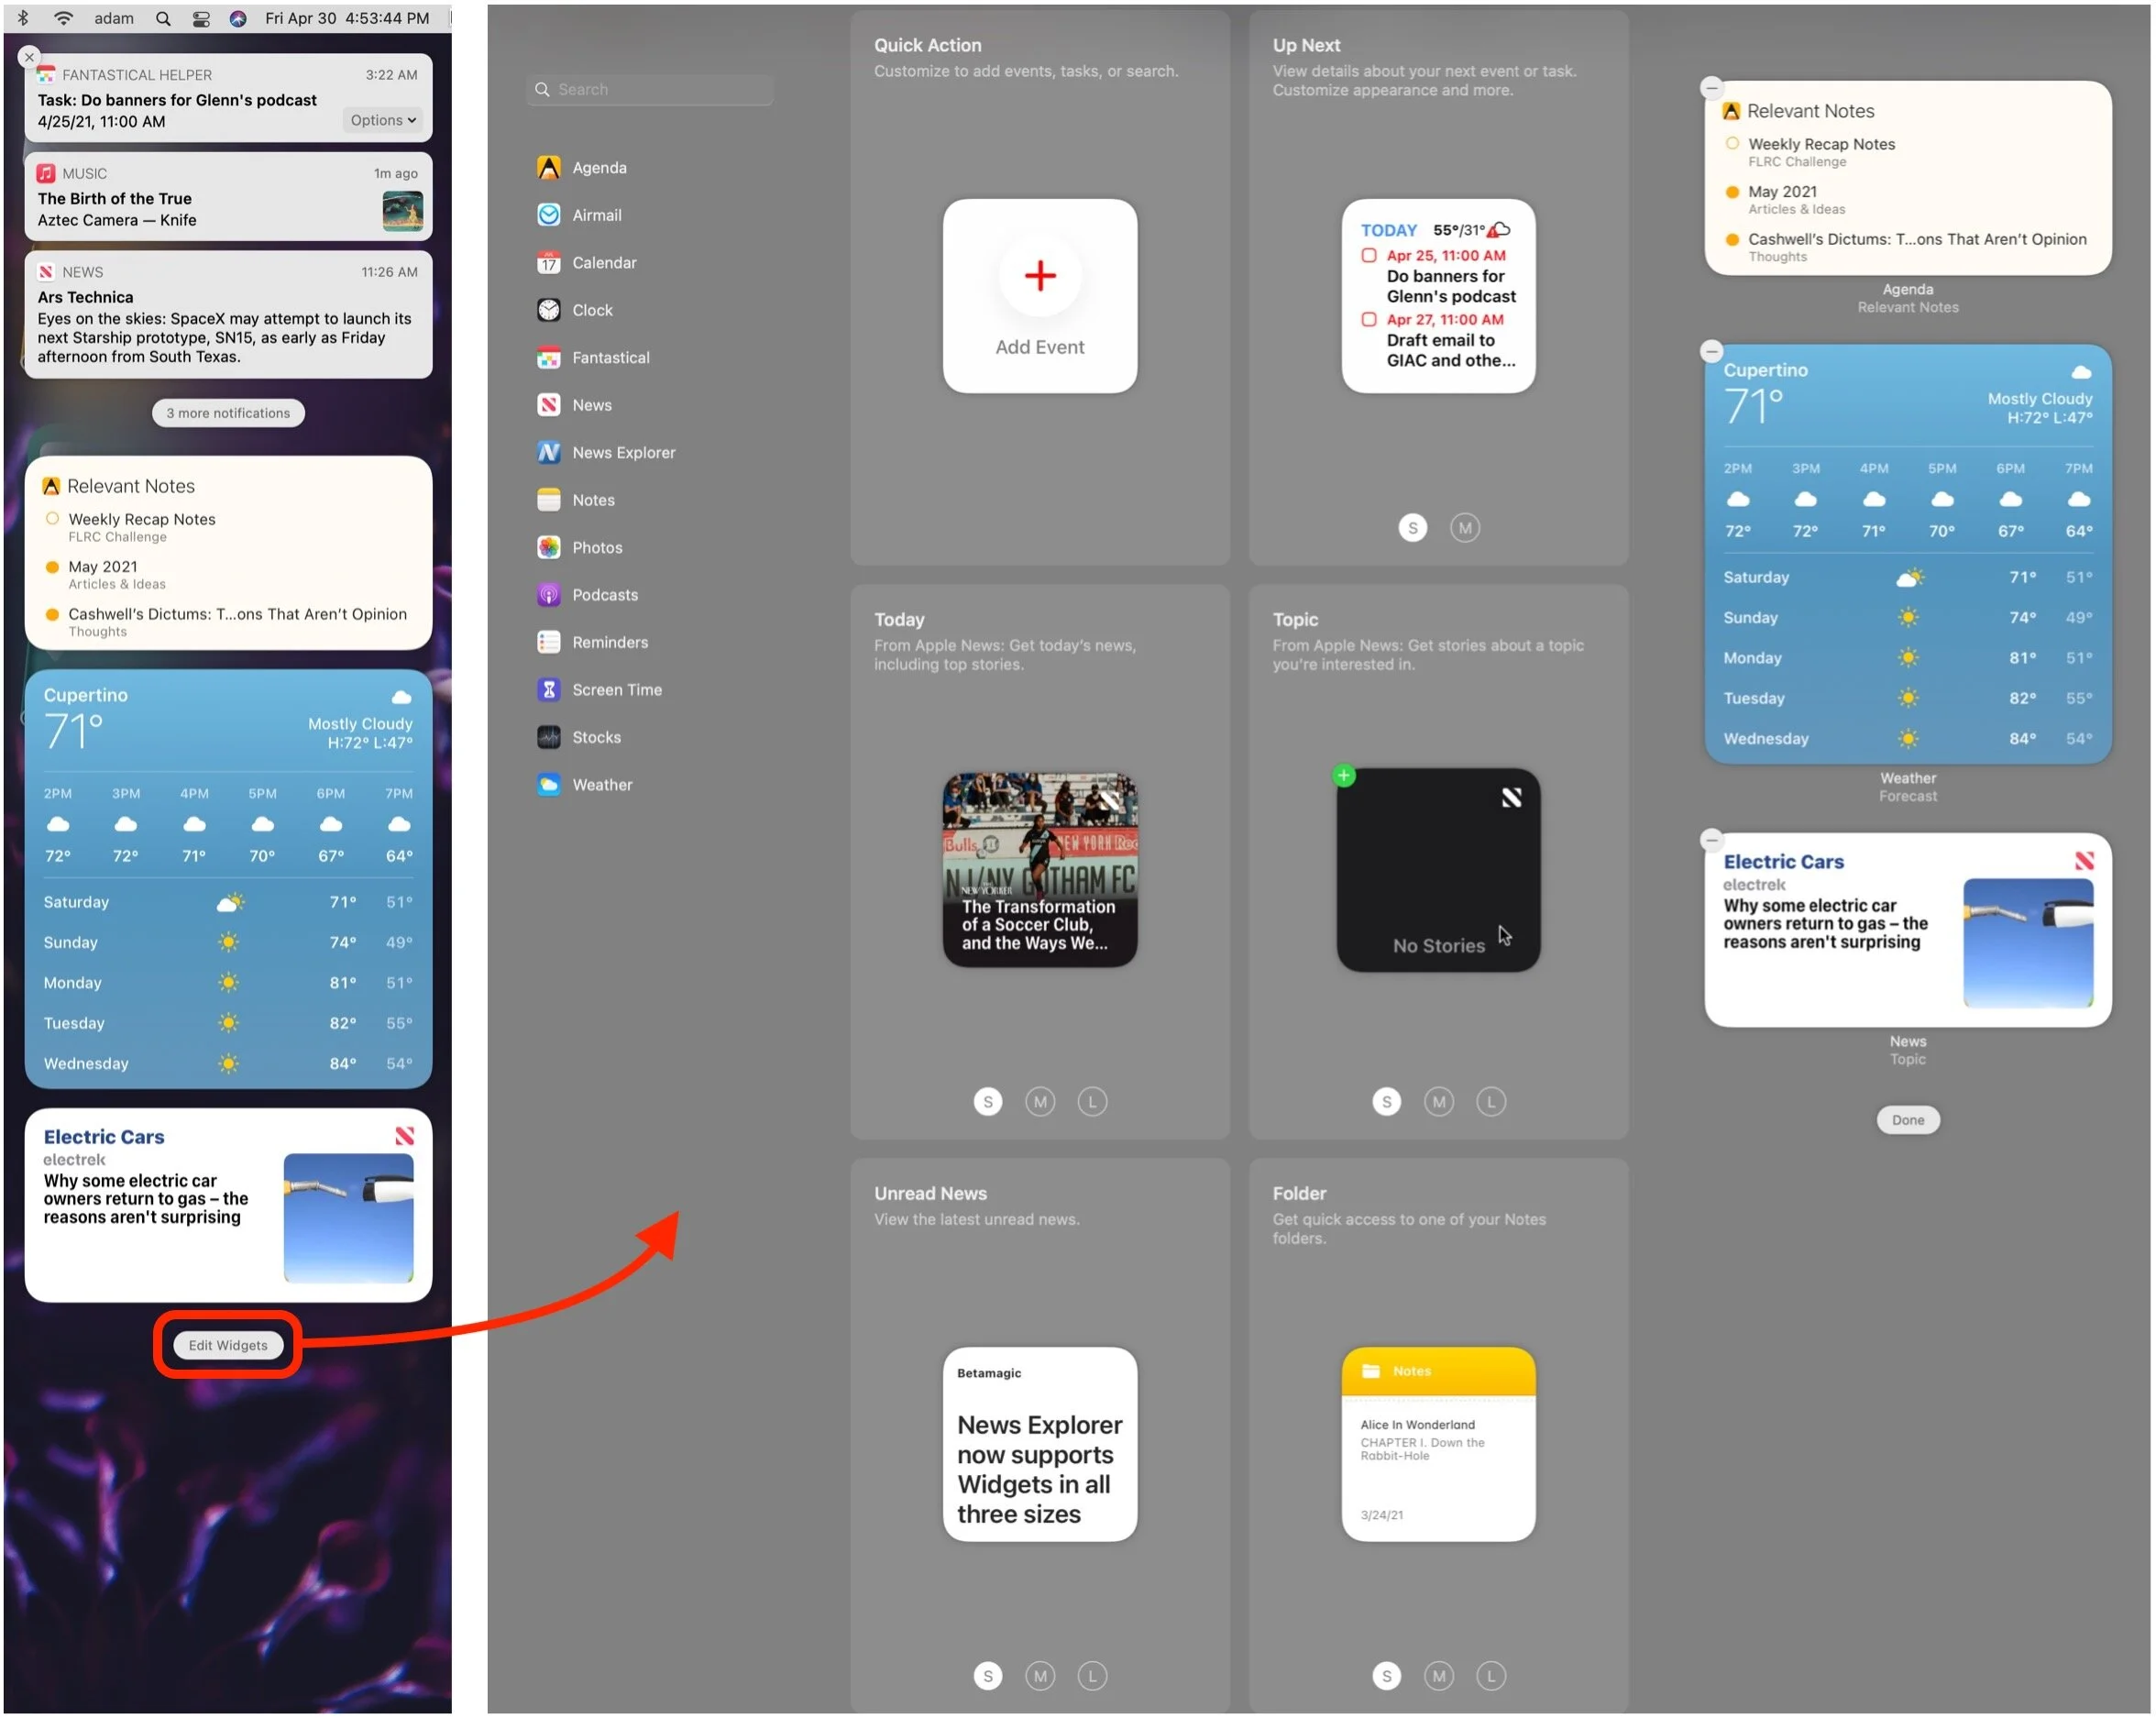
Notification Center
Since you can so easily open Notification Center by clicking the date and time (in macOS 11 Big Sur; in earlier versions of macOS, click the Notification Center icon) in the upper-right corner of your menu bar, it may not be worth wasting a hot corner on it. In Big Sur, Notification Center combines the Today and Notifications views from previous versions of macOS, with iOS-like widgets underneath the most recent notifications. You can control which apps can display notifications in System Preferences > Notifications. To add, remove, or rearrange widgets, click the Edit Widgets button at the bottom of Notification Center.
Start Screen Saver
Screen savers are more than just eye-candy you can use to personalize your Mac—they also serve to conceal the contents of your screen from people who might walk by when you’re not there. The Start Screen Saver hot corner shows the screen saver immediately, overriding the setting for how long the Mac must sit idle before the screen saver turns on (in System Preferences > Desktop & Screen Saver > Screen Saver). It’s helpful if you’re working on something sensitive that you don’t want anyone to see, but you need to leave your desk to chat with a coworker or use the bathroom. Depending on your setting for “Require password after sleep or screen saver begins” in System Preferences > Security & Privacy > General, you may have to enter your password to turn off the screen saver.
Disable Screen Saver
If you usually have your screen saver set to turn on automatically after just a minute or two, it may come on when you would prefer it didn’t. This could happen, for example, while you are pondering a complex idea or thinking about what to write. To disable the screen saver temporarily, use a Disable Screen Saver hot corner.
Launchpad
If you like using iOS, giving Launchpad a hot corner might make opening apps on your Mac easier. Apple designed Launchpad to look and work like the Home screen on an iPad or iPhone—just click an app to launch it. To see more apps, scroll horizontally—with a trackpad, swipe with two fingers; with an Apple Magic Mouse, swipe with one finger on the mouse surface. Just like in iOS, you can drag the apps around to put them in the order that works best for you.
Put Display to Sleep
Those who are concerned about energy usage might like this option. Toss your pointer in the associated hot corner, and your screen goes to sleep immediately, consuming less power than a screen saver. It lets you override the “Turn display off after” slider in System Preferences > Energy Saver. As with the screen saver, you may have to enter your password to wake the display when you come back.
Lock Screen
The Lock Screen option has roughly the same effect as Start Screen Saver and Put Display to Sleep in that it instantly displays the Mac’s login screen, preventing anyone from seeing what’s on your Desktop and requiring your password again.
Add Modifier Keys
If you find yourself triggering a hot corner accidentally, try adding a modifier key so its action activates only when the pointer is in the corner and the key is pressed. To set this up, open the Hot Corners dialog, open the corner’s pop-up menu, and press a key (Shift, Control, Option, or Command). The key’s symbol appears in the menu. Keep the key down and choose the desired action.

The best way to set up your hot corners depends on how you use your Mac, of course. Our favorites are Start Screen Saver because it’s a quick override of the screen saver settings and Desktop because it removes screen clutter that gets in the way of using the Desktop.
(Featured image by Norbert Levajsics on Unsplash)
Upgrade to iOS 14.5 and watchOS 7.4 to Unlock Face ID iPhones with Your Watch
It’s frustrating when your mask prevents Face ID from unlocking your iPhone, but Apple has now come to our rescue with iOS 14.5 and watchOS 7.4, which can automatically unlock using your Apple Watch. Learn more at:

You have to feel for Apple sometimes. The company’s engineers put an astonishing amount of work into the hardware and software necessary for Face ID to recognize your face nearly instantly and unlock your iPhone or iPad. Regardless of whether you’re wearing a hat and glasses. Even in the dark. It’s one of those pieces of technology that’s so advanced that it’s indistinguishable from magic.

But the one thing that stymies Face ID every time is also the most important factor in curbing the spread of the coronavirus: the humble face mask. We’ve all been wearing masks for the past year, so if you have an iPhone X or later with Face ID, you’ve undoubtedly been annoyed by having to tap in your passcode repeatedly while masked. Early in the pandemic, Apple tweaked iOS 13 so you could enter a passcode without waiting for Face ID to fail. That was a help, but with the just-released iOS 14.5, Apple has now made the problem go away entirely, at least if you have an Apple Watch.
Here’s how it works. Once you’ve updated your Face ID–enabled iPhone to iOS 14.5 and your Apple Watch Series 3 or later to watchOS 7.4, you can enable the Unlock with Apple Watch setting. From then on, if your mask prevents Face ID from unlocking your iPhone, iOS will check to see if your watch is nearby, on your wrist, protected by a passcode, and unlocked. If so, your iPhone unlocks immediately, just as though it had scanned your face successfully. Your Apple Watch also taps your wrist to alert you and give you the option of locking the iPhone again, just in case someone has surreptitiously snagged your iPhone and is using the feature to unlock it in your presence.
To enable this feature, go to Settings > Face ID & Passcode on your iPhone, scroll down to Unlock with Apple Watch, and turn on the switch next to your Apple Watch. If you don’t have a passcode enabled for your Apple Watch, turn that on in the Watch app, in My Watch > Passcode. (While you’re on that screen, be sure to enable Unlock with iPhone too, since that prevents you from having to type the Apple Watch passcode in nearly all situations.)

That’s all there is to it—it’s brilliant! Apple undoubtedly put a great deal of thought into architecting this feature so it’s easy to use without compromising the iPhone’s security. If you haven’t yet updated to iOS 14.5 and watchOS 7.4, we encourage you to do so right away to take advantage of this feature. And if you don’t yet have an Apple Watch, this might be reason enough to get one.
(Featured image by Uriel Mont from Pexels)
Four Ways to Reduce Zoom Fatigue
Why are video calls so exhausting when all you’re doing is sitting around and talking? Here’s the word from Stanford University researchers, along with advice on making those non-stop calls less tiring.

After a long day of video calls, you might feel like your brain has been wrung out like a wet washcloth—we certainly do. It’s exhausting to stare into a computer for hours every day while participating in meetings or classes. This condition is called Zoom fatigue, and it’s a recent affliction for most of us because the pandemic has dramatically increased the popularity of video calls. We don’t mean to beat on Zoom here—this condition plagues people who use Cisco WebEx, FaceTime, Google Hangouts, Google Meet, Microsoft Teams, Skype, and other videoconferencing software too.
Luckily there are techniques you can employ to reduce Zoom fatigue. Researchers at Stanford University have identified four reasons why video calls are so tiring and offer suggestions on making them less so. They include:
Close-up eye contact is overwhelming. You usually sit about an arm’s length from your computer display, and if one person is on screen at a time, their head may be close to life-size. You’d never be that near someone’s face in real life unless they were a close family member, and even then, you wouldn’t hold that position for long. Shrink your window or switch to gallery view so you’re talking to postage stamps rather than feeling like someone is up in your face.
Looking at yourself is psychologically harmful. We all have mirrors, but can you imagine staring into one for hours every day? Only a pathological narcissist would do that. Worse, constantly seeing your own image can make you worry about your appearance and what others think of you. Once you’ve verified that you’re properly framed and don’t have salad in your teeth, hide your preview or switch to a view that doesn’t include you.
Sitting perfectly still is difficult. This is hardest on kids, but even adults have trouble staying sufficiently still to remain perfectly framed in a video window. When you’re on a standard phone call or in an in-person meeting, you might pace around the room or at least adjust your position in your chair. Try turning off your camera when possible—most calls work just as well without video—or position it so you can fidget or pace in person. Another solution is Apple’s Center Stage technology on the new M1-based iPad Pros, which auto-matically pans and zooms to keep you in the picture as you move around.
Video calls make you constantly think about call mechanics. There’s nothing natural about interacting with multiple people on a screen, so we’ve all come up with behaviors (some of which we just recommended!) to smooth over the cracks in the system. For instance, your brain has to expend extra effort to help you stay framed in the video window, worry about how you look, use exaggerated facial expressions so people know you’re paying attention, and use techniques like a thumbs-up to indicate approval without unmuting. The solution is to turn off your camera and hide the video window so your brain can take a break and focus on just the audio content of the call.
You’ll notice that most of the recommendations for reducing the mental strain of video calls come down to eliminating video. It shouldn’t be surprising because talking on the phone isn’t nearly as tiring, even when you’re on a conference call with a couple of people. There’s no question that video can help convey information that would be lost in a phone call, and it’s nice to see far-flung friends and family, but there’s no rule that video calls are the best form of communication for all situations.
We’ve started to put these recommendations into practice ourselves, and we encourage you to do so as well. And if you need support for why you’re turning off your camera or asking for audio-only calls, send people a link to this article.
(Featured image by Anna Shvets from Pexels)
Apple Announces New Accessories Including the Long Rumored AirTag
Apple’s “Spring Loaded” event was indeed loaded with announcements, including the M1-based 24-inch iMac, M1-based iPad Pro, AirTag item tracker, updated Apple TV 4K with redesigned Siri Remote, and more:
Find Your Keys, Purse, or Backpack with an AirTag
The long-rumored AirTag has finally appeared, promising to help us all stop misplacing our keys, purses, backpacks, and more. An AirTag is a small disc that you put inside or attach to something you might need help finding. Should that item go missing, you use the Find My app on your Mac, iPhone, or iPad, or in iCloud to locate the associated AirTag, just as you can use Find My to locate missing Apple devices or find family members. The Find My network leverages nearly 1 billion Apple devices to relay the location of lost items back to you, all without compromising anyone’s privacy. Plus, Apple has built in alerts if someone tries to track you with an AirTag.
AirTags are 1.26 inches in diameter and .31 inches high—roughly the size of four half-dollar coins—and run on a standard user-replaceable CR2032 battery. They communicate with nearby Apple devices via Bluetooth and Ultra Wideband, the latter of which works with an iPhone 11 or iPhone 12 to provide Precision Finding that directs you to the exact location of the AirTag. (“You’re getting warmer…”)
To make it easier to attach an AirTag to your keys or backpack, Apple offers a variety of key rings and loops, including some pricey Hermès versions. We anticipate third-party manufacturers will offer numerous alternatives.
A single AirTag costs $29, or you can buy a four-pack for $99. Apple offers free engraving, although the company limits the emoji available to prevent pictographic rudeness. We’re looking forward to giving an AirTag a try, assuming we can still find our keys when it ships on April 30th.
Apple TV 4K Offers Enhanced Video and Redesigned Siri Remote

After four years, Apple has finally updated the hardware inside the Apple TV 4K, giving its second-generation model a faster A12 Bionic processor, HDMI 2.1, and 802.11ax Wi-Fi 6 wireless networking. The speedier processor enables playback of HDR and Dolby Vision video at 60 frames per second, and the other hardware changes could enable new capabilities in the future, like 4K video at 120 fps.
In software, Apple added a new color calibration feature that lets you use any Face ID-enabled iPhone running iOS 14.5 or later to calibrate the colors on your TV; it will also be available to the Apple TV HD and first-generation Apple TV 4K. Also new is support for Thread, a cross-platform mesh networking protocol for home automation devices, which could play a role in the future of HomeKit.
But the big news is that Apple redesigned the much-reviled Siri Remote, adding more buttons and reducing the emphasis on the touchpad surface. The new Siri Remote features a circular clickpad controller with five-way navigation, a touch-sensitive surface for swiping in the middle, and a touch-sensitive outer ring that works as a jog control for navigating within a video. It also features dedicated power and mute—at last!—buttons for your TV. Finally, there’s a new side button for invoking Siri so you don’t accidentally press it in the dark. It has a rechargeable battery that should last for months. The only thing lacking? The necessary hardware so you can use the Find My app to ferret it out from inside the couch.
Apple is bundling the new Siri Remote with the new Apple TV 4K ($179 for 32 GB or $199 for 64 GB) and the old Apple TV HD ($149), and if you already have an Apple TV HD or 4K, you can buy the new Siri Remote by itself for $59.
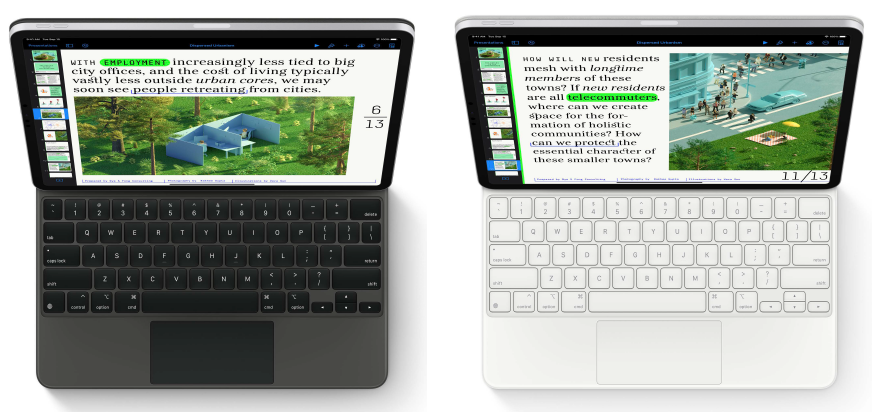
New Color options for iPad Magic Keyboard

Magic Keyboard for iPad features a comfortable and responsive typing experience with backlit keys and a built‑in trackpad. This keyboard offers front and back protection and an extra USB-C port for charging your iPad. Customers have been loving the experience that this accessory provides and can now find this keyboard in two colors. Choose between Black and White in both sizes of the Magic Keyboard.
The Magic Keyboard is available for the iPad Pro 11-inch (3rd generation) and iPad Air (4th generation) for $299 and the iPad Pro 12.9‑inch (5th generation) for $349, in both colors.
(Featured images by Apple)