Apple’s Evolution of Do Not Disturb Helps You Focus
Do you want more control over Do Not Disturb on your Apple devices? How about muting notifications while a particular app is active or while you are at a certain location? All this and more is now easy to set up with Apple’s new Focus feature—learn how at:

Between texts, alarms, reminders, calls, and myriad other notifications on our iPhones, iPads, and Macs, it’s a miracle we get anything done at all. To free us from this onslaught, Apple previously provided Do Not Disturb, which let you set times during which you could be free from interruption.
In iOS 15, iPadOS 15, and macOS 12 Monterey, Apple has gone even further. Do Not Disturb is now called Focus, and Apple has made it more powerful and flexible. Focus can turn on automatically at certain times, at particular locations, or when you’re using certain apps so you can avoid interruptions during activities like working out, doing homework, eating dinner, or gaming. But not all interruptions—you can allow certain people and apps to break through the cone of silence. A Focus can also hide or show certain Home screen pages, prevent notifications from appearing on the Lock screen, and more. Plus, all your devices can share the same Focus settings—we’re showing iPhone screenshots below, but the interface is identical in iPadOS and similar on the Mac, where you’ll find it in System Preferences > Notifications & Focus > Focus.
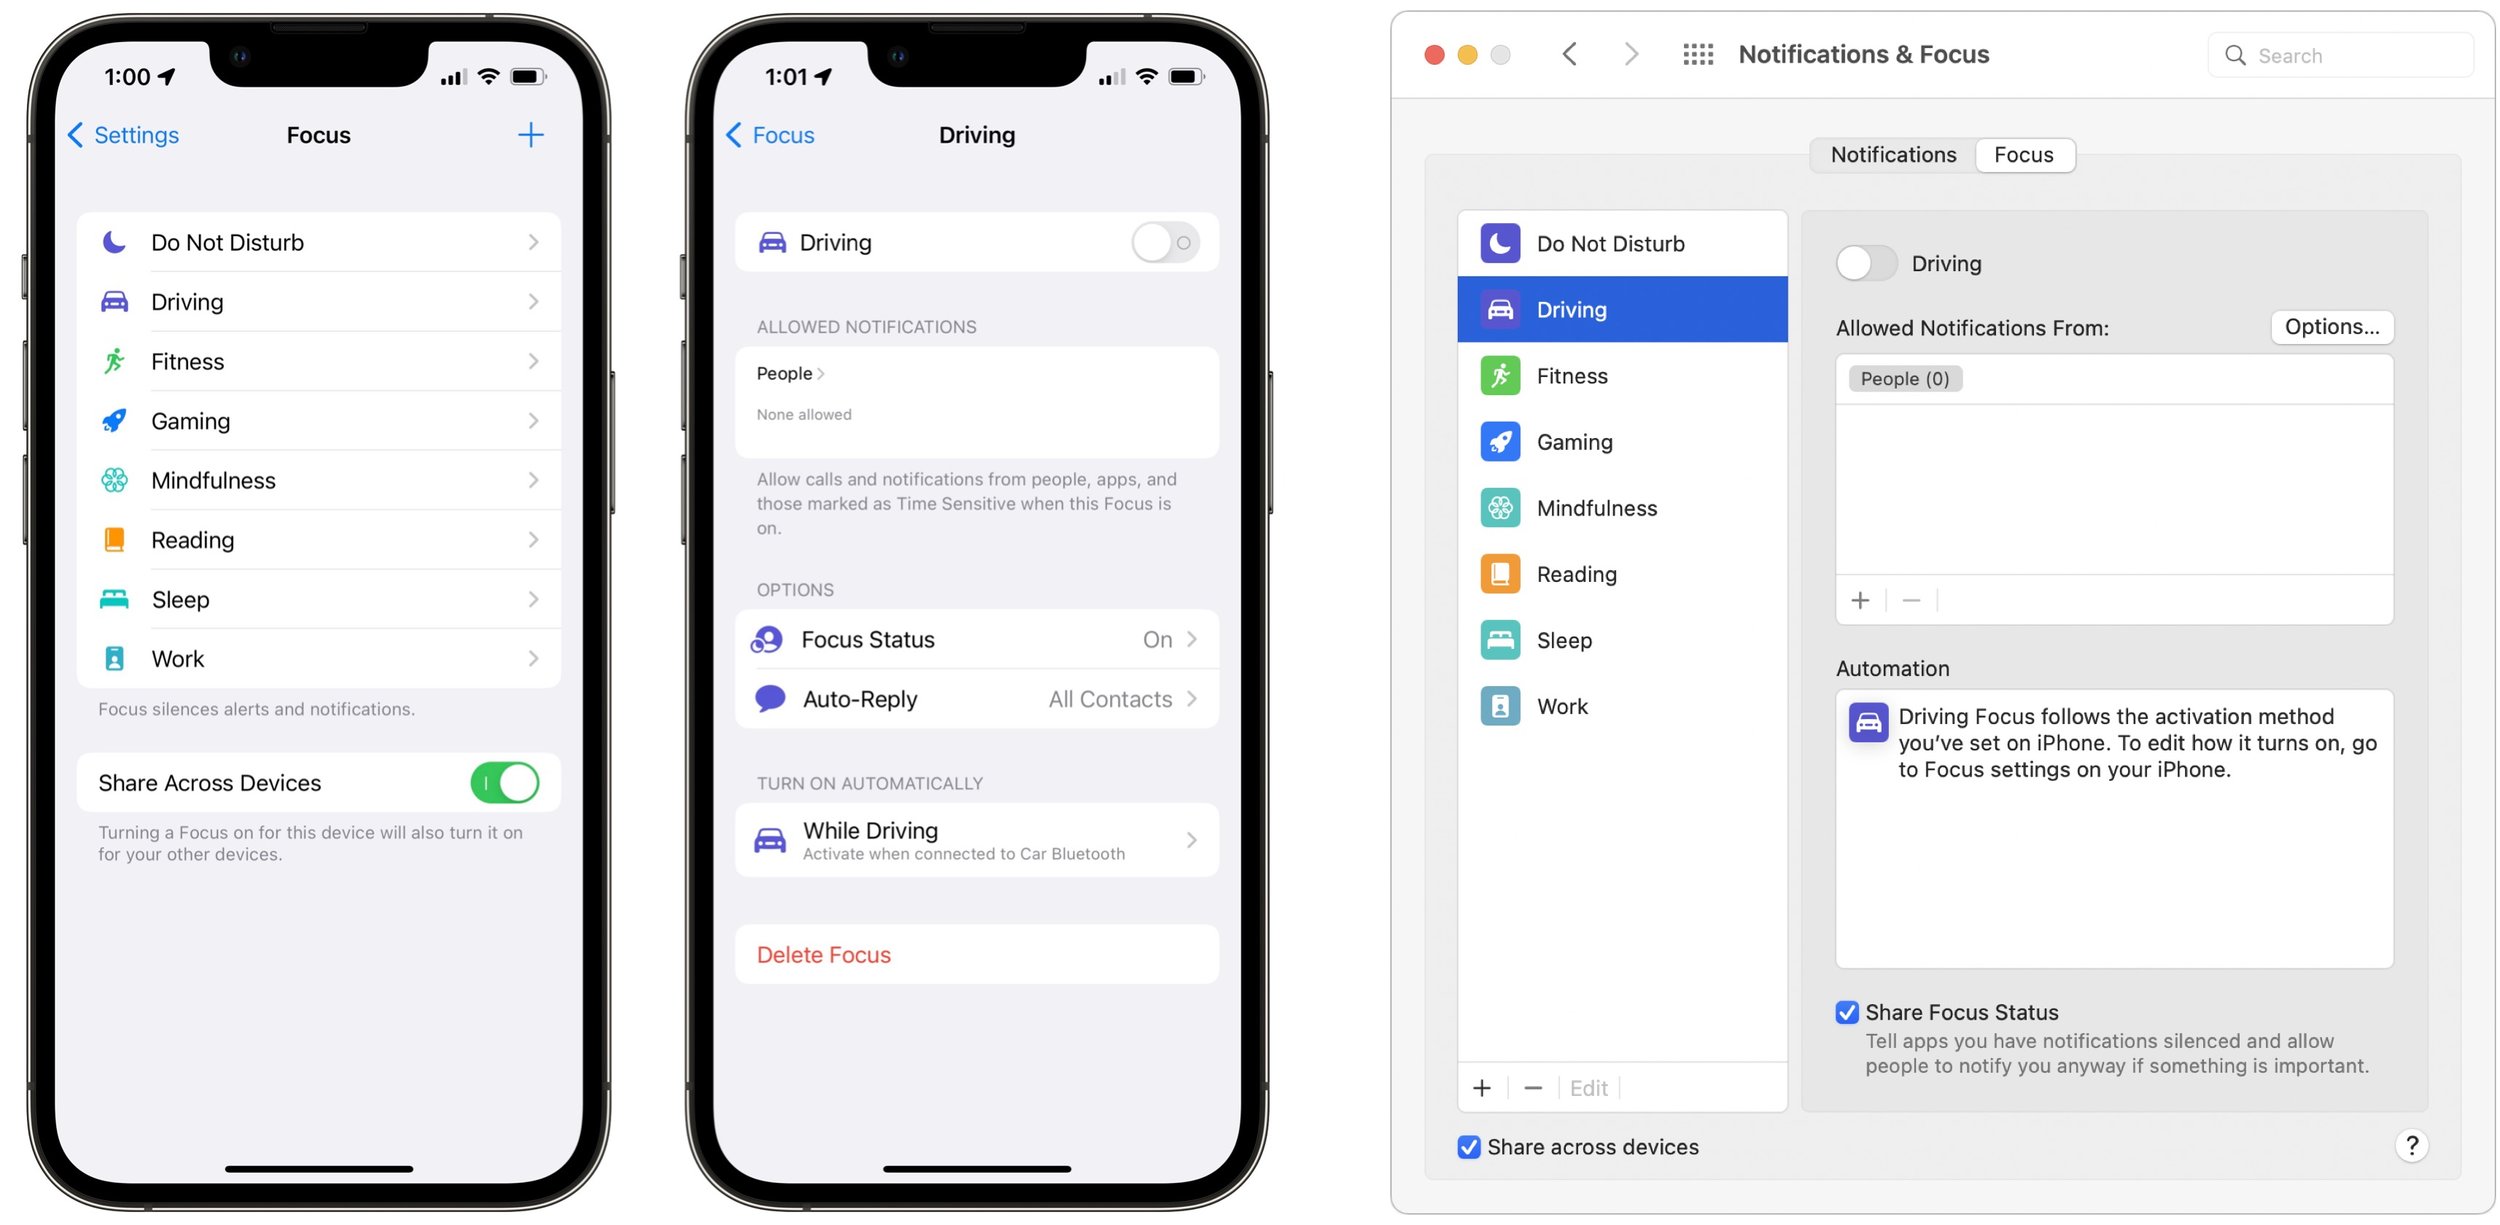
In Settings > Focus, Apple provides a pre-built Focus for Do Not Disturb, Driving, and Sleep to match the old Do Not Disturb options:
Do Not Disturb: This catch-all Focus takes over from the old Do Not Disturb setting.
Driving: This Focus replaces the old Do Not Disturb While Driving option. It’s unusual in that it doesn’t allow any app notifications through at all (eyes on the road!). It also lets you write a custom auto-reply for those who text you while you’re driving.
Sleep: If you use Apple’s sleep management features in the Health app, you’ll use this Focus to control which notifications can get through while you’re asleep.
Apart from those, Apple makes six suggestions: Personal and Work (in the main list), and Fitness, Gaming, Mindfulness, and Reading (when you add a new Focus). You can also create a custom Focus from scratch.

Apple’s suggestions are special in one important way. Fitness, Gaming, and Mindfulness can turn on automatically: when you’re engaged in a workout, when you connect a wireless controller, and when you’re in a Mindfulness session started from your Apple Watch, respectively.
When configuring a suggested Focus or creating a new one from scratch, Focus runs you through several setup screens. One has you choose people whose notifications you want to come through regardless, and what to do about incoming phone calls. The other screen lets you pick which apps can notify you when the Focus is active, with an additional option to allow notifications marked as Time Sensitive through regardless. (Time Sensitive notifications include timed Reminders alerts, for instance, and are usually best left enabled.)
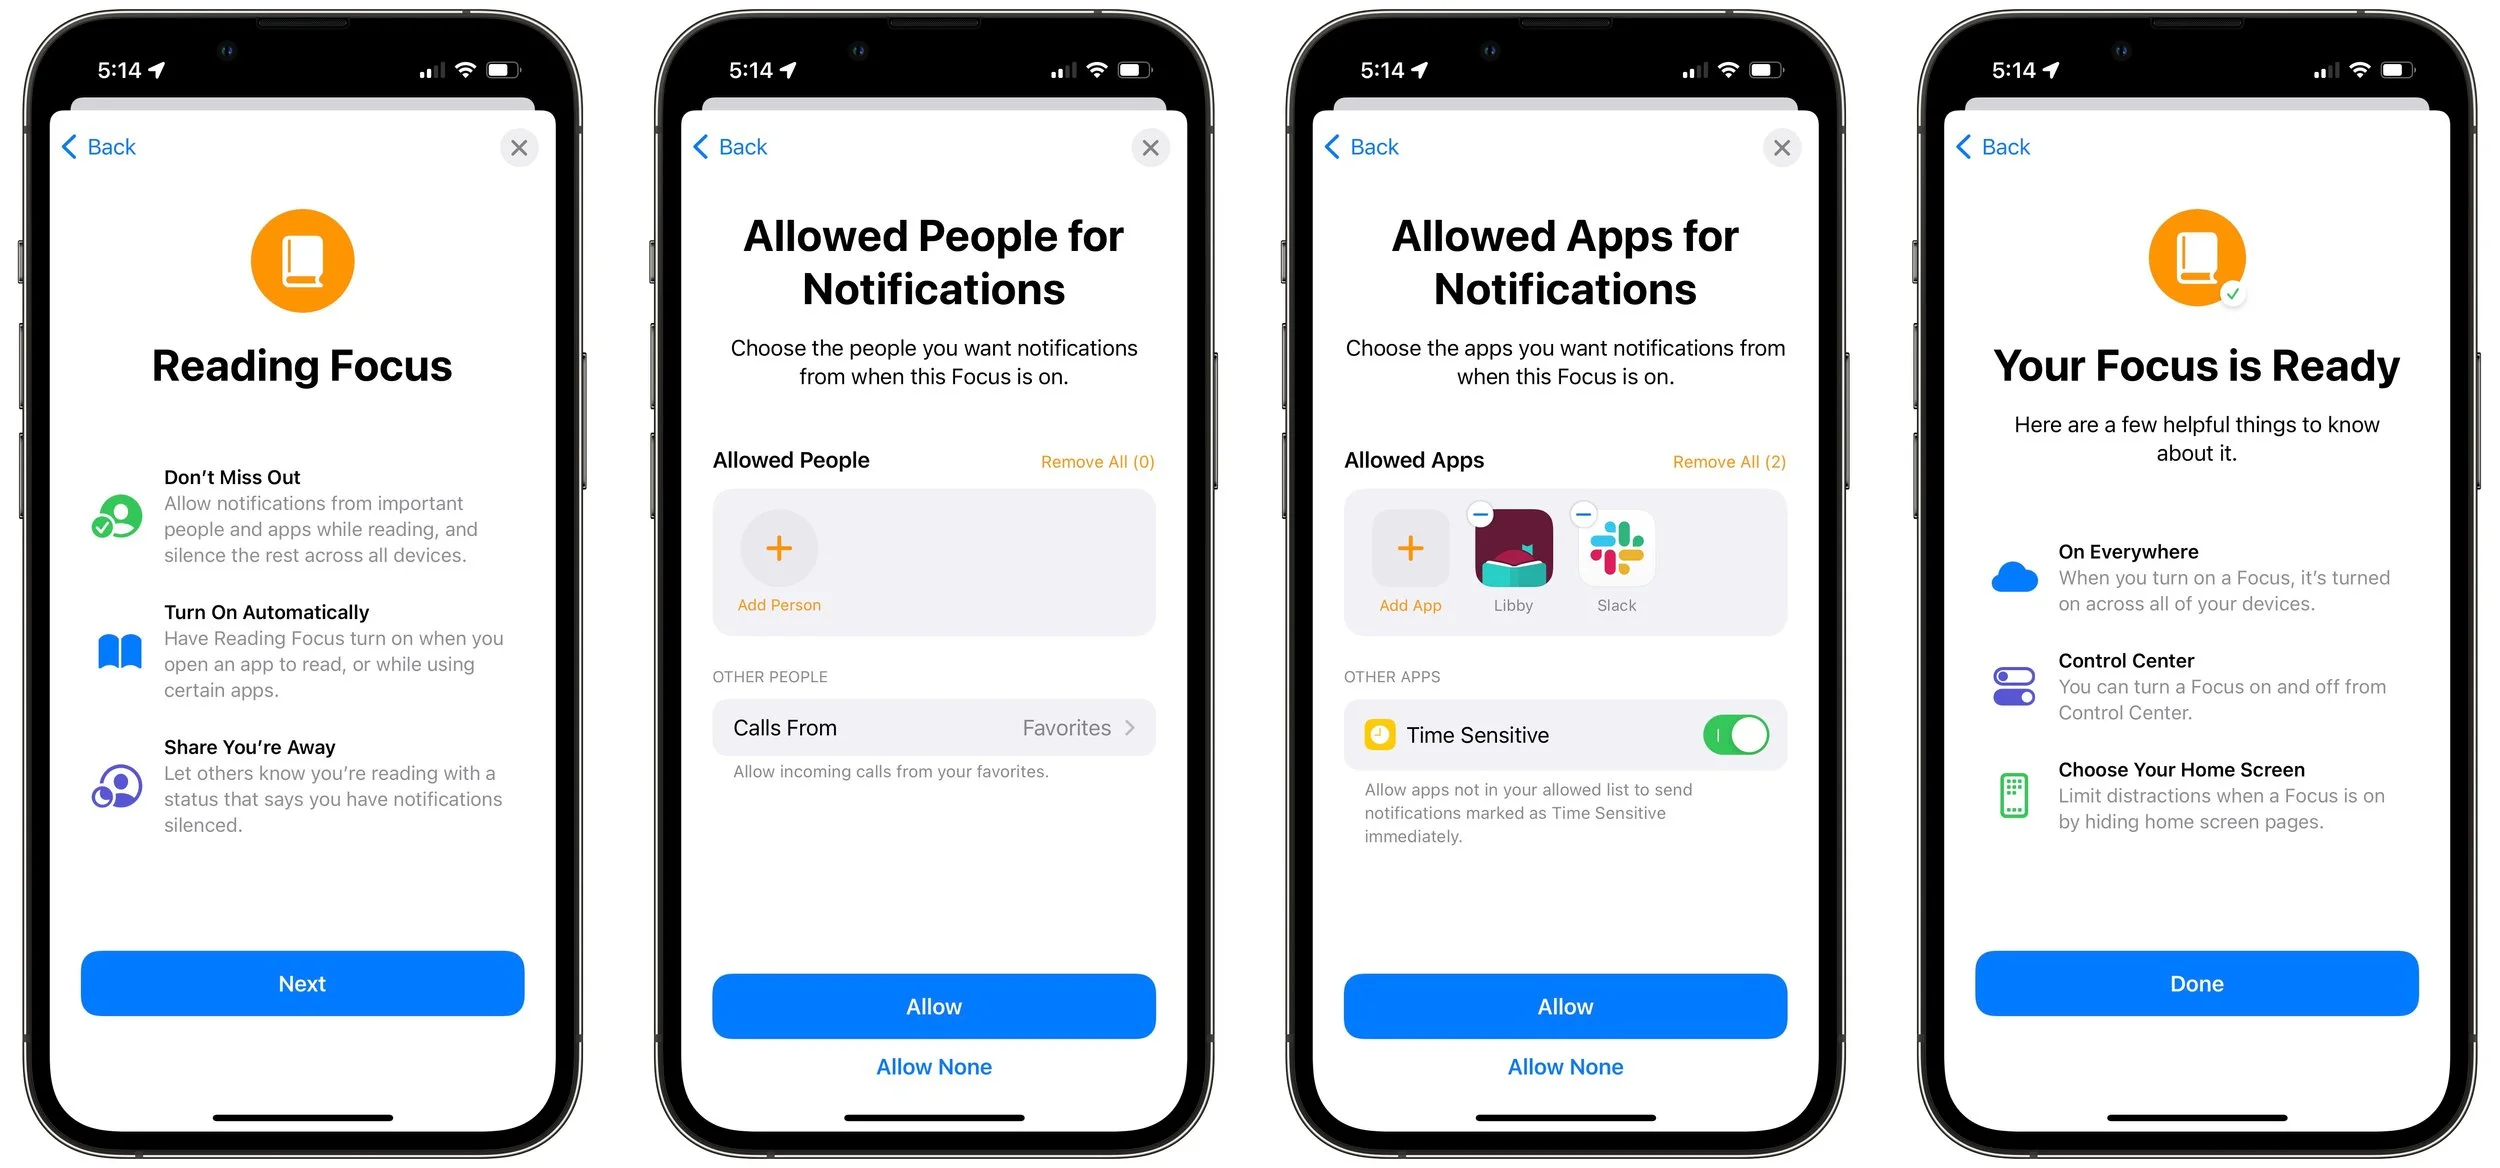
Once your Focus is ready, you can configure various options, including:
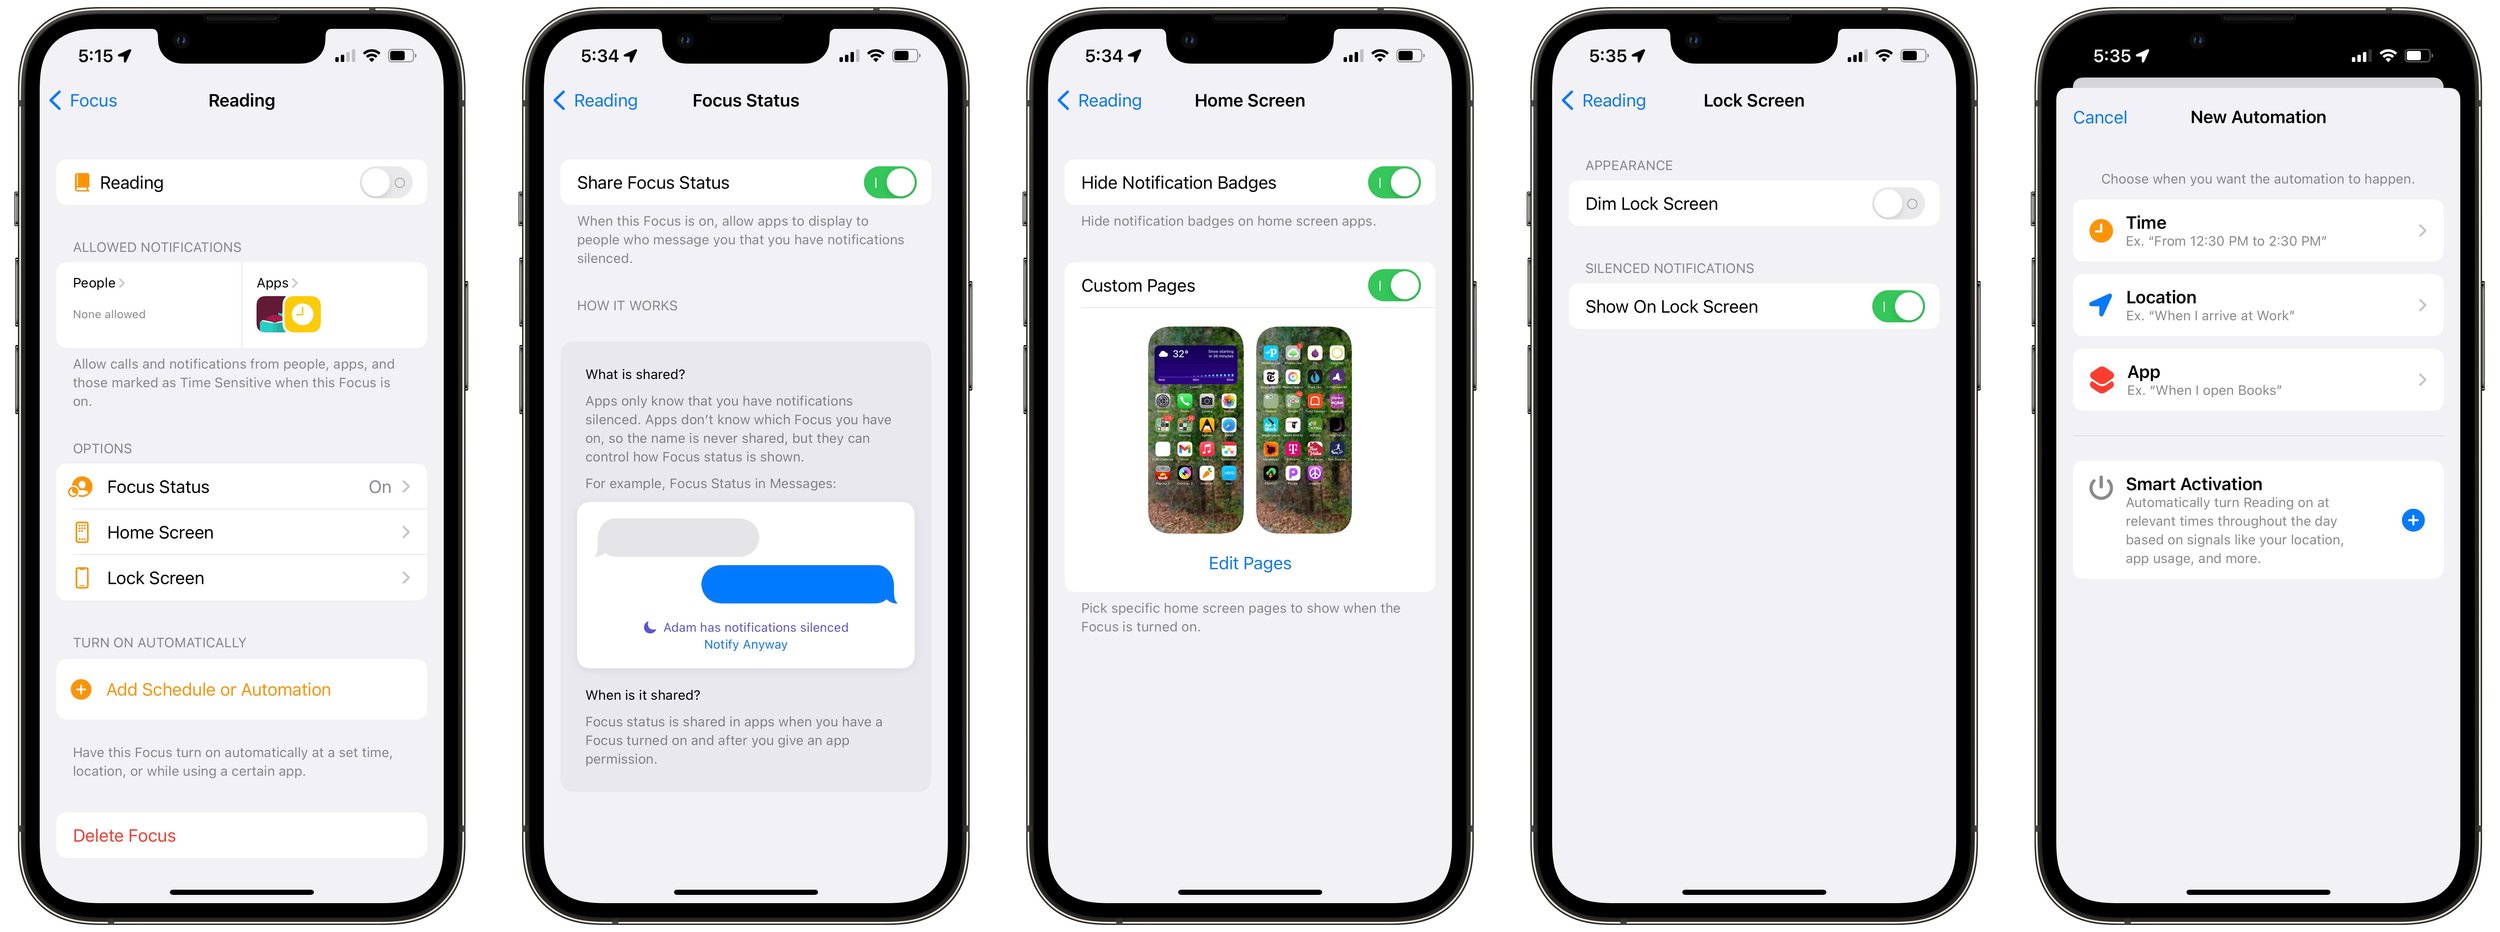
Focus Status: Enable this option to allow apps to alert those who message you that you have notifications silenced.
Home Screen: If your Focus involves you using the Home screen a lot, you can have it hide notification badges that might lure you into another app or even hide entire Home screen pages that could be distracting.
Lock Screen: If you might be looking at your Lock screen while the Focus is active, you can have it dim automatically and hide or show silenced notifications as appropriate.
Schedule or Automation: Although you can turn on any Focus from Control Center, it may be easier to have it turn itself on automatically at certain times, in particular locations, or when certain apps are active.
As with any new feature, it’s going to take a bit to figure out how to make Focus work best for you. We’re still learning it ourselves, but here are some recommendations:
To identify when a Focus would be helpful, wait until you find notifications irritating and then think about which ones you’d want a Focus to block.
Create just one or two Focuses at first. You don’t want to end up with a bunch that interact in unexpected ways and cause you to miss important notifications.
Be careful with schedules and automations. An automation that invokes the Reading Focus when Books is open might work well for reading before bed but could be problematic if you read while waiting for a meeting to start.
It may be safest to allow silenced notifications to appear on the Lock screen so you can easily see what you missed afterward and adjust the Focus as necessary.
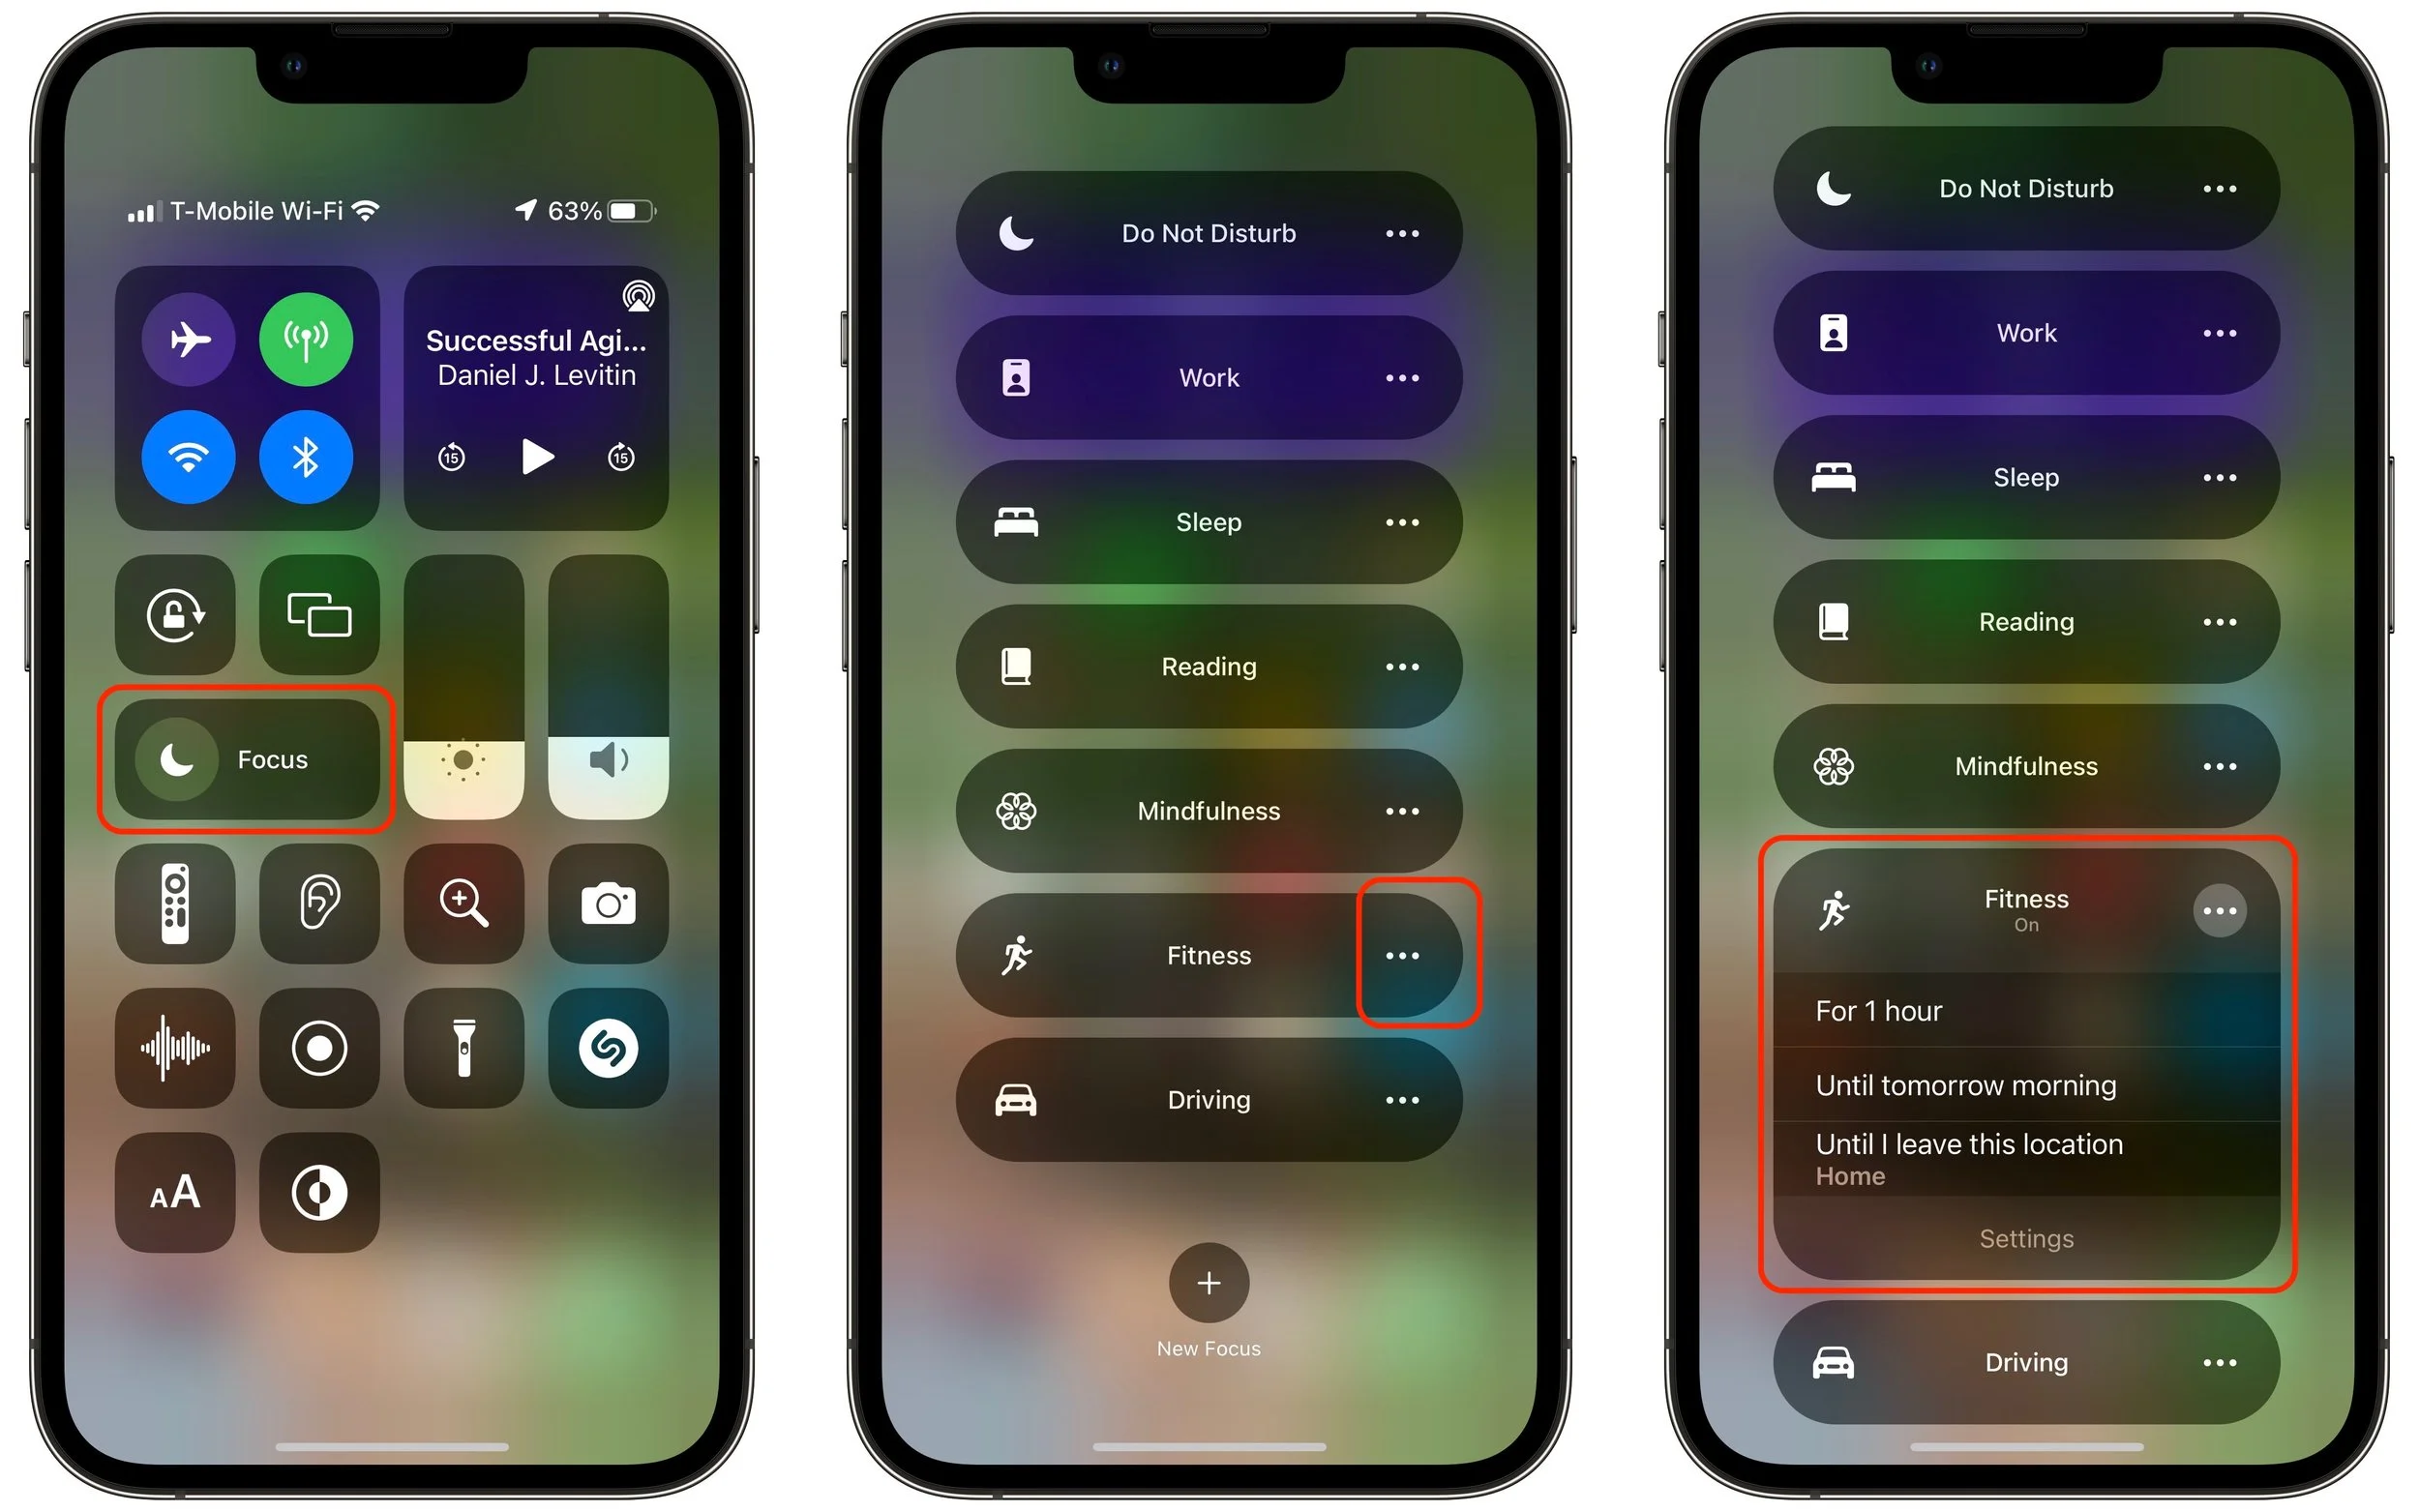
You can manually invoke a Focus by tapping the Focus button in Control Center and selecting the one you want. Tap the ••• button to the right of the Focus to specify when it should turn off automatically, or just tap the Focus again to turn it off.
Newness aside, Focus looks like it will help us all cut down on distracting notifications. And if all else fails, stick with just Do Not Disturb, Driving, and Sleep to replicate what we had before.
(Featured image by iStock.com/Daisy-Daisy)
Should You Use Apple’s New Password Manager in iOS 15, iPadOS 15, and macOS 12 Monterey?
Should you start using Apple’s built-in password manager? Most Apple users probably have at least some passwords stored there already, and our article explains who can benefit from it right away and how it differs from popular third-party password managers.

We continually recommend that every Apple user rely on a password manager like 1Password or LastPass for creating, managing, and entering passwords securely. What we haven’t encouraged as heavily is relying on Apple’s built-in password management features. Although they’re free, they’ve been too basic and hard to use over the years, relying largely on an ancient utility called Keychain Access.
However, with the release of iOS 15, iPadOS 15, and macOS 12 Monterey, Apple has at long last created a coherent platform-wide interface—the bluntly named Passwords—for viewing, editing, and deleting passwords on each of its platforms. You might wonder if you need a separate password manager anymore. First, let’s dispense with two common scenarios:
Start if you’re new to password management: If you have so far resisted adopting a password manager, you should start using Passwords on your Apple devices immediately. In all likelihood, you already have some login credentials stored there.
Don’t switch if you like your password manager: If you’re already using another password manager that you like, there’s no reason to switch to Apple’s password manager. It’s fine, but it doesn’t offer any capabilities beyond most independent password managers.
Those who are already using a password manager but aren’t entirely happy with it or would prefer not to pay for it face a tougher decision. How much your password manager is worth to you is a question only you can answer, but would Apple’s Passwords provide the features you need? Here’s what it can do:
Create strong passwords: Safari suggests strong passwords when it detects that you’re creating a new login. In iOS and iPadOS, make sure Settings > Passwords > AutoFill Passwords > AutoFill Passwords is enabled. On the Mac, make sure Safari > Preferences > Autofill > User Names and Passwords is selected.

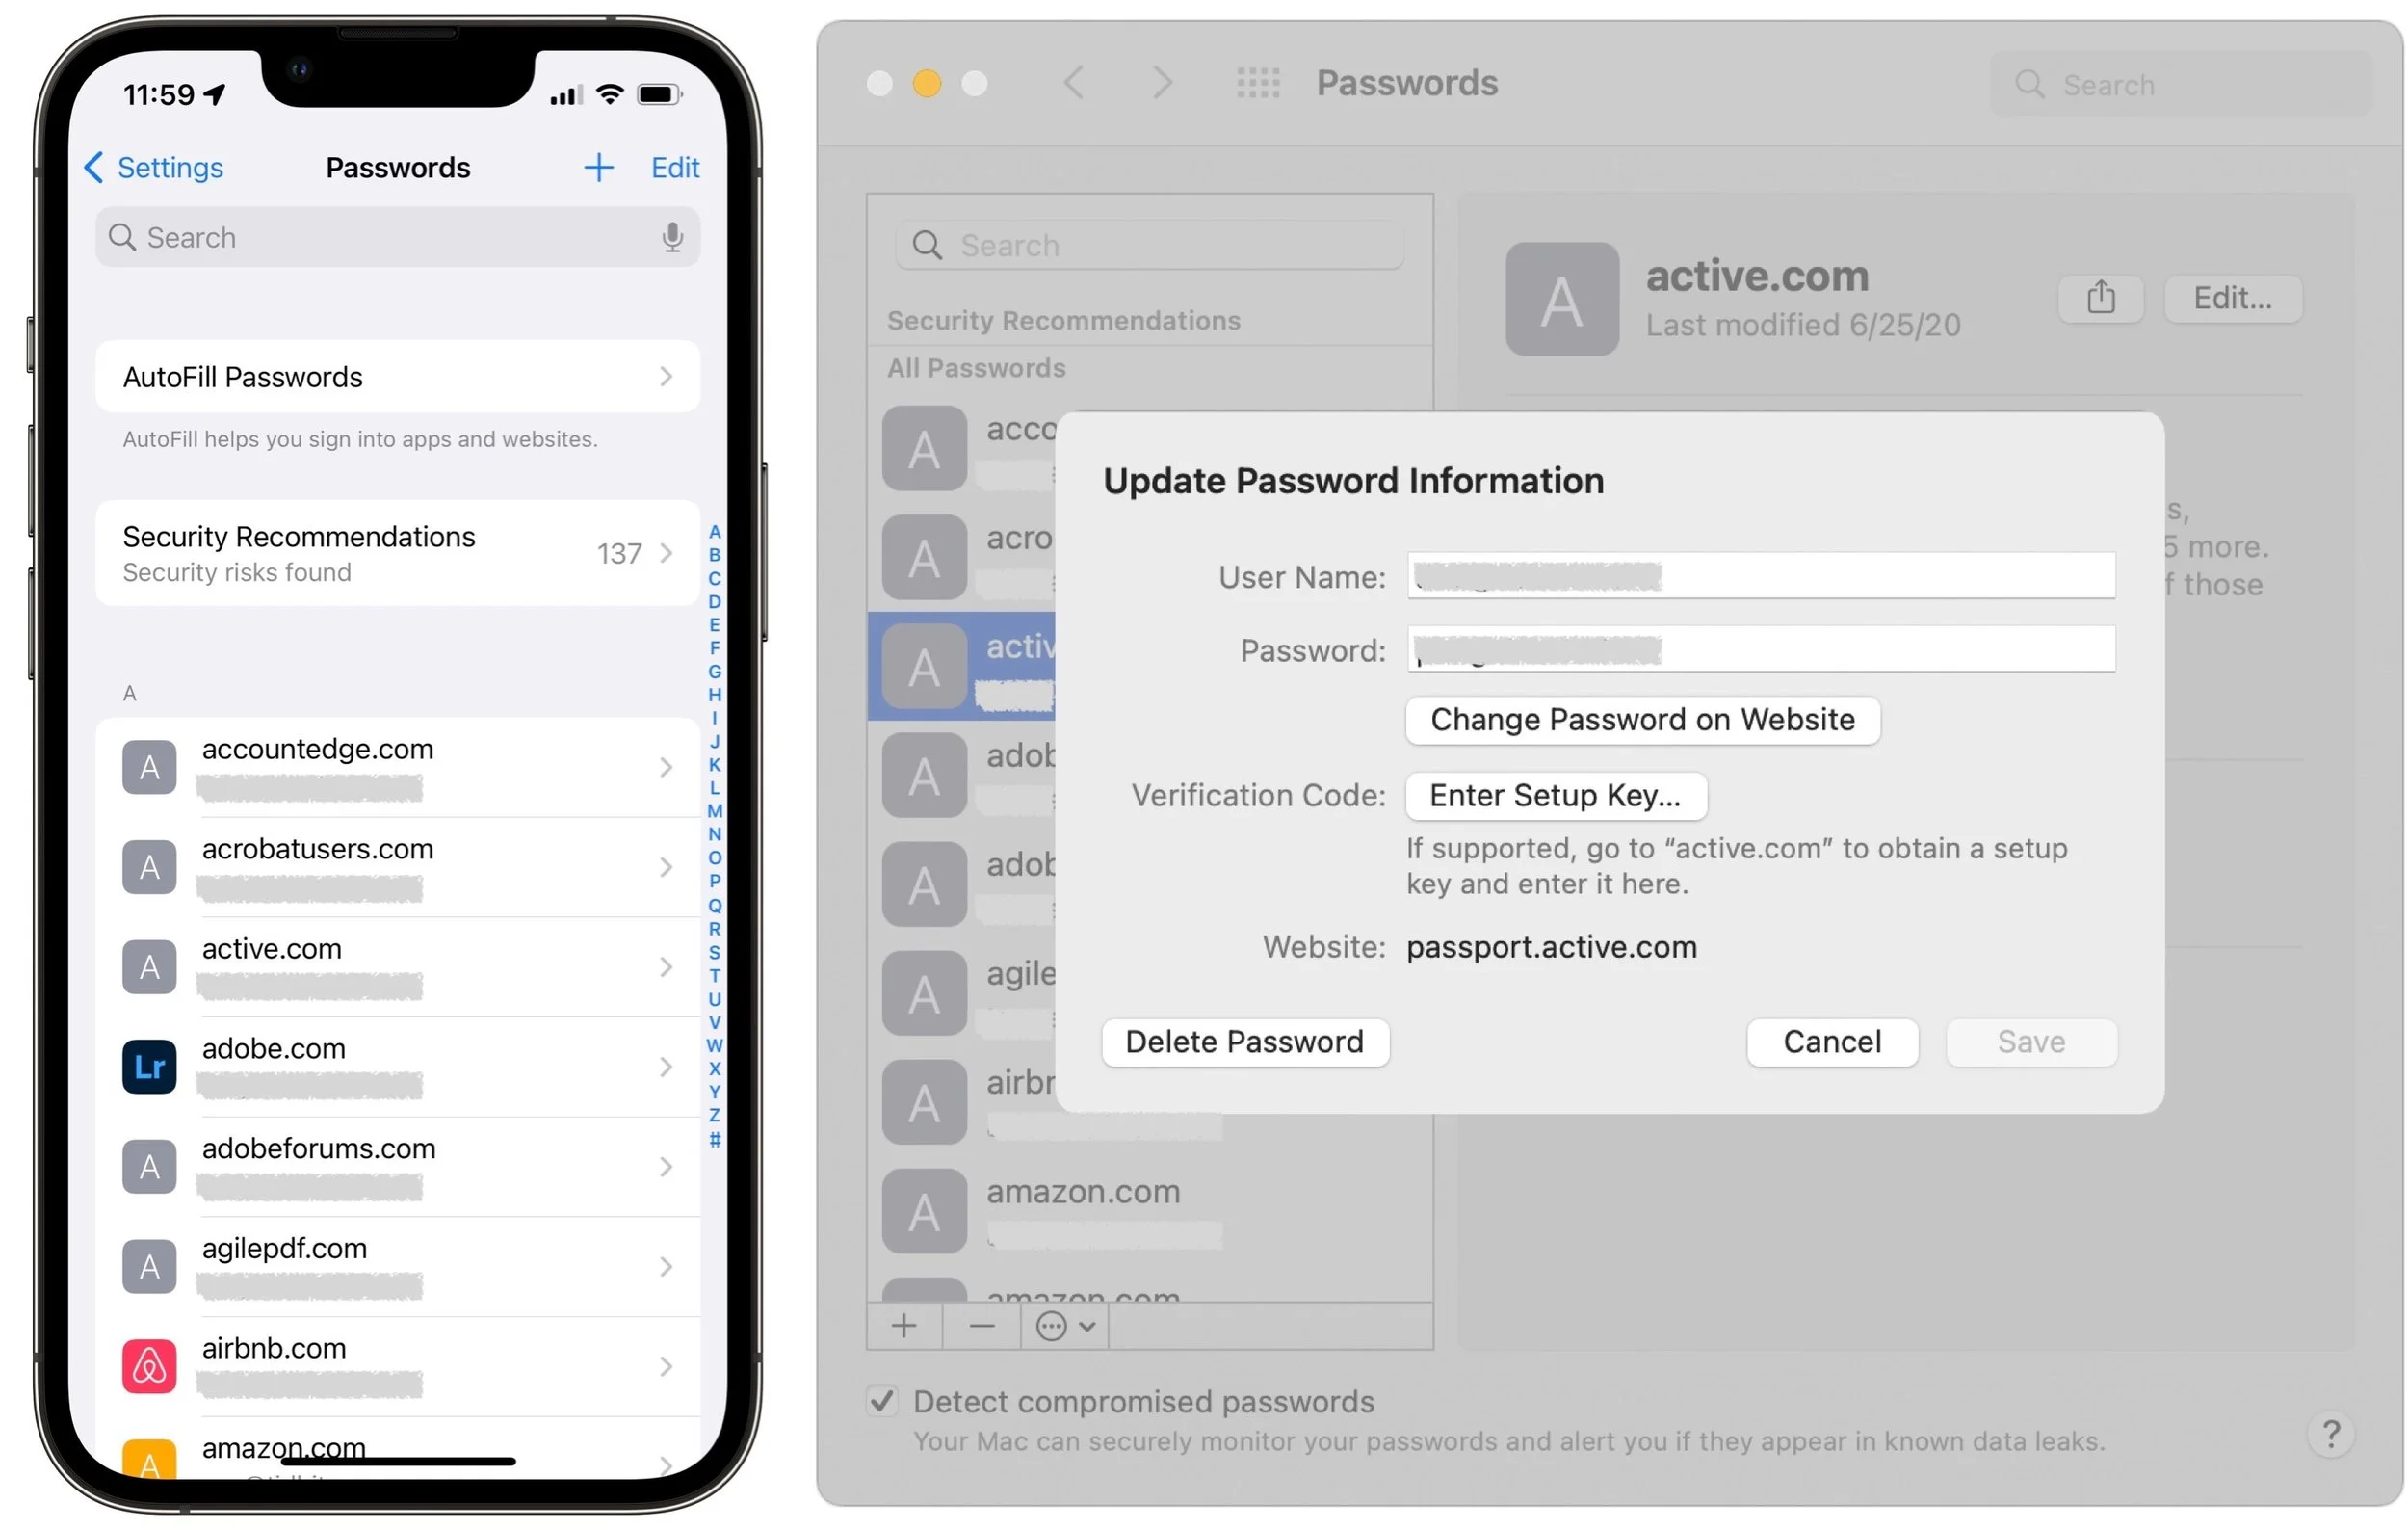
Manage passwords: To see all your passwords, look in Settings > Passwords in iOS 15 and iPadOS 15, and in System Preferences > Passwords in Monterey. Tap or click one to view its details; once inside, use Edit to make changes. You can delete an unused login while editing or from the list. In iOS and iPadOS, swipe left on a login and tap Delete; on the Mac, Control-click the login and choose Delete.
Sync passwords: Passwords are most useful when they’re accessible on all your devices. That will be true as long as Settings > Your Name > iCloud > Keychain > iCloud Keychain is enabled in iOS and iPadOS, and System Preferences > Apple ID > iCloud > Keychain is selected on the Mac. And, of course, all your devices must be signed in to the same iCloud account.
Autofill passwords: As long as the autofill settings mentioned earlier are active, Safari will offer to autofill passwords when you log in to a site whose credentials you’ve stored. iOS and iPadOS apps also support autofill through the keyboard.

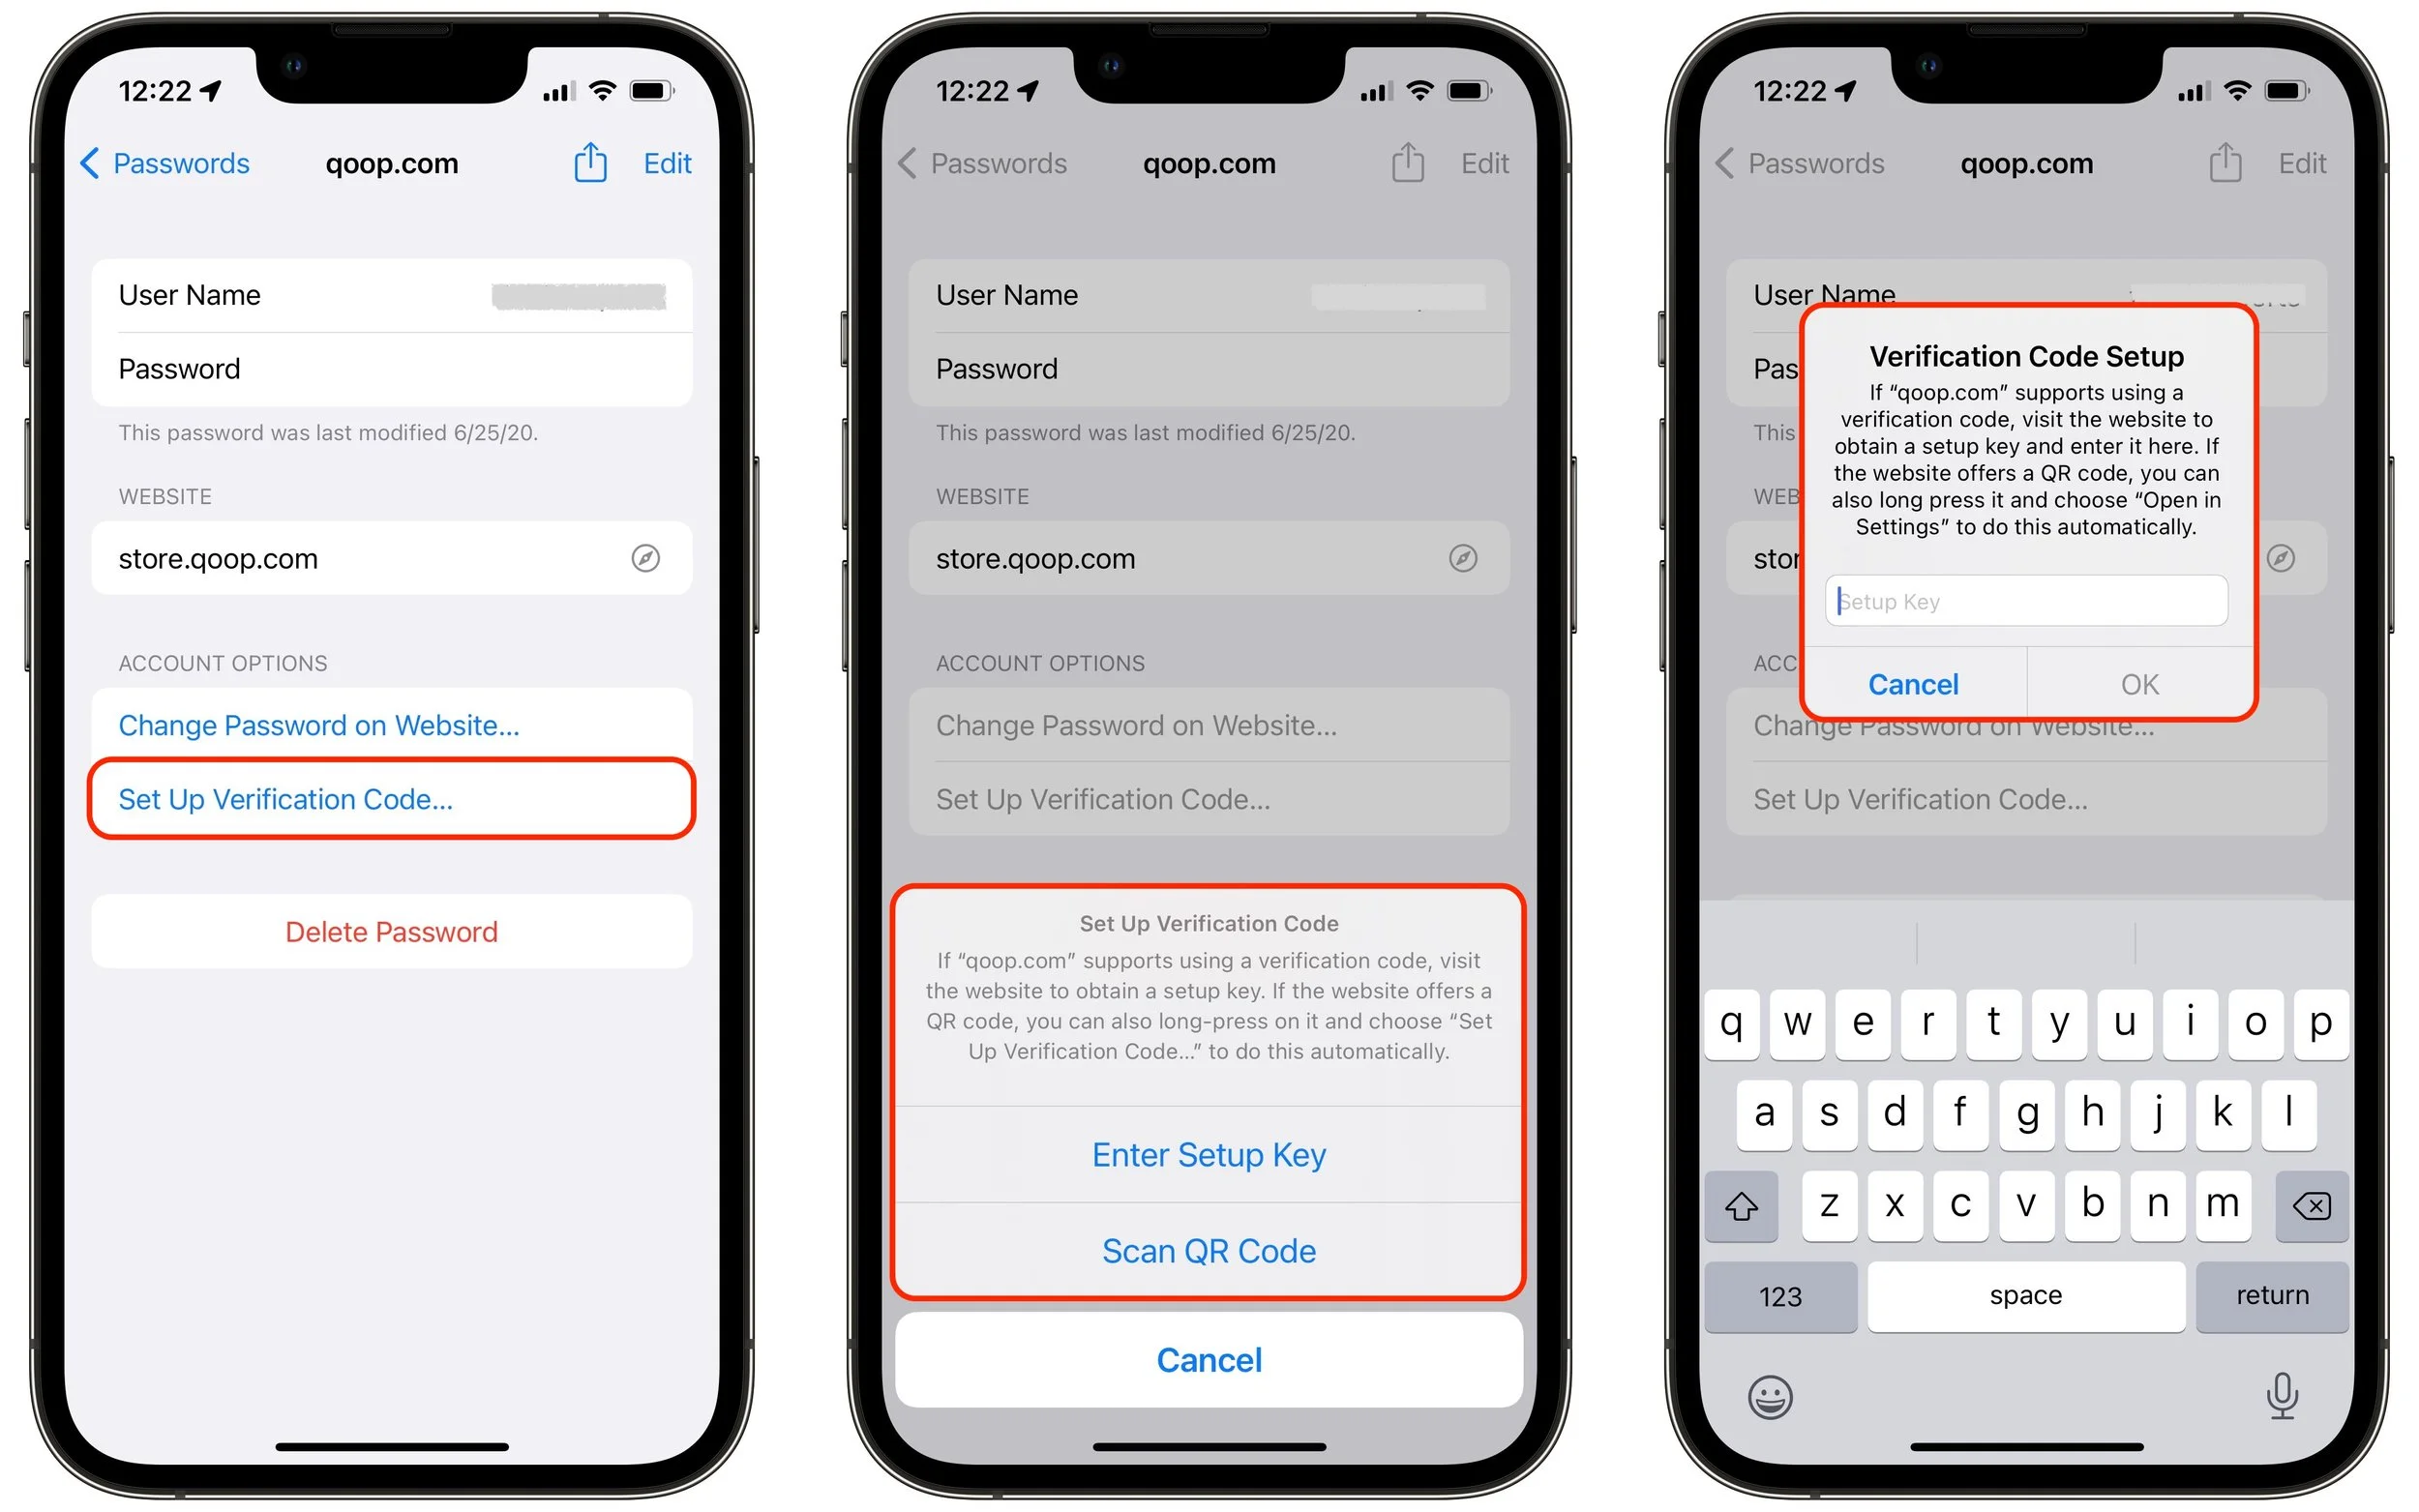
Support two-factor authentication (2FA): This new feature allows you to add the setup secret (usually a scanned QR code or manually entered key) that enables the creation and automatic entry of 2FA codes.
Import and export passwords: In the Passwords preference pane on the Mac, you can now import and export passwords, simplifying migration.
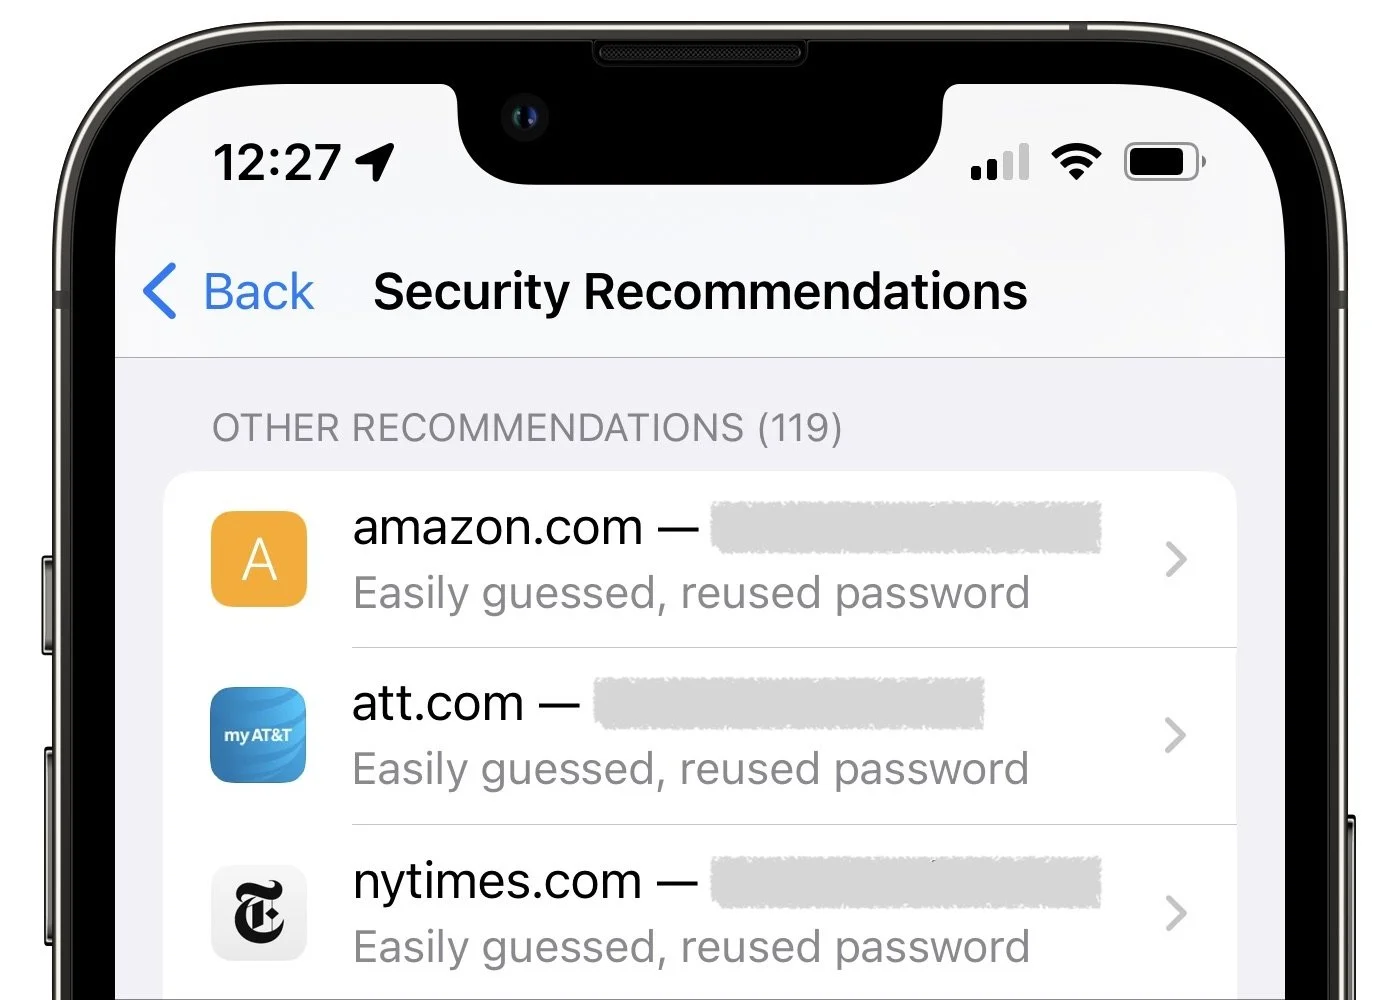
Report questionable passwords: We all have passwords that are easily guessed or reused on multiple sites—the Passwords interface calls out such passwords so you can change them.
Share passwords: If you need to share a password with a family member or colleague, the Share button lets you do that via AirDrop. Passwords are saved into the recipient’s keychain directly.
Detect compromised passwords: Both Settings > Passwords > Security Recommendations and System Preferences > Passwords have a Detect Compromised Passwords option. Select it to be alerted if any of your login credentials are compromised in a site’s security breach.
That’s a solid set of features, and for many people, it will be sufficient. However, independent password managers like 1Password and LastPass have evolved over many years and boast very real advantages:
Multiple platforms and Web browsers: Apple’s password management features focus on Apple operating systems and Safari. There is an iCloud Passwords Chrome extension for Windows, and Web browsers in iOS and iPadOS can tie into the system-wide password features. But for broad support across platforms and use within browsers other than Safari, stick with an independent password manager.
Data beyond Web logins: Want to store your bank account numbers, driver’s license, credit cards, vaccination card, and the like in your password manager? Many independent password managers support secure storage of types of data beyond logins. They also often let you leave notes on items and include file attachments—a screenshot of a screen summarizing login requirements, for instance.
Families and teams: Although Apple is inching in this direction with the forthcoming Digital Legacy program, in which you can specify someone as a Legacy Contact so they can access to your iCloud account in the event of your death, the group sharing features of independent password managers are much more useful here and now. Share key passwords with your spouse or your college-bound child to ensure that everyone will have the access they need to shared accounts.
One-time password sharing: 1Password added this feature recently, and there are independent sites like 1ty.me and onetimesecret.com that provide it as well. In essence, it lets you securely share a single password with anyone else, embedding it in a link that can be viewed only once. That prevents passwords from being sent around in email or text messages where they could be stolen.
In the end, Apple’s new password management features are like so many other built-in features. They offer the basic capabilities that most users need while leaving plenty of room for enterprising developers to offer compelling additional features. Use Apple’s Passwords or another password manager, whichever you prefer. Just don’t rely on a simple text file or physical notebook to manage passwords. It’s more work, easily lost, and far less secure.
(Featured image by iStock.com/peshkov)
Need to Resize Images in Various Ways? Give Preview a Try
If you need to work with graphics occasionally but lack professional tools and experience using them, give Preview a try. It’s on every Mac and is surprisingly capable. Follow along with our tutorial at:

Even those of us who don’t work with graphics professionally often find ourselves needing to resize images. Perhaps you have a large square headshot, but the site to which you’re uploading requires it to be exactly 100 by 100 pixels. Or maybe you have an iPhone 13 Pro photo that’s 4032 by 3024, but you need the long side to be 1280 pixels and the short side to be 800 pixels. You might even need to cut out an 800-by-600 rectangle from a much larger image.
These tasks are easily accomplished with professional graphics apps like Photoshop, but you don’t need to pay for or learn Photoshop for a quick resizing and cropping of an image. That’s because Preview, which is built into macOS, can do many of these tasks with aplomb.
One note: You can resize images to be smaller with little or no loss of quality, but you can’t make images bigger without them looking fuzzier unless you employ specialized tools.
Shrink an Image without Changing Aspect Ratio
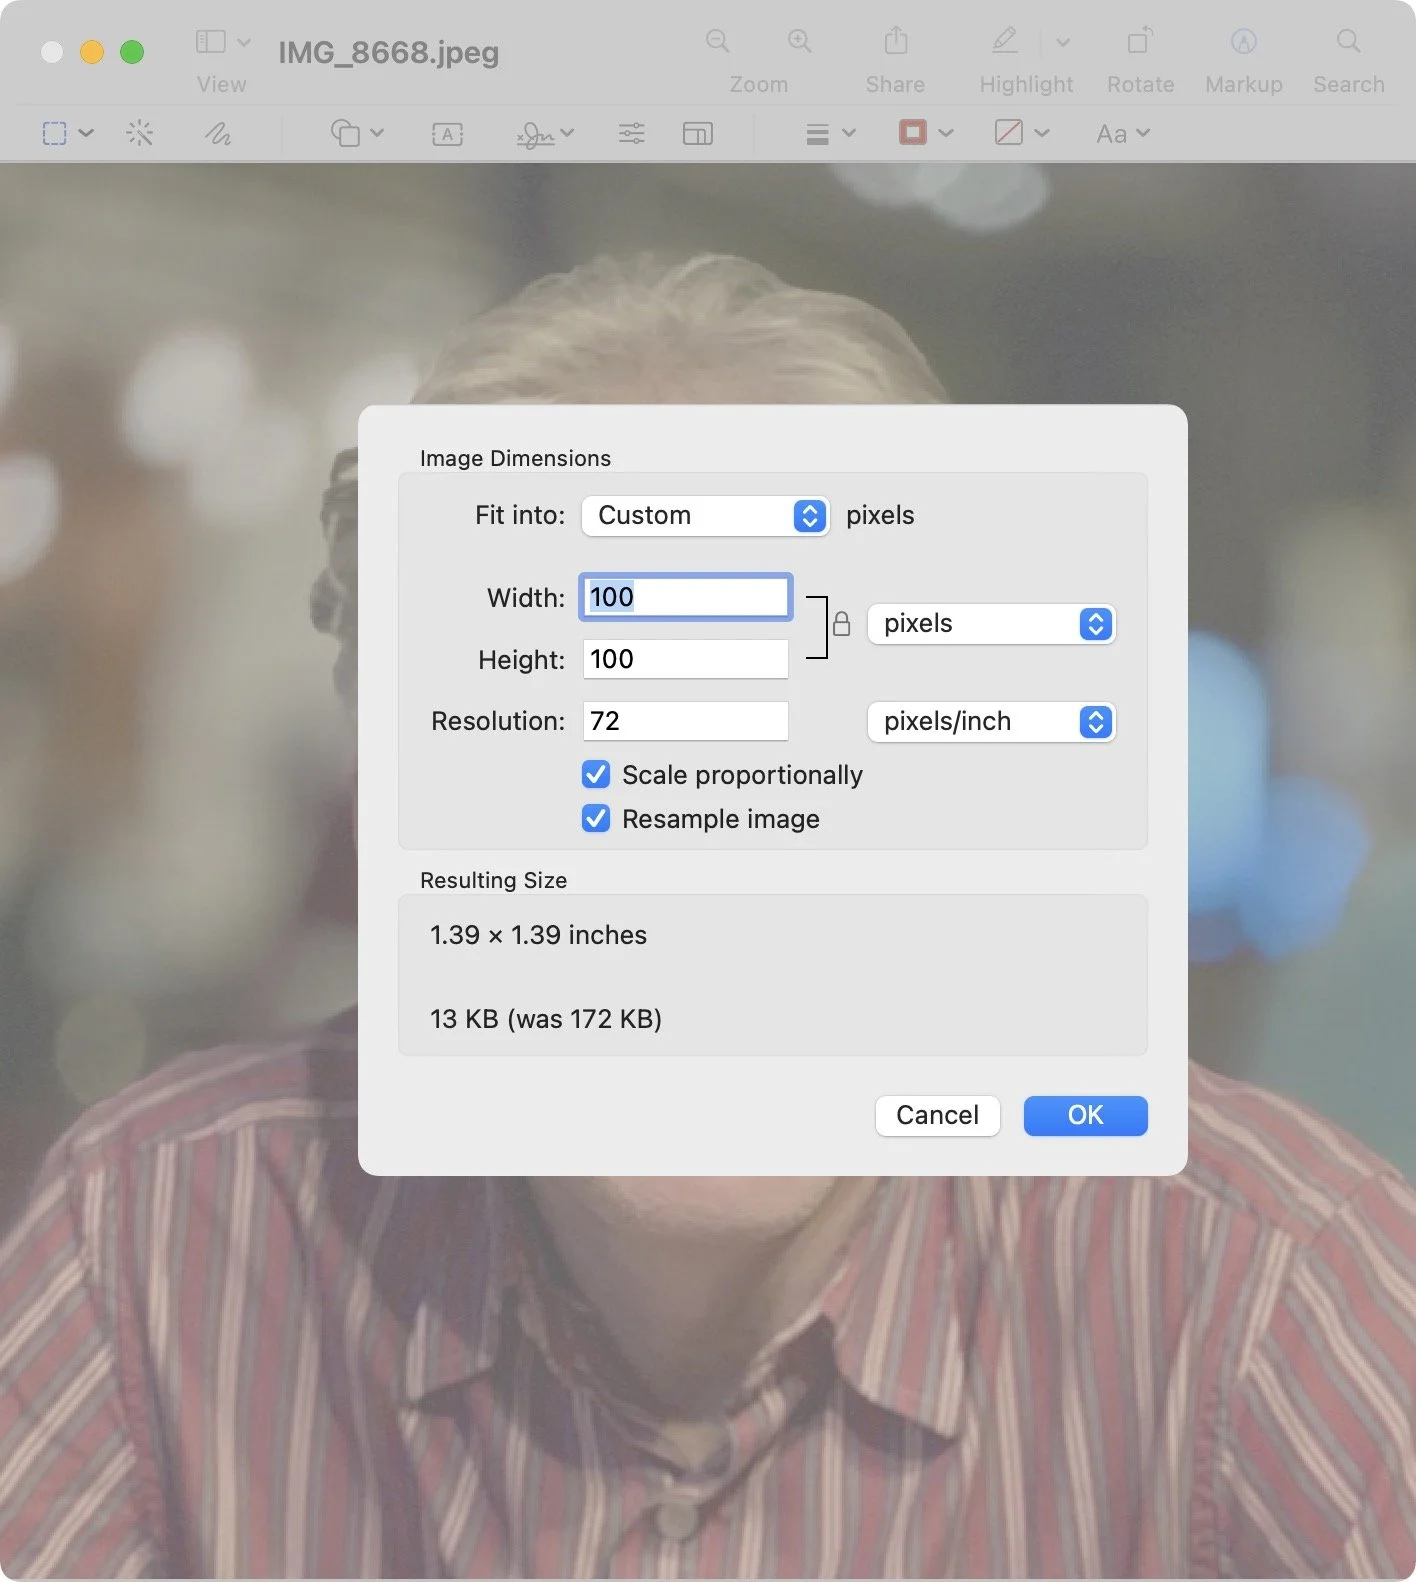
Let’s take our first example above. We have a square headshot that we need to upload to an account, but the site won’t accept an image larger than 100 pixels square. To shrink the image to the specified size, we’ll first make a copy in the Finder or we’ll open the file in Preview and choose File > Duplicate. Then, with the image open in Preview, we’ll choose Tools > Adjust Size, make sure “pixels” is chosen to the right of the Width and Height fields, and enter 100 into the Width field. Because Scale Proportionally is selected, Height automatically changes to 100 to match. We’ll click OK to exit the dialog and then save the file.
Shrink an Image and Crop to Different Dimensions
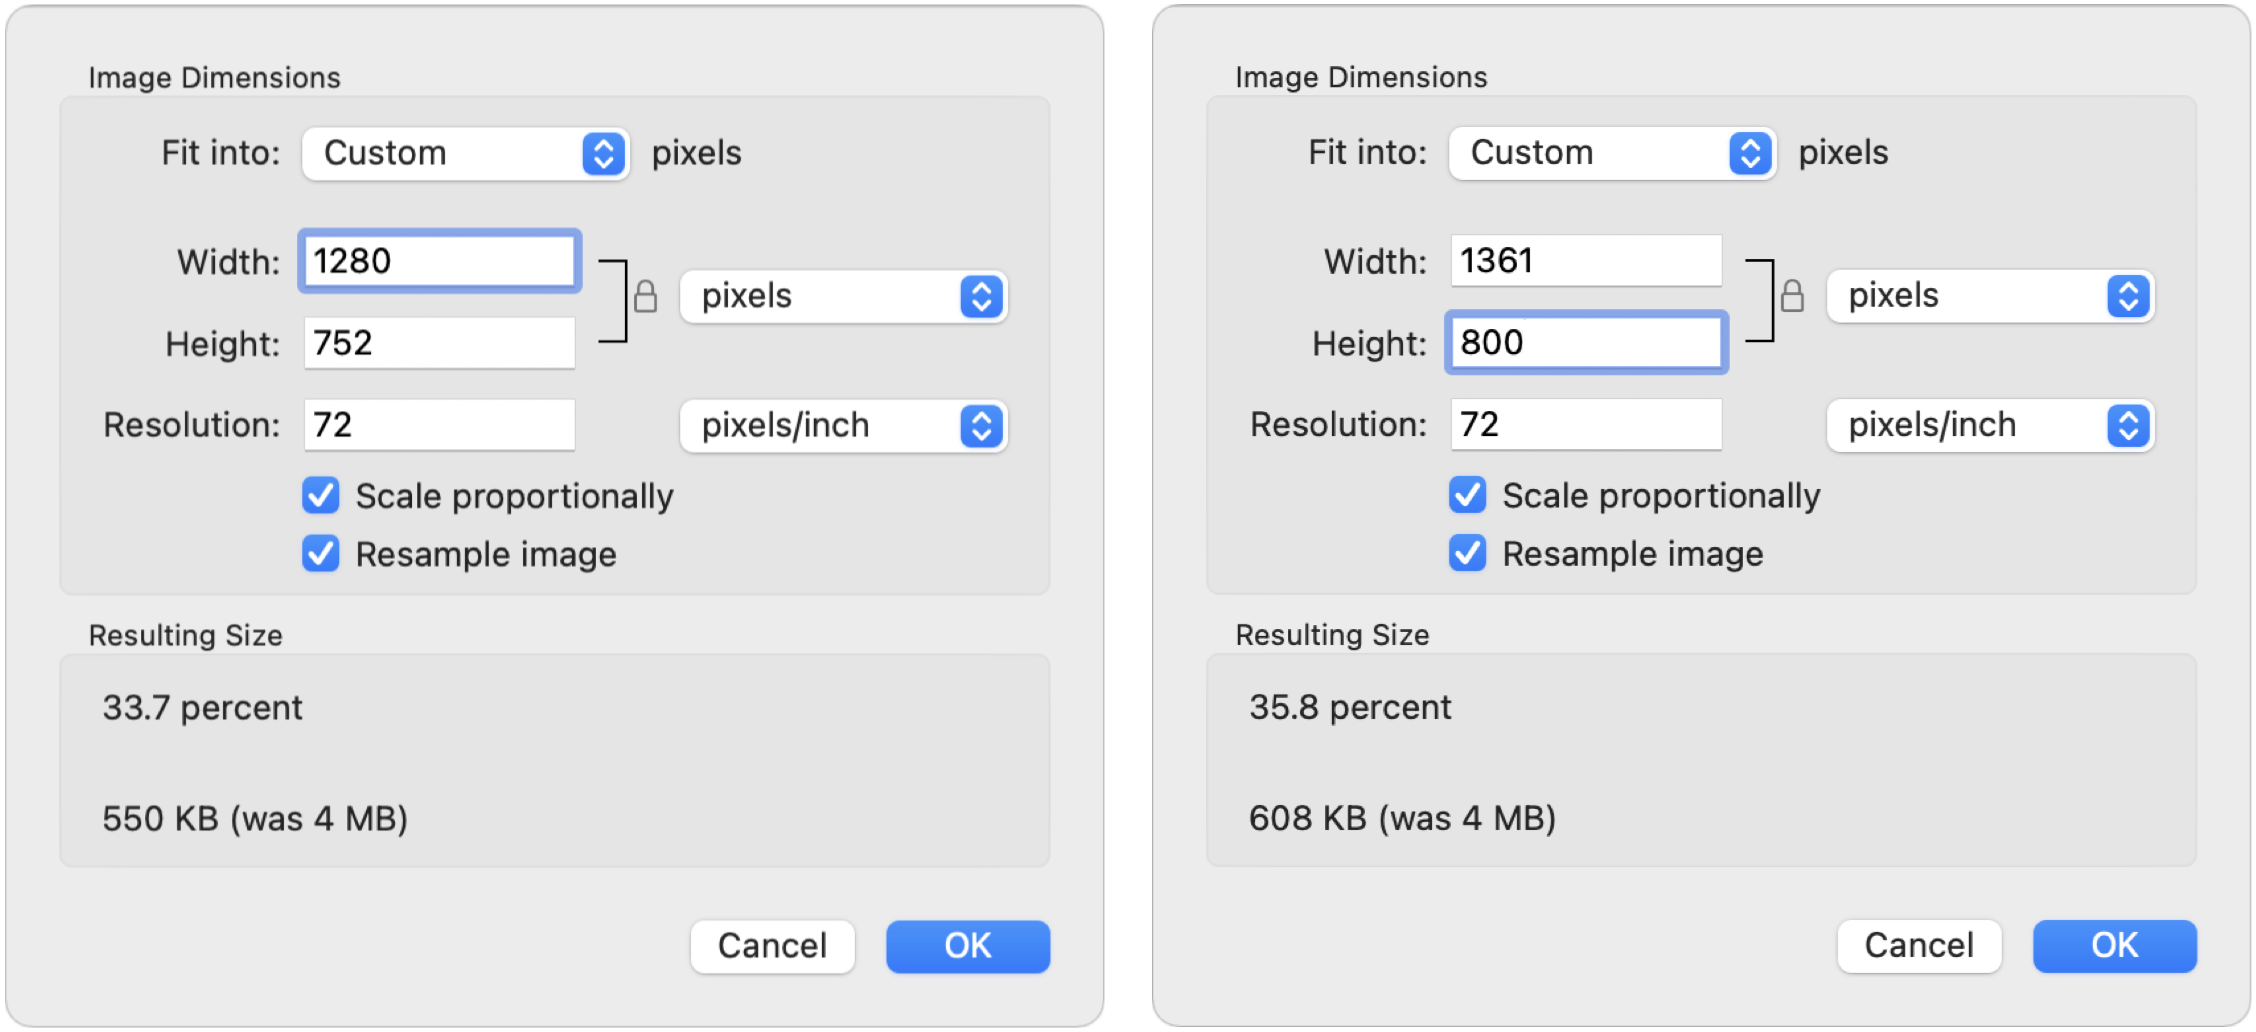
Let’s move on to our second example above. We have a photo of some home-baked bread loaves that we’ve taken with the iPhone, and we need to resize it to 1280 by 800 pixels before uploading it to our food blog. There are two problems: the image is much larger than we need to start, and when we try resizing it to the desired pixel count in one dimension, the other dimension is wrong.
We’ll start the same way we did before, by making a copy of the original and in Preview choosing Tools > Adjust Size. In the Image Dimensions dialog, we’ll first type 1280 into the Width field. In this example, doing that causes the Height field to change to 752, which is too small (below left). Remember, shrinking images is easy and works well, but expanding them is hard. So instead, we’ll type 800 into the Height field, which causes the Width field to change to 1361 (below right). That’s good; we’ll click OK to resize the image. It will look small, but we can zoom it back to the window size by choosing View > Zoom to Fit.
For the next step, we need to get the image width down from 1361 to 1280 pixels, which we do by cropping. Choose Edit > Select All (or just press Command-A), and notice that there’s a selection rectangle around the entire image, with blue drag handles in the middle of each side and at each corner. We’ll need to take some off each side to keep the loaves centered, so we’ll drag the left side in a little to start. If you have trouble grabbing the blue drag handles instead of the edge of Preview’s window, choose View > Zoom Out to zoom out one step and separate the handles from the window edges.

Next, we’ll drag the right side in. Notice that as we drag, Preview displays the image dimensions in a little lozenge (at the right in the screenshot)—we’ve stopped at 1280. Since we’re moving only the edges, only the width changes—resizing from the corners would be much harder because both dimensions would change simultaneously.
One tip. If you’ve gotten the selection rectangle to 1280 by 800, but the content under it isn’t centered as you’d like, press and hold the left or right arrow key to move the selection rectangle to the left or right.
Once we have the selection rectangle at the right size and in the right place, we’ll choose Tools > Crop to discard the image content outside the selection.
Extract a Portion of an Image with Specific Dimensions
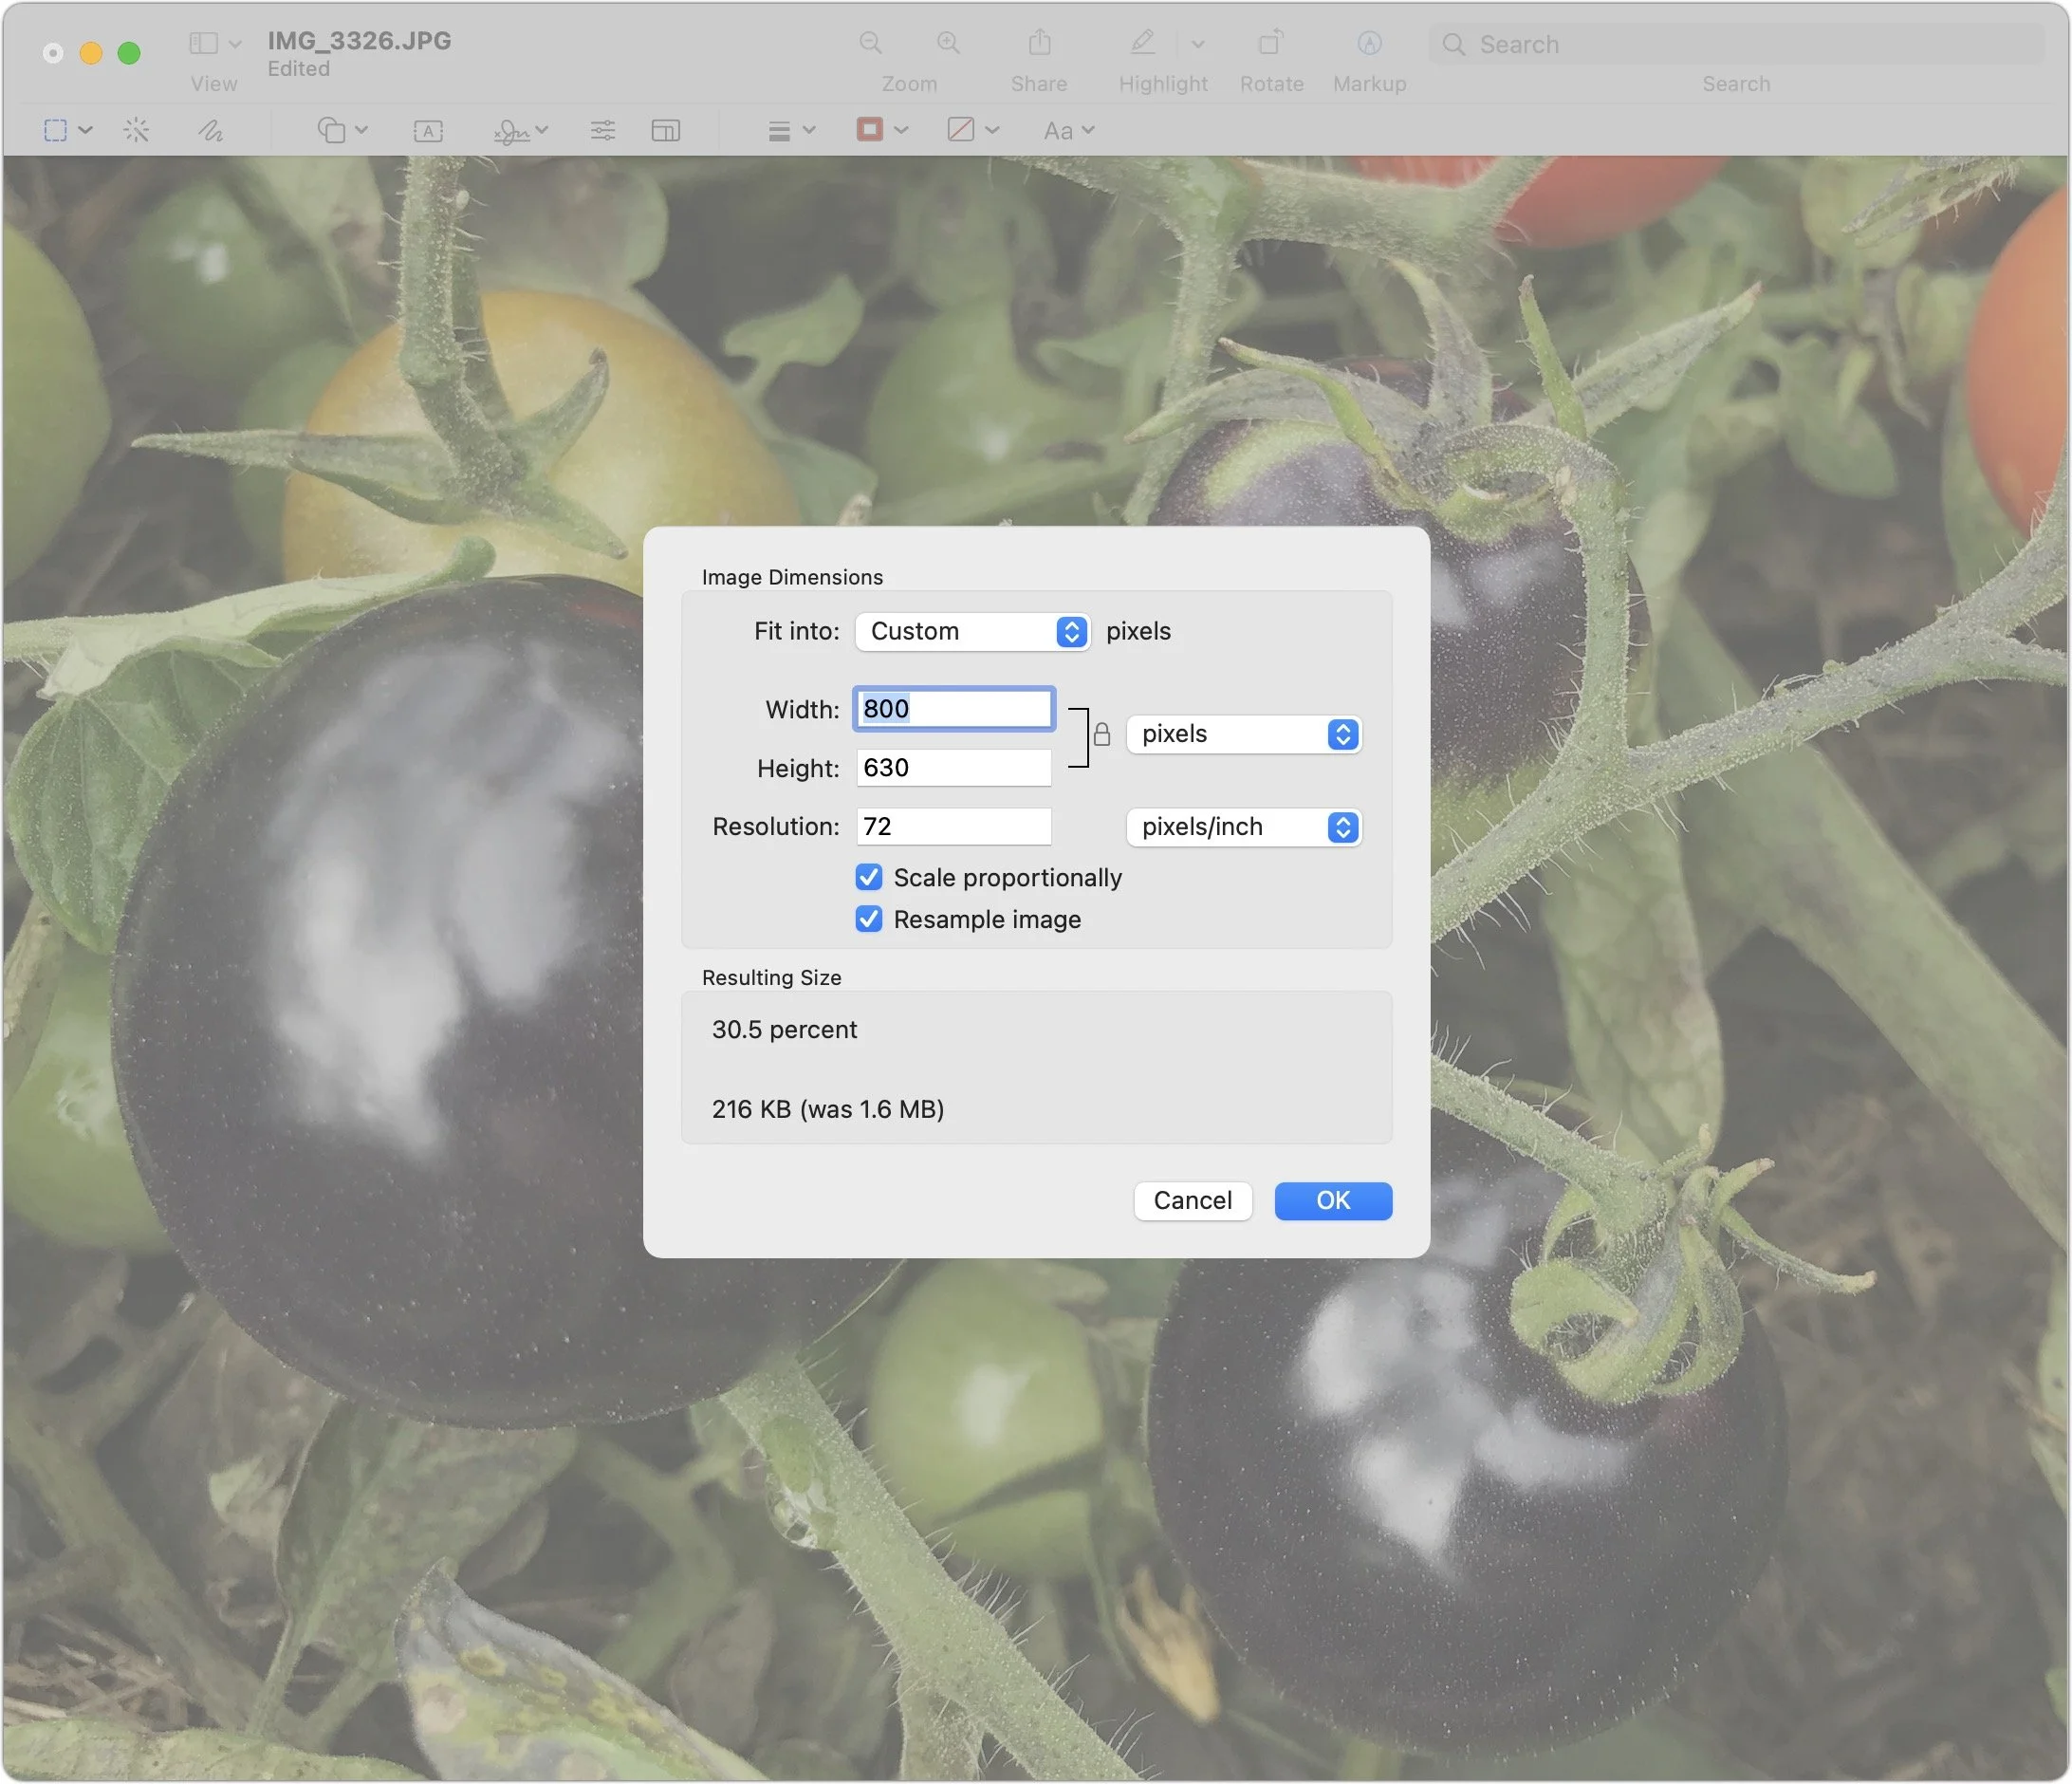
For our final example, let’s assume that we have a large picture of cherry tomatoes, and we need to cut out just the black tomatoes for a Web page that requires an 800-by-600 image. Once again, the image is too large, but the trickier problem is that we only need a small portion of it.
We’ll start by dragging out a selection rectangle that’s roughly 800 by 600, using Preview’s measurement lozenge. All we’re doing here is getting a sense of what the shape of 800 by 600 looks like. Then we make another selection around the black cherry tomatoes that’s roughly the same aspect ratio, wider than it is tall. The details don’t matter much at this point.

The next step is to crop the photo to the selection with Tools > Crop. Then we choose Tools > Adjust Size and set the Width field to 800 to get the width correct. That reveals that the height of our rough crop was slightly too large, at 630 pixels. We’ll click OK to resize the image to those dimensions.
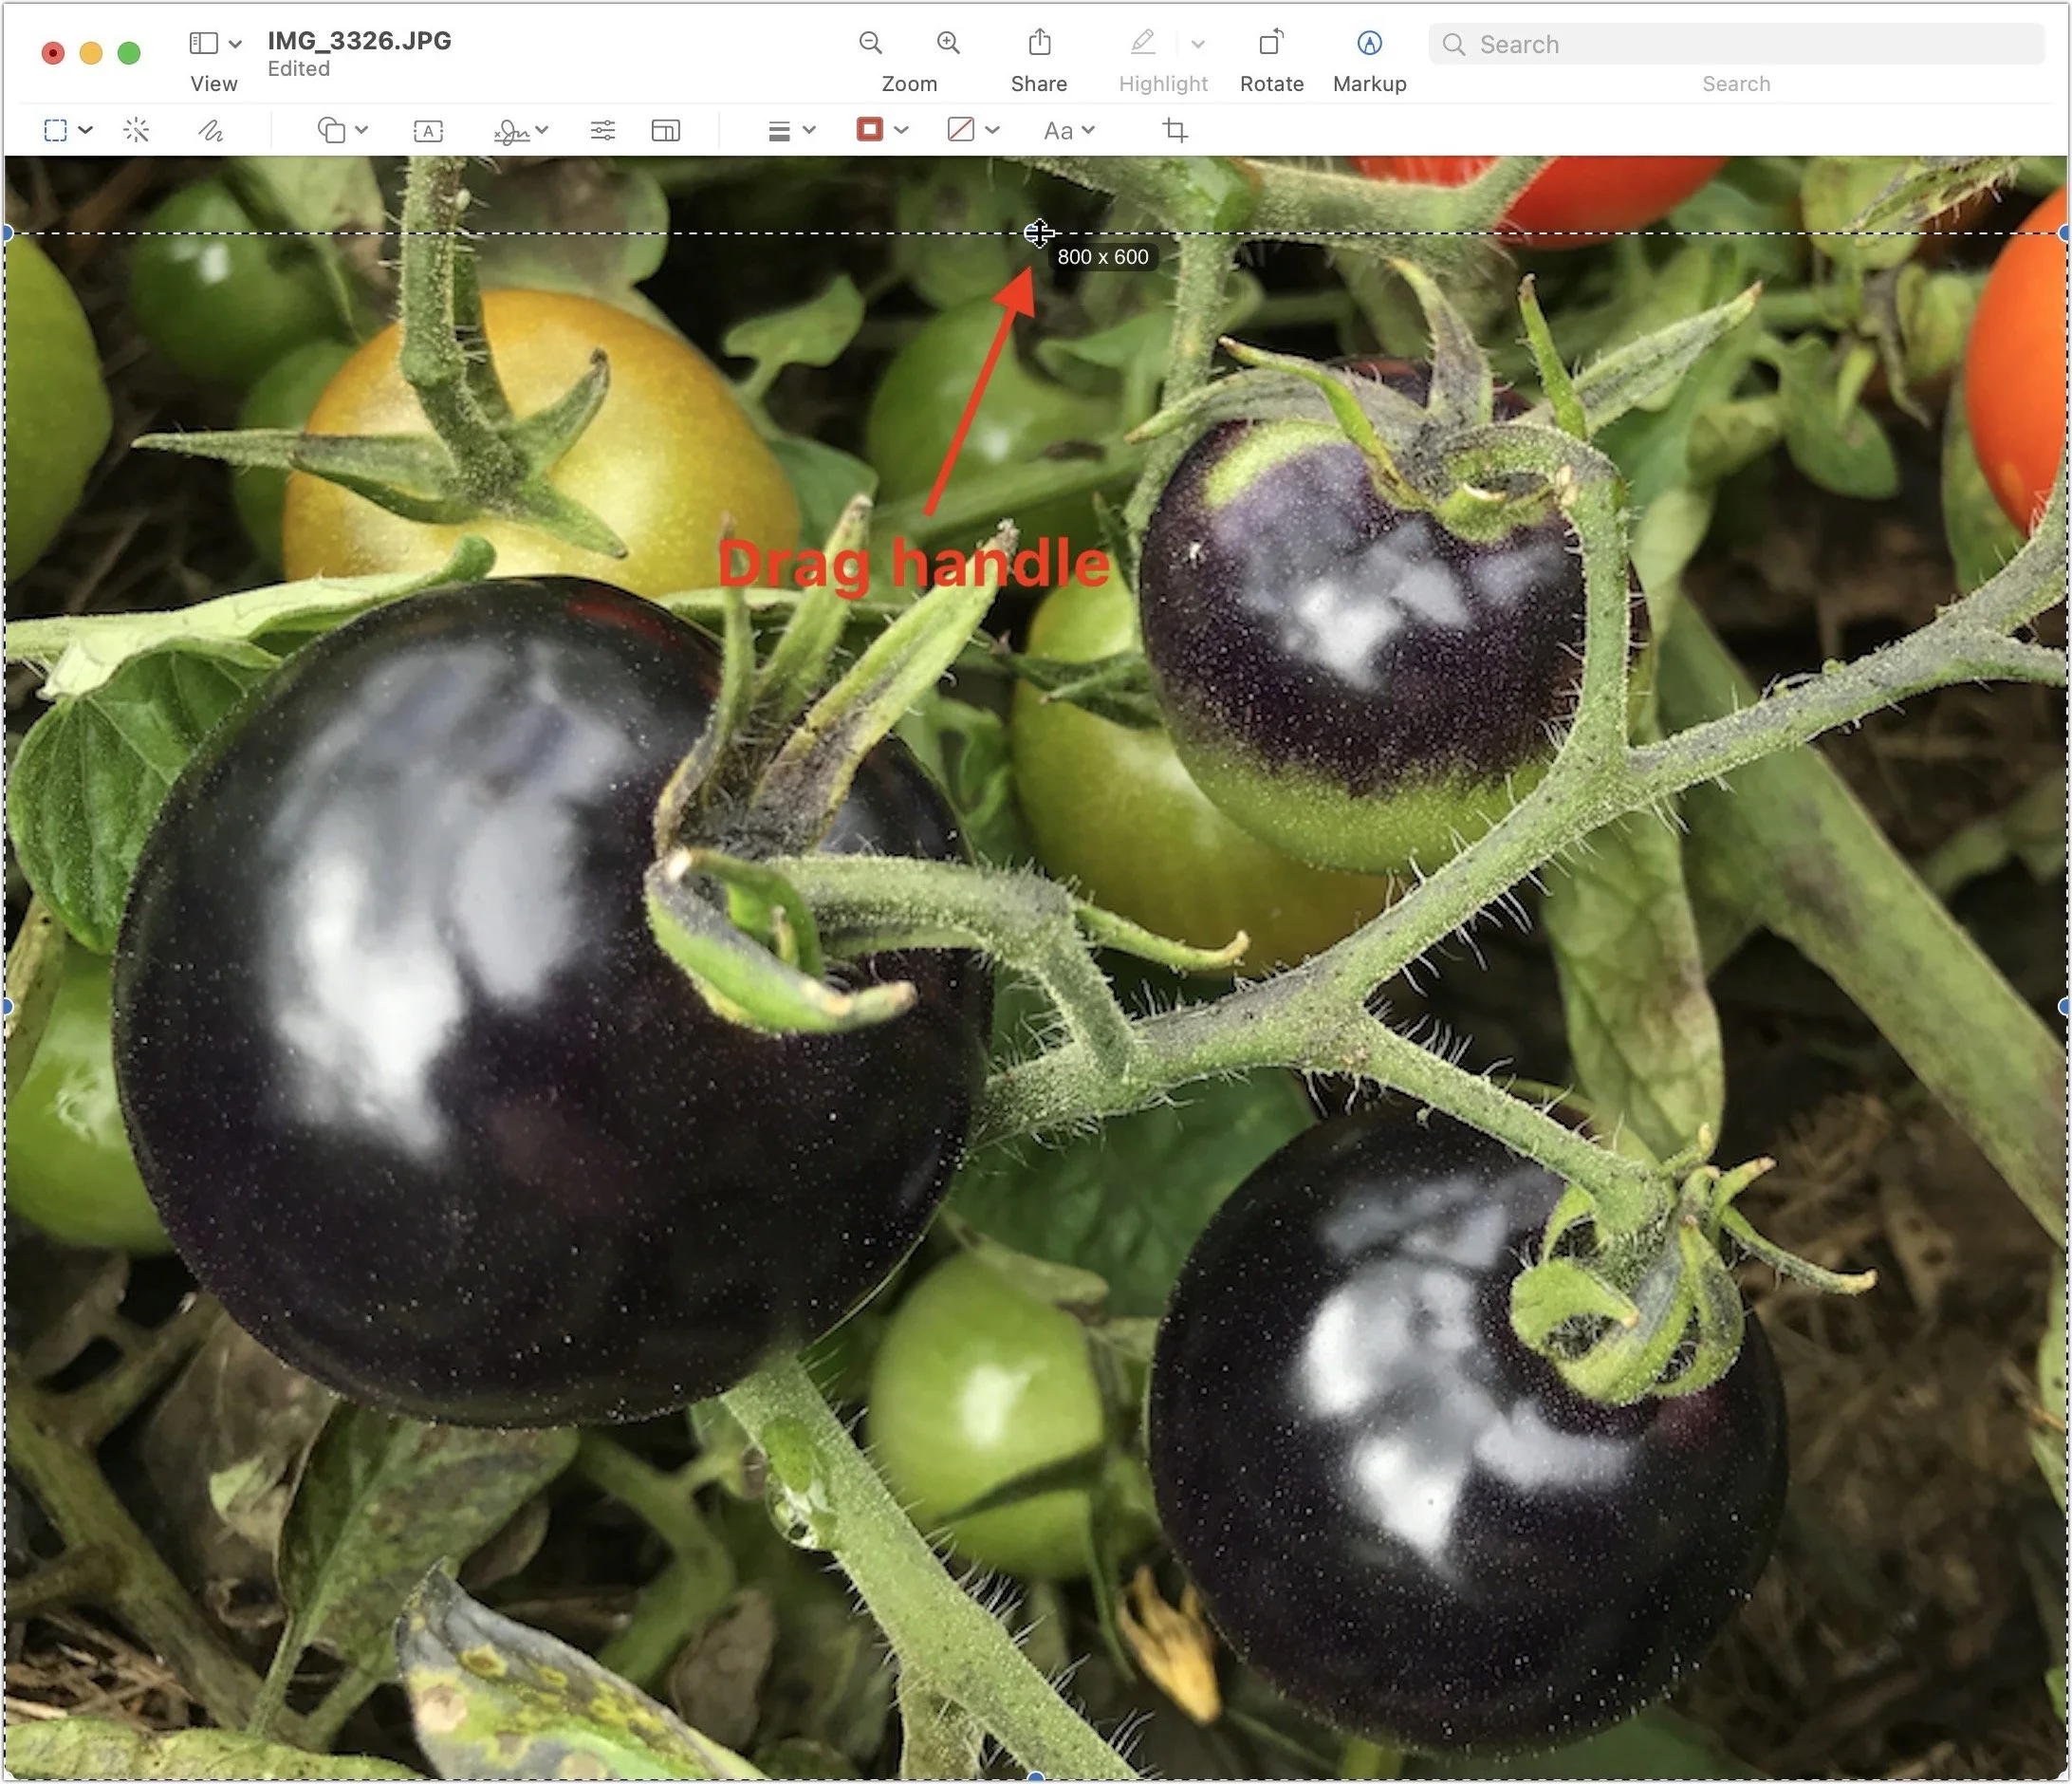
Finally, we’ll use the same technique we did in the example above, with Select All, dragging the top handle down until the dimensions are 800 by 600, and then using Tools > Crop to discard the extra content.
As you can see, you can do a lot with just three basic techniques in Preview:
Using Tools > Adjust Size to resize the entire image
Dragging out selection rectangles while paying attention to the measurements
Using Tools > Crop to get rid of content outside the selection rectangle
We won’t pretend that Preview is the ultimate graphics tool, but it’s capable, easy to use, and on every Mac.
(Featured image by iStock.com/Gearstd)
Live Text Digitizes Text in Photos in iOS 15, iPadOS 15, and macOS 12 Monterey
Perhaps the most magical feature of iOS 15, iPadOS 15, and macOS 12 Monterey is Live Text, which turns words in photos and other images into text you can select and then copy, look up, or translate. Learn how at:

The most magical feature of Apple’s latest crop of operating systems—iOS 15, iPadOS 15, and macOS 12 Monterey—may be Live Text. You’re probably familiar with the concept of optical character recognition (OCR), which turns all the text on a scanned page into normal text you can select, copy, and edit. Live Text does exactly that in Photos, Safari, and the Camera app, plus lets you search for text in photos. And it does it in not just in English, but also Chinese, French, German, Italian, Portuguese, and Spanish.
Thanks to the incredible processing power of Apple’s recent devices, this digitization of graphics to text takes place instantly—hence “live” text. Apple says it works on any Mac that can run Monterey, but on the iPhone and iPad, it requires a model with an A12 Bionic processor or later, which means anything in this list (check your device in Settings > General > About > Model Name):
iPhone XR, XS, XS Max, and later, including the iPhone SE (2nd generation)
iPad Pro 12.9-inch (3rd generation) and later
iPad Pro 11-inch
iPad Air (3rd generation) and later
iPad (8th generation) and later
iPad mini (5th generation) and later
Live Text in Photos
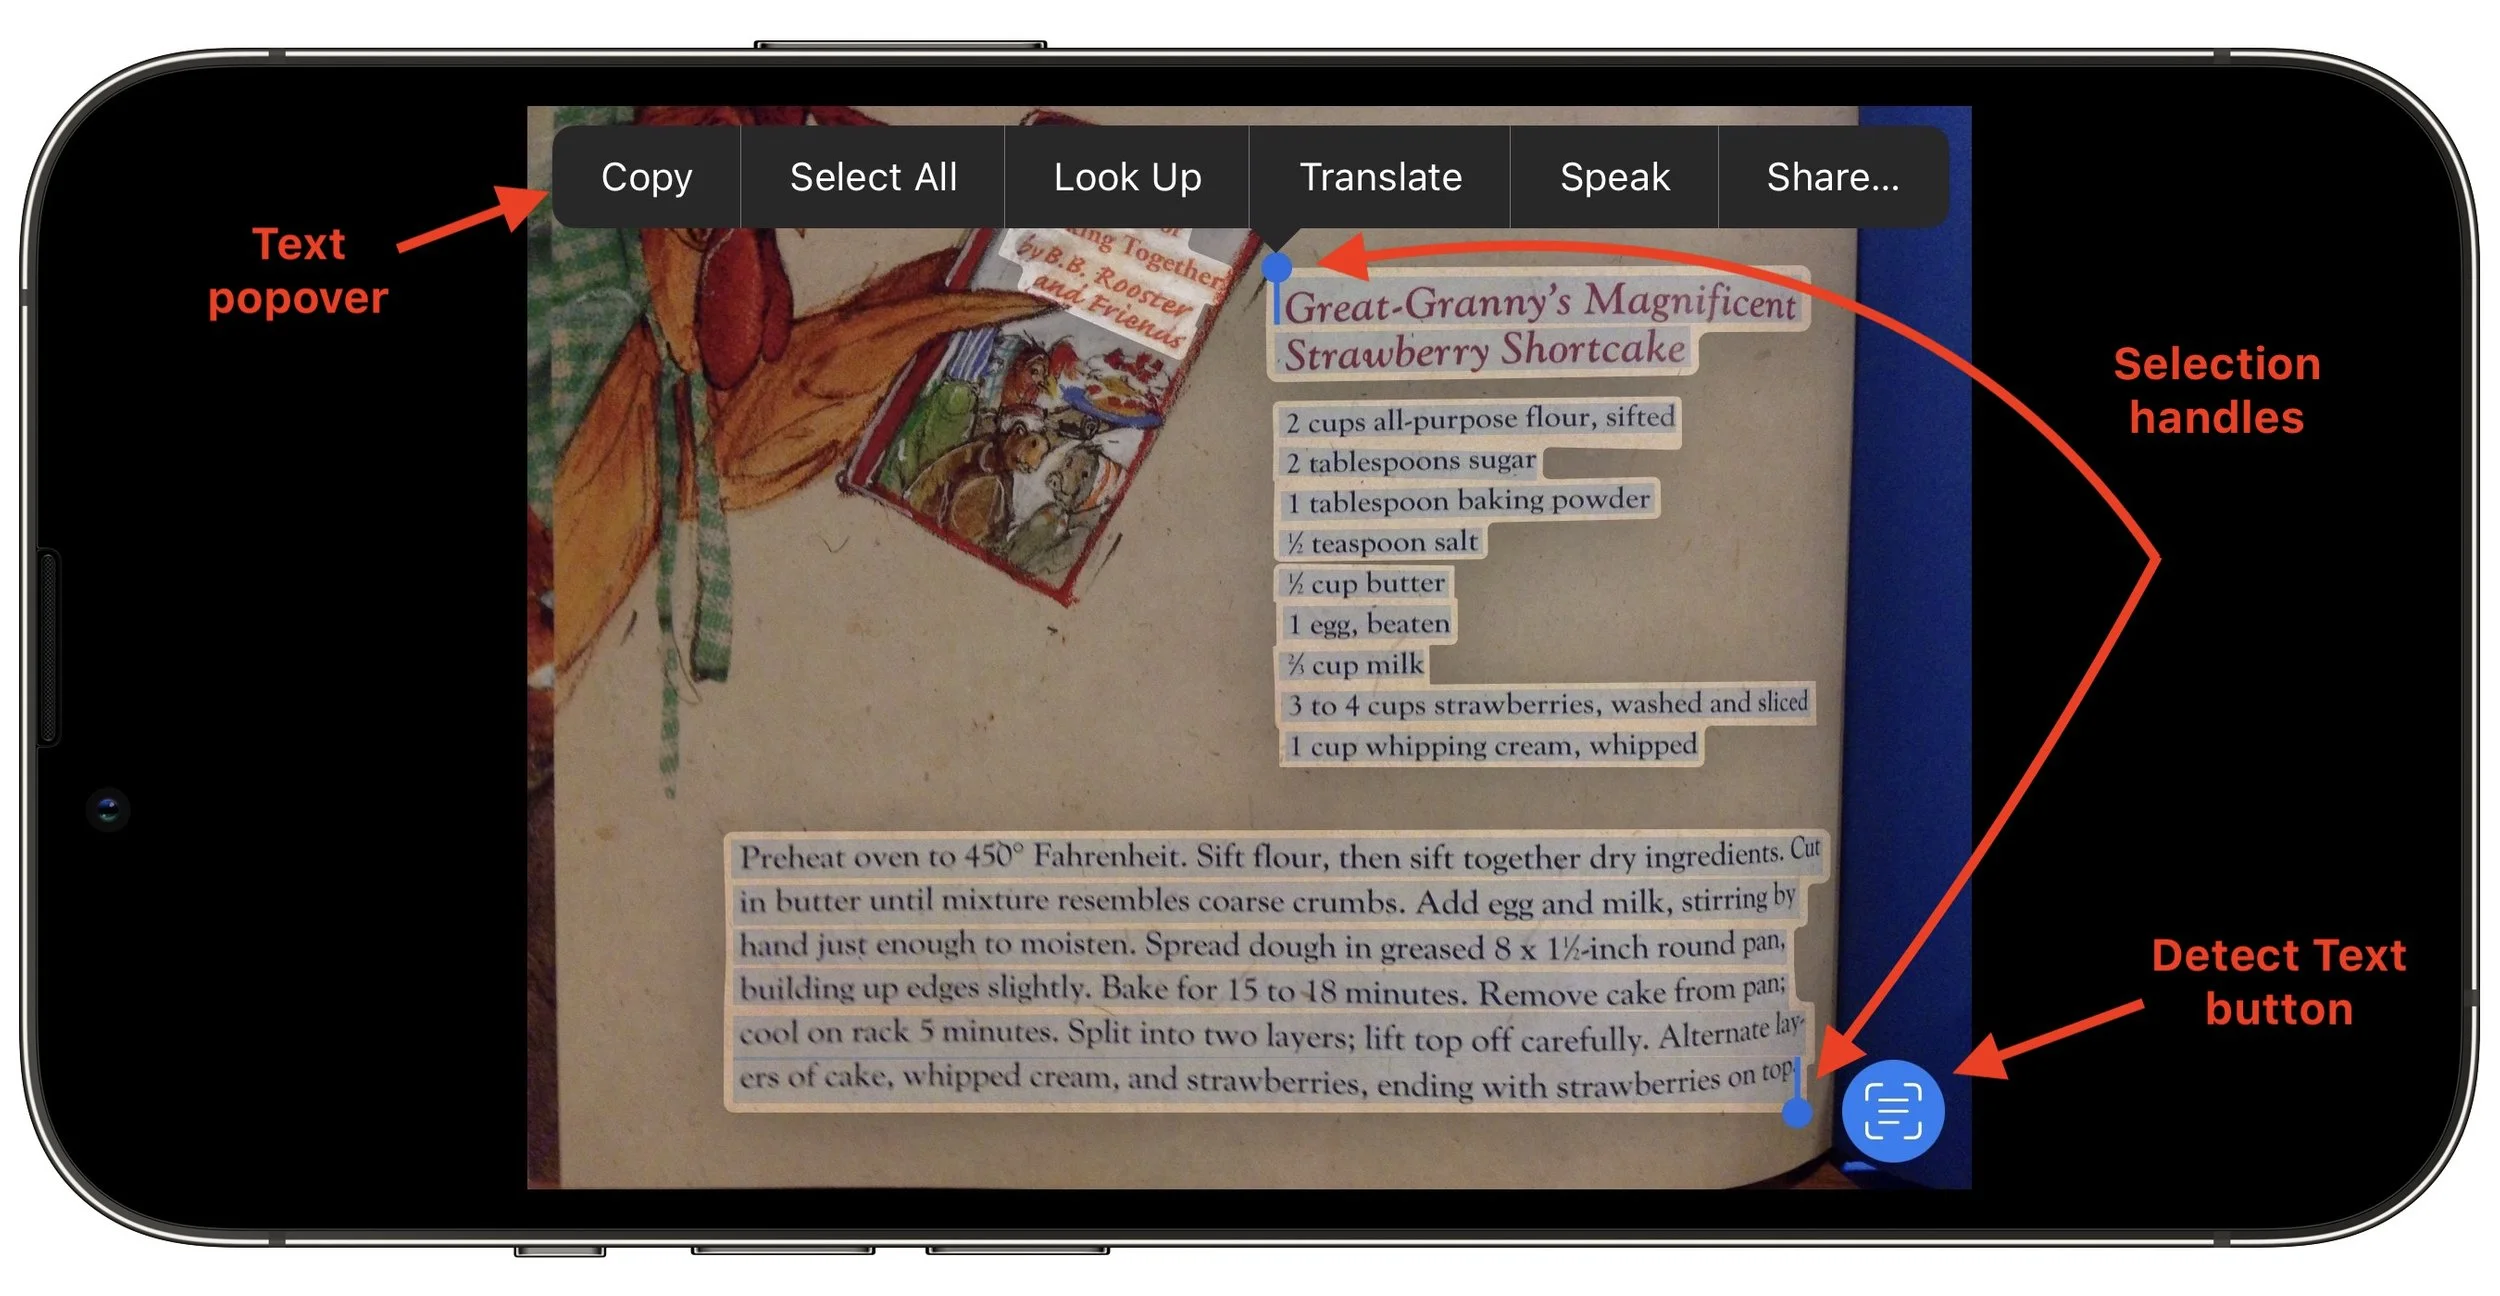
The main place you’ll use Live Text is in Photos. In iOS and iPadOS, when viewing a picture containing text, touch and hold a bit of text until it highlights in blue. (For text-intensive images, Photos displays a Detect Text button in the lower-right corner; tap it to highlight recognized text.) The familiar text popover then appears. Drag the blue selection handles to adjust the selection as desired or tap Select All. Then you’ll most likely want to copy the text, switch to another app, and paste, though you can also do a Web search by tapping Look Up or have the device read the text out loud by tapping Speak.
Two quick tips:
Want to copy text from an app that doesn’t even let you select text? Take a screenshot of the app and use Live Text to copy it.
If you have an animated Live Photo that contains text, touch and hold the text to select it; touch and hold away from the text to animate the photo.
In Monterey, move the pointer over the text so it turns to a text selection cursor, then select the text, after which you can copy it as you would any other text. You can also Control-click the selected text to access Look Up or Translate.
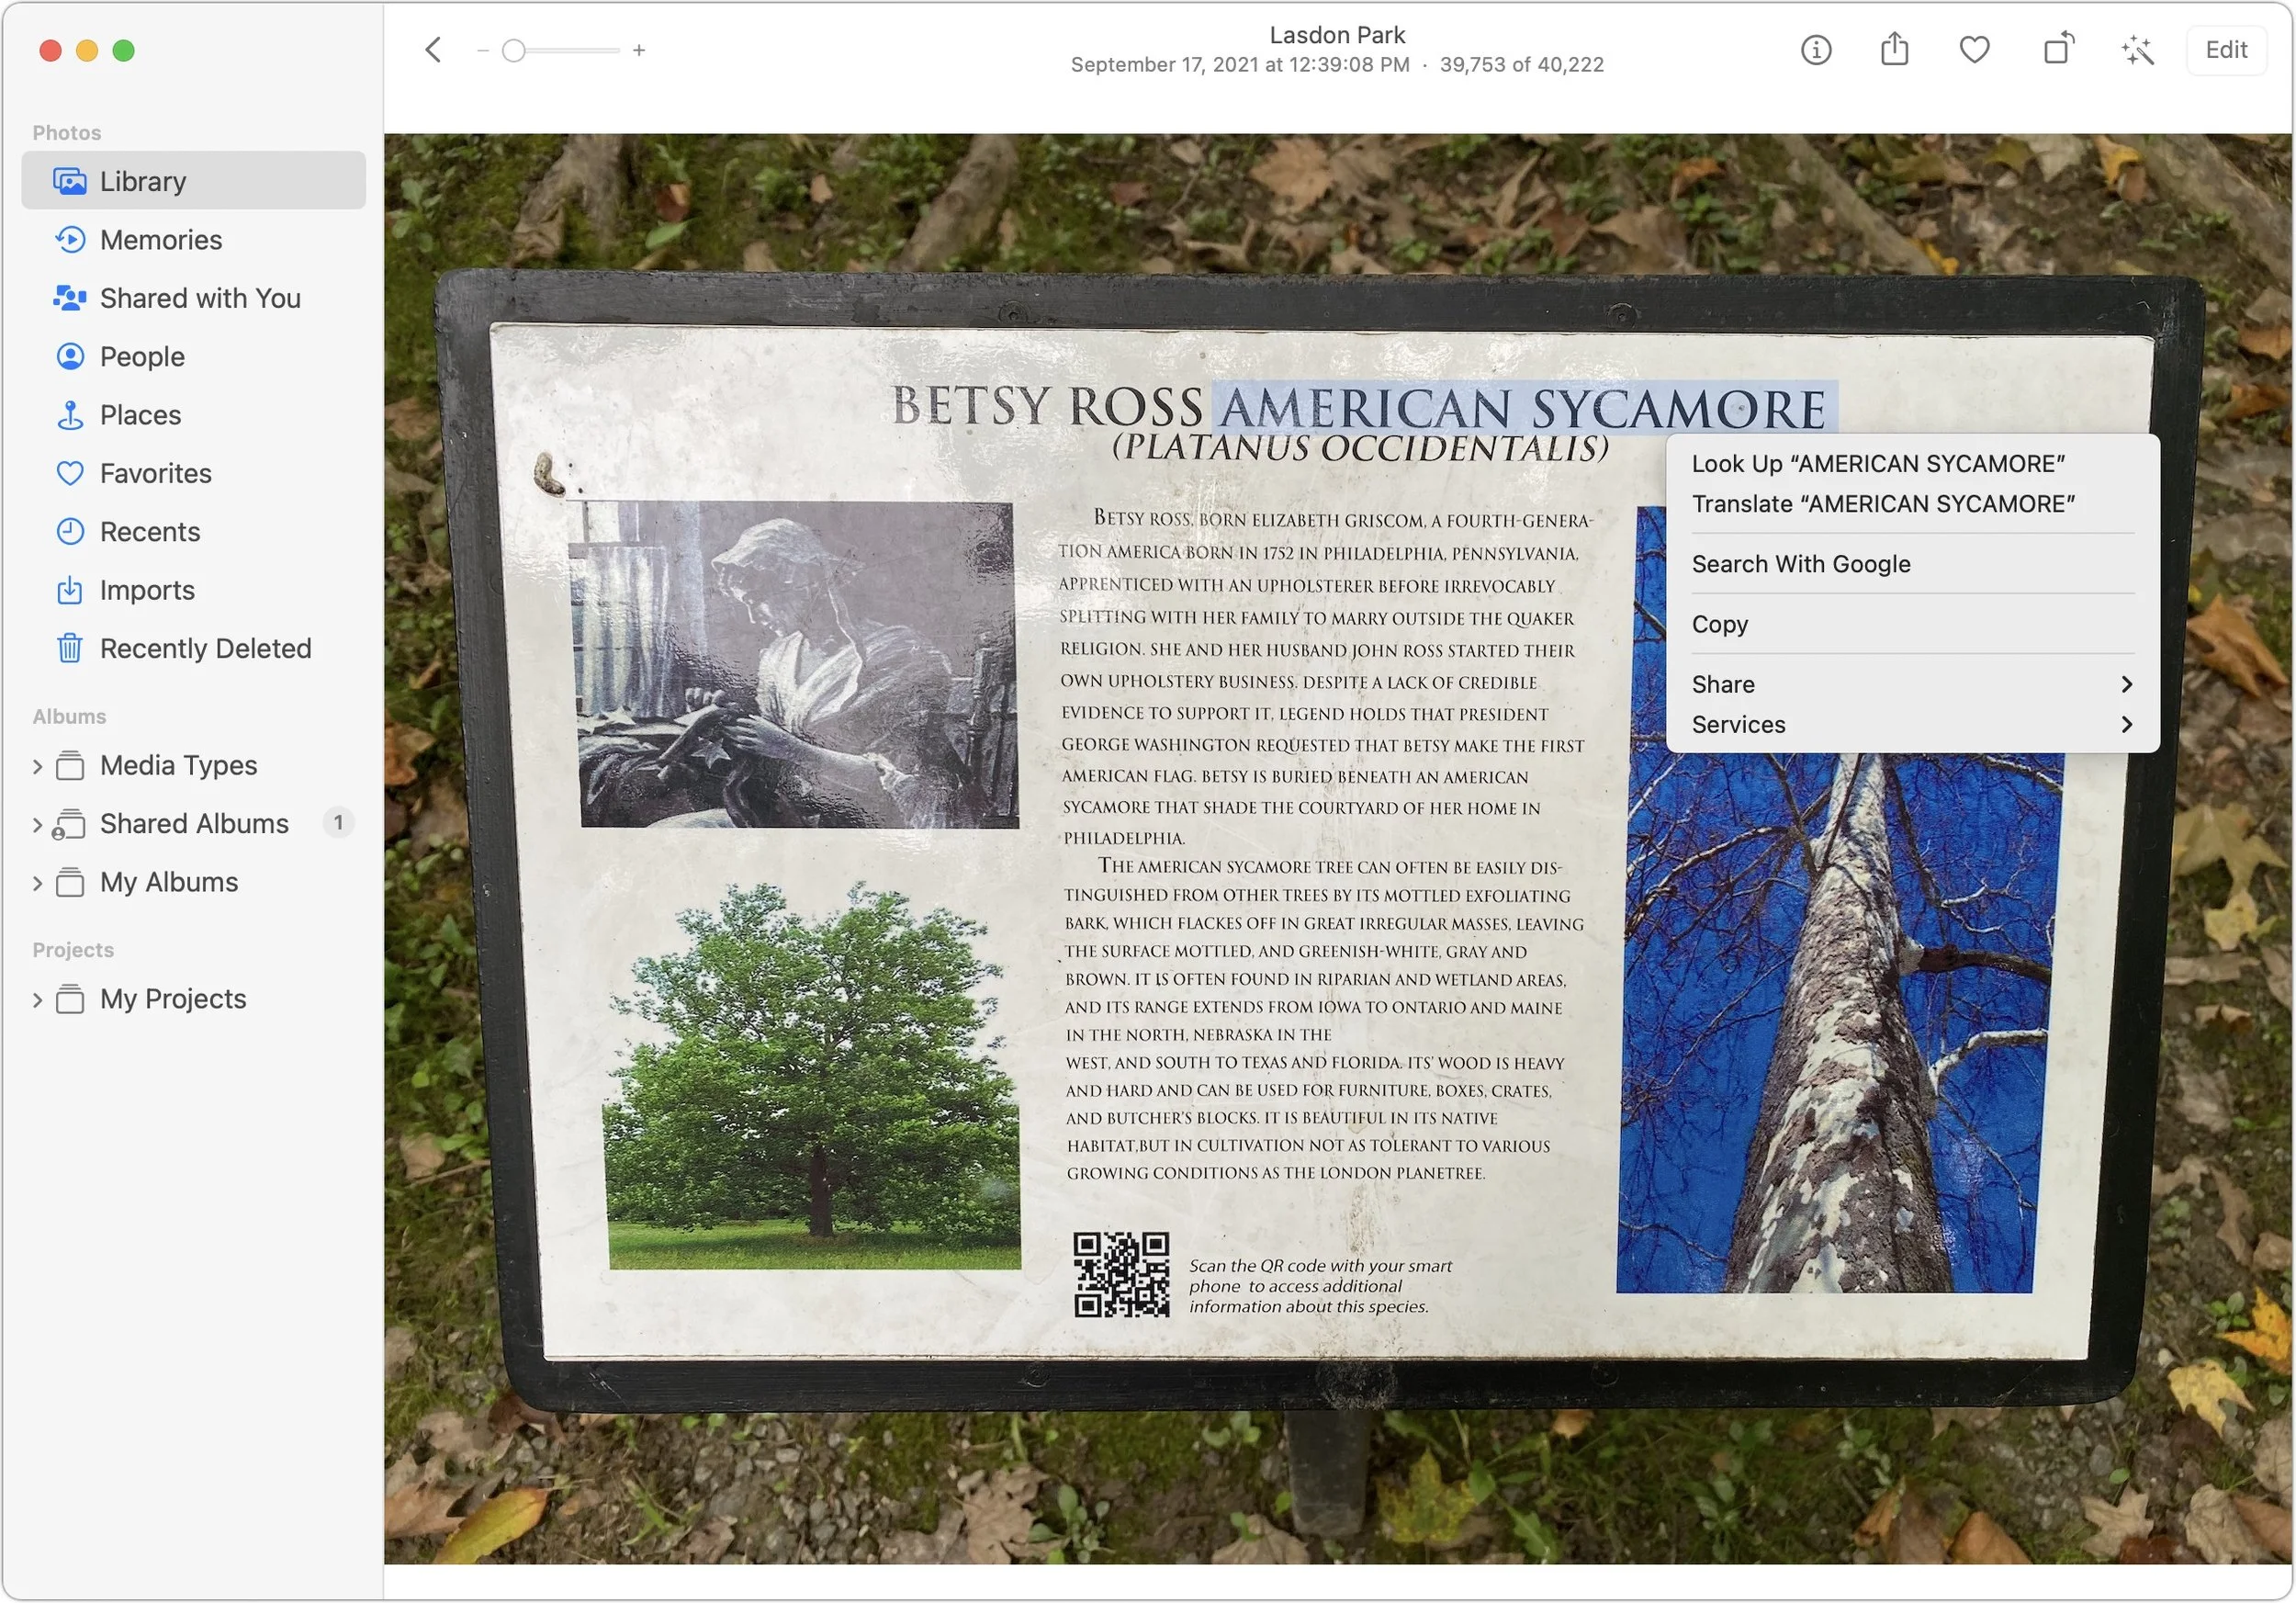
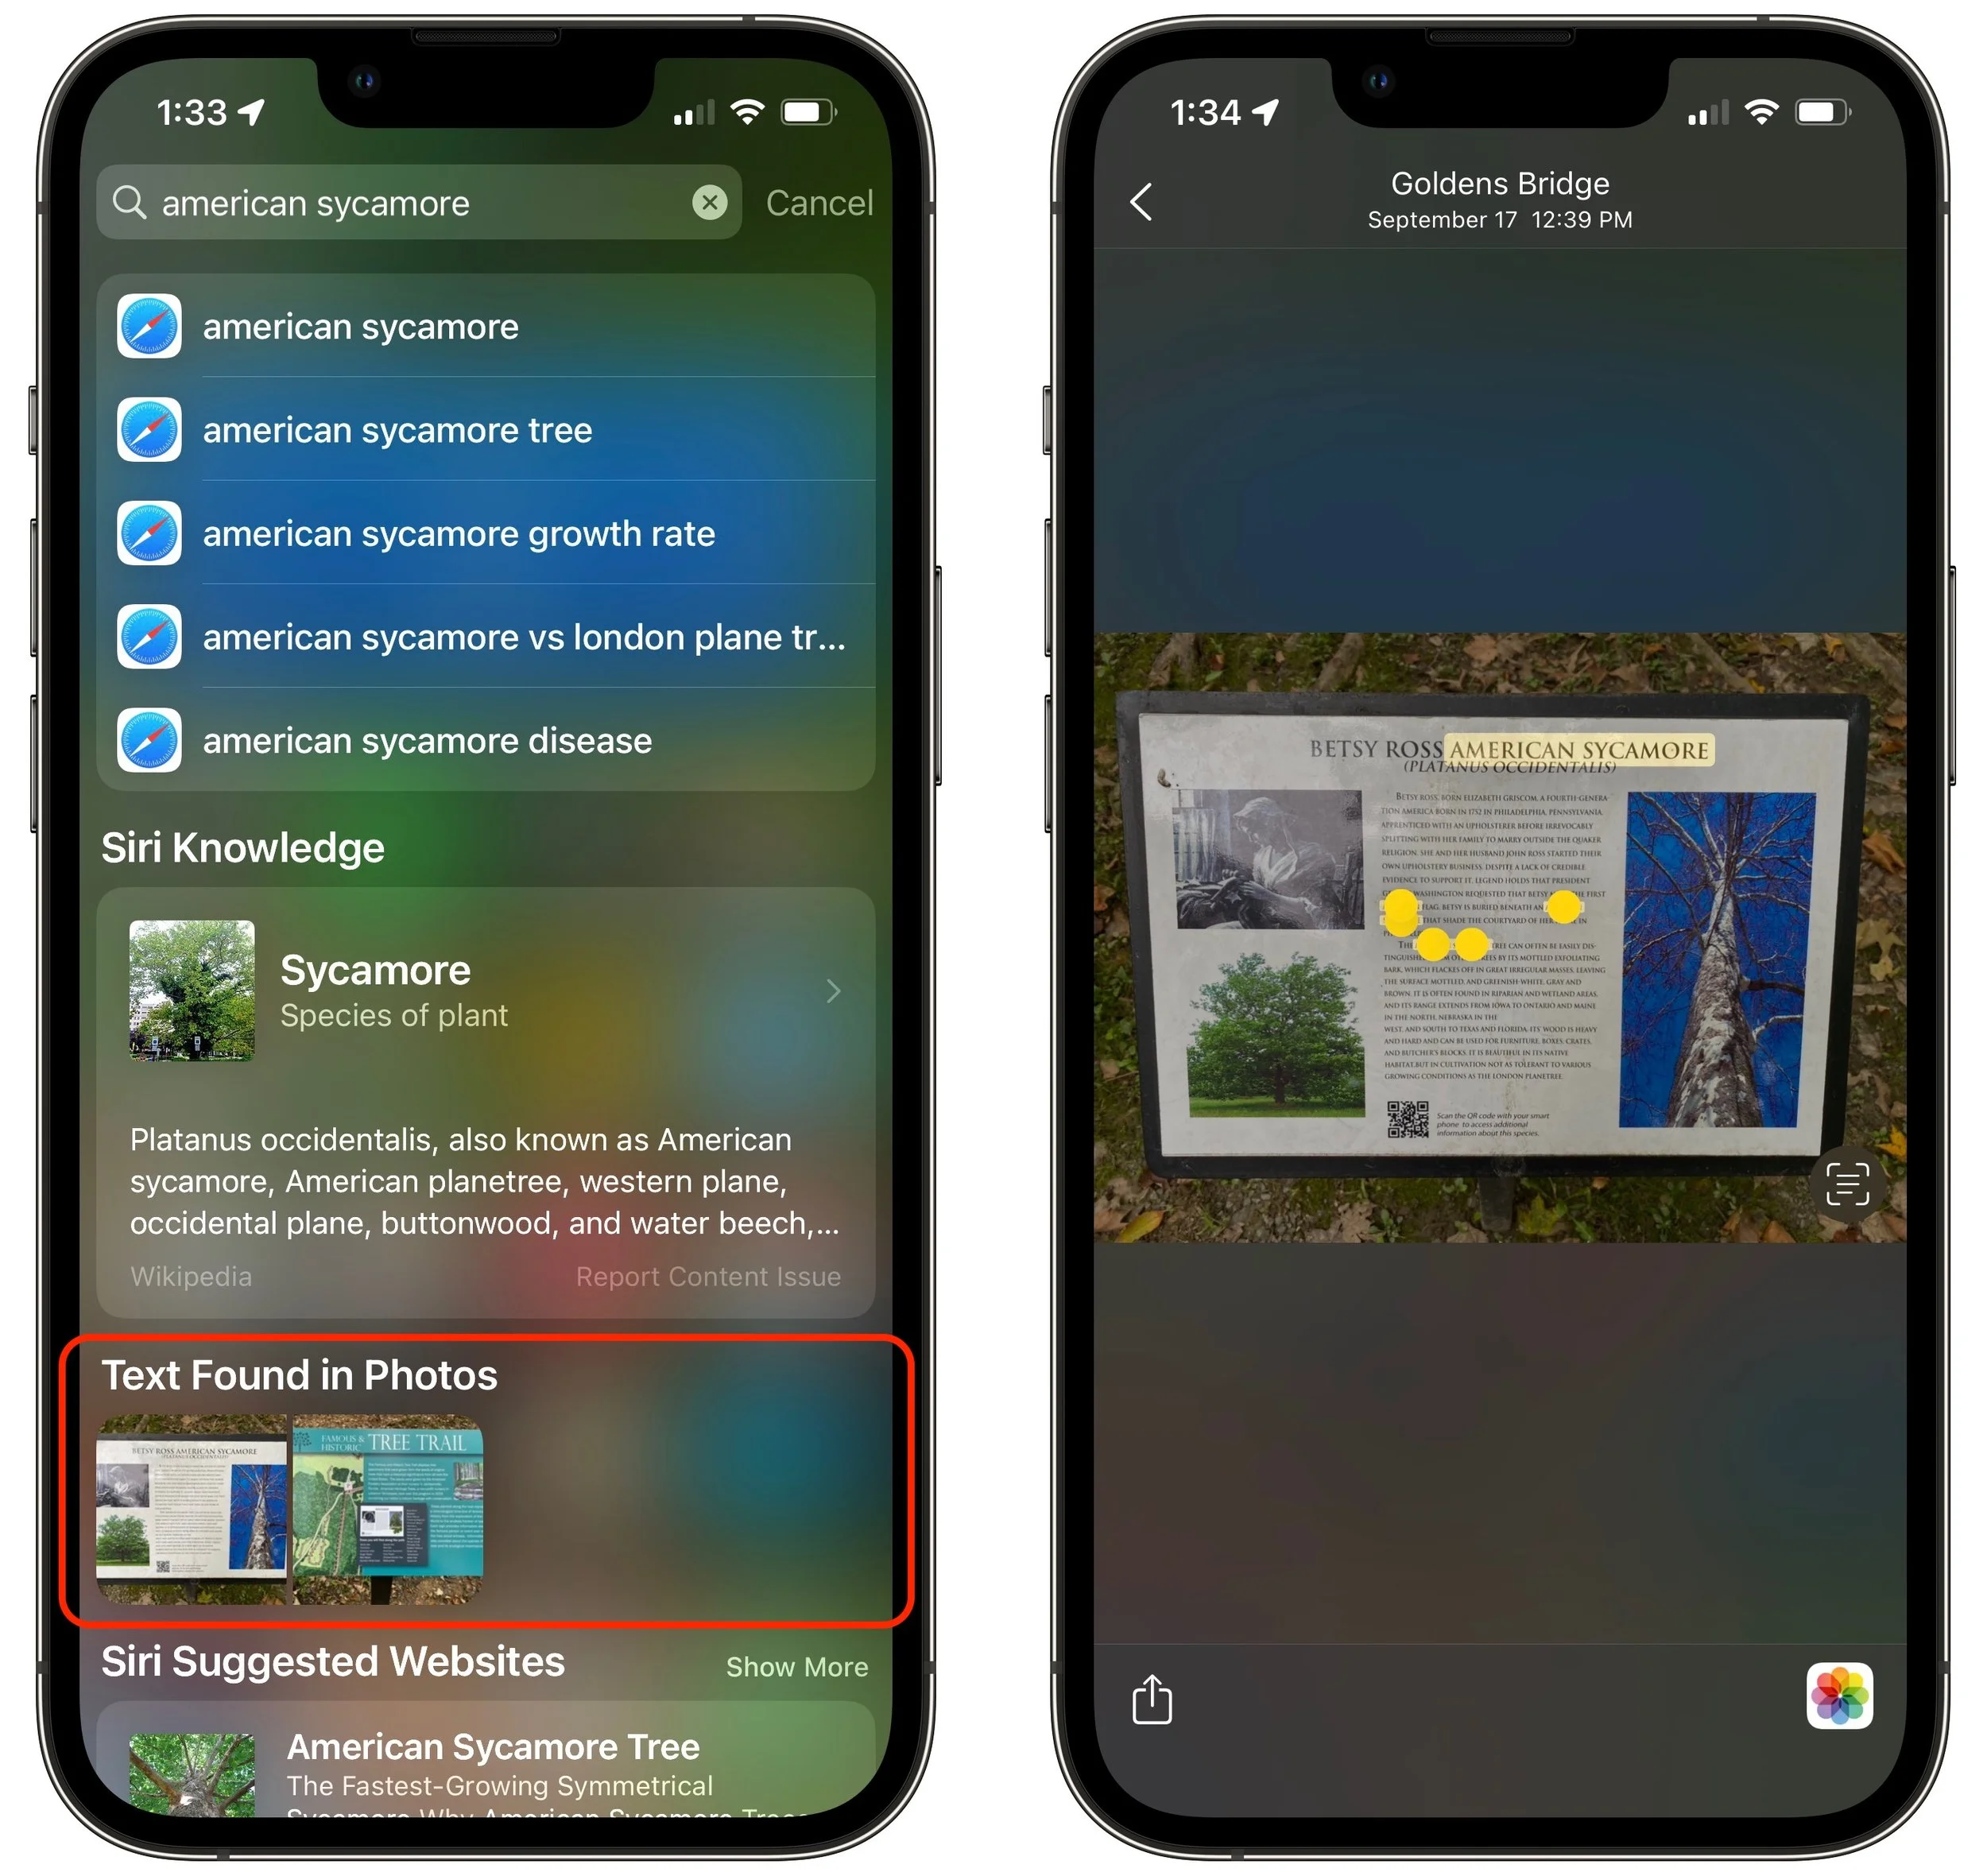
As a bonus in iOS 15 and iPadOS 15, text from Photos that Live Text has recognized is indexed by the system-wide search. So when you pull down from the middle of the Home screen and search, a Text Found in Photos section shows images that contain the search text. Tap one to view it, and note that there’s a Detect Text button in the preview that identifies text you can select right there. Or tap the Photos button in the lower-right corner to open the image in Photos.
Live Text in the Camera App
Sometimes you may want to capture some text in the real world without having a photo to store and later delete—getting an appliance’s model or serial number is a perfect example. When Live Text detects text in the Camera app’s viewfinder, it puts a faint yellow outline around it and displays the Detect Text button. Tap the Detect Text button to freeze and zoom the selection—it even rotates sideways text to be readable—and then tap the text to select and copy it. Tap the Detect Text button again when you’re done.

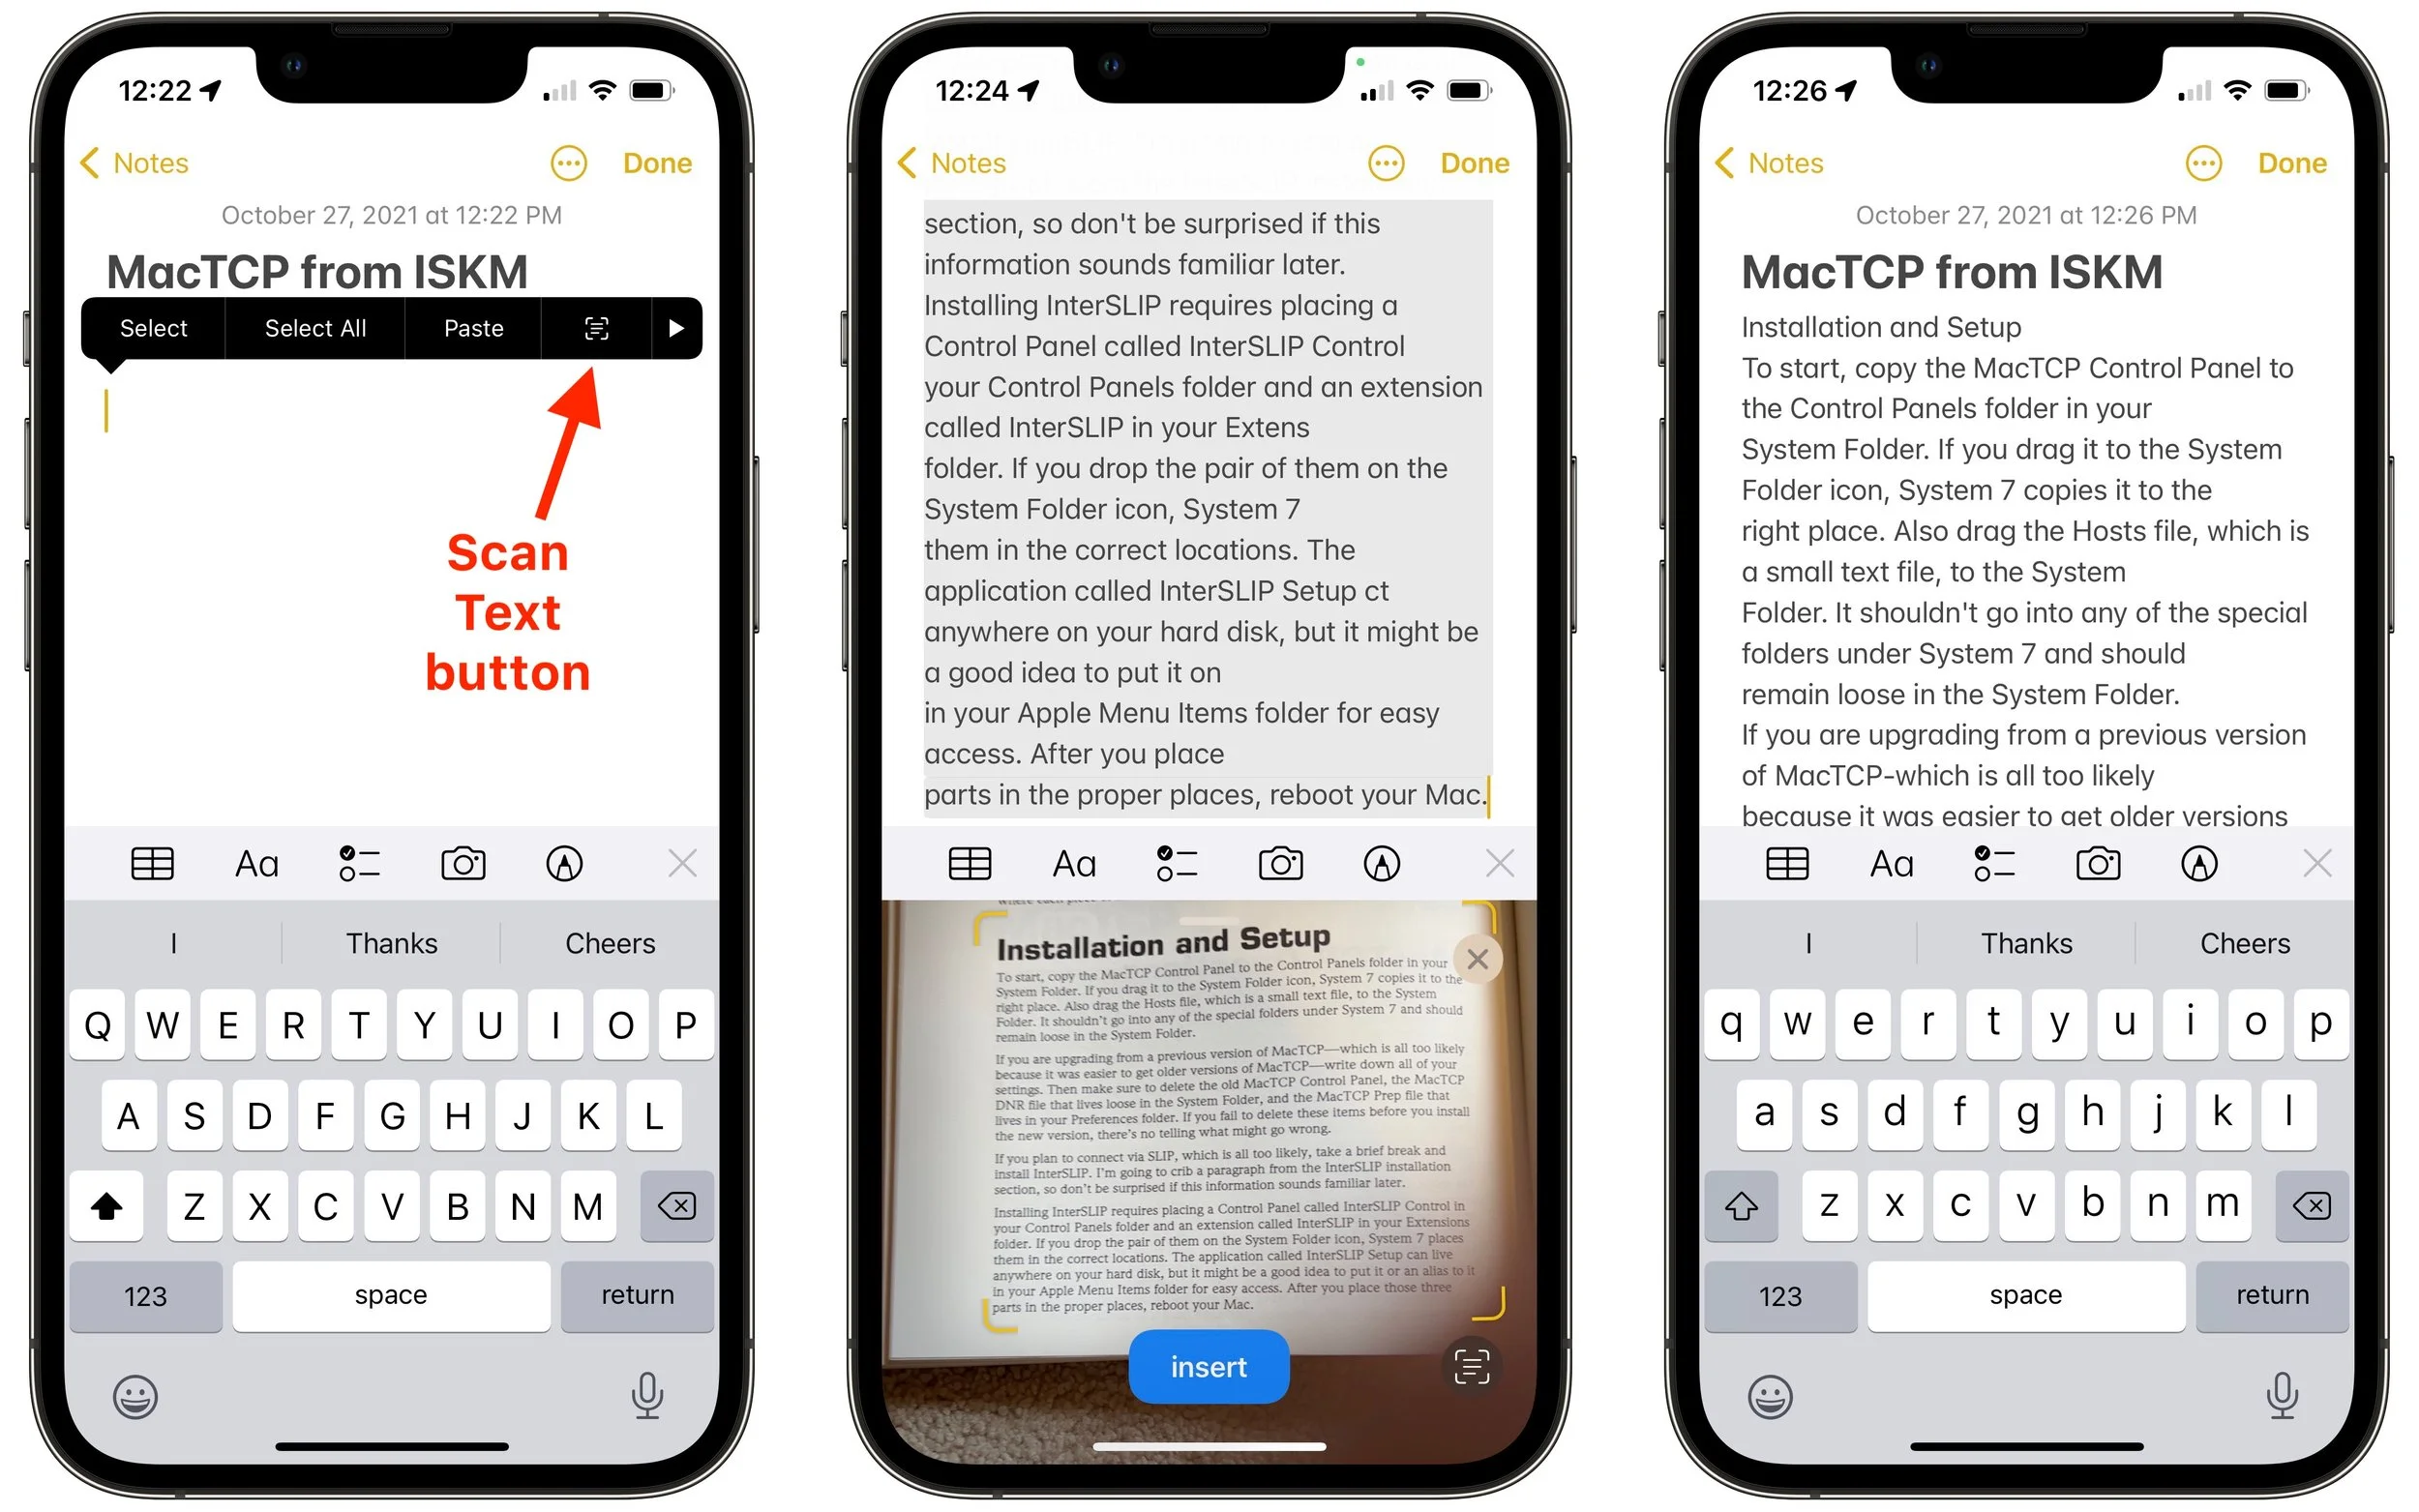
There’s another way to use Live Text in conjunction with the iPhone or iPad camera that’s useful if you need to insert a large amount of text directly into a document. In an app that supports Live Text, like Notes, tap in the text entry area and then tap the Scan Text button. A viewfinder appears on the bottom half of the screen, with a yellow outline around detected text, and the recognized text above. If that’s what you want, tap the Insert button to put the text into your note or document.
Live Text in Safari and Other Apps
Because Apple integrated Live Text into its operating systems, it’s available nearly anywhere you might see an image that contains text. For instance, in Safari, you’re likely to run across such images, or you might have embedded photos in Notes that contain text. Selecting text using Live Text works exactly the same as in Photos—either touch and hold on an iPhone or iPad, or just select the text on the Mac. And on the Mac, Live Text even works when you select an image in the Finder and press the Space bar to view it in Quick Look.

Other Live Text Tricks
Identify types of data: When Live Text recognizes text that contains an email address, phone number, postal address, or date, you can touch and hold it to bring up special options to send an email, call the number, map the address, or make an event or reminder.
Translate Live Text: The Translate app in iOS 15 and iPadOS 15 is now a system-wide service, so it can translate any text you can select, including text recognized by Live Text in a photo or in the Camera app. Just select it and tap Translate.
Hear Live Text: If you rely on VoiceOver to help you navigate your iPhone or iPad, note that you can leverage Live Text to get VoiceOver to read text in your photos out loud. Go to Settings > Accessibility > VoiceOver > VoiceOver Recognition and turn on Text Recognition. Then, while viewing a photo, tap the text in the photo to have VoiceOver read to you.
It may take a little while to remember that you can select and copy, look up, or translate nearly any text you see in a picture—or in your camera viewfinder—but once you’ve tried Live Text a few times, we’re betting that you’ll find it surprisingly useful.
(Featured image by Adam Engst)
Avoid Unusual Top-Level Domains in Custom Domain Names
Tempted to get a short, memorable domain name ending in .xyz or .shop? As we explain, that’s a bad idea if you care about user perception, email and text message deliverability, and not being blocked by social media and firewalls. Details at:

Remember the heady dotcom days, when businesses were desperate to get a short, memorable, easily typed .com domain? It quickly became difficult to get what you wanted—so much so that deep-pocketed companies paid exorbitant sums for just the right domain.
Before we go any further, let’s make sure we’re all on the same page. Domain names are necessary because computers on the Internet are all identified by inscrutable numeric IP addresses. You can remember and type apple.com easily; 184.31.17.21 not so much. Domain names have two or more parts: the top-level domain (read from the end, such as com) and the second-level domain (like apple), plus optional third-level domains (which could give you support.apple.com).
Since the days of speculating in .com domains, however, hundreds of additional top-level domains have been opened up, including domains from .aaa to .zone. There are now top-level domains for .doctor, .florist, .lawyer, and many more, including the general .xyz. It might be tempting to switch from the awkward dewey-cheatham-howe.com to the shorter and more memorable dch.lawyer. And even if there isn’t a profession-specific top-level domain that works for you, you may think that if abc.xyz is good enough for Google’s parent company Alphabet, surely it’s good enough for you.
Alas, much as we appreciate the creativity and flexibility offered by these alternative top-level domains, we’d like to dissuade you from using one, if possible. Problems include:
Email deliverability: If you’re sending email using an alternative top-level domain or including links to that domain, it’s much more likely that your email will be considered spam by receiving systems.
SMS deliverability: Some SMS text message providers will automatically delete messages containing URLs with alternative top-level domains in an effort to protect their customers from phishing attacks.
Social media spam filtering: As with SMS text messages, social media posts that include URLs with alternative top-level domains may be categorized as spam or as linking to a malicious site.
Firewall blocking: Abuse of alternative top-level domains has become so commonplace by scammers that some companies prevent their employees from accessing websites using certain alternative top-level domains at the firewall level.
User perception: Although there’s no telling how anyone will react to a particular top-level domain, people won’t think twice about .com but might think .ooo seems sketchy. (We would.)
Obviously, it may not be possible to get the domain name you want in .com. What to do? There are a few strategies:
Expand or abbreviate: At this time, people mostly don’t see, remember, or type domains apart from those that go with businesses that do a lot of real-world advertising. So if you need to add or subtract words (or letters) in your domain to find a unique one, that can work.
Use a country domain: Two-letter top-level domains are restricted for use by countries, so .us is for the United States, .ca for Canada, and .au for Australia. Every country has different rules for who can register them. For instance, it’s possible to get a domain ending in .it (Italy) as long as you work through a registrar that acts as your representative there. .io (British Indian Ocean Territory) and .ai (Anguilla) are popular top-level domains among tech companies.
Stick with better, pricier alternatives: Not all alternative top-level domains are equally problematic. The classic .net and .org are fine, and .biz isn’t bad. But how to determine that? When you’re checking to see if a domain name is available, compare prices. For instance, at one domain name registrar, iphonewhisperer.xyz costs only $1 per year, whereas the iphonewhisperer.biz version is $4.98 per year, iphonewhisperer.net is $9.18 per year, and iphonewhisperer.studio is $11.98 per year. The more you pay, the less likely that domain has been abused by spammers and marked for filtering.
In the end, when it comes to domain names, it’s best to be conservative and stick with a top-level domain that won’t cause people or filters to think twice. That’s probably .com, if you can make the rest of the name work for you.
(Featured image by iStock.com/BeeBright)
The Best Apple-Related Gifts for 2021
Looking for the perfect holiday gift for the Apple user in your life? Given supply chain problems, it’s not too early to start shopping. Here are our suggestions for the top Apple-related gifts for 2021.

It may seem early to start thinking about the holiday shopping season, but with the global supply chain suffering pandemic-related slowdowns, there’s no telling how long it will take to get something you order today. Apple has generally done a good job of managing its supply chain issues, but even still, if you want to make sure you have an Apple something for that special someone, we recommend buying it soon. Here are our recommendations.
AirTag
Do you know someone who’s always misplacing their keys, purse, or backpack? Apple’s new AirTag tracker is the perfect gift for such a person. Attach one to a keyring (with a separate $29 AirTag Loop or $39 AirTag Leather Loop) or drop it in a bag, and from then on, the person can use the Find My app to see where they left their stuff. Support for ultra-wideband enables precision finding with an iPhone 11 or later—with earlier iPhones, the detected location won’t be quite so precise. AirTag uses the Find My network, so even if the item is far away, passing Apple devices that detect it can securely share its location with you. One AirTag costs $29, or you can get a pack of four for $99. You can even have Apple personalize each AirTag with custom text and emoji.

AirPods and AirPods Pro
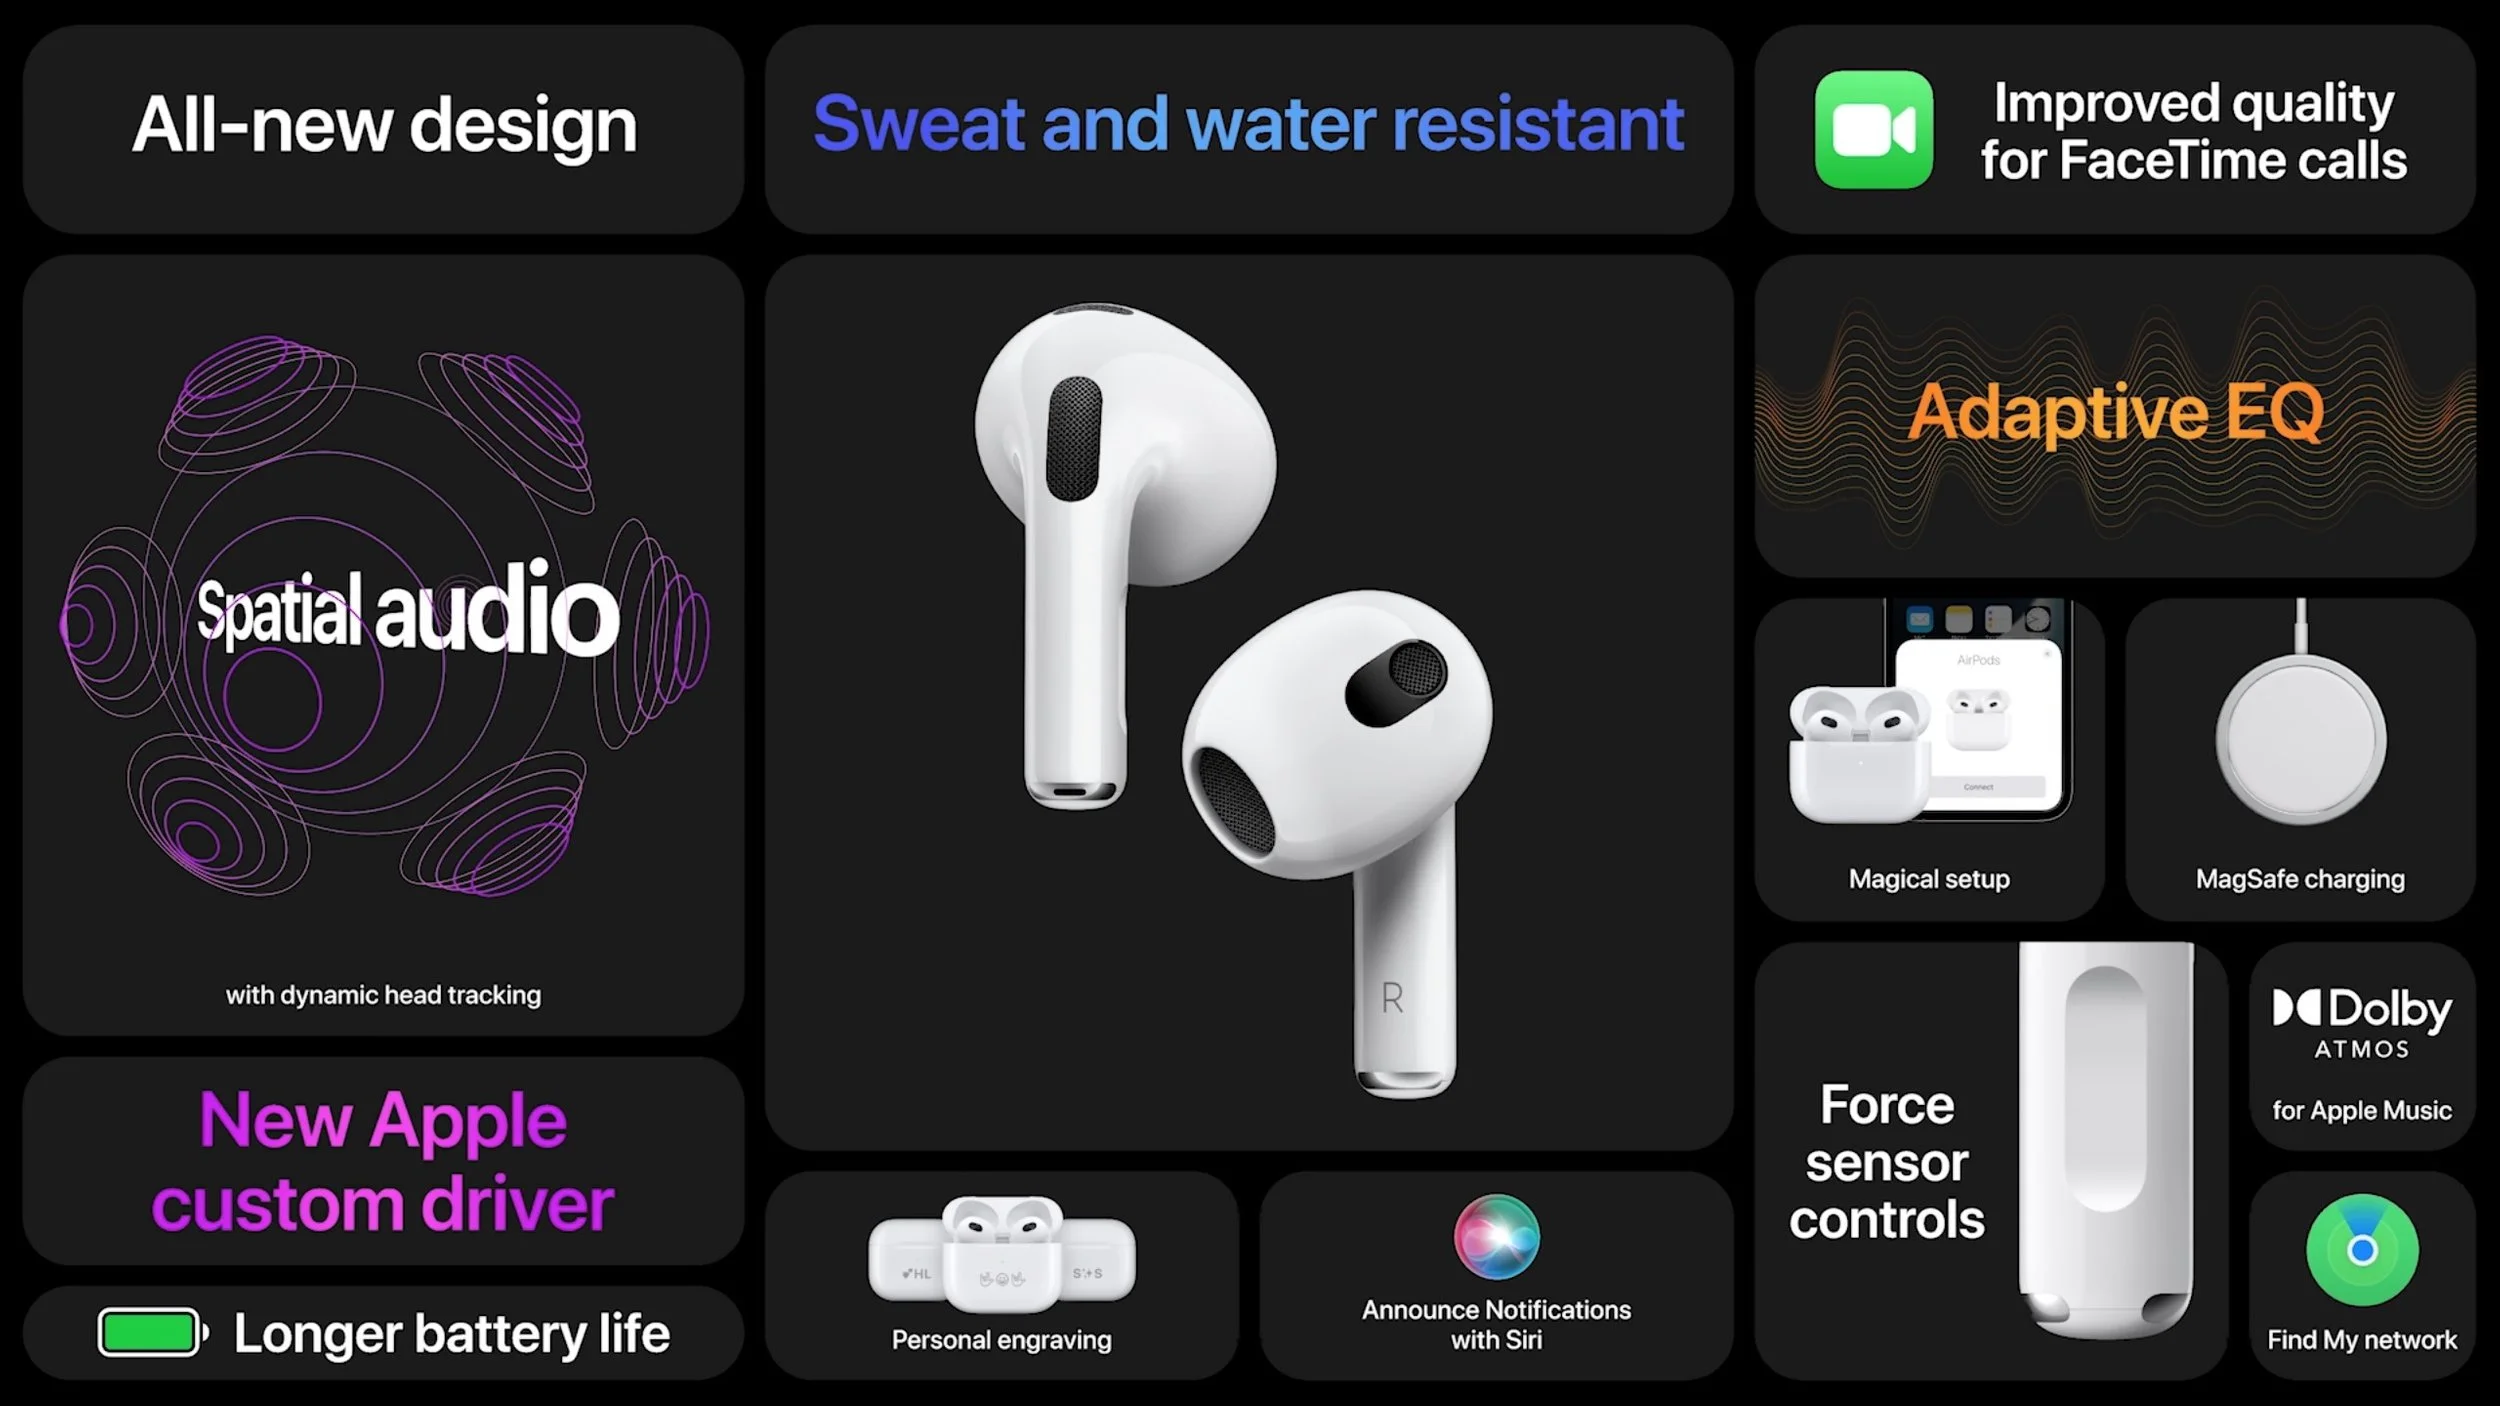
Apple’s wireless earbuds remain popular, and the company just released the third-generation AirPods to supplement the second-generation AirPods and the AirPods Pro. All three make excellent gifts. The second-generation AirPods cost $129, have a relatively long stalk, and boast up to 5 hours of listening on one charge. The $179 third-generation AirPods shrink the stalk, switch to a force sensor for controls, add support for spatial audio with dynamic head tracking, feature sweat and water resistance, have a MagSafe wireless charging case, and last up to 6 hours on a single charge. For $249, the AirPods Pro include the features of the third-generation AirPods and add silicone ear tips and active noise cancellation with optional transparency mode, but they have only 4.5 hours of listening time. All three have charging cases, support Hey Siri commands, and automatically switch between Apple devices.

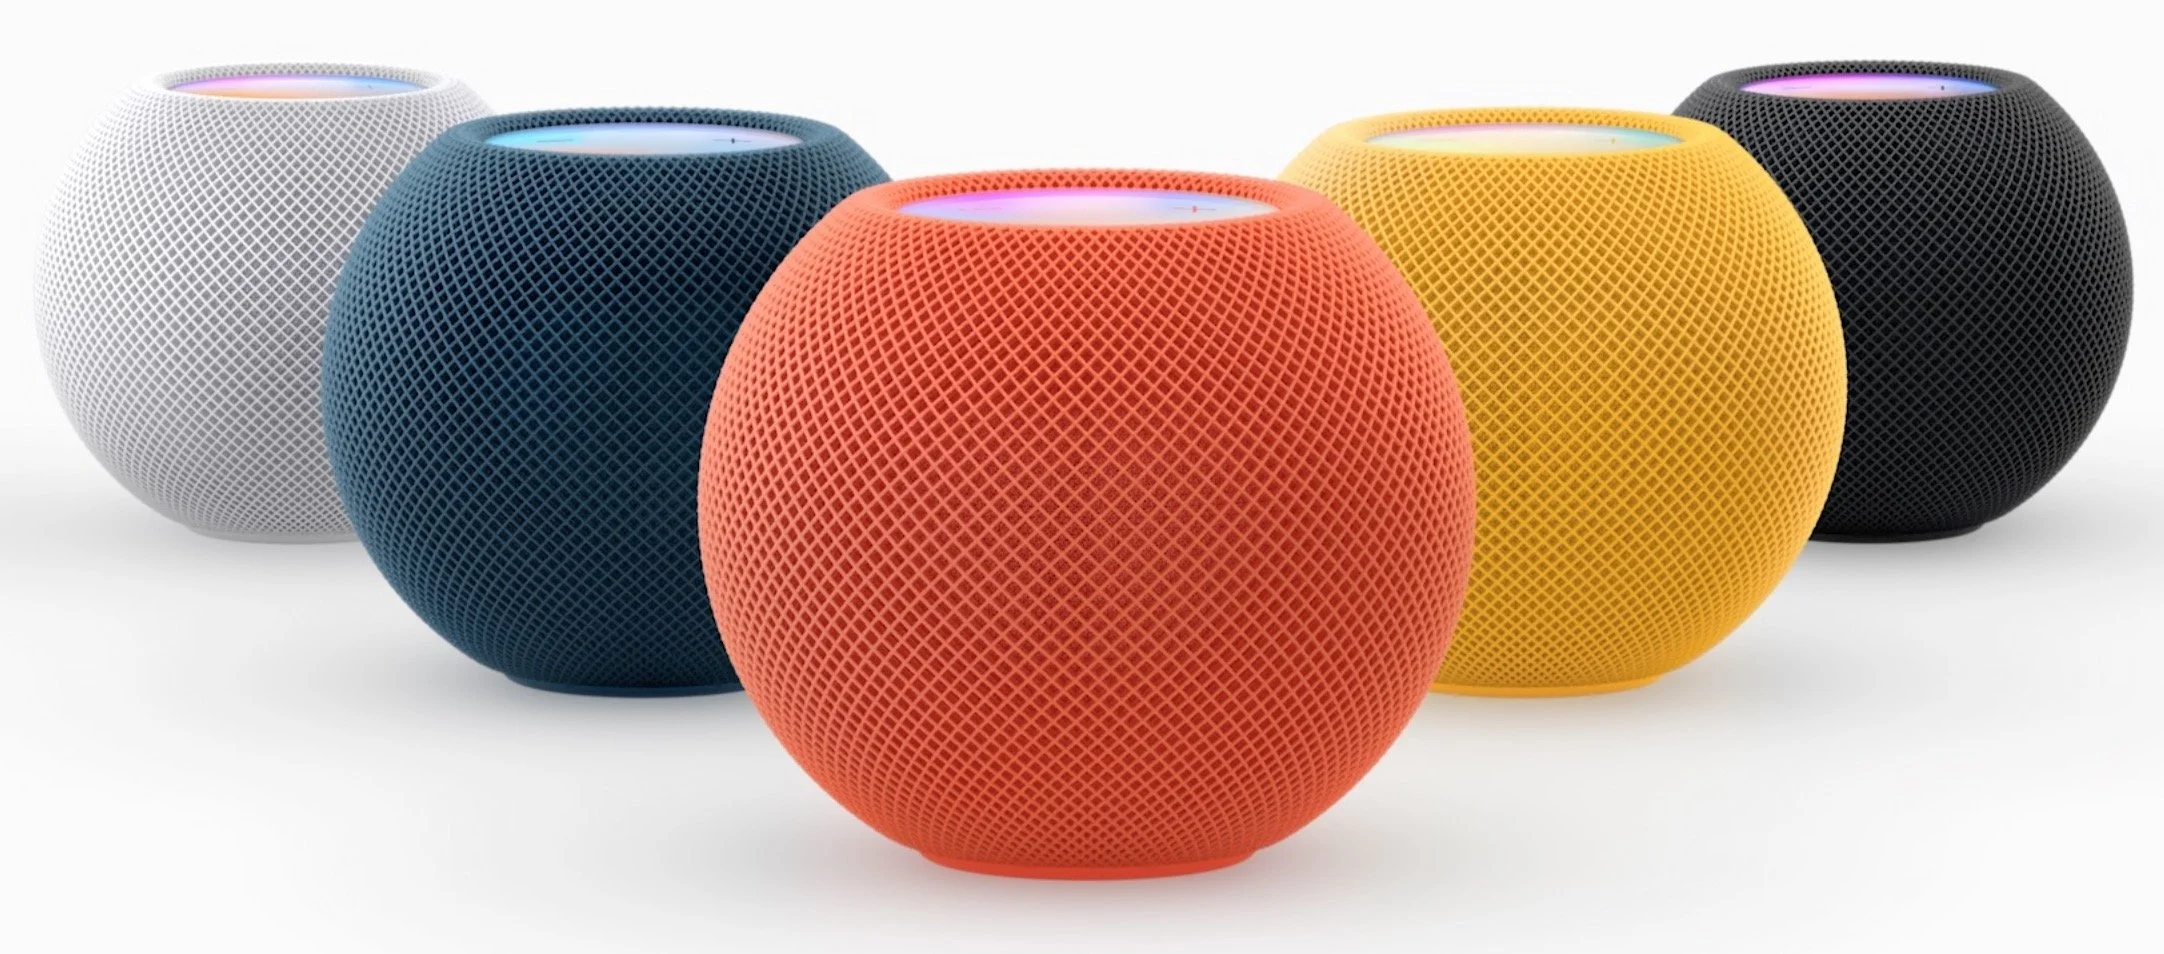
HomePod mini
Earlier this year, Apple discontinued the full-size HomePod, which wasn’t a big hit at its relatively high price of $299. However, the $99 HomePod mini remains available, and Apple is now selling it in five colors, with blue, orange, and yellow joining white and black. (The new colors will become available at some point in November.) The grapefruit-sized HomePod mini may be small, but it produces great sound for its size, and it can do pretty much everything the larger HomePod could do. You can control it entirely via Siri, pair two for stereo sound, use it as a hub for your HomeKit home automation accessories, and even have it play the sound from your Apple TV. Put a HomePod mini in different rooms in the house, and you can use Intercom to communicate with family members using your voice. If you’re giving it as a gift, remember that it’s best when paired with an Apple Music subscription.
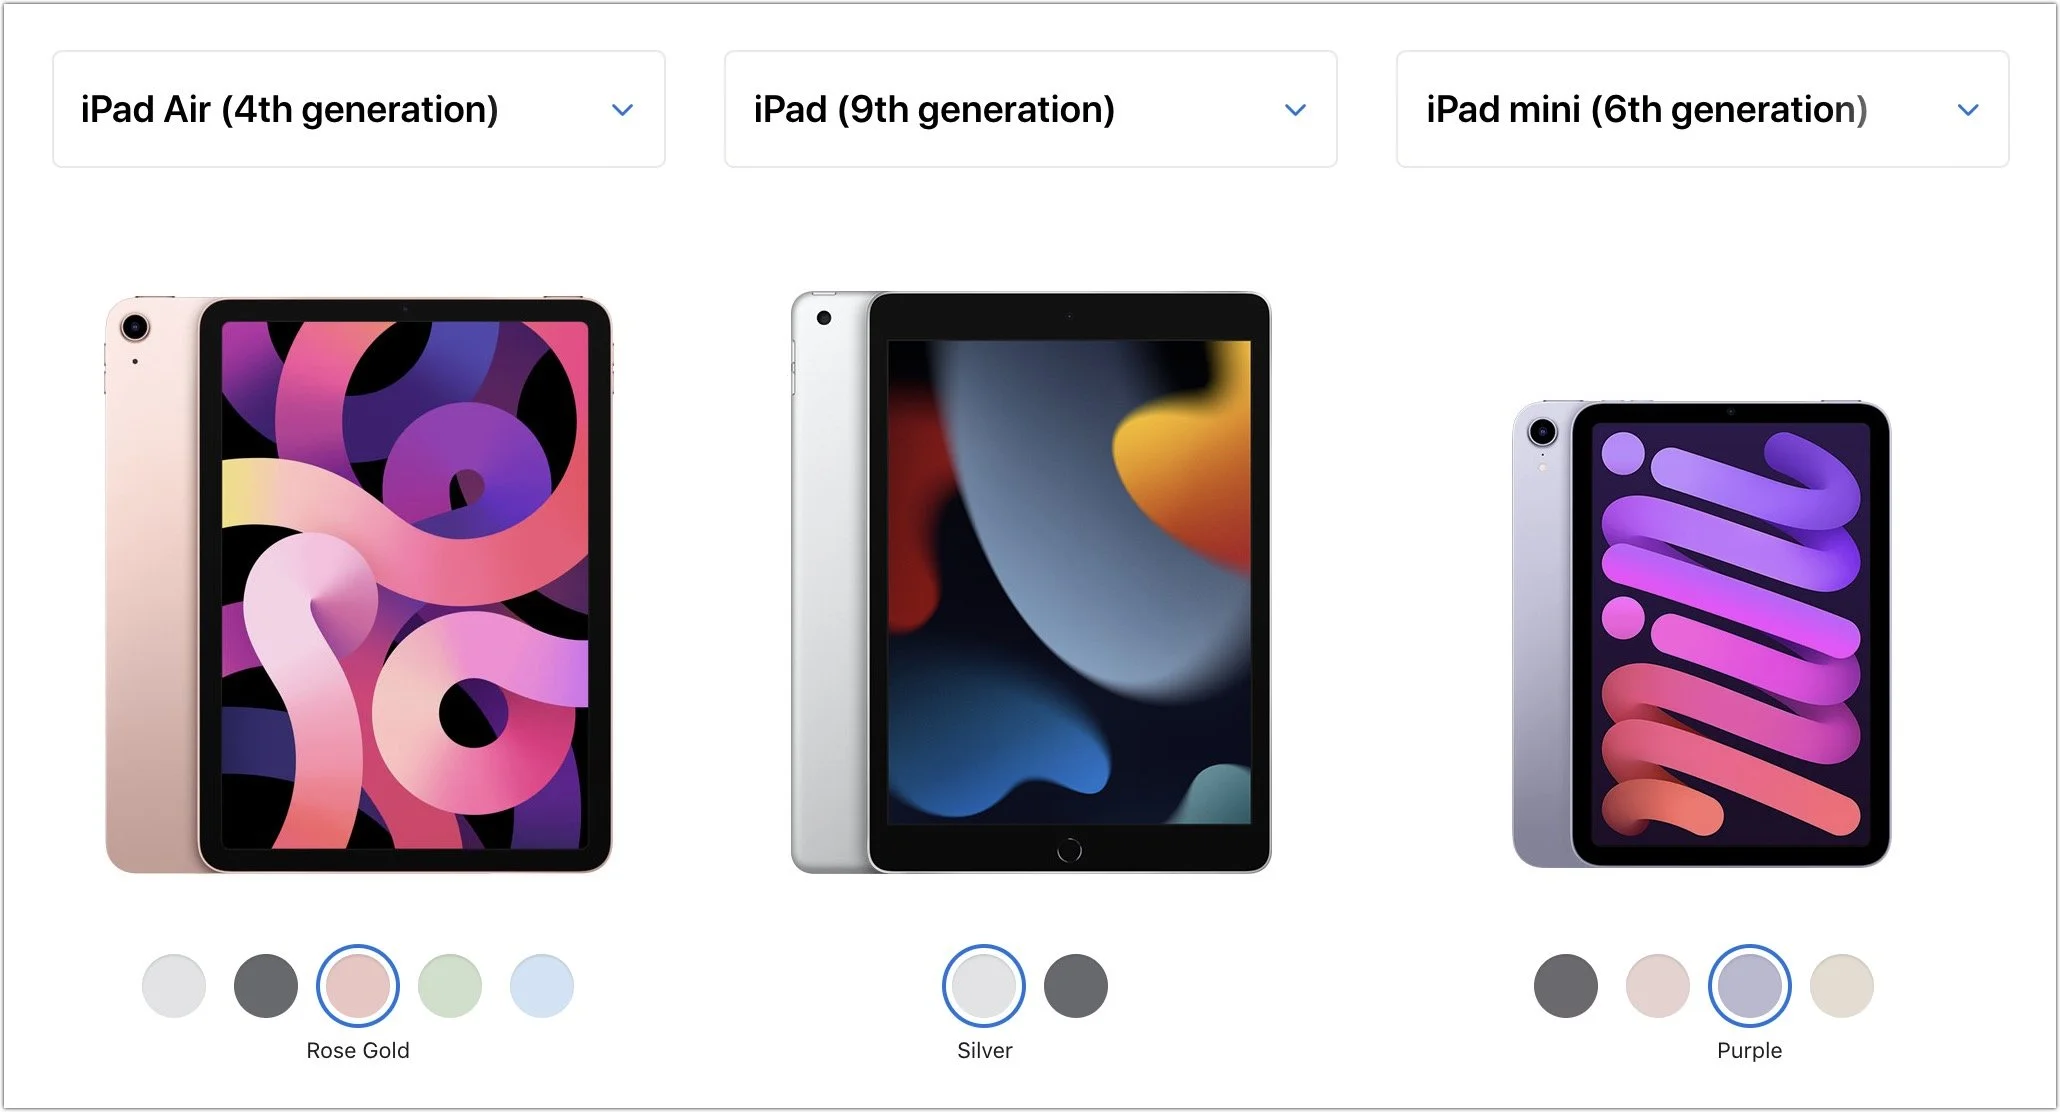
iPad and iPad mini
If you’re looking to give an iPad as a gift, you have a lot of choice. The top-of-the-line iPad Pro may be overkill for most given its power and price—$799 for the 11-inch model and $1099 for the 12.9-inch model. But the fourth-generation iPad Air, which starts at $599, provides sufficient power for even the most intensive tasks, especially when coupled with a second-generation Apple Pencil ($129) and either a Magic Keyboard ($299) or Smart Keyboard Folio ($179).
If those possibilities seem pricey for an iPad that’s destined for a kid or an adult with basic needs, look no further than the new ninth-generation iPad, which remains a bargain at $329. It works with the first-generation Apple Pencil ($99), and those who need to write can add the $159 Smart Keyboard. Finally, don’t forget the sixth-generation iPad mini, which benefited from a major redesign back in September. It’s now more like a diminutive version of the iPad Air, with more colors and a squared-off industrial design compatible with the second-generation Apple Pencil. It’s $499, and if you need a keyboard, you’ll have to look to a third-party manufacturer or use a standard Bluetooth wireless keyboard.
Apple Watch Gift Certificate
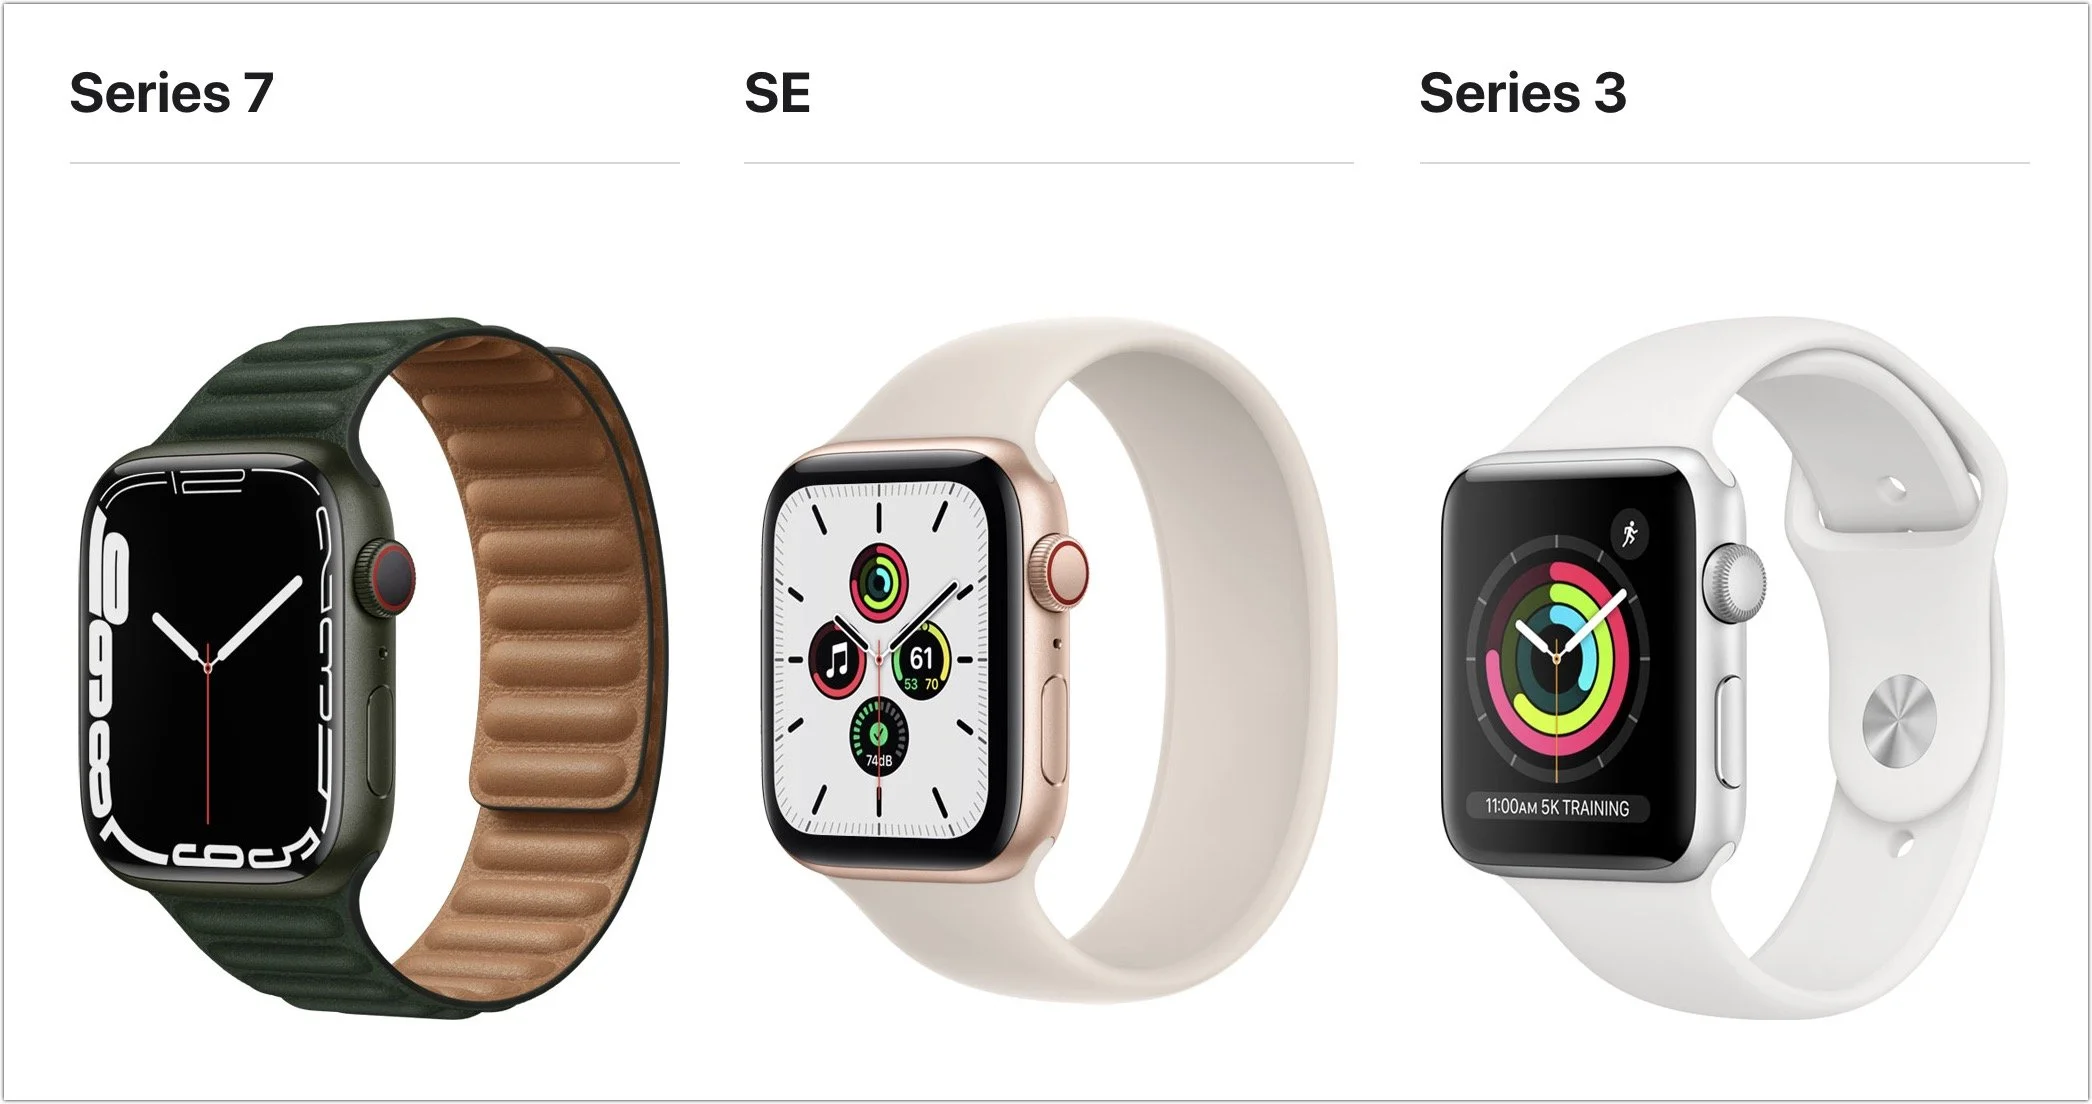
Last but far from least, we love the Apple Watch, and it would seem to make a great gift. However, we urge caution. Apple provides a dizzying number of options for case size, material, and color, plus the band and color, making it difficult to know what would be most appreciated. So we’d encourage giving a certificate that’s good for a conversation about what to purchase. Then sit down with the recipient to run through all the decisions in the Apple Watch Studio.
There are three options this year: the new Apple Watch Series 7 (starting at $399), last year’s less expensive Apple Watch SE (starting at $279), or the much older Apple Watch Series 3 (starting at $199). Get the Series 7 if you want an Always-On Display, blood oxygen sensor, and ECG capabilities—it also boasts a larger screen than last year’s Series 6 while remaining compatible with all the bands. The Apple Watch SE lacks the Series 7’s advanced sensors and has a slightly smaller screen size, but it still provides the compass, altimeter, and fall detection features. The screen on the Series 3 is smaller yet, and it lacks a number of key features. Unless keeping the cost to a minimum is essential, we have a hard time recommending the Series 3—it’s getting too old. Apple has a helpful comparison tool.
You may have noticed that we didn’t include any Macs in this article. They are worthy gifts, but they’re quite a bit more expensive and more difficult to select without extensive discussion of the recipient’s needs. Let us know if you need help choosing the right Mac for someone on your list, but we’re partial to the M1-based MacBook Air and 24-inch iMac for many users.
(Featured image by Adam Engst)
New M1 Pro and M1 Max Chips Power the 14-inch and 16-inch MacBook Pros
At its October 18th Unleashed event, Apple unveiled the new 14-inch and 16-inch MacBook Pro models, powered by the impressive new M1 Pro and M1 Max chips. Read on for details:

Last year, Apple started to transition Macs away from Intel processors to its custom M1 system-on-a-chip. The M1’s performance is stellar, but Apple has used it only in low-end models so far: the MacBook Air, 13-inch MacBook Pro, Mac mini, and new 24-inch iMac. For professionals looking for more power, Apple unveiled the future of high-end Macs at its October 18th Unleashed event.
Two new chips—the M1 Pro and M1 Max—increase performance significantly beyond the M1, and Apple built them into new 14-inch and 16-inch MacBook Pro models along with features that respond to criticisms of previous models. Welcome as these new MacBook Pros are, many people were also hoping to see an Apple silicon refresh of the popular 27-inch iMac. That didn’t happen, but Apple released several other music-related products and services at the event.
AirPods, HomePod mini, Apple Music, and Monterey Announcements
In a quick set of announcements at the start of its event, Apple revealed an update to the popular AirPods, new colors of the HomePod mini, and a budget pricing tier for Apple Music. Plus, press releases revealed the ship date for macOS 12 Monterey.
Third-generation AirPods: Building on the success of the classic AirPods and AirPods Pro, Apple redesigned the third-generation AirPods to have shorter mic stalks, force sensor controls, support for spatial audio, Adaptive EQ, longer battery life, wireless case charging, and sweat and water resistance. They cost $179; the second-generation AirPods remain available for $129.
New HomePod mini colors: Looking to coordinate your electronics with your decor? In November, the $99 HomePod mini will be available in blue, orange, and yellow, as well as the traditional black and white.

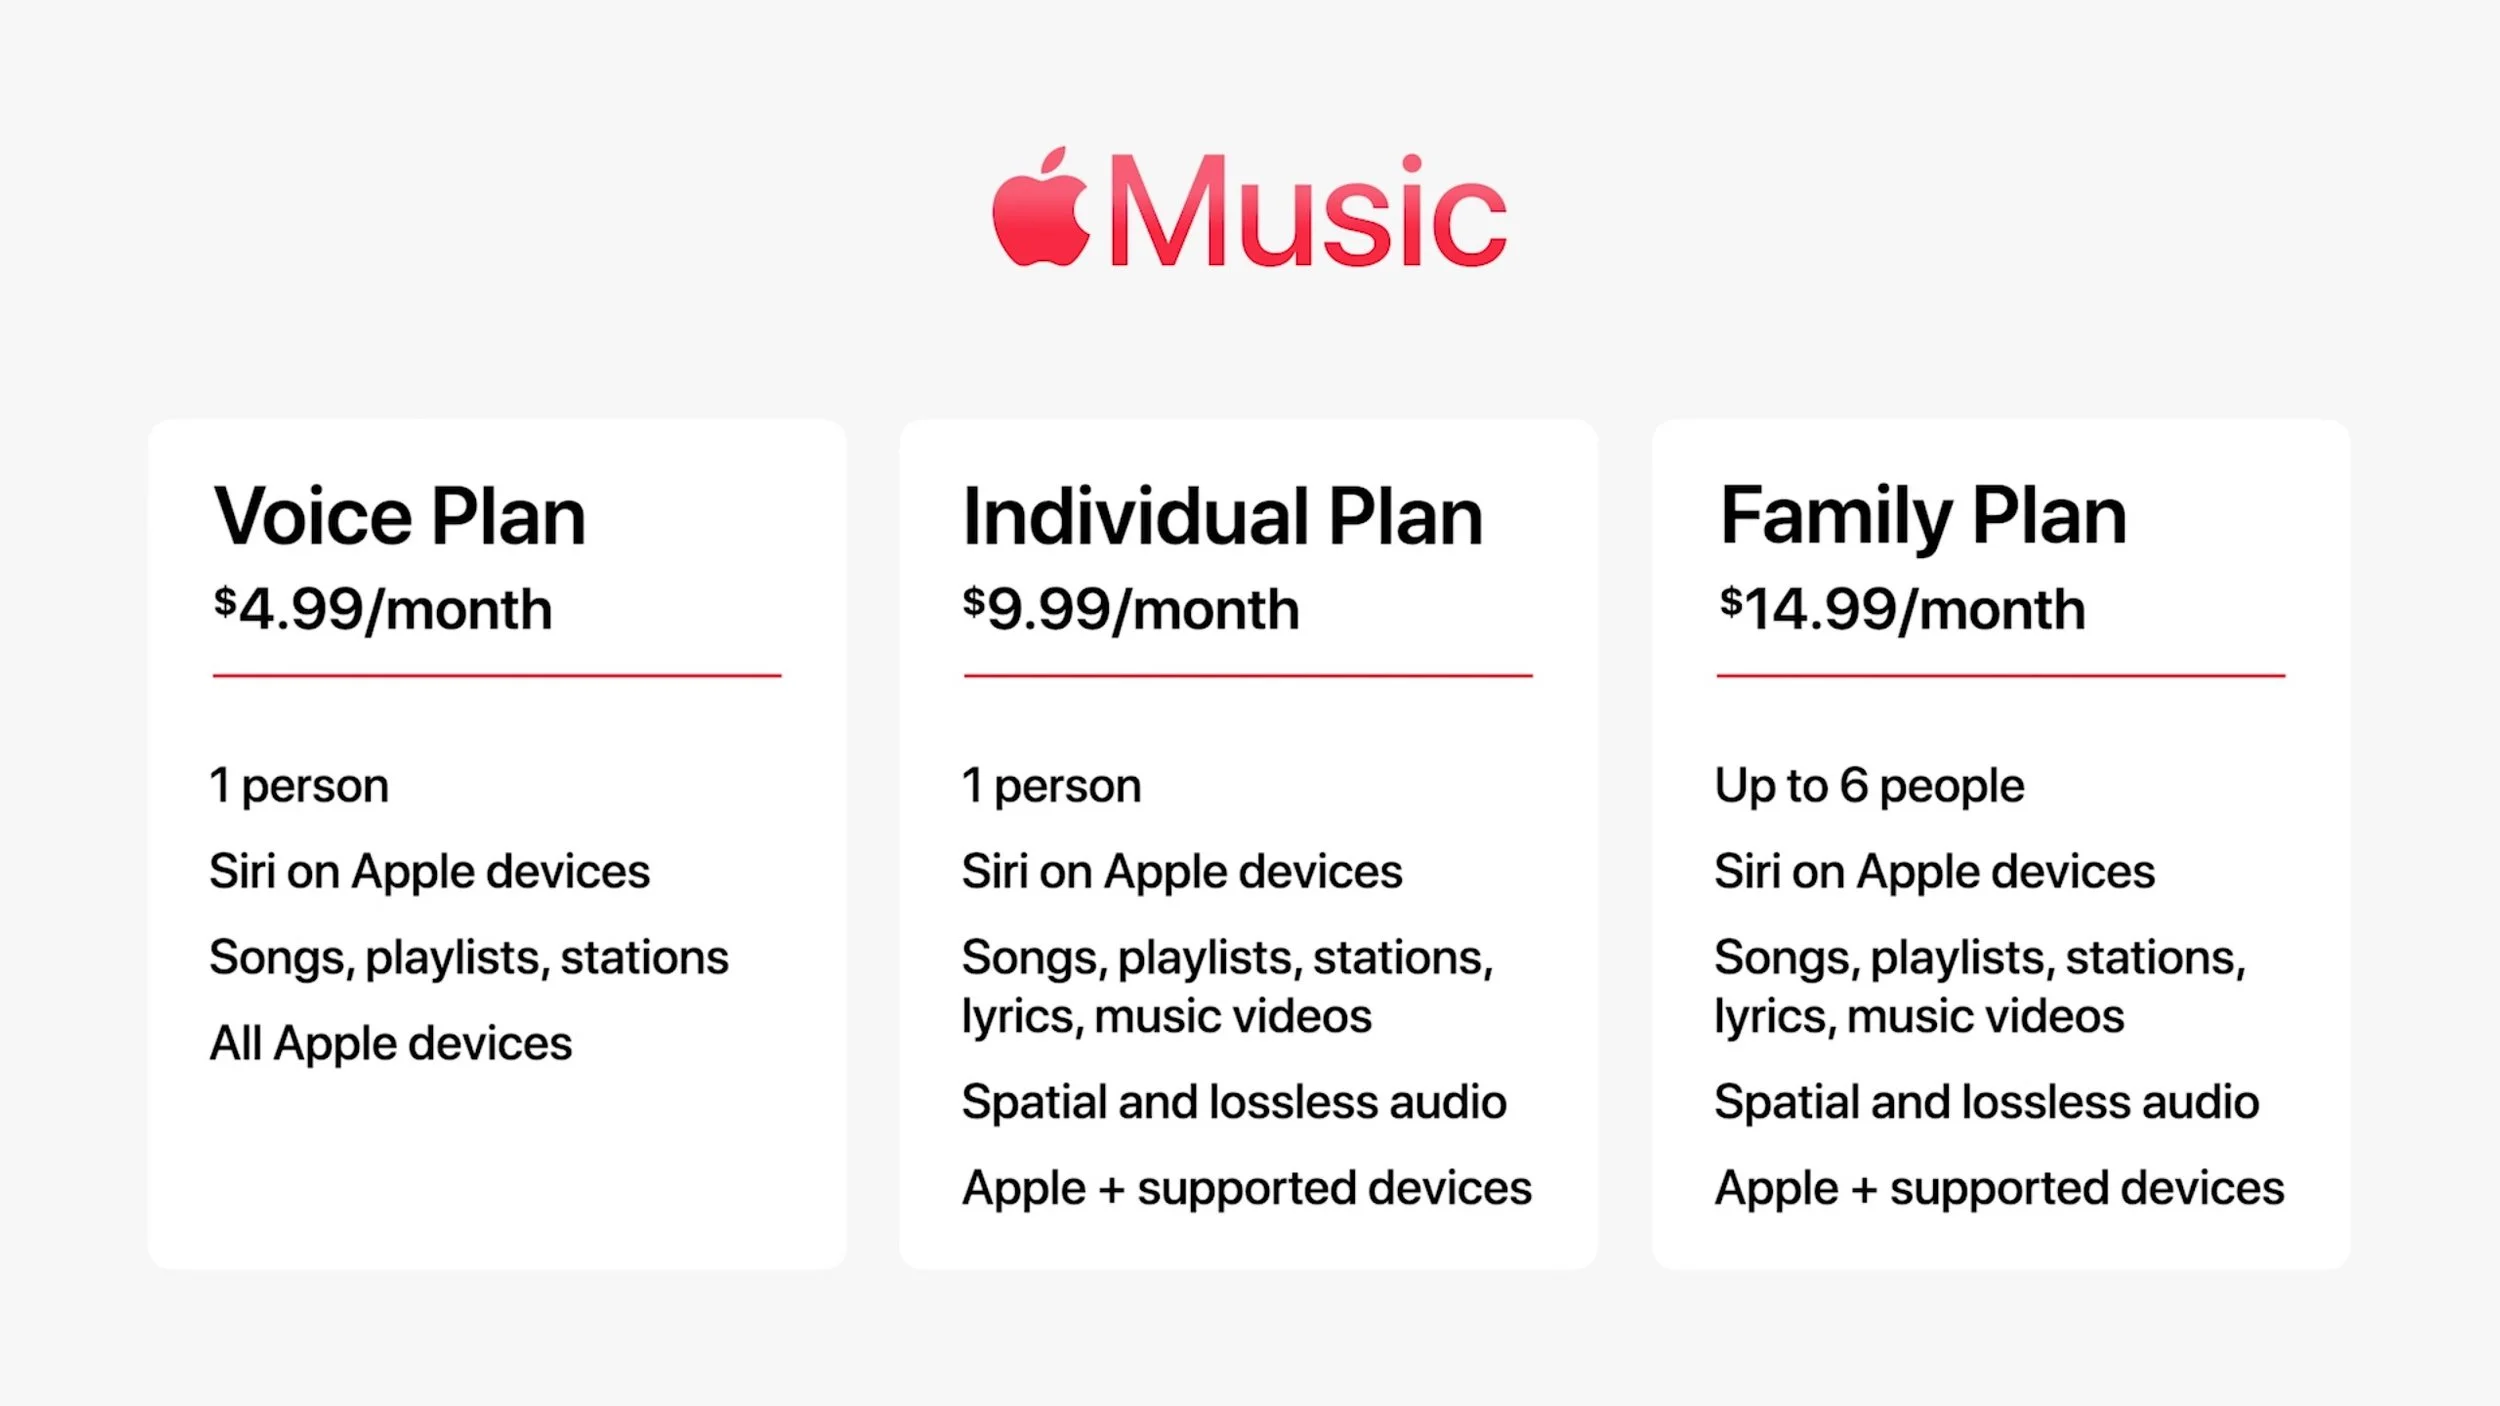
Apple Music Voice Plan: A new $4.99-per-month Apple Music Voice Plan reduces the cost of Apple Music for those who interact with the streaming service largely through Siri, but it lacks lyrics, music videos, spatial and lossless audio, and support for non-Apple devices.
macOS 12 Monterey release date: Hidden in the fine print in Apple’s press releases was the fact that macOS 12 Monterey—along with iOS 15.1, iPadOS 15.1, watchOS 8.1, and tvOS 15.1—will become available on October 25th. We strongly recommend that you do not upgrade to Monterey until we give the go-ahead. If you’ve already upgraded to the other new operating systems, it should be safe to install those updates a week or two after release.
New 14-inch and 16-inch MacBook Pros Answer Customer Desires
Apple’s professional MacBook Pro has been a workhorse of the Mac lineup for years, offering high-end performance in a portable package. Since 2016, however, customers have expressed irritation at Apple’s removal of ports other than Thunderbolt 3, the loss of MagSafe magnetic charging, and the Touch Bar replacing traditional F-keys. Here’s how the new MacBook Pros respond to those concerns.
Ports: Previously, the MacBook Pro had just four Thunderbolt 3 ports, forcing users to carry dongles to connect to legacy devices. The new models still lack USB-A ports but supplement three Thunderbolt 4 ports with an HDMI port for video, an SDXC card slot for camera media, and a headphone jack.
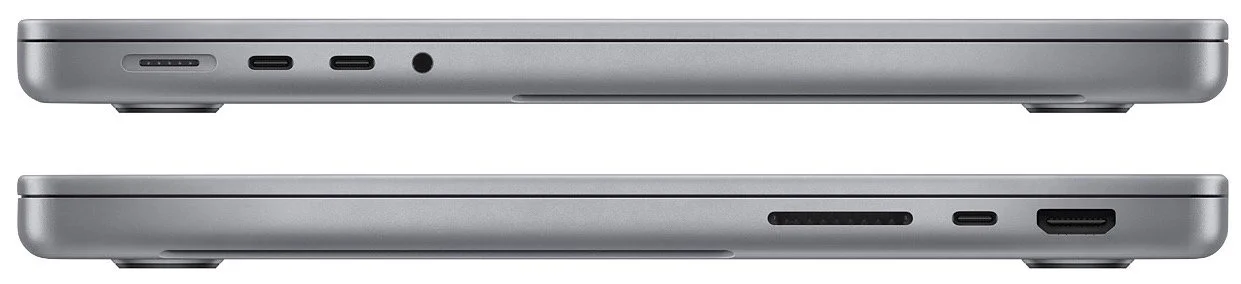
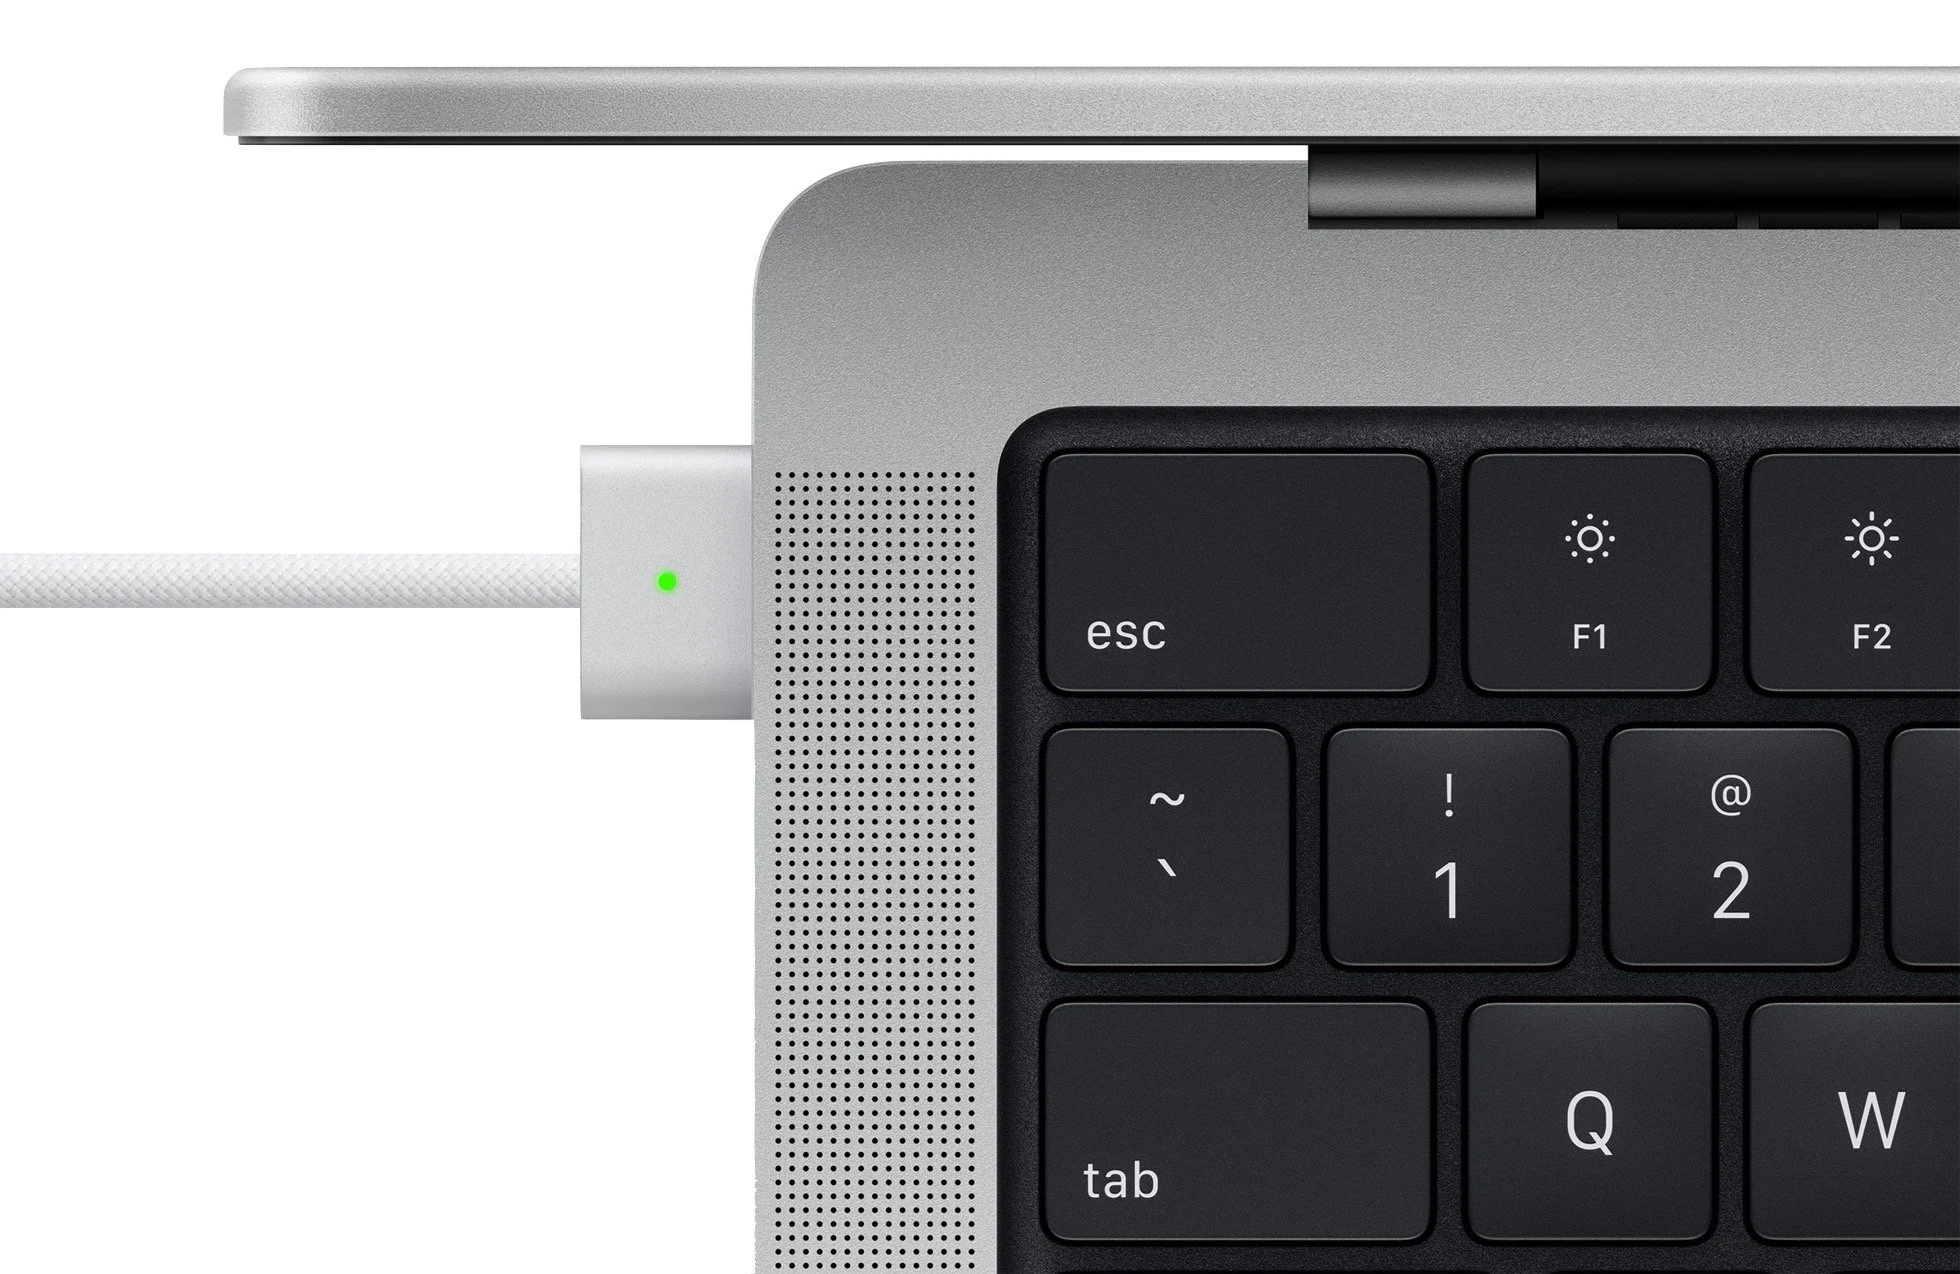
MagSafe: Although you can charge using the Thunderbolt 4 ports, most people will rely on the dedicated MagSafe 3 charging port. The MacBook Pros (apart from the low-end 14-inch model) include powerful chargers and a USB-C to MagSafe 3 charging cable capable of fast-charging the devices. They should also provide longer battery life than previous models.
F-keys with Touch ID: The Touch Bar hasn’t been a success, never migrating to any other Mac models and eliciting tepid support from developers. With these new MacBook Pros, Apple has reversed course, replacing the Touch Bar with traditional F-keys. A Touch ID sensor remains available for authentication at the top-right corner of the keyboard.
Although Apple did equip the 13-inch MacBook Pro with an M1 chip in November 2020, it wasn’t notably faster than the cheaper but largely comparable M1-based MacBook Air. We suspect no one will be complaining about the performance of the new 14-inch and 16-inch models thanks to the addition of Apple’s just-released M1 Pro and M1 Max chips.
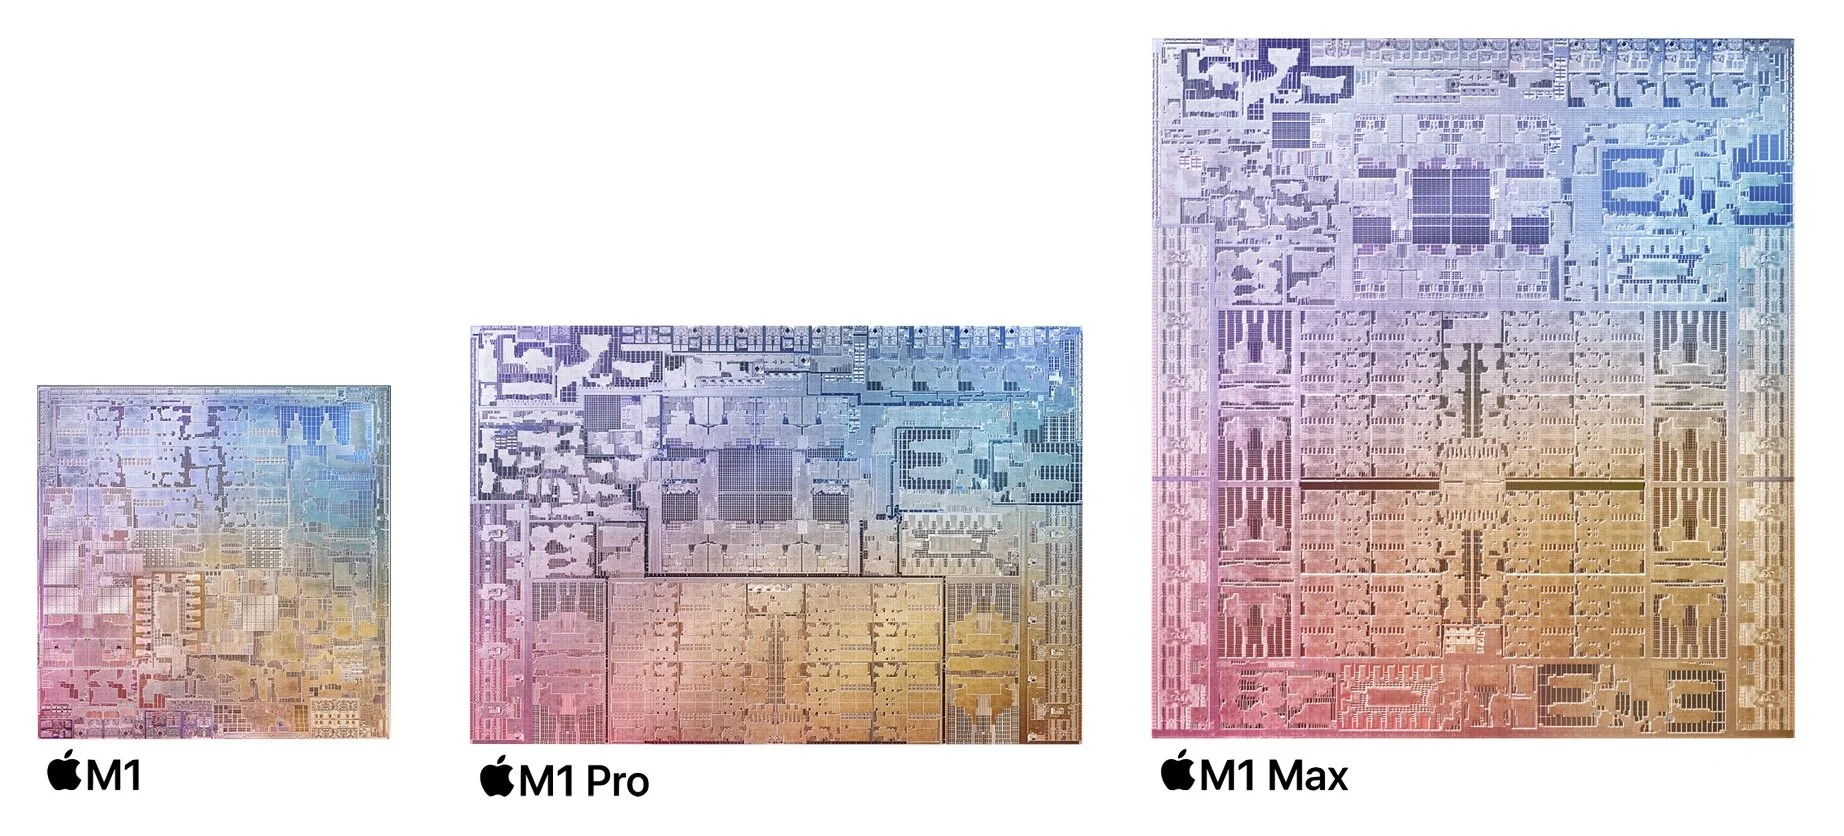
M1: For reference, last year’s M1 chip—widely acclaimed for providing excellent performance—offers an 8-core CPU with four performance and four efficiency cores, a 7-core or 8-core GPU, and either 8 GB or 16 GB of unified memory.
M1 Pro: The M1 Pro offers up to 1.7 times the performance of the M1 thanks to a 10-core CPU that has eight performance and two efficiency cores. Plus, its 16-core GPU is up to twice as fast as the M1. The M1 Pro provides either 16 GB or 32 GB of unified memory, and it increases the memory bandwidth by nearly three times, up to 200 gigabytes per second (GBps). To provide lower price points for 14-inch MacBook Pro configurations, Apple offers versions of the M1 Pro with an 8-core CPU (six performance and two efficiency cores) or a 14-core GPU.
M1 Max: The M1 Max has the same 10-core CPU as the M1 Pro but provides a massive 32-core GPU with up to four times the performance of the M1. The largest chip Apple has ever made, the M1 Max offers either 32 GB or 64 GB of memory, and it doubles the M1 Pro’s memory bandwidth to 400 GBps, nearly six times faster than the M1. A lower-cost M1 Max configuration has a 24-core GPU.
Both the M1 Pro and M1 Max feature an Apple-designed media engine that accelerates video processing while maximizing battery life. Both also have dedicated acceleration for the ProRes professional video codec for working with 4K and 8K video. The M1 Max doubles the M1 Pro’s performance for video encoding and provides two ProRes accelerators. In other words, if you’re working with video, these new Macs are going to scream, particularly with an M1 Max.
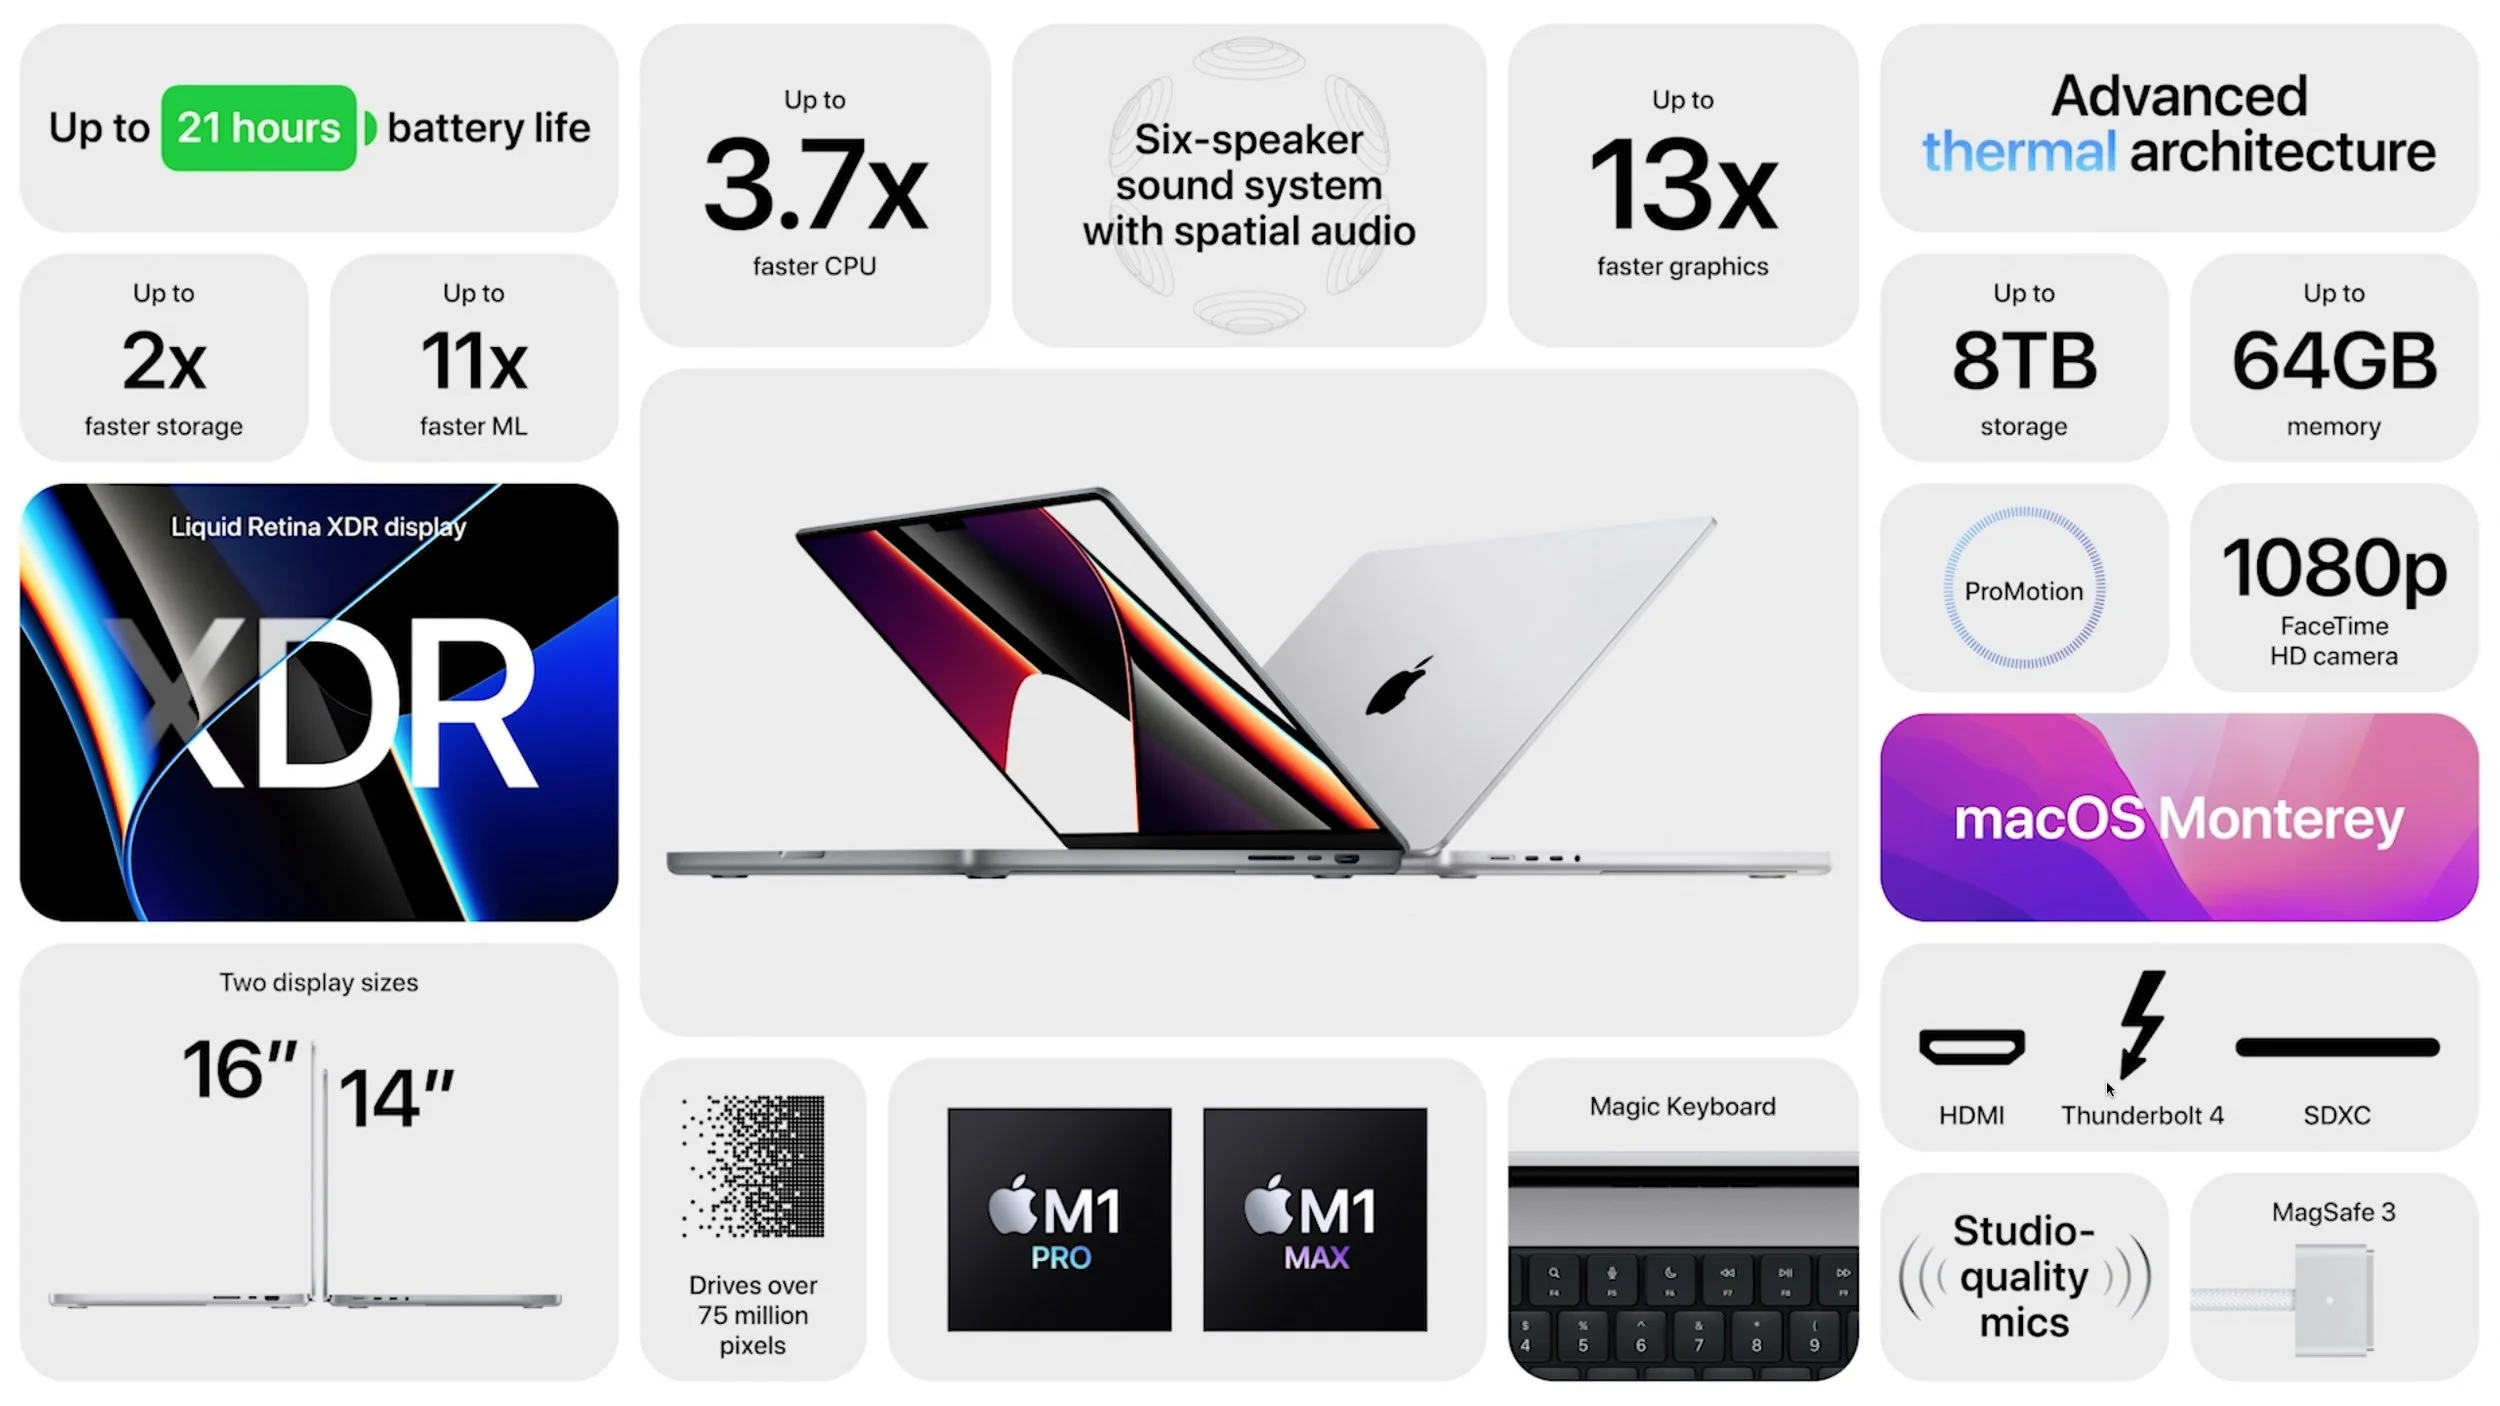
Apple didn’t stop after radically improving performance and bringing back beloved features. The new MacBook Pros feature new Liquid Retina XDR displays based on technology used in the latest iPad Pro models.
Most notably, for those who need more screen space than the 13-inch MacBook Pro can provide, the new MacBook Pro models have higher resolution displays. The 14-inch screen has a 3024-by-1964 native resolution that’s slightly larger than the previous 16-inch MacBook Pro (3072‑by‑1920), and the new 16-inch model offers even more pixels with a 3456-by-2234 resolution. The new displays are more than twice as bright as the previous models, and they support ProMotion, which adjusts the screen refresh rate (and thus power consumption) to match the needs of the onscreen content.
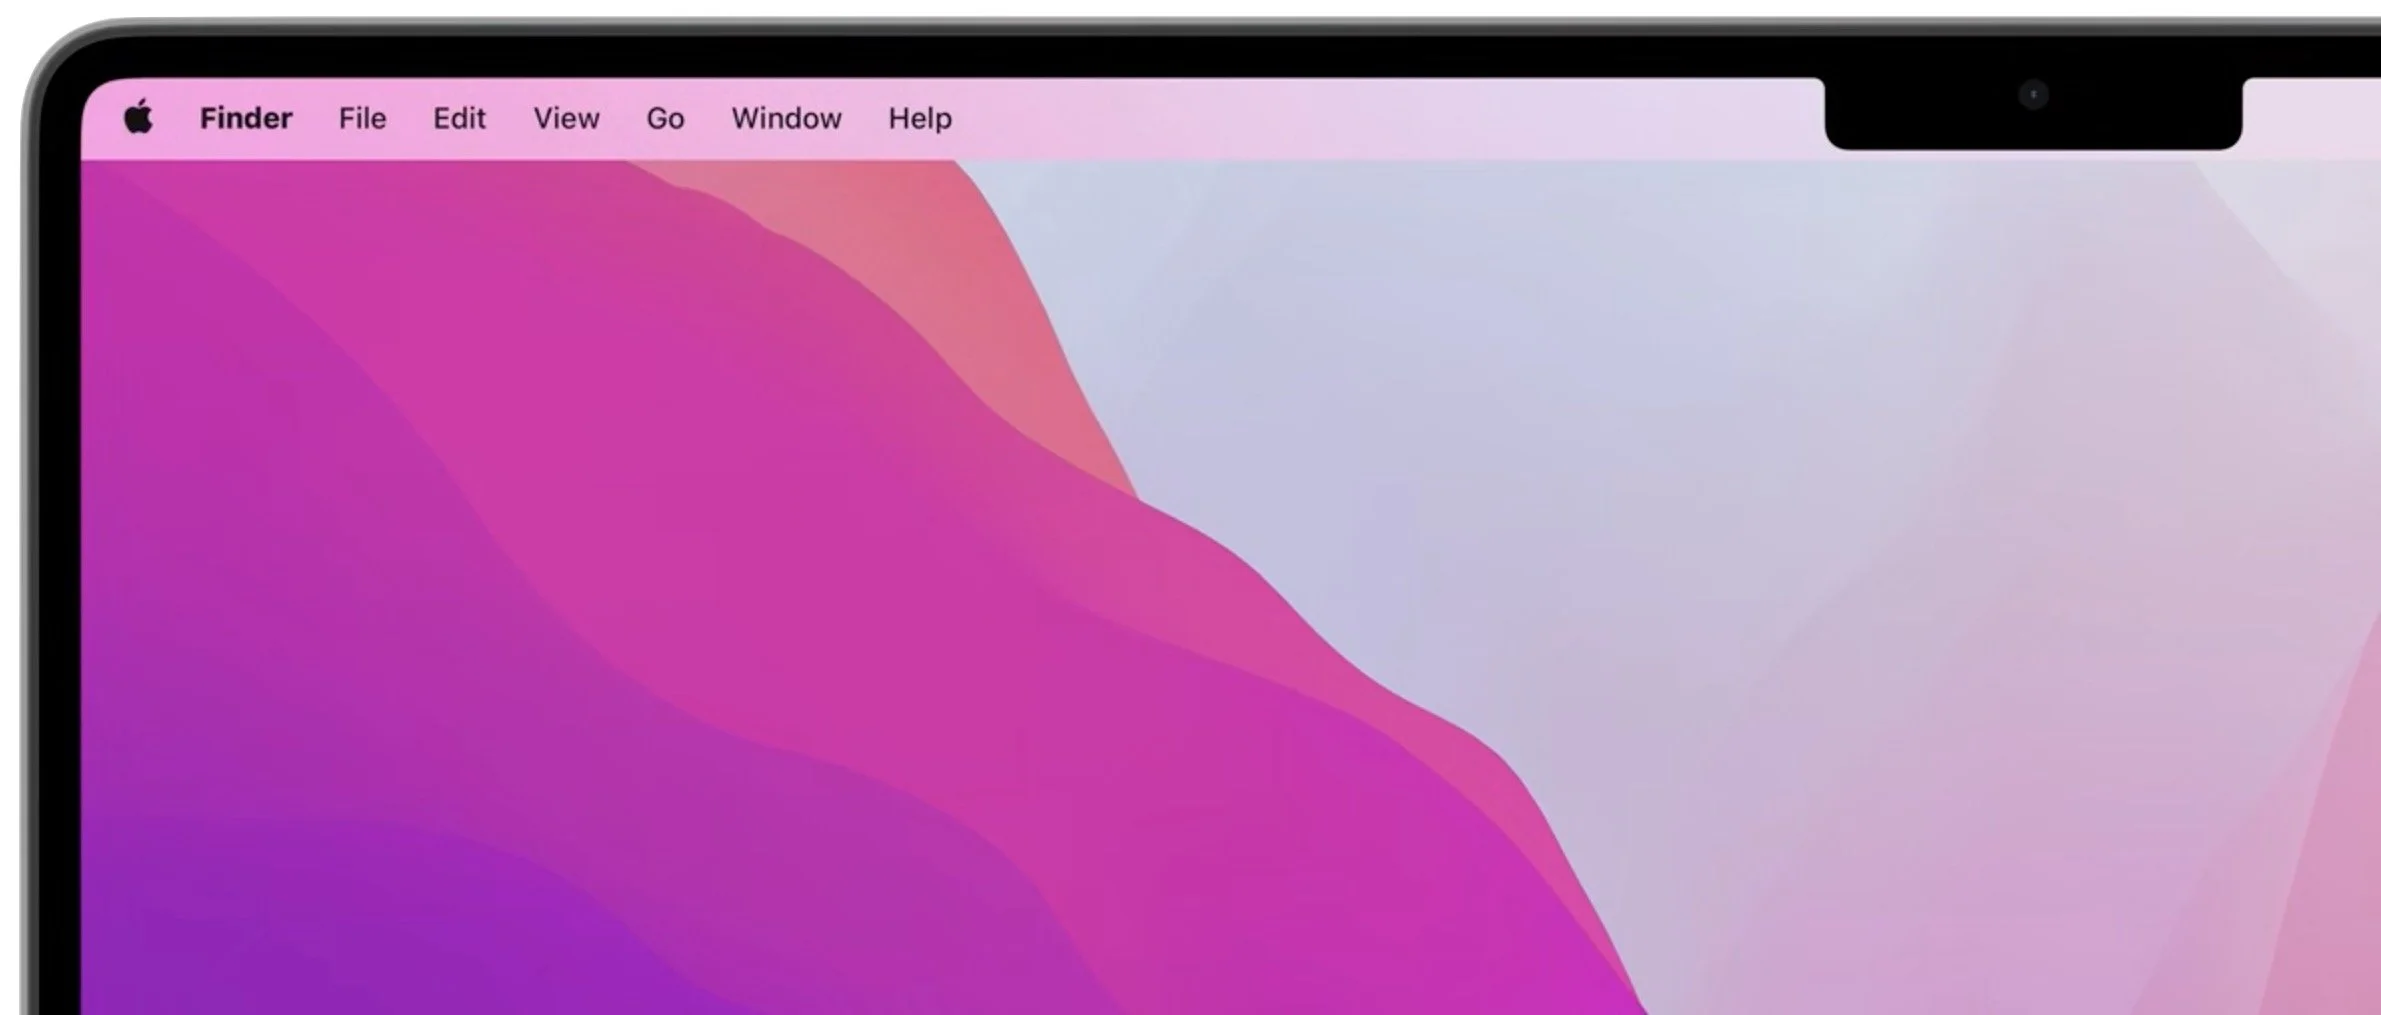
On the downside, Apple brought the new displays so close to the case edges that the new 1080p FaceTime HD camera (better videoconferencing quality but no Center Stage support) lives in an iPhone-like notch that cuts the Mac menu bar in half. Full-screen apps can avoid the notch. Although the notch isn’t ideal, iPhone users seldom notice it after a short while, and we expect the same will be true here.
The only other negative for the new 14-inch and 16-inch MacBook Pro models is weight. They’re both about 0.4 pounds (0.18 kg) heavier than the models they replace, at 3.5 pounds (1.6 kg) for the 14-inch model and 4.7 or 4.8 pounds (2.1 or 2.2 kg) for the 16-inch model—the M1 Max configurations are a bit heavier.
Despite the notch and the weight, these are impressive new entries in the Mac lineup, and we anticipate they’ll be well-received by users who are happy to pay more for top-of-the-line machines. The 14-inch MacBook Pro starts at $1999 and the 16-inch model at $2499. Numerous options are available, so you can choose an M1 Pro or M1 Max for either size, and pick from 16 GB, 32 GB, and 64 GB unified memory configurations. When it comes to storage (which Apple says is also more than twice as fast as previous SSDs), your choices are 512 GB, 1 TB, 2 TB, 4 TB, and 8 TB. Beware that the 8 TB SSD will cost you $2400.
We can’t make informed recommendations about what options you should choose until users start testing their real-world workflows against the M1 Pro and M1 Max and see how much memory is really necessary. For now, let your budget be your guide, and aim for an M1 Max if you work with video. You can place orders with Apple now, but be warned that global supply chain issues may mean waiting for some configurations.
(Featured image by Apple)
What Is iCloud+ and What Can You Do With It?
With iOS 15 and iPadOS 15, Apple has released iCloud+, the new name for what you get if you pay for iCloud storage. iCloud+ includes exclusive features like iCloud Private Relay, Hide My Email, custom email domains, and HomeKit Secure Video. See:

As you upgrade to iOS 15, iPadOS 15 (and macOS 12 Monterey by the end of the year), you’re going to see references to iCloud+. You might even already be an iCloud+ subscriber! That’s because iCloud+ is Apple’s new name for what you get if you pay for additional iCloud storage for yourself and up to five family members, which has been possible for a long time.
iCloud+ comes with some new features as well, namely iCloud Private Relay (still in beta), Hide My Email, and Custom Email Domain, along with expanded HomeKit Secure Video support. Three tiers of iCloud+ match up with the previous storage tiers:
50 GB for $0.99 per month gets you all the iCloud+ features plus HomeKit Secure Video support for one camera
200 GB for $2.99 per month gets you all the iCloud+ features plus HomeKit Secure Video support for five cameras
2 TB for $9.99 per month gets you all the iCloud+ features plus HomeKit Secure Video support for unlimited cameras
We expect that most people will subscribe to iCloud+ largely for the extra storage—Apple provides only 5 GB of iCloud storage for free—but once you’re paying for more storage, the other new features are welcome. Let’s look at each.

iCloud Private Relay
Whenever you browse the Internet, your privacy can be compromised in two ways. First, anyone on your local network can see the names of the websites you access based on your DNS lookups. Second, the websites you visit record the IP address of your computer, which makes it easier for advertisers to track you across multiple sites.
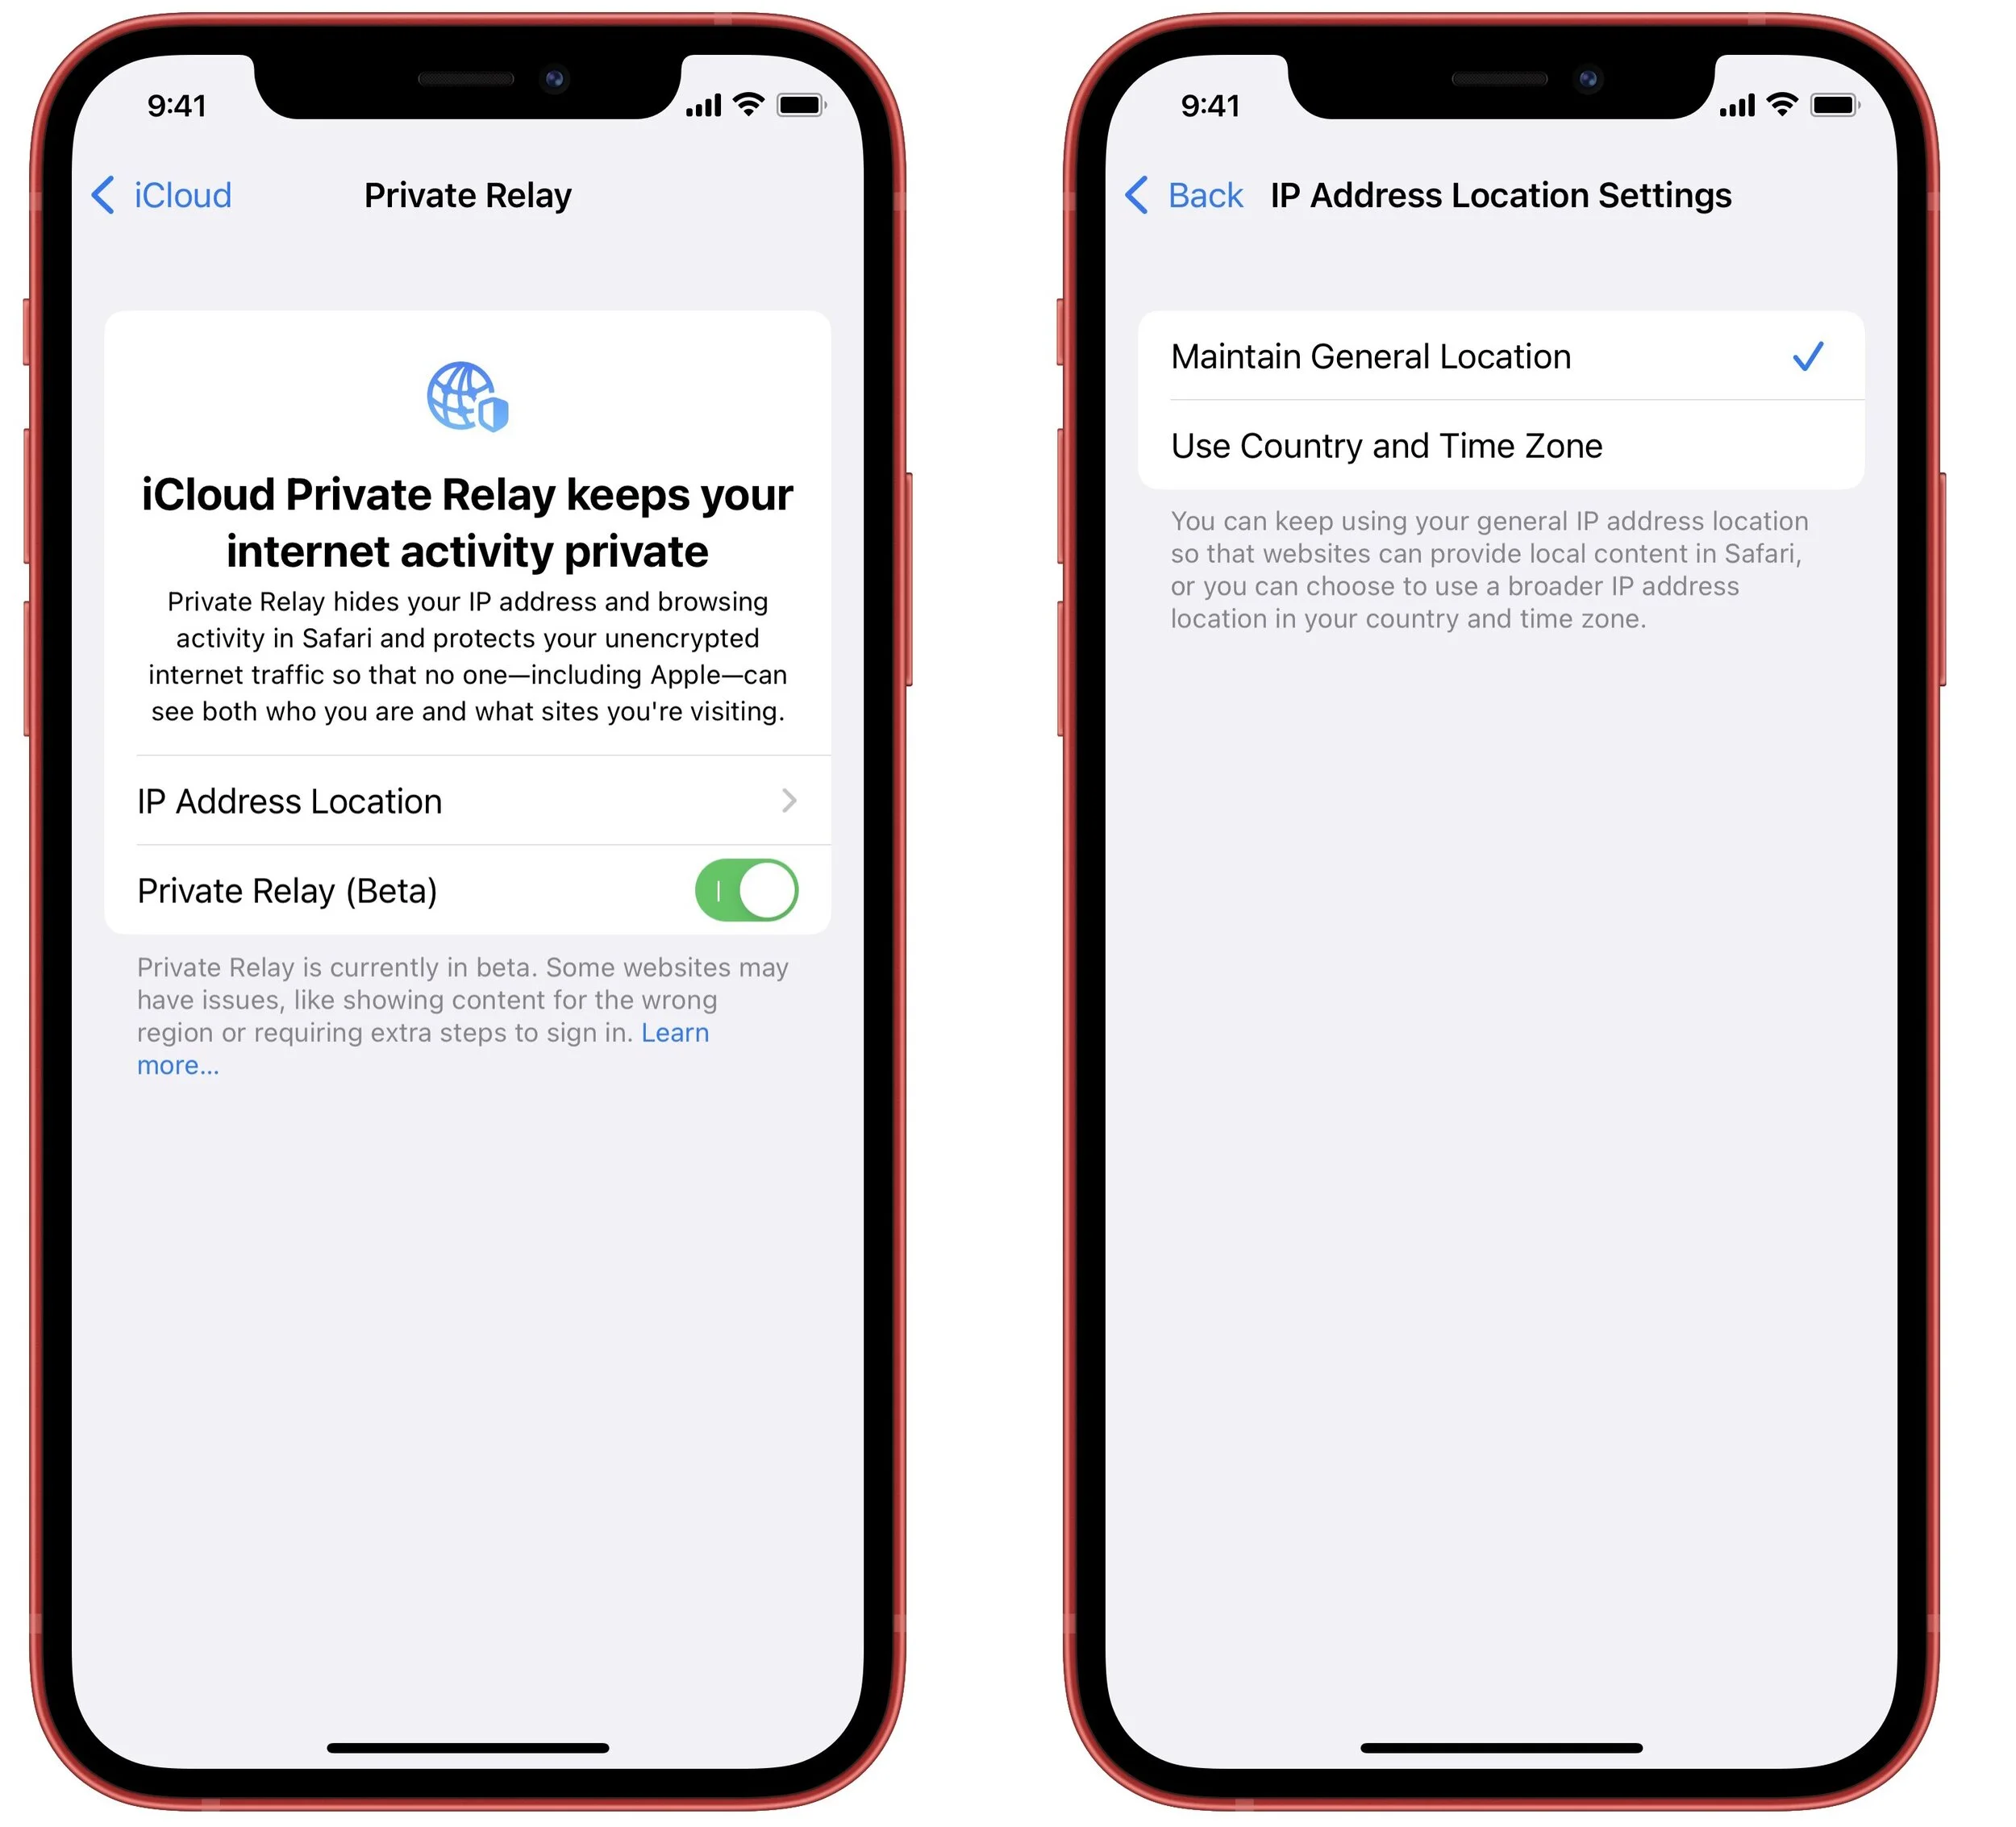
iCloud Private Relay, which Apple says will come out of beta by the end of the year, attempts to block such tracking by encrypting your Safari traffic (plus DNS queries and most non-HTTPS Web queries), sending it through two proxy servers, and associating it with a geographically reasonable but otherwise anonymous IP address. That way, the first proxy server (which Apple runs) knows who you are but not what site you’re visiting. The second proxy server (run by companies other than Apple) knows what site you’re visiting, but not who you are.

Although Apple’s technique appeared to work well and early reports suggest that it didn’t slow down traffic noticeably, networking is notoriously complex. Apple wanted more time to ensure that iCloud Private Relay works as promised with all network traffic, which is why the feature remains in beta. However, nothing prevents you from trying it out now. After you turn it on, you shouldn’t notice any difference when using the Internet. Just make sure that if you have network-related troubles, you remember to turn off iCloud Private Relay to remove it from the troubleshooting equation.
To enable the feature, go to Settings > Your Name > iCloud > Private Relay (Beta) and turn on the switch for Private Relay (Beta). In the IP Address Location Settings screen, you can choose whether iCloud Private Relay should try to maintain your general location or just make sure it gets your country and time zone correct.
Hide My Email
Have you ever felt icky giving your email address to a questionable website, knowing that it’s probably going to spam you with unwanted solicitations? The new Hide My Email service that’s part of iCloud+ creates random, unique email addresses that automatically forward to your inbox, either your Apple ID address or another address associated with an email account configured on your device. In fact, Apple has provided this option for some time with apps that use the Sign in with Apple service—you can opt to give them a random address instead of your real address.
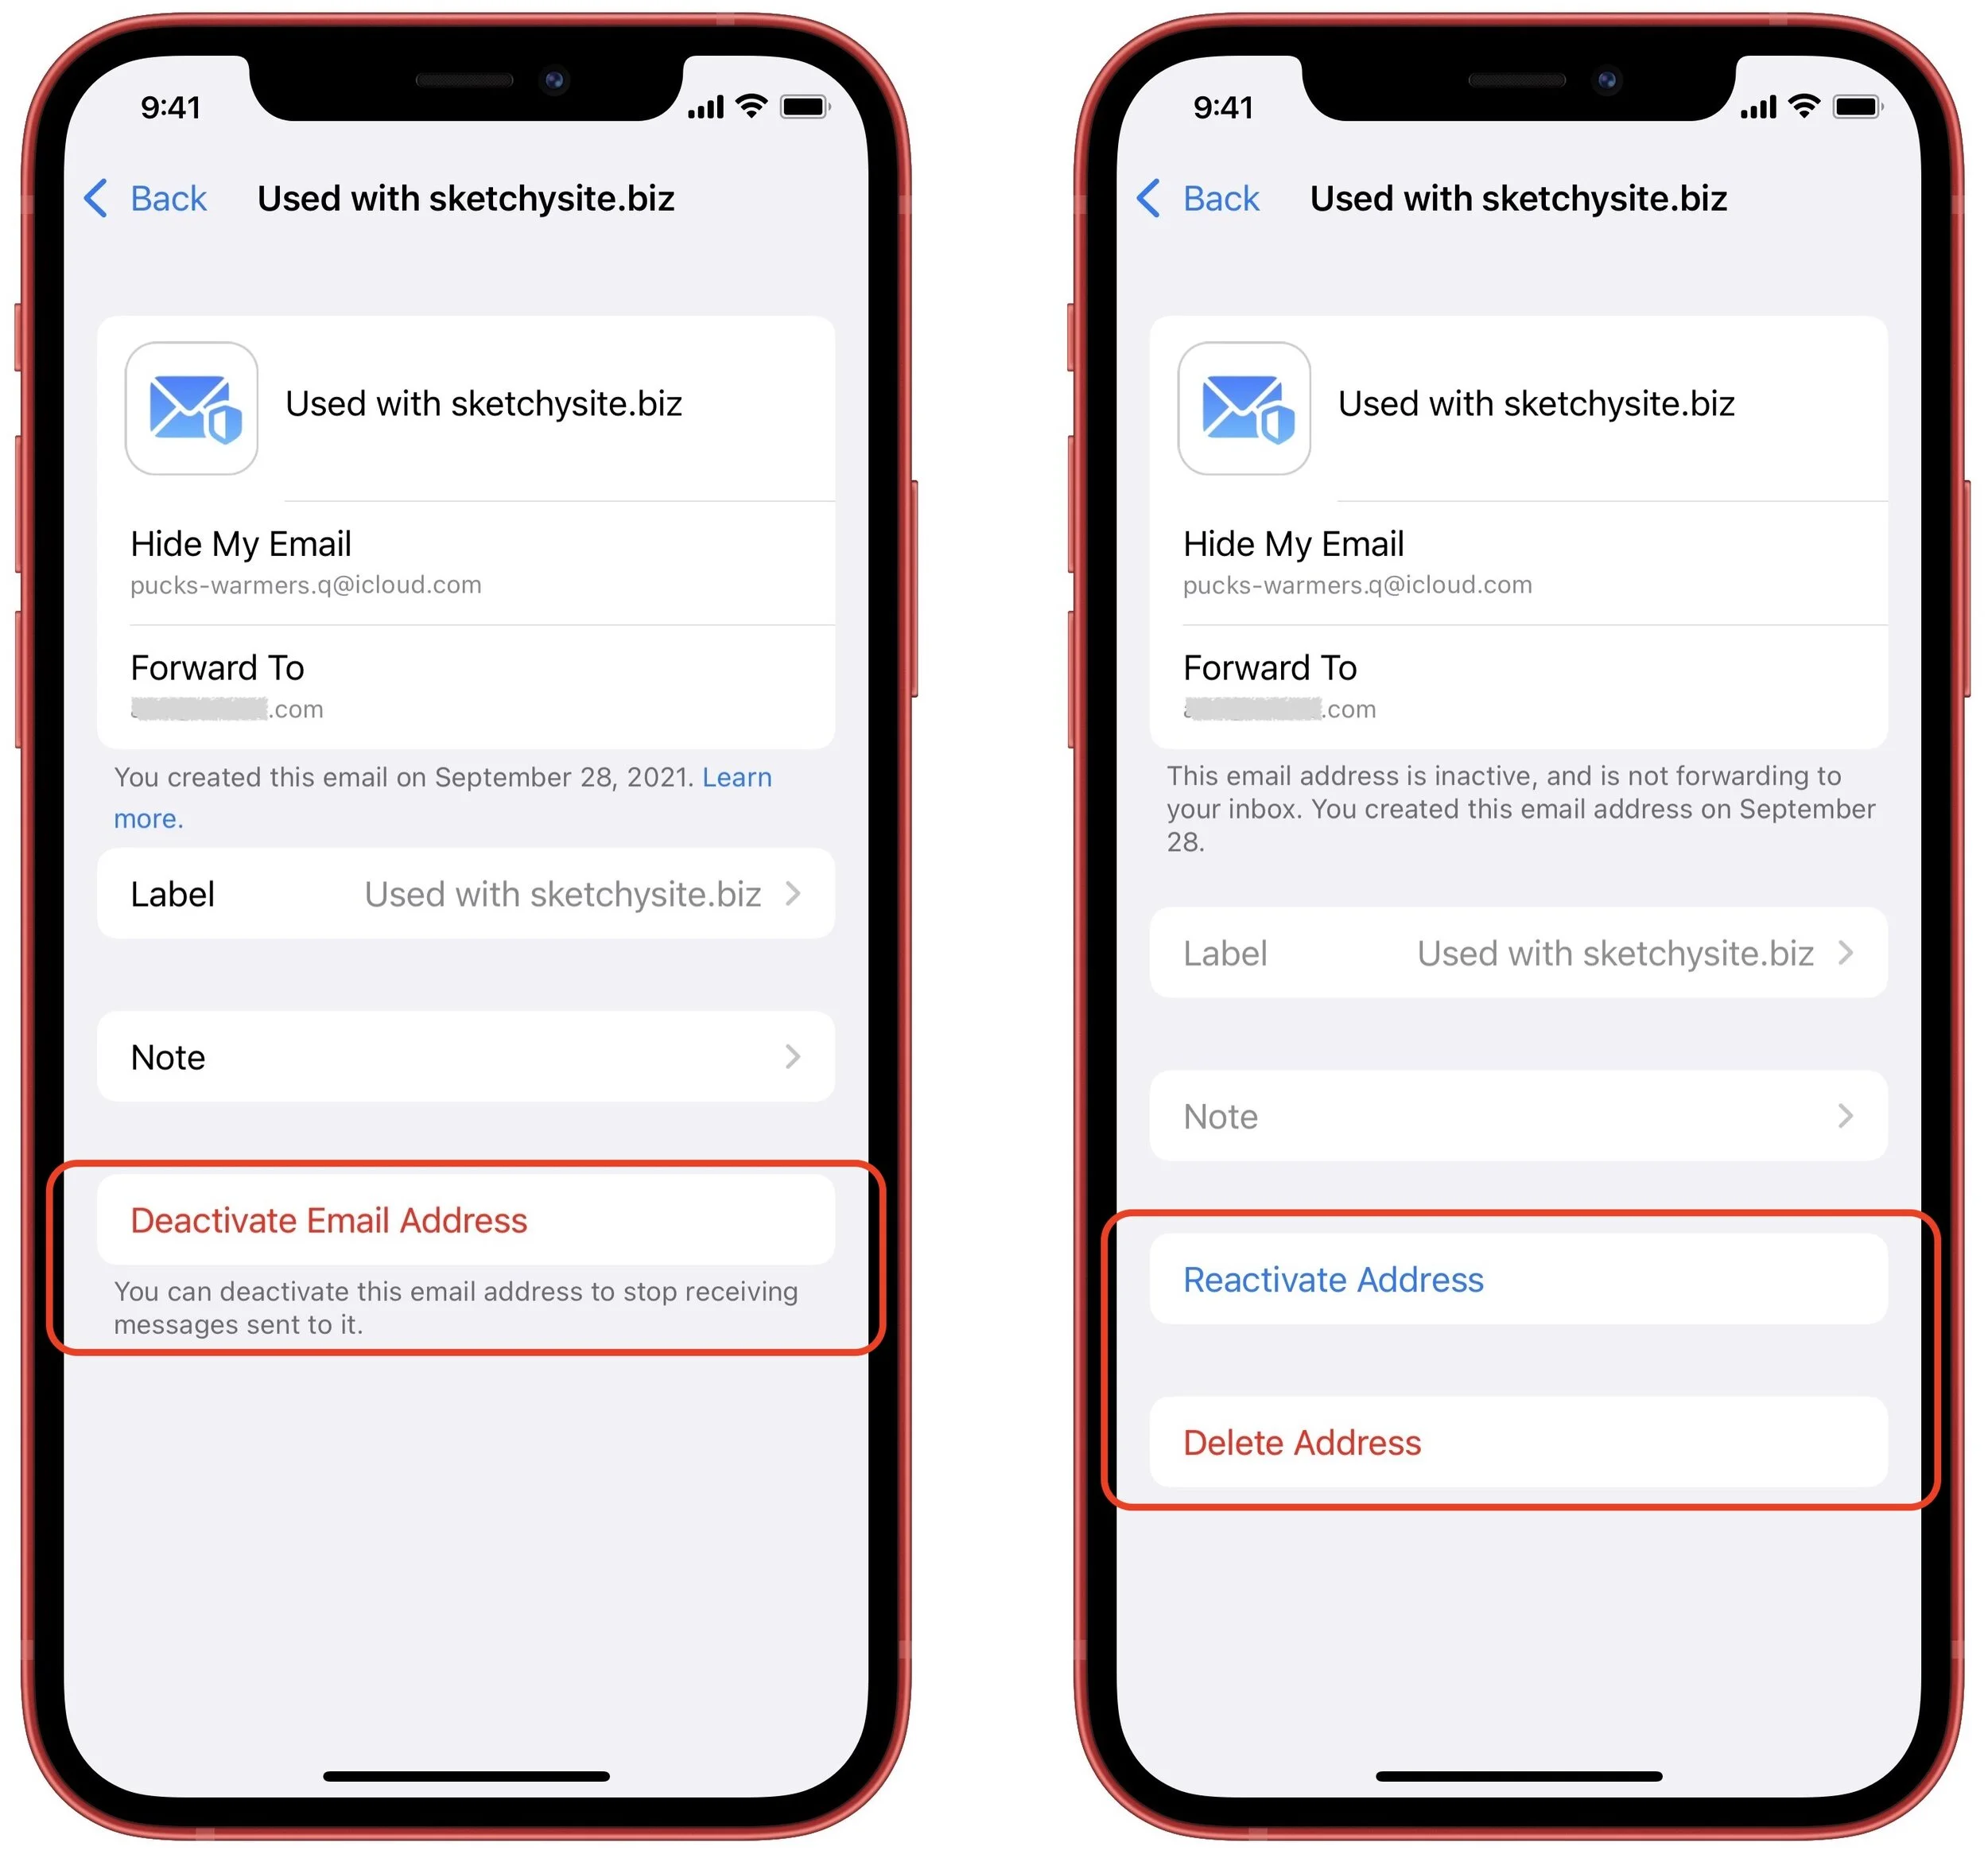
To use Hide My Email, go to Settings > Your Name > iCloud > Hide My Email. Make sure the Forward To address is the one you want, and then tap Create New Address at the top. Either accept the address provided or ask for a different one, give it a label and optional note so you know where you used it, tap Next, and tap Done.

To stop receiving email from an address, tap it in the list and tap Deactivate Email Address. In the Inactive Addresses list, you can see such addresses and leave them for reference, reactivate them, or delete them.
Custom Email Domain
Throughout the history of iCloud (including its predecessors iTools, Mac.com, and MobileMe), users have received email addresses that end with the mac.com, me.com, and icloud.com domains. If you wanted to register your own custom email domain (like hoopyfroodemail.com, for instance) and use that in a personalized email address, you had to rely on another service like Gmail or Fastmail.
With iCloud+, it is at long last possible to connect up to five custom domains and use them in addition to the standard domains. You (and each person in your Family Sharing group) can have up to three addresses for each domain. Note that you must have a primary iCloud Mail email address set up and have two-factor authentication enabled for your Apple ID.
Although the process for setting up a custom email domain isn’t that difficult, it’s beyond the scope of this article. You need to have a domain registered, update DNS records with your domain registrar, associate email addresses with the custom domain, and verify your settings. Apple provides instructions, and you should also read How to Set Up Custom Email Domains with iCloud Mail from TidBITS for more real-world coverage. Reach out if you need help.
Our take is that this feature is welcome, but it’s just for hobbyists and families. If you’re running a business of any sort, you should have a custom email domain with a full-fledged email service. Contact us for advice on the best solution for your particular situation—this is very much not a “one size fits all” scenario.
HomeKit Secure Video
The final iCloud+ feature is HomeKit Secure Video, previously a free bonus with the higher-level iCloud storage plans. It requires a compatible third-party security camera and takes over from the manufacturer’s app to ensure that no one can access your video, including the camera maker and Apple. That’s a big deal—one of the main problems with many third-party security cameras is that they transmit and store video in insecure ways, making it possible for evildoers to capture video from inside your house. (Yeah, it happens.)
All that seems to have changed with iCloud+ is that Apple has added HomeKit Secure Video to the 50 GB plan with support for one camera, increased the number of supported cameras on the 200 GB plan to five, and allowed an unlimited number of cameras for 2 TB plans.
As with custom email domains, the steps necessary to set up a security camera in the Home app and work with HomeKit Secure Video are beyond the scope of this article. Apple provides basic instructions, and the year-old article Apple’s HomeKit Secure Video Leverages iCloud Storage and Preserves Privacy from TidBITS explains more and provides context.
Welcome as these features may be, they’re unlikely to compel upgrades for those who don’t need more than the 5 GB of free iCloud storage. However, it’s so common to need more iCloud space for photos, backups, and files that we anticipate lots of people taking advantage of the iCloud+ features that come along for the ride.
(Featured image based on an original by iStock.com/AlSimonov)