You Can Now Upgrade to macOS 13 Ventura When You’re Ready
Should you upgrade to macOS 13 Ventura? There’s no need to install it today, but we think it’s now safe for those who want to take advantage of the new features and integration with Apple’s other operating systems. Details here:

When upgrading to a new version of macOS, we err on the side of caution, at least in our recommendations. (We’ve been using macOS 13 Ventura for some time now and often install beta releases on secondary machines for testing purposes.) Upgrading is easy, but if you upgrade too soon, the new macOS version could make key apps in-operable, create workflow interruptions, or cause other negative consequences. On the other hand, waiting too long can cause problems—it’s important to stay in sight of the cutting edge for security reasons and to take advantage of Apple’s advances. Upgrading is not an if question; it’s a when question.
That when could be now. There’s no reason you must upgrade to macOS 13 Ventura right away, but if you want to, you should now be able to do so without undue interruptions. Ventura has been quite stable and has received only three updates since its initial release in October 2022:
macOS 13.0.1 provided just unspecified bug fixes and two security fixes.
macOS 13.1 introduced the Freeform digital whiteboard app, Advanced Data Protection for iCloud, improved searching for photos in Messages, participant cursors for shared notes in Notes, and the option to play sounds in the Find My app. There were also a couple of bug fixes and important security fixes.
macOS 13.2 added support for Security Keys for Apple ID for those who need the utmost security, fixed a few bugs, and blocked more security vulnerabilities.
Apple may have another feature or two up its sleeve for Ventura, and we’ll undoubtedly see more updates to address bugs and newfound security vulnerabilities, but there’s no significant reason to wait any longer.
That said, you can continue to delay as long as you’re running macOS 11 Big Sur or macOS 12 Monterey and are staying up to date with Apple’s security releases. (Both have received important updates recently.) Earlier versions of macOS no longer receive security fixes, rendering them more vulnerable to attack. Reasons to delay include:
You’re too busy. The upgrade process will take a few hours, and it may take additional time to configure everything properly afterward. When you are ready to upgrade, aim for when a little downtime will be convenient.
You’re still using incompatible software. The jump from Big Sur or Monterey to Ventura isn’t a big one, so most modern apps should have been updated to ensure compatibility with Monterey by now. But if you’re still running macOS 10.14 Mojave or earlier with 32-bit apps, you’ll lose access to them if you upgrade. (That first happened with macOS 10.15 Catalina in 2019.) With Mojave no longer receiving security updates, you need to find replacements for those apps and upgrade soon.
You need consistent versions for workflow reasons. We’re unaware of any examples here, but it’s not inconceivable that a coworker could be stuck on an older version of macOS and thus older versions of shared productivity apps. If your upgrade would force you to update those apps and introduce compatibility issues when collaborating with that coworker, you may have to wait until your coworker can upgrade as well.
Ventura won’t upend your experience of using a Mac, but it has numerous useful features, large and small. Along with the features mentioned above that shipped in updates, the new iCloud Shared Photo Library enables you to share photos and videos with up to five family members in a separate shared library. Stage Manager provides a new paradigm for window management. Messages lets you edit messages, undo sending, and mark conversations as unread. Similarly, Mail lets you undo sending, schedule messages to send later, and get follow-up reminders for replying. For better videoconferencing quality, Continuity Camera enables you to use your iPhone as a webcam, complete with Desk View for showing what’s on your desk during a call. The Mac finally gets its own Weather app. Perhaps even more important, Ventura shares some of these features with Apple’s other operating systems: iOS 16, iPadOS 16, watchOS 9, and tvOS 16. To take full advantage of those features across all your Apple devices, your Mac must be running Ventura.
However, we want to be upfront about one downside to upgrading to Ventura. Apple replaced System Preferences with System Settings. While we wouldn’t have described System Preferences as having a stellar user interface, it was at least familiar after decades of use. The new System Settings, which tries to mimic the Settings app in iOS and iPadOS, moves numerous settings around and makes some odd and unfor-tunate design decisions. You may find yourself relying heavily on its search field to find commonly used options.

Before You Upgrade
Once you’ve decided to upgrade to Ventura, you have three main tasks:
Update apps: Make sure all your apps are as up-to-date as possible. If you regularly put off updates, now’s the time to let them complete so you have Ventura-compatible versions.

Clear space: Ventura needs about 25 GB of free space to upgrade, and the Ventura installer itself is about 12 GB, so we recommend making sure you have at least 37 GB free. Don’t cut this close—you should always have at least 10–20% free space for virtual memory, cache files, and breathing room. Check by choosing About This Mac from the Apple menu and then clicking Storage.

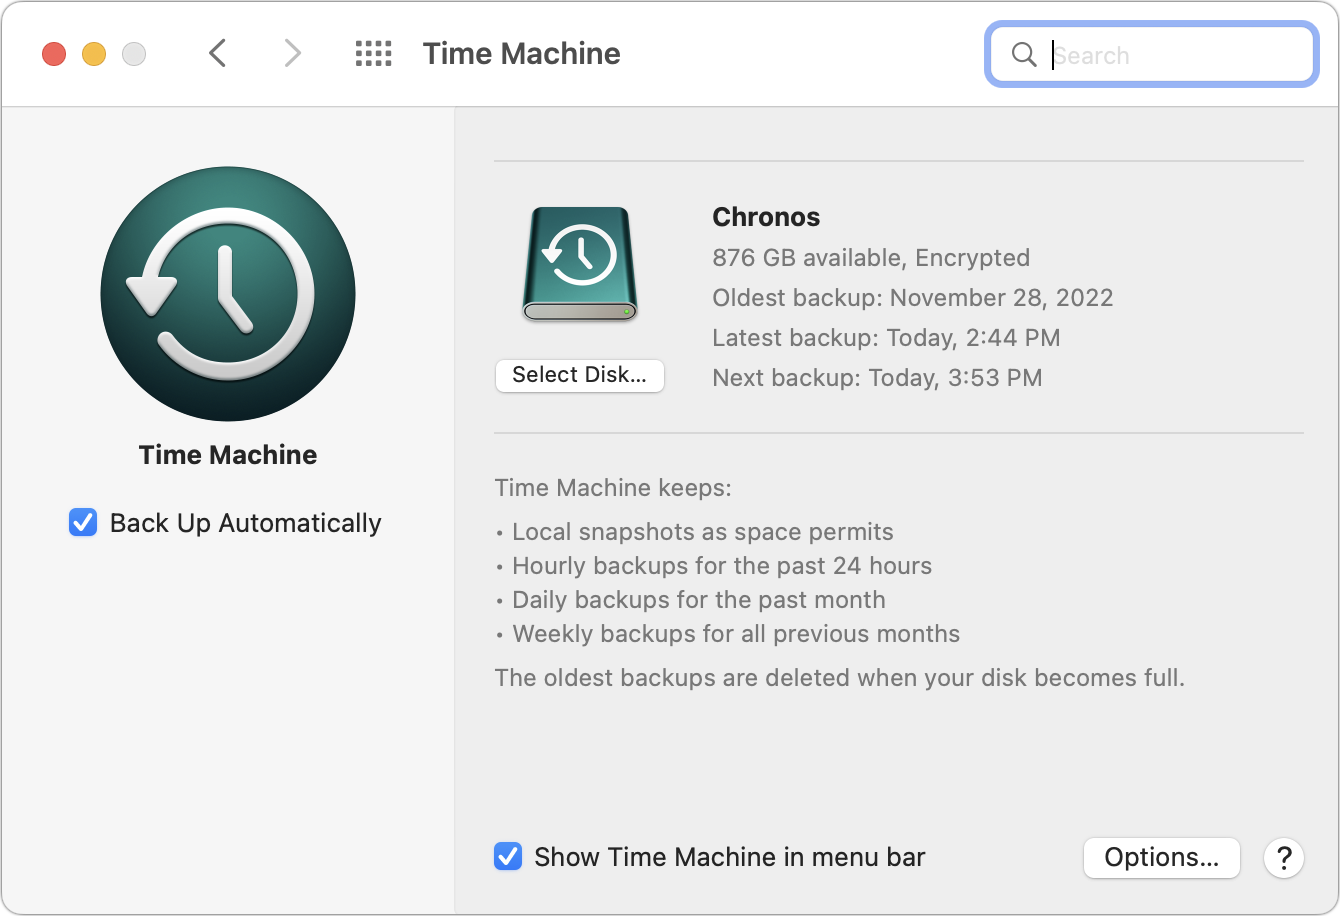
Make a backup: Never, ever install an update to macOS without ensuring that you have at least one current backup first. In an ideal world, you’d have an updated Time Machine backup, a bootable duplicate, and an Internet backup. That way, if something goes wrong, you can easily restore.
Upgrading
After completing the above-listed tasks, ensure you don’t need your Mac for a few hours. There’s no telling exactly how long the upgrade will take, so never start an upgrade if you need the Mac soon.
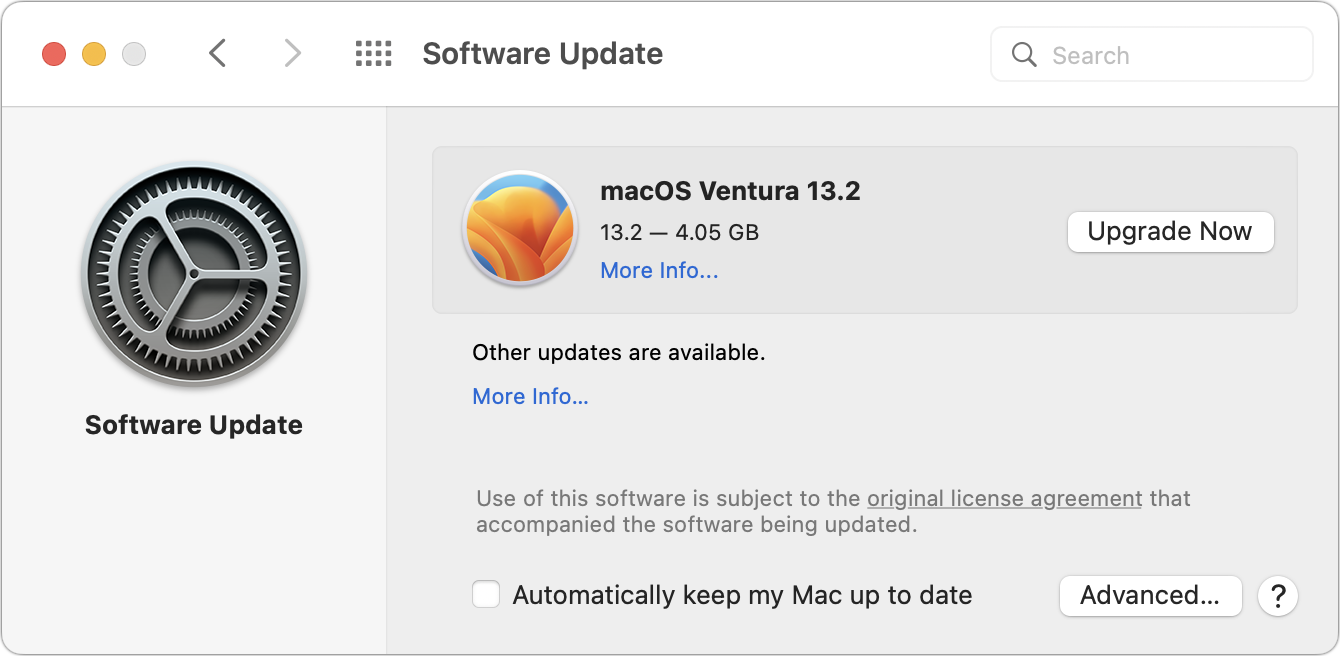
Initiating the upgrade is just a matter of opening System Preferences > Software Update, clicking the Upgrade Now button, and following the instructions. If you’d like more handholding, check out Joe Kissell’s ebook Take Control of Ventura.
After You Upgrade
Part of the reason to set aside plenty of time for your Ventura upgrade is that there are usually cleanup tasks afterward. We can’t predict precisely what you’ll run into, depending on what version of macOS you’re running now and what apps you use, but here are a few situations we’ve noticed in the past:
macOS may need to update its authentication situation by asking for your Apple ID password, your Mac’s password, and if you have another Mac, its password too. Don’t worry that your Mac has been compromised by malware—it’s fine.
Some apps may have to ask for various permissions even though you previously granted them. Again, that’s fine and won’t happen again.
If you use your Apple Watch to unlock your Mac and apps (and you should, it’s great!), you may need to re-enable that in System Settings > Touch ID & Password (it’s an example of something that moved; previously, it was in Sys-tem Preferences > Security & Privacy > General).
If you use Gmail, Google Calendar, or other Google services, you may need to log in to your Google account again.
Websites that usually remember your login state may require that you log in again. If you’re using a password manager like 1Password, that’s easy.
You may have to re-enable text message forwarding to your Mac. You do this on your iPhone in Settings > Messages > Text Message Forwarding.
With all that housekeeping done, it’s time to check out all the new features in Ventura!
(Featured image by Apple)
What Is Google Web & App Activity, and Should You Leave It Enabled?
Did you get an email from Google about your Web & App Activity tracking? It’s legitimate and is a good reminder to customize how Google saves information about you. Read on for more:

Earlier this year, some of our clients received an email from Google reminding them that they have Web & App Activity turned on. Those with a healthy dose of caution were concerned that it might be a phishing attack, but no, it’s legitimate. Their next questions were often, “Wait, what is Web & App Activity, and do I want it enabled?” Here are some answers.

What Is Web & App Activity at Google?
Simply put, Web & App Activity is a record of almost everything you do on Google sites, apps, and services. It includes your searches and activity in Google Search, Google Maps, Google Assistant, Google News, Google Photos, YouTube, and more. If you use Google Chrome as your browser, it includes your browsing history. It also stores usage and diagnostic information from Android smartphones. What’s less obvious is that Web & App Activity can even include information from sites and apps that partner with Google to show ads or that use Google services. Activity can be saved even when you’re offline or signed out.
That sounds like a lot, and it is! One reason there’s so much is because Google is such a dominant provider of services on the Internet today. Google Search is by far the most popular search engine, only recently has Apple Maps competed head-to-head with Google Maps, YouTube is the main source of video on the Internet, and so on. It’s hard to avoid Google, even if you wanted to, which most people don’t.
In addition to offering a lot of services, there are two more reasons why Google collects so much information about its users: personalization and advertising:
Personalization: When a service knows what you’ve searched for and how you’ve used it in the past, it can adjust its behavior to improve future usage. For instance, Google Search can suggest search results that are nearby you if it knows where you are, and YouTube can recommend videos based on what you’ve watched previously.
Advertising: The bulk of Google’s revenue comes from companies that pay Google to display their ads. We’re talking hundreds of billions of dollars per year, which is why it’s important to Google to learn as much about you as pos-sible in order to give advertisers the best chance of enticing you to click their ads.
For many (most?) people, there’s a tension between personalization and advertising. You want Google to know more about you so its services work better, but you may not want the company to know so much about you that it can charge advertisers a higher price for access to you. Ad-driven companies like Google claim people prefer personalized ads, but most people we talk with dislike having ads—particularly for already purchased items or past vacations—follow them around the Internet. That’s what Apple is channeling with its Tracked video.
How Should You Configure Web & App Activity?
What you should do depends on how much benefit you feel you derive from the personalization of Google apps and services, and what you think about personalized ads. On your Activity Controls page, Google provides a single master switch that lets you pause Web & App Activity, though you’ll have to acknowledge that it may impact your experience of Google sites, apps, and services signed in to your account. Make sure to scroll down on this page to access the settings for Location History, YouTube History, and Personalized Ads.
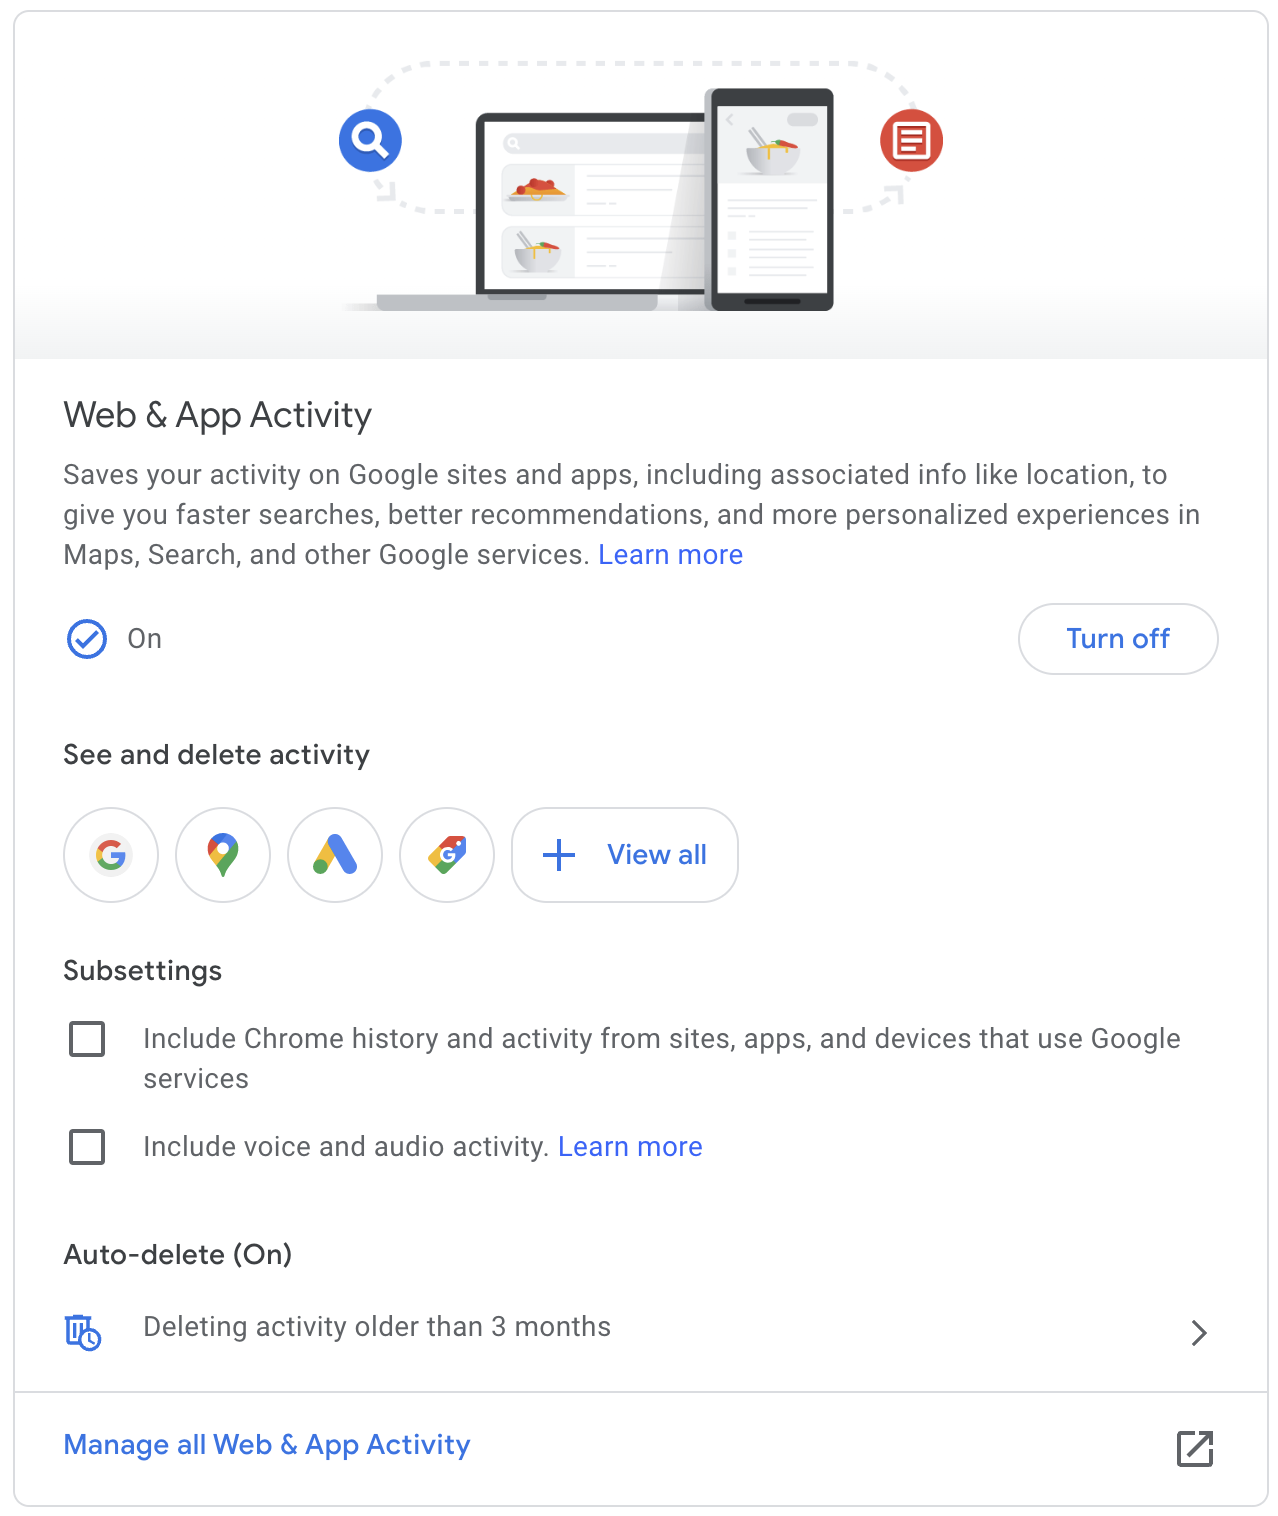
By clicking the icons for each service under “See and delete activity,” you can get a sense of just what Google has recorded about you, and you can delete data manually if it perturbs you. Google can also automatically delete activity older than 3 months, 18 months, or 36 months. The utility of keeping data longer is if you want to review what you did in the past. Google says that auto-deleting data sooner will reduce personalization, but that feels like a stretch.
There are two important subsettings:
Chrome: In the Web & App Activity card, under Subsettings, there’s a check-box for including Google Chrome history and activity from sites, apps, and devices that use Google services. We suggest disabling this—it seems unlikely that it would improve your Internet experience sufficiently to warrant the privacy intrusion.
Audio: You’ll also find another checkbox for voice and audio activity, which Google uses to improve its audio capabilities. The reason to turn this setting off is that human reviewers may listen to your audio samples. Google anonymizes and deletes the data after 7 days, but it may still feel icky to have people listening to your audio clips.
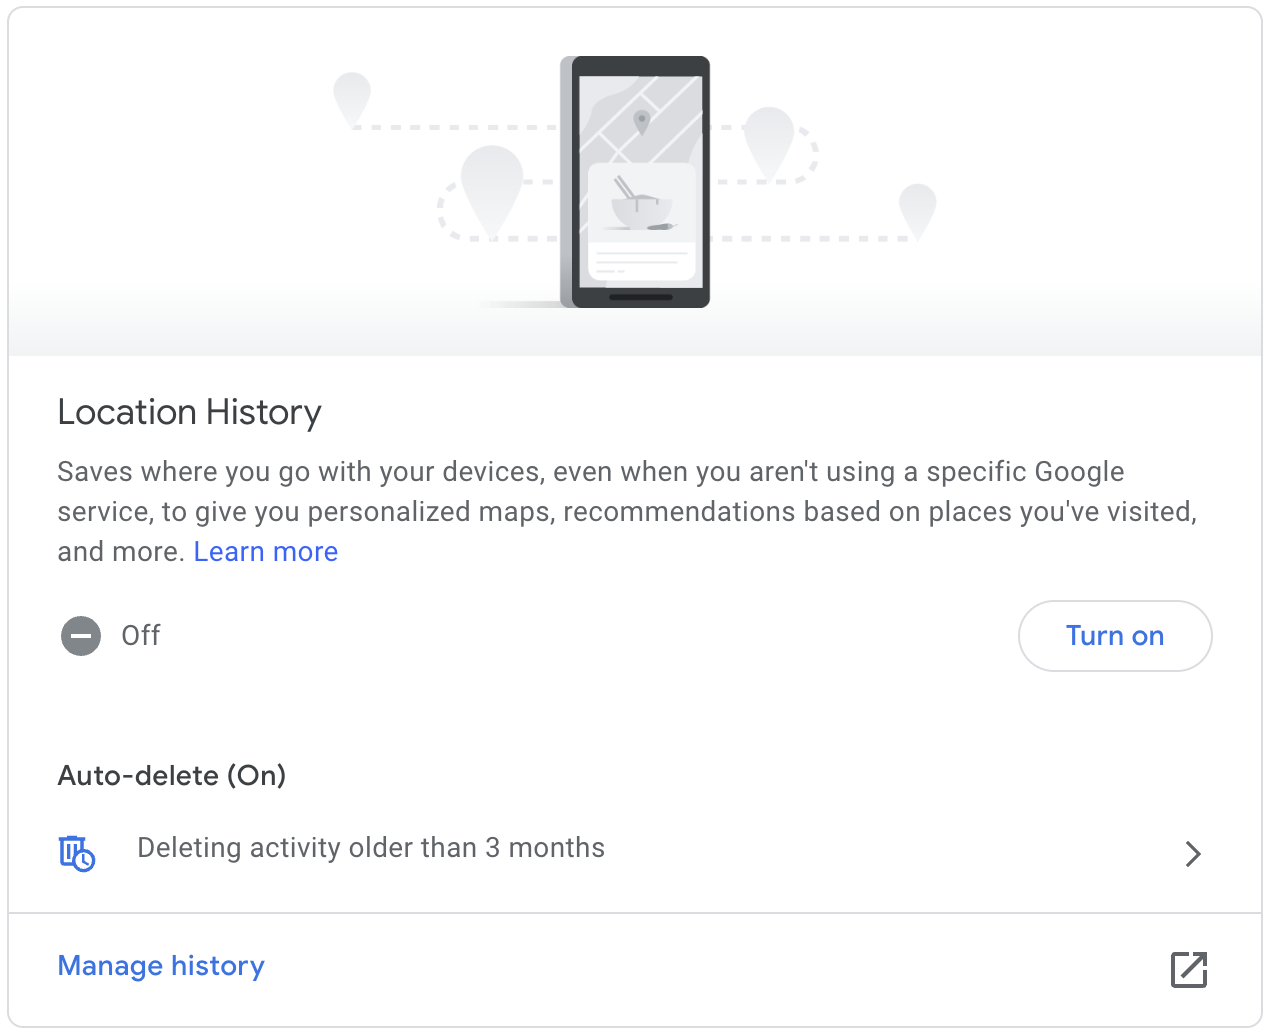
Scrolling down, you hit cards for the three major privacy settings that Google separates from Web & App Activity. (You can also access these on Google’s Data & Privacy page, where you can also start a privacy checkup.)
Location History: With this setting on, Google knows where you go with your devices, even when you aren’t using a specific Google service, to give you personalized maps, location-based recommendations, and more. If you look through this data and are creeped out by the fact that it shows your every movement, turn it off.
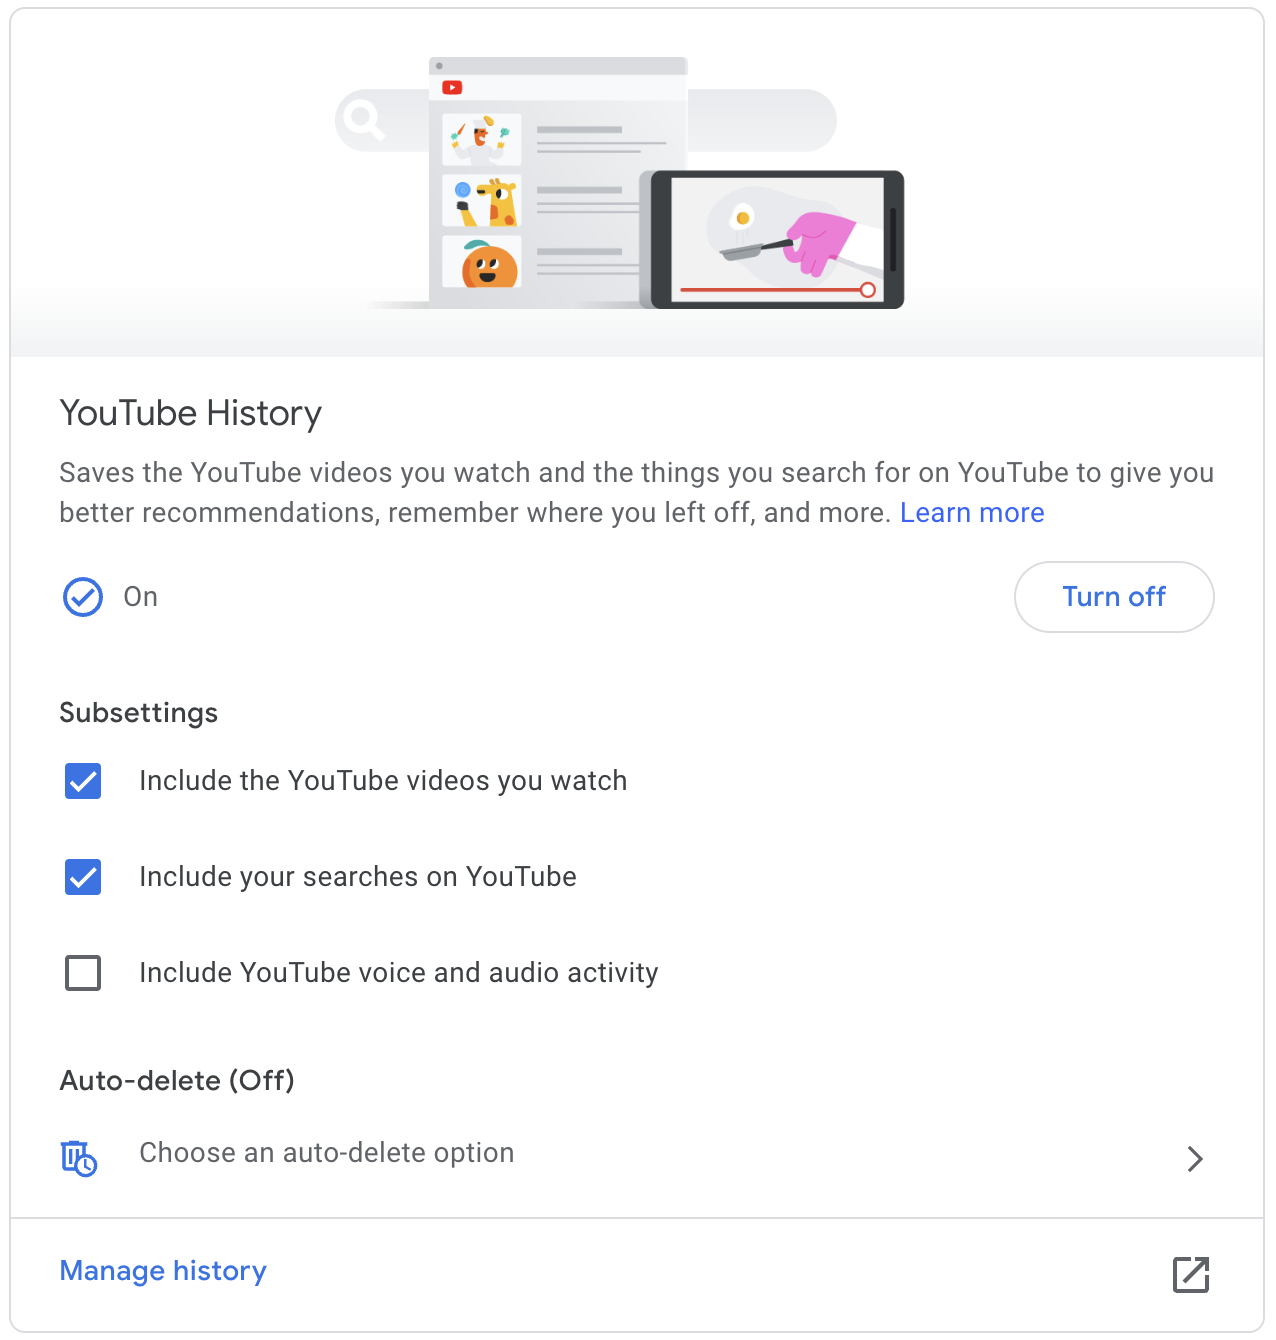
YouTube History: This setting saves the videos you search for and watch to provide better recommendations, remember where you left off, and more. This option may feel innocuous as long as you don’t mind your video watching being associated with your account—if you’re viewing content that would embarrass you if it got out, perhaps disable this setting.
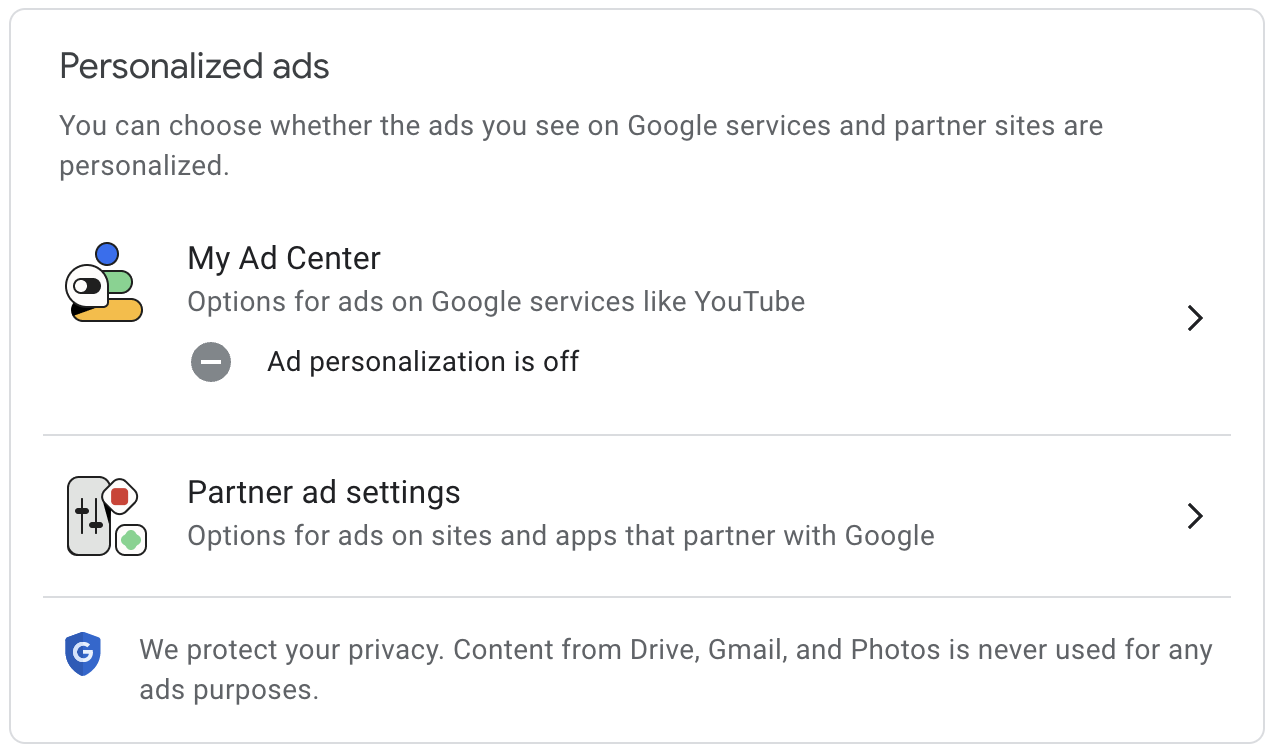
Ads: You can disable personalized ads from Google, which prevents Google from using your information to help advertisers entice you to buy more stuff. You’ll still see the same number of ads, but they should be less aimed at you personally.
Finally, there’s a grab-bag collection of lesser-known Google services that track your activity. To find these and delete the data they stored about you, go back to the Web & App Activity card, click Manage All Web & App Activity at the bottom, and then click Other Activity in the sidebar. It includes controls for Google Pay, Google Wallet, Google Workspace search history, YouTube channel subscriptions, YouTube “Not interested” feedback, and many other Google-related services. Most of this stuff seems unobjectionable, but delete it if it bothers you.
It’s hard to say if leaving any of these settings on or turning them off make a real difference in your life. If Google collecting all this data bothers you, try disabling everything and see if the lack of personalization makes for a worse experience. Or pick and choose based on things that perturb you more (like location tracking and ads) or less (like YouTube history). There’s no harm in testing!
(Featured image by iStock.com/ValeryBrozhinsky)
Six Ways of Making It Easier to Browse Your Favorite Websites
Open your favorite websites faster with bookmarks, favorites, Home Screen icons, bookmark folders, tab groups, and pinned tabs. Get the details here:

Everyone—or at least everyone reading this article—knows how to use a Web browser. But just because you can click links, search for websites, and type URLs doesn’t mean that you’re surfing the Web as smoothly and effectively as you could. We all have sites that we visit regularly—a local newspaper, perhaps, or a social media service that’s the only place to connect with far-flung family members. Plus, the rise of Web apps like Google Docs means that we may spend hours every day in a Web browser at a particular site.
Here then are six ways that you can make it easier to use the same sites every day. This list is far from comprehensive, but we hope it gets you thinking about how you can spend less time typing URLs and searching for sites. We’ll focus on Safari here, but similar features are available in most Web browsers.
Bookmarks
Many of you probably know about bookmarks, so let this serve as a nudge to remember how useful they can be. Dating from the earliest days of the Web browser, bookmarks are the original way to simplify revisiting a site.
In Safari on the Mac, save a bookmark by navigating to a page and then choosing Bookmarks > Add Bookmark. See your full list in the sidebar by choosing Book-marks > Show Bookmarks. Click one in the list to load it. On an iPhone or iPad, tap the share icon and tap Add Bookmark; on the iPad, you can also drag a tab to the sidebar when it’s displaying bookmarks. You can see and visit your bookmarks by tapping the Bookmark icon in the toolbar (iPhone) or the sidebar (iPad).
Favorites
To make a particular bookmark even easier to access, add it to your Favorites. On the Mac, you can display the Favorites bar underneath the Location bar (View > Show Favorites Bar) and then click bookmarks for quick loading. Create a new favorite by putting a bookmark in the Favorites folder when you create it or by dragging it in later.

On the iPhone and iPad, favorites appear when you tap the Location bar, and adding a favorite is as simple as choosing Add Favorite instead of Add Bookmark in the share sheet.
As long as you have Safari enabled in your iCloud settings, your bookmarks and fa-vorites sync among all your Apple devices.
Home Screen Icons
Want to go one step further? You can turn a Web page into a Home Screen icon on the iPhone or iPad. To set this up, just as with a bookmark, you navigate to the page and tap the share icon. Then select Add to Home Screen.
The Mac doesn’t have the same concept of Home Screen icons, but if you drag the URL for a Web page from the Location bar to your Mac’s Desktop, it will turn into a Web Internet Location file with a .webloc extension. It’s a normal file that you could put in the Dock, a Finder window’s toolbar, or anywhere else you want. Open it to load its page.
Bookmark Folders
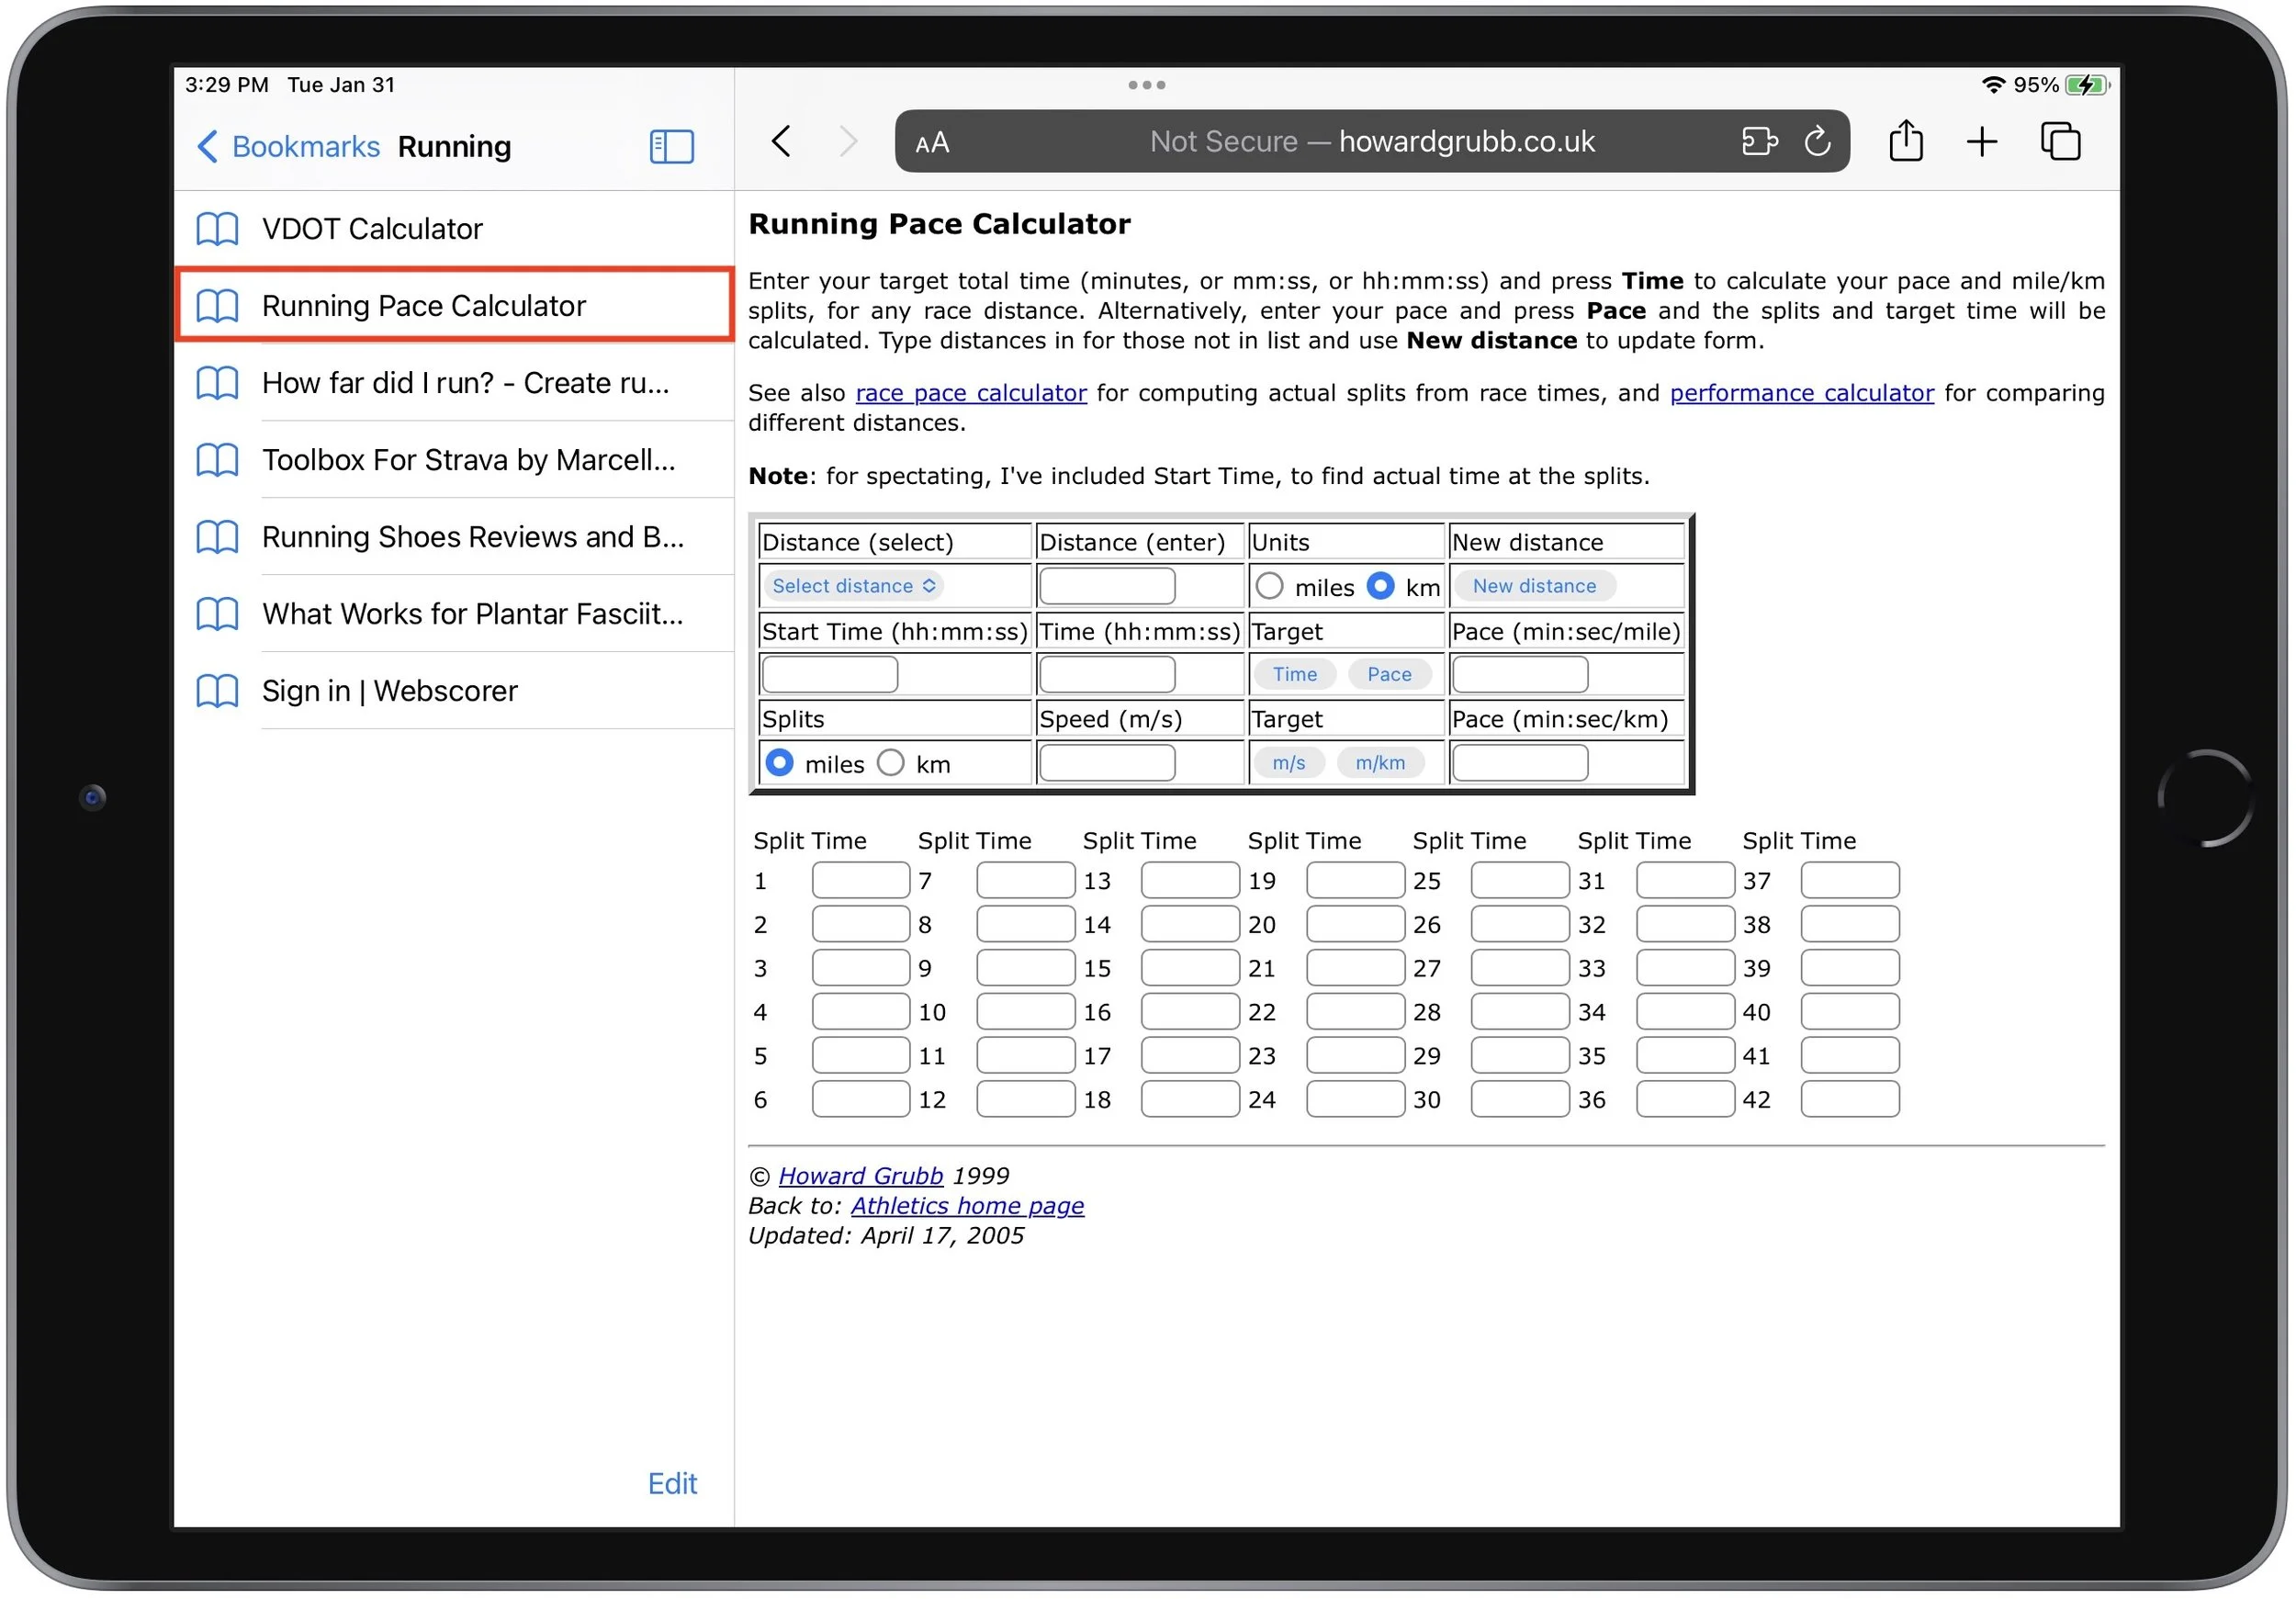
Bookmarks and favorites are great for a site or two, but what if you want to open the same handful of sites every morning to get your daily dose of news and comics? Put all those sites in the same folder in the Favorites folder, either by adding them to the folder when you create them or by dragging them in afterward.

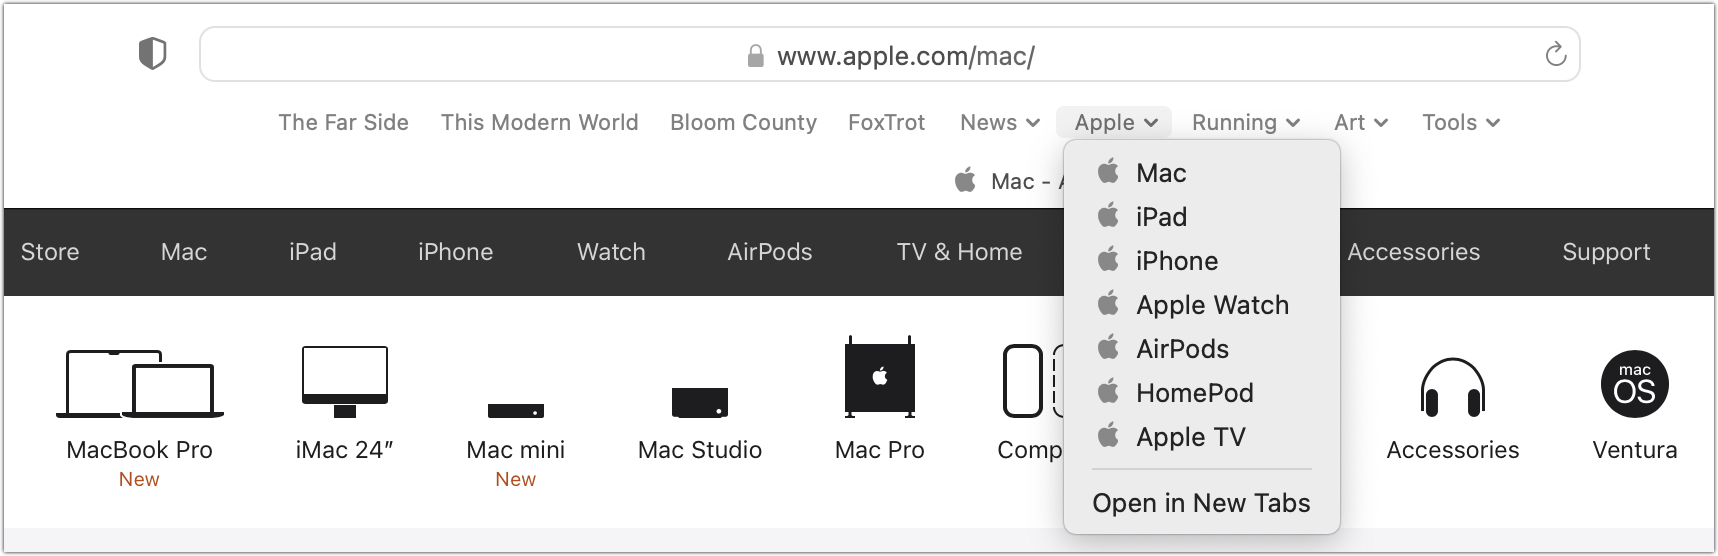
Once you have collected the desired bookmarks, you can open them all in new tabs by clicking the folder on the Favorites bar and choosing Open in New Tabs (or just Command-click it). If you don’t want it on your Favorites bar, the folder can live anywhere in your bookmarks—just Control-click it and choose Open in New Tabs.
This feature is available on the iPhone and iPad as well. Once the folder is in your Favorites, tap the Location bar and then touch and hold the folder. Choose Open in New Tabs from the menu that appears.
Tab Groups
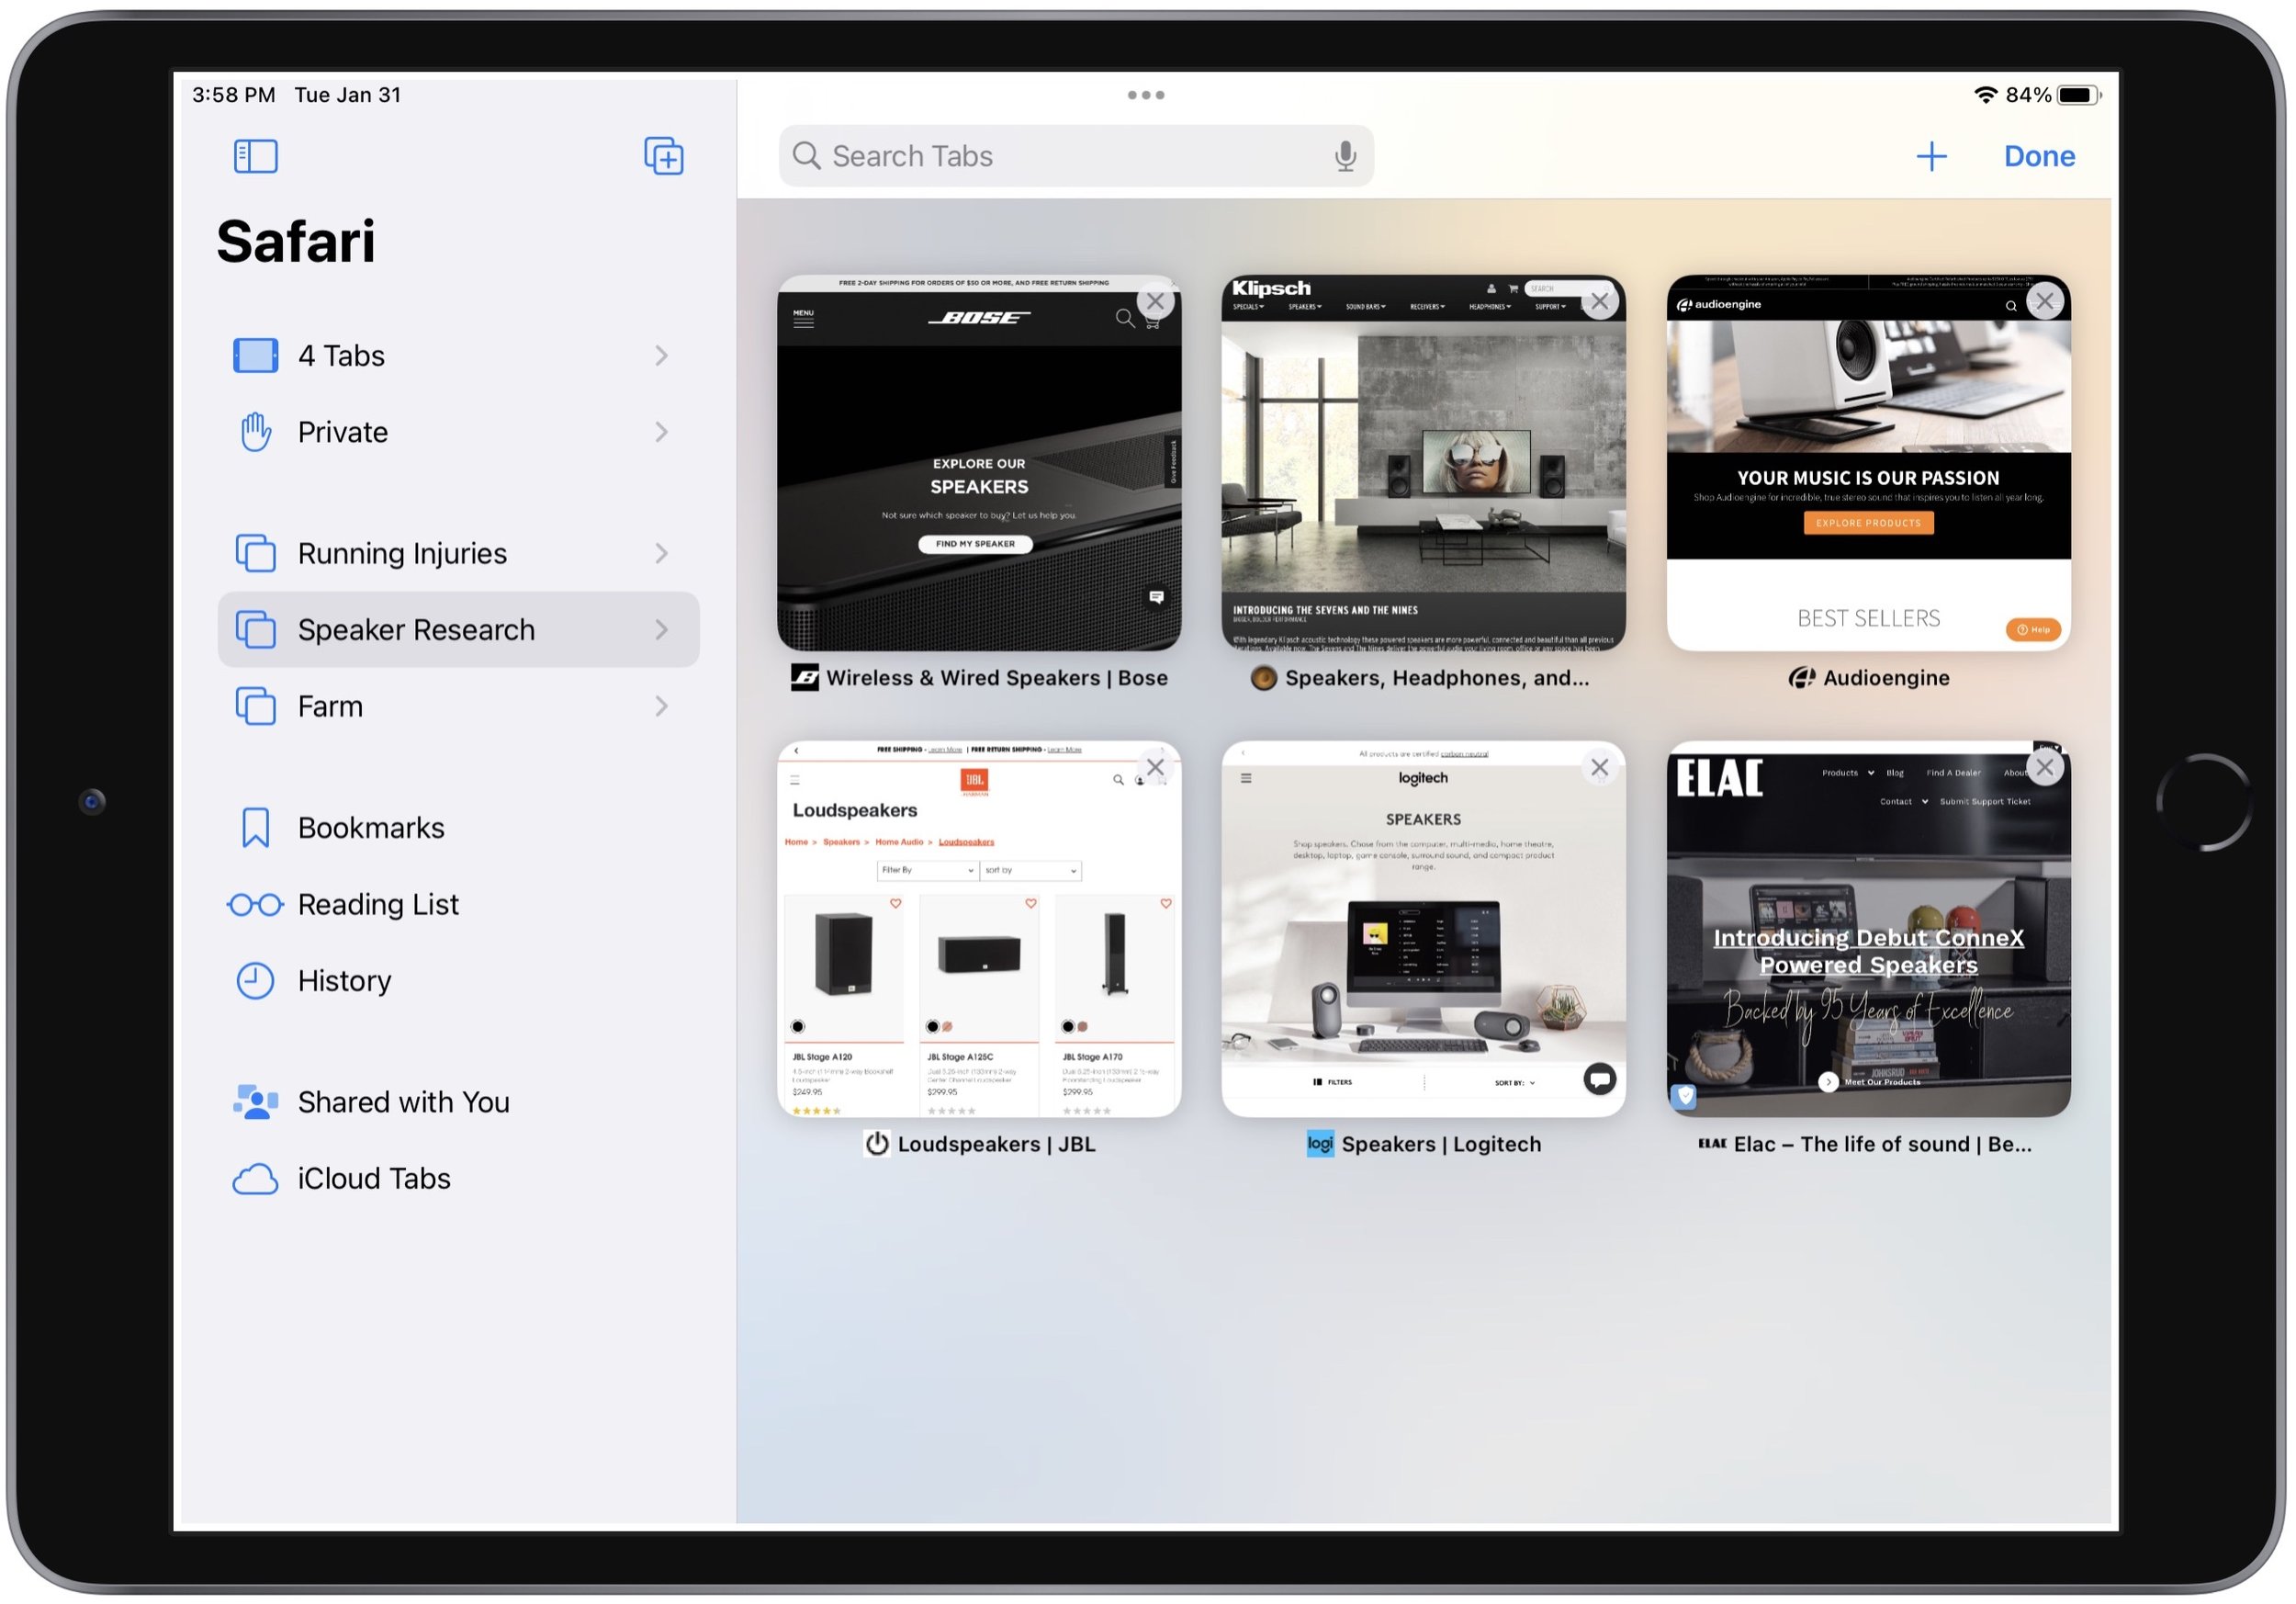
Web browser makers were apparently unsatisfied with letting users open all the bookmarks in a folder in new tabs because they have come up with a similar feature called tab groups. Let’s say you’re researching new speakers to buy, and you want to compare options from different companies. Once you have open tabs for all the sites, you can open the sidebar in Safari on the Mac or iPad and use the Add Tab Group icon at the top to create and name a new tab group.
From then on, it appears in the sidebar, and when you select it, those tabs load automatically, replacing the ones that were there before (which are stored as another group). The feature is also available on the iPhone, where you must tap the tab icon in the toolbar first. Unlike a folder of bookmarks, when you close a tab in a tab group, it disappears, and if you want it back, you have to open it again manually.
Pinned Tabs
Perhaps you have several sites that are so important to you that you want them open at all times. For such situations, you can pin tabs to those sites. The utility of pinned tabs is that they stay in place even when you open a new window or quit and reopen Safari. Plus, if you click a link to a different website in a pinned tab, it opens in a new tab—pinned tabs always show the website you pinned. On the iPhone, where there’s no tab bar, pinned tabs live at the top of the tab screen. Each tab group can have its own pinned tabs.
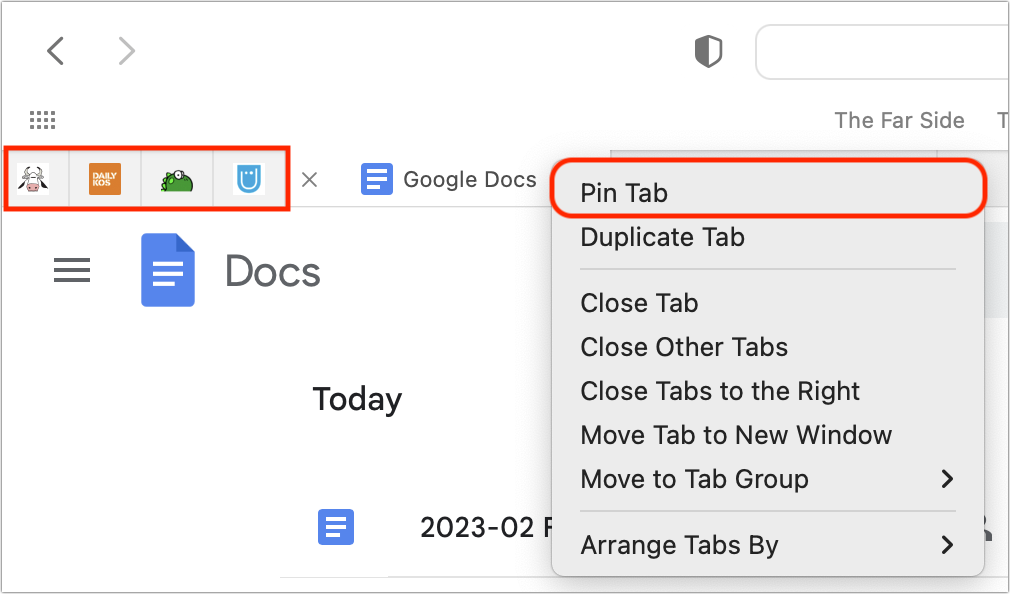
To pin a tab in Safari on the Mac or iPad, drag an open tab all the way to the left in the tab bar until it shrinks into a tiny box showing only the site’s favicon. Or, on the Mac, Control-click the tab and choose Pin Tab (shown below). On the iPad, touch and hold the tab and select Pin Tab. To pin a tab on the iPhone, tap the tab icon first and then touch and hold a tab and select Pin Tab.
So there you have it! None of these features are particularly new, but they’re easily overlooked, and from what we’ve seen while watching people browse the Web, lots of people could benefit from them.
(Featured image by Adam Engst)
Apple Powers Mac mini and MacBook Pro with New M2 Chips, Releases New HomePod
Apple has unveiled the M2 Pro and M2 Max chips and announced the M2 Mac mini and M2 Pro Mac mini, plus the M2 Pro and M2 Max models of the 14-inch and 16-inch MacBook Pro. Oh, and a new HomePod! Read all about it at:

With a handful of press releases buttressed by a 19-minute video, Apple pulled back the curtains on its new M2 Pro and M2 Max chips and announced updated Mac mini and MacBook Pro models that rely on the new chips. There are no significant design or feature changes with these updated models, just faster performance, enhanced external display support, and support for the latest wireless connectivity standards. The new Mac mini and MacBook Pro models are available to order now, with units in stores and orders starting to arrive on January 24th.
Then, in another surprise announcement, Apple announced the second-generation HomePod, which updates the full-size smart speaker with a few new features and likely makes it more cost-effective to produce.
New M2 Mac mini and M2 Pro Mac mini Broaden the Appeal
For many years, the Mac mini has been popular for its small size, low price, and decent performance, bolstered in 2020 by a move from Intel CPUs to Apple’s M1 chip. Apple has now increased the Mac mini’s power even more by letting users choose between the M2 and the new M2 Pro. How much more? It depends greatly on what you’re doing, and Apple offers some comparisons. The improvements will likely be noticeable with the M2 and obvious with the M2 Pro.
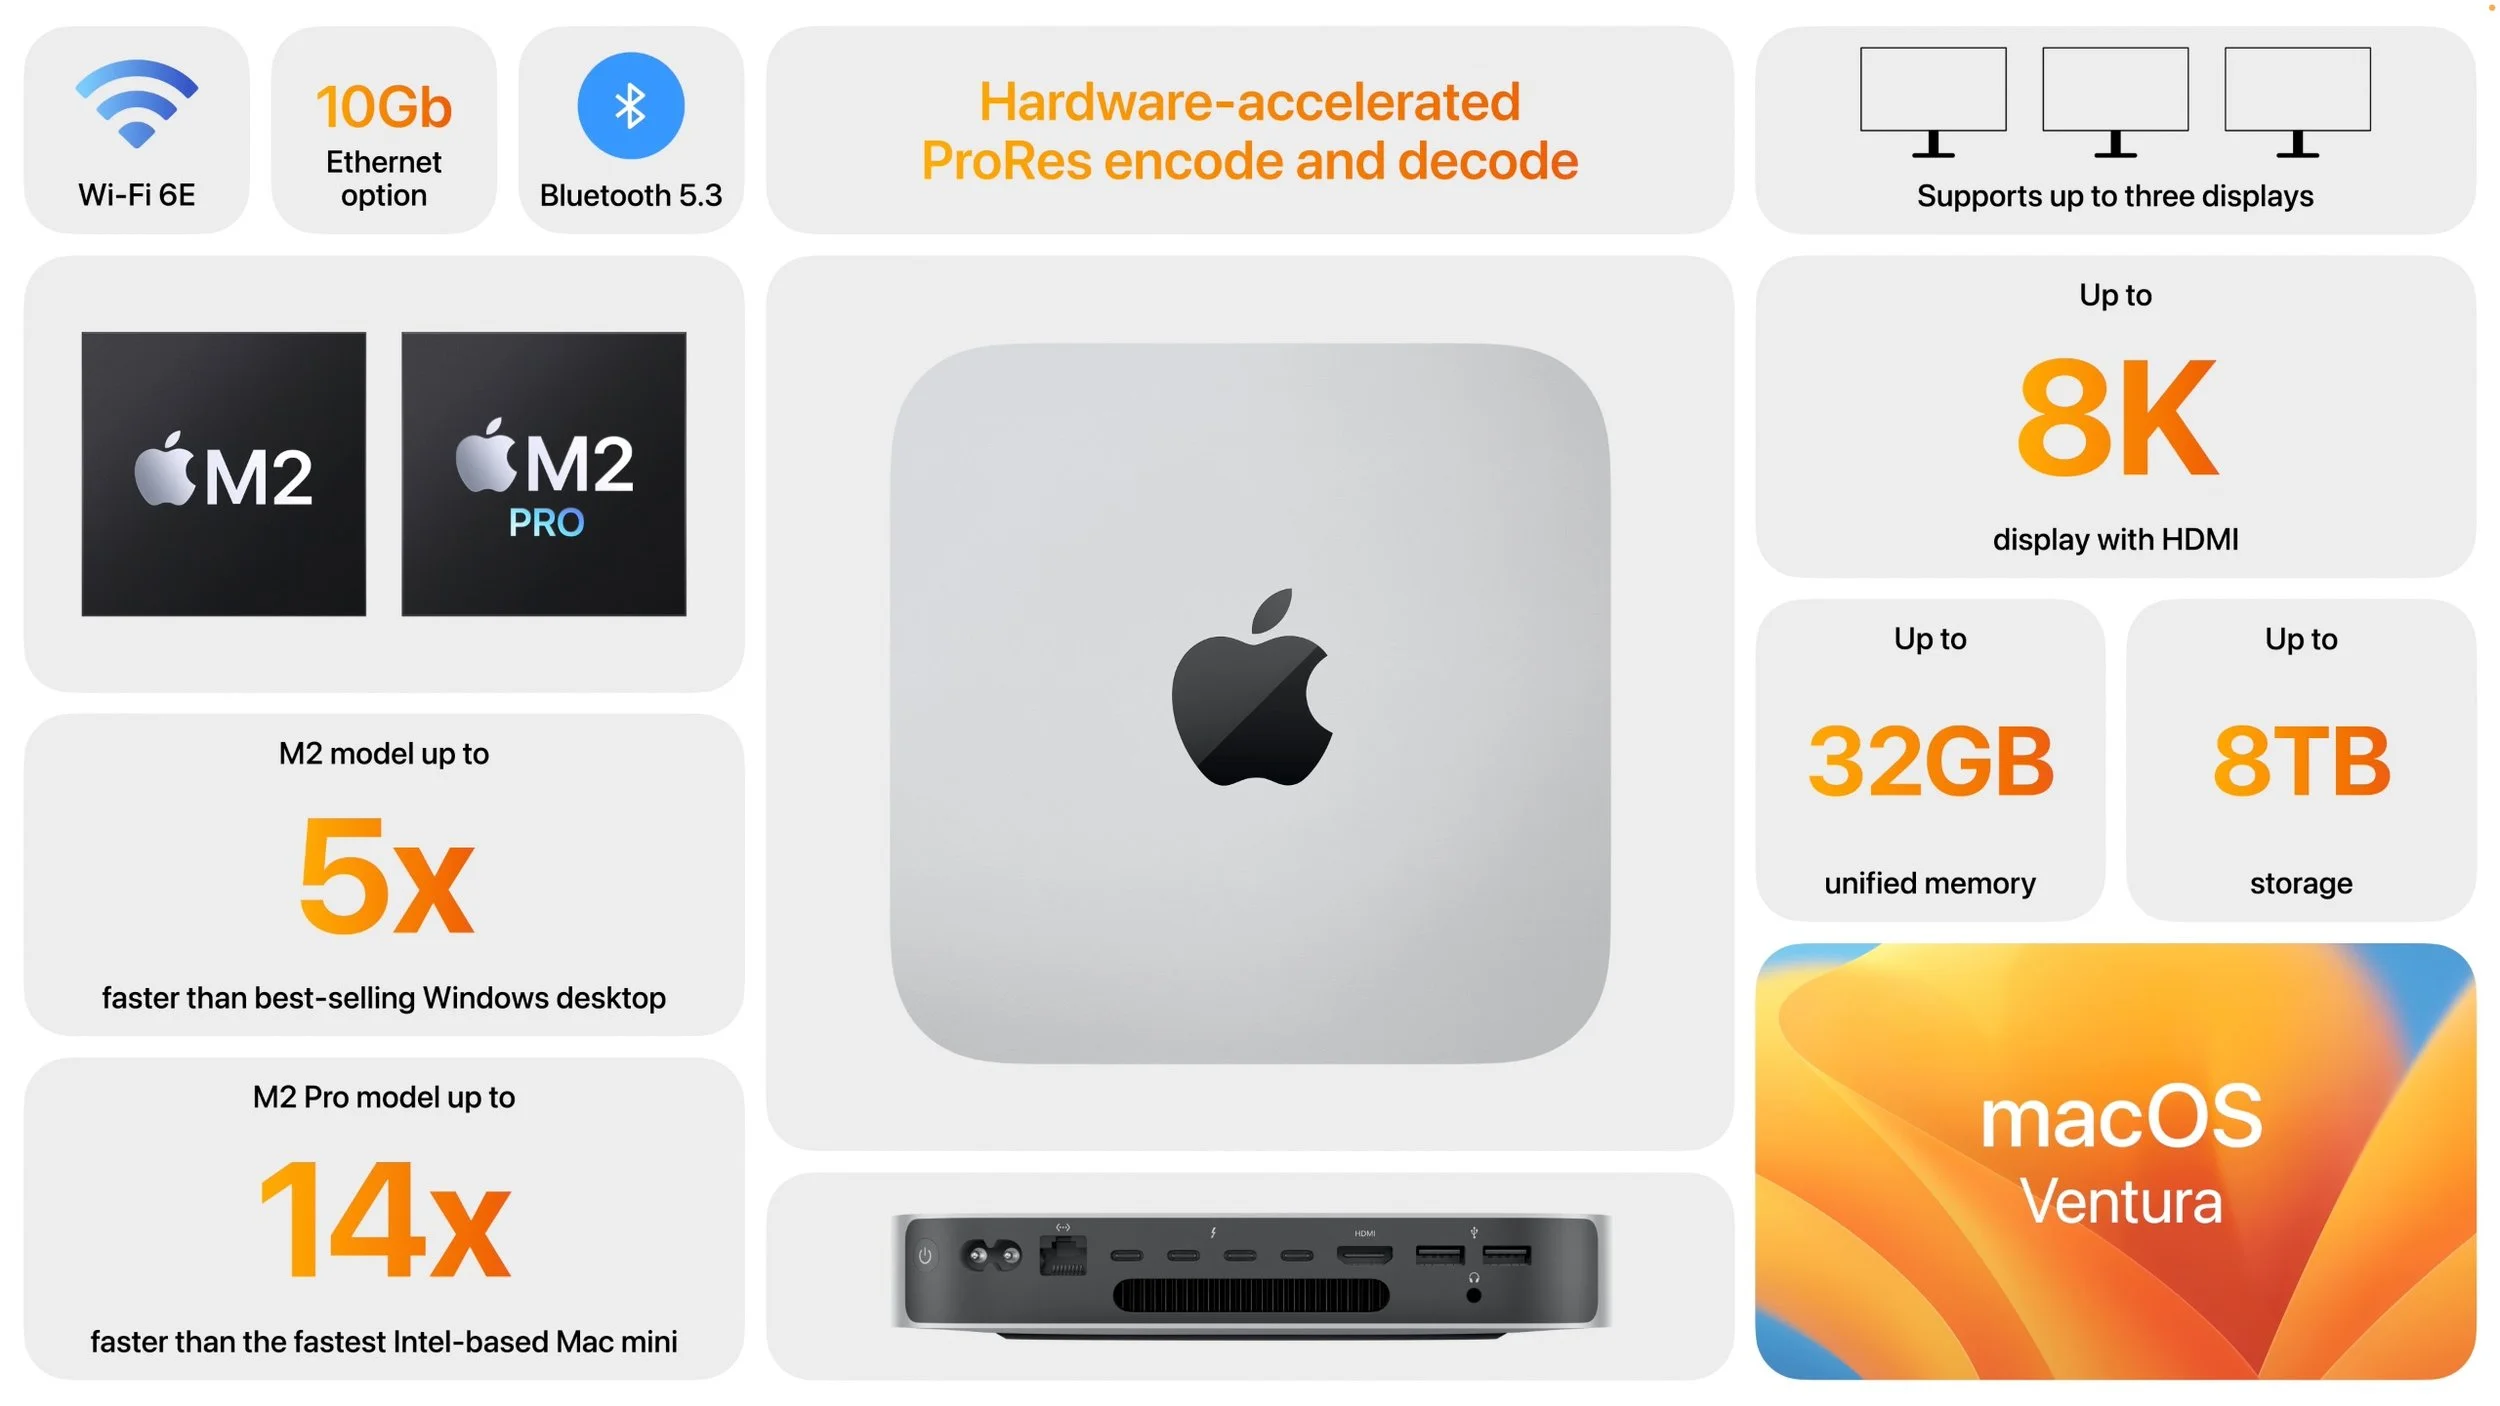
The M2 Mac mini starts at $599—$100 less than the starting price for the M1 Mac mini—and provides an 8-core CPU and 10-core GPU with unified memory configurations of 8 GB, 16 GB (add $200), or 24 GB ($400). In terms of storage, the base level is 256 GB, but you can increase that to 512 GB ($200), 1 TB ($400), or 2 TB ($800). It provides only two Thunderbolt 4 ports.
The M2 Pro Mac mini starts at $1299 for a 10-core CPU and 16-core GPU, but you can bump that up to an M2 Pro with a 12-core CPU and 19-core GPU for $300. You also get 16 GB of unified memory and 512 GB of storage for that base price. 32 GB of memory costs $400 more, and storage upgrades are 1 TB ($200), 2 TB ($600), 4 TB ($1200), and 8 TB ($2400). It offers more connectivity with four Thunderbolt 4 ports. Note that as you configure a powerful M2 Mac mini, you’ll be straying into Mac Studio territory in terms of both price and performance.
Both Mac mini models boast enhanced external display support. Read the tech specs for full details, but in essence, along with multiple monitor support over Thunderbolt, the HDMI port on an M2 Pro Mac mini supports either an 8K display or a 4K display running at a faster refresh rate, which might be a boon in video-focused fields. Other improvements that may be welcome in specific setups include the option to add 10 Gigabit Ethernet for $100, support for Wi-Fi 6E (which can improve throughput over short distances with a new router), and Bluetooth 5.3.
The updated Mac mini replaces both the M1 Mac mini and the Intel-based Mac mini that Apple had left in the lineup until now.
It probably won’t be long before Apple releases an M2 24-inch iMac, too. We know that some are pining for a 27-inch iMac with Apple silicon, and we’ll just have to wait to see if Apple returns to that form factor with either an iMac or iMac Pro. We can also expect M2 versions of the Mac Studio at some point, but we’ll have to wait for Apple to come out with an M2 Ultra chip if it’s to maintain the same lineup as today’s M1 family.
M2 Pro and M2 Max Speed Up 14-inch and 16-inch MacBook Pro
Since their October 2021 release, Apple’s professional laptops, the 14-inch MacBook Pro and 16-inch MacBook Pro, have provided impressive processing power thanks to their M1 Pro and M1 Max chips. Apple has now switched to the new M2 Pro and M2 Max chips, and the company says that both offer 20% more CPU performance, 30% more GPU performance, and 40% more Neural Engine performance than their predecessors. As with the Mac mini, the updated MacBook Pro models also feature enhanced external display support (see the tech specs for full details), Wi-Fi 6E, and Bluetooth 5.3. Finally, Apple estimates they’ll have an hour more battery life.
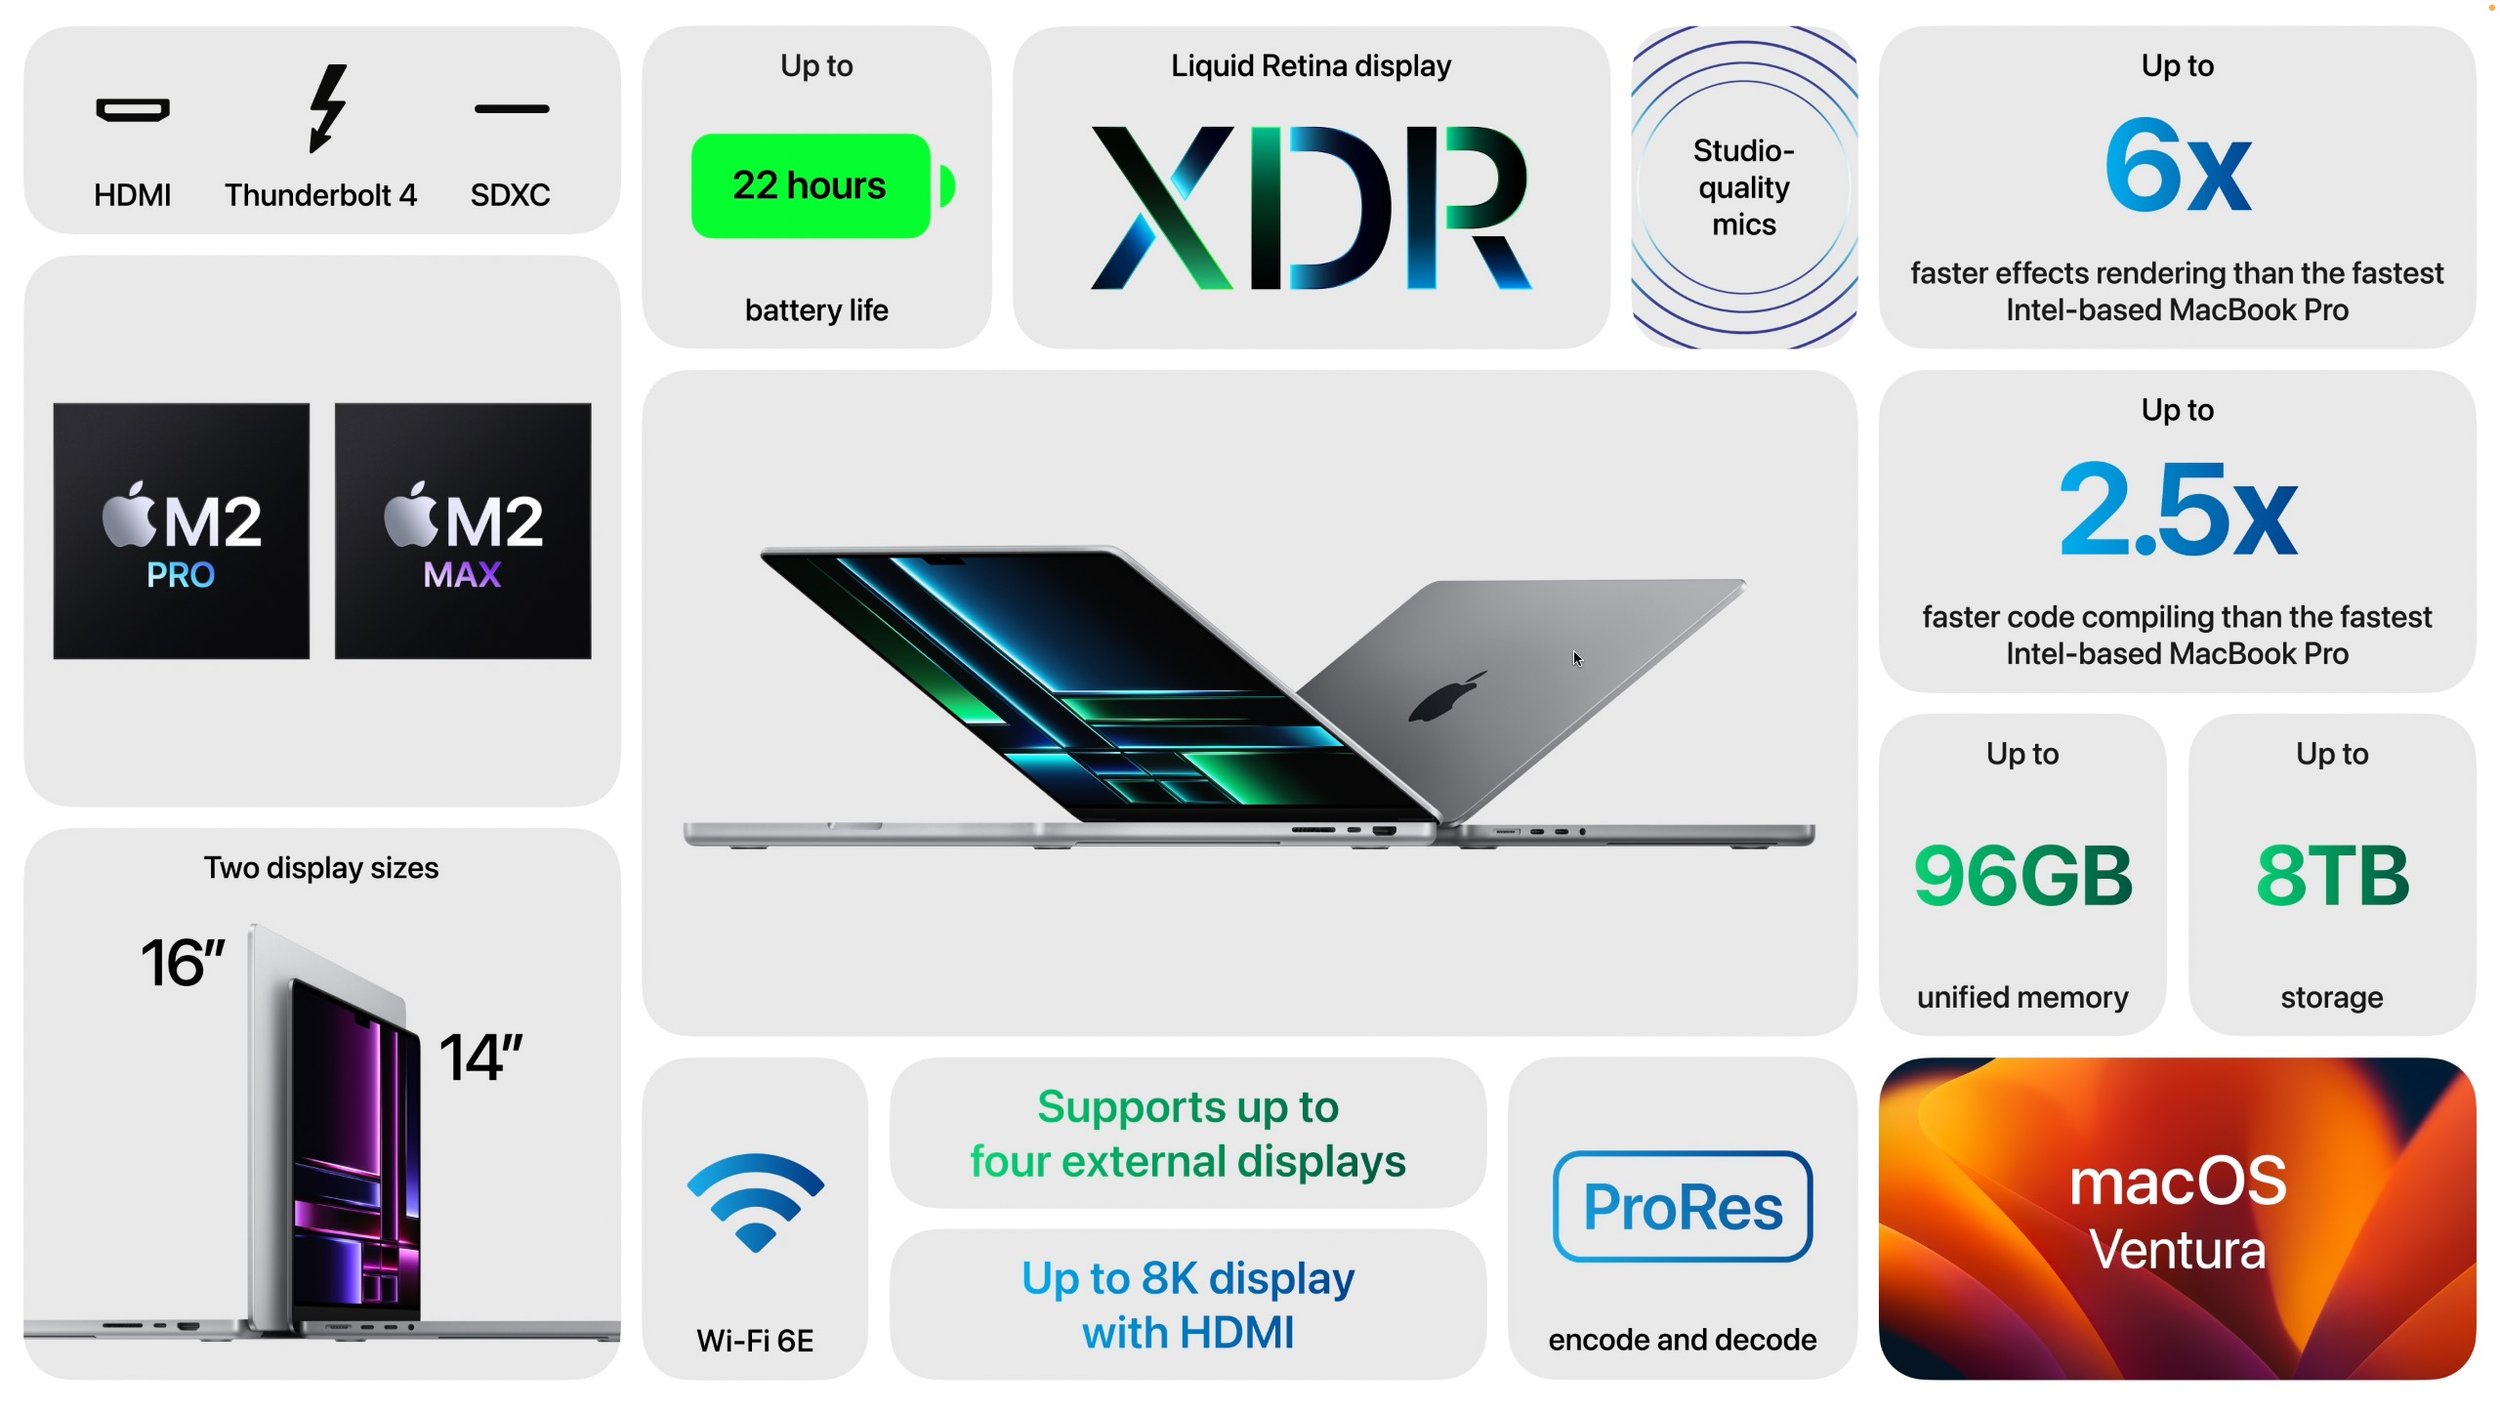
The 14-inch MacBook Pro starts at $1999 for an M2 Pro with a 10-core CPU and 16-core GPU, 16 GB of memory, and 512 GB of storage. Chip upgrades include the 12/19-core (CPU/GPU) M2 Pro ($300), the 12/30 M2 Max ($500), and the 12/38 M2 Max ($700). With memory, the M2 Pro configurations can upgrade to 32 GB ($400), whereas the M2 Max configurations start at 32 GB and let you go to 64 GB ($400) or 96 GB ($800, with the 12/38 M2 Max only).
The 16-inch MacBook Pro costs $2499 for an M2 Pro with a 12-core CPU and 19-core GPU, 16 GB of memory, and 512 GB of storage. Chip upgrades include the 12/30 M2 Max ($200) and the 12/38 M2 Max ($400). Memory is the same as with the 14-inch MacBook Pro, so the M2 Pro configuration can upgrade to 32 GB ($400), and the M2 Max configurations start at 32 GB and let you go to 64 GB ($400) or 96 GB ($800, with the 12/38 M2 Max only).
Given that these new MacBook Pro models provide more performance and battery life for the same prices as before, their release is entirely positive. If you were waiting for an M2 Pro or M2 Max laptop, now’s the time to place an order.
Apple Brings Back the Full-Size HomePod
Apple released the original HomePod in 2018, but even after dropping the price from $349 to $299, sales weren’t strong enough thanks to competition from much cheaper smart speakers from Amazon and Google. Apple discontinued the HomePod in 2021 and focused on the $99 HomePod mini. Now Apple has brought the full-size HomePod back, introducing a second-generation HomePod with a few extra features and the same $299 price. You can order it now in white or midnight, which replaces space gray, and it ships on February 3rd.

The new HomePod supports spatial audio with Dolby Atmos for music and video, which should enhance the listening experience. For those getting into home automation, it includes a sensor for temperature and humidity, and you’ll be able to use the Home app to create automations to control blinds, fans, and thermostats. It also supports the new Matter home automation standard. Finally, Apple says that a software update in a few months will add Sound Recognition, which will let the HomePod alert you if it hears smoke or carbon monoxide alarms. Wouldn’t you like to know if an alarm is going off while you’re away from home?
One note. You can use two HomePods to create a stereo pair, but both HomePods must be the same model. So you can’t pair an original HomePod with a second-generation HomePod or mix an HomePod mini with either one.
The main question, which we won’t be able to answer until the second-generation HomePod ships, is if it sounds as good as the original HomePod and hears Siri commands as well. That’s a question because Apple redesigned the HomePod’s audio hardware to use fewer tweeters and microphones. Plus, it relies on the S7 chip that powers the Apple Watch Series 7, as opposed to the A8 that first appeared in the iPhone 6. In short, it seems that Apple has worked to cut costs to enable the necessary profit margins. Given that Amazon’s hardware division reportedly lost $10 billion in 2022 by selling Echo smart speakers at cost, Apple’s move seems sensible, at least as long as it doesn’t hurt the HomePod user experience.
(Featured image by Apple)
Copy Gigabytes of Data Between Macs with Target Disk Mode
If you have to move tens or hundreds of gigabytes of data between Macs, give Target Disk Mode a try. It’s fast, easy, and reliable. Details here:

Apple makes it easy to move data between Macs. You can send files via AirDrop, attach them to an email message, put them in a Messages conversation, turn on and connect via File Sharing, or use a file-sharing service like iCloud Drive, Dropbox, or Google Drive as an intermediary, to name just a few of the more obvious approaches.
But what if you have a lot of data—say tens or even hundreds of gigabytes—to transfer from one Mac to another? The techniques listed above might work, but we wouldn’t bet on it. If you had an external drive with sufficient free space handy, you could copy all the data to it from one Mac and then copy the data from it to another Mac. To cut the copy time in half, try Target Disk Mode instead. You may even be able to use Target Disk Mode on an older Mac to transfer an account with Migration Assistant when setting up a new Mac.
What Is Target Disk Mode?
Target Disk Mode is a special boot mode for Intel-based Macs and an option in macOS Recovery on Macs with Apple silicon that enables one Mac to behave like an external drive for another Mac. Target Disk Mode is nearly universal, easy to set up, and one of the fastest methods of moving files between Macs. Let’s unpack that statement:
Nearly universal: Every Mac sold in the last decade supports Target Disk Mode, so you can be sure it will work with any modern Mac. That’s true of both Intel-based Macs and Macs with Apple silicon.
Easy setup: Because Apple has baked Target Disk Mode into the Mac firmware, the version of macOS is irrelevant beyond the Thunderbolt cable requirement discussed below. There’s no software to configure nor any permissions to worry about. Putting a Mac into Target Disk Mode is particularly simple on Intel-based Macs, but it’s also easy on Macs with Apple silicon.
Speed: Because you’re connecting one Mac directly to another using Thunderbolt, you’ll get the fastest transfer speeds available.
If either Mac has macOS 11 Big Sur or later installed, you’ll need to connect them with a Thunderbolt cable—it’s fine to use Apple’s Thunderbolt 3 to Thunderbolt 2 adapter for connecting newer and older Thunderbolt-capable Macs. If both Macs are running an earlier version of macOS, you can use Thunderbolt, USB, or FireWire, depending on the available ports. (Note that the Apple USB-C Charge Cable that comes with the Apple power adapter doesn’t support Target Disk Mode, so if that’s the cable you were planning to use, sorry, but you’ll need to buy a real Thunderbolt cable.)
Step-by-Step Instructions for Intel-based Macs
To put an Intel-based Mac into Target Disk Mode for copying data, follow these steps:
Connect the source Mac to the destination Mac with an appropriate cable.
On the source Mac, either:
Restart the Mac, and once it starts booting, hold down the T key until you see the Target Disk Mode screen with a bouncing Thunderbolt logo.
Open System Settings/Preferences > Startup Disk, click Target Disk Mode, and then click Restart.
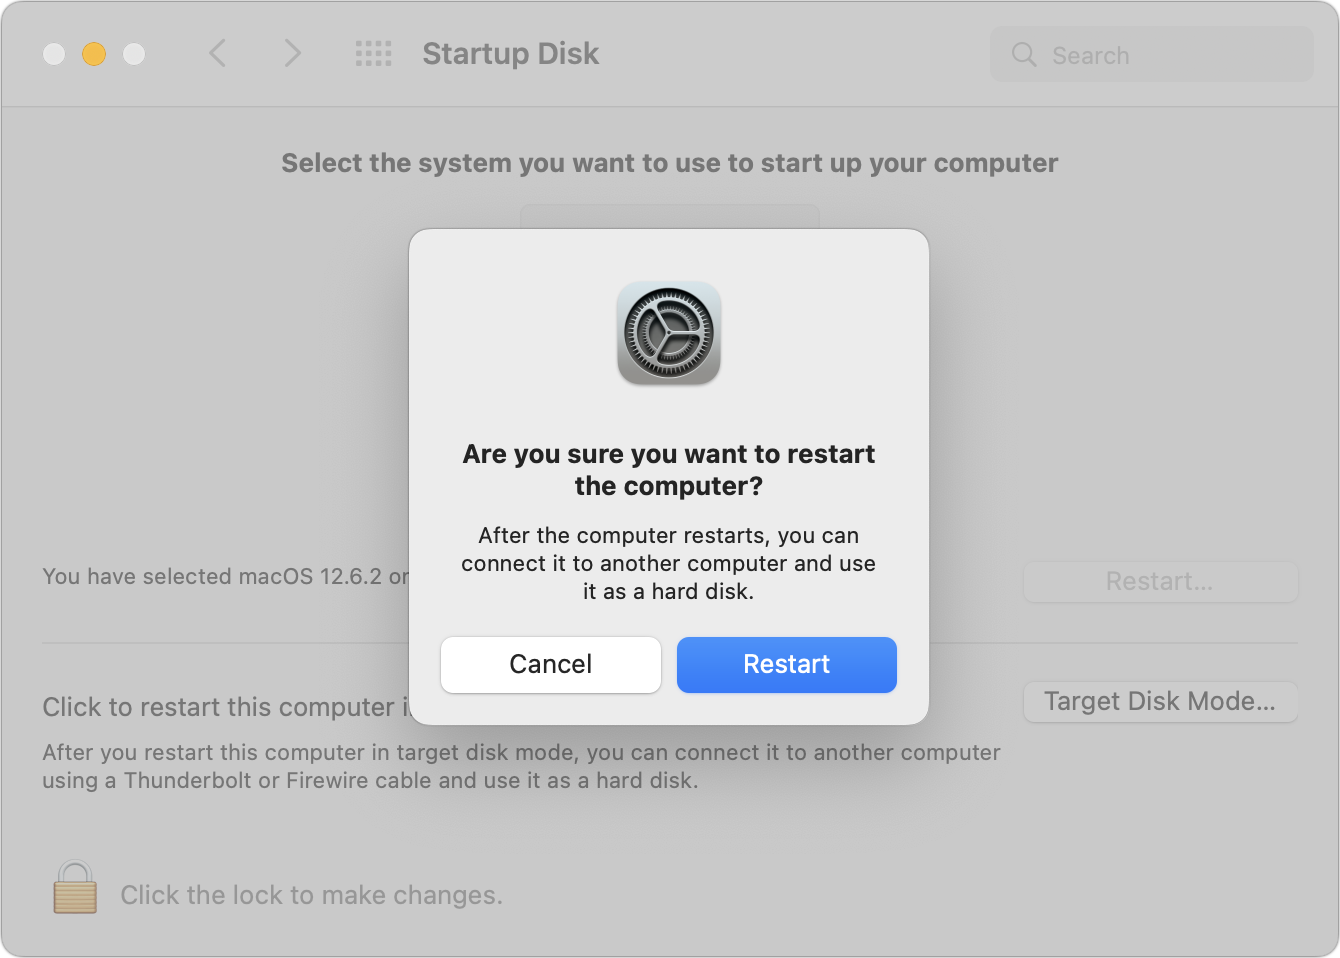
3. The source Mac’s data and applications volume appears on the destination Mac’s Desktop like an external drive; if the source Mac is encrypted with FileVault, give it a minute to appear on the destination Mac, after which you’ll need to enter its password.
4. Transfer the files as you would normally.
5. When you’re done, unmount the source Mac’s drive by dragging it to the Trash in the Dock. Then press and hold the power button on the source Mac for a few seconds to shut it down.
Step-by-Step Instructions for Macs with Apple Silicon
The process is somewhat more involved for Macs with Apple silicon, where the shared drive or volume appears like a network volume:
1. Connect the source Mac to the destination Mac with an appropriate cable.
2. On the Mac with Apple silicon, choose Shut Down from the Apple menu to turn it off.
3. Press and hold the power button until “Loading startup options” appears.
4. Click Options, and then click Continue to enter macOS Recovery.
5. Select a user, click Next, enter the user’s password, and click Continue.
6. Choose Utilities > Share Disk.
7. Select the drive or volume you want to share, and click Start Sharing. (If the drive is encrypted using FileVault, click Unlock and enter the FileVault pass-word first.)
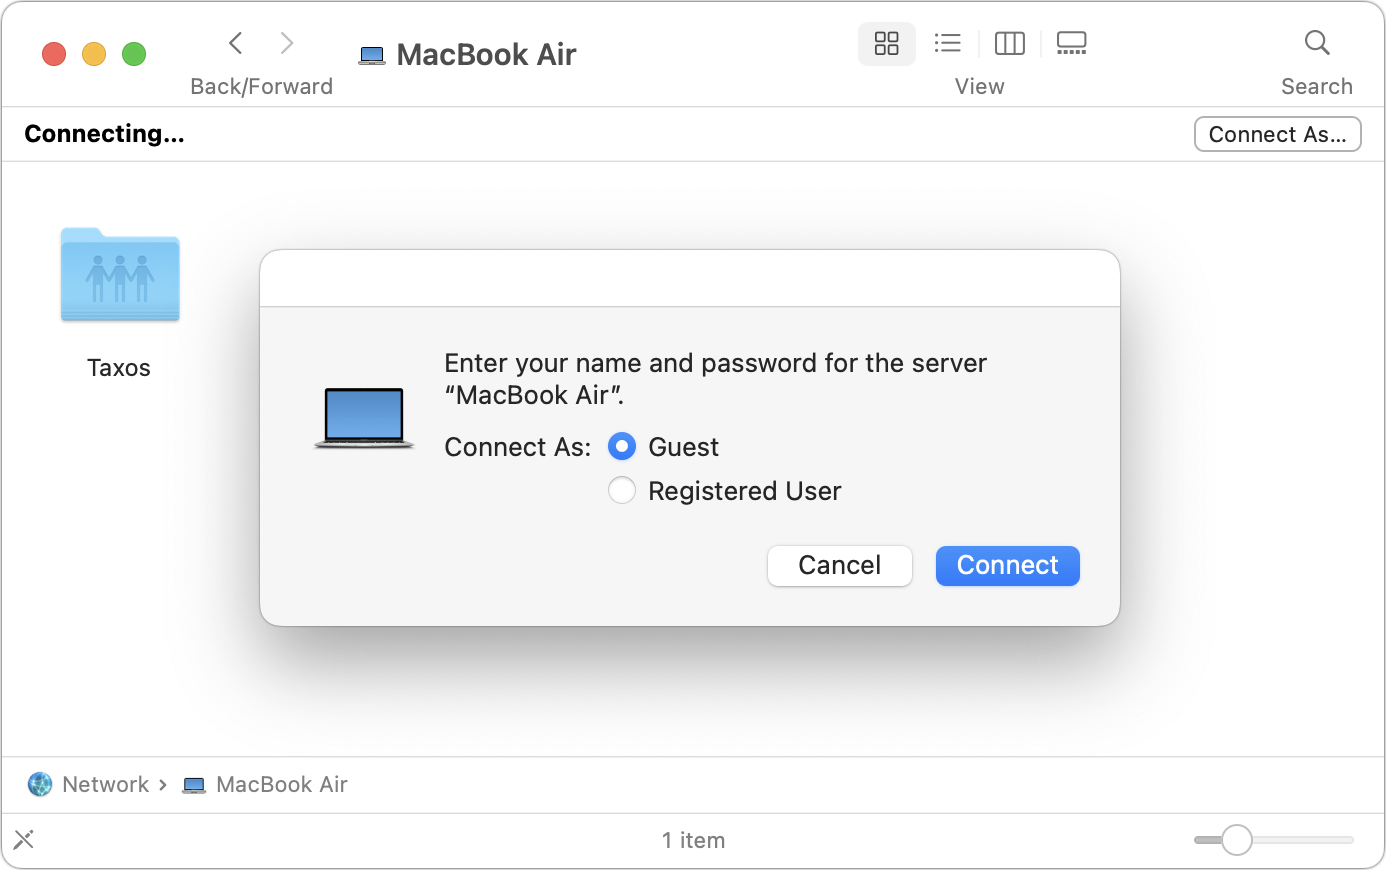
8. On the destination Mac, open a Finder window and click Network (under Locations) at the bottom of the sidebar.
9. In the Network window, double-click the Mac with the shared drive or volume, click Connect As, select Guest in the Connect As window, and then click Connect. The shared drive or volume becomes available like any other external hard drive.
10. Transfer the files as you would normally.
11. When you’re done, unmount the shared drive or volume by dragging it to the Trash, then click Stop Sharing on the source Mac.
Although it’s not something you’ll use every day, Target Disk Mode is one of the un-sung innovations that has made Macs easier to use for decades, and it’s well worth keeping in mind whenever you need to move lots of data between machines.
(Featured image by Adam Engst)
Apple Delivers Promised Features in End-of-Year OS Updates
At the end of 2022, Apple released operating system updates that delivered previously promised features like Freeform, Stage Manager on external displays, Advanced Data Protection for iCloud, and more. See what’s new at:

Every year at its Worldwide Developer Conference in June, Apple previews planned features in the upcoming versions of macOS, iOS, iPadOS, watchOS, and tvOS. However, not all of those features are necessarily ready for the initial releases of those operating systems. In part, that’s because iOS must ship in sync with the latest iPhone models that Apple releases in September, whereas iPadOS and macOS often come out later. Even then, some of Apple’s promised features may not be ready for public consumption until the .1 or .2 updates.
Just before the holidays, Apple released a full set of updates, including iOS 16.2, iPadOS 16.2, macOS 13.1 Ventura, watchOS 9.2, and tvOS 16.2. Between those updates and the ones immediately preceding them, Apple has now delivered on all of its 2022 promises.
Here is a rundown of what’s now possible. Some features are specific to one of Apple’s operating systems; others cut across several and may work only on updated devices or even require that all your devices be upgraded:
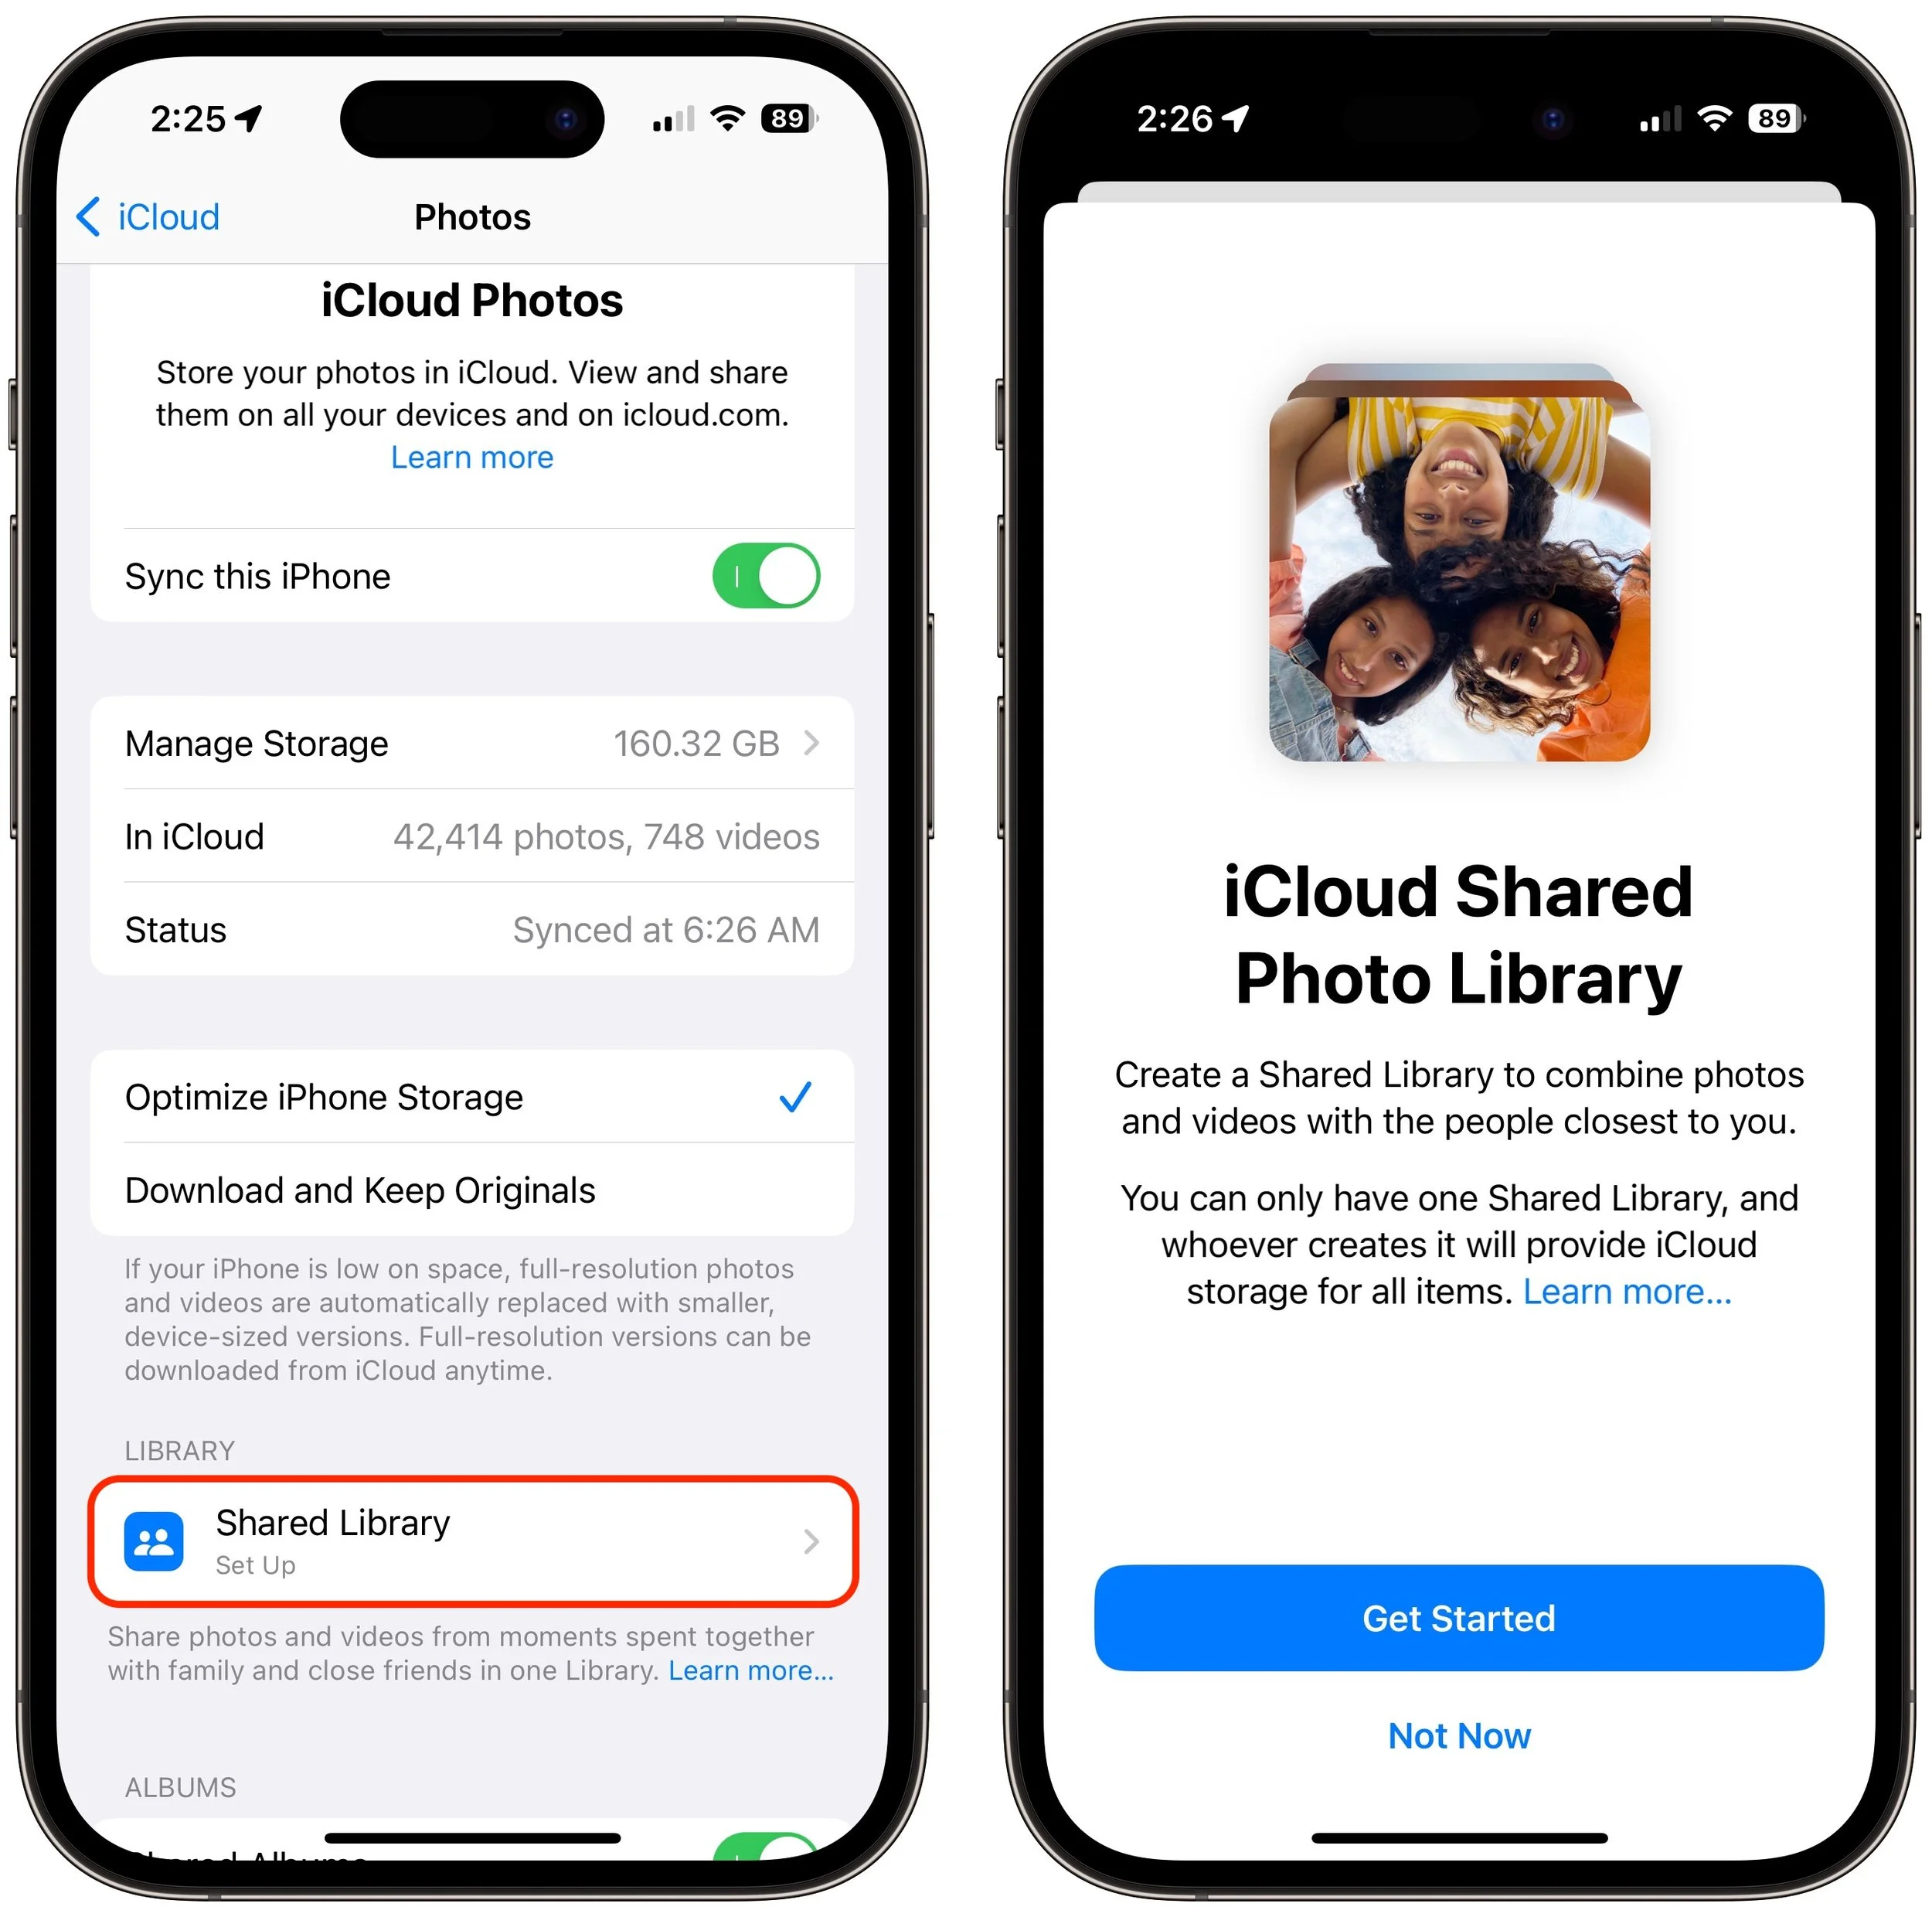
iCloud Shared Photo Library: Starting in iOS 16.1, iPadOS 16.1, and macOS 13.0, you can create another photo library and share it with family and close friends. It’s a great way to create a single shared space for photos and videos, but note that everything you contribute moves out of your Personal Library and into the Shared Library. Plus, everyone with whom you’re sharing has equal permissions to add, edit, and delete content in the Shared Library. The person who creates the Shared Library must have space in iCloud for it; it doesn’t count against anyone else’s iCloud storage.
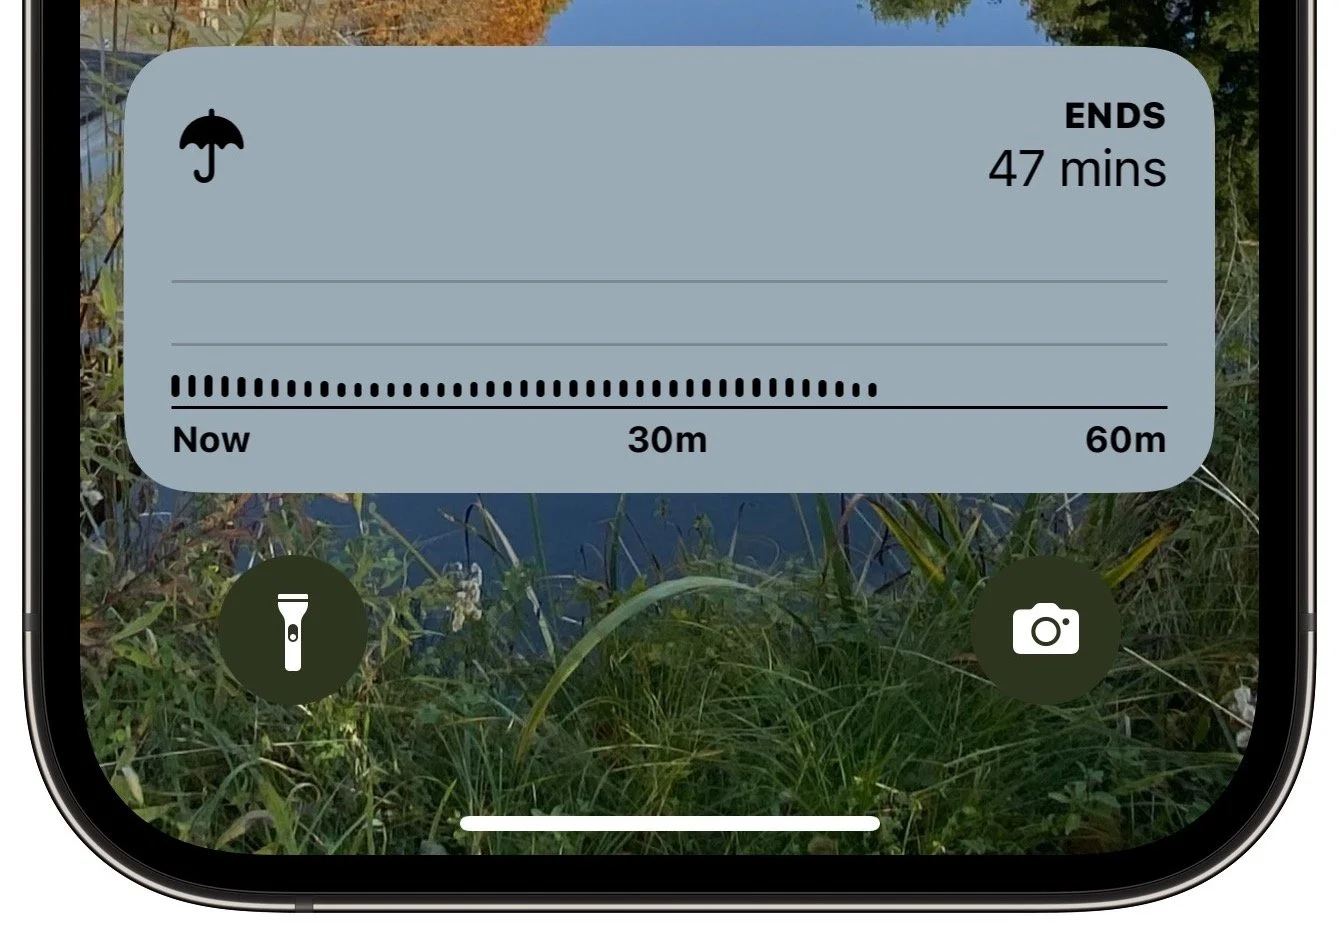
Live Activities: With iOS 16.1, Apple also unveiled Live Activities, a new type of dynamic notification that can appear on the iPhone’s Lock Screen or the iPhone 14 Pro’s Dynamic Island. Live Activities allow apps to display data like live sports scores (from the TV app), active weather (in CARROT Weather, below), flight tracking (in Flighty), and more.
Freeform: The most notable addition in iOS 16.2, iPadOS 16.2, and macOS 13.1 was Freeform, Apple’s digital whiteboard app designed for collaborative brainstorming. It enables users to lay out a wide variety of content on a flexible canvas without worrying about fixed layouts or restrictive page sizes. Boards can contain text, hand-drawn graphics, sticky notes, shapes, and attachments—nearly any file on your Mac, iPad, or iPhone. Data syncs to your other devices through iCloud, and you can invite others (who must also be running a supported operating system) to collaborate on a board in real time.

New Home architecture: Apple promised that the new Home architecture would be more reliable and efficient, although it’s not clear what that means. It does require an explicit upgrade, and once upgraded, devices that aren’t running the latest versions of iOS, iPadOS, macOS, watchOS, tvOS, and HomePod Software won’t be able to access the home. Apple has temporarily removed the option to upgrade after problems were reported, so perhaps wait until the company restores the upgrade and others have had a chance to test it.
Stage Manager on external displays: The feature that initially caused iPadOS 16 to be delayed was Stage Manager, Apple’s new windowing paradigm for the iPad and the Mac. However, even when it first shipped in iPadOS 16.1, Stage Manager didn’t support external displays on the iPad. With iPadOS 16.2, you can finally have four apps in Stage Manager on the iPad display and another four on an external display. However, using Stage Manager on an external display requires an M1 iPad, which means the fifth-generation iPad Air, the third-generation 11-inch iPad Pro and later, and the fifth-generation 12.9-inch iPad Pro and later.
Race Route and automatic track detection: In watchOS 9.2, the new Race Route feature gives you the option of racing your last or best time on any route you’ve run or biked at least twice. Plus, if you start an Outdoor Run workout while at a track, you’re prompted to begin a Track workout that optionally provides track-specific metrics like lap time and pace.
Advanced Data Protection: In a surprise announcement in December, Apple unveiled Advanced Data Protection for iCloud, which extends end-to-end encryption to many more types of data in iCloud. For those concerned about breaches of Apple’s security or overreach by law enforcement, Advanced Data Protection is a very good thing. The downside is that when the feature is enabled, Apple cannot recover your data if you forget your iCloud password. For most people, the standard iCloud data protection remains sufficient. If you want to upgrade, note that all devices that you want to connect to your iCloud account must be running the latest operating system versions, which may not be possible for some otherwise fully functional older devices.
Apple Music Sing: If you’ve been hankering to sing along with your favorite songs, Apple Music Sing is essentially karaoke for Apple Music subscribers on the iPhone, iPad, and third-generation Apple TV. Alcohol not included.
Between these new features and some important security updates, we strongly encourage anyone running iOS 16, iPadOS 16, watchOS 9, and tvOS 16 to update to iOS 16.2, iPadOS 16.2, watchOS 9.2, and tvOS 16.2. And if you’re still running an earlier version of one of those operating systems, you can upgrade to the latest at any time—they’re fine.
Similarly, if you’re already running macOS 13 Ventura—perhaps on a newly purchased Mac— you should update to version 13.1 to take advantage of security fixes. However, if you haven’t yet upgraded from macOS 12 Monterey, perhaps wait a little longer. There has been only one macOS update with bug fixes since the initial release of Ventura, so it feels as though another bug fix update might arrive soon, after which we may recommend general upgrades.
(Featured image based on original by iStock.com/champpixs)
LastPass Security Breach: Here’s What to Do
Password management company LastPass suffered a breach in which encrypted customer passwords were stolen. We explain what happened, how LastPass users should react, and what lessons other organizations can learn.

Password management company LastPass has announced that it suffered a security breach in which attackers stole both encrypted customer account data (which is bad) and customer vaults containing encrypted usernames and passwords (which is much, much worse). On the positive side, the data of users who abided by LastPass’s defaults and created master passwords of at least 12 characters in length will likely resist cracking attempts.
Although 1Password is the most popular password manager for Apple users, we’ve mentioned LastPass as an alternative in previous articles, so here’s what happened and how LastPass users should react. For those who don’t use LastPass, we also discuss ways your organization can improve its online security by learning from LastPass’s mistakes and misfortunes.
The Breach
According to LastPass, the breach started in August 2022 when an attacker compromised a developer’s account. The attacker then leveraged information and credentials from that initial breach to target another LastPass employee’s account, where they were able to steal data from cloud-based storage that LastPass used for backup.
The main lesson here is that a dedicated attacker will probe all points of access into a company’s digital infrastructure—everyone must be mindful of security at all times. It also seems that LastPass may have been paying more attention to its on-premises production systems than its cloud-based backup storage. Any organization can learn from that error—if backups contain sensitive data, they should be equally protected.
What Was Stolen
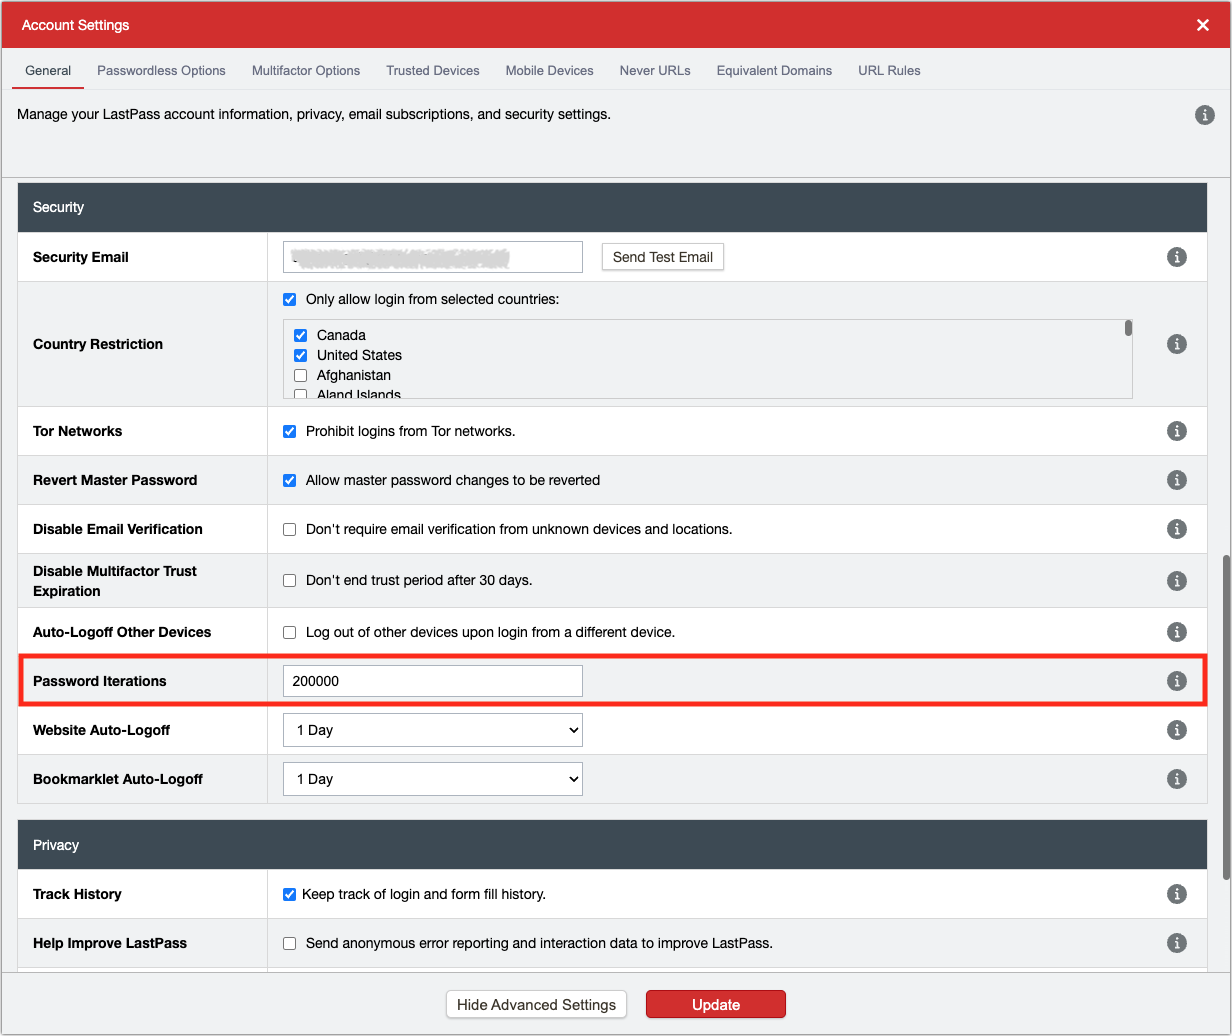
LastPass says that the stolen data included unencrypted customer account information such as names, addresses, and phone numbers, but not credit card details. In the customer vaults, LastPass did secure usernames, passwords, secure notes, and form-filled data using 256-bit AES encryption, so they can be decrypted only with a unique encryption key derived from each user’s master password. However, for in-explicable reasons, LastPass failed to encrypt website URLs associated with password entries.
Because LastPass left this information unencrypted, it’s now available for the attacker to use (or sell for others to use) in targeted phishing attacks. A forged password reset request from an unusual website you regularly use has a better chance of fooling you than a generic one for a big site that millions of people use. It’s even possible that the unencrypted website URLs could lead to extortion attempts, as in the infamous Ashley Madison data breach.
The larger lesson is that a high-value attack target like LastPass should never have stored customer data in unencrypted form. If your company handles customer data along these lines, ensure that it’s always stored in encrypted form. You may not be able to prevent attackers from accessing your network, but if all the data they can steal is encrypted, that limits the overall damage that can ensue.
Potential Problems
By default, LastPass requires master passwords to be at least 12 characters in length. Plus, LastPass applies 100,100 iterations of the PBKDF2 password-strengthening algorithm to make it harder for brute-force attacks to crack passwords. The company says:
If you use the default settings above, it would take millions of years to guess your master password using generally-available password-cracking technology. Your sensitive vault data, such as usernames and passwords, secure notes, attachments, and form-fill fields, remain safely encrypted based on LastPass’ Zero Knowledge architecture. There are no recommended actions that you need to take at this time.
Unfortunately, LastPass increased the master password minimum length only in 2018 and did not require users with shorter master passwords to reset them at that time. Similarly, the PBKDF2 setting now uses 100,100 iterations, but it previously used 5000, and some long-time users report it being set to 500.
LastPass was correct to increase the default level of security for new accounts as hardware cracking capabilities became faster. However, allowing users to continue using insecure master passwords that were too short and not forcing higher PBKDF2 iteration counts was a major mistake. If your organization steps up its security policies, bite the bullet and ensure that no accounts or users are grandfathered in with old, insecure options.
By not recommending any actions, LastPass missed an opportunity to encourage users to increase their security through multifactor authentication. LastPass also downplayed the concern over phishing attacks. That was likely a decision made by PR (and possibly Legal), but the company could have served users better. Should your organization ever be involved in a breach, make sure that someone involved in the transparency discussions represents the users’ best interests alongside those of the organization. And consider requiring multifactor authentication!
Finally, it’s worth noting that other companies significantly increase the security of their systems by mixing passwords with additional device-based keys. Apple does this by entangling device passcodes and passwords with the device’s unique ID, and 1Password strengthens your passwords with a secret key. LastPass has no such additional protection.
What LastPass Users Should Do
There are two types of LastPass users in this situation: those who had long, secure master passwords and 100,1000 iterations of PBKDF2 and those who didn’t:
Strong master password users: Despite LastPass’s claim that you don’t need to do anything, we recommend enabling multifactor authentication. (For instructions, click Features & Tools and then Multifactor Authentication in the LastPass support portal.) You could change your master password too, but that won’t affect the data that was already stolen. That horse has already left the barn, whereas enabling multifactor authentication would prevent even a cracked master password from being used in the future.
Weak master password users: Sorry, but you have work to do. Immediately change your master password and increase your PBKDF2 iterations to at least 100,100. We also recommend enabling multifactor authentication because LastPass is such an important account. Next, go through all your passwords and change at least those for important websites. Start with the critical accounts that could be used to impersonate you, like email, cell phone, and social media, plus those that contain financial data.
Regardless of the strength of your master password, be on high alert for phishing attacks conducted through email and text messages. Because the stolen data included both personal information and URLs to websites where you have accounts, phishing attacks may be personalized to you, making them harder to detect. In short, don’t follow links in email or texts to any website where you have to log in. Instead, navigate to the website directly in your browser and log in using links on the site. Don’t trust URL previews—it’s too easy to fake domain names in ways that are nearly impossible to identify.
Should you switch from LastPass to another service, like 1Password? It comes down to whether you believe LastPass has both a sufficiently secure architecture despite not entangling the master password with some device-based key and sufficiently robust security practices despite having been breached. It would not be irrational to switch, and we would recommend switching to 1Password. Other password managers like Bitwarden and Dashlane may be fine too. If you have to change numerous passwords and choose to switch, it may be easier to change the passwords after switching—see how the process of updating a password compares between LastPass and 1Password or whatever tool you end up using.
We realize this is an extremely worrying situation for LastPass users, particularly those with weak master passwords or too-few PBKDF2 iterations set. Only you can reset your passwords, but if you need assistance switching to another password manager, don’t hesitate to contact us.
(Featured image by LastPass)
What Is Advanced Data Protection for iCloud? Should You Enable It?
Do you want more security for your iCloud account? Apple’s Advanced Data Protection can now provide end-to-end encryption for nearly all iCloud data. But be aware that Apple won’t be able to recover your account if you forget your password.

In early December, Apple made a surprise announcement: Advanced Data Protection for iCloud. It’s not as though iCloud’s standard data protection is problematic, but it hinges on one architectural decision that makes some iCloud data theoretically vulnerable: Apple holds the encryption keys necessary to decrypt iCloud data. Because Apple controls those encryption keys, an attacker or rogue Apple employee who could gain access to them could theoretically steal iCloud data. (There are many more safeguards; it’s not like there’s a big printout of keys anywhere.) Plus, since Apple has the technical capability to read that data, law enforcement agencies could legally compel Apple to hand it over.
Not all iCloud data is vulnerable in this way. Of the 26 types of iCloud data, 14 already support end-to-end encryption, where you control the encryption keys. That’s true of Health data, Passwords and Keychain, Apple Card transactions, and so on. You may not realize you’re managing these keys because Apple has baked that into the security architecture of its overall ecosystem. Apple hadn’t previously extended end-to-end encryption to more iCloud data types because doing so prevents Apple’s support engineers from recovering accounts for users who forget their passwords. Even when Apple can recover an account, the end-to-end encrypted data isn’t included.
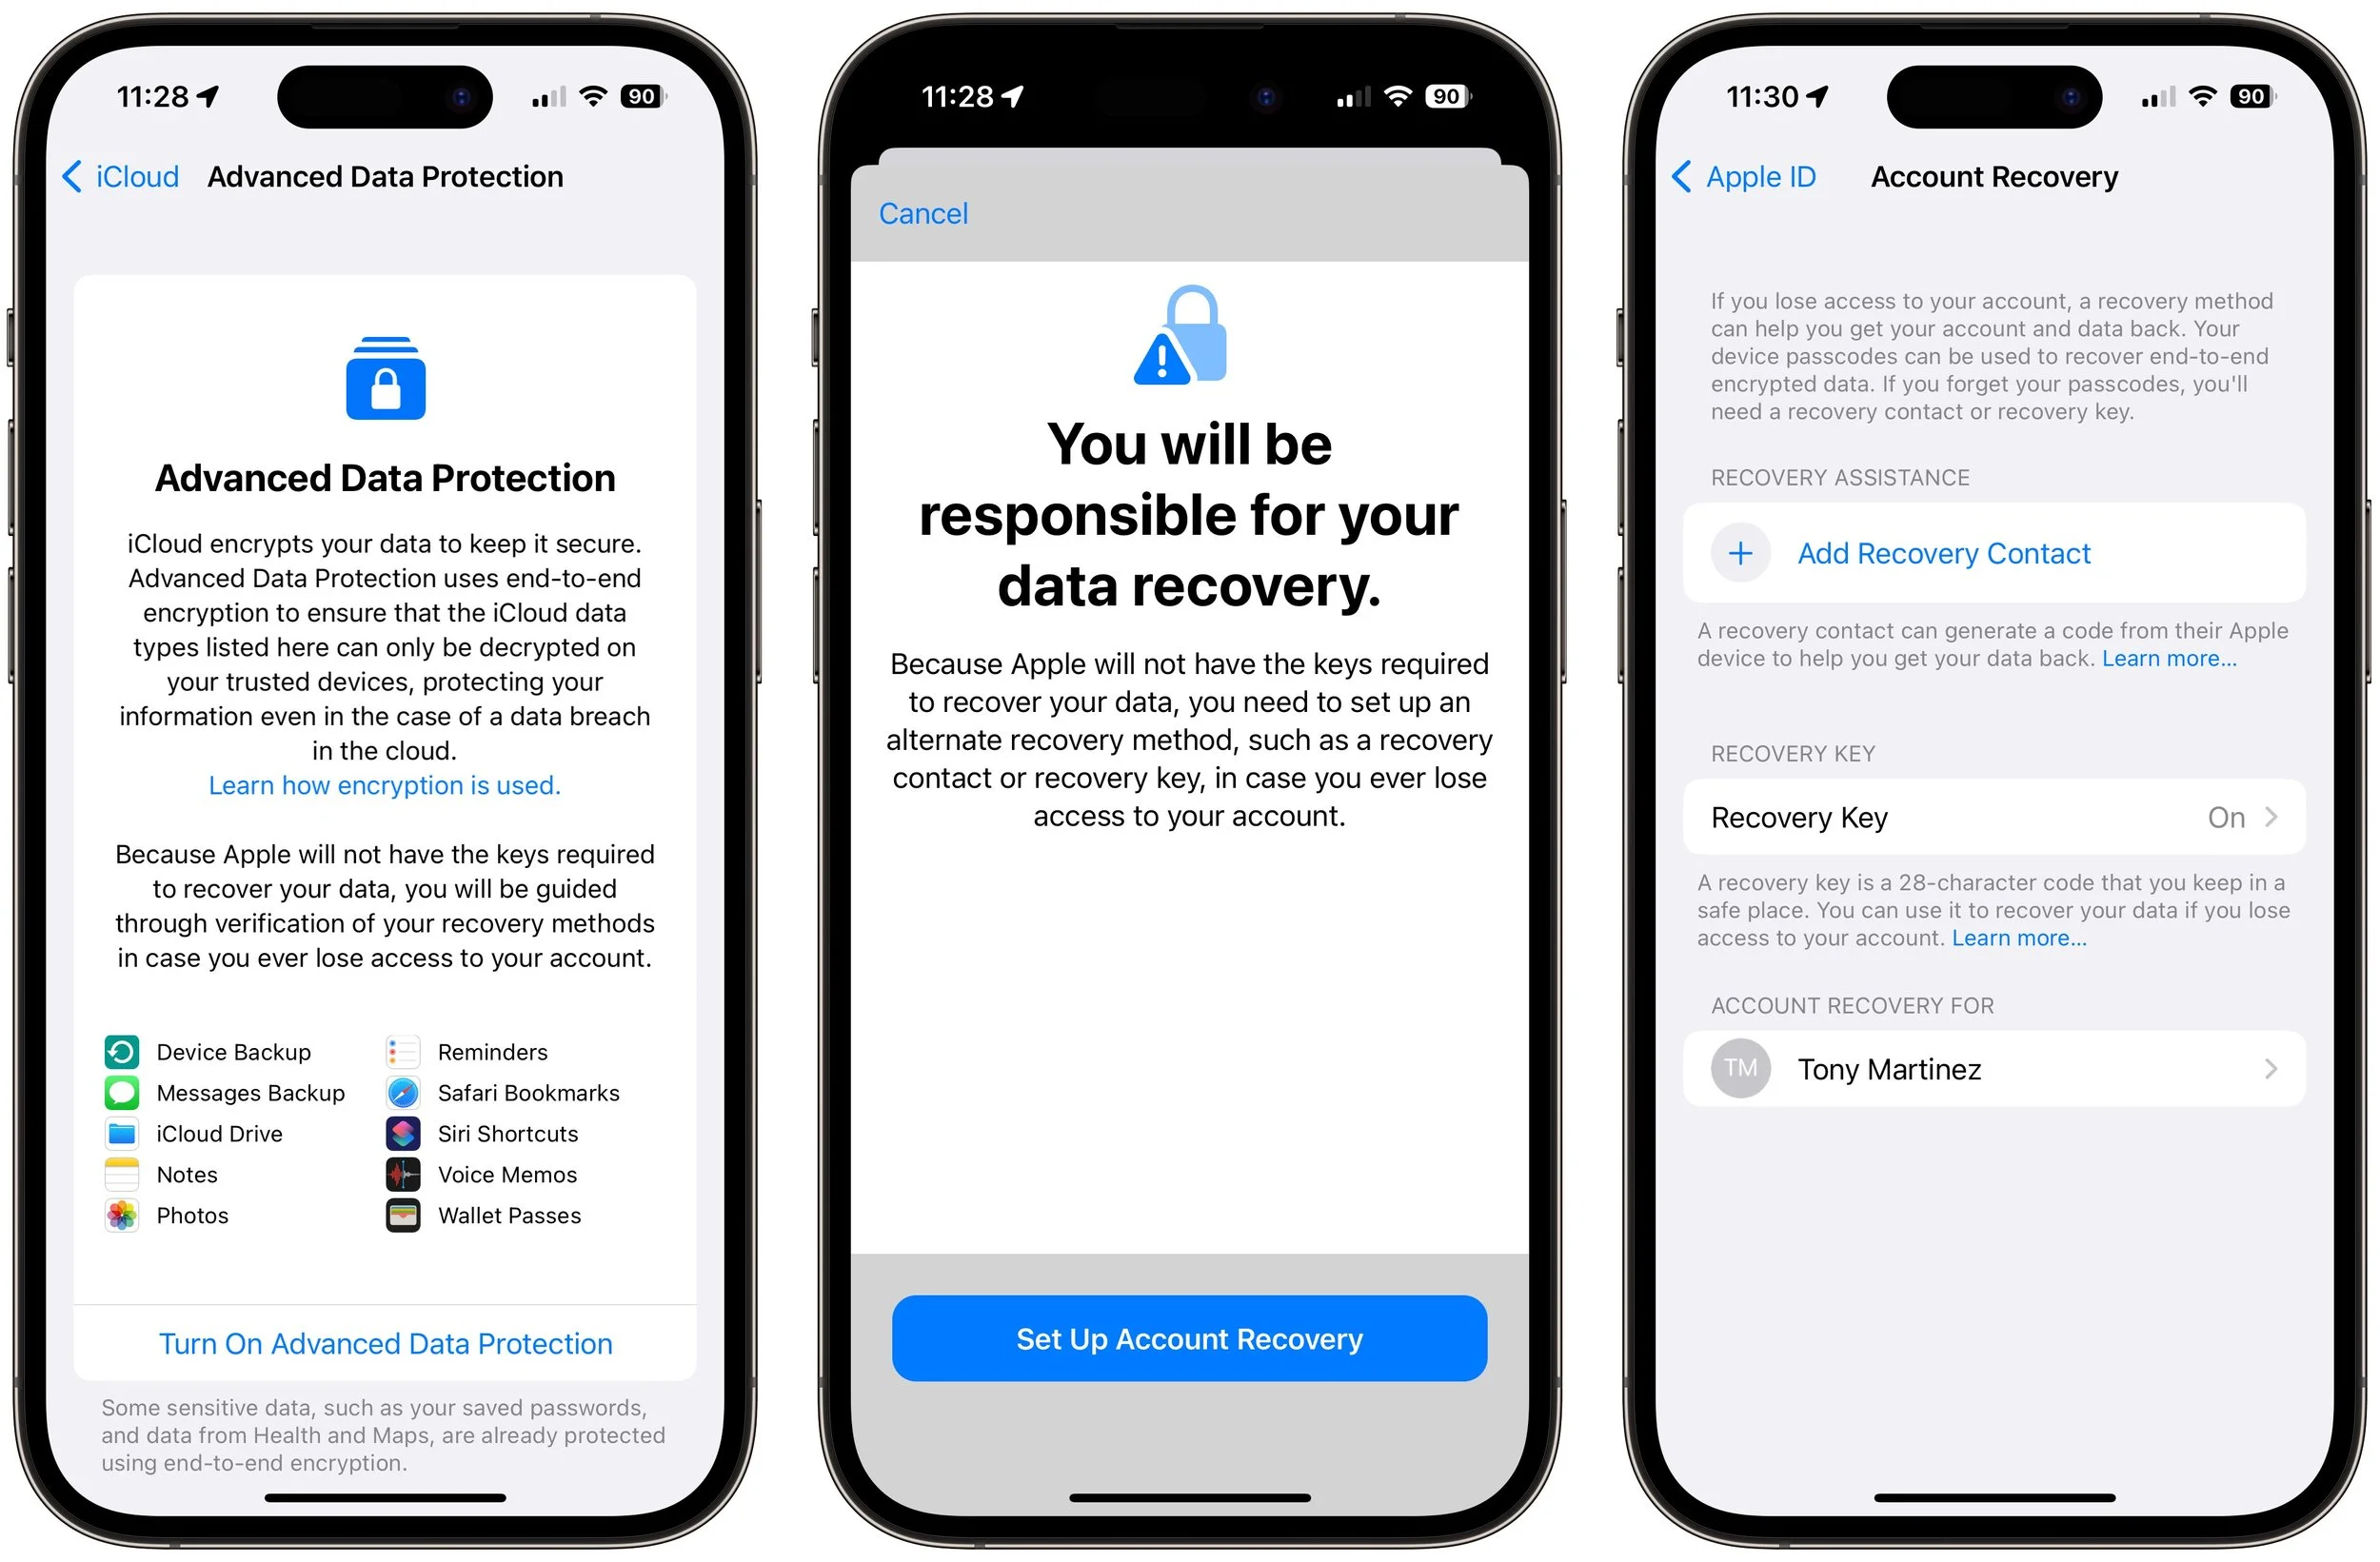
So that’s the tradeoff. Advanced Data Protection increases security by extending end-to-end encryption to 9 of the remaining 12 iCloud data types. Those include iCloud Backup, iCloud Drive, Photos, Notes, Reminders, Safari Bookmarks, Siri Shortcuts, Voice Memos, and Wallet passes. But if you turn on Advanced Data Protection and forget your password, Apple won’t be able to help you recover your data.
Apple isn’t being cavalier about this risk. When you enable Advanced Data Protection, you must set up an alternate recovery method, preferably two. The simplest is a printed recovery key that you should store with other important papers, perhaps in a safe deposit box, and the other is an account recovery contact, a trusted person who can verify your identity and help you regain access to your account.
Nor is Advanced Data Protection a one-way street. If you ever decide the risk of forgetting your password is too great, you can always turn it off and fall back to iCloud’s standard data protection.
Several types of iCloud data remain under the standard iCloud protection even after you turn on Advanced Data Protection. For iCloud Mail, Contacts, and Calendars, the need to interoperate with external email, contacts, and calendar systems requires that Apple manage the encryption keys. Similarly, the collaboration capabilities of Pages, Numbers, and Keynote and the Shared Albums feature of Photos don’t support Advanced Data Protection. Also, although Advanced Data Protection can protect shared notes, reminders, and iCloud Drive folders, plus iCloud Shared Photo Library, that’s true only if everyone involved in sharing has Advanced Data Protection turned on. If not, the shared content falls back to standard iCloud protection.
There are also two notable downsides to turning on Advanced Data Protection:
System requirements: All devices signed in with your Apple ID must be up-dated to at least iOS 16.2, iPadOS 16.2, macOS 13.1, tvOS 16.2, watchOS 9.2, or the latest version of iCloud for Windows. As a result, you’ll have to sign out of iCloud on any device too old to upgrade to the necessary operating system version. That may be a deal-breaker for some people. You must also have two-factor authentication enabled for your Apple ID and a password or passcode set on your devices, but everyone should already have done that, regardless of Advanced Data Protection.
iCloud.com Web access: Turning on Advanced Data Protection automatically disables Web access to data at iCloud.com. You can re-enable Web access, but every subsequent visit to iCloud.com requires authorization from a trusted device, and the connection only lasts for an hour. If you make heavy use of iCloud.com, Advanced Data Protection may be burdensome.
So, should you use Advanced Data Protection? As long as all your devices support it, you’re not perturbed about the repeated iCloud.com authorizations, and you’re capable of maintaining both account recovery methods, go ahead. Although the benefit to most people isn’t huge—Apple’s security is excellent, and most people won’t be targeted by law enforcement—the downside is minimal as long as you understand the risk of Apple not being able to recover your account.
To enable the feature, navigate to Settings > Your Name > iCloud > Advanced Data Protection, tap Turn On Advanced Data Protection, and follow the prompts. Remember that you’ll need to set up the Account Recovery options before turning on Advanced Data Protection, and you may need to remove older devices from your iCloud account.
(Featured image by iStock.com/TU IS)