What to Do If Your iPhone Takes a Plunge
Although iPhones can usually withstand some exposure to water and other liquids with no ill effects, follow our advice if yours suffers a spill or takes a dip.

No one intends to drop their iPhone in a pool or fall off a boat with their iPhone in a pocket. But accidents happen. Happily, Apple has designed the iPhone with significant levels of splash and water resistance, so brief exposure to rain or even a quick dunk might not cause any problems. If your iPhone does get wet, follow our advice below to dry it out before calling for more help.
How Waterproof Is Your Phone?
First, you’ll want to understand what you should worry about, which boils down to your phone’s IP rating and its age. All iPhones have an IP—Ingress Protection—rating that specifies what they should be able to handle when new. Current and recent iPhone models are rated at IP68, with the older iPhone 7, 8, XR, and second-generation SE models rated at IP67. The first digit specifies the protection against solid objects like dust, and the second against water. A rating of 6 for the first digit means the device is dust-tight—no dust can get in. For the second digit:
7 means the device is protected against the effects of temporary immersion in water under standardized conditions of time and pressure.
8 means the device is protected against the effects of continuous immersion in water. The conditions under which this rating is awarded are specified by the manufacturer but must be more severe than rating 7.
Apple has been improving the water resistance of iPhones. The iPhone 11, XS, and XS Max are designed to withstand immersion at a maximum depth of 2 meters for up to 30 minutes. The iPhone 11 Pro and 11 Pro Max increase the depth to 4 meters, and every newer model can handle the increased pressure of up to 6 meters. In other words, all should be able to survive a brief dip.
Don’t get complacent about that old iPhone XS, though. Water resistance isn’t a permanent condition. It depends on tight seals and gaskets that are weakened by age, drops, disassembly, extreme hot or cold temperatures, and exposure to chemicals (like insect repellent and sunscreen). The older your iPhone is, the less likely it is to meet the criteria of its IP rating.
Dealing with Splashes, Spills, and Submersion
Enough theory! What should you do if your iPhone gets wet? It depends on how wet it got. For instance, if you have to use your iPhone in the rain, it’s difficult to keep raindrops off the screen and case. They shouldn’t pose a problem; just dry the iPhone off with a cloth. However, if you accidentally tip over your coffee on your iPhone, first rinse the affected area with tap water. Then dry it off with a cloth. In both cases, we recommend not plugging in a Lightning cable until it’s had more time to dry out.
More concerning is when your iPhone takes a plunge. Despite the IP rating suggesting it can withstand up to 30 minutes of immersion, try to get it out of the water as quickly as possible. Then there are some dos and don’ts.
Do:
Do turn it off immediately with the power slider that appears when you hold the side button and either volume button (Face ID iPhones) or the side button (Touch ID iPhones).
Do rinse it under tap water if you dropped it in a muddy puddle (dirt and other contaminants), the ocean (salt water), a swimming pool (chlorinated water), or a toilet (ick)—basically anything other than clean, fresh water.
Do dry the exterior with a soft cloth.
Do remove excess liquid by tapping it gently against your hand with the Lightning port and speaker facing down.
Do open the SIM tray and leave the iPhone in a dry area with airflow. If possible, direct a fan at the openings.
Do leave it turned off and let it dry for at least 5 hours and up to 24 hours.
Don’t:
Don’t attempt to dry the iPhone with a hair dryer, any heat source, or compressed air.
Don’t insert anything like a cotton swab or tissue into the Lightning connector or SIM tray. Let any water inside evaporate.
Don’t connect a charging cable or any other cable until the iPhone is completely dry. Recent iPhones will warn if they detect water in the Lightning port. If you see that warning, Apple recommends waiting at least 30 minutes and up to 24 hours before trying again. (Wireless charging should be fine, but seriously, just leave the iPhone alone to dry.)

Bonus Techniques
There are two additional techniques you can try, one to remove water in general and another to clear water from the iPhone’s speaker.
First, the classic advice for a water-damaged electronic device is to bury it in a container of uncooked rice for a day or two. The idea is that the rice absorbs the moisture in its vicinity, pulling it out of the iPhone. It can work, but Apple recommends against it because of the likelihood of getting tiny bits of rice in the Lightning port. If you want to use rice, wrap the iPhone loosely in a paper towel first to protect its ports.
A better approach is to use a sealed plastic bag containing silica gel desiccant packets like those in vitamin bottles. They’re inexpensive and readily available, and you can even get ones that you can recharge in a microwave or oven. But of course, you have to have them on hand, or it’s back to the rice.
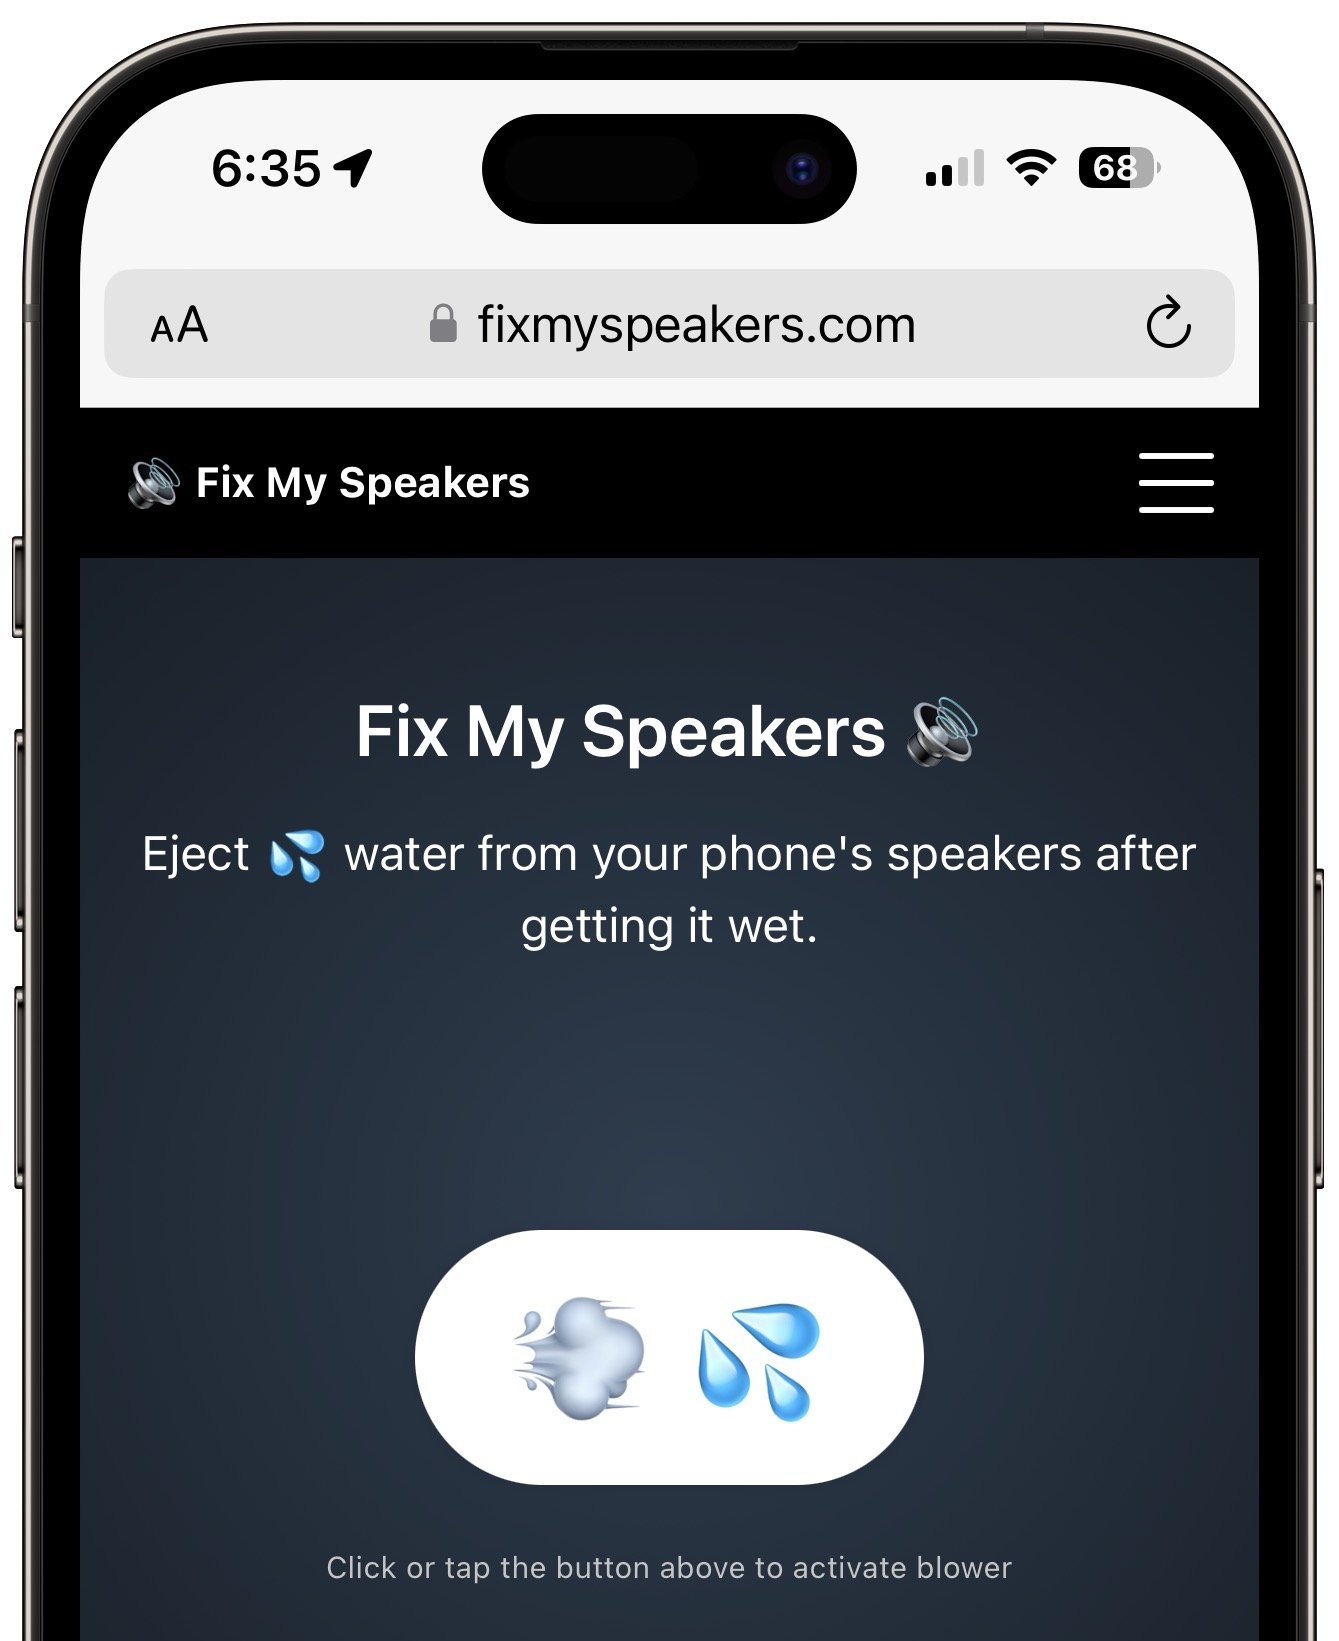
Second, if your iPhone’s speaker sounds muffled, some people suggest using an Apple Watch-like trick of playing a particular sound to eject water. Visit FixMySpeakers and tap the button. This is clever and shouldn’t hurt anything, but if there’s water in the speakers, there’s probably water elsewhere, and it might be safer to turn the iPhone off quickly and let it dry naturally—as I recommend above.
One last piece of advice: Apple doesn’t claim any sort of water resistance for iPads or MacBooks. If one of them gets wet, you can try following the advice above—it shouldn’t hurt anything—but it’s more likely that a repair is in your future.
(Featured image by iStock.com/Evgen_Prozhyrko)
Integrate Your Cloud Storage Service into the Finder
Do you struggle with clunky Web interfaces to cloud storage services like Box, Dropbox, Google Drive, and OneDrive? They’re easier to use when you install their Mac apps and access your files from the Finder. Learn how to get more from these services!

Many businesses, schools, and other organizations have adopted cloud storage services like Box, Dropbox, Google Drive, and Microsoft OneDrive for excellent reasons. Cloud storage provides a centralized spot for shared data without the up-front cost or maintenance issues of a network-attached storage device. It also allows individuals to access the same files on multiple devices and significantly enhances collaboration by allowing multiple people to work on the same file.
All cloud storage services provide a simple Web-based interface that’s the least common denominator. The Web interfaces look and work the same for everyone, regardless of platform. Unfortunately, they’re clumsier—sometimes much more so— than working with the same files in the Mac’s Finder.
Luckily, cloud storage services also provide deep integration with the Finder. If you haven’t already installed your cloud storage service’s Mac app, we strongly encour-age you to do so. Here are links for the big four; others will likely provide similar apps.
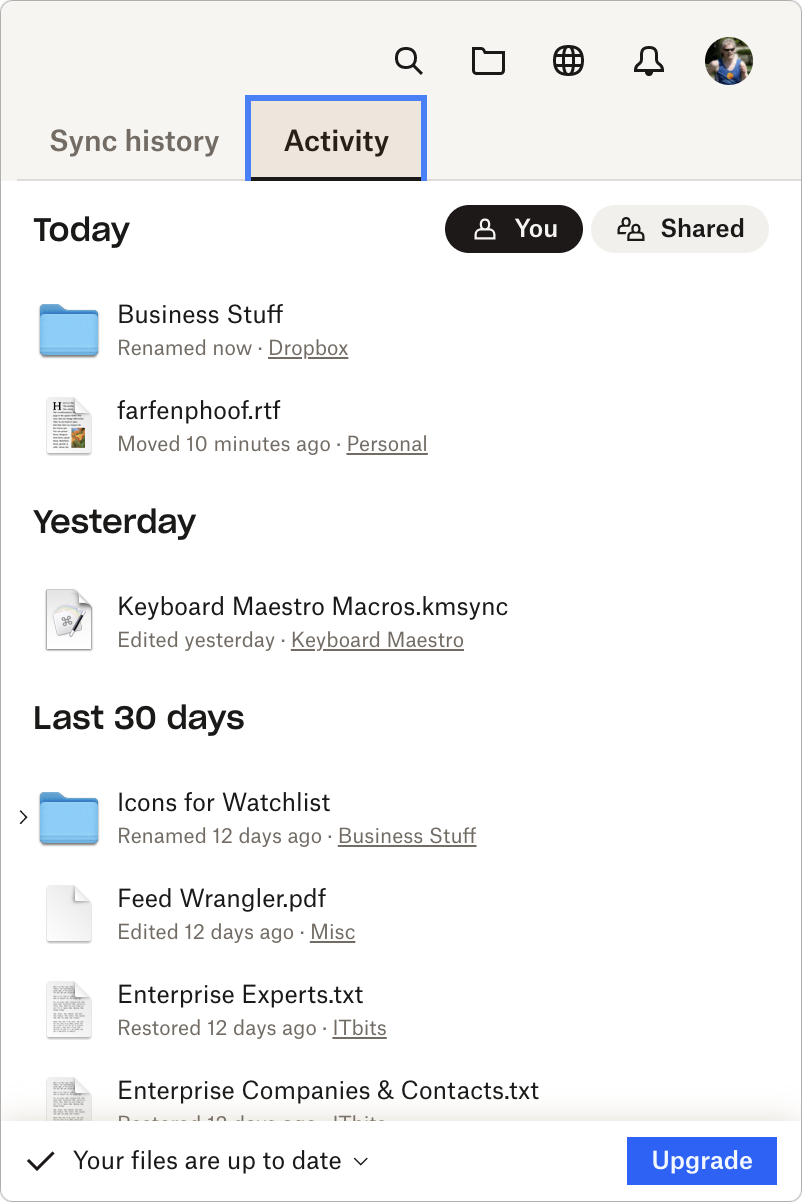
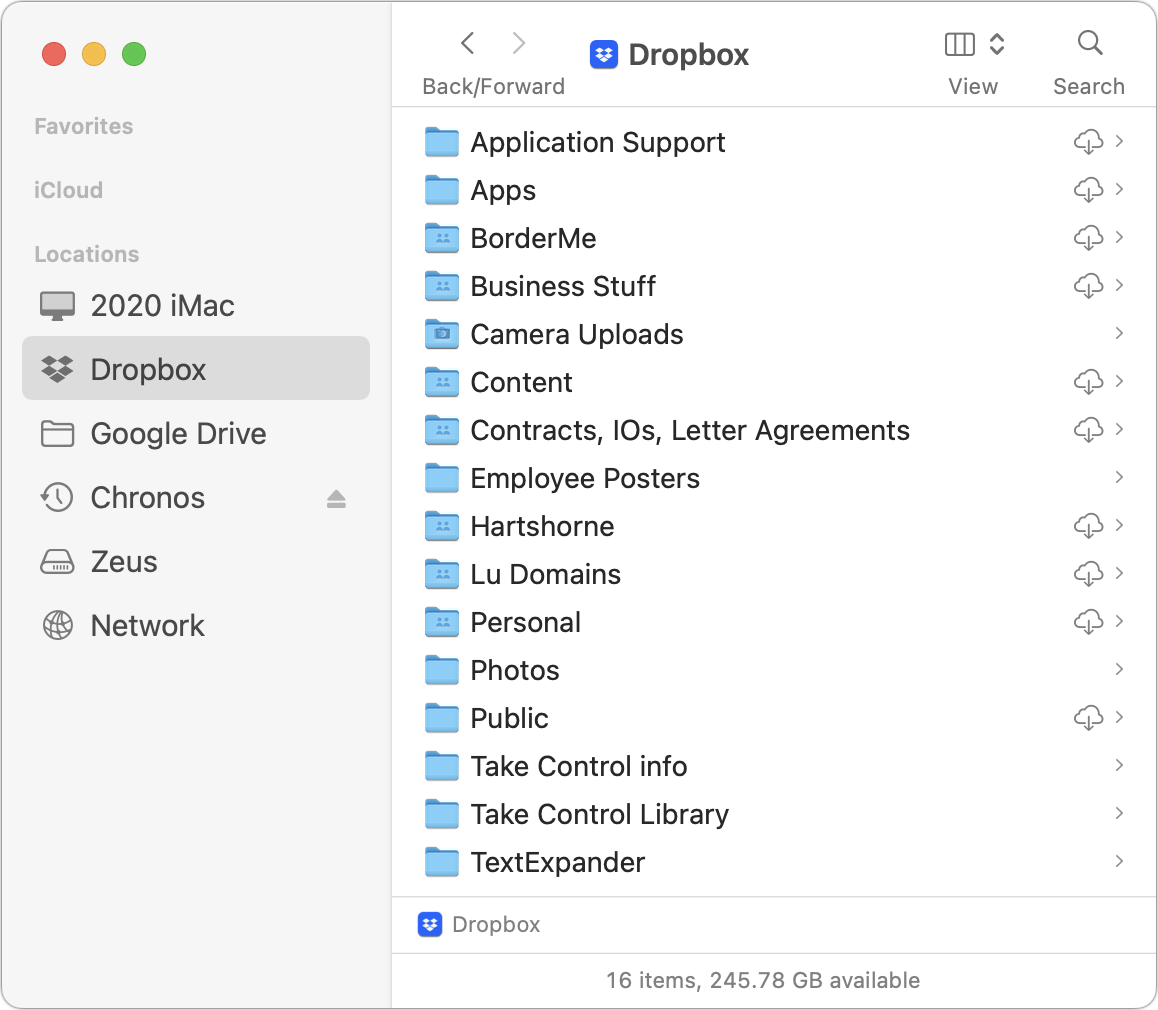
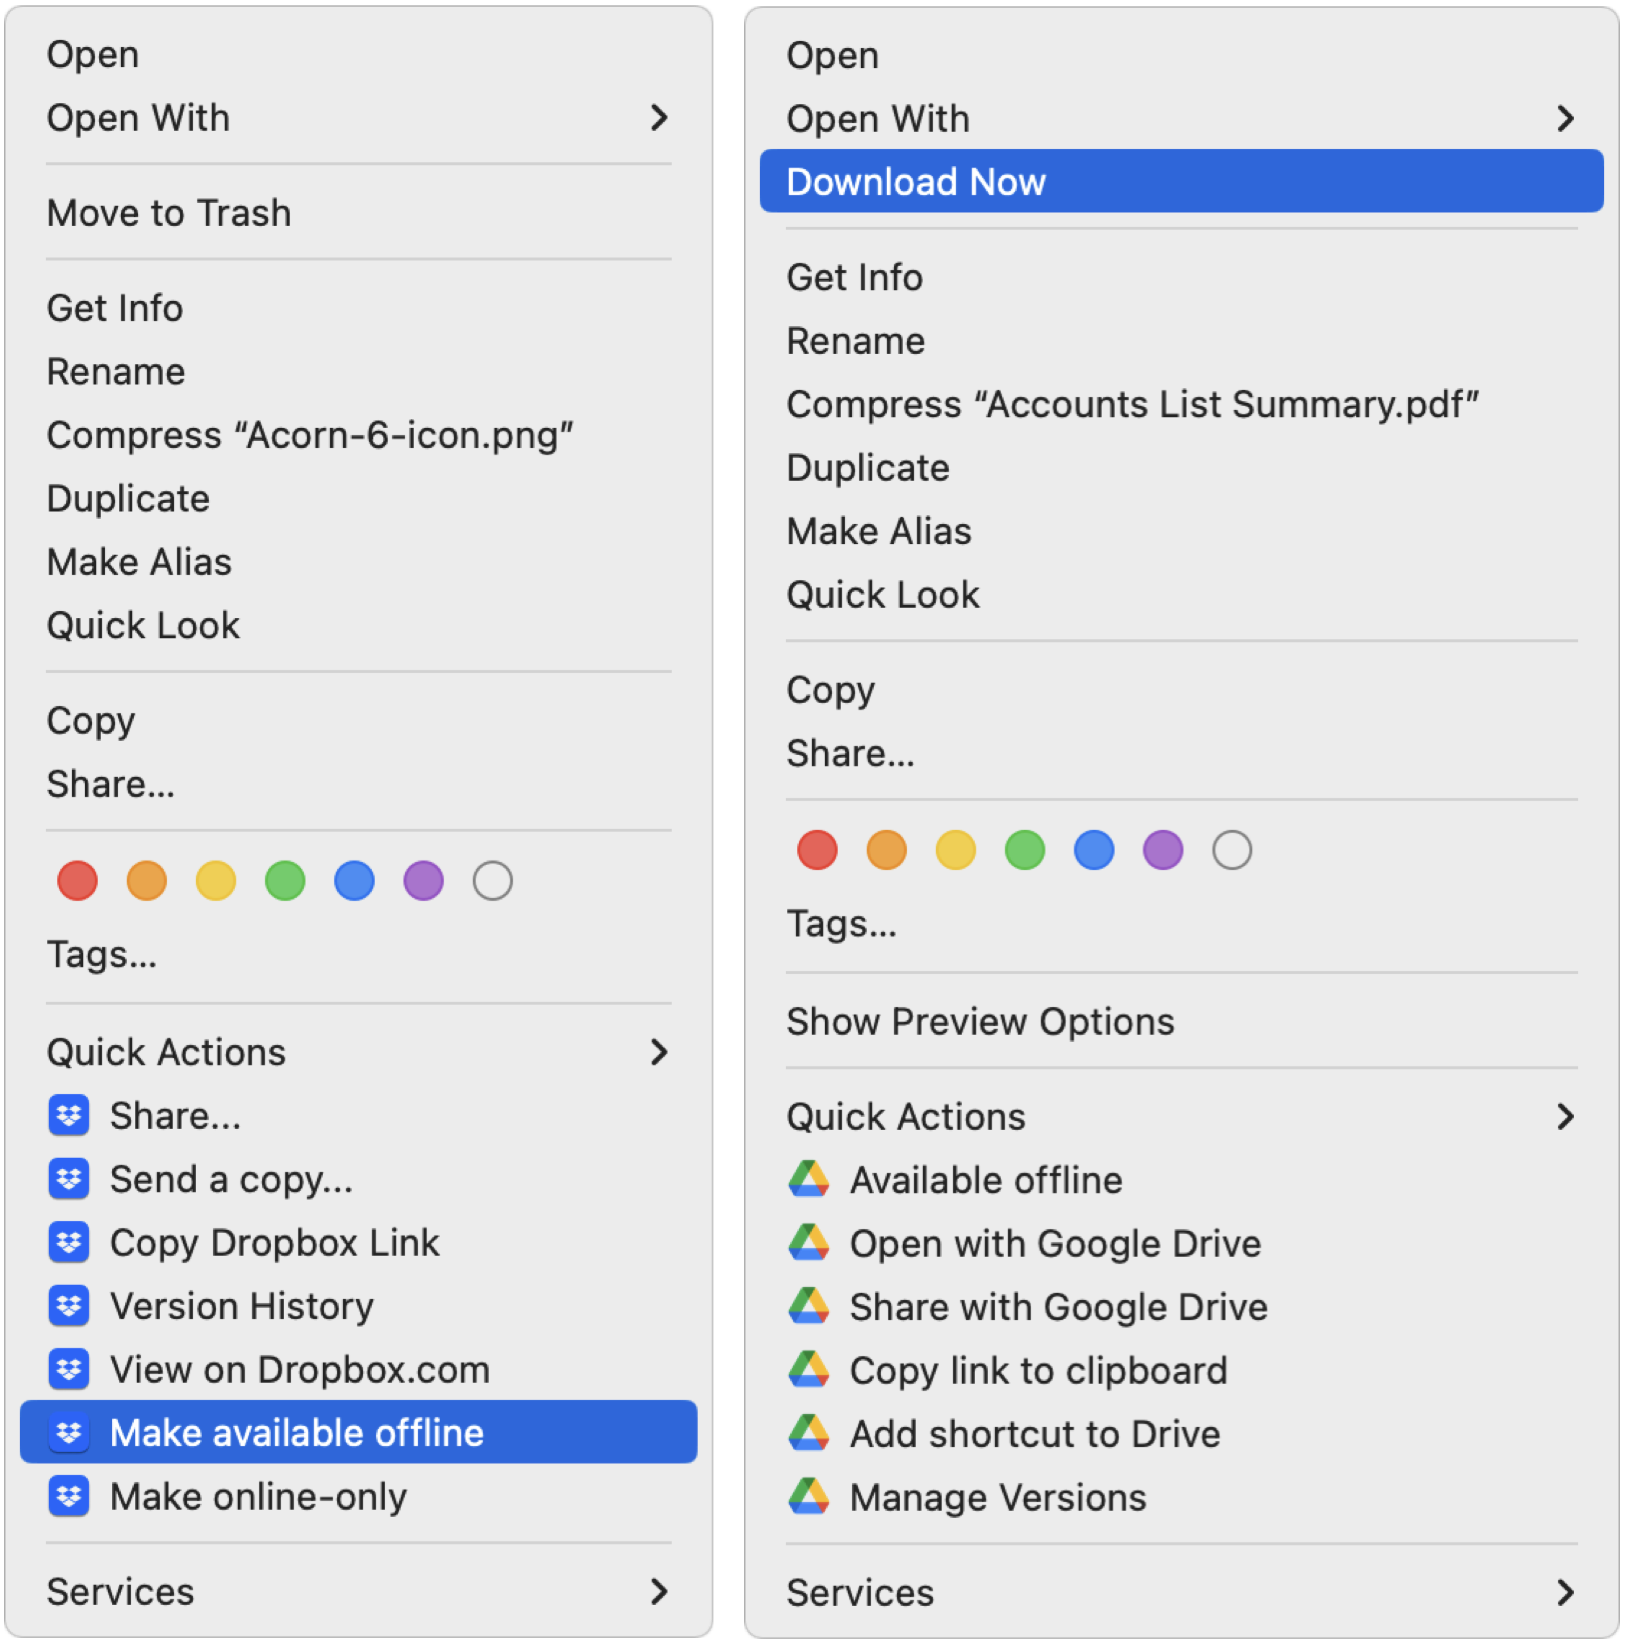
Once the software is installed, you’ll find an item in the Locations portion of your Finder window sidebar that provides access to everything in your cloud storage, as though it were on an external hard drive connected to your Mac. You can quickly rename files, add folders, move files between folders, and perform other basic Finder tasks. The services also install menu bar items you can click to access settings, activity, and other controls (Dropbox shown below).
Cloud storage is not the same as an external hard drive, of course, so you need to keep certain facts in mind when using cloud-based data in the Finder. Some of this information has changed within the last few months, as cloud storage providers have migrated from Apple-deprecated custom kernel extensions to Apple’s recommended File Provider extension. (The migration is still underway for Dropbox users.) Here are the most important things to know.
Data May or May Not Be Stored on Your Mac’s Drive
When integrating a cloud storage service into the Finder, it’s reasonable to ask where the data is actually stored. The short answer is that it’s always stored online, but it might also be stored on your Mac. All cloud-based files are either online-only, at which point all you see is a placeholder icon on your Mac, or offline, which means a copy of the files exists on your Mac. Online-only files and folders have a little cloud icon next to their names in the Finder; offline files lack that icon.
When you double-click an online-only file, the service’s Mac software downloads it in the background so it can open in the appropriate app. You shouldn’t notice a delay with small files, although it may become more noticeable with very large files or over slow Internet connections. And, of course, if you’re on an airplane or somewhere without connectivity, you can’t open online-only files at all. On the plus side, they don’t take up any space on your Mac’s drive until you open them.
You can control which files and folders are online-only and which are offline. Control-click the file or folder and look for commands like Download Now or Make Available Offline to bring its contents down to your Mac, or use commands like Remove Download or Make Online-Only to remove the download to save space.
All Your Files Live In ~/Library/CloudStorage
So where are the offline copies of cloud-based files stored on your Mac? It may seem like they’re on a drive of their own, but in reality, they’re stored in your home folder’s hidden Library folder, in a folder called CloudStorage. (To see the Library folder, open the Finder’s Go menu and press Option.) You never have to go there directly, but it can be useful to keep in mind when setting up backups, moving data between Macs, and more.
Only OneDrive Supports External Drives
There is an important caveat to the requirement that all cloud-based files live in ~/Library/CloudStorage. That folder lives on your Mac’s internal drive, which may not have sufficient space to store offline copies of all your cloud-based data. Before the switch to Apple’s File Provider extension, the cloud storage services let you store the offline copies of your files on an external hard drive. That’s no longer possible with Box, Dropbox, and Google Drive. Microsoft OneDrive has worked around this limitation, allowing you to specify an external drive as your cache to maintain a copy of offline data separately from the state of the items in the CloudStorage folder. (If you manage terabytes of offline files, particularly for audio or video editing work, check out the completely different LucidLink service.)
Dragging Files Moves Rather than Copies
When you work with an external hard drive or network drive, dragging a file from your Mac’s internal drive to one of those copies it because it’s going to a different volume. Although the cloud storage services seem to be separate volumes (some were in the past), they no longer act that way. That’s because all the data lives in the CloudStorage folder on your internal drive, so dragging a file out of Google Drive, say, moves it, just as though you dragged a file from one folder on your internal drive to another. It’s not a problem—and the services warn you about it—but keep it in mind.
Moved or Trashed Files Remain Available Online, at Least Temporarily
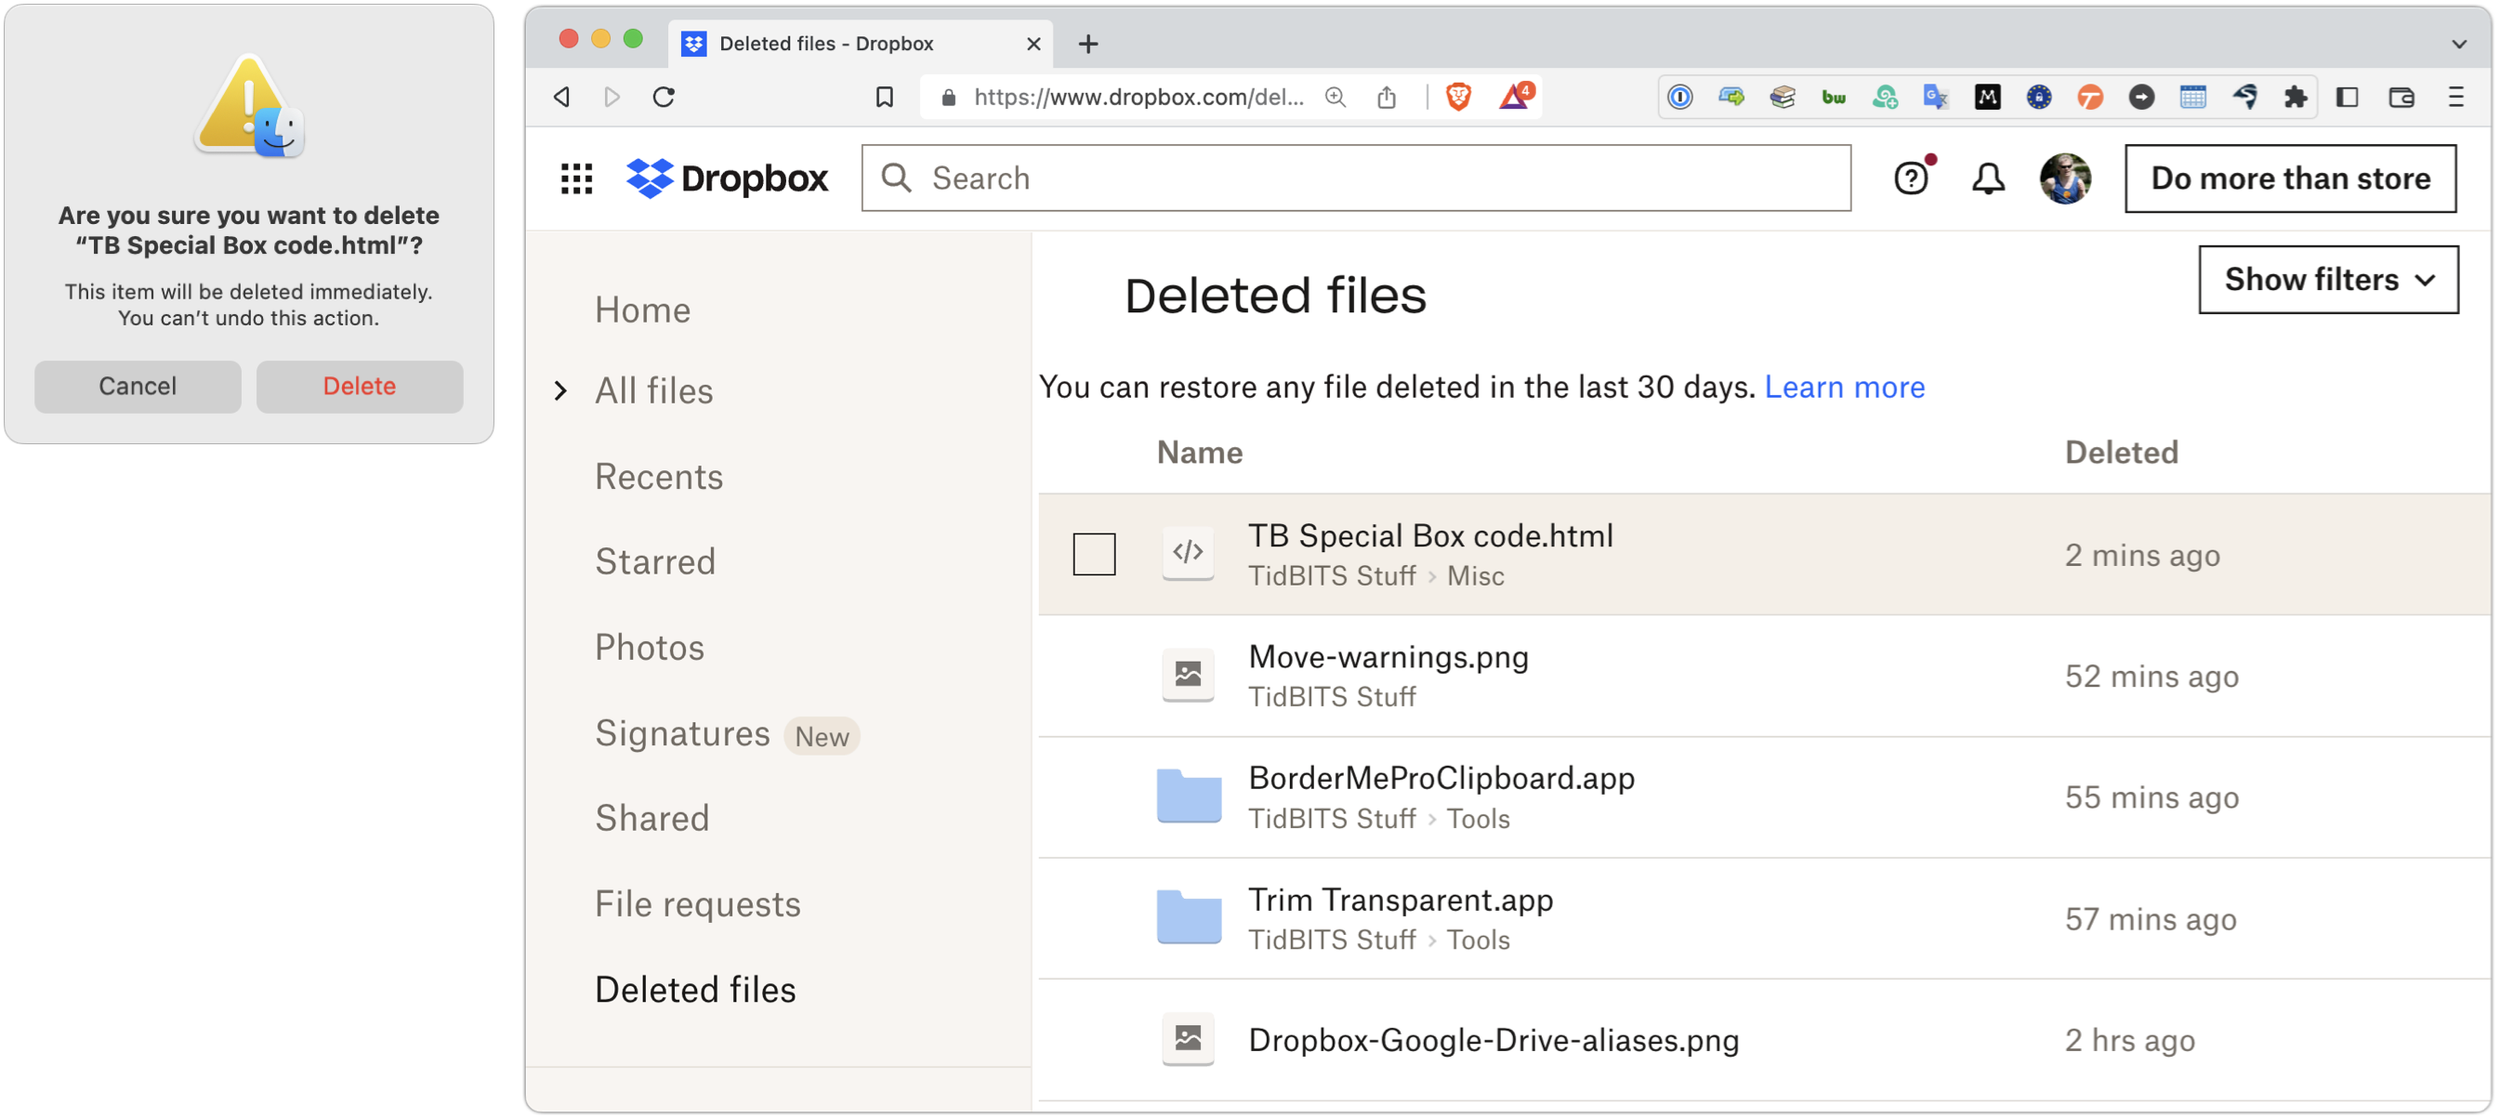
What happens to the online version of a file when you move it from the cloud storage service on your Mac to another location on your Mac’s internal drive? Good question, and the answer is that it ends up in the trash equivalent on the service’s website. Cloud storage services generally retain such files for some time—30 days is common—after which they go away for good.

When you delete a cloud-based file in the Finder, the same thing happens: it ends up in the service’s online trash equivalent. However, what happens on your Mac varies by service, so testing with a sacrificial file is worthwhile. For example, if you delete an offline file in Dropbox, it moves to the Mac’s Trash. However, if you delete an online-only file, Dropbox warns you that it will be deleted immediately, and it disappears instantly from the Mac rather than moving to the Trash. You can still find it in Dropbox’s Deleted Files folder on the Dropbox website. In contrast, deleting either type of file from Google Drive moves it to the Mac’s Trash (and puts it in Google Drive’s online Trash folder).
Sharing Files and Paths with Colleagues
All the cloud storage services let you Control-click a file and copy a link. When a coworker clicks that link, it will open in the cloud storage service’s Web interface or possibly in an online version of the app that created it. That may be fine, but our experience is that they won’t be able to find the file again in the future.
To help colleagues learn where files are in a shared cloud-based folder structure, send them the path to the file—the full list of folders containing the file. The trick for getting it is to select the file in the Finder, Option-click the Edit menu, and choose Copy “MyFile” as Pathname.
The start of the path is specific to your Mac, so delete that and leave the rest. For instance, when you paste the path, if you get this:
/Users/foobar/Library/CloudStorage/GoogleDrive-foobar@example.com/My Drive/GroupShared/Buzz/Posts/Buzz-0004.pdf
Trim it as follows to clarify that the file is in the Posts folder, which is in the Buzz folder, and that’s in a top-level folder called GroupShared:
/GroupShared/Buzz/Posts/Buzz-0004.pdf
Searches May Work Poorly for Online-Only Content
The split between online-only and offline files also affects how Spotlight and other content-based searches work. As you would imagine, if a file is online-only, there’s no way Spotlight can index its content, so Spotlight won’t be able to find such files based on content searches. Some of the cloud storage services offer content-based searches, so with Google Drive, for instance, if you initiate a search from its Web interface, it will find all files containing the search terms even when they’re set to online-only on your Mac.
Filename searches in Finder windows should work regardless of online-only/offline state, although we’ve experienced problems when trying to limit the scope within the service’s Mac folder—search the This Mac scope for the best results. (Click the This Mac button after starting the search if necessary.) You may also have good luck with third-party search utilities like EasyFind and Find Any File.

Backups Work Only for Offline Content
Finally, remember that Mac backup systems like Time Machine and Backblaze cannot back up online-only files because they don’t actually exist on your drive. At best, such backup apps will show the placeholder for the file but won’t back up its content. They work fine for offline files, of course, but if you have to find a particular file or folder when restoring, remember that backup apps other than Time Machine will probably see it as stored in ~/Library/CloudStorage.
Should you care if your cloud-based files are backed up locally? Cloud storage systems automatically protect data against drive failure or other problems in the cloud. Plus, any shared data that one of your collaborators deletes from their Mac—inadvertently or maliciously—should be maintained in that person’s online trash, even if it seems to disappear.
However, we’d argue that it’s all too easy to lose or corrupt cloud-based data such that you want a local backup. We’ve seen too many situations where cloud-based files went missing or had problems. In those cases, a local backup provided an essential fallback or welcome peace of mind.
To ensure that your cloud-based files are backed up alongside your other files, you must make sure they’re stored offline long enough to get into your backups. Select top-level folders, make them offline, and wait until everything has downloaded and been backed up. If you need the space back, you can return some folders to being online-only. Pay attention to new files added by other devices or people since they may be online-only by default and thus fail to be included in your backups.
For backup of an organizational cloud storage account, it might make more sense to use a service like Backupify, CloudAlly, or CubeBackup, or to rely on something like a Synology NAS device with Cloud Sync. But that’s a topic for another day or another discussion—get in touch to learn more.
(Featured image by iStock.com/Galeanu Mihai)
ChatGPT and Generative AI Will Be an Increasingly Large Part of Our Future
Have you heard of the ChatGPT chatbot? It responds in fluent English to questions and prompts of all sorts, but you must always remember its limitations—like a tendency to make stuff up. Nevertheless, the AI genie is out of the bottle.

Have you heard of ChatGPT? It’s likely—the service was launched in November 2022 and gathered 1 million users in the first week. It now has over 100 million users. However, many people are still unaware of it. If you haven’t heard of ChatGPT—or have heard of it but are unclear on what it is or what effect it and similar AI services might have on the world—read on.
ChatGPT is an AI-powered chatbot designed to mimic a human conversationalist. Its goal is to make communicating with computers more natural. Type anything into ChatGPT, and it will respond in clearly written English. You can also ask it to write things for you, like email responses or school essays, and it can generate text in a wide variety of styles, generating fairy tales, poetry, and even computer code. Unlike most chatbots, ChatGPT remembers what you’ve said and considers that context in its replies.
One way to think of ChatGPT is as a sort of search engine like Google or Microsoft’s Bing. There are three huge differences, however. First, ChatGPT answers your queries directly, rather than presenting you with a list of websites that contain information about your query. Second, although it sounds confident, ChatGPT often gets facts wrong. Third, if you ask ChatGPT the same question twice, you might not get precisely the same answer—there’s an element of randomness in its responses.
How could this be? ChatGPT is what’s called a “large language model,” a neural network that trains itself on extremely large quantities of text—reportedly 300 billion words from 570 GB of datasets. That means ChatGPT doesn’t “know” anything. Instead, it looks at a prompt and generates a response based on the probability that one word follows another. In some ways, it’s the ultimate form of auto-complete. Ask ChatGPT to write a fairy tale, and it will start “Once upon a time” because in its training data, text that matches the prompt of “fairy tale” very likely begins with those words. That’s also the source of its mistakes—just because words occur near one another says nothing about their relationship.
It’s difficult to avoid anthropomorphizing ChatGPT and similar AI-driven chatbots that are flooding the market. Their answers sound utterly convincing, but again, they don’t “know” anything. Despite AI being short for “artificial intelligence,” they don’t think (whatever that might mean). They have no agenda and aren’t trying to convince or mislead.
Rather than think of an AI as a person on the other side of the screen, it’s essential to realize its limitations, a few of which include the following:
AI-generated text tends to use generalities without much supporting detail, at least without further prompting. Non-experts may not notice, but experts often cringe when they read AI-generated text.
When details are present, there’s no guarantee that they’re correct. They could be slightly off or ludicrously wrong, so you must double-check everything before assuming it’s true.
If the desired information isn’t in the training set or is only weakly included, conversations about it can get weird. Notably, ChatGPT’s training data is from before 2021, so it can’t converse about anything more recent than that. Plus, it can completely fabricate answers. (When asked about American marathoner Keira D’Amato, ChatGPT stated that she held the world record for the mile while balancing a fruit basket on her head, which has no basis in reality.)

When prompts contain words that have multiple meanings, like break, run, and set, AI chatbots can return nonsensical results that confuse the different meanings.
Although the programmers behind AI chatbots try to head off requests aimed at producing obviously racist, sexist, or otherwise offensive responses, the training data includes all sorts of biased and even hateful text. As a result, AI chatbots can say things that are either explicitly or implicitly problematic.
Despite these very real concerns, the AI genie is out of the bottle. The two highest-profile announcements have come from Microsoft and Google. Microsoft has invested in ChatGPT-maker OpenAI and integrated the technology behind ChatGPT into a new version of its Bing search engine (available only in the Microsoft Edge browser for now), whereas Google, which pioneered the technology underpinning ChatGPT, has now released its own AI chatbot, Bard.
Those are just the tip of the iceberg. We’ve also seen AI appearing in products that can help write code, summarize meeting notes, polish email messages, and even create unlimited text adventure games. CARROT Weather, the famously snarky iPhone weather app, has even integrated ChatGPT and tuned it to respond with attitude.
It’s early days, but many people have already found good uses for ChatGPT. For instance:
If you’re faced with writing a difficult email, consider asking ChatGPT to draft it for you. It likely won’t be perfect, but you might get some text that you can tweak to make it better serve your needs. In fact, for many forms of writing, ChatGPT can both give you a draft to start from and suggest improvements to what you write. This is especially useful for people who struggle with writing in English.
ChatGPT can help generate code. For inexperienced programmers, it’s a good start, and for long-time coders, ChatGPT can save typing and debugging time. We tried asking it to write an AppleScript that would create a sequentially numbered calendar event every Monday, and although it didn’t work on the first try, after telling it about the errors generated by the code, it arrived at a functional script.
We know people who enjoy composing doggerel for birthday cards. If you’d like to do that but can’t come up with the words or rhymes, ask ChatGPT. For instance, try asking it to write a “roses are red” poem on a particular topic. Or ask it for a country music song— but don’t buy a ticket to Nashville.
Need to come up with a clever name for a project or event? Ask ChatGPT to give you ideas that are three or four words long and include certain concepts. Keep asking it to refine or nudge it in new directions. It may not generate exactly what you want, but it will give you lots of ideas to combine on your own.
If you’re editing some confusingly written text, you can ask ChatGPT to simplify the language in the paragraph. Again, it may not be perfect, but it might point you in a useful direction.
What all these examples have in common is that they use ChatGPT as a tool, not as a replacement for a person. It’s at its best when it’s helping you to improve what you already do. For instance, it won’t replace a programmer, but it can help get you started with simple scripts. The hard part is learning how to prompt it to output the results you want, but remember, it’s not a person, so you can keep asking and nudging until you’re happy with the results.
There are many reasons to be skeptical of how AI services are being used, and we recommend using them cautiously. But given the levels of interest from businesses and users alike, it seems that they’re here to stay.
(Featured image by iStock.com/Userba011d64_201)
Is Your Wi-Fi Network a Security Risk?
As more personal and work information passes through Wi-Fi networks, it becomes increasingly important that you follow this advice to secure your network.

With Wi-Fi security, it’s easy to fall into the “out of sight, out of mind” trap. Your Wi-Fi router probably lives in a corner or closet, and of course, Wi-Fi’s radio waves are invisible. But the ease of connecting your devices to your Wi-Fi network means it’s equally as easy for a hacker to connect to your network and eavesdrop on your traffic. Or rather, it’s easy unless you take advantage of the security options available in every Wi-Fi router.
Before looking at those options, let’s discuss the importance of securing your wireless network. The fact is, we all send sensitive data over Wi-Fi and onto the Internet. That data includes passwords, financial information, and personal details, all of which could be used for identity or outright theft. For those who work at home, it may also include important corporate credentials and information. In addition, if your Wi-Fi network is open for everyone and has a bandwidth cap, you could be throttled or incur additional charges due to extra usage from someone using your network without your knowledge. Worse, someone could engage in illegal activity from your network, potentially putting you at legal risk.
Here are six ways you should secure your Wi-Fi network, plus another that’s usually not worth the effort. Exactly how you go about these tasks varies depending on your Wi-Fi router, but they should all be easy to accomplish.
1. Change Your Wi-Fi Router’s Default Password
Every Wi-Fi router has an app- or Web-based administrative interface where you can adjust settings, including security options. The first thing you should do when setting up a new Wi-Fi router is change the password for accessing that admin interface. (And if you didn’t do that when you set up your current Wi-Fi router, go do it now. Immediately. We’ll wait.) The default passwords are well known to hackers, who can use them to take over routers and turn off all the other security settings.
2. Change the Default Network Name (SSID)
Every Wi-Fi network has a name—technically an SSID, or Service Set Identifier. There’s no security benefit in changing it to anything in particular, but you should change it from the default name. That’s because default names often identify the router's manufacturer, such as “Netgear” or “Linksys,” and some routers have known vulnerabilities or password styles that make it easier to break in. Of course, the main advantage of changing the network name is that it makes it easier to pick out from any other nearby networks.
3. Update Your Wi-Fi Router’s Firmware
Wi-Fi router manufacturers frequently fix security vulnerabilities and release new firmware versions. Check to make sure your Wi-Fi router has the latest firmware available, and if there’s an option for it to update its firmware automatically, turn that on.
4. Disable WPS (Wi-Fi Protected Setup) If Possible
When you connect a new device to your Wi-Fi network, you need to enter your Wi-Fi password. That’s entirely reasonable, and Apple devices automatically offer to share that password with your other Apple devices and other people in your Contacts. More generally, a technology called Wi-Fi Protected Setup (WPS) was designed to enable connecting without typing the Wi-Fi password, either by entering an 8-digit PIN or pressing a button on the router. The button is fine—no one can connect without physical access to the router. But the PIN is horribly insecure and can be brute forced with readily available cracking software. If your router supports WPS—not all do, happily—turn it off entirely.
5. Create a Guest Network
You’ll probably want to give visitors access to your Wi-Fi network so they can get to the Internet. The best way to do that is to create a guest network—a feature in nearly all Wi-Fi routers—separate from your main Wi-Fi network. It has a different name and password, and its traffic is isolated from yours, ensuring that even if a hacker were to access it, they wouldn’t be able to eavesdrop on your communications. It can have a simpler password since all it’s protecting is your bandwidth. One additional tip—put “Internet of Things” devices like smart appliances, video game consoles, and the like on your guest network to ensure they don’t provide access to your main network’s traffic if they’re hacked. You probably won’t want to do that with HomeKit devices, which will work better on the same network as your Apple devices.

6. Use Strong WPA2 or WPA3 Encryption
After changing the default admin password, this is the second-most important piece of Wi-Fi security advice. All traffic on a Wi-Fi network can (and should) be encrypted so hackers can’t eavesdrop with impunity. The first wireless security protocol was WEP (Wired Equivalent Privacy), which was commonly used from the late 1990s through 2004. Unfortunately, WEP is so easily broken today that it’s no longer considered secure. If you still use WEP, immediately switch to WPA2 (Wi-Fi Protected Access). There’s also WPA3, which is even more secure but is available only in hardware sold in the last few years.
Don’t Bother Hiding Your SSID
Finally, you may see suggestions that you should hide your Wi-Fi SSID, which prevents nearby devices from displaying it when they list available networks. That might seem like it would improve security, but all it does is prevent the sort of people who aren’t a threat anyway from seeing it. Anyone with the necessary software and skills to break into an unprotected or weakly protected Wi-Fi network can still detect and access a hidden network. They might even be more interested in what’s there, given that the network owner took the trouble to hide it. As long as you follow all the other advice in this article, there’s no benefit in hiding the SSID as well.
Bonus Advice: Use a VPN When on Public Wi-Fi Networks
Ensuring the security of your Wi-Fi network is essential, but what about public Wi-Fi networks in coffee shops, hotels, and airports? Because they’re open to anyone within range, they’re insecure by definition, and anyone on the network could theoretically see any other user’s traffic. Don’t panic. Most Web connections now use HTTPS, which encrypts traffic between you and the destination site (look for https at the start of URLs or a lock icon in the address bar of your Web browser). To ensure that all traffic is protected from prying eyes, use a VPN (Virtual Private Network), which creates an encrypted pipe from your computer to a VPN server elsewhere. Many organizations provide or even require VPN use so that traveling or remote employees can’t inadvertently use unencrypted connections. If your organization doesn’t have a VPN now but would like to set one up, contact us.
(Featured image by iStock.com/CASEZY)
Protect Your iPhone Passcode by Using Face ID or Touch ID
Prompted by a spate of attacks where an iPhone thief obtains the user’s passcode and uses it to lock the user out of their iCloud account, steal their money, and more, we suggest ways you can protect yourself.

This is troubling. Joanna Stern and Nicole Nguyen of the Wall Street Journal have published an article (paywalled) and accompanying video that describes attacks on hundreds of iPhone users in major cities throughout the United States. Some attacks involve drugging people in bars or even violence, but the most avoidable involve the thief or a confederate surreptitiously observing the iPhone user entering their passcode before snatching the iPhone and running.
However it happens, once the thief has a user’s iPhone and passcode, they change the user’s Apple ID password—which is shockingly easy for them to do. With the new password, they disable Find My, making it impossible for the iPhone’s owner to erase it remotely. Then they use Apple Pay to buy things and access passwords stored in iCloud Keychain. They can even look in Photos for pictures of documents containing confidential information, such as credit cards and ID cards. After that, they may transfer money from bank accounts, apply for an Apple Card, and more, all while keeping the user locked out of their account. Of course, they’ll resell the iPhone too. (Apparently, Android users are susceptible to similar attacks, but Android phones have a lower resale value, so they aren’t being targeted as much.) Victims have reported thefts of tens of thousands of dollars, and many of them remain unable to access their Apple accounts.
We fervently hope Apple addresses this vulnerability in iOS 17, if not before. At a minimum, Apple should require users to enter their current Apple ID password before allowing it to be changed, much as the company requires at the Apple ID website. Plus, Apple would ideally do more to protect access to iCloud Keychain passwords from a passcode-wielding iPhone thief. (The closest we have now is a different Screen Time passcode, which can prevent account changes, but it blocks access to so many settings that most people will find it too annoying and turn it off.)
Although the chances of you falling prey to one of these attacks is vanishingly low, particularly if you don’t frequent urban bars or areas that suffer from snatch-and-run thefts, the consequences of a passcode theft are so severe that it’s worth taking steps to deter the malicious use of your passcode. With luck, you’re already doing many of these things, but if not, take some time to re-evaluate your broader security assumptions and behavior.
Pay More Attention to Your iPhone’s Physical Security While in Public
Most importantly, you don’t want to make it easy for a thief to grab your iPhone. Apart from a wrist strap, there’s no reliable way to prevent someone from snatching it from your hand. When you’re not actively using your iPhone, stash it in a secure pocket or purse instead of leaving it out on a bar or table. Many people are blasé about protecting their iPhones, so if you take more precautions, you’re less likely to have problems.
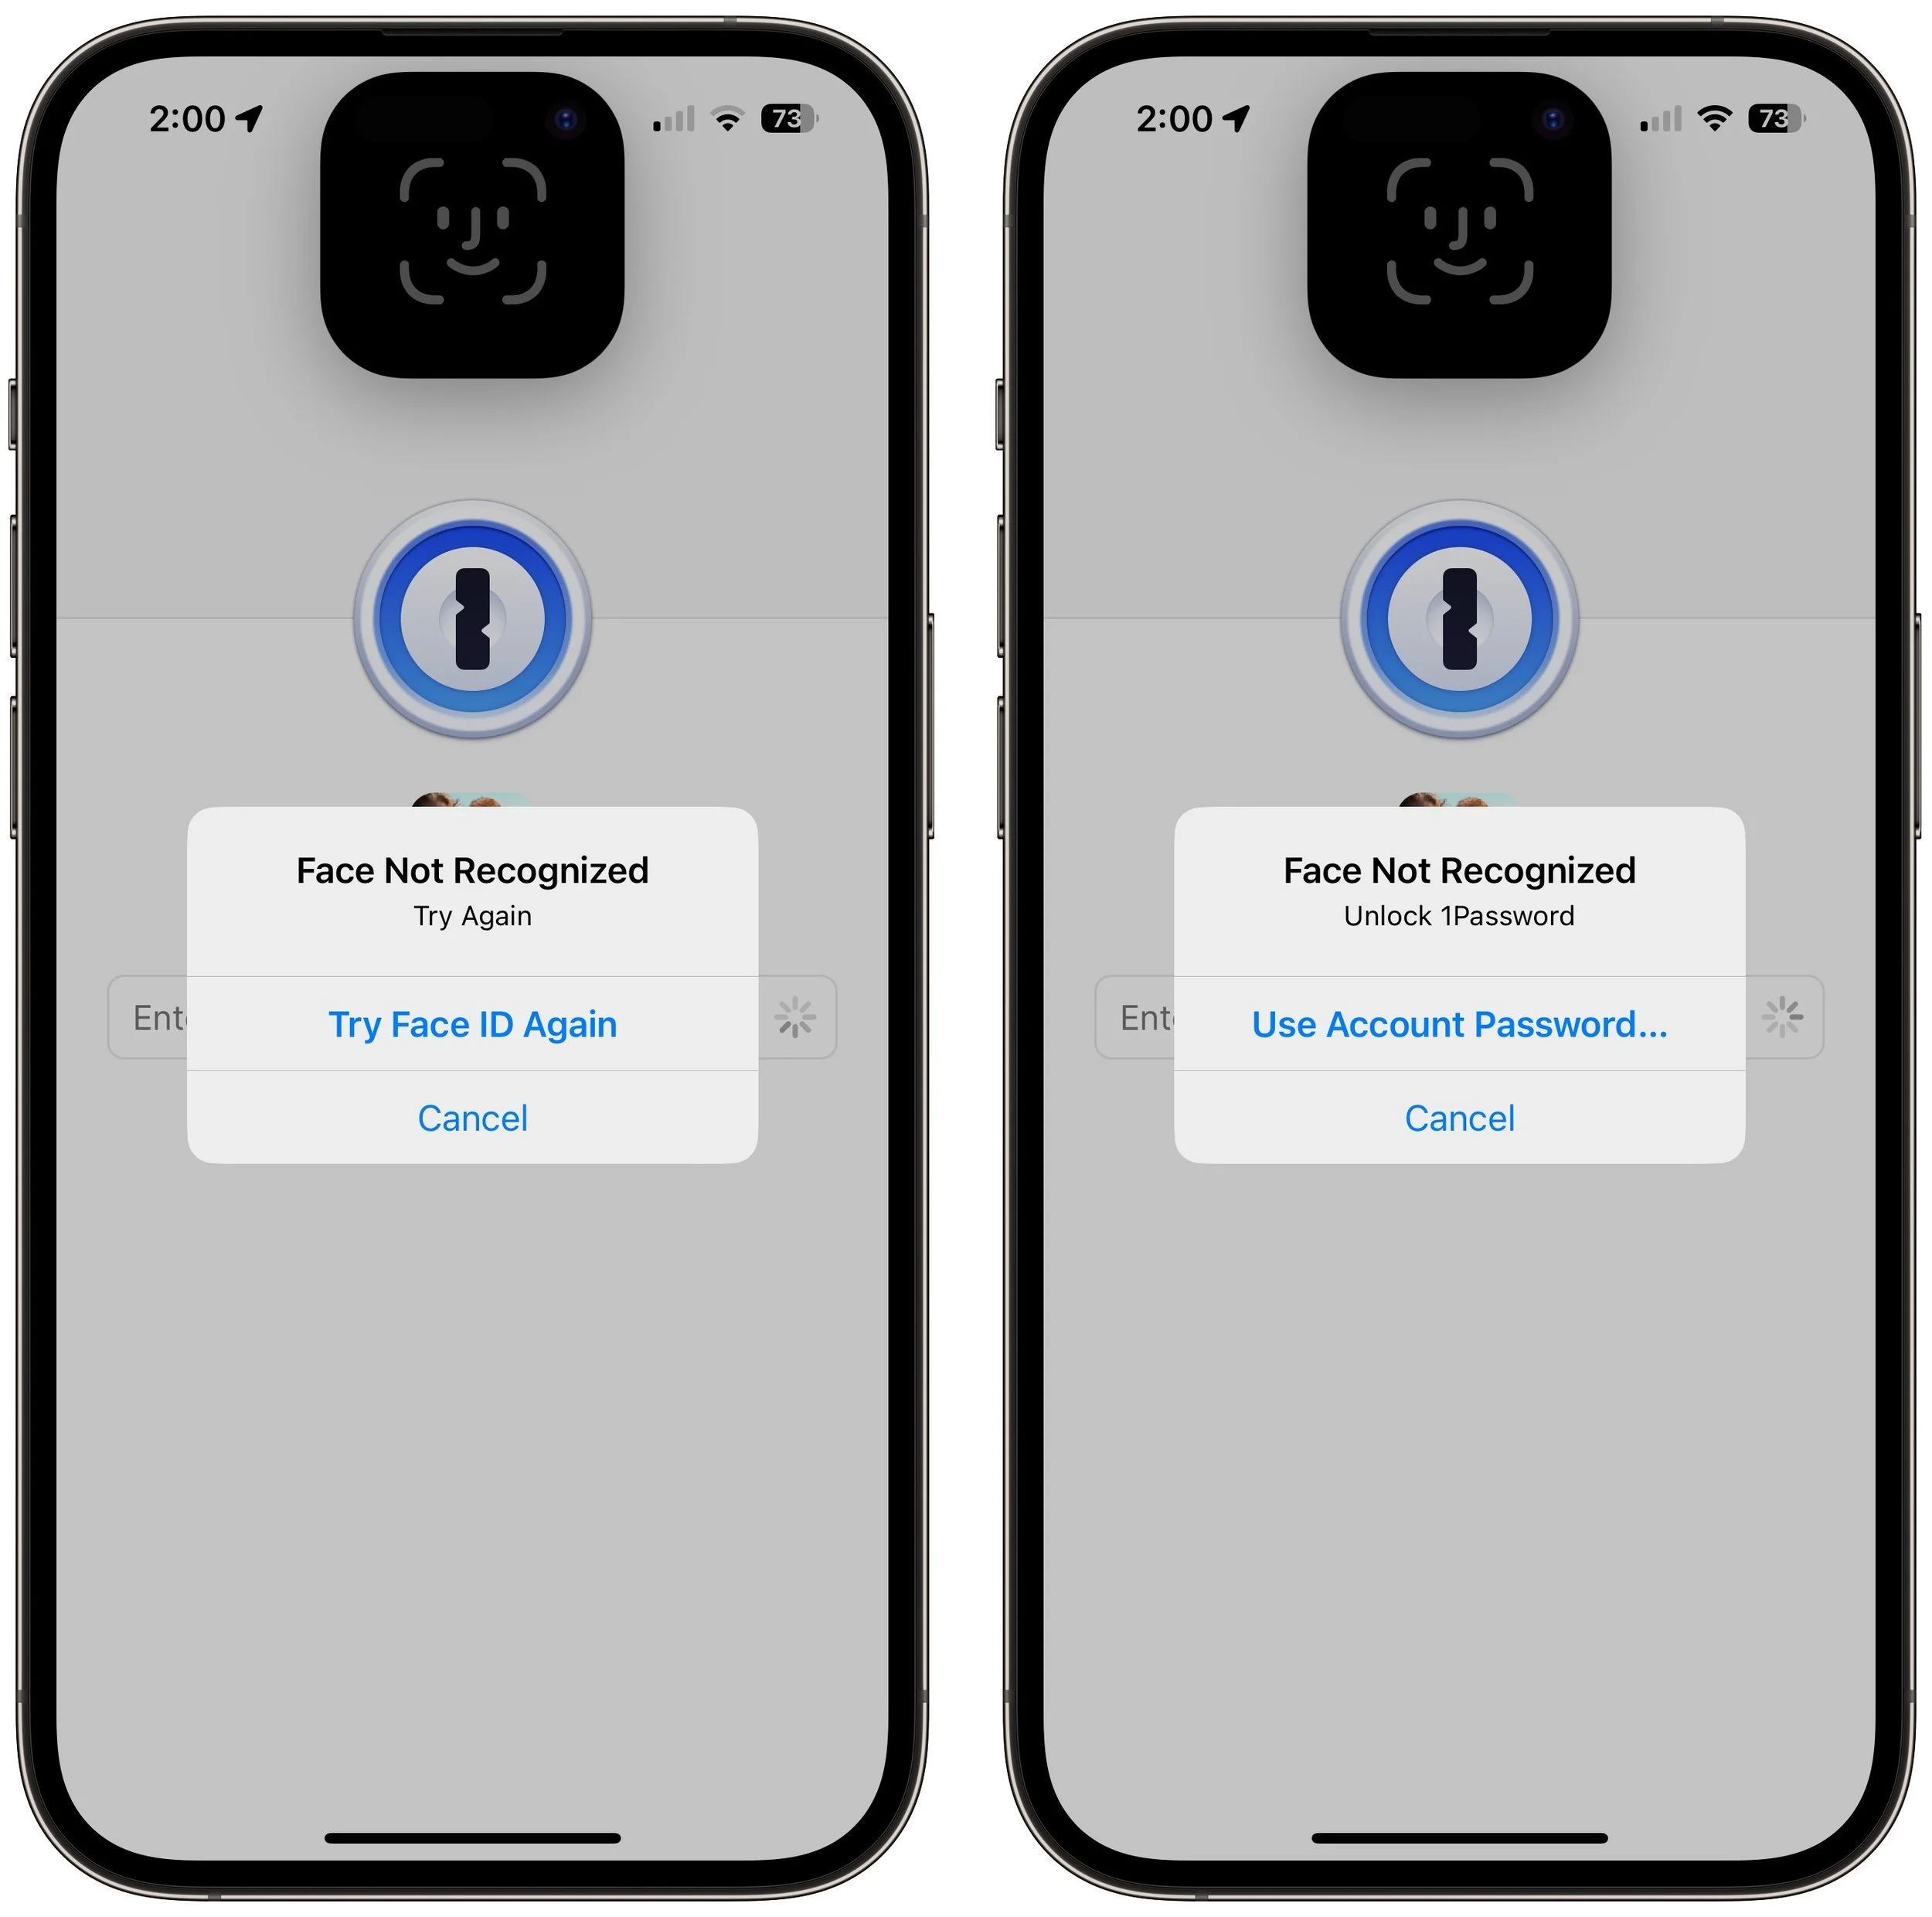
Always Use Face ID or Touch ID When Unlocking Your iPhone in Public
The easiest thing you can do to protect yourself from opportunistic attacks is to rely solely on Face ID or Touch ID when using your iPhone in public. If a thief sees you entering a passcode, you could become a target.
We know people who avoid Face ID or Touch ID based on some misguided belief that Apple controls their biometric information, but nothing could be further from the truth. Your fingerprint or facial information is stored solely on the device in the Secure Enclave, which is much more secure than passcode entry in nearly all circumstances.
We’ve also run across people for whom Face ID or Touch ID works poorly—if that’s you, conceal your passcode from anyone watching, just as you would when entering your PIN at an ATM.
Use a Strong Passcode
By default, iPhone passcodes are six digits. You can downgrade that security to four digits, but don’t—that’s asking for trouble. You can also upgrade the security to an alphanumeric passcode that can be as long as you like, but that’s overkill, in our opinion. Video would still capture you entering it, and if you’re focused on entering it accurately, you’re less likely to be aware of someone shoulder-surfing behind you.
That said, make sure your passcode isn’t trivially simple. Basic patterns like 333333 and 123456 are far more easily observed or even guessed. There’s no reason not to use a passcode that’s memorable but unguessable, such as your high school graduating class combined with your best friend’s birth month.
Don’t Share Your Passcode Beyond Trusted Family Members
Even those who don’t have motivated thieves targeting them need to be careful to protect their passcode. Our simple rule of thumb is that if you wouldn’t give someone complete access to your bank account, you shouldn’t give them your passcode. If extreme circumstances require you to trust a person outside that circle temporarily, reset the passcode to something they’ll remember—even 111111—and change it back as soon as they return your iPhone.
Switch from iCloud Keychain to a Third-Party Password Manager
Although Apple keeps improving iCloud Keychain’s interface and capabilities, having all your Internet passwords accessible to a thief who has your iPhone and passcode is unacceptable. Instead, we suggest you use a third-party password manager like 1Password or BitWarden (we no longer recommend LastPass). Even when a third-party password manager allows easier unlocking with Face ID or Touch ID (which both 1Password and BitWarden do), they fall back on their master password, not the device’s passcode. After you move your passwords from iCloud Keychain to another password manager, be sure to delete everything from iCloud Keychain.
Delete Photos Containing Identification Numbers
Many people take photos of their important documents as a backup in case the original is lost. That’s a good idea, but storing photos of your driver’s license, passport, Social Security card, credit cards, insurance card, and more in Photos leaves them vulnerable to a thief who has your iPhone and your passcode. With the information in those cards, the thief has a much better chance of impersonating you when opening credit cards, accessing financial accounts, and more. Instead, store those card photos—or at least the information on them—in your password manager.
A Security Wakeup Call
Again, although it’s very unlikely that you would fall prey to one of these attacks, we appreciated the encouragement to re-evaluate our security assumptions and behaviors, and we suggest you do the same.
(Featured image by iStock.com/AntonioGuillem)
FAQs about Apple’s Messages App and What Can Go Wrong When Using It
You probably use Messages every day to send texts from your iPhone, but do you know the answers to these frequently asked questions about Messages?

Most of us rely on Messages every day to text with family, friends, and colleagues. Not surprisingly, we’ve fielded numerous questions surrounding common confusions with this popular app. We hope our answers here will help you use Messages more effectively and work around problems.
What’s the difference between blue and green bubble conversations?
A common question is why some conversations have blue bubbles and others have green bubbles. The answer is that the color indicates whether the conversation uses iMessage or SMS/MMS. Blue bubble conversations use iMessage and are solely between Apple users, whereas green bubble conversations are with friends using SMS/MMS on Android or other phones.

What are iMessage and SMS/MMS, and how do they differ?
Messages supports two protocols for text messaging: iMessage and SMS/MMS. Although the end result is the same, apart from the color of the conversation bubbles, the two are quite different.
SMS (Short Message Service) and MMS (Multimedia Messaging Service) are cellular technologies that require only a wireless plan from a cellular carrier. SMS is limited to 160 characters of text, though longer messages are usually broken into multiple segments and reassembled upon receipt. MMS enables sending of pictures, audio, video, and more, as long as the message size doesn’t exceed carrier limits, which range from 300 KB to 3 MB). Because SMS uses extremely small amounts of band-width, SMS text messages may get through even when cellular service is too weak to place a call, a useful fact to know in emergencies.
In contrast, iMessage is proprietary to Apple and works only in Messages on Apple devices, including the iPhone, iPad, Mac, and Apple Watch. Apple has said the size limit for a message is 100 MB, but people have transferred even larger files. That’s possible in part because iMessage relies on Internet access, which requires either Wi-Fi or a sufficiently strong cellular connection. If an Internet connection isn’t available for either party when you want to send a message using iMessage, Messages tries to fall back on SMS/MMS, which can result in blue and green bubbles in the same conversation.
How does Messages work on Apple devices that lack cellular connectivity?
It’s no problem for all Apple devices to use iMessage when they have Internet connectivity through Wi-Fi, but you can also send and receive SMS/MMS messages on a Mac or iPad that has no native cellular connectivity. Apple extends SMS/MMS support to Messages on such devices by routing through your iPhone. In the iPhone’s Settings > Messages > Text Message Forwarding, you can specify which of your devices can send and receive SMS/MMS messages through your iPhone.
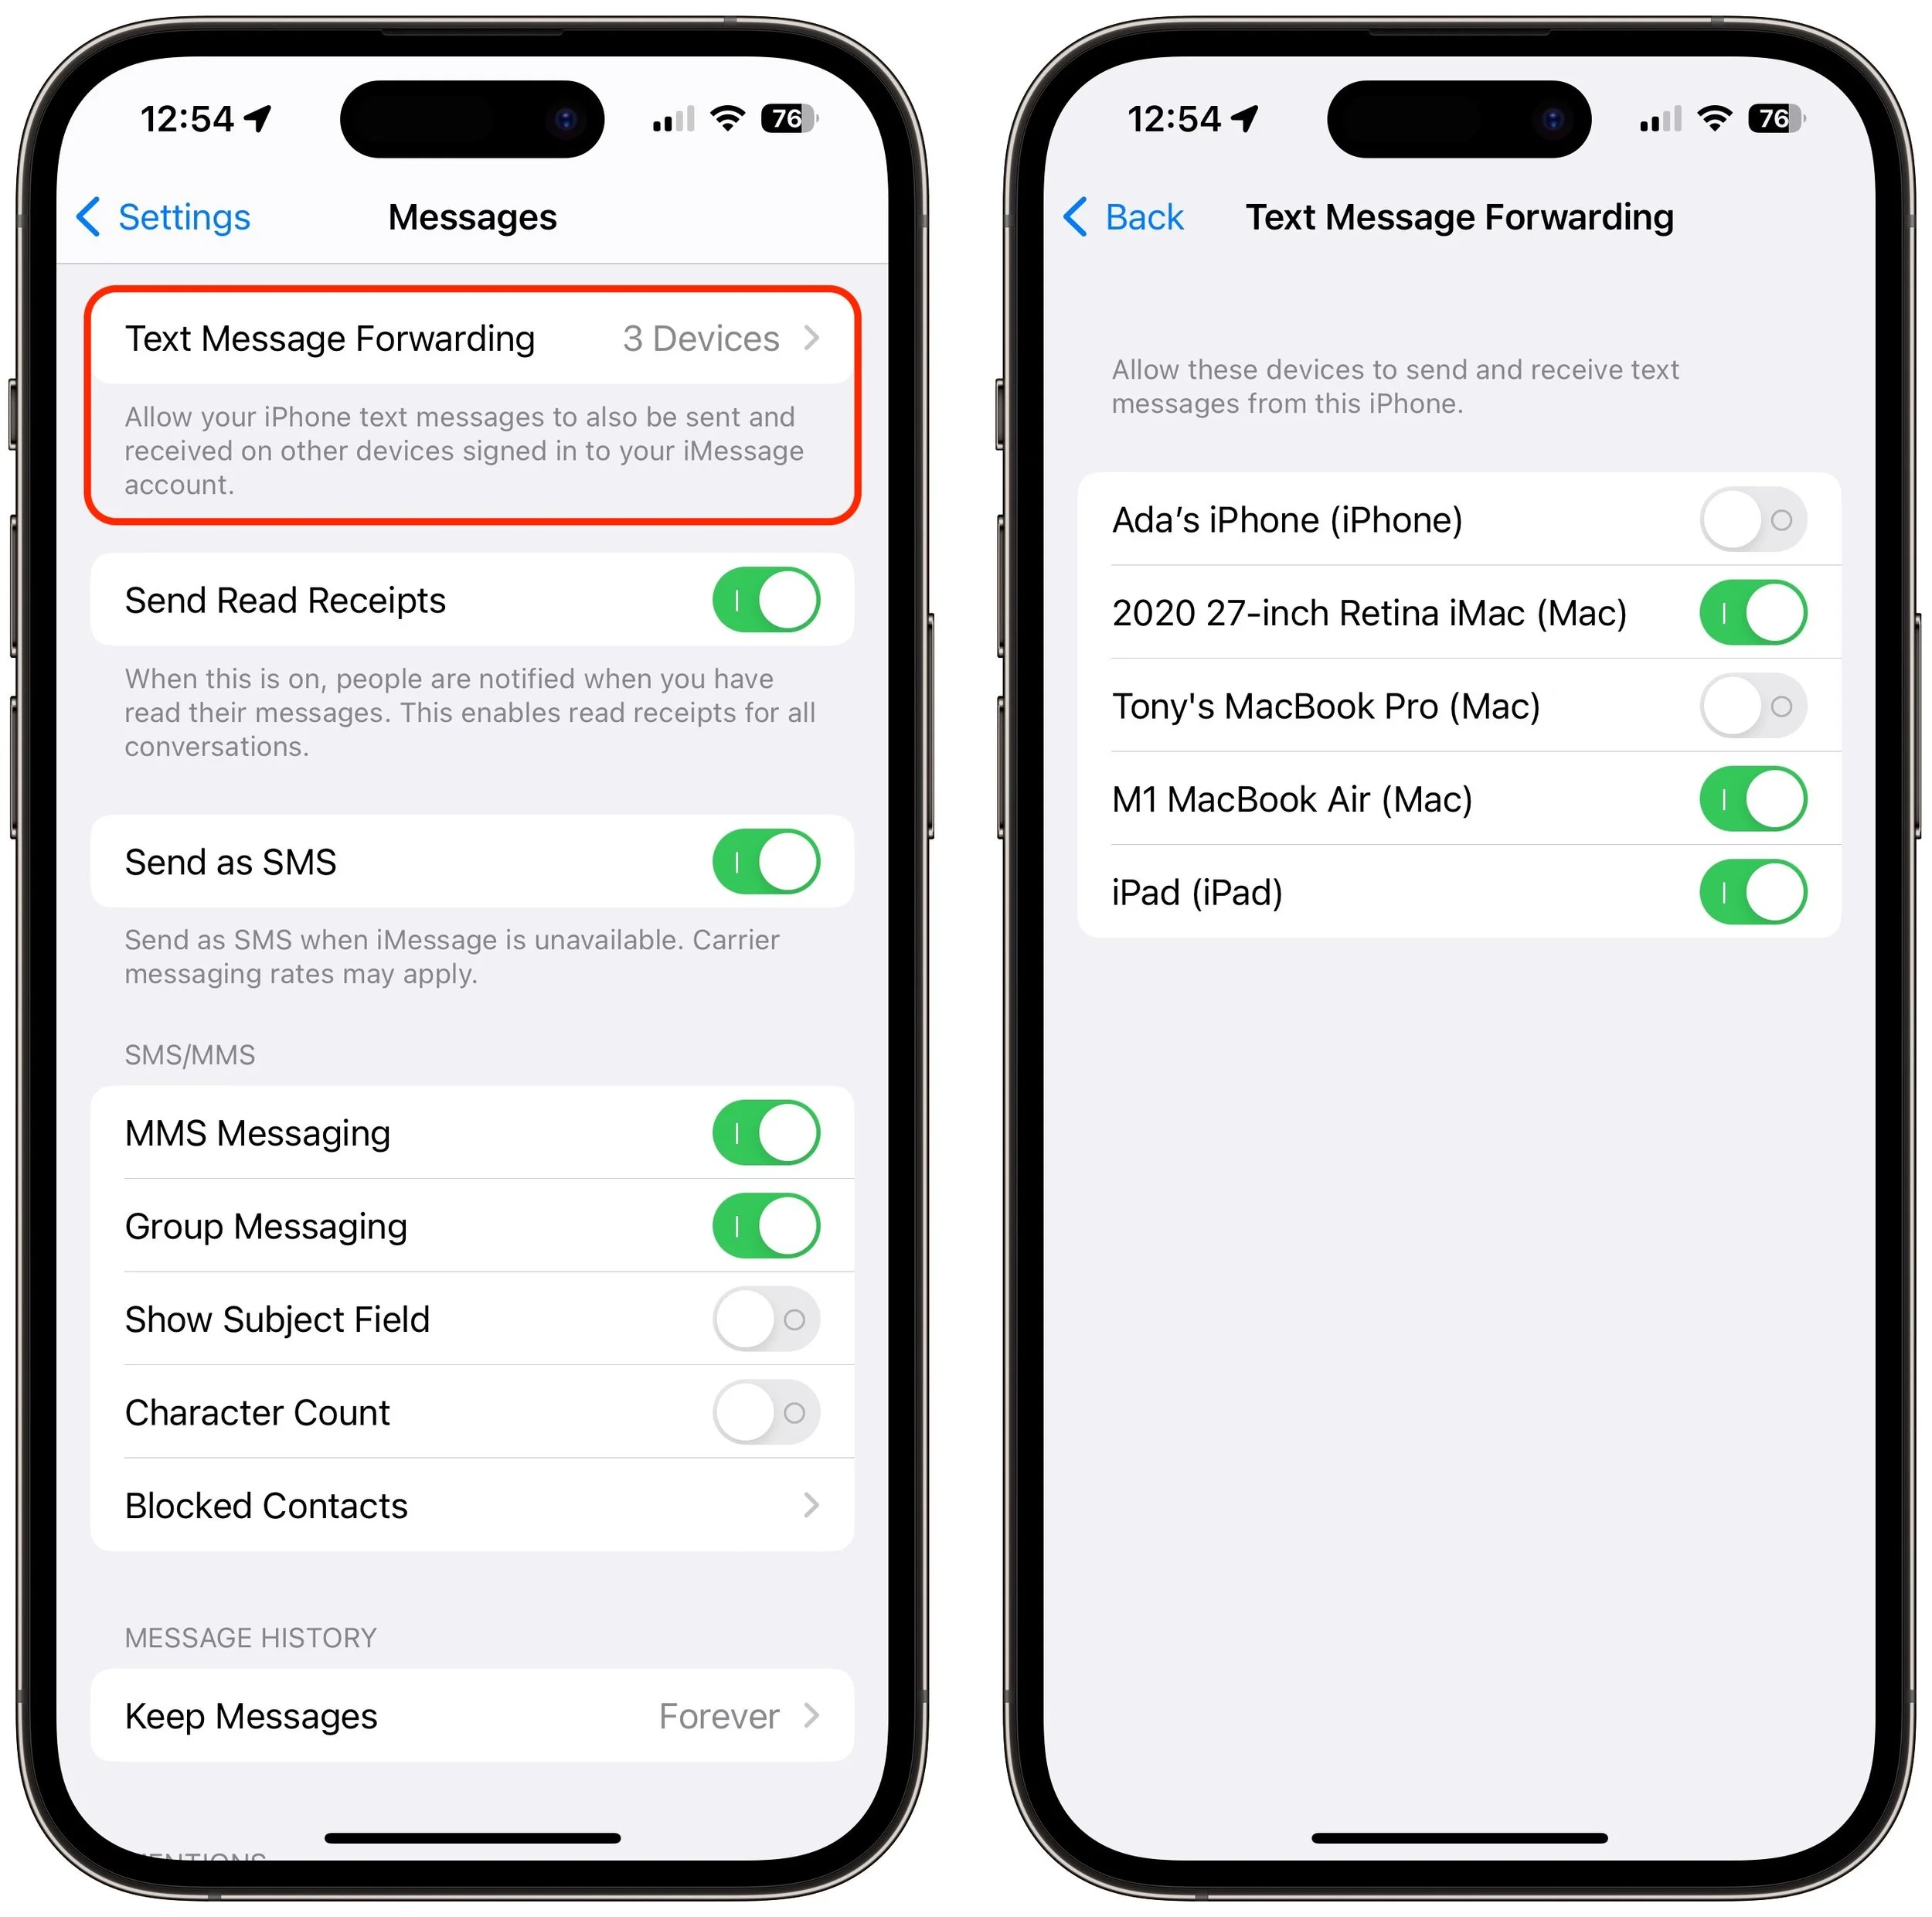
Keep this setting in mind if you stop receiving SMS/MMS text messages on your Mac or iPad, for instance. It’s not unheard of for it to get turned off after a major operating system upgrade.
How are iMessages addressed, and can that cause problems?
As cellular technologies, SMS and MMS are tied to a phone number. iMessage, however, can send and receive messages from one or more phone numbers and email addresses. The first time someone sets up an iPhone, it registers that iPhone’s number with Apple’s iMessage servers. That’s why, when you type in a phone number to start a new Messages conversation, Messages knows whether to make the conversation blue or green.
Because iMessage also supports email addresses, you can start Messages conversations with a fellow iMessage user when all you know is their email address, as long as they’ve enabled that email address to send and receive messages.
In Settings > Messages > Send & Receive, you can specify which of your email ad-dresses can receive messages and reply to them. If you want to be easily findable, select all of them, in addition to your phone number. Otherwise, turn off the email addresses you don’t want used. You can add an email address or phone number to this list on appleid.apple.com in Personal Information > Reachable At.
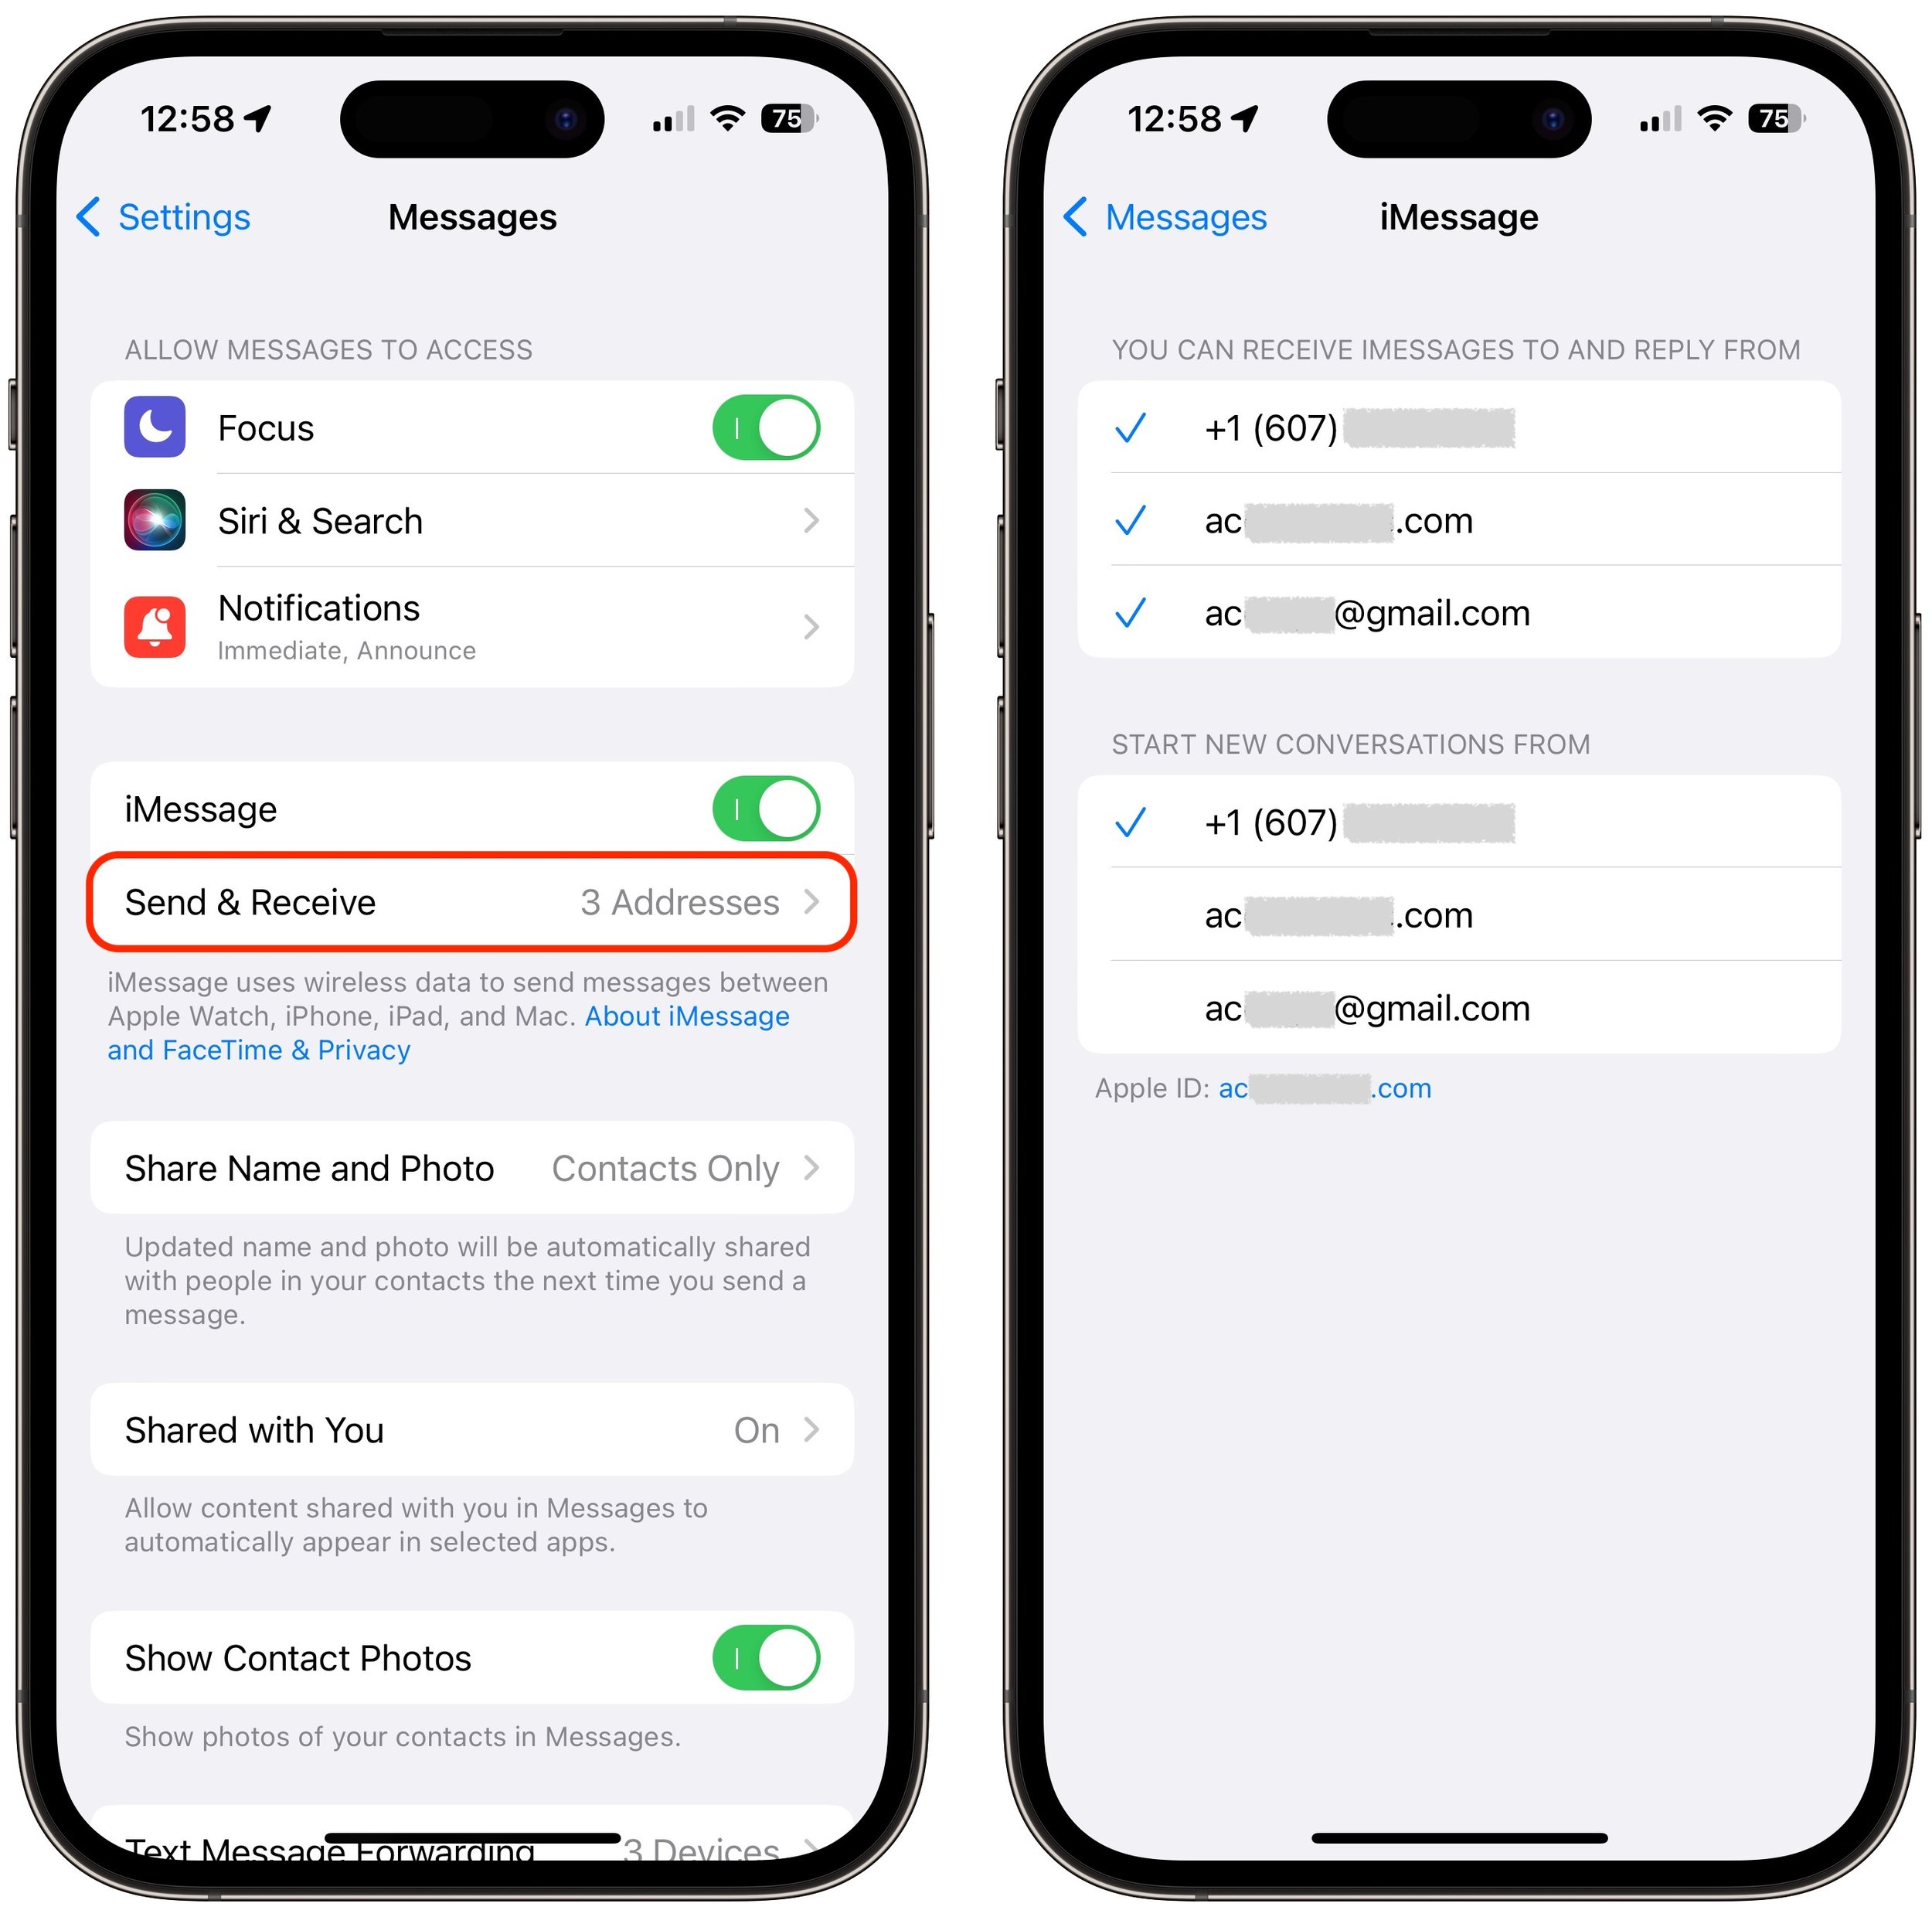
You can also specify which of your phone numbers or email addresses is used to start new iMessage conversations. In general, we recommend sticking with your phone number unless you plan to change it soon.
As you can imagine, changing these settings can cause problems. If you disable receiving for an email address used by an existing conversation, people in that conversation won’t be able to send you messages anymore. Even worse would be changing your main Apple ID address, which would break a lot of conversations, all of which would have to be started afresh with the new Apple ID.
Changing phone numbers is also problematic for the same reasons, though that probably happens less often. If you’ve temporarily attached a second phone number to your iPhone using eSIM while traveling, for instance, be careful how you initiate conversations from it because they’ll break as soon as you disable the associated plan.
Finally, switching from an iPhone to a non-Apple phone can cause delivery problems for SMS/MMS messages. To prevent that, either turn off iMessage in Settings > Messages before you switch or deregister iMessage online.
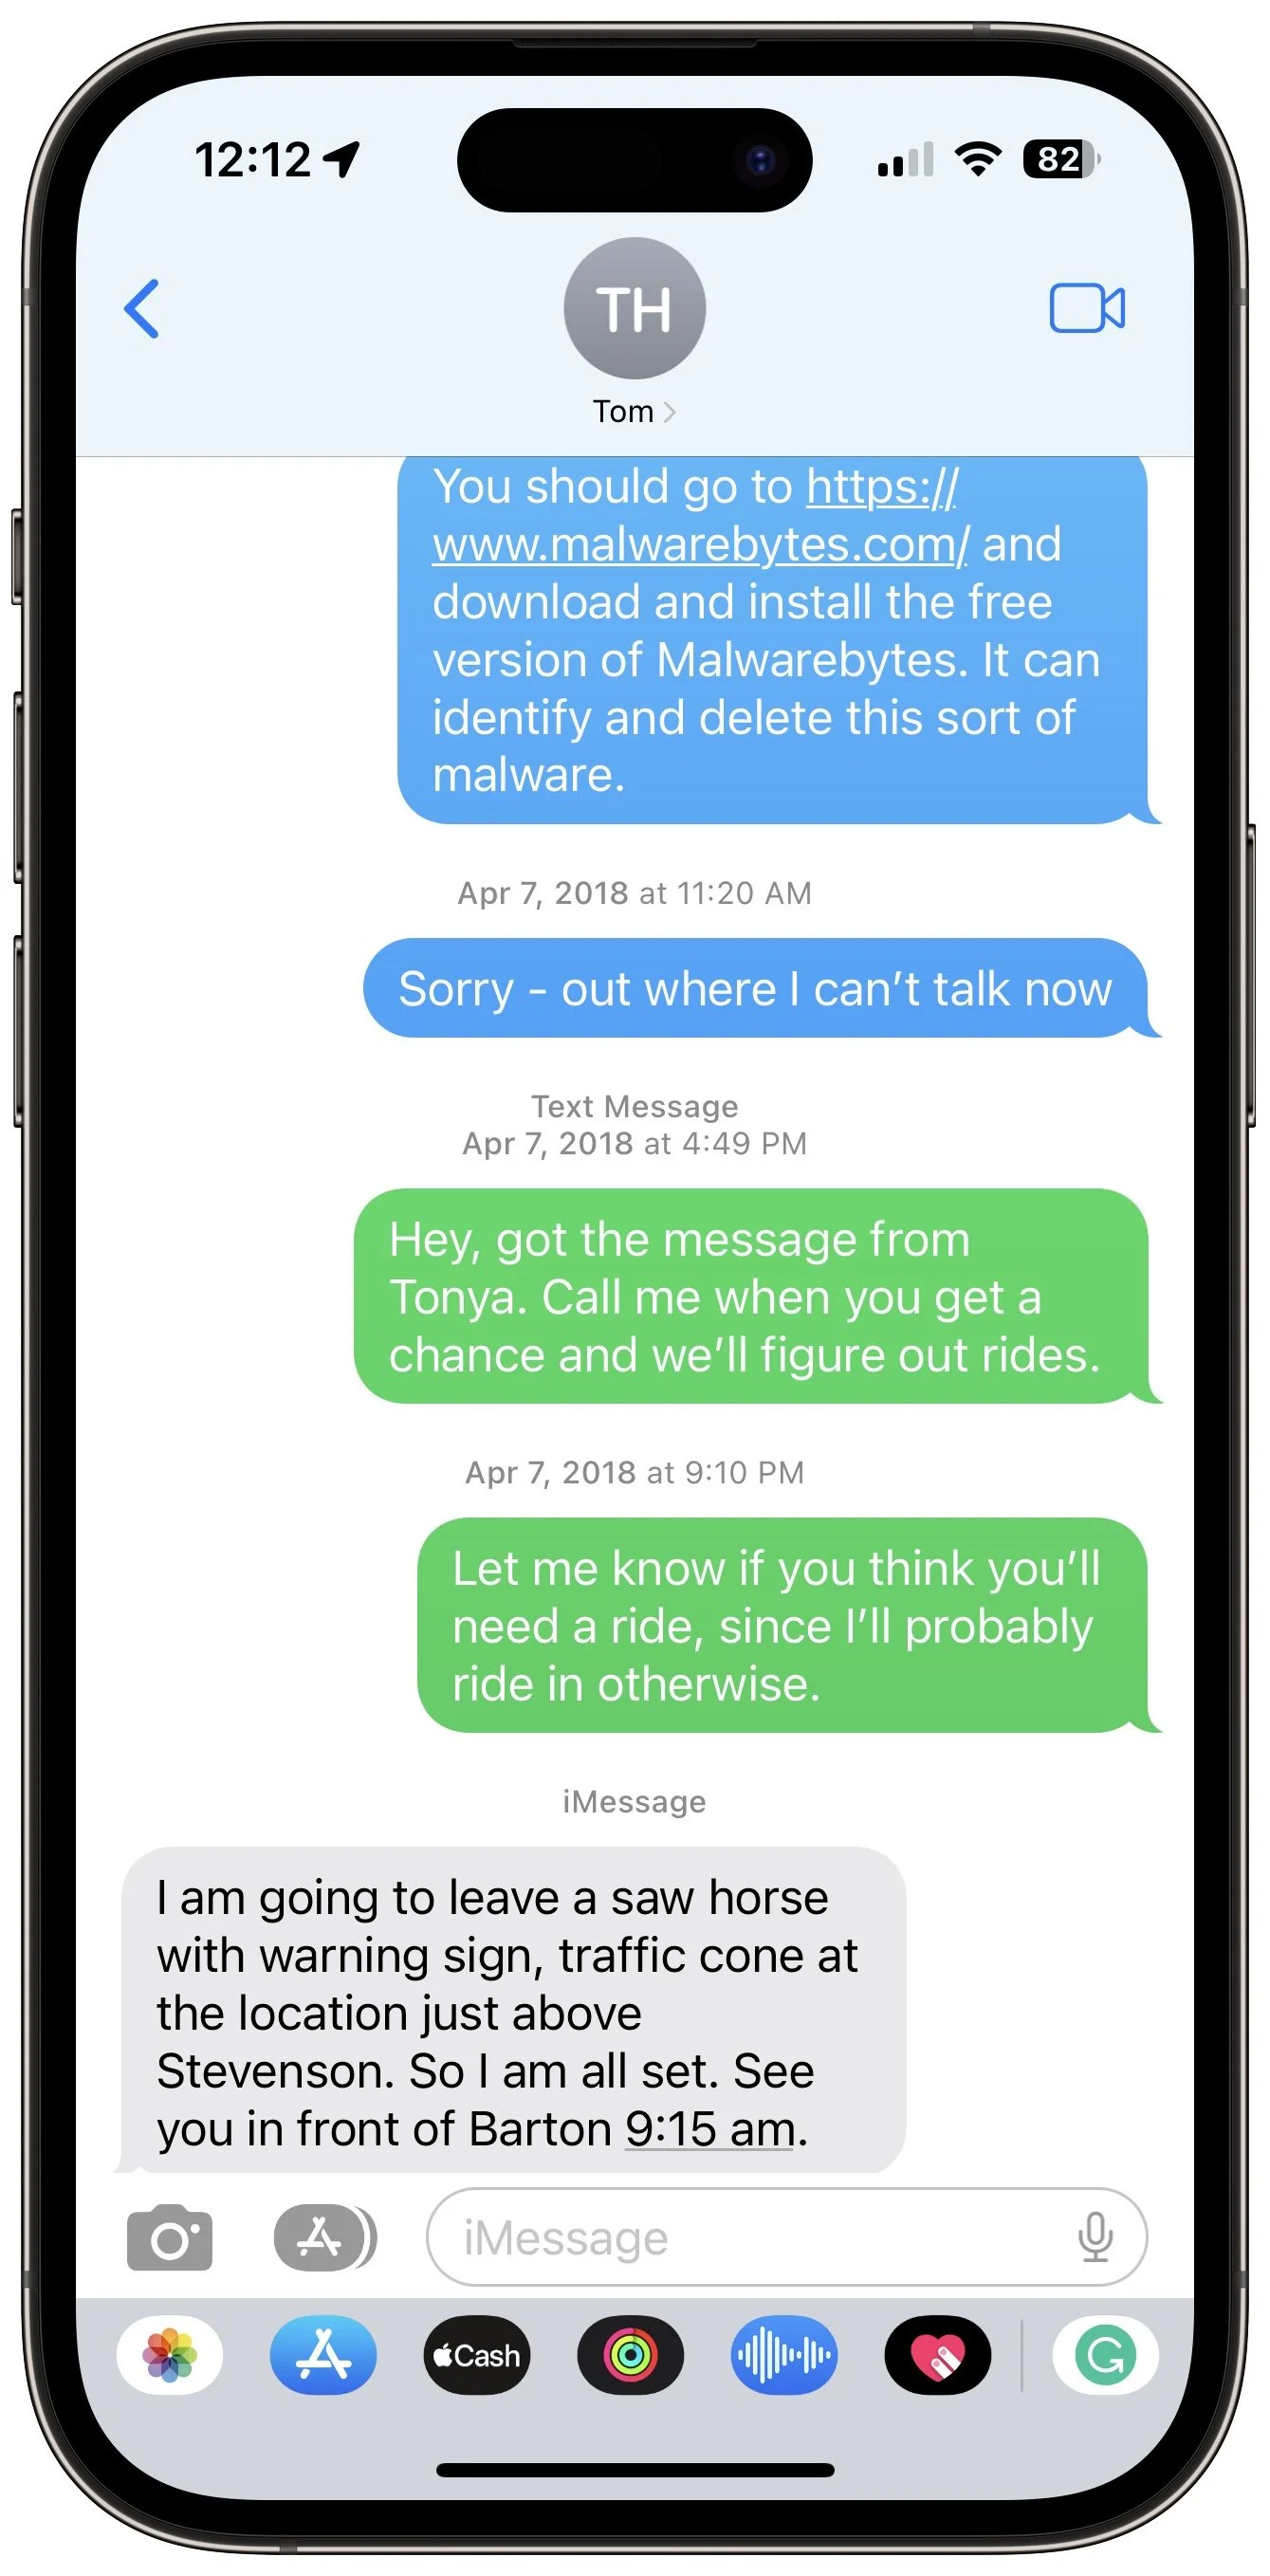
What happens when a message fails to send, and how do I fix it?
Occasionally, when you try to send a message, you may see one or more red exclamation points and an alert that says “Not Delivered.”
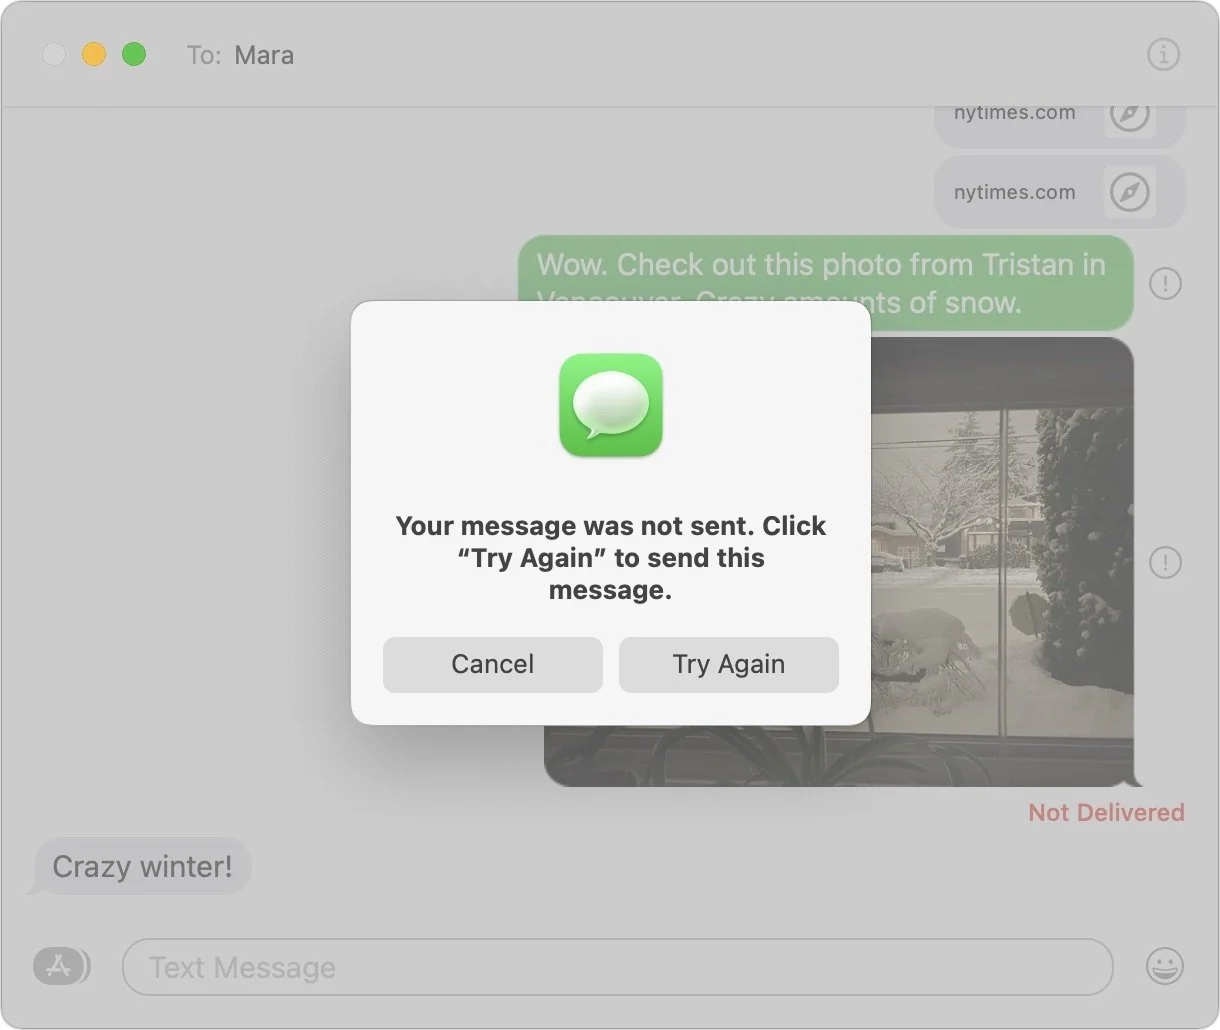
Most of the time, the problem is just poor connectivity, either for you or your recipient. First, just click an exclamation point and try again in case it was a one-time problem. If a second try doesn’t succeed, check your Internet connection in Safari, and if it seems to be working, tap Try Again. If you’re using iMessage and it remains stuck, tap Send as Text Message, which switches from iMessage to SMS. If that’s not it, there are a few other possibilities:
Make sure iMessage is enabled in Settings > Messages.
See if you have another phone number or email address for the recipient. If they disabled message receiving for the one you were using, that could cause failures.
If the problem occurs when sending to an SMS recipient while using a device without cellular connectivity, make sure the device is enabled in Settings> Messages > Text Forwarding.
If the problem occurs with an image or other file sent via MMS, it might be too large. If so, you may have to resort to email.
To ensure the iPhone isn’t temporarily confused, restart it (which is best done using Siri if you’re running iOS 16—just say, “Hey Siri, reboot.”) and try again.
Why do I see slightly different conversations on my iPhone and Mac?
With text message forwarding turned on for all your devices and each device logged into the same Apple ID, Messages should have the same conversations everywhere. In practice, that’s not always true, so Apple introduced Messages in iCloud, which uses iCloud as a centralized location for all messages. When it’s turned on, everything (other than failed SMS messages) should stay in sync.
Turn on Messages in iCloud in Messages > Settings/Preferences > iMessage on the Mac and in Settings > Your Name > iCloud > Apps Using iCloud > Show All > Messages on the iPhone or iPad. Make sure to enable it for every device.

Can someone eavesdrop on my Messages conversations?
SMS isn’t at all secure, so don’t use it for truly sensitive information (and whenever possible, use an authentication app instead of SMS for two-factor authentication codes). In contrast, Apple encrypts all iMessage conversations, so there’s no worry about someone listening in when you’re using a public Wi-Fi network at a hotel. However, iMessage conversations are not end-to-end encrypted by default, which means that law enforcement could compel Apple to turn over your data stored in its data centers. To provide full end-to-end encryption, Apple lets you turn on Advanced Data Protection for iCloud; the downside is that Apple can no longer help you recover your account if you forget your Apple ID password.
Other messaging apps also focus on security, most notably the free Signal, which is open source, provides end-to-end encryption, and lets you secure the app with an additional password. Messages can be set to self-destruct after a certain amount of time. The only downside is that you have to convince the people you want to message to use it. WhatsApp also provides end-to-end encryption, but you have to enable encryption for backups. It also shares a boatload of other information with Facebook to help it personalize ads, including your phone number, contacts, location information, device information, and more.
Don’t get the wrong impression—Messages usually works well. But on those rare occasions when you have problems, we hope this information explains more of what’s happening and helps you work around your issues.
(Featured image based on an original by iStock.com/fizkes)
A Practical Guide to Identifying Phishing Emails
Follow along as we examine three real-world phishing emails and explain how you can tell that they’re fake.

Phishing is becoming an ever more common way for people to get in trouble when using the Internet. A phishing attack is some communication, usually an email, that tries to lure you into revealing login credentials, financial information, or other confidential details.
A State of Phishing report from security firm SlashNext claims that there were more than 255 million phishing attacks in 2022, a 61% increase from the year before. Luckily, according to the Verizon Data Breach Investigations Report for 2022, only 2.9% of employees click through from phishing emails, but with hundreds of millions of email addresses targeted, the raw numbers are still high. We’ve been noticing—and hearing from clients—that phishing emails are also slipping through spam filters more than in the past.
To help you avoid falling prey to phishing tricks, check out our example screenshots below from real phishing emails, complete with annotations calling out the parts of a message that give it away. All phishing emails are trying to lure you into clicking a link or button to a website that will encourage you to enter your password or other confidential information. Once you realize that a message is a phishing attack, you won’t get suckered into clicking a link or revealing your personal information.
Fake Password Expiration Scam
Our first example is a password expiration scam—it’s trying to get you to click a button to keep your password from expiring. What’s ironic about this scam is that passwords should never expire—forcing users to change them regularly is terrible security practice. If a password is strong and unique, there is no reason to change it unless the site suffers a breach. Let’s look at what identifies this message as a phishing attack.
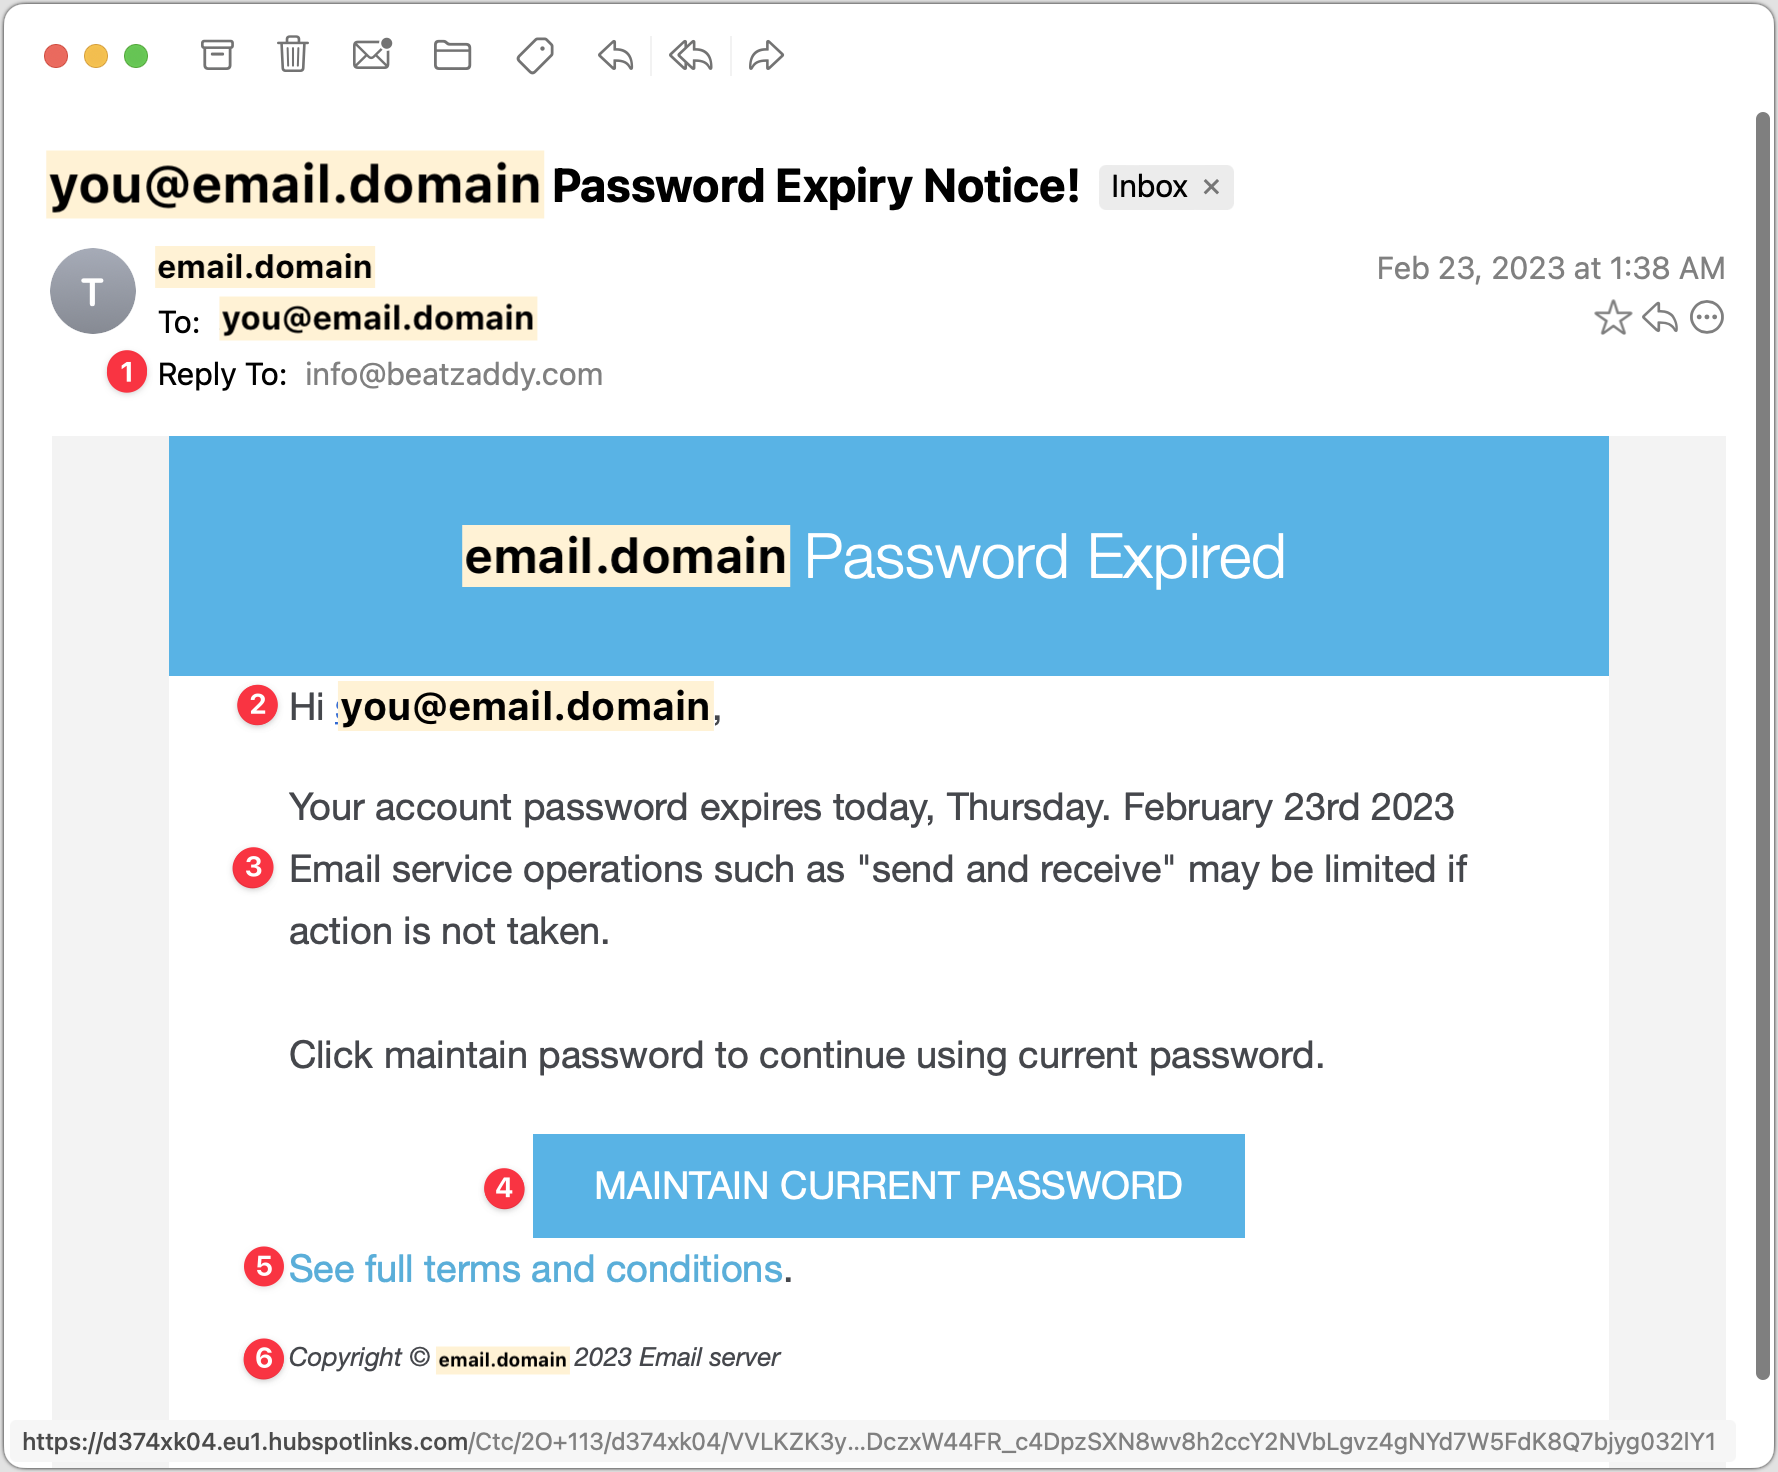
Note that the Reply-To address is generic and doesn’t match either the email domain used throughout the message or even a major email service provider, which would never send such a message.
Using your email address instead of your name is something scammers do to make the message seem personalized. If this email really came from your IT support staff, they’d be more likely to use your name or leave the email address out. And they’d never send such a message either.
The body of the message uses likely words, but they don’t quite sound like a native English speaker wrote them. The phrasing is slightly off, and quoting words like “send and receive” while not quoting the button name feels strange.
Be careful of things that look like buttons—we’re trained to click them without thinking. In many email apps, you can hover the pointer over a button or link to see where it will go. If you look at the URL at the bottom of the window, you can see that it’s completely different from any other domain listed—a clear sign that this is a phishing message.
“See full terms and conditions” is a strange thing to say in a password-expiration message. What terms and conditions could possibly apply? This is an example of someone who’s not a native English speaker throwing in random phrases they’ve seen elsewhere.
The copyright line is a similar tell. No organization would go to the effort of claiming copyright on a simple support message, and even if it did, it would use its name, not “Email server.”
Spurious Account Access Scam
Our second example pretends to be alerting you to a sign-in to your email account, with the goal of trying to scare you into resetting your password. Frankly, this phishing email stands a good chance of fooling people. You have no way of knowing if your account has been compromised, and if it were compromised, resetting your password is the right thing to do. However, never click through from an email to change a password! You can’t tell if you’re on the right site. Instead, navigate to the site manually, log in, and then change the password. Persuasive though this message is, it does make some mistakes.
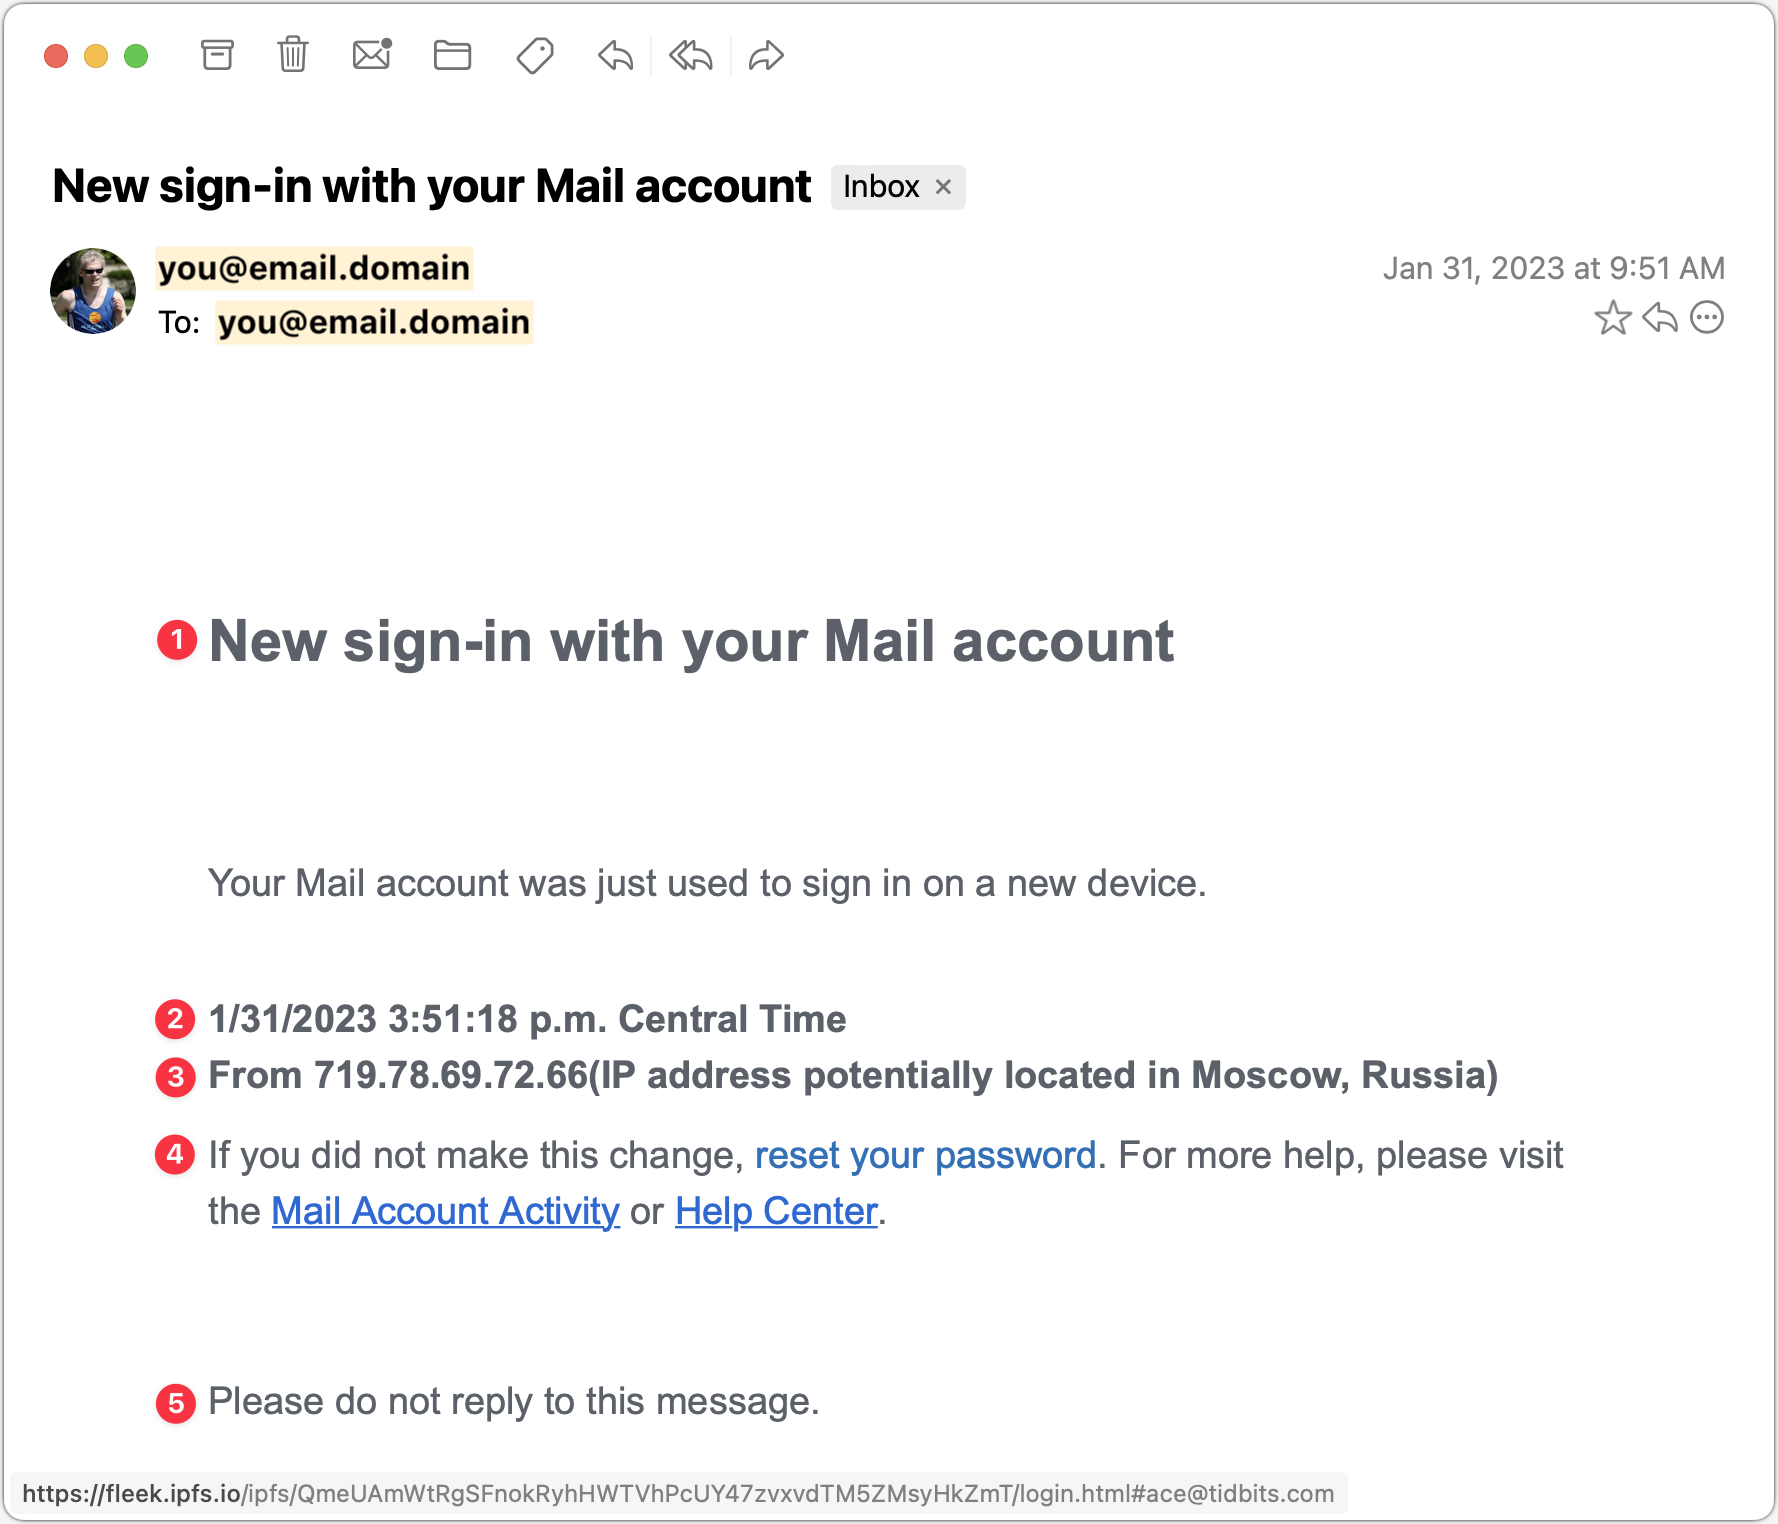
The capitalization of “Mail” in the Subject and this line should give you pause. Most people wouldn’t capitalize the word, or they’d refer to something more specific, like your “Gmail” or “Outlook” account.
Another slight strike against this message is the specificity in the timestamp. There’s no reason to include the seconds or the time zone, and most normal people wouldn’t.
There are three mistakes in this line that could tip off a savvy Internet user. It claims to provide the IP address from which the sign-in occurred, but real IP addresses are four sets of numbers from 0 to 255. This one has five sets of numbers, the first of which is way too high at 719. The missing space before the parenthetical makes it look wrong, and finally, the parenthetical claim that the IP address is located in Moscow is overdoing it by invoking scary Russian hackers.
Note that the “reset your password” link doesn’t have an underline, unlike the other two links. Again, that could happen in a legitimate message, but it’s an-other slight tell. Hovering over the link reveals the fleek.ipfs.io URL at the bottom—clearly nothing associated with your email account and a dead giveaway.
A line saying “Please do not reply to this message” is commonplace in transactional messages, so it makes the message seem more real, but a real warning from an IT department would want to make sure you could contact the support staff.
Fraudulent DocuSign Confirmation
Our final example pretends to be confirmation of a document that you’ve already signed in DocuSign. That’s more clever than trying to get you to sign a document (which we’ve seen in other phishing messages) because most people won’t sign something without looking at it carefully. But you might want to see what document this message is talking about and be suckered into clicking through. What’s trickiest about this message is that it has merely changed some of the text in a real DocuSign message, so someone familiar with DocuSign might think it was real. But there are always giveaways.
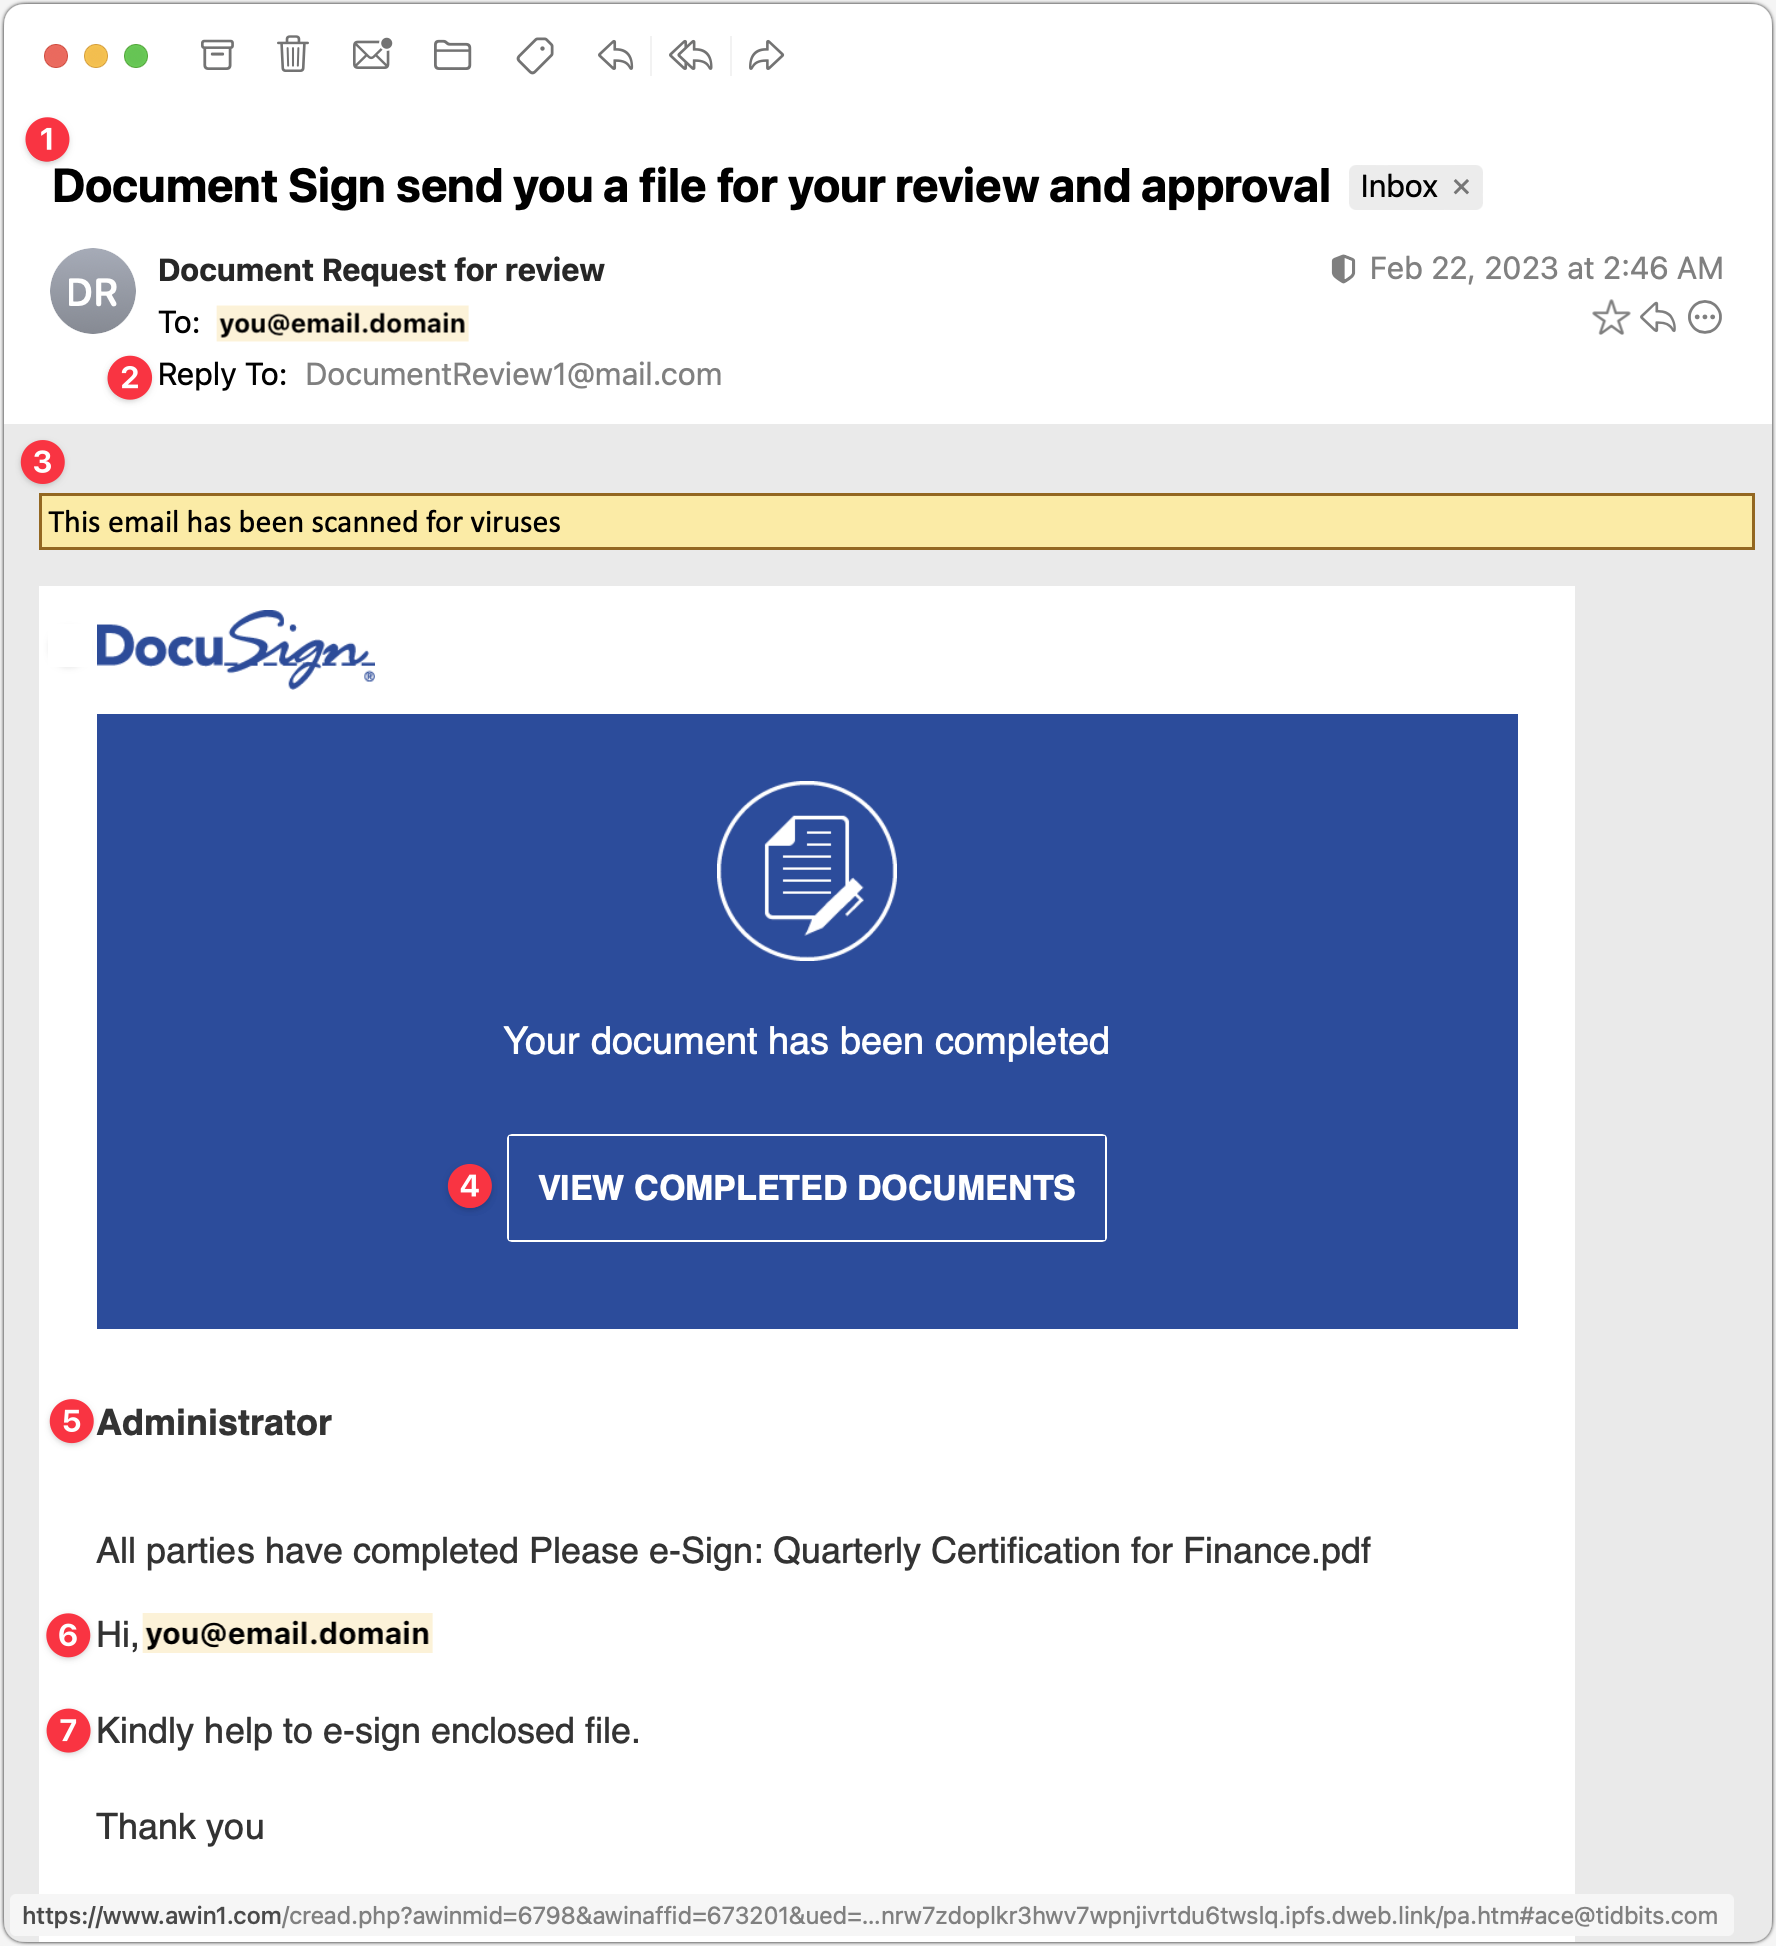
The Subject line of this message is a tell because its grammar is atrocious.
The Reply-To address should also ring warning bells because it’s so generic that it couldn’t possibly go with an organization with which you were signing documents.
The yellow line claiming that the email has been scanned for viruses will likely seem unusual to you—even if an email app presented such a message, it likely wouldn’t do so in the body of the message.
There’s nothing wrong with the View Completed Documents button, which looks exactly as it would in a real DocuSign message. However, hovering over it reveals the URL at the bottom, which has nothing to do with docusign.net.
Someone familiar with DocuSign messages might notice that there’s no email address under “Administrator,” as there should be. But that’s a long shot, we know.
As with an earlier example, personalizing with an email address is a definite tell. A real person would have entered your name there, if anything.
Once again, the phrasing isn’t what a native English speaker would say, but even more problematic is how it asks you to sign the enclosed file, whereas the text and button in the blue box say that the document is completed. The mismatch is a complete giveaway.
We didn’t have room to show the rest of this message, which adds to the verisimilitude by continuing to copy text from a real DocuSign message. The two remaining tells further down are links that are empty when you hover over them and an unknown name in the fine print at the bottom, which reads (bold added for emphasis):
This message was sent to you by sefanya maitimoe who is using the DocuSign Electronic Signature Service. If you would rather not receive email from this sender you may contact the sender with your request.
Overall Advice
Let’s distill what we’ve seen in the examples above into advice you can apply to any message:
Pay close attention to emails that are very simple, like our second example above, because there’s less they might get wrong.
With legitimate-looking messages copied from large firms like DocuSign or PayPal, pay special attention to unfamiliar names and email addresses.
Don’t click anything in an email unless you’ve given it a close-enough look that you’re sure it’s legitimate. It’s too easy to skim and click without thinking, which the scammers count on.
Read the text of messages with an eye for capitalization, spelling, and grammatical mistakes. Scammers could write correct English, but if they don’t speak the language natively, they’re likely to make mistakes.
Evaluate any claim about something happening within your organization against what you know to be true. It’s always better to ask someone if passwords need to be reset or accounts are being deactivated instead of assuming a random email message is true.
Fight the urge to click big, legitimate-looking buttons. They’re easy to make and hard to resist, but if you can preview the URL under one before clicking, it will often reveal the scam.
None of our examples fell into this category, but if an email message is just an image that’s being displayed in the body, it’s certainly fake.
Stay safe out there!
(Featured image by iStock.com/Philip Steury)
The Amazingly Convenient Way to Scan Documents Using Your iPhone or iPad
Do you need to scan something? Your iPhone or iPad can now make light work of scanning short documents into PDF format. Learn how here:
On occasion, we all need to scan a document—an invoice, a recipe, instructions from a book—but far more people have an iPhone or iPad than a hardware scanner. Luckily, Apple has built a scanning capability into iOS, iPadOS, and macOS for some years now. The next time you’re faced with a piece of paper that you need in digital form, follow the instructions below.
Scan Directly with an iPhone or iPad
The little-known key to scanning with an iPhone or iPad is the Files app, which lets you scan one or more pages and save a PDF anywhere you like. Since it’s particularly easy to use iCloud Drive with Files, it’s a good way to create a file you can work with on your Mac later. (You can also scan into a note using the Notes app, but that’s mostly useful for storing information rather than creating files you can upload to the Web, send via email, or share in other ways.)
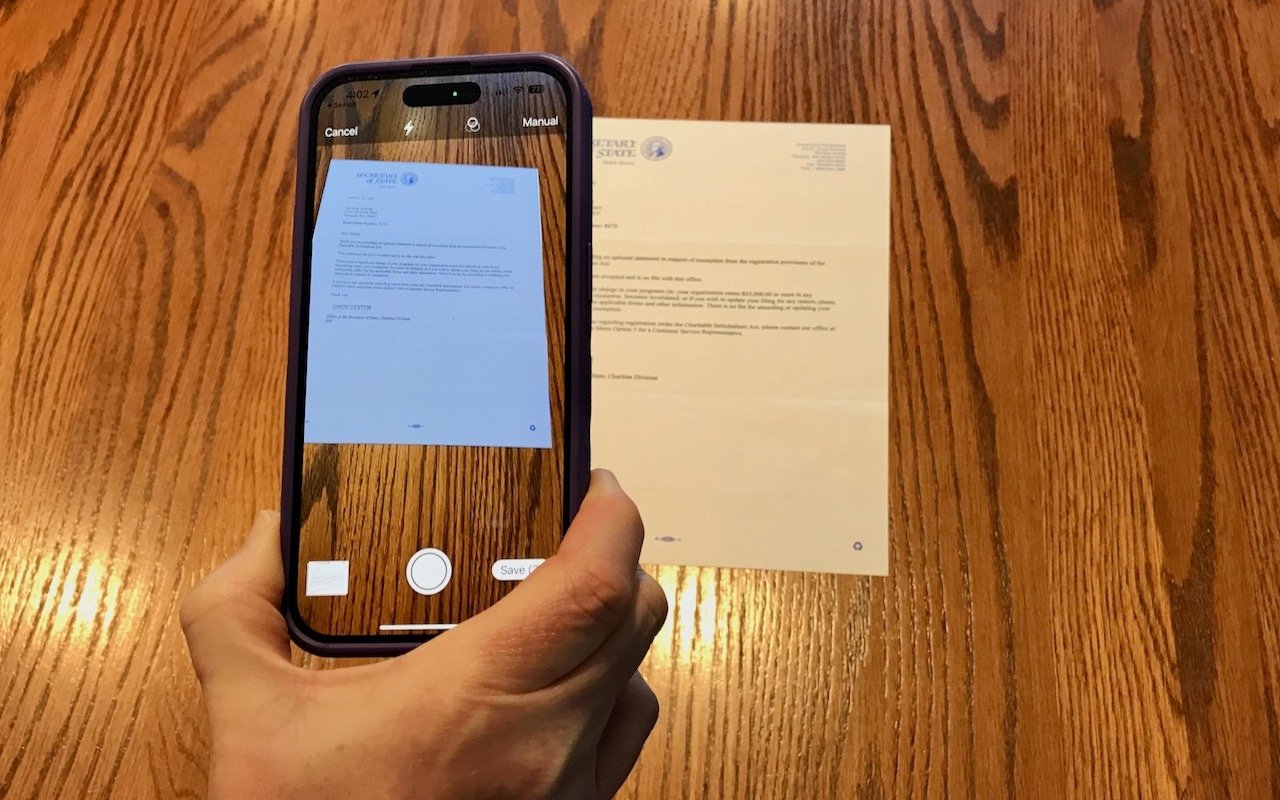
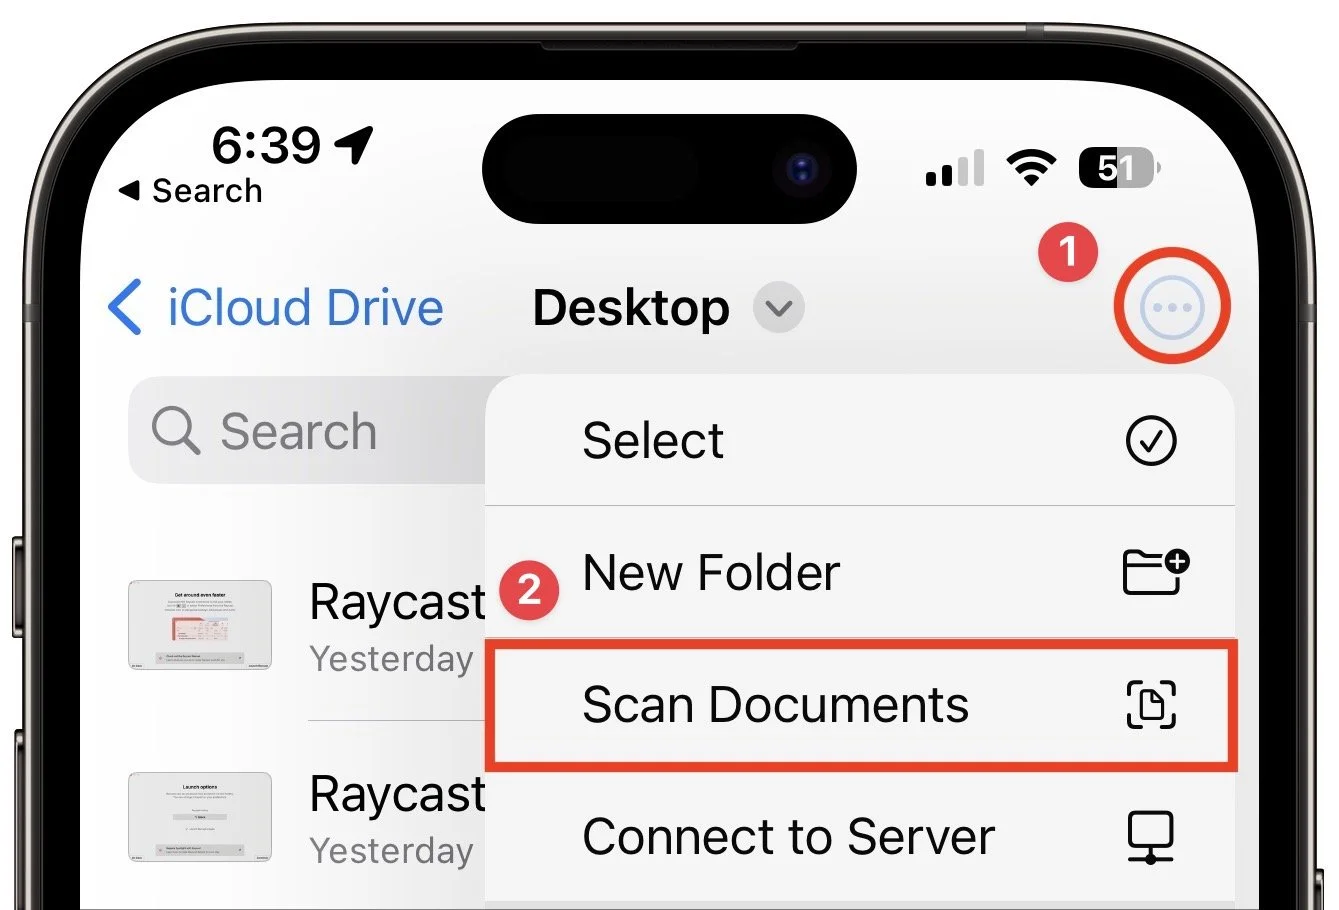
1. Open the Files app, tap Browse in the toolbar, and navigate to the folder where you want the scanned document to end up.
2. Tap the icon at the upper right and select Scan Documents.
3. The camera viewfinder appears. At the top of the screen, note the controls for the flash (the lightning bolt), the color filter, and the Auto/Manual toggle (below left). Immediately tap Auto to switch to Manual—we recommend using Manual until you’ve become fluid enough with the controls to let your device scan for you. You seldom need to change the flash setting, but you can force the flash on or off if you like. Similarly, the color filter option defaults to a color scan, but you can set it to grayscale or black-and-white if you want. It’s easier to make that change afterward.
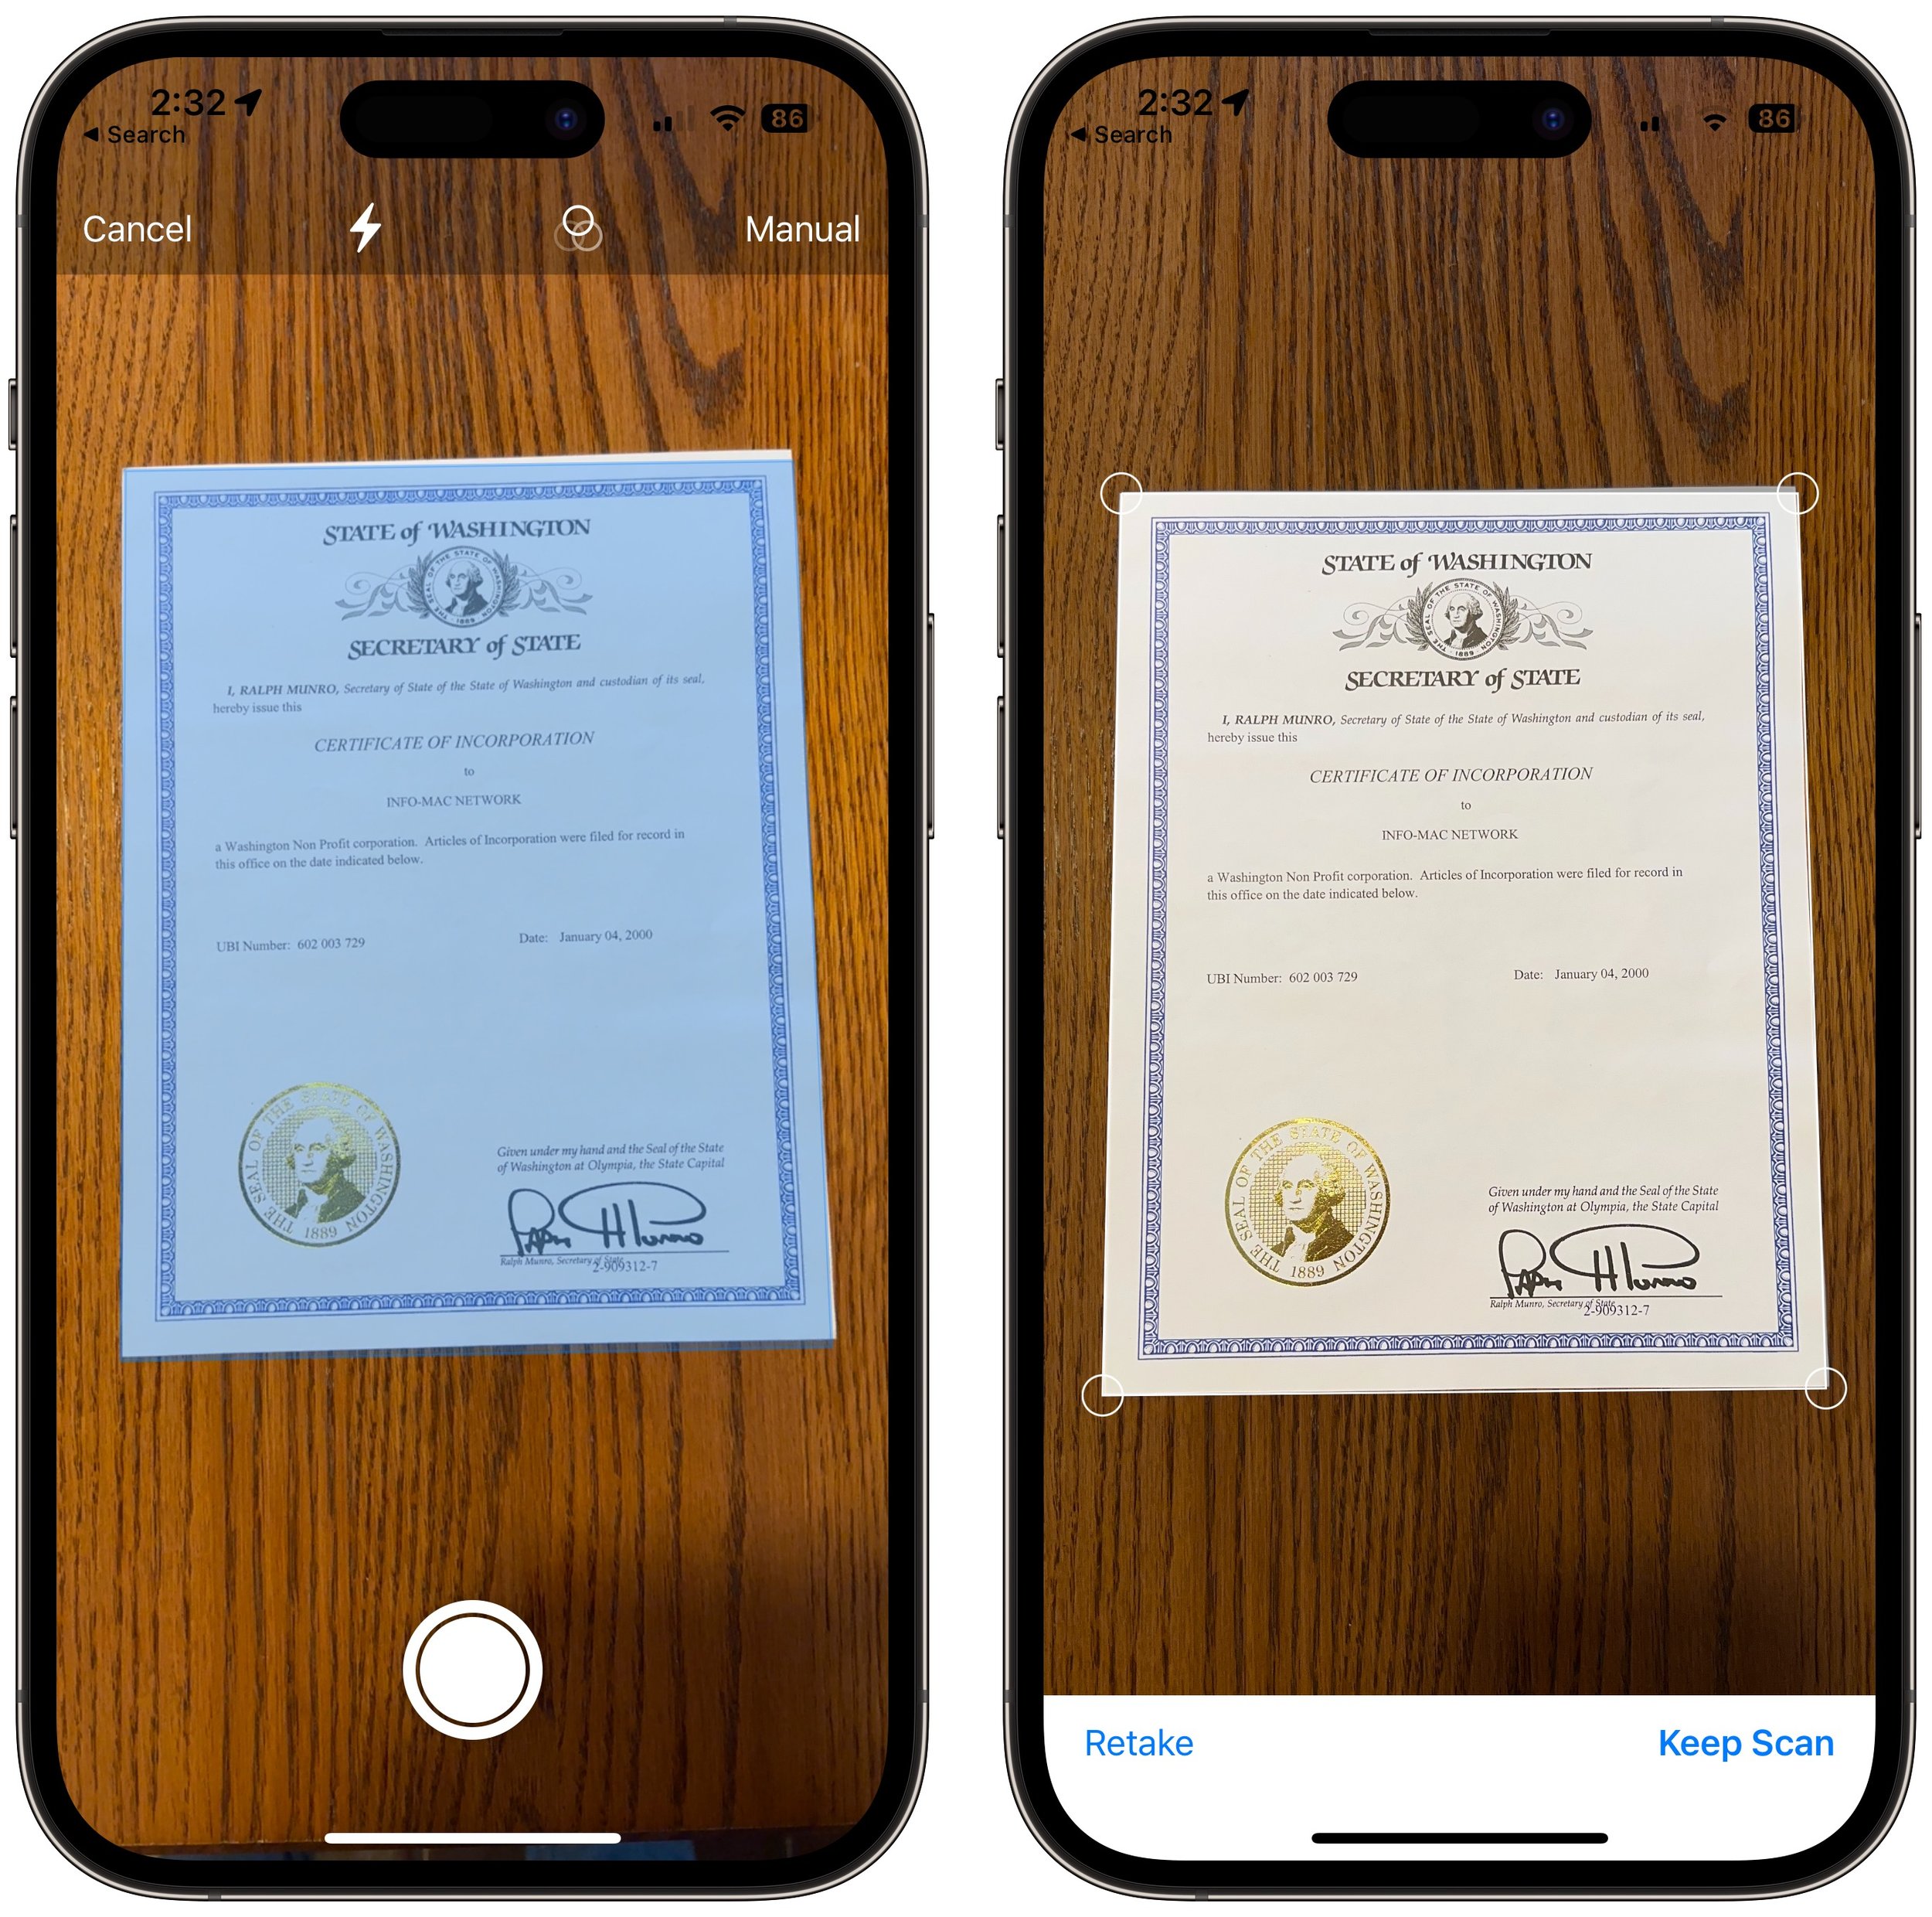
4. Hold the iPhone steady so it can detect the edges of the paper. When it has, tap the round white shutter button to take a photo (above left). In Auto mode, it will just keep taking images for you, which is efficient with multiple pages but stressful if you aren’t ready.
5. Examine the scan to see if it looks good. You can drag the corners to adjust the selection to capture just paper, or if the image isn’t right, tap Retake for a do-over (above right). When you have it as you want it, tap Keep Scan.
6. If you want to scan additional pages, put them in the viewfinder and repeat Steps 4 and 5 (below left). Or, if you’re done, tap Save and jump directly to naming your file (below right).
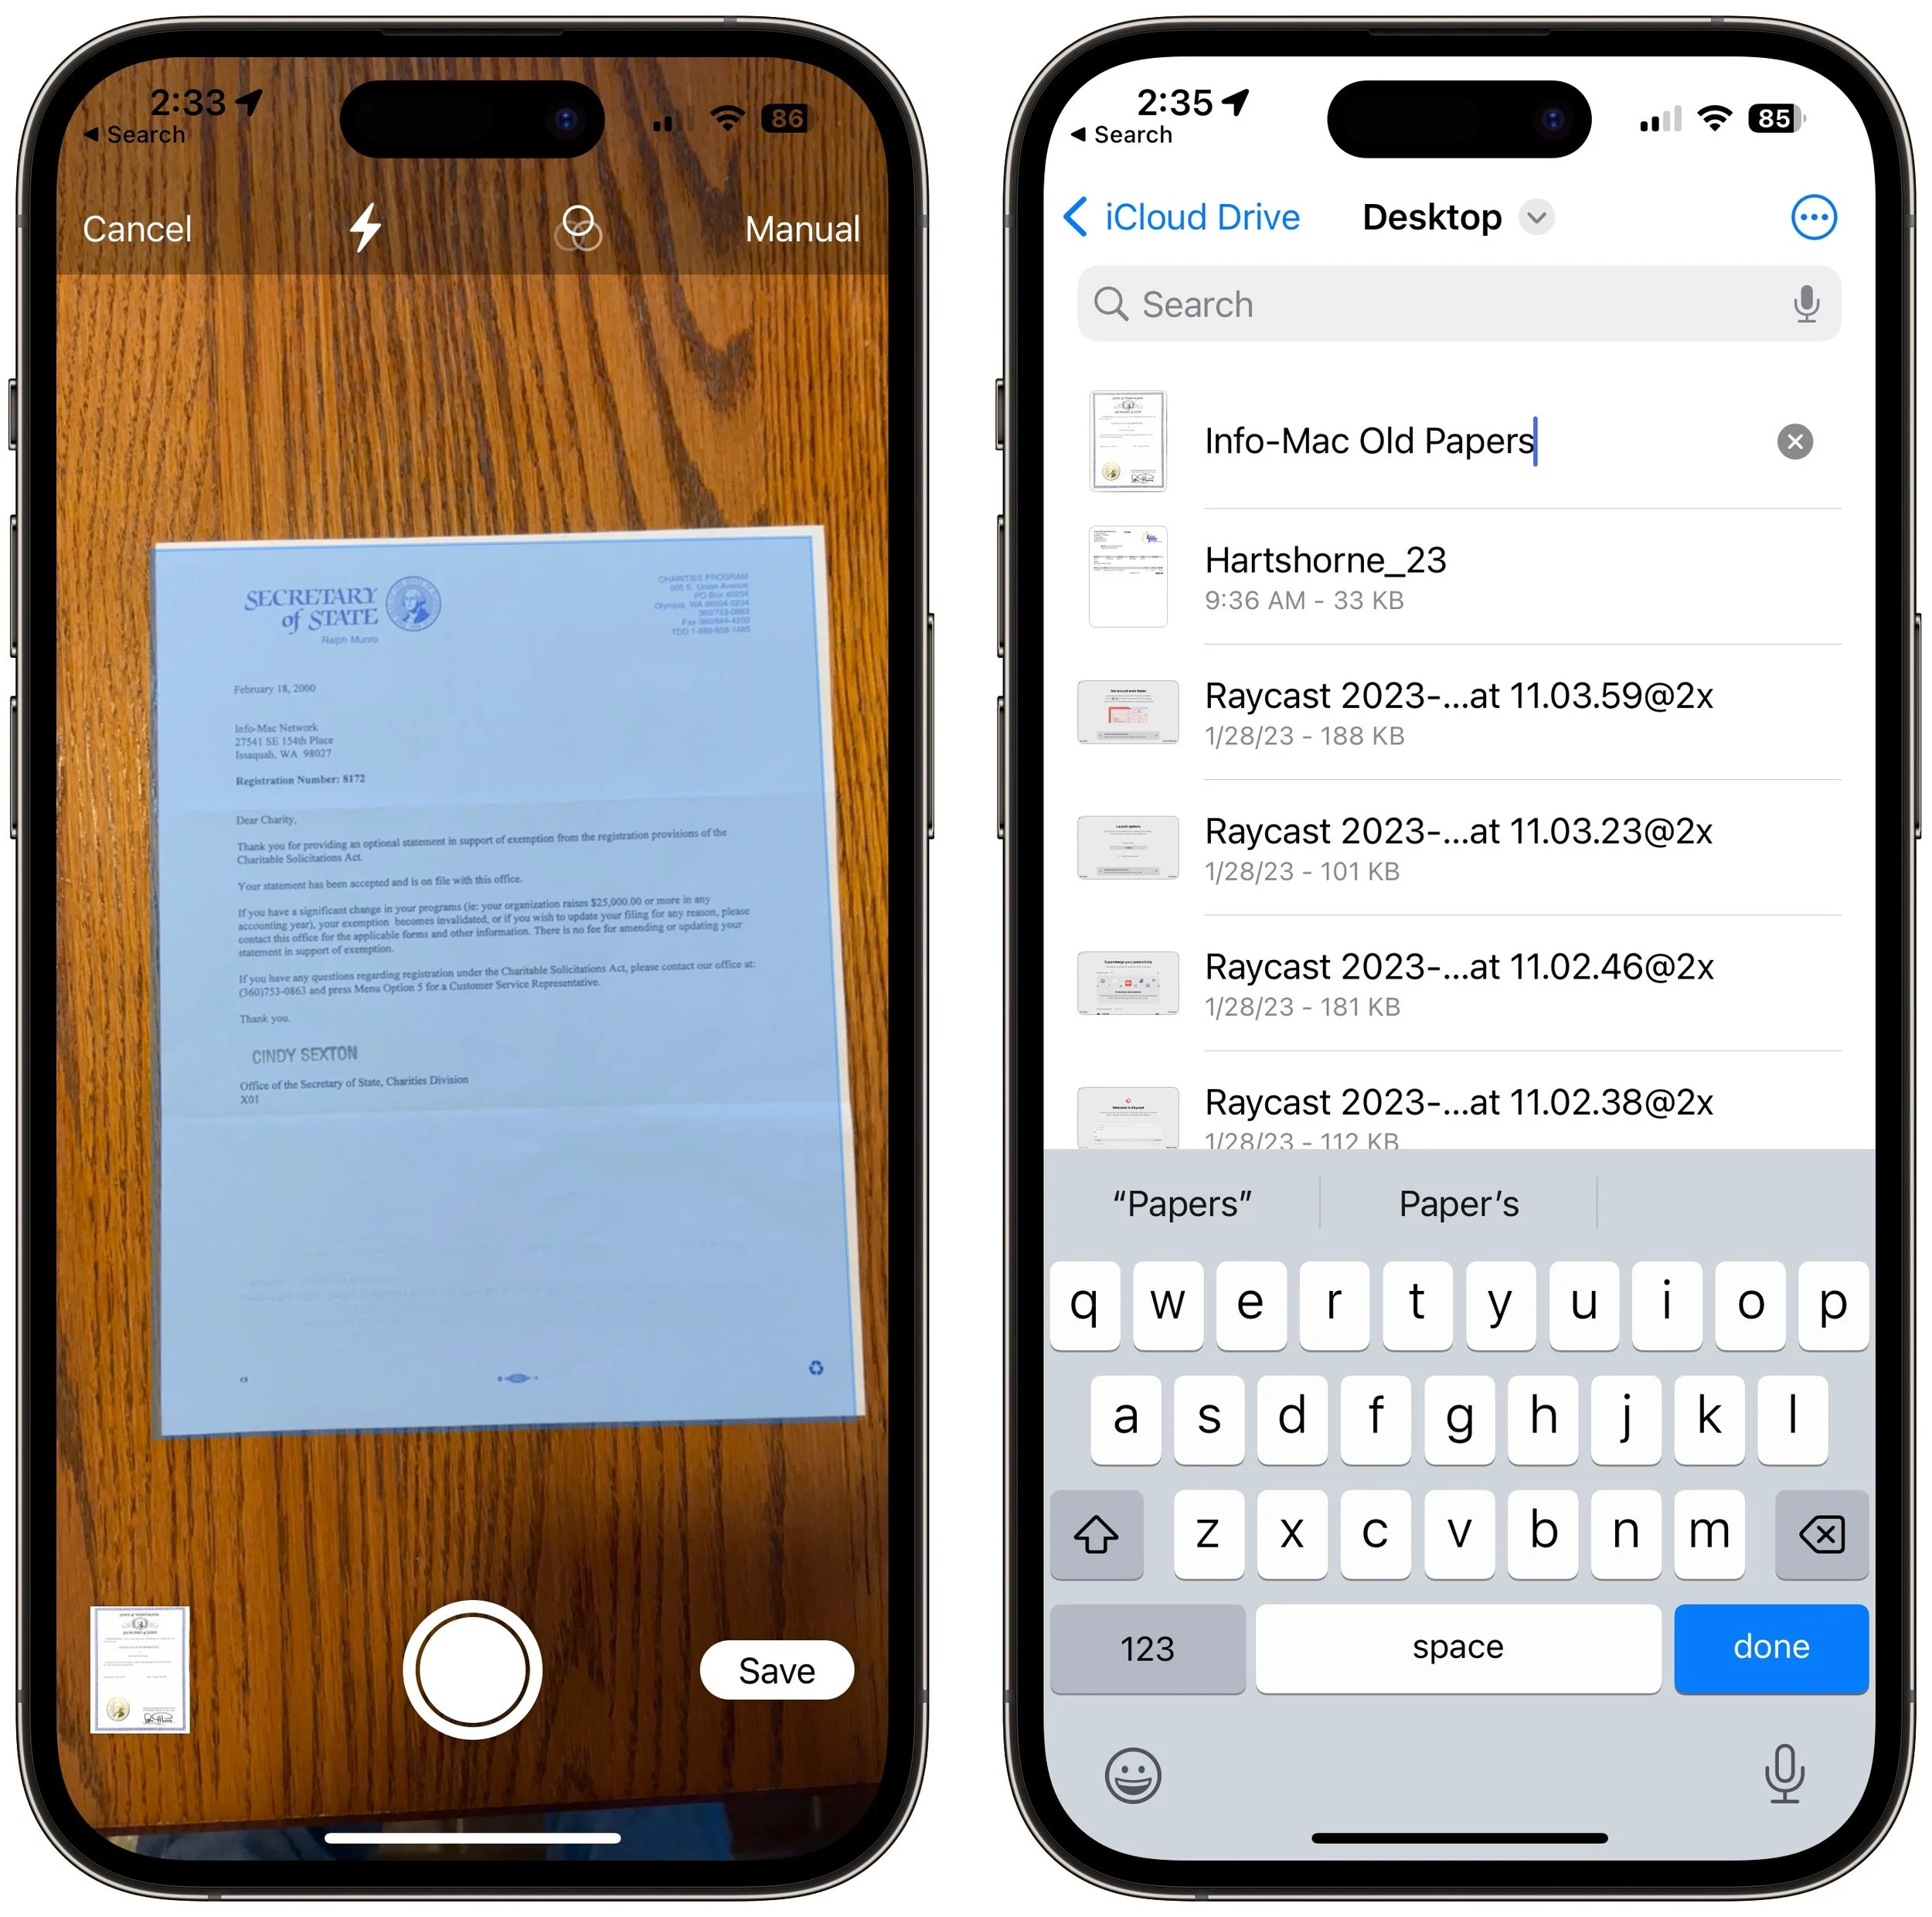
7. If a page isn’t exactly the way you want it, tap the image well to the left of the shutter button to make changes. On the edit page, the crop icon at the bottom returns you to the previous screen to adjust the corners again. The color filter icon lets you choose from Color, Grayscale, Black & White, and Pho-to—stick with color or grayscale for most documents. If the document came in at the wrong orientation, tap the rotate icon. If the image still isn’t to your liking, you can retake it or tap the trash icon to delete it. If you’ve scanned multiple documents, you can swipe between them. Tap Done when you’re finished, and return to Step 6 to save.

Scan to Your Mac with Your iPhone or iPad
It’s easy enough to save a scanned document to iCloud Drive or another file sharing service so you can access it on the Mac or move it from the Files app to the Mac. But if your goal is to scan directly to the Mac, you can do that too.
In Preview, choose File > Import from iPhone > Scan Documents. (Preview will know about all your devices, so it will have sections for each device.) A dialog will appear on the Mac, and your device will immediately switch to the scanning interface.
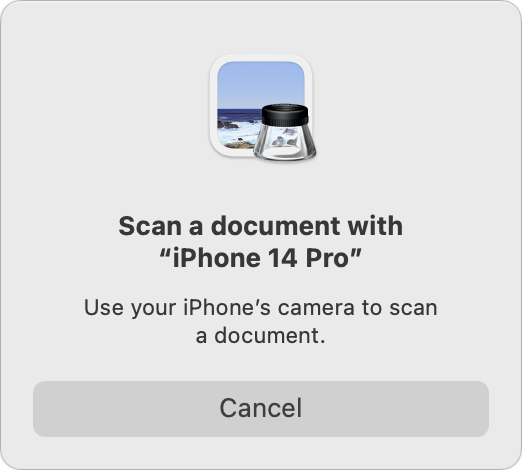
Everything works just as it does if you initiated scanning from the device, including the Auto/Manual switch and the need to tap Save when you’re done. However, instead of saving the document to Files, it will appear as a new document in Preview, where you can work with it like any other PDF and save it to your drive.
Final Thoughts
There are two caveats to scanning documents using your iPhone or iPad:
This approach to scanning does not do optical character recognition (OCR) to make the scanned text selectable—the resulting PDF pages are just images. Online tools can perform OCR on a PDF; we’ve seen good results from AvePDF’s OCR PDF tool. This might not be a good idea with sensitive documents.
Scanned documents tend to be large. If your scan ends up too big to share via email, for instance, other online PDF compression tools can shrink files. If you use AvePDF to OCR your document, another click on its Hyper-Compress PDFs tool can compress the same document by as much as 90%.
Overall, you’ll probably get better quality from a hardware scanner—particularly a flatbed—because it’s easier to position the pages perfectly, the light is stronger and more even, and there’s no need to deskew (straighten) the scanned page images, as Apple’s software attempts to do when you’re not directly over the page. But it’s hard to beat the convenience of a quick scan with your iPhone when quality isn’t paramount.
(Featured image by Adam Engst)