No, NameDrop in iOS 17 Isn’t a Privacy Concern. Here’s How to Use It
Is iOS 17’s new NameDrop feature a privacy concern or a quick way to share contact info with a new friend? We think the privacy concerns are entirely overblown and explain how easy it is to use NameDrop.

One of the prominent new features in iOS 17.1 and watchOS 10.1 is NameDrop, which makes it easy to exchange contact information with someone merely by putting your iPhone or Apple Watch next to theirs. When you do that, you can share your contact card and receive theirs, or just receive theirs—nothing happens unless you initiate an action.
Unfortunately, some police departments have posted warnings about NameDrop on Facebook, insinuating that it’s a privacy concern. Nothing could be further from the truth. First, NameDrop requires the devices to be almost touching, so it’s implausible that it could be triggered inadvertently, and second, you must unlock your iPhone and tap a button to share your contact information with the other person. If you lock your iPhone or move it out of range, Apple says the transfer will be canceled.

There’s no harm in turning NameDrop off by default other than losing access to the feature, but it’s a sufficient win that we encourage you to leave it enabled.
Imagine you meet someone new at a conference and want to share contact information. Previously, you would have had to find your contact card at the top of the Contacts app or Phone app, tap Share Contact, choose which fields to share, tap Done, and then share it via AirDrop (which may require them to enable their receive settings in Settings > General > AirDrop > Everyone for 10 Minutes), Messages (after entering their phone number), Mail (after typing their email address), or another method. It’s a pain.
Here’s how sharing contact information with someone new works in NameDrop. (It only supports sending new contact information, not updating an existing contact.) Both of you must have an iPhone running iOS 17.1 or an Apple Watch Ultra, Apple Watch Series 7 or later, or second-generation Apple Watch SE running watchOS 10.1. To get started, either:
Share from an iPhone to another iPhone or an Apple Watch: Hold your unlocked iPhone close (almost touching) to the top of the other person’s iPhone or Apple Watch.
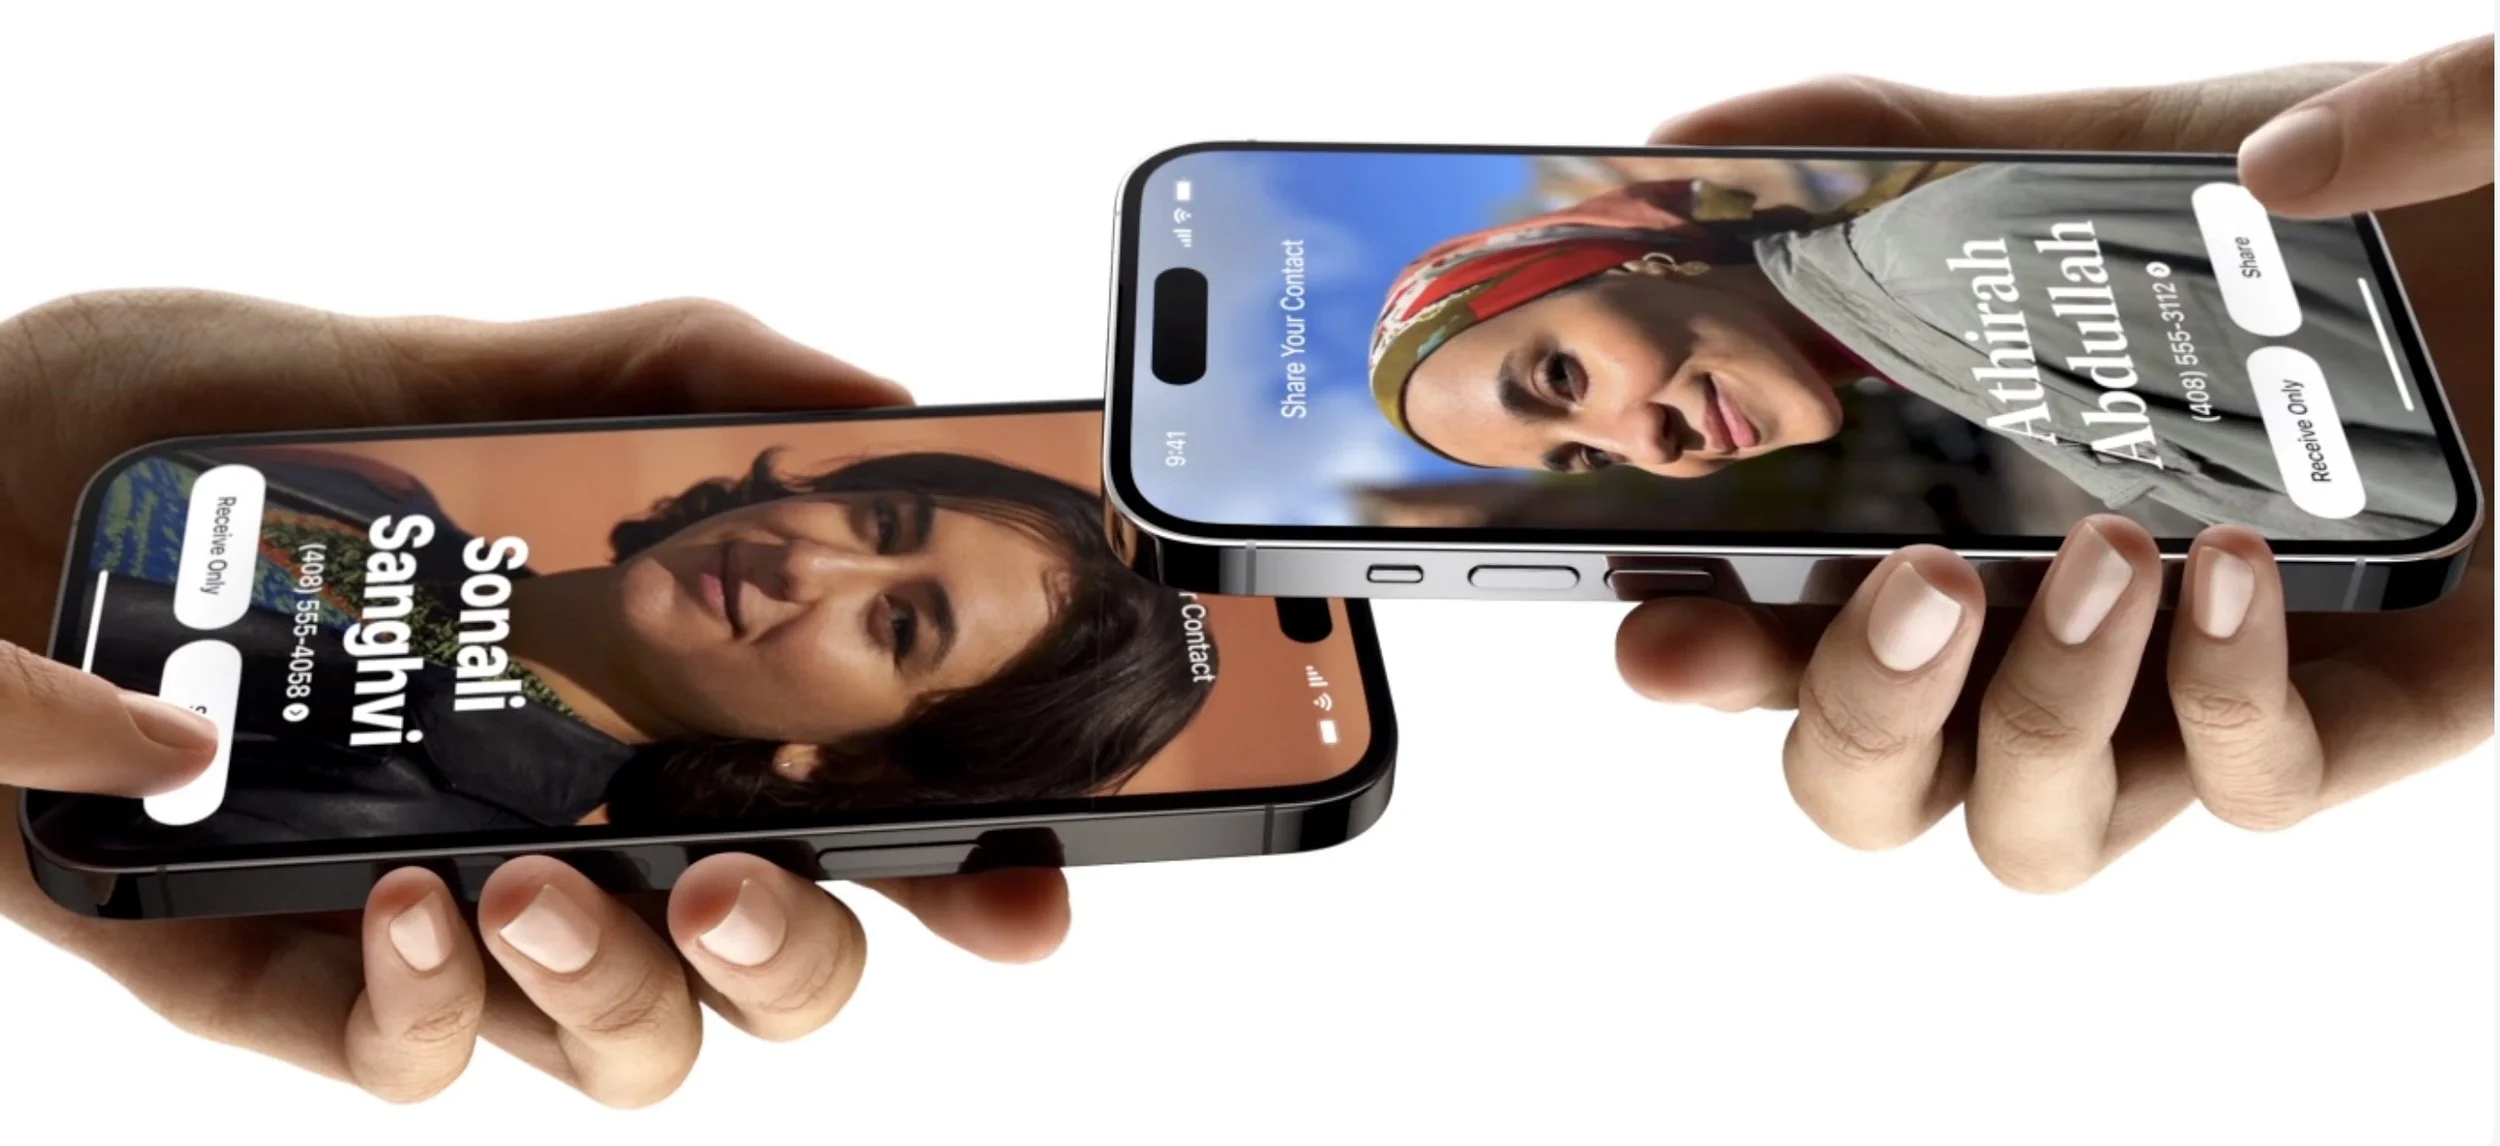
Share from an Apple Watch to another Apple Watch: Open the Contacts app on your Apple Watch, tap your picture in the upper-right corner, tap Share, and then put your watch close to the other person’s Apple Watch (Apple’s animation shows them being positioned face to face).
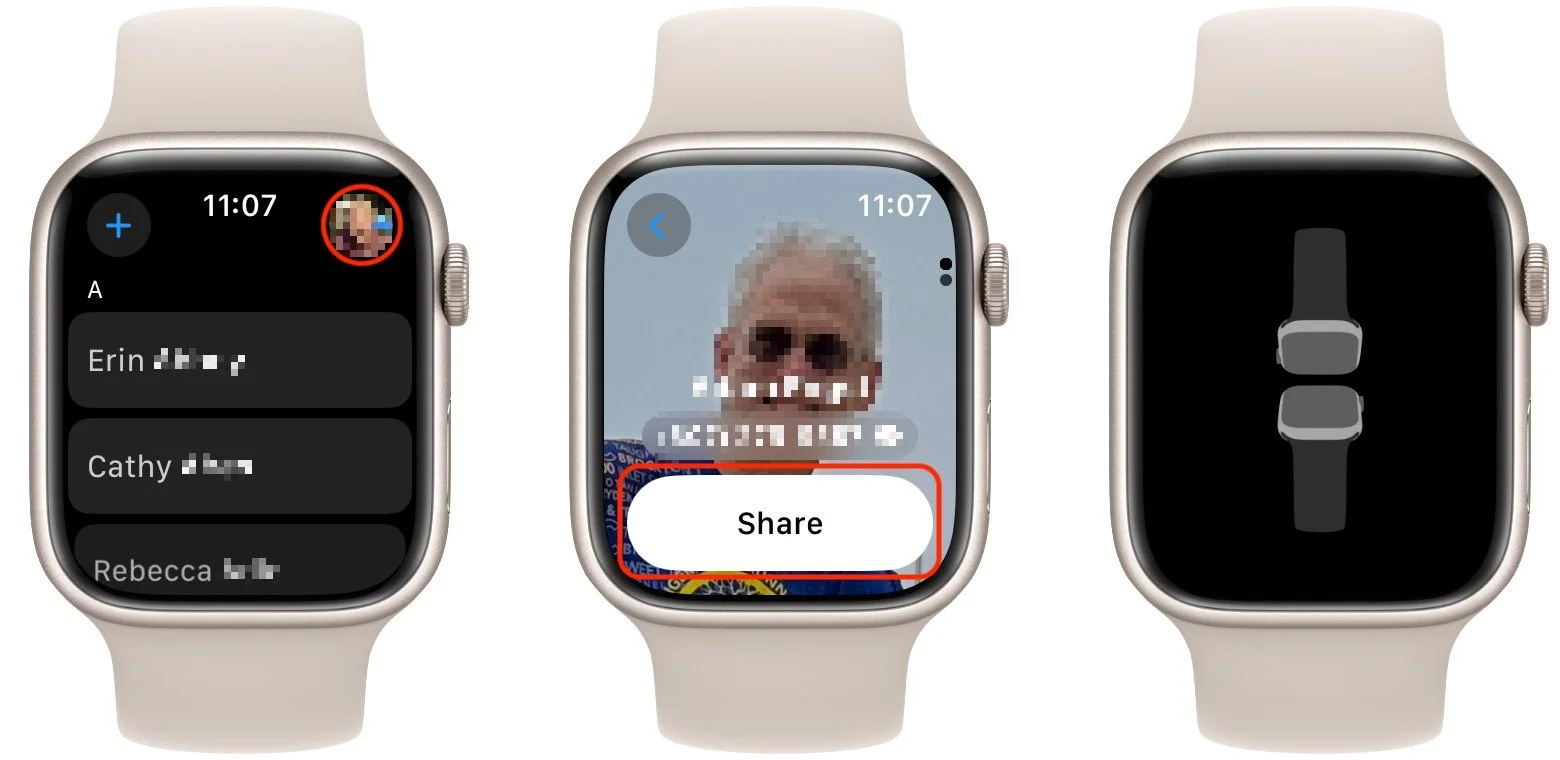
Keep the devices close together until NameDrop appears on both screens. On the iPhone, tap Share to exchange contact information or Receive Only to get theirs without sending yours. On the Apple Watch, you have only a Share button.
Next time you meet someone new and want to exchange contact information, give NameDrop a try. Alas, if they’re an Android user, you’ll have to fall back on the old, clumsy methods.
(Featured image based on an original by iStock.com/Caiaimage/Martin Barraud)
The Best Apple Gifts for 2023
Looking for the perfect holiday gift for the Apple user in your life? Here are our suggestions for the top Apple gifts for 2023.

We’re moving into the holiday shopping season, and if you’re looking for the perfect gift for that special someone, Apple-related gifts always go over well. Here are our recommendations this year.
AirTag
Do you know someone who’s always misplacing their keys, purse, or backpack, or who’s planning a trip? They might appreciate Apple’s AirTag trackers. Attach one to a keyring or backpack (with a separate $29 AirTag Loop or $35 AirTag FineWoven Key Ring—there are also lots of third-party clips and holders, such as for bikes) or store it deep in a bag pocket, and from then on, they can use the iPhone’s Find My app to see where they left their stuff. AirTags leverage the Find My network, so wherever the item is, nearby Apple devices that detect it can securely share its location with you. AirTags are especially helpful for tracking down checked luggage that hasn’t arrived at its destination—we wouldn’t travel without them anymore. One AirTag costs $29, or you can get a four-pack for $99. You can even have Apple personalize each AirTag with custom text and emoji. In iOS 17, you can better share AirTags with family members, too!

AirPods and AirPods Pro
Apple’s wireless earbuds keep getting better. In September, the company updated the second-generation AirPods Pro with a USB-C charging case (to match the USB-C–focused iPhone 15 line) and improved dust resistance. The updated AirPods Pro also support lossless audio with the Apple Vision Pro headset promised for early 2024. The second-generation AirPods and third-generation AirPods remain available, and all three make excellent gifts.
The second-generation AirPods cost $129, have a relatively long stalk, and feature up to 5 hours of listening on one charge. The $179 third-generation AirPods shrink the stalk, switch to a force sensor for controls, add support for spatial audio with dynamic head tracking, feature sweat and water resistance, have a MagSafe wireless charging case, and last up to 6 hours on a single charge. For $249, the second-generation AirPods Pro now offer Adaptive Audio, which blends Active Noise Cancellation and Transparency mode to let important sounds in when needed. They provide touch control for media playback and volume adjustments from the stem and boast a battery life of up to 6 hours. The new USB-C charging case for the AirPods Pro is dust- and water-resistant, includes a lanyard loop, and can charge from a USB-C cable, MagSafe charger, Qi wireless charger, or Apple Watch charger. All three models support Hey Siri commands and automatically switch between Apple devices. See all the similarities and differences in Apple’s comparison tool.

HomePod and HomePod mini
Apple unexpectedly brought the full-size HomePod back to its lineup in 2023, tweaking the hardware specs to reduce manufacturing costs while maintaining or even improving sound quality, depending on whose ears are listening. The $299 second-generation HomePod supports spatial audio with Dolby Atmos for music and video, includes temperature and humidity monitoring, and can alert you if smoke or carbon monoxide alarms go off. The grapefruit-sized HomePod mini takes up less space, produces excellent sound for its size, and can do almost everything the larger HomePod can do for only $99.
You can control either the HomePod or HomePod mini entirely via Siri, use it as a hub for your HomeKit home automation accessories, and even have it play sound from your Apple TV. Put a HomePod in different rooms in the house, and you can use Intercom to communicate with family members with your voice. Pair two HomePods of the same type and generation for stereo sound for the best audio experience. HomePods work best when coupled with an Apple Music subscription, but remember that either HomePod model comes with a free 6-month subscription.

Apple TV 4K
The Apple TV hasn’t changed much for a while, but last year’s models still make great gifts. If someone on your list would enjoy a streaming media player, consider the third-generation Apple TV 4K, which has a lot going for it. For someone who primarily wants to watch videos, the $129 Apple TV 4K (Wi-Fi) model is all they’ll ever need, with 64 GB of storage. For $149, the Apple TV 4K (Wi-Fi + Ethernet) has 128 GB of storage for loading numerous apps and games, and it includes a Gigabit Ethernet port and supports the Thread home automation protocol. Both include a Siri Remote that charges via USB-C.

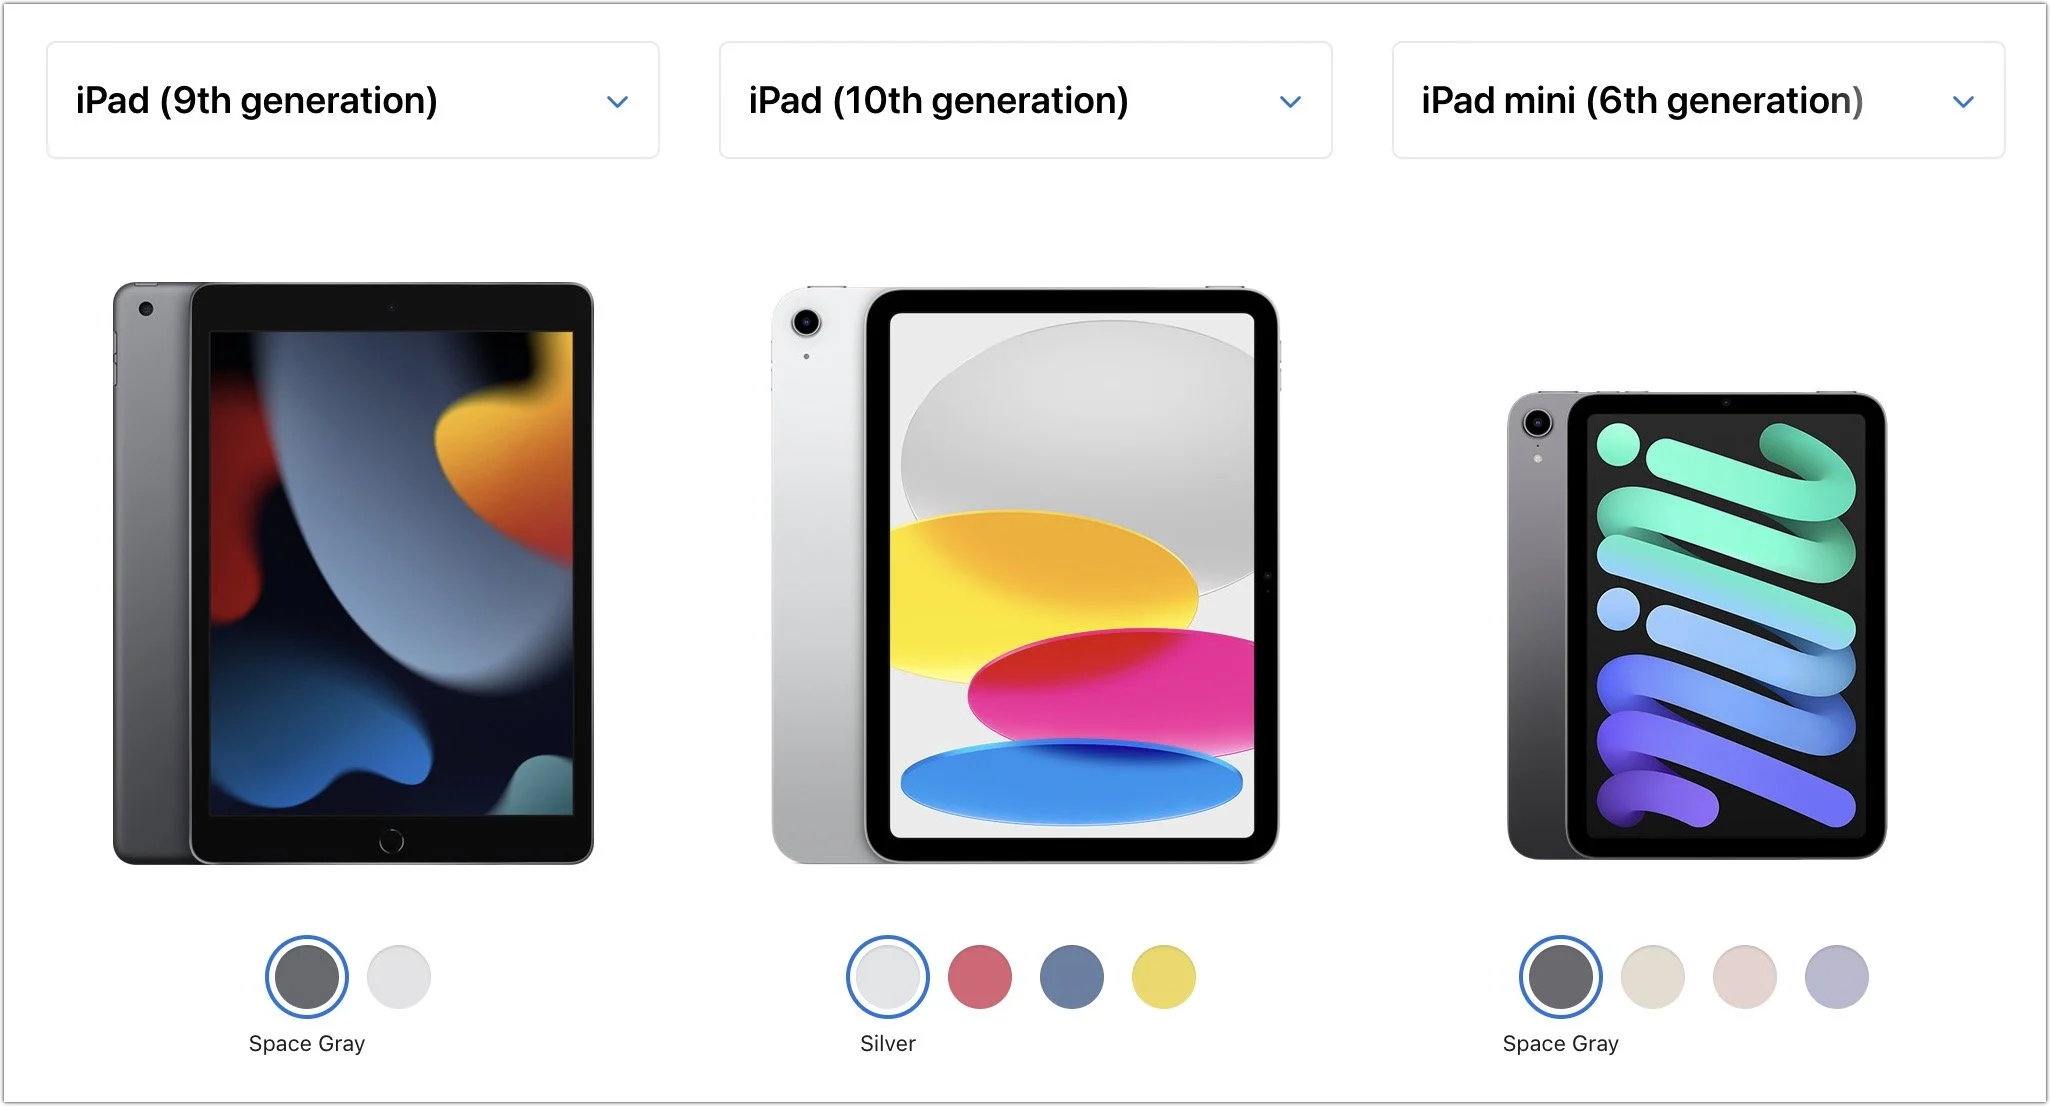
iPad, iPad mini, and iPad Air
If you’re considering giving an iPad as a gift, Apple has numerous options for you to choose from, with starting prices ranging from $329 to $599. The main change for 2023 is the release of the new USB-C Apple Pencil, which is compatible with all iPads with USB-C and costs just $79. The $50 price drop comes with the loss of pressure sensitivity and wireless charging.

iPad choices include:
Ninth-generation iPad: The budget choice for a kid or an adult with basic needs is the two-year-old ninth-generation iPad, which remains a bargain at $329. It works with the first-generation Apple Pencil ($99), and those who need to type can add the $159 Smart Keyboard.
Tenth-generation iPad: Last year’s tenth-generation iPad starts at $449. It moves Touch ID to the top button, increases the display size to 10.9 inches, and positions the front-facing camera on the landscape edge. It pairs with the $249 Magic Keyboard Folio and either the first-generation Apple Pencil or the USB-C Apple Pencil ($79).
iPad mini: If you’re looking for something small, the diminutive sixth-generation iPad mini fits the bill at just $499. It’s compatible with the second-generation Apple Pencil ($129) and the USB-C Apple Pencil, but to add a keyboard, you’ll have to look to a third-party manufacturer or use a standard Bluetooth wireless keyboard.
iPad Air: For the most power short of the pricey iPad Pro models, consider the fourth-generation iPad Air. It starts at $599 and can handle even the most intensive tasks, especially when coupled with a second-generation Apple Pencil or USB-C Apple Pencil and either a Magic Keyboard ($299) or Smart Keyboard Folio ($179).
Apple Watch Gift Certificate
We love the Apple Watch, but it can be tricky to give a gift. There are three rather different models, and Apple provides a dizzying number of options for case size, material, and color, plus many band options, making it difficult to know what would be most appreciated. Instead of guessing what your recipient would like, we encourage giving a certificate that’s good for a conversation about what to purchase. Then sit down with the recipient to run through all the decisions on the Apple Watch site.
2023’s options include the second-generation Apple Watch SE (starting at $249), the new Apple Watch Series 9 (starting at $399), and the second-generation of the big, beefy, adventure-focused Apple Watch Ultra (starting at $799). Remember that cellular models cost more and require a monthly service fee.
With its support for heart rate monitoring, fall detection, and crash detection, the Apple Watch SE is all that most people need. Consider the Apple Watch Series 9 if you also want a larger and brighter Always-On display, blood oxygen sensor, ECG capabilities, temperature sensor for cycle tracking, and support for watchOS 10’s new double-tap gesture for activating the default button in the current app. The second-generation Apple Watch Ultra puts all those features and more into a 49mm titanium case with an Action button for quick access to app-specific commands. Its buttons are larger and easier to press, the Always-On display is brighter, the GPS works better in challenging conditions, and it has a depth gauge and water temperature sensor so it can serve as a dive computer. The Apple Watch Ultra boasts up to 36 hours of battery life in everyday usage and up to 72 hours in Low Power Mode. It’s impressive, but make sure you like how it looks on your wrist, given how big it is. Again, Apple has a helpful comparison tool.

Even though they are worthy gifts, we didn’t include any Macs in this article because they’re quite a bit more expensive and difficult to select without extensive discussion of the recipient’s needs. Let us know if you need help choosing the right Mac for someone on your list, but we’re partial to the M1- and M2-based MacBook Air and the new M3-based 24-inch iMac for many users.
(Featured image by Adam Engst)
Nine Tips for Switching from an iPhone with Touch ID to One with Face ID
Are you switching from an iPhone with Touch ID to one with Face ID? The challenge of learning new things can intimidate some people, but we have a list of what you’ll need to know. (And some of the changes are better!)
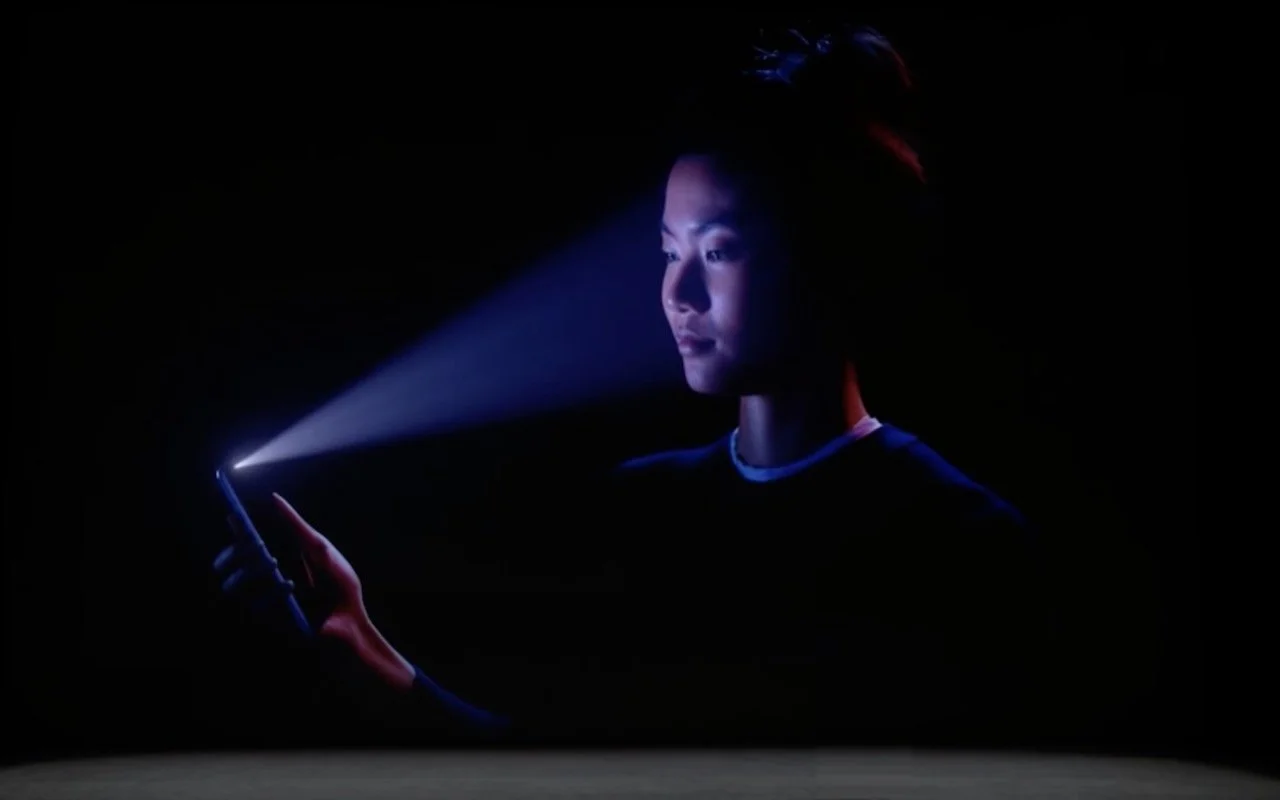
In 2013, Apple added Touch ID to the Home button of the iPhone 5S. Taking advantage of the uniqueness of fingerprints, Touch ID combines the Home button press to wake up the iPhone with a fingerprint scan to authenticate the user. But in 2017, Apple introduced the iPhone X with Face ID, which relies on cameras and sensors at the top of the screen to authenticate the user via facial recognition. Since then, Apple has slowly been phasing out Touch ID in the iPhone line, with only the third-generation iPhone SE still supporting it. (Only the iPad Pro models have Face ID; other iPads have Touch ID in the Home button or the top button.)
We’re not here to dub one better than the other, but many people find themselves needing to upgrade from an older iPhone with Touch ID to a newer one with Face ID. If you’re trying to switch between Touch ID and Face ID, we have some tips to help.
Unlock the iPhone
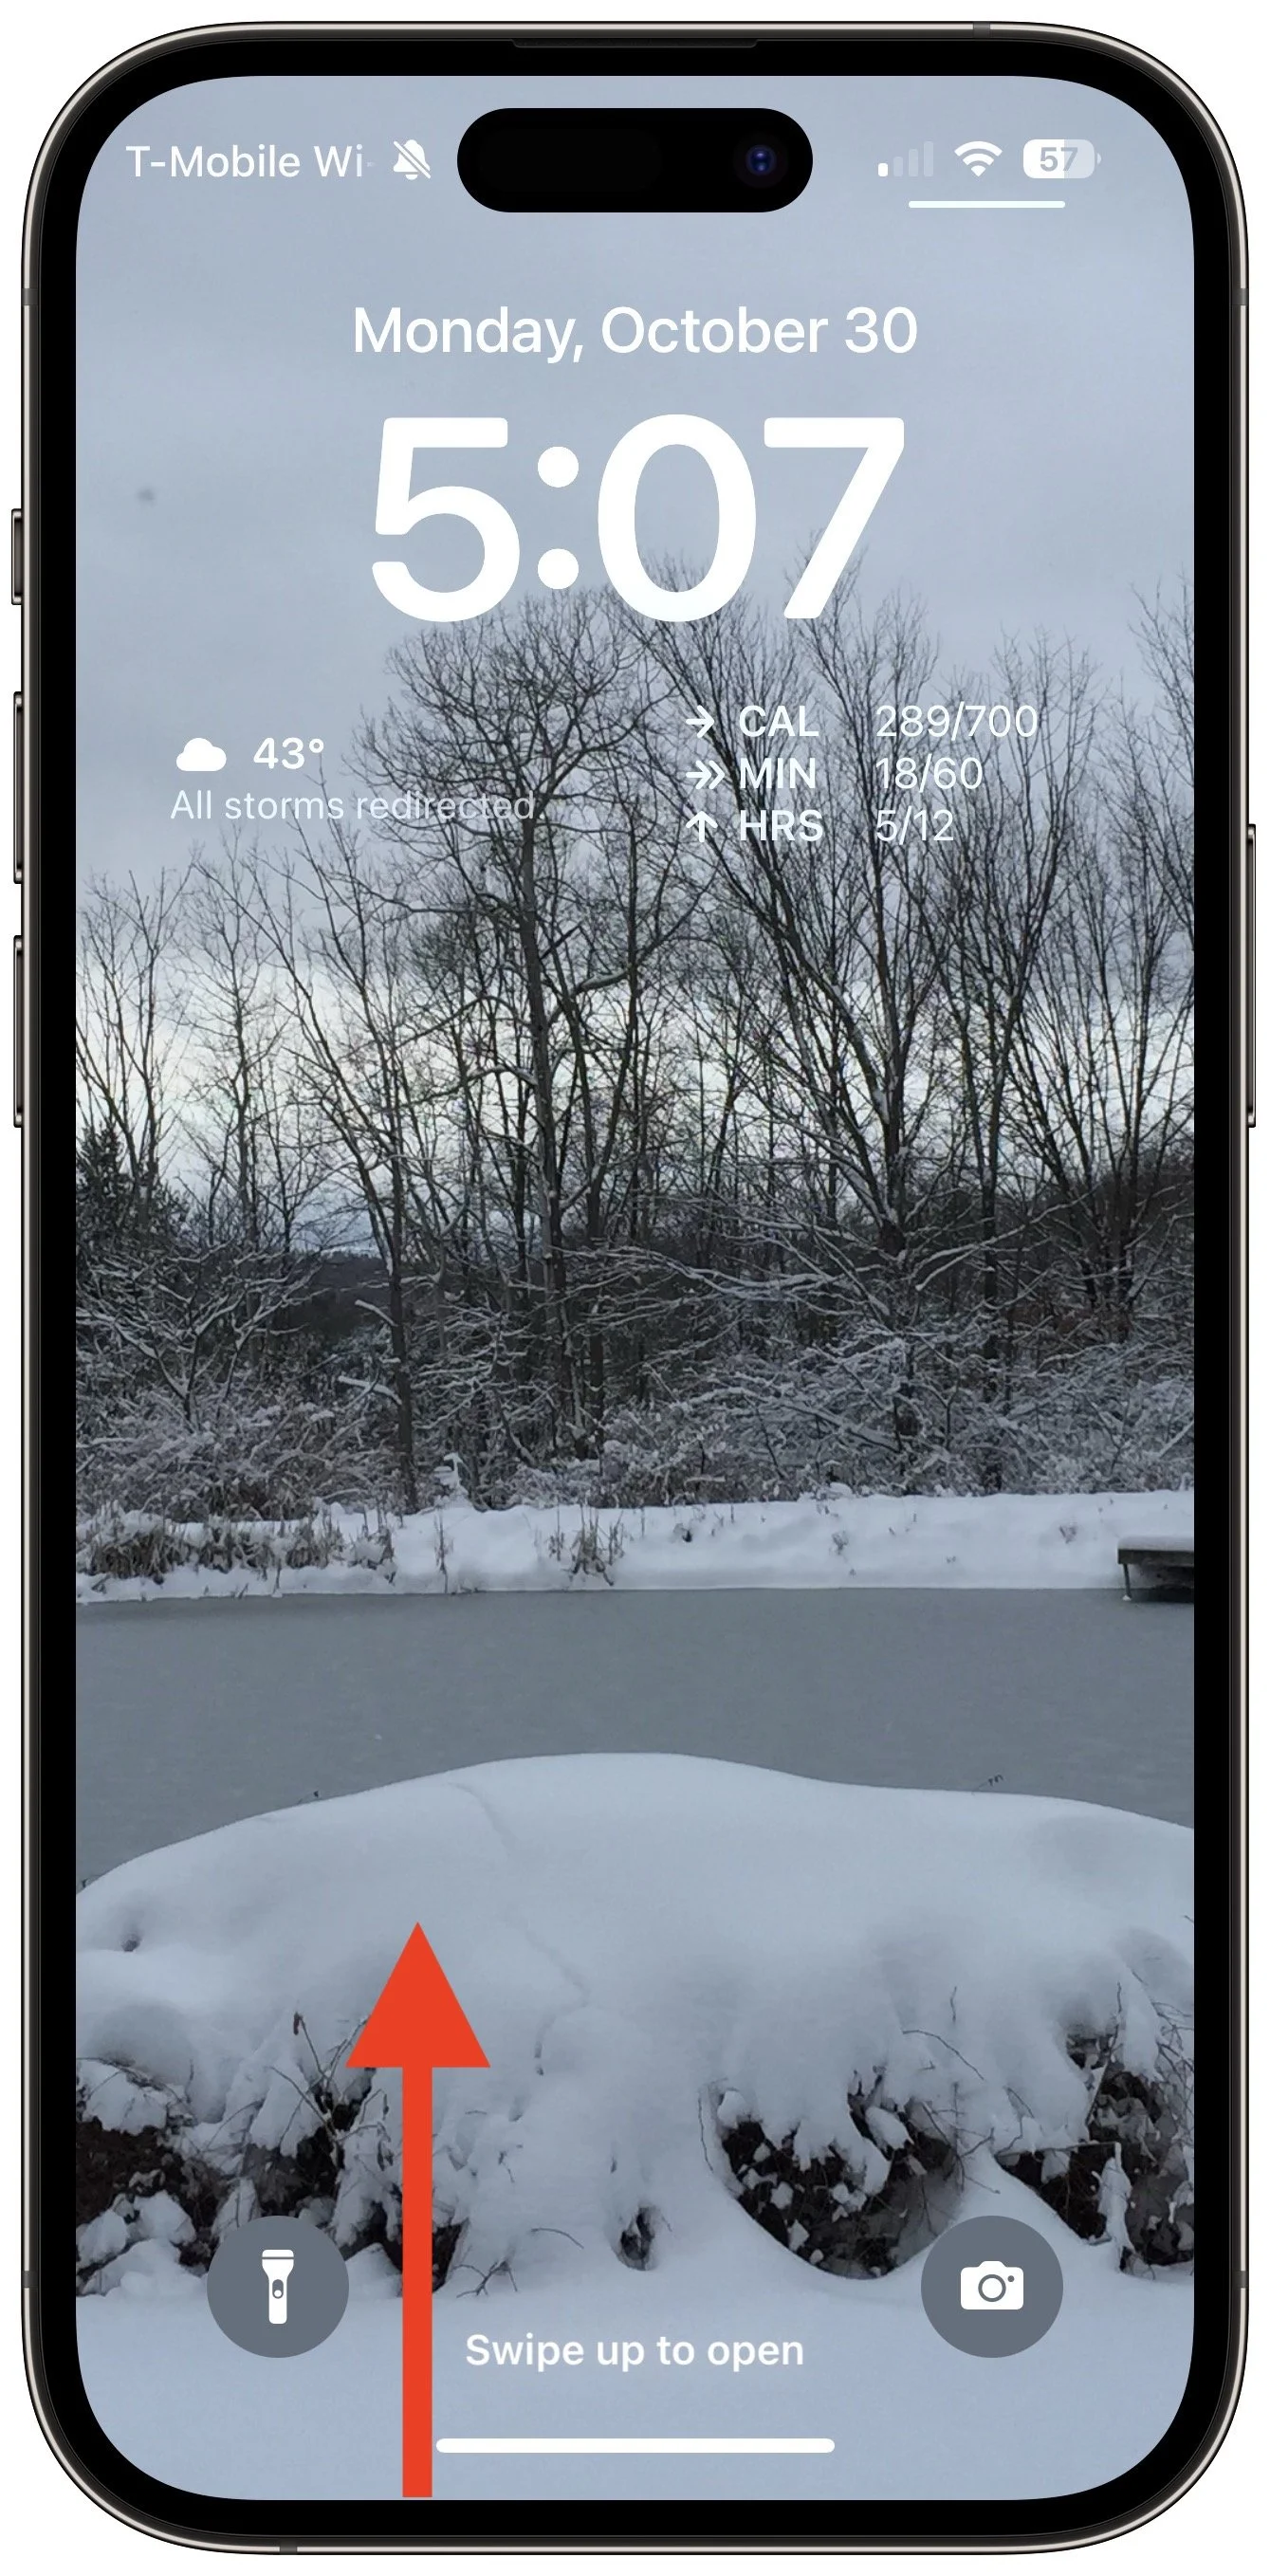
Once the iPhone is awake (the screen is lit up), you unlock an iPhone with Touch ID by pressing the Home button. On an iPhone with Face ID, you swipe up from the bottom of the Lock Screen—a bar reminds you where to start—while looking at the iPhone. Face ID is fast and accurate enough that you’ll notice that authentication is happening only if iOS asks to verify your passcode (which it also does with Touch ID).
Return to the Home Screen
When you’re using an app on an iPhone with Touch ID and want to return to the Home Screen, you press the Home button—logical! On an iPhone with Face ID, you repeat that swipe up from the bottom of the screen action you use to unlock the iPhone. You’ll get really good at it.
Switch between Apps
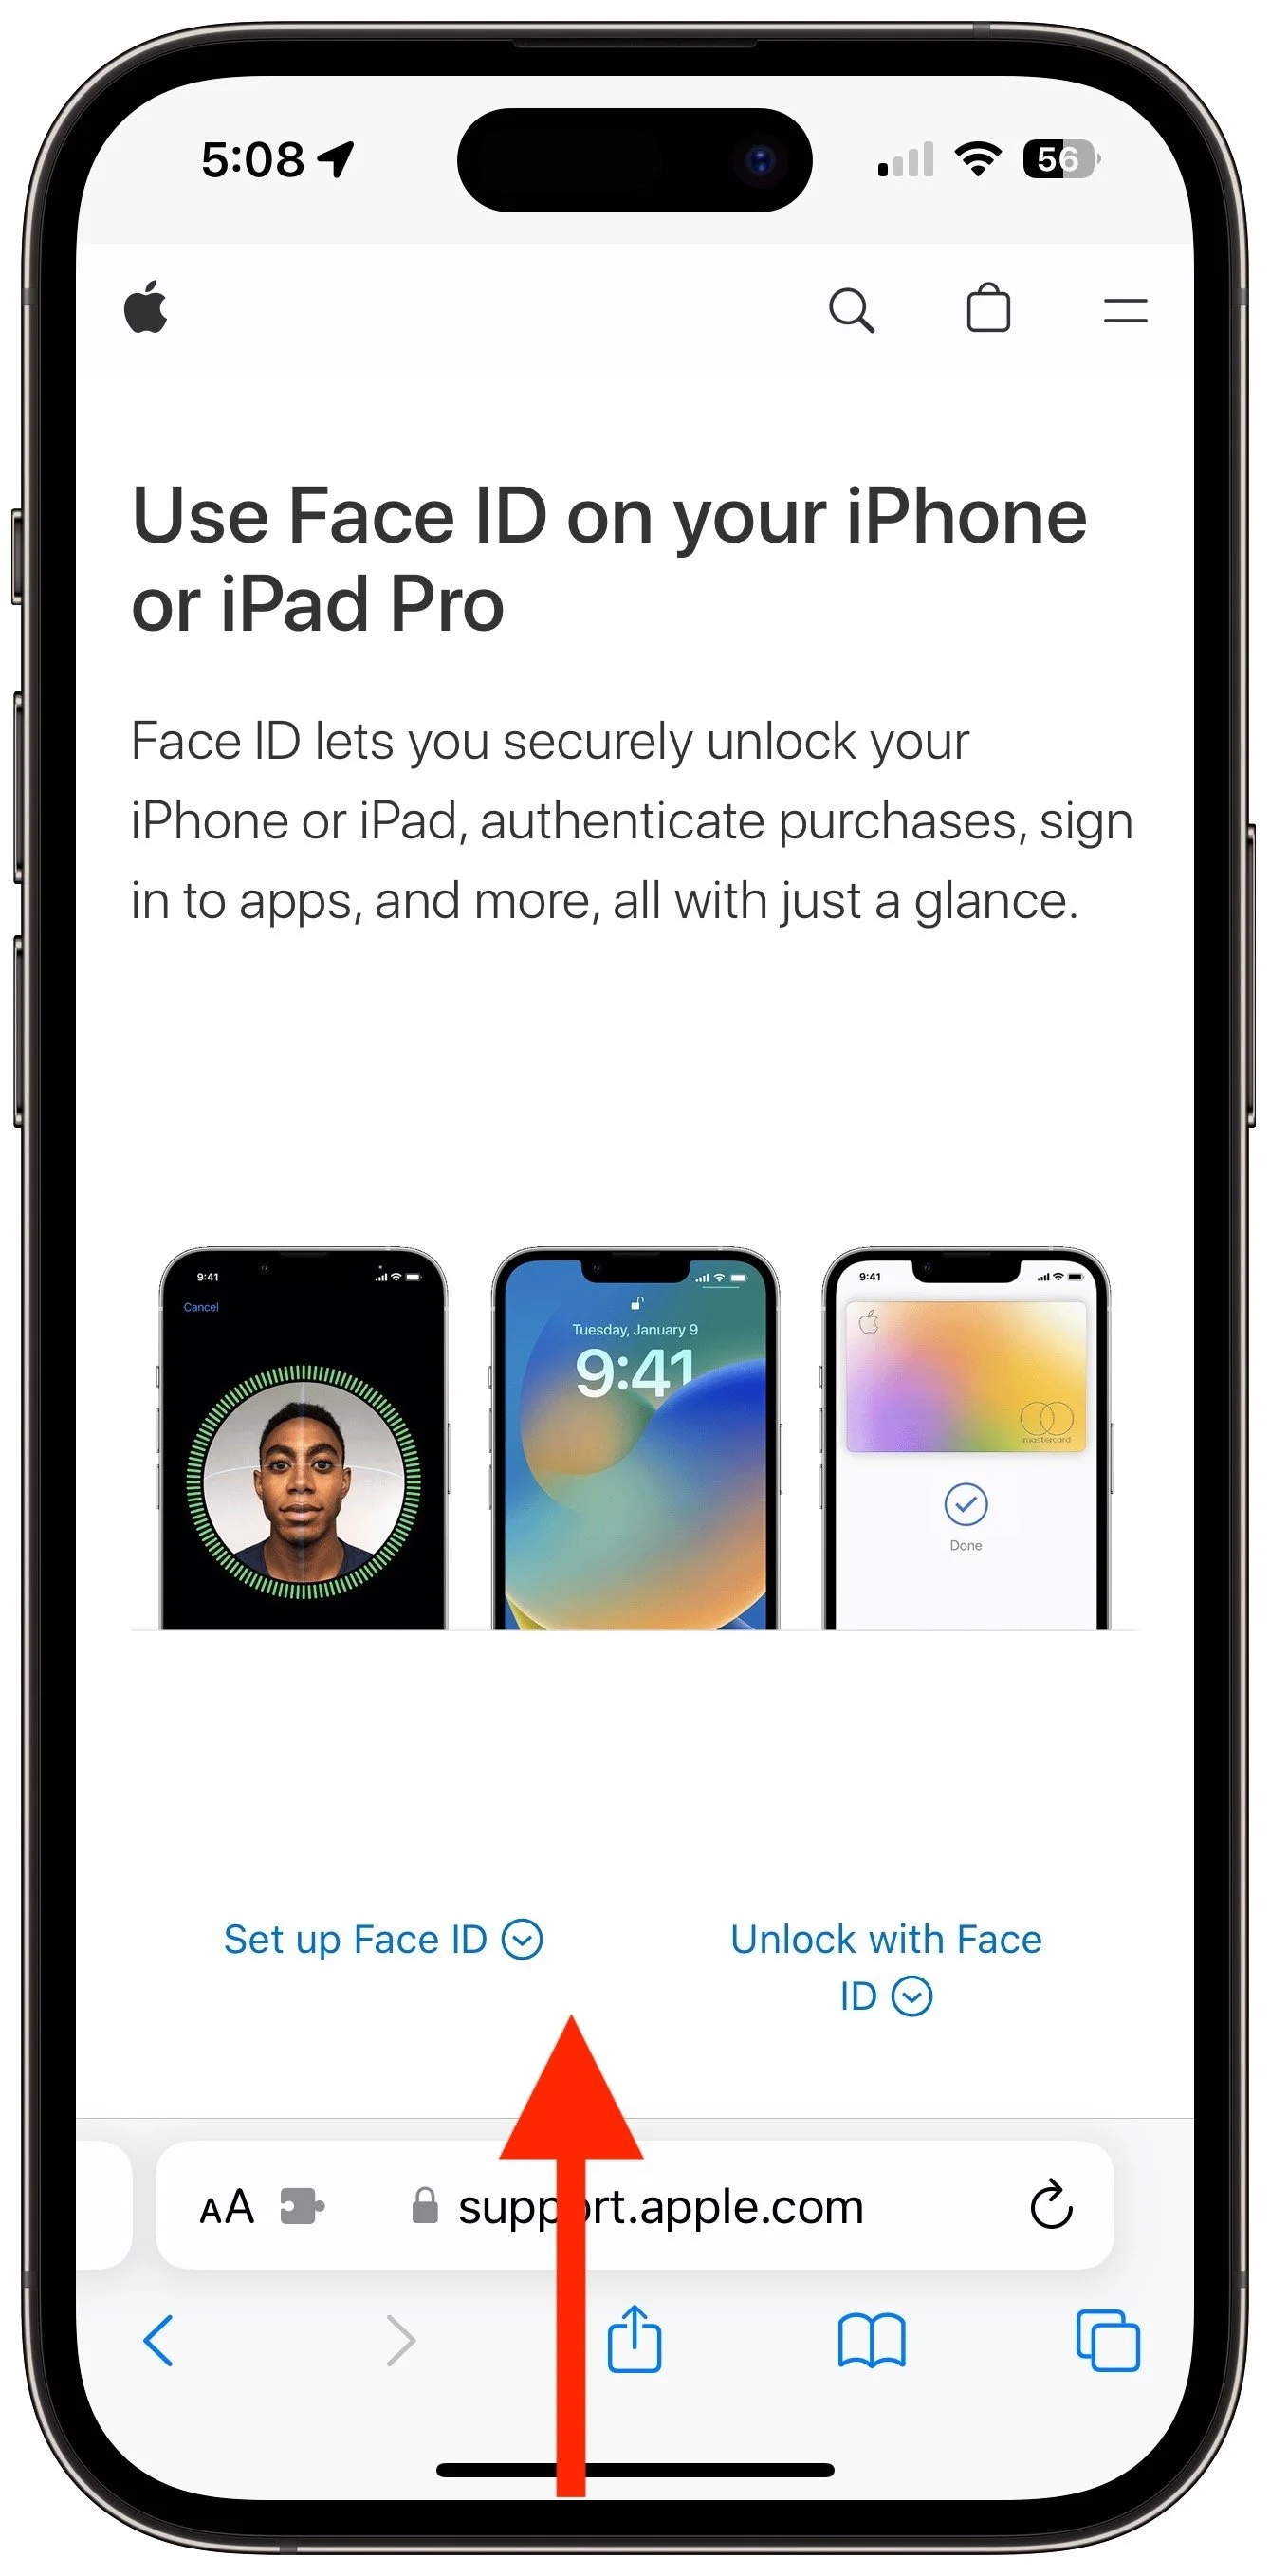
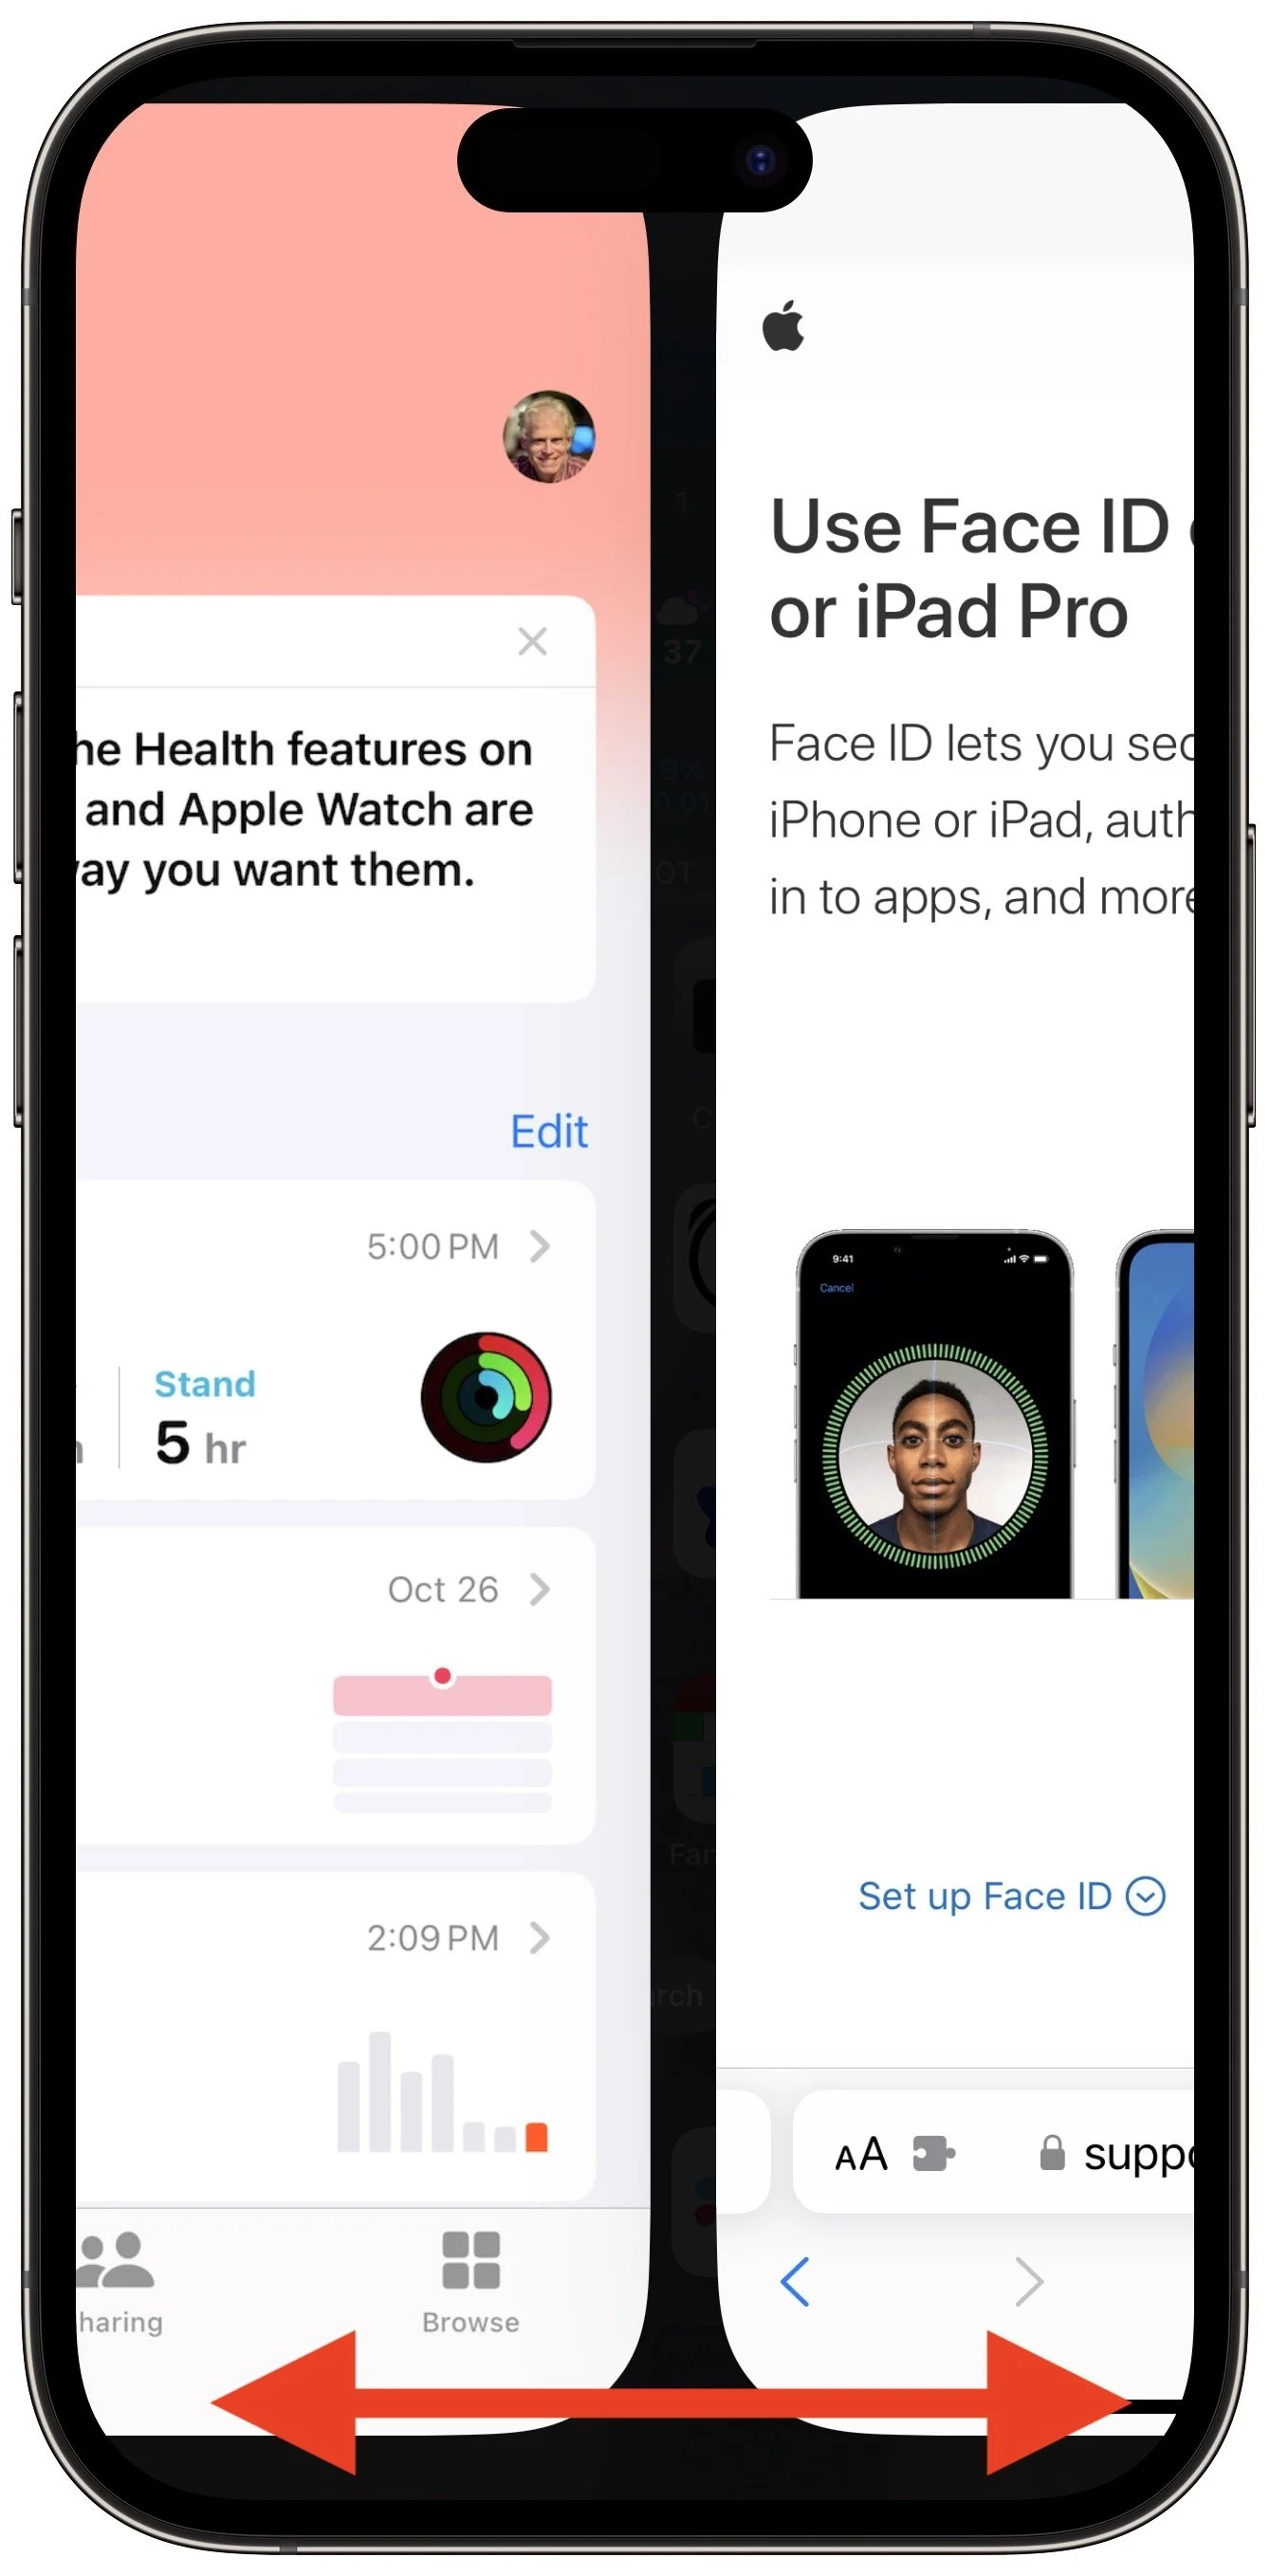
When it comes to switching between apps, iPhones with Face ID offer a unique shortcut. On an iPhone with Touch ID, you must quickly press the Home button twice and then swipe between apps in the App Switcher. Bringing up the App Switcher on an iPhone with Face ID requires swiping up from the bottom of the screen just slightly and then continuing the swipe to the right. But Face ID experts seldom do that. Instead, swipe right and left on the bar at the bottom of the screen to switch between apps—it’s far faster and easier, if hidden.
Activate Siri
On an iPhone with Touch ID, holding the Home button activates Siri. On an iPhone with Face ID, press and hold the side button to activate Siri. Tomato, tomahto.
Open Control Center
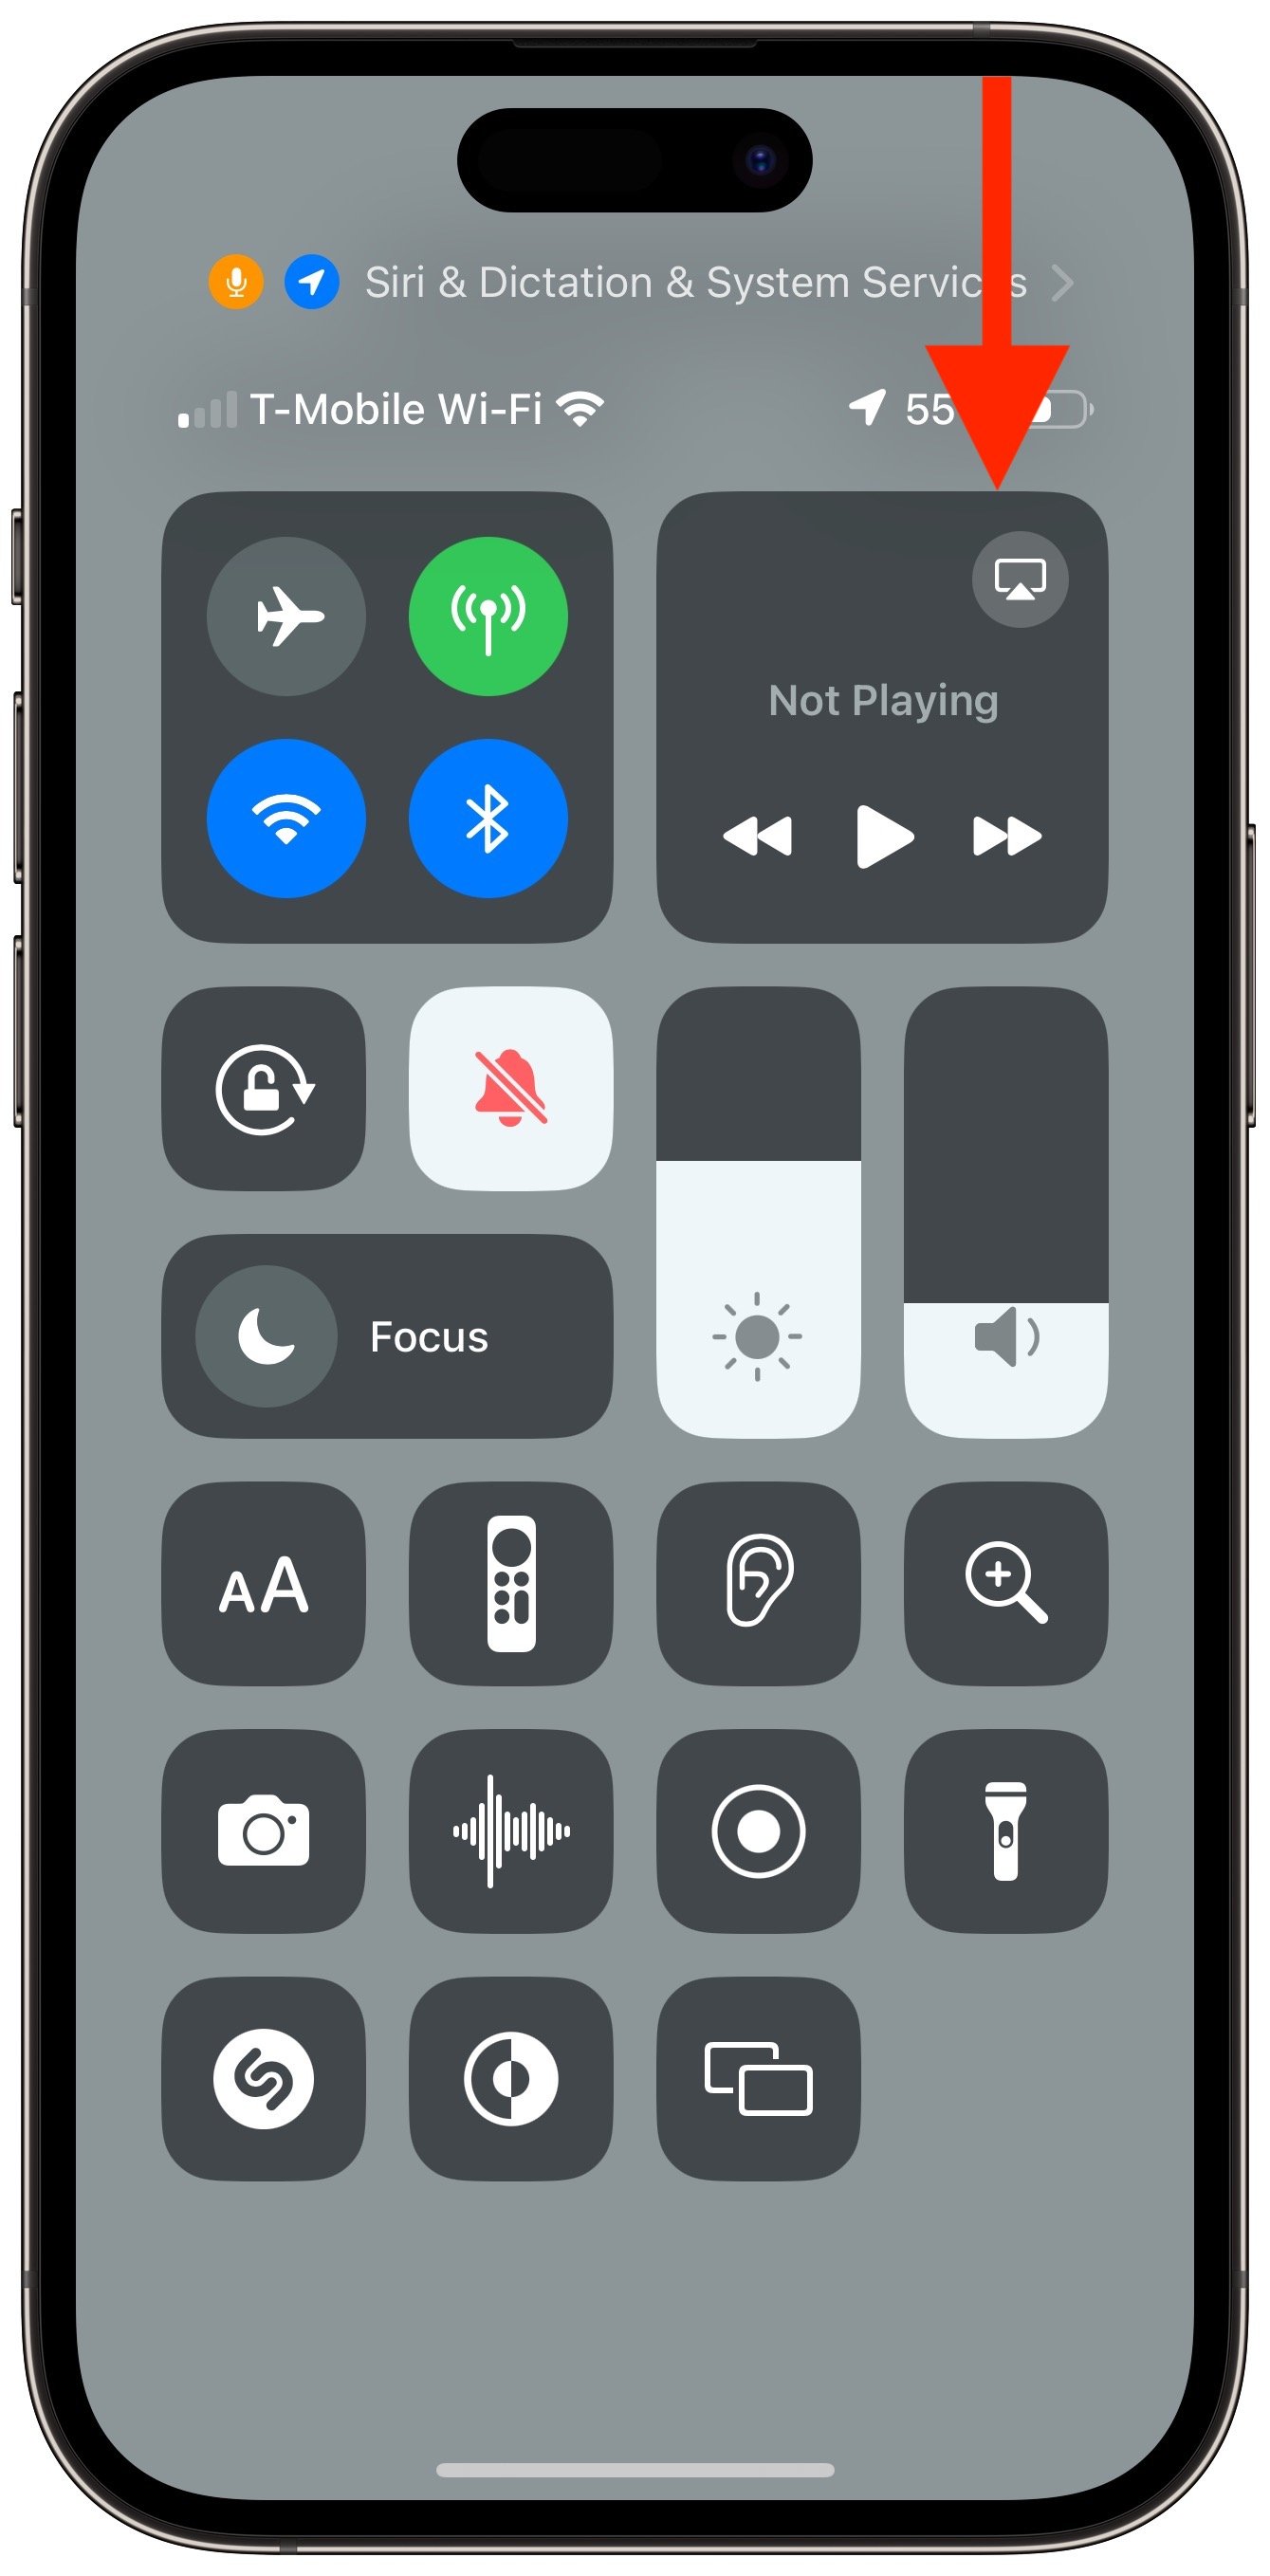
When all we had were iPhones with Touch ID, Apple decided we’d open Control Center by swiping up from the bottom of the screen. Face ID relies on that gesture for unlocking and opening the App Switcher, so on iPhones with Face ID, you instead open Control Center by swiping down from the top right of the screen. Think of it as swiping down from the cellular, Wi-Fi, and battery status icons.
View Notifications
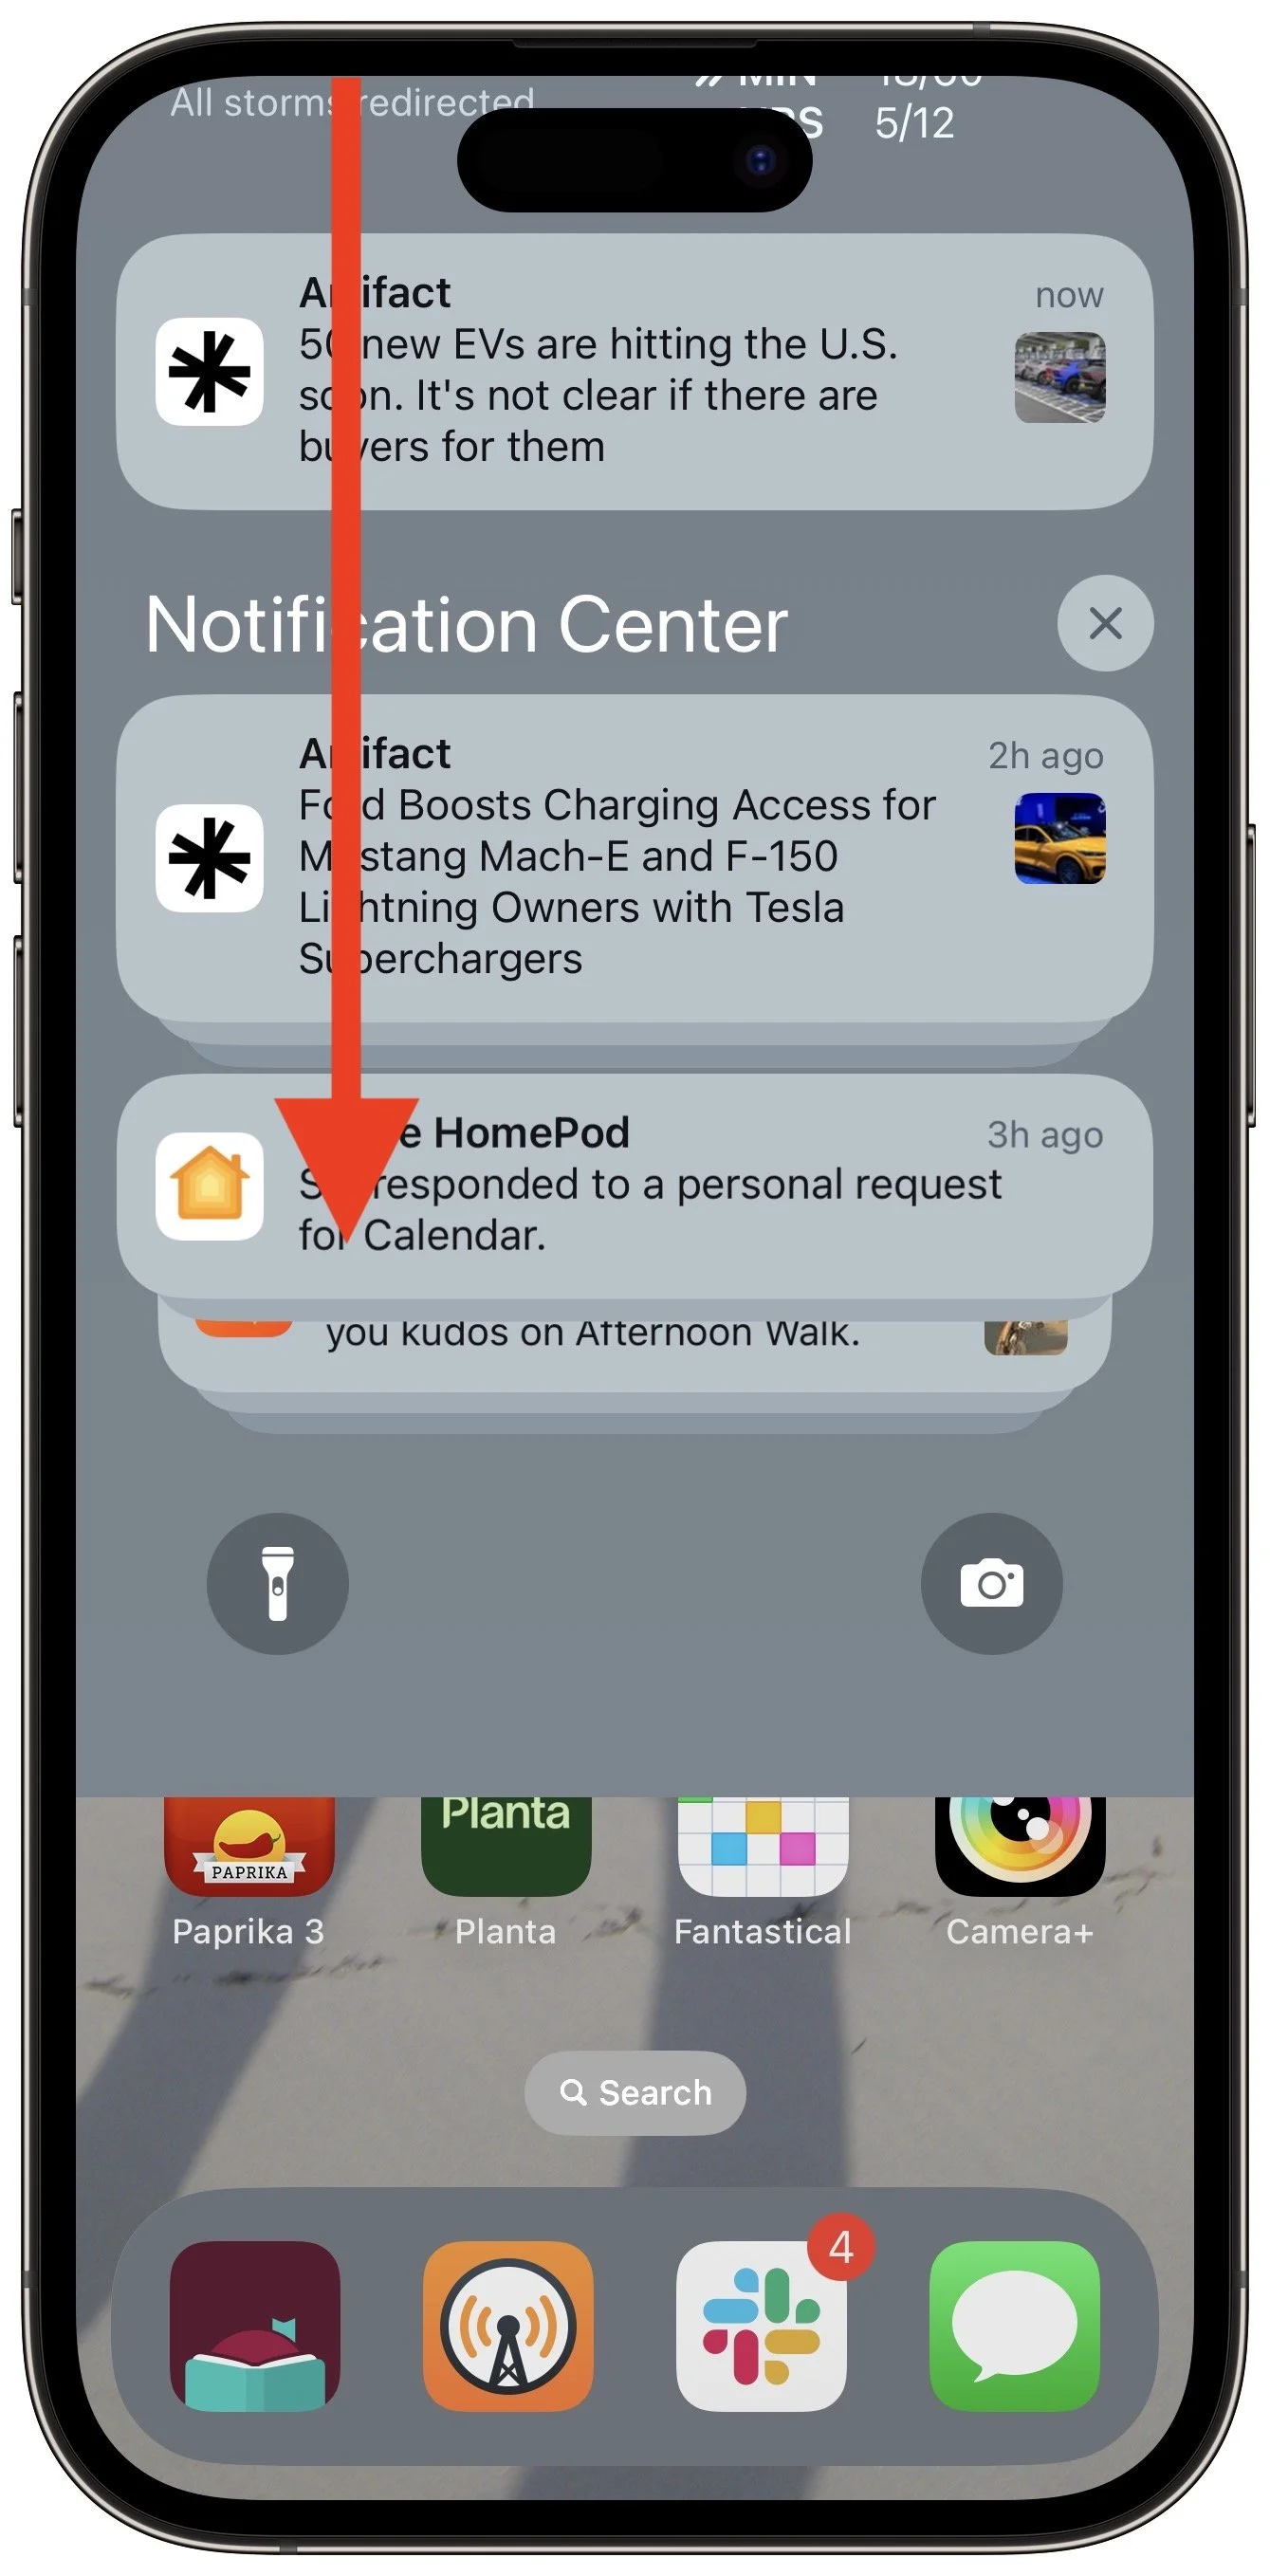
Because iPhones with Touch ID use a swipe up from the bottom for Control Center, they can devote a swipe down from the top of the screen to displaying the Lock Screen with notifications. The same gesture works on an iPhone with Face ID, but you must start from the left side of the screen.
Use Apple Pay
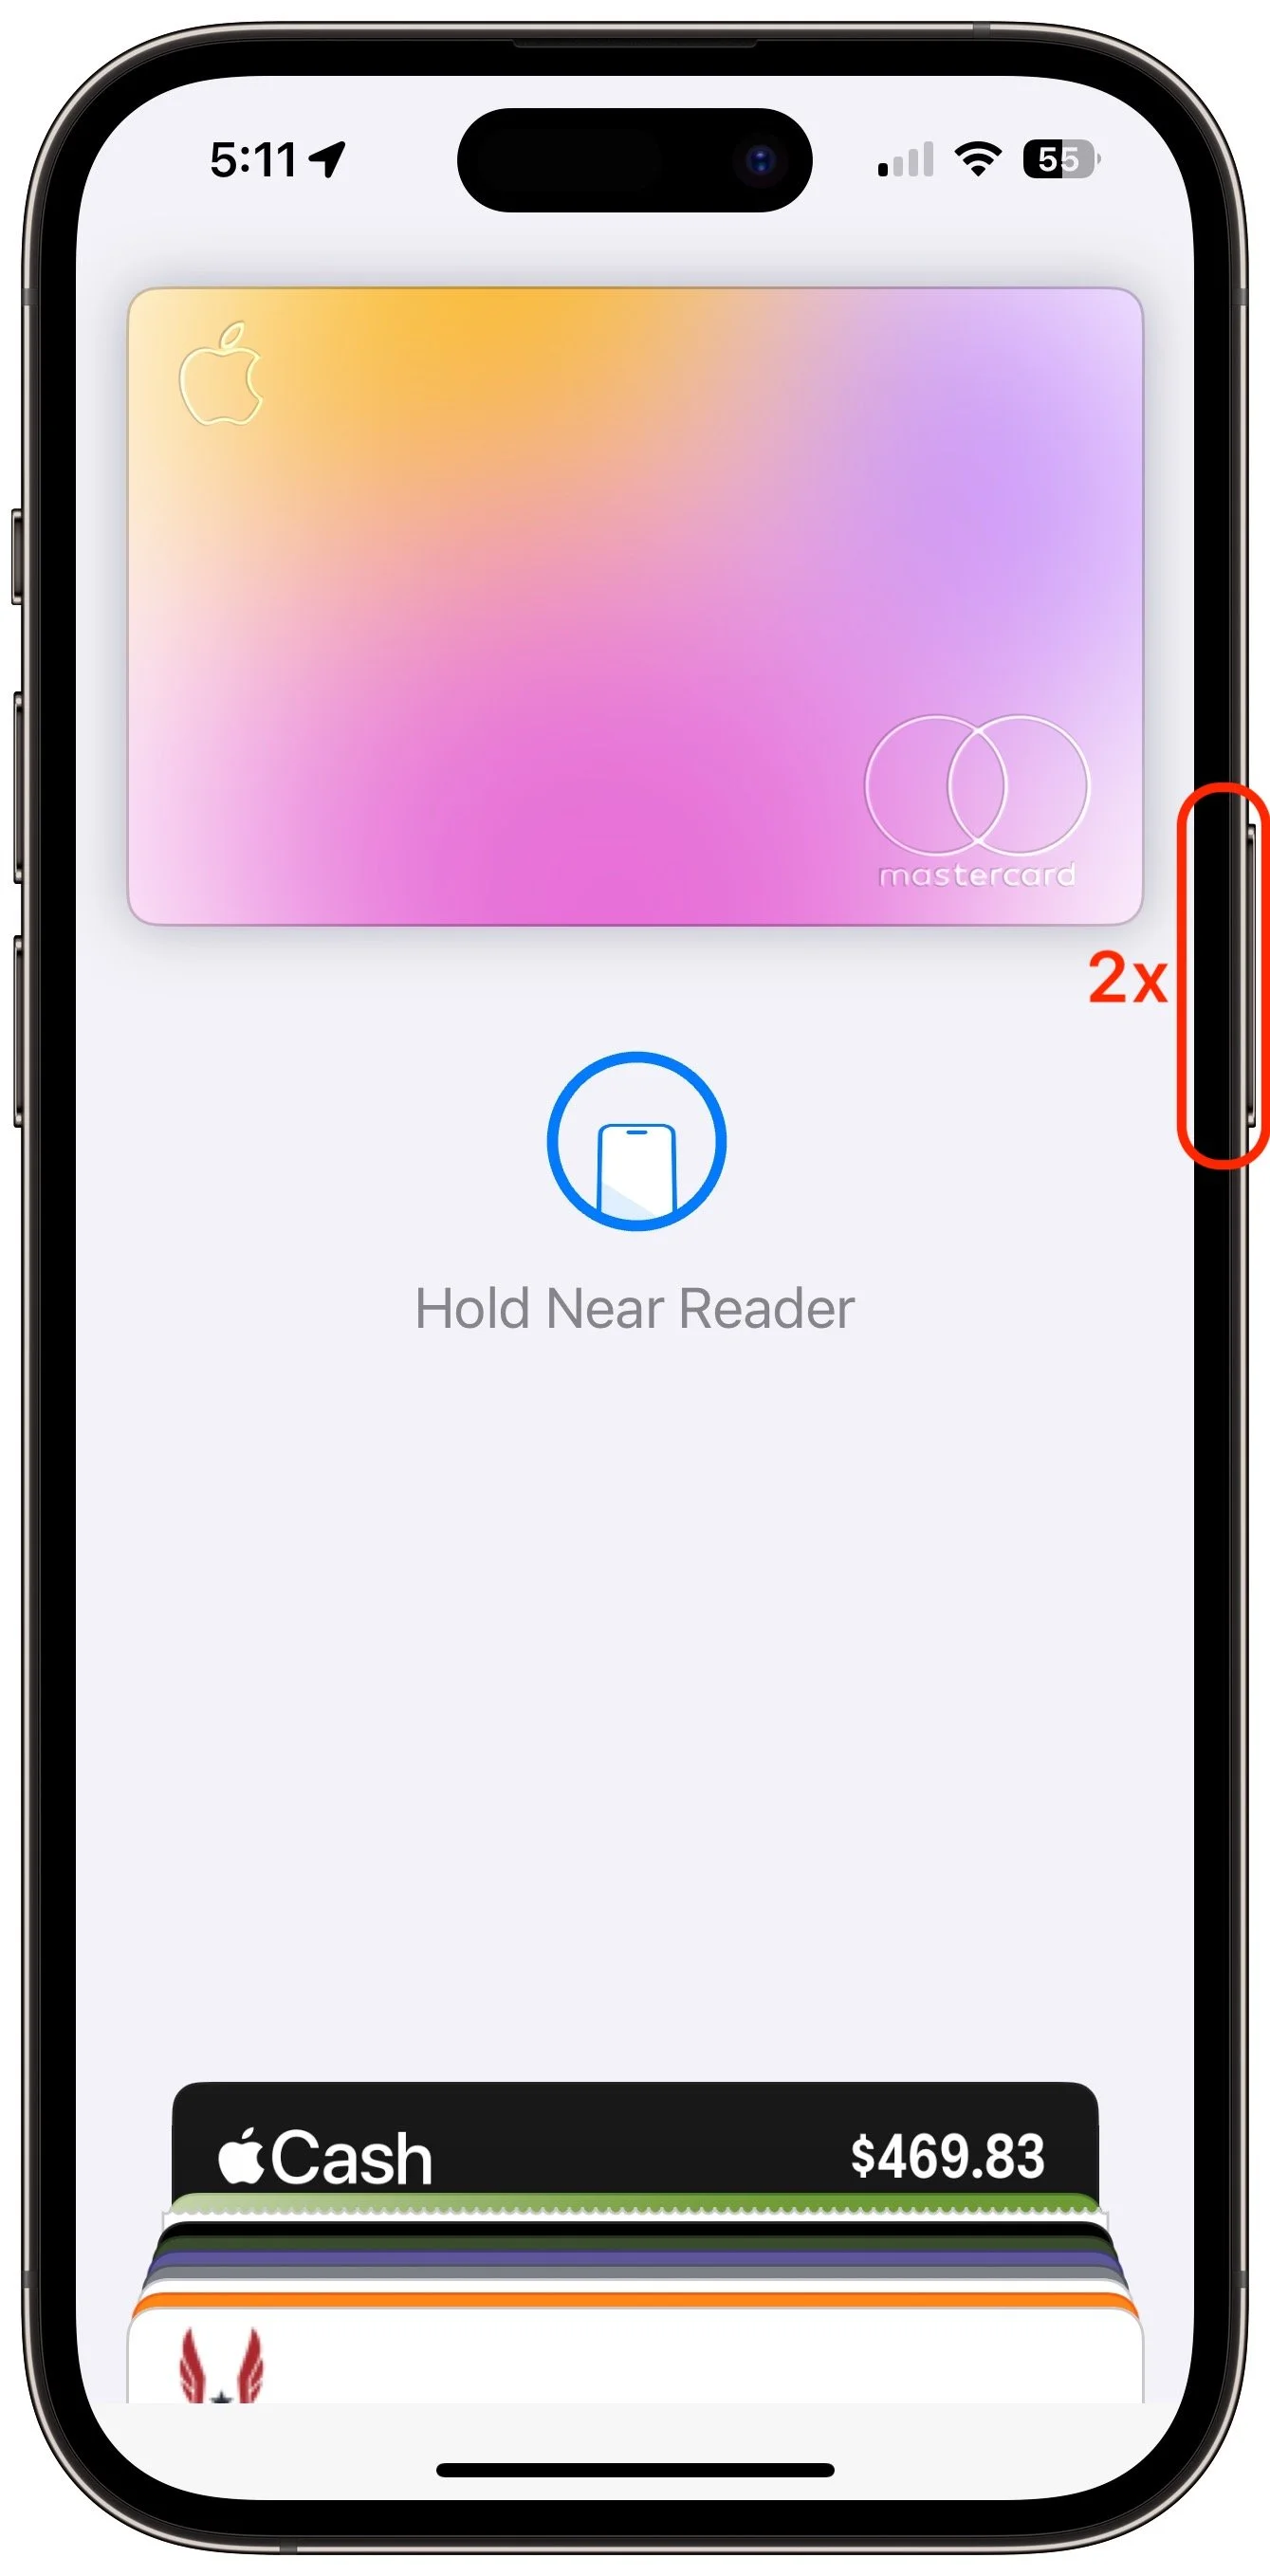
Paying for a purchase with Apple Pay requires that you authenticate, which means placing your finger on the Home button—but not pressing it!—on an iPhone with Touch ID. Getting the hang of the touch-but-don’t-press action can take some time, but once you have it, you may even have developed a habit of not looking at your iPhone to authenticate Apple Pay. In contrast, with an iPhone with Face ID, you must look at the screen when prompted so the Face ID sensors can confirm you’re making the purchase. Honestly, neither is as easy as double-pressing the side button on an Apple Watch.
Authenticate in Apps
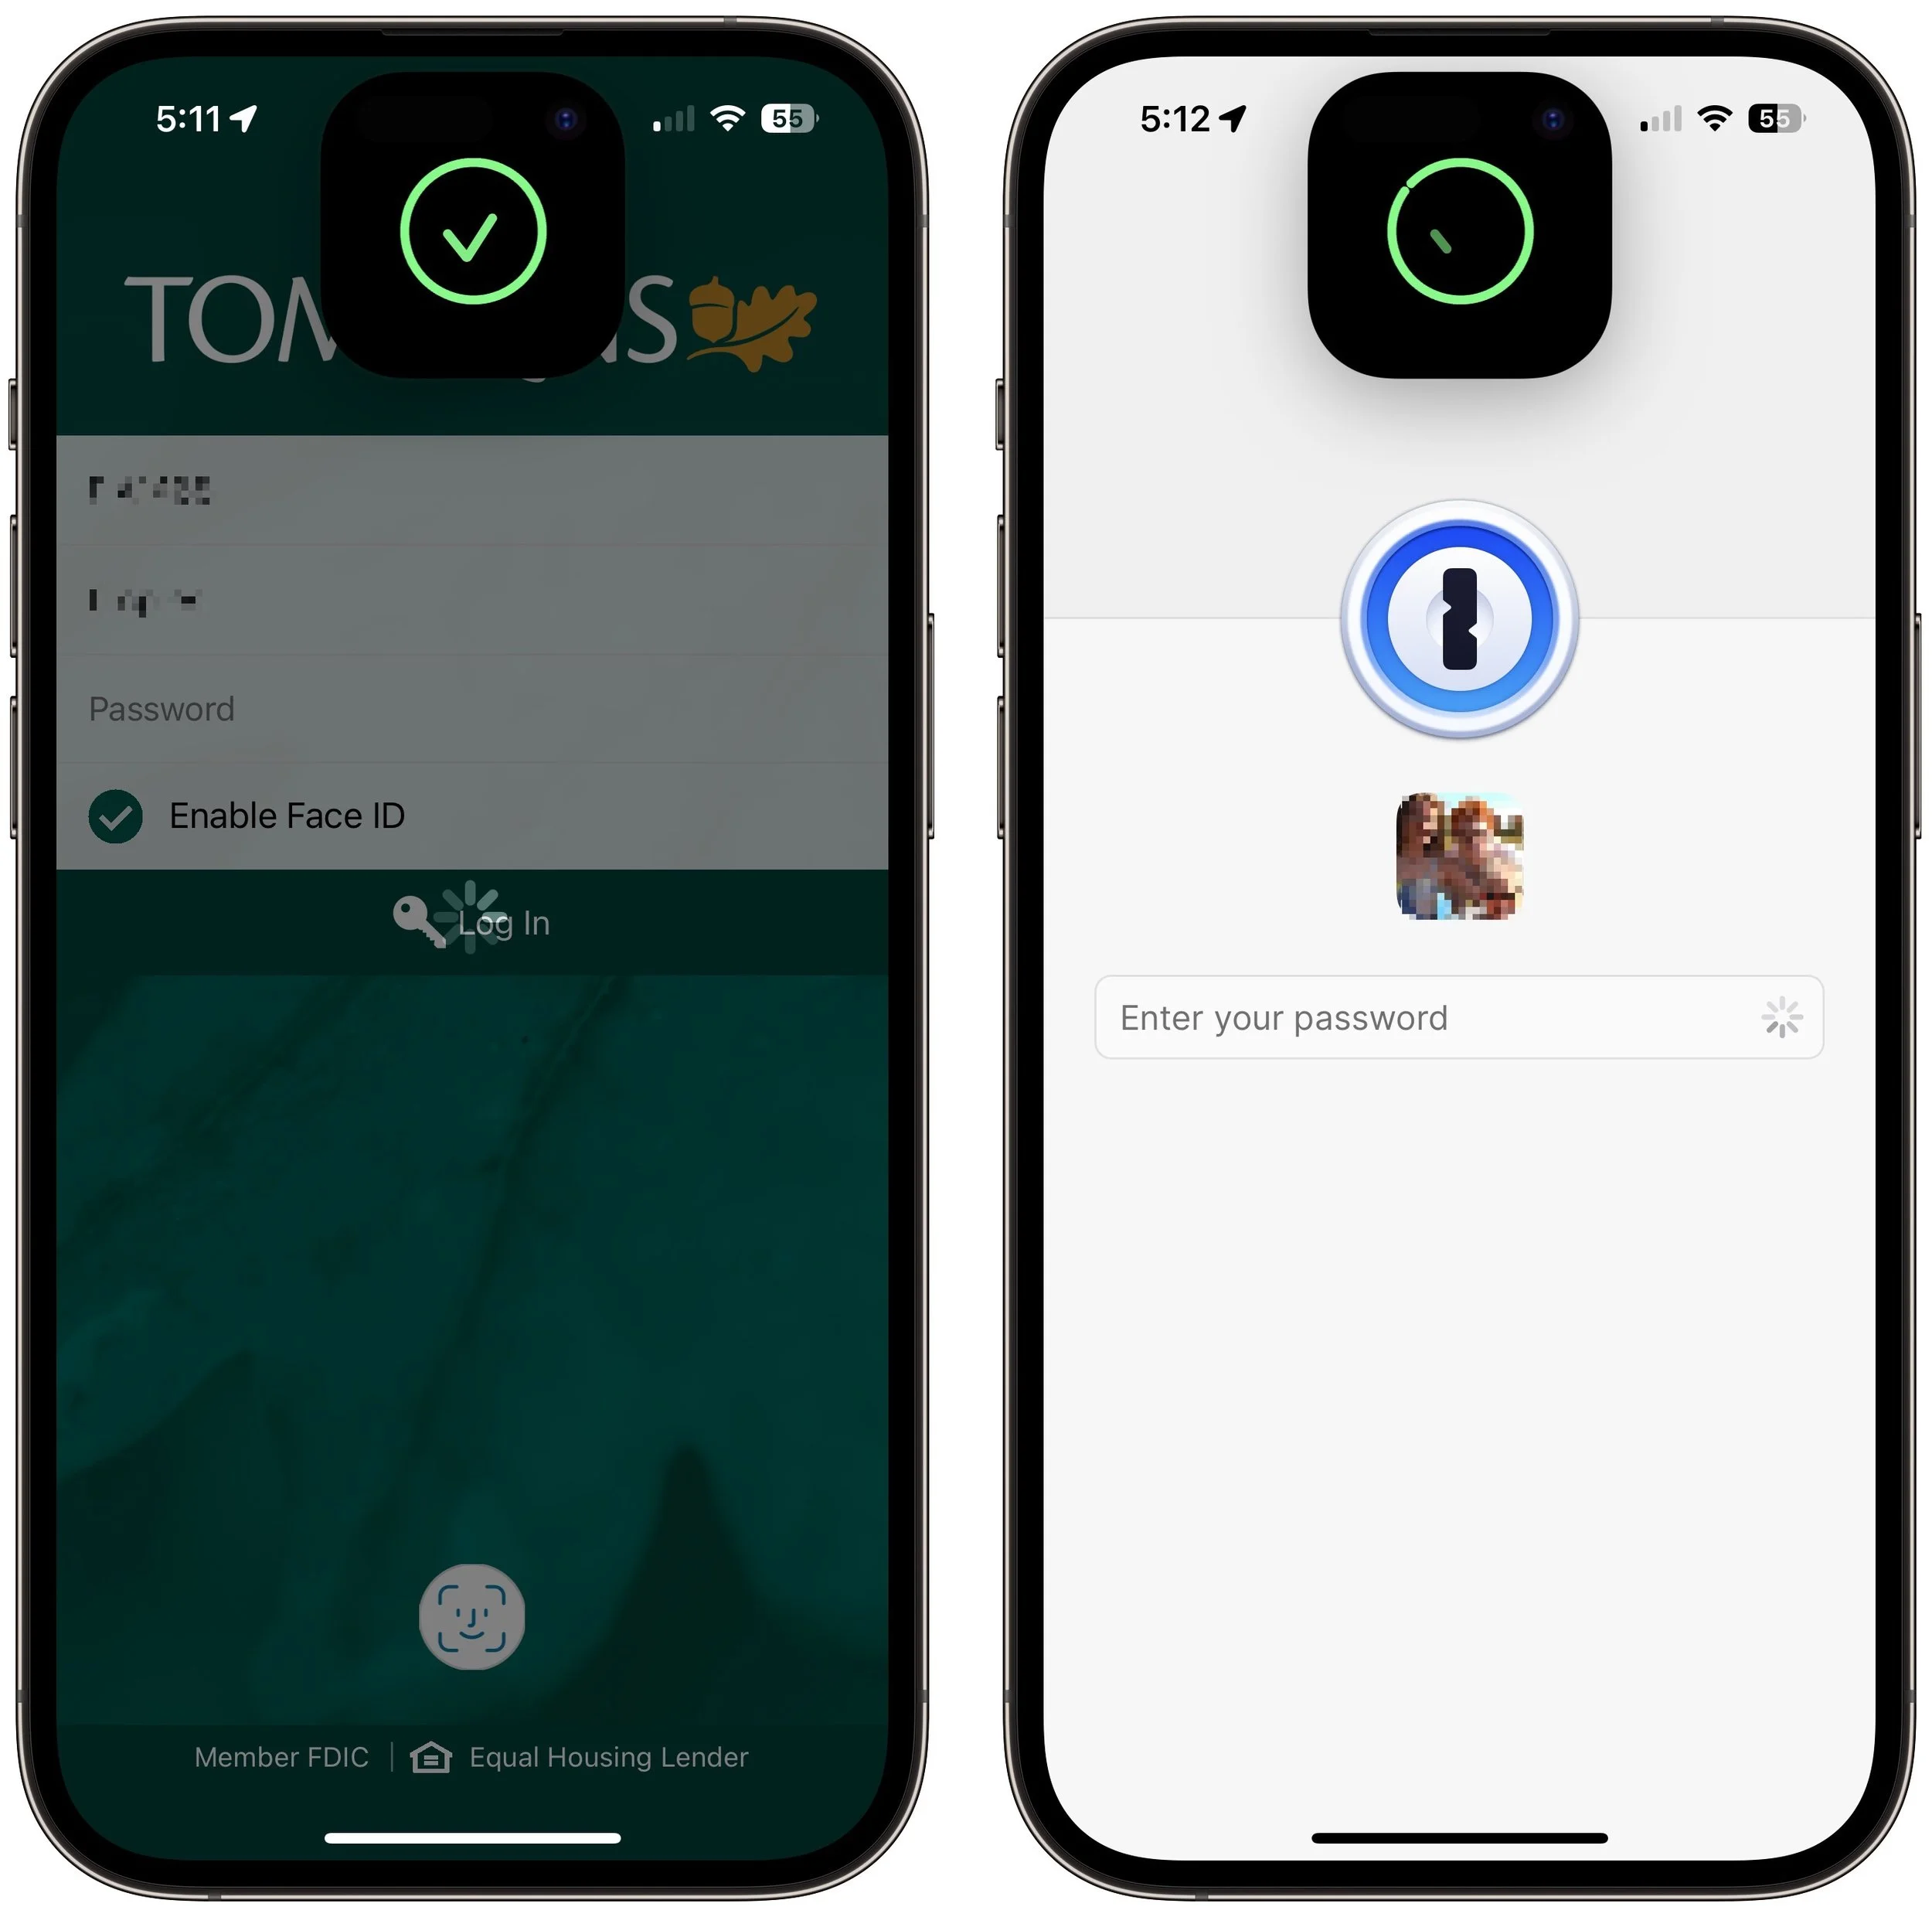
Beyond Apple Pay, plenty of apps from the App Store, like password managers and banking apps, tie into biometric authentication so you don’t have to type lengthy passwords. As you’d expect, if you previously authenticated by touching the Home button, doing so on an iPhone with Face ID requires looking at the iPhone screen. That’s nearly always what you do anyway, so it’s even easier than touching the Home button.
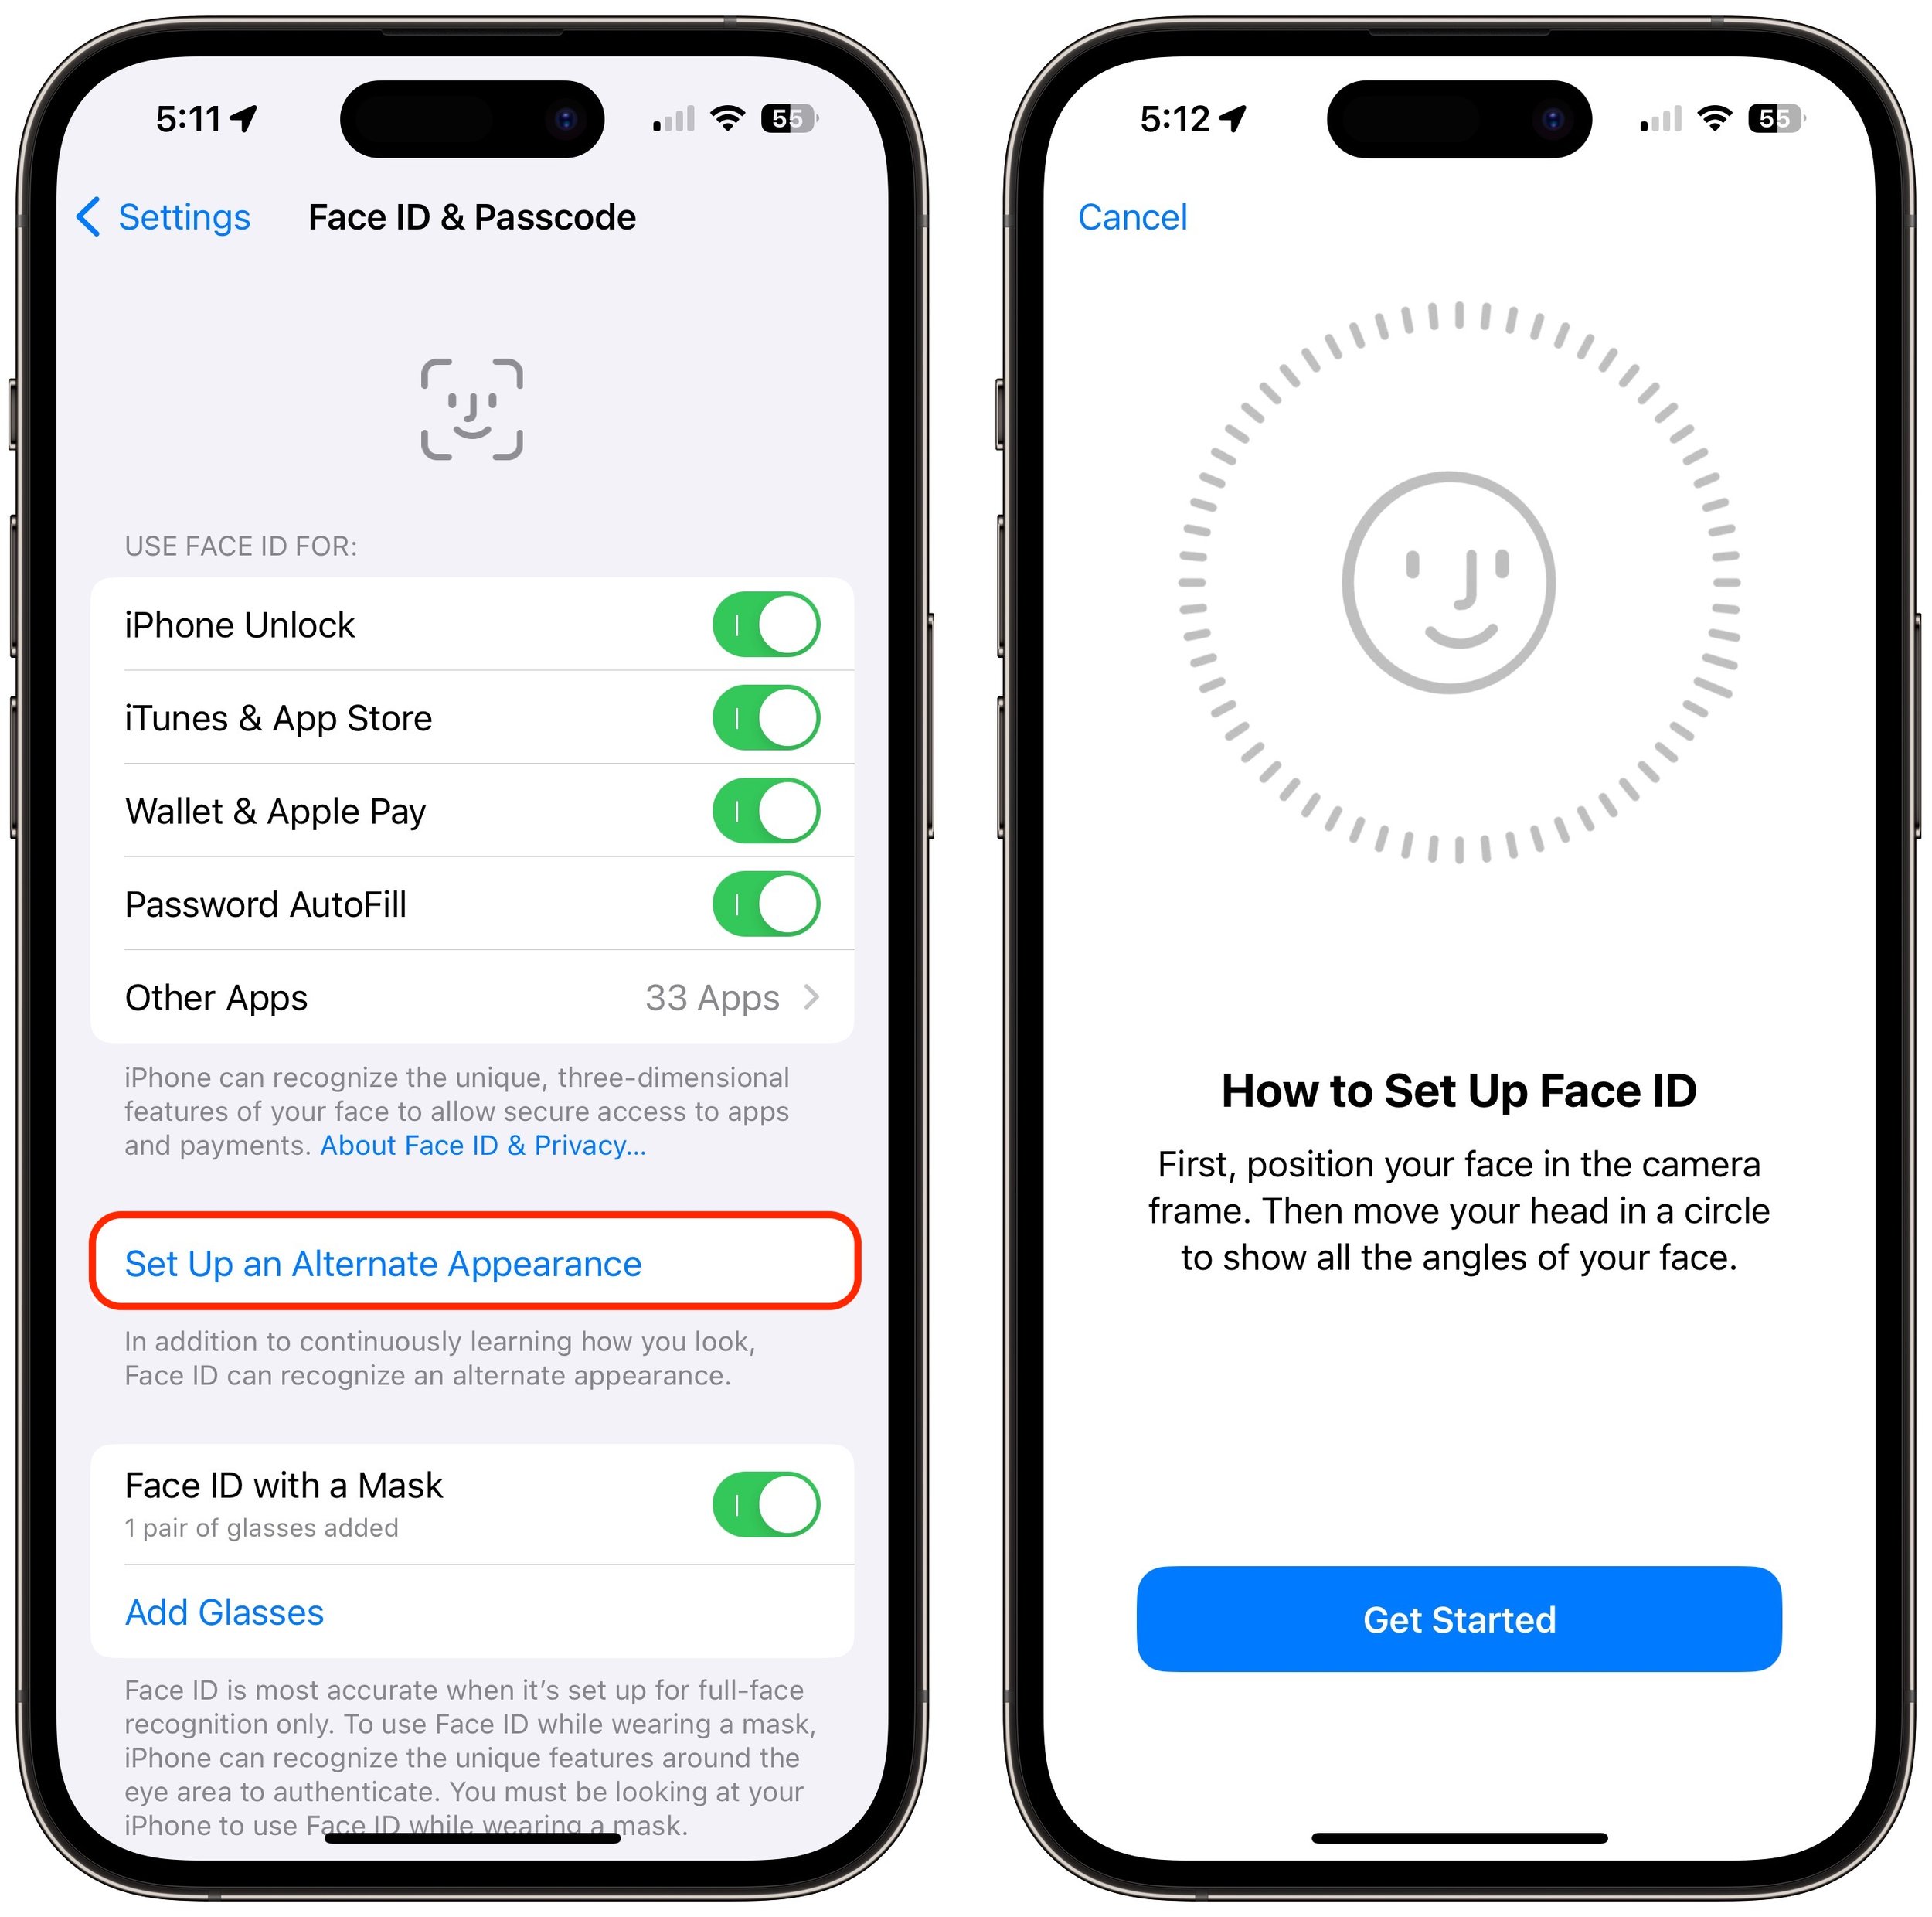
Register Alternate Appearances
With Touch ID, you can register up to five fingers, which lets you use several of your own and let a trusted spouse or family member authenticate using Touch ID as well. We tend to have more fingers than faces, though, so with Face ID, Apple allows only a single alternate appearance. That shouldn’t be too limiting, but if everyone in your family had a Touch ID finger, sorry, you’ll have to pick a favorite.
(Featured image by Apple)
Four Solutions to Gotchas in macOS 14 Sonoma
Some of the new default features in Sonoma have caused confusion. We explain why windows hide when you click the desktop, where printer queue apps went, how to turn off the new reaction gestures, and the privacy awareness icons.

We’re seeing an increasing number of people switching to macOS 14 Sonoma, and for the most part, things are going well. However, Apple introduced some new features—and turned them on by default—that are causing some consternation. If you’ve switched to Sonoma or are planning to soon, here are four features you might want to know about.
Hide Windows when Clicking on the Desktop
The most immediately surprising thing you’ll notice when you upgrade to Sonoma is that clicking an empty area on the desktop moves all windows off to the side to give you full access to icons and widgets on your desktop. It’s not a bad feature, but if you’re accustomed to clicking the desktop simply to switch to the Finder, it can be off-putting. To keep windows where they are, open System Settings > Desktop & Dock, and under Desktop & Stage Manager, where it says “Click wallpaper to reveal desktop,” choose Only in Stage Manager.

Apple has introduced additional interlocking settings here, so you might want to play with them to see if they support your preferred working style. In particular, note the Show Items checkboxes—if you don’t like seeing all your desktop icons, deselect the On Desktop box to make those icons appear only when you click the desktop.
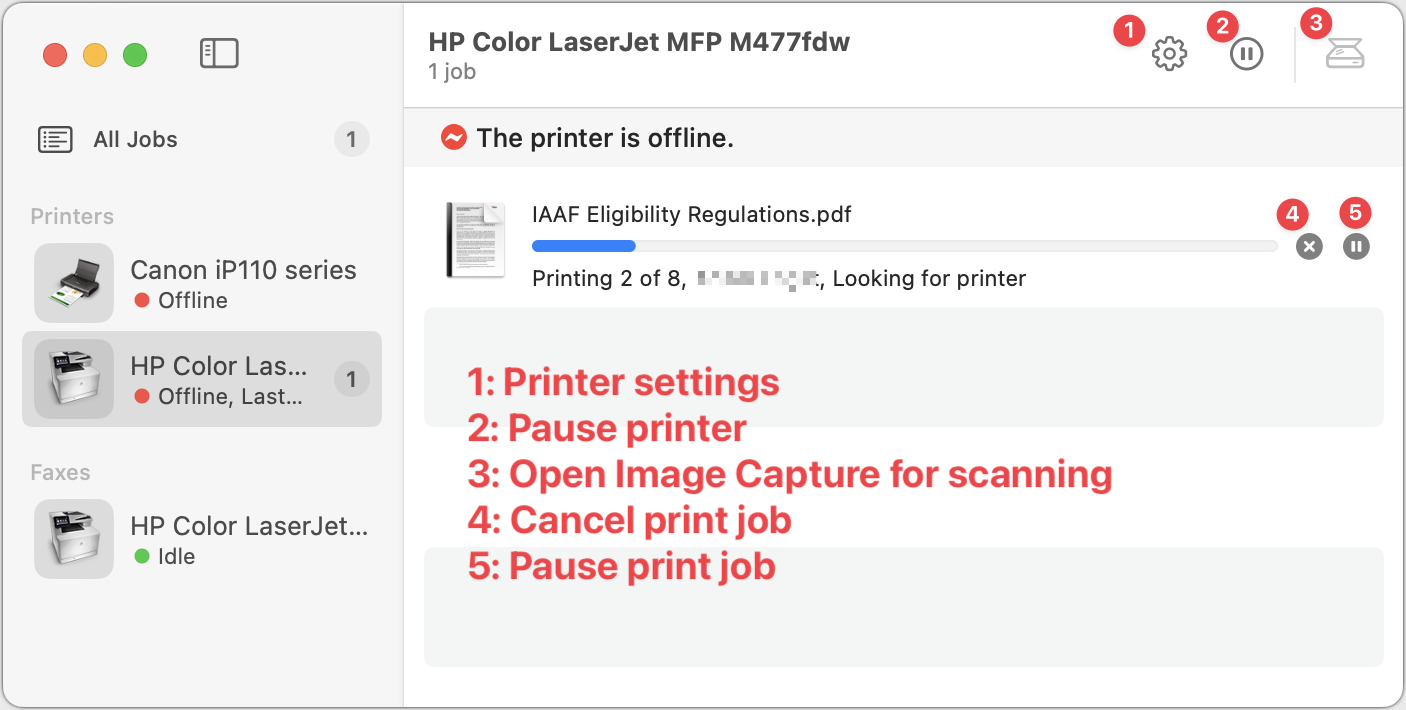
Print Queue Apps Are Now Part of Print Center
For many years, when you printed from a Mac, a print queue app launched to show the progress of your print job and quit automatically once the job was completed. Some people kept those print queue apps in the Dock afterward, perhaps as a way of accessing a multifunction printer’s scanner. Upgrading to macOS 14 Sonoma broke those Dock icons because individual print queue apps have been replaced by the new Print Center app.
Print Center now launches automatically to show print job progress, but you can also open it manually from the Application folder’s Utilities folder. It also offers options to manage the printer and launch Image Capture, Apple’s default interface for scanning. If you’ve been surprised by printing changes in Sonoma, take a few minutes to familiarize yourself with Print Center.
Gestures Can Trigger Fireworks and Other Effects
In Sonoma, when you’re in a video call using FaceTime, Zoom, Webex, or another supported videoconferencing app, making certain hand gestures will trigger special effects. (This works only on a Mac with Apple silicon or when using an iPhone as your webcam.) These reactions are fun… except when they’re not. A double thumbs-down gesture that generates rain during a therapy session may be utterly inappropriate, and causing balloons to fall during a serious business meeting just because you inadvertently made a V with your index and middle fingers might not be considered amusing. Here are the gestures and what they trigger.

To ensure you don’t accidentally generate a reaction with a stray gesture, click the green video camera icon that appears in your menu bar when using one of the apps that supports reactions. (You must be actively sending video—just having the app open may not be sufficient to make the green icon appear.) Then click Reactions under your preview so it goes from having a green icon to a gray icon. Reactions are now disabled. That app should remember your preference, but you’ll have to turn off reactions separately in every app where they’re available.

New Privacy Awareness Icons
That green video camera icon that appears in your menu bar when sending video in Sonoma isn’t the only one that can appear in that spot, and we’ve fielded questions from people who are surprised and confused by these icons appearing. Don’t worry; they aren’t an indication of malware on your Mac! Apple added them so you’d always be aware when an app was using your Mac’s camera or microphone, or recording the screen. You can think of them as an expansion of the tiny green LED that lights up next to the Mac’s camera when it’s in use.
The three icons you might see are:
Green camera, which indicates that the Mac’s video camera is in use. The microphone may also be active, but that’s not indicated separately.
Orange microphone, which shows that the Mac’s mic is recording audio.
Purple screen, which tells you that an app is recording your screen. Beyond screen-sharing apps, other apps like screenshot utilities can trigger this icon.
Click the icon to see what app is involved. You could even see multiple apps listed at the top, if several apps are recording the screen, for instance.
If you’ve switched to Sonoma already, we hope this quick tour of a few potentially confusing features has helped explain what’s going on. And if you’re still waiting to install Sonoma—which is fine!—remember to come back to this article when you decide to upgrade.
(Featured image based on an original by iStock.com/fizkes)
New M3 Chip Family Powers Updated MacBook Pros and 24-inch iMac
Apple has unveiled the M3, M3 Pro, and M3 Max chips alongside new 14-inch and 16-inch models of the MacBook Pro that use the new chips. The company also refreshed the 24-inch iMac, replacing its M1 with an M3.

At Apple’s Halloween-themed Scary Fast event on October 30, the company unveiled its next-generation Apple silicon chips for Macs, the M3, M3 Pro, and M3 Max. Apple also showcased new 14-inch and 16-inch MacBook Pro models and a faster version of the 24-inch iMac based on these chips. They’re available to order now, with units in stores and orders starting to arrive on November 7, apart from the M3 Max models that will arrive in late November. Apple also dropped the awkwardly positioned 13-inch MacBook Pro model from the lineup, leaving the low end to the highly capable MacBook Air.
Apart from the new chips, the updated MacBook Pro models boast only a brighter screen, a slightly longer battery life in the M3 14-inch model, and a new Space Black aluminum finish for the M3 Pro and M3 Max models. There are no other changes for the M3 24-inch iMac.
M3, M3 Pro, and M3 Max Bring More Power to the 14-inch and 16-inch MacBook Pro
Although the MacBook Air has done an admirable job of supporting everyday laptop users, professionals who rely on processor-intensive apps have long turned to the 14-inch and 16-inch MacBook Pro for more power. Apple updated the MacBook Pro to the M2 Pro and M2 Max in January 2023, a release that probably came later than Apple wanted. There’s less reason to upgrade from an M2 model to a new M3 one, but the performance gains are significant when upgrading from Intel-based and M1 models.
The M3 MacBook Pro models beat the equivalent Intel-based MacBook Pro models by 3x, 5.5x, 7.4x, and even 20x, depending on the specific app and task. Overall, Apple claims speed improvements up to 11x over the fastest Intel-based MacBook Pro. Gains over equivalent M1-based MacBook Pros are also significant, with improvements from 30% to 60%.

Apple expanded the options for the 14-inch MacBook Pro, so there are now three basic configurations:
M3 starting at $1599: It has an 8-core CPU, 10-core GPU, 8 GB of memory, and 512 GB of storage. You can (and probably should) jump to 16 GB of memory; 24 GB is also available. This model has only two Thunderbolt/USB 4 ports and can drive only a single external display.
M3 Pro starting at $1999: You have two options here: either 11 or 12 CPU cores and 14 or 18 GPU cores, and either 18 GB or 36 GB of memory. These models feature three Thunderbolt/USB 4 ports and support one or two external displays.
M3 Max starting at $3199: The maxed-out configuration also sports two options: either 14 or 16 CPU cores and 30 or 40 GPU cores, plus 36 GB of memory, upgradeable only to 96 GB. These models also have three Thunderbolt/USB 4 ports but can drive up to four external displays.
The 16-inch MacBook Pro has only M3 Pro and M3 Max configurations:
M3 Pro starting at $2899: There’s only one option here, matching the beefier 14-inch M3 Pro model: a 12-core CPU, 18-core GPU configuration with 36 GB of memory.
M3 Max starting at $3499: The choices here are either 14 or 16 CPU cores and 30 or 40 GPU cores. The lower-end configuration comes with 36 GB of memory and can upgrade to 96; the higher-end configuration has 48 GB of memory and has options for 64 GB or 128 GB.
Storage starts at 512 GB for the M3 14-inch model and 1 TB for the rest, with options for 2 TB, 4 TB, and 8 TB.
Note that the M3 14-inch MacBook Pro replaces the awkwardly positioned M2 13-inch MacBook Pro, which offered only the slightest advantage over its cheaper M2 13-inch MacBook Air cousin. The new M3 14-inch MacBook Pro does cost $100 more than the comparable 13-inch MacBook Pro that it replaces, but that’s a fair trade for the bigger, better screen and 1080p FaceTime HD camera. Now there’s once again a clear physical and performance distinction between the MacBook Air and the MacBook Pro lineups.
Otherwise, some prices have increased, but in most cases, that may be because the new configurations include more unified memory. For instance, the M3 Pro 16-inch MacBook Pro previously started at $2499 with 16 GB of memory, but now starts at $2899 with 36 GB of memory. Regardless, the professionals buying these speedy Macs can often justify paying more if the performance boost directly increases productivity.
M3 Chip Improves 24-inch iMac Performance
There isn’t much to say about the refreshed 24-inch iMac, which trades its M1 chip for an M3 but sports no other notable changes and keeps its $1299 starting price. The 24-inch iMac remains an attractive option for anyone looking for an all-in-one desktop Mac.
The switch to the M3 does provide more memory choices. Previously, you could choose only 8 GB or 16 GB of memory. With the M3, 8 GB of memory remains standard, but you can upgrade to either 16 GB (a good idea) or 24 GB (probably unnecessary for most people). Storage still starts at 256 GB, which isn’t much these days, particularly if you take a lot of photos or videos, and you can upgrade to 512 GB, 1 TB, or 2 TB.

Apple gave no hints that it is considering a replacement for the popular 27-inch iMac that Apple discontinued when it introduced the Mac Studio and 27-inch Studio Display. Though the 24-inch iMac has an impressive 4.5K Retina display, it’s still smaller than the 5K Retina display in the 27-inch iMac. Speculation has swirled around the possibility of a 32-inch iMac Pro, but given that a Mac Studio starts at $1999 and the 32-inch Pro Display XDR sells for $4999, it’s hard to imagine such an iMac Pro having a competitive price.
Also missing from the announcement was any mention of USB-C versions of the Magic Keyboard, Magic Trackpad, and Magic Mouse. Those accessories continue to use the Lightning connector and ship with a USB-C to Lightning cable for charging.
(Featured image by Apple)
Use iOS 17’s Check In Feature to Reduce Worry
The new Check In feature of iOS 17 can provide peace of mind by letting you specify a safety partner who will automatically be notified if you fail to arrive at your destination or complete a timer.

We’ve all had a friend or family member say, “Text me when you get home,” because they want the peace of mind from knowing you arrived safely. But what if something goes wrong—or you forget—so they never receive that text? They’ll be worried and won’t know where you are, if you’re OK, and so on.
In iOS 17, Apple has introduced the Check In feature to provide peace of mind—or in the worst case, to help emergency services. It’s conceptually simple. Before you leave to go somewhere, you create a Check In with someone—call them a safety partner—in Messages. You specify where you’re going and whether you’re driving, taking transit, or walking. Then, when you arrive, the Check In automatically ends, alerting your safety partner that you arrived. If you’re delayed en route, Check In takes that into account and extends the expected arrival time appropriately. If you fail to arrive, Check In shares your location and route with your safety partner. Also, if you make an Emergency SOS call or your iPhone or Apple Watch calls emergency services automatically during the Check In, it notifies your safety partner.
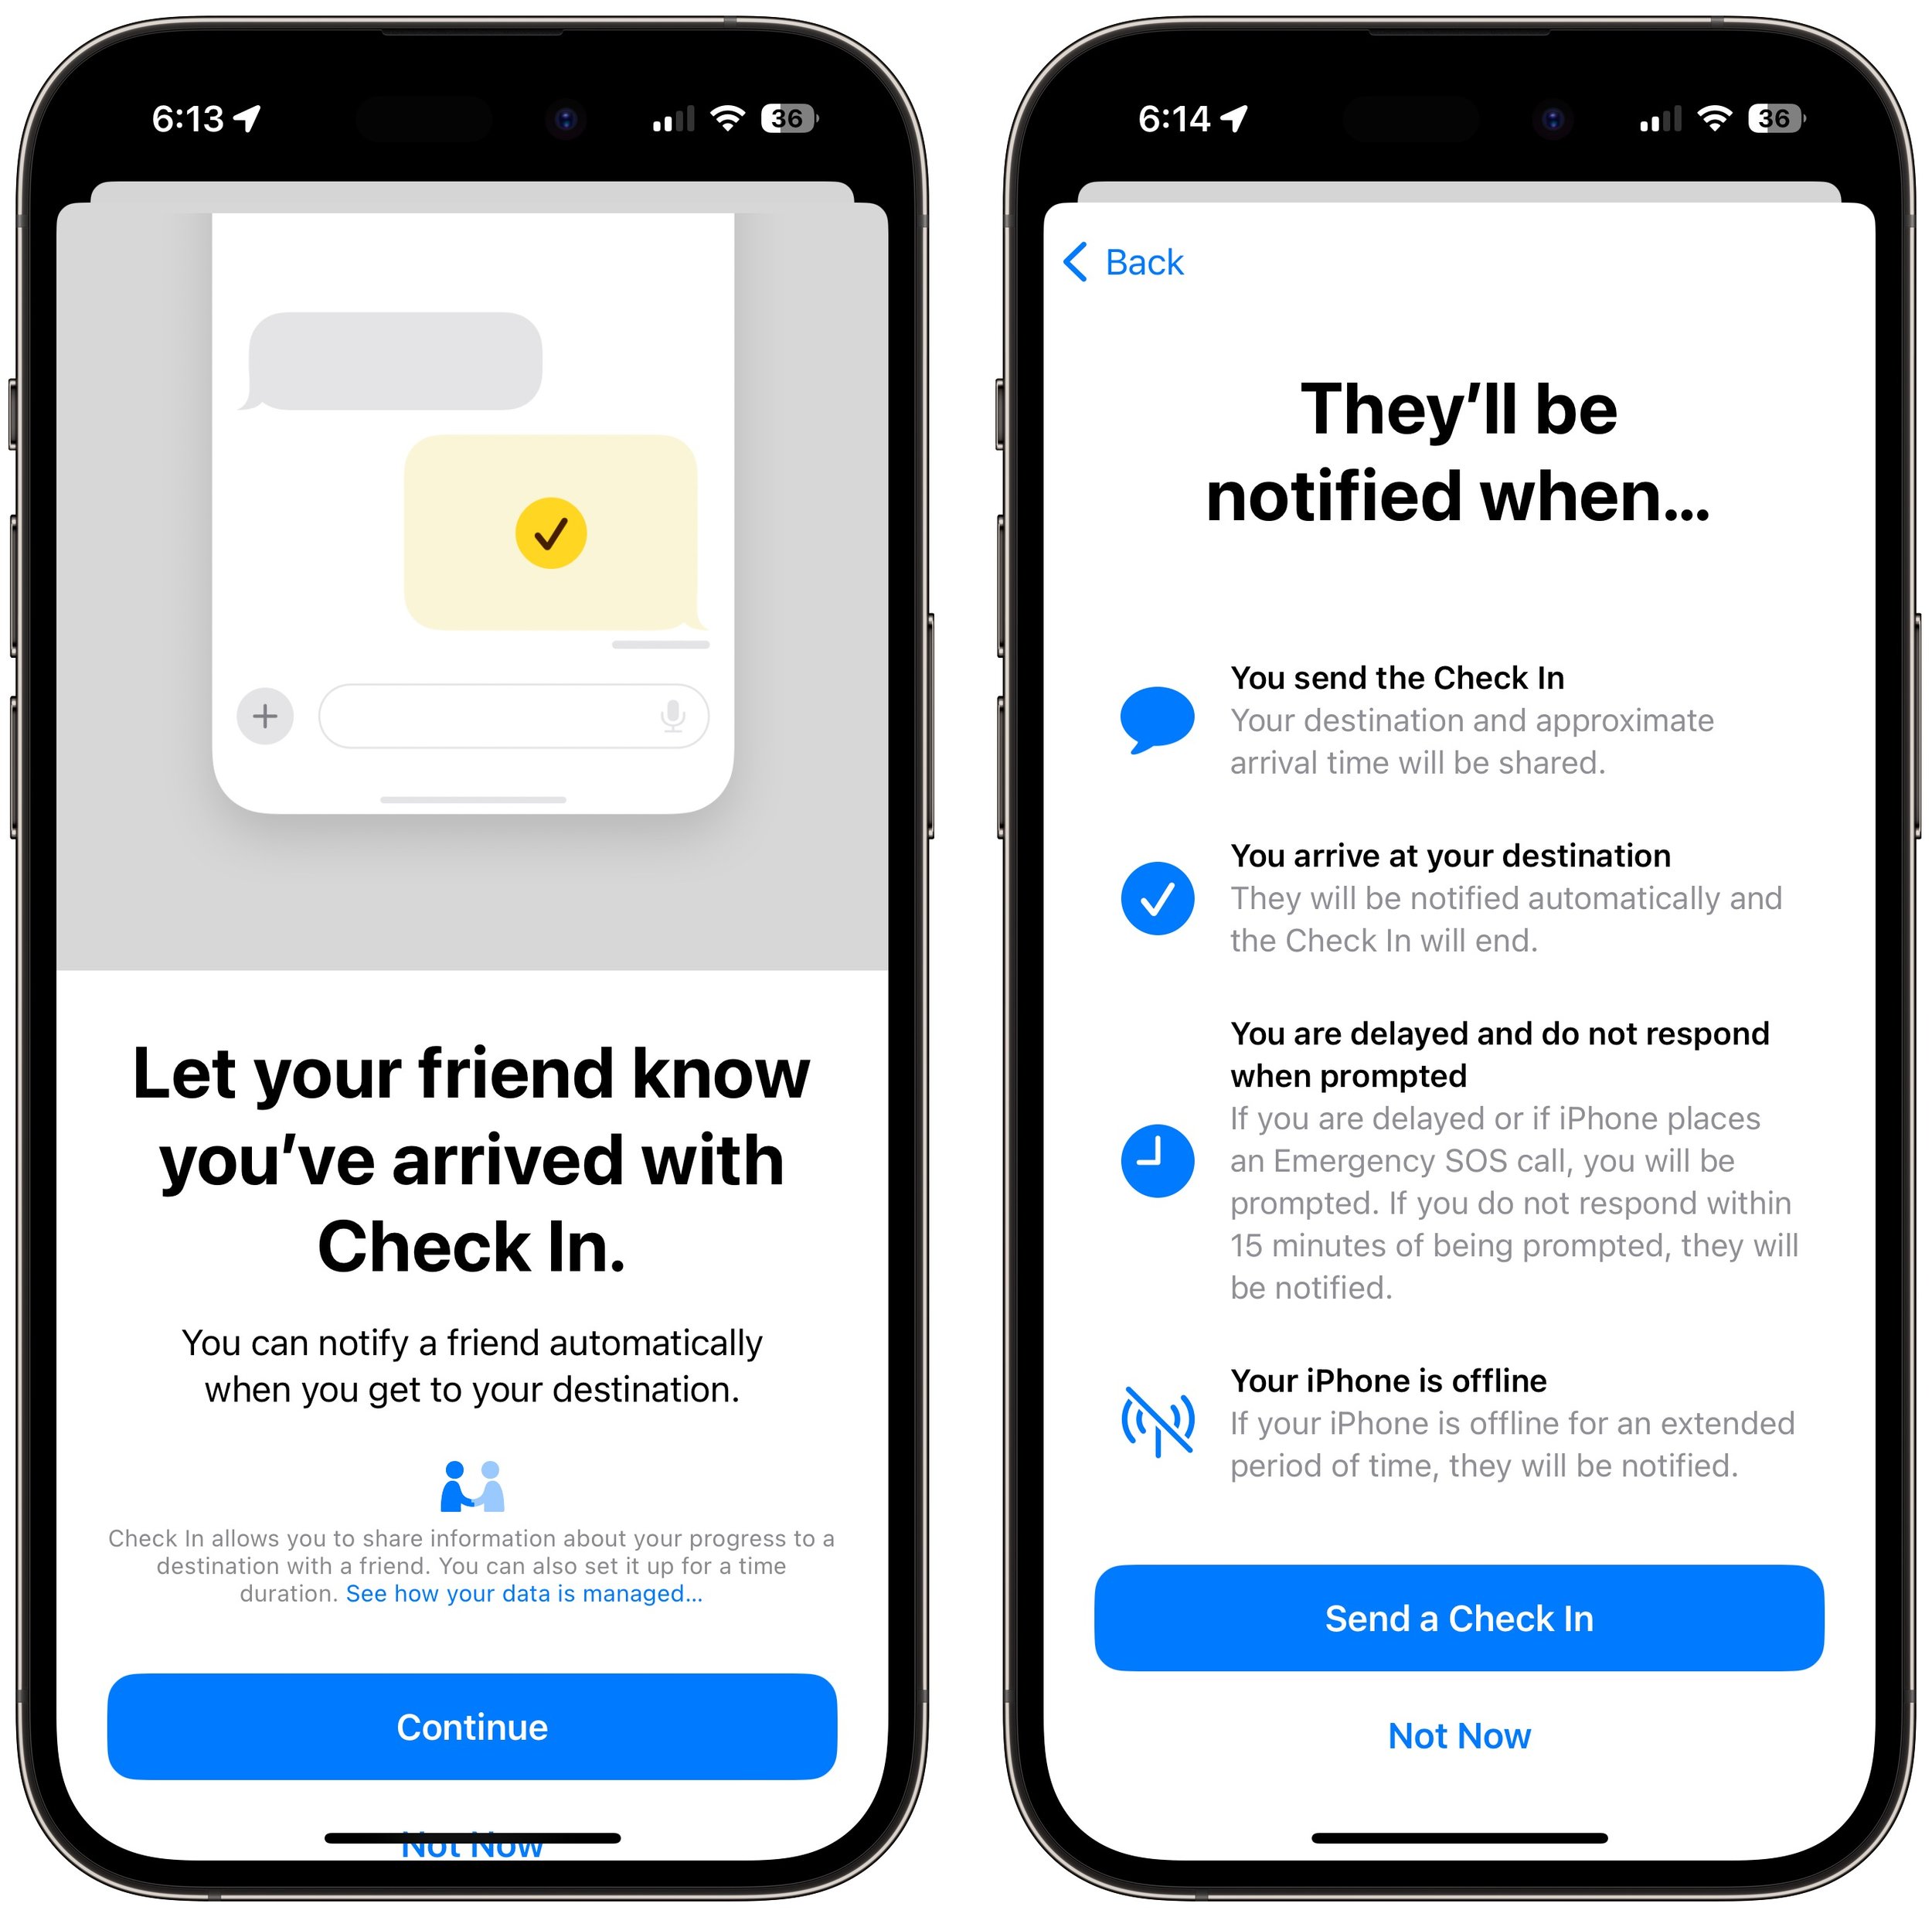
Not all situations revolve around following a specific route to a location, so Check In also supports timers. Perhaps a college student is going for an hour-long trail run and wants a friend to check on her if she’s not back as expected. She can use Check In to set a timer for 1 hour, share it with her friend, and when the timer ends, either tap the End button if she’s back or add more time if the run is going fine but taking longer than expected.
Although Check In may seem targeted at friends and family, it could have business uses as well. For instance, a destination Check In might work well for keeping tabs on a colleague traveling to a make-or-break pitch presentation.
Before you start using Check In with someone—in either direction—explain Check In to them and discuss an appropriate response if you or they fail to end Check In successfully. Responses should probably start with a quick text, followed by a phone call. If initial efforts to reach out are met with silence, contacting other people—friends, family members, neighbors, etc.—may be appropriate. At some point, depending on various factors, it will be time to call law enforcement. Of course, if the other person triggers an Emergency SOS during the Check In, call law enforcement immediately. At least in the US, if the person isn’t in your area, don’t call 911. Instead, find the law enforcement website for where the person is and call that organization’s 10-digit number. And here’s hoping it never comes to that!
Create a Check In
To get started with Check In, follow these steps:
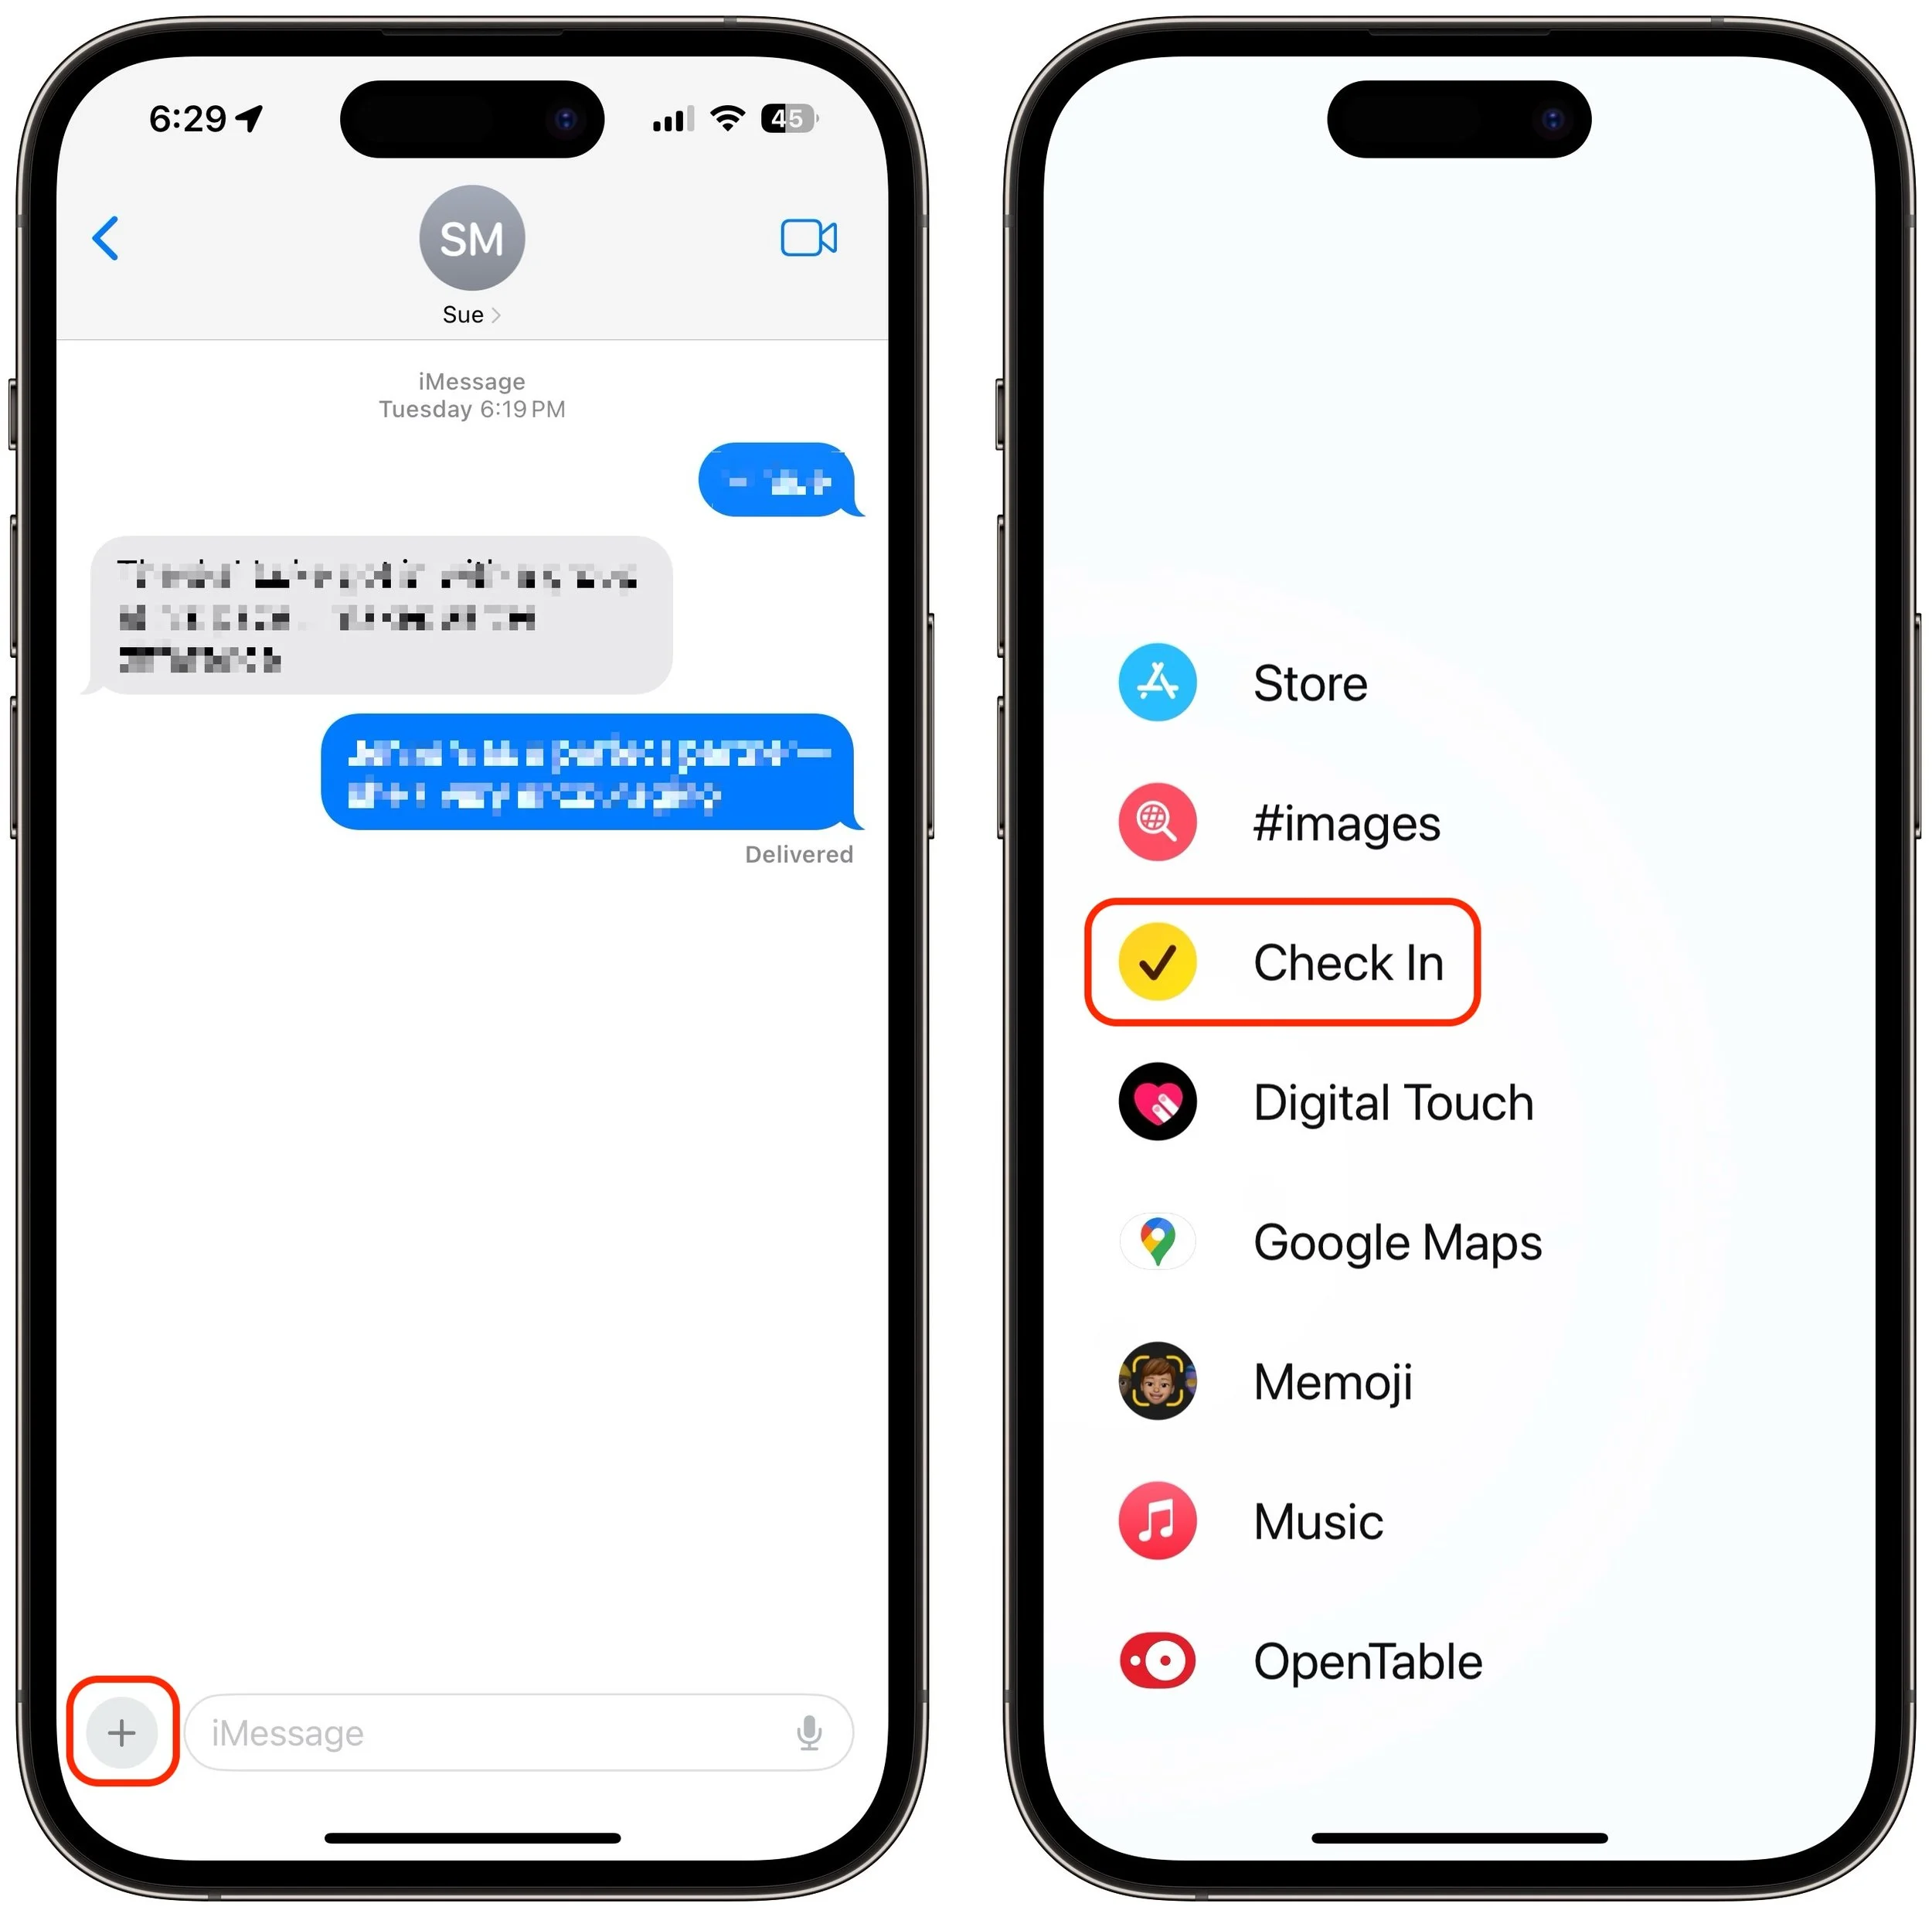
1. In Messages, open a conversation with the person you want to be your safety partner (Check In doesn’t currently work with group conversations).
2. Tap the ⊕ button to the left of the message field, tap More at the bottom, and tap Check In.
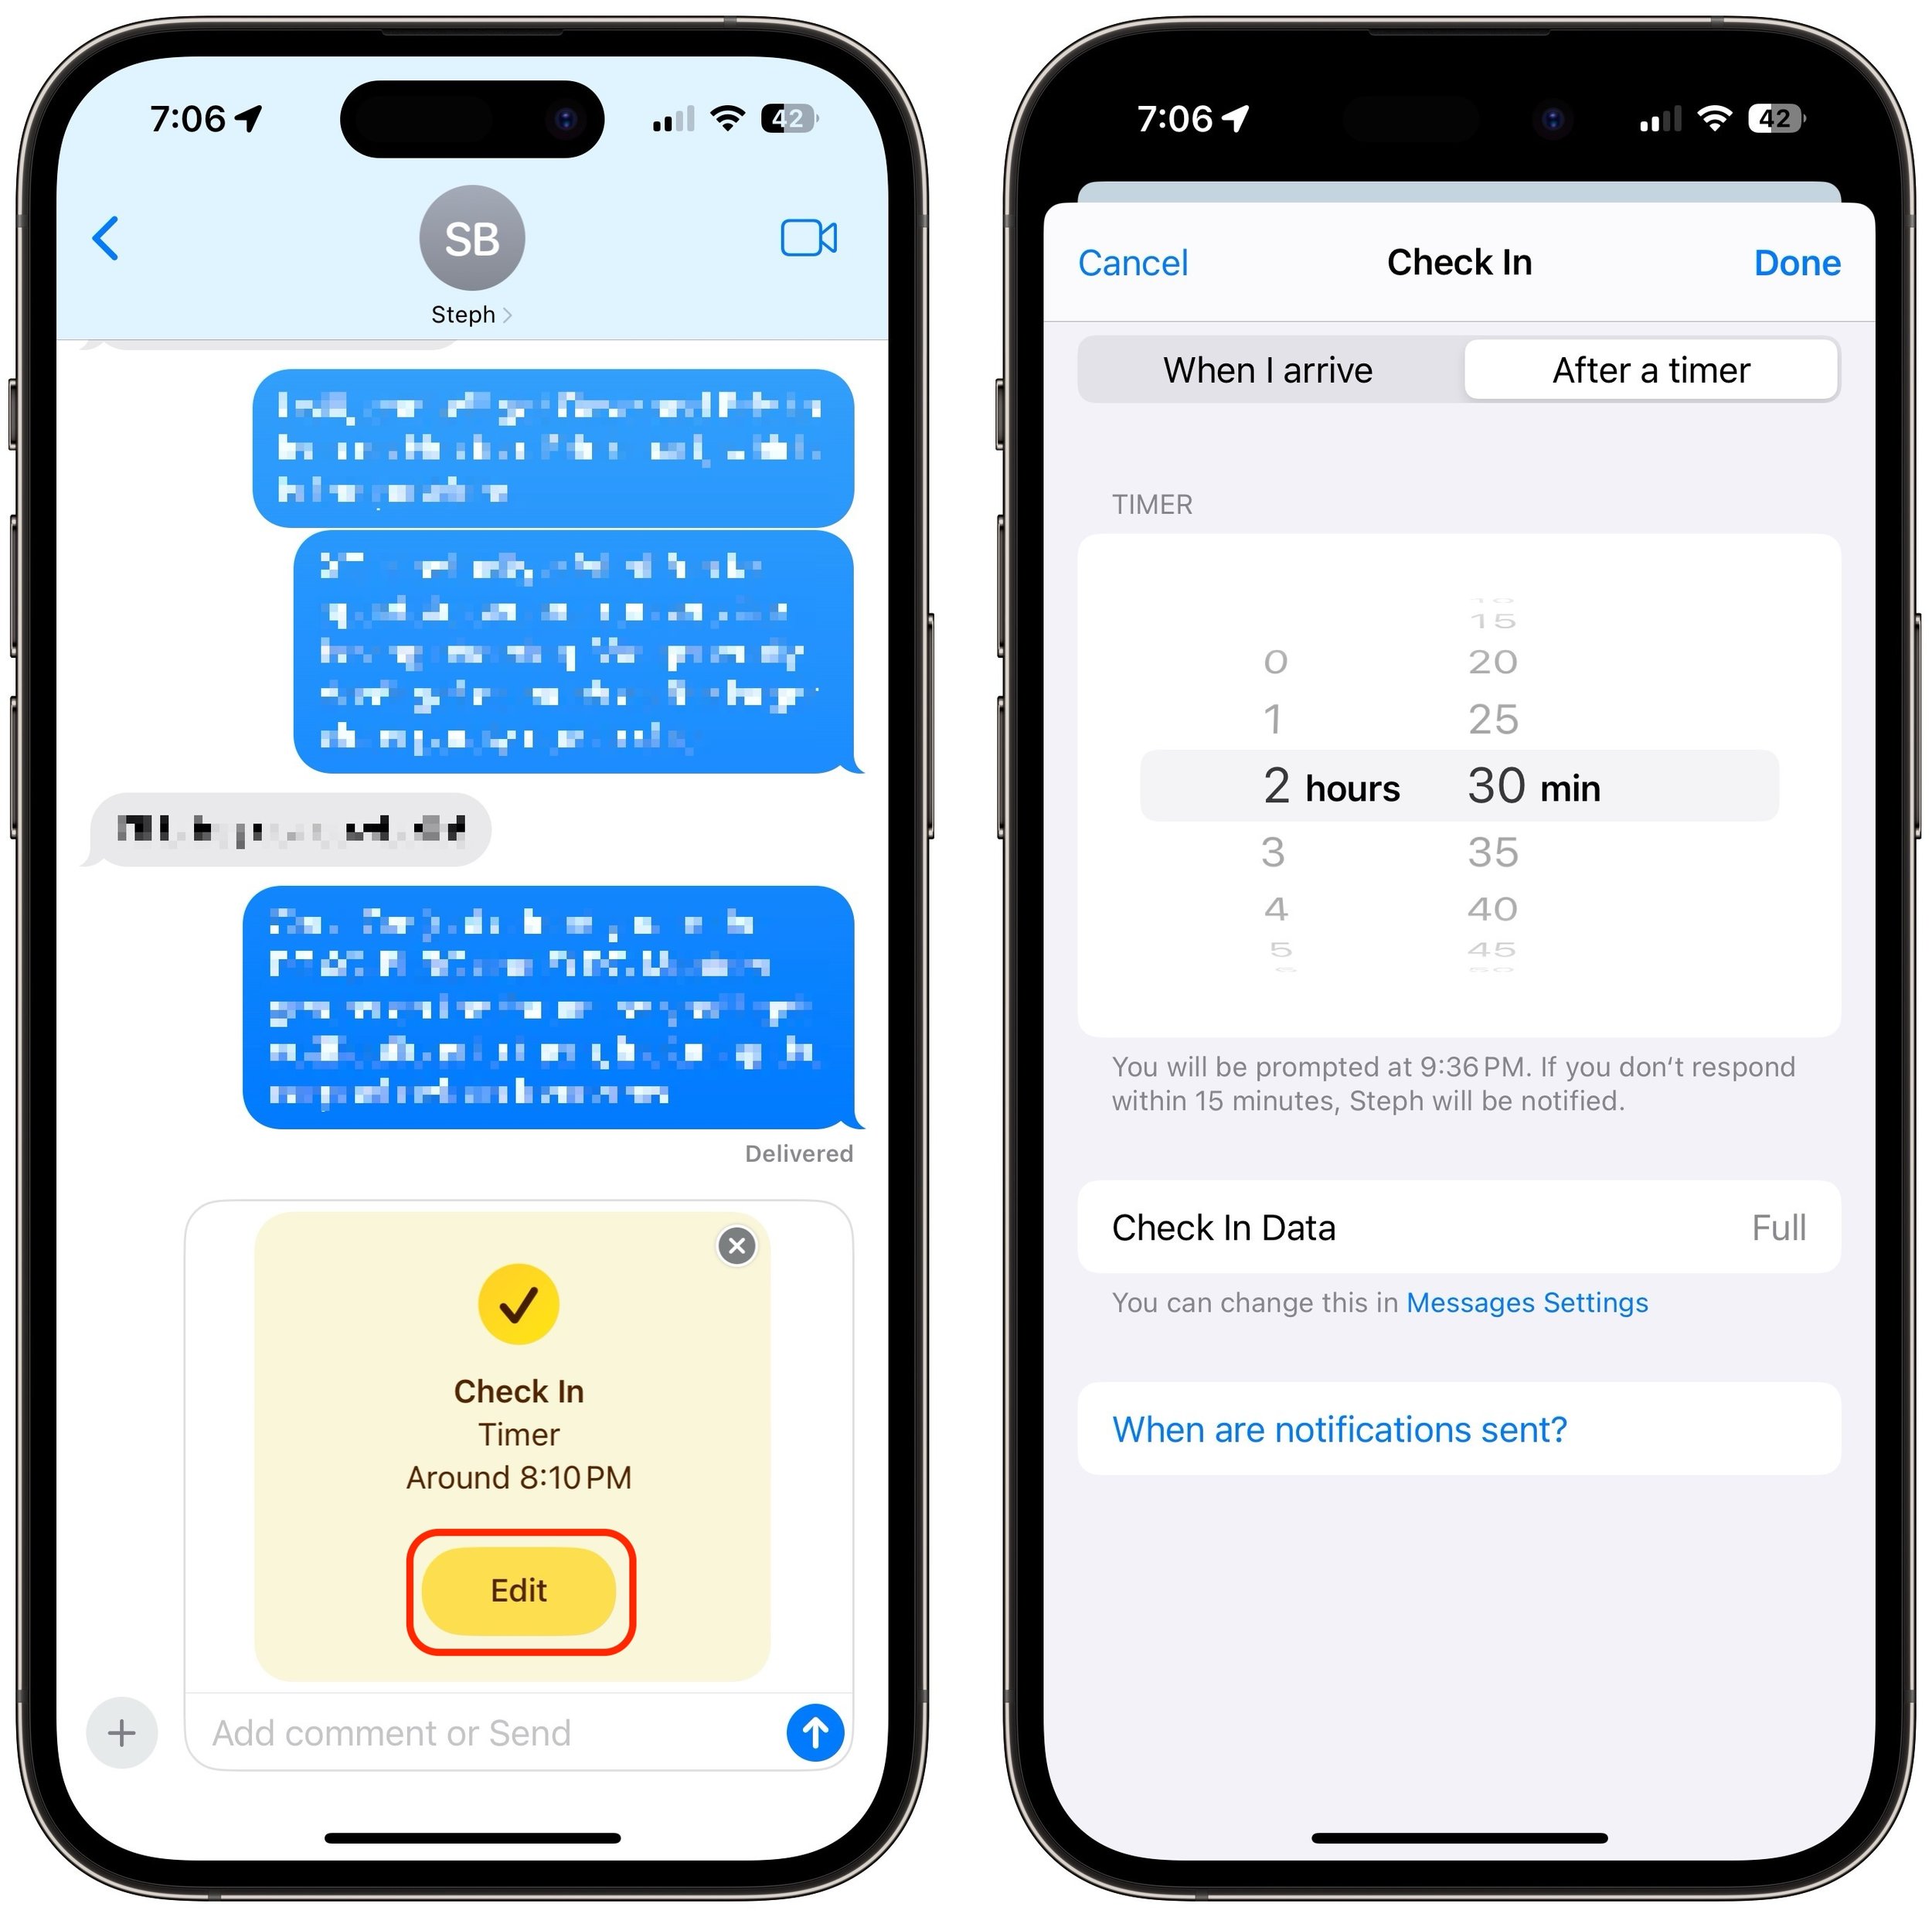
3. The first time you invoke Check In, Messages walks you through a series of explanatory screens, one of which is important—the privacy level of the data shared with your safety partner if you don’t arrive. Select Full—we can see almost no reason why you wouldn’t want that person to be able to share your exact location and route with emergency services if something has gone wrong. (If necessary, tweak this setting later in Settings > Messages > Data.)

4. On subsequent uses of Check In, an unsent card appears in the Messages conversation, usually set for an hour in the future. The card isn’t sent automatically so you can customize it before sending it.
5. Tap the Edit button to adjust the timer or destination.
6. To change the timer duration, use the time picker and tap Done. Skip to the last step in this list.
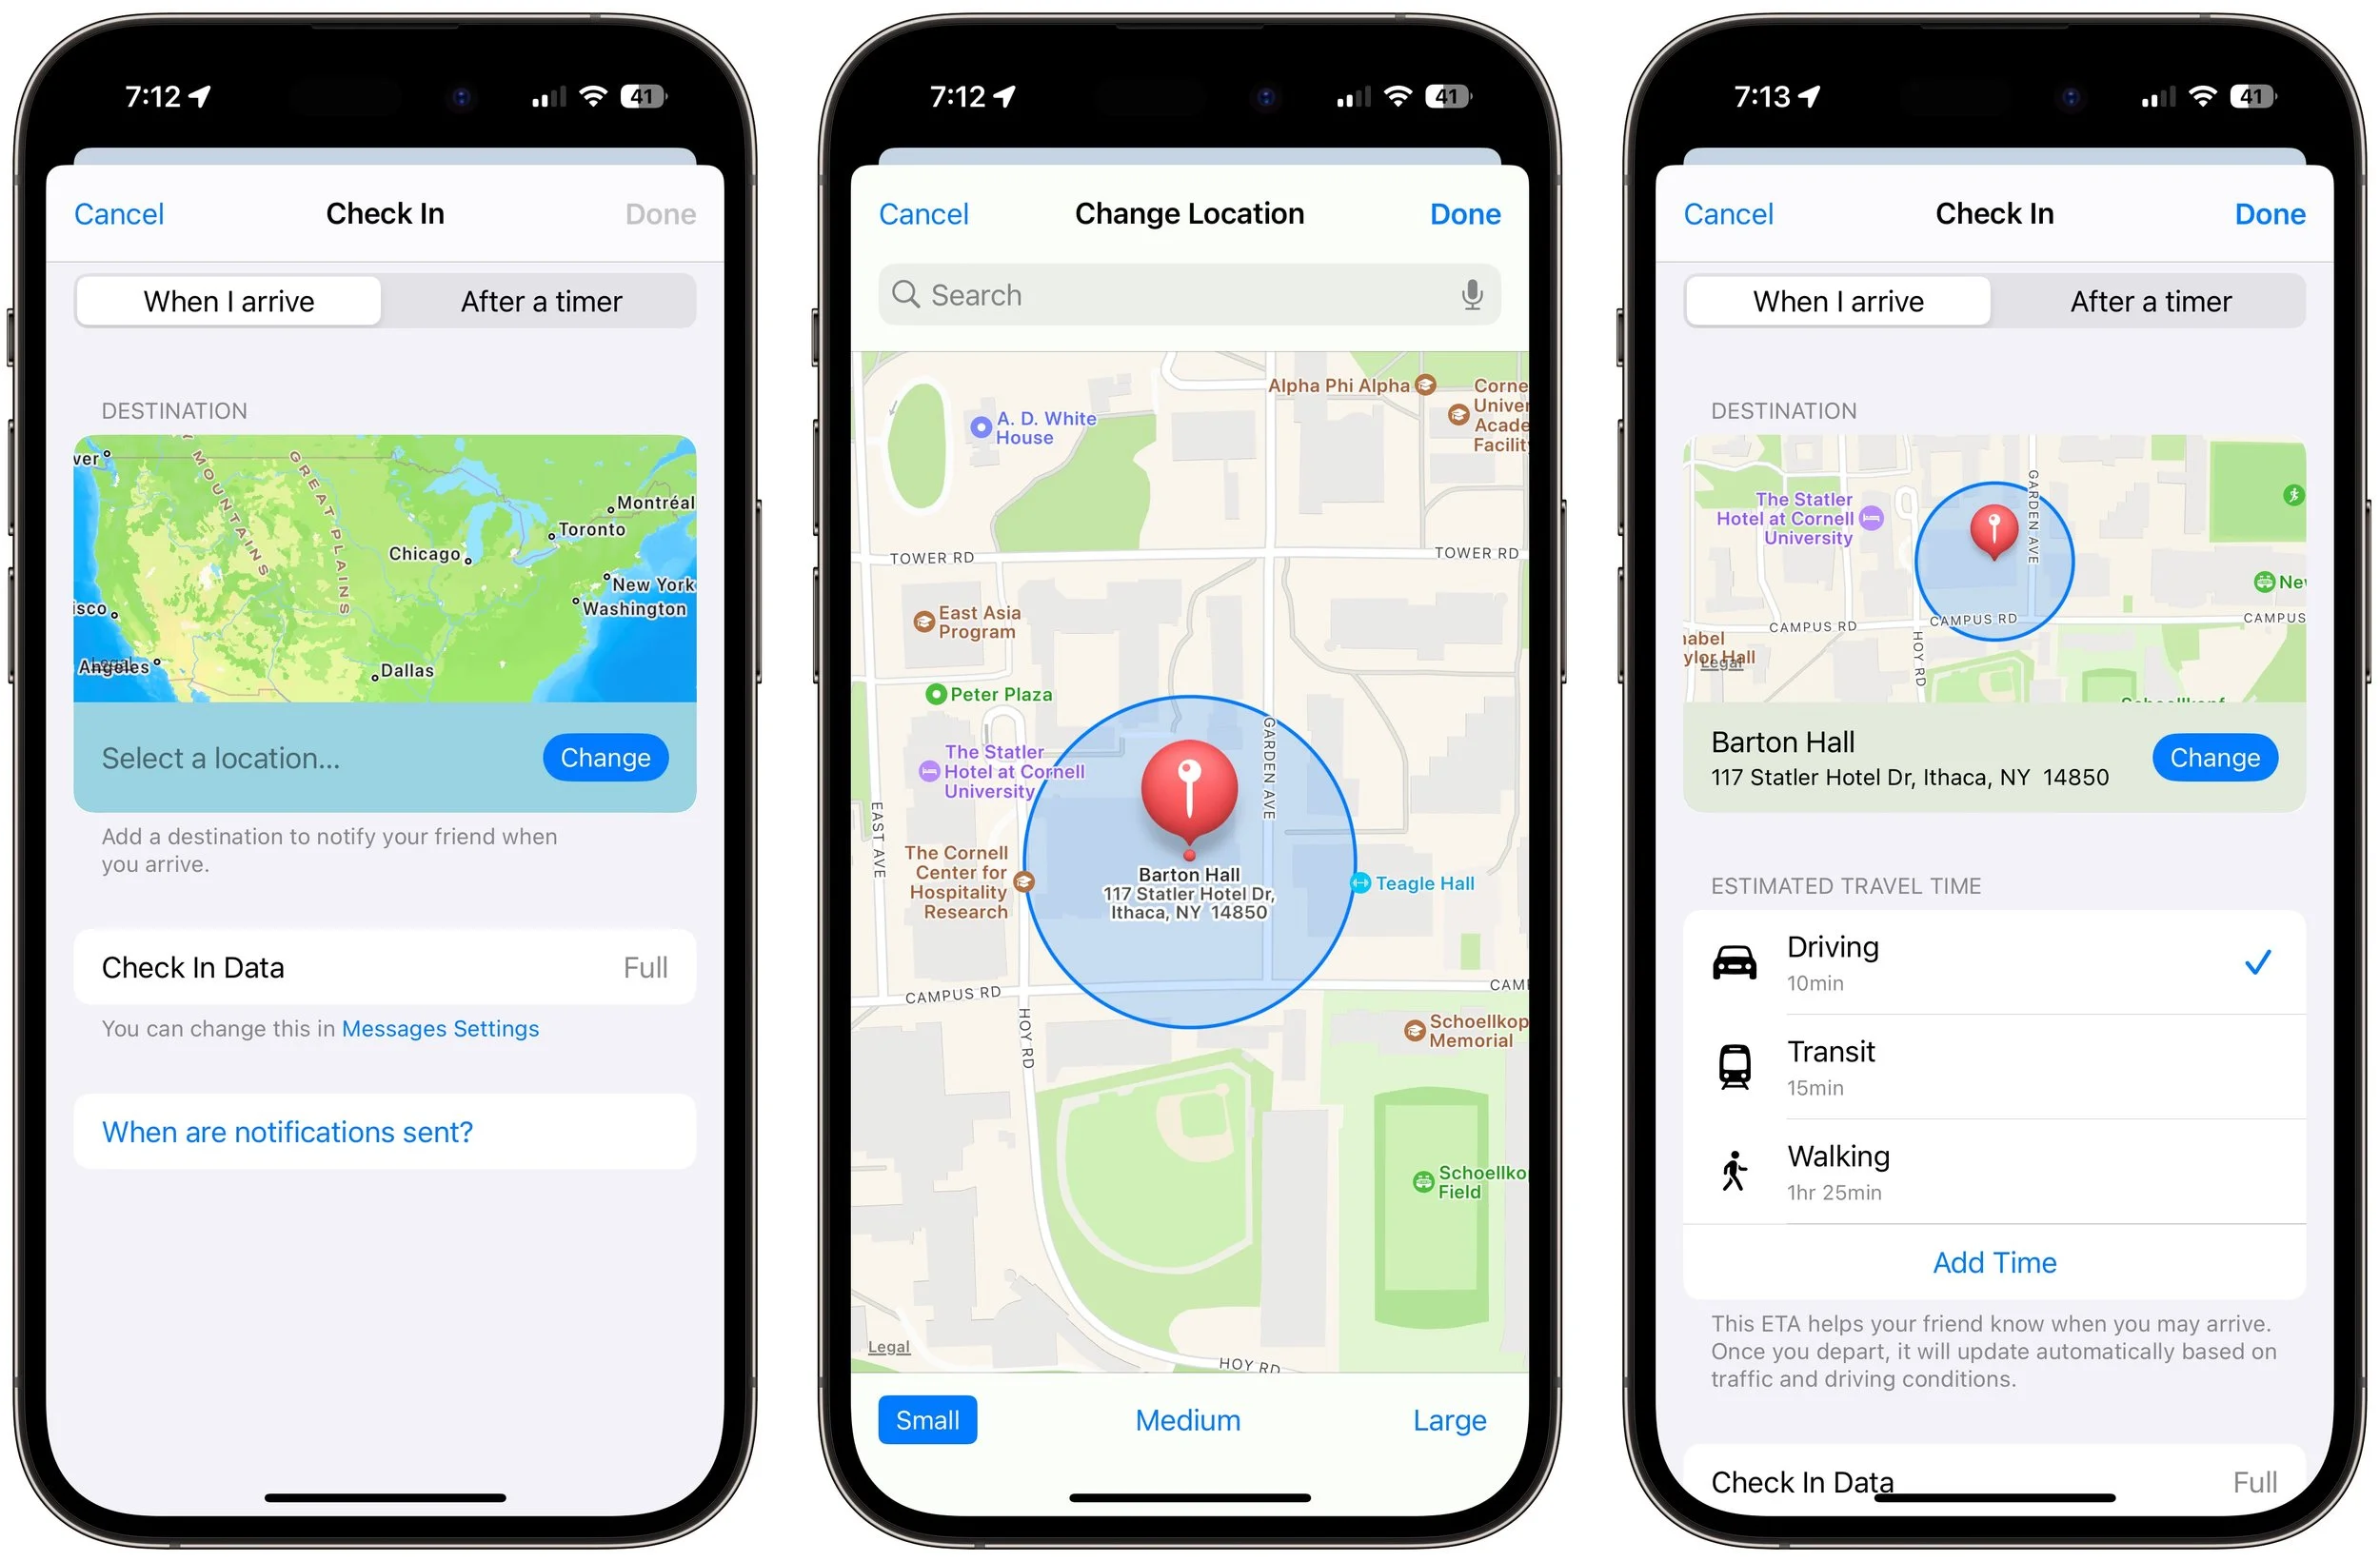
7. To set a destination instead of a timer, tap “When I arrive” at the top of the screen.
8. Tap the Change button, and in the map, either search for a location or find one manually by pinching and zooming—touch and hold the map to drop a destination pin. At the bottom of the screen, select Small, Medium, or Large to set the size of the area in which you’ll arrive.
9. Tap Done to close the map and then select Driving, Transit, or Walking so Check In can estimate your arrival time based on your method of transportation.
10. If you want additional buffer time, tap Add Time and give yourself 15, 30, or 60 minutes beyond when Check In thinks you’ll arrive. This shouldn’t usually be necessary.
11. Tap Done.
12. Once you’re back to the Check In card in the Messages conversation, tap the Send button to start the Check In.
Note that safety partners can’t reject Check In cards.
End a Check In
Once you trigger a Check In, it can end in a few ways. First, you can cancel it before the timer completes or you arrive at your destination. Second, it can end successfully when you tap End when the timer finishes or when you arrive at your specified location. Third and finally, there’s the core purpose of the Check In, which is to alert your safety partner if you fail to respond to a timer or arrive where and when you said you would.
Cancel: To cancel a Check In, tap the Details button on the Check In card in Messages, tap Cancel Check In, and agree that you don’t want your safety partner notified. Timer and destination Check Ins look slightly different but act the same way. Your safety partner will only see that the Check In card in Messages says it has ended.

End successfully: For a timer Check In to end successfully, you must respond when the iPhone prompts you (below left). All your safety partner sees when that happens is a note in the Check In card that the timer ended (below right). You don’t need to interact with your iPhone for a destination Check In to end successfully—just arrive at the specified location. The safety partner’s Check In card updates to say that you arrived.
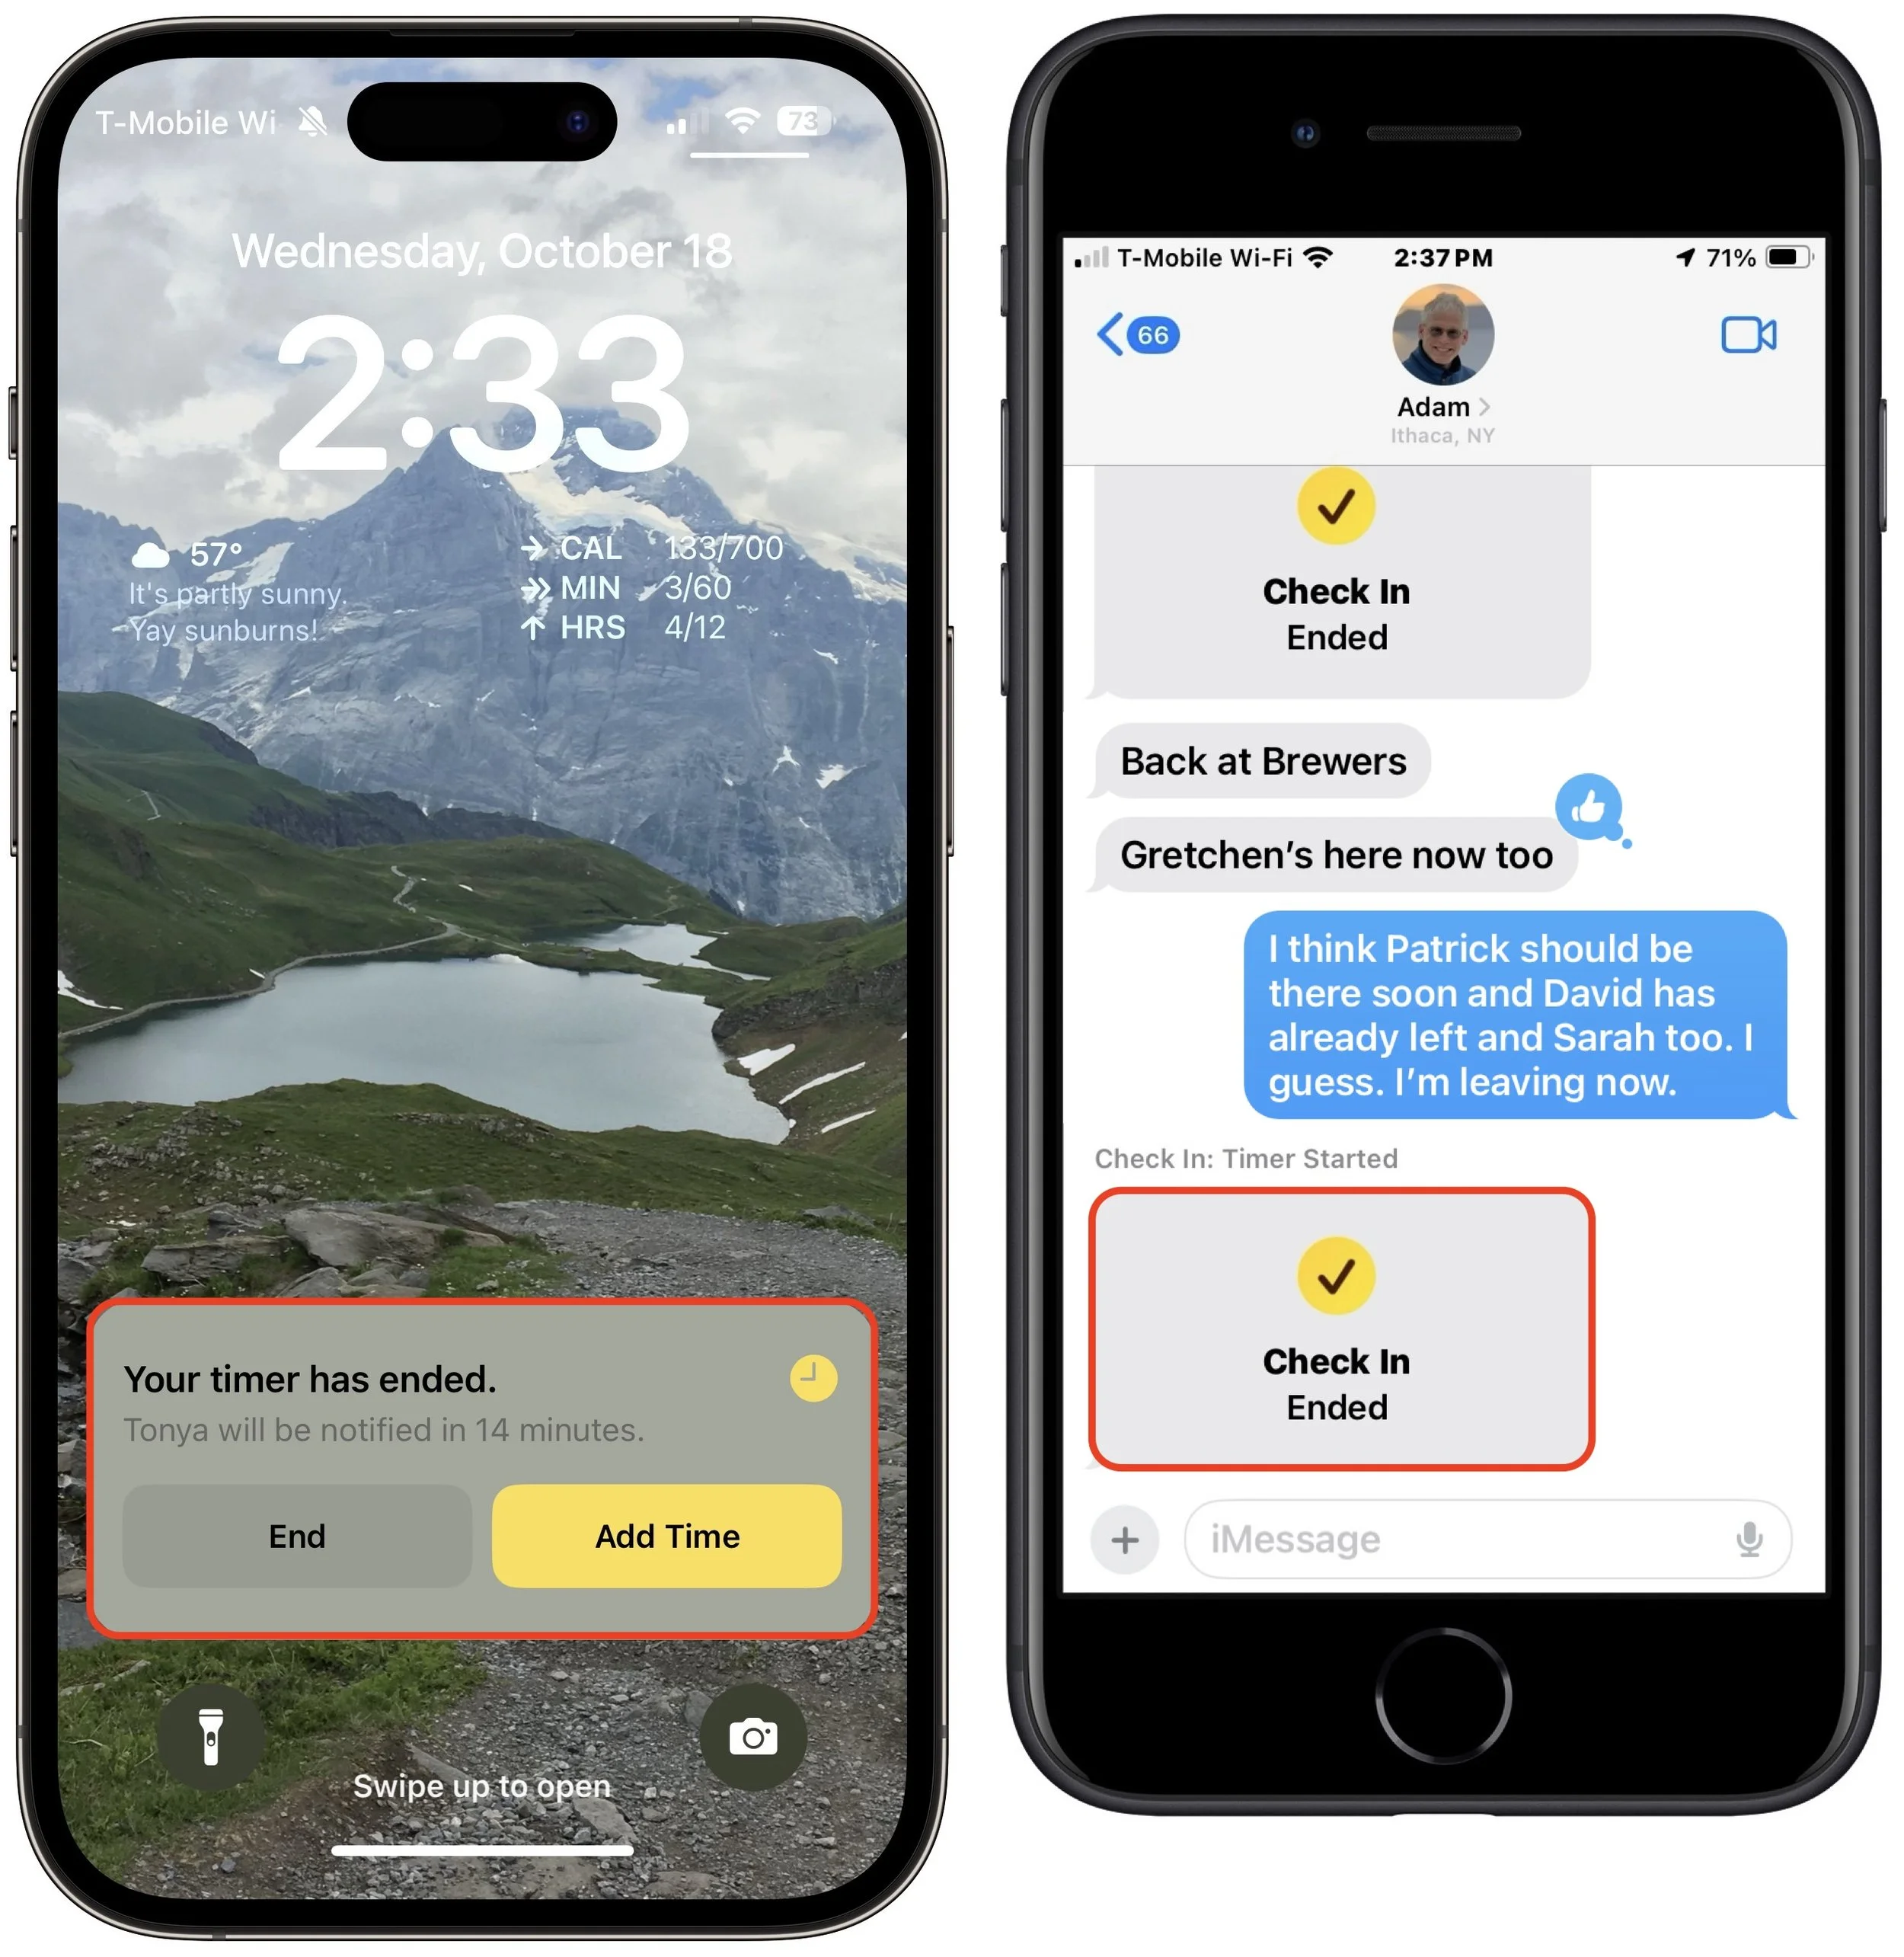
Check In fails to end (initiator): If you don’t arrive at your destination or fail to tap End when prompted, Check In gives you the option of adding time (below left) but after 15 minutes, tells you that it has alerted your safety partner (below center and right).
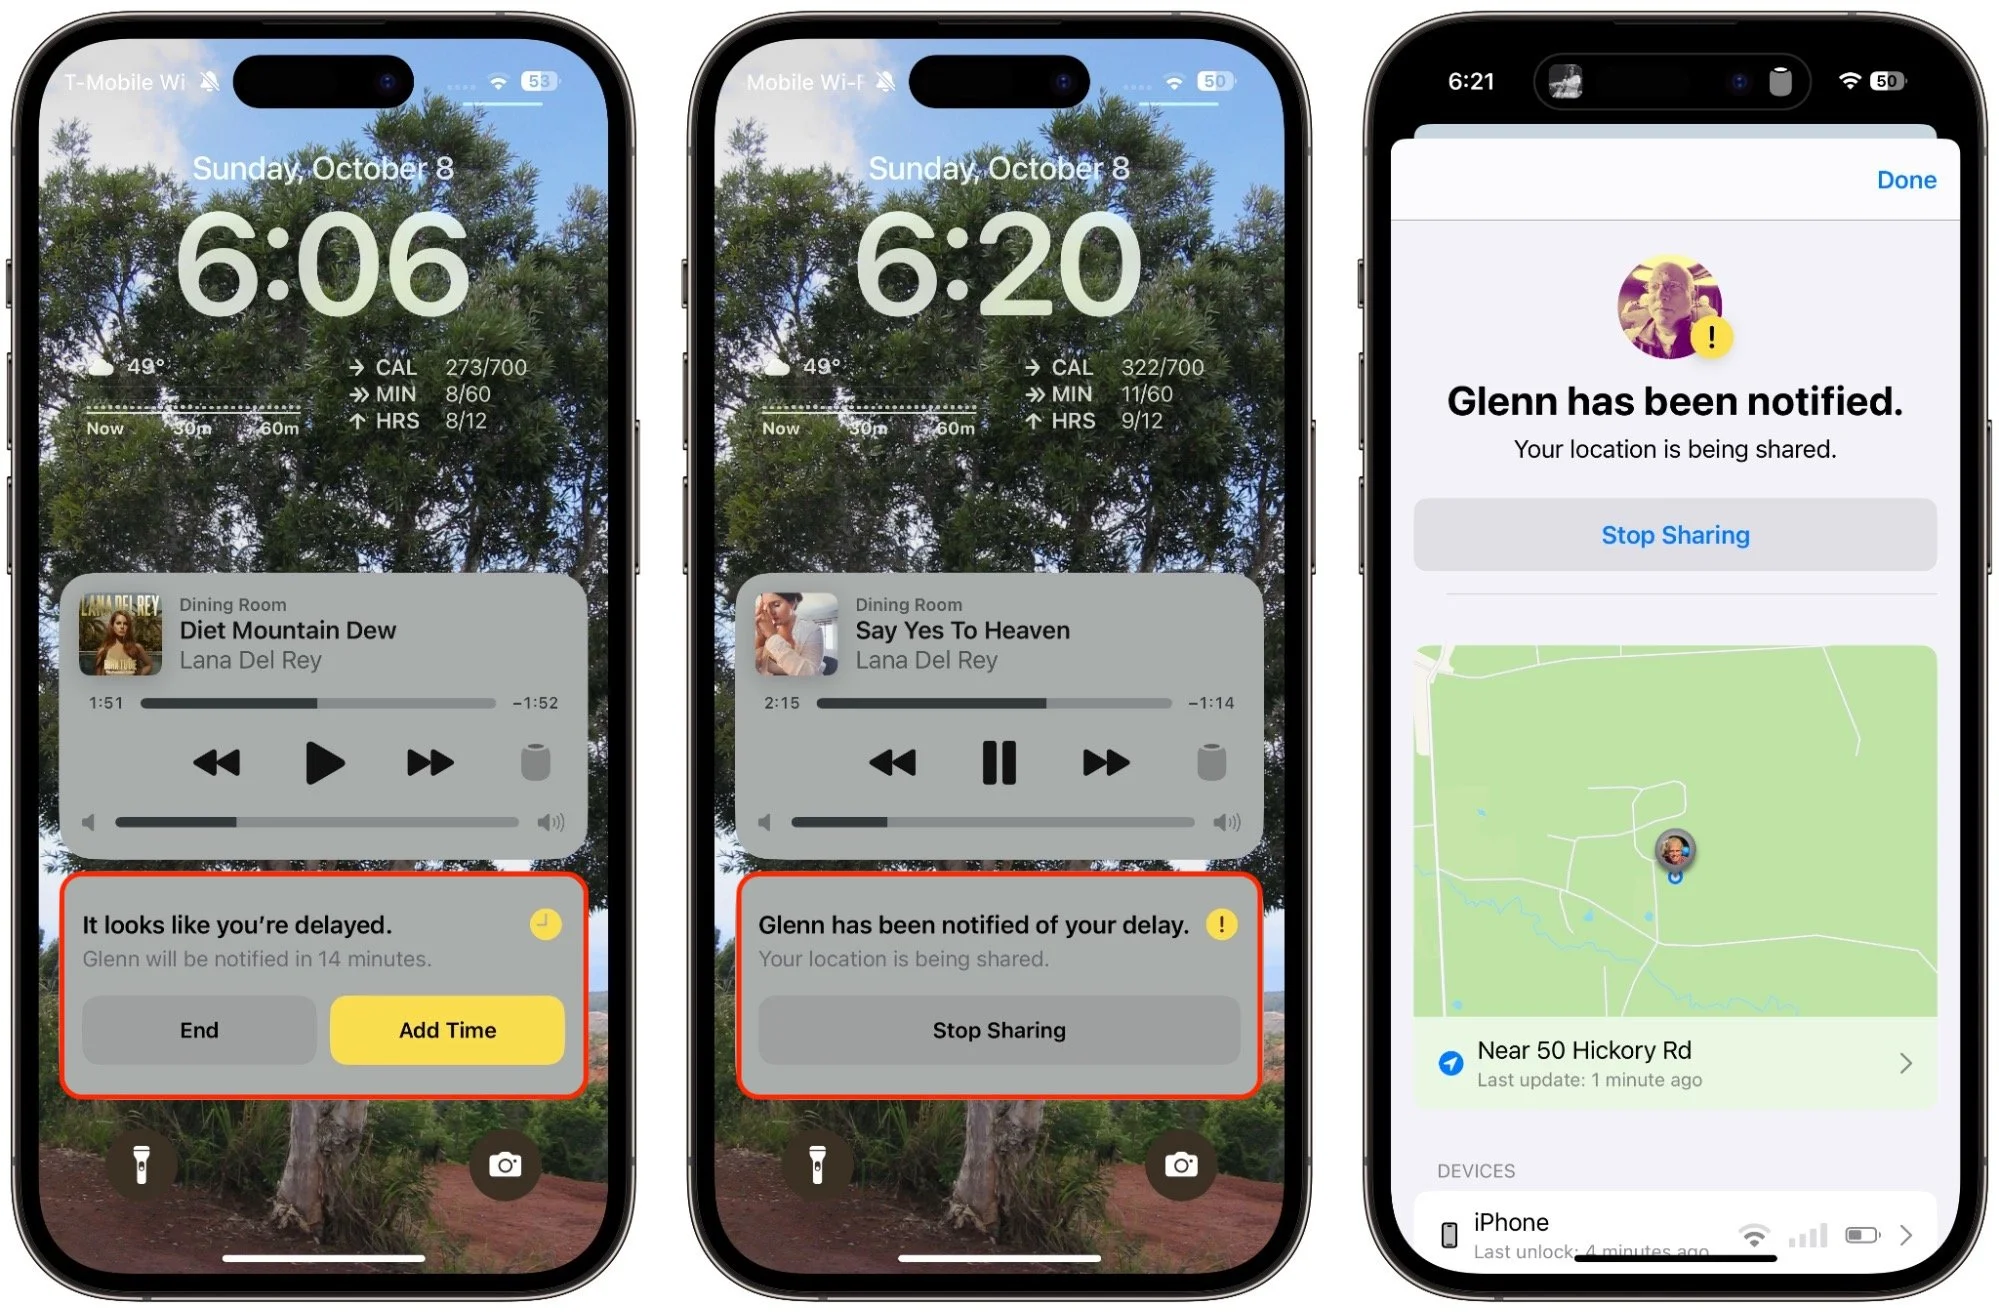
Check In fails to end (safety partner): More interesting is what your safety partner sees if you fail to complete a Check In. They’ll be alerted and can tap Details to see your location, when your devices were last unlocked, and more. They then have to figure out the best way to respond given your setup conversation.

It can take some practice to become fluid with Check In, so it’s worth testing it in everyday situations before using it when it might really matter. Once you use it a few times, you may notice Siri Suggestions offering to start it for you, making it even easier to initiate regularly. We hope you find that it provides some peace of mind and, in the worst-case scenario, helps someone in need of emergency services.
(Featured image by iStock.com/PeopleImages)
Want to Password-Protect a PDF? Follow These Best Practices
If you have a PDF with confidential information that you want to share, you can set a password to restrict opening, printing, or editing. We have instructions for Preview and Adobe Acrobat, plus advice on ensuring your document stays secure.

We periodically field questions about password-protecting a PDF to prevent the wrong people from reading it. Lawyers want to ensure that drafts of legal documents don’t fall into the wrong hands, financial advisers want to keep confidential financial information private, and authors want to prevent their writing from being shared broadly on the Internet. Others don’t worry so much about a document being read but want to ensure that it can’t be changed or printed.
PDF provides options for password-protecting documents for just these reasons, and you can add such protection to your PDFs in both Apple’s Preview and Adobe Acrobat. We’ll explain how to do that, but before we do, we want to share some best practices to increase the likelihood that your PDFs will remain protected as you wish.
Also, if you’re looking for a comprehensive solution to protecting lots of documents for a wide variety of situations, you’d be better off investigating document digital rights management systems along the lines of LockLizard and Vitrium.
Best Practices for Password-Protecting PDFs
There’s no such thing as perfect security, especially when you want to share information with others rather than just keeping it as your own secret. But you can increase the security of shared documents with these best practices.
Use strong passwords: All PDF passwords should be longer than 12 characters and include uppercase and lowercase letters, numbers, and punctuation, without using dictionary words or well-known number/letter substitutions. A plethora of online PDF unlocking tools can remove weak passwords, and passwords should be strong enough to withstand brute force and dictionary attacks from a determined attacker who could bring significant computing re-sources to bear.
Focus on Document Open passwords: PDFs can have two passwords: the Document Open password that users must enter to open the document and a Permissions password that restricts actions like editing, printing, and copying. Even if you mainly want to restrict actions, it’s worth setting a Document Open password because the Permissions password’s restrictions can be bypassed by third-party utilities or by screenshots and Live Text.
Share passwords out of band: When sharing a protected PDF with someone, send them the password via a different communications channel. So, if you email the PDF, give them the password via Messages or a voice call. That way, if an attacker gains access to the PDF, they won’t also have the password sitting next to it.
Educate recipients: When you share a user password with someone else, they can give it to anyone they want and, depending on how you set things up, remove the protection from the document. In short, your document security is only as strong as your recipients want it to be, so make sure to communicate your wishes to them.
Watermark documents: Along those lines, it may be worth adding a header/footer or watermark that identifies the document as Confidential or Draft to clarify why it shouldn’t be shared.
Avoid online tools: Numerous websites offer PDF utility functions, such as adding passwords, watermarking, merging and splitting, conversion, and more. There’s no harm in using them with documents you don’t care about, but if you’re concerned enough to password-protect a PDF, don’t upload it to a website with unknown security and document retention policies.
Clear metadata: Passwords protect PDF content, but not necessarily metadata that might include the author’s name, employer, and keywords.
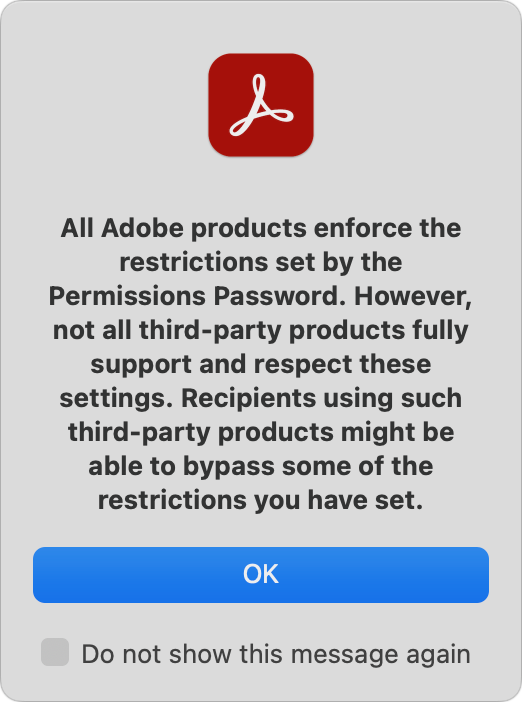
Use Adobe Acrobat: Apple’s Preview is a decent PDF app and offers basic password-protection capabilities, but for more protection capabilities and options, use the full-featured Adobe Acrobat. Preview is OK for those who need to protect an occasional PDF, but Acrobat is a better choice if protecting PDFs is essential for your situation.
Password-Protect a PDF Using Preview
It’s easy to add password protection to a PDF with Preview. Apple recommends a slightly fussier approach that involves setting the permissions during an export, although we didn’t find that it made any difference. Apple is likely trying to get you to make a copy so you don’t password-protect your original, but it’s easier to duplicate the file in the Finder first with File > Duplicate. Here’s the simple method:
With a copy of a PDF open in Preview, choose File > Edit Permissions to display the permissions dialog.
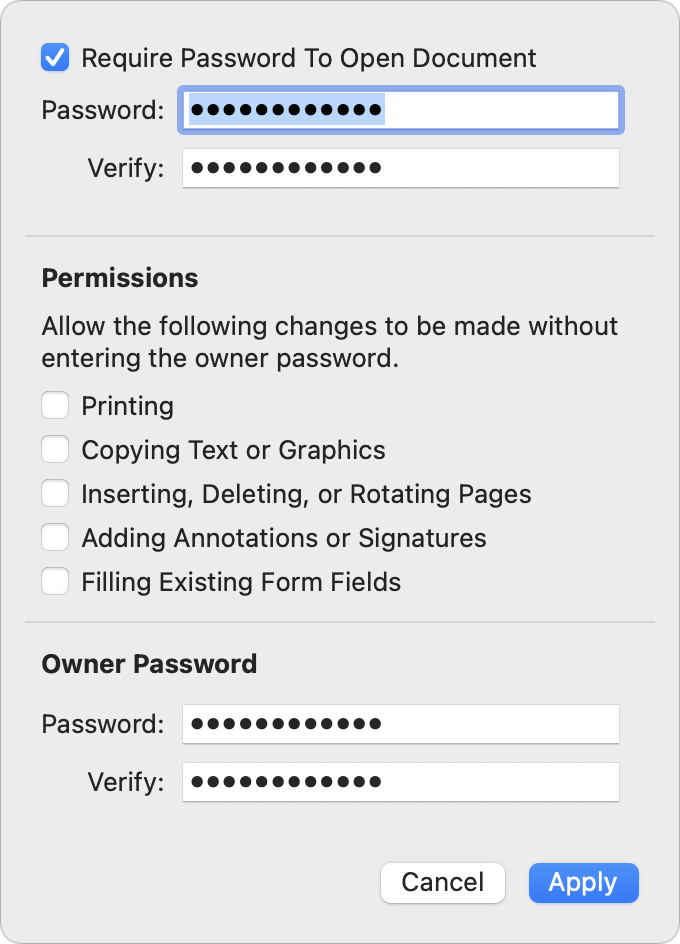
2. Select Require Password To Open Document, and enter the desired Document Open password twice.
3. Deselect desired checkboxes in the Permissions section to restrict those activities.
4. Enter the Owner (Permissions) password twice at the bottom of the dialog. It should be different from the Document Open password. Either will open the document, but only the Owner (Permissions) password will allow the document to be printed, copied, or edited as per those checkboxes.
5. Click Apply and save the document.
Password-Protect a PDF Using Adobe Acrobat
Adobe has extensive instructions on password-protecting PDFs using Acrobat in different scenarios, but the basics are still simple.
1. With a copy of a PDF open in Acrobat, choose File > Protect Using Password to open the password dialog.
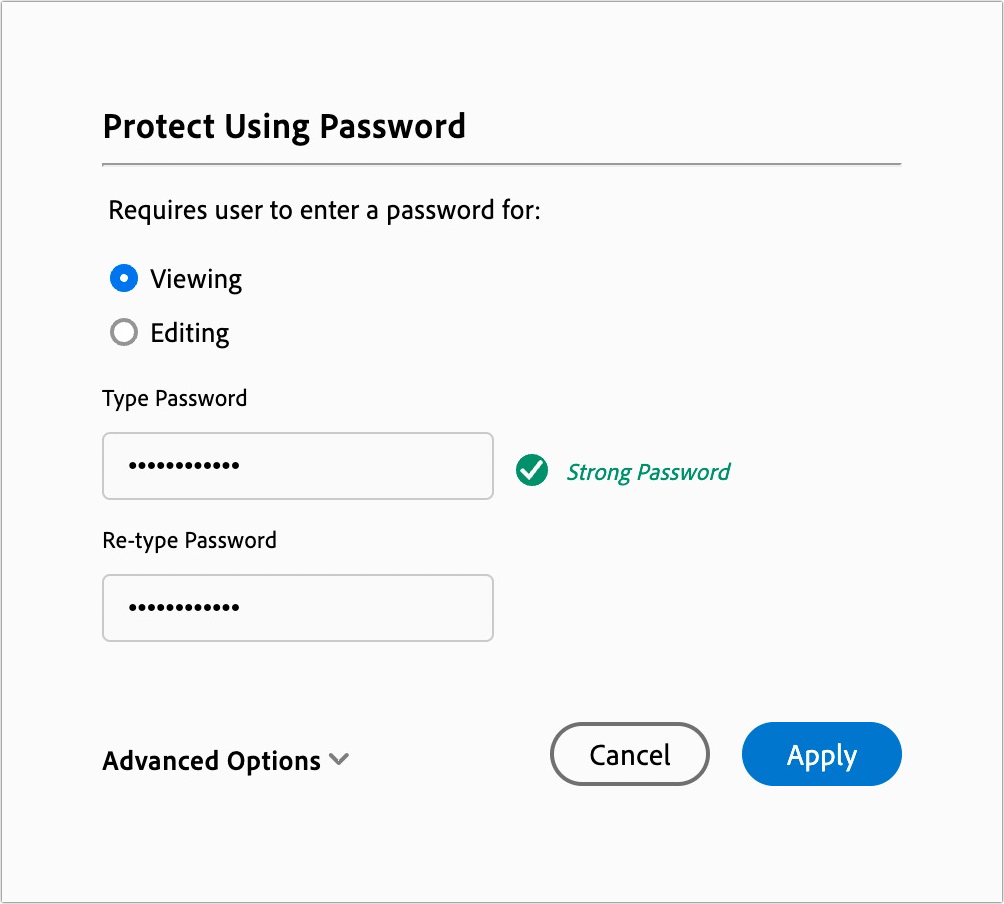
2. Select Viewing to add a Document Open password or Editing to add a Permissions password.
3. Enter the password, and retype it to confirm it.
4. Click Apply and save the document.
For a simple Document Open password, you’re all done, but if you want to set specific printing, editing, and copying restrictions, follow these steps:
1. Choose Edit > Protection > Security Properties to open the Document Properties dialog with the Security tab selected.

2. Next to Security Method (which should be set to Password Security), click Change Settings to open the Password Security - Settings dialog.
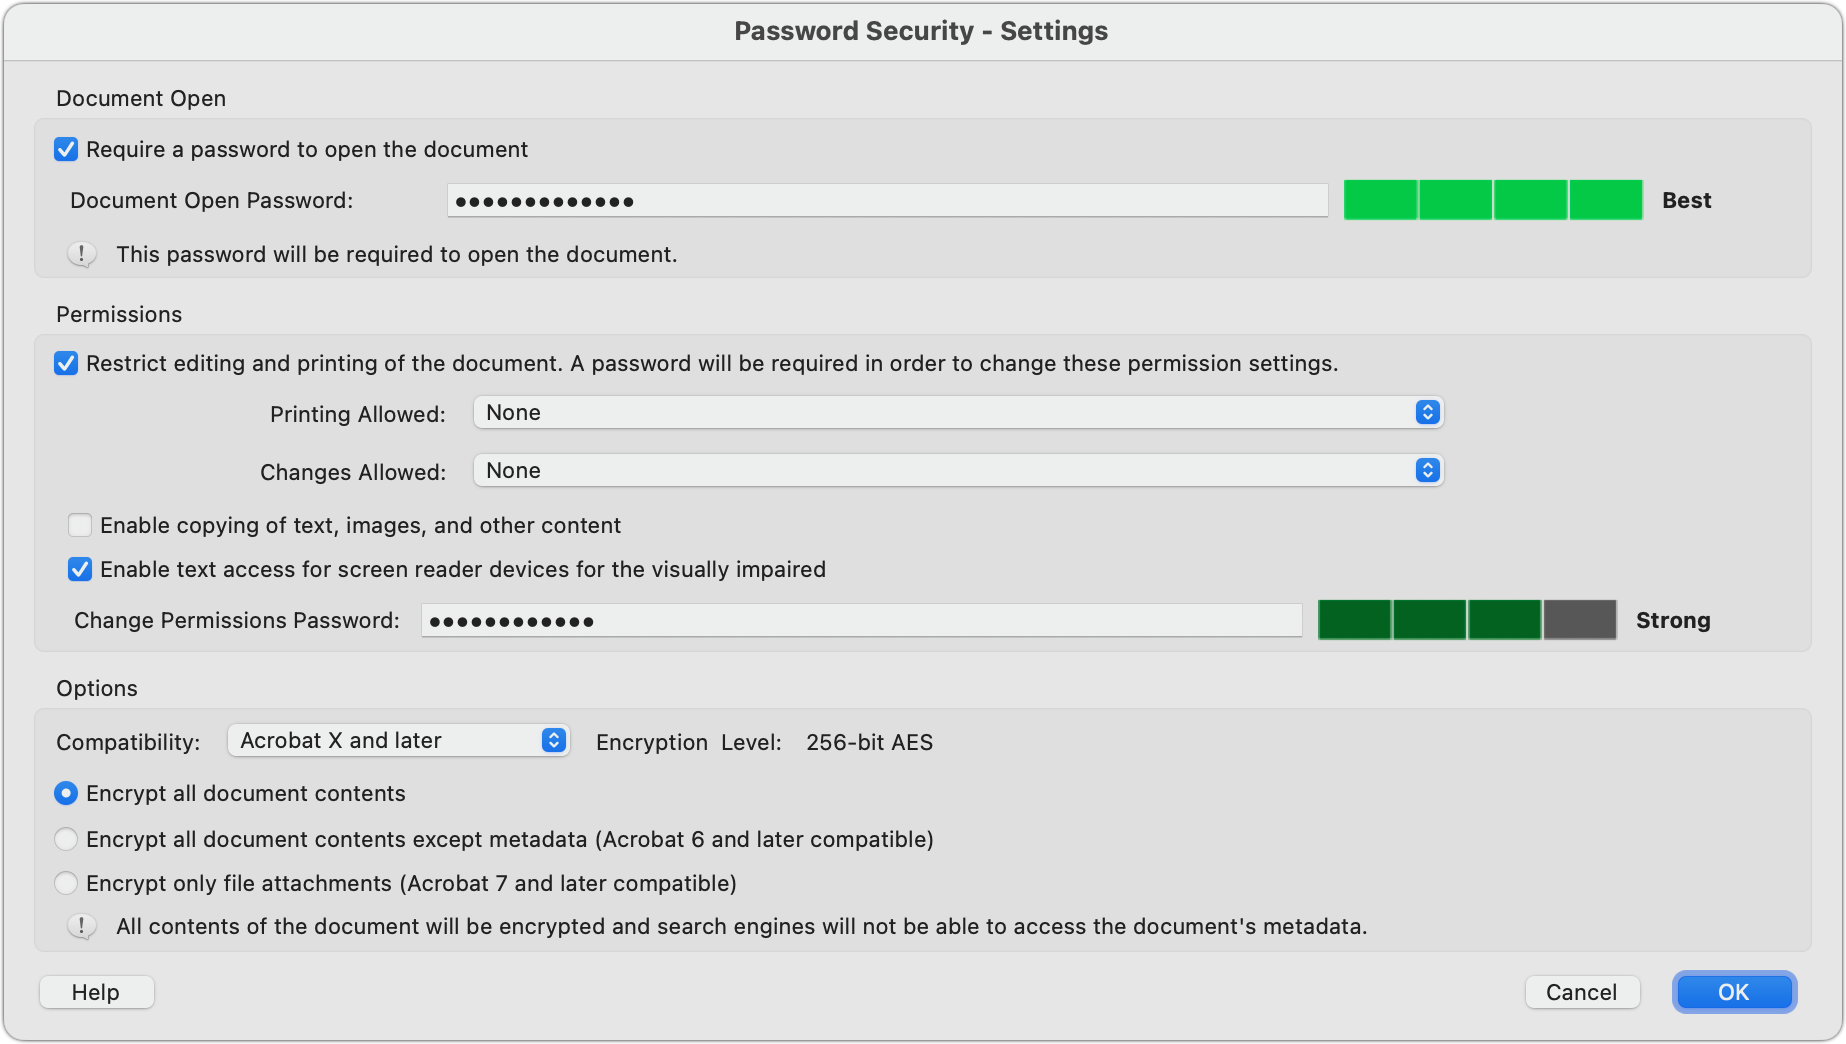
3. In the Permissions section, select the desired options to restrict printing, editing, and copying text in various ways.
4. Click OK and, when prompted, confirm the passwords you’ve entered.
5. Dismiss the Document Properties dialog and save the document.
Password-protecting a PDF can be helpful when you want to ensure a PDF containing sensitive information can’t be viewed or edited by the wrong people. Make sure to use strong passwords since weak passwords are so easily removed!
(Featured image based on an original by iStock.com/Thitichaya Yajampa)
Networking Gear Does Wear Out—Suspect It in Internet Slowdowns and Dropouts
If you’re suffering from Internet slowdowns and dropouts, remember that networking gear and cables can get flaky with age, so it’s worth checking your modems, routers, and switches when troubleshooting.

We’ve helped some clients recently with networking problems that seemed to be related to Internet connections. Most notable was intermittently slow Internet performance, causing the client to call their ISP to upgrade to a higher bandwidth connection with guaranteed throughput. But that extra monthly expense turned out to be unnecessary once we tracked the problem to a malfunctioning cable modem. Other problems we’ve seen involved occasional network dropouts (a bad Ethernet switch), flaky Wi-Fi access (a dying AirPort base station), and Internet slowdowns (squirrels gnawing on an outdoor coaxial cable).
Networking infrastructure is often the very definition of “out of sight, out of mind.” Modems, routers, and switches are usually hidden away in corners, closets, or machine rooms where few people notice them regularly. In addition, most users rely on Wi-Fi–equipped laptops, tablets, and smartphones and put no thought into how those Wi-Fi connections get their Internet access. Nor do many people realize the extent that physical cables—Ethernet, coaxial, fiber optic—are required.
Plus, because network cables and gear are so hidden, they tend to stay in place for years. For the most part, that’s fine. Most network devices other than those involving network-attached storage have no moving parts to fail, and cables that aren’t exposed to extreme environmental conditions or physical movement will last for a long time. But even solid-state electronic devices wear out, and while cables seldom degrade on their own, they’re easily damaged by movement. And never underestimate the damage mice and squirrels can inflict!
It’s worth making sure you or someone in your organization has a solid knowledge—and documentation—of your network infrastructure. For instance, can someone answer these questions:
Where does your Internet connection come into the building?
What cable modem or other router are you using? Do you own or rent it?
Does your network rely on multiple Ethernet switches? Other networking gear?
Is your Ethernet cabling Cat 5 (obsolete, limited to 100 Mbps), Cat 5e (capable of 1 Gbps), Cat 6 (up to 10 Gbps), Cat 6a (10 Gbps at longer distances), or Cat 6e (a meaningless marketing term)?
Where is your Ethernet cable strung, and is it reasonably accessible? Can you isolate portions of your network for testing?
We also recommend putting an installation date sticker on the bottom of your network devices. That way, if you’re troubleshooting a problem like poor performance or intermittent connections, you can check quickly to see if any suspect devices are truly ancient. Even when older devices like cable modems seem to be working correctly, they may lack support for newer standards or firmware updates that provide better stability and throughput. We’ve also seen that issue with powerline networking adapters that are useful for extending connectivity to areas that can’t easily be served by Wi-Fi or Ethernet—newer adapters can provide significantly more performance. Plus, hardware does degrade over time—in particular, we’ve seen Ethernet switches and Wi-Fi routers get flaky as they age.
Finally, if solving a network problem requires new gear or cables, we strongly encourage purchasing quality hardware and cabling. Spending a little more upfront can save a lot of money in troubleshooting down the road, especially when it comes to pulling new cables.
(Featured image by iStock.com/klmax)