
Apple Invites Simplifies Social Event Planning
The new Apple Invites app for iPhone simplifies inviting friends and family to social events for iCloud+ subscribers. Anyone can RSVP, even if they don’t use Apple devices.

Apple has launched the new Apple Invites iPhone app for planning social events with friends and family. Apple Invites requires iOS 18 on the iPhone, and you can also use it at iCloud.com/invites on the Mac and iPad. Event creation is limited to iCloud+ subscribers (those who pay for extra iCloud storage), but anyone can RSVP for an event, even if they don’t have the app, an Apple Account, or an Apple device. Creating an event is straightforward: simply name the event, set a date and optional time, specify a location, add a description, and pick a background. You can then invite people directly or by sharing a public link. Guests can RSVP whether they’re attending, not attending, or are unsure, and they can change their name and provide a custom response. Apple Invites may not change the world, but it’s a nice alternative to ad-infested invitation services.

(Featured image by iStock.com/Jacob Wackerhausen)
Add Weather to Your Mac’s Menu Bar with This Sequoia Tip
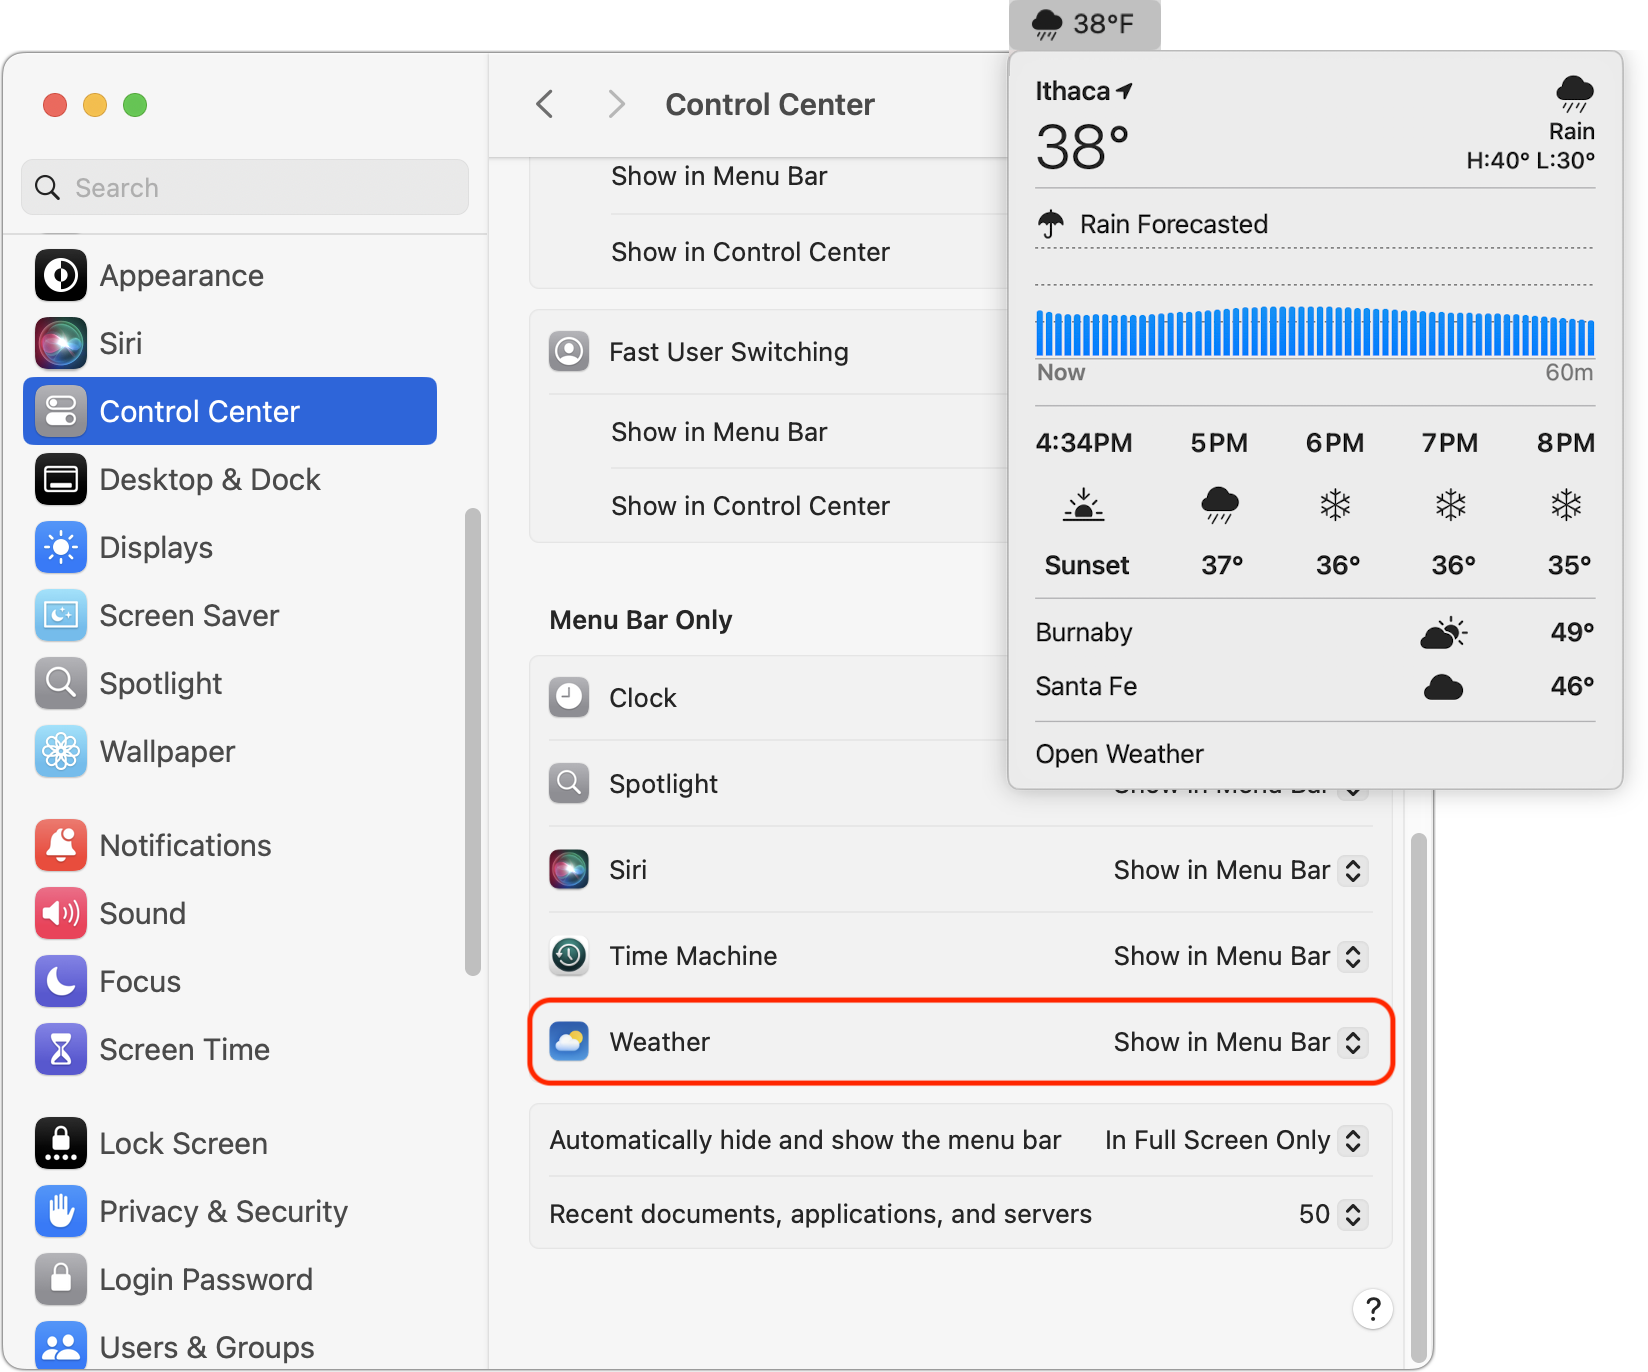
In macOS 15.2 Sequoia, you can display the current weather conditions in your Mac’s menu bar. Here’s how to enable that feature.

In macOS 15.2 Sequoia, Apple added the option to display the current weather conditions in the menu bar but hid the switch deep in the bowels of System Settings. To turn this option on, open System Settings > Control Center, scroll to the bottom, and in the Menu Bar Only section, for Weather, choose Show in Menu Bar. A new item with the current conditions at your location will appear in the menu bar; click it to see the forecast and access other locations in Apple’s Weather app.
(Featured image by iStock.com/trangiap)
Text Replacements Not Working on the Mac? Check This Setting
Apple’s built-in text replacement feature expands a short abbreviation you type into something longer, but a simple menu option can prevent it from working in a Mac app. Here’s how to fix it.

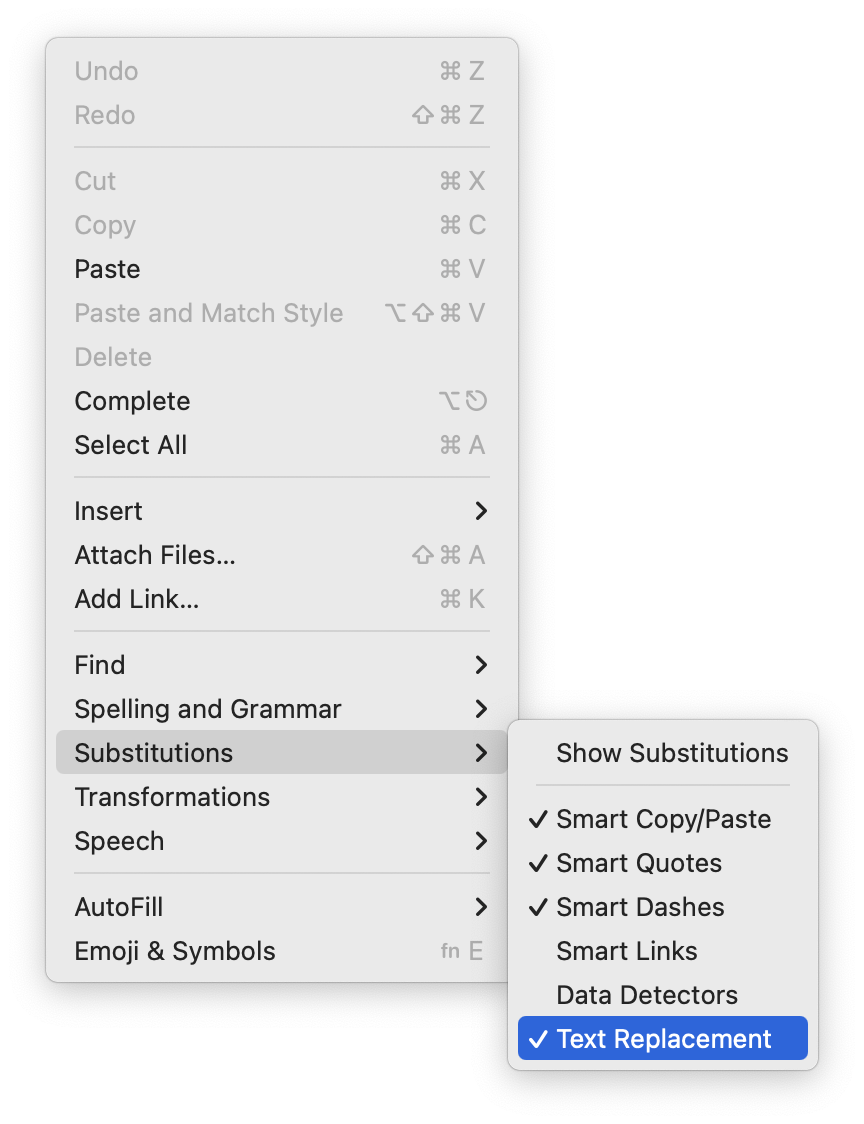
Apple provides a handy ecosystem-wide feature that replaces a typed abbreviation—say “eml”—with text you specify, like your email address. (Seriously, copy that one so you don’t have to type your email address repeatedly.) These automatic text replacements sync via iCloud so you can use them on the Mac, iPhone, and iPad. Find them on the Mac in System Settings > Keyboard > Text Replacements and on the iPhone and iPad in Settings > General > Keyboard > Text Replacement. They’re great, but it can be mysterious when they stop working on the Mac. The culprit? A menu item being turned off. So, if text replacements aren’t working in a particular app, choose Edit > Substitutions > Text Replacement to turn them back on.
(Featured image by iStock.com/tookitook)
How to Convince Microsoft Office Apps to Save Files on Your Mac
Microsoft Office apps save documents in the cloud-based OneDrive by default, but you can easily switch to saving files elsewhere. The apps generally remember your change but may forget after an update.

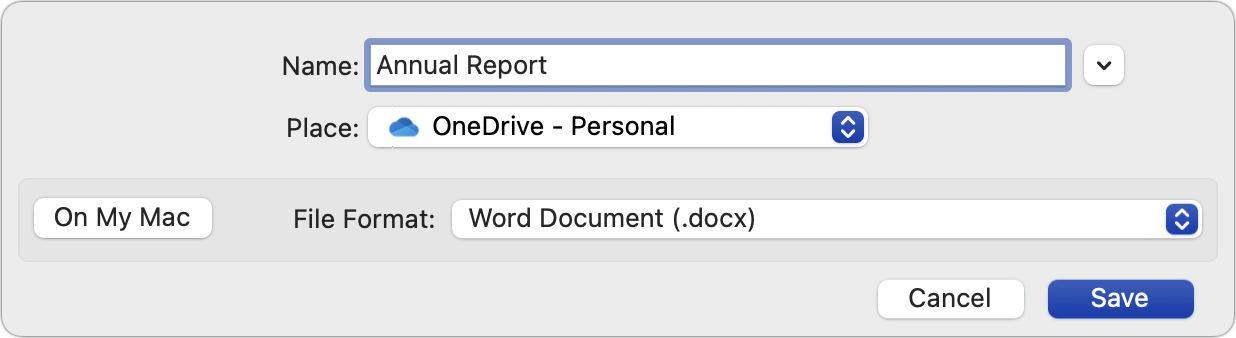
By default, Microsoft Office apps—Word, Excel, and PowerPoint—try to save files on Microsoft OneDrive as a way of promoting the company’s cloud storage. If that’s undesirable, you can easily keep your files locally on your Mac or in a different cloud storage location. In the Save dialog, click the On My Mac button to switch to a standard Save dialog showing all your other storage options. There’s no way to set On My Mac as the default location, but the Save dialog automatically remembers your last saved location. That should be sufficient most of the time, although it’s not unheard of for an Office update to flip the Save dialog back to OneDrive.
(Featured image based on an original by iStock.com/pzAxe)
Manage Default Apps in One Place in iOS 18.2 and iPadOS 18.2
Many people don’t realize they can choose alternatives to Apple’s Mail and Safari on the iPhone and iPad. A new Default Apps screen simplifies reviewing your options and changing your defaults.

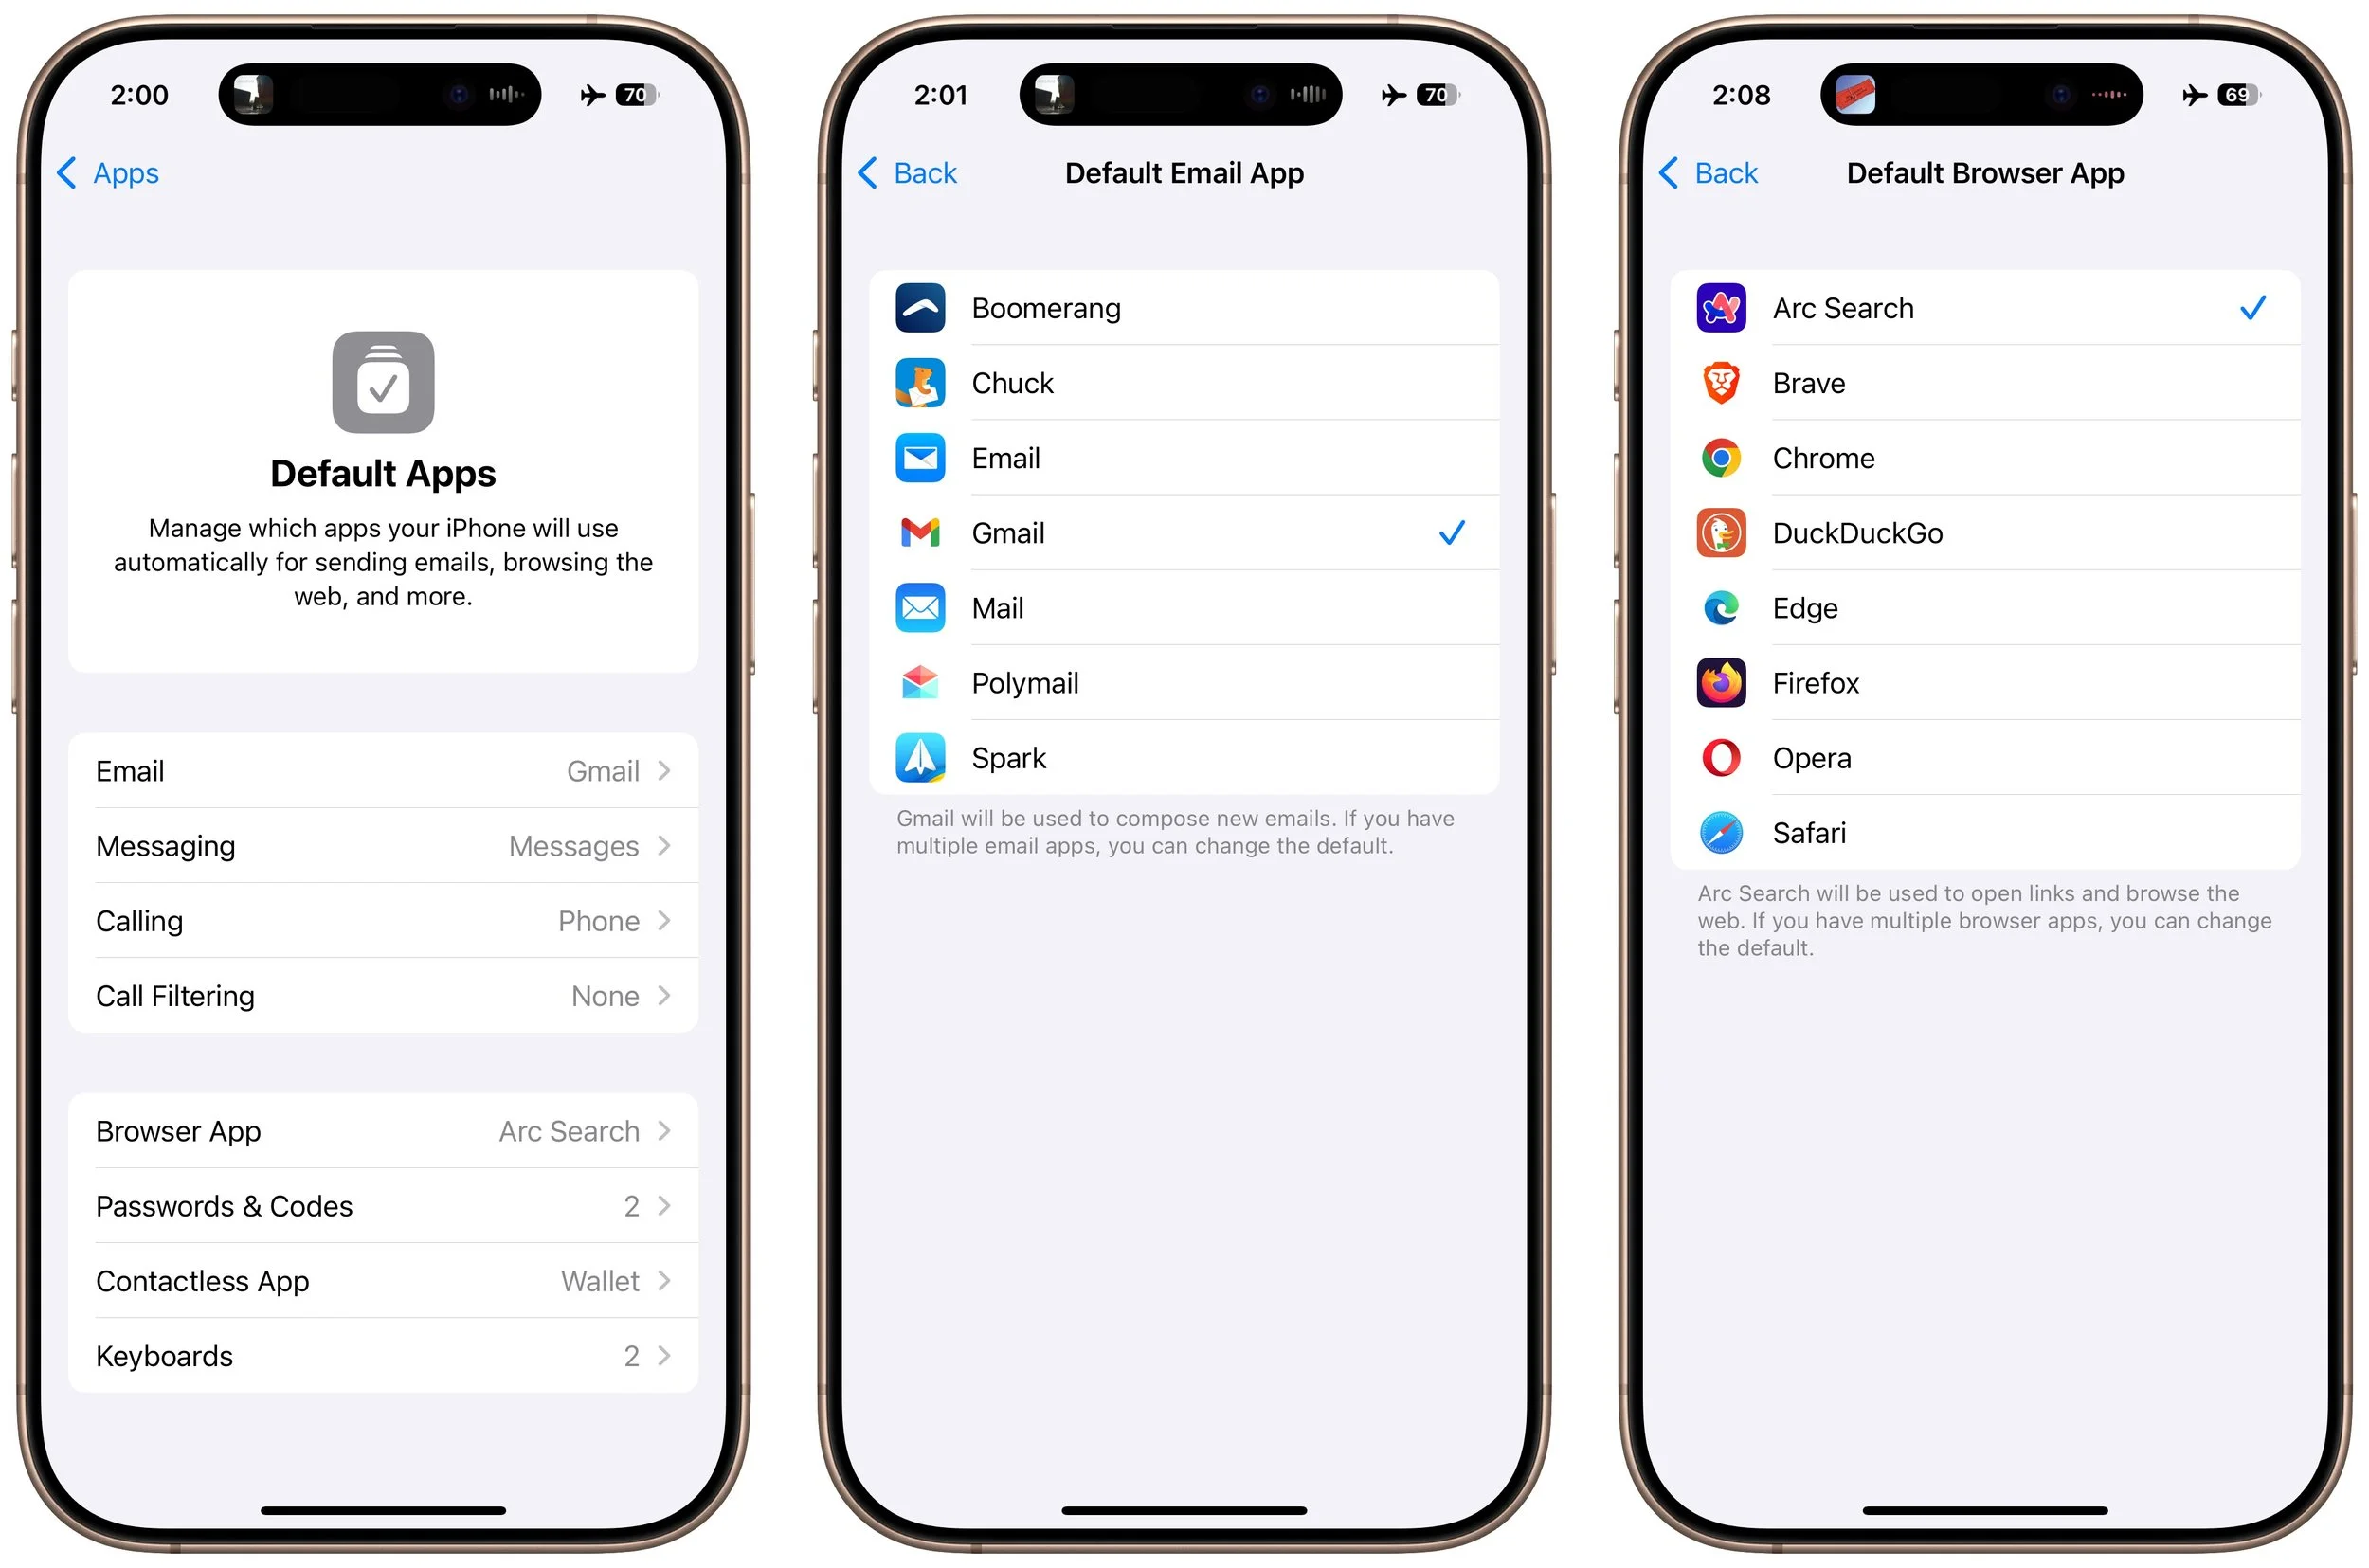
An unheralded feature in iOS 18.2 and iPadOS 18.2 helps you manage the default apps on your iPhone and iPad. A default app is one that opens automatically for a particular function, like opening a Web link or inserting a saved password. Previously, the only way to change a default app was within the settings for that app, but now you can go to Settings > Apps > Default Apps to see and set all your options in one place. The Calling and Messaging options are new in 18.2, but Apple hasn’t yet given any third-party apps permission to appear in those lists. This new screen isn’t that big of a deal, but we wanted to use it as a reminder that alternatives to Mail and Safari might better fit your needs.
(Featured image based on an original by iStock.com/Thicha Satapitanon)
Don’t Listen to Anyone Who Tells You to Drag a Text File into Terminal
Thing #17 to never do: Follow instructions to drop a text file into Terminal. It’s a great way to install malware and let cybercriminals steal your passwords, financial information, and more.

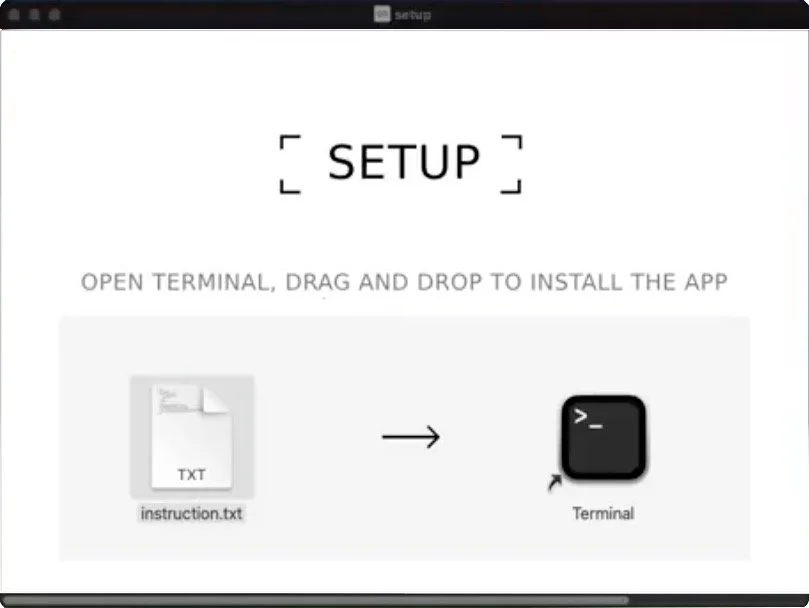
In macOS 15 Sequoia, Apple made it more difficult to bypass Gatekeeper to run apps that aren’t notarized. (Notarization is one of the ways Apple ensures that apps distributed outside the Mac App Store are unmodified and free from malware.) Cyber-criminals have responded to this increase in security with a new social engineering attack. They provide the victim with a disk image, ostensibly to install some desired piece of software, instructing the user to drag a text file into Terminal. Doing so executes a malicious script that installs an “infostealer” designed to exfiltrate a wide variety of data from your Mac. The simple advice here is to treat any guidance to drop a file into Terminal with extreme suspicion—no legitimate software or developer will ever ask you to do that.
(Featured image based on an original by iStock.com/Farion_O)
How to Train Yourself to Use the iPhone 16’s New Camera Control Button
The iPhone 16’s new Camera Control button is a welcome shortcut, but you may need to retrain your brain so you remember to use it.

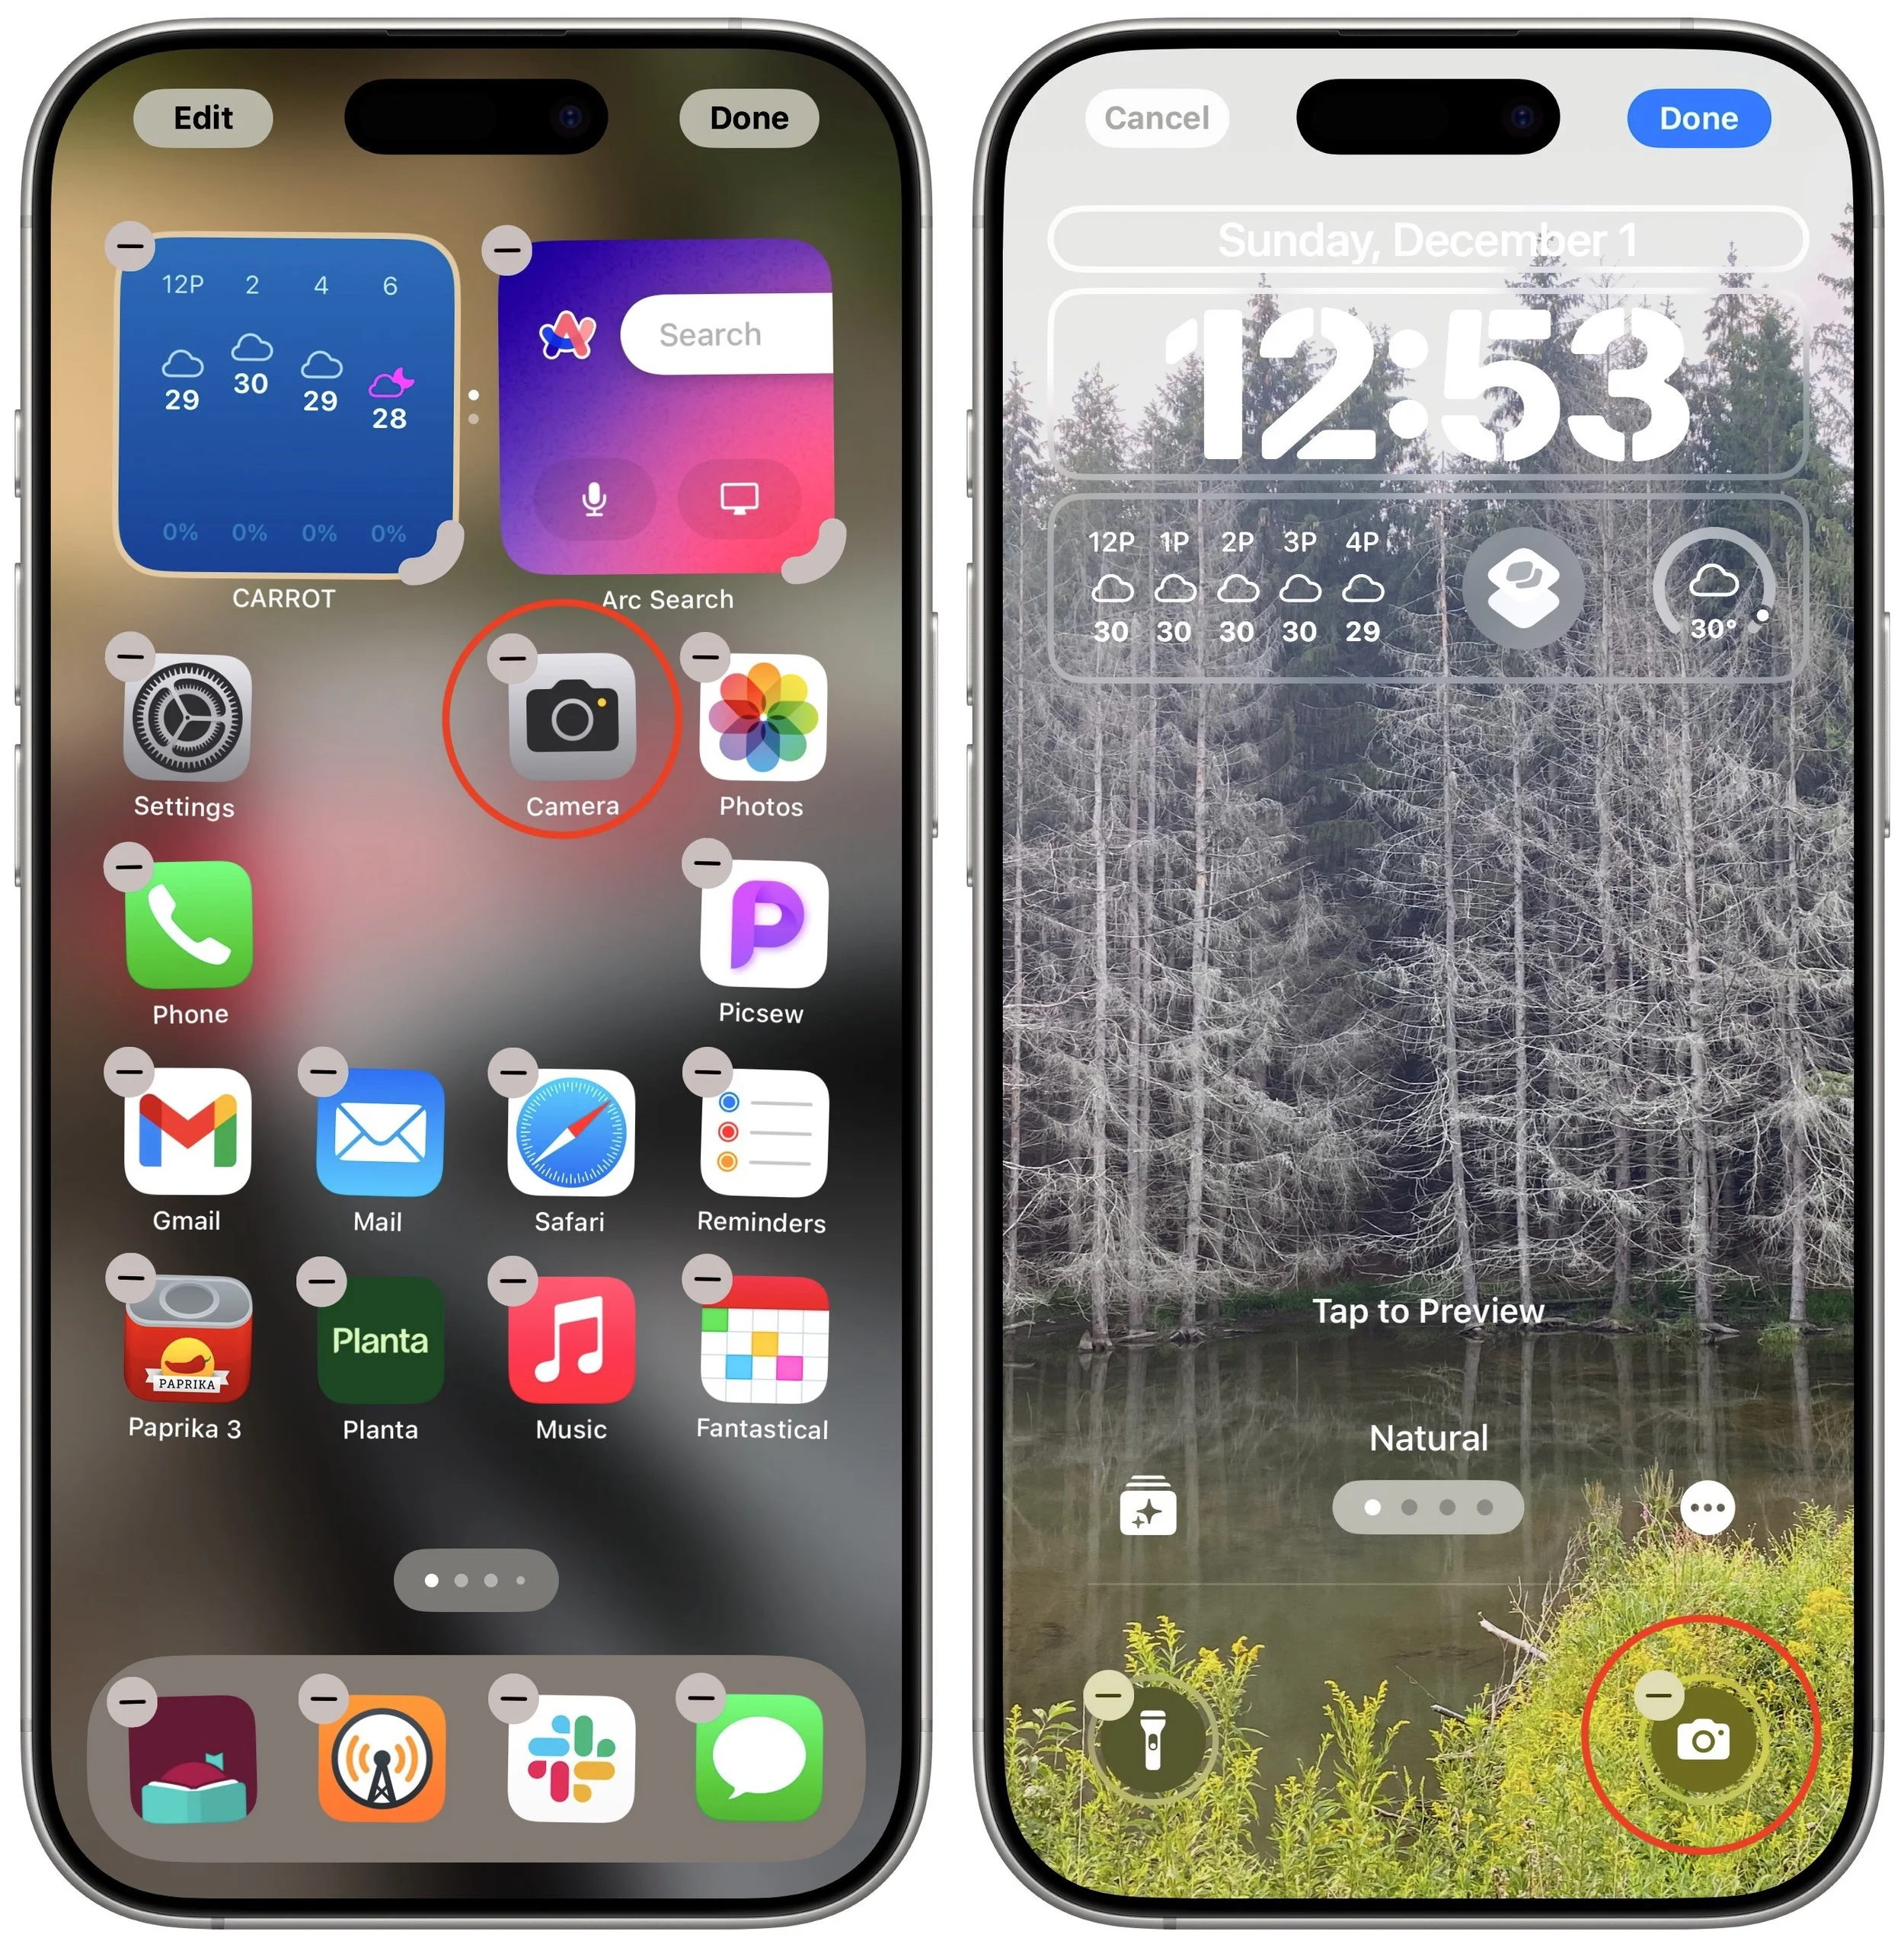
If you are accustomed to opening the Camera app on your iPhone by tapping its Home Screen app icon or Lock Screen widget icon, you may find it challenging to remember to use the new Camera Control button on the side of an iPhone 16. That button is a big win for easy access to the camera and its settings. To help retrain your camera habits, hide the Camera app icon on a secondary Home Screen or in a folder and remove it from the Lock Screen. To conceal it from your Home Screen, touch and hold it to enter jiggle mode, then drag it to another screen or into a folder. To remove it from the Lock Screen, touch and hold the Lock Screen, tap Customize, tap the Lock Screen, and then tap the minus button on the Camera widget. Replace it with another widget you’ll find useful.
(Featured image by iStock.com/valiantsin suprunovich)
Control Window Tiling in macOS 15 Sequoia
Those who are disconcerted by dragged windows suddenly resizing accidentally in macOS 15 Sequoia, take note: you can tweak settings to make Sequoia’s new window tiling feature activate only when you want.

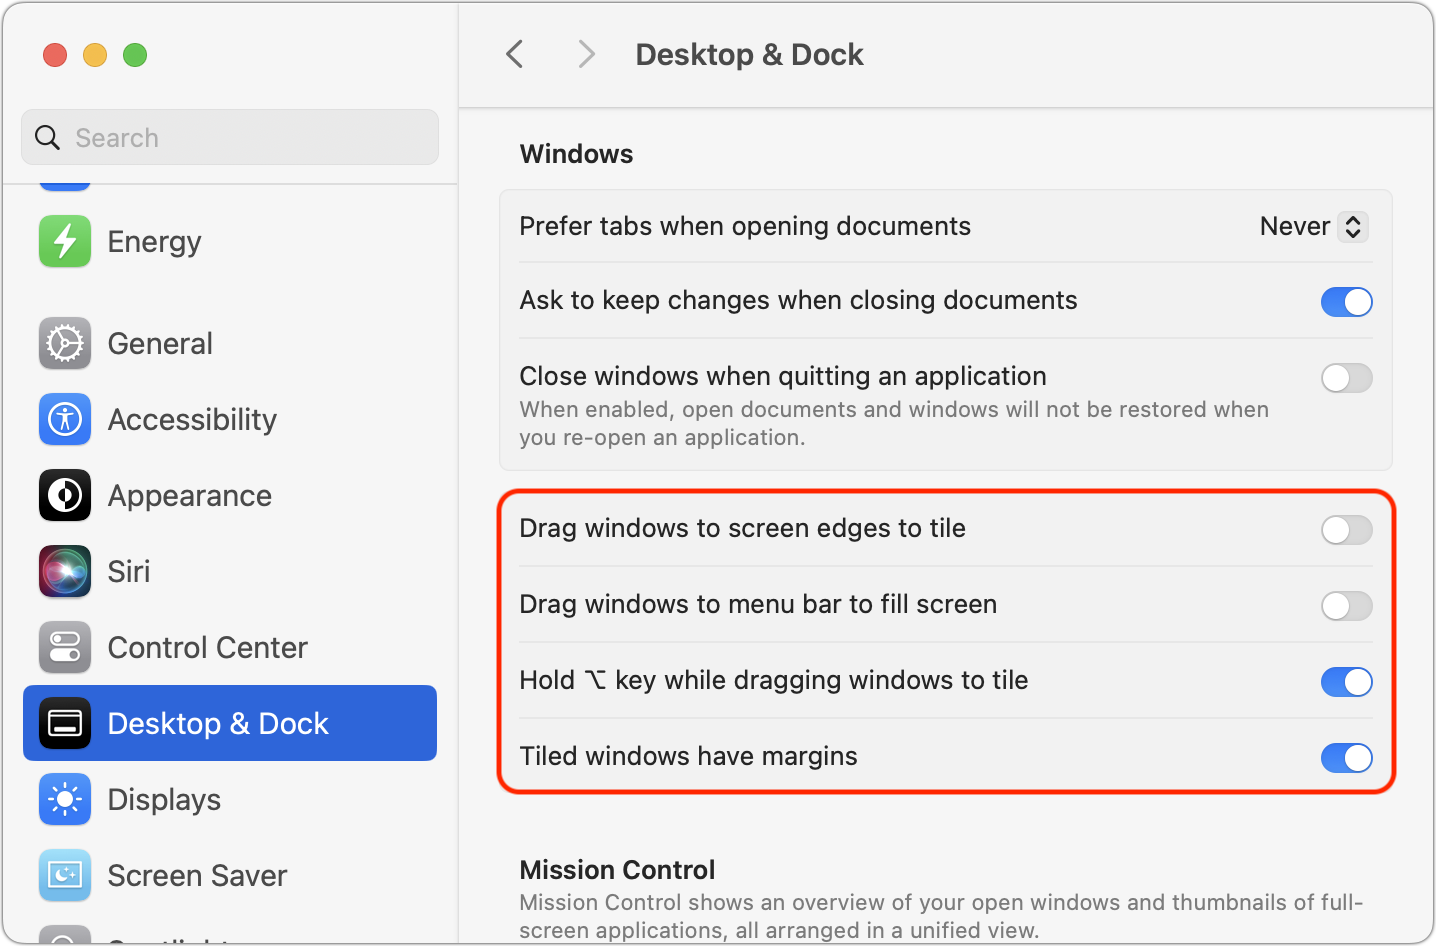
One of macOS 15 Sequoia’s most noticeable additions is a new form of window tiling. Drag a window to the menu bar to expand it to fill the screen, to the left or right edge to resize it to half the screen, or to a corner to resize it to that quarter of the screen. As you drag, a white outline shows what will happen when you drop the window. Unfortunately, accidentally invoking window tiling can be surprising and disruptive. The easiest way to ensure that dragging windows tiles them only when you want is to open System Settings > Desktop & Dock, scroll down to the Windows section, and turn off “Drag windows to screen edges to tile” and “Drag windows to menu bar to fill screen.” The important setting to leave turned on is “Hold Option key while dragging windows to tile” because from now on, your windows will tile only when you Option-drag them.
(Featured image based on an original by iStock.com/Jakob Berg)